1
Avaya MultiVantage® Application
Enablement Services
TR/87 Implementation Guide
02-601893
Release 4.0
February 2007
Issue 1.1
© 2007 Avaya Inc. All Rights Reserved.
Notice
While reasonable efforts were made to ensure that the information in this
document was complete and accurate at the time of printing, Avaya Inc. can
assume no liability for any errors. Changes and corrections to the information
in this document might be incorporated in future releases.
Documentation disclaimer
Avaya Inc. is not responsible for any modifications, additions, or deletions to
the original published version of this documentation unless such modifications,
additions, or deletions were performed by Avaya. Customer and/or End User
agree to indemnify and hold harmless Avaya, Avaya's agents, servants and
employees against all claims, lawsuits, demands and judgments arising out of,
or in connection with, subsequent modifications, additions or deletions to this
documentation to the extent made by the Customer or End User.
Link disclaimer
Avaya Inc. is not responsible for the contents or reliability of any linked Web
sites referenced elsewhere within this documentation, and Avaya does not
necessarily endorse the products, services, or information described or offered
within them. We cannot guarantee that these links will work all the time and we
have no control over the availability of the linked pages.
Warranty
Avaya Inc. provides a limited warranty on this product. Refer to your sales
agreement to establish the terms of the limited warranty. In addition, Avaya’s
standard warranty language, as well as information regarding support for this
product, while under warranty, is available through the Avaya Support Web
site:
http://www.avaya.com/support
License
USE OR INSTALLATION OF THE PRODUCT INDICATES THE END USER'S
ACCEPTANCE OF THE TERMS SET FORTH HEREIN AND THE GENERAL
LICENSE TERMS AVAILABLE ON THE AVAYA WEB SITE
http://support.avaya.com/LicenseInfo/ ("GENERAL LICENSE TERMS"). IF
YOU DO NOT WISH TO BE BOUND BY THESE TERMS, YOU MUST
RETURN THE PRODUCT(S) TO THE POINT OF PURCHASE WITHIN TEN
(10) DAYS OF DELIVERY FOR A REFUND OR CREDIT.
Avaya grants End User a license within the scope of the license types
described below. The applicable number of licenses and units of capacity for
which the license is granted will be one (1), unless a different number of
licenses or units of capacity is specified in the Documentation or other
materials available to End User. "Designated Processor" means a single
stand-alone computing device. "Server" means a Designated Processor that
hosts a software application to be accessed by multiple users. "Software"
means the computer programs in object code, originally licensed by Avaya and
ultimately utilized by End User, whether as stand-alone Products or
pre-installed on Hardware. "Hardware" means the standard hardware
Products, originally sold by Avaya and ultimately utilized by End User.
License type(s)
Designated System(s) License (DS). End User may install and use each
copy of the Software on only one Designated Processor, unless a different
number of Designated Processors is indicated in the Documentation or other
materials available to End User. Avaya may require the Designated
Processor(s) to be identified by type, serial number, feature key, location or
other specific designation, or to be provided by End User to Avaya through
electronic means established by Avaya specifically for this purpose.
Concurrent User License (CU). End User may install and use the Software on
multiple Designated Processors or one or more Servers, so long as only the
licensed number of Units are accessing and using the Software at any given
time. A “Unit” means the unit on which Avaya, at its sole discretion, bases the
pricing of its licenses and can be, without limitation, an agent, port or user, an
e-mail or voice mail account in the name of a person or corporate function
(e.g., webmaster or helpdesk), or a directory entry in the administrative
database utilized by the Product that permits one user to interface with the
Software. Units may be linked to a specific, identified Server.
Database License (DL). Customer may install and use each copy of the
Software on one Server or on multiple Servers provided that each of the
Servers on which the Software is installed communicate with no more than a
single instance of the same database.
CPU License (CP). End User may install and use each copy of the Software
on a number of Servers up to the number indicated by Avaya provided that the
performance capacity of the Server(s) does not exceed the performance
capacity specified for the Software. End User may not re-install or operate the
Software on Server(s) with a larger performance capacity without Avaya's prior
consent and payment of an upgrade fee.
Copyright
Except where expressly stated otherwise, the Product is protected by copyright
and other laws respecting proprietary rights. Unauthorized reproduction,
transfer, and or use can be a criminal, as well as a civil, offense under the
applicable law.
Third-party components
Certain software programs or portions thereof included in the Product may
contain software distributed under third party agreements ("Third Party
Components"), which may contain terms that expand or limit rights to use
certain portions of the Product ("Third Party Terms"). Information identifying
Third Party Components and the Third Party Terms that apply to them is
available on the Avaya Support Web site:
http://support.avaya.com/ThirdPartyLicense/
Preventing toll fraud
"Toll fraud" is the unauthorized use of your telecommunications system by an
unauthorized party (for example, a person who is not a corporate employee,
agent, subcontractor, or is not working on your company's behalf). Be aware
that there can be a risk of toll fraud associated with your system and that, if toll
fraud occurs, it can result in substantial additional charges for your
telecommunications services.
Avaya fraud intervention
If you suspect that you are being victimized by toll fraud and you need technical
assistance or support, call Technical Service Center Toll Fraud Intervention
Hotline at +1-800-643-2353 for the United States and Canada. For additional
support telephone numbers, see the Avaya Support Web site:
http://www.avaya.com/support
Trademarks
Avaya and the Avaya logo are either registered trademarks or trademarks of
Avaya Inc. in the United States of America and/or other jurisdictions.
MultiVantage is a is a trademark of Avaya, Inc.
DEFINITY is a registered trademark of Avaya, Inc.
All other trademarks are the property of their respective owners.
Downloading documents
For the most current versions of documentation, see the Avaya Support Web
site:
http://www.avaya.com/support
Avaya support
Avaya provides a telephone number for you to use to report problems or to ask
questions about your product. The support telephone number
is 1-800-242-2121 in the United States. For additional support telephone
numbers, see the Avaya Support Web site:
http://www.avaya.com/support
Contents
Chapter 1: Overview of the AE Services TR/87 Implementation . . . . . . . . . . . .
7
About this document . . . . . . . . . . . . . . . . . . . . . . . . . . . . . . . . .
Reason for reissue. . . . . . . . . . . . . . . . . . . . . . . . . . . . . . . . .
7
7
About TR/87 . . . . . . . . . . . . . . . . . . . . . . . . . . . . . . . . . . . . . .
7
Overview of the AE Services TR/87 Implementation . . . . . . . . . . . . . . . .
8
Requirements for AE Services and Live Communications Server integration . .
9
The road map for integrating AE Services and Live Communications Server . .
Phase 1 -- Setting up the Live Communications Server environment . . . . .
Phase 1 checklist -- Live Communications Server . . . . . . . . . . . . .
Phase 2 -- Setting up AE Services and Communication Manager . . . . . . .
Phase 2 checklists -- setting up AE Services and Communication Manager
Bundled Server installation checklist . . . . . . . . . . . . . . . . . . . .
Software-Only server installation checklist . . . . . . . . . . . . . . . . .
Phase 3 -- Integrating AE Services with Live Communications Server . . . .
12
12
13
16
16
17
18
19
Chapter 2: Integrating AE Services with Live Communications Server . . . . . . . .
21
How to use the information in this chapter . . . . . . . . . . . . . . . . . . . . .
21
Phase 3 Checklist --integrating AE Services with Live Communications Server .
21
About configuring AE Services for Live Communications Server . . . . . . . . .
23
Enabling the TR/87 port . . . . . . . . . . . . . . . . . . . . . . . . . . . . . . . .
23
Administering Certificates -- certificate management. . . . . . . . . . . . . . . .
Additional references . . . . . . . . . . . . . . . . . . . . . . . . . . . . .
About the sample scenario . . . . . . . . . . . . . . . . . . . . . . . . . . . .
Client and server authentication . . . . . . . . . . . . . . . . . . . . . . .
Procedure 1 - Installing the trusted certificate on Live
Communications Server . . . . . . . . . . . . . . . . . . . . . . . . . . . . .
Installing the trusted certificate from another vendor. . . . . . . . . . . .
Installing the trusted certificate generated by Microsoft Certificate
Services . . . . . . . . . . . . . . . . . . . . . . . . . . . . . . . . . . . .
Importing the certificate into the Live Communications Server’s
trust store . . . . . . . . . . . . . . . . . . . . . . . . . . . . . . . . . . .
Procedure 1a - Verifying the installation of the trusted certificate on Live
Communications Server . . . . . . . . . . . . . . . . . . . . . . . . . . .
Procedure 2 - Installing a server certificate for the Live
Communications Server . . . . . . . . . . . . . . . . . . . . . . . . . . . . .
Installing a server certificate from another vendor . . . . . . . . . . . . .
Installing a Microsoft Certificate Services-based certificate on the Live
Communications Server . . . . . . . . . . . . . . . . . . . . . . . . . . .
Procedure 2a - Verifying the installation of the server certificate for
Live Communications Server . . . . . . . . . . . . . . . . . . . . . . . .
24
24
24
25
AE Services TR/87 Implementation Guide, Issue 1.1
25
25
26
27
28
29
29
30
32
February 2007
3
Contents
Procedure 3 - Installing the trusted certificate on the AE Server. . . . . . .
Generic procedure for installing the trusted certificate for AE Services
Microsoft-based procedure for installing a trusted certificate chain. . .
Importing the trusted certificate into OAM . . . . . . . . . . . . . . . . .
Procedure 3a - Verifying the installation of the trusted certificate
in AE Services . . . . . . . . . . . . . . . . . . . . . . . . . . . . . . .
Converting Certificate files in other formats for AE Services . . . . . .
Procedure 4 - Creating a server certificate request for AE Services . . . . .
Procedure 5 - Creating a server certificate for AE Services . . . . . . . . .
Generic procedure for creating a server certificate for AE Services . . .
Microsoft-based procedure for creating a server certificate for
AE Services . . . . . . . . . . . . . . . . . . . . . . . . . . . . . . . . .
Procedure 6 - Importing the server certificate into AE Services OAM . . . .
Procedure 6a - Verifying the installation of the server certificate
in AE Services . . . . . . . . . . . . . . . . . . . . . . . . . . . . . . .
Replacing an expired server certificate . . . . . . . . . . . . . . . . . .
4
.
.
.
.
33
34
35
36
.
.
.
.
.
37
38
39
40
40
.
.
41
42
.
.
43
43
Dial Plan settings in AE Services OAM. . . . . . . . . . . .
Before you begin. . . . . . . . . . . . . . . . . . . . . .
About Tel URI formats and device IDs . . . . . . . . . .
About the From TelURI and To TelURI rules . . . . . . .
From TelURI settings . . . . . . . . . . . . . . . . .
To TelURI settings . . . . . . . . . . . . . . . . . . .
Dial Plan tips . . . . . . . . . . . . . . . . . . . . . .
Administering dial plan settings on a per-switch basis .
Administering default dial plan settings . . . . . . . . .
.
.
.
.
.
.
.
.
.
.
.
.
.
.
.
.
.
.
.
.
.
.
.
.
.
.
.
.
.
.
.
.
.
.
.
.
.
.
.
.
.
.
.
.
.
.
.
.
.
.
.
.
.
.
.
.
.
.
.
.
.
.
.
.
.
.
.
.
.
.
.
.
.
.
.
.
.
.
.
.
.
.
.
.
.
.
.
.
.
.
.
.
.
.
.
.
.
.
.
.
.
.
.
.
.
.
.
.
44
44
45
46
47
48
49
49
51
Administering Active Directory . . . . . . . .
DN entries and scope of search . . . . .
AE Services OAM Usage tips . . . . .
Determining the DN for a user object.
.
.
.
.
.
.
.
.
.
.
.
.
.
.
.
.
.
.
.
.
.
.
.
.
.
.
.
.
.
.
.
.
.
.
.
.
.
.
.
.
.
.
.
.
.
.
.
.
52
53
54
54
About configuring Live Communications Server for AE Services .
Enabling Remote Call Control in Active Directory . . . . . . .
Microsoft Office Communicator users - group policy settings .
Configuring a static route . . . . . . . . . . . . . . . . . . . . .
Specifying the AE Server as an authorized host . . . . . . . .
About authentication and authorization . . . . . . . . . . .
.
.
.
.
.
.
.
.
.
.
.
.
.
.
.
.
.
.
.
.
.
.
.
.
.
.
.
.
.
.
.
.
.
.
.
.
.
.
.
.
.
.
.
.
.
.
.
.
55
56
57
57
58
58
Using the TR/87 Test features. . . . . . . . . . . . . . . . . . . . . . . . . . . . .
59
Recovering from a system outage . . . . . . . . . . . . . . . . . . . . . . . . . .
59
.
.
.
.
.
.
.
.
AE Services TR/87 Implementation Guide, Issue 1.1
.
.
.
.
.
.
.
.
.
.
.
.
.
.
.
.
.
.
.
.
.
.
.
.
February 2007
Contents
Known issues . . . . . . . . . . . . . . . . . . . . . . . . . . . . . . . . .
Using the Call Forwarding or Send All Calls features . . . . . . . .
Using the Do Not Disturb feature . . . . . . . . . . . . . . . . . . .
Setting up forwarding off-switch . . . . . . . . . . . . . . . . . . .
Putting the active call on hold before starting a new call . . . . . .
Clear Connection request on a held connection is not supported .
Bridging irregularities . . . . . . . . . . . . . . . . . . . . . . . . .
Missed Call e-mail . . . . . . . . . . . . . . . . . . . . . . . . . . .
Unidentified caller in Microsoft Office Communicator window. . .
Communicator displays numbers with trunk notation . . . . . . .
.
.
.
.
.
.
.
.
.
.
.
.
.
.
.
.
.
.
.
.
.
.
.
.
.
.
.
.
.
.
.
.
.
.
.
.
.
.
.
.
60
60
61
61
61
61
62
62
62
63
Appendix A: SIP requests and associated errors . . . . . . . . . . . . . . . . . . . .
65
Appendix B: AE Services TR/87 call flow . . . . . . . . . . . . . . . . . . . . . . . .
67
Message flow. . . . . . . . . . . . . . . . . . . . . . . . . . . . . . . . . . . . . .
67
Appendix C: Capacities . . . . . . . . . . . . . . . . . . . . . . . . . . . . . . . . . .
71
Index
73
. . . . . . . . . . . . . . . . . . . . . . . . . . . . . . . . . . . . . . . .
AE Services TR/87 Implementation Guide, Issue 1.1
February 2007
5
Contents
6
AE Services TR/87 Implementation Guide, Issue 1.1
February 2007
About this document
Chapter 1: Overview of the AE Services
TR/87 Implementation
About this document
In terms of planning, this document is intended for anyone who is involved with integrating
Application Enablement Services (AE Services) with Microsoft Office Live Communications
Server. In terms of implementation, it is directed toward administrators from the Microsoft Office
Live Communications Server and the AE Services administrative domains. As a high-level
planning and implementation guide, this document serves as a road map for using the Microsoft
Live Communications Server documents and the AE Services documents.
Reason for reissue
The AE Services TR/87 Implementation Guide, Issue 1.1, includes an update to the
requirements for AE Services and Live Communications Server integration. Issue 1.1 of the
document includes the Microsoft Office 2005 Address Book Service as a requirement.
About TR/87
TR/87 refers to ECMA Technical Report TR/87, "Using CSTA for SIP Phone User Agents
(uaCSTA)." The TR/87 standard specifies how to send CSTA 3 XML messages over a SIP
transport. TR/87 is the method that Microsoft Live Communications Server uses to integrate
with Telephony systems to accomplish control of desktop phones. (SIP stands for Session
Initiation Protocol).
For AE Services Release 4.0, the AE Services Server (AE Server) has been enhanced to
include support for the TR/87 protocol.
Note:
Note:
Although TR/87 is a SIP-based protocol, AE Services and Communication
Manager do not currently support control of SIP endpoints using Microsoft Office
Communicator.
AE Services TR/87 Implementation Guide, Issue 1.1
February 2007
7
Chapter 1: Overview of the AE Services TR/87 Implementation
Overview of the AE Services TR/87 Implementation
The AE Services TR/87 Implementation provides a solution for controlling your Avaya telephone
or IP softphone using Microsoft Office Communicator. The AE Services TR/87 Implementation
enables users to operate more efficiently by launching and answering phone calls from the
Microsoft Office Communicator application. As a result, people, teams, and organizations are
able to communicate simply and effectively while working with Avaya and Microsoft
applications. The terms "AE Services TR/87 Implementation" and "AE Services and Microsoft
Live Communications Server integration" are synonymous.
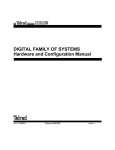
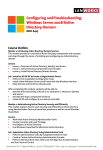
Figure 1 provides a high level view of the components in an AE Services TR/87 configuration.
Figure 1: High level view of the AE Services TR/87 components
Microsoft Office
Communicator 2005
Microsoft Live Communications
Server 2005 SP1
LCS
AE Services Server 4.0
SQL
ADS
Communication Manager 3.0, 3.1 or 4.0
8
AE Services TR/87 Implementation Guide, Issue 1.1
February 2007
Requirements for AE Services and Live Communications Server integration
Requirements for AE Services and Live Communications
Server integration
The the requirements for integration are as follows:
Live Communications Server Enterprise Edition with SP1 or Live Communications Server
Standard Edition with SP1: Live Communications Server Enterprise Edition with SP1 is
designed for installations with up to 125,000 users. Live Communications Server Standard
Edition with SP1 is designed for installations with up to 20,000 users.
Note:
●
All required servers must be joined to the domain and able to resolve each other’s fully
qualified domain names (FQDN). Microsoft Office Communicator clients must be able to
communicate with each other.
●
Microsoft Office Live Communications Server 2005 Address Book Service must be
configured and deployed for an AE Services and Live Communications Server integration.
The Address Book Service provides Microsoft Office Communicator users with a local
cache of the global address list. This enables Communicator users to quickly search the
global list using the Find feature. Optionally, you can set up Address Book to provide
phone number normalization. For more information see, Set up Address Book Service on
page 15.
Note:
AE Services supports a connection to only one Live Communications Server,
either Live Communications Server 2005 Standard Edition Server or one Live
Communications Server 2005 Enterprise Pool. For an illustration of sample
configurations, see Figure 3: Configuring AE Services with 5,000 or more
concurrent users on page 11).
A certificate authority (CA): The CA can be either Microsoft Certificate Services or a third
party CA.The Live Communications Server must trust the Certificate Authority and have its own
certificate installed.
Avaya Communication Manager 3.0, or later: Communication Manager 3.1 is strongly
recommended because it includes the Link Bounce Resiliency feature. Communication
Manager 4.0 is required for any installation with more than 21,000 concurrent Microsoft Office
Communicator 2005 (Communicator 2005) users.
AE Services Server 4.0: The AE Services Server must be set up as a dedicated server for the
TR/87 Implementation. That is, the AE Server must be dedicated to the AE Services and Live
Communications Server integration. AE Services does not support an AE Server configured
with AE Services TR/87 and another application, such as a TSAPI, JTAPI, DLG, CVLAN, or
Device, Media, and Call Control application.
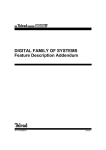
A single AE Server can to support up to 16 Communication Manager servers (switches) for an
AE Services TR/87 implementation (see Figure 2: Maximum number of Communication
Manager servers supported by AE Services on page 10).
AE Services TR/87 Implementation Guide, Issue 1.1
February 2007
9
Chapter 1: Overview of the AE Services TR/87 Implementation
An AE Services administrative workstation: The AE Services Bundled Server does not
provide a Web browser, and the AE Services Software Only solution does not assume that you
will install one. To administer AE Services, you need an administrative workstation -- a computer
running a browser with network access to the AE Server.
Unified Desktop License: When you install AE Services and activate the "Unified CC API Desktop Edition" license, the AE Server is TR/87-enabled. You do not have to install any special
software.
Note:
The certificates distributed by the AE Services license file do not work in the Live
Communications Server environment, and the AE Services administrator must
configure certificates. For more information, see Administering Certificates -certificate management on page 24.
Note:
Figure 2: Maximum number of Communication Manager servers supported by AE
Services
Maximum of 16 Communication Manager servers and 16 separate dial plans
1
Communication
Manager
AE Server
16
10
Live
Communications
Server
Communication
Manager
AE Services TR/87 Implementation Guide, Issue 1.1
February 2007
Requirements for AE Services and Live Communications Server integration
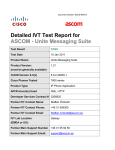
Figure 3: Configuring AE Services with 5,000 or more concurrent users
One AE Services server supports up to 5,000 concurrent users
Communication
Manager
AE Server
Live
Communications
Server
5,000 concurrent Microsoft
Office Communicator Clients
Two AE Services servers are required to support up to 10,000 concurrent users
Communication
Manager
Communication
Manager 3.0, 3.1 or 4.0
AE Server
AE Server
Live
Communications
Server
10,000 concurrent Microsoft
Office Communicator Clients
Three AE Services servers are required to support up to 15,000 concurrent users
AE Server
Communication
Manager
AE Server
Communication
Manager 3.0, 3.1 or 4.0
AE Server
Live
Communications
Server
15,000 concurrent Microsoft
Office Communicator Clients
Five AE Services servers are required to support up to 21,000 concurrent users.
A configuration of more than 21,000 concurrent users requires Communication
Manager 4.0.
AE Server
AE Server
Communication
Manager
Communication
Manager 4.0
AE Server
AE Server
Live
Communications
Server
21,000 concurrent Microsoft
Office Communicator Clients
AE Server
AE Services TR/87 Implementation Guide, Issue 1.1
February 2007
11
Chapter 1: Overview of the AE Services TR/87 Implementation
The road map for integrating AE Services and Live
Communications Server
This section maps the integration activities to the documentation.
Phase 1 -- Setting up the Live Communications Server
environment
For a checklist of activities associated with Phase 1, see Phase 1 checklist -- Live
Communications Server on page 13. Note that Phase 1 and Phase 2 activities can be carried
out concurrently.
Phase 1
Deploy Live Communications Server
Configure Components
LCS
Microsoft Office
Communicator 2005
SQL
ADS
Microsoft Office Live Communications
Server 2005 with SP1
Microsoft documents for Phase 1
This document assumes that you are implementing AE Services in an existing Live
Communications Server 2005 with SP1 configuration. The following list is not the complete list
of Microsoft Live Communications Server documents, but it includes documents that are
strongly recommended for integrating AE Services with Live Communications Server. The
Quick Start documents are particularly useful for integrating AE Services in a Live
Communications Server environment.
●
Live Communications Server 2005 Enterprise Edition Lab Quick Start
●
Live Communications Server 2005 with SP1 Standard Edition Lab Quick Start
●
Microsoft Office Live Communications Server 2005 with SP1 Active Directory Preparation
●
Microsoft Office Communicator 2005 Telephony Planning and Deployment Guide
●
Microsoft Office Live Communications Server 2005 Address Book Service Planning and
Deployment Guide
●
Microsoft Office Live Communications Server 2005 Certificate Configuration
You can download these documents from the Microsoft Download Center at:
http://www.microsoft.com/downloads
12
AE Services TR/87 Implementation Guide, Issue 1.1
February 2007
The road map for integrating AE Services and Live Communications Server
Phase 1 checklist -- Live Communications Server
This checklist refers to activities described in Phase 1 -- Setting up the Live Communications
Server environment on page 12.
The information in Table 1 is based on "Telephony Requirements" in the Microsoft Office
Communicator 2005 Telephony Planning and Deployment Guide. Table 1 applies to either of
the following configurations.
●
Live Communications Server 2005 Standard Edition (up to 20,000 users)
●
Live Communications Server 2005 Enterprise Edition (up to 125,000 users), sometimes
referred to as an Enterprise Pool
These tasks can be performed at the same time as the tasks described Phase 2 -- Setting up
AE Services and Communication Manager on page 16, but they must be completed before the
tasks described in Chapter 2: Integrating AE Services with Live Communications Server.
Table 1: Checklist for Live Communications Server
Task
1
Active Directory is set up
●
●
2
Document
Domain controllers with Microsoft
Windows 2000 SP4 or Microsoft Windows
2003.
Global catalog servers with Windows
2000 SP4 or Windows Server 2003.
For more information about Global catalog
servers, see "Infrastructure Requirements,"
in Live Communications Server 2005 with
SP1 Active Directory Preparation.
●
●
Microsoft Office Live Communications
Server 2005 with SP1 Standard Edition
Deployment Guide
Microsoft Office Live Communications
Server 2005 with SP1 Enterprise Edition
Deployment Guide
Active Directory preparation is completed
Carry out the Active Directory Preparation
basic steps:
● Prep Schema
● Prep Forest
● Prep Domain
● DomainAdd to the Forest Root
●
Microsoft Office Live Communications
Server 2005 with SP1 Active Directory
Preparation. See "Running Active
Directory Preparation Basic Steps: Prep
Schema, Prep Forest, Prep Domain and
DomainAdd to The Forest Root."
1 of 3
AE Services TR/87 Implementation Guide, Issue 1.1
February 2007
13
Chapter 1: Overview of the AE Services TR/87 Implementation
Table 1: Checklist for Live Communications Server (continued)
Task
3
Document
Public Key Infrastructure (PKI) is set up
Set up a Public Key Infrastructure (PKI).
●
●
4
Certificates have been configured
For the AE Services TR/87 integration, you
must configure the Live Communications
Server 2005 (Enterprise or Standard Edition)
server to use Mutual TLS (Transport Layer
Security) and then configure a certificate.
5
●
●
See Microsoft Office Live
Communications Server 2005 Certificate
Configuration, "Configuring Certificates on
Live Communications Servers."
See also, Administering Certificates -certificate management on page 24.
Domain Name System (DNS) is set up and deployed
Set up server.
6
For more information, see Microsoft Office
Live Communications Server 2005
Certificate Configuration.
See also, Live Communications Server
2005 with SP1 Security Guide.
See "Configuring DNS, Client Access and
User Settings" in either of these documents:
● Microsoft Office Live Communications
Server 2005 with SP1 Standard Edition
Deployment Guide
● Microsoft Office Live Communications
Server 2005 with SP1 Enterprise Edition
Deployment Guide
Live Communications Server (either Standard or Enterprise) is deployed
●
Deploy Standard Edition.
●
or
●
Deploy Enterprise Edition.
●
See "Deploying Live Communications
Server 2005 Standard Edition" in the
Microsoft Office Live Communications
Server 2005 with SP1 Standard Edition
Deployment Guide.
See "Deploying Live Communications
Server 2005 Enterprise Edition" in the
Microsoft Office Live Communications
Server 2005 with SP1 Enterprise Edition
Deployment Guide.
2 of 3
14
AE Services TR/87 Implementation Guide, Issue 1.1
February 2007
The road map for integrating AE Services and Live Communications Server
Table 1: Checklist for Live Communications Server (continued)
Task
7
Document
Servers are configured
Configure either the Standard Edition Server
or the Enterprise Edition Server.
●
●
8
DNS is configured
Configure DNS.
●
●
9
See "Configuring the Standard Edition
Server" in the Microsoft Office Live
Communications Server 2005 with SP1
Standard Edition Deployment Guide.
See "Configuring the Enterprise Edition
Server" in the Microsoft Office Live
Communications Server 2005 with SP1
Enterprise Edition Deployment Guide.
See "Configuring DNS, Client Access and
User Settings" in the Microsoft Office Live
Communications Server 2005 with SP1
Standard Edition Deployment Guide.
See "Configuring DNS, Client Access and
User Settings" in the Microsoft Office Live
Communications Server 2005 with SP1
Enterprise Edition Deployment Guide.
Set up Address Book Service
● Address Book Service is required for AE Services Live Communications Server integration.
The main function of the Address Book
Service is to provide Microsoft Office
Communicator with a local cache of the global
address list. AE Services requires that you
configure Live Communications Server with
the Address Book service so that
Communicator users can take advantage of
this capability.
Optionally, you can set up the Address Book
Service to perform phone number
normalization.
●
See Microsoft Office Live
Communications Server 2005 Address
Book Service Planning and Deployment
Guide.
Note: If you configure the Address Book
Service to normalize phone numbers, bear
in mind that it does not support
multinational deployments of Live
Communications Server. Only one set of
normalization rules can be configured per
Live Communications server. If that server
is supporting multiple countries, you can do
the normalization rules for only one of those
countries.
3 of 3
AE Services TR/87 Implementation Guide, Issue 1.1
February 2007
15
Chapter 1: Overview of the AE Services TR/87 Implementation
Phase 2 -- Setting up AE Services and Communication Manager
For the checklist of activities associated with Phase 2, see Phase 2 checklists -- setting up AE
Services and Communication Manager on page 16.
Phase 2
- No special
installation
procedures
- Standard
installation of
Bundled Server
or
Software-Only
server
Install and configure the required AE Services components
Confirm that Communication Manager is installed and configured
Confirm that the IP network is configured
Install and configure the AE Server
Unified Desktop
Install the Unified Desktop License
License
AE Server
Communication Manager
AE Services documents for Phase 2
To install the AE Services software and bring the AE Server to an operational state, use either
the Bundled Server or the Software Only installation guide, based on the offer you are using.
Use the Administration Guide and OAM Help for administering Communication Manager.
●
Avaya MultiVantage Application Enablement Services Installation and Upgrade Guide for
a Bundled Server, 02-300356
●
Avaya MultiVantage Application Enablement Services Installation Guide Software-Only
Offer, 02-300355
●
Avaya MultiVantage Application Enablement Services Administration and Maintenance
Guide, 02-300357
●
Application Enablement Services Operations, Administration, and Maintenance (OAM)
Help (which is included with the AE Services server software)
AE Services documents are available from the Web in Portable Document Format (.pdf) at the
Avaya Support Web Site (http://www.avaya.com/support).
Phase 2 checklists -- setting up AE Services and Communication Manager
Use the checklists in this section for either a Bundled Server installation or a Software-Only
server installation. The tasks in each of these checklists must be completed before you start the
procedures described in Chapter 2: Integrating AE Services with Live Communications Server.
16
●
Table 2 summarizes the tasks that are required for carrying out an AE Services Bundled
Server installation.
●
Table 3 summarizes the tasks that are required for carrying out an AE Services
Software-Only server installation.
AE Services TR/87 Implementation Guide, Issue 1.1
February 2007
The road map for integrating AE Services and Live Communications Server
Bundled Server installation checklist
Avaya Technical Services is responsible for installing and maintaining components in a Bundled
Server configuration. The following abbreviations are used in the Table 2: FE (Field Engineer)
and CSI (Communication Solutions and Integration, as in CSI technician).
Table 2: Bundled server installation checklist
Task
Role
Document
1
Verify that the installation site meets
the prerequisites.
FE
See Chapter 1 of the Avaya MultiVantage
Application Enablement Services Installation
and Upgrade Guide for a Bundled Server,
02-300356 (Bundled Server Installation
Guide).
2
Install and configure the hardware.
FE
See Chapter 2 of the Bundled Server
Installation Guide.
3
Install the software.
FE
See Chapter 3 of the Bundled Server
Installation Guide.
4
Install the AE Services license.
FE
See Chapter 4 of the Bundled Server
Installation Guide.
Note: For AE Services TR/87, install the
"Unified CC API - Desktop Edition"
license.
5
Verify Communication Manager
requirements.
CSI/FE
See Chapter 1 of the Avaya MultiVantage
Application Enablement Services
Administration and Maintenance Guide,
02-300357 (AE Services Administration and
Maintenance Guide).
6
Verify TN799DP CLAN board
installation and administration on CM.
CSI/FE
See "Adding CLANs to the network" in
Chapter 1 of the AE Services Administration
and Maintenance Guide.
7
Enable AE Services on Communication
Manager.
CSI
See "Enabling AE Services" in Chapter 1 of
the AE Services Administration and
Maintenance Guide.
8
Administer a CTI link (ADJ-IP).
CSI
See "Administering a CTI Link for TSAPI,
JTAPI, Telephony Web Service, and Device,
Media, and Call Control " in Chapter 1 of the
AE Services Administration and
Maintenance Guide.
9
Check the status of the switch
connection (from Communication
Manger to AE Services).
CSI
See "Checking the status of a Switch
Connection -- from Communication
Manager" in Chapter 1 of the AE Services
Administration and Maintenance Guide.
AE Services TR/87 Implementation Guide, Issue 1.1
February 2007
17
Chapter 1: Overview of the AE Services TR/87 Implementation
Software-Only server installation checklist
The customer or an Information Technology (IT) Technician is responsible for installing and
maintaining components in an AE Services Software-Only server configuration.
Table 3: Software-only server installation checklist
Task
Admin domain
Document
1
Determine that you have met
the prerequisites for AE
Services.
AE Services
See Chapter 1 of the Avaya MultiVantage
Application Enablement Services
Installation and Upgrade Guide,
Software-Only Offer, 02-300355
(Software-Only Installation Guide).
2
Install the Linux platform
software.
AE Services
See Chapter 2 of the Software-Only
Installation Guide.
3
Install the software
AE Services
See Chapter 3 of the Software-Only
Installation Guide.
4
Install the AE Services license
AE Services
See Chapter 4 of the Software-Only
Installation Guide.
Note: For AE Services TR/87, install the
"Unified CC API - Desktop Edition"
license.
18
5
Verify Communication
Manager requirements
Communication
Manager
See Chapter 1 of the Avaya MultiVantage
Application Enablement Services
Administration and Maintenance Guide,
02-300357 (AE Services Administration
and Maintenance Guide).
6
Verify TN799DP CLAN board
installation and administration
on Communication Manager
Communication
Manager
See "Adding CLANs to the network" in
Chapter 1 of the AE Services
Administration and Maintenance Guide
7
Enable AE Services on
Communication Manager
Communication
Manager
See "Enabling AE Services" in Chapter 1
of the AE Services Administration and
Maintenance Guide.
8
Administer a CTI link (ADJ-IP)
Communication
Manager
See "Administering a CTI Link for TSAPI,
JTAPI, Telephony Web Service, and
Device, Media, and Call Control " in
Chapter 1 of the AE Services
Administration and Maintenance Guide.
9
Check the status of the switch
connection (from
Communication Manger to AE
Services)
Communication
Manager
See "Checking the status of a Switch
Connection -- from Communication
Manager" in Chapter 1 of the AE Services
Administration and Maintenance Guide.
AE Services TR/87 Implementation Guide, Issue 1.1
February 2007
The road map for integrating AE Services and Live Communications Server
Phase 3 -- Integrating AE Services with Live Communications
Server
Phase 3 is presented separately in Chapter 2: Integrating AE Services with Live
Communications Server. Chapter 2 describes the administrative procedures for AE Services
and Live Communications Server that are necessary for a successful integration.
Phase 3
Integrate AE Services with Microsoft Live Communications Server
- Same as
TSAPI
administration
with additional
steps for
TR/87 configuration
and
certificate
management
AE Server
LCS
Microsoft Office
Communicator 2005
SQL
ADS
Microsoft Live
Communications
Server
Communication
Manager
Microsoft Office Live Communications Server documents for Phase 3
●
Microsoft Office Communicator 2005 Telephony Planning and Deployment Guide
●
Microsoft Office Live Communications Server 2005 Certificate Configuration
AE Services documents for Phase 3
●
Avaya MultiVantage Application Enablement Services TR/87 Implementation Guide,
02-601893
●
Avaya MultiVantage Application Enablement Services Administration and Maintenance
Guide, 02-300357
●
Application Enablement Services Operations, Administration, and Maintenance (OAM)
Help (included with the AE Services server software)
AE Services TR/87 Implementation Guide, Issue 1.1
February 2007
19
Chapter 1: Overview of the AE Services TR/87 Implementation
20
AE Services TR/87 Implementation Guide, Issue 1.1
February 2007
How to use the information in this chapter
Chapter 2: Integrating AE Services with
Live Communications Server
How to use the information in this chapter
After you complete the tasks in Chapter 1, use the information in this chapter to integrate
Application Enablement Services (AE Services) with Microsoft Live Communications Server.
Phase 3 Checklist --integrating AE Services with Live
Communications Server
Use Table 4 as a checklist for performing the tasks necessary for integrating AE Services in a
Microsoft Live Communications Server environment.
Table 4: Checklist for integrating AE Services with Live Communications Server
Task
Admin domain
Document
1
Administer a switch
connection from AE Services
to Communication Manager.
AE Services
See "Administering the Local IP for all
AE Services" Chapter 2 of the AE
Services Administration and
Maintenance Guide.
2
Check the status of the switch
connection (from AE Services
to Communication Manager).
AE Services
See "Checking the status of a switch
connection -- from the AE Server"
Chapter 2 of the AE Services
Administration and Maintenance Guide.
3
Administer a TSAPI Link.
AE Services
See "Administering TSAPI Links in AE
Services OAM" Chapter 2 of the AE
Services Administration and
Maintenance Guide.
4
Enable the TR/87 Port in
OAM.
AE Services
TR/87 Implementation Guide, see
Enabling the TR/87 port on page 23.
1 of 2
AE Services TR/87 Implementation Guide, Issue 1.1
February 2007
21
Chapter 2: Integrating AE Services with Live Communications Server
Table 4: Checklist for integrating AE Services with Live Communications Server (continued)
Task
5
Administer certificates for AE
Services and Microsoft Live
Communications Server.
Admin domain
Document
Microsoft Live
Communications
Server
See Procedure 1 - Installing the trusted
certificate on Live Communications
Server on page 25.
Microsoft Live
Communications
Server
See Procedure 2 - Installing a server
certificate for the Live Communications
Server on page 29 of this document.
AE Services
See Procedure 3 - Installing the trusted
certificate on the AE Server on page 33
of this document.
AE Services
See Procedure 4 - Creating a server
certificate request for AE Services on
page 39 of this document.
AE Services
See Procedure 5 - Creating a server
certificate for AE Services on page 40
of this document.
AE Services
See Procedure 6 - Importing the server
certificate into AE Services OAM on
page 42 of this document.
6
Administer settings for the dial
plan.
AE Services
See Dial Plan settings in AE Services
OAM on page 44 of this document.
7
Administer settings for Active
Directory.
AE Services
See Administering Active Directory on
page 52 of this document.
8
Configure the Microsoft Office
Communicator 2005 Client.
Microsoft -either the client
workstation or
the Active
Directory Server
See "Configuring the Client" in the
Microsoft Office Communicator 2005
Telephony Planning and Deployment
Guide.
9
Set up a static route.
Microsoft Live
Communications
Server
TR/87 Implementation Guide, See
Configuring a static route on page 57.
10
Specify the AE Server as an
authorized host.
Microsoft Live
Communications
Server
TR/87 Implementation Guide, see
Specifying the AE Server as an
authorized host on page 58.
11
Set up Remote Call Control
for each user in Active
Directory Services.
Microsoft Active
Directory Server
TR/87 Implementation Guide, see
Enabling Remote Call Control in Active
Directory on page 56. Based on
information from Microsoft Office
Communicator 2005 Telephony
Planning and Deployment Guide.
2 of 2
22
AE Services TR/87 Implementation Guide, Issue 1.1
February 2007
About configuring AE Services for Live Communications Server
About configuring AE Services for Live Communications
Server
In terms of the AE Services Operations, Administration and Maintenance (OAM) interface,
configuring AE Services for Live Communications Server is an extension of TSAPI-based
administration.
To configure AE Services for Live Communications Server, you must carry out the
TSAPI-related administration tasks as well as the TR/87 administration tasks.
●
TSAPI related administration tasks, which are described in Chapter 2 of the Avaya
MultiVantage Application Enablement Services Administration and Maintenance Guide,
02-300357:
- administering a local IP
- administering a switch connection
- administering a TSAPI link
●
TR/87 administration tasks, which are described in this document:
- enabling the TR/87 port - see Enabling the TR/87 port on page 23
- administering certificates - see Administering Certificates -- certificate management on
page 24
- administering the dial plan settings - see Dial Plan settings in AE Services OAM on
page 44
- administering settings for Active Directory - see Administering Active Directory on
page 52
Enabling the TR/87 port
AE Services uses port 4723 for communications between AE Services and Microsoft Live
Communications Server. Because this port is disabled by default in AE Services OAM, you
must log into OAM and enable it.
1. From the browser on your AE Services administrative workstation, log in to AE Services
OAM.
2. Select CTI OAM Admin > Administration > Network Configuration > Ports.
3. On the Ports page, under DMCC Server Ports, locate the TR/87 Port, and select the option
button for Enabled.
AE Services TR/87 Implementation Guide, Issue 1.1
February 2007
23
Chapter 2: Integrating AE Services with Live Communications Server
Administering Certificates -- certificate management
AE Services and Microsoft Live Communication Server communicate using Transport Layer
Security (TLS). For communication to take place, AE Services and Microsoft Live
Communications Server must exchange signed server certificates each time a TLS session is
opened. This section provides a sample certificate management scenario that includes the
following procedures.
●
Procedure 1 - Installing the trusted certificate on Live Communications Server on page 25
●
Procedure 2 - Installing a server certificate for the Live Communications Server on
page 29
●
Procedure 3 - Installing the trusted certificate on the AE Server on page 33
●
Procedure 4 - Creating a server certificate request for AE Services on page 39
●
Procedure 5 - Creating a server certificate for AE Services on page 40
●
Procedure 6 - Importing the server certificate into AE Services OAM on page 42
Additional references
The following documents are useful for understanding the tasks that are required for a service
integration.
●
Live Communications Server 2005 Enterprise Edition Lab Quick Start or
●
Live Communications Server 2005 with SP1 Standard Edition Lab Quick Start
About the sample scenario
The procedures in the sample scenario are based on using Microsoft Live Communications
Server 2005 Enterprise Edition along with a Microsoft Windows Server 2003 Standalone
Certificate Authority. Use the sample scenario to familiarize yourself with the basic tasks for
integrating AE Services with Microsoft Live Communications Server.
Because some users will rely on a certificate authority (CA) other than Microsoft Certificate
Services, the CA-based procedures include generic instructions as well as Microsoft-based
instructions.
24
AE Services TR/87 Implementation Guide, Issue 1.1
February 2007
Administering Certificates -- certificate management
Client and server authentication
The AE Services TR/87 Implementation requires a certificate that does both client
authentication and server authentication.
In terms of the Microsoft Windows Server 2003 Standalone CA, this means that when you
complete the Advanced Certificate Request, you will select Other... from the "Type of Certificate
Needed" drop-down list. When you select Other... the Advanced Certificate Request displays a
text entry field for the OID (object identifier). For information about completing this field, see
Installing a Microsoft Certificate Services-based certificate on the Live Communications
Server on page 30.
If you use another CA (either a generic CA or the Microsoft Windows Server 2003 Enterprise
CA), the certificate request will not contain the same drop-down menus and choices. For
example with Microsoft Windows Server 2003 Enterprise CA, you might not see a field for the
OIDs because the OIDs can be set by the CA administrator in a template.
Procedure 1 - Installing the trusted certificate on Live
Communications Server
The trusted certificate is also referred to as the CA Certificate. From the Microsoft Live
Communications Server, follow the appropriate procedure to obtain the trusted certificate and
import it into the Microsoft Live Communications Server certificate store.
When installing the trusted certificate, note that Live Communications Server and AE Services
must use either the same CA or an issuer in the same certificate chain.
●
If you are using a third party certificate authority other than Microsoft Certificate Services,
follow the procedure described in Installing the trusted certificate from another vendor.
●
If you are using Microsoft Certificate Services, follow the procedure described in Installing
the trusted certificate generated by Microsoft Certificate Services.
Installing the trusted certificate from another vendor
Steps 1 and 2 are provided as a general reference only -- follow the instructions on your CA’s
Web site.
1. From your browser, go your certificate authority’s Web page for requesting a trusted
certificate or a trusted certificate chain.
2. Import the trusted certificate. For information about importing certificates and using the
certreq utility, see "Using a Public Certificate," in Microsoft Office Live Communications
Server 2005 Certificate Configuration.
3. Continue with Importing the certificate into the Live Communications Server’s trust store on
page 27.
AE Services TR/87 Implementation Guide, Issue 1.1
February 2007
25
Chapter 2: Integrating AE Services with Live Communications Server
Installing the trusted certificate generated by Microsoft Certificate
Services
Follow this procedure to download the trusted certificate generated by Microsoft Certificate
Services.
1. From your browser, type the URL of the Microsoft Certificate Services Server. For
example:
http://<certificate_server.com>/certsrv
2. From the Microsoft Certificate Services page, click Download a CA certificate,
certificate chain, or CRL.
3. Complete the Download a CA Certificate, Certificate Chain, or CRL page as follows:
a. Under CA Certificate, in the list box, select the signing certificate.
b. Click Base 64.
c. Click Download CA certificate chain.
4. Save the CA certificate file (lcscertnew.p7b, for example) to a local directory on the
Microsoft Live Communications Server (C:\temp, for example).
5. Continue with the steps described next in Importing the certificate into the Live
Communications Server’s trust store.
26
AE Services TR/87 Implementation Guide, Issue 1.1
February 2007
Administering Certificates -- certificate management
Importing the certificate into the Live Communications Server’s
trust store
Use this procedure to import the trusted certificate, from any CA, in to the Live Communications
Server’s trust store.
1. Start the Microsoft Management console -- Click Start, and then click Run. In the Run
dialog box, type mmc, and click OK.
2. From the Console window, click File > Add/Remove Snap-in....
3. From the Add/Remove Snap-in dialog box, on the Standalone tab, which displays
Console Root as the default, click Add....
4. From the Add Standalone Snap-in dialog box, select Certificates, and click Add.
5. From the Certificates snap-in dialog box, select Computer account, and click Next.
6. From the Select Computer dialog box, select Local Computer: (the computer this
console is running on), and click Finish.
7. Click Close from the Add Standalone Snap-in dialog box, and then click OK from the Add/
Remove Snap-in dialog box.
8. From the left pane of the Console Root, under Certificates (Local Computer), expand
Trusted Root Certificates Authorities.
9. Right-click Certificates, and then select All Tasks and click Import.
10. From the Certificate Import Wizard, Welcome screen, select Next.
11. Click Browse, and go to the directory where you stored the certificate file (C:\temp\
lcscertnew.p7b, for example). Select the certificate file (lcscertnew.p7b, for example)
and click Open.
12. In the Certificate Import Wizard, Certificate Store dialog box, make sure that Place all
certificates in the following store is selected, and the Certificate Store is: Trusted Root
Certification Authorities. Click Next.
13. When the Certificate Import Wizard dialog box displays the message "You have
successfully completed the Certificate Import wizard," click Finish.
AE Services TR/87 Implementation Guide, Issue 1.1
February 2007
27
Chapter 2: Integrating AE Services with Live Communications Server
Procedure 1a - Verifying the installation of the trusted certificate on Live
Communications Server
Follow this procedure to verify that the trusted certificate is installed correctly.
1. Start the Microsoft Management console -- Click Start, and then click Run. In the Run
dialog box, type mmc, and click OK.
2. From the Console window, click File > Add/Remove Snap-in....
3. From the Add/Remove Snap-in dialog box, on the Standalone tab, which displays
Console Root as the default, click Add....
4. From the Add Standalone Snap-in dialog box, select Certificates, and click Add.
5. From the Certificates snap-in dialog box, select Computer account, and click Next.
6. From the Select Computer dialog box, select Local Computer: (the computer this
console is running on), and click Finish.
7. Click Close from the Add Standalone Snap-in dialog box, and then click OK from the Add/
Remove Snap-in dialog box.
8. Verify that the trusted certificate for the Live Communications Server is installed, as
follows:
a. In the left pane of the console, Under Certificates (Local Computer) expand Trusted
Root Certificates Authorities and click Certificate. The console displays a list of
trusted certificates in the right pane.
b. In the right pane of the console, verify that the display includes the trusted certificate
that you installed at the end of Procedure 1, as follows:
28
●
Make sure the Issued To field displays the fully-qualified domain name of the Live
Communications Server.
●
Make sure the Issued By field displays the name of the certificate authority that
issued the certificate. This issuer should be either the same issuer, or an issuer in
the same certificate chain, as described in Step 3c of Procedure 3a on page 37.
●
Make sure the expiration date is correct.
AE Services TR/87 Implementation Guide, Issue 1.1
February 2007
Administering Certificates -- certificate management
Procedure 2 - Installing a server certificate for the Live
Communications Server
Follow the appropriate procedure for installing a server certificate for the Live Communications
Server.
●
If you are using a third party certificate authority other than Microsoft Certificate Services,
refer to Installing a server certificate from another vendor on page 29.
●
If you are using Microsoft Certificate Services, refer to Installing a Microsoft Certificate
Services-based certificate on the Live Communications Server on page 30.
Installing a server certificate from another vendor
Steps 1 through 3 are provided as a general reference only -- follow the instructions on your
CA’s Web site.
1. From your browser, go your certificate authority’s Web page for requesting a server
certificate.
2. Complete the required fields for enrollment. Usually this includes contact information, such
as your name, email address, your organizational unit (OU), and so on.
When you are providing the name and IP address for the server, use this rule of thumb. If
you are using Enterprise Edition, use the fully qualified domain name and IP address of
your pool; if you are using Standard Edition use the fully qualified domain name and IP of
your server.
3. Import the trusted certificate. For information about importing certificates and using the
certreq utility, see "Using a Public Certificate," in Microsoft Office Live Communications
Server 2005 Certificate Configuration.
4. Continue with the steps for Configuring the certificate for automatic routing on page 31.
AE Services TR/87 Implementation Guide, Issue 1.1
February 2007
29
Chapter 2: Integrating AE Services with Live Communications Server
Installing a Microsoft Certificate Services-based certificate on the Live
Communications Server
From the Microsoft Live Communications Server, follow this procedure to install a server
certificate issued by Microsoft Certificate Services.
Note:
Note:
In terms of the Microsoft Live Communications Server 2005 Certificate
Configuration Guide, the AE Services TR/87 integration falls into the category of
"interoperating with partner systems." This means that you must install a
certificate that is configured for both client and server authorization, as depicted
in Step 4c.
1. From your Web browser, type the URL of your certificate server. For example:
http://<certificate_server.com>/certsrv
2. From the Microsoft Certificate Services Welcome page, click Request a Certificate.
3. From the Request a Certificate page, click advanced certificate request.
4. From the Advanced Certificate Request page, click Create and submit a request to this
CA. Microsoft Certificate Services displays the next page of the of Advanced Certificate
Request. Keep in mind that the fields presented on the Advanced Certificate Request
pages depend on how the certification server is set up.
Follow Step a through Step f to complete the Advanced Certificate Request.
a. Under Identifying Information, in the Name field, type the fully qualified domain name
(FQDN) of your pool. For example: mylcspool.example.com . The pool entry in the
Name field applies to the Enterprise Edition of Live Communications Server. If you are
using Standard Edition of Live Communications Server, you would use the FQDN of
the server.
b. Under Type of Certificate Needed, in the selection box, select Other... . When you
select Other, the Certificate Request displays the OID field.
Note:
Note:
If you do not see a selection for Other..., it means you are using a CA other than
Microsoft Windows Server 2003 Standalone Certificate Authority. See Client and
server authentication on page 25
c. In the OID field, type the following OID for your certificate:
1.3.6.1.5.5.7.3.1,1.3.6.1.5.5.7.3.2 (be sure to use a comma between the two parts of
the OID). The first part of the OID, which is provided by default, (1.3.6.1.5.5.7.3.1) is
for server authentication. The second part (1.3.6.1.5.5.7.3.2), which you must add, is
for client authentication.
30
AE Services TR/87 Implementation Guide, Issue 1.1
February 2007
Administering Certificates -- certificate management
d. Under Key Options, make the following selections:
●
In the Key Usage Field, select the option button for Both.
●
In the CSP field, accept the default, which is Microsoft Enhanced Cryptographic
Provider v1.0.
●
Select the check box for Store Certificate in the local computer certificate
store.
e. Under additional options, In the Friendly Name field, type a name that will help you
identify the certificate.
f. Click Submit. Microsoft Certificate Services displays the Certificate Issued page.
5. From the Certificate Issued page, click Install this certificate. Microsoft Certificate
Services displays the Certificate Installed page.
Configuring the certificate for automatic routing
Follow this procedure to configure the certificate for automatic routing among your pool and
servers. For more information, see "Configuring Certificates for Automatic Routing Among
Pools and Standard Edition Servers" in Microsoft Office Live Communications Server Certificate
Configuration.
1. Open the Microsoft Office Live Communications Server 2005 management console.
2. In the left pane, expand the Forest node and the following subordinate nodes.
●
Live Communications servers and pools
●
lcspool node - the name of Live Communications Server pool node. If you are using
Standard Edition, this refers to the Live Communications Server.
3. Under the lcs-pool node (mylcspool, for example), right-click the fully qualified domain
name of your server (mylcserver.example.com, for example), and then click Properties.
4. From the mylcsserver.example.com Properties dialog, follow these steps to add a TLS
certificate and a security certificate.
a. Select the General tab. In the Connections box, select the listing for Mutual TLS.
Choose either 1 or 2, based on what is appropriate for your situation.
1. In the Connections box, select the listed Mutual TLS connection, and click Edit. From the
Select Certificate dialog box, select the certificate that was issued to the pool name
mylcspool.example.com, and click OK. Continue with Step 4b.
2. Click Add to add a new connection so you can administer a certificate. From the Add
Connection dialog box, select TLS for Transport Type and click Select Certificate. From
the Select Certificate dialog box, select the certificate that was added to the pool name
mylcspool.example.com, and click OK. Continue with Step 4b.
b. Select the Security tab, and then click Select Certificate. From the Select Certificate dialog
box, select the certificate you installed, and click OK.
5. From the Properties dialog, click Apply, and then click OK to close the Properties dialog.
AE Services TR/87 Implementation Guide, Issue 1.1
February 2007
31
Chapter 2: Integrating AE Services with Live Communications Server
Procedure 2a - Verifying the installation of the server certificate for
Live Communications Server
Use this procedure to verify the installation of the server certificate, from any CA, for the Live
Communications Server.
1. Start the Microsoft Management console -- Click Start and then click Run. In the Run
dialog box, type mmc, and click OK.
2. From the Console window, click File > Add/Remove Snap-in....
3. From the Add/Remove Snap-in dialog box, on the Standalone tab, which displays
Console Root as the default, click Add....
4. From the Add Standalone Snap-in dialog box, select Certificates, and click Add.
5. From the Certificates snap-in dialog box, select Computer account, and click Next.
6. From the Select Computer dialog box, select Local Computer: (the computer this
console is running on), and click Finish.
7. Click Close from the Add Standalone Snap-in dialog box, and then click OK from the Add/
Remove Snap-in dialog box.
8. Verify that the server certificate for the Live Communications Server in installed, as follows:
a. In the left pane of the console, Under Certificates (Local Computer) expand Personal
and click Certificate. The console displays a list of certificates in the right pane.
b. In the right pane of the console, verify that the display includes the server certificate
that you installed at the end of Procedure 2, as follows:
32
●
Make sure the Issued To field displays the fully-qualified domain name of the Live
Communications Server.
●
Make sure the Issued By field displays the name of the certificate authority that
issued the certificate (referred to as the issuer on the certificate).
●
Make sure the expiration date is correct.
AE Services TR/87 Implementation Guide, Issue 1.1
February 2007
Administering Certificates -- certificate management
Procedure 3 - Installing the trusted certificate on the AE Server
The trusted certificate is also referred to as the certificate authority (CA) certificate. It is issued
by the certificate authority, which can be either Microsoft Certificate Services or another
certificate authority.
●
If you are using a certificate authority other than Microsoft Certificate Services, use the
procedure described in Generic procedure for installing the trusted certificate for AE
Services on page 34.
●
If you are using Microsoft Certificate Services, use the procedure described in
Microsoft-based procedure for installing a trusted certificate chain on page 35.
AE Services TR/87 Implementation Guide, Issue 1.1
February 2007
33
Chapter 2: Integrating AE Services with Live Communications Server
Generic procedure for installing the trusted certificate for AE Services
These steps are provided as a general reference only -- follow the instructions on your CA’s
Web site.
1. From your browser, go to your certificate authority’s Web page and download the
certificate chain.
!
Important:
You must import the entire certificate chain all the way back to the root certificate.
Important:
●
The trusted certificate or certificate chain must be in text format (PEM or Base-64). If you
are importing a certificate chain, it must be a text-based PKCS#7 file. Think of a PKCS#7
file as an envelope containing all trusted certificates.
●
It is acceptable to import certificates in the chain individually if they are not available in
PKCS#7 format, but all certificates must be in the trusted certificates store.
2. The certificate authority processes your request and issues a trusted certificate (or
certificate chain) for you to download.
3. Download the entire certificate to the AE Services administrative workstation, and save it
with a unique name (for example, C:\temp\aetrucert.cer).
4. Using a text editor, copy the contents of the trusted certificate file, including the header and
trailer.
●
The header and trailer for a PEM or Base 64 file are as follows:
----BEGIN CERTIFICATE----- (header)
-----END CERTIFICATE----- (trailer)
●
The header and trailer for a PKCS#7 file are as follows:
-----BEGIN PKCS7 ----- (header)
-----END PKCS7----- (trailer)
Note:
Note:
The header and trailer in your PKCS#7 file must read as follows before you import the
contents of the file into OAM.
-----BEGIN PKCS7---------END PKCS7----If the header and trailer read as -----BEGIN CERTIFICATE----- and -----END
CERTIFCATE----- you must edit them to read as -----BEGIN PKCS7----- and
-----END PKCS7-----.
5. Contact the Microsoft Live Communications Server administrator, and confirm that both
the server certificate and the trusted certificate are installed and operating on Live
Communications Server. The certificates must be installed and operating on Live
Communications Server before you can carry out the procedures in AE Services OAM.
6. Continue with the steps described next in Importing the trusted certificate into OAM on
page 36.
34
AE Services TR/87 Implementation Guide, Issue 1.1
February 2007
Administering Certificates -- certificate management
Microsoft-based procedure for installing a trusted certificate chain
If you use a Microsoft CA hierarchy, follow this procedure from the AE Server to import the
trusted certificate chain in PKCS#7 format from Microsoft Certificate Services into AE Services
OAM.
1. From Internet Explorer, type the URL of your certificate server. For example:
http://<microsoftcertificate_server.com>/certsrv
2. From the Microsoft Certificate Services page, click Download a CA certificate,
certificate chain, or CRL.
3. On the Download a CA Certificate, Certificate Chain, or CRL page, select the option button
for Base 64, and click Download CA certificate chain.
4. Save the CA certificate file (the trusted certificate) to a local directory on the Microsoft Live
Communications Server (for example C:\temp\aetrucert.cer).
5. Using a text editor, open the file and change the header and trailer, as follows:
Change the existing header and trailer
To this:
-----BEGIN CERTIFICATE---------END CERTIFICATE-----
-----BEGIN PKCS7---------END PKCS7-----
!
Important:
Important:
You must change the header and trailer in the PKCS#7 file as directed in Step 5
or you will not be able to successfully import the trusted certificate chain from a
Microsoft CA.
6. Copy the entire contents of the CA certificate file, including the updated header and trailer.
7. Contact the Microsoft Live Communications Server administrator, and confirm that both
the server certificate and the trusted certificate are installed and operating on the Live
Communications Server. The certificates must be installed and operating on Live
Communications Server before you can carry out the procedures in AE Services OAM.
8. Continue with the steps described next in Importing the trusted certificate into OAM on
page 36.
AE Services TR/87 Implementation Guide, Issue 1.1
February 2007
35
Chapter 2: Integrating AE Services with Live Communications Server
Importing the trusted certificate into OAM
1. From AE Services OAM, select CTI OAM Admin > Administration > Certificate
Management > Trusted Certificate.
2. From the Trusted Certificates page, click Import.
3. Complete the Trusted Certificate Import page, as follows:
Note:
36
●
In the Certificate Alias field, type an alias for the trusted certificate (for example,
catrusted). The trusted certificate alias can be arbitrary. It does not need to match any
aliases for AE Services.
●
In the Certificate PEM field, paste the contents of the CA's certificate file, and click
Apply. If the import is successful, OAM displays the following message: "Certificate
Imported Successfully."
Note:
At this point it is recommended that you complete Procedure 3a - Verifying the
installation of the trusted certificate in AE Services on page 37.
AE Services TR/87 Implementation Guide, Issue 1.1
February 2007
Administering Certificates -- certificate management
Procedure 3a - Verifying the installation of the trusted certificate
in AE Services
Use this procedure to verify the installation of the entire certificate chain (all the way back to the
root certificate) in AE Services.
1. In AE Services OAM, select CTI OAM Admin > Administration > Certificate
Management > Trusted Certificate.
2. From the Trusted Certificates page, select the alias of the trusted certificate (catrusted,
based on this sample scenario), and click View.
3. From the Trusted Certificate Details page, verify that the information for the trusted
certificate is correct.
a. Verify that the entire chain of certificates exists, all the way back to a self-signed
certificate.
b. Verify that the Issued To field displays name of the organization that the trusted
certificate is issued to.
c. Verify that the Issued By field Indicates the name of the certificate authority that issued
the trusted certificate (referred to as the issuer on the certificate). This issuer should
be either the same issuer, or an issuer in the same certificate chain, as described in
Step 8b of Procedure 1a on page 28.
d. Verify that the Expiration Date Indicates the date that the trusted certificate expires.
e. Verify the information in the Details display. Make sure the Certificate Status is valid.
4. Click Close to exit the Trusted Certificate Details page.
AE Services TR/87 Implementation Guide, Issue 1.1
February 2007
37
Chapter 2: Integrating AE Services with Live Communications Server
Converting Certificate files in other formats for AE Services
If your CA provides you with a certificate in a format other than PEM, you must convert it to PEM
before importing it into AE Services OAM. The following sections describe how to convert files
using openssl tools, which are available on the Web at www.openssl.org.
Converting a DER file to PEM : If your Certificate Authority provides you with a DER-encoded
certificate, you must convert it to PEM before you can import it into AE Services OAM. Use the
following command to convert the DER file to PEM format.
openssl x509 -in <input>.cer -inform DER -out <output>.cer -outform PEM
Converting a PKCS#12 file to PEM : If your CA provides you a certificate in PKCS#12 format
you must convert it to PEM before importing it into AE Services OAM. Use the following
command to convert the PKCS#12 file to PEM
openssl pkcs12 -clcerts -nokeys -in <cert.p12> -out <pathname>.pem
38
AE Services TR/87 Implementation Guide, Issue 1.1
February 2007
Administering Certificates -- certificate management
Procedure 4 - Creating a server certificate request for AE Services
In AE Services OAM, use this procedure to create a server certificate request (also referred to
as a certificate signing request, or CSR) for the AE Services server. This procedure generates a
certificate signing request which includes a private key.
1. From the browser on your AE Services administrative workstation, log in to AE Services
OAM.
2. Select CTI OAM Admin > Administration > Certificate Management > Server
Certificate.
3. On the Server Certificate page, Click Add.
4. Complete the Add Server Certificate page, as follows:
●
In the Certificate Alias field, type the alias (an arbitrary string of alphanumeric
characters). For example: aeservercert.
●
Leave the Create Self-Signed Certificate check box unchecked (the default).
●
In the Encryption Algorithm field, select 3DES.
●
In the Password field, type the password of your choice.
●
In the Key Size field, accept the default 1024.
●
In the Certificate Validity field, accept the default, 1825.
●
In the Distinguished Name field, type the LDAP entries required by your CA. These
entries must be in LDAP format and they must match the values required by your CA.
If you are not sure what the required entries are, contact your CA.
Among the required entries will be the FQDN of the AE Server in LDAP format.
Additionally you might need to provide your company name, your organization name
and so on. Separate each LDAP entry with a comma, and do not use blank spaces, for
example:
cn=myaeserver.example.com,ou=myOrganizationalUnit,o=examplecorp,L=Springfield,ST=Illinois,C=US
●
In the Challenge password field, type the challenge password of your choice.
●
Click Apply.
AE Services displays the Server Certificate Manual Enrollment Request page, which
displays the certificate alias and the certificate request itself in PEM (Privacy Enhanced
Mail) format. The certificate request consists of all the text in the box, including the header
(-----BEGIN CERTIFICATE REQUEST -----) and the trailer (-----END
CERTIFICATE REQUEST-----).
5. Copy the entire contents of the server certificate, including the header and the trailer. Keep
the contents available in the clipboard for the next procedure.
AE Services TR/87 Implementation Guide, Issue 1.1
February 2007
39
Chapter 2: Integrating AE Services with Live Communications Server
Procedure 5 - Creating a server certificate for AE Services
Use the appropriate procedure for creating a server certificate for AE Services.
●
If you are using a third party certificate authority other than Microsoft Certificate Services,
refer to Generic procedure for creating a server certificate for AE Services on page 40.
●
If you are using Microsoft Certificate Services, refer to Microsoft-based procedure for
creating a server certificate for AE Services on page 41.
Generic procedure for creating a server certificate for AE Services
These steps are provided as a general reference only -- follow the instructions on your CA’s
Web site.
1. From your browser, go your CA’s Web page for requesting a server certificate.
2. Complete the required fields for enrollment. Usually you provide information such as your
such as your name, email address, the IP address of your server, your organizational unit
(OU), and the type of server you have.
3. Paste the CSR into the appropriate field and submit or upload the request. (You paste the
certificate request that you copied in Step 5 of Procedure 4 on page 39).
4. The certificate authority processes your request and issues a server certificate for you to
download.
5. Download the certificate to your AE Services administrative workstation, and save it with a
unique name (for example, C:\aescert.cer).
!
Important:
Important:
The certificate data you import into AE Services OAM system must be
PEM-encoded (Base 64).
- If your CA issues certificates in DER format, you must convert it to PEM before
importing it into AE Services OAM. See Converting a DER file to PEM on page 38.
- If your CA issues certificates in PKCS#12 format, you must convert it to PEM
before importing it into AE Services OAM. See Converting a PKCS#12 file to
PEM on page 38.
40
AE Services TR/87 Implementation Guide, Issue 1.1
February 2007
Administering Certificates -- certificate management
Microsoft-based procedure for creating a server certificate for
AE Services
If you use Microsoft Certificate Services as the certificate authority, use this procedure as a
guide for creating a server certificate for AE Services.
1. From your Web browser, type the URL of your certificate server. For example:
http://<certificate_server.com>/certsrv
where: <certificate_server.com> is the domain name or IP address of your certificate
server.
2. On the Welcome page of Microsoft Certificate Services, click Request a certificate.
3. On the Request a Certificate page, click advanced certificate request.
4. On the Advanced Certificate Request page, click Submit a certificate request by using a
base-64-encoded CMC or PKCS #10 file, or submit a renewal request by using a
base-64-encoded PKCS #7 file . (AE Services uses a base-64-encoded CMC).
5. On the Submit a Request or Renewal Request page, paste the certificate request into the
Saved Request input field, and click Submit. (You paste the certificate request that you
copied in Step 5 of Procedure 4 on page 39).
6. From the Certificate Issued page, select Base 64 encoded, and click Download
certificate.
Note:
Note:
Some CAs are not set up to automatically grant certificates. If this case, you
might have to wait until your administrator issues the certificate. Once your
administrator issues the certificate, return to the Welcome page of Microsoft
Certificate Services, and click View the status of a pending certificate request
to get to the "Issued Certificate" page.
7. From the File download dialog box, save the certificate to your computer.
AE Services TR/87 Implementation Guide, Issue 1.1
February 2007
41
Chapter 2: Integrating AE Services with Live Communications Server
Procedure 6 - Importing the server certificate into AE Services
OAM
From AE Services OAM follow this procedure to import the AE Services server certificate into
AE Services OAM. This procedure assumes that your certificate is in PEM format. If your
certificate is in another format, see Converting Certificate files in other formats for AE
Services on page 38.
Note:
Note:
Always install just the server certificate (as opposed to a PKCS7 certificate
chain), but be sure to select Establish Chain of Trust as indicated in Step 6.
1. Using a text editor, open the certificate file you downloaded to your computer when you
created a server certificate for AE Services.
2. Copy the contents of the certificate file, including the header (-----BEGIN
CERTIFICATE-----) and the trailer (-----END CERTIFICATE-----).
3. In AE Services OAM, select CTI OAM Admin > Administration > Certificate
Management > Server Certificate > Pending Requests.
4. From the Pending Server Certificates page, select the certificate alias you specified when
you created the CSR for AE Services (based on the example, the alias is aeservercert).
Then click Manual Enroll.
5. From the Server Certificate Manual Enrollment Request page, click Import. When you
click Import, OAM displays the Server Request Import page.
6. Complete the Server Certificate Import page, as follows:
●
In the Alias field, type the alias you used to generate this certificate request (based on
the example, it is aeservercert).
●
Accept the default for Establish Chain of Trust (by default it is selected).
●
In the Certificate PEM field, paste the contents of the certificate file that you copied in
Step 2 of the current procedure.
●
Click Apply.
If the import is successful, AE Services displays the message: "Certificate imported
successfully."
42
AE Services TR/87 Implementation Guide, Issue 1.1
February 2007
Administering Certificates -- certificate management
Procedure 6a - Verifying the installation of the server certificate
in AE Services
Follow this procedure to verify the installation of the server certificate in AE Services.
1. In AE Services OAM, select CTI OAM Admin > Administration > Certificate
Management > Server Certificate .
2. From the Server Certificates page, select the alias of the server certificate (aeservercert,
based on this sample scenario), and click View.
3. From the Server Certificate Details page, verify that the information for the server
certificate is correct.
a. Verify that the Issued To field displays the fully qualified domain name of the AE
Server.
b. Verify that the Issued By field Indicates fully-qualified domain name of the certificate
authority that issued the server certificate.
c. Verify that the Expiration Date Indicates the date that the server certificate expires.
d. Verify the information in the Details window. Make sure the Certificate Status is valid.
4. Click Close to exit the Server Certificate Details page.
!
CAUTION:
CAUTION:
AE Services allows only one server certificate at a time. If you install more than
one server certificate and restart AE Services, the TR/87 service will fail to
initialize.
Replacing an expired server certificate
Once a server certificate has expired, links or security features that rely on the validity of the
certificate may fail. Because AE Services allows only one server certificate at a time, you must
carefully manage the process of replacing an expired certificate.
If you have a certificate that is about to expire, you can install a new certificate without impacting
AE Services. Before the server certificate expires, select the server certificate on the Server
Certificate page and delete it. Once you have deleted the expired server certificate, restart the
AE Server. When AE Services restarts the newly-installed certificate will go into effect.
AE Services TR/87 Implementation Guide, Issue 1.1
February 2007
43
Chapter 2: Integrating AE Services with Live Communications Server
Dial Plan settings in AE Services OAM
AE Services uses the information on the Dial Plan settings pages to process phone numbers
used in your TR/87 implementation. In AE Services you can use either of the following methods
to administer dial plan settings.
●
You can administer the dial plan settings for one switch at a time. For more information,
see Administering dial plan settings on a per-switch basis on page 49.
●
You can administer default dial plan settings that are used for all switches. For more
information, see Administering default dial plan settings on page 51.
!
Important:
Important:
In configurations with one AE Server supporting multiple switches, AE Services
does not support Microsoft Office Communicator control of the same extension
on more than one switch.
Before you begin
Before you start the procedures to administer dial plan settings, make sure you are familiar with
Tel URI formats and the dial plan conversion pages in OAM. Tel URI is an abbreviation for
Telephony Uniform Resource Identifier, sometimes it is expressed as "TelURI." OAM is an
abbreviation for Operations, Administration and Maintenance.
●
To familiarize yourself with Tel URI formats, see About Tel URI formats and device IDs on
page 45.
●
For information about using the OAM pages to create dial plan conversion rules for
converting E.164 phone numbers to switch extensions and switch extensions to E.164
phone numbers, see About the From TelURI and To TelURI rules on page 46.
To complete the dial plan settings Web pages in AE Services OAM, you need to know how the
dial plan is administered for on Communication Manager. If you do not know what the dial plan
settings are for a particular switch or set of switches, contact the Communication Manager
administrator.
44
AE Services TR/87 Implementation Guide, Issue 1.1
February 2007
Dial Plan settings in AE Services OAM
About Tel URI formats and device IDs
Table 5 describes the supported Tel URI formats that AE Services supports. The preferred
format is E.164, except in cases where the extension bears no resemblance to the E.164
number.
Calling device and monitored device ID: AE Services expects the calling device and
monitored devices to be in either E.164PlusExt format or E.164 format. The extOnly format
should be used only if there is no correlation between the E.164 number and the extension.
Called device ID: Called device IDs will not be in E.164PlusExt format, but they could be in any
of the other formats listed in Table 5 .
Table 5: Tel URI formats supported by AE Services
Format
Example
E.164
tel:+13035389000
E.164PlusExt
tel:+13035389000;ext=1234
extOnly
tel:5389000;phone-context=<domain>
where <domain> can be any organization’s domain name
tel:5380112;phone-context=example.com
AE Services TR/87 Implementation Guide, Issue 1.1
February 2007
45
Chapter 2: Integrating AE Services with Live Communications Server
About the From TelURI and To TelURI rules
The dial plan conversion pages ("Dial Plan Settings - Conversion Rules for Default" and "Dial
Plan Settings - Conversion Rules - switchname) in AE Services OAM are used for setting up
conversion rules for a switch connection. The conversion rules are expressed as two tables in
OAM, "From TelURI" and "To TelURI."
From TelURI: The term "From TelURI" is a shorthand way of saying "convert from a normalized
TelURI number to an extension or dial string," which is handed off to the switch (Communication
Manager).
From TelURI
Microsoft Office
Communicator normalized TelURI number
AE Server
extension or dial string
+13035381234
Communication
Manager
5381234
To TelURI: The term "To TelURI" is a shorthand way of saying "convert from an extension or
dial string to a normalized TelURI," which is handed off to Microsoft Office Communicator.
To TelURI
Microsoft Office
Communicator
normalized TelURI number
AE Server
+13035381234
extension or dial string
Communication
Manager
5381234
For a description of how these tables work, see
46
●
From TelURI settings on page 47
●
To TelURI settings on page 48
AE Services TR/87 Implementation Guide, Issue 1.1
February 2007
Dial Plan settings in AE Services OAM
From TelURI settings
The From TelURI table in OAM determines the way that the AE Services TR/87 interface processes
inbound E.164 numbers. Generally speaking, AE Services applies matching criteria to the incoming
number. When the number satisfies the matching criteria, AE Services manipulates the digits and passes
the number to Communication Manager (only one rule is applied for each number). When setting up the
From TelURI settings, you can specify up to 200 rules. Each row in the table represents a rule. The rules
are processed in order from top to bottom. If you have a rule that contains a wildcard (* - asterisk) for the
Minimum Length, Maximum Length, and Pattern match, it always must be the last rule in the list.
Example - From TelURI rules
Minimum Length
Maximum Length
Pattern Match
Delete Length
Replacement
A
11
11
1303538
4
(blank character)
B
11
11
1732852
4
(blank character)
C
11
11
1720444
4
(blank character)
D
11
11
1303
1
9
E
11
11
1720
1
9
F
11
11
1
0
9
G
*
*
*
0
9011
Example of processing incoming numbers based on From TelURI rules in the example
A
AE Services receives an 11-digit number, 13035381234. Based on the matching pattern of 1303538
at the beginning, AE Services deletes the first 4 digits, 1303, and sends 5381234 to the switch.
B
AE Services receives an 11-digit number, 17328521234. Based on the matching pattern of 1732852
at the beginning, AE Services deletes the first 4 digits, 1732, and sends 8521234 to the switch.
C
AE Services receives an 11-digit number, 17204441234. Based on the matching pattern of 1720444
at the beginning, AE Services deletes the first 4 digits, 1720, and sends 4441234 to the switch.
D
AE Services receives an 11-digit number, 13036791234. Based on the matching pattern of 1303 at
the beginning, AE Services deletes the first digit, 1, replaces it with a 9 and sends 93036791234 to the
switch.
E
AE Services receives an 11-digit number, 17202891234. Based on the matching pattern of 1720 at
the beginning, AE Services deletes the first digit, 1, replaces it with a 9 and sends 97202891234 to the
switch.
F
AE Services receives an 11-digit number, 18183891234. Based on the matching pattern of 1 at the
beginning, AE Services prepends a 9 to the number and sends 918183891234 to the switch.
G
AE Services receives a 13-digit number 4926892771234. Based on a matching pattern of any digits,
AE Services prepends 9011 to the number and sends 90114926892771234 to the switch.
AE Services TR/87 Implementation Guide, Issue 1.1
February 2007
47
Chapter 2: Integrating AE Services with Live Communications Server
To TelURI settings
The To TelURI table in OAM determines the way AE Services TR/87 interface processes
outbound E.164 numbers. Generally speaking, AE Services applies matching criteria to the
incoming number. When the number satisfies the matching criteria, AE Services manipulates
the digits and passes the number to Microsoft Office Communicator (only one rule is applied for
each number). When setting up the From TelURI settings, you can specify up to 200 rules. Each
row in the table represents a rule. The rules are processed in order from top to bottom. If you
have a rule that contains a wildcard (* - asterisk) for the Minimum Length, Maximum Length,
and Pattern match, it always must be the last rule in the list.
Example - To URI rules
Minimum Length
Maximum Length
Pattern Match
Delete Length
Replacement
A 7
7
538
0
1303
B 7
7
852
0
1732
C 7
7
444
0
1720
D 5
5
2
0
173285
E 5
5
4
0
172044
F
10
*
0
1
10
Example of processing incoming numbers based on To TelURI rules in the example
A
B
C
D
E
F
48
AE Services receives a 7-digit number from the switch, 5381234. Based on the matching pattern
of 538 at the beginning, AE Services prepends 1303 to the beginning and sends 13035381234 to
the Microsoft Office Communicator.
AE Services receives a 7-digit number, 8521234. Based on the matching pattern of 852 at the
beginning, AE Services prepends 1732 to the beginning and sends 17328521234 to the Microsoft
Office Communicator.
AE Services receives a 7-digit number, 4441234. Based on the matching pattern of 444 at the
beginning. AE Services prepends 1720 to the beginning and sends 17204441234 to the Microsoft
Office Communicator.
AE Services will sometimes receive a 5 digit extension from a networked switch, even if the local
dial plan is 7 digits (see Dial Plan tips on page 49). In this case, AE Services receives a 5 digit
number 21234. Based on the matching pattern of 2 at the beginning. AE Services prepends
173285 to the beginning and sends 17328521234 to the Microsoft Office Communicator.
AE Services will sometimes receive a 5 digit extension from a networked switch, even if the local
dial plan is 7 digits (see Dial Plan tips on page 49). In this case, AE Services receives a 5 digit
number 21234. Based on the matching pattern of 4 at the beginning, AE Services prepends
172044 to the beginning and sends 17204441234 to the Microsoft Office Communicator.
AE Services receives a 10-digit number, 2126711234from the switch. Based on the matching
pattern of any 10-digit string, AE Services prepends 1 to the beginning and sends 12126711234 to
the Microsoft Office Communicator.
AE Services TR/87 Implementation Guide, Issue 1.1
February 2007
Dial Plan settings in AE Services OAM
Dial Plan tips
When switches are networked together using ISDN QSIG tie trunks or ISDN tie trunks, in some
call scenarios Communication Manager sends extension numbers from the networked switch to
the AE Server. The format of these extension numbers may be different than the format of local
extension numbers.
To optimize the experience of Microsoft Office Communicator users, be sure to administer "To
TelURI" rules for the networked switch, or switches, as well as the local switch. Additionally, if
the networked switch has a different extension length than the local switch, extensions might be
reported with both the local extension length and the networked extension length. Be sure to
administer "To TelURI" rules that can successfully convert both extension lengths for the
networked switch.
Also, you might need multiple entries in the "To TelURI" rules for the networked switch if that
switch has a different extension length than the local switch.
Administering dial plan settings on a per-switch basis
Follow this procedure to administer the dial plan settings for a switch connection you have
already administered in AE Services (CTI OAM > Administration > Switch Connections). AE
Services uses the dial plan information to convert E.164 phone numbers to switch extensions
(From TelURI) and switch extensions to E.164 phone numbers (To TelURI). For more
information, see About the From TelURI and To TelURI rules on page 46.
Note:
Note:
If your TR/87 Implementation uses a number of switches that all have the same
dial plan, use the procedure described in Administering default dial plan
settings on page 51. By using the default settings, you enter the dial plan settings
only once.
1. From the browser on your AE Services administrative workstation, log in to AE Services
OAM.
2. Select CTI OAM Admin > Administration > TR87 Configuration > Dial Plan > Switch
Administration.
3. From the Switch Dial Plan Administration page, select the connection name for the switch
you want to administer, for example aeslcswitch, and click Details.
AE Services OAM displays the Dial Plan Settings - Conversion Rules for aeslcswitch page.
This OAM page provides you with a way to Add, Edit, Delete and Reorder "From TelURI"
conversion rules and "To TelURI" conversion rules. The Edit, Delete, and Reorder
functions apply to existing rules. This example assumes the initial state of the page -- no
conversion rules exist -- and focuses on adding two conversion rules, one for From TelURI
and one for To TelURI.
AE Services TR/87 Implementation Guide, Issue 1.1
February 2007
49
Chapter 2: Integrating AE Services with Live Communications Server
4. Follow Step a to add a From TelURI conversion rule, and follow Step b to add a To TelURI
conversion rule.
a. In the From TelURI section of the page, under the blank display area, click Add.
1. From the Add Dial Plan to aeslcswitch page, complete the fields for the From
TelURI settings, based on your dial plan.
2. Click Apply Changes. OAM displays the Add Dial Plan page, which asks you to
confirm your dial plan changes. From the Add Dial Plan page, click Apply.
At this point you have added one From TelURI conversion rule. If you want to add
another From TelURI conversion rule, you must repeat Steps a, 1, and 2.
b. In the To TelURI section of the page, under the blank display area, click Add.
1. From the Add Dial Plan to aeslcswitch page, complete the fields for the To TelURI
settings, based on your dial plan.
2. Click Apply Changes. OAM displays the Add Dial Plan page, which asks you to
confirm your dial plan changes. From the Add Dial Plan page, click Apply.
At this point you have added one To TelURI conversion rule. If you want to add
another To TelURI conversion rule, you must repeat Steps b, 1, and 2.
At this point the changes you made to your dial plan settings are in effect, and you do not
have to restart the AE Server.
50
AE Services TR/87 Implementation Guide, Issue 1.1
February 2007
Dial Plan settings in AE Services OAM
Administering default dial plan settings
If you use more than one switch in your TR/87 implementation, and all the switches have
common dial plan settings, you can use the Default Dial Settings page as a template. When you
add a switch connection for TR/87, the dial plan settings that you have administered on the
Default Dial Plan settings page are applied to that switch connection. Use this procedure to set
up the Default Dial Settings page.
1. From the browser on your AE Services administrative workstation, log in to AE Services
OAM.
2. Select CTI OAM Admin > Administration > TR87 Configuration > Dial Plan > Default
Settings.
AE Services OAM displays the Dial Plan Settings - Conversion Rules for default page.
This OAM page provides you with a way to Add, Edit, Delete and Reorder "From TelURI"
conversion rules and "To TelURI" conversion rules. The Edit, Delete, and Reorder
functions apply to existing rules. This example assumes the initial state of the page -- no
conversion rules exist -- and focuses on adding two conversion rules, one for From TelURI
and one for To TelURI.
3. Follow Step a to add a From TelURI conversion rule, and follow Step b to add a To TelURI
conversion rule.
a. In the From TelURI section of the page, under the blank display area, click Add.
1. From the Add Dial Plan to default page, complete the fields for the From TelURI
settings, based on your dial plan.
2. Click Apply Changes. OAM displays the Add Dial Plan page, which asks you to
confirm your dial plan changes." From the Add Dial Plan page, click Apply.
At this point you have added one From TelURI conversion rule. If you want to add
another From TelURI conversion rule, you must repeat Steps a, 1, and 2.
b. In the To TelURI section of the page, under the blank display area, click Add.
1. From the Add Dial Plan to default page, complete the fields for the To TelURI
settings, based on your dial plan.
2. Click Apply Changes. OAM displays the Add Dial Plan page, which asks you to
confirm your dial plan changes. From the Add Dial Plan page, click Apply.
At this point you have added one To TelURI conversion rule. If you want to add
another To TelURI conversion rule, you must repeat Steps b, 1, and 2.
At this point the changes you made to your dial plan settings are in effect, you do not have
to restart the AE Server.
AE Services TR/87 Implementation Guide, Issue 1.1
February 2007
51
Chapter 2: Integrating AE Services with Live Communications Server
Administering Active Directory
Follow this procedure to set up the connection to Active Directory for AE Services.
●
The examples in this procedure use the "example.com" domain name.
●
See also, DN entries and scope of search on page 53 for a diagram depicting
Distinguished Names.
1. From the browser on your AE Services administrative workstation, log in to AE Services
OAM.
2. Select CTI OAM Admin > Administration > TR 87 Configuration > Active Directory.
3. Complete the Active Directory Configuration page, as follows.
●
User DN for Query Authentication - Type the DN for the user object that AE Services
uses for accessing the Active directory. Based on how users are set up in Active
Directory, the user object could correspond to a Full Name, a Display Name, or a User
logon name. Here are two examples:
cn=Grey\\,Al,cn=sertech,cn=services,cn=users,dn=example,dc=com
cn=RTCAdmin,cn=devtech,cn=services,cn=development,dc=example,dc=com
Note:
Note:
If a DN attribute has a comma within it, you must precede it with a backslash. For
more information, see AE Services OAM Usage tips on page 54. If you are not
sure what the DN is for a user object, see Determining the DN for a user object on
page 54.
●
Password - Type a password to be used for Active Directory access; retype the same
password in the Confirm Password field. This Active Directory password is stored in an
encrypted format on the AE Server.
●
Base Search DN -The Base Search DN is less specific than the User DN. Type the DN
of the node that includes all user accounts that need access to the AE Services and
Live Communications Server integration in the following format:
cn=users,dc=example,dc=com
52
●
IP Address - Type the IP address or Host Name of the Domain Controller that runs
Active Directory.
●
Port - (used for Active Directory access) - Change the default port number to an
appropriate value for your configuration. The default is 389 (the port assignment for
LDAP).
●
Select Apply Changes to put your changes into effect.
AE Services TR/87 Implementation Guide, Issue 1.1
February 2007
Administering Active Directory
DN entries and scope of search
The DN entries you specify in the User DN for Query Authentication and the Base Search DN
field are, in effect, search paths in an LDAP structure.
Consider the DN examples used in Administering Active Directory on page 52:
●
User DN for Query Authentication
cn=Pat Brown,cn=sertech,cn=services,cn=users,dc=example,dc=com
●
Base Search DN
cn=users,dc=example,dc=com
Both DNs are unique, but the User DN for Query Authentication is more specific than the Base
Search DN. To get a sense of the difference between the two DNs see Figure 4.
Figure 4: DN entries and scope of search
com (dc=com)
example (dc=example)
Base Search DN (includes everything below)
users (cn=users)
development (cn=development)
sales (cn=sales)
saltech (cn=saltechs)
Green, Sam (cn=Green, Sam)
services (cn=services)
sertechs (cn=sertechs)
Pat Brown (cn=Pat Brown)
devtechs (cn=devtechs)
Al Grey (cn=Grey, Al)
RTCAdmin (cn=RTCAdmin)
User DN for Query Authentication (specific to users)
AE Services TR/87 Implementation Guide, Issue 1.1
February 2007
53
Chapter 2: Integrating AE Services with Live Communications Server
AE Services OAM Usage tips
Here are a few usage tips based on Figure 4.
●
If you were to specify a Base Search DN of
cn=development,cn=users,dc=example,dc=com the users in services and sales would
not be able to establish a session. Instead, you should specify a Base Search DN that is
less specific, such as cn=users,dc=example,dc=com .
●
The cn=attributes at the user level (Green, Sam; Pat Brown, and Grey, Al) are all valid, but
notice that the cn= attributes "Green, Sam" and "Grey, Al" contain a comma within the
attribute. When you enter these DNs in AE Services OAM, you must precede the internal
comma with two backslashes. This is necessary because the comma is a delimiter that is
used for separating DN attributes. For example:
cn=Green\\,Sam,cn=saltech,cn=sales,cn=users,dc=example,dc=com
cn=Grey\\,Al,cn=devtech,cn=development,cn=users,dc=example,dc=com
Determining the DN for a user object
If you are not sure what the DN for the user object is, follow this procedure from the Active
Directory Services domain controller.
1. At the command prompt, run the csvde -f command against the Users domain and save
the output to a file (csvde -f file.csv).
2. Open the file with a text editor or a spreadsheet program and locate the appropriate user
object (which can be the Full Name, Display Name, or User logon name on the Active
Directory User Properties dialog).
3. Copy the DN for the user object, and paste it into User DN for Query Authentication field in
OAM.
54
AE Services TR/87 Implementation Guide, Issue 1.1
February 2007
About configuring Live Communications Server for AE Services
About configuring Live Communications Server for AE
Services
To set up the Live Communications Server, follow the procedures listed in the section called
"Configuring the Server" (a subsection of "Deploying Telephony") in the Microsoft Office
Communicator 2005 Telephony Planning and Deployment Guide. The procedures that require
adding AE Services specific information are as follows:
●
Enabling Remote Call Control (RCC) extensions in Active Directory -- which refers to
per-user, manual administration. For more information see Enabling Remote Call Control
in Active Directory on page 56.
Tip:
Microsoft provides a utility called Office Communicator 2005 Phone
Normalization Script that enables you to make bulk changes to Active Directory.
If you run this utility, you do not have to do per-user manual administration. To get
this phone normalization script, go to www.microsoft.com, and locate Live
Communications Server 2005 with SP1 Resource Kit. The resource kit
includes this phone normalization script.
Tip:
●
Setting up a static route -- for more information see Configuring a static route on page 57.
AE Services TR/87 Implementation Guide, Issue 1.1
February 2007
55
Chapter 2: Integrating AE Services with Live Communications Server
Enabling Remote Call Control in Active Directory
In the Microsoft Office Communicator 2005 Telephony Planning and Deployment Guide, refer to the
procedure called "To enable RCC extensions in Active Directory for users." Follow Steps 1 through 3 as
directed, and complete Step 4 by following this procedure:
1. Click the option button for TEL URI, and type the appropriate telephone number in Tel URI format.
For example: tel:+13035389000.
Note:
If necessary, you can use the following format : tel:E.164 phone number;ext=extension
(for example, tel:+13035389000;ext=9000)
Note:
In most cases, the extension (ext=extension) is not required. It is required only under these
circumstances:
●
If the user's extension does not match the last x digits of their E.164 Direct Inward Dial
(DID) number.
●
If the dial plan information has not been configured for the user's switch.
2. In the Remote Call Control SIP URI field, type the destination URI in the following format:
sip:aes@AE_server_FQDN
where: aes is the identifier for the AE Server and AE_server_FQDN is a term you substitute with
the fully qualified domain name of your AE Server. For example:
sip:[email protected]
sip:[email protected]
tel:+13035389000
sip:[email protected]
●
Continue with the remaining steps in the Microsoft Office Communicator 2005 Telephony Planning
and Deployment Guide.
Note:
Note:
56
In terms of the Microsoft Office Communicator 2005 Telephony Planning and Deployment
Guide, the AE Server performs the role of the RCC Gateway only. The SIP/PSTN
Gateway and the PBX-SIP Proxy do not apply to AE Services TR/87 configurations.
AE Services TR/87 Implementation Guide, Issue 1.1
February 2007
About configuring Live Communications Server for AE Services
Microsoft Office Communicator users - group policy settings
Microsoft Office Communicator users must have the following features configured as policy
settings:
●
Enable Computer to Phone Calls
●
Enable Phone Control
For information about group policy settings, see "Group Policy Configuration (.adm)," in
Microsoft Office Communicator 2005 Planning and Deployment.
Configuring a static route
Handling SIP traffic from the Live Communications Server to AE Services requires creating a
static route between the Live Communications Server (or servers) and the AE Services server.
This procedure is based on a configuration using Live Communications Server 2005 Enterprise
Edition.
Follow this procedure to configure a static route between the Live Communications Server and
the AE Services Server.
1. Open the Microsoft Office Live Communications Server 2005 management console, and in
the left pane, expand the Forest node.
2. Right-click Live Communications servers and pools, and select Properties. (For
Enterprise Edition Live Communications servers and pools represents the pool node;
for Standard Edition, it represents the server node.)
3. From the Properties dialog box, select the Routing tab, and click Add.
4. Complete the fields on the Add Static Route dialog box as follows:
a. In the User field, type aes.
b. in the Domain field, type the fully qualified domain name of the AE Server (for
example, myaeserver.example.com).
c. In the Network address field, type the fully qualified domain name of the AE Server (for
example, myaeserver.example.com).
d. In the Transport field, select TLS.
e. In the Port field, type the port that was administered as the TR87 Port in AE Services
OAM. The default is 4723.
f. Click OK.
For more information about setting up static routes, see "To create static routes" in the
Microsoft Office Communicator 2005 Telephony Planning and Deployment Guide.
AE Services TR/87 Implementation Guide, Issue 1.1
February 2007
57
Chapter 2: Integrating AE Services with Live Communications Server
Specifying the AE Server as an authorized host
Follow this procedure to set up AE Services as an authorized host. This procedure is based on
a configuration using Live Communications Server 2005 Enterprise Edition.
1. Open the Microsoft Office Live Communications Server 2005 management console, and in
the left pane, expand the Forest node.
2. Right-click Live Communications servers and pools (the pool node), and select
Properties.
3. From the Properties dialog box, select the Host Authorization tab, and click Add.
4. Complete the fields on the Add Authorized Host dialog box as follows:
a. In Network address field, type the fully qualified domain name of the AE Server (for
example, myaeserver.example.com).
b. Select the check boxes (enable) for the following settings: Throttle as server and
Treat As Authenticated. Make sure that Outbound only is not checked (disabled).
c. Click OK.
For more information about setting up host authorization, refer to the figure called "Edit
Authorized Host" in the Microsoft Office Communicator 2005 Telephony Planning and
Deployment Guide.
About authentication and authorization
For the TR/87 integration, authentication and authorization are handed as follows.
Note:
58
●
AE Services authenticates Live Communications Server by using TLS to verify the Live
Communications Server certificate.
●
The Live Communications Server authenticates (confirms the identify) of the Microsoft
Office Communicator user.
●
The AE Server, in turn, authorizes (grants permission to) the user for device control.
●
To carry out authorization, AE Services verifies that the requested Tel URI matches the Tel
URI in the user record before granting access to a device.
Note:
When you complete the procedure to enable the Communicator client for RCC,
(Enabling Remote Call Control in Active Directory on page 56) you are
provisioning Active Directory with the user information that AE Services queries
for.
AE Services TR/87 Implementation Guide, Issue 1.1
February 2007
Using the TR/87 Test features
Using the TR/87 Test features
Follow these steps to use TR/87 test features in AE Services OAM.
1. From the browser on your AE Services administrative workstation, log in to AE Services
OAM.
2. Select CTI OAM Admin > Utilities > TR/87 Test.
3. From the TR/87 Self Test page, select from the following tests:
●
TR/87 Transport -- use TR/87 Transport to verify that the installed certificate can be used
to establish a SIP session on the loopback interface. This does not verify the far-end
server certificate.
●
TR/87 Service -- use TR/87 Service to verify the following
- the caller is administered in Active Directory
- the dial plan is administered for the caller's number
- the user's telephone device can be monitored
●
TR/87 Makecall -- use TR/87 Makecall to verify that phone control is active for the user.
Recovering from a system outage
When AE Services returns to an operational state after an outage, you will be able to use
Microsoft Office Communicator (Communicator) to place and control new calls. If you
experience an outage, bear the following in mind:
●
If you were on a call when an AE Services outage occurred, complete the call and
manually hang up the phone so that your phone and Communicator are synchronized.
When you are ready to start a new call in Communicator, your phone and Communicator
will be synchronized.
●
If Communicator signs you out as result of a network outage, you must sign in to
Communicator again before you can control new calls. If you attempt to sign in during an
AE Services outage, Communicator displays the warning icon along with the pop-up
indicating that Communicator can not make phone calls.
AE Services TR/87 Implementation Guide, Issue 1.1
February 2007
59
Chapter 2: Integrating AE Services with Live Communications Server
Known issues
This section describes a few feature-related issues, as follows:
●
Using the Call Forwarding or Send All Calls features on page 60
●
Using the Do Not Disturb feature on page 61
●
Putting the active call on hold before starting a new call on page 61
●
Clear Connection request on a held connection is not supported on page 61
●
Bridging irregularities on page 62
●
Missed Call e-mail on page 62
Additionally, this section addresses the general issue that under certain conditions a party’s
telephone number will not be available to Microsoft Office Communicator. When this is the case,
Microsoft Office Communicator can not display a telephone number or party identifier.
●
Unidentified caller in Microsoft Office Communicator window on page 62
●
Communicator displays numbers with trunk notation on page 63
Using the Call Forwarding or Send All Calls features
From the Microsoft Office Communicator, you can use Call Forwarding and Send All Calls as
follows:
●
You can set your phone to forward calls.
●
You can set the Microsoft Office Communicator to forward calls relative to the client you
are signed in to.
●
You can set your phone to "Do Not Disturb" mode, which refers to Send All Calls (SAC) in
AE Services.
!
CAUTION:
60
CAUTION:
Keep in mind, however, that you should not press the Forwarding or the Send All
Calls (SAC) buttons on a physical phone set. Pressing these buttons can cause
the Microsoft Office Communicator to lose synchronization with the phone.
AE Services TR/87 Implementation Guide, Issue 1.1
February 2007
Known issues
Using the Do Not Disturb feature
For Do Not Disturb (DND) to function properly, you must administer a coverage path on the
station, in Communication Manager. When you complete the Coverage path screen in
Communication Manager, make sure that you enable DND/SAC/Go to Cover for inside calls
and outside calls -- the settings for Inside Call and Outside Call should be y.
For information about administering a coverage path in Communication Manager, see "Creating
coverage paths" in Administrator Guide for Avaya Communication Manager, 03-300509.
Setting up forwarding off-switch
If you experience problems setting up forwarding off-switch (to your home or cell phone, for
example) you should contact the Communication Manager administrator. There are certain
settings in Communication Manager that could prevent your ability to set up forwarding
off-switch.
Putting the active call on hold before starting a new call
It is not possible to start a new call through Microsoft Office Communicator while there is
already an active call. You must put the active call on hold before starting a new call.
Clear Connection request on a held connection is not supported
Communication Manager does not support a Clear Connection request on a held connection
For the Microsoft Office Communicator user, this means that if you have a held call and you
press the red, "stop" button on the call windows, you will get an error message and the call will
remain in the held state.
AE Services TR/87 Implementation Guide, Issue 1.1
February 2007
61
Chapter 2: Integrating AE Services with Live Communications Server
Bridging irregularities
In an AE Services and Live Communications Server environment, the Microsoft Office
Communicator might not behave as expected if you use bridged call appearances. Here are
some examples of irregularities associated with bridged calls.
●
If a user answers on a bridged extension, Microsoft Office Communicator continues to
alert on the primary extension and eventually times out.
- This bridging irregularity occurs when you administer EC500 phones with XMOBILE. If
you administer EC500 phones with OPTIM, the bridging irregularities do not occur. For
more information see, “Considerations for Extension to Cellular” in Feature Description
and Implementation for Avaya Communication Manager, 555-245-205. OPTIM refers
to Off-PBX Telephone Integration and Mobility.
●
If you call someone whom has a bridged extension, the Microsoft Office Communicator
conversation window might display either of the following:
- an additional party on the call representing that bridged extension.
- "Unidentified Caller"
Missed Call e-mail
Missed Call e-mail is sent only if the caller hangs up before the call goes to call coverage (voice
mail).
Unidentified caller in Microsoft Office Communicator window
For the following reasons you might see "Unidentified Caller" in the Microsoft Office
Communicator conversation window:
●
The user you have called has a bridged extension.
●
Your call went to a voice mail system. If your call is answered by a voice mail system, the
voice mail system itself appears as an "Unidentified Caller."
●
Your call went to Music-on Hold by way of a Voice Announcement with LAN (VAL) board
on Communication Manager, causing you to lose phone control on your Microsoft Office
Communicator. You can resolve this issue by upgrading Communication Manager with
Service Pack 12866.
●
You manually entered a number in the FIND box that was not in the proper format.
If you are manually typing the number in the FIND box, be sure to enter the full phone
number, including the country code and either the area code or the region code, whichever
is appropriate. Depending on how the system has been administered, it might be
acceptable to not include the country code in the entered number. In all cases, the
Automatic Route Selection (ARS) code for the outside line (9, for example) should not be
included.
62
AE Services TR/87 Implementation Guide, Issue 1.1
February 2007
Known issues
Communicator displays numbers with trunk notation
Microsoft Office Communicator displays telephone numbers as trunk identifiers instead of
telephone numbers in both transfer and conference scenarios. Trunk identifiers are numbers
that are displayed in the following form: T5237#2.
●
In some transfer scenarios, Microsoft Office Communicator displays a trunk identifier
instead of a calling or called party.
●
In some conference scenarios, Microsoft Office Communicator displays a trunk identifier
as an extra party on the call.
Contact the Communication Manager administrator
In either type of scenario, the presence of trunk group identifiers might be the result of
improperly administered trunk groups in Communication Manager. If Microsoft Office
Communicator displays a trunk identifier, contact the Communication Manager administrator.
The Communication Manager administrator should verify that ISDN trunks are properly
administered (Trunk Group screen). The settings for "Send Calling Number" and "Send
Connected Number" should be set to y. Administering ISDN trunks also requires administration
of the "Numbering - Public/Unknown Format" screens. For more information, see Administrator
Guide for Avaya Communication Manager, 03-300509. ISDN is the acronym for Integrated
Services Digital Network.
Note:
Note:
When "QSIG Value-Added" is enabled for QSIG trunks, the label for "Send
Connected Number" changes to "Send Called/Busy/Connected Number".
AE Services TR/87 Implementation Guide, Issue 1.1
February 2007
63
Chapter 2: Integrating AE Services with Live Communications Server
64
AE Services TR/87 Implementation Guide, Issue 1.1
February 2007
Appendix A: SIP requests and associated
errors
SIP INVITE request (start application session)
Code
Description
200
OK
401
Unauthorized: Session could not be established - invalid AD search parameters
404
Not found: Session could not be established - no AD record for this user
408
Request timeout:Session could not be established - AD request timed out
480
Temporarily unavailable: Session could not be established - unable to connect to
AD Server
486
Busy Here: AE Services is temporarily overloaded.
500
Internal server error: Session could not be established.
AE Services TR/87 Implementation Guide, Issue 1.1
February 2007
65
Appendix A: SIP requests and associated errors
66
AE Services TR/87 Implementation Guide, Issue 1.1
February 2007
Message flow
Appendix B: AE Services TR/87 call flow
This appendix provides a basic message flow description and two illustrations that show the
interaction between Microsoft components and Avaya components in an Application
Enablement Services (AE Services) TR/87 implementation.
Message flow
The message flow diagram in Figure 5 shows the flow of messages from application startup
(Microsoft Office Communicator) to a successful MakeCall operation and associated Originated
event (AE Services and Communication Manager).
●
Steps 1 and 2 show some initial provisioning between the application, Microsoft Active
Directory Services, and Live Communications Server.
●
Steps 3 through 10 show the establishment of the SIP dialog.
- The Communicator client sends a SIP INVITE containing a Request System Status
message.
- When Live Communications Server receives this message, it opens a TLS connection
to AE Services. AE Services will be provisioned with the certificate of the Live
Communications Server server so that Live Communications Server will be a trusted
server on the TR/87 port.
- After the TLS connection has been established, Live Communications Server forwards
the INVITE message on to AE Services. At this point, the AE Services Device, Media,
and Call Control service will extract the user identity from the SIP message and query
Microsoft Active Directory Services to find the extension(s) that the given user can
control. This will be used for authorization of all subsequent requests.
- It will then send a SIP OK message with a System Status message indicating
everything is operational.
●
Steps 11 through 14 show the Communicator client requesting the set of supported CSTA
features. This is because not all telephony systems support all of the services that
Communicator uses.
●
Steps 15 through 18 show the Communicator client establishing a monitor for Pat's station.
●
Steps 19 through 22 show a Make Call request from Communicator being sent through to
AE Services. For more details on what happens when this request is received, refer to
Figure 5.
AE Services TR/87 Implementation Guide, Issue 1.1
February 2007
67
Appendix B: AE Services TR/87 call flow
●
Steps 23 through 26 show an Originated event coming from AE Services and being
delivered to the Communicator client. This would have started with a CSTA 1 event from
TSAPI to Call Control Services. CCS would then map this to the appropriate Call Control
Listener, convert the event to CSTA 3, and invoke the proper method on the listener. This
would result in the event being sent to the SIP UA and out to the Live Communications
Server and eventually to the Communicator Client.
Figure 5: Call flow scenario -- MakeCall and an associated Originated Event
Pat
Communicator
Active
Directory
Live
Communications
Server
AE Services
1. Pat’s line
2. Pat’s line (via Live Comm. Server in-band provisioning)
3. SIP: INVITE (Request System Status)
4. SIP: INVITE (Request System Status)
5. LDAP: Pat’s line (authorization)
6. Pat’s line
7. SIP: 200 OK (System Status)
8. SIP: 200 OK (System Status)
9. SIP: ACK
10. SIP: ACK
11. SIP: INFO (Get CSTA Features)
12. SIP: INFO (Get CSTA Features)
13. SIP: 200 OK (CSTA Features)
14. SIP: 200 OK (CSTA Features)
15. SIP: INFO (Monitor Start)
16. SIP: INFO (Monitor Start)
17: SIP: 200 OK (Monitor Start Response)
18. SIP: 200 OK (Monitor Start Response)
19. SIP: INFO (Make Call)
20. SIP: INFO (Make Call)
21. SIP: 200 OK (Make Call Response)
22. SIP: 200 OK (Make Call Response)
23. SIP: INFO (originated)
24. SIP: INFO (originated)
25. SIP: 200 OK
26. SIP: 200 OK
68
AE Services TR/87 Implementation Guide, Issue 1.1
February 2007
Message flow
Figure 6 illustrates the TR/87 Message flow for the Make Call operation in terms of a basic
connectivity diagram. Other requests would follow a similar pattern.
Figure 6: AE Services TR/87 Call flow
Avaya AE Server
SIP/CSTA
SIP/CSTA
Info(MakeCall)
Info(MakeCall)
Microsoft
Live Communications
Server
Off
Microsoft Office
Communicator
Of
Hoo H.323
/
k, D
ispl CCMS
ay,
lam
pu
pda
tes
Info(MakeCall)
Avaya
Communication
Manager
ASAI
s
MS date
/ CC mp up
3
2
H.3 lay, la
p
Dis
ok,
o
H
f
AE Services TR/87 Implementation Guide, Issue 1.1
February 2007
69
Appendix B: AE Services TR/87 call flow
70
AE Services TR/87 Implementation Guide, Issue 1.1
February 2007
Appendix C: Capacities
Communication Manager Domain Control Capacity Increase
The number of supported domain controls on Communication Manager 4.0 is 32,000. This
increase applies only to the S87-series servers and the S8500 server. If Communication
Manager is used for call center or other call control functionality, care must be taken to not
exceed the total number of domain controls.
AE Services Associations
The number of supported generic associations on the AE Services Server (AE Server) is
32,768.
Busy Hour Call Completion (BHCC)
For the AE Services TR/87 Implementation, the BHCC rate, in terms of Live Communications
Server traffic, is 17,000 calls per hour. This rate is based on counting a Make Call request and
an Answer Call request as separate calls on the AE Server. One Microsoft Office Communicator
client user calling another Microsoft Office Communicator client user would therefore count as
two calls in the BHCC measurements.
Maximum Users
The AE Services server supports a maximum of 5,000 concurrent users. If you plan to support
more than 5,000 concurrent Microsoft Office Communicator clients you must use more that one
AE Services server. For more information, see Figure 3: Configuring AE Services with 5,000 or
more concurrent users on page 11.
Throughput
The AE Server supports six TR/87 (CSTA 3) messages per second, per 1000 users.
License Consumption
A license is consumed for the entire duration of time that Microsoft Office Communicator is
signed in with Live Communications Server.
AE Services TR/87 Implementation Guide, Issue 1.1
February 2007
71
Appendix C: Capacities
72
AE Services TR/87 Implementation Guide, Issue 1.1
February 2007
Index
Index
A
Active directory configuration in AE Services . . . . . 52
Active Directory, enabling RCC extensions . . . . . 55
Address Book Service
local cache of address list . . . . . . . . . . . . 15
requirement for AE Services - Live Communications
Server integration . . . . . . . . . . . . . . . . 9
setting up . . . . . . . . . . . . . . . . . . . 15
AE Services administrative workstation, requirement . 10
AE Services associations capacity . . . . . . . . . 71
AE Services Server 4.0, integration requirement . . . . 9
Authentication of client and server . . . . . . . . . 25
Automatic routing, configuring certificate for . . . . . 31
B
Bundled Server installation checklist . . . . . . . . 17
C
Call flow (message flow) diagram . . . . . . . . .
Call flow, TR/87 . . . . . . . . . . . . . . . . .
capacities
AE Services associations . . . . . . . . . . .
busy hour call completion (BHCC) . . . . . . .
license consumption . . . . . . . . . . . . .
maximum concurrent users . . . . . . . . . .
throughput . . . . . . . . . . . . . . . . . .
Certificate administration
configuring certificate for automatic routing (Live
Communications Server). . . . . . . . . . .
importing the trusted certificate into AE Services
installing Microsoft-based certificate on Live
Communications Server . . . . . . . . . . .
installing the trusted certificate on AE Server . .
summary of sample scenario . . . . . . . . .
verifying installation of entire certificate chain in
AE Services. . . . . . . . . . . . . . . . .
verifying installation of server certificate for Live
Communications Server . . . . . . . . . . .
Certificate authority, integration requirement . . . .
Certificate management
converting certificates from other formats . . . .
importing the server certificate into AE Services
installing a trusted certificate chain on AE Server
Certificate management scenario, explanation of . .
. 68
. 67
.
.
.
.
.
71
71
71
71
71
. 31
. 36
. 30
. 33
. 24
Certificate management, Microsoft-based procedure
for creating a server certificate for AE Services . .
Checklist
Bundled Server installation . . . . . . . . . . .
Software-Only server installation . . . . . . . .
Checklist for Live Communications Server, phase 1 .
Communication Manager, integration requirement .
Configuring AE Services with 5,000 or more
concurrent users, diagram . . . . . . . . . . . .
Configuring AE Services, summary . . . . . . . .
Converting a DER file to PEM . . . . . . . . . . .
Converting a PKCS#12 file to PEM . . . . . . . .
. 41
.
.
.
.
17
18
13
.9
.
.
.
.
11
23
38
38
D
Dial plan administration in AE Services
per-switch settings. . . . . . . . . . . . .
summary . . . . . . . . . . . . . . . . .
using defaults . . . . . . . . . . . . . . .
Distinguished Name (DN) entries and scope of
search . . . . . . . . . . . . . . . . . . .
DN, usage tips . . . . . . . . . . . . . . . .
. . . 49
. . . 44
. . . 51
. . . 53
. . . 54
E
EC500 with XMOBILE, and bridging irregularities . . . 62
Error codes and SIP requests . . . . . . . . . . . . 65
F
FQDN (fully qualified domain name) of pool . . . . . 30
From TelURI and To TelURI rules . . . . . . . . . . 46
From TelURI settings . . . . . . . . . . . . . . . . 47
H
header and trailer of PEM (BAse 64) certificate file . . 34
header and trailer of PKCS#7 trusted certificate file . . 34
. 37
. 32
. . 9
.
.
.
.
38
42
35
24
AE Services TR/87 Implementation Guide, Issue 1.1
I
Information Technology (IT) technician, bundled server
installation . . . . . . . . . . . . . . . . . . . . 18
Integration checklist for AE Services and Live
Communications Server (Phase 3) . . . . . . . . . 21
ISDN trunk administration in Communication
Manager . . . . . . . . . . . . . . . . . . . . . 63
February 2007
73
Index
K
Known Issues
Microsoft Office Communicator displays numbers
with trunk notation . . . . . . . . . . . . . . .
unidentified caller in Microsoft Office
Communicator window . . . . . . . . . . . .
Known issues
Clear Connection request on a held connection
not supported . . . . . . . . . . . . . . . . .
missed call e-mail . . . . . . . . . . . . . . . .
putting active call on hold before starting new call .
setting up forwarding off-switch . . . . . . . . .
using the Call Forwarding or Send All Calls
features . . . . . . . . . . . . . . . . . . .
using the Do Not Disturb feature . . . . . . . . .
63
62
61
62
61
61
60
61
L
license consumption . . . . . . . . . . .
License, Unified CC API Desktop Edition .
Live Communications Server
installing server certificate . . . . . . .
installing trusted certificate . . . . . .
specifying AE Server as authorized host
. . . . . 71
. . . . . 10
. . . . . 29
. . . . . 25
. . . . . 58
M
Make call, call flow diagram. . . . . . . . . .
maximum concurrent users supported by
AE Services . . . . . . . . . . . . . . . .
Maximum number of Communication Manager
Servers supported, diagram . . . . . . . . .
Microsoft Office Communicator
configuring a static route . . . . . . . . .
group policy settings . . . . . . . . . . .
. . . 69
. . . 71
. . . 10
. . . 57
. . . 57
N
Normalizing phone numbers, Address Book . . . . . 15
Phase 3 Checklist -- integrating AE Services and Live
Communications Server . . . . . . . . . . . . . .
Phone Normalization Script . . . . . . . . . . . . .
PKCS#7 file, editing header and trailer . . . . . . . .
Procedure 1 - certificate management
if installing trusted certificate from another vendor .
importing certificate into trust store . . . . . . . .
installing trusted certificate from Microsoft
Certificate Services . . . . . . . . . . . . . .
installing trusted certificate on Live
Communications Server . . . . . . . . . . . .
Procedure 1a - verifying installation of trusted
certificate on Live Communications Server . . . . .
Procedure 2 - installing server certificate for Live
Communications Server . . . . . . . . . . . . . .
Procedure 2a - Verifying the installation of the server
certificate for . . . . . . . . . . . . . . . . . . .
Procedure 3 - Installing the trusted certificate on
the AE Server . . . . . . . . . . . . . . . . . . .
Procedure 3a - Verifying the installation of the trusted
certificate . . . . . . . . . . . . . . . . . . . . .
Procedure 4 - Creating a server certificate request
for AE Services . . . . . . . . . . . . . . . . . .
Procedure 5 - Creating a server certificate for
AE Services . . . . . . . . . . . . . . . . . . .
Procedure 6 - Importing the server certificate into AE
Services OAM . . . . . . . . . . . . . . . . . .
Procedure 6a - Verifying the installation of the server
certificate in AE Services . . . . . . . . . . . . .
Recovering from a system outage . . . . . . . . . .
Remote Call Control (RCC) extensions, enabling . . .
Remote Call Control SIP URI field . . . . . . . . . .
Replacing an expired server certificate . . . . . . . .
Requirements for AE Services - Live Communications
Server integration . . . . . . . . . . . . . . . . .
P
T
74
. . 12
. . 13
. . 16
. . 19
26
25
28
29
32
33
37
39
40
42
43
59
55
56
43
.9
S
OAM (Operations, Maintenance, and Administration) . 23
OID (Object Identifier Field), how to complete . . . . 30
openssl command (for converting certificates) . . . . 38
Phase 1 -- Setting up the Live Communications
Server environment . . . . . . . . . . . . . .
Phase 1 checklist -- Live Communications Server
Phase 2 -- Setting up AE Services and
Communication Manager . . . . . . . . . . .
Phase 3 -- Integrating AE Services with Live
Communications Server . . . . . . . . . . .
25
27
R
Service Pack 12866, Communication Manager .
SIP (Session Initiation Protocol) . . . . . . . .
SIP requests and error codes . . . . . . . . .
SIP URI field . . . . . . . . . . . . . . . . .
Software-Only server, installation checklist . . .
static route . . . . . . . . . . . . . . . . . .
O
21
55
35
Tel URI format, example . . . . . . . .
Tel URI formats and device IDs . . . . .
To TelURI settings . . . . . . . . . . .
TR/87 Implementation, defined . . . . .
TR/87 port in OAM, enabling . . . . . .
TR/87, defined . . . . . . . . . . . . .
Trust store, Live Communications Server
AE Services TR/87 Implementation Guide, Issue 1.1
.
.
.
.
.
.
.
.
.
.
.
.
.
.
.
.
.
.
.
.
.
.
.
.
.
.
.
.
.
.
.
.
.
.
.
.
.
.
.
62
.7
65
56
18
57
.
.
.
.
.
.
.
.
.
.
.
.
.
.
.
.
.
.
.
.
.
56
45
48
.8
23
.7
27
February 2007