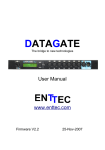
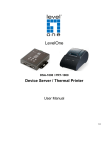
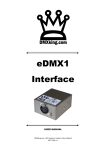
1
DMXEtherGate
Mk2
DMX512 Ethernet gateway
User Manual
www.enttec.com
Firmware V1.5
16-Dec-2005
V1.1
This page Blank
DMXEtherGate Mk2 User Manual
2
Table of Contents
This page Blank................................................................................. 2
Contents...............................................................................................4
Contacting ENTTEC........................................................................... 4
Warranty.............................................................................................. 5
Introduction......................................................................................... 7
Features................................................................................................8
Connector pinout................................................................................. 8
DMX OUT for DMXEtherGate Mk2 OUT:......................... 8
DMX IN for DMXEtherGate Mk2 IN:..................................8
Configuration.......................................................................................9
Getting Started (Plug & Play operation)..........................................10
Ethernet Connection.......................................................................... 11
Trouble shooting................................................................................12
No Ethernet traffic........................................................................ 12
DMX Output does not change...................................................... 12
Configured state.................................................................................12
Why use the configured state ?..................................................... 12
Configuring a node ...................................................................... 13
Status Page....................................................................................15
DMX............................................................................................. 15
Saving your settings......................................................................17
Resetting to Factory Default..............................................................17
Monitoring.........................................................................................17
Updating the firmware.......................................................................19
Appendix 1........................................................................................ 23
Appendix 2........................................................................................ 25
DMXEtherGate Mk2 User Manual
3
Contents
When you open the packaging, you should find these items in the
box:
•
•
•
•
•
•
•
•
DMXEthergate Mk2
2 x mounting brackets (pn:79105)
Cross over cable (pn:79101)
Stright cable (pn:79102)
IEC power cord (Australia only)
Programs and Docs CD (pn:79106)
Lightfactory Limited License (pn:79100)
User manual
If one of these items is missing please contact your local dealer.
The user manual for DMXEtherGate Mk2 IN and OUT
is the same. Please refer to the section relating to that
specific product.
Contacting ENTTEC
To contact us, please send an email to: [email protected]
Tel: +61 3 9819 2433 GMT+10
Fax: +61 3 9819 2733
To write us:
ENTTEC Pty Ltd
PO BOX 282
KEW, VIC, 3101
AUSTRALIA
DMXEtherGate Mk2 User Manual
4
Warranty
ENTTEC warrants that the product it manufactures and sells will be
free from defects in materials and workmanship for a period of 1 year
from the date of shipment from an authorized ENTTEC wholesaler.
If the device proves defective within the respective period, ENTTEC
will repair or replace the defective hardware at its sole discretion. If
the failure is due to an operator error the user accepts to pay for any
charge relating to the diagnosis of the hardware, faulty parts or
shipping from our factory.
ENTTEC makes no warranty of any kind, express or implied,
including without limitation the implied warranties of
merchantability and fitness for a particular purpose. In no event
shall ENTTEC be liable for indirect, special or consequential
damages.
Opening the unit voids the warranty as described above.
As this product uses ethernet as a communication medium, we
cannot officially support applications where the DMXEtherGate
is used on an existing computer network. We recommend you
have a good knowledge of networking infrastructure and IP
networking.
DMXEtherGate Mk2 User Manual
5
Introduction
Thank you for buying the DMXEtherGate Mk2. At ENTTEC we are
proud of our products and we hope you will enjoy them as much as
we enjoy making them.
Firstly, un pack the unit from the box. The DMXEtherGate Mk2 is a
1U 9.5 inch rack, you can mount 2 together to form a standard 19
inch rack.
On the front panel, you will find :
• RJ45 Ethercon connector for a 10Base-T ethernet connection
• Dip-switches to set the DMX universe and configuration
• Status Led indicating if the device is powered up and running
• Activity Led indicating the presence packets on the network
• Link led indicating the presence of an ethernet connection
On the back of the rack you will find:
• IEC connector, you can insert any AC voltage source between 100
and 260 V and 50 to 60Hz
• 2 DMX connectors, depending on the model you have this might
be male DMX input, or female DMX output.
The unit has no power switch and can be left on continuously.
DMXEtherGate Mk2 User Manual
6
Features
The DMXEtherGate Mk2 combo provides the following features:
• Full 512 channel DMX512 ethernet gateway.
• Up to 256 universes.
• Plug & Play or Configured mode.
• Unlimited Remote node-universe bindings.
• Node naming.
• IP addressable.
• Simple communication protocol.
Limitations:
As the DMXEtherGate Mk2 is reliant on ethernet, if you are using an
existing computer network and sharing the traffic, you might
experience delays and drop of the update rate.
Connector pinout
DMX OUT for DMXEtherGate Mk2 OUT:
Pin 1: Ground
Pin 2: Data Pin 3: Data +
Pin 4: NC
Pin 5: N
DMX IN for DMXEtherGate Mk2 IN:
Pin 1: Ground
DMXEtherGate Mk2 User Manual
7
Pin 2: Data Pin 3: Data +
Pin 4: NC
Pin 5: NC
Configuration
On the front panel of the DMXEtherGate Mk2 you will find 4 dipswitches.
The dip-switches let you set the universe in Plug&Play mode and
reset the node.
Switch settings
1
2
3
4
Description
OFF OFF OFF OFF Web configuration
ON
OFF OFF OFF System Mode
OFF OFF X
X
Output node
OFF ON
X
X
Input node
OFF X
OFF ON Universe 1-2
OFF X
ON OFF Universe 3-4
OFF X
ON ON Universe 5-6
X = Not important
After changing the universe setting please make sure
you reset the node. The node will only read the dipswitch configuration on startup.
DMXEtherGate Mk2 User Manual
8
To use the node in Web configured mode, you must leave the
dipswitches all OFF.
To set the node in Plug & Play mode and universe 1, set the node to
universe 2 and then switch back to universe 1.
When the node is set to Plug&Play mode, all the default parameters
will be loaded back into memory.
Attribute
Default
Description
Name
"DMXEthergate 2
port"
Node name.
IP Address
See below
IP address of the node.
Transmission Full Broadcast
Data is broadcast onto the
network.
Data type
RAW DMX
Uncompressed DMX packets
are sent on the network.
Protocol
ESP (ENTTEC)
The default IP address of the node is composed by the unique MAC
address of the node e.g.:
a node with a MAC address of 01-02-03-04-05-06, will have a
default IP of:10.04.05.06. The first address byte is always 10.
Getting Started (Plug & Play operation)
Before powering, start by setting the universe associated with this
node. To do this toggle the dipswitches as indicated on the front
DMXEtherGate Mk2 User Manual
9
panel. The universe configuration is read once on startup; changing
it once the unit is powered will have no effect.
Connect the power to the DMXEtherGate Mk2. Once the unit is
powered, the status led will stay on.
Now connect the DMX512 network to the DMXEtherGate Mk2
(node). If you are using an OUT node, you will connect your lighting
fixtures or dimmers, if it is an IN node you will be connecting the
lighting console.
Each DMXEthergate is built with a set of DMX connectors male or
female. You can change an input node to an output node simply by
changing the switch 2. In this case you also need to make an adapter
to change the gender on the DMX connector, or you can purchase a
new connector set from the factory.
Ethernet Connection
Plug in the ethernet connector. The link LED must turn on as soon as
the ethernet is plugged in. If not, you will need to check the cable and
the device connected to the other end of the cable.
You might see the Activity LED blinking, this will depend on the
current activity on the Ethernet network. Once the Ethernet
connection is established between the IN and OUT nodes, DMX
should pass through immediately.
If you have connected the 2 nodes together without using a HUB
please make sure you have used a cross-over patch lead. Otherwise
it will not work.
DMXEtherGate Mk2 User Manual
10
Trouble shooting
No Ethernet traffic
If the there is no DMX on the DMXEtherGate Mk2 IN, the node will
not send DMX packets on the ethernet. If there is a valid DMX signal
but the values are always the same, a packet will be sent on each
second.
If you have checked all physical connections and all are good, please
download GateConfig software from our website. Install and run the
software on a networked Windows computer.
DMX Output does not change
By moving a fader on the console, you should see the Activity led
blink faster on the output node.
If the led does blink faster and the values do not change, please check
that the IN and OUT nodes are set on the same universe.
Change the dipswitches so they are on the same universe and then,
cycle the power. To ensure the unit resets when you cycle the power
unplug the DMXEtherGate Mk2, wait 5 seconds and then turn the
power back on.
Configured state
Why use the configured state ?
You might have to configure the nodes if :
DMXEtherGate Mk2 User Manual
11
->You have multiple nodes on the same network and wish to
configure them from a remote location.
->You want to create complex bindings and patches.
->You you have more than 6 DMX512 universes.
->You wish to monitor the Ethernet traffic generated.
->You wish to change the DMX over ethernet protocol used.
Configuring a node
To configure the node, you can use any web browser such as Internet
explorer, Netscape ...
Firstly please make sure your computer is able to talk to the
Etheragte Mk2 by changing the IP to 10.0.0.1 and netmask to
255.0.0.0
Type in the address of the node in the address bar like this:
http://10.5.2.6
Where 10.5.2.6 is the IP address of the DMXEthergate Mk2. By
default , the IP address is 10.x.y.z where x,y and z are the last 3 bytes
(the MAC address is in hexadecimal) of MAC/Serial number.
Eg: For a MAC of 010203040506 the IP would be: 10.4.5.6
The default IP is situated on the IP address label included in the
box of your DMXEtheragte mk2.
DMXEtherGate Mk2 User Manual
12
Once the address typed into your favorite web browser the main page
will appear:
DMXEtherGate Mk2 User Manual
13
Status Page
The main page is the status page; it displays general information
about the node.
Node Name: The node name is displayed when using protocols such
as Artnet
DHCP Enable: Ticking this box will enable DHCP configuration of
the IP address. You must have a DHCP server running on your
network for this to work. If not, the node will wait for 60 seconds for
a response then use the pre-configured IP address. During the DHCP
timeout no DMX is sent or received.
IP: This is the IP address that is used if DHCP is disabled.
Broadcast Type: When sending DMX data, the node will broadcast
on the selected network class.
DMX
DMXEtherGate Mk2 User Manual
14
The DMX menu is used to configure each DMX port.
Type: Use this drop down box to select if the port is Disabled, Input
or Output. The port can also be set for RDM (talk back) operation.
Universe: This is the universe assigned to this port, from 1 to 256.
Buffer: by clicking on the link you can view or edit the DMX buffer
associated with this port. This can be used to modify values
DMXEtherGate Mk2 User Manual
15
Saving your settings
When you make a change to any setting, make sure you click on the
update setting button on the bottom of the page. The change will take
effect immediately but is not saved in non volatile memory.
To save the changes permanently click on the SAVE link in the
menu.
Resetting to Factory Default
To reset the DMXEthergate back to factory default, please firstly
make sure you are running V1.3 of the firmware.
Then follow these steps:
-power the unit up normally
-pull all switches down
-wait for a few seconds
-turn off
-set switch back to default (1:off,2:off,3:off,4:on)
-turn on
poll with gateconfig, the ip should go back to the default.
Monitoring
GateConfig available from our website can be used as a monitoring
tool. By clicking on the DMX menu, you can monitor the values of
all DMX channels for every universe been sent over the Ethernet.
You can also use this as a debugging tool. You can monitor the nodes
on your network and also check the amount of traffic been generated.
DMXEtherGate Mk2 User Manual
16
DMXEtherGate Mk2 User Manual
17
Updating the firmware
To update the firmware on the DMXEtheragte MK2, you will need a
DHCP and TFTP server. It is best to set aside a computer connected
directly using a cross over patch lead to the DMXEthergate Mk2.
Fortunately there is a windows program that includes a DHCP and
TFTP server in one: TFTPD32 available at : http://tftpd32.jounin.net/
Create a folder in your C drive called temp, and place the new
DMXEtheragte firmware file (ethergate.bin) in that folder.
You will need to configure this program, please configure using the
screen shots below as reference.
When you start the software the screen will look like this:
Click on DHCP server tab and configure like the screen below:
DMXEtherGate Mk2 User Manual
18
Click on the setting tab and configure like the screen below:
DMXEtherGate Mk2 User Manual
19
Once TFTPD32 is configured correctly, put the DMXEthergate in
System mode by setting the first dip-switch to ON.
Power the DMXEtheragte and the update procedure will start. The
upgrade will only last 2-3 seconds. Please wait until the download
progress bar on TFTPD32 is closed.
Then simply put the DMXEthergate back into normal mode (first dip
switch off) and cycle power.
The upgrade is completed.
DMXEtherGate Mk2 User Manual
20
Appendix 1
Federal Communications Commission (FCC) Declaration of
Conformity
Responsible Party:
ENTTEC Pty/Ltd
110 Auburn Rd
Hawthorn,Vic,3122
Australia
declares that the products:
Product Name: DMXEtherGate Mk2 IN, DMXEtherGate Mk2
OUT
complies with Part 15 of the FCC Rules. Operation is
subject to the following two conditions: (1) This
device may not cause harmful interference, and (2)
this device must accept any interference received,
including
interference
that
may
cause
undesired
operation.
This equipment has been tested and found to comply
with the limits for a Class B digital device, pursuant
to Part 15 of the FCC rules. These limits are designed
to provide reasonable protection against harmful
interference in a residential installation.
This
equipment generates, uses and can radiate radio
frequency energy and, if not installed and used in
accordance with the instructions, may cause harmful
interference to radio communications.
However, there
is no guarantee that interference will not occur in a
particular installation. If this equipment does cause
harmful interference to radio or television reception,
which can be determined by turning the equipment off
and on, the user is encouraged to try to correct the
interference by one or more of the following measures:
- Reorient or relocate the receiving antenna.
and
- Increase the separation between the equipment
the receiver.
- Connect the equipment into an outlet on a
circuit different from that to which the
receiver is connected.
DMXEtherGate Mk2 User Manual
21
- Consult the dealer or an experienced radio/TV
technician for help.
*
In order to maintain compliance with FCC
regulations shielded cables must be used with this
equipment.
Operation with non-approved equipment or
unshielded cables is likely to result in interference
to radio & television reception.
Appendix 2
We
ENTTEC Pty Ltd
110 Auburn Rd,
Hawthorn, Vic, 3122
Australia
declare under our sole responsibility that our products:
DMXEtherGate Mk2 IN, DMXEtherGate Mk2 OUT
conforms to the requirements of Council Directives 89/336/EEC and 73/23/EEC and therefore
complies with the requirements of Council Directive 73/23/EEC, (The Low Voltage Directive) on the
harmonisation of the laws of Member States relating to electrical equipment designed for use within
certain voltage limits as amended by Article 13 of Council Directive 93/68/EEC
•
•
•
EN 55103-1
EN 50103-2
EN 60065/AS 3650
DMXEtherGate Mk2 User Manual
22