1
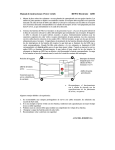
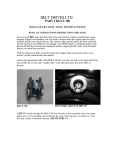
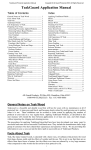
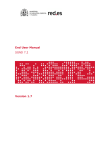
Bio-Doremi
Dual Security Fingerprint
Door Lock
User’s Manual
BDL-700
BDL-730
POTECS CORPORATION
BDL-600
Table of Contents
1. Introduction
1) Presentation------------------------------------------------------------------ 3
A. External Case------------------------------------------------------------- 3
B. Internal Case-------------------------------------------------------------- 4
C. Base-------------------------------------------------------------------------- 4
2) Specifications----------------------------------------------------------------- 5
2. How to use
1) Basic Understanding------------------------------------------------------ 6
2) Function Key----------------------------------------------------------------- 7
3) Main Menu--------------------------------------------------------------------- 8
4) Display Message------------------------------------------------------------ 9
5) Main Operations
A. Master Registration/Deletion-------------------------------------- 10
B. User Registration------------------------------------------------------ 11
C. User Deletion----------------------------------------------------------- 12
D. All User Deletion------------------------------------------------------- 13
E. Normal Entrance------------------------------------------------------- 13
F. User Identification Mode Selection------------------------------ 14
G. The Number of Identification Chances Setting up--------- 14
H. Lock Open Time Adjustment-------------------------------------- 15
I. Password User Registration--------------------------------------- 15
J. Date And Time Setting---------------------------------------------- 16
K. Audit Logs--------------------------------------------------------------- 17
L. Emergency Warning Number Registration-------------------- 17
M. Emergency Warning Call------------------------------------------- 17
O. Battery Recharge Warning----------------------------------------- 17
P. Test Function------------------------------------------------------------ 18
-2-
BIO DOREMI
1. INTRODUCTION
1) Presentation
A. External Case
BDL – 600
(Built-in Type)
BDL – 700
(Unit Type)
LCD
Battery condition display
Main menu display
Input condition display
Die Casting keypad
Friendly “Doremi” Sound key (Sol, La, La….)
Perfect waterproof design
Strong durability and easy use
Protecting Auto Shutter
for fingerprint sensor
Patent pending cutting-edge technology
Automatic vertical shutter
Protection sensor for inserted finger
Emergency Communication
Terminal
LEVER
-3-
B. Internal Case
BDL – 700
(Unit Type)
BDL – 600
(Built-in Type)
FUNCTION KEY
Open key
Close key
Set key for mode setting
BASIC MANUAL
User registration procedure
User deletion procedure
BATTERY COVER
For Li-ion battery
Convenient open/close way
C. Base : BDL 700
Emergency Communication Terminal
Connection terminal for Emergency
communication (9V battery connected)
FRONT BASE
Bolt Hole
Hole for socket wrench bolt
REAR BASE
-4-
BIO DOREMI
1. INTRODUCTION
2) SPECIFICATIONS
Classification
Specification
External
260mm(L) x 77mm(W) x 45mm(H)
Internal
260mm(L) x 77mm(W) x 35mm(H)
External
205mm(L) x 82mm(W) x 45mm(H)
Internal
210mm(L) x 74mm(W) x 35mm(H)
BDL - 700
Dimension
BDL - 600
Material
Zinc Alloy
Color
Gold, Silver
Option
Mortis Lock & History Back-up
Temperature
-10°C ~ +60°C
Humidity
10 ~ 90 % RH
Voltage
5.0 ~ 8.0 V
Operating
Environments
Input
AC 110V~220V/60Hz
Output
DC 12V/300mA
Adaptor
Power
Fingerprint
Recognition
Sensor
Shutter
Li-ion Battery
7.2V/1850mA : rechargeable
Recognition Sensor
Optical Lens Type
False Rejection Rate
Less than 0.01%
False Acceptance Rate
Less than 0.001%
Verification Time
Less than 1 Second
User Number
40 Persons (One person:2 images)
Sensor/Deceleration Gear
5V DC/3800RPM
Event Record(Date&Time)
100 Events
PC Communication
RS232 or RS485
Audit Logs
-5-
BIO DOREMI
2. HOW TO USE
1) Basic Understanding
WHAT’S THE FINGERPRINT ID?
When registering the fingerprint at this BioDoremi, Identification
number(4-digit) should be registered before registering user’s
fingerprint. The registered number is the Fingerprint ID.
By using this Fingerprint ID, BioDoremi will verify authorized user’s
fingerprint and record its access data.
ID should be registered as a 4 digits among 7 digit Keys (From 1 to 7).
1.
User Registration
•
2.
Register user’s ID number and its fingerprint according to
its proper order(Please refer to page 11). If the master user
have registered before, the master fingerprint will be
required in first stage of user registration.
Normal Access
•
1) Press power switch
•
2) Input USER ID (4 digits)
•
3) When Electric shutter goes up
•
4) Place a fingerprint at the sensor for fingerprint
verification
•
5) Door Open
WHAT’S THE MASTER USER?
The master is a person who is authorized to manage all user data including
its registration and deletion. If the master user already registered, all
operation menu will require verification of master’s fingerprint.
WHAT’S THE NORMAL USER?
Normal user can open door using his registered ID and fingerprint only. If
a master is registered, a registered normal user will not register other
user.
-6-
2). Function Key
MAIN KEY (Front Case)
•
PWR : Power Key. It supplies power to door
•
lock. So When you start operating
•
BioDoremi, all user should press this
•
button to start its verification
•
procedure.
( If there is no key input for 5 seconds,
power will be off automatically )
•
ENT : Enter Key. After pressing a key, press
•
this key to input data to the BioDoremi .
•
DO(1) ~ SI(7) : Available number key
SETTING KEY (Rear Case)
•
Open : Lock open
•
Close : Lock close
•
(Normal setting Condition)
•
Set : Use when register or delete
•
normal user and setting time of lock
-7-
Configuration of Main Menu(Networking Version)
Please select each menu to register, delete user and set each condition. When you want
to return to previous menu, please use ‘Set’ key(on the backside of device) at main menu
and ‘Ent’ key(on the front of device) at sub-menu.
1. REG
2 - DEL
3 - STA
1. MAST
Register ID & F/P of Master user
2. USE
Register ID & F/P of Normal User
3. EMERGENCY
Register emergency number
1. ALL
Delete registered all User data (ID & F/P)
2. SELE
Delete selected User ID & F/P data
1. GATE STAT
1. CHK
Set alarm on for gate open
2. CANC
Set alarm off for gate open
1. SUB
Set volume down for alarm & key sound
3. ADD
Set volume up for alarm & key sound
2. BUZZER VOL
3. MODE
1. 1:1
See page 14
2. 1:N
4. CHANCE
1. SET
2. CANCEL
4 - TIME
1. ENT+FP
Set ENT button available
before input fingerprint
2. PWR+FP
Set ENT button unavailable
before input fingerprint
Set the number of fingerprint
recognition chances.
(SET : 3 times / CANCEL : 1 time)
1. MORTISE
1. SUB
Decrease lock open time
2. SOLENOID
3. ADD
Increase lock open time
5 - PASS
Register 4 digit of user password - Password user only
6 - RTC
1. OK
Set present time to recode access history data
3. CANC
Cancel modified time setting
1. LCD
1. Previous
Display previous recoded access data
3. Next
Display next recoded access data
7 - HISTORY
2. COMM
Download access data to PC
3. All Clear
Delete all recoded access data
4) Display Message
Explanation
Display
USER ID >
Waiting for input a user ID
Displaying battery is full
Displaying when battery need charge
Put a Finger
Waiting for input a fingerprint
Failed
There is no user ID inputted
Failed 1 !
There is no fingerprint placed on the sensor
Failed 2 !
Fingerprint verification failure
Invalid ID
Unregistered USER ID
Lift finger
Lift finger from the sensor panel
Verified
Fingerprint was verified
Open door
Door was opened
-9-
5) Main Operation
A. Master Registration
PWR
Press the PWR key to turn on the power
SET
Press the SET(rear panel) to turn into setting
Mode (Shutter be remained open in setting mode)
1.REG
Press the No.1 REG to register Master or User
1.MAST
Press the No.1 MASTER REG to register Master
User
Master
ID
Input selected master ID ( 4 digit )
ENT
Master
Fingerprint
ENT
Main Menu
Press the ENT to register ID
Place master fingerprint on the sensor two times
( Register two images : Place two fingerprints
by turns or one fingerprint two times on sensor)
Press the ENT to back to main menu
Select other menu or press the Set key on the
Internal case to finish all procedure
- 10 -
B. User Registration
PWR
Press the PWR to turn on the power
Press the Set key on the rear panel to turn into
setting mode
Set
1.REG
Press the No.1 REG to register normal user
Master
Input registered master ID if a master has been
Registered already
ID
ENT
Press the ENT key to advance for next procedure
Master
Fingerprint
Place registered master fingerprint on the sensor
Press the No.2 USER to register normal user
2.USE
User ID
Input selected user ID ( 4-digit )
Press the ENT key to register user ID
ENT
User
Fingerprint
Place user’s fingerprint on the sensor to register
( Two images can be registered )
Press the ENT key to back to the main menu
ENT
Main Menu
Select other menu or press the Set key on the
Rear panel to finish all procedure
User Sequence Registration
PWR
SET
1.REG
Master ID
Master
Fingerprint
2.USE
User 1 ID
ENT
User 1
Fingerprint
User 2 ID
ENT
User 2
Fingerprint
SET
Shutter Close
( Repeat same procedure as many as user to register )
ENT
Power Off
C. User Deletion
PWR
Press the PWR key to turn on the power
SET
Press the Set key on the internal case to turn into
setting mode
Press the No.DEL to delete user data
2.DEL
Input master ID (4-digit) if a master has be
registered
Master ID
Press the ENT key to advance for next procedure
ENT
Master
Fingerprint
Place master fingerprint on the sensor
Input USER ID to delete
User ID
Press the ENT key to back main menu
ENT
Press the SET key on the internal case to finish
all procedure
Main Menu
Shutter Close
Power Off
Shutter will be closed and Power will be off
User Sequence Deletion
PWR
SET
2.DEL
Master ID
ENT
Master
Fingerprint
User ID
ENT
SET
Shutter Close
(Repeat as many times as person number to register )
- 12 -
Power Off
D. All User Deletion
PWR
SET
2.DEL
Master
Fingerprint
1.ALL
SET
Master ID
ENT
Shutter Close
Power Off
E. Normal Entrance
Press the PWR key to turn on the power
PWR
Input registered User ID number
User ID
Press the ENT key
ENT
User
Fingerprint
Place registered user fingerprint to the sensor
Door Open
If user fingerprint verified, door will be opened for
a time (It was set as 5 seconds from factory)
Shutter Close
Power Off
When all above procedure is completed, shutter
will be closed and Power will be off
1
Do Re Mi
Password
2
Shutter
Open
3
Place
fingerprint
4
Main Door
Lock Open
If registered fingerprint is not verified well,
1) clean sensor panel then try again
2) try again using other fingerprint registered.
- More then two fingerprint registration per each user are recommended
- 13 -
F. User Identification Mode Selection( 3. STA -> 3. MODE )
1. 1:1 mode : A user enter his/her ID(4 number) before input a fingerprint.
This mode identifies the fingerprint entered as his/her finger
print registered.
2. 1:N mode : A user doesn’t need to enter his/her ID before input fingerprint.
This mode checks that the fingerprint entered exists among
all fingerprint registered.
- submenu of 1:N mode 1. ENT + FP : After push PWR button, push ENT key before
input fingerprint.
2. PWR + FP : After push PWR button, input fingerprint directly.
PWR
SET
3.STA
3.MODE
1. 1:1
1. ENT + FP
Shutter Close
SET
Power Off
2. 1:N
2. PWR + FP
G. The Number of Identification Chances Setting up( 3. STA -> 4. CHANCE )
According to the identification mode selected in ‘3. MODE’ menu, set up the
number of entering User’s ID(1:1 mode) or inputting fingerprint(1:N mode).
‘1. SET’ give 3 times and ‘2 CANCEL’ give just 1 time.
PWR
SET
3.STA
4.CHANCE
1. SET
SET
2. CANCEL
- 14 -
Shutter Close
Power Off
H. Lock Open Time Adjustment
From the factory, lock open time was set as 5 seconds.
Notice! : According to your lock type, select MOT(Mortise) or SOL(Solenoid
and Electric - Magnetic lock). If you use the HAMODU mortise,
select 1.MOT.
PWR
SET
4.TIME
1. MOT
1. SUB
Decrease open time by 1 second
2. SOL
3. ADD
Increase open time by 1 second
ENT
Shutter Close
SET
Power Off
I. Password User Registration
User ID should be registered with fingerprint before registration of its
password(4-digit)
PWR
SET
5.PASS
Master
Fingerprint
User ID ①
ENT
ENT
SET
Shutter Close
Power OFF
Master
ID
User Password
②
( ① ~ ② repeat : sequence
Registration
PASSWORD USER ENTERANCE ORDER
PWR
User
Password
User ID
( Input 8-digits)
LOCK
OPEN
Shutter Close
Power Off
- 15 -
ENT
ENT
J. Date And Time Setting
PWR
SET
6.RTC
Master ID
ENT
Master
Fingerprint
7 Si
A(DD)
Year 2-Digit 00 ~ 99
7 Si
S(UB)
Year 2-Digit 00 ~ 99 Subtract
7 Si
A(DD)
Month 2-Digit 01 ~ 12
7 Si
S(UB)
Month 2-Digit 01~12 Subtract
7 Si
A(DD)
Date
7 Si
S(UB)
Date 2-Digit 01 ~ 31 Subtract
7 Si
A(DD)
Hour 2-Digit 00 ~ 23 Subtract
7 Si
S(UB)
Hour 2-Digit 00 ~ 23
7 Si
A(DD)
Minute 2-Digit 00~59 Subtract
7 Si
S(UB)
Minute 2-Digit 00 ~ 59
7 Si
A(DD)
Second 2-Digit 00~59 Subtract
7 Si
S(UB)
Second 2-Digit 00~59 Subtract
7 Si
A(DD)
Day 2-Digit Sun ~ Sat
7 Si
S(UB)
Day 2-Digit Sun ~ Sat Subtract
Add
1 Do
Add
2 Re
2-Digit 01 ~ 31
Add
3 Mi
4 Fa
Add
5 Sol
Add
6 Ra
Add
7 Si
ENT
1.OK
Main Menu
K. Audit Logs(Access history)
PWR
7.HISTORY
SET
Master
Fingerprint
ENT
ID
1. PREVIOUS
Find the logs forward
3. BACKWARD
Find the logs backward
1.LCD
Shutter Close
SET
ENT
Master
Power Off
L. Emergency Number Registration
Emergency Number should be registered as 4 digits
PWR
SET
1.REG
3.EMERGENCY
Input 4
digits
ENT
M. Emergency Warning Call
Installation of additional device such as auto-dialer will be required to use
this function
PWR
Emergency
Number
Place
Fingerprint
PWR
Emergency
Number
Input
User ID
Call to
Setting
Place
Call to
Setting
Place
LOCK
OPEN
LOCK
OPEN
O. Battery Recharge Warning
If external power is not connected, power charge will be required when below battery condition
displayed
Battery will be displayed as
and warning sound will be uttered.
•If this warning is ignored and neglected, door lock will stop operation and there
is no way to replace with a new back-up battery from out side of door except
Hamodu Emergency kit.
Therefore, Once the warning sound is uttered, please replace with a new battery.
P. Test Menu
4 - TIME
7. TEST
1. MOTs
1. S1=of
Closing shutter per 3 mm
3. S2=on
Opening shutter per 3 mm
2. MOT
Testing shutter motor for default times
3. TCS
Testing touch sensor around the
fingerprint sensor
4. REY1
1. OP
Testing lock relay - open
3. Close
Testing lock relay - close
5. REY2
Testing emergency relay
6. KEY
Testing keypad operation
7. Auto Test
- 18 -
Testing all function