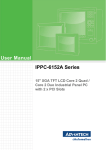
1
IPPC-6172A Series
17" SXGA TFT LCD Pentium M /
Celeron M Industrial Panel PC
with 2 x PCI slots
User Manual
Copyright
The documentation and the software included with this product are copyrighted 2007 by Advantech Co., Ltd. All rights are reserved. Advantech
Co., Ltd. reserves the right to make improvements in the products
described in this manual at any time without notice. No part of this manual may be reproduced, copied, translated or transmitted in any form or
by any means without the prior written permission of Advantech Co., Ltd.
Information provided in this manual is intended to be accurate and reliable. However, Advantech Co., Ltd. assumes no responsibility for its use,
nor for any infringements of the rights of third parties, which may result
from its use.
Acknowledgements
Intel and Pentium are trademarks of Intel Corporation.
Microsoft Windows and MS-DOS are registered trademarks of
Microsoft Corp.
All other product names or trademarks are properties of their respective
owners.
Part No. 2003617200
1st Edition
Printed in Taiwan
November 2007
IPPC-6172A User Manual
ii
Product Warranty (2 years)
Advantech warrants to you, the original purchaser, that each of its products will be free from defects in materials and workmanship for two years
from the date of purchase.
This warranty does not apply to any products which have been repaired or
altered by persons other than repair personnel authorized by Advantech,
or which have been subject to misuse, abuse, accident or improper installation. Advantech assumes no liability under the terms of this warranty as
a consequence of such events.
Because of Advantech’s high quality-control standards and rigorous testing, most of our customers never need to use our repair service. If an
Advantech product is defective, it will be repaired or replaced at no
charge during the warranty period. For out-of-warranty repairs, you will
be billed according to the cost of replacement materials, service time and
freight. Please consult your dealer for more details.
If you think you have a defective product, follow these steps:
1.
Collect all the information about the problem encountered. (For
example, CPU speed, Advantech products used, other hardware
and software used, etc.) Note anything abnormal and list any
onscreen messages you get when the problem occurs.
2.
Call your dealer and describe the problem. Please have your manual, product, and any helpful information readily available.
3.
If your product is diagnosed as defective, obtain an RMA (return
merchandize authorization) number from your dealer. This allows
us to process your return more quickly.
4.
Carefully pack the defective product, a fully-completed Repair and
Replacement Order Card and a photocopy proof of purchase date
(such as your sales receipt) in a shippable container. A product
returned without proof of the purchase date is not eligible for warranty service.
5.
Write the RMA number visibly on the outside of the package and
ship it prepaid to your dealer.
iii
Declaration of Conformity
CE
This product has passed the CE test for environmental specifications. Test
conditions for passing included the equipment being operated within an
industrial enclosure. In order to protect the product from being damaged
by ESD (Electrostatic Discharge) and EMI leakage, we strongly recommend the use of CE-compliant industrial enclosure products.
FCC Class A
Note: This equipment has been tested and found to comply with the limits
for a Class A digital device, pursuant to part 15 of the FCC Rules. These
limits are designed to provide reasonable protection against harmful
interference when the equipment is operated in a commercial environment. This equipment generates, uses, and can radiate radio frequency
energy and, if not installed and used in accordance with the instruction
manual, may cause harmful interference to radio communications. Operation of this equipment in a residential area is likely to cause harmful interference in which case the user will be required to correct the interference
at his own expense.
Technical Support and Assistance
Step 1. Visit the Advantech web site at www.advantech.com/support
where you can find the latest information about the product.
Step 2. Contact your distributor, sales representative, or Advantech's customer service center for technical support if you need additional
assistance. Please have the following information ready before
you call:
- Product name and serial number
- Description of your peripheral attachments
- Description of your software (OS, version, software, etc.)
- A complete description of the problem
- The exact wording of any error messages
IPPC-6172A User Manual
iv
Safety Instructions
1.
Read these safety instructions carefully.
2.
Keep this User's Manual for later reference.
3.
Disconnect this equipment from any AC outlet before cleaning.
Use a damp cloth. Do not use liquid or spray detergents for cleaning.
4.
For plug-in equipment, the power outlet socket must be located
near the equipment and must be easily accessible.
5.
Keep this equipment away from humidity.
6.
Put this equipment on a reliable surface during installation. Dropping it or letting it fall may cause damage.
7.
The openings on the enclosure are for air convection. Protect the
equipment from overheating. DO NOT COVER THE OPENINGS.
8.
Make sure the voltage of the power source is correct before connecting the equipment to the power outlet.
9.
Position the power cord so that people cannot step on it. Do not
place anything over the power cord.
10.
All cautions and warnings on the equipment should be noted.
11.
If the equipment is not used for a long time, disconnect it from the
power source to avoid damage by transient overvoltage.
12.
Never pour any liquid into an opening. This may cause fire or electrical shock.
13.
Never open the equipment. For safety reasons, the equipment
should be opened only by qualified service personnel.
14.
If one of the following situations arises, get the equipment checked
by service personnel:
a. The power cord or plug is damaged.
b. Liquid has penetrated into the equipment.
c. The equipment has been exposed to moisture.
d. The equipment does not work well, or you cannot get it to work
according to the user's manual.
e. The equipment has been dropped and damaged.
f. The equipment has obvious signs of breakage.
v
15.
DO NOT LEAVE THIS EQUIPMENT IN AN ENVIRONMENT
WHERE THE STORAGE TEMPERATURE MAY GO BELOW
-40° C OR ABOVE 85° C. THIS COULD DAMAGE THE
EQUIPMENT. THE EQUIPMENT SHOULD BE IN A CONTROLLED ENVIRONMENT.
Safety Precaution - Static Electricity
Follow these simple precautions to protect yourself from harm and the
products from damage.
1.
To avoid electrical shock, always disconnect the power from your
PC chassis before you work on it. Don't touch any components on
the CPU card or other cards while the PC is on.
2.
Disconnect power before making any configuration changes. The
sudden rush of power as you connect a jumper or install a card may
damage sensitive electronic components.
IPPC-6172A User Manual
vi
Contents
Chapter
Chapter
1 General Information ....................................... 2
1.1
1.2
Introduction ....................................................................... 2
Specifications .................................................................... 3
1.3
Dimensions........................................................................ 6
1.2.1
1.2.3
1.2.4
2 System Setup.................................................... 8
2.1.2
2.1.4
2.1.5
2.1.6
2.1.7
2.2
2.5
Chapter
Installing SDRAM........................................................... 11
Installing Add-on Cards .................................................. 14
Jumper Settings ............................................................... 16
3.1.3
3.1.4
3.1.5
3.1.6
3.1.7
3.1.8
3.1.9
LCD Power Select(JP1) ............................................... 19
CPU VCCA Power Select (JP2) .................................. 20
Measure Battery Current Jumper (JP3) ....................... 20
Clear CMOS (JP4) ....................................................... 20
LVDS Mode Select(JP5) ............................................. 21
Touchscreen Mode Select (JP6) .................................. 21
CPU Setting (CN20 and JP2) ....................................... 22
4 Software Configuration ................................ 24
4.1
4.2
Chapter
Parallel Port .................................................................... 9
Serial COM ports ........................................................... 9
USB ports ..................................................................... 10
Audio Interface ............................................................ 10
Ethernet ........................................................................ 10
3 Jumper Settings &Connectors ..................... 16
3.1
Chapter
General ........................................................................... 3
Display ........................................................................... 4
Audio Functions ............................................................. 4
Overview ......................................................................... 24
Utilities and Drivers ........................................................ 24
4.2.1
4.2.2
4.2.3
4.2.4
Installing the IPPC-6172A Watchdog Timer Driver ... 26
How to Use the IPPC-6172A Watchdog Timer ........... 31
Dual Display Setting .................................................... 33
Touchscreen Installation & Configuration .................. 34
5 Award BIOS Setup........................................ 36
5.1
5.2
Introduction ..................................................................... 36
Entering Setup ................................................................. 37
5.2.1
5.2.2
5.2.3
5.2.4
5.2.5
5.2.6
5.2.7
Standard CMOS Setup ................................................. 37
Advanced BIOS Features Setup .................................. 38
Advanced Chipset Features Setup ............................... 42
Integrated Peripherals .................................................. 44
Power Mangement Setup ............................................. 48
PNP/PCI Configuration Setup ..................................... 51
PC Health Status .......................................................... 53
vii
Table of Contents
5.2.8
5.2.9
5.2.10
5.2.11
5.2.12
Spread Spectrum Control ............................................. 54
Load Optimized Defaults ............................................. 54
Set Password ................................................................ 55
Save & Exit Setup ........................................................ 56
Exit Without Saving ..................................................... 56
Appendix A IO & Connector Pin Assigns ........................ 58
A.1
A.2
A.3
A.4
A.5
A.6
A.7
A.9
A.10
CN1,CN2 LVDS ............................................................. 58
CN9 LCD INVERTER ................................................... 59
CN12 Touchscreen ......................................................... 59
CN15/CN17 USB 6,7...................................................... 60
CN19,CN21 SATA POWER ......................................... 60
CN10 IDE ....................................................................... 61
CN18 Panel Header......................................................... 61
CN30 : PS/2 K/b & Mouse Connector Definitions ......... 63
CN28,CN29 : USB 0,1,2,3 Connector Definitions ......... 63
Appendix B System Assignments ...................................... 68
B.1
B.2
B.3
B.4
B.5
System I/O Ports.............................................................. 68
DMA Channel Assignments............................................ 69
Interrupt Assignments ..................................................... 69
1st MB Memory Map...................................................... 70
PCI Bus Map ................................................................... 70
Appendix C Watchdog Timer............................................ 72
C.1
C.2
C.3
Overview ......................................................................... 72
Watchdog Timer Programming....................................... 72
Example Programs .......................................................... 75
IPPC-6172A User Manual
viii
CHAPTER
1
General Information
Sections include:
• Introduction
• Specifications
• Dimensions
Chapter 1 General Information
1.1 Introduction
The IPPC-6172A series of industrial panel PCs is especially designed to
fit in space-limited environments where expansion is restricted. Its solidstructure enables systems to operate under harsh industrial conditions.
Sturdy Structure
The whole system is protected by a firm solid structure. The front panel is
made of sturdy aluminum and has strengthened glass. It is shock resistant,
and complies with NEMA4/IP65.
Easy Maintenance
The rear cover with gull open design above the motherboard. Thus users
can easily maintain the CPU, HDD, SDRAM and CD-ROM drive. Jumpers can be easily set without removing the rear cover.
Economical
The IPPC-6172A motherboard has Pentimu M Socket architecture. It
supports Pentium M up to 2.0 GHz and Celeron M up to 1.5 GHz. Pentium M is an economical yet powerful system. Its reliability enables the
system to operate faultlessly in industrial environments.
Friendly HMI
Systems in the IPPC-6172A series are equipped with a 17" LCD screen,
which provides high resolution display quality. The result is vivid, bright,
and sharp quality images. The panel PC is perfectly suited for Windows
OS. The touschscreen version enables simple operation, making the Panel
PC a solid industrial digital controller interface. In addition friendly HMI
design of the IPPC-6172A series offers front USB access port and reset
key for various requirements.
IPPC-6172A User Manual
2
1.2 Specifications
1.2.1 General
Dimensions (W x H x D):
Front Panel: 481.92 x 355.87 x 26 mm
Control Box: 362 x 285 x 112.2 mm
Cut out Dimensions: 457 x 342 mm
Weight: 13 kg (28 lb)
Power Supply: 180 W
Input Voltage: 100 V AC ~ 240 V AC @ 50 ~ 60 Hz, 4-2A
Output Voltage: +3.3V, 16.8A, +5 V @ 12A, +12 V @ 10A, -12V, 0.8A
Disk Drive Housing: Supports 1 x 2.5"SATA HDD, 1 x slim CD-ROM
1.2.2 Standard PC Functions
CPU: Socket 478 Pentium M up to 2 GHz
Celeron M up to 1.5 GHz
BIOS: Award 512Kbit Flash BIOS
Chipset: Intel 915 GM GMCH/ICH6M
2nd Level Cache: Depends on CPU from 512KB to 2MB
RAM: Two DDR2 DIMM sockets up to 2GB, accept 128/256/512/
1024MB DDR2 up to 400/533 DRAM
Parallel Port: One parallel port, supports SPP/EPP/ECP parallel mode.
BIOS configurable to LPT1, LPT2, LPT3 or disabled
Serial Ports: One serial port with one RS-232 port (COM1)
Universal Serial Bus (USB) Port: Supports up to 5 USB (2.0) ports.
PCI Bus Expansion Slots: Two expansion slots for two PCI cards.
Watchdog Timer:255-level interval timer, setup by software, Super I/O
integrated, SMSC controller
Battery: 3.0 V @ 196 mAH lithium battery
3
Chapter 1
1.2.3 Display
Chipset: Intel 915GM chip integrated Intel Extreme Graphics 2
for 2D/3D video accelerator
Display memory: 128 MB frame buffer using system memory
Display type: Simultaneous support of CRT & flat panel displays (TFT)
Display resolution: LCD displays up to 1280 x 1024 @ 16.7M colors
1.2.4 Audio Functions
Chipset: Integrated in Intel 9151GM ICH6M South Bridge
Audio controller:
AC97 Ver.2.0 compliant interface, Multi stream, Direct sound and
Direct Sound 3D acceleration
Stereo sound: 18-bit full-duplex codec
Audio interface:
Microphone-in, line-in, line-out, and game ports MPU-401.
1.2.5 PCI bus Ethernet Interface
One Intel 82573/L PCI Express Controller 10/100/1000Mb LAN support
Pre-boot Execution Environment (PXE), One Intel 82562GZ for ICH6M
LAN controller 10/100MB
Chipset: Intel 82573/L & Intel 82562GZ local bus.
Ethernet Interface: One Intel 82573/L PCI Express Controller 10/100/
1000Mb LAN support Pre-boot Execution Environment (PXE), One Intel
82562GZ for ICH6M LAN controller 10/100MB
1.2.6 Analog Resistive Touchscreen (Optional)
Type: Analog resistive
Resolution: 1024 x 1024
Light Transmission: >80%
Controller: RS-232 interface
Power Consumption: +5.5 V @ 20 mA
Software Drivers: Supports DOS, Win 95/98/Me, Win NT, Win 2000/XP
IPPC-6172A User Manual
4
1.2.7 Environmental
Operating Temperature: 0 ~ 50° C (32 ~ 122° F)
Storage Temperature: -20 ~ 60° C (-4 ~ 140° F)
Relative Humidity: 10 ~ 90% @ 40° C (non-condensing)
Shock: 30 G peak acceleration (11 ms duration)
Power MTBF: 100,000 hrs
Certifications: CE, CCC, FCC Class A, UL, BSMI
5
Chapter 1
1.3 Dimensions
IPPC-6172A User Manual
6
CHAPTER
2
System Setup
Sections include:
• General
• Installing SDRAM
• Installing a CPU
• Installing a 2.5" HDD
• Installing Add-on Cards
• Mounting Instructions
Chapter 2 System Setup
2.1 General
Before you start the computer, please follow these procedures for set up:
1.
Check and adjust jumpers on the motherboard (see Chapter 3)
2.
Install DDR2 SDRAM
3.
Install a CPU
4.
Install add-on cards
5.
Connect the wires, cables and accessories
6.
Mount the computer
7.
Program the BIOS settings
8.
Install an operating system.
Warning:
1. Switch off and unplug every time you access its interior.
2. The motherboard inside the system is composed of many
delicate ICs, chips and other integrated circuit components.
These components are easily damaged by static shock.
When you begin to install components, please:
- Avoid touching the metal parts of the motherboard.
- Use anti-static ring when handling CPU or SDRAM module.
- Put SDRAM modules and the CPU inside an anti-static bag
or a similar place before installation.
2.1.1 PS/2 Mouse & Keyboard
If you wish to use a full-size desktop keyboard and PS/2 mouse with your
panel PC, follow these instructions:
1.
Be sure the panel PC is turned off.
2.
Attach the keyboard adapter to the 5-pin green port on the rear bottom side of the rear cover.
3.
Attach the mouse adapter to the 5-pin purple port on the rear bottom side of the rear cover.
IPPC-6172A User Manual
8
2.1.2 Parallel Port
IPPC’s support the latest EPP and ECP parallel port protocols for
improved performance with compatible printers or other devices.
To connect the panel PC to a printer or other devices:
1.
Make sure both the panel PC and the printer/devices are turned off.
2.
Connect the 25-pin male connector of the printer cable to the 25pin female port on the panel PC labelled "parallel port."
3.
If necessary, attach the other end of your printer cable to your
printer, and fasten any retaining screws.
4.
Turn on the printer and any other peripheral devices you may have
connected to the panel PC. Then turn on the panel PC.
5.
If necessary, run the panel PC’s BIOS setup program to configure
the parallel port to respond as required by your printer and software
operating environment.
2.1.3 VGA port
An external VGA-compatible device may be connected to the system via
15-pin external port on the rear of the unit. The panel PC simultaneously
supports an external monitor in addition to its own LCD display.
2.1.4 Serial COM ports
There is one serial COM ports on the bottom of the rear cover. You can
easily attach a serial device to the panel PC, such as an external modem or
mouse. Follow these instructions:
1.
Make sure the panel PC and any other peripherial devices you mayhave connected to the panel PC are turned off.
2.
Attach the interface cable of the serial device to the panel PC’s
serial port. If necessary, attach the other end of the interface cable
to your serial device. Fasten any retaining screws.
3.
Turn on any other peripheral devices you may have connected to
the panel PC, and then turn on the panel PC.
4.
Refer to the manual(s) which accompanied your serial device(s) for
instructions on configuring your operating environment to recognize the device(s).
5.
Run the BIOS setup program to set the I/O address and IRQ, and
configure the jumper settings to change the mode of the COM ports
(refer to section 3.3).
9
Chapter 2
2.1.5 USB ports
An external USB device may be connected to the system via the 4-pin
USB ports located on the rear side of the system unit.
1.
Connect the external device to the system.
2.
The USB ports support hot plug-in connection. You should install
the device driver before you use the device.
2.1.6 Audio Interface
The audio interface includes three jacks: microphone-in, line-out and
line-in. Their functions are:
Microphone-in: Use an external microphone to record voice and sound.
Line-out: Output audio to external devices such as speakers or earphones. The built-in speaker will not be disabled when the line-out jack is
connected to external audio devices.
Line-in: Input audio from an external CD player or radio.
1.
Connect the audio device to the system.
2.
Install the driver before you use the device.
2.1.7 Ethernet
To install Ethernet for your system:
1.
Connect the Ethernet cable.
2.
Turn on the panel PC.
3.
Run the Ethernet driver to connect up to the network.
IPPC-6172A User Manual
10
2.2 Installing SDRAM
You can install from 128 MB to 2 GB (x2) of DDR2 SDRAM memory.
The Panel PC system provides two DDR2 SDRAM sockets
1.
Unlock the back cover and open it.
2.
Push the two white eject levers on each side of the DIMM outward
until they are separated from the black vertical posts.
3.
Insert the memory module into the socket at an angle of 90 degrees.
4.
Push the two eject levers toward the vertical posts at each end of
the socket until the module is upright.
A
B
11
Chapter 2
2.3 Installing a CPU
The CPU can be upgraded to improve system performance. The system
provides Socket 478 architecture which supports Pentium M CPU up to
2.0 GHz, and Celeron M up to 1.5 GHz..
1.
Unlock the back cover and open it(Same as RAM installation).
2.
The CPU jumper setting please check Chapter 3
3.
Remove the CPU cooler, then upwards at an angle of 90 degrees.
4.
Insert the CPU with the correct orientation. The notched corner of
the CPU (with the white dot) should point toward the end of the
lever. The end of the lever is the blank area where one hole is missing from the corner of the square array of pin holes. An arrowhead
printed on the motherboard points to the end of the lever.
5.
Slide the CPU in gently. It should insert easily. If not, pull the lever
up a little more and make sure the pins of the CPU correspond with
the holes of the socket. DO NOT USE EXCESSIVE FORCE!
6.
Press the lever down. The plate will slide forward.
7.
Place the heat sink on top of the CPU, secure with heat sink clip.
8.
Connect the CPU’s cooling fan power connector.
9.
Put back the rear cover and screw it back.
Warning:
Always disconnect the power cord from your panel PC when
you are working on it. Do not make connections while the
power is on, because sensitive electronic components can be
damaged by the sudden rush of power. Only experienced electronics personnel should open the panel PC.
IPPC-6172A User Manual
12
2.4 Installing a 2.5" SATA HDD
You can attach one enhanced Serial Advanced Technology Attachment
(SATA) hard disk drive to IPPC6152A’s internal controller which uses
PCI local bus interface. The following instructions are for installation:
1.
Unscrew the back cover and open it.
2.
Remove the two screws and take off CD-ROM, HDD cover.
3.
Remove four screws and take off HDD bracket.
4.
Insert the HDD into the bracket (see figure )
5.
Put the HDD bracket into the Chassis and fasten the four screws.
6.
Then attach the HDD flat cable and power cable.
7.
Close the rear cover
A
A
13
A
A
Chapter 2
2.5 Installing Add-on Cards
This system supports two PCI expansion cards.
1.
Detach the five screws on the back to open the lid.
2.
Take away the slot bracket.
3.
Insert the add-on card, and put on the lid.
2.6 Mounting Instructions
There are two ways to mount the system: panel mounting or rack mounting.
2.6.1 Panel Mounting
1.
Take the four mounting brackets out of the accessory box.
2.
Attach the four mounting brackets by inserting the screws into the
keyhole slots on the cover of the monitor.
3.
Use the screws to secure the brackets to the cover. Tighten the
screws to secure the monitor to the back panel.
2.6.2 Rack Mounting
The monitor can be mounted to a 19" industrial rack with an optional
bracket.
IPPC-6172A User Manual
14
CHAPTER
3
Jumper Settings &
Connectors
Sections include:
• Jumpers Settings
Chapter 3 Jumper Settings &Connectors
3.1 Jumper Settings
This section tells how to set the jumpers to configure your card. For the
locations of each jumper, see the board layout diagram depicted earlier in
this chapter. You configure your card to match the needs of your application by setting jumpers. A jumper is the simplest kind of electric switch.
It consists of two metal pins and a small metal cap (often protected by a
plastic cover) that slides over the pins to connect them. To "close" a
jumper you connect the pins with the cap. To "open" a jumper you
remove the cap. Sometimes a jumper will have three pins, labeled 1, 2
and 3. In this case you connect either pins 1 and 2 or 2 and 3.
The jumper settings are schematically depicted in this manual as follows:
You may find a pair of needle-nose pliers useful for setting the jumpers. If
you have any doubts about the best hardware configuration for your
application, contact your local distributor or sales representative before
you make any changes.
IPPC-6172A User Manual
16
3.1.1 Jumpers & Switches
The motherboard of the IPPC-6172A has a number of jumpers that allow
you to configure your system to suit your applications. The table below
lists the function of each of the board.s jumpers.
JP1
LCD Power Select
Select LCDPower 3.3V/5V
JP2
Select CPU VCCA
Select CPU VCCA Power 1.5V/1.8V
JP3
Measure Battery
Measure Battery of Current Jumper
JP4
Clear CMOS
Clear CMOS
JP5
LVDS Mode
LVDS Mode Select
JP6
Touchscreen Mode
Touchscreen Mode Select
1
17
Chapter 3
3.1.2 Connectors
Onboard connectors link the panel PC to external devices such as hard
disk drives or floppy drives. The table below lists the function of each of
the board.s connectors.
CN1, CN2
LVDS
18/24/36/48 BIT LVDS
CN3,
CN4,CN5
FAN
CONNECTOR
Wafer 2.54mm 3P 180D(M)
FAN CONNECTOR
CN7
ATX POWER
CONNECTOR
ATX Power CONN. 10*2P STAND ATX
POWER CONNECTOR
CN9
LCD INVERT
POWER
CONNECTOR
WAFER BOX 2.0mm 7P
CN10
IDE
CONNECTOR
CONN. 40P 90D 1.25mm SMD WO/Pb DF1340DP-1.25V -- SLIM TYPE CD-ROM
CN11
IDE
CONNECTOR
BOX HEADER 22*2P 2mm IDE
CONNECTOR
CN12
TOUCHSCREEN
WAFER BOX 2.0mm 9P 180D
CN13
CPU SOCKET
Micro-FCPGA 478 /P-M 1.6G,1.8G,2.0G/
C-M 1.5G
CN15/
CN17
USB PORT 6,7
WAFER BOX 2.5mm 5P USB EXT
CONNECTOR
CN18
PANEL HEADER
WAFER BOX 2.0mm 9P
CN19/
CN21
SATA POWER
CONNECTOR
WAFER BOX 2.5mm 8P
CN20
CPU SETTING
JUMPER
PIN HEADER 4*2P 180D(M) 2.0mm
SETTING CPU TYPE
CN25
PCI SOLT
PCI 32BIT/33MHZ
CN28
LAN1/USB0/
USB1
PhoneJack RJ45+USB*2
LAN1(10/100Mbase),USB port 0,1 (USB2.0)
CN29
LAN2/USB2/
USB3
PhoneJack RJ45+USB*2 LAN2(10/100/
1000Mbase),USB port 20,3 (USB2.0)
CN30
PS2
KEYBOARD ,MOUSE
CN31
AUDIO
LINE OUT, LINE IN, MIC IN
CN32
PRINT
D-Sub 25-pin
CN34
CRT
D-Sub 15-pin
CN36
COM1
D-Sub 9-pin
SA1/2
SATA PORT
SerialATA Con 7P 180D(M) Dip 1.27mm
IPPC-6172A User Manual
18
3.1.3 LCD Power Select(JP1)
This jumper is used to select LCD Power is +3.3V or +5V
LCD Power Select JP1
+3.3V
+5V
19
Chapter 3
3.1.4 CPU VCCA Power Select (JP2)
This jumper is used to select VCCA Power is +1.5V or +1.8V
CPU VCCA POWER Selec JP2
+1.5V
+1.8V
3.1.5 Measure Battery Current Jumper (JP3)
This jumper is used measure batter curren
Normal
Measure Current
Used series connection to
Current Meter measure
3.1.6 Clear CMOS (JP4)
This jumper is used to erase CMOS data and reset system BIOS
information. Follow the procedures below to clear the CMOS.
1.
Turn off the system.
2.
Close jumper JP1 (1-2).
3.
Turn on the system. The CMOS is now cleared.
4.
Turn on the system. The BIOS is reset to its default setting.
Clear CMOS JP4
Clear
Normal
IPPC-6172A User Manual
20
3.1.7 LVDS Mode Select(JP5)
1024 * 768 (24bit)
800 * 600 (18bit)
1280 * 1024 (48bit)
3.1.8 Touchscreen Mode Select (JP6)
5 wire
4 or 8 wire
21
Chapter 3
3.1.9 CPU Setting (CN20 and JP2)
CN20 : CPU Setting
JP2 : CPU VCCA Setting
Dothan Banias
Banias
533Mhz
400MHz
IPPC-6172A User Manual
22
CHAPTER
4
Intel Chipset
Sections include:
• Overview
• Utilities and Drivers
• Dual Display Setting
• Touchscreen Installation &
Configuration
Chapter 4 Software Configuration
4.1 Overview
In IPPC-6172A , Advantech provides a CD-ROM with utilities and drivers included. Please install the Chipset INF driver, VGA graphics driver,
LAN driver, audio driver, Touch Screen driver , Watchdog Timer (WDT)
driver sequentially.
4.2 Utilities and Drivers
The following utilities and drivers are provided with IPPC-6172A. You
can also find out the updated description of the utilities and drivers in the
ReadMe.txt file on the CD-ROM.
Intel Chipset Software Installation Utility
Path: \INF\
Available for the OS’s below,
• Microsoft Windows 2000
• Microsoft Windows XP
VGA Drivers (Intel(R) Graphics Driver)
Path: \VGA\
Available for the OS’s below,
• Microsoft Windows 2000
• Microsoft Windows XP
Intel Network Driver
Path: \Lan\
Available for the OS’s below,
• Microsoft Windows 2000
• Microsoft Windows XP
IPPC-6172A User Manual
24
Audio Driver
Path: \ audio\
Available for the OS’s below,
• Microsoft Windows 2000
• Microsoft Windows XP
Touchscreen Driver
Path: \ Touch screen \DMC 6000 (Combo)
Available for the OS’s below,
• Microsoft Windows 2000
• Microsoft Windows XP and more, on the driver CD-ROM.
WatchDog Timer Driver
Path: \WDT\
Available for the OS’s below:
• Microsoft Windows 2000
• Microsoft Windows XP
Watchdog Timer (WDT) Driver Installation
In order to ensure reliable and fail-safe performance, IPPC-6172A has a
built-in Watchdog Timer to handle unexpected system failures. IPPC6172A provides the drivers and a utility to activate and configure the
timer for Windows2000/XP operating systems. The following is a brief
introduction, using Windows2000 as an example, for the installation and
configuration procedures.
25
Chapter 4
4.2.1 Installing the IPPC-6172A Watchdog Timer Driver
1.
Insert the companion CD-ROM into your CD-ROM drive. Open
Path:\WDT
2.
Use Windows Explorer (or Windows Run command) to execute
SETUP.EXE from the companion CD-ROM.
IPPC-6172A User Manual
26
3.
Click Next to proceed.
4.
Click Next to confirm the customer information.
27
Chapter 4
5.
Select Advantech [W83627HF] Watchdog Timer and click Next.
6.
Click Next to confirm selecting the Typical setup type.
IPPC-6172A User Manual
28
7.
Click Next to proceed.
8.
Click Finish to complete the procedure.
29
Chapter 4
9.
Click OK to restart the system and activate the Watchdog Timer.
IPPC-6172A User Manual
30
4.2.2 How to Use the IPPC-6172A Watchdog Timer
1.
Open the Control Panel and click Watchdog Service Configuration.
2.
Click the Start Service button.
3.
Click Setting to select the setting page.
31
Chapter 4
4.
Select the Timer Span that meets your application requirement.
5.
Click Enable to enable the setting.
IPPC-6172A User Manual
32
6.
Check the Start watchdog service on boot to enable the Watchdogtimer to start automatically after the system boots every time.
7.
Click OK, then the configuration procedure is finished.
Note
Use advantech WDT Driver.WDT was enable,and
WDT LED was 1Hz glisten.
4.2.3 Dual Display Setting
If you use CRT monitor, you must Connections to CRT port in during
system boot up. During system boot up, the system will set CRT parameter. If you have multiple devices, you can set them.
1.
Click Intel graphic icon from the toolbars
33
Chapter 4
2.
Select Graphics properties
3.
This control allows selection of a device page. The currentlyactive
is indicated by a checkmark on the icon. If you have multipledevices, activation of an alternate device is accomplished by selectingthat device icon. Then, select either Apply or OK button. Intel
Dual Display Clone is for CRT monitor and IPPC-6172A LCD as
the below.
4.2.4 Touchscreen Installation & Configuration
Driver Installation
For driver installation, please insert the support CD and refer to the path:
\\Touchscreen Driver\DMC 6000 (Combo)\Manual\PenMount
Win2K&XP&2003&Vista Universal Driver Manual V1.02.pdf
IPPC-6172A User Manual
34
CHAPTER
5
Award BIOS Setup
Sections include:
• Introduction
• Entering Setup
Chapter 5 Award BIOS Setup
5.1 Introduction
Once you enter the Award BIOS CMOS Setup Utility, the Main Menu
(Figure 5-1) will appear on the screen. The Main Menu allows you to
select between nine setup functions and two exit choices. Use the arrow
keys to select among the items and press <Enter> to accept or enter the
submenu.
Award's BIOS ROM has a built-in Setup program that allows users to
modify the basic system configuration. This type of information is stored
in battery-backed CMOS so that it retains the Setup information when the
power is turned off.
IPPC-6172A User Manual
36
5.2 Entering Setup
Turn on the computer and press <Del> to enter the BIOS setup..
5.2.1 Standard CMOS Setup
Date
The date format is <week>, <month>, <day>, <year>.
Time
The time format is <hour> <minute> <second>, based on 24-hour clock.
IDE Primary Master/ Secondary Master/ Secondary Slave
• IDE HDD Auto-Detection: Press “Enter” to select this option for
automatic device detection.
• IDE Device Setup:
Auto: Automatically detects IDE devices during POST
None: Select this when no IDE device is used. The system will skip the
auto-detection step to make system start up faster.
37
Chapter 5
Halt On
This category determines whether system start-up will halt or not whenan
error is detected during power up.
The options are: No Errors/All Errors/All, But Keyboard/All, But Diskette/All, But Disk/Key
Memory
This category displays base memory, extended memory, and total memory detected during POST (Power On Self Test).
5.2.2 Advanced BIOS Features Setup
The "Advanced BIOS FEATURES" screen will appear after the BIOS
FEATURES SETUP item from the CMOS SETUP UTILITY Menu was
chosen. This screen allows the user to configure the board according to
his particular requirements. Below are some major items that are provided in the BIOS FEATURES SETUP screen:
IPPC-6172A User Manual
38
Hard Disk Boot Priority
Set hard disk boot device priority.
CPU Thermal Monitor
The Intel Thermal MonitorAutomatic Mode. There are two Automatic
modes called Intel Thermal Monitor 1 (TM1) and Intel Thermal Monitor
2 (TM2). And IPPC-9070 Auto dete C-M or P-M.When CPU was C-M
BIOS running in TM1,another running TM2.
TM1: When Intel Thermal Monitor 1 is enabled, and a high temperature
situation exists, the clocks will be modulated by alternately turning the
clocks off and on at a 50% duty cycle. Cycle times are processor speed
dependent and will decrease linearly as processor core frequencies
increase. After the temperature has returned to a non-critical level, modulation ceases and the TCC goes inactive.
TM2: When Intel Thermal Monitor 2 is enabled, and a high temperature
situation exists, the processor will perform an Enhanced Intel SpeedStep
technology transition to a lower operating point. When the processor temperature drops below the critical level, the processor will make an
Enhanced Intel SpeedStep technology transition to the last requested
operating point. Intel Thermal Monitor 2 is the recommended mode on
the Intel Pentium M processor
Enabled (default)
Enable Thermal Monitor
Disabled
Disable Thermal Monitor
Virus Warning
During and after the system boots up, any attempt sector or partition table
of the hard disk drive will this happens, a warning message will be displayed. anti-virus program to locate the problem. If the Virus disabled, no
warning message will appear if anything access the boot sector or hard
disk partition.
39
Chapter 5
CPU L1 & L2 Cache
Enabled (default)
Enable cache
Disabled
Disable cache
Note: The internal cache is built into the processor.
Quick Power On Self Test
This category speeds up Power On Self Test (POST) after you power on
the computer. If this is set to Enabled, BIOS will shorten or skip some
check items during POST.
Enabled (default)
Enable quick POST
Disabled Normal
Normal POST
First/Second/Third Boot Device and Boot Other Device
The BIOS attempts to load the operating system from the devices in the
sequence selected in these items. The settings are Hard
Disk,CDROM,USB-FDD,USB-ZIP,USB-CDROM,LAN 1,LAN 2 and
Disabled.
First boot device (default) USB-CDROM
Second boot device
Hard Disk
Third boot device
CDROM
NOTE: When you boot by USB- CDROM, please install WinXP with SP1
or Win 2000 with SP3.
Boot Up NumLock Status
On (default)
Keypad: numeric keys
Off
Keypad: arrow keys
Gate A20 Options
Normal
A20 signal is controlled by k/b controller or chipset.
Fast (default) A20 signal is controlled by port 92 or chipset specific.
IPPC-6172A User Manual
40
Typematic Rate Setting
Keystrokes repeat at a rate determined by the keyboard controller. When
enabled, the typematic rate and typematic delay can be selected. The settings are: Enabled/Disabled. The default setting is Disabled.
Typematic Rate (Chars/Sec)
Set the number of times a second to repeat a keystroke key down. The settings are: 6, 8, 10, 12, 15, 20, 24, 30.
Typematic Delay (Msec)
Sets the delay time after the key is held down before it the keystroke. The
settings are: 250, 500, 750, 1000.
Security Option
This category allows you to limit access to the system and/or to Setup.
Setup(default) The system will boot, but access to Setup will be denied
if the correct password is not entered at the prompt.
System
The system will not boot and access to Setup will be
denied if the correct password is not entered at the prompt.
OS Select For DRAM > 64MB
Allows OS2 to be used with > 64 MB of DRAM. Settings are Non-OS/2
(default) and OS2. Set to OS/2 if using more than 64MB and running OS/
2.
41
Chapter 5
5.2.3 Advanced Chipset Features Setup
The Advanced Chipset Features Setup option is used to change the values
of the chipset registers. These registers control most of the system options
in the computer. Choose the "Advanced Chipset Features" from the main
menu and the following screen will appear.
DRAM Timing Configuration
This field lets you select system memory timing data. Manual and BY
SPD are two options. Default is "BY SPD"
CAS Latency Time
When synchronous DRAM is installed, the number of clock cycles of
CAS latency depends on DRAM timing. The settings are: 3,4,5 and Auto.
DRAM RAS# to CAS# Delay
This field is used to insert a timing delay between the CAS and RAS
strobe signals, used when DRAM is written to, read from, or refreshed.
Fast gives faster performance; and Slow gives more stable performance.
This field applies only when synchronous DRAM have been installed in
the system. The settings are: 2,3,4,5 and auto.
IPPC-6172A User Manual
42
DRAM RAS# Precharge
If an insufficient number of cycles is allowed for the RAS to accumulate
its charge before DRAM refresh, the refresh may be incomplete and the
DRAM may fail to retain data. Fast gives faster performance; and Slow
gives more stable performance. This field applies only when synchronous
DRAM is installed in the system. The settings are: 2,3,4,5 and Auto.
Precharge Delay (tRAS)
If an insufficient number of cycles is allowed for the RAS to accumulate
its charge before DRAM refresh, the refresh may be incomplete and the
DRAM may fail to retain data. Fast gives faster performance; and Slow
gives more stable performance. This field applies only when synchronous
DRAM is installed in the system. The settings are: Auto and
2,3,4,5,6,7,8,9,10
System Memory Frequency
Default auto :The bios detect memory frequency is by SPD. The settings
are: Auto and 333MHz,400MHz,533MHz.
System BIOS Cacheable
Selecting Enabled allows caching of the system BIOS ROM at F0000hFFFFFh, resulting in better system performance. However, if any program writes to this memory area, a system error may result. The settings
are: Enabled (Default) and Disabled.
Video BIOS Cacheable
Select Enabled allows caching of the video BIOS, resulting in better system performance. However, if any program writes to this memory area, a
system error may result. The settings are: Enabled and Disabled
(Default).
Memory Hole At 15M-16M
You can reserve this area of system memory for ISA adapter ROM. When
this area is reserved, it cannot be cached. The user information of peripherals that need to use this area of system memory usually discusses their
memory requirements. The settings are: Enabled and Disabled (Default).
43
Chapter 5
PCI-E Compliancy Mode
This allows the user to select the PCI-E compliant mode. The options are
[v1.0], and [v1.0a].
On-Chip Video Memory Size
This field let you select On-Chip buffer size. The settings are: 1 and 8.
DVMT Mode
We have three options (Fixed, DVMT and Both). The default is DVMT.
DVMT/FIXED Memory Size
We have 64Mb and 128MB. The default is 128MB.
5.2.4 Integrated Peripherals
IPPC-6172A User Manual
44
IDE HDD Block Mode
Block mode is also called block transfer, multiple commands, or multiple
sector read/write. If your IDE hard drive supports block mode (most new
drives do), select Enabled for automatic detection of the
optimal number of block read/writes per sector the drive can support. The
settings are: Enabled (Default), Disabled.
On-Chip Primary (SATA) / Secondary (PATA) PCI IDE
The integrated peripheral controller contains an IDE interface with support for two IDE channels. Select Enabled to activate each channel separately. The settings are: Enabled (Default) and Disabled.
IDE Primary/Secondary Master/Slave PIO
The four IDE PIO (Programmed Input/Output) fields let you set a PIO
mode (0-4) for each of the four IDE devices that the onboard IDE interface supports. Modes 0 through 4 provide successively increased performance. In Auto mode, the system automatically determines the best mode
for each device. The settings are: Auto (Default), Mode 0, Mode 1, Mode
2, Mode 3, Mode 4.
45
Chapter 5
IDE Primary/Secondary Master/Slave UDMA
Ultra DMA/33 implementation is possible only if your IDE hard drive
supports it and the operating environment includes a DMA driver (Windows 95 OSR2 or a third-party IDE bus master driver). If your hard drive
and your system software both support Ultra DMA/33 and Ultra DMA/66
and Ultra DMA/100, select Auto to enable BIOS support. The settings
are: Auto (Default), Disabled.
USB Controller
Select enabled if your system contains a Universal Serial Bus (USB) 1.1
controller. The settings are: Enabled (Default), Disabled.
USB 2.0 Controller
Select enabled if your system contains a Universal Serial Bus (USB) 2.0
controller. The settings are: Enabled (Default), Disabled.
USB Keyboard Support
Select enabled if you use USB Keyboard in DOS mode. Enable (Default)
USB Mouse Support
Select enabled if you use USB Mouse in DOS mode. Disabled (Default)
IPPC-6172A User Manual
46
AC97 Audio
Select “Disable” if you do not want to use AC-97 audio. Options are
“Auto”, and “Disabled”.
Onboard Serial Port 1
The settings are “3F8/IRQ4”, “2F8/IRQ3”, “3E8/IRQ4”, “2E8/IRQ3”,
and “Disabled” for the on-board serial connector.
Onboard Serial Port 2
The settings are “3F8/IRQ4”, “2F8/IRQ3”, “3E8/IRQ4”, “2E8/IRQ3”,
and “Disabled” for the on-board serial connector.
Onboard Parallel Port
There is a built-in parallel port on the onboard Super I/O chipset that provides Standard, ECP, and EPP features. It has the following options: Disabled, 378/IRQ7 (Default), 278/IRQ5, 3BC/IRQ7 and Disabled. for the
on-board serial connector.
47
Chapter 5
Parallel Port Mode
This field allows you to set the operation mode of the parallel port. The
setting "SPP" allows standard speed operation. “EPP” allows bidirectional parallel port operation at maximum speed. “ECP” allows the parallel port to operate in bidirectional mode and at a speed faster than the
maximum data transfer rate. “ECP + EPP” allows normal speed operation
in a two-way mode.
EPP Mode Select
This field allows you to select EPP port type 1.7 or 1.9. The choices:
EPP1.7, 1.9.
ECP Mode Use DMA
This selection is available only if you select “ECP” or “ECP + EPP” in
the Parallel Port Mode field. In ECP Mode Use DMA, you can select
DMA channel 1, DMA channel 3, or Disable. Leave this field on the
default setting
5.2.5 Power Mangement Setup
ACPI Function
This category allows you to select if ACPI power management are
enabled or not. The options: Enabled (Default) and Disabled.
IPPC-6172A User Manual
48
Power Management
This category allows you to select the type (or degree) of power saving
and is directly related to the following modes:
1. HDD Power Down
2. Suspend Mode
There are four selections for Power Management, three of which havefixed mode settings.
User Defined(Default) Allows you to set each mode individually.
When not disabled,each of the ranges are from 1 min. to 1 hr. except for
HDD Power Down which ranges from 1 min. to 15 min.and disable.
Min Saving
Minimum power management., Suspend Mode = 1
hr.and HDD Power Down = 15 min.
Max Saving
Maximum power management., Suspend Mode = 1
min.and HDD Power Down = 1 min.
Video Off Method
Use this to select the method to turn off the video. The choices are :
"Blank Screen", "V/H SYNC+ Blank", "DPMS".
Video Off In Suspend
When system is in suspend, video will turn off.
Suspend Type
The choices are : "Stop Grant", "PwrOn Suspend.”
Modem Use IRQ
This determines the IRQ in which the MODEM can use.The choices: 3, 4,
5, 7, 9, 10, 11, NA.
49
Chapter 5
Suspend Mode
Please refer to 3.7.3
HDD Power Down
You can choose to turn the HDD off after one of the time intervals listed,
or when the system is in Suspend Mode. If the HDD is in a power saving
mode, any access to it will wake it up.
Soft-Off by PWR-BTTN
If you choose Instant-Off, then pushing the ATX soft power switch button
once will switch the system to System Off power mode. You can
choose Delay 4 sec. If you do, then pushing the button for more than 4
seconds will turn off the system, whereas pushing the button momentarily
(for less than 4 seconds) will switch the system to Suspend Mode.
PWRON After PWR-Fail
Use this to set up the system after power failure. The "Off" will keep the
system powered off after power failure, the "On" will boot up the system
after failure, and the "Former-Sts" will return the system to the status
CPU THRM-Throttling
This field allows you to select the CPU THRM-Throttling rate. The
choices: 12.5%, 25.0%, 37.5%, 50.0%, 62.5%, 75.0%, 87.5%.
Primary IDE 0 (1) and Secondary IDE 0 (1)
When Enabled, the system will resume from suspend mode if Primary
IDE 0 (1) or Secondary IDE 0 (1) is active. The choice: Enabled, Disabled.
FDD, COM, LPT PORT
When Enabled, the system will resume from suspend mode if FDD, COM
port, or LPT port is active. The choice: Enabled, Disabled.
IPPC-6172A User Manual
50
PCI PIRQ [A-D]#
When Enabled, the system will resume from suspend mode if interrupt
occurs. The choice: Enabled, Disabled.
5.2.6 PNP/PCI Configuration Setup
This section describes configuring the PCI bus system. PCI, or Personal
Computer Interconnect, is a system that allows I/O devices to operate at
speeds nearing the speed the CPU itself uses when communicating with
its own special components. This section covers some very technical
items and it is strongly recommended that only experienced make any
changes to the default settings.
Init Disply Fiest
The Default is PCI Slot.Select PCI Slot to boot VGA in extended VGA
Card.
Reset Configuration Data
The default is Disabled. Select Enabled to reset Extended System Configuration Data (ESCD) if you have installed a new add-on card, and system
configuration is in such a state that the OS cannot boot.
51
Chapter 5
Resource Controlled By
The Award Plug and Play BIOS has the capacity to automatically configure all the boot and Plug and Play compatible devices. However, this
capability means absolutely nothing unless you are using a Plug and Play
operating system such as Windows® 95/98. If you set this field to "manual," choose specific resources by going into each of the sub menus that
follow this field (a sub menu is preceded by a "Y"). The settings are: Auto
(ESCD) (Default), Manual.
IRQ Resources
When resources are controlled manually, assign each system interrupt a
type, depending on the type of device using the interrupt.
PCI/VGA Palette Snoop
Leave this field at Disabled. The settings are Enabled, Disabled (Default).
Maximum Payload Size
This allows you to set the maximum TLP payload size for PCI Express
devices. The options are [128 bytes], [256 bytes], [512 bytes], [1024
bytes], [2048 bytes], and [4096 bytes].
IPPC-6172A User Manual
52
5.2.7 PC Health Status
This section shows the Status of you CPU, System Temp, Warning for
overall system status. This is only available if there is Hardware Monitor
onboard.
CPU Warning Temperature
This item will prevent the CPU from overheating. The choices are “Disabled”, “50C/122F”, “53C/127F”, “56C/133F”, “60C/140F”, “63C/
145F”, “66C/151F”, “70C/158F”, “75C/167F”, “80C/176F”, “85C/
185F”, “90C/194F”, and “95C/205F”.
Current System/CPU Temp./ Fan1/Fan2/Fan3/Vcore/1.5V/3.3V/+5V/
+12V/-12V/-5V/Vbat/5Vsb
This shows system health status.
53
Chapter 5
5.2.8 Spread Spectrum Control
Spread Spectrum
This item allows you to enable spread spectrum function. Default is "Disabled."
5.2.9 Load Optimized Defaults
When you press <Enter> on this item, you get a confirmation dialog box
with a message similar to: Load Optimized Defaults (Y/N) ? N Pressing
'Y' loads the default values that are factory settings for optimal performance system operations.
IPPC-6172A User Manual
54
5.2.10 Set Password
To change, confirm, or disable the password, choose the "PASSWORD
SETTING" option form the Setup main menu and press [Enter]. The
password can be at most 8 characters long. Remember, to enable this feature. You must first select the Security Option in the Advanced BIOS
Features Setup to be either "Setup" or "System." Pressing
[Enter] again without typing any characters can disable the password setting function.
55
Chapter 5
5.2.11 Save & Exit Setup
If you select this and press the [Enter] key, the values entered in the setup
utilities will be recorded in the CMOS memory of the chipset. The microprocessor will check this every time you turn your system on and compare this to what it finds as it checks the system. This record is required
for the system to operate.
5.2.12 Exit Without Saving
Selecting this option and pressing the [Enter] key lets you exit the Setup
program without recording any new values or changing old ones.
IPPC-6172A User Manual
56
Appendix
IO & Connector
Pin Assignments
A
Appendix A IO & Connector Pin Assigns
A.1 CN1,CN2 LVDS
CN1
VDDSAFE
VDDSAFE
LCD_A_D3P
LCD_A_D3N
LCD_A_CLKP
LCD_A_CLKN
LCD_A_D2P
LCD_A_D2N
LCD_A_D1P
LCD_A_D1N
LCD_A_D0P
LCD_A_D0N
LCD_DCLK
LCD_DDAT
1
2
3
4
5
6
7
8
9
10
11
12
13
14
15
16
17
18
19
20
1
2
3
4
5
6
7
8
9
10
11
12
13
14
15
16
17
18
19
20
21
22
21
22
DF19G_20V_S1.00mm
CN2
VDDSAFE
VDDSAFE
LCD_B_CLKP
LCD_B_CLKN
LCD_B_D3P
LCD_B_D3N
LCD_B_D2P
LCD_B_D2N
LCD_B_D1P
LCD_B_D1N
LCD_B_D0P
LCD_B_D0N
1
2
3
4
5
6
7
8
9
10
11
12
13
14
15
16
17
18
19
20
1
2
3
4
5
6
7
8
9
10
11
12
13
14
15
16
17
18
19
20
21
22
21
22
DF19G_20V_S1.00mm
IPPC-6172A User Manual
58
1
2
20
A.2 CN9 LCD INVERTER
L23
30_100MHz
W_7H_2.00mm
LCDBLPWRVCC
LCD_VBR
LCD_BACKON#
VCC
+12V
L22
LCDBLPWR
30_100MHz
7
6
5
4
3
2
1
7
6
5
4
3
2
1
CN5
1
A.3 CN12 Touchscreen
CN30
TAVSS
TP_Y TP_Y +
TP_XTP_X+
TP_SENSE
9
8
7
6
5
4
3
2
1
WB_9V_2.0mm
59
1
Chapter A
A.4 CN15/CN17 USB 6,7
CN14
USBD6+
USBD6USBV67
5
4
3
2
1
W_5V_2.54mm
1
A.5 CN19,CN21 SATA POWER
8
7
6
5
4
3
2
1
+12V
VCC
VCC3
L42
30_100MHz SATA2_VCC12
L41
30_100MHz SATA2_VCC5
L40
30_100MHz SATA2_VCC3
N197
N198
N199
0.1uF
0.1uF
0.1uF
WB_8V_2.54mm
1
IPPC-6172A User Manual
60
A.6 CN10 IDE
SLIM TYP E CD-ROM
ID E_PD IOW#
ID E_PIORD Y
ID E_I RQ
ID E_PAD1
ID E_PAD0
ID E_PD CS1#
VCC
1
3
5
7
9
11
13
15
17
19
21
23
25
27
29
31
33
35
37
39
C N17
1
3
5
7
9
11
13
15
17
19
21
23
25
27
29
31
33
35
37
39
41
44
42
43
C D_L_R
C D_REF
ID ERST#1
ID E_PD D7
ID E_PD D6
ID E_PD D5
ID E_PD D4
ID E_PD D3
ID E_PD D2
ID E_PD D1
ID E_PD D0
2
4
6
8
10
12
14
16
18
20
22
24
26
28
30
32
34
36
38
40
C D_R_R
C D_REF
ID E_PD D8
ID E_PD D9
ID E_PD D10
ID E_PD D11
ID E_PD D12
ID E_PD D13
ID E_PD D14
ID E_PD D15
ID E_PD DR EQ
ID E_PD IOR#
2
4
6
8
10
12
14
16
18
20
22
24
26
28
30
32
34
36
38
40
2
1
40
39
ID E_PDD ACK#
ID E_PD AC TIVE#
ID E_PATADET
ID E_PAD2
ID E_PD CS3#
VC C
41
44
42
43
D F13_40V_S1. 25m m
DF13_40V_S1.25mm
A.7 CN18 Panel Header
CN34
VCC
R654
330 R0402 HDLEDA#
HDLEDC#
PWLED+
RESET_SW#
PANSWIN
PANSWIN_5VSB
9
8
7
6
5
4
3
2
1
WB_9V_2.0mm
Pin1-2
Pin3-4
Pin6-7
Pin8-9
:
:
:
:
POWER BUTTON
RESET BUTTON
POWER LED
HDD LED
61
1
Chapter A
A.8 CN34 : DB-15 VGA Connector Definitions
Pin
1
2
3
4
5
6
7
8
9
10
11
12
13
14
15
Signal
RED
GREEN
BLUE
N/C
GND
GND
GND
GND
N/C
(VGAVCC)
GND
N/ C
VGA_SDA
HSYNC
VSYNC
VGA_SCL
IPPC-6172A User Manual
62
A.9 CN30 : PS/2 K/b & Mouse Connector Definitions
Pin
1
2
3
4
5
6
7
8
9
10
11
12
Signal
KB DATA
GND
VCC
KB CLOCK
MS DATA
GND
VCC
MS CLOCK
A.10 CN28,CN29 : USB 0,1,2,3 Connector Definitions
87 6 54 3 2 1
63
Chapter A
A.11 10/100/1000Base-TX Ethernet
10/100Base-TX Signal
TD+
TDRD+
N/C
N/C
RDN/C
N/C
Pin
1
2
3
4
5
6
7
8
10/100/1000Base-TX Signal
MDIAX1+
MDIAX1MDIAX2+
MDIAX3+
MDIAX3MDIAX2MDIAX4+
MDIAX4-
LED Indicator Definition
Left
10Mbps
100Mbps
1000Mbps
Right
flick active/link mode
Off
Green
Orange
USB Ports Pin Definitions
Pin
1
2
3
4
Signal
VCC
USB_PUSB_P+
GND
2F-CN10-Secondary IDE 44pin 2mm Connector
1
43
2
44
For direct installation 2.5" IDE HDD (2F-CN17)
IPPC-6172A User Manual
64
Secondary IDE Connector for 2.5" HDD Pin Definitions
Pin
1
3
5
7
9
11
13
15
17
19
21
23
25
27
29
31
33
35
37
39
41
43
Signal
IDERST*
SDD7
SDD6
SDD5
SDD4
SDD3
SDD2
SDD1
SDD0
GND
SDDREQ
SDIOW*
SDIOR*
SDIORDY
SDDACK*
IRQ15
SDA1
SDA0
SDCS*1
HDD_LED
+5V
GND
Pin
2
4
6
8
10
12
14
16
18
20
22
24
26
28
30
32
34
36
38
40
42
44
Signal
GND
SDD8
SDD9
SDD10
SDD11
SDD12
SDD13
SDD14
SDD15
N/C
GND
GND
GND
GND
GND
N/C
S66DET
SDA2
SDCS*3
GND
+5V
N/C
*Low Active
65
Chapter A
CN36 : Serial port 1,2 RS232 Connector Definitions
1
5
6
Pin
1
2
3
4
5
6
7
8
9
9
Signal
NDCD
NRX
NTX
NDTR
GND
NDSR
NRTS
NCTS
NRI
2F-SA0 : Serial ATA0 (7pin connector)
Pin
1
2
3
4
5
6
7
Signal
GND
TX+
TXGND
RXRX+
GND
IPPC-6172A User Manual
66
Appendix
B
System Assignments
Appendix B System Assignments
B.1 System I/O Ports
Addr. Range (Hex)
Device
000-01F
DMA controller
020-021
Interrupt controller 1, master
022-023
Chipset address
040-05F
8254 timer
060-06F
8042 (keyboard controller)
070-07F
Real-time clock, non-maskable interrupt (NMI) mask
080-09F
DMA page register
0A0-0BF
Interrupt controller 2
0C0-0DF
DMA controller
0F0
Clear math co-processor
0F1
Reset math co-processor
0F8-0FF
Math co-processor
1F0-1F8
Fixed disk
278-27F
Parallel printer port 2 (LPT3)
290-297
On-board hardware monitor
2F8-2FF
Serial port 2
360-36F
Reserved
378-37F
Parallel printer port 1 (LPT2)
3C0-3CF
Reserved
3D0-3DF
Color/graphics monitor adapter
3F0-3F7
Diskette controller
3F8-3FF
Serial port 1
IPPC-6172A User Manual
68
B.2 DMA Channel Assignments
Channel
Function
0
Available
1
Available
2
Available
3
Available
4
Cascade for DMA controller 1
5
Available
6
Available
7
Available
B.3 Interrupt Assignments
Priority
Interrupt#
Interrupt Source
1
NMI
Parity error detected
2
IRQ0
Interval timer
3
IRQ1
Keyboard
- IRQ2
Interrupt from controller 2 (cascade)
4
IRQ8
Real-time clock
5
IRQ9
Cascaded to INT 0A (IRQ 2)
6
IRQ10
Available
7
IRQ11
Available
8
IRQ12
PS/2 mouse
9
IRQ13
INT from co-processor
10
IRQ14
Fixed disk controller
11
IRQ15
Available
12
IRQ3
Serial communication port 2
13
IRQ4
Serial communication port 1
14
IRQ5
Parallel port 2
15
IRQ6
Available
16
IRQ7
Parallel port 1 (print port)
69
Appendix B
B.4 1st MB Memory Map
Addr. range (Hex)
Device
E0000h - FFFFFh
System ROM
CC000h - DFFFFh
Unused
C0000h - CBFFFh
VGA BIOS
A0000h - BFFFFh
VGA buffer
00000h - 9FFFFh
Base memory
B.5 PCI Bus Map
Function Signals:
Device ID
INT# Pin
Onboard LAN1
AD24
INT E
PCI slot 2
AD29
INT B,C,D,A
PCI slot 3
AD30
INT C,D,A,B
GNT1#
PCI slot 4
AD31
INT D,A,B,C
GNT0#
IPPC-6172A User Manual
70
GNT# Pin
GNT2#
Appendix
Watchdog Timer
C
Appendix C Watchdog Timer
C.1 Overview
The IPPC-9070 cards’ watchdog timer can be used to monitor system
software operation and take corrective action if the software fails to function after the programmed period. This section describes the operation of
the watchdog timer, and how to program it. The watchdog timer is built
into the super I/O controller W83627HF. It provides the following functions for user programming:
• Can be enabled and disabled by user's program.
• Timer can be set from 1 to 255 seconds or 1 to 255 minutes.
• Generates an interrupt or resets signal if the software fails to reset the
• timer after time-out.
C.2 Watchdog Timer Programming
The I/O port address of the watchdog timer is 2E(hex) and 2F(hex), 2E
(hex) is the address port. 2F(hex) is the data port. You must first assign
the address of register by writing address value into address port 2E(hex),
then write/read data to/from the assigned register through data port 2F
(hex).
IPPC-6172A User Manual
72
73
Appendix C
Register
Address (2E)
Attribute
Description
Read/Write
Value (2F) and
description
87 (hex)
-----
Write this address to I/O address
port 2E (hex) twice to unlock the
W83627HF
07 (hex)
write
Write 08 (hex) to select register of
watchdog timer.
30 (hex)
write
Write 01 (hex) to enable the function
of the watchdog timer. Disabled is
set as default.
F5 (hex)
write
Set seconds or minutes as units for
the timer.
Write 0 to bit 3: set second as counting unit. [default]
Write 1 to bit 3: set minute as counting unit
F6 (hex)
write
0: stop timer [default]01~FF (hex): The
amount of the count, in seconds or minutes, depends on the value set in register
F5 (hex). This number decides how long
the watchdog timer waits for strobe before
generating an interrupt or reset signal.
Writing a new value to this register can
reset the timer to count with the new
value.
F7 (hex)
rd/wr
Bit 6: Write 1 to enable keyboard to reset
the timer, 0 to disable.[default] Bit 5: Write
1 to generate a timeout signal immediately
and automatically return to 0. [default=0]
Bit 4: Read status of watchdog timer, 1
means timer is "time out".
AA (hex)
-----
Write this address to I/O port 2E (hex) to
lock the watchdog timer.2
IPPC-6172A User Manual
74
C.3 Example Programs
1. Enable watchdog timer and set 10 sec. as timeout interval
;----------------------------------------------------------Mov dx,2eh ; Unlock W83627HF
Mov al,87h
Out dx,al
Out dx,al
;----------------------------------------------------------Mov al,07h ; Select registers of watchdog timer
Out dx,al
Inc dx
Mov al,08h
Out dx,al
;----------------------------------------------------------Dec dx ; Enable the function of watchdog timer
Mov al,30h
Out dx,al
Inc dx
Mov al,01h
Out dx,al
;----------------------------------------------------------Dec dx ; Set second as counting unit
Mov al,0f5h
Out dx,al
Inc dx
In al,dx
And al,not 08h
Out dx,al
;----------------------------------------------------------Dec dx ; Set timeout interval as 10 seconds and start counting
Mov al,0f6h
Out dx,al
Inc dx
Mov al,10
Out dx,al
;----------------------------------------------------------Dec dx ; lock W83627HF
75
Appendix C
Mov al,0aah
Out dx,al
2. Enable watchdog timer and set 5 minutes as timeout interval
;----------------------------------------------------------Mov dx,2eh ; unlock W83627H
Mov al,87h
Out dx,al
Out dx,al
;----------------------------------------------------------Mov al,07h ; Select registers of watchdog timer
Out dx,al
Inc dx
Mov al,08h
Out dx,al
;----------------------------------------------------------Dec dx ; Enable the function of watchdog timer
Mov al,30h
Out dx,al
Inc dx
Mov al,01h
Out dx,al
;----------------------------------------------------------Dec dx ; Set minute as counting unit
Mov al,0f5h
Out dx,al
Inc dx
In al,dx
Or al,08h
Out dx,al
;----------------------------------------------------------Dec dx ; Set timeout interval as 5 minutes and start counting
Mov al,0f6h
Out dx,al
Inc dx
Mov al,5
Out dx,al
;----------------------------------------------------------IPPC-6172A User Manual
76
Dec dx ; lock W83627HF
Mov al,0aah
Out dx,al
3. Enable watchdog timer to be reset by mouse
;----------------------------------------------------------Mov dx,2eh ; unlock W83627H
Mov al,87h
Out dx,al
Out dx,al
;----------------------------------------------------------Mov al,07h ; Select registers of watchdog timer
Out dx,al
Inc dx
Mov al,08h
Out dx,al
;----------------------------------------------------------Dec dx ; Enable the function of watchdog timer
Mov al,30h
Out dx,al
Inc dx
Mov al,01h
Out dx,al
;----------------------------------------------------------Dec dx ; Enable watchdog timer to be reset by mouse
Mov al,0f7h
Out dx,al
Inc dx
In al,dx
Or al,80h
Out dx,al
;----------------------------------------------------------Dec dx ; lock W83627HF
Mov al,0aah
Out dx,al
4. Enable watchdog timer to be reset by keyboard
;----------------------------------------------------------Mov dx,2eh ; unlock W83627H
77
Appendix C
Mov al,87h
Out dx,al
Out dx,al
;----------------------------------------------------------Mov al,07h ; Select registers of watchdog timer
Out dx,al
Inc dx
Mov al,08h
Out dx,al
;----------------------------------------------------------Dec dx ; Enable the function of watchdog timer
Mov al,30h
Out dx,al
Inc dx
Mov al,01h
Out dx,al
;----------------------------------------------------------Dec dx ; Enable watchdog timer to be strobed reset by keyboard
Mov al,0f7h
Out dx,al
Inc dx
In al,dx
Or al,40h
Out dx,al
;----------------------------------------------------------Dec dx ; lock W83627HF
Mov al,0aah
Out dx,al
5. Generate a time-out signal without timer counting
;----------------------------------------------------------Mov dx,2eh ; unlock W83627H
Mov al,87h
Out dx,al
Out dx,al
;----------------------------------------------------------Mov al,07h ; Select registers of watchdog timer
Out dx,al
Inc dx
IPPC-6172A User Manual
78
Mov al,08h
Out dx,al
;----------------------------------------------------------Dec dx ; Enable the function of watchdog timer
Mov al,30h
Out dx,al
Inc dx
Mov al,01h
Out dx,al
;----------------------------------------------------------Dec dx ; Generate a time-out signal
Mov al,0f7h
Out dx,al ;Write 1 to bit 5 of F7 register
Inc dx
In al,dx
Or al,20h
Out dx,al
;----------------------------------------------------------Dec dx ; lock W83627HF
Mov al,0aah
Out dx,al
79
Appendix C
IPPC-6172A User Manual
80