1
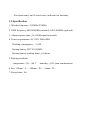
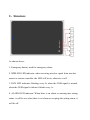
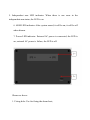
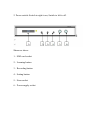
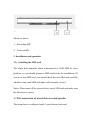
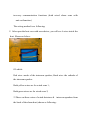
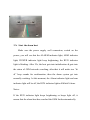
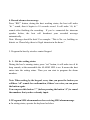
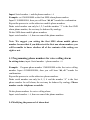
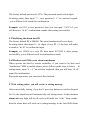
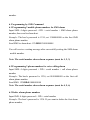
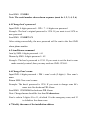
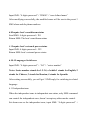
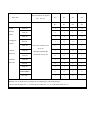
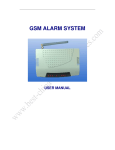
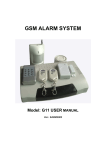
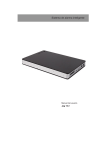
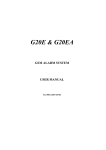
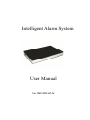
Intelligent Alarm System
User Manual
Ver 1202 2012-02-14
Dear users,
Thank you for having selected the intelligent alarm systems. Please read
through this manual before installation so as to operate properly.
The intelligent alarm system adopts the newest GSM network and Digital
Signal Processing technology, and is widely used in security fields, such as
protect your home, store, office, factory etc. It really realizes wireless alarm
dealing and controlling remotely, conveniently and flexible, and solves the
limitation of wired data transmission in telephone and wired network.
Perfect structure, convenient installation, easy operation with wireless
remote controllers are designed for the idea of people-oriented, which will
make you feel easy and comfortable while using this intelligent alarm
system.
“People is center, technology is first” is our company’s action rule.
Customer Satisfaction is our consistent pursuit. Perfect system, excellent
services, sincere attitudes will bring you a new enjoyment.
Contents
1.
.Description .
.
.
.
.
.
.
.
.
.
.
.
.
.
.
.
.
.
.
.
.
.
.
.
.
.
.
.
.
.
.
.
.
.
.
.
.1
1.1 Main functions.
.
.
.
.
.
.
.
.
.
.
.
.
.
.
.
.
.
.
.
.
.
.
.
.
.
.
.
.
.
.
.
.
.1
1.2 Specification.
.
.
.
.
..
.
.
.
.
.
.
.
.
.
.
.
.
.
.
.
.
.
.
.
.
.
.
.
.
.
.
.2
2.
.Structure.
.
.
.
.
.
.
.
..
.
.
.
.
.
.
.
.
.
.
.
.
.
.
.
.
.
.
.
.
.
.
.
.
.
.
.
.
.
.3
3.
.Installation and Operation.
.
.
.
.
.
.
.
.
.
.
.
.
.
..
.
.
.
.
.
.
.
.
.
.
.6
3.1. Installing the SIM card.
.
.
.
.
.
.
.
.
.
.
.
.
.
.
.
.
.
.
.
.
.
.
.
.
.
.6
3.2 The connection of wired detectors and speaker.
.
.
.
.
.
.
.
.6
3.3 Running.
.
.
.
.
.
.
.
.
..
.
.
.
.
.
.
.
.
.
.
.
.
.
.
.
.
.
.
.
.
.
.
.
.
.
.
.
.7
4. Pre-record alarming voice.
.
.
.
.
.
.
.
.
.
.
.
.
.
.
..
.
.
.
.
.
.
.
.
.
.
.7
5. Programming by keyboard.
.
.
.
.
.
.
.
.
.
.
.
.
.
.
.
.
.
.
.
.
.
.
.
.
.8
5.1. Entering into setting status.
.
.
.
.
.
.
.
.
.
.
.
.
.
.
.
.
.
.
.
.
.
.8
5.2. Programming mobile phone numbers for SMS alarm.
.
.8
5.3. Programming phone numbers for voice calling alarm.
.
.9
5.4. Modifying the password of alarm host.
.
.
.
.
..
.
.
.
.
.
.
.
.9
.9
5.5. Modifying alarm host ID.
.
.
.
.
.
.
.
.
.
.
.
.
.
.
...........
5.6.Whether send SMS or not when arm/disarm....
.
.
.
...........10
5.7. Exiting setting status............................
..
.
.
.
..
..
.
.10
6.
.Programming by SMS command.................................10
6.1. Programming 3 mobile phone numbers for SMS alarm...
.
...10
6.2. Programming 3 phone numbers for voice calling alarm...
..
..
.11
6.3. Deleting alarm phone numbers.............
.
......11
6.4. Modifying the password of alarm host.........
.
.
.
.
.
.
..
..
.
.11
6.5. Arm/Disarm...............................................11
.
.
.
.
..
..
..
..
..
..
.12
6.6. Modifying zones name...................
6.7. Modifying installation address name.................
.
..
..
.
.12
6.8. Inquiring arm/disarm status..........
.
.
.
.
.
...
..
..
..
..
..
..
.
.12
6.9. Inquiring AC power status of alarm host....
.
....
.
.........12
.
...
..
..
..
..
.
.13
6.10. Switching over four languages................
.
.
..
.
.
..
..
..
.13
6.11.Programming independent arm...............
6.12.Cancel independent arm....................................13
7. Programming by phone keypad remotely.........................14
8. Operating steps..................................................15
8.1.Arm/disarm by remote controller.............................15
8.2.Emergency alarm...........................................15
8.3.AC power failure alarm......................................15
8.4. Handling alarm.............................................16
8.5.Arm/disarm and listen in remotely...........................16
9. Installation and operation cautions...............................17
10.Encode method..................................................18
1. Description
The alarm system adopts SMS data transmission and voice platform of
GSM network to send control command and receive alarm message
remotely. The system can be armed according to user’s requirements, when
a signal is detected by sensors, the sensors will send alarm signal to alarm
host immediately, then the alarm host will send alarm SMS to pre-set
mobile phone numbers, and meanwhile dials its preset telephone/mobile
phone numbers automatically. In addition, user can dial the number in the
alarm host to remote control the host, such as arm, disarm etc.
1.1 Main functions
Whether send SMS or not when arm/disarm;
Arm/disarm remotely by phone keypad;
Automatically send SMS to 3 preset phone numbers while alarming;
Automatically call 3 preset phone numbers and start on-site listen in
while alarming;
Real-time report the alarm zone remotely by SMS and voice
reminding;
With user-friendly voice reminder while operating the alarm host;
Support two-way communications;
Built-in dedicated emergency alarm zone and fire alarm zone;
Automatically report while the AC power failed or recovered and
switch to backup battery when the external power failure;
Built-in 12 wireless alarm zones ( including 1 emergency zone and
1fire alarm zone), and 2 wired zones (with anti-cut function);
1.2 Specification
1. Wireless frequency: 315MHz/433MHz;
2. GSM frequency: 900/1800MHz(standard), 850/1900MHz (optional)
3. Alarm response time: ≤8s (GSM signal in normal)
4. Power requirements: AC 220V 50Hz/60Hz
Working consumption:< 0.6W
Backup battery: DC7.4V/850MA
Backup battery working hours: ≥10 hours
5.Working condition
temperature: -20~+60℃
humidity: ≤95% (non-condensation)
6.Size: 150mm(L)×100mm(W)×16mm(H)
7. Record time: 10s
2.
.Structure
As shown above:
1. Emergency button: used for emergency alarm
2. WIRLESS LED indicator: when receiving wireless signal from wireless
sensor or remote controller, the LED will be on, otherwise is off.
3. RUN LED indicator: blinking every 2s when the GSM signal is normal,
when the GSM signal is failure it blinks every 1s.
4. ALARM LED indicator: When there is an alarm or entering into setting
status, it will be on; when there is no alarm or escaping the setting status, it
will be off.
5. Independent arm LED indicator: When there is one zone in the
independent arm status, the LED is on.
6. ARM LED indicator: After system armed, it will be on; it will be off
when disarm.
7. Power LED indicator: External AC power is connected, the LED is
on; external AC power is failure, the LED is off.
Shown as above:
1. Fixing hole: Use for fixing the alarm host;
2. Power switch: Switch to right is on, Switch to left is off.
Shown as above:
1、SIM card socket
2、Learning button
3、Recording button
4、Setting button
5、Siren socket
6、Power supply socket
Shown as above:
1、Recording MIC
2、Listen in MIC
3. Installation and operation
3.1、
、Installing the SIM card
The alarm host transmits alarm information by GSM SMS & voice
platform, so you should prepare a SIM card before the installation. (If
you use a new SIM card, you should check the new SIM card carefully
whether it can send SMS and make calls normally or not.)
Notes: Please turn off the power before insert SIM card and make sure
the direction is correct.
3.2 The connection of wired detectors and speaker
The alarm host is configured with 2 wired alarm zones and
two-way communication functions (both wired alarm zone with
anti-cut function.)
The wiring method is as following:
1)After open the host case with screwdriver, you will see 6 wires inside the
host. Shown as below:
Of which:
Red wire: anode of the intercom speaker; black wire: the cathode of
the intercom speaker.
Both yellow wires are for wired zone 1;
Both green wires are for wired zone 2;
2)Draw out these wires of wired detectors & intercom speakers from
the back of the alarm host (shown as following:
3.3、
、Start the alarm host
Make sure the power supply well connection, switch on the
power; you will see that the ALARM indicator light, ARM indicator
light, POWER indicator light keep brightening, the RUN indicator
light is blinking. After 25s, the host gets into initialization & gets into
the status of GSM network searching, after that it will make two “di
di” beep sounds for confirmation, then the alarm system get into
normally working. At this moment, the Alarm indicator light and arm
indicator light will be off, the RUN indicator light will blink 2s/time.
Notes:
If the RUN indicator light keeps brightening or keeps light off, it
means that the alarm host has searched the GSM faults automatically.
4. Record alarm voice message
Press “REC” button, during the host working status, the host will make
“di ” sound, then it begins to 10 seconds record. It will make “di, di ”
sounds after finishing the recording. If you’ve connected the intercom
speaker before, the host will broadcast your recorded message
automatically.
Note: Message should be brief. For example: “This is No. xx, building xx
district xx. Please help, there is illegal intrusion in the house.”
5. Program the host by wireless control keypad
5.
.1. Get into setting status
During the host’s running status, press “set” button, it will make two di di
beep sounds, at the meanwhile the ALARM LED is on. It means the host
enters into the setting status. Then you can start to program the alarm
numbers.
Note: When setting by the keypad, every time you press the button you
will hear “di” sounds for confirmation, if there’s no voice you can press
the button again.
You can press this button “*” (before pressing the button “#”) to cancel
the numbers that you have already input.
5.2 Program SMS alarm numbers for receiving SMS alarm message
a. In setting status, operate the keyboard as below
Input: Serial number + mobile phone number + #
Example: set 13688888888 as the first SMS alarm phone number.
Input 113688888888#, then you will hear “di, di ”sounds for confirmation.
Repeat the process to set the other two mobile phone numbers.
Note: serial number can only be 1,2,3 and the number “1” is the first SMS
alarm phone number, the rest may be deduced by analogy.
Delete SMS alarm mobile phone numbers
Input: serial number + #, then can cancel the phone numbers.
Note: We suggest you setting the first SMS alarm mobile phone
number because that if you did not set the first sms alarm number; you
will be unable to know whether all of the contents of the setting are
right or not.
5.3 Programming phone numbers for voice calling alarm
In setting status, input: Serial number + phone number + #
Example: Program phone number 13688888888 as the first voice calling
number. Input 413688888888#, then you will hear “di, di ”sounds for
confirmation.
Repeat the process to set the other two phone numbers.
Note: serial number can only be 4, 5, 6 and the number “4” is the first
phone number for call alarm, the rest may be deduced by analogy. Phone
number can be telephone or mobile.
Delete phone numbers for voice calling alarm.
Input: serial number + #, then can cancel the phone numbers.
5.4 Modifying the password of alarm host
The factory default password is 1234. The password must be four digits.
In setting status, then input “7 + new password + #” by wireless keypad,
you will hear click sounds for confirmation.
Example: set 4321 as new password, then you can input: 7+4321+#, you
will hear two “di di ” confirmation sounds after setting successfully.
5.5 Modifying the alarm host ID
The factory default ID is 000000. The serial number must be six digits.
In setting status, then input 0 + six digits of new ID + #, the host will make
a sound as “di, di” to confirm the input.
Example: set 123456 as a new ID, then input: 0123456 #, after setting
successfully, you will here two di di confirmation sounds.
5.6 Whether send SMS or not when arm/disarm
When operate the host by remote controller, if you want to let host send
“arm/disarm” SMS to mobile phone, please follow up the steps as below. In
setting status, input “9 + # ” on wireless keyboard, then you will hear “di, di ”
sound for confirmation.
Repeat the operation, you can cancel this function.
5.7 Exit setting status, you will receive a setting message
After successfully setting, if you don’t’ press any button on wireless keypad
for 15s, the alarm host will automatically exit setting status. At this moment,
alarm indicator light will be off, and it will make two “di di ” beep sounds,
then the alarm host will send out a setting message to the first SMS alarm
number.
6. Programming by SMS Command
6.1 Programming 3 mobile phone numbers for SMS alarm
Input SMS: 4 digits password + DD + serial number + SMS alarm phone
number, then send to alarm host.
Example: The host’s password is 1234; set 13888888888 as the first SMS
alarm phone number.
Send SMS to alarm host: 1234DD113888888888
You will receive a setting message after successfully setting the SMS alarm
mobile number.
Note: The serial number shows alarm sequence (must be 1, 2, 3)
6.2 Programming 3 phone numbers for voice calling alarm
Input SMS: 4 digits password + DD + serial number + call alarm phone
number
Example: The host’s password is 1234; set 01088888888 as the first call
alarm phone number.
Send SMS: 1234DD401088888888
Note: The serial number shows alarm sequence (must be 4, 5, 6)
6.3 Delete alarm phone numbers
Input SMS: 4 digits password + DD + serial number
Example: The host’s password is 1234. If you want to delete the first alarm
phone number,
Send SMS: 1234DD1
Note: The serial number shows alarm sequence (must be 1, 2, 3, 4, 5, 6)
6.4 Change host’s password
Input SMS: 4 digits password + DD + 7 + 4 digits new password
Example: The host’s original password is 1234. If you want to set 5678 as
new password
Send SMS: 1234DD75678
After setting successfully, the new password will be sent to the first SMS
alarm phone number.
6.5 Arm/Disarm command
Arm by SMS: 4 digits password + A1
Disarm by SMS: 4 digits password + A2
Example: The host’s password is 1234. If you want to set the host in arm
mode remotely control, then you may send one SMS: 1234A1.
6.6 Change Zone’s name
Input SMS: 4 digits password + DM + zone’s code (2 digits) + New zone’s
name
Return SMS: New zone’s name.
Example: The host’s password is 1234. If you want to change zone 06’s
name into Our bedroom PIR Alarm.
Send SMS: 1234DM06Our bedroom PIR Alarm.
Note: Changed name should be less than 24 characters.
Zone’s code in 2 digits: 01 to 11, of which 11 is the emergency zone, and 12
is default as fire alarm zone
6.7 Modify the name of the installation address
Input SMS: “4 digits password”+ “DM00”+ “user defined name”
After modifying successfully, the modified name will be sent to the preset 3
SMS alarm mobile phone numbers.
6.8 Inquire host’s arm/disarm status
Send SMS: 4 digits password + W1
Return SMS: The host’s arm/disarm status
6.9 Inquire host’s external power status.
Input SMS: 4 digits password + W2
Return SMS: host’s external power status
6.10 4 Languages Switchover
Input SMS: “4 digits password” + “LG”+ “series number”
Notes: Series number stands for 1.2.3.4, of which 1 stands for English, 2
stands for Chinese, 3 stands for Russian, 4 stands for Spanish
After setting successfully, you will get 3 SMS reply for switching to related
language.
6.11 Independent arm
When the independent zone in independent arm status, only SMS command
can control the independent zone, doesn’t accept any other modes control.
Set alarm zone as the independent zone, input SMS: “4 digits password” +
“AA”+” zone series number”
Notes: “zone series number” stands for 10 zones (from zone 01 to zone10),
it’s allow to set multi-zones as independent zones.
Example: If you want to set zone 1, zone 3, and zone 4 as independent
zones, the host password is 1234, then you can send a SMS to alarm host,
input SMS: 1234AA01, 03, 04
Notes: Between each zone, you must use a comma “ , ” for separating.
SMS reply: the status of each zone, of which “A” stands for the zone has
been in status of independent zone.
6.12 Cancel independent arm
When the independent zone in the independent arm status, only SMS
command can control the independent zone, doesn’t accept any other modes
control. So we can use SMS to cancel the independent arm, SMS input:
“4 digits password” +”AD” + “Zone series number”
Notes: The zone series number stands for 10 zones (from zone01 to zone
10), you can cancel multi-independent zones one time.
Example: If you want to cancel independent zone 1, zone 3, zone 4, the
password is 1234, then you may send SMS to alarm host: 1234AD01,03,04
Please remember that you should use a comma “,” for separating each zone.
7. Remote control alarm host by phone
You can use any telephone or mobile phone to dial the phone number of the
host, the host will automatically get through after 15 seconds detecting and
remind you of inputting password with voice. If the entered password is
wrong for 3 times, the host will hand up the phone automatically; if the
entering password is correct, you will hear voice reminder, “Press one arm,
press two disarm”. Meanwhile, remote monitoring will run automatically.
Press “*”, you will hear “ di, di” sounds from host to indicate it entered into
setting Status, then you can continue the following steps
Note: Every time when you press the phone keyboard, the host will
make click sounds. If not, this means your operation is unsuccessful,
you should press it again.
You can press “*” to cancel the numbers which you have already
inputted (before press “#”).
(1). Program mobile phone numbers for SMS alarm
(2). Program mobile phone or telephone numbers for alarm call
(3). Modify password of the host
(4). Modify new ID of the host
(5). Set alarm host whether reply “arm or disarm” SMS or not
(6). Choose open/close alarm of hardwire zone contact
(7). Exit setting status of the host
The setting steps by phone are the same as by wireless keyboard. Please do
as corresponding operation method by wireless keyboard.
8. Usage
8.1 Arm/disarmed by remote controller
a. Press the button “ ” on the remote controller, the host makes “di” sound
and the LOCAL LED and REMOTE LED are twinkling. 30 seconds later
the host enters into arm mode and the LOCAL LED and REMOTE LED are
on.
When the LOCAL LED and REMOTE LED are twinkling, you can press
the button “ ” to enter into arm status quickly.
b. Press the button “ ” can disarm, the host make “di,di” sound, and
LOCAL LED and REMOTE LED are off.
8.2 Emergency alarm function
When an emergency alarm occurs, press the button “ ” or the panic
button on the alarm host, then the alarm host will get into emergency
alarm mode immediately, then it will automatically start the siren for 90
seconds to inform the neighbors. At the same time, the system will
automatically dial the pre-set phone numbers cycled for three times and
send the SMS of “Emergency alarm”.
8.3 External power failure alarm
When the system checks out that there’s something wrong with the external
power or the external power is off for more than 2 seconds, it will enter into
alarm status immediately. At the same time, the system will automatically
dial the pre-defined phone numbers cycled for three times and send the
SMS of “External power failed”.
When the power supply restored to normal, the system will stop alarming
immediately and send the SMS of “External power OK”.
8.4 Alarm Handling
When an alarm occurs, the system will start siren for 90 seconds to inform
the neighbors. At the same time, the system will automatically send SMS to
report the guarding zones and dial the pre-set phone numbers. When any
phone is answered, the system will playback the pre-recorded voice and get
into monitoring the sound at site. At this moment, the user presses the
phone keypad:
“1”-------------------armed
“2”-------------------disarmed
“3”-------------------start the Siren remotely
“4”……………….Switch off siren
If the phone line is busy or can’t get through, the system will auto-dial the
next phone number circularly till the one of them is answered. If nobody
answers the phone, the system will stop dialing after auto-dialing circularly
for three times.
Note: When you are monitoring the voice at site, the host is still on the arm
mode. If any detectors are triggered, the host will broadcast the zone
numbers to you.
8.5 Remote arm, disarm and monitor at site
You can use any telephone or mobile phone to dial the phone number of the
host, the host will automatically get through after 15 seconds detecting and
remind you of inputting password with voice. If the entered password is
wrong for 3 times, the host will hand up the phone automatically; if the
entering password is right, you will hear sounds: “Press one arm, press two
disarm”. Meanwhile, remote monitoring will run automatically. Then press
phone keypad:
“1”-------------------- armed
“2”-------------------- disarmed
“3”--------------------start siren
“4”………………..Switch off siren
“*”………………..the host gets into setting mode.
If the user hand up the phone, the host will automatically terminate the
operation.
Wireless address code from
Name
D0(13)
D1(12)
D2(11)
A0 to A7(1~8)
9. Operation Cautions
1. Make sure the equipments have no water.
2. Install the system in a hidden place, but normal GSM network.
3. Turn off the power supply before insert/take out the SIM card.
4. Have a hard connection to the main power supply and provide
good heat dissipation.
5. Don’t install the system close to the objects which generate strong
interference, such as TV set and computer.
6. Check all the detectors and their battery in time and change them
when power is low.
7. Inspect the GSM alarm system timely
8. This product is designed for the indoor use rather than outdoor
use.
10. The method for encoding wireless detectors & remote controllers.
D3(10)
Series number from right to
Alarm host
left
NC
NC
NC
NC
NC
NC
NC
NC
A0~A7
1. PIR
Zone 01
1
0
1
0
Motion
Zone 02
0
1
1
0
Zone 03
1
1
1
0
Zone 04
1
0
0
1
0
1
0
1
1
1
0
1
0
0
1
1
sensor
2.Magnetic
contact
Zone 05
The series numbers from
A0 to A7
3.Beam
Zone 06
should be matched the
detectors
Zone 07
alarm host one by one
4.Smoke
Zone 08
1
0
1
1
detecotrs
Zone 09
0
1
1
1
Zone 10
1
1
1
1
Panic button
0
0
1
0
Fire zone
1
1
0
0
Remark: A0~A7 & D0~D3 use jumpers or tin soldering for connecting the pins.
Connect N & H stands for “1”, Connect N & L stands for “ O”, no connection stands for “2”