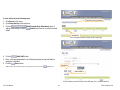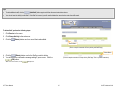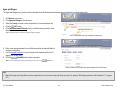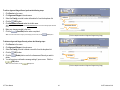
1
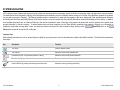
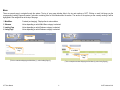
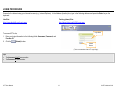
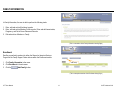
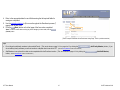
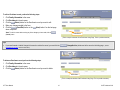
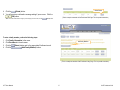
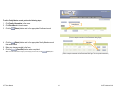
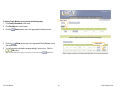
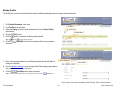
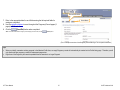
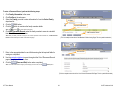
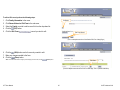
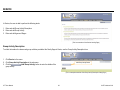
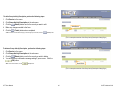
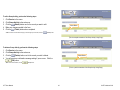
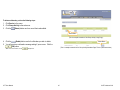
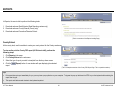
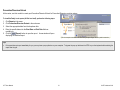
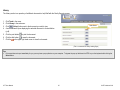
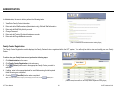
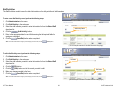
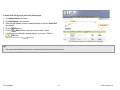
USER MANUAL
VERSION 1.5
September 2010
Ph: 888.600.4777
Fax: 412.366.7199
[email protected]
KIT Solutions®, LLC
5700 Corporate Dr
Suite 530
Pittsburgh, PA 15237
TABLE OF CONTENTS
Tips for Using the System Effectively.................................................................................................................................................................................................................. 4
Recommended Computer Settings................................................................................................................................................................................................................. 4
System Navigating .............................................................................................................................................................................................................................................. 5
Menu .............................................................................................................................................................................................................................................................. 6
Landing Pages ........................................................................................................................................................................................................................................... 8
Listing Pages.............................................................................................................................................................................................................................................. 9
Edit Forms.................................................................................................................................................................................................................................................. 9
Data Fields & Buttons................................................................................................................................................................................................................................... 10
Data Fields & Buttons................................................................................................................................................................................................................................... 10
Required Fields ........................................................................................................................................................................................................................................ 10
Edit Form Buttons......................................................................................................................................................................................................................................... 11
Additional Application Buttons ...................................................................................................................................................................................................................... 12
Page Level Features .................................................................................................................................................................................................................................... 12
Login Procedure................................................................................................................................................................................................................................................ 13
Family Information ............................................................................................................................................................................................................................................ 14
Enrollment .................................................................................................................................................................................................................................................... 14
Member Profiles ........................................................................................................................................................................................................................................... 25
General/Intensive Exit Form ......................................................................................................................................................................................................................... 33
Planning............................................................................................................................................................................................................................................................ 37
Service.............................................................................................................................................................................................................................................................. 38
Group Activity Description ............................................................................................................................................................................................................................ 38
Group Activity ............................................................................................................................................................................................................................................... 41
Ages and Stages .......................................................................................................................................................................................................................................... 48
Reports ............................................................................................................................................................................................................................................................. 50
Reports ............................................................................................................................................................................................................................................................. 50
County Extract .............................................................................................................................................................................................................................................. 50
Prevention/Diversion Extract ........................................................................................................................................................................................................................ 51
State Extracts ............................................................................................................................................................................................................................................... 52
Tools ................................................................................................................................................................................................................................................................. 53
Tools ................................................................................................................................................................................................................................................................. 53
Web Resources ............................................................................................................................................................................................................................................ 53
Library .......................................................................................................................................................................................................................................................... 55
Administration ................................................................................................................................................................................................................................................... 56
Family Center Registration ........................................................................................................................................................................................................................... 56
LIFT User Manual
2
© KIT Solutions® 2010
Staff Registration .......................................................................................................................................................................................................................................... 57
Staff Activities............................................................................................................................................................................................................................................... 58
Change Password ........................................................................................................................................................................................................................................ 60
Training/Technical Assistance ...................................................................................................................................................................................................................... 61
Progress/Barriers.......................................................................................................................................................................................................................................... 63
Lift Support ....................................................................................................................................................................................................................................................... 65
Appendix........................................................................................................................................................................................................................................................... 66
Permission Levels ........................................................................................................................................................................................................................................ 66
Organization Levels...................................................................................................................................................................................................................................... 66
Using the Reports Viewer............................................................................................................................................................................................................................. 67
LIFT User Manual
3
© KIT Solutions® 2010
TIPS FOR USING THE SYSTEM EFFECTIVELY
Recommended Computer Settings
Screen Resolution
You will get the best screen layout if you set your PC monitor settings to 1024 X 768 pixels or larger. If your screen resolution is smaller (i.e., 800 X 600 pixels), everything
on the screen will appear larger. But, if you use 800 X 600 pixels, you will have to scroll more both up & down and left & right to access all the data fields.
To change your PC monitor settings, right click on the Desktop background and select Properties. Next, click on the Settings tab and move the Screen Resolution scroll bar
to the right (towards “more”) to select 1024 X 768 resolution. Click the OK button at the bottom of the window to make the change effective.
*Note: These instructions may not work if you are using a MAC.
Web Browser
The web browser supported by LIFT is Microsoft Internet Explorer (IE). Mozilla Firefox, Netscape, Safari and other browsers may not be supported by LIFT. They may
function but not to design specifications. We recommend users have the latest version of IE installed on their computer along with the updates provided by Microsoft (which
are released periodically).
Pop-Up Blocker
Modern computer security technology and usability features development have lead to pop-up blocking. Although this new feature of internet browsers, toolbars, and other
3rd party managing software blocks hazardous and annoying pop-ups, sites like LIFT require pop-ups to be able to function. If your pop-up blocker is enabled, there is a
possibility that LIFT may not function or appear properly. You should either disable the pop-up blocker while using LIFT (while remembering to enable it, if desired, when
not in LIFT) or create exceptions for the pop-up blocker. This is cumbersome, but may be easier than making exceptions to the pop-up blocker.
To create exceptions for the pop-up blocker, open your Internet Explorer browser window. Once the browser is open, click the top toolbar option “Tools” and then go to
“Internet Options”. After the “Internet Options” window is available, you will want to click on the “Privacy” tab at the top of the window. You will notice while on the “Privacy”
tab, at the bottom will be a section on Pop-Up Blockers. If your “Block Pop-Ups” checkbox is checked then click on the “Settings” button. You can now add the LIFT link to
the “Allowed Sites” list which the pop-up blocker will ignore when trying to block pop-ups from LIFT.
LIFT User Manual
4
© KIT Solutions® 2010
SYSTEM NAVIGATING
LIFT is set up in such a fashion that moving from top to bottom of each page and in some cases, section to section on the menu, is the only approach to using the system.
You must start at Family Information, filling in all the information that is required to save for Enrollment, before moving on to Profiles. Once these two modules are complete,
you are able to move on to Planning. The Planning modules must be completed in the order that they appear on the menu, starting with Goal Area Benchmark Summary
and ending with Goal Plan and Activity Record. In the Service section, you must complete the Group Activity Description module before adding a Group Activity. In addition,
some modules have two forms, an initial and follow up, that must be completed in order. Continuing in this manner will ensure that all of the sections of the system have
enough information to function correctly. If certain sections have not been completed, you will have difficulty completing other sections. Although your information is
temporarily saved when moving within a form, you must save before moving onto the next module by either clicking on the
(Next) button located at the top left of the edit page.
(Save/Exit) button or the
Computer Keys
While entering information into a form, several keys are helpful for moving the cursor from one information box (called a data field) to another. The table below summarizes
those keys:
Key
Description
Function
The Cursor
Points to desired location
The TAB key
Moves the cursor to the next data field
Hold down the SHIFT key and then press the TAB key
Moves the cursor to the previous data field
The Control (Ctrl) key
Enables blocked material to open (due to pop-up blocker)
Use the MOUSE by pointing and clicking to move the cursor
Moves the cursor by pointing and clicking
LIFT User Manual
5
© KIT Solutions® 2010
Menu
There are several ways to navigate through the system. The top of every page includes links to the six main sections of LIFT. Clicking on each link brings you the
corresponding Landing Page and creates a sub-menu containing links for the modules within the section. The section of the system you are currently working in will be
highlighted in the navigation bar at the top of the page.
1. Main Menu
2. Submenu
3. Landing Page
4. Listing Page
Constant (unchanging). Displays the six main modules.
Varies depending on which Main Menu category is selected.
Varies depending on which Submenu category is selected.
Varies depending on which Submenu category is selected.
1. Main Menu
3. Landing
Page
2. Sub Menu
4. Listing
Page
(This is a screenshot displaying the Main Menu (1), and a Landing Page (3))
LIFT User Manual
(This is a sample screenshot displaying the Sub Menu (2) and a Listing Page (4))
6
© KIT Solutions® 2010
User currently
logged in
Above the Main Menu provides links to
Link to Home
page
of the system or back to the home
Logout button
page by clicking on
in the upper left corner. The user currently logged
into LIFT is also displayed to the left of the links.
LIFT User Manual
7
© KIT Solutions® 2010
Landing Pages
The Landing Page is the main page of each of the seven sections (Home, Family
Information, Planning, Service, Reports, Tools, and Administration) of LIFT. No data
is entered on the Landing Page. The Landing Page contains the links for each
module. An example of a Landing Page is found below.
(This is a screenshot displaying a Landing Page.)
LIFT User Manual
8
© KIT Solutions® 2010
Listing Pages
The Listing Page is the main page of each module within Family Information, Planning, Service, and Administration. The Listing Page contains either all data that has been
entered for the module or a portion of the data that has been entered with links to view/edit the previously recorded data in its entirety. In addition, the Listing Page includes
the link(s) to the edit page(s). No data is entered on the Listing Page.
Data View:
The Data View displays the saved data in tables. Multiple data is entered and saved
when a Data View Listing Page is available. (See the 3. Edit Form section for details on the
Add Button
Edit Form.)
•
•
Most Listing Pages include an
(Add) button or link which takes you to
the Edit Form and allows you to add a new record. Once records have been
added, they will then be displayed in a table (or grid) and identified by a portion
of the data that had been entered.
The user has the ability to view and/or edit individual records by clicking the
(Select) button next to the appropriate record name in the table.
Select Button
(This is a sample screenshot displaying a “Data View” Listing Page.)
Edit Forms
The Edit Form contains the fields for entering and editing data. The buttons for
saving, canceling, deleting, printing, and in some cases, adding and editing, are
available at the top right of the page. (See the Data Fields and Button section for additional
details on the function of these buttons.)
•
•
If you clicked the
(Add) button to enter new information into a form, the
Edit Form data fields will be blank.
When selecting the
(Select) button to view existing data, the Edit form data
fields will display the data entered/selected previously. These fields may be
modified, if needed.
(This is a sample screenshot displaying the Edit Form. This is a partial screenshot.)
LIFT User Manual
9
© KIT Solutions® 2010
Data Fields & Buttons
In LIFT there are several fields, boxes and buttons that are used to collect, store and organize data. Here are some examples:
Type
Preview / Description
Text Field
(aka ‘Text Box’)
Drop Down Menu
(aka ‘Pull Down Menu’)
Radio Button
Check Boxes
(fill in the blank)
(select one)
Selected
Selected
Not Selected
Not Selected
Entering data into LIFT can be made easier by using the “Tab” key on the keyboard. The tab key advances the cursor to the next data field. You can go from the current
field to the previous field by holding “Shift” and pressing “Tab” (Shift+Tab). You can also navigate through the fields by using the mouse.
Required Fields
There are two types of required fields: 1) Fields required for the form to be saved; and 2) Fields required to gain a “Complete” status for the form.
1) Fields required for the form to be saved
Required fields to save are marked with a check mark and shaded purple (e.g.,
). All required fields to save must be completed or you will
not be able to save the data entered for the module you are working in. If you try to save before completing all of the required fields to save, you will receive a message that
informs you of the field(s) vacant of data and you will not be able to save that form until the field(s) has data.
Note: If the State Reporting Required check box is checked on the first page of the Enrollment form, the fields required to save will change throughout the system.
2) Fields required gaining a “Complete” status for the form.
Fields required to “complete” the form are marked with an asterisk and shaded yellow (e.g.,
). These fields do not affect your ability to save but are
necessary to gain a status of “Complete” for the form. Forms will be considered “Incomplete” until all of these types of required fields are filled. The status of each form will
be displayed on the listing page.
LIFT User Manual
10
© KIT Solutions® 2010
Edit Form Buttons
Information is entered and edited through the Edit Forms (For additional details on Edit Forms, see the Edit Forms section). The table below summarizes the buttons used
to enter/edit information in an Edit Form. Special buttons are provided to move within edit pages when needed. In such cases, they are found at the top-left side of the
page and allow the user to either move to the Next page or move to the Previous page. In addition to these navigation buttons, a Save and Exit button will appear on all
pages with the exception of the final page to allow you to save your current work and exit the form. The Finish button will appear when you are on the last page of the
form. When you have completed the form, click on the Finish button and it will take you to the listing page of the section you are working in. Examples of these buttons are
found below.
Must be clicked first to add new family to an Edit Form
Must be clicked first to add new family members to a family in an Edit Form
Must be clicked to edit a record
Must be clicked to access the previous or next page of a form
Removes information from the application database
Cancels the Add or Edit without saving information entered
Adds the information entered on an Edit Form to the application database
LIFT User Manual
11
© KIT Solutions® 2010
Additional Application Buttons
Below are some additional buttons that may appear within a form.
Reviews the MCI database to find an existing record
and
Allows the Search option to appear where the user can search by Family and Family ID.
Clicking “Go” searches the application database for existing data
Allows the user to hide and/or clear the Search function
Archives a family for history purposes and to track changes in family information
Reenrolls a family that has been exited
Page Level Features
Every page in the LIFT system includes a Help and Tip box. The Help box contains the links for the FAQ page and the Technical Support page. The Tip box displays the
rules for fields required to save and required to complete.
If you would like to hide these and view the entire page, click on the toggle help link. To unhide the page level features, click the link again. Your viewing preference will be
remembered throughout the system and from session to session.
LIFT User Manual
12
© KIT Solutions® 2010
LOGIN PROCEDURE
Connect to the Internet using your Internet browser (e.g., Internet Explorer). In the Address (location) box, type in the following address and press the Enter key on the
keyboard:
Live Site:
https://www.familylift.com/Login.aspx
Training (demo) Site:
http://demo.kithost.net/Lift30/Login.aspx
Login fields
To access LIFT’s site,
1. Enter your login information in the following fields: Username, Password, and
Provider ID.
2. Click the
(Submit) button.
Submit
Button
(This is a screenshot of the LIFT Login Page.)
Tips
•
The Username IS NOT case sensitive.
•
The Password IS case sensitive.
LIFT User Manual
13
© KIT Solutions® 2010
FAMILY INFORMATION
In Family Information, the user is able to perform the following tasks:
1. Enter, edit and archive Enrollment records.
2. Enter, edit and archive Member Profile records. Enter and edit Immunization,
Pregnancy, and Out-of-Home Placement Records
3. Exit and archive a Member or Family
(This is a screenshot of the Family Information Landing Page.)
Enrollment
Enrolling a new family member into either the General or Intensive Services
Program of the Family Support Center is done within the Enrollment module.
1. Click Family Information in the menu.
2. Click Enrollment in the sub-menu.
3. Click the
(Add Family) button.
Add Family
(This is a sample screenshot of the Enrollment Listing Page.)
LIFT User Manual
14
© KIT Solutions® 2010
4. Enter in the appropriate data for each field ensuring that all required fields for
saving are completed.
5. Use the navigation buttons (p.9) to move throughout the Enrollment process (7
pages) to fill in each form.
6. Click the
(Next) button on the final page of the form when completed.
Navigation Buttons
*Note: To exit this screen without saving any of the changes you have made, click the
(Cancel) button.
(This is a sample screenshot of the Enrollment Listing Page. This is a partial screenshot.)
Tips
•
Do not forget to add family members to the enrolled Family. (This can be done on page 2 of 4 or page 4 of 4 by clicking the
do not add any family members you will not be able to complete other forms within LIFT. (See the Family Member section for instructions.)
•
Staff Members is an optional form that can be completed within the Enrollment section. (This can be done on page 4 of 4 by clicking the
button). (See the Staff Member section for instructions.)
LIFT User Manual
15
(Add Family Member) button.) If you
(Add Staff Member)
© KIT Solutions® 2010
To edit an Enrollment record, perform the following steps:
1.
2.
3.
4.
5.
Click Family Information in the menu.
Click Enrollment in the sub-menu.
Click the
(Select) button for the Enrollment record you want to edit.
Make any changes needed to the form.
Click the
(Save/Exit) button or the
(Next) button if on the last page
when completed.
*Note: To exit this screen without saving any of the changes you have made, click the
(Cancel) button.
Select Button
(This is a sample screenshot of the Enrollment Listing Page. This is a partial screenshot.)
Tips
•
If you need to make a “status” change to the record or archive the record, you must click the
Change/Archive a Family section for instructions.)
(Change/Archive) button next to the record on the listing page. (See the
To delete an Enrollment record, perform the following steps:
1. Click Family Information in the menu.
2. Click Enrollment in the sub-menu.
(Select) button for the Enrollment record you want to delete.
3. Click the
Select Button
(This is a sample screenshot of the Enrollment Listing Page. This is a partial screenshot.)
LIFT User Manual
16
© KIT Solutions® 2010
Delete Button
4. Click the
(Delete) button.
5. You will receive a confirmation message asking if you are sure. Click the
(OK) button.
*Note: To exit this screen without saving any of the changes you have made, click the
(This is a sample screenshot of the Enrollment Edit Page. This is a partial screenshot.)
(Cancel) button.
To enter a family member, perform the following steps:
1.
2.
3.
4.
Click Family Information in the menu.
Click Enrollment in the sub-menu.
Click the
(Select) button next to the appropriate Enrollment record.
(Add Family Member) button.
Click the
Add family Member
(This is a sample screenshot of the Enrollment Listing Page. This is a partial screenshot.)
LIFT User Manual
17
© KIT Solutions® 2010
5. Enter or select the First Name, Last Name, Date of Birth, and Sex of the
family member from the appropriate fields.
6. Click the
(Search) button to verify that the family member is unique.
*Note: Entering the First Name, Last Name, Date of Birth, and Sex of the family member will produce the most likely
match.
a. If a family member is unique, a message indicating that No record was
found in the MCI database will appear. Click the
(OK)
button.
b. If there are potential matches based on the data entered in the initial
fields (First Name, Last Name, Date of Birth, and Sex of the family member), a
data grid with each potential match will appear. Verify a match with an
existing client in the MCI database by clicking the Select button next to
the client’s record.
7. Enter in the appropriate data for each field ensuring that all required fields for
saving are completed.
8. Click the
(Save/Exit) button when the form is completed.
*Note: To exit this screen without saving any of the changes you have made, click the
Search Button
(Cancel) button.
(This is a screenshot of the Add a Family Member Edit Page. This is a partial screenshot.)
Tips
•
•
If No record was found in the MCI database, once Save is selected the new family member will be added to the Family Member data grid and while assigning the family member a
unique MCI ID and inserting him/her into the MCI database.
If Potential matches are listed but it is determined that none of the potential matches is the family member you are trying to add , try to correct the family member data and retry the
Search.
LIFT User Manual
18
© KIT Solutions® 2010
To edit a Family Member record, perform the following steps:
1. Click Family Information in the menu.
2. Click Enrollment in the sub-menu.
3. Click the
(Select) button next to the appropriate Enrollment record.
Select Button
(This is a sample screenshot of the Enrollment Listing Page.)
Edit Button
4. Click the
(Select) button next to the appropriate Family Member record
that needs edited.
5. Make any changes needed to the form.
6. Click the
(Save/Exit) button when completed.
*Note: To exit this screen without saving any of the changes you have made, click the
LIFT User Manual
(Cancel) button.
(This is a sample screenshot of the Enrollment Edit Page. This is a partial screenshot.)
19
© KIT Solutions® 2010
Select Button
To delete a Family Member record, perform the following steps:
1. Click Family Information in the menu.
2. Click Enrollment in the sub-menu.
3. Click the
(Select) button next to the appropriate Enrollment record.
(This is a sample screenshot of the Enrollment Listing Page.)
Delete Button
4. Click the
(Delete) button next to the appropriate Family Member record
that needs edited.
5. You will receive a confirmation message asking if you are sure. Click the
(OK) button.
*Note: To exit this screen without saving any of the changes you have made, click the
LIFT User Manual
(Cancel) button.
(This is a sample screenshot of the Enrollment Edit Page. This is a partial screenshot.)
20
© KIT Solutions® 2010
Save/Exit Button
To enter a Staff Member, perform the following steps:
1.
2.
3.
4.
Click Family Information in the menu.
Click Enrollment in the sub-menu.
Click the
(Select) button next to the appropriate Enrollment record.
Click the
(Next) button from the Enrollment record until you get to page 7 of
7.
5. Click the
(Add Staff Member) button.
6. Enter in the appropriate data for each field ensuring that all required fields for
saving are completed.
(Save/Exit) button when completed.
7. Click the
*Note: To exit this screen without saving any of the changes you have made, click the
Add Staff Member
(Cancel) button.
(This is a sample screen shot of the Enrollment Staff Member Edit Page)
LIFT User Manual
21
© KIT Solutions® 2010
Save/Exit Button
To delete a Staff Member, perform the following steps:
1.
2.
3.
4.
5.
6.
Click Family Information in the menu.
Click Enrollment in the sub-menu.
Click the
(Select) button next to the appropriate Enrollment record.
Click the
(Next) button from the Enrollment record until you get to page.
(Delete) button next to the corresponding staff member.
Click the
A pop up dialogue box will ask if you are sure, click the
(Ok) button.
*Note: To exit this dialogue box without making any changes, click the
8. Click the
Delete Button
(Cancel) button.
(Save/Exit) button when completed.
*Note: To exit this screen without saving any of the changes you have made, click the
(Cancel) button.
(This is a sample screen shot of the Enrollment Staff Member Edit Page)
LIFT User Manual
22
© KIT Solutions® 2010
To re-enroll an exited family, perform the following steps:
1.
2.
3.
4.
5.
Click Family Information in the menu.
Click Enrollment in the sub-menu.
Click the
(Re-Enroll Exited Family) button.
Select the appropriate family from the dropdown and click the (Go) button.
Enter in the appropriate data for each field ensuring that all required fields for
saving are completed.
6. Use the navigation buttons to move throughout the Enrollment process (7
pages) to fill in each form.
7. Click the
(Save/Exit) button when completed.
*Note: To exit this screen without saving any of the changes you have made, click the
Re-Enroll Exited Family
(Cancel) button.
(This is a sample screen shot of the Enrollment Listing Page)
To Change/Archive a family, perform the following steps:
1.
2.
3.
4.
Click Family Information in the menu.
Click Enrollment in the sub-menu.
Click the
(Change/Archive) button next to the appropriate Family.
(OK) button to archive the
You will receive confirmation; click the
record.
5. You will receive a message that the record was successfully archived.
*Note: To exit this screen without saving any of the changes you have made, click the
Change/Archive Button
(Cancel) button.
(This is a sample screen shot of the Enrollment Listing Page)
LIFT User Manual
23
© KIT Solutions® 2010
Verifying the Address
The address information for both the family and the family member will now be verified using Group One software. This software contains all addresses within Allegheny
County. In addition, it aids in keeping the address information consistent throughout the application by maintaining abbreviations (e.g., St, Ave, etc. ), assigning Zip Code,
etc.
- If an alternative address is displayed and you want to accept that address, choose the address and click the
(Save/Exit) button.
- If an alternative address is displayed and you are certain that the address you’ve provided is correct, choose the “Save without verifying” option.
- If you get a message stating, “The Address You Entered Is Invalid”, first click the
(Cancel) button and review the address data entered for data entry errors.
If none are found, choose “Save without verifying” when prompted to verify again.
Tips
•
In most cases, the alternative address will be nearly identical to the one entered with the exception of the city name used by the United States Postal Service. For example, if the city,
Pittsburgh, is entered with a zip code of 15201, the alternative address will show Arsenal as the correct city.
LIFT User Manual
24
© KIT Solutions® 2010
Member Profiles
The Profile form is used to collect information about the individual participants who are being enrolled as intensive.
1. Click Family Information in the menu.
2. Click Profiles in the sub-menu.
3. Select the Family you wish to enter information for from the Select Family
dropdown list.
4. Click the (GO) button.
5. Click the
button to maximize the family member details.
*Note: The
becomes a
6. Click the
enter/edit.
Go Button
View/Edit Button
and more details are displayed.
(View/Edit) button for the member profile record you want to
(This is a sample screen shot of the Member Profiles Listing Page.)
Save & Exit Button
7. Enter in the appropriate data for each field ensuring that all required fields for
saving are completed.
8. Use the navigation buttons to move throughout the Profile pages (page numbers
vary, see Tips below) to fill in each form.
9. Click the
(Save/Exit) button when completed.
**Note: To exit this screen without saving any of the changes you have made, click the
Cancel Button
(Cancel) button
(This is a sample screen shot of the Member Profiles Edit Page. This is a partial screenshot.)
LIFT User Manual
25
© KIT Solutions® 2010
Tips
•
The Profile form (pages within the form) may be different based on the A/T/TP/Child selection made when the Enrollment record was completed.
•
If you need to make a “status” change to the record or just archive the record, you must click the
(See the Change/Archive Profile section for details.)
(Change/Archive) button next to the record on the listing page.
To enter a pregnancy record, perform the following steps:
1. Click Family Information in the menu.
2. Click Profiles in the sub-menu.
3. Select the Family you wish to enter information for from the Select Family
dropdown list.
4. Click the (GO) button.
5. Click the button to maximize the family member details.
*Note: The
becomes a
Go Button
and more details are displayed.
6. Click Add Pregnancy Record under the family member’s name to enter their
Pregnancy information.
Add Pregnancy Record
*Note: When you identify a member as being pregnant in the Enrollment form, an Add Pregnancy Record link will
automatically be created on the Profile listing page.
(This is a sample screen shot of the Profile Listing Page.)
LIFT User Manual
26
© KIT Solutions® 2010
Save and Exit Button
7. Enter in the appropriate data for each field ensuring that all required fields for
saving are completed.
8. Use the navigation buttons to move throughout the Pregnancy Record pages (3
pages) to fill in each form.
9. Click the
(Save/Exit) button when completed.
*Note: To exit this screen without saving any of the changes you have made, click the
(Cancel) button.
Cancel Button
(This is a sample screen shot of the Pregnancy Record Edit Page. This is a partial screenshot.)
Tips
•
When you identify a member as being pregnant in the Member Profile form, an empty Pregnancy record will automatically be created on the Profile listing page. Therefore you will
only need to add new pregnancy records for subsequent pregnancies.
•
Page three of the Pregnancy form must be updated when the member is no longer Pregnant.
LIFT User Manual
27
© KIT Solutions® 2010
To edit a Pregnancy record, perform the following steps:
1. Click Family Information in the menu.
2. Click Profiles in the sub-menu.
3. Select the Family you wish to enter information for from the Select Family
dropdown list.
4. Click the (GO) button.
5. Click the button to maximize the family member details.
*Note: The
becomes a
Go Button
Expand Details Button
and more details are displayed.
6. Click Pregnancy Record under the family member’s name to edit their
Pregnancy information.
7. Make any changes needed to the form.
8. Click the
(Save/Exit) button when completed.
*Note: To exit this screen without saving any of the changes you have made, click the
Pregnancy Record
(Cancel) button.
(This is a sample screen shot of the Profile Listing Page.)
To delete a Pregnancy record, perform the following steps:
1. Click Family Information in the menu.
2. Click Profiles in the sub-menu.
3. Select the Family you wish to enter information for from the Select Family
dropdown list.
4. Click the (GO) button.
5. Click the button to maximize the family member details.
*Note: The
becomes a
6. Click the
name.
7. Click the
Expand Details Button
and more details are displayed.
button next to the Pregnancy Record under the family member’s
Delete Button
(Save/Exit) button when completed.
*Note: To exit this screen without saving any of the changes you have made, click the
LIFT User Manual
Go Button
(Cancel).
(This is a sample screen shot of the Profile Listing Page.)
28
© KIT Solutions® 2010
To enter a Placement Record, perform the following steps:
1. Click Family Information in the menu.
2. Click Profiles in the sub-menu.
3. Select the Family you wish to enter information for from the Select Family
dropdown list.
4. Click the (GO) button.
5. Click the button to maximize the family member details.
*Note: The
becomes a
Go Button
Expand Details Button
and more details are displayed.
6. Click Add Placement Record under the family member’s name to enter/edit
their Out of Placement information.
Add Placement Record
*Note: When you identify a member as living in an Out of Home placement in the Enrollment form, an Add Placement
Record link will automatically be created on the Profile listing page.
(This is a sample screen shot of the Member Profiles Listing Page. This is a partial screenshot.)
Save and Exit
7. Enter in the appropriate data for each field ensuring that all required fields for
saving are completed.
8. Use the navigation buttons to move throughout the Out of Placement Record
pages (2 pages) to fill in each form.
(Save and Exit) button when completed.
9. Click the
*Note: To exit this screen without saving any of the changes you have made, click the
(Cancel) button.
(This is a sample screen shot of the Out of Home Placement Edit Page. This is a partial Screenshot.)
LIFT User Manual
29
© KIT Solutions® 2010
Tips
•
Page two of the Out-of-Home Placement form must be updated when there is a change in the status of the child who has been placed out-of-home or when the expected date of the
child’s return to family has passed.
LIFT User Manual
30
© KIT Solutions® 2010
To edit a Placement record, perform the following steps:
1. Click Family Information in the menu.
2. Click Profiles in the sub-menu.
3. Select the Family you wish to enter information for from the Select Family
dropdown list.
4. Click the (GO) button.
5. Click the button to maximize the family member details.
*Note: The
becomes a
Go Button
and more details are displayed.
6. Click Out of Placement Form under the family member’s name to edit their
Placement information.
7. Make any changes needed to the form.
8. Click the
(Save and Exit) button when completed.
*Note: To exit this screen without saving any of the changes you have made, click the
Out of Placement Form
(This is a sample screen shot of the Member Profiles Listing Page. This is a partial screenshot.)
(Cancel) button.
To delete a Placement record, perform the following steps:
1. Click Family Information in the menu.
2. Click Profiles in the sub-menu.
3. Select the Family you wish to enter information for from the Select Family
dropdown list.
4. Click the (GO) button.
5. Click the button to maximize the family member details.
*Note: The
becomes a
Expand Details Button
Go Button
Delete Button
and more details are displayed.
6. Click the
button next to the Out of Placement Form under the family
member’s name.
7. You will receive a confirmation message asking if you are sure. Click the
(OK) button.
*Note: To exit this screen without saving any of the changes you have made, click the
LIFT User Manual
(This is a sample screen shot of the Member Profiles Listing Page. This is a partial screenshot.)
(Cancel) button.
31
© KIT Solutions® 2010
To Change/Archive a profile, perform the following steps:
1. Click Family Information in the menu.
2. Click Profiles in the sub-menu.
3. Select the Family you wish to enter information for from the Select Family
dropdown list.
4. Click the (GO) button.
5. Click the button to maximize the family member details.
Change/Archive Button
(Change/Archive) button.
6. Click the
7. You will receive confirmation; click the
(OK) button to archive the
record.
8. You will receive a message that the record was successfully archived.
*Note: To exit this screen without saving any of the changes you have made, click the
LIFT User Manual
(This is a sample screen shot of the Archive Confirmation message. This is a partial screenshot.)
(Cancel) button.
32
© KIT Solutions® 2010
General/Intensive Exit Form
Whenever a family or family member stops receiving services or when a family is transferred from general to intensive (or vice versa), the Exit Form must be completed.
1.
2.
3.
4.
5.
Click Family Information in the menu.
Click General/Intensive Exit Form in the sub-menu.
Select the Family you wish to add a record for from the dropdown list.
Click the (GO) button.
A new record will appear. Click the [Add Exit Form] link next t the Family
name.
6. Click the newly created Exit Form record.
a. If exiting the entire family, select Yes from the drop box for the question:
“Is the entire family going to stop receiving services from the program in which they are
Go Button
Add Exit Form
currently enrolled?”
Exit Form Record
i.
Enter in the appropriate data for each field and click the
(Save) button.
b. If exiting an individual member, select No and click the Add Exiting
Member button.
LIFT User Manual
(This is a sample screen shot of the Service Exit Form listing page.)
33
© KIT Solutions® 2010
7. Enter in the appropriate data for each field ensuring that all required fields for
saving are completed.
8. Click the
(Save) button.
*Note: To exit this screen without saving any of the changes you have made, click the
(Cancel) button.
Save Button
Cancel Button
(This is a sample screen shot of the Service Exit Form. This is a partial screenshot.)
Tips
•
You must click the
(Finish) button after saving a record in order to delete and/or archive all of the family and/or member records. If transferring a family, you will only
have to edit their enrollment type in the Enroll Form (This can be done on page 2 of 7.)
LIFT User Manual
34
© KIT Solutions® 2010
To edit an Exit record, perform the following steps:
1.
2.
3.
4.
5.
Go Button
Click Family Information in the menu.
Click General/Intensive Exit Form in the sub-menu.
Select the Family you wish to add a record for from the dropdown list.
Click the (GO) button.
Click the Exit Form (
) record you wish to edit.
Exit Form Record
(This is a sample screen shot of the Service Exit Form Listing Page.)
(Edit) button next to the record you wish to edit.
6. Click the
7. Make any changes needed to the form.
8. Click the
(Save) button.
*Note: To exit this screen without saving any of the changes you have made, click the
(Cancel) button.
Edit Button
(This is a sample screen shot of the Exit Form Edit Page. This is a partial screenshot.)
LIFT User Manual
35
© KIT Solutions® 2010
To delete an Exit record, perform the following steps:
1.
2.
3.
4.
5.
Click Family Information in the menu.
Click General/Intensive Exit Form in the sub-menu.
Select the Family you wish to delete a record for from the dropdown list.
Click the (GO) button.
Click the
(Delete) button below the Exit Form (
) record
you wish to delete.
6. You will receive a confirmation message asking if you are sure. Click the
(OK) button.
*Note: To cancel the deletion, click the
LIFT User Manual
Delete Button
(This is a sample screen shot of the Service Exit Form Listing Page.)
(Cancel) button.
36
© KIT Solutions® 2010
PLANNING
Under Construction
LIFT User Manual
37
© KIT Solutions® 2010
SERVICE
In Service, the user is able to perform the following tasks:
1. Enter and edit Group Activity Description
2. Enter and edit Group Activity
3. Enter and edit Ages and Stages
(This is a screenshot of the Service Landing Page.)
Group Activity Description
To collect information for classes and group activities provided at the Family Support Center, use the Group Activity Description form.
1. Click Service in the menu.
2. Click Group Activity Description in the sub-menu.
3. Click the
(Add Group Activity) button to enter the details of the
group activity.
Add Group Activity Button
(This is a sample screenshot of the Group Activity Description Listing Page.)
LIFT User Manual
38
© KIT Solutions® 2010
Finish Button
4. Enter in the appropriate data for each field ensuring that all required fields for
saving are completed.
5. Click the
(Finish) button when completed.
**Note: To exit this screen without saving any of the changes you have made, click the
(Cancel) button
(This is a partial screenshot of the Group Activity Description Edit Page.)
Tips
•
You must now define the class/activity type (e.g. Parent Support Group) for the purpose of reporting to the County through the monthly, quarterly, and annual Family Center Report.
LIFT User Manual
39
© KIT Solutions® 2010
To edit a Group Activity Description, perform the following steps:
1.
2.
3.
4.
5.
Click Service in the menu.
Click Group Activity Description in the sub-menu.
Click the
(Select) button next to the record you want to edit.
Make any changes needed to the form.
Click the
(Finish) button when completed.
**Note: To exit this screen without saving any of the changes you have made, click the
Select Button
(Cancel) button
(This is a sample screenshot of the Group Activity Description Listing Page.)
To delete a Group Activity Description, perform the following steps:
1.
2.
3.
4.
Click Service in the menu.
Click Group Activity Description in the sub-menu.
Click the
(Delete) button next to the record you wish to delete.
You will receive a confirmation message asking if you are sure. Click the
(OK) button.
*Note: To cancel the deletion, click the
Delete Button
(Cancel) button.
(This is a sample screenshot of the Group Activity Description Listing Page.)
LIFT User Manual
40
© KIT Solutions® 2010
Group Activity
To collect specific information on each group activity provided at the Family Support Center, use the Group Activity form.
1. Click Service in the menu.
2. Click Group Activity in the sub-menu.
3. Click the
(Add Group Activity Attendance) button to
enter the details of the group activity.
4. Enter in the appropriate data for each field ensuring that all required fields for
saving are completed.
5. Click the
(Finish) button when completed.
**Note: To exit this screen without saving any of the changes you have made, click the
Add Group Activity Attendance
(Cancel) button
(This is a sample screenshot of the Group Activity Listing Page.)
Tips
•
You must first save a class/activity in the Group Activity Description module before saving a record in the Group Activity module.
•
Attendee is an additional form that can be completed within the Group Activity section. (This can be done by clicking the
instructions.)
•
Staff is an additional form that can be completed within the Group Activity section. (This can be done clicking the
instructions.)
LIFT User Manual
41
(Add Goal) button). (See the Attendee section for
(Add Activity) button). (See the Staff section for
© KIT Solutions® 2010
To edit a Group Activity, perform the following steps:
1.
2.
3.
4.
5.
Click Service in the menu.
Click Group Activity in the sub-menu.
Click the
(Select) button next to the record you want to edit.
Make any changes needed to the form.
Click the
(Finish) button when completed.
**Note: To exit this screen without saving any of the changes you have made, click the
Select Button
(Cancel) button
(This is a sample screenshot of the Group Activity Listing Page.)
To delete a Group Activity, perform the following steps:
1.
2.
3.
4.
Click Service in the menu.
Click Group Activity in the sub-menu.
Click the
(Delete) button next to the record you wish to delete.
You will receive a confirmation message asking if you are sure. Click the
(OK) button.
*Note: To cancel the deletion, click the
Delete Button
(Cancel) button.
(This is a partial screenshot of the Group Activity Listing Page.)
LIFT User Manual
42
© KIT Solutions® 2010
To enter an Attendee, perform the following steps:
1. Click Service in the menu.
2. Click Group Activity in the sub-menu.
Add Group Activity Attendance
3. Click the
(Add Group Activity Attendance) button if
adding a new activity or click the
(Select) button next to a record that needs
edited.
Select Button
(This is a sample screenshot of the Group Activity Attendees Page. This is a partial screenshot.)
LIFT User Manual
43
© KIT Solutions® 2010
4. Select an attendees name from the dropdown list.
(Save) button when completed.
5. Click the
**Note: To exit this screen without saving any of the changes you have made, click the
(Cancel) button
Save Button
(This is a sample screenshot of the Group Activity Attendees Page. This is a partial screenshot.)
LIFT User Manual
44
© KIT Solutions® 2010
To delete an Attendee, perform the following steps:
1. Click Service in the menu.
2. Click Group Activity in the sub-menu.
3. Click the
(Select) button next to a record that needs edited.
Select Button
(This is a sample screenshot of the Group Activity Listing Page.)
Delete Button
4. Click the
(Delete) button next to the Attendee you wish to delete.
5. You will receive a confirmation message asking if you are sure. Click the
(OK) button.
*Note: To cancel the deletion, click the
LIFT User Manual
(This is a sample screenshot of the Group Activity Attendees Page. This is a partial screenshot.)
(Cancel) button.
45
© KIT Solutions® 2010
To enter Staff, perform the following steps:
Add Group Activity Attendance
1. Click Service in the menu.
2. Click Group Activity in the sub-menu.
3. Click the
(Add Group Activity Attendance) button if
adding a new activity or click the
(Select) button next to a record that needs
edited.
Select Button
(This is a sample screenshot of Group Activity Listing Page.)
4. Click the
(Add Staff) button.
5. Enter in the appropriate data for each field ensuring that all required fields for
saving are completed.
6. Click the
(Save) button.
**Note: To exit this screen without saving any of the changes you have made, click the
Save Button
(Cancel) button
Add Staff Button
(This is a sample screenshot of Group Activity Edit Page. This is a partial screenshot.)
LIFT User Manual
46
© KIT Solutions® 2010
Tips
•
To add additional staff, click the
(Add Staff) button again and follow the same instructions above.
•
You do not have the ability to edit Staff. If the Staff is incorrect you will need to delete the record and re-enter the staff record.
To delete Staff, perform the following steps:
1. Click Service in the menu.
2. Click Group Activity in the sub-menu.
3. Click the
(Select) button next to a record that needs edited.
Select Button
(This is a sample screenshot of Group Activity add Staff Page.)
Delete Button
4. Click the
(Delete) button next to the Staff you wish to delete.
5. You will receive a confirmation message asking if you are sure. Click the
(OK) button.
*Note: To cancel the deletion, click the
LIFT User Manual
(This is a sample screenshot of Group Activity Edit Page. This is a partial screenshot.)
(Cancel) button.
47
© KIT Solutions® 2010
Ages and Stages
The Ages and Stages form is used to collect information from the Developmental Assessments completed for any participating child.
1.
2.
3.
4.
5.
Click Service in the menu.
Click Ages and Stages in the sub-menu.
Select the Family you wish to enter information for from the dropdown list.
Click the
(GO) button.
Click [Add Assessment Record] next to the child’s name you wish to enter
information for.
Go Button
Add Assessment Record
*Note: Only registered children will appear on the Ages and Stages Listing page.
(This is a screenshot of the Ages and Stages Landing Page.)
6. Enter in the appropriate data for each field ensuring that all required fields for
saving are completed.
7. Use the navigation buttons to move throughout the Assessment Record (3
pages) to fill in each form.
8. Click the
(Save/Exit) button when completed.
*Note: To exit this screen without saving any of the changes you have made, click the
(Cancel) button.
(This is a screenshot of the Ages and Stages Assessment Record Edit Page.)
Tips
•
Part II of the Ages and Stages Record must be updated when the child has been referred to Early Intervention (3rd question “Which agency was the child referred to?”- On page 2
of 3).
LIFT User Manual
48
© KIT Solutions® 2010
To edit an Ages and Stages Record, perform the following steps:
1.
2.
3.
4.
5.
Click Service in the menu.
Click Ages and Stages in the sub-menu.
Select the Family you wish to enter information for from the dropdown list.
Click the
(GO) button.
Click Assessment Record under the child’s name.
Go Button
Assessment Record
*Note: An assessment date will appear beside the Assessment Record. Be sure to select the appropriate date when
editing.
6. Make any changes needed to the form.
7. Click the
(Save/Exit) button when completed.
*Note: To exit this screen without saving any of the changes you have made, click the
(Cancel) button.
(This is a sample screenshot of Ages and Stages Listing Page.)
To delete an Ages and Stages Record, perform the following steps:
1.
2.
3.
4.
5.
Click Service in the menu.
Click Ages and Stages in the sub-menu.
Select the Family you wish to delete a record for from the dropdown list.
Click the
(GO) button.
Click the
(Delete) button next to the Assessment Record you wish to
delete.
6. You will receive a confirmation message asking if you are sure. Click the
(OK) button.
*Note: To cancel the deletion, click the
Go Button
Delete Button
(Cancel) button.
(This is a sample screenshot of Ages and Stages Listing Page.)
LIFT User Manual
49
© KIT Solutions® 2010
REPORTS
In Reports, the user is able to perform the following tasks:
1. Download and save State Extracts (State Reporting centers only)
2. Download and save County Extracts (County only)
3. Download and save Prevention/Diversion Extract
(This is a screenshot of the Reports Landing Page.)
County Extract
At the county level, use this module to create your county extract for the County warehouse.
To view and/or print the County FSC report (All Site level staff), perform the
following steps:
1. Click Reports in the menu.
2. Click County Extract in the sub-menu.
3. Select the type of report you wish to view/print from the drop down menus.
4. Click the
(Export) button. A new window will open displaying the selected
report.
(This is a sample screenshot of the County FSC Report Page. This is a partial screenshot.)
Tips
•
If the report does not open immediately for you, you may have a pop-up blocker on your computer. To bypass the pop-up hold down the CTRL key on the keyboard while selecting the
report form the grid.
•
This report could take several minutes to load, please be patient.
LIFT User Manual
50
© KIT Solutions® 2010
Prevention/Diversion Extract
At the center, use this module to create your Prevention/Diversion Extract for Prevention/Diversion reporting centers.
To view Site/Family Level reports (All Site level staff), perform the following steps:
1.
2.
3.
4.
Click Reports in the menu.
Click Prevention/Diversion Extract in the sub-menu.
Select the appropriate data from the dropdown lists.
Enter the specific dates into the Start Date and End Date fields as
mm/dd/yyyy.
5. Click the
(Export) button to open the report. A new window will open
displaying the selected report.
Export Button
(This is a sample screenshot of the Site/Family Reports Page. This is a partial screenshot.)
Tips
•
If the report does not open immediately for you, you may have a pop-up blocker on your computer. To bypass the pop-up hold down the CTRL key on the keyboard while selecting the
report form the grid.
LIFT User Manual
51
© KIT Solutions® 2010
State Extracts
The State Extracts module is used to create state extracts for state reporting centers.
Click Reports in the menu.
2. Click State Extract in the sub-menu.
3. Select the type of report you wish to view/print from the drop down menus.
4. Click the
(Export) button. A new window will open displaying the selected
report.
1.
Export Button
(This is a screenshot of the State Extracts Page.)
Tips
•
If the report does not open immediately for you, you may have a pop-up blocker on your computer.
LIFT User Manual
52
© KIT Solutions® 2010
TOOLS
In Tools, the user is able to perform the following tasks:
1. View web resources related to family support
2. View Library documents related to family support
(This is a screenshot of the Tools Landing Page.)
Web Resources
The Web Resources area provides a list of helpful websites related to Family Support Center issues.
1.
2.
3.
4.
5.
Click Tools in the menu.
Click Web Resources in the sub-menu.
Select a category from the Choose Category dropdown list.
Browse the Web Resource list for the web site you would like to visit.
Click on the Web Resource link to open the web site.
*Note: The link is the underlined Web Resource.
6. A new window will open displaying the web site you selected.
(This is a partial screenshot of the Web Resources Landing Page.)
LIFT User Manual
53
© KIT Solutions® 2010
Tips
•
Clicking on the field name in a category field (
•
If the web site does not open immediately for you, you may have a pop-up blocker on your computer. To bypass the pop-up hold down the CTRL key on the keyboard while clicking on
the web source link.
•
To add additional web sites or modify existing ones, speak to someone at the County level.
LIFT User Manual
) will allow you to sort through the web sites by ascending or descending order.
54
© KIT Solutions® 2010
Library
The Library section is a repository of additional documents to help Staff with the Family Support process.
1.
2.
3.
4.
Click Tools in the menu.
Click Library in the sub-menu.
Click
(Select) button next to the document you wish to view.
A new window will open displaying the selected document in Acrobat Adobe
(.pdf).
5. Click the print button
Select Button
to print the document.
6. Click the disk button
to save the document.
7. Click the in the upper right hand corner to close the document.
(This is a screenshot of Library Landing Page.)
Tips
•
If the report does not open immediately for you, you may have a pop-up blocker on your computer. To bypass the pop-up hold down the CTRL key on the keyboard while clicking the
Select button.
LIFT User Manual
55
© KIT Solutions® 2010
ADMINISTRATION
In Administration, the user is able to perform the following tasks:
1.
2.
3.
4.
5.
6.
View/Enter Family Center information.
Enter and edit all Staff members (Administrator only); Edit self Staff information
Enter and edit Staff Daily Activity records
Change Password
Enter and edit Training/Technical Assistance records
Enter and edit Progress/Barriers records
(This is a screenshot of the Administration Landing Page.)
Family Center Registration
The Family Center Registration module displays the Family Centers that are registered within the LIFT system. You will only be able to view and modify your own Family
Center.
To edit or view your Family Center record, perform the following steps:
1. Click Administration in the menu.
2. Click Family Center Registration in the sub-menu.
3. Click
(Select) button next to the appropriate Family Center you wish to
edit/view.
4. If editing, enter in the appropriate data for each field ensuring that all required
fields for saving are completed.
(Save/Exit) button when completed.
5. Click the
*Note: To exit this screen without saving any of the changes you have made, click the
Select Button
(Cancel) button.
(This is a sample screenshot of the Family Center Registration Listing Page.)
LIFT User Manual
56
© KIT Solutions® 2010
Staff Registration
The Staff Registration module is used to register and maintain staff members within the LIFT system.
1.
2.
3.
4.
Click Administration in the menu.
Click Staff Registration in the sub-menu.
Click the
(Add Staff) button.
Enter in the appropriate data for each field ensuring that all required fields for
saving are completed.
5. Click the
(Save/Exit) button when completed.
*Note: To exit this screen without saving any of the changes you have made, click the
Add Staff Button
(Cancel) button.
(This is a sample screenshot of the Staff Registration Listing Page.)
Tips
•
The “Is this staff currently on the payroll” field is used for reporting to the County in the County FSC Report. Please ensure that this is checked in order to submit your FSC Report.
•
If a staff member leaves the center, you must set their Account Status to Inactive so that he/she will no longer be able to enter the LIFT system.
•
When first adding a staff, it is suggested that you set their password status to ‘Expired.’ When the new staff logs in with the login name and password you chose, they will immediately
have to change their password.
To edit a Staff record, perform the following steps:
1.
2.
3.
4.
5.
Select Button
Click Administration in the menu.
Click Staff Registration in the sub-menu.
Click the
(Select) button next to the staff record you want to edit.
Make any changes needed to the form.
(Save/Exit) button when completed.
Click the
*Note: To exit this screen without saving any of the changes you have made, click the
LIFT User Manual
(This is a sample screenshot of the Staff Registration Listing Page. This is a partial screenshot.)
(Cancel) button.
57
© KIT Solutions® 2010
Staff Activities
The Staff Activities module is used to collect information on the daily activities of staff members.
To enter a new Staff Activity record, perform the following steps:
1. Click Administration in the menu.
2. Click Staff Activity in the sub-menu.
3. Select the staff member you wish to enter information for from the Select Staff
dropdown list.
(Add Activity) button.
4. Click the
5. Enter in the appropriate data for each field ensuring that all required fields for
saving are completed.
6. Click the
(Save/Exit) button when completed.
*Note: To exit this screen without saving any of the changes you have made, click the
Add Activity Button
(Cancel) button.
(This is a sample screenshot of the Staff Activities Listing Page.)
To edit a Staff Activity record, perform the following steps:
1. Click Administration in the menu.
2. Click Staff Activity in the sub-menu.
3. Select the staff member you wish to enter information for from the Select Staff
dropdown list.
4. Click the (GO) button.
(Edit) button next to the record you wish to edit.
5. Click the
6. Make any changes needed to the form.
(Save/Exit) button when completed.
7. Click the
*Note: To exit this screen without saving any of the changes you have made, click the
Go Button
Edit Button
(Cancel) button.
(This is a sample screenshot of the Staff Activities Listing Page.)
LIFT User Manual
58
© KIT Solutions® 2010
To delete a Staff Activity record, perform the following steps:
1. Click Administration in the menu.
2. Click Staff Activity in the sub-menu.
3. Select the staff member you wish to delete information for from the Select Staff
dropdown list.
4. Click the (GO) button.
5. Click the
(Delete) button next to the record you wish to delete.
6. You will receive a confirmation message asking if you are sure. Click the
(OK) button.
*Note: To cancel the deletion, click the
Go Button
Delete Button
(Cancel) button.
(This is a sample screenshot of the Staff Activities Listing Page.)
Tips
•
You may also edit and delete sessions when in edit mode by following the same instructions above.
LIFT User Manual
59
© KIT Solutions® 2010
Change Password
The Change Password module also allows the user to change the password on the account they are currently logged into.
To change your password, perform the following steps:
1. Click Administration in the menu.
2. Click Change Password in the sub-menu.
3. Enter the Current Password for the account.
4. Enter the password you would like to use in the New Password field.
5. Re-type the new password in the Reenter New Password field.
Click the
(Save) button when completed. You will receive a confirmation
message informing you that the password was changed successfully.
Save Button
(This is a screenshot of the Change Your Password Page.)
Tips
•
Your new password will become effective immediately upon saving.
•
It is important to remember that passwords are case sensitive.
•
Passwords can be any combination of letters, numbers and/or characters.
•
When a new staff member logs in, they will immediately have to change their password.
•
You will be required to change your password every 30 days.
LIFT User Manual
60
© KIT Solutions® 2010
Training/Technical Assistance
The Training/Technical Assistance module is used to add and track training and technical assistance that is needed by your center.
To enter a new Training/Technical Assistance record, perform the following steps:
1. Click Administration in the menu.
2. Click Training/Technical Assistance in the sub-menu.
3. Click the
(Add Training/Technical Assistance)
button.
4. Enter in the appropriate data for each field ensuring that all required fields for
saving are completed.
5. Click the
(Save) button when completed.
*Note: To exit this screen without saving any of the changes you have made, click the
Add Training/Technical Assistance Button
(Cancel) button.
(This is a sample screenshot of the Training/Technical Assistance Listing Page.)
Tips
•
This module has been added to LIFT for reporting to the County in the County FSC report. Please ensure that this is used to track and record Trainings/Technical Assistance that are
requested and received.
•
Once the Training/Technical Assistance record has been received, you must edit the record and update the status to “Received”. Only Trainings that have a status of “Received” will
be counted in the County FSC report.
•
If Trainee is identified as “Other”, the entry will not appear on the FSC County Report.
•
Only the Site Director is able to add any training/technical assistance provided to your center.
LIFT User Manual
61
© KIT Solutions® 2010
To edit a Training/Technical Assistance record, perform the following steps:
1.
2.
3.
4.
5.
Click Administration in the menu.
Click Training/Technical Assistance in the sub-menu.
Click Select next to the record you want to edit.
Make any changes needed to the form.
(Save) button when completed.
Click the
*Note: To exit this screen without saving any of the changes you have made, click the
Select Link
(Cancel) button.
(This is a sample screenshot of the Training/Technical Assistance Listing Page.)
To enter the Received Training/Technical Assistance details, perform the following
steps:
1.
2.
3.
4.
5.
Click Administration in the menu.
Click Training/Technical Assistance in the sub-menu.
Click Select next to the record.
Change the Status to Received with the dropdown.
Enter in the appropriate data for each field ensuring that all required fields for
saving are completed.
6. Click the
(Save) button when completed.
*Note: To exit this screen without saving any of the changes you have made, click the
Select Link
(Cancel) button.
(This is a sample screenshot of the Received Training/Technical Assistance Details Page. This is a
partial screenshot.)
LIFT User Manual
62
© KIT Solutions® 2010
Progress/Barriers
To add and track the monthly highlights, progress, success, and barriers of your center, use the Progress/Barriers module.
To enter a new Progress/Barrier record, perform the following steps:
1.
2.
3.
4.
Click Administration in the menu.
Click Progress/Barriers in the sub-menu.
Click the
(Add Progress/Barrier) button.
Enter in the appropriate data for each field ensuring that all required fields for
saving are completed.
5. Click the
(Save) button when completed.
*Note: To exit this screen without saving any of the changes you have made, click the
Add Progress/Barrier Button
(Cancel) button.
(This is a sample screenshot of the Progress/Barrier Listing Page.)
Tips
•
This module has been added to LIFT for reporting to the County in the County FSC report and to the State in the State FSC report and Fatherhood Initiative report. Please ensure that
this is used to record Progress/Barriers that occur.
•
Only the Site Director is able to add any progress/barriers to your center.
LIFT User Manual
63
© KIT Solutions® 2010
To edit a Progress/Barrier record, perform the following steps:
1.
2.
3.
4.
5.
Click Administration in the menu.
Click Progress/Barriers in the sub-menu.
Click Select next to the record you want to edit.
Make any changes needed to the form.
Click the
(Save) button when completed.
*Note: To exit this screen without saving any of the changes you have made, click the
Select Link
(Cancel) button.
(This is a sample screenshot of the Progress/Barrier Listing Page.)
To delete a Progress/Barrier record, perform the following steps:
1. Click Administration in the menu.
2. Click Progress/Barriers in the sub-menu.
3. Click Delete next to the record you want to delete.
Delete Link
(This is a sample screenshot of the Progress/Barrier Listing Page.)
LIFT User Manual
64
© KIT Solutions® 2010
LIFT SUPPORT
On the Support Site, you will find information about how to contact Support, an online version of this manual, and frequently asked questions regarding the application.
1. To reach the KIT Solutions Support Site, click LIFT Support under the Helpful
Links section. A window will open displaying the Support Site.
2. To contact Support to ask a question, report a bug, or make a suggestion, click
the Contact Support link.
3. To find this manual in an online version, click the Manual link
4. To view frequently asked questions regarding the application, click the FAQ link.
(This is a screenshot of the LIFT Support Site.)
LIFT User Manual
65
© KIT Solutions® 2010
APPENDIX
Permission Levels
When selecting the permission levels it is important to remember that this is done to grant/limit access to certain portions of the LIFT application. The permission levels are
County, Administrator, and Staff.
County – Evaluator
The permission level County should be assigned to those that will be adding new Family Centers, also known as Organizations within the LIFT Application. This
permission has the County View for reports, Data Export access to all centers, and County Extract access.
Administrator – Site Director
The permission level Administrator should be assigned to those that will have read/write access to all modules except Index Manager. You will only have the ability to edit
your own family center’s Family enter Registration data. Keep in mind that you will not be able add new family center. This permission has Site Level view for county report,
data export access to all centers, and the Site ability to submit center report.
Staff
The permission level Staff has read access only for families that there are assigned to (As identified in the Family Support Team table). The main responsibility of this
permission is to report data within the LIFT Application.
Organization Levels
The Organization Level determines what tasks you will be performing within the LIFT application. The different levels are Center and County.
Center
The Center level is responsible for reporting data into the LIFT Application to be monitored by the County.
County
The County level is responsible for monitoring and overseeing the data entry from the Center level. The monitoring can be done through reports and Data Export.
LIFT User Manual
66
© KIT Solutions® 2010
Using the Reports Viewer
When using reports on the LIFT, reports initially are viewed using a Report Viewer. Once you have clicked the
screen. This screen is used to ONLY VIEW the data (you cannot print or save from this screen).
1. Click the arrows
to maneuver to other pages in the
report. Clicking the single arrow forward or backward, will move the view to
the next page or the previous page. The arrows with the bar can move the
report view to either the first or last page of the report.
2. To move to a specific page in the report, type in a page number into this field
(Show) button, you will then see a print preview
Print Button
Select a Format
Export Button
and click the Enter button on your keyboard.
3. The box with the label 100% can be used to change the level of magnification
of the report. To change the level, click the black arrow on the right side of
the blank and choose an appropriate percentage.
4. To download the report, select the type of file you want from the Select a
format dropdown menu and click the
(Export) link.
5. Click the
LIFT User Manual
(Printer) button to print a copy of the report.
(This is a sample screenshot of the Site/Family Report. This is a partial screenshot.)
67
© KIT Solutions® 2010