1
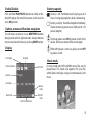
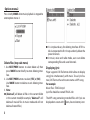
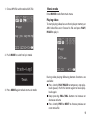
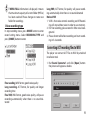
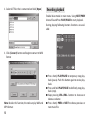
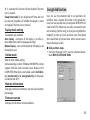
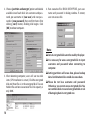
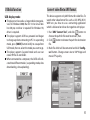
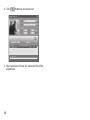
NEVADA PLAYER
Digital MP4/MP3/WMA/ASF Player
MT822
User Guide
Contents
Introduction .................................................................................2
Features..........................................................................................3
Safety instructions .....................................................................3
Player description ......................................................................4
Buttons ...........................................................................................4
Display ............................................................................................5
Battery capacity ..........................................................................5
Music mode ..................................................................................5
Options menu 1 ..........................................................................6
Options menu 2 ..........................................................................8
Movie mode .................................................................................9
Voice recording .........................................................................10
Converting ACT recording files to WAV ............................11
Recording playback .................................................................12
Options menu............................................................................13
TXT file viewer ...........................................................................13
Graphic file viewer ...................................................................13
FM radio ..................................................................................... 13
System setting ......................................................................... 14
Encrypt disk function ............................................................ 15
USB disk function .................................................................. 17
Convert video file to AMV format ..................................... 17
Troubleshooting ..................................................................... 19
Specification............................................................................. 20
2
Introduction
Welcome in MP4 users exclusive club. Because Your
new MP4 player is quite sophisticated device, please
read this manual first to discover all exciting features
of it.
MEDIA-TECH Team
Package includes
■
■
■
■
■
■
Player unit
USB cable
Stereo earphones
Power adaptor
Software disc
User manual
Features
■
■
■
■
■
■
■
■
■
■
■
■
■
■
■
■
■
■
■
■
■
■
■
Micro MP4/MP3/WMA player
FM Radio built-in
Scanned frequencies: 87.5~108MHz
Stereo speakers built-in
Voice recording with sampling frequency: 8~48kHz
WMA Bit Rate: 32~384Kbps
7 equalizer settings
7 playing modes
Picture viewer
Telephone database
TXT viewer
USB disk mode
Adjustable playing speed
Average continuous playing: up to 8 hrs
65K 128x128 ppi Color LCD display
Built-in internal memory
Supported sound & video file formats: MP1, MP2,
MP3, WMA, WMF, WMV, ASF, AMV
Supported picture format: JPG, BMP
Windows ME/2000/XP compatible
Power: built-in Li-Ion rechargeable battery
USB 2.0 interface
Dimensions: 78x42x17mm
Weight: 48g
Safety instructions
The manual contains the important safety instructions
and information of the device’s proper usage. Make
sure to read carefully and understand all the instructions to avoid accident.
Do not expose the device to extreme temperature
(above 40C), especially in cars with shutting windows in summer.
Do not expose to moisture. Do not store in humid or
dirty areas.
Avoid the device falling and bumping strongly. Do
not make OLED suffer from violent shake; otherwise,
OLED could be damaged or displayed abnormally.
Choose the suitable volume. Do not turn up the volume of the earphones too high while using it. If you
get ringing in your ears stop using the device or turn
the volume down.
Do not disassemble the device yourself and do not
wipe the surface of device with alcohol and benzene and thinners.
Do not using the device in areas with prohibiting
electronic devices, such as in plane.
Do not use the device while driving an automobile
or walking in the street, otherwise, an accident may
result.
3
Player description
Earphone socket 1
Buttons
Microphone
EQ – equalizer
Earphone socket 2
MODE – change
mode/option
(push the joystick)
Power switch
PREV/NEXT
– previous & next
(joystick left/right)
USB Port
VOL+/– volume control
(joystick up/down)
4
PLAY/PAUSE; ON/OFF
– playback & pause;
– Power ON/OFF
Note:
Several key functions are
available after special method of pressing. There are
methods of pressing:
Short press - press time below 2 seconds
Long press - press time
above 2 seconds but below
2 seconds
Hold - press above 5 seconds
Enable/Disable
Battery capacity
Push and hold PLAY/PAUSE button to enable or disable MP4 player. Be noted that power switch must be
set in ON position.
Options, menus and function navigation
To scroll menu or options list use NEXT/PREV buttons
(bear joystick to left or right direction). Accept choice or
move to next level of menu by pushing MODE button.
Display
PLAY MODE
battery is full. Predicted time of playing up to 8
hours. During playing battery level is decreasing.
battery is empty. Should be charged immediately.
Please connect to power source (USB port or +5V
power adaptor).
To charge, please turn ON the power switch in the
device, otherwise device will be not charged.
When MP4 player is not in use, please turn it OFF
by power switch.
EQ MODE
BIT/FILE FORMAT
Music mode
PLAY TIME
FOLDER
In music mode only MP3 and WMA music files can be
played back. This mode also supports LRC lyric files
which allows to display song lyric simultaneously with
music.
FILE NAME
VOLUME
LEVEL
TRACK INFO
BATTERY
LEVEL
LYRIC FILE PRESENCE
5
Playback
1. Insert earphone plug into the earphone socket
2. Move power switch to ON position
3. Press and hold PLAY/PAUSE button to turn device
ON
4. By PREV/NEXT buttons choose the music mode
and push MODE button to enter music mode
5. To choose track (song) use NEXT and PREV buttons.
Press PLAY/PAUSE to start playing
■ Press shortly PREV or NEXT to choose previous or
next music file
■ Press and hold PREV or NEXT to rewind back or forward rewind actual song.
■ Press shortly MODE to enter music mode option
menu
■ Press and hold MODE to exit to player main menu
■ Press EQ to enter equalizer setting menu
Options menu 1
Press shortly MODE to enter music mode option menu
■ Press shortly PLAY/PAUSE to temporary stop playback (pause). Push this button again to revive playback.
■ Press and hold PLAY/PAUSE to definitely stop playback (stop).
■ Keep pressing VOL+/VOL- buttons to increase or
decrease volume
6
Repeat
In music play menu, the user could enter Repeat interface. Use PREV/NEXT buttons to select repeat mode.
Note: Tempo rate setting is working only for MP3 files
Replay
Normal – Play all the songs once
Repeat One – Repeat play one song
Folder – Play the selected folder once
Repeat Folder – Repeat all songs
Repeat All – Repeat all songs
Random – Randomly select song to play
Intro – Play the first part of all saved tracks for 10 seconds
Equalizer
Allows to set Your favorite music filter for played back
music: NATURAL, ROCK, POP, POPULAR, CLASSIC, SOFT,
AZZ i DBB
Tempo rate
Use NEXT/PREV buttons to set speed of playback rate.
Move puller to positive direction to increase speed and
move o negative to decrease speed of playback. “0”
value means normal tempo rate.
A – B replay: set replay tag A and B, use the NEXT/PREV
buttons to set tag A and tag B.
1. After choosing „Replay” option, the character „A”
start blinking what is mean that player waiting for
setting starting point A.
2. Use NEXT to set starting point.
3. “B” character is blinking and waiting for setting end
point „B”.
4. Use NEXT to set ending point. After that player will
start playing back marked music fragment from
point A to point B
Replay time
In music play menu, enter [replay time] by using NEXT/
PREV button to select the number of replays. Then
press MODE to confirm.
Replay gap
Enter replay gap option. Refer to “replay time” setting
and set replay time gap between every replay (time
unit is second).
Exit
Exits options menu.
7
Options menu 2
Press shortly MODE when music playback is stopped to
enter options menu 2.
Delete files (stop sub-menu)
1. Use NEXT/PREV buttons to select delete all, then
press MODE button briefly to enter deleting interface.
2. Use NEXT/PREV buttons to select [YES] or [NO].
Use MODE button to delete or exit deleting interface.
3. Note:
■ [delete all] will delete all files in the current folder
in the current mode(for example, “delete all” will
delete all musical files in music mode and will not
delete all record files).
8
■ It is simple and easy for deleting interface of FM radio. Just operate the first 3 steps and only delete the
preset channels.
■ In music, voice and radio mode, users can delete
corresponding files and saved channels.
Displaying lyric
Player supports LRC file format which allows to display
song lyric simultaneously with music. To use lyric feature, LRC file must have the same name as MP3 song.
For example:
Music file is: TRACK-4.mp3
Lyric file should be named: TRACK-4.lrc
The MP3 song containing matched files with lyric are
displayed on screen with icon, close to battery icon:
1. Chose MP3 file with matched LRC file
Movie mode
Enter MOVIE mode from main menu
Playing video
To start playing video, be sure that in player memory an
AMV video files exist. Choose his file and press PLAY/
PAUSE to play it.
2. Push MODE to switch to lyric mode
3. Press MODE again to back to music mode
During video playing following buttons functions are
available:
■ Press shortly PLAY/PAUSE to temporary stop playback (pause). Push this button again to revive playback again.
■ Keep pressing VOL+/VOL- buttons to increase or
decrease volume
■ Press shortly PREV or NEXT to choose previous or
next movie file
9
■ Press and hold PREV or NEXT to rewind back or forward rewind actual movie.
Voice recording
Entering Voice recording mode
1. Enable main menu
2. By NEXT/PREV set Record option and confirm by
MODE button
3. Press PLAY/PAUSE shortly to start recording
4. Press PLAY/PAUSE shortly to pause recording or
hold this button to stop recording.
■ Press and hold MODE to exit to player main menu
Movie mode options menu
Press shortly MODE button when playback stops to enter options menu.
File with voice recorded is stored in current folder
which can be set in Record submenu (push MODE
button)
Next steps as described in Options menu 2 paragraph.
10
If SPACE FULL information is displayed, it means
that there is not enough space to store more recordings. Please delete unnecessary files to recovers memory space.
If MENU FULL information is displayed, it means
that maximum capacity of current folder (99 files)
has been reached. Please change or create new
folder for recordings.
Voice recording type
In stop recording status, press MODE button to enter
record setting menu. Select RECORDING TYPE and
press [MODE] button to enter.
Long VOR, ACT format, fair quality, will pause recording automatically when there is no sound detected
Notice: VOR
1. VOR is that voice controls recording on/off. Recording will stop without voice in order to save memory.
2. For fine recording, please record in little noise background.
3. Please do not talk before recording and start recording in 5-6 seconds.
Converting ACT recording files to WAV
The player can convert ACT files to WAV by attached
installation tool.
1. Run“Sound Converter” and click [Open] button:
the picture will appear as below:
Fine recoding, WAV format, good voice quality
Long recording, ACT format, fair quality and longer
recording time
Fine VOR, WAV format, good voice quality, will pause
recording automatically when there is no sound detected
11
2. Select ACT files that is converted and click [Open]
Recording playback
Enable Voice mode in main menu. Using NEXT/PREV
choose file and Press PLAY/PAUSE to start playback.
During playing following buttons functions are available:
3. Click [Convert] button and begin to convert to WAV
format
Note: Besides this function, the tool can play WAV and
MP3 formats
12
■ Press shortly PLAY/PAUSE to temporary stop playback (pause). Push this button again to revive playback.
■ Press and hold PLAY/PAUSE to definitely stop playback (stop).
■ Keep pressing VOL+/VOL- buttons to increase or
decrease volume
■ Press shortly PREV or NEXT to choose previous or
next music file
■ Press and hold PREV or NEXT to rewind back or forward rewind actual song.
■ Press shortly MODE to enter music mode option
menu
■ Press and hold MODE to exit to player main menu
Options menu
Press shortly MODE button when playback stops to enter options menu. Next steps as described in Options
menu 1 paragraph.
buttons to choose JPG or BMP file to view. Press PLAY/
PAUSE to display JPG/BMP file content.
FM radio
Choose FM Radio from main menu
■ Press MODE button to enter FM radio menu in FM
radio mode
TXT file viewer
Enter E-book mode from main menu. Use NEXT/PREV
buttons to choose TXT file to view. Press PLAY/PAUSE
to display TXT file content.
Graphic file viewer
Enter JPG mode from main menu. Use NEXT/PREV
Save – Save currently tuned frequency to a channel
Delete – Delete current preset channel
Delete All – Delete all preset channels
Normal Band – Frequencies from 87MHz- 108MHz
Japan Band – Frequencies from 76MHz - 90MHz
Auto Search – Auto search channel
Exit – Escape from FM radio mode
13
Auto search
1. Hold NEXT or PREV button for two seconds to tune
frequency upward or downward by 100KHz. When
a radio station is located, it will stop automatically.
Press MODE button briefly to enter radio submenu
to save orderly channels. Press again NEXT or PREV
button to resume auto searching and press NEXT or
PREV button shortly to stop the auto searching.
2. Use radio submenu to search channels automatically.
System setting
Enter System setting mode from main menu
Manual search
Press PREV button briefly to search channel upward
Press NEXT button briefly to search channel downward
Listen to FM radio
Press PLAY/PAUSE button to listen the saved channel.
If no channel is saved, you can listen channels by auto
or manual searching.
Note: Normal band and Japan band can each store 20
preset channels.
Clock
1. Use PREV/NEXT buttons to change value
2. Use VOL button to switch between cells
LCD setting
Available settings for display: brightness – setting of display brightness; darkle - setting of time to turn off display backlight; black - setting of time to turn display off
Language
Allows to change user interface language
Power off setting
Off time mode: To set the self-power off time when the
player playback is stopped and no button is pressed. If
14
“0” is selected, this function will be disabled. The time
unit is seconds.
Sleep time mode: To set self-power off time after last
key pressed, regardless of whether the player is active
or stopped. The time unit is minutes.
Replay mode setting
Two options are available:
Auto replay – end point of A-B replay is set after silence detection (used in language learning)
Manual replay – start and end point of A-B replay is set
manually by user
Online mode
Encrypt disk function
User can use the attached tool to set partitions for
USB disk. One is normal disk, other is encrypted disk.
(User can see two disk icons in computer. WINDOWS 2K
need install SP4, otherwise, user only see one disk icon
and selecting [normal only] or [encrypt only]of[online
mode]of [system set] [will see other icon]. Encrypted
disk would hide all private data, other cannot access
data without password.
■ Disk partition steps
1. Connect the player to PC and run attached procedure: MP3 PLAYER DISK TOOL.
Refer to other mode setting.
Some operating systems (Windows 98/98SEP4) cannot
support USB disk with two disks icons display in MY
COMPUTER. When disk is encrypted, select [multi driver], [normal only] and [encrypted only] in the player
via connection to PC.
Memory information
To display the built-in memory size and used memory
percentage.
Firmware version
To display the firmware version and date.
15
2. Choose [partition and encrypt] option and decide
available size of each disk. Set username and password, put username in [new user] and new password in [new password], then confirm them. After
clicking [start] button, dividing disk begins. Click
[OK] to reboot computer.
4. Run executive file: RDISK DECRYPT.EXE, put username and password in dialog window. If correct,
user can access disk.
Note:
Data in encrypted disk cannot be read by the player.
It is necessary for access encrypted disk to input
username and password when connecting to
computer.
3. After rebooting computer, users will see two disk
icons (SP4 installation is a must). Click the encrypted
disk and three files is in the encrypted disk. Two are
hidden files and one is executive file. Disk capacity is
only 300K.
16
Setting partitions will erase data, please backup
data. Combination disks would also erase data.
Please
do not lose username and password.
Otherwise, you cannot access encrypted disk. You
can combine disks to cancel encrypted disk at risk
of damaging data in encrypted one.
USB disk function
USB display mode
■ The player can be used as a large mobile storage device. For Windows 2000, Mac OS 10.3 or Linux Redhat 8.0 pro, no driver is required. For Windows 98,
driver is required.
■ The player supports USB bus-powered and began
to charge up when connecting to PC. In suspending
mode, press [MODE] button briefly to escape from
USB mode, then re-select the mode you want to go.
■ The player supports Suspend mode and user can
create 99 files in one folder.
■ When connected to a computer, the OLED will indicate three different modes: (suspending mode, data
downloading , data uploading).
Convert video file to AMV format
This device supports only AMV format for video files. To
watch other video format files such as AVI, MPG, MOV,
WMV etc. you have to use a converting application
which is delivered on driver disc together with player.
1. Run “AMV Convert Tool”, and click
button to
choose the path for file need to convert, then.
button to choose the path for destination
2. Click
file.
3. Mark file which will be converted and click “Configure” button. Change screen size to 128*96 ppi and
movie FPS quality.
17
4. Click
button to start conversion
5. After conversion finished, the converted file will be
played back.
18
Troubleshooting
If the player couldn’t play normally, please use trouble shooting guide to help you.
Symptom
The player cannot be turned on
Please check the battery capacity.
Please check if the device’s procedure is damaged.
The player crashes
Press RESET button to start the player.
The player cannot work
Please check the battery capacity.
Please check if HOLD mode is set.
Please check volume is set to “0” and make sure that
earphones are connected properly and clean.
Corrupted music data will make noise in some extent
even be played abnormally; make sure the files are full.
Please choose FAT file system in dialogue box when
formatting disk.
The player cannot upload /download files;
no disk icon in computer
Please check USB cable is correctly connected.
Please re-install properly driver.
The player cannot record
Please check if memory is sufficient.
Please check the battery capacity.
Strange characters are displayed on screen
Please check if the correct language is selected.
If you encounter other difficulties in warranty, please contact our company.
19
Specification
Item
Specification
Dimensions
78x42x17mm (W*H*D)
Weight
48g
Display
OLED 128x64 65K colors
Interface
USB2.0
File formats supported
Music&Video: MP1, MP2, MP3, WMA, WMV, ASF, WAV, AMV, JPG, BMP, Record: ACT, WAV
FM frequency
76MHz–96MHz/87MHz–108MHz
S/N rate
85dB
The max output power
(L) 10mW+(R) 10mW (32Ohm)
Built-in memory
128MB/256MB
Built-in speakers
RMS 0,3W
Power
3.7V lithium battery built-in
Time of working on battery (without recharging)
Play time: up to 8h, Record time: up to 8h, Radio FM listening time: up to 8h
Operating temperature
-5°C ~ 40°C
Operating System
WINSE/ME/2K/XP, Mac OS 10.x, Linux 2.4.2, (WIN98 needs the driver)
Accessories
User’s manual, earphone, power adaptor, USB cable, driver CD
Specification and appearance is subject to change and improvement without prior notice.
20