1
53-1002148-02
03 June 2011
®
Fabric OS
Administrator’s Guide
Supporting Fabric OS v7.0.0
MK-99COM096-01
Copyright © 2006-2011 Brocade Communications Systems, Inc. All Rights Reserved.
Brocade, the B-wing symbol, BigIron, DCFM, DCX, Fabric OS, FastIron, IronView, NetIron, SAN Health, ServerIron, TurboIron, and
Wingspan are registered trademarks, and Brocade Assurance, Brocade NET Health, Brocade One, Extraordinary Networks,
MyBrocade, VCS, and VDX are trademarks of Brocade Communications Systems, Inc., in the United States and/or in other
countries. Other brands, products, or service names mentioned are or may be trademarks or service marks of their respective
owners.
Notice: This document is for informational purposes only and does not set forth any warranty, expressed or implied, concerning
any equipment, equipment feature, or service offered or to be offered by Brocade. Brocade reserves the right to make changes to
this document at any time, without notice, and assumes no responsibility for its use. This informational document describes
features that may not be currently available. Contact a Brocade sales office for information on feature and product availability.
Export of technical data contained in this document may require an export license from the United States government.
The authors and Brocade Communications Systems, Inc. shall have no liability or responsibility to any person or entity with
respect to any loss, cost, liability, or damages arising from the information contained in this book or the computer programs that
accompany it.
The product described by this document may contain “open source” software covered by the GNU General Public License or other
open source license agreements. To find out which open source software is included in Brocade products, view the licensing
terms applicable to the open source software, and obtain a copy of the programming source code, please visit
http://www.brocade.com/support/oscd.
Brocade Communications Systems, Incorporated
Corporate and Latin American Headquarters
Brocade Communications Systems, Inc.
130 Holger Way
San Jose, CA 95134
Tel: 1-408-333-8000
Fax: 1-408-333-8101
E-mail: [email protected]
Asia-Pacific Headquarters
Brocade Communications Systems China HK, Ltd.
No. 1 Guanghua Road
Chao Yang District
Units 2718 and 2818
Beijing 100020, China
Tel: +8610 6588 8888
Fax: +8610 6588 9999
E-mail: [email protected]
European Headquarters
Brocade Communications Switzerland Sàrl
Centre Swissair
Tour B - 4ème étage
29, Route de l'Aéroport
Case Postale 105
CH-1215 Genève 15
Switzerland
Tel: +41 22 799 5640
Fax: +41 22 799 5641
E-mail: [email protected]
Asia-Pacific Headquarters
Brocade Communications Systems Co., Ltd. (Shenzhen WFOE)
Citic Plaza
No. 233 Tian He Road North
Unit 1308 – 13th Floor
Guangzhou, China
Tel: +8620 3891 2000
Fax: +8620 3891 2111
E-mail: [email protected]
Document History
Title
Publication number
Summary of changes
Date
Fabric OS Procedures Guide
53-0000518-02
First released edition.
April 2003
Fabric OS Procedures Guide
53-0000518-03
Revised for Fabric OS v4.2.0.
December 2003
Fabric OS Procedures Guide
53-0000518-04
Revised to include switch-specific
information.
March 2004
Fabric OS Procedures Guide
53-0000518-05
Revised for Fabric OS v4.4.0.
September 2004
Fabric OS Procedures Guide
53-0000518-06
Revised to add RADIUS and SSL
procedures.
October 2004
Fabric OS Administrator’s Guide
53-0000518-07
Revised book title. Added information
about 200E, 4012, and 48000
switches.
April 2005
Fabric OS Administrator’s Guide
53-1000043-01
Revised for Fabric OS v5.1.0.
January 2006
Title
Publication number
Summary of changes
Date
Fabric OS Administrator’s Guide
53-1000043-02
Removed SilkWorm 4016 and 4020
from supported switches; FCIP
chapter updates.
June 2006
Fabric OS Administrator’s Guide
53-1000239-01
Revised for Fabric OS v5.2.0 features.
Added new hardware platforms:
Brocade FC4-48 and FC4-16IP.
September 2006
Fabric OS Administrator’s Guide
53-1000448-01
Added Fabric OS v5.3.0 features.
Added support for new hardware
platforms: Brocade 7600, FA4-18, and
FC10-6.
15 June 2007
Fabric OS Administrator’s Guide
53-1000598-01
Added Fabric OS v6.0.0 features.
Added support for new hardware
platforms: Brocade DCX Backbone,
FC8-16, FC8-32, and FC8-48.
19 October 2007
Fabric OS Administrator’s Guide
53-1000598-02
Changed “DCX” and “DCX director” to
the correct name: Brocade DCX
Backbone. Also, added the word
“director” to the 48000.
22 January 2008
Fabric OS Administrator’s Guide
53-1000598-03
Added Fabric OS v6.1.0 features.
Added support for new hardware
platforms: Brocade 5300, 5100, and
300.
12 March 2008
Fabric OS Administrator’s Guide
53-1000598-04
Updated document to streamline
content. No new hardware or Fabric
OS features.
18 July 2008
Fabric OS Administrator’s Guide
53-1001185-01
Added Fabric OS v 6.2.0 software
features and support for new
hardware platforms: Brocade DCX-4S.
24 November 2008
Fabric OS Administrator’s Guide
53-1001336-01
Added Fabric OS v6.3.0 software
features and support for new
hardware platforms.
July 2009
Fabric OS Administrator’s Guide
53-1001336-02
Incorporate release notes from Fabric
OS v6.3.0 and v6.3.0a.
November 2009
Fabric OS Administrator’s Guide
53-1001763-01
Added enhancements and new
features for Fabric OS v6.4.0. Added
support for the Brocade VA-40FC
hardware.
March 2010
Fabric OS Administrator’s Guide
53-1001763-02
Corrected minor errors. Added
additional clarification in some
places.
September 2010
Fabric OS Administrator’s Guide
53-1002148-01
Added Fabric OS v7.0.0 software
features and support for new
hardware platforms: Brocade 6510,
DCX 8510-4, and DCX 8510-8.
April 2011
Fabric OS Administrator’s Guide
53-1002148-02
Corrected errors and added additional
explanations for some features.
June 2011
Fabric OS Administrator’s Guide
53-1002148-02
iii
iv
Fabric OS Administrator’s Guide
53-1002148-02
Contents
About This Document
In this chapter . . . . . . . . . . . . . . . . . . . . . . . . . . . . . . . . . . . . . . . . . xxxiii
How this document is organized . . . . . . . . . . . . . . . . . . . . . . . . . . xxxiii
Supported hardware and software . . . . . . . . . . . . . . . . . . . . . . . . xxxiv
What’s new in this document . . . . . . . . . . . . . . . . . . . . . . . . . . . . . . xxxv
Document conventions . . . . . . . . . . . . . . . . . . . . . . . . . . . . . . . . . . xxxvi
Notice to the reader . . . . . . . . . . . . . . . . . . . . . . . . . . . . . . . . . . . . xxxvii
Additional information. . . . . . . . . . . . . . . . . . . . . . . . . . . . . . . . . . xxxviii
Getting technical help . . . . . . . . . . . . . . . . . . . . . . . . . . . . . . . . . . xxxviii
Document feedback . . . . . . . . . . . . . . . . . . . . . . . . . . . . . . . . . . . . xxxix
Section I
Chapter 1
Standard Features
Understanding Fibre Channel Services
In this chapter . . . . . . . . . . . . . . . . . . . . . . . . . . . . . . . . . . . . . . . . . . . . 3
Fibre Channel services overview . . . . . . . . . . . . . . . . . . . . . . . . . . . . . 3
Management Server . . . . . . . . . . . . . . . . . . . . . . . . . . . . . . . . . . . . . . . 4
Platform services . . . . . . . . . . . . . . . . . . . . . . . . . . . . . . . . . . . . . . . . . 4
Platform services in a Virtual Fabric. . . . . . . . . . . . . . . . . . . . . . . 5
Enabling platform services . . . . . . . . . . . . . . . . . . . . . . . . . . . . . . 5
Disabling platform services. . . . . . . . . . . . . . . . . . . . . . . . . . . . . . 5
Management server database. . . . . . . . . . . . . . . . . . . . . . . . . . . . . . . 6
Displaying the management server ACL. . . . . . . . . . . . . . . . . . . . 6
Adding a member to the ACL. . . . . . . . . . . . . . . . . . . . . . . . . . . . . 6
Deleting a member from the ACL . . . . . . . . . . . . . . . . . . . . . . . . . 7
Viewing the contents of the management server database . . . . 8
Clearing the management server database . . . . . . . . . . . . . . . . 9
Topology discovery . . . . . . . . . . . . . . . . . . . . . . . . . . . . . . . . . . . . . . . . 9
Displaying topology discovery status . . . . . . . . . . . . . . . . . . . . . . 9
Enabling topology discovery . . . . . . . . . . . . . . . . . . . . . . . . . . . . . 9
Disabling topology discovery . . . . . . . . . . . . . . . . . . . . . . . . . . . . 10
Fabric OS Administrator’s Guide
53-1002148-02
v
Device login . . . . . . . . . . . . . . . . . . . . . . . . . . . . . . . . . . . . . . . . . . . . . 10
Principal switch . . . . . . . . . . . . . . . . . . . . . . . . . . . . . . . . . . . . . . 11
E_Port login . . . . . . . . . . . . . . . . . . . . . . . . . . . . . . . . . . . . . . . . . 11
Fabric login . . . . . . . . . . . . . . . . . . . . . . . . . . . . . . . . . . . . . . . . . . 11
Port login process . . . . . . . . . . . . . . . . . . . . . . . . . . . . . . . . . . . . 11
RSCN causes . . . . . . . . . . . . . . . . . . . . . . . . . . . . . . . . . . . . . . . . 12
High availability of daemon processes . . . . . . . . . . . . . . . . . . . . . . . 13
Chapter 2
Performing Basic Configuration Tasks
In this chapter . . . . . . . . . . . . . . . . . . . . . . . . . . . . . . . . . . . . . . . . . . . 15
Fabric OS overview . . . . . . . . . . . . . . . . . . . . . . . . . . . . . . . . . . . . . . . 15
Fabric OS command line interface. . . . . . . . . . . . . . . . . . . . . . . . . . . 16
Console sessions using the serial port. . . . . . . . . . . . . . . . . . . . 16
Telnet or SSH sessions . . . . . . . . . . . . . . . . . . . . . . . . . . . . . . . . 17
Getting help on a command . . . . . . . . . . . . . . . . . . . . . . . . . . . . 18
Password modification . . . . . . . . . . . . . . . . . . . . . . . . . . . . . . . . . . . . 19
Default account passwords. . . . . . . . . . . . . . . . . . . . . . . . . . . . . 19
The Ethernet interface on your switch . . . . . . . . . . . . . . . . . . . . . . . . 20
Virtual Fabrics and the Ethernet interface . . . . . . . . . . . . . . . . . 20
Displaying the network interface settings . . . . . . . . . . . . . . . . . 21
Static Ethernet addresses. . . . . . . . . . . . . . . . . . . . . . . . . . . . . . 22
DHCP activation . . . . . . . . . . . . . . . . . . . . . . . . . . . . . . . . . . . . . . 23
IPv6 autoconfiguration . . . . . . . . . . . . . . . . . . . . . . . . . . . . . . . . 24
Date and time settings . . . . . . . . . . . . . . . . . . . . . . . . . . . . . . . . . . . . 25
Setting the date and time . . . . . . . . . . . . . . . . . . . . . . . . . . . . . . 25
Time zone settings . . . . . . . . . . . . . . . . . . . . . . . . . . . . . . . . . . . . 26
Network time protocol . . . . . . . . . . . . . . . . . . . . . . . . . . . . . . . . . 27
Domain IDs . . . . . . . . . . . . . . . . . . . . . . . . . . . . . . . . . . . . . . . . . . . . . 28
Displaying the domain IDs. . . . . . . . . . . . . . . . . . . . . . . . . . . . . . 29
Setting the domain ID . . . . . . . . . . . . . . . . . . . . . . . . . . . . . . . . . 30
Switch names . . . . . . . . . . . . . . . . . . . . . . . . . . . . . . . . . . . . . . . . . . . 30
Customizing the switch name . . . . . . . . . . . . . . . . . . . . . . . . . . . 30
Chassis names . . . . . . . . . . . . . . . . . . . . . . . . . . . . . . . . . . . . . . . . . . 31
Customizing chassis names . . . . . . . . . . . . . . . . . . . . . . . . . . . . 31
Fabric name. . . . . . . . . . . . . . . . . . . . . . . . . . . . . . . . . . . . . . . . . . . . . 31
Configuring the fabric name . . . . . . . . . . . . . . . . . . . . . . . . . . . . 31
High availability considerations . . . . . . . . . . . . . . . . . . . . . . . . . 32
Upgrade and downgrade considerations . . . . . . . . . . . . . . . . . . 32
Config file upload and download considerations. . . . . . . . . . . . 32
Switch activation and deactivation . . . . . . . . . . . . . . . . . . . . . . . . . . 32
Disabling a switch . . . . . . . . . . . . . . . . . . . . . . . . . . . . . . . . . . . . 32
Enabling a switch . . . . . . . . . . . . . . . . . . . . . . . . . . . . . . . . . . . . . 32
Switch and enterprise-class platform shutdown. . . . . . . . . . . . . . . . 32
Powering off a Brocade switch . . . . . . . . . . . . . . . . . . . . . . . . . . 33
Powering off a Brocade enterprise-class platform. . . . . . . . . . . 33
vi
Fabric OS Administrator’s Guide
53-1002148-02
Basic connections . . . . . . . . . . . . . . . . . . . . . . . . . . . . . . . . . . . . . . . . 34
Device connection . . . . . . . . . . . . . . . . . . . . . . . . . . . . . . . . . . . . 34
Switch connection . . . . . . . . . . . . . . . . . . . . . . . . . . . . . . . . . . . . 34
Chapter 3
Performing Advanced Configuration Tasks
In this chapter . . . . . . . . . . . . . . . . . . . . . . . . . . . . . . . . . . . . . . . . . . . 35
PIDs and PID binding overview. . . . . . . . . . . . . . . . . . . . . . . . . . . . . . 35
Core PID addressing mode . . . . . . . . . . . . . . . . . . . . . . . . . . . . . 36
Fixed addressing mode . . . . . . . . . . . . . . . . . . . . . . . . . . . . . . . . 36
10-bit addressing mode . . . . . . . . . . . . . . . . . . . . . . . . . . . . . . . 36
256-area addressing mode. . . . . . . . . . . . . . . . . . . . . . . . . . . . . 37
WWN-based PID assignment . . . . . . . . . . . . . . . . . . . . . . . . . . . 37
Ports. . . . . . . . . . . . . . . . . . . . . . . . . . . . . . . . . . . . . . . . . . . . . . . . . . . 39
Setting port names . . . . . . . . . . . . . . . . . . . . . . . . . . . . . . . . . . . 40
Port identification by slot and port number . . . . . . . . . . . . . . . . 40
Port identification by port area ID. . . . . . . . . . . . . . . . . . . . . . . . 41
Port identification by index . . . . . . . . . . . . . . . . . . . . . . . . . . . . . 41
Swapping port area IDs . . . . . . . . . . . . . . . . . . . . . . . . . . . . . . . . 42
Port activation and deactivation . . . . . . . . . . . . . . . . . . . . . . . . . 42
Port decommissioning . . . . . . . . . . . . . . . . . . . . . . . . . . . . . . . . . 43
Setting port speeds . . . . . . . . . . . . . . . . . . . . . . . . . . . . . . . . . . . 44
Setting the same speed for all ports on the switch. . . . . . . . . . 44
Setting port speed for a port octet . . . . . . . . . . . . . . . . . . . . . . . 44
Blade terminology and compatibility . . . . . . . . . . . . . . . . . . . . . . . . . 45
CP blades . . . . . . . . . . . . . . . . . . . . . . . . . . . . . . . . . . . . . . . . . . . 46
Core blades . . . . . . . . . . . . . . . . . . . . . . . . . . . . . . . . . . . . . . . . . 47
Port and application blade compatibility . . . . . . . . . . . . . . . . . . 47
FX8-24 compatibility notes . . . . . . . . . . . . . . . . . . . . . . . . . . . . . 48
Enabling and disabling blades . . . . . . . . . . . . . . . . . . . . . . . . . . . . . . 48
Enabling blades . . . . . . . . . . . . . . . . . . . . . . . . . . . . . . . . . . . . . . 49
Disabling blades. . . . . . . . . . . . . . . . . . . . . . . . . . . . . . . . . . . . . . 50
Blade swapping . . . . . . . . . . . . . . . . . . . . . . . . . . . . . . . . . . . . . . . . . . 50
How blades are swapped . . . . . . . . . . . . . . . . . . . . . . . . . . . . . . 51
Swapping blades . . . . . . . . . . . . . . . . . . . . . . . . . . . . . . . . . . . . . 52
Power management . . . . . . . . . . . . . . . . . . . . . . . . . . . . . . . . . . . . . . 53
Powering off a port blade . . . . . . . . . . . . . . . . . . . . . . . . . . . . . . 53
Powering on a port blade . . . . . . . . . . . . . . . . . . . . . . . . . . . . . . 53
Equipment status . . . . . . . . . . . . . . . . . . . . . . . . . . . . . . . . . . . . . . . . 54
Checking switch operation . . . . . . . . . . . . . . . . . . . . . . . . . . . . . 54
Verifying High Availability features (enterprise-class
platforms only) . . . . . . . . . . . . . . . . . . . . . . . . . . . . . . . . . . . . . . . 54
Verifying fabric connectivity. . . . . . . . . . . . . . . . . . . . . . . . . . . . . 55
Verifying device connectivity . . . . . . . . . . . . . . . . . . . . . . . . . . . . 55
Track and control switch changes . . . . . . . . . . . . . . . . . . . . . . . . . . . 55
Enabling the track changes feature . . . . . . . . . . . . . . . . . . . . . . 56
Displaying the status of the track changes feature. . . . . . . . . . 56
Viewing the switch status policy threshold values. . . . . . . . . . . 56
Setting the switch status policy threshold values . . . . . . . . . . . 57
Fabric OS Administrator’s Guide
53-1002148-02
vii
Audit log configuration . . . . . . . . . . . . . . . . . . . . . . . . . . . . . . . . . . . . 58
Verifying host syslog prior to configuring the audit log . . . . . . . 59
Configuring an audit log for specific event classes . . . . . . . . . . 59
Chapter 4
Routing Traffic
In this chapter . . . . . . . . . . . . . . . . . . . . . . . . . . . . . . . . . . . . . . . . . . . 61
Routing overview . . . . . . . . . . . . . . . . . . . . . . . . . . . . . . . . . . . . . . . . . 61
Paths and route selection . . . . . . . . . . . . . . . . . . . . . . . . . . . . . . 62
FSPF . . . . . . . . . . . . . . . . . . . . . . . . . . . . . . . . . . . . . . . . . . . . . . . 62
Fibre Channel NAT . . . . . . . . . . . . . . . . . . . . . . . . . . . . . . . . . . . . 63
Inter-switch links . . . . . . . . . . . . . . . . . . . . . . . . . . . . . . . . . . . . . . . . . 64
Buffer credits . . . . . . . . . . . . . . . . . . . . . . . . . . . . . . . . . . . . . . . . 65
Virtual channels . . . . . . . . . . . . . . . . . . . . . . . . . . . . . . . . . . . . . . 65
Gateway links. . . . . . . . . . . . . . . . . . . . . . . . . . . . . . . . . . . . . . . . . . . . 66
Configuring a link through a gateway . . . . . . . . . . . . . . . . . . . . . 67
Inter-chassis links . . . . . . . . . . . . . . . . . . . . . . . . . . . . . . . . . . . . . . . . 68
Supported topologies. . . . . . . . . . . . . . . . . . . . . . . . . . . . . . . . . . 69
Routing policies . . . . . . . . . . . . . . . . . . . . . . . . . . . . . . . . . . . . . . . . . . 72
Displaying the current routing policy . . . . . . . . . . . . . . . . . . . . . 72
Exchange-based routing . . . . . . . . . . . . . . . . . . . . . . . . . . . . . . . 72
Port-based routing . . . . . . . . . . . . . . . . . . . . . . . . . . . . . . . . . . . . 73
AP route policy . . . . . . . . . . . . . . . . . . . . . . . . . . . . . . . . . . . . . . . 73
Route selection . . . . . . . . . . . . . . . . . . . . . . . . . . . . . . . . . . . . . . . . . . 74
Dynamic Load Sharing. . . . . . . . . . . . . . . . . . . . . . . . . . . . . . . . . 74
Static route assignment . . . . . . . . . . . . . . . . . . . . . . . . . . . . . . . 75
Frame order delivery . . . . . . . . . . . . . . . . . . . . . . . . . . . . . . . . . . . . . . 76
Forcing in-order frame delivery across topology changes . . . . . 77
Restoring out-of-order frame delivery across topology
changes . . . . . . . . . . . . . . . . . . . . . . . . . . . . . . . . . . . . . . . . . . . . 77
Lossless Dynamic Load Sharing on ports . . . . . . . . . . . . . . . . . . . . . 77
Lossless core . . . . . . . . . . . . . . . . . . . . . . . . . . . . . . . . . . . . . . . . 78
Configuring Lossless Dynamic Load Sharing . . . . . . . . . . . . . . . 79
Lossless Dynamic Load Sharing in Virtual Fabrics . . . . . . . . . . 79
Forward error correction . . . . . . . . . . . . . . . . . . . . . . . . . . . . . . . . . . . 80
Frame Redirection. . . . . . . . . . . . . . . . . . . . . . . . . . . . . . . . . . . . . . . . 80
Creating a frame redirect zone . . . . . . . . . . . . . . . . . . . . . . . . . . 81
Deleting a frame redirect zone . . . . . . . . . . . . . . . . . . . . . . . . . . 82
Viewing redirect zones. . . . . . . . . . . . . . . . . . . . . . . . . . . . . . . . . 82
Chapter 5
Managing User Accounts
In this chapter . . . . . . . . . . . . . . . . . . . . . . . . . . . . . . . . . . . . . . . . . . . 83
User accounts overview . . . . . . . . . . . . . . . . . . . . . . . . . . . . . . . . . . . 83
Role-Based Access Control . . . . . . . . . . . . . . . . . . . . . . . . . . . . . 84
The management channel . . . . . . . . . . . . . . . . . . . . . . . . . . . . . 85
Managing user-defined roles . . . . . . . . . . . . . . . . . . . . . . . . . . . 86
viii
Fabric OS Administrator’s Guide
53-1002148-02
Local database user accounts . . . . . . . . . . . . . . . . . . . . . . . . . . . . . . 87
Default accounts . . . . . . . . . . . . . . . . . . . . . . . . . . . . . . . . . . . . . 87
Local account passwords . . . . . . . . . . . . . . . . . . . . . . . . . . . . . . 89
Local account database distribution . . . . . . . . . . . . . . . . . . . . . . . . . 90
Distributing the local user database . . . . . . . . . . . . . . . . . . . . . 90
Accepting distribution of user databases on the local switch . 90
Rejecting distributed user databases on the local switch . . . . 91
Password policies . . . . . . . . . . . . . . . . . . . . . . . . . . . . . . . . . . . . . . . . 91
Password strength policy. . . . . . . . . . . . . . . . . . . . . . . . . . . . . . . 91
Password history policy . . . . . . . . . . . . . . . . . . . . . . . . . . . . . . . . 92
Password expiration policy . . . . . . . . . . . . . . . . . . . . . . . . . . . . . 93
Account lockout policy . . . . . . . . . . . . . . . . . . . . . . . . . . . . . . . . . 93
The boot PROM password . . . . . . . . . . . . . . . . . . . . . . . . . . . . . . . . . 95
Setting the boot PROM password for a switch with a
recovery string . . . . . . . . . . . . . . . . . . . . . . . . . . . . . . . . . . . . . . . 95
Setting the boot PROM password for a director with a
recovery string . . . . . . . . . . . . . . . . . . . . . . . . . . . . . . . . . . . . . . . 96
Setting the boot PROM password for a switch without a
recovery string . . . . . . . . . . . . . . . . . . . . . . . . . . . . . . . . . . . . . . . 97
Setting the boot PROM password for a director without a
recovery string . . . . . . . . . . . . . . . . . . . . . . . . . . . . . . . . . . . . . . . 98
The authentication model using RADIUS and LDAP . . . . . . . . . . . . . 99
Setting the switch authentication mode . . . . . . . . . . . . . . . . .101
Fabric OS user accounts . . . . . . . . . . . . . . . . . . . . . . . . . . . . . .101
Fabric OS users on the RADIUS server . . . . . . . . . . . . . . . . . . .103
The RADIUS server. . . . . . . . . . . . . . . . . . . . . . . . . . . . . . . . . . .105
LDAP configuration and Microsoft Active Directory . . . . . . . . .111
Authentication servers on the switch . . . . . . . . . . . . . . . . . . . .114
Configuring local authentication as backup. . . . . . . . . . . . . . .116
Chapter 6
Configuring Protocols
In this chapter . . . . . . . . . . . . . . . . . . . . . . . . . . . . . . . . . . . . . . . . . . 117
Security protocols . . . . . . . . . . . . . . . . . . . . . . . . . . . . . . . . . . . . . . . 117
Secure Copy. . . . . . . . . . . . . . . . . . . . . . . . . . . . . . . . . . . . . . . . . . . .118
Setting up SCP for configUploads and downloads . . . . . . . . .119
Secure Shell protocol . . . . . . . . . . . . . . . . . . . . . . . . . . . . . . . . . . . .119
SSH public key authentication . . . . . . . . . . . . . . . . . . . . . . . . .120
Secure Sockets Layer protocol . . . . . . . . . . . . . . . . . . . . . . . . . . . . .122
Browser and Java support . . . . . . . . . . . . . . . . . . . . . . . . . . . . .122
SSL configuration overview . . . . . . . . . . . . . . . . . . . . . . . . . . . .123
Certificate authorities . . . . . . . . . . . . . . . . . . . . . . . . . . . . . . . .123
The browser . . . . . . . . . . . . . . . . . . . . . . . . . . . . . . . . . . . . . . . .125
Root certificates for the Java Plug-in . . . . . . . . . . . . . . . . . . . .126
Simple Network Management Protocol . . . . . . . . . . . . . . . . . . . . . .127
SNMP and Virtual Fabrics . . . . . . . . . . . . . . . . . . . . . . . . . . . . .128
The security level . . . . . . . . . . . . . . . . . . . . . . . . . . . . . . . . . . . .129
The snmpConfig command . . . . . . . . . . . . . . . . . . . . . . . . . . . .129
Fabric OS Administrator’s Guide
53-1002148-02
ix
Telnet protocol . . . . . . . . . . . . . . . . . . . . . . . . . . . . . . . . . . . . . . . . . .129
Blocking Telnet . . . . . . . . . . . . . . . . . . . . . . . . . . . . . . . . . . . . . .129
Unblocking Telnet. . . . . . . . . . . . . . . . . . . . . . . . . . . . . . . . . . . .131
Listener applications. . . . . . . . . . . . . . . . . . . . . . . . . . . . . . . . . . . . .131
Ports and applications used by switches . . . . . . . . . . . . . . . . . . . .131
Port configuration . . . . . . . . . . . . . . . . . . . . . . . . . . . . . . . . . . .132
Chapter 7
Configuring Security Policies
In this chapter . . . . . . . . . . . . . . . . . . . . . . . . . . . . . . . . . . . . . . . . . .133
ACL policies overview . . . . . . . . . . . . . . . . . . . . . . . . . . . . . . . . . . . .133
How the ACL policies are stored . . . . . . . . . . . . . . . . . . . . . . . .133
Policy members . . . . . . . . . . . . . . . . . . . . . . . . . . . . . . . . . . . . .134
ACL policy management . . . . . . . . . . . . . . . . . . . . . . . . . . . . . . . . . .134
Displaying ACL policies . . . . . . . . . . . . . . . . . . . . . . . . . . . . . . .135
Saving changes without activating the policies . . . . . . . . . . . .135
Activating policy changes . . . . . . . . . . . . . . . . . . . . . . . . . . . . .135
Deleting an ACL policy . . . . . . . . . . . . . . . . . . . . . . . . . . . . . . . .135
Adding a member to an existing ACL policy . . . . . . . . . . . . . . .136
Removing a member from an ACL policy . . . . . . . . . . . . . . . . .136
Aborting unsaved policy changes . . . . . . . . . . . . . . . . . . . . . . .136
FCS policies . . . . . . . . . . . . . . . . . . . . . . . . . . . . . . . . . . . . . . . . . . . .137
FCS policy restrictions . . . . . . . . . . . . . . . . . . . . . . . . . . . . . . . .137
Ensuring fabric domains share policies . . . . . . . . . . . . . . . . . .138
Creating an FCS policy. . . . . . . . . . . . . . . . . . . . . . . . . . . . . . . .138
Modifying the order of FCS switches . . . . . . . . . . . . . . . . . . . .139
FCS policy distribution . . . . . . . . . . . . . . . . . . . . . . . . . . . . . . . .139
DCC policies. . . . . . . . . . . . . . . . . . . . . . . . . . . . . . . . . . . . . . . . . . . .140
DCC policy restrictions. . . . . . . . . . . . . . . . . . . . . . . . . . . . . . . . 141
Creating a DCC policy . . . . . . . . . . . . . . . . . . . . . . . . . . . . . . . . 141
Deleting a DCC policy. . . . . . . . . . . . . . . . . . . . . . . . . . . . . . . . .142
DCC policy behavior with Fabric Assigned PWWNs . . . . . . . . .143
SCC Policies . . . . . . . . . . . . . . . . . . . . . . . . . . . . . . . . . . . . . . . . . . . .144
Creating an SCC policy. . . . . . . . . . . . . . . . . . . . . . . . . . . . . . . .145
Authentication policy for fabric elements . . . . . . . . . . . . . . . . . . . .145
E_Port authentication . . . . . . . . . . . . . . . . . . . . . . . . . . . . . . . .146
Device authentication policy . . . . . . . . . . . . . . . . . . . . . . . . . . .148
AUTH policy restrictions . . . . . . . . . . . . . . . . . . . . . . . . . . . . . . .149
Authentication protocols . . . . . . . . . . . . . . . . . . . . . . . . . . . . . .150
Secret key pairs for DH-CHAP . . . . . . . . . . . . . . . . . . . . . . . . . .151
FCAP configuration overview. . . . . . . . . . . . . . . . . . . . . . . . . . .152
Fabric-wide distribution of the Auth policy . . . . . . . . . . . . . . . .155
x
Fabric OS Administrator’s Guide
53-1002148-02
IP Filter policy . . . . . . . . . . . . . . . . . . . . . . . . . . . . . . . . . . . . . . . . . .155
Creating an IP Filter policy. . . . . . . . . . . . . . . . . . . . . . . . . . . . .155
Cloning an IP Filter policy . . . . . . . . . . . . . . . . . . . . . . . . . . . . .156
Displaying an IP Filter policy . . . . . . . . . . . . . . . . . . . . . . . . . . .156
Saving an IP Filter policy . . . . . . . . . . . . . . . . . . . . . . . . . . . . . .156
Activating an IP Filter policy. . . . . . . . . . . . . . . . . . . . . . . . . . . .156
Deleting an IP Filter policy . . . . . . . . . . . . . . . . . . . . . . . . . . . . .157
IP Filter policy rules . . . . . . . . . . . . . . . . . . . . . . . . . . . . . . . . . .157
IP Filter policy enforcement. . . . . . . . . . . . . . . . . . . . . . . . . . . .160
Adding a rule to an IP Filter policy. . . . . . . . . . . . . . . . . . . . . . .161
Deleting a rule to an IP Filter policy . . . . . . . . . . . . . . . . . . . . .161
Aborting an IP Filter transaction . . . . . . . . . . . . . . . . . . . . . . . .161
IP Filter policy distribution . . . . . . . . . . . . . . . . . . . . . . . . . . . . .161
Managing filter thresholds . . . . . . . . . . . . . . . . . . . . . . . . . . . .162
Policy database distribution . . . . . . . . . . . . . . . . . . . . . . . . . . . . . . .162
Database distribution settings . . . . . . . . . . . . . . . . . . . . . . . . .163
ACL policy distribution to other switches . . . . . . . . . . . . . . . . .164
Fabric-wide enforcement . . . . . . . . . . . . . . . . . . . . . . . . . . . . . .165
Notes on joining a switch to the fabric . . . . . . . . . . . . . . . . . . .166
Management interface security . . . . . . . . . . . . . . . . . . . . . . . . . . . .168
Configuration examples. . . . . . . . . . . . . . . . . . . . . . . . . . . . . . .169
IPsec protocols . . . . . . . . . . . . . . . . . . . . . . . . . . . . . . . . . . . . . .170
Security associations. . . . . . . . . . . . . . . . . . . . . . . . . . . . . . . . . 171
Authentication and encryption algorithms . . . . . . . . . . . . . . . . 171
IPsec policies . . . . . . . . . . . . . . . . . . . . . . . . . . . . . . . . . . . . . . .172
IKE policies . . . . . . . . . . . . . . . . . . . . . . . . . . . . . . . . . . . . . . . . .172
Creating the tunnel . . . . . . . . . . . . . . . . . . . . . . . . . . . . . . . . . . 174
Example of an End-to-End Transport Tunnel mode . . . . . . . . . 176
Chapter 8
Maintaining the Switch Configuration File
In this chapter . . . . . . . . . . . . . . . . . . . . . . . . . . . . . . . . . . . . . . . . . .179
Configuration settings. . . . . . . . . . . . . . . . . . . . . . . . . . . . . . . . . . . .179
Configuration file format . . . . . . . . . . . . . . . . . . . . . . . . . . . . . .180
Configuration file backup . . . . . . . . . . . . . . . . . . . . . . . . . . . . . . . . .182
Uploading a configuration file in interactive mode . . . . . . . . .183
Configuration file restoration . . . . . . . . . . . . . . . . . . . . . . . . . . . . . .184
Restrictions. . . . . . . . . . . . . . . . . . . . . . . . . . . . . . . . . . . . . . . . .184
Configuration download without disabling a switch . . . . . . . .186
Configurations across a fabric . . . . . . . . . . . . . . . . . . . . . . . . . . . . .188
Downloading a configuration file from one switch to
another same model switch . . . . . . . . . . . . . . . . . . . . . . . . . . .188
Security considerations . . . . . . . . . . . . . . . . . . . . . . . . . . . . . . .188
Configuration management for Virtual Fabrics . . . . . . . . . . . . . . . .188
Uploading a configuration file from a switch with
Virtual Fabrics enabled . . . . . . . . . . . . . . . . . . . . . . . . . . . . . . .188
Restoring logical switch configuration using configDownload 189
Restrictions. . . . . . . . . . . . . . . . . . . . . . . . . . . . . . . . . . . . . . . . .190
Brocade configuration form . . . . . . . . . . . . . . . . . . . . . . . . . . . . . . .190
Fabric OS Administrator’s Guide
53-1002148-02
xi
Chapter 9
Installing and Maintaining Firmware
In this chapter . . . . . . . . . . . . . . . . . . . . . . . . . . . . . . . . . . . . . . . . . .193
Firmware download process overview . . . . . . . . . . . . . . . . . . . . . . .193
Upgrading and downgrading firmware . . . . . . . . . . . . . . . . . . .195
Considerations for FICON CUP environments . . . . . . . . . . . . .195
HA sync state . . . . . . . . . . . . . . . . . . . . . . . . . . . . . . . . . . . . . . .195
Preparing for a firmware download . . . . . . . . . . . . . . . . . . . . . . . . .196
Connected switches. . . . . . . . . . . . . . . . . . . . . . . . . . . . . . . . . .197
Finding the switch firmware version . . . . . . . . . . . . . . . . . . . . .197
Obtain and decompress firmware . . . . . . . . . . . . . . . . . . . . . .197
Firmware download on switches . . . . . . . . . . . . . . . . . . . . . . . . . . .198
Switch firmware download process overview. . . . . . . . . . . . . .198
Firmware download on an enterprise-class platform . . . . . . . . . . .200
Enterprise-class platform firmware download process
overview . . . . . . . . . . . . . . . . . . . . . . . . . . . . . . . . . . . . . . . . . . .200
Firmware download from a USB device . . . . . . . . . . . . . . . . . . . . . .203
Enabling USB . . . . . . . . . . . . . . . . . . . . . . . . . . . . . . . . . . . . . . .203
Viewing the USB file system . . . . . . . . . . . . . . . . . . . . . . . . . . .203
Downloading from USB using the relative path . . . . . . . . . . . .204
Downloading from USB using the absolute path . . . . . . . . . . .204
FIPS Support . . . . . . . . . . . . . . . . . . . . . . . . . . . . . . . . . . . . . . . . . . .204
Public and Private Key Management . . . . . . . . . . . . . . . . . . . .204
The firmwareDownload Command . . . . . . . . . . . . . . . . . . . . . .205
Power-on Firmware Checksum Test . . . . . . . . . . . . . . . . . . . . .206
Test and restore firmware on switches . . . . . . . . . . . . . . . . . . . . . .206
Testing a different firmware version on a switch . . . . . . . . . . .206
Test and restore firmware on enterprise-class platforms. . . . . . . .208
Testing different firmware versions on enterprise-class
platforms . . . . . . . . . . . . . . . . . . . . . . . . . . . . . . . . . . . . . . . . . .208
Validating a firmware download . . . . . . . . . . . . . . . . . . . . . . . . . . . .211
Chapter 10
Managing Virtual Fabrics
In this chapter . . . . . . . . . . . . . . . . . . . . . . . . . . . . . . . . . . . . . . . . . .213
Virtual Fabrics overview . . . . . . . . . . . . . . . . . . . . . . . . . . . . . . . . . .213
Logical switch overview . . . . . . . . . . . . . . . . . . . . . . . . . . . . . . . . . .214
Default logical switch. . . . . . . . . . . . . . . . . . . . . . . . . . . . . . . . .214
Logical switches and fabric IDs. . . . . . . . . . . . . . . . . . . . . . . . .215
Port assignment in logical switches . . . . . . . . . . . . . . . . . . . . .216
Logical switches and connected devices . . . . . . . . . . . . . . . . . 217
Logical fabric overview . . . . . . . . . . . . . . . . . . . . . . . . . . . . . . . . . . .218
Logical fabric and ISLs. . . . . . . . . . . . . . . . . . . . . . . . . . . . . . . .219
Base switch and extended ISLs . . . . . . . . . . . . . . . . . . . . . . . .220
Management model for logical switches. . . . . . . . . . . . . . . . . . . . .223
Account management and Virtual Fabrics . . . . . . . . . . . . . . . . . . .223
xii
Fabric OS Administrator’s Guide
53-1002148-02
Supported platforms for Virtual Fabrics . . . . . . . . . . . . . . . . . . . . .224
Supported port configurations in the fixed-port switches. . . .224
Supported port configurations in the enterprise-class
platforms . . . . . . . . . . . . . . . . . . . . . . . . . . . . . . . . . . . . . . . . . .224
Virtual Fabrics interaction with other Fabric OS features . . . .225
Limitations and restrictions of Virtual Fabrics . . . . . . . . . . . . . . . .226
Restrictions on XISLs . . . . . . . . . . . . . . . . . . . . . . . . . . . . . . . . .227
Restrictions on moving ports . . . . . . . . . . . . . . . . . . . . . . . . . .227
Enabling Virtual Fabrics mode . . . . . . . . . . . . . . . . . . . . . . . . . . . . .227
Disabling Virtual Fabrics mode . . . . . . . . . . . . . . . . . . . . . . . . . . . .228
Configuring logical switches to use basic configuration values. . .229
Creating a logical switch or base switch . . . . . . . . . . . . . . . . . . . . .229
Executing a command in a different logical switch context . . . . . .231
Deleting a logical switch . . . . . . . . . . . . . . . . . . . . . . . . . . . . . . . . . .232
Adding and removing ports on a logical switch. . . . . . . . . . . . . . . .232
Displaying logical switch configuration . . . . . . . . . . . . . . . . . . . . . .233
Changing the fabric ID of a logical switch . . . . . . . . . . . . . . . . . . . .234
Changing a logical switch to a base switch . . . . . . . . . . . . . . . . . . .234
Setting up IP addresses for a Virtual Fabric . . . . . . . . . . . . . . . . . .235
Removing an IP address for a Virtual Fabric . . . . . . . . . . . . . . . . . .236
Configuring a logical switch to use XISLs . . . . . . . . . . . . . . . . . . . .236
Changing the context to a different logical fabric . . . . . . . . . . . . . .237
Creating a logical fabric using XISLs . . . . . . . . . . . . . . . . . . . . . . . .237
Chapter 11
Administering Advanced Zoning
In this chapter . . . . . . . . . . . . . . . . . . . . . . . . . . . . . . . . . . . . . . . . . .239
Special zones . . . . . . . . . . . . . . . . . . . . . . . . . . . . . . . . . . . . . . . . . .239
Zoning overview. . . . . . . . . . . . . . . . . . . . . . . . . . . . . . . . . . . . . . . . .240
Approaches to zoning . . . . . . . . . . . . . . . . . . . . . . . . . . . . . . . . 241
Zone objects. . . . . . . . . . . . . . . . . . . . . . . . . . . . . . . . . . . . . . . .242
Zone aliases . . . . . . . . . . . . . . . . . . . . . . . . . . . . . . . . . . . . . . . .243
Zone configurations . . . . . . . . . . . . . . . . . . . . . . . . . . . . . . . . . .243
Zoning enforcement. . . . . . . . . . . . . . . . . . . . . . . . . . . . . . . . . .244
Considerations for zoning architecture . . . . . . . . . . . . . . . . . .245
Best practices for zoning . . . . . . . . . . . . . . . . . . . . . . . . . . . . . .246
Broadcast zones . . . . . . . . . . . . . . . . . . . . . . . . . . . . . . . . . . . . . . . .246
Broadcast zones and Admin Domains . . . . . . . . . . . . . . . . . . .246
Broadcast zones and FC-FC routing . . . . . . . . . . . . . . . . . . . . .248
High availability considerations with broadcast zones . . . . . .248
Loop devices and broadcast zones . . . . . . . . . . . . . . . . . . . . .248
Broadcast zones and default zoning mode . . . . . . . . . . . . . . .248
Fabric OS Administrator’s Guide
53-1002148-02
xiii
Zone aliases . . . . . . . . . . . . . . . . . . . . . . . . . . . . . . . . . . . . . . . . . . .248
Creating an alias . . . . . . . . . . . . . . . . . . . . . . . . . . . . . . . . . . . .249
Adding members to an alias . . . . . . . . . . . . . . . . . . . . . . . . . . .249
Removing members from an alias . . . . . . . . . . . . . . . . . . . . . .250
Deleting an alias . . . . . . . . . . . . . . . . . . . . . . . . . . . . . . . . . . . .250
Viewing an alias in the defined configuration . . . . . . . . . . . . .251
Zone creation and maintenance . . . . . . . . . . . . . . . . . . . . . . . . . . .251
Creating a zone . . . . . . . . . . . . . . . . . . . . . . . . . . . . . . . . . . . . .251
Adding devices (members) to a zone . . . . . . . . . . . . . . . . . . . .252
Removing devices (members) from a zone . . . . . . . . . . . . . . .252
Deleting a zone . . . . . . . . . . . . . . . . . . . . . . . . . . . . . . . . . . . . .253
Viewing a zone in the defined configuration . . . . . . . . . . . . . .253
Validating a zone . . . . . . . . . . . . . . . . . . . . . . . . . . . . . . . . . . . .254
Default zoning mode. . . . . . . . . . . . . . . . . . . . . . . . . . . . . . . . . . . . .255
Setting the default zoning mode. . . . . . . . . . . . . . . . . . . . . . . .255
Viewing the current default zone access mode . . . . . . . . . . . .256
Zone database size. . . . . . . . . . . . . . . . . . . . . . . . . . . . . . . . . . . . . .256
Zone configurations . . . . . . . . . . . . . . . . . . . . . . . . . . . . . . . . . . . . .257
Creating a zone configuration . . . . . . . . . . . . . . . . . . . . . . . . . .257
Adding zones (members) to a zone configuration . . . . . . . . . .258
Removing zones (members) from a zone configuration . . . . .258
Enabling a zone configuration . . . . . . . . . . . . . . . . . . . . . . . . .259
Disabling a zone configuration . . . . . . . . . . . . . . . . . . . . . . . . .259
Deleting a zone configuration . . . . . . . . . . . . . . . . . . . . . . . . . .260
Clearing changes to a configuration. . . . . . . . . . . . . . . . . . . . .260
Viewing all zone configuration information . . . . . . . . . . . . . . .260
Viewing selected zone configuration information . . . . . . . . . .261
Viewing the configuration in the effective zone database . . .261
Clearing all zone configurations . . . . . . . . . . . . . . . . . . . . . . . .262
Zone object maintenance. . . . . . . . . . . . . . . . . . . . . . . . . . . . . . . . .262
Copying a zone object . . . . . . . . . . . . . . . . . . . . . . . . . . . . . . . .262
Deleting a zone object . . . . . . . . . . . . . . . . . . . . . . . . . . . . . . . .263
Renaming a zone object . . . . . . . . . . . . . . . . . . . . . . . . . . . . . .264
Zone configuration management. . . . . . . . . . . . . . . . . . . . . . . . . . .264
Security and zoning. . . . . . . . . . . . . . . . . . . . . . . . . . . . . . . . . . . . . .265
Zone merging. . . . . . . . . . . . . . . . . . . . . . . . . . . . . . . . . . . . . . . . . . .265
Fabric segmentation and zoning. . . . . . . . . . . . . . . . . . . . . . . .267
Zone merging scenarios . . . . . . . . . . . . . . . . . . . . . . . . . . . . . .267
Chapter 12
Traffic Isolation Zoning
In this chapter . . . . . . . . . . . . . . . . . . . . . . . . . . . . . . . . . . . . . . . . . . 271
Traffic Isolation Zoning overview . . . . . . . . . . . . . . . . . . . . . . . . . . . 271
TI zone failover . . . . . . . . . . . . . . . . . . . . . . . . . . . . . . . . . . . . . .272
FSPF routing rules and traffic isolation . . . . . . . . . . . . . . . . . . 274
Enhanced TI zones . . . . . . . . . . . . . . . . . . . . . . . . . . . . . . . . . . . . . . 276
Illegal configurations with enhanced TI zones. . . . . . . . . . . . .277
xiv
Fabric OS Administrator’s Guide
53-1002148-02
Traffic Isolation Zoning over FC routers . . . . . . . . . . . . . . . . . . . . . .278
TI within an edge fabric . . . . . . . . . . . . . . . . . . . . . . . . . . . . . . .279
TI within a backbone fabric . . . . . . . . . . . . . . . . . . . . . . . . . . . .280
Limitations of TI zones over FC routers . . . . . . . . . . . . . . . . . .281
General rules for TI zones. . . . . . . . . . . . . . . . . . . . . . . . . . . . . . . . .281
Supported configurations for Traffic Isolation Zoning . . . . . . . . . .282
Additional configuration rules for enhanced TI zones . . . . . . .283
Trunking with TI zones . . . . . . . . . . . . . . . . . . . . . . . . . . . . . . . .283
Limitations and restrictions of Traffic Isolation Zoning . . . . . . . . .283
Admin Domain considerations for Traffic Isolation Zoning . . . . . .284
Virtual Fabric considerations for Traffic Isolation Zoning. . . . . . . .284
Traffic Isolation Zoning over FC routers with Virtual Fabrics . . . . .286
Creating a TI zone . . . . . . . . . . . . . . . . . . . . . . . . . . . . . . . . . . . . . . .287
Creating a TI zone in a base fabric . . . . . . . . . . . . . . . . . . . . . .289
Modifying TI zones. . . . . . . . . . . . . . . . . . . . . . . . . . . . . . . . . . . . . . .290
Changing the state of a TI zone . . . . . . . . . . . . . . . . . . . . . . . . . . . .291
Deleting a TI zone . . . . . . . . . . . . . . . . . . . . . . . . . . . . . . . . . . . . . . .292
Displaying TI zones . . . . . . . . . . . . . . . . . . . . . . . . . . . . . . . . . . . . . .292
Troubleshooting TI zone routing problems . . . . . . . . . . . . . . . . . . .293
Setting up TI over FCR (sample procedure). . . . . . . . . . . . . . . . . . .294
Chapter 13
Bottleneck Detection
In this chapter . . . . . . . . . . . . . . . . . . . . . . . . . . . . . . . . . . . . . . . . . .299
Bottleneck detection overview . . . . . . . . . . . . . . . . . . . . . . . . . . . . .299
Types of bottlenecks . . . . . . . . . . . . . . . . . . . . . . . . . . . . . . . . .300
How bottlenecks are reported. . . . . . . . . . . . . . . . . . . . . . . . . .300
Using alerting parameters to determine whether alerts are
generated . . . . . . . . . . . . . . . . . . . . . . . . . . . . . . . . . . . . . . . . . .301
Supported configurations for bottleneck detection . . . . . . . . . . . .302
Limitations of bottleneck detection . . . . . . . . . . . . . . . . . . . . .302
High availability considerations for bottleneck detection . . . .302
Upgrade and downgrade considerations for bottleneck
detection. . . . . . . . . . . . . . . . . . . . . . . . . . . . . . . . . . . . . . . . . . .302
Trunking considerations for bottleneck detection . . . . . . . . . .303
Virtual Fabrics considerations for bottleneck detection . . . . .303
Access Gateway considerations for bottleneck detection. . . .303
Advanced bottleneck detection settings . . . . . . . . . . . . . . . . . . . . .303
Enabling bottleneck detection on a switch . . . . . . . . . . . . . . . . . . .304
Excluding a port from bottleneck detection . . . . . . . . . . . . . . . . . .305
Displaying bottleneck detection configuration details . . . . . . . . . .305
Changing bottleneck parameters. . . . . . . . . . . . . . . . . . . . . . . . . . .306
Displaying bottleneck statistics . . . . . . . . . . . . . . . . . . . . . . . . . . . .309
Fabric OS Administrator’s Guide
53-1002148-02
xv
Disabling bottleneck detection on a switch . . . . . . . . . . . . . . . . . . 310
Chapter 14
In-flight Encryption and Compression
In this chapter . . . . . . . . . . . . . . . . . . . . . . . . . . . . . . . . . . . . . . . . . .311
In-flight encryption and compression overview. . . . . . . . . . . . . . . .311
Encryption and compression restrictions. . . . . . . . . . . . . . . . .312
How encryption and compression are enabled . . . . . . . . . . . .312
Authentication and key generation. . . . . . . . . . . . . . . . . . . . . .313
Availability considerations . . . . . . . . . . . . . . . . . . . . . . . . . . . . .313
VF mode considerations . . . . . . . . . . . . . . . . . . . . . . . . . . . . . .313
Recommendation for compression. . . . . . . . . . . . . . . . . . . . . .313
Configuring encryption and compression . . . . . . . . . . . . . . . . . . . . 314
Viewing the encryption and compression configuration . . . . .315
Configuring and enabling authentication. . . . . . . . . . . . . . . . . 316
Configuring encryption . . . . . . . . . . . . . . . . . . . . . . . . . . . . . . . 317
Configuring compression. . . . . . . . . . . . . . . . . . . . . . . . . . . . . . 317
Disabling encryption . . . . . . . . . . . . . . . . . . . . . . . . . . . . . . . . .318
Disabling compression . . . . . . . . . . . . . . . . . . . . . . . . . . . . . . .318
Encryption and compression example. . . . . . . . . . . . . . . . . . . . . . .319
Example of enabling encryption and compression on a port .319
Example of disabling encryption and compression. . . . . . . . .322
Chapter 15
Administering NPIV
In this chapter . . . . . . . . . . . . . . . . . . . . . . . . . . . . . . . . . . . . . . . . . .325
NPIV overview . . . . . . . . . . . . . . . . . . . . . . . . . . . . . . . . . . . . . . . . . .325
Upgrade considerations . . . . . . . . . . . . . . . . . . . . . . . . . . . . . .326
Fixed addressing mode . . . . . . . . . . . . . . . . . . . . . . . . . . . . . . .326
10-bit addressing mode . . . . . . . . . . . . . . . . . . . . . . . . . . . . . .326
Configuring NPIV . . . . . . . . . . . . . . . . . . . . . . . . . . . . . . . . . . . . . . . .327
Enabling and disabling NPIV . . . . . . . . . . . . . . . . . . . . . . . . . . . . . .328
Viewing NPIV port configuration information . . . . . . . . . . . . . . . . .329
Viewing virtual PID login information . . . . . . . . . . . . . . . . . . . .330
Chapter 16
Dynamic Fabric Provisioning: Fabric Assigned WWN
In this chapter . . . . . . . . . . . . . . . . . . . . . . . . . . . . . . . . . . . . . . . . . .331
Introduction to Dynamic Fabric Provisioning using FA-PWWN . . . .331
User- and auto-assigned FA-PWWN behavior . . . . . . . . . . . . . . . . .332
Checking for duplicate FA-PWWNs . . . . . . . . . . . . . . . . . . . . . .332
Configuring FA-PWWNs . . . . . . . . . . . . . . . . . . . . . . . . . . . . . . . . . . .332
Configuring an FA-PWWN for an HBA connected to an
Access Gateway . . . . . . . . . . . . . . . . . . . . . . . . . . . . . . . . . . . . .333
Configuring an FA-PWWN for an HBA connected to an
edge switch . . . . . . . . . . . . . . . . . . . . . . . . . . . . . . . . . . . . . . . .334
Supported switches and configurations for FA-PWWN. . . . . . . . . .335
xvi
Fabric OS Administrator’s Guide
53-1002148-02
Configuration upload and download considerations for
FA-PWWN . . . . . . . . . . . . . . . . . . . . . . . . . . . . . . . . . . . . . . . . . . . . . .336
Firmware upgrade and downgrade considerations for FA-PWWN .336
Security considerations for FA-PWWN . . . . . . . . . . . . . . . . . . . . . . .336
Restrictions of FA-PWWN . . . . . . . . . . . . . . . . . . . . . . . . . . . . . . . . .337
Access Gateway N_Port failover with FA-PWWN . . . . . . . . . . . . . . .337
Chapter 17
Managing Administrative Domains
In this chapter . . . . . . . . . . . . . . . . . . . . . . . . . . . . . . . . . . . . . . . . . .339
Administrative Domains overview . . . . . . . . . . . . . . . . . . . . . . . . . .339
Admin Domain features. . . . . . . . . . . . . . . . . . . . . . . . . . . . . . .341
Requirements for Admin Domains . . . . . . . . . . . . . . . . . . . . . .341
Admin Domain access levels. . . . . . . . . . . . . . . . . . . . . . . . . . .341
User-defined Admin Domains . . . . . . . . . . . . . . . . . . . . . . . . . .342
System-defined Admin Domains. . . . . . . . . . . . . . . . . . . . . . . .342
Home Admin Domains and login . . . . . . . . . . . . . . . . . . . . . . .344
Admin Domain member types. . . . . . . . . . . . . . . . . . . . . . . . . .345
Admin Domains and switch WWNs. . . . . . . . . . . . . . . . . . . . . .346
Admin Domain compatibility, availability, and merging . . . . . .348
Admin Domain management for physical fabric administrators . .348
Setting the default zoning mode for Admin Domains . . . . . . .348
Creating an Admin Domain . . . . . . . . . . . . . . . . . . . . . . . . . . . .349
User assignments to Admin Domains . . . . . . . . . . . . . . . . . . .350
Removing an Admin Domain from a user account . . . . . . . . .352
Activating an Admin Domain . . . . . . . . . . . . . . . . . . . . . . . . . . .352
Deactivating an Admin Domain . . . . . . . . . . . . . . . . . . . . . . . .353
Adding members to an existing Admin Domain . . . . . . . . . . . .353
Removing members from an Admin Domain . . . . . . . . . . . . . .354
Renaming an Admin Domain . . . . . . . . . . . . . . . . . . . . . . . . . .354
Deleting an Admin Domain . . . . . . . . . . . . . . . . . . . . . . . . . . . .355
Deleting all user-defined Admin Domains . . . . . . . . . . . . . . . .356
Deleting all user-defined Admin Domains non-disruptively . .356
Validating an Admin Domain member list . . . . . . . . . . . . . . . .360
SAN management with Admin Domains . . . . . . . . . . . . . . . . . . . . .360
CLI commands in an AD context . . . . . . . . . . . . . . . . . . . . . . . .361
Executing a command in a different AD context . . . . . . . . . . .361
Displaying an Admin Domain configuration . . . . . . . . . . . . . . .361
Switching to a different Admin Domain context. . . . . . . . . . . .362
Admin Domain interactions with other Fabric OS features . . .363
Admin Domains, zones, and zone databases . . . . . . . . . . . . .364
Admin Domains and LSAN zones . . . . . . . . . . . . . . . . . . . . . . .365
Configuration upload and download in an AD context . . . . . .366
Section II
Chapter 18
Licensed Features
Administering Licensing
In this chapter . . . . . . . . . . . . . . . . . . . . . . . . . . . . . . . . . . . . . . . . . .369
Fabric OS Administrator’s Guide
53-1002148-02
xvii
Licensing overview . . . . . . . . . . . . . . . . . . . . . . . . . . . . . . . . . . . . . .369
The Brocade 7800 Upgrade license . . . . . . . . . . . . . . . . . . . . . . . .375
ICL licensing. . . . . . . . . . . . . . . . . . . . . . . . . . . . . . . . . . . . . . . . . . . . 376
ICL 1st POD license . . . . . . . . . . . . . . . . . . . . . . . . . . . . . . . . . . 376
ICL 2nd POD license . . . . . . . . . . . . . . . . . . . . . . . . . . . . . . . . . 376
ICL 8-link license . . . . . . . . . . . . . . . . . . . . . . . . . . . . . . . . . . . . 376
ICL 16-link license . . . . . . . . . . . . . . . . . . . . . . . . . . . . . . . . . . .377
8G licensing. . . . . . . . . . . . . . . . . . . . . . . . . . . . . . . . . . . . . . . . . . . .377
Slot-based licensing . . . . . . . . . . . . . . . . . . . . . . . . . . . . . . . . . . . . .377
Upgrade/downgrade considerations . . . . . . . . . . . . . . . . . . . .378
Assigning a license to a slot . . . . . . . . . . . . . . . . . . . . . . . . . . .378
Removing a license from a slot . . . . . . . . . . . . . . . . . . . . . . . . .378
10G licensing. . . . . . . . . . . . . . . . . . . . . . . . . . . . . . . . . . . . . . . . . . .379
Enabling 10 Gbps operation on an FC port . . . . . . . . . . . . . . .380
Enabling the 10 GbE ports on an FX8-24 blade . . . . . . . . . . .381
Time-based licenses . . . . . . . . . . . . . . . . . . . . . . . . . . . . . . . . . . . . .382
Configupload and download considerations . . . . . . . . . . . . . .382
Expired licenses . . . . . . . . . . . . . . . . . . . . . . . . . . . . . . . . . . . . .382
Universal Time-based licenses. . . . . . . . . . . . . . . . . . . . . . . . . . . . .383
Universal Time-based license expiration date . . . . . . . . . . . . .383
Extending a license . . . . . . . . . . . . . . . . . . . . . . . . . . . . . . . . . .383
Deleting a license . . . . . . . . . . . . . . . . . . . . . . . . . . . . . . . . . . .383
Date change restriction . . . . . . . . . . . . . . . . . . . . . . . . . . . . . . .384
Universal Time-based license shelf life . . . . . . . . . . . . . . . . . .384
Viewing installed licenses. . . . . . . . . . . . . . . . . . . . . . . . . . . . . . . . .384
Activating a license . . . . . . . . . . . . . . . . . . . . . . . . . . . . . . . . . . . . . .384
Adding a licensed feature . . . . . . . . . . . . . . . . . . . . . . . . . . . . . . . . .384
Removing a licensed feature . . . . . . . . . . . . . . . . . . . . . . . . . . . . . .385
Ports on Demand . . . . . . . . . . . . . . . . . . . . . . . . . . . . . . . . . . . . . . .386
Displaying installed licenses . . . . . . . . . . . . . . . . . . . . . . . . . . .387
Activating Ports on Demand . . . . . . . . . . . . . . . . . . . . . . . . . . .388
Dynamic Ports on Demand . . . . . . . . . . . . . . . . . . . . . . . . . . . .388
Displaying the port license assignments . . . . . . . . . . . . . . . . .389
Enabling Dynamic Ports on Demand . . . . . . . . . . . . . . . . . . . .389
Disabling Dynamic Ports on Demand. . . . . . . . . . . . . . . . . . . .390
Reserving a port license . . . . . . . . . . . . . . . . . . . . . . . . . . . . . .390
Releasing a port from a POD set. . . . . . . . . . . . . . . . . . . . . . . .391
Chapter 19
Monitoring Fabric Performance
In this chapter . . . . . . . . . . . . . . . . . . . . . . . . . . . . . . . . . . . . . . . . . .393
xviii
Fabric OS Administrator’s Guide
53-1002148-02
Advanced Performance Monitoring overview . . . . . . . . . . . . . . . . .393
Types of monitors. . . . . . . . . . . . . . . . . . . . . . . . . . . . . . . . . . . .393
Restrictions for installing monitors . . . . . . . . . . . . . . . . . . . . . .394
Virtual Fabrics considerations for Advanced
Performance Monitoring . . . . . . . . . . . . . . . . . . . . . . . . . . . . . .394
Access Gateway considerations for Advanced Performance
Monitoring . . . . . . . . . . . . . . . . . . . . . . . . . . . . . . . . . . . . . . . . .395
End-to-end performance monitoring . . . . . . . . . . . . . . . . . . . . . . . .395
Maximum number of EE monitors . . . . . . . . . . . . . . . . . . . . . .395
Supported port configurations for EE monitors . . . . . . . . . . . .396
Adding end-to-end monitors . . . . . . . . . . . . . . . . . . . . . . . . . . .396
Setting a mask for an end-to-end monitor . . . . . . . . . . . . . . . .397
Deleting end-to-end monitors . . . . . . . . . . . . . . . . . . . . . . . . . .398
Displaying end-to-end monitor counters. . . . . . . . . . . . . . . . . .398
Clearing end-to-end monitor counters . . . . . . . . . . . . . . . . . . .399
Frame monitoring . . . . . . . . . . . . . . . . . . . . . . . . . . . . . . . . . . . . . . .400
Creating frame types to be monitored . . . . . . . . . . . . . . . . . . .400
Deleting frame types . . . . . . . . . . . . . . . . . . . . . . . . . . . . . . . . .401
Adding frame monitors to a port. . . . . . . . . . . . . . . . . . . . . . . .402
Removing frame monitors from a port . . . . . . . . . . . . . . . . . . .402
Saving frame monitor configuration . . . . . . . . . . . . . . . . . . . . .402
Displaying frame monitors . . . . . . . . . . . . . . . . . . . . . . . . . . . .403
Clearing frame monitor counters . . . . . . . . . . . . . . . . . . . . . . .403
Top Talker monitors. . . . . . . . . . . . . . . . . . . . . . . . . . . . . . . . . . . . . .404
Top Talker monitors and Fibre Channel routing . . . . . . . . . . . .405
Limitations of Top Talker monitors . . . . . . . . . . . . . . . . . . . . . .406
Adding a Top Talker monitor to a port (port mode) . . . . . . . . .407
Adding Top Talker monitors on all switches in the fabric
(fabric mode) . . . . . . . . . . . . . . . . . . . . . . . . . . . . . . . . . . . . . . .407
Displaying the top n bandwidth-using flows on a port
(port mode). . . . . . . . . . . . . . . . . . . . . . . . . . . . . . . . . . . . . . . . .407
Displaying top talking flows for a given domain ID
(fabric mode) . . . . . . . . . . . . . . . . . . . . . . . . . . . . . . . . . . . . . . .408
Deleting a Top Talker monitor on a port (port mode) . . . . . . .408
Deleting all fabric mode Top Talker monitors. . . . . . . . . . . . . .409
Trunk monitoring . . . . . . . . . . . . . . . . . . . . . . . . . . . . . . . . . . . . . . . .409
Saving and restoring monitor configurations . . . . . . . . . . . . . . . . .409
Performance data collection . . . . . . . . . . . . . . . . . . . . . . . . . . . . . . 410
Chapter 20
Optimizing Fabric Behavior
In this chapter . . . . . . . . . . . . . . . . . . . . . . . . . . . . . . . . . . . . . . . . . . 411
Adaptive Networking overview . . . . . . . . . . . . . . . . . . . . . . . . . . . . . 411
Ingress Rate Limiting . . . . . . . . . . . . . . . . . . . . . . . . . . . . . . . . . . . .412
Limiting traffic from a particular device . . . . . . . . . . . . . . . . . .413
Disabling ingress rate limiting. . . . . . . . . . . . . . . . . . . . . . . . . .413
QoS: SID/DID traffic prioritization . . . . . . . . . . . . . . . . . . . . . . . . . .413
License requirements for SID/DID prioritization . . . . . . . . . . . 414
Fabric OS Administrator’s Guide
53-1002148-02
xix
CS_CTL-based frame prioritization. . . . . . . . . . . . . . . . . . . . . . . . . . 414
Supported configurations for CS_CTL-based frame
prioritization . . . . . . . . . . . . . . . . . . . . . . . . . . . . . . . . . . . . . . . . 415
High availability considerations for CS_CTL-based frame
prioritization . . . . . . . . . . . . . . . . . . . . . . . . . . . . . . . . . . . . . . . . 415
Enabling CS_CTL-based frame prioritization . . . . . . . . . . . . . . . . . . 415
Disabling CS_CTL-based frame prioritization . . . . . . . . . . . . . . . . . 415
QoS zone-based traffic prioritization . . . . . . . . . . . . . . . . . . . . . . . . 415
Trunking considerations before you install the Adaptive
Networking license. . . . . . . . . . . . . . . . . . . . . . . . . . . . . . . . . . . 416
Manually disabling QoS on trunked ports . . . . . . . . . . . . . . . . 416
QoS zones . . . . . . . . . . . . . . . . . . . . . . . . . . . . . . . . . . . . . . . . . . . . .418
QoS on E_Ports . . . . . . . . . . . . . . . . . . . . . . . . . . . . . . . . . . . . . 419
QoS over FC routers . . . . . . . . . . . . . . . . . . . . . . . . . . . . . . . . . .420
Virtual Fabric considerations for QoS zone-based traffic
prioritization . . . . . . . . . . . . . . . . . . . . . . . . . . . . . . . . . . . . . . . .421
High availability considerations for QoS zone-based traffic
prioritization . . . . . . . . . . . . . . . . . . . . . . . . . . . . . . . . . . . . . . . .422
Supported configurations for QoS zone-based traffic
prioritization . . . . . . . . . . . . . . . . . . . . . . . . . . . . . . . . . . . . . . . .422
Limitations and restrictions for QoS zone-based traffic
prioritization . . . . . . . . . . . . . . . . . . . . . . . . . . . . . . . . . . . . . . . .422
Setting QoS zone-based traffic prioritization. . . . . . . . . . . . . . . . . .423
Setting QoS zone-based traffic prioritization over FC routers . . . .425
Disabling QoS zone-based traffic prioritization. . . . . . . . . . . . . . . .425
Chapter 21
Managing Trunking Connections
In this chapter . . . . . . . . . . . . . . . . . . . . . . . . . . . . . . . . . . . . . . . . . .427
Trunking overview . . . . . . . . . . . . . . . . . . . . . . . . . . . . . . . . . . . . . . .427
Types of trunking . . . . . . . . . . . . . . . . . . . . . . . . . . . . . . . . . . . .428
Masterless trunking . . . . . . . . . . . . . . . . . . . . . . . . . . . . . . . . . .428
License requirements for trunking . . . . . . . . . . . . . . . . . . . . . .429
Port groups for trunking. . . . . . . . . . . . . . . . . . . . . . . . . . . . . . .429
Requirements for trunk groups . . . . . . . . . . . . . . . . . . . . . . . . . . . .429
Supported configurations for trunking . . . . . . . . . . . . . . . . . . . . . .430
High availability support for trunking . . . . . . . . . . . . . . . . . . . .430
Supported platforms for trunking. . . . . . . . . . . . . . . . . . . . . . . . . . .430
Recommendations for trunking groups . . . . . . . . . . . . . . . . . . . . . .431
Configuring trunk groups . . . . . . . . . . . . . . . . . . . . . . . . . . . . . . . . .431
Enabling trunking on a port or switch . . . . . . . . . . . . . . . . . . . . . . .432
Disabling trunking on a port or switch. . . . . . . . . . . . . . . . . . . . . . .432
Displaying trunking information . . . . . . . . . . . . . . . . . . . . . . . . . . . .433
ISL trunking over long distance fabrics . . . . . . . . . . . . . . . . . . . . . .434
xx
Fabric OS Administrator’s Guide
53-1002148-02
ICL trunking . . . . . . . . . . . . . . . . . . . . . . . . . . . . . . . . . . . . . . . . . . . .435
Supported platforms for ICL trunking . . . . . . . . . . . . . . . . . . . .435
ICL trunking on the Brocade DCX 8510-8 and 8510-4 . . . . . .435
ICL trunking on the Brocade DCX and DCX-4S. . . . . . . . . . . . .436
EX_Port trunking . . . . . . . . . . . . . . . . . . . . . . . . . . . . . . . . . . . . . . . .436
Masterless EX_Port trunking. . . . . . . . . . . . . . . . . . . . . . . . . . .437
Supported configurations and platforms . . . . . . . . . . . . . . . . .437
Configuring EX_Port trunking . . . . . . . . . . . . . . . . . . . . . . . . . .437
Displaying EX_Port trunking information . . . . . . . . . . . . . . . . .438
F_Port trunking . . . . . . . . . . . . . . . . . . . . . . . . . . . . . . . . . . . . . . . . .438
F_Port trunking for Access Gateway . . . . . . . . . . . . . . . . . . . . .438
F_Port trunking for Brocade adapters . . . . . . . . . . . . . . . . . . .440
F_Port trunking considerations. . . . . . . . . . . . . . . . . . . . . . . . .440
Trunk Area and Admin Domains . . . . . . . . . . . . . . . . . . . . . . . .442
F_Port trunking in Virtual Fabrics . . . . . . . . . . . . . . . . . . . . . . .442
Configuring F_Port trunking for Access Gateway . . . . . . . . . . . . . .443
Configuring F_Port trunking for Brocade adapters . . . . . . . . . . . . .444
Displaying F_Port trunking information . . . . . . . . . . . . . . . . . . . . . .444
Disabling F_Port trunking . . . . . . . . . . . . . . . . . . . . . . . . . . . . . . . . .445
Enabling the DCC policy on a trunk area. . . . . . . . . . . . . . . . . . . . .445
Chapter 22
Managing Long Distance Fabrics
In this chapter . . . . . . . . . . . . . . . . . . . . . . . . . . . . . . . . . . . . . . . . . .447
Long distance fabrics overview . . . . . . . . . . . . . . . . . . . . . . . . . . . .447
Extended Fabrics device limitations . . . . . . . . . . . . . . . . . . . . . . . .448
Long distance link modes. . . . . . . . . . . . . . . . . . . . . . . . . . . . . . . . .448
Configuring an extended ISL . . . . . . . . . . . . . . . . . . . . . . . . . . . . . .448
Enabling long distance when connecting to TDM devices . . .450
Buffer credit management . . . . . . . . . . . . . . . . . . . . . . . . . . . . . . . .450
Buffer-to-Buffer flow control . . . . . . . . . . . . . . . . . . . . . . . . . . .451
Optimal buffer credit allocation . . . . . . . . . . . . . . . . . . . . . . . .452
Fibre Channel gigabit values reference definition. . . . . . . . . .452
Allocating buffer credits based on full-size frames . . . . . . . . .453
Allocating buffer credits based on average-size frames . . . . .455
Allocating buffer credits for F_Ports . . . . . . . . . . . . . . . . . . . . .456
Displaying the remaining buffers in a port group . . . . . . . . . .456
Buffer credits for each switch model . . . . . . . . . . . . . . . . . . . .456
Maximum configurable distances for Extended Fabrics . . . . .457
Buffer credit recovery . . . . . . . . . . . . . . . . . . . . . . . . . . . . . . . . . . . .458
Chapter 23
Using the FC-FC Routing Service
In this chapter . . . . . . . . . . . . . . . . . . . . . . . . . . . . . . . . . . . . . . . . . .461
Fabric OS Administrator’s Guide
53-1002148-02
xxi
FC-FC routing service overview . . . . . . . . . . . . . . . . . . . . . . . . . . . .461
License requirements for Fibre Channel Routing . . . . . . . . . .462
Supported platforms for Fibre Channel routing . . . . . . . . . . . .462
Supported configurations . . . . . . . . . . . . . . . . . . . . . . . . . . . . .462
Fibre Channel routing concepts . . . . . . . . . . . . . . . . . . . . . . . . . . . .463
Proxy devices . . . . . . . . . . . . . . . . . . . . . . . . . . . . . . . . . . . . . . .467
Types of FC routing. . . . . . . . . . . . . . . . . . . . . . . . . . . . . . . . . . .467
Phantom domains . . . . . . . . . . . . . . . . . . . . . . . . . . . . . . . . . . .468
Setting up the FC-FC routing service . . . . . . . . . . . . . . . . . . . . . . . .470
Verifying the setup for FC-FC routing . . . . . . . . . . . . . . . . . . . . 471
Backbone fabric IDs . . . . . . . . . . . . . . . . . . . . . . . . . . . . . . . . . . . . .472
Assigning backbone fabric IDs . . . . . . . . . . . . . . . . . . . . . . . . .472
FCIP tunnel configuration . . . . . . . . . . . . . . . . . . . . . . . . . . . . . . . . .473
Inter-fabric link configuration . . . . . . . . . . . . . . . . . . . . . . . . . . . . . .473
Configuring an IFL for both edge and backbone connections 474
FC Router port cost configuration . . . . . . . . . . . . . . . . . . . . . . . . . . 477
Port cost considerations . . . . . . . . . . . . . . . . . . . . . . . . . . . . . .478
Setting router port cost for an EX_Port. . . . . . . . . . . . . . . . . . .479
EX_Port frame trunking configuration . . . . . . . . . . . . . . . . . . . . . . .480
LSAN zone configuration . . . . . . . . . . . . . . . . . . . . . . . . . . . . . . . . .480
Use of Admin Domains with LSAN zones and FCR . . . . . . . . .480
Zone definition and naming . . . . . . . . . . . . . . . . . . . . . . . . . . .481
LSAN zones and fabric-to-fabric communications. . . . . . . . . .481
Controlling device communication with the LSAN . . . . . . . . . .481
Setting the maximum LSAN count . . . . . . . . . . . . . . . . . . . . . .484
Configuring backbone fabrics for interconnectivity . . . . . . . . .484
HA and downgrade considerations for LSAN zones . . . . . . . .485
LSAN zone policies using LSAN tagging . . . . . . . . . . . . . . . . . .485
LSAN zone binding . . . . . . . . . . . . . . . . . . . . . . . . . . . . . . . . . . .489
Proxy PID configuration. . . . . . . . . . . . . . . . . . . . . . . . . . . . . . . . . . .493
Fabric parameter considerations . . . . . . . . . . . . . . . . . . . . . . . . . . .494
Inter-fabric broadcast frames. . . . . . . . . . . . . . . . . . . . . . . . . . . . . .494
Displaying the current broadcast configuration. . . . . . . . . . . .495
Enabling broadcast frame forwarding . . . . . . . . . . . . . . . . . . .495
Disabling broadcast frame forwarding . . . . . . . . . . . . . . . . . . .495
Resource monitoring. . . . . . . . . . . . . . . . . . . . . . . . . . . . . . . . . . . . .495
FC-FC Routing and Virtual Fabrics . . . . . . . . . . . . . . . . . . . . . . . . . .496
Logical switch configuration for FC routing . . . . . . . . . . . . . . .497
Backbone-to-edge routing with Virtual Fabrics . . . . . . . . . . . .499
Upgrade and downgrade considerations for FC-FC routing . . . . . .499
How replacing port blades affects EX_Port configuration. . . .500
Displaying the range of output ports connected to xlate domains 500
Appendix A
Interoperation of Fabric OS and M-EOS Fabrics Using FC Router
In this appendix . . . . . . . . . . . . . . . . . . . . . . . . . . . . . . . . . . . . . . . . .501
xxii
Fabric OS Administrator’s Guide
53-1002148-02
Interoperability overview. . . . . . . . . . . . . . . . . . . . . . . . . . . . . . . . . .501
Release Compatibility . . . . . . . . . . . . . . . . . . . . . . . . . . . . . . . .501
Features of Connected SANs . . . . . . . . . . . . . . . . . . . . . . . . . .503
Fabric configurations for interconnectivity . . . . . . . . . . . . . . . . . . .504
Connectivity modes . . . . . . . . . . . . . . . . . . . . . . . . . . . . . . . . . .504
Configuring the FC router . . . . . . . . . . . . . . . . . . . . . . . . . . . . .505
Configuring LSAN zones in the M-EOS fabric . . . . . . . . . . . . . .506
Correcting errors if LSAN devices appear in only one of
the fabrics. . . . . . . . . . . . . . . . . . . . . . . . . . . . . . . . . . . . . . . . . .507
Completing the configuration . . . . . . . . . . . . . . . . . . . . . . . . . .507
Appendix B
Port Indexing
Appendix C
FIPS Support
In this appendix . . . . . . . . . . . . . . . . . . . . . . . . . . . . . . . . . . . . . . . . .515
FIPS overview . . . . . . . . . . . . . . . . . . . . . . . . . . . . . . . . . . . . . . . . . .515
Zeroization functions . . . . . . . . . . . . . . . . . . . . . . . . . . . . . . . . . . . .515
Power-on self tests. . . . . . . . . . . . . . . . . . . . . . . . . . . . . . . . . . . 516
Conditional tests . . . . . . . . . . . . . . . . . . . . . . . . . . . . . . . . . . . . 516
FIPS mode configuration . . . . . . . . . . . . . . . . . . . . . . . . . . . . . . . . . 517
LDAP in FIPS mode . . . . . . . . . . . . . . . . . . . . . . . . . . . . . . . . . .518
LDAP certificates for FIPS mode . . . . . . . . . . . . . . . . . . . . . . . .520
Preparing the switch for FIPS . . . . . . . . . . . . . . . . . . . . . . . . . . . . . .521
Overview of steps . . . . . . . . . . . . . . . . . . . . . . . . . . . . . . . . . . . .521
Enabling FIPS mode. . . . . . . . . . . . . . . . . . . . . . . . . . . . . . . . . .522
Zeroizing for FIPS . . . . . . . . . . . . . . . . . . . . . . . . . . . . . . . . . . . .524
Displaying FIPS configuration . . . . . . . . . . . . . . . . . . . . . . . . . .524
Appendix D
Hexadecimal
Hexadecimal overview . . . . . . . . . . . . . . . . . . . . . . . . . . . . . . . . . . .525
Example conversion of the hexadecimal triplet Ox616000 . .525
Index
Fabric OS Administrator’s Guide
53-1002148-02
xxiii
xxiv
Fabric OS Administrator’s Guide
53-1002148-02
Figures
Figure 1
Well-known addresses . . . . . . . . . . . . . . . . . . . . . . . . . . . . . . . . . . . . . . . . . . . . . . . 3
Figure 2
Identifying the blades . . . . . . . . . . . . . . . . . . . . . . . . . . . . . . . . . . . . . . . . . . . . . . . 51
Figure 3
Blade swap with Virtual Fabrics during the swap. . . . . . . . . . . . . . . . . . . . . . . . . 52
Figure 4
Blade swap with Virtual Fabrics after the swap . . . . . . . . . . . . . . . . . . . . . . . . . . 52
Figure 5
Principal ISLs. . . . . . . . . . . . . . . . . . . . . . . . . . . . . . . . . . . . . . . . . . . . . . . . . . . . . . 62
Figure 6
New switch added to existing fabric . . . . . . . . . . . . . . . . . . . . . . . . . . . . . . . . . . . 64
Figure 7
Virtual Channels on an ISL . . . . . . . . . . . . . . . . . . . . . . . . . . . . . . . . . . . . . . . . . . . 65
Figure 8
Virtual channels on a QoS-enabled ISL . . . . . . . . . . . . . . . . . . . . . . . . . . . . . . . . . 66
Figure 9
Gateway link merging SANs . . . . . . . . . . . . . . . . . . . . . . . . . . . . . . . . . . . . . . . . . . 67
Figure 10
DCX-4S allowed ICL connections . . . . . . . . . . . . . . . . . . . . . . . . . . . . . . . . . . . . . . 68
Figure 11
ICL triangular topology . . . . . . . . . . . . . . . . . . . . . . . . . . . . . . . . . . . . . . . . . . . . . . 70
Figure 12
64 Gbps ICL topology . . . . . . . . . . . . . . . . . . . . . . . . . . . . . . . . . . . . . . . . . . . . . . . 71
Figure 13
Minimum configuration for 64 Gbps ICLs . . . . . . . . . . . . . . . . . . . . . . . . . . . . . . . 71
Figure 14
Single host and target . . . . . . . . . . . . . . . . . . . . . . . . . . . . . . . . . . . . . . . . . . . . . . 81
Figure 15
Windows 2000 VSA configuration . . . . . . . . . . . . . . . . . . . . . . . . . . . . . . . . . . . . 103
Figure 16
Example of a Brocade DCT file . . . . . . . . . . . . . . . . . . . . . . . . . . . . . . . . . . . . . . 110
Figure 17
Example of the dictiona.dcm file . . . . . . . . . . . . . . . . . . . . . . . . . . . . . . . . . . . . . 111
Figure 18
DH-CHAP authentication . . . . . . . . . . . . . . . . . . . . . . . . . . . . . . . . . . . . . . . . . . . 146
Figure 19
Protected endpoints configuration . . . . . . . . . . . . . . . . . . . . . . . . . . . . . . . . . . . 169
Figure 20
Gateway tunnel configuration . . . . . . . . . . . . . . . . . . . . . . . . . . . . . . . . . . . . . . . 170
Figure 21
Endpoint to gateway tunnel configuration . . . . . . . . . . . . . . . . . . . . . . . . . . . . . 170
Figure 22
Switch before and after enabling Virtual Fabrics . . . . . . . . . . . . . . . . . . . . . . . . 214
Figure 23
Switch before and after creating logical switches . . . . . . . . . . . . . . . . . . . . . . . 215
Figure 24
Fabric IDs assigned to logical switches. . . . . . . . . . . . . . . . . . . . . . . . . . . . . . . . 216
Figure 25
Assigning ports to logical switches . . . . . . . . . . . . . . . . . . . . . . . . . . . . . . . . . . . 216
Figure 26
Logical switches connected to devices and non-Virtual Fabrics switch . . . . . . 218
Figure 27
Logical switches in a single chassis belong to separate fabrics . . . . . . . . . . . . 218
Figure 28
Logical switches connected to other logical switches through physical ISLs. . 219
Figure 29
Logical switches connected to form logical fabrics . . . . . . . . . . . . . . . . . . . . . . 219
Figure 30
Base switches connected by an XISL . . . . . . . . . . . . . . . . . . . . . . . . . . . . . . . . . 220
Figure 31
Logical ISLs connecting logical switches . . . . . . . . . . . . . . . . . . . . . . . . . . . . . . 221
Figure 32
Logical fabric using ISLs and XISLs . . . . . . . . . . . . . . . . . . . . . . . . . . . . . . . . . . . 221
Figure 33
Example of logical fabrics in multiple chassis and XISLs . . . . . . . . . . . . . . . . . 237
Figure 34
Zoning example. . . . . . . . . . . . . . . . . . . . . . . . . . . . . . . . . . . . . . . . . . . . . . . . . . . 241
Figure 35
Broadcast zones and Admin Domains . . . . . . . . . . . . . . . . . . . . . . . . . . . . . . . . 247
Figure 36
Traffic Isolation zone creating a dedicated path through the fabric . . . . . . . . . 272
Fabric OS Administrator’s Guide
53-1002148-02
xxv
xxvi
Figure 37
Fabric incorrectly configured for TI zone with failover disabled . . . . . . . . . . . . 274
Figure 38
Dedicated path is the only shortest path . . . . . . . . . . . . . . . . . . . . . . . . . . . . . . 275
Figure 39
Dedicated path is not the shortest path . . . . . . . . . . . . . . . . . . . . . . . . . . . . . . . 276
Figure 40
Enhanced TI zones . . . . . . . . . . . . . . . . . . . . . . . . . . . . . . . . . . . . . . . . . . . . . . . . 276
Figure 41
Illegal ETIZ configuration: two paths from one port to two devices on the
same remote domain . . . . . . . . . . . . . . . . . . . . . . . . . . . . . . . . . . . . . . . . . . . . . . 277
Figure 42
Illegal ETIZ configuration: two paths from one port . . . . . . . . . . . . . . . . . . . . . . 278
Figure 43
Traffic Isolation Zoning over FCR. . . . . . . . . . . . . . . . . . . . . . . . . . . . . . . . . . . . . 279
Figure 44
TI zone in an edge fabric . . . . . . . . . . . . . . . . . . . . . . . . . . . . . . . . . . . . . . . . . . . 279
Figure 45
TI zone in a backbone fabric . . . . . . . . . . . . . . . . . . . . . . . . . . . . . . . . . . . . . . . . 280
Figure 46
TI zone misconfiguration . . . . . . . . . . . . . . . . . . . . . . . . . . . . . . . . . . . . . . . . . . . 282
Figure 47
Dedicated path with Virtual Fabrics . . . . . . . . . . . . . . . . . . . . . . . . . . . . . . . . . . 285
Figure 48
Creating a TI zone in a logical fabric . . . . . . . . . . . . . . . . . . . . . . . . . . . . . . . . . . 285
Figure 49
Creating a TI zone in a base fabric . . . . . . . . . . . . . . . . . . . . . . . . . . . . . . . . . . . 285
Figure 50
Example configuration for TI zones over FC routers in logical fabrics . . . . . . . 286
Figure 51
Logical representation of TI zones over FC routers in logical fabrics . . . . . . . . 287
Figure 52
TI over FCR example . . . . . . . . . . . . . . . . . . . . . . . . . . . . . . . . . . . . . . . . . . . . . . . 294
Figure 53
Affected seconds for bottleneck detection . . . . . . . . . . . . . . . . . . . . . . . . . . . . . 301
Figure 54
Encryption and Compression on 16 Gbps ISLs . . . . . . . . . . . . . . . . . . . . . . . . . 311
Figure 55
Fabric-assigned Port World Wide Name provisioning scenarios . . . . . . . . . . . . 333
Figure 56
Fabric with two Admin Domains . . . . . . . . . . . . . . . . . . . . . . . . . . . . . . . . . . . . . 340
Figure 57
Filtered fabric views when using Admin Domains . . . . . . . . . . . . . . . . . . . . . . . 340
Figure 58
Fabric with AD0 and AD255. . . . . . . . . . . . . . . . . . . . . . . . . . . . . . . . . . . . . . . . . 344
Figure 59
Fabric showing switch and device WWNs . . . . . . . . . . . . . . . . . . . . . . . . . . . . . . 347
Figure 60
Filtered fabric views showing converted switch WWNs . . . . . . . . . . . . . . . . . . . 347
Figure 61
AD0 and two user-defined Admin Domains, AD1 and AD2 . . . . . . . . . . . . . . . . 358
Figure 62
AD0 with three zones . . . . . . . . . . . . . . . . . . . . . . . . . . . . . . . . . . . . . . . . . . . . . . 358
Figure 63
Setting end-to-end monitors on a port . . . . . . . . . . . . . . . . . . . . . . . . . . . . . . . . 396
Figure 64
Mask positions for end-to-end monitors . . . . . . . . . . . . . . . . . . . . . . . . . . . . . . . 398
Figure 65
Fabric mode Top Talker monitors on the FC router do not monitor any flows . 406
Figure 66
Fabric mode Top Talker monitors on the FC router monitor flows over the E_Port 406
Figure 67
QoS traffic prioritization . . . . . . . . . . . . . . . . . . . . . . . . . . . . . . . . . . . . . . . . . . . . 419
Figure 68
QoS with E_Ports enabled . . . . . . . . . . . . . . . . . . . . . . . . . . . . . . . . . . . . . . . . . . 420
Figure 69
Traffic prioritization in a logical fabric . . . . . . . . . . . . . . . . . . . . . . . . . . . . . . . . . 421
Figure 70
Trunk group configuration for the Brocade 5100 . . . . . . . . . . . . . . . . . . . . . . . 429
Figure 71
ICL trunking between two Brocade DCX 8510-8 platforms. . . . . . . . . . . . . . . . 436
Figure 72
Switch in Access Gateway mode without F_Port trunking . . . . . . . . . . . . . . . . . 439
Figure 73
Switch in Access Gateway mode with F_Port masterless trunking . . . . . . . . . . 439
Figure 74
A metaSAN with inter-fabric links . . . . . . . . . . . . . . . . . . . . . . . . . . . . . . . . . . . . 464
Figure 75
A metaSAN with edge-to-edge and backbone fabrics and LSAN zones . . . . . . 465
Figure 76
Edge SANs connected through a backbone fabric. . . . . . . . . . . . . . . . . . . . . . . 466
Figure 77
MetaSAN with imported devices . . . . . . . . . . . . . . . . . . . . . . . . . . . . . . . . . . . . . 467
Fabric OS Administrator’s Guide
53-1002148-02
Figure 78
Sample topology (physical topology) . . . . . . . . . . . . . . . . . . . . . . . . . . . . . . . . . . 468
Figure 79
EX_Port phantom switch topology . . . . . . . . . . . . . . . . . . . . . . . . . . . . . . . . . . . . 469
Figure 80
Example of setting up Speed LSAN tag. . . . . . . . . . . . . . . . . . . . . . . . . . . . . . . . 487
Figure 81
LSAN zone binding . . . . . . . . . . . . . . . . . . . . . . . . . . . . . . . . . . . . . . . . . . . . . . . . 490
Figure 82
EX_Ports in a base switch . . . . . . . . . . . . . . . . . . . . . . . . . . . . . . . . . . . . . . . . . . 498
Figure 83
Logical representation of EX_Ports in a base switch . . . . . . . . . . . . . . . . . . . . . 498
Figure 84
Backbone-to-edge routing across base switch using FC router in legacy mode 499
Fabric OS Administrator’s Guide
53-1002148-02
xxvii
xxviii
Fabric OS Administrator’s Guide
53-1002148-02
Tables
Table 1
Daemons that are automatically restarted. . . . . . . . . . . . . . . . . . . . . . . . . . . . . . 13
Table 2
Terminal port parameters . . . . . . . . . . . . . . . . . . . . . . . . . . . . . . . . . . . . . . . . . . . 16
Table 3
Help topic contents. . . . . . . . . . . . . . . . . . . . . . . . . . . . . . . . . . . . . . . . . . . . . . . . . 18
Table 4
fabricShow fields . . . . . . . . . . . . . . . . . . . . . . . . . . . . . . . . . . . . . . . . . . . . . . . . . . 29
Table 5
Port numbering schemes for the port and application blades . . . . . . . . . . . . . . 40
Table 6
Brocade enterprise-class platform blade terminology . . . . . . . . . . . . . . . . . . . . . 45
Table 7
Blades supported by each platform . . . . . . . . . . . . . . . . . . . . . . . . . . . . . . . . . . . 47
Table 8
Blade compatibility within a Brocade DCX, DCX-4S, and the Brocade
DCX 8510 family backbone . . . . . . . . . . . . . . . . . . . . . . . . . . . . . . . . . . . . . . . . . . 48
Table 9
LED behavior . . . . . . . . . . . . . . . . . . . . . . . . . . . . . . . . . . . . . . . . . . . . . . . . . . . . . . 69
Table 10
Combinations of routing policy and IOD with Lossless DLS enabled . . . . . . . . . 78
Table 11
Default Fabric OS roles . . . . . . . . . . . . . . . . . . . . . . . . . . . . . . . . . . . . . . . . . . . . . 84
Table 12
Permission types. . . . . . . . . . . . . . . . . . . . . . . . . . . . . . . . . . . . . . . . . . . . . . . . . . . 85
Table 13
Maximum number of simultaneous sessions. . . . . . . . . . . . . . . . . . . . . . . . . . . . 86
Table 14
Default local user accounts . . . . . . . . . . . . . . . . . . . . . . . . . . . . . . . . . . . . . . . . . . 88
Table 15
Authentication configuration options . . . . . . . . . . . . . . . . . . . . . . . . . . . . . . . . . 100
Table 16
Syntax for VSA-based account roles . . . . . . . . . . . . . . . . . . . . . . . . . . . . . . . . . . 102
Table 17
dictionary.brocade file entries . . . . . . . . . . . . . . . . . . . . . . . . . . . . . . . . . . . . . . . 103
Table 18
Secure protocol support. . . . . . . . . . . . . . . . . . . . . . . . . . . . . . . . . . . . . . . . . . . . 117
Table 19
Items needed to deploy secure protocols. . . . . . . . . . . . . . . . . . . . . . . . . . . . . . 118
Table 20
Main security scenarios . . . . . . . . . . . . . . . . . . . . . . . . . . . . . . . . . . . . . . . . . . . . 118
Table 21
SSL certificate files . . . . . . . . . . . . . . . . . . . . . . . . . . . . . . . . . . . . . . . . . . . . . . . . 123
Table 22
Blocked listener applications. . . . . . . . . . . . . . . . . . . . . . . . . . . . . . . . . . . . . . . . 131
Table 23
Access defaults. . . . . . . . . . . . . . . . . . . . . . . . . . . . . . . . . . . . . . . . . . . . . . . . . . . 132
Table 24
Port information . . . . . . . . . . . . . . . . . . . . . . . . . . . . . . . . . . . . . . . . . . . . . . . . . . 132
Table 25
Valid methods for specifying policy members . . . . . . . . . . . . . . . . . . . . . . . . . . 134
Table 26
FCS policy states. . . . . . . . . . . . . . . . . . . . . . . . . . . . . . . . . . . . . . . . . . . . . . . . . . 137
Table 27
FCS switch operations . . . . . . . . . . . . . . . . . . . . . . . . . . . . . . . . . . . . . . . . . . . . . 138
Table 28
Distribution policy states . . . . . . . . . . . . . . . . . . . . . . . . . . . . . . . . . . . . . . . . . . . 140
Table 29
DCC policy states . . . . . . . . . . . . . . . . . . . . . . . . . . . . . . . . . . . . . . . . . . . . . . . . . 141
Table 30
DCC policy behavior with FA PWWN when created using lockdown support . . 143
Table 31
DCC policy behavior when created manually with PWWN . . . . . . . . . . . . . . . . . 144
Table 32
SCC policy states . . . . . . . . . . . . . . . . . . . . . . . . . . . . . . . . . . . . . . . . . . . . . . . . . 144
Table 33
FCAP certificate files. . . . . . . . . . . . . . . . . . . . . . . . . . . . . . . . . . . . . . . . . . . . . . . 153
Table 34
Supported services. . . . . . . . . . . . . . . . . . . . . . . . . . . . . . . . . . . . . . . . . . . . . . . . 158
Table 35
Implicit IP Filter rules . . . . . . . . . . . . . . . . . . . . . . . . . . . . . . . . . . . . . . . . . . . . . . 159
Fabric OS Administrator’s Guide
53-1002148-02
xxix
xxx
Table 36
Default IP policy rules. . . . . . . . . . . . . . . . . . . . . . . . . . . . . . . . . . . . . . . . . . . . . . 160
Table 37
Interaction between fabric-wide consistency policy and distribution settings . 163
Table 38
Supported policy databases . . . . . . . . . . . . . . . . . . . . . . . . . . . . . . . . . . . . . . . . 163
Table 39
Fabric-wide consistency policy settings . . . . . . . . . . . . . . . . . . . . . . . . . . . . . . . 165
Table 40
Merging fabrics with matching fabric-wide consistency policies. . . . . . . . . . . . 167
Table 41
Examples of strict fabric merges . . . . . . . . . . . . . . . . . . . . . . . . . . . . . . . . . . . . . 168
Table 42
Fabric merges with tolerant/absent combinations . . . . . . . . . . . . . . . . . . . . . . 168
Table 43
Algorithms and associated authentication policies . . . . . . . . . . . . . . . . . . . . . . 171
Table 44
CLI commands to display or modify switch configuration information . . . . . . . 185
Table 45
Brocade configuration and connection . . . . . . . . . . . . . . . . . . . . . . . . . . . . . . . . 191
Table 46
Enterprise-class platform HA sync states . . . . . . . . . . . . . . . . . . . . . . . . . . . . . . 196
Table 47
Blade and port types supported on logical switches . . . . . . . . . . . . . . . . . . . . . 224
Table 48
Virtual Fabrics interaction with Fabric OS features . . . . . . . . . . . . . . . . . . . . . . 225
Table 49
Maximum number of logical switches per chassis. . . . . . . . . . . . . . . . . . . . . . . 226
Table 50
Approaches to fabric-based zoning . . . . . . . . . . . . . . . . . . . . . . . . . . . . . . . . . . . 241
Table 51
Considerations for zoning architecture . . . . . . . . . . . . . . . . . . . . . . . . . . . . . . . . 245
Table 52
Zone merging scenarios: Defined and effective configurations . . . . . . . . . . . . 268
Table 53
Zone merging scenarios: Different content . . . . . . . . . . . . . . . . . . . . . . . . . . . . 269
Table 54
Zone merging scenarios: Different names . . . . . . . . . . . . . . . . . . . . . . . . . . . . . 269
Table 55
Zone merging scenarios: TI zones . . . . . . . . . . . . . . . . . . . . . . . . . . . . . . . . . . . . 269
Table 56
Zone merging scenarios: Default access mode . . . . . . . . . . . . . . . . . . . . . . . . . 270
Table 57
Zone merging scenarios: Mixed Fabric OS versions. . . . . . . . . . . . . . . . . . . . . . 270
Table 58
Comparison of traffic behavior when failover is enabled or disabled in TI zones 273
Table 59
Example ISL connections . . . . . . . . . . . . . . . . . . . . . . . . . . . . . . . . . . . . . . . . . . . 319
Table 60
Number of supported NPIV devices . . . . . . . . . . . . . . . . . . . . . . . . . . . . . . . . . . 326
Table 61
AD user types . . . . . . . . . . . . . . . . . . . . . . . . . . . . . . . . . . . . . . . . . . . . . . . . . . . . 342
Table 62
Ports and devices in CLI output . . . . . . . . . . . . . . . . . . . . . . . . . . . . . . . . . . . . . . 361
Table 63
Admin Domain interaction with Fabric OS features . . . . . . . . . . . . . . . . . . . . . . 363
Table 64
Configuration upload and download scenarios in an AD context . . . . . . . . . . . 366
Table 65
Available Brocade Licenses . . . . . . . . . . . . . . . . . . . . . . . . . . . . . . . . . . . . . . . . . 370
Table 66
License Requirements and Location Name by Feature. . . . . . . . . . . . . . . . . . . 372
Table 67
Base to Upgrade License Comparison . . . . . . . . . . . . . . . . . . . . . . . . . . . . . . . . 375
Table 68
List of available ports when implementing PODs . . . . . . . . . . . . . . . . . . . . . . . 387
Table 69
Number of logical switches that support performance monitors . . . . . . . . . . . 394
Table 70
Maximum number of frame monitors and offsets per port . . . . . . . . . . . . . . . . 400
Table 71
Predefined values at offset 0. . . . . . . . . . . . . . . . . . . . . . . . . . . . . . . . . . . . . . . . 401
Table 72
Comparison between CS_CTL-based and QoS zone-based prioritization. . . . . 414
Table 73
Virtual channels assigned to QoS priority . . . . . . . . . . . . . . . . . . . . . . . . . . . . . . 414
Table 74
Virtual channels assigned to QoS priority . . . . . . . . . . . . . . . . . . . . . . . . . . . . . . 416
Table 75
Trunking over distance for the enterprise-class platforms . . . . . . . . . . . . . . . . 434
Table 76
F_Port masterless considerations . . . . . . . . . . . . . . . . . . . . . . . . . . . . . . . . . . . . 440
Table 77
PWWN format for F_Port and N_Port trunk ports. . . . . . . . . . . . . . . . . . . . . . . . 442
Fabric OS Administrator’s Guide
53-1002148-02
Table 78
Fibre Channel data frames . . . . . . . . . . . . . . . . . . . . . . . . . . . . . . . . . . . . . . . . . 453
Table 79
Buffer credits . . . . . . . . . . . . . . . . . . . . . . . . . . . . . . . . . . . . . . . . . . . . . . . . . . . . 456
Table 80
Configurable distances for Extended Fabrics . . . . . . . . . . . . . . . . . . . . . . . . . . . 457
Table 81
LSAN information stored in each FC router with and without LSAN zone binding 490
Table 82
Fabric OS and M-EOSc interoperability compatibility matrix . . . . . . . . . . . . . . . 501
Table 83
Fabric OS and M-EOSn interoperability compatibility matrix . . . . . . . . . . . . . . . 502
Table 84
portCfgEXPort -m values. . . . . . . . . . . . . . . . . . . . . . . . . . . . . . . . . . . . . . . . . . . . 504
Table 85
Zeroization behavior . . . . . . . . . . . . . . . . . . . . . . . . . . . . . . . . . . . . . . . . . . . . . . . 515
Table 86
FIPS mode restrictions . . . . . . . . . . . . . . . . . . . . . . . . . . . . . . . . . . . . . . . . . . . . . 517
Table 87
FIPS and non-FIPS modes of operation . . . . . . . . . . . . . . . . . . . . . . . . . . . . . . . 518
Table 88
Active Directory keys to modify . . . . . . . . . . . . . . . . . . . . . . . . . . . . . . . . . . . . . . 519
Table 89
Decimal to hexadecimal conversion table . . . . . . . . . . . . . . . . . . . . . . . . . . . . . 525
Fabric OS Administrator’s Guide
53-1002148-02
xxxi
xxxii
Fabric OS Administrator’s Guide
53-1002148-02
About This Document
In this chapter
• How this document is organized . . . . . . . . . . . . . . . . . . . . . . . . . . . . . . . . xxxiii
• Supported hardware and software. . . . . . . . . . . . . . . . . . . . . . . . . . . . . . . xxxiv
• What’s new in this document . . . . . . . . . . . . . . . . . . . . . . . . . . . . . . . . . . . . xxxv
• Document conventions . . . . . . . . . . . . . . . . . . . . . . . . . . . . . . . . . . . . . . . . xxxvi
• Notice to the reader . . . . . . . . . . . . . . . . . . . . . . . . . . . . . . . . . . . . . . . . . . xxxvii
• Additional information . . . . . . . . . . . . . . . . . . . . . . . . . . . . . . . . . . . . . . . . xxxviii
• Getting technical help . . . . . . . . . . . . . . . . . . . . . . . . . . . . . . . . . . . . . . . . xxxviii
• Document feedback . . . . . . . . . . . . . . . . . . . . . . . . . . . . . . . . . . . . . . . . . . xxxix
How this document is organized
The document is divided into two sections; the first, “Standard Features,” contains the following
topics:
• Chapter 1, “Understanding Fibre Channel Services,” provides information on the Fibre Channel
services on Brocade switches.
• Chapter 2, “Performing Basic Configuration Tasks,” gives a brief overview of Fabric OS,
explains the Fabric OS CLI Help feature, and provides typical connection and configuration
procedures.
• Chapter 3, “Performing Advanced Configuration Tasks,” provides advanced connection and
configuration procedures.
• Chapter 4, “Routing Traffic,” provides information and procedures for using switch routing
features.
• Chapter 5, “Managing User Accounts,” provides information and procedures on managing
authentication and user accounts for the switch management channel.
• Chapter 6, “Configuring Protocols,” provides procedures for basic password and user account
management.
• Chapter 7, “Configuring Security Policies,” provides information and procedures for configuring
ACL policies for FC port and switch binding and managing the fabric-wide consistency policy.
• Chapter 8, “Maintaining the Switch Configuration File,” provides procedures for maintaining
and backing up your switch configurations.
• Chapter 9, “Installing and Maintaining Firmware,” provides preparations and procedures for
performing firmware downloads.
• Chapter 10, “Managing Virtual Fabrics,” describes the concepts and provides procedures for
using Virtual Fabrics.
Fabric OS Administrator’s Guide
53-1002148-02
xxxiii
• Chapter 11, “Administering Advanced Zoning,” provides procedures for use of the Brocade
Advanced Zoning feature.
• Chapter 12, “Traffic Isolation Zoning,” provides concepts and procedures for use of Traffic
Isolation Zones within a fabric.
• Chapter 13, “Bottleneck Detection,” describes how you can detect and configure alert
thresholds for latency and congestion bottlenecks in the fabric.
• Chapter 14, “In-flight Encryption and Compression,” describes concepts and provide
procedures for configuring encryption and compression on 16 Gbps ports that connect to other
switches using ISLs.
• Chapter 15, “Administering NPIV,” provides procedures for enabling and configuring N-Port ID
Virtualization (NPIV).
• Chapter 16, “Dynamic Fabric Provisioning: Fabric Assigned WWN,” describes the Dynamic
Fabric Provisioning feature using the fabric-assigned port World Wide Name (FA-PWWN).
• Chapter 17, “Managing Administrative Domains,” describes the concepts and provides
procedures for using administrative domains.
The second section, “Licensed Features,” contains the following topics:
• Chapter 18, “Administering Licensing,” provides information about Brocade licenses and their
implementation on switches and enterprise-class directors.
• Chapter 19, “Monitoring Fabric Performance,” provides procedures for use of the Brocade
Advanced Performance Monitoring licensed feature.
• Chapter 20, “Optimizing Fabric Behavior,” provides procedures for use of the Brocade Adaptive
Networking suite of tools, including Traffic Isolation, QoS Ingress Rate Limiting, and QoS
SID/DID Traffic Prioritization.
• Chapter 21, “Managing Trunking Connections,” provides procedures for use of the Brocade ISL
Trunking licensed feature.
• Chapter 22, “Managing Long Distance Fabrics,” provides procedures for use of the Brocade
Extended Fabrics licensed feature.
• Chapter 23, “Using the FC-FC Routing Service,” provides information for setting up and using
the FC-FC Routing Service.
• The appendices provide special procedures or information for Fabric OS.
Supported hardware and software
In those instances in which procedures or parts of procedures documented here apply to some
switches but not to others, this guide identifies exactly which switches are supported and which are
not.
Although many different software and hardware configurations are tested and supported by
Brocade Communications Systems, Inc. for Fabric OS v7.0.0, documenting all possible
configurations and scenarios is beyond the scope of this document.
The following hardware platforms are supported by this release of Fabric OS:
• Brocade 300 switch
• Brocade 5100 switch
• Brocade 5300 switch
xxxiv
Fabric OS Administrator’s Guide
53-1002148-02
•
•
•
•
•
•
•
•
•
•
•
•
•
•
Brocade 5410 embedded switch
Brocade 5424 embedded switch
Brocade 5450 embedded switch
Brocade 5460 embedded switch
Brocade 5470 embedded switch
Brocade 5480 embedded switch
Brocade 6510 switch
Brocade 7800 extension switch
Brocade 8000 FCoE switch
Brocade VA-40FC
Brocade Encryption Switch
Brocade DCX
Brocade DCX-4S
Brocade DCX 8510 family:
-
Brocade DCX 8510-4
Brocade DCX 8510-8
What’s new in this document
Information that was added:
• Port indexing information for the Brocade 6510 and the Brocade DCX 8510 family of platforms,
and for various types of blades.
• Information for creating and maintaining 64 Gpbs ICLs for the Brocade DCX 8510 family of
platforms.
Information that was modified:
• Chapter 3, “Performing Advanced Configuration Tasks,” contains corrections and additions for
the supported ports and blades throughout.
• Licensing information for ICLs, 10 Gbps FC ports, and 10 GbE ports corrected and clarified.
• Use of FC router for Interoperation between Fabric OS and M-EOS fabrics clarified to reflect the
facts that as of Fabric OS v7.0.0, this method is the only way to interoperate these fabric types.
• FIPS mode information and procedures enhanced to clarify effects of new features on FIPS
mode operation.
•
•
•
•
•
•
Fabric Naming information for the basic configuration.
Lossless Dynamic Load Sharing on ports.
Routing Policy feature.
Route Selection feature.
Fabric Shortest Path First feature.
Dynamic Fabric Provisioning is expanded and moved to a separate chapter, Chapter 16,
“Dynamic Fabric Provisioning: Fabric Assigned WWN”.
Fabric OS Administrator’s Guide
53-1002148-02
xxxv
Document conventions
This section describes text formatting conventions and important notice formats used in this
document.
Text formatting
The narrative-text formatting conventions that are used are as follows:
bold text
Identifies command names
Identifies the names of user-manipulated GUI elements
Identifies keywords and operands
Identifies text to enter at the GUI or CLI
italic text
Provides emphasis
Identifies variables
Identifies paths and Internet addresses
Identifies document titles
code text
Identifies CLI output
Identifies command syntax examples
For readability, command names in the narrative portions of this guide are presented in mixed
lettercase: for example, switchShow. In actual examples, command lettercase is often all
lowercase. Otherwise, this manual specifically notes those cases in which a command is case
sensitive.
Command syntax conventions
Command syntax in this manual follows these conventions:
command
Commands are printed in bold.
--option, option
Command options are printed in bold.
-argument, arg
Arguments.
[]
Optional element.
variable
Variables are printed in italics. In the help pages, values are underlined or
enclosed in angled brackets < >.
...
Repeat the previous element, for example “member[;member...]”
value
Fixed values following arguments are printed in plain font. For example,
--show WWN
|
Boolean. Elements are exclusive. Example: --show -mode egress | ingress
Notes, cautions, and warnings
The following notices and statements are used in this manual. They are listed below in order of
increasing severity of potential hazards.
xxxvi
Fabric OS Administrator’s Guide
53-1002148-02
NOTE
A note provides a tip, guidance or advice, emphasizes important information, or provides a reference
to related information.
ATTENTION
An Attention statement indicates potential damage to hardware or data.
CAUTION
A Caution statement alerts you to situations that can be potentially hazardous to you or cause
damage to hardware, firmware, software, or data.
DANGER
A Danger statement indicates conditions or situations that can be potentially lethal or extremely
hazardous to you. Safety labels are also attached directly to products to warn of these conditions
or situations.
Key terms
For definitions specific to Brocade and Fibre Channel, see the Brocade Glossary.
For definitions of SAN-specific terms, visit the Storage Networking Industry Association online
dictionary at:
http://www.snia.org/education/dictionary
Notice to the reader
This document may contain references to the trademarks of the following corporations. These
trademarks are the properties of their respective companies and corporations.
These references are made for informational purposes only.
Corporation
Referenced Trademarks and Products
Microsoft Corporation
Windows, Windows NT, Internet Explorer
Mozilla Corporation
Mozilla, Firefox
Netscape Communications Corporation
Netscape
Red Hat, Inc.
Red Hat, Red Hat Network, Maximum RPM, Linux Undercover
Sun Microsystems, Inc.
Sun, Solaris
Fabric OS Administrator’s Guide
53-1002148-02
xxxvii
Additional information
This section lists additional Brocade and industry-specific documentation that you might find
helpful.
Brocade resources
To get up-to-the-minute information, go to http://my.brocade.com and register at no cost for a user
ID and password.
For practical discussions about SAN design, implementation, and maintenance, you can obtain
Building SANs with Brocade Fabric Switches through:
http://www.amazon.com
For additional Brocade documentation, visit the Brocade SAN Info Center and click the Resource
Library location:
http://www.brocade.com
Release notes are available on the My Brocade website and are also bundled with the Fabric OS
firmware.
Other industry resources
For additional resource information, visit the Technical Committee T11 website. This website
provides interface standards for high-performance and mass storage applications for Fibre
Channel, storage management, and other applications:
http://www.t11.org
For information about the Fibre Channel industry, visit the Fibre Channel Industry Association
website:
http://www.fibrechannel.org
Getting technical help
Contact your switch support supplier for hardware, firmware, and software support, including
product repairs and part ordering. To expedite your call, have the following information available:
1. General Information
•
•
•
•
•
Switch model
Switch operating system version
Error numbers and messages received
supportSave command output
Detailed description of the problem, including the switch or fabric behavior immediately
following the problem, and specific questions
• Description of any troubleshooting steps already performed and the results
• Serial console and Telnet session logs
xxxviii
Fabric OS Administrator’s Guide
53-1002148-02
• syslog message logs
2. Switch Serial Number
The switch serial number and corresponding bar code are provided on the serial number label,
as illustrated below.:
*FT00X0054E9*
FT00X0054E9
The serial number label is located as follows:
• Brocade 5424 — On the bottom of the switch module.
• Brocade 300, 5100, and 5300 — On the switch ID pull-out tab located on the bottom of
the port side of the switch.
• Brocade 6510 — On the switch ID pull-out tab located inside the chassis on the port side
on the left.
•
•
•
•
Brocade 7800 and 8000 — On the bottom of the chassis.
Brocade DCX Backbone — On the bottom right on the port side of the chassis.
Brocade DCX-4S Backbone — On the bottom right on the port side of the chassis.
Brocade DCX 8510-4 — On the nonport side of the chassis, on the left just below the
left-hand power supply.
• Brocade DCX 8510-8 — On the bottom right on the port side of the chassis and directly
above the cable management comb.
3. World Wide Name (WWN)
Use the wwn command to display the switch WWN.
If you cannot use the wwn command because the switch is inoperable, you can get the WWN
from the same place as the serial number, except for the Brocade DCX enterprise class
platform. For the Brocade DCX enterprise class platform, access the numbers on the WWN
cards by removing the Brocade logo plate at the top of the nonport side of the chassis.
For the Brocade 5424 embedded switch: Provide the license ID. Use the licenseIdShow
command to display the WWN.
Document feedback
Quality is our first concern at Brocade and we have made every effort to ensure the accuracy and
completeness of this document. However, if you find an error or an omission, or you think that a
topic needs further development, we want to hear from you. Forward your feedback to:
[email protected]
Provide the title and version number of the document and as much detail as possible about your
comment, including the topic heading and page number and your suggestions for improvement.
Fabric OS Administrator’s Guide
53-1002148-02
xxxix
xl
Fabric OS Administrator’s Guide
53-1002148-02
Section
Standard Features
I
This section describes standard Fabric OS features, and includes the following chapters:
• Chapter 1, “Understanding Fibre Channel Services”
• Chapter 2, “Performing Basic Configuration Tasks”
• Chapter 3, “Performing Advanced Configuration Tasks”
• Chapter 4, “Routing Traffic”
• Chapter 5, “Managing User Accounts”
• Chapter 6, “Configuring Protocols”
• Chapter 7, “Configuring Security Policies”
• Chapter 8, “Maintaining the Switch Configuration File”
• Chapter 9, “Installing and Maintaining Firmware”
• Chapter 10, “Managing Virtual Fabrics”
• Chapter 11, “Administering Advanced Zoning”
• Chapter 12, “Traffic Isolation Zoning”
• Chapter 13, “Bottleneck Detection”
• Chapter 14, “In-flight Encryption and Compression”
• Chapter 15, “Administering NPIV”
• Chapter 16, “Dynamic Fabric Provisioning: Fabric Assigned WWN”
• Chapter 17, “Managing Administrative Domains”
Fabric OS Administrator’s Guide
53-1002148-02
1
2
Fabric OS Administrator’s Guide
53-1002148-02
Chapter
Understanding Fibre Channel Services
1
In this chapter
• Fibre Channel services overview . . . . . . . . . . . . . . . . . . . . . . . . . . . . . . . . . . . 3
• Management Server . . . . . . . . . . . . . . . . . . . . . . . . . . . . . . . . . . . . . . . . . . . . . 4
• Platform services . . . . . . . . . . . . . . . . . . . . . . . . . . . . . . . . . . . . . . . . . . . . . . . . 4
• Management server database . . . . . . . . . . . . . . . . . . . . . . . . . . . . . . . . . . . . . 6
• Topology discovery. . . . . . . . . . . . . . . . . . . . . . . . . . . . . . . . . . . . . . . . . . . . . . . 9
• Device login . . . . . . . . . . . . . . . . . . . . . . . . . . . . . . . . . . . . . . . . . . . . . . . . . . . 10
• High availability of daemon processes. . . . . . . . . . . . . . . . . . . . . . . . . . . . . . 13
Fibre Channel services overview
Fibre Channel services define service functions such as the Name Server, Management Server,
Security Key Distribution Server, and Time Server. Every Brocade switch has reserved three-byte
addresses referred to as well-known addresses. These services provided by Brocade switches
reside at these addresses and provide a service to either nodes or management applications in the
fabric.
FIGURE 1
Well-known addresses
Fabric Login — The Fabric Login server assigns a fabric address. This allows a fabric node to
communicate with services on the switch or other nodes in the fabric. The fabric address assigned
to a nodes is a 24-bit address (0x000000) containing three - 3-byte long nodes. Reading from left
to right, the first node (0x000000), represents the domain ID, the second node (0x000000) the
port area number of the port where the node is attached, and the third node (0x000000) the
arbitrated loop physical address (AL_PA), if applicable.
Directory Server — The Directory Server or Name Server is used to register fabric and public nodes
and query to discover other devices in the fabric.
Fabric Controller — The Fabric Controller provides State Change Notifications (SCNs) to registered
nodes when a change in the fabric topology occurs.
Fabric OS Administrator’s Guide
53-1002148-02
3
1
Management Server
Time Server — The Time Server sends to the member switches in the fabric the time on either the
principal switch or the primary Fabric Configuration Server (FCS) switch, depending on whether or
not an FCS security policy has been implemented. See Chapter 7, “Configuring Security Policies”
for additional information on FCS policies.
Management Server — The Management Server provides a single point for managing the fabric.
The only service that is user-configurable is the Management Server.
Alias Server — The Alias Server keeps a group of nodes registered as one name to handle multicast
groups.
Broadcast Server — The Broadcast Server is optional, and when frames are transmitted to this
address they are broadcasted to all operational N_ and NL_Ports.
When registration and query frames are sent to a well-known address, a different protocol service,
Fibre Channel Common Transport (FC-CT), is used. This protocol provides a simple, consistent
format and behavior when a service provider is accessed for registration and query purposes.
Management Server
The Brocade Fabric OS Management Server (MS) allows a SAN management application to retrieve
information and administer interconnected switches, servers, and storage devices. The
management server assists in the autodiscovery of switch-based fabrics and their associated
topologies.
A client of the management server can find basic information about the switches in the fabric and
use this information to construct topology relationships. The management server also allows you to
obtain certain switch attributes and, in some cases, modify them. For example, logical names
identifying switches can be registered with the management server.
The management server provides several advantages for managing a Fibre Channel fabric:
• It is accessed by an external Fibre Channel node at the well-known address FFFFFAh, so an
application can access information about the entire fabric management with minimal
knowledge of the existing configuration.
• It is replicated on every Brocade switch within a fabric.
• It provides an unzoned view of the overall fabric configuration. This fabric topology view
exposes the internal configuration of a fabric for management purposes; it contains
interconnect information about switches and devices connected to the fabric. Under normal
circumstances, a device (typically an FCP initiator) queries the Name Server for storage devices
within its member zones. Because this limited view is not always sufficient, the management
server provides the application with a list of the entire Name Server database.
Platform services
By default, all management services except platform services are enabled; the MS platform service
and topology discovery are disabled.
You can activate and deactivate the platform services throughout the fabric. Activating the platform
services attempts to activate the MS platform service for each switch in the fabric. The change
takes effect immediately and is committed to the configuration database of each affected switch.
MS activation is persistent across power cycles and reboots.
4
Fabric OS Administrator’s Guide
53-1002148-02
Platform services
1
NOTE
The commands msplMgmtActivate and msplMgmtDeactivate are allowed only in AD0 and AD255.
Platform services in a Virtual Fabric
Each logical switch has a separate Platform Database. All platform registrations done to a logical
switch are valid only in that particular logical switch’s Virtual Fabric.
Activating the platform services on a switch or enterprise-class platform activates the platform
services on all logical switches in a Virtual Fabric. Similarly, deactivating the platform services
deactivates the platform service on all logical switches in a Virtual Fabric. The msPlatShow
command displays all platforms registered in a Virtual Fabric.
Enabling platform services
When FCS policy is enabled, the msplMgmtActivate command can be issued only from the primary
FCS switch.
The execution of the msplMgmtActivate command is subject to Admin Domain restrictions that may
be in place.
1. Connect to the switch and log in using an account assigned to the admin role.
2. Enter the msCapabilityShow command to verify that all switches in the fabric support the MS
platform service; otherwise, the next step fails.
3. Enter the msplMgmtActivate command.
switch:admin> msplmgmtactivate
Request to activate MS Platform Service in progress......
*Completed activating MS Platform Service in the fabric!
Disabling platform services
1. Connect to the switch and log in using an account assigned to the admin role.
2. Enter the msplMgmtDeactivate command.
3. Enter y to confirm the deactivation.
switch:admin> msplmgmtdeactivate
MS Platform Service is currently enabled.
This will erase MS Platform Service configuration
information as well as database in the entire fabric.
Would you like to continue this operation? (yes, y, no, n): [no] y
Request to deactivate MS Platform Service in progress......
*Completed deactivating MS Platform Service in the fabric!
Fabric OS Administrator’s Guide
53-1002148-02
5
1
Management server database
Management server database
You can control access to the management server database.
An access control list (ACL) of WWN addresses determines which systems have access to the
management server database. The ACL typically contains those WWNs of host systems that are
running management applications.
If the list is empty (the default), the management server is accessible to all systems connected
in-band to the fabric. For more access security, you can specify WWNs in the ACL so that access to
the management server is restricted to only those WWNs listed.
NOTE
The management server is logical switch-capable. All management server features are supported
within a logical switch.
Displaying the management server ACL
1. Connect to the switch and log in using an account assigned to the admin role.
2. Enter the msConfigure command.
The command becomes interactive.
3. At the “select” prompt, enter 1 to display the access list.
A list of WWNs that have access to the management server is displayed.
Example of an empty access list
switch:admin> msconfigure
0
Done
1
Display the access list
2
Add member based on its Port/Node WWN
3
Delete member based on its Port/Node WWN
select : (0..3) [1] 1
MS Access list is empty.
0
Done
1
Display the access list
2
Add member based on its Port/Node WWN
3
Delete member based on its Port/Node WWN
select : (0..3) [1] 0
done ...
Adding a member to the ACL
1. Connect to the switch and log in using an account assigned to the admin role.
2. Enter the msConfigure command.
The command becomes interactive.
3. At the “select” prompt, enter 2 to add a member based on its port/node WWN.
4. At the “Port/Node WWN” prompt, enter the WWN of the host to be added to the ACL.
5. At the “select” prompt, enter 1 to display the access list so you can verify that the WWN you
entered was added to the ACL.
6
Fabric OS Administrator’s Guide
53-1002148-02
Management server database
1
6. After verifying that the WWN was added correctly, enter 0 at the prompt to end the session.
7.
At the “Update the FLASH?” prompt, enter y.
8. Press Enter to update the nonvolatile memory and end the session.
Example of adding a member to the management server ACL
switch:admin> msconfigure
0
Done
1
Display the access list
2
Add member based on its Port/Node WWN
3
Delete member based on its Port/Node WWN
select : (0..3) [1] 2
Port/Node WWN (in hex): [00:00:00:00:00:00:00:00] 20:00:00:20:37:65:ce:aa
*WWN is successfully added to the MS ACL.
0
Done
1
Display the access list
2
Add member based on its Port/Node WWN
3
Delete member based on its Port/Node WWN
select : (0..3) [2] 1
MS Access List consists of (14): {
20:00:00:20:37:65:ce:aa
20:00:00:20:37:65:ce:bb
20:00:00:20:37:65:ce:ff
20:00:00:20:37:65:ce:11
20:00:00:20:37:65:ce:22
20:00:00:20:37:65:ce:33
20:00:00:20:37:65:ce:44
10:00:00:60:69:04:11:24
10:00:00:60:69:04:11:23
21:00:00:e0:8b:04:70:3b
10:00:00:60:69:04:11:33
20:00:00:20:37:65:ce:55
20:00:00:20:37:65:ce:66
00:00:00:00:00:00:00:00
}
0
Done
1
Display the access list
2
Add member based on its Port/Node WWN
3
Delete member based on its Port/Node WWN
select : (0..3) [1] 0
done ...
Update the FLASH? (yes, y, no, n): [yes] y
*Successfully saved the MS ACL to the flash.
Deleting a member from the ACL
1. Connect to the switch and log in as admin.
2. Enter the msConfigure command.
The command becomes interactive.
3. At the “select” prompt, enter 3 to delete a member based on its port/node WWN.
4. At the “Port/Node WWN” prompt, enter the WWN of the member to be deleted from the ACL.
5. At the “select” prompt, enter 1 to display the access list so you can verify that the WWN you
entered was deleted from the ACL.
Fabric OS Administrator’s Guide
53-1002148-02
7
1
Management server database
6. After verifying that the WWN was deleted correctly, enter 0 at the “select” prompt to end the
session.
7.
At the “Update the FLASH?” prompt, enter y.
8. Press Enter to update the nonvolatile memory and end the session.
Example of deleting a member from the management server ACL
switch:admin> msconfigure
0
Done
1
Display the access list
2
Add member based on its Port/Node WWN
3
Delete member based on its Port/Node WWN
select : (0..3) [1] 3
Port/Node WWN (in hex): [00:00:00:00:00:00:00:00] 10:00:00:00:c9:29:b3:84
*WWN is successfully deleted from the MS ACL.
0
Done
1
Display the access list
2
Add member based on its Port/Node WWN
3
Delete member based on its Port/Node WWN
select : (0..3) [3] 1
MS Access list is empty
0
Done
1
Display the access list
2
Add member based on its Port/Node WWN
3
Delete member based on its Port/Node WWN
select : (0..3) [1] 0
Viewing the contents of the management server database
1. Connect to the switch and log in using an account assigned to the admin role.
2. Enter the msPlatShow command.
Example of viewing the contents of the management server platform database
switch:admin> msplatshow
----------------------------------------------------------Platform Name: [9] "first obj"
Platform Type: 5 : GATEWAY
Number of Associated M.A.: 1
[35] "http://java.sun.com/products/plugin"
Number of Associated Node Names: 1
Associated Node Names:
10:00:00:60:69:20:15:71
----------------------------------------------------------Platform Name: [10] "second obj"
Platform Type: 7 : HOST_BUS_ADAPTER
Number of Associated M.A.: 1
Associated Management Addresses:
[30] "http://java.sun.com/products/1"
Number of Associated Node Names: 1
Associated Node Names:
10:00:00:60:69:20:15:75
8
Fabric OS Administrator’s Guide
53-1002148-02
Topology discovery
1
Clearing the management server database
NOTE
The command msPlClearDB is allowed only in AD0 and AD255.
1. Connect to the switch and log in using an account assigned to the admin role.
2. Enter the msplClearDb command.
3. Enter y to confirm the deletion.
The management server platform database is cleared.
Topology discovery
The topology discovery feature can be displayed, enabled, and disabled; it is disabled by default.
The commands mstdEnable and mstdDisable are allowed only in AD0 and AD255.
Displaying topology discovery status
1. Connect to the switch and log in as admin.
2. Enter the mstdReadConfig command.
switch:admin> mstdreadconfig
*MS Topology Discovery is Enabled.
Enabling topology discovery
1. Connect to the switch and log in as admin.
2. Enter the appropriate following command based on how you want to enable discovery:
• For the local switch, enter the mstdEnable command.
• For the entire fabric, enter the mstdEnable all command.
Example of enabling discovery
switch:admin> mstdenable
Request to enable MS Topology Discovery Service in progress....
*MS Topology Discovery enabled locally.
switch:admin> mstdenable ALL
Request to enable MS Topology Discovery Service in progress....
*MS Topology Discovery enabled locally.
*MS Topology Discovery Enable Operation Complete!!
Fabric OS Administrator’s Guide
53-1002148-02
9
1
Device login
Disabling topology discovery
1. Connect to the switch and log in as admin.
2. Enter the appropriate following command based on how you want to disable discovery:
• For the local switch, enter the mstdDisable command.
• For the entire fabric, enter the mstdDisable all command.
A warning displays stating that all NID entries might be cleared.
3. Enter y to disable the Topology Discovery feature.
NOTE
Disabling discovery of management server topology might erase all node ID entries.
Example of disabling discovery
switch:admin> mstddisable
This may erase all NID entries. Are you sure?
(yes, y, no, n): [no] y
Request to disable MS Topology Discovery Service in progress....
*MS Topology Discovery disabled locally.
switch:admin> mstddisable all
This may erase all NID entries. Are you sure?
(yes, y, no, n): [no] y
Request to disable MS Topology Discovery Service in progress....
*MS Topology Discovery disabled locally.
*MS Topology Discovery Disable Operation Complete!!
Device login
A device can be a storage, host, or switch. When new devices are introduced into the fabric, they
must be powered on and, if a host or storage device, connected to a switch. Switch-to-switch logins
(using the E_Port) are handled differently than storage and host logins. E_Ports exchange different
frames than the ones listed below with the Fabric Controller to access the fabric. Once storage and
host devices are powered on and connected, the following logins occur:
1. FLOGI—Fabric Login command establishes a 24-bit address for the device logging in, and
establishes buffer-to-buffer credits and the class of service supported.
2. PLOGI—Port Login command logs the device into the Name Server to register its information as
well as query for devices that share its zone. During the PLOGI process, information is
exchanged between the new device and the fabric. A few of the following types of information
exchanges occur:
• SCR—State Change Registration registers the device for State Change Notifications. If
there is a change in the fabric, such as a zoning change or a change in the state of a
device to which this device has access, the device receives a Registered State Change
Notification (RSCN).
• Registration—A device exchanges registration information with the Name Server.
• Query—Devices query the Name Server for information about the device it can access.
10
Fabric OS Administrator’s Guide
53-1002148-02
Device login
1
Principal switch
In a fabric with multiple switches, and one inter-switch link (ISL) exists between any two switches, a
principal switch is automatically elected. The principal switch provides the following capabilities:
• Maintains time for the entire fabric. Subordinate switches synchronize their time with the
principal switch. Changes to the clock server value on the principal switch are propagated to all
switches in the fabric.
• Manages domain ID assignment within the fabric. If a switch requests a domain ID that has
been used before, the principal switch grants the same domain ID unless it is in use by another
switch.
E_Port login
An E_Port does not use a FLOGI to log in to another switch. Instead, the new switch exchanges
frames with the principal switch to establish that the new switch is an E_Port and that it has
information to exchange. If everything is acceptable to the principal switch, it replies to the new
switch with an SW_ACC (accept) frame. The initializing frame is an Exchange Link Parameters (ELP)
frame that allows an exchange of parameters between two ports, such as flow control,
buffer-to-buffer credits, RA_TOV, and ED_TOV. This is not a negotiation. If one or the other port’s link
parameters do not match, a link does not occur. Once an SW_ACC frame is received from the
principal switch, the new switch sends an Exchange Switch Capabilities (ESC) frame. The two
switches exchange routing protocols and agree on a common routing protocol. An SW_ACC frame is
received from the principal switch and the new switch sends an Exchange Fabric Parameters (EFP)
frame to the principal switch, requesting principal switch priority and the domain ID list.
Buffer-to-buffer credits for the device and switch ports are exchanged in the SW_ACC command
sent to the device in response to the FLOGI.
Fabric login
A device performs a fabric login (FLOGI) to determine if a fabric is present. If a fabric is detected
then it exchanges service parameters with the fabric controller. A successful FLOGI sends back the
24-bit address for the device in the fabric. The device must issue and successfully complete a
FLOGI command before communicating with other devices in the fabric.
Because the device does not know its 24-bit address until after the FLOGI, the source ID (SID) in
the frame header making the FLOGI request are zeros (0x000000).
Port login process
The steps in the port initialization process represent a protocol used to discover the type of device
connected and establish the port type and negotiate port speed.
The possible port types are as follows:
• U_Port — A universal FC port is the base Fibre Channel port type, and all unidentified or
uninitiated ports are listed as U_Ports.
• L_/FL_Port — A loop or fabric loop port connects loop devices. L_Ports are associated with
private loop devices and FL_Ports are associated with public loop devices.
• G_Port — A generic port acts as a transition port for non-loop fabric-capable devices.
• E_Port — An expansion port is assigned to ISL links to expand your fabric by connecting it to
other switches.
Fabric OS Administrator’s Guide
53-1002148-02
11
1
Device login
• F_Port — A fabric port is assigned to fabric-capable devices, such as SAN storage devices.
• EX_Port — A type of E_Port that connects a Fibre Channel router to an edge fabric. From the
point of view of a switch in an edge fabric, an EX_Port appears as a normal E_Port. It follows
applicable Fibre Channel standards as other E_Ports. However, the router terminates EX_Ports
rather than allowing different fabrics to merge as would happen on a switch with regular
E_Ports.
• Mirror Port — A mirror port is a configured switch port that connects to a port to mirror a
specific source port and destination port traffic passing though any switch port. This is only
supported between F_Ports.
• VE_Port — A virtual E_Port is a gigabit Ethernet switch port configured for an FCIP tunnel.
However, with a VEX_Port at the other end, it does not propagate fabric services or routing
topology information from one edge fabric to another.
• VEX_Port — A virtual EX_Port connects a Fibre Channel router to an edge fabric. From the point
of view of a switch in an edge fabric, a VEX_Port appears as a normal VE_Port. It follows the
same Fibre Channel protocol as other VE_Ports. However, the router terminates VEX_Ports
rather than allowing different fabrics to merge as would happen on a switch with regular
VE_Ports.
The Fibre Channel protocol (FCP) auto discovery process enables private storage devices that
accept the process login (PRLI) to communicate in a fabric.
If device probing is enabled, the embedded performs a PLOGI and attempts a PRLI into the device
to retrieve information to enter into the Name Server. This enables private devices that do not
perform a FLOGI, but accept a PRLI, to be entered in the Name Server and receive full fabric
access.
A fabric-capable device registers its information with the Name Server during a FLOGI. These
devices typically register information with the Name Server before querying for a device list. The
embedded port still performs a PLOGI and attempts a PRLI with these devices.
If a port decides to end the current session, it initiates a logout. A logout concludes the session and
terminates any work in progress associated with that session.
To display the contents of a switch’s Name Server, use the nsShow or nsAllShow command. For
more information about these commands, refer to the Fabric OS Command Reference.
RSCN causes
An Registered State Change Notification (RSCN) is a notification frame that is sent to devices that
are zoned together and are registered to receive a State Change Notification (SCN). The RSCN is
responsible for notifying all devices of fabric changes. The following general list of actions can
cause an RSCN to be sent through your fabric:
•
•
•
•
•
A new device has been added to the fabric.
An existing device has been removed from the fabric.
A zone has changed.
A switch name has changed or an IP address has changed.
Nodes leaving or joining the fabric, such as zoning or powering on or shutting down a device, or
zoning changes.
NOTE
Fabric reconfigurations with no domain change do not cause an RSCN.
12
Fabric OS Administrator’s Guide
53-1002148-02
High availability of daemon processes
1
High availability of daemon processes
Starting non-critical daemons is automatic; you cannot configure the startup process. The following
sequence of events occurs when a non-critical daemon fails:
1. A RASlog and AUDIT event message is logged.
2. The daemon is automatically started again.
3. If the restart is successful, then another message is sent to RASlog and AUDIT, reporting the
successful restart status.
4. If the restart fails, another message is sent to RASlog and no further attempts are made to
restart the daemon.
Schedule downtime and reboot the switch at your convenience. Table 1 lists the daemons that are
considered non-critical and are automatically restarted on failure.
TABLE 1
Daemons that are automatically restarted
Daemon
Description
arrd
Asynchronous Response Router, which is used to send management data to hosts when the switch
is accessed through the APIs (FA API or SMI-S).
cald
Common Access Layer daemon, which is used by manageability applications.
raslogd
Reliability, Availability, and Supportability daemon logs error detection, reporting, handling, and
presentation of data into a format readable by you and management tools.
rpcd
Remote Procedure Call daemon, used by the API (Fabric Access API and SMI-S).
snmpd
Simple Network Management Protocol daemon.
traced
Trace daemon provides trace entry date/time translation to Trace Device at startup and when
date/time changed by command. Maintains the trace dump trigger parameters in a Trace Device.
Performs the trace Background Dump, trace automatic FTP, and FTP “aliveness check” if auto-FTP
is enabled.
trafd
Traffic daemon implements Bottleneck detection.
webd
Webserver daemon used for WebTools (includes httpd as well).
weblinkerd
Weblinker daemon provides an HTTP interface to manageability applications for switch
management and fabric discovery.
Fabric OS Administrator’s Guide
53-1002148-02
13
1
14
High availability of daemon processes
Fabric OS Administrator’s Guide
53-1002148-02
Chapter
2
Performing Basic Configuration Tasks
In this chapter
• Fabric OS overview . . . . . . . . . . . . . . . . . . . . . . . . . . . . . . . . . . . . . . . . . . . . .
• Fabric OS command line interface . . . . . . . . . . . . . . . . . . . . . . . . . . . . . . . . .
• Password modification . . . . . . . . . . . . . . . . . . . . . . . . . . . . . . . . . . . . . . . . . .
• The Ethernet interface on your switch . . . . . . . . . . . . . . . . . . . . . . . . . . . . . .
• Date and time settings . . . . . . . . . . . . . . . . . . . . . . . . . . . . . . . . . . . . . . . . . .
• Domain IDs . . . . . . . . . . . . . . . . . . . . . . . . . . . . . . . . . . . . . . . . . . . . . . . . . . .
• Switch names . . . . . . . . . . . . . . . . . . . . . . . . . . . . . . . . . . . . . . . . . . . . . . . . .
• Chassis names. . . . . . . . . . . . . . . . . . . . . . . . . . . . . . . . . . . . . . . . . . . . . . . . .
• Switch activation and deactivation . . . . . . . . . . . . . . . . . . . . . . . . . . . . . . . .
• Switch and enterprise-class platform shutdown . . . . . . . . . . . . . . . . . . . . . .
• Basic connections . . . . . . . . . . . . . . . . . . . . . . . . . . . . . . . . . . . . . . . . . . . . . .
15
16
19
20
25
28
30
31
32
32
34
Fabric OS overview
This chapter describes how to configure your Brocade SAN using the Fabric OS command line
interface (CLI). Before you can configure a storage area network (SAN), you must power up the
enterprise-class platform or switch and blades, and then set the IP addresses of those devices.
Although this chapter focuses on configuring a SAN using the CLI, you can also use the following
methods to configure a SAN:
• Web Tools
For Web Tools procedures, refer to Web Tools Administrator’s Guide.
• Data Center Fabric Manager (DCFM)
For DCFM procedures, see the Brocade Network Advisor User Manual for the version you have.
• A third-party application using the API
For third-party application procedures, refer to the third-party API documentation.
Because of the differences between fixed-port and variable-port devices, procedures sometimes
differ among Brocade models. As new Brocade models are introduced, new features sometimes
apply only to those models.
When procedures or parts of procedures apply to some models but not others, this guide identifies
the specifics for each model. For example, a number of procedures that apply only to variable-port
devices are found in Chapter 3, “Performing Advanced Configuration Tasks”.
Fabric OS Administrator’s Guide
53-1002148-02
15
2
Fabric OS command line interface
Although many different software and hardware configurations are tested and supported by
Brocade Communications Systems, Inc., documenting all possible configurations and scenarios is
beyond the scope of this document. In some cases, earlier releases are highlighted to present
considerations for interoperating with them.
The hardware reference manuals for Brocade products describe how to power up devices and set
their IP addresses. After the IP address is set, you can use the CLI procedures contained in this
guide. For additional information about the commands used in the procedures, refer to the Fabric
OS Command Reference.
Fabric OS command line interface
Fabric OS uses Role-Based Access Control (RBAC) to control access to all Fabric OS operations.
Each feature is associated with an RBAC role and you need to know which role is allowed to run a
command, make modifications to the switch, or view the output of the command. To determine
which RBAC role you need to run a command, review the section “Role-Based Access Control” on
page 84.
NOTE
When command examples in this guide show user input enclosed in quotation marks, the quotation
marks are required.
Console sessions using the serial port
Note the following behaviors for serial connections:
• Some procedures require that you connect through the serial port; for example, setting the IP
address or setting the boot PROM password.
• Brocade DCX, DCX-4S, and DCX 8510 enterprise-class platforms: You can connect to CP0 or
CP1 using either of the two serial ports.
Connecting to Fabric OS through the serial port
1. Connect the serial cable to the serial port on the switch and to an RS-232 serial port on
the workstation.
If the serial port on the workstation is an RJ-45 port, instead of RS-232, remove the adapter on
the end of the serial cable and insert the exposed RJ-45 connector into the RJ-45 serial port on
the workstation.
2. Open a terminal emulator application (such as HyperTerminal on a PC, TERM, TIP, or Kermit in
a UNIX environment), and configure the application as follows:
• In a Windows environment enter the following parameters:
TABLE 2
16
Terminal port parameters
Parameter
Value
Bits per second
9600
Databits
8
Parity
None
Fabric OS Administrator’s Guide
53-1002148-02
Fabric OS command line interface
TABLE 2
2
Terminal port parameters (Continued)
Parameter
Value
Stop bits
1
Flow control
None
• In a UNIX environment, enter the following string at the prompt:
tip /dev/ttyb -9600
If ttyb is already in use, use ttya instead and enter the following string at the prompt:
tip /dev/ttya -9600
Telnet or SSH sessions
Connect to the Fabric OS through a Telnet or SSH connection or through a console session on the
serial port. The switch must also be physically connected to the network. If the switch network
interface is not configured or the switch has been disconnected from the network, use a console
session on the serial port as described in “Console sessions using the serial port” on page 16.
NOTE
To automatically configure the network interface on a DHCP-enabled switch, plug the switch into the
network and power it on. The DHCP client automatically gets the IP and gateway addresses from the
DHCP server. The DHCP server must be on the same subnet as the switch. Refer to “DHCP
activation” on page 23.
Rules for Telnet connections
The following rules must be observed when making Telnet connections to your switch:
• Never change the IP address of the switch while two Telnet sessions are active; if you do, your
next attempt to log in fails. To recover, gain access to the switch by one of these methods:
-
You can use Web Tools to perform a fast boot. When the switch comes up, the Telnet quota
is cleared. (For instructions on performing a fast boot with Web Tools, see the Web Tools
Administrator’s Guide.)
-
If you have the required privileges, you can connect through the serial port, log in as
admin, and use the killTelnet command to identify and kill the Telnet processes without
disrupting the fabric.
• For accounts with an admin role, Fabric OS limits the number of simultaneous Telnet sessions
per switch to two. For more details on session limits, refer to Chapter 5, “Managing User
Accounts”.
Connecting to Fabric OS using Telnet
1. Connect through a serial port to the switch that is appropriate for your fabric:
• If Virtual Fabrics is enabled, log in using an admin account assigned the chassis-role
permission.
• If Virtual Fabrics is not enabled, log in using an account assigned to the admin role.
Fabric OS Administrator’s Guide
53-1002148-02
17
2
Fabric OS command line interface
2. Verify the switch’s network interface is configured and that it is connected to the IP network
through the RJ-45 Ethernet port.
Switches in the fabric that are not connected through the Ethernet port can be managed
through switches that are using IP over Fibre Channel. The embedded port must have an
assigned IP address.
3. Log off the switch’s serial port.
4. From a management station, open a Telnet connection using the IP address of the switch to
which you want to connect.
The login prompt is displayed when the Telnet connection finds the switch in the network.
5. Enter the account ID at the login prompt.
6. Enter the password.
If you have not changed the system passwords from the default, you are prompted to change
them. Enter the new system passwords, or press Ctrl+C to skip the password prompts. For
more information on system passwords, refer to “Default account passwords” on page 19.
7.
Verify the login was successful.
The prompt displays the switch name and user ID to which you are connected.
login: admin
password: xxxxxxx
Getting help on a command
You can display a list of all command help topics for a given login level. For example, if you are
logged in as user and enter the help command, a list of all user-level commands that can be
executed is displayed. The same rule applies to the admin, securityAdmin, and the switchAdmin
roles.
1. Connect to the switch and log in using an account assigned to the admin role.
2. Enter the help [|more] command with no specific command and all commands are displayed.
The optional |more argument displays the commands one page at a time.
For command-specific information, you can enter help <command> |more, where command
is the name of the command for which you need specific information.
The commands in the following table provides help files for the indicated specific topics.
TABLE 3
18
Help topic contents
Topic name
Help contents description
diagHelp
Diagnostic help information
ficonHelp
FICON help information
fwHelp
Fabric Watch help information
iscsiHelp
iSCSI help information
licenseHelp
License help information
perfHelp
Performance Monitoring help information
routeHelp
Routing help information
Fabric OS Administrator’s Guide
53-1002148-02
Password modification
TABLE 3
2
Help topic contents (Continued)
Topic name
Help contents description
trackChangesHelp
Track Changes help information
zoneHelp
Zoning help information
Password modification
The switch automatically prompts you to change the default account passwords after logging in for
the first time. If you do not change the passwords, the switch prompts you after each subsequent
login until all the default passwords have been changed.
NOTE
The default account passwords can be changed from their original values only when prompted
immediately following the login; the passwords cannot be changed using the passwd command later
in the session. If you skip the prompt, and then later decide to change the passwords, log out and
then back in.
The default accounts on the switch are admin, user, root, and factory. Use the “admin” account to
log in to the switch for the first time and to perform the basic configuration tasks. The password for
all of these accounts is “password”.
There is only one set of default accounts for the entire chassis. The root and factory default
accounts are reserved for development and manufacturing. The user account is primarily used for
system monitoring. For more information on default accounts, refer to “Default accounts” on
page 87.
Default account passwords
The change default account passwords prompt is a string that begins with the message “Please
change your passwords now”. User-defined passwords can have from 8 through 40 characters.
They must begin with an alphabetic character and can include numeric characters, the period (.),
and the underscore ( _ ). They are case-sensitive, and they are not displayed when you enter them
on the command line.
Record the passwords exactly as entered and store them in a secure place because recovering
passwords requires significant effort and fabric downtime. Although the root and factory accounts
are not meant for general use, change their passwords if prompted to do so and save the
passwords in case they are needed for recovery purposes.
Changing the default account passwords at login
1. Connect to the switch and log in using the default administrative account.
2. At each of the “Enter new password” prompts, either enter a new password or skip the prompt.
To skip a single prompt, press Enter. To skip all of the remaining prompts, press Ctrl-C.
Example output of changing passwords
login: admin
Password:
Please change your passwords now.
Fabric OS Administrator’s Guide
53-1002148-02
19
2
The Ethernet interface on your switch
Use Control-C to exit or press 'Enter' key to proceed.
for user - root
Changing password for root
Enter new password: <hidden>
Password changed.
Saving password to stable storage.
Password saved to stable storage successfully.
(output truncated)
The Ethernet interface on your switch
The Ethernet (network) interface provides management access, including direct access to the
Fabric OS CLI, and allows other tools, such as Web Tools, to interact with the switch. You can use
either Dynamic Host Configuration Protocol (DHCP) or static IP addresses for the Ethernet network
interface configuration. On Brocade enterprise-class platforms, you must set IP addresses for the
following components:
• Both Control Processors (CP0 and CP1)
• Chassis management IP
On the Brocade switches, you must set the Ethernet and chassis management IP interfaces.
Setting the chassis management IP address eliminates the need to know which CP is active and
automatically connects the requestor to the currently active CP.
You can continue to use a static Ethernet addressing system or allow the DHCP client to
automatically acquire Ethernet addresses. Configure the Ethernet interface IP address, subnet
mask, and gateway addresses in one of the following manners:
• Using static Ethernet addresses (refer to “Static Ethernet addresses” on page 22)
• Activating DHCP (refer to “DHCP activation” on page 23)
NOTE
When you change the Ethernet interface settings, open connections such as SSH or Telnet may be
dropped. Reconnect using the new Ethernet IP address information or change the Ethernet settings
using a console session through the serial port to maintain your session during the change. You
must connect through the serial port to set the Ethernet IP address if the Ethernet network interface
is not configured already. For details, refer to “Connecting to Fabric OS through the serial port” on
page 16.
Virtual Fabrics and the Ethernet interface
On the Brocade DCX and DCX-4S, the single-chassis IP address and subnet mask are assigned to
the management Ethernet ports on the front panels of the CPs. These addresses allow access to
the chassis—more specifically, the active CP of the chassis—and not individual logical switches. The
IP addresses can also be assigned to each CP individually. This allows for direct communication
with a CP, including the standby CP. On the Brocade DCX and DCX-4S Backbones, each CP has two
management Ethernet ports on its front panel. These two physical ports are bonded together to
create a single, logical Ethernet port, and it is the logical Ethernet port to which IP addresses are
assigned.
20
Fabric OS Administrator’s Guide
53-1002148-02
The Ethernet interface on your switch
2
IPv4 addresses assigned to individual Virtual Fabrics are assigned to IP over Fibre Channel (IPFC)
network interfaces. In Virtual Fabrics environments, a single chassis can be assigned to multiple
fabrics, each of which is logically distinct and separate from one another. Each IPFC point of
connection to a given chassis needs a separate IPv4 address and prefix to be accessible to a
management host. For more information on how to set up these IPFC interfaces to your Virtual
Fabric, refer to Chapter 10, “Managing Virtual Fabrics”.
Displaying the network interface settings
If an IP address has not been assigned to the network interface (Ethernet), you must connect to the
Fabric OS CLI using a console session on the serial port. For more information, see “Console
sessions using the serial port” on page 16. Otherwise, connect using SSH.
1. Connect to the switch and log in using an account assigned to the admin role.
2. Enter the ipAddrShow command.
Example output of an enterprise-class platform
ecp:admin> ipaddrshow
SWITCH
Ethernet IP Address: 10.1.2.3
Ethernet Subnetmask: 255.255.240.0
CP0
Ethernet IP Address: 10.1.2.3
Ethernet Subnetmask: 255.255.240.0
Host Name: ecp0
Gateway IP Address: 10.1.2.1
CP1
Ethernet IP Address: 10.1.2.4
Ethernet Subnetmask: 255.255.240.0
Host Name: ecp1
Gateway IP Address: 10.1.2.3
IPFC address for virtual fabric ID 123: 11.1.2.3/24
IPFC address for virtual fabric ID 45: 13.1.2.4/20
Slot 7
eth0: 11.1.2.4/24
Gateway: 11.1.2.1
Backplane IP address of CP0 : 10.0.0.5
Backplane IP address of CP1 : 10.0.0.6
IPv6 Autoconfiguration Enabled: Yes
Local IPv6 Addresses:
sw 0 stateless fd00:60:69bc:70:260:69ff:fe00:2/64 preferred
sw 0 stateless fec0:60:69bc:70:260:69ff:fe00:2/64 preferred
cp 0 stateless fd00:60:69bc:70:260:69ff:fe00:197/64 preferred
cp 0 stateless fec0:60:69bc:70:260:69ff:fe00:197/64 preferred
cp 1 stateless fd00:60:69bc:70:260:69ff:fe00:196/64 preferred
cp 1 stateless fec0:60:69bc:70:260:69ff:fe00:196/64 preferred
IPv6 Gateways:
cp 0 fe80:60:69bc:70::3
cp 0 fe80:60:69bc:70::2
cp 0 fe80:60:69bc:70::1
cp 1 fe80:60:69bc:70::3
Fabric OS Administrator’s Guide
53-1002148-02
21
2
The Ethernet interface on your switch
If the Ethernet IP address, subnet mask, and gateway address are displayed, then the network
interface is configured. Verify the information on your switch is correct. If DHCP is enabled, the
network interface information was acquired from the DHCP server.
NOTE
You can use either IPv4 or IPv6 with a classless inter-domain routing (CIDR) block notation (also
known as a network prefix length) to set up your IP addresses.
Static Ethernet addresses
Use static Ethernet network interface addresses on Brocade DCX and DCX-4S enterprise-class
platforms, and in environments where DHCP service is not available. To use static addresses for
the Ethernet interface, you must first disable DHCP. You can enter static Ethernet information and
disable DHCP at the same time. For more information, refer to “DHCP activation” on page 23.
If you choose not to use DHCP or to specify an IP address for your switch Ethernet interface, you
can do so by entering “none” or “0.0.0.0” in the Ethernet IP address field.
On an application blade, configure the two external Ethernet interfaces to two different subnets. If
two subnets are not present, configure one of the interfaces and leave the other unconfigured.
Otherwise, the following message displays and blade status may go into a faulty state after a
reboot.
Neighbor table overflow.
print: 54 messages suppressed
Setting the static addresses for the Ethernet network interface
1. Connect to the switch and log in using an account assigned to the admin role.
2. Perform the appropriate action based on whether you have a switch or enterprise-class
platform:
• If you are setting the IP address for a switch, enter the ipAddrSet command.
• If you are setting the IP address for an enterprise-class platform, enter the ipAddrSet
command specifying either CP0 or CP1. You must set the IP address for both CP0 and
CP1.
Example of setting the IPv4 address
switch:admin> ipaddrset
Ethernet IP Address [10.1.2.3]:
Ethernet Subnetmask [255.255.255.0]:
Fibre Channel IP Address [220.220.220.2]:
Fibre Channel Subnetmask [255.255.0.0]:
Gateway IP Address [10.1.2.1]:
DHCP [OFF]: off
Example of setting an IPv6 address on a switch
switch:admin> ipaddrset -ipv6 --add 1080::8:800:200C:417A/64
IP address is being changed...Done.
For more information on setting up an IP address for a Virtual Fabric, refer to Chapter 10,
“Managing Virtual Fabrics”.
3. Enter the network information in dotted-decimal notation for the Ethernet IPv4 address or in
semicolon-separated notation for IPv6.
22
Fabric OS Administrator’s Guide
53-1002148-02
The Ethernet interface on your switch
2
4. Enter the Ethernet Subnetmask at the prompt.
5. Skip the Fibre Channel prompts by pressing Enter.
The Fibre Channel IP address is used for management.
6. Enter the Gateway Address at the prompt.
7.
Disable DHCP by entering off.
Setting the static addresses for the chassis management IP interface
1. Connect to the switch and log in using an account assigned to the admin role.
2. Enter the ipAddrSet -chassis command.
switch:admin> ipaddrset -chassis
Ethernet IP Address [192.168.166.148]:
Ethernet Subnetmask [255.255.255.0]:
Committing configuration...Done.
3. Enter the network information in dotted-decimal notation for the Ethernet IPv4 address or in
semicolon-separated notation for IPv6.
4. Enter the Ethernet Subnet mask at the prompt.
DHCP activation
By default, some Brocade switches have DHCP enabled.
NOTE
The Brocade DCX and Brocade DCX-4S enterprise-class platforms do not support DHCP.
The Fabric OS DHCP client supports the following parameters:
• External Ethernet port IP addresses and subnet masks
• Default gateway IP address
The DHCP client uses a DHCP vendor-class identifier that allows DHCP servers to determine that
the discover/request packet are coming from a Brocade switch. The vendor-class identifier is the
string “BROCADE” followed by the SWBD model number of the platform. For example, the
vendor-class identifier for a request from a Brocade 5300 is “BROCADESWBD64.”
NOTE
The client conforms to the latest IETF Draft Standard RFCs for IPv4, IPv6, and DHCP.
Enabling DHCP
Connect the DHCP-enabled switch to the network, power on the switch, and the switch
automatically obtains the Ethernet IP address, Ethernet subnet mask, and default gateway address
from the DHCP server. The DHCP client can only connect to a DHCP server on the same subnet as
the switch. Do not enable DHCP if the DHCP server is not on the same subnet as the switch.
Enabling DHCP after the Ethernet information has been configured releases the current Ethernet
network interface settings, including Ethernet IP address, Ethernet subnet mask, and gateway IP
address. The Fibre Channel IP address and subnet mask are static and are not affected by DHCP;
for instructions on setting the FC IP address, see “Static Ethernet addresses” on page 22.
Fabric OS Administrator’s Guide
53-1002148-02
23
2
The Ethernet interface on your switch
1. Connect to the switch and log in using an account assigned to the admin role.
2. Enter the ipAddrSet command.
3. If already set up, skip the Ethernet IP address, Ethernet subnet mask, Fibre Channel IP
address, and Fibre Channel subnet mask prompts by pressing Enter.
4. Enable DHCP by entering on.
switch:admin> ipaddrset
Ethernet IP Address [10.1.2.3]:
Ethernet Subnetmask [255.255.255.0]:
Fibre Channel IP Address [220.220.220.2]:
Fibre Channel Subnetmask [255.255.0.0]:
Gateway IP Address [10.1.2.1]:
DHCP [Off]:on
Disabling DHCP
When you disable DHCP, enter the static Ethernet IP address and subnet mask of the switch and
default gateway address. Otherwise, the Ethernet settings may conflict with other addresses
assigned by the DHCP server on the network.
1. Connect to the switch and log in using an account assigned to the admin role.
2. Enter the ipAddrSet command.
3. Enter the network information in dotted-decimal notation for the Ethernet IPv4 address or in
semicolon-separated notation for IPv6.
If a static Ethernet address is not available when you disable DHCP, enter 0.0.0.0 at the
Ethernet IP address prompt.
4. Skip the Fibre Channel prompts by pressing Enter.
5. When you are prompted for DHCP[On], disable it by entering off.
switch:admin> ipaddrset
Ethernet IP Address [10.1.2.3]:
Ethernet Subnetmask [255.255.255.0]:
Fibre Channel IP Address [220.220.220.2]:
Fibre Channel Subnetmask [255.255.0.0]:
Gateway IP Address [10.1.2.1]:
DHCP [On]:off
IPv6 autoconfiguration
IPv6 can assign multiple IP addresses to each network interface. Each interface is configured with
a link local address in almost all cases, but this address is only accessible from other hosts on the
same network. To provide for wider accessibility, interfaces are typically configured with at least
one additional global scope IPv6 address. IPv6 autoconfiguration allows more IPv6 addresses, the
number of which is dependent on the number of routers serving the local network and the number
of prefixes they advertise.
There are two methods of autoconfiguration for IPv6 addresses, stateless autoconfiguration and
stateful autoconfiguration. Stateless allows an IPv6 host to obtain a unique address using the IEEE
802 MAC address; stateful uses a DHCPv6 server, which keeps a record of the IP address and
other configuration information for the host. Whether or not a host engages in autoconfiguration
and which method it uses is dictated by the routers serving the local network, not by a
24
Fabric OS Administrator’s Guide
53-1002148-02
Date and time settings
2
configuration of the host. There can be multiple routers serving the network, each potentially
advertising multiple network prefixes. Thus, the host is not in full control of the number of IPv6
addresses that it configures, much less the values of those addresses, and the number and values
of addresses can change as routers are added to or removed from the network.
When IPv6 autoconfiguration is enabled, the platform engages in stateless IPv6 autoconfiguration.
When IPv6 autoconfiguration is disabled, the platform relinquishes usage of any autoconfigured
IPv6 addresses that it may have acquired while it was enabled. This same enable or disable state
also enables or disables the usage of a link local address for each managed entity, though a link
local address continues to be generated for each nonchassis-based platform and for each CP of a
chassis-based platform because those link local addresses are required for router discovery. The
enabled or disabled state of autoconfiguration is independent of whether any static IPv6 addresses
have been configured.
Setting IPv6 autoconfiguration
1. Connect to the switch and log in using an account assigned to the admin role.
2. Take the appropriate following action based on whether you want to enable or disable IPv6
autoconfiguration:
• Enter the ipAddrSet -ipv6 -auto command to enable IPv6 autoconfiguration for all
managed entities on the target platform.
• Enter the ipAddrSet -ipv6 -noauto command to disable IPv6 autoconfiguration for all
managed entities on the target platform.
Date and time settings
Switches maintain the current date and time inside a battery-backed real-time clock (RTC) circuit
that receives the date and time from the fabric’s principal switch. Date and time are used for
logging events. Switch operation does not depend on the date and time; a switch with an incorrect
date and time value functions properly. However, because the date and time are used for logging,
error detection, and troubleshooting, you must set them correctly.
In a Virtual Fabric, there can be a maximum of eight logical switches per director or enterprise-class
platform. Only the default switch in the chassis can update the hardware clock. When the date
command is issued from a non-principal pre-Fabric OS v6.2.0 or earlier switch, the date command
request is dropped by a Fabric OS v6.2.0 and later switch and the pre-Fabric OS v6.2.0 switch or
earlier does not receive an error.
Authorization access to set or change the date and time for a switch is role-based. For an
understanding of role-based access, refer to “Role-Based Access Control” on page 84.
Setting the date and time
1. Connect to the switch and log in using an account assigned to the admin role.
2. Enter the date command, using the following syntax:
date "mmddHHMMyy"
The values represent the following:
• mm is the month; valid values are 01 through 12.
Fabric OS Administrator’s Guide
53-1002148-02
25
2
Date and time settings
•
•
•
•
dd is the date; valid values are 01 through 31.
HH is the hour; valid values are 00 through 23.
MM is minutes; valid values are 00 through 59.
yy is the year, valid values are 00 through 37 and 70 through 99 (year values from 70
through 99 are interpreted as 1970 through 1999, year values from 00 through 37 are
interpreted as 2000 through 2037).
Example of showing and setting the date
switch:admin> date
Fri Sep 29 17:01:48 UTC 2007
Stealth200E:admin> date "0204101008"
Mon Feb 4 10:10:00 UTC 2008
Time zone settings
You can set the time zone for a switch by name. You can specify the setting using country and city
or time zone parameters. Switch operation does not depend on a date and time setting. However,
having an accurate time setting is needed for accurate logging and audit tracking.
If the time zone is not set with new options, the switch retains the offset time zone settings. The
tsTimeZone command includes an option to revert to the prior time zone format. For more
information about the tsTimeZone command, refer to the Fabric OS Command Reference.
When you set the time zone for a switch, you can perform the following tasks:
• Display all of the time zones supported in the firmware.
• Set the time zone based on a country and city combination or based on a time zone ID,
such as PST.
The time zone setting has the following characteristics:
• Users can view the time zone settings. However, only those with administrative
permissions can set the time zones.
• The setting automatically adjusts for Daylight Savings Time.
• Changing the time zone on a switch updates the local time zone setup and is reflected in
local time calculations.
• By default, all switches are set to Greenwich Mean Time (0,0). If all switches in a fabric are
in one time zone, it is possible for you to keep the time zone setup at the default setting.
• System services that have already started reflect the time zone changes after the next
reboot.
• Time zone settings persist across failover for high availability.
Setting the time zone on any dual domain director has the following characteristics:
• Updating the time zone on any switch updates the entire director.
• The time zone of the entire director is the time zone of switch 0.
Setting the time zone
The following procedure describes how to set the time zone for a switch. You must perform the
procedure on all switches for which the time zone must be set. However, you only need to set the
time zone once on each switch because the value is written to nonvolatile memory.
26
Fabric OS Administrator’s Guide
53-1002148-02
Date and time settings
2
1. Connect to the switch and log in using an account assigned to the admin role and with the
chassis-role permission.
2. Enter the tsTimeZone command.
• Use tsTimeZone with no parameters to display the current time zone setting.
• Use --interactive to list all of the time zones supported by the firmware.
• Use timeZone_fmt to set the time zone by Country/City or by time zone ID, such as Pacific
Standard Time (PST).
Example of displaying and changing the time zone to US/Central
switch:admin> tstimezone
Time Zone : US/Pacific
switch:admin> tstimezone US/Central
switch:admin> tstimezone
Time Zone : US/Central
Setting the time zone interactively
The following procedure describes how to set the current time zone to PST using interactive mode.
1. Connect to the switch and log in using an account assigned to the admin role and with the
chassis-role permission.
2. Enter the tsTimeZone --interactive command.
You are prompted to select a general location.
Please identify a location so that time zone rules can be set correctly.
3. Enter the appropriate number or press Ctrl-D to quit.
4. Select a country location at the prompt.
5. Enter the appropriate number at the prompt to specify the time zone region of Ctrl-D to quit.
Network time protocol
You can synchronize the local time of the principal or primary fabric configuration server (FCS)
switch to a maximum of eight external Network Time Protocol (NTP) servers. To keep the time in
your SAN current, it is recommended that the principal or primary FCS switch has its time
synchronized with at least one external NTP server. The other switches in the fabric automatically
take their time from the principal or primary FCS switch, as described in “Synchronizing the local
time with an external source.”
All switches in the fabric maintain the current clock server value in nonvolatile memory. By default,
this value is the local clock server (LOCL) of the principal or primary FCS switch. Changes to the
clock server value on the principal or primary FCS switch are propagated to all switches in the
fabric.
In a Virtual Fabric, all the switches in the fabric must have the same NTP clock server configured.
This includes any Fabric OS v6.2.0 or earlier switches in the fabric. This ensures that time does not
go out of sync in the logical fabric. It is not recommended to have LOCL in the server list.
When a new switch enters the fabric, the time server daemon of the principal or primary FCS switch
sends out the addresses of all existing clock servers and the time to the new switch. When a switch
with Fabric OS v6.1.0 or later enters the fabric, it stores the list and the active servers.
Fabric OS Administrator’s Guide
53-1002148-02
27
2
Domain IDs
NOTE
In a Virtual Fabric, multiple logical switches can share a single chassis. Therefore, the NTP server
list must be the same across all fabrics.
Synchronizing the local time with an external source
The tsClockServer command accepts multiple server addresses in IPv4, IPv6, or Domain Name
System (DNS) name formats. When multiple NTP server addresses are passed, tsClockServer sets
the first obtainable address as the active NTP server. The rest are stored as backup servers that
can take over if the active NTP server fails. The principal or primary FCS switch synchronizes its
time with the NTP server every 64 seconds.
1. Connect to the switch and log in using an account assigned to the admin role.
2. Enter the tsClockServer command.
switch:admin> tsclockserver "<ntp1;ntp2>"
In this syntax, ntp1 is the IP address or DNS name of the first NTP server, which the switch
must be able to access. The second variable, ntp2, is the second NTP server and is optional.
The operand “<ntp1;ntp2>” is optional; by default, this value is LOCL, which uses the local
clock of the principal or primary FCS switch as the clock server.
Example of setting the NTP server
switch:admin> tsclockserver
LOCL
switch:admin> tsclockserver "10.1.2.3"
Example of displaying the NTP server
switch:admin> tsclockserver
10.1.2.3
Example of setting up more than one NTP server using a DNS name
switch:admin> tsclockserver "10.1.2.4;10.1.2.5;ntp.localdomain.net"
Updating Clock Server configuration...done.
Updated with the NTP servers
Changes to the clock server value on the principal or primary FCS switch are propagated to all
switches in the fabric.
Domain IDs
Although domain IDs are assigned dynamically when a switch is enabled, you can change them
manually so that you can control the ID number or resolve a domain ID conflict when you merge
fabrics.
If a switch has a domain ID when it is enabled, and that domain ID conflicts with another switch in
the fabric, the conflict is automatically resolved if the other switch’s domain ID is not persistently
set. The process can take several seconds, during which time traffic is delayed. If both switches
have their domain IDs persistently set, one of them needs to have its domain ID changed to a
domain ID not used within the fabric.
The default domain ID for Brocade switches is 1.
28
Fabric OS Administrator’s Guide
53-1002148-02
Domain IDs
2
ATTENTION
Do not use domain ID 0. The use of this domain ID can cause the switch to reboot continuously.
Avoid changing the domain ID on the FCS switch in secure mode. To minimize down time, change
the domain IDs on the other switches in the fabric.
Displaying the domain IDs
1. Connect to the switch and log in using an account assigned to the admin role.
2. Enter the fabricShow command.
Example output of fabric information, including the domain ID (D_ID)
The principal switch is determined by the arrow ( > ) next to the name of the switch. In this
output, the principal switch appears in blue boldface.
switch:admin> fabricshow
Switch ID
Worldwide Name
Enet IP Addr
FC IP Addr
Name
------------------------------------------------------------------------2: fffc02 10:00:00:60:69:e0:01:46 10.3.220.1
0.0.0.0
"ras001"
3: fffc03 10:00:00:60:69:e0:01:47 10.3.220.2
0.0.0.0
"ras002"
5: fffc05 10:00:00:05:1e:34:01:bd 10.3.220.5
0.0.0.0
"ras005"
fec0:60:69bc:63:205:1eff:fe34:1bd
6: fffc06 10:00:00:05:1e:34:02:3e 10.3.220.6
0.0.0.0
"ras006"
7: fffc07 10:00:00:05:1e:34:02:0c 10.3.220.7
0.0.0.0
"ras007"
10: fffc0a 10:00:00:05:1e:39:e4:5a 10.3.220.10
0.0.0.0
"ras010"
15: fffc0f 10:00:00:60:69:80:47:74 10.3.220.15
0.0.0.0
"ras015"
19: fffc13 10:00:00:05:1e:34:00:ad 10.3.220.19
0.0.0.0
"ras019"
fec0:60:69bc:63:219:1eff:fe34:1bd
20: fffc14 10:00:00:05:1e:40:68:78 10.3.220.20
0.0.0.0
"ras020"
25: fffc19 10:00:00:05:1e:37:23:c6 10.3.220.25
0.0.0.0
"ras025"
30: fffc1e 10:00:00:60:69:90:04:1e 10.3.220.30
0.0.0.0
"ras030"
35: fffc23 10:00:00:05:1e:07:c7:26 10.3.220.35
0.0.0.0
"ras035"
40: fffc28 10:00:00:60:69:50:06:7f 10.3.220.40
0.0.0.0
"ras040"
45: fffc2d 10:00:00:05:1e:35:10:72 10.3.220.45
0.0.0.0
"ras045"
46: fffc2e 10:00:00:05:1e:34:c5:17 10.3.220.46
0.0.0.0
"ras046"
47: fffc2f 10:00:00:05:1e:02:aa:f7 10.3.220.47
0.0.0.0
>"ras047"
50: fffc32 10:00:00:60:69:c0:06:64 10.1.220.50
0.0.0.0
"ras050"
(output truncated)
The Fabric has 26 switches
Table 4 displays the fabricShow fields.
TABLE 4
fabricShow fields
Field
Description
Switch ID
The switch’s domain_ID and embedded port D_ID. The numbers are broken down as follows:
Example 64: fffc40
64 is the switch domain_ID
fffc40 is the hexadecimal format of the embedded port D_ID.
World Wide Name The switch’s WWN.
Enet IP Addr
Fabric OS Administrator’s Guide
53-1002148-02
The switch’s Ethernet IP address for IPv4- and IPv6-configured switches. For IPv6 switches,
only the static IP address displays.
29
2
Switch names
TABLE 4
fabricShow fields (Continued)
Field
Description
FC IP Addr
The switch’s Fibre Channel IP address.
Name
The switch’s symbolic or user-created name in quotes. An arrow (>) indicates the principal
switch.
Setting the domain ID
1. Connect to the switch and log in on an account assigned to the admin role.
2. Enter the switchDisable command to disable the switch.
3. Enter the configure command.
4. Enter y after the Fabric Parameters prompt.
Fabric parameters (yes, y, no, n): [no] y
5. Enter a unique domain ID at the Domain prompt. Use a domain ID value from 1 through 239
for normal operating mode (FCSW-compatible).
Domain: (1..239) [1] 3
6. Respond to the remaining prompts, or press Ctrl-D to accept the other settings and exit.
7.
Enter the switchEnable command to re-enable the switch.
Switch names
Switches can be identified by IP address, domain ID, World Wide Name (WWN), or by customized
switch names that are unique and meaningful.
Switch names can be from 1 through 30 characters long. All switch names must begin with a letter,
and can contain letters, numbers, or the underscore character.
NOTE
Changing the switch name causes a domain address format RSCN to be issued and may be
disruptive to the fabric.
Customizing the switch name
1. Connect to the switch and log in using an account assigned to the admin role.
2. Enter the switchName command and enter a new name for the switch.
switch:admin> switchname newname
3. Record the new switch name for future reference.
30
Fabric OS Administrator’s Guide
53-1002148-02
Chassis names
2
Chassis names
Brocade recommends that you customize the chassis name for each platform. Some system logs
identify devices by platform names; if you assign meaningful platform names, logs are more useful.
All chassis names supported by Fabric OS v7.0.0 allow 31 characters. Chassis names must begin
with an alphabetic character and can include alphabetic and numeric characters, and the
underscore ( _ ).?
Customizing chassis names
1. Connect to the switch and log in using an account assigned to the admin role.
2. Enter the chassisName command.
ecp:admin> chassisname newname
3. Record the new chassis name for future reference.
Fabric name
You can assign a alphanumeric name to identify and manage a logical fabric that formerly could
only be identified by a fabric ID. The fabric name does not replace the fabric ID or its usage. The
fabric continues to have a fabric ID, in addition to the assigned alphanumeric fabric name.
Note the considerations:
• Each name must be unique for each logical switch within a chassis; duplicate fabric names are
not allowed.
• A fabric name can be from 1 through 128 alphanumeric characters.
• All switches in a logical fabric must be running Fabric OS v7.0.0. Switches running earlier
versions of the firmware can co-exist in the fabric, but do not show the fabric name details.
• You must have admin permissions to configure the fabric name.
Configuring the fabric name
To set and display the fabric name, use the command fabricname as shown in the following
example:
switch:user> fabricname --set myfabric@1
Using the fabricname --set command without a fabric name takes the existing fabric name and
synchronizes it across the entire fabric. An error message displays if no name is configured.
To set a fabric name that includes spaces, use the command fabricname as shown in the following
example:
switch:user> fabricname --set "my new fabric"
To set a fabric name that includes bash special meta-characters or spaces, use the command
fabricname as shown in the following example:
switch:user> fabricname --set 'red fabric $$'
To clear the fabric name, use the fabricname --clear command.
Fabric OS Administrator’s Guide
53-1002148-02
31
2
Switch activation and deactivation
High availability considerations
Fabric names locally configured or obtained from a remote switch are saved in the configuration
database, and then synchronized to the standby CP on dual-CP-based systems.
Upgrade and downgrade considerations
Fabric names are lost during a firmware downgrade. No default fabric name is provided. If a fabric
name is needed, it must be configured after the upgrade.
Config file upload and download considerations
A new key, “fabric name” is added to store the user configuration. You can only configure fabric
names using config download when the switch is offline.
Switch activation and deactivation
By default, the switch is enabled after power is applied and diagnostics and switch initialization
routines have finished. You can disable and re-enable the switch as necessary.
Disabling a switch
1. Connect to the switch and log in using an account assigned to the admin role.
2. Enter the switchDisable command.
All Fibre Channel ports on the switch are taken offline. If the switch is part of a fabric, the fabric
is reconfigured.
Enabling a switch
1. Connect to the switch and log in using an account assigned to the admin role.
2. Enter the switchEnable command.
All Fibre Channel ports that passed Power On Self Test (POST) are enabled. If the switch has
inter-switch links (ISLs) to a fabric, it joins the fabric.
Switch and enterprise-class platform shutdown
To avoid corrupting your file system, Brocade recommends that you perform graceful shutdowns of
Brocade switches and enterprise-class platforms.
Warm reboot (also known as graceful shutdown) refers to shutting down the switch or platform by
way of the following instructions. Cold boot (also known as a hard boot) refers to shutting down the
switch or platform by suddenly shutting down power and powering on again.
32
Fabric OS Administrator’s Guide
53-1002148-02
Switch and enterprise-class platform shutdown
2
Powering off a Brocade switch
The following procedure describes how to gracefully shut down a switch.
1. Connect to the switch and log in using an account assigned to the admin role.
2. Enter the sysShutdown command.
3. Enter y at the prompt.
switch:admin> sysshutdown
This command will shutdown the operating systems on your switch.
You are required to power-cycle the switch in order to restore operation.
Are you sure you want to shutdown the switch [y/n]?y
4. Wait until the following message displays:
Broadcast message from root (ttyS0) Wed Jan 25 16:12:09 2006...
The system is going down for system halt NOW !!
INIT: Switching to runlevel: 0
INIT: Sending processes the TERM signal
Unmounting all filesystems.
The system is halted
flushing ide devices: hda
Power down.
5. Power off the switch.
Powering off a Brocade enterprise-class platform
1. From the active CP in a dual-CP platform, enter the sysShutdown command.
NOTE
When the sysShutdown command is issued on the active CP, the active CP, the standby CP, and
any application blades are all shut down.
2. Enter y at the prompt.
3. Wait until the following message displays:
DCX:FID128:admin> sysshutdown
This command will shutdown the operating systems on your switch.
You are required to power-cycle the switch in order to restore operation.
Are you sure you want to shutdown the switch [y/n]?y
HA is disabled
Stopping blade 10
Shutting down the blade....
Stopping blade 12
Shutting down the blade....
Broadcast message from root (pts/0) Fri Oct 10 08:36:48 2008...
The system is going down for system halt NOW !!
4. Power off the switch.
Fabric OS Administrator’s Guide
53-1002148-02
33
2
Basic connections
Basic connections
Before connecting a switch to a fabric that contains switches running different firmware versions,
you must first set the same port identification (PID) format on all switches. The presence of
different PID formats in a fabric causes fabric segmentation.
• For information on PID formats and related procedures, refer to Chapter 3, “Performing
Advanced Configuration Tasks”.
• For information on configuring the routing of connections, refer to Chapter 4, “Routing Traffic”.
• For information on configuring extended inter-switch connections, refer to Chapter 22,
“Managing Long Distance Fabrics”.
Device connection
To minimize port logins, power off all devices before connecting them to the switch. When powering
the devices back on, wait for each device to complete the fabric login before powering on the next
one.
For devices that cannot be powered off, first use the portDisable command to disable the port on
the switch, connect the device, and then use the portEnable command to enable the port.
Switch connection
See the hardware reference manual of your specific switch for inter-switch link (ISL) connection and
cable management information. The standard or default ISL mode is L0. ISL mode L0 is a static
mode, with the following maximum ISL distances:
•
•
•
•
•
10 km at 1 Gbps
5 km at 2 Gbps
2.5 km at 4 Gbps
1 km at 8 Gbps
50m at 16 Gbps
For more information on extended ISL modes, which enable long distance inter-switch links, refer to
Chapter 22, “Managing Long Distance Fabrics”.
34
Fabric OS Administrator’s Guide
53-1002148-02
Chapter
3
Performing Advanced Configuration Tasks
In this chapter
• PIDs and PID binding overview . . . . . . . . . . . . . . . . . . . . . . . . . . . . . . . . . . . .
• Ports . . . . . . . . . . . . . . . . . . . . . . . . . . . . . . . . . . . . . . . . . . . . . . . . . . . . . . . . .
• Blade terminology and compatibility . . . . . . . . . . . . . . . . . . . . . . . . . . . . . . .
• Enabling and disabling blades . . . . . . . . . . . . . . . . . . . . . . . . . . . . . . . . . . . .
• Blade swapping . . . . . . . . . . . . . . . . . . . . . . . . . . . . . . . . . . . . . . . . . . . . . . . .
• Power management . . . . . . . . . . . . . . . . . . . . . . . . . . . . . . . . . . . . . . . . . . . .
• Equipment status . . . . . . . . . . . . . . . . . . . . . . . . . . . . . . . . . . . . . . . . . . . . . .
• Track and control switch changes . . . . . . . . . . . . . . . . . . . . . . . . . . . . . . . . .
• Audit log configuration . . . . . . . . . . . . . . . . . . . . . . . . . . . . . . . . . . . . . . . . . .
35
39
45
48
50
53
54
55
58
PIDs and PID binding overview
Port identifiers (PIDs, also called Fabric Addresses) are used by the routing and zoning services in
Fibre Channel fabrics to identify ports in the network. All devices in a fabric must use the same PID
format. When you add new equipment to the SAN, you might need to change the PID format on
legacy equipment.
Many scenarios cause a device to receive a new PID; for example, unplugging the device from one
port and plugging it into a different port as part of fabric maintenance, or changing the domain ID
of a switch, which might be necessary when merging fabrics, or changing compatibility mode
settings.
Some device drivers use the PID to map logical disk drives to physical Fibre Channel counterparts.
Most drivers can either change PID mappings dynamically, also called dynamic PID binding, or use
the WWN of the Fibre Channel disk for mapping, also called WWN binding.
Some older device drivers behave as if a PID uniquely identifies a device; they use static PID
binding. These device drivers should be updated, if possible, to use WWN or dynamic PID binding
instead, because static PID binding creates problems in many routine maintenance scenarios.
Fortunately, very few device drivers still behave this way. Many current device drivers enable you to
select static PID binding as well as WWN binding. You should only select static binding if there is a
compelling reason, and only after you have evaluated the effect of doing so.
Fabric OS Administrator’s Guide
53-1002148-02
35
3
PIDs and PID binding overview
Core PID addressing mode
Core PID is the default PID format for Brocade platforms. It uses the entire 24-bit address space of
the domain, area_ID, and AL_PA to determine an objects address within the fabric.
The Core PID is a 24-bit address built from the following three 8-bit fields:
• domain, written in hex and the numeric range is from 01-ee (1-239)
• area_ID, written in hex and the numeric range is from 01-ff (1-255)
• AL_PA
For example, if a device is assigned an address of 0f1e00, the following would apply:
• 0f is the domain ID.
• 1e is the area ID.
• 00 is the assigned AL_PA.
From this information, you can determine which switch the device resides on from the domain ID,
which port the device is attached to from the area_ID, and if this device is part of a loop from the
AL_PA number.
For more information on reading and converting hexadecimal, refer to Appendix D, “Hexadecimal”.
Fixed addressing mode
Fixed addressing mode is the default addressing mode used in all platforms that do not have
Virtual Fabrics enabled. When Virtual Fabrics is enabled on the Brocade DCX, DCX 8510 family, and
DCX-4S enterprise-class platforms, fixed addressing mode is used only on the default partition.
With fixed addressing mode enabled, each port has a fixed address assigned by the system based
on the port number. This address does not change unless you choose to swap the address using
the portSwap command.
10-bit addressing mode
This is the default mode for all the logical switches created in the Brocade DCX, DCX-4S, and the
Brocade DCX 8510 family enterprise-class platforms. This addressing scheme is flexible to support
a large number of F_Ports. In the regular 10-bit addressing mode, the portAddress --auto
command supports addresses from 0x00 to 0x8F.
NOTE
The default switch in the Brocade DCX, DCX-4S, and DCX 8510 family enterprise-class platforms still
uses the fixed addressing mode.
The 10-bit addressing mode utilizes the 8-bit area_ID and the borrowed upper two bits from the
AL_PA portion of the PID. Areas 0x00 through 0x8F use only 8 bits for the port address and support
up to 256 NPIV devices. This means a logical switch can support up to 144 ports that can each
support 256 devices. Areas 0x90 through 0xFF use an additional two bits from ALPA for the port
address. Hence these ports support only 64 NPIV devices per port.
10-bit addressing mode provides the following features:
• PID is dynamically allocated only when the port is first moved to a logical switch and thereafter
it is persistently maintained.
• Shared area limitations are removed on 48-port and 64-port blades.
36
Fabric OS Administrator’s Guide
53-1002148-02
PIDs and PID binding overview
3
• Any port on a 48-port or 64-port blade can support up to 256 NPIV devices (in fixed addressing
mode, only 128 NPIV devices are supported in non-VF mode and 64 NPIV devices in VF mode
on a 48-port blade).
• Any port on a 48-port blade can support loop devices.
• Any port on a 48-port or 64-port blade can support hard port zoning.
• Port index is not guaranteed to be equal to the port area_ID.
256-area addressing mode
This configurable addressing mode is available only in a logical switch on the Brocade DCX,
DCX-4S, and Brocade DCX 8510 family enterprise-class platforms. In this mode, only 256 ports are
supported and each port receives a unique 8-bit area address. This mode can be used in FICON
environments, which have strict requirements for 8-bit area FC addresses.
There are two types of area assignment modes in the 256-area addressing mode: zero-based and
port-based.
• Zero-based mode, which assigns areas as ports, are added to the partition, beginning at area
0x00. This mode allows FICON customers to make use of the upper ports of a 48-port or
64-port blade. Zero-based mode is also supported on the default switch.
• Port-based mode does not support the upper 16 ports of a 48-port or 64-port blade in a logical
switch. Port-based mode is not supported on the default switch.
WWN-based PID assignment
WWN-based PID assignment is disabled by default. When the feature is enabled, bindings are
created dynamically; as new devices log in, they automatically enter the WWN-based PID database.
The bindings exist until you explicitly unbind the mappings through the CLI or change to a different
addressing mode. If there are any existing devices when you enable the feature, you must manually
enter the WWN-based PID assignments through the CLI.
This feature also allows you to configure a PID persistently using a device WWN. When the device
logs in to the switch, the PID is bound to the device WWN. If the device is moved to another port in
the same switch, or a new blade is hot plugged, the device receives the same PID (area) at its next
login.
Once WWN-based PID assignment is enabled you must manually enter the WWN-based PID
assignments through the CLI for any existing devices.
ATTENTION
When WWN-base PID assignment is enabled, the area assignment is dynamic and does not
guarantee any order in the presence of static wwn-area binding or when the devices are moved
around.
PID assignments are supported for a maximum of 4096 devices; this includes both point-to-point
and NPIV devices. The number of point-to-point devices supported depends directly on the areas
available. For example, 448 areas are available on an enterprise-class platform and 256 areas are
available on switches. When the number of entries in the WWN-based PID database reaches 4096
areas are used up, the oldest unused entry is purged from the database to free up the reserved
area for the new FLOGI.
Fabric OS Administrator’s Guide
53-1002148-02
37
3
PIDs and PID binding overview
Virtual Fabric considerations
WWN-based PID assignment is disabled by default and is supported in the default switch on a
Brocade DCX, DCX-4S, and the Brocade DCX 8510 family. This feature is not supported on
application blades such as the FS8-18, FX8-24, and the FCOE10-24. The total number of ports in
the default switch must be 256 or less.
When the WWN-base PID assignment feature is enabled and a new blade is plugged into the
chassis, the ports for which the area is not available are disabled.
NPIV
If any NPIV devices have static PIDs configured and the acquired area is not the same as the one
being requested, the FDISC coming from that device is rejected and the error is noted in the
RASlog.
If the NPIV device has Dynamic Persistent PID set, the same AL_PA value in the PID is used. This
guarantees NPIV devices get the same PID across reboots and AL_PAs assigned for the device do
not depend on the order in which the devices come up. Refer to Chapter 15, “Administering NPIV”
for more information on NPIV.
Enabling automatic PID assignment
NOTE
To activate the WWN-based PID assignment, you do not need to disable the switch.
1. Connect to the switch and log in using an account with admin permissions.
2. Enter the configure command.
3. At the Fabric Parameters prompt, type y.
4. At the WWN Based persistent PID prompt, type y.
5. Press Enter to bypass the remaining prompts without changing them.
Example of activating PID assignments
Configure...
Fabric parameters (yes, y, no, n): [no] y
WWN Based persistent PID (yes, y, no, n): [no] y
System services (yes, y, no, n): [no]
ssl attributes (yes, y, no, n): [no]
rpcd attributes (yes, y, no, n): [no]
cfgload attributes (yes, y, no, n): [no]
webtools attributes (yes, y, no, n): [no]
Custom attributes (yes, y, no, n): [no]
system attributes (yes, y, no, n): [no]
Assigning a static PID
1. Connect to the switch and log in using an account with admin permissions.
2. Enter the wwnAddress -bind command to assign a 16-bit PID to a given WWN.
38
Fabric OS Administrator’s Guide
53-1002148-02
Ports
3
Clearing PID binding
1. Connect to the switch and log in using an account with admin permissions.
2. Enter the wwnAddress -unbind command to clear the PID binding for the specified WWN.
Showing PID assignments
1. Connect to the switch and log in using an account with admin permissions.
2. Based on what you want to display, enter the appropriate command:
• wwnAddress –show displays the assigned WWN-PID bindings.
• wwnAddress –findPID wwn displays the PID assigned to the device WWN specified.
Ports
Because enterprise-class platforms contain interchangeable port blades, their procedures differ
from those for fixed-port switches. For example, fixed-port models identify ports only by the port
number, while enterprise-class platforms identify ports by slot/port notation.
NOTE
For detailed information about the Brocade DCX, DCX-4S, and DCX 8510 family enterprise-class
platforms, refer to the hardware reference manuals.
The different blades that can be inserted into a chassis are described as follows:
• Control processor blades (CPs) contain communication ports for system management, and are
used for low-level, platform-wide tasks.
• Core blades are used for intra-chassis switching as well as interconnecting two
enterprise-class platforms.
• Port blades are used for host, storage, and interswitch connections.
• AP blades are used for Fibre Channel Application Services and Routing Services, FCIP,
Converged Enhanced Ethernet, and encryption support.
NOTE
On each port blade, a particular port must be represented by both slot number and port number.
The Brocade DCX and DCX 8510-8 each have 12 slots that contain control processor, core, port,
and AP blades:
• Slot numbers 6 and 7 contain CPs.
• Slot numbers 5 and 8 contain core blades.
• Slot numbers 1 through 4 and 9 through 12 contain port and AP blades.
The Brocade DCX-4S and DCX 8510-4 each have 8 slots that contain control processor, core, port,
and AP blades:
• Slot numbers 4 and 5 contain CPs.
• Slot numbers 3 and 6 contain core blades.
• Slot numbers 1 and 2, and 7 and 8 contain port and AP blades.
Fabric OS Administrator’s Guide
53-1002148-02
39
3
Ports
When you have port blades with different port counts in the same director (for example, 16-port
blades and 32-port blades, or 16-port blades and 18-port blades with 16 FC ports and 2 GbE ports,
or 16-port and 48-port blades), the area IDs no longer match the port numbers.
Table 5 lists the port numbering schemes for the blades.
TABLE 5
Port numbering schemes for the port and application blades
Port blades
Numbering scheme
FC8-16
Ports are numbered from 0 through 15 from bottom to top.
FC8-32
FC16-32
Ports are numbered from 0 through 15 from bottom to top on the left set of ports and 16 through
31 from bottom to top on the right set of ports.
FC8-48
FC16-48
Ports are numbered from 0 through 23 from bottom to top on the left set of ports and 24 through
47 from bottom to top on the right set of ports.
FC8-64
Ports are numbered from 0 through 32 from bottom to top on the left set of ports and 33 through
64 from bottom to top on the right set of ports.
FC10-6
Ports are numbered from 0 through 5 from bottom to top.
FR4-18i
Ports are numbered from 0 through 15 from bottom to top. There are also 2 GbE ports (numbered
ge0-ge1, from bottom to top). Going from bottom to top, the 2 GbE ports appear on the bottom of
the blade followed by 16 FC ports.
FS8-18
Ports are numbered from 0 through 15 from bottom to top. There are also 2 GbE ports (numbered
ge0-ge1, from top to bottom). Going from top to bottom, the 2 GbE ports appear on the top of the
blade followed by 16 FC ports.
FCOE10-24
Ports are numbered 0 through 11 from bottom to top on the left set of ports and 12 through 24
from bottom to top on the right set of ports.
FX8-24
In the first grouping, there are Fibre Channel ports numbered 0 through 5 from bottom to top on the
left set of ports and 6 through 11 from bottom to top on the right set of ports. In the second
grouping, there are two 10 GbE ports numbered xge0 and xge1 on the left set of ports and two GbE
ports numbered ge4 and ge5 on the right side. In the third grouping, the GbE ports are numbered
ge0 through ge3 on the left set of ports and ge6 through ge9 on the right set of ports.
Setting port names
Perform the following steps to specify a port name. For enterprise-class directors, specify the slot
number where the blade is installed.
1. Connect to the switch and log in using an account with admin permissions.
2. Enter the portName command.
Example of naming port 0
ecp:admin> portname 1/0 trunk1
Port identification by slot and port number
The port number is a number assigned to an external port to give it a unique identifier in a switch.
To select a specific port in the enterprise-class platforms, you must identify both the slot number
and the port number using the format slot number/port number. No spaces are allowed between
the slot number, the slash (/), and the port number.
Example of enabling port 4 on a blade in slot 2
ecp:admin> portenable 2/4
40
Fabric OS Administrator’s Guide
53-1002148-02
Ports
3
Port identification by port area ID
The relationship between the port number and area ID depends upon the PID format used in the
fabric. When Core PID format is in effect, the area ID for port 0 is 0, for port 1 is 1, and so forth.
For 32-port blades (FC8-32, FC16-32), the numbering is contiguous up to port 15; from port 16, the
numbering is still contiguous, but starts with 128. For example, port 15 in slot 1 has a port number
and area ID of 15; port 16 has a port number and area ID of 128; port 17 has a port number and
area ID of 129.
For 48-port blades (FC8-48, FC16-48), the numbering is the same as for 32-port blades for the first
32 ports on the blade. For ports 32 through 47, area IDs are not unique and port index should be
used instead of area ID.
For the 64-port blade (FC8-64), the numbering is the same as for 32-port blades for the first 32
ports on the blade. For ports 32 through 64, area IDs are not unique and port index should be used
instead of area ID.
If you perform a port swap operation, the port number and area ID no longer match. On 48-port
blades, port swapping is supported only on ports 0–15.
To determine the area ID of a particular port, enter the switchShow command. This command
displays all ports on the current (logical) switch and their corresponding area IDs.
Port identification by index
With the introduction of 48-port blades, indexing was introduced. Unique area IDs are possible for
up to 255 areas, but beyond that there needed to be some way to ensure uniqueness.
A number of fabric-wide databases supported by Fabric OS (including ZoneDB, the ACL DDC, and
Admin Domain) allow a port to be designated by the use of a “D,P” (domain,port) notation. While
the “P” component appears to be the port number, for up to 255 ports it is actually the area
assigned to that port.
ATTENTION
Port area schema does not apply to the Brocade DCX-4S and DCX 8510-4 enterprise-class
platforms.
If two ports are changed using the portSwap command, their respective areas and “P” values are
exchanged.
For ports that are numbered above 255, the “P” value is actually a logical index. The first 256 ports
continue to have an index value equal to the area_ID assigned to the port. If a switch is using Core
PID format, and no port swapping has been done, the port index value for all ports is the same as
the physical port numbers. Using portSwap on a pair of ports will exchange those ports’ area_ID
and index values.
NOTE
The portSwap command is not supported for ports above 256.
Fabric OS Administrator’s Guide
53-1002148-02
41
3
Ports
Swapping port area IDs
If a device that uses port binding is connected to a port that fails, you can use port swapping to
make another physical port use the same PID as the failed port. The device can then be plugged
into the new port without the need to reboot the device.
Use the following procedure to swap the port area IDs of two physical switch ports. In order to swap
port area IDs, the port swap feature must be enabled, and both switch ports must be disabled. The
swapped area IDs for the two ports remain persistent across reboots, power cycles, and failovers.
Brocade DCX, DCX-4S, DCX 8510-8, and DCX 8510-4 platforms only: You can swap only ports 0
through 15 on the FC8-48 port blades. You cannot swap ports 16 through 47.
1. Connect to the switch and log in using an account with admin permissions.
2. Enable the portSwapEnable command to enable the feature.
3. Enter the portDisable command on each of the source and destination ports to be swapped.
switch:admin>portdisable 1
ecp:admin>portdisable 1/2
4. Enter the portSwap command.
switch:admin>portswap 1 2
ecp:admin>portswap 1/1 2/2
5. Enter the portSwapShow command to verify that the port area IDs have been swapped.
A table shows the physical port numbers and the logical area IDs for any swapped ports.
6. Enter the portSwapDisable command to disable the port swap feature.
Port activation and deactivation
By default, all licensed ports are enabled. You can disable and re-enable them as necessary. Ports
that you activate with the Ports on Demand license must be enabled explicitly, as described in
“Ports on Demand” on page 386.
If ports are persistently disabled and you use the portEnable command to enable a disabled port,
the port will revert to being disabled after a power cycle or a switch reboot. To ensure the port
remains enabled, use the portCfgPersistentEnable command as instructed below.
CAUTION
The fabric will be reconfigured if the port you are enabling or disabling is connected to another
switch.
The switch with a port that has been disabled will be segmented from the fabric and all traffic
flowing between it and the fabric will be lost.
42
Fabric OS Administrator’s Guide
53-1002148-02
Ports
3
Enabling a port
1. Connect to the switch and log in using an account with admin permissions.
2. Enter the appropriate command based on the current state of the port and on whether it is
necessary to specify a slot number:
• To enable a port that is disabled, enter the command portEnable portnumber or
portEnable slotnumber/portnumber.
• To enable a port that is persistently disabled, enter the command portCfgPersistentEnable
portnumber or portCfgPersistentEnable slotnumber/portnumber.
If you change port configurations during a switch failover, the ports may become disabled. To
bring the ports online, re-issue the portEnable command after the failover is complete.
Disabling a port
1. Connect to the switch and log in using an account with admin permissions.
2. Enter the appropriate command based on the current state of the port and on whether it is
necessary to specify a slot number:
• To disable a port that is enabled, enter the command portDisable portnumber or
portDisable slotnumber/portnumber.
• To disable a port that is persistently enabled, enter the command
portCfgPersistentDisable portnumber or portCfgPersistentDisable
slotnumber/portnumber.
Port decommissioning
Fabric OS 7.0.0 provides an automated mechanism to remove an E_Port or E_Port trunk port from
use. This feature identifies the target port and communicates the intention to decommission the
port to those systems within the fabric affected by the action. Each affected system can agree or
disagree with the action, and these responses are automatically collected before a port is
decommissioned.
Note that all members of a trunk group must have an equal link cost value in order for any of the
members to be decommissioned. If any member of a trunk group does not have an equal cost,
requests to decommission a trunk member will fail and an error reminding the caller of this
requirement is produced.
Note the following restrictions of port decommissioning:
• The local switch and the remote switch on the other end of the E_Port must both be running
Fabric OS 7.0.0 or later.
• Port decommissioning is not supported on links configured for encryption or compression.
• Port decommissioning is not supported on ports with DWDM, CWDM, or TDM.
• Port decommissioning requires that the lossless feature is enabled on both the local switch
and the remote switch.
Use the portDecom [slot/]port command to begin the decommission process.
Fabric OS Administrator’s Guide
53-1002148-02
43
3
Ports
Setting port speeds
1. Connect to the switch and log in using an account with admin permissions.
2. Enter the portCfgSpeed command.
Example of setting the port speed
The following example sets the speed for port 3 on slot 2 to 4 Gbps:
ecp:admin> portcfgspeed 2/3 4
done.
The following example sets the speed for port 3 on slot 2 to autonegotiate:
ecp:admin> portcfgspeed 2/3 0
done.
Setting the same speed for all ports on the switch
1. Connect to the switch and log in using an account with admin permissions.
2. Enter the switchCfgSpeed command.
Example of setting the switch speed
The following example sets the speed for all ports on the switch to 8 Gbps:
switch:admin> switchcfgspeed 8
Committing configuration...done.
The following example sets the speed for all ports on the switch to autonegotiate:
switch:admin> switchcfgspeed 0
Committing configuration...done.
Setting port speed for a port octet
You can use the portCfgOctetSpeedCombo command to configure the speed for a port octet. Note
that in a Virtual Fabrics environment, this command applies chassis-wide and not just to the logical
switch.
1. Connect to the switch and log in using an account with admin permissions.
2. Enter the portCfgOctetSpeedCombo command.
Example
The following example configures the ports in the first octet for combination 3 (support
autonegotiated or fixed port speeds of 16 Gbps and 10 Gbps):
switch::admin> portcfgoctetspeedcombo 1 3
44
Fabric OS Administrator’s Guide
53-1002148-02
Blade terminology and compatibility
3
Blade terminology and compatibility
Before configuring a chassis, familiarize yourself with the platform CP blade and port blade
nomenclature, as well as the port blade compatibilities. Often in procedures, only the abbreviated
names for CP and port blades are used. Table 6 includes CP and port blade abbreviations and
descriptions.
TABLE 6
Brocade enterprise-class platform blade terminology
Term
Abbreviation Blade ID
Definition
(slotshow)
Brocade DCX, DCX-4S, and
DCX 8510 family control
processor blade
CP8
50
The CP blade provided with the Brocade DCX. This CP
supports all blades used in the DCX, DCX-4S, and DCX
8510 family.
Note: These CP blades are interchangeable between the
Brocade DCX, DCX-4S, and the Brocade DCX 8510 family.
Brocade DCX core blade
CORE8
52
A 16-port blade that provides 8 Gbps connectivity
between port blades in the Brocade DCX chassis.
Note: These blades are compatible only with the Brocade
DCX.
Brocade DCX-4S core blade
CR4S-8
46
A 16-port blade that provides 8 Gbps connectivity
between port blades in the Brocade DCX-4S chassis.
Note: These blades are compatible only with the Brocade
DCX-4S.
Brocade DCX 8510-8 core
blade
CR16-8
98
A core blade that has 16x4 QSFPs per blade. It can be
connected to another CR16-8 or a CR16-4 core blade.
Note: These blades are compatible only with the Brocade
DCX 8510-8.
Brocade DCX 8510-4 core
blade
CR16-4
99
A core blade that has 8x4 QSFPs per blade. It can be
connected to another CR16-4 or a CR16-8 core blade.
Note: These blades are compatible only with the DCX
8510-4.
16-port 8-Gbps port blade
FC8-16
21
A 16-port Brocade platform port blade supporting 1, 2, 4,
and 8 Gbps port speeds. The Brocade DCX and DCX-4S
support loop devices on 16-port blades in a Virtual
Fabric-enabled environment.
32-port 8-Gbps port blade
FC8-32
55
A 32-port Brocade platform port blade supporting 1, 2, 4,
and 8 Gbps port speeds. The Brocade DCX and DCX-4S
support loop devices on 32-port blades in a Virtual
Fabric-enabled environment.
48-port 8-Gbps port blade
FC8-48
51
A 48-port Brocade platform port blade supporting 1, 2, 4,
and 8 Gbps port speeds. The Brocade DCX and DCX-4S
support loop devices on 48-port blades in a Virtual
Fabric-enabled environment.
64-port 8-Gbps port blade
FC8-64
77
A 64-port Brocade platform port blade supporting 2, 4,
and 8 Gbps port speeds. The Brocade DCX, DCX-4S, and
the Brocade DCX 8510 family support loop devices on
64-port blades in a Virtual Fabric-enabled environment.
The loop devices can only be attached to ports on a
64-port blade that is not a part of the default logical
switch.
Fabric OS Administrator’s Guide
53-1002148-02
45
3
Blade terminology and compatibility
TABLE 6
Brocade enterprise-class platform blade terminology (Continued)
Term
Abbreviation Blade ID
Definition
(slotshow)
6-port 10-Gbps port blade
FC10-6
39
A 6-port Brocade platform port blade supporting 10 Gbps
port speed. Blade provides 10 Gbps ISLs. This port blade
is compatible only with the Brocade DCX and DCX-4S and
can be used to form ISLs only between other FC10-6
ports.
32-port 16-Gbps port blade
FC16-32
97
A 32-port Brocade platform port blade supporting 2, 4, 8,
10, and 16 Gbps port speeds.
NOTE: 10 Gbps speed for FC16-xx blades requires the
10G license.
48-port 16-Gbps port blade
FC16-48
96
A 48-port Brocade platform port blade supporting 2, 4, 8,
10, and 16 Gbps port speeds.
NOTE: 10 Gbps speed for FC16-xx blades requires the
10G license.
Fibre Channel Router blade
FR4-18i
24
A 16-port Fibre Channel routing and FCIP blade that also
has 2 GbE ports and is compatible only with the Brocade
DCX and DCX-4S CP blades.
Brocade Encryption blade
FS8-18
68
An application blade that provides high performance
32-port auto-sensing 8 Gbps Fibre Channel connectivity
with data cryptographic (encryption/decryption) and data
compression capabilities.
Converged Enhanced
Ethernet blade
FCOE10-24
74
An application blade that provides Converged Enhanced
Ethernet to bridge a Fibre Channel and Ethernet SAN.
This blade is supported only on the Brocade DCX and
DCX-4S.
DCX Extension blade
FX8-24
75
A 24-port Fibre Channel routing and FCIP blade that also
has 10 1-GbE and two 10-GbE ports and is compatible
with the Brocade DCX, DCX-4S, and DCX 8510 family CP
blades.
CP blades
The control processor (CP) blade provides redundancy and acts as the main controller on the
enterprise-class platforms. The Brocade DCX, DCX-4S, and the Brocade DCX 8510 family support
the CP8 blades.
The CP blades in the Brocade DCX, DCX-4S, and the Brocade DCX 8510 family are hot-swappable.
The CP8 blades are fully interchangeable among Brocade DCX, DCX-4S, DCX 8510-4, and DCX
8510-8 platforms. You can correct this issue by upgrading the firmware on the CP blade in a
Brocade DCX or DCX-4S chassis.
Brocade recommends that each CP (primary and secondary partition) should maintain the same
firmware version.
For more information on maintaining firmware in your enterprise-class platform, refer to Chapter 9,
“Installing and Maintaining Firmware”.
46
Fabric OS Administrator’s Guide
53-1002148-02
Blade terminology and compatibility
3
Core blades
Core blades provide intra-chassis switching and ICL connectivity, between DCX/DCX-4S platforms
and between DCX 8510 platforms.
•
•
•
•
Brocade DCX supports two CORE8 core blades.
Brocade DCX-4S supports two CR4S-8 core blades.
Brocade DCX 8510-8 supports two CR16-8 core blades.
Brocade DCX 8510-4 supports two CR16-4 core blades.
The core blades for each platform are not interchangeable or hot-swappable with the core blades
for any other platform. If you try to interchange the blades they become faulty.
Port and application blade compatibility
Table 7 identifies which port and application blades are supported for each Brocade DCX, DCX-4S,
DCX 8510-8, and DCX 8510-4 enterprise-class platform.
TABLE 7
Blades supported by each platform
Blades
Brocade DCX and DCX-4S
Brocade DCX 8510-8 and 8510-4
FC10-6
Supported
Not supported
FC8-16
Supported
Not supported
FC8-32
Supported
Not supported
FC8-48
Supported
Not supported
FC8-64
Supported
Supported
FC16-32
Not supported
Supported
FC16-48
Not supported
Supported
FCOE10-24
Supported
Not supported
FR4-18i1
Supported
Not supported
FS8-18
Supported
Supported
FX8-241
Supported
Supported
1.
The FR4-18i blade cannot coexist in the same chassis with an FX8-24 blade.
NOTE
During power up of a Brocade DCX or DCX-4S, if an FCOE10-24 is detected first before any other AP
blade, all other AP and FC8-64 blades will be faulted. If a non-FCOE10-24 blade is detected first,
then any subsequently-detected FCOE10-24 blades will be faulted. Blades are powered up starting
with slot 1.
The maximum number of intelligent blades supported on a Brocade DCX or DCX 8510-8 is eight.
The maximum number of intelligent blades supported on a Brocade DCX-4S or DCX 8510-4 is four.
Table 8 lists the maximum supported limits of each blade for a specific Fabric OS release. Software
functions are not supported across application blades.
Fabric OS Administrator’s Guide
53-1002148-02
47
3
Enabling and disabling blades
TABLE 8
Blade compatibility within a Brocade DCX, DCX-4S, and the Brocade DCX 8510 family backbone
Intelligent blade
Fabric OS v6.3.0
Fabric OS v6.4.0
Fabric OS v7.0.0
DCX
DCX-4S
DCX
DCX-4S
DCX
DCX-4S
DCX 8510-8
DCX 8510-4
FR4-18i1
8
4
8
4
8
4
0
0
FS8-18
4
4
4
4
4
4
4
4
FCOE10-242
2
2
2
2
4
4
0
0
2
4
4
4
4
4
4
4
FX8-24
3
1. The iSCSI function over FCIP is not supported, but the FCIP link is the same as other FC E_Ports. This is not
restricted by software.
2.
Not compatible with other application blades or with the FC8-64 in the same chassis.
3.
The hardware limit is enforced by software.
FX8-24 compatibility notes
Note the following guidelines:
• The FR4-18i and Brocade 7500 GbE ports cannot be connected to either the FX8-24 or
Brocade 7800 GbE ports. The ports may come online, but they will not communicate with each
other. Running physical cables between the FR4 -18i and FX8-24 blades is not supported.
• The port configuration is maintained separately for the GbE ports of the FR4 -18i and FX8-24
blades. The port configuration data of one blade is never applied to the other type even if an
FX8-24 replaces an FR4-18i in the same slot of a chassis. However, if an FR4 -18i blade is
replaced with an FX8-24 blade and then replaced back with an FR4 -18i, the FR4 -18i previous
IP configuration data would be applied to the new FR4 -18i. The same behavior applies if you
were to replace the FX8-24 with an FX8-24.
• When Virtual Fabrics is disabled, replacing an FR4 -18i with an FX8-24 (and vice-versa) is
allowed without any pre-conditions
• When Virtual Fabrics is enabled (regardless of whether the FR4 -18i or FX8-24 blade is in the
default switch), replacing an FR4 -18i with an FX8-24 (and vice-versa) without rebooting or
power cycling the chassis will fault the blade with reason code 91. However, after blade
removal, if you reboot or power cycle the chassis, inserting the other blade type is allowed.
• The data paths in both blades are interoperable between FC ports. FR4-18i FC ports can
stream data over FX8-24 GbE ports and vice versa.
• The FX8-24 blade cannot co-exist with the FS8-18, and FCOE10-24 blades. For example, you
cannot have an FA4-18 virtual device exported to an edge fabric, getting encrypted over an
FS8-18 blade, and then going over an FX8-24 FCIP distance VE_Port. There is no software
enforcement to detect the above configuration.
Enabling and disabling blades
Port blades are enabled by default. In some cases, you will need to disable a port blade to perform
diagnostics. When diagnostics are executed manually (from the Fabric OS command line), many
commands require the port blade to be disabled. This ensures that diagnostic activity does not
interfere with normal fabric traffic.
48
Fabric OS Administrator’s Guide
53-1002148-02
Enabling and disabling blades
3
If you need to replace an application blade with a different application blade, there may be extra
steps you need to take to ensure that the previous configuration is not interfering with your new
application blade.
Enabling blades
1. Connect to the switch and log in as admin.
2. Enter the bladeEnable command with the slot number of the port blade you want to enable.
ecp:admin> bladeenable 3
Slot 3 is being enabled
FC8-48, FC8-64, and FC16-48 port blade enabling exceptions
Because the area IDs are shared with different port IDs, the FC8-48, FC8-64, and FC16-48 blades
support only F_ and E_Ports. They do not support FL_Ports.
Port swapping on an FC8-48, FC8-64, and FC16-48 is supported only on ports 0–15. For the
FC8-32 and FC16-32 port blades, port swapping is supported on all 32 ports. This means that if
you replace a 32-port blade where a port has been swapped on ports 16–31 with a 48-port blade,
the 48-port blade faults. To correct this, reinsert the 32-port blade and issue portSwap to restore
the original area IDs to ports 16–31.
FR4-18i application blade enabling exceptions
Note the following exceptions to enabling the FR4-18i application blade:
• You have inserted the FR4-18i blade into a slot that was previously empty or contained an
FC8-16, FC8-32, FC8-48, FC10-6, FS8-18.
If the FR4-18i blade is operational and the platform is rebooted, then after the successful
bootup of the system the blade continues operations using the previous configurations.
If a previously configured FR4-18i blade is removed and another or the same FR4-18i blade is
inserted into the same slot, then the ports use the previous configuration and come up
enabled. If you do not want to use the previous configuration, you must clear the configuration
information, remove the blade, and then reseat the blade.
If a previously-configured FR4-18i blade is removed and an FC8-16, FC8-32, FC8-48, or
FC10-6 blade is plugged in, then—other than the port’s EX_Port configuration—all the
remaining port configurations previously applied to the FR4-18i ports can be used. The
EX_Port configuration on those ports is disabled before the FC8 port blade becomes
operational. When a blade is present in the slot, then any requested port configuration is
validated against the blade’s capabilities before accepting the request. Also, hot swapping
causes the ports on the FR4-18i to be persistently disabled which later need to be enabled.
• You have turned on the power to the chassis and the FR4-18i blade in that slot was not active
prior to the power-on you must persistently enable the ports manually. For instructions on how
to manually persistently enable a port, refer to “Port activation and deactivation” on page 42.
ATTENTION
The ports of an FR4-18i are persistently disabled only if an FR4-18i was not previously in that
slot. You can replace an FR4-18i with another one with no change in the port states.
Fabric OS Administrator’s Guide
53-1002148-02
49
3
Blade swapping
To summarize:
• When an FC8-16, FC8-32, FC10-6, FS8-18, or FX8-24 blade is replaced by an FR4-18i blade,
the current port configuration continues to be used, and all ports on the FR4-18i blade are
persistently disabled.
• When an FR4-18i blade is replaced by an FC8-16, FC8-32, FC8-48, or FC8-64 blade, then the
EX_Port configuration is retained, but the ports are persistently disabled. All remaining port
configurations are retained.
NOTE
The FC10-6 blade does not support EX_Ports.
Disabling blades
1. Connect to the switch and log in as admin.
2. Enter the bladeDisable command with the slot number of the port blade you want to disable.
ecp:admin> bladedisable 3
Slot 3 is being disabled
Blade swapping
Blade swapping allows you to swap one blade with another of the same type; in this way, you can
perform a FRU replacement with minimal traffic disruption. The entire operation is accomplished
when the bladeSwap command runs on the Fabric OS. The Fabric OS then validates each
command before actually implementing the command on the enterprise-class platform. If an error
is encountered then blade swap quits without disrupting traffic flowing through the blades. If an
unforeseen error does occur during the bladeSwap command, an entry will be made into the
RASlog and all ports that have been swapped as part of the blade swap operation will be swapped
back. On successful completion of the command, the source and destination blades are left in a
disabled state allowing you to complete the cable move.
Blade swapping is based on port swapping and has the same restrictions:
•
•
•
•
Shared area ports cannot be swapped.
Ports that are part of a trunk group cannot be swapped.
GbE ports cannot be swapped.
Swapping ports between different logical switches is not supported. The ports on the source
and destination blades need to be in the same logical switch.
• Undetermined board types cannot be swapped. For example, a blade swap will fail if the blade
type cannot be identified.
• Blade swapping is not supported when swapping to a different model of blade or a different
port count. For example, you cannot swap an FC8-32 blade with an FC8-48 port blade.
NOTE
This feature is not supported on the FX8-24 DCX Extension blade.
50
Fabric OS Administrator’s Guide
53-1002148-02
Blade swapping
3
How blades are swapped
The bladeSwap command performs the following operations:
1. Blade selection
The selection process includes selecting the switch and the blades to be affected by the swap
operation. Figure 2 shows the source and destination blades are identified to begin the
process.
FIGURE 2
Identifying the blades
2. Blade validation
The validation process includes determining the compatibility between the blades selected for
the swap operation:
• Blade technology. Both blades must be of compatible technology types (for example, Fibre
Channel to Fibre Channel, Ethernet to Ethernet, application to application, etc).
• Port Count. Both blades must support the same number of front ports. For example,
16-ports to 16-ports, 32-ports to 32-ports, 48-ports to 48-ports, and so on.
• Availability. The ports on the destination blade must be available for the swap operation
and not attached to any other devices.
3. Port preparation
The process of preparing ports for a swap operation includes basic operations such as insuring
the source and destination ports are offline, or verifying that none of the destination ports
have failed.
The preparation process also includes any special handling of ports associated with logical
switches. For example Figure 3 shows the source blade has ports in a logical switch or logical
fabric, then the corresponding destination ports must be included in the associated logical
switch or logical fabric of the source ports.
Fabric OS Administrator’s Guide
53-1002148-02
51
3
Blade swapping
FIGURE 3
Blade swap with Virtual Fabrics during the swap
4. Port swapping
The swap ports action is effectively an iteration of the portSwap command for each port on the
source blade to each corresponding port on the destination blade.
In Figure 4 shows Virtual Fabrics, where the blades can be carved up into different logical
switches as long as they are carved the same way. If slot 1 and slot 2 ports 0-7 are all in the
same logical switch, then blade swapping slot 1 to slot 2 will work. The entire blade does not
need to be in the same partition.
FIGURE 4
Blade swap with Virtual Fabrics after the swap
Swapping blades
1. Connect to the director and log in using an account with admin permissions.
2. Enter the bladeSwap command.
If no errors are encountered, the blade swap will complete successfully. If errors are
encountered, the command is interrupted and the ports are set back to their original
configuration.
52
Fabric OS Administrator’s Guide
53-1002148-02
Power management
3
3. Once the command completes successfully, move the cables from the source blade to the
destination blade.
4. Enter the bladeEnable command on the destination blade to enable all user ports.
Power management
All blades are powered on by default when the switch chassis is powered on. Blades cannot be
powered off when POST or AP initialization is in progress.
To manage power and ensure that more critical components are the least affected by a power
changes, you can specify the order in which the components are powered off, using the
powerOffListSet command
The power monitor compares the available power with the power required to determine if there will
be enough power to operate. If it is predicted to be less power available than required, the
power-off list is processed until there is enough power for operation. By default, the processing
begins with slot 1 and proceeds to the last slot in the chassis. As power becomes available, slots
are powered up in the reverse order. During the initial power up of a chassis, or using the
slotPowerOn command, or the insertion of a blade, the available power is compared to required
power before power is applied to the blade.
NOTE
Some FRUs in the chassis may use significant power, yet cannot be powered off through software.
The powerOffListShow command displays the power off order.
NOTE
In the enterprise-class platforms, the core blades and CPs cannot be powered off from the CLI
interface. You must manually power off the blades by lowering the slider or removing power from the
chassis. If there is no CP up and running then physical removal or powering off the chassis is
required.
Powering off a port blade
1. Connect to the switch and log in as admin.
2. Enter the slotPowerOff command with the slot number of the port blade you want to power off.
ecp:admin> slotpoweroff 3
Slot 3 is being powered off
Powering on a port blade
1. Connect to the switch and log in as admin.
2. Enter the slotPowerOn command with the slot number of the port blade you want to power on.
ecp:admin> slotpoweron 3
Powering on slot 3
Fabric OS Administrator’s Guide
53-1002148-02
53
3
Equipment status
Equipment status
You can check the status of switch operation, High Availability features, and fabric connectivity.
Checking switch operation
1. Connect to the switch and log in using an account with admin permissions.
2. Enter the switchShow command. This command displays a switch summary and a port
summary.
3. Check that the switch and ports are online.
4. Use the switchStatusShow command to further check the status of the switch.
Verifying High Availability features (enterprise-class platforms only)
High Availability (HA) features provide maximum reliability and nondisruptive management of key
hardware and software modules.
1. Connect to the switch and log in using an account with admin permissions.
2. Enter the chassisShow command to verify the model of the DCX and obtain a listing of all
field-replaceable units (FRUs).
3. Enter the haShow command to verify HA is enabled, the heartbeat is up, and that the HA state
is synchronized between the active and standby CP blades.
4. Enter the fanShow to display the current status and speed of each fan in the system. Refer to
the hardware reference manual of your system to determine the appropriate values.
5. Enter the psShow to display the current status of the switch power supplies. Refer to the
hardware reference manual of your system to determine the appropriate values.
6. Enter the slotShow -m command to display the inventory and the current status of each slot in
the system.
Example of the slot information displayed for a DCX chassis
DCX:FID128:admin> slotshow -m
Slot
Blade Type
ID
Model Name
Status
-------------------------------------------------1
SW BLADE
55
FC8-32
ENABLED
2
SW BLADE
51
FC8-48
ENABLED
3
SW BLADE
39
FC10-6
ENABLED
4
SW BLADE
51
FC8-48
ENABLED
5
CORE BLADE
52
CORE8
ENABLED
6
CP BLADE
50
CP8
ENABLED
7
CP BLADE
50
CP8
ENABLED
8
CORE BLADE
52
CORE8
ENABLED
9
SW BLADE
37
FC8-16
ENABLED
10
AP BLADE
43
FS8-18
ENABLED
11
SW BLADE
55
FC8-32
ENABLED
12
AP BLADE
24
FR4-18i
ENABLED
54
Fabric OS Administrator’s Guide
53-1002148-02
Track and control switch changes
3
Verifying fabric connectivity
1. Connect to the switch and log in using an account with admin permissions.
2. Enter the fabricShow command. This command displays a summary of all the switches in the
fabric.
The output of the fabricShow command is discussed in “Domain IDs” on page 28.
Verifying device connectivity
1. Connect to the switch and log in using an account with admin permissions.
2. Optional: Enter the switchShow command to verify devices, hosts, and storage are connected.
3. Optional: Enter the nsShow command to verify devices, hosts, and storage have successfully
registered with the name server.
4. Enter the nsAllShow command to display the 24-bit Fibre Channel addresses of all devices in
the fabric.
switch:admin> nsallshow
{
010e00 012fe8 012fef 030500
030b1e 030b1f 040000 050000
050def 051700 061c00 071a00
0a07cb 0a07cc 0a07cd 0a07ce
0a07d5 0a07d6 0a07d9 0a07da
0a0f02 0a0f0f 0a0f10 0a0f1b
0b2fef 0f0000 0f0226 0f0233
211700 211fe8 211fef 2c0000
611600 620800 621026 621036
621500 621700 621a00
75 Nx_Ports in the Fabric }
030b04
050200
073c00
0a07d1
0a07dc
0a0f1d
0f02e4
2c0300
6210e4
030b08
050700
090d00
0a07d2
0a07e0
0b2700
0f02e8
611000
6210e8
030b17
050800
0a0200
0a07d3
0a07e1
0b2e00
0f02ef
6114e8
6210ef
030b18
050de8
0a07ca
0a07d4
0a0f01
0b2fe8
210e00
6114ef
621400
The number of devices listed should reflect the number of devices that are connected.
Track and control switch changes
The track changes feature allows you to keep a record of specific changes that may not be
considered switch events, but may provide useful information. The output from the track changes
feature is dumped to the system messages log for the switch. Use the errDump or errShow
command to view the log.
Items in the log created from the Track changes feature are labeled TRCK.
Trackable changes are:
•
•
•
•
•
Successful login
Unsuccessful login
Logout
Track changes on
Track changes off
Fabric OS Administrator’s Guide
53-1002148-02
55
3
Track and control switch changes
Enabling the track changes feature
1. Connect to the switch and log in using an account with admin permissions.
2. Enter the trackChangesSet 1 command to enable the track changes feature.
A message displays, verifying that the track changes feature is on:
switch:admin> trackchangesset 1
Committing configuration...done.
3. View the log using the commands errDump |more to display a page at a time or errShow to
view one line at a time.
2008/10/10-08:13:36, [TRCK-1001], 5, FID 128, INFO, ras007, Successful login
by user admin.
Displaying the status of the track changes feature
1. Connect to the switch and log in using an account with admin permissions.
2. Enter the trackChangesShow command.
The status of the track changes feature is displayed as either on or off. The display includes
whether or not the track changes feature is configured to send SNMP traps.
switch:admin> trackchangesshow
Track changes status: ON
Track changes generate SNMP-TRAP: NO
Viewing the switch status policy threshold values
The policy parameter determines the number of failed or inoperable units for each contributor that
triggers a status change in the switch.
Each parameter can be adjusted so that a specific threshold must be reached before that
parameter changes the overall status of a switch to MARGINAL or DOWN. For example, if the
FaultyPorts DOWN parameter is set to 3, the status of the switch will change if three ports fail. Only
one policy parameter needs to pass the MARGINAL or DOWN threshold to change the overall status
of the switch.
For more information about setting policy parameters, see the Fabric Watch Administrator’s Guide.
1. Connect to the switch and log in using an account with admin permissions.
2. Enter the switchStatusPolicyShow command.
Whenever there is a switch change, an error message is logged and an SNMP
connUnitStatusChange trap is sent.
The output is similar to the following:
ecp:admin> switchstatuspolicyshow
switch:admin> switchstatuspolicyshow
The current overall switch status policy parameters:
Down
Marginal
---------------------------------PowerSupplies
0
0
Temperatures
0
0
Fans
1
0
56
Fabric OS Administrator’s Guide
53-1002148-02
Track and control switch changes
WWN
CP
Blade
CoreBlade
Flash
MarginalPorts
FaultyPorts
MissingSFPs
ErrorPorts
Number of ports: 4
0
0
0
0
0
0.00%[0]
0.00%[0]
0.00%[0]
0.00%[0]
3
0
0
0
0
0
0.00%[0]
0.00%[0]
0.00%[0]
0.00%[0]
Setting the switch status policy threshold values
1. Connect to the switch and log in using an account with admin permissions.
2. Enter the switchStatusPolicySet command.
The current switch status policy parameter values are displayed. You are prompted to enter
values for each DOWN and MARGINAL threshold parameter.
NOTE
By setting the DOWN and MARGINAL values for a parameter to 0,0 that parameter is no longer
used in setting the overall status for the switch.
3. Verify the threshold settings you have configured for each parameter.
Enter the switchStatusPolicyShow command to view your current switch status policy
configuration.
Example output from a switch
The following example displays what is typically seen from a Brocade switch, but the quantity and
types vary by platform.
switch:admin> switchstatuspolicyset
To change the overall switch status policy parameters
The current overall switch status policy parameters:
Down
Marginal
----------------------------------PowerSupplies
2
1
Temperatures
2
1
Fans
2
1
Flash
0
1
MarginalPorts
25.00%[12]
10.00%[5]
FaultyPorts
25.00%[12]
10.00%[5]
MissingSFPs
0.00%[0]
0.00%[0]
ErrorPorts
0.00%[0]
0.00%[0]
Number of ports: 48
Note that the value, 0, for a parameter, means that it is
NOT used in the calculation.
** In addition, if the range of settable values in the prompt is (0..0),
** the policy parameter is NOT applicable to the switch.
** Simply hit the Return key.
The minimum number of
Bad PowerSupplies contributing to DOWN status: (0..2) [2]
Fabric OS Administrator’s Guide
53-1002148-02
57
3
Audit log configuration
Bad PowerSupplies contributing to MARGINAL status: (0..2) [1]
Bad Temperatures contributing to DOWN status: (0..4) [2]1
Bad Temperatures contributing to MARGINAL status: (0..4) [1]2
Bad Fans contributing to DOWN status: (0..2) [2]
Bad Fans contributing to MARGINAL status: (0..2) [1]
(output truncated)
On the enterprise-class platforms, the command output includes parameters related to CP blades.
Audit log configuration
When managing SANs you may want to audit certain classes of events to ensure that you can view
and generate an audit log for what is happening on a switch, particularly for security-related event
changes. These events include login failures, zone configuration changes, firmware downloads,
and other configuration changes—in other words—critical changes that have a serious effect on the
operation and security of the switch.
Important information related to event classes is also tracked and made available. For example,
you can track changes from an external source by the user name, IP address, or type of
management interface used to access the switch.
Auditable events are generated by the switch and streamed to an external host through a
configured system message log daemon (syslog). You specify a filter on the output to select the
event classes that are sent through the system message log. The filtered events are streamed
chronologically and sent to the system message log on an external host in the specified audit
message format. This ensures that they can be easily distinguished from other system message log
events that occur in the network. Then, at some regular interval of your choosing, you can review
the audit events to look for unexpected changes.
Before you configure audit event logging, familiarize yourself with the following audit event log
behaviors and limitations:
• By default, all event classes are configured for audit; to create an audit event log for specific
events, you must explicitly set a filter with the class operand and then enable it.
• Audited events are generated specific to a switch and have no negative impact on
performance.
• The last 256 events are persistently stored on the switch and are streamed to a system
message log.
• The audit log depends on the system message log facility and IP network to send messages
from the switch to a remote host. Because the audit event log configuration has no control over
these facilities, audit events can be lost if the system message log and IP network facilities fail.
• If too many events are generated by the switch, the system message log becomes a bottleneck
and audit events are dropped by the Fabric OS.
• If the user name, IP address, or user interface is not transported, None is used instead for
each of the respective fields.
• For High Availability, the audit event logs exist independently on both active and standby CPs.
The configuration changes that occur on the active CP are propagated to the standby CP and
take effect.
• Audit log configuration is also updated through a configuration download.
Before configuring an audit log, you must select the event classes you want audited.
58
Fabric OS Administrator’s Guide
53-1002148-02
Audit log configuration
3
NOTE
Only the active CP can generate audit messages because event classes being audited occur only on
the active CP. Audit messages cannot originate from other blades in an enterprise-class platform.
Switch names are logged for switch components and enterprise-class platform names for
enterprise-class platform components. For example, an enterprise-class platform name may be
FWDL or RAS and a switch component name may be zone, name server, or SNMP.
Pushed messages contain the administrative domain of the entity that generated the event. Refer
to the Fabric OS Message Reference for details on event classes and message formats. For more
information on setting up the system error log daemon, refer to the Fabric OS Troubleshooting and
Diagnostics Guide.
NOTE
If an AUDIT message is logged from the CLI, any environment variables will be initialized with proper
values for login, interface, ip and other session information. See the Fabric OS Message Reference
for more information.
Verifying host syslog prior to configuring the audit log
Audit logging assumes that your syslog is operational and running. Before configuring an audit log,
you must perform the following steps to ensure that the host syslog is operational.
1. Set up an external host machine with a system message log daemon running to receive the
audit events that will be generated.
2. On the switch where the audit configuration is enabled, enter the syslogdIpAdd command to
add the IP address of the host machine so that it can receive the audit events.
You can use IPv4, IPv6, or DNS names for the syslogdIpAdd command.
3. Ensure the network is configured with a network connection between the switch and the
remote host.
4. Check the host SYSLOG configuration. If all error levels are not configured, you may not see
some of the audit messages.
Configuring an audit log for specific event classes
1. Connect to the switch from which you want to generate an audit log and log in using an account
with admin permissions.
2. Enter the auditCfg --class command, which defines the specific event classes to be filtered.
switch:admin> auditcfg --class 2,4
Audit filter is configured.
3. Enter the auditCfg --enable command, which enables audit event logging based on the
classes configured in step 2.
switch:admin> auditcfg --enable
Audit filter is enabled.
To disable an audit event configuration, enter the auditCfg --disable command.
Fabric OS Administrator’s Guide
53-1002148-02
59
3
Audit log configuration
4. Enter the auditCfg --show command to view the filter configuration and confirm that the
correct event classes are being audited, and the correct filter state appears (enabled or
disabled).
switch:admin> auditcfg --show
Audit filter is enabled.
2-SECURITY
4-FIRMWARE
5. Issue the auditDump -s command to confirm that the audit messages are being generated.
Example of the SYSLOG (system message log) output for audit logging
Oct 10 08:52:06 10.3.220.7 raslogd: AUDIT, 2008/10/10-08:20:19 (GMT),
[SEC-3020], INFO, SECURITY, admin/admin/10.3.220.13/telnet/CLI,
ad_0/ras007/FID 128, , Event: login, Status: success, Info: Successful login
attempt via REMOTE, IP Addr: 10.3.220.13.
Oct 10 08:52:23 10.3.220.7 raslogd: 2008/10/10-08:20:36, [CONF-1001], 13, WWN
10:00:00:05:1e:34:02:0c | FID 128, INFO, ras007, configUpload completed
successfully. All config parameters are uploaded.
Oct 10 09:00:04 10.3.220.7 raslogd: AUDIT, 2008/10/10-08:28:16 (GMT),
[SEC-3021], INFO, SECURITY, admin/NONE/10.3.220.13/None/CLI, None/ras007/FID
128, , Event: login, Status: failed, Info: Failed login attempt via REMOTE, IP
Addr: 10.3.220.13.
60
Fabric OS Administrator’s Guide
53-1002148-02
Chapter
4
Routing Traffic
In this chapter
• Routing overview . . . . . . . . . . . . . . . . . . . . . . . . . . . . . . . . . . . . . . . . . . . . . . .
• Inter-switch links . . . . . . . . . . . . . . . . . . . . . . . . . . . . . . . . . . . . . . . . . . . . . . .
• Gateway links . . . . . . . . . . . . . . . . . . . . . . . . . . . . . . . . . . . . . . . . . . . . . . . . . .
• Inter-chassis links . . . . . . . . . . . . . . . . . . . . . . . . . . . . . . . . . . . . . . . . . . . . . .
• Routing policies . . . . . . . . . . . . . . . . . . . . . . . . . . . . . . . . . . . . . . . . . . . . . . . .
• Route selection . . . . . . . . . . . . . . . . . . . . . . . . . . . . . . . . . . . . . . . . . . . . . . . .
• Frame order delivery . . . . . . . . . . . . . . . . . . . . . . . . . . . . . . . . . . . . . . . . . . . .
• Lossless Dynamic Load Sharing on ports . . . . . . . . . . . . . . . . . . . . . . . . . . .
• Frame Redirection . . . . . . . . . . . . . . . . . . . . . . . . . . . . . . . . . . . . . . . . . . . . . .
61
64
66
68
72
74
76
77
80
Routing overview
Data moves through a fabric from switch to switch and from storage to server along one or more
paths that make up a route. Routing policies determine the path for each frame of data.
Before the fabric can begin routing traffic, it must discover the route a packet should take to reach
the intended destination. Route tables are lists that indicate the next hop to which packets are
directed to reach a destination. Route tables include network addresses, the next address in the
data path, and a cost to reach the destination network. There are two kinds of routing protocols on
intranet networks, distance vector and link state.
• Distance vector is based on hop count. This is the number of switches that a frame passes
through to get from the source switch to the destination switch.
• Link state is based on a metric value based on a cost. The cost could be based on bandwidth,
line speed, or round-trip time.
With the link-state protocol, switches that discover a route identify the networks to which they are
attached, receiving an initial route table from the principal switch. After an initial message is sent
out, the switch only notifies the others when changes occur.
It is recommended that no more than seven hops occur between any two switches. This limit is not
required or enforced by Fabric Shortest Path First (FSPF). Its purpose is to ensure that a frame is
not delivered to a destination after Resource Allocation TimeOut Value (R_A_TOV) has expired.
Fabric OS v7.0.0 supports unicast Class 2 and 3 traffic, multicast, and broadcast traffic. Broadcast
and multicast are supported in Class 3 only.
Fabric OS Administrator’s Guide
53-1002148-02
61
4
Routing overview
Paths and route selection
Paths are possible ways to get from one switch to another. Each Inter-Switch Link (ISL) has a metric
cost based on bandwidth. The cumulative cost is based on the sum of all costs of all traversed ISLs.
Route selection is the path that is chosen. Paths that are selected from the routing database are
chosen based on the minimal cost.
FSPF
Fabric Shortest Path First (FSPF) is a link state path selection protocol that directs traffic along the
shortest path between the source and destination based upon the link cost. FSPF is also referred
to as Layer 2 routing. FSPF detects link failures, determines the shortest route for traffic, updates
the routing table, provides fixed routing paths within a fabric, and maintains correct ordering of
frames. FSPF keeps track of the state of the links on all switches in the fabric and associates a cost
with each link. The protocol computes paths from a switch to all the other switches in the fabric by
adding the cost of all links traversed by the path, and chooses the path that minimizes the costs.
This collection of the link states, including costs, of all the switches in the fabric constitutes the
topology database or link state database. Once established, FSPF programs the hardware routing
tables for all active ports on the switch. FSPF is not involved in frame switching. FSPF uses several
frames to perform its functions. Because it may run before fabric routing is set up, FSPF does not
use the routing tables to propagate the frames, but floods the frames throughout the fabric
hop-by-hop. Frames are first flooded on all the ISLs; as the protocol progresses, it builds a spanning
tree rooted on the principal switch. Frames are only sent on the principal ISLs that belong to the
spanning tree. When there are multiple ISLs between switches, the first ISL to respond to
connection requests becomes the principal ISL. Only one ISL from each switch is used as the
principal ISL. Figure 5 shows the thick red lines as principal ISLs, and thin green lines as regular
ISLs.
FIGURE 5
62
Principal ISLs
Fabric OS Administrator’s Guide
53-1002148-02
Routing overview
4
NOTE
FSPF only supports 16 routes in a zone, including Traffic Isolation Zones.
FSPF makes minimal use of the ISL bandwidth, leaving virtually all of it available for traffic. In a
stable fabric, a switch transmits 64 bytes every 20 seconds in each direction. FSPF frames have
the highest priority in the fabric. This guarantees that a control frame is not delayed by user data
and that FSPF routing decisions occur very quickly during convergence.
FSPF guarantees a routing loop-free topology at all times. It is essential for a fabric to include many
physical loops because, without loops, there would be no multiple paths between switches, and
therefore no redundancy. If a link goes down, part of the fabric becomes isolated. FSPF ensures
that the topology is loop-free and that the frame is never forwarded over the same ISL more than
once.
FSPF calculates paths based on the destination domain ID. The fabric protocol must complete
domain ID assignments before routing can begin. ISLs provide the physical pathway when the
Source ID (SID) address has a frame destined to a port on a remote switch Destination ID (DID).
When an ISL is attached or removed from a switch, the FSPF updates the route tables to reflect the
addition or deletion of the new routes.
As each host transmits a frame to the switch, the switch reads the SID and DID in the frame
header. If the domain ID of the destination address is the same as the switch (intra-switch
communications), the frame buffer is copied to the destination port and a credit R_RDY message is
sent to the host. The switch only needs to read word zero and word one of the Fibre Channel frame
to perform what is known as cut-through routing. A frame may begin to emerge from the output
port before it has been entirely received by the input port. The entire frame does not need to be
buffered in the switch.
If the destination domain ID is different than the source domain ID, then the switch consults the
FSPF route table to identify which local E_Port provides the Fabric Shortest Path First (FSPF) to the
remote domain.
Fibre Channel NAT
Within an edge fabric or across a backbone fabric, the standard Fibre Channel FSPF protocol
determines how frames are routed from the source Fibre Channel (FC) device to the destination FC
device. The source or destination device can be a proxy device.
Fibre Channel fabrics require that all ports be identified by a unique port identifier (PID). In a single
fabric, FC protocol guarantees that domain IDs are unique, and so a PID formed by a domain ID and
area ID is unique within a fabric. However, the domain IDs and PIDs in one fabric may be duplicated
within another fabric, just as IP addresses that are unique to one private network are likely to be
duplicated within another private network.
In an IP network, a network router can maintain network address translation (NAT) tables to replace
private network addresses with public addresses when a packet is routed out of the private
network, and to replace public addresses with private addresses when a packet is routed from the
public network to the private network. The Fibre Channel routing equivalent to this IP-NAT is the
Fibre Channel network address translation (FC-NAT). Using FC-NAT, the proxy devices in a fabric can
have PIDs that are different from the real devices they represent, allowing the proxy devices to have
appropriate PIDs for the address space of their corresponding fabric.
Fabric OS Administrator’s Guide
53-1002148-02
63
4
Inter-switch links
Inter-switch links
An inter-switch link (ISL) is a link between two switches, E_Port-to-E_Port. The ports of the two
switches automatically come online as E_Ports once the login process finishes successfully. For
more information on the login process, refer to Chapter 1, “Understanding Fibre Channel Services”.
FIGURE 6
New switch added to existing fabric
You can expand your fabric by connecting new switches to existing switches. Figure 6 shows a new
switch being added into an existing fabric. The thick red line is the newly formed ISL.
When connecting two switches together, Brocade recommends the best practice that the following
parameters are differentiated:
• Domain ID
• Switch name
• Chassis name
You must also verify the following fabric parameters are identical on each switch for a fabric to
merge:
•
•
•
•
•
•
•
Resource Allocation Time Out Value (R_A_TOV)
Error Detect Time Out Value (E_D_TOV)
Data field size
Sequence level switching
Disable device probing
Class F traffic suppression
Per-frame route priority
There are non-fabric parameters that must match as well, such as zoning. Some fabric services,
such as Management Server, must match. If the fabric service is enabled in the fabric, then the
switch you are introducing into the fabric must also have it enabled. If you experience a segmented
fabric, refer to the Fabric OS Troubleshooting and Diagnostics Guide to fix the problem.
64
Fabric OS Administrator’s Guide
53-1002148-02
Inter-switch links
4
Buffer credits
In order to prevent the dropping of frames in the fabric, a device can never send frames without the
receiving device being able to receive them, so an end-to-end flow control is used on the switch.
Flow control in Fibre Channel uses buffer-to-buffer credits, which are distributed by the switch.
When all buffer-to-buffer credits are utilized, a device waits for a VC_RDY or an R_RDY primitive
from the destination switch before resuming I/O. The primitive is dependent on whether you have
R_RDYs enabled on your switch using the portCfgISLMode command. When a device logs in to a
fabric, it typically requests from two to sixteen buffer credits from the switch, depending on the
device type, driver version, and configuration. This determines the maximum number of frames the
port can transmit before receiving an acknowledgement from the receiving device.
For more information on how to set the buffer-to-buffer credits on an extended link, refer to Chapter
22, “Managing Long Distance Fabrics”.
Virtual channels
Virtual channels create multiple logical data paths across a single physical link or connection. They
are allocated their own network resources such as queues and buffer-to-buffer credits. Virtual
channel technology is the fundamental building block used to construct Adaptive Networking
services. For more information on Adaptive Networking services, refer to Chapter 20, “Optimizing
Fabric Behavior”.
Virtual channels are divided into three priority groups. P1 is the highest priority, which is used for
Class F, F_RJT, and ACK traffic. P2 is the next highest priority, which is used for data frames. The
data virtual channels can be further prioritized to provide higher levels of Quality of Service. P3 is
the lowest priority and is used for broadcast and multicast traffic. This example is illustrated in
Figure 7.
FIGURE 7
Fabric OS Administrator’s Guide
53-1002148-02
Virtual Channels on an ISL
65
4
Gateway links
Quality of Service (QoS) is a licensed traffic shaping feature available in Fabric OS. QoS allows the
prioritization of data traffic based on the SID and DID of each frame. Through the use of QoS zones,
traffic can be divided into three priorities: high, medium, and low. The seven data virtual channels,
VC8 through VC14, are used to multiplex data frames based upon QoS zones when congestion
occurs. For more information on QoS zones, refer to Chapter 20, “Optimizing Fabric Behavior”. This
example is illustrated in Figure 8.
FIGURE 8
Virtual channels on a QoS-enabled ISL
Gateway links
A gateway merges SANs into a single fabric by establishing point-to-point E_Port connectivity
between two Fibre Channel switches that are separated by a network with a protocol such as IP or
SONET.
Except for link initialization, gateways are transparent to switches; the gateway simply provides
E_Port connectivity from one switch to another. Figure 9 shows two separate SANs, A-1 and A-2,
merged together using a gateway.
66
Fabric OS Administrator’s Guide
53-1002148-02
Gateway links
FIGURE 9
4
Gateway link merging SANs
By default, switch ports initialize links using the Exchange Link Parameters (ELP) mode 1. However,
gateways expect initialization with ELP mode 2, also referred to as ISL R_RDY mode. Therefore, to
enable two switches to link through a gateway, the ports on both switches must be set for ELP
mode 2.
Any number of E_Ports in a fabric can be configured for gateway links, provided the following
guidelines are followed:
• All switches in the fabric use the core PID format, as described in “Configuring a link through a
gateway” on page 67.
• The switches connected to both sides of the gateway are included when determining
switch-count maximums.
• Extended links (those created using the Extended Fabrics licensed feature) are not supported
through gateway links.
Configuring a link through a gateway
1. Connect to the switch at one end of the gateway and log in using an account assigned to the
admin role.
2. Enter the portCfgIslMode command.
3. Repeat steps 1 and 2 for any additional ports that are connected to the gateway.
4. Repeat this procedure on the switch at the other end of the gateway.
Fabric OS Administrator’s Guide
53-1002148-02
67
4
Inter-chassis links
Example of enabling a gateway link on slot 2, port 3
ecp:admin> portcfgislmode 2/3, 1
Committing configuration...done.
ISL R_RDY Mode is enabled for port 3. Please make sure the PID
formats are consistent across the entire fabric.
Inter-chassis links
An inter-chassis link (ICL) is a licensed feature used to interconnect two Brocade DCX Backbones,
two Brocade DCX-4S Backbones, or a Brocade DCX and a Brocade DCX-4S Backbone. ICL ports in
the core blades are used to interconnect two Brocade Backbones, potentially increasing the
number of usable ports in the Brocade DCX or DCX-4S chassis. The ICL ports on CORE8 and
CR4S-8 blades are internally managed as E_Ports. These ports use proprietary connectors instead
of traditional small form-factor pluggable (SFP) transceivers. When two Brocade Backbones are
interconnected by ICLs, each chassis requires a unique domain and is managed as a separate
switch.
On the Brocade DCX, there are two ICL connectors at ports ICL0 and ICL1 on each core blade, each
aggregating a set of 16 ports. Thus, each core blade provides 32 ICL ports and there are 64 ICL
ports available for the entire Brocade DCX chassis. All the ICL connector ports must be connected
to the same two Brocade DCX or DCX-4S chassis.
The Brocade DCX-4S has two ICL connector ports at ICL0 and ICL1, each aggregating a set of 8
ports. Thus, each core blade provides 16 ICL ports and there are 32 ICL ports available for the
entire Brocade DCX-4S chassis. All the ICL connector ports must be connected to the same two
Brocade DCX or DCX-4S chassis.
Only the following cross-ICL group connections are allowed, as illustrated in Figure 10:
• The ICL0 ports on switch A is connected to the ICL1 ports on switch B.
• The ICL1 ports on switch A is connected to the ICL0 ports on switch B.
FIGURE 10
68
DCX-4S allowed ICL connections
Fabric OS Administrator’s Guide
53-1002148-02
Inter-chassis links
4
The following ICL connections are not allowed:
• ICL0 ports to ICL0 ports
• ICL1 ports to ICL1 ports
For detailed ICL connection information, refer to the Brocade DCX Backbone Hardware Reference
Manual.
ICL ports can be used only with an ICL license. For more information on how license enforcement
occurs, see Chapter 18, “Administering Licensing”. After the addition or removal of a license, the
license enforcement is performed on the ICL ports only when you issue the portDisable or
portEnable commands on the switch for the ports. All ICL ports must be disabled and then
re-enabled for the license to take effect. An ICL license must be installed on both platforms forming
the ICL connection.
Each ICL connector port has two LEDs; a Status LED and an Attention LED. Table 9 describes the
behavior of the LEDs.
TABLE 9
LED behavior
LED
Color
Description
Action
Status
Black
No connection with peer blade.
NA
Green
ICL connection with peer blade is
good.
NA
Black
ICL is fully operational.
NA
Blinking Yellow
One or more links in the ICL
connection is not operational.
Reconnect the ICL cables
or replace the ICL cables.
Attention
The ICL ports appear as regular ports, with some restrictions. All port parameters associated with
ICL ports are static and all portCfg commands are blocked from changing any of the ICL port
parameters. The only management associated with ICL ports and cables is monitoring the status of
the LEDs on the ICL ports and any maintenance if the Attention LED is blinking yellow. For
additional information about the LED status for blades and ports, refer to the Brocade DCX
Backbone Hardware Reference Manual.
When you connect two Brocade Backbones, the following features are supported:
•
•
•
•
8 Gbps speed
Trunking
Buffer-to-buffer credit sharing
QoS
Supported topologies
A triangular topology is supported among three Brocade DCX or DCX-4S chassis. During an ICL
break, the chassis that has the connections of the other two is the main chassis. Any error
messages relating to a break in the topology appear in the RASlog of the main chassis.
If one ICL is broken but there is a regular ISL, the triangular topology holds given that the ISL cost is
lower than the total cost through the ICL linear topology. If a direct ICL link between two switches is
broken, the triangular topology is considered broken when the ISL path between the two switches is
a multiple hop. In this case, the triangular topology broken message is posted independently of the
Fabric OS Administrator’s Guide
53-1002148-02
69
4
Inter-chassis links
cost of the ISL path being lesser or greater than the ICL path between the two switches. For
instructions on how to cable ICLs, refer to the Brocade DCX Backbone Hardware Reference Manual
and the Brocade DCX-4S Backbone Hardware Reference Manual. Figure 11 illustrates a triangular
topology.
Chassis 1
Chassis 3
ICL 3
ICL 1
FIGURE 11
ICL 2
Chassis 2
ICL triangular topology
Virtual Fabrics considerations
In Virtual Fabrics, the ICL ports can be split across the logical switch, base switch, and default
switch. The triangular topology requirement must be met for each fabric individually. The present
restriction on the ICL being part of logical switches with only the “Allow XISL Use” attribute off
applies.
64 Gbps inter-chassis links
The 64 Gbps ICLs feature maximizes the performance, scalability, port density, and flexibility of
SAN fabrics. You can have up to 32 by 64 Gbps QSFP ports in a Brocade DCX 8510-8 chassis or a
16 by 64 Gbps QSFP ports in a Brocade DCX 8510-4 chassis, with up to 2 Gbps ICL bandwidth and
support for up to 50 meters of universal optical cables.
Brocade DCX 8510 switches with core blade ICL ports use laser transmission for data traffic. The
distance limit is extended up to 50m. This enables the use of ICLs, instead of ISLs, for regular
connections between switches. The longer cable length allows for flexible topologies while
connecting different Brocade DCX 8510 platforms.
This is in contrast to the restrictions imposed by shorter ICL cables on Brocade DCX/DCX-4s that
limited the number of topologies using ICLs. For example, Figure 12 shows up to five Brocade DCX
8510 chassis connected using ICLs.
70
Fabric OS Administrator’s Guide
53-1002148-02
Inter-chassis links
FIGURE 12
4
64 Gbps ICL topology
To connect two Brocade DCX 8510 switches redundantly, at least 4 ICL connections are required.
To achieve full redundancy, each core blade in a chassis must be connected to each of the two core
blades in the destination chassis, as shown in Figure 13.
Domain 1
DCX 8510-8
FIGURE 13
Domain 2
DCX 8510-8
Minimum configuration for 64 Gbps ICLs
If you want to add more QSFP cables, one QSFP cable from each blade must be connected to the
same blade of its neighbor. There must be a symmetrical number of QSFPs per blade. The
maximum number allowed between two chassis is 4 QSFPs per blade, within the 4 port QSFP trunk
boundary, which equals a total of 8 QSFPs per chassis.
If the QSFP ICLs and ISLs (including E_Ports and VE_Ports) are connected to the same neighboring
switch in the same logical switch, the default switch or a Non-VF switch are not supported. This is a
topology restriction with new 16 Gpbs ICL and any ISLs that are E_Ports or VE_Ports.
Fabric OS Administrator’s Guide
53-1002148-02
71
4
Routing policies
Routing policies
By default, all routing protocols place their routes into a routing table. You can control the routes
that a protocol places into each table and the routes from that table that the protocol advertises by
defining one or more routing policies and then applying them to the specific routing protocol.
The routing policy is responsible for selecting a route based on one of two user-selected routing
policies:
• Port-based routing
• Exchange-based routing
On the Brocade 300, 5100, 5300, 5410, 5450, 5460, 5470, 5480, 6510, 7800, 8000, and
VA-40FC switches, Brocade DCX and DCX-4S, and the Brocade DCX 8510 enterprise-class
platforms (all 4 Gbps ASICs and later), routing is handled by the FSPF protocol and either the
port-based routing or exchange-based routing policy.
Each switch can have its own routing policy and different policies can exist in the same fabric.
ATTENTION
For most configurations, the default routing policy is optimal and provides the best performance. You
should change the routing policy only if there is a performance issue that is of concern, or if a
particular fabric configuration or application requires it.
Displaying the current routing policy
1. Connect to the switch and log in as admin.
2. Enter the aptPolicy command with no parameters.
The current policy is displayed, followed by the supported policies for the switch.
Example of the output from the aptPolicy command
In the following example, the current policy is exchange-based routing (3) with the additional
AP dedicated link policy.
switch:admin> aptpolicy
Current Policy: 3 1(ap)
3 0(ap): Default Policy
1: Port Based Routing Policy
3: Exchange Based Routing Policy
0: AP Shared Link Policy
1: AP Dedicated Link Policy
Exchange-based routing
The choice of routing path is based on the Source ID (SID), Destination ID (DID), and Fibre Channel
originator exchange ID (OXID) optimizing path utilization for the best performance. Thus, every
exchange can take a different path through the fabric. Exchange-based routing requires the use of
the Dynamic Load Sharing (DLS) feature; when this policy is in effect, you cannot disable the DLS
feature.
72
Fabric OS Administrator’s Guide
53-1002148-02
Routing policies
4
Exchange-based routing is also known as Dynamic Path Selection (DPS). DPS is where exchanges
or communication between end devices in a fabric are assigned to egress ports in ratios
proportional to the potential bandwidth of the ISL or trunk group. When there are multiple paths to
a destination, the input traffic is distributed across the different paths in proportion to the
bandwidth available on each of the paths. This improves utilization of the available paths, thus
reducing possible congestion on the paths. Every time there is a change in the network (which
changes the available paths), the input traffic can be redistributed across the available paths. This
is a very easy and non-disruptive process when the exchange-based routing policy is engaged.
Port-based routing
The choice of routing path is based only on the incoming port and the destination domain. To
optimize port-based routing, DLS can be enabled to balance the load across the available output
ports within a domain.
NOTE
For FC routers only: When an FC router is in port-based routing mode, the backbone traffic is
load-balanced based on SID and DID. When an FC router is in exchange-based routing mode, the
backbone traffic is load-balanced based on SID, DID, and OXID.
Whatever routing policy a switch is using applies to the VE_Ports as well. For more information on
VE_Ports, refer to the Fibre Channel over IP Administrator’s Guide.
AP route policy
Two additional AP policies are supported under exchange-based routing:
• AP Shared Link policy (default)
• AP Dedicated Link policy
The AP policies are independent of the routing policies. Every routing policy supports both AP
policies.
The AP Dedicated Link policy relieves internal congestion in an environment where:
• There is a large amount of traffic going through both directions at the same time.
• There is a reduction of the effect of slow devices on the overall switch performance.
It is recommended that the default AP Shared Link policy be used for most environments. Also, it is
recommended that you design a SAN that localizes host-to-target traffic by reducing the amount of
traffic through the router.
ATTENTION
Setting either AP route policy is a disruptive process.
Routing in Virtual Fabrics
Virtual Fabrics support DPS on all partitions. DPS is limited where multiple paths are available for a
logical fabric frame entering a Virtual Fabrics chassis from a base fabric that is sent out using one
of the dedicated ISLs in a logical switch.
Fabric OS Administrator’s Guide
53-1002148-02
73
4
Route selection
The AP policy affecting the DPS behavior, whether it is exchange-based, device-based, or
port-based, is configured on a per-logical switch basis. In-order delivery (IOD) and DLS settings are
set per logical switch as well. IOD and DLS settings for the base switch affect all traffic going over
the base fabric including any logical fabric traffic that uses the base fabric.
CAUTION
Setting the routing policy is disruptive to the fabric because it requires that you disable the switch
where the routing policy is being changed.
Setting the routing policy
1. Connect to the VF switch and log in as admin.
2. Enter the setcontext command for the correct FID.
switch:admin> setcontext 20
3. Enter the switchDisable command to disable the switch.
4. Take the appropriate following action based on the AP route policy you choose to implement:
• If the exchange-based policy is required, enter the aptPolicy 3 command.
• If the port-based policy is required, enter the aptPolicy 1 command.
Setting up the AP route policy
The AP route policy can only be set in the base switches that are using virtual fabrics.
1. Connect to the base switch and log in as admin.
2. Enter the switchDisable command to disable the switch.
3. Take the appropriate following action based on the AP route policy you choose to implement:
• If the AP Shared Link policy (default) is required, enter the aptPolicy -ap 0 command.
• If the AP Dedicated Link policy is required, enter the aptPolicy -ap 1 command.
Route selection
Selection of specific routes can be dynamic, so that the router can constantly adjust to changing
network conditions; or it may be static, so that data packets always follow a predetermined path.
Dynamic Load Sharing
The exchange-based routing policy depends on the Fabric OS Dynamic Load Sharing (DLS) feature
for dynamic routing path selection. When using the exchange-based routing policy, DLS is enabled
by default and cannot be disabled. In other words, you cannot enable or disable DLS when the
exchange-based routing policy is in effect.
74
Fabric OS Administrator’s Guide
53-1002148-02
Route selection
4
When the port-based policy is in force, you can enable DLS to optimize routing. When DLS is
enabled, it shares traffic among multiple equivalent paths between switches. DLS recomputes load
sharing when any of the following occurs:
•
•
•
•
A switch boots up
An E_Port goes offline and online
An EX_Port goes offline
A device goes offline
Setting DLS
1. Connect to the switch and log in as admin.
2. Enter the dlsShow command to view the current DLS setting.
One of the following messages appears:
• “DLS is set” indicates that DLS is turned on.
• “DLS is not set” indicates that DLS is turned off.
• ”DLS is set with Lossless enabled.” DLS is enabled with the Lossless feature. Load sharing
is recomputed with every change in the fabric, and existing routes can be moved to
maintain optimal balance. In Lossless mode, no frames are lost during this operation.
• "DLS is set by default with current routing policy. DLS is set with Lossless enabled." The
current routing policy (exchange-based) requires DLS to be enabled by default. In addition,
the Lossless option is enabled. Frame loss is prevented during a load sharing
recomputation. If you get this message, you cannot perform step 3, so you are done with
this procedure.
3. Enter the dlsSet command to enable DLS or enter the dlsReset command to disable it.
Example of setting and resetting DLS
switch:admin> dlsshow
DLS is not set
switch:admin> dlsset
switch:admin> dlsshow
DLS is set
switch:admin> dlsreset
switch:admin> dlsshow
DLS is not set
Static route assignment
A static route can be assigned only when the active routing policy is port-based routing. When
exchange-based routing is active, you cannot assign static routes.
Static routes are supported only on the Brocade 4100 and 5000 platforms.
Static routes are not supported on the Brocade 300, 5100, 5300, 5410, 5424, 5450, 5460, 5470,
5480, 6510, 7800, 8000, and VA-40FC switches, the Brocade DCX, DCX-4S, or DCX 8510
enterprise-class platforms (all 4 Gbps ASICs and later). Instead, use the traffic isolation zoning
feature to create a dedicated path for inter-switch traffic. For information about this feature, refer to
Chapter 12, “Traffic Isolation Zoning”.
Fabric OS Administrator’s Guide
53-1002148-02
75
4
Frame order delivery
Assigning a static route
1. Connect to the switch and log in as admin.
2. Enter the uRouteConfig command.
Example of configuring a route
The following example shows how to configure a static route for all traffic coming in from port 1 and
addressed to domain 2 to go through port 5:
switch:admin> urouteconfig 1 2 5
done.
Removing a static route
1. Connect to the switch and log in as admin.
2. Enter the uRouteRemove command.
Frame order delivery
The order of delivery of frames is maintained within a switch and determined by the routing policy
in effect. The frame delivery behaviors for each routing policy are:
• Port-based routing
All frames received on an incoming port destined for a destination domain are guaranteed to
exit the switch in the same order in which they were received.
• Exchange-based routing
All frames received on an incoming port for a given exchange are guaranteed to exit the switch
in the same order in which they were received. Because different paths are chosen for
different exchanges, this policy does not maintain the order of frames across exchanges.
If even one switch in the fabric delivers out-of-order exchanges, then exchanges are delivered to the
target out of order, regardless of the policy configured on other switches in the fabric.
NOTE
Some devices do not tolerate out-of-order exchanges; in such cases, use the port-based routing
policy.
In a stable fabric, frames are always delivered in order, even when the traffic between switches is
shared among multiple paths. However, when topology changes occur in the fabric (for example, if
a link goes down), traffic is rerouted around the failure, and some frames could be delivered out of
order. Most destination devices tolerate out-of-order delivery, but some do not.
By default, out-of-order frame-based delivery is allowed to minimize the number of frames dropped.
Enabling in-order delivery (IOD) guarantees that frames are either delivered in order or dropped.
You should only force in-order frame delivery across topology changes if the fabric contains
destination devices that cannot tolerate occasional out-of-order frame delivery.
76
Fabric OS Administrator’s Guide
53-1002148-02
Lossless Dynamic Load Sharing on ports
4
Forcing in-order frame delivery across topology changes
1. Connect to the switch and log in as admin.
2. Enter the iodSet command.
NOTE
The iodSet command can cause a delay in the establishment of a new path when a topology
change occurs; use it with care.
3. Confirm the in-order delivery has been set by entering the iodShow command.
Restoring out-of-order frame delivery across topology changes
1. Connect to the switch and log in as admin.
2. Enter the iodReset command.
Lossless Dynamic Load Sharing on ports
Lossless Dynamic Load Sharing (DLS) allows you to rebalance port paths without causing
input/output (I/O) failures. For devices where in-order delivery (IOD) of frames is required, you can
set IOD separately. You can use this feature with the following hardware:
•
•
•
•
•
•
•
•
•
•
Brocade 300
Brocade 5100
Brocade 5300
Brocade 6510
Brocade VA-40FC switches
Brocade FC8-16, FC8-32, FC8-48, and FC8-64 port blades,
Brocade DCX 8510-8
Brocade 6510-4 and the supported blades.
Brocade FC16-32 and FC16-48
Brocade FX8-18 application blades in the Brocade DCX and DCX-4S enterprise-class platforms.
On the Brocade 7800 switch and the FX8-24 application blade, Lossless DLS is supported only on
FC-to-FC port flows.
ATTENTION
When you implement Lossless DLS, the switches in the fabric must all have either Fabric OS v6.3.0
or they must all have Fabric OS v6.4.0 or later installed to guarantee no frame loss.
Lossless DLS must be implemented along the path between the target and initiator. You can use
Lossless DLS on ports connecting switches to perform the following functions:
• Eliminate dropped frames and I/O failures by rebalancing the paths going over the ISLs
whenever there is a fabric event that might result in suboptimal utilization of the ISLs.
• Eliminate the frame delay caused by establishing a new path when a topology change occurs.
Fabric OS Administrator’s Guide
53-1002148-02
77
4
Lossless Dynamic Load Sharing on ports
Lossless mode means no frame loss during a rebalance and only takes effect if DLS is enabled.
Lossless DLS can be enabled on a fabric topology in order to have zero frame drops during
rebalance operations. If the end device also requires the order of frames to be maintained during
the rebalance operation, then IOD must be enabled. However this combination of Lossless DLS and
IOD is supported only in specific topologies, such as in a FICON environment.
You can disable or enable IOD when Lossless DLS is enabled. You can also choose between
exchange- or port-based policies with Lossless DLS. Events that cause a rebalance include the
following:
•
•
•
•
Adding an E_Port.
Adding a slave E_Port.
Removing an E_Port (however frame loss occurs on traffic flows to this port.)
Removing an F_Port (however frame loss occurs on traffic flows to this port.)
Lossless DLS does the following whenever paths need to be rebalanced:
1. Pauses ingress traffic by not returning credits. Frames that are already in transit are not
dropped.
2. Changes the existing path to a more optimal path.
3. If IOD is enabled, waits for sufficient time for frames already received to be transmitted. This is
needed to maintain IOD.
4. Resumes traffic.
Table 10 shows the effect of frames when you have a specific routing policy turned on with IOD.
TABLE 10
Combinations of routing policy and IOD with Lossless DLS enabled
Policy
IOD
Rebalance result with Lossless DLS enabled
Port-based
Disabled
No frame loss, but out-of-order frames may occur.
Port-based
Enabled
No frame loss and no out-of-order frames. Topology restrictions apply. Intended
for FICON environment.
Exchange-based
Disabled
No frame loss, but out-of-order frames may occur.
Exchange-based
Enabled
No frame loss and no out-of-order frames. Topology restrictions apply. Intended
for FICON environment.
Lossless core
Lossless core works with the default configuration of the Brocade DCX 8510-8 and 6510-4
hardware to prevent frame loss during a core blade removal and insertion. This feature is on by
default and cannot be disabled. Lossless core has the following limitations:
• Only supported with IOD disabled, which means Lossless core cannot guarantee in-order
delivery of exchanges
• ICL limitations
• Traffic flow limitations
ICL limitations
If ICL ports are connected during a core blade removal, it is equivalent to removing external E_Ports
which may cause I/O disruption on the ICL ports that have been removed.
78
Fabric OS Administrator’s Guide
53-1002148-02
Lossless Dynamic Load Sharing on ports
4
If ICL ports are connected during a core blade insertion, it is equivalent to adding external E_Ports
which may cause I/O disruption due to reroutes. Lossless DLS, if enabled, takes effect to prevent
I/O disruption.
Traffic flow limitations
The FA4-18 and FR4-18i AP blades, which is supported on the Brocade DCX and DCX-4S, may
continue to experience frame drops after core blade removal or insertion. The path between an
FC10-6, FA4-18 or FR4-18i blade and an FX8-24 blade, or vice versa, experiences I/O disruption
because the FC10-6, FA4-18, and FR4-18i blades do not support this feature.
Configuring Lossless Dynamic Load Sharing
You configure Lossless DLS switch- or chassis-wide by using the dlsSet command to specify that no
frames are dropped while rebalancing or rerouting traffic.
1. Connect to the switch and log in using an account assigned to the admin role.
2. Enter the appropriate dlsSet command to enable or disable Lossless Dynamic Load Sharing.
switch:admin>dlsset --enable -lossLess
switch:admin>dlsset --disable -lossLess
Lossless Dynamic Load Sharing in Virtual Fabrics
Enabling Lossless Dynamic Load Sharing is optional on logical switches in Virtual Fabrics. If you
enable this feature, it must be on a per-logical switch basis and can affect other logical switches in
the fabric. The use of eXtensible Interaction Scenario Language (XISL) must be disabled for
Lossless DLS to be enabled.
How DLS affects other logical switches in the fabric
On a Brocade DCX platform, logical switch 1 consists of ports 0 through 5 in slot 1. Logical switch 2
consists of ports 6 through 10 in slot 1. The Lossless DLS feature is enabled on logical switch 1.
Because ports 0 through 10 in slot 1 belong to a logical switch where Lossless DLS is enabled, the
traffic in logical switch 2 is affected whenever traffic for logical switch 1 is rebalanced.
ATTENTION
Although Lossless DSL is enabled for a specific logical switch, you must have chassis-level
permissions to use this feature.
This effect on logical switch 2 is based on the configuration on logical switch 2:
• If logical switch 2 has IOD enabled (iodSet only), IOD is enforced.
• If logical switch 2 has Lossless DLS enabled, traffic is paused and resumed.
• If logical switch 2 has no IOD (iodReset), traffic is paused and resumed.
To avoid this behavior, it is recommended to define your logical switches as follows:
• Define logical switches that require Lossless DLS at the blade boundary.
• Define logical switches that require Lossless DLS only using supported blades. For example, do
not use blades that support IOD, but do not support Lossless DLS.
For more information on Virtual Fabrics and chassis-level permissions, see Chapter 10, “Managing
Virtual Fabrics”.
Fabric OS Administrator’s Guide
53-1002148-02
79
4
Forward error correction
Forward error correction
Forward error correction (FEC) provides method error control during data transmission by sending
redundant data to ensure error-free transmission on a specified port or port range. If the ports are
already in the requested configuration, no action is taken. If a range of ports is specified, some of
which are already in the requested configuration, a notification is generated, and no action is taken
for those ports only. All other ports in the specified range are updated. Use the portCfgFec
command, as described in the Fabric OS Command Reference. Execution of this command is
non-disruptive.
If the FEC flag is already enabled on the ports, this command takes no action. If a range of ports is
specified, some of which are already in the requested configuration, a notification is generated,
and no action is taken for those ports only. All other ports in the specified range are updated.
Execution of this command is non-disruptive.
NOTE
FEC is a criteria for a port trunk, but it configurable only on the Brocade DCX 8510-8, 6510-4,
CR16-8, and CR16-4.
FEC does not require handshaking between the source and the destination, it can be used for
broadcasting data to many destinations simultaneously from a single source. In the simplest form
of FEC, each character is sent twice. The receiver checks both instances of each character for
adherence to the protocol being used. If conformity occurs in both instances, the character is
accepted. If conformity occurs in one instance and not in the other, the character that conforms to
the protocol is accepted. If conformity does not occur in either instance, the character is rejected
and a blank space or an underscore (_) is displayed in its place.
To enable the FEC feature on a single port and to display the configuration, perform the following
commands.
switch:admin>portcfgfec --enable 1
switch:admin>portcfgfec --show 1
Forward Error Correction capable: ON
Forward Error Correction configured: ON
To enable the FEC feature on a port, on which this feature is already enabled, perform the following
command.
switch:admin>portcfgfec --enable 8
Same configuration for port 8
To enable the FEC feature on a port range, perform the following command. Any ports in the range
that were enabled by previous commands remain enabled.
switch:admin>portcfgfec --enable 0-8
To disable the FEC feature on a port range, perform the following command.
switch:admin>portcfgfec --enable 0-8
Frame Redirection
Frame Redirection provides a means to redirect traffic flow between a host and a target that use
virtualization and encryption applications, such as the Brocade SAS blade and Brocade Data
Migration Manager (DMM), so that those applications can perform without having to reconfigure
the host and target. You can use this feature if the hosts and targets are not directly attached.
80
Fabric OS Administrator’s Guide
53-1002148-02
Frame Redirection
4
Frame Redirection depends on the wide distribution of the Defined Zone Database. The Defined
Zone Database on Fabric OS switches is pushed out to all other Fabric OS switches in the fabric
that support Frame Redirection. Redirection zones exist only in the defined configuration and
cannot be added to the effective configuration.
NOTE
Fabric OS v7.0.0 is not supported on the Brocade 7600 or Brocade SAS blade. However, this
hardware can run in a pre-Fabric OS v7.0.0 system and attach to a Fabric OS v7.0.0 fabric.
Frame Redirection uses a combination of special frame redirection zones and Name Server
changes to spoof the mapping of real device WWNs to virtual PIDs.
FIGURE 14
Single host and target
Figure 14 demonstrates the flow of Frame Redirection traffic. A frame starts at the host with a
destination to the target. The port where the appliance is attached to the host switch acts as the
virtual initiator and the port where the appliance is attached to the target switch is the virtual
target.
Creating a frame redirect zone
The first time the zone –-rdcreate command is run, the following zone objects are created by
default:
• The base zone object, "red_______base".
• The RD zone configuration, "r_e_d_i_r_c__fg".
NOTE
Frame redirect zones are not supported with D or I initiator target zones
1. Connect to the switch and log in using an account assigned to the admin role.
2. Enter the zone –-rdcreate command.
3. Enter the cfgSave command to save the frame redirect zones to the defined configuration.
Example of creating a frame redirect zone
The following example creates an RD zone, given a host (10:10:10:10:10:10:10:10), target
(20:20:20:20:20:20:20:20), virtual initiator (30:30:30:30:30:30:30:30), and virtual target
(40:40:40:40:40:40:40:40):
switch:admin>zone --rdcreate 10:10:10:10:10:10:10:10 20:20:20:20:20:20:20:20 \
30:30:30:30:30:30:30:30 40:40:40:40:40:40:40:40 restartable noFCR
Fabric OS Administrator’s Guide
53-1002148-02
81
4
Frame Redirection
Deleting a frame redirect zone
1. Connect to the switch and log in using an account assigned to the admin role.
2. Enter the zone --rdDelete command to remove the base RD zone object, "red_______base".
When the base zone is removed, the RD zone configuration "r_e_d_i_r_c__fg” is removed as
well.
3. Enter the cfgSave command to save changes to the defined configuration.
Example of deleting a frame redirect zone
switch:admin> zone --rddelete \
red_0917_10_10_10_10_10_10_10_10_20_20_20_20_20_20_20_20
Viewing redirect zones
1. Connect to the switch and log in using an account assigned to the admin role.
2. Enter the cfgShow command.
82
Fabric OS Administrator’s Guide
53-1002148-02
Chapter
5
Managing User Accounts
In this chapter
• User accounts overview . . . . . . . . . . . . . . . . . . . . . . . . . . . . . . . . . . . . . . . . .
• Local database user accounts . . . . . . . . . . . . . . . . . . . . . . . . . . . . . . . . . . . .
• Local account database distribution . . . . . . . . . . . . . . . . . . . . . . . . . . . . . . .
• Password policies . . . . . . . . . . . . . . . . . . . . . . . . . . . . . . . . . . . . . . . . . . . . . .
• The boot PROM password . . . . . . . . . . . . . . . . . . . . . . . . . . . . . . . . . . . . . . . .
• The authentication model using RADIUS and LDAP . . . . . . . . . . . . . . . . . . .
83
87
90
91
95
99
User accounts overview
In addition to the default permissions assigned to the following roles: root, factory, admin, and user,
Fabric OS supports up to 252 additional user accounts on the chassis. These accounts expand
your ability to track account access and audit administrative activities.
Each user account is associated with the following:
• Admin Domain list — Specifies the Administrative Domains a user account is allowed to log in
to.
• Home Admin Domain — Specifies the Admin Domain that the user is logged in to by default.
The home Admin Domain must be a member of the user’s Admin Domain list.
• Permissions — Associate roles with each user account to determine the functional access
levels within the bounds of the your current Admin Domain.
• Virtual Fabric list — Specifies the Virtual Fabric a user account is allowed to log in to.
• Home Virtual Fabric — Specifies the Virtual Fabric that the user is logged in to, if available. The
home Virtual Fabric must be a member of the user’s Virtual Fabric list. If the fabric ID is not
available, the next lower valid fabric ID is used.
• LF Permission List — Determines functional access levels within the bounds of the user’s
Virtual Fabrics.
• Chassis role — Similar to switch-level roles, but applies to a different subset of commands.
NOTE
Admin Domains are mutually exclusive from Virtual Fabrics permissions when setting up user
accounts. You will need to set up different user accounts for each feature.
You cannot have Admin Domain mode and Virtual Fabrics mode enabled at the same time.
For more information about Admin Domains, refer to Chapter 17, “Managing Administrative
Domains”.
For more information about Virtual Fabrics, refer to Chapter 10, “Managing Virtual Fabrics”.
Fabric OS Administrator’s Guide
53-1002148-02
83
5
User accounts overview
Fabric OS provides three options for authenticating users—remote RADIUS services, remote LDAP
service, and the local switch user database. All options allow users to be centrally managed using
the following methods:
• Remote RADIUS server: Users are managed in a remote RADIUS server. All switches in the
fabric can be configured to authenticate against the centralized remote database.
• Remote LDAP server: Users are managed in a remote LDAP server. All switches in the fabric
can be configured to authenticate against the centralized remote database.
• Local user database: Users are managed using the local user database. The local user
database is manually synchronized using the distribute command to push a copy of the
switch’s local user database to all other Fabric OS v5.3.0 and later switches in the fabric, but
the distribute command is blocked if users with user-defined roles exist on the sending switch
or on any remote, receiving switch.
Role-Based Access Control
Role-Based Action Control (RBAC) specifies the permissions that a user account has based on the
role the account has been assigned. For each role, there is a set of predefined permissions on the
jobs and tasks that can be performed on a fabric and its associated fabric elements. Fabric OS
uses RBAC to determine which commands a user has access to.
When you log in to a switch, your user account is associated with a predefined role or a
user-defined role. The role that your account is associated with determines the level of access you
have on that switch and in the fabric. The chassis role can also be associated with user defined
roles; it has permissions for RBAC classes of commands which are configured during user-defined
role creation. The chassis role is similar to a switch-level role except that it affects a different
subset of commands.You can use the userConfig command to add this permission to a user
account.
Table 11 outlines the Fabric OS predefined roles.
TABLE 11
Default Fabric OS roles
Role name
Duties
Description
Admin
All administration
All administrative commands.
BasicSwitchAdmin
Restricted switch administration
Mostly monitoring with limited switch (local)
commands.
FabricAdmin
Fabric and switch administration
All switch and fabric commands, excludes user
management and Admin Domains commands.
Operator
General switch administration
Routine switch maintenance commands.
SecurityAdmin
Security administration
All switch security and user management functions.
SwitchAdmin
Local switch administration
Most switch (local) commands, excludes security, user
management, and zoning commands.
User
Monitoring only
Nonadministrative use, such as monitoring system
activity.
ZoneAdmin
Zone administration
Zone management commands only.
Admin Domain considerations: Legacy users with no Admin Domain specified and their current role
is admin will have access to AD 0 through 255 (physical fabric admin); otherwise, they will have
access to AD0 only.
84
Fabric OS Administrator’s Guide
53-1002148-02
User accounts overview
5
If some Admin Domains have been defined for the user and all of them are inactive, the user will
not be allowed to log in to any switch in the fabric. If no Home Domain is specified for a user, the
system provides a default home domain.
The default home domain for the predefined account is AD0. For user-defined accounts, the default
home domain is the Admin Domain in the user’s Admin Domain list with the lowest ID.
Role permissions
Table 12 describes the types of permissions that are assigned to roles.
TABLE 12
Permission types
Abbreviation
Definition
Description
O
Observe
The user can run commands using options that display information only, such
as running userConfig --show -a to show all users on a switch.
M
Modify
The user can run commands using options that create, change, and delete
objects on the system, such as running userConfig --change username -r
rolename to change a user’s role.
OM
Observe and
Modify
The user can run commands using both observe and modify options; if a role
has modify permissions, it almost always has observe.
N
None
The user is not allowed to run commands in a given category.
To view the permission type for categories of commands, use the classConfig command:
1. Enter the classConfig --show -classlist command to list all command categories.
2. Enter the classConfig --showroles command with the command category of interest as the
argument.
This command shows the permissions that apply to all commands in a specific category. For
example:
classconfig --showroles authentication
Roles that have access to the RBAC Class ‘authentication’ are:
Role name
--------Admin
Factory
Root
Security Admin
Permission
---------OM
OM
OM
OM
You can also use the classConfig --showcli command to show the permissions that apply to a
specific command.
The management channel
The management channel is the communication established between the management
workstation and the switch. Table 13 shows the number of simultaneous login sessions allowed for
each role when authenticated locally. The roles are displayed in alphabetic order which does not
reflect their importance. When authenticating using LDAP or RADIUS, the total number of sessions
on a switch may not exceed 32.
Fabric OS Administrator’s Guide
53-1002148-02
85
5
User accounts overview
TABLE 13
Maximum number of simultaneous sessions
Role name
Maximum sessions
Admin
2
BasicSwitchAdmin
4
FabricAdmin
4
Operator
4
SecurityAdmin
4
SwitchAdmin
4
User
4
ZoneAdmin
4
Managing user-defined roles
Fabric OS provides an extensive toolset for managing user defined roles:
• The roleConfig command is available for defining new roles, deleting created roles, or viewing
information about user-defined roles.
• The classConfig command is available for displaying RBAC information about each category or
class of commands, including an option to show all roles associated with a given RBAC
command category.
• The userConfig command can be used to assign a user-defined role to a user account.
Creating a user-defined role
You can define a role as long as it has a unique name that is not the same as any of the Fabric OS
default roles, any other user-defined role, or any existing user account name.
The following conditions also apply:
• A role name is case-insensitive and contains only letters.
• The role name should have a minimum of 4 letters and can be up to 16 letters long.
• The maximum number of user-defined roles that are allowed on a chassis is 256.
The roleConfig command can be used to define unique roles. You must have chassis level access
and permissions to execute this command. The following example creates a user-defined role
called mysecurityrole. The RBAC class Security is added to the role, and the Observe permission is
assigned:
> roleconfig --add mysecurityrole -class security -perm O
Role added successfully
The assigned permissions can be no higher than the Admin role permission assigned to the class.
The Admin role permission for the Security class is Observe/Modify. Therefore, the Observe
permission is valid.
The roleConfig --show command is available to view the permissions assigned to a user-defined
role. You can also use the classConfig --showroles command to see that the role was indeed added
with Observe permission for the security commands:
86
Fabric OS Administrator’s Guide
53-1002148-02
Local database user accounts
5
> classConfig --showroles security
Roles that have access to RBAC Class ‘security’ are:
Role Name
--------User
Admin
Factory
Root
SwitchAdmin
FabricAdmin
BasicSwitchAdmin
SecurityAdmin
mysecurityrole
Permissions
----------O
OM
OM
OM
O
OM
O
OM
O
To delete a user-defined role, use the roleConfig --delete command.
Assigning a user-defined role to a user
You can assign a user-defined role to a user using one of the following options of the userConfig
command:
• userConfig --add with the -r option to create a new user account and assign a role.
• userConfig --change with the -r option to add or change a user-defined role for an existing user
account.
• userConfig --add with the -c option to create a new user account and assign a chassis role.
• userConfig --change with the -c options to add a chassis role to an account.
The following example assigns the mysecurityrole role to the existing anewuser account and adds
the admin chassis role:
> userConfig --change anewuser -r mysecurityrole -c admin
Local database user accounts
User add, change, and delete operations are subject to the subset rule: an admin with ADlist 0-10
or LFlist 1-10 cannot perform operations on an admin, user, or any role with an ADlist 11-25 or
LFlist 11-128. The user account being changed must have an ADlist or LFlist that is a subset of the
account that is making the change.
In addition to the default administrative and user accounts, Fabric OS supports up to 252
user-defined accounts in each switch (domain). These accounts expand your ability to track
account access and audit administrative activities.
Default accounts
Table 14 lists the predefined accounts offered by Fabric OS available in the local switch user
database. The password for all default accounts should be changed during the initial installation
and configuration for each switch.
Fabric OS Administrator’s Guide
53-1002148-02
87
5
Local database user accounts
TABLE 14
Default local user accounts
Account name
Role
Admin Domain
Logical Fabric
Description
admin
Admin
AD0-255
home: 0
LF1-128
home: 128
Most commands have
observe-modify permission.
factory
Factory
AD0-255
home: 0
LF1-128
home: 128
Reserved.
root
Root
AD0-255
home: 0
LF1-128
home: 128
Reserved.
user
User
AD0
home: 0
LF-128
home: 128
Most commands have observe-only
permission.
Admin Domain and Virtual Fabric considerations: Administrators can act on other accounts only if
that account has an Admin Domain or Logical Fabric list that is a subset of the administrator.
Displaying account information
1. Connect to the switch and log in using an account with admin permissions, or an account
associated with a user-defined role with permissions for the UserManagement class of
commands.
2. Enter the appropriate show operands for the account information you want to display:
• userConfig --show -a to show all account information for a switch
• userConfig --show username to show account information for the specified account
• userConfig --showad -a adminDomain_ID to show all accounts permitted to select the
specified adminDomain_ID
• userConfig --showlf -l logicalFabric_ID for each LF in an LF_ID_list, displays a list of users
that include that LF in their LF permissions.
Creating an account
1. Connect to the switch and log in using an account with admin permissions, or an account
associated with a user-defined role with permissions for the UserManagement class of
commands.
2. Enter the userConfig --add command. For example:
> userconfig --add metoo -l 1-128 -h 128 -r admin -c admin
This example creates a user account for the user metoo with the following properties:
•
•
•
•
Access to Virtual Fabrics 1 through 128
Default home logical switch to 128
Admin role permissions
Admin chassis role permissions
3. In response to the prompt, enter a password for the account.
The password is not displayed when you enter it on the command line.
88
Fabric OS Administrator’s Guide
53-1002148-02
Local database user accounts
5
Deleting an account
This procedure can be performed on local user accounts.
1. Connect to the switch and log in using an account with admin permissions, or an account
associated with a user-defined role with permissions for the UserManagement class of
commands.
2. Enter the userConfig --delete command.
NOTE
You cannot delete the default accounts. An account cannot delete itself. All active CLI sessions
for the deleted account are logged out.
3. At the prompt for confirmation, enter y.
Changing account parameters
This procedure can be performed on local user accounts.
When changing account parameters, if you change the ADlist for the user account, all of the
currently active sessions for that account will be logged out. For more information about changing
the Admin Domain on an account, refer to Chapter 17, “Managing Administrative Domains”.
1. Connect to the switch and log in using an account with admin permissions.
2. Enter the userConfig --change command.
Local account passwords
The following rules apply to changing passwords:
• Users can change their own passwords.
• To change the password for another account requires Admin permissions or an account
associated with a user-defined role with Modify permissions for the LocalUserEnvironment
RBAC class of commands. When changing an Admin account password, you must provide the
current password.
• An admin with ADlist 0-10 or LFlist 1-10 cannot change the password on an admin, user, or any
permission with an ADlist 11-25 or LFlist 11-128. The user account being changed must have
an ADlist that is a subset of the account that is making the change.
• A new password must have at least one character different from the previous password.
• You cannot change passwords using SNMP.
Changing the password for the current login account
1. Connect to the switch and log in.
2. Enter the passwd command.
3. Enter the requested information at the prompts.
Fabric OS Administrator’s Guide
53-1002148-02
89
5
Local account database distribution
Changing the password for a different account
1. Connect to the switch and log in using an account with admin permissions.
2. Enter the passwd command specifying the name of the account for which the password is
being changed.
3. Enter the requested information at the prompts.
Local account database distribution
Fabric OS allows you to distribute the user database and passwords to other switches in the fabric.
When the switch accepts a distributed user database, it replaces the local user database with the
user database it receives.
By default, switches accept the user databases and passwords distributed from other switches.
The ‘Locked’ status of a user account is not distributed as part of local user database distribution.
When distributing the user database, the database may be rejected by a switch for one of the
following reasons:
•
•
•
•
One of the target switches does not support local account database distribution.
One of the target switch’s user database is protected.
One of the remote switches has logical switches defined.
Either the local switch or one of the remote switches has user accounts associated with
user-defined roles.
Distributing the local user database
When distributing the local user database, all user-defined accounts residing in the receiving
switches are logged out of any active sessions.
1. Connect to the switch and log in using an account with admin permissions.
2. Enter the distribute -p PWD -d command.
NOTE
If Virtual Fabrics mode is enabled and there are logical switches defined other than the default
logical switch, then distributing the password database to switches is not supported.
If the distribute command is issued from a pre-Fabric OS v6.2.0, switches running Fabric OS v6.2.0
or later will reject it.
Distributing the password database to switches is not allowed if there are users associated with user
defined roles in either the sending switch or remote switch
Accepting distribution of user databases on the local switch
1. Connect to the switch and log in using an account with admin permissions.
2. Enter the fddCfg --localaccept PWD command.
90
Fabric OS Administrator’s Guide
53-1002148-02
Password policies
5
Rejecting distributed user databases on the local switch
1. Connect to the switch and log in using an account with admin permissions.
2. Enter the fddCfg --localreject PWD command.
Password policies
The password policies described in this section apply to the local switch user database only.
Configured password policies (and all user account attribute and password state information) are
synchronized across CPs and remain unchanged after an HA failover. Password policies can also be
manually distributed across the fabric (see “Local account database distribution” on page 90).
Following is a list of the configurable password policies:
•
•
•
•
Password strength
Password history
Password expiration
Account lockout
All password policies are enforced during logins to the standby CP. However, you may observe that
the password enforcement behavior on the standby CP is inconsistent with prior login activity
because password state information from the active CP is automatically synchronized with the
standby CP, thereby overwriting any password state information that was previously stored there.
Also, password changes are not permitted on the standby CP.
Password authentication policies configured using the passwdCfg command are not enforced
during initial prompts to change default passwords.
Password strength policy
The password strength policy is enforced across all user accounts, and enforces a set of format
rules to which new passwords must adhere. The password strength policy is enforced only when a
new password is defined. The total of the other password strength policy parameters (lowercase,
uppercase, digits, and punctuation) must be less than or equal to the value of the MinLength
parameter.
Use the following attributes to set the password strength policy:
• Lowercase
Specifies the minimum number of lowercase alphabetic characters that must appear in the
password. The default value is zero. The maximum value must be less than or equal to the
MinLength value.
• Uppercase
Specifies the minimum number of uppercase alphabetic characters that must appear in the
password. The default value is zero. The maximum value must be less than or equal to the
MinLength value.
• Digits
Specifies the minimum number of numeric digits that must appear in the password. The
default value is zero. The maximum value must be less than or equal to the MinLength value.
Fabric OS Administrator’s Guide
53-1002148-02
91
5
Password policies
• Punctuation
Specifies the minimum number of punctuation characters that must appear in the password.
All printable, non-alphanumeric punctuation characters except the colon ( : ) are allowed. The
default value is zero. The maximum value must be less than or equal to the MinLength value.
• MinLength
Specifies the minimum length of the password. The minimum can be from 8 to 40 characters.
New passwords must be between the minimum length specified and 40 characters. The
default value is 8. The maximum value must be greater than or equal to the MinLength value.
• Repeat
Specifies the length of repeated character sequences that will be disallowed. For example, if
the “repeat” value is set to 3, a password “passAAAword” is disallowed because it contains the
repeated sequence “AAA”. A password of “passAAword” would be allowed because no repeated
character sequence exceeds two characters. The range of allowed values is 1 – 40. The
default value is 1.
• Sequence
Specifies the length of sequential character sequences that will be disallowed. A sequential
character sequence is defined as a character sequence in which the ASCII value of each
contiguous character differs by one. The ASCII value for the characters in the sequence must
all be increasing or decreasing. For example, if the “sequence” value is set to 3, a password
“passABCword” is disallowed because it contains the sequence “ABC”. A password of
“passABword” would be allowed because it contains no sequential character sequence
exceeding two characters. The range of allowed values is 1 – 40. The default value is 1. When
set to 1, sequential characters are not enforced.
Example of a password strength policy
The following example shows a password strength policy that requires passwords to contain at
least 3 uppercase characters, 4 lowercase characters and 2 numeric digits; the minimum
length of the password is 9 characters.
passwdcfg --set -uppercase 3 -lowercase 4 -digits 2 -minlength 9
Password history policy
The password history policy prevents users from recycling recently used passwords, and is
enforced across all user accounts when users are setting their own passwords. The password
history policy is enforced only when a new password is defined.
Specify the number of past password values that are disallowed when setting a new password.
Allowable password history values range between 0 and 24. If the value is set to 0, it means that
the new password cannot be set to current password, but can be set to the most recent password.
The default value is 1, which means the current and one previous password cannot be reused. The
value 2 indicates that the current and the two previous passwords cannot be used (and so on, up
to 24 passwords).
This policy does not verify that a new password meets a minimal standard of difference from prior
passwords, rather, it only determines whether or not a newly-specified password is identical to one
of the specified number (1-24) of previously used passwords.
The password history policy is not enforced when an administrator sets a password for another
user; instead, the user’s password history is preserved and the password set by the administrator
is recorded in the user’s password history.
92
Fabric OS Administrator’s Guide
53-1002148-02
Password policies
5
Password expiration policy
The password expiration policy forces expiration of a password after a configurable period of time,
and is enforced across all user accounts. A warning that password expiration is approaching is
displayed when the user logs in. When a user’s password expires, he or she must change the
password to complete the authentication process and open a user session. You can specify the
number of days prior to password expiration during which warnings will commence. Password
expiration does not disable or lock out the account.
Use the following attributes to set the password expiration policy:
• MinPasswordAge
Specifies the minimum number of days that must elapse before a user can change a
password. MinPasswordAge values range from 0 to 999. The default value is zero. Setting this
parameter to a non-zero value discourages users from rapidly changing a password in order to
circumvent the password history setting to select a recently-used password. The
MinPasswordAge policy is not enforced when an administrator changes the password for
another user.
• MaxPasswordAge
Specifies the maximum number of days that can elapse before a password must be changed,
and is also known as the password expiration period. MaxPasswordAge values range from 0 to
999. The default value is zero. Setting this parameter to zero disables password expiration.
• Warning
Specifies the number of days prior to password expiration that a warning about password
expiration is displayed. Warning values range from 0 to 999. The default value is 0 days.
NOTE
When MaxPasswordAge is set to a non-zero value, MinPasswordAge and Warning must be set
to a value that is less than or equal to MaxPasswordAge.
Account lockout policy
The account lockout policy disables a user account when that user exceeds a specified number of
failed login attempts, and is enforced across all user accounts. You can configure this policy to
keep the account locked until explicit administrative action is taken to unlock it, or the locked
account can be automatically unlocked after a specified period. Administrators can unlock a locked
account at any time.
A failed login attempt counter is maintained for each user on each switch instance. The counters
for all user accounts are reset to zero when the account lockout policy is enabled. The counter for
an individual account is reset to zero when the account is unlocked after a lockout duration period
expires, or when the account user logs in successfully.
The admin account can also have the lockout policy enabled on it. The admin account lockout
policy is disabled by default and uses the same lockout threshold as the other permissions. It can
be automatically unlocked after the lockout duration passes or when it is manually unlocked by
either a user account that has a securityAdmin or other Admin permissions.
Virtual Fabric considerations: The home logical fabric context is used to validate user enforcement
for the account lockout policy.
Fabric OS Administrator’s Guide
53-1002148-02
93
5
Password policies
The following commands are used to manage the account lockout policy.
• userConfig --change account_name -u
• passwdCfg --disableadminlockout
Note that the account-locked state is distinct from the account-disabled state.
Use the following attributes to set the account lockout policy:
• LockoutThreshold
Specifies the number of times a user can attempt to log in using an incorrect password before
the account is locked. The number of failed login attempts is counted from the last successful
login. LockoutThreshold values range from 0 to 999, and the default value is 0. Setting the
value to 0 disables the lockout mechanism.
• LockoutDuration
Specifies the time, in minutes, after which a previously locked account is automatically
unlocked. LockoutDuration values range from 0 to 99999, and the default value is 30. Setting
the value to 0 disables lockout duration, and would require a user to seek administrative
action to unlock the account. The lockout duration begins with the first login attempt after the
LockoutThreshold has been reached. Subsequent failed login attempts do not extend the
lockout period.
Enabling the admin lockout policy
1. Log in to the switch using an account that is an Admin securityAdmin permissions.
2. Enter the passwdCfg --enableadminlockout command.
Unlocking an account
1. Log in to the switch using an account that has Admin securityAdmin permissions.
2. Enter the userConfig --change account_name -u command specifying the name of the user
account that is locked out.
Disabling the admin lockout policy
1. Log in to the switch using an account that has Admin or securityAdmin permissions.
2. Enter the passwdCfg --disableadminlockout command.
Denial of service implications
The account lockout mechanism may be used to create a denial of service condition by repeatedly
attempting to log in to an account using an incorrect password. Selected privileged accounts are
exempted from the account lockout policy to prevent them from being locked out from a denial of
service attack. However these privileged accounts may then become the target of password
guessing attacks. Audit logs should be examined to monitor if such attacks are attempted.
94
Fabric OS Administrator’s Guide
53-1002148-02
The boot PROM password
5
The boot PROM password
The boot PROM password provides an additional layer of security by protecting the boot PROM from
unauthorized use. Setting a recovery string for the boot PROM password enables you to recover a
lost boot PROM password by contacting your switch service provider. Without the recovery string, a
lost boot PROM password cannot be recovered.
Although you can set the boot PROM password without also setting the recovery string, it is strongly
recommended that you set both the password and the recovery string. If your site procedures
dictate that you set the boot PROM password without the recovery string, see “Setting the boot
PROM password for a switch without a recovery string” on page 97.
To set the boot PROM password with or without a recovery string, refer to the section that applies to
your switch model or enterprise-class platform.
CAUTION
Setting the boot PROM password requires accessing the boot prompt, which stops traffic flow
through the switch until the switch is rebooted. Perform this procedure during a planned
downtime.
Setting the boot PROM password for a switch with a recovery string
This procedure applies to the following switch models: Brocade 300, 5410, 5424, 5450, 5460,
5470, 5480, 5100, 5300, 65,10, 7800, 8000, and 8510 switches. If your switch is not listed,
please contact your switch support provider for instructions.
1. Connect to the serial port interface as described in “Connecting to Fabric OS through the serial
port” on page 16.
2. Reboot the switch.
3. Press ESC within four seconds after the message “Press escape within 4 seconds...” displays.
The following options are available:
Option
1
2
3
Description
Start system.
Recovery password.
Enter command shell.
Continues the system boot process.
Lets you set the recovery string and the boot PROM password.
Provides access to boot parameters.
4. Enter 2.
• If no password was previously set, the following message displays:
Recovery password is NOT set. Please set it now.
• If a password was previously set, the following messages display:
Send the following string to Customer Support for password recovery:
afHTpyLsDo1Pz0Pk5GzhIw==
Enter the supplied recovery password.
Recovery Password:
Fabric OS Administrator’s Guide
53-1002148-02
95
5
The boot PROM password
5. Enter the recovery password (string).
The recovery string must be between 8 and 40 alphanumeric characters. A random string that
is 15 characters or longer is recommended for higher security. The firmware prompts for this
password only once. It is not necessary to remember the recovery string because it is displayed
the next time you enter the command shell.
The following prompt displays:
New password:
6. Enter the boot PROM password, then re-enter it when prompted. The password must be eight
alphanumeric characters (any additional characters are not recorded). Record this password
for future use.
The new password is automatically saved.
7.
Reboot the switch by typing the reset command at the prompt.
Setting the boot PROM password for a director with a recovery string
This procedure applies to the following enterprise-class platforms: Brocade DCX and DCX-4S Data
Center Backbones.
The boot PROM and recovery passwords must be set for each CP blade on Brocade DCX and
DCX-4S enterprise-class platforms.
1. Connect to the serial port interface on the standby CP blade, as described in “Connecting to
Fabric OS through the serial port” on page 16.
2. Connect to the active CP blade by serial or Telnet and enter the haDisable command to prevent
failover during the remaining steps.
3. Reboot the standby CP blade by sliding the On/Off switch on the ejector handle of the standby
CP blade to Off, and then back to On.
4. Press ESC within four seconds after the message “Press escape within 4 seconds...” displays.
The following options are available:
Option
Description
1
2
3
Continues the system boot process.
Lets you set the recovery string and the boot PROM password.
Provides access to boot parameters.
Start system.
Recovery password.
Enter command shell.
5. Enter 2. Take the following appropriate action based on whether you find the password was
previously set:
• If no password was previously set, the following message displays:
Recovery password is NOT set. Please set it now.
• If a password was previously set, the following messages display:
Send the following string to Customer Support for password recovery:
afHTpyLsDo1Pz0Pk5GzhIw==
Enter the supplied recovery password.
Recovery Password:
96
Fabric OS Administrator’s Guide
53-1002148-02
The boot PROM password
5
6. Enter the recovery password (string).
The recovery string must be between 8 and 40 alphanumeric characters. A random string that
is 15 characters or longer is recommended for higher security. The firmware only prompts for
this password once. It is not necessary to remember the recovery string because it is displayed
the next time you enter the command shell.
The following prompt displays:
New password:
7.
Enter the boot PROM password, then re-enter it when prompted. The password must be eight
alphanumeric characters (any additional characters are not recorded). Record this password
for future use.
The new password is automatically saved (the saveEnv command is not required).
8. Connect to the active CP blade using serial or Telnet and enter the haEnable command to
restore high availability; then fail over the active CP blade by entering the haFailover command.
Traffic flow through the active CP blade resumes when the failover is complete.
9. Connect the serial cable to the serial port on the new standby CP blade (previously the active
CP blade).
10. Repeat step 2 through step 7 for the new standby CP blade (each CP blade has a separate
boot PROM password).
11. Connect to the active CP blade by serial or Telnet and enter the haEnable command to restore
high availability.
Although you can set the boot PROM password without also setting the recovery string, it is strongly
recommended that you set both the password and the string as described in “Setting the boot
PROM password for a switch with a recovery string” on page 95. If your site procedures dictate that
you must set the boot PROM password without the string, follow the procedure that applies to your
switch model.
Setting the boot PROM password for a switch without a recovery string
This procedure applies to the following switch models: Brocade 300, 5410, 5424, 5450, 5460,
5470, 5480, 5100, 5300, 6510, 7800, 8000, 8510, and VA-40FC switches.
The password recovery instructions contained within this section are only for the switches listed. If
your switch is not listed, contact your switch support provider for instructions.
1. Create a serial connection to the switch as described in “Connecting to Fabric OS through the
serial port” on page 16.
2. Reboot the switch by entering the reboot command.
3. Press ESC within four seconds after the message “Press escape within 4 seconds...” displays.
The following options are available:
Option
Description
1
2
3
Continues the system boot process.
Lets you set the recovery string and the boot PROM password.
Provides access to boot parameters.
Fabric OS Administrator’s Guide
53-1002148-02
Start system.
Recovery password.
Enter command shell.
97
5
The boot PROM password
4. Enter 3.
5. At the shell prompt, enter the passwd command.
NOTE
The passwd command only applies to the boot PROM password when it is entered from the
boot interface.
6. Enter the boot PROM password at the prompt, then re-enter it when prompted. The password
must be eight alphanumeric characters (any additional characters are not recorded). Record
this password for future use.
7.
Enter the saveEnv command to save the new password.
8. Reboot the switch by entering the reset command.
Setting the boot PROM password for a director without a recovery string
This procedure applies to the following enterprise-class platforms: Brocade DCX and DCX-4S Data
Center Backbones.
On the Brocade DCX enterprise-class platforms, set the password on the standby CP blade, fail
over, and then set the password on the previously active (now standby) CP blade to minimize
disruption to the fabric.
1. Determine the active CP blade by opening a Telnet session to either CP blade, connecting as
admin, and entering the haShow command.
2. Connect to the active CP blade by serial or Telnet and enter the haDisable command to prevent
failover during the remaining steps.
3. Create a serial connection to the standby CP blade as described in “Connecting to Fabric OS
through the serial port” on page 16.
4. Reboot the standby CP blade by sliding the On/Off switch on the ejector handle of the standby
CP blade to Off, and then back to On.
This causes the blade to reset.
5. Press ESC within four seconds after the message Press escape within 4 seconds...
displays.
The following options are available:
Option
Description
1
2
3
Continues the system boot process.
Lets you set the recovery string and the boot PROM password.
Provides access to boot parameters.
Start system.
Recovery password.
Enter command shell.
6. Enter 3.
7.
Enter the passwd command at the shell prompt.
NOTE
The passwd command applies only to the boot PROM password when it is entered from the
boot interface.
98
Fabric OS Administrator’s Guide
53-1002148-02
The authentication model using RADIUS and LDAP
5
8. Enter the boot PROM password at the prompt, then re-enter it when prompted. The password
must be eight alphanumeric characters (any additional characters are not recorded). Record
this password for future use.
9. Enter the saveEnv command to save the new password.
10. Reboot the standby CP blade by entering the reset command.
11. Connect to the active CP blade by serial or Telnet and enter the haEnable command to restore
high availability; then fail over the active CP blade by entering the haFailover command.
Traffic resumes flowing through the newly active CP blade after it has completed rebooting.
12. Connect the serial cable to the serial port on the new standby CP blade (previously the active
CP blade).
13. Repeat step 3 through step 10 for the new standby CP blade.
14. Connect to the active CP blade by serial or Telnet and enter the haEnable command to restore
high availability.
NOTE
To recover lost passwords refer to the Fabric OS Troubleshooting and Diagnostics Guide.
The authentication model using RADIUS and LDAP
Fabric OS supports the use of either the local user database and the remote authentication dial-in
user service (RADIUS) at the same time; or the local user database and lightweight directory
access protocol (LDAP) using Microsoft Active Directory in Windows at the same time. A switch can
be configured to try either RADIUS or LDAP and local switch authentication. The switch can also
be configured to use only RADIUS, only LDAP, or only local switch authentication.
When configured to use either RADIUS or LDAP, the switch acts as a network access server (NAS)
and RADIUS or LDAP client. The switch sends all authentication, authorization, and accounting
(AAA) service requests to the RADIUS or LDAP server. The RADIUS or LDAP server receives the
request, validates the request, and sends its response back to the switch.
The supported management access channels that integrate with RADIUS or LDAP include serial
port, Telnet, SSH, Web Tools, and API. All these require the switch IP address or name to connect.
RADIUS and LDAP servers accepts both IPv4 and IPv6 address formats. For accessing both the
active and standby CP, and for the purpose of HA failover, both CP IP addresses of a director should
be included in the RADIUS or LDAP server configuration.
NOTE
For systems such as the Brocade DCX enterprise-class platforms, the switch IP addresses are
aliases of the physical Ethernet interfaces on the CP blades. When specifying client IP addresses for
the logical switches in such systems, make sure the CP IP addresses are used.
When configured for RADIUS or LDAP, a switch becomes a RADIUS or LDAP client. In either of these
configurations, authentication records are stored in the RADIUS or LDAP host server database.
Login and logout account name, assigned permissions, and time-accounting records are also
stored on the RADIUS or LDAP server for each user.
By default, the RADIUS and LDAP services are disabled, so AAA services default to the switch’s
local database.
Fabric OS Administrator’s Guide
53-1002148-02
99
5
The authentication model using RADIUS and LDAP
To enable RADIUS or LDAP service, it is strongly recommended that you access the CLI through an
SSH connection so that the shared secret is protected. Multiple login sessions can configure
simultaneously, and the last session to apply a change leaves its configuration in effect. After a
configuration is applied, it persists after a reboot or an HA failover.
To enable the secure LDAP service, you need to install a certificate from the Microsoft Active
Directory server. By default, the LDAP service does not require certificates.
The configuration applies to all switches and on a director the configuration replicates itself on a
standby CP blade if one is present. It is saved in a configuration upload and applied in a
configuration download.
It is recommended to configure at least two RADIUS or LDAP servers so that if one fails, the other
will assume service. Up to five are supported.
You can set the configuration with either RADIUS or LDAP service and local authentication enabled
so that if the RADIUS or LDAP servers do not respond due to power failure or network problems, the
switch uses local authentication.
Consider the effects of the use of RADIUS or LDAP service on other Fabric OS features. For
example, when RADIUS or LDAP service is enabled, all account passwords must be managed on
the RADIUS or LDAP server. The Fabric OS mechanisms for changing switch passwords remain
functional; however, such changes affect only the involved switches locally. They do not propagate
to the RADIUS or LDAP server, nor do they affect any account on the RADIUS or LDAP server.
RADIUS and LDAP servers also support notifying users of expiring passwords.
When RADIUS or LDAP is set up for a fabric that contains a mix of switches with and without
RADIUS or LDAP support, the way a switch authenticates users depends on whether a RADIUS or
LDAP server is set up for that switch. For a switch with RADIUS or LDAP support and configuration,
authentication bypasses the local password database. For a switch without RADIUS or LDAP
support or configuration, authentication uses the switch’s local account names and passwords.
Table 15 outlines the aaaConfig command options used to set up the authentication mode.
TABLE 15
Authentication configuration options
aaaConfig options
100
Description
Equivalent setting in Fabric
OS v5.1.0 and earlier
--radius
--switchdb1
--authspec “local”
Default setting. Authenticates management
connections against the local database only.
If the password does not match or the user is
not defined, the login fails.
Off
On
--authspec “radius”
Authenticates management connections
against any RADIUS databases only.
If the RADIUS service is not available or the
credentials do not match, the login fails.
On
Off
--authspec “radius;local”
Authenticates management connections
against any RADIUS databases first.
If RADIUS fails for any reason, authenticates
against the local user database.
not
not
supported supported
Fabric OS Administrator’s Guide
53-1002148-02
5
The authentication model using RADIUS and LDAP
TABLE 15
Authentication configuration options (Continued)
aaaConfig options
Description
Equivalent setting in Fabric
OS v5.1.0 and earlier
--radius
--switchdb1
--authspec “radius;local” --backup
Authenticates management connections
against any RADIUS databases. If RADIUS fails
because the service is not available, it then
authenticates against the local user database.
The --backup option directs the service to try
the secondary authentication database only if
the primary authentication database is not
available.
On
On
--authspec “ldap”
Authenticates management connections
against any LDAP databases only. If LDAP
service is not available or the credentials do
not match, the login fails.
n/a
n/a
--authspec “ldap; local”
Authenticates management connections
against any LDAP databases first. If LDAP fails
for any reason, it then authenticates against
the local user database.
n/a
On
--authspec “ldap; local” --backup
Authenticates management connections
against any LDAP databases first. If LDAP fails
for any reason, it then authenticates against
the local user database. The --backup option
states to try the secondary authentication
database only if the primary authentication
database is not available.
n/a
On
--authspec -nologout
Prevents users from being logged out when
you change authentication. Default behavior is
to log users out when you change
authentication.
n/a
n/a
1.
Fabric OS v5.1.0 and earlier aaaConfig --switchdb <on | off> setting.
Setting the switch authentication mode
1. Connect to the switch and log in using an account with admin permissions.
2. Enter the aaaConfig --authspec command.
Fabric OS user accounts
RADIUS and LDAP servers allow you to set up user accounts by their true network-wide identity
rather than by the account names created on a Fabric OS switch. With each account name, assign
the appropriate switch access permissions. For LDAP servers, you can use the ldapCfg -–maprole
<ldap_role name> <switch_role> command to map an LDAP server permissions.
RADIUS and LDAP support all the defined RBAC roles described in Table 11 on page 84.
Fabric OS Administrator’s Guide
53-1002148-02
101
5
The authentication model using RADIUS and LDAP
Users must enter their assigned RADIUS or LDAP account name and password when logging in to a
switch that has been configured with RADIUS or LDAP. After the RADIUS or LDAP server
authenticates a user, it responds with the assigned switch role in a Brocade Vendor-Specific
Attribute (VSA). If the response does not have a VSA permissions assignment, the User role is
assigned. If no Administrative Domain is assigned, then the user is assigned to the default Admin
Domain AD0.
You can set a user password expiration date and add a warning for RADIUS login. The password
expiry date must be specified in UTC and in MM/DD/YYYY format. The password warning specifies
the number of days prior to the password expiration that a warning of password expiration notifies
the user. You either specify both attributes or none. If you specify a single attribute or there is a
syntax error in the attributes, the password expiration warning will not be issued. If your RADIUS
server maintains its own password expiration attributes, you must set the exact date twice to use
this feature, once on your RADIUS server and once in the VSA attribute. If the dates do not match,
then the RADIUS server authentication fails.
The syntax used for assigning VSA-based account switch roles on a RADIUS server is described in
Table 16.
TABLE 16
102
Syntax for VSA-based account roles
Item
Value
Description
Type
26
1 octet
Length
7 or higher
1 octet, calculated by the server
Vendor ID
1588
4 octet, Brocade SMI Private Enterprise Code
Vendor type
1
1 octet, Brocade-Auth-Role; valid attributes for the Brocade-Auth-Role are:
Admin
BasicSwitchAdmin
FabricAdmin
Operator
SecurityAdmin
SwitchAdmin
User
ZoneAdmin
2
Optional: Specifies the Admin Domain or Virtual Fabric member list. For
more information on Admin Domains or Virtual Fabrics, see “RADIUS
configuration with Admin Domains or Virtual Fabrics” on page 104.
Brocade-AVPairs1
3
Brocade-AVPairs2
4
Brocade-AVPairs3
5
Brocade-AVPairs4
6
Brocade Password ExpiryDate
7
Brocade Password ExpiryWarning
Vendor length
2 or higher
1 octet, calculated by server, including vendor-type and vendor-length
Attribute-specific data
ASCII string
Multiple octet, maximum 253, indicating the name of the assigned role and
other supported attribute values such as Admin Domain member list.
Fabric OS Administrator’s Guide
53-1002148-02
The authentication model using RADIUS and LDAP
5
Fabric OS users on the RADIUS server
All existing Fabric OS mechanisms for managing local switch user accounts and passwords remain
functional when the switch is configured to use RADIUS. Changes made to the local switch
database do not propagate to the RADIUS server, nor do the changes affect any account on the
RADIUS server.
Windows 2000 IAS
To configure a Windows 2000 internet authentication service (IAS) server to use VSA to pass the
Admin role to the switch in the dial-in profile, the configuration specifies the Vendor code (1588),
Vendor-assigned attribute number (1), and attribute value (admin), as shown in Figure 15.
FIGURE 15
Windows 2000 VSA configuration
Linux FreeRadius server
For the configuration on a Linux FreeRadius server, define the values outlined in Table 17 in a
vendor dictionary file called dictionary.brocade.
TABLE 17
dictionary.brocade file entries
Include
Key
Value
VENDOR
Brocade
1588
ATTRIBUTE
Brocade-Auth-Role
1 string Brocade
Brocade-AVPairs1, 2, 3, 4
2, 3, 4, 5 string
Admin Domain or Virtual Fabric member list
Brocade-Passwd-ExpiryDate
6 string MM/DD/YYYY in UTC
Brocade-Passwd-WarnPeriod
7 integer in days
Fabric OS Administrator’s Guide
53-1002148-02
103
5
The authentication model using RADIUS and LDAP
After you have completed the dictionary file, define the permissions for the user in a configuration
file. For example, to grant the user jsmith Admin permissions, you would add the following
statement to the configuration file:
swladmin
Auth-Type := Local, User-Password == "myPassword"
Brocade-Auth-Role = "admin",
Brocade-AVPairs1 = "HomeLF=70",
Brocade-AVPairs2 =
"LFRoleList=admin:2,4-8,70,80,128;ChassisRole=admin",
Brocade-Passwd-ExpiryDate = "11/10/2011",
Brocade-Passwd-WarnPeriod = "30"
RADIUS configuration with Admin Domains or Virtual Fabrics
When configuring users with Admin Domains or Virtual Fabrics, you must also include the Admin
Domain or Virtual Fabric member list. This section describes the way that you configure attribute
types for this configuration.
The values for the new attribute types use the syntax key=val[;key=val], where key is a text
description of attributes, value is the attribute value for the given key, the equal sign (=) is the
separator between key and value, and the semi-colon (;) is an optional separator for multiple
key-value pairs.
Multiple key-value pairs can appear for one Vendor-Type code. Key-value pairs with the same key
name may be concatenated across multiple Vendor-Type codes. You can use any combination of
the Vendor-Type codes to specify key-value pairs. Note that a switch always parses these attributes
from Vendor-Type code 2 to Vendor-Type code 4.
Only four kinds of keys are accepted; all other keys are ignored. The following keys are accepted:
• HomeAD is the designated home Admin Domain for the account. The valid range of values is
from 0 to 255. The first valid HomeAD key-value pair is accepted by the switch, and any
additional HomeAD key-value pairs are ignored.
• ADList is a comma-separated list of Administrative Domain numbers to which this account is a
member. Valid numbers range from 0 to 255. A dash between two numbers specifies a range.
Multiple ADlist key-value pairs within the same or across the different Vendor-Type codes are
concatenated. Multiple occurrences of the same Admin Domain number are ignored.
• HomeLF is the designated home Virtual Fabric for the account. The valid values are between 1
to 128 and chassis context. The first valid HomeLF key-value pair is accepted by the switch,
additional HomeLF key-value pairs are ignored.
• LFRoleList is a comma-separated list of Virtual Fabric ID numbers to which this account is a
member. Valid numbers range from 1 to 128. A dash between two numbers specifies a range.
Multiple Virtual Fabric list key-value pairs within the same or across the different Vendor-Type
codes are concatenated. Multiple occurrences of the same Virtual Fabric ID number are
ignored.
RADIUS authentication requires that the account have valid permissions through the attribute type
Brocade-Auth-Role. The additional attribute values ADList, HomeAD, HomeLF, and LFRoleList are
optional. If they are unspecified, the account can log in with AD0 as its member list and home
Admin Domain or VF128 as its member list and home Virtual Fabric. If there is an error in the
ADlist, HomeAD, LFRoleList, or HomeLF specification, the account cannot log in until the AD list or
Virtual Fabric list is corrected; an error message is displayed.
104
Fabric OS Administrator’s Guide
53-1002148-02
The authentication model using RADIUS and LDAP
5
For example, on a Linux FreeRadius Server, the user (user-za) with the following settings takes the
“zoneAdmin” permissions, with AD member list: 1, 2, 4, 5, 6, 7, 8, 9, 12; the Home Admin Domain
will be 1.
user-za Auth-Type := Local, User-Password == "password"
Brocade-Auth-Role = "ZoneAdmin",
Brocade-AVPairs1 = "ADList=1,2,6,"
Brocade-AVPairs2 = "ADList=4-8;ADList=7,9,12"
In the next example, on a Linux FreeRadius Server, the user has the “operator” permissions, with
ADList 1, 2, 4, 5, 6, 7, 8, 9, 12, 20 and HomeAD 2.
user-opr Auth-Type := Local, User-Password == "password"
Brocade-Auth-Role = "operator",
Brocade-AVPairs1 = "ADList=1,2;HomeAD=2",
Brocade-AVPairs2 = "ADList=-4-8,20;ADList=7,9,12"
In the next example, on a Linux FreeRadius Server, the user has the “zoneAdmin” permissions, with
VFlist 2, 4, 5, 6, 7, 8, 10, 11, 12, 13, 15 17, 19, 22, 23, 24, 25, 29, 31 and HomeLF 1.
user300 Auth-Type := Local, User-Password == "password"
Brocade-Auth-Role = "zoneadmin",
Brocade-AVPairs1 = "HomeLF=1;LFRoleList=securityadmin:2,4-8,10”
Brocade-AVPairs2 = "LFRoleList=admin:11-13, 15, 17, 19;user:22-25,29,31"
The RADIUS server
NOTE
To set up the RADIUS server, you must know the switch IP address, in either IPv4 or IPv6 notation,
or the name to connect to switches. Use the ipAddrShow command to display a switch IP address.
For Brocade directors, the switch IP addresses are aliases of the physical Ethernet interfaces on
the CP blades. When specifying client IP addresses for the logical switches in these systems, make
sure the CP blade IP addresses are used. For accessing both the active and standby CP blade, and
for the purpose of HA failover, both of the CP blade IP addresses must be included in the RADIUS
server configuration.
User accounts should be set up by their true network-wide identity rather than by the account
names created on a Fabric OS switch. Along with each account name, the administrator must
assign appropriate switch access permissions. To manage a fabric, these permissions can be User,
Admin, and SecurityAdmin.
Configuring RADIUS server support with Linux
The following procedures work for FreeRADIUS on Solaris and Red Hat Linux. FreeRADIUS is a
freeware RADIUS server that you can find at the following website:
www.freeradius.org
Follow the installation instructions at the website. FreeRADIUS runs on Linux (all versions),
FreeBSD, NetBSD, and Solaris. If you make a change to any of the files used in this configuration,
you must stop the server and restart it for the changes to take effect.
FreeRADIUS installation places the configuration files in $PREFIX/etc/raddb. By default, the
PREFIX is /usr/local.
Fabric OS Administrator’s Guide
53-1002148-02
105
5
The authentication model using RADIUS and LDAP
Configuring RADIUS service on Linux consists of the following tasks:
• Adding the Brocade attribute to the server
• Creating the user
• Enabling clients
Adding the Brocade attribute to the server
1. Create and save the file $PREFIX/etc/raddb/dictionary.brocade with the following information:
#
# dictionary.brocade
#
VENDOR Brocade 1588
#
# attributes
#
ATTRIBUTE
ATTRIBUTE
ATTRIBUTE
ATTRIBUTE
ATTRIBUTE
ATTRIBUTE
ATTRIBUTE
Brocade-Auth-Role
Brocade-AVPairs1
Brocade-AVPairs2
Brocade-AVPairs3
Brocade-AVPairs4
Brocade-Passwd-ExpiryDate
Brocade-Passwd-WarnPeriod
1
2
3
4
5
6
7
string
string
string
string
string
string
string
Brocade
Brocade
Brocade
Brocade
Brocade
Brocade
Brocade
This defines the Brocade vendor ID as 1588, the Brocade attribute 1 as Brocade-Auth-Role
and 6 as Brocade-Passwd-ExpiryDate, both are string values. The Brocade attribute 7 as
Brocade-Passwd-WarnPeriod, and it is an integer value.
2. Open the file $PREFIX/etc/raddb/dictionary in a text editor and add the line:
$INCLUDE dictionary.brocade
As a result, the file dictionary.brocade is located in the RADIUS configuration directory and
loaded for use by the RADIUS server.
Creating the user
1. Open the $PREFIX/etc/raddb/user file in a text editor.
2. Add the user names and their permissions for users accessing the switch and authenticating
through RADIUS.
The user will log in using the permissions specified with Brocade-Auth-Role. The valid
permissions include Root, Admin, SwitchAdmin, ZoneAdmin, SecurityAdmin,
BasicSwitchAdmin, FabricAdmin, Operator and User. You must use quotation marks around
“password” and “role”.
Example of adding a user name to the RADIUS authentication
For example, to set up an account called JohnDoe with Admin permissions with a password
expiry date of May 28, 2008 and a warning period of 30 days:
JohnDoe Auth-Type := Local
User-Password == "johnPassword",
Brocade-Auth-Role = "admin",
Brocade-Auth-Role = “admin”,
Brocade-Passwd-ExpiryDate = “05/28/08”,
Brocade-Passwd-WarnPeriod = 30
106
Fabric OS Administrator’s Guide
53-1002148-02
The authentication model using RADIUS and LDAP
5
Example of using the local system password to authenticate users
The next example uses the local system password file to authenticate users.
swadmin
Auth-Type := System
Brocade-Auth-Role = "admin",
Brocade-AVPairs1 = "HomeLF=70",
Brocade-AVPairs2 = "LFRoleList=admin:2,4-8,70,80,128",
Brocade-AVPairs3 = "ChassisRole=switchadmin",
Brocade-Passwd-ExpiryDate = "11/10/2008",
Brocade-Passwd-WarnPeriod = "30"
When you use network information service (NIS) for authentication, the only way to enable
authentication with the password file is to force the Brocade switch to authenticate using
password authentication protocol (PAP); this requires the -a pap option with the aaaConfig
command.
Enabling clients
Clients are the switches that will use the RADIUS server; each client must be defined. By default, all
IP addresses are blocked.
The Brocade enterprise-class platforms send their RADIUS requests using the IP address of the
active CP. When adding clients, add both the active and standby CP IP addresses so that, in the
event of a failover, users can still log in to the switch.
1. Open the $PREFIX/etc/raddb/client.config file in a text editor and add the switches that are to
be configured as RADIUS clients.
For example, to configure the switch at IP address 10.32.170.59 as a client:
client 10.32.170.59
secret
= Secret
shortname
= Testing Switch
nastype
= other
In this example, shortname is an alias used to easily identify the client. Secret is the shared
secret between the client and server. Make sure the shared secret matches that configured on
the switch (see “Adding a RADIUS or LDAP server to the switch configuration” on page 115).
2. Save the file $PREFIX/etc/raddb/client.config then start the RADIUS server as follows:
$PREFIX/sbin/radiusd
Configuring RADIUS server support with Windows 2000
The instructions for setting up RADIUS on a Windows 2000 server are listed here for your
convenience but are not guaranteed to be accurate for your network environment. Always check
with your system administrator before proceeding with setup.
NOTE
All instructions involving Microsoft Windows 2000 can be obtained from www.microsoft.com or your
Microsoft documentation. Confer with your system or network administrator prior to configuration
for any special needs your network environment may have.
Fabric OS Administrator’s Guide
53-1002148-02
107
5
The authentication model using RADIUS and LDAP
Configuring RADIUS service on Windows 2000 consists of the following steps:
1. Installing internet authentication service (IAS)
For more information and instructions on installing IAS, refer to the Microsoft website.
2. Enabling the Challenge Handshake Authentication Protocol (CHAP)
If CHAP authentication is required, then Windows must be configured to store passwords with
reversible encryption. Reverse password encryption is not the default behavior; it must be
enabled.
NOTE
If a user is configured prior to enabling reverse password encryption, then the user’s password
is stored and cannot utilize CHAP. To use CHAP, the password must be re-entered after
encryption is enabled. If the password is not re-entered, then CHAP authentication will not work
and the user will be unable to authenticate from the switch.
Alternatives to using CHAP are Password Authentication Protocol (PAP), or PEAP-MS-CHAP-v2.
3. Configuring a user
IAS is the Microsoft implementation of a RADIUS server and proxy. IAS uses the Windows
native user database to verify user login credentials; it does not list specific users, but instead
lists user groups. Each user group should be associated with specific switch role. For example,
you should configure a user group for root, admin, factory, switchAdmin, and user, and then
add any users whose logins you want to associate to the appropriate group.
4. Configuring the server
For more information and instructions on configuring the server, refer to the Microsoft website.
Below is the information you will need to configure the RADIUS server for a Brocade switch. A
client is the device that uses the RADIUS server; in this case, it is the switch.
a.
For the Add RADIUS Client window, provide the following:
Client address (IP or DNS)—Enter the IP address of the switch.
Client-Vendor—Select RADIUS Standard.
Shared secret—Provide a password. Shared secret is a password used between the client
device and server to prevent IP address spoofing by unwanted clients. Keep your shared
secret password in a safe place. You will need to enter this password in the switch
configuration.
After clicking Finish, add a new client for all switches on which RADIUS authentication will
be used.
b.
In the Internet Authentication Service window, right-click the Remote Access Policies
folder; then select New Remote Access Policy from the pop-up window.
A remote access policy must be created for each group of Brocade login permissions
(Root, Admin, Factory, SwitchAdmin, and User) for which you want to use RADIUS. Apply
this policy to the user groups that you already created.
c.
108
In the Vendor-Specific Attribute Information window, enter the vendor code value 1588.
Click the Yes. It conforms radio button and then click Configure Attribute.
Fabric OS Administrator’s Guide
53-1002148-02
The authentication model using RADIUS and LDAP
d.
5
In the Configure VSA (RFC compliant) window, enter the following values and click OK.
Vendor-assigned attribute number—Enter the value 1.
Attribute format—Enter String.
Attribute value—Enter the login role (Root, Admin, SwitchAdmin, User, etc.) the user group
must use to log in to the switch.
e.
After returning to the Internet Authentication Service window, add additional policies for all
Brocade login types for which you want to use the RADIUS server. After this is done, you
can configure the switch.
NOTE
Windows 2008 RADIUS (NPS) support is also available.
RSA RADIUS server
Traditional password-based authentication methods are based on one-factor authentication, where
you confirm your identity using a memorized password. Two-factor authentication increases the
security by using a second factor to corroborate identification. The first factor is either a PIN or
password and the second factor is the RSA SecurID token.
RSA SecurID with an RSA RADIUS server is used for user authentication. The Brocade switch does
not communicate directly with the RSA Authentication Manager, so the RSA RADIUS server is used
in conjunction with the switch to facilitate communication.
To learn more about how RSA SecurID works, visit www.rsa.com for more information.
Setting up the RSA RADIUS server
For more information on how to install and configure the RSA Authentication Manager and the RSA
RADIUS server, refer to your documentation or visit www.rsa.com.
1. Create user records in the RSA Authentication Manager.
2. Configure the RSA Authentication Manager by adding an agent host.
3. Configure the RSA RADIUS server.
Setting up the RSA RADIUS server involves adding RADIUS clients, users, and vendor specific
attributes to the RSA RADIUS server.
a.
Add the following data to the vendor.ini file:
vendor-product = Brocade
dictionary = brocade
ignore-ports = no
port-number-usage = per-port-type
help-id = 2000
b.
Create a brocade.dct file that needs to be added into the dictiona.dcm file located in the
following path:
C:\Program Files\RSA Security\RSA RADIUS\Service
Figure 16 on page 110 shows what the brocade.dct file should look like and Figure 17 on
page 111 shows what needs to be modified in the brocade.dcm file.
Fabric OS Administrator’s Guide
53-1002148-02
109
5
The authentication model using RADIUS and LDAP
NOTE
The dictionary files for RSA RADIUS Server must remain in the installation directory. Do not
move the files to other locations on your computer.
Add Brocade-VSA macro and define the attributes as follows:
• vid (Vendor-ID): 1588
• type1 (Vendor-Type): 1
• len1 (Vendor-Length): >=2
###########################################################################
# brocade.dct -- Brocade Dictionary
#
# (See readme.dct for more details on the format of this file)
###########################################################################
#
# Use the Radius specification attributes in lieu of the Brocade one:
#
@radius.dct
MACRO Brocade-VSA(t,s) 26 [vid=1588 type1=%t% len1=+2 data=%s%]
ATTRIBUTE
ATTRIBUTE
ATTRIBUTE
Brocade-Auth-Role
Brocade-Passwd-ExpiryDate
Brocade-Passwd-WarnPeriod
Brocade-VSA(1,string) r
Brocade-VSA(6,string) r
Brocade-VSA(7,integer) r
###########################################################################
# brocade.dct -- Brocade Dictionary
###########################################################################
FIGURE 16
110
Example of a Brocade DCT file
Fabric OS Administrator’s Guide
53-1002148-02
The authentication model using RADIUS and LDAP
5
#######################################################################
# dictiona.dcm
#######################################################################
# Generic Radius
@radius.dct
#
# Specific Implementations (vendor specific)
#
@3comsw.dct
@aat.dct
@acc.dct
@accessbd.dct
@agere.dct
@agns.dct
@airespace.dct
@alcatel.dct
@altiga.dct
@annex.dct
@aptis.dct
@ascend.dct
@ascndvsa.dct
@axc.dct
@bandwagn.dct
@brocade.dct <-------
FIGURE 17
Example of the dictiona.dcm file
c.
When selecting items from the Add Return List Attribute, select Brocade-Auth-Role and
type the string Admin. The string will equal the role on the switch.
d.
Add the Brocade profile.
e.
In RSA Authentication Manager, edit the user records that will be authenticating using RSA
SecurID.
LDAP configuration and Microsoft Active Directory
LDAP provides user authentication and authorization using the Microsoft Active Directory service in
conjunction with LDAP on the switch. There are two modes of operation in LDAP authentication,
FIPS mode and non-FIPS mode. This section discusses LDAP authentication in non-FIPS mode. For
more information on LDAP in FIPS mode, refer to Chapter 7, “Configuring Security Policies”. The
following are restrictions when using LDAP in non-FIPS mode:
• There is no password change through Active Directory.
• There is no automatic migration of newly created users from the local switch database to
Active Directory. This is a manual process explained later.
• Only IPv4 is supported for LDAP on Windows 2000 and LDAP on Windows Server 2003. For
LDAP on Windows Server 2008, both IPv4 and IPv6 are supported.
• LDAP authentication is used on the local switch only and not for the entire fabric.
Fabric OS Administrator’s Guide
53-1002148-02
111
5
The authentication model using RADIUS and LDAP
• You can use the User-Principal-Name and not the Common-Name for AD LDAP authentication.
To provide backward compatibility, authentication based on the Common Name is still
supported for Active Directory LDAP 2000 and 2003. Common Name based-authentication is
not recommended for new installations.
• A user can belong to multiple groups as long as one of the groups is the primary group. The
primary group in the AD server should not be set to the group corresponding to the switch role.
You can choose any other group.
• A user can be part of any Organizational Unit (OU).
• Active Directory LDAP 2000, 2003, and 2008 is supported.
Roles for Brocade-specific users can be added through the Microsoft Management Console.
Groups created in Active Directory must correspond directly to the RBAC user roles on the switch.
Role assignments can be achieved by including the user in the respective group. A user can be
assigned to multiple groups like Switch Admin and Security Admin. For LDAP servers, you can use
the ldapCfg -–maprole ldap_role_name switch_role command to map an LDAP server permissions
to one of the default roles available on a switch. For more information on RBAC roles, see
“Role-Based Access Control” on page 84.
NOTE
All instructions involving Microsoft Active Directory can be obtained from www.microsoft.com or your
Microsoft documentation. Confer with your system or network administrator prior to configuration
for any special needs your network environment may have.
Following is the overview of the process used to set up LDAP:
1. If your Windows Active Directory server for LDAP needs to be verified by the LDAP client (that is,
the Brocade switch), then you must install a Certificate Authority (CA) certificate on the
Windows Active Directory server for LDAP.
Follow Microsoft instructions for generating and installing CA certificates on a Windows server.
2. Create a user in Microsoft Active Directory server.
For instructions on how to create a user, refer to www.microsoft.com or Microsoft
documentation to create a user in your Active Directory.
3. Create a group name that uses the switch’s role name so that the Active Directory group’s
name is the same as the switch’s role name.
or
Use the ldapCfg -–maprole ldap_role_name switch_role command to map an LDAP server role
to one of the default roles available on the switch.
4. Associate the user to the group by adding the user to the group.
For instructions on how to create a user refer to www.microsoft.com or Microsoft
documentation to create a user in your Active Directory.
5. Add the user’s Administrative Domains or Virtual Fabrics to the CN_list by either editing the
adminDescription value or adding the brcdAdVfData attribute to the existing Active Directory
schema.
This action maps the Admin Domains or Virtual Fabrics to the user name. Multiple Admin
Domains can be added as a string value separated by the underscore character ( _ ). Virtual
Fabrics are added as a string value separate by a colon ( , ) and entered as a range.
112
Fabric OS Administrator’s Guide
53-1002148-02
The authentication model using RADIUS and LDAP
5
Creating a user
To create a user in Active Directory, refer to www.microsoft.com or Microsoft documentation. There
are no special attributes to set. You can use a fully qualified name for logging in, for example you
can log in as "[email protected]".
Creating a group
To create a group in Active Directory, refer to www.microsoft.com or Microsoft documentation. You
will need to verify that the group has the following attributes:
•
•
•
•
The name of the group has to match the RBAC role.
The Group Type must be Security.
The Group Scope must be Global.
The primary group in the AD server should not be set to the group corresponding to the switch
role. You can choose any other group.
• If the user you created is not a member of the Users OU then the User Principal Name, in the
format of "user@domain", is required to login.
Assigning the group (role) to the user
To assign the user to a group in Active Directory, refer to www.microsoft.com or Microsoft
documentation. You will need to verify that the user has the following attributes:
• Update the memberOf field with the login permissions (Root, Admin, SwitchAdmin, User, etc.)
that the user must use to log in to the switch.
or
If you have a user-defined group, then use the ldapCfg -–maprole ldap_role_name switch_role
command to map an LDAP server permissions to one of the default roles available on a switch.
Adding an Admin Domain or Virtual Fabric list
1. From the Windows Start menu, select Programs> Administrative Tools> ADSI.msc
ADSI is a Microsoft Windows Resource Utility. This will need to be installed to proceed with the
rest of the setup. For Windows 2003, this utility comes with Service Pack 1 or you can
download this utility from the Microsoft website.
2. Go to CN=Users.
3. Right click on select Properties. Click the Attribute Editor tab.
4. Double-click the adminDescription attribute.
This opens the String Attribute Editor dialog box.
5. Perform the appropriate action based on whether you are using Administrative Domains or
Virtual Fabrics:
• If you are using Administrative Domains, enter the value of the Admin Domain separated
by an underscore ( _ ) into the Value field.
Example for adding Admin Domains
adlist_0_10_200_endAd
Fabric OS Administrator’s Guide
53-1002148-02
113
5
The authentication model using RADIUS and LDAP
Home Admin Domain (homeAD) for the user will be the first value in the adlist (Admin
Domain list). If a user has no values assigned in the adlist attribute, then the homeAD ‘0’
will be the default administrative domain for the user.
• If you are using Virtual Fabrics, enter the value of the logical fabric separated by an
semi-colon ( ; ) into the Value field.
Example for adding Virtual Fabrics
HomeLF=10;LFRoleList=admin:128,10;ChassisRole=admin
In this example, the logical switch that would be logged into by default is 10. If 10 is not
available then the lowest FID available will be chosen. You would have permission to enter
logical switch 128 and 10 in an admin role and you would also have the chassis role
permission of admin.
NOTE
You can perform batch operations using the Ldifde.exe utility. For more information on
importing and exporting schemas, refer to your Microsoft documentation or visit
www.microsoft.com.
Adding attributes to the Active Directory schema
To create a group in Active Directory, refer to www.microsoft.com or Microsoft documentation. You
will need to verify that the schema has the following attributes:
• Add a new attribute brcdAdVfData as Unicode String.
• Add brcdAdVfData to the person’s properties.
Authentication servers on the switch
At least one RADIUS or LDAP server must be configured before you can enable RADIUS or LDAP
service. You can configure the RADIUS or LDAP service even if it is disabled on the switch. You can
configure up to five RADIUS or LDAP servers. You must be logged in as admin or switchAdmin to
configure the RADIUS service.
NOTE
On dual-CP enterprise-class platforms (Brocade DCX and DCX-4S devices), the switch sends its
RADIUS or LDAP request using the IP address of the active CP. When adding clients, add both the
active and standby CP IP addresses so that users can still log in to the switch in the event of a
failover.
RADIUS or LDAP configuration is chassis-based configuration data. On platforms containing
multiple switch instances, the configuration applies to all instances. The configuration is persistent
across reboots and firmware downloads. On a chassis-based system, the command must replicate
the configuration to the standby CP.
Multiple login sessions can invoke the command simultaneously. The last session that applies the
change is the one whose configuration is in effect. This configuration is persistent after an HA
failover.
The RADIUS or LDAP servers are contacted in the order they are listed, starting from the top of the
list and moving to the bottom.
114
Fabric OS Administrator’s Guide
53-1002148-02
The authentication model using RADIUS and LDAP
5
Adding a RADIUS or LDAP server to the switch configuration
1. Connect to the switch and log in using an account with admin permissions.
2. Enter the aaaConfig --add command.
At least one RADIUS or LDAP server must be configured before you can enable the RADIUS or LDAP
service.
If no RADIUS or LDAP configuration exists, turning on the RADIUS authentication mode triggers an
error message. When the command succeeds, the event log indicates that the configuration is
enabled or disabled.
Enabling and disabling a RADIUS or LDAP server
1. Connect to the switch and log in using an account with admin permissions.
2. Enter the aaaConfig --authspec command to enable RADIUS or LDAP using the local
database.
You must specify the type of server as either RADIUS or LDAP, but not both. Local is used for
local authentication if the user authentication fails on the RADIUS or LDAP server.
Example of enabling RADIUS
switch:admin> aaaconfig --authspec "radius;local" --backup
Deleting a RADIUS or LDAP server from the configuration
1. Connect to the switch and log in using an account with admin permissions.
2. Enter the aaaConfig --remove command.
When the command succeeds, the event log indicates that the server is removed.
Changing a RADIUS or LDAP server configuration
1. Connect to the switch and log in using an account with admin permissions.
2. Enter the aaaConfig --change command.
Changing the order in which RADIUS or LDAP servers are contacted for service
1. Connect to the switch and log in using an account with admin permissions.
2. Enter the aaaConfig --move command.
When the command succeeds, the event log indicates that a server configuration is changed.
Fabric OS Administrator’s Guide
53-1002148-02
115
5
The authentication model using RADIUS and LDAP
Displaying the current RADIUS configuration
1. Connect to the switch and log in using an account with admin permissions.
2. Enter the aaaConfig --show command.
If a configuration exists, its parameters are displayed. If RADIUS or LDAP service is not
configured, only the parameter heading line is displayed. Parameters include:
Position
Server
Port
Secret
Timeouts
Authentication
The order in which servers are contacted to provide service.
The server names or IPv4 or IPv6 addresses. IPv6 is not supported when using PEAP
authentication.
The server ports.
The shared secrets.
The length of time servers have to respond before the next server is contacted.
The type of authentication being used on servers.
Configuring local authentication as backup
It is useful to enable local authentication so that the switch can take over authentication locally if
the RADIUS or LDAP servers fail to respond because of power outage or network problems.
Example of enabling local authentication, enter the following command for RADIUS
switch:admin> aaaconfig --authspec "radius;local" --backup
Example for LDAP
switch:admin> aaaconfig --authspec "ldap;local" --backup
For details about this command see Table 15 on page 100.
When local authentication is enabled and the RADIUS or LDAP servers fail to respond, you can log
in to the default switch accounts (admin and user) or any user-defined account. You must know the
passwords of these accounts.
When the command succeeds, the event log indicates that local database authentication is
disabled or enabled.
116
Fabric OS Administrator’s Guide
53-1002148-02
Chapter
6
Configuring Protocols
In this chapter
• Security protocols . . . . . . . . . . . . . . . . . . . . . . . . . . . . . . . . . . . . . . . . . . . . .
• Secure Copy . . . . . . . . . . . . . . . . . . . . . . . . . . . . . . . . . . . . . . . . . . . . . . . . . .
• Secure Shell protocol . . . . . . . . . . . . . . . . . . . . . . . . . . . . . . . . . . . . . . . . . .
• Secure Sockets Layer protocol . . . . . . . . . . . . . . . . . . . . . . . . . . . . . . . . . . .
• Simple Network Management Protocol . . . . . . . . . . . . . . . . . . . . . . . . . . . .
• Telnet protocol . . . . . . . . . . . . . . . . . . . . . . . . . . . . . . . . . . . . . . . . . . . . . . . .
• Listener applications . . . . . . . . . . . . . . . . . . . . . . . . . . . . . . . . . . . . . . . . . . .
• Ports and applications used by switches. . . . . . . . . . . . . . . . . . . . . . . . . . .
117
118
119
122
127
129
131
131
Security protocols
Security protocols provide endpoint authentication and communications privacy using
cryptography. Typically, you are authenticated to the switch while the switch remains
unauthenticated to you. This means that you can be sure with what you are communicating. The
next level of security, in which both ends of the conversation are sure with whom they are
communicating, is known as two-factor authentication. Two-factor authentication requires public
key infrastructure (PKI) deployment to clients.
Fabric OS supports the secure protocols shown in Table 18.
TABLE 18
Secure protocol support
Protocol
Description
HTTPS
HTTPS is a Uniform Resource Identifier scheme used to indicate a secure HTTP connection. Web Tools
supports the use of hypertext transfer protocol over secure socket layer (HTTPS).
IPsec
Internet Protocol Security (IPsec) is a framework of open standards for providing confidentiality,
authentication and integrity for IP data transmitted over untrusted links or networks.
LDAPS
Lightweight Directory Access Protocol over SSL uses a certificate authority (CA). By default, LDAP traffic
is transmitted unsecured. You can make LDAP traffic confidential and secure by using Secure Sockets
Layer (SSL) / Transport Layer Security (TLS) technology in conjunction with LDAP.
SCP
Secure Copy (SCP) is a means of securely transferring computer files between a local and a remote
host or between two remote hosts, using the Secure Shell (SSH) protocol. Configuration upload and
download support the use of SCP.
SNMP
SNMP is used in network management systems to monitor network-attached devices for conditions
that warrant administrative attention. Supports SNMPv1, v2, and v3.
Fabric OS Administrator’s Guide
53-1002148-02
117
6
Secure Copy
TABLE 18
Secure protocol support (Continued)
Protocol
Description
SSH
Secure Shell (SSH) is a network protocol that allows data to be exchanged over a secure channel
between two computers. Encryption provides confidentiality and integrity of data. SSH uses public-key
cryptography to authenticate the remote computer and allow the remote computer to authenticate the
user, if necessary.
SSL
Fabric OS uses secure socket layer (SSL) to support HTTPS. A certificate must be generated and
installed on each switch to enable SSL. Supports SSLv3, 128-bit encryption by default.
Table 19 describes additional software or certificates that you must obtain to deploy secure
protocols.
TABLE 19
Items needed to deploy secure protocols
Protocol
Host side
Switch side
SSHv2
Secure shell client
None
HTTPS
No requirement on host side
except a browser that
supports HTTPS
Switch IP certificate for SSL
SCP
SSH daemon, SCP server
None
SNMPv1, SNMPv2, SNMPv3
None
None
The security protocols are designed with the four main use cases described in Table 20.
TABLE 20
Main security scenarios
Fabric
Management interfaces
Comments
Nonsecure
Nonsecure
No special setup is needed to use Telnet or HTTP.
Nonsecure
Secure
Secure protocols may be used. An SSL switch certificate must be installed
if HTTPS is used.
Secure
Secure
Switches running earlier Fabric OS versions can be part of the secure
fabric, but they do not support secure management.
Secure management protocols must be configured for each participating
switch. Nonsecure protocols may be disabled on nonparticipating
switches.
If SSL is used, then certificates must be installed. For more information on
installing certificates, refer to “Installing a switch certificate” on page 125.
Secure
Nonsecure
You must use SSH because Telnet is not allowed with some features.
Secure Copy
The secure copy protocol (SCP) runs on port 22. It encrypts data during transfer, thereby avoiding
packet sniffers that attempt to extract useful information during data transfer. SCP relies on SSH to
provide authentication and security.
118
Fabric OS Administrator’s Guide
53-1002148-02
Secure Shell protocol
6
Setting up SCP for configUploads and downloads
1. Log in to the switch as admin.
2. Type the configure command.
3. Type y or yes at the cfgload attributes prompt.
4. Type y or yes at the Enforce secure configUpload/Download prompt.
Example of setting up SCP for configUpload/download
switch:admin> configure
Not all options will be available on an enabled switch.
To disable the switch, use the "switchDisable" command.
Configure...
System services (yes, y, no, n): [no] n
ssl attributes (yes, y, no, n): [no] n
http attributes (yes, y, no, n): [no] n
snmp attributes (yes, y, no, n): [no] n
rpcd attributes (yes, y, no, n): [no] n
cfgload attributes (yes, y, no, n): [no] y
Enforce secure config Upload/Download (yes, y, no, n): [no] y
Enforce signature validation for firmware (yes, y, no, n): [no]
Secure Shell protocol
To ensure security, Fabric OS supports secure shell (SSH) encrypted sessions. SSH encrypts all
messages, including the client transmission of the password during login. The SSH package
contains a daemon (sshd), which runs on the switch. The daemon supports a wide variety of
encryption algorithms, such as Blowfish-Cipher block chaining (CBC) and Advanced Encryption
Standard (AES).
NOTE
To maintain a secure network, you should avoid using Telnet or any other unprotected application
when you are working on the switch.
Commands that require a secure login channel must originate from an SSH session. If you start an
SSH session, and then use the login command to start a nested SSH session, commands that
require a secure channel will be rejected.
Fabric OS v6.1.0 and later support OpenSSH protocol v2.0 (ssh2). For more information on SSH,
refer to the SSH IETF website:
http://www.ietf.org/ids.by.wg/secsh.html
For more information, refer to SSH, The Secure Shell: The Definitive Guide by Daniel J. Barrett,
Ph. D., Richard E. Silverman, and Robert G. Byrnes.
Fabric OS Administrator’s Guide
53-1002148-02
119
6
Secure Shell protocol
SSH public key authentication
OpenSSH public key authentication provides password-less logins, known as SSH authentication,
that uses public and private key pairs for incoming and outgoing authentication. This feature allows
only one allowed-user to be configured to utilize outgoing OpenSSH public key authentication.Any
admin user can perform incoming Open SSH public key authentication. Using OpenSSH RSA and
DSA, the authentication protocols are based on a pair of specially generated cryptographic keys,
called the private key and the public key. The advantage of using these key-based authentication
systems is that in many cases, it is possible to establish secure connections without having to
depend on passwords for security. RSA asynchronous algorithms are FIPS-compliant.
Incoming authentication is used when the remote host needs to authenticate to the switch.
Outgoing authentication is used when the switch needs to authenticate to a server or remote host,
such as when running the configUpload or configDownload commands, or performing firmware
download. Both password and public key authentication can coexist on the switch.
Allowed-user
For outgoing authentication, the default admin user must set up the allowed-user with admin
permissions. By default, the admin is the configured allowed-user. While creating the key pair, the
configured allowed-user can choose a passphrase with which the private key is encrypted. Then the
passphrase must always be entered when authenticating to the switch. The allowed-user must
have admin permissions to perform OpenSSH public key authentication, import and export keys,
generate a key pair for an outgoing connection, and delete public and private keys.
Configuring incoming SSH authentication
To configure incoming authentication, follow these steps:
1. Log in to your remote host.
2. Generate a key pair for host-to-switch (incoming) authentication by verifying that SSH v2 is
installed and working (refer to your host’s documentation as necessary) by typing the following
command:
ssh-keygen -t dsa
Example of RSA/DSA key pair generation
anyuser@mymachine: ssh-keygen -t dsa
Generating public/private dsa key pair.
Enter file in which to save the key (/users/anyuser/.ssh/id_dsa):
Enter passphrase (empty for no passphrase):
Enter same passphrase again:
Your identification has been saved in /users/anyuser/.ssh/id_dsa.
Your public key has been saved in /users/anyuser/.ssh/id_dsa.pub.
The key fingerprint is:
32:9f:ae:b6:7f:7e:56:e4:b5:7a:21:f0:95:42:5c:d1 anyuser@mymachine
3. Import the public key to the switch by logging in to the switch as any user with the Admin role
and entering the sshUtil importpubkey command to import the key.
Example of adding the public key to the switch
switch:anyuser> sshutil importpubkey
Enter user name for whom key is imported: aswitchuser
Enter IP address:192.168.38.244
Enter remote directory:~auser/.ssh
120
Fabric OS Administrator’s Guide
53-1002148-02
Secure Shell protocol
6
Enter public key name(must have .pub suffix):id_dsa.pub
Enter login name:auser
Password:
Public key is imported successfully.
4. Test the setup by logging into the switch from a remote device, or by running a command
remotely using ssh.
Configuring outgoing SSH authentication
After the allowed-user is configured, the remaining setup steps must be completed by the
allowed-user. To configure outgoing authentication, follow these steps:
1. Log in to the switch as the default admin.
2. Change the allowed-user’s permissions to admin, if applicable.
switch:admin> userconfig --change username -r admin
Where username is the name of the user you want to perform SSH public key authentication,
import, export, and delete keys.
3. Set up the allowed-user by typing the following command:
switch:admin> sshutil allowuser username
Where username is the name of the user you want to perform SSH public key authentication,
import, export, and delete keys.
4. Generate a key pair for switch-to-host (outgoing) authentication by logging in to the switch as
the allowed user and entering the sshUtil genkey command.
You may enter a passphrase for additional security.
Example of generating a key pair on the switch
switch:alloweduser> sshutil genkey
Enter passphrase (empty for no passphrase):
Enter same passphrase again:
Key pair generated successfully.
5. Export the public key to the host by logging in to the switch as the allowed-user and entering
the sshUtil exportpubkey command to export the key.
Example of exporting a public key from the switch
switch:alloweduser> sshutil exportpubkey
Enter IP address:192.168.38.244
Enter remote directory:~auser/.ssh
Enter login name:auser
Password:
public key out_going.pub is exported successfully.
6. Append the public key to a remote host by logging in to the remote host, locating the directory
where authorized keys are stored, and appending the public key to the file.
You may need to refer to the host’s documentation to locate where the authorized keys are
stored.
7.
Test the setup by using a command that uses SCP and authentication, such as
firmwareDownload or configUpload.
Fabric OS Administrator’s Guide
53-1002148-02
121
6
Secure Sockets Layer protocol
Deleting public keys on the switch
1. Log in to the switch as any user with the Admin role.
2. Use the sshUtil delpubkeys command to delete public keys.
You will be prompted to enter the name of the user whose the public keys you want to delete.
Enter all to delete public keys for all users.
For more information on IP Filter policies, refer to Chapter 7, “Configuring Security Policies”.
Deleting private keys on the switch
1. Log in to the switch as the allowed-user.
2. Use the sshUtil delprivkey command to delete the private key.
For more information on IP Filter policies, refer to Chapter 7, “Configuring Security Policies”.
Secure Sockets Layer protocol
Secure sockets layer (SSL) protocol provides secure access to a fabric through Web-based
management tools like Web Tools. SSL support is a standard Fabric OS feature.
Switches configured for SSL grant access to management tools through hypertext transfer protocol
over SSL links (which begin with https://) instead of standard links (which begin with http://).
SSL uses public key infrastructure (PKI) encryption to protect data transferred over SSL
connections. PKI is based on digital certificates obtained from an Internet Certificate Authority (CA)
that acts as the trusted key agent.
Certificates are based on the switch IP address or fully qualified domain name (FQDN), depending
on the issuing CA. If you change a switch IP address or FQDN after activating an associated
certificate, you may have to obtain and install a new certificate. Check with the CA to verify this
possibility, and plan these types of changes accordingly.
Browser and Java support
Fabric OS supports the following Web browsers for SSL connections:
• Internet Explorer v7.0 (Microsoft Windows)
• Mozilla Firefox v2.0 (Solaris and Red Hat Linux)
NOTE
Review the release notes for the latest information and to verify if your platform and browser are
supported.
In countries that allow the use of 128-bit encryption, you should use the latest version of your
browser. For example, Internet Explorer 7.0 and later supports 128-bit encryption by default. You
can display the encryption support (called “cipher strength”) using the Internet Explorer Help:About
menu option. If you are running an earlier version of Internet Explorer, you may be able to download
an encryption patch from the Microsoft website at http://www.microsoft.com.
You should upgrade to the Java 1.6.0 Plug-in on your management workstation. To find the Java
version that is currently running, open the Java console and look at the first line of the window. For
more details on levels of browser and Java support, see the Web Tools Administrator’s Guide.
122
Fabric OS Administrator’s Guide
53-1002148-02
Secure Sockets Layer protocol
6
SSL configuration overview
You configure for SSL by obtaining, installing, and activating digital certificates for SSL support.
Certificates are required on all switches that are to be accessed through SSL.
Also, you must install a certificate in the Java Plug-in on the management workstation, and you may
need to add a certificate to your Web browser.
Configuring for SSL involves these main steps, which are shown in detail in the next sections.
1. Choose a certificate authority (CA).
2. Generate the following items on each switch:
a.
A public and private key by using the secCertUtil genkey command.
b.
A certificate signing request (CSR) by using the secCertUtil gencsr command.
3. Store the CSR on a file server by using the secCertUtil export command.
4. Obtain the certificates from the CA.
You can request a certificate from a CA through a Web browser. After you request a certificate,
the CA either sends certificate files by e-mail (public) or gives access to them on a remote host
(private). Typically, the CA provides the certificate files listed in Table 21. Brocade supports
.pem, .crt. and .cer files from the Certificate Authority.
TABLE 21
SSL certificate files
Certificate file
Description
name.crt
The switch certificate.
nameRoot.crt
The root certificate. Typically, this certificate is already installed in the browser,
but if not, you must install it.
nameCA.crt
The CA certificate. It must be installed in the browser to verify the validity of the
server certificate or server validation fails.
5. On each switch, install the certificate. Once the certificate is loaded on the switch, HTTPS
starts automatically.
6. If necessary, install the root certificate to the browser on the management workstation.
7.
Add the root certificate to the Java Plug-in keystore on the management workstation.
Certificate authorities
To ease maintenance and allow secure out-of-band communication between switches, consider
using one certificate authority (CA) to sign all management certificates for a fabric. If you use
different CAs, management services operate correctly, but the Web Tools Fabric Events button is
unable to retrieve events for the entire fabric.
Each CA (for example, Verisign or GeoTrust) has slightly different requirements; for example, some
generate certificates based on IP address, while others require an FQDN, and most require a
1024-bit public/private key while some may accept a 2048-bit key. Consider your fabric
configuration, check CA websites for requirements, and gather all the information that the CA
requires.
Fabric OS Administrator’s Guide
53-1002148-02
123
6
Secure Sockets Layer protocol
Generating a public and private key
Perform this procedure on each switch.
1. Connect to the switch and log in as admin.
2. Enter the secCertUtil genkey command to generate a public/private key pair.
The system reports that this process will disable secure protocols, delete any existing CSR, and
delete any existing certificates.
3. Respond to the prompts to continue and select the key size.
Example of generating a key
Continue (yes, y, no, n): [no] y
Select key size [1024 or 2048]: 1024
Generating new rsa public/private key pair
Done.
Because CA support for the 2048-bit key size is limited, you should select 1024 in most cases.
Generating and storing a CSR
After generating a public/private key, perform this procedure on each switch.
1. Connect to the switch and log in as admin.
2. Enter the secCertUtil gencsr command.
3. Enter the requested information.
Example of generating a CSR
Country Name (2 letter code, eg, US):US
State or Province Name (full name, eg, California):California
Locality Name (eg, city name):San Jose
Organization Name (eg, company name):Brocade
Organizational Unit Name (eg, department name):Eng
Common Name (Fully qualified Domain Name, or IP address): 192.1.2.3
Generating CSR, file name is: 192.1.2.3.csr
Done.
Your CA may require specific codes for Country, State or Province, Locality, Organization, and
Organizational Unit names. Make sure that your spelling is correct and matches the CA
requirements. If the CA requires that the Common Name be specified as an FQDN, make sure
that the fully qualified domain name is set on the domain name server. The IP address or
FQDN will be the server where the certificate will be put on.
4. Enter the secCertUtil export command to store the CSR:
5. Enter the requested information. You can use either FTP or SCP.
Example of exporting a CSR
Select protocol [ftp or scp]: ftp
Enter IP address: 192.1.2.3
Enter remote directory: path_to_remote_directory
Enter Login Name: your account
Enter Password: your password
Success: exported CSR.
124
Fabric OS Administrator’s Guide
53-1002148-02
Secure Sockets Layer protocol
6
If you are set up for secure file copy protocol, you can select it; otherwise, select ftp. Enter the
IP address of the switch on which you generated the CSR. Enter the remote directory name of
the FTP server to which the CSR is to be sent. Enter your account name and password on the
server.
Obtaining certificates
Check the instructions on the CA website; then, perform this procedure for each switch.
1. Generate and store the CSR as described in “Generating and storing a CSR” on page 124.
2. Open a Web browser window on the management workstation and go to the CA website. Follow
the instructions to request a certificate. Locate the area in the request form into which you are
to paste the CSR.
3. Through a Telnet window, connect to the switch and log in as admin.
4. Enter the secCertUtil showcsr command. The contents of the CSR are displayed.
5. Locate the section that begins with “BEGIN CERTIFICATE REQUEST” and ends with “END
CERTIFICATE REQUEST”.
6. Copy and paste this section (including the BEGIN and END lines) into the area provided in the
request form; then, follow the instructions to complete and send the request.
It may take several days to receive the certificates. If the certificates arrive by e-mail, save them to
an FTP server. If the CA provides access to the certificates on an FTP server, make note of the path
name and make sure you have a login name and password on the server.
Installing a switch certificate
Perform this procedure on each switch.
1. Connect to the switch and log in as admin.
2. Enter the secCertUtil import command.
3. Select a protocol, enter the IP address of the host on which the switch certificate is saved, and
enter your login name and password.
Example of installing a switch certificate
Select protocol [ftp or scp]: ftp
Enter IP address: 192.10.11.12
Enter remote directory: path_to_remote_directory
Enter certificate name (must have ".crt" suffix):192.1.2.3.crt
Enter Login Name: your_account
Enter Password: *****
Success: imported certificate [192.1.2.3.crt].
Once the certificate is loaded on the switch, HTTPS starts automatically.
The browser
The root certificate may already be installed on your browser, if not, you must install it. To see
whether it is already installed, check the certificate store on your browser.
The next procedures are guides for installing root certificates to Internet Explorer and Mozilla
Firefox browsers. For more detailed instructions, refer to the documentation that came with the
certificate.
Fabric OS Administrator’s Guide
53-1002148-02
125
6
Secure Sockets Layer protocol
Checking and installing root certificates on Internet Explorer
1. Select Tools > Internet Options.
2. Click the Content tab.
3. Click Certificates.
4. Click the Intermediate or Trusted Root tabs and scroll the list to see if the root certificate is
listed. Take the appropriate following action based on whether you find the certificate:
• If the certificate is listed, you do not need to install it. You can skip the rest of this
procedure.
• If the certificate is not listed, click Import.
5. Follow the instructions in the Certificate Import wizard to import the certificate.
Checking and installing root certificates on Mozilla Firefox
1. Select Tools > Options.
2. Click Advanced.
3. Click the Encryption tab.
4. Click View Certificates > Authorities tab and scroll the list to see if the root certificate is listed.
For example, its name may have the form nameRoot.crt. Take the appropriate following action
based on whether you find the certificate:
• If the certificate is listed, you do not need to install it. You can skip the rest of this
procedure.
• If the certificate is not listed, click Import.
5. Browse to the certificate location and select the certificate. For example, select nameRoot.crt.
6. Click Open and follow the instructions to import the certificate.
Root certificates for the Java Plug-in
For information on Java requirements, see “Browser and Java support” on page 122.
This procedure is a guide for installing a root certificate to the Java Plug-in on the management
workstation. If the root certificate is not already installed to the plug-in, you should install it. For
more detailed instructions, refer to the documentation that came with the certificate and to the
Sun Microsystems website (www.sun.com).
Installing a root certificate to the Java Plug-in
1. Copy the root certificate file from its location on the FTP server to the Java Plug-in bin. For
example, the bin location may be:
C: \program files\java\j2re1.6.0\bin
2. Open a Command Prompt window and change the directory to the Java Plug-in bin.
3. Enter the keytool command and respond to the prompts.
126
Fabric OS Administrator’s Guide
53-1002148-02
Simple Network Management Protocol
6
Example of installing a root certificate
C:\Program Files\Java\j2re1.6.0\bin> keytool -import -alias RootCert -file
RootCert.crt -keystore ..\lib\security\RootCerts
Enter keystore password: changeit
Owner: CN=Brocade, OU=Software, O=Brocade Communications, L=San Jose,
ST=California, C=US
Issuer: CN=Brocade, OU=Software, O=Brocade Communications, L=San Jose,
ST=California, C=US
Serial number: 0
Valid from: Thu Jan 15 16:27:03 PST 2007 until: Sat Feb 14 16:27:03 PST 2007
Certificate fingerprints:
MD5: 71:E9:27:44:01:30:48:CC:09:4D:11:80:9D:DE:A5:E3
SHA1: 06:46:C5:A5:C8:6C:93:9C:FE:6A:C0:EC:66:E9:51:C2:DB:E6:4F:A1
Trust this certificate? [no]: yes
Certificate was added to keystore
In the example, changeit is the default password and RootCert is an example root certificate name.
Simple Network Management Protocol
The Simple Network Management Protocol (SNMP) is a standard method for monitoring and
managing network devices. Using SNMP components, you can program tools to view, browse, and
manipulate Brocade switch variables and set up enterprise-level management processes.
Every Brocade switch carries an SNMP agent and management information base (MIB). The agent
accesses MIB information about a device and makes it available to a network management station.
You can manipulate information of your choice by trapping MIB elements using the Fabric OS
command line interface (CLI), Web Tools, or Brocade Network Advisor.
The SNMP access control list (ACL) provides a way for the administrator to restrict SNMP get, set,
trap, and inform operations to certain hosts and IP addresses. This is used for enhanced
management security in the storage area network.
For details on Brocade MIB files, naming conventions, loading instructions, and information about
using Brocade's SNMP agent, see the Fabric OS MIB Reference.
You can configure SNMPv3 and SNMPv1 for the automatic transmission of SNMP information to
management stations.
The configuration process involves configuring the SNMP agent and configuring SNMP traps. Use
the snmpConfig command to configure the SNMP agent and traps for SNMPv3 or SNMPv1
configurations, and the security level. You can specify no security, authentication only, or
authentication and privacy.
The SNMP trap configuration specifies the MIB trap elements to be used to send information to the
SNMP management station. There are two main MIB trap choices:
• Brocade-specific MIB trap
Associated with the Brocade-specific MIB (SW-MIB), this MIB monitors Brocade switches
specifically.
• FibreAlliance MIB trap
Associated with the FibreAlliance MIB (FA-MIB), this MIB manages SAN switches and devices
from any company that complies with FibreAlliance specifications.
Fabric OS Administrator’s Guide
53-1002148-02
127
6
Simple Network Management Protocol
If you use both SW-MIB and FA-MIB, you may receive duplicate information. You can disable the
FA-MIB, but not the SW-MIB.
You can also use these additional MIBs and their associated traps:
• FICON-MIB (for FICON environments)
• SW-EXTTRAP
Includes the swSsn (Software Serial Number) as a part of Brocade SW traps.
For information on Brocade MIBs, see the Fabric OS MIB Reference.
For information on the specific commands used in these procedures, see online help or the Fabric
OS Command Reference.
SNMP and Virtual Fabrics
When an SNMPv3 request arrives with a particular username, it executes in the home Virtual
Fabric. From the SNMP manager all SNMPv3 requests must have a home Virtual Fabric that is
specified in the contextName field. Whenever the home Virtual Fabric is specified, it will be
converted to the corresponding switch ID and the home Virtual Fabric will be set. If the user does
not have permission for the specified home Virtual Fabric, this request fails with an error code of
noAccess.
For an SNMPv3 user to have a home Virtual Fabric, a list of allowed Virtual Fabrics, an RBAC role,
and the name of the SNMPv3 user should match that of the Fabric OS user in the local switch
database. SNMPv3 users whose names do not match with any of the existing Fabric OS local users
have a default RBAC role of admin with the SNMPv3 user access control of read/write. Their
SNMPv3 user logs in with an access control of read-only. Both user types will have the default
switch as their home Virtual Fabrics.
The contextName field should have the format “VF:xxx” where xxx is the actual VF_ID, for example
“VF:1”. If the contextName field is empty, then the home Virtual Fabric of the local Fabric OS user
with the same name is used. As Virtual Fabrics and Admin Domains are mutually exclusive, this
field is considered as Virtual Fabrics context whenever Virtual Fabrics is enabled. You cannot
specify chassis context in the contextName field.
The following example shows how the VF:xx field is used in the snmpwalk command. The snmpwalk
command is executed on the host and it walks the entire MIB tree specified (.1).
#snmpwalk -u admin -v 3 -n VF:4 192.168.176.181 .1
Filtering ports
Each port can belong to only one Virtual Fabric at any time. An SNMP request coming to one Virtual
Fabric can only view the port information of the ports belonging to that Virtual Fabric. All port
attributes are filtered to allow SNMP to obtain the port information only from within the current
Virtual Fabrics context.
Switch and chassis context enforcement
All attributes are classified into one of two categories:
• Chassis-level attributes
• Switch-level attributes
128
Fabric OS Administrator’s Guide
53-1002148-02
Telnet protocol
6
Attributes that are specific to each logical switch belong to the switch category. These attributes are
available in the Virtual Fabrics context and not available in the Chassis context.
Attributes that are common across the logical switches belong to the chassis level. These attributes
are accessible to users having the chassis-role permission. When a chassis table is queried the
context is set to chassis context, if the user has the chassis-role permission. The context is
switched back to the original context after the operation is performed.
The security level
Use the snmpConfig --set seclevel command to set the security level. For more information about
using the Brocade SNMP agent, see the Fabric OS MIB Reference.
The snmpConfig command
Use the snmpConfig --set command to change either the SNMPv3 or SNMPv1 configuration. You
can also change access control, MIB capability, and system group.
For details on Brocade MIB files, naming conventions, loading instructions, and information about
using the Brocade SNMP agent, see the Fabric OS MIB Reference.
Telnet protocol
Telnet is enabled by default. To prevent passing clear text passwords over the network when
connecting to the switch, you can block the Telnet protocol using an IP Filter policy. For more
information on IP Filter policies, refer to “IP Filter policy” on page 155.
ATTENTION
Before blocking Telnet, make sure you have an alternate method of establishing a connection with
the switch.
Blocking Telnet
If you create a new policy using commands with just one rule, all the missing rules have an implicit
deny and you lose all IP access to the switch, including Telnet, SSH, and management ports.
1. Connect to the switch and log in as admin.
2. Clone the default policy by typing the ipFilter --clone command.
switch:admin> ipfilter --clone BlockTelnet -from default_ipv4
3. Save the new policy by typing the ipFilter --save command.
switch:admin> ipfilter --save BlockTelnet
4. Verify the new policy exists by typing the ipFilter --show command.
switch:admin> ipfilter --show
Fabric OS Administrator’s Guide
53-1002148-02
129
6
Telnet protocol
5. Add a rule to the policy, by typing the ipFilter --addrule command.
switch:admin> ipfilter --addrule BlockTelnet -rule 1 -sip any -dp 23 -proto
tcp -act deny
ATTENTION
The rule number assigned has to precede the default rule number for this protocol. For
example, in the defined policy, the Telnet rule number is 2, therefore to effectively block Telnet,
the rule number to assign must be 1.
If you choose not to use 1, you will need to delete the telnet rule number 2 after adding this
rule. Refer to “Deleting a rule to an IP Filter policy” on page 161 for more information on
deleting IP filter rules.
6. Save the new ipfilter policy by typing the ipfilter --save command.
7.
Verify the new policy is correct by typing the ipFilter --show command.
8. Activate the new ipfilter policy by typing the ipfilter --activate command.
switch:admin> ipfilter --activate BlockTelnet
9. Verify the new policy is active (the default_ipv4 policy should be displayed as defined).
130
switch:admin> ipfilter --show
Name: BlockTelnet, Type: ipv4, State: defined
Rule
Source IP
Protocol
Dest Port
1
any
tcp
23
2
any
tcp
22
3
any
tcp
22
4
any
tcp
897
5
any
tcp
898
6
any
tcp
111
7
any
tcp
80
8
any
tcp
443
9
any
udp
161
10
any
udp
111
11
any
udp
123
12
any
tcp
600 - 1023
13
any
udp
600 - 1023
Action
deny
permit
permit
permit
permit
permit
permit
permit
permit
permit
permit
permit
permit
Name: default_ipv4, Type: ipv4, State:
Rule
Source IP
Protocol
1
any
tcp
2
any
tcp
3
any
tcp
4
any
tcp
5
any
tcp
6
any
tcp
7
any
tcp
8
any
udp
9
any
udp
10
any
udp
11
any
tcp
12
any
udp
Action
permit
permit
permit
permit
permit
permit
permit
permit
permit
permit
permit
permit
defined
Dest Port
22
23
897
898
111
80
443
161
111
123
600 - 1023
600 - 1023
Fabric OS Administrator’s Guide
53-1002148-02
Listener applications
6
Unblocking Telnet
1. Connect to the switch through a serial port or SSH and log in as admin.
2. Type in the ipfilter --delete command.
Refer to “Deleting a rule to an IP Filter policy” on page 161 for more information on deleting IP
filter rules.
3. To permanently delete the policy, type the ipfilter --save command.
ATTENTION
If you deleted the rule to permit Telnet, you will need to add a rule to permit Telnet.
Listener applications
Brocade switches block Linux subsystem listener applications that are not used to implement
supported features and capabilities. Table 22 lists the listener applications that Brocade switches
either block or do not start.
TABLE 22
Blocked listener applications
Listener application
Brocade DCX enterprise-class platforms
Brocade 300, 5410, 5424, 5450, 5460, 5470, 5480,
5100, 5300, 5424, 6510, 7800, 8000, 8510 and
VA-40FC switches; FC8-16, FC8-32, FC8-48, FC10-6,
FC16-32, FC16-48, FCOE10-24, FR4-18i, FS8-18, and
FX8-24 blades
chargen
Disabled
Disabled
echo
Disabled
Disabled
daytime
Disabled
Disabled
discard
Disabled
Disabled
ftp
Disabled
Disabled
rexec
Block with packet filter
Disabled
rsh
Block with packet filter
Disabled
rlogin
Block with packet filter
Disabled
time
Block with packet filter
Disabled
rstats
Disabled
Disabled
rusers
Disabled
Disabled
Ports and applications used by switches
If you are using the FC-FC Routing Service, be aware that the secModeEnable command is not
supported in Fabric OS v6.1.0 and later.
Table 23 lists the defaults for accessing hosts, devices, switches, and zones.
Fabric OS Administrator’s Guide
53-1002148-02
131
6
Ports and applications used by switches
TABLE 23
Access defaults
Access default
Hosts
Any host can access the fabric by SNMP.
Any host can Telnet to any switch in the fabric.
Any host can establish an HTTP connection to any switch in the fabric.
Any host can establish an API connection to any switch in the fabric.
Devices
All devices can access the management server.
Any device can connect to any FC port in the fabric.
Switch access
Any switch can join the fabric.
All switches in the fabric can be accessed through a serial port.
Zoning
No zoning is enabled.
Port configuration
Table 24 provides information on ports that the switch uses. When configuring the switch for
various policies, take into consideration firewalls and other devices that may sit between switches
in the fabric and your network or between the managers and the switch.
TABLE 24
132
Port information
Port
Type
Common use
Comment
22
TCP
SSH, SCP
23
TCP
Telnet
Use the ipfilter command to block the port.
80
TCP
HTTP
Use the ipfilter command to block the port.
111
UDP
sunrpc
This port is used by Platform API. Use the ipfilter command to
block the port.
123
UDP
NTP
161
UDP
SNMP
Disable the SNMP service on the remote host if you do not use it,
or filter incoming UDP packets going to this port.
443
TCP
HTTPS
Use the ipfilter command to block the port.
512
TCP
exec
513
TCP
login
514
TCP
shell
897
TCP
This port is used by the Platform API.
Fabric OS Administrator’s Guide
53-1002148-02
Chapter
7
Configuring Security Policies
In this chapter
• ACL policies overview . . . . . . . . . . . . . . . . . . . . . . . . . . . . . . . . . . . . . . . . . .
• ACL policy management . . . . . . . . . . . . . . . . . . . . . . . . . . . . . . . . . . . . . . . .
• FCS policies . . . . . . . . . . . . . . . . . . . . . . . . . . . . . . . . . . . . . . . . . . . . . . . . . .
• DCC policies . . . . . . . . . . . . . . . . . . . . . . . . . . . . . . . . . . . . . . . . . . . . . . . . . .
• SCC Policies . . . . . . . . . . . . . . . . . . . . . . . . . . . . . . . . . . . . . . . . . . . . . . . . . .
• Authentication policy for fabric elements . . . . . . . . . . . . . . . . . . . . . . . . . .
• IP Filter policy. . . . . . . . . . . . . . . . . . . . . . . . . . . . . . . . . . . . . . . . . . . . . . . . .
• Policy database distribution . . . . . . . . . . . . . . . . . . . . . . . . . . . . . . . . . . . . .
• Management interface security . . . . . . . . . . . . . . . . . . . . . . . . . . . . . . . . . .
133
134
137
140
144
145
155
162
168
ACL policies overview
Each supported Access Control List (ACL) policy listed below is identified by a specific name, and
only one policy of each type can exist, except for DCC policies. Policy names are case-sensitive and
must be entered in all uppercase. Fabric OS provides the following policies:
• Fabric configuration server (FCS) policy — Used to restrict which switches can change the
configuration of the fabric.
• Device connection control (DCC) policies — Used to restrict which Fibre Channel device ports
can connect to which Fibre Channel switch ports.
• Switch connection control (SCC) policy — Used to restrict which switches can join with a switch.
NOTE
Run all commands in this chapter by logging in to Administrative Domain (AD) 255 with the
suggested permissions. If Administrative Domains have not been implemented, log in to AD0.
How the ACL policies are stored
The policies are stored in a local database. The database contains the ACL policy types of FCS,
DCC, SCC, and IPFilter. The number of policies that may be defined is limited by the size of the
database. FCS, SCC and DCC policies are all stored in the same database.
In a fabric with Fabric OS v6.2.0 and later switches present, the limit for security policy database
size is set to 1Mb. The policies are grouped by state and type. A policy can be in either of the
following states:
• Active, which means the policy is being enforced by the switch.
• Defined, which means the policy has been set up but is not enforced.
Fabric OS Administrator’s Guide
53-1002148-02
133
7
ACL policy management
Policies with the same state are grouped together in a Policy Set. Each switch has the following two
sets:
• Active policy set, which contains ACL policies being enforced by the switch.
• Defined policy set, which contains a copy of all ACL policies on the switch.
When a policy is activated, the defined policy either replaces the policy with the same name in the
active set or becomes a new active policy. If a policy appears in the defined set but not in the active
set, the policy was saved but has not been activated. If a policy with the same name appears in
both the defined and active sets but they have different values, then the policy has been modified
but the changes have not been activated.
Admin Domain considerations: ACL management can be done on AD255 and in AD0 only if there
are no user-defined Admin Domains. Both AD0 (when no other user-defined Admin Domains exist)
and AD255 provide an unfiltered view of the fabric.
Virtual Fabric considerations: ACL policies such as DCC, SCC, and FCS can be configured on each
logical switch. The limit for security policy database size is set to 1Mb per logical switch.
Policy members
The FCS, DCC and SCC policy members are specified by device port WWN, switch WWN, domain
IDs, or switch names, depending on the policy. The valid methods for specifying policy members
are listed in Table 25.
TABLE 25
Valid methods for specifying policy members
Policy name
Device port WWN or
Fabric port WWN
Switch WWN
Domain ID
Switch name
FCS_POLICY
No
Yes
Yes
Yes
DCC_POLICY_nnn
Yes
Yes
Yes
Yes
SCC_POLICY
No
Yes
Yes
Yes
ACL policy management
All policy modifications are temporarily stored in volatile memory until those changes are saved or
activated. You can create multiple sessions to the switch from one or more hosts. It is
recommended you make changes from one switch only to prevent multiple transactions from
occurring. Each logical switch will have its own access control list.
The FCS, SCC and DCC policies in Secure Fabric OS are not interchangeable with Fabric OS FCS,
SCC and DCC policies. Uploading and saving a copy of the Fabric OS configuration after creating
policies is strongly recommended. For more information on configuration uploads, see Chapter 8,
“Maintaining the Switch Configuration File”.
NOTE
All changes, including the creation of new policies, are saved and activated on the local switch only—
unless the switch is in a fabric that has a strict or tolerant fabric-wide consistency policy for the ACL
policy type for SCC or DCC. See “Policy database distribution” on page 162 for more information on
the database settings and fabric-wide consistency policy.
134
Fabric OS Administrator’s Guide
53-1002148-02
ACL policy management
7
Displaying ACL policies
You can view the active and defined policy sets at any time. Additionally, in a defined policy set,
policies created in the same login session also appear but these policies are automatically deleted
if the you log out without saving them.
1. Connect to the switch and log in using an account with admin permissions, or an account with
O permission for the Security RBAC class of commands.
2. Type the secPolicyShow command.
switch:admin> secPolicyShow
____________________________________________________
ACTIVE POLICY SET
____________________________________________________
DEFINED POLICY SET
Saving changes without activating the policies
1. Connect to the switch and log in using an account with admin permissions, or an account with
OM permissions for the Security RBAC class of commands.
2. Enter the secPolicySave command.
Activating policy changes
You can implement changes to the ACL policies using the secPolicyActivate command. This saves
the changes to the active policy set and activates all policy changes since the last time the
command was issued. You cannot activate policies on an individual basis; all changes to the entire
policy set are activated by the command. Until a secPolicySave or secPolicyActivate command is
issued, all policy changes are in volatile memory only and are lost upon rebooting.
1. Connect to the switch and log in using an account with admin permissions, or an account with
OM permissions for the Security RBAC class of commands.
2. Type the secPolicyActivate command.
Example of activating policy changes
switch:admin> secpolicyactivate
About to overwrite the current Active data.
ARE YOU SURE (yes, y, no, n): [no] y
Deleting an ACL policy
1. Connect to the switch and log in using an account with admin permissions, or an account with
OM permissions for the Security RBAC class of commands.
2. Type secPolicyDelete “policy_name”.
where policy_name is the name of the ACL policy.
3. Save and activate the policy deletion by entering the secPolicyActivate command.
Fabric OS Administrator’s Guide
53-1002148-02
135
7
ACL policy management
Example of deleting an ACL policy
switch:admin> secpolicydelete "DCC_POLICY_010"
About to delete policy Finance_Policy.
Are you sure (yes, y, no, n):[no] y
Finance_Policy has been deleted.
Adding a member to an existing ACL policy
As soon as a policy has been activated, the aspect of the fabric managed by that policy is enforced.
1. Connect to the switch and log in using an account with admin permissions, or an account with
OM permissions for the Security RBAC class of commands.
2. Enter the secPolicyAdd command.
3. To implement the change immediately, enter the secPolicyActivate command.
Example of adding to an ACL policy
For example, to add a member to the SCC_POLICY using the switch WWN:
switch:admin> secpolicyadd "SCC_POLICY", "12:24:45:10:0a:67:00:40"
Member(s) have been added to SCC_POLICY.
Example of adding members to the DCC policy
To add two devices to the DCC policy, and to attach domain 3 ports 1 and 3 (WWNs of devices
are 11:22:33:44:55:66:77:aa and 11:22:33:44:55:66:77:bb):
switch:admin> secpolicyadd "DCC_POLICY_abc",
"11:22:33:44:55:66:77:aa;11:22:33:44:55:66:77:bb;3(1,3)"
Removing a member from an ACL policy
As soon as a policy has been activated, the aspect of the fabric managed by that policy is enforced.
1. Connect to the switch and log in using an account with admin permissions, or an account with
OM permissions for the Security RBAC class of commands.
2. Enter the secPolicyRemove command.
3. To implement the change immediately, enter the secPolicyActivate command.
Example of removing a member
For example, to remove a member that has a WWN of 12:24:45:10:0a:67:00:40 from the
SCC_POLICY:
switch:admin> secpolicyremove "SCC_POLICY", "12:24:45:10:0a:67:00:40"
Member(s) have been removed from SCC_POLICY.
Aborting unsaved policy changes
You can abort all ACL policy changes that have not yet been saved.
1. Connect to the switch and log in using an account with admin permissions, or an account with
OM permissions for the Security RBAC class of commands.
2. Enter the secPolicyAbort command.
136
Fabric OS Administrator’s Guide
53-1002148-02
FCS policies
7
Example of aborting unsaved changes
switch:admin> secpolicyabort
Unsaved data has been aborted.
All changes since the last time the secPolicySave or secPolicyActivate commands were entered are
aborted.
FCS policies
Fabric Configuration Server (FCS) policy in base Fabric OS may be performed on a local switch
basis and may be performed on any switch in the fabric.
The FCS policy is not present by default, but must be created. When the FCS policy is created, the
WWN of the local switch is automatically included in the FCS list. Additional switches can be
included in the FCS list. The first switch in the list becomes the Primary FCS switch.
Switches in the fabric are designated as either a Primary FCS, backup FCS, or non-FCS switch. Only
the Primary FCS switch is allowed to modify and distribute the database within the fabric.
Automatic distribution is supported and you can either configure the switches in your fabric to
accept the FCS policy or manually distribute the FCS policy. Changes made to the FCS policy are
saved to permanent memory only after the changes have been saved or activated; they can be
aborted later if you have set your fabric to distribute the changes manually.
TABLE 26
FCS policy states
Policy state
Characteristics
No active policy
Any switch can perform fabric-wide configuration changes.
Active policy with one entry
A Primary FCS switch is designated (local switch), but there are no backup
FCS switches. If the Primary FCS switch becomes unavailable for any reason,
the fabric is left without an FCS switch.
Active policy with multiple entries
A Primary FCS switch and one or more backup FCS switches are designated. If
the Primary FCS switch becomes unavailable, the next switch in the list
becomes the Primary FCS switch.
FCS policy restrictions
The backup FCS switches normally cannot modify the policy. However, if the Primary FCS switch in
the policy list is not reachable, then a backup FCS switch is allowed to modify the policy.
Once an FCS policy is configured and distributed across the fabric, only the Primary FCS switch can
perform certain operations. Operations that affect fabric-wide configuration are allowed only from
the Primary FCS switch. Backup and non-FCS switches cannot perform security, zoning and AD
operations that affect the fabric configuration. The following error message is returned if a backup
or non-FCS switch tries to perform these operations:
Can only execute this command on the Primary FCS switch.
Operations that do not affect the fabric configuration, such as show or local switch commands, are
allowed on backup and non-FCS switches.
FCS enforcement applies only for user-initiated fabric-wide operations. Internal fabric data
propagation because of a fabric merge is not blocked. Consequently, a new switch that joins the
FCS-enabled fabric could still propagate the AD and zone database.
Fabric OS Administrator’s Guide
53-1002148-02
137
7
FCS policies
Table 27 shows the commands for switch operations for Primary FCS enforcement.
TABLE 27
FCS switch operations
Allowed on FCS switches
Allowed on all switches
secPolicyAdd (Allowed on all switches for SCC and DCC
policies as long as it is not fabric-wide)
secPolicyShow
secPolicyCreate (Allowed on all switches for SCC and
DCC policies as long as it is not fabric-wide)
fddCfg –-localaccept or fddCfg --localreject
secPolicyDelete (Allowed on all switches for SCC and
DCC policies as long as its not fabric-wide)
userconfig, Passwd, Passwdcfg (Fabric-wide distribution
is not allowed from a backup or non-FCS switch.)
secPolicyRemove (Allowed on all switches for SCC and
DCC policies as long as its not fabric-wide)
secPolicyActivate
fddCfg –-fabwideset
secPolicySave
Any fabric-wide commands
secPolicyAbort
All zoning commands except the show commands
SNMP commands
All AD commands
configupload
Any local-switch commands
Any AD command that does not affect fabric-wide
configuration
Ensuring fabric domains share policies
Whether your intention is to create new FCS policies or manage your current FCS policies, you must
follow certain steps to ensure the domains throughout your fabric have the same policy.
The local-switch WWN cannot be deleted from the FCS policy.
1. Create the FCS policy using the secPolicyCreate command.
2. Activate the policy using the secPolicyActivate command.
If the command is not entered, the changes are lost when the session is logged out.
3. To distribute the policies, enter the distribute -p policy_list -d switch_list command to either
send the policies to intended domains, or enter the distribute -p policy_list -d wild_card (*)
command to send the policies to all switches.
Creating an FCS policy
1. Connect to the switch and log in using an account with admin permissions, or an account with
OM permissions for the Security RBAC class of commands.
2. Enter the secPolicyCreate “FCS_POLICY” command.
Example of creating an FCS policy
The following example creates an FCS policy that allows a switch with domain ID 2 to become a
primary FCS and domain ID 4 to become a backup FCS:
switch:admin> secpolicycreate "FCS_POLICY", "2;4"
FCS_POLICY has been created
138
Fabric OS Administrator’s Guide
53-1002148-02
FCS policies
7
3. To save or activate the new policy, enter either the secPolicySave or the secPolicyActivate
command. Once the policy has been activated you can distribute the policy.
NOTE
FCS policy must be consistent across the fabric. If the policy is inconsistent in the fabric, then you
will not be able to perform any fabric-wide configurations from the primary FCS.
Modifying the order of FCS switches
1. Log in to the Primary FCS switch using an account with admin permissions, or an account with
OM permissions for the Security RBAC class of commands.
2. Type secPolicyShow “Defined”, “FCS_POLICY”.
This displays the WWNs of the current Primary FCS switch and backup FCS switches.
3. Type secPolicyFCSMove; then provide the current position of the switch in the list and the
desired position at the prompts.
Alternatively, enter secPolicyFCSMove [From, To] command. From is the current position in the
list of the FCS switch and To is the desired position in the list for this switch.
Example of moving an FCS policy
The following example moves a backup FCS switch from position 2 to position 3 in the FCS list,
using interactive mode:
primaryfcs:admin> secpolicyfcsmove
PosPrimary WWN
DId
swName.
=================================================
1Yes
10:00:00:60:69:10:02:181
switch5.
2No
10:00:00:60:69:00:00:5a2
switch60.
3No
10:00:00:60:69:00:00:133
switch73.
Please enter position you’d like to move from : (1..3) [1] 2
Please enter position you’d like to move to : (1..3) [1] 3
____________________________________________________
DEFINED POLICY SET
FCS_POLICY
PosPrimaryWWN
DId swName
__________________________________________________
1Yes
10:00:00:60:69:10:02:181 switch5.
2No
10:00:00:60:69:00:00:133 switch73.
3No
10:00:00:60:69:00:00:5a2 switch60.
____________________________________________________
4. Type the secPolicyActivate command to activate and save the new order.
FCS policy distribution
The FCS policy can be automatically distributed using the fddCfg --fabwideset command or it can
be manually distributed to the switches using the distribute -p command. Each switch that receives
the FCS policy must be configured to receive the policy. To configure the switch to accept
distribution of the FCS policy, refer to “Database distribution settings” on page 163.
Database distributions may be initiated from only the Primary FCS switch. FCS policy configuration
and management is performed using the command line or a manageability interface.
Fabric OS Administrator’s Guide
53-1002148-02
139
7
DCC policies
Only the Primary FCS switch is allowed to distribute the database. The FCS policy may need to be
manually distributed across the fabric using the distribute -p command. Since this policy is
distributed manually, the command fddCfg –-fabwideset is used to distribute a fabric-wide
consistency policy for FCS policy in an environment consisting of only Fabric OS v6.2.0 and later
switches.
FCS enforcement for the distribute command is handled differently for FCS and other databases in
an FCS fabric:
• For an FCS database, the enforcement allows any switch to initiate the distribution. This is to
support FCS policy creation specifying a remote switch as Primary.
• For other database distributions, only the Primary FCS switch can initiate the distribution.
The FCS policy distribution is allowed to be distributed from a switch in the FCS list. However, if
none of the FCS switches in the existing FCS list are reachable, receiving switches accept
distribution from any switch in the fabric. To learn more about how to distribute policies, refer to
“ACL policy distribution to other switches” on page 164.
Local switch configuration parameters are needed to control whether a switch accepts or rejects
distributions of FCS policy and whether the switch is allowed to initiate distribution of an FCS policy.
A configuration parameter controls whether the distribution of the policy is accepted or rejected on
the local switch. Setting the configuration parameter to accept indicates distribution of the policy
will be accepted and distribution may be initiated using the distribute -p command. Setting the
configuration parameter to reject indicates the policy distribution is rejected and the switch may
not distribute the policy.
The default value for the distribution configuration parameter is accept, which means the switch
accepts all database distributions and is able to initiate a distribute operation for all databases.
TABLE 28
Distribution policy states
Fabric OS
State
v6.2.0 and later configured to
accept
Target switch accepts distribution and fabric state change occurs.
v6.2.0 and later configured to
reject
Target switch explicitly rejects the distribution and the operation fails. The
entire transaction is aborted and no fabric state change occurs.
DCC policies
Multiple DCC policies can be used to restrict which device ports can connect to which switch ports.
The devices can be initiators, targets, or intermediate devices such as SCSI routers and loop hubs.
By default, all device ports are allowed to connect to all switch ports; no DCC policies exist until
they are created. For information regarding DCC policies and F_Port trunking, refer to the Access
Gateway Administrator’s Guide.
Each device port can be bound to one or more switch ports; the same device ports and switch
ports may be listed in multiple DCC policies. After a switch port is specified in a DCC policy, it
permits connections only from designated device ports. Device ports that are not specified in any
DCC policies are allowed to connect only to switch ports that are not specified in any DCC policies.
When a DCC violation occurs, the related port is automatically disabled and must be re-enabled
using the portEnable command.
Table 29 on page 141 shows the possible DCC policy states.
140
Fabric OS Administrator’s Guide
53-1002148-02
DCC policies
TABLE 29
7
DCC policy states
Policy state
Characteristics
No policy
Any device can connect to any switch port in the fabric.
Policy with no entries
Any device can connect to any switch port in the fabric. An empty policy is the same as no
policy.
Policy with entries
If a device WWN or Fabric port WWN is specified in a DCC policy, that device is only
allowed access to the switch if connected by a switch port listed in the same policy.
If a switch port is specified in a DCC policy, it only permits connections from devices that
are listed in the policy.
Devices with WWNs that are not specified in a DCC policy are allowed to connect to the
switch at any switch ports that are not specified in a DCC policy.
Switch ports and device WWNs may exist in multiple DCC policies.
Proxy devices are always granted full access and can connect to any switch port in the
fabric.
Virtual Fabric considerations: The DCC policies that have entries for the ports that are being moved
from one logical switch to another will be considered stale and will not be enforced. You can choose
to keep stale policies in the current logical switch or delete the stale policies after the port
movements. Use the secPolicyDelete command to delete stale DCC policies.
DCC policy restrictions
The following restrictions apply when using DCC policies:
• Some older private-loop HBAs do not respond to port login from the switch and are not
enforced by the DCC policy. This does not create a security problem because these HBAs
cannot contact any device outside of their immediate loop.
• DCC policies cannot manage or restrict iSCSI connections, that is, an FC Initiator connection
from an iSCSI gateway.
• You cannot manage proxy devices with DCC policies. Proxy devices are always granted full
access, even if the DCC policy has an entry that restricts or limits access of a proxy device.
• DCC policies are not supported on the CEE ports of the Brocade 8000.
Creating a DCC policy
DCC policies must follow the naming convention “DCC_POLICY_nnn,” where nnn represents a
unique string. The maximum length is 30 characters, including the prefix DCC_POLICY_.
Device ports must be specified by port WWN. Switch ports can be identified by the switch WWN,
domain ID, or switch name followed by the port or area number. To specify an allowed connection,
enter the device port WWN, a semicolon, and the switch port identification.
The following methods of specifying an allowed connection are possible:
• deviceportWWN;switchWWN (port or area number)
• deviceportWWN;domainID (port or area number)
• deviceportWWN;switchname (port or area number)
Fabric OS Administrator’s Guide
53-1002148-02
141
7
DCC policies
1. Connect to the switch and log in using an account with admin permissions, or an account with
OM permissions for the Security RBAC class of commands.
2. Enter the secPolicyCreate “DCC_POLICY_nnn” command.
DCC_POLICY_nnn is the name of the DCC policy; nnn is a string consisting of up to 19
alphanumeric or underscore characters to differentiate it from any other DCC policies.
3. To save or activate the new policy, enter the appropriate command:
• To save the policy, enter the secPolicySave command.
• To save and activate the policy, enter the secPolicyActivate command.
If neither of these commands is entered, the changes are lost when the session is logged out.
Example of creating DCC policies
To create the DCC policy “DCC_POLICY_server” that includes device 11:22:33:44:55:66:77:aa
and port 1 and port 3 of switch domain 1:
switch:admin> secpolicycreate
"DCC_POLICY_server","11:22:33:44:55:66:77:aa;1(1,3)"
DCC_POLICY_server has been created
To create the DCC policy “DCC_POLICY_storage” that includes device port WWN
22:33:44:55:66:77:11:bb, all ports of switch domain 2, and all currently connected devices of
switch domain 2:
switch:admin> secpolicycreate "DCC_POLICY_storage",
"22:33:44:55:66:77:11:bb;2[*]"
DCC_POLICY_storage has been created
To create the DCC policy “DCC_POLICY_abc” that includes device 33:44:55:66:77:11:22:cc
and ports 1 through 6 and port 9 of switch domain 3:
switch:admin> secpolicycreate "DCC_POLICY_abc",
"33:44:55:66:77:11:22:cc;3(1-6,9)"
DCC_POLICY_abc has been created
To create the DCC policy “DCC_POLICY_example” that includes devices
44:55:66:77:22:33:44:dd and 33:44:55:66:77:11:22:cc, ports 1 through 4 of switch domain
4, and all devices currently connected to ports 1 through 4 of switch domain 4:
switch:admin> secpolicycreate "DCC_POLICY_example",
"44:55:66:77:22:33:44:dd;33:44:55:66:77:11:22:cc;4[1-4]"
DCC_POLICY_example has been created
Deleting a DCC policy
1. Connect to the switch and log in using an account with admin permissions, or an account with
OM permissions for the Security RBAC class of commands.
2. Enter the secPolicyDelete command.
Example of deleting stale DCC policies
switch:admin> secpolicydelete ALL_STALE_DCC_POLICY
About to clear all STALE DCC policies
ARE YOU SURE (yes, y, no, n): [no] y
142
Fabric OS Administrator’s Guide
53-1002148-02
DCC policies
7
DCC policy behavior with Fabric Assigned PWWNs
A DCC policy check is always performed for the physical port WWN of a device when the HBA has
established that the device is attempting a normal FLOGI and has both a fabric assigned port WWN
(FA PWWN) and a physical port WWN.
DCC policies created with FA PWWNs will result in the disabling of FA PWWN assigned ports on
subsequent FLOGI. It is therefore recommended to create policies with the physical PWWN
DCC policies created with the lock down feature result in DCC policies with FA PWWNs. It is
therefore recommended to avoid using the lock down feature in fabrics that are using FA PWWNs.
A DCC policy created with a device WWN for a specific port allows the device to log in only on the
same port. The same device will not be allowed to log in on a different port. For devices that log in
across an AG, the policy should be created with all the NPIV ports, so even if failover occurs the
device will be allowed to log in on a different NPIV port.
Table 30 lists the behavior of the DCC policy with FA PWWNs in the fabric when the DCC policy is
created using lockdown support.
TABLE 30
DCC policy behavior with FA PWWN when created using lockdown support
Configuration
WWN seen on
DCC policy list
Behavior when DCC policy
activates
•
FA PWWN has logged into
the switch
DCC policy creation with lock
down (uses FA PWWN).
DCC policy activation.
FA PWWN
Traffic will not be disrupted.* Ports will be disabled for
security violation.**
DCC policy creation with
lockdown (uses physical
PWWN).
FA PWWN has logged into
the switch
DCC policy activation.
Physical PWWN Traffic will not be disrupted.
Ports will come up without
security issues.
DCC policy creation with
lockdown (uses physical
PWWN)
DCC policy activation
FA PWWN has logged into
the switch
Physical PWWN Traffic will not be disrupted.
Ports will come up without
any security issues.
•
•
•
•
•
•
•
•
Behavior on portDisable and
portEnable
*Indicates a security concern, because devices that are logged in with FA PWWNs will not be disabled after activation
of DCC policies that are created with FA PWWNs. This is done to avoid disturbing any existing management.
**Any disruption in the port will disable the port for a security violation. As the traffic is already disrupted for this port,
you must enforce the DCC policy for a physical device WWN; otherwise, the device will not be allowed to login again.
Table 31 shows the behavior of a DCC policy created manually with the physical PWWN of a device.
The configurations shown in this table are the recommended configurations when an FA PWWN is
logged into the switch.
Fabric OS Administrator’s Guide
53-1002148-02
143
7
SCC Policies
TABLE 31
DCC policy behavior when created manually with PWWN
Configuration
WWN seen on
DCC policy list
Behavior when DCC policy
activates
Behavior on portDisable and
portEnable
•
FA PWWN has logged into the
switch.
DCC policy creation manually
with physical PWWN of
device.
DCC policy activation.
PWWN
Traffic will not be disrupted.
Ports will come up without
security issues.
DCC policy creation. manually
with physical PWWN
FA PWWN has logged into the
switch.
DCC policy activation.
PWWN
Traffic will not be disrupted.
Ports will come up without
security issues.
DCC policy creation manually
with physical PWWN,
DCC policy activation.
FA PWWN has logged into the
switch.
Physical PWWN Traffic will not be disrupted.
Ports will come up without
any security issues.
•
•
•
•
•
•
•
•
SCC Policies
The switch connection control (SCC) policy is used to restrict which switches can join the fabric.
Switches are checked against the policy each time an E_Port-to-E_Port connection is made. The
policy is named SCC_POLICY and accepts members listed as WWNs, domain IDs, or switch names.
Only one SCC policy can be created.
By default, any switch is allowed to join the fabric; the SCC policy does not exist until it is created.
When connecting a Fibre Channel router to a fabric or switch that has an active SCC policy, the
front domain of the Fibre Channel router must be included in the SCC policy.
SCC policy states are shown in Table 32.
TABLE 32
SCC policy states
Policy state
SCC policy enforcement
No active policy
All switches can connect to the switch with the specified policy.
Active policy that has no members
All neighboring switches are segmented.
Active policy that has members
The neighboring switches not specified in the SCC policy are
segmented.
Virtual Fabric considerations: In a logical fabric environment the SCC policy enforcement is not
done on the logical ISL. For a logical ISL-based switch, the SCC policy enforcement is considered as
the reference and the logical ISL is formed if the SCC enforcement passes on the extended ISL. The
following changes:
• A logical switch supports an SCC policy. You can configure and distribute an SCC policy on a
logical switch.
• SCC enforcement is performed on a ISL based on the SCC policy present on the logical switch.
For more information on Virtual Fabrics, refer to Chapter 10, “Managing Virtual Fabrics”.
144
Fabric OS Administrator’s Guide
53-1002148-02
Authentication policy for fabric elements
7
Creating an SCC policy
1. Connect to the switch and log in using an account with admin permissions, or an account with
OM permissions for the Security RBAC class of commands.
2. Enter the secPolicyCreate “SCC_POLICY” command.
3. Save or activate the new policy by entering either the secPolicySave or the secPolicyActivate
command.
If neither of these commands is entered, the changes are lost when the session is logged out.
Example of creating an SCC policy
For example, to create an SCC policy that allows switches that have domain IDs 2 and 4 to join
the fabric:
switch:admin> secpolicycreate "SCC_POLICY", "2;4"
SCC_POLICY has been created
switch:admin> secpolicysave
Authentication policy for fabric elements
By default, Fabric OS v6.2.0 and later use DH-CHAP or FCAP protocols for authentication. These
protocols use shared secrets and digital certificates, based on switch WWN and public key
infrastructure (PKI) technology, to authenticate switches. Authentication automatically defaults to
FCAP if both switches are configured to accept FCAP protocol in authentication, unless ports are
configured for in-flight encryption, in which case authentication defaults to DH-CHAP if both
switches are configured to accept the DH-CHAP protocol in authentication. To use FCAP on both
switches, PKI certificates have to be installed.
NOTE
The fabric authentication feature is available in base Fabric OS. No license is required.
FCAP requires the exchange of certificates between two or more switches to authenticate to each
other before they form or join a fabric. Beginning with Fabric OS v7.0.0, these certificates are no
longer issued by Brocade, but only by a third-party which is now the root CA for all of the issued
certificates. You can use Brocade and third-party certificates between switches that are Fabric OS
v6.4.0, but only Brocade-issued certificates (where Brocade is the root CA) for Fabric OS versions
earlier than v6.4.0. The certificates must be in PEM (Privacy Enhanced Mail) encoded format for
both root and peer certificates. The switch certificates issued from the third-party vendors can be
directly issued from the root CA or from an intermediate CA authority.
When you configure DH-CHAP authentication, you also must define a pair of shared secrets known
to both switches as a secret key pair. Figure 18 illustrates how the secrets are configured. A secret
key pair consists of a local secret and a peer secret. The local secret uniquely identifies the local
switch. The peer secret uniquely identifies the entity to which the local switch authenticates. Every
switch can share a secret key pair with any other switch or host in a fabric.
To use DH-CHAP authentication, a secret key pair has to be configured on both switches. For more
information on setting up secret key pairs, refer to “Setting a secret key pair” on page 151.
When configured, the secret key pair is used for authentication. Authentication occurs whenever
there is a state change for the switch or port. The state change can be due to a switch reboot, a
switch or port disable and enable, or the activation of a policy.
Fabric OS Administrator’s Guide
53-1002148-02
145
7
Authentication policy for fabric elements
Key database on switch
Local secret A
Peer secret B
Switch A
FIGURE 18
Key database on switch
Local secret B
Peer secret A
Switch B
DH-CHAP authentication
If you use DH-CHAP authentication, then a secret key pair must be installed only in connected
fabric elements. However, as connections are changed, new secret key pairs must be installed
between newly connected elements. Alternatively, a secret key pair for all possible connections
may be initially installed, enabling links to be arbitrarily changed while still maintaining a valid
secret key pair for any new connection.
The switch authentication (AUTH) policy initiates DH-CHAP/FCAP authentication on all E_Ports. This
policy is persistent across reboots, which means authentication will be initiated automatically on
ports or switches brought online if the policy is set to activate authentication. The AUTH policy is
distributed by command; automatic distribution of the AUTH policy is not supported.
The default configuration directs the switch to attempt FCAP authentication first, DH-CHAP second.
The switch may be configured to negotiate FCAP, DH-CHAP, or both.
The DH group is used in the DH-CHAP protocol only. The FCAP protocol exchanges the DH group
information, but does not use it.
Virtual Fabric considerations: If a Virtual Fabric is enabled, all AUTH module parameters such as
shared secrets, and shared switch and device policies, are logical switch-wide. That means you
must configure shared secrets and policies separately on each logical switch and the shared
secrets and policies must be set on each switch prior to authentication. On logical switch creation,
authentication takes default values for policies and other parameters. FCAP certificates are
installed on a chassis, but are configured on each logical switch.
E_Port authentication
The authentication (AUTH) policy allows you to configure DH-CHAP authentication on switches with
Fabric OS v5.3.0 and later. By default the policy is set to PASSIVE and you can change the policy. All
changes to the AUTH policy take effect during the next authentication request. This includes
starting authentication on all E_Ports on the local switch if the policy is changed to ON or ACTIVE,
and clearing the authentication if the policy is changed to OFF. The authentication configurations
will be effective only on subsequent E_ and F_Port initialization.
ATTENTION
A secret key pair has to be installed prior to changing the policy. For more information on setting up
secret key pairs, refer to “Setting a secret key pair” on page 151.
146
Fabric OS Administrator’s Guide
53-1002148-02
Authentication policy for fabric elements
7
Virtual Fabric considerations: The switch authentication policy applies to all E_Ports in a logical
switch. This includes ISLs and extended ISLs. Authentication of extended ISLs between two base
switches is considered peer-chassis authentication. Authentication between two physical entities is
required, so the extended ISL which connects the two chassis needs to be authenticated. The
corresponding extended ISL for a logical ISL authenticates the peer-chassis, therefore the logical
ISL authentication is not required. Because the logical ISLs do not carry actual traffic, they do not
need to be authenticated. Authentication on re-individualization is also blocked on logical ISLs. The
following error message is printed on the console when you execute the authUtil –-authinit
command on logical-ISLs, “Failed to initiate authentication. Authentication is not supported on
logical ports <port#>”. For more information on Virtual Fabrics, refer to Chapter 10, “Managing
Virtual Fabrics”.
Configuring E_Port authentication
1. Connect to the switch and log in using an account with admin permissions, or an account with
OM permissions for the Authentication RBAC class of commands.
2. Enter the authUtil command to set the switch policy mode.
Example of configuring E_Port authentication
The following example shows how to enable a Virtual Fabric and configure the E_Ports to perform
authentication using the AUTH policies authUtil command.
switch:admin> fosconfig -enable vf
WARNING: This is a disruptive operation that requires a reboot to take
effect.
All EX ports will be disabled upon reboot.
Would you like to continue [Y/N] y
switch:admin> authutil --authinit 2,3,4
CAUTION
If data input has not been completed and a failover occurs, the command is terminated without
completion and your entire input is lost.
If data input has completed, the enter key pressed, and a failover occurs, data may or may not be
replicated to the other CP depending on the timing of the failover. Log in to the other CP after the
failover is complete and verify the data was saved. If data was not saved, run the command
again.
Example of setting the policy to active mode
switch:admin> authutil --policy -sw active
Warning: Activating the authentication policy requires
either DH-CHAP secrets or PKI certificates depending
on the protocol selected. Otherwise, ISLs will be
segmented during next E-port bring-up.
ARE YOU SURE (yes, y, no, n): [no] y
Auth Policy is set to ACTIVE
Fabric OS Administrator’s Guide
53-1002148-02
147
7
Authentication policy for fabric elements
Re-authenticating E_Ports
Use the authUtil --authinit command to re-initiate the authentication on selected ports. It provides
flexibility to initiate authentication for specified E_Ports, a set of E_Ports, or all E_Ports on the
switch. This command does not work on loop, NPIV and FICON devices, or on ports configured for
in-flight encryption. The command authUtil can re-initiate authentication only if the device was
previously authenticated. If the authentication fails because shared secrets do not match, the port
is disabled.
This command works independently of the authentication policy; this means you can initiate the
authentication even if the switch is in PASSIVE mode. This command is used to restart
authentication after changing the DH-CHAP group, hash type, or shared secret between a pair of
switches.
ATTENTION
This command may bring down E_Ports if the DH-CHAP shared secrets are not installed correctly.
1. Log in to the switch using an account with admin permissions, or an account with OM
permissions for the Authentication RBAC class of commands.
2. Enter the authUtil –-authinit command.
Example for specific ports on the switch
switch:admin> authutil –-authinit
2,3,4
Example for all E_Ports on the switch
switch:admin> authutil –-authinit
allE
Example for enterprise-class platforms using the slot/port format
switch:admin> authutil –-authinit
1/1, 1/2
Device authentication policy
Device authentication policy can also be categorized as an F_Port, node port, or an HBA
authentication policy. Fabric-wide distribution of the device authentication policy is not supported
because the device authentication requires manual interaction in setting the HBA shared secrets
and switch shared secrets, and most of the HBAs do not support the defined DH groups for use in
the DH-CHAP protocol.
By default the switch is in the OFF state, which means the switch clears the security bit in the FLOGI
(fabric login). The authUtil command provides an option to change the device policy mode to select
PASSIVE policy, which means the switch responds to authentication from any device and does not
initiate authentication to devices. When the policy is set to ON, the switch expects a FLOGI with the
FC-SP bit set. If not, the switch rejects the FLOGI with reason LS_LOGICAL_ERROR (0x03),
explanation “Authentication Required”(0x48), and disables the port. Regardless of the policy, the
F_Port is disabled if the DH-CHAP protocol fails to authenticate. If the HBA sets the FC-SP bit during
FLOGI and the switch sends a FLOGI accept with the FC-SP bit set, then the switch expects the HBA
to start the AUTH_NEGOTIATE. From this point on until the AUTH_NEGOTIATE is completed, all ELS
and CT frames, except the AUTH_NEGOTIATE ELS frame, are blocked by the switch. During this
time, the Fibre Channel driver rejects all other ELS frames. The F_Port does not form until the
AUTH_NEGOTIATE is completed. It is the HBA's responsibility to send an Authentication Negotiation
ELS frame after receiving the FLOGI accept frame with the FC-SP bit set.
148
Fabric OS Administrator’s Guide
53-1002148-02
Authentication policy for fabric elements
7
Virtual Fabric considerations: Because the device authentication policy has switch and logical
switch-based parameters, each logical switch is set when Virtual Fabrics is enabled. Authentication
is enforced based on each logical switch’s policy settings.
Configuring device authentication
1. Connect to the switch and log in using an account with admin permissions, or an account with
OM permissions for the Authentication RBAC class of commands.
2. Enter the authUtil command to set the device policy mode.
Example of setting the Device policy to passive mode:
switch:admin> authutil --policy -dev passive
Warning: Activating the authentication policy requires
DH-CHAP secrets on both switch and device. Otherwise,
the F-port will be disabled during next F-port
bring-up.
ARE YOU SURE (yes, y, no, n): [no] y
Device authentication is set to PASSIVE
AUTH policy restrictions
All fabric element authentication configurations are performed on a local switch basis.
Device authentication policy supports devices that are connected to the switch in point-to-point
manner and is visible to the entire fabric. The following are not supported:
•
•
•
•
•
•
•
Public loop devices
Single private devices
Private loop devices
Mixed public and private devices in loop
NPIV devices
FICON channels
Configupload and download will not be supported for the following AUTH attributes: auth type,
hash type, group type.
Supported adapters
The following adapters support authentication:
•
•
•
•
•
Emulex LP11000 (Tested with Storport Miniport v2.0 windows driver)
Qlogic QLA2300 (Tested with Solaris v5.04 driver)
Brocade Fibre Channel HBA models 415, 425, 815 and 825
Brocade HCAs BR-1741M-k, BR-1020, and BR-1007
BR-1860 Fabric Adapter
Fabric OS Administrator’s Guide
53-1002148-02
149
7
Authentication policy for fabric elements
Authentication protocols
Use the authUtil command to perform the following tasks:
• Display the current authentication parameters.
• Select the authentication protocol used between switches.
• Select the DH (Diffie-Hellman) group for a switch.
Run the authUtil command on the switch you want to view or change. Below are the different
options to specify which DH group you want to use.
•
•
•
•
•
00 – DH Null option
01 – 1024 bit key
02 – 1280 bit key
03 - 1536 bit key
04 – 2048 bit key
Viewing the current authentication parameter settings for a switch
1. Log in to the switch using an account with admin permissions, or an account with the O
permission for the Authentication RBAC class of commands.
2. Enter the authUtil --show.
Example of output from the authUtil --show command
AUTH TYPE
HASH TYPE
GROUP TYPE
-------------------------------------fcap,dhchap
sha1,md5
0, 1, 2, 3, 4
Switch Authentication Policy: PASSIVE
Device Authentication Policy: OFF
Setting the authentication protocol
1. Log in to the switch using an account with admin permissions, or an account with OM
permissions for the Authentication RBAC class of commands.
2. Enter the authUtil --set -a command specifying fcap, dhchap, or all.
Example of setting the DH-CHAP authentication protocol
switch:admin> authutil --set -a dhchap
Authentication is set to dhchap.
When using DH-CHAP, make sure that you configure the switches at both ends of a link.
NOTE
If you set the authentication protocol to DH-CHAP or FCAP, have not configured shared secrets
or certificates, and authentication is checked (for example, you enable the switch), then switch
authentication fails.
If the E_Port is to carry in-flight encrypted traffic, the authentication protocol must be set to
DH-CHAP. You must also use the -g option to set the DH group value to group 4 or all groups.
See Chapter 14, “In-flight Encryption and Compression,” for details about in-flight encryption.
150
Fabric OS Administrator’s Guide
53-1002148-02
Authentication policy for fabric elements
7
Secret key pairs for DH-CHAP
When you configure the switches at both ends of a link to use DH-CHAP for authentication, you
must also define a secret key pair—one for each end of the link. Use the secAuthSecret command
to perform the following tasks:
• View the WWN of switches with a secret key pair.
• Set the secret key pair for switches.
• Remove the secret key pair for one or more switches.
Note the following characteristics of a secret key pair:
• The secret key pair must be set up locally on every switch. The secret key pair is not distributed
fabric-wide.
• If a secret key pair is not set up for a link, authentication fails. The “Authentication Failed”
(reason code 05h) error will be reported and logged.
• The minimum length of a shared secret is 8 characters and the maximum length is 40
characters. If the E_Port is to carry in-flight encrypted traffic, a shared secret or at least 32
characters is recommended. See Chapter 14, “In-flight Encryption and Compression” for
details about in-flight encryption.
NOTE
When setting a secret key pair, note that you are entering the shared secrets in plain text. Use a
secure channel (for example, SSH or the serial console) to connect to the switch on which you are
setting the secrets.
Viewing the list of secret key pairs in the current switch database
1. Log in to the switch using an account with admin permissions, or an account with the O
permission for the Authentication RBAC class of commands.
2. Enter the secAuthSecret --show command.
The output displays the WWN, domain ID, and name (if known) of the switches with defined
shared secrets:
WWN
DId
Name
----------------------------------------------10:00:00:60:69:80:07:52
Unknown
10:00:00:60:69:80:07:5c
1
switchA
Setting a secret key pair
1. Log in to the switch using an account with admin permissions, or an account with OM
permissions for the Authentication RBAC class of commands.
2. Enter the secAuthSecret --set command.
The command enters interactive mode. The command returns a description of itself and
needed input; then it loops through a sequence of switch specification, peer secret entry, and
local secret entry.
To exit the loop, press Enter for the switch name; then type y.
Fabric OS Administrator’s Guide
53-1002148-02
151
7
Authentication policy for fabric elements
Example of setting a secret key pair
switchA:admin> secauthsecret --set
This command is used to set up secret keys for the DH-CHAP authentication.
The minimum length of a secret key is 8 characters and maximum 40
characters. Setting up secret keys does not initiate DH-CHAP
authentication. If switch is configured to do DH-CHAP, it is performed
whenever a port or a switch is enabled.
Warning: Please use a secure channel for setting secrets. Using
an insecure channel is not safe and may compromise secrets.
Following inputs should be specified for each entry.
1. WWN for which secret is being set up.
2. Peer secret: The secret of the peer that authenticates to peer.
3. Local secret: The local secret that authenticates peer.
Press Enter to start setting up shared secrets > <cr>
Enter WWN, Domain, or switch name (Leave blank when done):
10:20:30:40:50:60:70:80
Enter peer secret: <hidden>
Re-enter peer secret: <hidden>
Enter local secret: <hidden>
Re-enter local secret: <hidden>
Enter WWN, Domain, or switch name (Leave blank when done):
10:20:30:40:50:60:70:81
Enter peer secret: <hidden>
Re-enter peer secret: <hidden>
Enter local secret: <hidden>
Re-enter local secret: <hidden>
Enter WWN, Domain, or switch name (Leave blank when done): <cr>
Are you done? (yes, y, no, n): [no] y
Saving data to key store… Done.
3. Disable and enable the ports on a peer switch using the portDisable and portEnable
commands.
FCAP configuration overview
Beginning with Fabric OS release 7.0.0, you must configure the switch to use third-party certificates
for authentication with the peer switch.
To perform authentication with FCAP protocol with certificates issued from third party, the user has
to perform following steps:
1. Choose a certificate authority (CA).
2. Generate a public, private key, passphrase and a CSR on each switch.
3. Store the CSR from each switch on a file server.
4. Obtain the certificates from the CA.
152
Fabric OS Administrator’s Guide
53-1002148-02
Authentication policy for fabric elements
7
You can request a certificate from a CA through a Web browser. After you request a certificate,
the CA either sends certificate files by e-mail (public) or gives access to them on a remote host
(private). Typically, the CA provides the certificate files listed in Table 33.
ATTENTION
Only the .pem file is supported for FCAP authentication.
TABLE 33
FCAP certificate files
Certificate file
Description
nameCA.pem
The CA certificate. It must be installed on the remote and local switch to verify the
validity of the switch certificate or switch validation fails.
name.pem
The switch certificate.
5. On each switch, install the CA certificate before installing switch certificate.
6. After the CA certificate is installed, install the switch certificate on each switch.
7.
Update the switch database for peer switches to use third-party certificates.
8. Use the newly installed certificates by starting the authentication process.
Generating the key and CSR for FCAP
The public/private key and CSR has to be generated for the local and remote switches that will
participate in the authentication. In FCAP, one command is used to generate the public/private key
the CSR, and the passphrase.
1. Log in to the switch using an account with admin permissions, or an account associated with
the chassis role and having OM permissions for the PKI RBAC class of commands.
2. Enter the secCertUtil generate -fcapall -keysize command on the local switch.
switch:admin> seccertutil generate -fcapall -keysize 1024
WARNING!!!
About to create FCAP:
ARE YOU SURE (yes, y, no, n): [no] y
Installing Private Key and Csr...
Switch key pair and CSR generated...
3. Repeat step 2 on the remote switch.
Exporting the CSR for FCAP
You will need to export the CSR file created in “Generating the key and CSR for FCAP” section and
send to a Certificate Authority (CA). The CA will in turn provide two files as outlined in “FCAP
configuration overview” on page 152.
1. Log in to the switch using an account with admin permissions, or an account associated with
the chassis role and having OM permissions for the PKI RBAC class of commands.
2. Enter the secCertUtil export –fcapswcsr command.
switch:admin> seccertutil export -fcapswcert
Select protocol [ftp or scp]: scp
Enter IP address: 10.1.2.3
Enter remote directory: /myHome/jdoe/OPENSSL
Fabric OS Administrator’s Guide
53-1002148-02
153
7
Authentication policy for fabric elements
Enter Login Name: jdoe
[email protected]'s password: <hidden text>
Success: exported FCAP CA certificate
Importing CA for FCAP
Once you receive the files back from the Certificate Authority, you will need to install or import them
onto the local and remote switches.
1. Log in to the switch using an account with admin permissions, or an account associated with
the chassis role and having OM permissions for the PKI RBAC class of commands.
2. Enter the secCertUtil import –fcapswcert command and verify the CA certificates are
consistent on both local and remote switches.
switch:admin> seccertutil import -fcapcacert
Select protocol [ftp or scp]: scp
Enter IP address: 10.1.2.3
Enter remote directory: /myHome/jdoe/OPENSSL
Enter certificate name (must have a ".pem" suffix):CACert.pem
Enter Login Name: jdoe
[email protected]'s password: <hidden text>
Success: imported certificate [CACert.pem].
Importing the FCAP switch certificate
ATTENTION
The CA certificates must be installed prior to installing the switch certificate.
1. Log in to the switch using an account with admin permissions, or an account associated with
the chassis role and having OM permissions for the PKI RBAC class of commands.
2. Enter the secCertUtil import –fcapcacert command.
switch:admin> seccertutil import -fcapswcert
Select protocol [ftp or scp]: scp
Enter IP address: 10.1.2.3
Enter remote directory: /myHome/jdoe/OPENSSL
Enter certificate name (must have ".crt" or ".cer" ".pem" or ".psk"
suffix):01.pem
Enter Login Name: jdoe
[email protected]'s password: <hidden text>
Success: imported certificate [01.pem].
Starting FCAP authentication
1. Log in to the switch using an account with admin permissions, or an account with OM
permissions for the Authentication RBAC class of commands.
2. Enter the authUtil --authinit command to start the authentication using the newly imported
certificates.
3. Enter the authUtil --policy -sw command and select active or on, the default is passive. This
makes the changes permanent and forces the switch to request authentication.
154
Fabric OS Administrator’s Guide
53-1002148-02
IP Filter policy
7
Fabric-wide distribution of the Auth policy
The AUTH policy can be manually distributed to the fabric by command; there is no support for
automatic distribution. To distribute the AUTH policy, see “Distributing the local ACL policies” on
page 164 for instructions.
Local Switch configuration parameters are needed to control whether a switch accepts or rejects
distributions of the AUTH policy using the distribute command and whether the switch may initiate
distribution of the policy. To set the local switch configuration parameter, refer to “Policy database
distribution” on page 162.
IP Filter policy
The IP Filter policy is a set of rules applied to the IP management interfaces as a packet filtering
firewall. The firewall permits or denies the traffic to go through the IP management interfaces
according to the policy rules.
Fabric OS supports multiple IP Filter policies to be defined at the same time. Each IP Filter policy is
identified by a name and has an associated type. Two IP Filter policy types, IPv4 and IPv6, exist to
provide separate packet filtering for IPv4 and IPv6. It is not allowed to specify an IPv6 address in
the IPv4 filter, or specify an IPv4 address in the IPv6 filter. There can be up to six different IP Filter
policies defined for both types. Only one IP Filter policy for each IP type can be activated on the
affected management IP interfaces.
Audit messages will be generated for any changes to the IP Filter policies.
The rules in the IP Filter policy are examined one at a time until the end of the list of rules. For
performance reasons, the most commonly used rules should be specified at the top.
On a chassis system, changes to persistent IP Filter policies are automatically synchronized to the
standby CP when the changes are saved persistently on the active CP. The standby CP will enforce
the filter policies to its management interface after policies are synchronized with the active CP.
Virtual Fabric considerations: Each logical switch cannot have its own different IP Filter policies. IP
Filter policies are treated as a chassis-wide configuration and are common for all the logical
switches in the chassis.
Creating an IP Filter policy
You can create an IP Filter policy specifying any name and using type IPv4 or IPv6. The policy
created is stored in a temporary buffer, and is lost if the current command session logs out. The
policy name is a unique string composed of a maximum of 20 alpha, numeric, and underscore
characters. The names default_ipv4 and default_ipv6 are reserved for default IP filter policies. The
policy name is case-insensitive and always stored as lowercase. The policy type identifies the policy
as an IPv4 or IPv6 filter. There can be a maximum of six IP Filter policies.
1. Log in to the switch using an account with admin permissions, or an account associated with
the chassis role and having OM permissions for the IPfilter RBAC class of commands.
2. Enter in the ipFilter--create command.
Fabric OS Administrator’s Guide
53-1002148-02
155
7
IP Filter policy
Cloning an IP Filter policy
You can create an IP Filter policy as an exact copy of an existing policy. The policy created is stored
in a temporary buffer and has the same type and rules as the existing defined or active policy.
1. Log in to the switch using an account with admin permissions, or an account associated with
the chassis role and having OM permissions for the IPfilter RBAC class of commands.
2. Enter the ipFilter --clone command.
Displaying an IP Filter policy
You can display the IP Filter policy content for the specified policy name, or all IP Filter policies if a
policy name is not specified.
For each IP Filter policy, the policy name, type, persistent state and policy rules are displayed. The
policy rules are listed by the rule number in ascending order. There is no pagination stop for
multiple screens of information. Pipe the output to the |more command to achieve this.
If a temporary buffer exists for an IP Filter policy, the --show subcommand displays the content in
the temporary buffer, with the persistent state set to no.
1. Log in to the switch using an account with admin permissions, or an account associated with
the chassis role and having the O permission for the IPfilter RBAC class of commands.
2. Enter the ipFilter –-show command.
Saving an IP Filter policy
You can save one or all IP Filter policies persistently in the defined configuration. The policy name is
optional for this subcommand. If the policy name is given, the IP Filter policy in the temporary
buffer is saved; if the policy name is not given, all IP Filter policies in the temporary buffer are
saved. Only the CLI session that owns the updated temporary buffer may run this command.
Modification to an active policy cannot be saved without being applied. Hence, the --save
subcommand is blocked for the active policies. Use --activate instead.
1. Log in to the switch using an account with admin permissions, or an account associated with
the chassis role and having the OM permissions for the IPfilter RBAC class of commands.
2. Enter the ipFilter –-save command.
Activating an IP Filter policy
IP Filter policies are not enforced until they are activated. Only one IP Filter policy per IPv4 and IPv6
type can be active. If there is a temporary buffer for the policy, the policy is saved to the defined
configuration and activated at the same time. If there is no temporary buffer for the policy, the
policy existing in the defined configuration becomes active. The activated policy continues to
remain in the defined configuration. The policy to be activated replaces the existing active policy of
the same type. Activating the default IP Filter policies returns the IP management interface to its
default state. An IP Filter policy without any rule cannot be activated. This subcommand prompts
for a user confirmation before proceeding.
156
Fabric OS Administrator’s Guide
53-1002148-02
IP Filter policy
7
1. Log in to the switch using an account with admin permissions, or an account associated with
the chassis role and having OM permissions for the IPfilter RBAC class of commands.
2. Enter the ipFilter –-activate command.
Deleting an IP Filter policy
You can delete a specified IP Filter policy. Deleting an IP Filter policy removes it from the temporary
buffer. To permanently delete the policy from the persistent database, run ipfilter --save. An active
IP Filter policy cannot be deleted.
1. Log in to the switch using an account with admin permissions, or an account associated with
the chassis role and having the OM permissions for the IPfilter RBAC class of commands.
2. Enter the ipFilter -–delete command.
3. To permanently delete the policy, enter the ipfilter --save command.
IP Filter policy rules
An IP Filter policy consists of a set of rules. Each rule has an index number identifying the rule.
There can be a maximum of 256 rules within an IP Filter policy.
Each rule contains the following elements:
•
•
•
•
Source Address: A source IP address or a group prefix.
Destination Port: The destination port number or name, such as: Telnet, SSH, HTTP, HTTPS.
Protocol:
The protocol type. Supported types are TCP or UDP.
Action:
The filtering action taken by this rule, either Permit or Deny.
A rule type and destination IP can also be specified
Source address
For an IPv4 filter policy, the source address has to be a 32-bit IPv4 address in dot decimal notation.
The group prefix has to be a CIDR block prefix representation. For example, 208.130.32.0/24
represents a 24-bit IPv4 prefix starting from the most significant bit. The special prefix 0.0.0.0/0
matches any IPv4 address. In addition, the keyword any is supported to represent any IPv4
address.
For an IPv6 filter policy, the source address has to be a 128-bit IPv6 address, in a format
acceptable in RFC 3513. The group prefix has to be a CIDR block prefix representation. For
example, 12AB:0:0:CD30::/64 represents a 64-bit IPv6 prefix starting from the most significant bit.
In addition, the keyword any is supported to represent any IPv6 address.
Destination port
For the destination port, a single port number or a port number range can be specified. According
to IANA (http://www.iana.org), ports 0 to 1023 are well-known port numbers, ports 1024 to 49151
are registered port numbers, and ports 49152 to 65535 are dynamic or private port numbers.
Well-known and registered ports are normally used by servers to accept connections, while
dynamic port numbers are used by clients.
Fabric OS Administrator’s Guide
53-1002148-02
157
7
IP Filter policy
For an IP Filter policy rule, you can only select port numbers in the well-known port number range,
between 0 and 1023, inclusive. This means that you have the ability to control how to expose the
management services hosted on a switch, but not the ability to affect the management traffic that
is initiated from a switch. A valid port number range is represented by a dash, for example 7-30.
Alternatively, service names can also be used instead of port number. Table 34 lists the supported
service names and their corresponding port numbers.
TABLE 34
158
Supported services
Service name
Port number
echo
7
discard
9
systat
11
daytime
13
netstat
15
chargen
19
ftp data
20
ftp
21
fsp
21
ssh
22
telnet
23
smtp
25
time
27
name
42
whois
43
domain
53
bootps
67
bootpc
68
tftp
69
http
80
kerberos
88
hostnames
101
sunrpc
111
sftp
115
ntp
123
snmp
161
snmp trap
162
https
443
ssmtp
465
exec
512
login
513
Fabric OS Administrator’s Guide
53-1002148-02
IP Filter policy
TABLE 34
7
Supported services (Continued)
Service name
Port number
shell
514
uucp
540
biff
512
who
513
syslog
514
route
520
timed
525
kerberos4
750
rpcd
897
securerpcd
898
Protocol
TCP and UDP protocols are valid protocol selections. Fabric OS v6.2.0 and later do not support
configuration to filter other protocols. Implicitly, ICMP type 0 and type 8 packets are always allowed
to support ICMP echo request and reply on commands like ping and traceroute.
Action
For the action, only “permit” and “deny” are valid.
Traffic type and destination IP
The traffic type and destination IP elements allow an IP policy rule to specify filter enforcement for
IP forwarding. The INPUT traffic type is the default and restricts rules to manage traffic on IP
management interfaces,
The FORWARD traffic type allows management of bidirectional traffic between the external
management interface and the inband management interface. In this case, the destination IP
element should also be specified.
Implicit filter rules
For every IP Filter policy, the two rules listed in Table 35 are always assumed to be appended
implicitly to the end of the policy. This ensures that TCP and UDP traffic to dynamic port ranges is
allowed, so that management IP traffic initiated from a switch, such as syslog, radius and ftp, is not
affected.
TABLE 35
Implicit IP Filter rules
Source address
Destination port
Protocol
Action
Any
1024-65535
TCP
Permit
Any
1024-65535
UDP
Permit
Fabric OS Administrator’s Guide
53-1002148-02
159
7
IP Filter policy
Default policy rules
A switch with Fabric OS v6.2.0 or later will have a default IP Filter policy for IPv4 and IPv6. The
default IP Filter policy cannot be deleted or changed. When an alternative IP Filter policy is
activated, the default IP Filter policy becomes deactivated. Table 36 lists the rules of the default IP
Filter policy.
TABLE 36
Default IP policy rules
Rule number
Source address
Destination port
Protocol
Action
1
Any
22
TCP
Permit
2
Any
23
TCP
Permit
3
Any
897
TCP
Permit
4
Any
898
TCP
Permit
5
Any
111
TCP
Permit
6
Any
80
TCP
Permit
7
Any
443
TCP
Permit
8
Any
161
UDP
Permit
9
Any
111
UDP
Permit
10
Any
123
UDP
Permit
11
Any
600-1023
TCP
Permit
12
Any
600-1023
UDP
Permit
IP Filter policy enforcement
An active IP Filter policy is a filter applied to the IP packets through the management interface. IPv4
management traffic passes through the active IPv4 filter policy, and IPv6 management traffic
passes through the active IPv6 filter policy. The IP Filter policy applies to the incoming (ingress)
management traffic only. When a packet arrives, it is compared against each rule, starting from the
first rule. If a match is found for the source address, destination port, and protocol, the
corresponding action for this rule is taken, and the subsequent rules in this policy are ignored. If
there is no match, then it is compared to the next rule in the policy. This process continues until the
incoming packet is compared to all rules in the active policy.
If none of the rules in the policy matches the incoming packet, the two implicit rules are matched to
the incoming packet. If the rules still do not match the packet, the default action, which is to deny,
is taken.
When the IPv4 or IPv6 address for the management interface of a switch is changed through the
ipAddrSet command or manageability tools, the active IP Filter policies automatically become
enforced on the management IP interface with the changed IP address.
NOTE
If a switch is part of a LAN behind a Network Address Translation (NAT) server, depending on the NAT
server configuration, the source address in an IP Filter rule may have to be the NAT server address.
160
Fabric OS Administrator’s Guide
53-1002148-02
IP Filter policy
7
Adding a rule to an IP Filter policy
There can be a maximum of 256 rules created for an IP Filter policy. The change to the specified IP
Filter policy is not saved to the persistent configuration until a save or activate subcommand is run.
1. Log in to the switch using an account with admin permissions, or an account associated with
the chassis role and having the OM permissions for the IPfilter RBAC class of commands.
2. Enter the ipFilter --addrule command.
Deleting a rule to an IP Filter policy
Deleting a rule in the specified IP Filter policy causes the rules following the deleted rule to shift up
in rule order. The change to the specified IP Filter policy is not saved to persistent configuration
until a save or activate subcommand is run.
1. Log in to the switch using an account with admin permissions, or an account associated with
the chassis role and having the OM permissions for the IPfilter RBAC class of commands.
2. Enter the ipFilter –-delrule command.
Aborting an IP Filter transaction
A transaction is associated with a command line or manageability session. It is opened implicitly
when the --create, --addrule, --delrule, --clone, and --delete subcommands are run. The
--transabort, --save, or --activate subcommands explicitly end the transaction owned by the
current command line or manageability session. If a transaction is not ended, other command line
or manageability sessions are blocked on the subcommands that would open a new transaction.
1. Log in to the switch using an account with admin permissions, or an account associated with
the chassis role and having the OM permissions for the IPfilter RBAC class of commands.
2. Enter the ipFilter –-transabort command.
IP Filter policy distribution
The IP Filter policy is manually distributed by command. The distribution includes both active and
defined IP Filter policies. All policies are combined as a single entity to be distributed and cannot be
selectively distributed. However, you may choose the time at which to implement the policy for
optimization purposes. If a distribution includes an active IP Filter policy, the receiving switches
activate the same IP Filter policy automatically. When a switch receives IP Filter policies, all
uncommitted changes left in its local transaction buffer are lost, and the transaction is aborted.
The IPFilter policy can be manually distributed to the fabric by command; there is no support for
automatic distribution. To distribute the IPFilter policy, see “Distributing the local ACL policies” on
page 164 for instructions.
Switches with Fabric OS v6.2.0 or later have the ability to accept or deny IP Filter policy distribution,
through the commands fddCfg --localaccept or fddCfg --localreject. See “Policy database
distribution” on page 162 for more information on distributing the IP Filter policy.
Virtual Fabric considerations: To distribute the IPFilter policy in a logical fabric, use the
chassisDistribute command.
Fabric OS Administrator’s Guide
53-1002148-02
161
7
Policy database distribution
Managing filter thresholds
Fabric OS v7.0.0 allows you to configure filter thresholds using the fmMonitor command.
1. Connect to the switch and log in using an account with admin permissions, or an account with
OM permissions for the FabricWatch RBAC class of commands.
2. Enter the fmMonitor command.
Example of fmMonitor command:
admin> fmMonitor -–create ex1 -pat 12,0xFF,0x08 -port 2/1-2,8/3 -highth
1000 - action snmp,raslog –timebase minute
Policy database distribution
Fabric OS lets you manage and enforce the ACL policy database on either a per-switch or
fabric-wide basis. The local switch distribution setting and the fabric-wide consistency policy affect
the switch ACL policy database and related distribution behavior.
The ACL policy database is managed as follows:
• Switch database distribution setting — Controls whether or not the switch accepts or rejects
databases distributed from other switches in the fabric. The distribute command sends the
database from one switch to another, overwriting the target switch database with the
distributed one. To send or receive a database the setting must be accept. For configuration
instructions, see “Database distribution settings” on page 163.
Virtual Fabric considerations: FCS, DCC, SCC, and AUTH databases can be distributed using
the -distribute command, but the PWD and IPFILTER databases are blocked from distribution.
• Manually distribute an ACL policy database — Run the distribute command to push the local
database of the specified policy type to target switches. “ACL policy distribution to other
switches” on page 164.
• Fabric-wide consistency policy — Use to ensure that switches in the fabric enforce the same
policies. Set a strict or tolerant fabric-wide consistency policy for each ACL policy type to
automatically distribute that database when a policy change is activated. If a fabric-wide
consistency policy is not set, then the policies are managed on a per switch basis. For
configuration instructions, see “Fabric-wide enforcement” on page 165.
Virtual Fabric considerations: Fabric-wide consistency policies are configured on a per logical
switch-basis and are applied to the fabrics connected to the logical switches. Automatic policy
distribution behavior for DCC, SCC and FCS is the same as that of pre-v6.2.0 releases and are
configured on a per logical switch basis.
Table 37 on page 163 explains how the local database distribution settings and the fabric-wide
consistency policy affect the local database when the switch is the target of a distribution
command.
162
Fabric OS Administrator’s Guide
53-1002148-02
Policy database distribution
TABLE 37
7
Interaction between fabric-wide consistency policy and distribution settings
Distribution
setting
Fabric-wide consistency policy
Absent (default)
Tolerant
configuration.1
Reject
Database is protected, it
cannot be overwritten.
May not match other
databases in the fabric.
Invalid
Accept (default)
Database is not protected,
the database can be
overwritten.
If the switch initiating a
distribute command has a
strict or tolerant fabric-wide
consistency policy, the
fabric-wide policy is also
overwritten.
May not match other
databases in the fabric.
Database is not protected.
Automatically distributes
activated changes to other
v6.2.0 or later switches in the
fabric.
May not match other
databases in the fabric.
Strict
Invalid configuration.1
Database is not protected.
Automatically distributes
activated changes to all
switches in the fabric.
Fabric can only contain
switches running Fabric OS
v6.2.0 or later.
Active database is the same for
all switches in the fabric.
1. An error is returned indicating that the distribution setting must be accept before you can set the fabric-wide
consistency policy.
Database distribution settings
The distribution settings control whether a switch accepts or rejects distributions of databases
from other switches and whether the switch may initiate a distribution. Configure the distribution
setting to reject when maintaining the database on a per-switch basis.
Table 38 lists the databases supported in Fabric OS v6.2.0 and later switches.
TABLE 38
Supported policy databases
Database type
Database identifier (ID)
Authentication policy database
AUTH
DCC policy database
DCC
FCS policy database
FCS
IP Filter policy database
IPFILTER
Password database
PWD
SCC policy database
SCC
Use the chassisDistribute command to distribute IP filter policies. To distribute other security
policies, use the distribute command.
Displaying the database distribution settings
1. Connect to the switch and log in using an account with admin permissions, or an account with
OM permissions for the FabricDistribution RBAC class of commands.
2. Enter the fddcfg --showall command.
Fabric OS Administrator’s Guide
53-1002148-02
163
7
Policy database distribution
Example shows the database distribution settings
switch:admin> fddcfg --showall
Local Switch Configuration for all Databases:DATABASE - Accept/Reject
--------------------------------SCC accept
DCC accept
PWD accept
FCS accept
AUTH accept
IPFILTER accept
Fabric Wide Consistency Policy:- ""
Enabling local switch protection
1. Connect to the switch and log in using an account with admin permissions, or an account with
OM permissions for the FabricDistribution RBAC class of commands.
2. Enter the fddCfg --localreject command.
Disabling local switch protection
1. Connect to the switch and log in using an account with admin permissions, or an account with
OM permissions for the FabricDistribution RBAC class of commands.
2. Enter the fddCfg --localaccept command.
ACL policy distribution to other switches
This section explains how to manually distribute local ACL policy databases. The distribute
command has the following dependencies:
• All target switches must be running Fabric OS v6.2.0 or later.
• All target switches must accept the database distribution (see “Database distribution settings”
on page 163).
• The fabric must have a tolerant or no (absent) fabric-wide consistency policy (see “Fabric-wide
enforcement” on page 165).
If the fabric-wide consistency policy for a database is strict, the database cannot be manually
distributed. When you set a strict fabric-wide consistency policy for a database, the distribution
mechanism is automatically invoked whenever the database changes.
• The local distribution setting must be accepted. To be able to initiate the distribute command,
set the local distribution to accept.
Distributing the local ACL policies
1. Connect to the switch and log in using an account with admin permissions, or an account with
OM permissions for the FabricDistribution RBAC class of commands.
2. Enter the distribute -p command.
164
Fabric OS Administrator’s Guide
53-1002148-02
Policy database distribution
7
Fabric-wide enforcement
The fabric-wide consistency policy enforcement setting determines the distribution behavior when
changes to a policy are activated. Using the tolerant or strict fabric-wide consistency policy ensures
that changes to local ACL policy databases are automatically distributed to other switches in the
fabric.
NOTE
To completely remove all policies from a fabric enter the fddCfg --fabwideset "” command.
When you set the fabric-wide consistency policy using the fddCfg command with the
<database_id> option, both the fabric-wide consistency policy and specified
database are distributed to the fabric.The active policies of the specified databases overwrite the
corresponding active and defined policies on the target switches.
--fabwideset
Policy changes that are saved but not activated are stored locally until a policy database change is
activated. Activating a policy automatically distributes the Active policy set for that policy type (SCC,
DCC, FCS, or any combination of the three) to the other switches in the fabric.
NOTE
FC routers cannot join a fabric with a strict fabric-wide consistency policy. FC routers do not support
the fabric-wide consistency policies.
Table 39 describes the fabric-wide consistency settings.
TABLE 39
Fabric-wide consistency policy settings
Setting
Value
When a policy is activated
Absent
null
Database is not automatically distributed to other switches in the fabric.
Tolerant
database_id
All updated and new policies of the type specified (SCC, DCC, FCS, or any
combination) are distributed to all Fabric v6.2.0 and later switches in the
fabric.
Strict
database_id:S
All updated and new policies of the type specified (SCC, DCC, FCS, or any
combination) are distributed to all switches in the fabric.
Displaying the fabric-wide consistency policy
1. Connect to the switch and log in using an account with admin permissions, or an account with
O permission for the FabricDistribution RBAC class of commands.
2. Enter the fddCfg --showall command.
Example shows policies for a fabric where no consistency policy is defined.
switch:admin> fddcfg --showall
Local Switch Configuration for all Databases:DATABASE - Accept/Reject
--------------------------------SCC accept
DCC accept
PWD accept
FCS accept
AUTH accept
IPFILTER accept
Fabric Wide Consistency Policy:- ""
Fabric OS Administrator’s Guide
53-1002148-02
165
7
Policy database distribution
Setting the fabric-wide consistency policy
1. Connect to the switch and log in using an account with admin permissions, or an account with
OM permissions for the FabricDistribution RBAC class of commands.
2. Enter the fddCfg --fabwideset command.
Example shows how to set a strict SCC and tolerant DCC fabric-wide consistency policy.
switch:admin> fddcfg --fabwideset "SCC:S;DCC"
switch:admin> fddcfg --showall
Local Switch Configuration for all Databases:DATABASE - Accept/Reject
--------------------------------SCC accept
DCC accept
PWD accept
FCS accept
AUTH accept
IPFILTER accept
Fabric Wide Consistency Policy:- "SCC:S;DCC"
Notes on joining a switch to the fabric
When a switch is joined to a fabric with a tolerant SCC, DCC, or FCS fabric-wide consistency policy,
the joining switch must have a matching tolerant SCC, DCC, or FCS fabric-wide consistency policy. If
the tolerant SCC, DCC, or FCS fabric-wide consistency policies do not match, the switch can join the
fabric, but an error message flags the mismatch. If the tolerant SCC, DCC, and FCS fabric-wide
consistency policies match, the corresponding SCC, DCC, and FCS ACL policies are compared.
The enforcement of fabric-wide consistency policy involves comparison of only the Active policy set.
If the ACL policies match, the switch joins the fabric successfully. If the ACL policies are absent on
the switch or on the fabric, the switch joins the fabric successfully, and the ACL policies are copied
automatically from where they exist to where they are absent. The Active policies set where they
exist and overwrite the Active and Defined policies where they are absent. If the ACL policies do not
match, the switch can join the fabric, but an error message flags the mismatch.
Under both conflicting conditions, secPolicyActivate is blocked in the merged fabric. Use the
fddCfg --fabwideset command to resolve the fabric-wide consistency policy conflicts. Use the
distribute command to explicitly resolve conflicting ACL policies.
When a switch is joined to a fabric with any strict fabric-wide consistency policy, the joining switch
must have a matching fabric-wide consistency policy. If the fabric-wide consistency policies do not
match, the switch cannot join the fabric and the neighboring E_Ports are disabled. If the fabric-wide
consistency policies match, the corresponding SCC, DCC, and FCS ACL policies are compared.
The enforcement of fabric-wide consistency policy involves comparison of only the Active policy set.
If the ACL polices match, the switch joins the fabric successfully. If the ACL policies are absent
either on the switch or on the fabric, the switch joins the fabric successfully, and the ACL policies
are copied automatically from where they are present to where they are absent. The Active policy
set where it is present overwrites the Active and Defined policy set where it is absent. If the ACL
policies do not match, the switch cannot join the fabric and the neighboring E_Ports are disabled.
166
Fabric OS Administrator’s Guide
53-1002148-02
Policy database distribution
7
Use the fddCfg –-fabwideset command on either this switch or the fabric to set a matching strict
SCC, DCC, or FCS fabric-wide consistency policy. Use ACL policy commands to delete the conflicting
ACL policy from one side to resolve ACL policy conflict. If neither the fabric nor the joining switch is
configured with a fabric-wide consistency policy, there are no ACL merge checks required.
The descriptions above also apply to joining two fabrics. In this context, the joining switch becomes
a joining fabric.
Matching fabric-wide consistency policies
This section describes the interaction between the databases with active SCC and DCC policies
and combinations of fabric-wide consistency policy settings when fabrics are merged.
For example: Fabric A with SCC:S;DCC (strict SCC and tolerant DCC) joins Fabric B with SCC:S;DCC
(strict SCC and tolerant DCC), the fabrics can merge as long as the SCC policies match, including
the order SCC:S;DCC and if both are set to strict.
Table 40 describes the impact of merging fabrics with the same fabric-wide consistency policy that
have SCC, DCC, or both policies.
TABLE 40
Merging fabrics with matching fabric-wide consistency policies
Fabric-wide
Fabric A
consistency policy ACL policies
Fabric B
ACL policies
Merge
results
Database copied
None
None
None
Succeeds
No ACL policies copied.
None
SCC/DCC
Succeeds
No ACL policies copied.
None
None
Succeeds
No ACL policies copied.
None
SCC/DCC
Succeeds
ACL policies are copied from B to A.
SCC/DCC
SCC/DCC
Succeeds
If A and B policies do not match, a
warning displays and policy
commands are disabled1.
None
None
Succeeds
No ACL policies copied.
None
SCC/DCC
Succeeds
ACL policies are copied from B to A.
Matching SCC/DCC
Matching SCC/DCC
Succeeds
No ACL policies copied.
Different SCC/DCC
policies
Different SCC/DCC
policies
Fails
Ports are disabled.
Tolerant
Strict
1. To resolve the policy conflict, manually distribute the database you want to use to the switch with the mismatched
database. Until the conflict is resolved, commands such as fddCfg --fabwideset and secPolicyActivate are
blocked.
Non-matching fabric-wide consistency policies
You may encounter one of the following two scenarios described in Table 41 and Table 42 where
you are merging a fabric with a strict policy to a fabric with an absent, tolerant, or non-matching
strict policy and the merge fails and the ports are disabled.
Table 41 on page 168 shows merges that are not supported.
Fabric OS Administrator’s Guide
53-1002148-02
167
7
Management interface security
TABLE 41
Examples of strict fabric merges
Fabric-wide consistency policy setting
Strict/Tolerant
Strict/Absent
Expected behavior
Fabric A
Fabric B
SCC:S;DCC:S
SCC;DCC:S
SCC;DCC:S
SCC:S;DCC
SCC:S;DCC
SCC:S
Ports connecting switches are disabled.
SCC:S;DCC:S
SCC:S
DCC:S
Strict/Strict
SCC:S
DCC:S
Table 42 has a matrix of merging fabrics with tolerant and absent policies.
TABLE 42
Fabric merges with tolerant/absent combinations
Fabric-wide consistency policy setting
Fabric A
Tolerant/Absent
Expected behavior
Fabric B
SCC;DCC
DCC
SCC;DCC
SCC
DCC
SCC
Error message logged.
Run fddCfg --fabwideset “<policy_ID>” from any
switch with the desired configuration to fix the
conflict. The secPolicyActivate command is blocked
until conflict is resolved.
Management interface security
You can secure an Ethernet management interface between two Brocade switches or
enterprise-class platforms by implementing IPsec and IKE policies to create a tunnel that protects
traffic flows. The tunnel has at each end a Brocade switch or enterprise-class platform. There may
be routers, gateways, and firewalls in between the two ends.
ATTENTION
Enabling secure IPsec tunnels does not provide IPsec protection for traffic flows on the external
management interfaces of intelligent blades in a chassis, nor does it support protection of traffic
flows on FCIP interfaces.
Internet Protocol security (IPsec) is a framework of open standards that ensures private and secure
communications over Internet Protocol (IP) networks through the use of cryptographic security
services. The goal of IPsec is to provide the following capabilities:
• Authentication — Ensures that the sending and receiving end-users and devices are known and
trusted by one another.
• Data Integrity — Confirms that the data received was in fact the data transmitted.
• Data Confidentiality — Protects the user data being transmitted, such as utilizing encryption to
avoid sending data in clear text.
• Replay Protection — Prevents replay attack in which an attacker resends previously-intercepted
packets in an effort to fraudulently authenticate or otherwise masquerade as a valid user.
168
Fabric OS Administrator’s Guide
53-1002148-02
Management interface security
7
• Automated Key Management—Automates the process, as well as manages the periodic
exchange and generation of new keys.
Using the ipsecConfig command, you must configure multiple security policies for traffic flows on
the Ethernet management interfaces based on IPv4 or IPv6 addresses, a range of IPv4 or IPv6
addresses, the type of application, port numbers, and protocols used (UDP/TCP/ICMP). You must
specify the transforms and processing choices for the traffic flow (drop, protect or bypass). Also,
you must select and configure the key management protocol using an automatic or manual key.
For more information on IPv4 and IPv6 addressing, refer to Chapter 2, “Performing Basic
Configuration Tasks”.
Configuration examples
Below are several examples of various configurations you can use to implement an IPsec tunnel
between two devices. You can configure other scenarios as nested combinations of these
configurations.
Endpoint-to-Endpoint Transport or Tunnel
In this scenario, both endpoints of the IP connection implement IPsec, as required of hosts in
RFC4301. Transport mode encrypts only the payload while tunnel mode encrypts the entire packet.
A single pair of addresses will be negotiated for packets protected by this SA.
It is possible in this scenario that one or both of the protected endpoints will be behind a network
address translation (NAT) node, in which case tunneled packets will have to be UDP-encapsulated
so that port numbers in the UDP headers can be used to identify individual endpoints behind the
NAT.
FIGURE 19
Protected endpoints configuration
A possible drawback of end-to-end security is that various applications that require the ability to
inspect or modify a transient packet will fail when end-to-end confidentiality is employed. Various
QoS solutions, traffic shaping, and firewalling applications will be unable to determine what type of
packet is being transmitted and will be unable to make the decisions that they are supposed to
make.
Gateway-to-Gateway Tunnel
In this scenario, neither endpoint of the IP connection implements IPsec, but the network nodes
between them protect traffic for part of the way. Protection is transparent to the endpoints, and
depends on ordinary routing to send packets through the tunnel endpoints for processing. Each
endpoint would announce the set of addresses behind it, and packets would be sent in tunnel
mode where the inner IP header would contain the IP addresses of the actual endpoints.
Fabric OS Administrator’s Guide
53-1002148-02
169
7
Management interface security
FIGURE 20
Gateway tunnel configuration
Endpoint-to-Gateway Tunnel
In this scenario, a protected endpoint (typically a portable computer) connects back to its corporate
network through an IPsec-protected tunnel. It might use this tunnel only to access information on
the corporate network, or it might tunnel all of its traffic back through the corporate network in
order to take advantage of protection provided by a corporate firewall against Internet-based
attacks. In either case, the protected endpoint will want an IP address associated with the security
gateway so that packets returned to it will go to the security gateway and be tunneled back.
FIGURE 21
Endpoint to gateway tunnel configuration
RoadWarrior configuration
In endpoint-to-endpoint security, packets are encrypted and decrypted by the host which produces
or consumes the traffic. In the gateway-to-gateway example, a router on the network encrypts and
decrypts the packets on behalf of the hosts on a protected network. A combination of the two is
referred to as a RoadWarrior configuration where a host on the Internet requires access to a
network through a security gateway that is protecting the network.
IPsec protocols
IPsec ensures confidentiality, integrity, and authentication using the following protocols:
•
•
Authentication Header (AH)
Encapsulating Security Payload (ESP)
IPsec protocols protect IP datagram integrity using hash message authentication codes (HMAC).
Using hash algorithms with the contents of the IP datagram and a secret key, the IPsec protocols
generate this HMAC and add it to the protocol header. The receiver must have access to the secret
key in order to decode the hash.
170
Fabric OS Administrator’s Guide
53-1002148-02
Management interface security
7
IPsec protocols use a sliding window to assist in flow control, The IPsec protocols also use this
sliding window to provide protection against replay attacks in which an attacker attempts a denial
of service attack by replaying an old sequence of packets. IPsec protocols assign a sequence
number to each packet. The recipient accepts each packet only if its sequence number is within
the window. It discards older packets.
Security associations
A security association (SA) is the collection of security parameters and authenticated keys that are
negotiated between IPsec peers to protect the IP datagram. A security association database (SADB)
is used to store these SAs. Information in these SAs—IP addresses, secret keys, algorithms, and so
on—is used by peers to encapsulate and decapsulate the IPsec packets
An IPsec security association is a construct that specifies security properties that are recognized by
communicating hosts. The properties of the SA are the security protocol (AH or ESP), destination IP
address, and Security Parameter Index (SPI) number. SPI is an arbitrary 32-bit value contained in
IPsec protocol headers (AH or ESP) and an IPsec SA is unidirectional. Because most
communication is peer-to-peer or client-to-server, two SAs must be present to secure traffic in both
directions. An SA specifies the IPsec protocol (AH or ESP), the algorithms used for encryption and
authentication, and the expiration definitions used in security associations of the traffic. IKE uses
these values in negotiations to create IPsec SAs. You must create an SA prior to creating an
SA-proposal. You cannot modify an SA once it is created. Use the ipsecConfig --flush manual-sa
command to remove all SA entries from the kernel SADB and re-create the SA. For more
information on the ipSecConfig command, refer to the Fabric OS Command Reference.
IPsec proposal
The IPsec sa-proposal defines an SA or an SA bundle. An SA is a set of parameters that define how
the traffic is protected using IPsec. These are the IPsec protocols to use for an SA, either AH or ESP,
and the encryption and authentication algorithms to use to protect the traffic. For SA bundles,
[AH, ESP] is the supported combination.
Authentication and encryption algorithms
IPsec uses different protocols to ensure the authentication, integrity, and confidentiality of the
communication. Encapsulating Security Payload (ESP) provides confidentiality, data integrity and
data source authentication of IP packets, and protection against replay attacks. Authentication
Header (AH) provides data integrity, data source authentication, and protection against replay
attacks, but unlike ESP, AH does not provide confidentiality.
In AH and ESP, hmac_md5 and hmac_sha1 are used as authentication algorithms. Only in ESP,
3des_cbc, blowfish_cbc, aes256_cbc and null_enc are used as encryption algorithms. Use
Table 43 on page 171 when configuring the authentication algorithm.
TABLE 43
Algorithms and associated authentication policies
Algorithm
Encryption Level Policy
Description
hmac_md5
128-bit
AH, ESP
hmac_sha1
160-bit
AH, ESP
A stronger MAC because it is a keyed hash inside a keyed hash. When
MD5 or SHA-1 is used in the calculation of an HMAC; the resulting MAC
algorithm is termed HMAC-MD5 or HMAC-SHA-1 accordingly.
NOTE: The MD5 hash algorithm is blocked when FIPS mode is
enabled
Fabric OS Administrator’s Guide
53-1002148-02
171
7
Management interface security
TABLE 43
Algorithms and associated authentication policies (Continued)
Algorithm
Encryption Level Policy
Description
3des_cbc
168-bit
ESP
Triple DES is a more secure variant of DES. It uses three different
56-bit keys to encrypt blocks of 64-bit plain text. The algorithm is
FIPS-approved for use by Federal agencies.
blowfish_cbc
64-bit
ESP
Blowfish is a 32-bit to 448-bit keyed, symmetric block cipher.
aes128_cbc
128-bit
ESP
aes256_cbc
256-bit
ESP
Advanced Encryption Standard is a 128- or 256-bit fixed block size
cipher.
null_enc
n/a
ESP
A form of plaintext encryption.
IPsec policies
An IPsec policy determines the security services afforded to a packet and the treatment of a packet
in the network. An IPsec policy allows classifying IP packets into different traffic flows and specifies
the actions or transformations performed on IP packets on each of the traffic flows. The main
components of an IPsec policy are: IP packet filter and selector (IP address, protocol, and port
information) and transform set.
IPsec traffic selector
The traffic selector is a traffic filter that defines and identifies the traffic flow between two systems
that have IPsec protection. IP addresses, the direction of traffic flow (inbound, outbound) and the
upper layer protocol are used to define a filter for traffic (IP datagrams) that is protected using
IPsec.
IPsec transform
A transform set is a combination of IPsec protocols and cryptographic algorithms that are applied
on the packet after it is matched to a selector. The transform set specifies the IPsec protocol, IPsec
mode and action to be performed on the IP packet. It specifies the key management policy that is
needed for the IPsec connection and the encryption and authentication algorithms to be used in
security associations when IKE is used as the key management protocol.
IPsec can protect either the entire IP datagram or only the upper-layer protocols using tunnel mode
or transport mode. Tunnel mode uses the IPsec protocol to encapsulate the entire IP datagram.
Transport mode handles only the IP datagram payload.
IKE policies
When IKE is used as the key management protocol, IKE policy defines the parameters used in IKE
negotiations needed to establish IKE SA and parameters used in negotiations to establish IPsec
SAs. These include the authentication and encryption algorithms, and the primary authentication
method, such as preshared keys, or a certificate-based method, such as RSA signatures.
172
Fabric OS Administrator’s Guide
53-1002148-02
Management interface security
7
Key management
The IPsec key management supports Internet Key Exchange or Manual key/SA entry. The Internet
Key Exchange (IKE) protocol handles key management automatically. SAs require keying material
for authentication and encryption. The managing of keying material that SAs require is called key
management.
The IKE protocol secures communication by authenticating peers and exchanging keys. It also
creates the SAs and stores them in the SADB.
The manual key/SA entry requires the keys to be generated and managed manually. For the
selected authentication or encryption algorithms, the correct keys must be generated using a third
party utility on your LINUX system. The key length is determined by the algorithm selected.
Linux IPsec-tools 0.7 provides tools for manual key entry (MKE) and automatic keyed connections.
The LINUX setKey command can be used for manually keyed connections, which means that all
parameters needed for the setup of the connection are provided by you. Based on which protocol,
algorithm, and key used for the creation of the security associations, the switch populates the
security association database (SAD) accordingly.
Pre-shared keys
A pre-shared key has the .psk extension and is one of the available methods IKE can be configured
to use for primary authentication. You can specify the pre-shared keys used in IKE policies; add and
delete pre-shared keys (in local database) corresponding to the identity of the IKE peer or group of
peers.
The ipSecConfig command does not support manipulating pre-shared keys corresponding to the
identity of the IKE peer or group of peers. Use the secCertUtil command to import, delete, or display
the pre-shared keys in the local switch database. For more information on this procedure, refer to
Chapter 6, “Configuring Protocols”.
Security certificates
A certificate is one of the available methods IKE can be configured to use for primary
authentication. You can specify the local public key and private key (in X.509 PEM format) and peer
public key (in X.509 format) to be used in a particular IKE policy.
Use the secCertUtil import command to import public key, private key and peer-public key (in X.509
PEM format) into the switch database. For more information on this procedure, refer to Chapter 6,
“Configuring Protocols”.
ATTENTION
The CA certificate name must have the IPSECCA.pem name.
Static Security Associations
Manual Key Entry (MKE) provides the ability to manually add, delete and flush SA entries in the
SADB. Manual SA entries may not have an associated IPsec policy in the local policy database.
Manual SA entries are persistent across system reboots.
Fabric OS Administrator’s Guide
53-1002148-02
173
7
Management interface security
Creating the tunnel
Each side of the tunnel must be configured in order for the tunnel to come up. Once you are logged
into the switch, do not log off as each step requires that you are logged in to the switch. IPsec
configuration changes take effect upon execution and are persistent across reboots. Configure the
following on each side of the tunnel:
NOTE
A backslash ( \ ) is used to skip the return character so you can continue the command on the next
line without the return character being interpreted by the shell.
1. Determine the authentication protocol and algorithm to be used on the tunnel.
Refer to Table 43 on page 171 to determine which algorithm to use in conjunction with a
specific authentication protocol.
2. Determine the type of keys to be used on the tunnel.
If you are using CA signed keys, you must generate them prior to setting up your tunnels.
3. Enable IPsec.
a.
Connect to the switch and log in using an account with admin permissions, or an account
associated with the chassis role and having OM permissions for the IPsec RBAC class of
commands.
b.
Enter the ipSecConfig --enable command to enable IPsec on the switch.
4. Create an IPsec SA policy on each side of the tunnel using the ipSecConfig --add command.
Example of creating an IPsec SA policy
This example creates an IPsec SA policy named AH01, which uses AH protection with MD5. You
would run this command on each switch; on each side of the tunnel so that both sides have
the same IPsec SA policy.
switch:admin> ipsecconfig --add policy ips sa -t AH01 -p ah -auth hmac_md5
5. Create an IPsec proposal on each side of the tunnel using the ipSecConfig --add command.
Example of creating an IPsec proposal
This example creates an IPsec proposal IPSEC-AH to use AH01 as SA.
switch:admin> ipsecconfig --add policy ips sa-proposal -t IPSEC-AH –sa AH01
6. Import the pre-shared key file.
Refer to Chapter 6, “Configuring Protocols” for information on how to set up pre-shared keys
and certificates.
7.
Configure the IKE policy using the ipSecConfig --add command.
Example of creating an IKE policy
This example creates an IKE policy for the remote peer.
switch:admin> ipsecconfig --add policy ike –t IKE01 -remote 10.33.74.13 \
-id 10.33.69.132 -remoteid 10.33.74.13 -enc 3des_cbc \
-hash hmac_md5 -prf hmac_md5 –auth psk -dh modp1024 \
-psk ipseckey.psk
174
Fabric OS Administrator’s Guide
53-1002148-02
Management interface security
7
8. Create an IPsec transform on each switch using the ipSecConfig --add command.
Example of creating an IPsec transform
This example creates an IPsec transform TRANSFORM01 to use the transport mode to protect
traffic identified for IPsec protection and use IKE01 as key management policy.
switch:admin> ipsecconfig --add policy ips transform –t TRANSFORM01 \
-mode transport -sa-proposal IPSEC-AH \
-action protect –ike IKE01
9. Create a traffic selector on each switch using the ipSecConfig --add command.
Example of creating a traffic selector
This example creates a traffic selector to select outbound and inbound traffic that needs to be
protected.
switch:admin> ipsecconfig --add policy ips selector –t SELECTOR-OUT \
-d out -l 10.33.69.132 -r 10.33.74.13 –transform TRANSFORM01
switch:admin> ipsecconfig --add policy ips selector –t SELECTOR-IN \
-d in -l 10.33.74.13 -r 10.33.69.132 –t transform TRANSFORM01
Inbound and outbound selectors use opposite values for local and remote IP addresses. In this
example, notice that the local ("-l") address of SELECTOR-OUT is the same as the remote ("-r")
address or SELECTOR-IN, Similarly, the local ("-l") address of SELECTOR-IN is the same as the
remote ("-r") address or SELECTOR-OUT. That is, “local” refers to the source IP address of the
packet, and “remote” is the destination IP address. Hence inbound packets have opposite
source and destination addresses than outbound packets.
10. Verify traffic is protected.
a.
Initiate a telnet, SSH, or ping session from the two switches.
b.
Verify that IP traffic is encapsulated.
c.
Monitor IPsec SAs created using IKE for above traffic flow
• Use the ipSecConfig -–show manual-sa –a command with the operands specified to
display the outbound and inbound SAs in kernel SADB.
• Use the ipSecConfig –-show policy ips sa -a command with the specified operands to
display all IPsec SA policies.
• Use the ipSecConfig –-show policy ips sa-proposal –a command with the specified
operands to display IPsec proposals.
• Use the ipSecConfig –-show policy ips transform –a command with the specified
operands to display IPsec transforms.
• Use the ipSecConfig –-show policy ips selector –a command with the specified
operands to display IPsec traffic selectors.
• Use the ipSecConfig –-show policy ike –a command with the specified operands to
display IKE policies.
• Use the ipSecConfig –-flush manual-sa command with the specified operands to flush
the created SAs in the kernel SADB.
Fabric OS Administrator’s Guide
53-1002148-02
175
7
Management interface security
Example of an End-to-End Transport Tunnel mode
This example illustrates securing traffic between two systems using AH protection with MD5 and
configure IKE with pre-shared keys. The two systems are a switch, BROCADE300 (IPv4 address
10.33.74.13), and an external host (10.33.69.132).
NOTE
A backslash ( \ ) is used to skip the return character so you can continue the command on the next
line without the return character being interpreted by the shell.
1. On the system console, log in to the switch as Admin.
2. Enable IPsec.
a.
Connect to the switch and log in using an account with admin permissions, or an account
with OM permissions for the IPsec RBAC class of commands.
b.
Enter the ipSecConfig --enable command to enable IPsec on the switch.
3. Create an IPsec SA policy named AH01, which uses AH protection with MD5.
switch:admin> ipsecconfig --add policy ips sa -t AH01 \
-p ah -auth hmac_md5
4. Create an IPsec proposal IPSEC-AH to use AH01 as SA.
switch:admin> ipsecconfig --add policy ips sa-proposal \
-t IPSEC-AH -sa AH01
5. Configure the SA proposal's lifetime in time units. The maximum lifetime is 86400, or one day.
switch:admin> ipsecconfig --add policy ips sa-proposal \
-t IPSEC-AH -lttime 86400 -sa AH01
6. Import the pre-shared key file using the secCertUtil command. The file name should have a
.psk extension.
For more information on importing the pre-shared key file, refer to “Installing a switch
certificate” on page 125.
7.
Configure an IKE policy for the remote peer.
switch:admin> ipsecconfig --add policy ike -t IKE01 \
-remote 10.33.69.132 -id 10.33.74.13 -remoteid 10.33.69.132 \
-enc 3des_cbc -hash hmac_md5 -prf hmac_md5 -auth psk \
-dh modp1024 -psk ipseckey.psk
NOTE
IKE version (‘-v’ option) needs to be set to 1 (IKEv1) if remote peer is a Windows XP or 2000 Host as
Windows XP and 2000 do not support IKEv2.
8. Create an IPsec transform named TRANSFORM01 to use transport mode to protect traffic
identified for IPsec protection and use IKE01 as key management policy.
switch:admin> ipsecconfig --add policy ips transform \
-t TRANSFORM01 -mode transport -sa-proposal IPSEC-AH -action \
protect -ike IKE01
176
Fabric OS Administrator’s Guide
53-1002148-02
Management interface security
7
9. Create traffic selectors to select the outbound and inbound traffic that needs to be protected.
switch:admin> ipsecconfig --add policy ips selector \
-t SELECTOR-OUT -d out -l 10.33.74.13 -r 10.33.69.132 \
-transform TRANSFORM01
switch:admin> ipsecconfig --add policy ips selector \
-t SELECTOR-IN -d in -l 10.33.69.132 -r 10.33.74.13 \
-transform TRANSFORM01
10. Verify the IPsec SAs created with IKE using the ipsecConfig --show manual-sa –a command.
11. Perform the equivalent steps on the remote peer to complete the IPsec configuration. Refer to
your server administration guide for instructions.
12. Generate IP traffic and verify that it is protected using defined policies.
a.
Initiate Telnet or SSH or ping session from BRCD300 to Remote Host.
b.
Verify that the IP traffic is encapsulated.
c.
Monitor IPsec SAs created using IKE for the above traffic flow.
• Use the ipSecConfig -–show manual-sa –a command with the operands specified to
display the outbound and inbound SAs in the kernel SADB.
• Use the ipSecConfig –-show policy ips sa -a command with the specified operands to
display all IPsec SA policies.
• Use the ipSecConfig –-show policy ips sa-proposal –a command with the specified
operands to display IPsec proposals.
• Use the ipSecConfig –-show policy ips transform –a command with the specified
operands to display IPsec transforms.
• Use the ipSecConfig –-show policy ips selector –a command with the specified
operands to display IPsec traffic selectors.
• Use the ipSecConfig –-show policy ike –a command with the specified operands to
display IKE policies.
• Use the ipSecConfig –-flush manual-sa command with the specified operands to flush
the created SAs in the kernel SADB.
CAUTION
Flushing SAs requires IPsec to be disabled and re-enabled. This operation is disruptive to traffic
on the tunnel.
NOTE
As of Fabric OS 7.0.0, IPsec no longer supports null encryption (null_enc) for IKE policies.
IPv6 policies cannot tunnel IMCP traffic.
Fabric OS Administrator’s Guide
53-1002148-02
177
7
178
Management interface security
Fabric OS Administrator’s Guide
53-1002148-02
Chapter
8
Maintaining the Switch Configuration File
In this chapter
• Configuration settings . . . . . . . . . . . . . . . . . . . . . . . . . . . . . . . . . . . . . . . . . .
• Configuration file backup . . . . . . . . . . . . . . . . . . . . . . . . . . . . . . . . . . . . . . .
• Configuration file restoration . . . . . . . . . . . . . . . . . . . . . . . . . . . . . . . . . . . .
• Configurations across a fabric . . . . . . . . . . . . . . . . . . . . . . . . . . . . . . . . . . .
• Configuration management for Virtual Fabrics . . . . . . . . . . . . . . . . . . . . . .
• Brocade configuration form . . . . . . . . . . . . . . . . . . . . . . . . . . . . . . . . . . . . .
179
182
184
188
188
190
Configuration settings
It is important to maintain consistent configuration settings on all switches in the same fabric
because inconsistent parameters, such as inconsistent PID formats, can cause fabric
segmentation. As part of standard configuration maintenance procedures, Brocade recommends
that you back up all important configuration data for every switch on a host computer server as a
safety measure.
NOTE
For information about AD-enabled switches, refer to Chapter 17, “Managing Administrative
Domains”.
For more information about troubleshooting configuration file uploads and downloads, refer to the
Fabric OS Troubleshooting and Diagnostics Guide.
There are two ways to view configuration settings for a switch in a Brocade fabric:
• Issue the configShow -all command.
To display configuration settings, connect to the switch, log in as admin, and enter the
configShow -all command. The configuration settings vary depending on switch model and
configuration. This command does not show as much configuration information as the text file
created from the configUpload command.
• Issue the configUpload -all command to upload an ASCII text file from the switch or switch
module.
You can open the text file with any text editor to view the configuration information of the
switch.
CAUTION
Editing of the uploaded file is unsupported and can result in system errors if an edited file is
subsequently downloaded.
Fabric OS Administrator’s Guide
53-1002148-02
179
8
Configuration settings
If your user account has chassis account permissions, you can do any of the following when
uploading or downloading a configuration file:
-fid
To upload the specified FID configuration.
-all
To upload all of the system configuration, including the chassis section
and all switch sections for all logical switches.
Note: Use this parameter when obtaining a complete capture of the switch
configuration in a switch that has Virtual Fabric mode disabled.
-chassis
To upload only the chassis section of the system configuration file.
Configuration file format
The configuration file is divided into three areas: the header, the chassis section, and one or more
switch sections.
CAUTION
If you have Virtual Fabrics enabled, you must follow the procedure in “Configuration management
for Virtual Fabrics” on page 188 to restore the logical switches.
Example of a configuration file
[Configuration upload Information]
Configuration Format = 3.0
Minimum Compatible Format = 3.0
Excluding Format = 0.0
date = Tue Mar 1 15:53:18 2011
FOS version = v7.0.0.0
Number of LS = 2
[Chassis Configuration Begin]
[fcRouting]
[Chassis Configuration]
[LicensesDB]
[Bottleneck Configuration]
[DMM_WWN]
[Licenses]
[Chassis Configuration End]
date = Thu Apr 2 21:28:52 2009
[Switch Configuration Begin : 0]
SwitchName = Sprint5100
Fabric ID = 128
[Boot Parameters]
180
Fabric OS Administrator’s Guide
53-1002148-02
Configuration settings
8
[Configuration]
[Bottleneck Configuration]
[Zoning]
[Defined Security policies]
[Active Security policies]
[cryptoDev]
[FICU SAVED FILES]
[Banner]
[End]
[Switch Configuration End : 0]
date = Thu Apr 2 21:28:52 2009
[Switch Configuration Begin : 1]
SwitchName = switch_2
Fabric ID = 1
[Boot Parameters]
[Configuration]
[Bottleneck Configuration]
[Zoning]
[Defined Security policies]
[Active Security policies]
[cryptoDev]
[FICU SAVED FILES]
[Banner]
[End]
[Switch Configuration End : 1]
Chassis section
There is only one chassis section within a configuration. It defines configuration data for chassis
components that affect the entire system, not just one individual logical switch. The chassis
section is included in non-Virtual Fabric modes only if you use the configUpload -all command.
The chassis area specifies characteristics for these software components:
• FC Routing - Fibre Channel Routing
• Chassis configuration - Chassis configuration
• FCOE_CH_CONF - FCoE chassis configuration
Fabric OS Administrator’s Guide
53-1002148-02
181
8
Configuration file backup
•
•
•
•
•
•
•
•
•
•
•
UDROLE_CONF - User defined role configuration
LicensesDB - License Database (slot based)
DMM_WWN- Data migration manager World Wide Name configuration
Licenses - (Feature based) Licenses configuration
AGWWN_MAPPING_CONF - Access Gateway WWN mapping configuration
LicensesLservc - Sentinel License configuration
GE blade mode - GigE Mode Configuration
FWD CHASSIS CFG -- Fabric watch configuration
FRAME LOG - Frame log configuration (enable/disable)
DMM_TB - Data migration manager configuration
MOTD - Message of the day
Switch section
There is always at least one switch section for the default switch or a switch that has Virtual Fabric
mode disabled, and there are additional sections corresponding to each additionally defined
logical switch instance on a switch with Virtual Fabric mode enabled. This data is switch-specific
and affects only that logical switch behavior.
The switch section of the configuration file contains information for all of the following:
•
•
•
•
•
•
•
•
•
•
•
•
Boot parameters
Configuration
Bottleneck configuration
FCOE software configuration
Zoning
Defined security policies
Active security policies
iSCSI
CryptoDev
FICU saved files
VS_SW_CONF
Banner
Configuration file backup
We recommend keeping a backup configuration file. You should keep individual backup files for all
switches in the fabric and avoid copying configurations from one switch to another. The
configUpload command, by default, only uploads the switch context configuration for the logical
switch context in which the command is executed.
In non-Virtual Fabric mode, you must use the configUpload -all command to include both the
switch and the chassis information. In Virtual Fabric mode, the configUpload -all command can be
selected to upload all logical switches and the chassis configuration. Only administrators with
chassis permissions are allowed to upload other FIDs or the chassis configuration.
182
Fabric OS Administrator’s Guide
53-1002148-02
Configuration file backup
8
The following information is not saved in a backup:
• dnsConfig information
• Passwords
Before you upload a configuration file, verify that you can reach the FTP server from the switch.
Using a Telnet connection, save a backup copy of the configuration file from a logical switch to a
host computer.
Secure File Transfer Protocol is now an option when uploading a configuration file. SFTP is
analogous to SCP (secure copy) and appears an option for the configupload/download,
supportsave, auto FFDC/trace upload (supportftp) commands.
Uploading a configuration file in interactive mode
1. Verify that the FTP, SFTP, or SCP service is running on the host computer.
2. Connect to the switch and log in as admin.
3. Enter the configUpload command. The command becomes interactive and you are prompted
for the required information.
4. Store a soft copy of the switch configuration information in a safe place for future reference.
NOTE
The configuration file is printable, but you may want to see how many pages will be printed
before you send it to the printer.
Example of configUpload on a switch without Admin Domains
switch:admin> configupload
Protocol (scp, ftp, sftp, local) [ftp]: sftp
Server Name or IP Address [host]: 10.1.2.3
User Name [user]: UserFoo
Path/Filename [<home dir>/config.txt]: switchConfig.txt
Section (all|chassis|FID# [all]): chassis
[email protected]'s password:
Password: <hidden>
configUpload complete
Example of configUpload on a switch with Admin Domains
NOTE
AD domains other than AD255 upload a subset of information. If you want a complete switch
configuration, you need use the configUpload command while logged into AD255.
switch:AD5:admin> ad --select 5
switch:AD5:admin> configUpload
Protocol (scp or ftp) [ftp]:
Server Name or IP Address [host]: 10.1.2.3
User Name [user]: UserFoo
Path/Filename [<home dir>/config.txt]: /pub/configurations/config.txt
Password: <hidden>
configUpload complete: Only zoning parameters are uploaded from ad5.
Fabric OS Administrator’s Guide
53-1002148-02
183
8
Configuration file restoration
Configuration file restoration
When you restore a configuration file, you overwrite the existing configuration with a previously
saved backup (configuration) file.
CAUTION
Make sure that the configuration file you are downloading is compatible with your switch model.
Configuration files from a model other than the switch to which you are uploading, or your
switch’s firmware could cause your switch to fail.
If a configDownload command is issued on a non-FCR platform, any FCR-like parameters may be
viewed in the downloaded data. This is harmless to the switch and can be ignored.
Configuration files transferred from a system running Fabric OS v6.2.0 to a system running v6.3.0,
and from a system running Fabric OS v6.3.0 to a system running v6.4.0, are applied only to the
default switch or chassis areas. All other areas are not affected.
Note also that while is possible to transfer a v6.4.1 config file to a v7.0.0 switch, the reverse cannot
be done. You cannot transfer a v7.0.0 config file to a v6.4.1 switch.
Restrictions
-chassis
The number of switches defined in the downloaded config file must match the
number of switches currently defined on the switch.
-fid FID
The FID must be defined in both the downloaded configuration file and the
current system.
NOTE
Brocade recommends you disable a switch before downloading a configuration
file. If you plan to download a configuration file while the switch is enabled, see
“Configuration download without disabling a switch” on page 186.
-fid FID -sfid FID The –fid FID must be defined on the switch and the –sfid FID must be defined in
the downloaded configuration file.
184
Fabric OS Administrator’s Guide
53-1002148-02
Configuration file restoration
-all
8
The number of switches or FIDs defined in the downloaded configuration file
must match the number of switches or FIDs currently defined on the switch.
The switches must be disabled first. If they are not, the configDownload
command will download the configuration for as many switches as possible until
a non-disabled switch is found. Then it will stop. Before running this command,
verify if any switches need to be disabled.
If you are performing a configDownload due to a configuration error, it is highly
recommended that you perform a configDefault before running the
configDownload command. See “Configuration download without disabling a
switch” on page 186 for more information on non-disruptive configuration
downloads.
In Virtual Fabric-enabled mode, the chassisDisable and chassisEnable
commands are used to disable all logical switches on the affected switch. This
bypasses the need to disable and enable each switch individually once the
configuration download has completed.
Non-Virtual Fabric configuration files downloaded to a Virtual Fabric system have
configuration applied only to the default switch. If there are multiple logical
switches created in a Virtual Fabric-enabled system, there could be some issues
if there are ports that belong to the default switch in a Virtual Fabric-disabled
system, but are now assigned to logical switches in a Virtual Fabric-enabled
system. Only configurations related to ports within the default switch are applied.
If you need to set up your switch again, run the commands listed in Table 44 and save the output in
a file format. Store the files in a safe place for emergency reference.
TABLE 44
CLI commands to display or modify switch configuration information
Command
Displays
configShow
System configuration parameters, settings, and license information.
fcLunQuery
LUN IDs and LUNs for all accessible targets.
fcrRouterPortCost
FC Router route information.
fcrXlateConfig
Translate (xlate) domain's domain ID for both EX_Port-attached fabric and backbone fabric.
fosConfig
Fabric OS features.
ipAddrShow
IP address.
isnscCfg
Configuration state of the iSNS client operation.
licenseShow
License keys installed with more detail than the license information from the configShow
command.
portCfgEXPort
EX_Port configuration parameters.
portCfgVEXPort
VEX_Port configuration parameters.
CAUTION
Though the switch itself has advanced error checking, the configdownload feature within
Fabric OS was not designed for users to edit, and is limited in its ability. Edited files can therefore
become corrupted and can lead to switch failures.
Fabric OS Administrator’s Guide
53-1002148-02
185
8
Configuration file restoration
Configuration download without disabling a switch
You can download configuration files to a switch while the switch is enabled; that is, you do not
need to disable the switch for changes in SNMP, Fabric Watch, or ACL parameters. However, if there
is any changed parameter that does not belong to SNMP, Fabric Watch, or ACL, then you must
disable the switch. When you use the configDownload command, you will be prompted to disable
the switch only when necessary.
Configuration download without disabling a switch is independent of the hardware platform and
supported on all hardware platforms running Fabric OS v6.1.0 and later.
ATTENTION
In Fabric OS v6.2.0 and later, the configuration download process can only restore logical switches
that already exist and with the same FIDs. It cannot be used to clone or repair the current switch
because the configDownload command cannot create logical switches if they do not exist.
Restoring a configuration
CAUTION
Using the SFID parameter erases all configuration information on the logical switch.
Use this parameter only when the logical switch has no configuration information you want to
save.
1. Verify that the FTP service is running on the server where the backup configuration file is
located.
2. Connect to the switch and log in using an account with admin permissions, and if necessary
with chassis permissions.
3. If there are any changed parameters in the configuration file that do not belong to SNMP,
Fabric Watch, or ACL, disable the switch by entering the switchDisable command.
4. Enter the configDownload command.
The command becomes interactive and you are prompted for the required information.
5. At the “Do you want to continue [y/n]” prompt, enter y.
Wait for the configuration to be restored.
6. If you disabled the switch, enter the switchEnable command when the process is finished.
NOTE
Because some configuration parameters require a reboot to take effect, after you download a
configuration file, you must reboot to be sure that the parameters are enabled. Before the reboot,
this type of parameter is listed in the configuration file, but it is not effective until after the reboot.
On dual-CP platforms, you must reboot both CPs simultaneously for changes to take effect.
Example of configDownload without Admin Domains
switch:admin> configdownload
Protocol (scp, ftp, local) [ftp]:
Server Name or IP Address [host]: 10.1.2.3
186
Fabric OS Administrator’s Guide
53-1002148-02
Configuration file restoration
8
User Name [user]: UserFoo
Path/Filename [<home dir>/config.txt]:
Section (all|chassis|FID# [all]): all
*** CAUTION ***
This command is used to download a backed-up configuration
for a specific switch. If using a file from a different
switch, this file's configuration settings will override
any current switch settings.
Downloading a configuration
file, which was uploaded from a different type of switch,
may cause this switch to fail. A switch reboot might be
required for some parameter changes to take effect.
configDownload operation may take several minutes
to complete for large files.
Do you want to continue [y/n]: y
Password: <hidden>
configDownload complete.
Example of configDownload with Admin Domains
switch:AD5:admin>configdownload
Protocol (scp or ftp) [ftp]:
Server Name or IP Address [host]: 10.1.2.3
User Name [user]: UserFoo
Path/Filename [<home dir>/config.txt]: /pub/configurations/config.txt
*** CAUTION ***
This command is used to download a backed-up configuration
for a specific switch. If using a file from a different
switch, this file's configuration settings will override
any current switch settings.
Downloading a configuration
file, which was uploaded from a different type of switch,
may cause this switch to fail. A switch reboot might be
required for some parameter changes to take effect.
configDownload operation may take several minutes
to complete for large files.
Do you want to continue [y/n]: y
Password: <hidden>
Activating configDownload: Switch is disabled
configDownload complete: Only zoning parameters are downloaded to ad5.
Example of a non-interactive download of all configurations (chassis + switches)
configdownload -a -ftp
10.1.2.3,UserFoo,/pub/configurations/config.txt,password
Fabric OS Administrator’s Guide
53-1002148-02
187
8
Configurations across a fabric
Configurations across a fabric
To save time when configuring fabric parameters and software features, you can save a
configuration file from one switch and download it to other switches of the same model type, as
shown in the following procedure.
Do not download a configuration file from one switch to another switch that is a different model or
firmware version, because it can cause the switch to fail. If you need to reset affected switches,
issue the configDefault command after download is completed but before the switch is enabled.
Once enabled with a duplicate domain ID, the switch will then become segmented.
Downloading a configuration file from one switch to another same
model switch
1. Configure one switch.
2. Use the configUpload command to save the configuration information. Refer to “Configuration
file backup” on page 182 for more information.
3. Run configDefault on each of the target switches, and then use the configDownload command
to download the configuration file to each of the target switches. Refer to “Configuration file
restoration” on page 184 for more information.
Security considerations
Security parameters and the switch identity cannot be changed by the configDownload command.
Parameters such as the switch name and IP address (lines in the configuration file that begin with
“boot”) are ignored. Security parameters (lines in the configuration file that begin with “sec”), such
as secure mode setting and version stamp, are ignored.
For more detailed information on security, refer to Chapter 6, “Configuring Protocols”.
Configuration management for Virtual Fabrics
You can use the configUpload -vf or configDownload -vf command to restore configurations to a
logical switch. The -vf option only restores the Virtual Fabrics configuration information on to a
switch of the same model.
The Virtual Fabric configuration on the switch defines all of the logical switches allowed and
configured for a particular platform.
Uploading a configuration file from a switch with Virtual Fabrics
enabled
The configUpload command with the -vf option specifies that configuration upload will upload the
Virtual Fabric configuration instead of the non-Virtual Fabric configuration information.
You must specify a filename with the configUpload -vf command. It is recommended not to use
config.txt for a filename as this can easily be confused with a normal uploaded configuration file.
188
Fabric OS Administrator’s Guide
53-1002148-02
Configuration management for Virtual Fabrics
8
Example of configUpload on a switch with Virtual Fabrics
Sprint5100:FID128:admin> configupload
Protocol (scp, ftp, sftp, local) [ftp]:
Server Name or IP Address [host]: 10.1.2.3
User Name [user]: UserFoo
Path/Filename [<home dir>/config.txt]: 5100.txt
Potentially remote file may get overwritten
Section (all|chassis|FID# [all]):
Password: <hidden>
configUpload complete: All selected config parameters are uploaded
Example of configUpload of a logical switch configuration
DCX_80:FID128:admin> configupload -vf
Protocol (scp, ftp, sftp, local) [ftp]:
Server Name or IP Address [host]: 10.1.2.3
User Name [user]: anonymous
Path/Filename [<home dir>/config.txt]:
configUpload complete: VF config parameters are uploaded
2009/07/20-09:13:40, [LOG-1000], 225, SLOT 7 | CHASSIS, INFO, BrocadeDCX,
Previous message repeated 7 time(s)
2009/07/20-10:27:14, [CONF-1001], 226, SLOT 7 | FID 128, INFO, DCX_80,
configUpload completed successfully for VF config parameters.
Restoring logical switch configuration using configDownload
The configDownload -vf command specifies that the Virtual Fabric configuration download file is
downloaded instead of the regular configuration. After the Virtual Fabric configuration file is
downloaded, the switch is automatically rebooted.
On dual-CP platforms, if CPs are incompatible (HA not in sync), the Virtual Fabric configuration file
is not propagated to the standby CP. Otherwise, the active CP attempts to remain active after the
reboot, and the new Virtual Fabric configuration file is then propagated to the standby CP.
CAUTION
You must perform the configDownload command on the switch after restoring the Virtual Fabric
configuration to fully restore your switch or chassis configuration.
1. Connect to the switch and log in using an account with admin permissions.
2. Enter the configDownload -vf command.
3. Respond to the prompts.
Wait for the configuration file to download onto the switch. You may need to reconnect to the
switch.
4. Enter the configDownload command.
5. Respond to the prompts.
Wait for the configuration file to download to the switch.
Fabric OS Administrator’s Guide
53-1002148-02
189
8
Brocade configuration form
6. Verify the LISL ports are set up correctly.
Example of a non-interactive download from a switch with an FID = 8, to FID 10
configdownload -fid 8 -sfid 10 -ftp 10.1.2.3,UserFoo,config.txt,password
Example of configDownload on a switch
5100:FID128:admin> configdownload -vf
Protocol (scp, ftp, sftp, local) [ftp]:
Server Name or IP Address [host]: 10.1.2.3
User Name [user]: UserFoo
Path/Filename [<home dir>/config.txt]: 5100_FID89.txt
*** CAUTION ***
This command is used to download the VF configuration to the
switch. Afterwards, the switch will be automatically rebooted
and the new VF settings will be used. You will then need to
run configdownload again to install the configuration(s) for
any logical switch(s) that are setup in the new VF configuration.
Do you want to continue [y/n]: y
(output truncated)
Restrictions
The following restrictions should be observed when using the configUpload or configDownload
commands when Virtual Fabrics is enabled:
• The -vf option is incompatible with the –fid, –sfid, or –all options. Any attempt to combine it
with any of the other three will fail the configuration upload or download operation.
• You are not allowed to modify the Virtual Fabric configuration file after it has been uploaded.
Only minimal verification is done by the configDownload command to ensure it is compatible,
much like the normal downloaded configuration file.
• After the configDownload -vf command completes and reboots your switch, you must then
download the matching regular configuration using the configDownload -all command. This
ensures proper behavior of the system and logical switches.
• All of the attributes of the Virtual Fabric configuration file will be downloaded to the system and
take effect. This includes, but is not limited to, logical switch definitions, whether the Virtual
Fabrics feature is enabled or disabled, and the F_Port trunking ports, except the LISL ports.
The LISL ports on the system are not affected by the Virtual Fabric configuration file download.
Brocade configuration form
Use the form in Table 45 as a hard copy reference for your configuration information.
In the hardware reference manuals for the Brocade DCX and DCX-4S enterprise-class platform,
there is a guide for FC port setting tables. The tables can be used to record configuration
information for the various blades.
190
Fabric OS Administrator’s Guide
53-1002148-02
Brocade configuration form
TABLE 45
8
Brocade configuration and connection
Brocade configuration settings
IP address
Gateway address
Chassis configuration option
Management connections
Serial cable tag
Ethernet cable tag
Configuration information
Domain ID
Switch name
Ethernet IP address
Ethernet subnet mask
Total number of local devices (nsShow)
Total number of devices in fabric (nsAllShow)
Total number of switches in the fabric (fabricShow)
Fabric OS Administrator’s Guide
53-1002148-02
191
8
192
Brocade configuration form
Fabric OS Administrator’s Guide
53-1002148-02
Chapter
9
Installing and Maintaining Firmware
In this chapter
• Firmware download process overview . . . . . . . . . . . . . . . . . . . . . . . . . . . . .
• Preparing for a firmware download . . . . . . . . . . . . . . . . . . . . . . . . . . . . . . .
• Firmware download on switches . . . . . . . . . . . . . . . . . . . . . . . . . . . . . . . . .
• Firmware download on an enterprise-class platform . . . . . . . . . . . . . . . . .
• Firmware download from a USB device . . . . . . . . . . . . . . . . . . . . . . . . . . . .
• FIPS Support . . . . . . . . . . . . . . . . . . . . . . . . . . . . . . . . . . . . . . . . . . . . . . . . .
• Test and restore firmware on switches . . . . . . . . . . . . . . . . . . . . . . . . . . . .
• Test and restore firmware on enterprise-class platforms . . . . . . . . . . . . . .
• Validating a firmware download . . . . . . . . . . . . . . . . . . . . . . . . . . . . . . . . . .
193
196
198
200
203
204
206
208
211
Firmware download process overview
Fabric OS v7.0.0 provides nondisruptive firmware installation.
This chapter refers to the following specific types of blades inserted into the Brocade DCX, DCX-4S,
or DCX 8510 Backbone platforms:
• FC blades or port blades that contain only Fibre Channel ports; the Brocade FC10-6 and the
Brocade FC8-16, FC8-32, FC8-48, and FC8-64.
• AP blades contain extra processors and specialized ports: Brocade FR4-18i, FA4-18,
FCOE10-24, and FX8-24.
• CP blades have a control processor (CP) used to control the entire switch; CP blades can be
inserted only into slots 6 and 7 on the Brocade DCX or DCX 8510-8, and slots 4 and 5 on the
Brocade DCX-4S or DCX 8510-4.
• CORE8 and CR4S-8 core blades provide ICL functionality between two Brocade DCX
Backbones. CORE8 blades can be inserted only into slots 5 and 8 on the Brocade DCX. CR4S-8
blades can be inserted only into slots 3 and 6 on the Brocade DCX-4S.
• CORE8 and CR4S-8 core blades provide ICL functionality between two Brocade DCX 8510-8
Backbones. CORE8 blades can be inserted only into slots 5 and 8 on the Brocade DCX. CR4S-8
blades can be inserted only into slots 3 and 6 on the Brocade DCX 8510-4.
NOTE
For more information on troubleshooting a firmware download, refer to the Fabric OS
Troubleshooting and Diagnostics Guide.
Fabric OS Administrator’s Guide
53-1002148-02
193
9
Firmware download process overview
You can download Fabric OS to a director, which is a chassis; and to a nonchassis-based system,
also referred to as a switch. The difference in the download process is that directors have two CPs
and nonchassis-based systems have one CP. Use the firmwareDownload command to download
the firmware from either an FTP or SSH server by using either the FTP, SFTP, or SCP protocol to the
switch. Or, on the Brocade 300, 5100, 5300, 6510, 7800, 8000, and VA-40FC switches, the
Brocade 5410, 5424, 5450, 5480 embedded switches, and the Brocade DCX, DCX-4S, or DCX
8510 Backbones you can use a Brocade-branded USB device.
The new firmware consists of multiple files in the form of RPM packages listed in a .plist file. The
.plist file contains specific firmware information (time stamp, platform code, version, and so forth)
and the names of packages of the firmware to be downloaded. These packages are made available
periodically to add features or to remedy defects. Contact your switch support provider to obtain
information about available firmware versions.
All systems maintain two partitions of nonvolatile storage areas, a primary and a secondary, to
store two firmware images. The firmware download process always loads the new image into the
secondary partition. It then swaps the secondary partition to be the primary and high availability
(HA) reboots (which is non-disruptive) the system. After the system boots up, the new firmware is
activated. The firmware download process then copies the new image from the primary partition to
the secondary partition.
ATTENTION
The Brocade 8000 does not support a non-disruptive firmwareDownload. The switch reboots once
the firmware upgrade or downgrade is complete.
In dual-CP systems, the firmware download process, by default, sequentially upgrades the firmware
image on both CPs using HA failover to prevent disruption to traffic flowing through the
enterprise-class platform. This operation depends on HA status on the enterprise-class platform. If
the platform does not support HA, you can still upgrade the CPs one at a time.
If you are using a Brocade DCX, DCX-4S, or DCX 8510- enterprise-class platform, with one or more
AP blades: The Fabric OS automatically detects mismatches between the active CP firmware and
the blade’s firmware and triggers the auto-leveling process. This auto-leveling process
automatically updates the blade firmware to match the active CP. At the end of the auto-leveling
process, the active CP and the blade run the same version of the firmware.
If the firmware download process is interrupted by an unexpected reboot, the system automatically
repairs and recovers the secondary partition. You must wait for the recovery to complete before
issuing another firmwareDownload command.
The command supports both non-interactive and interactive modes. If the firmwareDownload
command is issued without any operands, or if there is any syntax error in the parameters, the
command enters an interactive mode, in which you are prompted for input
ATTENTION
For each switch in your fabric, complete all firmware download changes on the current switch before
issuing the firmwareDownload command on the next switch. This process ensures nondisruption of
traffic between switches in your fabric.
To verify the firmwareDownload process is complete, enter the firmwareDownloadStatus command
on the switch, verify the process is complete, then move on to the next switch.
194
Fabric OS Administrator’s Guide
53-1002148-02
Firmware download process overview
9
Upgrading and downgrading firmware
Upgrading means installing a newer version of firmware. Downgrading means installing an older
version of firmware.
In most cases, you will be upgrading firmware; that is, installing a newer firmware version than the
one you are currently running. However, some circumstances may require installing an older
version; that is, downgrading the firmware. The procedures in this section assume that you are
upgrading firmware, but they work for downgrading as well, provided the old and new firmware
versions are compatible. Always reference the latest release notes for updates that may exist
regarding downgrades under particular circumstances.
For details on Administrative Domains and the firmware download process, see Chapter 17,
“Managing Administrative Domains” for more information.
For details about testing and restoring firmware, see “Test and restore firmware on enterprise-class
platforms” on page 208.
Password-less download of firmware
You can download firmware without a password using the sshutil command for public key
authentication when SSH is selected. The switch has to be configured to install the private key, and
the you must export the public key to the remote host. Before running the firmwareDownload
command, you must first configure the SSH protocol to permit passwordless logins for outgoing
authentication as described in “Configuring outgoing SSH authentication” on page 121
Considerations for FICON CUP environments
To prevent channel errors during nondisruptive firmware installation, the switch CUP port must be
taken offline from all host systems.
HA sync state
High availability (HA) synchronization occurs when two CPs in an enterprise-class platform are
synchronized. This state provides redundancy and a non-disruptive firmware download. In order for
a firmware download to successfully occur, the two CPs in an enterprise-class platform must be in
sync.
If the CPs have mixed versions when you enter the firmwareDownload command, the CPs may not
be in HA sync. In this case, you need to enter the firmwareDownload –s command first to upgrade
or downgrade the standby CP to the same level as the active CP first, and then upgrade the CPs to
the desired version of firmware.
NOTE
Do not run mixed firmware levels on CPs.
Table 46 shows the sync state of an enterprise-class platform that has different Fabric OS versions
installed on the active and standby CP. Use the table to determine if you need to use the
firmwareDownload -s command.
Fabric OS Administrator’s Guide
53-1002148-02
195
9
Preparing for a firmware download
TABLE 46
Enterprise-class platform HA sync states
Active CP Fabric OS
version
Standby CP Fabric OS
version
HA sync state
Remedy
v6.2.0
v6.2.0
inSync
n/a
v6.2.x
v6.3.0
inSync
n/a
v6.3.0
v6.2.x
If Ethernet Switch Service
is enabled, no sync.
Run firmwareDownload -s on the
standby CP and upgrade it to v6.3.0.
v6.3.0
v6.3.0
inSync
n/a
v6.3.0
v6.4.0
inSync
n/a
v6.4.0
v6.3.0
inSync
Run firmwareDownload -s on the
standby CP and upgrade it to v6.4.0.
v6.4.0
v6.4.0
inSync
n/a
v7.0.0
v6.4.0
inSync
Run firmwareDownload -s on the
standby CP to upgrade it to v7.0.0
v7.0.0
v7.0.0
inSync
n/a
Preparing for a firmware download
Before executing a firmware download, it is recommended that you perform the tasks listed in this
section. In the unlikely event of a failure or time-out, these preparation tasks enable you to provide
your switch support provider the information required to perform advanced troubleshooting.
It is recommended that you perform a configUpload to back up the current configuration before you
download firmware to a switch. See “Configuration file backup” on page 182 for details.
1. Read the release notes for the new firmware to find out if there are any updates related to the
firmware download process.
2. Connect to the switch and log in as admin. Enter the firmwareShow command to verify the
current version of Fabric OS.
Brocade does not support upgrades from more than one previous release. For example,
upgrading from Fabric OS v6.3.0 to v6.4.0 is supported, but upgrading from Fabric OS v6.2.0
or a previous release directly to v7.0.0 is not. In other words, upgrading a switch from Fabric OS
v6.3.0 to v7.0.0 is a two-step process—first upgrade to v6.4.0, and then upgrade to v7.0.0. If
you are running a pre-Fabric OS v6.2.0 version you must upgrade to v6.2.0, then to v6.3.0,
then to v6.4.0, and finally to v7.0.0.
3. Perform a configUpload prior to the firmwareDownload. Save the config file on your FTP or SSH
server or USB memory device on supported platforms.
4. Optional: For additional support, connect the switch to a computer with a serial console cable.
Ensure that all serial consoles (both CPs for directors) and any open network connection
sessions, such as Telnet, are logged and included with any trouble reports.
5. Connect to the switch and log in to the switch as admin. Enter the supportSave command to
retrieve all current core files prior to executing the firmware download. This helps to
troubleshoot the firmware download process if a problem is encountered.
6. Optional: Enter the errClear command to erase all existing messages in addition to internal
messages.
196
Fabric OS Administrator’s Guide
53-1002148-02
Preparing for a firmware download
9
Connected switches
Before you upgrade the firmware on your switch, you need to check the connected switches to
ensure compatibility and that any older versions are supported. Refer to the Fabric OS Compatibility
section of the Brocade Fabric OS Release Notes, for the recommended firmware version.
NOTE
Go to http://www.brocade.com to view end-of-life policies for Brocade products. Navigate to the
Support tab, then select Policies and Locations. Under Important Note, click on End of Life Support.
End-of-life products are not supported.
If Brocade 300, 5100, 5300, 5410, 5424, 5450, 5460, 5470, 5480, 5424, 6510, 7800, 8000,
and VA-40FC switches are adjacent and you start firmware downloads on them at the same time,
there may be traffic disruption.
To determine if you need to upgrade switches connected to the switch you are upgrading, use the
following procedure on each connected switch to display firmware information and build dates
Finding the switch firmware version
1. Connect to the switch and log in as admin.
2. Enter the version command.
The following information is displayed:
•
•
•
•
•
Kernel displays the version of switch kernel operating system.
Fabric OS displays the version of switch Fabric OS.
Made on displays the build date of firmware running in switch.
Flash displays the install date of firmware stored in nonvolatile memory.
BootProm displays the version of the firmware stored in the boot PROM.
Obtain and decompress firmware
Firmware upgrades are available for customers with support service contracts and for partners on
the Brocade website at http://www.brocade.com.
At the Brocade website click Brocade Connect, log in, and follow the instructions to register and
download firmware. Partners with authorized accounts can use the Brocade Partner Network.
You must decompress the firmware before you can use the firmwareDownload command to update
the firmware on your equipment. Use the UNIX tar command for .tar files, the gunzip command for
all .gz files, or a Windows unzip program for all .zip files
When you unpack the downloaded firmware, it expands into a directory that is named according to
the version of Fabric OS it contains. For example, when you download and unzip v7.0.0.zip, it
expands into a directory called v7.0.0. When you issue the firmwareDownload command, there is
an automatic search for the correct package file type associated with the switch. Specify only the
path up to and including the v7.0.0 directory.
Fabric OS Administrator’s Guide
53-1002148-02
197
9
Firmware download on switches
Firmware download on switches
Brocade 300, 5100, 5300, 5410, 5424, 5450, 5460, 5470, 5480, 6510, 7800, 8000, and
VA-40FC switches maintain primary and secondary partitions for firmware. The firmwareDownload
command defaults to an autocommit option that automatically copies the firmware from one
partition to the other.
NOTE
This section only applies when upgrading from Fabric OS v6.1.x to v6.2.0, or from different versions
of v6.2.0, such as patch releases. If you are downgrading from v6.2.0 to v6.1.x, you must enter the
firmwareDownload –s command as described in “Test and restore firmware on switches” on
page 206.
This is not necessary when downgrading from Fabric OS v6.3.0 to v6.2.0 or from Fabric OS v6.4.0
to v6.3.0.
Do not override autocommit under normal circumstances; use the default. See “Test and restore
firmware on enterprise-class platforms” on page 208 for details about overriding the autocommit
option.
Switch firmware download process overview
The following list describes the default behavior after you enter the firmwareDownload command
(without options) on Brocade 300, 5100, 5300, 5410, 5424, 5450, 5460, 5470, 5480, 5424,
6510, 7800, 8000, and VA-40FC switches:
• The Fabric OS downloads the firmware to the secondary partition.
• The system performs a high-availability reboot (haReboot). After the haReboot, the former
secondary partition is the primary partition.
• The system replicates the firmware from the primary to the secondary partition.
The upgrade process first downloads and then commits the firmware to the switch. While the
upgrade is proceeding, you can start a session on the switch and use the firmwareDownloadStatus
command to observe the upgrade progress if you wish.
CAUTION
After you start the process, do not enter any disruptive commands (such as reboot) that interrupt
the process. The entire firmware download and commit process takes approximately 17 minutes.
If there is a problem, wait for the time-out (30 minutes for network problems) before issuing the
firmwareDownload command again. Disrupting the process can render the switch inoperable and
require you to seek help from your switch service provider.
Do not disconnect the switch from power during the process. The switch could be inoperable
when rebooted.
198
Fabric OS Administrator’s Guide
53-1002148-02
Firmware download on switches
9
Upgrading firmware for Brocade 300, 5100, 5300, 5410, 5424, 5450, 5460,
5470, 5480, 6510, 7800, 8000, and VA-40FC switches
1. Take the following appropriate action based on what service you are using:
• If you are using FTP, SFTP, or SCP, verify that the FTP or SSH server is running on the host
server and that you have a valid user ID and password on that server.
• If your platform supports a USB memory device, verify that it is connected and running.
2. Obtain the firmware file from the Brocade website at http://www.brocade.com and store the
file on the FTP or SSH server or the USB memory device.
3. Unpack the compressed files preserving directory structures.
The firmware is in the form of RPM packages with names defined in a .plist file. The .plist file
contains specific firmware information and the names of packages of the firmware to be
downloaded.
4. Connect to the switch and log in as admin.
5. Issue the firmwareShow command to check the current firmware version on connected
switches. Upgrade their firmware if necessary before proceeding with upgrading this switch.
See “Connected switches” on page 197 for details.
6. Enter the firmwareDownload command and respond to the prompts.
NOTE
If DNS is enabled and a server name instead of a server IP address is specified in the
command line, firmwareDownload determines whether IPv4 or IPv6 should be used.
To be able to mention the FTP server by name, you must enter at least one DNS server using
the dnsConfig command.
7.
At the “Do you want to continue [y/n]” prompt, enter y.
8. After the HA reboot, connect to the switch and log in again as admin.
9. If you want snapshots of the upgrade progress, use a separate session and enter the
firmwareDownloadStatus command to monitor the firmware download.
10. After the firmware commit is completed, which takes several minutes, enter the firmwareShow
command to display the firmware level of both partitions.
Example of an interactive firmware download
switch:root> firmwaredownload
Server Name or IP Address: 10.31.2.25
User Name: releaseuser
File Name: /pub/sre/SQA/fos/v7.0.0/v7.0.0_main_bld33
Network Protocol(1-auto-select, 2-FTP, 3-SCP, 4-SFTP) [1]: 4
Verifying if the public key authentication is available.Please wait ...
The public key authentication is not available.
Password:
Server IP: 10.31.2.25, Protocol IPv4
Checking system settings for firmwaredownload...
Fabric OS Administrator’s Guide
53-1002148-02
199
9
Firmware download on an enterprise-class platform
Firmware download on an enterprise-class platform
You can download firmware to a Brocade DCX, DCX-4S, or DCX 8510 enterprise-class platform
without disrupting the overall fabric if the two CP blades are installed and fully synchronized. Use
the haShow command to verify that the CPs are synchronized prior to beginning the firmware
download process. If only one CP blade is inserted or powered on, you can run firmwareDownload –
s to upgrade the CP. If the CPs are not in sync, you can run firmwareDownload –s on each of the
CPs to upgrade them. These operations are disruptive. Or if the CPs are not in sync, run the
haSyncStart command. If the problem persists, refer to the Fabric OS Troubleshooting and
Diagnostics Guide. If the troubleshooting information fails to help resolve the issue, contact your
switch service provider.
During the upgrade process, the director fails over to its standby CP blade and the IP address for
the enterprise-class platform moves to that CP blade's Ethernet port. This may cause informational
ARP address reassignment messages to appear on other switches in the fabric. This is normal
behavior, because the association between the IP addresses and MAC addresses has changed.
ATTENTION
To successfully download firmware, you must have an active Ethernet connection on each CP.
Enterprise-class platform firmware download process overview
The following summary describes the default behavior of the firmwareDownload command (without
options) on a Brocade DCX, DCX-4S, or DCX 8510 enterprise-class platforms. After you enter the
firmwareDownload command on the active CP blade the following actions occur:
1. The standby CP blade downloads firmware.
2. The standby CP blade reboots and comes up with the new Fabric OS.
3. The active CP blade synchronizes its state with the standby CP blade.
4. The active CP blade forces a failover and reboots to become the standby CP blade.
5. The new active CP blade synchronizes its state with the new standby CP blade.
6. The new standby CP blade (the active CP blade before the failover) downloads firmware.
7.
The new standby CP blade reboots and comes up with the new Fabric OS.
8. The new active CP blade synchronizes its state with the new standby CP blade.
9. The firmwareCommit command runs automatically on both CP blades.
CAUTION
After you start the process, do not enter any disruptive commands (such as reboot) that interrupt
the process. The entire firmware download and commit process takes approximately 17 minutes.
If there is a problem, wait for the time-out (30 minutes for network problems) before issuing the
firmwareDownload command again. Disrupting the process can render the switch inoperable and
require you to seek help from your switch service provider.
Do not disconnect the switch from power during the process . The switch could be inoperable
when rebooted.
200
Fabric OS Administrator’s Guide
53-1002148-02
Firmware download on an enterprise-class platform
9
Upgrading firmware on enterprise-class platforms (including blades)
There is only one chassis management IP address for the Brocade DCX, DCX-4S, or DCX 8510
platforms.
NOTE
By default, the firmwareDownload command automatically upgrades both the active and the
standby CP and all co-CPs on the CP blades in the Brocade DCX, DCX-4S, or DCX 8510 Backbones.
It automatically upgrades all AP blades in the Brocade DCX, DCX-4S, or DCX 8510 platforms using
auto-leveling.
1. Verify that the Ethernet interfaces located on CP0 and CP1 are plugged into your network.
2. Verify that the FTP, SFTP, or SSH server is running on the host server and that you have a user
ID on that server.
3. Obtain the firmware file from the Brocade website at http://www.brocade.com and store the
file on the FTP or SSH server.
4. Unpack the compressed files preserving directory structures.
The firmware is in the form of RPM packages with names defined in a .plist file. The .plist file
contains specific firmware information and the names of packages of the firmware to be
downloaded.
5. Connect to the chassis IP management interface or active CP and log in as admin.
6. Use the firmwareShow command to check the current firmware version on connected
switches. Upgrade the firmware, if necessary, before proceeding with upgrading this switch.
See “Connected switches” on page 197.
7.
Enter the haShow command to confirm that the two CP blades are synchronized.
In the following example, the active CP blade is CP0 and the standby CP blade is CP1:
ecp:admin> hashow
Local CP (Slot 5, CP0): Active, Warm Recovered
Remote CP (Slot 6, CP1): Standby, Healthy
HA enabled, Heartbeat Up, HA State synchronized
CP blades must be synchronized and running Fabric OS v6.0.0 or later to provide a
nondisruptive download. If the two CP blades are not synchronized, enter the haSyncStart
command to synchronize them. If the CPs still are not synchronized, contact your switch
service provider.
For further troubleshooting, refer to the Fabric OS Troubleshooting and Diagnostics Guide.
8. Enter the firmwareDownload command and respond to the interactive prompts.
9. At the “Do you want to continue [y/n]” prompt, enter y.
The firmware is downloaded to one CP blade at a time, beginning with the standby CP blade.
During the process, the active CP blade fails over. After the firmware is downloaded, a firmware
commit starts on both CP blades. The entire firmware download and commit process takes
approximately 17 minutes.
Fabric OS Administrator’s Guide
53-1002148-02
201
9
Firmware download on an enterprise-class platform
If an AP blade is present: At the point of the failover an autoleveling process is activated.
Autoleveling is triggered when the active CP detects a blade that contains a different version of
the firmware, regardless of which version is older. Autoleveling downloads firmware to the AP
blade, swaps partitions, reboots the blade, and copies the new firmware from the primary
partition to the secondary partition. If you have multiple AP blades, they are updated
simultaneously; however, the downloads can occur at different rates.
Autoleveling takes place in parallel with the firmware download being performed on the CPs,
but does not impact performance. Fibre Channel traffic is not disrupted during autoleveling,
but GbE traffic on AP blades may be affected.
ecp:admin> firmwaredownload
Type of Firmware (FOS, SAS, or any application) [FOS]:
Server Name or IP Address: 10.1.2.3
User Name: userfoo
File Name: /home/userfoo/v7.0.0
Network Protocol (1-auto-select, 2-FTP, 3-SCP, 4-SFTP)) [1]:
Password: <hidden>
Checking version compatibility...
Version compatibility check passed.
The following AP blades are installed in the system.
Slot Name
Versions
Traffic Disrupted
----------------------------------------------------------------3
FC4-16IP
v7.0.0
GigE
4
FR4-18i
v7.0.0
None
10
FR4-18i
v7.0.0
None
This command will upgrade the firmware on both CPs and all AP blade(s) above.
If you want to upgrade firmware on a single CP only, please use -s option.
You may run firmwaredownloadstatus to get the status of this"
command.
This command will cause a warm/non-disruptive boot on the active CP,
but will require that existing telnet, secure telnet or SSH sessions
be restarted.
Do you want to continue [Y]: y
The firmware is being downloaded to the Standby CP. It may take up to 10
minutes
10. Optionally, after the failover, connect to the switch, and log in again as admin. Using a separate
session to connect to the switch, enter the firmwareDownloadStatus command to monitor the
firmware download status.
sw0:FID128:admin> firmwaredownloadstatus
[1]: Mon Mar 22 04:27:21 2010
Slot 7 (CP1, active): Firmware is being downloaded to the switch. This step
may take up to 30 minutes.
[2]: Mon Mar 22 04:34:58 2010
Slot 7 (CP1, active): Relocating an internal firmware image on the CP blade.
[3]: Mon Mar 22 04:35:29 2010
Slot 7 (CP1, active): The internal firmware image is relocated successfully.
[4]: Mon Mar 22 04:35:30 2010
202
Fabric OS Administrator’s Guide
53-1002148-02
Firmware download from a USB device
9
Slot 7 (CP1, active): Firmware has been downloaded to the secondary partition
of the switch.
[5]: Mon Mar 22 04:37:24 2010
Slot 7 (CP1, standby): The firmware commit operation has started. This may
take up to 10 minutes.
[6]: Mon Mar 22 04:41:59 2010
Slot 7 (CP1, standby): The commit operation has completed successfully.
[7]: Mon Mar 22 04:41:59 2010
Slot 7 (CP1, standby): Firmwaredownload command has completed successfully.
Use firmwareshow to verify the firmware versions.
11. Enter the firmwareShow command to display the new firmware versions.
Firmware download from a USB device
The Brocade 300, 5100, 5300, 6510, 7800, 8000, and VA-40FC switches and the Brocade DCX,
DCX-4S, or DCX 8510 Backbones support a firmware download from a Brocade branded USB
device attached to the switch or active CP. Before the USB device can be accessed by the
firmwareDownload command, it must be enabled and mounted as a file system. The firmware
images to be downloaded must be stored under the relative path from
/usb/usbstorage/brocade/firmware or use the absolute path in the USB file system. Multiple
images can be stored under this directory. There is a firmwarekey directory where the public key
signed firmware is stored.
When the firmwareDownload command line option, -U (upper case), is specified, the
firmwareDownload command downloads the specified firmware image from the USB device. When
specifying a path to a firmware image in the USB device, you can only specify the relative path to
/firmware or the absolute path.
Enabling USB
1. Log in to the switch using an account assigned to the admin role.
2. Enter the usbStorage -e command.
Viewing the USB file system
1. Log in to the switch using an account assigned to the admin role.
2. Enter the usbStorage -l command.
BrcdDCXBB:admin> usbstorage –l
firmware\
381MB
2010
v7.0.0\
381MB
2010
config\
0B
2010
support\
0B
2010
firmwarekey\
0B
2010
Available space on usbstorage 79%
Fabric OS Administrator’s Guide
53-1002148-02
Mar
Mar
Mar
Mar
Mar
28
28
28
28
28
15:33
10:39
15:33
15:33
15:33
203
9
FIPS Support
Downloading from USB using the relative path
1. Log in to the switch as admin.
2. Enter the firmwareDownload -U command.
ecp:admin>firmwaredownload –U v7.0.0
Downloading from USB using the absolute path
1. Log in to the switch as admin.
2. Enter the firmwareDownload command with the -U operand.
ecp:admin>firmwaredownload –U /usb/usbstorage/brocade/firmware/v7.0.0
FIPS Support
Federal information processing standards (FIPS) specify the security standards needed to satisfy a
cryptographic module utilized within a security system for protecting sensitive information in the
computer and telecommunication systems. For more information about FIPS, refer to Chapter 7,
“Configuring Security Policies”.
Fabric OS v7.0.0 firmware is digitally signed using the OpenSSL utility to provide FIPS support.To
use the digitally signed software, you must configure the switch to enable Signed
Firmwaredownload. If it is not enabled, the firmware download process ignores the firmware
signature and performs as before.
If Signed Firmwaredownload is enabled, and if the validation succeeds, the firmware download
process proceeds normally. If the firmware is not signed or if the signature validation fails,
firmwareDownload fails.
To enable or disable FIPS, refer to Chapter 7, “Configuring Security Policies”.
Public and Private Key Management
For signed firmware, Brocade uses RSA with 1024-bit length key pairs, a private key and a public
key. The private key is used to sign the firmware files when the firmware is generated. The public
key is packaged in an RPM-package as part of the firmware, and is downloaded to the switch. After
it is downloaded, it can be used to validate the firmware to be downloaded next time when you run
the firmwareDownload command.
The public key file on the switch contains only one public key. It is only able to validate firmware
signed using one corresponding private key. If the private key changes in future releases, you need
to change the public key on the switch by one of the following methods:
• By using the firmwareDownload command. When a new firmware is downloaded,
firmwareDownload always replaces the public key file on the switch with what is in the new
firmware. This allows you to have planned firmware key changes.
• By using the firmwareKeyUpdate command. This command retrieves a specified public key file
from a specific server location and replaces the one on the switch. So for easy access, the
information regarding firmware versions and their corresponding public key files is
documented in the release notes or stored in a known location in the Brocade website. This
command allows the customer to handle unplanned firmware key changes.
204
Fabric OS Administrator’s Guide
53-1002148-02
FIPS Support
9
NOTE
If FIPS is enabled, all logins should be done through SSH or direct serial and the transfer protocol
should be SCP.
Updating the firmware key
1. Log in to the switch as admin.
2. Type the firmwareKeyUpdate command and respond to the prompts.
The firmwareDownload Command
As mentioned previously, the public key file needs to be packaged, installed, and run on your switch
before downloading a signed firmware.
When firmwareDownload installs a firmware file, it needs to validate the signature of the file.
Different scenarios are handled as follows:
• If a firmware file does not have a signature, how it is handled depends on the
“signed_firmware” parameter on the switch. If it is enabled, firmwareDownload fails.
Otherwise, firmwareDownload displays a warning message and proceeds normally. So
when downgrading to a non-FIPS compliant firmware, the “signed_firmware” flag needs to
be disabled.
• If the firmware file has a signature but the validation fails, firmwareDownload fails. This
means the firmware is not from Brocade, or the contents have been modified.
• If the firmware file has a signature and the validation succeeds, firmwareDownload
proceeds normally.
SAS, DMM, and third party application images are not signed.
Configuring the switch for signed firmware
1. Connect to the switch and log in using an account assigned to the admin role.
2. Type the configure command.
3. Respond to the prompts as follows:
System Service
ssl attributes
snmp
attributes
rpcd attributes
cfgload
attributes
Webtools
attributes
System
Fabric OS Administrator’s Guide
53-1002148-02
Default is no; press Enter to select default setting.
Default is no; press Enter to select default setting.
Default is no; press Enter to select default setting.
Default is no; press Enter to select default setting.
Select Yes. The following questions are displayed:
Enforce secure config Upload/Download: Select yes
Enforce signed firmware download: Select yes
Default is no; press Enter to select default setting.
Default is no; press Enter to select default setting.
205
9
Test and restore firmware on switches
Power-on Firmware Checksum Test
FIPS requires the checksums of the executables and libraries on the filesystem to be validated
before Fabric OS modules are launched. This is to make sure these files have not been changed
after they are installed.
When firmware RPM packages are installed during firmwareDownload, the MD5 checksums of the
firmware files are stored in the RPM database on the filesystem. The checksums go through all of
the files in the RPM database. Every file compares its current checksum with the checksum that is
in the RPM database. If they are different, the command displays an output message informing you
of the difference.
Because the validation may take up to a few minutes, it is not performed during a hot code load. It
is only performed after a cold reboot of the switch.
For more information on FIPS, see Chapter 7, “Configuring Security Policies”.
Test and restore firmware on switches
NOTE
This section does not apply to SAS or storage applications applied to the FA4-18 AP blade.
Typically, users downgrade firmware after briefly evaluating a newer (or older) version and then
restore the original version of the firmware. Testing a new version of firmware in this manner
ensures that you do not replace existing firmware because the evaluated version occupies only one
partition on the switch.
ATTENTION
When you evaluate new firmware, make sure you disabled all features that are not supported by the
original firmware before restoring to the original version.
Testing a different firmware version on a switch
1. Verify that the FTP, SFTP, or SSH server is running on the host server and that you have a user
ID on that server.
2. Obtain the firmware file from the Brocade website at http://www.brocade.com or switch
support provider and store the file on the FTP or SSH server.
3. Unpack the compressed files preserving directory structures.
The firmware is in the form of RPM packages with names defined in a .plist file, that contains
specific firmware information and the names of packages of the firmware to be downloaded.
4. Connect to the switch and log in as admin.
5. Enter the firmwareShow command to view the current firmware.
6. Enter the firmwareDownload -s command to update the firmware and respond to the prompts.
Example of a firmwareDownload to a single partition
ecp:admin> firmwareDownload -s
Type of Firmware (FOS, SAS, or any application) [FOS]:
Server Name or IP Address: 10.1.2.3
Network Protocol (1-auto-select, 2-FTP, 3-SCP, 4-SFTP) [1]:
206
Fabric OS Administrator’s Guide
53-1002148-02
Test and restore firmware on switches
9
User Name: userfoo
File Name: /home/userfoo/v7.0.0
Password: <hidden>
Do Auto-Commit after Reboot [Y]: n
Reboot system after download [N]: y
Firmware is being downloaded to the switch. This step may take up to 30
minutes.
Checking system settings for firmwaredownload...
The switch performs a reboot and comes up with the new firmware to be tested. Your current
switch session automatically disconnects.
ATTENTION
Downloading firmware to a switch can be disruptive to switch traffic.
7.
Connect to the switch, log in as admin, and enter the firmwareShow command to confirm that
the primary partition of the switch contains the new firmware.
You are now ready to evaluate the new version of firmware.
ATTENTION
Stop! If you want to restore the firmware, stop here and skip ahead to step 9; otherwise,
continue to step 8 to commit the firmware on the switch, which completes the firmware
download operations.
8. Commit the firmware.
a.
Enter the firmwareCommit command to update the secondary partition with new firmware.
Note that it takes several minutes to complete the commit operation.
b.
Enter the firmwareShow command to confirm both partitions on the switch contain the
new firmware.
ATTENTION
Stop! If you have completed step 8, then you have committed the firmware on the switch and
you have completed the firmware download procedure.
9. Restore the firmware.
a.
Enter the firmwareRestore command. The switch reboots and comes up with the original
firmware again.
A firmwareCommit automatically begins to copy the original firmware from the primary
partition to the secondary partition. At the end of the firmware commit process, both
partitions have the original firmware. Note that it takes several minutes to complete the
commit operation.
b.
Wait five minutes to ensure that all processes have completed and the switch is fully up
and operational.
c.
Log in to the switch. Enter the firmwareShow command and verify that both partitions on
the switch have the original firmware.
Fabric OS Administrator’s Guide
53-1002148-02
207
9
Test and restore firmware on enterprise-class platforms
Test and restore firmware on enterprise-class platforms
This procedure enables you to perform a firmware download on each CP and verify that the
procedure was successful before committing to the new firmware. The old firmware is saved in the
secondary partition of each CP until you enter the firmwareCommit command. If you decide to back
out of the installation prior to the firmwareCommit, you can enter the firmwareRestore command to
restore the former active Fabric OS firmware image.
The firmwareRestore command can only run if autocommit was disabled during the
firmwareDownload. This command cannot be used to restore SAS and SA images.
NOTE
Brocade recommends that, under normal operating conditions, you maintain the same firmware
version on both CPs, and on both partitions of each CP. This procedure enables you to evaluate
firmware before you commit. As a standard practice, do not run mixed firmware levels on CPs.
Testing different firmware versions on enterprise-class platforms
1. Connect to the Brocade enterprise-class platform IP address.
2. Enter the ipAddrShow command and note the address of CP0 and CP1.
3. Enter the haShow command and note which CP is active and which CP is standby. Verify that
both CPs are in sync.
4. Enter the firmwareShow command and confirm that the current firmware on both partitions on
both CPs is listed as expected.
5. Exit the session.
6. Update the firmware on the standby CP.
a.
Connect to the enterprise-class platform and log in as admin to the standby CP.
b.
Enter the firmwareDownload -s command and respond to the prompts.
At this point, the firmware downloads to the standby CP only. When it has completed the
download to that CP, reboot it. The current enterprise-class platform session is
disconnected.
7.
Fail over to the standby CP.
a.
Connect to the enterprise-class platform on the active CP.
b.
Enter the haShow command to verify that HA synchronization is complete. It takes a
minute or two for the standby CP to reboot and synchronize with the active CP.
CAUTION
If you are downgrading from Fabric OS v6.2.0 to v6.1.0, your CPs do not gain synchronization, as
this is a disruptive firmware download. Refer to Table 46 on page 196 for more information on
synchronization states.
c.
208
Enter the firmwareShow command to confirm that the primary partition of the standby CP
contains the new firmware.
Fabric OS Administrator’s Guide
53-1002148-02
Test and restore firmware on enterprise-class platforms
d.
9
Enter the haFailover command. The active CP reboots and the current enterprise-class
platform session is disconnected.
If an AP blade is present: At the point of the failover an autoleveling process is activated.
See “Enterprise-class platform firmware download process overview” on page 200 for
details about autoleveling.
8. Verify the failover.
a.
Connect to the enterprise-class platform on the active CP, which is the former standby CP.
b.
Enter the haShow command to verify that the HA synchronization is complete. It takes a
minute or two for the standby CP, which is the old active CP, to reboot and synchronize with
the active CP.
NOTE
If the CPs fail to synchronize, you can still proceed because the version being tested is already
present on the active CP, and subsequent steps ensures that the standby CP is updated to the
same version as the active CP.
c.
Confirm the evaluation version of firmware is now running on the active CP by entering the
firmwareShow command.
9. Update firmware on the standby CP.
a.
Connect to the enterprise-class platform on the standby CP, which is the old active CP.
b.
Enter the firmwareDownload command with the -s -b -n operands. This ensures that the
following steps are successful.
At this point the firmware downloads to the standby CP only and reboots it. The current
enterprise-class platform session is disconnected.
c.
Wait one minute for the standby CP to reboot, and then connect to the enterprise-class
platform and log in as admin.
d.
Enter the firmwareShow command to confirm that both primary partitions now have the
test drive firmware in place.
You are now ready to evaluate the new version of firmware.
ATTENTION
Stop! If you want to restore the firmware, stop here and skip ahead to step 12; otherwise,
continue to step 10 to commit the firmware on both CPs, which completes the firmware
download.
10. Perform a commit on the standby CP.
From the current enterprise-class platform session on the standby CP, enter the
firmwareCommit command to update the secondary partition with new firmware. It takes
several minutes to complete the commit operation. Do not do anything on the enterprise-class
platform while this operation is in process.
Fabric OS Administrator’s Guide
53-1002148-02
209
9
Test and restore firmware on enterprise-class platforms
11. Perform a commit on the active CP.
a.
From the current enterprise-class platform session on the active CP, enter the
firmwareShow command and confirm that only the active CP secondary partition contains
the old firmware.
b.
Enter the firmwareCommit command to update the secondary partition with the new
firmware. It takes several minutes to complete the commit operation. Do not do anything
on the enterprise-class platform while this operation is in process.
c.
Upon completion of the firmwareCommit command, type the firmwareShow command to
confirm both partitions on both CPs contain the new firmware.
d.
Enter the haShow command to confirm that the HA state is in sync.
ATTENTION
Stop! If you have completed step 11, then you have committed the firmware on both CPs and
you have completed the firmware download procedure.
12. Restore the firmware on the standby CP.
In the current enterprise-class platform session for the standby CP, enter the firmwareRestore
command. The standby CP reboots and the current enterprise-class platform session ends.
Both partitions have the same Fabric OS after several minutes.
13. Perform haFailover on the active CP.
a.
In the current enterprise-class platform session for the active CP, enter the haShow
command to verify that HA synchronization is complete. It takes a minute or two for the
standby CP to reboot and synchronize with the active CP.
b.
Enter the haFailover command. The active CP reboots and the current enterprise-class
platform session ends. The enterprise-class platform is now running the original firmware.
14. Restore firmware on the “new” standby CP.
a.
Wait one minute and connect to the enterprise-class platform on the new standby CP,
which is the old active CP.
b.
Enter the firmwareRestore command. The standby CP reboots and the current
enterprise-class platform session ends. Both partitions have the same Fabric OS after
several minutes.
c.
Wait five minutes and log in to the enterprise-class platform. Enter the firmwareShow
command and verify that all partitions have the original firmware.
If an AP blade is present: Blade partitions always contain the same version of the firmware
on both partitions (it does not keep two copies). The firmware is stored on the blade’s
compact flash card and is always synchronized with the active CP’s firmware. Thus, if you
restore the active CP firmware, the blade firmware is automatically downloaded
(auto-leveled) to become consistent with the new CP firmware (the blade firmware is
basically restored).
Your system is now restored to the original partitions on both CPs. Make sure that servers using the
fabric can access their storage devices.
If you want to upgrade an enterprise-class platform with only one CP in it, follow the procedures in
“Test and restore firmware on switches” on page 206. Note, however, that upgrading an
enterprise-class platform with only one CP is disruptive to switch traffic.
210
Fabric OS Administrator’s Guide
53-1002148-02
Validating a firmware download
9
Validating a firmware download
Validate the firmware download by running the following commands: firmwareShow,
firmwareDownloadStatus, nsShow, nsAllShow, and fabricShow.
NOTE
When you prepared for the firmware download earlier, you issued either the supportShow or
supportSave command. Although you can issue the command again and compare the output from
before and after, it may take up to 30 minutes for the command to execute. To save time, it is
recommended that you use the commands listed below, which are all subsets of the supportSave
output.
All of the connected servers, storage, and switches should be present in the output of these
commands. If there is a discrepancy, it is possible that a device or switch cannot connect to the
fabric and further troubleshooting is necessary.
firmwareShow
Displays the current firmware level on the switch. For Brocade directors, this command
displays the firmware loaded on both partitions (primary and secondary) for both CPs
and AP blades. Brocade recommends that you maintain the same firmware level on
both partitions of each CP within the Brocade director. The firmwareShow command
displays the firmware version on the CPs.
ecp:admin> firmwareshow
Slot Name
Appl
Primary/Secondary Versions
Status
------------------------------------------------------------------------
*
6
CP0
FOS
7
CP1
FOS
v7.0.0
v7.0.0
v7.0.0
v7.0.0
ACTIVE *
STANDBY
Local CP
firmwareDownloadStatus
Displays an event log that records the progress and status of events during Fabric
OS, SAS, and SA firmwareDownload. The event log is created by the current
firmwareDownload command and is kept until another firmwareDownload
command is issued. There is a timestamp associated with each event. When
downloading SAS or SA in systems with two control processor (CP) cards, you can
only run this command on the active CP. When downloading Fabric OS, the event
logs in the two CPs are synchronized. This command can be run from either CP.
nsShow
Displays all devices directly connected to the switch that have logged into the
name server. Make sure the number of attached devices after the firmware
download is exactly the same as the number of attached devices prior to the
firmware download.
nsAllShow
Displays all devices connected to a fabric. Make sure the number of attached
devices after the firmware download is exactly the same as the number of
attached devices prior to the firmware download.
fabricShow
Displays all switches in a fabric. Make sure the number of switches in the fabric
after the firmware download is exactly the same as the number of attached
devices prior to the firmware download.
Fabric OS Administrator’s Guide
53-1002148-02
211
9
212
Validating a firmware download
Fabric OS Administrator’s Guide
53-1002148-02
Chapter
10
Managing Virtual Fabrics
In this chapter
• Virtual Fabrics overview . . . . . . . . . . . . . . . . . . . . . . . . . . . . . . . . . . . . . . . .
• Logical switch overview . . . . . . . . . . . . . . . . . . . . . . . . . . . . . . . . . . . . . . . . .
• Logical fabric overview . . . . . . . . . . . . . . . . . . . . . . . . . . . . . . . . . . . . . . . . .
• Management model for logical switches . . . . . . . . . . . . . . . . . . . . . . . . . . .
• Account management and Virtual Fabrics. . . . . . . . . . . . . . . . . . . . . . . . . .
• Supported platforms for Virtual Fabrics. . . . . . . . . . . . . . . . . . . . . . . . . . . .
• Limitations and restrictions of Virtual Fabrics. . . . . . . . . . . . . . . . . . . . . . .
• Enabling Virtual Fabrics mode . . . . . . . . . . . . . . . . . . . . . . . . . . . . . . . . . . .
• Disabling Virtual Fabrics mode. . . . . . . . . . . . . . . . . . . . . . . . . . . . . . . . . . .
• Configuring logical switches to use basic configuration values . . . . . . . . .
• Creating a logical switch or base switch . . . . . . . . . . . . . . . . . . . . . . . . . . .
• Executing a command in a different logical switch context . . . . . . . . . . . .
• Deleting a logical switch . . . . . . . . . . . . . . . . . . . . . . . . . . . . . . . . . . . . . . . .
• Adding and removing ports on a logical switch . . . . . . . . . . . . . . . . . . . . . .
• Displaying logical switch configuration . . . . . . . . . . . . . . . . . . . . . . . . . . . .
• Changing the fabric ID of a logical switch . . . . . . . . . . . . . . . . . . . . . . . . . .
• Changing a logical switch to a base switch . . . . . . . . . . . . . . . . . . . . . . . . .
• Setting up IP addresses for a Virtual Fabric . . . . . . . . . . . . . . . . . . . . . . . .
• Removing an IP address for a Virtual Fabric . . . . . . . . . . . . . . . . . . . . . . . .
• Configuring a logical switch to use XISLs. . . . . . . . . . . . . . . . . . . . . . . . . . .
• Changing the context to a different logical fabric . . . . . . . . . . . . . . . . . . . .
• Creating a logical fabric using XISLs . . . . . . . . . . . . . . . . . . . . . . . . . . . . . .
213
214
218
223
223
224
226
227
228
229
229
231
232
232
233
234
234
235
236
236
237
237
Virtual Fabrics overview
Virtual Fabrics is an architecture to virtualize hardware boundaries. Traditionally, SAN design and
management is done at the granularity of a physical switch. Virtual Fabrics allows SAN design and
management to be done at the granularity of a port.
Virtual Fabrics is a suite of related features that can be customized based on your needs. The
Virtual Fabrics suite consists of the following specific features:
• Logical switch
• Logical fabric
• Device sharing
Fabric OS Administrator’s Guide
53-1002148-02
213
10
Logical switch overview
This chapter describes the logical switch and logical fabric features. For information about device
sharing with Virtual Fabrics, refer to “FC-FC Routing and Virtual Fabrics” on page 496.
For information about supported switches and port types, refer to “Supported platforms for Virtual
Fabrics” on page 224.
Virtual Fabrics and Admin Domains are mutually exclusive and are not supported at the same time
on a switch.
NOTE
A note on terminology: Virtual Fabrics is the name of the suite of features. A logical fabric is a type
of fabric that you can create using the Virtual Fabrics suite of features.
Logical switch overview
Traditionally, each switch and all the ports in the switch act as a single Fibre Channel switch (FC
switch) that participates in a single fabric. The logical switch feature allows you to divide a physical
chassis into multiple fabric elements. Each of these fabric elements is referred to as a logical
switch. Each logical switch functions as an independent self-contained FC switch.
NOTE
Each chassis can have multiple logical switches.
Default logical switch
To use the Virtual Fabrics features, you must first enable Virtual Fabrics on the switch. Enabling
Virtual Fabrics creates a single logical switch in the physical chassis. This logical switch is called
the default logical switch, and it initially contains all of the ports in the physical chassis.
Figure 22 shows a switch before and after enabling Virtual Fabrics. In this example, the switch has
10 ports, labeled P0 through P9.
FIGURE 22
214
Before enabling Virtual Fabrics
After enabling Virtual Fabrics
Physical chassis
Physical chassis
P0
P3
P6
P1
P4
P7
P2
P5
P8
P9
Default logical switch
P0
P3
P6
P1
P4
P7
P2
P5
P8
P9
Switch before and after enabling Virtual Fabrics
Fabric OS Administrator’s Guide
53-1002148-02
Logical switch overview
10
After you enable Virtual Fabrics, you can create up to seven additional logical switches, depending
on the switch model.
Figure 23 shows a Virtual Fabrics-enabled switch before and after it is divided into logical switches.
Before you create logical switches, the chassis appears as a single switch (default logical switch).
After you create logical switches, the chassis appears as multiple independent logical switches. All
of the ports continue to belong to the default logical switch until you explicitly move them to other
logical switches.
The default logical switch always exists. You can add and delete other logical switches, but you
cannot delete the default logical switch unless you disable Virtual Fabrics.
Before logical switch creation
After logical switch creation
Physical chassis
Logical switch 1
(Default logical switch)
P0
P2
P4
P6
P8
P1
P3
P5
P7
P9
Default logical switch
P0
P3
P6
P1
P4
P7
P2
P5
P8
P9
Logical switch 2
Logical switch 3
Logical switch 4
FIGURE 23
Switch before and after creating logical switches
Logical switches and fabric IDs
When you create a logical switch, you must assign it a fabric ID (FID). The fabric ID uniquely
identifies each logical switch within a chassis and indicates to which fabric the logical switch
belongs. You cannot define multiple logical switches with the same fabric ID within the chassis.
In Figure 24 on page 216, logical switches 2, 3, 4, and 5 are assigned FIDs of 1, 15, 8, and 20,
respectively. These logical switches belong to different fabrics, even though they are in the same
physical chassis. For example, you could not assign logical switch 5 a fabric ID of 15, because
logical switch 3 is already assigned FID 15 in the chassis.
The default logical switch is initially assigned FID 128. You can change this value later.
NOTE
Each logical switch is assigned one and only one FID. The FID identifies the logical fabric to which
the logical switch belongs.
Fabric OS Administrator’s Guide
53-1002148-02
215
10
Logical switch overview
Physical chassis
Logical switch 1
(Default logical switch)
(FID = 128)
Logical switch 2
(FID = 1)
Logical switch 3
(FID = 15)
Logical switch 4
(FID = 8)
Logical switch 5
(FID = 20)
FIGURE 24
Fabric IDs assigned to logical switches
Port assignment in logical switches
Initially, all ports belong to the default logical switch. When you create additional logical switches,
they are empty and you must assign ports to those logical switches. As you assign ports to a logical
switch, the ports are moved from the default logical switch to the newly created logical switch. A
given port can be in only one logical switch.
In Figure 25, the default logical switch initially has 10 ports, labeled P0 through P9. After logical
switches are created, the ports are assigned to specific logical switches. Note that ports 0, 1, 7,
and 8 have not been assigned to a logical switch and so remain assigned to the default logical
switch.
Before port assignment
After port assignment
Logical switch 1
(Default logical switch)
Logical switch 1
(Default logical switch)
P0
P2
P4
P6
P8
P1
P3
P5
P7
P9
P0
P1
P7
P8
P2
Logical switch 2
Logical switch 2
P3
P4
Logical switch 3
P9
Logical switch 3
P5
P6
Logical switch 4
FIGURE 25
216
Logical switch 4
Assigning ports to logical switches
Fabric OS Administrator’s Guide
53-1002148-02
Logical switch overview
10
A given port is always in one (and only one) logical switch. The following scenarios refer to the
chassis after port assignment in Figure 25:
• If you assign P2 to logical switch 2, you cannot assign P2 to any other logical switch.
• If you want to remove a port from a logical switch, you cannot delete it from the logical switch,
but must move it to a different logical switch. For example, if you want to remove P4 from
logical switch 3, you must assign it to a different logical switch: logical switch 2, logical switch
4, or logical switch 1 (the default logical switch).
• If you assign a port to a logical switch, it is removed automatically from the logical switch it is
currently in. If you assign P3 to Logical switch 3, P3 is automatically removed from logical
switch 2.
• If you do not assign a port to any logical switch, it remains in the default logical switch, as is the
case with ports 0, 1, 7, and 8.
Refer to “Adding and removing ports on a logical switch” on page 232 for instructions for assigning
and moving ports on logical switches.
A logical switch can have as many ports as are available in the chassis. In Figure 25, the chassis
has 10 ports. You could assign all 10 ports to a single logical switch, such as logical switch 2; if you
did this, however, no ports would be available for logical switches 3 and 4.
You can move only F_Ports and E_Ports from one logical switch to another. If you want to configure
a different type of port, such as a VE_Port or EX_Port, you must configure them after you move
them. Some types of ports cannot be moved from the default logical switch. Refer to “Supported
platforms for Virtual Fabrics” on page 224 for detailed information about these ports.
Logical switches and connected devices
You can connect devices to logical switches, as shown in Figure 26 on page 218. In logical switch
2, P2 is an F_Port that is connected to H1. In logical switch 3, P4 is an F_Port that is connected to
D1. H1 and D1 cannot communicate with each other because they are in different fabrics, even
though they are both connected to the same physical chassis.
You can also connect other switches to logical switches. In Figure 26, P6 is an E_Port that forms an
inter-switch link (ISL) between logical switch 4 and the non-Virtual Fabrics switch. Logical switch 4
is the only logical switch that can communicate with the non-Virtual Fabrics switch and D2,
because the other logical switches are in different fabrics.
Fabric OS Administrator’s Guide
53-1002148-02
217
10
Logical fabric overview
Physical chassis
Logical switch 1
P1
(Default logical switch)
Fabric ID 128
Logical switch 2
Fabric ID 1
H1
P2
P3
D1
P4
Logical switch 3
Fabric ID 15
Logical switch 4
Fabric ID 8
P5
P6
D2
ISL
Switch
FIGURE 26
Logical switches connected to devices and non-Virtual Fabrics switch
Figure 27 shows a logical representation of the physical chassis and devices in Figure 26. As
shown in Figure 27, the devices are isolated into separate fabrics.
H1
Switch 1
D1
D2
Fabric 128
Switch 4
Switch 2
Fabric 1
FIGURE 27
Switch 3
Fabric 15
Fabric 8
Logical switches in a single chassis belong to separate fabrics
For information on allowing device sharing across fabrics in a Virtual Fabrics environment, refer to
“FC-FC Routing and Virtual Fabrics” on page 496.
Logical fabric overview
A logical fabric is a fabric that contains at least one logical switch. The four fabrics shown in
Figure 26 and Figure 27 are logical fabrics because they each have at least one logical switch.
You can connect logical switches to non-Virtual Fabrics switches and to other logical switches.
You connect logical switches to non-Virtual Fabrics switches using an ISL, as shown in Figure 26.
You connect logical switches to other logical switches in two ways:
• Using ISLs
• Using base switches and extended ISLs (XISLs)
218
Fabric OS Administrator’s Guide
53-1002148-02
Logical fabric overview
10
Logical fabric and ISLs
Figure 28 shows two physical chassis divided into logical switches. In Figure 28, ISLs are used to
connect the logical switches with FID 1 and the logical switches with FID 15. The logical switches
with FID 8 are each connected to a non-Virtual Fabrics switch. The two logical switches and the
non-Virtual Fabrics switch are all in the same fabric, with FID 8.
Physical chassis 2
Physical chassis 1
P1
Logical switch 1
(Default logical switch)
Fabric ID 128
P1
P2
P2
P3
P3
P4
P5
Logical switch 2
Fabric ID 1
Logical switch 3
Fabric ID 15
Logical switch 4
Fabric ID 8
P5
P6
P6
P8
Logical switch 5
(Default logical switch)
Fabric ID 128
Logical switch 6
Fabric ID 1
P4
P7
Logical switch 7
Fabric ID 15
Logical switch 8
Fabric ID 8
P9
Switch
FIGURE 28
Logical switches connected to other logical switches through physical ISLs
Figure 29 shows a logical representation of the configuration in Figure 28.
Fabric 15
Fabric 128
SW3
SW1
SW7
SW5
Fabric 8
Fabric 1
SW4
SW2
SW8
SW6
FIGURE 29
Logical switches connected to form logical fabrics
The ISLs between the logical switches are dedicated ISLs because they carry traffic only for a single
logical fabric. In Figure 28, Fabric 128 has two switches (the default logical switches), but they
cannot communicate with each other because they have no ISLs between them and they cannot
use the ISLs between the other logical switches.
NOTE
Only logical switches with the same FID can form a fabric. If you connect two logical switches with
different FIDs, the link between the switches segments.
Fabric OS Administrator’s Guide
53-1002148-02
219
10
Logical fabric overview
Base switch and extended ISLs
Another way to connect logical switches is to use extended ISLs and base switches.
When you divide a chassis into logical switches, you can designate one of the switches to be a base
switch. A base switch is a special logical switch that is used for interconnecting the physical
chassis. A base switch has the following properties:
• ISLs connected through the base switch can be used for communication among the other
logical switches.
• Base switches do not support direct device connectivity. A base switch can have only E_Ports,
VE_Ports, EX_Ports, or VEX_Ports, but no F_Ports.
• The base switch provides a common address space for communication between different
logical fabrics.
• A base switch can be configured for the preferred domain ID just like a non-Virtual Fabrics
switch.
• You can have only one base switch in a physical chassis.
A base switch can be connected to other base switches through a special ISL, called a shared ISL
or extended ISL (XISL). An extended ISL connects base switches. The XISL is used to share traffic
among different logical fabrics.
Fabric formation across an XISL is based on the FIDs of the logical switches.
Figure 30 shows two physical chassis divided into logical switches. Each chassis has one base
switch. An ISL connects the two base switches. This ISL is an extended ISL (XISL) because it
connects base switches.
Physical chassis 1
Physical chassis 2
P1
Logical switch 1
(Default logical switch)
Fabric ID 128
P1
P2
P2
Logical switch 2
Fabric ID 1
Logical switch 5
(Default logical switch)
Fabric ID 128
Logical switch 6
Fabric ID 1
P4
P7
Logical switch 3
Fabric ID 15
P6
P5
XISL
Base switch
Fabric ID 8
FIGURE 30
P6
P8
Logical switch 7
Fabric ID 15
Base switch
Fabric ID 8
P9
Base switches connected by an XISL
Traffic between the logical switches can now flow across this XISL. The traffic can flow only
between logical switches with the same fabric ID. For example, traffic can flow between logical
switch 2 in chassis 1 and logical switch 6 in chassis 2, because they both have FID 1. Traffic cannot
flow between logical switch 2 and logical switch 7, because they have different fabric IDs (and are
thus in different fabrics).
220
Fabric OS Administrator’s Guide
53-1002148-02
Logical fabric overview
10
Think of the logical switches as being connected with logical ISLs, as shown in Figure 31. In this
diagram, the logical ISLs are not connected to ports because they are not physical cables. They are
a logical representation of the switch connections that are allowed by the XISL.
Physical chassis 1
Physical chassis 2
P1
Logical switch 1
(Default logical switch)
Fabric ID 128
Logical switch 2
Fabric ID 1
P1
Logical ISL
Logical switch 5
(Default logical switch)
Fabric ID 128
P2
P2
Logical switch 6
Fabric ID 1
Logical ISL
P4
Logical ISL
P7
Logical switch 3
Fabric ID 15
Base switch
Fabric ID 8
FIGURE 31
P6
P5
P6
Logical switch 7
Fabric ID 15
XISL
P8
Base switch
Fabric ID 8
P9
Logical ISLs connecting logical switches
To use the XISL, the logical switches must be configured to allow XISL use. By default, they are
configured to do so; you can change this setting, however, using the procedure described in
“Configuring a logical switch to use XISLs” on page 236.
NOTE
It is a good practice to configure at least two XISLs, for redundancy.
You can also connect logical switches using a combination of ISLs and XISLs, as shown in
Figure 32. In this diagram, traffic between the logical switches in FID 1 can travel over either the
ISL or the XISL. Traffic between the other logical switches travels only over the XISL.
Physical chassis 1
Physical chassis 2
P1
Logical switch 1
(Default logical switch)
Fabric ID 128
Logical switch 2
Fabric ID 1
P2
P1
Logical ISL
ISL
P2
Logical ISL
Logical switch 5
(Default logical switch)
Fabric ID 128
Logical switch 6
Fabric ID 1
Logical ISL
Logical switch 3
Fabric ID 15
Base switch
Fabric ID 8
FIGURE 32
Fabric OS Administrator’s Guide
53-1002148-02
P6
P7
P6
P5
XISL
P4
P8
Logical switch 7
Fabric ID 15
Base switch
Fabric ID 8
P9
Logical fabric using ISLs and XISLs
221
10
Logical fabric overview
By default, the physical ISL path is favored over the logical path (over the XISL) because the
physical path has a lower cost. This behavior can be changed by configuring the cost of the
dedicated physical ISL to match the cost of the logical ISL.
ATTENTION
If you disable a base switch, all of the logical ISLs are broken and the logical switches cannot
communicate with each other unless they are connected by a physical ISL.
Base fabric
Base switch ports on different chassis can be connected together to form a fabric, called a base
fabric. Similar to other logical switches, the base switches must have the same FID to be
connected. If the base switches have different FIDs, the link between the switches is disabled.
The base fabric follows normal routing policies. As long as physical connectivity is available, the
base fabric maintains connectivity for the logical fabrics.
Logical ports
As shown in Figure 32, logical ISLs are formed to connect logical switches. A logical port represents
the ports at each end of a logical ISL. A logical port is a software construct only and does not
correspond to any physical port.
Most port commands are not supported on logical ports. For example, you cannot change the state
or configuration of a logical port.
The World Wide Name (WWN) for logical ports is in NAA=5 format, using the following syntax:
5n:nn:nn:nz:zz:zz:zx:xx
The NAA=5 syntax uses the following variables:
• nnnnnn is the Brocade Organizationally Unique Identifier (OUI).
• zzzzzz is the logical fabric serial number.
• xxx is the logical port number, in the range 0 through FFF.
Logical fabric formation
Fabric formation is not based on connectivity, but on the FIDs of the logical switches. The basic
order of fabric formation is as follows:
1. Base fabric forms.
2. Logical fabrics form when the base fabric is stable.
3. Traffic is initiated between the logical switches.
4. Devices begin recognizing one another.
222
Fabric OS Administrator’s Guide
53-1002148-02
Management model for logical switches
10
Management model for logical switches
You can use one common IP address for the hardware that is shared by all of the logical switches in
the chassis and you can set up individual IPv4 addresses for each Virtual Fabric. For a
management host to manage a logical switch using the Internet Protocol over Fibre Channel (IPFC)
IP address, it must be physically connected to the Virtual Fabric using a host bus adapter (HBA).
All user operations are classified into one of the following:
• Chassis management operations
These are operations that span logical switch boundaries, such as:
-
Logical switch configuration (creating, deleting, or modifying logical switches)
Account management (determining which accounts can access which logical switches)
Field-replaceable unit (FRU) management (slot commands, such as slotShow)
Firmware management (firmware upgrade, HA failover)
• Logical switch operations
These are operations that are limited to the logical switch, such as displaying or changing port
states. Logical switch operations include all operations that are not covered in the chassis
management operations.
When a user logs in, the user is assigned an active context, or active logical switch. This context
filters the view that the user gets, and determines which ports the user can see. You can change
the active context. For example, if you are working with logical switch 1, you can change the context
to logical switch 5. When you change the context to logical switch 5, you only see the ports that are
assigned to that logical switch. You do not see any of the other ports in the chassis.
The scope of logical switch operations is defined by the active context. When you are in the context
of a logical switch, you can perform port, switch, and fabric-level operations, subject to Role-Based
Access Control (RBAC) rules.
If you have permission to execute chassis-level commands, you can do so, regardless of which
logical switch context you are in.
Account management and Virtual Fabrics
When user accounts are created, they are assigned a list of logical fabrics to which they can log in
and a home logical fabric (home FID). When you connect to a physical chassis, the home FID
defines the logical switch to which you are logged in by default. You can change to a different
logical switch context, as described in “Changing the context to a different logical fabric” on
page 237.
When you are logged in to a logical switch, the system prompt changes to display the FID of that
switch. The following are example prompts for when you are logged in to the default logical switch
(FID = 128) and a user-defined logical switch (FID = 15):
switch:FID128:admin>
switch:FID15:admin>
Refer to Chapter 5, “Managing User Accounts,” for information about creating user accounts and
assigning FIDs to user accounts.
Fabric OS Administrator’s Guide
53-1002148-02
223
10
Supported platforms for Virtual Fabrics
Supported platforms for Virtual Fabrics
The following platforms are Virtual Fabrics-capable:
•
•
•
•
•
•
•
Brocade 5100
Brocade 5300
Brocade 6510
Brocade VA-40FC, in Native mode only
Brocade DCX
Brocade DCX-4S
Brocade DCX 8510 family
Some restrictions apply to the ports, depending on the port type and blade type. The following
sections explain these restrictions.
Supported port configurations in the fixed-port switches
There are no restrictions on the ports in the Brocade 5100, 5300, 6510, and VA-40FC; however,
the following rules apply:
• Any port can belong to any logical switch (including the base switch and default logical switch),
with the exception that F_Ports cannot belong to the base switch.
• The default logical switch can use XISLs.
• The default logical switch can also be a base switch.
Supported port configurations in the enterprise-class platforms
Some of the ports in the Brocade DCX, DCX-4S, and DCX 8510 family are not supported on all types
of logical switches. Table 47 lists the blades and ports that are supported on each type of logical
switch.
TABLE 47
224
Blade and port types supported on logical switches
Blade type
Default logical switch
User-defined logical switch
Base switch
FC8-16
FC8-32
FC8-48
FC16-32
FC16-48
Yes (F, E)
Yes (F, E)
Yes (E, EX)
FC8-64
Yes (F, E)1
Yes (F, E)
Yes (E, EX)2
FC10-6
Yes (F, E)
No
No
FS8-18
Yes (F, E)
No
No
FCOE10-24
Yes (F, E)
No
No
FX8-24: FC ports
GE ports
Yes (F, E)
Yes (VE)
Yes (F, E,)
Yes (VE)
Yes (E, EX)
Yes (VE, VEX)
Fabric OS Administrator’s Guide
53-1002148-02
Supported platforms for Virtual Fabrics
TABLE 47
10
Blade and port types supported on logical switches (Continued)
Blade type
Default logical switch
User-defined logical switch
Base switch
FR4-18i: FC ports
GE ports
Yes (F, E)
Yes (VE)
No
Yes (VE)
No
Yes (VE, VEX)
ICL ports
Yes
Yes
Yes
1.
In the Brocade DCX and DCX 8510-8, ports 56–63 of the FC8-64 blade are not supported as E_Ports on the
default logical switch. The Brocade DCX-4S and DCX 8510-4 do not have this limitation.
2.
In the Brocade DCX and DCX 8510-8, ports 48–63 of the FC8-64 blade are not supported in the base switch.
The Brocade DCX-4S and DCX 8510-4 do not have this limitation.
The following restrictions apply:
•
•
•
•
•
EX_Ports and VEX_Ports can be in only the base switch.
ICL ports cannot be in a logical switch that is using XISLs.
The default logical switch cannot use XISLs.
The default logical switch cannot be designated as the base switch.
VE_Ports on the FR4-18i blade are supported on the base switch only for carrying Fibre
Channel routing (FCR) traffic to VEX_Ports. These VE_Ports are not supported for carrying
logical fabric traffic over XISLs.
• Starting in Fabric OS v7.0.0, VE_Ports on the FX8-24 blade are supported on a logical switch
that is using an XISL, and on the base switch as an XISL.
NOTE
For the FX8-24 blade, if XISL use is enabled it is not recommended that you configure VE_Ports
on both the logical switch and the base switch, because FCIP tunnels support only two hops
maximum.
Virtual Fabrics interaction with other Fabric OS features
Table 48 lists some Fabric OS features and considerations that apply when using Virtual Fabrics.
TABLE 48
Virtual Fabrics interaction with Fabric OS features
Fabric OS feature
Virtual Fabrics interaction
Access Gateway
Virtual Fabrics is not supported on a switch if AG mode is enabled.
Admin Domains
Virtual Fabrics and Admin Domains are mutually exclusive and are not supported at the
same time on a switch. To use Admin Domains, you must first disable Virtual Fabrics; to
use Virtual Fabrics, you must first delete all Admin Domains.
Refer to “Deleting all user-defined Admin Domains non-disruptively” on page 356 for
information on deleting Admin Domains without disrupting device-to-device
communication.
Configuration upload
and download
Virtual Fabrics uses a configuration file that is different from the configuration file used
to download system configuration parameters. Refer to Chapter 8, “Maintaining the
Switch Configuration File,” for more information about how Virtual Fabrics affects the
configuration file.
Encryption
Encryption functionality using the FS8-18 blade is available only on the default logical
switch.
Fabric OS Administrator’s Guide
53-1002148-02
225
10
Limitations and restrictions of Virtual Fabrics
TABLE 48
Virtual Fabrics interaction with Fabric OS features (Continued)
Fabric OS feature
Virtual Fabrics interaction
FC-FC Routing Service
All EX_Ports must reside in a base switch.
You cannot attach EX_Ports to a logical switch that has XISL use enabled. You must use
ISLs to connect the logical switches in an edge fabric.
NOTE: FC-FC Routing is not supported on a Brocade 6510 with more than 3 logical
switches.
Refer to Chapter 23, “Using the FC-FC Routing Service,” for more information about
Virtual Fabrics and FC-FC routing.
FICON
Up to two logical switches per chassis can run FICON Management Server (CUP), but the
FICON logical switch must use ISLs and not XISLs.
Licensing
Licenses are applicable for all logical switches in a chassis.
Performance
monitoring
Performance monitors are supported in a limited number of logical switches, depending
on the platform type. Refer to Chapter 19, “Monitoring Fabric Performance,” for more
information about performance monitoring when Virtual Fabrics is enabled.
QoS
QoS VCs are maintained across the base fabric. Refer to Chapter 20, “Optimizing Fabric
Behavior,” for more information about using the Adaptive Networking features with
Virtual Fabrics.
Traffic Isolation
Traffic Isolation zones with failover disabled are not supported in logical fabrics. Refer to
Chapter 20, “Optimizing Fabric Behavior,” for additional information about using TI Zones
with Virtual Fabrics.
Limitations and restrictions of Virtual Fabrics
The maximum number of logical switches per chassis varies depending on the switch model.
Table 49 lists the supported platforms and the maximum number of logical switches (including the
default logical switch) supported on each.
TABLE 49
Maximum number of logical switches per chassis
Platform
Maximum number of logical switches
Brocade DCX
8
Brocade DCX-4S
8
Brocade DCX 8510 family
8
Brocade 5300
4
Brocade 5100
3
Brocade 6510
41
Brocade VA-40FC
3
1.
The maximum is 3 logical switches if you are using FC-FC routing.
Refer to “Supported port configurations in the enterprise-class platforms” on page 224 for
restrictions on the default logical switch.
226
Fabric OS Administrator’s Guide
53-1002148-02
Enabling Virtual Fabrics mode
10
Restrictions on XISLs
The Allow XISL Use option, available under the configure command, allows a logical switch to use
XISLs in the base switch as well as any standard ISLs that are connected to that logical switch. To
allow or disallow XISL use for a logical switch, see “Configuring a logical switch to use XISLs” on
page 236.
Following are restrictions on XISL use. XISL use is not permitted in any of the following scenarios:
•
•
•
•
•
•
The logical switch is intended for use with FICON.
Lossless Dynamic Load Sharing is enabled on the logical switch.
The logical switch has ICL ports.
The logical switch is the default logical switch in the Brocade DCX, DCX-4S, or DCX 8510 family.
The logical switch is a base switch.
The logical switch is an edge switch for an FC router.
In this case, if the logical switch is enabled, you cannot allow XISL use. If the logical switch is
disabled or has not yet joined the edge fabric, you can allow XISL use; however, fabric
segmentation occurs when the logical switch is enabled or is connected to an edge fabric.
Restrictions on moving ports
The following are restrictions on moving ports among logical switches:
• FC ports cannot be moved if any one of the following features is enabled:
- Long distance
- QoS
- F_Port buffers
- F_Port trunking
• Before moving VE_Ports, you must remove the VE_Port tunnel configuration.
• VE_Ports on the FX8-24 blade can be moved to any logical switch independent of the location
of the physical GE port.
Enabling Virtual Fabrics mode
A fabric is said to be in Virtual Fabrics mode (VF mode) when the Virtual Fabrics feature is enabled.
Before you can use the Virtual Fabrics features, such as logical switch and logical fabric, you must
enable VF mode.
VF mode is enabled by default.
NOTE
When you enable VF mode, the control processors (CPs) are rebooted and all EX_Ports are disabled
after the reboot.
1. Connect to the physical chassis and log in using an account with the chassis-role permission.
2. Enter the following command to check whether VF mode is enabled:
fosconfig --show
Fabric OS Administrator’s Guide
53-1002148-02
227
10
Disabling Virtual Fabrics mode
3. Delete all Admin Domains, as described in “Deleting all user-defined Admin Domains
non-disruptively” on page 356.
4. Enter the following command to enable VF mode:
fosconfig --enable vf
5. Enter y at the prompt.
Example
The following example checks whether VF mode is enabled or disabled and then enables it.
switch:admin> fosconfig --show
FC Routing service:
iSCSI service:
iSNS client service:
Virtual Fabric:
Ethernet Switch Service:
disabled
Service not supported on this Platform
Service not supported on this Platform
disabled
Service not supported on this Platform
switch:admin> fosconfig --enable vf
WARNING: This is a disruptive operation that requires a reboot to take
effect.
All EX ports will be disabled upon reboot.
Would you like to continue [Y/N] y
VF has been enabled. Your system is being rebooted.
Disabling Virtual Fabrics mode
When you disable VF mode, the following occurs:
• The CPs are rebooted.
• If F_Port trunking is enabled on ports in the default switch, the F_Port trunking information is
deleted.
If you want to use Admin Domains in a fabric, you must first disable VF mode.
1. Connect to the physical chassis and log in using an account with the chassis-role permission.
2. Enter the following command to check whether VF mode is disabled:
fosconfig --show
3. Move all ports to the default logical switch.
lscfg --config 128 -slot slot -port port
4. Delete all of the non-default logical switches.
lscfg --delete fabricID
5. Enter the following command to disable VF mode:
fosconfig --disable vf
6. Enter y at the prompt.
228
Fabric OS Administrator’s Guide
53-1002148-02
Configuring logical switches to use basic configuration values
10
Example
The following example checks whether VF mode is enabled or disabled and then disables it.
switchA:FID128:admin> fosconfig
FC Routing service:
iSCSI service:
iSNS client service:
Virtual Fabric:
Ethernet Switch Service
--show
disabled
Service not supported on this Platform
Service not supported on this Platform
enabled
Service not supported on this Platform
switch:admin> fosconfig --disable vf
WARNING: This is a disruptive operation that requires a reboot to take
effect.
Would you like to continue [Y/N] y
Configuring logical switches to use basic configuration values
All switches in the fabric are configured to use the same basic configuration values. When you
create logical switches, the logical switches might have different configuration values than the
default logical switch. Use the following procedure to ensure that newly created logical switches
have the same basic configuration values as the default logical switch.
NOTE
For most users, you do not need to run this procedure. Contact your switch service provider to
determine if you need to use this procedure.
You need to run this procedure only once on each chassis, after you enable Virtual Fabrics but
before you create logical switches. The configuration settings are then preserved across reboots
and firmware upgrades and downgrades.
1. Connect to the physical chassis and log in using an account with the chassis-role permission.
2. Enter the following command to ensure that newly created logical switches have the same
basic configuration values as the default logical switch:
configurechassis
3. Enter n at the prompts to configure system and cfgload attributes. Enter y at the prompt to
configure custom attributes.
System (yes, y, no, n): [no] n
cfgload attributes (yes, y, no, n): [no] n
Custom attributes (yes, y, no, n): [no] y
4. Enter the appropriate value at the Config Index prompt. Contact your switch service provider to
determine the appropriate value.
Config Index (0 to ignore): (0..1000) [3]:
Creating a logical switch or base switch
When the logical switch is created, it is automatically enabled and is empty—that is, it does not
have any ports. After creating the logical switch, you must disable the switch to configure it and set
the domain ID. You then assign ports to the logical switch.
Optionally, you can define the logical switch to be a base switch. Each chassis can have only one
base switch.
Fabric OS Administrator’s Guide
53-1002148-02
229
10
Creating a logical switch or base switch
NOTE
Domain ID conflicts are detected before fabric ID conflicts. If you have both a domain ID conflict and
a fabric ID conflict, only the domain ID conflict is reported.
1. Connect to the physical chassis and log in using an account with the chassis-role permission.
2. Enter the following command to create a logical switch:
lscfg --create fabricID [ -base ] [ -force ]
In the command syntax, fabricID is the fabric ID that is to be associated with the logical switch.
Specify the -base option if the logical switch is to be a base switch.
Specify the -force option to execute the command without any user prompts or confirmation.
3. Set the context to the new logical switch.
setcontext fabricID
The fabricID parameter is the fabric ID of the logical switch you just created.
4. Disable the logical switch.
switchdisable
5. Configure the switch attributes, including assigning a unique domain ID.
configure
6. Enable the logical switch.
switchenable
7.
Assign ports to the logical switch, as described in “Adding and removing ports on a logical
switch” on page 232.
Example
The following example creates a logical switch with FID 4, and then assigns domain ID 14 to it.
sw0:FID128:admin> lscfg --create 4
About to create switch with fid=4. Please wait...
Logical Switch with FID (4) has been successfully created.
Logical Switch has been created with default configurations.
Please configure the Logical Switch with appropriate switch
and protocol settings before activating the Logical Switch.
sw0:FID128:admin> setcontext 4
switch_4:FID4:admin> switchdisable
switch_4:FID4:admin> configure
Configure...
Fabric parameters (yes, y, no, n): [no] y
Domain: (1..239) [1] 14
WWN Based persistent PID (yes, y, no, n): [no]
...
(output truncated)
WARNING: The domain ID will be changed. The port level zoning may be affected
switch_4:FID4:admin> switchenable
230
Fabric OS Administrator’s Guide
53-1002148-02
Executing a command in a different logical switch context
10
Executing a command in a different logical switch context
This procedure describes how to execute a command for a logical switch while you are in the
context of a different logical switch. You can also execute a command for all the logical switches in
a chassis.
The command is not executed on those logical switches for which you do not have permission.
1. Connect to the physical chassis and log in using an account with the chassis-role permission.
2. Enter one of the following commands:
• To execute a command in a different logical switch context:
fosexec --fid fabricID -cmd "command"
• To execute the command on all logical switches:
fosexec --fid all -cmd "command"
Example 1: Executing the switchShow command in a different logical switch context
sw0:FID128:admin> fosexec --fid 4 -cmd "switchshow"
--------------------------------------------------"switchshow" on FID 4:
switchName:
switchType:
switchState:
switchMode:
switchRole:
switchDomain:
switchId:
switchWwn:
zoning:
switchBeacon:
FC Router:
Fabric Name:
Allow XISL Use:
LS Attributes:
switch_4
66.1
Online
Native
Principal
14
fffc0e
10:00:00:05:1e:82:3c:2b
OFF
OFF
OFF
Fab4
ON
[FID: 4, Base Switch: No, Default Switch: No, Address Mode 0]
Index Port Address Media Speed State
Proto
==============================================
22 22
0e1600
-N8
No_Module
FC Disabled
23 23
0e1700
-N8
No_Module
FC Disabled
Example 2: Executing the fabricShow command on all logical switches
sw0:FID128:admin> fosexec --fid all -cmd "fabricshow"
--------------------------------------------------"fabricshow" on FID 128:
Switch ID
Worldwide Name
Enet IP Addr
FC IP Addr
Name
------------------------------------------------------------------------97: fffc61 10:00:00:05:1e:82:3c:2a 10.32.79.105
0.0.0.0
>"sw0"
---------------------------------------------------
Fabric OS Administrator’s Guide
53-1002148-02
231
10
Deleting a logical switch
"fabricshow" on FID 4:
Switch ID
Worldwide Name
Enet IP Addr
FC IP Addr
Name
------------------------------------------------------------------------14: fffc0e 10:00:00:05:1e:82:3c:2b 10.32.79.105
0.0.0.0
>"switch_4"
(output truncated)
Deleting a logical switch
You must remove all ports from the logical switch before deleting it.
You cannot delete the default logical switch.
NOTE
If you are in the context of the logical switch you want to delete, you are automatically logged out
when the fabric ID changes. To avoid being logged out, make sure you are in the context of a different
logical switch from the one you are deleting.
1. Connect to the physical chassis and log in using an account with admin permissions.
2. Remove all ports from the logical switch, as described in “Adding and removing ports on a
logical switch.”
3. Enter the following command to delete the logical switch:
lscfg --delete fabricID
The fabricID parameter is the fabric ID of the logical switch to be deleted.
Example of deleting the logical switch with FID 7
switch_4:FID4:admin> lscfg --delete 7
All active login sessions for FID 7 have been terminated.
Switch successfully deleted.
Adding and removing ports on a logical switch
This procedure explains how to add and remove ports on logical switches.
You add ports to a logical switch by moving the ports from one logical switch to another. See
“Supported platforms for Virtual Fabrics” on page 224 for port restrictions.
If you want to remove a port from a logical switch, you cannot remove it from the logical switch; you
must move the port to a different logical switch.
When you move a port from one logical switch to another, the port is automatically disabled. Any
performance monitors that were installed on the port are deleted. If monitors are required in the
new logical switch, you must manually reinstall them on the port after the move.
NOTE
If the logical switch to which the port is moved has fabric mode Top Talkers enabled, then if the port
is an E_Port, fabric mode Top Talker monitors are automatically installed on that port.
232
Fabric OS Administrator’s Guide
53-1002148-02
Displaying logical switch configuration
10
NOTE
If you are deploying ICLs in the base switch, all ports associated with those ICLs must be assigned
to the base switch. If you are deploying ICLs to connect to default switches (that is, XISL use is not
allowed), the ICL ports should be assigned (or left) in the default logical switch.
1. Connect to the physical chassis and log in using an account with the chassis-role permission.
2. Enter the following command to move ports from one logical switch to another:
lscfg --config fabricID -slot slot -port port
The ports are assigned to the logical switch specified by fabricID and are removed from the
logical switch on which they are currently configured.
If the -port option is omitted, all ports on the specified slot are assigned to the logical switch.
NOTE
On the Brocade DCX and DCX 8510-8, the lscfg command does not allow you to add ports 48–
63 of the FC8-64 blade to the base switch. These ports are not supported on the base switch.
The Brocade DCX-4S and DCX 8510-4 do not have this limitation.
3. Enter y at the prompt.
The ports are automatically disabled, then removed from their current logical switch, and
assigned to the logical switch specified by fabricID.
Example of assigning ports 18 through 20 to the logical switch with FID 5
sw0:FID128:admin> lscfg --config 5 -port 18-20
This operation requires that the affected ports be disabled.
Would you like to continue [y/n]?: y
Making this configuration change. Please wait...
Configuration change successful.
Please enable your ports/switch when you are ready to continue.
Displaying logical switch configuration
1. Connect to the physical chassis and log in using an account with the chassis-role permission.
2. Enter the following command to display a list of all logical switches and the ports assigned to
them:
lscfg --show [ -provision ]
If the -provision option is specified, all ports on all slots are displayed, regardless of the slot
status.
Example displaying a list of all of the logical switches and the ports assigned to them
sw0:FID128:admin> lscfg --show
Created switches:
128(ds)
4
5
Port
0
1
2
3
4
5
6
7
8
9
------------------------------------------------------------------FID
128 | 128 | 128 | 128 | 128 | 128 | 128 | 128 |
5 |
5 |
(output truncated)
Fabric OS Administrator’s Guide
53-1002148-02
233
10
Changing the fabric ID of a logical switch
Changing the fabric ID of a logical switch
The following procedure describes how you can change the fabric ID of an existing logical switch.
The fabric ID indicates in which fabric the logical switch participates. By changing the fabric ID, you
are moving the logical switch from one fabric to another.
Changing the fabric ID requires permission for chassis management operations. You cannot
change the FID of your own logical switch context.
NOTE
If you are in the context of the logical switch with the fabric ID you want to change, you are
automatically logged out when the fabric ID changes. To avoid being logged out, make sure you are
in the context of a different logical switch from the one with the fabric ID you are changing.
1. Connect to the switch and log in using an account with admin permissions.
2. Enter the following command to change the fabric ID of a logical switch:
lscfg --change fabricID -newfid newFID
3. Enter y at the prompt.
4. Enable the logical switch.
fosexec --fid newFID -cmd "switchenable"
Example of changing the fabric ID on the logical switch from 5 to 7
sw0:FID128:admin> lscfg --change 5 -newfid 7
Changing of a switch fid requires that the switch be disabled.
Would you like to continue [y/n]?: y
Disabling switch...
All active login sessions for FID 5 have been terminated.
Checking and logging message: fid = 5.
Please enable your switch.
sw0:FID128:admin> fosexec --fid 7 -cmd "switchenable"
--------------------------------------------------"switchenable" on FID 7:
Changing a logical switch to a base switch
1. Connect to the switch and log in using an account with the chassis-role permission.
2. Set the context to the logical switch you want to change, if you are not already in that context.
setcontext fabricID
where fabricID is the fabric ID of the logical switch you want to change to a base switch.
3. Configure the switch to not allow XISL use, as described in “Configuring a logical switch to use
XISLs” on page 236.
4. Enter the following command to change the logical switch to a base switch:
lscfg --change fabricID -base
The fabricID parameter is the fabric ID of the logical switch with the attributes you want to
change.
234
Fabric OS Administrator’s Guide
53-1002148-02
Setting up IP addresses for a Virtual Fabric
10
5. Enable the switch.
switchenable
Example of changing the logical switch with FID 7 to a base switch
sw0:FID128:admin> setcontext 7
switch_25:FID7:admin> switchshow
switchName:
switch_25
switchType:
66.1
switchState:
Online
switchMode:
Native
switchRole:
Principal
switchDomain:
30
switchId:
fffc1e
switchWwn:
10:00:00:05:1e:82:3c:2c
zoning:
OFF
switchBeacon:
OFF
FC Router:
OFF
Fabric Name:
MktFab7
Allow XISL Use: ON
LS Attributes: [FID: 7, Base Switch: No, Default Switch: No, Address Mode 0]
(output truncated)
switch_25:FID7:admin> configure
Not all options will be available on an enabled switch.
To disable the switch, use the "switchDisable" command.
Configure...
Fabric parameters (yes, y, no, n): [no] y
WWN Based persistent PID (yes, y, no, n): [no]
Allow XISL Use (yes, y, no, n): [yes] n
WARNING!! Disabling this parameter will cause removal of LISLs to
other logical switches. Do you want to continue? (yes, y, no, n): [no] y
System services (yes, y, no, n): [no]
switch_25:FID7:admin> lscfg --change 7 -base
Creation of a base switch requires that the proposed new base switch on this
system be disabled.
Would you like to continue [y/n]?: y
Disabling the proposed new base switch...
Disabling switch fid 7
Please enable your switches when ready.
switch_25:FID7:admin> switchenable
Setting up IP addresses for a Virtual Fabric
NOTE
IPv6 is not supported when setting the IPFC interface for Virtual Fabrics.
Fabric OS Administrator’s Guide
53-1002148-02
235
10
Removing an IP address for a Virtual Fabric
1. Connect to the switch and log in using an account with admin permissions.
2. Enter the ipAddrSet -ls command. For the --add parameter, specify the network information in
dotted-decimal notation for the Ethernet IPv4 address with a Classless Inter-Domain Routing
(CIDR) prefix.
The following example sets an IP address for a logical switch in a Virtual Fabric with an FID of
123 in non-interactive mode with the CIDR prefix:
switch:admin> ipaddrset -ls 123 --add 11.1.2.4/24
Removing an IP address for a Virtual Fabric
1. Connect to the switch and log in using an account with admin permissions.
2. Enter the ipAddrSet -ls FID - -delete command.
switch:admin> ipaddrset -ls 123 –delete
Configuring a logical switch to use XISLs
When you create a logical switch, it is configured to use XISLs by default. Use the following
procedure to allow or disallow the logical switch to use XISLs in the base fabric.
XISL use is not supported in some cases. See “Limitations and restrictions of Virtual Fabrics” on
page 226 for restrictions on XISL use.
1. Connect to the physical chassis and log in using an account with the chassis-role permission.
2. Set the context to the logical switch you want to manage, if you are not already in that context.
setcontext fabricID
The fabricID parameter is the fabric ID of the logical switch you want to switch to and manage.
3. Enter the switchShow command and check the value of the Allow XISL Use parameter.
4. Enter the following command:
configure
5. Enter y after the Fabric Parameters prompt:
Fabric parameters (yes, y, no, n): [no] y
6. Enter y at the Allow XISL Use prompt to allow XISL use; enter n at the prompt to disallow XISL
use:
Allow XISL Use (yes, y, no, n): y
7.
236
Respond to the remaining prompts or press Ctrl-d to accept the other settings and exit.
Fabric OS Administrator’s Guide
53-1002148-02
Changing the context to a different logical fabric
10
Changing the context to a different logical fabric
You can change the context to a different logical fabric. Your user account must have permission to
access the logical fabric.
1. Connect to the physical chassis and log in using an account with the chassis-role permission.
2. Enter the following command to switch to a different logical switch in the chassis:
setcontext fabricID
The fabricID parameter is the fabric ID of the logical switch you want to switch to and manage.
Example of changing the context from FID 128 to FID 4
In this example, notice that the prompt changes when you change to a different logical fabric.
sw0:FID128:admin> setcontext 4
switch_4:FID4:admin>
Creating a logical fabric using XISLs
This procedure describes how to create a logical fabric using multiple chassis and XISLs and refers
to the configuration shown in Figure 33 as an example.
Physical chassis 2
Physical chassis 1
P1
P1
Logical switch 1
(Default logical switch)
Fabric ID 128
D1
P3
Logical switch 2
Fabric ID 1
ISL
P2
P2
Logical switch 5
(Default logical switch)
Fabric ID 128
H1
Logical switch 6
Fabric ID 1
P4
D2
P7
H2
P4
Logical switch 3
Fabric ID 15
P6
P5
Logical switch 7
Fabric ID 15
XISL
Base switch
Fabric ID 8
FIGURE 33
P6
P8
Base switch
Fabric ID 8
P9
Example of logical fabrics in multiple chassis and XISLs
1. Set up the base switches in each chassis:
a.
Connect to the physical chassis and log in using an account with the chassis-role
permission.
b.
Enable the Virtual Fabrics feature, if it is not already enabled. See “Enabling Virtual Fabrics
mode” on page 227 for instructions.
Enabling Virtual Fabrics automatically creates the default logical switch, with FID 128. All
ports in the chassis are assigned to the default logical switch.
Fabric OS Administrator’s Guide
53-1002148-02
237
10
Creating a logical fabric using XISLs
c.
Create a base switch and assign it a fabric ID that will become the FID of the base fabric.
See “Creating a logical switch or base switch” on page 229 for instructions on creating a
base switch.
For the example shown in Figure 33, you would create a base switch with fabric ID 8.
d.
Assign ports to the base switch, as described in “Adding and removing ports on a logical
switch” on page 232.
e.
Repeat step a through step d in all chassis that are to participate in the logical fabric.
2. Physically connect ports in the base switches to form XISLs.
3. Enable all of the base switches. This forms the base fabric.
4. Configure the logical switches in each chassis:
a.
Connect to the physical chassis and log in using an account with the chassis-role
permission.
b.
Create a logical switch and assign it a fabric ID for the logical fabric. This FID must be
different from the FID in the base fabric. See “Creating a logical switch or base switch” on
page 229 for instructions.
For the example shown in Figure 33, you would create a logical switch with FID 1 and a
logical switch with FID 15.
c.
Assign ports to the logical switch, as described in “Adding and removing ports on a logical
switch” on page 232.
d.
Physically connect devices and ISLs to these ports on the logical switch.
e.
(Optional) Configure the logical switch to use XISLs, if it is not already XISL-capable. See
“Configuring a logical switch to use XISLs” on page 236 for instructions.
By default, newly created logical switches are configured to allow XISL use.
f.
Repeat step a through step e in all chassis that are to participate in the logical fabric,
using the same fabric ID whenever two switches need to be part of a single logical fabric.
5. Enable all logical switches by entering the switchenable command on each logical switch that
you created in step 4 (the base switches are already enabled).
The logical fabric is formed.
The fabricShow command displays all logical switches configured with the same fabric ID as the
local switch and all non-Virtual Fabrics switches connected through ISLs to these logical switches.
The switchShow command displays logical ports as E_Ports, with -1 for the slot and the user port
number for the slot port.
238
Fabric OS Administrator’s Guide
53-1002148-02
Chapter
11
Administering Advanced Zoning
In this chapter
• Special zones. . . . . . . . . . . . . . . . . . . . . . . . . . . . . . . . . . . . . . . . . . . . . . . . .
• Zoning overview . . . . . . . . . . . . . . . . . . . . . . . . . . . . . . . . . . . . . . . . . . . . . . .
• Broadcast zones . . . . . . . . . . . . . . . . . . . . . . . . . . . . . . . . . . . . . . . . . . . . . .
• Zone aliases. . . . . . . . . . . . . . . . . . . . . . . . . . . . . . . . . . . . . . . . . . . . . . . . . .
• Zone creation and maintenance . . . . . . . . . . . . . . . . . . . . . . . . . . . . . . . . .
• Default zoning mode . . . . . . . . . . . . . . . . . . . . . . . . . . . . . . . . . . . . . . . . . . .
• Zone database size . . . . . . . . . . . . . . . . . . . . . . . . . . . . . . . . . . . . . . . . . . . .
• Zone configurations. . . . . . . . . . . . . . . . . . . . . . . . . . . . . . . . . . . . . . . . . . . .
• Zone object maintenance . . . . . . . . . . . . . . . . . . . . . . . . . . . . . . . . . . . . . . .
• Zone configuration management . . . . . . . . . . . . . . . . . . . . . . . . . . . . . . . . .
• Security and zoning . . . . . . . . . . . . . . . . . . . . . . . . . . . . . . . . . . . . . . . . . . . .
• Zone merging . . . . . . . . . . . . . . . . . . . . . . . . . . . . . . . . . . . . . . . . . . . . . . . . .
239
240
246
248
251
255
256
257
262
264
265
265
Special zones
Fabric OS has the following types of zones:
• Zones
Enable you to partition your fabric into logical groups of devices that can access each other.
These are “regular” or “normal” zones. Unless otherwise specified, all references to zones in
this chapter refer to these regular zones.
• Broadcast zones
Control which devices receive broadcast frames. A broadcast zone restricts broadcast packets
to only those devices that are members of the broadcast zone. See “Broadcast zones” on
page 246 for more information.
• Frame redirection zones
Re-route frames between an initiator and target through a Virtual Initiator and Virtual Target for
special processing or functionality, such as for storage virtualization or encryption. See “Frame
Redirection” on page 80 for more information.
• LSAN zones
Provide device connectivity between fabrics without merging the fabrics. See “LSAN zone
configuration” on page 480 for more information.
Fabric OS Administrator’s Guide
53-1002148-02
239
11
Zoning overview
• QoS zones
Assign high or low priority to designated traffic flows. QoS zones are regular zones with
additional QoS attributes specified by adding a QOS prefix to the zone name. See “QoS:
SID/DID traffic prioritization” on page 413 for more information.
• Traffic Isolation zones (TI zones)
Isolate inter-switch traffic to a specific, dedicated path through the fabric. See Chapter 12,
“Traffic Isolation Zoning,” for more information.
Zoning overview
Zoning is a fabric-based service that enables you to partition your storage area network (SAN) into
logical groups of devices that can access each other.
For example, you can partition your SAN into two zones, winzone and unixzone, so that your
Windows servers and storage do not interact with your UNIX servers and storage. You can use
zones to logically consolidate equipment for efficiency or to facilitate time-sensitive functions; for
example, you can create a temporary zone to back up nonmember devices.
A device in a zone can communicate only with other devices connected to the fabric within the
same zone. A device not included in the zone is not available to members of that zone. When
zoning is enabled, devices that are not included in any zone configuration are inaccessible to all
other devices in the fabric.
Zones can be configured dynamically. They can vary in size, depending on the number of
fabric-connected devices, and devices can belong to more than one zone.
Consider Figure 34 on page 241, which shows configured zones, Red, Green, and Blue.
•
•
•
•
Server 1 can communicate only with the Storage 1 device.
Server 2 can communicate only with the RAID and Storage 2 devices.
Server 3 can communicate with the RAID and Storage 1 devices.
The Storage 3 is not assigned to a zone; no other zoned fabric device can access it.
NOTE
When using a mixed fabric—that is, a fabric containing two or more switches running different
release levels of fabric operating systems—you should use the switch with the highest Fabric OS level
to perform zoning tasks.
To list the commands associated with zoning, use the zoneHelp command. For detailed information
on the zoning commands used in the procedures, see the Fabric OS Command Reference.
240
Fabric OS Administrator’s Guide
53-1002148-02
Zoning overview
11
Blue Zone
Server 2
Server 1
Storage 2
Red Zone
Storage 1
RAID
Green Zone
Storage 3
FIGURE 34
Server 3
Zoning example
Approaches to zoning
Table 50 lists the various approaches you can take when implementing zoning in a fabric.
TABLE 50
Approaches to fabric-based zoning
Zoning approach
Description
Recommended approach
Single HBA
Fabric OS Administrator’s Guide
53-1002148-02
Zoning by single HBA most closely re-creates the original SCSI bus. Each zone created has only
one HBA (initiator) in the zone; each of the target devices is added to the zone. Typically, a zone
is created for the HBA and the disk storage ports are added. If the HBA also accesses tape
devices, a second zone is created with the HBA and associated tape devices in it. In the case of
clustered systems, it could be appropriate to have an HBA from each of the cluster members
included in the zone; this is equivalent to having a shared SCSI bus between the cluster
members and assumes that the clustering software can manage access to the shared devices.
In a large fabric, zoning by single HBA requires the creation of possibly hundreds of zones;
however, each zone contains only a few members. Zone changes affect the smallest possible
number of devices, minimizing the impact of an incorrect zone change. This zoning philosophy
is the preferred method.
241
11
Zoning overview
TABLE 50
Approaches to fabric-based zoning (Continued)
Zoning approach
Description
Alternative approaches
Application
Zoning by application typically requires zoning multiple, perhaps incompatible, operating
systems into the same zones. This method of zoning creates the possibility that a minor server
in the application suite could disrupt a major server (such as a Web server disrupting a data
warehouse server). Zoning by application can also result in a zone with a large number of
members, meaning that more notifications, such as registered state change notifications
(RSCNs), or errors, go out to a larger group than necessary.
Operating
system
Zoning by operating system has issues similar to zoning by application. In a large site, this type
of zone can become very large and complex. When zone changes are made, they typically
involve applications rather than a particular server type. If members of different operating
system clusters can see storage assigned to another cluster, they might attempt to own the
other cluster’s storage and compromise the stability of the clusters.
Port allocation
Avoid zoning by port allocation unless the administration team has very rigidly enforced
processes for port and device allocation in the fabric. It does, however, provide some positive
features. For instance, when a storage port, server HBA, or tape drive is replaced, the change of
WWN for the new device is of no consequence. As long as the new device is connected to the
original port, it continues to have the same access rights. The ports on the edge switches can
be pre-associated to storage ports, and control of the fan-in ratio (the ratio of the input port to
output port) can be established. With this pre-assigning technique, the administrative team
cannot overload any one storage port by associating too many servers with it.
Not recommended
No fabric zoning
Using no fabric zoning is the least desirable zoning option because it allows devices to have
unrestricted access on the fabric. Additionally, any device attached to the fabric, intentionally or
maliciously, likewise has unrestricted access to the fabric. This form of zoning should be utilized
only in a small and tightly controlled environment, such as when host-based zoning or LUN
masking is deployed.
Zone objects
A zone object is any device in a zone, such as:
• Physical port number or port index on the switch
• Node World Wide Name (N-WWN)
• Port World Wide Name (P-WWN)
Zone objects identified by port number or index number are specified as a pair of decimal numbers
in the form D,I, where D is the domain ID of the switch and I is the index number on that switch in
relation to the port you want to specify.
For example, in enterprise-class platforms, “4,30” specifies port 14 in slot number 2 (domain ID 4,
port index 30). On fixed-port models, “3,13” specifies port 13 in switch domain ID 3.
Note the following effects on zone membership based on the type of zone object:
• When a zone object is the physical port number, then all devices connected to that port are in
the zone.
• World Wide Names are specified as 8-byte (16-digit) hexadecimal numbers, separated by
colons (:) for example, 10:00:00:90:69:00:00:8a.
• When a zone object is the node WWN name, only the specified device is in the zone.
• When a zone object is the port WWN name, only the single port is in the zone.
242
Fabric OS Administrator’s Guide
53-1002148-02
Zoning overview
11
The types of zone objects used to define a zone can be mixed. For example, a zone defined with the
zone objects 2,12; 2,14; 10:00:00:80:33:3f:aa:11 contains the devices connected to domain 2,
ports 12 and 14, and a device with the WWN 10:00:00:80:33:3f:aa:11 (either node name or port
name) that is connected on the fabric.
Zoning schemes
You can establish a zone by identifying zone objects using one or more of the following zoning
schemes:
• Domain,index (D,I)
All members are specified by domain ID, port number, or domain, index number pair or aliases.
• World Wide Name (WWN)
All members are specified only by World Wide Name (WWNs) or aliases of WWNs. They can be
node or port versions of the WWN.
• Mixed zoning
A zone containing members specified by a combination of domain,port or domain,index or
aliases, and WWNs or aliases of WWNs.
In any scheme, you can identify zone objects using aliases.
Zone aliases
A zone alias is a name assigned to a device or a group of devices. By creating an alias, you can
assign a familiar name to a device or group multiple devices into a single name. This simplifies
cumbersome data entry and allows an intuitive naming structure (such as using “NT_Hosts” to
define all NT hosts in the fabric).
Zone aliases also simplify repetitive entry of zone objects such as port numbers or a WWN. For
example, you can use the name “Eng” as an alias for “10:00:00:80:33:3f:aa:11”.
Naming zones for the initiator they contain can also be useful. For example, if you use the alias
SRV_MAILSERVER_SLT5 to designate a mail server in PCI slot 5, then the alias for the associated
zone is ZNE_MAILSERVER_SLT5. This clearly identifies the server host bus adapter (HBA)
associated with the zone.
Zone configuration naming is flexible. One configuration should be named PROD_fabricname,
where fabricname is the name that the fabric has been assigned. The purpose of the PROD
configuration is to easily identify the configuration that can be implemented and provide the most
generic services. If other configurations are used for specialized purposes, names such as
“BACKUP_A,” “RECOVERY_2,” and “TEST_18jun02” can be used.
Zone configurations
A zone configuration is a group of one or more zones. A zone can be included in more than one
zone configuration. When a zone configuration is in effect, all zones that are members of that
configuration are in effect.
Several zone configurations can reside on a switch at once, and you can quickly alternate between
them. For example, you might want to have one configuration enabled during the business hours
and another enabled overnight. However, only one zone configuration can be enabled at a time.
Fabric OS Administrator’s Guide
53-1002148-02
243
11
Zoning overview
The different types of zone configurations are:
• Defined Configuration
The complete set of all zone objects defined in the fabric.
• Effective Configuration
A single zone configuration that is currently in effect. The effective configuration is built when
you enable a specified zone configuration.
• Saved Configuration
A copy of the defined configuration plus the name of the effective configuration, which is saved
in flash memory. (You can also provide a backup of the zone configuration and restore the zone
configuration.) There might be differences between the saved configuration and the defined
configuration if you have modified any of the zone definitions and have not saved the
configuration.
• Disabled Configuration
The effective configuration is removed from flash memory.
If you disable the effective configuration, the Advanced Zoning feature is disabled on the fabric,
and all devices within the fabric can communicate with all other devices (unless you previously set
up a default zone, as described in “Default zoning mode” on page 255). This does not mean that
the zone database is deleted, however, only that there is no configuration active in the fabric.
On power-up, the switch automatically reloads the saved configuration. If a configuration was active
when it was saved, the same configuration is reinstated on the local switch.
Zoning enforcement
Zoning enforcement describes a set of predefined rules that the switch uses to determine where to
send incoming data. Fabric OS uses hardware-enforced zoning. Hardware-enforced zoning means
that each frame is checked by hardware (the ASIC) before it is delivered to a zone member and is
discarded if there is a zone mismatch. When hardware-enforced zoning is active, the Fabric OS
switch monitors the communications and blocks any frames that do not comply with the effective
zone configuration. The switch performs this blocking at the transmit side of the port on which the
destination device is located.
There are two methods of hardware enforcement:
• Frame-based hardware enforcement: All frames are checked by the hardware.
• Session-based hardware enforcement: The only frames checked by hardware are the ELS
frames (such as PLOGI and RNID) used to establish a session.
The method used depends on how the zones are configured.
A zone can contain all WWN members, or all D,I members, or a combination of WWN and D,I
members.
Frame-based hardware enforcement is in effect if all members of a zone are identified the same
way, either using WWNs or D,I notation, but not both. If the zone includes aliases, then the aliases
must also be defined the same way as the zone.
Session-based hardware enforcement is in effect if the zone has a mix of WWN and D,I members.
If a port is in multiple zones, and is defined by WWN in one zone and by D,I in another, then
session-based hardware enforcement is in effect.
244
Fabric OS Administrator’s Guide
53-1002148-02
Zoning overview
11
Identifying the enforced zone type
1. Connect to the switch and log in as admin.
2. Enter the portZoneShow command, using the following syntax:
portzoneshow
Considerations for zoning architecture
Table 51 lists considerations for zoning architecture.
TABLE 51
Considerations for zoning architecture
Item
Description
Type of zoning
enforcement: frameor session-based
If security is a priority, frame-based hardware enforcement is recommended. The best way
to do this is to use WWN identification exclusively for all zoning configurations.
Use of aliases
The use of aliases is optional with zoning. Using aliases requires structure when defining
zones. Aliases aid administrators of zoned fabrics in understanding the structure and
context.
Effect of changes in a
production fabric
Zone changes in a production fabric can result in a disruption of I/O under conditions
when an RSCN is issued because of the zone change and the HBA is unable to process the
RSCN fast enough. Although RSCNs are a normal part of a functioning SAN, the pause in
I/O might not be acceptable. For these reasons, you should perform zone changes only
when the resulting behavior is predictable and acceptable. Ensuring that the HBA drivers
are current can shorten the response time in relation to the RSCN.
Testing
Before implementing a new zone, you should run the Zone Analyzer from Web Tools to
isolate any possible problems. This is especially useful as fabrics increase in size.
Confirming operation
After changing or enabling a zone configuration, you should confirm that the nodes and
storage can identify and access one another. Depending on the platform, you might need
to reboot one or more nodes in the fabric with the new changes.
Zoning can be implemented and administered from any switch in the fabric, although it is
recommended that you use a switch running the latest Fabric OS version.
The zone configuration is managed on a fabric basis. When a change in the configuration is saved,
enabled, or disabled according to the transactional model, it is automatically (by closing the
transaction) distributed to all switches in the fabric, preventing a single point of failure for zone
information.
NOTE
Zoning commands make changes that affect the entire fabric. When executing fabric-level
configuration tasks, allow time for the changes to propagate across the fabric before executing any
subsequent commands. For a large fabric, you should wait several minutes between commands.
Fabric OS Administrator’s Guide
53-1002148-02
245
11
Broadcast zones
Best practices for zoning
The following are recommendations for using zoning:
• Always zone using the highest Fabric OS-level switch.
Switches with earlier Fabric OS versions do not have the capability to view all the functionality
that a newer Fabric OS provides, as functionality is backwards compatible but not forwards
compatible.
• Zone using the core switch versus an edge switch.
• Zone using an enterprise-class platform rather than a switch.
An enterprise-class platform has more resources to handle zoning changes and
implementations.
Broadcast zones
Fibre Channel allows sending broadcast frames to all Nx_Ports if the frame is sent to a broadcast
well-known address (FFFFFF); however, many target devices and HBAs cannot handle broadcast
frames. To control which devices receive broadcast frames, you can create a special zone, called a
broadcast zone, that restricts broadcast packets to only those devices that are members of the
broadcast zone.
If there are no broadcast zones or if a broadcast zone is defined but not enabled, broadcast frames
are not forwarded to any F_Ports. If a broadcast zone is enabled, broadcast frames are delivered
only to those logged-in Nx_Ports that are members of the broadcast zone and are also in the same
zone (regular zone) as the sender of the broadcast packet.
Devices that are not members of the broadcast zone can send broadcast packets, even though
they cannot receive them.
A broadcast zone can have domain,port, WWN, and alias members.
Broadcast zones do not function in the same way as other zones. A broadcast zone does not allow
access within its members in any way. If you want to allow or restrict access between any devices,
you must create regular zones for that purpose. If two devices are not part of a regular zone, they
cannot exchange broadcast or unicast packets.
To restrict broadcast frames reaching broadcast-incapable devices, create a broadcast zone and
populate it with the devices that are capable of handling broadcast packets. Devices that cannot
handle broadcast frames must be kept out of the broadcast zone so that they do not receive any
broadcast frames.
You create a broadcast zone the same way you create any other zone except that a broadcast zone
must have the name “broadcast” (case-sensitive). You set up and manage broadcast zones using
the standard zoning commands, described in “Zone creation and maintenance” on page 251.
Broadcast zones and Admin Domains
Each Admin Domain can have only one broadcast zone. However, all of the broadcast zones from
all of the Admin Domains are considered as a single consolidated broadcast zone.
246
Fabric OS Administrator’s Guide
53-1002148-02
Broadcast zones
11
Broadcast packets are forwarded to all the ports that are part of the broadcast zone for any Admin
Domain, have membership in that Admin Domain, and are zoned together (in a regular zone) with
the sender of the broadcast frame.
Figure 35 illustrates how broadcast zones work with Admin Domains. Figure 35 shows a fabric with
five devices and two Admin Domains, AD1 and AD2. Each Admin Domain has two devices and a
broadcast zone.
"3,1"
"1,1"
"4,1"
"2,1"
AD1
AD2
broadcast
"2,1; 3,1; 4,1"
broadcast
"1,1; 3,1; 5,1"
"5,1"
"1,1"
"3,1; 4,1"
broadcast
"1,1; 3,1; 4,1"
FIGURE 35
Broadcast zones and Admin Domains
The dotted box represents the consolidated broadcast zone, which contains all of the devices that
can receive broadcast packets. The actual delivery of broadcast packets is also controlled by the
Admin Domain and zone enforcement logic. The consolidated broadcast zone is not an actual zone,
but is just an abstraction used for explaining the behavior.
• The broadcast zone for AD1 includes member devices “1,1”, “3,1” and “5,1”; however, “3,1”
and “5,1” are not members of AD1. Consequently, from the AD1 broadcast zone, only “1,1” is
added to the consolidated broadcast zone.
• The broadcast zone for AD2 includes member devices “2,1”, “3,1”, and “4,1”. Even though
“2,1” is a member of AD1, it is not a member of AD2 and so is not added to the consolidated
broadcast zone.
• Device “3,1” is added to the consolidated broadcast zone because of its membership in the
AD2 broadcast zone.
When a switch receives a broadcast packet it forwards the packet only to those devices which are
zoned with the sender and are also part of the consolidated broadcast zone.
You can check whether a broadcast zone has any invalid members that cannot be enforced in the
current AD context. Refer to “Validating a zone” on page 254 for complete instructions.
Fabric OS Administrator’s Guide
53-1002148-02
247
11
Zone aliases
Broadcast zones and FC-FC routing
If you create broadcast zones in a metaSAN consisting of multiple fabrics connected through an FC
router, the broadcast zone must include the IP device that exists in the edge or backbone fabric as
well as the proxy device in the remote fabric. See Chapter 23, “Using the FC-FC Routing Service,”
for information about proxy devices and the FC router.
High availability considerations with broadcast zones
If a switch has broadcast zone-capable firmware on the active CP (Fabric OS v5.3.x or later) and
broadcast zone-incapable firmware on the standby CP (Fabric OS version earlier than v5.3.0), then
you cannot create a broadcast zone because the zoning behavior would not be the same across an
HA failover. If the switch failed over, then the broadcast zone would lose its special significance and
would be treated as a regular zone.
Loop devices and broadcast zones
Delivery of broadcast packets to individual devices in a loop is not controlled by the switch.
Consequently, adding loop devices to a broadcast zone does not have any effect. If a loop device is
part of a broadcast zone, then all devices in that loop receive broadcast packets.
Best practice: All devices in a single loop should have uniform broadcast capability. If all the
devices in the loop can handle broadcast frames, then add the FL_Port to the broadcast zone.
Broadcast zones and default zoning mode
The default zoning mode defines the device accessibility behavior if zoning is not implemented or if
there is no effective zone configuration. The default zoning mode has two options:
• All Access—All devices within the fabric can communicate with all other devices.
• No Access—Devices in the fabric cannot access any other device in the fabric.
If a broadcast zone is active, even if it is the only zone in the effective configuration, the default
zone setting is not in effect.
If the effective configuration has only a broadcast zone, then the configuration appears as a No
Access configuration. To change this configuration to All Access, you must put all the available
devices in a regular zone.
See “Default zoning mode” on page 255 for additional information about default zoning.
Zone aliases
A zone alias is a logical group of ports or WWNs. You can simplify the process of creating zones by
first specifying aliases, which eliminates the need for long lists of individual zone member names.
If you are creating a new alias using aliCreate w, “1,1”, and a user in another Telnet session
executes cfgEnable (or cfgDisable, or cfgSave), the other user’s transaction will abort your
transaction and you will receive an error message. Creating a new alias while there is a zone merge
taking place might also abort your transaction. For more details about zone merging and zone
merge conflicts, see “Zone merging” on page 265.
248
Fabric OS Administrator’s Guide
53-1002148-02
Zone aliases
11
Virtual Fabric considerations: Alias definitions should not include logical port numbers. Zoning is
not enforced on logical ports.
Creating an alias
1. Connect to the switch and log in as admin.
2. Enter the aliCreate command, using the following syntax:
alicreate "aliasname", "member[; member...]"
3. Enter the cfgSave command to save the change to the defined configuration.
The cfgSave command ends and commits the current zoning transaction buffer to nonvolatile
memory. If a transaction is open on a different switch in the fabric when this command is run,
the transaction on the other switch is automatically aborted. A message displays on the other
switches to indicate that the transaction was aborted.
Example
switch:admin> alicreate "array1", "2,32; 2,33; 2,34; 4,4"
switch:admin> alicreate "array2", "21:00:00:20:37:0c:66:23; 4,3"
switch:admin> alicreate "loop1", "4,6"
switch:admin> cfgsave
You are about to save the Defined zoning configuration. This
action will only save the changes on the Defined configuration.
Any changes made on the Effective configuration will not
take effect until it is re-enabled. Until the Effective
configuration is re-enabled, merging new switches into the
fabric is not recommended and may cause unpredictable
results with the potential of mismatched Effective Zoning
configurations.
Do you want to save Defined zoning configuration only? (yes, y, no, n): [no] y
Adding members to an alias
1. Connect to the switch and log in as admin.
2. Enter the aliAdd command, using the following syntax:
aliadd "aliasname", "member[; member...]"
3. Enter the cfgSave command to save the change to the defined configuration.
The cfgSave command ends and commits the current zoning transaction buffer to nonvolatile
memory. If a transaction is open on a different switch in the fabric when this command is run,
the transaction on the other switch is automatically aborted. A message displays on the other
switches to indicate that the transaction was aborted.
Example
switch:admin> aliadd "array1", "1,2"
switch:admin> aliadd "array2", "21:00:00:20:37:0c:72:51"
switch:admin> aliadd "loop1", "5,6"
switch:admin> cfgsave
You are about to save the Defined zoning configuration. This
action will only save the changes on the Defined configuration.
Any changes made on the Effective configuration will not
take effect until it is re-enabled. Until the Effective
Fabric OS Administrator’s Guide
53-1002148-02
249
11
Zone aliases
configuration is re-enabled, merging new switches into the
fabric is not recommended and may cause unpredictable
results with the potential of mismatched Effective Zoning
configurations.
Do you want to save Defined zoning configuration only? (yes, y, no, n): [no] y
Removing members from an alias
1. Connect to the switch and log in as admin.
2. Enter the aliRemove command, using the following syntax:
aliremove "aliasname", "member[; member...]"
3. Enter the cfgSave command to save the change to the defined configuration.
The cfgSave command ends and commits the current zoning transaction buffer to nonvolatile
memory. If a transaction is open on a different switch in the fabric when this command is run,
the transaction on the other switch is automatically aborted. A message displays on the other
switches to indicate that the transaction was aborted.
Example
switch:admin> aliremove "array1", "1,2"
switch:admin> aliremove "array2", "21:00:00:20:37:0c:72:51"
switch:admin> aliremove "loop1", "4,6"
switch:admin> cfgsave
You are about to save the Defined zoning configuration. This
action will only save the changes on the Defined configuration.
Any changes made on the Effective configuration will not
take effect until it is re-enabled. Until the Effective
configuration is re-enabled, merging new switches into the
fabric is not recommended and may cause unpredictable
results with the potential of mismatched Effective Zoning
configurations.
Do you want to save Defined zoning configuration only? (yes, y, no, n): [no] y
Deleting an alias
1. Connect to the switch and log in as admin.
2. Enter the aliDelete command, using the following syntax.
alidelete "aliasname"
3. Enter the cfgSave command to save the change to the defined configuration.
The cfgSave command ends and commits the current zoning transaction buffer to nonvolatile
memory. If a transaction is open on a different switch in the fabric when this command is run,
the transaction on the other switch is automatically aborted. A message displays on the other
switches to indicate that the transaction was aborted.
Example
switch:admin> alidelete "array1"
switch:admin> cfgsave
You are about to save the Defined zoning configuration. This
action will only save the changes on the Defined configuration.
Any changes made on the Effective configuration will not
250
Fabric OS Administrator’s Guide
53-1002148-02
Zone creation and maintenance
11
take effect until it is re-enabled. Until the Effective
configuration is re-enabled, merging new switches into the
fabric is not recommended and may cause unpredictable
results with the potential of mismatched Effective Zoning
configurations.
Do you want to save Defined zoning configuration only? (yes, y, no, n): [no] y
Viewing an alias in the defined configuration
1. Connect to the switch and log in as admin.
2. Enter the aliShow command, using the following syntax
alishow "pattern"[, mode]
If no parameters are specified, the entire zone database (both the defined and effective
configuration) is displayed.
Example
The following example shows all zone aliases beginning with “arr”.
switch:admin> alishow "arr*"
alias: array1 21:00:00:20:37:0c:76:8c
alias: array2 21:00:00:20:37:0c:66:23
Zone creation and maintenance
To create a broadcast zone, use the reserved name “broadcast”. Do not give a regular zone the
name of “broadcast”. See “Broadcast zones” on page 246 for additional information about this
special type of zone.
Virtual Fabric considerations: Zone definitions should not include logical port numbers. Zoning is
not enforced on logical ports.
Creating a zone
1. Connect to the switch and log in as admin.
2. Enter the zoneCreate command, using the following syntax:
zonecreate "zonename", "member[; member...]"
To create a broadcast zone, use the reserved name “broadcast”.
3. Enter the cfgSave command to save the change to the defined configuration.
The cfgSave command ends and commits the current zoning transaction buffer to nonvolatile
memory. If a transaction is open on a different switch in the fabric when this command is run,
the transaction on the other switch is automatically aborted. A message displays on the other
switches to indicate that the transaction was aborted.
Example
switch:admin>
switch:admin>
switch:admin>
switch:admin>
Fabric OS Administrator’s Guide
53-1002148-02
zonecreate "greenzone", "2,32; 2,33; 2,34; 4,4"
zonecreate "bluezone", "21:00:00:20:37:0c:66:23; 4,3"
zonecreate "broadcast", "1,2; 2,33; 2,34"
cfgsave
251
11
Zone creation and maintenance
You are about to save the Defined zoning configuration. This
action will only save the changes on the Defined configuration.
Any changes made on the Effective configuration will not
take effect until it is re-enabled. Until the Effective
configuration is re-enabled, merging new switches into the
fabric is not recommended and may cause unpredictable
results with the potential of mismatched Effective Zoning
configurations.
Do you want to save Defined zoning configuration only? (yes, y, no, n): [no] y
Adding devices (members) to a zone
1. Connect to the switch and log in as admin.
2. Enter the zoneAdd command, using the following syntax:
zoneadd "zonename", "member[; member...]"
3. Enter the cfgSave command to save the change to the defined configuration.
The cfgSave command ends and commits the current zoning transaction buffer to nonvolatile
memory. If a transaction is open on a different switch in the fabric when this command is run,
the transaction on the other switch is automatically aborted. A message displays on the other
switches to indicate that the transaction was aborted.
Example
switch:admin> zoneadd "greenzone", "1,2"
switch:admin> zoneadd "bluezone", "21:00:00:20:37:0c:72:51"
switch:admin> zoneadd "broadcast", "1,3"
switch:admin> cfgsave
You are about to save the Defined zoning configuration. This
action will only save the changes on the Defined configuration.
Any changes made on the Effective configuration will not
take effect until it is re-enabled. Until the Effective
configuration is re-enabled, merging new switches into the
fabric is not recommended and may cause unpredictable
results with the potential of mismatched Effective Zoning
configurations.
Do you want to save Defined zoning configuration only? (yes, y, no, n): [no] y
Removing devices (members) from a zone
1. Connect to the switch and log in as admin.
2. Enter the zoneRemove command, using the following syntax:
zoneremove "zonename", "member[; member...]"
3. Enter the cfgSave command to save the change to the defined configuration.
The cfgSave command ends and commits the current zoning transaction buffer to nonvolatile
memory. If a transaction is open on a different switch in the fabric when this command is run,
the transaction on the other switch is automatically aborted. A message displays on the other
switches to indicate that the transaction was aborted.
Example
switch:admin> zoneremove "greenzone", "1,2"
252
Fabric OS Administrator’s Guide
53-1002148-02
Zone creation and maintenance
11
switch:admin> zoneremove "bluezone", "21:00:00:20:37:0c:72:51"
switch:admin> zoneremove "broadcast", "2,34"
switch:admin> cfgsave
You are about to save the Defined zoning configuration. This
action will only save the changes on the Defined configuration.
Any changes made on the Effective configuration will not
take effect until it is re-enabled. Until the Effective
configuration is re-enabled, merging new switches into the
fabric is not recommended and may cause unpredictable
results with the potential of mismatched Effective Zoning
configurations.
Do you want to save Defined zoning configuration only? (yes, y, no, n): [no] y
Deleting a zone
1. Connect to the switch and log in as admin.
2. Enter the zoneDelete command, using the following syntax:
zonedelete "zonename"
3. Enter the cfgSave command to save the change to the defined configuration.
The cfgSave command ends and commits the current zoning transaction buffer to nonvolatile
memory. If a transaction is open on a different switch in the fabric when this command is run,
the transaction on the other switch is automatically aborted. A message displays on the other
switches to indicate that the transaction was aborted.
Example
switch:admin> zonedelete "bluezone"
switch:admin> cfgsave
You are about to save the Defined zoning configuration. This
action will only save the changes on the Defined configuration.
Any changes made on the Effective configuration will not
take effect until it is re-enabled. Until the Effective
configuration is re-enabled, merging new switches into the
fabric is not recommended and may cause unpredictable
results with the potential of mismatched Effective Zoning
configurations.
Do you want to save Defined zoning configuration only? (yes, y, no, n): [no] y
Viewing a zone in the defined configuration
1. Connect to the switch and log in as admin.
2. Enter the zoneShow command, using the following syntax:
zoneshow[--sort] ["pattern"] [, mode]
If no parameters are specified, the entire zone database (both the defined and effective
configuration) is displayed.
Example
The following example shows all zones beginning with A, B, or C, in ascending order:
switch:admin> zoneshow --sort "[A-C]*"
zone: Blue_zone 1,1; array1; 1,2; array2
zone: Bobs_zone 4,5; 4,6; 4,7; 4,8; 4,9
Fabric OS Administrator’s Guide
53-1002148-02
253
11
Zone creation and maintenance
Validating a zone
1. Connect to the switch and log in as admin.
2. Enter the cfgShow command to view the zone configuration objects you want to validate.
switch:admin> cfgShow
Defined configuration:
cfg: USA_cfg Purple_zone; White_zone; Blue_zone
zone: Blue_zone
1,1; array1; 1,2; array2
zone: Purple_zone
1,0; loop1
zone: White_zone
1,3; 1,4
alias: array1 21:00:00:20:37:0c:76:8c; 21:00:00:20:37:0c:71:02
alias: array2 21:00:00:20:37:0c:76:22; 21:00:00:20:37:0c:76:28
alias: loop1 21:00:00:20:37:0c:76:85; 21:00:00:20:37:0c:71:df
3. Enter the zone --validate command to list all zone members that are not part of the current
zone enforcement table. Note that zone configuration names are case-sensitive; blank spaces
are ignored.
switch:admin> zone --validate "White_zone"
4. Enter the following command to validate all zones in the zone database in the defined
configuration.
switch:admin>
Defined
cfg:
cfg:
zone:
zone:
alias:
alias:
sw5:root> zone --validate -m 1
configuration:
cfg1
zone1
cfg2
zone1; zone2
zone1
1,1; ali1
zone2
1,1; ali2
ali1
10:00:00:05:1e:35:81:7f*; 10:00:00:05:1e:35:81:7d*
ali2
10:00:00:05:1e:35:81:09*; 10:00:00:05:1e:35:81:88*
-----------------------------------~ - Invalid configuration
* - Member does not exist
The mode flag -m can be used to specify the zone database location. Supported mode flag
values are:
• 0 - zone database from the current transaction buffer
• 1 - zone database stored from the persistent storage
• 2 - currently effective zone database.
If no mode options are given, the validated output of all three buffers is shown.
If the -f option is specified, all the zone members that are not enforceable would be expunged
in the transaction buffer. This pruning operation always happens on the transaction and
defined buffers. You cannot specify a mode option or specify a zone object as an argument
with the -f option. This mode flag should be used after the zone has been validated.
254
Fabric OS Administrator’s Guide
53-1002148-02
Default zoning mode
11
Default zoning mode
The default zoning mode controls device access if zoning is not implemented or if there is no
effective zone configuration. The default zoning mode has two options:
• All Access—All devices within the fabric can communicate with all other devices.
• No Access—Devices in the fabric cannot access any other device in the fabric.
The default zone mode applies to the entire fabric, regardless of switch model.
The default setting is All Access.
Typically, when you disable the zoning configuration in a large fabric with thousands of devices, the
name server indicates to all hosts that they can communicate with each other. In fact, each host
can receive an enormous list of PIDs, and ultimately cause other hosts to run out of memory or
crash. To ensure that all devices in a fabric do not see each other during a configuration disable
operation, set the default zoning mode to No Access.
NOTE
For switches in large fabrics, the default zone mode should be set to No Access. You cannot disable
the effective configuration if the default zone mode is All Access and you have more than 120
devices in the fabric.
Admin Domain considerations: If you want to use Admin Domains, you must set the default zoning
mode to No Access prior to setting up the Admin Domains. You cannot change the default zoning
mode to All Access if user-specified Admin Domains are present in the fabric.
Setting the default zoning mode
NOTE
You should not change the default zone mode from No Access to All Access if there is no effective
zone configuration and more than 120 devices are connected to the fabric.
1. Connect to the switch and log in as admin.
2. Enter the cfgActvShow command to view the current zone configuration.
3. Enter the defZone command with one of the following options:
defzone --noaccess
defzone --allaccess
This command initiates a transaction (if one is not already in progress).
4. Enter either the cfgSave, cfgEnable, or cfgDisable command to commit the change and
distribute it to the fabric. The change will not be committed and distributed across the fabric if
you do not enter one of these commands.
Example
switch:admin> defzone --noaccess
You are about to set the Default Zone access mode to No Access
Do you want to set the Default Zone access mode to No Access ? (yes, y, no, n):
[no] y
switch:admin> cfgsave
Fabric OS Administrator’s Guide
53-1002148-02
255
11
Zone database size
You are about to save the Defined zoning configuration. This
action will only save the changes on Defined configuration.
Any changes made on the Effective configuration will not
take effect until it is re-enabled. Until the Effective
configuration is re-enabled, merging new switches into the
fabric is not recommended and may cause unpredictable
results with the potential of mismatched Effective Zoning
configurations.
Do you want to save Defined zoning configuration only? (yes, y, no, n): [no] y
Updating flash ...
Viewing the current default zone access mode
1. Connect to the switch and log in as admin.
2. Enter the defZone --show command.
NOTE
If you perform a firmware download of an older release, then the current default zone access state
will appear as it did prior to the download. For example, if the default zoning mode was No Access
before the download, it will remain as No Access afterward.
Zone database size
The maximum size of a zone database is the upper limit for the defined configuration, and it is
determined by the amount of flash memory available for storing the defined configuration.
Use the cfgSize command to display the zone database size.
The supported maximum zone database size is 1 MB.
Virtual Fabric considerations: If Virtual Fabrics is enabled, the sum of the zone database sizes on
all of the logical fabrics must not exceed the maximum size allowed for the chassis (1 MB). The
maximum size limit is enforced per-partition, but is not enforced chassis-wide. If the chassis size
limit is exceeded, you are not informed of this and unpredictable behavior might occur. It is your
responsibility to keep track of the chassis-wide zone database size.
ATTENTION
In a fabric with some switches running Fabric OS 7.0.0 or later and some switches running Fabric OS
versions earlier than 7.0.0, if you execute the cfgSave or cfgEnable command from a pre-7.0.0
switch, a zone database size of 128 KB is enforced.
To avoid this problem, use the switch with the highest Fabric OS version to perform zoning tasks, as
described in “Best practices for zoning” on page 246. Alternatively make sure that your pre-7.0.0
switches are upgraded with the latest patch release.
256
Fabric OS Administrator’s Guide
53-1002148-02
Zone configurations
11
Zone configurations
You can store a number of zones in a zone configuration database. The maximum number of items
that can be stored in the zone configuration database depends on the following criteria:
• Number of switches in the fabric.
• Number of bytes for each item name. The number of bytes required for an item name depends
on the specifics of the fabric, but cannot exceed 64 bytes for each item.
When enabling a new zone configuration, ensure that the size of the defined configuration does not
exceed the maximum configuration size supported by all switches in the fabric. This is particularly
important if you downgrade to a Fabric OS version that supports a smaller zone database than the
current Fabric OS. In this scenario, the zone database in the current Fabric OS would have to be
changed to the smaller zone database before the downgrade.
You can use the cfgSize command to check both the maximum available size and the currently
saved size on all switches. If you think you are approaching the maximum, you can save a partially
completed zone configuration and use the cfgSize command to determine the remaining space.
The cfgSize command reports the maximum available size on the current switch only. It cannot
determine the maximum available size on other switches in the fabric.
NOTE
The minimum zone database size is 4 bytes, even if the zone database is empty.
For important considerations for managing zoning in a fabric, and more details about the maximum
zone database size for each version of the Fabric OS, see “Zone database size” on page 256.
If you create or make changes to a zone configuration, you must enable the configuration for the
changes to take effect.
Creating a zone configuration
1. Connect to the switch and log in as admin.
2. Enter the cfgCreate command, using the following syntax:
cfgcreate "cfgname", "member[; member...]"
3. Enter the cfgSave command to save the change to the defined configuration.
The cfgSave command ends and commits the current zoning transaction buffer to nonvolatile
memory. If a transaction is open on a different switch in the fabric when this command is run,
the transaction on the other switch is automatically aborted. A message displays on the other
switches to indicate that the transaction was aborted.
Example
switch:admin> cfgcreate "NEW_cfg", "purplezone; bluezone; greenzone"
switch:admin> cfgsave
You are about to save the Defined zoning configuration. This
action will only save the changes on the Defined configuration.
Any changes made on the Effective configuration will not
take effect until it is re-enabled. Until the Effective
configuration is re-enabled, merging new switches into the
fabric is not recommended and may cause unpredictable
results with the potential of mismatched Effective Zoning configurations.
Do you want to save Defined zoning configuration only? (yes, y, no, n): [no] y
Fabric OS Administrator’s Guide
53-1002148-02
257
11
Zone configurations
Adding zones (members) to a zone configuration
1. Connect to the switch and log in as admin.
2. Enter the cfgAdd command, using the following syntax:
cfgadd "cfgname", "member[; member...]"
3. Enter the cfgSave command to save the change to the defined configuration.
The cfgSave command ends and commits the current zoning transaction buffer to nonvolatile
memory. If a transaction is open on a different switch in the fabric when this command is run,
the transaction on the other switch is automatically aborted. A message displays on the other
switches to indicate that the transaction was aborted.
Example
switch:admin> cfgadd "newcfg", "bluezone"
switch:admin> cfgsave
You are about to save the Defined zoning configuration. This
action will only save the changes on the Defined configuration.
Any changes made on the Effective configuration will not
take effect until it is re-enabled. Until the Effective
configuration is re-enabled, merging new switches into the
fabric is not recommended and may cause unpredictable
results with the potential of mismatched Effective Zoning
configurations.
Do you want to save Defined zoning configuration only? (yes, y, no, n): [no] y
Removing zones (members) from a zone configuration
1. Connect to the switch and log in as admin.
2. Enter the cfgRemove command, using the following syntax:
cfgremove "cfgname", "member[; member...]"
3. Enter the cfgSave command to save the change to the defined configuration.
The cfgSave command ends and commits the current zoning transaction buffer to nonvolatile
memory. If a transaction is open on a different switch in the fabric when this command is run,
the transaction on the other switch is automatically aborted. A message displays on the other
switches to indicate that the transaction was aborted.
Example
switch:admin> cfgremove "NEW_cfg", "purplezone"
switch:admin> cfgsave
You are about to save the Defined zoning configuration. This
action will only save the changes on the Defined configuration.
Any changes made on the Effective configuration will not
take effect until it is re-enabled. Until the Effective
configuration is re-enabled, merging new switches into the
fabric is not recommended and may cause unpredictable
results with the potential of mismatched Effective Zoning
configurations.
Do you want to save Defined zoning configuration only? (yes, y, no, n): [no] y
258
Fabric OS Administrator’s Guide
53-1002148-02
Zone configurations
11
Enabling a zone configuration
The following procedure ends and commits the current zoning transaction buffer to nonvolatile
memory. If a transaction is open on a different switch in the fabric when this procedure is run, the
transaction on the other switch is automatically aborted. A message displays on the other switches
to indicate that the transaction was aborted.
1. Connect to the switch and log in as admin.
2. Enter the cfgenable command, using the following syntax:
cfgenable "cfgname"
3. Enter y at the prompt.
Example
switch:admin> cfgenable "USA_cfg"
You are about to enable a new zoning configuration.
This action will replace the old zoning configuration with the
current configuration selected. If the update includes changes
to one or more traffic isolation zones, the update may result in
localized disruption to traffic on ports associated with
the traffic isolation zone changes.
Do you want to enable 'USA_cfg' configuration (yes, y, no, n): [no] y
zone config "USA_cfg" is in effect
Updating flash ...
Disabling a zone configuration
When you disable the current zone configuration, the fabric returns to non-zoning mode. All devices
can then access each other or not, depending on the default zone access mode setting.
NOTE
If the default zoning mode is set to All Access and more than 120 devices are connected to the
fabric, you cannot disable the zone configuration because this would enable All Access mode and
cause a large number of requests to the switch. In this situation, set the default zoning mode to No
Access prior to disabling the zone configuration. See “Default zoning mode” on page 255 for
information about setting this mode to No Access.
The following procedure ends and commits the current zoning transaction buffer to nonvolatile
memory. If a transaction is open on a different switch in the fabric when this procedure is run, the
transaction on the other switch is automatically aborted. A message displays on the other switches
to indicate that the transaction was aborted.
1. Connect to the switch and log in as admin.
2. Enter the cfgdisable command, using the following syntax:
cfgdisable
3. Enter y at the prompt.
Example
switch:admin> cfgdisable
You are about to disable zoning configuration. This
action will disable any previous zoning configuration enabled.
Do you want to disable zoning configuration? (yes, y, no, n): [no] y
Fabric OS Administrator’s Guide
53-1002148-02
259
11
Zone configurations
Deleting a zone configuration
1. Connect to the switch and log in as admin.
2. Enter the cfgDelete command, using the following syntax:
cfgdelete "cfgname"
3. Enter the cfgSave command to save the change to the defined configuration.
The cfgSave command ends and commits the current zoning transaction buffer to nonvolatile
memory. If a transaction is open on a different switch in the fabric when this command is run,
the transaction on the other switch is automatically aborted. A message displays on the other
switches to indicate that the transaction was aborted.
Example
switch:admin> cfgdelete "testcfg"
switch:admin> cfgsave
You are about to save the Defined zoning configuration. This
action will only save the changes on the Defined configuration.
Any changes made on the Effective configuration will not
take effect until it is re-enabled. Until the Effective
configuration is re-enabled, merging new switches into the
fabric is not recommended and may cause unpredictable
results with the potential of mismatched Effective Zoning
configurations.
Do you want to save Defined zoning configuration only? (yes, y, no, n): [no] y
Clearing changes to a configuration
• Enter the cfgTransAbort command.
When this command is executed, all changes since the last save operation (performed with the
cfgSave, cfgEnable, or cfgDisable command) are cleared.
Example
In the following example, assume that the removal of a member from zone1 was done in error:
switch:admin> zoneremove "zone1","3,5"
switch:admin> cfgtransabort
Viewing all zone configuration information
If you do not specify an operand when executing the cfgShow command to view zone
configurations, then all zone configuration information (both defined and effective) displays. If
there is an outstanding transaction, then the newly edited zone configuration that has not yet been
saved is displayed. If there are no outstanding transactions, then the committed zone configuration
displays.
1. Connect to the switch and log in as admin.
2. Enter the cfgShow command with no operands.
260
Fabric OS Administrator’s Guide
53-1002148-02
Zone configurations
11
Example
switch:admin> cfgshow
Defined configuration:
cfg:
USA1
Blue_zone
cfg:
USA_cfg Purple_zone; Blue_zone
zone: Blue_zone
1,1; array1; 1,2; array2
zone: Purple_zone
1,0; loop1
alias: array1 21:00:00:20:37:0c:76:8c; 21:00:00:20:37:0c:71:02
alias: array2 21:00:00:20:37:0c:76:22; 21:00:00:20:37:0c:76:28
alias: loop1
21:00:00:20:37:0c:76:85; 21:00:00:20:37:0c:71:df
Effective configuration:
cfg:
USA_cfg
zone: Blue_zone
1,1
21:00:00:20:37:0c:76:8c
21:00:00:20:37:0c:71:02
1,2
21:00:00:20:37:0c:76:22
21:00:00:20:37:0c:76:28
zone: Purple_zone
1,0
21:00:00:20:37:0c:76:85
21:00:00:20:37:0c:71:df
Viewing selected zone configuration information
1. Connect to the switch and log in as admin.
2. Enter the cfgShow command and specify a pattern.
cfgshow "pattern"[, mode]
Example
The following example displays all zone configurations that start with “Test”:
switch:admin> cfgshow "Test*"
cfg:
Test1 Blue_zone
cfg:
Test_cfg Purple_zone; Blue_zone
Viewing the configuration in the effective zone database
1. Connect to the switch and log in as admin.
2. Enter the cfgActvShow command.
Example
switch:admin> cfgactvshow
Effective configuration:
cfg:
NEW_cfg
zone: Blue_zone
1,1
21:00:00:20:37:0c:76:8c
21:00:00:20:37:0c:71:02
1,2
Fabric OS Administrator’s Guide
53-1002148-02
261
11
Zone object maintenance
21:00:00:20:37:0c:76:22
21:00:00:20:37:0c:76:28
zone: Purple_zone
1,0
21:00:00:20:37:0c:76:85
21:00:00:20:37:0c:71:df
Clearing all zone configurations
1. Connect to the switch and log in as admin.
2. Enter the cfgClear command to clear all zone information in the transaction buffer.
ATTENTION
Be careful using the cfgClear command because it deletes the defined configuration.
switch:admin> cfgclear
The Clear All action will clear all Aliases, Zones, FA Zones
and configurations in the Defined configuration.
Run cfgSave to commit the transaction or cfgTransAbort to
cancel the transaction.
Do you really want to clear all configurations? (yes, y, no, n): [no]
3. Enter one of the following commands, depending on whether an effective zone configuration
exists:
• If no effective zone configuration exists, enter the cfgSave command.
• If an effective zone configuration exists, enter the cfgDisable command to disable and
clear the zone configuration in nonvolatile memory for all switches in the fabric.
Zone object maintenance
The following procedures describe how to copy, delete, and rename zone objects. Depending on
the operation, a zone object can be a zone member, a zone alias, a zone, or a zone configuration.
Copying a zone object
When you copy a zone object, the resulting object has the same name as the original. The zone
object can be a zone configuration, a zone alias, or a zone.
1. Connect to the switch and log in as admin.
2. Enter the cfgShow command to view the zone configuration objects you want to copy.
cfgshow "pattern"[, mode]
For example, to display all zone configuration objects that start with “Test”:
switch:admin> cfgshow "Test*"
cfg:
Test1 Blue_zone
cfg:
Test_cfg Purple_zone; Blue_zone
262
Fabric OS Administrator’s Guide
53-1002148-02
Zone object maintenance
11
3. Enter the zone --copy command, specifying the zone objects you want to copy, along with the
new object name. Note that zone configuration names are case-sensitive; blank spaces are
ignored and it works in any Admin Domain other than AD255.
switch:admin> zone --copy Test1 US_Test1
4. Enter the cfgShow command to verify the new zone object is present.
switch:admin> cfgshow "Test*"
cfg:
Test1 Blue_zone
cfg:
Test_cfg Purple_zone; Blue_zone
switch:admin> cfgShow "US_Test1"
cfg:
US_Test1
Blue_zone
5. If you want the change preserved when the switch reboots, enter the cfgSave command to
save it to nonvolatile (flash) memory.
6. Enter the cfgEnable command for the appropriate zone configuration to make the change
effective.
Deleting a zone object
The following procedure removes all references to a zone object and then deletes the zone object.
The zone object can be a zone member, a zone alias, or a zone.
1. Connect to the switch and log in as admin.
2. Enter the cfgShow command to view the zone configuration objects you want to delete.
switch:admin> cfgShow
Defined configuration:
cfg: USA_cfg Purple_zone; White_zone; Blue_zone
zone: Blue_zone
1,1; array1; 1,2; array2
zone: Purple_zone
1,0; loop1
zone: White_zone
1,3; 1,4
alias: array1 21:00:00:20:37:0c:76:8c; 21:00:00:20:37:0c:71:02
alias: array2 21:00:00:20:37:0c:76:22; 21:00:00:20:37:0c:76:28
alias: loop1 21:00:00:20:37:0c:76:85; 21:00:00:20:37:0c:71:df
Effective configuration:
cfg: USA_cfg
zone: Blue_zone
1,1
21:00:00:20:37:0c:76:8c
21:00:00:20:37:0c:71:02
1,2
21:00:00:20:37:0c:76:22
21:00:00:20:37:0c:76:28
zone: Purple_zone
1,0
21:00:00:20:37:0c:76:85
21:00:00:20:37:0c:71:df
3. Enter the zone --expunge command to delete the zone object. Zone configuration names are
case-sensitive; blank spaces are ignored and it works in any Admin Domain other than AD255.
Fabric OS Administrator’s Guide
53-1002148-02
263
11
Zone configuration management
switch:admin> zone --expunge "White_zone"
You are about to expunge one configuration
or member. This action could result in removing
many zoning configurations recursively.
[Removing the last member of a configuration removes the configuration.]
Do you want to expunge the member? (yes, y, no, n): [no] yes
4. Enter yes at the prompt.
5. Enter the cfgShow command to verify the deleted zone object is no longer present.
6. If you want the change preserved when the switch reboots, enter the cfgSave command to
save it to nonvolatile (flash) memory.
7.
Enter the cfgEnable command for the appropriate zone configuration to make the change
effective.
Renaming a zone object
1. Connect to the switch and log in as admin.
2. Enter the cfgShow command to view the zone configuration objects you want to rename.
switch:admin> cfgShow
Defined configuration:
cfg: USA_cfg Purple_zone; White_zone; Blue_zone
zone: Blue_zone
1,1; array1; 1,2; array2
zone: Purple_zone
1,0; loop1
zone: White_zone
1,3; 1,4
alias: array1 21:00:00:20:37:0c:76:8c; 21:00:00:20:37:0c:71:02
alias: array2 21:00:00:20:37:0c:76:22; 21:00:00:20:37:0c:76:28
alias: loop1 21:00:00:20:37:0c:76:85; 21:00:00:20:37:0c:71:df
3. Enter the zoneObjectRename command to rename zone configuration objects. Note that zone
configuration names are case-sensitive; blank spaces are ignored and it works in any Admin
Domain other than AD255.
switch:admin> zoneObjectRename "White_zone", "Purple_zone"
4. Enter the cfgShow command to verify the renamed zone object is present.
5. If you want the change preserved when the switch reboots, enter the cfgSave command to
save it to nonvolatile (flash) memory.
6. Enter the cfgEnable command for the appropriate zone configuration to make the change
effective.
Zone configuration management
You can add, delete, or remove individual elements in an existing zone configuration to create an
appropriate configuration for your SAN environment. After the changes have been made, save the
configuration to ensure the configuration is permanently saved in the switch and that the
configuration is replicated throughout the fabric.
264
Fabric OS Administrator’s Guide
53-1002148-02
Security and zoning
11
The switch configuration file can also be uploaded to the host for archiving and it can be
downloaded from the host to a switch in the fabric. See “Configuration file backup” on page 182,
“Configuration file restoration” on page 184, or the configUpload and configDownload commands
in the Fabric OS Command Reference for additional information on uploading and downloading the
configuration file.
Security and zoning
Zones provide controlled access to fabric segments and establish barriers between operating
environments. They isolate systems with different uses, protecting individual systems in a
heterogeneous environment; for example, when zoning is in secure mode, no merge operations
occur.
Brocade Advanced Zoning is configured on the primary Fabric Configuration Server (FCS). The
primary FCS switch makes zoning changes and other security-related changes. The primary FCS
switch also distributes zoning to all other switches in the secure fabric. All existing interfaces can
be used to administer zoning.
You must perform zone management operations from the primary FCS switch using a zone
management interface, such as Telnet or Web Tools. You can alter a zone database, provided you
are connected to the primary FCS switch.
When two secure fabrics join, the traditional zone merge does not occur. Instead, a zone database
is downloaded from the primary FCS switch of the merged secure fabric. When E_Ports are active
between two switches, the name of the FCS server and a zoning policy set version identifier are
exchanged between the switches. If the views of the two secure fabrics are the same, the fabric’s
primary FCS server downloads the zone database and security policy sets to each switch in the
fabric. If there is a view conflict, the E_Ports are segmented due to incompatible security data.
All zones should use frame-based hardware enforcement; the best way to do this is to use WWN
identification exclusively for all zoning configurations.
Zone merging
When a new switch is added to the fabric, it automatically takes on the zone configuration
information from the fabric. You can verify the zone configuration on the switch using the procedure
described in “Viewing the configuration in the effective zone database” on page 261.
If you are adding a switch that is already configured for zoning, clear the zone configuration on that
switch before connecting it to the zoned fabric. See “Clearing all zone configurations” on page 262
for instructions.
Adding a new fabric that has no zone configuration information to an existing fabric is very similar
to adding a new switch. All switches in the new fabric inherit the zone configuration data. If the
existing fabric has an effective zone configuration, then the same configuration becomes the
effective configuration for the new switches.
Fabric OS Administrator’s Guide
53-1002148-02
265
11
Zone merging
Before the new fabric can merge successfully, it must pass the following criteria:
• Before merging
To facilitate merging, check the following before merging switches or fabrics:
-
Default Zone: The switches must adhere to the default zone merge rules, as described in
“Zone merging scenarios” on page 267.
-
Effective and defined zone configuration match: Ensure that the effective and defined
zone configurations match. If they do not match, and you merge with another switch, the
merge might be successful, but unpredictable zoning and routing behavior can occur.
• Merging and segmentation
The fabric is checked for segmentation during power-up, when a switch is disabled or enabled,
or when a new switch is added.
The zone configuration database is stored in nonvolatile memory by the cfgSave command. All
switches in the fabric have a copy of this database. When a change is made to the defined
configuration, the switch where the changes were made must close its transaction for the
change to be propagated throughout the fabric.
If you have implemented default zoning you must set the switch you are adding into the fabric
to the same default zone mode setting as the rest of the fabric to avoid segmentation.
• Merging rules
Observe these rules when merging zones:
-
Local and adjacent configurations: If the local and adjacent zone database configurations
are the same, they will remain unchanged after the merge.
-
Effective configurations: If there is an effective configuration between two switches, the
effective zone configurations must match.
-
Zone object naming: If a zoning object has the same name in both the local and adjacent
defined configurations, the object types and member lists must match. When comparing
member lists, the content and order of the members are important.
-
Objects in adjacent configurations: If a zoning object appears in an adjacent defined
configuration, but not in the local defined configuration, the zoning object is added to the
local defined configuration. The modified zone database must fit in the nonvolatile
memory area allotted for the zone database.
-
Local configuration modification: If a local defined configuration is modified because of a
merge, the new zone database is propagated to other the switches within the merge
request.
-
TI zones: If there is an effective configuration between two switches and TI zones are
present on either switch, the TI zones are not automatically activated after the merge.
Check the TI zone enabled status using the zone --show command and if the status does
not match across switches, issue the cfgenable command.
• Merging two fabrics
Both fabrics have identical zones and configurations enabled, including the default zone
mode. The two fabrics will join to make one larger fabric with the same zone configuration
across the newly created fabric.
If the two fabrics have different zone configurations, they will not be merged. If the two fabrics
cannot join, the ISL between the switches will segment.
266
Fabric OS Administrator’s Guide
53-1002148-02
Zone merging
11
• Merge conflicts
When a merge conflict is present, a merge will not take place and the ISL will segment. Use the
switchShow or errDump commands to obtain additional information about possible merge
conflicts, because many non-zone related configuration parameters can cause conflicts. See
the Fabric OS Command Reference for detailed information about these commands.
If the fabrics have different zone configuration data, the system attempts to merge the two
sets of zone configuration data. If the zones cannot merge, the ISL will be segmented.
A merge is not possible if any of the following conditions exist:
-
Configuration mismatch: Zoning is enabled in both fabrics and the zone configurations
that are enabled are different in each fabric.
-
Type mismatch: The name of a zone object in one fabric is used for a different type of zone
object in the other fabric.
-
Content mismatch: The definition of a zone object in one fabric is different from the
definition of zone object with the same name in the other fabric.
-
Zone Database Size: If the zone database size exceeds the maximum limit of another
switch.
NOTE
If the zoneset members on two switches are not listed in the same order, the configuration is
considered a mismatch, resulting in the switches being segmented from the fabric. For
example: cfg1 = z1; z2 is different from cfg1 = z2; z1, even though members of the
configuration are the same. If zoneset members on two switches have the same names
defined in the configuration, make sure zoneset members are listed in the same order.
Fabric segmentation and zoning
If the connections between two fabrics are no longer available, the fabric segments into two
separate fabrics. Each new fabric retains the same zone configuration.
If the connections between two fabrics are replaced and no changes have been made to the zone
configuration in either of the two fabrics, then the two fabrics merge back into one single fabric. If
any changes that cause a conflict have been made to either zone configuration, then the fabrics
might segment.
Zone merging scenarios
The following tables provide information on merging zones and the expected results.
•
•
•
•
•
•
Table 52 on page 268: Defined and effective configurations
Table 53 on page 269: Different content
Table 54 on page 269: Different names
Table 55 on page 269: TI zones
Table 56 on page 270: Default access mode
Table 57 on page 270: Mixed Fabric OS versions
Fabric OS Administrator’s Guide
53-1002148-02
267
11
Zone merging
TABLE 52
Zone merging scenarios: Defined and effective configurations
Description
Switch A
Switch B
Expected results
Switch A has a defined configuration.
Switch B does not have a defined
configuration.
defined:
cfg1:
zone1: ali1; ali2
effective: none
defined: none
effective: none
Configuration from Switch A to propagate
throughout the fabric in an inactive state,
because the configuration is not enabled.
Switch A has a defined and effective
configuration.
Switch B has a defined configuration
but no effective configuration.
defined: cfg1
zone1: ali1; ali2
effective: cfg1:
defined: cfg1
zone1: ali1; ali2
effective: none
Configuration from Switch A to propagate
throughout the fabric. The configuration is
enabled after the merge in the fabric.
Switch A and Switch B have the same
defined configuration. Neither have an
effective configuration.
defined: cfg1
zone1: ali1; ali2
effective: none
defined: cfg1
zone1: ali1; ali2
effective: none
No change (clean merge).
Switch A and Switch B have the same
defined and effective configuration.
defined: cfg1
zone1: ali1; ali2
effective: cfg1:
defined: cfg1
zone1: ali1; ali2
effective: cfg1:
No change (clean merge).
Switch A does not have a defined
configuration.
Switch B has a defined configuration.
defined: none
effective: none
defined:cfg1
zone1: ali1; ali2
effective: none
Switch A will absorb the configuration from the
fabric.
Switch A does not have a defined
configuration.
Switch B has a defined configuration.
defined: none
effective: none
defined:cfg1
zone1: ali1; ali2
effective: cfg1
Switch A will absorb the configuration from the
fabric, with cfg1 as the effective configuration.
Switch A and Switch B have the same
defined configuration. Only Switch B
has an effective configuration.
defined: cfg1
zone1: ali1; ali2
effective: none
defined: cfg1
zone1: ali1; ali2
effective: cfg1
Clean merge, with cfg1 as the effective
configuration.
Switch A and Switch B have different
defined configurations. Neither have an
enabled zone configuration.
defined: cfg2
zone2: ali3; ali4
effective: none
defined: cfg1
zone1: ali1; ali2
effective: none
Clean merge. The new configuration will be a
composite of the two.
defined: cfg1
zone1: ali1; ali2
cfg2:
zone2: ali3; ali4
effective: none
Switch A and Switch B have different
defined configurations. Switch B has an
effective configuration.
defined: cfg2
zone2: ali3; ali4
effective: none
defined: cfg1
zone1: ali1; ali2
effective: cfg1
Clean merge. The new configuration will be a
composite of the two, with cfg1 as the
effective configuration.
Switch A does not have a defined
configuration.
Switch B has a defined configuration
and an effective configuration, but the
effective configuration is different from
the defined configuration.
defined: none
effective: none
defined: cfg1
zone1: ali1; ali2
effective: cfg1
zone1: ali1; ali2
zone2: ali3, ali4
Clean merge. Switch A absorbs the defined
configuration from the fabric, with cfg1 as the
effective configuration.
In this case, however, the effective
configurations for Switch A and Switch B are
different. You should issue a cfgenable from
the switch with the proper effective
configuration.
268
Fabric OS Administrator’s Guide
53-1002148-02
Zone merging
TABLE 53
11
Zone merging scenarios: Different content
Description
Switch A
Switch B
Expected results
Effective configuration mismatch.
defined: cfg1
zone1: ali1; ali2
effective: cfg1
zone1: ali1; ali2
defined: cfg2
zone2: ali3; ali4
effective: cfg2
zone2: ali3; ali4
Fabric segments due to: Zone Conflict cfg
mismatch
Configuration content mismatch.
defined: cfg1
zone1: ali1; ali2
effective: irrelevant
defined: cfg1
zone1: ali3; ali4
effective: irrelevant
Fabric segments due to: Zone Conflict content
mismatch
TABLE 54
Zone merging scenarios: Different names
Description
Switch A
Switch B
Expected results
Same content, different effective cfg
name.
defined: cfg1
zone1: ali1; ali2
effective: cfg1
zone1: ali1; ali2
defined:cfg2
zone1: ali1; ali2
effective: cfg2
zone1: ali1; ali2
Fabric segments due to: Zone Conflict cfg
mismatch
Same content, different zone name.
defined: cfg1
zone1: ali1; ali2
effective: irrelevant
defined: cfg1
zone2: ali1; ali2
effective: irrelevant
Fabric segments due to: Zone Conflict content
mismatch
Same content, different alias name.
defined: cfg1
ali1: A; B
effective: irrelevant
defined:cfg1
ali2: A; B
effective: irrelevant
Fabric segments due to: Zone Conflict content
mismatch
Same alias name, same content,
different order.
defined: cfg1
ali1: A; B; C
effective: irrelevant
defined: cfg1
ali1: B; C; A
effective: irrelevant
Fabric segments due to: Zone Conflict content
mismatch
Same name, different types.
effective: zone1:
MARKETING
effective: cfg1:
MARKETING
Fabric segments due to: Zone Conflict type
mismatch
Same name, different types.
effective: zone1:
MARKETING
effective: alias1:
MARKETING
Fabric segments due to: Zone Conflict type
mismatch
Same name, different types.
effective: cfg1:
MARKETING
effective: alias1:
MARKETING
Fabric segments due to: Zone Conflict type
mismatch
TABLE 55
Zone merging scenarios: TI zones
Description
Switch A
Switch B
Expected results
Switch A does not have Traffic Isolation
(TI) zones.
Switch B has TI zones.
defined: cfg1
effective: cfg1
defined: cfg1
TI_zone1
effective: cfg1
Clean merge. TI zones are not automatically
activated after the merge.
Switch A has TI zones.
Switch B has identical TI zones.
defined: cfg1
TI_zone1
effective: cfg1
defined: cfg1
TI_zone1
effective: cfg1
Clean merge. TI zones are not automatically
activated after the merge.
Switch A has a TI zone.
Switch B has a different TI zone.
defined: cfg1
TI_zone1
defined: cfg1
TI_zone2
Fabric segments due to: Zone Conflict cfg
mismatch. Cannot merge switches with
different TI zone configurations.
Fabric OS Administrator’s Guide
53-1002148-02
269
11
Zone merging
TABLE 55
Zone merging scenarios: TI zones (Continued)
Description
Switch A
Switch B
Expected results
Switch A has Enhanced TI zones.
Switch B is running Fabric OS v6.4.0 or
later.
defined: cfg1
TI_zone1
TI_zone2
defined: none
Clean merge. TI zones are not automatically
activated after the merge.
Switch A has Enhanced TI zones.
Switch B is running a Fabric OS version
earlier than v6.4.0.
defined: cfg1
TI_zone1
TI_zone2
defined: none
Fabric segments because all switches in the
fabric must be running Fabric OS v6.4.0 or
later to support Enhanced TI zones.
TABLE 56
Zone merging scenarios: Default access mode
Description
Switch A
Switch B
Expected results
Different default zone access mode
settings.
defzone: allaccess
defzone: noaccess
Clean merge — noaccess takes precedence
and defzone configuration from Switch B
propagates to fabric.
defzone: noaccess
Same default zone access mode
settings.
defzone: allaccess
defzone: allaccess
Clean merge — defzone configuration is
allaccess in the fabric.
Same default zone access mode
settings.
defzone: noaccess
defzone: noaccess
Clean merge — defzone configuration is
noaccess in the fabric.
Effective zone configuration.
No effective
configuration.
defzone = allaccess
effective: cfg2
defzone: allaccess or
noaccess
Clean merge — effective zone configuration
and defzone mode from Switch B propagates
to fabric.
Effective zone configuration.
No effective
configuration.
defzone = noaccess
effective: cfg2
defzone: allaccess
Fabric segments because Switch A has a
hidden zone configuration (no access)
activated and Switch B has an explicit zone
configuration activated.
Effective zone configuration
effective: cfg1
defzone: noaccess
No effective
configuration.
defzone: noaccess
Clean merge — effective zone configuration
from Switch A propagates to fabric.
Effective zone configuration
effective: cfg1
defzone: allaccess
No effective
configuration.
defzone: noaccess
Fabric segments. You can resolve the zone
conflict by changing defzone to noaccess on
Switch 1.
TABLE 57
Zone merging scenarios: Mixed Fabric OS versions
Description
Switch A
Switch B
Expected results
Switch A is running Fabric OS 7.0.0 or
later.
Switch B is running a Fabric OS version
earlier than 7.0.0.
effective: cfg1
defzone = allaccess
No effective
configuration.
defzone - noaccess
Fabric segments due to zone conflict.
Switch A is running Fabric OS 7.0.0 or
later.
Switch B is running a Fabric OS version
earlier than 7.0.0.
No effective
configuration.
defzone = noaccess
effective: cfg2
defzone - allaccess
Fabric segments due to zone conflict.
NOTE
When merging mixed versions of Fabric OS where both sides have default zone mode No Access set,
the merge results vary depending on which switch initiates the merge.
270
Fabric OS Administrator’s Guide
53-1002148-02
Chapter
12
Traffic Isolation Zoning
In this chapter
• Traffic Isolation Zoning overview . . . . . . . . . . . . . . . . . . . . . . . . . . . . . . . . .
• Enhanced TI zones . . . . . . . . . . . . . . . . . . . . . . . . . . . . . . . . . . . . . . . . . . . .
• Traffic Isolation Zoning over FC routers . . . . . . . . . . . . . . . . . . . . . . . . . . . .
• General rules for TI zones . . . . . . . . . . . . . . . . . . . . . . . . . . . . . . . . . . . . . . .
• Supported configurations for Traffic Isolation Zoning. . . . . . . . . . . . . . . . .
• Limitations and restrictions of Traffic Isolation Zoning. . . . . . . . . . . . . . . .
• Admin Domain considerations for Traffic Isolation Zoning. . . . . . . . . . . . .
• Virtual Fabric considerations for Traffic Isolation Zoning . . . . . . . . . . . . . .
• Traffic Isolation Zoning over FC routers with Virtual Fabrics . . . . . . . . . . .
• Creating a TI zone . . . . . . . . . . . . . . . . . . . . . . . . . . . . . . . . . . . . . . . . . . . . .
• Modifying TI zones . . . . . . . . . . . . . . . . . . . . . . . . . . . . . . . . . . . . . . . . . . . . .
• Changing the state of a TI zone . . . . . . . . . . . . . . . . . . . . . . . . . . . . . . . . . .
• Deleting a TI zone . . . . . . . . . . . . . . . . . . . . . . . . . . . . . . . . . . . . . . . . . . . . .
• Displaying TI zones . . . . . . . . . . . . . . . . . . . . . . . . . . . . . . . . . . . . . . . . . . . .
• Troubleshooting TI zone routing problems. . . . . . . . . . . . . . . . . . . . . . . . . .
• Setting up TI over FCR (sample procedure) . . . . . . . . . . . . . . . . . . . . . . . . .
271
276
278
281
282
283
284
284
286
287
290
291
292
292
293
294
Traffic Isolation Zoning overview
The Traffic Isolation Zoning feature allows you to control the flow of interswitch traffic by creating a
dedicated path for traffic flowing from a specific set of source ports (N_Ports). For example, you
might use Traffic Isolation Zoning for the following scenarios:
• To dedicate an ISL to high priority, host-to-target traffic.
• To force high volume, low priority traffic onto a given ISL to limit the effect on the fabric of this
high traffic pattern.
• To ensure that requests and responses of FCIP-based applications such as tape pipelining use
the same VE_Port tunnel across a metaSAN.
Traffic Isolation Zoning does not require a license.
Traffic isolation is implemented using a special zone, called a Traffic Isolation zone (TI zone). A TI
zone indicates the set of N_Ports and E_Ports to be used for a specific traffic flow. When a TI zone
is activated, the fabric attempts to isolate all inter-switch traffic entering from a member of the
zone to only those E_Ports that have been included in the zone. The fabric also attempts to exclude
traffic not in the TI zone from using E_Ports within that TI zone.
Fabric OS Administrator’s Guide
53-1002148-02
271
12
Traffic Isolation Zoning overview
Figure 36 shows a fabric with a TI zone consisting of the following:
• N_Ports:
• E_Ports:
“1,7”, “1,8”, “4,5”, and “4,6”
“1,1”, “3,9”, “3,12”, and “4,7”
The dotted line indicates the dedicated path between the initiator in Domain 1 to the target in
Domain 4.
Domain 1
Domain 3
7
8
9
1
9
2
10
12
7
6
5
= Dedicated Path
4
= Ports in the TI zone
Domain 4
FIGURE 36
Traffic Isolation zone creating a dedicated path through the fabric
In Figure 36, all traffic entering Domain 1 from N_Ports 7 and 8 is routed through E_Port 1.
Similarly, traffic entering Domain 3 from E_Port 9 is routed to E_Port 12, and traffic entering
Domain 4 from E_Port 7 is routed to the devices through N_Ports 5 and 6. Traffic coming from
other ports in Domain 1 would not use E_Port 1, but would use E_Port 2 instead.
Use the zone command to create and manage TI zones. Refer to the Fabric OS Command
Reference for details about the zone command.
TI zone failover
A TI zone can have failover enabled or disabled.
Disable failover if you want to guarantee that TI zone traffic uses only the dedicated path, and that
no other traffic can use the dedicated path.
Enable failover if you want traffic to have alternate routes if either the dedicated or non-dedicated
paths cannot be used.
ATTENTION
If failover is disabled, use care when planning your TI zones so that non-TI zone devices are not
isolated. If this feature is not used correctly, it can cause major fabric disruptions that are difficult
to resolve. See “Additional considerations when disabling failover” on page 273 for additional
information about using this feature.
Table 58 compares the behavior of traffic when failover is enabled and disabled.
272
Fabric OS Administrator’s Guide
53-1002148-02
Traffic Isolation Zoning overview
TABLE 58
12
Comparison of traffic behavior when failover is enabled or disabled in TI zones
Failover enabled
Failover disabled
If the dedicated path is not the shortest path or if the
dedicated path is broken, the TI zone traffic will use a
non-dedicated path instead.
If the dedicated path is not the shortest path or if the
dedicated path is broken, traffic for that TI zone is
halted until the dedicated path is fixed.
Non-TI zone traffic will use the dedicated path if no
other paths through the fabric exist, or if the
non-dedicated paths are not the shortest paths.
Non-TI zone traffic will never use the dedicated path,
even if the dedicated path is the shortest path or if
there are no other paths through the fabric.
For example, in Figure 36 on page 272, if the dedicated ISL between Domain 1 and Domain 3 goes
offline, then the following occurs, depending on the failover option:
• If failover is disabled for the TI zone, the TI zone traffic is halted until the ISL between Domain
1 and Domain 3 is back online.
• If failover is enabled for the TI zone, the TI zone traffic is routed from Domain 1 to Domain 3
through E_Ports “1,2” and “3,10”.
NOTE
When TI zone traffic enters the non-TI path, the TI zone traffic continues to flow through that
path. In this example, when the TI zone traffic is routed through E_Ports “1,2” and “3,10”, that
traffic continues through the non-TI path between domains 3 and 4, even though the TI path
between domains 3 and 4 is not broken.
If the non-dedicated ISL between Domain 1 and Domain 3 goes offline, then the following occurs,
depending on the failover option:
• If failover is disabled for the TI zone, non-TI zone traffic is halted until the non-dedicated ISL
between Domain 1 and Domain 3 is back online.
• If failover is enabled for the TI zone, non-TI zone traffic is routed from Domain 1 to Domain 3
through the dedicated ISL.
NOTE
When non-TI zone traffic enters the TI path, the non-TI zone traffic continues to flow through
that path. In this example, when the non-TI zone traffic is routed through E_Ports “1,1” and
“3,9”, that traffic continues through E_Ports “3,12” and “4,7”, even though the non-dedicated
ISL between domains 3 and 4 is not broken.
Additional considerations when disabling failover
If failover is disabled, be aware of the following considerations:
• This feature is intended for use in simple linear fabric configurations, such as that shown in
Figure 36 on page 272.
• Ensure that there are non-dedicated paths through the fabric for all devices that are not in a TI
zone.
• If you create a TI zone with just E_Ports, failover must be enabled. If failover is disabled, the
specified ISLs will not be able to route any traffic.
• If the path between devices in a TI zone is broken, no inter-switch RSCNs are generated. Each
switch that is part of the TI zone generates RSCNs to locally attached devices that are part of
the TI zone and are registered to receive RSCNs.
Fabric OS Administrator’s Guide
53-1002148-02
273
12
Traffic Isolation Zoning overview
• Ensure that there are multiple paths between switches.
Disabling failover locks the specified route so that only TI zone traffic can use it. Non-TI zone
traffic is excluded from using the dedicated path.
• You should enable failover-enabled TI zones before enabling failover-disabled TI zones, to avoid
dropped frames.
When you issue the cfgEnable command to enable the zone configuration, if you have failover
disabled zones, do the following:
1. Temporarily change failover-disabled TI zones to failover-enabled.
2. Enable the zones (cfgEnable).
3. Reset all the zones you changed in step 1 to failover-disabled.
4. Enable the zones again (cfgEnable).
These steps are listed in the procedures in this section.
• It is recommended that TI zone definitions and regular zone definitions match.
• Domain controller frames can use any path between switches. Disabling failover does not
affect Domain Controller connectivity.
For example, in Figure 37, if failover is disabled, Domain 2 can continue to send domain
controller frames to Domain 3 and 4, even though the path between Domain 1 and Domain 3
is a dedicated path. Domain controller frames include zone updates and Name Server queries.
Domain 1
8
Domain 3
1
9
9
12
3
15
7
6
= Dedicated Path
= Ports in the TI zone
5
Domain 2
FIGURE 37
Domain 4
Fabric incorrectly configured for TI zone with failover disabled
• It is recommended that the insistent Domain ID feature be enabled; if a switch changes its
active domain ID, the route is broken. See the configure command in the Fabric OS Command
Reference for information about setting insistent Domain ID.
FSPF routing rules and traffic isolation
All traffic must use the lowest cost path. FSPF routing rules take precedence over the TI zones, as
described in the following situations.
274
Fabric OS Administrator’s Guide
53-1002148-02
Traffic Isolation Zoning overview
12
If the dedicated ISL is not the lowest cost path ISL, then the following rules apply:
• If failover is enabled, the traffic path for the TI zone is broken, and TI zone traffic uses the
lowest cost path instead.
• If failover is disabled, the TI zone traffic is blocked.
If the dedicated ISL is the only lowest cost path ISL, then the following rules apply:
• If failover is enabled, non-TI zone traffic as well as TI zone traffic uses the dedicated ISL.
• If failover is disabled, non-TI zone traffic is blocked because it cannot use the dedicated ISL,
which is the lowest cost path.
For example, in Figure 38, there is a dedicated path between Domain 1 and Domain 3, and
another, non-dedicated, path that passes through Domain 2. If failover is enabled, all traffic will use
the dedicated path, because the non-dedicated path is not the shortest path. If failover is disabled,
non-TI zone traffic is blocked because the non-dedicated path is not the shortest path.
Domain 1
8
Domain 3
1
9
9
14
12
3
15
7
16
= Dedicated Path
= Ports in the TI zone
6
5
Domain 2
FIGURE 38
Domain 4
Dedicated path is the only shortest path
In Figure 39 on page 276, a dedicated path between Domain 1 and Domain 4 exists, but is not the
shortest path. In this situation, if failover is enabled, the TI zone traffic uses the shortest path, even
though the E_Ports are not in the TI zone. If failover is disabled, the TI zone traffic stops until the
dedicated path is configured to be the shortest path.
Fabric OS Administrator’s Guide
53-1002148-02
275
12
Enhanced TI zones
Domain 1
8
Domain 3
1
9
9
14
12
3
15
7
16
6
= Dedicated Path
= Ports in the TI zone
5
Domain 4
Domain 2
FIGURE 39
Dedicated path is not the shortest path
NOTE
For information about setting or displaying the FSPF cost of a path, see the linkCost and
topologyShow commands in the Fabric OS Command Reference.
Enhanced TI zones
Prior to Fabric OS v6.4.0, a port could be in only one TI zone at a time. Starting in Fabric OS v6.4.0,
ports can be in multiple TI zones at the same time. Zones with overlapping port members are
called enhanced TI zones (ETIZ).
Figure 40 shows an example of two TI zones. Because these TI zones have an overlapping port
(3,8), they are enhanced TI zones.
Domain 1
Host 1
Domain 3
2
1
6
Target
8
7
Host 2
2
1
= ETIZ 1
= ETIZ 2
Domain 2
FIGURE 40
Enhanced TI zones
Enhanced TI zones are especially useful in FICON fabrics. See the FICON Administrator’s Guide for
example topologies using enhanced TI zones.
See “Additional configuration rules for enhanced TI zones” on page 283 for more information about
enhanced TI zones.
276
Fabric OS Administrator’s Guide
53-1002148-02
Enhanced TI zones
12
Illegal configurations with enhanced TI zones
When you create TI zones, ensure that all traffic from a port to all destinations on a remote domain
have the same path. Do not create separate paths from a local port to two or more ports on the
same remote domain.
If the TI zones are configured with failover disabled, some traffic will be dropped. If the TI zones are
configured with failover enabled, all traffic will go through, but half of the traffic will be routed
incorrectly according to the TI zone definitions.
A message is sent to the RASlog if a potential error condition is detected in the TIZ configuration.
You can also display a report of existing and potential problems with TI zone configurations, as
described in “Troubleshooting TI zone routing problems” on page 293.
Illegal ETIZ configuration: separate paths from a port to devices on same domain
Figure 41 shows two enhanced TI zones that are configured incorrectly because there are two
paths from a local port (port 8 on Domain 3) to two or more devices on the same remote domain
(ports 1 and 4 on Domain 1).
The TI zones are enhanced TI zones because they have an overlapping member (3,8). Each zone
describes a different path from the Target to Domain 1. Traffic is routed correctly from Host 1 and
Host 2 to the Target; however, traffic from the Target to the Hosts might not be.
Traffic from (3,8) destined for Domain 1 cannot go through both port 6 and port 7, so only one port
is chosen. If port 6 is chosen, frames destined for (1,4) will be dropped at Domain 1. If port 7 is
chosen, frames destined for (1,1) will be dropped.
Host 1
Domain 1
1
4
Domain 3
2
6
3
7
8
= ETIZ 1
= ETIZ 2
Host 2
FIGURE 41
Target
Illegal ETIZ configuration: two paths from one port to two devices on the same remote domain
Illegal ETIZ configuration: separate paths from a single port to the same domain
Figure 42 shows another example of an illegal ETIZ configuration. In this example, the two hosts
are on separate remote domains, but the path to each host goes through the same domain
(Domain 1).
This example contains two enhanced TI zones, with port (3,8) as the overlapping member:
• ETIZ 1 contains (1,1), (1,2), (3,6), (3,8)
• ETIZ 2 contains (2,1), (2,2), (1,4), (1,3), (3,7), (3,8)
Fabric OS Administrator’s Guide
53-1002148-02
277
12
Traffic Isolation Zoning over FC routers
In this example traffic from the Target to Domain 2 is routed correctly. Only one TI zone describes a
path to Domain 2. However, both TI zones describe different, valid paths from the Target to Domain
1. Only one path will be able to get to (1,1). Traffic from port (3,8) cannot be routed to Domain 1
over both (3,6) and (3,7), so one port will be chosen. If (3,7) is chosen, frames destined for (1,1)
will be dropped at Domain 1.
Domain 1
Host 1
1
Domain 3
2
6
3
7
Target
8
4
Host 2
2
1
= ETIZ 1
= ETIZ 2
Domain 2
FIGURE 42
Illegal ETIZ configuration: two paths from one port
Traffic Isolation Zoning over FC routers
This section describes how TI zones work with Fibre Channel routing (TI over FCR). See Chapter 23,
“Using the FC-FC Routing Service,” for information about FC routers, phantom switches, and the
FC-FC Routing Service.
Some VE_Port-based features, such as tape pipelining, require the request and corresponding
response traffic to traverse the same VE_Port tunnel across the metaSAN. To ensure that the
request and response traverse the same VE_Port tunnel, you must set up Traffic Isolation zones in
the edge and backbone fabrics.
• Set up a TI zone in an edge fabric to guarantee that traffic from a specific device in that edge
fabric is routed through a particular EX_Port or VEX_Port.
• Set up a TI zone in the backbone fabric to guarantee that traffic between two devices in
different fabrics is routed through a particular ISL (VE_Ports or E_Ports) in the backbone.
This combination of TI zones in the backbone and edge fabrics ensures that the traffic between
devices in different fabrics traverses the same VE_Port tunnel in a backbone fabric. Figure 43
shows how three TI zones form a dedicated path between devices in different edge fabrics. The
backbone fabric can contain one or more FC routers.
278
Fabric OS Administrator’s Guide
53-1002148-02
Traffic Isolation Zoning over FC routers
Edge fabric 1
Backbone
fabric
12
Edge fabric 2
= Dedicated path set up by TI zone in edge fabric 1
= Dedicated path set up by TI zone in edge fabric 2
= Dedicated path set up by TI zone in backbone fabric
FIGURE 43
Traffic Isolation Zoning over FCR
In addition to setting up TI zones, you must also ensure that the devices are in an LSAN zone so
that they can communicate with each other.
If failover is enabled and the TI path is not available, an alternate path is used. If failover is disabled
and the TI path is not available, then devices are not imported.
NOTE
For TI over FCR, all switches in the backbone fabric and in the edge fabrics must be running
Fabric OS v6.1.0 or later.
TI within an edge fabric
A TI zone within an edge fabric is used to route traffic between a real device and a proxy device
through a particular EX_Port. For example, in Figure 44, you can set up a TI zone to ensure that
traffic between Host 1 and the proxy target is routed through EX_Port 9.
Host 1
Domain 1
8
Front Domain 3
1
9
2
10
9
-1
Host 2
E_Ports
EX_Ports
-1
= Dedicated Path
= Ports in the TI zone
Xlate Domain 4
FIGURE 44
Fabric OS Administrator’s Guide
53-1002148-02
Proxy Target
TI zone in an edge fabric
279
12
Traffic Isolation Zoning over FC routers
In the TI zone, when you designate E_Ports between the front and xlate phantom switches, you
must use -1 in place of the “I” in the D,I notation. Both the front and xlate domains must be
included in the TI zone.
Using D,I notation, the members of the TI zone in Figure 44 are:
1,8
1,1
3,-1
4,-1
(E_Port for the front phantom domain)
(E_Port for the xlate phantom domain)
Note that in this configuration the traffic between the front and xlate domains can go through any
path between these two domains. The -1 does not identify any specific ISL. To guarantee a specific
ISL, you need to set up a TI zone within the backbone fabric.
TI within a backbone fabric
A TI zone within a backbone fabric is used to route traffic within the backbone fabric through a
particular ISL. For example, in Figure 45, a TI zone is set up in the backbone fabric to ensure that
traffic between EX_Ports “1,1” and “2,1” is routed through VE_Ports “1,4” and “2,7”.
Target 1
Target 2
WWN
WWN
Host
WWN
Target 3
Edge fabric 2
Edge fabric 1
Backbone fabric
1
3
1
2
4
VE_Ports
7
5
8
6
9
FC router 1
2
Edge fabric 3
3
FC router 2
= Dedicated Path
= Ports in the TI zone
FIGURE 45
TI zone in a backbone fabric
TI zones within the backbone fabric use the port WWN instead of D,I notation for devices that are to
communicate across fabrics. (You can use the portShow command to obtain the port WWN.) Port
WWNs should be used only in TI zones within a backbone fabric and should not be used in other TI
zones.
280
Fabric OS Administrator’s Guide
53-1002148-02
General rules for TI zones
12
Using D,I and port WWN notation, the members of the TI zone in Figure 45 are:
1,1
(EX_Port for FC router 1)
1,4
(VE_Port for FC router 1)
2,7
(VE_Port for FC router 2)
2,1
(EX_Port for FC router 2)
10:00:00:00:00:01:00:00
(Port WWN for the host)
10:00:00:00:00:02:00:00
(Port WWN for target 1)
10:00:00:00:00:03:00:00
(Port WWN for target 2)
Limitations of TI zones over FC routers
Be aware of the following when configuring TI zones over FC routers:
• A TI zone defined within the backbone fabric does not guarantee that edge fabric traffic will
arrive at a particular EX_Port. You must set up a TI zone in the edge fabric to guarantee this.
• TI zones within the backbone fabric cannot contain more than one destination router port
(DRP) per each fabric.
• Only one egress E_Port or VE_Port connected to the next hop can be defined within TI zones.
• TI over FCR is supported only from edge fabric to edge fabric. Traffic isolation from backbone to
edge is not supported.
• Non-TI data traffic is not restricted from going through the TI path in the backbone fabric.
• For TI over FCR, failover must be enabled in the TI zones in the edge fabrics and in the
backbone fabric.
• TI over FCR is not supported with FC Fast Write.
General rules for TI zones
Note the following general rules for TI zones:
• A TI zone must include E_Ports and N_Ports that form a complete, end-to-end route from
initiator to target.
• When an E_Port is a member of a TI zone that E_Port cannot have its indexed swapped with
another port.
• A given E_Port used in a TI zone should not be a member of more than one TI zone.
If multiple E_Ports are configured that are on the lowest cost route to a domain, the various
source ports for that zone are load-balanced across the specified E_Ports.
• TI zones reside only in the defined configuration and not in the effective configuration. When
you make any changes to TI zones, including creating or modifying them, you must enable the
effective configuration for the changes to take effect, even if the effective configuration is
unchanged.
• A TI zone only provides traffic isolation and is not a “regular” zone.
• Routing rules imposed by TI zones with failover disabled override regular zone definitions.
Regular zone definitions should match TI zone definitions.
• FSPF supports a maximum of 16 paths to a given domain. This includes paths in a TI zone.
Fabric OS Administrator’s Guide
53-1002148-02
281
12
Supported configurations for Traffic Isolation Zoning
• Each TI zone is interpreted by each switch and each switch considers only the routing required
for its local ports. No consideration is given to the overall topology and to whether the TI zones
accurately provide dedicated paths through the whole fabric.
For example, in Figure 46, the TI zone was configured incorrectly and E_Port “3,9” was
erroneously omitted from the zone. The domain 3 switch assumes that traffic coming from
E_Port 9 is not part of the TI zone and so that traffic is routed to E_Port 11 instead of E_Port
12, if failover is enabled. If failover is disabled, the route is broken and traffic stops.
Domain 1
8
Domain 3
1
9
2
10
9
12
11
8
7
6
= Dedicated path
5
= Ports in the TI zone
Domain 4
FIGURE 46
TI zone misconfiguration
Supported configurations for Traffic Isolation Zoning
Note the following configuration rules for TI zones:
• Ports in a TI zone must belong to switches that run Fabric OS v6.0.0 or later. For TI over FCR
zones, all switches and FC routers in both edge and backbone fabrics must be running Fabric
OS v6.1.0 or later.
• For the FC8-64 blade in the Brocade DCX and DCX 8510-8, ports 48–63 can be in a TI zone
only if all switches in that TI zone are running Fabric OS v6.4.0 or later. Ports 48–63 can still be
in a failover path for TI traffic.
The Brocade DCX-4S and DCX 8510-4 do not have this limitation.
• VE_Ports are supported in TI zones.
• TI Zoning is not supported in fabrics with switches running firmware versions earlier than
Fabric OS v6.0.0. However, the existence of a TI zone in such a fabric is backward-compatible
and does not disrupt fabric operation in switches running earlier firmware versions.
TI over FCR is not backward compatible with Fabric OS v6.0.x or earlier. The -1 in the
domain,index entries causes issues to legacy switches in a zone merge. Firmware downgrade
is prevented if TI over FCR zones exist.
282
Fabric OS Administrator’s Guide
53-1002148-02
Limitations and restrictions of Traffic Isolation Zoning
12
Additional configuration rules for enhanced TI zones
Enhanced TI zones (ETIZ) have the following additional configuration rules:
• Enhanced TI zones are currently supported only on the following platforms: Brocade 300,
5100, 5300, 5410, 5424, 5450, 5460, 5470, 5480, 6510, 7800, 8000, VA-40FC, DCX,
DCX-4S, DCX 8510 family, and Brocade Encryption Switch.
Enhanced TI zones are not supported on the Brocade 4100, 4900, 5000, 7500, 7500E, 7600,
and 48000.
• Enhanced TI zones are supported only if every switch in the fabric is ETIZ capable. A switch is
ETIZ capable if it meets the following qualifications:
-
The switch must be one of the supported platforms, as listed above.
The switch must be running Fabric OS v6.4.0 or later.
• If the fabric contains a switch running an earlier version of Fabric OS, you cannot create an
enhanced TI zone. You cannot merge a downlevel switch into a fabric containing enhanced TI
zones, and you cannot merge a switch with enhanced TI zones defined into a fabric containing
switches that do not support ETIZ.
• Overlapping TI zones must have the same failover type. That is, both must be either failover
enabled or failover disabled.
NOTE
FC router domains are excluded from the ETIZ platform restrictions. You can create enhanced TI
zones with these switches in the fabric.
Trunking with TI zones
Note the following if you implement trunking and TI zones:
• To include a trunk group in a TI zone, you must include all ports of the trunk in the TI zone.
• Trunked ISL ports cannot be members of more than one TI zone.
Limitations and restrictions of Traffic Isolation Zoning
• For switches running Fabric OS 6.1.0 or later, a maximum of 255 TI zones can be created in
one fabric. For switches running Fabric OS 6.0.x, no more than 239 TI zones should be
created.
A fabric merge resulting in greater than the maximum allowed TI zones results in merge failure
and the fabrics are segmented.
• A TI zone can be created using D,I (Domain, Index) notation only, except for TI zones in a
backbone fabric, which use port WWNs. See “Traffic Isolation Zoning over FC routers” on
page 278 for information about TI zones in a backbone fabric.
• To include a trunk group in a TI zone, you must include all ports of the trunk in the TI zone.
• Two N_Ports that have the same shared area should not be configured in different TI zones.
This limitation does not apply to E_Ports that use the same shared area on the FC4-48 and
FC8-48 port blades.
• Ports that are in different TI zones cannot communicate with each other if failover is disabled.
Fabric OS Administrator’s Guide
53-1002148-02
283
12
Admin Domain considerations for Traffic Isolation Zoning
• TI zone members that overlap must have the same TI failover policy across all TI zones to which
they belong. That is, if an overlapping member is part of a failover-disabled zone, then it can
belong only to other TI zones where the policy is also failover-disabled; the member cannot
overlap with failover-enabled TI zones.
• TI zones that have members with port index greater than 511 are not supported with Fabric OS
versions earlier than v6.4.0. If such a TI zone and Fabric OS version combination is detected, a
warning is issued. These configurations are not prevented, but their behavior is unpredictable.
• When you merge two switches, if there is an effective configuration on the switches and TI
zones are present on either switch, the TI zones are not automatically activated after the
merge. Check the TI zone enabled status using the zone --show command, and if the TI Zone
Enabled status does not match across switches, issue the cfgEnable command.
Admin Domain considerations for Traffic Isolation Zoning
Note the following if you implement Admin Domains and TI zones:
• TI zones are applicable only in AD0, and the E_Ports that are members of a TI zone must be in
the AD0 device list. Because TI zones must use D,I notation, the AD0 device list must be
declared using D,I notation for ports that are to be used in TI zones.
• A port used in a TI zone should not be a member of multiple Admin Domains.
• Use care if defining TI zones with ports that are shared across Admin Domains because of the
limitation that a given port can appear in only one TI zone.
Best practice: Do not use ports that are shared across Admin Domains in a TI zone.
Virtual Fabric considerations for Traffic Isolation Zoning
This section describes how TI zones work with Virtual Fabrics. See Chapter 10, “Managing Virtual
Fabrics,” for information about the Virtual Fabrics feature, including logical switches and logical
fabrics.
TI zones can be created in a logical fabric like in regular fabrics, with the following exceptions:
• The disable failover option is not supported in logical fabrics that use XISLs.
Although logical switches that use XISLs allow the creation of a TI zone with failover disabled,
this is not a supported configuration. Base switches do not allow the creation of a TI zone with
failover disabled.
• To create a TI zone for a logical fabric that uses XISLs, you must create two TI zones: one in the
logical fabric and one in the base fabric. The combination of TI zones in the base fabric and
logical fabric sets the path through the base fabric for logical switches.
The TI zone in the logical fabric includes the extended XISL (XISL) port numbers, as well as the
F_Ports and ISLs in the logical fabric.
The TI zone in the base fabric reserves XISLs for a particular logical fabric. The base fabric TI zone
should also include ISLs that belong to logical switches participating in the logical fabric.
Figure 47 shows an initiator and target in a logical fabric (FID1). The dotted line indicates a
dedicated path between initiator and target. The dedicated path passes through the base fabric
over an XISL. (Figure 47 shows only physical ISLs, not logical ISLs.) To create the TI zones for this
dedicated path, you must create a TI zone in the logical fabric (FID 1) and one in the base fabric.
284
Fabric OS Administrator’s Guide
53-1002148-02
12
Virtual Fabric considerations for Traffic Isolation Zoning
Host
Domain 8
8
9
1
2
5
6
3
4
8
7
LS3, FID1
Domain 3
Chassis 1
Target
Domain 9
LS1, FID1
Domain 5
Domain 7
LS4, FID3
Domain 4
10
Base switch
Domain 1
11
12
XISL
XISL
14
13
15
XISL
16
XISL
17
Chassis 2
LS2, FID3
Domain 6
Base switch
Domain 2
= Dedicated Path
= Ports in the TI zones
FIGURE 47
Dedicated path with Virtual Fabrics
Figure 48 shows a logical representation of FID1 in Figure 47. To create the dedicated path, you
must create and activate a TI zone in FID1 that includes the circled ports shown in Figure 48.
Domain 8
Host
Domain 3
2
4
Domain 5
Domain 9
11
17
7
6
10
16
8
5
8
Target
9
1
3
= Dedicated Path
= Ports in the TI zones
FIGURE 48
Creating a TI zone in a logical fabric
You must also create and activate a TI zone in the base fabric to reserve the XISLs for the dedicated
path. In Figure 49, the XISLs highlighted (by a dotted line) in the base fabric can be reserved for
FID1 by defining and activating a base fabric TI zone that consists of ports 10, 12, 14, and 16. You
must also include ports 3 and 8, because they belong to logical switches participating in the logical
fabric. For the TI zone, it is as though ports 3 and 8 belong to Domains 1 and 2 respectively.
Domain 1
Domain 7
11
13
4
3
10
12
Domain 2
15
14
17
16
7
8
= Dedicated Path
= Ports in the TI zones
FIGURE 49
Fabric OS Administrator’s Guide
53-1002148-02
Creating a TI zone in a base fabric
285
12
Traffic Isolation Zoning over FC routers with Virtual Fabrics
Using D,I notation, the port numbers for the TI zones in the logical fabric and base fabric are as
follows:
Port members for the TI zone in logical fabric
Port members for the TI zone in base fabric
8,8
8,1
3,3
3,10
5,16
5,8
9,5
9,9
1,3
1,10
7,12
7,14
2,16
2,8
F_Port
E_Port
E_Port
E_Port
E_Port
E_Port
E_Port
F_Port
E_Port for ISL in logical switch
E_Port for XISL
E_Port for XISL
E_Port for XISL
E_Port for XISL
E_Port for ISL in logical switch
Note that the base fabric zone contains a reference to port 1,3 even though the base switch with
domain 1 does not have a port 3 in the switch. This number refers to the port in the chassis with
port index 3, which actually belongs to LS3 in FID 1.
Traffic Isolation Zoning over FC routers with Virtual Fabrics
This section describes how you can set up TI zones over FC routers in logical fabrics. Figure 50
shows two physical chassis configured into logical switches. The initiator in FID 1 communicates
with the target in FID 3 over the EX_Ports in the base switches.
1
10
F
2
F
E
3
E
4
5
EX
LS2, FID3
Domain 6
LS3, FID1
Domain 3
Base switch
Domain 1
EX
11
E
E
E
E
6
7
15
E
EX
Base switch
Domain 2
16
E
12
13
14
EX
= Dedicated Path
= Ports in the TI zones
FIGURE 50
Example configuration for TI zones over FC routers in logical fabrics
Figure 51 shows a logical representation of the configuration in Figure 50. This SAN is similar to
that shown in Figure 43 on page 279 and you would set up the TI zones in the same way as
described in “Traffic Isolation Zoning over FC routers” on page 278.
286
Fabric OS Administrator’s Guide
53-1002148-02
Creating a TI zone
12
Edge fabric
Fabric 1
1
SW3
3
10
2
12
4
5
SW1
FIGURE 51
SW6
11
6
15 13
7
Backbone fabric
Edge fabric
Fabric 3
16
SW2
14
Logical representation of TI zones over FC routers in logical fabrics
Creating a TI zone
You create and modify TI zones using the zone command. Other zoning commands, such as
zoneCreate, aliCreate, and cfgCreate, cannot be used to manage TI zones.
When you create a TI zone, you can set the state of the zone to activated or deactivated. By default
the zone state is set to activated; however, this does not mean that the zone is activated. After you
create the TI zone, you must enable the current effective configuration to enforce the new TI zone,
which is either activated or deactivated.
Virtual Fabric considerations: Because base fabrics do not contain end devices, they normally do
not have an effective zone configuration. To activate a TI zone in a base fabric, you should create a
"dummy" configuration, as described in “Creating a TI zone in a base fabric” on page 289.
When you create a TI zone, you can enable or disable failover mode. By default, failover mode is
enabled. If you want to change the failover mode after you create the zone, see “Modifying TI
zones” on page 290.
If you are creating a TI zone with failover disabled, note the following:
• Ensure that the E_Ports of the TI zone correspond to valid paths; otherwise, the route might be
missing for ports in that TI zone. You can use the topologyShow command to verify the paths.
• Ensure that sufficient non-dedicated paths through the fabric exist for all devices that are not
in a TI zone; otherwise, these devices might become isolated.
See “TI zone failover” on page 272 for information about disabling failover mode.
Use the following procedure to create a TI zone. If you are creating a TI zone in a base fabric, use
the procedure described in “Creating a TI zone in a base fabric” on page 289.
1. Connect to the switch and log in as admin.
2. Enter the zone --create command:
zone --create -t objtype [-o optlist] name -p "portlist"
Fabric OS Administrator’s Guide
53-1002148-02
287
12
Creating a TI zone
Be aware of the ramifications if you create a TI zone with failover mode disabled. See “TI zone
failover” on page 272 for information about disabling failover mode.
3. Perform the following steps if you have any TI zones with failover disabled. If all of your TI zones
are failover-enabled, skip to step 4.
a.
Change the failover option to failover enabled. This is a temporary change to avoid frame
loss during the transition.
zone --add -o f name
b.
Enable the zones.
cfgenable "current_effective_configuration"
c.
Reset the failover option to failover disabled. Then continue with step 4.
zone --add -o n name
4. Enter the cfgEnable command to reactivate your current effective configuration and enforce
the TI zones.
cfgenable "current_effective_configuration"
Example of creating a TI zone
The following examples create a TI zone named “bluezone”, which contains E_Ports 1,1 and 2,4
and N_Ports 1,8 and 2,6.
To create a TI zone with failover enabled and in the activated state (default settings):
switch:admin> zone --create -t ti bluezone -p "1,1; 2,4; 1,8; 2,6"
To create a TI zone with failover enabled (the zone is set to the activated state by default):
switch:admin> zone --create -t ti -o f bluezone -p "1,1; 2,4; 1,8; 2,6"
To create a TI zone with failover disabled and the state set to activated:
switch:admin> zone --create -t ti -o an bluezone -p "1,1; 2,4; 1,8; 2,6"
To create a TI zone and set the state to deactivated (failover is enabled by default):
switch:admin> zone --create -t ti -o d bluezone -p "1,1; 2,4; 1,8; 2,6"
To create a TI zone with failover disabled and the state set to deactivated:
switch:admin> zone --create -t ti -o dn bluezone -p "1,1; 2,4; 1,8; 2,6"
To create a TI zone in the edge fabric with failover enabled and the state set to activated (default
settings):
switch:admin> zone --create -t ti bluezone -p "1,1; 1,8; 2,-1; 3,-1"
To create a TI zone in the backbone fabric with failover enabled and the state set to activated
(default settings):
switch:admin> zone --create -t ti backbonezone -p "10:00:00:04:1f:03:16:f2;
1,1; 1,4; 2,7; 2,1; 10:00:00:04:1f:03:18:f1, 10:00:00:04:1f:04:06:e2"
288
Fabric OS Administrator’s Guide
53-1002148-02
Creating a TI zone
12
To create TI zones in a logical fabric, such as the one shown in Figure 48 on page 285:
Log in to the logical switch FID1, Domain 7 and create a TI zone in the logical fabric with FID=1:
LS1> zone --create -t ti -o f "ti_zone1" -p "8,8; 8,1; 3,3; 3,10; 5,16; 5,8;
9,5; 9,9"
Then create a TI zone in the base fabric, as described in “Creating a TI zone in a base fabric”.
Remember that your changes are not enforced until you enter the cfgEnable command, as shown
here:
switch:admin> cfgenable "USA_cfg"
You are about to enable a new zoning configuration.
This action will replace the old zoning configuration with the
current configuration selected.
If the update includes changes to one or more traffic isolation zones, the
update may result in localized disruption to traffic on ports associated with
the traffic isolation zone changes
Do you want to enable 'USA_cfg' configuration (yes, y, no, n): [no] y
zone config "USA_cfg" is in effect
Updating flash ...
Creating a TI zone in a base fabric
1. Connect to the switch and log in as admin.
2. Create a “dummy” zone configuration in the base fabric. For example:
zone --create "z1", "1,1"
cfgcreate "base_config", z1
3. Enter the zone --create command to create the TI zone in the base fabric:
zone --create -t objtype -o f name -p "portlist"
The disable failover option is not supported in base fabrics.
4. Perform the following steps if you have any TI zones with failover disabled. If all of your TI zones
are failover-enabled, skip to step 5.
a.
Change the failover option to failover enabled. This is a temporary change to avoid frame
loss during the transition.
zone --add -o f name
b.
Enable the zones.
cfgenable "current_effective_configuration"
c.
Reset the failover option to failover disabled. Then continue with step 4.
zone --add -o n name
5. Enter the cfgEnable command to reactivate your current effective configuration and enforce
the TI zones.
cfgenable "base_config"
Fabric OS Administrator’s Guide
53-1002148-02
289
12
Modifying TI zones
Example
The following example creates TI zones in the base fabric shown in Figure 49 on page 285:
BS_D1>
BS_D1>
BS_D1>
2,8"
BS_D1>
zonecreate "z1", "1,1"
cfgcreate "base_cfg", z1
zone --create -t ti -o f "ti_zone2" -p "1,3; 1,10; 7,12; 7,14; 2,16;
cfgenable "base_config"
Modifying TI zones
Using the zone --add command, you can add ports to an existing TI zone, change the failover
option, or both.You can also activate or deactivate the TI zone.
Using the zone --remove command, you can remove ports from existing TI zones. If you remove the
last member of a TI zone, the TI zone is deleted.
After you modify the TI zone, you must enable the current effective configuration to enforce the
changes.
ATTENTION
If failover is disabled, do not allocate all ISLs in TI zones. Make sure sufficient non-dedicated paths
exist through the fabric for all devices that are not in a TI zone. See “TI zone failover” on page 272
for additional information about disabling failover mode.
NOTE
If you have overlapping TI zones and you want to change the failover option on these zones, you must
first remove the overlapping ports from the zones, then change the failover type, and finally re-add
the overlapping members.
1. Connect to the switch and log in as admin.
2. Enter one of the following commands, depending on how you want to modify the TI zone.
• Enter the zone --add command to add ports or change the failover option for an existing
TI zone. You can also activate or deactivate the zone.
zone --add [-o optlist] name -p "portlist"
zone --add -o optlist name [-p "portlist"]
• Enter the zone --remove command to remove ports from an existing TI zone.
zone --remove name -p "portlist"
Be aware of the ramifications if you disable failover mode. See “TI zone failover” on page 272
for information about disabling failover mode.
3. Perform the following steps if you have any TI zones with failover disabled. If all of your TI zones
are failover-enabled, skip to step 4.
a.
Change the failover option to failover enabled. This is a temporary change to avoid frame
loss during the transition.
zone --add -o f name
b.
Enable the zones.
cfgenable "current_effective_configuration"
290
Fabric OS Administrator’s Guide
53-1002148-02
Changing the state of a TI zone
c.
12
Reset the failover option to failover disabled. Then continue with step 4.
zone --add -o n name
4. Enter the cfgEnable command to reactivate your current effective configuration and enforce
the TI zones.
cfgenable "current_effective_configuration"
Example of modifying a TI zone
To add port members to the existing TI zone bluezone:
switch:admin> zone --add bluezone -p "3,4; 3,6"
To add port members to the existing TI zone in a backbone fabric:
switch:admin> zone --add backbonezone -p "3,4; 3,6; 10:00:00:04:1f:03:16:f2;"
To disable failover on the existing TI zone bluezone:
switch:admin> zone --add -o n bluezone
To enable failover and add ports to TI zone greenzone:
switch:admin> zone --add -o f greenzone -p "3,4"
To remove ports from the TI zone bluezone:
switch:admin> zone --remove bluezone -p "3,4; 3,6"
Remember that your changes are not enforced until you enter the cfgEnable command.
Changing the state of a TI zone
You can change the state of a TI zone to activated or deactivated. Changing the state does not
activate or deactivate the zone. After you change the state of the TI zone, you must enable the
current effective configuration to enforce the change.
The TI zone must exist before you can change its state.
1. Connect to the switch and log in as admin.
2. Perform one of the following actions:
• To activate a TI zone, enter the zone --activate command.
zone --activate name
• To deactivate a TI zone, enter the zone --deactivate command.
zone --deactivate name
3. Enter the cfgEnable command to reactivate your current effective configuration and enforce
the TI zones.
cfgenable "current_effective_configuration"
Fabric OS Administrator’s Guide
53-1002148-02
291
12
Deleting a TI zone
Example of setting the state of a TI zone
To change the state of the existing TI zone bluezone to activated, type:
switch:admin> zone --activate bluezone
To change the state of the existing TI zone greenzone to deactivated, type:
switch:admin> zone --deactivate greenzone
Remember that your changes are not enforced until you enter the cfgEnable command.
Deleting a TI zone
Use the zone --delete command to delete a TI zone from the defined configuration. This command
deletes the entire zone; to only remove port members from a TI zone, use the zone --remove
command, as described in “Modifying TI zones” on page 290.
1. Connect to the switch and log in as admin.
2. Enter the zone --delete command.
zone --delete name
You can delete multiple zones by separating the zone names with a semicolon and enclosing
them in quotation marks.
3. Enter the cfgEnable command to reactivate your current effective configuration and enforce
the TI zones.
cfgenable "current_effective_configuration"
Example of deleting a TI zone
To delete the TI zone bluezone, type:
switch:admin> zone --delete bluezone
Remember that your changes are not enforced until you enter the cfgEnable command.
Displaying TI zones
Use the zone --show command to display information about TI zones. This command displays the
following information for each zone:
•
•
•
•
•
Zone name
E_Port members
N_Port members
Configured status (the latest status, which may or may not have been activated by cfgEnable)
Enabled status (the status that has been activated by cfgEnable)
If you enter the cfgShow command to display information about all zones, the TI zones appear in
the defined zone configuration only and do not appear in the effective zone configuration.
292
Fabric OS Administrator’s Guide
53-1002148-02
Troubleshooting TI zone routing problems
12
1. Connect to the switch and log in as admin.
2. Enter the zone --show command.
zone --show [ name ] [-ascending]
To display information about the TI zone purplezone:
switch:admin> zone --show purplezone
Defined TI zone configuration:
TI Zone Name:
Port List:
redzone:
1,2; 1,3; 3,3; 4,5
Configured Status: Activated / Failover-Enabled
Enabled Status: Activated / Failover-Enabled
To display information about all TI zones in the defined configuration in ascending order:
switch:admin> zone --show -ascending
Defined TI zone configuration:
TI Zone Name:
Port List:
bluezone:
8,3; 8,5; 9,2; 9,3;
Configured Status: Deactivated / Failover-Disabled
Enabled Status: Activated / Failover-Enabled
TI Zone Name:
Port List:
greenzone:
2,2; 3,3; 4,11; 5,3;
Configured Status: Activated / Failover-Enabled
Enabled Status: Activated / Failover-Enabled
TI Zone Name:
Port List:
purplezone:
1,2; 1,3; 3,3; 4,5;
Configured Status: Activated / Failover-Enabled
Enabled Status: Deactivated / Failover-Enabled
Troubleshooting TI zone routing problems
Use the following procedure to generate a report of existing and potential problems with TI zones.
The report displays an error type.
• “ERROR” indicates a problem currently exists in the fabric.
• “WARNING” indicates that there is not currently a problem, given the current set of online
devices and reachable domains, but given the activated TI zone configuration, parallel
exclusive paths between a shared device and a remote domain have been detected, which
might cause a problem for devices that join the fabric later.
1. Connect to the switch and log in as admin.
2. Enter the zone --showTIerrors command.
zone --showTIerrors
Fabric OS Administrator’s Guide
53-1002148-02
293
12
Setting up TI over FCR (sample procedure)
Following is an example report that would be generated for the illegal configuration shown in
Figure 41 on page 277.
switch:admin> zone --showTIerrors
My Domain: 3
Error type:
ERROR
Affected Remote Domain: 1
Affected Local Port:
8
Affected TI Zones:
etiz1, etiz2
Affected Remote Ports: 1, 2, 3, 4
Setting up TI over FCR (sample procedure)
The following example shows how to set up TI zones over FCR to provide a dedicated path shown in
Figure 52. In this example, three TI zones are created: one in each of the edge fabrics and one in
the backbone fabric. The combination of these three TI zones creates a dedicated path for traffic
between Host 1 in edge fabric 1 and Targets 1 and 2 in edge fabric 2.
Host 1 has port WWN 10:00:00:00:00:08:00:00
Target 1 has port WWN 10:00:00:00:00:02:00:00
Target 2 has port WWN 10:00:00:00:00:03:00:00
Host 1
Target 1
Target 2
Domain ID = 1
Domain ID = 2
2
9
8
5
3
6
1
7
4
Edge fabric 1
Domain ID = 4
Backbone
fabric
Edge fabric 2
Domain ID = 9
= Dedicated path set up by TI zone in edge fabric 1
= Dedicated path set up by TI zone in edge fabric 2
= Dedicated path set up by TI zone in backbone fabric
FIGURE 52
TI over FCR example
NOTE
In the following procedure the three TI zones in the edge and backbone fabrics are all given the same
name, TI_Zone1. It is not required that the TI zones have the same name, but this is done to avoid
confusion. If several dedicated paths are set up across the FC router, the TI zones for each path can
have the same name.
294
Fabric OS Administrator’s Guide
53-1002148-02
Setting up TI over FCR (sample procedure)
12
1. In each edge fabric, set up an LSAN zone that includes Host 1, Target 1, and Target 2, so these
devices can communicate with each other. See Chapter 23, “Using the FC-FC Routing Service,”
for information about creating LSAN zones.
2. Log in to the edge fabric 1 and set up the TI zone.
a.
Enter the fabricShow command to display the switches in the fabric. From the output, you
can determine the front and translate domains.
E1switch:admin> fabricshow
Switch ID
Worldwide Name
Enet IP Addr
FC IP Addr
Name
------------------------------------------------------------------------1: fffc01 50:00:51:e3:95:36:7e:04 0.0.0.0
0.0.0.0
"fcr_fd_1"
4: fffc04 10:00:00:60:69:80:1d:bc 10.32.72.4
0.0.0.0
>"E1switch"
6: fffc06 50:00:51:e3:95:48:9f:a0 0.0.0.0
0.0.0.0
"fcr_xd_6_9"
The Fabric has 3 switches
b.
Enter the following commands to create and display a TI zone:
E1switch:admin> zone --create -t ti TI_Zone1 -p "4,8; 4,5, 1,-1; 6,-1"
E1switch:admin> zone --show
Defined TI zone configuration:
TI Zone Name:
Port List:
TI_Zone1
4,8; 4,5; 1,-1; 6,-1
Status: Activated
c.
Failover: Enabled
Enter the following commands to reactivate your current effective configuration and
enforce the TI zones.
E1switch:admin> cfgactvshow
Effective configuration:
cfg:
cfg_TI
zone: lsan_t_i_TI_Zone1
10:00:00:00:00:00:02:00:00
10:00:00:00:00:00:03:00:00
10:00:00:00:00:00:08:00:00
E1switch:admin> cfgenable cfg_TI
You are about to enable a new zoning configuration.
This action will replace the old zoning configuration with the
current configuration selected.
If the update includes changes to one or more traffic isolation zones, the
update may result in localized disruption to traffic on ports associated
with the traffic isolation zone changes
Do you want to enable 'cfg_TI' configuration (yes, y, no, n): [no] y
zone config "cfg_TI" is in effect
Updating flash ...
Fabric OS Administrator’s Guide
53-1002148-02
295
12
Setting up TI over FCR (sample procedure)
3. Log in to the edge fabric 2 and set up the TI zone.
a.
Enter the fabricShow command to display the switches in the fabric. From the output, you
can determine the front and translate domains.
E2switch:admin> fabricshow
Switch ID
Worldwide Name
Enet IP Addr
FC IP Addr
Name
------------------------------------------------------------------------1: fffc01 50:00:51:e3:95:36:7e:09 0.0.0.0
0.0.0.0
"fcr_fd_1"
4: fffc04 50:00:51:e3:95:48:9f:a1 0.0.0.0
0.0.0.0
"fcr_xd_6_9"
9: fffc09 10:00:00:05:1e:40:f0:7d 10.32.72.9
0.0.0.0
>"E2switch"
The Fabric has 3 switches
b.
Enter the following commands to create and display a TI zone:
E2switch:admin> zone --create -t ti TI_Zone1 -p "9,2; 9,3; 9,6; 1,-1; 4,-1"
E2switch:admin> zone --show
Defined TI zone configuration:
TI Zone Name:
Port List:
TI_Zone1
9,2; 9,3; 9,6; 1,-1; 4,-1
Status: Activated
c.
Failover: Enabled
Enter the following commands to reactivate your current effective configuration and
enforce the TI zones.
E2switch:admin> cfgactvshow
Effective configuration:
cfg:
cfg_TI
zone: lsan_t_i_TI_Zone1
10:00:00:00:00:00:02:00:00
10:00:00:00:00:00:03:00:00
10:00:00:00:00:00:08:00:00
E2switch:admin> cfgenable cfg_TI
You are about to enable a new zoning configuration.
This action will replace the old zoning configuration with the
current configuration selected.
If the update includes changes to one or more traffic isolation zones, the
update may result in localized disruption to traffic on ports associated
with the traffic isolation zone changes
Do you want to enable 'cfg_TI' configuration (yes, y, no, n): [no] y
zone config "cfg_TI" is in effect
Updating flash ...
4. Log in to the backbone fabric and set up the TI zone.
a.
Enter the following commands to create and display a TI zone:
BB_DCX_1:admin> zone --create -t ti TI_Zone1 -p "1,9; 1,1; 2,4; 2,7;
10:00:00:00:00:08:00:00; 10:00:00:00:00:02:00:00; 10:00:00:00:00:03:00:00"
BB_DCX_1:admin> zone --show
Defined TI zone configuration:
TI Zone Name:
TI_Zone1
Port List:
1,9; 1,1; 2,4; 2,7; 10:00:00:00:00:08:00:00;
10:00:00:00:00:02:00:00; 10:00:00:00:00:03:00:00
Status: Activated
296
Failover: Enabled
Fabric OS Administrator’s Guide
53-1002148-02
Setting up TI over FCR (sample procedure)
b.
12
Enter the following commands to reactivate your current effective configuration and
enforce the TI zones.
BB_DCX_1:admin> cfgactvshow
Effective configuration:
cfg:
cfg_TI
zone: lsan_t_i_TI_Zone1
10:00:00:00:00:00:02:00:00
10:00:00:00:00:00:03:00:00
10:00:00:00:00:00:08:00:00
BB_DCX_1:admin> cfgenable cfg_TI
You are about to enable a new zoning configuration.
This action will replace the old zoning configuration with the
current configuration selected.
If the update includes changes to one or more traffic isolation zones, the
update may result in localized disruption to traffic on ports associated
with the traffic isolation zone changes
Do you want to enable 'cfg_TI' configuration (yes, y, no, n): [no] y
zone config "cfg_TI" is in effect
Updating flash ...
Fabric OS Administrator’s Guide
53-1002148-02
297
12
298
Setting up TI over FCR (sample procedure)
Fabric OS Administrator’s Guide
53-1002148-02
Chapter
13
Bottleneck Detection
In this chapter
• Bottleneck detection overview . . . . . . . . . . . . . . . . . . . . . . . . . . . . . . . . . . .
• Supported configurations for bottleneck detection . . . . . . . . . . . . . . . . . .
• Advanced bottleneck detection settings . . . . . . . . . . . . . . . . . . . . . . . . . . .
• Enabling bottleneck detection on a switch . . . . . . . . . . . . . . . . . . . . . . . . .
• Excluding a port from bottleneck detection. . . . . . . . . . . . . . . . . . . . . . . . .
• Displaying bottleneck detection configuration details . . . . . . . . . . . . . . . .
• Changing bottleneck parameters . . . . . . . . . . . . . . . . . . . . . . . . . . . . . . . . .
• Displaying bottleneck statistics . . . . . . . . . . . . . . . . . . . . . . . . . . . . . . . . . .
• Disabling bottleneck detection on a switch . . . . . . . . . . . . . . . . . . . . . . . . .
299
302
303
304
305
305
306
309
310
Bottleneck detection overview
A bottleneck is a port in the fabric where frames cannot get through as fast as they should. In other
words, a bottleneck is a port where the offered load is greater than the achieved egress
throughput. Bottlenecks can cause undesirable degradation in throughput on various links. When a
bottleneck occurs at one place, other points in the fabric can experience bottlenecks as the traffic
backs up.
The bottleneck detection feature enables you to do the following:
• Prevent degradation of throughput in the fabric.
The bottleneck detection feature alerts you to the existence and locations of devices that are
causing latency. If you receive alerts for one or more F_Ports, use the CLI to check whether
these F_Ports have a history of bottlenecks.
• Reduce the time it takes to troubleshoot network problems.
If you notice one or more applications slowing down, you can determine whether any latency
devices are attached to the fabric and where. You can use the CLI to display a history of
bottleneck conditions on a port. If the CLI shows above-threshold bottleneck severity, you can
narrow the problem down to device latency rather than problems in the fabric.
You can use the bottleneck detection feature with other Adaptive Networking features to optimize
the performance of your fabric. For example, you can do the following:
• If the bottleneck detection feature detects a latency bottleneck, you can use TI zones or QoS
SID/DID traffic prioritization to isolate latency device traffic from high priority application
traffic.
• If the bottleneck detection feature detects ISL congestion, you can use ingress rate limiting to
slow down low priority application traffic, if it is contributing to the congestion.
Fabric OS Administrator’s Guide
53-1002148-02
299
13
Bottleneck detection overview
You configure bottleneck detection on a per-switch basis, with optional per-port exclusions.
NOTE
Bottleneck detection is disabled by default. Best practice is to enable bottleneck detection on all
switches in the fabric, and leave it on to continuously gather statistics.
Bottleneck detection does not require a license.
Types of bottlenecks
The bottleneck detection feature detects two types of bottlenecks:
• Latency bottleneck
• Congestion bottleneck
A latency bottleneck is a port where the offered load exceeds the rate at which the other end of the
link can continuously accept traffic, but does not exceed the physical capacity of the link. This
condition can be caused by a device attached to the fabric that is slow to process received frames
and send back credit returns. A latency bottleneck due to such a device can spread through the
fabric and can slow down unrelated flows that share links with the slow flow.
By default, bottleneck detection detects latency bottlenecks that are severe enough that they
cause 98% loss of throughput. This default value can be modified to a different percentage.
A congestion bottleneck is a port that is unable to transmit frames at the offered rate because the
offered rate is greater than the physical data rate of the line. For example, this condition can be
caused by trying to transfer data at 8 Gbps over a 4 Gbps ISL.
You can use the bottleneckMon command to configure alert thresholds for congestion and latency
bottlenecks.
Advanced settings allow you to refine the criterion for defining latency bottleneck conditions to
allow for more (or less) sensitive monitoring at the sub-second level. For example, you would use
the advanced settings to change the default value of 98% for loss of throughput.
If a bottleneck is reported, you can investigate and optimize the resource allocation for the fabric.
Using the zone setup and Top Talkers, you can also determine which flows are destined to any
affected F_Ports.
How bottlenecks are reported
Bottleneck detection uses the concept of an affected second when determining whether a
bottleneck exists on a port. Each second is marked as being affected or unaffected by a latency or
congestion bottleneck, based on certain criteria.
The bottleneck detection feature maintains a history of affected seconds for each port—one history
for latency and another for congestion bottlenecks. A history is maintained for a maximum of three
hours for each port. You can view the history using the bottleneckmon --show command, as
described in “Displaying bottleneck statistics” on page 309.
Bottlenecks are also reported through RASlog alerts and SNMP traps. These two alerting
mechanisms are intertwined and cannot be independently turned on and off. You can use the
bottleneckMon command to specify alerting parameters for the following:
• Whether alerts are to be sent when a bottleneck condition is detected
• The size of the time window to look at when determining whether to alert
300
Fabric OS Administrator’s Guide
53-1002148-02
Bottleneck detection overview
13
• How many affected seconds are needed to generate the alert.
• How long to stay quiet after an alert
Changing alerting parameters affects RASlog alerting as well as SNMP traps.
Using alerting parameters to determine whether alerts are generated
You have the option of receiving per-port alerts based on the latency and congestion history of the
port. Alerts are generated based on the number of affected seconds over a specified period of
time. If the number of affected seconds is higher than the threshold, an alert is generated. This
process is done independently for latency and congestion.
The bottleneckmon alerting parameters determine whether an alert is generated.
For example, Figure 53 shows an interval of 12 seconds, in which 6 seconds are affected by a
congestion bottleneck and 3 seconds are affected by a latency bottleneck.
Affected by congestion bottleneck?
Yes
No
Time (seconds)
0
1
2
3
4
5
6
7
8
9
10
11
12
4
5
6
7
8
9
10
11
12
Affected by latency bottleneck?
Time (seconds)
0
FIGURE 53
1
2
3
Affected seconds for bottleneck detection
The -time parameter specifies the time window. For this example, -time = 12 seconds.
The -cthresh and -lthresh parameters specify the thresholds on number of affected seconds that
trigger alerts for congestion and latency bottlenecks, respectively. For this example, assume the
default values for these parameters:
• -cthresh = 0.8 (80%)
• -lthresh = 0.1 (10%)
For this time window, 50% of the seconds (6 out of 12 seconds) are affected by congestion. This is
below the threshold of 80%, so an alert would not be generated for a congestion bottleneck.
For the same time window, 25% of the seconds (3 out of 12 seconds) are affected by latency. This
exceeds the threshold of 10%, so an alert would be generated for a latency bottleneck.
Fabric OS Administrator’s Guide
53-1002148-02
301
13
Supported configurations for bottleneck detection
Supported configurations for bottleneck detection
Note the following configuration rules for bottleneck detection:
• Bottleneck detection is supported only on Fibre Channel ports and FCoE F_Ports.
• Bottleneck detection is supported only on the following port types:
- E_Ports
- EX_Ports
- F_Ports
- FL_Ports
• F_Port and E_Port trunks are supported.
• Long distance E_Ports are supported.
• FCoE F_Ports are supported.
• Bottleneck detection is supported on 4-Gbps, 8-Gbps, and 16-Gbps platforms, including
10-Gbps speeds.
• Bottleneck detection is supported in Access Gateway mode.
• Bottleneck detection is supported whether Virtual Fabrics is enabled or disabled. In VF mode,
bottleneck detection is supported on all fabrics, including the base fabric. See “Virtual Fabrics
considerations for bottleneck detection” on page 303 for additional information on using
bottleneck detection in VF mode.
Limitations of bottleneck detection
Using this feature for latency bottleneck detection is not recommended for link utilizations above
85%.
The bottleneck detection feature detects latency bottlenecks only at the point of egress, not
ingress. For example, for E_Ports, only the traffic egressing the port is monitored. For FCoE ports,
bottleneck detection monitors traffic going from the FC side to the CEE side, and does not monitor
traffic going in the reverse direction.
High availability considerations for bottleneck detection
The bottleneck detection configuration is maintained across a failover or reboot; however,
bottleneck statistics collected are lost.
Upgrade and downgrade considerations for bottleneck detection
The bottleneck detection configuration is persistent across firmware upgrades and downgrades.
The sub-second latency criterion parameter settings are not preserved on downgrade to firmware
versions earlier than Fabric OS 7.0.0. If you downgrade and then upgrade back to Fabric OS 7.0.0,
the settings revert to their default values.
302
Fabric OS Administrator’s Guide
53-1002148-02
Advanced bottleneck detection settings
13
Trunking considerations for bottleneck detection
A trunk behaves like a single port. Both latency and congestion bottlenecks are reported on the
master port only, but apply to the entire trunk.
For masterless trunking, if the master port goes offline, the new master acquires all the
configurations and bottleneck history of the old master and continues with bottleneck detection on
the trunk.
Virtual Fabrics considerations for bottleneck detection
Bottleneck detection is supported in both VF and non-VF modes.
In VF mode, if a port on which bottleneck detection is enabled is moved out of a logical switch, any
per-port configurations are retained by the logical switch. The per-port configuration does not
propagate outside of the logical switch. If the port is returned to the logical switch, the previous
per-port configurations are automatically set for the port. See “Changing bottleneck parameters”
on page 306 for more information about changing per-port configurations.
In logical fabrics, bottleneck detection is not performed on logical ISLs.
Because a base fabric carries traffic from multiple logical fabrics, bottlenecks reported in the base
fabric can be caused by a mixture of traffic from multiple logical fabrics or by traffic from a single
logical fabric. It is not possible to attribute a base fabric bottleneck to the exact logical fabric
causing it. Dedicated ISLs are exclusive to one logical fabric, and any bottleneck on a dedicated ISL
E_Port pertains entirely to the traffic of that logical fabric.
Access Gateway considerations for bottleneck detection
If bottleneck detection is enabled on a logical switch with some F_Ports connected to an Access
Gateway, you do not get information about which device is causing a bottleneck, because devices
are not directly connected to this port. To detect bottlenecks on an Access Gateway, enable
bottleneck detection on the Access Gateway to which the devices are actually connected.
Advanced bottleneck detection settings
Bottleneck detection uses the concept of an affected second when determining whether a
bottleneck exists on a port. Each second is marked as being affected or unaffected by a latency or
congestion bottleneck, based on certain criteria.
You can use the sub-second latency criterion parameters to refine the criterion for determining
whether a second is marked as affected by latency bottlenecks. For example, you might want to use
the sub-second latency criterion parameters in the following cases:
• You notice an under-performing application, but do not see any latency bottlenecks detected.
You can temporarily increase the sub-second sensitivity of latency bottleneck detection on the
specific F_Ports for this application.
• You want greater-than-default (sub-second) latency sensitivity on your fabric, so you set
sub-second latency criterion parameters at the time you enable bottleneck detection.
• You want to reduce the number of alerts you are receiving about known latency bottlenecks in
the fabric, so you temporarily decrease the sub-second latency sensitivity on these ports.
Fabric OS Administrator’s Guide
53-1002148-02
303
13
Enabling bottleneck detection on a switch
• You have a latency bottleneck on an ISL that is not at the edge of the fabric.
The sub-second latency criterion parameters are always applicable. These parameters affect alerts
and, even if alerting is not enabled, they affect the history of bottleneck statistics.
The sub-second latency criterion parameters are the following, with default values in parentheses:
• -lsubsectimethresh (0.8) is similar to the -lthresh alerting parameter, except on a sub-second
level. The default value of 0.8 means that at least 80% of a second must be affected by latency
for the second to be marked as affected.
• -lsubsecsevthresh (50) specifies the factor by which throughput must drop in a second for that
second to be considered affected by latency. The default value of 50 means that the observed
throughput in a second must be no more than 1/50th the capacity of the port for that second
to be counted as an affected second. 1/50th of capacity means 2% of capacity, which means
98% loss of throughput.
Sub-second latency criterion parameters apply only to latency bottlenecks and not congestion
bottlenecks.
When you enable bottleneck detection, you can specify switch-wide sub-second latency criterion
parameters. After you enable bottleneck detection, you can change the sub-second latency
criterion parameters only on a per-port basis. You cannot change them on the entire switch, as you
can with alerting parameters, unless you disable and then re-enable bottleneck detection.
Changing the sub-second latency criterion parameters on specific ports causes an interruption in
the detection of bottlenecks on those ports, which means the history of bottlenecks is lost on these
ports. Also note the following behaviors if you change the sub-second latency criterion parameters:
• Traffic through these ports is not affected.
• History of latency bottlenecks and congestion bottlenecks is lost on these ports. Other ports
are not affected, however.
• The interruption occurs whether you set or clear per-port overrides on the sub-second latency
criterion parameters.
• Because of the interruption, you can never have an alert for a port such that the alert spans
periods of time with different sub-second latency criteria on that port.
Enabling bottleneck detection on a switch
Enabling bottleneck detection enables both latency and congestion detection.
Bottleneck detection is enabled on a switch basis. It is recommended that you enable bottleneck
detection on every switch in the fabric. If you later add additional switches, including logical
switches, to the fabric, be sure to enable bottleneck detection on those switches as well.
When you enable bottleneck detection on a switch, the settings are applied to all eligible ports on
that switch. If ineligible ports later become eligible or, in the case of a logical switch, if ports are
moved to the logical switch, bottleneck detection is automatically applied to those ports.
You can later override these settings on a port basis, as described in “Changing bottleneck
parameters” on page 306.
1. Connect to the switch and log in as admin.
2. Enter the bottleneckmon --enable command to enable bottleneck detection on all eligible
ports on the switch.
304
Fabric OS Administrator’s Guide
53-1002148-02
Excluding a port from bottleneck detection
13
By default, alerts are not sent unless you specify the alert parameter; however, you can view a
history of bottleneck conditions for the port as described in “Displaying bottleneck statistics”
on page 309.
3. Repeat step 1 and step 2 on every switch in the fabric.
NOTE
Best practice is to use the default values for the alerting and sub-second latency criterion
parameters.
Example of enabling bottleneck detection
(Preferred use case) The following example enables bottleneck detection on the switch with alerts
using default values for thresholds and time.
switch:admin> bottleneckmon --enable -alert
The following example enables bottleneck detection on the switch without alerts. Although alerts
are not delivered in bottleneck conditions, you can view the bottleneck history using the CLI.
switch:admin> bottleneckmon --enable
Excluding a port from bottleneck detection
When you exclude a port from bottleneck detection, no data is collected from the port and no alerts
are generated for the port. All statistics history for the port is discarded.
Alerting parameters for the port are preserved, so if you later include the port for bottleneck
detection, the alerting parameters are restored.
Per-port exclusions might be needed if, for example, a long-distance port is known to be a
bottleneck because of credit insufficiency. In general, however, per-port exclusions are not
recommended.
For trunking, if you exclude a slave port from bottleneck detection, the exclusion has no effect as
long as the port is a trunk slave. The exclusion takes effect only if the port becomes a trunk master
or leaves the trunk.
1. Connect to the switch to which the target port belongs and log in as admin.
2. Enter the bottleneckmon --exclude command to exclude the port from bottleneck detection.
To later include the port, enter the bottleneckmon --include command.
Example
switch:admin> bottleneckmon --exclude 4
Displaying bottleneck detection configuration details
1. Connect to the switch and log in as admin.
2. Enter the bottleneckmon --status command to display the details of bottleneck detection
configuration for the switch, which includes the following:
• Whether the feature is enabled
Fabric OS Administrator’s Guide
53-1002148-02
305
13
Changing bottleneck parameters
• Switch-wide parameters
• Per-port overrides, if any
• Excluded ports
Example
switch:admin> bottleneckmon --status
Bottleneck detection - Enabled
==============================
Switch-wide sub-second latency bottleneck criterion:
====================================================
Time threshold
- 0.800
Severity threshold
- 50.000
Switch-wide alerting parameters:
============================
Alerts
Latency threshold for alert
Congestion threshold for alert Averaging time for alert
Quiet time for alert
-
Yes
0.100
0.800
300 seconds
300 seconds
Per-port overrides for sub-second latency bottleneck criterion:
===============================================================
Slot
Port
TimeThresh
SevThresh
=========================================
0
3
0.500
100.000
0
4
0.600
50.000
0
5
0.700
20.000
Per-port overrides for alert parameters:
========================================
Slot
Port
Alerts? LatencyThresh
CongestionThresh
Time (s)
QTime (s)
=============================================================================
=============
0
1
Y
0.990
0.900
3000
600
0
2
Y
0.990
0.900
4000
600
0
3
Y
0.990
0.900
4000
600
Excluded ports:
===============
Slot
Port
============
0
2
0
3
0
4
Changing bottleneck parameters
When you enable bottleneck detection, you can configure switch-wide alerting and sub-second
latency criterion parameters that apply to every port on the switch. After you enable bottleneck
detection, you can change the alerting parameters on the entire switch or on individual ports. You
can change the sub-second latency criterion parameters on individual ports only. You can also
change the parameters on ports that have been excluded from bottleneck detection.
306
Fabric OS Administrator’s Guide
53-1002148-02
Changing bottleneck parameters
13
The alerting parameters indicate whether alerts are sent, and the threshold, time, and quiet time
options.
For a trunk, you can change the parameters only on the master port.
1. Connect to the switch and log in as admin.
2. Enter the bottleneckmon --config command to set the alerting and sub-second latency
criterion parameters.
Enter the bottleneckmon --configclear command to remove any port-specific alerting and
sub-second latency criterion parameters and revert to the switch-wide parameters.
Example
The following example disables alerts on port 1, excludes ports 2, 3, and 4 from bottleneck
monitoring, and changes the alerting parameters on ports 2 and 3. The bottleneck --status
command shows the settings for these ports. Note that this example changes the alerting
parameters on ports 2 and 3, even though they are excluded from bottleneck detection.
switch:admin> bottleneckmon --config -noalert 1
switch:admin> bottleneckmon --exclude 2-4
switch:admin> bottleneckmon --config -alert -lthresh .99 -cthresh .9 -time
4000 -qtime 600 2-3
switch:admin> bottleneckmon --status
Bottleneck detection - Enabled
==============================
Switch-wide sub-second latency bottleneck criterion:
====================================================
Time threshold
- 0.800
Severity threshold
- 50.000
Switch-wide alerting parameters:
================================
Alerts
Latency threshold for alert
Congestion threshold for alert Averaging time for alert
Quiet time for alert
-
Yes
0.100
0.800
300 seconds
300 seconds
Per-port overrides for alert parameters:
========================================
Port Alerts? LatencyThresh CongestionThresh Time(s) QTime(s)
================================================================
1
N
----2
Y
0.990
0.900
4000
600
3
Y
0.990
0.900
4000
600
Excluded ports:
===============
Port
====
2
3
4
Fabric OS Administrator’s Guide
53-1002148-02
307
13
Changing bottleneck parameters
Example
The following example changes alerting parameters for the entire logical switch.
switch:admin> bottleneckmon --config -alert -lthresh .97 -cthresh .8 -time
5000
switch:admin> bottleneckmon --status
Bottleneck detection - Enabled
==============================
Switch-wide sub-second latency bottleneck criterion:
====================================================
Time threshold
- 0.800
Severity threshold
- 0.100
Switch-wide alerting parameters:
================================
Alerts
Latency threshold for alert
Congestion threshold for alert Averaging time for alert
Quiet time for alert
-
Yes
0.970
0.800
5000 seconds
300 seconds
Per-port overrides for alert parameters:
========================================
Port Alerts? LatencyThresh CongestionThresh Time(s) QTime(s)
================================================================
1
N
----2
Y
0.990
0.900
4000
600
3
Y
0.990
0.900
4000
600
Excluded ports:
===============
Port
====
2
3
4
Example
The following example changes the sub-second latency criterion parameters for port 6.
switch:admin> bottleneckmon --config -lsubsectimethresh .6 -lsubsecsevthresh
40 6
switch:admin> bottleneckmon --status
Bottleneck detection - Enabled
==============================
Switch-wide sub-second latency bottleneck criterion:
====================================================
Time threshold
- 0.800
Severity threshold
- 50.000
Switch-wide alerting parameters:
================================
Alerts
Latency threshold for alert
Congestion threshold for alert Averaging time for alert
Quiet time for alert
-
308
Yes
0.100
0.800
300 seconds
300 seconds
Fabric OS Administrator’s Guide
53-1002148-02
Displaying bottleneck statistics
13
Per-port overrides for sub-second latency bottleneck criterion:
===============================================================
Port
TimeThresh
SevThresh
=================================
6
0.600
40.000
Per-port overrides for alert parameters:
========================================
Port Alerts? LatencyThresh CongestionThresh Time(s) QTime(s)
================================================================
6
N
-----
Displaying bottleneck statistics
You can use the bottleneckmon --show command to display a history of bottleneck conditions, for
up to three hours. This command has several display options:
• Display only latency bottlenecks, only congestion bottlenecks, or both combined.
• Display bottleneck statistics for a single port, bottleneck statistics for all ports on the switch, or
a list of ports affected by bottleneck conditions.
• Continuously update the displayed data with fresh data.
1. Connect to the switch and log in as admin.
2. Enter the bottleneckmon --show command.
Example of displaying the bottleneck history in 5-second windows over a period of 30 seconds
In this example, the definition of bottlenecked ports is any port that had a bottleneck occur during
any second in the corresponding interval.
switch:admin> bottleneckmon --show -interval 5 -span 30
==================================================================
Wed Jan 13 18:54:35 UTC 2010
==================================================================
List of bottlenecked ports in most recent interval:
23
==================================================================
Number of
From
To
bottlenecked ports
==================================================================
Jan 13 18:54:05
Jan 13 18:54:10
1
Jan 13 18:54:10
Jan 13 18:54:15
2
Jan 13 18:54:15
Jan 13 18:54:20
1
Jan 13 18:54:20
Jan 13 18:54:25
1
Jan 13 18:54:25
Jan 13 18:54:30
0
Jan 13 18:54:30
Jan 13 18:54:35
0
Fabric OS Administrator’s Guide
53-1002148-02
309
13
Disabling bottleneck detection on a switch
Disabling bottleneck detection on a switch
When you disable bottleneck detection on a switch, all bottleneck configuration details are
discarded, including the list of excluded ports and non-default values of alerting parameters.
1. Connect to the switch and log in as admin.
2. Enter the bottleneckmon --disable command to disable bottleneck detection on the switch.
switch:admin> bottleneckmon --disable
310
Fabric OS Administrator’s Guide
53-1002148-02
Chapter
14
In-flight Encryption and Compression
In this chapter
• In-flight encryption and compression overview . . . . . . . . . . . . . . . . . . . . . . 311
• Configuring encryption and compression . . . . . . . . . . . . . . . . . . . . . . . . . . 314
• Encryption and compression example . . . . . . . . . . . . . . . . . . . . . . . . . . . . . 319
In-flight encryption and compression overview
The in-flight encryption and compression feature of Fabric OS allows frames to be encrypted or
compressed at the egress point of an ISL between two Brocade switches, and then to be decrypted
or decompressed at the ingress point of the ISL. This feature uses port-based encryption and
compression. It is supported on 16 Gbps E_Ports, only.
The purpose of encryption is to provide security for frames while they are in flight between two
switches. The purpose of compression is for better bandwidth use on the ISLs, especially over long
distance. An average compression ratio of 2:1 is provided. Frames are never left in an encrypted or
compressed state when delivered to an end device. Both ends of the ISL must terminate at 16
Gbps ports.
Encryption and compression can be enabled at the same time for an ISL, or you can enable either
encryption or compression selectively. Figure 54 shows an example of 16 Gbps links connecting
three Brocade switches. One link is configured with encryption and compression, one with just
encryption, and one with just compression.
tio
yp
cr
En
n
o
si
es
pr
om
C
n
16G
16G
FIGURE 54
Fabric OS Administrator’s Guide
53-1002148-02
Compression/Encryption
16G
Encryption and Compression on 16 Gbps ISLs
311
14
In-flight encryption and compression overview
The encryption and compression features are designed to work only with E_Ports. Encryption and
compression are also compatible with the following features:
•
•
•
•
E_Ports with trunking, QoS, or long distance features enabled.
Flow control modes R_RDY, VC_RDY, and EXT_VC_RDY.
XISL ports in VF mode.
FCP data frames and non FCP data frames except ELS and BLS frames.
FCP data frames are of Type=0x8. For encryption, R_CTL=0x1 and R_CTL=0x4 are supported.
For compression, only R_CTL=0x1 is supported.
Non FCP data frames are of Type != 0x8. Non FCP frames with ELS/BLS (R_CTL==0x2 ||
R_CTL== 0x8) are not supported.
No license is needed to configure and enable in-flight encryption or compression.
Encryption and compression restrictions
• No more than two ports on one chip can be configured with encryption, compression, or both.
This restriction equates to a maximum of four ports per FC16-32 or FC 16-48 blade, or two
ports per Brocade 6510 switch.
• The number of ports in a trunk is limited to two ports when encryption or compression is
enabled for the trunk.
• Ports must be 16 Gbps capable, although port speed can be any configurable value.
• The devices at either end of the ISL must run Fabric OS 7.0.0 or later software.
• Only E_Ports are supported.Although VE_Ports, VEX_Ports, EX_Ports, GE ports, FCoE ports,
F_Ports, F_Port trunks, ICL ports, and D_Ports cannot be configured for encryption or
compression, they can exist along the I/O path.
• The encryption feature is not supported in FIPS mode. In-flight encryption is not FIPS
compliant.
• Network Advisor does not support encryption or compression.
• Port mirroring through any encryption-enabled port or compression-enabled port is not
supported.
How encryption and compression are enabled
This feature provides encryption and decryption or compression and decompression between two
E_Ports across an ISL. You can enable encryption, compression, or encryption and compression on
an E_Port on a per port basis. By default, this feature is disabled on all ports on a switch.
Encryption and compression capabilities and configurations from each end of the ISL are
exchanged during E_Port initialization. Capabilities and configurations must match, otherwise port
segmentation or disablement occurs. If the port was configured for compression, then the
compression feature is enabled.
If the port was configured for encryption, authentication is performed and the keys needed for
encryption are generated. The encryption feature is enabled if authentication is successful. If
authentication fails, then the ports will be segmented.
312
Fabric OS Administrator’s Guide
53-1002148-02
In-flight encryption and compression overview
14
Authentication and key generation
The DH-CHAP (Diffie Hellman - Challenge Handshake Authentication Protocol) protocol must be
configured along with the DH group 4 for port level authentication as a prerequisite for in-flight
encryption. Pre-shared secret keys must be configured on the devices at either end of the ISL to
perform authentication. Authentication secrets greater than 32 characters are recommended for
stronger encryption keys.. Once the link is authenticated, the keys are generated and exchanged.
These encryption keys never expire. While the port remains online, the keys generated for the port
remain the same. When a port is disabled, segmented, or taken offline, a new set of keys is
generated when the port is enabled again.
All members of a trunk group use the same set of keys as the master port. Slave ports do not
exchange keys. If the master port goes offline causing an E_Port change, the trunk continues to
use the same set of keys.
Availability considerations
For FC16-32 or FC 16-48 blades, if the two ports configured for encryption or compression within
the same chip are not configured for trunking, it is recommended to connect each ISL to a different
chip on the peer switch. Similarly, configure the two ports on the other chip of the blade. If the ports
are configured for trunking, it is recommended to connect each trunk group to different chips of the
peer switch. Configuring all 4 ports of the blade with this suggested configuration will provide
redundancy in the event of encryption/compression port failures.
For the Brocade 6510, if its two ports are not configured for trunking, it is recommended to connect
each ISL to different chips of the peer switch.
NOTE
if any port in the chip with encryption/compression enabled encounters rare error conditions that
would need error recovery to be performed on the encryption engine within that chip, it causes all
encryption/compression enabled ports (maximum of two ports) on that chip to go offline.
VF mode considerations
The E_Ports in the user-created logical switch, base switch, or default switch can support
encryption and compression. You can configure encryption on XISL ports, but not on LISL ports.
However, frames from the LISL ports are implicitly encrypted or compressed as they pass through
encryption/compression enabled XISL ports.
If an encryption or compression enabled port needs to be moved from one logical switch to another
logical switch, the movement of the port is blocked. You must disable the encryption and
compression configurations before moving the port, and then enable encryption and compression
after the port has moved.
Recommendation for compression
When configuring compression on long distance ports, it is recommended to configure the long
distance ports with double the number of buffers. This can be done by configuring the port with
long distance LS mode and specifying the number of buffers to allocate to the port.
Fabric OS Administrator’s Guide
53-1002148-02
313
14
Configuring encryption and compression
Configuring encryption and compression
On a given ISL between two 16 Gbps E_Ports, you can configure each port for encryption,
compression, or both. Your encryption and compression settings must match at either end of the
ISL. Port segmentation will occur during port initialization if these configurations do not match.
Before configuring a port for encryption, you must configure the port for authentication using the
authUtil and secAuthSecret commands:
• Use the authUtil command to enable switch authentication, enable the DH-CHAP
authentication protocol for ports that support encryption, and select the appropriate DH
(Diffie-Hellman) group (4 or “*”).
To enable switch authentication, use the authUtil --policy command with the -sw option to
select either the on mode or the active mode.
To enable the DH-CHAP authentication protocol, use the authUtil --set command with the -a
option and select either dhchap or all. dhchap explicitly specifies the DH-CHAP protocol.
Although all enables both FCAP and DH-CHAP, the active protocol defaults to DH-CHAP for all
ports configured for in-flight encryption.
To select the appropriate DH group, use the authUtil --set command with the -g option and
choose either group 4 or “*”. If “*” is entered, then group 4 is selected from a list.
• Use the secAuthSecret command to configure a pre-shared secret on both sides of the ISL for
all ports configured for in-flight encryption. A secret of at least 32 characters is recommended.
Maximum is 40 characters.
Port segmentation will occur during port initialization if authentication fails.
If you need to disable authentication on a port that has encryption or compression configured, you
must first disable encryption or compression on the port, and then disable authentication.
These steps summarize how to enable encryption or compression on a port:
1. Use the portEncCompShow command to determine which ports are available for encryption or
compression.
2. If you are enabling encryption on the port, configure port level authentication for the port using
the secAuthSecret and authUtil commands. Omit this step if you want to enable only
compression on the port.
3. Use the portCfgEncrypt command to enable encryption on the port. This step will fail if you try
to exceed the number of allowable ports available for encryption or compression on the chip.
4. Use the portCfgCompress command to enable compression on the port. This step will fail if you
try to exceed the number of allowable ports available for encryption or compression on the
chip.
Following successful port initialization, the configured features are enabled and active. You can use
the islShow command to check that the E_Port has come online with encryption or compression
enabled.
If port initialization is not successful, you can check for port segmentation errors with the
switchShow command. This command will tell you if the segmentation was due to mismatched
encryption or compression configurations on the ports at either end of the ISL, if port-level
authentication failed, or if a required resource was not available.
314
Fabric OS Administrator’s Guide
53-1002148-02
Configuring encryption and compression
14
The following topics provide step-by-step instructions for performing encryption and compression
tasks:
•
•
•
•
“Viewing the encryption and compression configuration” on page 315
“Configuring and enabling authentication” on page 316
“Configuring encryption” on page 317
“Configuring compression” on page 317
Viewing the encryption and compression configuration
To determine which ports are available for encryption or compression on each chip on the switch,
follow these steps:
1. Connect to the switch and log in using an account with admin permissions, or an account with
O permission for the SwitchPortManagement RBAC class of commands.
2. Enter the portEncCompShow command.
The following example shows the output for two chips. Chip 1 (below the line of dashes) already
has compression configured and active on user ports 348 and 349. Given the limit of two
ports per chip, chip 1 has no more ports available for encryption or compression. Chip 0 (above
the dashed line) has no ports configured for either encryption or compression and therefore
has any two ports available for this purpose. For bladed switches, use the switchShow
command to determine the slot number of a specific user port.
sw0:FID128:root> portenccompshow
User
Encryption
Compression
Port
configured
Active
configured
Active
-------------------------------------17
No
No
No
No
18
No
No
No
No
19
No
No
No
No
20
No
No
No
No
21
No
No
No
No
22
No
No
No
No
23
No
No
No
No
144
No
No
No
No
145
No
No
No
No
146
No
No
No
No
147
No
No
No
No
148
No
No
No
No
149
No
No
No
No
150
No
No
No
No
151
No
No
No
No
----------------------------------------------------88
No
No
No
No
89
No
No
No
No
90
No
No
No
No
91
No
No
No
No
92
No
No
No
No
93
No
No
No
No
94
No
No
No
No
95
No
No
No
No
208
No
No
No
No
209
No
No
No
No
210
No
No
No
No
211
No
No
No
No
Fabric OS Administrator’s Guide
53-1002148-02
315
14
Configuring encryption and compression
212
213
214
215
344
345
346
347
348
349
350
351
No
No
No
No
No
No
No
No
No
No
No
No
No
No
No
No
No
No
No
No
No
No
No
No
No
No
No
No
No
No
No
No
Yes
Yes
No
No
No
No
No
No
No
No
No
No
Yes
Yes
No
No
Configuring and enabling authentication
To configure authentication for ports that will later be configured for encryption, follow these steps:
1. Log in to the switch using an account with admin permissions, or an account with OM
permissions for the Authentication RBAC class of commands.
2. Enter the secAuthSecret --set command to establish pre-shared secrets at each end of the ISL.
It is recommended to use a 32 bit secret for an ISL carrying encrypted or compressed traffic.
secauthsecret --set
When prompted, enter the WWN for the local switch and secret strings for the local switch and
the remote switch.
NOTE
When setting a secret key pair, you are entering the shared secrets in plain text. Use a secure
channel, such as SSH or the serial console, to connect to the switch on which you are setting
the secrets.
3. Enter the authUtil command to set the switch policy mode to Active or On:
authutil --policy -sw active
or:
authutil --policy -sw on
4. Enable the DH-CHAP authentication protocol:
authutil --set -a dhchap
or:
authutil --set -a all
5. Enable authentication with DH group 4 or “*”:
authutil --set -g 4
DH Group was set to 4.
or
authutil --set -g “*”
DH Group was set to 0,1,2,3,4.
316
Fabric OS Administrator’s Guide
53-1002148-02
Configuring encryption and compression
14
For additional information about establishing DH-CHAP secrets, see “Secret key pairs for DH-CHAP”
on page 151.
For additional information about configuring DH-CHAP authentication for E_Ports, see
“Authentication policy for fabric elements” on page 145.
Configuring encryption
NOTE
Before performing this procedure, you must authenticate the port as described in “Configuring and
enabling authentication” on page 316. It is also recommended that you check for port availability
using the portEncCompShow command. See “Viewing the encryption and compression
configuration” on page 315 for details.
To configure encryption on a port, follow these steps:
1. Connect to the switch and log in using an account with secure admin permissions, or an
account with OM permissions for the EncryptionConfiguration RBAC class of commands.
2. Disable the port on which you want to configure encryption. Use the portDisable command.
3. Enter the portCfgEncrypt --enable command.
This example enables encryption on port 21 on a Brocade 6510 switch:
portcfgencrypt --enable 21
This example enables encryption on port 15 of an FC16-32 blade in slot 9 of an enterprise
class platform:
portcfgencrypt --enable 9/15
4. Enable the port with the portEnable command.
After manually enabling the port, the new configuration becomes active.
Configuring compression
NOTE
Before performing this procedure, it is recommended that you check for port availability using the
portEncCompShow command. See “Viewing the encryption and compression configuration” on
page 315 for details.
To configure compression on a port, follow these steps:
1. Connect to the switch and log in using an account with admin permissions, or an account with
OM permissions for the SwitchPortConfiguration RBAC class of commands.
2. Disable the port on which you want to configure compression. Use the portDisable command.
3. Enter the portCfgCompress --enable command.
This example enables compression on port 21 on a Brocade 6510 switch:
portcfgcompress --enable 21
Fabric OS Administrator’s Guide
53-1002148-02
317
14
Configuring encryption and compression
This example enables compression on port 15 of an FC16-32 blade in slot 9 of an enterprise
class platform:
portcfgcompress --enable 9/15
4. Enable the port with the portEnable command.
After enabling the port, the new configuration becomes active.
Disabling encryption
To disable encryption on a port, follow these steps:
1. Connect to the switch and log in using an account with secure admin permissions, or an
account with OM permissions for the EncryptionConfiguration RBAC class of commands.
2. Disable the port on which you want to disable encryption. Use the portDisable command.
3. Enter the portCfgEncrypt --disable command.
This example disables encryption on port 21 on a Brocade 6510 switch:
portcfgencrypt --disable 21
This example disables encryption on port 15 of an FC16-32 blade in slot 9 of an enterprise
class platform:
portcfgencrypt --disable 9/15
4. Enable the port with the portEnable command.
After enabling the port, the new configuration becomes active.
Disabling compression
To disable compression on a port, follow these steps:
1. Connect to the switch and log in using an account with admin permissions, or an account with
OM permissions for the SwitchPortConfiguration RBAC class of commands.
2. Disable the port on which you want to disable compression. Use the portDisable
command.Enter the portCfgCompress --disable command.
This example disables compression on port 21 on a Brocade 6510 switch:
portcfgcompress --disable 21
This example disables compression on port 15 of an FC16-32 blade in slot 9 of an enterprise
class platform:
portcfgcompress --disable 9/15
3. Enable the port with the portEnable command.
After enabling the port, the new configuration becomes active.
318
Fabric OS Administrator’s Guide
53-1002148-02
Encryption and compression example
14
Encryption and compression example
The following example shows configuring and enabling encryption and compression.In this case,
encryption and compression are applied to the E_Ports at either end of and ISL connecting a port
on a blade in an enterprise class platform named myDCX to a port on a Brocade 6510 switch
named myswitch. Table 59 identifies each end of the ISL connection by device name, device WWN,
and port number.
TABLE 59
Example ISL connections
Enterprise class platform
Brocade 6510
Name
myDCX
myswitch
WWN
10:00:00:05:1e:e5:cb:00
10:00:00:05:33:13:71:3e
port ID
port index: 246
slot number: 12
port number: 22
port number: 0
The example includes the following steps:
•
•
•
•
•
Setting up authentication to permit key generation
Enabling encryption
Enabling compression
Disabling encryption
Disabling compression
Example of enabling encryption and compression on a port
This example configures and enables encryption and compression on a given port. Authentication
and secret key must also be configured as these are required before configuring encryption. The
commands in this example are shown entered on the Brocade 6510 named myswitch. The same
commands must also be entered on the peer switch.
This first part of the example shows a command sequence that sets up authentication in
preparation for in-flight encryption. Specifically, it configures the DH-CHAP protocol for
authentication, sets the DH group to group 4, and activates authentication:
myswitch:root> authutil --show
AUTH TYPE
HASH TYPE
GROUP TYPE
-------------------------------------fcap,dhchap
sha1,md5
0,1,2,3,4
Switch Authentication Policy: PASSIVE
Device Authentication Policy: OFF
myswitch:root> authutil --set -a dhchap
myswitch:root> authutil --set -g “*”
myswitch:root> authutil --policy -sw active
Warning: Activating the authentication policy requires either DH-CHAP secrets
or PKI certificates depending on the protocol selected. Otherwise, ISLs will
be segmented during next E-port bring-up.
ARE YOU SURE (yes, y, no, n): [no] y
Auth Policy is set to ON
Fabric OS Administrator’s Guide
53-1002148-02
319
14
Encryption and compression example
myswitch:root> authutil --show
AUTH TYPE
HASH TYPE
GROUP TYPE
-------------------------------------dhchap
md5
4
Switch Authentication Policy: ON
Device Authentication Policy: OFF
myswitch:root>
Next, you set a secret key. For this you need to get the WWN of the peer switch.
myswitch:root> secauthsecret
Usage: secAuthSecret <args>
--show: displays the secret key database
--set: sets up (add or modify) secret keys
--remove [wwn | domain | <sw name>]: removes an entry from secret key database
--remove --all: deletes secret key database
myswitch:root> secauthsecret --set
This command is used to set up secret keys for the DH-CHAP authentication.
The minimum length of a secret key is 8 characters and maximum 40
characters. Setting up secret keys does not initiate DH-CHAP
authentication. If switch is configured to do DH-CHAP, it is performed
whenever a port or a switch is enabled.
Warning: Please use a secure channel for setting secrets. Using
an insecure channel is not safe and may compromise secrets.
Following inputs should be specified for each entry.
1. WWN for which secret is being set up.
2. Peer secret: The secret of the peer that authenticates to peer.
3. Local secret: The local secret that authenticates peer.
Press enter to start setting up secrets >1
Enter peer WWN, Domain, or switch name (Leave blank when done):
10:00:00:05:1e:e5:cb:00
Enter peer secret:
Re-enter peer secret:
Enter local secret:
Re-enter local secret:
Enter peer WWN, Domain, or switch name (Leave blank when done):
Are you done? (yes, y, no, n): [no] y
Saving data to key store... Done.
myswitch:root> secauthsecret --show
WWN
DId
Name
----------------------------------------------10:00:00:05:1e:e5:cb:00
150 dcx_150
myswitch:root>
Next, you enable encryption on port 0. Note that the first attempt fails because the port is currently
enabled. This example uses the portCfgShow command to check the result. Notice that the output
shows encryption to be enabled on the port.
myswitch:root> portcfgencrypt --enable 0
Please disable port to configure Encryption/Compression.
320
Fabric OS Administrator’s Guide
53-1002148-02
Encryption and compression example
14
myswitch:root> portdisable 0
myswitch:root> portcfgencrypt --enable 0
Turning ON Encryption on port(246) will cause the port to be disabled during
next LOGIN
myswitch:root> portenable 0
myswitch:root> portcfgshow 0
Area Number:
0
Octet Speed Combo:
3(16G,10G)
Speed Level:
AUTO(SW)
AL_PA Offset 13:
OFF
Trunk Port
ON
Long Distance
OFF
VC Link Init
OFF
Locked L_Port
OFF
Locked G_Port
OFF
Disabled E_Port
OFF
Locked E_Port
OFF
ISL R_RDY Mode
OFF
RSCN Suppressed
OFF
Persistent Disable
OFF
LOS TOV enable
OFF
NPIV capability
ON
QOS E_Port
AE
Port Auto Disable:
OFF
Rate Limit
EX Port
Mirror Port
Credit Recovery
F_Port Buffers
Fault Delay:
NPIV PP Limit:
CSCTL mode:
Frame Shooter Port
D-Port mode:
Compression:
Encryption:
FEC:
myswitch:root>
OFF
OFF
OFF
ON
OFF
0(R_A_TOV)
126
OFF
OFF
OFF
OFF
ON
OFF
Finally, you enable compression on the same port. The subsequent portCfgShow command shows
both encryption and compression to be enabled on the port.
myswitch:root> portdisable 0
myswitch:root> portcfgcompress --enable 0
Turning ON Compression on port(0) will cause the port to be disabled during
next LOGIN
myswitch:root> portenable 0
myswitch:root> portcfgshow 0
Area Number:
0
Octet Speed Combo:
3(16G,10G)
Speed Level:
AUTO(SW)
AL_PA Offset 13:
OFF
Trunk Port
ON
Long Distance
OFF
VC Link Init
OFF
Locked L_Port
OFF
Locked G_Port
OFF
Disabled E_Port
OFF
Fabric OS Administrator’s Guide
53-1002148-02
321
14
Encryption and compression example
Locked E_Port
ISL R_RDY Mode
RSCN Suppressed
Persistent Disable
LOS TOV enable
NPIV capability
QOS E_Port
Port Auto Disable:
OFF
OFF
OFF
OFF
OFF
ON
AE
OFF
Rate Limit
EX Port
Mirror Port
Credit Recovery
F_Port Buffers
Fault Delay:
NPIV PP Limit:
CSCTL mode:
Frame Shooter Port
D-Port mode:
Compression:
Encryption:
FEC:
myswitch:root>
OFF
OFF
OFF
ON
OFF
0(R_A_TOV)
126
OFF
OFF
OFF
ON
ON
OFF
Example of disabling encryption and compression
This example disables the encryption and compression that were enabled in the previous example.
The first part of the example shows a command sequence that disables encryption on port 0:
myswitch:root> portdisable 0
myswitch:root> portcfgencrypt --disable 0
myswitch:root> portenable 0
Next, disable compression:
myswitch:root> portdisable 0
myswitch:root> portcfgcompress --disable 0
myswitch:root> portenable 0
Now use the portCfgShow command to check the results:
myswitch:root> portcfgshow 0
Area Number:
0
Octet Speed Combo:
3(16G,10G)
Speed Level:
AUTO(SW)
AL_PA Offset 13:
OFF
Trunk Port
ON
Long Distance
OFF
VC Link Init
OFF
Locked L_Port
OFF
Locked G_Port
OFF
Disabled E_Port
OFF
Locked E_Port
OFF
ISL R_RDY Mode
OFF
RSCN Suppressed
OFF
Persistent Disable
OFF
LOS TOV enable
OFF
NPIV capability
ON
322
Fabric OS Administrator’s Guide
53-1002148-02
Encryption and compression example
QOS E_Port
Port Auto Disable:
AE
OFF
Rate Limit
EX Port
Mirror Port
Credit Recovery
F_Port Buffers
Fault Delay:
NPIV PP Limit:
CSCTL mode:
Frame Shooter Port
D-Port mode:
Compression:
Encryption:
FEC:
myswitch:root>
OFF
OFF
OFF
ON
OFF
0(R_A_TOV)
126
OFF
OFF
OFF
OFF
OFF
OFF
Fabric OS Administrator’s Guide
53-1002148-02
14
323
14
324
Encryption and compression example
Fabric OS Administrator’s Guide
53-1002148-02
Chapter
15
Administering NPIV
In this chapter
• NPIV overview . . . . . . . . . . . . . . . . . . . . . . . . . . . . . . . . . . . . . . . . . . . . . . . .
• Configuring NPIV . . . . . . . . . . . . . . . . . . . . . . . . . . . . . . . . . . . . . . . . . . . . . .
• Enabling and disabling NPIV. . . . . . . . . . . . . . . . . . . . . . . . . . . . . . . . . . . . .
• Viewing NPIV port configuration information. . . . . . . . . . . . . . . . . . . . . . . .
325
327
328
329
NPIV overview
N_Port ID Virtualization (NPIV) enables a single Fibre Channel protocol port to appear as multiple,
distinct ports, providing separate port identification within the fabric for each operating system
image behind the port (as if each operating system image had its own unique physical port). NPIV
assigns a different virtual port ID to each Fibre Channel protocol device. NPIV is designed to enable
you to allocate virtual addresses without affecting your existing hardware implementation. The
virtual port has the same properties as an N_Port, and is therefore capable of registering with all
services of the fabric. This chapter does not discuss the Access Gateway feature. For more
information on the Access Gateway feature, refer to the Access Gateway Administrator’s Guide.
Each NPIV device has a unique device PID, Port WWN, and Node WWN, and behaves the same as
all other physical devices in the fabric. In other words, multiple virtual devices emulated by NPIV
appear no different than regular devices connected to a non-NPIV port. The same zoning rules
apply to NPIV devices as non-NPIV devices. Zones can be defined by domain,port notation, by WWN
zoning, or both. To perform zoning to the granularity of the virtual N_Port IDs, you must use
WWN-based zoning.
If you are using domain,port zoning for an NPIV port, and all the virtual PIDs associated with the
port are included in the zone, then a port login (PLOGI) to a non-existent virtual PID is not blocked
by the switch; rather, it is delivered to the device attached to the NPIV port. In cases where the
device is not capable of handling such unexpected PLOGIs, use WWN-based zoning.
The following example shows the number of NPIV devices in the output of the switchShow
command. The number of NPIV devices is equal to the sum of the base port plus the number of
NPIV public devices. The base port is the N_Port listed in the switchShow output. Based on the
formula, index 010000 shows only 1 NPIV device and index 010300 shows a total of 222 NPIV
devices (one N_Port flogi device and 221 NPIV devices).
Example of NPIV devices
switch:admin> switchshow
switchName:
5100
switchType:
71.2
switchState:
Online
switchMode:
Access Gateway Mode
switchWwn:
10:00:00:05:1e:41:49:3d
switchBeacon:
OFF
Fabric OS Administrator’s Guide
53-1002148-02
325
15
NPIV overview
Index Port Address Media Speed State Proto
==============================================
0
0
010000 id
N4
Online FC F-Port
1
1
010100 id
N4
Online FC F-Port
2
2
010200 id
N4
Online FC F-Port
3
3
010300 id
N4
Online FC F-Port
20:0c:00:05:1e:05:de:e4 0xa06601
1 N Port + 4 NPIV public
1 N Port + 119 NPIV public
1 N Port + 221 NPIV public
On the Brocade DCX and DCX-4S with the FC8-64 blade, the base port is not included in the NPIV
device count. The following example shows 63 NPIV devices total.
Index Slot Port Address Media Speed State
Proto
==================================================
127
12
15
a07f40 id
N4
Online FC F-Port
(AoQ)
1 N Port + 63 NPIV public
Upgrade considerations
The maximum logins per switch has decreased with Fabric OS v6.4.0. When upgrading from a
release previous to Fabric OS v6.4.0, the configured maximum is carried forward and may exceed
the Fabric OS v6.4.0 limit. It is recommended to reconfigure this parameter to be within the range
permitted in Fabric OS v6.4.0.
Fixed addressing mode
Fixed addressing mode is the default addressing mode used in all platforms that do not have
Virtual Fabrics enabled. When Virtual Fabrics is enabled on the Brocade DCX and DCX-4S, fixed
addressing mode is used only on the default partition. The number of NPIV devices supported on
shared area ports (48-port blades) is reduced to 64 from 128 when Virtual Fabrics mode is
enabled.
10-bit addressing mode
The 10-bit addressing mode is the default mode for all the logical switches created in the Brocade
DCX and DCX-4S enterprise-class platform. The number of NPIV or loop devices supported on a
port is 64.
Table 60 shows the number of NPIV devices supported on the Brocade DCX and DCX-4S
enterprise-class platform.
TABLE 60
326
Number of supported NPIV devices
Platform
Virtual Fabrics
Logical switch type
NPIV support
DCX
Disabled
N/A
Yes, 127 virtual device limit.1
DCX
Enabled
Default switch
Yes, 63 virtual device limit.1
DCX
Enabled
Logical switch
Yes, 255 virtual device limit.2, 3
DCX
Enabled
Base switch
No.
DCX-4S
Disabled
N/A
Yes, 255 virtual device limit.
DCX-4S
Enabled
Default switch
Yes, 255 virtual device limit.
Fabric OS Administrator’s Guide
53-1002148-02
Configuring NPIV
TABLE 60
15
Number of supported NPIV devices (Continued)
Platform
Virtual Fabrics
Logical switch type
NPIV support
DCX-4S
Enabled
Logical switch
Yes, 255 virtual device limit.3
DCX-4S
Enabled
Base switch
No.
1. Maximum limit support takes precedence if user-configured maximum limit is greater.
This applies to shared areas on the FC4-48, FC8-48 and FC8-64 port blades.
2. The first 112 physical NPIV-capable devices connected to a logical switch using 10-bit
addressing can log in 255 logical devices. The physical NPIV-capable devices after 112, 113,
and higher, are limited to 63 logical devices.
3.
Maximum limit of 63 for 10-bit areas connected to third-party (non-Brocade) NPIV HBAs.
Configuring NPIV
The NPIV feature is enabled by default. You can set the number of virtual N_Port_IDs per port to a
value between 1 through 255 per port. The default setting is 126.
The portCfgNpivPort command is be used to specify the maximum number of virtual N_port_ID's
per port on a switch. It can also be used to enable to disable NPIV. Once NPIV is enabled on the
port, you can specify the number of logins per port. If the feature has been disabled, then the NPIV
port configuration does not work.
The addressing mode can limit the maximum number of NPIV logins to 127 or 63 depending on the
mode. The portCfgNPIVPort command can set the maximum number of NPIV logins limit to
anything from 1 through 255, regardless of the addressing mode. Whichever of these two
(addressing mode or the value configured through portCfgNPIVPort) is lower will be the maximum
number that can be logged in.
CAUTION
The portDisable command disables the port and stops all traffic flowing to and from the port.
Perform this command during a scheduled maintenance.
1. Connect to the switch and log in using an account assigned to the admin role.
2. Enter the portDisable command.
3. Enter the portCfgNPIVPort --setloginlimit command with the port number and the number of
logins per port.
4. Press Enter.
5. Enter the portEnable command to enable the port.
Example of setting the login limit
switch:adnin> portcfgnpivport --setloginlimit 7/0 128
NPIV Limit Set to 128 for Port 128
switch:adnin> portcfgshow
Area Number:
Octet Speed Combo:
Speed Level:
AL_PA Offset 13:
Trunk Port
Fabric OS Administrator’s Guide
53-1002148-02
7/0
128
1(16G|8G|4G|2G)
AUTO(SW)
OFF
ON
327
15
Enabling and disabling NPIV
Long Distance
VC Link Init
Locked L_Port
Locked G_Port
Disabled E_Port
Locked E_Port
ISL R_RDY Mode
RSCN Suppressed
Persistent Disable
LOS TOV enable
NPIV capability
QOS E_Port
Port Auto Disable:
Rate Limit
EX Port
Mirror Port
Credit Recovery
F_Port Buffers
Fault Delay:
NPIV PP Limit:
CSCTL mode:
Frame Shooter Port
D-Port mode:
Compression:
Encryption:
FEC:
OFF
OFF
OFF
OFF
OFF
OFF
OFF
OFF
OFF
OFF
ON
AE
OFF
OFF
OFF
OFF
ON
OFF
0(R_A_TOV)
128
OFF
OFF
OFF
OFF
OFF
ON
Enabling and disabling NPIV
On the Brocade 300, 5100, 5300, 6510, and 8000 switches, the Brocade 5410, 5424, 5450,
5460, 5470, and 5480 embedded switches, Brocade DCX, DCX-4S, and DCX 8510 enterprise-class
platforms, and the FA4-18 blade, NPIV is enabled for every port.
NOTE
CEE/FCoE ports on the Brocade 8000 have NPIV enabled by default, but NPIV cannot be enabled or
disabled on these ports. The login limit can be set on these ports provided you disable and enable
the ports using the fcoe --disable and fcoe --enable commands.
1. Connect to the switch and log in using an account assigned to the admin role.
2. To enable or disable NPIV on a port, enter the portCfgNPIVPort command with either the
--enable or --disable option.
The following example shows NPIV being enabled on port 10 of a Brocade 5100:
switch:admin> portCfgNPIVPort --enable 10
NOTE
If the NPIV feature is disabled, the port is toggled if NPIV devices are logged in from that F_Port (a
true NPIV port). Otherwise, the firmware considers that port as an F_Port even though the NPIV
feature was enabled.
328
Fabric OS Administrator’s Guide
53-1002148-02
Viewing NPIV port configuration information
15
Viewing NPIV port configuration information
1. Connect to the switch and log in using an account assigned to the admin role.
2. Enter the portCfgShow command to view the switch ports information.
The following example shows whether a port is configured for NPIV:
switch:admin> portcfgshow
Ports of Slot 0
0 1 2 3
4 5 6 7
8 9 10 11
12 13 14 15
-----------------+--+--+--+--+----+--+--+--+----+--+--+--+----+--+--+-Speed
AN AN AN AN
AN AN AN AN
AN AN AN AN
AN AN AN AN
Trunk Port
ON ON ON ON
ON ON ON ON
ON ON ON ON
ON ON ON ON
Long Distance
.. .. .. ..
.. .. .. ..
.. .. .. ..
.. .. .. ..
VC Link Init
.. .. .. ..
.. .. .. ..
.. .. .. ..
.. .. .. ..
Locked L_Port
.. .. .. ..
.. .. .. ..
.. .. .. ..
.. .. .. ..
Locked G_Port
.. .. .. ..
.. .. .. ..
.. .. .. ..
.. .. .. ..
Disabled E_Port
.. .. .. ..
.. .. .. ..
.. .. .. ..
.. .. .. ..
ISL R_RDY Mode
.. .. .. ..
.. .. .. ..
.. .. .. ..
.. .. .. ..
RSCN Suppressed
.. .. .. ..
.. .. .. ..
.. .. .. ..
.. .. .. ..
Persistent Disable.. .. .. ..
.. .. .. ..
.. .. .. ..
.. .. .. ..
NPIV capability
ON ON ON ON
ON ON ON ON
ON ON ON ON
ON ON ON ON
3. Use the switchShow and portShow commands to view NPIV information for a given port. If a
port is an F_Port, and you enter the switchShow command, then the port WWN of the N_Port is
returned. For an NPIV F_Port, there are multiple N_Ports, each with a different port WWN. The
switchShow command output indicates whether or not a port is an NPIV F_Port, and identifies
the number of virtual N_Ports behind it. The following example is sample output from the
switchShow command:
switch:admin> switchshow
switchName:switch
switchType:66.1
switchState:Online
switchMode:Native
switchRole:Principal
switchDomain:1
switchId:fffc01
switchWwn:10:00:00:05:1e:82:3c:2a
zoning:OFF
switchBeacon:OFF
FC Router:OFF
FC Router BB Fabric ID:128
Area Port Media Speed State
Proto
=====================================
0
0
id
N1
Online
F-Port
1
1
id
N4
No_Light
2
2
id
N4
Online
F-Port
3
3
id
N4
No_Light
4
4
id
N4
No_Light
...
<output truncated>
1 Nport + 1 NPIV devices.
20:0e:00:05:1e:0a:16:59
4. Use the portShow command to view the NPIV attributes and all the N_Port (physical and
virtual) port WWNs that are listed under portWwn of device(s) connected. The following
example is sample output for the portShow command:
switch:admin> portshow 2
Fabric OS Administrator’s Guide
53-1002148-02
329
15
Viewing NPIV port configuration information
portName: 02
portHealth: HEALTHY
Authentication: None
portDisableReason: None
portCFlags: 0x1
portFlags: 0x24b03 PRESENT ACTIVE F_PORT G_PORT NPIV LOGICAL_ONLINE LOGIN
NOELP LED ACCEPT
portType: 10.0
portState: 1Online
portPhys: 6In_Sync
portScn:
32F_Port
port generation number:
148
portId:
630200
portIfId:
43020005
portWwn:
20:02:00:05:1e:35:37:40
portWwn of device(s) connected:
c0:50:76:ff:fb:00:16:fc
c0:50:76:ff:fb:00:16:f8
...
<output truncated>
...
c0:50:76:ff:fb:00:16:80
50:05:07:64:01:a0:73:b8
Distance: normal
portSpeed: N2Gbps
Interrupts:
Unknown:
Lli:
Proc_rqrd:
Timed_out:
Rx_flushed:
Tx_unavail:
Free_buffer:
Overrun:
Suspended:
Parity_err:
2_parity_err:
CMI_bus_err:
0
0
294803
0
0
0
0
0
0
0
0
0
0
Link_failure: 16
Loss_of_sync: 422
Loss_of_sig: 808
Protocol_err: 0
Invalid_word: 0
Invalid_crc: 0
Delim_err:
0
Address_err: 1458
Lr_in:
15
Lr_out:
17
Ols_in:
16
Ols_out:
15
Frjt:
Fbsy:
0
0
Viewing virtual PID login information
Use the portLoginShow command to display the login information for the virtual PIDs of a port. The
following example is sample output from the portLoginShow command:
switch:admin> portloginshow 2
Type PID
World Wide Name
credit df_sz cos
=====================================================
fe 630240 c0:50:76:ff:fb:00:16:fc
101 2048
c
fe 63023f c0:50:76:ff:fb:00:16:f8
101 2048
c
fe 63023e c0:50:76:ff:fb:00:17:ec
101 2048
c
...
<output truncated>
...
ff 630202 c0:50:76:ff:fb:00:17:70
192 2048
c
ff 630201 c0:50:76:ff:fb:00:16:80
192 2048
c
330
scr=3
scr=3
scr=3
d_id=FFFFFC
d_id=FFFFFC
Fabric OS Administrator’s Guide
53-1002148-02
Chapter
16
Dynamic Fabric Provisioning: Fabric Assigned WWN
In this chapter
• Introduction to Dynamic Fabric Provisioning using FA-PWWN . . . . . . . . . .
• User- and auto-assigned FA-PWWN behavior . . . . . . . . . . . . . . . . . . . . . . .
• Configuring FA-PWWNs . . . . . . . . . . . . . . . . . . . . . . . . . . . . . . . . . . . . . . . . .
• Supported switches and configurations for FA-PWWN . . . . . . . . . . . . . . . .
• Configuration upload and download considerations for FA-PWWN . . . . . .
• Firmware upgrade and downgrade considerations for FA-PWWN . . . . . . .
• Security considerations for FA-PWWN . . . . . . . . . . . . . . . . . . . . . . . . . . . . .
• Restrictions of FA-PWWN . . . . . . . . . . . . . . . . . . . . . . . . . . . . . . . . . . . . . . .
• Access Gateway N_Port failover with FA-PWWN . . . . . . . . . . . . . . . . . . . . .
331
332
332
335
336
336
336
337
337
Introduction to Dynamic Fabric Provisioning using FA-PWWN
Fabric OS v7.0.0 introduces Dynamic Fabric Provisioning (DFP) to simplify server deployment in
your Fibre Channel SAN (FC SAN) environment.
Server deployment typically requires that multiple administrative teams (for example, server and
SAN/storage teams) coordinate with each other to perform configuration tasks such as zone
creation in the fabric and LUN mapping/masking on the storage device. These tasks must be
completed before the server is deployed. Before you can configure WWN zones and LUN masks,
you need to find out the physical port world wide name (PWWN) of the server. This means that
administrative teams cannot start their configuration tasks until the physical server arrives (and its
physical PWWN is known). Because the configuration tasks are sequential and interdependent
across various administrative teams, it may take several days before the server gets deployed in an
FC SAN.
Dynamic fabric provisioning simplifies and accelerates new server deployment and improves
operational efficiency by using a fabric-assigned PWWN or FA-PWWN. An FA-PWWN is a “virtual”
port WWN that can be used instead of the physical PWWN to create zoning and LUN
mapping/masking. When the server is later attached to the SAN, the FA-PWWN is then assigned to
the server.
The FA-PWWN feature allows you to do the following:
• Replace one server with another server, or replace failed HBAs/Adapters within a server,
without having to change any zoning or LUN mapping/masking configurations.
• Easily move servers across ports or Access Gateways by way of reassigning the FA-PWWN to
another port.
Fabric OS Administrator’s Guide
53-1002148-02
331
16
User- and auto-assigned FA-PWWN behavior
• Use FA-PWWN to represent a server in boot LUN zone configurations so that any physical
server that is mapped to this FA-PWWN can boot from that LUN, thus simplifying boot over SAN
configuration.
For the server to use this feature, it must be using a Brocade HBA/Adapter with HBA driver version
3.0.0.0 or later. Some configuration of the HBA must be performed to use FA-PWWN.
User- and auto-assigned FA-PWWN behavior
An FA-PWWN can be either user-generated or automatically assigned by the fabric. The
automatically assigned FA-PWWN is created by default when you enable the feature without
explicitly providing a VPWWN.
Each switch port and AG port can be assigned up to two WWNs, one assigned automatically and
one assigned by the user. Only one FA-PWWN can be active at any given time. The user-assigned
FA-PWWN takes precedence over the automatically assigned FA-PWWN. This means the switch will
bind the user-assigned FA-PWWN to the port if both a user-assigned and an automatically assigned
FA-PWWN are available. If you want to select the automatically assigned FA-PWWN over the
user-assigned FA-PWWN, you must delete the user-assigned FA-PWWN from the port to which it has
been assigned.
Checking for duplicate FA-PWWNs
The switch ensures that automatically assigned FA-PWWNs are unique in a fabric. However, it is the
responsibility of the administrators to ensure that user-assigned FA-PWWNs are also unique
throughout the fabric.
ATTENTION
The administrators should ensure that the same user-assigned FA-PWWN is not used in multiple
chassis. There is no fabric-wide database, and adding the same FA-PWWNs in multiple chassis
causes duplicate PWWNs.
Configuring FA-PWWNs
Use the faPwwn command to create and manage FA-PWWNs. The faPwwn command supports the
following management tasks:
•
•
•
•
•
•
•
Bind an automatically assigned or a user-assigned FA-PWWN to a switch port.
Override an automatically assigned FA-PWWN with a user-assigned FA-PWWN.
Bind an AG port with an automatically assigned or a user-assigned FA-PWWN.
Delete any existing FA-PWWN bindings.
Move an FA-PWWN from one port to another port.
Move an FA-PWWN assigned to an AG port to another AG.
Display information about configured FA-PWWN bindings.
Refer to the Fabric OS Command Reference for information about using this command.
332
Fabric OS Administrator’s Guide
53-1002148-02
Configuring FA-PWWNs
16
This section includes an FA-PWWN configuration procedure for each of the following two topologies:
• An FA-PWWN for an HBA device that is connected to an Access Gateway switch.
• An FA-PWWN for an HBA device that is connected directly to an edge switch.
These topologies are shown in Figure 55.
Access Gateway Switch
Edge Switch
running FOS 7.0.0
running FOS 7.0.0
F-Port
N-Port
NPIV
F-Port
F-Port
HBA
Scenario 1
An FA-PWWN is
configured for an HBA
device connected to an
Access Gateway Switch.
HBA
Scenario 2
Configure an FA-PWWN
for an HBA device connected
directly to an edge switch.
FIGURE 55
Fabric-assigned Port World Wide Name provisioning scenarios
Configuring an FA-PWWN for an HBA connected to an Access Gateway
For this procedure, some of the steps are to be executed on the switch and some are to be
executed on the server.
1. Log in to the edge switch to which the Access Gateway is directly connected.
2. Assign the FA-PWWN.
• If you are manually assigning a WWN, enter the following:
fapwwn --assign -ag AG_WWN -port AG_port -v Virtual_PWWN
• If you want the WWN to be automatically assigned, enter the following:
fapwwn --assign -ag AG_WWN -port AG_port
3. Enter the following command:
fapwwn --show -ag all
You should see output similar to the following sample. (The output is split, for better
readability.)
----------------------------------------------------------AG Port
Port
Device Port WWN
\
----------------------------------------------------------10:00:00:05:1e:65:8a:d5/16 ---:--:--:--:--:--:--:-- \
10:00:00:05:1e:d7:3d:dc/8
20
20:08:00:05:1e:d7:2b:74 \
\
Fabric OS Administrator’s Guide
53-1002148-02
333
16
Configuring FA-PWWNs
10:00:00:05:1e:d7:3d:dc/9
20
20:09:00:05:1e:d7:2b:73 \
10:00:00:05:1e:d7:3d:dc/16 ---:--:--:--:--:--:--:-- \
-----------------------------------------------------------Virtual Port WWN
PID
Enable MapType
-----------------------------------------------------------52:00:10:00:00:0f:50:30
-Yes
AG/Auto
11:22:33:44:55:66:77:88
11403 Yes
AG/User
52:00:10:00:00:0f:50:32
2:00:10:00:00:0f:50:33
11404 Yes
AG/Auto
52:00:10:00:00:0f:50:38
-Yes
AG/Auto
4. Enable the FA-PWWN on the HBA. The following steps are to be executed on the server and not
the switch.
a.
Log in to the server as root.
b.
Enter the following command:
bcu port -faa port_id --enable
c.
Enter the following command:
bcu port -faa port_id --query
Once the Brocade HBA has been assigned the FA-PWWN, the HBA retains the FA-PWWN until
rebooted. This means you cannot unplug and plug the cable to a different port on the AG. You must
reboot the HBA before moving the HBA to a different port. If you move an HBA to a different port on
a switch running Fabric OS 7.0.0 or later, the HBA will disable its port. If HBA moves to a different
port on a switch running a version of Fabric OS earlier than 7.0.0, the HBA will continue to disable
its port.
Configuring an FA-PWWN for an HBA connected to an edge switch
For this procedure, some of the steps are to be executed on the switch and some are to be
executed on the server.
1. Log in to the edge switch to which the device is connected.
2. Assign the FA-PWWN.
• If you are manually assigning a WWN, enter the following:
fapwwn --assign -port [slot/]port -v Virtual_PWWN
• If you want the WWN to be automatically assigned, enter the following:
fapwwn --assign -port [slot/]port
3. Enter the following command:
fapwwn --show -port all
You should see output similar to the following sample.
----------------------------------------------------------------------Port
PPWWN
VPWWN
PID Enable MapType
----------------------------------------------------------------------0 --:--:--:--:--:--:--:-- 52:00:10:00:00:0f:50:30 10101 Yes Port/Auto
1 --:--:--:--:--:--:--:-- 11:22:33:44:33:22:11:22 -Yes Port/User
52:00:10:00:00:0f:50:44
10 --:--:--:--:--:--:--:-- 52:00:10:00:00:0f:50:45 -Yes Port/Auto
334
Fabric OS Administrator’s Guide
53-1002148-02
Supported switches and configurations for FA-PWWN
16
4. Enable the FA-PWWN on the HBA. The following steps are to be executed on the server and not
the switch.
a.
Log in to the server as root.
b.
Enter the following command:
bcu port -faa port_id --enable
c.
Enter the following command:
bcu port -faa port_id --query
Once the Brocade HBA has been assigned the FA-PWWN, the HBA retains the FA-PWWN until it is
rebooted. This means you cannot unplug and plug the cable to a different port on the switch. You
must reboot the HBA before moving the HBA to a different port. If you move an HBA to a different
port on a switch running Fabric OS 7.0.0 or later, the HBA will disable its port. If the HBA moves to a
different port on a switch running a version of Fabric OS earlier than 7.0.0, the HBA will continue to
disable its port.
Supported switches and configurations for FA-PWWN
The FA-PWWN feature is supported on the following platforms:
• Switch platforms running Fabric OS 7.0.0 or later:
- Brocade DCX, DCX-4S, and DCX 8510 family
- Brocade 300
- Brocade 5100
- Brocade 5300
- Brocade 6510
- Brocade VA-40FC
• Access Gateway platforms running Fabric OS 7.0.0 or later
- Brocade 300
- Brocade 5100
- Brocade 6510
• Brocade HBAs with driver version 3.0.0.0:
- Brocade 415
- Brocade 425
- Brocade 815
- Brocade 825
Fabric OS Administrator’s Guide
53-1002148-02
335
16
Configuration upload and download considerations for FA-PWWN
Configuration upload and download considerations for FA-PWWN
The configuration upload and download utilities can be used to import and export the FA-PWWN
configuration.
ATTENTION
Brocade recommends you delete all FA-PWWNs from the switch whose configuration is being
replaced before you upload or download a modified configuration. This is to ensure no duplicate
FA-PWWNs in the fabric.
Firmware upgrade and downgrade considerations for FA-PWWN
Firmware downgrade is blocked if the FA-PWWN feature is enabled on the switch. All FA-PWWN
configurations are lost if firmware is downgraded, followed by an upgrade back to Fabric OS 7.0.0.
This is done to ensure that the FA-PWWN configurations are not tampered when the switch is
running an earlier version of the firmware.
You must also consider zone configuration, security configuration, and target ACLs when
downgrading from Fabric OS 7.0.0 because if any of these (zone, security, and target ACLs) have
FA-PWWNs configured, the SAN network might not function properly, or at all.
Security considerations for FA-PWWN
The FA-PWWN feature can be enabled only by authorized administrators. Thus, existing user-level
authentication and authorization mechanisms should be used to ensure only authorized users can
configure this feature.
If you are concerned about security for FA-PWWN, you should configure device authentication. You
can use authentication at the device level to ensure security between the switch and the server.
Refer to “Device authentication policy” on page 148 for information about configuring device
authentication.
You can also use the Device Connection Control (DCC) policy to ensure that only an authorized
physical server can connect to a specific switch port.
NOTE
When creating the DCC policy, use the physical device WWN and not the FA-PWWN.
If you use DCC, a policy check is done on the physical PWWN on the servers. In the case of an HBA,
the FA-PWWN is assigned to the HBA only after the DCC check is successful.
Refer to “DCC policy behavior with Fabric Assigned PWWNs” on page 143 for additional
information.
336
Fabric OS Administrator’s Guide
53-1002148-02
Restrictions of FA-PWWN
16
Restrictions of FA-PWWN
Note the following restrictions when using the FA-PWWN feature:
• FA-PWWN is supported only on Brocade HBAs.
• FA-PWWN is not supported for the following:
- FCoE devices
- FL_Ports
- Swapped ports (using the portswap feature)
- Cascaded Access Gateway topologies
- FICON/FMS mode
NOTE
FA-WWN is supported with F_Port trunking on the supported Access Gateway platforms.
Access Gateway N_Port failover with FA-PWWN
If an FA-PWWN F_Port on an Access Gateway fails over to an N_Port that is connected to a different
switch, the FA-PWWN of that Access Gateway F_Port must also be configured on that switch. If not,
the FA-PWWN assigned to the AG F_Port following a failover will be different than it was before the
failover occurred. This situation might require the host to reboot to bring it back online. Even after
the reboot, the host might potentially go into a different zone since the FA-PWWN is different.
Fabric OS Administrator’s Guide
53-1002148-02
337
16
338
Access Gateway N_Port failover with FA-PWWN
Fabric OS Administrator’s Guide
53-1002148-02
Chapter
Managing Administrative Domains
17
In this chapter
• Administrative Domains overview . . . . . . . . . . . . . . . . . . . . . . . . . . . . . . . . 339
• Admin Domain management for physical fabric administrators . . . . . . . . 348
• SAN management with Admin Domains . . . . . . . . . . . . . . . . . . . . . . . . . . . 360
Administrative Domains overview
An Administrative Domain (Admin Domain or AD) is a logical grouping of fabric elements that
defines which switches, ports, and devices you can view and modify. An Admin Domain is a filtered
administrative view of the fabric.
NOTE
If you do not implement Admin Domains, the feature has no impact on users and you can ignore this
chapter.
Admin Domains permit access to a configured set of users. Using Admin Domains, you can
partition the fabric into logical groups and allocate administration of these groups to different user
accounts. These accounts can manage only the Admin Domains assigned to them and cannot
make changes to the rest of the fabric.
For example, you can put all the devices in a particular department in the same Admin Domain for
ease of managing those devices. If you have remote sites, you could put the resources in the
remote site in an Admin Domain and assign the remote site administrator to manage those
resources.
Admin Domains and Virtual Fabrics are mutually exclusive and are not supported at the same time
on a switch.
Do not confuse Admin Domains with zones:
• Zones define which devices and hosts can communicate with each other.
• Admin Domains define which users can manage which devices, hosts, and switches.
You can have up to 256 Admin Domains in a fabric (254 user-defined and 2 system-defined),
numbered from 0 through 255.
Admin Domains are designated by a name and a number. This document refers to specific Admin
Domains using the format “ADn” where n is a number between 0 and 255.
ATTENTION
The Admin Domain administrator can define up to 254 ADs (AD1 through AD254) in the AD
database; however, it is recommended that no more than 16 active Admin Domains run
concurrently. More than 16 active Admin Domains might cause performance degradation and
unpredictable system behavior.
Fabric OS Administrator’s Guide
53-1002148-02
339
17
Administrative Domains overview
NOTE
Do not confuse an Admin Domain number with the domain ID of a switch. They are two different
identifiers. The Admin Domain number identifies the Admin Domain and has a range from 0 through
255. The domain ID identifies a switch in the fabric and has a range from 1 through 239.
Figure 56 shows a fabric with two Admin Domains: AD1 and AD2.
AD1
AD2
FIGURE 56
Fabric with two Admin Domains
Figure 57 shows how users get a filtered view of this fabric, depending on which Admin Domain
they are in. As shown in Figure 57, users can see all switches and E_Ports in the fabric, regardless
of their Admin Domain; however, the switch ports and end devices are filtered based on Admin
Domain membership.
FIGURE 57
340
Filtered fabric views when using Admin Domains
Fabric OS Administrator’s Guide
53-1002148-02
Administrative Domains overview
17
Admin Domain features
Admin Domains allow you to do the following:
• Define the scope of an Admin Domain to encompass ports and devices within a switch or a
fabric.
• Share resources across multiple Admin Domains. For example, you can share array ports and
tape drives between multiple departments. In Figure 56 on page 340, one of the storage
devices is shared between AD1 and AD2.
• Have a separate zone database for each Admin Domain. Refer to “Admin Domains, zones, and
zone databases” on page 364 for more information.
• Move devices from one Admin Domain to another without traffic disruption, cable reconnects,
or discontinuity in zone enforcement.
• Provide strong fault and event isolation between Admin Domains.
• Have visibility of all physical fabric resources. All switches, E_Ports, and FRUs (including blade
information) are visible.
• Continue to run existing third-party management applications. Prior and existing versions of
third-party management applications continue to work with admin IDs and user IDs.
Requirements for Admin Domains
Implementing Admin Domains in a fabric has the following requirements:
• Admin Domains are not supported on the Brocade 8000. The Brocade 8000 can be in AD0
only.
• The default zone mode setting must be set to No Access before you create Admin Domains
(refer to “Setting the default zoning mode for Admin Domains” on page 348 for instructions).
• Virtual Fabrics must be disabled before you create Admin Domains (refer to “Disabling Virtual
Fabrics mode” on page 228 for instructions).
• Gigabit Ethernet (GbE) ports cannot be members of an Admin Domain.
• Traffic Isolation Zoning is supported within Admin Domains, with some restrictions, as
described in “Admin Domain considerations for Traffic Isolation Zoning” on page 284.
• If the fabric includes LSAN zones:
- The LSAN zone names must not end with “_ADn”.
- The LSAN zone names must not be longer than 57 characters.
Refer to Chapter 23, “Using the FC-FC Routing Service,” for information about the FC-FC
Routing Service and LSAN zones.
Admin Domain access levels
Admin Domains offer a hierarchy of administrative access. To manage Admin Domains, you must
be a physical fabric administrator. A physical fabric administrator is a user with admin permissions
and access to all Admin Domains (AD0 through AD255). Only a physical fabric administrator can
perform Admin Domain configuration and management.
Other administrative access is determined by your defined Role-Based Access Control (RBAC) role
and AD membership. Your role determines your access level and permission to perform an
operation. Your AD membership determines the fabric resources on which you can operate.
Fabric OS Administrator’s Guide
53-1002148-02
341
17
Administrative Domains overview
Table 61 lists each Admin Domain user type and describes its administrative access and
capabilities.
TABLE 61
AD user types
User type
Description
Physical fabric
administrator
User account with admin permissions and with access to all Admin Domains (AD0 through
AD255).
Creates and manages all Admin Domains.
Assigns other administrators or users to each Admin Domain.
The default admin account is the first physical fabric administrator.
Only a physical fabric administrator can create other physical fabric administrators.
Administrative
Domain users
Can be assigned to one or more Admin Domains.
Manage the resources within their Admin Domains.
If their role permits, can create user accounts and assign them to Admin Domains in their list.
Cannot view other Admin Domain definitions. They can view only members of their own Admin
Domains.
User-defined Admin Domains
AD1 through AD254 are user-defined Admin Domains. These user-defined Admin Domains can be
created only by a physical fabric administrator (refer to “Admin Domain access levels” on page 341
for more information).
In Figure 56 on page 340, AD1 and AD2 are user-defined Admin Domains.
System-defined Admin Domains
AD0 and AD255 are system-defined Admin Domains. AD0 and AD255 always exist and cannot be
deleted or renamed. They are reserved for use in creation and management of Admin Domains.
AD0
AD0 is a system-defined Admin Domain. Unlike user-defined Admin Domains, AD0 has an implicit
and an explicit membership list. User-defined Admin Domains have only an explicit membership
list.
• The implicit membership list contains all devices, switch ports, and switches that have not
been assigned to any other Admin Domain.
Initially, the AD0 implicit membership list contains all devices, switch ports, and switches in the
fabric. When you create AD1 through AD254, the devices, switch ports, and switches used to
create these user-defined Admin Domains disappear from the AD0 implicit membership list.
• The explicit membership list contains all devices, switch ports, and switches that you explicitly
add to AD0 and can be used to force device and switch sharing between AD0 and other Admin
Domains.
AD0 is managed like any user-defined Admin Domain. The only difference between AD0 and
user-defined Admin Domains is the implicit membership list.
The implicit members of AD0 change dynamically as the membership of other Admin Domains
changes. The explicit members of AD0 are not deleted unless you explicitly remove them.
342
Fabric OS Administrator’s Guide
53-1002148-02
Administrative Domains overview
17
For example, if DeviceA is not a member of any user-defined Admin Domain, then it is an implicit
member of AD0.
If you explicitly add DeviceA to AD0, then DeviceA is both an implicit and an explicit member of AD0.
AD0 implicit members
DeviceA
AD0 explicit members
DeviceA
AD2 members
none
If you add DeviceA to AD2, then DeviceA is deleted from the AD0 implicit membership list, but is not
deleted from the AD0 explicit membership list.
AD0 implicit members
none
AD0 explicit members
DeviceA
AD2 members
DeviceA
If you then remove DeviceA from AD2, DeviceA is added back to the AD0 implicit membership list
(assuming DeviceA is not in any other Admin Domain).
AD0 implicit members
DeviceA
AD0 explicit members
DeviceA
AD2 members
none
When a new device is added to the fabric, it automatically becomes an implicit member of AD0
until it is explicitly added to an Admin Domain.
AD0 is useful when you create Admin Domains because you can see which devices, switch ports,
and switches are not yet assigned to any Admin Domains.
AD0 owns the root zone database (legacy zone database).
AD255
AD255 is a system-defined Admin Domain that is used for Admin Domain management. AD255
always contains all of the devices in the entire physical fabric. You can use AD255 to get an
unfiltered view of the fabric and to view the hierarchical zone databases of AD0 through AD254. All
Admin Domain management is done in the AD255 context.
AD255 does not have a zone database associated with it; you cannot use AD255 to perform any
zoning management tasks (non-read operations such as creating or modifying zones).
Figure 58 on page 344 shows the same fabric from Figure 56 on page 340, but with AD0 and
AD255 shown. AD0 contains the two devices that are not in any of the user-defined Admin
Domains (AD1 and AD2). AD255 always encompasses the entire physical fabric.
Fabric OS Administrator’s Guide
53-1002148-02
343
17
Administrative Domains overview
FIGURE 58
Fabric with AD0 and AD255
Home Admin Domains and login
You are always logged in to an Admin Domain, and you can view and modify only the devices in that
Admin Domain.
If you have access to more than one Admin Domain, one of them is designated as your home
Admin Domain, the one you are automatically logged in to. If your home Admin Domain is deleted
or deactivated, then by default you are logged in to the lowest-numbered active Admin Domain in
your Admin Domain list. The home Admin Domain, like the Admin Domain list, is a configurable
property of a non-default user account. Here is some additional information about AD accounts:
• You can log in to only one Admin Domain at a time. You can later switch to a different Admin
Domain (refer to “Switching to a different Admin Domain context” on page 362 for
instructions).
• For default accounts such as admin and user, the home Admin Domain defaults to AD0 and
cannot be changed.
• The Admin Domain list for the default admin account is 0 through 255, which gives this
account automatic access to any Admin Domain as soon as the domain is created, and makes
this account a physical fabric administrator.
• The Admin Domain list for the default user account is AD0 only.
• For user-defined accounts, the home Admin Domain defaults to AD0 but an administrator can
set the home Admin Domain to any Admin Domain to which the account is given access.
• If you are in any Admin Domain context other than AD0, the Admin Domain number is included
in the system prompt displayed during your session. The following are example prompts for
when you are in the AD0, AD1, and AD255 contexts, respectively:
switch:admin>
switch:AD1:admin>
switch:AD255:admin>
344
Fabric OS Administrator’s Guide
53-1002148-02
Administrative Domains overview
17
Admin Domain member types
You define an Admin Domain by identifying members of that domain. Admin Domain members can
be devices, switch ports, or switches. Defining these member types is similar to defining a
traditional zone member type. An Admin Domain does not require or have a new domain ID or
management IP address linked to it.
Device members
Device members are defined by the device World Wide Name (WWN) and have the following
properties:
• A device member can be either a device port WWN or a device node WWN.
• A device member grants view access to the device and zoning rights. View rights are also
granted to the switch port to which the device is attached.
• A device member provides a pure virtual view. The cabling and switch port diagnostics and
control are done by the physical fabric administrator.
Port control is provided only through switch port membership and is not provided for device
members. When you create an Admin Domain, the end device members do not need to be online,
even though their WWNs are used in the Admin Domain definition.
You can share device members across multiple Admin Domains. You can also zone shared devices
differently in each Admin Domain. A device WWN member does not automatically grant usage of
corresponding domain,index members in the zone configuration. If you specify a device WWN
member in the Admin Domain member list, zone enforcement ignores zones with the
corresponding port (the port to which the device is connected) member usage.
Switch port members
Switch port members are defined by switch domain,index and have the following properties:
• A switch port member grants port control rights and zoning rights for that switch port.
• A switch port member grants view access and zoning rights to the device connected to that
switch port.
• A switch port member allows you to share domain,index members across multiple Admin
Domains. In each Admin Domain, you can also zone shared devices differently.
• A switch port member implicitly includes all devices connected to the specified domain,index
members in the Admin Domain membership.
• A switch port member allows you to specify a range of indices as Admin Domain members, for
example: <D,[0-15]>. The index range arguments are expanded and stored in the Admin
Domain member list.
If a device is a member of an Admin Domain, the switch port to which the device is connected
becomes an indirect member of that Admin Domain and the domain,index is removed from the
AD0 implicit membership list.
NOTE
If the switch domain ID changes, the domain,index members are invalid (they are not automatically
changed). You must then reconfigure the Admin Domain with the current domain,index members.
Fabric OS Administrator’s Guide
53-1002148-02
345
17
Administrative Domains overview
Switch members
Switch members are defined by the switch WWN or domain ID, and have the following properties:
• A switch member grants administrative control to the switch.
• A switch member grants port control for all ports in that switch.
• A switch member allows switch administrative operations such as disabling and enabling a
switch, rebooting, and firmware downloads.
• A switch member does not provide zoning rights for the switch ports or devices.
To allow devices to be zoned within Admin Domains, you must specify the port members using
domain,index or device WWN members.
E_Ports (including VE_Ports, EX_Ports, and VEX_Ports) are implicitly shared across all Admin
Domains. An administrator can perform port control operations only if the domain,index of the
E_Port is part of the Admin Domain.
NOTE
Only the WWN of the switch is saved in the Admin Domain. If you change the domain ID of the switch,
the Admin Domain ownership of the switch is not changed.
Admin Domains and switch WWNs
Admin Domains are treated as fabrics. Because switches cannot belong to more than one fabric,
switch WWNs are converted so that they appear as unique entities in different Admin Domains
(fabrics). This WWN conversion is done only in the AD1 through AD254 context. AD0 and AD255
use unconverted switch WWNs.
The switch WWN has the following format:
10:00:nn:nn:nn:nn:nn:nn
In an Admin Domain context, the switch WWN is converted from NAA=1 to NAA=5 format, with the
Admin Domain number added, using the following syntax:
5n:nn:nn:nn:nn:nn:n9:xx
In the syntax, xx is the Admin Domain number.
For example, the following switch WWN is in NAA=1 format:
10:00:00:60:69:e4:24:e0
The following switch WWN is the converted WWN for the previous example in AD1:
50:06:06:9e:42:4e:09:01
Figure 59 on page 347 shows an unfiltered view of a fabric with two switches, three devices, and
two Admin Domains. The devices are labeled with device WWNs and the switches are labeled with
domain IDs and switch WWNs.
346
Fabric OS Administrator’s Guide
53-1002148-02
Administrative Domains overview
FIGURE 59
17
Fabric showing switch and device WWNs
Figure 60 shows the filtered view of the fabric as seen from AD3 and AD4. The switch WWNs are
converted to the NAA=5 syntax; the device WWNs and domain IDs remain the same.
Fabric Visible to AD3 User
WWN = 10:00:00:00:c2:37:2b:a3
WWN = 10:00:00:00:c7:2b:fd:a3
Domain ID = 1
WWN = 50:00:51:f0:52:36:f9:03
Domain ID = 2
WWN = 50:00:52:e0:63:46:e9:03
WWN = 10:00:00:00:c2:37:2b:a3
Fabric Visible to AD4 User
Domain ID = 1
WWN = 50:00:51:f0:52:36:f9:04
Domain ID = 2
WWN = 50:00:52:e0:63:46:e9:04
WWN = 10:00:00:00:c8:3a:fe:a2
FIGURE 60
Fabric OS Administrator’s Guide
53-1002148-02
Filtered fabric views showing converted switch WWNs
347
17
Admin Domain management for physical fabric administrators
Admin Domain compatibility, availability, and merging
Admin Domains maintain continuity of service for Fabric OS features and operate in mixed-release
Fabric OS environments. High availability is supported with some backward compatibility.
When an E_Port comes online, the adjacent switches merge their AD databases. The receiving
switch accepts an AD database from the neighboring switch only if the local AD database is empty
or if the new AD database exactly matches both the defined and effective configurations of the
local AD database. If the AD database merge fails, the E_Port is segmented with an “AD conflict”
error code.
Admin Domain management for physical fabric administrators
NOTE
This section is for physical fabric administrators who are managing Admin Domains.
The ad command follows a batched-transaction model, which means that changes to the Admin
Domain configuration occur in the transaction buffer.
An Admin Domain configuration can exist in several places:
• Effective configuration — The Admin Domain configuration that is currently in effect.
• Defined configuration — The Admin Domain configuration that is saved in flash memory. There
might be differences between the effective configuration and the defined configuration.
• Transaction buffer — The Admin Domain configuration that is in the current transaction buffer
and has not yet been saved or canceled.
How you end the transaction determines the disposition of the Admin Domain configuration in the
transaction buffer. The following commands end the Admin Domain transaction:
ad --save
Saves the changes in the transaction buffer to the defined configuration in
persistent storage and propagates the defined configuration to all switches
in the fabric. Note that for delete and clear operations, if one or more of the
deleted Admin Domains are in the effective configuration, you cannot use
--save, but must use --apply instead.
ad --apply
Saves the changes to the defined configuration in persistent storage and
enforces the defined configuration on all switches in the fabric, replacing the
effective configuration.
ad --transabort Aborts the transaction and clears the transaction buffer. The effective and
defined configurations remain unchanged.
You can enter the ad --transshow command at any time to display the ID of the current Admin
Domain transaction.
Setting the default zoning mode for Admin Domains
To begin implementing an Admin Domain structure within your SAN, you must first set the default
zoning mode to No Access. You must be in AD0 to change the default zoning mode.
348
Fabric OS Administrator’s Guide
53-1002148-02
Admin Domain management for physical fabric administrators
17
1. Log in to the switch with the appropriate RBAC role.
2. Ensure you are in the AD0 context by entering the ad --show command to determine the
current Admin Domain.
If necessary, switch to the AD0 context by entering the ad --select 0 command.
3. Set the default zoning mode to No Access, as described in “Setting the default zoning mode”
on page 255.
Creating an Admin Domain
To create an Admin Domain, you must specify an Admin Domain name, number, or both:
• If you create an Admin Domain using only a number, the Admin Domain name is automatically
assigned to be “ADn”, where n is the number you specified.
For example, if you specify AD number = 4, then AD name is set to “AD4”.
• If you create an Admin Domain using only a name, the Admin Domain number is automatically
assigned and is the lowest available AD number, except if you specify a name in the format
“ADn”, in which case the Admin Domain number is assigned to be n.
For example, if you specify AD name = “blueAD” and the lowest available AD number is 5, then
AD name is “blueAD” and AD number is 5.
If you specify AD name = “AD15” and the lowest available AD number is 6, then AD name is
“AD15” and AD number is 15. Because the specified name is in the format “ADn”, the AD
number is assigned to be n and not the lowest available AD number.
When you create an Admin Domain, you must specify at least one member (switch, switch port, or
device). You cannot create an empty Admin Domain. For more information about these member
types, refer to “Admin Domain member types” on page 345.
A newly created Admin Domain has no zoning defined and the default access mode is No Access.
This means the devices in the Admin Domain cannot communicate with each other. You must set
up zones in the newly created Admin Domain to allow devices to access each other, even if the
devices were already zoned together prior to your moving them to the Admin Domain. Refer to
“Admin Domains, zones, and zone databases” on page 364 for additional information about how
zones work with Admin Domains.
You create Admin Domains in the transaction buffer. You can either save the newly created Admin
Domain to a defined configuration or make it the effective configuration directly.
The following procedure describes the steps for creating Admin Domains.
1. Log in to the switch as the physical fabric administrator.
2. Disable Virtual Fabrics, if necessary, as described in “Disabling Virtual Fabrics mode” on
page 228. Admin Domains and Virtual Fabrics cannot co-exist.
3. Set the default zone mode to No Access, if you have not already done so. Refer to “Setting the
default zoning mode” on page 255 for instructions.
4. Switch to the AD255 context, if you are not already in that context:
ad --select 255
Fabric OS Administrator’s Guide
53-1002148-02
349
17
Admin Domain management for physical fabric administrators
5. Enter the ad --create command using the -d option to specify device and switch port members
and the -s option to specify switch members:
ad --create ad_id -d "dev_list" -s "switch_list"
6. Enter the appropriate command based on whether you want to save or activate the Admin
Domain definition:
• To save the Admin Domain definition, enter ad --save.
• To save the Admin Domain definition and directly apply the definition to the fabric, enter ad
--apply.
7.
Set up zones in the newly created Admin Domain. Refer to Chapter 11, “Administering
Advanced Zoning,” for instructions.
Example of creating Admin Domains
The following example creates Admin Domain AD1, consisting of two switches, which are
designated by domain ID and switch WWN.
switch:AD255:admin> ad --create AD1 -s "97; 10:00:00:60:69:80:59:13"
The following example creates Admin Domain “blue_ad,” consisting of two switch ports
(designated by domain,index), one device (designated by device WWN), and two switches
(designated by domain ID and switch WWN).
switch:AD255:admin> ad --create blue_ad –d "100,5; 1,3;
21:00:00:e0:8b:05:4d:05" –s "97; 10:00:00:60:69:80:59:13"
User assignments to Admin Domains
After you create an Admin Domain, you can specify one or more user accounts as the valid
accounts that can use that Admin Domain. User accounts have the following characteristics with
regard to Admin Domains:
• A user account can have only a single role.
• You can configure a user account to have access to the physical fabric through AD255 and to a
list of Admin Domains (AD0 through AD254).
• You can configure a user account to have access to only a subset of your own Admin Domain
list. Only a physical fabric administrator can create another physical fabric administrator user
account.
• Users capable of using multiple Admin Domains can designate one of these Admin Domains as
the home Admin Domain, which is the default Admin Domain context after login.
• If you do not specify one, the home Admin Domain is the lowest valid Admin Domain in the
numerically-sorted AD list.
• Users can log in to their Admin Domains and create their own Admin Domain-specific zones
and zone configurations.
350
Fabric OS Administrator’s Guide
53-1002148-02
Admin Domain management for physical fabric administrators
17
Creating a new user account for managing Admin Domains
1. Connect to the switch and log in using an account with admin permissions.
2. Enter the userConfig --add command using the -r option to set the role, the -a option to
provide access to Admin Domains, and the -h option to specify the home Admin Domain.
userconfig --add username -r role -h home_AD -a "AD_list"
Example of creating new user accounts
The following example creates new user account ad1admin with an admin role and assigns
one Admin Domain, blue_ad1, to it. This example also assigns blue_ad1 as the user’s home
Admin Domain.
switch:admin> userconfig --add ad1admin -r admin -h blue_ad1 -a "blue_ad1"
The following example creates new user account ad2admin with an admin role, access to
Admin Domains 1 and 2, and home Admin Domain set to 2.
switch:admin> userconfig --add ad2admin -r admin -h 2 -a "1,2"
Assigning Admin Domains to an existing user account
1. Connect to the switch and log in using an account with admin permissions.
2. Enter the userConfig --addad command using the -a option to provide access to Admin
Domains and the -h option to specify the home Admin Domain.
userconfig --addad username -h home_AD -a "AD_list"
Example
The following example assigns Admin Domain green_ad2 to the existing user account
ad1admin.
switch:admin> userconfig --addad ad1admin -a "green_ad2"
Creating a physical fabric administrator user account
1. Connect to the switch and log in using an account with admin permissions.
2. Enter the userConfig --add command using the -r option to set the role to admin and the -a
option to provide access to Admin Domains 0 through 255.
userconfig --add username -r admin -h home_AD -a "0-255"
Example
The following example creates new user account pfa_admin1 with an admin role, access to all
Admin Domains (AD0 through AD255), and home Admin Domain set to 255. This user account
is now a physical fabric administrator.
switch:admin> userconfig --add pfa_admin1 -r admin -h 255 -a "0-255"
Fabric OS Administrator’s Guide
53-1002148-02
351
17
Admin Domain management for physical fabric administrators
Removing an Admin Domain from a user account
When you remove an Admin Domain from an account, all of the currently active sessions for that
account are logged out.
1. Connect to the switch and log in using an account with admin permissions.
2. Enter the userconfig --deletead command:
userconfig --deletead username [-h admindomain_ID] [-a admindomain_ID_list]
If the –h argument is not specified, the home Admin Domain either remains as it was or
becomes the lowest Admin Domain ID in the remaining list.
Example of removing Admin Domain green_ad2 from the user account adm1
switch:admin> userconfig --deletead adm1 -a "green_ad2"
Broadcast message from root (pts/0) Wed Jan 27 20:57:14 2010...
Security Policy, Password or Account Attribute Change: adm1 will be logged out
Ads for account adm1 has been successfully deleted.
Activating an Admin Domain
An Admin Domain can be in either an active or inactive state. When you create an Admin Domain, it
is automatically in the active state.
1. Connect to the switch and log in using an account with admin permissions.
2. Switch to the AD255 context, if you are not already in that context.
ad --select 255
3. Enter the ad --activate command.
ad --activate ad_id
You are prompted for confirmation.
By default, after the Admin Domain is activated, the devices specified under that AD are not
able to see each other until they are zoned together.
4. Enter the appropriate command based on whether you want to save or activate the Admin
Domain definition:
• To save the Admin Domain definition, enter ad --save.
• To save the Admin Domain definition and directly apply the definition to the fabric, enter ad
--apply.
Example
The following example activates Admin Domain AD_B5.
switch:AD255:admin> ad --activate AD_B5
You are about to activate a new admin domain.
Do you want to activate ’AD_B5’ admin domain (yes, y, no, n): [no]: y
switch:AD255:admin>
352
Fabric OS Administrator’s Guide
53-1002148-02
Admin Domain management for physical fabric administrators
17
Deactivating an Admin Domain
If you deactivate an Admin Domain, the members assigned to the Admin Domain can no longer
access their hosts or storage unless those members are part of another Admin Domain.
You cannot log in to an Admin Domain that has been deactivated. You must activate an Admin
Domain before you can log in to it.
1. Connect to the switch and log in using an account with admin permissions.
2. Disable the zone configuration under the Admin Domain you want to deactivate.
cfgdisable
3. Switch to the AD255 context, if you are not already in that context.
ad --select 255
4. Enter the ad --deactivate command.
ad --deactivate ad_id
You are prompted for confirmation.
5. Enter the appropriate command based on whether you want to save or activate the Admin
Domain definition:
• To save the Admin Domain definition, enter ad --save.
• To save the Admin Domain definition and directly apply the definition to the fabric, enter ad
--apply.
All active user sessions associated with the Admin Domain are terminated. The ad
--deactivate command does not disable ports.
Example of deactivating Admin Domain AD_B4
switch:AD255:admin> ad --deactivate AD_B4
You are about to deactivate an AD.
This operation will fail if an effective zone configuration exists in the AD
Do you want to deactivate ’AD_B5’ admin domain (yes, y, no, n): [no] y
switch:AD255:admin>
Adding members to an existing Admin Domain
1. Connect to the switch and log in using an account with admin permissions.
2. Switch to the AD255 context, if you are not already in that context.
ad --select 255
3. Enter the ad --add command using the -d option to specify device and switch port members
and the -s option to specify switch members.
ad --add ad_id -d "dev_list" -s "switch_list"
In the syntax, ad_id is the Admin Domain name or number, dev_list is a list of device WWNs or
domain,index members, and switch_list is a list of switch WWNs or domain IDs.
Fabric OS Administrator’s Guide
53-1002148-02
353
17
Admin Domain management for physical fabric administrators
4. Enter the appropriate command based on whether you want to save or activate the Admin
Domain definition:
• To save the Admin Domain definition, enter ad --save.
• To save the Admin Domain definition and directly apply the definition to the fabric, enter ad
--apply.
Example of adding two switch ports, designated by domain,index, to AD1
switch:AD255:admin> ad --add AD1 -d "100,5; 4,1"
Removing members from an Admin Domain
If you remove the last member of an Admin Domain, that Admin Domain is automatically deleted.
1. Connect to the switch and log in using an account with admin permissions.
2. Switch to the AD255 context, if you are not already in that context.
ad --select 255
3. Enter the ad --remove command using the -d option to specify device and switch port
members and the -s option to specify switch members.
ad --remove ad_id -d "dev_list" -s "switch_list"
Removing the last member element of an Admin Domain deletes the Admin Domain.
4. Enter the appropriate command based on whether you want to save or activate the Admin
Domain definition:
• To save the Admin Domain definition, enter ad --save.
• To save the Admin Domain definition and directly apply the definition to the fabric, enter ad
--apply.
Example 1
The following example removes port 5 of domain 100 and port 3 of domain 1 from AD1.
switch:AD255:admin> ad --remove AD1 –d "100,5; 1,3"
Example 2
The following example removes switch 100 from the membership list of AD4.
switch:AD255:admin> ad --remove AD4 –s "100"
Renaming an Admin Domain
Use this procedure if you want to change the name of an Admin Domain. You can also change
auto-assigned names (ADn).
The rename operation does not take effect if the Admin Domain you want to rename is part of the
effective configuration.
1. Connect to the switch and log in using an account with admin permissions.
2. Switch to the AD255 context, if you are not already in that context.
ad --select 255
354
Fabric OS Administrator’s Guide
53-1002148-02
Admin Domain management for physical fabric administrators
17
3. Enter the ad --rename command with the present name and the new name.
ad --rename present_name new_name
4. Enter the appropriate command based on whether you want to save or activate the Admin
Domain definition:
• To save the Admin Domain definition, enter ad --save.
• To save the Admin Domain definition and directly apply the definition to the fabric, enter ad
--apply.
The Admin Domain numbers remain unchanged after the operation.
Example of changing the name of Admin Domain Eng_AD to Eng_AD2
switch:AD255:admin> ad --rename Eng_AD Eng_AD2
Deleting an Admin Domain
When you delete an Admin Domain, its devices no longer have access to the members of the zones
with which it was associated.
1. Connect to the switch and log in using an account with admin permissions.
2. Switch to the Admin Domain that you want to delete.
ad --select ad_id
3. Enter the appropriate command to clear the zone database under the Admin Domain you want
to delete.
• To remove the effective configuration, enter cfgdisable.
• To remove the defined configuration, enter cfgclear.
• To save the changes to nonvolatile memory, enter cfgsave.
4. Switch to the AD255 context.
ad --select 255
5. Enter the ad --delete command.
ad --delete ad_id
The ad --delete command prompts you for confirmation before triggering the deletion. The
command succeeds whether the Admin Domain is in an activated or deactivated state.
6. Enter the ad --apply command to save the Admin Domain definition and directly apply the
definition to the fabric.
Example of deleting Admin Domain AD_B3
switch:AD255:admin> ad --delete AD_B3
You are about to delete an AD.
This operation will fail if zone configuration exists in the AD
Do you want to delete ’AD_B3’ admin domain (yes, y, no, n): [no] y
switch:AD255:admin>
Fabric OS Administrator’s Guide
53-1002148-02
355
17
Admin Domain management for physical fabric administrators
Deleting all user-defined Admin Domains
When you clear the Admin Domain configuration, all user-defined Admin Domains are deleted, the
explicit membership list of AD0 is cleared, and all fabric resources (switches, ports, and devices)
are returned to the implicit membership list of AD0.
You cannot clear the Admin Domain configuration if zone configurations exist in any of the
user-defined Admin Domains.
If you want to remove all Admin Domains while retaining device connectivity (for example, if you
want to enable Virtual Fabrics), use the procedure described in “Deleting all user-defined Admin
Domains non-disruptively.”
1. Clear all individual AD zone databases, in separate transactions, before proceeding with this
operation. Refer to “Clearing all zone configurations” on page 262 for instructions.
2. Connect to the switch and log in using an account with admin permissions.
3. Switch to the AD255 context, if you are not already in that context.
ad --select 255
4. Enter the ad --clear command.
This option prompts you for confirmation before triggering the deletion of all Admin Domains.
5. Enter the ad --apply command to save the Admin Domain definition and directly apply the
definitions to the fabric.
Example
switch:AD255:admin> ad --clear
You are about to delete all ADs definitions.
This operations will fail if zone configurations exists in AD1-AD254
Do you want to clear all admin domains (yes, y, no, n): [no] y
switch:AD255:admin>
Deleting all user-defined Admin Domains non-disruptively
To disable Admin Domains non-disruptively, you must do the following before you clear the
user-defined ADs:
• Create and activate zone configurations in AD0 that are equivalent to the zone configurations
in each of the user-defined ADs.
• Define all of the members that are currently in user-defined ADs in AD0.
This will ensure that the devices are able to communicate when they are removed from the
user-defined ADs.
You can use this procedure to remove all Admin Domains before enabling Virtual Fabrics.
1. Connect to the switch and log in using an account with admin permissions.
2. Enter the cfgshow command in the AD255 context to display the zone configurations for all
Admin Domains.
ad --exec 255 "cfgshow"
356
Fabric OS Administrator’s Guide
53-1002148-02
Admin Domain management for physical fabric administrators
17
3. Enter the zone --copy command to copy the zones from all user-defined Admin Domains to
AD0.
zone --copy source_AD.source_name dest_name
In this syntax, source_AD is the name of the user-defined AD from which you are copying the
zone, source_name is the name of the zone to be copied, and dest_name is the name to give
to the zone after it is copied to AD0.
4. Copy the newly added zones in AD0 to the zone configuration.
cfgadd "cfgName", "member[;member]"
5. Enable the configuration to complete the transaction.
cfgenable cfgName
6. Switch to the AD255 context.
ad --select 255
7.
Explicitly add devices that are present in the user-defined ADs to AD0.
ad --add AD0 -d "dev_list"
8. Enter the ad --apply command to save the Admin Domain definition and directly apply the
definitions to the fabric.
ad --apply
At this point, all of the devices in the user-defined ADs are also defined and zoned in AD0.
9. Clear the user-defined ADs.
ad --clear -f
10. Enter the ad --apply command to save the Admin Domain definition and directly apply the
definitions to the fabric.
ad --apply
All user-defined Admin Domains have now been removed, but all device communication that was
allowed with the original Admin Domain configuration is still permitted in the context of AD0.
Example
The following example assumes the configuration shown in Figure 61 on page 358:
•
•
•
•
•
Three Admin Domains: AD0, plus two user-defined Admin Domains (AD1 and AD2).
AD0 has two devices, WWN1 and WWN2, in the AD0_RedZone.
AD1 has two devices, WWN2 and WWN3, in the AD1_BlueZone.
AD2 has two devices, WWN4 and WWN5, in the AD2_GreenZone.
The device WWN2 is in both AD0 and AD1.
Fabric OS Administrator’s Guide
53-1002148-02
357
17
Admin Domain management for physical fabric administrators
FIGURE 61
AD0 and two user-defined Admin Domains, AD1 and AD2
At the conclusion of the procedure, all devices and zones are moved to AD0, and the user-defined
Admin Domains are deleted, as shown in Figure 62.
FIGURE 62
AD0 with three zones
sw0:admin> ad --exec 255 "cfgshow"
Zone CFG Info for AD_ID: 0
(AD Name: AD0, State: Active) :
Defined configuration:
cfg:
AD0_cfg AD0_RedZone
zone: AD0_RedZone
10:00:00:00:01:00:00:00; 10:00:00:00:02:00:00:00
Effective configuration:
cfg:
AD0_cfg
zone: AD0_RedZone
10:00:00:00:01:00:00:00
10:00:00:00:02:00:00:00
Zone CFG Info for AD_ID: 1
(AD Name: AD1, State: Active) :
Defined configuration:
cfg:
AD1_cfg AD1_BlueZone
zone: AD1_BlueZone
358
Fabric OS Administrator’s Guide
53-1002148-02
Admin Domain management for physical fabric administrators
17
10:00:00:00:02:00:00:00; 10:00:00:00:03:00:00:00
Effective configuration:
cfg:
AD1_cfg
zone: AD1_BlueZone
10:00:00:00:02:00:00:00
10:00:00:00:03:00:00:00
Zone CFG Info for AD_ID: 2
(AD Name: AD2, State: Active) :
Defined configuration:
cfg:
AD2_cfg AD2_GreenZone
zone: AD2_GreenZone
10:00:00:00:04:00:00:00; 10:00:00:00:05:00:00:00
Effective configuration:
cfg:
AD2_cfg
zone: AD2_GreenZone
10:00:00:00:04:00:00:00
10:00:00:00:05:00:00:00
sw0:admin> zone --copy AD1.AD1_BlueZone AD0_BlueZone
sw0:admin> zone --copy AD2.AD2_GreenZone AD0_GreenZone
sw0:admin> cfgadd "AD0_cfg", "AD0_BlueZone; AD0_GreenZone"
sw0:admin> cfgenable AD0_cfg
You are about to enable a new zoning configuration.
This action will replace the old zoning configuration with the
current configuration selected. If the update includes changes
to one or more traffic isolation zones, the update may result in
localized disruption to traffic on ports associated with
the traffic isolation zone changes
Do you want to enable 'AD0_cfg' configuration (yes, y, no, n): [no] y
zone config "AD0_cfg" is in effect
Updating flash ...
sw0:admin> ad --select 255
sw0:AD255:admin> ad --add AD0 -d "10:00:00:00:03:00:00:00;
10:00:00:00:04:00:00:00; 10:00:00:00:05:00:00:00"
sw0:AD255:admin> ad --apply
You are about to enforce the saved AD configuration.
This action will trigger AD apply to all switches in the fabric
Do you want to apply all admin domains (yes, y, no, n): [no] y
sw0:AD255:admin> ad --clear -f
You are about to delete all ADs definitions and zone databases under them.
This could involve multiple independent zone transactions and
no auto recovery will be done in case of failure in the middle.
Do you want to clear all admin domains (yes, y, no, n): [no] y
sw0:AD255:admin> ad --apply
You are about to enforce the saved AD configuration.
This action will trigger AD apply to all switches in the fabric
Do you want to apply all admin domains (yes, y, no, n): [no] y
Fabric OS Administrator’s Guide
53-1002148-02
359
17
SAN management with Admin Domains
Validating an Admin Domain member list
You can validate the device and switch member list. You can list non-existing or offline Admin
Domain members. You can also identify misconfigurations of the Admin Domain.
The Admin Domain validation process is not applicable for AD0, because AD0 implicitly contains all
unassigned online switches and their devices.
1. Connect to the switch and log in using an account with admin permissions.
2. Switch to the AD255 context, if you are not already in that context.
ad --select 255
3. Enter the ad --validate command.
ad --validate ad_id -m mode
If you do not specify any parameters, the entire AD database (transaction buffer, defined
configuration, and effective configuration) is displayed.
If you do not specify an Admin Domain, information about all existing Admin Domains is
displayed.
The -m mode option can be used with the following values:
• 0 to display the Admin Domain configuration in the current transaction buffer.
• 1 to display the Admin Domain configuration stored in the persistent memory (defined
configuration).
• 2 to display the currently enforced Admin Domain configuration (effective configuration).
Example of validating the member list of Admin Domain 10 in the current transaction buffer
switch:AD255:admin> ad --validate 10 –m 0
Current AD Number: 255 AD Name: AD255
Transaction buffer configuration:
--------------------------------AD Number:
2
AD Name: ad2
State: Active
Switch port members:
1,1; 1,3; 2,5+; 3,6;
---------------------------* - Member does not exist
+ - Member is AD Unaware
SAN management with Admin Domains
This section is for both users and administrators and describes how Admin Domains affect
commands and other Fabric OS features. If you are a physical fabric administrator and you want to
create, modify, or otherwise manage Admin Domains, refer to “Admin Domain management for
physical fabric administrators” on page 348.
The Admin Domain looks like a virtual switch or fabric to a user. However, based on the user role
and type (User_ID), users are presented with only their relevant AD-based views (refer to Figure 56
on page 340 and Figure 57 on page 340). Any devices and switch ports that are not defined as
part of the Admin Domain are not shown and are not available to that AD user.
Each Admin Domain can also have its own zone configurations (defined and effective) with zones
and aliases under them.
360
Fabric OS Administrator’s Guide
53-1002148-02
SAN management with Admin Domains
17
CLI commands in an AD context
The CLI command input arguments are validated against the AD member list; they do not work with
input arguments that specify resources that are not members of the current Admin Domain. All
commands present filtered output, showing only the members of the current Admin Domain.
For example, switchShow displays details for the list of AD members present in that switch. Note
the following about the switchShow output:
• Because all E_Ports and EX_Ports are shared across all Admin Domains, they are shown under
all Admin Domains.
• Other ports are displayed without any attribute details (with an explanation that they are not
part of the current Admin Domain).
A port or device appears in CLI command output or other management tool outputs if any one of
the conditions listed in Table 62 is met.
TABLE 62
Ports and devices in CLI output
For
Condition
domain,index
•
•
•
•
Device WWN
The port is specified in the domain,index member list of the Admin Domain.
One or more WWNs specified in the AD member list is attached to the domain,index.
The device WWN is specified in the AD WWN member list.
The device WWN is attached to one of the domain,index members specified in the AD
member list.
RASlog and syslog output is not filtered based on AD membership.
Refer to the Fabric OS Command Reference for more detailed information about command syntax
and usage and to understand how existing commands behave in an AD context.
Executing a command in a different AD context
You can execute a command in an Admin Domain that is different from your current AD context.
The Admin Domain must be one that you can access. This option creates a new shell with the
current User_ID, switches to the specified Admin Domain, performs the specified command, and
exits the shell.
1. Connect to the switch and log in.
2. Enter the ad --exec command, specifying the Admin Domain and the command you want to
execute.
ad --exec ad_id "command"
Example of executing the switchShow command in the AD7 context
switch:AD255:admin> ad --exec 7 "switchshow"
Displaying an Admin Domain configuration
You can display the membership information and zone database information of a specified Admin
Domain. Note the following differences in the information displayed based on the Admin Domain:
• AD255: If you do not specify the AD name or number, all information about all existing Admin
Domains is displayed.
Fabric OS Administrator’s Guide
53-1002148-02
361
17
SAN management with Admin Domains
• AD0–AD254: The membership of the current Admin Domain is displayed.
• AD0: The device and switch list members are categorized into implicit and explicit member
lists.
1. Connect to the switch and log in as any user type.
2. Enter the ad --show command.
ad --show
If you are in the AD0 context, you can use the -i option to display the implicit membership list of
AD0; otherwise, only the explicit membership list is displayed.
ad --show -i
If you are in the AD255 context, all Admin Domain configurations from the transaction buffer,
defined configuration, and effective configuration are displayed, unless you use the -m option:
ad --show ad_id -m mode
In the syntax, ad_id is the Admin Domain for which you want to display information and mode is
one of the following values:
• 0 to display the Admin Domain configuration in the current transaction buffer.
• 1 to display the Admin Domain configuration stored in the persistent memory (defined
configuration).
• 2 to display the currently enforced Admin Domain configuration (effective configuration).
Example of displaying membership information about AD1
switch:AD1:admin> ad --show
Current AD Number: 1 AD Name: TheSwitches
Effective configuration:
-----------------------AD Number: 1 AD Name:
TheSwitches
Switch WWN members:
State: Active
50:06:06:99:00:2a:e9:01;
50:00:51:e0:23:36:f9:01;
50:06:06:98:05:be:99:01;
Switching to a different Admin Domain context
You can switch between different Admin Domain contexts. This option creates a new shell with a
new Admin Domain context. If the corresponding Admin Domain is not activated, the operation
fails.
1. Connect to the switch and log in as any user type.
2. Enter the ad --select command and the Admin Domain to which you want to switch.
3. Leave the new Admin Domain context by exiting from the shell.
logout
You cannot switch to another Admin Domain context from within the shell created by ad
--select. You must first exit the shell, and then issue the ad --select command again.
362
Fabric OS Administrator’s Guide
53-1002148-02
SAN management with Admin Domains
17
Example of switching to a different Admin Domain context
The following example switches to the AD12 context and back. Note that the prompt changes
to display the Admin Domain.
switch:admin> ad --select 12
switch:AD12:admin> logout
switch:admin>
Admin Domain interactions with other Fabric OS features
The Admin Domain feature provides interaction with other Fabric OS features and across third-party
applications. You can manage Admin Domains with Web Tools as well as the CLI. If the current
Admin Domain owns the switch, you can perform Fabric Watch operations.
Admin Domain interactions do not extend to user session tunneling across switches. A user logged
in to a switch can control only the local switch ports as specified in the Admin Domain.
When the fabric is in secure mode, the following restrictions apply:
• There is no support for ACL configuration under each Administrative Domain.
• ACL configuration commands are allowed only in AD0 and AD255. None of the policy
configurations are validated with AD membership.
Table 63 lists some of the Fabric OS features and considerations that apply when using Admin
Domains.
TABLE 63
Admin Domain interaction with Fabric OS features
Fabric OS feature
Admin Domain interaction
ACLs
If no user-defined Admin Domains exist, you can run ACL configuration commands in only
AD0 and AD255. If any user-defined Admin Domains exist, you can run ACL configuration
commands only in AD255.
You cannot use ACL configuration commands or validate ACL policy configurations
against AD membership under each Admin Domain.
Advanced Performance
Monitoring (APM)
All APM-related filter setup and statistics viewing is allowed only if the local switch is part
of the current Admin Domain.
Fabric Watch
Fabric Watch configuration operations are allowed only if the local switch is part of the
current Admin Domain.
FC-FC Routing Service
You can create LSAN zones as a physical fabric administrator or as an individual AD
administrator. The LSAN zone can be part of the root zone database or the AD zone
database.
FCR collects the LSAN zones from all ADs. If both edge fabrics have matching LSAN
zones and both devices are online, FCR triggers a device import.
LSAN zone enforcement in the local fabric occurs only if the AD member list contains
both of the devices (local and imported devices) specified in the LSAN zone.
To support legacy applications, WWNs are reported based on the AD context using
NAA=5. As a result, you cannot use the NAA=5 field alone in the WWN to detect an FC
router.
FDMI
FDMI operations are allowed only in AD0 and AD255.
Fabric OS Administrator’s Guide
53-1002148-02
363
17
SAN management with Admin Domains
TABLE 63
Admin Domain interaction with Fabric OS features (Continued)
Fabric OS feature
Admin Domain interaction
FICON
Admin Domains support FICON. However, you must perform additional steps because
FICON management requires additional physical control of the ports. You must set up the
switch as a physical member of the FICON AD.
Device Connection Control (DCC) and Switch Connection Control (SCC) policies are
supported only in AD0 and AD255, because ACL configurations are supported only in
AD0 and AD255.
iSCSI
iSCSI operations are supported only in AD0.
Management
applications
Management interfaces that access the fabric without a user’s credentials continue to
get the physical fabric view. Examples include SNMPv1, Web Tools, HTTP access,
unzoned management server query, FAL in-band CT requests from FAL Proxy to FAL
Target, and FC-CT-based management applications.
Access from applications or hosts using Management Server calls can be controlled
using the Management Server ACL support provided by the msConfigure command. Note
that this is a switch-specific setting and not a fabric-wide setting.
Port swapping and PID
formats
Admin Domain port members are specified in domain,index format. Based on the PID
format, a domain,index member indicates a slot and port in the switch. The
domain,index member is effectively a member of that AD.
Port swapping has no effect on AD support as port swapping swaps only the area
numbers of two ports and Admin Domains are specified using domain,index members.
For detailed information about configuring the PID format, refer to Chapter 3,
“Performing Advanced Configuration Tasks”.
RSCN
Admin Domains do not introduce any RSCN changes to devices or hosts.
Virtual Fabrics
Virtual Fabrics and Admin Domains are mutually exclusive and are not supported at the
same time on a switch. To use Admin Domains, you must first disable Virtual Fabrics; to
use Virtual Fabrics, you must first delete all Admin Domains.
If you connect a switch with Admin Domains to a Virtual Fabrics-enabled switch, the link
is segmented with the reason “VF AD conflict.”
Admin Domains, zones, and zone databases
Admin Domains introduce two types of zone database nomenclature and behavior:
• Root zone database
If you do not use Admin Domains, there is only one zone database. This legacy zone database
is known as the root zone database. If you create Admin Domains, several zone databases
exist: the root zone database, which is owned by AD0, and other zone databases, one for each
user-defined Admin Domain.
AD-level zone information is merged with the root zone configuration and enforced.
• AD zone databases
Each AD (AD1 through AD254) has its own zone database, with the defined and effective zone
configurations and all related zone objects (zones, zone aliases, and zone members). Each AD
has its own zone transaction buffer. Within an Admin Domain, you can configure zoning only
with the devices that are present in that Admin Domain.
364
Fabric OS Administrator’s Guide
53-1002148-02
SAN management with Admin Domains
17
The AD zone database also has the following characteristics:
-
Each zone database has its own name space. For example, you can define a zone name of
test_z1 in more than one Admin Domain.
-
There is no zone database linked to the physical fabric (AD255) and no support for zone
database updates. In the physical fabric context (AD255), you can only view the complete
hierarchical zone database, which is all of the zone databases in AD0 through AD254.
-
You can concurrently edit the separate zone databases.
With AD support, zoning updates are supported selectively at each AD level. For example,
a zone change in AD1 results in an update request only for the AD1 zone database.
Zoning operations ignore any resources not in the Admin Domain, even if they are specified in the
zone. The behavior functions similarly to specifying offline devices in a zone. All zones from each
AD zone configuration are enforced. The enforcement policy encompasses zones in the effective
zone configuration of the root zone database and the effective zone configurations of each AD.
Using the zone --validate command, you can see all zone members that are not part of the current
zone enforcement table but are part of the zoning database. A member might not be part of the
zone enforcement table for the following reasons:
• The device is offline.
• The device is online but is not part of the current Admin Domain.
Refer to “Validating a zone” on page 254 for instructions on using the zone --validate command.
NOTE
AD zone databases do not have an enforced size limit. The zone database size is calculated by the
upper limit of the AD membership definition and the sum of all the zone databases for each AD.
Admin Domains support the default zone mode of No Access only. Before configuring any Admin
Domain, you must set the default zone to No Access mode. Admin Domains without effective zone
configurations are presented with No Access. Refer to “Default zoning mode” on page 255 for more
information.
If the administrative domain feature is not active (AD1 through AD254 are not configured and no
explicit members are added to AD0), AD0 supports both All Access and No Access default zone
modes.
Admin Domains and LSAN zones
LSANs under each Admin Domain are collated into a single name space and sent out to FCR
phantom domains using the following format:
<original_LSAN_name>_AD<AD_num>
For example, a zone with name lsan_for_linux_farm in AD5 is internally converted to
lsan_for_linux_farm_AD005.
LSAN zone names in AD0 are never converted for backward-compatibility reasons.
The auto-converted LSAN zone names might collide with LSAN zone names in AD0 (in the example,
if AD0 contains lsan_for_linux_farm_AD005, this causes a name collision). Fabric OS does not
detect or report such name clashes.
LSAN zone names greater than 57 characters are not converted or sent to the FCR phantom
domain. Refer to Chapter 23, “Using the FC-FC Routing Service,” for information about LSAN zones.
Fabric OS Administrator’s Guide
53-1002148-02
365
17
SAN management with Admin Domains
Configuration upload and download in an AD context
The behavior of the configUpload and configDownload commands varies depending on the AD
context and whether the switch is a member of the current Admin Domain. In the AD context, these
commands include only the zone configuration of the current Admin Domain. If the switch is a
member of the Admin Domain, all switch configuration parameters are saved and the zone
database for that Admin Domain is also saved.
Table 64 lists the sections in the configuration file and the Admin Domain contexts in which you
can upload and download these sections. Refer to Chapter 8, “Maintaining the Switch
Configuration File,” for additional information about uploading and downloading configurations.
NOTE
You cannot use configDownload to restore a single Admin Domain. To restore a single Admin
Domain, you must first delete all Admin Domains and then issue configDownload to restore them.
TABLE 64
Configuration upload and download scenarios in an AD context
Configuration file sections
AD contexts
iSCSI
ACL
Zone
AD headers
Switch configuration
and other parameters
AD255:
Yes
Yes
Yes1
Yes
Yes
Yes
Yes
1
Yes
Yes
2
No
Yes
With ADs
Without ADs
AD0:
With ADs and switch membership
Yes
No
Yes
With ADs and without switch membership
Yes
No
Yes2
No
No
Without ADs
Yes
Yes
Yes2
No
Yes
Yes
3
No
Yes
Yes
3
No
No
AD1 – AD254: With switch membership
Without switch membership
1.
Yes
No
No
No
No
Zone databases for AD0 through AD254.
2.
Only zone database for AD0.
3.
Only zone database for current AD.
The configDefault command does not clear zone or Admin Domain database information. This
command is allowed only if the switch is a member of the current Admin Domain.
366
Fabric OS Administrator’s Guide
53-1002148-02
Section
Licensed Features
II
This section describes optionally licensed Brocade Fabric OS features and includes the following
chapters:
•
•
•
•
•
•
Chapter 18, “Administering Licensing”
Chapter 19, “Monitoring Fabric Performance”
Chapter 20, “Optimizing Fabric Behavior”
Chapter 21, “Managing Trunking Connections”
Chapter 22, “Managing Long Distance Fabrics”
Chapter 23, “Using the FC-FC Routing Service”
Fabric OS Administrator’s Guide
53-1002148-02
367
368
Fabric OS Administrator’s Guide
53-1002148-02
Chapter
18
Administering Licensing
In this chapter
• Licensing overview. . . . . . . . . . . . . . . . . . . . . . . . . . . . . . . . . . . . . . . . . . . . .
• The Brocade 7800 Upgrade license . . . . . . . . . . . . . . . . . . . . . . . . . . . . . .
• ICL licensing . . . . . . . . . . . . . . . . . . . . . . . . . . . . . . . . . . . . . . . . . . . . . . . . . .
• 8G licensing . . . . . . . . . . . . . . . . . . . . . . . . . . . . . . . . . . . . . . . . . . . . . . . . . .
• Slot-based licensing . . . . . . . . . . . . . . . . . . . . . . . . . . . . . . . . . . . . . . . . . . .
• 10G licensing . . . . . . . . . . . . . . . . . . . . . . . . . . . . . . . . . . . . . . . . . . . . . . . . .
• Time-based licenses . . . . . . . . . . . . . . . . . . . . . . . . . . . . . . . . . . . . . . . . . . .
• Universal Time-based licenses . . . . . . . . . . . . . . . . . . . . . . . . . . . . . . . . . . .
• Viewing installed licenses . . . . . . . . . . . . . . . . . . . . . . . . . . . . . . . . . . . . . . .
• Activating a license . . . . . . . . . . . . . . . . . . . . . . . . . . . . . . . . . . . . . . . . . . . .
• Adding a licensed feature . . . . . . . . . . . . . . . . . . . . . . . . . . . . . . . . . . . . . . .
• Removing a licensed feature . . . . . . . . . . . . . . . . . . . . . . . . . . . . . . . . . . . .
• Ports on Demand. . . . . . . . . . . . . . . . . . . . . . . . . . . . . . . . . . . . . . . . . . . . . .
369
375
376
377
377
379
382
383
384
384
384
385
386
Licensing overview
Feature licenses are often part of the licensed paperpack supplied with your switch software; if not,
they can be purchased separately from your switch vendor, who provides the transaction keys to
activate the associated feature or features. Each product, each feature, and each individual switch
within a fabric requires its own license key.
Licences might be associated with a feature version. If a feature has a version-based license, that
license is valid only for a particular version of the feature. If you want a newer version of the
feature, you must purchase a new license. If a license is not version-based, then it is valid for all
versions of the feature. Likewise, if you downgrade Fabric OS to an earlier version, some licenses
associated with specific features of the version you are downgrading might not work.
NOTE
To preserve licenses and the functioning of features associated with the licenses installed on your
switch, use the configUpload command before you upgrade or downgrade Fabric OS.
Fabric OS includes basic switch and fabric support software, and support for optionally licensed
software that is enabled using license keys.
In Fabric OS v7.0.0 or later release, some licenses might display with the text “Obsolete license.”
This happens because of changes in licensing requirements of some features that no longer
require a license key, yet are still installed on a switch.
Fabric OS Administrator’s Guide
53-1002148-02
369
18
Licensing overview
Table 65 lists the optionally licensed features that are available in Fabric OS 7.0.0:
TABLE 65
Available Brocade Licenses
License
Description
10 Gigabit FCIP/Fibre Channel License
(10G license)
•
•
•
•
7800 Upgrade License
•
•
•
Allows 10 Gbps operation of FC ports on the Brocade 6510
switch or the FC ports of FC16-32 or FC16-48 port blades
installed on a Brocade DCX 8510 enterprise-class platform.
Enables the two 10GbE ports on the FX8-24 extension blade
when installed on the Brocade DCX,DCX-4S, DCX 8510-4, or
Brocade DCX 8510-8 enterprise-class platform.
Allows selection of the following operational modes on the
FX8-24 blade:
• 10 1GbE ports and 1 10GbE port, or
• 2 10GbE ports
License is slot based when applied to a Brocade enterprise-class
platform. It is chassis based when applied to a Brocade 6510
switch.
Enables full hardware capabilities on the Brocade 7800 base
switch, increasing the number of Fibre Channel ports from four
to sixteen and the number of GbE ports from two to six.
Supports up to eight FCIP tunnels instead of two.
Supports advanced capabilities like tape read/write pipelining.
NOTE: The Brocade 7800 switch must have the Upgrade License to
add FICON Management Server (CUP) or Advanced
Accelerator for FICON.
Adaptive Networking with QoS
•
Advanced Extension License
•
•
•
•
•
Advanced FICON Acceleration
•
•
370
Enables QoS SID/DID Prioritization and Ingress Rate Limiting
features. These features ensure high priority connections by
obtaining the bandwidth necessary for optimum performance,
even in congested environments.
Available on all 8 Gbps platforms.
Enables 2 advanced extension features: FCIP Trunking and
Adaptive Rate Limiting.
FCIP Trunking feature allows all of the following:
• Multiple (up to 4) IP source and destination address pairs
(defined as FCIP Circuits) using multiple (up to 4) 1 GbE or
10 GbE interfaces to provide a high bandwidth FCIP tunnel
and failover resiliency.
• Support for up to 4 of the following QoS classes: Class-F,
high, medium and low priority, each as a TCP connection.
Adaptive Rate Limiting feature provides a minimum bandwidth
guarantee for each tunnel with full usage of available network
bandwidth without any negative impact to throughput
performance under high traffic load.
Available on the Brocade 7800 switch, and the Brocade DCX and
DCX-4S and the Brocade DCX 8510 family for the FX8-24 on an
individual slot basis.
Allows use of specialized data management techniques and
automated intelligence to accelerate FICON tape read and write
and IBM Global Mirror data replication operations over distance,
while maintaining the integrity of command and
acknowledgement sequences.
Available on the Brocade 7800 switch, and the Brocade DCX and
DCX-4S and the Brocade DCX 8510 family for the FX8-24 on an
individual slot basis.
Fabric OS Administrator’s Guide
53-1002148-02
Licensing overview
TABLE 65
18
Available Brocade Licenses (Continued)
License
Description
Brocade Advanced Performance
Monitoring
•
Brocade Extended Fabrics
Provides greater than 10km of switched fabric connectivity at full
bandwidth over long distances (depending on the platform this can be
up to 3000km).
•
Enables performance monitoring of networked storage
resources.
Includes the Top Talkers feature.
NOTE: This license is not required for long distance connectivity using
licensed 10G ports.
Brocade Fabric Watch
Brocade ISL Trunking
•
•
•
•
Brocade Ports on Demand
Monitors mission-critical switch operations.
Includes Port Fencing capabilities.
Provides the ability to aggregate multiple physical links into one
logical link for enhanced network performance and fault
tolerance.
Includes Access Gateway ISL Trunking on those products that
support Access Gateway deployment.
Allows you to instantly scale the fabric by provisioning additional ports
using license key upgrades.
NOTE: Applies to the Brocade 300, 5000, 5100, 5300, 6510, and
VA-40FC switches.
DataFort Compatibility License
Provides ability to read, write, decrypt, and encrypt the NetApp
DataFort-encrypted Disk LUNs and Tapes to all of the following:
• Brocade Encryption Switch
• Brocade enterprise platforms with FS8-18 blade
Includes metadata, encryption and compression algorithms.
NOTE: Availability is limited. Contact your vendor for details.
Encryption Performance Upgrade License
Provides additional encryption bandwidth on encryption platforms.
For the Brocade Encryption Switch, two Encryption Performance
Upgrade licenses can be installed to enable the full available
bandwidth. On a Brocade enterprise platforms, a single Performance
License can be installed to enable full bandwidth on all FS8-18 blades
installed in the chassis.
Enhanced Group Management
Enables full management of the device in a data center fabric with
deeper element management functionality and greater management
task aggregation throughout the environment. This license is used in
conjunction with Brocade Network Advisor application software. This
license is applicable to all of Brocade’s 8G and 16G FC platforms.
Note:
NOTE: This license is enabled by default on all 16G FC platforms, and
on DCX and DCX-4S platforms that are running Fabric OS
v7.0.0.
This license is not included by default on 8G FC fixed port
switches (5300, 5100, VA-40FC, 300 and 8G FC embedded
switches).
FCoE License
Included with the Brocade 8000 switch; enables Fibre Channel over
Ethernet (FCoE) functions.
FICON Management Server
(Also known as “CUP”, Control Unit Port)
Enables host-control of switches in mainframe environments.
Fabric OS Administrator’s Guide
53-1002148-02
371
18
Licensing overview
TABLE 65
Available Brocade Licenses (Continued)
License
Description
High Performance Extension over FCIP/FC
(formerly known as “FC-IP Services”)
Includes the IPsec capabilities. Applies to FR4-18i blade.
ICL 16-link License
Provides dedicated high-bandwidth links between two Brocade DCX
chassis, without consuming valuable front-end 8 Gbps ports. Each
chassis must have the ICL license installed in order to enable the full
16-link ICL connections.
Available on the DCX only.
ICL 8-Link License
Activates all eight links on ICL ports on a Brocade DCX-4S chassis or
half of the ICL bandwidth for each ICL port on the Brocade DCX
platform by enabling only eight links out of the sixteen links available.
This allows you to purchase half the bandwidth of DCX ICL ports
initially and upgrade with an additional 8-link license to utilize the full
ICL bandwidth at a later time. This license is also useful for
environments that wish to create ICL connections between a DCX and
a DCX-4S; the latter cannot support more than 8 links on an ICL port.
Available on the Brocade DCX and DCX-4S platforms only
Inter Chassis Link (2nd POD) License
Provides dedicated high-bandwidth links between two Brocade DCX
8510-8 chassis, without consuming valuable front-end Gbps ports.
Each chassis must have an ICL license installed in order to enable all
available ICL connections. (Available on DCX 8510-8 only.)
Inter Chassis Link (1st POD) License
Activates half of the ICL bandwidth on a DCX 8510-8, or all the ICL
bandwidth on a DCX 8510-4, allowing you to purchase less bandwidth
and upgrade to a 2nd POD license at a later time. This license is also
useful for environments that wish to create ICL connections between
a DCX 8510-8, and a DCX 8510-4; the latter platform supports only
half the number of ICL links that the former platform supports.
Available on the Brocade DCX 8510-8and 8510-4 platforms only.
Integrated Routing
•
•
Server Application Optimization
•
•
•
Allows any ports in a Brocade 5100, 5300, 6510, and VA-40FC
switches, the Brocade Encryption Switch, or the Brocade DCX,
DCX 8510 family, and DCX-4S platforms to be configured as an
EX_Port supporting Fibre Channel Routing (FCR).
Eliminates the need to add an FR4-18i blade or use the 7500 for
FCR purposes.
Optimizes application performance for physical servers and
virtual machines.
Extends virtual channels across server infrastructure.
Enables configuration, prioritization, and optimization of
application specific traffic flows.
NOTE: This license is not supported on the Brocade 8000. For more
information on this license, refer to the Brocade Adapters
Administrator’s Guide.
Table 66 lists licensed features, each feature’s associated license name, and, if applicable, the
location on the local or any connecting switch on which the license must be installed.
TABLE 66
372
License Requirements and Location Name by Feature
Feature
License
Where license should be installed
Adaptive Rate Limiting
Advanced Extension
Local switch.
Administrative Domains
No license required.
n/a
Fabric OS Administrator’s Guide
53-1002148-02
Licensing overview
TABLE 66
18
License Requirements and Location Name by Feature (Continued)
Feature
License
Where license should be installed
Bottleneck Detection
No license required.
n/a
Configuration
up/download
No license required.
n/a
Converged Enhanced
Ethernet
Requires FCoE base license and POD1 license.
Brocade Network Advisor
No license required for base use.
See also the Brocade Network
Advisor User Manual.
Diagnostic tools
No license required.
n/a
Distributed Management
Server
No license required.
n/a
EX_Ports
Integrated Routing.
Local switch.
Extended Fabrics
Extended Fabrics.
Local switch and any attached
switches.
Fabric Watch
No license required for base use.
See the Fabric Watch
Administrator’s Guide.
FCIP
•
•
NOTE: Local and attached
switches. License is needed
on both sides of tunnel.
FCIP Trunking
Advanced Extension
Local and attached switches.
Fibre Channel Routing
Integrated Routing
Local and attached switches.
FICON
No license required.
n/a
FICON-CUP
FICON Management Server
Local switch.
FICON Tape Read and
Write Emulation over an
FCIP Tunnel
•
•
FICON Tape
High-Performance Extension over FCIP/FC
license or Advanced FICON Acceleration
on Brocade 7800
Local and attached switches.
FICON XRC Sequence
Emulation over an FCIP
Tunnel
•
•
FICON XRC
High-Performance Extension over FCIP/FC
or
Advanced FICON Acceleration on Brocade
7800
Local and attached switches.
FIPS
No license required.
n/a
No license required.
n/a
Firmware download
NOTE: configUpload and configDownload
commands are provided automatically
with Fabric OS on the switch.
NOTE: These licenses are installed by default
and you should not remove them.
•
FC-IP Services or
High Performance Extension over FCIP/FC
Local switch.
Brocade 8000 only.
NOTE: firmwareDownload command is
provided automatically with Fabric OS
on the switch.
Full fabric connectivity
Full Fabric.
NOTE: Also called the Fabric license (visible in
licenseShow output) and E_Port
Upgrade license.
Inband Management
Fabric OS Administrator’s Guide
53-1002148-02
No license required.
Local switch. May be required on
attached switches.
n/a
373
18
Licensing overview
TABLE 66
License Requirements and Location Name by Feature (Continued)
Feature
License
Where license should be installed
Ingress rate limiting
Adaptive Networking
Local switch.
Integrated routing
Integrated Routing.
Local switch.
Inter-chassis link (ICL)
•
Local and attached platforms.
•
•
•
ICL 1st POD (Ports on Demand) on the
Brocade DCX 8510-8 and DCX 8510-4
only.
ICL 2nd POD on the Brocade DCX 8510-8
only.
ICL 8-link on the Brocade DCX and
DCX-4S.
ICL 16-link on the Brocade DCX only.
IPSec
No license required.
n/a
IPsec for FCIP tunnels
•
•
LDAP
No license required.
n/a
Logical fabric
No license required.
n/a
Logical switch
No license required.
n/a
Long distance
Extended Fabrics
Local and attached switches.
FC-IP Services or
NOTE: Local and attached
switches. License is needed
High Performance Extension over FCIP/FC.
on both sides of tunnel.
NOTE: License is needed on both
sides of connection.
NPIV
No license required.
n/a
OpenSSH public key
No license required.
n/a
Performance monitoring
•
•
Local switch.
Port fencing
Fabric Watch
Local switch.
Ports
•
Local switch.
•
•
•
•
374
Basic features - no
Advanced features - yes: Performance
Monitoring.
POD licenses required, applicable to a
select set of switches only.
Upgrade license for the 7800 switches to
use all ports.
10 Gigabit FCIP/Fibre Channel license to
use 10Gb FC ports on FC 16-32 blades, FC
16-48 blades, and the Brocade 6510.
10 Gigabit FCIP/Fibre Channel license to
enable 10Gb Ethernet ports on the FX8-24
extension blades.
Brocade 8000 – Must have license
installed to enable the 8 FC ports. A
maximum of 8 FC ports are allowed.
QoS
Adaptive Networking.
Local switch and attached switches.
QoS on an HBA
•
•
Local switch
RADIUS
No license required.
n/a
RBAC
No license required.
n/a
Server Application Optimization and
Adaptive Networking.
Fabric OS Administrator’s Guide
53-1002148-02
The Brocade 7800 Upgrade license
TABLE 66
18
License Requirements and Location Name by Feature (Continued)
Feature
Routing traffic
License
Where license should be installed
No license required.
n/a
NOTE: Port-based or exchanged-based routing,
static routes, frame-order deliver, and
dynamic routes all included.
Security
n/a
No license required.
NOTE: DCC, SCC, FCS, IP Filter, and
authentication policies all included.
SNMP
No license required.
n/a
Speed
8 Gbps license needed to support 8 Gbps on
the Brocade 300, 5100, 5300, and VA-40FC
switches and embedded switches only.
Local switch
NOTE: The 8 Gbps license is installed by
default, and you should not remove it.
10 Gigabit FCIP/Fibre Channel license is
needed to support 10Gb FC ports on FC 16-32,
FC 16-48 blades and the Brocade 6510, as well
as to support the 10Gb Ethernet ports on
FX8-24 blades. (See “Ports,” above for more
information.)
SSH public key
No license required.
n/a
Top Talkers
Advanced Performance Monitoring
Local switch and attached switches.
Traffic Isolation
No license required.
n/a
Trunking
•
•
Local and attached switches.
Two-to-four domains in a
fabric
Value Line (Two/Four)
Local switch. May be required on
attached switches.
USB usage
No license required.
n/a
Virtual Fabrics
No license required.
n/a
Web Tools
No license required.
Local and any switch you will be
managing using Web Tools.
Zoning
No license required.
n/a
ISL Trunking or
ISL Trunking Over Extended Fabrics
The Brocade 7800 Upgrade license
The Brocade 7800 has four Fibre Channel (FC) ports and two GbE ports active by default. The
number of physical ports active on the Brocade 7800 is fixed. There is one upgrade license to
activate the rest of the FC and GbE ports for a total of 16 FC ports and six GbE ports. The Upgrade
license activates FC and GbE ports, and also activates additional features outlined in Table 67.
TABLE 67
Base to Upgrade License Comparison
Feature
Base model
Upgrade License
Number of Fibre Channel (FC) ports
4
16
Number of GbE ports
2
8
Fabric OS Administrator’s Guide
53-1002148-02
375
18
ICL licensing
TABLE 67
Base to Upgrade License Comparison (Continued)
Feature
Base model
Upgrade License
Number of 10-GbE ports
0
0
Number of FCIP Tunnels
2
8
Tape Pipelining over FCIP Tunnel
No
Yes
ICL licensing
Brocade ICL links operate between the core blades of the DCX 8510 family of enterprise-class
platforms, or between the core blades of the DCX and DCX-4S platforms. Typically, if both core
blades are installed then they are active on the DCX and DCX-4S (or DCX 8510 family)
enterprise-class platforms.
ICL ports on core blades of a DCX 8510-8 can be used only with an ICL (1st or 2nd) POD license.
ICL ports on core blades of a DCX 8510-4 can be used only with an ICL 1st POD licence.
ICL ports on core blades of a DCX can be used only with an ICL 16-link or 8-link license. ICL ports on
core blades of a DCX-4S can be used only with an ICL 8-link licence.
After the addition or removal of a license, the license enforcement is performed on the ICL ports
only when the portDisable and portEnable commands are issued on the ports. An ICL license must
be installed on the enterprise platforms at either end of the ICL connection.
ICL 1st POD license
This license activates half of the ICL bandwidth for each ICL port on the Brocade DCX 8510-8
platform by enabling only half of the ICL links available. This allows you to purchase half the
bandwidth of the Brocade DCX 8510-8 ICL ports initially and upgrade with an additional ICL license
to use the full ICL bandwidth later. This license is also useful for environments with ICL connections
between a Brocade DCX 8510-8 and a DCX 8510-4, as the latter supports half the bandwidth of the
DCX 8510-8 on each ICL port.
This license is available on the Brocade DCX 8510-8 and DCX 8510-4 platforms only.
ICL 2nd POD license
This license provides dedicated high-bandwidth links between two Brocade DCX 8510-8 platforms
without consuming valuable front-end ports. Each Brocade DCX 8510-8 platform must have the ICL
2nd POD license installed in order to enable the full number of ICL connections possible.
This license is available for the Brocade DCX 8510-8 only.
ICL 8-link license
This license activates half of the ICL bandwidth for each ICL port on the Brocade DCX platform by
enabling only half of the ICL links available. This allows you to purchase half the bandwidth of the
Brocade DCX ICL ports initially and upgrade with an additional ICL license to use the full ICL
bandwidth later. This license is also useful for environments with ICL connections between a
Brocade DCX and a DCX-4S, as the latter cannot support more than eight links on an ICL port.
This license is available on the DCX-4S and DCX platforms only.
376
Fabric OS Administrator’s Guide
53-1002148-02
8G licensing
18
ICL 16-link license
This license provides dedicated high-bandwidth links between two Brocade DCX chassis, without
consuming valuable front-end ports. Each Brocade DCX chassis must have the ICL 16-link license
installed in order to enable the full number of ICL connections possible (16-links in the case of a
DCX chassis).
This license is available for the Brocade DCX only.
8G licensing
ATTENTION
This license is installed by default and you should not remove it. Port operation might become
disrupted, and ports might be prevented from operating at 8 Gbps when the license is removed.
The 8 Gbps license applies to the Brocade 300, 5100, 5300, and VA-40FC switches and the 8
Gbps embedded switches; this license does NOT apply to the Brocade 6510.
The following list describes the basic rules of using, adding, or removing 8G licenses:
• Without an 8G license, even if there is an 8 Gbps SFP plugged into a port in an applicable
platform, the port would be enabled to run at a maximum speed of 4 Gbps.
• To obtain an 8G license, only the License ID from the switch is required. When you add the 8G
license, you must enter either the portDisable and portEnable commands on each individual
port on the switch, or the switchDisable and switchEnable commands on the switch, to enable
8 Gbps features.
• When you remove the 8G license, the ports which are online and already running at 8 Gbps are
not disturbed until the port goes offline or the switch is rebooted. The switch ports return to
their pre-licensed state maximum speed of 4 Gbps.
Slot-based licensing
Slot-based licensing is used on the Brocade DCX 8510 family, DCX and DCX-4S platforms to
support the FX8-24 blade and on the Brocade DCX 8510 family to support also the 16 Gbps FC port
blades (FC16-24 and FC16-48). License capacity is equal to the number of slots. These licenses
allow you to select the slots that the license will enable up to the capacity purchased and to
increase the capacity without disrupting slots that already have licensed features running. Each
slot-based license key is for a single feature.
Features utilizing slot-based licenses on the FX8-24 blade include:
• 10GbE
• Advanced Extension
• Advanced FICON Acceleration
Features using slot-based licenses on the 16 Gbps FC port blades include 10 Gbps FC port
operation.
Fabric OS Administrator’s Guide
53-1002148-02
377
18
Slot-based licensing
NOTE
The 10 GbE feature on the FX8-24 blade and the 10 Gbps FC feature on the 16 Gbps FC blades are
both enabled by the same 10 Gigabit FCIP/Fibre Channel license (10G license). This license can also
enable the 10 Gbps FC feature on a Brocade 6510 switch as a chassis based license.
All other licensed blade features continue to be exclusively chassis-based licenses.
Any unassigned slot-based license will be automatically assigned to applicable blades that are
detected in the chassis when the license is installed. If you have more applicable blades than
available license capacity, then you can manually assign or re-assign the licenses as necessary.
Once a license is assigned to a slot, whether it has been automatically assigned or
manually-assigned, the assignment will remain until you manually reassign the license to another
slot. This design allows for various maintenance operations to occur without having the license
move around to other slots.
For a slot-based licensed feature to be active, follow these steps:
1. Install a slot-based license on the platform with sufficient slot count for the number of slots you
plan to activate the feature on.
2. Configure slots so that the licensed feature is assigned to slots. No more slots can be
configured than specified in the license.
3. Configure the application that uses the licensed feature on the blade in the slot. This operation
verifies that the previous two steps have been successfully completed.
Once these steps are complete, the feature will work on the blade.
Upgrade/downgrade considerations
When a Slot-based license is present on the switch, firmware downgrade to pre-Fabric OS v6.3.0 is
allowed, but the slot-based features that were licensed will not be functional.
On upgrade to Fabric OS v7.0.0, any slot-based license that displayed the 10GbE operation name in
the earlier release displays instead as “10 Gigabit FCIP/Fibre Channel (FTR_10G) license.”
Assigning a license to a slot
1. Connect to the switch and log in using an account with admin permissions, or an account with
OM permissions in the license class of RBAC commands.
2. Enter the licenseSlotCfg -add command to add the license to the appropriate slot.
Removing a license from a slot
To remove a slot-based license from a blade slot, follow these steps:
1. Connect to the switch and log in using an account with admin permissions, or an account with
OM permissions in the license class of RBAC commands.
2. Deconfigure the application that uses the licensed feature on the blade slot.
3. Enter the licenseSlotCfg -remove command to remove the license from slot.
378
Fabric OS Administrator’s Guide
53-1002148-02
10G licensing
18
10G licensing
The 10 Gbps FCIP/Fibre Channel license (10G license) enables the following features:
• 10 Gbps access on the 16 Gbps FC ports on the Brocade 6510 switch, and the FC16-32 and
FC16-48 port blades. This feature is new in the Fabric OS v7.0.0 release.
• The two 10GbE ports on the FX8-24 extension blade. Before the Fabric OS v7.0.0 release, this
feature was enabled by the 10 GbE license.
This 10G license is applied as a slot-based license on the FC16-32 and FC16-48 port blades and
on the FX8-24 extension blade; generic rules for adding slot-based licenses apply, as described in
“Slot-based licensing” on page 377. When this license is applied to the Brocade 6510 switch, it is
applied to the whole chassis.
Whether you have a bladed (DCX, DCX-4S, DCX 8510-8, or DCX 8510-4) platform or nonbladed
(Brocade 6510) switch, you add the 10G license to the chassis using the LicenseAdd command, as
for any license.
For the bladed platforms, you can either allow automatic license assignment, or choose the blades
you want the licences assigned to manually, as for any slot-based license. Automatic assignment is
done sequentially by slot number, beginning with the lowest numbered slot with an enabled blade
that supports this feature (FX8-24, FC16-32, or FC16-48 blade), and that does not already have the
license applied. If the automatic license assignment does not match your needs, you can use the
licenseSlotCfg --remove and licenseSlotCfg --add commands to remove the license manually from a
slot and assign it to a different slot with an FX8-24, FC16-32, or FC16-48 blade.
The same multiple slot-based 10G license can be applied to a mixture of 16 Gbps blades and
FX8-24 blades. For example, if you have a 10G license for two slot capacity, and you have an
FX8-24 blade in one slot and a FC16-48 blade in a second slot, then the same license can activate
the 10GE ports on the FX8-24 blade and enable 10 Gbps operation on the 10G FC ports on the
FC16-48 blade.
After applying a 10G license to the Brocade 6510 chassis or to a 16 Gbps FC blade, you must also
configure the port octet (portCfgOctetSpeedCombo command) with the correct port octet speed
group and configure each port to operate at 10 Gbps (portCfgSpeed command). It is necessary to
configure the port octet because only certain combinations of port speeds are allowed within the
port octet. No license is required for the octet group. If the speed configuration operation succeeds
and a 10G-capable SFP is inserted in the port connector, the port will allow operation at 10Gbps
when the link becomes active at that speed.
NOTE
10 Gbps FC capability is restricted to the ports in the first port octet group on each blade or chassis
to which the license is applied.
Before removing a 10 Gbps license from an entire platform (licenseRemove command) or from a
specific blade (licenseSlotCfg --remove command), you must first deconfigure all affected FC ports
to no longer operate at 10Gbps.
NOTE
An FC port that is operating at 10G FC speed on a 16G FC blade or 16G FC switch does not need an
Extended Fabrics license to be used for FC long distance connectivity.
FC ports licensed and configured to operate at 10 Gbps on a Brocade 6510 switch or 16 Gbps FC
port blade cannot interoperate with 10 Gbps ports on an FC10-6 port blade or with 10 Gbps FC ports
on the Mc-6140 platform. The new FC ports use different protocols and physical connections.
Fabric OS Administrator’s Guide
53-1002148-02
379
18
10G licensing
Enabling 10 Gbps operation on an FC port
To enable 10 Gbps operation on an FC port on a Brocade 6510 switch or an FC16-32 or FC16-48
blade, follow these steps:
1. Connect to the switch and log in using an account with admin permissions, or an account with
OM permissions for the license and switchportconfiguration classes of RBAC commands.
2. Use the licenseAdd command to add the 10G license.
3. Bladed platforms only: Use the licenseShow command to check the results of automatic
license assignment. If the results are not what you intended, use the licenseSlotCfg command
to reassign the license to the desired blades.
4. Use the licenseShow command to verify the license.
5. Use the portCfgOctetSpeedCombo command to set the combination speed for the first port
octet to a setting that supports 10 Gbps operations. Valid settings for 10 Gbps operations
include:
• 2—autonegotiated or fixed port speeds of 10 Gbps, 8 Gbps,4 Gbps, and 2 Gbps
• 3—autonegotiated or fixed port speeds of 16 Gbps and 10 Gbps
6. Use the portCfgSpeed command to set the port speed on each port you want to operate at 10
Gbps.
Example of assigning a 10G license on an FC port blade and enabling 10 Gbps operation on a port
This example assigns a license to slot 4 on a DCX 8510-8 Backbone and enables 10 Gbps
operation on port 2 of the port blade in that slot. In this example, the 10G license was first
automatically assigned to slot 1.
8510-8switch:admin> licenseadd aTFPNFXGLmABANMGtT4LfSBJSDLWTYD3EFrr4WGAEMBA
8510-8switch:admin> licenseshow
aTFPNFXGLmABANMGtT4LfSBJSDLWTYD3EFrr4WGAEMBA
10 Gigabit FCIP/Fibre Channel (FTR_10G) license
Capacity 1
Consumed 1
Configured Blade Slots 1
8510-8switch:admin> licenseslotcfg -remove FTR_10G 1
8510-8switch:admin> licenseslotcfg -add FTR_10G 4
8510-8switch:admin> licenseshow
aTFPNFXGLmABANMGtT4LfSBJSDLWTYD3EFrr4WGAEMBA
10 Gigabit FCIP/Fibre Channel (FTR_10G) license
Capacity 1
Consumed 1
Configured Blade Slots 4
8510-8switch:admin> portcfgoctetspeedcombo 4/2 2
8510-8switch:admin> portcfgspeed 4/2 10
8510-8switch:admin>
Example of assigning a 10G license on a Brocade 6510 and enabling 10 Gbps operation on a port
This example assigns a license to the Brocade 6510 switch and enables 10 Gbps operation on port
2.
6510-switch:admin> licenseadd aTFPNFXGLmABANMGtT4LfSBJSDLWTYD3EFrr4WGAEMBA
6510-switch:admin> licenseshow
aTFPNFXGLmABANMGtT4LfSBJSDLWTYD3EFrr4WGAEMBA
10 Gigabit FCIP/Fibre Channel (FTR_10G) license
Capacity 1
Consumed 1
380
Fabric OS Administrator’s Guide
53-1002148-02
10G licensing
18
6510-switch:admin> portcfgoctetspeedcombo 2
6510-switch:admin> portcfgspeed 2 10
6510-switch:admin>
Enabling the 10 GbE ports on an FX8-24 blade
To enable the 10 GbE ports on an FX8-24 blade, follow these steps:
1. Connect to the Brocade enterprise-class platform and log in using an account with admin
permissions, or an account with OM permissions for the license class of RBAC commands.
2. Use the licenseAdd command to add the 10G license.
3. Use the licenseShow command to check the results of automatic license assignment. If the
results are not what you intended, use the licenseSlotCfg command to reassign the license to
the desired FX8-24 blades.
4. Use the licenseShow command to verify the license.
5. Use the bladeCfgGeMode --set <mode> command to configure the GbE port mode for the
FX8-24 blade. To enable the 10GbE ports, set the <mode> parameter to one of the following:
• 10g—enables both 10 GbE ports, disables all ten 1GbE ports.
• dual—enables the xge0 port (but not xge1) and also enables all ten 1 GbE ports.
Example of assigning a 10G license on an FX8-24 extension blade and enabling both 10 GbE ports
This example assigns a license to slot 7 on a DCX 8510-4 Backbone and enables both 10 GbE
ports on the FX8-24 blade in that slot. In this example, the license was first automatically assigned
to slot 1.
8510-4switch:admin> licenseadd aTFPNFXGLmABANMGtT4LfSBJSDLWTYD3EFrr4WGAEMBA
8510-4switch:admin> licenseshow
aTFPNFXGLmABANMGtT4LfSBJSDLWTYD3EFrr4WGAEMBA
10 Gigabit FCIP/Fibre Channel (FTR_10G) license
Capacity 1
Consumed 1
Configured Blade Slots 1
8510-4switch:admin> licenseslotcfg -remove FTR_10G 1
8510-4switch:admin> licenseslotcfg -add FTR_10G 7
8510-4switch:admin> licenseshow
aTFPNFXGLmABANMGtT4LfSBJSDLWTYD3EFrr4WGAEMBA
10 Gigabit FCIP/Fibre Channel (FTR_10G) license
Capacity 1
Consumed 1
Configured Blade Slots 7
8510-4switch:admin> bladecfggemode --set 10G -slot 7
8510-4switch:admin> switchshow -slot 7
…
158
7
30
019e00
--Offline
VE
159
7
31
019f00
--Offline
VE
7 ge0
-1G
No_Module FCIP Disabled (10G Mode)
7 ge1
-1G
No_Module FCIP Disabled (10G Mode)
7 ge2
-1G
No_Module FCIP Disabled (10G Mode)
7 ge3
-1G
No_Module FCIP Disabled (10G Mode)
7 ge4
-1G
No_Module FCIP Disabled (10G Mode)
7 ge5
-1G
No_Module FCIP Disabled (10G Mode)
7 ge6
-1G
No_Module FCIP Disabled (10G Mode)
7 ge7
-1G
No_Module FCIP Disabled (10G Mode)
Fabric OS Administrator’s Guide
53-1002148-02
381
18
Time-based licenses
7 ge8
7 ge9
7 xge0
7 xge1
-----
1G
1G
10G
10G
No_Module
No_Module
No_Module
No_Module
FCIP
FCIP
FCIP
FCIP
Disabled (10G Mode)
Disabled (10G Mode)
Time-based licenses
A Time-based license applies a try-before-you-buy approach to certain features so that you can
experience the feature and its capabilities prior to buying the license. Once you have installed the
license, you are given a time limit to use the feature. The following lists the types of licenses that
have this time-based trial feature:
•
•
•
•
•
•
•
•
•
•
•
10 Gigabit FCIP/Fibre Channel license
Advanced Extension
Advanced FICON Acceleration license
Adaptive Networking
Advanced Performance Monitoring
Fabric
Fabric Watch
Extended Fabric
High Performance Extension over FCIP/FC
Integrated Routing
Trunking
Once the Time-base license is installed you cannot change the time of the switch until the
Time-based license is removed. To change the time, you must remove the license, change the date,
and then re-install the license on the switch. However, if there is any other mechanism that exists to
change time, such as NTP, then it is not blocked. If you are using NTP to synchronize the time
between your network devices, including switches or enterprise-class platforms, then do not
attempt to change system date and time when a time-based license is installed.
Configupload and download considerations
The configDownload and configUpload commands download the legacy, enhanced, consumed
capacities, and time-based licenses.
Expired licenses
Once a Time-based license has expired, you can view it through the licenseShow command.
Expired licenses have an output string of ‘License has expired’. RASlog warning messages are
generated every hour for licenses present in the database which have expired or which are going to
expire in the next five days. An expired license might become unusable after a reboot, failover,
firmware download, or a port or switch disable/enable operation.
382
Fabric OS Administrator’s Guide
53-1002148-02
Universal Time-based licenses
18
Removing an expired license
CAUTION
The following procedure is disruptive to the switch.
1. Connect to the switch and log in using an account with admin permissions.
2. Enter the reboot command for the expiry to take affect.
Universal Time-based licenses
Universal Time-based licenses behave the same way as the Time-based temporary licenses
supported in prior Fabric OS versions. Prior to Fabric OS v6.3.0 release, when a Time-based
temporary license for a feature expires, the general policy is to allow the feature to continue
working while generating warning messages until the switch is either reset or a CP failover occurs,
at which time the feature will no longer work. When an expired license is replaced with a new
license (permanent, or another time-based license) the warning messages cease (if no
reset/failover has already happened since expiration) and, if a reset/failover has happened, the
feature will work again. This behavior is also applicable to Universal Time-based Licenses.
Universal Time-based license expiration date
Unlike prior temporary licenses that have a specific expiration date encoded in them, Universal
Time-based license keys include a duration period. Once installed on a switch, an expiration date is
calculated and the duration is decremented until there is no remaining time, at which point it is
expired. Because of this, Universal Time-based licenses should not be installed on a switch until
you are ready to use or test the feature, so as not to unnecessarily consume a portion of the
temporary use duration.
The expiration date is based on the system time at the installation of the license plus the number
of days that the Universal Time-based license is valid for. Universal Time-based licenses cannot be
removed and reinstallation of the same Universal Time-based license on the same switch is not
permitted.
Extending a license
Extending a Universal Time-based license is done by adding a temporary license with expiry date
after the Universal Time-based license expiry date, or by adding a permanent license. Re-applying
an existing Universal Time-based license is not allowed.
Deleting a license
Universal Time-based licenses are always retained in the license database on the product even
though they can be explicitly deleted from any user interface.
Fabric OS Administrator’s Guide
53-1002148-02
383
18
Viewing installed licenses
Date change restriction
Once temporary licenses (including Universal Time-based licenses) are installed, you are not
allowed to change the system date. If there is a need to change the date, you are expected to
remove the time-based licenses and then change the date.
Universal Time-based license shelf life
All Universal Time-based licenses are encoded with a “shelf life” expiration date. Once this date is
reached, the time-based license can no longer be used on a switch. This expiration of the Universal
Time-based license key provides a mechanism to discontinue offering of a particular feature.
Viewing installed licenses
1. Connect to the switch and log in using an account with admin permissions.
2. Enter the licenseShow command.
Activating a license
The transaction key is case-sensitive; it must be entered exactly as it appears in the paperpack. To
lessen the chance of error, copy and paste the transaction key. The quotation marks are optional.
1. Take the appropriate following action based on whether you have a license key:
• If you have a license key, go to “Adding a licensed feature”.
• If you do not have a license key and are using a transaction key, launch an Internet
browser and go to the Brocade website at http://www.brocade.com.
2. Select Products > Software License Keys.
The Software License Keys instruction page appears.
3. Enter the requested information in the required fields and click Next.
A verification screen appears.
4. Verify the information appears correctly.
Click Submit if the information displayed is correct. If the information is incorrect, click
Previous, correct the information, and click Submit.
An information screen displays the license keys and you will receive an e-mail with the software
license keys and installation instructions.
Adding a licensed feature
To enable a feature, go to the feature’s appropriate section in this manual. Enabling a feature on a
switch may be a separate task from adding the license.
384
Fabric OS Administrator’s Guide
53-1002148-02
Removing a licensed feature
18
For the Brocade enterprise-class platforms, licenses are effective on both CP blades, but are valid
only when the CP blade is inserted into an enterprise-class platform that has an appropriate license
ID stored in the WWN card. If a CP is moved from one enterprise-class platform to another, the
license works in the new enterprise-class platform only if the WWN card is the same in the new
enterprise-class platform. Otherwise, you must transfer licenses from the old platform to the new
platform by obtaining new licenses for the previously licensed features using the new license ID.
For example, if you swap one CP blade at a time, or replace a single CP blade, then the existing CP
blade (the active CP blade) propagates the licenses to the new CP blade if the WWN card has been
moved to the new platform.
If you move a standby CP from one enterprise-class platform to another, then the active CP will
propagate its configuration (including license keys) onto that standby CP.
1. Connect to the switch and log in using an account with admin permissions.
2. Activate the license using the licenseAdd command.
3. Verify the license was added by entering the licenseShow command. The licensed features
currently installed on the switch are listed. If the feature is not listed, enter the licenseAdd
command again.
Some features may require additional configuration, or you may need to disable and re-enable
the switch to make them operational; see the feature documentation for details.
switch:admin> licenseshow
aAYtMJg7tmMZrTZ9JTWBC4SXWLJMY3QfBJYHG:
Fabric license
Remote Switch license
Remote Fabric license
Extended Fabric license
Entry Fabric license
Fabric Watch license
Performance Monitor license
Trunking license
4 Domain Fabric license
FICON_CUP license
High-Performance Extension over FCIP/FC license
Full Ports on Demand license - additional 16 port upgrade license
2 Domain Fabric license
Integrated Routing license
Storage Application Services license
FICON Tape license
FICON XRC license
Adaptive Networking license
Inter Chassis Link license
Enhanced Group Management license
8 Gig FC license
DataFort Compatibility license
Server Application Optimization license
Removing a licensed feature
1. Connect to the switch and log in using an account with admin permissions.
2. Enter the licenseShow command to display the active licenses.
Fabric OS Administrator’s Guide
53-1002148-02
385
18
Ports on Demand
3. Remove the license key using the licenseRemove command.
The license key is case-sensitive and must be entered exactly as given. The quotation marks
are optional. After removing a license key, the licensed feature is disabled when the switch is
rebooted or when a switch disable and enable is performed.
4. Enter the licenseShow command to verify the license is disabled.
switch:admin> licenseshow
bQebzbRdScRfc0iK:
Entry Fabric license
Fabric Watch license
SybbzQQ9edTzcc0X:
Fabric license
switch:admin> licenseremove "bQebzbRdScRfc0iK"
removing license key "bQebzbRdScRfc0iK"
Only the remaining licenses appear:
switch:admin> licenseshow
SybbzQQ9edTzcc0X:
Fabric license
If there are no license keys, licenseShow displays “No licenses.”
Ports on Demand
The Brocade models in the following list can be purchased with the number of licensed ports
indicated. As your needs increase, you can activate unlicensed ports up to a particular maximum
by purchasing and installing the optional Ports on Demand licensed product:
Brocade 300—Can be purchased with eight ports and no E_Port, eight ports with full fabric access,
or 16 ports with full fabric access. A maximum of 16 ports is allowed; eight-port systems can be
upgraded in four-port increments. An E_Port license upgrade is also available for purchase.
Brocade 5000—Can be purchased with 16, 24, or 32 licensed ports. A maximum of 32 ports is
allowed.
Brocade 5100—Can be purchased with 24, 32, or 40 licensed ports. A maximum of 40 ports is
allowed.
Brocade 5300—Can be purchased with 48, 64, or 80 licensed ports. A maximum of 80 ports is
allowed.
Brocade 6510—Can be purchased with a maximum of 48 licensed ports. Configurations can be 24,
36, or 48 licensed ports.
Brocade 8000—Must have license installed to enable the 8 FC ports. A maximum of 8 ports are
allowed.
Brocade VA-40FC—Can be purchased with 24, 32, or 40 licensed ports. A maximum of 40 ports is
allowed.
ATTENTION
Licenses are not interchangeable between units. For example, if you bought a POD license for a
Brocade 300, you cannot use that license on a Brocade 5100 or VA-40FC. The licenses are based
on the switches' License Identifiers and are not interchangeable.
386
Fabric OS Administrator’s Guide
53-1002148-02
Ports on Demand
18
Table 68 shows the ports that are enabled by default and the ports that can be enabled after you
install the first and second Ports on Demand licenses for each switch type.
TABLE 68
List of available ports when implementing PODs
Platform
Available user ports
No POD license
POD1 or POD2 present
Both POD licenses present
Brocade 300
0-7
0-15
0-23
Brocade 5100
0-23
0-31
0-39
Brocade 5300
0-47
0-63
0-79
Brocade 5410
0-11
n/a
0-11
Brocade 5424
1-8 and 17-20
POD1: 0, 9-16, and 21-23
0-23
Brocade 5450
1-10 and 19-22
POD1: 0, 11-18, and 23-25 0-25
Brocade 5480
1-8 and 17-20
POD1: 9-12 and 21-22
POD2: 0, 13-16, and 23
0-23
Brocade 6510
0-23
0-35
0-47
Brocade 8000
24 Gbe
24 Gbe and 8 FC
24 Gbe and 8 FC
Brocade VA-40FC
0-23
0-31
0-39
Ports on Demand is ready to be unlocked in the switch firmware. Its license key may be part of the
licensed paperpack supplied with switch software, or you can purchase the license key separately
from your switch vendor. You may need to generate a license key from a transaction key supplied
with your purchase. If so, launch an Internet browser and go to the Brocade website at
http://www.brocade.com. Click Products > Software Products > Software License Keys and follow
the instructions to generate the key.
Each Ports on Demand license activates the next group of ports in numerical order in either
four-port or 8- or 12-port increments, depending on the model. Before installing a license key, you
must insert transceivers in the ports to be activated. Remember to insert the transceivers in the
lowest group of inactive port numbers first. For example, if only 16 ports are currently active and
you are installing one Ports on Demand license key, make sure to insert the transceivers in ports
16 through 23. If you later install a second license key, insert the transceivers in ports 24 through
31. For details on inserting transceivers, see the switch’s hardware reference manual.
Displaying installed licenses
If a single license is installed that enables all Ports on Demand, the license will display as “Full
Ports on Demand license - additional X port upgrade license.” If there are other individual Ports on
Demand licenses installed, these will also be displayed when listing the licenses for a switch, and
you will see either “First Ports on Demand license - additional Y port upgrade license” or “Second
Ports on Demand license - additional Z port upgrade license.” In cases where there are multiple
Ports on Demand licenses, the total additional allowed ports will not exceed the total displayed for
the “Full Ports on Demand” license.
1. Connect to the switch and log in using an account with admin permissions.
2. Enter the licenseshow command.
switch:admin> licenseshow
SdSSc9SyRSTuTTdz:
First Ports on Demand license - additional 16 port upgrade license
Fabric OS Administrator’s Guide
53-1002148-02
387
18
Ports on Demand
SdSSc9SyRSTeXTdn:
Second Ports on Demand license - additional 16 port upgrade license
SdSSc9SyRSTuXTd3:
Full Ports on Demand license - additional 32 port upgrade license
ATTENTION
If you enable or disable an active port you will disrupt any traffic and potentially lose data flowing on
that port.
If the port is connected to another switch, you will segment the switch from the fabric and all traffic
flowing between the disabled port and the fabric will be lost.
If you remove a Ports on Demand license, the licensed ports will become disabled after the next
platform reboot or the next port deactivation.
Activating Ports on Demand
1. Connect to the switch and log in using an account with admin permissions.
2. Verify the current states of the ports, using the portShow command.
In the portShow output, the Licensed field indicates whether the port is licensed.
3. Install the Brocade Ports on Demand license.
For instructions on how to install a license, see “Adding a licensed feature” on page 384.
4. Use the portEnable command to enable the ports.
Alternatively, you can disable and re-enable the switch to activate ports.
5. Use the portShow command to check the newly activated ports.
Dynamic Ports on Demand
The Brocade 5410, 5424, 5450, 5460, 5470, and 5480 embedded switches modules are for
bladed servers. These switches support the Dynamic Ports on Demand (POD) feature. The Dynamic
POD feature automatically assigns POD licenses from a pool of available licenses based on the
server blade installation.
The Dynamic POD feature detects and assigns ports to a POD license only if the server blade is
installed with an HBA present. A server blade that does not have a functioning HBA is treated as an
inactive link during initial POD port assignment.
The Dynamic POD feature assigns the ports to the POD license as they come online. Typically,
assignments are sequential, starting with the lowest port number. However, variations in the
equipment attached to the ports can cause the ports to take different amounts of time to come
online. This means that the port assignment order is not guaranteed.
If the switch detects more active links than allowed by the current POD licenses, then some ports
will not be assigned a POD license. Ports that do not receive a POD assignment have a state of No
Sync or In Sync; these ports are not allowed to progress to the online state. Ports that cannot be
brought online because of insufficient POD licenses have a state of (No POD License) Disabled. You
can use the switchShow command to display the port states.
388
Fabric OS Administrator’s Guide
53-1002148-02
Ports on Demand
18
Displaying the port license assignments
When you display the available licenses, you can also view the current port assignment of those
licenses.
1. Connect to the switch and log in using an account with admin permissions.
2. Enter the licensePort --show command.
Example showing manually assigned POD licenses.
switch:admin> licenseport --show
24 ports are available in this switch
Full POD license is installed
Dynamic POD method is in use
24 port assignments are provisioned for use in this switch:
12 port assignments are provisioned by the base switch license
12 port assignments are provisioned by a full POD license
24 ports are assigned to installed licenses:
12 ports are assigned to the base switch license
12 ports are assigned to the full POD license
Ports assigned to the base switch license:
1, 2, 3, 4, 5, 6, 7, 8, 17, 18, 19, 20
Ports assigned to the full POD license:
0, 9, 10, 11, 12, 13, 14, 15, 16, 21, 22, 23
Enabling Dynamic Ports on Demand
If the switch is in the Static POD mode, then activating the Dynamic POD will erase any prior port
license assignments the next time the switch is rebooted. The static POD assignments become the
initial Dynamic POD assignments. After the Dynamic POD feature is enabled, you can customize
the POD license associations.
The Dynamic POD feature is supported on the Brocade 4016, 4018, 4020, and 4024 switch
modules only.
1. Connect to the switch and log in using an account with admin permissions.
2. Enter the licensePort --method command with the dynamic option to change the license
assignment method to dynamic.
switch:admin> licenseport --method dynamic
The POD method has been changed to dynamic.
Please reboot the switch now for this change to take effect.
3. Enter the reboot command to restart the switch.
switch:admin> reboot
4. Enter the licensePort --show command to verify the switch started the Dynamic POD feature.
switch:admin> licenseport --show
24 ports are available in this switch
Full POD license is installed
Dynamic POD method is in use
24 port assignments are provisioned for use in this switch:
12 port assignments are provisioned by the base switch license
12 port assignments are provisioned by a full POD license
8 ports are assigned to installed licenses:
8 ports are assigned to the base switch license
0 ports are assigned to the full POD license
Fabric OS Administrator’s Guide
53-1002148-02
389
18
Ports on Demand
Ports assigned to the base switch license:
1, 2, 5, 6, 8*, 21, 22, 23
Ports assigned to the full POD license:
None
Ports not assigned to a license:
0, 3, 4, 7, 9, 10, 11, 12, 13, 14, 15, 16, 17, 18, 19, 20
16 license reservations are still available for use by unassigned ports
1 license assignment is held by an offline port (indicated by *)
Disabling Dynamic Ports on Demand
Disabling the Dynamic POD feature changes the POD method to static and erases any prior port
license associations or assignments the next time the switch is rebooted.
1. Connect to the switch and log in using an account with admin permissions. Enter the
licensePort --method command with the static option to change the license assignment
method to static.
switch:admin> licenseport --method static
The POD method has been changed to static.
Please reboot the switch now for this change to take effect.
2. Enter the reboot command to restart the switch.
3. Enter the licensePort --show command to verify the switch started the Static POD feature.
switch:admin> licenseport --show
24 ports are available in this switch
Full POD license is installed
Dynamic POD method is in use
24 port assignments are provisioned for use in this switch:
12 port assignments are provisioned by the base switch license
12 port assignments are provisioned by a full POD license
24 ports are assigned to installed licenses:
12 ports are assigned to the base switch license
12 ports are assigned to the full POD license
Ports assigned to the base switch license:
1, 2, 3, 4, 5, 6, 7, 8, 17, 18, 19, 20
Ports assigned to the full POD license:
0, 9, 10, 11, 12, 13, 14, 15, 16, 21, 22, 23
Reserving a port license
You can allocate licenses by reserving and releasing POD assignments to specific ports. Disabled
ports are not candidates for automatic license assignment by the Dynamic POD feature.
Persistently disable an otherwise viable port to prevent it from coming online, and thereby preserve
a license assignment for another port.
Reserving a license for a port assigns a POD license to that port whether the port is online or
offline. That license will not be available to other ports that come online before the specified port.
To allocate licenses to a specific port instead of automatically assigning them as the ports come
online, reserve a license for the port. The port receives a POD assignment if any are available.
390
Fabric OS Administrator’s Guide
53-1002148-02
Ports on Demand
18
1. Connect to the switch and log in using an account with admin permissions.
2. Enter the licensePort --show command to verify there are port reservations available.
switch:admin> licenseport --show
24 ports are available in this switch
Full POD license is installed
Dynamic POD method is in use
24 port assignments are provisioned for use in this switch:
12 port assignments are provisioned by the base switch license
12 port assignments are provisioned by a full POD license
10 ports are assigned to installed licenses:
10 ports are assigned to the base switch license
0 ports are assigned to the full POD license
Ports assigned to the base switch license:
1*, 2*, 3*, 4*, 5*, 6*, 8*, 21, 22, 23
Ports assigned to the full POD license:
None
Ports not assigned to a license:
0, 7, 9, 10, 11, 12, 13, 14, 15, 16, 17, 18, 19, 20
3. Take the following appropriate action based on whether port reservations are available:
• If a port reservation is available, then issue the licensePort --reserve command to reserve
a license for the port.
switch:admin> licenseport -reserve 0
• If all port reservations are assigned, select a port to release its POD license. Follow the
instructions in “Releasing a port from a POD set” to release a port from its POD
assignment. Once the port is released, you can reserve it.
Releasing a port from a POD set
Releasing a port removes it from the POD set; the port appears as unassigned until it comes back
online. Persistently disabling the port ensures that the port cannot come back online and be
automatically assigned to a POD assignment. Before you can re-assign a license, you must disable
the port and release the license.
After a port is assigned to the POD set, the port is licensed until it is manually removed from the
POD port set. When a port is released from its POD port set (Base, Single, or Double), it creates a
vacancy in that port set.
1. Connect to the switch and log in using an account with admin permissions.
2. Enter the switchDisable command to take the switch offline.
switch:admin> switchdisable
3. Enter the switchShow command to verify the switch state is offline.
4. Enter the licensePort --release command to remove the port from the POD license.
switch:admin> licenseport --release 0
5. Enter the licensePort --show command to verify the port is no longer assigned to a POD set.
switch:admin> licenseport --show
24 ports are available in this switch
Full POD license is installed
Dynamic POD method is in use
24 port assignments are provisioned for use in this switch:
Fabric OS Administrator’s Guide
53-1002148-02
391
18
Ports on Demand
12 port assignments are provisioned by the base switch license
12 port assignments are provisioned by a full POD license
10 ports are assigned to installed licenses:
10 ports are assigned to the base switch license
0 ports are assigned to the full POD license
Ports assigned to the base switch license:
1*, 2*, 3*, 4*, 5*, 6*, 8*, 21, 22, 23
Ports assigned to the full POD license:
None
Ports not assigned to a license:
0, 7, 9, 10, 11, 12, 13, 14, 15, 16, 17, 18, 19, 20
6. Enter the switchEnable command to bring the switch back online.
7.
392
Enter the switchShow command to verify the switch state is now online.
Fabric OS Administrator’s Guide
53-1002148-02
Chapter
19
Monitoring Fabric Performance
In this chapter
• Advanced Performance Monitoring overview . . . . . . . . . . . . . . . . . . . . . . .
• End-to-end performance monitoring . . . . . . . . . . . . . . . . . . . . . . . . . . . . . .
• Frame monitoring . . . . . . . . . . . . . . . . . . . . . . . . . . . . . . . . . . . . . . . . . . . . .
• Top Talker monitors . . . . . . . . . . . . . . . . . . . . . . . . . . . . . . . . . . . . . . . . . . . .
• Trunk monitoring . . . . . . . . . . . . . . . . . . . . . . . . . . . . . . . . . . . . . . . . . . . . . .
• Saving and restoring monitor configurations. . . . . . . . . . . . . . . . . . . . . . . .
• Performance data collection. . . . . . . . . . . . . . . . . . . . . . . . . . . . . . . . . . . . .
393
395
400
404
409
409
410
Advanced Performance Monitoring overview
Advanced Performance Monitoring is a licensed feature that provides a comprehensive tool for
monitoring the performance of networked storage resources. Additional performance monitoring
features, such as CRC error reports, are provided through Web Tools and Brocade Network Advisor.
See the Web Tools Administrator’s Guide and Brocade Network Advisor User Manual for
information about monitoring performance using a graphical interface.
Advanced Performance Monitor commands are available only to users with admin permissions.
Use the perfhelp command to display a list of commands associated with Advanced Performance
Monitoring.
NOTE
The command examples in this chapter use the slot/port syntax required by enterprise-class
platforms. For fixed-port switches, use only the port number where needed in the commands.
Types of monitors
Advanced Performance Monitoring provides the following monitors:
• End-to-End monitors (EE monitors) measure the traffic between a host/target pair.
• Frame monitors measure the traffic transmitted through a port with specific values in the first
64 bytes of the frame.
• Top Talker monitors measure the flows that are major consumers of bandwidth on a switch or
port.
Fabric OS Administrator’s Guide
53-1002148-02
393
19
Advanced Performance Monitoring overview
Restrictions for installing monitors
• Advanced Performance Monitoring is not supported on VE_Ports and EX_Ports. If you issue
commands for any Advanced Performance Monitors on VE_Ports or EX_Ports you will receive
error messages.
• For the Brocade 8000, performance monitoring is supported only on the FC ports and not on
the CEE ports.
• All monitor types are allowed only on physical ports.
• Top Talker and EE monitors on E_Ports should be installed only in the ingress direction.
Virtual Fabrics considerations for Advanced Performance Monitoring
In a fabric with Virtual Fabrics enabled, the number of logical switches that can be configured with
monitors is restricted. Table 69 lists the platforms that support logical switches and, for each
platform, the maximum number of logical switches that can support performance monitors.
TABLE 69
Number of logical switches that support performance monitors
Platform
Maximum number of logical switches supported
Maximum number of logical switches on which
monitors are supported
Brocade DCX
Brocade DCX-4S
Brocade 8510 family
8
4
Brocade 6510
4
4
Brocade 5100
Brocade VA-40FC
3
3
Brocade 5300
4
3
Each logical switch can have its own set of performance monitors. The installation of monitors is
restricted to the ports that are present in the respective logical switch.
• Top Talker and EE monitors are supported on the default logical switch, the base switch, and
user-defined logical switches.
• Frame monitors are not supported on logical ISLs (LISLs) in user-defined logical switches.
If a port is moved from one logical switch to another, the behavior of monitors installed on that port
is as follows:
• Frame monitor: Any frame monitors on the port are deleted. To keep the frame monitor, the
monitor must be manually installed on the port after the move.
• Top Talker (fabric mode): If fabric mode Top Talkers is enabled on the logical switch, a fabric
mode Top Talker monitor is automatically installed on the port after it is moved to the logical
switch.
• Top Talker (port mode): Any port mode Top Talker monitors on the port are deleted. To keep the
port mode Top Talker monitor, the monitor must be manually installed on the port after the
move.
394
Fabric OS Administrator’s Guide
53-1002148-02
End-to-end performance monitoring
19
Access Gateway considerations for Advanced Performance Monitoring
EE monitors and frame monitors are supported on switches in Access Gateway mode. Top Talker
monitors are not supported on these switches.
EE monitors must be installed on F_Ports. Frame monitors can be installed on F_Ports or N_Ports.
See the Access Gateway Administrator’s Guide for additional information.
End-to-end performance monitoring
Use end-to-end monitoring when you want to monitor throughput between a pair of devices.
End-to-end performance monitoring counts the number of words in Fibre Channel frames for a
specified Source ID (SID) and Destination ID (DID) pair.
To enable end-to-end performance monitoring, you must configure an EE monitor on a port,
specifying the SID-DID pair (in hexadecimal). The monitor counts only those frames with matching
SID and DID.
Each SID or DID has the following three fields:
• Domain ID (DD)
• Area ID (AA)
• AL_PA (PP)
For example, the SID 0x118a0f denotes DD 0x11, AA 0x8a, and AL_PA 0x0f.
An EE monitor includes these counts:
• RX_COUNT - words in frames received at the port
For frames received at the port with the EE monitor installed, the RX_COUNT is updated if the
frame SID is the same as the SID in the monitor and the frame DID is the same as the DID in
the monitor.
• TX_COUNT - words in frames transmitted from the port
For frames transmitted from the port with the EE monitor installed, TX_COUNT is updated if the
frame DID is the same as the SID in the monitor and the frame SID is the same as the DID in
the monitor.
Maximum number of EE monitors
The maximum number of end-to-end monitors supported varies depending on the switch model:
• The Brocade DCX, DCX-4S, DCX 8510, 5100, 6510, 8000, VA-40FC, and Brocade Encryption
Switch models allow up to 1024 end-to-end monitors shared by all ports in the same ASIC chip.
• The Brocade 300, 5300, 5410, 5424, 5450, 5460, 5470, 5480, and 7800 models allow up to
768 end-to-end monitors shared by all ports in the same ASIC chip.
The number of interswitch links (ISLs) configured on the switch affects the amount of resources
available for end-to-end monitors.
Virtual Fabrics considerations: If Virtual Fabrics is enabled, the Brocade DCX, DCX-4S, DCX 8510
and 5300 models allow up to 256 end-to-end monitors on one logical switch. The Brocade 5100,
6510, and VA-40FC allow up to 337 end-to-end monitors on one logical switch.
Fabric OS Administrator’s Guide
53-1002148-02
395
19
End-to-end performance monitoring
Supported port configurations for EE monitors
You can configure EE monitors on F_Ports and, depending on the switch model, on E_Ports. The
following platforms support EE monitors on E_Ports:
• Brocade 6510
• Brocade DCX 8510 family
Identical EE monitors cannot be added to the same port. Two EE monitors are considered identical
if they have the same SID and DID values after applying the end-to-end mask.
An EE monitor and a port Top Talker monitor cannot co-exist on the same port.
Co-existence of EE monitors and Top Talker monitors on ports belonging to the same ASIC is not
recommended because the statistics for the same flow going through ports on the same ASIC
might be inaccurate.
Adding end-to-end monitors
1. Connect to the switch and log in as admin.
2. Enter the following command:
perfaddeemonitor [slotnumber/]portnumber sourceID destID
When you add an EE monitor to a port, specify the sourceID and destID in the ingress direction. For
example, Figure 63 shows two devices:
• Host A is connected to domain 1 (0x01), switch area ID 18 (0x12), AL_PA 0x00.
• Dev B is a storage device connected to domain 2 (0x02), switch area ID 30 (0x1e), AL_PA
0x00.
Host A
F_Port
2
E_Port
Domain 1
E_Port
13
3
F_Port
Domain 2
14
DID = 0x021e00
SID = 0x011200
Monitor 1
FIGURE 63
Dev B
Monitor 2
Monitor 3
Monitor 4
Setting end-to-end monitors on a port
End-to-end performance monitoring looks at traffic on SID/DID pairs in any direction. That is, even
if the SID is for a remote device, the traffic is monitored in both directions (the Tx/Rx counters are
reversed).
Example of monitoring the traffic from Host A to Dev B
On Domain 1, add a monitor to the F_Port, as follows:
switch:admin> perfaddeemonitor 2/2 "0x011200" "0x021e00"
This monitor (Monitor 1) counts the frames that have an SID of 0x011200 and a DID of 0x021e00.
For Monitor 1, RX_COUNT is the number of words from Host A to Dev B, and TX_COUNT is the
number of words from Dev B to Host A.
396
Fabric OS Administrator’s Guide
53-1002148-02
End-to-end performance monitoring
19
Example of monitoring the traffic from Dev B to Host A
On Domain 2, add a monitor to the F_Port as follows:
switch:admin> perfaddeemonitor 2/14 "0x021e00" "0x011200"
This monitor (Monitor 4) counts the frames that have an SID of 0x021e00 and a DID of 0x011200.
For Monitor 4, RX_COUNT is the number of words from Dev B to Host A, and TX_COUNT is the
number of words from Host A to Dev B.
The E_Port monitors are configured similar to the F_Port monitors, but the ingress and egress
directions are reversed.
For Monitor 2:
switch:admin> perfaddeemonitor 2/3 "0x021e00" "0x011200"
For Monitor 3:
switch:admin> perfaddeemonitor 2/13 "0x011200" "0x021e00"
Setting a mask for an end-to-end monitor
End-to-end monitors count the number of words in Fibre Channel frames that match a specific
SID/DID pair. If you want to match only part of the SID or DID, you can set a mask on the port to
compare only certain parts of the SID or DID. By default, the frame must match the entire SID and
DID to trigger the monitor. By setting a mask, you can choose to have the frame match only one or
two of the three fields (Domain ID, Area ID, and AL_PA) to trigger the monitor.
You specify the masks in the form dd:aa:pp, where dd is the domain ID mask, aa is the area ID
mask, and pp is the AL_PA mask. The values for dd, aa, and pp are either ff (the field must match)
or 00 (the field is ignored). The default EE mask value is ff:ff:ff.
NOTE
Only one mask per port can be set. When you set a mask, all existing end-to-end monitors are
deleted.
End-to-end masks are supported only on the Brocade 8000, and Brocade Encryption Switch.
1. Connect to the switch and log in as admin.
2. Enter the perfSetPortEEMask command.
perfsetporteemask [slotnumber/]portnumber "TxSIDMsk" "TxDIDMsk" "RxSIDMsk"
"RxDIDMsk"
The perfSetPortEEMask command sets the mask for all end-to-end monitors of a port. If any
end-to-end monitors are programmed on a port when the perfSetPortEEMask command is issued,
then a message displays similar to the following example:
switch:admin> perfsetporteemask 1/2, "00:ff:ff"
Changing EE mask for this port will cause ALL EE monitors on this port to be
deleted.
Continue? (yes, y, no, n): [no] y
The EE mask on port 2 is set and EE monitors on this port are deleted
The perfSetPortEEMask command sets a mask for the Domain ID, Area ID, and AL_PA of the SIDs
and DIDs for frames transmitted from and received by the port.
Fabric OS Administrator’s Guide
53-1002148-02
397
19
End-to-end performance monitoring
Figure 64 shows the mask positions in the command. A mask (“ff”) is set on slot 1, port 2 to
compare the AL_PA fields on the SID and DID in all frames (transmitted and received) on port 2.
The frame SID and DID must match only the AL_PA portion of the specified SID-DID pair. Each port
can have only one EE mask. The mask is applied to all end-to-end monitors on the port. Individual
masks for each monitor on the port cannot be specified.
Transmitted from port
SID mask
DID mask
Received by port
SID mask
DID mask
perfsetporteemask 1/2, "00:ff:ff" "00:ff:ff" "00:ff:ff" "00:ff:ff"
AL_PA mask
Area ID mask
Domain ID mask
FIGURE 64
Mask positions for end-to-end monitors
Deleting end-to-end monitors
1. Connect to the switch and log in as admin.
2. Enter the perfMonitorShow command to list the valid end-to-end monitor numbers for a port.
3. Enter the perfDelEEMonitor command to delete a specific monitor.
If you do not specify which monitor number to delete, you are asked if you want to delete all
entries.
Example
The following example displays the end-to-end monitors on port 0 (the monitor numbers are listed
in the KEY column) and deletes monitor number 2 on port 0:
switch:admin> perfmonitorshow --class EE 0
There are 4 end-to-end monitor(s) defined on port
0.
KEY
SID
DID
OWNER_APP
TX_COUNT
RX_COUNT
OWNER_IP_ADDR
-------------------------------------------------------------------------------------0 0x000024 0x000016 WEB_TOOLS
0x0000000000000000 0x0000000000000000 10.106.7.179
1 0x000022 0x000033 WEB_TOOLS
0x0000000000000000 0x0000000000000000 10.106.7.179
2 0x000123 0x000789 WEB_TOOLS
0x0000000000000000 0x0000000000000000 10.106.7.179
3 0x001212 0x003434 WEB_TOOLS
0x0000000000000000 0x0000000000000000 10.106.7.179
switch:admin> perfdeleemonitor 0, 2
End-to-End monitor number 2 deleted
Displaying end-to-end monitor counters
You can use this procedure display the end-to-end monitors on a specified port. You can display
either the cumulative count of the traffic detected by the monitors or a snapshot of the traffic at
specified intervals.
1. Connect to the switch and log in as admin.
2. Enter the perfmonitorshow command.
perfmonitorshow --class monitor_class [slotnumber/]portnumber [interval]
398
Fabric OS Administrator’s Guide
53-1002148-02
End-to-end performance monitoring
19
Example of displaying an end-to-end monitor on a port at 10-second intervals
switch:admin> perfMonitorShow --class EE 4/5 10
Showing EE monitors 4/5 10: Tx/Rx are # of bytes
0
1
2
3
4
--------- --------- --------- --------- --------Tx
Rx
Tx
Rx
Tx
Rx
Tx
Rx
Tx
Rx
========= ========= ========= ========= =========
0
0
0
0
0
0
0
0
0
0
53m 4.9m 53m 4.9m 53m 4.9m 53m 4.9m 53m 0
53m 4.4m 53m 4.4m 53m 4.4m 53m 4.4m 53m 0
53m 4.8m 53m 4.8m 53m 4.8m 53m 4.8m 53m 0
53m 4.6m 53m 4.6m 53m 4.6m 53m 4.6m 53m 0
53m 5.0m 53m 5.0m 53m 5.0m 53m 5.0m 53m 0
53m 4.5m 53m 4.5m 53m 4.5m 53m 4.5m 53m 0
Example of displaying EE monitors on a port
switch:admin> perfMonitorShow --class EE 4/5
There are 7 end-to-end monitor(s) defined on port 53.
KEY
SID
DID
OWNER_APP TX_COUNT
RX_COUNT
OWNER_IP_ADDR
-----------------------------------------------------------------------------------------0 0x58e0f 0x1182ef
TELNET
0x0000000000000000 0x0000000000000000
N/A
0 0x21300 0x21dda
TELNET
0x00000004d0ba9915 0x0000000067229e65
N/A
1 0x21300 0x21ddc
TELNET
0x00000004d0baa754 0x0000000067229e65
N/A
2 0x21300 0x21de0
TELNET
0x00000004d0bab3a5 0x0000000067229e87
N/A
3 0x21300 0x21de1
TELNET
0x00000004d0bac1e4 0x0000000067229e87
N/A
4 0x21300 0x21de2
TELNET
0x00000004d0bad086 0x0000000067229e87
N/A
5 0x11000 0x21fd6 WEB_TOOLS 0x00000004d0bade54 0x0000000067229e87 192.168.169.40
6 0x11000 0x21fe0 WEB_TOOLS 0x00000004d0baed41 0x0000000067229e98 192.168.169.40
Clearing end-to-end monitor counters
You can use this procedure to clear statistics counters for end-to-end monitors.
1. Connect to the switch and log in as admin.
2. Enter the perfmonitorshow command, to display the monitor numbers on a specific port.
perfmonitorshow --class monitor_class [slotnumber/]portnumber
3. Enter the perfmonitorclear command.
perfmonitorclear --class monitor_class [slotnumber/]portnumber [monitorId]
The following example clears statistics counters for an end-to-end monitor:
switch:admin> perfMonitorClear --class EE 1/2 5
End-to-End monitor number 5 counters are cleared
switch:admin> perfMonitorClear --class EE 1/2
This will clear ALL EE monitors' counters on port 2, continue?
(yes, y, no, n): [no] y
Fabric OS Administrator’s Guide
53-1002148-02
399
19
Frame monitoring
Frame monitoring
Frame monitoring counts the number of times a frame with a particular pattern is transmitted by a
port and generates alerts when thresholds are crossed. Frame monitoring is achieved by defining a
filter, or frame type, for a particular purpose. The frame type can be a standard type (for example, a
SCSI read command filter that counts the number of SCSI read commands that have been
transmitted by the port) or a user-defined frame type customized for your particular use. For a
complete list of the standard, pre-defined frame types, see the fmMonitor command description in
the Fabric OS Command Reference.
NOTE
The Advanced Performance Monitoring license is required to use the fmMonitor command. The
monitoring functionality, however, also requires the Fabric Watch license. When you configure
actions and alerts through the fmMonitor command, Fabric Watch uses these values and generates
alerts based on the configuration. If you do not have a Fabric Watch license, these values are
ignored. See the Fabric Watch Administrator’s Guide for more information about using Fabric Watch.
The maximum number of frame monitors and offsets per port depends on the platform. Table 70
shows the maximum number of frame monitors, in any combination of standard and user-defined
frame types, and the maximum number of offsets per port.
TABLE 70
Maximum number of frame monitors and offsets per port
Platform
Max number of frame monitors per port Max number of offsets per port
Brocade 300, 5300, 5410, 5424, 5450,
5460, 5470, 5480, and 7800
8
81
Brocade 5000, 5100, 6510, 8000, VA-40FC,
DCX, DCX-4S, DCX 8510, and Brocade
Encryption Switch
12
202
1.
For switches in Access Gateway mode, the maximum number of offsets per port is 7.
2.
For switches in Access Gateway mode, the maximum number of offsets per port is 15.
The actual number of frame monitors that can be configured on a port depends on the complexity
of the frame types. For trunked ports, the frame monitor is configured on the trunk master.
Virtual Fabrics considerations: Frame monitors are not supported on logical ISLs (LISLs), but are
supported on ISLs and extended ISLs (XISLs).
Creating frame types to be monitored
In addition to the standard frame types, you can create custom frame types to gather statistics that
fit your needs. To define a custom frame type, you must specify a series of offsets, bitmasks, and
values. For all transmitted frames, the switch performs these tasks:
•
•
•
•
400
Locates the byte found in the frame at the specified offset.
Applies the bitmask to the byte found in the frame.
Compares the new value with the given value.
Increments the filter counter if a match is found.
Fabric OS Administrator’s Guide
53-1002148-02
Frame monitoring
19
You can specify up to four values to compare against each offset. If more than one offset is
required to properly define a filter, the bytes found at each offset must match one of the given
values for the filter to increment its counter. If one or more of the given offsets does not match any
of the given values, the counter does not increment. The value of the offset must be between 0 and
63, in decimal format. Byte 0 indicates the first byte of the Start of Frame (SOF), byte 4 is the first
byte of the frame header, and byte 28 is the first byte of the payload. Thus only the SOF, frame
header, and first 36 bytes of payload can be selected as part of a filter definition. Offset 0 is a
special case, which can be used to monitor the first 4 bytes of the frame (SOF). When the offset is
set to 0, the values 0–7 that are checked against that offset are predefined as shown in Table 71.
TABLE 71
Predefined values at offset 0
Value
SOF
Value
SOF
0
SOFf
4
SOFi2
1
SOFc1
5
SOFn2
2
SOFi1
6
SOFi3
3
SOFn1
7
SOFn3
1. Connect to the switch and log in as admin.
2. Enter the fmMonitor --create command to create a user-defined frame.
Complete details of the fmMonitor command parameters are provided in the Fabric OS Command
Reference. The highth and action options set values and actions for Fabric Watch, but do not apply
monitoring. To apply the custom values, use the thconfig --apply command. See the Fabric Watch
Administrator’s Guide for more information about using this command.
Example of creating a user-defined frame type
switch:admin> fmmonitor --create MyFrameMonitor -pat
"17,0xFF,0x07;7,0x4F,0x01;" -action email
Example of creating a user-defined frame type and applying frame monitors to ports 3, 4, and 5
switch:admin> fmmonitor --create MyFrameMonitor -pat
"17,0xFF,0x007;7,0x4F,0x01;" -port 3-5
Deleting frame types
Deleting a frame type removes the entire configuration, including configured thresholds and
associated actions. It also removes any frame monitors of the specified type from all ports.
You can delete only user-defined frame types; you cannot delete the pre-defined frame types.
1. Connect to the switch and log in as admin.
2. Enter the fmMonitor --delete command to delete a specific frame type.
Example
switch:admin> fmmonitor --delete MyFrameMonitor
Fabric OS Administrator’s Guide
53-1002148-02
401
19
Frame monitoring
Adding frame monitors to a port
If the switch does not have enough resources to add a frame monitor to a port, then other frame
monitors on that port might have to be deleted to free resources.
1. Connect to the switch and log in as admin.
2. Enter the fmMonitor --addmonitor command to add a frame monitor to one or more ports.
The set of ports to be monitored is automatically saved to the persistent configuration unless
you specify the -nosave option on this command.
Example
This example adds a standard SCSI frame type monitor to ports 3 through 12.
switch:admin> fmmonitor --addmonitor SCSI -port 3-12
Removing frame monitors from a port
1. Connect to the switch and log in as admin.
2. Enter the fmMonitor --delmonitor command to remove a specific monitor from one or more
ports.
The set of ports to be unmonitored is automatically saved to the persistent configuration
unless you specify the -nosave option on this command.
Example
The following example removes the user-defined frame monitor, MyFrameMonitor, from all ports.
switch:admin> fmmonitor --delmonitor MyFrameMonitor
Saving frame monitor configuration
When you assign or remove frame monitors on ports, the list of ports to be monitored is
automatically saved persistently, unless you specified the -nosave option.
1. Connect to the switch and log in as admin.
2. Enter the fmmonitor --save command to save the set of ports on which the frame type is
monitored to the persistent configuration.
Example
In this example, the first command adds a standard SCSI frame type monitor to ports 3 through 12,
but does not save the port configuration. The second command saves the port configuration
persistently.
switch:admin> fmmonitor --addmonitor SCSI -port 3-12 -nosave
switch:admin> fmmonitor --save SCSI
402
Fabric OS Administrator’s Guide
53-1002148-02
Frame monitoring
19
Displaying frame monitors
1. Connect to the switch and log in as admin.
2. Enter the fmmonitor --show command.
Example
This example displays the existing frame types and associated bit patterns on the switch:
switch:admin> fmmonitor --show
FRAME_TYPE
BIT PATTERN
---------------------------------------scsi
12,0xFF,0x08;
scsiread
12,0xFF,0x08;4,0xFF,0x06;40,0xFF,0x08,0x28;
scsiwrite
12,0xFF,0x08;4,0xFF,0x06;40,0xFF,0x08,0x28,0x0A,0x2A;
scsirw
12,0xFF,0x08;4,0xFF,0x06;40,0xFF,0x08,0x28,0x0A,0x2A;
scsi2reserve
12,0xFF,0x08;4,0xFF,0x06;40,0xFF,0x16,0x56;
scsi3reserve
12,0xFF,0x08;4,0xFF,0x06;40,0xFF,0x5F;41,0xFF,0x01
ip
12,0xFF,0x05;
abts
4,0xFF,0x81;40,0xFF,0x81;12,0xFF,0x0;17,0xFF,0x0;
baacc
4,0xff,0x84;12,0xff,0x00;17,0xff,00;
This example displays configuration details for the pre-defined SCSI frame monitor. Note that in the
last entry, the “-” in the Count column indicates that the monitor is configured, but is not installed
on the port.
switch:admin> fmmonitor --show SCSI
Port|Frame Type |Count
|HIGH Thres|Actions
|TIMEBASE |CFG
----------------------------------------------------------------------------000001|scsi
|0x0000000000000123|1000
|Email
|None
|saved
000002|scsi
|0x0000000000000125|1000
|Email
|None
|saved
000003|scsi
|0x0000000000000143|1000
|Email
|None
|saved
000022|scsi
||0
|None
|None
|saved
This example displays values for the pre-defined SCSI frame monitor on port 5, every 5 seconds.
Press Enter to halt the display.
switch:admin> fmmonitor --show scsi -port 5 -timeinterval 5
Port|Count
|
---------------------2011-03-21 00:59:50
000005|
48.3k
2011-03-21 00:59:55
000005|
48.6k
(output truncated)
Clearing frame monitor counters
1. Connect to the switch and log in as admin.
2. Enter the fmMonitor --clear command to clear the counters on the ports on which the
specified frame type is monitored.
Fabric OS Administrator’s Guide
53-1002148-02
403
19
Top Talker monitors
Example
This example clears the counters for the ABTS monitor from ports 7 through 10.
switch:admin> fmmonitor --clear ABTS -port 7-10
Top Talker monitors
Top Talker monitors determine the flows (SID/DID pairs) that are the major users of bandwidth
(after initial stabilization). Top Talker monitors measure bandwidth usage data in real-time and
relative to the port on which the monitor is installed.
NOTE
Initial stabilization is the time taken by a flow to reach the maximum bandwidth. This time varies
depending on the number of flows in the fabric and other factors. The incubation period can be up
to 14 seconds in the enterprise-class platforms, and up to 82 seconds in the fixed-port switches.
Applications can use the Top Talker data to do the following:
• Re-route the traffic through different ports that are less busy, so as not to overload a given
port.
• Alert you to the top-talking flows on a port if the total traffic on the port exceeds the acceptable
bandwidth consumption.
You can use Top Talkers to identify the SID/DID pairs that consume the most bandwidth and can
then configure them with certain Quality of Service (QoS) attributes so they get proper priority. See
Chapter 20, “Optimizing Fabric Behavior,” for information on QoS.
The Top Talker monitor is based on SID/DID and not WWNs. Once Top Talker is installed on a switch
or port, it remains installed across power cycles.
Top Talkers supports two modes, port mode and fabric mode:
• Port mode Top Talker
A Top Talker monitor can be installed on a port to measure the traffic originating from the port
and flowing to different destinations.
You can configure Top Talker monitors on F_Ports and, depending on the switch model, on
E_Ports. The following platforms support Top Talker monitors on E_Ports:
-
Brocade 6510
Brocade DCX 8510 family
• Fabric mode Top Talker
In fabric mode, Top Talker monitors are installed on all E_Ports in the fabric and measure the
data rate of all the possible flows in the fabric (ingress E_Port traffic only). In fabric mode, Top
Talker monitors can determine the top n bandwidth users on a given switch.
You can install Top Talker monitors either in port mode or fabric mode, but not both.
NOTE
A fabric mode Top Talker monitor and an EE monitor cannot be configured on the same fabric. You
must delete the EE monitor before you configure the fabric mode Top Talker.
404
Fabric OS Administrator’s Guide
53-1002148-02
Top Talker monitors
19
How do Top Talker monitors differ from EE monitors? EE monitors provide counter statistics for
traffic flowing between a given SID-DID pair. Top Talker monitors identify all possible SID-DID flow
combinations that are possible on a given port and provides a sorted output of the top talking
flows. Also, if the number of flows exceeds the hardware resources, existing EE monitors fail to get
real time data for all of them; however, Top Talker monitors can monitor all flows for a given E_Port
or F_Port.
Virtual Fabric considerations: All logical switches in the same chassis can use either fabric mode
Top Talker monitors or port mode Top Talker and EE monitors. You cannot use fabric mode Top
Talker monitors and EE monitors together on the same logical switch.
Admin Domain considerations: Top Talker monitors are always installed in AD255.
NPIV considerations: Top Talker takes NPIV devices into consideration when calculating the top
talking flows.
Top Talker monitors are not supported on the embedded platforms: Brocade 5410, 5424, 5450,
5460, 5470, and 5480.
Top Talker monitors and Fibre Channel routing
You can enable Top Talker monitors on a platform that is configured to be an FC router. Top Talker
monitors and FC routers are concurrently supported on the following platforms:
-
Brocade 6510
Brocade DCX 8510 family, with the following blades only: FC16-32, FC16-48.
On all other platforms, you can have either Top Talker monitors or FC-FC routing, but not both.
Top Talker monitors are supported on an FC router in both backbone-to-edge and edge-to-edge
configurations.
Note the following restrictions:
• An E_Port-attached switch must be connected and merged with the backbone FC router before
you can enable Top Talker on the FC router.
• Fabric mode Top Talker does not support requests for domains (either front port domain or
xlate domain).
• Fabric mode Top Talker monitors do not monitor flows over EX_Ports.
For example, if a host is connected directly to an FC router and the target is on the edge switch
(see Figure 65), no flows are monitored because none of the flows traverse an E_Port on the
FCR.
In Figure 66, however, the flows across the E_Port on the FC router are monitored.
Fabric OS Administrator’s Guide
53-1002148-02
405
19
Top Talker monitors
Edge fabric
E_Port
FC router
EX_Port
Backbone fabric
FIGURE 65
Fabric mode Top Talker monitors on the FC router do not monitor any flows
Edge fabric
E_Port
E_Port
E_Port
FC router
EX_Port
Backbone fabric
FIGURE 66
Fabric mode Top Talker monitors on the FC router monitor flows over the E_Port
Limitations of Top Talker monitors
Be aware of the following when using Top Talker monitors:
•
•
•
•
•
406
Top Talker monitors cannot detect transient surges in traffic through a given flow.
You cannot install a Top Talker monitor on a mirrored port.
Top Talker can monitor only 10,000 flows at a time.
Top Talker is not supported on VE_Ports, EX_Ports, and VEX_Ports.
The maximum number of all port mode Top Talker monitors on an ASIC is 16. If Virtual Fabrics
is enabled, the maximum number of all port mode Top Talker monitors on an ASIC is 8.
Fabric OS Administrator’s Guide
53-1002148-02
Top Talker monitors
19
Adding a Top Talker monitor to a port (port mode)
1. Connect to the switch and log in as admin.
2. Enter the perfTTmon --add command.
perfttmon --add [egress | ingress] [slotnumber/]port
For example, to monitor the incoming traffic on port 7:
perfttmon --add ingress 7
To monitor the outgoing traffic on slot 2, port 4 on an enterprise-class platform:
perfttmon --add egress 2/4
Adding Top Talker monitors on all switches in the fabric (fabric mode)
When fabric mode is enabled, you can no longer install Top Talker monitors on an F_Port unless you
delete fabric mode.
1. Connect to the switch and log in as admin.
2. Remove any EE monitors in the fabric, as described in “Deleting end-to-end monitors” on
page 398. Fabric mode Top Talker monitors and EE monitors cannot both exist in the fabric.
3. Enter the perfTTmon --add fabricmode command.
perfttmon --add fabricmode
The system responds:
Before enabling fabric mode, please remove all EE monitors in the fabric
continue? (yes, y, no, n):
4. Type y at the prompt to continue.
Top Talker monitors are added to E_Ports in the fabric and fabric mode is enabled. Any Top
Talker monitors that were already installed on F_Ports are automatically uninstalled.
If EE monitors are present on the local switch, the command fails with the message:
Cannot install Fabric Mode Top Talker because EE monitor is already present
If EE monitors are present on remote switches, the command succeeds; however, on the
remote switches, fabric mode fails and a raslog message is displayed on those switches.
If a new switch joins the fabric, you must run the perfTTmon --add fabricmode command on
that switch. The Top Talker configuration information is not automatically propagated to the
new switch.
Displaying the top n bandwidth-using flows on a port (port mode)
1. Connect to the switch and log in as admin.
2. Enter the perfTTmon --show command.
perfttmon --show [slotnumber/]port [n] [wwn | pid]
Fabric OS Administrator’s Guide
53-1002148-02
407
19
Top Talker monitors
The output is sorted based on the data rate of each flow. If you do not specify the number of
flows to display, then the command displays the top 8 flows or the total number of flows,
whichever is less.
For example, to display the top 5 flows on port 7 in WWN (default) format:
perfttmon --show 7 5
To display the top flows on slot 2, port 4 on an enterprise-class platform in PID format:
perfttmon --show 2/4 pid
switch:admin> perfttmon --show 2/4 pid
========================================
Src_PID
Dst_PID
MB/sec
========================================
0xa90800
0xa05200
6.926
0xa90800
0xa908ef
6.872
Displaying top talking flows for a given domain ID (fabric mode)
1. Connect to the switch and log in as admin.
2. Enter the perfTTmon --show dom command.
perfttmon --show dom domainid [n] [wwn | pid]
Fabric mode must be enabled for this option.
The output is sorted based on the data rate of each flow. If you do not specify the number of
flows to display, then the command displays the top 8 flows or the total number of flows,
whichever is less. The command can display a maximum of 32 flows.
For example, to display the top 5 flows on for domain 1 in WWN (default) format:
perfttmon --show dom 1 5
To display the top flows on domain 2 in PID format:
perfttmon --show dom 2 pid
Example
switch:admin> perfttmon --show dom 2 pid
=================================================================
Src_PID
Dst_PID
MB/sec
Potential E-Ports
=================================================================
0x03f600
0x011300
121.748
2/0,2/2,2/3
0x03f600
0x011300
121.748
3/14,3/15
Deleting a Top Talker monitor on a port (port mode)
1. Connect to the switch and log in as admin.
2. Enter the perfTTmon --delete command.
perfttmon --delete [slotnumber/]port
408
Fabric OS Administrator’s Guide
53-1002148-02
Trunk monitoring
19
For example, to delete the monitor on port 7:
perfttmon --delete 7
To delete the monitor on slot 2, port 4 on an enterprise-class platform:
perfttmon --delete 2/4
Deleting all fabric mode Top Talker monitors
1. Connect to the switch and log in as admin.
2. Enter the perfTTmon --delete fabricmode command.
perfttmon --delete fabricmode
All Top Talker monitors are deleted.
Trunk monitoring
To monitor E_Port (ISL) and F_Port trunks, you can set monitors only on the master port of the
trunk. If the master changes, the monitor automatically moves to the new master port.
If a monitor is installed on a port that later becomes a slave port when a trunk comes up, the
monitor automatically moves to the master port of the trunk.
Note the following:
• End-to-end monitors are supported for ISLs only on the Brocade 6510 and DCX 8510 family.
• If an EE monitor is installed on a trunk group and you disable the trunk, the EE monitor will be
installed only on the last master port of that trunk group, which might not be the actual port on
which the EE monitor was installed when the trunk was enabled.
• For F_Port trunks, end-to-end masks are allowed only on the F_Port trunk master. Unlike the
monitors, if the master changes, the mask does not automatically move to the new master
port.
• All platforms support 12 frame monitors for trunks, except for the Brocade 300, which
supports 8 frame monitors for trunks.
• For the Brocade 8000, trunk monitoring is supported only on the FC ports and not on the CEE
ports.
Saving and restoring monitor configurations
To prevent the switch configuration flash from running out of memory, the number of monitors
saved to flash memory is limited as follows:
• The total number of EE monitors per port is limited to 16.
• The total number of frame monitors per port is limited to 16.
• The total number of monitors per switch is limited to 512.
Fabric OS Administrator’s Guide
53-1002148-02
409
19
Performance data collection
When there are more than 512 monitors in the system, monitors are saved to flash memory in the
following order:
• The EE monitors for each port (from 0 to MAX_PORT)
• The frame monitors for each port
EE monitors get preference saving to flash memory when the total number of monitors in a switch
exceeds 512. If the total number of monitors per port or switch exceeds the limit, then you will
receive an error message indicating the count has been exceeded and that some monitors have
been discarded.
1. Connect to the switch and log in as admin.
2. Type one of the following commands, depending on the action you want to perform:
• To save the current end-to-end and frame monitor configuration settings into nonvolatile
memory, use the perfCfgSave command:
switch:admin> perfcfgsave
This will overwrite previously saved Performance Monitoring
settings in FLASH. Do you want to continue? (yes, y, no, n): [no] y
Please wait ...
Performance monitoring configuration saved in FLASH.
• To restore a saved monitor configuration, use the perfCfgRestore command. For example,
to restore the original performance monitor configuration after making several changes:
switch:admin> perfcfgrestore
This will overwrite current Performance Monitoring settings in RAM. Do you
want to continue? (yes, y, no, n): [no] y
Please wait... Performance monitoring configuration restored from FLASH
ROM.
• To clear the previously saved performance monitoring configuration settings from
nonvolatile memory, use the perfCfgClear command:
switch:admin> perfcfgclear
This will clear Performance Monitoring settings in FLASH. The RAM settings
won’t change. Do you want to continue? (yes, y, no, n): [no] y
Please wait... Committing configuration...done.
Performance Monitoring configuration cleared from FLASH.
Performance data collection
Data collected through Advanced Performance Monitoring is deleted when the switch is rebooted.
Using the Brocade Network Advisor Enterprise Edition, you can store performance data persistently.
For details on this feature, see the Brocade Network Advisor User Manual.
410
Fabric OS Administrator’s Guide
53-1002148-02
Chapter
20
Optimizing Fabric Behavior
In this chapter
• Adaptive Networking overview . . . . . . . . . . . . . . . . . . . . . . . . . . . . . . . . . . .
• Ingress Rate Limiting. . . . . . . . . . . . . . . . . . . . . . . . . . . . . . . . . . . . . . . . . . .
• QoS: SID/DID traffic prioritization . . . . . . . . . . . . . . . . . . . . . . . . . . . . . . . .
• CS_CTL-based frame prioritization . . . . . . . . . . . . . . . . . . . . . . . . . . . . . . . .
• Enabling CS_CTL-based frame prioritization . . . . . . . . . . . . . . . . . . . . . . . .
• Disabling CS_CTL-based frame prioritization. . . . . . . . . . . . . . . . . . . . . . . .
• QoS zone-based traffic prioritization . . . . . . . . . . . . . . . . . . . . . . . . . . . . . .
• QoS zones . . . . . . . . . . . . . . . . . . . . . . . . . . . . . . . . . . . . . . . . . . . . . . . . . . .
• Setting QoS zone-based traffic prioritization . . . . . . . . . . . . . . . . . . . . . . . .
• Setting QoS zone-based traffic prioritization over FC routers . . . . . . . . . .
• Disabling QoS zone-based traffic prioritization . . . . . . . . . . . . . . . . . . . . . .
411
412
413
414
415
415
415
418
423
425
425
Adaptive Networking overview
Adaptive Networking is a suite of tools and capabilities that enable you to ensure optimized
behavior in the SAN. Even under the worst congestion conditions, the Adaptive Networking features
can maximize the fabric behavior and provide necessary bandwidth for high-priority, mission-critical
applications and connections.
The Adaptive Networking suite includes the following features:
• Bottleneck detection
The bottleneck detection feature identifies devices attached to the fabric that are slowing
down traffic. Bottleneck detection does not require a license. See Chapter 13, “Bottleneck
Detection,” for information about this feature.
• Top Talkers
The Top Talkers feature provides real-time information about the top “n” bandwidth-consuming
flows passing through a specific port in the network. Top Talkers requires an Advanced
Performance Monitoring license. See “Top Talker monitors” on page 404 for more information
about this feature.
• Traffic Isolation Zoning
Traffic Isolation Zoning (TI zoning) allows you to control the flow of interswitch traffic by creating
a dedicated path for traffic flowing from a specific set of source ports (F_Ports). Traffic
Isolation Zoning does not require a license. See Chapter 12, “Traffic Isolation Zoning,” for more
information about this feature.
Fabric OS Administrator’s Guide
53-1002148-02
411
20
Ingress Rate Limiting
• Ingress Rate Limiting
Ingress rate limiting restricts the speed of traffic from a particular device to the switch port.
Ingress rate limiting requires an Adaptive Networking license. See “Ingress Rate Limiting” on
page 412 for more information about this feature.
• Quality of Service (QoS) SID/DID Traffic Prioritization
SID/DID traffic prioritization allows you to categorize the traffic flow between a host and target
has having a high or low priority. QoS SID/DID traffic prioritization requires an Adaptive
Networking license for 8 Gbps platforms, but does not require a license for 4 Gbps platforms.
See “QoS: SID/DID traffic prioritization” on page 413 for more information about this feature.
You can use the Adaptive Networking features together to optimize the performance of your fabric.
For example, you can do the following:
• You can use Top Talkers to identify the SID/DID pairs that consume the most bandwidth and
can then configure them with certain QoS attributes so they get proper priority.
• If the bottleneck detection feature detects a latency bottleneck, you can use TI zones or QoS
SID/DID traffic prioritization to isolate latency device traffic from high priority application
traffic.
• If the bottleneck detection feature detects ISL congestion, you can use ingress rate limiting to
slow down low priority application traffic, if it is contributing to the congestion.
Ingress Rate Limiting
Ingress rate limiting is a licensed feature that requires the Adaptive Networking license. Ingress
rate limiting restricts the speed of traffic from a particular device to the switch port. Use ingress
rate limiting for the following situations:
• To reduce existing congestion in the network or proactively avoid congestion.
• To enable you to offer flexible bandwidth limit services based on requirements.
• To enable more important devices to use the network bandwidth during specific services, such
as network backup.
To limit the traffic, you set the maximum speed at which the traffic can flow through a particular
F_Port or FL_Port. For example, if you set the rate limit at 4 Gbps, then traffic from a particular
device is limited to a maximum of 4 Gbps.
Ingress rate limiting enforcement is needed only if the port can run at a speed higher than the rate
limit. For example, if the rate limit is 4 Gbps and the port is only a 2 Gbps port, then ingress rate
limiting is not enforced.
The ingress rate limiting configuration is persistent across reboots.
Note the following considerations about ingress rate limiting:
• Ingress rate limiting is applicable only to F_Ports and FL_Ports.
• QoS traffic prioritization takes precedence over ingress rate limiting.
• Ingress rate limiting is not enforced on trunked ports.
412
Fabric OS Administrator’s Guide
53-1002148-02
QoS: SID/DID traffic prioritization
20
Virtual Fabrics considerations: If Virtual Fabrics is enabled, the rate limit configuration on a port is
on a per-logical switch basis. That is, if a port is configured to have a certain rate limit value, and
the port is then moved to a different logical switch, it would have no rate limit applied to it in the
new logical switch. If that same port is moved back to the original logical switch, it would have the
original rate limit take effect again.
Limiting traffic from a particular device
1. Connect to the switch and log in as admin.
2. Enter the portCfgQos --setratelimit command.
portcfgqos --setratelimit slot/port ratelimit
Example of setting the rate limit on slot 3, port 9 to 4000 Mbps
portcfgqos --setratelimit 3/9 4000
Disabling ingress rate limiting
1. Connect to the switch and log in as admin.
2. Enter the portCfgQos --resetratelimit command.
portcfgqos --resetratelimit slot/port
Example of disabling ingress rate limiting on slot 3, port 9
portcfgqos --resetratelimit 3/9
QoS: SID/DID traffic prioritization
SID/DID traffic prioritization allows you to categorize the traffic flow between a host and target as
having a high, medium, or low priority. Fabric OS supports two types of prioritization:
• Class Specific Control (CS_CTL)-based frame prioritization
Each frame between a host and a target is assigned a specific priority, depending on the value
of the CS_CTL field in the frame header.
• QoS zone-based traffic prioritization
All traffic between a host and a target is assigned a specific priority, depending on the name
you define for the QoS zone.
CS_CTL-based prioritization and QoS zone-based prioritization are mutually exclusive. If you enable
CS_CTL-based prioritization on F/FL_Ports, then QoS zone-based prioritization cannot be used
between any devices connected to those F/FL_Ports.
CS_CTL-based prioritization takes precedence over QoS zone-based prioritization. If you enable
CS_CTL-based prioritization on F/FL_Ports that are defined in a QoS zone, CS_CTL-based
prioritization takes precedence over the QoS zones.
Table 72 shows a basic comparison between CS-CTL-based and QoS zone-based prioritization. See
“CS_CTL-based frame prioritization” on page 414 and “QoS zone-based traffic prioritization” on
page 415 for detailed information about each type of prioritization scheme.
Fabric OS Administrator’s Guide
53-1002148-02
413
20
CS_CTL-based frame prioritization
TABLE 72
Comparison between CS_CTL-based and QoS zone-based prioritization
CS_CTL-based frame prioritization
QoS zone-based traffic prioritization
Requires Adaptive Networking license.
Requires Adaptive Networking license.
Must be manually enabled after you install the license.
Automatically enabled when you install the license.
No zones are required.
Requires you to create QoS zones.
Enabled on F/FL_Ports.
Enabled on E_Ports.
Takes precedence over QoS zone-based prioritization.
Is overridden by CS_CTL-based prioritization.
Priority is defined by CS-CTL field in frame header.
Priority is defined by name of QoS zone.
Prioritization is on a frame-basis.
Prioritization is on a flow-basis.
Setup steps:
• Enable QoS on F/FL_Ports.
Setup steps:
Create QoS zones with host/target members.
Add the QoS zones to the zone configuration.
Save and then and enable the zone configuration.
Enable QoS on E_Ports.
•
•
•
•
License requirements for SID/DID prioritization
Both CS_CTL-based frame prioritization and QoS zone-based traffic prioritization require the
Adaptive Networking license.
An Adaptive Networking license must be installed on every switch that is in the path between a
configured device pair.
When you install the Adaptive Networking license, QoS zone-based traffic prioritization is
automatically enabled on the E_Ports, except for long-distance E_Ports. For long-distance E_Ports,
you must manually enable QoS zone-based traffic prioritization after you install the license.
ATTENTION
To preserve existing trunk groups, before you install the Adaptive Networking license, manually
disable QoS on the 8 Gbps ports. See “Trunking considerations before you install the Adaptive
Networking license” on page 416 for more information.
CS_CTL-based frame prioritization
CS_CTL-based frame prioritization allows you to prioritize the frames between a host and target as
having high, medium, or low priority, depending on the value of the CS_CTL field in the FC frame
header.
High, medium, and low priority frames are allocated to different virtual channels (VCs). High priority
frames receive more VCs than medium priority frames, which receive more VCs than low priority
frames. The virtual channels are allocated according to the CS_CTL value, as shown in Table 73.
TABLE 73
414
Virtual channels assigned to QoS priority
CS_CTL value
Priority
Number of VCs
VCs assigned
1–8
High priority
4
10, 11, 12, 13
9 – 16
Medium priority
4
2, 3, 4, 5
17 – 24
Low priority
2
8, 9
Fabric OS Administrator’s Guide
53-1002148-02
Enabling CS_CTL-based frame prioritization
20
Supported configurations for CS_CTL-based frame prioritization
• CS_CTL-based frame prioritization is supported on all 8-Gbps and 16-Gbps platforms.
• All switches in the fabric should be running Fabric OS v6.0.0 or later.
NOTE
If a switch is running a firmware version earlier than Fabric OS v6.0.0, the outgoing frames
from that switch lose their priority.
High availability considerations for CS_CTL-based frame prioritization
If the standby CP is running a Fabric OS version earlier than 6.3.0 and is synchronized with the
active CP, then you cannot enable CS_CTL-based frame prioritization on the active CP. If the
standby CP is not synchronized or if no standby CP exists, then enabling CS_CTL-based frame
prioritization succeeds.
Enabling CS_CTL-based frame prioritization
When you enable CS_CTL-based frame prioritization, you should enable it on both the source port
and the destination port, so that the frames returned from the destination port for a given
exchange always have the same CS_CTL prioritization as the frames originating from the source
port.
1. Connect to the switch and log in to an account that has admin permissions.
2. Enter the portcfgqos command.
portcfgqos --enable [slot/]port csctl_mode
3. Enter y at the prompt to override QoS zone-based traffic prioritization.
Disabling CS_CTL-based frame prioritization
When you disable CS_CTL-based frame prioritization, QoS zone-based traffic prioritization is
restored, if it had been previously enabled.
1. Connect to the switch and log in to an account that has admin permissions.
2. Enter the portcfgqos command.
portcfgqos --disable [slot/]port csctl_mode
QoS zone-based traffic prioritization
QoS zone-based traffic prioritization allows you to categorize the traffic flow between a host and
target as having a high or low priority. For example, you could assign online transaction processing
(OLTP) to high priority and backup traffic to low priority.
All flows without QoS prioritization are considered medium priority.
Fabric OS Administrator’s Guide
53-1002148-02
415
20
QoS zone-based traffic prioritization
High, medium, and low priority flows are allocated to different virtual channels (VCs). High priority
flows receive more VCs than medium priority flows, which receive more VCs than low priority flows.
The virtual channels are allocated as shown in Table 74.
TABLE 74
Virtual channels assigned to QoS priority
Priority
Number of VCs
VCs assigned
High priority
5
10, 11, 12, 13, 14
Medium priority
4
2, 3, 4, 5
Low priority
2
8, 9
NOTE
If there is a single low priority flow to a destination ID (DID) and several medium priority flows to that
same DID, then it is possible that the medium priority flows would have less bandwidth because they
have to share the medium priority VCs, whereas the low priority flow would have a separate VC.
Trunking considerations before you install the Adaptive Networking
license
NOTE
This section applies only to 8 Gbps and 16 Gbps ports that are not long-distance ports.
If ports are part of an active trunk group before the Adaptive Networking license is added, ISLs are
formed without QoS.
When you install the Adaptive Networking license, QoS is automatically enabled on all ports for
which you have not manually disabled QoS, as the ports in the trunk group are set to QoS enabled
by default.
Adding the license does not immediately affect the trunk groups, however. The trunks continue to
operate without QoS until the next time one of the ISLs is toggled, at which point the toggled ISL
comes up with QoS enabled and splits from the trunk group because of a QoS mismatch.
To preserve existing trunk groups, before you install the Adaptive Networking license, manually
disable QoS on these ports, as described next.
Manually disabling QoS on trunked ports
NOTE
QoS is disabled by default on long-distance 8 Gbps and 16 Gbps ports. The following procedure does
not apply to these ports.
1. Connect to the switch and log in as admin.
2. Display the ISL information using the following command:
islshow
416
Fabric OS Administrator’s Guide
53-1002148-02
QoS zone-based traffic prioritization
20
3. Identify E_Ports on which QoS should be manually disabled. In the islshow output, these ports
have all of the following characteristics:
• 8 Gbps or 16 Gbps ports
• Trunking is enabled
• QoS is disabled
4. Check whether QoS is enabled on each port identified in step 3 using the following command:
portcfgshow
In the output, the value of QOS E_Port is AE if QoS is automatically enabled by default, ON if
QoS is enabled manually, and OFF or ".." if QoS is disabled.
5. Manually disable QoS on all of the ports identified in step 3 for which QoS is enabled (in the
portcfgshow output, QOS E_Port is AE or ON).
portcfgqos --disable [slot/]port
This is a disruptive operation.
Example
In this example, the islshow output displays ports involved in three ISLs:
• Port 2
QoS is already enabled on this ISL, so you should not disable QoS on port 2.
• Ports 19 and 24 QoS is disabled on these ISLs. Check the portcfgshow output to determine
whether QoS is disabled on these ports.
In the portcfgshow output, the value of QOS_E_Port is AE for port 19 and ".." for port 24. This
means that QoS is enabled by default on port 19 and disabled on port 24.
You need to disable QoS on port 19.
switch:admin> islshow
1: 2->300 10:00:00:05:1e:43:00:00 100 DCX
3: 19-> 10 10:00:00:05:1e:41:43:ac 50 B300
4: 24-> 12 10:00:00:05:1e:41:42:ad 30 B5300
sp:
sp:
sp:
8.000G bw: 32.000G TRUNK QOS
8.000G bw: 64.000G TRUNK
8.000G bw: 16.000G TRUNK
switch:admin> portcfgshow
(output truncated)
Ports of Slot 0
16 17 18 19
20 21 22 23
24 25 26 27
28 29 30 31
-----------------+---+---+---+---+-----+---+---+---+-----+---+---+---+-----+---+---+--Speed
AN AN AN AN
AN AN AN AN
AN AN AN AN
AN AN AN AN
Fill Word
0
0
0
0
0
0
0
0
0
0
0
0
0
0
0
0
AL_PA Offset 13
.. .. .. ..
.. .. .. ..
.. .. .. ..
.. .. .. ..
Trunk Port
ON ON ON ON
ON ON ON ON
ON ON ON ON
ON ON ON ON
Long Distance
.. .. .. ..
.. .. .. ..
.. .. .. ..
.. .. .. ..
VC Link Init
.. .. .. ..
.. .. .. ..
.. .. .. ..
.. .. .. ..
Locked L_Port
.. .. .. ..
.. .. .. ..
.. .. .. ..
.. .. .. ..
Locked G_Port
.. .. .. ..
.. .. .. ..
.. .. .. ..
.. .. .. ..
Disabled E_Port
.. .. .. ..
.. .. .. ..
.. .. .. ..
.. .. .. ..
Locked E_Port
.. .. .. ..
.. .. .. ..
.. .. .. ..
.. .. .. ..
ISL R_RDY Mode
.. .. .. ..
.. .. .. ..
.. .. .. ..
.. .. .. ..
RSCN Suppressed
.. .. .. ..
.. .. .. ..
.. .. .. ..
.. .. .. ..
Persistent Disable ON .. .. ..
.. .. .. ..
.. .. .. ..
.. .. .. ..
LOS TOV enable
.. .. .. ..
.. .. .. ..
.. .. .. ..
.. .. .. ..
Fabric OS Administrator’s Guide
53-1002148-02
417
20
QoS zones
NPIV capability
ON ON ON ON
NPIV PP Limit
126 126 126 126
QOS E_Port
AE AE AE AE
EX Port
.. .. .. ..
Mirror Port
ON .. .. ..
Rate Limit
.. .. .. ..
Credit Recovery
ON ON ON ON
Fport Buffers
.. .. .. ..
Port Auto Disable .. .. .. ..
CSCTL mode
.. .. .. ..
ON ON ON ON
126 126 126 126
AE AE AE AE
.. .. .. ..
ON .. .. ..
.. .. .. ..
ON ON ON ON
.. .. .. ..
.. .. .. ..
.. .. .. ..
ON ON ON ON
126 126 126 126
.. .. .. ..
.. .. .. ..
.. .. .. ..
.. .. .. ..
ON ON ON ON
.. .. .. ..
.. .. .. ..
.. .. .. ..
ON ON ON ON
126 126 126 126
.. .. .. ..
.. .. .. ..
.. .. .. ..
.. .. .. ..
ON ON ON ON
.. .. .. ..
.. .. .. ..
.. .. .. ..
where AE:QoSAutoEnable, AN:AutoNegotiate, ..:OFF, NA:NotApplicable, ??:INVALID,
switch:admin> portcfgqos --disable 19
QoS zones
You assign high or low priority (QoS level) using a QoS zone. A QoS zone is a special zone that
indicates the priority of the traffic flow between a given host/target pair.
The members of a QoS zone are the host/target pairs. QoS zones can contain WWN members
(WWNN or WWPN) or Domain, Index (D,I) members. If you use D,I notation in your QoS zones, see
“Limitations and restrictions for QoS zone-based traffic prioritization” on page 422 for some
considerations you should be aware of.
A QoS zone has a special name to differentiate it from a regular zone. The format of the QoS zone
name is as follows:
For high priority:
For low priority:
QOSHid_xxxxx
QOSLid_xxxxx
where id is a flow identifier that designates a specific virtual channel for the traffic flow and xxxxx is
the user-defined portion of the name. For example, the following are valid QoS zone names:
QOSH3_HighPriorityTraffic
QOSL1_LowPriorityZone
The switch automatically sets the priority for the “host,target” pairs specified in the zones based on
the priority level (H or L) in the zone name.
The flow id allows you to have control over the VC assignment and control over balancing the flows
throughout the fabric. The id is from 1–5 for high priority traffic, which corresponds to VCs 10–14.
For low priority traffic, the id is from 1–2, which corresponds to VCs 8 and 9. The id is optional; if it
is not specified, the virtual channels are allocated using a round-robin scheme.
NOTE
If a QoS zone name prefix is specified in an LSAN zone (a zone beginning with prefix "LSAN_"), the
QoS tag is ignored. Only the first prefix in a zone name is recognized. For example, a zone with the
name "LSAN_QOSH_zone1" is recognized as an LSAN zone and not a QoS zone.
See “QoS over FC routers” on page 420 for additional considerations when using QoS to prioritize
traffic between device pairs in different edge fabrics.
418
Fabric OS Administrator’s Guide
53-1002148-02
QoS zones
20
For example, Figure 67 shows a fabric with two hosts (H1, H2) and three targets (S1, S2, S3). The
traffic prioritization is as follows:
• Traffic between H1 and S1 is high priority.
• Traffic between H1 and S3 and between H2 and S3 is low priority.
• All other traffic is medium priority, which is the default.
Domain 1
H1
Domain 3
1
9
14
H2
3
= Low priority
= Medium priority
= High priority
15
13
12
8
7
S2
S3
16
Domain 2
FIGURE 67
S1
Domain 4
QoS traffic prioritization
For this fabric, you could set up the following QoS zones:
QOSH_Zone1
Members: H1, S1
QOSL_Zone3
Members: H1, H2, S3
QoS on E_Ports
In addition to configuring the hosts and targets in a zone, you must also enable QoS on individual
E_Ports that might carry traffic between the host and target pairs. Path selection between the
“host,target” pairs is governed by FSPF rules and is not affected by QoS priorities. For example, in
Figure 68, QoS should be enabled on the encircled E_Ports.
NOTE
By default, QoS is enabled on 8 Gbps ports, except for long-distance 8 Gbps ports. QoS is disabled
by default on all 4 Gbps ports and long-distance 8 Gbps ports.
Fabric OS Administrator’s Guide
53-1002148-02
419
20
QoS zones
Domain 1
H1
Domain 3
1
9
14
H2
3
13
12
15
8
7
= Low priority
= Medium priority
= High priority
= E_Ports with
QoS enabled
FIGURE 68
S1
S3
16
Domain 2
S2
Domain 4
QoS with E_Ports enabled
You need to enable QoS on the E_Ports on both ISLs between Domain 3 and Domain 4 because
either path might be selected to carry the traffic.
You do not need to enable QoS on the E_Ports on the ISLs between Domain 1 and Domain 2 and
between Domain 2 and Domain 3, because these are not the shortest paths between the hosts
and the targets. However, if the ISL between Domain 1 and Domain 3 is broken, then the path
through Domain 2 would be used.
To guarantee traffic priority, you should enable QoS on all possible E_Ports. Alternatively, you could
use a TI zone to limit the E_Ports that carry the traffic between a “host,target” pair and enable QoS
on only those E_Ports.
If QoS is not enabled on an E_Port, the traffic prioritization stops at that point. For example, in
Figure 68 if you disabled QoS on E_Ports “3,12” and “3,13” then the traffic from H1 and H2 to S3
would be low priority from the hosts to Domain 3, but would switch to the default (medium) priority
from Domain 3 to the target S3.
QoS over FC routers
QoS over FCR is QoS traffic prioritization between devices in edge fabrics over an FC router. See
Chapter 23, “Using the FC-FC Routing Service,” for information about FC routers, phantom
switches, and the FC-FC Routing Service.
To establish QoS over FC routers, you must do the following:
•
•
•
•
Define QoS zones in each edge fabric.
Define LSAN zones in each edge fabric.
Enable QoS on the E_Ports in each edge fabric.
Enable QoS on the EX_Ports in the backbone fabric.
See “Setting QoS zone-based traffic prioritization over FC routers” on page 425 for detailed
instructions.
Following are requirements for establishing QoS over FCR:
• QoS over FC routers is supported in Brocade native mode only. It is not supported in
interopmode 2 or interopmode 3.
420
Fabric OS Administrator’s Guide
53-1002148-02
QoS zones
20
• QoS over FC routers is supported for the following configurations:
- Edge-to-edge fabric configuration: supported on all platforms.
- Backbone-to-edge fabric configuration: supported on 16-Gbps-capable platforms only
(Brocade 6510 and Brocade DCX 8510 family), and only if the setup contains no other
platforms. For all other platforms, you cannot prioritize the flow between a device in an
edge fabric and a device in the backbone fabric.
• QoS over FC routers is supported only if Virtual Fabrics is disabled in the backbone fabric. QoS
over FC routers cannot be enabled if Virtual Fabrics is also enabled in the backbone fabric.
• The port WWN of the host or target and the port WWN of the proxy device must be in both an
LSAN zone and a QoS zone.
• QoS over FC routers is supported on both EX_Ports and VEX_Ports. QoS over FC routers is not
supported on the FR4-18i blade.
• The EX_Ports (or VEX_Ports) in the path between the QoS devices must be on switches running
Fabric OS v6.3.0 or later.
• QoS zones must use WWN notation only; D,I notation is not supported for QoS over FCR.
• An Adaptive Networking license must be installed on every switch that is in the path between a
given configured device pair, including the switches in the backbone fabric and both edge
fabrics.
Virtual Fabric considerations for QoS zone-based traffic prioritization
You can prioritize flows between devices in a logical fabric. The priority is retained for traffic going
across ISLs and through the base fabric XISLs.
For example, Figure 69 shows a logical fabric that includes H1 and S1. To set the traffic between
H1 and S1 to high priority, create a QoS zone in the logical fabric with H1 and S1 as members. Then
enable QoS on all of the E_Ports shown circled in the figure, including all of the E_Ports in the XISLs
(ports 10, 11, 12, 13, 14, 15, 16, and 17).
Domain 1
Domain 3
8
9
H1
S1
1
2
5
3
4
8
LS3, FID1
Domain 7
Chassis 1
LS4, FID3
Domain 8
12
14
16
Base switch
Domain 10
11
13
7
LS1, FID1
Domain 5
Domain 2
10
6
LS2, FID3
Domain 6
Chassis 2
Base switch
Domain 9
15
17
= High priority
= E_Ports with QoS enabled
FIGURE 69
Fabric OS Administrator’s Guide
53-1002148-02
Traffic prioritization in a logical fabric
421
20
QoS zones
High availability considerations for QoS zone-based traffic prioritization
If the standby CP is running a Fabric OS version earlier than 6.3.0 and is synchronized with the
active CP, then QoS zones using D,I notation cannot be created. If the standby CP is not
synchronized or if no standby CP exists, then the QoS zone creation succeeds.
If QoS zones using D,I notation exist in either the defined or active configuration and the standby
CP tries to synchronize with the active CP, the synchronization fails if the standby CP is running a
Fabric OS version earlier than 6.3.0. Synchronization can succeed only if the QoS D,I zones are
removed.
Supported configurations for QoS zone-based traffic prioritization
Note the following configuration rules for traffic prioritization:
• All switches in the fabric must be running Fabric OS v6.0.0 or later.
ATTENTION
If QoS traffic crosses an ISL for a switch running a firmware version earlier than Fabric OS
v6.0.0, the frames are dropped.
• By default, all devices are assigned medium priority.
- To be assigned high or low priority, hosts and targets must be connected to a Brocade
8-Gbps or 16-Gbps switch or port blade.
-
To preserve the priority level across ISLs, the switches must be running Fabric OS v6.0.0 or
later and must be one of the following platforms: Brocade 300, 4100, 4900, 5000, 5100,
5300, 5410, 5424, 5450, 5480, 6510, 7500, 7500E, 7600, 7800, 8000, VA-40FC,
48000, Brocade DCX, DCX-4S, or DCX 8510 family.
• QoS is enabled by default on 8-Gbps and 16-Gbps ports. QoS is disabled by default on all
4-Gbps ports and long-distance ports.
Limitations and restrictions for QoS zone-based traffic prioritization
• Enabling and disabling QoS is potentially disruptive to the I/O on the affected port.
• If a host and target are included in two or more QoS zones with different priorities, the zone
with the lowest priority takes precedence. For example, if an effective zone configuration has
QOSH_z1 (H,T) and QOSL_z2 (H,T), the traffic flow between H and T will be of low QoS priority.
Additionally, if QOSH_z1 (H,T) overlaps with a “domain,port” zone at the H port, the traffic flow
between H and T is dropped to medium priority and the H port is marked as a session-based
zoning port.
•
•
•
•
Traffic prioritization is enforced on the egress ports only, not on the ingress ports.
Traffic prioritization is not supported on 10 Gbps ISLs.
Traffic prioritization is not supported on mirrored ports.
Traffic prioritization is not supported over LSAN zones. The traffic is always medium priority in
the ingress edge fabric, the backbone fabric, and the egress edge fabric.
• Traffic prioritization is not supported on a CryptoTarget container (redirection zone). See the
Fabric OS Encryption Administrator’s Guide for information about redirection zones.
422
Fabric OS Administrator’s Guide
53-1002148-02
Setting QoS zone-based traffic prioritization
20
• Traffic prioritization is not supported in McDATA Fabric Mode (interopmode 2) or Open Fabric
Mode (interopmode 3).
•
•
•
•
You must be running Fabric OS v6.3.0 or later to create QoS zones using D,I notation.
QoS zones using D,I notation are not supported for QoS over FCR.
QoS zones using D,I notation should not be used for loop or NPIV ports.
If QoS is enabled, an additional 16 buffer credits are allocated per port for 8-Gbps ports in LE
mode. See Chapter 22, “Managing Long Distance Fabrics,” for information about buffer credit
allocation in extended fabrics.
• Trunking considerations: If some ports in a trunk group have QoS enabled and some ports
have QoS disabled, then two different trunks are formed, one with QoS enabled and one with
QoS disabled.
Setting QoS zone-based traffic prioritization
1. Connect to the switch and log in as admin.
2. Enter the zoneCreate command to create zones for high and low priority traffic.
• For high priority traffic, use the following syntax:
zonecreate "QOSHid_zonename", "member[; member...]"
• For low priority traffic, use the following syntax:
zonecreate "QOSLid_zonename", "member[; member...]"
The id is from 1–5 for high priority traffic, which corresponds to VCs 10–14. For low priority
traffic, the id is from 1–2, which corresponds to VCs 8 and 9. The id is optional; if it is not
specified, the virtual channels are allocated using a round-robin scheme.
3. Enter the cfgAdd command to add the QoS zone to the zone configuration, using the following
syntax:
cfgadd "cfgname", "QOSzonename"
4. Enter the cfgSave command to save the change to the defined configuration.
5. Enter the cfgEnable command for the appropriate zone configuration to make the change
effective.
cfgenable "cfgname"
6. Enter the portCfgQos command to enable QoS on the E_Ports, using the following syntax:
portcfgqos --enable [slot/]port
The portCfgQos command does not affect QoS prioritization. It only enables or disables the link
to pass QoS priority traffic.
Fabric OS Administrator’s Guide
53-1002148-02
423
20
Setting QoS zone-based traffic prioritization
NOTE
QoS is enabled by default on all ports (except long-distance ports). If you use the portCfgQos
command to enable QoS on a specific port, the port is toggled to apply this configuration, even
though the port already has QoS enabled. The port is toggled because the user configuration
changed, even though the actual configuration of the port did not change.
If you later use the portCfgQos command to enable QoS on the port again, the port is not toggled
because the configuration did not change.
Example
sw0:admin> zonecreate "QOSH1_zone", "10:00:00:00:10:00:00:00;
10:00:00:00:20:00:00:00"
sw0:admin> zonecreate "QOSL2_zone", "10:00:00:00:30:00:00:00;
10:00:00:00:40:00:00:00"
sw0:admin> zoneshow
sw0:admin> cfgadd "cfg1", "QOSH1_zone"
sw0:admin> cfgadd "cfg1", "QOSL2_zone"
sw0:admin> cfgshow
Defined configuration:
cfg:
cfg1
zone1; QOSH1_zone; QOSL2_zone
zone: QOSH1_zone
10:00:00:00:10:00:00:00; 10:00:00:00:20:00:00:00
zone: QOSL2_zone
10:00:00:00:30:00:00:00; 10:00:00:00:40:00:00:00
zone: zone1
10:00:00:00:10:00:00:00; 10:00:00:00:20:00:00:00;
10:00:00:00:30:00:00:00; 10:00:00:00:40:00:00:00
Effective configuration:
No Effective configuration: (No Access)
sw0:admin> cfgsave
You are about to save the Defined zoning configuration. This
action will only save the changes on Defined configuration.
Any changes made on the Effective configuration will not
take effect until it is re-enabled. Until the Effective
configuration is re-enabled, merging new switches into the
fabric is not recommended and may cause unpredictable
results with the potential of mismatched Effective Zoning
configurations.
Do you want to save Defined zoning configuration only? (yes, y, no, n): [no] y
Updating flash ...
sw0:admin> cfgenable "cfg1"
You are about to enable a new zoning configuration.
This action will replace the old zoning configuration with the
current configuration selected. If the update includes changes
to one or more traffic isolation zones, the update may result in
localized disruption to traffic on ports associated wi


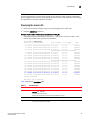
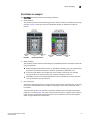
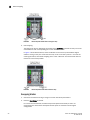


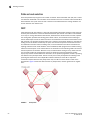
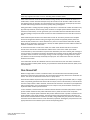
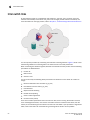
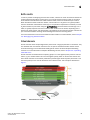
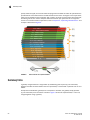
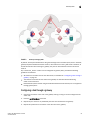
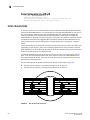
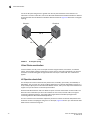
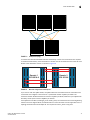


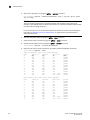


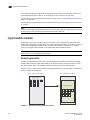
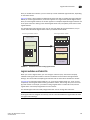
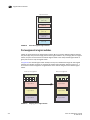
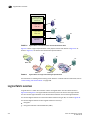
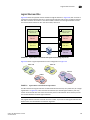
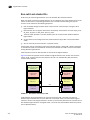
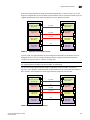
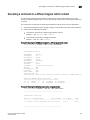
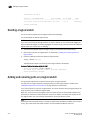
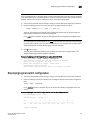
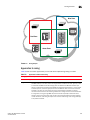
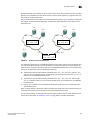

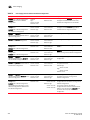
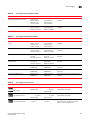
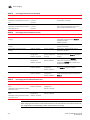

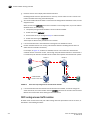
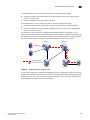
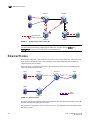
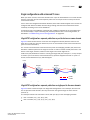
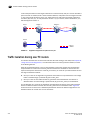
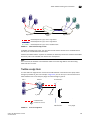
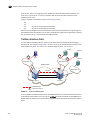
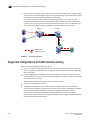
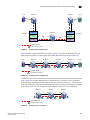
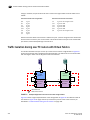
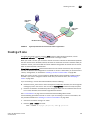
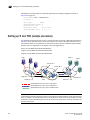


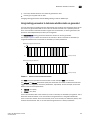

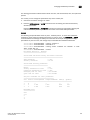
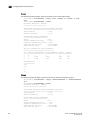
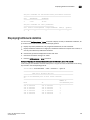

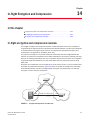


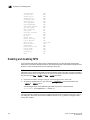
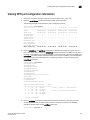
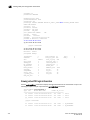
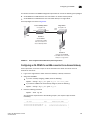
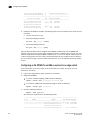


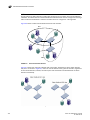

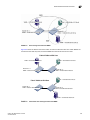
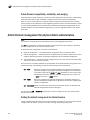

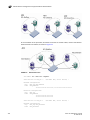
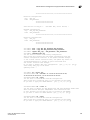


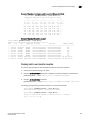


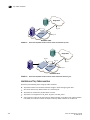

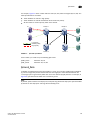
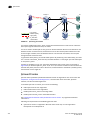
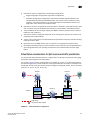


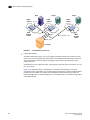
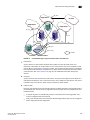
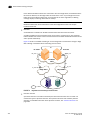
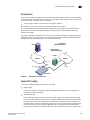

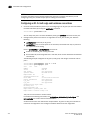
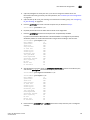
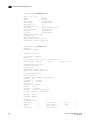
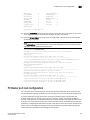
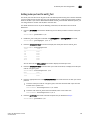

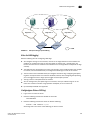
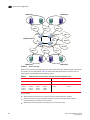

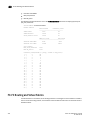

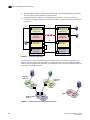
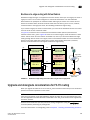

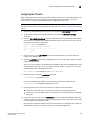
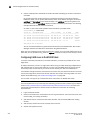
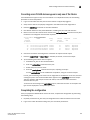
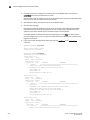


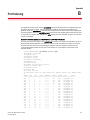
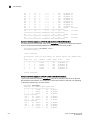
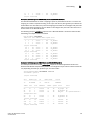
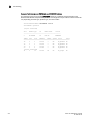


![FICON_AdminGd_v700[1].](http://vs1.manualzilla.com/store/data/005962703_1-207ddf39f2a91b852624dcbb8fd7d57f-150x150.png)