1
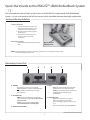
Quick Start Guide to the EMG-EZ™ sEMG Biofeedback System
This illustrated tech-note will aid in the first time use of the EMG-EZ single channel sEMG Biofeedback
System. It is not a substitute for the full user manual, which should be read and thoroughly understood.
Inserting and Removing the Batteries
Inserting the battery
1. Line-up the battery’s positive and
negative terminals with the + and connectors of the compartment.
2. Place the battery’s bottom against
the foam pad.
3. Snap the top of the battery in by
pushing it against the metal
connectors.
Foam Pad
Removing the battery
Remove the battery by lifting its top out
first.
Bottom View of
EMG-EZ device
NOTE: Inserting the battery top first or removing it bottom first can damage the foam pad and
cause intermittent battery contact.
Understanding the Control Panel
A
B
C
D
E
D. GAIN
A. VOLUME
• Plug earphones into connector labeled
EAR and adjust the sound to a comfortable level.
• Turn clockwise to maximum if not using
the earphones.
• X10 gives a threshold indicator value of ten
times the value set on the threshold dial.
• X100 gives a threshold indicator value of one
hundred times the value set on the
threshold dial.
B. OFF/CONT/THR
• CONT = Continuous feedback. This gives the
client proportional audio feedback across the full
range of the scale.
• THR gives proportional feedback from
the threshold indicator level and higher.
E. THRESHOLD DIAL
• Begin the threshold at 2. This gives a
threshold indicator value of 20 μV.
• If 2 is not enough range then increase to 3,5,
or 10.
• If 2 is too small, reduce it using the THR dial.
C. THRESHOLD INDICATOR
1
Getting Started Using EMG-EZ™ sEMG Biofeedback System
1. Connect the electrodes to the sensor
head and remove the backing paper.
• Read user manual for complete information and cautions.
• Do not connect inputs or outputs of the encoder or sensors to
line powered devices, except through the fiber optic cable.
Sensor Head
• To prevent voiding warranty by breaking connector pins,
Electrode
carefully align white guiding dot on sensor plug with slot on
sensor input.
• To avoid corrosion, remove single electrodes from sensor
snaps immediately after use.
• Use Chattanooga Group’s Dura-Stick® EMG electrodes
only.
• Apply conductive gel only to electrodes. Never put gel
directly to sensor snaps.
• Do not plug third party sensors directly into instrument
inputs. Plug only EMG-EZ sensor cable connectors into
instrument inputs. All EMG electrodes and third party
2. Place electrodes firmly onto the client,
and plug into the sensor input.
sensors must be connected to EMG-EZ sensors,
either directly or through an adapter.
• Remove batteries when the device is not being used
Sensor Input
for an extended period of time.
Earphones Input
• Sensors damaged by static electricity are not covered
under warranty. In dry climates, apply anti-static spray
on carpets each week and use a conductive floor mat
(available from computer stores). A humidifier may also
be used to prevent static environments by conditioning
hot, dry air.
ISO 13485 CERTIFIED
4717 Adams Road
P.O. Box 489
Hixson, TN 37343
1.423.870.2281
USA
1.423.592.7329
Canada
1.800.361.6661
Outside U.S.A.
1.423.870.7200
Fax
1.423.870.2046
www.chattgroup.com
© 2005 Encore Medical, L.P.
2
41008A