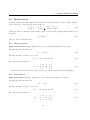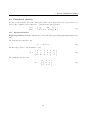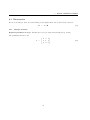
1
HiQLab: User’s Manual David Bindel and Tsuyoshi Koyama July 20, 2006 Contents 1 Introducing HiQLab 1.1 HiQLab description . . . . . . . . . . . . 1.2 HiQLab architecture . . . . . . . . . . . 1.3 Download and basic setup . . . . . . . . 1.3.1 Running in MATLAB . . . . . . 1.3.2 Running in standalone mode . . 1.4 “Hello world” in HiQLab . . . . . . . . . 1.4.1 Describing a cantilever beam . . 1.4.2 Eigenvalue analysis in MATLAB 1.4.3 Eigenvalue analysis in standalone 1.5 Getting help . . . . . . . . . . . . . . . . . . . . . . . . . . . . . . . . . . . . . . . . . . . . . . . . mode . . . . . . . . . . . . . . . . . . . . . . . . . . . . . . . . . . . . . . . . . . . . . . . . . . . . . . . . . . . . . . . . . . . . . . . . . . . . . . . . . . . . . . . . . . . . . . . . . . . . . . . . . . . . . . . . . . . . . . . . . . . . . . . . . . . . . . . . . . . . . . . . . . . . . . . . . . . . . . . . . . . . . . . . . . . . . . . . . . . . . . . . . . . . . . . . . . . . . . . . . . . . . . . . . . . . . . . . . . . . . . . . . . . . . . . . . . . . . . . . . . . . . . . . . . . . . . . . . . . . . . . . 4 4 4 5 6 7 7 7 9 9 9 2 Basic features from Lua 2.1 Variable types . . . . . 2.2 Ending a line . . . . . 2.3 Print statement . . . . 2.4 Comments . . . . . . . 2.5 For loops . . . . . . . 2.6 If statements . . . . . 2.7 Functions . . . . . . . . . . . . . . . . . . . . . . . . . . . . . . . . . . . . . . . . . . . . . . . . . . . . . . . . . . . . . . . . . . . . . . . . . . . . . . . . . . . . . . . . . . . . . . . . . . . . . . . . . . . . . . . . . . . . . . . . . . . . . . . . . . . . . . . . . . . . . . . . . . . . . . . . . . . . . . . . . . . . . . . . . . . . . . . . . . . . . . . . . . . . . . . . . . . . . . . . . . . . . . . . . . . . . . . . . 10 10 11 12 12 12 13 13 3 Mesh description (Lua) 3.1 require statements and common files . . . 3.2 Constructing the Mesh object . . . . . . . 3.3 Adding nodes . . . . . . . . . . . . . . . . . 3.4 Adding elements . . . . . . . . . . . . . . . 3.4.1 Element types . . . . . . . . . . . . 3.4.2 Line, quad, and brick node ordering 3.4.3 Adding elements to mesh . . . . . . 3.5 Block generators . . . . . . . . . . . . . . . 3.5.1 Simple block generators . . . . . . . 3.5.2 Multiple block generators . . . . . . 3.5.3 Transformed block generation in Lua . . . . . . . . . . . . . . . . . . . . . . . . . . . . . . . . . . . . . . . . . . . . . . . . . . . . . . . . . . . . . . . . . . . . . . . . . . . . . . . . . . . . . . . . . . . . . . . . . . . . . . . . . . . . . . . . . . . . . . . . . . . . . . . . . . . . . . . . . . . . . . . . . . . . . . . . . . . . . . . . . . . . . . . . . . . . . . . . . . . . . . . . . . . . . . . . . . . . . . . . . . . . . . . . . . . . . . . . . . . . . . . . . . . . . . . . . . . . . . . . . . . . . . . . . . . . . . . . . . . . . . . . . . . . . . . . . . . . . . . . . . . . . . . . . . . . . . . . . . . . . . . . . . . . 15 15 17 17 17 17 17 18 20 20 22 25 . . . . . . . . . . . . . . . . . . . . . . . . . . . . . . . . . . . . . . . . . . . . . . . . . . . . . . . . . . . . . . . . . . . . . . 1 CONTENTS 3.6 3.7 3.8 Tie command . . . . . . . . . . . . . . . . . . . Applying boundary conditions . . . . . . . . . . 3.7.1 Nodal boundary conditions . . . . . . . 3.7.2 Global variable boundary conditions . . 3.7.3 Element variable boundary conditions . Helper Lua commands . . . . . . . . . . . . . . 3.8.1 Numerical value comparison commands . . . . . . . . . . . . . . . . . . . . . . . . . . . . . . . . . . . . . . . . . . . . . . . . . . . . . . . . . . . . . . . . . . . . . . . . . . . . . . . . . . . . . . . . . . . . . . . . . . . . . . . . . . . . . . . . . . . . . . . . . . . . . . . . . . . . . . . . . . . . . . . . . . . . . . . . . . . . . . . . . . . . . . . . . . . . . . . . . . . . . . 27 27 28 28 28 29 29 4 Global variables 30 4.1 Concept of a global variable . . . . . . . . . . . . . . . . . . . . . . . . . . . . . . . . . . . . . 30 4.2 Creating and defining global variables . . . . . . . . . . . . . . . . . . . . . . . . . . . . . . . 30 5 Element library 5.1 PML elements . . . . . . . . . . . . 5.2 Laplace elements . . . . . . . . . . . 5.3 Elastic elements . . . . . . . . . . . . 5.4 Thermoelastic Elements . . . . . . . 5.5 Piezoelectric elements . . . . . . . . 5.6 Electromechanical coupling elements 5.7 Discrete circuit elements . . . . . . . 5.8 Electrode . . . . . . . . . . . . . . . . . . . . . . . . . . . . . . . . . . . . . . . . . . . . . . . . . . . . . . . . . . . . . . . . . . . . . . . . . . . . . . . . . . . . . . . . . . . . . . . . . . . . . . . . . . . . . . . . . . . . . . . . . . . . . . . . . . . . . . . . . . . . . . . . . . . . . . . . . . . . . . . . . . . . . . . . . . . . . . . . . . . . . . . . . . . . . . . . . . . . . . . . . . . . . . . . . . . . . . . . . . . . . . . . . . . . . . . . . . . . . . . . . . . . . . . . . . . . . . . . . . . . . . . . . . . . . . . 32 32 33 34 36 38 40 41 43 6 Linear material models 6.1 Elasticity . . . . . . . . . 6.1.1 Isotropic material . 6.1.2 Cubic material . . 6.1.3 Hexagonal material 6.2 Thermoelasticity . . . . . 6.2.1 Isotropic material . 6.2.2 Cubic material . . 6.3 Piezoelectric elasticity . . 6.3.1 Hexagonal material 6.4 Electrostatics . . . . . . . 6.4.1 Isotropic material . 6.5 Supporting functions . . . . . . . . . . . . . . . . . . . . . . . . . . . . . . . . . . . . . . . . . . . . . . . . . . . . . . . . . . . . . . . . . . . . . . . . . . . . . . . . . . . . . . . . . . . . . . . . . . . . . . . . . . . . . . . . . . . . . . . . . . . . . . . . . . . . . . . . . . . . . . . . . . . . . . . . . . . . . . . . . . . . . . . . . . . . . . . . . . . . . . . . . . . . . . . . . . . . . . . . . . . . . . . . . . . . . . . . . . . . . . . . . . . . . . . . . . . . . . . . . . . . . . . . . . . . . . . . . . . . . . . . . . . . . . . . . . . . . . . . . . . . . . . . . . . . . . . . . . . . . . . . . . . . . . . . . . . . . . . . . . . . . . . . . . . . . . . . . . . . . . . . . . . . . . . . . . . . . . . . . . . . . . . . . . . . . . . . . . . . . . . . . . . 45 46 46 46 47 48 48 48 49 49 50 50 51 . . . . . . . . . . . . . . . . . . . . . . . . . . . . . . . . . . . . . . . . . . . . . . . . . . . . . . . . . . . . . . . . . . . . . . . . 7 Non-dimensionalization 52 7.1 Incorporating non-dimensionalization . . . . . . . . . . . . . . . . . . . . . . . . . . . . . . . . 52 7.2 Compute non-dimensionalizing constants . . . . . . . . . . . . . . . . . . . . . . . . . . . . . . 55 7.3 Non-dimensionalize material parameters . . . . . . . . . . . . . . . . . . . . . . . . . . . . . . 56 8 Basic functions (Matlab) 8.1 Loading and deleting Lua mesh input files 8.2 Getting Scaling parameters . . . . . . . . 8.3 Obtain basic information about mesh . . . 8.4 Obtain particular information about ids . . . . . . . . . 2 . . . . . . . . . . . . . . . . . . . . . . . . . . . . . . . . . . . . . . . . . . . . . . . . . . . . . . . . . . . . . . . . . . . . . . . . . . . . . . . . . . . . . . . . . . . . . . . . . . . . . . . . . . . . 58 58 58 58 59 CONTENTS 8.5 8.6 8.7 8.8 8.9 8.10 8.11 8.12 Obtain particular information about id, nodes, or elements Getting displacements and force . . . . . . . . . . . . . . . . Functions to form global matrices . . . . . . . . . . . . . . . Other useful functions . . . . . . . . . . . . . . . . . . . . . Assigning and reassigning ids . . . . . . . . . . . . . . . . . Producing forcing and sensing pattern vectors . . . . . . . . Getting and setting variables in the Lua environment . . . . Manipulating the Lua environment . . . . . . . . . . . . . . 9 Functions for analysis(MATLAB) 9.1 Static analysis . . . . . . . . . . 9.2 Time-harmonic analysis . . . . . 9.3 Modal analysis . . . . . . . . . . 9.4 Transfer function evaluation . . . 9.5 Model reduction . . . . . . . . . . . . . . . . . . . . . . . . . . . . . . . . . . . . . . . . . . . . . . . . . . . . . . . . . . . . . . . . . . . . . . . . . . . . . . . . . . . . . . . . . . . . . . . . . . . . . . . . . . . . . . . . . . . . . . . . . . . . . . . . . . . . . . . . . . . . . . . . . . . . . . . . . . . . . . . . . . . . . . . . . . . . . . . . . . . . . . . . . . . . . . . . . . . . . . . . . . . . . . . . . . . . . . . . . . . . . . . . . . . . . . . . . . . . 59 59 60 61 61 61 63 64 . . . . . . . . . . . . . . . . . . . . . . . . . . . . . . . . . . . . . . . . . . . . . . . . . . . . . . . . . . . . . . . . . . . . . . . . . . . . . . . . . . . . . . . . . . . . . . . 65 65 65 66 68 68 10 Basic analysis (Lua) 70 10.1 Functions to obtain basic information about mesh . . . . . . . . . . . . . . . . . . . . . . . . 70 10.2 Obtain particular information about ids . . . . . . . . . . . . . . . . . . . . . . . . . . . . . . 70 11 Plotting results (Matlab) 11.1 Mesh plots . . . . . . . . . 11.2 Plotting the deformed mesh 11.3 Animations . . . . . . . . . 11.4 Plotting Bode plots . . . . . . . . . . . . . . . . . . . . . . . . . . . . . . . . . . . . . . . . . . . . . 3 . . . . . . . . . . . . . . . . . . . . . . . . . . . . . . . . . . . . . . . . . . . . . . . . . . . . . . . . . . . . . . . . . . . . . . . . . . . . . . . . . . . . . . . . . . . . . . . . . . . . . . . . . . . . 71 71 71 72 73 1 1 INTRODUCING HIQLAB Introducing HiQLab 1.1 HiQLab description Electromechanical resonators and filters, such as quartz, ceramic, and surface-acoustic wave devices, are important signal-processing elements in communication systems. Over the past decade, there has been substantial progress in developing new types of miniaturized electromechanical resonators using microfabrication processes. For these micro-resonators to be viable they must have high and predictable quality factors (Q). Depending on scale and geometry, the energy losses that lower Q may come from material damping, thermoelastic damping, air damping, or radiation of elastic waves from an anchor. While commercial finite element codes can calculate the resonant frequencies, they typically offer only limited support for computing damping effects; and even if the software is capable of forming the systems of equations that describe physically realistic damping, there may not be algorithms to quickly solve those equations. HiQLab is a finite element program written to study damping in resonant MEMS. Though the program is designed with resonant MEMS in mind, the architecture is general, and can handle other types of problems. Most architectural features in HiQLab can be found in standard finite element codes like FEAP; we also stole liberally from the code base for the SUGAR MEMS simulator. We wrote HiQLab to be independent of any existing finite element code for the following reasons: • We want to share our code, both with collaborators and with the community. This is a much easier if the code does not depend on some expensive external package. • We want to experiment with low-level details, which is more easily done if we have full access to the source code. • We are mostly interested in linear problems, but they are problems with unusual structure. It is possible to fit those structures into existing finite element codes, but if we have to write new elements, new solver algorithms, and new assembly code in order to simulate anchor losses using perfectly matched layers, we get little added benefit to go with the cost and baggage of working inside a commercial code. • We are still discovering which algorithms work well, and would like to be able to prototype our algorithms inside MATLAB. We also want to be able to run multi-processor simulations outside of MATLAB, both to solve large problems and to run optimization loops. FEMLAB supports a MATLAB interface, but in our experience does not deal well with large simulations. FEAP also supports a MATLAB interface (which we wrote), and the data structures in HiQLab and FEAP are similar enough that we can share data between the two programs. The main drawback of developing a new code is that we lack the pre- and post-processing facilities of some other programs. 1.2 HiQLab architecture The main components of HiQLab are as follows. • The mesh description language The main way to describe devices in HiQLab is to write a mesh input deck using the Lua programming language (http://www.lua.org). Because meshes are generated programmatically, it is easy to create parameterized descriptions with hierarchies and arrays. 4 1 Input deck Models Assembly INTRODUCING HIQLAB Solvers Results Programmatic user interface Figure 1: Architecture of HiQLab • The programmatic user interfaces There are two versions of the user interface: the MATLAB interface and the standalone interface. When using the MATLAB interface, a user has access to the full range of MATLAB’s numerical solvers and graphics routines. When using the standalone interface, a user does not have as many built-in capabilities; but because the standalone interface does not rely on MATLAB, it takes less memory and can solve larger problems. Like the mesh description interface, the user interface is written in the Lua language, and is fully programmable. We describe both the MATLAB interface and the standalone interface in this manual. • The element model library The element library includes linear, quadratic, and cubic quad and brick elements for elastic problems and coupled thermoelastic problems in plane strain, plane stress, axisymmetry, or three dimensions. The code also provides scalar wave equation elements in one, two, or three dimensions. For both scalar and elastic waves, the code supports perfectly matched layer sbsorbing boundaries to mimic the effect of infinite domains. • The solver library The solver library includes code for – Modal analysis of structures with anchor loss and thermoelastic damping. – Forced response analysis, including forced response visualization and Bode plot construction. The forced response analysis routines incorporate reduced order models. 1.3 Download and basic setup The fastest way to get started with HiQLab is to use the pre-compiled version, available for Linux or Windows machines. You can download the source code and pre-compiled executables at http://www.cs.berkeley.edu/~dbindel/hiqlab/ If you wish to run HiQLab with the MATLAB interface, you will need MATLAB version 6 or later. If you wish to build your own version of HiQLab, you will need 5 1 INTRODUCING HIQLAB • A C/C++ compiler and a FORTRAN 77 compiler (we have used the GNU compiler on Linux and Windows, and the Intel compilers on Itanium) • Perl 5.002 or later • LAPACK and BLAS (Basic Linear Algebra Subroutine) libraries. If you are compiling the MATLAB front-end for HiQLab, these are already provided. • UMFPACK (a linear system solver) • ARPACK (an iterative eigenvalue solver) If these packages are installed, you should be able to configure and compile the software by running the following commands from the HiQLab top-level directory: ./configure make At the time this manual is being written, HiQLab is alpha software. The code is still changing rapidly, and if you have trouble setting up the program and running basic examples, please check to make sure you have the most recent version. 1.3.1 Running in MATLAB Once you have downloaded the pre-compiled version of the code (or once you have built your own version), start MATLAB and run the file init.m. You should see something like the following: < M A T L A B > Copyright 1984-2001 The MathWorks, Inc. Version 6.1.0.450 Release 12.1 May 18 2001 To get started, type one of these: helpwin, helpdesk, or demo. For product information, visit www.mathworks.com. >> init HiQlab 0.2 Copyright : Build system: Build date : Bug reports : >> Regents of the University of California i686-pc-linux-gnu Tue Mar 1 12:51:22 PST 2005 [email protected] You must run init before using HiQLabfrom MATLAB. The init script sets the MATLAB path variable so that MATLAB can find the files HiQLab needs for its analyses. If you run init and see the HiQLab banner, that means that you have a working version of the MATLAB HiQLab interface for your machine. If there is an error message when you run init, please send an e-mail including the exact error message, operating system version, and MATLAB version. 6 1 1.3.2 INTRODUCING HIQLAB Running in standalone mode If you want to use the standalone version, look for an executable file called hiqlab in the src/lua subdirectory. When you run hiqlab with no arguments, you should see an banner with program information and a control prompt: [dbindel@localhost lua]$ ./hiqlab ------------------------------------------------------HiQlab 0.2 Copyright : Regents of the University of California Build system: i686-pc-linux-gnu Build date : Thu Mar 3 19:29:03 PST 2005 Bug reports : [email protected] Lua 5.0.2 Copyright (C) 1994-2004 Tecgraf, PUC-Rio ------------------------------------------------------> To end the HiQLab session, press Ctrl-D on the keyboard. HiQLab may also be run non-interactively: if batch.lua is a script that runs an analysis and prints it out, for example, you might run hiqlab batch.lua Like the MATLAB interface, the standalone user interface needs to know where to find files. The init.lua file in the HiQLab main directory specifies these files. The first line of init.lua has the form HOME=’/my/hiq/directory’ where “my hiq directory” should be replaced by the directory where HiQLab is installed. This is usually done automatically at configuration time. You can ensure that HiQLab executes init.lua when it starts in one of two ways: 1. Set the HIQ INIT environment variable to point to the full path for init.lua. HiQLab calls any files specified in the HiQLab directory 2. Specify init.lua using the -l argument to HiQLab. For example, to execute init.lua before running HiQLab in interactive mode, hiqlab -l /my/hiq/directory/init.lua -i and to run a batch script, hiqlab -l /my/hiq/directory/init.lua batch.lua 1.4 1.4.1 “Hello world” in HiQLab Describing a cantilever beam Figure 2 shows the input file used to describe a simple cantilever beam. We now describe the input file in detail. 7 1 INTRODUCING HIQLAB require ’common.lua’ l = 10e-6 w = 2e-6 dense = 0.5e-6 order = 2 ----- Beam length Beam width Approximate element size (for block generator) Order of elements mesh = Mesh:new(2) mat = make_material(’silicon2’, ’planestrain’) mesh:blocks2d( { 0, l }, { -w/2.0, w/2.0 }, mat ) mesh:set_bc(function(x,y) if x == 0 then return ’uu’, 0, 0; end end) Figure 2: The complete mesh input file for a cantilever beam • Including common support files: require ’common.lua’ Typically, input files will start with one or more require statements, which are used to load function definitions, material databases, and other data. The require statement is much like an include statement in C or Fortran, except that require loads each file once. For example, the file common.lua begins by requiring material.lua; if my input file also started with a line require ’material.lua’, I would not end up with two copies of the material definitions file. When the interpreter encounters a require statement, it searches through a standard path to find a file with a matching name. We will say more about the search path in Section 3.1. The file common.lua, which is defined in models/common.lua provides functions that are useful for defining element types; common.lua should be included in most mesh description files. • Defining geometric parameters: l = 10e-6 w = 2e-6 -- Beam length -- Beam width A two-dimensional beam model must have a length and a width. These two lines give the beam length (10 µm) and width (2 µm) in MKS units. Giving names to geometric parameters makes the input file easier to read than it would otherwise be. In Section ??, we describe how named parameters can be set from outside the input file in order to simplify parameter studies. • Defining mesh generation parameters: dense = 0.5e-6 order = 2 -- Approximate element size (for block generator) -- Order of elements 8 1 INTRODUCING HIQLAB The mesh file must describe both the geometry of the device and the parameters that define the mesh. HiQLab includes several functions that define regular “blocks” that can be tied together to form a mesh. The dense and order parameters control how HiQLab builds these blocks. The order parameter is the order of polynomial interpolation used within each element: linear, quadratic, and cubic elements are available. The dense parameter describes the element size. • Creating a mesh object: mesh = Mesh:new(2) All information about the mesh is stored in a mesh object. The mesh constructor has a single argument, the dimension of the ambient space for the problem. The mesh object should be called mesh. • Defining a material: mat = make_material(’silicon2’, ’planestrain’) Build an element type for computing the response of silicon in plane strain. The first argument refers to an entry in materials.lua which defines material arguments like Young’s modulus and the Poission ratio; subsequent arguments define the type of analysis (plane stress, plane strain, axisymmetric, or three-dimensional). • Defining the mesh: mesh:blocks2d( { 0, l }, { -w/2.0, w/2.0 }, mat ) The mesh for a cantilever beam is simple: it covers the rectangular region [0, l] × [−w/2, w/2]. The blocks2d generator creates such a region and adds it to the mesh; the element size and order are determined by the global variables dense and order defined earlier, and the mat parameter from the previous line defines which material should be used. • Defining boundary conditions: mesh:set_bc(function(x,y) if x == 0 then return ’uu’, 0, 0; end end) By calling mesh:set bc(myfunc), we define boundary conditions for the problem. myfunc may be an anonymous function (a function without an explicitly assigned name), which is what we use for this problem. The function is called at every node in the mesh. If the call returns nothing, then no boundary conditions are applied; otherwise, the call returns a string which defines whether essential or natural (displacement or flux) boundary conditions are applied. In this example, displacement boundary conditions (denoted by ’u’) are given for both the x and y displacements. The two numeric arguments after the string indicate that the x and y displacements are set to zero. 1.4.2 Eigenvalue analysis in MATLAB 1.4.3 Eigenvalue analysis in standalone mode 1.5 Getting help 9 2 2 BASIC FEATURES FROM LUA Basic features from Lua Write about and or features!! 2.1 Variable types Since Lua is a dynamically typed language, there are no type definitions in the language. In other words, the type is defined by the variable assigned. There are eight basic types in Lua. Of these the HiQLab user should be aware of the following 6. 1. nil: This is the type that is assigned to all variables by default. nil can be assigned to a variable as, a = nil 2. boolean: This has two types, trueand false. In Lua, any value may represent a condition. In conditionals, ONLY false and nil are considered false, and everything else is considered true. Beware that the value zero and empty string both represent TRUE. 3. number: Lua has only one number type, real double-precision floating point numbers. There are NO integer types. Valid types of number representations are, 4 0.4 4.57e-3 0.3e12 5e+20 4. string: Strings have the usual meaning, a sequence of characters. The string can be assigned by putting them between single quotes or double quotes. They can be assigned to a variable by the following statement. a = "a line" b = ’another line’ Strings in Lua can contain the following C-like escape sequences: Table 1: C-like escape sequences : back space \b \n : newline \t : horizontal tab \v : vertical tab \\ : back slash \’ : single quote \" : double quote Strings can be concatenated by the operator ... a = "Hello" b = "World" c = a..b d = a.." "..b print(c) print(d) --> HelloWorld --> Hello World 10 2 BASIC FEATURES FROM LUA 5. table: This type is used to implement associative arrays. An associative array is an array that can be indexed not only with numbers, but also with strings or any other value of the language. Moreover, tables have no fixed size, and the size is adjusted dynamically. Thus a single Lua table can contain different types of data. a = {} a[1] = 4 a[21]= ’Hello world’ print(a[1]) -- create a table -- store double -- store string --> 4 a[’A’] = a a[’John’] = Doe print(a[’John’]) print(a[John]) -- Index with character -- Index with string --> Doe --> nil Tables in Lua are treated as objects similar to Java. Thus a program that manipulates tables, only manipulates references or pointer to them. b = a -- the reference to the table that ’a’ -- points to is passed Additionally, since tables are like objects, a.name cna be used as syntactic sugar for a["name"]. a = {} a["x"] = 4 print(a["x"]) print(a.x) --> 4 --> 4 Tables can be initialied with values by the following argument, in which case the keys to the corresponding values start from one (and not with zero, as in C). a = { 10, 11, 12} print(a[1]) --> 10 6. function This aspect will further be explained in section ????. WHAT YOU SHOULD KNOW(Zentei Chishiki). 2.2 Ending a line A statement in Lua is called a chunk, and is simply a sequence of statements. This chunk can take a single line, multiple lines, or can even span multiple files. A semicolon may optionally follow any statement, but this is just a convention. Thus, the following four chunks are equivalent. -- Chunk 1 a = 1 b = a*2 11 2 BASIC FEATURES FROM LUA -- Chunk 2 a = 1; b = a*2 -- Chunk 3 a = 1; b = a*2 -- Chunk 4 a = 1 b = a*2 2.3 Print statement All variable types can be printed to the screen through the command print a = 4 print(a) --> 4 b = "Hello World" print(b) --> Hello World c = false print(c) --> false d = {4, 5, 6} print(d) --> table: 0x8067d90 (The reference is printed in this case) print(d[2]) --> 5 2.4 Comments A comment starts anywhere with a double hyphen (–) and runs until the end of the line. Lua also offers block comments, starting with --[[ and run till --]]. -- This is a commented line --[[ print(10) --]] 2.5 --This is a commented block For loops for loops in Lua are stated by the following structure. for var=start_value, end_value, increment do do something end The loop will execute something for each value of var from start value to end value with and increment of increment. If increment is absent, the increment will be assumed one. An example for printing the numbers 1 through 10 is presented below. 12 2 BASIC FEATURES FROM LUA for i=1,10 do print(i) end One remark that should be made is that in the example above the index i is declared as a local variable. This implies that once the for loop is terminated the value of i will not be retained and cannnot be referenced to. 2.6 If statements if statements in Lua are defined by the following structures. if condition_expression then do something end or, if condition_expression then do something else do something else end All other values other than false or nil that are returned by the condition expression will be treated as true. An example code to print the larger of the value a,b is: if a > b then print(a) else print(b) end To avoid writing nested ifs, one can use elseif in the following structure. if condition_expression then do something elseif condition_expression do something else else do yet something else end 2.7 Functions A function in Lua is defined by the following format. function function_name(input_arguments) function_body end 13 2 BASIC FEATURES FROM LUA The input arguments can any type of Lua variable, and when multiple values are passed, they must be seperated by a comma. It is possible to assign no input arguments. function body will consist of the standard Lua chunks. For the function to return an output value the return command must be placed. function function_name(input_arguments) function_body return output_arguments end output arguments may return any type of Lua variable, and when multiple values are returned, they must be seperated by a comma. An example of a function which takes two numbers a,b as the input and returns their sum is shown below. function add(a,b) sum_ab = a + b return sum_ab end The method of calling this function is the following. a = 4 b =-2.11 sum_ab = add(a,b) print(sum_ab) -> 1.89 The function above can be modified to also return the difference by the following code. function add_diff(a,b) sum_ab = a + b diff_ab= a - b return sum_ab, diff_ab end The method of calling this function is the following. a = 4 b =-2.11 sum_ab, diff_ab = add_diff(a,b) print(sum_ab) -> 1.89 print(diff_ab) -> 6.11 14 3 3 3.1 MESH DESCRIPTION (LUA) Mesh description (Lua) require statements and common files Need directory tree diagram or something Typically, mesh input files will start with one or more require statements, which are used to load function definitions, material databases, and other data. The require statement is much like an include statement in C or Fortran, except that require loads each file once. For example, the file common.lua begins by requiring material.lua; if my input file also started with a line require ’material.lua’, I would not end up with two copies of the material definitions file. When the interpreter encounters this require statement, it searches through a standard path to find a file with a matching name. The file common.lua, which is defined in models/common.lua provides functions that are useful for defining element types; common.lua should be included in most mesh description files. The functions contained in common.lua are sorted by functionality and presented in table 2. Further details on the input and output arguments of the function are given in the section?? related with non-dimensionalization and section??? related with material models. The file material.lua, which is defined in models/material.lua provides a material database which is useful for defining element types; materials.lua is automatically incorporated by including the file common.lua. The functions contained in materials.lua are sorted by functionality and presented in table 3. The materials in the database are sorted by the type of analysis they are capable of in table 4. Further details on the input and output arguments of the functions and properties of the materials are given in the section?? related with material models. Table 2: Functions contained in common.lua Functionality Retrieve material property values Set characteristic scales for nondimensionalization Non-dimensionlize material properties Construct element with mtype material property Function name get material(mtype) mech nondim(mtype,cL), ted nondim(mtype,cL), pz nondim(mtype,cL), em nondim(mtype,cL,eps) mech material normalize(mtype), ted material normalize(mtype), pz material normalize(mtype) make material(mtype,etype,wafer,angle), make material te(mtype,etype,wafer,angle), make material pz(mtype,etype,wafer,angle), make material couple em2d(eps,etype) 15 3 MESH DESCRIPTION (LUA) Table 3: Functions contained in materials.lua Functionality Assign proper mechanical variables if non-existent Assign proper piezoelectric variables if non-existent Function name fill mech(mtype) fill piezo(mtype) Table 4: Materials contained in materials.lua Material name sc silicon poly silicon amor silicon silicon silicon2 hfo2 sic sige siox diamond aln aln isotropic aln piazza pt piazza al piazza Crystal cubic isotropic cubic isotropic isotropic isotropic isotropic isotropic isotropic isotropic hexagonal isotropic hexagonal isotropic isotropic mech Analysis thermoelastic piezo × × × × × × × × × × × × × × × × × × × × × × × 16 electromech × × × 3 3.2 MESH DESCRIPTION (LUA) Constructing the Mesh object All the information about the mesh is stored in a mesh object. The mesh constructor has a single argument, the dimension of the ambient space for the problem. Mesh(ndm) A mesh object with ndm dimensions for the ambient space. The mesh object should be called mesh. The mesh is usually constructed by the following statement. mesh = Mesh:new(ndm) 3.3 Adding nodes Nodal points must be defined in order to construct the mesh. There are two primitive operations to add nodes to the mesh geometry. add node(x) Adds a single node with positions listed consecutively in the array x={x1,y1}, and returns the identifier of the node. add node(x,n) Adds n nodes with positions listed consecutively in the array x={x1 ,. . .,xn }, and returns the identifier of the first node. It must be noted that the identifier of the nodes are 0 based in the Lua environment. Thus the the identifier returned after adding the very first node will be 0. The nodes can be added to mesh by the following statements. x = {x1, y1, x2, y2, x3, y3} identifier_for_first_node = mesh:add_node(x,3) 3.4 3.4.1 Adding elements Element types HiQLab currently supports line, quad, and brick elements for mechanical, thermomechanical, piezoelectric mechanical, and electromechanical problems. Details of implementation and capabilities of each element are noted in section 5, which explains the element library. 3.4.2 Line, quad, and brick node ordering The current shape function library supports linear, quadratic, and cubic; and bilinear, biquadratic, and bicubic quads; and trilinear, triquadratic, and tricubic bricks. The ordering is non-standard. For lines, the nodes are listed in increasing order starting from one end node. This is shown in Figure 3. For quads, the nodes are listed in increasing order by their coordinates, with the y coordinate varying fastest. For example, for 4-node,9-node, and 16-node quads, we use the ordering shown in Figure 4. The ordering in the 3D brick case is similar, but with the z coordinate varying fastest, the y coordinate second-fastest, and the x coordinate most slowly. For example, for 8-node and 27-node bricks, we use the ordering shown in Figure 5. 17 3 MESH DESCRIPTION (LUA) So long as the ordering in the spatial domain is consistent with the ordering in the parent domain, the isoparametric mapping will be well-behaved (so long as element distortion is not too great). The add block commands described in the section 3.5 produce node orderings which are consistent with our convention. The primary advantage of the node ordering we have chosen is that it becomes trivial to write loops to construct 2D and 3D tensor product shape functions out of simple 1D Lagrangian shape functions. Also, it becomes simple to write the loops used to convert a mesh of higher order elements into four-node quads or eight-node bricks for visualization (see Section ??). Development note: Currently, the number of Gauss points used by the element library is fixed at compile time. It might be wise to allow the user to change that. 3.4.3 Adding elements to mesh In order to add an element to the mesh, we must first construct an element object. This can be done by the following statement. etype = mesh:Element(arguments) To construct a PMLElastic2D element, Element is replaced by the following, etype = mesh:PMLElastic2d( E, nu, rho, analysis_type); Once this element object is constructed we must define the connectivity of a particular element and add this to the mesh object by the command: add element(con,etype,nen,num) Adds n elements of type etype with node lists of length nen listed consecutively in the array con, and returns the identifier of the first element added. It must be noted that the identifier of the elements are 0 based in the Lua environment. Thus the the identifier returned after adding the very first element will be 0. A sample code for adding one 4-noded quad element to the mesh would look like, con = { node_num1, node_num2, node_num3, node_num4} identifier_for_first_element = mesh:add_element(con, etype, 4, 1) 18 3 MESH DESCRIPTION (LUA) Figure 3: Node ordering for 2-node, 3-node, and 4-node line elements Figure 4: Node ordering for 4-node, 9-node, and 16-node quads Figure 5: Node ordering for 8-node and 27-node brick 19 3 3.5 MESH DESCRIPTION (LUA) Block generators Thought the methods introduced above for adding nodes and elements are general, they can be tedious to use when defining complicated geometry or for parametric mesh refinement analyses. Mesh generation can be simplified by using the block generator commands introduced in this section. 3.5.1 Simple block generators add block(x1,x2,nx,etype,order) The add block methods allow you to add a Cartesian strip of elements. This method takes two end points x1,x2 and the number of points along the edge (including end points), and constructs a mesh of the strip [xmin , xmax ]×. It is possible to remap the bricks later by directly manipulating the mesh x array. Each element has a specified order, and the number of points along each edge should be one greater than a multiple of that order. Thus nx and order should satisfy the relation, nx = order × (number of elements between end points) + 1 The case where we have 7 nodes (nx=7) with varying order of elements is shown in Figure 6. Figure 6: add block(x1,x2,nx=7,etype,order=1,2,3) 20 3 MESH DESCRIPTION (LUA) add block(x1,y1,x2,y2,nx,ny,etype,order) This is a 2D version of the add block generator. The case where we have 7 nodes (nx=7) by 3 nodes (ny=3) with varying order of elements is shown in Figure 7. We see here in this case that nx,ny both must satisfy the relation, nx = order × (number of elements between end points) + 1 ny = order × (number of elements between end points) + 1 $ !" $ # !" # Figure 7: add block(x1,y1,x2,y2,nx=7,ny=3,etype,order=1,2) add block(x1,y1,z1,x2,y2,z2,nx,ny,nz,etype,order) This is a 3D version of the add block generator. 21 3 3.5.2 MESH DESCRIPTION (LUA) Multiple block generators The block generators listed in this section can be understood as conducting multiple add blocks simultaneously. This is done by passing an array of controls points along each edge, and specifying the number of nodes along the edge between these control points. blocks1dn(xlist,rlist,etype,order) Creates a 1D strip of elements with specified nodes along the edge xlist={x1 ,...,xm }, and specified number of nodes along the edge between specified nodes rlist={r1 ,...,rm−1 }. rk (k = 1, . . . , m − 1) and order must satisfy the relation stated in the generator add block. The case where we have 3 control nodes, with 5 and 3 nodes along the edges between these nodes and varying order of elements, is shown in Figure 8. Figure 8: blocks1dn({x1,x2,x3},{r1=5,r2=3},etype,order=1,2) blocks2dn(xlist,rlist,ylist,slist,etype,order) Creates a 2D block of elements with specified nodes along the edges xlist={x1 ,...,xm }, ylist={y1 ,...,yn }, and specified number of nodes along each edge between specified nodes rlist={r1 ,...,rm−1 }, slist={s1 ,...,sn−1 }. Both rk (k = 1, . . . , m − 1),sk (k = 1, . . . , n − 1) and order must satisfy the relation stated in the generator add block. blocks3dn(xlist,rlist,ylist,slist,zlist,tlist,etype,order) Creates a 3D block of elements with specified nodes along the edges xlist={x1 ,...,xm }, ylist={y1 ,...,yn }, zlist={z1 ,...,zp }, and specified number of nodes along each edge between specified nodes rlist={r1 ,...,rm−1 }, slist={s1 ,...,sn−1 }, tlist={t1 ,...,tp−1 }. Both rk (k = 1, . . . , m − 1),sk (k = 1, . . . , n − 1), tk (k = 1, . . . , p − 1) and order must satisfy the relation stated in the generator add block. 22 3 MESH DESCRIPTION (LUA) blocks1d(xlist,etype,order,dense1) Creates a 1D strip of elements with specified nodes along the edge xlist={x1 ,...,xm }. Nodes are inserted between these nodes according to the parameter dense1, which specifies the approximate size of the element. The method will fit rk number of elements with order between the specified nodes, where rk (k = 1, . . . , m − 1) is defined by the equation, xk+1 − xk +1 . rk = order ∗ ceil dense1 The function ceil rounds to the nearest integer towards infinity. If the parameter order or dense1 is not specified, the method will look for a global variable with the name order and dense. If these are supplied, the method will execute with no error. The case where we have 3 control nodes with specified dense1 is shown in Figure 9. Since the number of elements is specified by dense1, we can see that as we increase the order of each element, the number of nodes increases. ! Figure 9: blocks1d(x={x1,x2,x3},etype,order=1,2,3,dense1) 23 3 MESH DESCRIPTION (LUA) blocks2d(xlist,ylist,etype,order,dense1,dense2) Creates a 2D block of elements with specified nodes along the edge xlist={x1 ,...,xm }, ylist={y1 ,...,yn }. Nodes are inserted between these nodes according to the parameter dense1,dense2, which specify the approximate size of the element. The method will fit rk number of elements in the x direction with order between the specified nodes, and sk number of elements in the y direction with order between the specified nodes, where rk (k = 1, . . . , m − 1), sk (k = 1, . . . , n − 1) is defined by the equation, xk+1 − xk rk = order ∗ ceil +1 dense1 yk+1 − yk sk = order ∗ ceil +1 . dense2 The function ceil rounds to the nearest integer towards infinity. If the parameter order or dense1 dense2 is not specified, the method will look for a global variable with the name order and dense. If these are supplied, the method will assume order = order , dense1 = dense, and dense2 = dense and execute with no error. The case where we have 3 control nodes along the x direction and 2 control nodes along the y direction with specified dense1,dense2 is shown in Figure 11. Since the number of elements is specified by dense1,dense2, we can see that as we increase the order of each element, the number of nodes increases. '&)#! '&("! '&)#! '&("! "! #! $%! Figure 10: blocks2d(m=3,n=4,etype,order=1,func) Figure 11: blocks2d(x={x1,x2,x3},y={y1,y2},etype,order=1,2,dense1,dense2) blocks3d(xlist,ylist,zlist,etype,order,dense1,dense2,dense3) Creates a 3D block of elements with specified nodes along the edge. 3D version of the function above. 24 3 3.5.3 MESH DESCRIPTION (LUA) Transformed block generation in Lua The block generators introduced in the previous two sections are limitted to constructing square rectanglur mesh regions which lacks flexibility. The generators presented in this section are versions of the add block command which can construct curved or non-rectangular blocks. add block shape(m,n,p,etype,order,pts) Creates a 3D (or 2D if p is omitted) quad block with node positions on [−1, 1]n dm and transforms them using an isoparametric mapping with points specified in the pts array. For example, for pts = {0,0, 0,1, 1,0, 1,1}, we would get a mesh for [0, 1]2 . m,n,p and order must satisfy the relation stated in the generator add block. An example of a [−1, 1]2 region with 3 nodes along the x direction and 4 nodes along the y direction mapped to a 4-noded polygon with specified nodal points is presented in Figure 12. "!# $ & $ "!# %!# '(*),+-(&. / & % !# Figure 12: add block shape(m=3,n=4,etype,order=1,pts) add block transform(m,n,p,etype,order,func) Creates a 3D (or 2D if p is omitted) quad block with node positions on [−1, 1]n dm and transforms them using the specified function. The function func must have the following form for 2D, function func(x,y) -- Compute mapped coordinates (new_x,new_y) from (x,y) return new_x,new_y end and for 3D, function func(x,y,z) -- Compute mapped coordinates (new_x,new_y,new_z) from (x,y,z) return new_x,new_y,new_z end m,n,p and order must satisfy the relation stated in the generator add block. An example of a [−1, 1]2 region with 3 nodes along the x direction and 4 nodes along the y direction mapped to a curved block according to a polar mapping is presented in Figure 13. 25 3 MESH DESCRIPTION (LUA) "!#%$ & Figure 13: add block transform(m=3,n=4,etype,order=1,func) add curved block shape2d(m,n,etype,order,pts,curv) Creates a 2D quad block with nodes positions on [−1, 1]2 , m node points along the x direction and n node points along the y direction, both including edge points. m,n and order must satisfy the relation stated in the generator add block. The nodes on the corner of the quad block are mapped to the 4 node points stored in the table pts={x1,y1,x2,y2,x3,y3,x4,y4}. The table curv={curv1,curv2,curv3,curv4} contains the curvature on each edge, positive values specifying outward curvature and negative values inward curvature. m,n and order must satisfy the relation stated in the generator add block. An example of a [−1, 1]2 region with 3 nodes along the x direction and 4 nodes along the y direction mapped to a curved block with 4 control nodes and various curvatures on the edges is presented in Figure 14. "!# $ & $ '#()"* 0 '#()"* ,+.- "!# %!# '#()"* /+. 23547683&9 : & %!# '#()"*10 - Figure 14: add curved block shape2d(m=3,n=4,etype,order=1,pts,curv) 26 3 3.6 MESH DESCRIPTION (LUA) Tie command The mesh class also has a tie method which “merges” nodes which are close to each other. tie(tol) The tie method takes a tolerance tol to try to tie nodes together. If this argument isn’t specified, the method will look for a global parameter named meshtol. When this is given, the method will execute without error. If tie finds that nodes i and j in the specified range are within the given tolerance of each other, the ix array is rewritten so that references to either i or j become references to min(i, j). The tie method acts as though the relation “node i is within the tolerance of node j” were an equivalence relation. But while this relation is reflexive and symmetric, it does not have to be transitive for general meshes: that is, if xi , xj , and xk are three node positions, you might have kxi − xj k < tol and kxj − xk k < tol and kxi − xk k > tol. The behavior of the tie algorithm is undefined in this case. Make sure it does not happen in your mesh. Development note: The right thing to do here is to make the semantics explicit (by using the transitive closure of the above relationship, for instance) and warn the user if there were any places where the behavior of the tie command is not obvious. 3.7 Applying boundary conditions There are three types of boundary conditions that can be set. • Nodal boundary conditions: These are set on the degrees of freedom of each node in the mesh. • Global variable boundary conditions: These are set on the global degrees of freedom that can be set. (See section on global variables for details). • Element variable boundary conditions: These are set on the variables that pertain to a specific element. For each case they are set by specifying functions and passing them into the mesh through the command, set bc(func) Passes a single nodal boundary condition function func. set bc(func table) Passes a table of nodal boundary condition functions func table={func1 ,. . .,funcn }. set globals bc(func) Passes a single global variable boundary condition function func. set globals bc(func table) Passes a table of global variable boundary condition functions func table={func1 ,. . .,funcn } set elements bc(func) Passes a single element variable boundary condition function func. set elements bc(func table) Passes a table of element variable boundary condition functions func table={func1 ,. . .,fun 27 3 3.7.1 MESH DESCRIPTION (LUA) Nodal boundary conditions The Lua function passed to set bc should take as input the coordinates of the nodal point (the number depends on ndm), and should return a string describing which variables at that node are subject to force or displacement boundary conditions. If there are any nonzero boundary conditions, they should be specified by additional return arguments. For example, the following function applies zero displacement boundary conditions to the first degree of freedom and nonzero force conditions (of −1) to the third degree of freedom along the line x = 0: function bcfunc(x,y) if x == 0 then return ’u f’, 0, -1; end end If no boundary condition is specified (as occurs at x 6= 0 in the above example), then we assume that there is no boundary condition. If a boundary condition is specified, but without a specific value, then we assume the corresponding force or displacement should be zero. Run time errors result in a user warning, as described in Section ??. The bcfunc defined above is passed to the mesh through the sample code, mesh:set_bc(bcfunc) 3.7.2 Global variable boundary conditions The Lua function passed to set globals bc should take as input the index of the global variable. This index is returned when the global variable is set to the mesh with the function add global. (See section on global variables for details.) The function should return a string describing whether the global variable is subject to a force or displacement boundary condition. If there are any nonzero boundary conditions, they should be specified by additional return arguments. For example, the following function applies zero displacement boundary conditions to the global variable with index equal to 3: function global_variable_bcfunc(ind) if ind == 3 then return ’u’, 0; end end If no boundary condition is specified then we assume that there is no boundary condition. If a boundary condition is specified, but without a specific value, then we assume the corresponding force or displacement should be zero. Run time errors result in a user warning, as described in Section ??. The global variable bcfunc defined above is passed to the mesh through the sample code, mesh:set_globals_bc(global_variable_bcfunc) 3.7.3 Element variable boundary conditions The Lua function passed to set elements bc should take as input the number of the element. This number is returned when the element is set to the mesh with the function add element. (See section on elements for details.) The function should return a string describing whether the element variables are subject to a force or displacement boundary condition. If there are any nonzero boundary conditions, they should be specified by additional return arguments. For example, the following function applies a unit forced boundary conditions to the 2nd element variable of element number 42: 28 3 MESH DESCRIPTION (LUA) function element_variable_bcfunc(elemnum) if elemnum == 42 then return ’ f’, 1; end end If no boundary condition is specified then we assume that there is no boundary condition. If a boundary condition is specified, but without a specific value, then we assume the corresponding force or displacement should be zero. Run time errors result in a user warning, as described in Section ??. The element variable bcfunc defined above is passed to the mesh through the sample code, mesh:set_elements_bc(element_variable_bcfunc) 3.8 3.8.1 Helper Lua commands Numerical value comparison commands The methods stated here exist to mitigate the error introduced by numerical roundoff errors. When defining parameters and nodes for mesh information, addition, multiplication, and division give rise to situations where a variable x and y take the value, x = 4.0 y = 4.000000000000003 If we compare these two values, the statement x == y will return false, though actually they are the same value to the extent that we are interested in. Comparissons of numerical values such as these arise in boundary condition functions, pml stretch functions, and many more and can cause error. This can be alleviated by using the following comparison functions which take a certain tolerance in the comparison. For each function, if tol is not specified, it will search for a global variable named meshtol. If this variable is found the function will execute properly. mesheq(x,y,tol) Returns true if |x − y| < tol and false otherwise. meshleq(x,y,tol) Returns true if x < y + tol and false otherwise. meshsl(x,y,tol) Returns true if x < y − tol and false otherwise. meshgeq(x,y,tol) Returns true if x + tol > y and false otherwise. meshsg(x,y,tol) Returns true if x − tol > y and false otherwise. meshbetween(x,xmin,xmax,tol) Returns true if xmin − tol < x < xmax + tol and false otherwise. meshsbetween(x,xmin,xmax,tol) Returns true if xmin + tol < x < xmax − tol and false otherwise. 29 4 4 4.1 GLOBAL VARIABLES Global variables Concept of a global variable Introducing a global variable can be understood as a means to specify constraints among individual nodal degrees of freedom much like a lagrange multiplier. It allows one to specify a mode shape for selected nodal degrees of freedom and assigns a general degree of freedom for that mode. The following simple example of a three degree of freedom spring mass mechanical system may clarify this concept. The equation of motion for the system can be written as, m1 0 0 ü1 (t) k1 + k2 −k2 0 u1 (t) F1 (t) 0 m2 0 ü2 (t) + −k2 k2 + k3 −k3 u2 (t) = F2 (t) (1) 0 0 m3 ü3 (t) −k2 k2 − k3 k3 u3 (t) F3 (t) or in more compact form, Mü(t) + Ku(t) = F(t) (2) If we assume that the 2 and 3 degrees of freedom are connected by a rigid element, then the degrees of freedom can be expressed by one general degree of freedom as follows, u1 (t) 1 0 u2 (t) = 0 u1 (t) + 1 z(t) u3 (t) 0 1 = e1 u1 (t) + Vz z(t) u1 (t) e1 V z = z(t) u1 (t) = W z(t) (3) Inserting this expression and restricting the error to be orthogonal to this subspace spanned by the column vectors of W results in the two degree of freedom system, ü1 (t) u1 (t) ∗ ∗ W MW + W KW = W∗ F(t) (4) z̈(t) z(t) that must be solved. 4.2 Creating and defining global variables The key to creating a global variable is to construct the shape vector Vz pertaining to the global variable. This is conducted by specifying a function which is evaluated at each nodal degree of freedom, similar to the form of the nodal boundary conditions without the initial string. There is also an additional restriction that a number must be assigned for each nodal degree of freedom. As an example the shape function for the first example would have the form, function shape_func_global_variable(x) if x==2 then return 1; end if x==3 then return 1; end end 30 4 GLOBAL VARIABLES The general constructor for adding global variables to the mesh is: index = Mesh:add global(shapeg,s 1,s 2) shapeg must be a function of the form presented above. The variables s 1,s 2 are optional and are the nondimensionalization parameters for the global variable. They can be numbers or strings that are predefined in the table dim scales. (See section on non-dimensionalization for details). The function returns the index of the global variable. Mesh:set globals() Once all the global variables required are added they must be set to the mesh. Unless this function is called, the process will not be complete. For the case presented in the previous section adding the global variable would take the process, index = mesh:add_global(shape_func_global_variable,’L’,’F’) mesh:set_globals() The value for the strings ’L’ and ’F’ must be set in dim scales. 31 5 5 ELEMENT LIBRARY Element library 5.1 PML elements Perfectly matched layers (PMLs) are what is used to model the effect of energy loss through supports or anchor loss. PMLs mimic the effect of an infinite or semi-infinite medium, by applying complex-value coordinate transformations. PMLs fit naturally into a finite element framework, but to implement them, we need some way to describe the exact form of the coordinate transformation. This coordinate-stretching function used in a PML is is defined as a Lua function and set to the set to the element that the PML is imposed by the following function: set stretch(stretch func) Use a Lua function stretch func to describe the coordinate transformation. The coordinate stretching function in 2D should have the form function stretch_func(x,y) -- Compute stretching parameters sx and sy return sx, sy end If no stretch values are returned, they are assumed to be zero. The PML element should stretch the x and y coordinates by (1 − isx ) and (1 − isy ), respectively. The 3D case is handled similarly. This function is set to the element in the following manner. element_to_apply_pml:set_stretch(stretch_func) The stretching function is only ever evaluated at node positions. If there are no calls to either form of set stretch, the PML element does not stretch the spatial coordinate at all, and so the element behaves exactly like an ordinary (non-PML) element. For the exact form of this coordinate transformation function and details in implementation, see the PML example in the Examples Manual. 32 5 5.2 ELEMENT LIBRARY Laplace elements The PMLScalar1d, PMLScalar2d, PMLScalar3d, and PMLScalarAxis classes implement scalar wave equation elements with an optional PML. The general constructor takes the form, etype = make material s(mtype,analysistype) The variable mtype must contain the fields rho(mass density) and E(material stiffness). analysis type can take one of the following strings, The variable • 1d: 1 dimensional analysis • 2d: 2 dimensional analysis • 3d: 3 dimensional analysis • axis: Axis symmetric analysis The scalar wave equation has the form, ρ ∂2u ∂t2 = ∇ · (κ∇u) (5) where u is the scalar displacement, ρ is the density, and κ is the stiffness. If no coordinate stretching is defined, the elements will generate standard (real) mass and stiffness matrices. The class provides the following constructors: PMLScalar1d(kappa,rho) Creates an isotropic 1D scalar wave equation element with material property κ and mass density ρ. PMLScalar2d(kappa,rho) Creates an isotropic 2D scalar wave equation element with material property κ and mass density ρ. PMLScalar2d(D,rho) Creates a 2D anisotropic element with a 2-by-2 property matrix D. Other than the material properties, this constructor is identical to the previous one. PMLScalarAxis(kappa,rho) Creates an isotropic axisymmetric scalar wave equation element with material property κ and mass density ρ. PMLElasticAxis(D,rho) Creates a 2D anisotropic element with a 2-by-2 property matrix D. Other than the material properties, this constructor is identical to the previous one. PMLScalar3d(kappa,rho) Creates an isotropic 3D scalar wave equation element with material property κ and mass density ρ. PMLScalar3d(D,rho) Creates a 3D anisotropic element with a 3-by-3 property matrix D. Other than the material properties, this constructor is identical to the previous one. 33 5 5.3 ELEMENT LIBRARY Elastic elements The PMLElastic2d, PMLElastic3d, and PMLElasticAxis classes implement elasticity (Solid) elements with an optional PML transformation. The general constructor takes the form, etype = make material e(mtype,analysistype) etype = make material e(mtype, etype, wafer, angle) Constructs and returns a PMLElastic element, depending on the given arguments. The material type mtype (string or table containing material mechanical properties) and element type etype(planestrain,planestress,axis,3d) must be given. The arguments defining wafer orientation wafer(’100’ or ’111’) and orientation angle angle [rad] are optional. The table of mechanical properties mtype should contain the fields rho, E, nu for isotropic material, and lambda, mu, alpha for cubic material. (Currently this element can only treat cubic and isotropic mechanical material). The variable mtype must be an elastic materail containing different fields depending on the symmetry of the crystal considered. In the case of anisotropic material the second constructor is used, which defines the wafer orientation and angle. The variable analysis type can take one of the following strings, • planestrain: 2 dimensional planestrain analysis • planestress: 2 dimensional planestress analysis • 3d: 3 dimensional analysis • axis: Axis symmetric analysis These elements solve the following equation, ρ ∂2u = ∇·σ ∂t2 σ = C:ε ε = ∇sym u (6) (7) (8) Here, ρ is the density, σ is the stress, C is the material stiffness tensor, ε is the infinitesimal strain, and u is the displacement vector. In the case of an isotropic material, C will depend only on two variables: the Youngs modulus E and Poisson ratio ν. Otherwise the material property can be expressed by a matrix via Voigt notation. (See section on material models for further information). If no coordinate stretching is defined, the elements will generate standard (real) mass and stiffness matrices. The classes provides the following constructors: PMLElastic2d(E,nu,rho,plane type) Creates a plane strain (plane type = 0) or plane stress (plane type = 1) isotropic elasticity element with Young’s modulus E, Poisson ratio nu, and mass density rho. PMLElastic2d(D,rho) Creates a 2D element with a 3-by-3 elastic property matrix D. Other than the elastic properties, this constructor is identical to the previous one. PMLElastic2d(lua State* L, lua Object func) Creates a 2D element with material parameters defined by a Lua function func. This function is accessed via the Lua state L. func must take one of the following forms. 34 5 ELEMENT LIBRARY function material_function(x,y) -- Compute 3-by-3 elastic property matrix D and -mass density rho return D, rho end or, function material_function(x,y) -- Compute Young’s modulus E, Poisson ration nu, -mass density rho, and analysis plane_type return E, nu, rho, plane_type end PMLElasticAxis(E,nu,rho) Creates an isotropic axisymmetric elasticity element with Young’s modulus E, Poisson ratio nu, and mass density rho. PMLElasticAxis(D,rho) Creates an element with a 4-by-4 elastic property matrix D. Other than the elastic properties, this constructor is identical to the previous one. PMLElasticTAxis(E,nu,rho,ltheta) Creates an isotropic axisymmetric elasticity element with Young’s modulus E, Poisson ratio nu, mass density rho, and wave number ltheta. PMLElasticTAxis(D,rho,ltheta) Creates an element with a 6-by-6(????) elastic property matrix D. Other than the elastic properties, this constructor is identical to the previous one. PMLElastic3d(E,nu,rho) Creates an isotropic 3D elasticity element with Young’s modulus E, Poisson ratio nu, and mass density rho. PMLElastic3d(D,rho) Creates an element with a 6-by-6 elastic property matrix D. Other than the elastic properties, this constructor is identical to the previous one. 35 5 5.4 ELEMENT LIBRARY Thermoelastic Elements The PMLElastic2d te, PMLElastic3d te, and PMLElasticAxis te classes implement thermoelasticity (Solid) elements with an optional PML transformation. The general constructor takes the form, etype = make material te(mtype,analysistype) etype = make material te(mtype,analysistype,wafer,angle) Constructs and returns a PMLElastic te element, depending on the given arguments. The material type mtype (string or table containing material thermomechanical properties) and element type etype(planestrain,planestress,axis,3d) must be given. The arguments defining wafer orientation wafer(’100’ or ’111’) and orientation angle angle [rad] are optional. The table of thermomechanical properties mtype should contain the fields rho, E, nu for isotropic material, and lambda, mu, alpha for cubic material. For both cases it should contain the fields at, cp, kt and T0. (Currently this element can only treat cubic and isotropic thermomechanical material). The variable mtype must be an elastic materail containing different fields depending on the symmetry of the crystal considered. In the case of anisotropic material the second constructor is used, which defines the wafer orientation and angle. The variable analysis type can take one of the following strings, • planestrain: 2 dimensional planestrain analysis • planestress: 2 dimensional planestress analysis • 3d: 3 dimensional analysis • axis: Axis symmetric analysis These elements solve the following coupled equation, ∂2u ∂t2 ρcv θ̇ ρ = ∇·σ (9) = ∇ · (κT ∇θ) − T0 ε̇ : C : αT σ = C : (ε − αT θ) ε = ∇sym u (10) (11) (12) Here, ρ is the density, σ is the stress, C is the material stiffness tensor, ε is the infinitesimal strain, u is the displacement vector and θ is the temperature fluctuation from T0 , which is the referential temperature. In the case of an isotropic material, C will depend only on two variables: the Youngs modulus E and Poisson ratio ν. In the case of a cubic material, it will depend on three variables: λ, µ, and α. In both cases the material property can be expressed by a matrix via Voigt notation. (See section on material models for further information). The constants related with the thermal field are, κT the thermal conductivity tensor, cv the specific heat at constant volume, and αT which is the linear coefficient of thermal expansion tensor. If no coordinate stretching is defined, the elements will generate standard (real) mass and stiffness matrices. The classes provides the following constructors: PMLElastic2d te(E,nu,rho,at,cp,kt,T0,plane type) Creates a plane strain (plane type = 0) or plane stress (plane type = 1) isotropic thermoelasticity element with Young’s modulus E, Poisson ratio nu, mass density rho, coefficient of thermal expansion at, thermal capacity at constant pressure cp, thermal conductivity at kt, and reference temperature T0. 36 5 ELEMENT LIBRARY PMLElastic2d te(Db,rho,at,cp,kt,T0) Creates a 2D element with a 4-by-4 thermoelastic property matrix D. Other than the thermoelastic properties, this constructor is identical to the previous one. PMLElastic3d te(E,nu,rho,at,cp,kt,T0) Creates an isotropic 3D thermoelasticity element with Young’s modulus E, Poisson ratio nu, mass density rho, coefficient of thermal expansion at, thermal capacity at constant pressure cp, thermal conductivity at kt, and reference temperature T0. PMLElastic3d te(Db,rho,at,cp,kt,T0) Creates a 3D element with a 7-by-7 thermoelastic property matrix D. Other than the thermoelastic properties, this constructor is identical to the previous one. PMLElasticAxis te(E,nu,rho,at,cp,kt,T0) Creates an isotropic axisymmetric elasticity element with Young’s modulus E, Poisson ratio nu, mass density rho, coefficient of thermal expansion at, thermal capacity at constant pressure cp, thermal conductivity at kt, and reference temperature T0. PMLElasticAxis te(Db,rho,at,cp,kt,T0) Creates an element with a 5-by-5 thermoelastic property matrix D. Other than the thermoelastic properties, this constructor is identical to the previous one. 37 5 5.5 ELEMENT LIBRARY Piezoelectric elements The PMLElastic2d pz, PMLElastic3d pz, and PMLElasticAxis pz classes implement piezoelectric elasticity (Solid) elements with an optional PML transformation. The general constructor takes the form, etype = make material pz(mtype,analysistype) etype = make material pz(mtype,analysistype,wafer,angle) Constructs and returns a PMLElastic pz element, depending on the given arguments. The material type mtype (string or table containing material thermomechanical properties) and element type etype(planestrain,planestress,2hd,3d) must be given. The arguments defining wafer orientation wafer(’100’ or ’111’) and orientation angle angle [rad] are optional. The table of thermomechanical properties mtype should contain the fields c11, c12, c13, c33, c55, d16, d31, d33, kds1, kds3 for a hexagonal material. (Currently this element can only treat hexagonal piezoelectric mechanical material). The variable mtype must be an elastic material containing different fields depending on the symmetry of the crystal considered. In the case of anisotropic material the second constructor is used, which defines the wafer orientation and angle. The variable analysis type can take one of the following strings, • planestrain: 2 dimensional planestrain analysis • planestress: 2 dimensional planestress analysis • 3d: 3 dimensional analysis • axis: Axis symmetric analysis These elements solve the following coupled equation, ρ ∂2u ∂t2 0 σ = ∇·σ (13) = ∇·D (14) = C : ε − dT E T = C:ε−e E D = d : σ + κdσ E = e : ε + κdε E (15) (16) (17) (18) ε = ∇sym u (19) E = −∇φ (20) Here, ρ is the density, σ is the stress, C is the material stiffness tensor, ε is the infinitesimal strain, u is the displacement vector and φ is the voltage potential. In the case of an isotropic material, C will depend only on two variables: the Youngs modulus E and Poisson ratio ν. In the case of a hexagonal material, it will depend on five variables: c11 , c12 , c13 , c33 , c55 . In both cases the material property can be expressed by a matrix via Voigt notation. (See section on material models for further information). The constants related with the electric field are, κdσ the permittivity tensor at constant stress, κdε the permittivity tensor at constant strain, d the piezoelectric strain coefficients, and e the piezoelectric stress coefficients. If no coordinate stretching is defined, the elements will generate standard (real) mass and stiffness matrices. The classes provides the following constructors: 38 5 ELEMENT LIBRARY PMLElastic2d pz(E,nu,rho,pz,kds,plane type) Creates a plane strain (plane type = 0) or plane stress (plane type = 1) isotropic piezoelectric elasticity element with Young’s modulus E, Poisson ratio nu, mass density rho, piezoelectric coefficients(6-by-3), and isotropic dielectric constant kds(constant stress) or kde (constant strain). A piezoelectric crystal is generally anisotropic but here we have assumed mechanical isotropy. PMLElastic2d pz(Db,rho) Creates a 2D element with a 5-by-5 piezoelectric elastic property matrix Db. Other than the piezoelectric elastic properties, this constructor is identical to the previous one. PMLElastic2hd pz(E,nu,rho,pz,kds) Creates a plane stress isotropic piezoelectric elasticity element with Young’s modulus E, Poisson ratio nu, mass density rho, piezoelectric coefficients(6-by-3), and isotropic dielectric constant kds(constant stress) or kde (constant strain). A piezoelectric crystal is generally anisotropic but here we have assumed mechanical isotropy. This element is for piezoelectric actuation by an electric field orthogonal to the plane of analysis. PMLElastic2hd pz(Db,rho) Creates a 2D element with a 4-by-4 piezoelectric elastic property matrix Db. Other than the piezoelectric elastic properties, this constructor is identical to the previous one. PMLElastic3d pz(E,nu,rho,pz,kds) Creates an isotropic 3D piezoelectric elasticity element with Young’s modulus E, Poisson ratio nu, mass density rho, piezoelectric coefficients(6-by-3), and isotropic dielectric constant kds(constant stress) or kde (constant strain). A piezoelectric crystal is generally anisotropic but here we have assumed mechanical isotropy. PMLElastic3d pz(Db,rho) Creates a 3D element with a 9-by-9 piezoelectric elastic property matrix Db. Other than the piezoelectric elastic properties, this constructor is identical to the previous one. 39 5 5.6 ELEMENT LIBRARY Electromechanical coupling elements The CoupleEM2d classes implements electromechanical coupling elements. Currently only a 2D implementation is available. The general constructor takes the form, etype = make material couple em(eps,analysistype) Constructs and returns a CoupleEM2d element, depending on the given arguments. eps is the material permitivity, and etype which is the element type may be either planestrain or planestress. The variable eps is the element permitivity. The variable analysis type can take one of the following strings, • planestrain: 2 dimensional planestrain analysis • planestress: 2 dimensional planestress analysis These elements solve the following equation, 0 = ∇·D D = κdσ E (21) (22) E = −∇φ (23) on a domain that can deform finitely. This is the only element that implemented that considers finite deformation. This is because the electromechanical coupling is a second order effect and does not arise in linear theory where we assume that the domain does not deform. Here, D is the electric displacement, E is the electric field, κdσ is the permittivity at constant stress, and φ is the voltage potential. This element alone can not solve the electromechanical problem. It must be overlayed with one of the elastic elements presented in the previous section. The classes provides the following constructors: CoupleEM2d(kappa) Creates a 2D element with kappa the permittivity at constant stress of the element. 40 5 5.7 ELEMENT LIBRARY Discrete circuit elements The resistor, capacitor, inductor, and VIsrc classes implement 1D line elements which enable nodal analysis of circuits. The general constructor takes the form, etype = make material circuit LRC(mtype,analysistype) The variable analysistype takes a string resistor, capacitor, inductor and constructs the appropriate element. The variable mtype defines the numerical value of the component. It can be a real number or a table which contains the real and imaginary part of the number. etype = make material circuit wire() This constructs a short circuit element. By defining the element variables of this element, it can be converted to a voltage or current source. Used alone, they can solve simple circuits, but the usage in HiQLab is to connect these to mechanical resonator meshes. Resistor element The equation governing this element is, 1 (V1 − V2 ) R = I (24) and the matrix representation is, 1/R −1/R −1/R 1/R V1 V2 = 0 0 (25) The constructors for this element are: Resistor(resist) Creates a 1D lumped resistor element with resistance resist. Resistor(resist table) Creates a 1D lumped resistor element with complex resistance. The value is extracted from the table resist table={resist r,resist i} and is given as (resist r + i resist i). Capacitor element The equation governing this element is, Q = CV dQ dV I = =C dt dt (26) (27) Since the capacitor is a short circuit, the terms only appear in the first derivative for the matrix formulation. C −C V̇1 0 0 V1 0 + = (28) −C C 0 0 V2 0 V̇2 The constructors for this element are: Capacitor(cap) Creates a 1D lumped capacitor element with capacitance cap. Capacitor(cap table) Creates a 1D lumped capacitor element with complex capacitance. The value is extracted from the table cap table={cap r,cap i} and is given as (cap r + i cap i). 41 5 ELEMENT LIBRARY Inductor element The equation governing this element is, V1 − V2 The matrix representation 0 0 0 becomes, 0 0 0 0 0 −L = L V̇1 0 V̇2 + 0 1 I˙e dI dt 0 1 V1 0 0 −1 V2 = 0 −1 0 Ie 0 (29) (30) The constructors for this element are: Inductor(induct) Creates a 1D lumped inductor element with inductance induct. Inductor(induct table) Creates a 1D lumped inductor element with complex inductance. The value is extracted from the table induct table={induct r,induct i} and is given as (induct r + i induct i). Short circuit, Voltage source, and Current source element The equation governing this element is, V1 − V2 The matrix representation becomes, 0 0 1 = E 0 1 V1 0 0 −1 V2 = 0 −1 0 I E (31) (32) where an element variable I which represents the current has been introduced. This element can represent different states by the following procedures. 1. Short circuit(default): Set the value E to zero. Since this is a force boundary condition of zero, it is done by default when the element is constructed. 2. Voltage source: Set the value E to the desired voltage through specifying a force boundary condtion of value E on the element variable through the set elements bc function. (See section on boundary conditions for details). 3. Current source: Set the value I to the desired current through specifying a displacement boundary condtion of value I on the element variable through the set elements bc function. (See section on boundary conditions for details). The constructors for this element are: VIsrc() Creates a 1D lumped voltage source, current source, or short circuited wire. 42 5 5.8 ELEMENT LIBRARY Electrode These elements are the key to the coupled resonator circut analysis available. They serve as an interface element between the discrete circuit elements and finite element meshes. The general constructor takes the form, eltnum,index = add electrode(etype,nodenum,efunc,lt) The variable etype refers to the type of electrode element to be used. Though there are two available, electrode,electrode2, only support for the first is available. efunc must be a global function which ties multiple potential variables of the finite element mesh together to one global variable. nodenum refers to the node number of the voltage variable that the global variable is tied together with. The last argument lt is optional. In the case of 2D analysis, this variable is used to link the difference between the displacements and force variables which are given per unit normalized length. Thus for the 2D plane stress case, lt must equal layer thickness/characteritic length. The index of this global variable is returned by index as well as the element number eltnum. elt,index = make material electrode(etype,efunc,lt) This constructor conducts the same procedure as above but does not take in the nodenum, and thus does not add the electrode element to the mesh. Instead it will just return the global index number index and the element elt. The user is recommended to use the previous constructor. A schematic of this electrode is shown in the figure. The equation governing this element is, Figure 15: Electrode element Qe The matrix representation 0 0 0 becomes, V̇n 0 lt 0 0 0 V̇e + 0 1 0 0 Q̇e = Ce Ve 0 0 Vn 0 0 −1 Ve = 0 −1 0 0 Qe (33) (34) Vn represents the voltage variable at the node which is linked to the finite element mesh. Two element variables are introduced, Ve and Qe . Ve , which is additionally a global variable, is introduced to tie the 43 5 ELEMENT LIBRARY selected potentials of the finite element mesh to one variable. This global variable is then linked to Vn . Thus a shape function for the global variable must be specified for the formulation. Qe represents the total charge on the plate. The classes provides the following constructors: Electrode(vglobalid) Creates an Electrode element with vglobalid. Electrode2(vglobalid) Creates an Electrode element with vglobalid. 44 6 6 LINEAR MATERIAL MODELS Linear material models The set of linear models in Voigt notation can be expressed by the following equation, ε = DE,T σ + dσ,T E + ασ,E ∆T (35) D = dE,T σ + κσ,T E + pσ ∆T Cσ,E ∆S = αE,T + pσ,T E + ∆T T (36) (37) or in matrix notation, DE,T ε D = dTE,T ∆S αTE,T dσ,T κσ,T pTσ,T ασ,E σ pσ,E E Cσ,E ∆T T (38) Here, ε denotes the linearized strain tensor, σ the stress tensor, D the electric displacement, E the electric field, ∆S the change in entropy, and ∆T the change in temperature. The material dependent coeficients are denoted by, s the compliance tensor, d the piezoelectric strain coeficient, α the linear thermal expansion coeficient, κ the dielectric coeficient, p the pyroelectric coeficient, C the heat capacity, and T is the reference temperature. The subscripts denote the fields which are taken as constant in evaluating the coeficients. We assume these coficients are represented in Voigt notation shown in Table 5 Additionally, the strain tensor in Table 5: Voigt notation Voigt (i, j) 1 (1,1) 2 (2,2) 3 (3,3) 4 (1,2) 5 (2,3) 6 (3,1) vector form is represented by, ε = T [ε11 , ε22 , ε33 , 2ε12 , 2ε23 , 2ε31 ] (39) Depending on the fields that are coupled, certain portions of the relation above are extracted. Often, instead of the compliance D, the inverse value representing the stiffness C = D−1 is used. The number of material constants required to represent the material differ depending on the geometry. These are summarized in Table 6. Crystal Isotropic Cubic Hexagonal Table 6: Material constants for different crystals Elastic(C) Piezo(d) Thermal(α) Dielectric(κ) C12 ,C44 (-) αT κ C11 ,C12 ,C44 (-) αT κ C11 ,C12 ,C13 ,C33 ,C55 d16 ,d31 ,d33 αT 1 ,αT 2 κ1 ,κ2 45 Pyro(p) (-) (-) (-) 6 6.1 LINEAR MATERIAL MODELS Elasticity For elasticity, only the terms relatin stress and strain are extracted. The compliance tensor is inverted to obtain stress in terms of strain as, σ = Cε C = D−1 (40) (41) The number of elastic constants that must be specified differ depending on the symmetry of the crystal. 6.1.1 Isotropic material Required parameters in mtype: [E and nu] or [lambda and mu] Two numbers define the elastic properties of an isotropic material. In matrix form the stiffness is, C12 + 2C44 C12 C12 0 0 0 C12 C12 + 2C44 C12 0 0 0 C C C + 2C 0 0 0 12 12 12 44 Cisotropic = (42) 0 0 0 C44 0 0 0 0 0 0 0 C44 0 0 0 0 0 C44 The values C12 and C44r correspond to the Lame constants λ and µ and are related to the Youngs modulus E and Poisson ratio ν by, C12 C44 νE (1 − 2ν)(1 + ν) E = µ= 2(1 + ν) = λ= (43) (44) We can express the material tensors in a coordinate free notation where given crystal axes orientation [a, b, c], the elasticity tensor can be expressed as, Ccubic 6.1.2 = C12 1 ⊗ 1 + 2C44 Isym Cubic material Required parameters in mtype: [alpha, lambda, and mu] Two numbers define the elastic properties of C11 C12 C12 Ccubic = 0 0 0 an isotropic material. In matrix form the stiffness is, C12 C12 0 0 0 C11 C12 0 0 0 C12 C11 0 0 0 (45) 0 0 C44 0 0 0 0 0 0 C44 0 0 0 0 C44 46 6 LINEAR MATERIAL MODELS The cubic coefficients are related to the usual expression for cubic materials λ, µ, α by the relations, C11 C12 = α = λ C44 = µ We can express the material tensors in a coordinate free notation where given the cubic coeffecients c11 , c12 , cc44 and crystal axes orientation [a, b, c], the elasticity tensor can be expressed as, Ccubic 6.1.3 = c12 1 ⊗ 1 + 2c44 Isym + (c11 − c12 − 2c44 ) (a ⊗ a ⊗ a ⊗ a + b ⊗ b ⊗ b ⊗ b + c ⊗ c ⊗ c ⊗ c) Hexagonal material Required parameters in mtype: [c11, c12, c13, c33, and c55] The crystal has an in plane hexagonal structure giving it an isotropic property in plane. The material begin piezoelectric has no center of symmetry(inversion center). A hexagonal crystal has the following structure for the elasticity tensor bbChex , piezoelectric strain coefficients dhex and dielectric constants κdσ in Voigt notation. The 1,2 axes are assumed to be in the isotropic crystal plane with the 3 axis perpendicular to this plane. Chex = c11 c12 c13 0 0 0 c12 c11 c13 0 0 0 c13 c13 c33 0 0 0 0 0 0 c11 −c12 2 0 0 0 0 0 0 c55 0 0 0 0 0 0 c55 (46) In a hexagonal material, given the stiffness coefficients, c11 , c12 , c13 , c33 , c55 , the elasticity tensor can be expressed as, Chex = c12 1 ⊗ 1 + (c11 − c12 ) Isym + (c33 − c11 ) (c ⊗ c ⊗ c ⊗ c) + (c13 − c12 ) (a ⊗ a ⊗ c ⊗ c + c ⊗ c ⊗ a ⊗ a + b ⊗ b ⊗ c ⊗ c + c ⊗ c ⊗ b ⊗ b) c11 − c12 (b ⊗ c ⊗ b ⊗ c + b ⊗ c ⊗ c ⊗ b + c ⊗ b ⊗ b ⊗ c + c ⊗ b ⊗ c ⊗ b) + c55 − 2 c11 − c12 + c55 − (c ⊗ a ⊗ c ⊗ a + c ⊗ a ⊗ a ⊗ c + a ⊗ c ⊗ c ⊗ a + a ⊗ c ⊗ a ⊗ c) 2 47 6 6.2 LINEAR MATERIAL MODELS Thermoelasticity For thermoelasticity, the terms relating stress,strain,entropy and temperature are extracted. The compliance tensor is inverted to obtain stress in terms of strain as, C −Cα σ ε = (47) T ∆S ∆T αT C C T − α Cα Additional to this, a constitutive equation must be given for the heat flux q. Standard linear Fourier model is assumed. q = κT ∇T (48) where, κT is the conductivity tensor. 6.2.1 Isotropic material Required parameters in mtype: Parameters for isotropic elastic material plus [at,cp, and kt] The elasticity tensor takes the form, = Cisotropic C (49) The linear thermal coeficient vector becomes, αT = T [αT , αT , αT , 0, 0, 0] (50) The conductivity takes the form, κT κT = 0 0 0 κT 0 0 0 κT (51) Two numbers define the elastic properties of an isotropic material. In matrix form the stiffness is, 6.2.2 Cubic material Required parameters in mtype: Parameters for cubic elastic material plus [at,cp, and kt] The elasticity tensor takes the form, = Ccubic C (52) The linear thermal coeficient vector becomes, αT = T [αT , αT , αT , 0, 0, 0] (53) The conductivity takes the form, κT κT = 0 0 48 0 κT 0 0 0 κT (54) 6 6.3 LINEAR MATERIAL MODELS Piezoelectric elasticity For piezoelectric elasticity, the terms relating stress,strain,electric displacement and electric field are extracted. The compliance tensor is inverted to obtain stress in terms of strain as, C −Cd σ ε = (55) D E dT C κσ,T − dT Cd 6.3.1 Hexagonal material Required parameters in mtype: Parameters for hexagonal elastic material plus [kds1,kds3,d16,d33 and d31] The elasticity tensor takes the form, C = Chexagonal The linear piezoelectric coeficient matrix becomes, 0 0 0 d = 0 d31 d31 0 0 d33 0 0 0 (56) 0 d16 0 d16 0 0 (57) The permitivity takes the form, κT κ1 = 0 0 49 0 κ1 0 0 0 κ3 (58) 6 6.4 LINEAR MATERIAL MODELS Electrostatics For an electrostatic problem, the terms relating electric displacement and electric field are extracted. D = κσ,T E 6.4.1 (59) Isotropic material Required parameters in mtype: Parameters for isotropic elastic material plus [at,cp, and kt] The permitivity takes the form, κ 0 0 κ = 0 κ 0 0 0 κ 50 (60) 6 6.5 LINEAR MATERIAL MODELS Supporting functions get material(mtype) Converts a material name mtype to a table of material properties and returns this table. wafer orientation(wafer,angle) Computes crystal axes for a cubic material given the wafer orientation wafer, either ’100’ or ’111’, and the angle [rad] between the global coordinate x-axis and a projection of a material axis onto the x-y plane. A table axis containing the two 3-dimensional vectors which define the direction of the x-y axes of the crystal will be returned, components of the axis1 followed by those of axis2. 0 / 0 1 * + &%"$ , -.! #"$ %'&%"(#) / * + &%"$ , -.! #"$ %'&%"(#) ! #"$ %'&%"() ! #"$ %'&%"() Figure 16: Crystal orientation (wafer and angle) function isotropic_elasticity(mtype, etype, D) function cubic_elasticity(mtype, etype, axis1, axis2, D) function hexagonal_elasticity(mtype, etype, axis1, axis2, D) function isotropic_thermoelasticity(mtype, etype, Db) function cubic_thermoelasticity(mtype, etype, axis1, axis2, Db) function piezoelectric_elasticity(mtype, etype, axis1, axis2, Db) 51 1 7 7 NON-DIMENSIONALIZATION Non-dimensionalization The solution to involving coupled fields can cause computational difficulties to the various physical time scales that existent. As a result the magnitude of the entries in the matrices can vary tremendously, leading to very ill-conditioned matrices. To circumvent this problem, non-dimensionalization of dimensional parameters is conducted. 7.1 Incorporating non-dimensionalization Non-dimensionalization can easily be incorporated in the analysis by specifying the functions summarized in Table 7 at the beginning of the input file immediately after the mesh construction. The only thing that the user must take care is on which functions return dimensionalized values and which do not. Generally, values which are intermediate results are returned in non-dimensionlized form and those that are the final results are dimensionalized. For instance, an array returning just the free degrees of freedom would be non-dimensionalized as opposed to an array of nodal degrees of freedom at every node in the mesh would be dimensionalized. These are summarized in Tables 8 and 9. Thus if values are extracted from the arrays disp or force obtained from, disp = Mesh_get_disp(mesh); force= Mesh_get_force(mesh); they will be in their dimensional form. Also extraction of desired quantaties by multiplying disp or force with the sense vectors obtained from, sense_disp_vec = Mesh_get_sense_disp(mesh,’disp_func’); sense_force_vec= Mesh_get_sense_force(mesh,’force_func’); will also result in dimensional results. Vectors U or F obtained through, U = Mesh_get_u(mesh); F = Mesh_assemble_k(mesh) * U; will contain only the free dofs in their nondimensional form. But multiplication of these vectors with the sense vectors obtained through, sense_u_vec = Mesh_get_sense_u(mesh,’u_func’); sense_f_vec = Mesh_get_sense_f(mesh,’f_func’); will give dimensional results. See example of a MEMS cantilever in the Examples manual for details on how to use these functions. 52 7 NON-DIMENSIONALIZATION Table 7: Functions to evaluate non-dimensional constants Function name mech nondim(mtype,cL) ted nondim(mtype,cL) pz nondim(mtype,cL) em nondim(mtype,cL,(eps)) Required fields mtype.E, mtype.nu, mtype.rho, cL mtype.E, mtype.nu, mtype.rho, mtype.at, mtype.cp, mtype.kt, (mtype.T0 or dim scales.T0), cL mtype.E, mtype.nu, mtype.rho, mtype.kds, mtype.d, cL mtype.E, mtype.nu, mtype.rho, mtype.kds, mtype.d, cL, (eps or mtype.eps or dim scales.eps) Table 8: function name Mesh x.m Mesh get x.m Mesh get disp.m Mesh get force.m Mesh get sense disp.m Mesh get sense force.m Key constants Aux constants M,L,T F M,L,T,Th F,Qt M,L,T,A F,V,Q,E,R M,L,T,A F,V,Q,E,R Returns dimensional quantaties value returned A coordinate of a specific node Array of nodal coordinates Array of nodal displacements Array of nodal forces Sense vector for nodal displacements Sense vector for nodal forces 53 7 NON-DIMENSIONALIZATION Table 9: Returns non-dimensional quantaties value returned function name Vector of displacement free dofs Mesh get u.m Set a vector of displacement free dofs Mesh set u.m Assemble stiffness matrix Mesh assemble k.m Assemble mass and stiffnes matrices Mesh assemble mk.m Assemble mass,stiffness, and damping matrices Mesh assemble mkc.m Assemble gradient of residual Mesh assemble dR.m Assemble residual Mesh assemble R.m Sense vector for displacement free dofs Mesh get sense u.m Sense vector for force free dofs Mesh get sense f.m Drive vector for force free dofs Mesh get drive f.m Sense vector for displacement global variable free Mesh get sense globals u.m dofs Sense vector for force global variable free dofs Mesh get sense globals f.m Sense vector for force global variable free dofs Mesh get sense globals f.m Drive vector for displacement element variable free Mesh get drive elements u.m dofs Mesh get sense elements f.m Sense vector for force global variable free dofs Mesh get drive elements f.m Drive vector for force global variable free dofs 54 7 7.2 NON-DIMENSIONALIZATION Compute non-dimensionalizing constants Depending on the fields that are involved, there are currently four functions shown in Table 7 which compute the non-dimensionalizing constants given representative material parameters and geometry. The key constants are, M(mass), L(length), T(time), A(current), and Th(temperature), which are essential in nondimensionalizing the appropriate fields. The auxiliary constants, F(force), Qt(thermal flux), V(voltage), Q(charge), E(e-field), and R(resistance), are derived from these key constants. Their dimensions are presented in Table 10. Table 10: Dimensions of auxiliary variables Variable name F Qt Q V E R Field name force thermal flux current voltage e-field resistance M 1 1 1 1 1 L 1 2 1 2 T -2 -3 1 -3 -3 -3 Th - A 1 -1 -1 -2 Further details on how these are computed from the material properties are presented below in the codelist. mech nondim(mtype,cL) Computes characteristic scales (M,L,T) and dimensional quantaties (F) from a table of material properties mtype and characteristic length scale cL, which are used for nondimensionalization in a mechanical problem. mtype must have the fields rho(mass density) and E (Youngs modulus). M = rho ∗ cL3 L = cL cL T = p E/rho A table named dim scales with these fields is returned. ted nondim(mtype,cL) Computes characteristic scales (M,L,T,Th) and dimensional quantaties (F,Qt) from a table of material properties mtype and characteristic length scale cL, which are used for nondimensionalization in a mechanical problem. mtype must have the fields rho(mass density) and E (Youngs modulus), at(linear coefficient of thermal expansion), cp(specific heat at constant pressure), and T0(ambient temperature). M = rho ∗ cL3 L = cL T = p Th = cL E/rho T0 * at * E rho*cp A table named dim scales with these fields is returned. 55 7 NON-DIMENSIONALIZATION pz nondim(mtype,cL) Computes characteristic scales (M,L,T,A) and dimensional quantaties (F,V,Q,E,R) from a table of material properties mtype and characteristic length scale cL, which are used for non-dimensionalization in a piezoelectric mechanical problem. mtype must have the fields rho(mass density) and E (Youngs modulus), kds(permitivity at constant stress), and d(piezoelectric strain coefficients). M = rho ∗ cL3 L = cL T = p A = kds * cL d*T cL E/rho 2 A table named dim scales with these fields is returned. em nondim(mtype,cL,(eps)) Computes characteristic scales (M,L,T,A) and dimensional quantaties (F,V,Q,E,R) from a table of material properties mtype and characteristic length scale cL, which are used for nondimensionalization in a electromechanical problem. mtype must have the fields rho(mass density) and E (Youngs modulus), and eps(permitivity at constant stress). M = rho ∗ cL3 L = cL T = cL p E/rho A = eps * E * cL T 3 7.3 Non-dimensionalize material parameters material normalize(ftype,...) Non-dimensionalizes all arguments ... by the the dimensional scale dim scales[ftype]. ftype must be a string corresponding to a characteristic scale (M,L,T,Th,A) or a dimensional quantaty F,V,Q,E,R,Qt,etc. that has been predefined in the table dim scales. If such a field does not exist, dim scales[ftype] is assumed one. The number of input arguments will be returned. mech material normalize(m) Non-dimensionalizes the mechanical fields of the material m given as a table by the characteristic scales defined in dim scales, and returns a table with ONLY these mechanical fields. There is no restriction on the fields existing in m, but only the fields, rho, E, lambda, mu, alpha, c11, c12, c13, c33, c55 will be non-dimensionalized. If a field in dim scales does not exist, it will be assumed one. ted material normalize(m) Non-dimensionalizes the thermomechanical fields of the material m given as a table by the characteristic scales defined in dim scales, and returns a table with ONLY these thermomechanical fields. There is no restriction on the fields existing in m, but only the fields, rho, E, lambda, mu, alpha, at, cp, kt, T0 will be non-dimensionalized. If a field in dim scales does not exist, it will be assumed one. 56 7 NON-DIMENSIONALIZATION pz material normalize(m) Non-dimensionalizes the piezoelectric-mechanical fields of the material m given as a table by the characteristic scales defined in dim scales, and returns a table with ONLY these piezoelectric-mechanical fields. There is no restriction on the fields existing in m, but only the fields, rho, c11, c12, c13, c33, c55, d16, d31, d33, kds1, kds3 will be non-dimensionalized. If a field in dim scales does not exist, it will be assumed one. 57 8 8 BASIC FUNCTIONS (MATLAB) Basic functions (Matlab) 8.1 Loading and deleting Lua mesh input files The Lua object interface is used in the MATLAB Mesh load function: Mesh load(filename,p) Creates a Lua interpreter and executes the named file in order to generate a mesh object (which is returned). The mesh should be named “mesh”; if such an object is undefined on output, Mesh load returns an error message. Before executing the named file, Mesh load copies the entries of the structure p, which may only be strings or doubles, into the Lua global state; in this way, it is possible to vary mesh parameters from MATLAB. Mesh delete(mesh) Deletes the mesh object. 8.2 Getting Scaling parameters scale param = Mesh get scale(scale name) Get a characteristic scale described by the given name. [cu,cf] = Mesh get scales(mesh) Return an array of dimensional scales for the problem. Outputs: cu - scales for the primary variables cf - scales for the secondary (flux) variables 8.3 Obtain basic information about mesh ndm = Mesh get ndm(mesh) Return the dimension of the ambient space for the mesh. numnp = Mesh numnp(mesh) Return the number of nodal points in the mesh. ndf = Mesh get ndf(mesh) Return the number of degrees of freedom per node in the mesh. numid = Mesh get numid(mesh) Return the total number of degrees of freedom in the mesh. numelt = Mesh numelt(mesh) Return the number of elements in the mesh. nen = Mesh get nen(mesh) Return the maximum number of nodes per element. numglobals = Mesh numglobals(mesh) Return the number of global degrees of freedom in the mesh nbranch id = Mesh nbranch id(mesh) Return the number of branch variables in the mesh x = Mesh get x(mesh, (cL)) Return an ndm-by-numnp array of node positions. Inputs: cL - characteristic length used for redimensionalization (default: mesh ’L’ scale) e = Mesh get e(mesh) Return the element connectivity array (a maxnen-by-numelt array). 58 8 BASIC FUNCTIONS (MATLAB) id = Mesh get id(mesh) Return the variable-to-identifier mapping (a maxndf-by-numnp array). Nodal variables subject to displacement BCs are represented by a 0. bc = Mesh get bc(mesh) Return an ndf-by-numnp array of boundary codes. The codes are 0 - No boundary condition for this dof 1 - Displacement (essential) boundary conditions 2 - Flux (natural) boundary conditions [p,e,id,bc,numnp] = Mesh get parameters(mesh,(cL)) Input: cL - characteristic length to redim node positions (default: mesh ’L’ parameter) Return mesh parameters: p - Node position array e - Element connectivity array (nen-by-numelt) id - Variable identifier array (ndf-by-numnp) bc - Boundary condition codes (see Mesh\_get\_bc) numnp - Number of nodal points 8.4 Obtain particular information about ids ix = Mesh ix(mesh,i,j) Return the ith node of element j id = Mesh id(mesh,i,j) Return the ith variable of node j id = Mesh branchid(mesh,i,j) Return the ith variable of branch j id = Mesh globalid(mesh,j) Return the id for jth global variable nbranch id = Mesh nbranch id(mesh,j) Return the number of variables of branch j 8.5 Obtain particular information about id, nodes, or elements x = Mesh x(mesh,i,j,(cL)) Return the ith coordinate of node j. Inputs: i - coordinate index j - node number cL - characteristic length scale for redimensionalization (default: mesh ’L’ scale) nen = Mesh get nen elt(mesh,j) Return the number of nodes for element j 8.6 Getting displacements and force [u] = Mesh get disp(mesh,is dim) Get the node displacement array (dimensionless) Inputs: - is\_dim - should the vector be redimensionalized? (default: 1) 59 8 BASIC FUNCTIONS (MATLAB) [f] = Mesh get force(mesh,is dim) Get the node force array (dimensionless) Inputs: - is\_dim - should the vector be redimensionalized? (default: 1) [u] = Mesh get u(mesh, cx, cv, ca, reduced, is dim) Get the node displacement array (dimensionless) Inputs: - cx For - cv For - ca For - reduced variables (default: 1) 1st derivative variables 2nd derivative variables or not? Mesh set u(mesh, u, v, a) Set the displacement, velocity, and acceleration vectors. should be in dimensionless form. The vectors Inputs: u - displacement vector (or zero or no arg to clear the mesh u) v - velocity vector (or zero or no arg to clear the mesh v) a - acceleration vector (or zero or no arg to clear the mesh a) 8.7 Functions to form global matrices [K] = Mesh assemble k(mesh) Assemble the stiffness matrix for the mesh. Matrix is in dimensionless form. [M,K] = Mesh assemble mk(mesh) Assemble the mass and stiffness matrices for the mesh. Matrices are in dimensionless form. [M,K,C] = Mesh assemble mkc(mesh) Assemble the mass, stiffness, and damping matrices. Matrices are in dimensionless form. [K] = Mesh assemble dR(mesh, cx, cv, ca, reduced) Assembles mass, damping, or stiffness matrix from mesh. If ’reduced’ is given -’reduced=1’ Reduced form -’reduced=0’ Non-reduced form Matrices are in dimensionless form. [K = Mesh element dR(mesh, eltid, cx, cv, ca)] Gets scattered mass, damping, or stiffness matrix from mesh element. Matrices are in dimensionless form. [R,Ri] = Mesh assemble R(mesh) Assemble the system residual vector and return it in R and Ri. The residual vector is in dimensionless form. Outputs: R - real part of the residual vector Ri - imag part of the residual vector 60 8 8.8 BASIC FUNCTIONS (MATLAB) Other useful functions E = Mesh mean power(mesh) Compute the time-averaged energy flux at each node. TODO: The flux is currently in dimensionless form, but it probably shouldn’t be. f = Mesh get lua fields(mesh, name, nfields) Return an array of field values. Inputs: name nfields - the name of the Lua function to define the fields - number of fields requested Mesh make harmonic(mesh,omega) Set v = i*omega*u and a = -omega**2*u Input: omega units ’hz’: ’rs’: ’nd’: cT : 8.9 forcing frequency specify units of forcing frequency (default ’rs’): omega is in units of Hz omega is in units of rad/s omega is in dimensionless units nondimensionalize omega using the given characteristic time Assigning and reassigning ids int = Mesh assign ids(mesh) Number the degrees of freedom in the mesh. Returns the total number of dofs. int = ted block mesh(mesh) Relabel the nodal degrees of freedom so that all mechanical degrees of freedom come first, followed by all thermal degrees of freedom. Return the total number of mechanical degrees of freedom. int = pz block mesh(mesh) Relabel the nodal degrees of freedom so that all mechanical degrees of freedom come first, followed by all potential degrees of freedom. Return the total number of mechanical degrees of freedom. 8.10 Producing forcing and sensing pattern vectors u = Mesh get sense u(mesh, name, is reduced) Return a vector for a displacement sense pattern. The vector is in dimensionless form. Inputs: name - the name of the Lua function to define the pattern is\_reduced - do we want the reduced (vs full) vector? Default: 1 u = Mesh get sense disp(mesh, name, is reduced) Return a vector for a displacement sense pattern. The vector is in dimension form. Inputs: name - the name of the Lua function to define the pattern is\_reduced - do we want the reduced (vs full) vector? Default: 1 61 8 BASIC FUNCTIONS (MATLAB) f = Mesh get sense f(mesh, name, is reduced) Return a vector for a force sense pattern The vector is in dimensionless form. Inputs: name - the name of the Lua function to define the pattern is\_reduced - do we want the reduced (vs full) vector? Default: 1 f = Mesh get drive f(mesh, name, is reduced) Return a vector for a drive sense pattern The vector is in dimensionless form. Inputs: name - the name of the Lua function to define the pattern is\_reduced - do we want the reduced (vs full) vector? Default: 1 f = Mesh get sense force(mesh, name, is reduced) Return a vector for a force sense pattern The vector is in dimension form. Inputs: name - the name of the Lua function to define the pattern is\_reduced - do we want the reduced (vs full) vector? Default: 1 u = Mesh get sense globals u(mesh, name) Return a vector for a global variable displacement sense pattern. The vector is in dimensionless form. Inputs: name - the name of the Lua function to define the pattern f = Mesh get sense globals f(mesh, name) Return a vector for a global variable force sense pattern. The vector is in dimensionless form. Inputs: name - the name of the Lua function to define the pattern f = Mesh get drive globals f(mesh, name) Return a vector for a global variable force drive pattern. The vector is in dimensionless form. Inputs: name - the name of the Lua function to define the pattern u = Mesh get sense elements u(mesh, name) Return a vector for an element variable displacement sense pattern. The vector is in dimensionless form. Inputs: name - the name of the Lua function to define the pattern f = Mesh get sense elements f(mesh, name) Return a vector for an element variable force sense pattern. The vector is in dimensionless form. 62 8 Inputs: name BASIC FUNCTIONS (MATLAB) - the name of the Lua function to define the pattern f = Mesh get drive elements f(mesh, name) Return a vector for an element variable force drive pattern. The vector is in dimensionless form. Inputs: name 8.11 - the name of the Lua function to define the pattern Getting and setting variables in the Lua environment Lua set string(L, string name, string value) Set a string variable in the Lua environment L - the Lua interpreter object string\_name - the name of the Lua variable(must be string) s - a string value(must be string) string = Lua get string(L, string name) Get a string variable out of the Lua environment L - the Lua interpreter object. name - the name of the Lua variable. Returns an empty string if no such variable exists. Lua set double(L, double name, double value) Set a numeric variable in the Lua environment L - the Lua interpreter object name - the name of the Lua variable x - a number [x] = Lua get double(L, name) Get a numeric variable out of the Lua environment x - the value of the Lua variable Lua set table double(L, table name, double name, double value x) Set a numeric variable in a table in the Lua environment L - the Lua interpreter object table\_name - the name of the Lua table double\_name - the name of the Lua key double\_value- a number key can be a number or a string. [x] = Lua get table double(L, table name, double name) Get a numeric variable out of a table in the Lua environment 63 8 x BASIC FUNCTIONS (MATLAB) - the value of the Lua variable key can be a number or a string. Lua set table string(L, table name, string name, string value) Set a string variable in a table in the Lua environment L - the Lua interpreter object table\_name - the name of the Lua table string\_name - the name of the Lua key string\_value- a number key can be a number or a string. [s] = Lua get table string(L, table name, string name) Get a string variable out of a table in the Lua environment s - the string value of the Lua variable key can be a number or a string. Lua set array(L, aname, array, a type) Set a matrix variable in the Lua environment Input: L - the Lua interpreter object aname - the name of the matrix variable array - a numeric array a\_type(0)- the type of array to construct 0: Real array 1: Real array of twice the size (Not supported yet) 2: Complex array [m Object] = Lua get array(L, name) Get a matrix variable from the Lua environment Input: L - the Lua interpreter object name - the name of the Lua variable 8.12 Manipulating the Lua environment The same interfaces that are automatically bound to Lua are also automatically bound to MATLAB. In addition, several methods are defined which allow MATLAB to manipulate a Lua interpreter: Lua open Return a pointer to a new Lua interpreter L Lua close(L) Close the Lua interpreter Lua dofile(L,filename) Execute a Lua file Lua set mesh(L,name,mesh) Assign a mesh object to a Lua global Lua get mesh(L,name) Retrieve a mesh object from a Lua global 64 9 9 FUNCTIONS FOR ANALYSIS(MATLAB) Functions for analysis(MATLAB) 9.1 Static analysis Solves for the static state of a device. The equation, R(U) = 0 (61) KU = F (62) for the general case, and for the linear case is solved. static state(mesh,opt) Solves for the static state. If the field nonlinear is not specified only 1 iteration will be conducted. Input: mesh - Mesh object *opt nonlinear(’NR’)- Conduct non-linear solve ’NR’ :Newton-Raphson ’MNR’:Modified-Newton-Raphson kmax(20) - Max number of iterations du_tol(1e-15) - Tolerance for convergence for increment R_tol (1e-15) - Tolerance for convergence for residual U - Initial starting vector for solve 9.2 Time-harmonic analysis Solves for the time harmonic state. K + iωC − ω 2 M u = F harmonic state(mesh,F,w,opt) Solves for the time-harmonic state. Input: mesh - Mesh object F - Forcing vector(in nondimensional form) w - Forcing frequency *opt mkc(0) - Include damping matrix kmax(1) - Max number of iterations du_tol(1e-15) - Tolerance for convergence for increment R_tol(1e-15) - Tolerance for convergence for residual 65 (63) 9 9.3 FUNCTIONS FOR ANALYSIS(MATLAB) Modal analysis The MATLAB sparse eigensolver routine eigs is actually an interface to ARPACK (see Section ??). We express all frequencies in radians/s rather than Hertz. We provide one function to compute complex frequencies and associated mode shapes for PML eigenvalue problems: [V,w,Q] = pml mode(M,K,w0,nmodes,opt) Find the requested number of modes closest in frequency to w0. Return an array of mode shapes, a vector of complex frequencies, and a vector of Q values. Options are use matlab Use MATLAB’s eigs rather than ARPACK? (default: false) use umfpack Use UMFPACK with MATLAB eigs, if present? (default: true) disp Verbosity level? (default: 0) [V,w,Q] = tedmode(mesh, w0, nev, opt) Computes the eigenfrequencies and modes of a thermoelastic problem. Compute nev complex frequencies w (in rad/s) near target frequency w0, and also associated Q values. V contains the eigenvectors (mechanical and thermal parts). *Note*: tedmode will reorder the degrees of freedom in the mesh. opt contains optional parameters: mech - Conduct purely mechanical analysis type - Use a perturbation method (’pert’) or linearization (’full’). Default is ’full’. T0 - Baseline temperature for use in symmetric linearization cT - Characteristic time scale for redimensionalization (Default: Mesh_get_scale(’T’) use_matlab - use matlab eigs or not (Default:0) [V,w,Q] = emmode(mesh, w0, nev, opt) Computes the eigenfrequencies and modes of a electromechanical problem. Compute nev complex frequencies w (in rad/s) near target frequency w0, and also associated Q values. V contains the eigenvectors opt contains optional parameters: mech - Conduct purely mechanical analysis type - Use a perturbation method (’pert’) or linearization (’full’). Default is ’full’. cT - Characteristic time scale for redimensionalization (Default: Mesh_get_scale(’T’) use_matlab - use matlab eigs or not (Default:1) 66 9 FUNCTIONS FOR ANALYSIS(MATLAB) idg_m - array of global numbers for mechanical variables idg_p - array of global numbers for potential variables [V,w,Q] = emcmode(mesh, w0, nev, opt) Computes the eigenfrequencies and modes of a electromechanical problem with surrounding circuitry. Compute nev complex frequencies w (in rad/s) near target frequency w0, and also associated Q values. V contains the eigenvectors opt must contain following parameters eno - array of element numbers for electrodes idg - array of global number for driving electrode opt contains optional parameters: mech - Conduct purely mechanical analysis type - Use a perturbation method (’pert’) or linearization (’full’). Default is ’full’. cT - Characteristic time scale for redimensionalization (Default: Mesh_get_scale(’T’) use_matlab - use matlab eigs or not (Default:1) 67 9 9.4 FUNCTIONS FOR ANALYSIS(MATLAB) Transfer function evaluation [H,freq] = second order bode(mesh,wc,drive pat,sense pat,opt) Computes the transfer function given the driving pattern and sensing pattern. The frequency range is set by specifying the center frequency wc and the range. Model reduction can be conducted by specifying the number of iterations kmax conducted to produce the reduced order model. Different projection bases can also be selected. Output: freq H Input: mesh wc drive_pat sense_pat *opt -freq -mkc(0) -cT - Frequency array [rad/s] Output the mesh input center frequency[rad/s] Driving pattern vector Sensing pattern vector - Predefined array of freq - Include damping or not - Characteristic time scale for redimensionalization (Default: Mesh_get_scale(’T’) -wr_min(0.90) - left value mag of bode plot -wr_max(1.10) - right value mag of bode plot -w_ndiv(50) - number divisions in bode plot -w_type(’lin’) - division type (linspae or logspace) -kmax(0) - number of arnoldi iterations -realbasis(0) - use real basis?? -structurep(0) - use structure preserving basis?? -use_umfpack - use UMFPACK?? (Default: use if exist) If kmax and wc are given, use model reduction via an Arnoldi expansion about the shift w0. 9.5 Model reduction There is currently one model reduction routine in the MATLAB support files for HiQLab. As before, all frequencies are expressed in radians/s rather than Hz. [Mk,Dk,Kk,Lk,Bk,Vk] = rom arnoldi(M,K,l,b,kk,w0,opt) Takes kk steps of shift-and-invert Arnoldi to form a basis for the Krylov subspace Kk (K − (2πω0 )2 M )−1 M, b in order to form a reduced system to estimate the system transfer function. Returns reduced matrices Mk , Kk , lk , and bk , along with the projection basis Vk . If opt.realbasis is set to true (default is false), then the projection will use a real basis for the span of [Re(Vk ), Im(Vk )]. To do this, the matrix [Re(Vk ), Im(Vk )] will be orthonormalized using an SVD, and vectors corresponding to values less than opt.realtol (default 10−8 ) will be dropped. [Mk,Dk,Kk,Lk,Bk,Vk] = rom soar(M,D,K,L,B,kk,w0,opt) Takes kk steps of shift-and-invert SOAR to form a basis for the second order Krylov subspace, in order to form a reduced system to estimate the system transfer function. Returns reduced matrices Mk , Kk , lk , and bk , along with the projection 68 9 FUNCTIONS FOR ANALYSIS(MATLAB) basis Vk . If opt.realbasis is set to true (default is false), then the projection will use a real basis for the span of [Re(Vk ), Im(Vk )]. To do this, the matrix [Re(Vk ), Im(Vk )] will be orthonormalized using an SVD, and vectors corresponding to values less than opt.realtol (default 10−8 ) will be dropped. To form the structure preserving base for the thermoelastic problem, the id array must be reordered so that the mechanical dofs come first before the thermal dofs. opt.structurep must be set to 1, and the number of mechanical degrees of freedom must also be specified. 69 10 10 10.1 BASIC ANALYSIS (LUA) Basic analysis (Lua) Functions to obtain basic information about mesh ndm = Mesh:get ndm() Return the dimension of the ambient space for the mesh. numnp = Mesh:numnp() Return the number of nodal points in the mesh. ndf = Mesh:get ndf() Return the number of degrees of freedom per node in the mesh. numid = Mesh:get numid() Return the total number of degrees of freedom in the mesh. numelt = Mesh:numelt() Return the number of elements in the mesh. nen = Mesh:get nen() Return the maximum number of nodes per element. numglobals = Mesh:numglobals() Return the number of global degrees of freedom in the mesh nbranch id = Mesh:nbranch id() Return the number of branch variables in the mesh 10.2 Obtain particular information about ids id = Mesh:id(mesh,i,j) Return the ith variable of node j id = Mesh:branchid(mesh,i,j) Return the ith variable of branch j id = Mesh:globalid(mesh,j) Return the id for jth global variable nbranch id = Mesh:nbranch id(mesh,j) Return the number of variables of branch j 70 11 11 11.1 PLOTTING RESULTS (MATLAB) Plotting results (Matlab) Mesh plots There are several plotting routines for viewing the behavior of 2D meshes: plotmesh(mesh,opt) Plots a given mesh. Options are anchors Marker for nodes with displacement BC (default: ’g+’) forces Marker for nodes with force BC (default: ’r+’) deform Deform mesh according to first to fields of u? (default: false) clf Clear the figure before display? (default: true) axequal Use equal axes in plots? (default: false) 11.2 Plotting the deformed mesh plotfield1d(mesh,opt) Colors are chosen according to the magnitudes of the u components. ufields Fields to use for displacement (default: [1]) cfields Fields to use for coloring (default: [1]) ncfields Number of color Fields to obtain axequal Use equal axes in plots? (default: false) subplot Subplot setup (default: [length(nfields), 1]) deform Deform mesh according to first to fields of u? (default: false) clf Clear the figure before display? (default: true) axis Set axes subplot Subplot size (default is [nfields 1]) xscale Amount to scale by (for unit change)(Default:1) xlabel X label (Default: []) ylabel Y label (Default: []) titles Title (can be a cell array of titles)(Default: []) plotfield2d(mesh,opt) Colors are chosen according to the magnitudes of the u components. ufields Fields to use for displacement (default: [1,2]) cfields Fields to use for coloring (default: [1,2]) ncfields Number of color Fields to obtain(defualt:1) cbias Bias of the color scale (cmax/cbias-¿red)(default: 3) cbar Add colorbar (Default: false) cscale Scale field colors together? (Default: false) axequal Use equal axes in plots? (default: false) 71 11 PLOTTING RESULTS (MATLAB) subplot Subplot setup (default: [length(nfields), 1]) deform Deform mesh according to first to fields of u? (default: false) clf Clear the figure before display? (default: true) axis Set axes subplot Subplot size (default is [nfields 1]) xscale Amount to scale by (for unit change)(Default:1) xlabel X label (Default: []) ylabel Y label (Default: []) titles Title (can be a cell array of titles)(Default: []) 11.3 Animations plotcycle1d(mesh,s,opt) Plot an animation of the motion of the mesh. The amplitude of motion is scaled by the factor s (which defaults to one if it is not provided). The frames can be written to disk as a sequence of PNG files to make a movie later. The following options can be set through the opt structure framepng Format string for movie frame files (default: []) nframes Number of frames to be plotted (default: 32) fpcycle Frames per cycle (default: 16) startf Start frame number (default: 1) fpause Pause between re-plotting frames (default: 0.25) axequal Use equal axes in plots? (default: false) axis Set axes subplot Subplot size (default is [nfields 1]) xscale Amount to scale by (for unit change)(Default:1) xlabel X label (Default: []) ylabel Y label (Default: []) titles Title (can be a cell array of titles)(Default: []) avi file Title of avi file to generate(Default: []) (Default: NO AVI FILE IS PRODUCED) avi w Width of the window size(Default: 300) avi h Height of the window size(Default: 300) avi left Window distance from left side of monitor(Default: 10) avi bottom Window distance from bottom of monitor(Default: def) (Default is set so window touches top of monitor) plotcycle2d(mesh,s,opt) Plot an animation of the motion of the mesh. The amplitude of motion is scaled by the factor s (which defaults to one if it is not provided). The frames can be written to disk as a sequence of PNG files to make a movie later. The following options can be set through the opt structure 72 11 PLOTTING RESULTS (MATLAB) framepng Format string for movie frame files (default: []) nframes Number of frames to be plotted (default: 32) fpcycle Frames per cycle (default: 16) startf Start frame number (default: 1) fpause Pause between re-plotting frames (default: 0.25) cscale Color all fields on the same scale? (default: false) cbias Bias of the color scale (cmax/cbias-¿red)(default: 3) ufields Fields to use for displacement (default: [1 2]) cfields Fields to use for coloring (default: [1 2]) axequal Use equal axes in plots? (default: false) subplot Subplot setup (default: [length(cfields), 1]) axis Set axes subplot Subplot size (default is [nfields 1]) xscale Amount to scale by (for unit change)(Default:1) xlabel X label (Default: []) ylabel Y label (Default: []) titles Title (can be a cell array of titles)(Default: []) avi file Title of avi file to generate(Default: []) (Default: NO AVI FILE IS PRODUCED) avi w Width of the window size(Default: 300) avi h Height of the window size(Default: 300) avi left Window distance from left side of monitor(Default: 10) avi bottom Window distance from bottom of monitor(Default: def) (Default is set so window touches top of monitor) 11.4 Plotting Bode plots In addition, there is a function for viewing Bode plots: plot bode(freq,H,opt) Plots a Bode plot. H is the transfer function evaluated at frequency points freq. The option structure opt may contain the following options: usehz Assume freq is in Hz (default: false) logf Use a log scale on the frequency axis (default: false) magnitude Plot magnitude only (default: false) visualQ Visually compute Q for the highest peak (default: false) lstyle Set the line style for the plot (default: ’b’) For example, to plot a reduced model Bode plot on top of an exact Bode plot, we might use the following code: 73 11 figure(1); opt.logf = opt.lstyle opt.lstyle hold off PLOTTING RESULTS (MATLAB) hold on 1; = ’b’ ; plot_bode(freq_full, H_full, opt); = ’r:’; plot_bode(freq_rom, H_rom, opt); It is also possible to simultaneously show a deformed mesh and a Bode plot with a marker indicating the excitation frequency. plotmesh bode(mesh,f,H,fcurrent,opt) Plot the deformed mesh and create a Bode plot. The opt field is passed through to plotmesh. 74