1
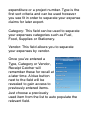
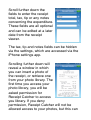
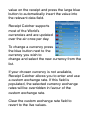
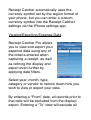
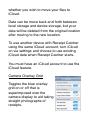
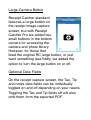
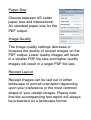
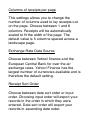
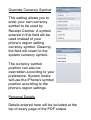
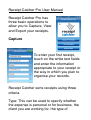
Receipt Catcher Pro User Manual
Receipt Catcher Pro has
three basic operations to
allow you to Capture, View
and Export your receipts.
Capture
To enter your first receipt,
touch on the white text fields
and enter the information
appropriate to your receipt or
the way in which you plan to
organise your records.
Receipt Catcher sorts receipts using three
criteria.
Type: This can be used to specify whether
the expense is personal or for business, the
client you are working for, the type of
expenditure or a project number. Type is the
first sort criteria and can be used however
you see fit in order to separate your expense
claims for later export.
Category: This field can be used to separate
your expenses categories such as Fuel,
Food, Supplies or Stationery.
Vendor: This field allows you to separate
your expenses by vendor.
Once you’ve entered a
Type, Category or Vendor,
Receipt Catcher will
remember these for recall at
a later time. A blue button
next to the field will be
revealed to gain access to
previously entered items.
Just choose a previously
used item from the list to auto populate the
relevant field.
Scroll further down the
fields to enter the receipt
total, tax, tip or any notes
concerning the expenditure.
These fields are all optional
and can be edited at a later
date from the receipt
viewer.
The tax, tip and notes fields can be hidden
via the settings, which are accessed via the
iPhone settings app.
Scrolling further down will
reveal a window in which
you can insert a photo of
the receipt, or retrieve one
from your photo library. The
first time you access your
photo library, you will be
asked permission for
Receipt Catcher to access
you library. If you deny
permission, Receipt Catcher will not be
allowed access to your photos, but this can
be changed later using the iPhone settings
app under the Privacy section.
Using either the camera or
the photo library will take
you to the crop screen.
Here you have the option to
drag a frame around your
receipt to crop it to the size
you want.
Once you’ve entered all of the information
related to your receipt, press save to save
the entry to the database.
Currency Converter
Pressing on one of the
small blue arrows next to
the total, tax or tip will take
you to the integral currency
converter. If your
expenditure is in another
currency, just enter the
value on the receipt and press the large blue
button to automatically insert the value into
the relevant data field.
Receipt Catcher supports
most of the World’s
currencies and are updated
over the air once per day.
To change a currency press
the blue button next to the
currency you wish to
change and select the new currency from the
list.
If your chosen currency is not available,
Receipt Catcher allows you to enter and use
a custom exchange rate. If this field is
populated, the selected currency exchange
rates will be overridden in favour of the
custom exchange rate.
Clear the custom exchange rate field to
revert to the live values.
Receipt Catcher automatically uses the
currency symbol set by the region format of
your phone, but you can enter a custom
currency symbol into the Receipt Catcher
settings via the iPhone settings app.
Viewing/Exporting Expense Data
Receipt Catcher Pro allows
you to view and export your
expense data using any of
the criteria entered when
capturing a receipt, as well
as refining the display and
export even further by
applying date filters.
Select year, month, type,
category or vendor to narrow down how you
wish to view or export your data.
By entering a “From” date, all records prior to
that date will be excluded from the display/
export. Entering a “To” date will exclude all
records after the entered date. Both fields
are optional.
Logo Editor
Available from the Export
screen is the Logo Editor.
This will allow you to add a
small image or logo to the
top right corner of your PDF
expense reports. You may
photograph an image or
choose one from your library.
Settings
Settings for Receipt Catcher
can be accessed via the
iPhone settings app. Scroll
down to your installed apps
and look for RC Pro and the
RC Pro logo.
iCloud Storage
Receipt Catcher Pro allows
you to use iCloud for the
storage of your data. Doing
so will allow you to use
Receipt Catcher on multiple
devices using the same
iCloud account. Not only will
your data be kept safe in the cloud, but will
automatically be synced across all of your
devices.
Receipt Catcher Pro features built in iCloud
conflict resolution and data recovery, so even
if your devices become out of sync due to
one or more of them being disconnected
from the network, all of your data will be
merged upon reconnection.
You can start using Receipt Catcher on your
device and turn iCloud on whenever you
wish. The next time you start Receipt
Catcher, you will be prompted to that you
have turned on iCloud storage and asked
whether you wish to move your files to
iCloud.
Data can be move back and forth between
local storage and device storage, but your
data will be deleted from the original location
after moving to the new location.
To use another device with Receipt Catcher
using the same iCloud account, turn iCloud
on via settings and choose to use existing
iCloud data when Receipt Catcher starts.
You must have an iCloud account to use the
iCloud feature.
Camera Overlay Grid
Toggles the blue overlay
grid on or off that is
superimposed over the
camera display to aid taking
straight photographs of
receipts.
Large Camera Button
Receipt Catcher standard
features a large button on
the receipt image capture
screen, but with Receipt
Catcher Pro we added two
small buttons in the bottom
corners for accessing the
camera and photo library.
However, for those that
liked the original RC large button, or just
want something less fiddly, we added the
option to turn the large button on or off.
Optional Data Fields
On the receipt capture screen, the Tax, Tip
and notes data fields can be individually
toggled on and off depending on your needs.
Toggling the Tax and Tip fields off will also
omit them from the exported PDF.
Paper Size
Choose between US Letter
paper size and international
A4 standard paper size for the
PDF output.
Image Quality
The image quality settings decrease or
increase the quality of receipt images on the
PDF output. Lower quality images will result
in a smaller PDF file size and higher quality
images will result in a larger PDF file size.
Receipt Layout
Receipt images can be laid out in either
landscape or portrait orientation depending
upon your preference or the most common
shape of your receipt images. Please note
that the accompanying text report will always
be presented an a landscape format.
Columns of receipts per page
This settings allows you to change the
number of columns used to lay receipts out
on the page. Choose between 1 and 8
columns. Receipts will be automatically
scaled to fit the width of the page. The
default value is 5 columns spaced across a
landscape page.
Exchange Rate Data Source
Choose between Yahoo! finance and the
European Central Bank for over the air
exchange rates. Yahoo! Finance has the
largest number of currencies available and is
therefore the default setting.
Receipt Sort Order
Choose between date sort order or input
order. Choosing input order will export your
records in the order in which they were
entered. Date sort order will export your
records in ascending date order.
Override Currency Symbol
This setting allows you to
enter your own currency
symbol to be used by
Receipt Catcher. A symbol
entered in this field will be
used instead of your
phone’s region setting
currency symbol. Clearing
the field will revert to the
system currency symbol.
The currency symbol
position can also be
overridden according to your
preference. System locale
will use the iPhone’s symbol
position according to the
phone’s region settings.
Personal Details
Details entered here will be included at the
top of every page of the PDF output.
Frequently Asked Questions
My default currency is incorrect how do I
change it?
The default currency that is
set in Receipt Catcher is
determined by the ‘Region
Format’ settings on your
phone. If you think your
currency is showing as
incorrect then go to
‘Settings’ then ‘General’ then
‘International’ and then
‘Region format’ This will
determine your phone’s
default currency display.
I own the original Receipt Catcher, can I
port my data into Receipt Catcher Pro?
Yes you can by using iTunes file sharing
whilst using local storage. (Note: you can
move the data to iCloud at a later date or
after conversion).
Open iTunes whilst your phone with the
original Receipt Catcher is connected, and
then click on your device.
Choose apps from the top menu and scroll
down to File Sharing. Select Receipt Catcher
and your documents will be listed within the
right hand window.
Select all of the files and click “Save to...” at
the bottom of the window. Choose a location
on your computer to temporarily store the
files.
Connect your device containing Receipt
Catcher Pro (it may be the same one).
Navigate to the same location for RC Pro
which should be empty if you haven’t yet
started Receipt Catcher Pro. If the directory
contains files, these will be lost in the
conversion process.
Drag and drop all of your Receipt Catcher
files into the documents directory of RC Pro
within iTunes.
Safely eject and disconnect your device from
iTunes and then start Receipt Catcher Pro.
All of your files will be converted and the old
ones deleted upon starting the app.
You should now see your records within
Receipt Catcher Pro and can use them as
usual. You can also move them to iCloud by
going to the settings app and turning iCloud
storage on.
Please note that the original Receipt Catcher
did not support the “Type” category, so all of
your files will have been given an “Untagged”
name for this field. To organise your receipts,
simply open them in the viewer and assign a
Type to your receipt record.
RC Pro selected and showing some newly
added documents from the original Receipt
Catcher.
If you have any queries regarding Receipt
Catcher, then please contact us at:
[email protected] or visit our
website at: http://www.dna-apps.com
Thank you for using Receipt Catcher and we
hope you find it an invaluable tool to keep
track of your expenses.
The Receipt Catcher dev team.