1
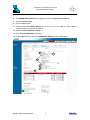
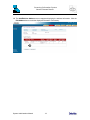
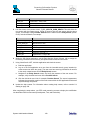
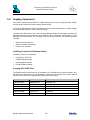
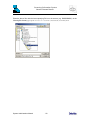
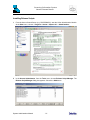
Screening Information System
Genetic Disease Branch
A403: System Administration Manual
Version 2
March 11, 2005
Prepared by:
Deloitte
2868 Prospect Park Drive, Suite 400
Rancho Cordova, CA 95670
Screening Information System
Genetic Disease Branch
3
SIS Components Administration
This chapter describes the information and procedures to administer the software components of
the SIS application. This includes instructions for maintaining and updating online utilities and
address verification software; reviewing, modifying, and individually running batch operations;
setting up the imaging component, and obtaining system reports.
ITSD is responsible for administering hardware, operating system (first tier software), and
monitoring/performance tools (second tier software).
3.1
Online Application
Administrators (and users) can run the SIS application online through a web browser interface.
Because, administrators have higher security privileges than other users, SIS provides complete
functional access to certain utilities. Address verification software is also detailed below, including
installation, update, and verification procedures. The software’s database of address information
must be updated periodically by the administrator.
3.1.1 IT Utilities
The SIS application contains more than one hundred individual information and control screens.
The SIS User Manual contains detailed descriptions and procedures for their use. A selected
subset of these screens is included within this document. This subset includes screens for which
GDB IT Administrators have security rights (GDB IT-Administrator Security Group) beyond those
of any other users, or for which their applicability to IT use merits their presence here. Access
these SIS screens from the Utilities menu tab.
Note: Refer to the System Design Deliverable document Security_Matrix.xls for the
complete system security matrix. The CD distributed with this SIS Administrator
Manual contains Security_Matrix.xls in electronic format, current as of this manual’s
publication date.
System Administration Manual
12
Screening Information System
Genetic Disease Branch
To View Entity Relationships
1
Click the Entity tab. The Entity Search screen appears. Specify suitable search criteria for
finding the desired entity, then click the Search button.
2
The Search Results grid appears at the bottom of the screen. Select the desired entity from
the grid.
3
Click the View Entity Profile button.
1
2
3
System Administration Manual
13
Screening Information System
Genetic Disease Branch
4
The Entity Profile screen appears. Click the Entity Relation third level menu.
4
5
The Entity Relation screen appears. View the listing, or select one from the Current
Relationships grid, then click the Submit button to further review or edit the relationship.
5
System Administration Manual
14
Screening Information System
Genetic Disease Branch
To Add a New Entity Address or Edit an Existing Entity Address
1
Click the Entity tab. The Entity Search screen appears. Specify suitable search criteria for
finding the desired entity, then click the Search button.
2
The Search Results grid appears at the bottom of the screen. Select the desired entity from
the grid.
3
Click the View Entity Profile button.
1
2
3
System Administration Manual
15
Screening Information System
Genetic Disease Branch
4
The Entity Profile screen appears. Click the View Address third level menu.
4
5
The View Address screen appears. Click the Add Address button to add the entity’s
address, or the Edit Address button to edit an entity’s existing address.
5
System Administration Manual
16
Screening Information System
Genetic Disease Branch
6
The Add/Edit New Address screen appears. Select the Program Area (or None.)
7
Select the Contact Type.
8
Enter the address data.
9
Select the Do not validate address check box if you do not want the ZIP+4 address
validation software to validate the address.
10 Select the Kaiser Affiliation (or None.)
11 Enter Telecom Information if available.
12 Click the Save button to save the Add/Edit New Address screen’s information.
6
7
8
9
10
11
12
System Administration Manual
17
Screening Information System
Genetic Disease Branch
13 The Add/Edit New Address screen reappears displaying the address information. Click the
Edit Address button to edit the displayed information if necessary.
13
System Administration Manual
18
Screening Information System
Genetic Disease Branch
5
Software Deployment Procedures
5.1
Online Application and Batch Jobs
A SIS application administrator can deploy changes that fall into two broad categories:
•
Application Changes
•
Database Changes
5.1.1 Application Changes
To make any modifications to the SIS application, including batch or interface programming, the
developer must have an appropriate development environment. The workstation setup must
include Microsoft Visual Studio .NET 2003, Microsoft Visual SourceSafe, and Microsoft SQL
Server client. The developer must also be well versed in the following products and tools:
•
Microsoft Visual Studio .NET 2003
•
VB.NET
•
Web Services
•
XML
•
SQL
•
Object Oriented Programming
In making any changes to the application, the developer must point to the correct Visual
SourceSafe project, and follow proper procedures once changes are made so that all changed
files are promoted to test and production environments.
All code and database structure changes require creation of a new build. For more information
about creating a build, refer to the document A104 – Software Build Procedure and SIS Build
Process for Development.
5.1.2 Database Changes
Only a qualified Database Administrator may make changes to the database. The Application
Manager must approve any changes to the database, as they have a far-reaching effect on the
application, and should be made very carefully. It is expected that developers will continue to
make changes to stored procedures, and that the Database Administrator will promote these
changes.
Because SIS has two reporting databases with ETLs, any database structure change
affects the CRDB database structure and may affect the BO database structure. Any
database structure changes in SIS OLTP may require replication in the database structure
reporting instances.
System Administration Manual
105
Screening Information System
Genetic Disease Branch
All changes to the application, including changes that are data-only related, e.g. changes to the
Interpretation Parameters tables, must be tested in the Development/Test environment, and only
after thorough testing should they be approved for production deployment. All database changes,
including data-only changes must be performed manually by a Database Administrator, and are
not done automatically.
All promotions to different environments must be performed in a synchronized manner and
require that the application to be stopped for maintenance.
The administrator performs other maintenance tasks including clearing log files from the database
server, removing results files from the batch server after they have been processed, and
removing temporary files used for creating faxes. The location of the files is as follows:
Files
Location
Database log files
D:\MSSQL\log\
Fax Files
<SIS online path>\fax
Interface Files
Configurable location in the Application Table
T_UTL_INTERFACE_CONFIG
Processed
Interface Files
Same location as item above under the \processed folder
5.1.3 To Create a New Screen in the SIS Application
The following procedure creates a new screen in the SIS application. As the steps involved may
be difficult to appreciate in the abstract, for the purpose of demonstration assume that the steps
create a Provider Search screen.
Note: Observe the developer requirements in the Application Changes section above.
1
From the SIS application screens inventory, obtain a New Screen ID, and reserve it for the
new screen. For this example, consider the screen ID to be 250.
2
Within the Visual Studio .NET environment, add New files to the solution per the screen’s
requirements. At least one ASPX file must be added to the SIS.UserInterface project (e.g.
ENT_ProviderSearch.aspx under the Entity folder). Set the screen ID property (an integer)
in the Page_Init event of the code behind file as follows:
ScreenId = 250
Note: You can reuse existing Controller, Web Service, and Business Class files.
3
Configuration Settings in the web.config file under the SIS.UserInterface project.
a
Define the controller in the event that you have created a new controller class. For
example, in the CONTROLLER CONFIGURATION section include:
<controller name="CCProviderSearch"
type="SIS.UserInterface.Controller.CCC.CCProviderSearch,
System Administration Manual
106
Screening Information System
Genetic Disease Branch
SIS.UserInterface,
Version=1.0.1.0,Culture=neutral,PublicKeyToken=null"/>
b
Define the View/Navigation Node. For example, specify ENT_ProviderSearch as the
View Name, which also can be called as the Navigation Node. For example, in the
views section include:
<view name="ENT_ProviderSearch"
type="Entity/ENT_ProviderSearch.aspx"
controller="CCProviderSearch"/>
c
Create the Navigation Graph. Assuming that Provider Search (on the third level menu
screen) is accessible from the Search Entity screen (on the second level menu screen),
create the navigation graph from the menu as well as from the Search Entity screen.
i
Add a new (first) screen in the navigation graph from the SIS_MENU. For example,
add the following line under the <node view="SIS_Menu"> section.
<navigateTo navigateValue="ENT_ProviderSearch"
view="ENT_ProviderSearch"/>
ii
Add a new screen in the navigation graph from Entity Search. For example, add the
following line under the <node view="ENT_SearchEntityProfile"> section.
<navigateTo navigateValue="ENT_ProviderSearch"
view="ENT_ProviderSearch"/>
iii Create the navigation graph for Provider Search, the new screen in the executable.
There must be navigation to the View Entity Address screen, and particularly, there
must always be a Default Navigation to the menu. For example:
<node view="ENT_ProviderSearch">
<navigateTo
navigateValue="ENT_ViewEntityAddress"
view="ENT_ViewEntityAddress"/>
<navigateTo navigateValue="SIS_Menu"
view="SIS_Menu"/>
</node>
4
Log on to SQL Server and open the Enterprise Table Manager. Create a new entry in
T_UTL_APPLTN_SCRN_MENU. This table contains master details of all screens in the
application. Create a new record with the following details (for example):
Column
Value
PK_SCRN_ID
Screen Id = 250
MDUL_CODE
Module Code = “ENT”
MENU_LVL
Menu Level = 3
MENU_TXT
Text which will appear in menu = “Provider Search”
MENU_URL
View Name/Navigation Node = “ENT_ProviderSearch”
MENU_TOOL_TIP
Tool tip which appears when you move mouse over the menu link in application
= “Search for Provider”. This can provide additional information regarding the
screen.
CRTD_BY
Created by user’s ID = 1
System Administration Manual
107
Screening Information System
Genetic Disease Branch
5
Column
Value
CRTD_DT
Created date = Today’s date
UPDTD_BY
Updated by user’s ID = 1
UPDTD_DT
Updated date = Today’s date
Link the screen to the parent screen, T_UTL_APPLTN_SCRN_GRAPH. This table links the
new screen with the parent screen. Create a record to link the new screen with the parent
screen; for example, linking Provider Search with the Parent screen Entity Search (screen
ID 55). Include the details, for example:
Column
Value
PK_PARENT_SCRN_ID
Parent screen ID = 55
PK_FK_SCRN_ID
New screen ID = 250
MENU_ORDR
Display order for new screen under parent screen = 1
CRTD_BY
Created by user’s ID = 1
CRTD_DT
Created date = Today’s date
UPDTD_BY
Updated by user’s ID = 1
UPDTD_DT
Updated date = Today’s date
6
Within the SIS Online Application, use the Page Security Screen (Screen 140) to assign the
necessary permissions to the Security Groups that must access the new screen.
7
Using Visual Studio .NET, build the application and check the screen.
8
a
Build the application.
b
Log on to the SIS application as a user from the intended security group intended (or
create a new user within the group.) The user must have security permissions for access
to the newly created screen and the Entity Search screen.
c
Navigate to the Entity Search screen, and verify the presence of the new screen. For
example, verify the third level menu link to Provider Search.
d
Click the third level menu link; for example, Provider Search. The screen’s appearance
indicates the successful creation of the new screen within the SIS application and that all
required settings are present.
Update the help content. For information about creating help content, refer to section 5.4
starting on page 128.
After completing the steps above, use ITSD code promotion process to deploy the modification
into the different SIS environments (Development, Test, and Production).
System Administration Manual
108
Screening Information System
Genetic Disease Branch
5.2
Imaging Component
This section explains the procedure for initially deploying the Custom Imaging Release Scripts.
Use the same procedure to modify existing release scripts.
A Custom Imaging Release Script is a software program that extracts data from a scanned image
into a format-specific file for further OCR processing.
To make any modifications to the Custom Imaging Release Scripts, the developer must have an
appropriate development environment with installed copies of Microsoft Visual Studio 6.0 and
Microsoft Visual SourceSafe. The developer must also be well versed in the following products
and tools:
•
Microsoft Visual Studio 6.0
•
Object Oriented Programming
•
Dynamic Link Libraries
Installing Custom Form Release Scripts
Installation involves four operations:
•
Copying DLL & INF files
•
Installing Release Scripts
•
Importing Batch Classes
•
Publishing Batch Classes
Copying DLL & INF Files
The Release Scripts folder found on the Installation CD provided with this guide contains a DLL
and INF file for each form in the SIS application. These must be copied into the Ascent Central
Server Bin directory before registering the associated release scripts.
Form Name
DLL File
INF File
NBS MR FORM
NBSMRREL.DLL
NBSMRREL.INF
NBS NO FORM
NBSNOREL. DLL
NBSNOREL.INF
NBS OH FORM
NBSOHREL.DLL
NBSOHREL.INF
NBS TR FORM
NBSTRREL.DLL
NBSTRREL.INF
NBS TRF FORM
NBSREL.DLL
NBSREL.INF
PNS TRF FORM
PNSREL.DLL
PNSREL.INF
System Administration Manual
109
Screening Information System
Genetic Disease Branch
Place the above files with their accompanying DLLs on the servers (e.g. DHSSISIMG01) in the
following Bin directory: program files on <server>\AscentSS\ServLib\Bin.
System Administration Manual
110
Screening Information System
Genetic Disease Branch
Installing Release Scripts
1
From the Ascent Central Server (e.g. DHSSISIMG01), start the Kofax Administration Module.
At the Start menu, choose > Program > Ascent > Capture 6.1 > Administration.
2
In the Ascent Administrator, from the Tools menu, choose Release Script Manager. The
Release Script Manager dialog box appears. Choose the Add button.
System Administration Manual
111
Screening Information System
Genetic Disease Branch
3
Select the Bin folder to display the Inf files.
4
Select the desired release script to install. For NBSTR the release script name is
NBSTRREL.INF. Click Open.
System Administration Manual
112
Screening Information System
Genetic Disease Branch
5
In the Add Release Scripts dialog box, highlight the release script to install and click Install.
6
On completion, a confirmation message appears. Click OK, then click Close in the Add
Release Scripts dialog box.
7
Repeat this Release Scripts Installation process for each release script provided on the
installation CD.
System Administration Manual
113
Screening Information System
Genetic Disease Branch
Import Batch Classes
The Installation CD in the Batch Class folder contains Batch Class (.cab) files of form-specific
application configuration data.
1
Once the release scripts are installed, each Batch Class file must be imported into Kofax from
the Kofax Administration Module. Run this program as described above.
2
From the Administration module’s File menu, choose Import. The Open dialog box appears.
3
Navigate to the directory containing your .CAB files. (When batch classes are exported, they
are exported as .CAB files.) Select the desired .CAB file, then click Open. The Import/Export
window appears, and the .CAB file is unpacked and prepared for import. The Unpacking
area of the dialog box displays the results of this process. When unpacking finishes, the
system reports: Unpacking done. Complete.
4
Click OK. The Import dialog box appears. Select the batch classes you want to import from
the list of Available Batch Classes. The list contains all the batch classes that were
exported into the .CAB file you unpacked. Click the Add button to add them to the list of
Selected Batch Classes.
5
Select the desired Transfer Mode. You can choose one of the following:
6
a
Do not import duplicates – Select this option if you do not want to overwrite duplicate
batch class settings.
b
Save duplicates to new name – Select this option if you want to save duplicate batch
class settings to a new name.
c
Replace duplicates with items imported – Select this option if you want to overwrite
duplicate batch class settings with the ones you are importing.
Click Import. The Import/Export window appears. View the import results. Once the batch
class is imported, you must publish it before you can use it. In addition, you may need to
recompile any custom scripts associated with the batch class.
System Administration Manual
114
Screening Information System
Genetic Disease Branch
Publish Batch Classes
Once imported the Batch Classes must be published. Run this also from the Kofax
Administration Module.
1
From the File Menu choose Publish. Select one or more batch classes to publish, or click
Select All to select all batch classes in the list.
2
If desired, validate your batch classes before you attempt to publish them.
3
a
Click Validate. The validation process runs stringent checks on your batch class
selections. The Results dialog box display the results of the validation process.
b
If errors are found, click Close, then fix the problems. If warnings appear, click Close,
then check the problems. If no problems are found, continue with step 3.
Publish your batch classes.
a
Click Publish. The process runs stringent checks on your batch class selections. The
Results dialog box display the results of the publishing process.
b
If errors are found, click Close, then fix the problems. If warnings appear, click Close,
then check the problems. If no problems are found, continue with step 4.
4
Repeat steps 1–3 for each batch class to be published.
5
Click Close to close the dialog box.
System Administration Manual
115