1
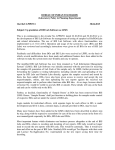
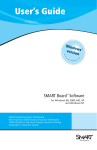
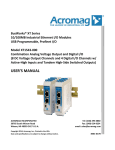
TECHNOLOGY IN A LECTURE HALL (Click on link to navigate) Typically, a lecture hall is a learning space that seats 30 or more students. The technology in a lecture hall consists of: CLASSROOM PC to research, create, interact with and playback images, video, audio and data. One large or two regular LCD PROJECTOR(s) to project the image from the Classroom PC, DVD/VHS Player, Document Camera and/or a laptop or other mobile device. CRESTRON TOUCH PANEL to operate the LCD Projector, select a media source, CONTROL OVERALL VOLUME, as well as, to CONNECT A LAPTOP OR OTHER MOBILE DEVICE to the LCD Projector. DVD/VHS PLAYER to playback videos on DVD and VHS formats. DOCUMENT CAMERA to project transparencies and solid objects through the LCD Projector. Wall mounted speakers or a house PA system. SMART SYMPODIUM to digitally annotate lecture notes and PowerPoint presentations on the Classroom PC. For technical assistance or to schedule one-on-one training for these and other classroom technologies, please contact IT / Media Services. Warwick (Knight) Campus: 825-2231 Providence (Liston) Campus: 455-6111 Lincoln (Flanagan) Campus: 333-7081 Newport County Campus: 851-1708 To reserve equipment, click here to submit an online form or call 455-6111. Table of Contents | Top of Section | 1 Table of Contents About the Classroom PC Page 3 - 6 About the Crestron Touch Panel Page 7 - 8 Operating the LCD Projector via Crestron Touch Panel Connecting a laptop or other mobile device via the Crestron Touch Panel Page 9 - 10 Page 11 Operating the DVD/VHS Player Page 12 - 13 Volume Control via the Crestron Touch Panel Page 14 - 15 Operating the Document Camera Page 16 - 18 About the SMART Sympodium CCRI Web URL (Coming Soon) Page 19 Table of Contents | Top of Section | 2 ABOUT THE CLASSROOM PC The Classroom PC can be used to present images, presentations, data and videos to the classroom, along with the use of the classroom LCD Projector and Speaker. Currently, Windows 8 is the operating system that is being used. For more detailed information about the Windows 8 operating system, click here. Instructors who need special software to be installed on a classroom computer or are having problems with hardware/software should notify the Service Desk at 825-1112 or [email protected]. POWER ON and SIGN ON To power on the classroom computer: A. Press the power button on the front of the computer. To sign on to the classroom computer: B. After the computer powers on, a welcome screen appears. Press the spacebar to advance to the sign on screen. C. Enter your username and password. Then click OK. The start screen will appear Table of Contents | Top of Section | 3 Accessing the DESKTOP The start screen is the Windows 8 version of the traditional start menu, where the computer’s software applications can be found. For the user’s convenience, many of the software application icons have been placed in folders onto the Classroom PC’s desktop. To access the Classroom PC’s desktop: A. Click the desktop “tile” in the upper left corner of the start screen. B. To toggle between the desktop and the start screen, press the “windows” key. Devices with Removable Storage First: To access media and data files on a DVD or a CD, insert (1.A) the DVD or CD into (1.B) the disc tray. To access media and data files on an USB flash drive, insert (2.A) the USB flash drive into the (2.B) USB Port. Table of Contents | Top of Section | 4 Second: A. Click on the file explorer icon on the desktop’s task bar. The file explorer window will appear. B. In the side menu click on computer. The window’s appearance will change. Under the “devices with movable storage” section, the inserted item will appear. 1. To open a data file: Double click on the item to open and access the files. 2. To play a video: right click on the DVD or the video file on the USB Flash Drive. A menu will appear and select Play with VLC Media Player. SIGN OUT When finished using the classroom computer, you must either sign out or shut down the Classroom PC. To sign out of the Classroom PC: A. Press the “windows” key to enter the start screen. B. In the upper right corner of the start screen, click on your username. A menu will appear. C. Click the sign out option. Table of Contents | Top of Section | 5 SHUT DOWN To shut down the Classroom PC: A. Press the “Windows” and “I” keys to access the setting’s menu. B. Click on the power icon. A menu will appear. C. Click the “shut down” option. Table of Contents | Top of Section | 6 ABOUT THE CRESTRON TOUCH PANEL The Crestron Touch Panel is used to turn on/off LCD PROJECTOR(s) and select which device’s audiovisual signal is to be broadcasted throughout the lecture hall. Certain devices can even be operated directly from the Crestron Touch Panel if the users chooses to do so. To begin: 1. Touch the touch screen to begin. The Activity screen will appear. 2. The Activity screen is where: a. A device can be selected. When a device is selected, the LCD PROJECTOR(s) will turned on. b. The system can be turned off. c. The volume can be muted, decreased or increased. Table of Contents | Top of Section | 7 Devices to choose from: A. B. C. D. Press Classroom PC to project the content from the CLASSROOM PC. Press Watch Video to project a video image from the DVD/VHS PLAYER. Press Laptop to project the content from a LAPTOP OR OTHER MOBILE DEVICE. Press Document Camera to project displayed subject from the DOCUMENT CAMERA. The DOCUMENT CAMERA and the DVD/VHS PLAYER have their own dedicated screens that allow the user the control the device from the Crestron Touch Panel if they choose to do so. When the device is selected, its associated screen will appear. To exit the device’s screen and return to the Activity screen, press the return button in the top right corner of the screen. Table of Contents | Top of Section | 8 OPERATING THE LCD PROJECTOR ~ VIA ~ CRESTRON TOUCH PANEL The classroom LCD Projector can be used to project videos, images, graphics and data from the CLASSROOM PC, a LAPTOP AND OTHER MOBILE DEVICES, videos from the classroom DVD/VHS PLAYER and images from a DOCUMENT CAMERA. In a lecture hall there may be one or two LCD Projectors to accommodate the layout of the room. The LCD Projector can be operated with the CRESTRON TOUCH PANEL. CRESTRON TOUCH PANEL A. To begin, touch the touch panel’s screen. The activity screen will appear. B. To turn on the LCD Projector(s), press the button for the device that you wish to use. i. Be sure that the device is powered on/connected (if it is a mobile device); if not a message will appear stating to do so. Table of Contents | Top of Section | 9 Press Classroom PC to project the content from the CLASSROOM PC. Press Watch Video to project a video image from the DVD/VHS PLAYER. Press Laptop to project the content from a LAPTOP OR OTHER MOBILE DEVICE. Press Document Camera to project displayed subject from the DOCUMENT CAMERA. To project an image from a different device other than the one initially selected, press the button for the device that you wish to use. To turn off the LCD Projector(s), press the Power button. A message will appear asking you to confirm the command. Press ‘Yes’ to turn the system off. Press ‘No’ to return to the activity screen. Table of Contents | Top of Section | 10 CONNECTING A LAPTOP OR OTHER MOBILE DEVICE ~ VIA ~ CRESTRON TOUCH PANEL By connecting a laptop or other mobile device to the Crestron Touch Panel, images, graphics, video and data from that device can be displayed through the LCD PROJECTOR. 1. Turn on your laptop or other device. 1. Connect (A) the VGA cable (located on the side of the desk) to (B) the laptop or other mobile device’s display port. ** Note: Not all devices use a VGA as a display port connection. A VGA adaptor may be required. Consult the device’s user manual and/or contact IT Media Services for assistance. ** 2. With the laptop or other device connected, press the Laptop button on the Crestron Touch Panel. The image from the laptop or other device will be projected through the lecture hall’s LCD PROJECTOR(s). Table of Contents | Top of Section | 11 OPERATING THE DVD/VHS PLAYER The DVD/VHS Player can be used to play videos from VHS Cassette Tapes and DVDs to be displayed through the LCD PROJECTOR. Table of Contents | Top of Section | 12 1. 1 Press the power button to turn on/off the DVD/VHS Player. 2. Press the eject button to eject the media from the device. a. Press the DVD eject button to open/close the DVD tray. b. Press the VHS eject button to eject the VHS cassette tape. 3. Press the DVD/VHS button to toggle between the DVD and VHS players. 4. To control the media, press the play button to play/pause playback, rewind to reverse playback, fast forward to quickly advance and stop to end the last action. 5. To interact with a DVD menu, using the remote, use the arrow buttons to browse and the enter button to select. To have the video from the DVD/VHS PLAYER project through the LCD PROJECTOR(s), press the watch video button on the Crestron Touch Panel. Once selected, the display will change and then the DVD/VHS PLAYER can be operated with the basic/necessary controls (if you choose to do so). From the DVD-VCR Controls screen: 1. Press the associated button to operate the DVD/VHS PLAYER. a. Stop, Play and Fast Forward controls (DVD and VHS) b. Navigate arrows and Enter button (DVD only) 2. Press the VOL – and VOL + buttons for overall VOLUME CONTROL. 3. Press ‘Return’ to return to the activity screen. Table of Contents | Top of Section | 13 VOLUME CONTROL The lecture hall’s Crestron Touch Panel can be used to adjust the audio’s volume from both the CLASSROOM PC and DVD/VHS PLAYER. The audio projects from the lecture hall’s wall mounted speakers and/or PA system. CLASSROOM PC – Volume Control When playing audio from the CLASSROOM PC: 1. First, the CLASSROOM PC’s master volume controls the PC’s output volume that goes into the speaker. a. Press the Windows and I keys to access the setting’s menu. b. Click on the speaker icon. i. If there is an “X” over the speaker icon, the volume is muted. c. Click and drag the volume fader. Drag the fader up to raise the volume; drag the fader down to lower the volume. 2. Next, adjust the volume on the speaker. DVD/VHS PLAYER – Volume Control The DVD/VHS PLAYER does not have its own volume control. The volume can be raised and lower directly from the Crestron Touch Panel. Table of Contents | Top of Section | 14 (Overall Volume Control) Crestron Touch Panel 1. Make sure that the desired device is selected. 2. The overall volume is controlled by three buttons: a. Press the MUTE button to mute the audio. If the MUTE is highlighted, the audio is muted. b. Press the VOL – button to decrease the overall volume. c. Press the VOL+ button to increase the overall volume. d. The intensity of the volume can visually be determined by the volume meter. Table of Contents | Top of Section | 15 Operating the Document Camera ** NOTE: Not all classrooms are outfitted a Document Camera. ** A Document Camera is similar to an old-fashioned overhead projector in that it can be used to display acetate transparencies. However, unlike an old-fashioned overhead projector, a Document Camera can be used to display a video image of transparent and solid objects through the LCD PROJECTOR. 1. Press the power button to turn on/off the Document Camera. 2. Place objects underneath Document Camera’s camera to broadcast the video image through the LCD PROJECTOR. 3. The needed light source will differ between objects. a. To display solid objects (i.e.: a book), turn on the upper lamps. b. To display transparent objects (i.e.: an acetate transparency), turn on the base lamp. 4. Use the buttons on the control panel to operate the Document Camera. Table of Contents | Top of Section | 16 1. The needed light source will differ between objects. a. To display solid objects (i.e.: a book), press the lamp button once (1x) turn on the upper lamps. b. To display transparent objects (i.e.: an acetate transparency), press the lamp button twice (2x) turn on the base lamp. c. To turn off the lamps, press the lamp button three times (3x). 2. To zoom in/out of the object: a. Press tele to zoom in. b. Press wide to zoom out. 3. To put the object in focus, press the auto focus button. 4. Press image rotation to rotate the video image of the object in 90 degrees increments. 5. To adjust how the camera manages the light… a. Press open to open the iris to brighten the video image. b. Press close to close the iris to darken the video image. c. Press contrast to adjust the difference between light and dark within the video image. To have the Document Camera display its video image through the LCD PROJECTOR(s): 1. Press the Document Camera button on the Crestron Touch Panel. Once selected, the display will change and then the document camera can be operated with the basic/necessary controls (if you choose to do so). Table of Contents | Top of Section | 17 2. The document camera can be operated with the basic/necessary controls (if you choose to do so). a. Press the Paper/Book Object button to project a solid object. b. Press the Transparency button to project a transparent object. c. Press the magnify glass + button to zoom in on an object and press the magnify glass – button to zoom out of an object. d. Press the ‘Auto Focus’ button to focus in on the object that is being projected. e. Press the ‘Brightness’ button to adjust the image’s brightness. 3. Press the ‘Return’ button to return to the ‘Activity Screen’. The document camera does not have to be operate with Crestron controls, it still can be operated with its own buttons and features as previously mentioned if preferred. Table of Contents | Top of Section | 18 ABOUT THE SMART SYMPODIUM Writing tablets, such as the SMART Sympodium, allow presenters to annotate any desktop application in digital ink to make a point, reinforce content and engage students. Along with SMART Ink (add-on), PowerPoint slides can be annotated, web content can be highlighted and videos, images and data can be labeled and SMART Notebook (software), lecture notes can be written, saved and distributed. It is well suited for the CLASSROOM and LECTURE HALL where viewing whiteboard content may be difficult and is an asset in lecture capture and distance learning applications where the presenter (instructor) is not physically present before the viewer (student). The SMART Sympodium takes the place of the CLASSROOM PC’s monitor. 1. Press the power button, to power on/off the Sympodium. 2. Use the stylus pen to interact with the CLASSROOM PC or to annotate in digital ink. 3. The buttons at the top of the Sympodium control the stylus pen’s functions: a. Press the arrow (select) button to use the stylus pen as a mouse. i. Tap the screen with the stylus pen to click. ii. Hold the icon/selection and glide the stylus pen and the release to drag and drop. b. Press the black, blue or red pen buttons to write and draw in digital ink in the associate color. i. Glide the stylus pen over the screen to write and draw. c. Press the eraser button to use the stylus pen to erase the digital annotations. i. Glide the stylus pen over the annotations to erase. 4. On either side of the Sympodium is a USB port to insert a USB flash drive. Table of Contents | Top of Section | 19