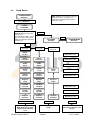
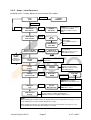
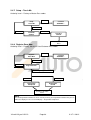
1
AUTO INGRESS DEVICE MANAGER DIGITAL MODE/KEY PAD SERVICE MANUAL & MENU OUTLINE Version 3.7.1 Australia Wide Service Phone: 1300 138 750 E: [email protected] Head Office: Phone: +61 7 3290 1500 Fax: +61 7 3290 1567 E: [email protected] E: [email protected] Web: www.autoingress.com.au LS220B LS300 LSW LP V-3.7.1~2012 LS220B LS300 LSW LP V-3.7.1~2012 Table of Contents Quality Statement Page 1 Standards Compliance Page 2 Standard Specification Page 3 Section 1 – Using the Keys 1.1 keys page 4 Page 4 Quick Guide - Owners Operating Instructions Mode Change Procedure Silence Alarm Procedure Page 5 Page 5 Page 5 Service Guide Door will not close To reboot the microcontroller three options are available Page 6 Page 6 Page 6 User Accessible Key Pad Options Mode Change Pass code Protection User Code (user changeable – Default 1234) Mode Change Set up local People counter View Settings… Diagnose Faults Register door Page 7 Page 7 Page 8 Page 8 Page 8 Page 9 Page 10 Page 10 Page 10 Page 10 Service guide Page 10 Overview: Master Code (Technicians Pass code) Set up:Params Set up Functions (setup: Functns) Page 11 Page 11 Page 13 Local Settings Page 15 Factory Code Overview Page 16 Technician’s Service Guide Page 17 Mechanical Components Page 18 Door Operation Overview Page 18 Common Faults Safe mode Door beeping Page 19 Page 21 Page 21 Registration Procedure Page 22 LS220B LS300 LSW LP V-3.7.1~2012 Reset Buzzer or Silence Buzzer Procedure Page 22 Disable Service Warning Procedure Page 23 Disable Buzzer Procedure Page 23 Commissioning Instructions: (Refer wiring diagram) Page 24 Wiring Diagram Page 25 Security/Fire Alarm Connection Fire Alarm Security company Page 26 Page 26 Page 26 Remote Keypad: Menu Outline Section 1 1.1 Keys Page 27 Page 27 Section 2: Screen Menus and set up screens 2.1 Start-up Screens and Mode Displays 2.2 Exit Button (when exit key function is set to enabled) 2.2a Exit Button (when exit key function is set to DISABLED) 2.3 Mode Button 2.4 Set up button 2.4.1 Set – Factory 2.4.2 Reset Alarms 2.4.3 Set Timed Unlock/lock 2.4.4 Setup – Parameters 2.4.5 Setup – Functions (options) 2.4.6 Setup – Local Functions 2.4.7 Setup – Teach Me 2.4.8 Register Door Now Page 28 Page 28 Page 29 Page 29 Page 30 Page 31 Page 32 Page 33 Page 34 Page 35 Page 36 Page 37 Page 38 Page 38 Section 3 General Information and operation 3.1 Menu and Entry Timeouts 3.2 Communication with the Door Slide Controller 3.3 Exit Key and Entry Key Access 3.4 Timed Unlock /Lock Facility 3.5 Door Registration 3.6 Pass Code 3.7 Serial Number 3.8 Day and Time 3.9 A.C Power Failure 3.10 Service due Warning 3.11 Diagnostics Page 39 Page 39 Page 39 Page 39 Page 40 Page 40 Page 41 Page 41 Page 42 Page 42 Page 42 Page 43 Remote Keypad: Menu outline Section 1 1.1 Cyclic Screens Page 44 LS220B LS300 LSW LP Page 44 V-3.7.1~2012 Section 2 2.1 Main Menu 2.2 Parameters Menu 2.3 Functions (Options) Menu 2.4 Local (user) Menu 2.5 Factory Menu 2.6 Manual System Reboot 2.7 Exit Key Page 45 Page 45 Page 46 Page 47 Page 48 Page 49 Page 50 Page 50 Important Safety Message Service Assistance Service Help Desk Page 50 Page 50 Page 50 Maintenance Program Auto Ingress PTY LTD Service Offer and Terms Page 51 Page 51 Warranty Terms & Conditions Page 52 Notes Page 53 LS220B LS300 LSW LP V-3.7.1~2012 Quality Statement All Auto Ingress door operators are manufactured under stringent quality assurance conditions using high quality components with a primary focus on providing a cost effective, reliable product. To provide an automatic door of the best quality and reliability with the best after sales service. The elegance of architecture is equally matched by the quality and reliability of the Auto Ingress automatic door operating equipment. Innovative Technology 24 Hr Service Interface Ability Australian Owned LS220B LS300 LSW LP Page 1 V-3.7.1~2012 Standards Compliance B.C.A and Standards Certification All sliding door operators have been independently tested by a NATA accredited body, and fully comply with the current building egress codes and Australian Standard AS5007-2007 Building Code of Australia - BCA AS 5007-2007 / NZS 4239/1993 Australian & New Zealand Standards for Automatic Door Assemblies AS/NZS 4251.1/1999 EMC Compliance – Electro Magnetic Emissions Standard Important Note If the Mode/Key Pad is not fitted the door will not operate unless in lock mode. The door system has been tested by a NATA accredited independent agency for compliance to AS5007:2007 when used with the key pad. If the key pad is not used vital error messages such as battery failure etc will not be displayed therefore the door will not comply with the requirements of this standard. The Logic Slide/Swing Automatic Door: Proudly Australian owned and manufactured LS220B LS300 LSW LP Page 2 V-3.7.1~2012 Standard Specifications The Auto Ingress Logic Slide operator is to incorporate the following as a minimum requirement and is to take precedence over those unable to meet the minimum requirements. The operator shall provide all of the following features. • Computer micro-chip control • Heavy-duty chain drive or steel reinforced notched belt. • Actuation sensors to be active infra-red / microwave. • Failsafe Operation – Doors to open fully under power-fail conditions via monitored battery failsafe or full uninterrupted operation for a minimum of 60 cycles. • Dual Sets (2) of a photo-electric (PE) safety cells or presence sensors for additional safety to prevent door(s) from closing if threshold area is obstructed. • Automatic safety reversing – if obstructed during closing/opening sequence with adjustable sensitivity setting. • The motor is to be fully electric continuously rated with no thermal overload and sealed maintenance free gearbox. • Mode Keypad to control Day/Night operational modes • Fully integrated and programmable 7 day time clock • Integral people counter • Service reminder with user reset capability. • Climate Control facility to provide dual openings • Selectable Fire Alarm/Security Status Terminals provided. • Remote parameter and functional changes plus reset by helpdesk via phone • Twelve (12) months labour warranty and two (2) years parts warranty as per our warranty form. LS220B LS300 LSW LP Page 3 V-3.7.1~2012 Section 1 – Using the Keys 1.1 Keys Down Arrow Up Arrow Enter Enter Key Select the displayed menu item; save the displayed parameter value and function setting; save the pass codes and service phone number; confirm sending a command. When Exit Key is Disabled, permits the door to open after entering a passcode. Mode Mode Key Cycle through available operating modes with each press. Passcode required. De-activates after time delay. Setup Setup Key Invokes Setup Menu for changing Parameter values and Function settings. Passcode required. Factory setup, reset alarms, Setup parameters and functions, user functions and initialise teaching mode. Exit Exit Key When not in a menu mode, Open Door regardless of the operating mode setting when the Exit Key is Enabled. When the Exit Key is Disabled, it allows the door to be opened after entering a passcode in the same way as the Enter Key. Returns to previous menu or exits the menu function, returning to the cyclic mode display sequence. 1-0 Keys 1-0 Numeric keypad when entering or changing a passcode, or registering the door or changing clock settings or for key pad entry. Decrease/increase parameter values in Setup menus; Cycle back/forward through enumerated function settings as in Setup/Function menu. Cycle through the menu items in the in Setup, Setup/Parameter, Setup/Functions & other menus. Reset of the door by pressing the up arrow for more than 10 seconds. Important Note: If the key pad is not connected the controllers are factory set to keep the doors open in all modes except the lock mode. This is to ensure compliance to AS5007:2007. This door operator must be serviced periodically by a suitably qualified person as required by AS5007:2007 to ensure continued compliance to this standard. The door operator has a service alarm to notify when this service is due so that the safety aspect of the installation is not compromised. Please ensure the ‘Days to service” is displayed on the mode key pad and service is arranged 5 to 10 days prior to the required day. Refer to alarm reset if the service alarm sounds LS220B LS300 LSW LP Page 4 V-3.7.1~2012 Quick Guide - Owners Operating Instructions These models are equipped with a microcomputer that automatically sets the open and close positions of the door. The microcomputer utilises a digital mode pad to communicate to and fro with users as below: 1. Mode changes: AUTO – two way traffic. 2. EXIT - one way exit only 3. LOCK – Both the entry and exit sensors are disabled. Door will lock if an electric lock is fitted or allow mechanical lock to be engaged by the user. OPEN – The door will remain in the open position. MANUAL - The door will switch the motor off to allow mechanical operation while the mains power is still on. This prevents the battery from being drained. Mode Change Procedure: Press the setup key followed by the user code (1234 – Default). Press the mode key repeatedly till the desired mode is displayed. Press enter to select. Key pad will confirm by saying mode sent ok. Note: If a 4 position switch is used for mode change or the door is controlled by an access control system / building management system, the mode on the key pad should be left on AUTO permanently. 2. Warnings: The door provides audible beeping while displaying messages to indicate certain error conditions. This occurs when: a. the battery has failed – wait to see if the battery will recharge before calling for service b. When the door requires routine service as required by the Australian Standard AS5007-2007 (the door will require a one off registration code available by calling the phone number displayed on the mode pad). c. If errors or operational problems such as door obstruction occurs. Note: The audible alarm can be silenced for 48 hours 3 times prior to requiring a technician to remedy the problem or carry out the routine maintenance service. Silence Alarm Procedure: Press the setup key followed by the user code. Setup: Local is displayed – press the enter key to select. Silence Buzzer 48H is displayed – press the enter key to select. Confirm reset is displayed – press the enter key to confirm. Buzzer reset ok is displayed. Press the exit key twice to save changes - done. 3. Setup Local: Allows the user access to the following: a. Show timed lokunlok – allows user to see lock and unlock times if the built in time clock is enabled. b. Disable/Enable timed lock – this allows the user to override the time clock. c. Set Day and Time – allows day and time adjustment. d. People counter – allows user to view and reset the count of people entering and exiting. e. Change User code – user may select or change their own code. f. Managed Lock – used to override the safety sensors on closing to obtain lockup, upon sensor failure or damage. Note: For local setup and adjustments press the setup key followed by the user code. Select the menu items and confirm your selection by pressing the enter key. Save changes and escape setup by pressing the exit key. LS220B LS300 LSW LP Page 5 V-3.7.1~2012 Service Guide: Door will not close: 1. 2. 3. 4. 5. check mode is not on open or manual. check mains power is on check nothing is activating the sensors. No moving signs or plants etc. check nothing is blocking the safety sensors (eyes in door jamb) refer managed lock in (f) above if emergency lock up is required. Check doors are not obstructed or jammed. Door will not open: 1. 2. 3. check mains power is on check mode is set to auto check doors are not obstructed, jammed or locked. Quick Fix: Reset: In most cases service problems can be eliminated by rebooting or resetting the doors by one of the three methods below. The door will open and close for one cycle very slowly to recalibrate. 1. 2. 3. Press and hold key no. 2 or up arrow for 10 seconds. Press enter to confirm. Press the reset button accessible through a hole on the underside of the key pad using a pen or similar. Switch mains power off for 30 seconds then on again. If in lock mode change to auto or press the exit switch. Over View These models use microcontroller based intelligence utilising purpose designed remote key pad for all error and warning messages, controls, functions and adjustments. To reboot/reset the microcontroller three options are available: 1. Switch mains power off for 30 seconds and switch back on while the door is on Auto mode. If the door is in Lock mode then press the exit push button switch, after power up or change mode to auto. 2. Press the reset button on the underside of the key pad. This is a recessed button accessible through a hole on the underside of the key pad enclosure. 3. Press the up key on the key pad and hold down for 10 seconds. The door may require resetting if there is disruption to mains power or power surges or certain abnormalities and malfunctions. This is generally recognised when the door is operating slowly or erratically or the key pad display shows safe or unknown modes. LS220B LS300 LSW LP Page 6 V-3.7.1~2012 User Accessible Key Pad Options Mode Change The user may use the key pad to change the operational modes. This is done by pressing the mode button on the key pad followed by the user code (default code 1234) if requested. All subsequent press of the mode button will show the 5 different mode options; Auto, Exit, Lock, Open and Manual. Select the desired mode by pressing the enter button. Auto Mode: Door will open then close for normal operation from both the inside and outside sensors. The door will not lock when closed. When manually pushed open approximately 100mm the door will open by itself. The doors will failsafe to the open position on power failure unless the failsafe is set to open close. The door in this case will operate normally until the battery is flat or the mains power is restored. Exit Mode: Door will open and close from the inside or exit sensor only. The door will lock after every operation when shut. It will unlock and open on power failure unless set to open/close as in Auto mode above. Lock Mode: Door will not operate from either sensor. It can be opened from the after-hours exit push button switch or entry switch. The door will remain locked on power failure. The after-hours push button switch will unlock and open the door with or without the mains power present. The door will close and lock after every operation. Open Mode: The door will remain in the open position. Manual Mode: allows the door to be opened and closed by hand and left in any position. The door will recalibrate when any other mode is selected before resuming normal operation. Note: mode changes may also be made using the key mode or knob switches or by the building management or security/access control systems if connected, or the built in time clocks if enabled via the key pad or add on time clocks if fitted. When multiple devices are connected for mode control the order of precedence for the mode setting is: Open, Lock, Exit and Auto. Auto is the default mode. LS220B LS300 LSW LP Page 7 V-3.7.1~2012 Pass code Protection: Three levels of pass code protection is utilised to ensure unauthorised and/or accidental change of parameters or functions or modes are not possible. This ensures system integrity and compliance to the appropriate standards as master codes and factory codes are only to be used by suitably trained and/or authorised personnel. User Code: (User changeable – default 1234) This code allows the user to: 1. Change the mode from auto to lock to exit etc 2. Change of user code 3. 4. Gain entry or exit after-hours via the key pad. Diagnose and view the operational settings 5. 6. Reset the alarm for 48 hours 3 times before the master code is needed for a full reset Carry out product registration at the factory 7. Change the clock time/day setup 8. Enable/disable the built in time clock locking or override of the time clock if enabled 9. Check the people counter and to zero the count 10. Enable the Managed lock – which allows the user to secure the building after hours on safety sensor failure or damage or sabotage. This eliminates expensive after hours service and inconvenience plus enhanced security should safety sensors be tempered with Mode Change a. Press mode followed the user code (if requested) – press mode again to display the actual mode to be selected. Press enter key to select. Example; to change from Auto to Lock mode: Press the Mode Key – Enter user code(1234) – Press the Mode key again and again until ‘Chg Mode Locked’ is displayed – Press the Enter Key – Done. b. If time lock or unlock is active mode changes are not available until this is disabled. To disable time lock press setup followed by the user code. Select – Setup Local, use bottom arrow to go to DisEnabl TimedLok, press Enter to select, Use up arrow to change from enable to disable or from disable to enable, press enter to select. Press exit button twice or until settings are saved c. If key switches and or building management systems are controlling the door then all other mode control devices must remain in Auto or default mode LS220B LS300 LSW LP Page 8 V-3.7.1~2012 Set up local 1. User Code Change: Press setup followed by the existing user code. Press the enter button to select ‘Setup Local’. Press bottom arrow to scroll down to ‘Change User Pcd” press enter to select. Enter the new 4 digit code, Press enter to confirm when prompted or exit to discard. Press ‘exit’ to escape the program menu then press exit to save changes 2. Silence Buzzer/Alarm Reset In the event of battery failure for instance and or when service or product registration is required the built in alarm will sound. This can be silenced for 48 hours while service is arranged by calling the phone number displayed on the key pad. To silence the alarm Press “Setup’ followed by the user code when prompted. Press to select ‘Local setup’. Press to select ‘Silence Buzzer 48h’. Press enter to confirm reset of the alarm. Press exit to escape the menu item and exit again to save the settings. Please note that the alarms /Buzzer can only be reset 3 times for 48 hours. So a service must be arranged prior to the elapse of this period. 3. Managed Lock Managed lock allows the door operator to override the close safety sensor so the door can be locked in the event there is a sensor failure. This function is only available in lock mode. This allows added security and convenience plus the elimination of expensive after hours service calls. The operator will revert back to normal safety sensor operation on first change of mode. Managed lock should only be used under guidance from a suitably qualified automatic door technician. It is enabled by pressing the ‘setup’ key followed by the user code. Then selecting the local setting by pressing the enter key followed by pressing the bottom arrow down to the managed lock. Press enter to select and then enter again to confirm when prompted. Press exit to escape from the menu and exit again to save. 4. Set Day & Time The current day and time can be changed by pressing the setup key followed by the user code. Then selecting the local setting by pressing the enter key and followed by pressing the bottom arrow down to ‘set day & time’. Change to suit. Press enter to confirm followed by exit to escape the menu and exit again to save. 5. Enable/Disable Timed Lock If the built in time clock is enabled (Time clock locking/unlocking can only be set up by a technician), it must be disabled for overriding of the clock such as when a door needs to be locked for a public holidays or using the doors in automatic mode while the time clock locking is active. Press setup and the user code followed by selecting the local settings. Use bottom arrow to key- down to this menu item and use the up or down key to change. Press enter to select the new setting followed by pressing the exit key to escape then save. Repeat the procedure to enable the time clock again. Mode changes can be made as described in ‘mode change’ above while the time clock is inactive. LS220B LS300 LSW LP Page 9 V-3.7.1~2012 People Counter The user may view and/or zero the people count or the number of people that passed through the doorway. This is done by pressing the setup key followed by the user code. Then select the local settings by pressing the enter key and arrow down to the people count. After viewing the count you can leave the count as is by pressing the exit key to escape out of the menu. While the count is displayed by pressing the enter key you may go and zero the count. Then escape by pressing the exit key. View Settings By pressing the setup followed by the user code and selecting the local settings the user may view the time clock settings and also the functional settings. Diagnose Faults Press setup followed by user code then arrow down to diagnose faults which will show the current operational status and/or faults such as door obstruction. Register Door This allows the product to be registered with the factory so that service reminders, warranty issues and soft ware upgrades can be carried out with least inconvenience to the customer. This menu item is also found in the setup menu followed by the user code. A unique factory generated pass code must be obtained and keyed in to clear the registration. Please phone using our toll free phone 1300 138 750 in Australia for assistance. Alternatively please phone +617 3290 1500 or email: [email protected] Please refer to www.autoingress.com.au for further information. Service Guide Door will not close: 1. Check door mode is not on open or manual 2. Check safety beam in the door jamb is not obstructed or the sensors are not picking up any moving objects. Refer Managed Lock – for temporary over ride of safety beams in lock mode. 3. Check mains power is on 4. 5. Check the doors are not obstructed Check push button switch or the entry switch is not actuated 6. Check the security system or the fire alarm system is not holding the door open Door will not open: 1. Check the mains power is present 2. Check the door is not obstructed or locked mechanically 3. Check the mode is set to auto Please refer to the reset procedure if the problem persists LS220B LS300 LSW LP Page 10 V-3.7.1~2012 Overview: Master Code (Technicians Pass code) The Master code is the next level of code and allows the access level up to the same level as the user code plus additional higher level of access to the key pad as per the list below. 1. All mode changes and user code accessible actions and checks except if master code is used to reset the alarm or reset the service timer it will reset it till the next service is due. The user code only resets for 48hours. 2. To reset alarms and service timers after the periodic service. 3. To change parameters such as speeds, dwell times, brake settings etc 4. To change functions such as enable/disable buzzer, enable/disable service warning etc. 5. 6. Set timed lock and unlock using the inbuilt time clock. To initiate learning mode (teach me) via the key pad. Setup: Params To make changes to speeds and other variable parameters as listed below: 1. Open speed: normal faster speed opening direction only. 2. 3. 4. 5. 6. 7. 8. Close speed: normal faster speed in closing direction only. Slow open: slow speed in open direction only: used in learning mode, to drive up to the stop after braking, in safe mode and on obstruction clearing in open direction. Slow close: slow speed in close direction only: used in learning mode, to drive up to the fully closed position after braking in closed direction, obstruction clearing and safe modes in close direction. DwellLok: The time period the door will remain open before closing in Lock mode only DwellAut: The time the door will remain open in Auto and Exit modes. Open Trim: The distance of travel after the open speed and between the open stop and the point of braking in the open direction. The door will open up to this point and brake then travel using the slow open speed to the rest of the distance to the open stop. ClosTrim: The distance of travel after the closing speed where the door brakes in the closing direction then travels to the fully shut position using the slow close speed. 9. Climate: The reduced opening distance on climate mode. Note this can be hard wired with a switch or selected using the key pad for various modes. Key pad selection by pressing the setup key followed by the master code then these can be found in the functions menu. 10. Slow boost: is the percentage increase in slow open or close speeds to overcome unexpected wind loads etc. If the door is obstructed while in the slow open or slow close mode it will increase this speed by the percentage set here and then try again before going into obstruction clearing mode. Opn ILim%: Safety reversing in open direction or the current limit – if exceeded the door will go into obstruction clearing mode. 11. 12. Cls I Lim%: Safety reversing in the close direction. If this current limit is exceeded in the close direction the door will reverse and retry to close at slow speed. LS220B LS300 LSW LP Page 11 V-3.7.1~2012 Cont 13. 14. Open Brake: The time brake is applied for in the open direction. This brake is applied at the beginning of the open trim point. Open speed is switched off first then the brake is applied for a time to stop the door or slow it right down then the slow open speed opens the door for the rest of the way up to the open stop. ClosBrake: The time brake is applied in the close direction. This brake is applied at the beginning of the close trim. The closing speed is switched off and the close brake is applied for this duration. The door is slowed sufficiently and then driven with slow close speed to the fully shut position. The below settings found in Setup Params are more relevant to swing door operation however they can be and sometimes does get used on sliding doors. 15. 16. 17. 18. 19. OsafTrim: The point at which the open safety sensor stops operating in the open direction. This is to enable the door to open up to a wall or similar when the safety sensor is fitted on the back of a swing door. SoftSTIm: Soft start trim – the time it takes to ramp up to the open or close speeds from when the motor is stationery. RevDelay: The time it takes to stop the door in the closing direction before initiating the open cycle. ClSafTrm: The point at which the close safety sensor is disabled to allow full closer of the door. Hold Open: The period where the door will stop and remain stationary if the open safety sensor is actuated when the door is opening. The door will close if the sensor is still active after this period. If the open safety sensor is no longer activated within this period the door will resume opening. LS220B LS300 LSW LP Page 12 V-3.7.1~2012 Setup Functions (Setup: Functns) 1. Functions Opensafe: - allows selection of monitored or non monitored open safety devices such as presence sensors or safety beams. 2. Functions Opensafe realy: allows the selection of either normally open or normally input from the open safety devices. 3. Functions Closesafe: Allows selection of monitored or non monitored presence sensors or safety beams in the closing direction. 4. Functions Closesafe relay: allows normally open or normally closed contacts from the output relay of the close safety devices. 5. Functions Lock Fail safe: Default -In lock mode on power failure the door will operate as normal i.e open and close until the battery is flat. This allows selection of the door to open and stay open or open and close as per the default setting. 6. Functions Auto Failsafe: Default door will open and remain one in auto and exit modes in power failure. This function allows doors to keep operating normally i.e open and close or remain open as per the default. 7. Functions Push and Go: allows the door to open when manually pushed open or driven shut when someone tries to open the door. 8. Functions Service warning: if on (default is on) it will advise when the service is due as per AS5007:2007 by audible alarm as well flashing display. When off no warning will be provided when service is due. Functions Service Intervals: allows us to setup the duration of the service warning i.e 1 month , 3months, 4 months etc 9. 10. Functions Service mode: default door warns but remains operational other option door warns and remains open in Auto and Exit modes but is operational in lock mode only. 11. Functions Battery mode: Default – with normal mains power on the door operates normally but warns if battery test fails or the option where the door will warn and remain open except in lock mode. 12. Function Buzzer: enables or disables warning buzzer. Default enabled. When disabled the door will warn via the display only no audible alarm will sound for any of the alarm conditions. Functions Exit Key: On pressing the exit key on the key pad it allows selection of whether the user code is required or the door will open without a code. This is handy if only one code pad is used but is installed on the secure side or outside of the doorway. If two key pad is used then the secondary key pad plugged into the second or JP1 plug will require a code if the enter or exit button is pressed while the key pad plugged into CN2 will allow opening of the door without the code or with the code depending on the selection made here. Functions Climate Auto: When enabled the door will open to the reduced opening as set by the climate parameter setting in Auto mode only. 13. 14. 15. Functions Climate Lock: When set it will open to the climate setting in Lock mode only. 16. Functions climate Exit: When enabled will open to the reduced climate setting in Exit mode only. 17. Functions climate Open: When enabled will open to the reduced climate setting in open mode only. LS220B LS300 LSW LP Page 13 V-3.7.1~2012 Cont 18. Functions Stop Mode: Allows door to open up to a physical stop or 15mm or one count short of the stop. 19. Functions How You Lock: Allows the use of maintained locking such as maglocks for instance or pulse to lock or unlock such as latches. 20. Functions Lock Type: Allows the failsafe (power on to lock) or fail secure (power off to lock) locks. 21. Functions latch Resistor: When the door is in slow close it utilises a resistor across the motor to limit the slow speed. This function gives us the option of disabling this resistor so the door will have more slow speed hence more torque at slow speed settings. Handy for swing doors with electric latches as opposed to maglocks. Functions Backcheck resistor: As in 21 above except it increases the slow open speed and torque by allowing us to disable the back check or slow open speed resistor. 22. 23. Functions Hold Open: It allows the door to open up and remain open at the position it detects an object or person by the open safety sensor or reverse immediately on detection by the open safety sensor. When on hold open the door will stay open for 10 minutes before closing. When disabled the door will reverse immediately. 24. Functions Mode Pass code: Allows mode change with or without using the user code. Default with user code. LS220B LS300 LSW LP Page 14 V-3.7.1~2012 Local settings Setup Local: can be assessed using the user code or master code and provides the same changes. Refer to information under user code for subheadings. Diagnose Faults: Displays faults etc and can be accessed with both the user code and master code. Set Timed LokUnlok: This requires the master code to set or alter. Allows locking and unlocking of the door using the inbuilt time clock. Each day of the week needs to be programmed separately. This is a seven day time clock and holidays etc cannot be programmed. So the time clock has to be disabled or overridden for specific holidays. The user can override the time clock using the user code. To set press: Setup – master code – arrow down to: Set Timed LokUnlok. Press enter to select. Switch on the day need the time clock locking/unlocking and the days not required off. When a day is switched on it will allow you to set the time to unlock then time to lock. Press enter to save or exit to discard before progressing to the next day. Press exit twice to save settings when finished. Setup Teach me: Allows the doors to be recalibrated. If speed changes are made prior to calibration, changes cannot be saved until calibrated. All changes will be lost if the power is turned off and on to recalibrate the door. This function allows us to make changes and calibrate without losing these changes. Register door now: as with user code Reset Service Timer: Allows the technician to reset the timer back to 90 days or to the set service interval after the door has been serviced. A technician should reset this timer at the commissioning stage as well so the correct service interval is observed as required by AS5007-2007. Note: To save the customer additional costs when servicing doors we should pay attention to the days remaining for service and carry out AS 5007 periodic service if this service is due within say 15 or so days. You may need to talk to the user with regards to this. The timer should then be reset and we should make notes to this effect so we do not repeat this service before it needs to be done again. LS220B LS300 LSW LP Page 15 V-3.7.1~2012 Factory Code Overview: This code changes every seven days and is derived using the serial number. The factory code needs to be obtained via our service support staff. The factory code is only released to selected individuals who are familiar with its use or is used by our interval service support staff. This is the highest level of code and allows the technicians to make changes not ordinarily required for normal service and commissioning. The factory code will allow all user code and master code settings plus additional changes as listed below: Only changes that require code level above master code or factory code are listed below. Setup Factory Enter serial No: When installing a new controller it is very important that we use the factory code to enter the serial number of the automatic door the controller is fitted to. This allows the appropriate records to be maintained by us for codes on future service. If the serial number is pre-existing in the controller then the door must be reset to the factory defaults – refer below. Reset to Defaults: This allows the information such as the serial number, time clock settings and any other altered parameters to be deleted and the controller is then set up with original data and settings as found on the unused or new controller. The controller must be reset to factory defaults if it is reused on a different door operator. Change Master Code: This allows the 4 digit master code or technician’s code to be entered or changed. Once stored this code is stored permanently until changed using the factory code. Generally the master code is recorded by our service department for future service work. If it needs to be altered or changed please ensure our records are updated accordingly. If not updated we will not be able to remember the pass code at the next service. Select Door Type: This option allows us to configure the control board to a slide door or swing door. Controller operation will change as below: 1. Open safe sensor stops the door from opening if it is a swing door but in a slide door the open sensor opens the door prior to someone getting to the danger point. 2. The door status relay closes only when the door is in the open position for swing door. This relay closes when the door shuts in the sliding door. 3. The climate control input in the swing type can be fitted with a door position switch which overrides the open safety sensor. 4. Energy wise input changes to the open limit switch for swing models. Climate control is only available via the mode pad in swing models. Select Battery: This allows the door to be operated without the battery backup and cancels the battery failure alarm. Note the door will not retain the electric locking functions and/ battery failsafe or the UPS operation on mains power failure. Change Service Phone Number: Allows change of display phone number. LS220B LS300 LSW LP Page 16 V-3.7.1~2012 Technician’s Service Guide Overview In order to service, repair or maintain any product or equipment you must first understand how it operates, what is connected to it and what these peripheral devices such as sensors switches etc do and how they work. 1. Auto door controller – it accepts inputs such as signals from sensors, switches, inbuilt time clocks or software programmes and other systems such as fire alarms and security systems. It then decides what the outputs should switch on and off based on the signals and commands it gets. Some of the outputs are power to the motor, power to the lock, power to the buzzer, power to relays such as door status relay or people counter etc. Power to accessories such as sensors are outputs via the control board however these come directly from the voltage source via the onboard power supply. So strictly speaking we should consider this as a separate source not a controlled output. 2. 3. 4. 5. Motor – type permanent magnet DC motors (please research and understand how they work). Essentially if the nominal rated dc voltage is applied the motor will turn in one direction at the rated speed. When this voltage is reversed it will turn the opposite way. When the voltage applied is reduced it will run slower. So in theory a zero voltage will produce no speed and zero torque, 50% of the nominal voltage will roughly produce 50% of the full speed but the torque may not be 50% of full torque. It will not be 100% torque either. The torque will be somewhat less but can be determined by its torque speed characteristics data. For this exercise we just need to be mindful of the fact that the speed and torque has a relationship and that the lower the speed hence the applied voltage the lower the torque is. Sensors – these are either detection sensors or safety sensors. Essentially they are switches that close and open via relay contacts for example. Depending on where they are connected to, the controller takes the appropriate actions. Control switches such as push button or mode switches again as in 4 above. Control signals from security system or fire alarms again are similar to 3 & 4. Mode Key Pad This is purpose designed to communicate with the controller and is an interface between us and the control board. The controller communicates to us and we communicate to it via this device. Key pads software must match the controller software. The door may not operate correctly if the key pad and controller is mismatched. LS220B LS300 LSW LP Page 17 V-3.7.1~2012 Mechanical Components Aluminium cowl, Pelmet, stainless track, wheels and floor guides chain or belt These are components which ensure safe and effective mechanical operation of the doors. Some of the common faults relate to tight or binding floor guides, damaged or dirty track or door binding because of lack of floor clearance. Wheels and in particular floor guides need to be free to ensure the door speed such as slow speeds are not affected. Many call backs relate to the floor guide being too tight or because the door has been hit and the guide has moved etc. It is very prudent to pay particular attention to the floor guide clearance and fixing. Chain and belt over tightening may cause noisy operation but will also put load on the motor there by affecting the slow speed – hence erratic door operation. Door Operation Overview Calibration On power up in auto mode the door will open up to a mechanical stop. Then it will close up to a mechanical stop. While closing it will count the number of turns the motor does to close the door fully (roughly one turn of the motor equates to the door travel of 15mm). If the door is in lock mode then the door will not start this learning process until the exit button is pressed or the mode is changed to auto. Slow Speed Setup: Open and Close While the door is programming most technicians will adjust the slow open and close speeds so the door has sufficient torque and speed to fully open and close. So the door must have the ability to open and close fully on slow speed in both directions. It must not struggle to open and close in slow speed. If it struggles then the door may not work in slow speed if the wind load changes for example. A technician may reset or initiate the teaching mode to open and close a few times until he/she is satisfied that the slow speed is set correctly. Most experienced technicians will know how important this speed setting is and may even test the door by applying some pressure or load on the door to ensure there is sufficient torque to overcome external factors while in slow speed. We suggest the technicians err on the side of higher slow open and close speeds then lower i.e. put these speeds up until the door starts to bang harder then acceptable then back off slightly. This is the most critical aspect of door setup and needs to be mastered to avoid call backs. Once setup this speed should not be changed. If it is changed then go back and test again by going through the learning cycle or reset again. Open Speed Open speed determines how fast the door will travel. If this is set up too high the door will travel fast and will over run the brake and may even bang on to the open stop. So the open speed is decided upon based on the size of the door and the application. If the speed does need to be high and the door does not brake quick enough then you may choose to increase the open trim or increase the brake duration. Open Trim This is the position of door travel where the door brakes before travelling open the rest of the way in slow open speed. LS220B LS300 LSW LP Page 18 V-3.7.1~2012 Open Brake (Open Brak) How long the brake is applied for before the slow speed comes on and drives the rest of the way.Note: The brake intensity or force can be increased by bridging out LR1 & LR 2 on CN10 (Motor Plug) Close Speed Closing speed determines how fast the door shuts before braking and stopping in the fully shut position. This speed is limited within the Australian standard by the weight of the door. Essentially the heavier the door the slower it needs to close. This is so that it causes less impact or damage to a person or object should it close on someone. For this exercise, we close all doors as slowly as practical. If the door needs to close faster refer to the standard for guidance or use of the formula and graph provide in AS5007-2007. Close Trim This determines where the brake is applied prior to the door shutting the rest of the way in slow close speed. Close Brake: ClosBrak This is the duration of brake applied in the closing direction. It can be zero in certain cases which will eliminate the hesitation you see in the door movement in the closed direction. Common Faults 1. Door opening and closing by itself or opens before fully closing a. Check all sensors and safety beams. Entry sensor eliminate by turning mode to exit. Entry and Exit sensor – eliminate by mode switch on lock. If the fault persists check safety beams and /or switches or inputs to PB terminal i.e. Pins 1 & 3 on CN5. Simple check – reset door; if the door opens and closes then opens straight away then it is more than likely a signal on CN5 pins 1 & 3. Could be even fire alarm or swipe reader etc. If the door remains shut after programming or reset but will not close after the door has been opened then it is more than likely it will be the closing safety beam. b. c. d. 2. Door stays open a. b. c. d. Check door mode switch is not on open Check signals from the fire alarm or security system is not holding the door open Check safety beam is not obstructed or faulty Check to see the sensors are not holding the door open refer mode change above to eliminate sensors etc Check door is not jammed or obstructed Check entry and exit switches are not actuated or damaged. Check if the mains power is on e. f. g. LS220B LS300 LSW LP Page 19 V-3.7.1~2012 Cont: 3. Door will not Open a. b. c. Is the mains power on. Is the mode switch on auto Check the door is not mechanically locked or obstructed. 4. Door operates erratically or slow from time to time or all the time. a. f. The slow speed is not correct – could it be caused by mechanical reasons such as: floor guide tight or worn, wheels tight or worn, gearbox tight or binding. Belt or chain tension will cause this also. Faulty encoder – so the controller cannot determine the correct door position. Door obstructed or jamming – several reasons but a close inspection will reveal most issues. Controller/motor gearbox failure: if all else is ok then check motor gearbox or the controller or both. Motor can be tested by applying 12 volts from the battery directly to the motor. It should be removed from the controller before doing this. Testing the controller to see if the controller is putting our sufficient voltage to the motor once the motor tests ok. Correct supply- check to see that the transformer voltages are connected to the board correctly. Also check fuses or for loose connection or thermal/mains circuit breaker shutdown if used. Incorrect key pad for the controller. 5. The door will not calibrate or go into learning mode a. Is the mode switch on auto – if not press the push button switch to initiate or change mode to auto. Slow open and close speed is set too low Door is binding or jammed. Hall Effect encoder or counter failure. The door will only open and close about 120 mm each way. Moto or controller faulty. Incorrect voltage to the control board or mains supply is not present. b. c. d. e. b. c. d. e. f. Note if the door cannot calibrate because it is obstructed or if the encoder has failed or if the slow speed are set too low to calibrate etc it will operate in safe mode. LS220B LS300 LSW LP Page 20 V-3.7.1~2012 Safe Mode Fault condition but the door will operate in slow speed provided of course the slow speed is set correctly. The door will operate using a fixed time of 40 seconds in each direction. The door will self reset once the fault is eradicated. Door Reset/Calibration a. b. c. d. Press the up arrow for 20 seconds then confirm reboot by pressing the enter key. Press the reset button on the underside of the key pad. Small hole requires a pen or similar. Press setup master code and go to teach me – press enter to select. Switch the mains power off for 30 seconds then on again. Press PB exit switch if in lock mode or change mode to auto. Door Beeping Causes: 1. Door requires registration. Why register: a. b. c. d. At registration the customer is advised of their obligation to service the doors under the Australian Standards AS5007:2007. This ensures a safer door for the customers patrons. We can obtain information such as the location, customer contact details plus site and billing address. This ensures any future service / warranty work is carried out efficiently and with the least amount of inconvenience to the customer. So we can place the customer on a routine quarterly service if they choose to do so. Alternatively obtain details of who we should be contacting for authorisation of this service. Note if the customer does not require their doors to be serviced then we can disable the service warning if they so require – refer details below. If service warning is enabled the door will ask for service every three months as default or intervals set via the key pad. So we can teach the customer how to silence the buzzer using their user code; generally this code is 1234. 2. Door is due for service. The technician services the door then resets the alarm by pressing setup followed by the master code or factory code. Then arrowing down to “reset alarm” or “RsetService Timer”. Confirm by pressing the enter key and press exit twice to save. 3. Battery has failed – customer needs to wait for the battery to recharge. 4. Door is obstructed or is in error – Clear the obstruction or the error being displayed on the key pad. The door will reset by itself in most cases, refer to the reset procedure if required. Note: In all situations above the buzzer can be disabled for 48 hours by the customer. This is done by pressing setup then their user code. LS220B LS300 LSW LP Page 21 V-3.7.1~2012 Registration procedure 1. Ask for the serial # displayed on the key pad. Use this to obtain the registration code from our website. 2. Ask the customer to Press the setup key on the key pad followed by their user code which is generally 1234. Then they press the bottom arrow key until they see the display message: “Register door now” press the enter key. Then they key in the registration code we provide and it is done. The door will still most likely beep as it will also be due for a service. Teach the customer how to reset or silence the buzzer. Reset buzzer or silence buzzer Procedure Press setup then the user code (1234). The display will show “Setup Local” – press the enter key. It will display “Silence Buzzer 48h’. Press the enter key and press the enter key again to confirm when prompted. The door alarm will now switch off for 48 hrs. Advise the customer that he/she needs to remember this procedure for the future. Customer awareness message – as our duty of care 1. We must advise the customer the Australian Standards AS5007-2007 requires mandatory service of all automatic doors by suitably qualified personal. 2. The customer should be made aware that we can arrange this service for them by scheduling this service automatically for them at minimal costs. 3. If the customer declines this service offer or chooses to make alternative arrangements we can disable their service warning alarm if they wish as per the instructions below. Please do note that it is unadvisable to disable alarms and the customer must understand the full implications of this. We must recommend that they make some arrangements for service in order to eliminate any possible injury or accidents. LS220B LS300 LSW LP Page 22 V-3.7.1~2012 Disable Service Warning Procedure (This will stop the service alarm) 1. Press setup then master or factory code. 2. Use bottom arrow to scroll down to “Setup Functns” then press the enter key 3. Press the bottom arrow and scroll to “Functns ServWarn” press enter. 4. Change using up arrow to “Off”. 5. Press the enter key to select 6. Press the exit key twice to save settings. Disable Buzzer Procedure (This will warn without the buzzer sounding) 1. Go to “ Setup Functions” as above 2. Press enter then scroll using the bottom key to “Functns Buzzer” 3. Select using the enter key – disable with the arrow key 4. Press the enter key followed by the exit key twice to save settings. LS220B LS300 LSW LP Page 23 V-3.7.1~2012 Commissioning Instructions – refer wiring diagram. Ensure the automatic door operator is fixed securely, the doors are hung plumb and slide freely to full open and close positions. 1. 2. 3. 4. 5. 6. 7. 8. 9. Check the floor guide and anti-rise wheels are not too tight and allows enough travel. Adjust the height if needed to provide adequate floor clearance (approx 10mm). Set the mechanical stops securely. If fitted check the manual lock engages correctly. Wire up all switches and sensors as per the diagram below. Set the mode switch to auto and turn the mains power on. The door should slowly open first. If it closes instead then switch the power off swap the motor direction by swapping the supply wires to the motor. Turn the power back on to reprogram then operate the doors several times and plug the batteries. If the settings need changing, press the setup key on the mode pad and key in the 4 digit master code then press the enter key. Using the up or down arrow keys choose the setup parameter or setup function by pressing the enter key. Press the arrow keys up or down for the sub parameter or the function required. Press enter to select or exit to escape. Once selected change if required using the up or down arrow keys. Press enter to retain the change or exit to discard. Press the up or down arrow key to select the next function or parameter to change. Press enter to select or keep pressing the exit key to return to the previous menus and/or to return from the programming screen to the normal rolling display. To change the operational mode press the mode key and key in the user code followed by the enter key. Press mode key to change from the current mode to the desired new mode. Pressing the setup key and using the user code will allow the alarm reset for 48 hours, user code change and managed lock. In lock mode only, managed lock enables locking of the doors by overriding the safety sensors until the next mode change. The master code is used for permanent alarm reset, parameter and function changes and new user or master code change. Pressing the exit key and confirming by the enter key will open the door in all modes for egress except when disabled; then pressing the enter key followed by the user code will open the door in all modes. Please note that all parameter and functional changes should only be carried out by competent personal to avoid injuries or accidents. The commissioning is to be carried out to AS5007 and BCA requirements with particular notice for the safety and egress requirements. LS220B LS300 LSW LP Page 24 V-3.7.1~2012 The following items are available on the mode pad: Modes: Open, Auto, Exit, Lock and Manual, Plus additional Climate Open, Climate Auto, Climate Exit, Climate Lock and Safe Mode User Setup: 48 hour alarm/buzzer reset, User pass-code change, Managed lock, Time and Day setup, People Counter, Register door, View settings and Diagnose faults. Setup Master-code: Diagnose faults, programme time clock, reset service timer plus functions and parameters. Setup Parameters: Open, Close, Slow open and slow close speeds, Open and close current limit, Dwell Time Auto, Dwell Time Lock, Open and close brake trims, Slow Boost, Climate, Open and Close Brake times, Reverse delay, Soft Start trim, Open Safe and Close safe Trims, Hold Open. Setup Functions: Battery, Failsafe, Service, Push & Go, Open/Close Safety Sensor Relay o/p, Open/Close Safety Sensor Monitor, Buzzer Enable/Disable, Key pad entry enable/disable, Climate options, Lock type, Back check and Latch Resistance, Keypad Mode Code disable, Service warning function enable/disable. Setup Factory code : Enter serial Number, Master-code Change, Factory registration setup, Service phone, Door type, Default Settings, Select Battery, Select Key Pad, Reset Service Timer, Buzzer Setup. Wiring Diagram SWING DOOR OPTIONS WIRING DIAGRAM - AS5 V7-3.6 MODE PAD Black Exit PB Switch Optional open safety override in swing mode Yellow Black White Blue Red Optional open limit in swing mode Optional hold open brake output in swing mode Green NOTE: Connect GND, ENIN, EXIN on CN1 together for double swing door, plus any required inputs from CN5. Yellow Reset Red CN 2 Red JP 1 Blue Blue White White CN 4 Black Black ENIN Entry sensor Exit sensor BUZZER EXIN CSIN BZ -ve +ve -ve +ve Exit Lock 24v 5v 12v 0v Battery 2 Battery 1 motor 0v Smoke Switch After hours entry/exit CN 3 CN 5 CN 1 Control Board Climate Control Energy wise Switch PANIC LOCK PEOPLE PC COUNTER 12V GND MONITOR Close safety sensor / PE Green Reset button elect lock 12v 18v 0v Delivery Switch CN 8 Note: Default mode Auto DS Door Status LS Lock Status CN 9 Link used for Heavy Doors only CN 10 +12V GND LS220B LS300 LSW LP Black White Blue Red ENTRY KEY PAD OSIN Page 25 step down transformer MONITOR Open safety sensor Active Netural Earth V-3.7.1~2012 Security/Fire Alarm Connection refer Wiring Diagram Fire Alarm 1. One set of normally open voltage free contacts to close on alarm is to be provided by the fire alarm company. The door will unlock and open then close and lock when these contacts are closed momentarily. It will stay open while the contacts are closed. 2. It needs to be connected to the terminal block labelled CN5, pins 1 and 3 from the bottom. Note: this will open the doors in all modes including when the door is locked and will open if the power has failed provided of course the battery is charged. Security – Building Management System 1. 2. 3. 4. To lock/unlock the door: One set of normally open voltage free contacts are required. Connect to CN5 between GND & LK or pins 1 & 5 from the bottom end of the terminal block. The door will lock when the contact are closed. All other mode signals such as 4 position mode switch or key pad must remain in AUTO mode. When contact is opened the door will go to AUTO mode. To unlock & open: One set of normally open voltage free contacts from the swipe card reader or similar is required. Connect to CN 5 between GND & ULK or pins 1 & 3 from the bottom of the terminal block, the same as fire alarm above. The door will open when contacts are closed momentarily then close and lock again provided the door is still lock in lock mode. Door status: One set of voltage free contacts which closes when the door is closed is provided. For door status connect to CN9 between Com & NO or pins 3 & 4 from the bottom of the terminal block. Lock Status: One set of normally open voltage free contacts is provided which closes when the door is locked. For lock status connect to CN9 between KST + and KST or pins 1 & 2 form the bottom of the terminal block Note: Recommended cable requirements, 8 core 0.2mm security or similar for security. Fire alarm cable requirements, 2 core fire rated. All connection to the door controller must be voltage free. LS220B LS300 LSW LP Page 26 V-3.7.1~2012 Remote Keypad: Menu outline Section 1: Using the keys 1.1 Enter Keys Down Arrow Up Arrow Left Arrow Left Arrow Enter Key Decrease/increase parameter values in Setup menus; Cycle back/forward through enumerated function settings as in Setup/Function menu. Cycle through the menu items in the in Setup, Setup/Parameter, Setup/Functions & other menus. Not used for navigation. Select the displayed menu item; save the displayed parameter value and function setting; save the pass codes and service phone number; confirm sending a command. When Exit Key is Disabled, permits the door to open after entering a passcode. Mode Mode Key Setup Setup Key Invokes Setup Menu for changing Parameter values and Function settings. Passcode required. Factory setup, reset alarms, Setup parameters and functions, user functions and initialise teaching mode. Exit Exit Key When not in a menu mode, Open Door regardless of the operating mode setting when the Exit Key is Enabled. When the Exit Key is Disabled, it allows the door to be opened after entering a passcode in the same way as the Enter Key. Returns to previous menu or exits the menu function, returning to the cyclic mode display sequence. 1-0 Keys 1-0 Numeric keypad when entering or changing a passcode, or entering a new service phone number. Cycle through available operating modes with each press. Passcode required. De-activates after time delay. LS220B LS300 LSW LP Page 27 V-3.7.1~2012 Section 2: Screen Menus and set up screens 2.1 Start-up Screens and Mode Displays START-UP AUTO INGRESS Screen(s) which display on connection before any keys are pressed <CURRENT MODE> # Day & Time AUTO INGRESS Mode MODE KEY allows selection of operational modes – sect 2.3. Factory, Master or User passcode reqd. AUTO – EXIT – LOCK – OPEN – AUTO ... Setup SETUP allows selection of all settings & functions – sect 2.4 Factory, Master or User Code reqd & determines permissions. FOR SERVICE: PH: 1300 138750 Exit EXIT KEY opens all doors in all modes – sect 2.2, unless disabled. Enter ENTER KEY – if Exit Key is disabled, opens door after entering a passcode. SerialNo 12345678 ^ Battery 99% * BATT FAILURE * DOOR OBSTRUCT * = as required by fault conditions # Day & Time displayed when Timed Unlock/Lock is Enabled ^ Battery Capacity displayed when AC Power Failure * SERVICE REQUIRED * AC Power Failure * REGISTER NOW!!!!! Current Mode Display Screens: AUTO MODE OPEN MODE LOCKED MODE EXIT MODE DELIVERY MODE SMOKE MODE PLOCKED MODE LEARNING MODE UNKNOWN MODE MANUAL MODE LS220B LS300 LSW LP Page 28 V-3.7.1~2012 2.2 Exit Button (When Exit Key Function is set to Enabled) <CURRENT MODE DISPLAY> The door opening action of the EXIT KEY can be disabled with the Exit Key Function in the Setup: Functions Menu. Master authority or higher is required. Press EXIT KEY When the door opening action of the EXIT KEY is disabled, pressing the ENTER KEY will open the door if a valid passcode is entered. EXIT KEY CONFIRM EXIT KEY ENTER KEY Sends command to set mode to Exit Mode. Returns to cyclic menus without action. <CURRENT MODE DISPLAY> NOTES: The EXIT KEY does NOT open doors when in a menu or during numeric entry. In a menu, it returns to the previous menu without changing anything. When in a numeric mode, it enters the number zero. Screen reverts to display of the current operating mode when command sent 2.2a Exit Button (When Exit Key Function is set to DISABLED) The immediate door opening action of the EXIT KEY can be disabled with the Exit Key Function in the Setup: Functions Menu. Master authority or higher is required. When the Exit Key function is set to DISABLED, both the EXIT Key AND the ENTER Key can be pressed to cause the door to open, but a valid Pass code is requested before the opening action will take place. Pressing either the ENTER Key or the EXIT Key on either of the two available remote units will request a pass code instead of the Confirm screen as shown above. The door will open immediately a valid pass code is entered – no confirmation is required. Normally, the User pass code would be used, but Master and Factory pass codes are also valid. Note that the possession of the User pass code allows that user to also change the User pass code. LS220B LS300 LSW LP Page 29 V-3.7.1~2012 2.3 Mode Button <CURRENT MODE DISPLAY> Press MODE KEY NOTE: ENTER KEY is also numeric 5, and is only read as an ENTER key in context. By default, when a numeric entry is required, the key is read as Numeric (5). >>ENTER PASSCODE Enter the exactly 4-digit Factory, Master or User Code with Numeric Keys. No digits are displayed. After 4 digits are entered, code is validated or rejected. This requires that when entering numbers, a pre-defined number of digits are required to allow correct interpretation of the ENTER function. INVALID PASSCODE INVALID! Digit 0 is also the Exit key, and is interpreted as 0 when in Passcode entry mode. 3 Secs VALID <CURRENT MODE DISPLAY> <CURRENT MODE DISPLAY> FALSE Time since last KEY Press is less than 15 seconds TRUE ENTER KEY <CURRENT MODE DISPLAY> EXIT KEY KEY Press (MODE, ENTER or EXIT) <CURRENT MODE DISPLAY> MODE KEY Change Mode Display to next Mode in sequence. < NEW MODE DISPLAY> Change Mode to the mode displayed on the screen. NOTES: Mode display sequence is – Auto – Exit – Lock – Open – Manual - Auto … LS220B LS300 LSW LP Page 30 V-3.7.1~2012 2.4 Setup Button <CURRENT MODE DISPLAY> NOTE: All Menu Screens will revert to the Main Cyclic Screens if no key press is recorded for a fixed Menu-timeout time – default 30 seconds. Press SETUP KEY >>ENTER PASSCODE Enter the exactly 4-digit Factory, Master or User passcode with Numeric Keys. Does NOT display digits. After 4 digits, passcode is checked for validity & evaluated to determine authority level. INVALID 3 Secs PASSCODE INVALID! <CURRENT MODE DISPLAY> VALID Factory Passcode Master Passcode Customer/User Passcode SETUP: Factory Refer Sect. 2.4.1. SETUP: Parameters SETUP: Parameters Refer Sect. 2.4.4. RESET Alarms RESET Alarms Refer Sect. 2.4.2. SETUP: Local SETUP: Local SETUP: Functions SETUP: Functions Diagnose Faults Diagnose Faults SetTimed LokUnlok SetTimed LokUnlok Refer Sect. 2.4.3. SETUP: Teach Me SETUP: Teach Me Refer Sect. 2.4.7. Register Door Now Register Door Now SETUP: Local Refer Sect. 2.4.6. Refer Sect. 2.4.5. Diagnose Faults Register Door Now Refer Sect. 2.4.8. UP and DOWN KEYS ENTER KEY EXIT KEY Cycle through the available Main Menu Groups which depend on the authority level. Select the displayed menu group. Quit the menu selections and return to the main cyclic screens. LS220B LS300 LSW LP Page 31 V-3.7.1~2012 2.4.1 Setup - Factory UP and DOWN Keys to cycle through the Factory Menu. Authority Level – Factory Pass code only EXIT Key to return to the Main Menu. SETUP: Factory Set Day & Time ENT Today is Sun … Sat ENT TimeHHMM hhmm 4 digits Day OK? hh:mm Press ENTER to accept. Press EXIT to cancel. Change Service Phone No. ENT ServPhNo Keys 0 – 9 Up to 16 digits Enter 16 digits OR press SETUP to end NNNNNNNN NNNNNNNN Confirm Ph No OK? Press ENTER to accept. Press EXIT to cancel. Change Mastercode ENT NewMast= Keys 0 – 9 4 Digits Press ENTER to accept. Press EXIT to cancel. Select DoorType Register Setup ENT ENT NewMast= NNNN Master OK? NNNN Press ENTER to accept. Press EXIT to cancel. DoorType Sliding/Swing # Registrn Disabled/Enabled NNNNNNNN NNNNNNNN ENT Reg Mode Warn Only / Warn & Open Press ENTER to accept. Press EXIT to cancel. Reset to Defaults ENT Confirm Reset OK Press ENTER to Reset. Press EXIT to cancel. NOTES: When in the Factory Menu, the display will revert to the Main Menu if a key press is not received within the menu timeout time (default 30 seconds). When entering new values, the display will revert to the Factory Menu if a key press is not received within the entry timeout time (default 15 seconds). # Registration is Disabled by default. Once Registration has been Enabled and saved, it cannot be disabled. LS220B LS300 LSW LP Page 32 V-3.7.1~2012 2.4.2 Reset Alarms Authority Level – Factory or Master Pass codes Reset Alarms ENTER Key Confirm Reset EXIT Key Press EXIT to cancel the reset alarms command and return to the menu. ENTER Key Press ENTER to accept and return to menu. NOTE: When displaying “Reset Alarms” or “Confirm Reset”, the display will revert to the Main Menu if a key press is not received within the menu timeout time (default 30 seconds). LS220B LS300 LSW LP Page 33 V-3.7.1~2012 2.4.3 Set Timed Unlock/Lock Authority Level – Factory or Master Pass codes The Timed Unlock/Lock Function allows the user to automatically unlock the door at a given time and lock the door at a later time on the same day. Unlock and Lock times are set for each day individually, or the user can choose not to use the facility on some or all days. SetTimed LokUnlok Which Day Sun … Sat ENT Set Time Lock Day: Off / On OFF ON Set UnLock hh:mm Enter 4 digit time in 24-hour format Set Lock hh:mm Enter 4 digit time in 24-hour format TimLokOK? Day: On Press ENTER to accept. Press EXIT to cancel. hh:mm hh:mm NOTE: The display will revert to a previous menu if a key press is not received within the timeout time. You must set each day to Off or On. When a day is set to On, both Unlock Time and Lock Time must be set for that day. Use 24-hour format to enter time eg 0630. The Unlock Time must be earlier in the day than the Lock Time. Timed Unlock/Lock actions can be turned off without destroying the daily settings by going to the Local Menu – (see Setup: Local). Setting Timed Lock to Disabled in the Local Menu will ignore any Timed Lock/Unlock settings that have been set at this menu item. Setting Timed Lock to Enabled will revert to the daily sequence. LS220B LS300 LSW LP Page 34 V-3.7.1~2012 2.4.4 Setup - Parameters Authority Level – Factory or Master Pass codes Setup: Parameters EXIT KEY Parameters Open Speed EXIT KEY < CYCLIC SCREENS > ENTER KEY Open Speed NNNN Parameters Close Speed UP and DOWN KEYS to change value. Parameters Slow Open Speed EXIT KEY returns to Parameter Menu ENTER KEY to accept the value and return to the Parameter Menu. Parameters Slow Close Speed Parameters Dwell Parameters Open Brake Trim UP and DOWN KEYS to cycle through the Menu Parameters Close Slow Trim Parameters Climate Parameters Slow Boost Parameters Open ILimit% Parameters Close ILimit% NOTE: When displaying the Parameters Menu, the display will revert to the Main Menu if a key press is not received within the menu timeout time (default 30 seconds). When displaying a Parameter, the display will revert to the Parameter Menu if a key press is not received within the entry timeout time (default 15 seconds). Parameters Open Brake Period Parameters Open Safety Trim Parameters Soft Start Period Parameters Reverse Delay LS220B LS300 LSW LP Page 35 V-3.7.1~2012 2.4.5 Setup – Functions (Options) Authority Level – Factory or Master Pass codes Setup: Functions EXIT KEY Functions Open Safe Normally Open / Normally Closed Functions Open Safe Relay Off / On Functions Close Safe Normally Open / Normally Closed Functions Close Safe Relay Open Only/ Open & Close Functions Lock Fail Safe Open Only/ Open & Close Functions Auto Fail Safe Off / On Functions Push & Go Off / On 3, 4, 5 or 6 Months Warn / Warn & Open Warn / Warn & Open EXIT KEY ENTER KEY Open Safe ON / OFF UP and DOWN KEYS to change value. UP and DOWN KEYS to cycle through the Menu Functions Service Warn Functions Service Interval Functions Service Mode Functions Buzzer Disabled / Enabled Functions Exit Key EXIT KEY returns to Functions Menu ENTER KEY to accept the value and return to the Functions Menu. Functions Climate Auto Disabled / Enabled Functions Climate Lock Disabled / Enabled Functions Climate Exit Disabled / Enabled Functions Climate Open Disabled / Enabled Functions Stop Mode Stop at Stop / Stop at Count Functions How Unlock No Pulsing / Pulse Functions Lock Type Functions Battery Mode Disabled / Enabled < CYCLIC SCREENS > Fail to Locked / Fail to Unlocked Functions Latch Resistor Off / On Functions Backcheck Resistor Off / On NOTE: When displaying the Functions Menu, the display will revert to the Main Menu if a key press is not received within the menu timeout time (default 30 seconds). When displaying a Function, the display will revert to the Functions Menu if a key press is not received within the entry timeout time (default 15 seconds). LS220B LS300 LSW LP Page 36 V-3.7.1~2012 2.4.6 Setup – Local Functions Authority Level – Factory, Master or User/Customer Pass codes Setup: Local EXIT KEY < CYCLIC SCREENS > ENTER KEY EXIT KEY 48hr Reset Error Alarms Show Timed Lock & Unlock ENTER ENTER KEY to execute Reset & return to Local Menu. EXIT KEY returns to Local Menu Confirm 48hr Reset ENTER Day Off / On Press UP/DOWN to change day. Press EXIT to return to Menu. Unlock Time Lock Time Disable or Enable Timed Lock/Unlock UP and DOWN KEYS to cycle through the Menu ENTER Change User Passcode Timed Lock Disable / Enable Refer to Section 2.4.1 – Set Day & Time. Set Day & Time People Counter ENTER KEY to accept & return to Local Menu. EXIT KEY returns to Local Menu without change. ENTER ENTER Counter 12345678 New Code = NNNN ENTER KEY to confirm whether to reset Counter. EXIT KEY returns to Local Menu without reset. 4 digits 0 - 9 Code OK? NNNN ENTER KEY to confirm. EXIT KEY return without reset. Managed Lock View Function Settings ENTER Confirm Managed Lock ENTER KEY to confirm. EXIT KEY to reject. Press ENTER KEY then use UP/DOWN Keys to view various function settings, including Serial Number. EXIT KEY returns to Local Menu without reset. NOTE: When displaying the Functions Menu, the display will revert to the Main Menu if a key press is not received within the menu timeout time (default 30 seconds). When displaying a Function, the display will revert to the Functions Menu if a key press is not received within the entry timeout time (default 15 seconds). LS220B LS300 LSW LP Page 37 V-3.7.1~2012 2.4.7 Setup – Teach Me Authority Level – Factory or Master Pass codes EXIT KEY Setup: Teach Me < CYCLIC SCREENS > ENTER KEY EXIT KEY ENTER KEY Teach Me Confirm Teaching Started Returns to the Main Menu. 2.4.8 Register Door Now Authority Level – Factory, Master or User/Customer Pass codes EXIT KEY Register Door Now < CYCLIC SCREENS > ENTER KEY EXIT KEY Registration No. Enter 8-digit Registration Code Valid Code Invalid Code Registration Completed Registration Invalid Returns to the Main Menu. NOTE: If a valid Registration Number has been entered previously, the Registration Number Entry Screen will not be displayed. The screen will display – “Registration Completed” LS220B LS300 LSW LP Page 38 V-3.7.1~2012 Section 3 General Information and operation 3.1 Menu and Entry Timeouts The default screen display comprises a series of cycling screens displaying the current door operating Mode, the phone number for service enquiries, the door serial number and any fault alarm messages, such as low battery, door jam and service due. Each display screen is visible for approximately 3 seconds before being replaced by the next screen. While any of these cyclic screens are displayed, the Mode Key, the Setup Key and the Exit Key may be pressed to invoke the functions described above. The Mode and Setup keys require the entry of a pass code before the available functions can be accessed. The Exit key can be actuated without pass code. Pass codes (Factory, Master and User/Customer) are entered when requested using the numeric keys 0 – 9. Four digits must be entered, following which the entered pass code is evaluated to determine validity and authority level. When in any menu or entry screen, a time-out function is invoked to revert to the previous screen/menu after an appropriate time delay if no key is pressed within that time. The default delay for menus is 30 seconds, and for entering or changing data, 15 seconds. 3.2 Communication with the Door Slide Controller The remote control device communicates with the door slide controller to obtain the current settings of all pass codes, parameters and functions. If the remote device is unable to obtain the required information from the door slide controller, a communication error message is displayed for approximately 3 seconds, the required action is abandoned, and the display reverts to the parent menu screen. If this message should be displayed consistently, it indicates a fault in the connection between the remote and the slide controller, and should be referred to the organisation servicing the device. 3.3 Exit Key and Enter Key Access The default setting allows for pressing the EXIT Key to open the door. It requires confirmation by pressing the ENTER Key. The EXIT Key function can be disabled in the Setup: - Functions menu, Functions – Exit Key. Master or Factory pass code authority is required. When the Exit Key is disabled, the pass code controlled entry and exit facility is enabled (which would normally only be needed when the door is in a locked state). By pressing the ENTER or EXIT Key on either the internal or external remote panel, followed by entering a valid pass code, the door will open, then close to the locked state. All three pass codes are valid for this function. LS220B LS300 LSW LP Page 39 V-3.7.1~2012 3.4 Timed Unlock – Lock Facility The door can be set to automatically go into Auto Mode from the locked state at a given time, and revert to the Locked state at a later time that day. Different Unlock and Lock times can be set for each day of the week, or disabled for one or more days. Time settings are made through the Main Menu, Set Timed Unlock/Lock, requires Master authority or above. For each day, the function can be set on or off. If set to On, Unlock and Lock times must be set, the Lock Time must be later in that day than the Unlock Time. The settings can be viewed, but not changed, by the User/Customer through the Local Menu. The User/Customer can also toggle the function on or off through the Local Menu, with User Pass code Authority or above. Disabling the facility does not affect the time settings, and the unlocking and locking actions will resume once the function is enabled through the Local Menu 3.5 Door Registration By default, doors are required to be registered with the supplier within a 3 – 6 month period. This requirement can be turned on or off in the Factory Menu (Factory Level Authority required), the time period set and the action to be taken if registration is not completed. An 8-digit Registration Number may be obtained from the supplier by advising the 8-digit Serial Number. Note that the Serial Number may change from time to time, so it is important that Registration entry be completed promptly following receipt of the number. Registration is done via the Main Menu (User Pass code or above authority is required) at the “Register Door Now” screen. Note that the time period before which registration is required commences when the Door Registration function is enabled through the Factory Menu. If there is going to be a delay between factory despatch and commissioning on site, the Door Registration function should be disabled in the factory and enabled by the commissioning technician, obtaining the Factory Pass code from the manufacturer. LS220B LS300 LSW LP Page 40 V-3.7.1~2012 3.6 Pass codes Three levels of authority are invoked – Factory, Master and User. Factory Pass code: Is calculated internally from the serial number. The serial Number changes over time so a particular Factory Pass code will become invalid after a period of time. The current Factory Pass code can be obtained from the manufacturer by supplying the current 8-digit Serial Number. This Pass code provides access to all menus, and is required to access the Factory Settings Menu – refer Section 2.4.1 – Setup – Factory. It is primarily used to set the pre-delivery parameters which will not be changed once installed. Master Pass code: Can be set from the Factory Menu, requiring a valid Factory Pass code. This pass code provides access to the menus where operating parameters and functions can be set. It is primarily used by the installer and service technicians to set the operating parameters for the individual installation and to reset the “Service Due” alarm after servicing. User Pass code: Can be set from the Local Menu, requiring a valid User, Master or Factory Pass code. This pass code provides access to the Local Menu where day-to-day operations may be needed. In particular, it provides a facility to disable the alarms for 48 hours, as well as providing for viewing the settings for the Timed Unlock/Lock function, viewing the Serial Number and other function settings and viewing and resetting the People Counter. It is primarily used by the local owner of the door to manage operations locally. Note also that, if the door is set to allow Pass code controlled entry (i.e. the EXIT Key is disabled), pressing the ENTER Key will ask for a pass code. The pass code normally used will be the User Pass code. Be aware that the possessor of the User Pass code to allow that person access can also change the User Pass code. 3.7 Serial Number Each device will have a unique 6-digit Serial Number. This Serial Number is entered in the factory before dispatch. To enter the Serial Number, use the Factory Menu (requires the Factory Pass code level of authority). Before the Serial Number is entered, the Factory Pass code is the default pass code written into the program. Once the Serial Number has been entered, a variable suffix is appended to make the Serial Number an 8-digit Serial Number, and the default Factory Pass code is no longer valid. The new Factory Pass code associated with the Serial Number can be obtained by using a calculation program available to the manufacturer. Once a Serial Number has been entered, it cannot be changed and the Serial Number Entry screen is no longer displayed in the Factory Menu. If the Serial Number needs to be changed, the door slide processor must be re-programmed. LS220B LS300 LSW LP Page 41 V-3.7.1~2012 3.8 Day and Time The door controller is fitted with a real time clock, set to maintain the time-of-day and the day of the week. It does not maintain day of month or the year.The day-of-week and the time-ofday can be set in either the Factory or the Local Menus. If the Timed Unlock/Lock facility is not being used, it is not necessary to set the clock, although it will normally be set at the factory before dispatch. 3.9 A.C. Power Failure Should the A.C. Power fail, the door will switch over to battery operation. After a short period, an error message will appear cyclically on the remote - “AC Power Failure”, and another screen in the cycle will advise the approximate remaining capacity of the battery – e.g. “Battery 85% Left”. The screen will flash and the buzzer sound according to the error function setting. When AC power is reinstated, the warnings will no longer be displayed. 3.10 Service Due Warning A facility is available in the Functions Menu (Factory or Master authority) to provide a warning if a service has not been carried out at the recommended interval. If this function is turned on, the service period can be set to 3 – 6 months. If this period elapses without the master “Reset Alarms” function being activated (in the Main Menu), a service warning will be displayed. The warning can be reset temporarily for 48 hours) in the Local Menu. LS220B LS300 LSW LP Page 42 V-3.7.1~2012 3.11 Diagnostics A diagnostics facility is available to all pass codes. Diagnostic error messages are displayed in a cyclic sequence as appropriate. Up to 31 distinctive errors can be displayed, and where appropriate the error message can incorporate a number value up to 4 digits. The current error diagnostic responses are: AC Failure with Batt Charge Level Battery Failure Door Opening Obstruction Door Closing Obstruction Hall Failure Open Safe Mon Failure Close Safe Mon Failure Entry Input Active Exit Input Active Open Safe Active Close Safe Active Exit Active Delivery Active I Open Current % I Close Current % P Lock Active Smoke Active Lock Active Climate Active Unlock Active Notes: LS220B LS300 LSW LP Page 43 V-3.7.1~2012 Remote Keypad: Menu outline Supplement : Describes the menu changes made to date to upgrade the software. The changed items are highlighted in bold. Section 1 1.1 Cyclic Screens ITEM Access '<Mode> ',' MODE ' ' <Day> ',' <Time> ' Displayed only if Timed Lock is enabled ' AUTO ‘ ‘INGRESS ' 'ServDue:' 'NNN Days' Displays number of days to next service. Service Timer can be reset from the Main Menu (Setup) – Master or Factory authority required. Service Timer can also be reset from the Factory Menu together with the Registration Timer – Factory authority required. 'Service ','Phone No' ' 1300 ' ' 138750 ' 'SerialNo' 'NNNNNNNN' Warnings (Alarms): 'Battery ' 'Failure ' 'Door ' 'Obstruct' 'Service ' 'Required' 'AC Power' 'Failure ' 'REGISTER' 'NOW!!!!!' LS220B LS300 LSW LP Page 44 V-3.7.1~2012 Section 2 2.1 Main Menu ITEM Access 'Setup: ',' Factory' Factory 'Setup: ','Params. ' Master, Factory ‘Reset’ ‘Alarms’ Master, Factory 'Setup: ',' Local ' User, Master, Factory 'Setup: ',' Functns' Master, Factory 'Diagnose',' Faults ' User, Master, Factory 'SetTimed','LokUnlok' Master, Factory 'Setup: ','Teach me' Master, Factory 'Register','Door Now' User, Master, Factory 'RsetServ','iceTimer' Master, Factory LS220B LS300 LSW LP Page 45 Resets all alarm warnings that are current at the time. Does not reset Service Warning timer unless the service period has expired. Does not reset the Registration Warning, which is automatically cancelled when registration is completed. Resets Service Timer regardless of whether the service period has expired or not; used to reset service timer if door has been serviced ahead of schedule, as well as when serviced after the service alarm warning has been initiated. V-3.7.1~2012 2.2 Parameters Menu ITEM SET ' Params ','Opn Sped' ' Params ','Cls Sped' ' Params ','Slo Open' ' Params ','Slo Clos' ' Params ','Dwell' Replaced with Dwell-Lock and Dwell-Auto/Exit ' Params ','DwellLok' 0 – 36 secs Displays 0 – 360 Dwell Period for Locked Mode ' Params ','DwellAut' 0 – 36 secs Displays 0 – 360 Dwell Period for Auto and Exit Modes 0 – 2.5 secs Display 0 – 25 0 - 100 Adjusts distance from fully closed position where the close safety sensor is disabled. ' Params ','OpenTrim' ' Params ','ClosTrim' ' Params ','Climate ' ' Params ','SloBoost' ' Params ','OpnILim%' ' Params ','ClsILim%' ' Params ','OpenBrak' ' Params ','ClosBrak' ' Params ','OSafTrim' ' Params ','SoftSTim' ' Params ','RevDelay' ' Params ','ClsafTrm' LS220B LS300 LSW LP Page 46 V-3.7.1~2012 2.3 Functions (Options) Menu ITEM ' Functns','OpenSafe' ' Functns','OpnSfRly' ' Functns','ClosSafe' ' Functns','ClsSfRly' ' Functns','Lock F/S' ' Functns','Auto F/S' ' Functns','Push &Go' ' Functns','ServWarn' ' Functns','ServIval' (Valid Periods changed) Valid service intervals are: 1 month, 3 months, 4 months, 6 months and 12 months. A screen in the cyclic screens display shows the number of days before a service is due. ' Functns','ServMode' ' Functns','BattMode' Selects whether a battery failure will Warn Only or Warn and Open Door. ' Functns','Buzzer ' Selects whether the remote buzzer will sound on a Fault Warning. If disabled, the remote screen will flash only. Note that the buzzer can be inhibited for a 48-hour period using the Local User Menu - '48hReset','AlarmBuz' item. ' Functns','Exit Key' Enabled/Disabled This function controls the action on the remote connected to the Primary Remote Port. If “Enabled”, pressing the Exit key will immediately open the door (no confirmation is required). If “Disabled”, pressing the Exit key will request the entry of a valid pass code (User or higher) before opening the door. For the remote connected to the Secondary Remote Port, pressing the Exit key will always request the entry of a valid pass code (User or higher) before opening the door. ' Functns','ClimAuto' ' Functns','ClimLock' ' Functns','ClimExit' ' Functns','ClimOpen' ' Functns','StopMode' ' Functns','HowULock' ' Functns','LockType' ' Functns','LatResis' ' Functns','BChResis' ' Functns','HoldOpen' Enabled/Disabled Determines if the Hold Open volts set in Parameters – Hold Open are to be applied to the door. ‘ Functns’,’ModePCd?’ Required/Not Required.Determines if a pass code is required to change modes when the Mode Key is pressed. If set to Required, the pass code screen requests a pass code (User or above), otherwise the change mode screen is displayed. Mode is changed by repeated press of mode key and followed by enter key to select. LS220B LS300 LSW LP Page 47 V-3.7.1~2012 2.4 Local (User) Menu ITEM 'Silence ','Buzzr48h' While displaying the cyclic screen, the buzzer on the remote unit, by default, sounds when there is a fault condition. This can be enabled or disabled in the Functions – Buzzer screen. This item will temporarily inhibit the buzzer from sounding for 48 hours. A confirmation screen is displayed to accept or cancel the action. '48hReset','ErrAlarm' When there is a fault condition while displaying the cyclic screen, warning screens are displayed, the buzzer on the remote unit sounds and the screen flashes. These warnings can be temporarily inhibited for 48 hours with this menu item. '48hReset','AlarmBuz' While displaying the cyclic screen, the buzzer on the remote unit, by default, sounds when there is a fault condition. This can be enabled or disabled in the Functions – Buzzer screen. This item will temporarily inhibit the buzzer from sounding for 48 hours. A confirmation screen is displayed to accept or cancel the action. 'ShoTimed','LokUnlok' 'DisEnabl','TimedLok' 'Set Day ',' & Time ' ' People ',' Counter' 'Change ','User PCd' 'Managed ',' Lock ' 'View Fn ','Settings' LS220B LS300 LSW LP Page 48 V-3.7.1~2012 2.5 Factory Menu ITEM 'Enter ','SerialNo' 'Set Day ',' & Time ' ‘RsetServ' 'RegTimer' Resets both the Service Required and Registration Timers to zero so that the intervals before warnings are generated start from the current time. A confirmation screen is displayed so the reset can be actioned or cancelled. 'Change ','MasterCd' 'Select ','DoorType' 'Select ','Keypad? ' Required/Not Required If “Required” is selected, the door will not operate if a remote keypad is not connected; if “Not Required”, door will operate whether or not a remote is connected. 'Select ','Battery?' Installed/NoBattery Select “No Battery” if a battery is not installed in this unit. Inhibits Fault Warning for Battery Fault. 'Select ','DoorBuzz' On Alarm/Not Alarm If “On Alarm” is selected, the Door Buzzer will sound for Fault Warnings (as well as the remote Buzzer if enabled). 'Register','Setup ' 'Reset to','Defaults' 'Change ','ServPhNo' 2.6 Manual System Reboot The control system (door and remotes) can be re-booted by pressing the re-boot button with a thin object. The same function can be initiated by holding down the Up-arrow key on the Remote Device for approximately 3 – 4 seconds while the cyclic screens are being displayed. A confirmation screen is displayed, requiring confirmation by pressing the Enter key, or Exit key to abandon the re-boot. 2.7 Exit Key For a remote unit connected to the Primary Remote Port, the Functions Menu “Exit Key” controls the action which occurs when the exit key is pressed. If “Enabled”, pressing the Exit key will immediately open the door (no confirmation is required). If “Disabled”, pressing the Exit key (or the “Enter” key) will request the entry of a valid pass code (User or higher) before opening the door. For the remote unit connected to the Secondary Remote Port, pressing the Exit (or Enter) key will always request the entry of a valid pass code (User or higher) before opening the door. LS220B LS300 LSW LP Page 49 V-3.7.1~2012 Important Safety Message: The Australian Standard AS5007-2007 has a mandatory requirement for periodic log book service by suitably qualified personnel. Your automatic door operator may be required to meet the requirements of the Building Code of Australia and allow safe egress at all times including power failures and emergencies. Some automatic door operators could be part of the required exits and may be deemed to be part of the essential services. There may be a legal obligation to ensure that your door operator performs to the requirements of the building code and also provides optimum safety for all users. Please contact your regional authority or AUTO INGRESS PTY LTD should you require any further information on this vital safety requirement. We as manufacturers of this equipment have identified and adopted some very stringent maintenance guidelines. The service procedures we undertake not only ensure that your door operator will perform to the requirements of the BCA. It also ensures that the safety and security of the users is optimised on normal operation. AUTO INGRESS PTY LTD strongly believes in the merits of this service and recommends four services per year to meet the requirements of the standard. Please review the service offer provided in the Maintenance Program outlined in this manual. Service Assistance Auto Ingress recognises that Service is an integral component to providing the peace of mind necessary for our customers to enjoy their new automatic door systems. Your new Auto Ingress Automatic door operator comes with a full 12 months warranty on labour and 2 years warranty on parts as set out in Chapter 5 Automatic Door Warranty (Terms & Conditions apply). Service Help Desk If you experience a service problem or breakdown call us at (07) 3290 1500 or Toll Free in Australia 1300 138 750 Auto Ingress PTY LTD (head office) 46 Rowland Street, Slacks Creek QLD 4127 P.O. Box 825, Springwood QLD 4127 Australia Phone: Fax: +61 (07) 3290 1500 +61 (07) 3290 1567 E-mail: [email protected] LS220B LS300 LSW LP Page 50 Web: www.autoingress.com.au V-3.7.1~2012 Maintenance Program The Australian Standards AS5007-2007 has a mandatory requirement for periodic log book service by suitably qualified personnel. We as the manufacturer of this equipment recommend quarterly or four periodic services per year for most applications. For extremely busy or heavy applications or in harsh environmental situations more regular service is recommended. The maintenance procedures we have adopted ensure that every door operator provides hassle free performance, increased long-term reliability and optimum safety at all times. Auto Ingress PTY LTD Service offer and terms Quarterly service agreement a) Service to be carried out every quarter (4 maintenance calls per year ) b) Complete functional testing and full routine maintenance. c) Labour to be on 12 months warranty subject to our standard warranty terms. d) Parts to be on 24 months warranty subject to our standard warranty terms. e) All service work warranted for 90 days subject to our standard warranty terms. f) All work carried out to comply with AS5007/2007 and BCA requirements. g) All work to be carried out by AUTO INGRESS or its accredited agents. h) Cost per service per operator ……….........................+ GST i) Serial Number……….................................................…. The above service agreement is for a period of 12 months from the date of acceptance and is terminable thereafter by three months written notice. Name of Authorised Person: Site/ Company Name: Site Address: Phone No: Email: Invoice To: Postal Address: The above service offer is hereby accepted: Name: Signature: LS220B LS300 LSW LP Page 51 Date: V-3.7.1~2012 Warranty Terms & Conditions The Automatic Door Equipment as per the unit serial number is manufactured from good quality material and under careful supervision. The unit before installation was checked and tested and is warranted to be free from defects in materials and workmanship from the date of commissioning on the following basis: 1. Auto Ingress or their authorised distributor, will undertake to replace or repair at their discretion parts that prove to be defective due to faulty manufacture for a period of two years from the date of commissioning. Except for the first twelve months of this warranty period, labour charges would be made at prevailing charge out rates. The motor and gearbox is warranted for a further three year period (total five years). The stainless track is warranted for the lifetime of the automatic door operator. The decision as to whether defects should be repaired or replaced will be solely that of Auto Ingress or its distributor. 2. The warranty is in lieu of any other warranty expressed or implied by agreement or law, and is automatically invalidated in the event of any person other than a recognised Auto Ingress distributor servicing the equipment without prior written consent of Auto Ingress. 3. This warranty is automatically invalidated if the manufacturer’s specifications or the recommended installation, commissioning, service and maintenance procedures are not followed as required by AS5007-2007. 4. To be valid the warranty included in the factory registration form must be registered with Auto Ingress Pty Ltd at PO Box 825, Springwood QLD 4127 by completing the factory registration enclosed with the equipment within fourteen days of commissioning of the equipment. No claims will be recognised against equipment that is not covered by a registration form held by the factory and dated no later than fourteen days from the date of commissioning. 5. Auto Ingress or their distributor; do not accept any liability for consequential loss, damage or injury resulting from defective workmanship or material. 6. The warranty is invalidated in the event of any misuse or abuse of the equipment and does not cover defects due to or occasioned by War, Fire, Flood, Earthquake, Act of God, Acts of Third Parties, subsidence or faults in the structure of the building in which it is installed. Please note: Design and Specification are subject to change without notice. All rights reserved. Copyright Auto Ingress Pty Ltd, March, 2012. No part of this document may be copied, altered or reproduced without the prior written consent of Auto Ingress Pty Ltd. © Copyright Auto Ingress Pty Ltd www.autoingress.com.au MADE IN AUSTRALIA LS220B LS300 LSW LP Page 52 V-3.7.1~2012 NOTES: LS220B LS300 LSW LP Page 53 V-3.7.1~2012 LS220B LS300 LSW LP Page 54 V-3.7.1~2012