1
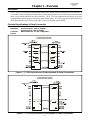
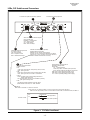
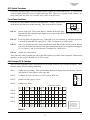
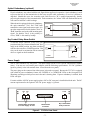
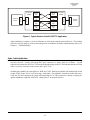
TC1705
RS-232/TTL
SYNC/ASYNC
FIBER OPTIC MODEM
User's Manual
MODEL:
S/N:
DATE:
Notice!
Although every effort has been made to insure that this manual is current
and accurate as of date of publication, no guarantee is given or implied
that this document is error free or accurate with regard to any specification. TC Communications, Inc. reserves the right to change or modify
the contents of this manual at any time without prior notification.
© COPYRIGHT 1992-2002. ALL RIGHTS RESERVED.
Table of Contents
TC1705 RS-232/TTL
User's Manual
Rev. 2.3
Chapter 1 - Overview ................................................................................................... 3
Description .......................................................................................................................................... 3
Electrical Specifications & Virtual Connections ............................................................................ 3
LEDs, DIP Switches and Connectors .............................................................................................. 4
DIP Switch Functions ........................................................................................................................ 5
Front Panel Switches ........................................................................................................................ 5
SW1 internal PCB Dip Switches ...................................................................................................... 5
SW1 internal PCB Dip Switches ...................................................................................................... 6
Optical Specifications ....................................................................................................................... 6
RS-232/TTL Signal Cross Referece ................................................................................................ 6
Optical Redundancy (optional) ........................................................................................................ 7
Dry Contact Relay Alarm Switch ...................................................................................................... 7
Power Supply ...................................................................................................................................... 7
Chapter 2 - Installation ................................................................................................ 8
Unpacking the Unit ............................................................................................................................ 8
Equipment Location .......................................................................................................................... 8
Installation Procedure Summary ..................................................................................................... 8
Typical RS-232/TTL point to point application ............................................................................... 9
Optic Cable Verification .................................................................................................................... 9
Chapter 3 - Troubleshooting ...................................................................................... 10
General .............................................................................................................................................. 10
All LEDs are "Off" ............................................................................................................................. 10
Alarm LED ......................................................................................................................................... 10
Optic Cable Types ............................................................................................................................ 10
Calculating the Fiber Optic Loss Budget ..................................................................................... 10
RS-232/TTL Cable Verification ....................................................................................................... 10
Chapter 4 - Bench Tests ............................................................................................ 11
General .............................................................................................................................................. 11
Test Equipment Requirements ...................................................................................................... 11
Pre-Installation Tests ....................................................................................................................... 11
Local Optic Loopback Test ............................................................................................................. 11
Remote Optic Loopback Test ......................................................................................................... 12
Bench Test With Built-In Signal Generator .................................................................................. 13
Other Testing Considerations ........................................................................................................ 14
Chapter 5 - Component Placement ............................................................................ 15
Chapter 6 - Specifications .......................................................................................... 16
Appendix A ................................................................................................................ 17
Return Policy .................................................................................................................................... 17
Warranty ............................................................................................................................................ 17
Appendix B................................................................................................................ 18
Typical TC1705 RS-232 Application with Telephone Modem.................................................... 18
−2−
Chapter 1 - Overview
TC1705 RS-232/TTL
User's Manual
Rev. 2.3
Description
The TC1705 is an economical and dependable fiber optic modem with an ANSI RS-232/TTL interface. It
is available in either rack mount or stand alone versions; the rack mount version can be converted to the stand
alone version with the addition of a sheet metal box. The TC1705 can communicate at distances up to 4 km
using Multimode optics and up to 30 km using Single Mode optics. TC1705's design utilizes advanced FPGA
(Field Programmable Gate Array) technology to increase reliability and flexibility.
Electrical Specifications & Virtual Connection
Interface:
Data Rates:
Connector:
Pinouts:
RS-232/TTL
Asynchronous DC (0Hz) to 128Kbps
Synchronous DC (0Hz) to 64Kbps
DB25 Female DCE (or DTE configurable)
TC1705 Virtual Connection
(Connect two DTE devices)
Figure 1. TC1705's Asynchronous Pin Assignments & Virtual Connections
TC1705 Virtual Connection
(Connect two DTE devices)
Figure 2. TC1705's Synchronous Pin assignment & Virtual Connections
−3−
TC1705 RS-232/TTL
User's Manual
Rev. 2.3
LEDs, DIP Switches and Connectors
Connector for primary optic link
Connector for optional secondary optic link
6
7
TxB
T xD
RTS
DTR
RxB
RxD
CTS
CD
DS R
SYNC/ASYNC
FIBER OPTIC MODEM
TxA
RxA
Rx-A
Rx-B
US E-B
DTE
11 22 33 44
ALARM
PWRA
P WRB
V cc
RMTLB
DIS ALM
LOCLB SLAVE-CLK
TCCOMM.COM
Made in U.S.A.
4
status for received electrical signals
(from remote unit):
RxD(RD) - “received data”
CTS- “clear to send”
CD- “carrier detect”
DSR- “data set ready”
3
5
Switches to initiate (”down” position)
following tests and function:
RMTLB- turn on remote unit’s loopback
LOCLB- turn on local electrical interface’s loopback
SLAVE-CLK - Turns on Slave Clock mode: (RT=ST)
DISALM- disable alarm buzzer and relay
Status for electrical signal from
local user’s device:
TxD- “transmit data”
RTS- “request to send”
DTR- “data terminal ready”
1
2
received optic signal status
& DTE indicator
RxA:
solid- optic received “OK” from primary side (”A” side)
flash- optic signal lost
RxB:
solid- optic received “OK” from secondary side (”B” side)
flash- optic signal lost or “B” side is not enabled
USE-B:
solid- secondary optic signal is being used due to
primary optic signal lost
off- secondary optic receiver is not enabled or primary
optic signal is being used.
DTE:
the electrical signal interface at the rear panel
(DB25 female connector) is a “DTE” interface
Alarm Indicator, Power Status &
Operating Voltage Status
Alarm (red):
off - normal operation
solid- major alarm condition (optic input lost)
flash- remote loopback activated by remote unit
PWR A: DC power supply from PWR A jack
PWR B: DC power supply from PWR B jack
Vcc: +5 VDC operating voltage power supply
NOTE:
SLAVE-CLK Switch 3: - DTE it is not used.
- DCE when it is “on” (down position), it turns “on” the Slave-clock mode: (RT=ST).
when it is “off” (up position), it turns “on” the Internal clock mode: (ST=Internal clock) see table 1.
Internal clock
Pin:
Function of Sw3
15
Sw3
Slave clock
“off” (up position)
“On” (down position)
Figure 3. TC1705's Front Panel
−4−
TC1705 RS-232/TTL
User's Manual
Rev. 2.3
DIP Switch Functions
For trouble-shooting purpose, user can conduct remote loopback and local loopback test. TC1705 also has
a built-in signal generator for user to validate fiber optic link. There are two groups of DIP switches: one
at the front panel, the other one is located at the center of the PC board.
Front Panel Switches
There are four DIP switches located at the front panel. Usually, they are very
useful during installation or trouble-shooting. They are described as follows:
11 22 33 44
RMTLB
DIS ALM
LOCLB SLAVE-CLK
DIP #1:
Remote loop back. This switch (DIP #1) initiates the Remote loop
back function. The composite optic signal is received from optic "RxA" and decoded, then looped
back to optic "TxA."
DIP #2:
Local loop back (for diagnostic use). When DIP #2 is pressed down, an electrical signal loop
is created, the input RS-232 signal (pin 2) "TxD" is looped back to "RxD" (pin3).
DIP #3:
In the "Up" position, the unit is in the internal clock mode. When in the "Down" position, the unit
is in slave clock mode.The internal clock signal is transmitted to the user's equipment through pin
15 ( see figures 1 and 2) when the unit is configured as a DCE device.
DIP #4:
Disable dry contact alarm.
These functions can be initiated from one of four DIP switches accessable from front panel. Under normal
operation, all the switches should be set in "UP" position.
SW1 Internal PCB Switches
There are other eight DIP switches located at the PC board and can not be accessed from front panel. These
switches usually only used during installation.
Enable signal generators. This switch initiates the built-in Signal Generator function. The unit
will generatea visual signal to verify optic link.
SW1-2:
Configure TC1705's interface as a DCE (off) or DTE (on).
SW1-3:
Enable secondary optic receiver.
SW1-4:
Enable async mode.
ON
SW1-1:
1 234 56 78
For Oscillator: 8.192Mhz
0
SW1-5:
1
2
x
SW1-6:
3
4
x
x
5
x
x
SW1-7:
6
x
x
7
8
x
x
x
x
x
8k
Hz
9.6k
Hz
16k
Hz
19.2k 32k
Hz
Hz
38.4k 56k
Hz
Hz
10
x
64k
Hz
11 12
x
x
x
SW1-8:
9
x
128k
Hz
x
x
−5−
14
x
x
256k 512k
Hz
Hz
Table 1.
13
15
x
x
x
x
x
x
x
x
x
x
x
1.024M
Hz
2.048M
Hz
4.096M
Hz
5.00M
Hz
Legend: X = ON
This table shows the
Internal Clock speed
when the TC1705 is
DCE, on DB25 pin 15
Internal
DIP
Switches
(SW3)
TC1705 RS-232/TTL
User's Manual
Rev. 2.3
SW1 Internal PCB Switches
For Oscillator: 6.176Mhz
0
SW1-5:
1
2
3
x
SW1-6:
4
x
5
x
SW1-7:
x
7
x
x
x
x
SW1-8:
6.031k 9.6k
12k
8
x
x
x
x
6
19.2k 24.1k 38.4k N/A
9
10 11 12
13
x
x
x
x
x
14
15
x
x
x
x
x
x
x
x
x
x
x
x
x
x
x
48k
96k
192k
385k
772M
1.54M
3.087M
N/A
Table 2.
Optical Specifications
Transmitter:
Laser:
LED/ELED; typical Launch Power: -19dBm* (850/1310nm Multimode, @62.5/125µm)
-19dBm* (1310/1550nm Single Mode, @9/125µm)
LED/ELED; typical Launch Power: -9dBm* (1310/1550nm Single Mode, @9/125µm)
Receiver:
PIN Diode; typical Sensitivity:
-34dBm* (850/1310nm Multimode, @62.5/125µm)
-34dBm* (1310/1550nm Single Mode, @9/125µm)
Loss Budget:
850/1310nm MM, @62.5/125µm:
1310/1550nm SM, @9/125µm:
15dB
15dB
Distance:
850nm Multimode, @62.5/125µm:
1310nm Multimode, @62.5/125µm:
1310nm Single Mode, @9/125µm:
1550nm Single Mode, @9/125µm:
up to 3km distance*
up to 4km distance*
up to 24km distance*
up to 30km distance*
*Launch power, sensitivity and distance are listed for reference only. These numbers may vary.
RS-232/TTL Signal Cross Referece
SD
TxD
RTS
Data Terminal Ready
DTR
RxD
CTS
CD
DSR
RD
Data set ready
Figure 4. TC1705's Signal Cross Reference
−6−
TC1705 RS-232/TTL
User's Manual
Rev. 2.3
Optical Redundancy (optional)
If optic redundancy was ordered with the unit, figure below applies to its operation. Optic redundancy is used
to prevent the loss of data transmission in the event an optic cable, transmitter, or receiver is broken or
degraded. Should this occur, the secondary optic link & receiver "B" is enabled automatically, thereby
preserving the integrity of the communication. In the meantime, the "Alarm" LED will flash and the buzzer
will sound to indicate a cable breakage.
When the unit is equipped with optic redundancy,
the optic transmitter "TxA" and "TxB" both
transmit the same signal to the remote unit. It is
up to the remote unit to decide whether "RxA" or
"RxB" should be used as the valid incoming optic
signal. By default, "RxA" is the primary receiver; "RxB" is the stand by backup.
TxA
RxA
Tx
TxB
RxB
Optic Signal
Detector
&
Automatic
Switchover
Control
Rx
TC1705
Dry Contact Relay Alarm Switch
A terminal block connector at the rear panel
provides for the Dry Contact Alarm Switch. Normally in the OPEN position, any alarm condition
will force the switch to a CLOSED position. This
relay can be used in conjunction with an external
device to signal an alarm condition.
TxA
RxA
Optic Signal
Detector &
Auto Switch Over
Control
Tx
TxB
Rx
RxB
TC1705
TC1705
Power Supply
The TC1705 consumes very low power. The input voltage is from 12V to 14V DC and current is 500mA
(max). You may use an external power adapter with the following specifications: 12V DC @800mA
(positive polarity at the left terminal when viewed from the rear panel).
The power plug can be connected into either power jack on the rear panel. Because the TC1705 is equipped
with a built-in power redundancy feature, the "POWER A" or "POWER B" LEDs on the front panel will
illuminate according to which power source the unit is drawing from. If power redundancy is utilized, both
LEDs will light.
For units with the -48V DC power supply option, a DC-to-DC converter is installed inside the unit. The DC
current requirement for the optional -48V DC power supply is @50mA.
PWR
A
PWR
B
ALARM
+ - + (12-14 VDC) @500mA
Terminal Block Connectors
for Power Supply "A" & "B"
DB25 Female
Connector
Figure 5. TC1705's Rear Panel
−7−
Dry Contact Alarm
Relay Connector
Chapter 2 - Installation
TC1705 RS-232/TTL
User's Manual
Rev. 2.3
Unpacking the Unit
Before unpacking any equipment, inspect all shipping containers for evidence of external damage caused
during transportation. The equipment should also be inspected for damage after it is removed from the
container(s). Claims concerning shipping damage should be made directly to the pertinent shipping agencies.
Any discrepancies should be reported immediately to the Customer Service Department at TC Communications, Inc.
Equipment Location
The TC1705 should be located in an area that provides adequate light, work space, and ventilation. Avoid
locating it next to any equipment that may produce electrical interference or strong magnetic fields, such as
elevator shafts, heavy duty power supplies, etc. As with any electronic equipment, keep the unit from
excessive moisture, heat, vibration, metallic particles and freezing temperatures.
Installation Procedure Summary
The TC1705 is designed for quick and easy installation. Before installing, however, make sure all DIP
switches are in the up (Off) position and double-check the polarity at the DC power's terminal block
connector. The installation procedure is as follows:
1. Connect your DTE/DCE Device to the DB25 Connector: Check the Pin Assignments and verify
your application's data rate. Shielded cable is recommended.
2. Connect the optic cables: Connect the local unit's optic "TxA" to the remote unit's optic "RxA". Connect
the local unit's optic "RxA" to the remote unit's optic "TxA." (do the same for "TxB" and "RxB" on Dual
Optics Models).
3. Connect the power plug: The plug can be connected into either power terminal "A" or "B" (check for
proper polarity). The unit is equipped with power redundancy. By plugging a second power supply to
the spare power terminal, power redundancy is enabled. Verify that the power "A" and/or "B" LED is
illuminated.
4. Turn "On" your DTE/DCE device: "TxD," "RTS," and "DTR," LEDs should be illuminated.
5. Check the remote unit's "RxD" & "DSR" LEDs: "RxD," "CTS," "CD," and "DSR," LEDs should
be illuminated when there is data signal being received.
6. Check the "Rx-A" LEDs: When a good optic signal is received, the "Rx-A" LED on the corresponding
unit should illuminate. (Check "Rx-B" LED when "Optic TxB" and "Optic RxB" are in use. Dual Optics
model only).
−8−
TC1705 RS-232/TTL
User's Manual
Rev. 2.3
RS-232 F/O
MODEM
DTE/DCE
DEVICE
R
S
232
R
S
232
OPTIC
RxA
OPTIC
RxA
OPTIC
TxA
OPTIC
TxA
OPTIC
RxB
OPTIC
RxB
OPTIC
TxB
OPTIC
TxB
(Dual Optic Models only)
RS-232 F/O
MODEM
R
S
232
R
S
232
DTE/DCE
DEVICE
Figure 6. Typical Point-to-Point RS-232/TTL Application
After installation is complete, it is an excellent idea to verify and record the optical cable loss. This reading
will both verify the integrity of the system and provide a benchmark for future troubleshooting efforts (see
Chapter 3 - Troubleshooting).
Optic Cable Verification
If the "Rx-A" LED on the front panel is flashing (or off), this is an indication that the optic signal is not being
correctly received. Usually, unsecured fiber optic connectors or faulty cable are to blame. A good
connection is indicated by the "Rx-A" LED on the front panel being solidly lit. This indicates that the receiving
cable is correctly connected to the remote unit's optic "TxA."
On Dual Optics Models, the same applies to "RxB" and "TxB." Dual Optics Models will automatically switch
to optic "RxB" if optic "RxA" is not receiving a valid signal. This automatic switchover enables the user to
verify the "B" fiber connection by simply disconnectiong the "A" fiber connection, thereby verifying the
optical redundancy capability of the unit. (Dual Optics is an optional feature).
−9−
Chapter 3 - Troubleshooting
TC1705 RS-232/TTL
User's Manual
Rev. 2.3
General
Typically, most problems encountered during installation are related to an improperly wired RS-232/TTL
cable or a break in the integrity of the fiber optic link (cable or connectors).
All LEDs are "Off"
If no LEDs are lit on the unit, check the DC power supply, terminal block connector plug, and/or power
source. If the problem persists, contact the Technical Support Department at TC Communications, Inc.
Alarm LED
When there is an alarm condition, the red "ALARM" LED will be lit and the "RxA" LED will also flash to
indicate the optic signal has been lost. The Alarm will also trigger the dry contact relay switch.
Optic Cable Types
Conventionally, fiber optic cable with yellow-colored insulation is used for single mode applications; gray or
orange-colored insulated cable is for multimode use. If multimode cable is used in a single mode application,
the test results could be erroneous and confusing.
Calculating the Fiber Optic Loss Budget
The fiber optic link and/or the connectors are frequently the source of communication problems. If problems
are present, check the optic connectors and the integrity of the link first. Ideally, the link should be calibrated
for total loss after the installation has been completed. This will accomplish two things: (1) it will verify that
the total loss of the link is within the loss budget of the device and (2) it will provide a benchmark for future
testing. For example, a system that has been tested as having 6dB of signal loss when installed should not
suddenly test out as having a loss of 10dB. If this were the case, however, the fiber link or connector would
probably be the source of the problem.
To calculate the loss budget:
Multimode 850nm
Multimode 1310nm
Single Mode 1310nm
Single Mode 1550nm
:
:
:
:
3 dB loss per km on 62.5/125µm cable*
2 dB loss per km on 62.5/125µm cable*
0.5 dB loss per km on 9/125µm cable*
0.4 dB loss per km on 9/125µm cable*
*These numbers are listed for reference only. We recommend an OTDR reading be used to measure actual link loss.
RS-232/TTL Cable Verification
1. Make sure the electrical signal connections match the pin assignments for the device (refer to page 3
for DCE/DTE user equipment pin connections). Verify signal connections by checking the status LEDs
on the front panel of the TC1705. Verify that the pin signal connections match the appropriate LED
responses (see Figure 3).
2. Conduct a Local Loopback Test (DIP switch #2 set to the down (on) position) to help isolate a RS-232/
TTL interface problem. This will loopback the electrical signal to the DTE/DCE device for verification.
3. Be sure that all switches are set correctly. (All the front panel DIP switches should be in up (off) position.
All the "SW1 Internal DIP Switches" should be in the up (off) position. If the TC1705 is an "Async" unit,
SW1-4(switch 4 of the "Internal DIP Switches") should be in the down (on) position.
−10−
Chapter 4 - Bench Tests
TC1705 RS-232/TTL
User's Manual
Rev. 2.3
General
It is highly recommended to conduct a bench test before actual installation. A bench test will allow the user
to get familiar with all the functions and features of the TC1705 in a controlled environment. Knowledge
of the TC1705's functions and features will facilitate installation and troubleshooting efforts later on.
Test Equipment Requirements
End user equipment required for testing:
1. One BERT (Bit Error Rate Tester) test set with a DB25 male adapter and appropriate interface module
(match pin assignments with the diagrams on page 3).
2. Two short optical cable jumpers with appropriate connectors (ST or FC).
3. Three small copper-wire jumpers.
Pre-Installation Tests
1. Make sure the appropriate power supply accompanies the TC1705 unit (see page 7).
2. To verify that the unit functions properly, plug in only the power connector to the terminal (be sure to
observe correct polarity), without having any other cable connections to the unit.
3. On the front panel, the appropriate green "Power A" or "Power B" LED should be illuminated (depending
on whether you plug into the "A" or "B" terminal on the back of the unit). Both lights should be on if you
utilize power redundancy (power is connected to both "A" and "B" terminals on the rear panel).
4. The "ALARM" is lit and "Rx-A" LEDs should be flashing.
5. The "Vcc" LED should be illuminated. Please note: all other LEDs can be in a random state (flashing,
solidly lit, or off) as only upon proper receipt and transmission of a signal will the TC1705 set its LEDs
appropriately for normal operation. Proceed to the Local Optical Loopback Test.
Local Optic Loopback Test
1. Set up the bench test as illustrated in Figure 7 on the following page.
2. Make sure your BERT tester is turned on and configured as a DTE device if the unit is DCE.
3. Connect the DB25 male adapter (check pin assignments on page 3) from the BERT tester to the
TC1705’s DB25 female connector (on the rear panel).
4. Make sure you have the appropriate optical jumper cable with the correct connectors (see page 7).
Connect one end of a short optical jumper to the optic "TxA" of the unit being tested and the other end
to the optic "RxA" on the same unit to complete the optical loopback.
5. Set the BERT test set to the same (or as close to the same) data rate as the application you plan to connect
to (typically 19.2Kbps through 128Kbps Synchronous).
6. The data bits should be selected as ‘8 bits’ and the data pattern should be set to ‘2047’ on the BERT
tester.
7. At this point, the tester should indicate a Synchronous signal being received (if the optical cable and
connectors are good and the cable has been connected properly).
8. Check that the "Rx-A," "TxD," "RxD," "RTS," "CTS," "DTR," "DSR,"and "CD" LEDs are illuminated.
If any other LEDs illuminate or flash, make sure all DIP switches on the TC1705 are in the correct
position and reset the BERT tester. You should not see any bit errors. To verify this, inject an error
using the BERT tester to see if it will be recorded by the tester, then verify that no additional errors appear
after the user injected error.
−11−
TC1705 RS-232/TTL
User's Manual
Rev. 2.3
Proceed to the Remote Optic Loopback Test.
Female DB25
ALARM
(optional)
Figure 7. Local Optic Loopback Test Connection Diagram
Remote Optic Loopback Test
1. Connect a second TC1705 unit. As with the first unit, follow the bench test steps on the previous page.
When you have completed the Local Optic Loopback Test for the second unit, proceed to the next step.
2. Set up the bench test as illustrated in Figure 8 on the following page.
3. Connect three copper-wire jumpers to short (loopback) the DB25 Female connector on the rear of the
remote unit as follows (these copper-wire connections will loopback the signal at the remote TC1705):
Pin 2 (SD) to Pin 3 (RD)
Pin 4 (RTS) to Pin 5 (CTS)
Pin 20 (DTR) to Pin 6 (DSR)
4. Set the BERT test set to the same (or as close to the same) data rate as the application you plan to connect
to (typically 19.2Kbps through 128Kbps Synchronous).
5. The data bits should be selected as ‘8 bits’ and the data pattern should be set to ‘2047’ on the BERT
tester.
6. At this point, the tester should indicate a Synchronous signal being received (if the optical cable and
connectors are good and the cable has been connected properly).
7. Check that the "Rx-A," "TxD," "RxD" "RTS," "CTS," "DTR," "DSR,"and "CD" LEDs are illuminated.
If any other LEDs illuminate or flash, make sure all DIP Switches on the TC1705 are in the correct
position and reset the BERT tester. You should not see any bit errors. To verify this, inject an error
using the BERT tester to see if it will be recorded by the tester, then verify that no additional errors appear
after the user injected error.
−12−
TC1705 RS-232/TTL
User's Manual
Rev. 2.3
8. At this point, both units tested will have passed all electrical and optical tests and will have been verified
that they are functioning properly. Proceed to the next TC1705 unit to be tested or begin verifying other
equipment and cabling in your application if you have not already done so.
Female DB25
Female DB25
(optional)
(optional)
Figure 8. Remote Optic Loopback Test Connection Diagram
Bench Test With Built-In Signal Generator
The TC1705 has built-in signal generator to simulate a polling device's incoming electrical signal. The built
-in signal generator is a pulse signal indicated by blinking LED. The flash rate intentionally reduced for easy
visual confirmation.
1. Setup the bench test as shown in figure 9.
−13−
TC1705 RS-232/TTL
User's Manual
Rev. 2.3
2. At the local TC1705 unit, turn on the "SIG-GEN" by sliding SW1-1 (switch 1 of the "SW1 Internal DIP
Switches") to the up (on) postion.
Turn on the "RMTLB" by pressing down the DIP switches #1 of "Front Panel DIP Switches" on the Local
TC1705. The "TxD," "RTS," and "DTR," LEDs on the local TC1705 should start blinking. Verify that the
remote unit's "RxD," "CTS," and "DSR," "TxD," LEDs also blink, indicating receipt of the remote unit's
simulated response. The "CD" LED will be solidly lit.
Female DB25
Female DB25
(optional)
(optional)
Figure 9. Signal Generator Bench Test Connection Diagram
Other Testing Considerations
1. If front panel DIP switch #3 (slave clock) is pressed down, the received clock signal from the remote
unit is used as an internal clock signal and is transmitted to the user’s equipment through pin 15.
−14−
TC1705 RS-232/TTL
User's Manual
Rev. 2.3
Chapter 5 - Component Placement
DB25 female connector
for electrical signal connection
POWER B POWER A
-
+
-
+
DRY
CONTACT
ALARM
(12 - 14VDC) @500mA
TERMINAL
BLOCK
CONNECTORS
INTERFACE MODULE
fuses
JP2
F1
SW1
ON
12 345 67 8
FPGA
chip
FPGA configuration
EEPROM
F2
Trim-pot to adjust optic launch power:
Clockwise to increase optic power;
counter-clockwise to decrease optic power.
U4
SW2
1
Optic “TxB” (optional)
2
Optic “RxB (optional)
3
4
Optic “TxA”
Optic “RxA”
SW1 Internal DIP Switches
Legend: X = ON
Used to configure TC1705 as a
DCE (left) or DTE (right) device,
enable secondary optic receiver,
enable signal generator & select
internal clock rate.
SW1-1: enable signal generators
SW1-2: configure TC1705’s interface to DTE
(see text for details)
SW1-3: enable secondary optic receiver
SW1-4: enable “async” mode
This table shows the
Internal Clock speed
when the TC1705 is
DCE, on DB25 pin 15
0
SW1-5:
1
2
x
4
x
x
SW1-6:
3
For Oscillator: 8.192Mhz
5
x
x
7
8
x
x
x
SW1-7:
6
x
x
x
x
x
9.6k
Hz
16k
Hz
19.2k 32k
Hz Hz
38.4k 56k
Hz
Hz
10 11 12
13
x
x
x
x
SW1-8:
8k
Hz
9
64k
Hz
x
128k
Hz
x
x
x
14
15
x
x
x
x
x
x
x
x
x
x
x
256k 512k 1.024M 2.048M
Hz
Hz
Hz
Hz
4.096M
Hz
5.00M
Hz
Figure 10. Component Locations on TC1705's Internal PCB (with optional Dual Optics)
−15−
Chapter 6 - Specifications
TC1705 RS-232/TTL
User's Manual
Rev. 2.3
Data Rates
Asynchronous DC (0Hz) ......................................................................... DC to 128Kbps
Synchronous DC (0Hz) ............................................................................. DC to 64Kbps
Optical
Transmitter ...................................................................................................... LED/ELED
Receiver .......................................................................................................... Pin Diode
Wavelength ............................................................................ 850nm/1310nm Multimode
.............................................................................................. 1310/1550nm Single Mode
Connector .......................................................................................... ST* (optional FC)
Loss Budget** ....................................... 15dB Multimode 850nm/1310nm @62.5/125µm
................................................................... 15dB Single Mode 1310/1550nm @9/125µm
Electrical
Interface ........................................................................................................ RS-232/TTL
Connector ................................................................................................... DB25 Female
TTL
Input Voltage Maximum Rating .................................................................. -0.5V to 7V
Recommended TTL Input Voltage ...............................................................................
Vin High .................................................................................................... 2.0V to 5V
Vin Low ..................................................................................................... 0V to 0.8V
System
Bit Error Rate ........................................................................................ 1 in 109 or better
Indicators
System status ............................ ALARM, PWR A, PWR B, Vcc, Rx-A, Rx-B, USE-B, DTE
Electrical Signal Status ......................... RxD, TxD, RTS, CTS, CD, CD, TxCLK, RxCLK
Optic Signal Status ...................................... TxA, RxA (for Dual Optics, TxB and RxB)
Power Source
Standard ....................................................................... 12V to 14VDC @500mA (typical)
Optional .......................... 24VDC, 48VDC, or 115/230VAC with an external power cube
Temperature
Operating ................................................................................................... -10oC to 50oC
Hi-Temp Version (optional) ....................................................................... -12oC to 70oC
Storage ....................................................................................................... -40oC to 90oC
Humidity ........................................................................................ 95% non-condensing
Physical (Rackmount Card)
Height ........................................................................................................ (17.7 cm) 7.0"
Width .......................................................................................................... (3.2 cm) 1.25"
Depth ........................................................................................................ (14.8 cm) 5.75"
Weight ................................................................................................... (192 gm) 5.44 oz
*ST is a trademark of AT&T
**Contact factory for loss budget requirements greater than 15dB (Laser version).
−16−
DTE
PC
RS-232
COM 1
or
COM 2
DB
9
DB
25
DCE
RxA
OPTIC
TxA
RS-232 F/O
MODEM OPTIC
TC 1705
DB9 to DB25 adapter
List of Materials Included:
OPTIC
CABLES
1. TC1705’s
2. DB9 to DB25 adapter
3. RS-232 Null Modem Adapter
OPTIC
RxA
OPTIC
TxA
DCE
RS-232 F/O
MODEM
TC 1705
DB
25
DB
25
DB
25
Straight through cable
DB
25
DCE
To Central Office
−18−
TC1705 RS-232/TTL
User's Manual
Rev. 2.3
Appendix B
Figure 11. Typical TC1705 RS-232 Application with Telephone Modem