1
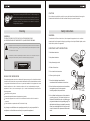
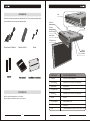
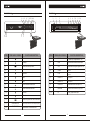
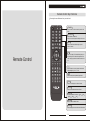
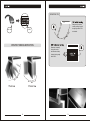
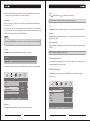
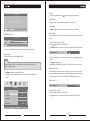
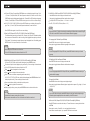
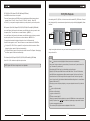
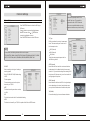
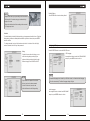
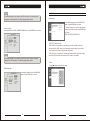
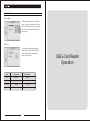
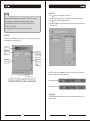
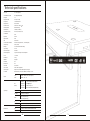
We continuously improve our products specifications and details. The pictures used in this menu
subject to changes and products improvement. Please contact your supplier to confirm
specifications before purchase.
KITCHEN TV USER MANUAL
15.4 Flip Down TV
Www.luxurite.com
Contents
Introduction
Warning
01
Safety instructions
02
Accessories
Introduction
05
05
Installation
09
Remote Control
11
General Operation
On Screen Display
MENU (OSD)
DVD
Main Operation
16
Connection
17
Monitor Turning Instruction
19
ATV
22
DTV
36
DVD Operation
42
Supporting DVD format
44
MP3/JPEG Playback
50
Function Settings
51
USB & Card Reader
Operation
58
Trouble shooting
64
Technical specifications
69
Thank you for choosing LUXURITE kitchen TV. Before using this
product please read the instruction manual carefully which will
ensure correct installation and ease of use. Please keep this manual
for future reference. The information in this manual is subject to
change without prenotice.
CAUTION:
Do not attempt to modify this product in any way without written authorization from supplier.
Unauthorized modification could void the user s authority to operate this product.
Warning
Safety instructions
WARNING:
WARNING :
TO REDUCE THE RISK OF ELECTRIC SHOCK DO NOT REMOVE ENCLOSURE.
To reduce the risk of fire or electric shock, do not expose this apparatus to rain or moisture.
NO USER SERVICEABLE PARTS INSIDE. REFER TO QUALIFIED SERVICE PERSONNEL.
Apparatus shall not be exposed to dripping or splashing and no objects filled with liquids, such as
vases, shall be placed on the apparatus.
The lightning flash with arrowhead symbol, within an equilateral triangle, is intended to alert the user to the presence
of uninsulated
dangerous volta ge
within the products enclosure that may be of sufficient magnitude to constitute
IMPORTANT SAFETY INSTRUCTIONS
a risk of electric shock to persons.
!
1. Read these instructions.
The exclamation point within an equilateral triangle is intended to alert the user to the presence of importan t
operating and maintenance (servicing )instructions in the literature accompanying the appliance.
CAUTION
2. Keep these instructions.
3. Keep all wamings in mind.
RISK OF ELECTRIC SHOCK
DO NOT OPEN
4. Follow all instructions.
5. Do not use this unit near water.
6. Clean only with a dry cloth.
REGULATORY INFORMATION
This equipment generates, uses and can radiate radio frequency energy and, if not installed and used in
accordance with the i nstruction s, may cause harmful interference to radio communication.However, there
is no guarantee that interference will not occur in a particular installation. If this equipment does cause
harmful interference to radio or television reception, which can be determined by turning the
equipment off and on, the user encouraged to try to correct the interference by one or more of the
following measures:
Relocate the receiving antenna.
Increase the separation between the equipment and receiver.
Connect the equipment into an outlet on a circuit different from that to which the receiver is
connected.
Contact the dealer or experienced radio/TV technician for help.
Any changes or modifications not expressly approved by the party responsible for
compliance could void the user s authority to operate the equipment.
1
7. Do not block radiating channels.Install in
accordance with the manufacturer s instruct ions.
8. Do not ins tall near an y heat source such as radiators,
heat registers, stoves, or other apparatus
(including amplifiers) that produce heat.
9. Do not defeat the safety purpose of the polarized or
grounding type plug. A polarized plug has tw o
blades with one wider than other. A grounding type
plug has two blades and a third grounding prong. The
wide blade or the third prong is provided for your safety.
When the provided plug does not fit into your outlet,
consult an electrician for replacement ofthe obsolete
outlet.
2
10. Protect the power cable from being walked on or
pinched particularly at plugs.
11. The product can only be powered by original
attached power supply, I/P:100-240 V~,50/60 Hz,
1,5A, O/P: 12V ,3A
12. Use only cart, stand, tripod, bracket, or table
specified by the manufacturer or sold wit h the
apparatus.
13. Unplug this apparatus during lightning storms or
when unused for a long time.
14. Refer all servicing to qualified service personnel.
Servicing is required when the apparatus has been
damaged in any way.
Note
If the TV is under cold condition, there may be a small
flicker
when you turn it on.
Avoid touching the LCD screen or holding your finger(s) against it.
CAUTION connecting the Power Cord
Do not overload wall outlets. Overloaded wall outlets could damage the TV and could result to
electric shock or fire. Periodically examine the cord of your appliance; if its appearance indicates
damage or deterioration, unplug it. Stop using it until you have it replaced with a cord authorized
by your dealer. Protect the power cord from physical or mechanical abuse, such as being twisted,
kinked or pinched.
On Disposal
The fluorescent lamp used in this product contains a small amount of mercury
Disposal of this product must be carried out in accordance to the regulations of your local
authority.
3
Introduction
Accessories
CI solt
Ensure that the following accessories are attached with your TV. If any accessory is missing, please
contact the dealer from where you purchased the product.
Screw Hole
DVD eject
Rear Panel
Control Panel
Stereo Speaker
LCD display screen
Power Lead + Adaptor
Remote control
Screw
USB port
3 in 1 card reader
Introduction
This is a simplified representation of the product.
There might be some differences from your actual unit.
5
ITEM NAME
FUNCTION DESCRIPTION
Screw Hole
Screw Hole For Vertical Installation
Control Panel
Specification Of This Part Views in following page
Stereo Speaker
Stereo Speaker
LCD display screen
LCD display screen
Rear Panel
Specification Of This Part Views in following page
USB port
USB port
3 in 1 card reader
Insert SD/MS/MMC card
DVD slot
slot-in DVD
CI solt
Common interface for CI card
6
to some models,
( Subject
please contact your supplier to confirm. )
Control Panel
Rear Panel
1
4
2
3
13 14
ITEM
ITEM NAME / SYMBOL
5
6
7
8 12 10 9
1
2
3
4
5
6
7
8
9
10
11
FUNCTION DESCRIPTION
ITEM
ITEM NAME / SYMBOL
FUNCTION DESCRIPTION
1
Turn on/off the LCD TV
1
DC 12V
DC power Input, supplied with DC 12V
2
Load/Eject
2
HDMI
High-Definition Multimedia interface Input
3
Press to select the input source.
3
VGA
connected with analog RGB signal from a PC.
4
Previous
4
S-VIDEO
connected with Y/C video signal from external signal
equipment
5
Play/Pause
5
CVBS
connected with CVBS video signal from external signal
equipment
6
Stop
6
AUDIO IN - L
connected with stereo audio signal input interface L from
signal equipment
7
Next
7
AUDIO IN - R
connected with stereo audio signal input interface R from
signal equipment
8
Press to decrease the sound level.
8
AUDIO IN -PC
connected with audio card input of PC
9
Press to increase the sound level.
9
EARPHONE
connected with external loudhailer and earplug output
10
Channel+
10
RF
Analog / Digital Antenna input.
11
Channel-
12
Press to bring up the main menu to the screen.
13
POWER INDICATOR
14
REMOTE SENSOR
Red/Green light indicates LCD TV is at standby/working mode;
Infrared sensor for the remote control.
7
8
All electrical work should be undertaken by a suitably qualified person.
Installation
Instructions
bottom board for
installation of cupboard
Screw Holes
Screw
Installation
KITCHEN TV
1.Use this template to locate the screw holes position.
2.Make 4X6.0MM holes at the positions shown on this template.
3.Use screws from the accessories box to carefully fix the TV unit as instructed in this
template.
10
Remote Control Key Functions
There might be some differences from your actual nuit.
EJECT
AUTO
STANDBY
MUTE
STANDBY
1
2
3
4
5
6
7
8
9
-/--
Switch on LCD TV when at stand by mode or vice
versa.
EJECT/AUTO
Eject the DVD in DVDmode;
Press to do auto configuration directly in PC source.
0
ASPECT
MUTE
NICAM
Press to mute the sound.Press again or press
VOL+ to unmute.
DISPLAY
0-9
ENTER
Remote Control
LCD
MENU
DVD
SETUP
INPUT
PMODE
SMODE
FAV
FAV-
FAV+
TEXT
HOLD
LANG
EXIT
SLEEP
EPG
SUBTITLE
AUDIO
INDEX
SiZE
REVEAL SUBPAGE
ANGLE
ZOOM
D.MENU
TITLE
D.DISP
GOTO
PROG
INTRO
REPEAT
A-B
Press 0-9 to select a TV channel directly when you
are watching TV. The channel change after 2 seconds.To enter page number in teletext mode and so
on.
-/--
Press this button to enter a program number with
different digits. Eg. -for 1, --for 11.
Returns to the previously viewed programme.
CH+/Press to scan through or to select a channel.
VOL+/Press to increase/decrease the sound level.
ASPECT
To select the aspect of screen.eg.: 16:9
zoom
auto
4:3 ;
14:9
NICAM
Press to select the NICAM modes.
DISPLAY
Press to display the source and channel!`s information.
12
TEXT/
/
/
/
Switch On or Off the teletext mode;
Press to replay the current program from the previous
chapter.
/ENTER
Allows you to navigate the on-screen menus and
adjust the system settings to your preference.
EJECT
AUTO
STANDBY
MUTE
1
2
3
4
5
6
7
8
9
-/--
NICAM
EJECT
AUTO
STANDBY
LCD MENU
Brings up the LCD main menu to the screen in analogue TV mode.
DVD MENU/EXIT
To display the setup menu of DVD on the screen;
To exit menu or submenu.
0
ASPECT
TEXT/
MUTE
LANG/AUDIO
1
2
3
4
5
6
7
8
9
-/--
0
ASPECT
DISPLAY
SIZE/
Change display size in teletext mode;
Press to play a DVD program in fast forwad mode.
Press to cycle through the input source.
EXIT
SLEEP
INPUT
PMODE
SMODE
FAV
FAV-
FAV+
EPG
TEXT
HOLD
LANG
SUBTITLE
INDEX
SiZE
REVEAL SUBPAGE
ANGLE
ZOOM
D.MENU
TITLE
D.DISP
PROG
INTRO
REPEAT
Press repeatedly to cycle through the available video
picture modes
REVEAL/ANGLE
ENTER
PMODE
DVD
SETUP
LCD
MENU
DVD
SETUP
EXIT
SLEEP
INPUT
PMODE
SMODE
FAV
FAV-
FAV+
EPG
TEXT
HOLD
LANG
SUBTITLE
INDEX
SiZE
REVEAL SUBPAGE
ANGLE
ZOOM
GOTO
D.MENU
TITLE
D.DISP
GOTO
A-B
PROG
INTRO
REPEAT
A-B
SMODE
AUDIO
Press to cycle through the different sound settings.
SLEEP
Let you select a mount of time before your TV turn
itself off automatically.
SUBTITLE
To switch the dialogueat the bottom of the screen.
Request the index page;
Press to play a DVD program in fast rewind mode.
DISPLAY
ENTER
To show the list of audio languages available for the
Current channel. Just in DVB mode;
Change audio mode: left, right, mono, stereo.
INDEX/
NICAM
INPUT
LCD
MENU
Hold On or Off for current page display;
Press to advance for ward to the next chapter.
AUDIO
Reveal or hidden the hidden words;
Select different angle of DVD.
SUBPAGE/ZOOM
Sub coded page access;
Select the zoom of DVD playback
D.MENU
Brings up the DVD main menu to the screen in
DVD mode.
TITLE
Press to display title.
D.DISP
FAV/
Press to display FAV menu in DVB mode;
Press the DVD playing.
FAV-/
DVB source decrease fav channel;
Pres s the DVD stop and press again the DVD playing,
FAV+/
DVB source increase fav channel;
Press to slow/step the speed of DVD playing.
Press to display the source and channel`s in formationi
DVD mode.
GOTO
Press to select the film go to one time in DVD.
PROG
To select the DVD program playback.
INTRO
Intro/scan/9 picture display.
REPEAT
Repeatplayback.
A-B
PresstoABplayback.
EPG
Press to show the Electronic Program Guide menu.
13
RED/GREEN/YELLOW/BLUE
Correspond to the differently colored subjects.
14
Main Operation
TURN ON LCD TV
1. Connect the AC power adapter cable to TV, At this time the TV will enter into standby mode
and the indicator will switch to red as standby mode
2. Press STANDBY button on the TV set or
button on the remote control to turn on lcd
TV. indicator will switch to green as working mode.
TURN OFF LCD TV
1. Press STANDBY button on the TV set or
button on the remote control to enter standby
mode. At this time indicator will switch to red.
2. unplua the LCD TV to turn off completely.
Active the INPUT SOURCE
1. press INPUT button on the control panel or on remote control to display input source.
2. Press / button to select input source.
3. Press the enter button to choose the menu you want.
General Operation
TV
SCART
cvbs
S-VIDEO
VGA
HDMI
DVD
DTV
16
CONNECTION
AUDIO cable
R
1. Connect the TV
Make sure that LCD TV is power off
AUDIO IN
R
Insert the TV cable into antenna socket
Turn on the TV
CVBS cable
Select TV mode
Control the volume by VOL- / VOL+
Using CH+/CH-
AUDIO cable
L
AUDIO IN
L
CVBS
to choose the channel
LCD TV can be turned off by power button on remote control
3. Connect to the PC
Make sure that both of PC and LCD TV are power off
Connect PC and LCD TV with the D type VGA cable. Fasten the screws.
Insert the AC adaptor port into power input jack, connect another port to the power
supply (Range from 110V to 240V).
Connect the audio cable
Turn the LCD TV on , and then turn on the PC
Antenna
Socket
TV cable
Set the input source to PC mode
Control the volume by
LCD TV can be turned off by the power button on remote control
2. Connect to CVBS/S-VIDEO device
Make sure that both of CVBS/S-Video device and LCD TV are power off
Connect CVBS device and LCD TV with CVBS cable or S-VIDEO cable
Connect audio cable into the audio input jack on LCD TV
Turn on the LCD TV , then turn on the CVBS/S-VIDEO device
Select CVBS or S-VEDIO mode
Control the volume by VOL- / VOL+
LCD TV can be turned off by power button on remote control
VGA cable
VGA
4. Connect to the HDMI
Make sure that both of HDMI device and LCD TV are power off
Connect HDMI device and LCD TV with the HDMI cable.
Turn on the LCD TV , then turn on the HDMI device
S-VIDEO
cable
S-VIDEO
Select HDMI mode
Control the volume by VOL- / VOL+
LCD TV can be turned off by power button on remote control
17
18
OPERATING TIPS
HDMI cable
Please move the monitor
carefully and keep it vertical
turning angle within 120%
as instructed.
HDMI
MONITOR TURNING INSTRUCTION
Please start horizontally
turning the monitor
anticlockwise and keep
horizontal turning angle
within 300% .
19
20
ATV
Below instruction is for your reference only,the actual OSD
(On Screen Display)menu may be different from your TV`s
First Time Installation
First Time Installation
Country
UK
Language
English
Delete Analog Program
Analog Program Search
On Screen Display MENU
(OSD)
Delete Digital Program
Digital Program Search
OK
Select
Cancel
Adjust
If this is the first time you open the TV and there is no programs in the TV memory, the
First Time Installation menu will appear in the picture.
Country
Press / button and then use / to select the country.
Language
Press / button and then use / to select the OSD language.
Delete Analog Program
Press / button and then use / to select whether to delete all the analog programs.
22
Analog Program Search
1. The number of current program.
Press / button and then use / to select whether to start searching analog programs.
2. The colour system of current program, could be selected in Manual Tuning menu (an option
Delete Digital Program
3. The name of current program.
Press / button and then use / to select whether to delete all the digital programs.
4. The label of current program, you can label it in Manual Tuning menu (an option of SETUP
of SETUP menu).
menu).
Digital Program Search
5. The sound system of current program, could be selected in Manual Tuning menu (an option
Press / button and then use / to select whether to start searching digital programs.
of SETUP menu).
After setting the items, select OK to finish the first time installation, or select Cancel to exit
6. The NICAM mode of current program.
this menu.
If the icon of NICAM mode is red, it means the current program supplies multi NICAM
signals, and you can select it by pressing NICAM button.
If you cancelled the first time installation, it will remind you whether to set the first time
installation next time.
The NICAM modes and relative icons:
Mono
Stereo
Dual
Dual
First Time Installation
First time installation is not finished!
Are you sure to exit?
YES
Do It next time
VIDEO menu options
Press MENU button on the front panel or LCD-MENU on the remote control to display the main
NO
menu.
TV Information
PICTURE
Program Information
1
2
3
25 TV Label
Auto
No Signal
Auto
Standard
PictureMode
Press DISPLAY or NICAM button to display the program information.
Contrast
50
Brightness
50
4
Colour
50
5
Tint
6
0
Sharpness
Normal
Select
Adjust
Press / button to select PICTURE in the main menu.
Press / button to select the option that you want to adjust in the PICTURE menu.
Press / button to adjust.
23
24
When you are satisfied with your adjustment, press the LCD-MENU button to return to the
Colour
previous menu or press the EXIT button to exit the main menu.
Press / button and then use / to adjust the colour saturation.
NOTE: This option is invalid in PC mode, and it will be shown in gray.
Picture Mode
Select Picture Mode in PICTURE menu. (Available picture mode: Standard, Personal,Movie,
Sport, Mild, Game.)
If you change the value of Contrast, Brightness, Colour, Tint, Sharpness or Colour temperature
on the picture menu, the picture mode will be changed to "Personal" automatically. You may
select the picture mode directly by pressing PMODE button.
Tint
Press / button and then use / to adjust the tone of colour when your system is in NTSC.
Sharpness
Press / To select the sharpness mode of your TV. (Available Sharpness Mode: Normal, Sharp,
TIPS
Sharpest, Softest, Soft.)
You can press PMODE button on the remote control, to select the Picture Mode directly.
Colour temperature
Select an optimum colour temperature mode to suit your eyes for viewing among Nor mal, Warm
and Cold.
Contrast
Press / button and then use /
to adjust the contrast of the picture.
Contrast
NOTE: This option is available only in PC mode.
28
DNR (Digital Noise Reduction)
If the broadcast signal received is weak, you can select the DNR option to reduce the video
noise level between Off, Low,Mid and High.
After adjust the value you want, press LCD-MENU button to return to the preview MENU.
AUDIO menu options
Press MENU button on the front panel or LCD-MENU on the remote control to display
the main menu.
PICTURE
50
Colour
0
Tint
Sharpness
Normal
Colourtemperature
Normal
DNR
Off
Select
Adjust
SOUND
28
Volume
SoundMode
Personal
Bass
0
Treble
0
Balance
0
Brightness
Press / button and then use /
to adjust the brightness of the picture.
25
Select
Adjust
26
Press the
/
button to select SOUND in the main menu.
Press the
/
button to select the option that you want to adjust in the SOUND menu.
Press the
/
button to adjust.
NOTE
SETUP menus are different for different input sources, if the input source is selected
When you are satisfied with your adjustment, press the LCD-MENU button to return
HDMI / YPbPr / VGA and there are no relative input signal, SETUP menu will be
to the previous menu or press the EXIT button to exit the main menu.
unavailable.
Volume
Press / button and then use / to adjust the sound level.
SETUP menu of TV input:
Volume
28
After adjust the value you want, press LCD-MENU button to return to the preview MENU.
SETUP
UK
Country
Sound Mode
Autotuning
Select Sound Mode in SOUND menu. (Available sound mode: Personall, Voice, Music, Theatre.)
Manualtuning
If you change the value of Bass and Treble on the Sound menu, the sound mode will be changed
to "Personal" automatically. You may select the sound mode directly by pressing SMODE button.
Program Edit
TIPS
Select
You can press SMODE button on the remote control to select the Sound Mode directly.
Adjust
Press the / button to select SETUP in the main menu.
Press the / bu tton to sele ct your option what you want to adjust in the SETUP menu.
Bass
Press the / button to adjust.
Press / button and then use / to increase or decrease the level of the lower-pitched sounds.
When you are satisfied with your adjustment, press the LCD-MENU button to return to the
previous menu or press the EXIT button to exit the main menu.
Treble
Country
Press / button and then use / to increase or decrease the level of the higher-pitched sounds.
This option allows you to select the country.
Auto tuning
Balance
Press / button and then use / to adjust the audio output between left and right speakers.
This option allows you to tune the channels that can be received automatically.
NOTE
Setup menu options
Before you perform Auto Tuning, you must choose the country where you are by selecting
Press MENU button on the front panel or LCD-MENU on the remote control to display the main
COUNTRY option.
menu.
27
28
Program
Auto Tuning
The current program number. Press / to select the upper or lower program.
Sound System
Press ENTER key to start.
Press / to select a corresponding sound system, such as DK, L/L , BG.
Colour System
ENTER
Enter
MENU
Press / to select a corresponding colour system, such as Auto, PAL, SECAM.
Return
Program Label
Press ENTER key to start.
This option allows you to label a channel, you can also relabel the programs have been
labeled.
Auto Tuning
Searching
ATV
MENU
6
215.00MHz
Exit
1. Select a channel you want to labeled.
2. Press / select Program Label in SETUP menu.
3. Press / to perform your selection. The menu of program label will display as below:
You can press LCD-MENU button to stop auto tuning and close the OSD menu.
Program Label
Manual Tuning
This option allows you to perform Manual Tuning.
NOTE
Before you perform Manual Tuning, you must choose the country where you are
by selecting Country option.
4. Press the numeric buttons to input the numbers directly or press / to select the
letters.
5. Press / to move the cursor.
6. Press ENTER, LCD-MENU or EXIT button to confirm and return to previous menu.
AFT (Auto Fine Tune)
1. Press / to select Manual tuning in SETUP menu.
2. Press / to perform your selection, the menu of Manual tuning will display on the
screen.
Due to weak signals or a wrong antenna configuratio n, some of the channels may not
be tuned to the best reception condition. AFT function allows you to fine tune channel
selected(the frequency of channel is around the value in Manual Search option.
Manual Search
Manual Search
-
-
-
.
-
-
MHz
Manualtuning
Program
23
This option has two functions:
SoundSystem
DK
1. Set the frequency of channel for AFT option.
ColourSystem
Auto
2. Press
button for 3+ seconds and it will start auto tuning from this frequency.
Program Lable
AFT
Off
ManualSearch
471.43 MHz
Select
Adjust
29
30
Program Edit
Channel List
Flags
the TV programs according to
ATV
your preferences, as following:
1.
x
2.
x
3.
x
4.
x
5.
x
6.
x
7.
x
8.
SETUP menu of HDMI input (for setting the HDMI picture position):
This function allows you to sort
HDMI Position
H Position
50
V Position
50
Position Reset
Select
Adjust
SETUP menu of YPbPr input (for setting the YPbPr picture position):
Favorite
Skip
Lock
Move
1. Press / to select Program Edit in SETUP menu.
2. Press / to enter into the sub menu, a channel list will display.
3. Press / to select the channel in the list which you would like to sort.
4. Press to perform your selection.
5. Press / to select the location you would like to place the channel.
6. Press to perform you selection.
YPbPr Position
H Position
50
V Position
50
Position Reset
7. Press LCD-MENU to return to the previous menu or press EXIT to exit.
SETUP menu of VGA input
(for setting the PC picture
Select
Adjust
position):
PC Position
Begin
Auto Sync
Phase
51
Clock
50
H Position
50
V Position
50
Timer menu options
Press MENU button on the front panel or LCD-MENU on the remote control to display
the main menu.
1. Press the / button to select TIMER in the main menu.
Position Reset
2. Press the / bu tton to sele ct your option what you want to adjust in the TIMER menu.
Select
Adjust
31
32
3. Press the / button to adjust.
4. When you are satisfied with your adjustment, press the LCD-MENU button to return
to the previous menu or press the EXIT button to exit the main menu.
FUNCTION
TIMER
Language
English
Video Size
Auto
Bluescreen
On
Child Lock
SleepTimer
0 Min.
OSDTimer
30Sec
First Time Installation
Reset
Select
Adjust
Language
Press / to select the OSD language.
Select
Adjust
Video Size
Sleep Timer
This option allows you to select the screen display mode which best corresponds to your viewing
Select the sleep time to put automatically the TV in standby mode. Timer can be selected
requirements.
as 0min, 15min, 30min,45min,60min,75min,90min,105min,120min. Also you can select the sleep
time by pressing SLEEP button repeatedly.
Note: The available aspect mode may be different in different input signal.
OSD Timer
You can select the time when the OSD display on the screen such as: 5Sec,10Sec,15Sec,20Sec,
Blue screen
25Sec,30Sec.
This option allows you to select the blue background on or off. If on, the screen
Function menu options
Child Lock
background will turn blue at very weak or no signal condition.
Press ENTER or button to set the child lock.
Press MENU button on the front panel or LCD-MENU on the remote control to display the main
menu.
You need to enter the PIN code if the Child lock is set on , and the default PIN code is empty,
you can press ENTER button directly to enter.
1. Press the / button to select FUNCTION in the main menu.
2. Press the / button to select your option what you want to adjust in the FUNCTION menu.
3. Press the / button to adjust.
PIN Code:
Delete
4. When you are satisfied with your adjustment, press the LCD-MENU button to return
to the previous menu or press the EXIT button to exit the main menu.
0~9
Input
ENTER
Enter
TIPS
The superuser's (administrator's) password is 4711.
33
34
Child Lock
First Time Installation
Press ENTER or button to
Press button to open the first time installation menu, and the operation of this menu
set the child lock.
is in page 3.
On
Key Lock
Reset
On
Press ENTER or button to
Press ENTER or button to reset the TV to the factory default.
FUNCTION
Child Lock
Key Lock
set the key lock.
Change PIN Code
Change PIN Code
Press button
to enter
Change PIN Code menu.
Select
DTV
Adjust
Program List
Channel List options
Change PIN Code
Old PIN Code
Press ENTER button to open the Channel List, then Press
New PIN Code
watch.
Enter Again
Channel List
DTV
Select
Adjust
0~9
Input
ENTER
Confirm
Old PIN Code
Press 0~9 buttons to enter the correct old PIN code, you can not change the PIN code if you
entered a wrong PIN code.
New PIN Code
Press 0~9 buttons to enter the new PIN code you want.
Change PIN Code
Press 0~9 buttons to enter the PIN code you entered in the New PIN Code menu again to confirm
the new PIN code.
Select
35
ENTER
Enter
36
/
to select the channel you want to
Favorite List options
Press FAV button to open the Favorite List, then Press /
to select the channel you want to
SETUP
watch.
UK
Country
Favorite List
Autotuning
Manualtuning
Program Edit
Select
Enter
Manualtuning
21
Channel
Start Search
Select
ENTER
Enter
Begin
Service Found
1
Signal Quality
0%
Signal Strength
0%
Frequency
474.00 MHz
Select
NOTE
Only the channels that you selected to FAV in Program Edit Menu could be displayed
Press
in Favorite List.
Tuning.
Adjust
0~9
Input
/ button to select Manual Search, Press ENTER or
button to set the Manual
Channel
The current channel number. Press / to select the upper or lower channel, Press 0~9 to
Channel Search options
select the channel directly.
1.Press the / button to select SETUP in the main menu.
Start Search
2.Press the / button to select your option what you want to adjust in the SETUP menu.
3.Press the / button to adjust.
To select whether to start searching in begin/searching/finished.
4.When you are satisfied with your adjustment, press the LCD-MENU button to return to the
previous menu or press the EXIT button to exit the main menu.
Service Found
37
The services be found.
38
Signal Quality
Channel List
The signal quality of current
Flags
channel.
EPG Menu
Use EPG button on the remote control to display the EPG menu directly as below:
DTV
Signal Strength
The signal strength of current
Electronic Programme Guide
Sun 13/1 22:10
channel.
GD TV Best Scapes
22:00-00.00
Frequency
The frequency of current channel.
GD TV Best Scapes
Program Edit
This function allows you to edit
Channels
the DTV programs according to
2. GD-3
GD TV Best Scapes
your preferences, as following:
3. GD-5
The Jewellery Chan...
The Jewellery Chan...
4. GD Life
Programmes start at...
Programmes start at...
5. GD Finance
The Ten Minute Free...
The Ten Minute Free...
Favorite
Delete
Lock
Current Event
Navigate
Press
Press
Press
Schedule
Next Event
OK
Fit & Fearless
Watch
Favorite on your remote control to label your favoritep rograms. Favorite
delete to delete programs already added on Channel List. Delete
lock to lock up programs according to your preferences.
Common interface
If you have inserted a CI card into TV, you can see an OSD menu as followed. Press ENTER to get
detailed CI information.
Common Interface
-------
Access
Subject to some models, please contact your supplier to confirm.
39
40
INFO
More
DVD Operation
Basic operation
1. Turn ON and OFF the DVD function
Turn on the LCD TV and then press INPUT to select DVD mode.
2. Insert Disc to DVD
Insert the Disc to the Disc slot (printed side of the disc has to face upward), theplaye r will loa d
the disc auto matically.There will have an on screen indicatio n
CLOSE
then
READ .
After loading the disc content, it will switch to play mode automatically. If the disc is already
placed inside, the disc will be read automatically.
NOTE
For some discs, after loading the content of the disc, need to press
or select from the
disc menu to start.
Please make sure when inserting the Disc, the printed side of the disc should be facing
upward when inserting the Disc incorrectly, you may damage the DVD mechanism.
DVD
3. Play the DVD
According to the disc content, the disc menu will display for your selection. When playing the
disc, you may use
button to toggle between Play and Pause mode. This product also supports
Menu, Title, Sequential and Program playback.
4. Menu playback (for DVD/ super VCD and VCD 2.0 discs)
Press MENU button
For DVD discs, the screen will display the DVD Disc Menu (Root Menu)
For Super VCD & VCD2.0 discs, the screen will display the Super VCD, VCD2.0 Disc Menu
(PBC: [OFF]) (Press the MENU button to display the PBC status).
Playback the Super VCD & VCD2.0 discs, the default PBC status is ON.
For DVD discs, use the navigation buttons to select and Play the highlighted contents; For Super
VCD & VCD2.0 discs, use the numeric buttons to play your favorite content directly.
NOTE: PBC should be OFF.
Press ENTER or
button to start from the highlighted content.
Return to the Root Menu when playing the disc
For DVD discs, press MENU to display the Disc Menu.
For Super VCD & VCD2.0 discs, when PBC is ON, press MENU to display the Disc Menu.
42
STOP
Press
button once to stop. Press
button to resume from where you stopped.
Press
button Twice to stop. Press
button to start from beginning.
In order to protect the disc, press
Supporting DVD format
button then press EJECT button to take the disc out. When the
disc is ejected, hold the disc edge slightly and take it from the eject direction to prevent scratches.
This products can play the following format of DVD disc.
Disc Type
Disc Size (Diameter)
When not using the DVD function (in stand-by mode or using others modes for a long time),
please take out the disc to protect the DVD loader and the disc.
Recorded Time
Recorded Content
Single side:120mins. Approx
DVD
DVD format:
Compressed digital
audio and video
12cm
Double side:240mins. Approx
5. Title playback (for DVD disc only)
Press TITLE button, there will have an on screen indication
TITLE
Super VCD
12cm
45mins. Approx
MPEG2
Compressed digital
audio and video
Include SVCD
VCD
12cm
74mins. Approx
MPEG1
Compressed digital
audio and video
Include
VCD2.0/ VCD1.1
VCD1.0/ DVCD
CD
12cm
74mins. Approx
CD-DA: Digital audio
HD-CD
12cm
74mins. Approx
HD-DA: Digital audio
MP3/JPEG
12cm
600mins. Approx
Digital audio
Press the direction or numeric buttons to select your favorite title.
Then will play from the first chapter of the selected title.
6. Swquential playback (for DVD/ Super VCD/ VCD/ CD/ CD-G/HD-CD and Mp3/ JPEG discs)
For Super VCD & VCD discs, if PBC is
ON
Press MENU button to turn PBC OFF. Press
stopped, press
status, press
button will enter the disc menu.
button to start in sequent. For others, while it
button to start in sequent.
Remarks
7. Program playback (for DVD/ Super VCD/ VCD/ CD/ CD-G/HD-CD and Mp3/ JPEG discs)
Using Program playback, you can select max. 16 tracks from the disc to playback in programmed order.
OSD for program playback as below.
DVD/ MP3/JPEG discs
PROG
T C
1
2
3
4
Super VCD/ VCD/ CD /CD-G/ HD-CD discs
NOTE: Also support DVD-R, CD-R, CD-RW playback.
WARNING!
PROG
T
C
T
C
T
13
5
9
6
10
11
16
7
8
PLAY
12
DO NOT INSERT OR PLAY 8CM DISC, THEY WILL GET STUCK.
C
1
5
9
12
14
2
6
10
14
15
3
7
11
15
4
8
13
16
CLEAR
PLAY
Region Code 2
As it is usual for DVD movies to be released at different times in different regions of the world, all
CLEAR
players have region codes and discs can have an optional region code. If you load a disc of a
different region code into your player you will see the Region code notice on the screen. The disc
If it is in PBC ON status, using program playback will turn to PBC OFF automatically.
According to the highlight area input the title and chapter number by numeric buttons, press
button to start; or move to the <PLAY> by navigation buttons, press ENTER button to start.
will not p layback an d should b e unloaded . The region code for this player is 2 (refer to the symbols
below).
While playing the program, you may press PROG button to display the program menu for edit.
To clear the program by moving to <CLEAR> and press ENTER button. Or press
end the program. When press
button to
button again, the disc will play by sequent.
While playing the program, there will have an on screen indication
PRG PLAY
and the
ALL
2
1
current title and chapter number.
43
44
2
1
3
2
4
DVD Functions operating instructions
4. Slow motion(for DVD/ Super VCD/ VCDdiscs)
-While playing the disc, you may use slow motion function.
There are 6 speeds for slow motion. Press
1. Play (for DVD/ Super VCD/ VCD/ CD/ CD-G/HD-CD and Mp3/ JPEG discs)
For DVD disc , press
button from root or title menu; while playing the DVD, you may play your
While in slow motion, you may press
favorite title directly with title selection by pressing the TITLE button.
button to toggle between different speeds in
sequent. (SF1/2, SF1/3, SF1/4, SF1/5, SF1/6, SF1/7, Play).
to resume normal speed.
For S uper VCD & VCD discs , whi le playing the disc, you may play your favorite tracks by numeric
NOTE: During Slow motion, the sound will be off.
buttons.
NOTE
When using the Program playback or when it is PCB ON status, you can only use
or
buttons to change the track
5. Pause (for DVD/ Super VCD/ VCD/ CD/ CD-G/HD-CD and Mp3/ JPEG discs)
FOR CD, CD- G, HD-CD & MP3/JPEG discs, press
F OR DV D, Su per V CD, V CD di scs, press
by frame; press
button to pause; press
button to pause; press
button to resume.
button to playback frame
button to resume.
For CD, CD-G & HD-CD discs, while playing the disc, you may play your favorite tracks by numeric
buttons.
6. Repeat (for DVD/ Super VCD/ VCD/ CD/ CD-G/HD-CD and Mp3/ JPEG discs)
For MP3 / JPEG disc, you may play your favorite tracks by numeric buttons from the content menu.
-Press REPEAT button once to display the current repeat mode.
If input track number is not valid, it will not function.
For Super VCD, VCD, CD, CD-G, HD-CD, discs, while playing in sequent, you may use the repeat
NOTE: From track 1-10, use numeric buttons directly; For tracks over 10, press - / -- button first.
(E.g. Track 15, press - / --Then 5)
playback. There are 2 repeat modes, press REPEAT to toggle between different modes in sequent.
(REPEAT (OFF)/ REPEAT (1)/REPEAT (ALL)).
For DVD discs, you may setup the repeat playback mode. There are 2 repeat modes, press REPEAT
2. Previous/Next (for DVD/ Super VCD/ VCD/ CD/ CD-G/HD-CD and Mp3/ JPEG discs)
to toggle between different modes in sequent. (REP: (OFF) / REP: (CHAPTER) / REP: (TITLE) / REP:
(ALL)).
- While playing the disc;
Press
button to play to the last Title / Chapter / track.
Press
button to play to the next Title / Chapter / track
- For super VCD & VCD discs, in PBC OFF status;
If the current track is the first one, press
button will stop the playback.
If the current track is the last one, press
button will stop the playback.
- For DVD discs, the above functions may vary due to different DVD disc's structure.
For MP3 / JPEG discs, while playing the disc, you may use the repeat playback. There are 3 repeat
modes, pressREPEAT to toggle between different modes in sequent. (REPEAT (OFF) / REPEAT (1) /
REPEAT (DIR) / REPEAT (ALL)).
7. Display (for DVD/ Super VCD/ VCD/ CD/ CD-G/HD-CD and Mp3/ JPEG discs)
-Press D.DISP button to activate the on screen roll-down menu for the current Title, Chapter, time
and other information
3. Forward/ Backward (for DVD/ Super VCD/ VCD/ CD/ CD-G/HD-CD and Mp3/ JPEG discs)
- While playing the disc, you may use forward or backward function.
- There are 4 speeds for forward. Press
button to toggle between different speeds in sequent.
(FORWARDx2 / FORWARDx4 / FORWARDx8 / FORWARDx20 / Play).
While in backward, you may press
to resume normal speed.
For DVD discs, (2 pages) Press DISPLAY button once to display first page as shown below:
Disc Type
For Super VCD & VCD discs, in PBC ON status, if backward to the first track, it will start from
-/-(Current/Full)
Elapsed disc time
DVD
For CD, HD-CD, MP3, backward also has audio output.
For DVD discs, if backward to first title / chapter, it will start from the beginning.
Chapter
Tiltle
Press D.DISP
Audio
-/- (Current/ Full)
button again to display second pages shown below:
Language
Audio Type
Angle ON/OFF
the beginning.
NOTE: During Forward or Backward, the sound will be off.
-/- (Current/ Full) or OFF
45
Subtitle -/-(Current/Full)or OFF
46
For Super VCD discs, (2 pages),Press D.DISP Button once to display first page: Disc type, Track
10. AUDIO (for DVD/ Super VCD/ VCD/ CD/ CD-G/HD-CD and Mp3/ JPEG discs)
-/- (Current / Full),Mute status, PBC status, Repeat mode status, Current track time. Press
- Press LANG button once to display current audio mode.
D.DISP button again to display second page:Audio-/--(Current/Full) or OFF, Audio type, Language,
- Press again to toggle between different audio modes in sequent.
Subtitle-/-(Current/Full) or OFF. Press D.DISP button again to turn off the on screen display.
For Super VCD & VCD discs: (Stereo - L - R - Auto L - Auto R)
For CD, CD-G, HD-CD, MP3 / JPEG discs, Press D.DISP button once to display first page: Disc
For CD, CD-G, HD-CD, MP3 discs: (Stereo - L - R)
type, Track -/- (Current / Full), Mute status, Repeat mode status, Current track time.
NOTE
- Press D.DISP button again to turn off the on screen display.
8. Goto (for DVD/ Super VCD/ VCD/ CD/ CD-G/HD-CD and Mp3/ JPEG discs)
-This function allows you to play your favorite Title / Chapter / track. Press GOTO button to activate
Switching to Auto L / R audio channel may be varied due to different discs contents. Bilingual
VCD discs can use AUDIO button to switch between different languages.
the on screen scroll-down menu for edit. According to the highlighted area, input your favorite
Title / chapter / Track number by numeric buttons or input the playback time. After editing, press
11. Language (for DVD and Super VCDdiscs)
ENTER to start. If the input is invalid, it will not function.
-Press AUDIO button once to display current language.
-Press again to toggle between different languages mode in sequent.
NOTE
While editing, the GOTO button is not function.
NOTE
-If it is in PBC ON status, this function will switch it to OFF.
For Multi-languages DVD & Super VCD discs, press AUDIO button to select your favorite
language.
9. PREVIEW (for DVD/ Super VCD/ VCD/ CD/ CD-G/HD-CD and Mp3/ JPEG discs)
12. Subtitle (for DVD and Super VCDdiscs)
-For Super VCD & VCD discs, while the disc had stopped, press PREVIEW button.
-Press SUBTITLE button once to display current sub-title.
The screen will split to 9 small displays to play each track by 3 sec. according to the tracks order.
-Press again to toggle between different subtitle modes in sequent.
If it is in PBC ON status, this function will switch it to OFF.
Press
Press
/
button to navigate the 9 small screens.
button to playback the current selection.
Press 1 - 9 button to activate corresponding small screen directly.
NOTE
For Multi-languages subtitle DVD & Super VCD discs, press SUBTITLE button to select your
favorite subtitle language.
-For CD, CD-G, DTC-CD, HD-CD discs, while the disc had stopped, press PREVIEW button. It will
start to play each track by 15 sec. according to the tracks order.
13. Angle (for DVDdisc)
Press numeric buttons directly to select the tracks for preview
-Press ANGLE button once to display current playback angle.
Press
-Press again to toggle between different playback angle codes in sequent. (E.g. Angle -/- (Current
button to playback the current track
While playing the discs, you may also press PREVIEW button to activate this function.
/Full) or OFF)
NOTE
NOTE
Only for DVD with multi-angle, press ANGLE button to select your favorite playback angle.
-If started the disc menu, preview will not function.
Selectable playback angle depends on the availability of the DVD contents.
-If the current track started over 15 sec. this function will start from next track.
14. Mute (for DVD/ Super VCD/ VCD/ CD/ CD-G/HD-CD and Mp3/ JPEG discs)
-Press MUTE button to mute the audio output. There will have an on screen symbol indicate
MUTE
-Press again to cancel, or Press VOL + to cancel and adjust the volume.
-In case there is no audio output, try to press MUTE button to cancel mute.
47
48
15. ZOOM (for DVD/ Super VCD/ VCD/ Mp3 and JPEG discs)
MP3/JPEG Playback
-Press ZOOM button to zoom in the picture.
-There are 6 zoom modes, press ZOOM button to toggle between different zoom modes in
sequent. (Zoom2 - Zoom3 - Zoom4 - Zoom1/2 - Zoom1/3 - Zoom1/4 - Zoom OFF)
-In Zoom2-4, you may use the navigation buttons to pan the picture for your favorite portion.
After loading the MP3 / JPEG disc, it wil start to scan for the stored MP3 /JP EG folders . Then wil l
firstly display the Mp3 contents automatically and start to play the first file (highlighted file). Screen
as below:
16. Repeat A- B (for DVD/ Super VCD/ VCD/ CD/ CD-G/HD-CD and Mp3/ JPEG discsB)
-In normal Playback, fast forward or fast reverse, press A-B button at where you want to start
the repeat portion. There will have an on screen indication
REPEAT A
-In normal Playback, fast forward or fast reverse, press A-B button again at where you want to
stop the repeat portion. There will have an on screen indication
REPEAT A B
Highlight file for
current playback.
Display current
MP3 playback
function
Display current
MP3 playback
function
-The repeat function started to playback the portion from A to B automatically.
Scroll bar to view
next page.
Buttons for switching
between MP3 and JPEG
playback function.
-Press A-B button again to cancel. There will have an on screen indication A B CANCEL
For Super VCD, VCD & CD discs, repeat A-B is only function within the same track. When
playing the others, repeat A-B will cancel automatically.
For Super DVD discs, repeat A-B is only function within the same Title /Chapter. When playing
the others, repeat A-B will cancel automatically.
17. Volume (for DVD/ Super VCD/ VCD/ CD/ CD-G/HD-CD and Mp3/ JPEG discs)
-Press VOL- / VOL + buttons to adjust the output volume.
NOTE: Playback DVD discs in original code, is not adjustable
-Using the navigation buttons to check you favorite folder and playback the first file or move to
the your favorite file.
NOTE
-Press
buttons to move the highlight to folders, documents or mode selection.
-Press numeric buttons to select the contents directly. For number over 10, press 0 button first.
(e.g. File number 15, press 0 then 5.)
-When playback MP3 files, there is no picture display, only audio output.
-Playing the JPEG discs, press PROG button to select slide effects. There are 17 slide modes,
press PROG button to toggle between different modes in sequent. (Start from top Start from
bottom Start from left Start from right Start from upper left corner Start from upper right
corner Merge from left / right Horizontal blades Vertical blades Merge form 4 corners Random
Playback Slide effect OFF).
-When play or pause with picture playback, you may use navigation butoons to flip / rotate the
picture.
button to flip horizontally.
button to flip vertically.
button to rotate left 90 .
Button to rotate right 90 .
-When play or pause with picture playback, you may use D.MENU button to enter preview mode
to dis lay 12 pictu res. Pr ess
/
button to select next / previous page or press numeric buttons
to view the corresponding pictures.
-The maximum JPEG image size that can be displayed is 1280 x 1024.
49
50
Function Settings
NOTE
PAL format is generally used for TVs in
the UK.Check your TV user guide for
System Setup
supported formats. If NTSC is selected
-Press DVD SETUP button to activate the DVD player
with a non-compatible television you may
OSD menu;
experience interference or picture scrolling.
-Press / button to move and highlight between
different sub-menu. Press
/
ENTER button
to enter the highlighted sub-menu.
-Press DVD SETUP button to exit the OSD menu.
TV Type
DVDs are produced in a variety of screen aspect
ratios. This menu enables you to select one of
the three aspect ratios:
NOTE
4:3 PS (Normal)
In Setup mode, the following functions will be cancel or pause :
TITLE, SUB-TITLE, DISPLAY, PLAY, SETUP, STOP, SLOW / STEP, NICAM / AUDIO, FF, FR, PREV,
4:3 LB (Normal)
16:9 (Wide)
NEXT, GOTO, ZOOM, ANGLE, PROGRAM, PREVIEW, REPEAT, REPEAT A-B.
-Select the most appropriate aspect ratio for
SOURCE
4:3PS (Normal)
Normal Pan and Scan is used for most normal television
Select according to what type of media you
broadcasts and it is the default setting. It has an aspect
want to playback:
ration of 4:3. If you select this setting when viewing a DVD
(Disc, USB, MEMORY CARD) Default setting
the picture will fill the screen but, you will not see the left
is DISC.
and right edges of the picture.
TV color system
4:3LB (Normal)
This menu enables you to set the picture
Normal Letter Box will show the DVD in its original aspect
format for your TV/DVD.
ratio so depending on the size of your television screen,
NTSC
you may see black borders above and below the picture.
the DVD being viewed.
This format is used by some other countries,
16:9 (Wide)
e.g. USA
Choose this setting if you have a widescreen television.
PAL
This is the format used in the UK and the default setting.
AUTO
This format can be used if your TV/DVD is capable of both PAL and NTSC formats.
51
52
NOTE
Teletext operation
-Playback screen size may vary according to the discs contents.
Default Setting
-Press ENTER button to restore factory default.
-For discs with 4:3 contents, using any mode would only
display a 4:3 screen
-Screen ratio selection should be according to the connected
TV / Display aspect ratio.
PassWord
-The default setting is locked. No Rating selection or change password could be done. To edit the
Rating setting, please enter default password 0000 by numeric buttons, then press ENTER
button to confirm.
-To change password, input any 4 digit number when the lock is unlocked. Once the 4 digit
number is entered, that will be your new password.
Rating
-Playback for some discs with rating, you can
Language Setup
Press DVD SETUP button to enter the DVD OSD menu.
-OSD Language
select the rating setting according to your
ENGLISH
GERMAN
SPANISH
FRENCH
PORTUGUESE
ITALIAN
DUTCH
preference. Rating restriction divided in eight
different category from KID SAFE to ADULT.
Use navigation buttons to select the OSD LANGUAGE
setup icon, press ENTER button to confirm.
NOTE
NOTE
Only editable when password is unlocked.
If the selected language is not included in you DVD disc content, it will select the default language
of the disc automatically. The default language setting is English.
And only can function when password
is locked. It does not, however, reset
either the Password or the Rating setting.
-Audio Language
Use navigation buttons to select the AUDIO LANG
setup icon, press ENTER button to confirm.
53
54
ENGLISH
GERMAN
SPANISH
FRENCH
PORTUGUESE
ITALIAN
DUTCH
Audio Setup
NOTE
If the selected language is not included in you DVD disc content, it will select the default
language of the disc automatically. The default language setting is English.
Audio Output
- Use navigation buttons to select the AUDIO OUT
setup icon,press ENTER button to confirm.
- There are 3 modes for your selection; use navigation
-Subtitle Language
buttons to select different modes, press ENTER button
Use navigation buttons to select the SUBTITLE LANG setup icon, press ENTER button to confirm.
to confirm.
(SPDIF / OFF SPDIF / RAW SPDIF / PCM).
ENGLISH
GERMAN
SPANISH
FRENCH
PORTUGUESE
ITALIAN
DUTCH
OFF
- SPDIF / OFF: Coaxial output off.
- SPDIF / RAW: When connected the coaxial output to your audio amplifier, playing back
the discs with Dolby, MPEG contents, the coaxial output the original signal to your amplifier.
Your Amplifier must have the corresponding decoding function.
- SPDIF / PCM: When connected with 2 channels digital stereo amplifier, playing back the discs
with Dolby, MPEG contents the coaxial output with 2 channel to your amplifier.
NOTE
If the selected language is not included in you DVD disc content, it will select the default
language of the disc automatically. The default language setting is English.
Tone
-Use
&
buttons to adjust the Tone setting
MENU Language
-Use navigation buttons to select the MENU LANG
ENGLISH
GERMAN
SPANISH
FRENCH
PORTUGUESE
ITALIAN
DUTCH
setup icon, press ENTER button to confirm.
55
56
Digital Setup
Dynamic Range
- When switch the compress mode to
Audio
output , adjust the compress ratio for different
effect. When selected FULL, the peak signal value
is smallest. When selected OFF, the peak signal
value is biggest.
Dual Mono
- You can select four different audio output,
STEREO, MONO L, MONO R, MIX MONO. The
audio out description of these Selections is
shown in the table below.
MODE
LEFT SPEAKER
RIGHT SPEAKER
STEREO
STEREO-L
STEREO-R
L-MONO
L-MONO
L-MONO
R-MONO
R-MONO
R-MONO
MIX-MONO
L-MONO+R-MONO
L-MONO+R-MONO
57
USB & Card Reader
Operation
Select Files
NOTES
1. Press
buttons to move the highlight through folders.
Before operating USB/Cardreader, please select USB or CARD to be the input source.
2. Press ENTER button to open the folder, and the highlight will move to the file list area.
The card reader supports SD/MMC/MS cards, USB reader supports USB2.0.
3. Press
SUPPORTED FORMATS: JPEG, MP3, WMA, DVD VIDEO, MPEG2, MPEG4, AVI,
4. Press ENTER or
buttons to move the highlight through file.
button to play the file you selected, and you can press numeric buttons to
play the files directly
DIVX(3.11, 4.11, 5.11), XVID.
When playback MP3 files, there is no picture display, only audio output.
Load Files
After inserting the USB storage or Card, it will start to scan for the supported files. Then it will
automatically start to play the first MP3 file.
Press GOTO button, then press
buttons to select the input position, then press numeric
buttons to input the number of file you want to play.
When playing MP3 music:
When displaying JPG image:
Repeat Files
Press REPEAT button to select the repeat mode, there are 4 available modes, and the icons of
them are different.
59
60
When select through JPG files, the preview of highlighted JPG file will appear in the folder list area.
REPEAT 1
Repeat the current playing file once, then play the files according to the file list.
REPEAT DIR
Repeat the available files in current folder.
REPEAT ALL
Repeat all the available files in the storage.
REPEAT OFF
Never repeat the files, and after playing the final file, the program will stop.
Playback JPEG Images
The maximum JPEG image size that can be displayed is 1280 x 1024.
When Playing the JPEG files, press PROG button to select slide effects. There are 17 sl ide
modes, press PROGRAM button to toggle between different modes in sequent. (Start from top,
When play or pause with picture playback, you may use
butons to flip / rotate the picture:
Start from bottom, Start from left, Start from right, Start from upper left corner, Start from upper
right corner, Merge from left / right, Horizontal blades, Vertical blades, Merge form 4 corners,
Press
button to flip horizontally.
Random Playback, Slide effect OFF).
Press
button to flip vertically.
Press
button to rotate 90 clockwise.
Press
button to rotate 90 anticlockwise
Playback Video Files
Move the highlight to the video you want to watch, then press ENTER or
button to play the
file you selected, also you can press numeric buttons to play the files directly.
61
62
Trouble shooting
63
Before contrast the service technician, perform the following simple checks. If any problem still
persists, unplug the LCD TV and calling for serving.
PROBLEM
There is a problem in VGA mode.(Only VGA mode applied)
POSSIBLE SOLUTION
PROBLEM
POSSIBLE SOLUTION
No sound and picture
- Check that the main plug has been connected to a wall let.
- Check that you have pressed the STANDBY button on the front of TV set.
- Check the picture contrast and brightness settings.
No output from one of
the speakes
- Adjust balance in menu option.
Normal picture but
no sound
- Check the volume.
- Sound muted? Press the MUTE button.
- Try another channel ,the problem may be with the broadcast.
- Are the audio cables installed properly.
The signal is out of range.
- Adjust resolution, horizontal frequency, or vertical frequency.
- Check it whether the signal cable is connected or loose.
- Check the input source.
The remote control
does not work
- Check to see if there any object between the product and remote control Causing obstruction.
- Are batteries installed with correct polarity(+ to +,- to -).
- Correct remote operating mode set: TV, VCR etc.
- Install new batteries
Vertical bar or stripe on back
ground&Horizontal
Noise&Incorrect position.
- Work the auto configure or adjust clock, phase, or H/V position.
Power is suddenly
turned off
- Is the sleep timer set.
- Check the power control settings. Power interrupted.
- No broadcast on station tuned with auto activated.
Screen color is unstable or single
color.Picture is not in the centre
- Check the signal cable.
- Reinstall the PC video card.
Picture appears slowly
after switching on
- This is normal, the image is muted during the product startup process. Please
contact your service center, if the picture has not appeared after five minutes.
No or poor color or
poor picture
- Adjust the color in menu option.
- Keep a sufficient distance between the product and the VCR.
- Try another channel, the problem may be with the broadcast.
- Are the VIDEO cables installed properly?
- Activate the any function to restore the brightness of the picture.
Horizontal/vertical bars or
picture shaking
- Check for local interference such as an electrical appliance or power tool.
Early malfunctions can be prevented. Careful and regular cleaning can extend the amount of time
you will have your new TV. Be sure to turn the power off and unplug the power cord before you
begin any cleaning.
Cleaning the screen
1. Here s a great way to keep the dust off your screen for a while. Wet a soft cloth in a mixture
of lukewarm water and a little fabric softener or dish washing detergent. Wring the cloth until
it
s almost dry, and then used it to wipe the screen.
2. Make sure the excess water is off the screen, and then let it air-dry before you turn on your TV.
Poor reception on
some channels
- Station or cable product experiencing problems. Tune to another station.
- Station signal is weak, reorient antenna to receive weaker station.
- Check for sources of possible interference.
Cleaning the cabinet
To remove dirt or dust, wipe the cabinet with a soft, dry, lint-free cloth. Please be sure not to use
Lines or streaks in pictures
The picture is not sharp.
The picture moves.
- Check the antenna (Change the direction of the antenna).
a wet cloth.
The reception may be weak. The state of the
broadcast may also be bad. Make sure the
antenna is facing the right direction. Make sure
the outside antenna is not disconnected.
65
66
5. Do not stick paper or write anything with a ball point pen on the label side of the disc.
Extended Absence
Teletext operation
If you expect to leave your TV dormant for a long time(such as a vacation), it s a good
6.The USB and Card Reader will not work if the disk tray is not closed completely.
idea to unplug the power cord to protect against possible damage from lightning or
power surges.
If you expect to leave your TV dormant for a long time (such as a vacation), it s a good
idea to unplug the power cord to protect against possible damage from lightning or
power surges.
Handing Discs
1. To remove a disc from its storage case, press on the centre of the case and take the disc out.
2. Hold the disc by the edges, to avoid touching the Recorded side of the disc.
Cleaning discs
1. Fingerprints and dust should be carefully wiped from the disc's surface with a soft Cloth. Audio
discs and DVD discs have no grooves to collect dust and microscopic debris so gently wiping
with a soft cloth should remove most particles. Wipe in a straight line from the inside to the
outside of the disc. Small dust particles and light stains should have no effect on reproduction
quality.
2. Never use chemicals such as record sprays, antistatic sprays, Benzine, or thinners to clean the
discs. These chemicals can irreparably damage the disc's surface.
3. Discs should be returned to their cases after use. This avoids serious scratches that could cause
the laser pickup to skip.
4. Do not expose discs to direct sunlight, high humidity, or high temperature for extended periods.
Exposure to high temperatures can warp the disc.
67
68
Technical specifications
LCD SIZE
15.4 inchs (diagonal)
Overall Dimensions (mm)
380 W
Weight KG
3.0
Display area (mm)
331.2(H) x 207.0(V)
Drive System
a-Si TFT active matrix
Display Colours
262,144 colours
Number of Pixels
1280 x R.G.B. x 800 (16 10)
Pixel arrangement
RGB Vertical stripe
Pixel Pitch(mm)
0.2588 (H) x 0.2588 (V)
TFT Module size (mm)
344.0 (H) x 222.0(V) x6.5 (D)
Contrast Ratio
400:1
Brightness
400nits
Response Time
16ms
Lifes
50,000 hours
TFT LCD Surface Treatment
Anti-Glare Coating (Haze 25%)
Viewing Angle
140(H) / 120(V)
Backlight
one cold cathode flourescent lamps.
X296(H) X52(D)
Hard Coating(3H)
Input Voltage
DC 12V
Power consumption
40W MAX.
Power Management
Low power consumption mode, standby<1W
Audio
2 x 3 Watts
RF Selection
Tuning
TELETEXT
300 pages
NICAM/A2
YES
Build-in DVD
YES
Certificates
FCC,CE,RoHs,
Colour / Finish
Silver , Others on application
OSD Languages
English, French, German, Italian, Spanish, Portuguese.
Accessories
Remote controller, Cell(2 x AAA Batteries), AC adapter , AC wire.
System
Input Signal
Video
systemPAL, SECAM, DVB-T ( ATSC optional )
Audio
systemBG, DK, I, L/L'
Modulation
COFDM 2K/8K QPSK,16QAM,64QAM.
DTV
Video System
MPEG-
(DVB-T)
Audio System
MPEG-1/2 layer 1,2,3
Basic Function
EPG,Subtitle,Teletext,(EURO),MHEG-5(UK)
ATV
75 ANT.
AV,S-video
AV Cable input, S-video input
Audio
Build-in DVD
MP@ML
Audio 1 (R/L speaker input)
Audio 2 (R/L speaker input)
PC
DB 15 VGA Input
HDMI
480i, 480p, 576i, 576p, 720p,1080i, 1080p
Card reader/USB
SD/MMC/MS/CF/USB2.0
Disc
CD,HDCD,VCD,DVD,DVD+R,DVD-R,DVD+RW,DVD-RW
Multimedia format JPEG,MP3,WMA,MPEG-1,MPEG-2,MPEG-4,DIVX3.xx-DIVX5.xx (Option)
69
70
WARRANTY
CARD
COMMODITY:
PRODUCT MODEL:
INSPECTOR:
CUSTOMER NAME:
SERIES NO:
PURCHASING DATE:
CONTACT TEL:
INVOICE NO:
PRODUCTION DATE:
SELLER:
THROUGH THE TEST OF QUALITY CONTROL DEPARTMENT IN OUR COMPANY, THE PRODUCT
HAS BEEN PROVED THAT THE FUNCTION PARA-METER HAS REACHED THE TECHNIQUE
CRITERIA. THEY ARE PERMITTED TO LEAVE FACTORY.
REPAIR INFORMATION
DATE
CONDITION
REPAIRMAN