1
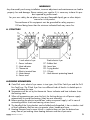
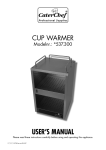
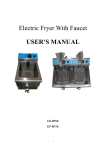
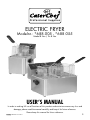
P ro fes s i o n a l Su p p l i e s ELECTRIC FRYER Modelnr.: *688.005 - *688.055 Model 8 liter / 2x 8 liter USER’S MANUAL In order to making full use of functions of this product and minimize unnecessary loss and damage, please read the manual carefully and keep it for future reference. Please keep this manual for future reference. 688005-55 en ma 2014 1 WARNING! Any disassembly and wrong installation, incorrect adjustment and maintenance can lead to property loss and damage. Please contact your supplier if it is necessary to have this product repaired by professionals. For your own safety, do not place or store any flammable liquid, gas or other objects around or in the product. The mainframe of this equipment must be grounded for safety purposes. Oil level being lower than the minimum indicated level may cause fire. A. STRUCTURE 1-tank electric fryer 1 2 3 4 5 6 - Power indicator Heat indicator Thermostat Electric terminal box Heat element Power cord 2-tank electric fryer 07 08 09 10 11 - Rubber feet Lower box Frying basket Oil pot Heat element protecting board ALGEMENE KENMERKEN A CaterChef series electric fryer comes in two types, the 8 litre Tank fryer and the 2x 8 litre Tank fryer. The 2-Tank fryer fries two different kinds of food in its double pots in case of blending the taste. B Temperature can be set by the thermostat. Power indicator and heat indicator show the heating status. C When oil temperature goes over the limit, the limiting device cuts off power supply automatically to avoid overheating. (May be reset manually). D Before opening the electric terminal box, make sure power supply is off in case of contracting electric shock and causing serious burns. E The handle of the frying baskets can be folded and dismantled, it has a stainless steel oil level calibrator, they are easy to operate, clean, handle and store. F Heating Elements have a cover which is simple to draw out from the bottom box away from oil pot making clean heating elements and the oil pot easier 688005-55 en ma 2014 2 B. PRODUCT SPECIFICATIONS Name Model Voltage Power Number Of Oil Pots Size of oil pot (mm) Volume No. of frying basket Size of frying basket Oil temperature range Dimensions (mm) Weight 1 Tank Fryer 8 liter ~230V, 50Hz 3250W 1 240×300×200 mm 8 litre 1 195×250×150 mm 60ºC ~ 190ºC 295×430×345 mm 8,1kg Naam Model Voltage Power Number Of Oil Pots Size of oil pot (mm) Volume No. of frying basket Size of frying basket Oil temperature range Dimensions (mm) Weight 2 tank Fryer 2 x 8 liter ~230V, 50Hz 2 × 3250W 2 240×300×200 mm 2 × 8 liter 2 195×250×150 mm 60ºC ~ 190ºC 550×430×345 mm 14 kg NOTE THE QUANTITY OF FOOD MUST BE LIMITED IN ORDER TO AVOID OIL OVERFLOW. FRYING TOO WATERY FOOD AND PUTTING TOO MUCH AT ONE TIME WILL CAUSE OIL TO OVERBOIL. ADD FOOD MODERATELY AND IN LIMITED VOLUME INTO EACH FRIER. 8 LITER / 2X 8 LITRE ±1.2KG/POT C. CIRCUIT DIAGRAM S1 - MICRO-SWITCH SA - TEMPERATURE LIMITER EH - HEAT ELEMENT HL1 - POWER INDICATOR 688005-55 en ma 2014 HL2 - HEATING INDICATOR B - GROUND STUD SB - THERMOSTAT 3 E. INSTRUCTION 01. - Check if the power supply is normal and makes sure both supplied and utilized voltage are the same. 02. - There is an oil level indicator in the inner side of the pot, oil should be poured in quantity depending on amount necessary. 03. - 1) Plug-in to start operating, a green indicator light will turn on. 2) Turn the thermostat clockwise to the desired temperature degree level. A yellow indicator will turn on and green indicator goes off simultaneously, therefore the heating elements begin to work and oil temperature rises 04. - 1) When oil temperature rises to the preset degree, its controller will cut off power automatically 2) Once oil temperature lowers, its controller will give power again automatically. The yellow indicator will turn on and green indicator will go off, heating elements begin heating up again and oil temperature rises. 3) It does this repeatedly to make sure oil temperature is constant in the preset degree. 05. - The pot cover is designed for keeping clean and warm. When covering the pot, please make sure there is no water on the cover in case it drips into oil. 06. - 1) There is a hook and handle on the Clip-On Frying Basket for smaller foods. 2) Drop the baskets into oil pot, lift them up once its done and hang them on top of the pot to let the oil filter out. 07. - After operation please turn the switch to “off” position and unplug cord to cut off power supply. 08. - 1) Please get rid of the old oil once oil temperature is drops low. 2) First, cut off power supply then take out the electric terminal box together with the heating elements, making it more convenient to clean the oil pot. 09. - To ensure product durability and effectiveness please clean each and every part of this equipment frequently. 10. - The oil pot partition board is designed to protect the heating elements, place the partition board into oil pot when frying food. 11. - 1) There is a constant temperature in the electric terminal box. The displacing temperature is 230°C; reset temperature is less then 170°C. 2) There is an “abort button for over-heating” on the side. When temperature goes over the limit, press the abort button to restart. 12. - There is a micro-limit switch inside the electric terminal box, when placed in bottom box power goes on, when taken out power goes off. 13. - Please use fresh vegetable oil which better prevents from over boiling. 688005-55 en ma 2014 4 NOTICE: This equipment must be operated by trained personnel. Do not disassemble! The disassembly of this product may cause serious accident. Do not wash the machine with a water hose or soak the electric box into water while cleaning. Do not touch the lower portion of this equipment shortly after use in case of serious burns. Do not use a power supply with different voltage. Do not use main switch that does not accord with safety regulations. When thunder and lighting approaches, cut off main switch to avoid damage. Do not use hard or sharp objects to destroy the surface of oven body and oil pot. Please shut off main switch after operation. The installation and maintenance of the electric circuit should be done by professionals. If power cord is damaged please contact manufacturer or maintenance department or professionals for replacement. NOTES FOR INSTALLATION The voltage for this equipment must equal the supplied voltage. A suitable power switch and breaker switch should be installed near the fryer. On the back of the equipment is the ground bolt. Please connect the ground wire in compliance with safety regulations preferably use copper cable at least 2mm. Before operation check whether every connection is firm, voltage is normal and ground connection is safe. Do not use a water jet directly on the electric box. The installation of this appliance should be done by trained and qualified personnel. WARNING! When operating, hands, plug and switch must be dry. Oil should not be lower than the minimum indicated level. Do not use water to wash the electric terminal box directly. Do not use old oil to fry for it may cause over boiling. Do not fry food too wet for it may cause accidents. 688005-55 en ma 2014 5 G. TROUBLESHOOTING. Problem: Causes: 1. Plug is not inserted well. 1. Plug the machine and get through power supply, power 2. Micro-switch contacts not well. indicator is not on and heat. Not on either. 2. Heating indicator is not on and temperature is not raised. 1. Connection of thermostat is loose. Solution: 1. Remove the plug. 2. Adjust the limit distance of micro-switch 1. Firm two sides of electric heating tube and screw it tight. 2. Change heat element. 3. Power indicator is on but the 1. Thermostat is burned. set temperature is not raised. 1. Change thermostat. 4. Thermostat is normal but indicator is not on. 1. Indicator is burned. 1. Change indicator. 5. After circuit heating electric heating tube is not heated. 1. Temperature limiter works. 1. Reset “over heating protecting button” manually. 6. Temperature can not be controlled. 1. Temperature limiter is out of order. 1. Change temperature limiter. The above content is for reference, only if other problems arise, please stop using immediately and contact our company or agency for diagnosis and repair. H. DISPLACEMENT AND STORAGE. During displacement, the machine should be carefully handled and prevented from jostle and collision. When still unpacked, it should not be stored outdoors but in a ventilated warehouse away from the possibility of contacting corrosive gas. It should not be placed upside down, if for any reasons this product should be placed outdoors please make sure it is safe from rain and dirt. I. CLEANING AND MAINTENANCE. A Cut off the power supply before cleaning in case of serious danger. B Do not use a wet towel with any type of corrosive substances to clean the module plates along with the surface of the equipment and power cord. Direct water spraying is not suggested in case of functional damage. C If not in use please turn off temperature switch and power switch. D Please store the equipment in a ventilated area without contact of corrosive gas. 688005-55 en ma 2014 6 J. DAILY CHECK Check the status of the equipment everyday before and after operation. Check whether the machine is tilted? BEFORE USE Check whether the power cord is stripped, broken or damaged? Check whether the control panel is damaged? Check whether there is an awkward smell. AFTER USE Check whether the upper and lower module plates cannot be heated at the same time? Check whether there are strange noises or if the machine is out of order? WARNING! PLEASE CHECK THE MACHINE FREQUENTLY TO PREVENT FUTURE PROBLEMS. NOTHING WITH TEMPERATURE EXCEEDING 300°C SHOULD BE AROUND THE MACHINE. STOP USING IMMEDIATELY IF IT FEELS THAT THE MACHINE IS NOT WORKING PROPERLY. SEEK A TECHNICIAN FOR CHECK AND MAINTENANCE OF THE MACHINE AS SOON AS POSSIBLE. 688005-55 en ma 2014 7