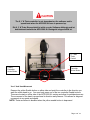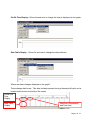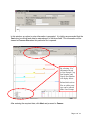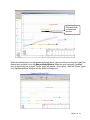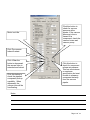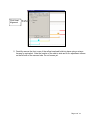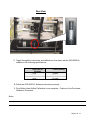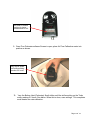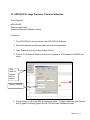
1
Precision Systems for the Electronics Bench
APR-5000XL and APR-5000XLS
Users Guide
APR-5000XL and APR-5000XLS Users Guide 7000-1590_E
Page 1 of 114
Copyright © 2004
OK International, Inc.
12151 Monarch Street
Garden Grove, CA 92841
Visit us on the web at www.okinternational.com
PROPRIETARY NOTICE:
This document contains proprietary data of OK International, Inc. The receipt or
possession of this document does not convey any rights to reproduce it, disclose its
contents, or to manufacture the concepts and details disclosed by this document. This
document may not be copied or disclosed in whole or in part to anyone without written
permission of an officer of OK International, Inc.
All rights reserved.
Page 2 of 114
CONTENTS
Preface................................................................................................................................... 4
1. Introduction and General Overview.................................................................................. 9
2. System Features and Accessories................................................................................. 11
3. Set-Up Procedures......................................................................................................... 13
4. Software Operation ........................................................................................................ 20
5. Getting Started ............................................................................................................... 24
6. New Placement Process ................................................................................................ 31
7. Modify Existing Process ................................................................................................. 44
8. Manual Mode ................................................................................................................. 46
9. APR-5000-XL Test Tab Window .................................................................................... 53
10. APR-5000-XL Head Alignment Procedure ..................................................................... 59
11. APR-5000-XL Optical Calibration Procedure ................................................................. 70
12. Centralization of Vacuum Nozzle in Software Window.................................................. 76
13. APR-5000-XL Quick Nozzle Co-planarity and Vacuum Nozzle Adjustment ................... 80
14. APR-5000-XL Thermocouple Calibration ....................................................................... 82
15. APR-5000-XL Reflow Head Airflow Calibration .............................................................. 85
16. APR-5000-XL Preheater Airflow Calibration (Small and Large) .................................... 88
17. APR-5000-XL Head Thermal Calibration ....................................................................... 96
18. APR-5000-XL Large Preheater Thermal Calibration ...................................................... 99
19. APR-5000-XL Thermal Calibration of Small Preheater ................................................ 102
20. Trouble Shooting Grid & Error Messages..................................................................... 103
21. Nozzles, Vacuum Pickup Nozzle And Accessories ...................................................... 108
22. Calibration Kit & Spare Parts........................................................................................ 110
23. Site Preparation ........................................................................................................... 111
24. Warranty And Service .................................................................................................. 114
25. Technical Support Contact ........................................................................................... 114
Page 3 of 114
Preface
Safety And Regulatory Information
WARNING
• TO PREVENT FIRE OR SHOCK HAZARD, DO NOT EXPOSE SYSTEM TO
MOISTURE.
•
TO PREVENT FIRE OR SHOCK HAZARD, DO NOT USE FLAMMABLE SOLVENTS
NEAR OR ON THE SYSTEM WHILE CONNECTED TO POWER SOURCE.
•
TO PREVENT POSSIBILITY OF INJURY OR DAMAGE TO THE SYSTEM, DO NOT
OPERATE WITH ANY COVERS OR PANELS REMOVED.
•
CHANGES OR MODIFICATIONS MADE TO THIS PRODUCT WITHOUT EXPRESS
APPROVAL FROM OK INTERNATIONAL COULD VOID THE USERS AUTHORITY
TO OPERATE THE EQUIPMENT.
● Read and understand the entire User’s Manual before installation or operation of the
APR-5000-XL/XLS. Heed all warnings on the system and in the operating instructions.
Vor Installation oder Inbetriebnahme des APR-5000 muss die gesamte
Bedienungsanleitung gelesen und verstanden worden sein. Beachten Sie alle
Warnhinweise am System selbst, sowie die Sicherheitshinweise in diesem Handbuch.
● Use of the APR-5000-XL/XLS is intended only for the removal and placement of
electronic components on to printed circuit boards by properly trained personnel. If
you are not familiar with the proper and safe operation of the APR-5000-XL/XLS, do
not operate until proper training has been obtained.
Das APR-5000 darf nur zum Entlöten und Platzieren elektronischer Komponenten auf
Leiterplatten durch entsprechend geschultes Personal eingesetzt werden. Wenn Sie
mit dem ordnungsgemäßen und sicheren Betrieb des Systems nicht vertraut sind,
sollten Sie zunächst in die Funktionen eingewiesen worden sein.
● Unit should be operated only from the type of power source indicated on the serial
number label.
Schließen Sie das Gerät nur an die Stromversorgung an, die auf dem Typenschild
angegeben ist.
● Use only the supplied power cords. Avoid damage to the power cord. If damage
should occur, replace it with the approved OK International replacement power cord.
Page 4 of 114
Verwenden Sie nur die zum Lieferumfang gehörenden Netzkabel, und achten Sie
darauf, dass Sie diese nicht beschädigen. Ersetzen Sie beschädigte Kabel durch
Originalkabel des Lieferanten.
This CAUTION symbol on the equipment refers the user to the User’s Manual for
additional information. This symbol appears next to the relevant information in the
manual.
Das Symbol “Caution” (Vorsicht) am Gerät verweist auf weitere Informationen im
Handbuch. Dieses Symbol erscheint neben den entsprechenden Hinweisen in der
Bedienungsanleitung.
This HOT symbol on the equipment warns the user of a hot surface and potential injury if
touched. Please refer to the User’s Manual for additional information. This symbol
appears next to the relevant information in the manual.
Das Symbol “Hot” (Heiß) am Gerät warnt vor heißen Oberflächen und möglichen
Personenverletzungen. Weitere Informationen finden Sie in der Bedienungsanleitung, in
der die Hinweise entsprechend gekennzeichnet sind.
This HEAVY LIFTING symbol on the packaging warns the user to team lift the APR-5000XL/XLS during removal from packaging and installation on the workbench. Please refer to
the User’s Manual for additional information. This symbol appears next to the relevant
information in the manual.
Mit dem Symbol “Heavy lifting” (schwer) auf der Verpackung wird der Bediener darauf
aufmerksam gemacht, dass das Gerät nur von mehreren Personen aus der Verpackung
genommen und an dem Arbeitsplatz installiert werden sollte. Weitere Informationen
finden Sie in der Bedienungsanleitung, in der die Hinweise entsprechend gekennzeichnet
sind.
Page 5 of 114
Other Safety Tips
● Unplug the unit before cleaning. Clean the exterior of the system with a damp cloth.
Do not use solvent-based cleaners.
WARNING: When there is no power to the APR, the reflow head will slowly descend to
the down position from its “home position”. This may result in the head assembly
coming in contact with the work piece. To avoid potential damage to the workpiece it
is highly recommended it be removed before removing power from the APR. Users
may also consider the use of an Uninterruptible Power Supply (UPS) in areas where
unplanned power outages occur.
● Slots and openings in the system provided for ventilation and to ensure reliable
operation and protection from overheating. The openings should never be blocked or
covered.
● Do not overload power outlets and extension cords. This can result in a risk of fire or
electric shock.
Safety and EMC Information
Declaration of Conformity
TUV Certified
89/336/EEC
EN61326-1: 1997
EN 55011/CISPR 11:1998
FCC CFR Part 15 Subpart B
EMC Standards
Europe
North America
Federal Communications Commission
This equipment has been tested and found to comply with the limits for Class A digital
device, pursuant to part 15 of the FCC Rules. These limits are designed to provide
reasonable protection against harmful interference in an industrial installation. This
equipment generates, uses and can radiate radio frequency energy and, if not installed
and used in accordance with the instructions, may cause harmful interference to radio
communications. However, there is no guarantee that interference will not occur in a
particular installation. If this equipment does cause harmful interference to radio or
television reception, which can be determined by turning the system off and on, the user
is encouraged to try to correct the interference by one or more of the following measures:
● Reorient or relocate the receiving antenna.
● Increase the separation between the equipment and receiver.
● Connect the equipment into an outlet on a circuit different from that to which the
receiver is connected.
Page 6 of 114
● Consult the dealer or an experienced radio / TV technician for help.
Specifications
Input Voltage
200-240 VAC, 50/60 Hz
Power Consumption
System Total
Pre-Heater (Large Configuration)
Pre-Heater (Small Configuration)
Reflow Head
20 AMP, single phase
3700 W
2800 W
1400 W
550 W
Circuit Breaker
Pre-Heater
Base
15 AMP
15 AMP
Temperature Control Type
Closed-Loop Control (RTD Sensors)
Maximum Source Temperature
Reflow Head
Large Pre-Heater source temp
Small Preheater source temp
400°C (842°F)
350°c (662°F)
350°c (662°F)
Airflow
Control
Supply
Optional Nitrogen Input
Nitrogen Operating Spec
Preset to 8, 16 & 24 l/min
Self contained pump
Standard Feature
Not to exceed 65 PSI(4.7 BAR)
Component Handling
Maximum Size
Minimum Size
Maximum Weight
55mm x 55mm (2.2" x 2.2")
1.0mm x 1.0 mm (0.040” x 0.040”)
55 g (0.92 oz)
PCB Handling Capability
Maximum Size
Maximum Thickness
622mm x 622mm (24.5” x 24.5”)
6.0mm (0.240”)
Vision
Maximum Field of View
Maximum Magnification
55mm x 55mm (2.2” x 2.2”)
10-55X
System Dimensions (Estimate)
WxDxH
Weight
914mm x 914mm x 711mm
(36” x 36” x 36”)
100Kg (220lbs)
Page 7 of 114
Warranty
System Part Numbers
Part Number
APR-5000-XL
One-year parts & labor
90 days heaters & lamps
Item Description
XL Array Package Rework Sys with Standard
Vision
APR-5000-XLS
XL Array Package Rework Sys with Split Vision
APR-M17*
APR Monitor, 17" Flat Panel
APR-CNTRL-EN*
APR-Controller, English Version
APR-CNTRL-SP*
APR-Controller, Spanish Version
APR-CNTRL-JP*
APR-Controller, Japanese Version
APR-CNTRL-TC*
APR-Controller, Traditional Chinese Version
APR-CNTRL-SC*
APR-Controller, Simplified Chinese Version
APR-CNTRL-KR*
APR-Controller, Korean Version
APR-CNTRL-FR*
APR-Controller, French Version
APR-CNTRL-GR*
APR-Controller, German Version
* Required for APR-5000-XL and APR-5000-XLS system.
Environmental Conditions (all models)
•
Suitable for indoor use only at altitudes not exceeding 6500 ft (2km)
•
All systems must be grounded
•
Maximum relative humidity of 80% at 88°F (31°C) decreasing linearly to 50% at 104°F
(40°C)
•
Temperature range of 41°F (5°C) to 104°F (40°C)
•
Mains supply voltage fluctuations not to exceed ±10% of 210 VAC
•
Pollution degree 2 per IEC 644
•
Insulation category II
Vision System
The APR-5000-XLS system provide split field image system to allow corner crossover on
large components a maximum four-sided view of 55mm x 55mm (2.2” x 2.2”). The
camera magnification has a range of 10X to 55X optical zoom.
Page 8 of 114
Shipping Data
48" W x 48"D x 48" H
Size
Weight
340 lbs. (154 KG.)
1. Introduction and General Overview
Thank you for your purchase of a OK International APR-5000-XL/XLS Array Package
Rework System. Each unit has been inspected thoroughly by OK International prior to
shipment, and with proper maintenance will give you years of reliable performance.
This Operator’s Instruction Manual is a valuable resource. It explains the systems
options, features, specifications and the basic operation of your APR-5000-XL/XLS Array
Package Rework System. This manual is intended as a guide to the operation of the
software. The software itself provides users prompts and, along with training, will guide
the operator in use. If any problems should occur during setup or operation of your
system, contact OK International's Technical Support Department at
[email protected] or refer to section XVII of this manual for the nearest local
OK International Representative.
This OK Internatioal APR-5000-XL/XLS Array Package Rework System provides both
accurate component placement and specifically tailored reflow profiles (through OK
International’s patented single component Micro Oven™) in one user friendly, single
platform rework system.
The challenges of Array Package Rework, and the inability to easily inspect placement
accuracy (with BGAs in particular), call for a solution that allows for simultaneous viewing
of PC board pads and component pads or balls for accurate placement. The APR-5000XL/XLS fills this need with quick, accurate placement through the use of an optical
system employing dual image overlay technology. The image of the BGA solder balls is
overlaid with that of the PC board pattern. The image is viewed on the computer monitor
then the motorized fine adjustment permits fine X, Y, Z and theta adjustment at up to 50X
magnification. Finally, the part is placed and the vacuum is released automatically.
After accurate component placement is achieved, the vacuum pickup tube is
automatically retracted and the reflow nozzle is lowered into place. At this point, the
component is subjected to a five zone, full convection reflow profile, specifically tailored to
the requirements of that particular PCB, device and solder paste. Accurate duplication of
original oven reflow parameters is achieved.
During the course of the reflow profile, source temperatures and time intervals can be
modified “On the Fly”, eliminating the need to wait for the current pro\file to terminate
before modifications can be made. Precise solder joint temperatures are measured and
displayed on a real time graphical display, thus providing the necessary data to
accurately and easily establish the optimum reflow profile for each particular application
within minutes.
Page 9 of 114
When operating this equipment, please exercise caution. If this unit is used in
a manner, which it is not intended for, serious personal injury may occur.
Please read this operators manual thoroughly prior to use.
Seien Sie während des Betriebs des Gerätes vorsichtig. Wird das System für
einen anderen Verwendungszweck eingesetzt, kann es zu ernsthaften
Personenschäden kommen. Lesen Sie diese Bedienungsanleitung vor der
Inbetriebnahme sorgfältig.
The main power cord is a means for disconnecting the APR-5000-XL/XLS
from an operating energy source. Equipment must not be positioned in a way
that impedes the disconnection of the main power cord in case of an
emergency.
Für den Anwender ist die Benutzung eines Erdungsbandes während der
Bedienung der APR-5000 XL/XLS zwingend erforderlich.
Mandatory use of a grounding strap is required when operating the APR-5000
XL/XLS.
Für den Anwender ist die Benutzung eines Erdungsbandes während der
Bedienung der APR-5000 XL/XLS zwingend erforderlich.
Page 10 of 114
2. System Features and Accessories
APR-5000-XL/XLS ARRAY PACKAGE REOWRK SYSTEM INCLUDES:
1. APR-5000-XL/XLS Series Base Unit
2. Adjustable size board holder
3. APR-5000-XL/XLS Accessory Kit (APR-5XLAK)
APR-5XLAK ACCESSORY KIT INCLUDES:
Lid Storage Organizer 18 1/4 x 13 3/8 x 3 5/8
MPVB, Adj. "V" Block for BGA Components
Optical Calibration Kit
Tape, Kapton
Handle, Squeegee
CSP-VB, Adj. "V" Block for CSP Components
Fine gauge multi-colored thermocouples (5incl.)
Wrench, hex key, T-handle, 9/64, 6" blade
Wrench, hex key, T-handle, 7/64, 6" blade
Screwdriver, slotted, 3/16" width,7"blade
Screwdriver, Phillips, #2,7 13/16" long
Ball end hex key set
Cable, EGA/CGA ser. Monitor ext., db9f/db9m, 6 ft.
Cable, video w/ RCA, 2 meter, low loss
Nozzle removal pad
APR-5XLAK contents checklist
O-Ring Kit
Vacuum nozzle removal pad
PCB spring finger long (pack 2)
PCB spring finger short (pack 2)
Kit, solder paste/flux prep plate
APR Vacuum pick up nozzle 1mm O/D
APR Vacuum pick up nozzle 3mm O/D
APR Vacuum pick up nozzle 5mm O/D
APR Vacuum pick up nozzle 8mm O/D
APR Vacuum pick up nozzle 12mm O/D
APR Vacuum pick up nozzle 19mm O/D
1
1
1
1
1
1
1
1
1
1
1
1
1
1
1
1
1
1
2
2
1
1
1
1
1
1
1
Page 11 of 114
1
13
2
3
11
4
5
6
10
7
9
8
Figure 1
17
12
14
15
16
Figure 2
18
APR-5000XL and APR-5000XLS Users Guide 7000-1590_D
Page 12 of 114
Main Unit Components (Figure 1 and Figure 2)
1.
2.
3.
4.
5.
6.
7.
8.
9.
10.
11.
12.
13.
14.
15.
16.
17.
18.
LED Power Indicator
Reflow Head
Composite video output
Computer RS232 cable input
Open Frame adjustable printed circuit board holder
Next Button (Enter)
Reflow Head Up Action Button (2 button operation 1 on each side of casting)
Reflow Head Down Action Button (2 button operation 1 on each side of casting)
X & Y Axis Enable Button (2 button operation 1 on each side of casting)
Type K thermocouple inputs (5)
X, Y & Theta Adjustment Control
Main Power Switch
Camera & Lighting assembly
Nitrogen input
Circuit breaker
Main power cord
Flow meter head
Cooling fan
3. Set-Up Procedures
The main unit is very heavy. Please uncrate the unit with 2 people.
DO NOT LIFT THE MAIN UNIT BY THE PCBA BOARD HOLDER RAILS.
LIFTING BY THE RAILS WILL DAMAGE THEM!
Das Basisgerät ist sehr schwer. Bitte nur mit 2 Personen auspacken.
HEBEN SIE DAS HAUPTGERÄT NICHT AN DEN SCHIENEN AN.
UB ESCHÄDIGUNGEN ZU VERMEIDEN!
Page 13 of 114
APR-5000-XL/XLS Main System
Prior to performing initial set-up, unpack all accessories from their shipping containers.
Ensure that your APR-5000-XL has arrived complete by verifying that all of the accessories
listed in Section II of this manual have been included. After all components are located, setup
can then begin.
•
Remove the APR-5000-XL Main Unit and all accessories from their shipping containers.
When setting up this equipment, be sure to arrange it in a position that allows the user to
operate this machine in a comfortable, well-spaced environment.
IMPORTANT: Every APR-5000-XL Rework System has been factory assembled and calibrated.
Recalibration is not necessary after initial setup. However verifying Airflow, Calibration and
product functionality is strongly recommended prior to initial use. This procedure is thoroughly
discussed later in the manual in the section titled “Calibration.”
Controller and Software Setup
System Requirements
To run the APR-5000-XL/XLS you will need the following:
●
●
●
●
●
●
●
●
●
PC with Pentium III processor (600 MHz or higher recommended)
128 MB of (RAM) memory
3.5” floppy disk drive
Hard disk drive with at least 20 Megabytes of free space
CD-ROM
32MB, 4X AGP video card or equivalent
17” Monitor (28dpi) 1280 x 1024 optimal resolution *
Windows® 98, 2000 or Windows® NT operating system
Internal Hauppauge
* Note – To optimize screen use and vision, resolution must be set at 1280 x 1024.
Page 14 of 114
Computer Set-up
1. Unpack the controller and all its accessories.
2. Using the documentation supplied by the Controller Manufacturer make all the necessary
connections.
3. Connect the controller to the APR-5000-XL utilizing the supplied RS-232 cable.
4. Connect the video output from the APR to the video input on the controller utilizing the
supplied RCA video cable and S-Video adaptor.
5. When powering the system please use the following startup sequence:
i. Power on APR
ii. Power on the Controller
iii. Initialize the APR Software
6. When powering down the system
i. Close the APR Software
ii. Power down the APR
iii. Power down the Controller
7. This controller is for APR operation ONLY and is not meant to be a network computer.
Even though it will operate on a network it is not recommended.
8. This controller MUST NOT be locked while APR software is in use as this will shut down
the I/O and causes the controller to lose connection with the APR which may cause
damage to your product and or the APR machine.
9. NEVER turn on the screen saver or power management options as this may cause a
loss in connection between the controller and the APR machine.
NOTE: If you receive a communication error at anytime; reboot the computer and the APR
and reinitialize the startup sequence.
Internal
Hauppauge
video card
“Video In”
Mouse and
Keyboard
video output card.
Machine
RS232 cable
Controller Connections
Page 15 of 114
Final Power-up Sequence
Attach an appropriate power plug to the stripped end of the power cord.
Use recommended power plugs:
•
•
•
Nema 6-20
Nema L6-20
IEC 60309
Use the following diagrams together with the manufacturer’s recommended procedure
for hooking up wires to a power plug:
IMPORTANT
Before connecting the machine to power you will need to determine the voltage at
the wall socket. Use a basic AC voltmeter to do this task. Below are three
different diagrams showing some basic wire configurations for the US. These are
not necessarily showing what configuration you will see. Please have a qualified
electrician wire in the machine.
Configuration 1
1. Measure from X to Y. This measurement should always be 208VAC to 240VAC
2. Measure from G to X. This measurement will be 110VAC-125VAC
3. Measure from G to Y. This measurement will be 110VAC-125VAC
115VAC
240VAC
115VAC
Page 16 of 114
Configuration 2
1. Measure from X to Y. This measurement should always be 208VAC to 240VAC
2. Measure from G to X. This measurement will be 0 VAC
3. Measure from G to Y. This measurement will be 208VAC-240VAC
0 VAC
240VAC
240VAC
1. Set the APR-5000-XL Main power switch to the “on” position.
2. Turn on controller
3. On the “desktop” Double click the Oki icon.
Your APR-5000-XL Series Rework System is now ready for operation!
Using the Main X, Y & Theta Controller
All Reflow Head movement is driven and controlled by the base action buttons and control stick.
Proper understanding of the Reflow Head movement is necessary. It is recommended that the
end user become familiar with the X, Y and Theta controller to optimize use and avoid any
movement errors that may occur during a standard process run.
Page 17 of 114
The X, Y & Theta controller is not dependant on the software and is
operational when the APR-500-XL base is powered up.
Die X, Y & Theta Steuereinheit ist nicht von der Software abhängig und ist
betriebsbereit sobald das APR-5000-XL Basisgerät eingeschaltet ist.
X, Y and
Theta
Control
X and Y
Controller
Action Button
X and Y
Controller
Action Button
X or Y Axis Head Movement
Depress the yellow Enable button on either side and point the controller in the direction you
want the reflow head to go. You need only press one of the two controller Enable buttons.
These are located on either side of the APR-5000-XL casting and allow for ambidextrous use.
The movement of the head is proportional in direction and pressure. This allows for diagonal
movement at any grade and speed.
NOTE: Theta movement is disabled when the yellow enable button is depressed
Page 18 of 114
X Axis Movement
Y Axis
Movement
Controller Top View
Fine Theta Adjustment
Fine Theta adjustment is done when the yellow Enable button on either side are NOT
depressed. This allows for fine movement with minimal touch. Simply turn the top of the
controller in the direction you need the reflow head vacuum tube to turn.
Controller Top View
Page 19 of 114
4. Software Operation
Once your system has been setup and your software has been installed you must follow this
sequence for everyday operation of your APR-5000-XL system.
1. Set the APR-5000-XL Main power switch to the “on” position.
Turn on the controller
2. On the “desktop” Double click the Oki icon.
To begin operation, first turn the APR-5000-XL on and then launch the software.
After the system has initialized and the head has “homed”, three options will appear on the
primary software page:
Process Run – Allows end-user to open and use a current or saved profile.
Process Setup – Allows the end user to design Place and Remove profiles.
System Setup – Allows for verification and calibration of APR-5000-XL.
Primary Software Page
Page 20 of 114
Window Options and Features
The following Window Options and Features are available in all Process Setup windows.
File
Options in File are limited and are self explanatory with the exception of Export and Import.
The Export and Import functions allow the user to export or import thermal profiles from a
saved file. This function is the only way thermal plots can be saved and e-mailed from machine
to machine.
Edit
Options in Edit allow the end-user to copy the actual screen as a screen print or as a profile
image only. Also, the end-user can modify the type of curves and Temp/Time lines.
Copy Window
screen-prints the
entire image on
screen
Save Window
Image allows the
end-user to copy
the profile image
only
Page 21 of 114
Curve Options
Select Curve to
be modified
Select Curve
name, style,
width, and color.
Temp/Line Options
Select Line to be
modified
Select line style,
width, and color.
View
Options in View allow the end-user to change data viewed during recording or during use. The
two modifiable items are Profile Time Display and Data Table Display.
Page 22 of 114
Profile Time Display – Allows the end-user to change the time as displayed on the graph.
Data Table Display - Allows for end-user to change the data collected.
Where are these changes displayed on the graph?
These change data format. This data is always present during a thermal profile plot and is
located on the bottom right side of the screen.
Profile Live
Time
Display
Data Table
Display
Data from Temperature
and Time lines
Page 23 of 114
5. Getting Started
To begin using your APR-5000-XL system, click Process Setup to begin designing your
Removal or Placement process. In this part of the software, information is recorded and saved
as a file for use in Process Run.
Note –A saved profile can be opened and used in this mode however, the added steps required
to drive part of the program will make your common removal or placement tedious. Remember,
this mode is primarily for profile design, and not repeated use.
Process Setup – Guided process development. Not intended for repeated operation.
Process Run –Intended for repeated operation of a developed process. End User can be
provided with minor fine adjustment privileges.
Choose from one of the following options:
•
New Removal Process – Setup mode for creating a removal process for shields, BGA, CSP,
and micro-SMD components.
•
New Placement Process – Setup mode for creating a placement process for shields, BGA,
CSP, and micro-SMD components.
•
Modify Existing Process – Setup mode for modifying an existing placement or removal process
for shields, BGA, CSP, and micro-SMD components.
•
Manual – Setup mode that allows the end user to import existing thermal plots (not Processes)
and operate the APR-5000-XL manually.
This feature allows
the end user to toggle
between the Profile
and Vision.
Page 24 of 114
New Removal Process
Type in the necessary information such as Chip Package, Component Ref (location of
component on PCB) and PCB Desc (PCB description) and choose the amount of heating your
PCB needs by either picking Large preheater or Small preheater.
Page 25 of 114
In this window, an option to enter information is prompted. It is highly recommended that the
Yes button be clicked and data be entered in each of the three fields. This information will be
viewed in Process Run when this particular file is opened.
By selecting “Yes”
information keyed in
User Prompt, Cup
Part Number, and
Nozzle Part Number
will display below.
After entering the required data, click Next and proceed to Camera
The APR-5000-XL software will automatically switch to the Vision screen. The following
information is now available to modify:
•
Head Speed (Coarse and Fine Adjustment)
•
Lighting Controls (Top & Bottom)
•
Camera Focus
•
Camera Zoom
Page 26 of 114
This button allows the end user to
modify the programmed height in
Process Run.
Head Speed (Coarse and Fine Adjustment)
– Allows end-user to alter speed of head
during a process.
Lighting Control- Allows end-user to alter
light setting to achieve optimum lighting for
a given component.
Focus - Allows end-user to alter focus to
achieve optimum visual on component.
Zoom - Allows end-user to alter zoom to
achieve optimum visual on component.
Copy Window screen-prints the entire
image on screen. Save Image saves picture
as a J-PEG file.
Page 27 of 114
IMPORTANT
All movements are recorded during Process Setup. As a result, any and all
mistakes will appear in the Process Run. A way to avoid editing Process Setup
programs each time an error is discovered is by clicking the Enable operator
control during process run. This will allow the end user to modify the
programmed height in Process Run.
When done with adjustments, press Next and proceed to Lift.
In Lift, the option to lift the component during the removal process is provided. This option was
designed to allow for a three distinct processes that are used in rework.
Retract vacuum tube - Designed to minimize adjacent component heating that may occur after
removal.
Raise head – Designed for use with high I/O removable such as large BGA components or
CBGA.
Do not remove – Designed to self-center components that have slightly skewed but not
bridged or reflow cold solder joints.
Follow prompt on the screen to Create Profile.
During the Create Profile run, two key buttons are visible. One is Stop, and the other is Cycle
Advance.
Stop allows the process to be aborted before a profile has been created.
Cycle Advance allows the end user to cycle to the next zone.
Page 28 of 114
When this has been accomplished, proceed to Save the profile. To save the profile, the end
user must press Finished.
The New Removal Process is now complete.
IMPORTANT
These features allow the end user to create the correct profile for the process
movement and makes thermal profiles easier to modify or e-mail. To monitor your
profile, attached the five thermocouples to the PCB and component as needed.
Profile Window Options
Options in the Profile Window allow the end user to add eight time lines and modify existing
temperature lines while the program is in process. This allows the end user to record eight key
data points in the profile. These options can be activated when the using the pointer on the
screen. Data within those crossing lines will be monitored as part of the graph data located on
the lower middle part of the screen.
How to activate new time lines?
Left click your pointer on a far right of your screen where the dotted time line is. When active,
simply hold and drag the new line to any point on the profile you wish to record.
How to modify existing temperature lines?
Left click your pointer to any one of the four available temperature lines and drag the line to
vertical position desired.
Page 29 of 114
Temperature
Lines
Left click mouse and
hold & drag time line.
Data from temperature
and time lines
Cut/Copy Curve
The Cut/Copy Curve option allows the end use to copy a given profile line and superimpose it
on another profile. This option allows can be used to verify an existing profile and test the APR5000 XL performance over time.
To activate this copy option, right click your mouse pointer on the target line you wish to copy.
When activated, an option window will appear in the middle of the monitor screen and prompt
the end user to pick from one of the seven curves. They are as follows:
Page 30 of 114
•
•
•
•
•
•
•
Bottom Heat
TC1
TC2
TC3
TC4
TC5
Top Heat
6. New Placement Process
Go to Main Process Setup Window and click New Placement Process.
Type in the necessary information such as Chip Package, Component Ref (location of
component on PCB) and PCB Desc (PCB description) and choose the amount of heating your
PCB needs by either picking Large preheater or Small preheater.
Page 31 of 114
In this window, an option to enter information is prompted. It is highly recommended that the
Yes button be clicked and data be entered each of the three fields. This information will be
viewed in Process Run when this particular file is opened.
By selecting “Yes”
information keyed
in User Prompt, Cup
Part Number, and
Nozzle Part Number
will display below.
Related info such as
Flux or solder paste
type can be entered
under User Prompt.
After entering the required data, click Next and proceed to Camera
Page 32 of 114
The next option to appear in the window is “Select component pickup method”. This option is
required for the next step.
Component pick up - Designed for use with the component pick-up block. Although not
preferred, this option also allows the end user to prepare the rework site with liquid flux instead
of gel flux or solder paste.
Note-Liquid flux does not evenly distribute the organic material necessary for
a sound solder joint. This method can create voids or opens.
Pickup with paste - Designed for use with OK International component stenciling plate (BST).
This method along with the correct stencil allows the end user to recreate OEM stand-off height.
This process is preferred to both flux methods.
Pickup with flux dip - Designed for use with OK International Dip Transfer Plates (DTP), this
process allows end users to transfer gel flux onto the solder ball only, increasing
success rate and minimizing the amount of flux residue.
DTP Plate
DTB Block
Page 33 of 114
Component pickup Process
Click on Component pickup Process and the “Component” window will appear. Focus on the
PCB pads.
When in this window follow the prompts place the centering fixture into position.
When the fixture is in position and component oriented, follow the prompts on the screen. Use
both coarse and fine adjustments to place the vacuum cup onto the component.
When the component is in position and the head is lifted up from the fixture, remove the
centering fixture and click “Next”.
Using the up and down keys on the APR-5000-XL system, lower the head until the component
has come into view and the over lay image of the component is directly above the solder pads.
Focus on the component.
Focusing Process
1.
2.
3.
4.
5.
6.
Dim the component lamp (top lamp).
Focus directly onto the PCBA and zoom into view.
Dim the PCBA lamp (bottom lamp) and increase lighting on component.
Using the action buttons, drive the head down until the component comes into full view
Do not adjust focus. Focus will be driven by the height of the component.
Once bit the component and the PCBA have been set, increase the lighting on the
PCBA.
Your view should be in focus now.
Page 34 of 114
Component
Overlay
Solder Pads
If the image is not over-laid correctly, press one of the yellow buttons located on either side of
the APR-5000-XL body and, using the joystick, orient the component into position.
As prompted, focus the PCBA and use the UP/Down keys to place he component in focus.
Page 35 of 114
Using the action buttons, lower the head into position. Use the Coarse button to lower the
component to the PCB. The head will lower to approximately 2 inches form the PCB. At this
point, you will need to click Fine to continue. Proceed until the component has touched the
PCBA and the component is in position.
Adjust reflow nozzle height using the same up and down keys.
Note- OK International’s patented reflow nozzle allows the nozzle to touch
the PCBA with minimal clearance from the nozzle body (.010). This
increases thermal efficiency and reduces spacing issues that may exist.
The reflow nozzle can also reflow components when spaced up to 3mm
from the PCBA. This can be very helpful when reworking densely packed
PCBAs.
Click Next to release the component.
Follow prompt on the screen to Create Profile.
Profiling during a process is allowed. This on-the-fly profiling allows the end user to quickly
change the profile during the record mode and get the profile right the first time around. To
make changes during a process, simply left click your mouse on one of the 10 temperature
bars (five for Top Heat and five for Preheater) and drag the bar into the desired position. This
feature allows the end user to modify existing processes as well.
Page 36 of 114
Temperature
Setting Bars
When the profile has been determined, proceed to Save the profile. To save the profile, the
end user must press Finished.
Pickup with paste Process
Click on Pickup with paste and the “Component” window will appear. Focus on the PCB pads.
When in this window follow the prompts place the centering fixture into position.
Place the BGA Stenciling Template (BST) into position.
Page 37 of 114
Lower the head into position and pick up the solder pasted component.
Click “Next” to turn the vacuum on.
When the component is in position and the head is lifted up from the fixture, remove the
centering fixture and click “Next”.
Using the up and down keys on the APR-5000-XL system, lower the head until the component
has come into view and the over lay image of the component is directly above the solder pads.
Focus on the component.
Component
Overlay
Solder Pads
If the image is not over-laid correctly, press one of the yellow buttons located on either side of
the APR-5000-XL body and, using the joystick, orient the component into position.
Page 38 of 114
As prompted, focus the PCBA and use the Up/Down keys to focus the component.
Using the action buttons, lower the head into position. Use the Coarse button to lower the
component to the PCB. The head will lower to approximately 2 inches from the PCB. At this
point, you will need to click Fine to continue. Proceed until the component has touched the
PCBA and the component is in position.
IMPORTANT
While placing the component onto the PCB, a fine adjustment of 10 mils or
less is recommended. This avoids problems with crushed solder paste and
minimizes solder bridging.
Adjust reflow nozzle height using the same up and down keys.
Page 39 of 114
Note- OK International’s patented reflow nozzle allows the nozzle to
touch the PCBA with minimal clearance from the nozzle body (.010).
This increases thermal efficiency and reduces spacing issues that
may exist. The reflow nozzle can also reflow components when
spaced up to 3mm from the PCBA. This can be very helpful when
reworking densely packed PCBAs.
Click Next to release the component.
Follow prompt on the screen to Create Profile.
When this has been accomplished, proceed to Save the profile. To save the profile, the end
user must press Finished.
Pickup with flux dip Process
Click on Pickup with flux dip and the “Component” window will appear. Focus on the PCB
pads.
When in this window follow the prompts place the centering fixture into position.
When the fixture is in position and component oriented, follow the prompts on the screen. Use
both coarse and fine adjustments to place the vacuum cup onto the component.
Page 40 of 114
When the component is in position and the head is lifted up from the fixture, remove the
centering fixture and click “Next”.
Using the up and down keys on the APR-5000-XL system, lower the head until the component
has come into view and the over lay image of the component is directly above the solder pads.
Focus on the component by using the fine up and down control keys and not by using the
Focus function.
Component
Overlay
Solder Pads
If the image is not over-laid correctly, press one of the yellow buttons located on either side of
the APR-5000-XL body and, using the joystick, orient the component into position.
Page 41 of 114
As prompted, focus the PCBA and use the Up/Down keys to place the component in focus.
After the component has been aligned and focused to the PCB pads, click next.
Using the spatula provided with the flux transfer kit spread a controlled bead of gel flux onto the
flux transfer plate (DTP).
As prompted, move the centering fixture forward and place the flux transfer plate (DTP) into the
centering fixture.
Using the down keys, lower the component into the flux transfer plate (DTP).
Once the component is immersed in flux, use the Up keys to raise the head up and away from
the flux transfer plate (DTP).
Page 42 of 114
Using the action buttons, lower the head into position. Use the Coarse button to lower the
component to the PCB. The head will lower to approximately 2 inches from the PCB. At this
point, you will need to click Fine to continue. Proceed until the component has touched the
PCBA and the component is in position.
Adjust reflow nozzle height using the same Up and Down keys.
Note- OK International’s patented reflow nozzle allows the nozzle to
touch the PCBA with minimal clearance from the nozzle body (.010).
This increases thermal efficiency and reduces spacing issues that
may exist. The reflow nozzle can also reflow components when
spaced up to 3mm from the PCBA. This can be very helpful when
reworking densely packed PCBAs.
Click Next to release the component.
Follow prompt on the screen to Create Profile.
Profiling during a process is allowed. This on-the-fly profiling allows the end user to quickly
change the profile during the record mode and get the profile right the first time around. To
make changes during a process, simply right click your mouse on one of the 10 temperature
bars (five for Top Heat and five for Preheater) and drag the bar into the desired position. This
feature allows the end user to modify existing processes as well.
Page 43 of 114
Temperature
Setting Bars
When the profile has been determined, proceed to Save the profile. To save the profile, the
end user must press Finished. When this has been accomplished, proceed to Save the profile.
To save the profile, the end user must press Finished.
The New Placement Process is now complete.
7. Modify Existing Process
Modify Existing Process allows the end user to modify any Removal or Placement process.
This simplifies the process and allows multiple component types to be removed from the same
PCB.
Follow the prompts on the screen and modify the data as needed.
Click Next to release the component.
Page 44 of 114
Follow prompt on the screen to Create Profile.
Profiling during a process is allowed. This on-the-fly profiling allows the end user to quickly
change the profile during the record mode and get the profile right the first time around. To
make changes during a process, simply right click your mouse on one of the 10 temperature
bars (five for Top Heat and five for Preheater) and drag the bar into the desired position. This
feature allows the end user to modify existing processes as well.
Temperature
Setting Bars
When the profile has been determined, proceed to Save the profile. To save the profile, the
end user must press Finished.
To Save T/C plots, you must EXPORT the profile.
Page 45 of 114
Notes
8. Manual Mode
Setup mode that allows the end user to import existing thermal plots (not Processes) and operate the
APR-5000-XL manually.
Click on “No Password” button and enter the APR password 1923523. Click Software tab and
then "enable" in the Manual Mode option.
Page 46 of 114
Go to APR-5000-XL Main page and click on Process Setup.
Type in the necessary information such as Chip Package, Component Ref (location of
component on PCB) and PCB Desc (PCB description) and choose the amount of heating your
PCB needs by either picking Large preheater or Small preheater.
Page 47 of 114
In this window, an option to enter information is prompted. It is highly recommended that the
Yes button be clicked and data be entered each of the three fields. This information will be
viewed in Manual Window ONLY.
By selecting “Yes”
information keyed in
User Prompt, Cup
Part Number, and
Nozzle Part Number
will display below.
Page 48 of 114
Once the information has been entered, proceed to Next button and click the Manual Mode
Option. This will take you to the active Manual Mode window.
Manual Mode Window
The Manual Mode Window allows the end user to use existing thermal plots while controlling all
other mechanical features of the APR-5000-XL. The following functions can be edited at any
time during the a profile:
Direction of head movement
Speed of head movement
Vacuum tube movement
Vacuum control: (Puff-off control)
How can I use Manual Mode to remove or place a component?
When you have reached this page, you have option to use any saved thermal plots in the
library. To start, "Click" of File as shown below.
Page 49 of 114
Pick the desired thermal plot from your thermal plot library that you have developed.
Once the thermal profile has been chosen, the profile will automatically appear in front of the
Manual Mode Window.
Page 50 of 114
Click and Grab
on the actual
plot line.
When the thermal plot is on the screen as shown above, use your left mouse key and "grab" the
thermal plot and slide it into the Manual Mode Window. When the plot is properly "grabbed"
from an actual plot bar, a small "Profile" glyph will appear . At this point, slide the "Profile" glyph
onto the Manual Mode Window and the profile will copy over.
Transferred Thermal Plot
Page 51 of 114
When the plot has been transferred to the Manual Mode Window, proceed to Start the thermal
cycle when ever you are ready to begin. Use the functions available to help you manipulate the
mechanical functions of the APR-5000-XL.
Note- This is a temporary function that cannot be saved. By clicking on "Next", the Manual
Mode Window will close. To start the thermal profile, press the Start button.
Quick reference guide.
•
•
•
•
•
Direction of head movement
Speed of head movement
Vacuum tube movement
Vacuum control
Puff-off control
Controls the
speed of head
movement
Start button
begins thermal
profile
Controls the
vacuum tube
location
Controls the
vacuum pump
Controls the "puff-off"
/assist release of
component
Please do not use your hand to catch the component.
Even after the cooling cycle the component can be extremely hot.
Nehmen Sie das Bauteil nicht mit der Hand auf, da es auch nach der
Abkühlphase noch sehr heiß sein kann.
Page 52 of 114
9. APR-5000-XL Test Tab Window
Set Up
1. Turn APR-5000-XL unit on and boot the APR-5000-XL Software.
2. Open System Set-Up by clicking System Set-Up.
3. Click on “No Password” button and enter the APR password 94025.
Click Here for
System Set
Up Option
Type in 94025
4. Click on the Test tab.
5. This test window must be exited as shown below.
Page 53 of 114
Press Action Buttons as
noted. Check mark
identifies if buttons are
working properly.
Press Next Button as
noted. Check mark
identifies if button is
working properly.
Head Home switch
check mark must be
checked.
Inputs are not
to be altered or
tested.
Physically lift head up.
Head Switch must go
off when head is lifted.
Notes
Page 54 of 114
Physically pull
camera out.
Check mark
toggles from
Camera Home
switch to Camera
EOT switch.
Inputs are not
to be altered or
tested.
Notes
Page 55 of 114
Motor is at idle.
Click this button to
check for vacuum
pressure at the
pipette. If the vacuum
pressure is low or
cannot lift a
component, check the
vacuum hoses and
vacuum pump.
Click The vacuum
tube will retract.
Click. When the
button is depressed,
the vacuum tube is
extended and locked.
Click this button to
check the pipette’s
component pick-up
capability. When
depressed, the
vacuum tube will be
free-floating.
Click this button to
check for component
release air pressure.
This has no minimum
or maximum
specification but must
be able to release a
component instantly
from the vacuum
pipette.
Notes
Page 56 of 114
Click to turn on
power to
camera.
Using your mouse,
grab the bar and
slide it back and
forth. This tests the
component/upper
lamp.
Using your mouse,
grab the bar and
slide it back and
forth. This tests the
PCBA/lower lamp.
Notes
Page 57 of 114
Using your mouse,
grab the bar and run
the bar left to right to
test airflow and heat
accordingly.
Using
yourmouse,
mouse,
Using your
grab
thebar
barand
and
grab the
run
thebar
barleft
lefttoto
run the
right
to test
testairflow
airflow
right to
and
heat
and heat
accordingly.
accordingly.
Before exiting the troubleshooting window you must ensure all check marks are in their original
position. Failure to do so will hinder the performance of your APR-5000-XL and may cause a
Process Run failure.
When any tests or adjustments are done and the test window is closed, a grey reset window will
appear. This is normal when resting the APR-5000-XL software.
Notes
Page 58 of 114
10. APR-5000-XL Head Alignment Procedure
The Head Alignment procedure details the correct process necessary to center the image and
vacuum tube in the center of the monitor. This process consists of two process must be
finished before the Optical Calibration procedure. These steps are Vacuum Coplanar
Calibration and Head X-Y Calibration.
Vacuum Coplanar Calibration
Tools Required
VNZ-12 Vacuum Nozzle
Glass Optical Calibration Tool
Allen Keys
Procedure
1. Turn APR-5000-XL unit on and boot the APR-5000-XL Software.
2. Open System Set-Up by clicking System Set-Up.
Click Here for
System Set Up
Option
Type in 94025
3. Click on “No Password” button and enter the APR password 94025.
4. Open Calibration Screen and Click on Calibration to set reflow to table co planarity. (See
next page). The APR head will be in the “home”/up position.
Page 59 of 114
Click Head
Alignment
5. Carefully remove the front cover of the reflow head and hold into place using a using a
tie-wrap or equivalent. Note the location of the side-to-side and to-fro adjustment screws
on the left side of the vacuum tube. Do not loosen yet.
Page 60 of 114
Zoom View
`
6. Reverse-mount the Optical Calibration Tool onto the board holder and use glass top on
bottom surface of matching plate as shown.
Page 61 of 114
7. Take vacuum nozzle #12, remove rubber o-ring and attach the vacuum nozzle to the
APR.
Removing the o-ring allows
you to optimize the vacuum
pick-up point accuracy.
8. Follow prompts past the vision calibration to when the vacuum engages.
9. Next, mount the Glass Calibration plate on vacuum nozzle and, using the down action
keys, lower the Calibration Mirror approximately .25” over the reverse-mounted
calibration plate.
10. Using your software options, fine control reduce the lowering speed to .001”-.010 ″.
Reducing speed will increase you field of view.
11. Using the down action keys, lower the glass stencil plate until it nearly touches the
reverse-mount the Optical Calibration Tool and check distance to be parallel on all four
edges.
Page 62 of 114
Must be parallel
on all four edges.
12. If the calibration mirror is not parallel to the reverse-mounted metal plate, loosen the
adjustment screws as necessary and adjust the head manually until the mirror is
parallel to the reverse mounted calibration tool. Top two screws adjust front to back
motion for front and rear. They act as lock-down screws so the bottom screws must be
loosened first. Loosen bottom two screws and adjust the side-to-side movement. Grasp
the head and manually moving it into position. Refer to the picture below.
Page 63 of 114
Top two screws adjust
front to back motion for
front and rear. They act
as lock-down screws so
the bottom screws must
be loosened first.
Loosen bottom two
screws and adjust the
side-to-side movement.
Grasp the head and
manually moving it into
position.
Note- For a final test, lower the glass stencil plate to the reverse mounted tool, release the glass
stencil and attempt to pick-up the plate. If aligned correctly, the steel vacuum pipette will pick
up the component. Adjust as needed.
13. When the glass stencil plate is parallel to the reverse mounted Optical Calibration tool,
tighten the lock screws and reassemble font cover to APR heater head.
Notes
Page 64 of 114
APR-5000-XL Pickup Nest Coplanar Adjustment
The Pickup Nest Coplanar Adjustment is critical for accurate placement of the component as it
determines where the component will be picked and where the rotation of the component will
occur. If the pickup point is not established before proceeding the calibration routine may not
yield the desired results.
Tools Required:
Large Vacuum Nozzle
Calibration Fixture
Allen Keys
1. Drive the motor head down to the PCB pick up point and pick up the centered mirror.
2. Follow the prompts on the screen.
3. Drive motor up until the head is above the centering fixture. Pull out the camera.
Page 65 of 114
4. Pull out slide and loosen pick-up point lock-down screws. Lock Down Screws are located
opposite each other on the camera for optimum adjustment.
Lock Down Screw
Page 66 of 114
Movement
5. Adjust side to side as needed and front to rear as needed with mirror near the pick up
point as a gauge.
This side
does not
adjust.
Movement
Side to Side Adjustment
Front to Rear Adjustment
Page 67 of 114
6. Adjust until mirror is parallel to the pick up fixture. When parallel (see below), tighten the
lock-down screws.
Must be parallel
on all four edges.
Notes
Page 68 of 114
Rotational Error of Picture in Monitor Adjustments
Image rotated
in screen
This can be adjusted by loosening top locking screw. Then making very small adjustments to
the leveling screw on the underside of camera box. When picture is square lock top screw up
again.
Locking screw
Rotational Adjustment
Page 69 of 114
11. APR-5000-XL Optical Calibration Procedure
Tools Required:
VNZ-12 Vacuum Nozzle
Vision Calibration Tool
Allen Keys
Procedure
1. Turn APR-5000-XL unit on and boot the APR-5000-XL Software.
2. Open System Set-Up by clicking System Set-Up.
Click Here for
System Set Up
Option
Type in 94025
3. Click on “No Password” button and enter the APR password 94025.
4. Open Calibration Screen and Click on Calibration to set reflow to table co planarity. (See
next page). The APR head will be in the “home”/up position.
Page 70 of 114
Click
Optical
option
5. Place the optical calibration plate into position as shown below. The calibration fixture
must be central to the pre-heater grate.
Place top
calibration plate in
upward position
Page 71 of 114
6. Pull camera out and zoom up to see picture below. Focus in on the bottom calibration
plate using focus control on software, then drive head down to bring vacuum cup and
calibration plate into focus. Do not touch focus control again.
7. Follow software prompts.
8. Pick up top plate.
9. Drive above camera and verify focus of bottom to top fixture.
10. Use fine “Z” axis head control to adjust top plate in focus. Do not use software focus
control. Only use the focus control to focus on the bottom plate. Use lighting controls to
see top then bottom plate clearer.
Example of unit Out of Calibration
11. Adjust the optical adjustment screws located on the side of the camera until the
component image overlays the calibration plate image. The screws should be turned in
a clockwise direction to adjust prism if left loose the prism will not be held tight and may
result in un-repeatable placement errors as prism may move in camera movement. The
three screws are set in a triangle and a combination of the three screws will calibrate
the calibration plates perfectly if care is taken.
Page 72 of 114
Optical Adjustment Screws
Note: The prism adjustment screws are adjusted as needed to overlay the
top and bottom gun sight images. Each of the three screws can be adjusted
as needed to achieve this. (Camera shown is APR-5000-XL version.
12. Follow the directions on the screen.
13. Once the two plates are optically perfect one on one.
14. Place picture frame into bottom cal fixture to space the top plate from the bottom plate.
This is used to stop mechanical alignment of top plate to bottom plate and acts as a
spacer. (See below).
Picture frame
Page 73 of 114
15.
Before placing bottom plate it is a good idea to now move the head with the joystick
and then realign with joystick to exact overlay this will prove 100% placement accuracy.
16. Return camera and follow instructions to place top plate on bottom calibration plate.
17. To verify optical calibration and placement, using the 90º bent light source provided in
the kit, light the under side of the numbers. When the calibration is correct, light will
pass through the numbering and it will be visible. Letter 2 represents .002″ cut
through, letter 3 represents .003″, and 4 represents .004″. The X is a .002″ and shows
rotation inaccuracy if light is blocked. If by moving the light underside you can see all
the numbers and the x clearly; placement and calibration are complete.
Notes
Page 74 of 114
12. Centralization of Vacuum Nozzle in Software Window
Tools Required:
VNZ-12
Glass Optical Calibration Tool
Ball Allen Keys
Procedure
1. Place the optical calibration plate into position as shown below. The calibration fixture
must be central to the pre-heater grate.
APR-5000-XLS camera featured
Page 75 of 114
X-Axis
Y-Axis
2. If the vacuum nozzle image is not centered in the software window the in Y-axis
movement, adjustment the image using the Y-Adjustment screws using the appropriate
Allen key.
Loosen and
slid forward to
alter ‘y’ axis
stop position
Page 76 of 114
3. If the vacuum nozzle image is not centered in the software window in the X movement,
remove the camera heat shield plate and loosen the four camera lock-down screws
located underneath the front part of the camera. (Single camera version.)
Camera Heat Shield
Camera Lock-Down Screws
\
4. When loosened, adjust the X-axis movement as needed to align the vacuum nozzle
image to the center of the software image window.
X-Axis Adjustment Screws
Note: When adjusting X-axis make to adjust both screws on each side equally.
Page 77 of 114
5. When the image is centered, tighten the camera lock-down screws located underneath
the front part of the camera (screws identified in step 5 above).
6. The final image should have the vacuum cup centered in the software window. Now the
vacuum head is central to the camera.
7. Click the “Next” key and follow the prompts on the monitor.
Notes
Page 78 of 114
13. APR-5000-XL Quick Nozzle Co-planarity and Vacuum Nozzle Adjustment
In the rare case that the vacuum nozzle is not central to the box nozzle after the unit has been
calibrated the APR-5000-XL does allow for some adjustment
Tools Required:
Any Vacuum Nozzle
Vision Calibration Tool
Allen Keys
Procedure
1. Turn APR-5000-XL unit on and boot the APR-5000-XL Software.
2. Open any standard placement or removal process per the instructions in this manual
3. Once a process has been opened, click on Vision.
4. View the image on the monitor. If the image of vacuum cup is not central to the nozzle,
proceed to the next step.
Vacuum cup
Centering of VAC Cup
is set to one side
5. If the nozzle is not central to the PCB, loosen the four heater screws located on the
bottom of the heater head and slightly move the heater head into position.
Page 79 of 114
Bottom View
Screw Holes
6. If the nozzle is not complainer to the PCB insert the small Allen key into one of the three
holes located on the inner ring and adjust. This provides the end user with an angular
adjustment of nozzle to PCB.
Bottom View
Adjustment Screws
Notes
14. APR-5000-XL Thermocouple Calibration
Page 80 of 114
Tools Required:
Thermal Injection Meter
Convection/Thermal Calibration Thermocouple
Thermal Calibration Fixture for XL
Procedure
1. Turn APR-5000-XL unit on and boot the APR-5000-XL Software.
2. Run a default profile without taking to warm up the machine inside to get repeatable
measurements.
3. Open System Set-Up by clicking System Set-Up.
4. Click on “No Password” button and enter the “engineer’s” APR password 1923523 and
return.
Click
Here for
System
Set Up
Option
Type in 1923523
5. This will kick you out to the APR process page again. To begin calibration, open System
Set-Up again by clicking "System Set-Up". This will open Calibration Screen.
6. Click TC tab to begin process.
Page 81 of 114
Click this option to
open thermocouple
calibration
7. The APR-5000-XL software is now in calibration mode. DO NOT ADJUST AT THIS
POINT.
8. Connect the Omega Thermal Injection Meter to TC1 (thermocouple input on the top right)
and turn the meter on and set the meter at 200ºC.
Set in the
“ON” position
TC1 Input
Meter info
Set at
200ºC
Page 82 of 114
9. Using the slide bars slide the bars in the + or – to set the monitor and meter to the same
temperature (200ºC). When this done, channel 5 is calibrated.
Using your
mouse,
"grab" the
slide bar and
move in the +
or – to set
TC1 to
200ºC.
10. Repeat steps 7-9 to calibrate TC2 through TC5.
Note- Offset only updated when “Apply” and “ok” buttons have been pressed.
Notes
Page 83 of 114
15. APR-5000-XL Reflow Head Airflow Calibration
Tools Required:
NZA 490-490 Nozzle
In-Line Air Flow Meter
Procedure
1. Turn APR-5000-XL unit on and boot the APR-5000-XL Software.
2. Open System Set-Up by clicking System Set-Up.
3. Click on “No Password” button and enter the “engineer’s” APR password 1923523 and
return.
Click
Here for
System
Set Up
Option
Type in 1923523
4. This will kick you out to the APR process page again. To begin calibration, Open System
Set-Up again by clicking System Set-Up. This will open Calibration Screen.
5. Click Temperature Calibration.
Page 84 of 114
Click
Here for
System
Set Up
Option
Click this option to
open Flow Reflow
Head calibration
6. Open Calibration Screen and Click on Flow Reflow Head to set reflow head airflow. The
APR head will be in the “home”/up position. Click OK to begin calibration.
7. Attach the NZA-490-490 without vacuum cup to the head assembly.
8. The vacuum calibration gauge is permanently mounted on the rear to APR-5000-XL.
Locate this meter before proceeding. (See next page for details).
Notes
Page 85 of 114
Rear View
9. Toggle through the instructions and calibrate air flow meter and the APR-5000-XL
software to the following specifications:
APR-5000-XL
Software
Low
Medium
High
Factory Setting
8 liters
16 liters
24 liters
10. Follow the APR-5000-XL Software instructions prompts.
11. Flow Reflow Head Airflow Calibration is now complete. Continue to the Pre-heater
Calibration Procedure.
Notes
Page 86 of 114
16. APR-5000-XL Preheater Airflow Calibration (Small and Large)
Tools Required:
Air Flow Gauge Fixture
Convection/Thermal Calibration Fixture
Turbo Airflow Meter
Procedure
1. Turn APR-5000-XL unit on and boot the APR-5000-XL Software.
2. Open System Set-Up by clicking System Set-Up.
3. Click on “No Password” button and enter the “engineer’s” APR password 1923523 and
return.
Click Here for
System Set Up
Option
Type in 1923523
4. This will open Calibration Screen and Click on Temperature Calibration to set pre-heater
airflow.
Page 87 of 114
Click this option to
open Flow Preheater
Calibration
5. Select large or small heater for airflow calibration.
6. Open Calibration Screen and Click on Flow Pre-heater to set pre-heater Airflow. Select
either small heater or large heater to set flow calibration. Simultaneous calibration of the
small and large preheater is not allowed. The APR-5000-XL software is now in calibration
mode.
Page 88 of 114
Airflow Calibration Window
7. Remove top heater grill from machine.
8. Set the Turbo airflow meter to measure knots. A reading of 5 knots should be obtained
by sliding airflow slider until 5.0 is measured. If multiply by 100 this measures feet
per/minute, thus meeting the OK International APR-5000-XL specification of 500 feet per
minute. Depending on voltage/country, the meter should be set between 70% and 80%.
Page 89 of 114
Set meter to middle
position for knots
measurement of 5.0
9. Once Flow Preheater software Screen is open, place Air Flow Calibration meter into
position as shown.
Vary airflow speed
until airflow setting
reaches 5.0 knots
10.
Vary the Bottom Heat (Preheater) Small airflow until the airflow setting on the Turbo
meter reaches 5.0 knots. See below. When this is done, save settings. This completes
small heater flow rate calibration.
Page 90 of 114
To achieve 5
knots speed on
Flow Meter, the
slide bar must be
greater than 80%
11.
Now to set large bowl heater flow rate, cover center cone for small heater to stop
airflow going into this chamber with small metal disc supplied.
Cover Disc
Page 91 of 114
12. Now use calibration fixture with flow meter to the left of the machine as shown. Do not
forget to close the center hole and open the hole under the flow meter as shown.
13. Adjust the large heater flow rate to read five knots, the same as small heater. Five
knots is 500 feet per/minute.
14. Vary the Bottom Heat (Preheater) Small airflow until the airflow setting on the Turbo
meter reaches 5.0 knots. See below. When this is done, save settings. This completes
small heater flow rate calibration.
Page 92 of 114
Vary airflow speed
until airflow setting
reaches 5.0 knots.
This will be between
70% -80%
APR Software Reading
Small Bowl
> 80%
Air Flow Gauge Reading
APR Software Reading
Large Bowl
70% to 80%
Air Flow Gauge Reading
> 500 Ft/min
> 500 Ft/min
Page 93 of 114
15. Apply and save settings follow the APR-5000-XL Software instructions prompts.
16. Remove the Air Flow Gauge and Air Flow Gauge Fixture from the Air Flow/Thermal
Calibration Fixture.
Notes
Page 94 of 114
17. APR-5000-XL Head Thermal Calibration
Tools Required:
NZA-490-490
Thermocouple Probe
Convection/Thermal Calibration Fixture
Procedure
1. Turn APR-5000-XL unit on and boot the APR-5000-XL Software.
2. Ensure the heaters and thermocouples are at room temperature.
3. Open System Set-Up by clicking System Set-Up.
4. Click on “No Password” button and enter the “engineer’s” APR password 1923523 and
return.
Click
Here for
System
Set Up
Option
Type in 1923523
5. This will kick you out to the APR process page again. To begin calibration, open System
Set-Up again by clicking System Set-Up. This will open Calibration Screen.
6. Click “Temp of Reflow Head” to begin process.
Page 95 of 114
Click this option to
open Reflow Heater
Head
7. Attach NZA-490-490 nozzle to APR Reflow Head.
8. Place Convection/Thermal Calibration Fixture and thermocouple probe in place, connect
thermocouple probe to input three as shown below.
When located
central to
window, close
the box
window. (slide)
Connect
Thermocoupl
e probe to
TC3.
Page 96 of 114
9. Follow the prompts and center the thermocouple as shown below. This must be done to
ensure accurate temperature reading. Make sure t/c is in the center of the calibration
window as shown this should be marked for repeatability with the mechanical stop.
Locate thermocouple
in exactly the center.
Also vertically open
as in photo.
10. Follow the prompts on the monitor through the auto-calibration process.
11. Thermal graph should look similar to this for reflow nozzle
Page 97 of 114
18. APR-5000-XL Large Preheater Thermal Calibration
Tools Required:
NZA-490-490
Thermocouple Probe
Convection/Thermal Calibration Fixture
Procedure
1. Turn APR-5000-XL unit on and boot the APR-5000-XL Software.
2. Ensure the heaters and thermocouples are at room temperature.
3. Open System Set-Up by clicking System Set-Up.
4. Click on “No Password” button and enter the “engineer’s” APR password 1923523 and
return.
Click
Here for
System
Set Up
Option
Type in 1923523
5. This will kick you out to the APR process page again. To begin calibration, open System
Set-Up again by clicking System Set-Up. This will open Calibration Screen.
Page 98 of 114
6. Click “Temp of Preheater” to begin process.
Click this option to
open Preheater
Calibration.
7. Select large heater for calibration and place Convection/Thermal Calibration Fixture and
thermocouple probe in place. Connect thermocouple probe to input five (TC5). Position
of calibration hole must be left front. See below.
Page 99 of 114
8. Follow the prompts and center the thermocouple as shown below. This must be done to
ensure accurate temperature reading. Thermocouple must be in center as before.
9. Follow the prompts on the monitor through the auto-calibration process. Graph should be
similar to graph below
Page 100 of 114
19. APR-5000-XL Thermal Calibration of Small Preheater
Tools Required:
NZA-490-490
Thermocouple Probe
Convection/Thermal Calibration Fixture
Procedure
1. Position the thermal calibration fixture as in photograph below.
Close corner
calibration
hole and
open center
calibration
hole
Page 101 of 114
Check central
position of
thermocouple
to the
calibration hole
2. Run thermal calibration for small heater and save setting by clicking "Finish" in software
window. During all calibration of heaters control air changes in room due to door or air
condition changes in temperature.
This now completes the thermal calibration of the machine.
Note- All offsets are saved into the machine and not the PC so a record should be kept of the
offsets in profile window and can be save by print screen or copy and paste.
If new calibrations are done the old readings should be checked against the new and if any
major differences occur this should be looked into as heaters may be getting old or reflow
pumps. These offsets are your calibration data for ISO9000 references.
20. Trouble Shooting Grid & Error Messages
Troubleshooting
Fault
No video picture
Reason
Hauppauge Disconnected
No monitor picture
VGA cable connected to
incorrect out put
Solution
Connected Video Cable into
back of computer integrated
Hauppauge card.
Connect to horizontal video
card. See computer
connection procedures in
this manual.
Page 102 of 114
Reflow Head Airflow is
incorrect
Thermocouple plot is erratic
(noisy)
Preheater plot not reaching
set point (large preheater)
Check calibration on site.
Intermittent connection in
yellow plug
Damaged thermocouple
Thermocouple is not
attached to the PCBA or
component
Reflow Head is shorting
thermocouple wires
Fan or heating element
failed
Blower speed is set too low
Preheater plot not reaching
set point (small preheater)
Fan or heating element
failed
Blower speed is set too low
Component moves on
placement
Excessive air set point in
Puff Off
Unsuccessful component
removal
Check solder reflow
temperature. Eutectic or
PD-free
Co planarity of vacuum
head
Lack of vacuum
Unsuccessful component
pick-up on camera
Pick-up plate is not co
planar to vacuum cup
Faulty o-ring
See Airflow calibration in
procedure in this manual.
Check connection at
thermocouple
Replace thermocouple
Attach to PCBA using
Kapton tape
Raise head off wires.
Check all four heaters and
blowers for large bowl. See
the software test tab
window
Using airflow calibration
procedure, check blower
speed. See the software
test tab window
Check both heaters and
blowers for large bowl. See
the software test tab
window
Using airflow calibration
procedure, check blower
speed. See the software
test tab window
Adjust “Puff-Off” in Process
Setup to achieve placement
without removing
component. Range is from
1 MS to 1 thousand MS.
Check Reflow at removal
point
Calibrate per vacuum head
calibration procedure.
Check 15 hg of vacuum is
available at vacuum cup. If
not, check for air leaks or
vacuum pump failure. Use
test tab to check
See calibration procedure
for flatness calibration
procedure
Replace o-ring
Page 103 of 114
Unsuccessful component
pick-up on camera
Component pick up not
central to nozzle.
Stencil is not co planar to
vacuum cup
Component slide in X/Y is
out of adjustment
Component is not central in
vision window.
Vision window is too small.
Camera is out of
adjustment.
PC resolution is not
optimized or monitor is
wrong size
Possible RTD failure
Erratic top or bottom heater
plots (not from
thermocouples)
Error Codes
Message
Critical System Error (X)- Contact
OK International Technical Service.
Communications Failure ( X ) – See
Troubleshooting Section of the
Operator's Manual.
APR Hardware Error ( X ) – Please
contact Technical Service..
Damaged stencil. Replace
Check centralization pick up
plate to vacuum cup. See
procedure in this manual.
Adjust X Y and rotation.
See manual.
Use 17 inch monitor, check
resolution as per manual
specification.
Use test tab in software
window to view RTD is
approximately 100 ohms at
25ºC
Corrective Action
1. Check administrator rights for PC.
2. Reinstall software
Contact OK International Technical Service for
help in resolving your system malfunction.
1. Ensure the serial cable is properly
connected to the communications port on your
computer.
2. Ensure the serial cable is properly
connected to the APR 5000 hardware.
3. Ensure the APR 5000 hardware power is
on.
4. If you still experience problems, please
contact Technical Service.
1. Ensure the serial cable is properly
connected to the communications port on
your computer.
2. Ensure the serial cable is properly
connected to the APR 5000 hardware.
3. Ensure the APR 5000 hardware power is
on.
4. If you still experience problems, please
contact Technical Support.
5. Messages 7-12.
6. Hardware problem. Please contact
Technical Service.
7. Message 13, 15.
8. Cool down the APR5000. Rerun process. If
Page 104 of 114
Motor Malfunction ( X ) – See
Troubleshooting Section of the
Operator's Manual.
Camera Malfunction ( X ) – See
Troubleshooting Section of the
Operator's Manual.
Printer Error (X) - See
Troubleshooting Section of the
Operator's Manual.
File Error - See Troubleshooting
Section of the Operator's Manual.
System Error (X)- Contact
OK International Technical Service.
you still experience problems, please
contact Technical Support.
9. Message 14.
10. Check camera position. Rerun process. If
you still experience problems, please
contact Technical Service.
1. Ensure there is nothing physically impeding
the movement of the reflow head.
2. If the reflow head was completely lowered
before starting the software, try closing the
software and starting the program again.
3. Ensure the serial cable is properly
connected to the communications port on
your computer.
4. Ensure the serial cable is properly
connected to the APR 5000 hardware.
5. Ensure the APR 5000 hardware power is
on.
6. If you still experience problems, please
contact Technical Service.
1. Ensure there is nothing physically impeding
the movement of the camera.
2. Ensure the serial cable is properly
connected to the communications port on your
computer.
3. Ensure the serial cable is properly
connected to the APR 5000 hardware.
4. Ensure the Camera Box cable is properly
connected.
5. Ensure the APR 5000 hardware power is
on.
6. If you still experience problems, please
contact Technical Service.
1. Ensure the printer is properly connected to
the computer.
2. Ensure the printer power is turned on.
3. Ensure there is an adequate supply of
paper in the printer.
4. Ensure the printer has adequate printing
material (ribbon, toner, etc.)
5. If you still experience problems, please
contact Technical Service.
File Error - See Troubleshooting Section of the
Operator's Manual.
Contact OK International Technical Service for
help in resolving your system malfunction.
Page 105 of 114
Page 106 of 114
21. Nozzles, Vacuum Pickup Nozzle And Accessories
Nozzle
NZA-USMD
NZA-060-060
NZA-080-080
NZA-080-095
NZA-100-100
NZA-130-130
NZA-150-150
NZA-180-180
NZA-200-200
NZA-230-230
NZA-250-290
NZA-270-270
NZA-300-300
NZA-350-350
NZA-350-350-CGA
NZA-355-455-CGA
NZA-400-400
NZA-450-450
NZA-470-470-CGA
NZA-490-490
NZA-555-555-CGA
Vacuum Pick-Up Nozzle
VNZ-005
VNZ-01
VNZ-03
VNZ-05
VNZ-08
VNZ-12
VNZ-19
Accessories
AC-RP
APR-NK
APR-NK-CSP
APR-VRT
APR-CNTRL-EN
VPI-M17
APR-DK1
FL-APR-2
FLL-APR-2
FLS-APR-2
FLSL-APR-2
FLSS-APR-2
3 mm Round Nozzle
APR Reflow Nozzle 6mm x 6mm
APR Reflow Nozzle 8mm x 8mm
APR Reflow Nozzle 8mm x 9.5mm
APR Reflow Nozzle 10mm x 10mm
APR Reflow Nozzle 13mm x 13mm
APR Reflow Nozzle 15mm x 15mm
APR Reflow Nozzle 18mm x 18mm
APR Reflow Nozzle 20mm x 20mm
APR Reflow Nozzle 23mm x 23mm
APR Reflow Nozzle 25mm x 29mm
APR Reflow Nozzle 27mm x 27mm
APR Reflow Nozzle 30mm x 30mm
APR Reflow Nozzle 35mm x 35mm
APR Reflow Nozzle 35mm x 35mm Column Grid Array
APR Reflow Nozzle 35.5mm x 45.5mm Column Grid Array
APR Reflow Nozzle 40mm x 40mm
APR Reflow Nozzle 45mm x 45mm
APR Reflow Nozzle 47 mm x 47 mm Column Grid Array
APR Reflow Nozzle 49mm x 49mm
APR Reflow Nozzle 55.5 mm x 55.5 mm Column Grid Array
APR Vacuum pick up nozzle .5 mm O/D
APR Vacuum pick up nozzle 1mm O/D
APR Vacuum pick up nozzle 3mm O/D
APR Vacuum pick up nozzle 5mm O/D
APR Vacuum pick up nozzle 8mm O/D
APR Vacuum pick up nozzle 12mm O/D
APR Vacuum pick up nozzle 19mm O/D
Nozzle Removal Pad
APR 5000 Nozzle Kit
APR 5000 CSP and Micro SMD Nozzle Kit
Vacuum Nozzle Removal Tool
APR-Controller, English Version
VPI Monitor, 17" Flat Panel
Demonstration PCB with BGA & CSP Component Kit
PCB Finger Long (Pack 2)
Thick PCB Finger Long (Pack 2)
Thick PCB Finger Short (Pack 2)
Thick PCB Spring Finger Long (Pack 2)
Thick PCB Spring Finger Short (Pack 2)
Page 107 of 114
FS-APR-2
FSL-APR-2
FSS-APR-2
PF-1
PICK-APR
TF-1T
TF-2T
TF-3T
UBS-APR-XL
VNZ-ORINGK-XL
VNZ12-ORING
VNZ19-ORING
APR-5XLAK
VAC-P100
PCB Finger Short (Pack 2)
PCB Spring Finger Long (Pack 2)
PCB Spring Finger Short (Pack 2)
KIT, Solder Paste/Flux Prep Plate
Component Pick Up Plate
Tape Feeder, Micro SMD with Thumb Wheel
Tape Feeder, 0603-0402 with Thumb Wheel
Tape Feeder, 0201 with Thumb Wheel
APR-5000-XL Underboard Support
APR-5000-XL/XLS VNZ Pipette O-Ring Kit
VNZ-12 O-ring replacement kit (Qty 50)
VNZ-19 O-ring replacement kit (Qty 50)
APR-5000-XL Accessory Kit
Vacuum Assist Plate (double sided Kapton plate) (Qty 100)
Page 108 of 114
22. Calibration Kit & Spare Parts
Listed below are the calibration kit and spare parts that are available for your APR-5000-XL Rework System.
APR-XLVPUK
APR-5000-XL Vacuum Pick Up Kit
APR-TRM
APR-5000-XL Theta Rotation Motor
APR-PAC
APR-5000-XL Pneumatic Cylinder, Head
APR-ZAM
APR-5000-XL Z-Axis Motor
APR-XLRP
APR-5000-XL Reflow Pump
APR-TCP
APR-5000-XL Thermocouple Panel
APR-JS
APR-5000-XL Joy Stick
APR-XAM
APR-5000-XL X-Axis Motor
APR-YAM
APR-5000-XL Y Axis Motor
APR-DCPS
APR-5000-XL Dc Power Supply
APR-XLPHK
APR-5000-XL Preheater Kit
APR-XLPHB
APR-5000-XL Preheater Blower (Set Of 2)
APR-XLPHRTD
APR-5000-XL Preheater Rtd (Set Of 2)
APR-XLMC
APR-5000-XL Motor Control
APR-SSR
APR-5000-XL Solid State Relay (Set Of 2)
APR-EMIPCB
APR-5000-XL Emi Circuit Board
APR-SVCA
APR-5000-XL Split View Camera
APR-XLABK
APR-5000-XL Action Button Kit
APR-EBK
APR-5000-XL Enable Button Kit
APR-CALKITXL
APR-5000-XL Calibration Kit
Page 109 of 114
23. Site Preparation
Solder Removal:
Prepare the site to receive a new component by removing all of the residual solder. This can be
accomplished by using an OK International MX-500 Series Rework System with blade cartridge
assembly. Employing OK International Smart Heat™ Technology into your rework process will
virtually eliminate the potential of accidentally removing any pads when removing residual
solder. This is because OK International’s patented Smart Heat™ Technology ensures that tip
temperature is constantly maintained, regardless of the thermal demand of the assembly that is
being reworked. For more information on OK International Smart Heat™ Technology, please
contact your local OK International representative or visit
www.OK International.com for more information.
The following blade style tips are available for the OK International MX-500 Series Rework
System:
SMTC-x60 (.410” length)
SMTC-x61 (.620” length)
SMTC-x62 (.870” length)
SMTC-x110 (1.55” length)
Please note that “x” denotes tip temperature. All cartridges are available in 500, 600 and 700
series styles. (5 = 500°F, 0=600°F and 1=700°F).
As an option you can utilize a vacuum desoldering system such as the OK International
SP-440 Self-Contained Desoldering System or MX-500DS Shop-Air Desolder / Solder Rework
System to vacuum residual solder from the PCB.
NOTE ON CLEANING:
Although isopropyl rubbing alcohol and cotton swab work satisfactory for removing flux residue,
it is strongly recommended you contact your solder paste manufacturer for recommendations
for cleaning the residue left by their products.
Solder Paste Deposition And Flux Application
Component Stenciling Templates
The application of new solder paste or flux directly to the component’s solder balls can be
accomplished with OK International’s Component Stenciling Templates. The templates allow
the precise application of solder paste without concern for surrounding parts on your PCB.
Since the component is pasted rather than the board, operators find this to be a much faster
and simpler solution. Please contact your local OK International representative for information
and availability. Custom sizes and styles are available.
Page 110 of 114
Solder Paste Application using the Component Stenciling Templates:
1. Select the correct solder paste plate for your component and application.
2. Position the component onto the component side of the plate (the side with the smaller
cut out or etched component corners.)
3. Secure the component with the supplied clamp assembly. Please be careful not to overtighten the clamp as this can cause the plate to bend, which will affect print quality.
4. Apply solder paste to the solder balls using the supplied spatula. When printing, make
sure the stencil face remains clean after your print, this ensures correct solder paste
volume.
5. Carefully remove the component clamp assembly and position the solder paste plate
onto the component pick up plate aligning it with the two tooling pins.
6. Using the vacuum pipette lift the component from the solder paste plate and continue
with your alignment process.
Two types of paste deposition plates exist
1. To print on balled devices these are called BST plates Balled stencil template.
2. To print on flat components such as LLP or LGA (Land Grid Array) this is the only
recommended way to rework these type of parts as different volumes of solder paste
need to be applied to the component pads, this is done with this plate called BRP Plates.
Body recognition plate.
Type 2 Body Recognition Plate
Type 1 Balled Stencil Plate
Page 111 of 114
Dip Transfer Plates
The application of high viscosity paste flux can be accomplished with OK International’s Dip
Transfer Plates. These plates allow for a simple, controlled application of paste flux to the
solder balls of your BGA or CSP component. They are available in many sizes and depths.
Please contact your local OK International representative for information and availability.
Custom sizes and configurations are available.
OK International has pioneered the application of high viscosity paste flux using specialized
fixtures to ensure consistent repeatable results.
1. Select the Dip Transfer Plate that meets your components requirements for size and
depth.
2. Using the supplied spatula fill the cavity with paste flux. Use the spatula to smooth the
flux level with the sides of the transfer plate. This ensures a repeatable deposit.
3. Place your component into the component pick up plate and pick it up with the vacuum
pipette.
4. Using the joystick, align the component in the X, Y and Theta axes.
5. Remove the adjustable component fixture and replace it with the flux transfer plate.
6. Follow the screen prompts to lower the component into the flux transfer plate so the
solder balls contact the bottom plate of the flux transfer plate. Depress the “Z” axis “UP”
buttons to return the component to the focus position.
7. Remove the component pick up plate and inspect the impression left in the flux to ensure
all the solder balls have been coated.
8. Check component alignment and adjust as required.
9. Follow the screen prompts, push in the camera and click next.
10. Place the component as directed by the screen prompts, and continue with the
placement process that you have selected.
Flux Dip plates BGA and CSP
Page 112 of 114
24. Warranty And Service
Contact your local authorized Ok International Representative or Distributor for details.
25. Technical Support Contact
OK International offers Hot Line service. Please contact your nearest OK International office for technical
support:
OK International, Inc.
12151 Monarch Street
Garden Grove, CA 92841
USA
Phone: +1 714-799-9910
Fax: +1 714-799-9533
European Headquarters
OK International Ltd
Eagle Close, Chandlers Ford
Hampshire, SO53 4NF
U.K.
Phone: +44 (0) 23 8048 9100
Fax: +44 (0) 23 8048 9109
Germany
OK International GmbH
Frankfurter Strasse 74
D-64521 Gross-Gerau
Germany
Phone: +49 (0) 61 52-71 12-0
Fax: +49 (0) 61 52-71 12-22
France
OK International SA
Rue de la Saône
ZAC de Folliouses-les Echêts
01706 Miribel Cedex
France
Tel: +33 (0)4 72 26 20 30
Fax: +33 (0)4 72 26 20 35
Page 113 of 114
Italy
Dover Italy, S.R.I.
Strada Statale 11 -No. 28,
20010 Vittuone (Milano), Italia
Phone: +39 02 9025161
Fax: +39 02 90111147
China
OK Electronics (Beijing) Co., Ltd
No. 1 Building, A –10 Long Qing Street
Beijing Economic & Technical Developing Zone
Beijing, 100176
P. R. China
Tel: +86-10-67878490
Fax: +86-10-67878491
Japan
OK International Japan Co.
5-3-1 Heiwajima, Ota-ku
Tokyo 143-0006
Japan
Tel: +81-3-5753-0085
Fax: +81-3-3765-8855
India
OK International
D3/302, Lok Upavan Phase II
Glady's Alwaris Road
Majiwade,
Thane West 400601
Maharashtra
India
Tel: +91-22-25396047
Singapore
OK International (Sales Support Office)
1 Temasek Avenue
#27-01 Millenia Tower
Singapore 039192
Tel: +65 67263914
Mobile: +65 9798 4443/ +65 94874276
Page 114 of 114