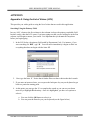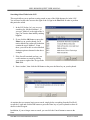
1
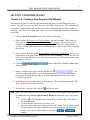
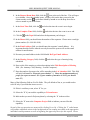
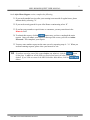
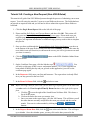
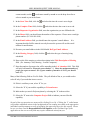
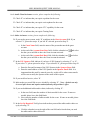
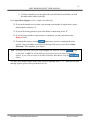
MDL Scheduler
User‟s Guide
Revised: May 2009
2
MDL ROOM REQUEST USER MANUAL
BLANK PAGE
INFORMATION ENGINEERING BRANCH
Printed: 5/19/2009
3
MDL ROOM REQUEST USER MANUAL
TABLE OF CONTENTS
TABLE OF CONTENTS ................................................................................................................ 3
INTRODUCTION .......................................................................................................................... 4
OVERVIEW ................................................................................................................................... 4
NAVIGATION ............................................................................................................................... 4
CONTACT INFORMATION ......................................................................................................... 4
SECTION 1: ACCESS ................................................................................................................... 5
Tutorial 1-A: Accessing the MDL Room Scheduler Request Form ........................................... 5
SECTION 2: ROOM REQUESTS ................................................................................................. 6
Tutorial 2-A: Creating a New Request (USU Billeted) .............................................................. 6
Tutorial 2-B: Creating a New Request (Non-USU Billeted) .................................................... 10
Tutorial 2-C: Creating Multiple Room Requests ...................................................................... 14
Tutorial 2-D: Creating Recurring Room Requests ................................................................... 16
SECTION 3: CALENDAR VIEWS AND SCHEDULES ........................................................... 19
Tutorial 3-A: Viewing Existing Multiple and Recurring Room Requests ............................... 19
Tutorial 3-B: Viewing All Pending Room Requests ................................................................ 20
Tutorial 3-B: View Calendar .................................................................................................... 21
APPENDIX ................................................................................................................................... 22
Appendix A: Using the List of Values (LOV) .......................................................................... 22
INFORMATION ENGINEERING BRANCH
Printed: 5/19/2009
4
MDL ROOM REQUEST USER MANUAL
INTRODUCTION
The new system that will be used is the Multidiscipline Laboratory (MDL) Scheduler. This
application replaces the paper Room Request forms as well as the electronic calendar that existed
in MDL and has been designed to assist the staff with scheduling rooms around the university.
The system will be automated for both the users and the MDL staff with the goal to eliminate the
need for paper and the use of multiple applications.
OVERVIEW
This document will guide the users through each section of the MDL Scheduler Room Request
Process. This manual will cover the following functions in the application:
Entering Single Room Requests
Entering Multiple Room Requests
Entering Recurring Room Requests
Viewing All Pending Requests
Viewing All Confirmed Requests
Viewing Scheduled Rooms on the Calendar
NAVIGATION
The MDL Scheduler is accessible through your internet browser. It will work in Internet
Explorer 7.0. The application uses features similar to an internet browser environment, such as
drop down list, calendar icons, and radio buttons. We recommend that you use the navigation
buttons in the application and not the navigation buttons on your browser. There is also a
security check at the beginning of the Single Room Request application that will require you to
enter a series of characters before you can access the actual room request form. You will have
multiple chances to enter the correct characters.
CONTACT INFORMATION
If you need information relating to your room request, please contact the MDL Office at (301)
295-3301. However, if you encounter technical problems while using this application, please
submit a ticket to the HelpDesk via one of the following methods:
Login to Heat Self Service (HSS) via http://www.usuhs.mil/uis/forms/trouble.html
o Your domain login will allow you access to the system
o No password is required
Send an email to [email protected]
Call the Helpdesk at (301) 295-9800
Visit the Helpdesk in Room G074
INFORMATION ENGINEERING BRANCH
Printed: 5/19/2009
5
MDL ROOM REQUEST USER MANUAL
SECTION 1: ACCESS
Tutorial 1-A: Accessing the MDL Room Scheduler Request Form
This tutorial will guide you through the process of accessing the online form needed to submit a
room request as a USU or Non-USU Billeted.
1. Open your browser. (This application works in Internet Explorer 7.0)
2. In the address field, type the following web address: www.usuhs.mil/mdl. See note
below about bookmarking.
3. Click the Single Room Request link on the left side of the page.
4. Please read the DoD Notice and Consent Banner and then click OK. This action will
take you to an Responsibilities of the University Sponsor page. Please make sure you
read this page in its entirety (printing this page for later reference is recommended). It
will give you important information on additional steps you may need to take to complete
this process.
5. Once you have read through the Responsibilities of the University Sponsor, type the text
at the bottom of the page in the security field and click Continue. If you do not enter the
text (which is not case-sensitive) as shown on the screen, you will be given new text until
you enter it correctly.
TIP
Once you enter the web address, you may want to bookmark the page. You may do so
by clicking Favorites on the menu bar, then Add To Favorites. The name will default
to MDL Room Request. Click Add to save this bookmark to your favorites list.
INFORMATION ENGINEERING BRANCH
Printed: 5/19/2009
6
MDL ROOM REQUEST USER MANUAL
SECTION 2: ROOM REQUESTS
Tutorial 2-A: Creating a New Request (USU Billeted)
This tutorial will guide USU Billeted persons through the process of submitting a new room
request. You will notice the asterisk (*) next to several fields on the screen. The fields that have
an asterisk are required fields and you will not be able to submit the request if those fields are
left blank. Also, if you click on the field names, you will see additional information about many
of the fields.
1. Click the Single Room Request link on the left side of the page.
2. Please read the DoD Notice and Consent Banner and then click OK. This action will
take you to an Responsibilities of the University Sponsor page. Please make sure you
read this page in its entirety (printing this page for later reference is recommended). It
will give you important information on additional steps you may need to take to complete
this process.
3. Once you have read through the Responsibilities of the University Sponsor, type the text
at the bottom of the page in the security field and click Continue. If you do not enter the
text (which is not case-sensitive) as shown on the screen, you will be given new text until
you enter it correctly.
4. Click the
Request screen.
button on the MDL Scheduler Online Room
5. On the Certificate Error page, click the link that says
. You
will only see this page if this is a new workstation instance. So, if your computer has
been turned off during the day and you go back to this application, you will see the
certificate page again.
6. In the Requestor field, enter your first and last name. The request date is already filled
in so you may proceed to the next field.
7. In the Room No/Name field, click the
and select a room.
TIP Before selecting a date for your event, you are able to get a quick glance at the dates that
are taken under the View Occupied Time By Room function to the right of the request
form.
a. Click the
icon to the right of the Search Room No/Name field. This shows a
list of all the rooms.
b. Click on the link to the room you want to view.
c. Once you return to the request page, click the „Go‟ button. This will show you all
the times that are currently occupied for the room you selected and the current
month. You can view other months by clicking the
or
buttons.
INFORMATION ENGINEERING BRANCH
Printed: 5/19/2009
7
MDL ROOM REQUEST USER MANUAL
8. In the Request Room Date field, click the
icon at the end of the line. This will open
up a calendar. Once the calendar opens, you may click on the date you need in the
current month, use the
to advance month by month or use the drop down list to
select a month or year in the future.
9. In the Start Time field, click the
and select the time the event is set to begin.
10. In the Complete Time field, click the
11. Click the
and select the time the event is set to end.
in the Dept field and select the department you belong to.
12. In the Phone field, you should enter the number of the requestor. Please enter a ten digit
phone number. (Ex. 999-999-9999)
13. In the Email Address field, you should enter the requestor‟s email address. It is
important that this field be entered correctly because the system will use this email
address for notifications.
14. Re-enter your email address in the field labeled Re-Type Email Address.
15. In the Meeting Category field, click the
scheduled.
and select the type of meeting being
16. Enter a title of the meeting or a short description in the Title/Description of Meeting
field. (Ex. Anatomy Class, Meeting – Leased Computers).
17. Enter the number of persons who will be attending in the # of Attendees field. This field
will only hold numbers. Please do not use dashes “-“. Enter the maximum number of
people you expect to attend. (Ex. If your number of attendees is 20-25, you should
enter 25.)
Many of the following field are Yes/No fields. They all default to No, so you would need to
select Y only if you need that item or service.
18. If this is a military event, select „Y‟ for yes.
19. Select the „Y’ if you need the capability to Teleconference.
20. Indicate that you need a Polycom phone by selecting the „Y‟ in the next line.
21. Select the „Y’ next to the Computer Project field to indicate your need for this
capability.
Several of the next questions are answered by clicking Yes or No. Clicking the ‘Y’ radio button
will produce additional actions in the background such as sending out emails to the appropriate
individuals and departments as well as beginning the approval process for this request. Please
INFORMATION ENGINEERING BRANCH
Printed: 5/19/2009
8
MDL ROOM REQUEST USER MANUAL
be sure you have read the Responsibilities of the Sponsor on the Welcome Page of this
application as the next several fields may require additional action from you.
In the Audio Visual Assistance section, please complete the following:
22. Check „Y‟ to indicate that you require a podium for the event.
23. Check „Y‟ to indicate that you require a microphone for the event.
24. Check „Y‟ to indicate that you require VTC capability for the event.
25. Check „Y‟ to indicate that you require Turning Point.
In the Other Assistance section, please complete the following:
26. If you need a guest account, mark „Y‟ to indicate in the Guest Account field. If you
selected „Y‟, proceed to step a. If you left „N‟ selected, proceed to Step 23.
a. In the Guest Name field, enter the name of the person that needs the guest
account.
b. At the end of the Account Start Date field, click the calendar icon
and select
the date you would like to have the Guest account activated.
c. At the end of the Account End Date field, click the calendar icon
and select
the date you would like to have the Guest account deactivated.
27. If you need food service, select „Y‟.
28. Indicate that you would like to serve alcohol by selecting „Y‟. Note: Alcohol can only
be served after hours and requires authorization by the president’s office.
29. If you need additional tables and/or chairs, indicate by clicking „Y‟.
a. In the next field, enter the number of chairs needed for the event. If none are
needed, please leave this field blank.
b. Next, enter the number of tables needed for the event. If none are needed, please
leave the field blank.
30. In the Set Up Required? field, please indicate that you need the tables and/or chairs set
up by selecting „Y‟.
a. Click the calendar icon at the right of the text field and select the date you need
the tables and/or chairs delivered.
b. Click the calendar icon at the right of the text field and select the date you need
the tables and/or chairs picked up.
INFORMATION ENGINEERING BRANCH
Printed: 5/19/2009
9
MDL ROOM REQUEST USER MANUAL
In the After Hours Support section, complete the following:
31. If you need custodial services after your meeting/event outside of regular hours, please
indicate that by selecting „Y‟.
32. If you need security guards for your After Hours event/meeting select „Y‟.
33. If you have any remarks or special notes or comments, you may enter them in the
Remarks field.
34. To submit this request, click the
button once you have completed the entire
request. Once you submit your request, at the top of the screen, you will see Action
Processed. This completes your request.
35. You may enter another request on the same screen by repeating steps 6 – 34. When you
are done entering requests, please close your browser to exit.
TIP If you have a need to cancel this request before you submit it, click the
button
on the form. It will clear all the fields you entered and return all other fields to their
default. If you’d like to return to the MDL Scheduler Main Menu, click the
button.
INFORMATION ENGINEERING BRANCH
Printed: 5/19/2009
10
MDL ROOM REQUEST USER MANUAL
Tutorial 2-B: Creating a New Request (Non-USU Billeted)
This tutorial will guide Non-USU Billeted persons through the process of submitting a new room
request. You will notice the asterisk (*) next to several fields on the screen. The fields that have
an asterisk are required fields and you will not be able to submit the request if those fields are
left blank.
1. Click the Single Room Request link on the left side of the page.
2. Please read the DoD Notice and Consent Banner and then click OK. This action will
take you to an Responsibilities of the University Sponsor page. Please make sure you
read this page in its entirety (printing this page for later reference is recommended). It
will give you important information on additional steps you may need to take to complete
this process.
3. Once you have read through the Responsibilities of the University Sponsor, type the text
at the bottom of the page in the security field and click Continue. If you do not enter the
text (which is not case-sensitive) as shown on the screen, you will be given new text until
you enter it correctly.
4. Click the
Request screen.
button on the MDL Scheduler Online Room
5. On the Certificate Error page, click the link that says
. You
will only see this page if this is a new workstation instance. So, if your computer has
been turned off during the day and you go back to this application, you will see the
certificate page again.
6. In the Requestor field, enter your first and last name. The request date is already filled
in so you may proceed to the next field.
7. In the Room No/Name field, click the
and select a room.
TIP Before selecting a date for your event, you are able to get a quick glance at the dates that
are taken under the View Occupied Time By Room function to the right of the request
form.
a. Click the
icon to the right of the Search Room No/Name field. This shows a
list of all the rooms.
b. Click on the link to the room you want to view.
c. Once you return to the request page, click the „Go‟ button. This will show you all
the times that are currently occupied for the room you selected and the current
month. You can view other months by clicking the
or
buttons.
8. In the Request Room Date field, click the
icon at the end of the line. This will open
up a calendar. Once the calendar opens, you may click on the date you need in the
INFORMATION ENGINEERING BRANCH
Printed: 5/19/2009
11
MDL ROOM REQUEST USER MANUAL
current month, use the
to advance month by month or use the drop down list to
select a month or year in the future.
9. In the Start Time field, click the
and select the time the event is set to begin.
10. In the Complete Time field, click the
and select the time the event is set to end.
11. In the Requestor Organization field, enter the organization you are affiliated with.
12. In the Phone field, you should enter the number of the requestor. Please enter a ten digit
phone number. (Ex. 999-999-9999)
13. In the Email Address field, you should enter the requestor‟s email address. It is
important that this field be entered correctly because the system will use this email
address for notifications.
14. Re-enter your email address in the field labeled Re-Type Email Address.
15. In the Meeting Category field, click the
scheduled.
and select the type of meeting being
16. Enter a title of the meeting or a short description in the Title/Description of Meeting
field. (Ex. Anatomy Class, Meeting – Leased Computers).
17. Enter the number of persons who will be attending in the # of Attendees field. This field
will only hold numbers. Please do not use dashes “-“. Enter the maximum number of
people you expect to attend. (Ex. If your number of attendees is 20-25, you should
enter 25.)
Many of the following field are Yes/No fields. They all default to No, so you would need to
select Y only if you need that item or service.
18. If this is a military event, select „Y‟ for yes.
19. Select the „Y’ if you need the capability to Teleconference.
20. Indicate that you need a Polycom phone by selecting the „Y‟ in the next line.
21. Select the „Y’ next to the Computer Project field to indicate your need for this
capability.
Several of the next questions are answered by clicking Yes or No. Clicking the ‘Y’ radio button
will produce additional actions in the background such as sending out emails to the appropriate
individuals and departments as well as beginning the approval process for this request. Please
be sure you have read the Responsibilities of the Sponsor on the Welcome Page of this
application as the next several fields may require additional action from you.
INFORMATION ENGINEERING BRANCH
Printed: 5/19/2009
12
MDL ROOM REQUEST USER MANUAL
In the Audio Visual Assistance section, please complete the following:
22. Check „Y‟ to indicate that you require a podium for the event.
23. Check „Y‟ to indicate that you require a microphone for the event.
24. Check „Y‟ to indicate that you require VTC capability for the event.
25. Check „Y‟ to indicate that you require Turning Point.
In the Other Assistance section, please complete the following:
26. If you need a guest account, mark „Y‟ to indicate in the Guest Account field. If you
selected „Y‟, proceed to step a. If you left „N‟ selected, proceed to Step 23.
a. In the Guest Name field, enter the name of the person that needs the guest
account.
b. At the end of the Account Start Date field, click the calendar icon
and select
the date you would like to have the Guest account activated.
c. At the end of the Account End Date field, click the calendar icon
and select
the date you would like to have the Guest account deactivated.
27. In the USU Sponsor field, indicate if you have a USU Sponsor by selecting „Y‟ or „N‟.
If you select „Y‟, please proceed to step a. If you selected „N‟, please proceed to Step 24.
a. Enter the first and last name of the USU Sponsor in the Sponsor Name field.
b. Enter the email address of the USU Sponsor in the Sponsor Email field. It is
important that this email be entered correctly, as this will be where status emails
will be sent to notify the Sponsor of the status of this request.
28. If you need food service, select „Y‟.
29. Indicate that you would like to serve alcohol by selecting „Y‟. Note: Alcohol can only
be served after hours and requires authorization by the president’s office.
30. If you need additional tables and/or chairs, indicate by clicking „Y‟.
a. In the next field, enter the number of chairs needed for the event. If none are
needed, please leave this field blank.
b. Next, enter the number of tables needed for the event. If none are needed, please
leave the field blank.
31. In the Set Up Required? field, please indicate that you need the tables and/or chairs set
up by selecting „Y‟.
a. Click the calendar icon at the right of the text field and select the date you need
the tables and/or chairs delivered.
INFORMATION ENGINEERING BRANCH
Printed: 5/19/2009
13
MDL ROOM REQUEST USER MANUAL
b. Click the calendar icon at the right of the text field and select the date you need
the tables and/or chairs picked up.
In the After Hours Support section, complete the following:
32. If you need custodial services after your meeting/event outside of regular hours, please
indicate that by selecting „Y‟.
33. If you need security guards for your After Hours event/meeting select „Y‟.
34. If you have any remarks or special notes or comments, you may enter them in the
Remarks field.
35. To submit this request, click the
button once you have completed the entire
request. Once you submit your request, at the top of the screen, you will see Action
Processed. This completes your request.
TIP If you have a need to cancel this request before you submit it, click the
button
on the form. It will clear all the fields you entered and return all other fields to their
default. If you’d like to return to the MDL Scheduler Main Menu, click the
button.
You may enter another request on the same screen by repeating steps 6 – 35. When you are done
entering requests, please close your browser to exit.
INFORMATION ENGINEERING BRANCH
Printed: 5/19/2009
14
MDL ROOM REQUEST USER MANUAL
Tutorial 2-C: Creating Multiple Room Requests
This tutorial will guide you through the process of submitting a new multiple room request. You
will notice the asterisk (*) next to several fields on the screen. The fields that have an asterisk
are required fields and you will not be able to submit the request if those fields are left blank.
1. If you are not sure how to access the application, please refer to Tutorial 1 for assistance.
2. Once you have reached the MDL webpage, click the
on the left side under the Room Requests heading.
link
3. Read through and follow the instructions on the page to make sure that J Initiator has
been installed on your computer. Once you are sure it has been installed (if you can
access this application, then it has been installed successfully), click the „Continue‟ link
at the end of the instructions.
4. When the Multiple/Recurring Room Request Menu shows on your screen, click the
button.
5. In the Requestor field, enter your first and last name.
6. Click the gray button to the right of the Department field and select your department
from the list of values (LOV). See Appendix A on how to use the LOV.
7. In the Meeting Category field, click the gray button (LOV) at the end of the row and
select the type of meeting being scheduled.
8. Enter a title of the meeting or a short description in the Title/Des. Mtg field. (Ex.
Anatomy Class, Meeting – Leased Computers).
9. Enter the number of persons who will be attending in the # of Attendees field. This field
will only hold numbers. Please do not use dashes “-“. Enter the maximum number of
people you expect to attend. (Ex. If your number of attendees is 20-25, you should
enter 25.)
10. In the Phone field, enter your ten-digit phone number. (Ex. 999-999-9999)
11. In the Email Address field, enter your email address. It is important that this field be
entered correctly because the system will use this email address for notifications.
12. Re-enter your email address in the field labeled Re-Type Email Address.
13. If you have any remarks or special notes or comments, you may enter them in the
Remarks field.
INFORMATION ENGINEERING BRANCH
Printed: 5/19/2009
15
MDL ROOM REQUEST USER MANUAL
14. On the right side of the screen there are options for additional items/services you may
want to request. If you want/need to request those items/services, place a checkmark next
to the option by clicking in the blank field.
15. In the Request Room Date field, enter the date you would like to reserve the room.
Please make sure you enter the date in the correct format or you will get an error
message. The date format is mm/dd/yyyy. The date format is also on the screen.
16. In the Start Time field, click the gray button (LOV) to the right of the field and select the
time the event is set to begin.
17. In the End Time field, click the gray button (LOV) to the right of the field and select the
time the event is set to end.
18. In the Room No/Name/Capacity field, click the gray button (LOV) to the right of the
field and select an available room.
TIP The rooms listed in the window are currently available. However, someone else may
have requested the same room before you, but it has not been approved by MDL yet. You
will receive an email if MDL has to assign you to another room.
19. To submit this request, click the
request.
button once you have completed the entire
20. You will see a message that asks, “Are you sure you want to submit the request?”. Click
the
button to clear the message. If you are not sure, click the
button to go
back to the form.
21. Once you submit your request, and click OK, you will see a message that you have
temporarily submitted your multiple room request. If you check the email account that
your denoted on the form, you will see an email shortly from
[email protected].
TIP Make a note of the event number, you will need it to view your request or to search for it
on the pending and confirmed room request views on the MDL webpage.
INFORMATION ENGINEERING BRANCH
Printed: 5/19/2009
16
MDL ROOM REQUEST USER MANUAL
Tutorial 2-D: Creating Recurring Room Requests
This tutorial will guide you through the process of submitting a new recurring room request.
You will notice the asterisk (*) next to several fields on the screen. The fields that have an
asterisk are required fields and you will not be able to submit the request if those fields are left
blank.
1. If you are not sure how to access the application, please refer to Tutorial 1 for assistance.
2. Once you have reached the MDL webpage, click the
on the left side under the Room Requests heading.
link
3. Read through and follow the instructions on the page to make sure that J Initiator has
been installed on your computer. Once you are sure it has been installed (if you can
access this application, then it has been installed successfully), click the „Continue‟ link
at the end of the instructions.
4. When the Multiple/Recurring Room Request Menu shows on your screen, click the
button.
5. In the Requestor field, enter your first and last name.
6. Click the gray button to the right of the Department field and select your department
from the list of values (LOV). See Appendix A on how to use the LOV.
7. In the Meeting Category field, click the gray button (LOV) at the end of the row and
select the type of meeting being scheduled.
8. Enter a title of the meeting or a short description in the Title/Des. Mtg field. (Ex.
Anatomy Class, Meeting – Leased Computers).
9. Enter the number of persons who will be attending in the # of Attendees field. This field
will only hold numbers. Please do not use dashes “-“. Enter the maximum number of
people you expect to attend. (Ex. If your number of attendees is 20-25, you should
enter 25.)
10. In the Phone field, enter your ten-digit phone number. (Ex. 999-999-9999)
11. In the Email Address field, enter your email address. It is important that this field be
entered correctly because the system will use this email address for notifications.
12. Re-enter your email address in the field labeled Re-Type Email Address.
13. If you have any remarks or special notes or comments, you may enter them in the
Remarks field.
INFORMATION ENGINEERING BRANCH
Printed: 5/19/2009
17
MDL ROOM REQUEST USER MANUAL
14. On the right side of the screen there are options for additional items/services you may
want to request. If you want/need to request those items/services, place a checkmark next
to the option by clicking in the blank field.
15. In the Room No/Name/Capacity field, click the gray button (LOV) to the right of the
field and select an available room.
16. In the Request Start Date field, enter the date you would like the reservation to begin.
Please make sure you enter the date in the correct format or you will get an error
message. The date format is mm/dd/yyyy. The date format is also on the screen.
17. In the Request End Date field, enter the date you would like the reservation to end.
18. In the Start Time field, click the gray button (LOV) to the right of the field and select the
time the event is set to begin.
19. In the End Time field, click the gray button (LOV) to the right of the field and select the
time the event is set to end.
20. To the right of the above fields, you‟ll notice the days of the week are listed. Select the
day(s) you want your event to occur on. For instance, if your dates were from May 1 –
July 30, every Monday, Wednesday and Friday, you would need to click the checkboxes
to the left of those three days.
21. Check the availability of that room on the dates you entered by clicking the
button. If there are conflicts with the room, you will
see the conflicts show up in the window on the bottom part of the screen. The Room
Status will appear as „Not Available‟.
22. If there is a conflict, click the gray button (LOV) on each line to the right of the Room
Name/Capacity field and select a new room. You will see the Room Status change to
„OK‟.
TIP You can yield the same result if you click the Submit button. However, it will only
submit a partial request (the items that do not have a conflict) and you will still have to
make the corrections to the items that do have a conflict and submit again. We suggest
running the query first, make any necessary corrections and then submit the request.
23. To submit this request, click the
request.
button once you have completed the entire
24. You will see a message that asks, “Are you sure you want to submit the request?”. Click
the
button to clear the message. If you are not sure, click the
button to go
back to the form.
25. Once you submit your request, and click OK, you will see a message that you have
temporarily submitted your recurring room request. If you check the email account that
INFORMATION ENGINEERING BRANCH
Printed: 5/19/2009
18
MDL ROOM REQUEST USER MANUAL
your denoted on the form, you will see an email shortly from
[email protected].
TIP Make a note of the event number, you will need it to view your request or to search for it
on the pending and confirmed room request views on the MDL webpage.
INFORMATION ENGINEERING BRANCH
Printed: 5/19/2009
19
MDL ROOM REQUEST USER MANUAL
SECTION 3: CALENDAR VIEWS AND SCHEDULES
Tutorial 3-A: Viewing Existing Multiple and Recurring Room Requests
This tutorial will guide you through the process of viewing existing multiple and recurring room
requests.
1. If you have not already accessed the MDL Scheduler Online Room Request Menu, please
refer to Tutorial 1 on how to access the system.
2. Once you have reached the MDL webpage, click the
on the left side under the Room Requests heading.
link
3. Read through and follow the instructions on the page to make sure that J Initiator has
been installed on your computer. Once you are sure it has been installed (if you can
access this application, then it has been installed successfully), click the „Continue‟ link
at the end of the instructions.
4. When the Multiple/Recurring Room Request Menu shows on your screen, click the
button.
5. Enter your event number in the Event Number field. This is the number that was shown
on your request. You also received this number in the confirmation email that you
received from MDL.
6. In the Your Email Address field, enter the email you entered in the request. This field is
case-sensitive. You MUST enter this email exactly how you entered it in the request or
you will not be able to retrieve your request.
7. Click the
button. You will see the request you entered. You will see that the
confirmation and authorization fields have been added. This section shows you if your
request has been approved or cancelled and by whom.
TIP If you realize that you need to cancel this request, contact the MDL office by phone or
email. Make sure you have the event number, as this will help them process your
cancellation more efficiently.
INFORMATION ENGINEERING BRANCH
Printed: 5/19/2009
20
MDL ROOM REQUEST USER MANUAL
Tutorial 3-B: Viewing All Pending Room Requests
This tutorial guides you through the steps of viewing all requests that are awaiting approval by
the MDL office.
1. If you have not already accessed the MDL Scheduler Online Room Request Menu, please
refer to Tutorial 1 on how to access the system.
2. Once you have reached the MDL webpage, click the
the left side under the MDL Schedules heading.
link on
3. You may get a Certificate Error Page. If you do, click the link that says
.
4. You will see the All Pending Room Requests heading at the top of the page.
5. You can search for a request by entering your search criteria in the Search field and
clicking the
button. The columns you can search on are listed below. The search
returns any value that matches or contains your criteria.
a. Event No
b. Tracking Number
6. When you are done viewing the calendar, please close your browser to exit.
INFORMATION ENGINEERING BRANCH
Printed: 5/19/2009
21
MDL ROOM REQUEST USER MANUAL
Tutorial 3-B: View Calendar
This tutorial shows you how to view the Monthly Room Schedule Calendar and the approved
requests.
7. If you have not already accessed the MDL Scheduler Online Room Request Menu, please
refer to Tutorial 1 on how to access the system.
8. On the MDL Scheduler main menu screen, click the
button. You will see the monthly calendar view. You may encounter the certificate page,
if so, please click the
link to continue.
9. If you want to move forward or backward in the calendar, click the
buttons.
or
10. If you would like to see the details for a particular scheduled item, click the red link that
says „Click for details‟. The number after that statement tells you how many events are
scheduled for that day.
a. You will see the details of the events scheduled for the day you chose. If you‟d
like to see another date, click the calendar
icon above the details and select the
date you would like to view, then click the
button.
b. To see the additional rows, click the
arrow at the bottom of the list or select a
group from the drop down list.
11. When you are done viewing the calendar, please close your browser to exit.
INFORMATION ENGINEERING BRANCH
Printed: 5/19/2009
22
MDL ROOM REQUEST USER MANUAL
APPENDIX
Appendix A: Using the List of Values (LOV)
This provides you with a guide to using the list of values that are used in this application.
Searching Using the Primary Field
In every LOV, whatever the first column is, that column is always the primary searchable field.
In other words, when the LOV opens, if you start typing text that you are looking for in the first
column, it will begin to narrow your search. It is important that you do not click anywhere
before you begin typing.
1. In the LOV below, the primary field would be Department Code. For instance, if you
were searching for „BIO‟, type „B‟. You will notice immediately it begins to filter out
everything that does not begin with the letter „B‟.
2. Next, type the letter „I‟. Notice that it further filters out those choices that don‟t match.
3. If you enter an incorrect letter, you can press the backspace key on your keyboard to get
back to a particular starting point.
4. At this point, you can type the „O‟ to complete the search or you can use your down
arrow key to highlight Biochemistry. Once it is highlighted, you have two options to
select it.
a. You can click the OK button to select it or
b. You can press the Enter key on your keyboard (see the figure below)
INFORMATION ENGINEERING BRANCH
Printed: 5/19/2009
23
MDL ROOM REQUEST USER MANUAL
Searching Other Fields in the LOV
This search allows you to perform a string search on any of the fields that may be in the LOV.
You will need to place the cursor to the right of the % sign in the Find field in order to perform
this particular search
1. In the LOV below, let‟s say we were
searching for „Medical Students‟. If
you type „Medical‟ to the right of the %
sign, you‟ll notice than initially nothing
happens.
2. If you click the OK button or press the
Enter key on your keyboard, you‟ll
notice that the list returns all results that
contain the word „Medical‟. From
there, you will be able to select Medical
Students option as denoted in the above
example.
3. If the list still remained too long, you
could continue to search by placing
your cursor to right of the % sign in the
Find field.
4. Enter „student‟, then click the OK button or the press the Enter key on your keyboard.
At anytime that you want to begin a new search, simply delete everything from the Find field
except the % sign and click the OK button or press the Enter key on your keyboard to show all
choices in the list again.
In addition, if you no longer want to search, you can click the Cancel button to return to the
form.
INFORMATION ENGINEERING BRANCH
Printed: 5/19/2009
24
MDL ROOM REQUEST USER MANUAL
BLANK PAGE
INFORMATION ENGINEERING BRANCH
Printed: 5/19/2009