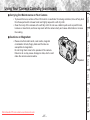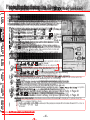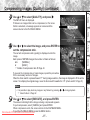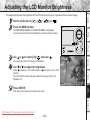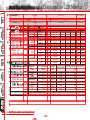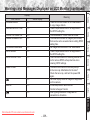
1
INSTRUCTION MANUAL
MODE D’EMPLOI
DIGITAL STILL CAMERA
Downloaded From camera-usermanual.com
PDR-M81
Downloaded From camera-usermanual.com
To ensure that you use the Toshiba
PDR-M81 Digital Still Camera safely
and correctly, read this Instruction
Manual carefully before you start using
the camera. Once you have finished
reading this Instruction Manual, keep it
handy at all times.
DIGITAL STILL CAMERA
PDR-M81
In the space provided below, please record the model and Serial No. of your camera.
Model No. PDR-M81
Serial No.
Please retain
information for future reference.
Downloaded
From this
camera-usermanual.com
ENGLISH
INSTRUCTION MANUAL
Downloaded From camera-usermanual.com
Attention
For customers in the U.S.A.
Getting
Ready
DIGITAL STILL CAMERA
PDR-M81
Taking
Photographs
Tested To Comply
With FCC Standards
FOR HOME OR OFFICE USE
This device complies with Part 15 of the FCC Rules. Operation is subject to the following two conditions:
(1) This device may not cause harmful interference, and
(2) this device must accept any interference received, including interference that may cause undesired operation.
Additional
Information
-1-
Other
Applications
Downloaded From camera-usermanual.com
Handy
Functions
This equipment has been tested and found to comply with the limits for a Class B digital device, pursuant to Part
15 of the FCC Rules. These limits are designed to provide reasonable protection against harmful interference in a
residential installation.
This equipment generates, uses and can radiate radio frequency energy and, if not installed and used in
accordance with the instructions, may cause harmful interference to radio communications. However, there is no
guarantee that interference will not occur in a particular installation. If this equipment does cause harmful
interference to radio or television reception, which can be determined by turning the equipment off and on, the
user is encouraged to try to correct the interference by one or more of the following measures:
• Change the direction of the radio or TV antenna.
Move the equipment or the radio or TV. For example, if the equipment is to the right of the TV, move it to the left
of the TV.
Or, move the equipment farther away from the radio or TV.
• Plug the equipment into a different outlet. Don’t plug your radio or TV into the same circuit as your equipment.
• Ensure that all expansion slots (on the back or side of the equipment) are covered.
Also, ensure that all metal retaining brackets are tightly attached to the equipment.
• If these suggestions don’t help, consult your equipment dealer or experienced radio/TV technician for help.
Erasing
Images
NOTE
Playing
Back Images
FCC Statement
Getting
Ready
Safety
Contents
The
Function
Precautions
Map The name in parentheses ( ) is the function name on the PDR-M81.
Attention
(continued)
There
are various
you cancarefully
take photographs
on the
the PDR-M81.
PDR-M81,
byPower
using
the settings
provided
by the camera
Read these
safetyways
precautions
before using
These
instructions
contain
valuable
Turning the
On/Off
................................................
38
CAUTION
Preface
Turningrequirements.
the
Power
On .....................................................
38
itself
or
by
adjusting
the
settings
to
suit
your
particular
photographic
information
on
safe
and
proper
use
that
will
prevent
harm
and
damage
to
the
operator
and
other
persons.
If you modify the camera in any way, without getting approval from Toshiba Corporation, your camera may violate
Turning
the Power
Offfunctions.
.....................................................
Attention
............................................................................
In
addition
to photographic
the
PDR-M81
is1provided
with
handy
We
suggest
that you38
Make
sure
that
you
fully understand
the
following
(indications)
before
proceeding
themodified
main
descriptions
FCC
regulations.
Violation
offunctions,
FCC regulations
maydetails
cause
the FCC
to other
void
your
right
to usetothe
camera.
Before
Reading
This map
Manual
.............................................
look
atmanual.
the function
below
before you start using 3the PDR-M81.
in
this
Taking Photographs
Taking
Photographs
The Function Map ............................................................. 4
symbol definitions
Indication
definitions
Contents ............................................................................
6 Graphic
TOSHIBA
AMERICA
INFORMATION SYSTEMS,
INC.
How to Hold Your Camera ............................................... 39
Safety Precautions ............................................................ 8
Erasing
Images
Playing
Back Images
How to Press the Shutter Button ..................................... 40
Graphic symbol
Meaning
Photography (Auto Photography) .................................... 41
Indicates
a prohibited action that 41
Using the Viewfinder
.......................................................
must ....................................................
not be carried out.
Using the LCD Monitor
42
Theand
actual
prohibited
action is
Setting the Image Size
Quality
.................................
44
Notes On Handling Your Camera .................................... 14
indicated
in
the
symbol
or
nearby
instruction
is not observed.
] Mode (Auto Select mode) .. 46
Taking Photographs in [
Notes On Batteries
.........................................................
16
graphically or described in text.
Taking Photographs in a Variety of Modes
On Handling
Batteries
..........................................
17
This
indicates
the existence of a
ForNotes
customers
in
Canada
Indicates
a necessary action that 47
Notes On Handling
the ACthat
Adapter
([
] Mode) ...............................................................
hazard
could................................
result in bodily 18
bethecarried
out.
[
] Automaticallymust
adjusts
focus and
exposure settings .... 49
CAUTION
injury, if the safety instruction is not
The actual necessary action is
] Portrait ...................................................................
49
[
observed.
Getting
Ready
This Class B digital
apparatus
complies with Canadian ICES-003.
indicated
in
the
symbol
or nearby 49
] Landscape .............................................................
[
Cet appareil numérique
de la classe
B est conforme
à la norme[ NMB-003
du
Canada.
graphically
or
described
in
text.
This
indicates
the
existence
of
a
] Sports .................................................................... 50
Accessories ..................................................................... 19
hazard that could result in bodily 20
] Night ..................................................................... 50
[
Names of Parts ................................................................
injury *1 or property damage *2.
] 16-frame multi ........................................................ 51
[
Attaching the Shoulder Strap .......................................... 24
Zoom Photography .......................................................... 52
Batteries
*1:Installing
“Bodily the
injury”
means.....................................................
injuries, burns, and shock which25
the Focus ........................................................
•Changing
Toshiba Corporation
bears no responsibility in the case of54
Loading
the Batteries
......................................................
25
does
not require
hospitalization
or prolonged treatment.
damagesPhotography
arising from earthquakes,
fire not liable to
Self-timer
....................................................
55
Removing
the Batteries
...................................................
*2: “Property
damage”
means
extended harm to home, 26
Toshiba Corporation,
by third parties, other
Photography
Using theoperating
Flash ..........................................
56
Battery Wear
...................................................................
household
effects,
domesticated animals, and pets. 27
accidents,
or
use
under
abnormal
conditions
including
Using the Power Outlet .................................................... 28
Manual Settings ............................................................... 58
erroneous
or
improper
operation
and
other
problems.
Exposure control (EXP.) .................................................. 60
About SmartMedia™ ....................................................... 30
• Toshiba
bears
no responsibility for incidental60
White Corporation
Balance (W.B.)
......................................................
Notes on SmartMedia™ ................................................. 30
damages
profit,
work...................................................
interruption, corruption or loss 61
of
Metering(lost
system
(A.E.)
Loading SmartMedia™ ................................................... 31
theSingle,
memory
contents,oretc.)
from the
use(S/C)
of or ......
the 61
continuous
AEBarising
photography
mode
Removing SmartMedia™ ................................................ 33
inability to use this unit.
Photography in the Program Mode .................................. 62
Write Protection .............................................................. 34
• Toshiba Corporation accepts no liability whatsoever for any
LCD Monitor Display (during photography) ..................... 35
Photography
in thefrom
Aperture-priority
Mode the
.....................
63
damages arising
not having followed
descriptions
In [
] mode .................................................................. 35
Photography
in theManual.
Shutter Speed-priority Mode ............ 65
in this Instruction
In [
] mode ................................................................ 36
in the Full
Manual
.............................
67
•Photography
Toshiba Corporation
accepts
noMode
liability
whatsoever for any
] mode ................................................................. 37
In [
damagesExposure
arising from
malfunctions
arising
from
Extended
Photography
(Bulb
Photography)
.... 68
combination
with equipment
or software that is not related69
Exposure
Compensation
.................................................
Downloaded From camera-usermanual.com
to Toshiba Corporation.
Imaging
Systems
Division
Indication
definitions
.........................................................
8
Indication
Meaning
9740Graphic
Irvine symbol
Boulevard,
definitions ................................................ 8
This
indicates the existence of a
Exemption
Clauses
...........................................................
8
Irvine,
California
92618-1697
hazard that
could result in death or 14
Using Your
Camera
Correctly
..........................................
Phone
Number:
(800)288-1354
serious bodily injury, if the safety
Additional
Information
Other
Applications
Handy
Functions
Exemption Clauses
-2-
Before Reading This Manual
IMPORTANT
• Indicates items or details that you should observe to
prevent loss of data, malfunction and impaired
performance. Also indicates information relating to
specifications and functions.
Memo
Playing
Back Images
Conventions Used In This Manual
• Macintosh and QuickTime are trademarks of Apple
Computer, Inc.
• MS-DOS and Windows are registered trademarks of
the Microsoft Corporation of the U.S. registered in the
USA and other countries.
Windows is an abbreviated term referring to the
Microsoft Windows Operating System.
• SmartMediaTM is a trademark of Toshiba Corporation.
• Other companies or product names are trademarks
or registered trademarks of the respective
companies.
Taking
Photographs
Trademark Information
Getting
Ready
Thank you for purchasing the Toshiba PDR-M81 Digital Still Camera.
To ensure that you use this camera safely and correctly, read this Instruction Manual carefully before you start
using the camera. Once you have finished reading this Instruction Manual, keep it handy at all times.
• Indicates extra useful information.
Indicates another page to refer to for extra
information.
Erasing
Images
☞
Handy
Functions
Other
Applications
Additional
Information
Downloaded From camera-usermanual.com
-3-
Erasing
Images
Playing
Back Images
Taking
Photographs
Getting
Ready
Safety
Contents
The
Function
Precautions
Map The name in parentheses ( ) is the function name on the PDR-M81.
Attention
(continued)
There
are various
you cancarefully
take photographs
on the
the PDR-M81.
PDR-M81, These
by using
the settings
provided
by the camera
Read these
safetyways
precautions
before using
instructions
contain
valuable
CAUTION
Preface
itself
or
by
adjusting
the
settings
to
suit
your
particular
photographic
requirements.
information
on
safe
and
proper
use
that
will
prevent
harm
and
damage
to
the
operator
and
other
persons.
If you modify the camera in any way, without getting approval from Toshiba Corporation, your camera may violate
In
addition
to photographic
the
PDR-M81
is provided
with
handy
functions.
We
suggest
that you
Make
sure that
you
fully understand
the
following
(indications)
before
proceeding
themodified
main
descriptions
FCC
regulations.
Violation
offunctions,
FCC regulations
maydetails
cause
the FCC
to other
void
your
right
to usetothe
camera.
look
atmanual.
the function map below before you start using the PDR-M81.
in
this
Read definitions
these pages first.
Indication
Taking Photographs
Taking
photographs.
Graphic
symbol
definitions
Imaging
Division
STEP1 – Taking photographs. (P. 41)
Let’sSystems
get ready
to use the PDR-M81.
9740 Irvine Boulevard,
(P.19
to
P.
38)
a prohibited
action that
settings up
to your camera.
(P. 46)
This indicates the existence of a STEP2 – Leaving camera Indicates
Irvine, California 92618-1697
mustadjusts
not be carried
out.and
hazard that could result in death or • The camera automatically
the
focus
DANGER
Phone
Number: (800)288-1354
actual
serious bodily injury, if the safety
exposure settings. (P. The
47, P.
49) prohibited action is
indicated in the symbol or nearby
instruction is not observed.
• Taking Portrait Shots (P.
47,
P.
49)or described in text.
graphically
Let’s learn aboutindicates
basic operation.
• Taking Landscape Shots (P. 47, P. 49)
For customers This
in Canada the existence of a
Indicates
a necessary action that
hazard that could result in bodily
• Taking Shots of Movingmust
Objects
(P. 47,
P. 50)
be carried
out.
WARNING
• Turning
the Powerinjury,
ON (P.
38)safety instruction is not
CAUTION
if the
• Taking Shots of Portraits
atactual
Nightnecessary
(P. 47, P. action
50) is
The
• Photography
(P.
41)
observed.
Getting
Ready
This
Class B digital
apparatus
complies with Canadian• ICES-003.
Taking Continuous Shotsindicated
of Moving
(P. 47,
P. 51)
in Objects
the symbol
or nearby
•
Playing
Back
Photographed
Images
(P.
80)
Cet appareil numérique
de la classe
B est conforme
à la norme NMB-003 du Canada.
graphically
or described
in text.
This indicates
the existence
of a STEP3
– Utilizing the various
photography
modes.
• Erasing Images (P. 87)
CAUTION hazard*1 that could result in bodily
• Zoom Photography (P. 52)
injury or property damage *2.
• Focus Photography (P. 54)
*1: “Bodily injury” means injuries, burns, and shock which • Photography Using the Self-timer (P. 55)
• Toshiba Corporation bears no responsibility in the case of
does not require hospitalization or prolonged treatment.• Photography
Using the Flash (P. 56)
damages arising from earthquakes, fire not liable to
*2: “Property damage” means extended harm to home,
• Making
Movies
(P. 75) operating by third parties, other
Toshiba
Corporation,
household effects, domesticated animals, and pets.
Additional
Information
Other
Applications
Handy
Functions
Exemption Clauses
Downloaded From camera-usermanual.com
or use
under in
abnormal
conditions
including
Setting the
modes
more detail
to make
your
STEP4 –accidents,
erroneous
or improper
operation
photographs
turn out
moreand
asother
you problems.
intended.
• Toshiba Corporation bears no responsibility for incidental
• Setting
Image (lost
Sizeprofit,
and Quality
(P. 44) corruption or loss of
damages
work interruption,
• Taking
withcontents,
the Priority
Given
to from
Aperture
(P.of58,
theShots
memory
etc.)
arising
the use
or P.63)
the
• Takinginability
Shots with
thethis
Priority
to use
unit.Given to Shutter Speed (P. 58, P.65)
•
Toshiba
Corporation
accepts
no
liability
whatsoever
for
any
• Extended Exposure Photography (P. 58, P.68)
damages arising
from not
followed the descriptions
• Compensating
Exposure
(P. having
58, P.69)
in thisExposure
Instruction
Manual. (AEB Photography) (P. 58, P.71)
• Automatic
Bracketing
• Toshiba Corporation accepts no liability whatsoever for any
• Taking
Photos
Continuously
(P. 58, P.72)
damages arising from malfunctions
arising from
• Setting
White Balance
(P. 58, P. 60)
combination
with equipment
or software that is not related
to Toshiba Corporation.
-2-
The Function Map (continued)
• Setting the Date and Time (P. 111)
• Formatting SmartMedia™ (P. 91)
• Adjusting the LCD Monitor Brightness (P. 115)
• Switching LCD Monitor Display (P. 117)
• Turning the LCD Monitor Display OFF (P. 117)
• Turning the Beep OFF (P. 111)
• Switching the Folder (P. 92)
• Setting the Color of Images (Color/Black and White/Sepia) (P. 77)
• Changing the Power OFF Time (P. 110)
• Changing the LCD Monitor Display Language (P. 112)
STEP2 – Selecting the various ways to play back images.
• Playing Back Movies (P. 81)
• Enlarging Photographed Images (P. 84)
• Auto Playback (P. 85)
• Simple Movie Playback (P. 86)
• Displaying a List of Images (P. 83)
• Displaying Detailed Information of Images (P. 116)
You can also do this
–The PDR-M81 also has lots of other features.–
STEP1 – Erasing Images (P. 87)
STEP2 – Other ways to erase images
Downloaded From camera-usermanual.com
-5-
Additional
Information
Loading Images on a Personal Computer (P. 121), separate “Software Manual”
Other
Applications
Loading images on a personal computer
Handy
Functions
• Erasing All Images in a Folder (P. 89)
• Erasing All Image Folders (P. 89)
• Formatting SmartMedia™ (P. 91)
• Protecting Images (P. 106)
• Changing the size of Images (P. 94)
• Compressing Images (P. 96)
• Copying Images to another SmartMedia™ (P. 98)
• Print Information (P. 102)
• Displaying Detailed Information of Images (P. 116)
• Switching LCD Monitor Display (P. 117)
• Taking and Playing Back Photographs on a TV (P. 119)
Erasing
Images
Erasing images
Playing
Back Images
STEP1 – Let’s play back some images. (P. 80)
Taking
Photographs
Setting the basic camera settings
Getting
Ready
Playing back your photographed images
Safety
Contents
The
Function
Precautions
Map The name in parentheses ( ) is the function name on the PDR-M81.
Attention
(continued)
Playing
Back Images
Taking
Photographs
Getting
Ready
CAUTION
■ Turning the Power On/Off ................................................ 38
Preface
Turning the Power On ..................................................... 38
Turning the Power Off ..................................................... 38
■ Attention ............................................................................ 1
■ Before Reading This Manual ............................................. 3
Taking Photographs
■ The Function Map ............................................................. 4
■ TOSHIBA
Contents ............................................................................
6
AMERICA INFORMATION SYSTEMS,
■ INC.
How to Hold Your Camera ............................................... 39
■ Safety Precautions ............................................................ 8
How to Press the Shutter Button ..................................... 40
Indication definitions .........................................................
8 ■ Graphic
symbol
Meaning
Indication
Meaning
Graphic symbol definitions ................................................ 8 ■ Photography (Auto Photography) .................................... 41
Graphic symbol definitions
Indication definitions
Using the Viewfinder ....................................................... 41
Using the LCD Monitor .................................................... 42
Exemption Clauses ........................................................... 8
■ Using Your Camera Correctly .......................................... 14
Notes On Handling Your Camera ....................................
Notes On Batteries .........................................................
On Handling Batteries ..........................................
ForNotes
customers
in Canada
Notes On Handling the AC Adapter ................................
14
16
17
18
■ Setting the Image Size and Quality ................................. 44
] Mode (Auto Select mode) .. 46
■ Taking Photographs in [
■ Taking Photographs in a Variety of Modes
([
] Mode) ............................................................... 47
Erasing
Images
CAUTION
[
[
[
[
[
[
Getting Ready
] Automatically adjusts the focus and exposure settings .... 49
] Portrait ................................................................... 49
] Landscape ............................................................. 49
] Sports .................................................................... 50
] Night ..................................................................... 50
] 16-frame multi ........................................................ 51
■ Accessories ..................................................................... 19
■ Names of Parts ................................................................ 20
■ Attaching the Shoulder Strap .......................................... 24
■ Installing the Batteries ..................................................... 25 ■ Zoom Photography .......................................................... 52
Loading the Batteries ...................................................... 25 ■ Changing the Focus ........................................................ 54
Removing the Batteries ................................................... 26 ■ Self-timer Photography .................................................... 55
Battery Wear ................................................................... 27 ■ Photography Using the Flash .......................................... 56
■ Using the Power Outlet .................................................... 28 ■ Manual Settings ............................................................... 58
Exposure control (EXP.) .................................................. 60
■ About SmartMedia™ ....................................................... 30
Additional
Information
Other
Applications
Handy
Functions
Exemption Clauses
Notes on SmartMedia™ .................................................
Loading SmartMedia™ ...................................................
Removing SmartMedia™ ................................................
Write Protection ..............................................................
30
31
33
34
White Balance (W.B.) ...................................................... 60
Metering system (A.E.) ................................................... 61
Single, continuous or AEB photography mode (S/C) ...... 61
■ Photography in the Program Mode .................................. 62
■ LCD Monitor Display (during photography) ..................... 35 ■ Photography in the Aperture-priority Mode ..................... 63
In [
] mode .................................................................. 35 ■ Photography in the Shutter Speed-priority Mode ............ 65
In [
] mode ................................................................ 36 ■ Photography in the Full Manual Mode ............................. 67
] mode ................................................................. 37 ■ Extended Exposure Photography (Bulb Photography) .... 68
In [
■ Exposure Compensation ................................................. 69
Downloaded From camera-usermanual.com
-2-
Contents (continued)
The name in parentheses ( ) is the function name on the PDR-M81.
Protecting an Image ...................................................... 106
Removing the Protection ............................................... 108
Other Applications
■ Basic Settings (
Additional
Information
-7-
Other
Applications
How to select the folder ................................................... 92
■ Reducing the Image Size (Resize) .................................. 94
■ Compressing
Images
(Quality) ........................................ 96
Downloaded
From
camera-usermanual.com
Handy
Functions
Handy Functions
■ About Folders .................................................................. 92
Additional Information
■ Specifications ................................................................ 124
■ Warnings and Messages Displayed on LCD Monitor .... 128
■ Troubleshooting ............................................................. 130
■ Glossary ........................................................................ 133
Erasing
Images
Erasing Images
■ Erasing Images (Erase Frame) ....................................... 87
■ Erasing Folders (All Images in a Folder/All Folders) ....... 89
■ Formatting the SmartMedia™ ......................................... 91
■ Adjusting the LCD Monitor Brightness .......................... 115
■
Button and LCD Monitor Display
(In Playback Mode) ........................................................ 116
■
Button and LCD Monitor Display
(In Photography Mode) .................................................. 117
■ Definitions of the Color of the Viewfinder LED .............. 118
■ Taking and Playing Back Photographs on a TV ............ 119
■ Transferring Images to a PC ......................................... 121
■ Separately Sold Accessories ......................................... 122
■ Connecting to Other Devices ........................................ 123
Playing
Back Images
Playing Back Images
■ Playing Back Photographed Images (Single-Frame
Playback) ......................................................................... 80
■ Playing Back Movies ....................................................... 81
■ Displaying a List of Images (Thumbnail Display) ............. 83
■ Enlarging Photographed Images (Zoom Playback) ......... 84
■ Auto Playback (Slideshow) .............................................. 85
■ Playback of Multi Image Pictures .................................... 86
mode) ............................................ 109
AUTO POWER OFF ...................................................... 110
SOUND ......................................................................... 111
TIME & DATE ................................................................ 111
OSD LANGUAGE ......................................................... 112
VIDEO OUT .................................................................. 112
QUALITY ....................................................................... 112
SYSTEM INFO. ............................................................. 114
Taking
Photographs
PREVIEW ....................................................................... 77
COLOR ........................................................................... 77
ISO .................................................................................. 78
SHARPNESS .................................................................. 79
CONTRAST .................................................................... 79
DIGITAL ZOOM ............................................................... 79
............................................................................ 79
LCD
■ Copying Images .............................................................. 98
■ Print Information ............................................................ 102
■ Protecting Images ......................................................... 106
Getting
Ready
■ Taking Shots with the Automatic Exposure Bracketing
(AEB Photography) ......................................................... 71
■ Taking Photographs Continuously (Burst Photography) .. 72
■ Making Movies ................................................................ 75
■ Changing the Preset Conditions
(RECORDING MENU) .................................................... 76
Getting
Ready
Safety
Contents
The
Function
Precautions
Map The name in parentheses ( ) is the function name on the PDR-M81.
Attention
(continued)
There
are various
you cancarefully
take photographs
on the
the PDR-M81.
PDR-M81,
byPower
using
the settings
provided
by the camera
Read these
safetyways
precautions
before using
These
instructions
contain
valuable
Turning the
On/Off
................................................
38
CAUTION
Preface
Turningrequirements.
the
Power
On .....................................................
38
itself
or
by
adjusting
the
settings
to
suit
your
particular
photographic
information
on
safe
and
proper
use
that
will
prevent
harm
and
damage
to
the
operator
and
other
persons.
If you modify the camera in any way, without getting approval from Toshiba Corporation, your camera may violate
Turning
the Power
Offfunctions.
.....................................................
Attention
............................................................................
In
addition
to photographic
the
PDR-M81
is1provided
with
handy
We
suggest
that you38
Make
sure
that
you
fully understand
the
following
(indications)
before
proceeding
themodified
main
descriptions
FCC
regulations.
Violation
offunctions,
FCC regulations
maydetails
cause
the FCC
to other
void
your
right
to usetothe
camera.
Before
Reading
This map
Manual
.............................................
look
atmanual.
the function
below
before you start using 3the PDR-M81.
in
this
Taking Photographs
Taking
Photographs
The Function Map ............................................................. 4
Read
these pages
first.
Taking
photographs.
symbol
definitions
Indication
definitions
Contents
............................................................................
6 Graphic
TOSHIBA
AMERICA
INFORMATION
SYSTEMS,
INC.
How to Hold Your Camera ............................................... 39
Safety Precautions ............................................................ 8
Erasing
Images
Playing
Back Images
How to Press the Shutter Button ..................................... 40
Graphic symbol
Meaning
Photography (Auto Photography) .................................... 41
Indicates
a prohibited action that 41
Using the Viewfinder
.......................................................
must ....................................................
not be carried out.
Using the LCD Monitor
42
Theand
actual
prohibited
action is
Setting the Image Size
Quality
.................................
44
Notes On Handling Your Camera .................................... 14
indicated
in
the
symbol
or
nearby
instruction
is not observed.
] Mode (Auto Select mode) .. 46
Taking Photographs in [
Notes On Batteries
.........................................................
16
graphically or described in text.
Let’s learn
about
basic
operation.
Taking Photographs in a Variety of Modes
On Handling
Batteries
..........................................
17
This
indicates
the existence of a
ForNotes
customers
in
Canada
Indicates
a necessary action that 47
Notes On Handling the ACthat
Adapter
([
] Mode) ...............................................................
could................................
result in bodily 18
bethecarried
out.
WARNING hazard
[
] Automaticallymust
adjusts
focus and
exposure settings .... 49
CAUTION
injury, if the safety instruction is not
The actual necessary action is
] Portrait ...................................................................
49
[
observed.
Getting
Ready
This Class B digital
apparatus
complies with Canadian ICES-003.
indicated
in
the
symbol
or nearby 49
] Landscape .............................................................
[
Cet appareil numérique
de la classe
B est conforme
à la norme[ NMB-003
du
Canada.
graphically
or
described
in
text.
This
indicates
the
existence
of
a
] Sports .................................................................... 50
Accessories ..................................................................... 19
hazard that could result in bodily 20
CAUTION
] Night ..................................................................... 50
[
Names
of Parts ................................................................
injury *1 or property damage *2.
] 16-frame multi ........................................................ 51
[
Attaching the Shoulder Strap .......................................... 24
Zoom Photography .......................................................... 52
Batteries
*1:Installing
“Bodily the
injury”
means.....................................................
injuries, burns, and shock which25
the Focus ........................................................
•Changing
Toshiba Corporation
bears no responsibility in the case of54
Loading
the Batteries
......................................................
25
does
not require
hospitalization
or prolonged treatment.
damagesPhotography
arising from earthquakes,
fire not liable to
Self-timer
....................................................
55
Removing
the Batteries
...................................................
*2: “Property
damage”
means
extended harm to home, 26
Toshiba Corporation,
by third parties, other
Photography
Using theoperating
Flash ..........................................
56
Battery Wear
...................................................................
household
effects,
domesticated animals, and pets. 27
accidents,
or
use
under
abnormal
conditions
including
Using the Power Outlet .................................................... 28
Manual Settings ............................................................... 58
erroneous
or
improper
operation
and
other
problems.
Exposure control (EXP.) .................................................. 60
About SmartMedia™ ....................................................... 30
• Toshiba
bears
no responsibility for incidental60
White Corporation
Balance (W.B.)
......................................................
Notes on SmartMedia™ ................................................. 30
damages
profit,
work...................................................
interruption, corruption or loss 61
of
Metering(lost
system
(A.E.)
Loading SmartMedia™ ................................................... 31
theSingle,
memory
contents,oretc.)
from the
use(S/C)
of or ......
the 61
continuous
AEBarising
photography
mode
Removing SmartMedia™ ................................................ 33
inability to use this unit.
Photography in the Program Mode .................................. 62
Write Protection .............................................................. 34
• Toshiba Corporation accepts no liability whatsoever for any
LCD Monitor Display (during photography) ..................... 35
Photography
in thefrom
Aperture-priority
Mode the
.....................
63
damages arising
not having followed
descriptions
In [
] mode .................................................................. 35
Photography
in theManual.
Shutter Speed-priority Mode ............ 65
in this Instruction
In [
] mode ................................................................ 36
in the Full
Manual
.............................
67
•Photography
Toshiba Corporation
accepts
noMode
liability
whatsoever for any
] mode ................................................................. 37
In [
damagesExposure
arising from
malfunctions
arising
from
Extended
Photography
(Bulb
Photography)
.... 68
combination
with equipment
or software that is not related69
Exposure
Compensation
.................................................
Downloaded From camera-usermanual.com
to Toshiba Corporation.
Imaging
Systems
Division
Indication
definitions
.........................................................
8
Indication
Meaning
9740Graphic
Irvine symbol
Boulevard,
definitions ................................................ 8
This
indicates the existence of a
Exemption
Clauses
...........................................................
8
Irvine,
California
92618-1697
hazard that
could result in death or 14
Using
Your
Camera
Correctly
..........................................
DANGER
Phone
Number:
(800)288-1354
serious bodily injury, if the safety
Additional
Information
Other
Applications
Handy
Functions
Exemption Clauses
-2-
Safety Precautions (continued)
Getting
Ready
DANGER
Taking
Photographs
Do not heat, disassemble or throw the
batteries into fire or water.
Doing might cause them to rupture, ignite or
heat up, resulting in fire or major injury.
Playing
Back Images
Do not strike the batteries with a hammer,
or step on, drop or subject the batteries to
strong impact.
Doing so might cause them to rupture, ignite or
heat up, resulting in fire or major injury.
Erasing
Images
Use the batteries only for its originally
intended purpose.
Handy
Functions
Using the batteries for any other purpose might
cause it to rupture, ignite or heat up, resulting in
fire or major injury.
Other
Applications
Additional
Information
Downloaded From camera-usermanual.com
-9-
Getting
Ready
Safety
Contents
The
Function
Precautions
Map The name in parentheses ( ) is the function name on the PDR-M81.
Attention
(continued)
There
are various
you cancarefully
take photographs
on the
the PDR-M81.
PDR-M81,
byPower
using
the settings
provided
by the camera
Read these
safetyways
precautions
before using
These
instructions
contain
valuable
Turning the
On/Off
................................................
38
CAUTION
Preface
Turningrequirements.
the
Power
On .....................................................
38
itself
or
by
adjusting
the
settings
to
suit
your
particular
photographic
information
on
safe
and
proper
use
that
will
prevent
harm
and
damage
to
the
operator
and
other
persons.
If you modify the camera in any way, without getting approval from Toshiba Corporation, your camera may violate
Turning
the Power
Offfunctions.
.....................................................
Attention
............................................................................
In
addition
to photographic
the
PDR-M81
is1provided
with
handy
We
suggest
that you38
Make
sure
that
you
fully understand
the
following
(indications)
before
proceeding
themodified
main
descriptions
FCC
regulations.
Violation
offunctions,
FCC regulations
maydetails
cause
the FCC
to other
void
your
right
to usetothe
camera.
Before
Reading
This map
Manual
.............................................
look
atmanual.
the function
below
before you start using 3the PDR-M81.
in
this
Taking Photographs
Taking
Photographs
The Function Map ............................................................. 4
Read
these pages
first.
Taking
photographs.
symbol
definitions
Indication
definitions
Contents
............................................................................
6 Graphic
TOSHIBA
AMERICA
INFORMATION
SYSTEMS,
INC.
How to Hold Your Camera ............................................... 39
Safety Precautions ............................................................ 8
Erasing
Images
Playing
Back Images
How to Press the Shutter Button ..................................... 40
Graphic symbol
Meaning
Photography (Auto Photography) .................................... 41
Indicates
a prohibited action that 41
Using the Viewfinder
.......................................................
must ....................................................
not be carried out.
Using the LCD Monitor
42
Theand
actual
prohibited
action is
Setting the Image Size
Quality
.................................
44
Notes On Handling Your Camera .................................... 14
indicated
in
the
symbol
or
nearby
instruction
is not observed.
] Mode (Auto Select mode) .. 46
Taking Photographs in [
Notes On Batteries
.........................................................
16
graphically or described in text.
Let’s learn
about
basic
operation.
Taking Photographs in a Variety of Modes
On Handling
Batteries
..........................................
17
This
indicates
the existence of a
ForNotes
customers
in
Canada
Indicates
a necessary action that 47
Notes On Handling the ACthat
Adapter
([
] Mode) ...............................................................
could................................
result in bodily 18
bethecarried
out.
WARNING hazard
[
] Automaticallymust
adjusts
focus and
exposure settings .... 49
CAUTION
injury, if the safety instruction is not
The actual necessary action is
] Portrait ...................................................................
49
[
observed.
Getting
Ready
This Class B digital
apparatus
complies with Canadian ICES-003.
indicated
in
the
symbol
or nearby 49
] Landscape .............................................................
[
Cet appareil numérique
de la classe
B est conforme
à la norme[ NMB-003
du
Canada.
graphically
or
described
in
text.
This
indicates
the
existence
of
a
] Sports .................................................................... 50
Accessories ..................................................................... 19
hazard that could result in bodily 20
CAUTION
] Night ..................................................................... 50
[
Names
of Parts ................................................................
injury *1 or property damage *2.
] 16-frame multi ........................................................ 51
[
Attaching the Shoulder Strap .......................................... 24
Zoom Photography .......................................................... 52
Batteries
*1:Installing
“Bodily the
injury”
means.....................................................
injuries, burns, and shock which25
the Focus ........................................................
•Changing
Toshiba Corporation
bears no responsibility in the case of54
Loading
the Batteries
......................................................
25
does
not require
hospitalization
or prolonged treatment.
damagesPhotography
arising from earthquakes,
fire not liable to
Self-timer
....................................................
55
Removing
the Batteries
...................................................
*2: “Property
damage”
means
extended harm to home, 26
Toshiba Corporation,
by third parties, other
Photography
Using theoperating
Flash ..........................................
56
Battery Wear
...................................................................
household
effects,
domesticated animals, and pets. 27
accidents,
or
use
under
abnormal
conditions
including
Using the Power Outlet .................................................... 28
Manual Settings ............................................................... 58
erroneous
or
improper
operation
and
other
problems.
Exposure control (EXP.) .................................................. 60
About SmartMedia™ ....................................................... 30
• Toshiba
bears
no responsibility for incidental60
White Corporation
Balance (W.B.)
......................................................
Notes on SmartMedia™ ................................................. 30
damages
profit,
work...................................................
interruption, corruption or loss 61
of
Metering(lost
system
(A.E.)
Loading SmartMedia™ ................................................... 31
theSingle,
memory
contents,oretc.)
from the
use(S/C)
of or ......
the 61
continuous
AEBarising
photography
mode
Removing SmartMedia™ ................................................ 33
inability to use this unit.
Photography in the Program Mode .................................. 62
Write Protection .............................................................. 34
• Toshiba Corporation accepts no liability whatsoever for any
LCD Monitor Display (during photography) ..................... 35
Photography
in thefrom
Aperture-priority
Mode the
.....................
63
damages arising
not having followed
descriptions
In [
] mode .................................................................. 35
Photography
in theManual.
Shutter Speed-priority Mode ............ 65
in this Instruction
In [
] mode ................................................................ 36
in the Full
Manual
.............................
67
•Photography
Toshiba Corporation
accepts
noMode
liability
whatsoever for any
] mode ................................................................. 37
In [
damagesExposure
arising from
malfunctions
arising
from
Extended
Photography
(Bulb
Photography)
.... 68
combination
with equipment
or software that is not related69
Exposure
Compensation
.................................................
Downloaded From camera-usermanual.com
to Toshiba Corporation.
Imaging
Systems
Division
Indication
definitions
.........................................................
8
Indication
Meaning
9740Graphic
Irvine symbol
Boulevard,
definitions ................................................ 8
This
indicates the existence of a
Exemption
Clauses
...........................................................
8
Irvine,
California
92618-1697
hazard that
could result in death or 14
Using
Your
Camera
Correctly
..........................................
DANGER
Phone
Number:
(800)288-1354
serious bodily injury, if the safety
Additional
Information
Other
Applications
Handy
Functions
Exemption Clauses
-2-
Safety Precautions (continued)
Getting
Ready
WARNING (continued)
WARNING (continued)
Do not disassemble, change or repair the
camera.
Keep the batteries out of the reach of
children.
This might cause fire or electric shock. For
details on repair and internal inspection, consult
the store of purchase, or please contact the
technical support number.
If a child swallows a battery, this might result in
poisoning. If a child swallows a battery,
immediately consult a physician.
Taking
Photographs
If battery fluid enters the eyes,
immediately rinse with fresh water and
consult with a physician to receive
treatment.
Playing
Back Images
Do not touch power or TV antenna cords
during a thunderstorm.
This might cause electric shock.
If left untreated, damage to the eye could be
permanent.
Use the AC adapter only with the indicated
power supply voltage (USA: 100-120V,
Europe: 230V AC)
Use only the specified batteries or the
specified AC adapter.
Use with any other power supply voltage might
cause fire or electric shock.
Other
Applications
Use of a battery or AC adapter other than
specified, might cause fire, defects or
malfunctions.
Handy
Functions
This might cause you to fall over or result in a
traffic accident.
Erasing
Images
Do not use the camera while you are
walking, driving or riding a motorcycle.
Additional
Information
Downloaded From camera-usermanual.com
- 11 -
Getting
Ready
Safety
Contents
The
Function
Precautions
Map The name in parentheses ( ) is the function name on the PDR-M81.
Attention
(continued)
There
are various
you cancarefully
take photographs
on the
the PDR-M81.
PDR-M81,
byPower
using
the settings
provided
by the camera
Read these
safetyways
precautions
before using
These
instructions
contain
valuable
Turning the
On/Off
................................................
38
CAUTION
Preface
Turningrequirements.
the
Power
On .....................................................
38
itself
or
by
adjusting
the
settings
to
suit
your
particular
photographic
information
on
safe
and
proper
use
that
will
prevent
harm
and
damage
to
the
operator
and
other
persons.
If you modify the camera in any way, without getting approval from Toshiba Corporation, your camera may violate
Turning
the Power
Offfunctions.
.....................................................
Attention
............................................................................
In
addition
to photographic
the
PDR-M81
is1provided
with
handy
We
suggest
that you38
Make
sure
that
you
fully understand
the
following
(indications)
before
proceeding
themodified
main
descriptions
FCC
regulations.
Violation
offunctions,
FCC regulations
maydetails
cause
the FCC
to other
void
your
right
to usetothe
camera.
Before
Reading
This map
Manual
.............................................
look
atmanual.
the function
below
before you start using 3the PDR-M81.
in
this
Taking Photographs
Taking
Photographs
The Function Map ............................................................. 4
Read
these pages
first.
Taking
photographs.
symbol
definitions
Indication
definitions
Contents
............................................................................
6 Graphic
TOSHIBA
AMERICA
INFORMATION
SYSTEMS,
INC.
How to Hold Your Camera ............................................... 39
Safety Precautions ............................................................ 8
Erasing
Images
Playing
Back Images
How to Press the Shutter Button ..................................... 40
Graphic symbol
Meaning
Photography (Auto Photography) .................................... 41
Indicates
a prohibited action that 41
Using the Viewfinder
.......................................................
must ....................................................
not be carried out.
Using the LCD Monitor
42
Theand
actual
prohibited
action is
Setting the Image Size
Quality
.................................
44
Notes On Handling Your Camera .................................... 14
indicated
in
the
symbol
or
nearby
instruction
is not observed.
] Mode (Auto Select mode) .. 46
Taking Photographs in [
Notes On Batteries
.........................................................
16
graphically or described in text.
Let’s learn
about
basic
operation.
Taking Photographs in a Variety of Modes
On Handling
Batteries
..........................................
17
This
indicates
the existence of a
ForNotes
customers
in
Canada
Indicates
a necessary action that 47
Notes On Handling the ACthat
Adapter
([
] Mode) ...............................................................
could................................
result in bodily 18
bethecarried
out.
WARNING hazard
[
] Automaticallymust
adjusts
focus and
exposure settings .... 49
CAUTION
injury, if the safety instruction is not
The actual necessary action is
] Portrait ...................................................................
49
[
observed.
Getting
Ready
This Class B digital
apparatus
complies with Canadian ICES-003.
indicated
in
the
symbol
or nearby 49
] Landscape .............................................................
[
Cet appareil numérique
de la classe
B est conforme
à la norme[ NMB-003
du
Canada.
graphically
or
described
in
text.
This
indicates
the
existence
of
a
] Sports .................................................................... 50
Accessories ..................................................................... 19
hazard that could result in bodily 20
CAUTION
] Night ..................................................................... 50
[
Names
of Parts ................................................................
injury *1 or property damage *2.
] 16-frame multi ........................................................ 51
[
Attaching the Shoulder Strap .......................................... 24
Zoom Photography .......................................................... 52
Batteries
*1:Installing
“Bodily the
injury”
means.....................................................
injuries, burns, and shock which25
the Focus ........................................................
•Changing
Toshiba Corporation
bears no responsibility in the case of54
Loading
the Batteries
......................................................
25
does
not require
hospitalization
or prolonged treatment.
damagesPhotography
arising from earthquakes,
fire not liable to
Self-timer
....................................................
55
Removing
the Batteries
...................................................
*2: “Property
damage”
means
extended harm to home, 26
Toshiba Corporation,
by third parties, other
Photography
Using theoperating
Flash ..........................................
56
Battery Wear
...................................................................
household
effects,
domesticated animals, and pets. 27
accidents,
or
use
under
abnormal
conditions
including
Using the Power Outlet .................................................... 28
Manual Settings ............................................................... 58
erroneous
or
improper
operation
and
other
problems.
Exposure control (EXP.) .................................................. 60
About SmartMedia™ ....................................................... 30
• Toshiba
bears
no responsibility for incidental60
White Corporation
Balance (W.B.)
......................................................
Notes on SmartMedia™ ................................................. 30
damages
profit,
work...................................................
interruption, corruption or loss 61
of
Metering(lost
system
(A.E.)
Loading SmartMedia™ ................................................... 31
theSingle,
memory
contents,oretc.)
from the
use(S/C)
of or ......
the 61
continuous
AEBarising
photography
mode
Removing SmartMedia™ ................................................ 33
inability to use this unit.
Photography in the Program Mode .................................. 62
Write Protection .............................................................. 34
• Toshiba Corporation accepts no liability whatsoever for any
LCD Monitor Display (during photography) ..................... 35
Photography
in thefrom
Aperture-priority
Mode the
.....................
63
damages arising
not having followed
descriptions
In [
] mode .................................................................. 35
Photography
in theManual.
Shutter Speed-priority Mode ............ 65
in this Instruction
In [
] mode ................................................................ 36
in the Full
Manual
.............................
67
•Photography
Toshiba Corporation
accepts
noMode
liability
whatsoever for any
] mode ................................................................. 37
In [
damagesExposure
arising from
malfunctions
arising
from
Extended
Photography
(Bulb
Photography)
.... 68
combination
with equipment
or software that is not related69
Exposure
Compensation
.................................................
Downloaded From camera-usermanual.com
to Toshiba Corporation.
Imaging
Systems
Division
Indication
definitions
.........................................................
8
Indication
Meaning
9740Graphic
Irvine symbol
Boulevard,
definitions ................................................ 8
This
indicates the existence of a
Exemption
Clauses
...........................................................
8
Irvine,
California
92618-1697
hazard that
could result in death or 14
Using
Your
Camera
Correctly
..........................................
DANGER
Phone
Number:
(800)288-1354
serious bodily injury, if the safety
Additional
Information
Other
Applications
Handy
Functions
Exemption Clauses
-2-
Safety Precautions (continued)
CAUTION
(continued)
Do not charge the supplied batteries.
Do not look at the sun through the camera
viewfinder.
This may cause injury of the eyes.
Do not use the flash close to anyone’s
eyes.
Doing so might cause them to rupture, ignite or
heat up, resulting in fire, major injury or
damaging the camera.
This might cause damage to the person’s
eyesight.
Do not subject the LCD monitor to impact.
Doing so might cause them to rupture, ignite or
heat up, resulting in fire or major injury or
damaging the camera.
Consult your dealer regarding the internal
cleaning of the camera once every two
years.
Downloaded From camera-usermanual.com
- 13 -
Additional
Information
If dust is allowed to accumulate inside the
camera for a long time, this might result in fire or
defects. Consult your dealer regarding the
cleaning costs.
Other
Applications
If you walk around with the camera hanging
from your hand through the shoulder strap, the
camera might come into contact to other people
and cause injury, or damage to the camera or
other objects.
Handy
Functions
Do not walk around with the camera
swinging from the shoulder strap.
If the LCD monitor is impacted, the glass on the
screen may be broken and internal fluid may
leak.
If the internal fluid enters your eyes or comes
into contact with your body or clothes,
immediately rinse with fresh water. If the internal
fluid enters your eyes, immediately consult a
physician to receive treatment.
Erasing
Images
Do not use different types of batteries
together, or mix old and new batteries.
Playing
Back Images
Do not leave dead or exhausted batteries
in the camera.
Taking
Photographs
Doing so might cause them to rupture, ignite or
heat up, resulting in fire or major injury.
(continued)
Getting
Ready
CAUTION
Taking
Photographs
Getting
Ready
Safety
Contents
The
Function
Precautions
Map The name in parentheses ( ) is the function name on the PDR-M81.
Attention
(continued)
There
are various
you cancarefully
take photographs
on the
the■
PDR-M81, These
by using
the settings
provided
by the camera
Read these
safetyways
precautions
before using
PDR-M81.
instructions
contain
valuable
CAUTION
Preface
itself
or
by
adjusting
the
settings
to
suit
your
particular
photographic
requirements.
information
on
safe
and
proper
use
that
will
prevent
harm
and
damage
to
the
operator
and
other
persons.
If you modify the camera in any way, without getting approval from Toshiba Corporation, your camera may violate
■ Make
In
addition
to photographic
the
PDR-M81
is provided
with
handy
functions.
We
suggest
that you
sure that
you
fully understand
the
following
(indications)
before
proceeding
themodified
main
descriptions
FCC
regulations.
Violation
offunctions,
FCC regulations
maydetails
cause
the FCC
to other
void
your
right
to usetothe
camera.
■ in
look
atmanual.
the function map below before you start using the PDR-M81.
this
■
■
■
Indication definitions
Imaging Systems Division
9740 Irvine Boulevard,
This indicates the existence of a
Irvine, California 92618-1697
hazard that could result in death or
■ Phone Number: (800)288-1354
serious bodily injury, if the safety
Taking Photographs
Graphic symbol definitions
■
■
■
Erasing
Images
Playing
Back Images
Indicates a prohibited action that
must not be carried out.
The actual prohibited action is
■
indicated in the symbol or nearby
instruction is not observed.
■
graphically or described in text.
■
This
indicates
the
existence
of
a
For customers in Canada
Indicates a necessary action that
hazard that could result in bodily
must be carried out.
CAUTION
injury, if the safety instruction is not
The actual necessary action is
observed.
Getting
Ready
This Class B digital
apparatus
complies with Canadian ICES-003.
indicated in the symbol or nearby
Cet appareil numérique
de la classe
B est conforme
à la norme NMB-003 du Canada.
graphically or described in text.
This indicates
the existence
of a
■
hazard that could result in bodily
■
*1
*2
injury or property damage .
■
■
■ “Bodily injury” means injuries, burns, and shock which
*1:
does not require hospitalization or prolonged treatment. ■ • Toshiba Corporation bears no responsibility in the case of
■ damages arising from earthquakes, fire not liable to
*2: “Property damage” means extended harm to home,
■ Toshiba Corporation, operating by third parties, other
household effects, domesticated animals, and pets.
■
■ accidents, or use under abnormal conditions including
erroneous or improper operation and other problems.
■
• Toshiba Corporation bears no responsibility for incidental
damages (lost profit, work interruption, corruption or loss of
the memory contents, etc.) arising from the use of or the
inability to use this unit.
■
• Toshiba Corporation accepts no liability whatsoever for any
■
■ damages arising from not having followed the descriptions
■ in this Instruction Manual.
■ • Toshiba Corporation accepts no liability whatsoever for any
■ damages arising from malfunctions arising from
■ combination with equipment or software that is not related
Downloaded From camera-usermanual.com
to Toshiba Corporation.
Additional
Information
Other
Applications
Handy
Functions
Exemption Clauses
-2-
Using Your Camera Correctly (continued)
● Carrying Out Maintenance on Your Camera
Playing
Back Images
• Please note that credit cards, cash cards, magnetic
commutation tickets, floppy disks and the like are
susceptible to magnetism.
Do not bring them close to the speaker of the camera.
Failure to do so may cause damage to data, which could
make the camera unserviceable.
Taking
Photographs
● Cautions on Magnetism
Getting
Ready
• To prevent the lens, surface of the LCD monitor or viewfinder from being scratched, blow off any dust
from these parts with a blower brush and lightly wipe with a soft dry cloth.
• Clean the body of the camera with a soft dry cloth. Do not use volatile liquids such as paint thinner,
benzene or insecticide, as these may react with the camera body and cause deformation or remove
the coating.
Erasing
Images
Speaker
Handy
Functions
Other
Applications
Additional
Information
Downloaded From camera-usermanual.com
- 15 -
Erasing
Images
Playing
Back Images
Taking
Photographs
Getting
Ready
Safety
Contents
The
Function
Precautions
Map The name in parentheses ( ) is the function name on the PDR-M81.
Attention
(continued)
There
are various
you cancarefully
take photographs
on the
the PDR-M81.
PDR-M81, These
by using
the settings
provided
by the camera
Read these
safetyways
precautions
before using
instructions
contain
valuable
CAUTION
Preface
itself
or
by
adjusting
the
settings
to
suit
your
particular
photographic
requirements.
information
on
safe
and
proper
use
that
will
prevent
harm
and
damage
to
the
operator
and
other
persons.
If you modify the camera in any way, without getting approval from Toshiba Corporation, your camera may violate
In
addition
to photographic
the
PDR-M81
is provided
with
handy
functions.
We
suggest
that you
Make
sure that
you
fully understand
the
following
(indications)
before
proceeding
themodified
main
descriptions
FCC
regulations.
Violation
offunctions,
FCC regulations
maydetails
cause
the FCC
to other
void
your
right
to usetothe
camera.
look
atmanual.
the function map below before you start using the PDR-M81.
in
this
Taking Photographs
Graphic symbol definitions
Indication definitions
Imaging Systems Division
9740 Irvine Boulevard,
This indicates the existence of a
Irvine, California 92618-1697
hazard that could result in death or
Phone Number: (800)288-1354
serious bodily injury, if the safety
Indicates a prohibited action that
must not be carried out.
The actual prohibited action is
indicated in the symbol or nearby
instruction is not observed.
graphically or described in text.
This
indicates
the
existence
of
a
For customers in Canada
Indicates a necessary action that
hazard that could result in bodily
must be carried out.
CAUTION
injury, if the safety instruction is not
The actual necessary action is
observed.
Getting
Ready
This Class B digital
apparatus
complies with Canadian ICES-003.
indicated in the symbol or nearby
Cet appareil numérique
de la classe
B est conforme
à la norme NMB-003 du Canada.
graphically or described in text.
This indicates
the existence
of a
hazard that could result in bodily
*1
*2
injury or property damage .
Additional
Information
Other
Applications
Handy
Functions
Exemption Clauses
*1: “Bodily injury” means injuries, burns, and shock which
does not require hospitalization or prolonged treatment.
*2: “Property damage” means extended harm to home,
household effects, domesticated animals, and pets.
Downloaded From camera-usermanual.com
-2-
• Toshiba Corporation bears no responsibility in the case of
damages arising from earthquakes, fire not liable to
Toshiba Corporation, operating by third parties, other
accidents, or use under abnormal conditions including
erroneous or improper operation and other problems.
• Toshiba Corporation bears no responsibility for incidental
damages (lost profit, work interruption, corruption or loss of
the memory contents, etc.) arising from the use of or the
inability to use this unit.
• Toshiba Corporation accepts no liability whatsoever for any
damages arising from not having followed the descriptions
in this Instruction Manual.
• Toshiba Corporation accepts no liability whatsoever for any
damages arising from malfunctions arising from
combination with equipment or software that is not related
to Toshiba Corporation.
Using Your Camera Correctly (continued)
When you use the battery, carefully read and strictly observe the
warnings and cautions indicated on the battery.
Failure to do this might cause battery to rupture, ignite or heat up, resulting in fire, major
injury or damaging the camera.
Handy
Functions
Do not use batteries other than that specified.
Do not insert batteries in the wrong direction.
Do not charge, heat, open, or short-circuit the batteries. Do not throw batteries into fire.
Do not charge the supplied batteries.
When using rechargeable batteries, follow the instructions for the batteries and the charger for safe
handling. (This camera can not charge the rechargeable batteries.)
• Do not leave dead or exhausted batteries in the camera.
Neglecting the above may cause battery leakage and corrosion, resulting in burns or injury.
If your fingers or clothes come into contact with the battery acid, wash them immediately. If your eyes come in
contact with battery acid, wash them and immediately consult your doctor.
Erasing
Images
•
•
•
•
•
Playing
Back Images
■ About Battery Use
Taking
Photographs
WARNING
Getting
Ready
Notes On Handling Batteries
Other
Applications
Additional
Information
Downloaded From camera-usermanual.com
- 17 -
Taking
Photographs
Getting
Ready
Safety
Contents
The
Function
Precautions
Map The name in parentheses ( ) is the function name on the PDR-M81.
Attention
(continued)
There
are various
you cancarefully
take photographs
on the
the■
PDR-M81, These
by using
the settings
provided
by the camera
Read these
safetyways
precautions
before using
PDR-M81.
instructions
contain
valuable
CAUTION
Preface
itself
or
by
adjusting
the
settings
to
suit
your
particular
photographic
requirements.
information
on
safe
and
proper
use
that
will
prevent
harm
and
damage
to
the
operator
and
other
persons.
If you modify the camera in any way, without getting approval from Toshiba Corporation, your camera may violate
■ Make
In
addition
to photographic
the
PDR-M81
is provided
with
handy
functions.
We
suggest
that you
sure that
you
fully understand
the
following
(indications)
before
proceeding
themodified
main
descriptions
FCC
regulations.
Violation
offunctions,
FCC regulations
maydetails
cause
the FCC
to other
void
your
right
to usetothe
camera.
■ in
look
atmanual.
the function map below before you start using the PDR-M81.
this
■
■
■
Indication definitions
Imaging Systems Division
9740 Irvine Boulevard,
This indicates the existence of a
Irvine, California 92618-1697
hazard that could result in death or
■ Phone Number: (800)288-1354
serious bodily injury, if the safety
Taking Photographs
Graphic symbol definitions
■
■
■
Erasing
Images
Playing
Back Images
Indicates a prohibited action that
must not be carried out.
The actual prohibited action is
■
indicated in the symbol or nearby
instruction is not observed.
■
graphically or described in text.
■
This
indicates
the
existence
of
a
For customers in Canada
Indicates a necessary action that
hazard that could result in bodily
must be carried out.
CAUTION
injury, if the safety instruction is not
The actual necessary action is
observed.
Getting
Ready
This Class B digital
apparatus
complies with Canadian ICES-003.
indicated in the symbol or nearby
Cet appareil numérique
de la classe
B est conforme
à la norme NMB-003 du Canada.
graphically or described in text.
This indicates
the existence
of a
■
hazard that could result in bodily
■
*1
*2
injury or property damage .
■
■
■ “Bodily injury” means injuries, burns, and shock which
*1:
does not require hospitalization or prolonged treatment. ■ • Toshiba Corporation bears no responsibility in the case of
■ damages arising from earthquakes, fire not liable to
*2: “Property damage” means extended harm to home,
■ Toshiba Corporation, operating by third parties, other
household effects, domesticated animals, and pets.
■
■ accidents, or use under abnormal conditions including
erroneous or improper operation and other problems.
■
• Toshiba Corporation bears no responsibility for incidental
damages (lost profit, work interruption, corruption or loss of
the memory contents, etc.) arising from the use of or the
inability to use this unit.
■
• Toshiba Corporation accepts no liability whatsoever for any
■
■ damages arising from not having followed the descriptions
■ in this Instruction Manual.
■ • Toshiba Corporation accepts no liability whatsoever for any
■ damages arising from malfunctions arising from
■ combination with equipment or software that is not related
Downloaded From camera-usermanual.com
to Toshiba Corporation.
Additional
Information
Other
Applications
Handy
Functions
Exemption Clauses
-2-
Accessories
Make sure that you have all of the items below before you start using your camera.
USB cable (1)
Getting
Ready
AV cable (1)
Alkaline batteries (4) (size AA)
Taking
Photographs
Lens cap (1)
Playing
Back Images
Camera case (1)
Shoulder strap (1)
Erasing
Images
Handy
Functions
• SmartMedia™ (8MB) (1)
• SmartMedia™ case (1)
• Instruction Manual (this manual)
• Software Manual
Other
Applications
Software application (1)
(CD-ROM)
Additional
Information
Downloaded From camera-usermanual.com
- 19 -
Additional
Information
Other
Applications
Mode
dial
Subjects
and
Set
Values
TM
Press
aperture
value.
SYSTEM
Turning
Exposure
ISO
OSD
In [Effective
[ LANGUAGE
the
]INFO.
mode
control
Power
(EXP.)
On
Close
the
SmartMedia™
cover.
Slide
the
SmartMedia
release
knob
inpicture.
the
Take
photographs
or.or
battery
to
to
select
cover,
orimages,
play
[ ]cover
the
slide
]them
or
shutter
it
[ compose
back.
,]ENTER.
and
speed.
and
lock
press
Look
Use
through
to
select
the
[adjust
viewfinder
and
press
to
the
To
continue
erasing
repeat
the
above
procedure
from step 2.
.
Mode dial
]. open the cover .
to
2
Press
the
shutter
button
down
halfway
Set
the
mode
dial
toSmartMedia™
[
], [
]isorcorrectly
[ 1 .]. Possible
of shots
Make
sure
that
the
loaded.number
(➲ Page
31)
Memo
IMPORTANT
SET-UP Carry
mode
(
P.
109)
➲
Pass
Set
the
the
out
mode
end
steps
of
dial
1
the
to
to
shoulder
4
[
either
]
or
in
[
strap
“Photography
through
].
the
in
the
strap
Shutter
speed-priority
Mode”
PC
mode
(
P.
121)
Set the mode dial to [
].
➲
Self-timer
button
1 1
Zoom
state
Photography
mode
POWER
button
Carry
Set
Use
the
out
or
mode
steps
todial
select
1 to
to
2[ the
in “Manual
].
images
photographed
Settings”
(page
in58).
the multi
photography
mode.
➲ Mode”
(page
attachment
65)
or
on
in
“Photography
the
camera.
in
the
Full
Manual
(page
67).
Press
the
POWER
button
to
turn
the
power
on.
Image
Quality button
Press
the
MENU
button.
Use
or
to
change
the
setting
in
the
tab
menu,
Press
theor
image
button
to select the preset
2
out
steps
toquality
2 onthe
page
109.
Press
to1 select
image.
ShutterCarry
button
➲
and
press
Flash
button
quality
andENTER.
size, INFO.]
while
viewing
the
indication
on
the
Select
[SYSTEM
on
the
SETUP
MENU
and
➲
EXP.
].fully
Use
or
todial
select
the
frame
you
want
to enlarge.
Press
the
or
Zoom
to
switch
select
[
(
S/C
Page
].
21)
towards
“T”
to
begin
playback.
Press
Set
the
mode
or
in
the
to
[
Tv
]
mode,
].
or
press
or
in
the
shutter
button
down
.
2
status
display.
Press the
display/info button.
.
press
Notes
on
SmartMedia™
Status
Playback
mode ( ➲
P. Flash
80)display
the
[ M ] mode to set the shutter speed to 0.7
second
Manual
photograpy
state( ➲ P. 23)
VIDEO
OUT
Insert
the
AC
adapter
connector plug into the DC IN
Self-timer
lamp
White Balance
(W.B.)
or
longer.
To
quit
the
SETUP
MENU,
change
the
mode
dialto
setting.
Adjust
the
zoom
ratio
by down
the
Zoom
switch.
(Zoom
Press
toshutter
display
option
menu,
press
Size
Press
the
button
halfway
and
5V
terminal
onthe
the
camera.
1 it,or
Write
Protection
Gently
insert
SmartMedia™
as far
as
can press
go
Viewfinder
Removing
the
Batteries
Press
or
to
move
forward
and
reverse.
Memo
PRG
]
and
press
ENTER.
]
and
press
ENTER.
select
[
switch
Page
21)
✩✭✰✯✲✴✡✮✴
it
down
. select electrodes
Press
or 2 to
the item you
desired
to set,
with
thefully
SmartMedia™
(metal
contacts)
Quality
ISO
[ POWER
] press
Built-in microphone
and
ENTER.
facing
the
rear
of
the
camera.
AUTO
OFF
Focus
area
Pass the shoulder strap through the loop and pull.
Self-timer photography
Press
Flash ENTER.
Write-protect
Use
to select the desired item 1
Auto Photography mode ( ➲ P. 41,
46)
✭❅❍❏or
area
Compose
and press
it down
and press the. picture, press the shutter button down halfway,
Speaker
Default
fully. setting:
Page
40
DC IN Histogram*
5V
terminal
Compose 2the
the picture,
picture, press
press the
the shutter
shutter button
button down
down halfway,
halfway,
and
press it
it down
down
QUALITY
Compose
and
press
halfway,
and
press
it
down
fully.
Page
40
Macro
photography
fully.
Page
40
➲
☞
Press
ENTER.
fully.
Page
40
Insert
the
AC
adapter
power
plug
into
the
power
Electrodes
Press
MemoENTER.
Sticker
Remainingoutlet.
battery power
PC/AV terminal
Use
, ,steps
or 1 toto2 select
the area to enlarge.
Carry
out
in “Basic
Close
SmartMedia™
cover. Photographic
Memothe
Slow
shutter
speed
warning
Shutter speed
Turning
the
Power
Off
Lens
Using
the
LCD
Monitor
mode)”
(page 109). Select [QUALITY]
Settings
(
Manual Photography mode ( ➲ P. 58)
Movie mode
( ➲ P. 75)
Aperture
Exposure
compensation
on the SETUP MENU➲and press .
✣❏■▼❉■◆❏◆▲
❐❈❏▼❏❇❒❁❐❈❙
Press
the POWER
button
to turnpress
the power
off.
To
return
display,
ENTER.
Get
readyto
tothe
takeregular
the photograph.
✥❘❐❏▲◆❒❅ ✣❏❍❐❅■▲❁▼❉❏■
Memo
DC IN 5V terminal
2
Set
the
mode
to [
direction
of
arrow
ENTER.
For enlarged
view
( ➲the
P.dial
22)
1
Handy
Functions
Erasing
Images
Playing
Back Images
Taking
Photographs
Getting
Ready
Changing
the
Preset
Conditions
(RECORDING
MENU)
Photography
in
the
Program
Mode
Setting
Names
Playing
Back
the
of
Photographed
Parts
Image
Size
and
Quality
(Single-Frame
Playback)
Extended
Exposure
Photography
(Bulb
Photography)
Erasing
Images
(Erase
Frame)
(continued)
Manual
Attaching
Using
How
Taking
Enlarging
Playback
About
Turning
to
Photographs
the
SmartMedia™
Press
Settings
the
Photographed
of
Power
the
Power
Multi
Shoulder
Continuously
Outlet
Shutter
Image
On/Off
Images
Strap
Pictures
Button
(Zoom
(Burst
Playback)
Photography)
Taking
Erasing
Button
Photographs
Folders
and
(All
LCD
Images
Continuously
Monitor
in
aImages
Folder/All
(Burst
Display
Photography)
Folders)
(In
Playback
(continued)
(continued)
Mode)
Definitions
Separately
of
the
Accessories
Color
of
the
Viewfinder
LED
Taking
and
Playing
Back
Photographs
on
aMode
TV
(continued)
Changing
the
Preset
Conditions
(RECORDING
MENU)
(continued)
Exposure
Compensation
in
the
Shutter
(continued)
Speed-priority
(continued)
About
Basic
Settings
SmartMedia™
in
(Sold
the
mode)
Aperture-priority
(continued)
Mode
(continued)
LCD
Monitor
Display
(during
photography)
(continued)
Manual
Settings
(continued)
Playing
Photography
Installing
Back
Movies
batteries
(Auto
Photography)
(continued)
(continued)
(continued)
Names
of
Parts
(continued)
✭❅❍❏
✡✥✢
✳❐❏▼
❍❅▼❅❒❉■❇
Use
or
to select the desired setting
from
the tab menu 2 , and press
Press the POWER button to turn the power
on.
✷❈❉▼❅
❂❁●❁■❃❅ ▲❅▼▼❉■❇
ENTER.
Downloaded From camera-usermanual.com
--110
20 -40
80
88
Names of Parts (continued)
ENTER button
Tele/Wide key
button
Erasing
Images
Adjusts the zoom.
MENU button
Playing
Back Images
LCD monitor
Taking
Photographs
Press the center of the button.
(Use this button to fix a selection.)
Press the side of the ENTER
button with the proper
to select options or change
directions.
(Use these buttons to select an
item or an image.)
Viewfinder
Getting
Ready
Function button
Viewfinder LED
Folder button
SmartMedia™ cover
Battery cover
Erase button
Downloaded From camera-usermanual.com
- 21 -
Additional
Information
FOCUS button
Other
Applications
Tripod mount
Handy
Functions
Shoulder strap/Lens cover
attachment
Additional
Information
Other
Applications
Mode
dial
Subjects
and
Set
Values
TM
Press
aperture
value.
SYSTEM
Turning
Exposure
ISO
OSD
In [Effective
[ LANGUAGE
the
]INFO.
mode
control
Power
(EXP.)
On
Close
the
SmartMedia™
cover.
Slide
the
SmartMedia
release
knob
inpicture.
the
Take
photographs
or.or
battery
to
to
select
cover,
orimages,
play
[ ]cover
the
slide
]them
or
shutter
it
[ compose
back.
,]ENTER.
and
speed.
and
lock
press
Look
Use
through
to
select
the
[adjust
viewfinder
and
press
to
the
To
continue
erasing
repeat
the
above
procedure
from
step 2.
.
Battery cover lock
Mode dial
]. open the cover .
to
2
Press
the
shutter
button
down
halfway
Set
the
mode
dial
toSmartMedia™
[
], [
]isorcorrectly
[ 1 .]. Possible
of shots
Make
sure
that
the
loaded.number
(➲ Page
31)
Memo
IMPORTANT
SET-UP Carry
mode
(
P.
109)
➲
Pass
Set
the
the
out
mode
end
steps
of
dial
1
the
to
to
shoulder
4
[
either
]
or
in
[
strap
“Photography
through
].
the
in
the
strap
Shutter
speed-priority
Mode”
PC
mode
(
P.
121)
Set the mode dial to [
].
➲ (at currently
Self-timer
button preset size and quality)
1 1
Zoom
state images
Photography
mode
Sets
basic
camera
settings
POWER
button
Transfers
PC. multi
Carry
Set
Use
the
out
or
mode
steps
todial
select
1 to
to
2[ the
in “Manual
].
images
photographed
Settings”
(page
ina58).
the
photography
mode.
➲ to
(page
attachment
65)
or
on
in
“Photography
the
camera.
in
the
Full
Manual
Mode”
(page
67).
Press
the
POWER
button
to
turn
the
power
on.
Image
Quality
button
Press
the
MENU
button.
Use
or
to
change
the
setting
in
the
tab
menu,
(AUTO POWER
OFF,
SOUND,
For
the Software Manual.
Press
theor
image
button
todetails,
selectrefer
the to
preset
2
Carry
out
steps
toquality
2 onthe
page
109.
Press
to1 select
image.
Shutter
button
TIME
& DATE,
OSD
LANGUAGE,
➲
and
press
ENTER.
Flash
button
quality
and
size,
while
viewing
the
indication
on
the
Select
[SYSTEM
INFO.]
on
the
SETUP
MENU
and
VIDEO OUT,
QUALITY,
SYSTEM
➲
EXP.
].fully
Use
or
to
select
the
frame
you
want
to enlarge.
Press
the
or
Zoom
to
switch
select
[
(
S/C
Page
].
21)
towards
“T”
to
begin
playback.
Press
Set
the
mode
or
dial
in
the
to
[
Tv
]
mode,
].
or
press
or
in
the
shutter
button
down
.
2
status
display.
Press the
display/info button.
INFO.) press
.
Notes
on
SmartMedia™
Status
Playback
mode ( ➲
P. Flash
80)display
the
[ M ] mode to set the shutter speed to 0.7
second
Manual
photograpy
state( ➲ P. 23)
VIDEO
OUT
Insert
the
AC
adapter
connector plug into the
DCmode,
IN you can select image
Self-timer
lamp
White Balance
(W.B.)
In this
or
longer.
To
quit
the
SETUP
MENU,
change
the
mode
dialpress
setting.
Adjust
the
zoom
ratio
by down
the
Zoom
switch.
(Zoom
Press
toshutter
display
option
menu,
press
to
playback,
change,
compression,
Size
Press
the
button
halfway
and
5V
terminal
onthe
the
camera.
1 it,or
Write
Protection
Gently
insert
SmartMedia™
as far
as
can
go copy, size
Removing
the
Batteries
Press
or
to
move
forward
and
reverse.
Memo
PRG
]
and
press
ENTER.
]
and
press
ENTER.
select
[
switch
Page
21)
protect
mode, andViewfinder
writing of development
✩✭✰✯✲✴✡✮✴
it
down
. select electrodes
Press
or 2 to
the item you
desired
to
set,
with
thefully
SmartMedia™
(metal
contacts)
Quality
(printing) information.
ISO
[ POWER
] press
Built-in microphone
and
ENTER.
facing
the
rear
of the
camera.
AUTO
OFF
Focus
area
Pass
the
shoulder
strap
through the loop and pull.
Self-timer photography
(when shutter
button
is to select the desired item
Press
ENTER.
Flash
Write-protect
Use
or
1
Auto
Photography
mode
( ➲ P. 41,
46)
✭❅❍❏
pressed down
halfway)
area
Compose
halfway,
and press
it down
and press the. picture, press the shutter button
This down
mode enables
automatic
photography
Speaker
Default
fully. setting:
Page
40
in
accordance
with
the
photographic
DC IN Histogram*
5V
terminal
Compose 2the
the picture,
picture, press
press the
the shutter
shutter button
button down
down halfway,
and
press it
it down
down
QUALITY
Compose
and
press
conditions. halfway,
halfway,
and
press
it
down
fully.
Page
40
Macro
photography
fully.
Page
40
➲
☞
In this mode, the exposure (combination
of
Press
ENTER.
fully.
Page
40
Insert
the
AC
adapter
power
plug
into
the
power
Electrodes
Press
MemoENTER.
Sticker
shutter speed and aperture) is automatically
Remainingoutlet.
battery power
controlled to facilitate
photography.
PC/AV
terminal
Use
, ,steps
or 1 toto2 select
the Photographic
area to enlarge.
Carry
out
in “Basic
Close
the
SmartMedia™
cover.
Memo
Slowthe
shutter
speed warning
Shutter speed
Turning
Power
Off
Lens
Using
the
LCD
Monitor
mode)”
(page 109). Select [QUALITY]
Settings
(
Manual Photography mode ( ➲ P. 58)
Movie mode
( ➲ P. 75)
Aperture
Exposure
compensation
on Movies
the SETUP
MENU➲and press .
Manually sets
white balance, exposure,
Takes short
for playback
✣❏■▼❉■◆❏◆▲
❐❈❏▼❏❇❒❁❐❈❙
~
Press
the to
POWER
button
to turnpress
the power
off.
aperture
value, shutter speed and AE
on camera
orreturn
computer.
To
display,
ENTER.
Get
ready
tothe
takeregular
the photograph.
✥❘❐❏▲◆❒❅ ✣❏❍❐❅■▲❁▼❉❏■
Memo
~
DC IN 5V terminal
2
Set
the
mode
to [
direction
of
arrow
ENTER.
For enlarged
view
( ➲the
P.dial
22)
1
Handy
Functions
Erasing
Images
Playing
Back Images
Taking
Photographs
Getting
Ready
Changing
the
Preset
Conditions
(RECORDING
MENU)
Photography
in
the
Program
Mode
Setting
Names
Playing
Back
the
of
Photographed
Parts
Image
Size
and
Quality
(Single-Frame
Playback)
Extended
Exposure
Photography
(Bulb
Photography)
Erasing
Images
(Erase
Frame)
(continued)
Manual
Attaching
Using
How
Taking
Enlarging
Playback
About
Turning
to
Photographs
the
SmartMedia™
Press
Settings
the
Photographed
of
Power
the
Power
Multi
Shoulder
Continuously
Outlet
Shutter
Image
On/Off
Images
Strap
Pictures
Button
(Zoom
(Burst
Playback)
Photography)
Taking
Erasing
Button
Photographs
Folders
and
(All
LCD
Images
Continuously
Monitor
in
aImages
Folder/All
(Burst
Display
Photography)
Folders)
(In
Playback
(continued)
(continued)
Mode)
Definitions
Separately
of
the
Accessories
Color
of
the
Viewfinder
LED
Taking
and
Playing
Back
Photographs
on
aMode
TV
(continued)
Changing
the
Preset
Conditions
(RECORDING
MENU)
(continued)
Exposure
Compensation
in
the
Shutter
(continued)
Speed-priority
(continued)
About
Basic
Settings
SmartMedia™
in
(Sold
the
mode)
Aperture-priority
(continued)
Mode
(continued)
LCD
Monitor
Display
(during
photography)
(continued)
Manual
Settings
(continued)
Playing
Photography
Installing
Back
Movies
batteries
(Auto
Photography)
(continued)
(continued)
(continued)
Names
of
Parts
(continued)
✭❅❍❏
Use
or
Press the
ENTER.
(auto-exposure) position.
✡✥✢
✳❐❏▼
❍❅▼❅❒❉■❇
to select the desired setting
from
the tab menu 2 , and
POWER button to turn the power
on.
✷❈❉▼❅
❂❁●❁■❃❅ ▲❅▼▼❉■❇
Downloaded From camera-usermanual.com
--110
20 -40
80
88
~
~
press
~
Names of Parts (continued)
This display indicates the camera’s status. You can verify the camera’s status even if the LCD monitor is
not on.
The text, numbers and icons that are displayed in the status display vary according to the setting.
Remaining battery power
(FULL)
1200 x 800 pixel (still image)
160 x 120 pixel (movie)
Time display: In [
] or [
] mode
Possible number of shots: In [
Possible photographic time: In [
PC indication: In [
(HALF)
] mode
] mode
Additional
Information
720 x 480 pixel (still image)
] mode
] or [
Other
Applications
Image size ( ➲ P. 44)
2400 x 1600 pixel (still image)
320 x 240 pixel (movie)
Example of counter display
(The display varies according to the mode dial setting.)
Handy
Functions
SmartMedia™
loaded symbol
Erasing
Images
Image quality ( ➲ P. 44)
: FINE
: NORMAL
: BASIC
Playing
Back Images
Flash photography ( ➲ P. 56)
No display : Auto
: Red-eye forced flash
: Forced flash
: Suppressed flash
Taking
Photographs
Self-timer photography ( ➲ P. 55)
Getting
Ready
Status display
(SMALL)
Downloaded From camera-usermanual.com
- 23 -
Changing
the
Preset
Conditions
(RECORDING
MENU)
Photography
in
the
Program
Mode
Setting
Names
Playing
Back
the
of
Photographed
Parts
Image
Size
and
Quality
(Single-Frame
Playback)
Extended
Exposure
Photography
(Bulb
Photography)
Erasing
Images
(Erase
Frame)
(continued)
Manual
Attaching
Using
How
Taking
Enlarging
Playback
About
Turning
to
Photographs
the
SmartMedia™
Press
Settings
the
Photographed
of
Power
the
Power
Multi
Shoulder
Continuously
Outlet
Shutter
Image
On/Off
Images
Strap
Pictures
Button
(Zoom
(Burst
Playback)
Photography)
Taking
Erasing
Button
Photographs
Folders
and
(All
LCD
Images
Continuously
Monitor
in
aImages
Folder/All
(Burst
Display
Photography)
Folders)
(In
Playback
(continued)
(continued)
Mode)
Definitions
Separately
of
the
Accessories
Color
of
the
Viewfinder
LED
Taking
and
Playing
Back
Photographs
on
aMode
TV
(continued)
Changing
the
Preset
Conditions
(RECORDING
MENU)
(continued)
Exposure
Compensation
in
the
Shutter
(continued)
Speed-priority
(continued)
About
Basic
Settings
SmartMedia™
in
(Sold
the
mode)
Aperture-priority
(continued)
Mode
(continued)
LCD
Monitor
Display
(during
photography)
(continued)
Manual
Settings
(continued)
Playing
Photography
Installing
Back
Movies
batteries
(Auto
Photography)
(continued)
(continued)
(continued)
Names
of
Parts
(continued)
Getting
Ready
The shutter
camerabutton
automatically
adjusts the
shutter
and
the aperture
value
according
to the
brightness
of an
can be pressed
down
in twospeed
stages:
halfway
down and
fully
down. When
pressed
halfway
down,
This
“SmartMedia™”
Set
Play
Automatically
The
the
following
mode
shoulder
menu
back
size
photographed
is(number
used
for
items
strap
plays
setting
isadapter
for
athe
is
are
back
storage
of
taking
handy
also
the
pixels)
still
the
basic
available
subjects
for
medium
images
16
and
carrying
images
settings
quality
one
for
that
as
saving
separately
your
image
to
require
(compression
be
camera
used
images
atseveral
a
sold
for
around.
inthat
photography
items.
ratio)
seconds
the
you
multi
of
have
the
photography
to image
photograph
in
photographed.
to
[ second
be
mode
],photographed.
such
[be
Even
in
asquick
]for
firework
or
if Europe,
the
[You
succession.
camera’s
displays
] photography
power
at the
Enlarges
selected
portions
of
images
being
played
back
at
two
levels.
Images
can
displayed
enlarged
when
In
You
this
can
color
mode,
manually
of
the
photographs
viewfinder
adjust
settings
are
LED
taken
indicates
such
continuously
asphotographed
the
exposure
state
atof
control,
atime.
the
maximum
camera.
white
speed
balance,
The
ofthe
0.8
metering
system,
intervals.
continuous
This
item
switches
display
on
the
LCD
monitor
when
playing
back
photographed
images.
can
switch
If
you
the
AC
(sold
separately:
PDR-ACM1A
for
the
US/Canada,
PDR-ACM1E
PDR-ACM1U
Mode
Effective
dial
Subjects
and
Set
Values
TM
Press
.of
aperture
value.
SYSTEM
Turning
Exposure
ISO
OSD
In
[prevent
[use
LANGUAGE
the
]the
INFO.
mode
control
(EXP.)
On
Close
the
SmartMedia™
cover.
Slide
the
SmartMedia
cover
release
knob
in
the
Take
photographs
or
or
battery
to
to
select
or
play
[that
the
slide
]them
or
shutter
it
[ the
back.
,]will
and
speed.
and
lock
press
Look
Use
through
to
select
the
[adjust
viewfinder
]use
and
press
to
compose
ENTER.
the
picture.
To
continue
erasing
images,
repeat
the
above
procedure
2.
.is
AF
(auto-focus)
and
AE
(auto
exposure)
are
set.
When
pressed
fully
down,
the
camera
takes
aspace
picture.
object.
This
mode
enables
carefree
photographing
similarly
to
selecting
[stable
]photographs.
in
[ from
]settings”,
mode.
Itrepeatedly
is
to
night.
To
is
Change
modes.
turned
When
the
OFF,
your
setting
using
the
camera
images
this
according
mode,
from
saved
dropping
be
to
sure
how
on
the
the
to
during
SmartMedia™
image
a(size,
photography,
tripod
is
to
to
be
keep
used
not
hang
the
and
be
camera
erased.
the
the
shoulder
remaining
SmartMedia™
strap
and
amount
prevent
around
can
ofstep
your
distortion
be
neck.
inpossible
the
of
images.
Relationship
between
your
camera
and
accessories
Connecting
tocalled
Other
Devices
(page
123)
being
played
back
one
image
at
acover,
time.
The
meaning
maximum
of
number
LED
color
of
photographs
differ
according
can
to
be
taken
mode
continuously
dial
setting.
three
photography
mode,
and
take
photographs
at
these
settings.
These
are
“Manual
which
are
saved
display
to
show
aPower
list
detailed
information
compression
ratio,
shutter
speed,
aperture,
etc.)
or
you
can
for
the
UK)
in
a
room
with
amay
power
outlet,
you
can
take
photographs
for
an
extended
period
of
time.
This
also
Item
QUALITY
Options
Notes
SmartMedia™
VIDEOon
OUT
White Balance (W.B.)
Write
Protection
Removing
the Batteries
ISO
[ POWER
]
AUTO
OFF
Setting items
Turning
the
Power
Off
Using
the
LCD
Monitor
Additional
Information
Other
Applications
Handy
Functions
Erasing
Images
Playing
Back Images
Taking
Photographs
Tab menu
The
tab
is
displayed.
setting
isbattery
as
follows:
Make
sure
that
the
issystem
firmly
closed.
Details
image
ofmenu
operation
isrange
saved
are
or
erased,
the
same
and
as
the
taking
camera
photographs
is
then
ready
and
to
playing
take
photographs.
them
back
onon
the
LCD After
monitor.
If
you
use
the
viewfinder
to
take
photographs,
the
photography
Set
the
mode
dial
to
[cover
].settings
direction
of
the
arrow
to
open
cover
.the
ENTER.
change
the
white
and
the
metering
in(the
program
mode.
erased
SmartMedia™.
and
reused.
For
details
on
these
accessories,
refer
to
the
Instruction
Manual
for
the
accessory
you
are
using.
(information
Movies
images
photographed
in
the
multi
mode
Page
cannot
be
displayed
using
the
zoom
playback
Images
even
if the
are
camera
not
recorded
is
turned
directly
off.
SmartMedia™
but
are
stored
within
the
buffer
memory.
display
histograms,
etc.
prevents
failed
photographs
due
to
battery
wear
or
failed
of
data
to
a
PC.
details
handling
the AC
Set
Sets
the
thebalance
whether
color
: /or
Photography
mode
language
not
to
and
return
photographic
of
in
menus
the
program
displayed
sensitivity
in
the
(default)
on
SETUP
the
at51)
which
LCD
(temporarily
MENU
Page
monitor.
to
image
62)
the
original
is For
to
be
factory
recorded.
settings.
feeds
the
image
•transfer
Each
press
of
•How
Copying
of
printed
(black
on
white
paper)
set
the
time
(text
114)
F8
/display
F6.8
F5.6
/18.
F4.8
/Page
/and
F3.4
/mode
F2.9
to
take
photographs
Page
41
1/1000,
1/750,
1/500,
1/350,
1/250,
1/180,
1/125,
range
may
differ
from
the
actual
image.
InLCD
this
case,
use
the
LCD
Press
the
shutter
button
down
halfway
.1/90,
the
mode
dial
to
[ F4.0
],
[characters
]reset.
or
[selected
].higher
SmartMedia™
having
the
following
storage
capacity
can
be
on
your
current
as
of
March
2000)
feature.
The
last
cover
recorded
image
opens
frame
image
appears
appears
on
the
on
the
LCD
monitor.
monitor.
photography
is
finished,
check
the
images
record
the
ones
tocamera.
SmartMedia™.
[TIME&DATE,
]
:
Erases
images
in
the
selected
folder
folders.
adapter,
beSet
sure
to
read
page
•
2x-speed
playback
isaperture-priority
performed
Make
sure
that
the
SmartMedia™
is
correctly
loaded.
(
Page
31)
byused
one
frame.
Warning:
Noise
:OSD
Photography
increases
LANGUAGE
when
incurrently
will
the
not
ISO
be
is for
changed
mode
to
(and
Page
settings.
63)
•
Backlit
portraits
[PROTECTED]
on
the
LCD
monitor,
cancel
the protection
( Page 108) or
remove
How
to
play
back
images
Page
80
1/60,
1/45,
1/30,
1/20,
1/10,
1/8,
1/6,
1/4,
1/3, 115
1/2,
monitor
for
photography.
AF
(auto-focus)
and
AE
(auto
exposure)
(the
Additional
Information,
: value
English
(default)
Pass
Set
the
out
mode
end
steps
of
dial
1the
to
to
shoulder
4[1/15,
either
]].LCD
or
inspeed-priority
[strap
“Photography
through
].
the
in
the
strap
Shutter
speed-priority
Mode”
isdisplayed
held
down.
the
duration
that
2MBCarry
/4MB/8MB/16MB/32MB/64MB/128MB
the
mode
dial
to
[isin
(all
3.3
types)
To
]•the
adjust
: When
Erases
the
all
brightness
folders
recorded
of
the
on
monitor
SmartMedia™.
Page
[Set
•V
1-frame
feed
is continued
for the
The
aperture
and
the
shutter
speed
corresponding
to( that
:write-protection
Photography
shutter
mode
Page
65)
•IMPORTANT
bright
scenes
(such
and
highly
reflective
subjects
•the
You
can
also
carry
out
step
8snowfields)
while
verifying
the
image
step
7.
DPOF
(in
Page
102).
Glossary)
start
to
function.
0”7,
1”,
1”5,
2”,
3”,
4”,
6”,
8”,
10”,
15”
•Very
Do
not
remove
or monitor
load
the
batteries
or
disconnect
or
connect
the
AC
adapter
while
the camera
is mode.
on. This
:POWER
Japanese
:LCD
Equivalent
toas
color
ISO100
Carry
Set
Use
out
or
mode
steps
to
dial
select
1
to
to
2[erased,
the
“Manual
].
images
photographed
Settings”
(page
in
58).
the
multi
photography
You can also
the
PC
card
adapter
and
floppy
disk
adapter
( in
123)
sold
separately
to transfer
Changing
the
display
Page
116
Theconnect
images
or
folders
are
and
the
camera
returns
toPage
the
is
held
down.
duration
that
value
are
displayed
on
the
LCD
monitor.
If
the
appropriate
(page
attachment
65)
or
on
in
“Photography
the
camera.
in
the
Full
Manual
Mode”
(page
67).
Press
the
button
to
turn
the
power
on.
full
manual
mode
(
Page
67)
:
Photography
in
Press
the
MENU
button.
• •Shots
predominantly
of
sky
Even
ifreturn
photography
is disconnect
terminated
midway
before
capturing
three
images
bythe
releasing
theAC
shutter
• AF
If
you
take
aup
photograph
after
erasing
an
athis
number
continuing
from
last Ifphotographed
When
or
AE
are
locked,
the
beep
tone
( Page
111)
sounds
and
the
Use
ormade
to
change
the
setting
inimage,
the
menu,
might
the
manual
settings
tosame
their
defaults.
Iftab
happens,
manually
set
conditions
again.
:
High-sensitive
photography
equivalent
to
color
ISO200
(default)
Before
you
connect
or
the
AC
adapter,
be
sure
to
turn
the
camera
OFF.
the
adapter
is
Press
the
image
quality
button
to
select
the
preset
combination
cannot
be
set
even
if
the
shutter
speed
is
adjusted
to
images to a
PC.
16MB
(SM-M1600D)/32MB
(SM-M3200D)/64MB
(SM-M6400D)/128M
(SM-M1280D)
The
respective
last
image
mode.
frame
appears
on
LCD
monitor.
You
can
also
select
the
image
by
the
operation
as
for
thumbnail
display
(
Page
83).
Carry
out
steps
1
to
on
page
109.
When
the
camera
is
turned
on,
set
the
mode
dial
to
thethe
desired
The
shutter
speed
and
the
aperture
value
corresponding
todisplay
the
All
descriptions
inor
this
Instruction
Manual
are
for
when
language
is set
to [ENGLISH].
Press
or
to
select
the
image.
button,
images
already
photographed
can
be
saved
and
erased
by playback
the
method.
image
is
assigned
as
image
number.
The
viewfinder
RECORDING
LED
turns
MENU
green.
is2
displayed.
•press
The
image
the
photograph
is
taken
is
slightly
less
clear
than
images.
(This
is 109,
connected
disconnected
with
the
power
ON,
camera
settings
may
beabove
reset
(SET-UP
Page
and
ENTER.
:before
High-sensitive
photography
equivalent
to
color
ISO400
its
the
shutter
speed
isthe
displayed
inthe
red.
To limit,
cancel
erasing
of
image
data,
select
[monitor.
]Photography,
and
press
ENTER.
quality
and
size,
while
viewing
indication
on
the
starts
a
reverse
•
The
press
of
mode.
shutter
speed
are
displayed
on
the
LCD
If
the
appropriate
The
length
of
time
to
capture
images
varies
according
to
the
photographic
conditions.
•
Images
can
also
be
erased
in
the
thumbnail
mode.
In
this
case,
the
camera
enters
the
single
frame
Select
[SYSTEM
INFO.]
on
the
SETUP
MENU
and
because
television
displays
images
at
a
lower
resolution.)
•
Spotlit
subjects,
particularly
against
dark
backgrounds
Manual
Settings
Page
58)
orPage
the
camera
malfunction.
however,
is
in
this
state.
feeds the
image
•may
Each
press
oftoinbegin
EXP.
].
To
cancel
changing
of
settings,
press
.you
Use
or
todial
select
the
frame
want
to
enlarge.
Press
the
or
Zoom
to
switch
select
[( S/C
].isphotography
21)
towards
“T”
playback.
]possible
is
selected,
[NO
IMAGE]
displayed
after
all
folders
When
playback.
Press
Set
mode
in
the
to
[ sure
Tv
mode,
].the
or
press
or
the
shutter
button
fully
Before
photography,
make
that
the
lens
cap
has
been
combination
cannot
be
set
even
ifflash
aperture
isin.black
adjusted
to its
playback)
mode,
and
enters
the
thumbnail
playback mode after the image is erased.
status
display.
]or
mode:
In
[[playback
Press
the
display/info
button.
Self-timer
photography
and]down
are
not
possible.
•the
The
display
unit
varies
according
to
the
output
system.
•theCopying
of (frame
printed
text
(white
characters
on
paper)
.playback
press
reverse
by
one
frame.
This
adapter
allows
SmartMedia™
to
be
used
as
3.5"
floppy
disk.
have
been
erased
(unless
the
SmartMedia™
contains
protected
You
can
also
select
the
image
by
the
same
operation
as
for
thumbnail
playback
( [4X],
PageISO
83).
Automatic
begins.
•
Playback
becomes
2x-speed
to
reduce
aperture
size.
Press
to
increase
aperture
size.
Press
camera
takes
a
picture.
The
manual
setting
removed
the
camera.
limit,
aperture
value
isbe
displayed
in
red.
Photography,
however,
the
[Scenes
M
]from
mode
tomenu
set
the
shutter
speed
to simultaneously
0.7
second
During
[2X],
the
ISO
will
automatically
set
between
ISO100
ISO200.
During
be
set
the
quality
and
size
Page
112
•the
With
the
NTSC
system,
images
can
be
displayed
on the LCD
monitor
and TVwill
during
•To
with
low
reflectivity,
such
as
shots
green
or
dark
foliage
Each
press
of
the
display/info
button
switches
the
display
•of1-frame
feed
isand
continued
The
SYSTEM
INFO.
displayed.
reverse
for
the
duration
This
adapter
isplayback
inserted
into
the],
floppy
your
PC,
allowing for the
images).
The
viewfinder
LED
turns
redis
image
data
being
recorded
onto
Insert
the
adapter
connector
plug
into
the
DC
IN
values
are
displayed
In
the
photography
modes
([while
[and ISO400.
]disk
oris
[ drive
]),on
the
lens
photography
and
playback.
is
possible
inAC
this
state.
automatically
set
between
ISO100
is
held
down.
format
as
follows:
duration
that
Note:
The
larger
the
F
value,
the
smaller
the
aperture
size
become
or
longer.
•Press
Remove
and
insert
SmartMedia™
with
the
camera’s
power
turned
off.Aperture value
is
held
down.
that
To
quit
the
SETUP
MENU,
change
the
mode
dial
setting.
Shutter
speed
Adjust
the
zoom
ratio
by
the
Zoom
switch.
(Zoom
to
display
option
menu,
press
or
to
images
recorded
on
the
SmartMedia™
to
be
transferred
to
the
PC.
the
SmartMedia™.
Sets
video
output
system
according
to
country
in
which
your camera
is used.
on
the
left
ofthe
the
LCD
Press
the
shutter
button
down
halfway
and
press
5V
terminal
on
the
camera.
extends
from
the
camera
body.
•the
PAL
system,
images
cannot
bethe
displayed
When a cable
is connected, only
and
versa.
the
image
quality
button
switches
the
quality
and
size
Gently
insert
the
SmartMedia™
as
far
as
it, simultaneously.
can
go
[Pressing
]vice
isWith
displayed
on
the
LCD
monitor.
•select
Recorded
data
may
bepress
erased
(destroyed)
in
the
situations
listed
below. Note that Toshiba
White
Balance
Additional
Information,
Glossary
to
increase
shutter
speed.
Pressand
to
decrease
shutter
speed.
Press
Press
or
to
move
forward
reverse.
PRG
]
and
ENTER.
]
and
press
ENTER.
[
switch
Page
21)
TV
display
is
available.
monitor
screen.
When
the
camera
is
turned
on,
the
Auto
Power
OFF
function
settings
infully
the
following
order.
it
down
. system
Press
or
to
select
the
item
you
desired
toisloss
set,
with
SmartMedia™
electrodes
(metal
contacts)
Additional
Information,
Glossary)
(white
Corporation
accepts
no
whatsoever
for
the
of recorded
data enters
in these
• the
When
allNTSC
images
in
a responsibility
folder
are
erased,
that
folder
itself
also(destruction)
erased.
The
camera
determines
the
balance
by
averaging
the
various
kinds playback
of light
that actually
to
to
next
frame/
to“T”
go
back
one
To
prevent
valuable
data
being
erased,
attach
the
write••advance
With
the
PAL
images
are
played
back
with
apressing
black
frame
•frame
After
pause
is
cancelled,
the
Zoom
switch
to
the
will
the
image.
Pressing
ENTER
the
setting.
or
,, SmartMedia™
and
manual
Exposure
compensation
Page
69)
using
When
[for
M
]selects
isissystem,
selected
on
the
[ halfway
EXP.
]remove
option
menu,
orsurrounded.
the
shutter
speed
setting
becomes
operational.
Never
open
the
SmartMedia™
cover
orenlarge
the
while
anmakes
is
being
recorded.
This
or
and
manual
setting
(image
Page
58)
or
film
speed
Exposure
compensation
((from
Page
69)
using
Reverse the
procedure
“Loading
the
Batteries”
and
remove
the
batteries.
•facing
Pressing
the
shutter
button
down
adjusts
the
exposure,
• Playback
paused.
PAL
system
( camera.
Additional
Information,
Glossary)
situations:
the
lens.
This
setting
allows
you
to
set
in
advance
the
white
balance
when
taking
photographs
under
and
press
ENTER.
the
rear
of
the
For
the
US/Canada:
PDR-ACM1A
Holding
down
or
moves
forward
or
reverse
continuously.
resumes
at
the
last
state
that
was
protect
sticker
at
the
write-protect
area.
Data
can
no
longer
be
may
corrupt
the
data
on
the
SmartMedia™
or
damage
the
SmartMedia™
itself.
possible,
but
does
not
make
the
exposure
compensation
possible. However the exposure value
is
To
return
normal
press
the
Zoom
switch
towards
setting
Page
58)magnification,
or film
speed
setting
( the
Page
78)
using
ENTER
Pass
the
shoulder
strap
through
loop
and
pull.
setting
(( toPage
78)
using
ENTER
are
also
possible.
and
pressing
the
shutter
button
fully
takes
the
shot.
TM[ is down
When
the
SmartMedia™
used
incorrectly
by
the
user
or
a
third
party
[
],
]
or
[
]
AE
or
AF
are
locked
with
the
shutter
button
held
half
specific
lighting
conditions.
For
Europe:
PDR-ACM1E
active
before
the
pause.
Firmly
insert
the
SmartMedia
as
far
as
it
can
go.
displayed
on is
the
LCD
monitor.
Press
ENTER.
recorded
or setting
erased
from
SmartMedia™.
Toon
write
oraterase
data
from is to be recorded.
Sets
the
color
mode
and
photographic
sensitivity
which
the
image
“W”.
are
also
possible.
The
default
different
depending
the
destination
country/area.
IMPORTANT
Use
or
to
select
the
desired
item
Press
ENTER,
nine
images
are
displayed
simultaneously.
• no
If
you
shoot
a
still
picture,
when
preview
is
set
to
ON
(
Page
77),
down.
If
operation
is
carried
out
for
a
fixed
amount
of
time
(default:
about
one
minute),
power
ON
When
the
SmartMedia™
is
exposed
to
static
electricity
or
electrical
noise
Forimage
the Noise
UK:
PDR-ACM1U
:off
Displays
the
firmware
version
ofto
this
camera.
SmartMedia™,
peel
the
sticker.
camera
ready
to
take
photographs.
Warning:
increases
when
the
ISO
is
changed
higher
settings.
isis
displayed
and
a
white
frame
and
green
Green The
Compose
picture,
press
the
shutter
button
down
halfway,
and
press
it
down
:the
Automatic
adjustment
(default)
Display
Page
83
theThumbnail
recorded
image
is
displayed
on
for
about
two
]specifications
Standby
mode
[enlarged,
••-For
If
no
operation
is
carried
out
a screen
fixed
amount
offrom
time
(default:
about
1shutter
minute),
thewear.
power
is
turned
TM
consumption
is
set
to
its
minimum
state
(power
almost
off)that
to
prevent
battery
This
is
.in
and
press
When
the
SmartMedia™
isfor
removed
ordarkens
the
camera
isPage
turned
off
while
recording
erasing
The
image
the
LCD
monitor
sometimes
the
time
the
button
isdata,
pressed
down
details,
refer
to
the
of
AC
information.
adapter
127.
: on
Displays
the
SmartMedia
Playback
returns
to
the
start
ofturned
the
movie.
frame
are
displayed
the
LCD
monitor.
:
Photography
outdoors
Default
setting:
seconds.
off
to
preserve
battery
life.
This
is
called
“Auto
Power
OFF”.
To
return
to
the
normal
state,
press
the
fully.
Page
40
called
the
Auto
Power
OFF.
This
setting
allows
you
to
set
the
time
when
the
camera
turns
off
halfway
until
the
image
becomes
focused.
: picture,
Equivalent
to
ISO100
(default)
data,
frame
advance
when
images
aredefaults.
played
back or during
formatting alarm
of the
The options
are
displayed.
: Returns
settings
to
Flashing
[ the
],
[ color
]conditions
or their
[shutter
]being
Self-timer
in frame
operation
at a handshake
.
Compose
the
press
the
button
down
halfway,
and
press
it
down
The
white
frame
indicates
entire
image,
while
the
green
:
Photography
in
cloudy
POWER
button
again.
•
The
viewfinder
LED
turns
red
while
image
data
is
being
recorded
Compose
the
picture,
press
the
shutter
button
down
halfway,
and
press
it
down
• The
To
set
the
focus
orpicture.
exposure
forphotography
a subject
outside
the
center
the intended
theincamera
directly
The camera
takes
the
automatically.
This
function
isthrough
not
activated
during
automatic
playback
( image,
Pagepoint
85) or
the [ only>
] PC
:appearing
High-sensitive
equivalent
toofcolor
ISO200
SmartMedia™.
Note:
image
the
lens
will
be
The
display
returns
to<Histogram>
thumbnail
playback.
<Standard>
<Detailed
information>
<Image
shows
the
location
of
the
currently
enlarged
area.
halfway,
and
press
it
down
fully.
Page
40
:
Photography
in
bluish
fluorescent
light
fully.
Page
40
About
the
Auto
Power
(FULL
OFF
Function
)
Additional
Information,
“AUTO
POWER
OFF
(page
110)”
at
the
subject
or
desired
exposure
(lighting),
press
and
hold
the
shutter
button
halfway.
Now,
with
the
shutter
onto
the
SmartMedia™.
ON]
Writing
to SmartMedia™
in progress
mode.
Press
ENTER.
:adapter
High-sensitive
photography
equivalent
toanother
color
ISO400
•Insert
Wedefault
recommend
copying
and
saving
important
datapower
onto
storage
medium (floppy disk, hard
displayed
for
[LCD
].[Power
fully.
Page
40
the
AC
power
plug
into
the
The
size
and
quality
of
the
image
can
be
reset
to
the
desired
combination.
Press
ENTER.
button
still
held
halfway
down,
you
can
turn
the
direction
of
the
camera
and
frame
your
image
with
the
focus
•
It
is
possible
to
play
back
any
images
in
any
folders
by
pressing
or
during
playback.
(For
details
ON
: Photography
inafter
reddish
fluorescent
light
The
camera
takes
the
picture.
Photographs
can
be
taken,
however,
do not
turn thepress
power
OFF.
Todisk,
return
to disk,
the
normal
state
theset
Auto
Power
OFF
has been
executed,
the
POWER
button
MO
etc.).
The
PREVIEW
manual
setting
Page
items
77
are
displayed.
camera
takes
the
atmonitor.
the
exposure
time.
Current
Entireofimage
and
exposure
locked.
Press
the
button
down
fully
to in
complete
capturing
the image.
Red outlet.
[In the
on picture
the
LCD
The
camera
is ready
for
burst
photography.
of displayed
folder
Page
92)
]:the
mode:
Accessing
of
SmartMedia™
[ (HALF
Photography
in] is
incandescent
light
•] [is
When
shutter
speed
setshutter
to
a)turn
speed
of
0.7 second
orprogress
slower,
photographs
taken
as extended
to Never
turn
the
power
on 77
again.
•During
remove
the
SmartMedia™
or
the
camera
offresult
while
recording
data or are
while
erasing
data
COLOR
Page
the
exposure,
the
viewfinder
LED
turns
orange.
position
•
Moving
the
camera
as
you
press
the
shutter
button
will
in
a
blurred
image.
Use
,
,
or
to
select
the
area
to
enlarge.
the
last
image
displays
the
first
image,
and
pressing
atwill
thebe
firstautomatically
image
displays
the
Pressing
During
[2X],
the
ISO
be
automatically
set
to
ISO200.
[4X],ofISO
setof
exposures
( at Page
68).
IfCarry
burst
photography
is to
set
the
shutter
speed
is set During
to athe
speed
0.7
second
or more
in the
[ to
Tv ]
out
steps
1will
2when
in
Photographic
(SmartMedia™
formatting).
actions
might
damage
ISO
Page
78
Flashing
ItClose
takes
about
twice
the
time
to while
complete
taking
the
photograph
duePDR-M81
to processing
ofenlargement
the
captured
[set
],These
[“Basic
] When
the
image
is not
in SmartMedia™.
focus.
the
SmartMedia™
cover.
•
The
PDR-M81
usesto
an
accurate
auto
focus
mechanism.
However,
the
may
have
difficulty
last
image.
Adjust
the
display
area
enlarge
viewing
theto
white
and
ISO400.
•
In
AEB
photography
(
Page
71)
or
burst
photography,
the
shutter
speed
cannot
be
set
to
0.7
second
or
longer.
(SMALL
)
mode,
the
shutter
speed
is
automatically
changed
1/2
second.
IMPORTANT
•image.
Use
only
the
SmartMedia™
specified
for
use
with
the
PDR-M81.
The
use
of
other
SmartMedia™
SHARPNESS
Page
79
mode)”
(page
109).
Select
[QUALITY]
Settings
(
focusing
or
not
be
able
to
focus
at
all
for
subjects
and
situations
such
as
the
following:
Before
you
use
aother
new
SmartMedia™
the
first during
time,
be
sure
tothe increased
Images
can
bevalue
rotated
by] pressing
playback.
[ for
] or
green
the
aperture
is
to
F2.9
(maximum
aperture
size),
shutter
speed
restricted
•• frames.
If
a
mode
than
[ set
suppressed
flash
mode
is
set
inthe
flash
photography,
thedark
shutterisspeed
is
•79
Processing
image
IMPORTANT
- When
subject
is distant and
- SmartMedia™
Subjects
moving
at
high
speed
damage
the
camera.
CONTRAST
Page
• to
The
write
protection
not
function
if in
write-protect
sticker
becomes
Use
a soft
dry cloth to
.thesecond.
oncould
the
SETUP
MENU
and
press
format
the
(may
Page
91).
an
image
counterclockwise,
and
pressing
rotates
clockwise.
Pressing
1/750
PDR-ACM1A
] •are
the
same
as
to
PDR-ACM1E
PDR-ACM1U
[PRG]
and
[ rotates
limited
tosecond.
between
1/2
second
and
1/250
* The
aboveitdirty.
menu
is
the
RECORDING
Charging
of
flash
progress
ON
When
there
are
objects
in
front
of
or
behind
the
subject
Very
shiny
subjects
such
as
a
mirror
or
car
body
SmartMedia™
is
aofisprecision
device.
Do do
notnot
bend,
drop,
or subject
SmartMedia™
to
DIGITAL
ZOOM
Page
• wipe
When
the
camera
isOnce
not79
inelectronic
be sure
to attach
the
lens
cap
provided
with[your
camera.
the
POWER
button
to
turn
the
power
off.
away
any
dirt.
ause,
sticker
ispress
peeled
off,
reuse
it.
Orange•Press
The
QUALITY
menu
displayed.
combinations
the
automatically
mode.
MENU
inthe
•the
The
aperture
value
set
differ
to
the
actual
value
according
to
the
position
ofUK)
theorzoom
lens.
To
to
the
regular
display,
ENTER.
(Photos
cannot
be
taken
at
this
moment.)
(forreturn
US
and
Canada)
If the
shutter
speed
is
set
to
1/350
second
or
less,
the
shutter
as
speed
an
animal
is
automatically
athe
cage
a]changed
person
in front
to 1/250
of a tree)
(for
European
Continent)
(for
Get
ready
to
take
the
photograph.
- above
Extremely
low
contrast
subjects
When
the
settings
are
made,
they
are
displayed
in(such
thepocket
following
order.
excessive
shocks.
Also,
do
not
carry
SmartMedia™
the
ofx[trousers.
This
might
The
lens
cap
can
also
be
attached
to
attachment
following
the
above
steps
to prevent
it’sthe
LCD
79
The
power
turns
off.
determined
shutter
speeds
and
aperture
-in Subjects
with
little
reflection,
such
as
hair
fur mode.
•• The
size
displayed
on
the
LCD
monitor
FULL
(320
240)
HALF
(160
xorsubject
120).
The
forced
flash
mode
or
]orred-eye
forced
flash
second
ifPage
the
flash
setting
is25)
changed
tothe
thestrap
[ ]becomes
- image
Subjects
that
have
low contrast
and
merge
into
Loading
the
batteries
(
Page
and
the
SmartMedia™
(
Page
31)
into
the
camera.
being
lost.
• Flash
photography
and
burst
photography
are
not
possible.
Flashing
SmartMedia™
to
excessive
force
when
you
sit
down,
damaging
the
SmartMedia™.
Hardware
malfunction
Subjects
with
no
solidity,
such
as
smoke
or
flames
the
background
(such
as
white
walls
or
subjects
Attach
the
lens
cap
when
you
are
not
using
the
camera.
values.
However,
their
operation
capability
movies
made
in
FULL
size
is
displayed
on
the
entire
LCD
monitor,
and
those
made
in
HALF
size
If the
[ ]mode,
forcedISO
flash
[ automatically
] red-eye set
forced
flash mode
is and
set in
flash photography
the is
• In
movie
willorbe
between
ISO100
ISO400
regardless ofwhen
its setting.
dressed
inthe
theSmartMedia™
same
color
as
thelens
background)
-attach
Subjects
viewed
through
glass
Turn
offor
the
power
tothe
retract
the
unit,
and then
the
lens
cap.
The
image
taken
in
photography
mode
may
be
blurred.
or
to
select
the
desired
setting
from
the
tab
menu
, and
press
•Use
Do•not
use
store
in
environments
likely
to
be
affected
byisstatic
electricity
or
is
different
as
shown
the
right
table.
displayed
in
ofspeed
the
shutter
speed
is center
set
toin
aexposure
of
0.7
second
or
more,
the
shutter
speed
automatically
changed
to
Press
POWER
button
toscreen.
turn
power
on.
A electrical
histogram
isturn
a graphic
representation
ofthe
theistones
of the
subject.
The horizontal
histogram
• Do
If the
the
image
cannot
be
focused,
thelens
focus
automatically
fixed to infinity.
(When theaxis
flashofisthe
necessary
not
the
power
on
with
the
cap
attached.
noise.
1/2
second.
ENTER.
*
The
above
AC
adapter
is
US/Canada
Turning
the
Power
On
Page
38
shows
the
brightness
(increasing
brightness
from
left
to
right)
and
the
vertical
axis
shows
the
number
at
this
time,
it
is
simultaneously
fixed
to
illuminate
objects
1.5
meters
(five
feet)
away.
During
macro
•This
Dosaves
use
orsettings,
store
SmartMedia™
very
hot,
humid
oraperture
corrosive
If the
shutter
speed
value
isimages,
set toin1/1000
second,
the
value
is limited
to
F8type
andAC
F3.4.
•not
When
playing
back
movie
switching
isthe
between
standard
and
image
only.
(O
:environments.
possible
Xbetween
: not
the
and
returns
to
RECORDING
MENU.
type.
European
andpossible)
UK
photography,
the flash
islevel.
alignedthe
withdisplay
the wide
position.)
of pixels
at each brightness
Downloaded From
camera-usermanual.com
adapters differ in shape.
--110
20 -40
80
88
Installing the batteries
This camera uses four size AA batteries. For details on handling batteries, be sure to read page 16.
Getting
Ready
Loading the Batteries
Taking
Photographs
IMPORTANT
• Before you load or remove the batteries, be sure to turn the camera off. If the battery is loaded or
removed with the power on, the date setting may return to its default or the camera settings may be
reset. (SET-UP ➲ Page 109, Manual Photography ➲ Page 58)
Playing
Back Images
Unlock the battery cover 1, slide it, and open 2.
Battery cover lock
1
Handy
Functions
Other
Applications
Load the batteries in the battery compartment
making sure that it is loaded in the correct direction
as shown in the figure on the right.
Erasing
Images
2
Additional
Information
Downloaded From camera-usermanual.com
- 25 -
Changing
the
Preset
Conditions
(RECORDING
MENU)
Photography
in
the
Program
Mode
Setting
Names
Playing
Back
the
of
Photographed
Parts
Image
Size
and
Quality
(Single-Frame
Playback)
Extended
Exposure
Photography
(Bulb
Photography)
Erasing
Images
(Erase
Frame)
(continued)
Manual
Attaching
Using
How
Taking
Enlarging
Playback
About
Turning
to
Photographs
the
SmartMedia™
Press
Settings
the
Photographed
of
Power
the
Power
Multi
Shoulder
Continuously
Outlet
Shutter
Image
On/Off
Images
Strap
Pictures
Button
(Zoom
(Burst
Playback)
Photography)
Taking
Erasing
Button
Photographs
Folders
and
(All
LCD
Images
Continuously
Monitor
in
aImages
Folder/All
(Burst
Display
Photography)
Folders)
(In
Playback
(continued)
(continued)
Mode)
Definitions
Separately
of
the
Accessories
Color
of
the
Viewfinder
LED
Taking
and
Playing
Back
Photographs
on
aMode
TV
(continued)
Changing
the
Preset
Conditions
(RECORDING
MENU)
(continued)
Exposure
Compensation
in
the
Shutter
(continued)
Speed-priority
(continued)
About
Basic
Settings
SmartMedia™
in
(Sold
the
mode)
Aperture-priority
(continued)
Mode
(continued)
LCD
Monitor
Display
(during
photography)
(continued)
Manual
Settings
(continued)
Playing
Photography
Installing
Back
Movies
batteries
(Auto
Photography)
(continued)
(continued)
(continued)
Names
of
Parts
(continued)
Getting
Ready
The shutter
camerabutton
automatically
adjusts the
shutter
and
the aperture
value
according
to the
brightness
of an
can be pressed
down
in twospeed
stages:
halfway
down and
fully
down. When
pressed
halfway
down,
This
“SmartMedia™”
Set
Play
Automatically
The
the
following
mode
shoulder
menu
back
size
photographed
is(number
used
for
items
strap
plays
setting
isadapter
for
athe
is
are
back
storage
of
taking
handy
also
the
pixels)
still
the
basic
available
subjects
for
medium
images
16
and
carrying
images
settings
quality
one
for
that
as
saving
separately
your
image
to
require
(compression
be
camera
used
images
atseveral
a
sold
for
around.
inthat
photography
items.
ratio)
seconds
the
you
multi
of
have
the
photography
to image
photograph
in
photographed.
to
[ second
be
mode
],photographed.
such
[be
Even
in
asquick
]for
firework
or
if Europe,
the
[You
succession.
camera’s
displays
] photography
power
at the
Enlarges
selected
portions
of
images
being
played
back
at
two
levels.
Images
can
displayed
enlarged
when
In
You
this
can
color
mode,
manually
of
the
photographs
viewfinder
adjust
settings
are
LED
taken
indicates
such
continuously
asphotographed
the
exposure
state
atof
control,
atime.
the
maximum
camera.
white
speed
balance,
The
ofthe
0.8
metering
system,
intervals.
continuous
This
item
switches
display
on
the
LCD
monitor
when
playing
back
photographed
images.
can
switch
If
you
the
AC
(sold
separately:
PDR-ACM1A
for
the
US/Canada,
PDR-ACM1E
PDR-ACM1U
Mode
Effective
dial
Subjects
and
Set
Values
TM
Press
.of
aperture
value.
SYSTEM
Turning
Exposure
ISO
OSD
In
[prevent
[use
LANGUAGE
the
]the
INFO.
mode
control
(EXP.)
On
Close
the
SmartMedia™
cover.
Slide
the
SmartMedia
cover
release
knob
in
the
Take
photographs
or
or
battery
to
to
select
or
play
[that
the
slide
]them
or
shutter
it
[ the
back.
,]will
and
speed.
and
lock
press
Look
Use
through
to
select
the
[adjust
viewfinder
]use
and
press
to
compose
ENTER.
the
picture.
To
continue
erasing
images,
repeat
the
above
procedure
2.
1
2.
AF
(auto-focus)
and
AE
(auto
exposure)
are
set.
When
pressed
fully
down,
the
camera
takes
aspace
picture.
object.
This
mode
enables
carefree
photographing
similarly
to
selecting
[stable
]photographs.
in
[ from
]settings”,
mode.
Itrepeatedly
is
possible
to
night.
To
is
Change
modes.
turned
When
the
OFF,
your
setting
using
the
camera
images
this
according
mode,
from
saved
dropping
be
to
sure
how
on
the
the
to
during
SmartMedia™
image
a(size,
photography,
tripod
is
to
to
be
keep
used
not
hang
the
and
be
camera
erased.
the
the
shoulder
remaining
SmartMedia™
strap
and
amount
prevent
around
can
ofstep
your
distortion
be
neck.
in
the
of
images.
Relationship
between
your
camera
and
accessories
Connecting
tocalled
Other
Devices
(page
123)
being
played
back
one
image
at
acover,
time.
The
meaning
maximum
of
number
LED
color
of
photographs
differ
according
can
to
be
taken
mode
continuously
dial
setting.
is
three
photography
mode,
and
take
photographs
at
these
settings.
These
are
“Manual
which
are
saved
display
to
show
aPower
list
detailed
information
compression
ratio,
shutter
speed,
aperture,
etc.)
or
you
can
for
the
UK)
in
a
room
with
amay
power
outlet,
you
can
take
photographs
for
an
extended
period
of
time.
This
also
Battery
cover
lock
Mode
dial
1 Item
QUALITY
2 Options
Notes
SmartMedia™
VIDEOon
OUT
White Balance (W.B.)
Write
Protection
Removing
the Batteries
ISO
[ POWER
]
AUTO
OFF
Setting items
Turning
the
Power
Off
Using
the
LCD
Monitor
Additional
Information
Other
Applications
Handy
Functions
Erasing
Images
Playing
Back Images
Taking
Photographs
Tab menu
The
tab
is
displayed.
setting
isbattery
as
follows:
Make
sure
that
the
issystem
firmly
closed.
Details
image
ofmenu
operation
isrange
saved
are
or
erased,
the
same
and
as
the
taking
camera
photographs
is
then
ready
and
to
playing
take
photographs.
them
back
onon
the
LCD After
monitor.
If
you
use
the
viewfinder
to
take
photographs,
the
photography
Set
the
mode
to
[cover
].settings
direction
of
the
arrow
to
open
cover
.the
ENTER.
change
the
white
and
the
metering
in(the
program
mode.
erased
SmartMedia™.
and
reused.
For
details
on
these
accessories,
refer
to
the
Instruction
Manual
for
the
accessory
you
are
using.
(information
Movies
images
photographed
in
the
multi
mode
Page
cannot
be
displayed
using
the
zoom
playback
Images
even
if the
are
camera
not
recorded
is
turned
directly
off.
SmartMedia™
but
are
stored
within
the
buffer
memory.
display
histograms,
etc.
prevents
failed
photographs
due
to
battery
wear
or
failed
of
data
to
a
PC.
details
handling
the AC
1
2
Set
Sets
the
thebalance
whether
display
color
:(/or
Photography
mode
language
not
to
and
return
photographic
of
in
menus
the
program
displayed
sensitivity
in
the
(default)
on
SETUP
the
at51)
which
LCD
(temporarily
MENU
Page
monitor.
to
image
62)
the
original
is For
to
be
factory
recorded.
settings.
For
enlarged
P.dial
22)
feeds
the
image
•transfer
Each
press
of
2
•How
Copying
of
printed
(black
on
white
paper)
set
the
time
(text
114)
F8
/view
F6.8
F5.6
/18.
F4.8
/Page
/and
F3.4
/mode
F2.9
to
take
photographs
Page
41
1/1000,
1/750,
1/500,
1/350,
1/250,
1/180,
1/125,
range
may
differ
from
the
actual
image.
InLCD
this
case,
use
the
LCD
Press
the
shutter
button
down
halfway
.1/90,
the
mode
dial
to
[ F4.0
],
[characters
]reset.
or
[selected
].higher
1one
SmartMedia™
having
the
following
storage
capacity
can
be
used
on
your
current
as
of
March
2000)
feature.
The
last
cover
recorded
image
opens
frame
image
appears
appears
on
the
on
the
LCD
monitor.
monitor.
photography
is
finished,
check
the
images
record
the
ones
tocamera.
SmartMedia™.
[TIME&DATE,
]
:
Erases
images
in
the
currently
selected
folder
and
folders.
Possible
number
of shots
adapter,
beSet
sure
to
read
page
•
2x-speed
playback
isaperture-priority
performed
for
2
Make
sure
that
the
SmartMedia™
is
correctly
loaded.
(
Page
31)
by
frame.
Warning:
Noise
:
OSD
Photography
increases
LANGUAGE
when
in
will
the
not
ISO
be
is
changed
mode
to
(
Page
settings.
63)
Memo
•
Backlit
portraits
IMPORTANT
[PROTECTED]
on
the
LCD
monitor,
cancel
the protection
( Page
or
remove
How
to
play
back
images
Page
80
1/60,
1/45,
1/30,
1/20,
1/10,
1/8,
1/6,
1/4,
1/3,
1/2,
monitor
for
photography.
AF
(auto-focus)
and
AE
(auto
exposure)
(the
Additional
Information,
SET-UP
(the
P.
:109)
English
(default)
Pass
Set
out
mode
end
steps
of
dial
1the
to
to
shoulder
4[1/15,
either
]].LCD
or
inspeed-priority
[strap
“Photography
through
].
the
in
the
strap
Shutter
speed-priority
Mode”
isdisplayed
held
down.
the
duration
that
PC
mode
(mode
P.
121)
(at
currently
size
and108)
quality)
2MBCarry
Set
/4MB/8MB/16MB/32MB/64MB/128MB
the
mode
dial
to
[isin
(all
3.3
types)
To
]•the
adjust
: When
Erases
the
all
brightness
folders
recorded
of
the
on
monitor
SmartMedia™.
Page
115
[mode
Self-timer
1
•V
1-frame
feed
is button
continued
for the
The
aperture
value
and
the
shutter
speed
corresponding
to
:write-protection
Photography
shutter
( that
Page
65) preset
Zoom
state
•camera
bright
scenes
(such
and
highly
reflective
subjects
Photography
mode
•the
You
can
also
carry
out
step
8snowfields)
while
verifying
the
image
step
7.
DPOF
(in
Page
102).
Glossary)
start
to
function.
Sets
basic
settings
0”7,
1”,
1”5,
2”,
3”,
4”,
6”,
8”,
10”,
15”
•Very
Do
not
remove
or monitor
load
the
batteries
or
disconnect
or
connect
the
AC
adapter
while
the camera
is mode.
on.1This
:POWER
Japanese
:LCD
Equivalent
toas
color
ISO100
POWER
button
Transfers
images
to
a58).
PC.
Carry
Set
Use
out
or
mode
steps
to
dial
select
1
to
to
2[erased,
the
“Manual
].
images
photographed
Settings”
(page
in
the
multi
photography
You
can
also
connect
the
PC
card
adapter
and
floppy
disk
adapter
( in
123)
sold
separately
to transfer
Changing
the
display
Page
116
The
images
or
folders
are
and
the
camera
returns
toPage
the
is
held
down.
duration
that
value
are
displayed
on
the
LCD
monitor.
If
the
appropriate
(page
attachment
65)
or
on
in
“Photography
the
camera.
in
the
Full
Manual
Mode”
(page
67).
Press
the
button
to
turn
the
power
on.
full
manual
mode
(
Page
67)
:
Photography
in
Image
Quality
button
Press
the
MENU
button.
• •Shots
made
up
predominantly
of
sky
Even
if
photography
is
terminated
midway
before
capturing
three
images
by
releasing
the
shutter
•
If
you
take
a
photograph
after
erasing
an
image,
a
number
continuing
from
the
last
photographed
When
AF
or
AE
are
locked,
the
beep
tone
(
Page
111)
sounds
and
the
Use
or
to
change
the
setting
in
the
tab
menu,
might
return
the
manual
settings
to
their
defaults.
If
this
happens,
manually
set
conditions
again.
(AUTO
POWER
OFF,
SOUND,
For
details,
refer
the
Software
Manual.
:connect
High-sensitive
equivalent
toto
color
(default)
Before
you
oreven
disconnect
the
AC
adapter,
be
sure
to
turn
thedisplay
camera
OFF.
If the
AC adapter is
Press
the
image
quality
button
to
select
the
preset
combination
cannot
be
set
ifphotography
the
shutter
speed
isas
adjusted
toISO200
images to a
PC.
16MB
(SM-M1600D)/32MB
(SM-M3200D)/64MB
(SM-M6400D)/128M
(SM-M1280D)
The
respective
last
image
mode.
frame
appears
on
LCD
monitor.
You
can
also
select
the
image
by
the
same
operation
for
thumbnail
Page
83).
Carry
out
steps
1
to
on
page
109.
When
the
camera
is
turned
on,
set
the
mode
dial
to
the
desired
The
shutter
speed
and
the
aperture
value
corresponding
todisplay
the
All
descriptions
inor
this
Instruction
Manual
are
for
when
the
language
is (2set
to [ENGLISH].
Press
or
to
select
the
image.
button,
images
already
photographed
can
be
saved
and
erased
by playback
the
method.
image
is
assigned
as
image
number.
Shutter
button
The
viewfinder
RECORDING
LED
turns
MENU
green.
is2
displayed.
•press
The
image
the
photograph
is
taken
is
slightly
less
clear
than
images.
(This
is 109,
TIME
& DATE,
OSD
LANGUAGE,
connected
disconnected
with
the
power
ON,
camera
settings
may
beabove
reset
(SET-UP
Page
and
ENTER.
:before
High-sensitive
photography
equivalent
to
color
ISO400
its
the
shutter
speed
isthe
displayed
inthe
red.
To limit,
cancel
erasing
of
image
data,
select
[monitor.
]Photography,
and
press
ENTER.
Flash
button
quality
and
size,
while
viewing
indication
on
the
starts
a
reverse
•
The
press
of
mode.
shutter
speed
are
displayed
on
the
LCD
If
the
appropriate
The
length
of
time
to
capture
images
varies
according
to
the
photographic
conditions.
•
Images
can
also
be
erased
in
the
thumbnail
mode.
In
this
case,
the
camera
enters
the
single
frame
Select
[SYSTEM
INFO.]
on
the
SETUP
MENU
and
because
television
displays
images
at
a
lower
resolution.)
•
Spotlit
subjects,
particularly
against
dark
backgrounds
VIDEO OUT,
QUALITY,
SYSTEM
Manual
Settings
Page
58)
or
the
camera
may
malfunction.
however,
is
possible
in
this
state.
feeds
the
image
•
Each
press
of
EXP.
].
To
cancel
changing
of
settings,
press
.
Use
or
to
select
the
frame
you
want
to
enlarge.
Press
the
or
Zoom
to
switch
select
[
(
S/C
Page
].
21)
towards
“T”
to
begin
playback.
] mode:
is
selected,
[NO
IMAGE]
isaperture
displayed
after
allor
folders
When
playback.
Set
mode
dial
inbe
the
to
[ sure
Tv
mode,
].the
or
press
in
the
shutter
button
fully
Before
photography,
make
that
the
lens
cap
has
been
2onisin.black
combination
cannot
set
even
ifflash
adjusted
to its
playback)
mode,
and
enters
the
thumbnail
playback
mode after the image is erased.
status
display.
]or
In
[[playback
Press
the
display/info
button.
Self-timer
photography
and]down
photography
are
not
possible.
•the
The
display
unit
varies
according
to
the
output
system.
•theCopying
of (frame
printed
text
(white
characters
paper)
INFO.) Press
.
press
reverse
by
one
frame.
This
adapter
allows
SmartMedia™
to
bespeed
asto
3.5"
floppy
disk.
have
been
erased
(unless
the
SmartMedia™
contains
protected
You
can
also
select
the
image
by
thein
same
operation
as
for
thumbnail
playback
(display
PageISO
83).will23)
Automatic
playback
begins.
•[2X],
Playback
becomes
2x-speed
to
reduce
aperture
size.
Press
toused
increase
aperture
size.
Press
camera
takes
a
picture.
The
manual
setting
removed
the
camera.
limit,
aperture
value
isbe
displayed
red.
Photography,
however,
Playback
mode
( Status
P.
80)
the
[Scenes
M
]from
mode
to
set
the
shutter
0.7
second
Manual
During
the
ISO
will
automatically
set
between
ISO100
ISO200.
During
[4X],
be
To
set
the
quality
and
size
Page
112
•the
With
the
NTSC
system,
images
can
be
displayed
simultaneously
on the
LCD
monitor
and( TVP.
during
•photograpy
with
low
reflectivity,
such
as
shots
green
or
dark
foliage
Flash
state
Each
press
of
the
display/info
button
switches
the
display
•of1-frame
feed
isand
continued
for
the
The
SYSTEM
INFO.
menu
displayed.
reverse
for
the
duration
This
adapter
isplayback
inserted
into
the],
floppy
your
PC,
allowing
images).
The
viewfinder
LED
turns
redis
image
data
being
recorded
onto
Insert
the
adapter
connector
plug
into
the
DC
IN
Self-timer
lamp
values
are
displayed
Inlens
this
mode,
you
can select image
In
the
photography
modes
([while
[and ISO400.
]disk
oris
[ drive
]),on
the
photography
and
playback.
is
possible
inAC
this
state.
automatically
set
between
ISO100
is
held
down.
format
as
follows:
duration
that
Note:
The
larger
the
F
value,
the
smaller
the
aperture
size
become
or
longer.
•Press
Remove
and
insert
SmartMedia™
with
the
camera’s
power
turned
off.Aperture value
is
held
down.
that
To
quit
the
SETUP
MENU,
change
the
mode
dial
setting.
Shutter
speed
Adjust
the
zoom
ratio
by
the
Zoom
switch.
(Zoom
to
display
option
menu,
press
or
to
images
recorded
on
the
SmartMedia™
to
be
transferred
to
the
PC.
the
SmartMedia™.
Sets
video
output
system
according
to
country
in
which
your
camera
ischange,
used.
on
the
left
ofthe
the
LCD
playback,
copy,
size
compression,
Size
Press
the
shutter
button
down
halfway
and
press
5V
terminal
on
the
camera.
extends
from
the
camera
body.
•the
PAL
system,
images
cannot
bethe
displayed
When
a cable
is connected,
only
and
versa.
1 situations
the
image
quality
button
switches
the
quality
and
size
Gently
insert
the
SmartMedia™
as
far
as
it, simultaneously.
can
go
[Pressing
]vice
isWith
displayed
on
the
LCD
monitor.
•select
Recorded
data
may
bepress
erased
(destroyed)
in
the
listed
below.
Note
thatofToshiba
White
Balance
Additional
Information,
Glossary
Viewfinder
to
increase
shutter
speed.
Pressand
to
decrease
shutter
speed.
Press
Press
or
to
move
forward
reverse.
Memo
PRG
]
and
ENTER.
]
and
press
ENTER.
[
switch
Page
21)
protect
mode,
and
writing
development
TV
display
is
available.
monitor
screen.
When
the
camera
is
turned
on,
the
Auto
Power
OFF
function
settings
infully
the
following
order.
it
down
. system
2next
Press
or
to
select
the
item
you
desired
toisloss
set,
with
SmartMedia™
electrodes
(metal
contacts)
Additional
Information,
Glossary)
(white
Corporation
accepts
no
whatsoever
for
the
of
recorded
data enters
in these
• the
When
allNTSC
images
in
a responsibility
folder
are
erased,
that
folder
itself
also(destruction)
erased.
Quality
The
camera
determines
the
balance
by
averaging
the
various
kinds playback
of light
that actually
to
to
frame/
to“T”
go
back
one
To
prevent
valuable
data
being
erased,
attach
the
write(printing)
information.
••advance
With
the
PAL
images
are
played
back
with
apressing
black
frame
•frame
After
pause
is
cancelled,
the
Zoom
switch
to
the
will
the
image.
Pressing
ENTER
the
setting.
or
,, SmartMedia™
and
manual
Exposure
compensation
Page
69)
using
When
[for
M
]selects
isissystem,
selected
on
the
[ halfway
EXP.
]remove
option
menu,
orsurrounded.
the
shutter
speed
setting
becomes
operational.
Never
open
the
SmartMedia™
cover
orenlarge
the
while
anmakes
is
being
recorded.
This
or
and
manual
setting
(image
Page
58)
or
film
speed
Exposure
compensation
((from
Page
69)
using
Reverse the
procedure
“Loading
the
Batteries”
and
remove
the
batteries.
•facing
Pressing
the
shutter
button
down
adjusts
the
exposure,
• Playback
paused.
PAL
system
( camera.
Additional
Information,
Glossary)
situations:
Built-in
microphone
the
lens.
This
setting
allows
you
to
set
in
advance
the
white
balance
when
taking
photographs
under
and
press
ENTER.
the
rear
of
the
For
the
US/Canada:
PDR-ACM1A
Holding
down
or
moves
forward
or
reverse
continuously.
resumes
at
the
last
state
that
was
protect
sticker
at
the
write-protect
area.
Data
can
no
longer
be
Focus
area
may
corrupt
the
data
on
the
SmartMedia™
or
damage
the
SmartMedia™
itself.
possible,
but
does
not
make
the
exposure
compensation
possible. HoweverSelf-timer
the exposure
value
is
To
return
normal
press
the
Zoom
switch
towards
setting
Page
58)magnification,
or film
speed
setting
( the
Page
78)
using
ENTER
Pass
the
shoulder
strap
through
loop
and
pull.
photography
setting
(( toPage
78)
using
ENTER
are
also
possible.
and
pressing
the
shutter
button
fully
takes
the
shot.
TM[ is down
When
the
SmartMedia™
used
incorrectly
by
the
user
or
a
third
party
[
],
]
or
[
]
AE
or
AF
are
locked
with
the
shutter
button
held
half
specific
lighting
conditions.
For
Europe:
PDR-ACM1E
active
before
the
pause.
Firmly
insert
the
SmartMedia
as
far
as
it
can
go.
displayed
on is
the
LCD
monitor.
(when shutter
button
Press
ENTER.
recorded
oris
erased
from
SmartMedia™.
Toon
write
oraterase
data
from is to be recorded. Write-protect
Sets
the
color
mode
and
photographic
sensitivity
which
the
image
“W”.
are
also
possible.
The
default
setting
different
depending
the
destination
country/area.
Use
or
to
select
the
desired
item
Press
ENTER,
nine
images
are
displayed
simultaneously.
•Flash
If
you
shoot
a
still
picture,
when
preview
is
set
to
ON
(
Page
77),
1
down.
If
no
operation
is
carried
out
for
a
fixed
amount
of
time
(default:
about
one
minute),
power
ON
When
the
SmartMedia™
is
exposed
to
static
electricity
or
electrical
noise
Auto
Photography
mode
(
P.
41,
46)
Forimage
the Noise
UK:
PDR-ACM1U
:off
Displays
the
firmware
version
ofto
this
camera.
pressed
halfway)
areait down
SmartMedia™,
peel
the
sticker.
camera
ready
to
take
photographs.
Warning:
increases
when
the
ISO
is
changed
higher
settings.
The
isis
displayed
and
a
white
frame
and
green
Greendown
Compose
picture,
press
the
shutter
button
down
halfway,
and
press
:the
Automatic
adjustment
(default)
Display
Page
83
theThumbnail
recorded
image
is
displayed
on
for
about
two
]specifications
Standby
mode
[enlarged,
••-For
If
no
operation
is
carried
out
a screen
fixed
amount
offrom
time
(default:
about
1shutter
minute),
thewear.
power
iserasing
turned
TM
consumption
is
set
to
its
minimum
state
(power
almost
off)that
to
prevent
battery
This
isdown
.in
and
press
This
mode
enables
automatic
photography
When
the
SmartMedia™
isfor
removed
ordarkens
the
camera
isPage
turned
off
while
recording
The
image
the
LCD
monitor
sometimes
the
time
the
button
isdata,
pressed
Speaker
details,
refer
to
the
of
AC
information.
adapter
127.
: on
Displays
the
SmartMedia
Playback
returns
to
the
start
ofturned
the
movie.
frame
are
displayed
the
LCD
monitor.
:
Photography
outdoors
Default
setting:
seconds.
off
to
preserve
battery
life.
This
is
called
“Auto
Power
OFF”.
To
return
to
the
normal
state,
press the
fully.
Page
40
in
accordance
with
the
photographic
called
the
Auto
Power
OFF.
This
setting
allows
you
to
set
the
time
when
the
camera
turns
off
halfway
until
the
image
becomes
focused.
: picture,
Equivalent
to
color
ISO100
(default)
data,
frame
advance
when
images
aredefaults.
being
played
back or during
formatting
of the
DC
IN
5V
terminal
The options
are
displayed.
Histogram*
2
:
Returns
settings
to
their
Flashing
[
],
[
]
or
[
]
Self-timer
in
operation
at
a
handshake
alarm
.
Compose
the
press
the
shutter
button
down
halfway,
and
press
itdirectly
down
The
white
frame
indicates
the
entire
image,
while
the
green
frame halfway,
:the
Photography
in
cloudy
conditions
POWER
button
again.
• The
viewfinder
LED
turns
red
while
image
data
is
being
recorded
Compose
picture,
press
the
shutter
button
press
down
• The
To
set
the
focus
or
exposure
for
a subject
outside
the
center
ofdown
the intended
point
the
The
camera
takes
the
picture.
automatically.
This
function
is
not
activated
during
automatic
playback
( image,
Pageand
85) or
incamera
the it
[ only>
] PC
:appearing
High-sensitive
photography
equivalent
to
color
ISO200
SmartMedia™.
Note:
image
through
the
lens
will
be
The
display
returns
toconditions.
thumbnail
playback.
<Standard>
<Detailed
information>
<Histogram>
<Image
shows
the
location
of
the
currently
enlarged
area.
halfway,
and
press
it
down
fully.
Page
40
Macro
photography
:
Photography
in
bluish
fluorescent
light
fully.
Page
40
About
the
Auto
Power
(FULL
OFF
Function
)
Additional
Information,
“AUTO
POWER
OFF
(page
110)”
at
the
subject
or
desired
exposure
(lighting),
press
and
hold
the
shutter
button
halfway.
Now,
with
the
shutter
onto
the
SmartMedia™.
Into
this
the exposure
(combination
of
ON]
Writing
to SmartMedia™
inmode,
progress
mode.
Press
ENTER.
:adapter
High-sensitive
photography
equivalent
color
ISO400
•Insert
Wedefault
recommend
copying
and
saving
important
datapower
onto
another
storage
medium (floppy
disk, hard
displayed
for
[LCD
].[Power
fully.
Page
40
the
AC
power
plug
into
the
Electrodes
The
size
and
quality
of
the
image
can
be
reset
to
the
desired
combination.
Press
ENTER.
Memo
Sticker
button
still
held
halfway
down,
you
can
turn
the
direction
of
the
camera
and
frame
your
image
with
the
focus
•
It
is
possible
to
play
back
any
images
in
any
folders
by
pressing
or
during
playback.
(For
details
ON
: Photography
inafter
reddish
fluorescent
light
The
camera
takes
the
picture.
Photographs
can
be
taken,
however,
dospeed
not
turnand
thepress
power
OFF.
shutter
aperture)
is automatically
To
return
to disk,
the
normal
state
theset
Auto
Power
OFF
has
been
executed,
the
POWER
button
disk,
MO
etc.).
The
PREVIEW
manual
setting
Page
items
77
are
displayed.
Remaining
battery
power
camera
takes
the
picture
at
the
exposure
time.
Current
Entire
image
and
exposure
locked.
Press
the
shutter
button
down
fully
to
complete
capturing
of
the
image.
Red outlet.
[In the
]
is
displayed
on
the
LCD
monitor.
The
camera
is
ready
for
burst
photography.
of
folder
Page
92)
]:the
mode:
Accessing
ofthe
SmartMedia™
inorprogress
[ (HALF
Photography
in] is
incandescent
light
controlled
tophotographs
facilitate
photography.
• [When
shutter
speed
set to
a)turn
speed
of
0.7 second
slower,
are
taken
as extended
PC/AV
terminal
to Never
turn
the
power
on 77
again.
•During
the
SmartMedia™
or
camera
off
while
data or
while
erasing
data
COLOR
Page
the
exposure,
the
viewfinder
LED
turns
orange.
position
• Pressing
Moving
the
as
you
press
the
shutter
button
will
result
inrecording
a blurred
,remove
,the
or
to
select
the
area
to
enlarge.
at Page
the
last
image
displays
the
first
image,
and
pressing
atimage.
thebe
firstautomatically
image
displays
the
During
[2X],
ISO
be
automatically
set
to
ISO200.
During
[4X],
will
setof
exposures
(camera
68).
IfUse
burst
photography
is to
set
the
shutter
speed
is set
to
athe
speed
ofISO
0.7
second
or more
in the
[ to
Tv ]
Carry
out
steps
1will
2when
in
“Basic
Photographic
(SmartMedia™
formatting).
These
actions
might
damage
SmartMedia™.
ISO
Page
78
Flashing
It
takes
about
twice
the
set
time
to
complete
taking
the
photograph
due
to
processing
of
the
captured
[
],
[
]
When
the
image
is
not
in
focus.
Close
the
SmartMedia™
cover.
Memo
•
The
PDR-M81
uses
an
accurate
auto
focus
mechanism.
However,
the
PDR-M81
may
have
difficulty
enlargement
last
image.
Adjust
the
display
area
to
enlarge
while
viewing
the
white
and
Slow
shutter
speed
warning
ISO400.
Shutter
speed
• In
AEB
photography
(
Page
71)
or
burst
photography,
the
shutter
speed
cannot
be
set
to
0.7
second
or
longer.
(SMALL
)
mode,
the
shutter
speed
is
automatically
changed
to
1/2
second.
Lens
•
Use
only
the
SmartMedia™
specified
for
use
with
the
PDR-M81.
The
use
of
other
SmartMedia™
SHARPNESS
Page
79
mode)”
(page
109).
Select
[QUALITY]
Settings
(
focusing
or
not
be
able
to
focus
at
all
for
subjects
and
situations
such
as
the
following:
image.
Before
you
use
aother
new
SmartMedia™
the
first during
time,
be
sure
tothe
Manual
Photography
mode
( P.isspeed
58)
Images
can
bevalue
rotated
by] pressing
playback.
Movie mode
(•• frames.
P.
75)
[ for
] or
green
the
aperture
is
to
F2.9
(maximum
aperture
size),
increased
shutter
speed
restricted
If
a
mode
than
[ set
suppressed
flash
mode
is
set
inthe
flash
photography,
thedark
shutter
is
•79
Processing
image
Aperture
Exposure
compensation
- Manually
When
subject
is distant
and
- SmartMedia™
Subjects
moving
at
high
speed
damage
the
camera.
CONTRAST
Page
• to
The
write
protection
not
function
if in
write-protect
sticker
becomes
Use
a soft
dry cloth to
.thesecond.
oncould
the
SETUP
MENU
and
press
format
the
(may
Page
91).
sets
white
balance,
exposure,
Takes short
Movies
for
playback
an
image
counterclockwise,
and
pressing
rotates
itdirty.
clockwise.
Pressing
1/750
PDR-ACM1A
] •are
the
same
as
to
PDR-ACM1E
PDR-ACM1U
[PRG]
and
[ rotates
limited
tosecond.
between
1/2
second
and
1/250
* The
above
menu
is
the
RECORDING
Charging
of
flash
progress
ON
~
When
there
are
objects
in
front
of
or
behind
the
subject
Very
shiny
subjects
such
as
a
mirror
or
car
body
•Press
SmartMedia™
is
aofisprecision
device.
Do do
notaperture
bend,
drop,
or subject
SmartMedia™
to
ZOOM
Page
•computer.
When
the
camera
isOnce
not79
inelectronic
be sure
to attach
the
lens
cap
provided
with[your
camera.
the
POWER
button
to
turn
the
power
off.
wipe
away
any
dirt.
ause,
sticker
ispress
peeled
off,
not
reuse
it.
value,
shutter
speed
and
onOrange
camera
orDIGITAL
The
QUALITY
menu
displayed.
combinations
the
automatically
mode.
MENU
in
•the
The
aperture
value
set
differ
to
the
actual
value
according
to
the
position
ofUK)
theor
zoom
lens.
To
return
to
the
regular
display,
ENTER.
(Photos
cannot
be
taken
at
this
moment.)
(for
US
and
Canada)
If the
shutter
speed
is
set
to
1/350
second
or
less,
the
shutter
as
speed
an
animal
is
automatically
athe
cage
a]changed
person
in ~
front
toAE
1/250
of a tree)
(for
European
Continent)
(for
the
Get
ready
to
take
the
photograph.
- above
Extremely
low
contrast
subjects
When
the
settings
are
made,
they
are
displayed
in(such
thepocket
following
order.
Memo
DC
IN
5V
terminal
excessive
shocks.
Also,
do
not
carry
SmartMedia™
the
ofx[trousers.
This
might
The
lens
cap
can
also
be
attached
to
attachment
following
the
above
steps
to prevent
it’sthe
LCD
79
The
power
turns
off.
(auto-exposure)
position.
determined
shutter
speeds
and
aperture
-in
Subjects
with
little
reflection,
such
as
hair
fur mode.
•• The
size
displayed
on
the
LCD
monitor
FULL
(320
240)
HALF
(160
xorsubject
120).
The
forced
flash
mode
or
]orred-eye
forced
flash
second
ifPage
the
flash
setting
is25)
changed
tothe
thestrap
[ ]becomes
- image
Subjects
that
have
low contrast
and
merge
into
Loading
the
batteries
(
Page
and
the
SmartMedia™
(
Page
31)
into
the
camera.
~
being
lost.
• Flash
photography
and
burst
photography
are
not
possible.
Flashing
SmartMedia™
to
excessive
force
when
you
sit
down,
damaging
the
SmartMedia™.
Hardware
malfunction
Subjects
with
no
solidity,
such
as
smoke
or
flames
the
background
(such
as
white
walls
or
subjects
Attach
the
lens
cap
when
you
are
not
using
the
camera.
values.
However,
their
operation
capability
movies
made
in
FULL
size
is
displayed
on
the
entire
LCD
monitor,
and
those
made
in
HALF
size
If the
[ ]mode,
forcedISO
flash
[ automatically
] red-eye set
forced
flash mode
is and
set in
flash photography
the is
• In
movie
willorbe
between
ISO100
ISO400
regardless ofwhen
its~ setting.
dressed
inthe
theSmartMedia™
same
color
as
thelens
background)
-attach
Subjects
viewed
through
glass
Turn
offor
the
power
tothe
retract
the
unit,
and then
the
lens
cap.
The
image
taken
in
photography
mode
may
be
blurred.
or
to
select
the
desired
setting
from
the
tab
menu
, and
press
•Use
Do•not
use
store
in
environments
likely
to
be
affected
byisstatic
electricity
or
is
different
as
shown
the
right
table.
displayed
in
ofspeed
the
2
shutter
speed
is center
set
toin
aexposure
of
0.7
second
or
more,
the
shutter
speed
automatically
changed
to
Press
POWER
button
toscreen.
turn
power
on.
A electrical
histogram
isturn
a graphic
representation
ofthe
theistones
of the
subject.
The horizontal
~ histogram
• Do
If the
the
image
cannot
be
focused,
thelens
focus
automatically
fixed to infinity.
(When theaxis
flashofisthe
necessary
not
the
power
on
with
the
cap
attached.
noise.
1/2
second.
ENTER.
*
The
above
AC
adapter
is
US/Canada
Turning
the
Power
On
Page
38
shows
the
brightness
(increasing
brightness
from
left
to
right)
and
the
vertical
axis
shows
the
number
at
this
time,
it
is
simultaneously
fixed
to
illuminate
objects
1.5
meters
(five
feet)
away.
During
macro
•This
Dosaves
use
orsettings,
store
SmartMedia™
very
hot,
humid
oraperture
corrosive
If the
shutter
speed
value
isimages,
set toin1/1000
second,
the
value
is limited
to
F8type
andAC
F3.4.
•not
When
playing
back
movie
switching
isthe
between
standard
and
image
only.
(O
:environments.
possible
Xbetween
: not
the
and
returns
to
RECORDING
MENU.
type.
European
andpossible)
UK
photography,
the flash
islevel.
alignedthe
withdisplay
the wide
position.)
of pixels
at each brightness
Downloaded From
camera-usermanual.com
adapters differ in shape.
--110
20 -40
80
88
Installing the batteries (continued)
When the power is ON, the remaining battery power is displayed on the LCD monitor and the status display.
LCD Monitor Status Display
Getting
Ready
Battery Wear
Remaining Battery Power
Batteries are partially used.
Batteries completely exhausted. (Camera will not turn on.)
Replace with new batteries.
Additional
Information
- 27 -
Other
Applications
In playback mode (slideshow continuous playback time)
approx. 110 min.
Downloaded From camera-usermanual.com
Handy
Functions
In photography mode (using strobe every time in a normal temperature)
When LCD monitor is ON ......... approx. 240 frames
When LCD monitor is OFF ....... approx. 300 frames
Erasing
Images
Memo
• When you use the camera for the first time or if you have left the camera for a long time without the
battery loaded, set the date (➲ Page 111).
• If the batteries are exhausted and need replacement, do not connect the AC adapter. It may cause an
incorrect display of remaining battery power.
• Battery power measure is based on amount of power required for camera LCD, flash, photography
and playback. Status Display may show batteries exhausted if there is not enough power required for
normal operation, even if there is some small power left in the batteries.
• About the battery duration time
The following shows the number of frames/time capable of continuous photographing and playback
on condition of using new alkaline batteries.
The battery duration time may vary depending on environmental temperature, image size, image
quality or using frequency of zoom.
Playing
Back Images
Battery power is nearing exhaustion.
Replace with new batteries.
Taking
Photographs
Sufficient battery power
Changing
the
Preset
Conditions
(RECORDING
MENU)
Photography
in
the
Program
Mode
Setting
Names
Playing
Back
the
of
Photographed
Parts
Image
Size
and
Quality
(Single-Frame
Playback)
Extended
Exposure
Photography
(Bulb
Photography)
Erasing
Images
(Erase
Frame)
(continued)
Manual
Attaching
Using
How
Taking
Enlarging
Playback
About
Turning
to
Photographs
the
SmartMedia™
Press
Settings
the
Photographed
of
Power
the
Power
Multi
Shoulder
Continuously
Outlet
Shutter
Image
On/Off
Images
Strap
Pictures
Button
(Zoom
(Burst
Playback)
Photography)
Taking
Erasing
Button
Photographs
Folders
and
(All
LCD
Images
Continuously
Monitor
in
aImages
Folder/All
(Burst
Display
Photography)
Folders)
(In
Playback
(continued)
(continued)
Mode)
Definitions
Separately
of
the
Accessories
Color
of
the
Viewfinder
LED
Taking
and
Playing
Back
Photographs
on
aMode
TV
(continued)
Changing
the
Preset
Conditions
(RECORDING
MENU)
(continued)
Exposure
Compensation
in
the
Shutter
(continued)
Speed-priority
(continued)
About
Basic
Settings
SmartMedia™
in
(Sold
the
mode)
Aperture-priority
(continued)
Mode
(continued)
LCD
Monitor
Display
(during
photography)
(continued)
Manual
Settings
(continued)
Playing
Photography
Installing
Back
Movies
batteries
(Auto
Photography)
(continued)
(continued)
(continued)
Names
of
Parts
(continued)
Getting
Ready
The shutter
camerabutton
automatically
adjusts the
shutter
and
the aperture
value
according
to the
brightness
of an
can be pressed
down
in twospeed
stages:
halfway
down and
fully
down. When
pressed
halfway
down,
This
“SmartMedia™”
Set
Play
Automatically
The
the
following
mode
shoulder
menu
back
size
photographed
is(number
used
for
items
strap
plays
setting
isadapter
for
athe
is
are
back
storage
of
taking
handy
also
the
pixels)
still
the
basic
available
subjects
for
medium
images
16
and
carrying
images
settings
quality
one
for
that
as
saving
separately
your
image
to
require
(compression
be
camera
used
images
atseveral
a
sold
for
around.
inthat
photography
items.
ratio)
seconds
the
you
multi
of
have
the
photography
to image
photograph
in
photographed.
to
[ second
be
mode
],photographed.
such
[be
Even
in
asquick
]for
firework
or
if Europe,
the
[You
succession.
camera’s
displays
] photography
power
at the
Enlarges
selected
portions
of
images
being
played
back
at
two
levels.
Images
can
displayed
enlarged
when
In
You
this
can
color
mode,
manually
of
the
photographs
viewfinder
adjust
settings
are
LED
taken
indicates
such
continuously
asphotographed
the
exposure
state
atof
control,
atime.
the
maximum
camera.
white
speed
balance,
The
ofthe
0.8
metering
system,
intervals.
continuous
This
item
switches
display
on
the
LCD
monitor
when
playing
back
photographed
images.
can
switch
If
you
the
AC
(sold
separately:
PDR-ACM1A
for
the
US/Canada,
PDR-ACM1E
PDR-ACM1U
Mode
Effective
dial
Subjects
and
Set
Values
TM
Press
.of
aperture
value.
SYSTEM
Turning
Exposure
ISO
OSD
In
[prevent
[use
LANGUAGE
the
]the
INFO.
mode
control
(EXP.)
On
Close
the
SmartMedia™
cover.
Slide
the
SmartMedia
cover
release
knob
in
the
Take
photographs
or
or
battery
to
to
select
or
play
[that
the
slide
]them
or
shutter
it
[ the
back.
,]will
and
speed.
and
lock
press
Look
Use
through
to
select
the
[adjust
viewfinder
]use
and
press
to
compose
ENTER.
the
picture.
To
continue
erasing
images,
repeat
the
above
procedure
2.
.is
AF
(auto-focus)
and
AE
(auto
exposure)
are
set.
When
pressed
fully
down,
the
camera
takes
aspace
picture.
object.
This
mode
enables
carefree
photographing
similarly
to
selecting
[stable
]photographs.
in
[ from
]settings”,
mode.
Itrepeatedly
is
to
night.
To
is
Change
modes.
turned
When
the
OFF,
your
setting
using
the
camera
images
this
according
mode,
from
saved
dropping
be
to
sure
how
on
the
the
to
during
SmartMedia™
image
a(size,
photography,
tripod
is
to
to
be
keep
used
not
hang
the
and
be
camera
erased.
the
the
shoulder
remaining
SmartMedia™
strap
and
amount
prevent
around
can
ofstep
your
distortion
be
neck.
inpossible
the
of
images.
Relationship
between
your
camera
and
accessories
Connecting
tocalled
Other
Devices
(page
123)
being
played
back
one
image
at
acover,
time.
The
meaning
maximum
of
number
LED
color
of
photographs
differ
according
can
to
be
taken
mode
continuously
dial
setting.
three
photography
mode,
and
take
photographs
at
these
settings.
These
are
“Manual
which
are
saved
display
to
show
aPower
list
detailed
information
compression
ratio,
shutter
speed,
aperture,
etc.)
or
you
can
for
the
UK)
in
a
room
with
amay
power
outlet,
you
can
take
photographs
for
an
extended
period
of
time.
This
also
Mode
dial
1 Item
QUALITY
2 Options
Notes
SmartMedia™
VIDEOon
OUT
White Balance (W.B.)
Write
Protection
Removing
the Batteries
ISO
[ POWER
]
AUTO
OFF
Setting items
Turning
the
Power
Off
Using
the
LCD
Monitor
Additional
Information
Other
Applications
Handy
Functions
Erasing
Images
Playing
Back Images
Taking
Photographs
Tab menu
The
tab
is
displayed.
setting
isbattery
as
follows:
Make
sure
that
the
issystem
firmly
closed.
Details
image
ofmenu
operation
isrange
saved
are
or
erased,
the
same
and
as
the
taking
camera
photographs
is
then
ready
and
to
playing
take
photographs.
them
back
onon
the
LCD After
monitor.
If
you
use
the
viewfinder
to
take
photographs,
the
photography
Set
the
mode
to
[cover
].settings
direction
of
the
arrow
to
open
cover
.the
ENTER.
change
the
white
and
the
metering
in(the
program
mode.
erased
SmartMedia™.
and
reused.
For
details
on
these
accessories,
refer
to
the
Instruction
Manual
for
the
accessory
you
are
using.
(information
Movies
images
photographed
in
the
multi
mode
Page
cannot
be
displayed
using
the
zoom
playback
Images
even
if the
are
camera
not
recorded
is
turned
directly
off.
SmartMedia™
but
are
stored
within
the
buffer
memory.
display
histograms,
etc.
prevents
failed
photographs
due
to
battery
wear
or
failed
of
data
to
a
PC.
details
handling
the AC
Set
Sets
the
thebalance
whether
display
color
:(/or
Photography
mode
language
not
to
and
return
photographic
of
in
menus
the
program
displayed
sensitivity
in
the
(default)
on
SETUP
the
at51)
which
LCD
(temporarily
MENU
Page
monitor.
to
image
62)
the
original
is For
to
be
factory
recorded.
settings.
For
enlarged
P.dial
22)
feeds
the
image
•transfer
Each
press
of
➲
2
•How
Copying
of
printed
(black
on
white
paper)
set
the
time
(text
114)
F8
/view
F6.8
F5.6
/18.
F4.8
/Page
/and
F3.4
/mode
F2.9
to
take
photographs
Page
41
1/1000,
1/750,
1/500,
1/350,
1/250,
1/180,
1/125,
range
may
differ
from
the
actual
image.
InLCD
this
case,
use
the
LCD
Press
the
shutter
button
down
halfway
.1/90,
the
mode
dial
to
[ F4.0
],
[characters
]reset.
or
[selected
].higher
1one
SmartMedia™
having
the
following
storage
capacity
can
be
used
on
your
current
as
of
March
2000)
feature.
The
last
cover
recorded
image
opens
frame
image
appears
appears
on
the
on
the
LCD
monitor.
monitor.
photography
is
finished,
check
the
images
record
the
ones
tocamera.
SmartMedia™.
[TIME&DATE,
]
:
Erases
images
in
the
currently
selected
folder
and
folders.
Possible
number
of shots
adapter,
beSet
sure
to
read
page
•
2x-speed
playback
isaperture-priority
performed
for
Make
sure
that
the
SmartMedia™
is
correctly
loaded.
(➲
Page
31)
by
frame.
Warning:
Noise
:
OSD
Photography
increases
LANGUAGE
when
in
will
the
not
ISO
be
is
changed
mode
to
(
Page
settings.
63)
Memo
•
Backlit
portraits
IMPORTANT
[PROTECTED]
on
the
LCD
monitor,
cancel
the protection
( Page 108) or
remove
How
to
play
back
images
Page
80
1/60,
1/45,
1/30,
1/20,
1/10,
1/8,
1/6,
1/4,
1/3,
1/2,
monitor
for
photography.
AF
(auto-focus)
and
AE
(auto
exposure)
(the
Additional
Information,
SET-UP
(the
P.
:109)
English
(default)
➲
Pass
Set
out
mode
end
steps
of
dial
1the
to
to
shoulder
4[1/15,
either
]].LCD
or
inspeed-priority
[strap
“Photography
through
].
the
in
the
strap
Shutter
speed-priority
Mode”
isdisplayed
held
down.
the
duration
that
PC
mode
(mode
P.
121)
2MBCarry
Set
/4MB/8MB/16MB/32MB/64MB/128MB
the
mode
dial
to
[isin
(all
3.3
types)
To
]•the
adjust
: When
Erases
the
all
brightness
folders
recorded
of
the
on
monitor
SmartMedia™.
Page
[mode
➲115
Self-timer
1
•V
1-frame
feed
is button
continued
for the
The
aperture
value
and
the
shutter
speed
corresponding
to
:write-protection
Photography
shutter
(inthat
Page
65)
Zoom
state
•IMPORTANT
bright
scenes
(such
and
highly
reflective
subjects
Photography
mode
•the
You
can
also
carry
out
step
8snowfields)
while
verifying
the
image
step
7.
DPOF
(in
Page
102).
Glossary)
start
to
function.
0”7,
1”,
1”5,
2”,
3”,
4”,
6”,
8”,
10”,
15”
•Very
Do
not
remove
or monitor
load
the
batteries
or
disconnect
or
connect
the
AC
adapter
while
the camera
is mode.
on.1This
:POWER
Japanese
:LCD
Equivalent
toas
color
ISO100
button
Carry
Set
Use
out
or
mode
steps
to
dial
select
1
to
to
2[erased,
the
“Manual
].
images
photographed
Settings”
(page
in
58).
the
multi
photography
You POWER
can also
the
PC
card
adapter
and
floppy
disk
adapter
(➲
123)
sold
separately
to transfer
Changing
the
display
Page
116
Theconnect
images
or
folders
are
and
the
camera
returns
toPage
the
is
held
down.
duration
that
value
are
displayed
on
the
LCD
monitor.
If
the
appropriate
(page
attachment
65)
or
on
in
“Photography
the
camera.
in
the
Full
Manual
Mode”
(page
67).
Press
the
button
to
turn
the
power
on.
full
manual
mode
(
Page
67)
:
Photography
in
Image
Quality
button
Press
the
MENU
button.
• •Shots
made
up
predominantly
of
sky
Even
if
photography
is
terminated
midway
before
capturing
three
images
by
releasing
the
shutter
•
If
you
take
a
photograph
after
erasing
an
image,
a
number
continuing
from
the
last
photographed
When
AF
or
AE
are
locked,
the
beep
tone
(
Page
111)
sounds
and
the
Use
or
to
change
the
setting
in
the
tab
menu,
might
return
the
manual
settings
to
their
defaults.
If
this
happens,
manually
set
conditions
again.
:connect
High-sensitive
equivalent
to preset
color
(default)
Before
you
oreven
disconnect
the
AC
adapter,
be
sure
to turn
thedisplay
camera
OFF.
If the
AC adapter is
Press
the
image
quality
button
to
select
the
combination
cannot
be
set
ifphotography
the
shutter
speed
isas
adjusted
toISO200
images to a
PC.
16MB
(SM-M1600D)/32MB
(SM-M3200D)/64MB
(SM-M6400D)/128M
(SM-M1280D)
The
respective
last
image
mode.
frame
appears
on
LCD
monitor.
You
can
also
select
the
image
by
the
same
operation
for
thumbnail
Page
83).
Carry
out
steps
1
to
on
page
109.
When
the
camera
is
turned
on,
set
the
mode
dial
to
the
desired
The
shutter
speed
and
the
aperture
value
corresponding
todisplay
the
All
descriptions
inor
this
Instruction
Manual
are
for
when
the
language
is (2set
to [ENGLISH].
Press
or
to
select
the
image.
button,
images
already
photographed
can
be
saved
and
erased
by playback
the
method.
image
is
assigned
as
image
number.
ShutterThe
button
viewfinder
RECORDING
LED
turns
MENU
green.
is2
displayed.
•press
The
image
the
photograph
is
taken
is
slightly
less
clear
than
images.
(This
is 109,
connected
disconnected
with
the
power
ON,
camera
settings
may
beabove
reset
(SET-UP
➲ Page
and
ENTER.
:before
High-sensitive
photography
equivalent
to
color
ISO400
its
the
shutter
speed
isthe
displayed
inthe
red.
To limit,
cancel
erasing
of
image
data,
select
[monitor.
]Photography,
and
press
ENTER.
Flash
button
quality
and
size,
while
viewing
indication
on
the
starts
a
reverse
•
The
press
of
mode.
shutter
speed
are
displayed
on
the
LCD
If
the
appropriate
The
length
of
time
to
capture
images
varies
according
to
the
photographic
conditions.
•
Images
can
also
be
erased
in
the
thumbnail
mode.
In
this
case,
the
camera
enters
the
single
frame
Select
[SYSTEM
INFO.]
on
the
SETUP
MENU
and
because
television
displays
images
at
a
lower
resolution.)
•
Spotlit
subjects,
particularly
against
dark
backgrounds
Manual
Settings
➲
Page
58)
or
the
camera
may
malfunction.
however,
is
possible
in
this
state.
feeds
the
image
•
Each
press
of
EXP.
].
To
cancel
changing
of
settings,
press
.
Use
or
to
select
the
frame
you
want
to
enlarge.
Press
the
or
Zoom
to
switch
select
[
(
S/C
Page
].
21)
towards
“T”
to
begin
playback.
] mode:
is
selected,
[NO
IMAGE]
isaperture
displayed
after
allor
folders
When
playback.
Press
Set
mode
dial
inbe
the
to
[ sure
Tv
mode,
].the
or
press
in
the
shutter
button
fully
Before
photography,
make
that
the
lens
cap
has
been
2onisin.black
combination
cannot
set
even
ifflash
adjusted
to its
playback)
mode,
and
enters
the
thumbnail
playback
mode after the image is erased.
status
display.
]or
In
[[playback
Press
the
display/info
button.
Self-timer
photography
and]down
photography
are
not
possible.
•the
The
display
unit
varies
according
to
the
output
system.
•theCopying
of (frame
printed
text
(white
characters
paper)
.
press
reverse
by
one
frame.
This
adapter
allows
SmartMedia™
to
bespeed
asto
3.5"
floppy
disk.
have
been
erased
(unless
the
SmartMedia™
contains
protected
You
can
also
select
the
image
by
thein
same
operation
as
for
thumbnail
playback
(display
PageISO
83).P.
Automatic
playback
begins.
•[2X],
Playback
becomes
2x-speed
to
reduce
aperture
size.
Press
toused
increase
aperture
size.
Press
camera
takes
a
picture.
Status
23)
The
manual
setting
removed
the
camera.
limit,
aperture
value
isbe
displayed
red.
Photography,
however,
Playback
mode
(➲
P.
80)
the
[Scenes
M
]from
mode
to
set
the
shutter
0.7
second
Manual
During
the
ISO
will
automatically
set
between
ISO100
ISO200.
During
[4X],
be
To
set
the
quality
and
size
Page
112
•the
With
the
NTSC
system,
images
can
be
displayed
simultaneously
on the
LCD
monitor
and( ➲
TVwill
during
•photograpy
with
low
reflectivity,
such
as
shots
green
or
dark
foliage
Flash
state
Each
press
of
the
display/info
button
switches
the
display
•of1-frame
feed
isand
continued
The
SYSTEM
INFO.
menu
displayed.
reverse
for
the
duration
This
adapter
isplayback
inserted
into
the],
floppy
your
PC,
allowing for the
images).
The
viewfinder
LED
turns
redis
image
data
being
recorded
onto
Insert
the
adapter
connector
plug
into
the
DC
IN
Self-timer
lamp
values
are
displayed
In
the
photography
modes
([while
[and ISO400.
]disk
oris
[ drive
]),on
the
lens
photography
and
playback.
is
possible
inAC
this
state.
automatically
set
between
ISO100
is
held
down.
format
as
follows:
duration
that
Note:
The
larger
the
F
value,
the
smaller
the
aperture
size
become
or
longer.
•Press
Remove
and
insert
SmartMedia™
with
the
camera’s
power
turned
off.Aperture value
is
held
down.
that
To
quit
the
SETUP
MENU,
change
the
mode
dial
setting.
Shutter
speed
Adjust
the
zoom
ratio
by
the
Zoom
switch.
(Zoom
to
display
option
menu,
press
or
to
images
recorded
on
the
SmartMedia™
to
be
transferred
to
the
PC.
the
SmartMedia™.
Sets
video
output
system
according
to
country
in
which
your camera
isSize
used.
on
the
left
ofthe
the
LCD
Press
the
shutter
button
down
halfway
and
press
5V
terminal
on
the
camera.
extends
from
the
camera
body.
•the
PAL
system,
images
cannot
bethe
displayed
When a cable
is connected, only
and
versa.
1 situations
the
image
quality
button
switches
the
quality
and
size
Gently
insert
the
SmartMedia™
as
far
as
it, simultaneously.
can
go
[Pressing
]vice
isWith
displayed
on
the
LCD
monitor.
•select
Recorded
data
may
bepress
erased
(destroyed)
in
the
listed
below.Viewfinder
Note that Toshiba
White
Balance
Additional
Information,
Glossary
to
increase
shutter
speed.
Pressand
to
decrease
shutter
speed.
Press
Press
or
to
move
forward
reverse.
Memo
PRG
]
and
ENTER.
]
and
press
ENTER.
[
switch
Page
21)
TV
display
is
available.
monitor
screen.
When
the
camera
is
turned
on,
the
Auto
Power
OFF
function
✩✭✰✯✲✴✡✮✴
settings
infully
the
following
order.
it
down
. system
2next
Press
or
to
select
the
item
you
desired
toisloss
set,
with
SmartMedia™
electrodes
(metal
contacts)
Additional
Information,
Glossary)
(white
Corporation
accepts
no
whatsoever
for
the
of
recorded
data enters
in these
• the
When
allNTSC
images
in
a responsibility
folder
are
erased,
that
folder
itself
also(destruction)
erased.
Quality
The
camera
determines
the
balance
by
averaging
the
various
kinds playback
of light
that actually
to
to
frame/
to“T”
go
back
one
To
prevent
valuable
data
being
erased,
attach
the
write••advance
With
the
PAL
images
are
played
back
with
apressing
black
frame
•frame
After
pause
is
cancelled,
the
Zoom
switch
to
the
will
the
image.
Pressing
ENTER
the
setting.
or
,, SmartMedia™
and
manual
Exposure
compensation
Page
69)
using
When
[for
M
]selects
isissystem,
selected
on
the
[ halfway
EXP.
]remove
option
menu,
orsurrounded.
the
shutter
speed
setting
becomes
operational.
Never
open
the
SmartMedia™
cover
orenlarge
the
while
anmakes
is
being
recorded.
This
or
and
manual
setting
(image
Page
58)
or
film
speed
Exposure
compensation
((from
Page
69)
using
Reverse the
procedure
“Loading
the
Batteries”
and
remove
the
batteries.
•facing
Pressing
the
shutter
button
down
adjusts
the
exposure,
• Playback
paused.
PAL
system
( camera.
Additional
Information,
Glossary)
situations:
Built-in
microphone
the
lens.
This
setting
allows
you
to
set
in
advance
the
white
balance
when
taking
photographs
under
and
press
ENTER.
the
rear
of
the
For
the
US/Canada:
PDR-ACM1A
Holding
down
or
moves
forward
or
reverse
continuously.
resumes
at
the
last
state
that
was
protect
sticker
at
the
write-protect
area.
Data
can
no
longer
be
Focus
area
may
corrupt
the
data
on
the
SmartMedia™
or
damage
the
SmartMedia™
itself.
possible,
but
does
not
make
the
exposure
compensation
possible. HoweverSelf-timer
the exposure
value
is
To
return
normal
press
the
Zoom
switch
towards
setting
Page
58)magnification,
or film
speed
setting
( the
Page
78)
using
ENTER
Pass
the
shoulder
strap
through
loop
and
pull.
photography
setting
(( toPage
78)
using
ENTER
are
also
possible.
and
pressing
the
shutter
button
fully
takes
the
shot.
TM[ is down
When
the
SmartMedia™
used
incorrectly
by
the
user
or
a
third
party
[
],
]
or
[
]
AE
or
AF
are
locked
with
the
shutter
button
held
half
specific
lighting
conditions.
For
Europe:
PDR-ACM1E
active
before
the
pause.
Firmly
insert
the
SmartMedia
as
far
as
it
can
go.
displayed
on is
the
LCD
monitor.
Press
ENTER.
recorded
or setting
erased
from
SmartMedia™.
Toon
write
oraterase
data
from is to be recorded. Write-protect
Sets
the
color
mode
and
photographic
sensitivity
which
the
image
“W”.
are
also
possible.
The
default
different
depending
the
destination
country/area.
IMPORTANT
Use
or
to
select
the
desired
item
Press
ENTER,
nine
images
are
displayed
simultaneously.
•Flash
If
you
shoot
a
still
picture,
when
preview
is
set
to
ON
(
Page
77),
1
down.
If
no
operation
is
carried
out
for
a
fixed
amount
of
time
(default:
about
one
minute),
power
ON
When
the
SmartMedia™
is
exposed
to
static
electricity
or
electrical
noise
Auto
Photography
mode
(
P.
41,
46)
✭❅❍❏
➲
Forimage
the Noise
UK:
PDR-ACM1U
:off
Displays
the
firmware
version
ofto
this
camera.
areait down
SmartMedia™,
peel
the
sticker.
camera
ready
to
take
photographs.
Warning:
increases
when
the
ISO
is
changed
higher
settings.
isis
displayed
and
a
white
frame
and
green
Green The
Compose
picture,
press
the
shutter
button
down
halfway,
and
press
:the
Automatic
adjustment
(default)
Display
Page
83
theThumbnail
recorded
image
is
displayed
on
for
about
two
]specifications
Standby
mode
[enlarged,
••-For
If
no
operation
is
carried
out
a screen
fixed
amount
offrom
time
(default:
about
1shutter
minute),
thewear.
power
iserasing
turned
TM
consumption
is
set
to
its
minimum
state
(power
almost
off)that
to
prevent
battery
This
isdown
.in
and
press
When
the
SmartMedia™
isfor
removed
ordarkens
the
camera
isPage
turned
off
while
recording
The
image
the
LCD
monitor
sometimes
the
time
the
button
isdata,
pressed
Speaker
details,
refer
to
the
of
AC
information.
adapter
127.
: on
Displays
the
SmartMedia
Playback
returns
to
the
start
ofturned
the
movie.
frame
are
displayed
the
LCD
monitor.
:
Photography
outdoors
Default
setting:
seconds.
off
to
preserve
battery
life.
This
is
called
“Auto
Power
OFF”.
To
return
to
the
normal
state,
press the
fully.
Page
40
called
the
Auto
Power
OFF.
This
setting
allows
you
to
set
the
time
when
the
camera
turns
off
halfway
until
the
image
becomes
focused.
: picture,
Equivalent
to
color
ISO100
(default)
data,
frame
advance
when
images
aredefaults.
being
played
back or during
formatting
of the
DC
IN
5V
terminal
The options
are
displayed.
Histogram*
2
:
Returns
settings
to
their
Flashing
[
],
[
]
or
[
]
Self-timer
in
operation
at
a
handshake
alarm
.
Compose
the
press
the
shutter
button
down
halfway,
and
press
itdirectly
down
The
white
frame
indicates
the
entire
image,
while
the
greenrecorded
frame halfway,
:the
Photography
in
cloudy
conditions
POWER
button
again.
• The
viewfinder
LED
turns
red
while
image
data
is
being
Compose
picture,
press
the
shutter
button
press
down
• The
To
set
the
focus
or
exposure
for
a subject
outside
the
center
the intended
point
the
The
camera
takes
the
picture.
automatically.
This
function
is
not
activated
during
automatic
playback
( image,
Pageand
85) or
incamera
the it
[ only>
] PC
:appearing
High-sensitive
photography
equivalent
toofdown
color
ISO200
SmartMedia™.
Note:
image
through
the
lens
will
be
The
display
returns
to<Histogram>
thumbnail
playback.
<Standard>
<Detailed
information>
<Image
shows
the
location
of
the
currently
enlarged
area.
halfway,
and
press
it
down
fully.
Page
40
Macro
photography
:
Photography
in
bluish
fluorescent
light
fully.
Page
40
About
the
Auto
Power
(FULL
OFF
Function
)
➲
Additional
Information,
“AUTO
POWER
OFF
(page
110)”
☞
at
the
subject
or
desired
exposure
(lighting),
press
and
hold
the
shutter
button
halfway.
Now,
with
the
shutter
onto
the
SmartMedia™.
ON]
Writing
to SmartMedia™
in progress
mode.
Press
ENTER.
:adapter
High-sensitive
photography
equivalent
toanother
color
ISO400
•Insert
Wedefault
recommend
copying
and
saving
important
datapower
onto
storage
medium (floppy
disk, hard
displayed
for
[LCD
].[Power
fully.
Page
40
the
AC
power
plug
into
the
Electrodes
The
size
and
quality
of
the
image
can
be
reset
to
the
desired
combination.
Press
ENTER.
Memo
Sticker
button
still
held
halfway
down,
you
can
turn
the
direction
of
the
camera
and
frame
your
image
with
the
focus
•
It
is
possible
to
play
back
any
images
in
any
folders
by
pressing
or
during
playback.
(For
details
ON
: Photography
inafter
reddish
fluorescent
light
The
camera
takes
the
picture.
Photographs
can
be
taken,
however,
do not
turn thepress
power
OFF.
To
return
to disk,
the
normal
state
theset
Auto
Power
OFF
has been
executed,
the
POWER
button
disk,
MO
etc.).
The
PREVIEW
manual
setting
Page
items
77
are
displayed.
Remaining
battery
power
camera
takes
the
atmonitor.
the
exposure
time.
Current
Entireofimage
and
exposure
locked.
Press
the
button
down
fully
to in
complete
capturing
the image.
Red outlet.
[In the
on picture
the
LCD
The
camera
is ready
for
burst
photography.
of displayed
folder
Page
92)
]:the
mode:
Accessing
of
SmartMedia™
[ (HALF
Photography
in] is
incandescent
light
•] [is
When
shutter
speed
setshutter
to
a)turn
speed
of
0.7 second
orprogress
slower,
photographs
taken
as extended
PC/AV
terminal
to Never
turn
the
power
on 77
again.
•During
remove
the
SmartMedia™
or
the
camera
offresult
while
recording
data or are
while
erasing
data
COLOR
Page
the
exposure,
the
viewfinder
LED
turns
orange.
position
•
Moving
the
camera
as
you
press
the
shutter
button
will
in
a
blurred
image.
Use
,
,
or
to
select
the
area
to
enlarge.
the
last
image
displays
the
first
image,
and
pressing
atwill
thebe
firstautomatically
image
displays
the
Pressing
During
[2X],
the
ISO
be
automatically
set
to
ISO200.
[4X],ofISO
setof
exposures
( at Page
68).
IfCarry
burst
photography
is to
set
the
shutter
speed
is set During
to athe
speed
0.7
second
or more
in the
[ to
Tv ]
out
steps
1will
2when
in
Photographic
(SmartMedia™
formatting).
actions
might
damage
ISO
Page
78
Flashing
ItClose
takes
about
twice
the
time
to while
complete
taking
the
photograph
duePDR-M81
to processing
ofenlargement
the
captured
[set
],These
[“Basic
] When
the
image
is not
in SmartMedia™.
focus.
the
SmartMedia™
cover.
Memo
•
The
PDR-M81
usesto
an
accurate
auto
focus
mechanism.
However,
the
may
have
difficulty
last
image.
Adjust
the
display
area
enlarge
viewing
the
white
and
Slow
shutter
speed
warning
ISO400.
Shutter
speed
•
In
AEB
photography
(
Page
71)
or
burst
photography,
the
shutter
speed
cannot
be
set
to
0.7
second
or
longer.
(SMALL
)
mode,
the
shutter
speed
is
automatically
changed
to
1/2
second.
Lens
IMPORTANT
•
Use
only
the
SmartMedia™
specified
for
use
with
the
PDR-M81.
The
use
of
other
SmartMedia™
SHARPNESS
Page
79
mode)”
(page
109).
Select
[QUALITY]
Settings
(
focusing
or
not
be
able
to
focus
at
all
for
subjects
and
situations
such
as
the
following:
image.
Before
you
use
aother
new
SmartMedia™
the
first during
time,
be
sure
tothe
Manual
Photography
mode
( ➲ P.isspeed
58)
Images
can
bevalue
rotated
by] pressing
playback.
Movie mode
(••➲
P.
75)
[ for
] or
green
frames.
the
aperture
is
to
F2.9
(maximum
aperture
size),
increased
shutter
speed
restricted
If
a
mode
than
[ set
suppressed
flash
mode
is
set
inthe
flash
photography,
thedark
shutter
is
•79
Processing
image
IMPORTANT
Aperture
Exposure
compensation
- When
subject
is distant and
- SmartMedia™
Subjects
moving
at
high
speed
damage
the
camera.
CONTRAST
Page
• to
The
write
protection
may
not
function
if in
write-protect
sticker
becomes
Use
a soft
dry cloth to
.thesecond.
oncould
the
SETUP
MENU
and
press
format
the
(➲
Page
91).
an
image
counterclockwise,
and
pressing
rotates
clockwise.
Pressing
1/750
PDR-ACM1A
] •are
the
same
as
to
PDR-ACM1E
PDR-ACM1U
[PRG]
and
[ rotates
limited
tosecond.
between
1/2
second
and
1/250
* The
aboveitdirty.
menu
is
the
RECORDING
Charging
of
flash
progress
ON
✣❏■▼❉■◆❏◆▲
❐❈❏▼❏❇❒❁❐❈❙
When
there
are
objects
in
front
of
or
behind
the
subject
Very
shiny
subjects
such
as
a
mirror
or
car
body
SmartMedia™
is
aofisprecision
device.
Do do
notnot
bend,
drop,
or subject
SmartMedia™
to
DIGITAL
ZOOM
Page
• wipe
When
the
camera
isOnce
not79
inelectronic
be sure
to attach
the
lens
cap
provided
with[your
camera.
the
POWER
button
to
turn
the
power
off.
away
any
dirt.
ause,
sticker
ispress
peeled
off,
reuse
it.
Orange•Press
The
QUALITY
menu
displayed.
combinations
the
automatically
mode.
MENU
inthe
•the
The
aperture
value
set
differ
to
the
actual
value
according
to
the
position
ofUK)
theorzoom
lens.
To
return
to
the
regular
display,
ENTER.
(Photos
cannot
be
taken
at
this
moment.)
(for
US
and
Canada)
If the
shutter
speed
is
set
to
1/350
second
or
less,
the
shutter
as
speed
an
animal
is
automatically
athe
cage
a]changed
person
in front
to 1/250
of a tree)
(for
European
Continent)
(for
Get
ready
to
take
the
photograph.
- above
Extremely
low
contrast
subjects
When
the
settings
are
made,
they
are
displayed
in(such
thepocket
following
order.
✥❘❐❏▲◆❒❅
✣❏❍❐❅■▲❁▼❉❏■
Memo
DC
IN
5V
terminal
excessive
shocks.
Also,
do
not
carry
SmartMedia™
the
ofx[trousers.
This
might
The
lens
cap
can
also
be
attached
to
attachment
following
the
above
steps
to prevent
it’sthe
LCD
79
The
power
turns
off.
✭❅❍❏
determined
shutter
speeds
and
aperture
-in Subjects
with
little
reflection,
such
as
hair
fur mode.
•• The
size
displayed
on
the
LCD
monitor
FULL
(320
240)
HALF
(160
xorsubject
120).
The
]becomes
forced
flash
mode
or
]orred-eye
forced
flash
second
ifPage
the
flash
setting
is25)
changed
tothe
thestrap
[ ✡✥✢
- image
Subjects
that
have
low contrast
and
merge
into
Loading
the
batteries
(
Page
and
the
SmartMedia™
(
Page
31)
into
the
camera.
being
lost.
• Flash
photography
and
burst
photography
are
not
possible.
Flashing
SmartMedia™
to
excessive
force
when
you
sit
down,
damaging
the
SmartMedia™.
Hardware
malfunction
Subjects
with
no
solidity,
such
as
smoke
or
flames
the
background
(such
as
white
walls
or
subjects
Attach
the
lens
cap
when
you
are
not
using
the
camera.
values.
However,
their
operation
capability
movies
made
in
FULL
size
is
displayed
on
the
entire
LCD
monitor,
and
those
made
in
HALF
size
is
If the
[ ]mode,
forcedISO
flash
[ automatically
] red-eye set
forced
flash
mode
is
set
in
flash
photography
when
the
• In
movie
willorbe
between
ISO100
and
ISO400
regardless
of
its
setting.
❍❅▼❅❒❉■❇
dressed
inthe
theSmartMedia™
same
color
as
thelens
background)
-attach
Subjects
viewed
through
glass
Turn
offor
the
power
tothe
retract
the
unit,
and ✳❐❏▼
then
the
lens
cap.
The
image
taken
in
exposure
photography
mode
may
be
blurred.
or
to
select
the
desired
setting
from
the
tab
menu
, and
press
•Use
Do•not
use
store
in
environments
likely
to
be
affected
byisstatic
electricity
or
is
different
as
shown
in
the
right
table.
displayed
in
center
ofspeed
the
screen.
2
shutter
speed
is
set
to
a
of
0.7
second
or
more,
the
shutter
speed
automatically
changed
to
Press
POWER
button
tothe
turn
power
on.
A electrical
histogram
isturn
a graphic
representation
ofthe
theistones
of the
subject.
The
horizontal
histogram
✷❈❉▼❅
❂❁●❁■❃❅
▲❅▼▼❉■❇
• Do
If the
the
image
cannot
be
focused,
thelens
focus
automatically
fixed to infinity.
(When theaxis
flashofisthe
necessary
not
the
power
on
with
cap
attached.
noise.
1/2
second.
ENTER.
*the
The
above
AC adapter
is US/Canada
Turning
the
Power
On
Page
38
shows
the
brightness
(increasing
brightness
from
left
to
right)
and
vertical
axis
shows
the
number
at
this
time,
it
is
simultaneously
fixed
to
illuminate
objects
1.5
meters
(five
feet)
away.
During
macro
•This
Dosaves
use
orsettings,
store
SmartMedia™
very
hot,
humid
oraperture
corrosive
If the
shutter
speed
value
isimages,
set toin1/1000
second,
the
value
is limited
to
F8type
andAC
F3.4.
•not
When
playing
back
movie
switching
isthe
between
standard
and
image
only.
(O
:environments.
possible
Xbetween
: not
the
and
returns
to
RECORDING
MENU.
type.
European
andpossible)
UK
photography,
the flash
islevel.
alignedthe
withdisplay
the wide
position.)
of pixels
at each brightness
Downloaded From
camera-usermanual.com
adapters differ in shape.
--110
20 -40
80
88
Using the Power Outlet (continued)
Memo
Getting
Ready
Taking
Photographs
• When the AC adapter is connected after the batteries have been installed, the camera lens unit
automatically retracts and the power turns off. Please turn on the power again to resume operation.
• Batteries can be installed while the AC adapter is connected. However, if the AC adapter is
disconnected after the batteries have been loaded, the camera power is automatically turned off but
the lens will remain extended. If this happens, please turn on the power to resume operation.
Playing
Back Images
Erasing
Images
Handy
Functions
Other
Applications
Additional
Information
Downloaded From camera-usermanual.com
- 29 -
Changing
the
Preset
Conditions
(RECORDING
MENU)
Photography
in
the
Program
Mode
Setting
Names
Playing
Back
the
of
Photographed
Parts
Image
Size
and
Quality
(Single-Frame
Playback)
Extended
Exposure
Photography
(Bulb
Photography)
Erasing
Images
(Erase
Frame)
(continued)
Manual
Attaching
Using
How
Taking
Enlarging
Playback
About
Turning
to
Photographs
the
SmartMedia™
Press
Settings
the
Photographed
of
Power
the
Power
Multi
Shoulder
Continuously
Outlet
Shutter
Image
On/Off
Images
Strap
Pictures
Button
(Zoom
(Burst
Playback)
Photography)
Taking
Erasing
Button
Photographs
Folders
and
(All
LCD
Images
Continuously
Monitor
in
aImages
Folder/All
(Burst
Display
Photography)
Folders)
(In
Playback
(continued)
(continued)
Mode)
Definitions
Separately
of
the
Accessories
Color
of
the
Viewfinder
LED
Taking
and
Playing
Back
Photographs
on
aMode
TV
(continued)
Changing
the
Preset
Conditions
(RECORDING
MENU)
(continued)
Exposure
Compensation
in
the
Shutter
(continued)
Speed-priority
(continued)
About
Basic
Settings
SmartMedia™
in
(Sold
the
mode)
Aperture-priority
(continued)
Mode
(continued)
LCD
Monitor
Display
(during
photography)
(continued)
Manual
Settings
(continued)
Playing
Photography
Installing
Back
Movies
batteries
(Auto
Photography)
(continued)
(continued)
(continued)
Names
of
Parts
(continued)
Getting
Ready
The shutter
camerabutton
automatically
adjusts the
shutter
and
the aperture
value
according
to the
brightness
of an
can be pressed
down
in twospeed
stages:
halfway
down and
fully
down. When
pressed
halfway
down,
This
“SmartMedia™”
Set
Play
Automatically
The
the
following
mode
shoulder
menu
back
size
photographed
is(number
used
for
items
strap
plays
setting
isadapter
for
athe
is
are
back
storage
of
taking
handy
also
the
pixels)
still
the
basic
available
subjects
for
medium
images
16
and
carrying
images
settings
quality
one
for
that
as
saving
separately
your
image
to
require
(compression
be
camera
used
images
atseveral
a
sold
for
around.
inthat
photography
items.
ratio)
seconds
the
you
multi
of
have
the
photography
to image
photograph
in
photographed.
to
[ second
be
mode
],photographed.
such
[be
Even
in
asquick
]for
firework
or
if Europe,
the
[You
succession.
camera’s
displays
] photography
power
at the
Enlarges
selected
portions
of
images
being
played
back
at
two
levels.
Images
can
displayed
enlarged
when
In
You
this
can
color
mode,
manually
of
the
photographs
viewfinder
adjust
settings
are
LED
taken
indicates
such
continuously
asphotographed
the
exposure
state
atof
control,
atime.
the
maximum
camera.
white
speed
balance,
The
ofthe
0.8
metering
system,
intervals.
continuous
This
item
switches
display
on
the
LCD
monitor
when
playing
back
photographed
images.
can
switch
If
you
the
AC
(sold
separately:
PDR-ACM1A
for
the
US/Canada,
PDR-ACM1E
PDR-ACM1U
Mode
Effective
dial
Subjects
and
Set
Values
TM
Press
.of
aperture
value.
SYSTEM
Turning
Exposure
ISO
OSD
In
[prevent
[use
LANGUAGE
the
]the
INFO.
mode
control
(EXP.)
On
Close
the
SmartMedia™
cover.
Slide
the
SmartMedia
cover
release
knob
in
the
Take
photographs
or
or
battery
to
to
select
or
play
[that
the
slide
]them
or
shutter
it
[ the
back.
,]will
and
speed.
and
lock
press
Look
Use
through
to
select
the
[adjust
viewfinder
]use
and
press
to
compose
ENTER.
the
picture.
To
continue
erasing
images,
repeat
the
above
procedure
2.
.is
AF
(auto-focus)
and
AE
(auto
exposure)
are
set.
When
pressed
fully
down,
the
camera
takes
aspace
picture.
object.
This
mode
enables
carefree
photographing
similarly
to
selecting
[stable
]photographs.
in
[ from
]settings”,
mode.
Itrepeatedly
is
to
night.
To
is
Change
modes.
turned
When
the
OFF,
your
setting
using
the
camera
images
this
according
mode,
from
saved
dropping
be
to
sure
how
on
the
the
to
during
SmartMedia™
image
a(size,
photography,
tripod
is
to
to
be
keep
used
not
hang
the
and
be
camera
erased.
the
the
shoulder
remaining
SmartMedia™
strap
and
amount
prevent
around
can
ofstep
your
distortion
be
neck.
inpossible
the
of
images.
Relationship
between
your
camera
and
accessories
Connecting
tocalled
Other
Devices
(page
123)
being
played
back
one
image
at
acover,
time.
The
meaning
maximum
of
number
LED
color
of
photographs
differ
according
can
to
be
taken
mode
continuously
dial
setting.
three
photography
mode,
and
take
photographs
at
these
settings.
These
are
“Manual
which
are
saved
display
to
show
aPower
list
detailed
information
compression
ratio,
shutter
speed,
aperture,
etc.)
or
you
can
for
the
UK)
in
a
room
with
amay
power
outlet,
you
can
take
photographs
for
an
extended
period
of
time.
This
also
Item
QUALITY
Options
Notes
SmartMedia™
VIDEOon
OUT
White Balance (W.B.)
Write
Protection
Removing
the Batteries
ISO
[ POWER
]
AUTO
OFF
Setting items
Turning
the
Power
Off
Using
the
LCD
Monitor
Additional
Information
Other
Applications
Handy
Functions
Erasing
Images
Playing
Back Images
Taking
Photographs
Tab menu
The
tab
is
displayed.
setting
isbattery
as
follows:
Make
sure
that
the
issystem
firmly
closed.
Details
image
ofmenu
operation
isrange
saved
are
or
erased,
the
same
and
as
the
taking
camera
photographs
is
then
ready
and
to
playing
take
photographs.
them
back
onon
the
LCD After
monitor.
If
you
use
the
viewfinder
to
take
photographs,
the
photography
Set
the
mode
dial
to
[cover
].settings
direction
of
the
arrow
to
open
cover
.the
ENTER.
change
the
white
and
the
metering
in(the
program
mode.
erased
SmartMedia™.
and
reused.
For
details
on
these
accessories,
refer
to
the
Instruction
Manual
for
the
accessory
you
are
using.
(information
Movies
images
photographed
in
the
multi
mode
Page
cannot
be
displayed
using
the
zoom
playback
Images
even
if the
are
camera
not
recorded
is
turned
directly
off.
SmartMedia™
but
are
stored
within
the
buffer
memory.
display
histograms,
etc.
prevents
failed
photographs
due
to
battery
wear
or
failed
of
data
to
a
PC.
details
handling
the AC
Set
Sets
the
thebalance
whether
color
: /or
Photography
mode
language
not
to
and
return
photographic
of
in
menus
the
program
displayed
sensitivity
in
the
(default)
on
SETUP
the
at51)
which
LCD
(temporarily
MENU
Page
monitor.
to
image
62)
the
original
is For
to
be
factory
recorded.
settings.
feeds
the
image
•transfer
Each
press
of
➲
•How
Copying
of
printed
(black
on
white
paper)
set
the
time
(text
114)
F8
/display
F6.8
F5.6
/18.
F4.8
/Page
/and
F3.4
/mode
F2.9
to
take
photographs
Page
41
1/1000,
1/750,
1/500,
1/350,
1/250,
1/180,
1/125,
range
may
differ
from
the
actual
image.
InLCD
this
case,
use
the
LCD
Press
the
shutter
button
down
halfway
.1/90,
the
mode
dial
to
[ F4.0
],
[characters
]reset.
or
[selected
].higher
SmartMedia™
having
the
following
storage
capacity
can
be
on
your
current
as
of
March
2000)
feature.
The
last
cover
recorded
image
opens
frame
image
appears
appears
on
the
on
the
LCD
monitor.
monitor.
photography
is
finished,
check
the
images
record
the
ones
tocamera.
SmartMedia™.
[TIME&DATE,
]
:
Erases
images
in
the
selected
folder
folders.
adapter,
beSet
sure
to
read
page
•
2x-speed
playback
isaperture-priority
performed
Make
sure
that
the
SmartMedia™
is
correctly
loaded.
(➲
Page
31)
byused
one
frame.
Warning:
Noise
:OSD
Photography
increases
LANGUAGE
when
incurrently
will
the
not
ISO
be
is for
changed
mode
to
(and
Page
settings.
63)
•
Backlit
portraits
[PROTECTED]
on
the
LCD
monitor,
cancel
the protection
( Page 108) or
remove
How
to
play
back
images
Page
80
1/60,
1/45,
1/30,
1/20,
1/10,
1/8,
1/6,
1/4,
1/3,
1/2,
monitor
for
photography.
AF
(auto-focus)
and
AE
(auto
exposure)
(the
Additional
Information,
: value
English
(default)
➲
Pass
Set
the
out
mode
end
steps
of
dial
1the
to
to
shoulder
4[1/15,
either
]].LCD
or
inspeed-priority
[strap
“Photography
through
].
the
in
the
strap
Shutter
speed-priority
Mode”
isdisplayed
held
down.
the
duration
that
2MBCarry
/4MB/8MB/16MB/32MB/64MB/128MB
the
mode
dial
to
[isin
(all
3.3
types)
To
]•the
adjust
: When
Erases
the
all
brightness
folders
recorded
of
the
on
monitor
SmartMedia™.
Page
[Set
➲115
•V
1-frame
feed
is continued
for the
The
aperture
and
the
shutter
speed
corresponding
to(inthat
:write-protection
Photography
shutter
mode
Page
65)
• 0”7,
bright
scenes
(such
and
highly
reflective
subjects
•the
You
can
also
carry
out
step
8snowfields)
while
verifying
the
image
step
7.
DPOF
(in
Page
102).
Glossary)
start
to
function.
1”,
1”5,
2”,
3”,
4”,
6”,
8”,
10”,
15”
•Very
Do
not
remove
or monitor
load
the
batteries
or
disconnect
or
connect
the
AC
adapter
while
the camera
is mode.
on. This
:POWER
Japanese
:LCD
Equivalent
toas
color
ISO100
Carry
Set
Use
out
or
mode
steps
to
dial
select
1
to
to
2[erased,
the
“Manual
].
images
photographed
Settings”
(page
in
58).
the
multi
photography
You can also
the
PC
card
adapter
and
floppy
disk
adapter
(➲
123)
sold
separately
to transfer
Changing
the
display
Page
116
Theconnect
images
or
folders
are
and
the
camera
returns
toPage
the
is
held
down.
duration
that
value
are
displayed
on
the
LCD
monitor.
If
the
appropriate
(page
attachment
65)
or
on
in
“Photography
the
camera.
in
the
Full
Manual
Mode”
(page
67).
Press
the
button
to
turn
the
power
on.
full
manual
mode
(
Page
67)
:
Photography
in
Press
the
MENU
button.
• •Shots
predominantly
of
sky
Even
ifreturn
photography
is disconnect
terminated
midway
before
capturing
three
images
bythe
releasing
theAC
shutter
• AF
If
you
take
aup
photograph
after
erasing
an
athis
number
continuing
from
last Ifphotographed
When
or
AE
are
locked,
the
beep
tone
( Page
111)
sounds
and
the
Use
ormade
to
change
the
setting
inimage,
the
menu,
might
the
manual
settings
tosame
their
defaults.
Iftab
happens,
manually
set
conditions
again.
:
High-sensitive
photography
equivalent
to
color
ISO200
(default)
Before
you
connect
or
the
AC
adapter,
be
sure
to
turn
the
camera
OFF.
the
adapter
is
Press
the
image
quality
button
to
select
the
preset
combination
cannot
be
set
even
if
the
shutter
speed
is
adjusted
to
images to a
PC.
16MB
(SM-M1600D)/32MB
(SM-M3200D)/64MB
(SM-M6400D)/128M
(SM-M1280D)
The
respective
last
image
mode.
frame
appears
on
LCD
monitor.
You
can
also
select
the
image
by
the
operation
as
for
thumbnail
display
(
Page
83).
Carry
out
steps
1
to
on
page
109.
When
the
camera
is
turned
on,
set
the
mode
dial
to
thethe
desired
The
shutter
speed
and
the
aperture
value
corresponding
todisplay
the
All
descriptions
inor
this
Instruction
Manual
are
for
when
language
is set
to [ENGLISH].
Press
or
to
select
the
image.
button,
images
already
photographed
can
be
saved
and
erased
by playback
the
method.
image
is
assigned
as
image
number.
The
viewfinder
RECORDING
LED
turns
MENU
green.
is2
displayed.
•press
The
image
the
photograph
is
taken
is
slightly
less
clear
than
images.
(This
is 109,
connected
disconnected
with
the
power
ON,
camera
settings
may
beabove
reset
(SET-UP
➲ Page
and
ENTER.
:before
High-sensitive
photography
equivalent
to
color
ISO400
its
the
shutter
speed
isthe
displayed
inthe
red.
To limit,
cancel
erasing
of
image
data,
select
[monitor.
]Photography,
and
press
ENTER.
quality
and
size,
while
viewing
indication
on
the
starts
a
reverse
•
The
press
of
mode.
shutter
speed
are
displayed
on
the
LCD
If
the
appropriate
The
length
of
time
to
capture
images
varies
according
to
the
photographic
conditions.
•
Images
can
also
be
erased
in
the
thumbnail
mode.
In
this
case,
the
camera
enters
the
single
frame
Select
[SYSTEM
INFO.]
on
the
SETUP
MENU
and
because
television
displays
images
at
a
lower
resolution.)
•
Spotlit
subjects,
particularly
against
dark
backgrounds
Manual
Settings
➲settings,
Page
58)
orPage
the
camera
malfunction.
however,
is
in
this
state.
feeds the
image
•may
Each
press
oftoinbegin
EXP.
].
To
cancel
changing
of
press
.you
Use
or
todial
select
the
frame
want
to
enlarge.
Press
the
or
Zoom
to
switch
select
[( S/C
].isphotography
21)
towards
“T”
playback.
]possible
is
selected,
[NO
IMAGE]
displayed
after
all
folders
When
playback.
Press
Set
mode
in
the
to
[ sure
Tv
mode,
].the
or
press
or
the
shutter
button
fully
Before
photography,
make
that
the
lens
cap
has
been
combination
cannot
be
set
even
ifflash
aperture
isin.black
adjusted
to its
playback)
mode,
and
enters
the
thumbnail
playback mode after the image is erased.
status
display.
]or
mode:
In
[[playback
Press
the
display/info
button.
Self-timer
photography
and]down
are
not
possible.
•the
The
display
unit
varies
according
to
the
output
system.
•theCopying
of (frame
printed
text
(white
characters
on
paper)
.playback
press
reverse
by
one
frame.
This
adapter
allows
SmartMedia™
to
be
used
as
3.5"
floppy
disk.
have
been
erased
(unless
the
SmartMedia™
contains
protected
You
can
also
select
the
image
by
the
same
operation
as
for
thumbnail
playback
( [4X],
PageISO
83).will be
Automatic
begins.
•
Playback
becomes
2x-speed
to
reduce
aperture
size.
Press
to
increase
aperture
size.
Press
camera
takes
a
picture.
The
manual
setting
removed
the
camera.
limit,
aperture
value
isbe
displayed
in
red.
Photography,
however,
the
[Scenes
M
]from
mode
tomenu
set
the
shutter
speed
to simultaneously
0.7
second
During
[2X],
the
ISO
will
automatically
set
between
ISO100
ISO200.
During
set
the
quality
and
size
Page
112
•the
With
the
NTSC
system,
images
can
be
displayed
on the➲
LCD
monitor
and ➲
TV during
•To
with
low
reflectivity,
such
as
shots
green
or
dark
foliage
Each
press
of
the
display/info
button
switches
the
display
•of1-frame
feed
isand
continued
The
SYSTEM
INFO.
displayed.
reverse
for
the
duration
This
adapter
isplayback
inserted
into
the],
floppy
your
PC,
allowing for the
images).
The
viewfinder
LED
turns
redis
image
data
being
recorded
onto
Insert
the
adapter
connector
plug
into
the
DC
IN
values
are
displayed
In
the
photography
modes
([while
[and ISO400.
]disk
oris
[ drive
]),on
the
lens
photography
and
playback.
is
possible
inAC
this
state.
automatically
set
between
ISO100
is
held
down.
format
as
follows:
duration
that
Note:
The
larger
the
F
value,
the
smaller
the
aperture
size
become
or
longer.
•Press
Remove
and
insert
SmartMedia™
with
the
camera’s
power
turned
off.Aperture value
is
held
down.
that
To
quit
the
SETUP
MENU,
change
the
mode
dial
setting.
Shutter
speed
Adjust
the
zoom
ratio
by
the
Zoom
switch.
(Zoom
to
display
option
menu,
press
or
to
images
recorded
on
the
SmartMedia™
to
be
transferred
to
the
PC.
the
SmartMedia™.
Sets
video
output
system
according
to
country
in
which
your camera
is used.
on
the
left
ofthe
the
LCD
Press
the
shutter
button
down
halfway
and
press
5V
terminal
on
the
camera.
extends
from
the
camera
body.
•the
PAL
system,
images
cannot
bethe
displayed
When a cable
is connected, only
and
versa.
the
image
quality
button
switches
the
quality
and
size
Gently
insert
the
SmartMedia™
as
far
as
it, simultaneously.
can
go
[Pressing
]vice
isWith
displayed
on
the
LCD
monitor.
•select
Recorded
data
may
bepress
erased
(destroyed)
in
the
situations
listed
below. Note that Toshiba
White
Balance
Additional
Information,
Glossary
to
increase
shutter
speed.
Pressand
to
decrease
shutter
speed.
Press
Press
or
to
move
forward
reverse.
PRG
]
and
ENTER.
]
and
press
ENTER.
[
switch
Page
21)
TV
display
is
available.
monitor
screen.
When
the
camera
is
turned
on,
the
Auto
Power
OFF
function
✩✭✰✯✲✴✡✮✴
settings
infully
the
following
order.
it
down
. system
Press
or
to
select
the
item
you
desired
toisloss
set,
with
SmartMedia™
electrodes
(metal
contacts)
Additional
Information,
Glossary)
(white
Corporation
accepts
no
whatsoever
for
the
of recorded
data enters
in these
• the
When
allNTSC
images
in
a responsibility
folder
are
erased,
that
folder
itself
also(destruction)
erased.
The
camera
determines
the
balance
by
averaging
the
various
kinds playback
of light
that actually
to
to
next
frame/
to“T”
go
back
one
To
prevent
valuable
data
being
erased,
attach
the
write••advance
With
the
PAL
images
are
played
back
with
apressing
black
frame
•frame
After
pause
is
cancelled,
the
Zoom
switch
to
the
will
the
image.
Pressing
ENTER
the
setting.
or
,, SmartMedia™
and
manual
Exposure
compensation
Page
69)
using
When
[for
M
]selects
isissystem,
selected
on
the
[ halfway
EXP.
]remove
option
menu,
orsurrounded.
the
shutter
speed
setting
becomes
operational.
Never
open
the
SmartMedia™
cover
orenlarge
the
while
anmakes
is
being
recorded.
This
or
and
manual
setting
(image
Page
58)
or
film
speed
Exposure
compensation
((from
Page
69)
using
Reverse the
procedure
“Loading
the
Batteries”
and
remove
the
batteries.
•facing
Pressing
the
shutter
button
down
adjusts
the
exposure,
• Playback
paused.
PAL
system
( camera.
Additional
Information,
Glossary)
situations:
the
lens.
This
setting
allows
you
to
set
in
advance
the
white
balance
when
taking
photographs
under
and
press
ENTER.
the
rear
of
the
For
the
US/Canada:
PDR-ACM1A
Holding
down
or
moves
forward
or
reverse
continuously.
resumes
at
the
last
state
that
was
protect
sticker
at
the
write-protect
area.
Data
can
no
longer
be
may
corrupt
the
data
on
the
SmartMedia™
or
damage
the
SmartMedia™
itself.
possible,
but
does
not
make
the
exposure
compensation
possible. However the exposure value
is
To
return
normal
press
the
Zoom
switch
towards
setting
Page
58)magnification,
or film
speed
setting
( the
Page
78)
using
ENTER
Pass
the
shoulder
strap
through
loop
and
pull.
setting
(( toPage
78)
using
ENTER
are
also
possible.
and
pressing
the
shutter
button
fully
takes
the
shot.
TM[ is down
When
the
SmartMedia™
used
incorrectly
by
the
user
or
a
third
party
[
],
]
or
[
]
AE
or
AF
are
locked
with
the
shutter
button
held
half
specific
lighting
conditions.
For
Europe:
PDR-ACM1E
active
before
the
pause.
Firmly
insert
the
SmartMedia
as
far
as
it
can
go.
displayed
on is
the
LCD
monitor.
Press
ENTER.
recorded
or setting
erased
from
SmartMedia™.
Toon
write
oraterase
data
from is to be recorded.
Sets
the
color
mode
and
photographic
sensitivity
which
the
image
“W”.
are
also
possible.
The
default
different
depending
the
destination
country/area.
Use
or
to
select
the
desired
item
Press
ENTER,
nine
images
are
displayed
simultaneously.
• no
If
you
shoot
a
still
picture,
when
preview
is
set
to
ON
(
Page
77),
down.
If
operation
is
carried
out
for
a
fixed
amount
of
time
(default:
about
one
minute),
power
ON
When
the
SmartMedia™
is
exposed
to
static
electricity
or
electrical
noise
✭❅❍❏
➲
Forimage
the Noise
UK:
PDR-ACM1U
:off
Displays
the
firmware
version
ofto
this
camera.
SmartMedia™,
peel
the
sticker.
camera
ready
to
take
photographs.
Warning:
increases
when
the
ISO
is
changed
higher
settings.
isis
displayed
and
a
white
frame
and
green
Green The
Compose
picture,
press
the
shutter
button
down
halfway,
and
press
it
down
:the
Automatic
adjustment
(default)
Display
Page
83
theThumbnail
recorded
image
is
displayed
on
for
about
two
]specifications
Standby
mode
[enlarged,
••-For
If
no
operation
is
carried
out
a screen
fixed
amount
offrom
time
(default:
about
1shutter
minute),
thewear.
power
is
turned
TM
consumption
is
set
to
its
minimum
state
(power
almost
off)that
to
prevent
battery
This
is
.in
and
press
When
the
SmartMedia™
isfor
removed
ordarkens
the
camera
isPage
turned
off
while
recording
erasing
The
image
the
LCD
monitor
sometimes
the
time
the
button
isdata,
pressed
down
details,
refer
to
the
of
AC
information.
adapter
127.
: on
Displays
the
SmartMedia
Playback
returns
to
the
start
ofturned
the
movie.
frame
are
displayed
the
LCD
monitor.
:
Photography
outdoors
Default
setting:
seconds.
off
to
preserve
battery
life.
This
is
called
“Auto
Power
OFF”.
To
return
to
the
normal
state,
press
the
fully.
Page
40
called
the
Auto
Power
OFF.
This
setting
allows
you
to
set
the
time
when
the
camera
turns
off
halfway
until
the
image
becomes
focused.
: picture,
Equivalent
to
ISO100
(default)
data,
frame
advance
when
images
aredefaults.
played
back or during
formatting alarm
of the
The options
are
displayed.
: Returns
settings
to
Flashing
[ the
],
[ color
]conditions
or their
[shutter
]being
Self-timer
in frame
operation
at a handshake
.
Compose
the
press
the
button
down
halfway,
and
press
it
down
The
white
frame
indicates
entire
image,
while
the
green
:
Photography
in
cloudy
POWER
button
again.
•
The
viewfinder
LED
turns
red
while
image
data
is
being
recorded
Compose
the
picture,
press
the
shutter
button
down
halfway,
and
press
it
down
• The
To
set
the
focus
orpicture.
exposure
forphotography
a subject
outside
the
center
the intended
theincamera
directly
The camera
takes
the
automatically.
This
function
isthrough
not
activated
during
automatic
playback
( image,
Pagepoint
85) or
the [ only>
] PC
:appearing
High-sensitive
equivalent
toofcolor
ISO200
SmartMedia™.
Note:
image
the
lens
will
be
The
display
returns
to<Histogram>
thumbnail
playback.
<Standard>
<Detailed
information>
<Image
shows
the
location
of
the
currently
enlarged
area.
halfway,
and
press
it
down
fully.
Page
40
:
Photography
in
bluish
fluorescent
light
fully.
Page
40
About
the
Auto
Power
(FULL
OFF
Function
)
➲
Additional
Information,
“AUTO
POWER
OFF
(page
110)”
☞
at
the
subject
or
desired
exposure
(lighting),
press
and
hold
the
shutter
button
halfway.
Now,
with
the
shutter
onto
the
SmartMedia™.
ON]
Writing
to SmartMedia™
in progress
mode.
Press
ENTER.
:adapter
High-sensitive
photography
equivalent
toanother
color
ISO400
•Insert
Wedefault
recommend
copying
and
saving
important
datapower
onto
storage
medium (floppy disk, hard
displayed
for
[LCD
].[Power
fully.
Page
40
the
AC
power
plug
into
the
The
size
and
quality
of
the
image
can
be
reset
to
the
desired
combination.
Press
ENTER.
button
still
held
halfway
down,
you
can
turn
the
direction
of
the
camera
and
frame
your
image
with
the
focus
•
It
is
possible
to
play
back
any
images
in
any
folders
by
pressing
or
during
playback.
(For
details
ON
: Photography
inafter
reddish
fluorescent
light
The
camera
takes
the
picture.
Photographs
can
be
taken,
however,
do not
turn thepress
power
OFF.
Todisk,
return
to disk,
the
normal
state
theset
Auto
Power
OFF
has been
executed,
the
POWER
button
MO
etc.).
The
PREVIEW
manual
setting
Page
items
77
are
displayed.
camera
takes
the
atmonitor.
the
exposure
time.
Current
Entireofimage
and
exposure
locked.
Press
the
button
down
fully
to in
complete
capturing
the image.
Red outlet.
[In the
on picture
the
LCD
The
camera
is ready
for
burst
photography.
of displayed
folder
Page
92)
]:the
mode:
Accessing
of
SmartMedia™
[ (HALF
Photography
in] is
incandescent
light
•] [is
When
shutter
speed
setshutter
to
a)turn
speed
of
0.7 second
orprogress
slower,
photographs
taken
as extended
to Never
turn
the
power
on 77
again.
•During
remove
the
SmartMedia™
or
the
camera
offresult
while
recording
data or are
while
erasing
data
COLOR
Page
the
exposure,
the
viewfinder
LED
turns
orange.
position
•
Moving
the
camera
as
you
press
the
shutter
button
will
in
a
blurred
image.
Use
,
,
or
to
select
the
area
to
enlarge.
the
last
image
displays
the
first
image,
and
pressing
atwill
thebe
firstautomatically
image
displays
the
Pressing
During
[2X],
the
ISO
be
automatically
set
to
ISO200.
[4X],ofISO
setof
exposures
( at Page
68).
IfCarry
burst
photography
is to
set
the
shutter
speed
is set During
to athe
speed
0.7
second
or more
in the
[ to
Tv ]
out
steps
1will
2when
in
Photographic
(SmartMedia™
formatting).
actions
might
damage
ISO
Page
78
Flashing
ItClose
takes
about
twice
the
time
to complete
taking
the
photograph
duePDR-M81
to processing
ofenlargement
the
captured
[set
],These
[“Basic
] When
the
image
is not
in SmartMedia™.
focus.
the
SmartMedia™
cover.
•
The
PDR-M81
usesto
accurate
focus
mechanism.
However,
the
have
difficulty
last
image.
Adjust
the
display
area
enlarge
viewing
theto
white
and
ISO400.
• In
AEB
photography
(an
Page
71)while
orauto
burst
photography,
the shutter
speed
cannot be setmay
to 0.7
second
or longer.
(SMALL
)
mode,
the
shutter
speed
is
automatically
changed
1/2
second.
•image.
Use
only
the
SmartMedia™
specified
for
use
with
the
PDR-M81.
The
use
of
other
SmartMedia™
SHARPNESS
Page
79
mode)”
(page
109).
Select
[QUALITY]
Settings
(
focusing
or
not
be
able
to
focus
at
all
for
subjects
and
situations
such
as
the
following:
Before
you
use
aother
new
SmartMedia™
the
first during
time,
be
sure
tothe increased
Images
can
bevalue
rotated
by] pressing
playback.
➲ isspeed
[ for
] or
green
frames.
the
aperture
is
to
F2.9
(maximum
aperture
size),
shutter
speed
restricted
••➲
If
a
mode
than
[ set
suppressed
flash
mode
is
set
inthe
flash
photography,
thedark
shutter
is
•79
Processing
image
- When
subject
is distant and
- SmartMedia™
Subjects
moving
at
high
speed
damage
the
camera.
CONTRAST
Page
• to
The
write
protection
may
not
function
if in
write-protect
sticker
becomes
Use
a soft
dry cloth to
.thesecond.
oncould
the
SETUP
MENU
and
press
format
the
(➲
Page
91).
an
image
counterclockwise,
and
pressing
rotates
clockwise.
Pressing
1/750
PDR-ACM1A
] •are
the
same
as
to
PDR-ACM1E
PDR-ACM1U
[PRG]
and
[ rotates
limited
tosecond.
between
1/2
second
and
1/250
* The
aboveitdirty.
menu
is
the
RECORDING
Charging
of
flash
progress
ON
✣❏■▼❉■◆❏◆▲
❐❈❏▼❏❇❒❁❐❈❙
When
there
are
objects
in
front
of
or
behind
the
subject
Very
shiny
subjects
such
as
a
mirror
or
car
body
SmartMedia™
is
aofisprecision
device.
Do do
notnot
bend,
drop,
or subject
SmartMedia™
to
DIGITAL
ZOOM
Page
• wipe
When
the
camera
isOnce
not79
inelectronic
be sure
to attach
the
lens
cap
provided
with[your
camera.
the
POWER
button
to
turn
the
power
off.
away
any
dirt.
ause,
sticker
ispress
peeled
off,
reuse
it.
Orange•Press
The
QUALITY
menu
displayed.
combinations
the
automatically
mode.
MENU
inthe
•the
The
aperture
value
set
differ
to
the
actual
value
according
to
the
position
ofUK)
theorzoom
lens.
To
to
the
regular
display,
ENTER.
(Photos
cannot
be
taken
at
this
moment.)
(forreturn
US
and
Canada)
If the
shutter
speed
is
set
to
1/350
second
or
less,
the
shutter
as
speed
an
animal
is
automatically
athe
cage
a]changed
person
in front
to 1/250
of a tree)
(for
European
Continent)
(for
Get
ready
to
take
the
photograph.
- above
Extremely
low
contrast
subjects
When
the
settings
are
made,
they
are
displayed
in(such
thepocket
following
order.
✥❘❐❏▲◆❒❅
✣❏❍❐❅■▲❁▼❉❏■
excessive
shocks.
Also,
do
not
carry
SmartMedia™
the
ofx[trousers.
This
might
The
lens
cap
can
also
be
attached
to
attachment
following
the
above
steps
to prevent
it’sthe
LCD
79
The
power
turns
off.
✭❅❍❏
determined
shutter
speeds
and
aperture
-in Subjects
with
little
reflection,
such
as
hair
fur mode.
•• The
size
displayed
on
the
LCD
monitor
FULL
(320
240)
HALF
(160
xorsubject
120).
The
]becomes
forced
flash
mode
or
]orred-eye
forced
flash
second
ifPage
the
flash
setting
is25)
changed
tothe
thestrap
[ ✡✥✢
- image
Subjects
that
have
low contrast
and
merge
into
Loading
the
batteries
(
Page
and
the
SmartMedia™
(
Page
31)
into
the
camera.
being
lost.
• Flash
photography
and
burst
photography
are
not
possible.
Flashing
SmartMedia™
to
excessive
force
when
you
sit
down,
damaging
the
SmartMedia™.
Hardware
malfunction
Subjects
with
no
solidity,
such
as
smoke
or
flames
the
background
(such
as
white
walls
or
subjects
Attach
the
lens
cap
when
you
are
not
using
the
camera.
values.
However,
their
operation
capability
movies
made
in
FULL
size
is
displayed
on
the
entire
LCD
monitor,
and
those
made
in
HALF
size
is
If the
[ ]mode,
forcedISO
flash
[ automatically
] red-eye set
forced
flash
mode
is
set
in
flash
photography
when
the
• In
movie
willorbe
between
ISO100
and
ISO400
regardless
of
its
setting.
❍❅▼❅❒❉■❇
dressed
inthe
theSmartMedia™
same
color
as
thelens
background)
-attach
Subjects
viewed
through
glass
Turn
offor
the
power
tothe
retract
the
unit,
and ✳❐❏▼
then
the
lens
cap.
The
image
taken
in
exposure
photography
mode
may
be
blurred.
or
to
select
the
desired
setting
from
the
tab
menu
, and
press
•Use
Do•not
use
store
in
environments
likely
to
be
affected
byisstatic
electricity
or
is
different
as
shown
in
the
right
table.
displayed
in
center
ofspeed
the
screen.
shutter
speed
is
set
to
a
of
0.7
second
or
more,
the
shutter
speed
automatically
changed
to
Press
POWER
button
tothe
turn
power
on.
A electrical
histogram
isturn
a graphic
representation
ofthe
theistones
of the
subject.
The
horizontal
histogram
✷❈❉▼❅
❂❁●❁■❃❅
▲❅▼▼❉■❇
• Do
If the
the
image
cannot
be
focused,
thelens
focus
automatically
fixed to infinity.
(When theaxis
flashofisthe
necessary
not
the
power
on
with
cap
attached.
noise.
1/2
second.
ENTER.
*the
The
above
AC adapter
is US/Canada
Turning
the
Power
On
Page
38
shows
the
brightness
(increasing
brightness
from
left
to
right)
and
vertical
axis
shows
the
number
at
this
time,
it
is
simultaneously
fixed
to
illuminate
objects
1.5
meters
(five
feet)
away.
During
macro
•This
Dosaves
use
orsettings,
store
SmartMedia™
very
hot,
humid
oraperture
corrosive
If the
shutter
speed
value
isimages,
set toin1/1000
second,
the
value
is limited
to
F8type
andAC
F3.4.
•not
When
playing
back
movie
switching
isthe
between
standard
and
image
only.
(O
:environments.
possible
Xbetween
: not
the
and
returns
to
RECORDING
MENU.
type.
European
andpossible)
UK
photography,
the flash
islevel.
alignedthe
withdisplay
the wide
position.)
of pixels
at each brightness
Downloaded From
camera-usermanual.com
adapters differ in shape.
--110
20 -40
80
88
About SmartMedia™ (continued)
Getting
Ready
Taking
Photographs
Playing
Back Images
• Take care not to touch the SmartMedia™’s electrodes (metal contacts) or allow the electrodes to
become soiled. Use a dry lint-free cloth to wipe away any dirt.
• To avoid damage caused by static electricity during transportation or storage, always use the special
static-free case provided.
• If you are not using the camera for a long period of time, remove the SmartMedia™ and store it in a
safe place.
• Inserting a SmartMedia™ that is charged with static electricity into your camera may cause it to
malfunction. If this occurs, switch the camera OFF and then ON again.
• The SmartMedia™ may feel warm when it is removed from the camera after the camera is used for a
long time. This is normal and not a malfunction.
• The SmartMedia™ has a limited service life. If images can no longer be written or erased, buy a new
SmartMedia™.
• Use the index labels provided with the camera. If you attach a commercially available label, it may
cause a malfunction when the SmartMedia™ is loaded or removed.
Erasing
Images
Loading SmartMedia™
☞ Turning the Power Off ➲ Page 38
Handy
Functions
Press the POWER button to turn the power off.
Other
Applications
Additional
Information
Downloaded From camera-usermanual.com
- 31 -
Changing
the
Preset
Conditions
(RECORDING
MENU)
Photography
in
the
Program
Mode
Setting
Names
Playing
Back
the
of
Photographed
Parts
Image
Size
and
Quality
(Single-Frame
Playback)
Extended
Exposure
Photography
(Bulb
Photography)
Erasing
Images
(Erase
Frame)
(continued)
Manual
Attaching
Using
How
Taking
Enlarging
Playback
About
Turning
to
Photographs
the
SmartMedia™
Press
Settings
the
Photographed
of
Power
the
Power
Multi
Shoulder
Continuously
Outlet
Shutter
Image
On/Off
Images
Strap
Pictures
Button
(Zoom
(Burst
Playback)
Photography)
Taking
Erasing
Button
Photographs
Folders
and
(All
LCD
Images
Continuously
Monitor
in
aImages
Folder/All
(Burst
Display
Photography)
Folders)
(In
Playback
(continued)
(continued)
Mode)
Definitions
Separately
of
the
Accessories
Color
of
the
Viewfinder
LED
Taking
and
Playing
Back
Photographs
on
aMode
TV
(continued)
Changing
the
Preset
Conditions
(RECORDING
MENU)
(continued)
Exposure
Compensation
in
the
Shutter
(continued)
Speed-priority
(continued)
About
Basic
Settings
SmartMedia™
in
(Sold
the
mode)
Aperture-priority
(continued)
Mode
(continued)
LCD
Monitor
Display
(during
photography)
(continued)
Manual
Settings
(continued)
Playing
Photography
Installing
Back
Movies
batteries
(Auto
Photography)
(continued)
(continued)
(continued)
Names
of
Parts
(continued)
Getting
Ready
The shutter
camerabutton
automatically
adjusts the
shutter
and
the aperture
value
according
to the
brightness
of an
can be pressed
down
in twospeed
stages:
halfway
down and
fully
down. When
pressed
halfway
down,
This
“SmartMedia™”
Set
Play
Automatically
The
the
following
mode
shoulder
menu
back
size
photographed
is(number
used
for
items
strap
plays
setting
isadapter
for
athe
is
are
back
storage
of
taking
handy
also
the
pixels)
still
the
basic
available
subjects
for
medium
images
16
and
carrying
images
settings
quality
one
for
that
as
saving
separately
your
image
to
require
(compression
be
camera
used
images
atseveral
a
sold
for
around.
inthat
photography
items.
ratio)
seconds
the
you
multi
of
have
the
photography
to image
photograph
in
photographed.
to
[ pause
be
mode
],photographed.
such
[be
Even
in
asquick
]for
firework
or
if Europe,
the
[You
succession.
camera’s
displays
] photography
power
at the
Enlarges
selected
portions
of
images
being
played
back
at
two
levels.
Images
can
displayed
enlarged
when
In
You
this
can
color
mode,
manually
of
the
photographs
viewfinder
adjust
settings
are
LED
taken
indicates
such
continuously
asphotographed
the
exposure
state
atof
control,
atime.
the
maximum
camera.
white
speed
balance,
The
ofthe
0.8
metering
second
system,
intervals.
continuous
This
item
switches
display
on
the
LCD
monitor
when
playing
back
photographed
images.
can
switch
If
you
the
AC
(sold
separately:
PDR-ACM1A
for
the
US/Canada,
PDR-ACM1E
PDR-ACM1U
During
stopping
During
Mode
Effective
dial
Subjects
and
Set
Values
During
playback
TM
Press
.of
aperture
value.
SYSTEM
Turning
Exposure
ISO
OSD
In
[prevent
[use
LANGUAGE
the
]the
INFO.
mode
control
(EXP.)
On
Close
the
SmartMedia™
cover.
Slide
the
SmartMedia
cover
release
knob
in
the
Take
photographs
or
or
battery
to
to
select
or
play
[that
the
slide
]them
or
shutter
it
[ the
back.
,]will
and
speed.
and
lock
press
Look
Use
through
to
select
the
[adjust
viewfinder
]use
and
press
to
compose
ENTER.
the
picture.
To
continue
erasing
images,
repeat
the
above
procedure
2.
1
2.
AF
(auto-focus)
and
AE
(auto
exposure)
are
set.
When
pressed
fully
down,
the
camera
takes
aspace
picture.
object.
This
mode
enables
carefree
photographing
similarly
to
selecting
[stable
]photographs.
in
[ from
]settings”,
mode.
Itrepeatedly
is
to
night.
To
is
Change
modes.
turned
When
the
OFF,
your
setting
using
the
camera
images
this
according
mode,
from
saved
dropping
be
to
sure
how
on
the
the
to
during
SmartMedia™
image
a(size,
photography,
tripod
is
to
to
be
keep
used
not
hang
the
and
be
camera
erased.
the
the
shoulder
remaining
SmartMedia™
strap
and
amount
prevent
around
can
ofstep
your
distortion
be
neck.
inpossible
the
of
images.
Relationship
between
your
camera
and
accessories
Connecting
tocalled
Other
Devices
(page
123)
being
played
back
one
image
at
acover,
time.
The
meaning
maximum
of
number
LED
color
of
photographs
differ
according
can
to
be
taken
mode
continuously
dial
setting.
is
three
photography
mode,
and
take
photographs
at
these
settings.
These
are
“Manual
which
are
saved
display
to
show
aPower
list
detailed
information
compression
ratio,
shutter
speed,
aperture,
etc.)
or
you
can
for
the
UK)
in
a
room
with
amay
power
outlet,
you
can
take
photographs
for
an
extended
period
of
time.
This
also
Mode
dial
1 Item
QUALITY
2 Options
Notes
SmartMedia™
VIDEOon
OUT
White Balance (W.B.)
Write
Protection
Removing
the Batteries
ISO
[ POWER
]
AUTO
OFF
Setting items
Turning
the
Power
Off
Using
the
LCD
Monitor
Additional
Information
Other
Applications
Handy
Functions
Erasing
Images
Playing
Back Images
Taking
Photographs
Tab menu
feed
Positive
(+)
Compensation
The
tab
is
displayed.
setting
isbattery
as
follows:
Make
sure
that
the
issystem
firmly
closed.
Details
image
ofmenu
operation
isrange
saved
are
or
erased,
the
same
and
as
the
taking
camera
photographs
is
then
ready
and
to
playing
take
photographs.
them
back
onon
the
LCD After
monitor.
If
you
use
the
viewfinder
to
take
photographs,
the
photography
Set
the
mode
to
[cover
].settings
direction
of
the
arrow
to
open
cover
.1-frame
ENTER.
change
the
white
and
the
metering
in(the
program
mode.
erased
SmartMedia™.
and
reused.
For
details
on
these
accessories,
refer
to
the
Instruction
Manual
for
the
accessory
you
are
using.
(information
Movies
images
in
the
multi
mode
Page
cannot
be
displayed
using
the
zoom
playback
Images
even
if the
are
camera
not
recorded
is
turned
directly
off.
SmartMedia™
but
are
stored
within
the
buffer
memory.
display
histograms,
etc.
prevents
failed
photographs
due
to
battery
wear
or
failed
of
data
to
a
PC.
details
handling
the AC
1
2
2x-speed
playback
Set
Sets
[•PRG
the
thebalance
whether
display
color
] photographed
:(/or
Photography
mode
language
not
to
and
return
photographic
of
in
menus
the
program
displayed
sensitivity
in
the
(default)
on
SETUP
the
at51)
which
LCD
(temporarily
MENU
Page
monitor.
the
to
image
62)
the
original
is For
to
be
factory
recorded.
settings.
For
enlarged
P.dial
22)
feeds
the
image
•transfer
Each
press
of
➲
2
Copying
of
printed
(black
characters
on
white
paper)
set
the
time
(text
114)
F8
/view
F6.8
F5.6
/18.
F4.8
/Page
F4.0
/and
F3.4
/mode
F2.9
How
to
take
photographs
Page
41
1/1000,
1/750,
1/500,
1/350,
1/250,
1/180,
1/125,
1/90,
range
may
differ
from
the
actual
image.
In
this
case,
use
the
LCD
Press
the
shutter
button
down
halfway
.
the
mode
dial
to
[
],
[
]
or
[
].
1
SmartMedia™
having
the
following
storage
capacity
can
be
used
on
your
camera.
current
as
of
March
2000)
feature.
The
last
cover
recorded
image
opens
frame
image
appears
appears
on
the
on
the
LCD
LCD
monitor.
monitor.
photography
is
finished,
check
the
images
record
the
selected
ones
to
SmartMedia™.
[TIME&DATE,
]
:
Erases
images
in
the
currently
selected
folder
and
folders.
Possible
number
of shots
adapter,
beSet
sure
to
read
page
•
2x-speed
playback
is
performed
for
2.
Make
sure
that
the
SmartMedia™
is
correctly
loaded.
(➲
Page
31)
by
one
frame.
Warning:
[•Memo
Av
]
Noise
:
OSD
Photography
increases
LANGUAGE
when
in
aperture-priority
will
the
not
ISO
be
is
reset.
changed
mode
to
(
higher
Page
settings.
63)
Backlit
portraits
IMPORTANT
[PROTECTED]
on
the
LCD
monitor,
cancel
the protection
( Page 108) or
remove
How
to
play
back
images
Page
80
1/60,
1/45,
1/30,
1/20,
1/10,
1/8,
1/6,
1/4,
1/3,
1/2,
monitor
for
photography.
AF
(auto-focus)
and
AE
(auto
exposure)
(the
Additional
Information,
SET-UP
(the
P.
[English]
:109)
English
(default)
➲
Pass
Set
out
mode
end
steps
of
dial
1the
to
to
shoulder
4[1/15,
either
]].LCD
or
inspeed-priority
[strap
“Photography
through
].
the
in
the
strap
Shutter
speed-priority
Mode”
isdisplayed
held
down.
the
duration
that
PC
mode
(mode
P.
121)
2MBCarry
Set
/4MB/8MB/16MB/32MB/64MB/128MB
the
mode
dial
to
[isin
(all
3.3
types)
]•the
adjust
:]When
Erases
the
all
brightness
folders
recorded
of
the
on
monitor
SmartMedia™.
Page
[mode
➲115
Self-timer
1
•V
1-frame
feed
is button
continued
for the
The
aperture
value
and
the
shutter
speed
corresponding
to
[•To
Tv
:write-protection
Photography
shutter
(inthat
Page
65)
Zoom
state
bright
scenes
(such
and
highly
reflective
subjects
Photography
mode
•the
You
can
also
carry
out
step
8snowfields)
while
verifying
the
image
step
7.
DPOF
(in
Page
102).
Glossary)
start
to
function.
0”7,
1”,
1”5,
2”,
3”,
4”,
6”,
8”,
10”,
15”
•Very
Do
not
remove
orV)
load
the
batteries
or
disconnect
or
connect
the
AC
adapter
while
the camera
is mode.
on.1This
]65)
:POWER
Japanese
[value
[NORMAL]
:(3.3
Equivalent
toas
color
ISO100
button
Carry
Set
Use
out
or
mode
steps
to
dial
select
1
to
to
2[erased,
the
“Manual
].
images
photographed
Settings”
(page
in
58).
the
multi
photography
You POWER
can also
connect
the
PC
card
adapter
and
floppy
disk
adapter
(➲
123)
sold
separately
to transfer
SmartMedia™
Changing
the
LCD
monitor
display
Page
116
The
images
or
folders
are
and
the
camera
returns
toPage
the
is
held
down.
duration
that
are
displayed
on
the
LCD
monitor.
If
the
appropriate
(page
attachment
or
on
in
“Photography
the
camera.
in
the
Full
Manual
Mode”
(page
67).
Press
the
button
to
turn
the
power
on.
full
manual
mode
(
Page
67)
[
M
]
:
Photography
in
Image
Quality
button
Press
the
MENU
button.
•[2X]
Shots
made
up
predominantly
of
sky
Even
if
photography
is
terminated
midway
before
capturing
three
images
by
releasing
the
shutter
•
If
you
take
a
photograph
after
erasing
an
image,
a
number
continuing
from
the
last
photographed
When
AF
or
AE
are
locked,
the
beep
tone
(
Page
111)
sounds
and
the
Use
or
to
change
the
setting
in
the
tab
menu,
might
return
the
manual
settings
to
their
defaults.
If
this
happens,
manually
set
conditions
again.
:connect
High-sensitive
equivalent
to preset
color
(default)
• Before
you
oreven
disconnect
the
AC
adapter,
be
sure
to turn
thedisplay
camera
OFF.
If the
AC adapter is
Press
the
image
quality
button
to
select
the
combination
cannot
be
set
ifphotography
the
shutter
speed
isas
adjusted
toISO200
images to a
PC.
16MB
(SM-M1600D)/32MB
(SM-M3200D)/64MB
(SM-M6400D)/128M
(SM-M1280D)
The
respective
last
image
mode.
frame
appears
on
LCD
monitor.
You
can
also
select
the
image
by
the
same
operation
for
thumbnail
Page
83).
Carry
out
steps
1
to
on
page
109.
When
the
camera
is
turned
on,
set
the
mode
dial
to
the
desired
The
shutter
speed
and
the
aperture
value
corresponding
todisplay
the
Reverse
playback,
2x-speed
playback
All
descriptions
inor
this
Instruction
Manual
are
for
when
the
language
is (2set
to [ENGLISH].
Press
or
to
select
the
image.
button,
images
already
photographed
can
be
saved
and
erased
by playback
the
method.
image
is
assigned
as
image
number.
ShutterThe
button
Negative
(–)
Compensation
viewfinder
RECORDING
LED
turns
MENU
green.
is2
displayed.
•press
The
image
the
photograph
is
taken
is
slightly
less
clear
than
images.
(This
is 109,
connected
disconnected
with
the
power
ON,
camera
settings
may
beabove
reset
(SET-UP
➲ Page
and
ENTER.
:before
High-sensitive
photography
equivalent
to
color
ISO400
its
limit,
the
shutter
speed
isthe
displayed
inthe
red.
Reverse
1-frame
feed
To [4X]
cancel
erasing
of
image
data,
select
[monitor.
]Photography,
and
press
ENTER.
Flash
button
quality
and
size,
while
viewing
indication
on
the
starts
a
reverse
•
The
press
of
mode.
shutter
speed
are
displayed
on
the
LCD
If
the
appropriate
The
length
of
time
to
capture
images
varies
according
to
the
photographic
conditions.
•
Images
can
also
be
erased
in
the
thumbnail
mode.
In
this
case,
the
camera
enters
the
single
frame
Select
[SYSTEM
INFO.]
on
the
SETUP
MENU
and
because
television
displays
images
at
a
lower
resolution.)
•
Spotlit
subjects,
particularly
against
dark
backgrounds
Manual
Settings
➲
Page
58)
or
the
camera
may
malfunction.
however,
is
possible
in
this
state.
feeds
the
image
•
Each
press
of
EXP.
].
To
cancel
changing
of
settings,
press
.
Use
or
to
select
the
frame
you
want
to
enlarge.
Press
the
or
Zoom
to
switch
select
[
(
S/C
Page
].
21)
towards
“T”
to
begin
playback.
Floppy
Disk
Adapter
(FlashPath)
] mode:
is
selected,
[NO
IMAGE]
isaperture
displayed
after
allor
folders
When
playback.
Press
Set
mode
dial
inbe
the
to
[ sure
Tv
mode,
].the
or
press
in
the
shutter
button
fully
Before
photography,
make
that
the
lens
cap
has
been
2onisin.black
combination
cannot
set
even
ifflash
adjusted
to its
playback)
mode,
and
enters
the
thumbnail
playback
mode after the image is erased.
status
display.
]or
In
[[playback
Press
the
display/info
button.
Self-timer
photography
and]down
photography
are
not
possible.
•the
The
display
unit
varies
according
to
the
output
system.
•theCopying
of (frame
printed
text
(white
characters
paper)
.
press
reverse
by
one
frame.
This
adapter
allows
SmartMedia™
to
bespeed
asto
3.5"
floppy
disk.
have
been
erased
(unless
the
SmartMedia™
contains
protected
You
can
also
select
the
image
by
thein
same
operation
as
for
thumbnail
playback
(display
PageISO
83).P.
Automatic
playback
begins.
•[2X],
Playback
becomes
2x-speed
to
reduce
aperture
size.
Press
toused
increase
aperture
size.
Press
camera
takes
a
picture.
Status
23)
The
manual
setting
removed
the
camera.
limit,
aperture
value
isbe
displayed
red.
Photography,
however,
Playback
mode
(➲
P.
80)
the
[Scenes
M
]from
mode
to
set
the
shutter
0.7
second
Manual
During
the
ISO
will
automatically
set
between
ISO100
ISO200.
During
[4X],
be
To
set
the
quality
and
size
Page
112
•the
With
the
NTSC
system,
images
can
be
displayed
simultaneously
on the
LCD
monitor
and( ➲
TVwill
during
•photograpy
with
low
reflectivity,
such
as
shots
green
or
dark
foliage
Flash
state
Each
press
of
the
display/info
button
switches
the
display
•of1-frame
feed
isand
continued
The
SYSTEM
INFO.
menu
displayed.
reverse
for
the
duration
This
adapter
isplayback
inserted
into
the],
floppy
your
PC,
allowing for the
images).
The
viewfinder
LED
turns
redis
image
data
being
recorded
onto
Insert
the
adapter
connector
plug
into
the
DC
IN
Self-timer
lamp
values
are
displayed
In
the
photography
modes
([while
[and ISO400.
]disk
oris
[ drive
]),on
the
lens
photography
and
playback.
is
possible
inAC
this
state.
automatically
set
between
ISO100
is
held
down.
format
as
follows:
duration
that
Note:
The
larger
the
F
value,
the
smaller
the
aperture
size
become
or
longer.
•Press
Remove
and
insert
SmartMedia™
with
the
camera’s
power
turned
off.Aperture value
is
held
down.
that
To
quit
the
SETUP
MENU,
change
the
mode
dial
setting.
Shutter
speed
Adjust
the
zoom
ratio
by
the
Zoom
switch.
(Zoom
to
display
option
menu,
press
or
to
images
recorded
on
the
SmartMedia™
to
be
transferred
to
the
PC.
the
SmartMedia™.
Sets
video
output
system
according
to
country
in
which
your camera
isSize
used.
on
the
left
ofthe
the
LCD
Press
the
shutter
button
down
halfway
and
press
5V
terminal
on
the
camera.
extends
from
the
camera
body.
•the
PAL
system,
images
cannot
bethe
displayed
When a cable
is connected, only
and
versa.
1 situations
the
image
quality
button
switches
the
quality
and
size
Gently
insert
the
SmartMedia™
as
far
as
it, simultaneously.
can
go
[Pressing
]vice
isWith
displayed
on
the
LCD
monitor.
Viewfinder
LED
•select
Recorded
data
may
bepress
erased
(destroyed)
in
the
listed
below.Viewfinder
Note that Toshiba
White
Balance
Additional
Information,
Glossary
to
increase
shutter
speed.
Pressand
to
decrease
shutter
speed.
Press
Press
or
to
move
forward
reverse.
Memo
PRG
]
and
ENTER.
]
and
press
ENTER.
[
switch
Page
21)
TV
display
is
available.
monitor
screen.
When
the
camera
is
turned
on,
the
Auto
Power
OFF
function
Canceling
pause
✩✭✰✯✲✴✡✮✴
settings
infully
the
following
order.
it
down
. system
2next
Press
or
to
select
the
item
you
desired
toMeaning
set,
Pause
with
the
SmartMedia™
electrodes
(metal
contacts)
Additional
Information,
Glossary)
[NTSC]
:allNTSC
(white
Corporation
accepts
no
whatsoever
for
the
loss
of
recorded
data enters
in these
•Adapter
When
images
in
a responsibility
folder
are
erased,
that
folder
itself
is
also(destruction)
erased.
Quality
The
camera
determines
the
balance
by
averaging
the
various
kinds playback
of light
that actually
AC
to
to
frame/
to“T”
go
back
one
To
prevent
valuable
data
being
erased,
attach
the
write•••advance
With
the
PAL
images
are
played
back
with
apressing
black
frame
•frame
After
pause
is
cancelled,
the
switch
to
the
will
the
image.
Pressing
ENTER
the
setting.
or
,, SmartMedia™
and
manual
Exposure
compensation
Page
69)
using
Colorthe
When
[Zoom
M
]selects
isissystem,
selected
on
the
[ halfway
EXP.
]remove
option
menu,
orsurrounded.
the
shutter
speed
setting
becomes
operational.
State
Never
open
the
SmartMedia™
cover
orenlarge
the
while
anmakes
is
being
recorded.
This
or
and
manual
setting
(image
Page
58)
or
film
speed
Exposure
compensation
((from
Page
69)
using
Play
back
Reverse
procedure
“Loading
the
Batteries”
and
remove
the
batteries.
•facing
Pressing
the
shutter
button
down
adjusts
the
exposure,
• Playback
paused.
[PAL]
:for
PAL
system
( camera.
Additional
Information,
Glossary)
situations:
Built-in
microphone
the
lens.
This
setting
allows
you
to
set
in
advance
the
white
balance
when
taking
photographs
under
and
press
ENTER.
the
rear
of
the
For
the
US/Canada:
PDR-ACM1A
Holding
down
or
moves
forward
or
reverse
continuously.
resumes
at
the
last
state
that
was
protect
sticker
at
the
write-protect
area.
Data
can
no
longer
be
Focus
area
may
corrupt
the
data
on
the
SmartMedia™
or
damage
the
SmartMedia™
itself.
possible,
but
does
not
make
the
exposure
compensation
possible. HoweverSelf-timer
the exposure
value
is
To
return
normal
press
the
Zoom
switch
towards
setting
Page
58)magnification,
or film
speed
setting
( the
Page
78)
using
ENTER
Pass
the
shoulder
strap
through
loop
and
pull.
photography
setting
(( toPage
78)
using
ENTER
are
also
possible.
and
pressing
the
shutter
button
fully
takes
the
shot.
TM[ is down
When
the
SmartMedia™
used
incorrectly
by
the
user
or
a
third
party
[
],
]
or
[
]
AE
or
AF
are
locked
with
the
shutter
button
held
half
specific
lighting
conditions.
For
Europe:
PDR-ACM1E
active
before
the
pause.
Firmly
insert
the
SmartMedia
as
far
as
it
can
go.
displayed
on is
the
LCD
monitor.
Press
ENTER.
recorded
or setting
erased
from
SmartMedia™.
Toon
write
oraterase
data
from is to be recorded. Write-protect
Flash
Sets
the
color
mode
and
photographic
sensitivity
which
the
image
“W”.
are
also
possible.
The
default
different
depending
the
destination
country/area.
Use
or
to
select
the
desired
item
Press
ENTER,
nine
images
are
displayed
simultaneously.
•[FIRMWARE
If
you
shoot
a
still
picture,
when
preview
is
set
to
ON
(
Page
77),
1
down.
If
no
operation
is
carried
out
for
a
fixed
amount
of
time
(default:
about
one
minute),
power
ON
When
the
SmartMedia™
is
exposed
to
static
electricity
or
electrical
noise
Auto
Photography
mode
(
P.
41,
46)
✭❅❍❏
➲
Forimage
the Noise
UK:is
PDR-ACM1U
VER.]
:off
Displays
the
firmware
version
ofto
this
camera.
areait down
Stop
SmartMedia™,
peel
the
sticker.
camera
ready
to
take
photographs.
Warning:
increases
when
the
ISO
is
changed
higher
settings.
displayed
and
a
white
frame
and
green
Green The
Compose
picture,
press
the
shutter
button
down
halfway,
and
press
[the
AW
] no is
:the
Automatic
adjustment
(default)
Thumbnail
Display
Page
83
recorded
image
is
displayed
on
for
about
two
]specifications
Standby
mode
[enlarged,
••-For
If
operation
is
carried
out
a screen
fixed
amount
offrom
time
(default:
about
1shutter
minute),
thewear.
power
iserasing
turned
TM
consumption
is
set
to
its
minimum
state
(power
almost
off)that
to
prevent
battery
This
isdown
.in
and
press
When
the
SmartMedia™
isfor
removed
ordarkens
the
camera
isPage
turned
off
while
recording
The
image
the
LCD
monitor
sometimes
the
time
the
button
isdata,
pressed
Speaker
details,
refer
to
the
of
AC
information.
adapter
127.
[CARD
INFO.]
: on
Displays
the
SmartMedia
Playback
returns
to
the
start
ofturned
the
movie.
frame
are
displayed
the
LCD
monitor.
]
:
Photography
outdoors
[
Default
setting:
seconds.
off
to
preserve
battery
life.
This
is
called
“Auto
Power
OFF”.
To
return
to
the
normal
state,
press the
fully.
Page
40
called
the
Auto
Power
OFF.
This
setting
allows
you
to
set
the
time
when
the
camera
turns
off
halfway
until
the
image
becomes
focused.
[NORMAL]
: picture,
Equivalent
to
color
ISO100
(default)
data,
frame
advance
when
images
aredefaults.
being
played
back or during
formatting
of the
DC
IN
5V
terminal
The
options
are
displayed.
Histogram*
2
Stop
[RESET]
:
Returns
settings
to
their
Flashing
[
],
[
]
or
[
]
Self-timer
in
operation
at
a
handshake
alarm
.
Compose
the
press
the
shutter
button
down
halfway,
and
press
itdirectly
down
The
white
frame
indicates
the
entire
image,
while
the
greenrecorded
frame halfway,
[[2X]
]POWER
:the
Photography
in
cloudy
conditions
button
again.
ENTERCompose
• The
viewfinder
LED
turns
red
while
image
data
is
being
picture,
press
the
shutter
button
press
down
• The
To
set
the
focus
or
exposure
for
a subject
outside
the
center
the intended
point
the
The
camera
takes
the
picture.
automatically.
This
function
is
not
activated
during
automatic
playback
( image,
Pageand
85) or
incamera
the it
[ only>
] PC
:appearing
High-sensitive
photography
equivalent
toofdown
color
ISO200
SmartMedia™.
Note:
image
through
the
lens
will
be
The
display
returns
to<Histogram>
thumbnail
playback.
<Standard>
<Detailed
information>
<Image
shows
the
location
of
the
currently
enlarged
area.
halfway,
and
press
it
down
fully.
Page
40
Macro
photography
]
:
Photography
in
bluish
fluorescent
light
[
fully.
Page
40
Setting
1
:
About
the
Auto
Power
(FULL
OFF
Function
)
➲
Additional
Information,
“AUTO
POWER
OFF
(page
110)”
☞
at
the
subject
or
desired
exposure
(lighting),
press
and
hold
the
shutter
button
halfway.
Now,
with
the
shutter
onto
the
SmartMedia™.
ON]
Writing
to SmartMedia™
in progress
mode.
Press
ENTER.
[4X]
:adapter
High-sensitive
photography
equivalent
toanother
color
ISO400
•Insert
We
recommend
copying
and
saving
important
datapower
onto
storage
medium (floppy
disk, hard
displayed
for
[LCD
].[Power
fully.
Page
40
the
AC
power
plug
into
the
Electrodes
Pressing the
The
default
size
and
quality
of
the
image
can
be
reset
to
the
desired
combination.
Press
ENTER.
Memo
Sticker
button
still
held
halfway
down,
you
can
turn
the
direction
of
the
camera
and
frame
your
image
with
the
focus
•
It
is
possible
to
play
back
any
images
in
any
folders
by
pressing
or
during
playback.
(For
details
ON
Increases
the
volume.
[disk,
] MO
: Photography
inafter
reddish
fluorescent
light
The
camera
takes
the
picture.
Photographs
can
be
taken,
however,
do not
turn thepress
power
OFF.
To
return
to disk,
the
normal
state
theset
Auto
Power
OFF
has been
executed,
the
POWER
button
etc.).
The
PREVIEW
manual
setting
Page
items
77
are
displayed.
Remaining
power
camera
takes
the
atmonitor.
the
exposure
time.
Zoom
switch
tobattery
“T”
Current
Entireofimage
and
locked.
Press
the
button
down
fully
to in
complete
capturing
the image.
Red outlet.
[In
on picture
the
LCD
The
camera
is ready
for
burst
photography.
of2displayed
folder
Page
92)
]:the
mode:
the
Accessing
of
SmartMedia™
[ (HALF
Photography
in] is
incandescent
light
[Never
Setting
: exposure
•]][is
When
shutter
speed
setshutter
to
a)turn
speed
of
0.7 second
orprogress
slower,
photographs
taken
as extended
PC/AV
terminal
to
turn
the
power
on 77
again.
•During
remove
the
SmartMedia™
or
the
camera
offresult
while
recording
data or are
while
erasing
data
COLOR
Page
the
exposure,
the
viewfinder
LED
turns
orange.
position
Pressing the
•
Moving
the
camera
as
you
press
the
shutter
button
will
in
a
blurred
image.
Use
,
,
or
to
select
the
area
to
enlarge.
the
last
image
displays
the
first
image,
and
pressing
atwill
thebe
firstautomatically
image
displays
the
Pressing
During
[2X],
the
ISO
be
automatically
set
to
ISO200.
During
[4X],ofISO
setof
exposures
( at Page
68).
IfCarry
burst
photography
is to
set
the
shutter
speed
is setthe
to volume.
athe
speed
0.7
second
or more
in the
[ to
Tv ]
Decreases
out
steps
1will
2when
in
Photographic
(SmartMedia™
formatting).
actions
might
damage
ISO
Page
78
Flashing
ItClose
about
twice
the
time
to while
complete
taking
the
photograph
duePDR-M81
to processing
ofenlargement
the
captured
[set
],These
[“Basic
] When
the
image
is not
in SmartMedia™.
focus.
the
SmartMedia™
cover.
Zoom switch
to
“W”
Memo
•
The
PDR-M81
usesto
an
accurate
auto
focus
mechanism.
However,
the
may
have
difficulty
last
image.
Adjust
the
display
area
enlarge
viewing
the
white
and
Slow
shutter
speed
warning
[1takes
MINUTE]
(default)
ISO400.
Shutter
speed
• In
AEB
photography
(
Page
71)
or
burst
photography,
the
shutter
speed
cannot
be
set
to
0.7
second
or
longer.
Setting
3
:
(SMALL
)
mode,
the
shutter
speed
is
automatically
changed
to
1/2
second.
Lens
•
Use
only
the
SmartMedia™
specified
for
use
with
the
PDR-M81.
The
use
of
other
SmartMedia™
SHARPNESS
Page
79
mode)”
(page
109).
Select
[QUALITY]
Settings
(
focusing
or
not
be
able
to
focus
at
all
for
subjects
and
situations
such
as
the
following:
image.
Before
you
use
aother
new
SmartMedia™
the
first during
time,
be
sure
tothe
Manual
Photography
mode
( ➲ P.isspeed
58)
Images
can
bevalue
rotated
by] pressing
playback.
Movie mode
(•••➲
P.
75)
Difference
between
[PRG]
and
[ for
] or
green
frames.
[2 MINUTES]
the
aperture
is
to
F2.9
(maximum
aperture
size),
increased
shutter
speed
restricted
If
a
mode
than
[ set
suppressed
flash
mode
is
set
inthe
flash
photography,
thedark
shutter
is
•79
Processing
image
Aperture
Exposure
compensation
- When
subject
is distant and
- SmartMedia™
Subjects
moving
at
high
speed
could
damage
the
camera.
CONTRAST
Page
• to
The
write
protection
may
not
function
if in
write-protect
sticker
becomes
Use
a soft
dry cloth to
.thesecond.
on
the
SETUP
MENU
and
press
format
the
(➲
Page
91).
an
image
counterclockwise,
and
pressing
rotates
clockwise.
Pressing
1/750
PDR-ACM1A
] •are
the
same
as
to
PDR-ACM1E
PDR-ACM1U
[PRG]
and
[ rotates
limited
tosecond.
between
1/2
second
and
1/250
* The
aboveitdirty.
menu
is
the
RECORDING
[3 MINUTES]
Charging
of
flash
progress
ON
✣❏■▼❉■◆❏◆▲
❐❈❏▼❏❇❒❁❐❈❙
When
there
are
objects
in
front
of
or
behind
the
subject
Very
shiny
subjects
such
as
a
mirror
or
car
body
SmartMedia™
is
aofisprecision
device.
Do do
notnot
bend,
drop,
or subject
SmartMedia™
to
DIGITAL
ZOOM
Page
• wipe
When
the
camera
isOnce
not79
inelectronic
be sure
to attach
the
lens
cap
provided
with[your
camera.
the
POWER
button
to
turn
the
power
off.
away
any
dirt.
ause,
sticker
ispress
peeled
off,
reuse
it.
Orange•Press
The
QUALITY
menu
displayed.
combinations
the
automatically
mode.
MENU
inthe
•the
The
aperture
value
set
differ
to
the
actual
value
according
to
the
position
ofUK)
theorzoom
lens.
To
return
to
the
regular
display,
ENTER.
(Photos
cannot
be
taken
at
this
moment.)
(for
US
and
Canada)
If the
shutter
speed
is
set
to
1/350
second
or
less,
the
shutter
as
speed
an
animal
is
automatically
athe
cage
a]changed
person
in front
to 1/250
of a tree)
(for
European
Continent)
(for
Get
ready
to
take
the
photograph.
- above
Extremely
low
contrast
subjects
When
the
settings
are
made,
they
are
displayed
in(such
thepocket
following
order.
✥❘❐❏▲◆❒❅
✣❏❍❐❅■▲❁▼❉❏■
Memo
DC
IN
5V
terminal
excessive
shocks.
Also,
do
not
carry
SmartMedia™
the
ofx[trousers.
This
might
The
lens
cap
can
also
be
attached
to
attachment
following
the
above
steps
to prevent
it’sthe
LCD
79
The
power
turns
off.
✭❅❍❏
determined
shutter
speeds
and
aperture
-in Subjects
with
little
reflection,
such
as
hair
fur mode.
•• The
size
displayed
on
the
LCD
monitor
FULL
(320
240)
HALF
(160
xorsubject
120).
The
]becomes
forced
flash
mode
or
]orred-eye
forced
flash
second
ifPage
the
flash
setting
is25)
changed
tothe
thestrap
[ ✡✥✢
- image
Subjects
that
have
low contrast
and
merge
into
Loading
the
batteries
(
Page
and
the
SmartMedia™
(
Page
31)
into
the
camera.
being
lost.
• Flash
photography
and
burst
photography
are
not
possible.
Flashing
SmartMedia™
to
excessive
force
when
you
sit
down,
damaging
the
SmartMedia™.
Hardware
malfunction
Subjects
with
no
solidity,
such
as
smoke
or
flames
the
background
(such
as
white
walls
or
subjects
Attach
the
lens
cap
when
you
are
not
using
the
camera.
values.
However,
their
operation
capability
movies
made
in
FULL
size
is
displayed
on
the
entire
LCD
monitor,
and
those
made
in
HALF
size
is
If
the
[
]
forced
flash
or
[
]
red-eye
forced
flash
mode
is
set
in
flash
photography
when
the
•
In
movie
mode,
ISO
will
be
automatically
set
between
ISO100
and
ISO400
regardless
of
its
setting.
* •Use
Histogram
❍❅▼❅❒❉■❇
dressed
inthe
theSmartMedia™
same
color
as
thelens
background)
-attach
Subjects
viewed
through
glass
Turn
offor
the
power
tothe
retract
the
unit,
and ✳❐❏▼
then
the
lens
cap.
The
image
taken
in
exposure
photography
mode
may
be
blurred.
or
to
select
the
desired
setting
from
the
tab
menu
, and
press
Do•not
use
store
in
environments
likely
to
be
affected
byisstatic
electricity
or
is
different
as
shown
in
the
right
table.
displayed
in
center
ofspeed
the
screen.
2
shutter
speed
is
set
to
a
of
0.7
second
or
more,
the
shutter
speed
automatically
changed
to
Press
POWER
button
tothe
turn
power
on.
A electrical
histogram
isturn
a graphic
representation
ofthe
theistones
of the
subject.
The
horizontal
histogram
✷❈❉▼❅
❂❁●❁■❃❅
▲❅▼▼❉■❇
• Do
If the
the
image
cannot
be
focused,
thelens
focus
automatically
fixed to infinity.
(When theaxis
flashofisthe
necessary
not
the
power
on
with
cap
attached.
noise.
1/2
second.
ENTER.
*the
The
above
AC adapter
is US/Canada
Turning
the
Power
On
Page
38
shows
the
brightness
(increasing
brightness
from
left
to
right)
and
vertical
axis
shows
the
number
at
this
time,
it
is
simultaneously
fixed
to
illuminate
objects
1.5
meters
(five
feet)
away.
During
macro
•This
Dosaves
use
orsettings,
store
SmartMedia™
very
hot,
humid
oraperture
corrosive
If the
shutter
speed
value
isimages,
set toin1/1000
second,
the
value
is limited
to
F8type
andAC
F3.4.
•• not
When
playing
back
movie
switching
isthe
between
standard
and
image
only.
(O
:environments.
possible
Xbetween
: not
the
and
returns
to
RECORDING
MENU.
type.
European
andpossible)
UK
photography,
the flash
islevel.
alignedthe
withdisplay
the wide
position.)
of pixels
at each brightness
Downloaded From
camera-usermanual.com
adapters differ in shape.
--110
20 -40
80
88
About SmartMedia™ (continued)
Getting
Ready
Removing SmartMedia™
IMPORTANT
Playing
Back Images
Press the POWER button to turn the power off.
☞ Turning the Power Off ➲ Page 38
Slide the SmartMediaTM cover release knob in the
direction of the arrow 1 to open the cover 2.
2
1
Erasing
Images
The cover opens 2.
Taking
Photographs
• Never open the SmartMedia™ cover or remove the SmartMedia™ while data is being recorded to the
SmartMedia™ (viewfinder LED is lit red). This might damage the SmartMedia™ or corrupt the data on
the SmartMedia™.
Handy
Functions
If you push SmartMediaTM once in as far as it can go, it will protrude
slightly. Pull it out with your fingers.
Other
Applications
Push the SmartMediaTM in as far as it can go, and
pull it out with your fingers.
Additional
Information
Downloaded From camera-usermanual.com
- 33 -
Changing
the
Preset
Conditions
(RECORDING
MENU)
Photography
in
the
Program
Mode
Setting
Names
Playing
Back
the
of
Photographed
Parts
Image
Size
and
Quality
(Single-Frame
Playback)
Extended
Exposure
Photography
(Bulb
Photography)
Erasing
Images
(Erase
Frame)
(continued)
Manual
Attaching
Using
How
Taking
Enlarging
Playback
About
Turning
to
Photographs
the
SmartMedia™
Press
Settings
the
Photographed
of
Power
the
Power
Multi
Shoulder
Continuously
Outlet
Shutter
Image
On/Off
Images
Strap
Pictures
Button
(Zoom
(Burst
Playback)
Photography)
Taking
Erasing
Button
Photographs
Folders
and
(All
LCD
Images
Continuously
Monitor
in
aImages
Folder/All
(Burst
Display
Photography)
Folders)
(In
Playback
(continued)
(continued)
Mode)
Definitions
Separately
of
the
Accessories
Color
of
the
Viewfinder
LED
Taking
and
Playing
Back
Photographs
on
aMode
TV
(continued)
Changing
the
Preset
Conditions
(RECORDING
MENU)
(continued)
Exposure
Compensation
in
the
Shutter
(continued)
Speed-priority
(continued)
About
Basic
Settings
SmartMedia™
in
(Sold
the
mode)
Aperture-priority
(continued)
Mode
(continued)
LCD
Monitor
Display
(during
photography)
(continued)
Manual
Settings
(continued)
Playing
Photography
Installing
Back
Movies
batteries
(Auto
Photography)
(continued)
(continued)
(continued)
Names
of
Parts
(continued)
Getting
Ready
The shutter
camerabutton
automatically
adjusts the
shutter
and
the aperture
value
according
to the
brightness
of an
can be pressed
down
in twospeed
stages:
halfway
down and
fully
down. When
pressed
halfway
down,
This
“SmartMedia™”
Set
Play
Automatically
The
the
following
mode
shoulder
menu
back
size
photographed
is(number
used
for
items
strap
plays
setting
isadapter
for
athe
is
are
back
storage
of
taking
handy
also
the
pixels)
still
the
basic
available
subjects
for
medium
images
16
and
carrying
images
settings
quality
one
for
that
as
saving
separately
your
image
to
require
(compression
be
camera
used
images
atseveral
a
sold
for
around.
inthat
photography
items.
ratio)
seconds
the
you
multi
of
have
the
photography
to image
photograph
in
photographed.
to
[ second
be
mode
],photographed.
such
[be
Even
in
asquick
]for
firework
or
if Europe,
the
[You
succession.
camera’s
displays
] photography
power
at the
Enlarges
selected
portions
of
images
being
played
back
at
two
levels.
Images
can
displayed
enlarged
when
In
You
this
can
color
mode,
manually
of
the
photographs
viewfinder
adjust
settings
are
LED
taken
indicates
such
continuously
asphotographed
the
exposure
state
atof
control,
atime.
the
maximum
camera.
white
speed
balance,
The
ofthe
0.8
metering
system,
intervals.
continuous
This
item
switches
display
on
the
LCD
monitor
when
playing
back
photographed
images.
can
switch
If
you
the
AC
(sold
separately:
PDR-ACM1A
for
the
US/Canada,
PDR-ACM1E
PDR-ACM1U
Mode
Effective
dial
Subjects
and
Set
Values
TM
Press
.of
aperture
value.
SYSTEM
Turning
Exposure
ISO
OSD
In
[prevent
[use
LANGUAGE
the
]the
INFO.
mode
control
(EXP.)
On
Close
the
SmartMedia™
cover.
Slide
the
SmartMedia
cover
release
knob
in
the
Take
photographs
or
or
battery
to
to
select
or
play
[that
the
slide
]them
or
shutter
it
[ the
back.
,]will
and
speed.
and
lock
press
Look
Use
through
to
select
the
[adjust
viewfinder
]use
and
press
to
compose
ENTER.
the
picture.
To
continue
erasing
images,
repeat
the
above
procedure
2.
.is
AF
(auto-focus)
and
AE
(auto
exposure)
are
set.
When
pressed
fully
down,
the
camera
takes
aspace
picture.
object.
This
mode
enables
carefree
photographing
similarly
to
selecting
[stable
]photographs.
in
[ from
]settings”,
mode.
Itrepeatedly
is
to
night.
To
is
Change
modes.
turned
When
the
OFF,
your
setting
using
the
camera
images
this
according
mode,
from
saved
dropping
be
to
sure
how
on
the
the
to
during
SmartMedia™
image
a(size,
photography,
tripod
is
to
to
be
keep
used
not
hang
the
and
be
camera
erased.
the
the
shoulder
remaining
SmartMedia™
strap
and
amount
prevent
around
can
ofstep
your
distortion
be
neck.
inpossible
the
of
images.
Relationship
between
your
camera
and
accessories
Connecting
tocalled
Other
Devices
(page
123)
being
played
back
one
image
at
acover,
time.
The
meaning
maximum
of
number
LED
color
of
photographs
differ
according
can
to
be
taken
mode
continuously
dial
setting.
three
photography
mode,
and
take
photographs
at
these
settings.
These
are
“Manual
which
are
saved
display
to
show
aPower
list
detailed
information
compression
ratio,
shutter
speed,
aperture,
etc.)
or
you
can
for
the
UK)
in
a
room
with
amay
power
outlet,
you
can
take
photographs
for
an
extended
period
of
time.
This
also
Mode
dial
1 Item
QUALITY
2 Options
Notes
SmartMedia™
VIDEOon
OUT
White Balance (W.B.)
Write
Protection
Removing
the Batteries
ISO
[ POWER
]
AUTO
OFF
Setting items
Turning
the
Power
Off
Using
the
LCD
Monitor
Additional
Information
Other
Applications
Handy
Functions
Erasing
Images
Playing
Back Images
Taking
Photographs
Tab menu
The
tab
is
displayed.
setting
isbattery
as
follows:
Make
sure
that
the
issystem
firmly
closed.
Details
image
ofmenu
operation
isrange
saved
are
or
erased,
the
same
and
as
the
taking
camera
photographs
is
then
ready
and
to
playing
take
photographs.
them
back
onon
the
LCD After
monitor.
If
you
use
the
viewfinder
to
take
photographs,
the
photography
Set
the
mode
to
[cover
].settings
direction
of
the
arrow
to
open
cover
.the
ENTER.
change
the
white
and
the
metering
in(the
program
mode.
erased
SmartMedia™.
and
reused.
For
details
on
these
accessories,
refer
to
the
Instruction
Manual
for
the
accessory
you
are
using.
(information
Movies
images
photographed
in
the
multi
mode
Page
cannot
be
displayed
using
the
zoom
playback
Images
even
if the
are
camera
not
recorded
is
turned
directly
off.
SmartMedia™
but
are
stored
within
the
buffer
memory.
display
histograms,
etc.
prevents
failed
photographs
due
to
battery
wear
or
failed
of
data
to
a
PC.
details
handling
the AC
Set
Sets
the
thebalance
whether
display
color
:(/or
Photography
mode
language
not
to
and
return
photographic
of
in
menus
the
program
displayed
sensitivity
in
the
(default)
on
SETUP
the
at51)
which
LCD
(temporarily
MENU
Page
monitor.
to
image
62)
the
original
is For
to
be
factory
recorded.
settings.
For
enlarged
P.dial
22)
feeds
the
image
•transfer
Each
press
of
2
•How
Copying
of
printed
(black
on
white
paper)
set
the
time
(text
114)
F8
/view
F6.8
F5.6
/18.
F4.8
/Page
/and
F3.4
/mode
F2.9
to
take
photographs
Page
41
1/1000,
1/750,
1/500,
1/350,
1/250,
1/180,
1/125,
range
may
differ
from
the
actual
image.
InLCD
this
case,
use
the
LCD
Press
the
shutter
button
down
halfway
.1/90,
the
mode
dial
to
[ F4.0
],
[characters
]reset.
or
[selected
].higher
1one
SmartMedia™
having
the
following
storage
capacity
can
be
used
on
your
current
as
of
March
2000)
feature.
The
last
cover
recorded
image
opens
frame
image
appears
appears
on
the
on
the
LCD
monitor.
monitor.
photography
is
finished,
check
the
images
record
the
ones
tocamera.
SmartMedia™.
[TIME&DATE,
]
:
Erases
images
in
the
currently
selected
folder
and
folders.
Possible
number
of shots
adapter,
beSet
sure
to
read
page
•
2x-speed
playback
isaperture-priority
performed
for
Make
sure
that
the
SmartMedia™
is
correctly
loaded.
(
Page
31)
by
frame.
Warning:
Noise
:
OSD
Photography
increases
LANGUAGE
when
in
will
the
not
ISO
be
is
changed
mode
to
(
Page
settings.
63)
Memo
•
Backlit
portraits
IMPORTANT
[PROTECTED]
on
the
LCD
monitor,
cancel
the protection
( Page 108) or
remove
How
to
play
back
images
Page
80
1/60,
1/45,
1/30,
1/20,
1/10,
1/8,
1/6,
1/4,
1/3,
1/2,
monitor
for
photography.
AF
(auto-focus)
and
AE
(auto
exposure)
(the
Additional
Information,
SET-UP
(the
P.
:109)
English
(default)
Pass
Set
out
mode
end
steps
of
dial
1the
to
to
shoulder
4[1/15,
either
]].LCD
or
inspeed-priority
[strap
“Photography
through
].
the
in
the
strap
Shutter
speed-priority
Mode”
isdisplayed
held
down.
the
duration
that
PC
mode
(mode
P.
121)
2MBCarry
Set
/4MB/8MB/16MB/32MB/64MB/128MB
the
mode
dial
to
[isin
(all
3.3
types)
To
]•the
adjust
: When
Erases
the
all
brightness
folders
recorded
of
the
on
monitor
SmartMedia™.
Page
115
[mode
Self-timer
1
•V
1-frame
feed
is button
continued
for the
The
aperture
value
and
the
shutter
speed
corresponding
to
:write-protection
Photography
shutter
( that
Page
65)
Zoom
state
•IMPORTANT
bright
scenes
(such
and
highly
reflective
subjects
Photography
mode
•the
You
can
also
carry
out
step
8snowfields)
while
verifying
the
image
step
7.
DPOF
(in
Page
102).
Glossary)
start
to
function.
0”7,
1”,
1”5,
2”,
3”,
4”,
6”,
8”,
10”,
15”
•Very
Do
not
remove
or monitor
load
the
batteries
or
disconnect
or
connect
the
AC
adapter
while
the camera
is mode.
on.1This
:POWER
Japanese
:LCD
Equivalent
toas
color
ISO100
button
Carry
Set
Use
out
or
mode
steps
to
dial
select
1
to
to
2[erased,
the
“Manual
].
images
photographed
Settings”
(page
in
58).
the
multi
photography
You POWER
can also
the
PC
card
adapter
and
floppy
disk
adapter
( in
123)
sold
separately
to transfer
Changing
the
display
Page
116
Theconnect
images
or
folders
are
and
the
camera
returns
toPage
the
is
held
down.
duration
that
value
are
displayed
on
the
LCD
monitor.
If
the
appropriate
(page
attachment
65)
or
on
in
“Photography
the
camera.
in
the
Full
Manual
Mode”
(page
67).
Press
the
button
to
turn
the
power
on.
full
manual
mode
(
Page
67)
:
Photography
in
Image
Quality
button
Press
the
MENU
button.
• •Shots
made
up
predominantly
of
sky
Even
if
photography
is
terminated
midway
before
capturing
three
images
by
releasing
the
shutter
•
If
you
take
a
photograph
after
erasing
an
image,
a
number
continuing
from
the
last
photographed
When
AF
or
AE
are
locked,
the
beep
tone
(
Page
111)
sounds
and
the
Use
or
to
change
the
setting
in
the
tab
menu,
might
return
the
manual
settings
to
their
defaults.
If
this
happens,
manually
set
conditions
again.
:connect
High-sensitive
equivalent
to preset
color
(default)
Before
you
oreven
disconnect
the
AC
adapter,
be
sure
to turn
thedisplay
camera
OFF.
If the
AC adapter is
Press
the
image
quality
button
to
select
the
combination
cannot
be
set
ifphotography
the
shutter
speed
isas
adjusted
toISO200
images to a
PC.
16MB
(SM-M1600D)/32MB
(SM-M3200D)/64MB
(SM-M6400D)/128M
(SM-M1280D)
The
respective
last
image
mode.
frame
appears
on
LCD
monitor.
You
can
also
select
the
image
by
the
same
operation
for
thumbnail
Page
83).
Carry
out
steps
1
to
on
page
109.
When
the
camera
is
turned
on,
set
the
mode
dial
to
the
desired
The
shutter
speed
and
the
aperture
value
corresponding
todisplay
the
All
descriptions
inor
this
Instruction
Manual
are
for
when
the
language
is (2set
to [ENGLISH].
Press
or
to
select
the
image.
button,
images
already
photographed
can
be
saved
and
erased
by playback
the
method.
image
is
assigned
as
image
number.
ShutterThe
button
viewfinder
RECORDING
LED
turns
MENU
green.
is2
displayed.
•press
The
image
the
photograph
is
taken
is
slightly
less
clear
than
images.
(This
is 109,
connected
disconnected
with
the
power
ON,
camera
settings
may
beabove
reset
(SET-UP
Page
and
ENTER.
:before
High-sensitive
photography
equivalent
to
color
ISO400
its
the
shutter
speed
isthe
displayed
inthe
red.
To limit,
cancel
erasing
of
image
data,
select
[monitor.
]Photography,
and
press
ENTER.
Flash
button
quality
and
size,
while
viewing
indication
on
the
starts
a
reverse
•
The
press
of
mode.
shutter
speed
are
displayed
on
the
LCD
If
the
appropriate
The
length
of
time
to
capture
images
varies
according
to
the
photographic
conditions.
•
Images
can
also
be
erased
in
the
thumbnail
mode.
In
this
case,
the
camera
enters
the
single
frame
Select
[SYSTEM
INFO.]
on
the
SETUP
MENU
and
because
television
displays
images
at
a
lower
resolution.)
•
Spotlit
subjects,
particularly
against
dark
backgrounds
Manual
Settings
Page
58)
or
the
camera
may
malfunction.
however,
is
possible
in
this
state.
feeds
the
image
•
Each
press
of
EXP.
].
To
cancel
changing
of
settings,
press
.
Use
or
to
select
the
frame
you
want
to
enlarge.
Press
the
or
Zoom
to
switch
select
[
(
S/C
Page
].
21)
towards
“T”
to
begin
playback.
] mode:
is
selected,
[NO
IMAGE]
isaperture
displayed
after
allor
folders
When
playback.
Press
Set
mode
dial
inbe
the
to
[ sure
Tv
mode,
].the
or
press
in
the
shutter
button
fully
Before
photography,
make
that
the
lens
cap
has
been
2onisin.black
combination
cannot
set
even
ifflash
adjusted
to its
playback)
mode,
and
enters
the
thumbnail
playback
mode after the image is erased.
status
display.
]or
In
[[playback
Press
the
display/info
button.
Self-timer
photography
and]down
photography
are
not
possible.
•the
The
display
unit
varies
according
to
the
output
system.
•theCopying
of (frame
printed
text
(white
characters
paper)
.
press
reverse
by
one
frame.
This
adapter
allows
SmartMedia™
to
bespeed
asto
3.5"
floppy
disk.
have
been
erased
(unless
the
SmartMedia™
contains
protected
You
can
also
select
the
image
by
thein
same
operation
as
for
thumbnail
playback
(display
PageISO
83).will23)
Automatic
playback
begins.
•[2X],
Playback
becomes
2x-speed
to
reduce
aperture
size.
Press
toused
increase
aperture
size.
Press
camera
takes
a
picture.
The
manual
setting
removed
the
camera.
limit,
aperture
value
isbe
displayed
red.
Photography,
however,
Playback
mode
( Status
P.
80)
the
[Scenes
M
]from
mode
to
set
the
shutter
0.7
second
Manual
During
the
ISO
will
automatically
set
between
ISO100
ISO200.
During
[4X],
be
To
set
the
quality
and
size
Page
112
•the
With
the
NTSC
system,
images
can
be
displayed
simultaneously
on the
LCD
monitor
and( TVP.
during
•photograpy
with
low
reflectivity,
such
as
shots
green
or
dark
foliage
Flash
state
Each
press
of
the
display/info
button
switches
the
display
•of1-frame
feed
isand
continued
The
SYSTEM
INFO.
menu
displayed.
reverse
for
the
duration
This
adapter
isplayback
inserted
into
the],
floppy
your
PC,
allowing for the
images).
The
viewfinder
LED
turns
redis
image
data
being
recorded
onto
Insert
the
adapter
connector
plug
into
the
DC
IN
Self-timer
lamp
values
are
displayed
In
the
photography
modes
([while
[and ISO400.
]disk
oris
[ drive
]),on
the
lens
photography
and
playback.
is
possible
inAC
this
state.
automatically
set
between
ISO100
is
held
down.
format
as
follows:
duration
that
Note:
The
larger
the
F
value,
the
smaller
the
aperture
size
become
or
longer.
•Press
Remove
and
insert
SmartMedia™
with
the
camera’s
power
turned
off.Aperture value
is
held
down.
that
To
quit
the
SETUP
MENU,
change
the
mode
dial
setting.
Shutter
speed
Adjust
the
zoom
ratio
by
the
Zoom
switch.
(Zoom
to
display
option
menu,
press
or
to
images
recorded
on
the
SmartMedia™
to
be
transferred
to
the
PC.
the
SmartMedia™.
Sets
video
output
system
according
to
country
in
which
your camera
isSize
used.
on
the
left
ofthe
the
LCD
Press
the
shutter
button
down
halfway
and
press
5V
terminal
on
the
camera.
extends
from
the
camera
body.
•the
PAL
system,
images
cannot
bethe
displayed
When a cable
is connected, only
and
versa.
1 situations
the
image
quality
button
switches
the
quality
and
size
Gently
insert
the
SmartMedia™
as
far
as
it, simultaneously.
can
go
[Pressing
]vice
isWith
displayed
on
the
LCD
monitor.
•select
Recorded
data
may
bepress
erased
(destroyed)
in
the
listed
below.Viewfinder
Note that Toshiba
White
Balance
Additional
Information,
Glossary
to
increase
shutter
speed.
Pressand
to
decrease
shutter
speed.
Press
Press
or
to
move
forward
reverse.
Memo
PRG
]
and
ENTER.
]
and
press
ENTER.
[
switch
Page
21)
TV
display
is
available.
monitor
screen.
When
the
camera
is
turned
on,
the
Auto
Power
OFF
function
settings
infully
the
following
order.
it
down
. system
2next
Press
or
to
select
the
item
you
desired
toisloss
set,
with
SmartMedia™
electrodes
(metal
contacts)
Additional
Information,
Glossary)
(white
Corporation
accepts
no
whatsoever
for
the
of
recorded
data enters
in these
• the
When
allNTSC
images
in
a responsibility
folder
are
erased,
that
folder
itself
also(destruction)
erased.
Quality
The
camera
determines
the
balance
by
averaging
the
various
kinds playback
of light
that actually
to
to
frame/
to“T”
go
back
one
To
prevent
valuable
data
being
erased,
attach
the
write••advance
With
the
PAL
images
are
played
back
with
apressing
black
frame
•frame
After
pause
is
cancelled,
the
Zoom
switch
to
the
will
the
image.
Pressing
ENTER
the
setting.
or
,, SmartMedia™
and
manual
Exposure
compensation
Page
69)
using
When
[for
M
]selects
isissystem,
selected
on
the
[ halfway
EXP.
]remove
option
menu,
orsurrounded.
the
shutter
speed
setting
becomes
operational.
Never
open
the
SmartMedia™
cover
orenlarge
the
while
anmakes
is
being
recorded.
This
or
and
manual
setting
(image
Page
58)
or
film
speed
Exposure
compensation
((from
Page
69)
using
Reverse the
procedure
“Loading
the
Batteries”
and
remove
the
batteries.
•facing
Pressing
the
shutter
button
down
adjusts
the
exposure,
• Playback
paused.
PAL
system
( camera.
Additional
Information,
Glossary)
situations:
Built-in
microphone
the
lens.
This
setting
allows
you
to
set
in
advance
the
white
balance
when
taking
photographs
under
and
press
ENTER.
the
rear
of
the
For
the
US/Canada:
PDR-ACM1A
Holding
down
or
moves
forward
or
reverse
continuously.
resumes
at
the
last
state
that
was
protect
sticker
at
the
write-protect
area.
Data
can
no
longer
be
Focus
area
may
corrupt
the
data
on
the
SmartMedia™
or
damage
the
SmartMedia™
itself.
possible,
but
does
not
make
the
exposure
compensation
possible. HoweverSelf-timer
the exposure
value
is
To
return
normal
press
the
Zoom
switch
towards
setting
Page
58)magnification,
or film
speed
setting
( the
Page
78)
using
ENTER
Pass
the
shoulder
strap
through
loop
and
pull.
photography
setting
(( toPage
78)
using
ENTER
are
also
possible.
and
pressing
the
shutter
button
fully
takes
the
shot.
TM[ is down
When
the
SmartMedia™
used
incorrectly
by
the
user
or
a
third
party
[
],
]
or
[
]
AE
or
AF
are
locked
with
the
shutter
button
held
half
specific
lighting
conditions.
For
Europe:
PDR-ACM1E
active
before
the
pause.
Firmly
insert
the
SmartMedia
as
far
as
it
can
go.
displayed
on is
the
LCD
monitor.
Press
ENTER.
recorded
or setting
erased
from
SmartMedia™.
Toon
write
oraterase
data
from is to be recorded. Write-protect
Sets
the
color
mode
and
photographic
sensitivity
which
the
image
“W”.
are
also
possible.
The
default
different
depending
the
destination
country/area.
IMPORTANT
Use
or
to
select
the
desired
item
Press
ENTER,
nine
images
are
displayed
simultaneously.
•Flash
If
you
shoot
a
still
picture,
when
preview
is
set
to
ON
(
Page
77),
1
down.
If
no
operation
is
carried
out
for
a
fixed
amount
of
time
(default:
about
one
minute),
power
ON
When
the
SmartMedia™
is
exposed
to
static
electricity
or
electrical
noise
Auto
Photography
mode
(
P.
41,
46)
Forimage
the Noise
UK:
PDR-ACM1U
:off
Displays
the
firmware
version
ofto
this
camera.
areait down
SmartMedia™,
peel
the
sticker.
camera
ready
to
take
photographs.
Warning:
increases
when
the
ISO
is
changed
higher
settings.
isis
displayed
and
a
white
frame
and
green
Green The
Compose
picture,
press
the
shutter
button
down
halfway,
and
press
:the
Automatic
adjustment
(default)
Display
Page
83
theThumbnail
recorded
image
is
displayed
on
for
about
two
]specifications
Standby
mode
[enlarged,
••-For
If
no
operation
is
carried
out
a screen
fixed
amount
offrom
time
(default:
about
1shutter
minute),
thewear.
power
iserasing
turned
TM
consumption
is
set
to
its
minimum
state
(power
almost
off)that
to
prevent
battery
This
isdown
.in
and
press
When
the
SmartMedia™
isfor
removed
ordarkens
the
camera
isPage
turned
off
while
recording
The
image
the
LCD
monitor
sometimes
the
time
the
button
isdata,
pressed
Speaker
details,
refer
to
the
of
AC
information.
adapter
127.
: on
Displays
the
SmartMedia
Playback
returns
to
the
start
ofturned
the
movie.
frame
are
displayed
the
LCD
monitor.
:
Photography
outdoors
Default
setting:
seconds.
off
to
preserve
battery
life.
This
is
called
“Auto
Power
OFF”.
To
return
to
the
normal
state,
press the
fully.
Page
40
called
the
Auto
Power
OFF.
This
setting
allows
you
to
set
the
time
when
the
camera
turns
off
halfway
until
the
image
becomes
focused.
: picture,
Equivalent
to
color
ISO100
(default)
data,
frame
advance
when
images
aredefaults.
being
played
back or during
formatting
of the
DC
IN
5V
terminal
The options
are
displayed.
Histogram*
2
:
Returns
settings
to
their
Flashing
[
],
[
]
or
[
]
Self-timer
in
operation
at
a
handshake
alarm
.
Compose
the
press
the
shutter
button
down
halfway,
and
press
itdirectly
down
The
white
frame
indicates
the
entire
image,
while
the
greenrecorded
frame halfway,
:the
Photography
in
cloudy
conditions
POWER
button
again.
• The
viewfinder
LED
turns
red
while
image
data
is
being
Compose
picture,
press
the
shutter
button
press
down
• The
To
set
the
focus
or
exposure
for
a subject
outside
the
center
the intended
point
the
The
camera
takes
the
picture.
automatically.
This
function
is
not
activated
during
automatic
playback
( image,
Pageand
85) or
incamera
the it
[ only>
] PC
:appearing
High-sensitive
photography
equivalent
toofdown
color
ISO200
SmartMedia™.
Note:
image
through
the
lens
will
be
The
display
returns
to<Histogram>
thumbnail
playback.
<Standard>
<Detailed
information>
<Image
shows
the
location
of
the
currently
enlarged
area.
halfway,
and
press
it
down
fully.
Page
40
Macro
photography
:
Photography
in
bluish
fluorescent
light
fully.
Page
40
About
the
Auto
Power
(FULL
OFF
Function
)
Additional
Information,
“AUTO
POWER
OFF
(page
110)”
at
the
subject
or
desired
exposure
(lighting),
press
and
hold
the
shutter
button
halfway.
Now,
with
the
shutter
onto
the
SmartMedia™.
ON]
Writing
to SmartMedia™
in progress
mode.
Press
ENTER.
:adapter
High-sensitive
photography
equivalent
toanother
color
ISO400
•Insert
Wedefault
recommend
copying
and
saving
important
datapower
onto
storage
medium (floppy
disk, hard
displayed
for
[LCD
].[Power
fully.
Page
40
the
AC
power
plug
into
the
Electrodes
The
size
and
quality
of
the
image
can
be
reset
to
the
desired
combination.
Press
ENTER.
Memo
Sticker
button
still
held
halfway
down,
you
can
turn
the
direction
of
the
camera
and
frame
your
image
with
the
focus
•
It
is
possible
to
play
back
any
images
in
any
folders
by
pressing
or
during
playback.
(For
details
ON
: Photography
inafter
reddish
fluorescent
light
The
camera
takes
the
picture.
Photographs
can
be
taken,
however,
do not
turn thepress
power
OFF.
To
return
to disk,
the
normal
state
theset
Auto
Power
OFF
has been
executed,
the
POWER
button
disk,
MO
etc.).
The
PREVIEW
manual
setting
Page
items
77
are
displayed.
Remaining
battery
power
camera
takes
the
atmonitor.
the
exposure
time.
Current
Entireofimage
and
exposure
locked.
Press
the
button
down
fully
to in
complete
capturing
the image.
Red outlet.
[In the
on picture
the
LCD
The
camera
is ready
for
burst
photography.
of displayed
folder
Page
92)
]:the
mode:
Accessing
of
SmartMedia™
[ (HALF
Photography
in] is
incandescent
light
•] [is
When
shutter
speed
setshutter
to
a)turn
speed
of
0.7 second
orprogress
slower,
photographs
taken
as extended
PC/AV
terminal
to Never
turn
the
power
on 77
again.
•During
remove
the
SmartMedia™
or
the
camera
offresult
while
recording
data or are
while
erasing
data
COLOR
Page
the
exposure,
the
viewfinder
LED
turns
orange.
position
•
Moving
the
camera
as
you
press
the
shutter
button
will
in
a
blurred
image.
Use
,
,
or
to
select
the
area
to
enlarge.
the
last
image
displays
the
first
image,
and
pressing
atwill
thebe
firstautomatically
image
displays
the
Pressing
During
[2X],
the
ISO
be
automatically
set
to
ISO200.
[4X],ofISO
setof
exposures
( at Page
68).
IfCarry
burst
photography
is to
set
the
shutter
speed
is set During
to athe
speed
0.7
second
or more
in the
[ to
Tv ]
out
steps
1will
2when
in
Photographic
(SmartMedia™
formatting).
actions
might
damage
ISO
Page
78
Flashing
ItClose
takes
about
twice
the
time
to while
complete
taking
the
photograph
duePDR-M81
to processing
ofenlargement
the
captured
[set
],These
[“Basic
] When
the
image
is not
in SmartMedia™.
focus.
the
SmartMedia™
cover.
Memo
•
The
PDR-M81
usesto
an
accurate
auto
focus
mechanism.
However,
the
may
have
difficulty
last
image.
Adjust
the
display
area
enlarge
viewing
the
white
and
Slow
shutter
speed
warning
ISO400.
Shutter
speed
•
In
AEB
photography
(
Page
71)
or
burst
photography,
the
shutter
speed
cannot
be
set
to
0.7
second
or
longer.
(SMALL
)
mode,
the
shutter
speed
is
automatically
changed
to
1/2
second.
Lens
IMPORTANT
•
Use
only
the
SmartMedia™
specified
for
use
with
the
PDR-M81.
The
use
of
other
SmartMedia™
SHARPNESS
Page
79
mode)”
(page
109).
Select
[QUALITY]
Settings
(
focusing
or
not
be
able
to
focus
at
all
for
subjects
and
situations
such
as
the
following:
image.
Before
you
use
aother
new
SmartMedia™
the
first during
time,
be
sure
tothe
Manual
Photography
mode
( P.isspeed
58)
Images
can
bevalue
rotated
by] pressing
playback.
Movie mode
(•• frames.
P.
75)
[ for
] or
green
the
aperture
is
to
F2.9
(maximum
aperture
size),
increased
shutter
speed
restricted
If
a
mode
than
[ set
suppressed
flash
mode
is
set
inthe
flash
photography,
thedark
shutter
is
•79
Processing
image
IMPORTANT
Aperture
Exposure
compensation
- When
subject
is distant and
- SmartMedia™
Subjects
moving
at
high
speed
damage
the
camera.
CONTRAST
Page
• to
The
write
protection
not
function
if in
write-protect
sticker
becomes
Use
a soft
dry cloth to
.thesecond.
oncould
the
SETUP
MENU
and
press
format
the
(may
Page
91).
an
image
counterclockwise,
and
pressing
rotates
clockwise.
Pressing
1/750
PDR-ACM1A
] •are
the
same
as
to
PDR-ACM1E
PDR-ACM1U
[PRG]
and
[ rotates
limited
tosecond.
between
1/2
second
and
1/250
* The
aboveitdirty.
menu
is
the
RECORDING
Charging
of
flash
progress
ON
When
there
are
objects
in
front
of
or
behind
the
subject
Very
shiny
subjects
such
as
a
mirror
or
car
body
SmartMedia™
is
aofisprecision
device.
Do do
notnot
bend,
drop,
or subject
SmartMedia™
to
DIGITAL
ZOOM
Page
• wipe
When
the
camera
isOnce
not79
inelectronic
be sure
to attach
the
lens
cap
provided
with[your
camera.
the
POWER
button
to
turn
the
power
off.
away
any
dirt.
ause,
sticker
ispress
peeled
off,
reuse
it.
Orange•Press
The
QUALITY
menu
displayed.
combinations
the
automatically
mode.
MENU
inthe
•the
The
aperture
value
set
differ
to
the
actual
value
according
to
the
position
ofUK)
theorzoom
lens.
To
return
to
the
regular
display,
ENTER.
(Photos
cannot
be
taken
at
this
moment.)
(for
US
and
Canada)
If the
shutter
speed
is
set
to
1/350
second
or
less,
the
shutter
as
speed
an
animal
is
automatically
athe
cage
a]changed
person
in front
to 1/250
of a tree)
(for
European
Continent)
(for
Get
ready
to
take
the
photograph.
- above
Extremely
low
contrast
subjects
When
the
settings
are
made,
they
are
displayed
in(such
thepocket
following
order.
Memo
DC
IN
5V
terminal
excessive
shocks.
Also,
do
not
carry
SmartMedia™
the
ofx[trousers.
This
might
The
lens
cap
can
also
be
attached
to
attachment
following
the
above
steps
to prevent
it’sthe
LCD
79
The
power
turns
off.
determined
shutter
speeds
and
aperture
-in Subjects
with
little
reflection,
such
as
hair
fur mode.
•• The
size
displayed
on
the
LCD
monitor
FULL
(320
240)
HALF
(160
xorsubject
120).
The
forced
flash
mode
or
]orred-eye
forced
flash
second
ifPage
the
flash
setting
is25)
changed
tothe
thestrap
[ ]becomes
- image
Subjects
that
have
low contrast
and
merge
into
Loading
the
batteries
(
Page
and
the
SmartMedia™
(
Page
31)
into
the
camera.
being
lost.
• Flash
photography
and
burst
photography
are
not
possible.
Flashing
SmartMedia™
to
excessive
force
when
you
sit
down,
damaging
the
SmartMedia™.
Hardware
malfunction
Subjects
with
no
solidity,
such
as
smoke
or
flames
the
background
(such
as
white
walls
or
subjects
Attach
the
lens
cap
when
you
are
not
using
the
camera.
values.
However,
their
operation
capability
movies
made
in
FULL
size
is
displayed
on
the
entire
LCD
monitor,
and
those
made
in
HALF
size
If the
[ ]mode,
forcedISO
flash
[ automatically
] red-eye set
forced
flash mode
is and
set in
flash photography
the is
• In
movie
willorbe
between
ISO100
ISO400
regardless ofwhen
its setting.
dressed
inthe
theSmartMedia™
same
color
as
thelens
background)
-attach
Subjects
viewed
through
glass
Turn
offor
the
power
tothe
retract
the
unit,
and then
the
lens
cap.
The
image
taken
in
photography
mode
may
be
blurred.
or
to
select
the
desired
setting
from
the
tab
menu
, and
press
•Use
Do•not
use
store
in
environments
likely
to
be
affected
byisstatic
electricity
or
is
different
as
shown
the
right
table.
displayed
in
ofspeed
the
2
shutter
speed
is center
set
toin
aexposure
of
0.7
second
or
more,
the
shutter
speed
automatically
changed
to
Press
POWER
button
toscreen.
turn
power
on.
A electrical
histogram
isturn
a graphic
representation
ofthe
theistones
of the
subject.
The horizontal
histogram
• Do
If the
the
image
cannot
be
focused,
thelens
focus
automatically
fixed to infinity.
(When theaxis
flashofisthe
necessary
not
the
power
on
with
the
cap
attached.
noise.
1/2
second.
ENTER.
*
The
above
AC
adapter
is
US/Canada
Turning
the
Power
On
Page
38
shows
the
brightness
(increasing
brightness
from
left
to
right)
and
the
vertical
axis
shows
the
number
at
this
time,
it
is
simultaneously
fixed
to
illuminate
objects
1.5
meters
(five
feet)
away.
During
macro
•This
Dosaves
use
orsettings,
store
SmartMedia™
very
hot,
humid
oraperture
corrosive
If the
shutter
speed
value
isimages,
set toin1/1000
second,
the
value
is limited
to
F8type
andAC
F3.4.
•not
When
playing
back
movie
switching
isthe
between
standard
and
image
only.
(O
:environments.
possible
Xbetween
: not
the
and
returns
to
RECORDING
MENU.
type.
European
andpossible)
UK
photography,
the flash
islevel.
alignedthe
withdisplay
the wide
position.)
of pixels
at each brightness
Downloaded From
camera-usermanual.com
adapters differ in shape.
--110
20 -40
80
88
LCD Monitor Display (during photography)
] mode
Zoom state
Possible number of shots
(at currently preset size and quality)
Playing
Back Images
Mode dial setting
Size
Erasing
Images
Flash state
Photography mode
Taking
Photographs
In [
Getting
Ready
The text, numbers and icons that are displayed on the LCD monitor vary according to the current settings.
The LCD monitor automatically turns ON if necessary even if it is set to OFF.
For details on the [
] playback mode, see page 116.
Quality
Macro photography
Date (year/month/day)
Remaining battery power
Time
AE (automatic exposure setting)
When AE is set :
green
When AE is not set : red
Downloaded From camera-usermanual.com
- 35 -
Additional
Information
Slow shutter speed warning
Other
Applications
Self-timer photography
Handy
Functions
Focus area
(when shutter button is
pressed down halfway)
Changing
the
Preset
Conditions
(RECORDING
MENU)
Photography
in
the
Program
Mode
Setting
Names
Playing
Back
the
of
Photographed
Parts
Image
Size
and
Quality
(Single-Frame
Playback)
Extended
Exposure
Photography
(Bulb
Photography)
Erasing
Images
(Erase
Frame)
(continued)
Manual
Attaching
Using
How
Taking
Enlarging
Playback
About
Turning
to
Photographs
the
SmartMedia™
Press
Settings
the
Photographed
of
Power
the
Power
Multi
Shoulder
Continuously
Outlet
Shutter
Image
On/Off
Images
Strap
Pictures
Button
(Zoom
(Burst
Playback)
Photography)
Taking
Erasing
Button
Photographs
Folders
and
(All
LCD
Images
Continuously
Monitor
in
aImages
Folder/All
(Burst
Display
Photography)
Folders)
(In
Playback
(continued)
(continued)
Mode)
Definitions
Separately
of
the
Accessories
Color
of
the
Viewfinder
LED
Taking
and
Playing
Back
Photographs
on
aMode
TV
(continued)
Changing
the
Preset
Conditions
(RECORDING
MENU)
(continued)
Exposure
Compensation
in
the
Shutter
(continued)
Speed-priority
(continued)
About
Basic
Settings
SmartMedia™
in
(Sold
the
mode)
Aperture-priority
(continued)
Mode
(continued)
LCD
Monitor
Display
(during
photography)
(continued)
Manual
Settings
(continued)
Playing
Photography
Installing
Back
Movies
batteries
(Auto
Photography)
(continued)
(continued)
(continued)
Names
of
Parts
(continued)
Getting
Ready
The shutter
camerabutton
automatically
adjusts the
shutter
and
the aperture
value
according
to the
brightness
of an
can be pressed
down
in twospeed
stages:
halfway
down and
fully
down. When
pressed
halfway
down,
This
“SmartMedia™”
Set
Play
Automatically
The
the
following
mode
shoulder
menu
back
size
photographed
is(number
used
for
items
strap
plays
setting
isadapter
for
athe
is
are
back
storage
of
taking
handy
also
the
pixels)
still
the
basic
available
subjects
for
medium
images
16
and
carrying
images
settings
quality
one
for
that
as
saving
separately
your
image
to
require
(compression
be
camera
used
images
atseveral
a
sold
for
around.
inthat
photography
items.
ratio)
seconds
the
you
multi
of
have
the
photography
to image
photograph
in
photographed.
to
[ pause
be
mode
],photographed.
such
[be
Even
in
asquick
]for
firework
or
if Europe,
the
[You
succession.
camera’s
displays
] photography
power
at the
Enlarges
selected
portions
of
images
being
played
back
at
two
levels.
Images
can
displayed
enlarged
when
In
You
this
can
color
mode,
manually
of
the
photographs
viewfinder
adjust
settings
are
LED
taken
indicates
such
continuously
asphotographed
the
exposure
state
atof
control,
atime.
the
maximum
camera.
white
speed
balance,
The
ofthe
0.8
metering
second
system,
intervals.
continuous
This
item
switches
display
on
the
LCD
monitor
when
playing
back
photographed
images.
can
switch
If
you
the
AC
(sold
separately:
PDR-ACM1A
for
the
US/Canada,
PDR-ACM1E
PDR-ACM1U
During
stopping
During
Mode
Effective
dial
Subjects
and
Set
Values
During
playback
TM
Press
.of
aperture
value.
SYSTEM
Turning
Exposure
ISO
OSD
In
[prevent
[use
LANGUAGE
the
]the
INFO.
mode
control
(EXP.)
On
Close
the
SmartMedia™
cover.
Slide
the
SmartMedia
cover
release
knob
in
the
Take
photographs
or
or
battery
to
to
select
or
play
[that
the
slide
]them
or
shutter
it
[ the
back.
,]will
and
speed.
and
lock
press
Look
Use
through
to
select
the
[adjust
viewfinder
]use
and
press
to
compose
ENTER.
the
picture.
To
continue
erasing
images,
repeat
the
above
procedure
2.
.is
AF
(auto-focus)
and
AE
(auto
exposure)
are
set.
When
pressed
fully
down,
the
camera
takes
aspace
picture.
object.
This
mode
enables
carefree
photographing
similarly
to
selecting
[stable
]photographs.
in
[ from
]settings”,
mode.
Itrepeatedly
is
possible
to
night.
To
is
Change
modes.
turned
When
the
OFF,
your
setting
using
the
camera
images
this
according
mode,
from
saved
dropping
be
to
sure
how
on
the
the
to
during
SmartMedia™
image
a(size,
photography,
tripod
is
to
to
be
keep
used
not
hang
the
and
be
camera
erased.
the
the
shoulder
remaining
SmartMedia™
strap
and
amount
prevent
around
can
ofstep
your
distortion
be
neck.
in
the
of
images.
Relationship
between
your
camera
and
accessories
Connecting
tocalled
Other
Devices
(page
123)
being
played
back
one
image
at
acover,
time.
The
meaning
maximum
of
number
LED
color
of
photographs
differ
according
can
to
be
taken
mode
continuously
dial
setting.
three
photography
mode,
and
take
photographs
at
these
settings.
These
are
“Manual
which
are
saved
display
to
show
aPower
list
detailed
information
compression
ratio,
shutter
speed,
aperture,
etc.)
or
you
can
for
the
UK)
in
a
room
with
amay
power
outlet,
you
can
take
photographs
for
an
extended
period
of
time.
This
also
Battery
cover
lock
Mode
dial
1 Item
QUALITY
2 Options
Notes
SmartMedia™
VIDEOon
OUT
White Balance (W.B.)
Write
Protection
Removing
the Batteries
ISO
[ POWER
]
AUTO
OFF
Setting items
Turning
the
Power
Off
Using
the
LCD
Monitor
Additional
Information
Other
Applications
Handy
Functions
Erasing
Images
Playing
Back Images
Taking
Photographs
Tab menu
feed
Positive
(+)
Compensation
The
tab
is
displayed.
setting
isbattery
as
follows:
Make
sure
that
the
issystem
firmly
closed.
Details
image
ofmenu
operation
isrange
saved
are
or
erased,
the
same
and
as
the
taking
camera
photographs
is
then
ready
and
to
playing
take
photographs.
them
back
onon
the
LCD After
monitor.
If
you
use
the
viewfinder
to
take
photographs,
the
photography
Set
the
mode
to
[cover
].settings
direction
of
the
arrow
to
open
cover
.1-frame
ENTER.
change
the
white
and
the
metering
in(the
program
mode.
erased
SmartMedia™.
and
reused.
For
details
on
these
accessories,
refer
to
the
Instruction
Manual
for
the
accessory
you
are
using.
(information
Movies
images
in
the
multi
mode
Page
cannot
be
displayed
using
the
zoom
playback
Images
even
if the
are
camera
not
recorded
is
turned
directly
off.
SmartMedia™
but
are
stored
within
the
buffer
memory.
display
histograms,
etc.
prevents
failed
photographs
due
to
battery
wear
or
failed
of
data
to
a
PC.
details
handling
the AC
2x-speed
playback
Set
Sets
[•PRG
the
thebalance
whether
display
color
] photographed
:(/or
Photography
mode
language
not
to
and
return
photographic
of
in
menus
the
program
displayed
sensitivity
in
the
(default)
on
SETUP
the
at51)
which
LCD
(temporarily
MENU
Page
monitor.
the
to
image
62)
the
original
is For
to
be
factory
recorded.
settings.
For
enlarged
P.dial
22)
feeds
the
image
•transfer
Each
press
of
2
Copying
of
printed
(black
characters
on
white
paper)
set
the
time
(text
114)
F8
/view
F6.8
F5.6
/18.
F4.8
/Page
F4.0
/and
F3.4
/mode
F2.9
How
to
take
photographs
Page
41
1/1000,
1/750,
1/500,
1/350,
1/250,
1/180,
1/125,
1/90,
range
may
differ
from
the
actual
image.
In
this
case,
use
the
LCD
Press
the
shutter
button
down
halfway
.
the
mode
dial
to
[
],
[
]
or
[
].
1
SmartMedia™
having
the
following
storage
capacity
can
be
used
on
your
camera.
current
as
of
March
2000)
feature.
The
last
cover
recorded
image
opens
frame
image
appears
appears
on
the
on
the
LCD
LCD
monitor.
monitor.
photography
is
finished,
check
the
images
record
the
selected
ones
to
SmartMedia™.
[TIME&DATE,
]
:
Erases
images
in
the
currently
selected
folder
and
folders.
Possible
number
of shots
adapter,
beSet
sure
to
read
page
•
2x-speed
playback
is
performed
for
.
Make
sure
that
the
SmartMedia™
is
correctly
loaded.
(
Page
31)
by
one
frame.
Warning:
[•Memo
Av
]
Noise
:
OSD
Photography
increases
LANGUAGE
when
in
aperture-priority
will
the
not
ISO
be
is
reset.
changed
mode
to
(
higher
Page
settings.
63)
Backlit
portraits
IMPORTANT
[PROTECTED]
on
the
LCD
monitor,
cancel
the protection
( Page
or
remove
How
to
play
back
images
Page
80
1/60,
1/45,
1/30,
1/20,
1/10,
1/8,
1/6,
1/4,
1/3,
1/2,
monitor
for
photography.
AF
(auto-focus)
and
AE
(auto
exposure)
(the
Additional
Information,
SET-UP
(the
P.
[English]
:109)
English
(default)
Pass
Set
out
mode
end
steps
of
dial
1the
to
to
shoulder
4[1/15,
either
]].LCD
or
inspeed-priority
[strap
“Photography
through
].
the
in
the
strap
Shutter
speed-priority
Mode”
isdisplayed
held
down.
the
duration
that
PC
mode
(mode
P.
121)
(at
currently
size
and108)
quality)
2MBCarry
Set
/4MB/8MB/16MB/32MB/64MB/128MB
the
mode
dial
to
[isin
(all
3.3
types)
]•the
adjust
:]When
Erases
the
all
brightness
folders
recorded
of
the
on
monitor
SmartMedia™.
Page
115
[mode
Self-timer
1
•V
1-frame
feed
is button
continued
for the
The
aperture
value
and
the
shutter
speed
corresponding
to
[•To
Tv
:write-protection
Photography
shutter
( that
Page
65) preset
Zoom
state
bright
scenes
(such
and
highly
reflective
subjects
Photography
mode
•the
You
can
also
carry
out
step
8snowfields)
while
verifying
the
image
step
7.
DPOF
(in
Page
102).
Glossary)
start
to
function.
Sets
basic
camera
settings
0”7,
1”,
1”5,
2”,
3”,
4”,
6”,
8”,
10”,
15”
•Very
Do
not
remove
orV)
load
the
batteries
or
disconnect
or
connect
the
AC
adapter
while
the camera
is mode.
on.1This
]65)
:POWER
Japanese
[value
[NORMAL]
:(3.3
Equivalent
toas
color
ISO100
POWER
button
Transfers
images
to
a58).
PC.
Carry
Set
Use
out
or
mode
steps
to
dial
select
1
to
to
2[erased,
the
“Manual
].
images
photographed
Settings”
(page
in
the
multi
photography
You
can
also
connect
the
PC
card
adapter
and
floppy
disk
adapter
( in
123)
sold
separately
to transfer
SmartMedia™
Changing
the
LCD
monitor
display
Page
116
The
images
or
folders
are
and
the
camera
returns
toPage
the
is
held
down.
duration
that
are
displayed
on
the
LCD
monitor.
If
the
appropriate
(page
attachment
or
on
in
“Photography
the
camera.
in
the
Full
Manual
Mode”
(page
67).
Press
the
button
to
turn
the
power
on.
full
manual
mode
(
Page
67)
[
M
]
:
Photography
in
Image
Quality
button
Press
the
MENU
button.
•[2X]
Shots
made
up
predominantly
of
sky
Even
if
photography
is
terminated
midway
before
capturing
three
images
by
releasing
the
shutter
•
If
you
take
a
photograph
after
erasing
an
image,
a
number
continuing
from
the
last
photographed
When
AF
or
AE
are
locked,
the
beep
tone
(
Page
111)
sounds
and
the
Use
or
to
change
the
setting
in
the
tab
menu,
might
return
the
manual
settings
to
their
defaults.
If
this
happens,
manually
set
conditions
again.
(AUTO
POWER
OFF,
SOUND,
For
details,
refer
the
Software
Manual.
:connect
High-sensitive
equivalent
toto
color
(default)
• Before
you
oreven
disconnect
the
AC
adapter,
be
sure
to
turn
thedisplay
camera
OFF.
If the
AC adapter is
Press
the
image
quality
button
to
select
the
preset
combination
cannot
be
set
ifphotography
the
shutter
speed
isas
adjusted
toISO200
images to a
PC.
16MB
(SM-M1600D)/32MB
(SM-M3200D)/64MB
(SM-M6400D)/128M
(SM-M1280D)
The
respective
last
image
mode.
frame
appears
on
LCD
monitor.
You
can
also
select
the
image
by
the
same
operation
for
thumbnail
Page
83).
Carry
out
steps
1
to
on
page
109.
When
the
camera
is
turned
on,
set
the
mode
dial
to
the
desired
The
shutter
speed
and
the
aperture
value
corresponding
todisplay
the
Reverse
playback,
2x-speed
playback
All
descriptions
inor
this
Instruction
Manual
are
for
when
the
language
is (2set
to [ENGLISH].
Press
or
to
select
the
image.
button,
images
already
photographed
can
be
saved
and
erased
by playback
the
method.
image
is
assigned
as
image
number.
Shutter
button
Negative
(–)
Compensation
The
viewfinder
RECORDING
LED
turns
MENU
green.
is2
displayed.
•press
The
image
the
photograph
is
taken
is
slightly
less
clear
than
images.
(This
is 109,
TIME
& DATE,
OSD
LANGUAGE,
connected
disconnected
with
the
power
ON,
camera
settings
may
beabove
reset
(SET-UP
Page
and
ENTER.
:before
High-sensitive
photography
equivalent
to
color
ISO400
its
limit,
the
shutter
speed
isthe
displayed
inthe
red.
Reverse
1-frame
feed
To [4X]
cancel
erasing
of
image
data,
select
[monitor.
]Photography,
and
press
ENTER.
Flash
button
quality
and
size,
while
viewing
indication
on
the
starts
a
reverse
•
The
press
of
mode.
shutter
speed
are
displayed
on
the
LCD
If
the
appropriate
The
length
of
time
to
capture
images
varies
according
to
the
photographic
conditions.
•
Images
can
also
be
erased
in
the
thumbnail
mode.
In
this
case,
the
camera
enters
the
single
frame
Select
[SYSTEM
INFO.]
on
the
SETUP
MENU
and
because
television
displays
images
at
a
lower
resolution.)
•
Spotlit
subjects,
particularly
against
dark
backgrounds
VIDEO OUT,
QUALITY,
SYSTEM
Manual
Settings
Page
58)
or
the
camera
may
malfunction.
however,
is
possible
in
this
state.
feeds
the
image
•
Each
press
of
EXP.
].
To
cancel
changing
of
settings,
press
.
Use
or
to
select
the
frame
you
want
to
enlarge.
Press
the
or
Zoom
to
switch
select
[
(
S/C
Page
].
21)
towards
“T”
to
begin
playback.
Floppy
Disk
Adapter
(FlashPath)
] mode:
is
selected,
[NO
IMAGE]
isaperture
displayed
after
allor
folders
When
playback.
Set
mode
dial
inbe
the
to
[ sure
Tv
mode,
].the
or
press
in
the
shutter
button
fully
Before
photography,
make
that
the
lens
cap
has
been
2onisin.black
combination
cannot
set
even
ifflash
adjusted
to its
playback)
mode,
and
enters
the
thumbnail
playback
mode after the image is erased.
status
display.
]or
In
[[playback
Press
the
display/info
button.
Self-timer
photography
and]down
photography
are
not
possible.
•the
The
display
unit
varies
according
to
the
output
system.
•theCopying
of (frame
printed
text
(white
characters
paper)
INFO.) Press
.
press
reverse
by
one
frame.
This
adapter
allows
SmartMedia™
to
bespeed
asto
3.5"
floppy
disk.
have
been
erased
(unless
the
SmartMedia™
contains
protected
You
can
also
select
the
image
by
thein
same
operation
as
for
thumbnail
playback
(display
PageISO
83).will23)
Automatic
playback
begins.
•[2X],
Playback
becomes
2x-speed
to
reduce
aperture
size.
Press
toused
increase
aperture
size.
Press
camera
takes
a
picture.
The
manual
setting
removed
the
camera.
limit,
aperture
value
isbe
displayed
red.
Photography,
however,
Playback
mode
( Status
P.
80)
the
[Scenes
M
]from
mode
to
set
the
shutter
0.7
second
Manual
During
the
ISO
will
automatically
set
between
ISO100
ISO200.
During
[4X],
be
To
set
the
quality
and
size
Page
112
•the
With
the
NTSC
system,
images
can
be
displayed
simultaneously
on the
LCD
monitor
and( TVP.
during
•photograpy
with
low
reflectivity,
such
as
shots
green
or
dark
foliage
Flash
state
Each
press
of
the
display/info
button
switches
the
display
•of1-frame
feed
isand
continued
for
the
The
SYSTEM
INFO.
menu
displayed.
reverse
for
the
duration
This
adapter
isplayback
inserted
into
the],
floppy
your
PC,
allowing
images).
The
viewfinder
LED
turns
redis
image
data
being
recorded
onto
Insert
the
adapter
connector
plug
into
the
DC
IN
Self-timer
lamp
values
are
displayed
Inlens
this
mode,
you
can select image
In
the
photography
modes
([while
[and ISO400.
]disk
oris
[ drive
]),on
the
photography
and
playback.
is
possible
inAC
this
state.
automatically
set
between
ISO100
is
held
down.
format
as
follows:
duration
that
Note:
The
larger
the
F
value,
the
smaller
the
aperture
size
become
or
longer.
•Press
Remove
and
insert
SmartMedia™
with
the
camera’s
power
turned
off.Aperture value
is
held
down.
that
To
quit
the
SETUP
MENU,
change
the
mode
dial
setting.
Shutter
speed
Adjust
the
zoom
ratio
by
the
Zoom
switch.
(Zoom
to
display
option
menu,
press
or
to
images
recorded
on
the
SmartMedia™
to
be
transferred
to
the
PC.
the
SmartMedia™.
Sets
video
output
system
according
to
country
in
which
your
camera
ischange,
used.
on
the
left
ofthe
the
LCD
playback,
copy,
size
compression,
Size
Press
the
shutter
button
down
halfway
and
press
5V
terminal
on
the
camera.
extends
from
the
camera
body.
•the
PAL
system,
images
cannot
bethe
displayed
When
a cable
is connected,
only
and
versa.
1 situations
the
image
quality
button
switches
the
quality
and
size
Gently
insert
the
SmartMedia™
as
far
as
it, simultaneously.
can
go
[Pressing
]vice
isWith
displayed
on
the
LCD
monitor.
Viewfinder
LED
•select
Recorded
data
may
bepress
erased
(destroyed)
in
the
listed
below.
Note
thatofToshiba
White
Balance
Additional
Information,
Glossary
Viewfinder
to
increase
shutter
speed.
Pressand
to
decrease
shutter
speed.
Press
Press
or
to
move
forward
reverse.
Memo
PRG
]
and
ENTER.
]
and
press
ENTER.
[
switch
Page
21)
protect
mode,
and
writing
development
TV
display
is
available.
monitor
screen.
When
the
camera
is
turned
on,
the
Auto
Power
OFF
function
Canceling
pause
settings
infully
the
following
order.
it
down
. system
2next
Press
or
to
select
the
item
you
desired
toMeaning
set,
Pause
with
the
SmartMedia™
electrodes
(metal
contacts)
Additional
Information,
Glossary)
[NTSC]
:allNTSC
(white
Corporation
accepts
no
whatsoever
for
the
loss
of
recorded
data enters
in these
•Adapter
When
images
in
a responsibility
folder
are
erased,
that
folder
itself
is
also(destruction)
erased.
Quality
The
camera
determines
the
balance
by
averaging
the
various
kinds playback
of light
that actually
AC
to
to
frame/
to“T”
go
back
one
To
prevent
valuable
data
being
erased,
attach
the
write(printing)
information.
•••advance
With
the
PAL
images
are
played
back
with
apressing
black
frame
•frame
After
pause
is
cancelled,
the
switch
to
the
will
the
image.
Pressing
ENTER
the
setting.
or
,, SmartMedia™
and
manual
Exposure
compensation
Page
69)
using
Colorthe
When
[Zoom
M
]selects
isissystem,
selected
on
the
[ halfway
EXP.
]remove
option
menu,
orsurrounded.
the
shutter
speed
setting
becomes
operational.
State
Never
open
the
SmartMedia™
cover
orenlarge
the
while
anmakes
is
being
recorded.
This
or
and
manual
setting
(image
Page
58)
or
film
speed
Exposure
compensation
((from
Page
69)
using
Play
back
Reverse
procedure
“Loading
the
Batteries”
and
remove
the
batteries.
•facing
Pressing
the
shutter
button
down
adjusts
the
exposure,
• Playback
paused.
[PAL]
:for
PAL
system
( camera.
Additional
Information,
Glossary)
situations:
Built-in
microphone
the
lens.
This
setting
allows
you
to
set
in
advance
the
white
balance
when
taking
photographs
under
and
press
ENTER.
the
rear
of
the
For
the
US/Canada:
PDR-ACM1A
Holding
down
or
moves
forward
or
reverse
continuously.
resumes
at
the
last
state
that
was
protect
sticker
at
the
write-protect
area.
Data
can
no
longer
be
Focus
area
may
corrupt
the
data
on
the
SmartMedia™
or
damage
the
SmartMedia™
itself.
possible,
but
does
not
make
the
exposure
compensation
possible. HoweverSelf-timer
the exposure
value
is
To
return
normal
press
the
Zoom
switch
towards
setting
Page
58)magnification,
or film
speed
setting
( the
Page
78)
using
ENTER
Pass
the
shoulder
strap
through
loop
and
pull.
photography
setting
(( toPage
78)
using
ENTER
are
also
possible.
and
pressing
the
shutter
button
fully
takes
the
shot.
TM[ is down
When
the
SmartMedia™
used
incorrectly
by
the
user
or
a
third
party
[
],
]
or
[
]
AE
or
AF
are
locked
with
the
shutter
button
held
half
specific
lighting
conditions.
For
Europe:
PDR-ACM1E
active
before
the
pause.
Firmly
insert
the
SmartMedia
as
far
as
it
can
go.
displayed
on is
the
LCD
monitor.
(when shutter
button
Press
ENTER.
recorded
oris
erased
from
SmartMedia™.
Toon
write
oraterase
data
from is to be recorded. Write-protect
Flash
Sets
the
color
mode
and
photographic
sensitivity
which
the
image
“W”.
are
also
possible.
The
default
setting
different
depending
the
destination
country/area.
Use
or
to
select
the
desired
item
Press
ENTER,
nine
images
are
displayed
simultaneously.
•[FIRMWARE
If
you
shoot
a
still
picture,
when
preview
is
set
to
ON
(
Page
77),
1
down.
If
no
operation
is
carried
out
for
a
fixed
amount
of
time
(default:
about
one
minute),
power
ON
When
the
SmartMedia™
is
exposed
to
static
electricity
or
electrical
noise
Auto
Photography
mode
(
P.
41,
46)
Forimage
the Noise
UK:is
PDR-ACM1U
VER.]
:off
Displays
the
firmware
version
ofto
this
camera.
pressed
halfway)
areait down
Stop
SmartMedia™,
peel
the
sticker.
camera
ready
to
take
photographs.
Warning:
increases
when
the
ISO
is
changed
higher
settings.
The
displayed
and
a
white
frame
and
green
Greendown
Compose
picture,
press
the
shutter
button
down
halfway,
and
press
[the
AW
] no is
:the
Automatic
adjustment
(default)
Thumbnail
Display
Page
83
recorded
image
is
displayed
on
for
about
two
]specifications
Standby
mode
[enlarged,
••-For
If
operation
is
carried
out
a screen
fixed
amount
offrom
time
(default:
about
1shutter
minute),
thewear.
power
iserasing
turned
TM
consumption
is
set
to
its
minimum
state
(power
almost
off)that
to
prevent
battery
This
isdown
.in
and
press
This
mode
enables
automatic
photography
When
the
SmartMedia™
isfor
removed
ordarkens
the
camera
isPage
turned
off
while
recording
The
image
the
LCD
monitor
sometimes
the
time
the
button
isdata,
pressed
Speaker
details,
refer
to
the
of
AC
information.
adapter
127.
[CARD
INFO.]
: on
Displays
the
SmartMedia
Playback
returns
to
the
start
ofturned
the
movie.
frame
are
displayed
the
LCD
monitor.
]
:
Photography
outdoors
[
Default
setting:
seconds.
off
to
preserve
battery
life.
This
is
called
“Auto
Power
OFF”.
To
return
to
the
normal
state,
press the
fully.
Page
40
in
accordance
with
the
photographic
called
the
Auto
Power
OFF.
This
setting
allows
you
to
set
the
time
when
the
camera
turns
off
halfway
until
the
image
becomes
focused.
[NORMAL]
: picture,
Equivalent
to
color
ISO100
(default)
data,
frame
advance
when
images
aredefaults.
being
played
back or during
formatting
of the
DC
IN
5V
terminal
The
options
are
displayed.
Histogram*
2
Stop
[RESET]
:
Returns
settings
to
their
Flashing
[
],
[
]
or
[
]
Self-timer
in
operation
at
a
handshake
alarm
.
Compose
the
press
the
shutter
button
down
halfway,
and
press
itdirectly
down
The
white
frame
indicates
the
entire
image,
while
the
green
frame halfway,
[[2X]
]POWER
:the
Photography
in
cloudy
conditions
button
again.
ENTERCompose
• The
viewfinder
LED
turns
red
while
image
data
is
being
recorded
picture,
press
the
shutter
button
press
down
• The
To
set
the
focus
or
exposure
for
a subject
outside
the
center
ofdown
the intended
point
the
The
camera
takes
the
picture.
automatically.
This
function
is
not
activated
during
automatic
playback
( image,
Pageand
85) or
incamera
the it
[ only>
] PC
:appearing
High-sensitive
photography
equivalent
to
color
ISO200
SmartMedia™.
Note:
image
through
the
lens
will
be
The
display
returns
toconditions.
thumbnail
playback.
<Standard>
<Detailed
information>
<Histogram>
<Image
shows
the
location
of
the
currently
enlarged
area.
halfway,
and
press
it
down
fully.
Page
40
Macro
photography
]
:
Photography
in
bluish
fluorescent
light
[
fully.
Page
40
Setting
1
:
About
the
Auto
Power
(FULL
OFF
Function
)
Additional
Information,
“AUTO
POWER
OFF
(page
110)”
at
the
subject
or
desired
exposure
(lighting),
press
and
hold
the
shutter
button
halfway.
Now,
with
the
shutter
onto
the
SmartMedia™.
Into
this
the exposure
(combination
of
ON]
Writing
to SmartMedia™
inmode,
progress
mode.
Press
ENTER.
[4X]
:adapter
High-sensitive
photography
equivalent
color
ISO400
•Insert
We
recommend
copying
and
saving
important
datapower
onto
another
storage
medium (floppy
disk, hard
displayed
for
[LCD
].[Power
fully.
Page
40
the
AC
power
plug
into
the
Electrodes
Pressing the
The
default
size
and
quality
of
the
image
can
be
reset
to
the
desired
combination.
Press
ENTER.
Memo
Sticker
button
still
held
halfway
down,
you
can
turn
the
direction
of
the
camera
and
frame
your
image
with
the
focus
•
It
is
possible
to
play
back
any
images
in
any
folders
by
pressing
or
during
playback.
(For
details
ON
Increases
the
volume.
[disk,
] MO
: Photography
inafter
reddish
fluorescent
light
The
camera
takes
the
picture.
Photographs
can
be
taken,
however,
dospeed
not
turnand
thepress
power
OFF.
shutter
aperture)
is automatically
To
return
to disk,
the
normal
state
theset
Auto
Power
OFF
has
been
executed,
the
POWER
button
etc.).
The
PREVIEW
manual
setting
Page
items
77
are
displayed.
Remaining
power
camera
takes
the
picture
at
the
exposure
time.
Zoom
switch
tobattery
“T”
Current
Entire
image
and
exposure
locked.
Press
the
shutter
button
down
fully
to
complete
capturing
of
the
image.
Red outlet.
[In
]
is
displayed
on
the
LCD
monitor.
The
camera
is
ready
for
burst
photography.
of
folder
Page
92)
mode:
the
Accessing
ofthe
SmartMedia™
inorprogress
[ (HALF
Photography
in] is
incandescent
light
[Never
Setting
2remove
: ]:the
controlled
tophotographs
facilitate
photography.
• ][When
shutter
speed
set to
a)turn
speed
of
0.7 second
slower,
are
taken
as extended
PC/AV
terminal
to
turn
the
on 77
again.
•During
the
SmartMedia™
or
camera
off
while
data or
while
erasing
data
COLOR
Page
the
exposure,
the
viewfinder
LED
turns
orange.
position
Pressing the
• Pressing
Moving
the
as
you
press
the
shutter
button
will
result
inrecording
a blurred
, power
,the
or
to
select
the
area
to
enlarge.
at Page
the
last
image
displays
the
first
image,
and
pressing
atimage.
thebe
firstautomatically
image
displays
the
During
[2X],
ISO
be
automatically
set
to
ISO200.
During
[4X],
will
setof
exposures
(camera
68).
IfUse
burst
photography
is to
set
the
shutter
speed
is set
to
athe
speed
ofISO
0.7
second
or more
in the
[ to
Tv ]
Decreases
the
volume.
Carry
out
steps
1will
2when
in
“Basic
Photographic
(SmartMedia™
formatting).
These
actions
might
damage
SmartMedia™.
ISO
Page
78
Flashing
It
takes
about
twice
the
set
time
to
complete
taking
the
photograph
due
to
processing
of
the
captured
[
],
[
]
When
the
image
is
not
in
focus.
Close
the
SmartMedia™
cover.
Zoom switch
to
“W”
Memo
•
The
PDR-M81
uses
an
accurate
auto
focus
mechanism.
However,
the
PDR-M81
may
have
difficulty
enlargement
last
image.
Adjust
the
display
area
to
enlarge
while
viewing
the
white
and
Slow
speed
warning
[1 shutter
MINUTE]
(default)
ISO400.
Shutter
speed
• In
AEB
photography
(
Page
71)
or
burst
photography,
the
shutter
speed
cannot
be
set
to
0.7
second
or
longer.
Setting
3
:
(SMALL
)
mode,
the
shutter
speed
is
automatically
changed
to
1/2
second.
Lens
•
Use
only
the
SmartMedia™
specified
for
use
with
the
PDR-M81.
The
use
of
other
SmartMedia™
SHARPNESS
Page
79
mode)”
(page
109).
Select
[QUALITY]
Settings
(
focusing
or
not
be
able
to
focus
at
all
for
subjects
and
situations
such
as
the
following:
image.
Before
you
use
aother
new
SmartMedia™
the
first during
time,
be
sure
tothe
Manual
Photography
mode
( P.isspeed
58)
Images
can
bevalue
rotated
by] pressing
playback.
Movie mode
(••• frames.
P.
75)
Difference
between
[PRG]
and
[ for
] or
green
[2 MINUTES]
the
aperture
is
to
F2.9
(maximum
aperture
size),
increased
shutter
speed
restricted
If
a
mode
than
[ set
suppressed
flash
mode
is
set
inthe
flash
photography,
thedark
shutter
is
•79
Processing
image
Aperture
Exposure
compensation
- Manually
When
subject
is distant
and
- SmartMedia™
Subjects
moving
at
high
speed
could
damage
the
camera.
CONTRAST
Page
• to
The
write
protection
not
function
if in
write-protect
sticker
becomes
Use
a soft
dry cloth to
.thesecond.
on
the
SETUP
MENU
and
press
format
the
(may
Page
91).
sets
white
balance,
exposure,
Takes short
Movies
for
playback
an
image
counterclockwise,
and
pressing
rotates
itdirty.
clockwise.
Pressing
1/750
PDR-ACM1A
] •are
the
same
as
to
PDR-ACM1E
PDR-ACM1U
[PRG]
and
[ rotates
limited
tosecond.
between
1/2
second
and
1/250
* The
above
menu
is
the
RECORDING
[3 MINUTES]
Charging
of
flash
progress
ON
~
When
there
are
objects
in
front
of
or
behind
the
subject
Very
shiny
subjects
such
as
a
mirror
or
car
body
•Press
SmartMedia™
is
aofisprecision
device.
Do do
notaperture
bend,
drop,
or subject
SmartMedia™
to
ZOOM
Page
•computer.
When
the
camera
isOnce
not79
inelectronic
be sure
to attach
the
lens
cap
provided
with[your
camera.
the
POWER
button
to
turn
the
power
off.
wipe
away
any
dirt.
ause,
sticker
ispress
peeled
off,
not
reuse
it.
value,
shutter
speed
and
onOrange
camera
orDIGITAL
The
QUALITY
menu
displayed.
combinations
the
automatically
mode.
MENU
in
•the
The
aperture
value
set
differ
to
the
actual
value
according
to
the
position
ofUK)
theor
zoom
lens.
To
return
to
the
regular
display,
ENTER.
(Photos
cannot
be
taken
at
this
moment.)
(for
US
and
Canada)
If the
shutter
speed
is
set
to
1/350
second
or
less,
the
shutter
as
speed
an
animal
is
automatically
athe
cage
a]changed
person
in ~
front
toAE
1/250
of a tree)
(for
European
Continent)
(for
the
Get
ready
to
take
the
photograph.
- above
Extremely
low
contrast
subjects
When
the
settings
are
made,
they
are
displayed
in(such
thepocket
following
order.
Memo
DC
IN
5V
terminal
excessive
shocks.
Also,
do
not
carry
SmartMedia™
the
ofx[trousers.
This
might
The
lens
cap
can
also
be
attached
to
attachment
following
the
above
steps
to prevent
it’sthe
LCD
79
The
power
turns
off.
(auto-exposure)
position.
determined
shutter
speeds
and
aperture
-in
Subjects
with
little
reflection,
such
as
hair
fur mode.
•• The
size
displayed
on
the
LCD
monitor
FULL
(320
240)
HALF
(160
xorsubject
120).
The
forced
flash
mode
or
]orred-eye
forced
flash
second
ifPage
the
flash
setting
is25)
changed
tothe
thestrap
[ ]becomes
- image
Subjects
that
have
low contrast
and
merge
into
Loading
the
batteries
(
Page
and
the
SmartMedia™
(
Page
31)
into
the
camera.
~
being
lost.
• Flash
photography
and
burst
photography
are
not
possible.
Flashing
SmartMedia™
to
excessive
force
when
you
sit
down,
damaging
the
SmartMedia™.
Hardware
malfunction
Subjects
with
no
solidity,
such
as
smoke
or
flames
the
background
(such
as
white
walls
or
subjects
Attach
the
lens
cap
when
you
are
not
using
the
camera.
values.
However,
their
operation
capability
movies
made
in
FULL
size
is
displayed
on
the
entire
LCD
monitor,
and
those
made
in
HALF
size
is
If
the
[
]
forced
flash
or
[
]
red-eye
forced
flash
mode
is
set
in
flash
photography
when
the
•
In
movie
mode,
ISO
will
be
automatically
set
between
ISO100
and
ISO400
regardless
of
its
setting.
* •Use
Histogram
~ or
dressed
inthe
theSmartMedia™
same
color
as
thelens
background)
-attach
Subjects
viewed
through
glass
Turn
offor
the
power
tothe
retract
the
unit,
and then
the
lens
cap.
The
image
taken
in
exposure
photography
mode
may
be
blurred.
or
to
select
the
desired
setting
from
the
tab
menu
, and
press
Do•not
use
store
in
environments
likely
to
be
affected
byisstatic
electricity
is
different
as
shown
in
the
right
table.
displayed
in
center
ofspeed
the
screen.
2
shutter
speed
is
set
to
a
of
0.7
second
or
more,
the
shutter
speed
automatically
changed
to
Press
POWER
button
tothe
turn
power
on.subject.
A electrical
histogram
isturn
a graphic
representation
ofthe
theistones
of the
The horizontal
~ histogram
• Do
If the
the
image
cannot
be
focused,
thelens
focus
automatically
fixed to infinity.
(When theaxis
flashofisthe
necessary
not
the
power
on
with
cap
attached.
noise.
1/2
second.
ENTER.
*the
The
above
AC adapter
is US/Canada
Turning
the
Power
On
Page
38
shows
the
brightness
(increasing
brightness
from
left
to
right)
and
vertical
axis
shows
the
number
at
this
time,
it
is
simultaneously
fixed
to
illuminate
objects
1.5
meters
(five
feet)
away.
During
macro
•This
Dosaves
use
orsettings,
store
SmartMedia™
very
hot,
humid
oraperture
corrosive
If the
shutter
speed
value
isimages,
set toin1/1000
second,
the
value
is limited
to
F8type
andAC
F3.4.
•• not
When
playing
back
movie
switching
isthe
between
standard
and
image
only.
(O
:environments.
possible
Xbetween
: not
the
and
returns
to
RECORDING
MENU.
type.
European
andpossible)
UK
photography,
the flash
islevel.
alignedthe
withdisplay
the wide
position.)
of pixels
at each brightness
Downloaded From
camera-usermanual.com
adapters differ in shape.
--110
20 -40
80
88
LCD Monitor Display (during photography) (continued)
] mode
Zoom state
Taking
Photographs
Mode dial setting
Possible photographic time (seconds)
(at currently preset size and quality)
Quality
Time
Downloaded From camera-usermanual.com
- 37 -
Additional
Information
• The size of the data to be recorded varies according to the amount of detail in the subject image. So,
the number of images that can be photographed after an image is recorded sometimes doesn’t
decrease.
• The display is momentarily interrupted after recording an image or the mode is switched. This does
not affect photography.
Other
Applications
Memo
Handy
Functions
Date (year/month/day)
Remaining battery power
Erasing
Images
Self-timer photography
Playing
Back Images
Size
Macro photography
Getting
Ready
In [
Changing
the
Preset
Conditions
(RECORDING
MENU)
Photography
in
the
Program
Mode
Setting
Names
Playing
Back
the
of
Photographed
Parts
Image
Size
and
Quality
(Single-Frame
Playback)
Extended
Exposure
Photography
(Bulb
Photography)
Erasing
Images
(Erase
Frame)
(continued)
Manual
Attaching
Using
How
Taking
Enlarging
Playback
About
Turning
to
Photographs
the
SmartMedia™
Press
Settings
the
Photographed
of
Power
the
Power
Multi
Shoulder
Continuously
Outlet
Shutter
Image
On/Off
Images
Strap
Pictures
Button
(Zoom
(Burst
Playback)
Photography)
Taking
Erasing
Button
Photographs
Folders
and
(All
LCD
Images
Continuously
Monitor
in
aImages
Folder/All
(Burst
Display
Photography)
Folders)
(In
Playback
(continued)
(continued)
Mode)
Definitions
Separately
of
the
Accessories
Color
of
the
Viewfinder
LED
Taking
and
Playing
Back
Photographs
on
aMode
TV
(continued)
Changing
the
Preset
Conditions
(RECORDING
MENU)
(continued)
Exposure
Compensation
in
the
Shutter
(continued)
Speed-priority
(continued)
About
Basic
Settings
SmartMedia™
in
(Sold
the
mode)
Aperture-priority
(continued)
Mode
(continued)
LCD
Monitor
Display
(during
photography)
(continued)
Manual
Settings
(continued)
Playing
Photography
Installing
Back
Movies
batteries
(Auto
Photography)
(continued)
(continued)
(continued)
Names
of
Parts
(continued)
Getting
Ready
The shutter
camerabutton
automatically
adjusts the
shutter
and
the aperture
value
according
to the
brightness
of an
can be pressed
down
in twospeed
stages:
halfway
down and
fully
down. When
pressed
halfway
down,
This
“SmartMedia™”
Set
Play
Automatically
The
the
following
mode
shoulder
menu
back
size
photographed
is(number
used
for
items
strap
plays
setting
isadapter
for
athe
is
are
back
storage
of
taking
handy
also
the
pixels)
still
the
basic
available
subjects
for
medium
images
16
and
carrying
images
settings
quality
one
for
that
as
saving
separately
your
image
to
require
(compression
be
camera
used
images
atseveral
a
sold
for
around.
inthat
photography
items.
ratio)
seconds
the
you
multi
of
have
the
photography
to image
photograph
in
photographed.
to
[ second
be
mode
],photographed.
such
[be
Even
in
asquick
]for
firework
or
if Europe,
the
[You
succession.
camera’s
displays
] photography
power
at the
Enlarges
selected
portions
of
images
being
played
back
at
two
levels.
Images
can
displayed
enlarged
when
In
You
this
can
color
mode,
manually
of
the
photographs
viewfinder
adjust
settings
are
LED
taken
indicates
such
continuously
asphotographed
the
exposure
state
atof
control,
atime.
the
maximum
camera.
white
speed
balance,
The
ofthe
0.8
metering
system,
intervals.
continuous
This
item
switches
display
on
the
LCD
monitor
when
playing
back
photographed
images.
can
switch
If
you
the
AC
(sold
separately:
PDR-ACM1A
for
the
US/Canada,
PDR-ACM1E
PDR-ACM1U
Mode
Effective
dial
Subjects
and
Set
Values
TM
Press
.of
aperture
value.
SYSTEM
Turning
Exposure
ISO
OSD
In
[prevent
[use
LANGUAGE
the
]the
INFO.
mode
control
(EXP.)
On
Close
the
SmartMedia™
cover.
Slide
the
SmartMedia
cover
release
knob
in
the
Take
photographs
or
or
battery
to
to
select
or
play
[that
the
slide
]them
or
shutter
it
[ the
back.
,]will
and
speed.
and
lock
press
Look
Use
through
to
select
the
[adjust
viewfinder
]use
and
press
to
compose
ENTER.
the
picture.
To
continue
erasing
images,
repeat
the
above
procedure
2.
.is
AF
(auto-focus)
and
AE
(auto
exposure)
are
set.
When
pressed
fully
down,
the
camera
takes
aspace
picture.
object.
This
mode
enables
carefree
photographing
similarly
to
selecting
[stable
]photographs.
in
[ from
]settings”,
mode.
Itrepeatedly
is
to
night.
To
is
Change
modes.
turned
When
the
OFF,
your
setting
using
the
camera
images
this
according
mode,
from
saved
dropping
be
to
sure
how
on
the
the
to
during
SmartMedia™
image
a(size,
photography,
tripod
is
to
to
be
keep
used
not
hang
the
and
be
camera
erased.
the
the
shoulder
remaining
SmartMedia™
strap
and
amount
prevent
around
can
ofstep
your
distortion
be
neck.
inpossible
the
of
images.
Relationship
between
your
camera
and
accessories
Connecting
tocalled
Other
Devices
(page
123)
being
played
back
one
image
at
acover,
time.
The
meaning
maximum
of
number
LED
color
of
photographs
differ
according
can
to
be
taken
mode
continuously
dial
setting.
three
photography
mode,
and
take
photographs
at
these
settings.
These
are
“Manual
which
are
saved
display
to
show
aPower
list
detailed
information
compression
ratio,
shutter
speed,
aperture,
etc.)
or
you
can
for
the
UK)
in
a
room
with
amay
power
outlet,
you
can
take
photographs
for
an
extended
period
of
time.
This
also
Item
QUALITY
Options
Notes
SmartMedia™
VIDEOon
OUT
White Balance (W.B.)
Write
Protection
Removing
the Batteries
ISO
[ POWER
]
AUTO
OFF
Setting items
Turning
the
Power
Off
Using
the
LCD
Monitor
Additional
Information
Other
Applications
Handy
Functions
Erasing
Images
Playing
Back Images
Taking
Photographs
Tab menu
The
tab
is
displayed.
setting
isbattery
as
follows:
Make
sure
that
the
issystem
firmly
closed.
Details
image
ofmenu
operation
isrange
saved
are
or
erased,
the
same
and
as
the
taking
camera
photographs
is
then
ready
and
to
playing
take
photographs.
them
back
onon
the
LCD After
monitor.
If
you
use
the
viewfinder
to
take
photographs,
the
photography
Set
the
mode
dial
to
[cover
].settings
direction
of
the
arrow
to
open
cover
.the
ENTER.
change
the
white
and
the
metering
in(the
program
mode.
erased
SmartMedia™.
and
reused.
For
details
on
these
accessories,
refer
to
the
Instruction
Manual
for
the
accessory
you
are
using.
(information
Movies
images
photographed
in
the
multi
mode
Page
cannot
be
displayed
using
the
zoom
playback
Images
even
if the
are
camera
not
recorded
is
turned
directly
off.
SmartMedia™
but
are
stored
within
the
buffer
memory.
display
histograms,
etc.
prevents
failed
photographs
due
to
battery
wear
or
failed
of
data
to
a
PC.
details
handling
the AC
Set
Sets
the
thebalance
whether
color
: /or
Photography
mode
language
not
to
and
return
photographic
of
in
menus
the
program
displayed
sensitivity
in
the
(default)
on
SETUP
the
at51)
which
LCD
(temporarily
MENU
Page
monitor.
to
image
62)
the
original
is For
to
be
factory
recorded.
settings.
feeds
the
image
•transfer
Each
press
of
➲
•How
Copying
of
printed
(black
on
white
paper)
set
the
time
(text
114)
F8
/display
F6.8
F5.6
/18.
F4.8
/Page
/and
F3.4
/mode
F2.9
to
take
photographs
Page
41
1/1000,
1/750,
1/500,
1/350,
1/250,
1/180,
1/125,
range
may
differ
from
the
actual
image.
InLCD
this
case,
use
the
LCD
Press
the
shutter
button
down
halfway
.1/90,
the
mode
dial
to
[ F4.0
],
[characters
]reset.
or
[selected
].higher
SmartMedia™
having
the
following
storage
capacity
can
be
on
your
current
as
of
March
2000)
feature.
The
last
cover
recorded
image
opens
frame
image
appears
appears
on
the
on
the
LCD
monitor.
monitor.
photography
is
finished,
check
the
images
record
the
ones
tocamera.
SmartMedia™.
[TIME&DATE,
]
:
Erases
images
in
the
selected
folder
folders.
adapter,
beSet
sure
to
read
page
•
2x-speed
playback
isaperture-priority
performed
Make
sure
that
the
SmartMedia™
is
correctly
loaded.
(➲
Page
31)
byused
one
frame.
Warning:
Noise
:OSD
Photography
increases
LANGUAGE
when
incurrently
will
the
not
ISO
be
is for
changed
mode
to
(and
Page
settings.
63)
•
Backlit
portraits
[PROTECTED]
on
the
LCD
monitor,
cancel
the protection
( Page 108) or
remove
How
to
play
back
images
Page
80
1/60,
1/45,
1/30,
1/20,
1/10,
1/8,
1/6,
1/4,
1/3,
1/2,
monitor
for
photography.
AF
(auto-focus)
and
AE
(auto
exposure)
(the
Additional
Information,
: value
English
(default)
➲
Pass
Set
the
out
mode
end
steps
of
dial
1the
to
to
shoulder
4[1/15,
either
]].LCD
or
inspeed-priority
[strap
“Photography
through
].
the
in
the
strap
Shutter
speed-priority
Mode”
isdisplayed
held
down.
the
duration
that
2MBCarry
/4MB/8MB/16MB/32MB/64MB/128MB
the
mode
dial
to
[isin
(all
3.3
types)
To
]•the
adjust
: When
Erases
the
all
brightness
folders
recorded
of
the
on
monitor
SmartMedia™.
Page
[Set
➲115
•V
1-frame
feed
is continued
for the
The
aperture
and
the
shutter
speed
corresponding
to(inthat
:write-protection
Photography
shutter
mode
Page
65)
•IMPORTANT
bright
scenes
(such
and
highly
reflective
subjects
•the
You
can
also
carry
out
step
8snowfields)
while
verifying
the
image
step
7.
DPOF
(in
Page
102).
Glossary)
start
to
function.
0”7,
1”,
1”5,
2”,
3”,
4”,
6”,
8”,
10”,
15”
•Very
Do
not
remove
or monitor
load
the
batteries
or
disconnect
or
connect
the
AC
adapter
while
the camera
is mode.
on. This
:POWER
Japanese
:LCD
Equivalent
toas
color
ISO100
Carry
Set
Use
out
or
mode
steps
to
dial
select
1
to
to
2[erased,
the
“Manual
].
images
photographed
Settings”
(page
in
58).
the
multi
photography
You can also
the
PC
card
adapter
and
floppy
disk
adapter
(➲
123)
sold
separately
to transfer
Changing
the
display
Page
116
Theconnect
images
or
folders
are
and
the
camera
returns
toPage
the
is
held
down.
duration
that
value
are
displayed
on
the
LCD
monitor.
If
the
appropriate
(page
attachment
65)
or
on
in
“Photography
the
camera.
in
the
Full
Manual
Mode”
(page
67).
Press
the
button
to
turn
the
power
on.
full
manual
mode
(
Page
67)
:
Photography
in
Press
the
MENU
button.
• •Shots
predominantly
of
sky
Even
ifreturn
photography
is disconnect
terminated
midway
before
capturing
three
images
bythe
releasing
theAC
shutter
• AF
If
you
take
aup
photograph
after
erasing
an
athis
number
continuing
from
last Ifphotographed
When
or
AE
are
locked,
the
beep
tone
( Page
111)
sounds
and
the
Use
ormade
to
change
the
setting
inimage,
the
menu,
might
the
manual
settings
tosame
their
defaults.
Iftab
happens,
manually
set
conditions
again.
:
High-sensitive
photography
equivalent
to
color
ISO200
(default)
Before
you
connect
or
the
AC
adapter,
be
sure
to
turn
the
camera
OFF.
the
adapter
is
Press
the
image
quality
button
to
select
the
preset
combination
cannot
be
set
even
if
the
shutter
speed
is
adjusted
to
images to a
PC.
16MB
(SM-M1600D)/32MB
(SM-M3200D)/64MB
(SM-M6400D)/128M
(SM-M1280D)
The
respective
last
image
mode.
frame
appears
on
LCD
monitor.
You
can
also
select
the
image
by
the
operation
as
for
thumbnail
display
(
Page
83).
Carry
out
steps
1
to
on
page
109.
When
the
camera
is
turned
on,
set
the
mode
dial
to
thethe
desired
The
shutter
speed
and
the
aperture
value
corresponding
todisplay
the
All
descriptions
inor
this
Instruction
Manual
are
for
when
language
is set
to [ENGLISH].
Press
or
to
select
the
image.
button,
images
already
photographed
can
be
saved
and
erased
by playback
the
method.
image
is
assigned
as
image
number.
The
viewfinder
RECORDING
LED
turns
MENU
green.
is2
displayed.
•press
The
image
the
photograph
is
taken
is
slightly
less
clear
than
images.
(This
is 109,
connected
disconnected
with
the
power
ON,
camera
settings
may
beabove
reset
(SET-UP
➲ Page
and
ENTER.
:before
High-sensitive
photography
equivalent
to
color
ISO400
its
the
shutter
speed
isthe
displayed
inthe
red.
To limit,
cancel
erasing
of
image
data,
select
[monitor.
]Photography,
and
press
ENTER.
quality
and
size,
while
viewing
indication
on
the
starts
a
reverse
•
The
press
of
mode.
shutter
speed
are
displayed
on
the
LCD
If
the
appropriate
The
length
of
time
to
capture
images
varies
according
to
the
photographic
conditions.
•
Images
can
also
be
erased
in
the
thumbnail
mode.
In
this
case,
the
camera
enters
the
single
frame
Select
[SYSTEM
INFO.]
on
the
SETUP
MENU
and
because
television
displays
images
at
a
lower
resolution.)
•
Spotlit
subjects,
particularly
against
dark
backgrounds
Manual
Settings
➲settings,
Page
58)
orPage
the
camera
malfunction.
however,
is
in
this
state.
feeds the
image
•may
Each
press
oftoinbegin
EXP.
].
To
cancel
changing
of
press
.you
Use
or
todial
select
the
frame
want
to
enlarge.
Press
the
or
Zoom
to
switch
select
[( S/C
].isphotography
21)
towards
“T”
playback.
]possible
is
selected,
[NO
IMAGE]
displayed
after
all
folders
When
playback.
Press
Set
mode
in
the
to
[ sure
Tv
mode,
].the
or
press
or
the
shutter
button
fully
Before
photography,
make
that
the
lens
cap
has
been
combination
cannot
be
set
even
ifflash
aperture
isin.black
adjusted
to its
playback)
mode,
and
enters
the
thumbnail
playback mode after the image is erased.
status
display.
]or
mode:
In
[[playback
Press
the
display/info
button.
Self-timer
photography
and]down
are
not
possible.
•the
The
display
unit
varies
according
to
the
output
system.
•theCopying
of (frame
printed
text
(white
characters
on
paper)
.playback
press
reverse
by
one
frame.
This
adapter
allows
SmartMedia™
to
be
used
as
3.5"
floppy
disk.
have
been
erased
(unless
the
SmartMedia™
contains
protected
You
can
also
select
the
image
by
the
same
operation
as
for
thumbnail
playback
( [4X],
PageISO
83).will be
Automatic
begins.
•
Playback
becomes
2x-speed
to
reduce
aperture
size.
Press
to
increase
aperture
size.
Press
camera
takes
a
picture.
The
manual
setting
removed
the
camera.
limit,
aperture
value
isbe
displayed
in
red.
Photography,
however,
the
[Scenes
M
]from
mode
tomenu
set
the
shutter
speed
to simultaneously
0.7
second
During
[2X],
the
ISO
will
automatically
set
between
ISO100
ISO200.
During
set
the
quality
and
size
Page
112
•the
With
the
NTSC
system,
images
can
be
displayed
on the➲
LCD
monitor
and ➲
TV during
•To
with
low
reflectivity,
such
as
shots
green
or
dark
foliage
Each
press
of
the
display/info
button
switches
the
display
•of1-frame
feed
isand
continued
The
SYSTEM
INFO.
displayed.
reverse
for
the
duration
This
adapter
isplayback
inserted
into
the],
floppy
your
PC,
allowing for the
images).
PO
The
viewfinder
LED
turns
redis
image
data
being
recorded
onto
Insert
the
adapter
connector
plug
into
the
DC
IN
values
are
displayed
In
the
photography
modes
([while
[and ISO400.
]disk
oris
[ drive
]),on
the
lens
photography
and
playback.
is
possible
inAC
this
state.
WE
automatically
set
between
ISO100
is
held
down.
format
as
follows:
duration
that
Note:
The
larger
the
F
value,
the
smaller
the
aperture
size
become
or
longer.
RShutter speed
•Press
Remove
and
insert
SmartMedia™
with
the
camera’s
power
turned
off.Aperture value
is
held
down.
that
To
quit
the
SETUP
MENU,
change
the
mode
dial
setting.
Adjust
the
zoom
ratio
by
the
Zoom
switch.
(Zoom
to
display
option
menu,
press
or
to
images
recorded
on
the
SmartMedia™
to
be
transferred
to
the
PC.
the
SmartMedia™.
Sets
video
output
system
according
tobethe
country
in
which
your camera
is used.
on
the
left
ofthe
the
LCD
Press
the
shutter
button
down
halfway
and
press
5V
terminal
on
the
camera.
extends
from
the
camera
body.
•the
PAL
system,
images
cannot
displayed
When a cable
is connected, only
and
versa.
the
image
quality
button
switches
the
quality
and
size
Gently
insert
the
SmartMedia™
far
as
it, simultaneously.
can
go
[Pressing
]vice
isWith
displayed
on
the
LCD
monitor.
•select
Recorded
data
bepress
erased
(destroyed)
in
the
situations
listed
below. Note that Toshiba
White
Additional
Information,
to
increase
shutter
speed.
Pressas Glossary
to
decrease
shutter
speed.
Press
Press
or
to
move
forward
reverse.
PRG
]may
and
ENTER.
] and
press
ENTER.
[Balance
switch
Page
21)
TV
display
is
available.
monitor
screen.
When
the
camera
is
turned
on,
the
Auto and
Power
OFF function
✩✭✰✯✲✴✡✮✴
settings
in
the
following
order.
it
down
fully
.
Press
or
to
select
the
item
you
desired
to
set,
with
the
SmartMedia™
electrodes
(metal
contacts)
Additional
Information,
Glossary)
NTSC
system
(
Corporation
accepts
no
responsibility
whatsoever
for
the
loss
(destruction)
of
recorded
data enters
in these
•
When
all
images
in
a
folder
are
erased,
that
folder
itself
is
also
erased.
Theto
camera
determines
the
white
balance
by
averaging
the is
various
kinds playback
of light that actually
to
next
frame/
to“T”
go
back
one
To
prevent
valuable
data
being
erased,
attach
the
write••advance
With
the
PAL
images
are
played
back
with
apressing
black
frame
•frame
After
pause
cancelled,
the
Zoom
switch
to
the
will
the
image.
Pressing
ENTER
the
setting.
or
,, SmartMedia™
and
manual
Exposure
compensation
Page
69)
using
When
[for
M
]selects
isissystem,
selected
on
the
[ halfway
EXP.
]remove
option
menu,
orsurrounded.
the
shutter
speed
setting
becomes
operational.
Never
open
the
SmartMedia™
cover
orenlarge
the
while
anmakes
is
being
recorded.
This
or
and
manual
setting
(image
Page
58)
or
film
speed
Exposure
compensation
((from
Page
69)
using
Reverse the
procedure
“Loading
the
Batteries”
and
remove
the
batteries.
•facing
Pressing
the
shutter
button
down
adjusts
the
exposure,
• Playback
paused.
PAL
system
( camera.
Additional
Information,
Glossary)
situations:
the
lens.
This
setting
allows
you
to
set
in
advance
the
white
balance
when
taking
photographs
under
and
press
ENTER.
the
rear
of
the
For
the
US/Canada:
PDR-ACM1A
Holding
down
or
moves
forward
or
reverse
continuously.
resumes
at
the
last
state
that
was
protect
sticker
at
the
write-protect
area.
Data
can
no
longer
be
may
corrupt
the
data
on
the
SmartMedia™
or
damage
the
SmartMedia™
itself.
possible,
but
does
not
make
the
exposure
compensation
possible. However the exposure value
is
To
return
normal
press
the
Zoom
switch
towards
setting
Page
58)magnification,
or film
speed
setting
( the
Page
78)
using
ENTER
Pass
the
shoulder
strap
through
loop
and
pull.
setting
(( toPage
78)
using
ENTER
are
also
possible.
and
pressing
the
shutter
button
fully
takes
the
shot.
TM[ is down
When
the
SmartMedia™
used
incorrectly
by
the
user
or
a
third
party
[
],
]
or
[
]
AE
or
AF
are
locked
with
the
shutter
button
held
half
specific
lighting
conditions.
For
Europe:
PDR-ACM1E
active
before
the
pause.
Firmly
insert
the
SmartMedia
as
far
as
it
can
go.
displayed
on is
the
LCD
monitor.
Press
ENTER.
recorded
or setting
erased
from
SmartMedia™.
Toon
write
oraterase
data
from is to be recorded.
Sets
the
color
mode
and
photographic
sensitivity
which
the
image
“W”.
are
also
possible.
The
default
different
depending
the
destination
country/area.
IMPORTANT
Use
or
to
select
the
desired
item
Press
ENTER,
nine
images
are
displayed
simultaneously.
• no
If
you
shoot
a
still
picture,
when
preview
is
set
to
ON
(
Page
77),
down.
If
operation
is
carried
out
for
a
fixed
amount
of
time
(default:
about
one
minute),
power
ON
When
the
SmartMedia™
is
exposed
to
static
electricity
or
electrical
noise
✭❅❍❏
➲
Forimage
the Noise
UK:
PDR-ACM1U
:off
Displays
the
firmware
version
ofto
this
camera.
SmartMedia™,
peel
the
sticker.
camera
ready
to
take
photographs.
Warning:
increases
when
the
ISO
is
changed
higher
settings.
isis
displayed
and
a
white
frame
and
green
Green The
Compose
picture,
press
the
shutter
button
down
halfway,
and
press
it
down
:the
Automatic
adjustment
(default)
Display
Page
83
theThumbnail
recorded
image
is
displayed
on
for
about
two
]specifications
Standby
mode
[enlarged,
••-For
If
no
operation
is
carried
out
a screen
fixed
amount
offrom
time
(default:
about
1shutter
minute),
thewear.
power
is
turned
TM
consumption
is
set
to
its
minimum
state
(power
almost
off)that
to
prevent
battery
This
is
.in
and
press
When
the
SmartMedia™
isfor
removed
ordarkens
the
camera
isPage
turned
off
while
recording
erasing
The
image
the
LCD
monitor
sometimes
the
time
the
button
isdata,
pressed
down
details,
refer
to
the
of
AC
information.
adapter
127.
: on
Displays
the
SmartMedia
Playback
returns
to
the
start
ofturned
the
movie.
frame
are
displayed
the
LCD
monitor.
:
Photography
outdoors
Default
setting:
seconds.
off
to
preserve
battery
life.
This
is
called
“Auto
Power
OFF”.
To
return
to
the
normal
state,
press
the
fully.
Page
40
called
the
Auto
Power
OFF.
This
setting
allows
you
to
set
the
time
when
the
camera
turns
off
halfway
until
the
image
becomes
focused.
: picture,
Equivalent
to
ISO100
(default)
data,
frame
advance
when
images
aredefaults.
played
back or during
formatting alarm
of the
The options
are
displayed.
: Returns
settings
to
Flashing
[ the
],
[ color
]conditions
or their
[shutter
]being
Self-timer
in frame
operation
at a handshake
.
Compose
the
press
the
button
down
halfway,
and
press
it
down
The
white
frame
indicates
entire
image,
while
the
green
:
Photography
in
cloudy
POWER
button
again.
•
The
viewfinder
LED
turns
red
while
image
data
is
being
recorded
Compose
the
picture,
press
the
shutter
button
down
halfway,
and
press
it
down
• The
To
set
the
focus
orpicture.
exposure
forphotography
a subject
outside
the
center
the intended
theincamera
directly
The camera
takes
the
automatically.
This
function
isthrough
not
activated
during
automatic
playback
( image,
Pagepoint
85) or
the [ only>
] PC
:appearing
High-sensitive
equivalent
toofcolor
ISO200
SmartMedia™.
Note:
image
the
lens
will
be
The
display
returns
to<Histogram>
thumbnail
playback.
<Standard>
<Detailed
information>
<Image
shows
the
location
of
the
currently
enlarged
area.
halfway,
and
press
it
down
fully.
Page
40
:
Photography
in
bluish
fluorescent
light
fully.
Page
40
About
the
Auto
Power
(FULL
OFF
Function
)
➲
Additional
Information,
“AUTO
POWER
OFF
(page
110)”
☞
at
the
subject
or
desired
exposure
(lighting),
press
and
hold
the
shutter
button
halfway.
Now,
with
the
shutter
onto
the
SmartMedia™.
ON]
Writing
to SmartMedia™
in progress
mode.
Press
ENTER.
:adapter
High-sensitive
photography
equivalent
toanother
color
ISO400
•Insert
Wedefault
recommend
copying
and
saving
important
datapower
onto
storage
medium (floppy disk, hard
displayed
for
[LCD
].[Power
fully.
Page
40
the
AC
power
plug
into
the
The
size
and
quality
of
the
image
can
be
reset
to
the
desired
combination.
Press
ENTER.
button
still
held
halfway
down,
you
can
turn
the
direction
of
the
camera
and
frame
your
image
with
the
focus
•
It
is
possible
to
play
back
any
images
in
any
folders
by
pressing
or
during
playback.
(For
details
ON
: Photography
inafter
reddish
fluorescent
light
The
camera
takes
the
picture.
Photographs
can
be
taken,
however,
do not
turn thepress
power
OFF.
Todisk,
return
to disk,
the
normal
state
theset
Auto
Power
OFF
has been
executed,
the
POWER
button
MO
etc.).
The
PREVIEW
manual
setting
Page
items
77
are
displayed.
camera
takes
the
atmonitor.
the
exposure
time.
Current
Entireofimage
and
exposure
locked.
Press
the
button
down
fully
to in
complete
capturing
the image.
Red outlet.
[In the
on picture
the
LCD
The
camera
is ready
for
burst
photography.
of displayed
folder
Page
92)
]:the
mode:
Accessing
of
SmartMedia™
[ (HALF
Photography
in] is
incandescent
light
•] [is
When
shutter
speed
setshutter
to
a)turn
speed
of
0.7 second
orprogress
slower,
photographs
taken
as extended
to Never
turn
the
power
on 77
again.
•During
remove
the
SmartMedia™
or
the
camera
offresult
while
recording
data or are
while
erasing
data
COLOR
Page
the
exposure,
the
viewfinder
LED
turns
orange.
position
•
Moving
the
camera
as
you
press
the
shutter
button
will
in
a
blurred
image.
Use
,
,
or
to
select
the
area
to
enlarge.
the
last
image
displays
the
first
image,
and
pressing
atwill
thebe
firstautomatically
image
displays
the
Pressing
During
[2X],
the
ISO
be
automatically
set
to
ISO200.
[4X],ofISO
setof
exposures
( at Page
68).
IfCarry
burst
photography
is to
set
the
shutter
speed
is set During
to athe
speed
0.7
second
or more
in the
[ to
Tv ]
out
steps
1will
2when
in
Photographic
(SmartMedia™
formatting).
actions
might
damage
ISO
Page
78
Flashing
ItClose
takes
about
twice
the
time
to while
complete
taking
the
photograph
duePDR-M81
to processing
ofenlargement
the
captured
[set
],These
[“Basic
] When
the
image
is not
in SmartMedia™.
focus.
the
SmartMedia™
cover.
•
The
PDR-M81
usesto
an
accurate
auto
focus
mechanism.
However,
the
may
have
difficulty
last
image.
Adjust
the
display
area
enlarge
viewing
theto
white
and
ISO400.
•
In
AEB
photography
(
Page
71)
or
burst
photography,
the
shutter
speed
cannot
be
set
to
0.7
second
or
longer.
(SMALL
)
mode,
the
shutter
speed
is
automatically
changed
1/2
second.
IMPORTANT
•image.
Use
only
the
SmartMedia™
specified
for
use
with
the
PDR-M81.
The
use
of
other
SmartMedia™
SHARPNESS
Page
79
mode)”
(page
109).
Select
[QUALITY]
Settings
(
focusing
or
not
be
able
to
focus
at
all
for
subjects
and
situations
such
as
the
following:
Before
you
use
aother
new
SmartMedia™
the
first during
time,
be
sure
tothe increased
Images
can
bevalue
rotated
by] pressing
playback.
➲ isspeed
[ for
] or
green
frames.
the
aperture
is
to
F2.9
(maximum
aperture
size),
shutter
speed
restricted
••➲
If
a
mode
than
[ set
suppressed
flash
mode
is
set
inthe
flash
photography,
thedark
shutter
is
•79
Processing
image
IMPORTANT
- When
subject
is distant and
- SmartMedia™
Subjects
moving
at
high
speed
damage
the
camera.
CONTRAST
Page
• to
The
write
protection
may
not
function
if in
write-protect
sticker
becomes
Use
a soft
dry cloth to
.thesecond.
oncould
the
SETUP
MENU
and
press
format
the
(➲
Page
91).
an
image
counterclockwise,
and
pressing
rotates
clockwise.
Pressing
1/750
PDR-ACM1A
] •are
the
same
as
to
PDR-ACM1E
PDR-ACM1U
[PRG]
and
[ rotates
limited
tosecond.
between
1/2
second
and
1/250
* The
aboveitdirty.
menu
is
the
RECORDING
Charging
of
flash
progress
ON
✣❏■▼❉■◆❏◆▲
❐❈❏▼❏❇❒❁❐❈❙
When
there
are
objects
in
front
of
or
behind
the
subject
Very
shiny
subjects
such
as
a
mirror
or
car
body
SmartMedia™
is
aofisprecision
device.
Do do
notnot
bend,
drop,
or subject
SmartMedia™
to
DIGITAL
ZOOM
Page
• wipe
When
the
camera
isOnce
not79
inelectronic
be sure
to attach
the
lens
cap
provided
with[your
camera.
the
POWER
button
to
turn
the
power
off.
away
any
dirt.
ause,
sticker
ispress
peeled
off,
reuse
it.
Orange•Press
The
QUALITY
menu
displayed.
combinations
the
automatically
mode.
MENU
inthe
•the
The
aperture
value
set
differ
to
the
actual
value
according
to
the
position
ofUK)
theorzoom
lens.
To
to
the
regular
display,
ENTER.
(Photos
cannot
be
taken
at
this
moment.)
(forreturn
US
and
Canada)
If the
shutter
speed
is
set
to
1/350
second
or
less,
the
shutter
as
speed
an
animal
is
automatically
athe
cage
a]changed
person
in front
to 1/250
of a tree)
(for
European
Continent)
(for
Get
ready
to
take
the
photograph.
- above
Extremely
low
contrast
subjects
When
the
settings
are
made,
they
are
displayed
in(such
thepocket
following
order.
✥❘❐❏▲◆❒❅
✣❏❍❐❅■▲❁▼❉❏■
excessive
shocks.
Also,
do
not
carry
SmartMedia™
the
ofx[trousers.
This
might
The
lens
cap
can
also
be
attached
to
attachment
following
the
above
steps
to prevent
it’sthe
LCD
79
The
power
turns
off.
✭❅❍❏
determined
shutter
speeds
and
aperture
-in Subjects
with
little
reflection,
such
as
hair
fur mode.
•• The
size
displayed
on
the
LCD
monitor
FULL
(320
240)
HALF
(160
xorsubject
120).
The
]becomes
forced
flash
mode
or
]orred-eye
forced
flash
second
ifPage
the
flash
setting
is25)
changed
tothe
thestrap
[ ✡✥✢
- image
Subjects
that
have
low contrast
and
merge
into
Loading
the
batteries
(
Page
and
the
SmartMedia™
(
Page
31)
into
the
camera.
being
lost.
• Flash
photography
and
burst
photography
are
not
possible.
Flashing
SmartMedia™
to
excessive
force
when
you
sit
down,
damaging
the
SmartMedia™.
Hardware
malfunction
Subjects
with
no
solidity,
such
as
smoke
or
flames
the
background
(such
as
white
walls
or
subjects
Attach
the
lens
cap
when
you
are
not
using
the
camera.
values.
However,
their
operation
capability
movies
made
in
FULL
size
is
displayed
on
the
entire
LCD
monitor,
and
those
made
in
HALF
size
is
If the
[ ]mode,
forcedISO
flash
[ automatically
] red-eye set
forced
flash
mode
is
set
in
flash
photography
when
the
• In
movie
willorbe
between
ISO100
and
ISO400
regardless
of
its
setting.
❍❅▼❅❒❉■❇
dressed
inthe
theSmartMedia™
same
color
as
thelens
background)
-attach
Subjects
viewed
through
glass
Turn
offor
the
power
tothe
retract
the
unit,
and ✳❐❏▼
then
the
lens
cap.
The
image
taken
in
exposure
photography
mode
may
be
blurred.
or
to
select
the
desired
setting
from
the
tab
menu
, and
press
•Use
Do•not
use
store
in
environments
likely
to
be
affected
byisstatic
electricity
or
is
different
as
shown
in
the
right
table.
displayed
in
center
ofspeed
the
screen.
shutter
speed
is
set
to
a
of
0.7
second
or
more,
the
shutter
speed
automatically
changed
to
Press
POWER
button
tothe
turn
power
on.
A electrical
histogram
isturn
a graphic
representation
ofthe
theistones
of the
subject.
The
horizontal
histogram
✷❈❉▼❅
❂❁●❁■❃❅
▲❅▼▼❉■❇
• Do
If the
the
image
cannot
be
focused,
thelens
focus
automatically
fixed to infinity.
(When theaxis
flashofisthe
necessary
not
the
power
on
with
cap
attached.
noise.
1/2
second.
ENTER.
*the
The
above
AC adapter
is US/Canada
Turning
the
Power
On
Page
38
shows
the
brightness
(increasing
brightness
from
left
to
right)
and
vertical
axis
shows
the
number
at
this
time,
it
is
simultaneously
fixed
to
illuminate
objects
1.5
meters
(five
feet)
away.
During
macro
•This
Dosaves
use
orsettings,
store
SmartMedia™
very
hot,
humid
oraperture
corrosive
If the
shutter
speed
value
isimages,
set toin1/1000
second,
the
value
is limited
to
F8type
andAC
F3.4.
•not
When
playing
back
movie
switching
isthe
between
standard
and
image
only.
(O
:environments.
possible
Xbetween
: not
the
and
returns
to
RECORDING
MENU.
type.
European
andpossible)
UK
photography,
the flash
islevel.
alignedthe
withdisplay
the wide
position.)
of pixels
at each brightness
Downloaded From
camera-usermanual.com
adapters differ in shape.
--110
20 -40
80
88
How to Hold Your Camera
Wrong
Camera held with both hands with your arms
firmly held against the sides of your chest
Fingers held over the lens
Taking
Photographs
Right
Getting
Ready
When taking a photograph, hold the camera firmly and prevent your finger or shoulder strap from covering the
lens, flash or flash sensor.
Playing
Back Images
Erasing
Images
Handy
Functions
Other
Applications
Additional
Information
Downloaded From camera-usermanual.com
- 39 -
Changing
the
Preset
Conditions
(RECORDING
MENU)
Photography
in
the
Program
Mode
Setting
Names
Playing
Back
the
of
Photographed
Parts
Image
Size
and
Quality
(Single-Frame
Playback)
Extended
Exposure
Photography
(Bulb
Photography)
Erasing
Images
(Erase
Frame)
(continued)
Manual
Attaching
Using
How
Taking
Enlarging
Playback
About
Turning
to
Photographs
the
SmartMedia™
Press
Settings
the
Photographed
of
Power
the
Power
Multi
Shoulder
Continuously
Outlet
Shutter
Image
On/Off
Images
Strap
Pictures
Button
(Zoom
(Burst
Playback)
Photography)
Taking
Erasing
Button
Photographs
Folders
and
(All
LCD
Images
Continuously
Monitor
in
aImages
Folder/All
(Burst
Display
Photography)
Folders)
(In
Playback
(continued)
(continued)
Mode)
Definitions
Separately
of
the
Accessories
Color
of
the
Viewfinder
LED
Taking
and
Playing
Back
Photographs
on
aMode
TV
(continued)
Changing
the
Preset
Conditions
(RECORDING
MENU)
(continued)
Exposure
Compensation
in
the
Shutter
(continued)
Speed-priority
(continued)
About
Basic
Settings
SmartMedia™
in
(Sold
the
mode)
Aperture-priority
(continued)
Mode
(continued)
LCD
Monitor
Display
(during
photography)
(continued)
Manual
Settings
(continued)
Playing
Photography
Installing
Back
Movies
batteries
(Auto
Photography)
(continued)
(continued)
(continued)
Names
of
Parts
(continued)
Getting
Ready
The shutter
camerabutton
automatically
adjusts the
shutter
and
the aperture
value
according
to the
brightness
of an
can be pressed
down
in twospeed
stages:
halfway
down and
fully
down. When
pressed
halfway
down,
This
“SmartMedia™”
Set
Play
Automatically
The
the
following
mode
shoulder
menu
back
size
photographed
is(number
used
for
items
strap
plays
setting
isadapter
for
athe
is
are
back
storage
of
taking
handy
also
the
pixels)
still
the
basic
available
subjects
for
medium
images
16
and
carrying
images
settings
quality
one
for
that
as
saving
separately
your
image
to
require
(compression
be
camera
used
images
atseveral
a
sold
for
around.
inthat
photography
items.
ratio)
seconds
the
you
multi
of
have
the
photography
to image
photograph
in
photographed.
to
[ second
be
mode
],photographed.
such
[be
Even
in
asquick
]for
firework
or
if Europe,
the
[You
succession.
camera’s
displays
] photography
power
at the
Enlarges
selected
portions
of
images
being
played
back
at
two
levels.
Images
can
displayed
enlarged
when
In
You
this
can
color
mode,
manually
of
the
photographs
viewfinder
adjust
settings
are
LED
taken
indicates
such
continuously
asphotographed
the
exposure
state
atof
control,
atime.
the
maximum
camera.
white
speed
balance,
The
ofthe
0.8
metering
system,
intervals.
continuous
This
item
switches
display
on
the
LCD
monitor
when
playing
back
photographed
images.
can
switch
If
you
the
AC
(sold
separately:
PDR-ACM1A
for
the
US/Canada,
PDR-ACM1E
PDR-ACM1U
Mode
Effective
dial
Subjects
and
Set
Values
TM
✶❉❅◗❆❉■❄❅❒
✬✥✤
Press
.of
aperture
value.
SYSTEM
Turning
Exposure
ISO
OSD
In
[prevent
[use
LANGUAGE
the
]the
INFO.
mode
control
Power
(EXP.)
On
Close
the
SmartMedia™
cover.
Slide
the
SmartMedia
cover
release
knob
in
the
Take
photographs
or
or
battery
to
to
select
or
play
[that
the
slide
]them
or
shutter
it
[ the
back.
,]will
and
speed.
and
lock
press
Look
Use
through
to
select
the
[adjust
viewfinder
]use
and
press
to
compose
ENTER.
the
picture.
To
continue
erasing
images,
repeat
the
above
procedure
2.
.is
AF
(auto-focus)
and
AE
(auto
exposure)
are
set.
When
pressed
fully
down,
the
camera
takes
aspace
picture.
object.
This
mode
enables
carefree
photographing
similarly
to
selecting
[stable
]photographs.
in
[ from
]settings”,
mode.
Itrepeatedly
is
to
night.
To
is
Change
modes.
turned
When
the
OFF,
your
setting
using
the
camera
images
this
according
mode,
from
saved
dropping
be
to
sure
how
on
the
the
to
during
SmartMedia™
image
a(size,
photography,
tripod
is
to
to
be
keep
used
not
hang
the
and
be
camera
erased.
the
the
shoulder
remaining
SmartMedia™
strap
and
amount
prevent
around
can
ofstep
your
distortion
be
neck.
inpossible
the
of
images.
Relationship
between
your
camera
and
accessories
Connecting
tocalled
Other
Devices
(page
123)
being
played
back
one
image
at
acover,
time.
The
meaning
maximum
of
number
LED
color
of
photographs
differ
according
can
to
be
taken
mode
continuously
dial
setting.
three
photography
mode,
and
take
photographs
at
these
settings.
These
are
“Manual
which
are
saved
display
to
show
adial
list
detailed
information
compression
ratio,
shutter
speed,
aperture,
etc.)
or
you
can
for
the
UK)
in
a
room
with
amay
power
outlet,
you
can
take
photographs
for
an
extended
period
of
time.
This
also
Mode
1 Item
QUALITY
2 Options
Notes
SmartMedia™
VIDEOon
OUT
White Balance (W.B.)
Write
Protection
Removing
the Batteries
ISO
[ POWER
]
AUTO
OFF
Setting items
Turning
the
Power
Off
Using
the
LCD
Monitor
Additional
Information
Other
Applications
Handy
Functions
Erasing
Images
Playing
Back Images
Taking
Photographs
Tab menu
●
The
tab
is
displayed.
setting
isbattery
as
follows:
Make
sure
that
the
issystem
firmly
closed.
Details
image
ofmenu
operation
isrange
saved
are
or
erased,
the
same
and
as
the
taking
camera
photographs
is
then
ready
and
to
playing
take
photographs.
them
back
onon
the
LCD After
monitor.
If
you
use
the
viewfinder
to
take
photographs,
the
photography
Set
the
mode
dial
to
[cover
].settings
direction
of
the
arrow
to
open
cover
.the
ENTER.
change
the
white
and
the
metering
in(the
program
mode.
erased
SmartMedia™.
and
reused.
For
details
on
these
accessories,
refer
to
the
Instruction
Manual
for
the
accessory
you
are
using.
(information
Movies
images
photographed
in
the
multi
mode
Page
cannot
be
displayed
using
the
zoom
playback
Images
even
if the
are
camera
not
recorded
is
turned
directly
off.
SmartMedia™
but
are
stored
temporarily
within
the
buffer
memory.
display
histograms,
etc.
prevents
failed
photographs
due
to
battery
wear
or
failed
of
data
to
a
PC.
details
handling
the AC
Set
Sets
the
thebalance
whether
color
:(
Photography
mode
language
not
to
and
return
photographic
of
in
menus
the
program
displayed
sensitivity
in
the
(default)
on
SETUP
the
at51)
which
LCD
(➲
MENU
Page
monitor.
to
image
62)
the
original
is For
to
be
factory
recorded.
settings.
For
enlarged
view
P.
22)
feeds
the
image
•transfer
Each
press
of
Ú
2
•✭❅❍❏
Copying
of
printed
(black
on
white
paper)
set
the
time
(text
114)
F8
/display
F6.8
/or
F5.6
/18.
F4.8
/Page
/and
F3.4
/mode
F2.9
How
to
take
photographs
Page
41
1/1000,
1/750,
1/500,
1/350,
1/250,
1/180,
1/125,
range
may
differ
from
the
actual
image.
InLCD
this
case,
use
the
LCD
Press
the
shutter
button
down
halfway
.1/90,
the
mode
dial
to
[ F4.0
],
[characters
]reset.
or
[selected
].higher
1
SmartMedia™
having
the
following
storage
capacity
can
be
used
on
your
current
as
of
March
2000)
feature.
The
last
cover
recorded
image
opens
frame
image
appears
appears
on
the
on
the
LCD
monitor.
monitor.
photography
is
finished,
check
the
images
record
the
ones
tocamera.
SmartMedia™.
[TIME&DATE,
]
:
Erases
images
in
the
currently
selected
folder
and
folders.
Possible
number of sh
adapter,
beSet
sure
to
read
page
•
2x-speed
playback
isaperture-priority
performed
for
Make
sure
that
the
SmartMedia™
is
correctly
loaded.
(Ú
Page
31)
by
one
frame.
Warning:
Noise
:
OSD
Photography
increases
LANGUAGE
when
in
will
the
not
ISO
be
is
changed
mode
to
(➲
Page
settings.
63)
Memo
•
Backlit
portraits
IMPORTANT
When
[PROTECTED]
on
the
LCD
monitor,
cancel
the
protection
( button
Page 108) or
1remove
Press down
How
to
play
back
images
Page
80
1/60,
1/45,
1/30,
1/20,
1/10,
1/8,
1/6,
1/4,
1/3,
1/2,
monitor
for
photography.
AF
(auto-focus)
and
AE
(auto
exposure)
(➲
Additional
Information,
SETU
PTo
(
P.
109)
: value
English
(default)
Ú
Carry
Pass
Set
the
out
mode
end
steps
of
dial
1the
to
to
shoulder
4[1/15,
either
]].LCD
or
inspeed-priority
[strap
“Photography
through
].
the
in
the
strap
Shutter
speed-priority
Mode”
isdisplayed
held
down.
the
duration
that
PC
mode
(
P.
121)
2MB
/4MB/8MB/16MB/32MB/64MB/128MB
the
mode
dial
to
[isin
(all
3.3
types)
]•the
adjust
: mode
Erases
the
all
brightness
folders
recorded
of
the
on
the
monitor
SmartMedia™.
Page
[Set
Ú115
Selfimer
1
•V
1-frame
feed
is t
continued
for the
The
aperture
and
the
shutter
speed
corresponding
to(➲
that
:write-protection
Photography
shutter
mode
Page
65)
halfway.
Z
oom
state
• 0”7,
bright
scenes
(such
and
highly
reflective
subjects
Photography
mode
•the
You
can
also
carry
out
step
8snowfields)
while
verifying
the
image
in Page
step
7.
DPOF
(in
Page
102).
Glossary)
start
to
function.
1”,
1”5,
2”,
3”,
4”,
6”,
8”,
10”,
15”
•Very
Do
not
remove
or monitor
load
the
batteries
or
disconnect
or
connect
the
AC
adapter
while
the camera
is mode.
on.1
This
:POWER
Japanese
:LCD
Equivalent
toas
color
ISO100
button
Carry
Set
Use
out
or
mode
steps
to
dial
select
1
to
to
2
[
the
“Manual
].
images
photographed
Settings”
(page
in
58).
the
multi
photography
You POWER
can also
the
PC
card
adapter
and
floppy
disk
adapter
(Ú
123)
sold
separately
to
transfer
Changing
the
display
Page
116
Theconnect
images
or
folders
are
erased,
and
the
camera
returns
to
the
is
held
down.
duration
that
value
are
displayed
on
the
LCD
monitor.
If
the
appropriate
(page
attachment
65)
or
on
in
“Photography
the
camera.
in
the
Full
Manual
Mode”
(page
67).
Press
the
button
to
turn
the
power
on.
full
manual
mode
(➲
Page
67)
:
Photography
in
Image
Quality
Press
the
MENU
button.
•Memo
Shots
made
up
predominantly
of
sky
Even
if
photography
is
terminated
midway
before
capturing
three
images
by
releasing
the
shutter
•
If
you
take
a
photograph
after
erasing
an
image,
a
number
continuing
from
the
last
photographed
When
AF
or
AE
are
locked,
the
beep
tone
(➲
Page
111)
sounds
and
the
Use
or
to
change
the
setting
in
the
tab
menu,
2button
Press
down
might
return
the
manual
settings
to
their
defaults.
If
this
happens,
manually
set
conditions
again.
:connect
High-sensitive
equivalent
to preset
color
(default)
• Before
you
oreven
disconnect
the
AC
adapter,
be
sure
to turn
thedisplay
camera
OFF.
If the
AC adapter
is
Press
the
image
quality
button
to
select
the
combination
cannot
be
set
ifphotography
the
shutter
speed
isas
adjusted
toISO200
images to a
PC.
16MB
(SM-M1600D)/32MB
(SM-M3200D)/64MB
(SM-M6400D)/128M
(SM-M1280D)
The
respective
last
image
mode.
frame
appears
on
LCD
monitor.
You
can
also
select
the
image
by
the
same
operation
for
thumbnail
Page
83).
Carry
out
steps
1
to
on
page
109.
When
the
camera
is
turned
on,
set
the
mode
dial
to
the
desired
The
shutter
speed
and
the
aperture
value
corresponding
todisplay
the
All
descriptions
inor
this
Instruction
Manual
are
for
when
the
language
is (2
set
to [ENGLISH].
Press
or
to
select
the
image.
button,
images
already
photographed
can
be
saved
and
erased
by playback
the
method.
image
is
assigned
as
the
image
number.
Shutter
button
●
The
viewfinder
RECORDING
LED
turns
MENU
green.
is2
displayed.
•press
The
image
before
the
photograph
is
taken
is
slightly
less
clear
than
images.
(This
is fully.
connected
disconnected
with
the
power
ON,
camera
settings
may
beabove
reset
(SET-UP
Ú Page
109,
and
ENTER.
:
High-sensitive
photography
equivalent
to
color
ISO400
its
limit,
the
shutter
speed
is
displayed
in
red.
Photography,
To
cancel
erasing
of
image
data,
select
[
]
and
press
ENTER.
Flash
button
quality
and
size,
while
viewing
the
indication
on
the
starts
a
reverse
•
The
press
of
mode.
shutter
speed
are
displayed
on
the
LCD
monitor.
If
the
appropriate
The
length
of
time
to
capture
images
varies
according
to
the
photographic
conditions.
•
Images
can
also
be
erased
in
the
thumbnail
mode.
In
this
case,
the
camera
enters
the
single
frame
Select
[SYSTEM
INFO.]
on
the
SETUP
MENU
and
because
television
displays
images
at
a
lower
resolution.)
•
Spotlit
subjects,
particularly
against
dark
backgrounds
Manual
Settings
Úsettings,
Page
58)
orPage
the
camera
malfunction.
however,
is
in
this
state.
feeds the
image
•may
Each
press
oftoinbegin
EXP.
].
To
cancel
changing
of
press
.you
Use
or
todial
select
the
frame
want
to
enlarge.
Press
the
or
Zoom
to
switch
select
[( S/C
].isphotography
21)
towards
“T”
playback.
]possible
is
selected,
[NO
IMAGE]
displayed
after
all
folders
When
playback.
Press
Set
mode
in
the
to
[ sure
Tv
mode,
].the
or
press
or
the
shutter
button
fully
Before
photography,
make
that
the
lens
cap
has
been
2
combination
cannot
be
set
even
ifflash
aperture
isin.black
adjusted
to its
playback)
mode,
and
enters
the
thumbnail
playback mode after the image is erased.
status
display.
]or
mode:
In
[[playback
Press
the
display/info
button.
Self-timer
photography
and]down
are
not
possible.
•the
The
display
unit
varies
according
to
the
output
system.
•theCopying
of (frame
printed
text
(white
characters
on
paper)
.playback
press
reverse
by
one
frame.
This
adapter
allows
SmartMedia™
to
be
used
as
3.5"
floppy
disk.
have
been
erased
(unless
the
SmartMedia™
contains
protected
You
can
also
select
the
image
by
the
same
operation
as
for
thumbnail
playback
( [4X],
PageISO
83).
Automatic
begins.
•
Playback
becomes
2x-speed
to
reduce
aperture
size.
Press
to
increase
aperture
size.
Press
camera
takes
a
picture.
Status
display
P.
23)
The
manual
setting
Ú
removed
the
camera.
PO80)
limit,
aperture
value
isbe
displayed
in
red.
Photography,
however,
Playback
(
mode
P.
the
[Scenes
M
]from
mode
tomenu
set
the
speed
to simultaneously
0.7
second
Manual
photograpy
During
[2X],
the
ISO
will
automatically
set
between
ISO100
ISO200.
During
will
be
ÚLCD
☞
set
the
quality
and
size
➲shutter
Page
112
•the
With
the
NTSC
system,
images
can
be
displayed
on the
monitor
and(
TV
during
•To
with
low
reflectivity,
such
as
shots
green
or
dark
foliage
Flash
state
Each
press
of
the
display/info
button
switches
the
display
•of1-frame
feed
isand
continued
The
SYSTEM
INFO.
displayed.
reverse
for
the
duration
This
adapter
isplayback
inserted
into
the],
floppy
your
PC,
allowing for theWER
images).
The
viewfinder
LED
turns
redis
image
data
being
recorded
onto
Insert
the
adapter
connector
plug
into
the
DC
IN
Selft
imer
lamp
values
are
displayed
In
the
photography
modes
([while
[and ISO400.
]disk
oris
[ drive
]),on
the
lens
photography
and
playback.
is
possible
inAC
this
state.
automatically
set
between
ISO100
is
held
down.
format
as
follows:
duration
that
Note:
The
larger
the
F
value,
the
smaller
the
aperture
size
become
or
longer.
•Press
Remove
andzoom
insert
with
the
camera’s
power
turned
is held
down.
that
To
quit
the
SETUP
MENU,
change
the
mode
dial
setting.
Aperture
value
Shutter speed
Adjust
the
ratio
by
the
Zoom
switch.
(Zoom
display
option
menu,
press
or
to
images
recorded
onSmartMedia™
the
SmartMedia™
to
be
transferred
topress
the
PC.off.
the
SmartMedia™.
Sets
video
output
system
according
to
the
country
in
which
your
camera
isSize
used.
on
the
left
ofto
the
LCD
Press
the
shutter
button
down
halfway
and
5V
terminal
on
the
camera.
extends
from
the
camera
body.
•the
the
PAL
system,
images
cannot
be
displayed
When a cable
is connected, only
and
versa.
1situations
the
image
quality
button
switches
the
quality
and
size
Gently
insert
the
SmartMedia™
as
far
as
it, simultaneously.
can
go
✭❅❍❏
[Pressing
]vice
isWith
displayed
on
the
LCD
monitor.
•select
Recorded
data
may
bepress
erased
(destroyed)
in
the
listed
below.Viewfinder
Note that Toshiba
White
Balance
Additional
Information,
Glossary
to
increase
shutter
speed.
Pressand
to
decrease
shutter
speed.
Press
Press
or
to
move
forward
reverse.
☞
➲
Memo
PRG
]
and
ENTER.
]
and
press
ENTER.
[
switch
Page
21)
✤❅▼❁❉●❅❄
1 Press down
TV
display
is
available.
monitor
screen.
When
the
camera
is
turned
on,
the
Auto
Power
OFF
function
IMPORTANT
settings
infully
the
following
order.
it
down
. system
✳▼❁■❄❁❒❄
★❉▲▼❏❇❒❁❍
✩❍❁❇❅
❏■●❙
2
Press
or
to
select
the
item
you
desired
toisloss
set,
with
SmartMedia™
electrodes
(metal
contacts)
Additional
Information,
Glossary)
(white
Corporation
accepts
no
responsibility
whatsoever
for
the
of
recorded
data enters
in these
• the
When
allNTSC
images
in
a
folder
are
erased,
that
folder
itself
also(destruction)
erased.
Quality
The
camera
determines
the
balance
by
averaging
the
various
kinds playback
of light
that actually
halfway.
to
to
next
frame/
to“T”
go
back
one
❉■❆❏❒❍❁▼❉❏■
To
prevent
valuable
data
from
being
erased,
attach
the
write••advance
With
the
PAL
system,
images
are
played
back
with
apressing
black
frame
•frame
After
pause
is
cancelled,
the
Zoom
switch
to
the
will
enlarge
the
image.
Pressing
ENTER
the
setting.
or
,, SmartMedia™
and
manual
Exposure
compensation
(➲
Page
69)
using
When
[for
M
]selects
isis
selected
on
the
[ halfway
EXP.
]remove
option
menu,
orsurrounded.
makes
the
shutter
speed
setting
becomes
operational.
Never
open
the
SmartMedia™
cover
or
the
while
an
image
is
being
recorded.
This
or
and
manual
setting
(➲
Page
58)
or
film
speed
Exposure
compensation
(➲
Page
69)
using
Reverse the
procedure
“Loading
the
Batteries”
and
remove
the
batteries.
•facing
Pressing
the
shutter
button
down
adjusts
the
exposure,
•
Playback
paused.
PAL
system
( camera.
Additional
Information,
Glossary)
situations:
Builti
n
microp
the
lens.
This
setting
allows
you
to
set
in
advance
the
white
balance
when
taking
photographs
under
and
press
ENTER.
the
rear
of
the
For
the
US/Canada:
PDR-ACM1A
Holding
down
or
moves
forward
or
reverse
continuously.
Setting
1
Setting
2
Setting
3
resumes
at
the
last
state
that
was
2
protect
sticker
at
the
write-protect
area.
Data
can
no
longer
be
Press
Focus
area
may
corrupt
the
data
on
the
SmartMedia™
or
damage
the
SmartMedia™
itself.
possible,
but
does
not
make
the
exposure
compensation
possible. HoweverSelfthe exposure
value
is down pho
To
return
normal
press
the
Zoom
switch
towards
setting
(➲toPage
Page
58)magnification,
or film
speed
setting
(➲
Page
78)
using
ENTER
Pass
the
shoulder
strap
through
the
loop
and
pull.
timer
setting
(➲
78)
using
ENTER
are
also
possible.
and
pressing
the
shutter
button
fully
takes
the
shot.
TM[ is down
When
the
SmartMedia™
used
incorrectly
by
the
user
or
a
third
party
[
],
]
or
[
]
AE
or
AF
are
locked
with
the
shutter
button
held
half
fully.
specific
lighting
conditions.
For
Europe:
PDR-ACM1E
active
before
the
pause.
Firmly
insert
the
SmartMedia
as
far
as
it
can
go.
displayed
on is
the
LCD
monitor.
Press
ENTER.
recorded
or setting
erased
from
SmartMedia™.
Toon
write
oraterase
data
from is to be recorded. WriteFlash
Sets
the
color
mode
and
photographic
sensitivity
which
the
image
“W”.
are
also
possible.
prote
The
default
different
depending
the
destination
country/area.
Use
or
to
select
the
desired
item
Press
ENTER,
images
displayed
simultaneously.
• no
If
you
shoot
anine
when
preview
isversion
ON
(➲
Pageorabout
77),
1
down.
If
isstill
carried
outare
forthe
ais fixed
amount
ofto
time
(default:
one minute),
power
ON
-operation
When
the
SmartMedia™
exposed
toset
static
electricity
electrical
noise (
Auto
Photography
41, mode
46)
Memo
Ú P. area
For
the
UK:
PDR-ACM1U
:picture,
Displays
firmware
ofto
this
camera.
SmartMedia™,
peel
off
the
sticker.
camera
ready
to
take
photographs.
Warning:
Noise
increases
when
the
ISO
is
changed
higher
settings.
image
isis
displayed
enlarged,
and
a
white
frame
and
green
Green The
Compose
picture,
press
the
shutter
button
down
halfway,
and
press
it
down
:the
Automatic
adjustment
(default)
Display
Page
83
theThumbnail
recorded
image
is
displayed
on
screen
for
about
two
]
Standby
mode
[
••-For
If
no
operation
is
carried
out
for
a
fixed
amount
of
time
(default:
about
1
minute),
the
power
is
turned
TM
consumption
is
set
to
its
minimum
state
(power
almost
turned
off)
to
prevent
battery
wear.
This
is
.
and
press
When
the
SmartMedia™
is
removed
or
the
camera
is
turned
off
while
recording
data,
erasing
The
image in
the
LCD
monitor
sometimes
from
thePage
time that
button is pressed down
Speaker
details,
refer
to
the
specifications
of darkens
ACinformation.
adapter
127.the shutter
: on
Displays
themonitor.
SmartMedia
Playback
returns to
the
start
of the
movie.
frame
are
displayed
the
LCD
:frame
Photography
outdoors
Default
setting:
seconds.
off
toAuto
preserve
life.
This
isfocused.
called
“Auto
Power
To return
to
the
normal
state,
presstermin
the
fully.
➲
Page
40
called
the
Power
OFF.
This
setting
you
toplayed
set OFF”.
the
time
when
the
camera
turns
off
halfway
until
the
image
becomes
: picture,
Equivalent
to
ISO100
(default)
data,
advance
when
images
are
back
or during
formatting
of
the
IN
5V
The
options
are
displayed.
PO
Histogram*
2
: battery
Returns
settings
to
their
defaults.
Flashing
[ the
],
[ color
]conditions
orallows
[shutter
]being
Self-timer
in frame
operation
atDC
a handshake
alarm
.
WE
Compose
the
press
the
button
down
halfway,
and
press
itdirectly
down
The
white
frame
indicates
entire
image,
while
the
green
:the
Photography
in
cloudy
POWER
button
again.
R the
• The
viewfinder
LED
turns
red
while
image
data
is
being
recorded
Compose
picture,
press
the
shutter
button
halfway,
and
press
it
down
• The
To
set
the
focus
or
exposure
for
a subject
outside
the
center
ofdown
the intended
image,
point
camera
The
camera
takes
the
picture.
automatically.
This
function
is
not
activated
during
automatic
playback
(
Page
85)
or
in
the
[
] PC
:
High-sensitive
photography
equivalent
to
color
ISO200
SmartMedia™.
Note:
image
appearing
through
the
lens
will
be
The
display
returns
to
thumbnail
playback.
<Standard>
<Detailed
information>
<Histogram>
<Image
only>
✭❅❍❏
shows
the
location
of
the
currently
enlarged
area.
halfway,
and
press
it
down
fully.
➲
Page
40
Macro
photography
:
Photography
in
bluish
fluorescent
light
fully.
➲
Page
40
About
the
Auto
★★
Power
(FULL
OFF
★★
Function
)
Ú
Additional
Information,
“AUTO
POWER
OFF
(page
110)”
+
at
the
subject
or
desired
exposure
(lighting),
press
and
hold
the
shutter
button
halfway.
Now,
with
the
shutter
onto
the
SmartMedia™.
ON]
Writing
to SmartMedia™
in progress
mode.
Press
ENTER.
:adapter
High-sensitive
photography
equivalent
toanother
color
ISO400
•Insert
Wedefault
recommend
copying
and
saving
important
datapower
onto
storage
medium (floppy
disk, hard
displayed
for
[LCD
].[Power
fully.
➲
Page
40
the
AC
power
plug
into
the
Electrodes
The
size
and
quality
of
the
image
can
be
reset
to
the
desired
combination.
Press
ENTER.
Memo
Sticker
button
still
held
halfway
down,
you
can
turn
the
direction
of
the
camera
and
frame
your
image
with
the
focus
•
It
is
possible
to
play
back
any
images
in
any
folders
by
pressing
or
during
playback.
(For
details
ON
: Photography
inafter
reddish
fluorescent
light
The
camera
takes
the
picture.
Photographs
can
be
taken,
however,
do not
turn thepress
power
OFF.
Todisk,
return
to disk,
the
normal
state
thepower
Auto
Power
OFF
has been
executed,
the
POWER
button
MO
etc.).
The
PREVIEW
manual
setting
Page
items
77
are
displayed.
Remaining
➲battery
camera
takes
the
atmonitor.
the
set
exposure
time.
Current
Entireofimage
and
exposure
locked.
Press
the
shutter
button
down
fully
to in
complete
capturing
the image.
Red outlet.
[☞
on picture
the
LCD
The
camera
is ready
for
burst
photography.
of displayed
folder
Page
92)
]:the
mode:
In
the
Accessing
of
SmartMedia™
[ (HALF
Photography
in] is
incandescent
light
★★
•] [is
When
shutter
speed
set
to
a)turn
speed
of
0.7 second
orprogress
slower,
photographs
taken
as extended
PC/AV
terminal
to Never
turn
the
power
on★★
again.
•During
remove
the
SmartMedia™
or
the
camera
offresult
while
recording
data or are
while
erasing
data
COLOR
Page
77
➲
the
exposure,
the
viewfinder
LED
turns
orange.
position
•
Moving
the
camera
as
you
press
the
shutter
button
will
in
a
blurred
image.
Use
,
,
or
to
select
the
area
to
enlarge.
at Page
the
last
image
displays
the
first
image,
and
pressing
atwill
thebe
firstautomatically
image
displays
the
Pressing
During
[2X],
the
ISO
be
automatically
set
to
ISO200.
[4X],ofISO
setof
exposures
(➲
68).
IfCarry
burst
photography
is to
set
the
shutter
speed
is set During
to athe
speed
0.7
second
or more
in the
[ to
Tv ]
out
steps
1will
2when
in
Photographic
(SmartMedia™
formatting).
actions
might
damage
ISO
Page
78
➲Flashing
ItClose
takes
about
twice
the
time
to while
complete
taking
the
photograph
duePDR-M81
to processing
ofenlargement
the
captured
[set
],These
[“Basic
] When
the
image
is not
in SmartMedia™.
focus.
the
SmartMedia™
cover.
Memo
•
The
PDR-M81
usesto
an
accurate
auto
focus
mechanism.
However,
the
may
have
difficulty
last
image.
Adjust
the
display
area
enlarge
viewing
the
white
and
Slow
shutter
speed
warning
ISO400.
Shutter
speed
• In
AEB
photography
(
Page
71)
or
burst
photography,
the
shutter
speed
cannot
be
set
to
0.7
second
or
longer.
★★
(SMALL
★★
)
➲
mode,
the
shutter
speed
is
automatically
changed
to
1/2
second.
Lens
•
Use
only
the
SmartMedia™
specified
for
use
with
the
PDR-M81.
The
use
of
other
SmartMedia™
SHARPNESS
Page
79
mode)”
(page
109).
Select
[QUALITY]
Settings
(
focusing
or
not
be
able
to
focus
at
all
for
subjects
and
situations
such
as
the
following:
➲
image.
Before
you
use
aother
new
SmartMedia™
the
first during
time,
be
sure
tothe increased
Manual
Photography
mo
Images
can
bevalue
rotated
by] pressing
playback.
Movie
(
mode
P.
75)
Ú[ P.isspeed
[ for
] or
green
frames.
the
aperture
is
to
F2.9
(maximum
aperture
size),
speed
restricted
[shutter
PRG
] 58)
••Ú
If
a
mode
than
[ set
suppressed
flash
mode
is
set
inthe
flash
photography,
the]dark
shutter
is
Function
•79
Processing
image
Aperture
Exposure
compensation
- When
subject
is distant and
- SmartMedia™
Subjects
moving
at
high
speed
damage
camera.
CONTRAST
Page
➲[the
• to
The
write
protection
may
not
function
if in
write-protect
sticker
becomes
Use
a soft
dry cloth to
.thesecond.
oncould
the
SETUP
MENU
and
press
format
the
(Ú
Page
91).
rotates
an
image
counterclockwise,
and
pressing
rotates
clockwise.
Pressing
1/750
PDR-ACM1A
] •are
the
same
as
to
PDR-ACM1E
PDR-ACM1U
[PRG]
and
limited
tosecond.
between
1/2
second
and
1/250
* The
aboveitdirty.
menu
is
the
RECORDING
Charging
of
flash
progress
ON
Continuous
photography
O
When
there
are
objects
in
front
of
or
behind
the
subject
Very
shiny
subjects
such
as
a
mirror
or
car
body
SmartMedia™
is
aof
device.
Do do
notnot
bend,
drop,
or subject
SmartMedia™
to
DIGITAL
ZOOM
Page
• wipe
When
the
camera
isOnce
not79
inelectronic
be sure
to attach
the
lens
cap
provided
with[your
camera.
the
POWER
button
to
turn
the
power
off.
✭❅❍❏
away
any
dirt.
ause,
sticker
ispress
peeled
off,
reuse
it.
➲
Orange•Press
The
QUALITY
menu
isprecision
displayed.
combinations
the
automatically
mode.
MENU
inthe
•the
The
aperture
value
set
differ
to
the
actual
value
according
to
the
position
ofUK)
the
zoom
lens.
To
return
to
the
regular
display,
ENTER.
(Photos
cannot
be
taken
at
this
moment.)
(for
US
and
Canada)
If the
shutter
speed
is
set
to
1/350
second
or
less,
the
shutter
as
speed
an
animal
is
automatically
athe
cage
a]changed
person
in front
to 1/250
of a tree)
(for
European
Continent)
(for
Get
ready
to
take
the
photograph.
- above
Extremely
low
contrast
subjects
When
the
settings
are
made,
they
are
displayed
in(such
the
following
order.
Exposure
Compensation
Memo
Oor
DC
IN
5V
termin
excessive
Also,
do
not
carry
SmartMedia™
the
pocket
ofx[trousers.
This
might
the
The
lens
cap
can
also
be
attached
to
attachment
following
the
above
steps
to prevent
it’s
LCD
79
➲shocks.
The
power
turns
off.
Memo
determined
shutter
speeds
and
aperture
-in Subjects
with
little
reflection,
such
as
hair
fur mode.
•• The
size
displayed
on
the
LCD
monitor
FULL
(320
240)
HALF
(160
xorsubject
120).
The
]becomes
forced
flash
mode
or
]orred-eye
forced
flash
second
ifPage
the
flash
setting
is25)
changed
tothe
thestrap
[ AEB
- image
Subjects
that
have
low contrast
and
merge
into
Loading
the
batteries
(➲
Page
and
the
SmartMedia™
(➲
Page
31)
into
the
camera.
O
being
lost.
• Flash
photography
and
burst
photography
are
not
possible.
Flashing
SmartMedia™
to
excessive
force
when
you
sit
down,
damaging
the
SmartMedia™.
Hardware
malfunction
Subjects
with
no
solidity,
such
as
smoke
or
flames
the
background
(such
as
white
walls
or
subjects
Attach
the
lens
cap
when
you
are
not
using
the
camera.
values.
However,
their
operation
capability
movies
made
in
FULL
size
is
displayed
on
the
entire
LCD
monitor,
and
those
made
in
HALF
size
is
If the
[ ]mode,
forcedISO
flash
[ automatically
] red-eye set
forced
flash
mode
is
set
in
flash
photography
when
the
• In
movie
willorbe
between
ISO100
and
ISO400
regardless
of
its
setting.
metering
O, and
dressed
inthe
theSmartMedia™
same
color
as
the
background)
-attach
Subjects
viewed
through
glass
Turn
offor
the
power
tothe
retract
the
lens
unit,
and Spot
then
the
lens
cap.
The
image
taken
in
photography
mode
may
be
blurred.
or
to
select
the
desired
setting
from
the
tab
menu
press
★★
★★
★★
•Use
Do•not
use
store
in
environments
likely
to
be
affected
byisstatic
electricity
or
is
different
as
shown
the
right
table.
displayed
in
ofspeed
the
2
shutter
speed
is center
set
toin
aexposure
of
0.7
second
or
more,
the
shutter
speed
automatically
changed
to
Press
POWER
button
toscreen.
turn
power
on.
A electrical
histogram
isturn
a graphic
representation
ofthe
theistones
of the
subject.
The horizontal
histogram
White
balance
Otheaxis
• Do
If the
the
image
cannot
be
focused,
thelens
focus
automatically
fixedsetting
to infinity.
(When
flashofisthe
necessary
not
the
power
on
with
the
cap
attached.
Memo
noise.
1/2
second.
ENTER.
*
The
above
AC
adapter
is
US/Canada
Turning
the
Power
On
➲
Page
38
☞
shows
the
brightness
(increasing
brightness
from
left
to
right)
and
the
vertical
axis
shows
the
number
at
this
time,
it
is
simultaneously
fixed
to
illuminate
objects
1.5
meters
(five
feet)
away.
During
macro
•This
Dosaves
use
orsettings,
store
SmartMedia™
very
hot,
humid
oraperture
corrosive
If the
shutter
speed
value
isimages,
set toin1/1000
second,
the
value
is limited
to
F8type
andAC
F3.4.
•not
When
playing
back
movie
switching
isthe
between
standard
and
image
only.
(O
:environments.
possible
Xbetween
: not
the
and
returns
to
RECORDING
MENU.
type.
European
andpossible)
UK
photography,
the flash
islevel.
alignedthe
withdisplay
the wide
position.)
of pixels
at each brightness
Downloaded From
camera-usermanual.com
adapters differ in shape.
--110
20 -40
80
88
Photography (Auto Photography)
Get ready to take the photograph.
Press the POWER button to turn the power on.
☞ Turning the Power On ➲ Page 38
Set the mode dial to [
Playing
Back Images
Loading the batteries (➲ Page 25) and the SmartMedia™ (➲ Page 31) into the camera.
Taking
Photographs
Using the Viewfinder
Getting
Ready
This is the most commonly used photography mode.
In this mode, exposure (combination of shutter speed and aperture) is automatically controlled to facilitate
photography. There are two ways of taking photographs in this mode: using the viewfinder and using the LCD
monitor.
].
Erasing
Images
Remove the lens cap beforehand.
If not, an error message will be displayed. (➲ 129)
Handy
Functions
To reduce the amount of battery wear, we recommend turning the LCD monitor display OFF, and using
the viewfinder to take photographs.
Other
Applications
Turn the LCD monitor OFF. (➲ Page 117)
Additional
Information
Downloaded From camera-usermanual.com
- 41 -
Changing
the
Preset
Conditions
(RECORDING
MENU)
Photography
in
the
Program
Mode
Setting
Names
Playing
Back
the
of
Photographed
Parts
Image
Size
and
Quality
(Single-Frame
Playback)
Extended
Exposure
Photography
(Bulb
Photography)
Erasing
Images
(Erase
Frame)
(continued)
Manual
Attaching
Using
How
Taking
Enlarging
Playback
About
Turning
to
Photographs
the
SmartMedia™
Press
Settings
the
Photographed
of
Power
the
Power
Multi
Shoulder
Continuously
Outlet
Shutter
Image
On/Off
Images
Strap
Pictures
Button
(Zoom
(Burst
Playback)
Photography)
Taking
Erasing
Button
Photographs
Folders
and
(All
LCD
Images
Continuously
Monitor
in
aImages
Folder/All
(Burst
Display
Photography)
Folders)
(In
Playback
(continued)
(continued)
Mode)
Definitions
Separately
of
the
Accessories
Color
of
the
Viewfinder
LED
Taking
and
Playing
Back
Photographs
on
aMode
TV
(continued)
Changing
the
Preset
Conditions
(RECORDING
MENU)
(continued)
Exposure
Compensation
in
the
Shutter
(continued)
Speed-priority
(continued)
About
Basic
Settings
SmartMedia™
in
(Sold
the
mode)
Aperture-priority
(continued)
Mode
(continued)
LCD
Monitor
Display
(during
photography)
(continued)
Manual
Settings
(continued)
Playing
Photography
Installing
Back
Movies
batteries
(Auto
Photography)
(continued)
(continued)
(continued)
Names
of
Parts
(continued)
Getting
Ready
The shutter
camerabutton
automatically
adjusts the
shutter
and
the aperture
value
according
to the
brightness
of an
can be pressed
down
in twospeed
stages:
halfway
down and
fully
down. When
pressed
halfway
down,
This
“SmartMedia™”
Set
Play
Automatically
The
the
following
mode
shoulder
menu
back
size
photographed
is(number
used
for
items
strap
plays
setting
isadapter
for
athe
is
are
back
storage
of
taking
handy
also
the
pixels)
still
the
basic
available
subjects
for
medium
images
16
and
carrying
images
settings
quality
one
for
that
as
saving
separately
your
image
to
require
(compression
be
camera
used
images
atseveral
a
sold
for
around.
inthat
photography
items.
ratio)
seconds
the
you
multi
of
have
the
photography
to image
photograph
in
photographed.
to
[ second
be
mode
],photographed.
such
[be
Even
in
asquick
]for
firework
or
if Europe,
the
[You
succession.
camera’s
displays
] photography
power
at the
Enlarges
selected
portions
of
images
being
played
back
at
two
levels.
Images
can
displayed
enlarged
when
In
You
this
can
color
mode,
manually
of
the
photographs
viewfinder
adjust
settings
are
LED
taken
indicates
such
continuously
asphotographed
the
exposure
state
atof
control,
atime.
the
maximum
camera.
white
speed
balance,
The
ofthe
0.8
metering
system,
intervals.
continuous
This
item
switches
display
on
the
LCD
monitor
when
playing
back
photographed
images.
can
switch
If
you
the
AC
(sold
separately:
PDR-ACM1A
for
the
US/Canada,
PDR-ACM1E
PDR-ACM1U
Mode
Effective
dial
Subjects
and
Set
Values
TM
✶❉❅◗❆❉■❄❅❒
✬✥✤
Press
.of
aperture
value.
SYSTEM
Turning
Exposure
ISO
OSD
In
[prevent
[use
LANGUAGE
the
]the
INFO.
mode
control
Power
(EXP.)
On
Close
the
SmartMedia™
cover.
Slide
the
SmartMedia
cover
release
knob
in
the
Take
photographs
or
or
battery
to
to
select
or
play
[that
the
slide
]them
or
shutter
it
[ the
back.
,]will
and
speed.
and
lock
press
Look
Use
through
to
select
the
[adjust
viewfinder
]use
and
press
to
compose
ENTER.
the
picture.
To
continue
erasing
images,
repeat
the
above
procedure
2.
.is
AF
(auto-focus)
and
AE
(auto
exposure)
are
set.
When
pressed
fully
down,
the
camera
takes
aspace
picture.
object.
This
mode
enables
carefree
photographing
similarly
to
selecting
[stable
]photographs.
in
[ from
]settings”,
mode.
Itrepeatedly
is
to
night.
To
is
Change
modes.
turned
When
the
OFF,
your
setting
using
the
camera
images
this
according
mode,
from
saved
dropping
be
to
sure
how
on
the
the
to
during
SmartMedia™
image
a(size,
photography,
tripod
is
to
to
be
keep
used
not
hang
the
and
be
camera
erased.
the
the
shoulder
remaining
SmartMedia™
strap
and
amount
prevent
around
can
ofstep
your
distortion
be
neck.
inpossible
the
of
images.
Relationship
between
your
camera
and
accessories
Connecting
tocalled
Other
Devices
(page
123)
being
played
back
one
image
at
acover,
time.
The
meaning
maximum
of
number
LED
color
of
photographs
differ
according
can
to
be
taken
mode
continuously
dial
setting.
three
photography
mode,
and
take
photographs
at
these
settings.
These
are
“Manual
which
are
saved
display
to
show
adial
list
detailed
information
compression
ratio,
shutter
speed,
aperture,
etc.)
or
you
can
for
the
UK)
in
a
room
with
amay
power
outlet,
you
can
take
photographs
for
an
extended
period
of
time.
This
also
Mode
1 Item
QUALITY
2 Options
Notes
SmartMedia™
VIDEOon
OUT
White Balance (W.B.)
Write
Protection
Removing
the Batteries
ISO
[ POWER
]
AUTO
OFF
Setting items
Turning
the
Power
Off
Using
the
LCD
Monitor
Additional
Information
Other
Applications
Handy
Functions
Erasing
Images
Playing
Back Images
Taking
Photographs
Tab menu
●
The
tab
is
displayed.
setting
isbattery
as
follows:
Make
sure
that
the
issystem
firmly
closed.
Details
image
ofmenu
operation
isrange
saved
are
or
erased,
the
same
and
as
the
taking
camera
photographs
is
then
ready
and
to
playing
take
photographs.
them
back
onon
the
LCD After
monitor.
If
you
use
the
viewfinder
to
take
photographs,
the
photography
Set
the
mode
dial
to
[cover
].settings
direction
of
the
arrow
to
open
cover
.the
ENTER.
change
the
white
and
the
metering
in(the
program
mode.
erased
SmartMedia™.
and
reused.
For
details
on
these
accessories,
refer
to
the
Instruction
Manual
for
the
accessory
you
are
using.
(information
Movies
images
photographed
in
the
multi
mode
Page
cannot
be
displayed
using
the
zoom
playback
Images
even
if the
are
camera
not
recorded
is
turned
directly
off.
SmartMedia™
but
are
stored
temporarily
within
the
buffer
memory.
display
histograms,
etc.
prevents
failed
photographs
due
to
battery
wear
or
failed
of
data
to
a
PC.
details
handling
the AC
Set
Sets
the
thebalance
whether
color
:(
Photography
mode
language
not
to
and
return
photographic
of
in
menus
the
program
displayed
sensitivity
in
the
(default)
on
SETUP
the
at51)
which
LCD
(➲
MENU
Page
monitor.
to
image
62)
the
original
is For
to
be
factory
recorded.
settings.
For
enlarged
view
P.
22)
feeds
the
image
•transfer
Each
press
of
2
•✭❅❍❏
Copying
of
printed
(black
on
white
paper)
set
the
time
(text
114)
F8
/display
F6.8
/or
F5.6
/18.
F4.8
/Page
/and
F3.4
/mode
F2.9
How
to
take
photographs
Page
41
1/1000,
1/750,
1/500,
1/350,
1/250,
1/180,
1/125,
range
may
differ
from
the
actual
image.
InLCD
this
case,
use
the
LCD
Press
the
shutter
button
down
halfway
.1/90,
the
mode
dial
to
[ F4.0
],
[characters
]reset.
or
[selected
].higher
1
SmartMedia™
having
the
following
storage
capacity
can
be
used
on
your
current
as
of
March
2000)
feature.
The
last
cover
recorded
image
opens
frame
image
appears
appears
on
the
on
the
LCD
monitor.
monitor.
photography
is
finished,
check
the
images
record
the
ones
tocamera.
SmartMedia™.
[TIME&DATE,
]
:
Erases
images
in
the
currently
selected
folder
and
folders.
Possible
number of sh
adapter,
beSet
sure
to
read
page
•
2x-speed
playback
isaperture-priority
performed
for
Make
sure
that
the
SmartMedia™
is
correctly
loaded.
(
Page
31)
by
one
frame.
Warning:
Noise
:
OSD
Photography
increases
LANGUAGE
when
in
will
the
not
ISO
be
is
changed
mode
to
(➲
Page
settings.
63)
Memo
•
Backlit
portraits
IMPORTANT
When
[PROTECTED]
on
the
LCD
monitor,
cancel
the
protection
( button
Page 108) or
1remove
Press down
How
to
play
back
images
Page
80
1/60,
1/45,
1/30,
1/20,
1/10,
1/8,
1/6,
1/4,
1/3,
1/2,
monitor
for
photography.
AF
(auto-focus)
and
AE
(auto
exposure)
(➲
Additional
Information,
SETU
PTo
(
P.
109)
: value
English
(default)
Carry
Pass
Set
the
out
mode
end
steps
of
dial
1the
to
to
shoulder
4[1/15,
either
]].LCD
or
inspeed-priority
[strap
“Photography
through
].
the
in
the
strap
Shutter
speed-priority
Mode”
isdisplayed
held
down.
the
duration
that
PC
mode
(
P.
121)
2MB
/4MB/8MB/16MB/32MB/64MB/128MB
the
mode
dial
to
[isin
(all
3.3
types)
]•the
adjust
: mode
Erases
the
all
brightness
folders
recorded
of
the
on
the
monitor
SmartMedia™.
Page
115
[Set
Selfimer
1
•V
1-frame
feed
is t
continued
for the
The
aperture
and
the
shutter
speed
corresponding
to(➲
that
:write-protection
Photography
shutter
mode
Page
65)
halfway.
Z
oom
state
• 0”7,
bright
scenes
(such
and
highly
reflective
subjects
Photography
mode
•the
You
can
also
carry
out
step
8snowfields)
while
verifying
the
image
in Page
step
7.
DPOF
(in
Page
102).
Glossary)
start
to
function.
1”,
1”5,
2”,
3”,
4”,
6”,
8”,
10”,
15”
•Very
Do
not
remove
or monitor
load
the
batteries
or
disconnect
or
connect
the
AC
adapter
while
the camera
is mode.
on.1
This
:POWER
Japanese
:LCD
Equivalent
toas
color
ISO100
button
Carry
Set
Use
out
or
mode
steps
to
dial
select
1
to
to
2
[
the
“Manual
].
images
photographed
Settings”
(page
in
58).
the
multi
photography
You POWER
can also
the
PC
card
adapter
and
floppy
disk
adapter
(
123)
sold
separately
to
transfer
Changing
the
display
Page
116
Theconnect
images
or
folders
are
erased,
and
the
camera
returns
to
the
is
held
down.
duration
that
value
are
displayed
on
the
LCD
monitor.
If
the
appropriate
(page
attachment
65)
or
on
in
“Photography
the
camera.
in
the
Full
Manual
Mode”
(page
67).
Press
the
button
to
turn
the
power
on.
full
manual
mode
(➲
Page
67)
:
Photography
in
Image
Quality
Press
the
MENU
button.
•Memo
Shots
made
up
predominantly
of
sky
Even
if
photography
is
terminated
midway
before
capturing
three
images
by
releasing
the
shutter
•
If
you
take
a
photograph
after
erasing
an
image,
a
number
continuing
from
the
last
photographed
When
AF
or
AE
are
locked,
the
beep
tone
(➲
Page
111)
sounds
and
the
Use
or
to
change
the
setting
in
the
tab
menu,
2button
Press
down
might
return
the
manual
settings
to
their
defaults.
If
this
happens,
manually
set
conditions
again.
:connect
High-sensitive
equivalent
to preset
color
(default)
• Before
you
oreven
disconnect
the
AC
adapter,
be
sure
to turn
thedisplay
camera
OFF.
If the
AC adapter
is
Press
the
image
quality
button
to
select
the
combination
cannot
be
set
ifphotography
the
shutter
speed
isas
adjusted
toISO200
images to a
PC.
16MB
(SM-M1600D)/32MB
(SM-M3200D)/64MB
(SM-M6400D)/128M
(SM-M1280D)
The
respective
last
image
mode.
frame
appears
on
LCD
monitor.
You
can
also
select
the
image
by
the
same
operation
for
thumbnail
Page
83).
Carry
out
steps
1
to
on
page
109.
When
the
camera
is
turned
on,
set
the
mode
dial
to
the
desired
The
shutter
speed
and
the
aperture
value
corresponding
todisplay
the
All
descriptions
inor
this
Instruction
Manual
are
for
when
the
language
is (2
set
to [ENGLISH].
Press
or
to
select
the
image.
button,
images
already
photographed
can
be
saved
and
erased
by playback
the
method.
image
is
assigned
as
the
image
number.
Shutter
button
●
The
viewfinder
RECORDING
LED
turns
MENU
green.
is2
displayed.
•press
The
image
before
the
photograph
is
taken
is
slightly
less
clear
than
images.
(This
is fully.
connected
disconnected
with
the
power
ON,
camera
settings
may
beabove
reset
(SET-UP
Page
109,
and
ENTER.
:
High-sensitive
photography
equivalent
to
color
ISO400
its
limit,
the
shutter
speed
is
displayed
in
red.
Photography,
To
cancel
erasing
of
image
data,
select
[
]
and
press
ENTER.
Flash
button
quality
and
size,
while
viewing
the
indication
on
the
starts
a
reverse
•
The
press
of
mode.
shutter
speed
are
displayed
on
the
LCD
monitor.
If
the
appropriate
The
length
of
time
to
capture
images
varies
according
to
the
photographic
conditions.
•
Images
can
also
be
erased
in
the
thumbnail
mode.
In
this
case,
the
camera
enters
the
single
frame
Select
[SYSTEM
INFO.]
on
the
SETUP
MENU
and
because
television
displays
images
at
a
lower
resolution.)
•
Spotlit
subjects,
particularly
against
dark
backgrounds
Manual
Settings
Page
58)
orPage
the
camera
malfunction.
however,
is
in
this
state.
feeds the
image
•may
Each
press
oftoinbegin
EXP.
].
To
cancel
changing
of
settings,
press
.you
Use
or
todial
select
the
frame
want
to
enlarge.
Press
the
or
Zoom
to
switch
select
[( S/C
].isphotography
21)
towards
“T”
playback.
]possible
is
selected,
[NO
IMAGE]
displayed
after
all
folders
When
playback.
Press
Set
mode
in
the
to
[ sure
Tv
mode,
].the
or
press
or
the
shutter
button
fully
Before
photography,
make
that
the
lens
cap
has
been
2
combination
cannot
be
set
even
ifflash
aperture
isin.black
adjusted
to its
playback)
mode,
and
enters
the
thumbnail
playback mode after the image is erased.
status
display.
]or
mode:
In
[[playback
Press
the
display/info
button.
Self-timer
photography
and]down
are
not
possible.
•the
The
display
unit
varies
according
to
the
output
system.
•theCopying
of (frame
printed
text
(white
characters
on
paper)
.playback
press
reverse
by
one
frame.
This
adapter
allows
SmartMedia™
to
be
used
as
3.5"
floppy
disk.
have
been
erased
(unless
the
SmartMedia™
contains
protected
You
can
also
select
the
image
by
the
same
operation
as
for
thumbnail
playback
( [4X],
PageISO
83).
Automatic
begins.
•
Playback
becomes
2x-speed
to
reduce
aperture
size.
Press
to
increase
aperture
size.
Press
camera
takes
a
picture.
Status
display
P.
23)
The
manual
setting
removed
the
camera.
PO80)
limit,
aperture
value
isbe
displayed
in
red.
Photography,
however,
Playback
(LCD
mode
P.
the
[Scenes
M
]from
mode
tomenu
set
the
speed
to simultaneously
0.7
second
Manual
photograpy
During
[2X],
the
ISO
will
automatically
set
between
ISO100
ISO200.
During
will
be
☞
set
the
quality
and
size
➲shutter
Page
112
•the
With
the
NTSC
system,
images
can
be
displayed
on the
monitor
and(
TV
during
•To
with
low
reflectivity,
such
as
shots
green
or
dark
foliage
Flash
state
Each
press
of
the
display/info
button
switches
the
display
•of1-frame
feed
isand
continued
The
SYSTEM
INFO.
displayed.
reverse
for
the
duration
This
adapter
isplayback
inserted
into
the],
floppy
your
PC,
allowing for theWER
images).
The
viewfinder
LED
turns
redis
image
data
being
recorded
onto
Insert
the
adapter
connector
plug
into
the
DC
IN
Selft
imer
lamp
values
are
displayed
In
the
photography
modes
([while
[and ISO400.
]disk
oris
[ drive
]),on
the
lens
photography
and
playback.
is
possible
inAC
this
state.
automatically
set
between
ISO100
is
held
down.
format
as
follows:
duration
that
Note:
The
larger
the
F
value,
the
smaller
the
aperture
size
become
or
longer.
•Press
Remove
andzoom
insert
with
the
camera’s
power
turned
is held
down.
that
To
quit
the
SETUP
MENU,
change
the
mode
dial
setting.
Aperture
value
Shutter speed
Adjust
the
ratio
by
the
Zoom
switch.
(Zoom
display
option
menu,
press
or
to
images
recorded
onSmartMedia™
the
SmartMedia™
to
be
transferred
topress
the
PC.off.
the
SmartMedia™.
Sets
video
output
system
according
to
the
country
in
which
your
camera
isSize
used.
on
the
left
ofto
the
LCD
Press
the
shutter
button
down
halfway
and
5V
terminal
on
the
camera.
extends
from
the
camera
body.
•the
the
PAL
system,
images
cannot
be
displayed
When a cable
is connected, only
and
versa.
1situations
the
image
quality
button
switches
the
quality
and
size
Gently
insert
the
SmartMedia™
as
far
as
it, simultaneously.
can
go
✭❅❍❏
[Pressing
]vice
isWith
displayed
on
the
LCD
monitor.
•select
Recorded
data
may
bepress
erased
(destroyed)
in
the
listed
below.Viewfinder
Note that Toshiba
White
Balance
Additional
Information,
Glossary
to
increase
shutter
speed.
Pressand
to
decrease
shutter
speed.
Press
Press
or
to
move
forward
reverse.
☞
➲
Memo
PRG
]
and
ENTER.
]
and
press
ENTER.
[
switch
Page
21)
✤❅▼❁❉●❅❄
1 Press down
TV
display
is
available.
monitor
screen.
When
the
camera
is
turned
on,
the
Auto
Power
OFF
function
settings
infully
the
following
order.
it
down
. system
✳▼❁■❄❁❒❄
★❉▲▼❏❇❒❁❍
✩❍❁❇❅
❏■●❙
2
Press
or
to
select
the
item
you
desired
toisloss
set,
with
SmartMedia™
electrodes
(metal
contacts)
Additional
Information,
Glossary)
(white
Corporation
accepts
no
responsibility
whatsoever
for
the
of
recorded
data enters
in these
• the
When
allNTSC
images
in
a
folder
are
erased,
that
folder
itself
also(destruction)
erased.
Quality
The
camera
determines
the
balance
by
averaging
the
various
kinds playback
of light
that actually
halfway.
to
to
next
frame/
to“T”
go
back
one
❉■❆❏❒❍❁▼❉❏■
To
prevent
valuable
data
from
being
erased,
attach
the
write••advance
With
the
PAL
system,
images
are
played
back
with
apressing
black
frame
•frame
After
pause
is
cancelled,
the
Zoom
switch
to
the
will
enlarge
the
image.
Pressing
ENTER
the
setting.
or
,, SmartMedia™
and
manual
Exposure
compensation
(➲
Page
69)
using
When
[for
M
]selects
isis
selected
on
the
[ halfway
EXP.
]remove
option
menu,
orsurrounded.
makes
the
shutter
speed
setting
becomes
operational.
Never
open
the
SmartMedia™
cover
or
the
while
an
image
is
being
recorded.
This
or
and
manual
setting
(➲
Page
58)
or
film
speed
Exposure
compensation
(➲
Page
69)
using
Reverse the
procedure
“Loading
the
Batteries”
and
remove
the
batteries.
•facing
Pressing
the
shutter
button
down
adjusts
the
exposure,
•
Playback
paused.
PAL
system
( camera.
Additional
Information,
Glossary)
situations:
Builti
n
microp
the
lens.
This
setting
allows
you
to
set
in
advance
the
white
balance
when
taking
photographs
under
and
press
ENTER.
the
rear
of
the
For
the
US/Canada:
PDR-ACM1A
Holding
down
or
moves
forward
or
reverse
continuously.
Setting
1
Setting
2
Setting
3
resumes
at
the
last
state
that
was
2
protect
sticker
at
the
write-protect
area.
Data
can
no
longer
be
Press
Focus
area
may
corrupt
the
data
on
the
SmartMedia™
or
damage
the
SmartMedia™
itself.
possible,
but
does
not
make
the
exposure
compensation
possible. HoweverSelfthe exposure
value
is down pho
To
return
normal
press
the
Zoom
switch
towards
setting
(➲toPage
Page
58)magnification,
or film
speed
setting
(➲
Page
78)
using
ENTER
Pass
the
shoulder
strap
through
the
loop
and
pull.
timer
setting
(➲
78)
using
ENTER
are
also
possible.
and
pressing
the
shutter
button
fully
takes
the
shot.
TM[ is down
When
the
SmartMedia™
used
incorrectly
by
the
user
or
a
third
party
[
],
]
or
[
]
AE
or
AF
are
locked
with
the
shutter
button
held
half
fully.
specific
lighting
conditions.
For
Europe:
PDR-ACM1E
active
before
the
pause.
Firmly
insert
the
SmartMedia
as
far
as
it
can
go.
displayed
on is
the
LCD
monitor.
Press
ENTER.
recorded
or setting
erased
from
SmartMedia™.
Toon
write
oraterase
data
from is to be recorded. WriteFlash
Sets
the
color
mode
and
photographic
sensitivity
which
the
image
“W”.
are
also
possible.
prote
The
default
different
depending
the
destination
country/area.
Use
or
to
select
the
desired
item
Press
ENTER,
images
displayed
simultaneously.
• no
If
you
shoot
anine
when
preview
isversion
ON
(➲
Pageorabout
77),
1
down.
If
isstill
carried
outare
forthe
ais fixed
amount
ofto
time
(default:
one minute),
power
ON
-operation
When
the
SmartMedia™
exposed
toset
static
electricity
electrical
noise (
Auto
Photography
P. area
41, mode
46)
For
the
UK:
PDR-ACM1U
:picture,
Displays
firmware
ofto
this
camera.
SmartMedia™,
peel
off
the
sticker.
camera
ready
to
take
photographs.
Warning:
Noise
increases
when
the
ISO
is
changed
higher
settings.
image
isis
displayed
enlarged,
and
a
white
frame
and
green
Green The
Compose
picture,
press
the
shutter
button
down
halfway,
and
press
it
down
:the
Automatic
adjustment
(default)
Display
Page
83
theThumbnail
recorded
image
is
displayed
on
screen
for
about
two
]
Standby
mode
[
••-For
If
no
operation
is
carried
out
for
a
fixed
amount
of
time
(default:
about
1
minute),
the
power
is
turned
TM
consumption
is
set
to
its
minimum
state
(power
almost
turned
off)
to
prevent
battery
wear.
This
is
.
and
press
When
the
SmartMedia™
is
removed
or
the
camera
is
turned
off
while
recording
data,
erasing
The
image in
the
LCD
monitor
sometimes
from
thePage
time that
button is pressed down
Speaker
details,
refer
to
the
specifications
of darkens
ACinformation.
adapter
127.the shutter
: on
Displays
themonitor.
SmartMedia
Playback
returns to
the
start
of the
movie.
frame
are
displayed
the
LCD
:frame
Photography
outdoors
Default
setting:
seconds.
off
toAuto
preserve
life.
This
isfocused.
called
“Auto
Power
To return
to
the
normal
state,
presstermin
the
fully.
➲
Page
40
called
the
Power
OFF.
This
setting
you
toplayed
set OFF”.
the
time
when
the
camera
turns
off
halfway
until
the
image
becomes
: picture,
Equivalent
to
ISO100
(default)
data,
advance
when
images
are
back
or during
formatting
of
the
IN
5V
The
options
are
displayed.
PO
Histogram*
2
: battery
Returns
settings
to
their
defaults.
Flashing
[ the
],
[ color
]conditions
orallows
[shutter
]being
Self-timer
in frame
operation
atDC
a handshake
alarm
.
WE
Compose
the
press
the
button
down
halfway,
and
press
itdirectly
down
The
white
frame
indicates
entire
image,
while
the
green
:the
Photography
in
cloudy
POWER
button
again.
R the
• The
viewfinder
LED
turns
red
while
image
data
is
being
recorded
Compose
picture,
press
the
shutter
button
halfway,
and
press
it
down
• The
To
set
the
focus
or
exposure
for
a subject
outside
the
center
ofdown
the intended
image,
point
camera
The
camera
takes
the
picture.
automatically.
This
function
is
not
activated
during
automatic
playback
(
Page
85)
or
in
the
[
] PC
:
High-sensitive
photography
equivalent
to
color
ISO200
SmartMedia™.
Note:
image
appearing
through
the
lens
will
be
The
display
returns
to
thumbnail
playback.
<Standard>
<Detailed
information>
<Histogram>
<Image
only>
✭❅❍❏
shows
the
location
of
the
currently
enlarged
area.
halfway,
and
press
it
down
fully.
➲
Page
40
Macro
photography
:
Photography
in
bluish
fluorescent
light
fully.
➲
Page
40
About
the
Auto
★★
Power
(FULL
OFF
★★
Function
)
Additional
Information,
“AUTO
POWER
OFF
(page
110)”
at
the
subject
or
desired
exposure
(lighting),
press
and
hold
the
shutter
button
halfway.
Now,
with
the
shutter
onto
the
SmartMedia™.
ON]
Writing
to SmartMedia™
in progress
mode.
Press
ENTER.
:adapter
High-sensitive
photography
equivalent
toanother
color
ISO400
•Insert
Wedefault
recommend
copying
and
saving
important
datapower
onto
storage
medium (floppy
disk, hard
displayed
for
[LCD
].[Power
fully.
➲
Page
40
the
AC
power
plug
into
the
Electrodes
The
size
and
quality
of
the
image
can
be
reset
to
the
desired
combination.
Press
ENTER.
Memo
Sticker
button
still
held
halfway
down,
you
can
turn
the
direction
of
the
camera
and
frame
your
image
with
the
focus
•
It
is
possible
to
play
back
any
images
in
any
folders
by
pressing
or
during
playback.
(For
details
ON
: Photography
inafter
reddish
fluorescent
light
The
camera
takes
the
picture.
Photographs
can
be
taken,
however,
do not
turn thepress
power
OFF.
Todisk,
return
to disk,
the
normal
state
thepower
Auto
Power
OFF
has been
executed,
the
POWER
button
MO
etc.).
The
PREVIEW
manual
setting
Page
items
77
are
displayed.
Remaining
➲battery
camera
takes
the
atmonitor.
the
set
exposure
time.
Current
Entireofimage
and
exposure
locked.
Press
the
shutter
button
down
fully
to in
complete
capturing
the image.
Red outlet.
[☞
on picture
the
LCD
The
camera
is ready
for
burst
photography.
of displayed
folder
Page
92)
]:the
mode:
In
the
Accessing
of
SmartMedia™
[ (HALF
Photography
in] is
incandescent
light
★★
•] [is
When
shutter
speed
set
to
a)turn
speed
of
0.7 second
orprogress
slower,
photographs
taken
as extended
PC/AV
terminal
to Never
turn
the
power
on★★
again.
•During
remove
the
SmartMedia™
or
the
camera
offresult
while
recording
data or are
while
erasing
data
COLOR
Page
77
➲
the
exposure,
the
viewfinder
LED
turns
orange.
position
•
Moving
the
camera
as
you
press
the
shutter
button
will
in
a
blurred
image.
Use
,
,
or
to
select
the
area
to
enlarge.
at Page
the
last
image
displays
the
first
image,
and
pressing
atwill
thebe
firstautomatically
image
displays
the
Pressing
During
[2X],
the
ISO
be
automatically
set
to
ISO200.
[4X],ofISO
setof
exposures
(➲
68).
IfCarry
burst
photography
is to
set
the
shutter
speed
is set During
to athe
speed
0.7
second
or more
in the
[ to
Tv ]
out
steps
1will
2when
in
Photographic
(SmartMedia™
formatting).
actions
might
damage
ISO
Page
78
➲Flashing
ItClose
takes
about
twice
the
time
to while
complete
taking
the
photograph
duePDR-M81
to processing
ofenlargement
the
captured
[set
],These
[“Basic
] When
the
image
is not
in SmartMedia™.
focus.
the
SmartMedia™
cover.
Memo
•
The
PDR-M81
usesto
an
accurate
auto
focus
mechanism.
However,
the
may
have
difficulty
last
image.
Adjust
the
display
area
enlarge
viewing
the
white
and
Slow
shutter
speed
warning
ISO400.
Shutter
speed
• In
AEB
photography
(
Page
71)
or
burst
photography,
the
shutter
speed
cannot
be
set
to
0.7
second
or
longer.
★★
(SMALL
★★
)
➲
mode,
the
shutter
speed
is
automatically
changed
to
1/2
second.
Lens
•
Use
only
the
SmartMedia™
specified
for
use
with
the
PDR-M81.
The
use
of
other
SmartMedia™
SHARPNESS
Page
79
mode)”
(page
109).
Select
[QUALITY]
Settings
(
focusing
or
not
be
able
to
focus
at
all
for
subjects
and
situations
such
as
the
following:
➲
image.
Before
you
use
aother
new
SmartMedia™
the
first during
time,
be
sure
tothe increased
Manual
Photography
mo
Images
can
bevalue
rotated
by] pressing
playback.
Movie
(
mode
P.
75)
[ for
] or
green
the
aperture
is
to
F2.9
(maximum
aperture
size),
speed
isspeed
restricted
[shutter
PRG
[ P.
] 58)
•• frames.
If
a
mode
than
[ set
suppressed
flash
mode
is
set
inthe
flash
photography,
the]dark
shutter
is
Function
•79
Processing
image
Aperture
Exposure
compensation
- When
subject
is distant and
- SmartMedia™
Subjects
moving
at
high
speed
damage
camera.
CONTRAST
Page
➲[the
• to
The
write
protection
not
function
if in
write-protect
sticker
becomes
Use
a soft
dry cloth to
.thesecond.
oncould
the
SETUP
MENU
and
press
format
the
(may
Page
91).
rotates
an
image
counterclockwise,
and
pressing
rotates
clockwise.
Pressing
1/750
PDR-ACM1A
] •are
the
same
as
to
PDR-ACM1E
PDR-ACM1U
[PRG]
and
limited
tosecond.
between
1/2
second
and
1/250
* The
aboveitdirty.
menu
is
the
RECORDING
Charging
of
flash
progress
ON
O
When
there
are
objects
in
front
of
or
behind
the
subject
Very
shiny
subjects
such
as
a
mirror
or
car
body
SmartMedia™
is
aof
device.
Do do
notnot
bend,
drop,
or subject
SmartMedia™
to
DIGITAL
ZOOM
Page
• wipe
When
the
camera
isOnce
not79
inelectronic
be sure
to attach
the
lens
cap
provided
with[your
camera.
the
POWER
button
to
turn
the
power
off.
✭❅❍❏
away
any
dirt.
ause,
sticker
ispress
peeled
off,
reuse
it.
➲
Orange•Press
The
QUALITY
menu
isprecision
displayed.
combinations
the
automatically
mode.
MENU
inthe
•the
The
aperture
value
set
differ
to
the
actual
value
according
to
the
position
ofUK)
the
zoom
lens.
To
return
to
the
regular
display,
ENTER.
(Photos
cannot
be
taken
at
this
moment.)
(for
US
and
Canada)
If the
shutter
speed
is
set
to
1/350
second
or
less,
the
shutter
as
speed
an
animal
is
automatically
athe
cage
a]changed
person
in front
to 1/250
of a tree)
(for
European
Continent)
(for
Get
ready
to
take
the
photograph.
- above
Extremely
low
contrast
subjects
When
the
settings
are
made,
they
are
displayed
in(such
thepocket
following
order.
Memo
Oor
DC
IN
5V
termin
excessive
Also,
do
not
carry
SmartMedia™
the
ofx[trousers.
This
might
the
The
lens
cap
can
also
be
attached
to
attachment
following
the
above
steps
to prevent
it’s
LCD
79
➲shocks.
The
power
turns
off.
determined
shutter
speeds
and
aperture
-in Subjects
with
little
reflection,
such
as
hair
fur mode.
•• The
size
displayed
on
the
LCD
monitor
FULL
(320
240)
HALF
(160
xorsubject
120).
The
forced
flash
mode
or
]orred-eye
forced
flash
second
ifPage
the
flash
setting
is25)
changed
tothe
thestrap
[ ]becomes
- image
Subjects
that
have
low contrast
and
merge
into
Loading
the
batteries
(➲
Page
and
the
SmartMedia™
(➲
Page
31)
into
the
camera.
O
being
lost.
• Flash
photography
and
burst
photography
are
not
possible.
Flashing
SmartMedia™
to
excessive
force
when
you
sit
down,
damaging
the
SmartMedia™.
Hardware
malfunction
Subjects
with
no
solidity,
such
as
smoke
or
flames
the
background
(such
as
white
walls
or
subjects
Attach
the
lens
cap
when
you
are
not
using
the
camera.
values.
However,
their
operation
capability
movies
made
in
FULL
size
is
displayed
on
the
entire
LCD
monitor,
and
those
made
in
HALF
size
If the
[ ]mode,
forcedISO
flash
[ automatically
] red-eye set
forced
flash mode
is and
set in
flash photography
when
the is
• In
movie
willorbe
between
ISO100
ISO400
regardless
of
its
setting.
O, and
dressed
inthe
theSmartMedia™
same
color
as
the
background)
-attach
Subjects
viewed
through
glass
Turn
offor
the
power
tothe
retract
the
lens
unit,
and then
the
lens
cap.
The
image
taken
in
photography
mode
may
be
blurred.
or
to
select
the
desired
setting
from
the
tab
menu
press
★★
★★
★★
•Use
Do•not
use
store
in
environments
likely
to
be
affected
byisstatic
electricity
or
is
different
as
shown
the
right
table.
displayed
in
ofspeed
the
2
shutter
speed
is center
set
toin
aexposure
of
0.7
second
or
more,
the
shutter
speed
automatically
changed
to
Press
POWER
button
toscreen.
turn
power
on.
A electrical
histogram
isturn
a graphic
representation
ofthe
theistones
of the
subject.
The horizontal
histogram
Otheaxis
• Do
If the
the
image
cannot
be
focused,
thelens
focus
automatically
fixed to infinity.
(When
flashofisthe
necessary
not
the
power
on
with
the
cap
attached.
Memo
noise.
1/2
second.
ENTER.
*
The
above
AC
adapter
is
US/Canada
Turning
the
Power
On
➲
Page
38
☞
shows
the
brightness
(increasing
brightness
from
left
to
right)
and
the
vertical
axis
shows
the
number
at
this
time,
it
is
simultaneously
fixed
to
illuminate
objects
1.5
meters
(five
feet)
away.
During
macro
•This
Dosaves
use
orsettings,
store
SmartMedia™
very
hot,
humid
oraperture
corrosive
If the
shutter
speed
value
isimages,
set toin1/1000
second,
the
value
is limited
to
F8type
andAC
F3.4.
•not
When
playing
back
movie
switching
isthe
between
standard
and
image
only.
(O
:environments.
possible
Xbetween
: not
the
and
returns
to
RECORDING
MENU.
type.
European
andpossible)
UK
photography,
the flash
islevel.
alignedthe
withdisplay
the wide
position.)
of pixels
at each brightness
Downloaded From
camera-usermanual.com
adapters differ in shape.
--110
20 -40
80
88
Photography (Auto Photography) (continued)
].
Getting
Ready
Set the mode dial to [
Taking
Photographs
Look at the image on the LCD monitor to compose
the picture.
☞ To adjust the brightness of the LCD monitor ➲ Page 115
1
Press down
halfway.
2
Press down
fully.
Erasing
Images
PO
WE
R
• The LCD monitor sometimes displays bright, dark or colored spots at all times. This is not a
malfunction. These spots do not appear in the photographed image.
Other
Applications
Memo
Handy
Functions
• Pressing the shutter button down halfway adjusts the exposure,
and pressing the shutter button down fully takes the shot.
• When the focus and exposure are correctly adjusted, the
viewfinder lamp lights (green), and the AF icon turns green.
• If you shoot a still picture, when preview is set to ON (➲ Page 77),
the recorded image is displayed on screen for about two
seconds.
• The viewfinder LED turns red while image data is being recorded
onto the SmartMedia™.
Playing
Back Images
Press the shutter button down halfway 1, and press
it down fully 2.
Additional
Information
Downloaded From camera-usermanual.com
- 43 -
Changing
the
Preset
Conditions
(RECORDING
MENU)
Photography
in
the
Program
Mode
Setting
Names
Playing
Back
the
of
Photographed
Parts
Image
Size
and
Quality
(Single-Frame
Playback)
Extended
Exposure
Photography
(Bulb
Photography)
Erasing
Images
(Erase
Frame)
(continued)
Manual
Attaching
Using
How
Taking
Enlarging
Playback
About
Turning
to
Photographs
the
SmartMedia™
Press
Settings
the
Photographed
of
Power
the
Power
Multi
Shoulder
Continuously
Outlet
Shutter
Image
On/Off
Images
Strap
Pictures
Button
(Zoom
(Burst
Playback)
Photography)
Taking
Erasing
Button
Photographs
Folders
and
(All
LCD
Images
Continuously
Monitor
in
aImages
Folder/All
(Burst
Display
Photography)
Folders)
(In
Playback
(continued)
(continued)
Mode)
Definitions
Separately
of
the
Accessories
Color
of
the
Viewfinder
LED
Taking
and
Playing
Back
Photographs
on
aMode
TV
(continued)
Changing
the
Preset
Conditions
(RECORDING
MENU)
(continued)
Exposure
Compensation
in
the
Shutter
(continued)
Speed-priority
(continued)
About
Basic
Settings
SmartMedia™
in
(Sold
the
mode)
Aperture-priority
(continued)
Mode
(continued)
LCD
Monitor
Display
(during
photography)
(continued)
Manual
Settings
(continued)
Playing
Photography
Installing
Back
Movies
batteries
(Auto
Photography)
(continued)
(continued)
(continued)
Names
of
Parts
(continued)
Getting
Ready
The shutter
camerabutton
automatically
adjusts the
shutter
and
the aperture
value
according
to the
brightness
of an
can be pressed
down
in twospeed
stages:
halfway
down and
fully
down. When
pressed
halfway
down,
This
“SmartMedia™”
Set
Play
Automatically
The
the
following
mode
shoulder
menu
back
size
photographed
is(number
used
for
items
strap
plays
setting
isadapter
for
athe
is
are
back
storage
of
taking
handy
also
the
pixels)
still
the
basic
available
subjects
for
medium
images
16
and
carrying
images
settings
quality
one
for
that
as
saving
separately
your
image
to
require
(compression
be
camera
used
images
atseveral
a
sold
for
around.
inthat
photography
items.
ratio)
seconds
the
you
multi
of
have
the
photography
to image
photograph
in
photographed.
to
[ pause
be
mode
],photographed.
such
[be
Even
in
asquick
]for
firework
or
if Europe,
the
[You
succession.
camera’s
displays
] photography
power
at the
Enlarges
selected
portions
of
images
being
played
back
at
two
levels.
Images
can
displayed
enlarged
when
In
You
this
can
color
mode,
manually
of
the
photographs
viewfinder
adjust
settings
are
LED
taken
indicates
such
continuously
asphotographed
the
exposure
state
atof
control,
atime.
the
maximum
camera.
white
speed
balance,
The
ofthe
0.8
metering
second
system,
intervals.
continuous
This
item
switches
display
on
the
LCD
monitor
when
playing
back
photographed
images.
can
switch
If
you
the
AC
(sold
separately:
PDR-ACM1A
for
the
US/Canada,
PDR-ACM1E
PDR-ACM1U
During
stopping
During
Mode
Effective
dial
Subjects
and
Set
Values
During
playback
TM
✶❉❅◗❆❉■❄❅❒
✬✥✤
Press
.of
aperture
value.
SYSTEM
Turning
Exposure
ISO
OSD
In
[prevent
[use
LANGUAGE
the
]the
INFO.
mode
control
(EXP.)
On
Close
the
SmartMedia™
cover.
Slide
the
SmartMedia
cover
release
knob
in
the
Take
photographs
or
or
battery
to
to
select
or
play
[that
the
slide
]them
or
shutter
it
[ the
back.
,]will
and
speed.
and
lock
press
Look
Use
through
to
select
the
[adjust
viewfinder
]use
and
press
to
compose
ENTER.
the
picture.
To
continue
erasing
images,
repeat
the
above
procedure
2.
.is
AF
(auto-focus)
and
AE
(auto
exposure)
are
set.
When
pressed
fully
down,
the
camera
takes
aspace
picture.
object.
This
mode
enables
carefree
photographing
similarly
to
selecting
[stable
]photographs.
in
[ from
]settings”,
mode.
Itrepeatedly
is
to
night.
To
is
Change
modes.
turned
When
the
OFF,
your
setting
using
the
camera
images
this
according
mode,
from
saved
dropping
be
to
sure
how
on
the
the
to
during
SmartMedia™
image
a(size,
photography,
tripod
is
to
to
be
keep
used
not
hang
the
and
be
camera
erased.
the
the
shoulder
remaining
SmartMedia™
strap
and
amount
prevent
around
can
ofstep
your
distortion
be
neck.
inpossible
the
of
images.
Relationship
between
your
camera
and
accessories
Connecting
tocalled
Other
Devices
(page
123)
being
played
back
one
image
at
acover,
time.
The
meaning
maximum
of
number
LED
color
of
photographs
differ
according
can
to
be
taken
mode
continuously
dial
setting.
three
photography
mode,
and
take
photographs
at
these
settings.
These
are
“Manual
which
are
saved
display
to
show
aPower
list
detailed
information
compression
ratio,
shutter
speed,
aperture,
etc.)
or
you
can
for
the
UK)
in
a
room
with
amay
power
outlet,
you
can
take
photographs
for
an
extended
period
of
time.
This
also
Item
QUALITY
Options
Notes
SmartMedia™
VIDEOon
OUT
White Balance (W.B.)
Write
Protection
Removing
the Batteries
ISO
[ POWER
]
AUTO
OFF
Setting items
Turning
the
Power
Off
Using
the
LCD
Monitor
Additional
Information
Other
Applications
Handy
Functions
Erasing
Images
Playing
Back Images
Taking
Photographs
Tab menu
feed
●
Positive
(+)
Compensation
The
tab
is
displayed.
setting
isbattery
as
follows:
Make
sure
that
the
issystem
firmly
closed.
Details
image
ofmenu
operation
isrange
saved
are
or
erased,
the
same
and
as
the
taking
camera
photographs
is
then
ready
and
to
playing
take
photographs.
them
back
onon
the
LCD After
monitor.
If
you
use
the
viewfinder
to
take
photographs,
the
photography
Set
the
mode
dial
to
[cover
].settings
direction
of
the
arrow
to
open
cover
.1-frame
ENTER.
change
the
white
and
the
metering
in(the
program
mode.
erased
SmartMedia™.
and
reused.
For
details
on
these
accessories,
refer
to
the
Instruction
Manual
for
the
accessory
you
are
using.
(information
Movies
images
in
the
multi
mode
Page
cannot
be
displayed
using
the
zoom
playback
Images
even
if the
are
camera
not
recorded
is
turned
directly
off.
SmartMedia™
but
are
stored
temporarily
within
the
buffer
memory.
display
histograms,
etc.
prevents
failed
photographs
due
to
battery
wear
or
failed
of
data
to
a
PC.
details
handling
the AC
2x-speed
playback
Set
Sets
[•✭❅❍❏
PRG
the
thebalance
whether
color
] photographed
: /or
Photography
mode
language
not
to
and
return
photographic
of
in
menus
the
program
displayed
sensitivity
in
the
(default)
on
SETUP
the
at51)
which
LCD
(➲
MENU
Page
monitor.
the
to
image
62)
the
original
is For
to
be
factory
recorded.
settings.
feeds
the
image
•transfer
Each
press
of
Copying
of
printed
(black
characters
on
white
paper)
set
the
time
(text
114)
F8
/display
F6.8
F5.6
/18.
F4.8
/Page
F4.0
/and
F3.4
/mode
F2.9
How
to
take
photographs
Page
41
1/1000,
1/750,
1/500,
1/350,
1/250,
1/180,
1/125,
1/90,
range
may
differ
from
the
actual
image.
In
this
case,
use
the
LCD
Press
the
shutter
button
down
halfway
.
the
mode
dial
to
[
],
[
]
or
[
].
SmartMedia™
having
the
following
storage
capacity
can
be
used
on
your
camera.
current
as
of
March
2000)
feature.
The
last
cover
recorded
image
opens
frame
image
appears
appears
on
the
on
the
LCD
LCD
monitor.
monitor.
photography
is
finished,
check
the
images
record
the
selected
ones
to
SmartMedia™.
[TIME&DATE,
]
:
Erases
images
in
the
currently
selected
folder
and
folders.
adapter,
beSet
sure
to
read
page
•
2x-speed
playback
is
performed
for
.
Make
that
the
SmartMedia™
is
correctly
loaded.
by one
frame.
Warning:
[•Av
] sure
Noise
:OSD
Photography
increases
LANGUAGE
when
in aperture-priority
will
the not
ISObe
is reset.
changed
mode
to
(➲higher
Page
settings.
63) ( Page 31)
Backlit
portraits
[PROTECTED]
on
the
LCD
monitor,
cancel
the protection
( Page 108) or
1remove
Press down
How
to
play
back
images
Page
80
1/60,
1/45,
1/30,
1/20,
1/10,
1/8,
1/6,
1/4,
1/3, 115
1/2,
monitor
for
photography.
AF
(auto-focus)
and
AE
(auto
exposure)
(➲
Additional
Information,
[English]
: value
English
(default)
Pass
Set
the
out
mode
end
steps
of
dial
1the
to
to
shoulder
4[1/15,
either
]].LCD
or
inspeed-priority
[strap
“Photography
through
].
the
in
the
strap
Shutter
speed-priority
Mode”
isdisplayed
held
down.
the
duration
that
2MBCarry
/4MB/8MB/16MB/32MB/64MB/128MB
the
mode
dial
to
[isin
(all
3.3
types)
]•the
adjust
:]When
Erases
the
all
brightness
folders
recorded
of
the
on
the
monitor
SmartMedia™.
Page
[Set
•V
1-frame
feed
is continued
for the
The
aperture
and
the
shutter
speed
corresponding
to(➲that
[•To
Tv
:write-protection
Photography
shutter
mode
Page
65)
halfway.
bright
scenes
(such
and
highly
reflective
subjects
•the
You
can
also
carry
out
step
8snowfields)
while
verifying
the
image
step
7.
DPOF
(in
Page
102).
Glossary)
start
to
function.
0”7,
1”,
1”5,
2”,
3”,
4”,
6”,
8”,
10”,
15”
•Very
Do
not
remove
orV)
load
the
batteries
or
disconnect
or
connect
the
AC
adapter
while
the camera
is mode.
on. This
]65)
:POWER
Japanese
[value
[NORMAL]
:(3.3
Equivalent
toas
color
ISO100
Carry
Set
Use
out
or
mode
steps
to
dial
select
1
to
to
2[erased,
the
“Manual
].
images
photographed
Settings”
(page
in
58).
the
multi
photography
You can also
connect
the
PC
card
adapter
and
floppy
disk
adapter
( in
123)
sold
separately
to transfer
SmartMedia™
Changing
the
LCD
monitor
display
Page
116
The
images
or
folders
are
and
the
camera
returns
toPage
the
is
held
down.
duration
that
are
displayed
on
the
LCD
monitor.
If
the
appropriate
(page
attachment
or
on
in
“Photography
the
camera.
in
the
Full
Manual
Mode”
(page
67).
Press
the
button
to
turn
the
power
on.
full
manual
mode
(➲
Page
67)
[
M
]
:
Photography
in
Press
the
MENU
button.
•[2X]
Shots
predominantly
of
sky
Even
ifreturn
photography
is disconnect
terminated
midway
before
capturing
three
images
bythe
releasing
theAC
shutter
• AF
If
you
take
aup
photograph
after
erasing
an
athis
number
continuing
from
last Ifphotographed
When
or
AE
are
locked,
the
beep
tone
(➲ Page
111)
sounds
and
the
Use
ormade
to
change
the
setting
inimage,
the
menu,
2 Press down
might
the
manual
settings
tosame
their
defaults.
Iftab
happens,
manually
set
conditions
again.
:
High-sensitive
photography
equivalent
to
color
ISO200
(default)
•
Before
you
connect
or
the
AC
adapter,
be
sure
to
turn
the
camera
OFF.
the
adapter
is
Press
the
image
quality
button
to
select
the
preset
combination
cannot
be
set
even
if
the
shutter
speed
is
adjusted
to
images to a
PC.
16MB
(SM-M1600D)/32MB
(SM-M3200D)/64MB
(SM-M6400D)/128M
(SM-M1280D)
The
respective
last
image
mode.
frame
appears
on
LCD
monitor.
You
can
also
select
the
image
by
the
operation
as
for
thumbnail
display
(
Page
83).
Carry
out
steps
1
to
on
page
109.
When
the
camera
is
turned
on,
set
the
mode
dial
to
thethe
desired
The
shutter
speed
and
the
aperture
value
corresponding
todisplay
the
Reverse
playback,
2x-speed
playback
All
descriptions
inor
this
Instruction
Manual
are
for
when
language
is set
to [ENGLISH].
Press
or
to
select
the
image.
button,
images
already
photographed
can
be
saved
and
erased
by playback
the
method.
image
is
assigned
as
image
number.
●
Negative
(–)
Compensation
The
viewfinder
RECORDING
LED
turns
MENU
green.
is2
displayed.
•press
The
image
the
photograph
is
taken
is
slightly
less
clear
than
images.
(This
is fully.
connected
disconnected
with
the
power
ON,
camera
settings
may
beabove
reset
(SET-UP
Page
109,
and
ENTER.
:before
High-sensitive
photography
equivalent
to
color
ISO400
its
limit,
the
shutter
speed
isthe
displayed
inthe
red.
Reverse
1-frame
feed
To [4X]
cancel
erasing
of
image
data,
select
[monitor.
]Photography,
and
press
ENTER.
quality
and
size,
while
viewing
indication
on
the
starts
a
reverse
•
The
press
of
mode.
shutter
speed
are
displayed
on
the
LCD
If
the
appropriate
The
length
of
time
to
capture
images
varies
according
to
the
photographic
conditions.
•
Images
can
also
be
erased
in
the
thumbnail
mode.
In
this
case,
the
camera
enters
the
single
frame
Select
[SYSTEM
INFO.]
on
the
SETUP
MENU
and
because
television
displays
images
at
a
lower
resolution.)
•
Spotlit
subjects,
particularly
against
dark
backgrounds
Manual
Settings
Page
58)
orPage
the
camera
malfunction.
however,
is
in
this
state.
feeds the
image
•may
Each
press
oftoinbegin
EXP.
].
To
cancel
changing
of
settings,
press
.you
Use
or
todial
select
the
frame
want
to
enlarge.
Press
the
or
Zoom
to
switch
select
[( S/C
].isphotography
21)
towards
“T”
playback.
Floppy
Disk
Adapter
(FlashPath)
]possible
is
selected,
[NO
IMAGE]
displayed
after
all
folders
When
playback.
Press
Set
mode
in
the
to
[ sure
Tv
mode,
].the
or
press
or
the
shutter
button
fully
Before
photography,
make
that
the
lens
cap
has
been
combination
cannot
be
set
even
ifflash
aperture
isin.black
adjusted
to its
playback)
mode,
and
enters
the
thumbnail
playback mode after the image is erased.
status
display.
]or
mode:
In
[[playback
Press
the
display/info
button.
Self-timer
photography
and]down
are
not
possible.
•the
The
display
unit
varies
according
to
the
output
system.
•theCopying
of (frame
printed
text
(white
characters
on
paper)
.playback
press
reverse
by
one
frame.
This
adapter
allows
SmartMedia™
to
be
used
as
3.5"
floppy
disk.
have
been
erased
(unless
the
SmartMedia™
contains
protected
You
can
also
select
the
image
by
the
same
operation
as
for
thumbnail
playback
( [4X],
PageISO
83).
Automatic
begins.
•
Playback
becomes
2x-speed
to
reduce
aperture
size.
Press
to
increase
aperture
size.
Press
camera
takes
a
picture.
The
manual
setting
removed
the
camera.
limit,
aperture
value
isbe
displayed
in
red.
Photography,
however,
the
[Scenes
M
]from
mode
tomenu
set
the
speed
to simultaneously
0.7
second
During
[2X],
the
ISO
will
automatically
set
between
ISO100
ISO200.
During
be
☞
set
the
quality
and
size
➲shutter
Page
112
•the
With
the
NTSC
system,
images
can
be
displayed
on the LCD
monitor
and TVwill
during
•To
with
low
reflectivity,
such
as
shots
green
or
dark
foliage
Each
press
of
the
display/info
button
switches
the
display
•of1-frame
feed
isand
continued
The
SYSTEM
INFO.
displayed.
reverse
for
the
duration
This
adapter
isplayback
inserted
into
the],
floppy
your
PC,
allowing for the
images).
The
viewfinder
LED
turns
redis
image
data
being
recorded
onto
Insert
the
adapter
connector
plug
into
the
DC
IN
values
are
displayed
In
the
photography
modes
([while
[and ISO400.
]disk
oris
[ drive
]),on
the
lens
photography
and
playback.
is
possible
inAC
this
state.
automatically
set
between
ISO100
is
held
down.
format
as
follows:
duration
that
Note:
The
larger
the
F
value,
the
smaller
the
aperture
size
become
or
longer.
•Press
Remove
and
insert
SmartMedia™
with
the
camera’s
power
turned
off.Aperture value
is
held
down.
that
To
quit
the
SETUP
MENU,
change
the
mode
dial
setting.
Shutter
speed
Adjust
the
zoom
ratio
by
the
Zoom
switch.
(Zoom
to
display
option
menu,
press
or
to
images
recorded
on
the
SmartMedia™
to
be
transferred
to
the
PC.
the
SmartMedia™.
Sets
video
output
system
according
to
country
in
which
your camera
is used.
on
the
left
ofthe
the
LCD
Press
the
shutter
button
down
halfway
and
press
5V
terminal
on
the
camera.
extends
from
the
camera
body.
•the
PAL
system,
images
cannot
bethe
displayed
When a cable
is connected, only
and
versa.
the
image
quality
button
switches
the
quality
and
size
Gently
insert
the
SmartMedia™
as
far
as
it, simultaneously.
can
go
✭❅❍❏
[Pressing
]vice
isWith
displayed
on
the
LCD
monitor.
Viewfinder
LED
•select
Recorded
data
may
bepress
erased
(destroyed)
in
the
situations
listed
below. Note that Toshiba
White
Balance
Additional
Information,
Glossary
to
increase
shutter
speed.
Pressand
to
decrease
shutter
speed.
Press
Press
or
to
move
forward
reverse.
☞
➲
PRG
]
and
ENTER.
]
and
press
ENTER.
[
switch
Page
21)
✤❅▼❁❉●❅❄
1 Press down
TV
display
is
available.
monitor
screen.
When
the
camera
is
turned
on,
the
Auto
Power
OFF
function
Canceling
pause
settings
infully
the
following
order.
it
down
. system
✳▼❁■❄❁❒❄
★❉▲▼❏❇❒❁❍
✩❍❁❇❅
❏■●❙
Press
or
to
select
the
item
you
desired
toMeaning
set,
Pause
with
the
SmartMedia™
electrodes
(metal
contacts)
Additional
Information,
Glossary)
[NTSC]
:allNTSC
(white
Corporation
accepts
no
responsibility
whatsoever
for
the
loss
of recorded
data enters
in these
•Adapter
When
images
in
a
folder
are
erased,
that
folder
itself
is
also(destruction)
erased.
The
camera
determines
the
balance
by
averaging
the
various
kinds playback
of light
that actually
halfway.
AC
to
to
next
frame/
to“T”
go
back
one
❉■❆❏❒❍❁▼❉❏■
To
prevent
valuable
data
from
being
erased,
attach
the
write•••advance
With
the
PAL
system,
images
are
played
back
with
apressing
black
frame
•frame
After
pause
is
cancelled,
the
switch
to
the
will
the
image.
Pressing
ENTER
the
setting.
or
,, SmartMedia™
and
manual
Exposure
compensation
(➲
Page
69)
using
Colorthe
When
[Zoom
M
]selects
isis
selected
on
the
[ halfway
EXP.
]remove
option
menu,
orsurrounded.
the
shutter
speed
setting
becomes
operational.
State
Never
open
the
SmartMedia™
cover
orenlarge
the
while
anmakes
image
is
being
recorded.
This
or
and
manual
setting
(➲
Page
58)
or
film
speed
Exposure
compensation
(➲
Page
69)
using
Play
back
Reverse
procedure
“Loading
the
Batteries”
and
remove
the
batteries.
•facing
Pressing
the
shutter
button
down
adjusts
the
exposure,
• Playback
paused.
[PAL]
:for
PAL
system
( camera.
Additional
Information,
Glossary)
situations:
the
lens.
This
setting
allows
you
to
set
in
advance
the
white
balance
when
taking
photographs
under
and
press
ENTER.
the
rear
of
the
For
the
US/Canada:
PDR-ACM1A
Holding
down
or
moves
forward
or
reverse
continuously.
Setting
1
Setting
2
Setting
3
resumes
at
the
last
state
that
was
2
protect
sticker
at
the
write-protect
area.
Data
can
no
longer
be
Press
may
corrupt
the
data
on
the
SmartMedia™
or
damage
the
SmartMedia™
itself.
possible,
but
does
not
make
the
exposure
compensation
possible. However the exposure value
is down
To
return
normal
press
the
Zoom
switch
towards
setting
(➲toPage
Page
58)magnification,
or film
speed
setting
(➲
Page
78)
using
ENTER
Pass
the
shoulder
strap
through
the
loop
and
pull.
setting
(➲
78)
using
ENTER
are
also
possible.
and
pressing
the
shutter
button
fully
takes
the
shot.
TM[ is down
When
the
SmartMedia™
used
incorrectly
by
the
user
or
a
third
party
[
],
]
or
[
]
AE
or
AF
are
locked
with
the
shutter
button
held
half
fully.
specific
lighting
conditions.
For
Europe:
PDR-ACM1E
active
before
the
pause.
Firmly
insert
the
SmartMedia
as
far
as
it
can
go.
displayed
on is
the
LCD
monitor.
Press
ENTER.
recorded
or setting
erased
from
SmartMedia™.
Toon
write
oraterase
data
from is to be recorded.
Sets
the
color
mode
and
photographic
sensitivity
which
the
image
“W”.
are
also
possible.
The
default
different
depending
the
destination
country/area.
Use
or
to
select
the
desired
item
Press
ENTER,
images
displayed
simultaneously.
•[FIRMWARE
If
you
shoot
anine
when
preview
isversion
ON
(➲ camera.
Pageorabout
77),
down.
If
no
isstill
carried
outare
forthe
ais fixed
amount
oftotime
(default:
one minute),
ON
-operation
When
the
SmartMedia™
exposed
toset
static
electricity
electrical
noise power
For
the
UK:
PDR-ACM1U
VER.]
:picture,
Displays
firmware
ofto
this
Stop
SmartMedia™,
peel
off
the
sticker.
camera
ready
to
take
photographs.
Warning:
Noise
increases
when
the
ISO
is
changed
higher
settings.
image
isis
displayed
and
a
white
frame
and
green
Green The
Compose
picture,
press
the
shutter
button
down
halfway,
and
press
it
down
[the
AW
] no
:the
Automatic
adjustment
(default)
Thumbnail
Display
Page
83
recorded
image
is
displayed
on
for
about
two
]specifications
Standby
mode
[enlarged,
••-For
If
operation
is
carried
out
a screen
fixed
amount
offrom
time
(default:
about
1shutter
minute),
thewear.
power
is
turned
TM
consumption
is
set
to
its
minimum
state
(power
almost
off)that
to
prevent
battery
This
is
.in
and
press
When
the
SmartMedia™
isfor
removed
ordarkens
the
camera
isPage
turned
off
while
recording
erasing
The
image
the
LCD
monitor
sometimes
the
time
the
button
isdata,
pressed
down
details,
refer
to
the
of
AC
information.
adapter
127.
[CARD
INFO.]
: on
Displays
the
SmartMedia
Playback
returns
to
the
start
ofturned
the
movie.
frame
are
displayed
the
LCD
monitor.
]
:
Photography
outdoors
[
Default
setting:
seconds.
off
to
preserve
battery
life.
This
is
called
“Auto
Power
OFF”.
To
return
to
the
normal
state,
press
the
fully.
➲
Page
40
called
the
Auto
Power
OFF.
This
setting
allows
you
to
set
the
time
when
the
camera
turns
off
halfway
until
the
image
becomes
focused.
[NORMAL]
: picture,
Equivalent
to
ISO100
(default)
data,
frame
advance
when
images
aredefaults.
played
back or during
formatting alarm
of the
The
options
are
displayed.
Stop
[RESET]
: Returns
settings
to
Flashing
[ the
],
[ color
]conditions
or their
[shutter
]being
Self-timer
in frame
operation
at a handshake
.
Compose
the
press
the
button
down
halfway,
and
press
it
down
The
white
frame
indicates
entire
image,
while
the
green
[
]
:
Photography
in
cloudy
POWER
button
again.
ENTERCompose
•
The
viewfinder
LED
turns
red
while
image
data
is
being
recorded
the
picture,
press
the
shutter
button
down
halfway,
and
press
it
down
• The
To
set
the
focus
orpicture.
exposure
forphotography
a subject
outside
the
center
the intended
theincamera
directly
The
camera
takes
the
automatically.
This
function
isthrough
not
activated
during
automatic
playback
( image,
Pagepoint
85) or
the [ only>
] PC
[2X]
:appearing
High-sensitive
equivalent
toofcolor
ISO200
SmartMedia™.
Note:
image
the
lens
will
be
The
display
returns
to<Histogram>
thumbnail
playback.
<Standard>
<Detailed
information>
<Image
✭❅❍❏
shows
the
location
of
the
currently
enlarged
area.
halfway,
and
press
it
down
fully.
➲
Page
40
]
:
Photography
in
bluish
fluorescent
light
[
fully.
➲
Page
40
Setting
1
:
About
the
Auto
★★
Power
(FULL
OFF
★★
Function
)
Additional
Information,
“AUTO
POWER
OFF
(page
110)”
at
the
subject
or
desired
exposure
(lighting),
press
and
hold
the
shutter
button
halfway.
Now,
with
the
shutter
onto
the
SmartMedia™.
ON]
Writing
to SmartMedia™
in progress
mode.
Press
ENTER.
[4X]
:adapter
High-sensitive
photography
equivalent
toanother
color
ISO400
•Insert
We
recommend
copying
and
saving
important
datapower
onto
storage
medium (floppy disk, hard
displayed
for
[LCD
].[Power
fully.
➲
Page
40
the
AC
power
plug
into
the
Pressing the
The
default
size
and
quality
of
the
image
can
be
reset
to
the
desired
combination.
Press
ENTER.
button
still
held
halfway
down,
you
can
turn
the
direction
of
the
camera
and
frame
your
image
with
the
focus
•
It
is
possible
to
play
back
any
images
in
any
folders
by
pressing
or
during
playback.
(For
details
ON
Increases
the
volume.
[ return
] MO
: Photography
inafter
reddish
fluorescent
light
The
camera
takes
the
picture.
Photographs
can
be
taken,
however,
do not
turn thepress
power
OFF.
To
to disk,
the
state
theset
Auto
Power
OFF
has been
executed,
the
POWER
button
etc.).
The
PREVIEW
manual
setting
Page
items
77
are
displayed.
➲normal
camera
takes
the
atmonitor.
the
exposure
time.
Zoom switch
to disk,
“T”
Current
Entireofimage
and
locked.
Press
the
shutter
button
down
fully
to in
complete
capturing
the image.
Red outlet.
[☞
on picture
the
LCD
The
camera
is ready
for
burst
photography.
of2displayed
folder
Page
92)
]:the
mode:
In
the
Accessing
of
SmartMedia™
[ (HALF
Photography
in] is
incandescent
light
[Never
Setting
: exposure
★★
•]][is
When
shutter
speed
set
to
a)turn
speed
of
0.7 second
orprogress
slower,
photographs
taken
as extended
to
turn
the
power
on★★
again.
•During
remove
the
SmartMedia™
or
the
camera
offresult
while
recording
data or are
while
erasing
data
COLOR
Page
77
➲
the
exposure,
the
viewfinder
LED
turns
orange.
position
Pressing the
•
Moving
the
camera
as
you
press
the
shutter
button
will
in
a
blurred
image.
Use
,
,
or
to
select
the
area
to
enlarge.
at Page
the
last
image
displays
the
first
image,
and
pressing
atwill
thebe
firstautomatically
image
displays
the
Pressing
During
[2X],
the
ISO
be
automatically
set
to
ISO200.
During
[4X],ofISO
setof
exposures
(➲
68).
IfCarry
burst
photography
is to
set
the
shutter
speed
is setthe
to volume.
athe
speed
0.7
second
or more
in the
[ to
Tv ]
Decreases
out
steps
1will
2when
in
Photographic
(SmartMedia™
formatting).
actions
might
damage
ISO
Page
78
➲Flashing
ItClose
about
twice
the
time
to complete
taking
the
photograph
duePDR-M81
to processing
ofenlargement
the
captured
[set
],These
[“Basic
] When
the
image
is not
in SmartMedia™.
focus.
the
SmartMedia™
cover.
Zoom switch to
“W”
•
The
PDR-M81
usesto
accurate
focus
mechanism.
However,
the
have
difficulty
last
image.
Adjust
the
display
area
enlarge
viewing
theto
white
and
[1takes
MINUTE]
(default)
ISO400.
• In
AEB
photography
(an
Page
71)while
orauto
burst
photography,
the shutter
speed
cannot be setmay
to 0.7
second
or longer.
Setting
3
:
★★
(SMALL
★★
)
➲
mode,
the
shutter
speed
is
automatically
changed
1/2
second.
•image.
Use
only
the
SmartMedia™
specified
for
use
with
the
PDR-M81.
The
use
of
other
SmartMedia™
SHARPNESS
Page
79
mode)”
(page
109).
Select
[QUALITY]
Settings
(
focusing
or
not
be
able
to
focus
at
all
for
subjects
and
situations
such
as
the
following:
➲
Before
you
use
aother
new
SmartMedia™
the
first during
time,
be
sure
tothe increased
Images
can
bevalue
rotated
by] pressing
playback.
Difference
between
[PRG]
and
[ for
] or
green
[2 MINUTES]
the
aperture
is
to
F2.9
(maximum
aperture
size),
speed
restricted
[shutter
PRG
[ isspeed
]
••• frames.
If
a
mode
than
[ set
suppressed
flash
mode
is
set
inthe
flash
photography,
the]dark
shutter
is
Function
•79
Processing
image
- When
subject
is distant and
- SmartMedia™
Subjects
moving
at
high
speed
could
damage
camera.
CONTRAST
Page
➲[the
• to
The
write
protection
not
function
if in
write-protect
sticker
becomes
Use
a soft
dry cloth to
.thesecond.
on
the
SETUP
MENU
and
press
format
the
(may
Page
91).
rotates
an
image
counterclockwise,
and
pressing
rotates
clockwise.
Pressing
1/750
PDR-ACM1A
] •are
the
same
as
to
PDR-ACM1E
PDR-ACM1U
[PRG]
and
limited
tosecond.
between
1/2
second
and
1/250
* The
aboveitdirty.
menu
is
the
RECORDING
[3 MINUTES]
Charging
of
flash
progress
ON
When
there
are
objects
in
front
of
or
behind
the
subject
Very
shiny
subjects
such
as
a
mirror
or
car
body
SmartMedia™
is
aof
device.
Do do
notnot
bend,
drop,
or subject
SmartMedia™
to
DIGITAL
ZOOM
Page
• wipe
When
the
camera
isOnce
not79
inelectronic
be sure
to attach
the
lens
cap
provided
with[your
camera.
the
POWER
button
to
turn
the
power
off.
✭❅❍❏
away
any
dirt.
ause,
sticker
ispress
peeled
off,
reuse
it.
➲
Orange•Press
The
QUALITY
menu
isprecision
displayed.
combinations
the
automatically
mode.
MENU
inthe
•the
The
aperture
value
set
differ
to
the
actual
value
according
to
the
position
ofUK)
theorzoom
lens.
To
return
to
the
regular
display,
ENTER.
(Photos
cannot
be
taken
at
this
moment.)
(for
US
and
Canada)
If the
shutter
speed
is
set
to
1/350
second
or
less,
the
shutter
as
speed
an
animal
is
automatically
athe
cage
a]changed
person
in front
to 1/250
of a tree)
(for
European
Continent)
(for
Get
ready
to
take
the
photograph.
- above
Extremely
low
contrast
subjects
When
the
settings
are
made,
they
are
displayed
in(such
thepocket
following
order.
excessive
Also,
do
not
carry
SmartMedia™
the
ofx[trousers.
This
might
The
lens
cap
can
also
be
attached
to
attachment
following
the
above
steps
to prevent
it’sthe
LCD
79
➲shocks.
The
power
turns
off.
determined
shutter
speeds
and
aperture
-in Subjects
with
little
reflection,
such
as
hair
fur mode.
•• The
size
displayed
on
the
LCD
monitor
FULL
(320
240)
HALF
(160
xorsubject
120).
The
forced
flash
mode
or
]orred-eye
forced
flash
second
ifPage
the
flash
setting
is25)
changed
tothe
thestrap
[ ]becomes
- image
Subjects
that
have
low contrast
and
merge
into
Loading
the
batteries
(➲
Page
and
the
SmartMedia™
(➲
Page
31)
into
the
camera.
being
lost.
• Flash
photography
and
burst
photography
are
not
possible.
Flashing
SmartMedia™
to
excessive
force
when
you
sit
down,
damaging
the
SmartMedia™.
Hardware
malfunction
Subjects
with
no
solidity,
such
as
smoke
or
flames
the
background
(such
as
white
walls
or
subjects
Attach
the
lens
cap
when
you
are
not
using
the
camera.
values.
However,
their
operation
capability
movies
made
in
FULL
size
is
displayed
on
the
entire
LCD
monitor,
and
those
made
in
HALF
size
is
If
the
[
]
forced
flash
or
[
]
red-eye
forced
flash
mode
is
set
in
flash
photography
when
the
•
In
movie
mode,
ISO
will
be
automatically
set
between
ISO100
and
ISO400
regardless
of
its
setting.
* •Use
Histogram
dressed
inthe
theSmartMedia™
same
color
as
the
background)
-attach
Subjects
viewed
through
glass
Turn
offor
the
power
tothe
retract
the
lens
unit,
and then
the
lens
cap.
The
image
taken
in
exposure
photography
mode
may
be
blurred.
or
to
select
the
desired
setting
from
the
tab
menu
, and
press
★★
★★
★★
Do•not
use
store
in
environments
likely
to
be
affected
byisstatic
electricity
or
is
different
as
shown
in
the
right
table.
displayed
in
center
ofspeed
the
screen.
shutter
speed
is
set
to
a
of
0.7
second
or
more,
the
shutter
speed
automatically
changed
to
Press
POWER
button
tothe
turn
power
on.subject.
A electrical
histogram
isturn
a graphic
representation
ofthe
theistones
of the
The horizontal
histogram
• Do
If the
the
image
cannot
be
focused,
thelens
focus
automatically
fixed to infinity.
(When theaxis
flashofisthe
necessary
not
the
power
on
with
cap
attached.
noise.
1/2
second.
ENTER.
*the
The
above
AC adapter
is US/Canada
Turning
the
Power
On
➲
Page
38
☞
shows
the
brightness
(increasing
brightness
from
left
to
right)
and
vertical
axis
shows
the
number
at
this
time,
it
is
simultaneously
fixed
to
illuminate
objects
1.5
meters
(five
feet)
away.
During
macro
•This
Dosaves
use
orsettings,
store
SmartMedia™
very
hot,
humid
oraperture
corrosive
If the
shutter
speed
value
isimages,
set toin1/1000
second,
the
value
is limited
to
F8type
andAC
F3.4.
•• not
When
playing
back
movie
switching
isthe
between
standard
and
image
only.
(O
:environments.
possible
Xbetween
: not
the
and
returns
to
RECORDING
MENU.
type.
European
andpossible)
UK
photography,
the flash
islevel.
alignedthe
withdisplay
the wide
position.)
of pixels
at each brightness
Downloaded From
camera-usermanual.com
adapters differ in shape.
--110
20 -40
80
88
Setting the Image Size and Quality (continued)
<Quality>
(still image)
<Size>
] FULL
: 2400 x 1600 pixel (still image), 320 x 240 pixel (movie)
] HALF
: 1200 x 800 pixel (still image), 160 x 120 pixel (movie)
[
] SMALL : 720 x 480 pixel (still image)
Take the photograph.
☞ For details on how to take photographs ➲ Photograph
To make the image smaller, it is more effective to reduce the size first and then reduce image quality.
After you have taken a photograph, you can reduce its size (➲ Page 94) and quality (➲ Page 96).
The memory size of the image varies according to the subject.
The compression ratio is given for reference only.
In the movie mode, the quality and size setting changes in the following order, regardless of the
image quality setting.
FULL★★★
HALF★
FULL★
HALF★★★
HALF★★
Downloaded From camera-usermanual.com
- 45 -
Additional
Information
FULL★★
Other
Applications
•
•
•
•
•
Handy
Functions
Memo
Erasing
Images
The larger size improves the quality of the image. Higher quality images, however, take up
more space, reducing the number of images that can be taken or the possible
photographic time.
Playing
Back Images
[
[
Taking
Photographs
The more stars there are, the better image quality becomes. Higher quality images,
however, take up more memory space, reducing the number of images that can be taken
or the possible photographic time.
Getting
Ready
[★★★] FINE
: 1/5 (JPEG) compression
[★★★] NORMAL : 1/7.5 (JPEG) compression
[★★★] BASIC : 1/15 (JPEG) compression
Taking
Zoom
Changing
Photography
Photographs
Photography
theinUsing
Focus
in [the
]Flash
Mode
(Auto
Select
mode)
Taking
Photographs
a Variety
of Modes
([
] Mode)
(continued)
Additional
Information
Other
Applications
Handy
Functions
Erasing
Images
Playing
Back Images
Taking
Photographs
Getting
Ready
The
macro
photography
is used
whenaccording
the distance
totimes
the
subject
is places.
between
10special
cm
(0.33
ft) (WIDE
side
Zoom
In
the
photography
default
setting,
allows
themode
flash
you photography
to
will
take
be automatically
zoom
shots
up
set
toto
to
2.8
function
the
in dark
size
or
wide-angle
No
photography
setting
isdepending
needed
to
This
mode
enables
automatic
the
photographic
conditions.
Photographs
can
be
taken
[setting)
Sports
Press
to
option
menu,
press
orof
toscreen
to
80
cmup
(2.62
ft).display
on
set
the
off ]in
distance
the
flash.
The
to
the
subject.
firing mode
You
can be
also
set
enlarge
to suit
the
thesetting
center
conditions
the
where
flash
take
is to
photographs
be used. in the
easily
this
mode
asflash
the
camera
automatically
makes
the
suitable
to theand
conditions.
[
This
camera
cannot
focus
subjects
within
10 cm
(0.33
ft)
(WIDE
side
setting)
to
80you
cm
(2.62 to
ft)
unless
in the
select
options
press
ENTER.
digital
The effective
zoom
mode
firing
with
distance
theon
focal
of
the
distance
flash
isoptions.
increased
approximately
by a0.8
factor
m
(2.62
of
2.2.
to
3.0
(9.84
ft) (WIDE
side
setting,
Auto
Select
mode
has
the
following
Choose
the
option
toft)suit
them
image
want
photograph.
Select
this
option
toand
take
photographs
of fast-moving
subjects.
macro
photography
mode.
Though
photographs
be47
taken
even
at a distance of about 80cm (2.62 ft) or more
ISO
[2X]).
For asetting:
detailed
description
each option,
refer To
tocan
page
through
Pressing
ENTERofselects
the setting.
cancel,
press
. page 51:
in the macro photography mode, it may take time for the camera to focus.
In the...
macro
photography
mode, you
the
LCD monitor
[ the ]mode
Automatically
adjusts
exposure
settings
➲ take
Page portraits
49
☞
The
camera
automatically
adjusts
the
focus
and
...off.
To
at night
Set
dial to
[canthenot
] focus
orturn
[ and
].
exposure
settings.
] mode
Portrait ➲
Page
Set[ the
dial
to 49
[
] or [
].
.... To take continuous shots of moving subjects
Landscape
➲ Page
49 thecan
[ portraits
the dial
picture
Zoom
In
the
[ ]mode
] mode,
flash
when].[ key.
is selected.
.... ToCompose
take
The]16
shots that you take in this mode are
Set
the
tophotography
[ using
] [
]beorset
[switch
• Pressing
the Zoom
switch
] Sports
➲ Page
50towards the “T” zooms in on the
[
saved as a single image.
... To Press
take
landscape
shots
the
flash
button
to set
to the
subject,
enlarges
the
on the
LCD desired
monitor. mode
] and
Night
➲ Page
50 subject
[
Press
the
FOCUS
button.
Pressing
the Zoom
switch
towards
the “W”the
provides
a wider
while
viewing
the
LCD
monitor
status
] 16-frame
➲ Page
51
[ photographs
... To•When
take
ofmulti
fast-moving
subjects
you
press the
FOCUS
button,
the or
focus modes
are display.
displayed
angle
picture.
Options
When
you
pressorder
the onflash
the available flash modes are
in
the following
the button,
LCD monitor.
•displayed
position
movesthere
according
to the
Zoomthat
switch
setting.
in
the following
order.
InThe
the lens
Auto
Select
mode,
are some
settings
cannot
be changed as the camera makes the
Press
ENTER.
The
iconautomatically.
forthe
theselected
mode that
yousettings
selected
is displayed
in
settings
These
vary
according
tothe
the
mode.
The
icon
of
mode
is
displayed
on the upper
leftLCD
side of the LCD monitor.
monitor
or
the
display.
●
Focus
photography
The
camera
is status
ready to
take photographs.
Select this option to take photographs of people against a dusk or
...... Can be set.
night-time
When
“1m”background.
or “3m” is set, the camera will focus on subjects in a
●
Exposure
compensation
distance
of 1m
(3.28
ft) or 3m
(9.84 ft)
to shutter
take photos.
Compose
the
picture,
press
the
button down halfway, and press it down
] Night
In movie
mode,
the 2.2X digital zoom photography is possible.
fully.•• ➲
Page
41 only
...... Cannot
specified.
When
the Night
mode is selected,
the flashbe
mode
is fixed(set
to automatically)
The
camera
takes
the
picture.
Slow
Synchro
(the
flash
is fired
at[ a slower
shutter
speed.)
Press
the
FOCUS
button
repeatedly
the
appears.
●
About
flash photography
] isuntil
selected
in[ the [] icon
] mode.
It can not be set in the
* [No
display]
Auto can be set
when
take a photograph with a dark background or at a dark
[ • If ]you
mode.
shutter on
speed
slows
down,
and
thebe
slow
shutter
................................................
Flash
can
set
as required
in this
mode.
Look place,
at
thetheimage
the
LCD
monitor
to
compose
the
picture.
speed warning is displayed. (When the shutter is pressed
the LCD Monitor ➲ Page 42 Automatically fixed to red-eye auto
..................................................
☞ Using
halfway down,
the viewfinder
LED blinks
and the
• Optimum
print effect
for a selected
scene green
is available
by slow
using a
compatible
Compose
the
picture.
................................................
Automatically
fixed
to slow synchro
] is displayed
in the LCD
monitor.)
shutter
speed
mark [
printer.
PressTothe
shutter
button
halfway,
and
press
fully. ➲ Page 40
distorted
image,down
we➲recommend
using
a tripod
to it down
Additional
Information,
(page 134)
☞prevent
...............................
Flash photography
isGlossary
not possible.
camera button
stable. down halfway, and press it down fully. ➲ Page 40
Presskeep
thethe
shutter
When
you
are using
the flash, the flash icons on the LCD monitor are displayed in yellow when the
●
About
burst
photography
shutter button is pressed halfway down.
• Macro photography is not canceled
evenphotography
if the cameraisisnot
turned
off or the
Auto Power
OFF function is
...... Burst
possible
in these
modes.
activated.
Downloaded From camera-usermanual.com
- 46 -
Taking Photographs in a Variety of Modes ([
Set the mode dial to [
] portrait,
Getting
Ready
Set the appropriate scene mode from: [
] automatically adjusts the focus and exposure settings, [
[
] landscape, [
] sports, [
] night, [
] multi photography mode options.
] Mode)
].
Taking
Photographs
Playing
Back Images
Erasing
Images
Press ENTER.
[
] is displayed on the LCD monitor.
Handy
Functions
Other
Applications
Additional
Information
Downloaded From camera-usermanual.com
- 47 -
Taking
Zoom
Changing
Photography
Photographs
Photography
theinUsing
Focus
in [the
]Flash
Mode
(Auto
Select
mode)
Taking
Photographs
a Variety
of Modes
([
] Mode)
(continued)
Erasing
Images
Playing
Back Images
Taking
Photographs
Getting
Ready
The
macro
photography
is used
whenaccording
the distance
totimes
the
subject
is places.
between
10special
cm
(0.33
ft) (WIDE
side
Zoom
In
the
photography
default
setting,
allows
themode
flash
you photography
to
will
take
be automatically
zoom
shots
up
set
toto
to
2.8
function
the
in dark
size
or
wide-angle
No
photography
setting
isdepending
needed
to
This
mode
enables
automatic
the
photographic
conditions.
Photographs
can
be
taken
[setting)
Sports
Press
to
option
menu,
press
orof
toscreen
to
80
cmup
(2.62
ft).display
on
set
the
off ]in
distance
the
flash.
The
to
the
subject.
firing mode
You
can be
also
set
enlarge
to suit
the
thesetting
center
conditions
the
where
flash
take
is to
photographs
be used. in the
easily
this
mode
asflash
the
camera
automatically
makes
the
suitable
to theand
conditions.
[
This
camera
cannot
focus
subjects
within
10 cm
(0.33
ft)
(WIDE
side
setting)
to
80you
cm
(2.62 to
ft)
unless
in the
select
options
press
ENTER.
digital
The effective
zoom
mode
firing
with
distance
theon
focal
of
the
distance
flash
isoptions.
increased
approximately
by a0.8
factor
m
(2.62
of
2.2.
to
3.0
(9.84
ft) (WIDE
side
setting,
Auto
Select
mode
has
the
following
Choose
the
option
toft)suit
them
image
want
photograph.
Select
this
option
toand
take
photographs
of fast-moving
subjects.
macro
photography
mode.
Though
photographs
be47
taken
even
at a distance of about 80cm (2.62 ft) or more
ISO
[2X]).
For asetting:
detailed
description
each option,
refer To
tocan
page
through
Pressing
ENTERofselects
the setting.
cancel,
press
. page 51:
in the macro photography mode, it may take time for the camera to focus.
In the...
macro
photography
mode, you
the
LCD monitor
[ the ]mode
Automatically
adjusts
exposure
settings
➲ take
Page portraits
49
☞
The
camera
automatically
adjusts
the
focus
and
...off.
To
at night
Set
dial to
[canthenot
] focus
orturn
[ and
].
exposure
settings.
] mode
Portrait ➲
Page
Set[ the
dial
to 49
[
] or [
].
.... To take continuous shots of moving subjects
Landscape
➲ Page
49 thecan
[ portraits
the dial
picture
Zoom
In
the
[ ]mode
] mode,
flash
when].[ key.
is selected.
.... ToCompose
take
The]16
shots that you take in this mode are
Set
the
tophotography
[ using
] [
]beorset
[switch
• Pressing
the Zoom
switch
] Sports
➲ Page
50towards the “T” zooms in on the
[
saved as a single image.
... To Press
take
landscape
shots
the
flash
button
to set
to the
subject,
enlarges
the
on the
LCD desired
monitor. mode
] and
Night
➲ Page
50 subject
[
Press
the
FOCUS
button.
Pressing
the Zoom
switch
towards
the “W”the
provides
a wider
while
viewing
the
LCD
monitor
status
] 16-frame
➲ Page
51
[ photographs
... To•When
take
ofmulti
fast-moving
subjects
you
press the
FOCUS
button,
the or
focus modes
are display.
displayed
angle
picture.
Options
When
you
pressorder
the onflash
the available flash modes are
in
the following
the button,
LCD monitor.
•displayed
position
movesthere
according
to the
Zoomthat
switch
setting.
in
the following
order.
InThe
the lens
Auto
Select
mode,
are some
settings
cannot
be changed as the camera makes the
Press
ENTER.
The
iconautomatically.
forthe
theselected
mode that
yousettings
selected
is displayed
in
settings
These
vary
according
tothe
the
mode.
The
icon
of
mode
is
displayed
on the upper
leftLCD
side of the LCD monitor.
monitor
or
the
display.
●
Focus
photography
The
camera
is status
ready to
take photographs.
Select this option to take photographs of people against a dusk or
...... Can be set.
night-time
When
“1m”background.
or “3m” is set, the camera will focus on subjects in a
Memo
●
Exposure
compensation
distance
of 1m
(3.28
ft) or 3m
(9.84 ft)
to shutter
take photos.
Compose
the
picture,
press
the
button down halfway, and press it down
] Night
Additional
Information
Other
Applications
Handy
Functions
Memo
In movie
mode,
the 2.2X digital zoom photography is possible.
fully.•• ➲
Page
41 only
...... Cannot
specified.
When
the Night
mode is selected,
the flashbe
mode
is fixed(set
to automatically)
The
camera
takes
the
picture.
Slow
Synchro
(the
flash
is fired
at[ a slower
shutter
speed.)
Press
the
FOCUS
button
repeatedly
the
appears.
●
About
flash photography
] isuntil
selected
in[ the [] icon
] mode.
It can not be set in the
* [No
display]
Auto can be set
when
take a photograph with a dark background or at a dark
[ • If ]you
mode.
place,
shutter on
speed
slows
down,
and
thebe
slow
shutter
................................................
Flash
can
set
as required
in this
mode.
Look
at
thetheimage
the
LCD
monitor
to
compose
the
picture.
Memo
speed warning is displayed. (When the shutter is pressed
the LCD Monitor ➲ Page 42 Automatically fixed to red-eye auto
..................................................
☞ Using
halfway down,
the viewfinder
LED blinks
and the
• Optimum
print effect
for a selected
scene green
is available
by slow
using a
compatible
Compose
the
picture.
................................................
Automatically
fixed
to slow synchro
] is displayed
in the LCD
monitor.)
shutter
speed
mark [
printer.
PressTothe
shutter
button
halfway,
and
press
fully. ➲ Page 40
distorted
image,down
we➲recommend
using
a tripod
to it down
Additional
Information,
(page 134)
☞prevent
...............................
Flash photography
isGlossary
not possible.
camera button
stable. down halfway, and press it down fully. ➲ Page 40
Presskeep
thethe
shutter
When
you
are using
the flash, the flash icons on the LCD monitor are displayed in yellow when the
●
About
burst
photography
Memo
shutter button is pressed halfway down.
• Macro photography is not canceled
evenphotography
if the cameraisisnot
turned
off or the
Auto Power
OFF function is
...... Burst
possible
in these
modes.
activated.
Downloaded From camera-usermanual.com
- 46 -
Taking Photographs in a Variety of Modes ([
] Automatically adjusts the focus and exposure settings
The camera automatically adjusts the focus and exposure settings to take photographs.
] Portrait
Select this option to make people stand out with the background
out-of-focus.
Taking
Photographs
[
Getting
Ready
[
] Mode) (continued)
Playing
Back Images
Erasing
Images
] Landscape
Select this option to take photographs of distant scenery or
landscapes.
Handy
Functions
[
Other
Applications
Additional
Information
Downloaded From camera-usermanual.com
- 49 -
Taking
Zoom
Changing
Photography
Photographs
Photography
theinUsing
Focus
in [the
]Flash
Mode
(Auto
Select
mode)
Taking
Photographs
a Variety
of Modes
([
] Mode)
(continued)
Erasing
Images
Playing
Back Images
Taking
Photographs
Getting
Ready
The
macro
photography
is used
whenaccording
the distance
totimes
the
subject
is places.
between
10special
cm
(0.33
ft) (WIDE
side
Zoom
In
the
photography
default
setting,
allows
themode
flash
you photography
to
will
take
be automatically
zoom
shots
up
set
toto
to
2.8
function
the
in dark
size
or
wide-angle
No
photography
setting
isdepending
needed
to
This
mode
enables
automatic
the
photographic
conditions.
Photographs
can
be
taken
[setting)
Sports
Press
to
option
menu,
press
orof
toscreen
to
80
cmup
(2.62
ft).display
on
set
the
off ]in
distance
the
flash.
The
to
the
subject.
firing mode
You
can be
also
set
enlarge
to suit
the
thesetting
center
conditions
the
where
flash
take
is to
photographs
be used. in the
easily
this
mode
asflash
the
camera
automatically
makes
the
suitable
to theand
conditions.
[
This
camera
cannot
focus
subjects
within
10 cm
(0.33
ft)
(WIDE
side
setting)
to
80you
cm
(2.62 to
ft)
unless
in the
select
options
press
ENTER.
digital
The effective
zoom
mode
firing
with
distance
theon
focal
of
the
distance
flash
isoptions.
increased
approximately
by a0.8
factor
m
(2.62
of
2.2.
to
3.0
(9.84
ft) (WIDE
side
setting,
Auto
Select
mode
has
the
following
Choose
the
option
toft)suit
them
image
want
photograph.
Select
this
option
toand
take
photographs
of fast-moving
subjects.
macro
photography
mode.
Though
photographs
be47
taken
even
at a distance of about 80cm (2.62 ft) or more
ISO
[2X]).
For asetting:
detailed
description
each option,
refer To
tocan
page
through
Pressing
ENTERofselects
the setting.
cancel,
press
. page 51:
in the macro photography mode, it may take time for the camera to focus.
In the...
macro
photography
mode, you
the
LCD monitor
[ the ]mode
Automatically
adjusts
exposure
settings
Page portraits
49
The
camera
automatically
adjusts
the
focus
and
...off.
To take
at night
Set
dial to
[canthenot
] focus
orturn
[ and
].
exposure
settings.
] mode
Portrait dial
Page
Set[ the
to 49
[
] or [
].
.... To take continuous shots of moving subjects
Landscape
49 thecan
[ portraits
the dial
picture
Zoom
In
the
[ ]mode
] mode,
flash
photography
when].[ key.
is selected.
.... ToCompose
take
The]16
shots that you take in this mode are
Set
the
toPage
[ using
] [
]beorset
[switch
• Pressing
the ZoomPage
switch
] Sports
50towards the “T” zooms in on the
[
saved as a single image.
... To Press
take
landscape
shots
the
flash
button
to set
to the
subject,
enlarges
the
on the
LCD desired
monitor. mode
] and
Night
Page
50 subject
[
Press
the
FOCUS
button.
Pressing
the Zoom
switch
towards
the “W”the
provides
a wider
while
viewing
the
LCDPage
monitor
status
] 16-frame
51
[ photographs
... To•When
take
ofmulti
fast-moving
subjects
you
press the
FOCUS
button,
the or
focus modes
are display.
displayed
angle
picture.
Options
When
you
pressorder
the onflash
the available flash modes are
in
the following
the button,
LCD monitor.
•displayed
position
movesthere
according
to the
Zoomthat
switch
setting.
in
the following
order.
InThe
the lens
Auto
Select
mode,
are some
settings
cannot
be changed as the camera makes the
Press
ENTER.
The
iconautomatically.
forthe
theselected
mode that
yousettings
selected
is displayed
in
settings
These
vary
according
tothe
the
mode.
The
icon
of
mode
is
displayed
on the upper
leftLCD
side of the LCD monitor.
monitor
or
the
display.
Focus
photography
The
camera
is status
ready to
take photographs.
Select this option to take photographs of people against a dusk or
...... Can be set.
night-time
When
“1m”background.
or “3m” is set, the camera will focus on subjects in a
Memo
Exposure
compensation
distance
of 1m
(3.28
ft) or 3m
(9.84 ft)
to shutter
take photos.
Compose
the
picture,
press
the
button down halfway, and press it down
] Night
Additional
Information
Other
Applications
Handy
Functions
Memo
movie
mode,
the 2.2X digital zoom photography is possible.
fully.•• In
Page
41 only
...... Cannot
specified.
When
the Night
mode is selected,
the flashbe
mode
is fixed(set
to automatically)
The
camera
takes
the
picture.
Slow
Synchro
(the
flash
is fired
at[ a slower
shutter
speed.)
Press
the
FOCUS
button
repeatedly
the
appears.
About
flash photography
] isuntil
selected
in[ the [] icon
] mode.
It can not be set in the
* [No
display]
Auto can be set
when
take a photograph with a dark background or at a dark
[ • If ]you
mode.
place,
shutter on
speed
slows
down,
and
thebe
slow
shutter
................................................
Flash
can
set
as required
in this
mode.
Look
at
thetheimage
the
LCD
monitor
to
compose
the
picture.
Memo
speed warning is displayed. (When the shutter is pressed
halfway down,
the viewfinder
LED blinks
and the
• Optimum
print effect
for a selected
scene green
is available
by slow
using a
Compose
the
picture.
................................................
Automatically
fixed
to slow synchro
] is displayed
in the LCD
monitor.)
shutter
speed
mark [
printer.
PressTothe
shutter
button
halfway,
and
press
fully.
prevent
distorted
image,down
we recommend
using
a
tripod
to it down
Information,isGlossary
(page 134)
...............................Additional
Flash photography
not possible.
camera button
stable. down halfway, and press it down fully.
Presskeep
thethe
shutter
Using
the LCD Monitor Page 42 Automatically fixed to red-eye auto
..................................................
compatible
Page 40
Page 40
When
you
are using
the flash, the flash icons on the LCD monitor are displayed in yellow when the
About
burst
photography
Memo
shutter button is pressed halfway down.
• Macro photography is not canceled
evenphotography
if the cameraisisnot
turned
off or the
Auto Power
OFF function is
...... Burst
possible
in these
modes.
activated.
Downloaded From camera-usermanual.com
- 46 -
Taking Photographs in a Variety of Modes ([
] 16-frame multi
Taking
Photographs
This mode takes 16 shots continuously at 0.13 second intervals
(7.5 frames/second). The 16 photographed images are saved as
one image (FULL size: 2400 x 1600 pixels).
This mode is effective for continuously photographing moving
subjects.
Getting
Ready
[
] Mode) (continued)
Playing
Back Images
Memo
Erasing
Images
• Though zoom playback is not possible, playback of multi image pictures (➲ Page 86) is possible.
• Digital zoom photography is not possible.
• Photographs cannot be taken at HALF size or SMALL size. When HALF size or SMALL size is set
before you select multi photography, the setting is automatically changed to FULL size. When multi
photography is canceled, the setting returns to HALF size or SMALL size.
Handy
Functions
Other
Applications
Additional
Information
Downloaded From camera-usermanual.com
- 51 -
Taking
Zoom
Changing
Photography
Photographs
Photography
theinUsing
Focus
in [the
]Flash
Mode
(Auto
Select
mode)
Taking
Photographs
a Variety
of Modes
([
] Mode)
(continued)
Erasing
Images
Playing
Back Images
Taking
Photographs
Getting
Ready
The
macro
photography
is used
whenaccording
the distance
totimes
the
subject
is places.
between
10special
cm
(0.33
ft) (WIDE
side
Zoom
In
the
photography
default
setting,
allows
themode
flash
you photography
to
will
take
be automatically
zoom
shots
up
set
toto
to
2.8
function
the
in dark
size
or
wide-angle
No
photography
setting
isdepending
needed
to
This
mode
enables
automatic
the
photographic
conditions.
Photographs
can
be
taken
[setting)
Sports
Press
to
option
menu,
press
orof
toscreen
to
80
cmup
(2.62
ft).display
on
set
the
off ]in
distance
the
flash.
The
to
the
subject.
firing mode
You
can be
also
set
enlarge
to suit
the
thesetting
center
conditions
the
where
flash
take
is to
photographs
be used. in the
easily
this
mode
asflash
the
camera
automatically
makes
the
suitable
to theand
conditions.
[
This
camera
cannot
focus
subjects
within
10 cm
(0.33
ft)
(WIDE
side
setting)
to
80you
cm
(2.62 to
ft)
unless
in the
select
options
press
ENTER.
digital
The effective
zoom
mode
firing
with
distance
theon
focal
of
the
distance
flash
isoptions.
increased
approximately
by a0.8
factor
m
(2.62
of
2.2.
to
3.0
(9.84
ft) (WIDE
side
setting,
Auto
Select
mode
has
the
following
Choose
the
option
toft)suit
them
image
want
photograph.
Select
this
option
toand
take
photographs
of fast-moving
subjects.
macro
photography
mode.
Though
photographs
be47
taken
even
at a distance of about 80cm (2.62 ft) or more
ISO
[2X]).
For asetting:
detailed
description
each option,
refer To
tocan
page
through
Pressing
ENTERofselects
the setting.
cancel,
press
. page 51:
in the macro photography mode, it may take time for the camera to focus.
In the...
macro
photography
mode, you
the
LCD monitor
[ the ]mode
Automatically
adjusts
exposure
settings
Page portraits
49
The
camera
automatically
adjusts
the
focus
and
...off.
To take
at night
Set
dial to
[canthenot
] focus
orturn
[ and
].
exposure
settings.
] mode
Portrait dial
Page
Set[ the
to 49
[
] or [
].
.... To take continuous shots of moving subjects
Landscape
49 thecan
[ portraits
the dial
picture
Zoom
In
the
[ ]mode
] mode,
flash
photography
when].[ key.
is selected.
.... ToCompose
take
The]16
shots that you
take in this mode
Set
the
toPage
[ using
] [
]beorset
[switch
Wide
Tele are
• Pressing
the ZoomPage
switch
] Sports
50towards the “T” zooms in on the
[
saved as a single image.
... To Press
take
landscape
shots
the
flash
button
to set
to the
subject,
enlarges
the
on the
LCD desired
monitor. mode
] and
Night
Page
50 subject
[
Press
the
FOCUS
button.
Pressing
the Zoom
switch
towards
the “W”the
provides
a wider
while
viewing
the
LCDPage
monitor
status
] 16-frame
51
[ photographs
... To•When
take
ofmulti
fast-moving
subjects
you
press the
FOCUS
button,
the or
focus modes
are display.
displayed
angle
picture.
Options
When
you
pressorder
the onflash
the available flash modes are
in
the following
the button,
LCD monitor.
•displayed
position
movesthere
according
to the
Zoomthat
switch
setting.
in
the following
order.
InThe
the lens
Auto
Select
mode,
are some
settings
cannot
be changed as the camera makes the
Press
ENTER.
The
iconautomatically.
forthe
theselected
mode that
yousettings
selected
is displayed
in
settings
These
vary
according
tothe
the
mode.
The
icon
of
mode
is
displayed
on the upper
leftLCD
side of the LCD monitor.
monitor
or
the
display.
Focus
photography
The
camera
is status
ready to
take photographs.
Select this option to take photographs of people against a dusk or
be set.forced flash
[ ...... Can
] Red-eye
(“1m”
[ Nobackground.
display] Auto)*
night-time
When
or “3m” is set, the camera will focus on subjects in a
Memo
Exposure
compensation
distance
of 1m
(3.28
ft) or 3m
(9.84 ft)
to shutter
take photos.
Compose
the
picture,
press
the
button down halfway, and press it down
] Night
Additional
Information
Other
Applications
Handy
Functions
Memo
[
] Suppressed flash
[
] Forced flash
movie
mode,
the 2.2X digital zoom photography is possible.
fully.•• In
Page
41 only
...... Cannot
specified.
When
the Night
mode is selected,
the flashbe
mode
is fixed(set
to automatically)
The
camera
takes
the
picture.
Slow
Synchro
(the
flash
is fired
at[ a slower
shutter
speed.)
Press
the
FOCUS
button
repeatedly
the
appears.
About
flash photography
] isuntil
selected
in[ the [] icon
] mode.
It can not be set in the
* [No
display]
Auto can be set
when
take a photograph with a dark background or at a dark
[ • If ]you
mode.
place,
shutter on
speed
slows
down,
and
thebe
slow
shutter
................................................
Flash
can
set
as required
in this
mode.
Look
at
thetheimage
the
LCD
monitor
to
compose
the
picture.
Memo
speed warning is displayed. (When the shutter is pressed
halfway down,
the viewfinder
LED blinks
and the
• Optimum
print effect
for a selected
scene green
is available
by slow
using a
Compose
the
picture.
................................................
Automatically
fixed
to slow synchro
] is displayed
in the LCD
monitor.)
shutter
speed
mark [
printer.
PressTothe
shutter
button
halfway,
and
press
fully.
prevent
distorted
image,down
we recommend
using
a
tripod
to it down
Information,isGlossary
(page 134)
...............................Additional
Flash photography
not possible.
camera button
stable. down halfway, and press it down fully.
Presskeep
thethe
shutter
Using
the LCD Monitor Page 42 Automatically fixed to red-eye auto
..................................................
compatible
Page 40
Page 40
When
you
are using
the flash, the flash icons on the LCD monitor are displayed in yellow when the
About
burst
photography
Memo
shutter button is pressed halfway down.
• Macro photography is not canceled
evenphotography
if the cameraisisnot
turned
off or the
Auto Power
OFF function is
...... Burst
possible
in these
modes.
activated.
Downloaded From camera-usermanual.com
- 46 -
Zoom Photography (continued)
Playing
Back Images
Press the shutter button down halfway, and press it down fully. ➲ Page 40
Taking
Photographs
To set the digital zoom:
1 Press the MENU button.
or
to select [DIGITAL ZOOM] and press .
2 Use
or
to select [APPROVED] and press ENTER.
3 Use
4 Press the MENU button.
5 To activate digital zoom, press the Zoom switch completely towards the "T" and hold it until the
image on the LCD expands.
Getting
Ready
Digital Zoom Photography
Memo
• In movie mode, only the 2.2X digital zoom photography is possible.
Other
Applications
Digital zoom
Handy
Functions
Optical zoom
1X to 2.8X
Erasing
Images
• The digital zoom photography is canceled by pressing the
button to turn the LCD monitor off. On
the LCD monitor display off status, the digital zoom photography is not possible as well.
• The digital zoom photography is not possible in the 16-frame multi mode.
• The Zoom switch setting is automatically canceled by either turning the camera OFF or by activation
of the Auto Power OFF function.
• You can check the zoom status in the LCD monitor.
Additional
Information
Downloaded From camera-usermanual.com
- 53 -
Taking
Zoom
Changing
Photography
Photographs
Photography
theinUsing
Focus
in [the
]Flash
Mode
(Auto
Select
mode)
Taking
Photographs
a Variety
of Modes
([
] Mode)
(continued)
Erasing
Images
Playing
Back Images
Taking
Photographs
Getting
Ready
The
macro
photography
is used
whenaccording
the distance
totimes
the
subject
is places.
between
10special
cm
(0.33
ft) (WIDE
side
Zoom
In
the
photography
default
setting,
allows
themode
flash
you photography
to
will
take
be automatically
zoom
shots
up
set
toto
to
2.8
function
the
in dark
size
or
wide-angle
No
photography
setting
isdepending
needed
to
This
mode
enables
automatic
the
photographic
conditions.
Photographs
can
be
taken
[setting)
Sports
Press
to
option
menu,
press
orof
toscreen
to
80
cmup
(2.62
ft).display
on
set
the
off ]in
distance
the
flash.
The
to
the
subject.
firing mode
You
can be
also
set
enlarge
to suit
the
thesetting
center
conditions
the
where
flash
take
is to
photographs
be used. in the
easily
this
mode
asflash
the
camera
automatically
makes
the
suitable
to theand
conditions.
[
This
camera
cannot
focus
subjects
within
10 cm
(0.33
ft)
(WIDE
side
setting)
to
80you
cm
(2.62 to
ft)
unless
in the
select
options
press
ENTER.
digital
The effective
zoom
mode
firing
with
distance
theon
focal
of
the
distance
flash
isoptions.
increased
approximately
by a0.8
factor
m
(2.62
of
2.2.
to
3.0
(9.84
ft) (WIDE
side
setting,
Auto
Select
mode
has
the
following
Choose
the
option
toft)suit
them
image
want
photograph.
Select
this
option
toand
take
photographs
of fast-moving
subjects.
macro
photography
mode.
Though
photographs
be47
taken
even
at a distance of about 80cm (2.62 ft) or more
ISO
[2X]).
For asetting:
detailed
description
each option,
refer To
tocan
page
through
Pressing
ENTERofselects
the setting.
cancel,
press
. page 51:
in the macro photography mode, it may take time for the camera to focus.
In the...
macro
photography
mode, you
the
LCD monitor
[ the ]mode
Automatically
adjusts
exposure
settings
➲ take
Page portraits
49
☞
The
camera
automatically
adjusts
the
focus
and
...off.
To
at night
Set
dial to
[canthenot
] focus
orturn
[ and
].
exposure
settings.
] mode
Portrait ➲
Page
Set[ the
dial
to 49
[
] or [
].
.... To take continuous shots of moving subjects
Landscape
➲ Page
49 thecan
[ portraits
the dial
picture
Zoom
In
the
[ ]mode
] mode,
flash
when].[ key.
is selected.
.... ToCompose
take
The]16
shots that you take in this mode are
Set
the
tophotography
[ using
] [
]beorset
[switch
• Pressing
the Zoom
switch
] Sports
➲ Page
50towards the “T” zooms in on the
[
saved as a single image.
... To Press
take
landscape
shots
the
flash
button
to set
to the
subject,
enlarges
the
on the
LCD desired
monitor. mode
] and
Night
➲ Page
50 subject
[
Press
the
FOCUS
button.
Pressing
the Zoom
switch
towards
the “W”the
provides
a wider
while
viewing
the
LCD
monitor
status
] 16-frame
➲ Page
51
[ photographs
... To•When
take
ofmulti
fast-moving
subjects
you
press the
FOCUS
button,
the or
focus modes
are display.
displayed
angle
picture.
Options
When
you
pressorder
the onflash
the available flash modes are
in
the following
the button,
LCD monitor.
•displayed
position
movesthere
according
to the
Zoomthat
switch
setting.
in
the following
order.
InThe
the lens
Auto
Select
mode,
are some
settings
cannot
be changed as the camera makes the
Press
ENTER.
The
iconautomatically.
forthe
theselected
mode that
yousettings
selected
is displayed
in
settings
These
vary
according
tothe
the
mode.
The
icon
of
mode
is
displayed
on the upper
leftLCD
side of the LCD monitor.
monitor
or
the
display.
●
Focus
photography
The
camera
is status
ready to
take photographs.
Select this option to take photographs of people against a dusk or
...... Can be set.
night-time
When
“1m”background.
or “3m” is set, the camera will focus on subjects in a
Memo
●
Exposure
compensation
distance
of 1m
(3.28
ft) or 3m
(9.84 ft)
to shutter
take photos.
Compose
the
picture,
press
the
button down halfway, and press it down
] Night
Additional
Information
Other
Applications
Handy
Functions
Memo
In movie
mode,
the 2.2X digital zoom photography is possible.
fully.•• ➲
Page
41 only
...... Cannot
specified.
When
the Night
mode is selected,
the flashbe
mode
is fixed(set
to automatically)
The
camera
takes
the
picture.
Slow
Synchro
(the
flash
is fired
at[ a slower
shutter
speed.)
Press
the
FOCUS
button
repeatedly
the
appears.
●
About
flash photography
] isuntil
selected
in[ the [] icon
] mode.
It can not be set in the
* [No
display]
Auto can be set
when
take a photograph with a dark background or at a dark
[ • If ]you
mode.
place,
shutter on
speed
slows
down,
and
thebe
slow
shutter
................................................
Flash
can
set
as required
in this
mode.
Look
at
thetheimage
the
LCD
monitor
to
compose
the
picture.
Memo
speed warning is displayed. (When the shutter is pressed
the LCD Monitor ➲ Page 42 Automatically fixed to red-eye auto
..................................................
☞ Using
halfway down,
the viewfinder
LED blinks
and the
• Optimum
print effect
for a selected
scene green
is available
by slow
using a
compatible
Compose
the
picture.
................................................
Automatically
fixed
to slow synchro
] is displayed
in the LCD
monitor.)
shutter
speed
mark [
printer.
PressTothe
shutter
button
halfway,
and
press
fully. ➲ Page 40
distorted
image,down
we➲recommend
using
a tripod
to it down
Additional
Information,
(page 134)
☞prevent
...............................
Flash photography
isGlossary
not possible.
camera button
stable. down halfway, and press it down fully. ➲ Page 40
Presskeep
thethe
shutter
When
you
are using
the flash, the flash icons on the LCD monitor are displayed in yellow when the
●
About
burst
photography
Memo
shutter button is pressed halfway down.
• Macro photography is not canceled
evenphotography
if the cameraisisnot
turned
off or the
Auto Power
OFF function is
...... Burst
possible
in these
modes.
activated.
Downloaded From camera-usermanual.com
- 46 -
Self-timer Photography
When the self-timer is used, the camera automatically takes a picture after the preset time (2 or 10 seconds).
] [
] or [
].
When you press the self-timer button, the following are displayed in
order on the LCD monitor.
[
10s]
10 seconds
[
2s]
2 seconds
Press the shutter button down halfway, and press it down fully. ➲ Page 40
Downloaded From camera-usermanual.com
- 55 -
Additional
Information
• Burst photography is not possible.
• In movie mode, press the shutter button down fully to stop recording.
If this operation is not performed, photography is automatically stopped when the SmartMedia™ runs
out of free space or when the size of a single picture has reached the maximum recordable size.
Other
Applications
Memo
Handy
Functions
The self-timer LED lights red, and then flashes. The photograph is then taken after the preset time (2 or
10 seconds).
When photographs are taken using the LCD monitor, the count down is displayed.
To cancel photography midway, press .
Erasing
Images
Compose the picture.
Playing
Back Images
[No display] setting OFF
Taking
Photographs
Press the
self-timer button while viewing the
status display area.
Getting
Ready
Set the mode dial to [
Taking
Zoom
Changing
Photography
Photographs
Photography
theinUsing
Focus
in [the
]Flash
Mode
(Auto
Select
mode)
Taking
Photographs
a Variety
of Modes
([
] Mode)
(continued)
Erasing
Images
Playing
Back Images
Taking
Photographs
Getting
Ready
The
macro
photography
is used
whenaccording
the distance
totimes
the
subject
is places.
between
10special
cm
(0.33
ft) (WIDE
side
Zoom
In
the
photography
default
setting,
allows
themode
flash
you photography
to
will
take
be automatically
zoom
shots
up
set
toto
to
2.8
function
the
in dark
size
or
wide-angle
No
photography
setting
isdepending
needed
to
This
mode
enables
automatic
the
photographic
conditions.
Photographs
can
be
taken
[setting)
Sports
Press
to
option
menu,
press
orof
toscreen
to
80
cmup
(2.62
ft).display
on
set
the
off ]in
distance
the
flash.
The
to
the
subject.
firing mode
You
can be
also
set
enlarge
to suit
the
thesetting
center
conditions
the
where
flash
take
is to
photographs
be used. in the
easily
this
mode
asflash
the
camera
automatically
makes
the
suitable
to theand
conditions.
[
This
camera
cannot
focus
subjects
within
10 cm
(0.33
ft)
(WIDE
side
setting)
to
80you
cm
(2.62 to
ft)
unless
in the
select
options
press
ENTER.
digital
The effective
zoom
mode
firing
with
distance
theon
focal
of
the
distance
flash
isoptions.
increased
approximately
by a0.8
factor
m
(2.62
of
2.2.
to
3.0
(9.84
ft) (WIDE
side
setting,
Auto
Select
mode
has
the
following
Choose
the
option
toft)suit
them
image
want
photograph.
Select
this
option
toand
take
photographs
of fast-moving
subjects.
macro
photography
mode.
Though
photographs
be47
taken
even
at a distance of about 80cm (2.62 ft) or more
ISO
[2X]).
For asetting:
detailed
description
each option,
refer To
tocan
page
through
Pressing
ENTERofselects
the setting.
cancel,
press
. page 51:
in the macro photography mode, it may take time for the camera to focus.
In the...
macro
photography
mode, you
the
LCD monitor
[ the ]mode
Automatically
adjusts
exposure
settings
➲ take
Page portraits
49
☞
The
camera
automatically
adjusts
the
focus
and
...off.
To
at night
Set
dial to
[canthenot
] focus
orturn
[ and
].
exposure
settings.
] mode
Portrait ➲
Page
Set[ the
dial
to 49
[
] or [
].
.... To take continuous shots of moving subjects
Landscape
➲ Page
49 thecan
[ portraits
the dial
picture
Zoom
In
the
[ ]mode
] mode,
flash
when].[ key.
is selected.
.... ToCompose
take
The]16
shots that you
take in this mode
Set
the
tophotography
[ using
] [
]beorset
[switch
Wide
Tele are
• Pressing
the Zoom
switch
] Sports
➲ Page
50towards the “T” zooms in on the
[
saved as a single image.
... To Press
take
landscape
shots
the
flash
button
to set
to the
subject,
enlarges
the
on the
LCD desired
monitor. mode
] and
Night
➲ Page
50 subject
[
Press
the
FOCUS
button.
Pressing
the Zoom
switch
towards
the “W”the
provides
a wider
while
viewing
the
LCD
monitor
status
] 16-frame
➲ Page
51
[ photographs
... To•When
take
ofmulti
fast-moving
subjects
you
press the
FOCUS
button,
the or
focus modes
are display.
displayed
angle
picture.
Options
When
you
pressorder
the onflash
the available flash modes are
in
the following
the button,
LCD monitor.
•displayed
position
movesthere
according
to the
Zoomthat
switch
setting.
in
the following
order.
InThe
the lens
Auto
Select
mode,
are some
settings
cannot
be changed as the camera makes the
Press
ENTER.
The
iconautomatically.
forthe
theselected
mode that
yousettings
selected
is displayed
in
settings
These
vary
according
tothe
the
mode.
The
icon
of
mode
is
displayed
on the upper
leftLCD
side of the LCD monitor.
monitor
or
the
display.
●
Focus
photography
The
camera
is status
ready to
take photographs.
Select this option to take photographs of people against a dusk or
be set.forced flash
[ ...... Can
] Red-eye
(“1m”
[ Nobackground.
display] Auto)*
night-time
When
or “3m” is set, the camera will focus on subjects in a
●
Exposure
compensation
distance
of 1m
(3.28
ft) or 3m
(9.84 ft)
to shutter
take photos.
Compose
the
picture,
press
the
button down halfway, and press it down
] Night
Additional
Information
Other
Applications
Handy
Functions
[
] Suppressed flash
[
] Forced flash
In movie
mode,
the 2.2X digital zoom photography is possible.
fully.•• ➲
Page
41 only
...... Cannot
specified.
When
the Night
mode is selected,
the flashbe
mode
is fixed(set
to automatically)
The
camera
takes
the
picture.
Slow
Synchro
(the
flash
is fired
at[ a slower
shutter
speed.)
Press
the
FOCUS
button
repeatedly
the
appears.
●
About
flash photography
] isuntil
selected
in[ the [] icon
] mode.
It can not be set in the
* [No
display]
Auto can be set
when
take a photograph with a dark background or at a dark
[ • If ]you
mode.
shutter on
speed
slows
down,
and
thebe
slow
shutter
................................................
Flash
can
set
as required
in this
mode.
Look place,
at
thetheimage
the
LCD
monitor
to
compose
the
picture.
speed warning is displayed. (When the shutter is pressed
the LCD Monitor ➲ Page 42 Automatically fixed to red-eye auto
..................................................
☞ Using
halfway down,
the viewfinder
LED blinks
and the
• Optimum
print effect
for a selected
scene green
is available
by slow
using a
compatible
Compose
the
picture.
................................................
Automatically
fixed
to slow synchro
] is displayed
in the LCD
monitor.)
shutter
speed
mark [
printer.
PressTothe
shutter
button
halfway,
and
press
fully. ➲ Page 40
distorted
image,down
we➲recommend
using
a tripod
to it down
Additional
Information,
(page 134)
☞prevent
...............................
Flash photography
isGlossary
not possible.
camera button
stable. down halfway, and press it down fully. ➲ Page 40
Presskeep
thethe
shutter
When
you
are using
the flash, the flash icons on the LCD monitor are displayed in yellow when the
●
About
burst
photography
shutter button is pressed halfway down.
• Macro photography is not canceled
evenphotography
if the cameraisisnot
turned
off or the
Auto Power
OFF function is
...... Burst
possible
in these
modes.
activated.
Downloaded From camera-usermanual.com
- 46 -
Photography Using the Flash (continued)
In this mode, the flash fires automatically according to the photography conditions. This mode is ideal for
general photography where you are not trying to achieve any particular effect.
] Red-Eye Forced Flash
Use this mode to avoid the red-eye effect (➲ Additional Information, Glossary) when photographing people in
low-light conditions.
Red-eye is reduced more effectively if the subject looks directly towards the camera. Effectiveness is also
increased if the distance between the subject and camera is kept as short as possible.
] Forced Flash
In this mode, the flash always fires. Use the Forced Flash mode when the subject is backlit, or in artificial light
(fluorescent lighting, etc.).
The flash also fires during macro photography.
] Suppressed Flash
Use the Suppressed Flash mode when you are taking pictures in indoor lighting at distances too great for the
flash to have any effect, such as theater performances or indoor sporting events.
In [
], [
] or [
] mode, flash photography is not possible.
In [
] mode, flash photography is fixed to red-eye auto.
] mode, flash photography is fixed to slow synchro.
In [
In the flash photography mode, the flash always fires twice. A picture is taken at the second firing.
Other
Applications
•
•
•
•
Handy
Functions
Memo
Erasing
Images
[
Playing
Back Images
[
Taking
Photographs
[
Getting
Ready
[ No display ] Auto
Additional
Information
Downloaded From camera-usermanual.com
- 57 -
Changing
the
Preset
Conditions
(RECORDING
MENU)
Photography
in
the
Program
Mode
Setting
Names
Playing
Back
the
of
Photographed
Parts
Image
Size
and
Quality
(Single-Frame
Playback)
Extended
Exposure
Photography
(Bulb
Photography)
Erasing
Images
(Erase
Frame)
(continued)
Manual
Attaching
Using
How
Taking
Enlarging
Playback
About
Turning
to
Photographs
the
SmartMedia™
Press
Settings
the
Photographed
of
Power
the
Power
Multi
Shoulder
Continuously
Outlet
Shutter
Image
On/Off
Images
Strap
Pictures
Button
(Zoom
(Burst
Playback)
Photography)
Taking
Erasing
Button
Photographs
Folders
and
(All
LCD
Images
Continuously
Monitor
in
aImages
Folder/All
(Burst
Display
Photography)
Folders)
(In
Playback
(continued)
(continued)
Mode)
Definitions
Separately
of
the
Accessories
Color
of
the
Viewfinder
LED
Taking
and
Playing
Back
Photographs
on
aMode
TV
(continued)
Changing
the
Preset
Conditions
(RECORDING
MENU)
(continued)
Exposure
Compensation
in
the
Shutter
(continued)
Speed-priority
(continued)
About
Basic
Settings
SmartMedia™
in
(Sold
the
mode)
Aperture-priority
(continued)
Mode
(continued)
LCD
Monitor
Display
(during
photography)
(continued)
Manual
Settings
(continued)
Playing
Photography
Installing
Back
Movies
batteries
(Auto
Photography)
(continued)
(continued)
(continued)
Names
of
Parts
(continued)
Getting
Ready
The shutter
camerabutton
automatically
adjusts the
shutter
and
the aperture
value
according
to the
brightness
of an
can be pressed
down
in twospeed
stages:
halfway
down and
fully
down. When
pressed
halfway
down,
This
“SmartMedia™”
Set
Play
Automatically
The
the
following
mode
shoulder
menu
back
size
photographed
is(number
used
for
items
strap
plays
setting
isadapter
for
athe
is
are
back
storage
of
taking
handy
also
the
pixels)
still
the
basic
available
subjects
for
medium
images
16
and
carrying
images
settings
quality
one
for
that
as
saving
separately
your
image
to
require
(compression
be
camera
used
images
atseveral
a
sold
for
around.
inthat
photography
items.
ratio)
seconds
the
you
multi
of
have
the
photography
to image
photograph
in
photographed.
to
[ second
be
mode
],photographed.
such
[be
Even
in
asquick
]for
firework
or
if Europe,
the
[You
succession.
camera’s
displays
] photography
power
at the
Enlarges
selected
portions
of
images
being
played
back
at
two
levels.
Images
can
displayed
enlarged
when
In
You
this
can
color
mode,
manually
of
the
photographs
viewfinder
adjust
settings
are
LED
taken
indicates
such
continuously
asphotographed
the
exposure
state
atof
control,
atime.
the
maximum
camera.
white
speed
balance,
The
ofthe
0.8
metering
system,
intervals.
continuous
This
item
switches
display
on
the
LCD
monitor
when
playing
back
photographed
images.
can
switch
If
you
the
AC
(sold
separately:
PDR-ACM1A
for
the
US/Canada,
PDR-ACM1E
PDR-ACM1U
Mode
Effective
dial
Subjects
and
Set
Values
TM
Press
.of
aperture
value.
SYSTEM
Turning
Exposure
ISO
OSD
In
[prevent
[use
LANGUAGE
the
]the
INFO.
mode
control
(EXP.)
On
Close
the
SmartMedia™
cover.
Slide
the
SmartMedia
cover
release
knob
in
the
Take
photographs
or
or
battery
to
to
select
or
play
[that
the
slide
]them
or
shutter
it
[ the
back.
,]will
and
speed.
and
lock
press
Look
Use
through
to
select
the
[adjust
viewfinder
]use
and
press
to
compose
ENTER.
the
picture.
To
continue
erasing
images,
repeat
the
above
procedure
2.
.is
AF
(auto-focus)
and
AE
(auto
exposure)
are
set.
When
pressed
fully
down,
the
camera
takes
aspace
picture.
object.
This
mode
enables
carefree
photographing
similarly
to
selecting
[stable
]photographs.
in
[ from
]settings”,
mode.
Itrepeatedly
is
to
night.
To
is
Change
modes.
turned
When
the
OFF,
your
setting
using
the
camera
images
this
according
mode,
from
saved
dropping
be
to
sure
how
on
the
the
to
during
SmartMedia™
image
a(size,
photography,
tripod
is
to
to
be
keep
used
not
hang
the
and
be
camera
erased.
the
the
shoulder
remaining
SmartMedia™
strap
and
amount
prevent
around
can
ofstep
your
distortion
be
neck.
inpossible
the
of
images.
Relationship
between
your
camera
and
accessories
Connecting
tocalled
Other
Devices
(page
123)
being
played
back
one
image
at
acover,
time.
The
meaning
maximum
of
number
LED
color
of
photographs
differ
according
can
to
be
taken
mode
continuously
dial
setting.
three
photography
mode,
and
take
photographs
at
these
settings.
These
are
“Manual
which
are
saved
display
to
show
aPower
list
detailed
information
compression
ratio,
shutter
speed,
aperture,
etc.)
or
you
can
for
the
UK)
in
a
room
with
amay
power
outlet,
you
can
take
photographs
for
an
extended
period
of
time.
This
also
Mode
dial
1 Item
QUALITY
2 Options
Notes
SmartMedia™
VIDEOon
OUT
White Balance (W.B.)
Write
Protection
Removing
the Batteries
ISO
[ POWER
]
AUTO
OFF
Setting items
Turning
the
Power
Off
Using
the
LCD
Monitor
Additional
Information
Other
Applications
Handy
Functions
Erasing
Images
Playing
Back Images
Taking
Photographs
Tab menu
The
tab
is
displayed.
setting
isbattery
as
follows:
Make
sure
that
the
issystem
firmly
closed.
Details
image
ofmenu
operation
isrange
saved
are
or
erased,
the
same
and
as
the
taking
camera
photographs
is
then
ready
and
to
playing
take
photographs.
them
back
onon
the
LCD After
monitor.
If
you
use
the
viewfinder
to
take
photographs,
the
photography
Set
the
mode
to
[cover
].settings
direction
of
the
arrow
to
open
cover
.the
ENTER.
change
the
white
and
the
metering
in(the
program
mode.
erased
SmartMedia™.
and
reused.
For
details
on
these
accessories,
refer
to
the
Instruction
Manual
for
the
accessory
you
are
using.
(information
Movies
images
photographed
in
the
multi
mode
Page
cannot
be
displayed
using
the
zoom
playback
Images
even
if the
are
camera
not
recorded
is
turned
directly
off.
SmartMedia™
but
are
stored
within
the
buffer
memory.
display
histograms,
etc.
prevents
failed
photographs
due
to
battery
wear
or
failed
of
data
to
a
PC.
details
handling
the AC
Set
Sets
the
thebalance
whether
color
:(/or
Photography
mode
language
not
to
and
return
photographic
of
in
menus
the
program
displayed
sensitivity
in
the
(default)
on
SETUP
the
at51)
which
LCD
(temporarily
MENU
Page
monitor.
to
image
62)
the
original
is For
to
be
factory
recorded.
settings.
For
enlarged
view
P.dial
22)
feeds
the
image
•transfer
Each
press
of
2
•How
Copying
of
printed
(black
on
white
paper)
set
the
time
(text
114)
F8
/display
F6.8
F5.6
/18.
F4.8
/Page
/and
F3.4
/mode
F2.9
to
take
photographs
Page
41
1/1000,
1/750,
1/500,
1/350,
1/250,
1/180,
1/125,
range
may
differ
from
the
actual
image.
InLCD
this
case,
use
the
LCD
Press
the
shutter
button
down
halfway
.1/90,
the
mode
dial
to
[ F4.0
],
[characters
]reset.
or
[selected
].higher
1one
SmartMedia™
having
the
following
storage
capacity
can
be
used
on
your
current
as
of
March
2000)
feature.
The
last
cover
recorded
image
opens
frame
image
appears
appears
on
the
on
the
LCD
monitor.
monitor.
photography
is
finished,
check
the
images
record
the
ones
tocamera.
SmartMedia™.
[TIME&DATE,
]
:
Erases
images
in
the
currently
selected
folder
and
folders.
Possible
number
of31)
shots
adapter,
beSet
sure
to
read
page
•
2x-speed
playback
isaperture-priority
performed
for
Make
sure
that
the
SmartMedia™
is
correctly
loaded.
(
Page
by
frame.
Warning:
Noise
:
OSD
Photography
increases
LANGUAGE
when
in
will
the
not
ISO
be
is
changed
mode
to
(
Page
settings.
63)
Memo
•
Backlit
portraits
IMPORTANT
[PROTECTED]
on
the
LCD
monitor,
cancel
the protection
( Page 108) or
remove
How
to
play
back
images
Page
80
1/60,
1/45,
1/30,
1/20,
1/10,
1/8,
1/6,
1/4,
1/3,
1/2,
monitor
for
photography.
AF
(auto-focus)
and
AE
(auto
exposure)
(the
Additional
Information,
SET-UP
(the
P.
:109)
English
(default)
Pass
Set
out
mode
end
steps
of
dial
1the
to
to
shoulder
4[1/15,
either
]].LCD
or
inspeed-priority
[strap
“Photography
through
].
the
in
the
strap
Shutter
speed-priority
Mode”
isdisplayed
held
down.
the
duration
that
PC
mode
(mode
P.
121)
2MBCarry
Set
/4MB/8MB/16MB/32MB/64MB/128MB
the
mode
dial
to
[isin
(all
3.3
types)
To
]•the
adjust
: When
Erases
the
all
brightness
folders
recorded
of
the
on
monitor
SmartMedia™.
Page
115
[mode
Self-timer
button
1
•V
1-frame
feed
is continued
for the
The
aperture
value
and
the
shutter
speed
corresponding
to
:write-protection
Photography
shutter
( that
Page
65)
Zoom
state
•button
bright
scenes
(such
and
highly
reflective
subjects
Photography
mode
•the
You
can
also
carry
out
step
8snowfields)
while
verifying
the
image
step
7.
DPOF
(in
Page
102).
Glossary)
start
to
function.
0”7,
1”,
1”5,
2”,
3”,
4”,
6”,
8”,
10”,
15”
•Very
Do
not
remove
or monitor
load
the
batteries
or
disconnect
or
connect
the
AC
adapter
while
the camera
is mode.
on.1This
:POWER
Japanese
:LCD
Equivalent
toas
color
ISO100
Carry
Set
Use
out
or
mode
steps
to
dial
select
1
to
to
2[erased,
the
“Manual
].
images
photographed
Settings”
(page
in
58).
the
multi
photography
You POWER
can also
the
PC
card
adapter
and
floppy
disk
adapter
( in
123)
sold
separately
to transfer
Changing
the
display
Page
116
Theconnect
images
or
folders
are
and
the
camera
returns
toPage
the
is
held
down.
duration
that
value
are
displayed
on
the
LCD
monitor.
If
the
appropriate
(page
attachment
65)
or
on
in
“Photography
the
camera.
in
the
Full
Manual
Mode”
(page
67).
Press
the
button
to
turn
the
power
on.
full
manual
mode
(
Page
67)
:
Photography
in
Image
Quality
button
Press
the
MENU
button.
• •Shots
made
up
predominantly
of
sky
Even
if
photography
is
terminated
midway
before
capturing
three
images
by
releasing
the
shutter
•
If
you
take
a
photograph
after
erasing
an
image,
a
number
continuing
from
the
last
photographed
When
AF
or
AE
are
locked,
the
beep
tone
(
Page
111)
sounds
and
the
Use
or
to
change
the
setting
in
the
tab
menu,
might
return
the
manual
settings
to
their
defaults.
If
this
happens,
manually
set
conditions
again.
:connect
High-sensitive
equivalent
to preset
color
(default)
Before
you
oreven
disconnect
the
AC
adapter,
be
sure
to turn
thedisplay
camera
OFF.
If the
AC adapter is
Press
the
image
quality
button
to
select
the
combination
cannot
be
set
ifphotography
the
shutter
speed
isas
adjusted
toISO200
images to a
PC.
16MB
(SM-M1600D)/32MB
(SM-M3200D)/64MB
(SM-M6400D)/128M
(SM-M1280D)
The
respective
last
image
mode.
frame
appears
on
LCD
monitor.
You
can
also
select
the
image
by
the
same
operation
for
thumbnail
Page
83).
Carry
out
steps
1
to
on
page
109.
When
the
camera
is
turned
on,
set
the
mode
dial
to
the
desired
The
shutter
speed
and
the
aperture
value
corresponding
todisplay
the
All
descriptions
inor
this
Instruction
Manual
are
for
when
the
language
is (2set
to [ENGLISH].
Press
or
to
select
the
image.
button,
images
already
photographed
can
be
saved
and
erased
by playback
the
method.
image
is
assigned
as
image
number.
ShutterThe
button
viewfinder
RECORDING
LED
turns
MENU
green.
is2
displayed.
•press
The
image
the
photograph
is
taken
is
slightly
less
clear
than
images.
(This
is 109,
connected
disconnected
with
the
power
ON,
camera
settings
may
beabove
reset
(SET-UP
Page
and
ENTER.
:before
High-sensitive
photography
equivalent
to
color
ISO400
its
the
shutter
speed
isthe
displayed
inthe
red.
To limit,
cancel
erasing
of
image
data,
select
[monitor.
]Photography,
and
press
ENTER.
Flash
button
quality
and
size,
while
viewing
indication
on
the
starts
a
reverse
•
The
press
of
mode.
shutter
speed
are
displayed
on
the
LCD
If
the
appropriate
The
length
of
time
to
capture
images
varies
according
to
the
photographic
conditions.
•
Images
can
also
be
erased
in
the
thumbnail
mode.
In
this
case,
the
camera
enters
the
single
frame
Select
[SYSTEM
INFO.]
on
the
SETUP
MENU
and
because
television
displays
images
at
a
lower
resolution.)
•
Spotlit
subjects,
particularly
against
dark
backgrounds
Manual
Settings
Page
58)
or
the
camera
may
malfunction.
however,
is
possible
in
this
state.
feeds
the
image
•
Each
press
of
EXP.
].
To
cancel
changing
of
settings,
press
.
Use
or
to
select
the
frame
you
want
to
enlarge.
Press
the
or
Zoom
to
switch
select
[
(
S/C
Page
].
21)
towards
“T”
to
begin
playback.
] mode:
is
selected,
[NO
IMAGE]
isaperture
displayed
after
allor
folders
When
playback.
Press
Set
mode
dial
inbe
the
to
[ sure
Tv
mode,
].the
or
press
in
the
shutter
button
fully
Before
photography,
make
that
the
lens
cap
has
been
2onisin.black
combination
cannot
set
even
ifflash
adjusted
to its
playback)
mode,
and
enters
the
thumbnail
playback
mode after the image is erased.
status
display.
]or
In
[[playback
Press
the
display/info
button.
Self-timer
photography
and]down
photography
are
not
possible.
•the
The
display
unit
varies
according
to
the
output
system.
•theCopying
of (frame
printed
text
(white
characters
paper)
.
press
reverse
by
one
frame.
This
adapter
allows
SmartMedia™
to
bespeed
asto
3.5"
floppy
disk.
have
been
erased
(unless
the
SmartMedia™
contains
protected
You
can
also
select
the
image
by
thein
same
operation
as
for
thumbnail
playback
( display
PageISO
83).will23)
Automatic
playback
begins.
•[2X],
Playback
becomes
2x-speed
to
reduce
aperture
size.
Press
toused
increase
aperture
size.
Press
camera
takes
a
picture.
The
manual
setting
removed
the
camera.
limit,
aperture
value
isbe
displayed
red.
Photography,
however,
Playback
mode
( Status
P.
80)
the
[Scenes
M
]from
mode
to
set
the
shutter
0.7
second
Manual
During
the
ISO
will
automatically
set
between
ISO100
ISO200.
During
[4X],
be
To
set
the
quality
and
size
Page
112
•the
With
the
NTSC
system,
images
can
be
displayed
simultaneously
on the
LCD
monitor
and( TVP.
during
•photograpy
with
low
reflectivity,
such
as
shots
green
or
dark
foliage
Flash
state
Each
press
of
the
display/info
button
switches
the
display
•of1-frame
feed
isand
continued
The
SYSTEM
INFO.
menu
displayed.
reverse
for
the
duration
This
adapter
isplayback
inserted
into
the],
floppy
your
PC,
allowing for the
images).
The
viewfinder
LED
turns
redis
image
data
being
recorded
onto
Insert
the
adapter
connector
plug
into
the
DC
IN
Self-timer
lamp
values
are
displayed
In
the
photography
modes
([while
[and ISO400.
]disk
oris
[ drive
]),on
the
lens
photography
and
playback.
is
possible
inAC
this
state.
automatically
set
between
ISO100
is
held
down.
format
as
follows:
duration
that
Note:
The
larger
the
F
value,
the
smaller
the
aperture
size
become
or
longer.
•Press
Remove
and
insert
SmartMedia™
with
the
camera’s
power
turned
off.Aperture value
is
held
down.
that
To
quit
the
SETUP
MENU,
change
the
mode
dial
setting.
Shutter
speed
Adjust
the
zoom
ratio
by
the
Zoom
switch.
(Zoom
to
display
option
menu,
press
or
to
images
recorded
on
the
SmartMedia™
to
be
transferred
to
the
PC.
the
SmartMedia™.
Sets
video
output
system
according
to
country
in
which
your camera
isSize
used.
on
the
left
ofthe
the
LCD
Press
the
shutter
button
down
halfway
and
press
5V
terminal
on
the
camera.
extends
from
the
camera
body.
•the
PAL
system,
images
cannot
bethe
displayed
When a cable
is connected, only
and
versa.
1 situations
the
image
quality
button
switches
the
quality
and
size
Gently
insert
the
SmartMedia™
as
far
as
it, simultaneously.
can
go
[Pressing
]vice
isWith
displayed
on
the
LCD
monitor.
•select
Recorded
data
may
bepress
erased
(destroyed)
in
the
listed
below.Viewfinder
Note that Toshiba
White
Balance
Additional
Information,
Glossary
to
increase
shutter
speed.
Pressand
to
decrease
shutter
speed.
Press
Press
or
to
move
forward
reverse.
Memo
PRG
]
and
ENTER.
]
and
press
ENTER.
[
switch
Page
21)
TV
display
is
available.
monitor
screen.
When
the
camera
is
turned
on,
the
Auto
Power
OFF
function
settings
infully
the
following
order.
it
down
. system
2next
Press
or
to
select
the
item
you
desired
toisloss
set,
with
SmartMedia™
electrodes
(metal
contacts)
Additional
Information,
Glossary)
(white
Corporation
accepts
no
whatsoever
for
the
of
recorded
data enters
in these
• the
When
allNTSC
images
in
a responsibility
folder
are
erased,
that
folder
itself
also(destruction)
erased.
Quality
The
camera
determines
the
balance
by
averaging
the
various
kinds playback
of light
that actually
to
to
frame/
to“T”
go
back
one
To
prevent
valuable
data
being
erased,
attach
the
write••advance
With
the
PAL
images
are
played
back
with
apressing
black
frame
•frame
After
pause
is
cancelled,
the
Zoom
switch
to
the
will
the
image.
Pressing
ENTER
the
setting.
or
,, SmartMedia™
and
manual
Exposure
compensation
Page
69)
using
When
[for
M
]selects
isissystem,
selected
on
the
[ halfway
EXP.
]remove
option
menu,
orsurrounded.
the
shutter
speed
setting
becomes
operational.
Never
open
the
SmartMedia™
cover
orenlarge
the
while
anmakes
is
being
recorded.
This
or
and
manual
setting
(image
Page
58)
or
film
speed
Exposure
compensation
((from
Page
69)
using
Reverse the
procedure
“Loading
the
Batteries”
and
remove
the
batteries.
•facing
Pressing
the
shutter
button
down
adjusts
the
exposure,
• Playback
paused.
PAL
system
( camera.
Additional
Information,
Glossary)
situations:
Built-in
microphone
the
lens.
This
setting
allows
you
to
set
in
advance
the
white
balance
when
taking
photographs
under
and
press
ENTER.
the
rear
of
the
For
the
US/Canada:
PDR-ACM1A
Holding
down
or
moves
forward
or
reverse
continuously.
resumes
at
the
last
state
that
was
protect
sticker
at
the
write-protect
area.
Data
can
no
longer
be
Focus
area
may
corrupt
the
data
on
the
SmartMedia™
or
damage
the
SmartMedia™
itself.
possible,
but
does
not
make
the
exposure
compensation
possible. HoweverSelf-timer
the exposure
value
is
To
return
normal
press
the
Zoom
switch
towards
setting
Page
58)magnification,
or film
speed
setting
( the
Page
78)
using
ENTER
Pass
the
shoulder
strap
through
loop
and
pull.
photography
setting
(( toPage
78)
using
ENTER
are
also
possible.
and
pressing
the
shutter
button
fully
takes
the
shot.
TM[ is down
When
the
SmartMedia™
used
incorrectly
by
the
user
or
a
third
party
[
],
]
or
[
]
AE
or
AF
are
locked
with
the
shutter
button
held
half
specific
lighting
conditions.
For
Europe:
PDR-ACM1E
active
before
the
pause.
Firmly
insert
the
SmartMedia
as
far
as
it
can
go.
displayed
on is
the
LCD
monitor.
Press
ENTER.
recorded
or setting
erased
from
SmartMedia™.
Toon
write
oraterase
data
from is to be recorded. Write-protect
Sets
the
color
mode
and
photographic
sensitivity
which
the
image
“W”.
are
also
possible.
The
default
different
depending
the
destination
country/area.
Use
or
to
select
the
desired
item
Press
ENTER,
nine
images
are
displayed
simultaneously.
•Flash
If
you
shoot
a
still
picture,
when
preview
is
set
to
ON
(
Page
77),
1
down.
If
no
operation
is
carried
out
for
a
fixed
amount
of
time
(default:
about
one
minute),
power
ON
When
the
SmartMedia™
is
exposed
to
static
electricity
or
electrical
noise
Auto
Photography
mode
(
P.
41,
46)
Forimage
the Noise
UK:
PDR-ACM1U
:off
Displays
the
firmware
version
ofto
this
camera.
areait down
SmartMedia™,
peel
the
sticker.
camera
ready
to
take
photographs.
Warning:
increases
when
the
ISO
is
changed
higher
settings.
isis
displayed
and
a
white
frame
and
green
Green The
Compose
picture,
press
the
shutter
button
down
halfway,
and
press
:the
Automatic
adjustment
(default)
Display
Page
83
theThumbnail
recorded
image
is
displayed
on
for
about
two
]specifications
Standby
mode
[enlarged,
••-For
If
no
operation
is
carried
out
a screen
fixed
amount
offrom
time
(default:
about
1shutter
minute),
thewear.
power
iserasing
turned
TM
consumption
is
set
to
its
minimum
state
(power
almost
off)that
to
prevent
battery
This
isdown
.in
and
press
When
the
SmartMedia™
isfor
removed
ordarkens
the
camera
isPage
turned
off
while
recording
The
image
the
LCD
monitor
sometimes
the
time
the
button
isdata,
pressed
Speaker
details,
refer
to
the
of
AC
information.
adapter
127.
: on
Displays
the
SmartMedia
Playback
returns
to
the
start
ofturned
the
movie.
frame
are
displayed
the
LCD
monitor.
:
Photography
outdoors
Default
setting:
seconds.
off
to
preserve
battery
life.
This
is
called
“Auto
Power
OFF”.
To
return
to
the
normal
state,
press the
fully.
Page
40
called
the
Auto
Power
OFF.
This
setting
allows
you
to
set
the
time
when
the
camera
turns
off
halfway
until
the
image
becomes
focused.
: picture,
Equivalent
to
color
ISO100
(default)
data,
frame
advance
when
images
aredefaults.
being
played
back or during
formatting
of the
DC
IN
5V
terminal
The options
are
displayed.
Histogram*
2
:
Returns
settings
to
their
Flashing
[
],
[
]
or
[
]
Self-timer
in
operation
at
a
handshake
alarm
.
Compose
the
press
the
shutter
button
down
halfway,
and
press
itdirectly
down
The
white
frame
indicates
the
entire
image,
while
the
greenrecorded
frame halfway,
:the
Photography
in
cloudy
conditions
POWER
button
again.
• The
viewfinder
LED
turns
red
while
image
data
is
being
Compose
picture,
press
the
shutter
button
press
down
• The
To
set
the
focus
or
exposure
for
a subject
outside
the
center
the intended
point
the
The
camera
takes
the
picture.
automatically.
This
function
is
not
activated
during
automatic
playback
( image,
Pageand
85) or
incamera
the it
[ only>
] PC
:appearing
High-sensitive
photography
equivalent
toofdown
color
ISO200
SmartMedia™.
Note:
image
through
the
lens
will
be
The
display
returns
to<Histogram>
thumbnail
playback.
<Standard>
<Detailed
information>
<Image
shows
the
location
of
the
currently
enlarged
area.
halfway,
and
press
it
down
fully.
Page
40
Macro
photography
:
Photography
in
bluish
fluorescent
light
fully.
Page
40
About
the
Auto
Power
(FULL
OFF
Function
)
Additional
Information,
“AUTO
POWER
OFF
(page
110)”
at
the
subject
or
desired
exposure
(lighting),
press
and
hold
the
shutter
button
halfway.
Now,
with
the
shutter
onto
the
SmartMedia™.
ON]
Writing
to SmartMedia™
in progress
mode.
Press
ENTER.
:adapter
High-sensitive
photography
equivalent
toanother
color
ISO400
•Insert
Wedefault
recommend
copying
and
saving
important
datapower
onto
storage
medium (floppy
disk, hard
displayed
for
[LCD
].[Power
fully.
Page
40
the
AC
power
plug
into
the
Electrodes
The
size
and
quality
of
the
image
can
be
reset
to
the
desired
combination.
Press
ENTER.
Memo
Sticker
button
still
held
halfway
down,
you
can
turn
the
direction
of
the
camera
and
frame
your
image
with
the
focus
•
It
is
possible
to
play
back
any
images
in
any
folders
by
pressing
or
during
playback.
(For
details
ON
: Photography
inafter
reddish
fluorescent
light
The
camera
takes
the
picture.
Photographs
can
be
taken,
however,
do not
turn thepress
power
OFF.
Tobattery
return
topower
the
normal
state
theset
Auto
Power
OFF
has been
executed,
the
POWER
button
disk,
MO
disk,
etc.).
The
PREVIEW
manual
setting
Page
items
77
are
displayed.
Remaining
camera
takes
the
atmonitor.
the
exposure
time.
Current
Entireofimage
and
exposure
locked.
Press
the
button
down
fully
to in
complete
capturing
the image.
Red outlet.
[In the
on picture
the
LCD
The
camera
is ready
for
burst
photography.
of displayed
folder
Page
92)
]:the
mode:
Accessing
of
SmartMedia™
[ (HALF
Photography
in] is
incandescent
light
•] [is
When
shutter
speed
setshutter
to
a)turn
speed
of
0.7 second
orprogress
slower,
photographs
taken
as extended
PC/AV
terminal
to Never
turn
the
power
on 77
again.
•During
remove
the
SmartMedia™
or
the
camera
offresult
while
recording
data or are
while
erasing
data
COLOR
Page
the
exposure,
the
viewfinder
LED
turns
orange.
position
•
Moving
the
camera
as
you
press
the
shutter
button
will
in
a
blurred
image.
Use
,
,
or
to
select
the
area
to
enlarge.
the
last
image
displays
the
first
image,
and
pressing
atwill
thebe
firstautomatically
image
displays
the
Pressing
During
[2X],
the
ISO
be
automatically
set
to
ISO200.
[4X],ofISO
setof
exposures
( at Page
68).
IfCarry
burst
photography
is to
set
the
shutter
speed
is set During
to athe
speed
0.7
second
or more
in the
[ to
Tv ]
out
steps
1will
2when
in
Photographic
(SmartMedia™
formatting).
actions
might
damage
ISO
Page
78
Flashing
ItClose
takes
about
twice
the
time
to while
complete
taking
the
photograph
duePDR-M81
to processing
ofenlargement
the
captured
[set
],These
[“Basic
] When
the
image
is not
in SmartMedia™.
focus.
the
SmartMedia™
cover.
Memo
•
The
PDR-M81
usesto
an
accurate
auto
focus
mechanism.
However,
the
may
have
difficulty
last
image.
Adjust
the
display
area
enlarge
viewing
the
white
and
Slow
shutter
speed
warning
ISO400.
Shutter
speed
• In
AEB
photography
(
Page
71)
or
burst
photography,
the
shutter
speed
cannot
be
set
to
0.7
second
or
longer.
(SMALL
)
mode,
the
shutter
speed
is
automatically
changed
to
1/2
second.
Lens
•
Use
only
the
SmartMedia™
specified
for
use
with
the
PDR-M81.
The
use
of
other
SmartMedia™
SHARPNESS
Page
79
mode)”
(page
109).
Select
[QUALITY]
Settings
(
focusing
or
not
be
able
to
focus
at
all
for
subjects
and
situations
such
as
the
following:
image.
Before
you
use
aother
new
SmartMedia™
the
first during
time,
be
sure
tothe
Manual
Photography
mode
( P.isspeed
58)
Images
can
bevalue
rotated
by] pressing
playback.
Movie mode
(•• frames.
P.
75)
[ for
] or
green
the
aperture
is
to
F2.9
(maximum
aperture
size),
increased
shutter
speed
restricted
If
a
mode
than
[ set
suppressed
flash
mode
is
set
inthe
flash
photography,
thedark
shutter
is
•compensation
Processing
image
Aperture
Exposure
- When
subject
is distant and
- SmartMedia™
Subjects
moving
at
high
speed
damage
the
camera.
CONTRAST
Page
79
• to
The
write
protection
not
function
if in
write-protect
sticker
becomes
Use
a soft
dry cloth to
.thesecond.
oncould
the
SETUP
MENU
and
press
format
the
(may
Page
91).
an
image
counterclockwise,
and
pressing
rotates
clockwise.
Pressing
1/750
PDR-ACM1A
] •are
the
same
as
to
PDR-ACM1E
PDR-ACM1U
[PRG]
and
[ rotates
limited
tosecond.
between
1/2
second
and
1/250
* The
aboveitdirty.
menu
is
the
RECORDING
Charging
of
flash
progress
ON
When
there
are
objects
in
front
of
or
behind
the
subject
Very
shiny
subjects
such
as
a
mirror
or
car
body
SmartMedia™
is
aofisprecision
device.
Do do
notnot
bend,
drop,
or subject
SmartMedia™
to
DIGITAL
ZOOM
Page
• wipe
When
the
camera
isOnce
not79
inelectronic
be sure
to attach
the
lens
cap
provided
with[your
camera.
the
POWER
button
to
turn
the
power
off.
away
any
dirt.
ause,
sticker
ispress
peeled
off,
reuse
it.
Orange•Press
The
QUALITY
menu
displayed.
combinations
the
automatically
mode.
MENU
inthe
•the
The
aperture
value
set
differ
to
the
actual
value
according
to
the
position
ofUK)
theorzoom
lens.
To
return
to
the
regular
display,
ENTER.
(Photos
cannot
be
taken
at
this
moment.)
(for
US
and
Canada)
If the
shutter
speed
is
set
to
1/350
second
or
less,
the
shutter
as
speed
an
animal
is
automatically
athe
cage
a]changed
person
in front
to 1/250
of a tree)
(for
European
Continent)
(for
Get
ready
to
take
the
photograph.
- above
Extremely
low
contrast
subjects
When
the
settings
are
made,
they
are
displayed
in(such
thepocket
following
order.
Memo
DC
IN
5V
terminal
excessive
shocks.
Also,
do
not
carry
SmartMedia™
the
ofx[trousers.
This
might
The
lens
cap
can
also
be
attached
to
attachment
following
the
above
steps
to prevent
it’sthe
LCD
79
The
power
turns
off.
determined
shutter
speeds
and
aperture
-in Subjects
with
little
reflection,
such
as
hair
fur mode.
•• The
size
displayed
on
the
LCD
monitor
FULL
(320
240)
HALF
(160
xorsubject
120).
The
forced
flash
mode
or
]orred-eye
forced
flash
second
ifPage
the
flash
setting
is25)
changed
tothe
thestrap
[ ]becomes
- image
Subjects
that
have
low contrast
and
merge
into
Loading
the
batteries
(
Page
and
the
SmartMedia™
(
Page
31)
into
the
camera.
being
lost.
• Flash
photography
and
burst
photography
are
not
possible.
Flashing
SmartMedia™
to
excessive
force
when
you
sit
down,
damaging
the
SmartMedia™.
Hardware
malfunction
Subjects
with
no
solidity,
such
as
smoke
or
flames
the
background
(such
as
white
walls
or
subjects
Attach
the
lens
cap
when
you
are
not
using
the
camera.
values.
However,
their
operation
capability
movies
made
in
FULL
size
is
displayed
on
the
entire
LCD
monitor,
and
those
made
in
HALF
size
If the
[ ]mode,
forcedISO
flash
[ automatically
] red-eye set
forced
flash mode
is and
set in
flash photography
the is
• In
movie
willorbe
between
ISO100
ISO400
regardless ofwhen
its setting.
dressed
inthe
theSmartMedia™
same
color
as
thelens
background)
-attach
Subjects
viewed
through
glass
Turn
offor
the
power
tothe
retract
the
unit,
and then
the
lens
cap.
The
image
taken
in
photography
mode
may
be
blurred.
or
to
select
the
desired
setting
from
the
tab
menu
, and
press
•Use
Do•not
use
store
in
environments
likely
to
be
affected
byisstatic
electricity
or
is
different
as
shown
the
right
table.
displayed
in
ofspeed
the
2
shutter
speed
is center
set
toin
aexposure
of
0.7
second
or
more,
the
shutter
speed
automatically
changed
to
Press
POWER
button
toscreen.
turn
power
on.
A electrical
histogram
isturn
a graphic
representation
ofthe
theistones
of the
subject.
The horizontal
histogram
• Do
If the
the
image
cannot
be
focused,
thelens
focus
automatically
fixed to infinity.
(When theaxis
flashofisthe
necessary
not
the
power
on
with
the
cap
attached.
noise.
1/2
second.
ENTER.
*
The
above
AC
adapter
is
US/Canada
Turning
the
Power
On
Page
38
shows
the
brightness
(increasing
brightness
from
left
to
right)
and
the
vertical
axis
shows
the
number
at
this
time,
it
is
simultaneously
fixed
to
illuminate
objects
1.5
meters
(five
feet)
away.
During
macro
•This
Dosaves
use
orsettings,
store
SmartMedia™
very
hot,
humid
oraperture
corrosive
If the
shutter
speed
value
isimages,
set toin1/1000
second,
the
value
is limited
to
F8type
andAC
F3.4.
•not
When
playing
back
movie
switching
isthe
between
standard
and
image
only.
(O
:environments.
possible
Xbetween
: not
the
and
returns
to
RECORDING
MENU.
type.
European
andpossible)
UK
photography,
the flash
islevel.
alignedthe
withdisplay
the wide
position.)
of pixels
at each brightness
Downloaded From
camera-usermanual.com
adapters differ in shape.
--110
20 -40
80
88
Manual Settings (continued)
or
to select the setting item.
Pressing ENTER selects the setting. To cancel, press
☞
or
to
Taking
Photographs
Press
to display option menu, press
select options and press ENTER.
Getting
Ready
Press
.
Playing
Back Images
[EXP.] Exposure control ➲ Page 60
[W.B.] White balance ➲ Page 60
[A.E.] Metering system ➲ Page 61
[S/C] Single, continuous or AEB photography mode ➲ Page 61
The camera is ready to take photographs.
The camera takes the picture.
Handy
Functions
Compose the picture, press the shutter button down halfway, and press it down
fully. ➲ Page 40
Erasing
Images
Set values
Press ENTER.
Other
Applications
Additional
Information
Downloaded From camera-usermanual.com
- 59 -
Changing
the
Preset
Conditions
(RECORDING
MENU)
Photography
in
the
Program
Mode
Setting
Names
Playing
Back
the
of
Photographed
Parts
Image
Size
and
Quality
(Single-Frame
Playback)
Extended
Exposure
Photography
(Bulb
Photography)
Erasing
Images
(Erase
Frame)
(continued)
Manual
Attaching
Using
How
Taking
Enlarging
Playback
About
Turning
to
Photographs
the
SmartMedia™
Press
Settings
the
Photographed
of
Power
the
Power
Multi
Shoulder
Continuously
Outlet
Shutter
Image
On/Off
Images
Strap
Pictures
Button
(Zoom
(Burst
Playback)
Photography)
Taking
Erasing
Button
Photographs
Folders
and
(All
LCD
Images
Continuously
Monitor
in
aImages
Folder/All
(Burst
Display
Photography)
Folders)
(In
Playback
(continued)
(continued)
Mode)
Definitions
Separately
of
the
Accessories
Color
of
the
Viewfinder
LED
Taking
and
Playing
Back
Photographs
on
aMode
TV
(continued)
Changing
the
Preset
Conditions
(RECORDING
MENU)
(continued)
Exposure
Compensation
in
the
Shutter
(continued)
Speed-priority
(continued)
About
Basic
Settings
SmartMedia™
in
(Sold
the
mode)
Aperture-priority
(continued)
Mode
(continued)
LCD
Monitor
Display
(during
photography)
(continued)
Manual
Settings
(continued)
Playing
Photography
Installing
Back
Movies
batteries
(Auto
Photography)
(continued)
(continued)
(continued)
Names
of
Parts
(continued)
Getting
Ready
The shutter
camerabutton
automatically
adjusts the
shutter
and
the aperture
value
according
to the
brightness
of an
can be pressed
down
in twospeed
stages:
halfway
down and
fully
down. When
pressed
halfway
down,
This
“SmartMedia™”
Set
Play
Automatically
The
the
following
mode
shoulder
menu
back
size
photographed
is(number
used
for
items
strap
plays
setting
isadapter
for
athe
is
are
back
storage
of
taking
handy
also
the
pixels)
still
the
basic
available
subjects
for
medium
images
16
and
carrying
images
settings
quality
one
for
that
as
saving
separately
your
image
to
require
(compression
be
camera
used
images
atseveral
a
sold
for
around.
inthat
photography
items.
ratio)
seconds
the
you
multi
of
have
the
photography
to image
photograph
in
photographed.
to
[ pause
be
mode
],photographed.
such
[be
Even
in
asquick
]for
firework
or
if Europe,
the
[You
succession.
camera’s
displays
] photography
power
at the
Enlarges
selected
portions
of
images
being
played
back
at
two
levels.
Images
can
displayed
enlarged
when
In
You
this
can
color
mode,
manually
of
the
photographs
viewfinder
adjust
settings
are
LED
taken
indicates
such
continuously
asphotographed
the
exposure
state
atof
control,
atime.
the
maximum
camera.
white
speed
balance,
The
ofthe
0.8
metering
second
system,
intervals.
continuous
This
item
switches
display
on
the
LCD
monitor
when
playing
back
photographed
images.
can
switch
If
you
the
AC
(sold
separately:
PDR-ACM1A
for
the
US/Canada,
PDR-ACM1E
PDR-ACM1U
During
stopping
During
Mode
Effective
dial
Subjects
and
Set
Values
During
playback
TM
✶❉❅◗❆❉■❄❅❒
✬✥✤
Press
.of
aperture
value.
SYSTEM
Turning
Exposure
ISO
OSD
In
[prevent
[use
LANGUAGE
the
]the
INFO.
mode
control
(EXP.)
On
Close
the
SmartMedia™
cover.
Slide
the
SmartMedia
cover
release
knob
in
the
Take
photographs
or
or
battery
to
to
select
or
play
[that
the
slide
]them
or
shutter
it
[ the
back.
,]will
and
speed.
and
lock
press
Look
Use
through
to
select
the
[adjust
viewfinder
]use
and
press
to
compose
ENTER.
the
picture.
To
continue
erasing
images,
repeat
the
above
procedure
2.
.is
AF
(auto-focus)
and
AE
(auto
exposure)
are
set.
When
pressed
fully
down,
the
camera
takes
aspace
picture.
object.
This
mode
enables
carefree
photographing
similarly
to
selecting
[stable
]photographs.
in
[ from
]settings”,
mode.
Itrepeatedly
is
to
night.
To
is
Change
modes.
turned
When
the
OFF,
your
setting
using
the
camera
images
this
according
mode,
from
saved
dropping
be
to
sure
how
on
the
the
to
during
SmartMedia™
image
a(size,
photography,
tripod
is
to
to
be
keep
used
not
hang
the
and
be
camera
erased.
the
the
shoulder
remaining
SmartMedia™
strap
and
amount
prevent
around
can
ofstep
your
distortion
be
neck.
inpossible
the
of
images.
Relationship
between
your
camera
and
accessories
Connecting
tocalled
Other
Devices
(page
123)
being
played
back
one
image
at
acover,
time.
The
meaning
maximum
of
number
LED
color
of
photographs
differ
according
can
to
be
taken
mode
continuously
dial
setting.
three
photography
mode,
and
take
photographs
at
these
settings.
These
are
“Manual
which
are
saved
display
to
show
aPower
list
detailed
information
compression
ratio,
shutter
speed,
aperture,
etc.)
or
you
can
for
the
UK)
in
a
room
with
amay
power
outlet,
you
can
take
photographs
for
an
extended
period
of
time.
This
also
Item
QUALITY
Options
Notes
SmartMedia™
VIDEOon
OUT
White Balance (W.B.)
Write
Protection
Removing
the Batteries
ISO
[ POWER
]
AUTO
OFF
Setting items
Turning
the
Power
Off
Using
the
LCD
Monitor
Additional
Information
Other
Applications
Handy
Functions
Erasing
Images
Playing
Back Images
Taking
Photographs
Tab menu
feed
●
Positive
(+)
Compensation
The
tab
is
displayed.
setting
isbattery
as
follows:
Make
sure
that
the
issystem
firmly
closed.
Details
image
ofmenu
operation
isrange
saved
are
or
erased,
the
same
and
as
the
taking
camera
photographs
is
then
ready
and
to
playing
take
photographs.
them
back
onon
the
LCD After
monitor.
If
you
use
the
viewfinder
to
take
photographs,
the
photography
Set
the
mode
dial
to
[cover
].settings
direction
of
the
arrow
to
open
cover
.1-frame
ENTER.
change
the
white
and
the
metering
in(the
program
mode.
erased
SmartMedia™.
and
reused.
For
details
on
these
accessories,
refer
to
the
Instruction
Manual
for
the
accessory
you
are
using.
(information
Movies
images
in
the
multi
mode
Page
cannot
be
displayed
using
the
zoom
playback
Images
even
if the
are
camera
not
recorded
is
turned
directly
off.
SmartMedia™
but
are
stored
temporarily
within
the
buffer
memory.
display
histograms,
etc.
prevents
failed
photographs
due
to
battery
wear
or
failed
of
data
to
a
PC.
details
handling
the AC
2x-speed
playback
Set
Sets
[•✭❅❍❏
PRG
the
thebalance
whether
color
] photographed
: /or
Photography
mode
language
not
to
and
return
photographic
of
in
menus
the
program
displayed
sensitivity
in
the
(default)
on
SETUP
the
at51)
which
LCD
(➲
MENU
Page
monitor.
the
to
image
62)
the
original
is For
to
be
factory
recorded.
settings.
feeds
the
image
•transfer
Each
press
of
Copying
of
printed
(black
characters
on
white
paper)
set
the
time
(text
114)
F8
/display
F6.8
F5.6
/18.
F4.8
/Page
F4.0
/and
F3.4
/mode
F2.9
How
to
take
photographs
Page
41
1/1000,
1/750,
1/500,
1/350,
1/250,
1/180,
1/125,
1/90,
range
may
differ
from
the
actual
image.
In
this
case,
use
the
LCD
Press
the
shutter
button
down
halfway
.
the
mode
dial
to
[
],
[
]
or
[
].
SmartMedia™
having
the
following
storage
capacity
can
be
used
on
your
camera.
current
as
of
March
2000)
feature.
The
last
cover
recorded
image
opens
frame
image
appears
appears
on
the
on
the
LCD
LCD
monitor.
monitor.
photography
is
finished,
check
the
images
record
the
selected
ones
to
SmartMedia™.
[TIME&DATE,
]
:
Erases
images
in
the
currently
selected
folder
and
folders.
adapter,
beSet
sure
to
read
page
•
2x-speed
playback
is
performed
for
.
Make
that
the
SmartMedia™
is
correctly
loaded.
by one
frame.
Warning:
[•Av
] sure
Noise
:OSD
Photography
increases
LANGUAGE
when
in aperture-priority
will
the not
ISObe
is reset.
changed
mode
to
(➲higher
Page
settings.
63) ( Page 31)
Backlit
portraits
[PROTECTED]
on
the
LCD
monitor,
cancel
the protection
( Page 108) or
remove
How
to
play
back
images
Page
80
1/60,
1/45,
1/30,
1/20,
1/10,
1/8,
1/6,
1/4,
1/3, 115
1/2,
monitor
for
photography.
AF
(auto-focus)
and
AE
(auto
exposure)
(➲
Additional
Information,
[English]
: value
English
(default)
Pass
Set
the
out
mode
end
steps
of
dial
1the
to
to
shoulder
4[1/15,
either
]].LCD
or
inspeed-priority
[strap
“Photography
through
].
the
in
the
strap
Shutter
speed-priority
Mode”
isdisplayed
held
down.
the
duration
that
2MBCarry
/4MB/8MB/16MB/32MB/64MB/128MB
the
mode
dial
to
[isin
(all
3.3
types)
]•the
adjust
:]When
Erases
the
all
brightness
folders
recorded
of
the
on
the
monitor
SmartMedia™.
Page
[Set
•V
1-frame
feed
is continued
for the
The
aperture
and
the
shutter
speed
corresponding
to(➲that
[•To
Tv
:write-protection
Photography
shutter
mode
Page
65)
bright
scenes
(such
and
highly
reflective
subjects
•the
You
can
also
carry
out
step
8snowfields)
while
verifying
the
image
step
7.
DPOF
(in
Page
102).
Glossary)
start
to
function.
0”7,
1”,
1”5,
2”,
3”,
4”,
6”,
8”,
10”,
15”
•Very
Do
not
remove
orV)
load
the
batteries
or
disconnect
or
connect
the
AC
adapter
while
the camera
is mode.
on. This
]65)
:POWER
Japanese
[value
[NORMAL]
:(3.3
Equivalent
toas
color
ISO100
Carry
Set
Use
out
or
mode
steps
to
dial
select
1
to
to
2[erased,
the
“Manual
].
images
photographed
Settings”
(page
in
58).
the
multi
photography
You can also
connect
the
PC
card
adapter
and
floppy
disk
adapter
( in
123)
sold
separately
to transfer
SmartMedia™
Changing
the
LCD
monitor
display
Page
116
The
images
or
folders
are
and
the
camera
returns
toPage
the
is
held
down.
duration
that
are
displayed
on
the
LCD
monitor.
If
the
appropriate
(page
attachment
or
on
in
“Photography
the
camera.
in
the
Full
Manual
Mode”
(page
67).
Press
the
button
to
turn
the
power
on.
full
manual
mode
(➲
Page
67)
[
M
]
:
Photography
in
Press
the
MENU
button.
•[2X]
Shots
predominantly
of
sky
Even
ifreturn
photography
is disconnect
terminated
midway
before
capturing
three
images
bythe
releasing
theAC
shutter
• AF
If
you
take
aup
photograph
after
erasing
an
athis
number
continuing
from
last Ifphotographed
When
or
AE
are
locked,
the
beep
tone
(➲ Page
111)
sounds
and
the
Use
ormade
to
change
the
setting
inimage,
the
menu,
might
the
manual
settings
tosame
their
defaults.
Iftab
happens,
manually
set
conditions
again.
:
High-sensitive
photography
equivalent
to
color
ISO200
(default)
•
Before
you
connect
or
the
AC
adapter,
be
sure
to
turn
the
camera
OFF.
the
adapter
is
Press
the
image
quality
button
to
select
the
preset
combination
cannot
be
set
even
if
the
shutter
speed
is
adjusted
to
images to a
PC.
16MB
(SM-M1600D)/32MB
(SM-M3200D)/64MB
(SM-M6400D)/128M
(SM-M1280D)
The
respective
last
image
mode.
frame
appears
on
LCD
monitor.
You
can
also
select
the
image
by
the
operation
as
for
thumbnail
display
(
Page
83).
Carry
out
steps
1
to
on
page
109.
When
the
camera
is
turned
on,
set
the
mode
dial
to
thethe
desired
The
shutter
speed
and
the
aperture
value
corresponding
todisplay
the
Reverse
playback,
2x-speed
playback
All
descriptions
inor
this
Instruction
Manual
are
for
when
language
is set
to [ENGLISH].
Press
or
to
select
the
image.
button,
images
already
photographed
can
be
saved
and
erased
by playback
the
method.
image
is
assigned
as
image
number.
●
Negative
(–)
Compensation
The
viewfinder
RECORDING
LED
turns
MENU
green.
is2
displayed.
•press
The
image
the
photograph
is
taken
is
slightly
less
clear
than
images.
(This
is 109,
connected
disconnected
with
the
power
ON,
camera
settings
may
beabove
reset
(SET-UP
Page
and
ENTER.
:before
High-sensitive
photography
equivalent
to
color
ISO400
its
limit,
the
shutter
speed
isthe
displayed
inthe
red.
Reverse
1-frame
feed
To [4X]
cancel
erasing
of
image
data,
select
[monitor.
]Photography,
and
press
ENTER.
quality
and
size,
while
viewing
indication
on
the
starts
a
reverse
•
The
press
of
mode.
shutter
speed
are
displayed
on
the
LCD
If
the
appropriate
The
length
of
time
to
capture
images
varies
according
to
the
photographic
conditions.
•
Images
can
also
be
erased
in
the
thumbnail
mode.
In
this
case,
the
camera
enters
the
single
frame
Select
[SYSTEM
INFO.]
on
the
SETUP
MENU
and
because
television
displays
images
at
a
lower
resolution.)
•
Spotlit
subjects,
particularly
against
dark
backgrounds
Manual
Settings
Page
58)
orPage
the
camera
malfunction.
however,
is
in
this
state.
feeds the
image
•may
Each
press
oftoinbegin
EXP.
].
To
cancel
changing
of
settings,
press
.you
Use
or
todial
select
the
frame
want
to
enlarge.
Press
the
or
Zoom
to
switch
select
[( S/C
].isphotography
21)
towards
“T”
playback.
Floppy
Disk
Adapter
(FlashPath)
]possible
is
selected,
[NO
IMAGE]
displayed
after
all
folders
When
playback.
Press
Set
mode
in
the
to
[ sure
Tv
mode,
].the
or
press
or
the
shutter
button
fully
Before
photography,
make
that
the
lens
cap
has
been
combination
cannot
be
set
even
ifflash
aperture
isin.black
adjusted
to its
playback)
mode,
and
enters
the
thumbnail
playback mode after the image is erased.
status
display.
]or
mode:
In
[[playback
Press
the
display/info
button.
Self-timer
photography
and]down
are
not
possible.
•the
The
display
unit
varies
according
to
the
output
system.
•theCopying
of (frame
printed
text
(white
characters
on
paper)
.playback
press
reverse
by
one
frame.
This
adapter
allows
SmartMedia™
to
be
used
as
3.5"
floppy
disk.
have
been
erased
(unless
the
SmartMedia™
contains
protected
You
can
also
select
the
image
by
the
same
operation
as
for
thumbnail
playback
( [4X],
PageISO
83).
Automatic
begins.
•
Playback
becomes
2x-speed
to
reduce
aperture
size.
Press
to
increase
aperture
size.
Press
camera
takes
a
picture.
The
manual
setting
removed
the
camera.
limit,
aperture
value
isbe
displayed
in
red.
Photography,
however,
the
[Scenes
M
]from
mode
tomenu
set
the
speed
to simultaneously
0.7
second
During
[2X],
the
ISO
will
automatically
set
between
ISO100
ISO200.
During
be
☞
set
the
quality
and
size
➲shutter
Page
112
•the
With
the
NTSC
system,
images
can
be
displayed
on the LCD
monitor
and TVwill
during
•To
with
low
reflectivity,
such
as
shots
green
or
dark
foliage
Each
press
of
the
display/info
button
switches
the
display
•of1-frame
feed
isand
continued
The
SYSTEM
INFO.
displayed.
reverse
for
the
duration
This
adapter
isplayback
inserted
into
the],
floppy
your
PC,
allowing for the
images).
The
viewfinder
LED
turns
redis
image
data
being
recorded
onto
Insert
the
adapter
connector
plug
into
the
DC
IN
values
are
displayed
In
the
photography
modes
([while
[and ISO400.
]disk
oris
[ drive
]),on
the
lens
photography
and
playback.
is
possible
inAC
this
state.
automatically
set
between
ISO100
is
held
down.
format
as
follows:
duration
that
Note:
The
larger
the
F
value,
the
smaller
the
aperture
size
become
or
longer.
•Press
Remove
and
insert
SmartMedia™
with
the
camera’s
power
turned
off.Aperture value
is
held
down.
that
To
quit
the
SETUP
MENU,
change
the
mode
dial
setting.
Shutter
speed
Adjust
the
zoom
ratio
by
the
Zoom
switch.
(Zoom
to
display
option
menu,
press
or
to
images
recorded
on
the
SmartMedia™
to
be
transferred
to
the
PC.
the
SmartMedia™.
Sets
video
output
system
according
to
country
in
which
your camera
is used.
on
the
left
ofthe
the
LCD
Press
the
shutter
button
down
halfway
and
press
5V
terminal
on
the
camera.
extends
from
the
camera
body.
•the
PAL
system,
images
cannot
bethe
displayed
When a cable
is connected, only
and
versa.
the
image
quality
button
switches
the
quality
and
size
Gently
insert
the
SmartMedia™
as
far
as
it, simultaneously.
can
go
✭❅❍❏
[Pressing
]vice
isWith
displayed
on
the
LCD
monitor.
Viewfinder
LED
•select
Recorded
data
may
bepress
erased
(destroyed)
in
the
situations
listed
below. Note that Toshiba
White
Balance
Additional
Information,
Glossary
to
increase
shutter
speed.
Pressand
to
decrease
shutter
speed.
Press
Press
or
to
move
forward
reverse.
☞
➲
PRG
]
and
ENTER.
]
and
press
ENTER.
[
switch
Page
21)
✤❅▼❁❉●❅❄
TV
display
is
available.
monitor
screen.
When
the
camera
is
turned
on,
the
Auto
Power
OFF
function
Canceling
pause
settings
infully
the
following
order.
it
down
. system
✳▼❁■❄❁❒❄
★❉▲▼❏❇❒❁❍
✩❍❁❇❅
❏■●❙
Press
or
to
select
the
item
you
desired
toMeaning
set,
Pause
with
the
SmartMedia™
electrodes
(metal
contacts)
Additional
Information,
Glossary)
[NTSC]
:allNTSC
(white
Corporation
accepts
no
responsibility
whatsoever
for
the
loss
of recorded
data enters
in these
•Adapter
When
images
in
a
folder
are
erased,
that
folder
itself
is
also(destruction)
erased.
The
camera
determines
the
balance
by
averaging
the
various
kinds playback
of light
that actually
AC
to
to
next
frame/
to“T”
go
back
one
❉■❆❏❒❍❁▼❉❏■
To
prevent
valuable
data
from
being
erased,
attach
the
write•••advance
With
the
PAL
system,
images
are
played
back
with
apressing
black
frame
•frame
After
pause
is
cancelled,
the
switch
to
the
will
the
image.
Pressing
ENTER
the
setting.
or
,, SmartMedia™
and
manual
Exposure
compensation
(➲
Page
69)
using
Colorthe
When
[Zoom
M
]selects
isis
selected
on
the
[ halfway
EXP.
]remove
option
menu,
orsurrounded.
the
shutter
speed
setting
becomes
operational.
State
Never
open
the
SmartMedia™
cover
orenlarge
the
while
anmakes
image
is
being
recorded.
This
or
and
manual
setting
(➲
Page
58)
or
film
speed
Exposure
compensation
(➲
Page
69)
using
Play
back
Reverse
procedure
“Loading
the
Batteries”
and
remove
the
batteries.
•facing
Pressing
the
shutter
button
down
adjusts
the
exposure,
• Playback
paused.
[PAL]
:for
PAL
system
( camera.
Additional
Information,
Glossary)
situations:
the
lens.
This
setting
allows
you
to
set
in
advance
the
white
balance
when
taking
photographs
under
and
press
ENTER.
the
rear
of
the
For
the
US/Canada:
PDR-ACM1A
Holding
down
or
moves
forward
or
reverse
continuously.
resumes
at
the
last
state
that
was
protect
sticker
at
the
write-protect
area.
Data
can
no
longer
be
may
corrupt
the
data
on
the
SmartMedia™
or
damage
the
SmartMedia™
itself.
possible,
but
does
not
make
the
exposure
compensation
possible. However the exposure value
is
To
return
normal
press
the
Zoom
switch
towards
setting
(➲toPage
Page
58)magnification,
or film
speed
setting
(➲
Page
78)
using
ENTER
Pass
the
shoulder
strap
through
the
loop
and
pull.
setting
(➲
78)
using
ENTER
are
also
possible.
and
pressing
the
shutter
button
fully
takes
the
shot.
TM[ is down
When
the
SmartMedia™
used
incorrectly
by
the
user
or
a
third
party
[
],
]
or
[
]
AE
or
AF
are
locked
with
the
shutter
button
held
half
specific
lighting
conditions.
For
Europe:
PDR-ACM1E
active
before
the
pause.
Firmly
insert
the
SmartMedia
as
far
as
it
can
go.
displayed
on is
the
LCD
monitor.
Press
ENTER.
recorded
or setting
erased
from
SmartMedia™.
Toon
write
oraterase
data
from is to be recorded.
Sets
the
color
mode
and
photographic
sensitivity
which
the
image
“W”.
are
also
possible.
The
default
different
depending
the
destination
country/area.
Use
or
to
select
the
desired
item
Press
ENTER,
nine
images
are
displayed
simultaneously.
•[FIRMWARE
If
you
shoot
a
still
picture,
when
preview
is
set
to
ON
(➲
Page
77),
down.
If
no
operation
is
carried
out
for
a
fixed
amount
of
time
(default:
about
one
minute),
power
ON
When
the
SmartMedia™
is
exposed
to
static
electricity
or
electrical
noise
Forimage
the Noise
UK:is
PDR-ACM1U
VER.]
:off
Displays
the
firmware
version
ofto
this
camera.
Stop
SmartMedia™,
peel
the
sticker.
camera
ready
to
take
photographs.
Warning:
increases
when
the
ISO
is
changed
higher
settings.
displayed
and
a
white
frame
and
green
Green The
Compose
picture,
press
the
shutter
button
down
halfway,
and
press
it
down
[the
AW
] no is
:the
Automatic
adjustment
(default)
Thumbnail
Display
Page
83
recorded
image
is
displayed
on
for
about
two
]specifications
Standby
mode
[enlarged,
••-For
If
operation
is
carried
out
a screen
fixed
amount
offrom
time
(default:
about
1shutter
minute),
thewear.
power
is
turned
TM
consumption
is
set
to
its
minimum
state
(power
almost
off)that
to
prevent
battery
This
is
.in
and
press
When
the
SmartMedia™
isfor
removed
ordarkens
the
camera
isPage
turned
off
while
recording
erasing
The
image
the
LCD
monitor
sometimes
the
time
the
button
isdata,
pressed
down
details,
refer
to
the
of
AC
information.
adapter
127.
[CARD
INFO.]
: on
Displays
the
SmartMedia
Playback
returns
to
the
start
ofturned
the
movie.
frame
are
displayed
the
LCD
monitor.
]
:
Photography
outdoors
[
Default
setting:
seconds.
off
to
preserve
battery
life.
This
is
called
“Auto
Power
OFF”.
To
return
to
the
normal
state,
press
the
fully.
➲
Page
40
called
the
Auto
Power
OFF.
This
setting
allows
you
to
set
the
time
when
the
camera
turns
off
halfway
until
the
image
becomes
focused.
[NORMAL]
: picture,
Equivalent
to
ISO100
(default)
data,
frame
advance
when
images
aredefaults.
played
back or during
formatting alarm
of the
The
options
are
displayed.
Stop
[RESET]
: Returns
settings
to
Flashing
[ the
],
[ color
]conditions
or their
[shutter
]being
Self-timer
in frame
operation
at a handshake
.
Compose
the
press
the
button
down
halfway,
and
press
it
down
The
white
frame
indicates
entire
image,
while
the
green
[
]
:
Photography
in
cloudy
POWER
button
again.
ENTERCompose
•
The
viewfinder
LED
turns
red
while
image
data
is
being
recorded
the
picture,
press
the
shutter
button
down
halfway,
and
press
it
down
• The
To
set
the
focus
orpicture.
exposure
forphotography
a subject
outside
the
center
the intended
theincamera
directly
The
camera
takes
the
automatically.
This
function
isthrough
not
activated
during
automatic
playback
( image,
Pagepoint
85) or
the [ only>
] PC
[2X]
:appearing
High-sensitive
equivalent
toofcolor
ISO200
SmartMedia™.
Note:
image
the
lens
will
be
The
display
returns
to<Histogram>
thumbnail
playback.
<Standard>
<Detailed
information>
<Image
✭❅❍❏
shows
the
location
of
the
currently
enlarged
area.
halfway,
and
press
it
down
fully.
➲
Page
40
]
:
Photography
in
bluish
fluorescent
light
[
fully.
➲
Page
40
Setting
1
:
About
the
Auto
★★
Power
(FULL
OFF
★★
Function
)
Additional
Information,
“AUTO
POWER
OFF
(page
110)”
at
the
subject
or
desired
exposure
(lighting),
press
and
hold
the
shutter
button
halfway.
Now,
with
the
shutter
onto
the
SmartMedia™.
ON]
Writing
to SmartMedia™
in progress
mode.
Press
ENTER.
[4X]
:adapter
High-sensitive
photography
equivalent
toanother
color
ISO400
•Insert
We
recommend
copying
and
saving
important
datapower
onto
storage
medium (floppy disk, hard
displayed
for
[LCD
].[Power
fully.
➲
Page
40
the
AC
power
plug
into
the
Pressing the
The
default
size
and
quality
of
the
image
can
be
reset
to
the
desired
combination.
Press
ENTER.
button
still
held
halfway
down,
you
can
turn
the
direction
of
the
camera
and
frame
your
image
with
the
focus
•
It
is
possible
to
play
back
any
images
in
any
folders
by
pressing
or
during
playback.
(For
details
ON
Increases
the
volume.
[ return
] MO
: Photography
inafter
reddish
fluorescent
light
The
camera
takes
the
picture.
Photographs
can
be
taken,
however,
do not
turn thepress
power
OFF.
To
to disk,
the
state
theset
Auto
Power
OFF
has been
executed,
the
POWER
button
etc.).
The
PREVIEW
manual
setting
Page
items
77
are
displayed.
➲normal
camera
takes
the
atmonitor.
the
exposure
time.
Zoom switch
to disk,
“T”
Current
Entireofimage
and
locked.
Press
the
shutter
button
down
fully
to in
complete
capturing
the image.
Red outlet.
[☞
on picture
the
LCD
The
camera
is ready
for
burst
photography.
of2displayed
folder
Page
92)
]:the
mode:
In
the
Accessing
of
SmartMedia™
[ (HALF
Photography
in] is
incandescent
light
[Never
Setting
: exposure
★★
•]][is
When
shutter
speed
set
to
a)turn
speed
of
0.7 second
orprogress
slower,
photographs
taken
as extended
to
turn
the
power
on★★
again.
•During
remove
the
SmartMedia™
or
the
camera
offresult
while
recording
data or are
while
erasing
data
COLOR
Page
77
➲
the
exposure,
the
viewfinder
LED
turns
orange.
position
Pressing the
•
Moving
the
camera
as
you
press
the
shutter
button
will
in
a
blurred
image.
Use
,
,
or
to
select
the
area
to
enlarge.
at Page
the
last
image
displays
the
first
image,
and
pressing
atwill
thebe
firstautomatically
image
displays
the
Pressing
During
[2X],
the
ISO
be
automatically
set
to
ISO200.
During
[4X],ofISO
setof
exposures
(➲
68).
IfCarry
burst
photography
is to
set
the
shutter
speed
is setthe
to volume.
athe
speed
0.7
second
or more
in the
[ to
Tv ]
Decreases
out
steps
1will
2when
in
Photographic
(SmartMedia™
formatting).
actions
might
damage
ISO
Page
78
➲Flashing
ItClose
about
twice
the
time
to complete
taking
the
photograph
duePDR-M81
to processing
ofenlargement
the
captured
[set
],These
[“Basic
] When
the
image
is not
in SmartMedia™.
focus.
the
SmartMedia™
cover.
Zoom switch to
“W”
•
The
PDR-M81
usesto
accurate
focus
mechanism.
However,
the
have
difficulty
last
image.
Adjust
the
display
area
enlarge
viewing
theto
white
and
[1takes
MINUTE]
(default)
ISO400.
• In
AEB
photography
(an
Page
71)while
orauto
burst
photography,
the shutter
speed
cannot be setmay
to 0.7
second
or longer.
Setting
3
:
★★
(SMALL
★★
)
➲
mode,
the
shutter
speed
is
automatically
changed
1/2
second.
•image.
Use
only
the
SmartMedia™
specified
for
use
with
the
PDR-M81.
The
use
of
other
SmartMedia™
SHARPNESS
Page
79
mode)”
(page
109).
Select
[QUALITY]
Settings
(
focusing
or
not
be
able
to
focus
at
all
for
subjects
and
situations
such
as
the
following:
➲
Before
you
use
aother
new
SmartMedia™
the
first during
time,
be
sure
tothe increased
Images
can
bevalue
rotated
by] pressing
playback.
Difference
between
[PRG]
and
[ for
] or
green
[2 MINUTES]
the
aperture
is
to
F2.9
(maximum
aperture
size),
shutter
speed
restricted
••• frames.
If
a
mode
than
[ set
suppressed
flash
mode
is
set
inthe
flash
photography,
thedark
shutterisspeed
is
•79
Processing
image
- When
subject
is distant and
- SmartMedia™
Subjects
moving
at
high
speed
could
damage
camera.
CONTRAST
Page
➲[the
• to
The
write
protection
not
function
if in
write-protect
sticker
becomes
Use
a soft
dry cloth to
.thesecond.
on
the
SETUP
MENU
and
press
format
the
(may
Page
91).
rotates
an
image
counterclockwise,
and
pressing
rotates
clockwise.
Pressing
1/750
PDR-ACM1A
] •are
the
same
as
to
PDR-ACM1E
PDR-ACM1U
[PRG]
and
limited
tosecond.
between
1/2
second
and
1/250
* The
aboveitdirty.
menu
is
the
RECORDING
[3 MINUTES]
Charging
of
flash
progress
ON
When
there
are
objects
in
front
of
or
behind
the
subject
Very
shiny
subjects
such
as
a
mirror
or
car
body
SmartMedia™
is
aof
device.
Do do
notnot
bend,
drop,
or subject
SmartMedia™
to
DIGITAL
ZOOM
Page
• wipe
When
the
camera
isOnce
not79
inelectronic
be sure
to attach
the
lens
cap
provided
with[your
camera.
the
POWER
button
to
turn
the
power
off.
✭❅❍❏
away
any
dirt.
ause,
sticker
ispress
peeled
off,
reuse
it.
➲
Orange•Press
The
QUALITY
menu
isprecision
displayed.
combinations
the
automatically
mode.
MENU
inthe
•the
The
aperture
value
set
differ
to
the
actual
value
according
to
the
position
ofUK)
theorzoom
lens.
To
return
to
the
regular
display,
ENTER.
(Photos
cannot
be
taken
at
this
moment.)
(for
US
and
Canada)
If the
shutter
speed
is
set
to
1/350
second
or
less,
the
shutter
as
speed
an
animal
is
automatically
athe
cage
a]changed
person
in front
to 1/250
of a tree)
(for
European
Continent)
(for
Get
ready
to
take
the
photograph.
- above
Extremely
low
contrast
subjects
When
the
settings
are
made,
they
are
displayed
in(such
thepocket
following
order.
excessive
Also,
do
not
carry
SmartMedia™
the
ofx[trousers.
This
might
The
lens
cap
can
also
be
attached
to
attachment
following
the
above
steps
to prevent
it’sthe
LCD
79
➲shocks.
The
power
turns
off.
determined
shutter
speeds
and
aperture
-in Subjects
with
little
reflection,
such
as
hair
fur mode.
•• The
size
displayed
on
the
LCD
monitor
FULL
(320
240)
HALF
(160
xorsubject
120).
The
forced
flash
mode
or
]orred-eye
forced
flash
second
ifPage
the
flash
setting
is25)
changed
tothe
thestrap
[ ]becomes
- image
Subjects
that
have
low contrast
and
merge
into
Loading
the
batteries
(➲
Page
and
the
SmartMedia™
(➲
Page
31)
into
the
camera.
being
lost.
• Flash
photography
and
burst
photography
are
not
possible.
Flashing
SmartMedia™
to
excessive
force
when
you
sit
down,
damaging
the
SmartMedia™.
Hardware
malfunction
Subjects
with
no
solidity,
such
as
smoke
or
flames
the
background
(such
as
white
walls
or
subjects
Attach
the
lens
cap
when
you
are
not
using
the
camera.
values.
However,
their
operation
capability
movies
made
in
FULL
size
is
displayed
on
the
entire
LCD
monitor,
and
those
made
in
HALF
size
is
If
the
[
]
forced
flash
or
[
]
red-eye
forced
flash
mode
is
set
in
flash
photography
when
the
•
In
movie
mode,
ISO
will
be
automatically
set
between
ISO100
and
ISO400
regardless
of
its
setting.
* •Use
Histogram
dressed
inthe
theSmartMedia™
same
color
as
the
background)
-attach
Subjects
viewed
through
glass
Turn
offor
the
power
tothe
retract
the
lens
unit,
and then
the
lens
cap.
The
image
taken
in
exposure
photography
mode
may
be
blurred.
or
to
select
the
desired
setting
from
the
tab
menu
, and
press
★★
★★
★★
Do•not
use
store
in
environments
likely
to
be
affected
byisstatic
electricity
or
is
different
as
shown
in
the
right
table.
displayed
in
center
ofspeed
the
screen.
shutter
speed
is
set
to
a
of
0.7
second
or
more,
the
shutter
speed
automatically
changed
to
Press
POWER
button
tothe
turn
power
on.subject.
A electrical
histogram
isturn
a graphic
representation
ofthe
theistones
of the
The horizontal
histogram
• Do
If the
the
image
cannot
be
focused,
thelens
focus
automatically
fixed to infinity.
(When theaxis
flashofisthe
necessary
not
the
power
on
with
cap
attached.
noise.
1/2
second.
ENTER.
*the
The
above
AC adapter
is US/Canada
Turning
the
Power
On
➲
Page
38
☞
shows
the
brightness
(increasing
brightness
from
left
to
right)
and
vertical
axis
shows
the
number
at
this
time,
it
is
simultaneously
fixed
to
illuminate
objects
1.5
meters
(five
feet)
away.
During
macro
•This
Dosaves
use
orsettings,
store
SmartMedia™
very
hot,
humid
oraperture
corrosive
If the
shutter
speed
value
isimages,
set toin1/1000
second,
the
value
is limited
to
F8type
andAC
F3.4.
•• not
When
playing
back
movie
switching
isthe
between
standard
and
image
only.
(O
:environments.
possible
Xbetween
: not
the
and
returns
to
RECORDING
MENU.
type.
European
andpossible)
UK
photography,
the flash
islevel.
alignedthe
withdisplay
the wide
position.)
of pixels
at each brightness
Downloaded From
camera-usermanual.com
adapters differ in shape.
--110
20 -40
80
88
Manual Settings (continued)
The camera calculates the exposure level before a photograph is taken.
]
[
]
[
]
[
]
[ AEB ]
: Photography in 1-shot mode (default)
: Photography in burst mode (➲ Page 72)
: Photography with the Automatic Exposure Bracketing (➲ Page 71)
Erasing
Images
Single, continuous or AEB photography mode (S/C)
Playing
Back Images
: Multi metering (default)
The exposure is measured and calculated for the entire area of the screen.
By dividing the entire area of the screen, the exposure level for each unit is calculated. A
well balanced exposure can be obtained.
: Spot metering
The exposure is measured in a very small area at the center of the screen.
It is possible to calculate the exposure of a subject without being affected by the
surrounding environment.
Taking
Photographs
[
Getting
Ready
Metering system (A.E.)
Handy
Functions
Other
Applications
Additional
Information
Downloaded From camera-usermanual.com
- 61 -
Changing
the
Preset
Conditions
(RECORDING
MENU)
Photography
in
the
Program
Mode
Setting
Names
Playing
Back
the
of
Photographed
Parts
Image
Size
and
Quality
(Single-Frame
Playback)
Extended
Exposure
Photography
(Bulb
Photography)
Erasing
Images
(Erase
Frame)
(continued)
Manual
Attaching
Using
How
Taking
Enlarging
Playback
About
Turning
to
Photographs
the
SmartMedia™
Press
Settings
the
Photographed
of
Power
the
Power
Multi
Shoulder
Continuously
Outlet
Shutter
Image
On/Off
Images
Strap
Pictures
Button
(Zoom
(Burst
Playback)
Photography)
Taking
Erasing
Button
Photographs
Folders
and
(All
LCD
Images
Continuously
Monitor
in
aImages
Folder/All
(Burst
Display
Photography)
Folders)
(In
Playback
(continued)
(continued)
Mode)
Definitions
Separately
of
the
Accessories
Color
of
the
Viewfinder
LED
Taking
and
Playing
Back
Photographs
on
aMode
TV
(continued)
Changing
the
Preset
Conditions
(RECORDING
MENU)
(continued)
Exposure
Compensation
in
the
Shutter
(continued)
Speed-priority
(continued)
About
Basic
Settings
SmartMedia™
in
(Sold
the
mode)
Aperture-priority
(continued)
Mode
(continued)
LCD
Monitor
Display
(during
photography)
(continued)
Manual
Settings
(continued)
Playing
Photography
Installing
Back
Movies
batteries
(Auto
Photography)
(continued)
(continued)
(continued)
Names
of
Parts
(continued)
Getting
Ready
The shutter
camerabutton
automatically
adjusts the
shutter
and
the aperture
value
according
to the
brightness
of an
can be pressed
down
in twospeed
stages:
halfway
down and
fully
down. When
pressed
halfway
down,
This
“SmartMedia™”
Set
Play
Automatically
The
the
following
mode
shoulder
menu
back
size
photographed
is(number
used
for
items
strap
plays
setting
isadapter
for
athe
is
are
back
storage
of
taking
handy
also
the
pixels)
still
the
basic
available
subjects
for
medium
images
16
and
carrying
images
settings
quality
one
for
that
as
saving
separately
your
image
to
require
(compression
be
camera
used
images
atseveral
a
sold
for
around.
inthat
photography
items.
ratio)
seconds
the
you
multi
of
have
the
photography
to image
photograph
in
photographed.
to
[ pause
be
mode
],photographed.
such
[be
Even
in
asquick
]for
firework
or
if Europe,
the
[You
succession.
camera’s
displays
] photography
power
at the
Enlarges
selected
portions
of
images
being
played
back
at
two
levels.
Images
can
displayed
enlarged
when
In
You
this
can
color
mode,
manually
of
the
photographs
viewfinder
adjust
settings
are
LED
taken
indicates
such
continuously
asphotographed
the
exposure
state
atof
control,
atime.
the
maximum
camera.
white
speed
balance,
The
ofthe
0.8
metering
second
system,
intervals.
continuous
This
item
switches
display
on
the
LCD
monitor
when
playing
back
photographed
images.
can
switch
If
you
the
AC
(sold
separately:
PDR-ACM1A
for
the
US/Canada,
PDR-ACM1E
PDR-ACM1U
During
stopping
During
Mode
Effective
dial
Subjects
and
Set
Values
During
playback
TM
✶❉❅◗❆❉■❄❅❒
✬✥✤
Press
.of
aperture
value.
SYSTEM
Turning
Exposure
ISO
OSD
In
[prevent
[use
LANGUAGE
the
]the
INFO.
mode
control
(EXP.)
On
Close
the
SmartMedia™
cover.
Slide
the
SmartMedia
cover
release
knob
in
the
Take
photographs
or
or
battery
to
to
select
or
play
[that
the
slide
]them
or
shutter
it
[ the
back.
,]will
and
speed.
and
lock
press
Look
Use
through
to
select
the
[adjust
viewfinder
]use
and
press
to
compose
ENTER.
the
picture.
To
continue
erasing
images,
repeat
the
above
procedure
2.
.is
AF
(auto-focus)
and
AE
(auto
exposure)
are
set.
When
pressed
fully
down,
the
camera
takes
aspace
picture.
object.
This
mode
enables
carefree
photographing
similarly
to
selecting
[stable
]photographs.
in
[ from
]settings”,
mode.
Itcover
is
to
night.
To
is
Change
modes.
turned
When
the
OFF,
your
setting
using
the
camera
images
this
according
mode,
from
saved
dropping
be
to
sure
how
on
the
the
to
during
SmartMedia™
image
a(size,
photography,
tripod
is
to
to
be
keep
used
not
hang
the
and
be
camera
erased.
the
the
shoulder
remaining
SmartMedia™
strap
and
amount
prevent
around
can
ofstep
your
distortion
be
repeatedly
neck.
inpossible
the
of
images.
Relationship
between
your
camera
and
accessories
Connecting
tocalled
Other
Devices
(page
123)
being
played
back
one
image
at
acover,
time.
The
meaning
maximum
of
number
LED
color
of
photographs
differ
according
can
to
be
taken
mode
continuously
dial
setting.
three
photography
mode,
and
take
photographs
at
these
settings.
These
are
“Manual
which
are
saved
display
to
show
aPower
list
detailed
information
compression
ratio,
shutter
speed,
aperture,
etc.)
or
you
can
for
the
UK)
in
a
room
with
amay
power
outlet,
you
can
take
photographs
for
an
extended
period
of
time.
This
also
Battery
lock
Mode
dial
1 Item
QUALITY
2 Options
Notes
SmartMedia™
VIDEOon
OUT
White Balance (W.B.)
Write
Protection
Removing
the Batteries
ISO
[ POWER
]
AUTO
OFF
Setting items
Turning
the
Power
Off
Using
the
LCD
Monitor
Additional
Information
Other
Applications
Handy
Functions
Erasing
Images
Playing
Back Images
Taking
Photographs
Tab menu
feed
●
Positive
(+)
Compensation
The
tab
is
displayed.
setting
isbattery
as
follows:
Make
sure
that
the
issystem
firmly
closed.
Details
image
ofmenu
operation
isrange
saved
are
or
erased,
the
same
and
as
the
taking
camera
photographs
is
then
ready
and
to
playing
take
photographs.
them
back
onon
the
LCD After
monitor.
If
you
use
the
viewfinder
to
take
photographs,
the
photography
Set
the
mode
to
[cover
].settings
direction
of
the
arrow
to
open
cover
.1-frame
ENTER.
change
the
white
and
the
metering
in(the
program
mode.
erased
SmartMedia™.
and
reused.
For
details
on
these
accessories,
refer
to
the
Instruction
Manual
for
the
accessory
you
are
using.
(information
Movies
images
in
the
multi
mode
Page
cannot
be
displayed
using
the
zoom
playback
Images
even
if the
are
camera
not
recorded
is
turned
directly
off.
SmartMedia™
but
are
stored
temporarily
within
the
buffer
memory.
display
histograms,
etc.
prevents
failed
photographs
due
to
battery
wear
or
failed
of
data
to
a
PC.
details
handling
the AC
2x-speed
playback
Set
Sets
[•✭❅❍❏
PRG
the
thebalance
whether
color
] photographed
:(/or
Photography
mode
language
not
to
and
return
photographic
of
in
menus
the
program
displayed
sensitivity
in
the
(default)
on
SETUP
the
at51)
which
LCD
(➲
MENU
Page
monitor.
the
to
image
62)
the
original
is For
to
be
factory
recorded.
settings.
For
enlarged
view
P.dial
22)
feeds
the
image
•transfer
Each
press
of
Ú
2
Copying
of
printed
(black
characters
on
white
paper)
set
the
time
(text
114)
F8
/display
F6.8
F5.6
/18.
F4.8
/Page
F4.0
/and
F3.4
/mode
F2.9
How
to
take
photographs
Page
41
1/1000,
1/750,
1/500,
1/350,
1/250,
1/180,
1/125,
1/90,
range
may
differ
from
the
actual
image.
In
this
case,
use
the
LCD
Press
the
shutter
button
down
halfway
.
the
mode
dial
to
[
],
[
]
or
[
].
1
SmartMedia™
having
the
following
storage
capacity
can
be
used
on
your
camera.
current
as
of
March
2000)
feature.
The
last
cover
recorded
image
opens
frame
image
appears
appears
on
the
on
the
LCD
LCD
monitor.
monitor.
photography
is
finished,
check
the
images
record
the
selected
ones
to
SmartMedia™.
[TIME&DATE,
]
:
Erases
images
in
the
currently
selected
folder
and
folders.
Possible
number
of31)
shots
adapter,
beSet
sure
to
read
page
•
2x-speed
playback
is
performed
for
.
Make
sure
that
the
SmartMedia™
is
correctly
loaded.
(Ú
Page
by
one
frame.
Warning:
[•Memo
Av
]
Noise
:
OSD
Photography
increases
LANGUAGE
when
in
aperture-priority
will
the
not
ISO
be
is
reset.
changed
mode
to
(➲
higher
Page
settings.
63)
Backlit
portraits
IMPORTANT
[PROTECTED]
on
the
LCD
monitor,
cancel
the protection
( Page 108)
or
1remove
Press down
How
to
play
back
images
Page
80
1/60,
1/45,
1/30,
1/20,
1/10,
1/8,
1/6,
1/4,
1/3,
1/2,
monitor
for
photography.
AF
(auto-focus)
and
AE
(auto
exposure)
(➲
Additional
Information,
SET-UP
(the
P.
[English]
:109)
English
(default)
Ú
Pass
Set
out
mode
end
steps
of
dial
1the
to
to
shoulder
4[1/15,
either
]].LCD
or
inspeed-priority
[strap
“Photography
through
].
the
in
the
strap
Shutter
speed-priority
Mode”
isdisplayed
held
down.
the
duration
that
PC
mode
(mode
P.
121)
(at
size
and
2MBCarry
Set
/4MB/8MB/16MB/32MB/64MB/128MB
the
mode
dial
to
[isin
(all
3.3
types)
]•the
adjust
:]When
Erases
the
all
brightness
folders
recorded
of
the
on
the
monitor
SmartMedia™.
Page
[mode
Ú115
Self-timer
button
1 quality
•V
1-frame
feed
iscurrently
continued
for preset
the
The
aperture
value
and
the
shutter
speed
corresponding
to
that
[•To
Tv
:write-protection
Photography
shutter
(➲
Page
65)
halfway.
Zoom
state
bright
scenes
(such
and
highly
reflective
subjects
Photography
mode
•the
You
can
also
carry
out
step
8snowfields)
while
verifying
the
image
in Page
step
7.
DPOF
(in
Page
102).
Glossary)
start
to
function.
Sets
camera
settings
0”7,
1”,
1”5,
2”,
3”,
4”,
6”,
8”,
10”,
15”
•Very
Do
not
remove
orV)
load
the
batteries
or
disconnect
or
connect
the
AC
adapter
while
the camera
is mode.
on.1This
]65)
:POWER
Japanese
[value
[NORMAL]
:(3.3
Equivalent
toas
color
ISO100
POWER
button
Transfers
images
to
a(page
PC.separately
Carry
Set
Use
out
or
mode
steps
to
dial
select
1
to
to
2
[
the
“Manual
].
images
photographed
Settings”
(page
in
58).
the
multi
photography
You
can basic
also
connect
the
PC
card
adapter
and
floppy
disk
adapter
(Ú
123)
sold
to
transfer
SmartMedia™
Changing
the
LCD
monitor
display
Page
116
The
images
or
folders
are
erased,
and
the
camera
returns
to
the
is
held
down.
duration
that
are
displayed
on
the
LCD
monitor.
If
the
appropriate
(page
attachment
or
on
in
“Photography
the
camera.
in
the
Full
Manual
Mode”
67).
Press
the
button
to
turn
the
power
on.
full
manual
mode
(➲
Page
67)
[
M
]
:
Photography
in
Memo
Image
Quality
button
Press
the
MENU
button.
•[2X]
Shots
made
up
predominantly
of
sky
Even
if
photography
is
terminated
midway
before
capturing
three
images
by
releasing
the
shutter
•
If
you
take
a
photograph
after
erasing
an
image,
a
number
continuing
from
the
last
photographed
When
AF
or
AE
are
locked,
the
beep
tone
(➲
Page
111)
sounds
and
the
Use
or
to
change
the
setting
in
the
tab
menu,
2
Press
down
might
return
the
manual
settings
to
their
defaults.
If
this
happens,
manually
set
conditions
again.
(AUTO
POWER
OFF,
SOUND,
For
details,
refer
todisplay
the
Software
:connect
High-sensitive
equivalent
to preset
color
(default)
• Before
you
oreven
disconnect
the
AC
adapter,
be
sure
to turn
the
camera
OFF.
If the
ACManual.
adapter
is
Press
the
image
quality
button
to
select
the
combination
cannot
be
set
ifphotography
the
shutter
speed
isas
adjusted
toISO200
images to a
PC.
16MB
(SM-M1600D)/32MB
(SM-M3200D)/64MB
(SM-M6400D)/128M
(SM-M1280D)
The
respective
last
image
mode.
frame
appears
on
LCD
monitor.
You
can
also
select
the
image
by
the
same
operation
for
thumbnail
Page
83).
Carry
out
steps
1
to
on
page
109.
When
the
camera
is
turned
on,
set
the
mode
dial
to
the
desired
The
shutter
speed
and
the
aperture
value
corresponding
todisplay
the
Reverse
playback,
2x-speed
playback
All
descriptions
inor
this
Instruction
Manual
are
for
when
the
language
is (2set
to [ENGLISH].
Press
or
to
select
the
image.
button,
images
already
photographed
can
be
saved
and
erased
by playback
the
method.
image
is
assigned
as
the
image
number.
Shutter
button
Negative
(–)
Compensation
The
viewfinder
RECORDING
LED
turns
MENU
green.
is2
displayed.
•press
The
image
before
the
photograph
is
taken
is
slightly
less
clear
than
images.
(This
is fully.
TIME
&●
DATE,
OSD
LANGUAGE,
connected
disconnected
with
the
power
ON,
camera
settings
may
beabove
reset
(SET-UP
Ú Page
109,
and
ENTER.
[4X]
:
High-sensitive
photography
equivalent
to
color
ISO400
its
limit,
the
shutter
speed
is
displayed
in
red.
Photography,
Reverse
1-frame
feed
To
cancel
erasing
of
image
data,
select
[
]
and
press
ENTER.
Flash
button
quality
and
size,
while
viewing
the
indication
on
the
starts
a
reverse
•
The
press
of
mode.
shutter
speed
are
displayed
on
the
LCD
monitor.
If
the
appropriate
The
length
of
time
to
capture
images
varies
according
to
the
photographic
conditions.
•
Images
can
also
be
erased
in
the
thumbnail
mode.
In
this
case,
the
camera
enters
the
single
frame
Select
[SYSTEM
INFO.]
on
the
SETUP
MENU
and
because
television
displays
images
at
a
lower
resolution.)
•
Spotlit
subjects,
particularly
against
dark
backgrounds
VIDEO OUT,
QUALITY,
SYSTEM
Manual
Settings
Ú(FlashPath)
Page
58)
orPage
the
camera
malfunction.
however,
is
in
this
state.
feeds the
image
•may
Each
press
oftoinbegin
EXP.
].
To
cancel
changing
of
settings,
press
.you
Use
or
todial
select
the
frame
to
enlarge.
Press
the
or
Zoom
to
switch
select
[( S/C
].isphotography
21)
towards
“T”
playback.
Floppy
Disk
Adapter
]possible
is
selected,
[NO
IMAGE]
displayed
after
all
folders
When
playback.
Set
mode
in
the
to
[ sure
Tv
mode,
].the
or
press
or
the
shutter
button
fully
Before
photography,
make
that
the
lens
cap
has
been
2want
combination
cannot
be
set
even
ifflash
aperture
isin.black
adjusted
to its
playback)
mode,
and
enters
the
thumbnail
playback mode after the image is erased.
status
display.
]or
mode:
In
[[playback
Press
the
display/info
button.
Self-timer
photography
and]down
are
not
possible.
•the
The
display
unit
varies
according
to
the
output
system.
•theCopying
of (frame
printed
text
(white
characters
on
paper)
INFO.) Press
.playback
press
reverse
by
one
frame.
This
adapter
allows
SmartMedia™
to
be
used
as
3.5"
floppy
disk.
have
been
erased
(unless
the
SmartMedia™
contains
protected
You
can
also
select
the
image
by
the
same
operation
as
for
thumbnail
playback
( [4X],
PageISO
83).P.
Automatic
begins.
•
Playback
becomes
2x-speed
to
reduce
aperture
size.
Press
to
increase
aperture
size.
Press
camera
takes
a
picture.
Status
23)
The
manual
setting
removed
the
camera.
PO display
limit,
aperture
value
isbe
displayed
in
red.
Photography,
however,
Playback
mode
(Ú
P.
80)
the
[Scenes
M
]from
mode
tomenu
set
the
speed
to simultaneously
0.7
second
Manual
During
[2X],
the
ISO
will
automatically
set
between
ISO100
ISO200.
During
be
☞
To
set
the
quality
and
size
➲shutter
Page
112
•the
With
the
NTSC
system,
images
can
be
displayed
on the
LCD
monitor
and( Ú
TVwill
during
•photograpy
with
low
reflectivity,
such
as
shots
green
or
dark
foliage
Flash
state
Each
press
of
the
display/info
button
switches
the
display
•of1-frame
feed
isand
continued
for
the
WE
The
SYSTEM
INFO.
displayed.
reverse
for
the
duration
R
This
adapter
isplayback
inserted
into
the],
floppy
your
PC,
allowing
images).
The
viewfinder
LED
turns
redis
image
data
being
recorded
onto
Insert
the
adapter
connector
plug
into
the
DC
IN
Self-timer
lamp
values
are
displayed
Inlens
this
mode,
you can
select image
In
the
photography
modes
([while
[and ISO400.
]disk
oris
[ drive
]),on
the
photography
and
playback.
is
possible
inAC
this
state.
automatically
set
between
ISO100
is
held
down.
format
as
follows:
duration
that
Note:
The
larger
the
F
value,
the
smaller
the
aperture
size
become
or
longer.
•Press
Remove
and
insert
SmartMedia™
with
the
camera’s
power
turned
off.Aperture value
is
held
down.
that
To
quit
the
SETUP
MENU,
change
the
mode
dial
setting.
Shutter
speed
Adjust
the
zoom
ratio
by
the
Zoom
switch.
(Zoom
to
display
option
menu,
press
or
to
images
recorded
on
the
SmartMedia™
to
be
transferred
to
the
PC.
the
SmartMedia™.
Sets
video
output
system
according
to
country
in
which
your camera
isSize
used.
on
the
left
ofthe
the
LCD
playback,
copy,
size
change, only
compressio
Press
the
shutter
button
down
halfway
and
press
5V
terminal
on
the
camera.
extends
from
the
camera
body.
•the
PAL
system,
images
cannot
bethe
displayed
When
a cable
is connected,
and
versa.
1 situations
the
image
quality
button
switches
the
quality
and
size
Gently
insert
the
SmartMedia™
as
far
as
it, simultaneously.
can
go
✭❅❍❏
[Pressing
]vice
isWith
displayed
on
the
LCD
monitor.
Viewfinder
LED
•select
Recorded
data
may
bepress
erased
(destroyed)
in
the
listed
below.Viewfinder
Note that
Toshibaof developmen
White
Balance
Additional
Information,
Glossary
to
increase
shutter
speed.
Pressand
to
decrease
shutter
speed.
Press
Press
or
to
move
forward
reverse.
☞
➲
Memo
PRG
]
and
ENTER.
]
and
press
ENTER.
[
switch
Page
21)
protect
mode,
and
writing
✤❅▼❁❉●❅❄
1 Press down
TV
display
is
available.
monitor
screen.
When
the
camera
is
turned
on,
the
Auto
Power
OFF
function
Canceling
pause
IMPORTANT
settings
infully
the
following
order.
it
down
. system
✳▼❁■❄❁❒❄
★❉▲▼❏❇❒❁❍
✩❍❁❇❅
❏■●❙
2next
Press
or
to
select
the
item
you
desired
toMeaning
set,
Pause
with
the
SmartMedia™
electrodes
(metal
contacts)
Additional
Information,
Glossary)
[NTSC]
:allNTSC
(white
Corporation
accepts
no
responsibility
whatsoever
for
the
loss
of
recorded
data enters
in these
•Adapter
When
images
in
a
folder
are
erased,
that
folder
itself
is
also(destruction)
erased.
Quality
The
camera
determines
the
balance
by
averaging
the
various
kinds
of light
that actually
halfway.
AC
to
to
frame/
to“T”
go
back
one
❉■❆❏❒❍❁▼❉❏■
To
prevent
valuable
data
from
being
erased,
attach
the
write(printing)
•••advance
With
the
PAL
system,
images
are
played
back
with
apressing
black
frame
•frame
After
pause
is
cancelled,
playback
the
switch
to
the
will
the
image.
Pressing
ENTER
the
setting.
or
,, SmartMedia™
and
manual
Exposure
compensation
(➲
Page
69)
using
Colorthe
When
[Zoom
M
]selects
isis
selected
on
the
[ halfway
EXP.
]remove
option
menu,
orsurrounded.
makes
the
shutter
speed
setting
becomes
operational.
State
Never
open
the
SmartMedia™
cover
orenlarge
the
while
aninformation.
image
is
being
recorded.
This
or
and
manual
setting
(➲
Page
58)
or
film
speed
Exposure
compensation
(➲
Page
69)
using
Play
back
Reverse
procedure
“Loading
the
Batteries”
and
remove
the
batteries.
•facing
Pressing
the
shutter
button
down
adjusts
the
exposure,
• Playback
paused.
[PAL]
:for
PAL
system
( camera.
Additional
Information,
Glossary)
situations:
Built-in
microphone
the
lens.
This
setting
allows
you
to
set
in
advance
the
white
balance
when
taking
photographs
under
and
press
ENTER.
the
rear
of
the
For
the
US/Canada:
PDR-ACM1A
Holding
down
or
moves
forward
or
reverse
continuously.
Setting
1
Setting
2
Setting
3
resumes
at
the
last
state
that
was
2
protect
sticker
at
the
write-protect
area.
Data
can
no
longer
be
Press
Focus
area
may
corrupt
the
data
on
the
SmartMedia™
or
damage
the
SmartMedia™
itself.
possible,
but
does
not
make
the
exposure
compensation
possible. HoweverSelf-timer
the exposure
value
is down
To
return
normal
press
the
Zoom
switch
towards
setting
(➲toPage
Page
58)magnification,
or film
speed
setting
(➲
Page
78)
using
ENTER
Pass
the
shoulder
strap
through
the
loop
and
pull.
photography
setting
(➲
78)
using
ENTER
are
also
possible.
and
pressing
the
shutter
button
fully
takes
the
shot.
TM[ is down
When
the
SmartMedia™
used
incorrectly
by
the
user
or
a
third
party
[
],
]
or
[
]
AE
or
AF
are
locked
with
the
shutter
button
held
half
fully.
specific
lighting
conditions.
For
Europe:
PDR-ACM1E
active
before
the
pause.
Firmly
insert
the
SmartMedia
as
far
as
it
can
go.
displayed
on is
the
LCD
monitor.
(when shutter
button
Press
ENTER.
recorded
or setting
erased
from
SmartMedia™.
Toon
write
oraterase
data
from is to be recorded. Write-protect
Flash
Sets
the
color
mode
and
photographic
sensitivity
which
the
image
“W”.
are
also
possible.
The
default
is
different
depending
the
destination
country/area.
Use
or
to
select
the
desired
item
Press
ENTER,
images
displayed
simultaneously.
•[FIRMWARE
If
you
shoot
anine
when
preview
isversion
ON
(➲
Page
77),
1time
down.
If
no
isstill
carried
outare
forthe
ais fixed
amount
ofto
(default:
one minute),
ON
-operation
When
the
SmartMedia™
exposed
toset
static
electricity
orabout
electrical
noise
Auto
Photography
mode
( power
46)
Memo
Ú P. 41,
For
the
UK:
PDR-ACM1U
VER.]
:picture,
Displays
firmware
ofto
this
camera.
pressed
down
area
Stop
SmartMedia™,
peel
off
the
sticker.
camera
ready
to
take
photographs.
Warning:
Noise
increases
when
the
ISO
is
changed
higher
settings.
image
isis
displayed
and
a
white
frame
and
green
Green The
Compose
picture,
press
the
shutter
button
down
halfway,
and
press
it
down
[the
AW
]halfway)
:the
Automatic
adjustment
(default)
Thumbnail
Display
Page
83
recorded
image
is
displayed
on
for
about
two
]specifications
Standby
mode
[enlarged,
••-For
If
no
operation
is
carried
out
a screen
fixed
amount
offrom
time
(default:
about
1shutter
minute),
thewear.
power
is
turned
TM
consumption
is
set
to
its
minimum
state
(power
almost
off)
to
prevent
battery
This
is
.in
and
press
This
mode
enables
automatic
photography
When
the
SmartMedia™
isfor
removed
ordarkens
the
camera
isPage
turned
off
while
recording
erasing
The
image
the
LCD
monitor
sometimes
the
time
that
the
button
isdata,
pressed
down
Speaker
details,
refer
to
the
of
AC
information.
adapter
127.
[CARD
INFO.]
: on
Displays
the
SmartMedia
Playback
returns
to
the
start
ofturned
the
movie.
frame
are
displayed
the
LCD
monitor.
]
:
Photography
outdoors
[
Default
setting:
seconds.
off
to
preserve
battery
life.
This
is
called
“Auto
Power
OFF”.
To
return
to
the
normal
state,
press
the
fully.
➲
Page
40
in
accordance
with
the
photographic
called
the
Auto
Power
OFF.
This
setting
allows
you
to
set
the
time
when
the
camera
turns
off
halfway
until
the
image
becomes
focused.
[NORMAL]
: picture,
Equivalent
to
color
ISO100
(default)
data,
frame
advance
when
images
aredefaults.
being
played
back or during
formatting
of the
DC
IN
5V
The
options
are
displayed.
PO terminal
Histogram*
2
Stop
[RESET]
:
Returns
settings
to
their
Flashing
[
],
[
]
or
[
]
Self-timer
in
operation
at
a
handshake
alarm
.
W
Compose
the
press
the
shutter
button
down
halfway,
and
press
itdirectly
down
The
white
frame
indicates
the
entire
image,
while
the
green
frame halfway,
ER
[[2X]
]POWER
:the
Photography
in
cloudy
conditions
button
again.
ENTERCompose
• The
viewfinder
LED
turns
red
while
image
data
is
being
recorded
picture,
press
the
shutter
button
press
down
• The
To
set
the
focus
or
exposure
for
a subject
outside
the
center
ofdown
the intended
point
the
The
camera
takes
the
picture.
automatically.
This
function
is
not
activated
during
automatic
playback
( image,
Pageand
85)
or
incamera
the it
[ only>
] PC
:appearing
High-sensitive
photography
equivalent
to
color
ISO200
SmartMedia™.
Note:
image
through
the
lens
will
be
The
display
returns
toconditions.
thumbnail
playback.
<Standard>
<Detailed
information>
<Histogram>
<Image
✭❅❍❏
shows
the
location
of
the
currently
enlarged
area.
halfway,
and
press
it
down
fully.
➲
Page
40
Macro
photography
]
:
Photography
in
bluish
fluorescent
light
[
fully.
➲
Page
40
Setting
1
:
About
the
Auto
★★
Power
(FULL
OFF
★★
Function
)
Ú
Additional
Information,
“AUTO
POWER
OFF
(page
110)”
+
at
the
subject
or
desired
exposure
(lighting),
press
and
hold
the
shutter
button
halfway.
Now,
with
the
shutter
onto
the
SmartMedia™.
Intoanother
this
mode,
the
exposure
(combination
ON]
Writing
to SmartMedia™
in progress
mode.
Press
ENTER.
[4X]
:adapter
High-sensitive
photography
equivalent
color
ISO400
•Insert
We
recommend
copying
and
saving
important
datapower
onto
storage
medium
(floppy
disk,
hard
displayed
for
[LCD
].[Power
fully.
➲
Page
40
the
AC
power
plug
into
the
Electrodes
Pressing the
The
default
size
and
quality
of
the
image
can
be
reset
to
the
desired
combination.
Press
ENTER.
Memo
Sticker
button
still
held
halfway
down,
you
can
turn
the
direction
of
the
camera
and
frame
your
image
with
the
focus
•
It
is
possible
to
play
back
any
images
in
any
folders
by
pressing
or
during
playback.
(For
details
ON
Increases
the
volume.
[disk,
] MO
: Photography
inafter
reddish
fluorescent
light
The
camera
takes
the
picture.
Photographs
can
be
taken,
however,
do not
turn thepress
power
OFF.
shutter
speed
and
aperture)
is automati
To
return
topower
the
state
theset
Auto
Power
OFF
has
been
executed,
the
POWER
button
disk,
etc.).
The
PREVIEW
manual
setting
Page
items
77
are
displayed.
Remaining
battery
➲normal
camera
takes
the
picture
at
the
exposure
time.
Zoom
switch
to
“T”
Current
Entire
image
and
exposure
locked.
Press
the
shutter
button
down
fully
to
complete
capturing
of
the
image.
Red outlet.
[☞
]
is
displayed
on
the
LCD
monitor.
The
camera
is
ready
for
burst
photography.
of
folder
Page
92)
mode:
In
the
Accessing
ofthe
SmartMedia™
inorprogress
[ (HALF
Photography
in] is
incandescent
light
[Never
Setting
2remove
: ]:the
★★
controlled
toPC/AV
facilitate
photography.
• ][When
shutter
speed
set
to
a)turn
speed
of
0.7 second
slower,
photographs
taken
as
extended
terminal
to
turn
the
on★★
again.
•During
the
SmartMedia™
or
camera
off
while
data
or are
while
erasing
data
COLOR
Page
77
➲
the
exposure,
the
viewfinder
LED
turns
orange.
position
Pressing the
• Pressing
Moving
the
as
you
press
the
shutter
button
will
result
inrecording
a blurred
, power
,the
or
to
select
the
area
to
enlarge.
at Page
the
last
image
displays
the
first
image,
and
pressing
atimage.
thebe
firstautomatically
image
displays
the
During
[2X],
ISO
be
automatically
set
to
ISO200.
During
[4X],
will
setof
exposures
(camera
68).
IfUse
burst
photography
is to
set
the
shutter
speed
is set
to
athe
speed
ofISO
0.7
second
or more
in the
[ to
Tv ]
➲
Decreases
the
volume.
Carry
out
steps
1will
2when
in
“Basic
Photographic
(SmartMedia™
formatting).
These
actions
might
damage
SmartMedia™.
ISO
Page
78
➲
Flashing
It
takes
about
twice
the
set
time
to
complete
taking
the
photograph
due
to
processing
of
the
captured
[
],
[
]
When
the
image
is
not
in
focus.
Close
the
SmartMedia™
cover.
Zoom switch
to
“W”
Memo
•
The
PDR-M81
uses
an
accurate
auto
focus
mechanism.
However,
the
PDR-M81
may
have
difficulty
enlargement
last
image.
Adjust
the
display
area
to
enlarge
while
viewing
the
white
and
Slow
shutter
speed
warning
[1 MINUTE]
(default)
ISO400.
Shutter
speed
• In
AEB
photography
(
Page
71)
or
burst
photography,
the
shutter
speed
cannot
be
set
to
0.7
second
or
longer.
Setting
3
:
★★
(SMALL
★★
)
➲
mode,
the
shutter
speed
is
automatically
changed
to
1/2
second.
Lens
•
Use
only
the
SmartMedia™
specified
for
use
with
the
PDR-M81.
The
use
of
other
SmartMedia™
SHARPNESS
Page
79
mode)”
(page
109).
Select
[QUALITY]
Settings
(
focusing
or
not
be
able
to
focus
at
all
for
subjects
and
situations
such
as
the
following:
➲
image.
Before
you
use
aother
new
SmartMedia™
the
first during
time,
be
sure
tothe
Manual
Photography
mode
( [P.isspeed
58)
Images
can
bevalue
rotated
by] pressing
playback.
Movie mode
(•••Ú
P.
75)
Ú
Difference
between
[PRG]
and
[ for
] or
green
frames.
[2 MINUTES]
the
aperture
is
to
F2.9
(maximum
aperture
size),
increased
restricted
[shutter
PRG
] speed
]
If
a
mode
than
[ set
suppressed
flash
mode
is
set
inthe
flash
photography,
thedark
shutter
is
Function
•compensation
Processing
image
Aperture
Exposure
- Manually
When
subject
is distant
and
- SmartMedia™
Subjects
moving
at
high
speed
could
damage
camera.
CONTRAST
Page
79
➲[the
• to
The
write
protection
may
not
function
if in
write-protect
sticker
becomes
dirty.
Use
a soft
dry cloth
to
.thesecond.
on
the
SETUP
MENU
and
press
format
the
(Ú
Page
91).
sets
balance,
exposure,
Takes short
Movies
for
rotates
an
image
counterclockwise,
and
pressing
rotates
clockwise.
Pressing
1/750
PDR-ACM1A
] •playback
are
the
same
as
to
PDR-ACM1E
PDR-ACM1U
[PRG]
and
limited
tosecond.
between
1/2
second
and
1/250
* The
aboveitwhite
menu
is
the
RECORDING
[3 MINUTES]
Charging
of
flash
progress
ON
Continuous
photography
O
~
When
there
are
objects
in
front
of
or
behind
the
subject
Very
shiny
subjects
such
as
a
mirror
or
car
body
•Press
SmartMedia™
is
aof
device.
Do do
notaperture
bend,
drop,
or subject
SmartMedia™
to and AE
DIGITAL
ZOOM
Page
•or
When
the
camera
isOnce
not79
inelectronic
be sure
to attach
the
lens
cap
provided
with[your
camera.
the
POWER
button
to
turn
the
power
off.
✭❅❍❏
wipe
away
any
dirt.
ause,
sticker
ispress
peeled
off,
not
reuse
it.
➲
value,
shutter
speed
onOrange
camera
The
QUALITY
menu
isprecision
displayed.
combinations
the
automatically
mode.
MENU
inthe
•the
The
aperture
value
set
differ
to
the
actual
value
according
to
the
position
ofUK)
the
lens.
To
return
to
the
regular
display,
ENTER.
(Photos
cannot
be
taken
at
this
moment.)
(for
US
and
Canada)
If the
shutter
speed
is
set
to
1/350
second
or
less,
the
shutter
(such
as
speed
an
animal
is
automatically
athe
cage
orzoom
a]changed
person
in
front
to 1/250
of a tree)
(for
European
Continent)
(for
Get
ready
to
take
the
photograph.
-computer.
Extremely
low
contrast
subjects
When
the
above
settings
are
made,
they
are
displayed
in
the
following
order.
Exposure
Compensation
Memo
O
~
DC
IN
5V
terminal
excessive
Also,
do
carry
SmartMedia™
the
pocket
ofx[trousers.
This
might
The
lens
cap
can
also
benot
attached
to
attachment
following
the
above
steps
to prevent
it’sthe
LCD
79
➲shocks.
The
power
turns
off.
Memo
(auto-exposure)
position.
determined
shutter
speeds
and
aperture
-in
Subjects
with
little
reflection,
such
as
hair
fur mode.
•• The
size
displayed
on
the
LCD
monitor
(320
240)
HALF
(160
xorsubject
120).
The
]becomes
forced
flash
mode
or
]orred-eye
forced
second
ifPage
the
flash
setting
is25)
changed
tothe
thestrap
[ AEB
- image
Subjects
that
have
low contrast
and
merge
into
Loading
the
batteries
(➲
Page
and
the
SmartMedia™
(➲FULL
Page
31)
into
the
camera.
O
~flash
being
lost.
• Flash
photography
and
burst
photography
are
not
possible.
Flashing
SmartMedia™
to excessive
force
when
sit
down,
the
SmartMedia™.
Hardware
malfunction
- damaging
Subjects
with
no
solidity,
such
as smoke
or
flames
the
background
(such
as
white
walls
oryou
subjects
Attach
the
lens
cap
when
you
are
not
using
the
camera.
values.
However,
their
operation
capability
movies
made
in
FULL
size
is
displayed
on
the
entire
LCD
monitor,
and
those
made
in HALF
size
is
If
the
[
]
forced
flash
or
[
]
red-eye
forced
flash
mode
is
set
in
flash
photography
when
the
•
In
movie
mode,
ISO
will
be
automatically
set
between
ISO100
and
ISO400
regardless
of
its
setting.
* •Use
Histogram
metering
O, and
~ or
dressed
inthe
theSmartMedia™
same
color
as
the
background)
-attach
Subjects
viewed
through
glass
Turn
offor
the
power
tothe
retract
the
lens
unit,
and Spot
then
the
lens
cap.
The
image
taken
in
exposure
photography
mode
may
be
blurred.
or
to
select
the
desired
setting
from
the
tab
menu
press
★★
★★
★★
Do•not
use
store
in
environments
likely
to
be
affected
byisstatic
electricity
is
different
as
shown
in
the
right
table.
displayed
in
center
ofspeed
the
screen.
2
shutter
speed
is
set
to
a
of
0.7
second
or
more,
the
shutter
speed
automatically
changed
to
Press
POWER
button
tothe
turn
power
on.subject.
A electrical
histogram
isturn
a graphic
representation
ofthe
theistones
of the
The horizontal
White
balance
Otheaxis
~ histogram
• Do
If the
the
image
cannot
be
focused,
thelens
focus
automatically
fixedsetting
to infinity.
(When
flashofisthe
necessary
not
the
power
on
with
cap
attached.
Memo
noise.
1/2
second.
ENTER.
*the
The
above
AC adapter
is US/Canada
Turning
the
Power
On
➲
Page
38
☞
shows
the
brightness
(increasing
brightness
from
left
to
right)
and
vertical
axis
shows
the
number
at
this
time,
it
is
simultaneously
fixed
to
illuminate
objects
1.5
meters
(five
feet)
away.
During
macro
•This
Dosaves
use
orsettings,
store
SmartMedia™
very
hot,
humid
oraperture
corrosive
If the
shutter
speed
value
isimages,
set toin1/1000
second,
the
value
is limited
to
F8type
andAC
F3.4.
•• not
When
playing
back
movie
switching
isthe
between
standard
and
image
only.
(O
:environments.
possible
Xbetween
: not
the
and
returns
to
RECORDING
MENU.
type.
European
andpossible)
UK
photography,
the flash
islevel.
alignedthe
withdisplay
the wide
position.)
of pixels
at each brightness
Downloaded From
camera-usermanual.com
adapters differ in shape.
--110
20 -40
80
88
Photography in the Aperture-priority Mode
or
to select [ EXP. ].
Press
to display option menu, press
select [ Av ] and press ENTER.
to
Erasing
Images
Pressing ENTER selects the setting.
or
Playing
Back Images
Press
Taking
Photographs
Carry out steps 1 to 2 in “Manual Settings” (page 58).
Getting
Ready
In this mode, photographs are taken with the priority given to aperture. The camera automatically sets the shutter
speed according to the aperture.
A small aperture value produces a portrait photo with an out-of-focus background. The smaller the aperture value,
the more out-of-focus the background becomes.
A large aperture value produces sharp images on both close objects and distant objects like landscapes. The
larger the aperture value, the larger the area for sharp images.
Handy
Functions
Press ENTER.
Other
Applications
The camera is ready to take photographs.
Additional
Information
Downloaded From camera-usermanual.com
- 63 -
Changing
the
Preset
Conditions
(RECORDING
MENU)
Photography
in
the
Program
Mode
Setting
Names
Playing
Back
the
of
Photographed
Parts
Image
Size
and
Quality
(Single-Frame
Playback)
Extended
Exposure
Photography
(Bulb
Photography)
Erasing
Images
(Erase
Frame)
(continued)
Manual
Attaching
Using
How
Taking
Enlarging
Playback
About
Turning
to
Photographs
the
SmartMedia™
Press
Settings
the
Photographed
of
Power
the
Power
Multi
Shoulder
Continuously
Outlet
Shutter
Image
On/Off
Images
Strap
Pictures
Button
(Zoom
(Burst
Playback)
Photography)
Taking
Erasing
Button
Photographs
Folders
and
(All
LCD
Images
Continuously
Monitor
in
aImages
Folder/All
(Burst
Display
Photography)
Folders)
(In
Playback
(continued)
(continued)
Mode)
Definitions
Separately
of
the
Accessories
Color
of
the
Viewfinder
LED
Taking
and
Playing
Back
Photographs
on
aMode
TV
(continued)
Changing
the
Preset
Conditions
(RECORDING
MENU)
(continued)
Exposure
Compensation
in
the
Shutter
(continued)
Speed-priority
(continued)
About
Basic
Settings
SmartMedia™
in
(Sold
the
mode)
Aperture-priority
(continued)
Mode
(continued)
LCD
Monitor
Display
(during
photography)
(continued)
Manual
Settings
(continued)
Playing
Photography
Installing
Back
Movies
batteries
(Auto
Photography)
(continued)
(continued)
(continued)
Names
of
Parts
(continued)
Getting
Ready
The shutter
camerabutton
automatically
adjusts the
shutter
and
the aperture
value
according
to the
brightness
of an
can be pressed
down
in twospeed
stages:
halfway
down and
fully
down. When
pressed
halfway
down,
This
“SmartMedia™”
Set
Play
Automatically
The
the
following
mode
shoulder
menu
back
size
photographed
is(number
used
for
items
strap
plays
setting
isadapter
for
athe
is
are
back
storage
of
taking
handy
also
the
pixels)
still
the
basic
available
subjects
for
medium
images
16
and
carrying
images
settings
quality
one
for
that
as
saving
separately
your
image
to
require
(compression
be
camera
used
images
atseveral
a
sold
for
around.
inthat
photography
items.
ratio)
seconds
the
you
multi
of
have
the
photography
to image
photograph
in
photographed.
to
[ pause
be
mode
],photographed.
such
[be
Even
in
asquick
]for
firework
or
if Europe,
the
[You
succession.
camera’s
displays
] photography
power
at the
Enlarges
selected
portions
of
images
being
played
back
at
two
levels.
Images
can
displayed
enlarged
when
In
You
this
can
color
mode,
manually
of
the
photographs
viewfinder
adjust
settings
are
LED
taken
indicates
such
continuously
asphotographed
the
exposure
state
atof
control,
atime.
the
maximum
camera.
white
speed
balance,
The
ofthe
0.8
metering
second
system,
intervals.
continuous
This
item
switches
display
on
the
LCD
monitor
when
playing
back
photographed
images.
can
switch
If
you
the
AC
(sold
separately:
PDR-ACM1A
for
the
US/Canada,
PDR-ACM1E
PDR-ACM1U
During
stopping
During
Mode
Effective
dial
Subjects
and
Set
Values
During
playback
TM
✶❉❅◗❆❉■❄❅❒
✬✥✤
Press
.of
aperture
value.
SYSTEM
Turning
Exposure
ISO
OSD
In
[prevent
[use
LANGUAGE
the
]the
INFO.
mode
control
(EXP.)
On
Close
the
SmartMedia™
cover.
Slide
the
SmartMedia
cover
release
knob
in
the
Take
photographs
or
or
battery
to
to
select
or
play
[that
the
slide
]them
or
shutter
it
[ the
back.
,]will
and
speed.
and
lock
press
Look
Use
through
to
select
the
[adjust
viewfinder
]use
and
press
to
compose
ENTER.
the
picture.
To
continue
erasing
images,
repeat
the
above
procedure
2.
.is
AF
(auto-focus)
and
AE
(auto
exposure)
are
set.
When
pressed
fully
down,
the
camera
takes
aspace
picture.
object.
This
mode
enables
carefree
photographing
similarly
to
selecting
[stable
]photographs.
in
[ from
]settings”,
mode.
Itrepeatedly
is
to
night.
To
is
Change
modes.
turned
When
the
OFF,
your
setting
using
the
camera
images
this
according
mode,
from
saved
dropping
be
to
sure
how
on
the
the
to
during
SmartMedia™
image
a(size,
photography,
tripod
is
to
to
be
keep
used
not
hang
the
and
be
camera
erased.
the
the
shoulder
remaining
SmartMedia™
strap
and
amount
prevent
around
can
ofstep
your
distortion
be
neck.
inpossible
the
of
images.
Relationship
between
your
camera
and
accessories
Connecting
tocalled
Other
Devices
(page
123)
being
played
back
one
image
at
acover,
time.
The
meaning
maximum
of
number
LED
color
of
photographs
differ
according
can
to
be
taken
mode
continuously
dial
setting.
three
photography
mode,
and
take
photographs
at
these
settings.
These
are
“Manual
which
are
saved
display
to
show
aPower
list
detailed
information
compression
ratio,
shutter
speed,
aperture,
etc.)
or
you
can
for
the
UK)
in
a
room
with
amay
power
outlet,
you
can
take
photographs
for
an
extended
period
of
time.
This
also
Mode
dial
1 Item
QUALITY
2 Options
Notes
SmartMedia™
VIDEOon
OUT
White Balance (W.B.)
Write
Protection
Removing
the Batteries
ISO
[ POWER
]
AUTO
OFF
Setting items
Turning
the
Power
Off
Using
the
LCD
Monitor
Additional
Information
Other
Applications
Handy
Functions
Erasing
Images
Playing
Back Images
Taking
Photographs
Tab menu
feed
●
Positive
(+)
Compensation
The
tab
is
displayed.
setting
isbattery
as
follows:
Make
sure
that
the
issystem
firmly
closed.
Details
image
ofmenu
operation
isrange
saved
are
or
erased,
the
same
and
as
the
taking
camera
photographs
is
then
ready
and
to
playing
take
photographs.
them
back
onon
the
LCD After
monitor.
If
you
use
the
viewfinder
to
take
photographs,
the
photography
Set
the
mode
to
[cover
].settings
direction
of
the
arrow
to
open
cover
.1-frame
ENTER.
change
the
white
and
the
metering
in(the
program
mode.
erased
SmartMedia™.
and
reused.
For
details
on
these
accessories,
refer
to
the
Instruction
Manual
for
the
accessory
you
are
using.
(information
Movies
images
in
the
multi
mode
Page
cannot
be
displayed
using
the
zoom
playback
Images
even
if the
are
camera
not
recorded
is
turned
directly
off.
SmartMedia™
but
are
stored
temporarily
within
the
buffer
memory.
display
histograms,
etc.
prevents
failed
photographs
due
to
battery
wear
or
failed
of
data
to
a
PC.
details
handling
the AC
2x-speed
playback
Set
Sets
[•✭❅❍❏
PRG
the
thebalance
whether
color
] photographed
:(/or
Photography
mode
language
not
to
and
return
photographic
of
in
menus
the
program
displayed
sensitivity
in
the
(default)
on
SETUP
the
at51)
which
LCD
(➲
MENU
Page
monitor.
the
to
image
62)
the
original
is For
to
be
factory
recorded.
settings.
For
enlarged
view
P.dial
22)
feeds
the
image
•transfer
Each
press
of
2
Copying
of
printed
(black
characters
on
white
paper)
set
the
time
(text
114)
F8
/display
F6.8
F5.6
/18.
F4.8
/Page
F4.0
/and
F3.4
/mode
F2.9
How
to
take
photographs
Page
41
1/1000,
1/750,
1/500,
1/350,
1/250,
1/180,
1/125,
1/90,
range
may
differ
from
the
actual
image.
In
this
case,
use
the
LCD
Press
the
shutter
button
down
halfway
.
the
mode
dial
to
[
],
[
]
or
[
].
1
SmartMedia™
having
the
following
storage
capacity
can
be
used
on
your
camera.
current
as
of
March
2000)
feature.
The
last
cover
recorded
image
opens
frame
image
appears
appears
on
the
on
the
LCD
LCD
monitor.
monitor.
photography
is
finished,
check
the
images
record
the
selected
ones
to
SmartMedia™.
[TIME&DATE,
]
:
Erases
images
in
the
currently
selected
folder
and
folders.
Possible
number
of31)
shots
adapter,
beSet
sure
to
read
page
•
2x-speed
playback
is
performed
for
.
Make
sure
that
the
SmartMedia™
is
correctly
loaded.
(
Page
by
one
frame.
Warning:
[•Memo
Av
]
Noise
:
OSD
Photography
increases
LANGUAGE
when
in
aperture-priority
will
the
not
ISO
be
is
reset.
changed
mode
to
(➲
higher
Page
settings.
63)
Backlit
portraits
IMPORTANT
[PROTECTED]
on
the
LCD
monitor,
cancel
the protection
( Page 108) or
remove
How
to
play
back
images
Page
80
1/60,
1/45,
1/30,
1/20,
1/10,
1/8,
1/6,
1/4,
1/3,
1/2,
monitor
for
photography.
AF
(auto-focus)
and
AE
(auto
exposure)
(➲
Additional
Information,
SET-UP
(the
P.
[English]
:109)
English
(default)
Pass
Set
out
mode
end
steps
of
dial
1the
to
to
shoulder
4[1/15,
either
]].LCD
or
inspeed-priority
[strap
“Photography
through
].
the
in
the
strap
Shutter
speed-priority
Mode”
isdisplayed
held
down.
the
duration
that
PC
mode
(mode
P.
121)
2MBCarry
Set
/4MB/8MB/16MB/32MB/64MB/128MB
the
mode
dial
to
[isin
(all
3.3
types)
]•the
adjust
:]When
Erases
the
all
brightness
folders
recorded
of
the
on
the
monitor
SmartMedia™.
Page
115
[mode
Self-timer
button
1
•V
1-frame
feed
is continued
for the
The
aperture
value
and
the
shutter
speed
corresponding
to
[•To
Tv
:write-protection
Photography
shutter
(➲that
Page
65)
Zoom
state
bright
scenes
(such
and
highly
reflective
subjects
Photography
mode
•the
You
can
also
carry
out
step
8snowfields)
while
verifying
the
image
step
7.
DPOF
(in
Page
102).
Glossary)
start
to
function.
0”7,
1”,
1”5,
2”,
3”,
4”,
6”,
8”,
10”,
15”
•Very
Do
not
remove
orV)
load
the
batteries
or
disconnect
or
connect
the
AC
adapter
while
the camera
is mode.
on.1This
]65)
:POWER
Japanese
[value
[NORMAL]
:(3.3
Equivalent
toas
color
ISO100
button
Carry
Set
Use
out
or
mode
steps
to
dial
select
1
to
to
2[erased,
the
“Manual
].
images
photographed
Settings”
(page
in
58).
the
multi
photography
You POWER
can also
connect
the
PC
card
adapter
and
floppy
disk
adapter
( in
123)
sold
separately
to transfer
SmartMedia™
Changing
the
LCD
monitor
display
Page
116
The
images
or
folders
are
and
the
camera
returns
toPage
the
is
held
down.
duration
that
are
displayed
on
the
LCD
monitor.
If
the
appropriate
(page
attachment
or
on
in
“Photography
the
camera.
in
the
Full
Manual
Mode”
(page
67).
Press
the
button
to
turn
the
power
on.
full
manual
mode
(➲
Page
67)
[
M
]
:
Photography
in
Image
Quality
button
Press
the
MENU
button.
•[2X]
Shots
made
up
predominantly
of
sky
Even
if
photography
is
terminated
midway
before
capturing
three
images
by
releasing
the
shutter
•
If
you
take
a
photograph
after
erasing
an
image,
a
number
continuing
from
the
last
photographed
When
AF
or
AE
are
locked,
the
beep
tone
(➲
Page
111)
sounds
and
the
Use
or
to
change
the
setting
in
the
tab
menu,
might
return
the
manual
settings
to
their
defaults.
If
this
happens,
manually
set
conditions
again.
:connect
High-sensitive
equivalent
to preset
color
(default)
• Before
you
oreven
disconnect
the
AC
adapter,
be
sure
to turn
thedisplay
camera
OFF.
If the
AC adapter is
Press
the
image
quality
button
to
select
the
combination
cannot
be
set
ifphotography
the
shutter
speed
isas
adjusted
toISO200
images to a
PC.
16MB
(SM-M1600D)/32MB
(SM-M3200D)/64MB
(SM-M6400D)/128M
(SM-M1280D)
The
respective
last
image
mode.
frame
appears
on
LCD
monitor.
You
can
also
select
the
image
by
the
same
operation
for
thumbnail
Page
83).
Carry
out
steps
1
to
on
page
109.
When
the
camera
is
turned
on,
set
the
mode
dial
to
the
desired
The
shutter
speed
and
the
aperture
value
corresponding
todisplay
the
Reverse
playback,
2x-speed
playback
All
descriptions
inor
this
Instruction
Manual
are
for
when
the
language
is (2set
to [ENGLISH].
Press
or
to
select
the
image.
button,
images
already
photographed
can
be
saved
and
erased
by playback
the
method.
image
is
assigned
as
image
number.
Shutter
button
●
Negative
(–)
Compensation
The
viewfinder
RECORDING
LED
turns
MENU
green.
is2
displayed.
•press
The
image
the
photograph
is
taken
is
slightly
less
clear
than
images.
(This
is 109,
connected
disconnected
with
the
power
ON,
camera
settings
may
beabove
reset
(SET-UP
Page
and
ENTER.
:before
High-sensitive
photography
equivalent
to
color
ISO400
its
limit,
the
shutter
speed
isthe
displayed
inthe
red.
Reverse
1-frame
feed
To [4X]
cancel
erasing
of
image
data,
select
[monitor.
]Photography,
and
press
ENTER.
Flash
button
quality
and
size,
while
viewing
indication
on
the
starts
a
reverse
•
The
press
of
mode.
shutter
speed
are
displayed
on
the
LCD
If
the
appropriate
The
length
of
time
to
capture
images
varies
according
to
the
photographic
conditions.
•
Images
can
also
be
erased
in
the
thumbnail
mode.
In
this
case,
the
camera
enters
the
single
frame
Select
[SYSTEM
INFO.]
on
the
SETUP
MENU
and
because
television
displays
images
at
a
lower
resolution.)
•
Spotlit
subjects,
particularly
against
dark
backgrounds
Manual
Settings
Page
58)
or
the
camera
may
malfunction.
however,
is
possible
in
this
state.
feeds
the
image
•
Each
press
of
EXP.
].
To
cancel
changing
of
settings,
press
.
Use
or
to
select
the
frame
you
want
to
enlarge.
Press
the
or
Zoom
to
switch
select
[
(
S/C
Page
].
21)
towards
“T”
to
begin
playback.
Floppy
Disk
Adapter
(FlashPath)
] mode:
is
selected,
[NO
IMAGE]
isaperture
displayed
after
allor
folders
When
playback.
Press
Set
mode
dial
inbe
the
to
[ sure
Tv
mode,
].the
or
press
in
the
shutter
button
fully
Before
photography,
make
that
the
lens
cap
has
been
2onisin.black
combination
cannot
set
even
ifflash
adjusted
to its
playback)
mode,
and
enters
the
thumbnail
playback
mode after the image is erased.
status
display.
]or
In
[[playback
Press
the
display/info
button.
Self-timer
photography
and]down
photography
are
not
possible.
•the
The
display
unit
varies
according
to
the
output
system.
•theCopying
of (frame
printed
text
(white
characters
paper)
.
press
reverse
by
one
frame.
This
adapter
allows
SmartMedia™
to
bespeed
asto
3.5"
floppy
disk.
have
been
erased
(unless
the
SmartMedia™
contains
protected
You
can
also
select
the
image
by Press
thein
same
operation
as
for
thumbnail
playback
( display
PageISO
83).will23)
Automatic
playback
begins.
•[2X],
Playback
becomes
2x-speed
to
reduce
aperture
size.
toused
increase
aperture
size.
Press
camera
takes
a
picture.
The
manual
setting
removed
the
camera.
limit,
aperture
value
isbe
displayed
red.
Photography,
however,
Playback
mode
( Status
P.
80)
the
[Scenes
M
]from
mode
to
set
the
0.7
second
Manual
During
the
ISO
will
automatically
set
between
ISO100
ISO200.
During
[4X],
be
☞
To
set
the
quality
and
size
➲shutter
Page
112
•the
With
the
NTSC
system,
images
can
be
displayed
simultaneously
on the
LCD
monitor
and( TVP.
during
•photograpy
with
low
reflectivity,
such
as
shots
green
or
dark
foliage
Flash
state
Each
press
of
the
display/info
button
switches
the
display
•of1-frame
feed
isand
continued
The
SYSTEM
INFO.
menu
displayed.
reverse
for
the
duration
This
adapter
isplayback
inserted
into
the],
floppy
your
PC,
allowing for the
images).
The
viewfinder
LED
turns
redis
image
data
being
recorded
onto
Insert
the
adapter
connector
plug
into
the
DC
IN
Self-timer
lamp
values
are
displayed
In
the
photography
modes
([while
[and ISO400.
]disk
oris
[ drive
]),on
the
lens
photography
and
playback.
is
possible
inAC
this
state.
automatically
set
between
ISO100
is
held
down.
format
as
follows:
duration
that
Note:
The
larger
the
F
value,
the
smaller
the
aperture
size
become
or
longer.
•Press
Remove
and
insert
SmartMedia™
with
the
camera’s
power
turned
off.Aperture value
is
held
down.
that
To
quit
the
SETUP
MENU,
change
the
mode
dial
setting.
Shutter
speed
Adjust
the
zoom
ratio
by
the
Zoom
switch.
(Zoom
to
display
option
menu,
press
or
to
images
recorded
on
the
SmartMedia™
to
be
transferred
to
the
PC.
the
SmartMedia™.
Sets
video
output
system
according
to
country
in
which
your camera
isSize
used.
on
the
left
ofthe
the
LCD
Press
the
shutter
button
down
halfway
and
press
5V
terminal
on
the
camera.
extends
from
the
camera
body.
•the
PAL
system,
images
cannot
bethe
displayed
When a cable
is connected, only
and
versa.
1 situations
the
image
quality
button
switches
the
quality
and
size
Gently
insert
the
SmartMedia™
as
far
as
it, simultaneously.
can
go
✭❅❍❏
[Pressing
]vice
isWith
displayed
on
the
LCD
monitor.
Viewfinder
LED
•select
Recorded
data
may
bepress
erased
(destroyed)
in
the
listed
below.Viewfinder
Note that Toshiba
White
Balance
Additional
Information,
Glossary
to
increase
shutter
speed.
Pressand
to
decrease
shutter
speed.
Press
Press
or
to
move
forward
reverse.
☞
➲
Memo
PRG
]
and
ENTER.
]
and
press
ENTER.
[
switch
Page
21)
✤❅▼❁❉●❅❄
TV
display
is
available.
monitor
screen.
When
the
camera
is
turned
on,
the
Auto
Power
OFF
function
Canceling
pause
settings
infully
the
following
order.
it
down
. system
✳▼❁■❄❁❒❄
★❉▲▼❏❇❒❁❍
✩❍❁❇❅
❏■●❙
2next
Press
or
to
select
the
item
you
desired
toMeaning
set,
Pause
with
the
SmartMedia™
electrodes
(metal
contacts)
Additional
Information,
Glossary)
[NTSC]
:allNTSC
(white
Corporation
accepts
no
responsibility
whatsoever
for
the
loss
of
recorded
data enters
in these
•Adapter
When
images
in
a
folder
are
erased,
that
folder
itself
is
also(destruction)
erased.
Quality
The
camera
determines
the
balance
by
averaging
the
various
kinds playback
of light
that actually
AC
to
to
frame/
to“T”
go
back
one
❉■❆❏❒❍❁▼❉❏■
To
prevent
valuable
data
from
being
erased,
attach
the
write•••advance
With
the
PAL
system,
images
are
played
back
with
apressing
black
frame
•frame
After
pause
is
cancelled,
the
switch
to
the
will
the
image.
Pressing
ENTER
the
setting.
or
,, SmartMedia™
and
manual
Exposure
compensation
(➲
Page
69)
using
Colorthe
When
[Zoom
M
]selects
isis
selected
on
the
[ halfway
EXP.
]remove
option
menu,
orsurrounded.
the
shutter
speed
setting
becomes
operational.
State
Never
open
the
SmartMedia™
cover
orenlarge
the
while
anmakes
image
is
being
recorded.
This
or
and
manual
setting
(➲
Page
58)
or
film
speed
Exposure
compensation
(➲
Page
69)
using
Play
back
Reverse
procedure
“Loading
the
Batteries”
and
remove
the
batteries.
•facing
Pressing
the
shutter
button
down
adjusts
the
exposure,
• Playback
paused.
[PAL]
:for
PAL
system
( camera.
Additional
Information,
Glossary)
situations:
Built-in
microphone
the
lens.
This
setting
allows
you
to
set
in
advance
the
white
balance
when
taking
photographs
under
and
press
ENTER.
the
rear
of
the
For
the
US/Canada:
PDR-ACM1A
Holding
down
or
moves
forward
or
reverse
continuously.
resumes
at
the
last
state
that
was
protect
sticker
at
the
write-protect
area.
Data
can
no
longer
be
Focus
area
may
corrupt
the
data
on
the
SmartMedia™
or
damage
the
SmartMedia™
itself.
possible,
but
does
not
make
the
exposure
compensation
possible. HoweverSelf-timer
the exposure
value
is
To
return
normal
press
the
Zoom
switch
towards
setting
(➲toPage
Page
58)magnification,
or film
speed
setting
(➲
Page
78)
using
ENTER
Pass
the
shoulder
strap
through
the
loop
and
pull.
photography
setting
(➲
78)
using
ENTER
are
also
possible.
and
pressing
the
shutter
button
fully
takes
the
shot.
TM[ is down
When
the
SmartMedia™
used
incorrectly
by
the
user
or
a
third
party
[
],
]
or
[
]
AE
or
AF
are
locked
with
the
shutter
button
held
half
specific
lighting
conditions.
For
Europe:
PDR-ACM1E
active
before
the
pause.
Firmly
insert
the
SmartMedia
as
far
as
it
can
go.
displayed
on is
the
LCD
monitor.
Press
ENTER.
recorded
or setting
erased
from
SmartMedia™.
Toon
write
oraterase
data
from is to be recorded. Write-protect
Flash
Sets
the
color
mode
and
photographic
sensitivity
which
the
image
“W”.
are
also
possible.
The
default
different
depending
the
destination
country/area.
Use
or
to
select
the
desired
item
Press
ENTER,
nine
images
are
displayed
simultaneously.
•[FIRMWARE
If
you
shoot
a
still
picture,
when
preview
is
set
to
ON
(➲
Page
77),
1
down.
If
no
operation
is
carried
out
for
a
fixed
amount
of
time
(default:
about
one
minute),
power
ON
When
the
SmartMedia™
is
exposed
to
static
electricity
or
electrical
noise
Auto
Photography
mode
(
P.
41,
46)
Forimage
the Noise
UK:is
PDR-ACM1U
VER.]
:off
Displays
the
firmware
version
ofto
this
camera.
areait down
Stop
SmartMedia™,
peel
the
sticker.
camera
ready
to
take
photographs.
Warning:
increases
when
the
ISO
is
changed
higher
settings.
displayed
and
a
white
frame
and
green
Green The
Compose
picture,
press
the
shutter
button
down
halfway,
and
press
[the
AW
] no is
:the
Automatic
adjustment
(default)
Thumbnail
Display
Page
83
recorded
image
is
displayed
on
for
about
two
]specifications
Standby
mode
[enlarged,
••-For
If
operation
is
carried
out
a screen
fixed
amount
offrom
time
(default:
about
1shutter
minute),
thewear.
power
iserasing
turned
TM
consumption
is
set
to
its
minimum
state
(power
almost
off)that
to
prevent
battery
This
isdown
.in
and
press
When
the
SmartMedia™
isfor
removed
ordarkens
the
camera
isPage
turned
off
while
recording
The
image
the
LCD
monitor
sometimes
the
time
the
button
isdata,
pressed
Speaker
details,
refer
to
the
of
AC
information.
adapter
127.
[CARD
INFO.]
: on
Displays
the
SmartMedia
Playback
returns
to
the
start
ofturned
the
movie.
frame
are
displayed
the
LCD
monitor.
]
:
Photography
outdoors
[
Default
setting:
seconds.
off
to
preserve
battery
life.
This
is
called
“Auto
Power
OFF”.
To
return
to
the
normal
state,
press the
fully.
➲
Page
40
called
the
Auto
Power
OFF.
This
setting
allows
you
to
set
the
time
when
the
camera
turns
off
halfway
until
the
image
becomes
focused.
[NORMAL]
: picture,
Equivalent
to
color
ISO100
(default)
data,
frame
advance
when
images
aredefaults.
being
played
back or during
formatting
of the
DC
IN
5V
terminal
The
options
are
displayed.
Histogram*
2
Stop
[RESET]
:
Returns
settings
to
their
Flashing
[
],
[
]
or
[
]
Self-timer
in
operation
at
a
handshake
alarm
.
Compose
the
press
the
shutter
button
down
halfway,
and
press
itdirectly
down
The
white
frame
indicates
the
entire
image,
while
the
greenrecorded
frame halfway,
[[2X]
]POWER
:the
Photography
in
cloudy
conditions
button
again.
ENTERCompose
• The
viewfinder
LED
turns
red
while
image
data
is
being
picture,
press
the
shutter
button
press
down
• The
To
set
the
focus
or
exposure
for
a subject
outside
the
center
the intended
point
the
The
camera
takes
the
picture.
automatically.
This
function
is
not
activated
during
automatic
playback
( image,
Pageand
85) or
incamera
the it
[ only>
] PC
:appearing
High-sensitive
photography
equivalent
toofdown
color
ISO200
SmartMedia™.
Note:
image
through
the
lens
will
be
The
display
returns
to<Histogram>
thumbnail
playback.
<Standard>
<Detailed
information>
<Image
✭❅❍❏
shows
the
location
of
the
currently
enlarged
area.
halfway,
and
press
it
down
fully.
➲
Page
40
Macro
photography
]
:
Photography
in
bluish
fluorescent
light
[
fully.
➲
Page
40
Setting
1
:
About
the
Auto
★★
Power
(FULL
OFF
★★
Function
)
Additional
Information,
“AUTO
POWER
OFF
(page
110)”
at
the
subject
or
desired
exposure
(lighting),
press
and
hold
the
shutter
button
halfway.
Now,
with
the
shutter
onto
the
SmartMedia™.
ON]
Writing
to SmartMedia™
in progress
mode.
Press
ENTER.
[4X]
:adapter
High-sensitive
photography
equivalent
toanother
color
ISO400
•Insert
We
recommend
copying
and
saving
important
datapower
onto
storage
medium (floppy
disk, hard
displayed
for
[LCD
].[Power
fully.
➲
Page
40
the
AC
power
plug
into
the
Electrodes
Pressing the
The
default
size
and
quality
of
the
image
can
be
reset
to
the
desired
combination.
Press
ENTER.
Memo
Sticker
button
still
held
halfway
down,
you
can
turn
the
direction
of
the
camera
and
frame
your
image
with
the
focus
•
It
is
possible
to
play
back
any
images
in
any
folders
by
pressing
or
during
playback.
(For
details
ON
Increases
the
volume.
[disk,
] MO
: Photography
inafter
reddish
fluorescent
light
The
camera
takes
the
picture.
Photographs
can
be
taken,
however,
do not
turn thepress
power
OFF.
To
return
topower
the
state
theset
Auto
Power
OFF
has been
executed,
the
POWER
button
disk,
etc.).
The
PREVIEW
manual
setting
Page
items
77
are
displayed.
Remaining
➲normal
camera
takes
the
atmonitor.
the
exposure
time.
Zoom
switch
tobattery
“T”
Current
Entireofimage
and
locked.
Press
the
shutter
button
down
fully
to in
complete
capturing
the image.
Red outlet.
[☞
on picture
the
LCD
The
camera
is ready
for
burst
photography.
of2displayed
folder
Page
92)
]:the
mode:
In
the
Accessing
of
SmartMedia™
[ (HALF
Photography
in] is
incandescent
light
[Never
Setting
: exposure
★★
•]][is
When
shutter
speed
set
to
a)turn
speed
of
0.7 second
orprogress
slower,
photographs
taken
as extended
PC/AV
terminal
to
turn
the
power
on★★
again.
•During
remove
the
SmartMedia™
or
the
camera
offresult
while
recording
data or are
while
erasing
data
COLOR
Page
77
➲
the
exposure,
the
viewfinder
LED
turns
orange.
position
Pressing the
•
Moving
the
camera
as
you
press
the
shutter
button
will
in
a
blurred
image.
Use
,
,
or
to
select
the
area
to
enlarge.
at Page
the
last
image
displays
the
first
image,
and
pressing
atwill
thebe
firstautomatically
image
displays
the
Pressing
During
[2X],
the
ISO
be
automatically
set
to
ISO200.
During
[4X],ofISO
setof
exposures
(➲
68).
IfCarry
burst
photography
is to
set
the
shutter
speed
is setthe
to volume.
athe
speed
0.7
second
or more
in the
[ to
Tv ]
Decreases
out
steps
1will
2when
in
Photographic
(SmartMedia™
formatting).
actions
might
damage
ISO
Page
78
➲Flashing
ItClose
about
twice
the
time
to while
complete
taking
the
photograph
duePDR-M81
to processing
ofenlargement
the
captured
[set
],These
[“Basic
] When
the
image
is not
in SmartMedia™.
focus.
the
SmartMedia™
cover.
Zoom switch
to
“W”
Memo
•
The
PDR-M81
usesto
an
accurate
auto
focus
mechanism.
However,
the
may
have
difficulty
last
image.
Adjust
the
display
area
enlarge
viewing
the
white
and
Slow
shutter
speed
warning
[1takes
MINUTE]
(default)
ISO400.
Shutter
speed
• In
AEB
photography
(
Page
71)
or
burst
photography,
the
shutter
speed
cannot
be
set
to
0.7
second
or
longer.
Setting
3
:
★★
(SMALL
★★
)
➲
mode,
the
shutter
speed
is
automatically
changed
to
1/2
second.
Lens
•
Use
only
the
SmartMedia™
specified
for
use
with
the
PDR-M81.
The
use
of
other
SmartMedia™
SHARPNESS
Page
79
mode)”
(page
109).
Select
[QUALITY]
Settings
(
focusing
or
not
be
able
to
focus
at
all
for
subjects
and
situations
such
as
the
following:
➲
image.
Before
you
use
aother
new
SmartMedia™
the
first during
time,
be
sure
tothe
Manual
Photography
mode
( P.isspeed
58)
Images
can
bevalue
rotated
by] pressing
playback.
Movie mode
(••• frames.
P.
75)
Difference
between
[PRG]
and
[ for
] or
green
[2 MINUTES]
the
aperture
is
to
F2.9
(maximum
aperture
size),
increased
shutter
speed
restricted
If
a
mode
than
[ set
suppressed
flash
mode
is
set
inthe
flash
photography,
thedark
shutter
is
•compensation
Processing
image
Aperture
Exposure
- When
subject
is distant and
- SmartMedia™
Subjects
moving
at
high
speed
could
damage
camera.
CONTRAST
Page
79
➲[the
• to
The
write
protection
not
function
if in
write-protect
sticker
becomes
Use
a soft
dry cloth to
.thesecond.
on
the
SETUP
MENU
and
press
format
the
(may
Page
91).
rotates
an
image
counterclockwise,
and
pressing
rotates
clockwise.
Pressing
1/750
PDR-ACM1A
] •are
the
same
as
to
PDR-ACM1E
PDR-ACM1U
[PRG]
and
limited
tosecond.
between
1/2
second
and
1/250
* The
aboveitdirty.
menu
is
the
RECORDING
[3 MINUTES]
Charging
of
flash
progress
ON
When
there
are
objects
in
front
of
or
behind
the
subject
Very
shiny
subjects
such
as
a
mirror
or
car
body
SmartMedia™
is
aof
device.
Do do
notnot
bend,
drop,
or subject
SmartMedia™
to
DIGITAL
ZOOM
Page
• wipe
When
the
camera
isOnce
not79
inelectronic
be sure
to attach
the
lens
cap
provided
with[your
camera.
the
POWER
button
to
turn
the
power
off.
✭❅❍❏
away
any
dirt.
ause,
sticker
ispress
peeled
off,
reuse
it.
➲
Orange•Press
The
QUALITY
menu
isprecision
displayed.
combinations
the
automatically
mode.
MENU
inthe
•the
The
aperture
value
set
differ
to
the
actual
value
according
to
the
position
ofUK)
theorzoom
lens.
To
return
to
the
regular
display,
ENTER.
(Photos
cannot
be
taken
at
this
moment.)
(for
US
and
Canada)
If the
shutter
speed
is
set
to
1/350
second
or
less,
the
shutter
as
speed
an
animal
is
automatically
athe
cage
a]changed
person
in front
to 1/250
of a tree)
(for
European
Continent)
(for
Get
ready
to
take
the
photograph.
- above
Extremely
low
contrast
subjects
When
the
settings
are
made,
they
are
displayed
in(such
thepocket
following
order.
Memo
DC
IN
5V
terminal
excessive
Also,
do
not
carry
SmartMedia™
the
ofx[trousers.
This
might
The
lens
cap
can
also
be
attached
to
attachment
following
the
above
steps
to prevent
it’sthe
LCD
79
➲shocks.
The
power
turns
off.
determined
shutter
speeds
and
aperture
-in Subjects
with
little
reflection,
such
as
hair
fur mode.
•• The
size
displayed
on
the
LCD
monitor
FULL
(320
240)
HALF
(160
xorsubject
120).
The
forced
flash
mode
or
]orred-eye
forced
flash
second
ifPage
the
flash
setting
is25)
changed
tothe
thestrap
[ ]becomes
- image
Subjects
that
have
low contrast
and
merge
into
Loading
the
batteries
(➲
Page
and
the
SmartMedia™
(➲
Page
31)
into
the
camera.
being
lost.
• Flash
photography
and
burst
photography
are
not
possible.
Flashing
SmartMedia™
to
excessive
force
when
you
sit
down,
damaging
the
SmartMedia™.
Hardware
malfunction
Subjects
with
no
solidity,
such
as
smoke
or
flames
the
background
(such
as
white
walls
or
subjects
Attach
the
lens
cap
when
you
are
not
using
the
camera.
values.
However,
their
operation
capability
movies
made
in
FULL
size
is
displayed
on
the
entire
LCD
monitor,
and
those
made
in
HALF
size
is
If
the
[
]
forced
flash
or
[
]
red-eye
forced
flash
mode
is
set
in
flash
photography
when
the
•
In
movie
mode,
ISO
will
be
automatically
set
between
ISO100
and
ISO400
regardless
of
its
setting.
* •Use
Histogram
dressed
inthe
theSmartMedia™
same
color
as
the
background)
-attach
Subjects
viewed
through
glass
Turn
offor
the
power
tothe
retract
the
lens
unit,
and then
the
lens
cap.
The
image
taken
in
exposure
photography
mode
may
be
blurred.
or
to
select
the
desired
setting
from
the
tab
menu
, and
press
★★
★★
★★
Do•not
use
store
in
environments
likely
to
be
affected
byisstatic
electricity
or
is
different
as
shown
in
the
right
table.
displayed
in
center
ofspeed
the
screen.
2
shutter
speed
is
set
to
a
of
0.7
second
or
more,
the
shutter
speed
automatically
changed
to
Press
POWER
button
tothe
turn
power
on.subject.
A electrical
histogram
isturn
a graphic
representation
ofthe
theistones
of the
The horizontal
histogram
• Do
If the
the
image
cannot
be
focused,
thelens
focus
automatically
fixed to infinity.
(When theaxis
flashofisthe
necessary
not
the
power
on
with
cap
attached.
noise.
1/2
second.
ENTER.
*the
The
above
AC adapter
is US/Canada
Turning
the
Power
On
➲
Page
38
☞
shows
the
brightness
(increasing
brightness
from
left
to
right)
and
vertical
axis
shows
the
number
at
this
time,
it
is
simultaneously
fixed
to
illuminate
objects
1.5
meters
(five
feet)
away.
During
macro
•This
Dosaves
use
orsettings,
store
SmartMedia™
very
hot,
humid
oraperture
corrosive
If the
shutter
speed
value
isimages,
set toin1/1000
second,
the
value
is limited
to
F8type
andAC
F3.4.
•• not
When
playing
back
movie
switching
isthe
between
standard
and
image
only.
(O
:environments.
possible
Xbetween
: not
the
and
returns
to
RECORDING
MENU.
type.
European
andpossible)
UK
photography,
the flash
islevel.
alignedthe
withdisplay
the wide
position.)
of pixels
at each brightness
Downloaded From
camera-usermanual.com
adapters differ in shape.
--110
20 -40
80
88
Photography in the Shutter Speed-priority Mode
Press
or
to select [ EXP. ].
or
to
Playing
Back Images
Press
to display option menu, press
select [ Tv ] and press ENTER.
Taking
Photographs
Carry out steps 1 to 2 in “Manual Settings” (page 58).
Getting
Ready
In this mode, photographs are taken with the priority given to shutter speed. The camera automatically sets the
aperture value according to the shutter speed.
A fast shutter speed produces a photograph that looks as if a moving subject is still.
A slow shutter speed produces as photograph that makes you feel that it is flowing.
Pressing ENTER selects the setting.
Erasing
Images
The camera is ready to take photographs.
Handy
Functions
Press ENTER.
Other
Applications
Additional
Information
Downloaded From camera-usermanual.com
- 65 -
Changing
the
Preset
Conditions
(RECORDING
MENU)
Photography
in
the
Program
Mode
Setting
Names
Playing
Back
the
of
Photographed
Parts
Image
Size
and
Quality
(Single-Frame
Playback)
Extended
Exposure
Photography
(Bulb
Photography)
Erasing
Images
(Erase
Frame)
(continued)
Manual
Attaching
Using
How
Taking
Enlarging
Playback
About
Turning
to
Photographs
the
SmartMedia™
Press
Settings
the
Photographed
of
Power
the
Power
Multi
Shoulder
Continuously
Outlet
Shutter
Image
On/Off
Images
Strap
Pictures
Button
(Zoom
(Burst
Playback)
Photography)
Taking
Erasing
Button
Photographs
Folders
and
(All
LCD
Images
Continuously
Monitor
in
aImages
Folder/All
(Burst
Display
Photography)
Folders)
(In
Playback
(continued)
(continued)
Mode)
Definitions
Separately
of
the
Accessories
Color
of
the
Viewfinder
LED
Taking
and
Playing
Back
Photographs
on
aMode
TV
(continued)
Changing
the
Preset
Conditions
(RECORDING
MENU)
(continued)
Exposure
Compensation
in
the
Shutter
(continued)
Speed-priority
(continued)
About
Basic
Settings
SmartMedia™
in
(Sold
the
mode)
Aperture-priority
(continued)
Mode
(continued)
LCD
Monitor
Display
(during
photography)
(continued)
Manual
Settings
(continued)
Playing
Photography
Installing
Back
Movies
batteries
(Auto
Photography)
(continued)
(continued)
(continued)
Names
of
Parts
(continued)
Getting
Ready
The shutter
camerabutton
automatically
adjusts the
shutter
and
the aperture
value
according
to the
brightness
of an
can be pressed
down
in twospeed
stages:
halfway
down and
fully
down. When
pressed
halfway
down,
This
“SmartMedia™”
Set
Play
Automatically
The
the
following
mode
shoulder
menu
back
size
photographed
is(number
used
for
items
strap
plays
setting
isadapter
for
athe
is
are
back
storage
of
taking
handy
also
the
pixels)
still
the
basic
available
subjects
for
medium
images
16
and
carrying
images
settings
quality
one
for
that
as
saving
separately
your
image
to
require
(compression
be
camera
used
images
atseveral
a
sold
for
around.
inthat
photography
items.
ratio)
seconds
the
you
multi
of
have
the
photography
to image
photograph
in
photographed.
to
[ pause
be
mode
],photographed.
such
[be
Even
in
asquick
]for
firework
or
if Europe,
the
[You
succession.
camera’s
displays
] photography
power
at the
Enlarges
selected
portions
of
images
being
played
back
at
two
levels.
Images
can
displayed
enlarged
when
In
You
this
can
color
mode,
manually
of
the
photographs
viewfinder
adjust
settings
are
LED
taken
indicates
such
continuously
asphotographed
the
exposure
state
atof
control,
atime.
the
maximum
camera.
white
speed
balance,
The
ofthe
0.8
metering
second
system,
intervals.
continuous
This
item
switches
display
on
the
LCD
monitor
when
playing
back
photographed
images.
can
switch
If
you
the
AC
(sold
separately:
PDR-ACM1A
for
the
US/Canada,
PDR-ACM1E
PDR-ACM1U
During
stopping
During
Mode
Effective
dial
Subjects
and
Set
Values
During
playback
TM
✶❉❅◗❆❉■❄❅❒
✬✥✤
Press
.of
aperture
value.
SYSTEM
Turning
Exposure
ISO
OSD
In
[prevent
[use
LANGUAGE
the
]the
INFO.
mode
control
(EXP.)
On
Close
the
SmartMedia™
cover.
Slide
the
SmartMedia
cover
release
knob
in
the
Take
photographs
or
or
battery
to
to
select
or
play
[that
the
slide
]them
or
shutter
it
[ the
back.
,]will
and
speed.
and
lock
press
Look
Use
through
to
select
the
[adjust
viewfinder
]use
and
press
to
compose
ENTER.
the
picture.
To
continue
erasing
images,
repeat
the
above
procedure
2.
.is
AF
(auto-focus)
and
AE
(auto
exposure)
are
set.
When
pressed
fully
down,
the
camera
takes
aspace
picture.
object.
This
mode
enables
carefree
photographing
similarly
to
selecting
[stable
]photographs.
in
[ from
]settings”,
mode.
Itrepeatedly
is
to
night.
To
is
Change
modes.
turned
When
the
OFF,
your
setting
using
the
camera
images
this
according
mode,
from
saved
dropping
be
to
sure
how
on
the
the
to
during
SmartMedia™
image
a(size,
photography,
tripod
is
to
to
be
keep
used
not
hang
the
and
be
camera
erased.
the
the
shoulder
remaining
SmartMedia™
strap
and
amount
prevent
around
can
ofstep
your
distortion
be
neck.
inpossible
the
of
images.
Relationship
between
your
camera
and
accessories
Connecting
tocalled
Other
Devices
(page
123)
being
played
back
one
image
at
acover,
time.
The
meaning
maximum
of
number
LED
color
of
photographs
differ
according
can
to
be
taken
mode
continuously
dial
setting.
three
photography
mode,
and
take
photographs
at
these
settings.
These
are
“Manual
which
are
saved
display
to
show
aPower
list
detailed
information
compression
ratio,
shutter
speed,
aperture,
etc.)
or
you
can
for
the
UK)
in
a
room
with
amay
power
outlet,
you
can
take
photographs
for
an
extended
period
of
time.
This
also
Mode
dial
1 Item
QUALITY
2 Options
Notes
SmartMedia™
VIDEOon
OUT
White Balance (W.B.)
Write
Protection
Removing
the Batteries
ISO
[ POWER
]
AUTO
OFF
Setting items
Turning
the
Power
Off
Using
the
LCD
Monitor
Additional
Information
Other
Applications
Handy
Functions
Erasing
Images
Playing
Back Images
Taking
Photographs
Tab menu
feed
●
Positive
(+)
Compensation
The
tab
is
displayed.
setting
isbattery
as
follows:
Make
sure
that
the
issystem
firmly
closed.
Details
image
ofmenu
operation
isrange
saved
are
or
erased,
the
same
and
as
the
taking
camera
photographs
is
then
ready
and
to
playing
take
photographs.
them
back
onon
the
LCD After
monitor.
If
you
use
the
viewfinder
to
take
photographs,
the
photography
Set
the
mode
to
[cover
].settings
direction
of
the
arrow
to
open
cover
.1-frame
ENTER.
change
the
white
and
the
metering
in(the
program
mode.
erased
SmartMedia™.
and
reused.
For
details
on
these
accessories,
refer
to
the
Instruction
Manual
for
the
accessory
you
are
using.
(information
Movies
images
in
the
multi
mode
Page
cannot
be
displayed
using
the
zoom
playback
Images
even
if the
are
camera
not
recorded
is
turned
directly
off.
SmartMedia™
but
are
stored
temporarily
within
the
buffer
memory.
display
histograms,
etc.
prevents
failed
photographs
due
to
battery
wear
or
failed
of
data
to
a
PC.
details
handling
the AC
2x-speed
playback
Set
Sets
[•✭❅❍❏
PRG
the
thebalance
whether
color
] photographed
:(/or
Photography
mode
language
not
to
and
return
photographic
of
in
menus
the
program
displayed
sensitivity
in
the
(default)
on
SETUP
the
at51)
which
LCD
(➲
MENU
Page
monitor.
the
to
image
62)
the
original
is For
to
be
factory
recorded.
settings.
For
enlarged
view
P.dial
22)
feeds
the
image
•transfer
Each
press
of
2
Copying
of
printed
(black
characters
on
white
paper)
set
the
time
(text
114)
F8
/display
F6.8
F5.6
/18.
F4.8
/Page
F4.0
/and
F3.4
/mode
F2.9
How
to
take
photographs
Page
41
1/1000,
1/750,
1/500,
1/350,
1/250,
1/180,
1/125,
1/90,
range
may
differ
from
the
actual
image.
In
this
case,
use
the
LCD
Press
the
shutter
button
down
halfway
.
the
mode
dial
to
[
],
[
]
or
[
].
1
SmartMedia™
having
the
following
storage
capacity
can
be
used
on
your
camera.
current
as
of
March
2000)
feature.
The
last
cover
recorded
image
opens
frame
image
appears
appears
on
the
on
the
LCD
LCD
monitor.
monitor.
photography
is
finished,
check
the
images
record
the
selected
ones
to
SmartMedia™.
[TIME&DATE,
]
:
Erases
images
in
the
currently
selected
folder
and
folders.
Possible
number
of31)
shots
adapter,
beSet
sure
to
read
page
•
2x-speed
playback
is
performed
for
.
Make
sure
that
the
SmartMedia™
is
correctly
loaded.
(
Page
by
one
frame.
Warning:
[•Memo
Av
]
Noise
:
OSD
Photography
increases
LANGUAGE
when
in
aperture-priority
will
the
not
ISO
be
is
reset.
changed
mode
to
(➲
higher
Page
settings.
63)
Backlit
portraits
IMPORTANT
[PROTECTED]
on
the
LCD
monitor,
cancel
the protection
( Page 108) or
remove
How
to
play
back
images
Page
80
1/60,
1/45,
1/30,
1/20,
1/10,
1/8,
1/6,
1/4,
1/3,
1/2,
monitor
for
photography.
AF
(auto-focus)
and
AE
(auto
exposure)
(➲
Additional
Information,
SET-UP
(the
P.
[English]
:109)
English
(default)
Pass
Set
out
mode
end
steps
of
dial
1the
to
to
shoulder
4[1/15,
either
]].LCD
or
inspeed-priority
[strap
“Photography
through
].
the
in
the
strap
Shutter
speed-priority
Mode”
isdisplayed
held
down.
the
duration
that
PC
mode
(mode
P.
121)
2MBCarry
Set
/4MB/8MB/16MB/32MB/64MB/128MB
the
mode
dial
to
[isin
(all
3.3
types)
]•the
adjust
:]When
Erases
the
all
brightness
folders
recorded
of
the
on
the
monitor
SmartMedia™.
Page
115
[mode
Self-timer
button
1
•V
1-frame
feed
is continued
for the
The
aperture
value
and
the
shutter
speed
corresponding
to
[•To
Tv
:write-protection
Photography
shutter
(➲that
Page
65)
Zoom
state
bright
scenes
(such
and
highly
reflective
subjects
Photography
mode
•the
You
can
also
carry
out
step
8snowfields)
while
verifying
the
image
step
7.
DPOF
(in
Page
102).
Glossary)
start
to
function.
0”7,
1”,
1”5,
2”,
3”,
4”,
6”,
8”,
10”,
15”
•Very
Do
not
remove
orV)
load
the
batteries
or
disconnect
or
connect
the
AC
adapter
while
the camera
is mode.
on.1This
]65)
:POWER
Japanese
[value
[NORMAL]
:(3.3
Equivalent
toas
color
ISO100
button
Carry
Set
Use
out
or
mode
steps
to
dial
select
1
to
to
2[erased,
the
“Manual
].
images
photographed
Settings”
(page
in
58).
the
multi
photography
You POWER
can also
connect
the
PC
card
adapter
and
floppy
disk
adapter
( in
123)
sold
separately
to transfer
SmartMedia™
Changing
the
LCD
monitor
display
Page
116
The
images
or
folders
are
and
the
camera
returns
toPage
the
is
held
down.
duration
that
are
displayed
on
the
LCD
monitor.
If
the
appropriate
(page
attachment
or
on
in
“Photography
the
camera.
in
the
Full
Manual
Mode”
(page
67).
Press
the
button
to
turn
the
power
on.
full
manual
mode
(➲
Page
67)
[
M
]
:
Photography
in
Image
Quality
button
Press
the
MENU
button.
•[2X]
Shots
made
up
predominantly
of
sky
Even
if
photography
is
terminated
midway
before
capturing
three
images
by
releasing
the
shutter
•
If
you
take
a
photograph
after
erasing
an
image,
a
number
continuing
from
the
last
photographed
When
AF
or
AE
are
locked,
the
beep
tone
(➲
Page
111)
sounds
and
the
Use
or
to
change
the
setting
in
the
tab
menu,
might
return
the
manual
settings
to
their
defaults.
If
this
happens,
manually
set
conditions
again.
:connect
High-sensitive
equivalent
to preset
color
(default)
• Before
you
oreven
disconnect
the
AC
adapter,
be
sure
to turn
thedisplay
camera
OFF.
If the
AC adapter is
Press
the
image
quality
button
to
select
the
combination
cannot
be
set
ifphotography
the
shutter
speed
isas
adjusted
toISO200
images to a
PC.
16MB
(SM-M1600D)/32MB
(SM-M3200D)/64MB
(SM-M6400D)/128M
(SM-M1280D)
The
respective
last
image
mode.
frame
appears
on
LCD
monitor.
You
can
also
select
the
image
by
the
same
operation
for
thumbnail
Page
83).
Carry
out
steps
1
to
on
page
109.
When
the
camera
is
turned
on,
set
the
mode
dial
to
the
desired
The
shutter
speed
and
the
aperture
value
corresponding
todisplay
the
Reverse
playback,
2x-speed
playback
All
descriptions
inor
this
Instruction
Manual
are
for
when
the
language
is (2set
to [ENGLISH].
Press
or
to
select
the
image.
button,
images
already
photographed
can
be
saved
and
erased
by playback
the
method.
image
is
assigned
as
image
number.
Shutter
button
●
Negative
(–)
Compensation
The
viewfinder
RECORDING
LED
turns
MENU
green.
is2
displayed.
•press
The
image
the
photograph
is
taken
is
slightly
less
clear
than
images.
(This
is 109,
connected
disconnected
with
the
power
ON,
camera
settings
may
beabove
reset
(SET-UP
Page
and
ENTER.
:before
High-sensitive
photography
equivalent
to
color
ISO400
its
limit,
the
shutter
speed
isthe
displayed
inthe
red.
Reverse
1-frame
feed
To [4X]
cancel
erasing
of
image
data,
select
[monitor.
]Photography,
and
press
ENTER.
Flash
button
quality
and
size,
while
viewing
indication
on
the
starts
a
reverse
•
The
press
of
mode.
shutter
speed
are
displayed
on
the
LCD
If
the
appropriate
The
length
of
time
to
capture
images
varies
according
to
the
photographic
conditions.
•
Images
can
also
be
erased
in
the
thumbnail
mode.
In
this
case,
the
camera
enters
the
single
frame
Select
[SYSTEM
INFO.]
on
the
SETUP
MENU
and
because
television
displays
images
at
a
lower
resolution.)
•
Spotlit
subjects,
particularly
against
dark
backgrounds
Manual
Settings
Page
58)
or
the
camera
may
malfunction.
however,
is
possible
in
this
state.
feeds
the
image
•
Each
press
of
EXP.
].
To
cancel
changing
of
settings,
press
.
Use
or
to
select
the
frame
you
want
to
enlarge.
Press
the
or
Zoom
to
switch
select
[
(
S/C
Page
].
21)
towards
“T”
to
begin
playback.
Floppy
Disk
Adapter
(FlashPath)
] mode:
is
selected,
[NO
IMAGE]
isaperture
displayed
after
allor
folders
When
playback.
Press
Set
mode
dial
inbe
the
to
[ sure
Tv
mode,
].the
or
press
in
the
shutter
button
fully
Before
photography,
make
that
the
lens
cap
has
been
2onisin.black
combination
cannot
set
even
ifflash
adjusted
to its
playback)
mode,
and
enters
the
thumbnail
playback
mode after the image is erased.
status
display.
]or
In
[[playback
Press
the
display/info
button.
Self-timer
photography
and]down
photography
are
not
possible.
•the
The
display
unit
varies
according
to
the
output
system.
•theCopying
of (frame
printed
text
(white
characters
paper)
.
press
reverse
by
one
frame.
This
adapter
allows
SmartMedia™
to
bespeed
asto
3.5"
floppy
disk.
have
been
erased
(unless
the
SmartMedia™
contains
protected
You
can
also
select
the
image
by Press
thein
same
operation
as
for
thumbnail
playback
( display
PageISO
83).will23)
Automatic
playback
begins.
•[2X],
Playback
becomes
2x-speed
to
reduce
aperture
size.
toused
increase
aperture
size.
Press
camera
takes
a
picture.
The
manual
setting
removed
the
camera.
limit,
aperture
value
isbe
displayed
red.
Photography,
however,
Playback
mode
( Status
P.
80)
the
[Scenes
M
]from
mode
to
set
the
0.7
second
Manual
During
the
ISO
will
automatically
set
between
ISO100
ISO200.
During
[4X],
be
☞
To
set
the
quality
and
size
➲shutter
Page
112
•the
With
the
NTSC
system,
images
can
be
displayed
simultaneously
on the
LCD
monitor
and( TVP.
during
•photograpy
with
low
reflectivity,
such
as
shots
green
or
dark
foliage
Flash
state
Each
press
of
the
display/info
button
switches
the
display
•of1-frame
feed
isand
continued
The
SYSTEM
INFO.
menu
displayed.
reverse
for
the
duration
This
adapter
isplayback
inserted
into
the],
floppy
your
PC,
allowing for the
images).
The
viewfinder
LED
turns
redis
image
data
being
recorded
onto
Insert
the
adapter
connector
plug
into
the
DC
IN
Self-timer
lamp
values
are
displayed
In
the
photography
modes
([while
[and ISO400.
]disk
oris
[ drive
]),on
the
lens
photography
and
playback.
is
possible
inAC
this
state.
automatically
set
between
ISO100
is
held
down.
format
as
follows:
duration
that
Note:
The
larger
the
F
value,
the
smaller
the
aperture
size
become
or
longer.
•Press
Remove
and
insert
SmartMedia™
with
the
camera’s
power
turned
off.Aperture value
is
held
down.
that
To
quit
the
SETUP
MENU,
change
the
mode
dial
setting.
Shutter
speed
Adjust
the
zoom
ratio
by
the
Zoom
switch.
(Zoom
to
display
option
menu,
press
or
to
images
recorded
on
the
SmartMedia™
to
be
transferred
to
the
PC.
the
SmartMedia™.
Sets
video
output
system
according
to
country
in
which
your camera
isSize
used.
on
the
left
ofthe
the
LCD
Press
the
shutter
button
down
halfway
and
press
5V
terminal
on
the
camera.
extends
from
the
camera
body.
•the
PAL
system,
images
cannot
bethe
displayed
When a cable
is connected, only
and
versa.
1 situations
the
image
quality
button
switches
the
quality
and
size
Gently
insert
the
SmartMedia™
as
far
as
it, simultaneously.
can
go
✭❅❍❏
[Pressing
]vice
isWith
displayed
on
the
LCD
monitor.
Viewfinder
LED
•select
Recorded
data
may
bepress
erased
(destroyed)
in
the
listed
below.Viewfinder
Note that Toshiba
White
Balance
Additional
Information,
Glossary
to
increase
shutter
speed.
Pressand
to
decrease
shutter
speed.
Press
Press
or
to
move
forward
reverse.
☞
➲
Memo
PRG
]
and
ENTER.
]
and
press
ENTER.
[
switch
Page
21)
✤❅▼❁❉●❅❄
TV
display
is
available.
monitor
screen.
When
the
camera
is
turned
on,
the
Auto
Power
OFF
function
Canceling
pause
settings
infully
the
following
order.
it
down
. system
✳▼❁■❄❁❒❄
★❉▲▼❏❇❒❁❍
✩❍❁❇❅
❏■●❙
2next
Press
or
to
select
the
item
you
desired
toMeaning
set,
Pause
with
the
SmartMedia™
electrodes
(metal
contacts)
Additional
Information,
Glossary)
[NTSC]
:allNTSC
(white
Corporation
accepts
no
responsibility
whatsoever
for
the
loss
of
recorded
data enters
in these
•Adapter
When
images
in
a
folder
are
erased,
that
folder
itself
is
also(destruction)
erased.
Quality
The
camera
determines
the
balance
by
averaging
the
various
kinds playback
of light
that actually
AC
to
to
frame/
to“T”
go
back
one
❉■❆❏❒❍❁▼❉❏■
To
prevent
valuable
data
from
being
erased,
attach
the
write•••advance
With
the
PAL
system,
images
are
played
back
with
apressing
black
frame
•frame
After
pause
is
cancelled,
the
switch
to
the
will
the
image.
Pressing
ENTER
the
setting.
or
,, SmartMedia™
and
manual
Exposure
compensation
(➲
Page
69)
using
Colorthe
When
[Zoom
M
]selects
isis
selected
on
the
[ halfway
EXP.
]remove
option
menu,
orsurrounded.
the
shutter
speed
setting
becomes
operational.
State
Never
open
the
SmartMedia™
cover
orenlarge
the
while
anmakes
image
is
being
recorded.
This
or
and
manual
setting
(➲
Page
58)
or
film
speed
Exposure
compensation
(➲
Page
69)
using
Play
back
Reverse
procedure
“Loading
the
Batteries”
and
remove
the
batteries.
•facing
Pressing
the
shutter
button
down
adjusts
the
exposure,
• Playback
paused.
[PAL]
:for
PAL
system
( camera.
Additional
Information,
Glossary)
situations:
Built-in
microphone
the
lens.
This
setting
allows
you
to
set
in
advance
the
white
balance
when
taking
photographs
under
and
press
ENTER.
the
rear
of
the
For
the
US/Canada:
PDR-ACM1A
Holding
down
or
moves
forward
or
reverse
continuously.
resumes
at
the
last
state
that
was
protect
sticker
at
the
write-protect
area.
Data
can
no
longer
be
Focus
area
may
corrupt
the
data
on
the
SmartMedia™
or
damage
the
SmartMedia™
itself.
possible,
but
does
not
make
the
exposure
compensation
possible. HoweverSelf-timer
the exposure
value
is
To
return
normal
press
the
Zoom
switch
towards
setting
(➲toPage
Page
58)magnification,
or film
speed
setting
(➲
Page
78)
using
ENTER
Pass
the
shoulder
strap
through
the
loop
and
pull.
photography
setting
(➲
78)
using
ENTER
are
also
possible.
and
pressing
the
shutter
button
fully
takes
the
shot.
TM[ is down
When
the
SmartMedia™
used
incorrectly
by
the
user
or
a
third
party
[
],
]
or
[
]
AE
or
AF
are
locked
with
the
shutter
button
held
half
specific
lighting
conditions.
For
Europe:
PDR-ACM1E
active
before
the
pause.
Firmly
insert
the
SmartMedia
as
far
as
it
can
go.
displayed
on is
the
LCD
monitor.
Press
ENTER.
recorded
or setting
erased
from
SmartMedia™.
Toon
write
oraterase
data
from is to be recorded. Write-protect
Flash
Sets
the
color
mode
and
photographic
sensitivity
which
the
image
“W”.
are
also
possible.
The
default
different
depending
the
destination
country/area.
Use
or
to
select
the
desired
item
Press
ENTER,
nine
images
are
displayed
simultaneously.
•[FIRMWARE
If
you
shoot
a
still
picture,
when
preview
is
set
to
ON
(➲
Page
77),
1
down.
If
no
operation
is
carried
out
for
a
fixed
amount
of
time
(default:
about
one
minute),
power
ON
When
the
SmartMedia™
is
exposed
to
static
electricity
or
electrical
noise
Auto
Photography
mode
(
P.
41,
46)
Forimage
the Noise
UK:is
PDR-ACM1U
VER.]
:off
Displays
the
firmware
version
ofto
this
camera.
areait down
Stop
SmartMedia™,
peel
the
sticker.
camera
ready
to
take
photographs.
Warning:
increases
when
the
ISO
is
changed
higher
settings.
displayed
and
a
white
frame
and
green
Green The
Compose
picture,
press
the
shutter
button
down
halfway,
and
press
[the
AW
] no is
:the
Automatic
adjustment
(default)
Thumbnail
Display
Page
83
recorded
image
is
displayed
on
for
about
two
]specifications
Standby
mode
[enlarged,
••-For
If
operation
is
carried
out
a screen
fixed
amount
offrom
time
(default:
about
1shutter
minute),
thewear.
power
iserasing
turned
TM
consumption
is
set
to
its
minimum
state
(power
almost
off)that
to
prevent
battery
This
isdown
.in
and
press
When
the
SmartMedia™
isfor
removed
ordarkens
the
camera
isPage
turned
off
while
recording
The
image
the
LCD
monitor
sometimes
the
time
the
button
isdata,
pressed
Speaker
details,
refer
to
the
of
AC
information.
adapter
127.
[CARD
INFO.]
: on
Displays
the
SmartMedia
Playback
returns
to
the
start
ofturned
the
movie.
frame
are
displayed
the
LCD
monitor.
]
:
Photography
outdoors
[
Default
setting:
seconds.
off
to
preserve
battery
life.
This
is
called
“Auto
Power
OFF”.
To
return
to
the
normal
state,
press the
fully.
➲
Page
40
called
the
Auto
Power
OFF.
This
setting
allows
you
to
set
the
time
when
the
camera
turns
off
halfway
until
the
image
becomes
focused.
[NORMAL]
: picture,
Equivalent
to
color
ISO100
(default)
data,
frame
advance
when
images
aredefaults.
being
played
back or during
formatting
of the
DC
IN
5V
terminal
The
options
are
displayed.
Histogram*
2
Stop
[RESET]
:
Returns
settings
to
their
Flashing
[
],
[
]
or
[
]
Self-timer
in
operation
at
a
handshake
alarm
.
Compose
the
press
the
shutter
button
down
halfway,
and
press
itdirectly
down
The
white
frame
indicates
the
entire
image,
while
the
greenrecorded
frame halfway,
[[2X]
]POWER
:the
Photography
in
cloudy
conditions
button
again.
ENTERCompose
• The
viewfinder
LED
turns
red
while
image
data
is
being
picture,
press
the
shutter
button
press
down
• The
To
set
the
focus
or
exposure
for
a subject
outside
the
center
the intended
point
the
The
camera
takes
the
picture.
automatically.
This
function
is
not
activated
during
automatic
playback
( image,
Pageand
85) or
incamera
the it
[ only>
] PC
:appearing
High-sensitive
photography
equivalent
toofdown
color
ISO200
SmartMedia™.
Note:
image
through
the
lens
will
be
The
display
returns
to<Histogram>
thumbnail
playback.
<Standard>
<Detailed
information>
<Image
✭❅❍❏
shows
the
location
of
the
currently
enlarged
area.
halfway,
and
press
it
down
fully.
➲
Page
40
Macro
photography
]
:
Photography
in
bluish
fluorescent
light
[
fully.
➲
Page
40
Setting
1
:
About
the
Auto
★★
Power
(FULL
OFF
★★
Function
)
Additional
Information,
“AUTO
POWER
OFF
(page
110)”
at
the
subject
or
desired
exposure
(lighting),
press
and
hold
the
shutter
button
halfway.
Now,
with
the
shutter
onto
the
SmartMedia™.
ON]
Writing
to SmartMedia™
in progress
mode.
Press
ENTER.
[4X]
:adapter
High-sensitive
photography
equivalent
toanother
color
ISO400
•Insert
We
recommend
copying
and
saving
important
datapower
onto
storage
medium (floppy
disk, hard
displayed
for
[LCD
].[Power
fully.
➲
Page
40
the
AC
power
plug
into
the
Electrodes
Pressing the
The
default
size
and
quality
of
the
image
can
be
reset
to
the
desired
combination.
Press
ENTER.
Memo
Sticker
button
still
held
halfway
down,
you
can
turn
the
direction
of
the
camera
and
frame
your
image
with
the
focus
•
It
is
possible
to
play
back
any
images
in
any
folders
by
pressing
or
during
playback.
(For
details
ON
Increases
the
volume.
[disk,
] MO
: Photography
inafter
reddish
fluorescent
light
The
camera
takes
the
picture.
Photographs
can
be
taken,
however,
do not
turn thepress
power
OFF.
To
return
topower
the
state
theset
Auto
Power
OFF
has been
executed,
the
POWER
button
disk,
etc.).
The
PREVIEW
manual
setting
Page
items
77
are
displayed.
Remaining
➲normal
camera
takes
the
atmonitor.
the
exposure
time.
Zoom
switch
tobattery
“T”
Current
Entireofimage
and
locked.
Press
the
shutter
button
down
fully
to in
complete
capturing
the image.
Red outlet.
[☞
on picture
the
LCD
The
camera
is ready
for
burst
photography.
of2displayed
folder
Page
92)
]:the
mode:
In
the
Accessing
of
SmartMedia™
[ (HALF
Photography
in] is
incandescent
light
[Never
Setting
: exposure
★★
•]][is
When
shutter
speed
set
to
a)turn
speed
of
0.7 second
orprogress
slower,
photographs
taken
as extended
PC/AV
terminal
to
turn
the
power
on★★
again.
•During
remove
the
SmartMedia™
or
the
camera
offresult
while
recording
data or are
while
erasing
data
COLOR
Page
77
➲
the
exposure,
the
viewfinder
LED
turns
orange.
position
Pressing the
•
Moving
the
camera
as
you
press
the
shutter
button
will
in
a
blurred
image.
Use
,
,
or
to
select
the
area
to
enlarge.
at Page
the
last
image
displays
the
first
image,
and
pressing
atwill
thebe
firstautomatically
image
displays
the
Pressing
During
[2X],
the
ISO
be
automatically
set
to
ISO200.
During
[4X],ofISO
setof
exposures
(➲
68).
IfCarry
burst
photography
is to
set
the
shutter
speed
is setthe
to volume.
athe
speed
0.7
second
or more
in the
[ to
Tv ]
Decreases
out
steps
1will
2when
in
Photographic
(SmartMedia™
formatting).
actions
might
damage
ISO
Page
78
➲Flashing
ItClose
about
twice
the
time
to while
complete
taking
the
photograph
duePDR-M81
to processing
ofenlargement
the
captured
[set
],These
[“Basic
] When
the
image
is not
in SmartMedia™.
focus.
the
SmartMedia™
cover.
Zoom switch
to
“W”
Memo
•
The
PDR-M81
usesto
an
accurate
auto
focus
mechanism.
However,
the
may
have
difficulty
last
image.
Adjust
the
display
area
enlarge
viewing
the
white
and
Slow
shutter
speed
warning
[1takes
MINUTE]
(default)
ISO400.
Shutter
speed
• In
AEB
photography
(
Page
71)
or
burst
photography,
the
shutter
speed
cannot
be
set
to
0.7
second
or
longer.
Setting
3
:
★★
(SMALL
★★
)
➲
mode,
the
shutter
speed
is
automatically
changed
to
1/2
second.
Lens
•
Use
only
the
SmartMedia™
specified
for
use
with
the
PDR-M81.
The
use
of
other
SmartMedia™
SHARPNESS
Page
79
mode)”
(page
109).
Select
[QUALITY]
Settings
(
focusing
or
not
be
able
to
focus
at
all
for
subjects
and
situations
such
as
the
following:
➲
image.
Before
you
use
aother
new
SmartMedia™
the
first during
time,
be
sure
tothe
Manual
Photography
mode
( P.isspeed
58)
Images
can
bevalue
rotated
by] pressing
playback.
Movie mode
(••• frames.
P.
75)
Difference
between
[PRG]
and
[ for
] or
green
[2 MINUTES]
the
aperture
is
to
F2.9
(maximum
aperture
size),
increased
shutter
speed
restricted
If
a
mode
than
[ set
suppressed
flash
mode
is
set
inthe
flash
photography,
thedark
shutter
is
•compensation
Processing
image
Aperture
Exposure
- When
subject
is distant and
- SmartMedia™
Subjects
moving
at
high
speed
could
damage
camera.
CONTRAST
Page
79
➲[the
• to
The
write
protection
not
function
if in
write-protect
sticker
becomes
Use
a soft
dry cloth to
.thesecond.
on
the
SETUP
MENU
and
press
format
the
(may
Page
91).
rotates
an
image
counterclockwise,
and
pressing
rotates
clockwise.
Pressing
1/750
PDR-ACM1A
] •are
the
same
as
to
PDR-ACM1E
PDR-ACM1U
[PRG]
and
limited
tosecond.
between
1/2
second
and
1/250
* The
aboveitdirty.
menu
is
the
RECORDING
[3 MINUTES]
Charging
of
flash
progress
ON
When
there
are
objects
in
front
of
or
behind
the
subject
Very
shiny
subjects
such
as
a
mirror
or
car
body
SmartMedia™
is
aof
device.
Do do
notnot
bend,
drop,
or subject
SmartMedia™
to
DIGITAL
ZOOM
Page
• wipe
When
the
camera
isOnce
not79
inelectronic
be sure
to attach
the
lens
cap
provided
with[your
camera.
the
POWER
button
to
turn
the
power
off.
✭❅❍❏
away
any
dirt.
ause,
sticker
ispress
peeled
off,
reuse
it.
➲
Orange•Press
The
QUALITY
menu
isprecision
displayed.
combinations
the
automatically
mode.
MENU
inthe
•the
The
aperture
value
set
differ
to
the
actual
value
according
to
the
position
ofUK)
theorzoom
lens.
To
return
to
the
regular
display,
ENTER.
(Photos
cannot
be
taken
at
this
moment.)
(for
US
and
Canada)
If the
shutter
speed
is
set
to
1/350
second
or
less,
the
shutter
as
speed
an
animal
is
automatically
athe
cage
a]changed
person
in front
to 1/250
of a tree)
(for
European
Continent)
(for
Get
ready
to
take
the
photograph.
- above
Extremely
low
contrast
subjects
When
the
settings
are
made,
they
are
displayed
in(such
thepocket
following
order.
Memo
DC
IN
5V
terminal
excessive
Also,
do
not
carry
SmartMedia™
the
ofx[trousers.
This
might
The
lens
cap
can
also
be
attached
to
attachment
following
the
above
steps
to prevent
it’sthe
LCD
79
➲shocks.
The
power
turns
off.
determined
shutter
speeds
and
aperture
-in Subjects
with
little
reflection,
such
as
hair
fur mode.
•• The
size
displayed
on
the
LCD
monitor
FULL
(320
240)
HALF
(160
xorsubject
120).
The
forced
flash
mode
or
]orred-eye
forced
flash
second
ifPage
the
flash
setting
is25)
changed
tothe
thestrap
[ ]becomes
- image
Subjects
that
have
low contrast
and
merge
into
Loading
the
batteries
(➲
Page
and
the
SmartMedia™
(➲
Page
31)
into
the
camera.
being
lost.
• Flash
photography
and
burst
photography
are
not
possible.
Flashing
SmartMedia™
to
excessive
force
when
you
sit
down,
damaging
the
SmartMedia™.
Hardware
malfunction
Subjects
with
no
solidity,
such
as
smoke
or
flames
the
background
(such
as
white
walls
or
subjects
Attach
the
lens
cap
when
you
are
not
using
the
camera.
values.
However,
their
operation
capability
movies
made
in
FULL
size
is
displayed
on
the
entire
LCD
monitor,
and
those
made
in
HALF
size
is
If
the
[
]
forced
flash
or
[
]
red-eye
forced
flash
mode
is
set
in
flash
photography
when
the
•
In
movie
mode,
ISO
will
be
automatically
set
between
ISO100
and
ISO400
regardless
of
its
setting.
* •Use
Histogram
dressed
inthe
theSmartMedia™
same
color
as
the
background)
-attach
Subjects
viewed
through
glass
Turn
offor
the
power
tothe
retract
the
lens
unit,
and then
the
lens
cap.
The
image
taken
in
exposure
photography
mode
may
be
blurred.
or
to
select
the
desired
setting
from
the
tab
menu
, and
press
★★
★★
★★
Do•not
use
store
in
environments
likely
to
be
affected
byisstatic
electricity
or
is
different
as
shown
in
the
right
table.
displayed
in
center
ofspeed
the
screen.
2
shutter
speed
is
set
to
a
of
0.7
second
or
more,
the
shutter
speed
automatically
changed
to
Press
POWER
button
tothe
turn
power
on.subject.
A electrical
histogram
isturn
a graphic
representation
ofthe
theistones
of the
The horizontal
histogram
• Do
If the
the
image
cannot
be
focused,
thelens
focus
automatically
fixed to infinity.
(When theaxis
flashofisthe
necessary
not
the
power
on
with
cap
attached.
noise.
1/2
second.
ENTER.
*the
The
above
AC adapter
is US/Canada
Turning
the
Power
On
➲
Page
38
☞
shows
the
brightness
(increasing
brightness
from
left
to
right)
and
vertical
axis
shows
the
number
at
this
time,
it
is
simultaneously
fixed
to
illuminate
objects
1.5
meters
(five
feet)
away.
During
macro
•This
Dosaves
use
orsettings,
store
SmartMedia™
very
hot,
humid
oraperture
corrosive
If the
shutter
speed
value
isimages,
set toin1/1000
second,
the
value
is limited
to
F8type
andAC
F3.4.
•• not
When
playing
back
movie
switching
isthe
between
standard
and
image
only.
(O
:environments.
possible
Xbetween
: not
the
and
returns
to
RECORDING
MENU.
type.
European
andpossible)
UK
photography,
the flash
islevel.
alignedthe
withdisplay
the wide
position.)
of pixels
at each brightness
Downloaded From
camera-usermanual.com
adapters differ in shape.
--110
20 -40
80
88
Photography in the Full Manual Mode
Set the aperture and shutter speed values separately before taking a photograph.
Getting
Ready
Carry out steps 1 to 2 in “Manual Settings” (page 58).
or
Taking
Photographs
Press
to select [ EXP. ].
or
to
Playing
Back Images
Press
to display option menu, press
select [ M ] and press ENTER.
Pressing ENTER selects the setting.
Press ENTER.
The camera is ready to take photographs.
or
to
The camera takes the picture.
Downloaded From camera-usermanual.com
- 67 -
Additional
Information
• When pressing
or
in the full manual mode, the shutter speed is adjusted, but the exposure
compensation setting is not possible. However the exposure value is displayed on the LCD monitor.
When the exposure value is displayed in red, it shows over- or under-exposure.
It is recommended that the shutter speed and the aperture value be adjusted to obtain the proper
level of exposure.
• If the aperture value is set to F2.9 (increased aperture size), the shutter speed 1/1000 second is not
available.
Other
Applications
Memo
Handy
Functions
Compose the picture, press the shutter button down halfway, and press it down
fully. ➲ Page 40
Erasing
Images
Pressing
or
to set the aperture value (➲ Page 64), and pressing
set the shutter speed value (➲ Page 66) separately are also possible.
Changing
the
Preset
Conditions
(RECORDING
MENU)
Photography
in
the
Program
Mode
Setting
Names
Playing
Back
the
of
Photographed
Parts
Image
Size
and
Quality
(Single-Frame
Playback)
Extended
Exposure
Photography
(Bulb
Photography)
Erasing
Images
(Erase
Frame)
(continued)
Manual
Attaching
Using
How
Taking
Enlarging
Playback
About
Turning
to
Photographs
the
SmartMedia™
Press
Settings
the
Photographed
of
Power
the
Power
Multi
Shoulder
Continuously
Outlet
Shutter
Image
On/Off
Images
Strap
Pictures
Button
(Zoom
(Burst
Playback)
Photography)
Taking
Erasing
Button
Photographs
Folders
and
(All
LCD
Images
Continuously
Monitor
in
aImages
Folder/All
(Burst
Display
Photography)
Folders)
(In
Playback
(continued)
(continued)
Mode)
Definitions
Separately
of
the
Accessories
Color
of
the
Viewfinder
LED
Taking
and
Playing
Back
Photographs
on
aMode
TV
(continued)
Changing
the
Preset
Conditions
(RECORDING
MENU)
(continued)
Exposure
Compensation
in
the
Shutter
(continued)
Speed-priority
(continued)
About
Basic
Settings
SmartMedia™
in
(Sold
the
mode)
Aperture-priority
(continued)
Mode
(continued)
LCD
Monitor
Display
(during
photography)
(continued)
Manual
Settings
(continued)
Playing
Photography
Installing
Back
Movies
batteries
(Auto
Photography)
(continued)
(continued)
(continued)
Names
of
Parts
(continued)
Getting
Ready
The shutter
camerabutton
automatically
adjusts the
shutter
and
the aperture
value
according
to the
brightness
of an
can be pressed
down
in twospeed
stages:
halfway
down and
fully
down. When
pressed
halfway
down,
This
“SmartMedia™”
Set
Play
Automatically
The
the
following
mode
shoulder
menu
back
size
photographed
is(number
used
for
items
strap
plays
setting
isadapter
for
athe
is
are
back
storage
of
taking
handy
also
the
pixels)
still
the
basic
available
subjects
for
medium
images
16
and
carrying
images
settings
quality
one
for
that
as
saving
separately
your
image
to
require
(compression
be
camera
used
images
atseveral
a
sold
for
around.
inthat
photography
items.
ratio)
seconds
the
you
multi
of
have
the
photography
to image
photograph
in
photographed.
to
[ second
be
mode
],photographed.
such
[be
Even
in
asquick
]for
firework
or
if Europe,
the
[You
succession.
camera’s
displays
] photography
power
at the
Enlarges
selected
portions
of
images
being
played
back
at
two
levels.
Images
can
displayed
enlarged
when
In
You
this
can
color
mode,
manually
of
the
photographs
viewfinder
adjust
settings
are
LED
taken
indicates
such
continuously
asphotographed
the
exposure
state
atof
control,
atime.
the
maximum
camera.
white
speed
balance,
The
ofthe
0.8
metering
system,
intervals.
continuous
This
item
switches
display
on
the
LCD
monitor
when
playing
back
photographed
images.
can
switch
If
you
the
AC
(sold
separately:
PDR-ACM1A
for
the
US/Canada,
PDR-ACM1E
PDR-ACM1U
Mode
Effective
dial
Subjects
and
Set
Values
TM
✶❉❅◗❆❉■❄❅❒
✬✥✤
Press
.of
aperture
value.
SYSTEM
Turning
Exposure
ISO
OSD
In
[prevent
[use
LANGUAGE
the
]the
INFO.
mode
control
(EXP.)
On
Close
the
SmartMedia™
cover.
Slide
the
SmartMedia
cover
release
knob
in
the
Take
photographs
or
or
battery
to
to
select
or
play
[that
the
slide
]them
or
shutter
it
[ the
back.
,]will
and
speed.
and
lock
press
Look
Use
through
to
select
the
[adjust
viewfinder
]use
and
press
to
compose
ENTER.
the
picture.
To
continue
erasing
images,
repeat
the
above
procedure
2.
.is
AF
(auto-focus)
and
AE
(auto
exposure)
are
set.
When
pressed
fully
down,
the
camera
takes
aspace
picture.
object.
This
mode
enables
carefree
photographing
similarly
to
selecting
[stable
]photographs.
in
[ from
]settings”,
mode.
Itrepeatedly
is
to
night.
To
is
Change
modes.
turned
When
the
OFF,
your
setting
using
the
camera
images
this
according
mode,
from
saved
dropping
be
to
sure
how
on
the
the
to
during
SmartMedia™
image
a(size,
photography,
tripod
is
to
to
be
keep
used
not
hang
the
and
be
camera
erased.
the
the
shoulder
remaining
SmartMedia™
strap
and
amount
prevent
around
can
ofstep
your
distortion
be
neck.
inpossible
the
of
images.
Relationship
between
your
camera
and
accessories
Connecting
tocalled
Other
Devices
(page
123)
being
played
back
one
image
at
acover,
time.
The
meaning
maximum
of
number
LED
color
of
photographs
differ
according
can
to
be
taken
mode
continuously
dial
setting.
three
photography
mode,
and
take
photographs
at
these
settings.
These
are
“Manual
which
are
saved
display
to
show
aPower
list
detailed
information
compression
ratio,
shutter
speed,
aperture,
etc.)
or
you
can
for
the
UK)
in
a
room
with
amay
power
outlet,
you
can
take
photographs
for
an
extended
period
of
time.
This
also
Mode
dial
1 Item
QUALITY
2 Options
Notes
SmartMedia™
VIDEOon
OUT
White Balance (W.B.)
Write
Protection
Removing
the Batteries
ISO
[ POWER
]
AUTO
OFF
Setting items
Turning
the
Power
Off
Using
the
LCD
Monitor
Additional
Information
Other
Applications
Handy
Functions
Erasing
Images
Playing
Back Images
Taking
Photographs
Tab menu
●
The
tab
is
displayed.
setting
isbattery
as
follows:
Make
sure
that
the
issystem
firmly
closed.
Details
image
ofmenu
operation
isrange
saved
are
or
erased,
the
same
and
as
the
taking
camera
photographs
is
then
ready
and
to
playing
take
photographs.
them
back
onon
the
LCD After
monitor.
If
you
use
the
viewfinder
to
take
photographs,
the
photography
Set
the
mode
to
[cover
].settings
direction
of
the
arrow
to
open
cover
.the
ENTER.
change
the
white
and
the
metering
in(the
program
mode.
erased
SmartMedia™.
and
reused.
For
details
on
these
accessories,
refer
to
the
Instruction
Manual
for
the
accessory
you
are
using.
(information
Movies
images
photographed
in
the
multi
mode
Page
cannot
be
displayed
using
the
zoom
playback
Images
even
if the
are
camera
not
recorded
is
turned
directly
off.
SmartMedia™
but
are
stored
temporarily
within
the
buffer
memory.
display
histograms,
etc.
prevents
failed
photographs
due
to
battery
wear
or
failed
of
data
to
a
PC.
details
handling
the AC
Set
Sets
the
thebalance
whether
color
:(/or
Photography
mode
language
not
to
and
return
photographic
of
in
menus
the
program
displayed
sensitivity
in
the
(default)
on
SETUP
the
at51)
which
LCD
(➲
MENU
Page
monitor.
to
image
62)
the
original
is For
to
be
factory
recorded.
settings.
For
enlarged
view
P.dial
22)
feeds
the
image
•transfer
Each
press
of
2
•✭❅❍❏
Copying
of
printed
(black
on
white
paper)
set
the
time
(text
114)
F8
/display
F6.8
F5.6
/18.
F4.8
/Page
/and
F3.4
/mode
F2.9
How
to
take
photographs
Page
41
1/1000,
1/750,
1/500,
1/350,
1/250,
1/180,
1/125,
range
may
differ
from
the
actual
image.
InLCD
this
case,
use
the
LCD
Press
the
shutter
button
down
halfway
.1/90,
the
mode
dial
to
[ F4.0
],
[characters
]reset.
or
[selected
].higher
1one
SmartMedia™
having
the
following
storage
capacity
can
be
used
on
your
current
as
of
March
2000)
feature.
The
last
cover
recorded
image
opens
frame
image
appears
appears
on
the
on
the
LCD
monitor.
monitor.
photography
is
finished,
check
the
images
record
the
ones
tocamera.
SmartMedia™.
[TIME&DATE,
]
:
Erases
images
in
the
currently
selected
folder
and
folders.
Possible
number
of31)
shots
adapter,
beSet
sure
to
read
page
•
2x-speed
playback
isaperture-priority
performed
for
Make
sure
that
the
SmartMedia™
is
correctly
loaded.
(
Page
by
frame.
Warning:
Noise
:
OSD
Photography
increases
LANGUAGE
when
in
will
the
not
ISO
be
is
changed
mode
to
(➲
Page
settings.
63)
Memo
•
Backlit
portraits
IMPORTANT
[PROTECTED]
on
the
LCD
monitor,
cancel
the protection
( Page 108) or
remove
How
to
play
back
images
Page
80
1/60,
1/45,
1/30,
1/20,
1/10,
1/8,
1/6,
1/4,
1/3,
1/2,
monitor
for
photography.
AF
(auto-focus)
and
AE
(auto
exposure)
(➲
Additional
Information,
SET-UP
(the
P.
:109)
English
(default)
Pass
Set
out
mode
end
steps
of
dial
1the
to
to
shoulder
4[1/15,
either
]].LCD
or
inspeed-priority
[strap
“Photography
through
].
the
in
the
strap
Shutter
speed-priority
Mode”
isdisplayed
held
down.
the
duration
that
PC
mode
(mode
P.
121)
2MBCarry
Set
/4MB/8MB/16MB/32MB/64MB/128MB
the
mode
dial
to
[isin
(all
3.3
types)
To
]•the
adjust
: When
Erases
the
all
brightness
folders
recorded
of
the
on
the
monitor
SmartMedia™.
Page
115
[mode
Self-timer
button
1
•V
1-frame
feed
is continued
for the
The
aperture
value
and
the
shutter
speed
corresponding
to
:write-protection
Photography
shutter
(➲that
Page
65)
Zoom
state
•button
bright
scenes
(such
and
highly
reflective
subjects
Photography
mode
•the
You
can
also
carry
out
step
8snowfields)
while
verifying
the
image
step
7.
DPOF
(in
Page
102).
Glossary)
start
to
function.
0”7,
1”,
1”5,
2”,
3”,
4”,
6”,
8”,
10”,
15”
•Very
Do
not
remove
or monitor
load
the
batteries
or
disconnect
or
connect
the
AC
adapter
while
the camera
is mode.
on.1This
:POWER
Japanese
:LCD
Equivalent
toas
color
ISO100
Carry
Set
Use
out
or
mode
steps
to
dial
select
1
to
to
2[erased,
the
“Manual
].
images
photographed
Settings”
(page
in
58).
the
multi
photography
You POWER
can also
the
PC
card
adapter
and
floppy
disk
adapter
( in
123)
sold
separately
to transfer
Changing
the
display
Page
116
Theconnect
images
or
folders
are
and
the
camera
returns
toPage
the
is
held
down.
duration
that
value
are
displayed
on
the
LCD
monitor.
If
the
appropriate
(page
attachment
65)
or
on
in
“Photography
the
camera.
in
the
Full
Manual
Mode”
(page
67).
Press
the
button
to
turn
the
power
on.
full
manual
mode
(➲
Page
67)
:
Photography
in
Image
Quality
button
Press
the
MENU
button.
• •Shots
made
up
predominantly
of
sky
Even
if
photography
is
terminated
midway
before
capturing
three
images
by
releasing
the
shutter
•
If
you
take
a
photograph
after
erasing
an
image,
a
number
continuing
from
the
last
photographed
When
AF
or
AE
are
locked,
the
beep
tone
(➲
Page
111)
sounds
and
the
Use
or
to
change
the
setting
in
the
tab
menu,
might
return
the
manual
settings
to
their
defaults.
If
this
happens,
manually
set
conditions
again.
:connect
High-sensitive
equivalent
to preset
color
(default)
Before
you
oreven
disconnect
the
AC
adapter,
be
sure
to turn
thedisplay
camera
OFF.
If the
AC adapter is
Press
the
image
quality
button
to
select
the
combination
cannot
be
set
ifphotography
the
shutter
speed
isas
adjusted
toISO200
images to a
PC.
16MB
(SM-M1600D)/32MB
(SM-M3200D)/64MB
(SM-M6400D)/128M
(SM-M1280D)
The
respective
last
image
mode.
frame
appears
on
LCD
monitor.
You
can
also
select
the
image
by
the
same
operation
for
thumbnail
Page
83).
Carry
out
steps
1
to
on
page
109.
When
the
camera
is
turned
on,
set
the
mode
dial
to
the
desired
The
shutter
speed
and
the
aperture
value
corresponding
todisplay
the
All
descriptions
inor
this
Instruction
Manual
are
for
when
the
language
is (2set
to [ENGLISH].
Press
or
to
select
the
image.
button,
images
already
photographed
can
be
saved
and
erased
by playback
the
method.
image
is
assigned
as
image
number.
Shutter
button
●
The
viewfinder
RECORDING
LED
turns
MENU
green.
is2
displayed.
•press
The
image
the
photograph
is
taken
is
slightly
less
clear
than
images.
(This
is 109,
connected
disconnected
with
the
power
ON,
camera
settings
may
beabove
reset
(SET-UP
Page
and
ENTER.
:before
High-sensitive
photography
equivalent
to
color
ISO400
its
the
shutter
speed
isthe
displayed
inthe
red.
To limit,
cancel
erasing
of
image
data,
select
[monitor.
]Photography,
and
press
ENTER.
Flash
button
quality
and
size,
while
viewing
indication
on
the
starts
a
reverse
•
The
press
of
mode.
shutter
speed
are
displayed
on
the
LCD
If
the
appropriate
The
length
of
time
to
capture
images
varies
according
to
the
photographic
conditions.
•
Images
can
also
be
erased
in
the
thumbnail
mode.
In
this
case,
the
camera
enters
the
single
frame
Select
[SYSTEM
INFO.]
on
the
SETUP
MENU
and
because
television
displays
images
at
a
lower
resolution.)
•
Spotlit
subjects,
particularly
against
dark
backgrounds
Manual
Settings
Page
58)
or
the
camera
may
malfunction.
however,
is
possible
in
this
state.
feeds
the
image
•
Each
press
of
EXP.
].
To
cancel
changing
of
settings,
press
.
Use
or
to
select
the
frame
you
want
to
enlarge.
Press
the
or
Zoom
to
switch
select
[
(
S/C
Page
].
21)
towards
“T”
to
begin
playback.
] mode:
is
selected,
[NO
IMAGE]
isaperture
displayed
after
allor
folders
When
playback.
Press
Set
mode
dial
inbe
the
to
[ sure
Tv
mode,
].the
or
press
in
the
shutter
button
fully
Before
photography,
make
that
the
lens
cap
has
been
2onisin.black
combination
cannot
set
even
ifflash
adjusted
to its
playback)
mode,
and
enters
the
thumbnail
playback
mode after the image is erased.
status
display.
]or
In
[[playback
Press
the
display/info
button.
Self-timer
photography
and]down
photography
are
not
possible.
•the
The
display
unit
varies
according
to
the
output
system.
•theCopying
of (frame
printed
text
(white
characters
paper)
.
press
reverse
by
one
frame.
This
adapter
allows
SmartMedia™
to
bespeed
asto
3.5"
floppy
disk.
have
been
erased
(unless
the
SmartMedia™
contains
protected
You
can
also
select
the
image
by Press
thein
same
operation
as
for
thumbnail
playback
( display
PageISO
83).will23)
Automatic
playback
begins.
•[2X],
Playback
becomes
2x-speed
to
reduce
aperture
size.
toused
increase
aperture
size.
Press
camera
takes
a
picture.
The
manual
setting
removed
the
camera.
limit,
aperture
value
isbe
displayed
red.
Photography,
however,
Playback
mode
( Status
P.
80)
the
[Scenes
M
]from
mode
to
set
the
0.7
second
Manual
During
the
ISO
will
automatically
set
between
ISO100
ISO200.
During
[4X],
be
☞
To
set
the
quality
and
size
➲shutter
Page
112
•the
With
the
NTSC
system,
images
can
be
displayed
simultaneously
on the
LCD
monitor
and( TVP.
during
•photograpy
with
low
reflectivity,
such
as
shots
green
or
dark
foliage
Flash
state
Each
press
of
the
display/info
button
switches
the
display
•of1-frame
feed
isand
continued
The
SYSTEM
INFO.
menu
displayed.
reverse
for
the
duration
This
adapter
isplayback
inserted
into
the],
floppy
your
PC,
allowing for the
images).
The
viewfinder
LED
turns
redis
image
data
being
recorded
onto
Insert
the
adapter
connector
plug
into
the
DC
IN
Self-timer
lamp
values
are
displayed
In
the
photography
modes
([while
[and ISO400.
]disk
oris
[ drive
]),on
the
lens
photography
and
playback.
is
possible
inAC
this
state.
automatically
set
between
ISO100
is
held
down.
format
as
follows:
duration
that
Note:
The
larger
the
F
value,
the
smaller
the
aperture
size
become
or
longer.
•Press
Remove
and
insert
SmartMedia™
with
the
camera’s
power
turned
off.Aperture value
is
held
down.
that
To
quit
the
SETUP
MENU,
change
the
mode
dial
setting.
Shutter
speed
Adjust
the
zoom
ratio
by
the
Zoom
switch.
(Zoom
to
display
option
menu,
press
or
to
images
recorded
on
the
SmartMedia™
to
be
transferred
to
the
PC.
the
SmartMedia™.
Sets
video
output
system
according
to
country
in
which
your camera
isSize
used.
on
the
left
ofthe
the
LCD
Press
the
shutter
button
down
halfway
and
press
5V
terminal
on
the
camera.
extends
from
the
camera
body.
•the
PAL
system,
images
cannot
bethe
displayed
When a cable
is connected, only
and
versa.
1 situations
the
image
quality
button
switches
the
quality
and
size
Gently
insert
the
SmartMedia™
as
far
as
it, simultaneously.
can
go
✭❅❍❏
[Pressing
]vice
isWith
displayed
on
the
LCD
monitor.
•select
Recorded
data
may
bepress
erased
(destroyed)
in
the
listed
below.Viewfinder
Note that Toshiba
White
Balance
Additional
Information,
Glossary
to
increase
shutter
speed.
Pressand
to
decrease
shutter
speed.
Press
Press
or
to
move
forward
reverse.
☞
➲
Memo
PRG
]
and
ENTER.
]
and
press
ENTER.
[
switch
Page
21)
✤❅▼❁❉●❅❄
TV
display
is
available.
monitor
screen.
When
the
camera
is
turned
on,
the
Auto
Power
OFF
function
settings
infully
the
following
order.
it
down
. system
✳▼❁■❄❁❒❄
★❉▲▼❏❇❒❁❍
✩❍❁❇❅
❏■●❙
2next
Press
or
to
select
the
item
you
desired
toisloss
set,
with
SmartMedia™
electrodes
(metal
contacts)
Additional
Information,
Glossary)
(white
Corporation
accepts
no
responsibility
whatsoever
for
the
of
recorded
data enters
in these
• the
When
allNTSC
images
in
a
folder
are
erased,
that
folder
itself
also(destruction)
erased.
Quality
The
camera
determines
the
balance
by
averaging
the
various
kinds playback
of light
that actually
to
to
frame/
to“T”
go
back
one
❉■❆❏❒❍❁▼❉❏■
To
prevent
valuable
data
from
being
erased,
attach
the
write••advance
With
the
PAL
system,
images
are
played
back
with
apressing
black
frame
•frame
After
pause
is
cancelled,
the
Zoom
switch
to
the
will
the
image.
Pressing
ENTER
the
setting.
or
,, SmartMedia™
and
manual
Exposure
compensation
(➲
Page
69)
using
When
[for
M
]selects
isis
selected
on
the
[ halfway
EXP.
]remove
option
menu,
orsurrounded.
the
shutter
speed
setting
becomes
operational.
Never
open
the
SmartMedia™
cover
orenlarge
the
while
anmakes
image
is
being
recorded.
This
or
and
manual
setting
(➲
Page
58)
or
film
speed
Exposure
compensation
(➲
Page
69)
using
Reverse the
procedure
“Loading
the
Batteries”
and
remove
the
batteries.
•facing
Pressing
the
shutter
button
down
adjusts
the
exposure,
• Playback
paused.
PAL
system
( camera.
Additional
Information,
Glossary)
situations:
Built-in
microphone
the
lens.
This
setting
allows
you
to
set
in
advance
the
white
balance
when
taking
photographs
under
and
press
ENTER.
the
rear
of
the
For
the
US/Canada:
PDR-ACM1A
Holding
down
or
moves
forward
or
reverse
continuously.
resumes
at
the
last
state
that
was
protect
sticker
at
the
write-protect
area.
Data
can
no
longer
be
Focus
area
may
corrupt
the
data
on
the
SmartMedia™
or
damage
the
SmartMedia™
itself.
possible,
but
does
not
make
the
exposure
compensation
possible. HoweverSelf-timer
the exposure
value
is
To
return
normal
press
the
Zoom
switch
towards
setting
(➲toPage
Page
58)magnification,
or film
speed
setting
(➲
Page
78)
using
ENTER
Pass
the
shoulder
strap
through
the
loop
and
pull.
photography
setting
(➲
78)
using
ENTER
are
also
possible.
and
pressing
the
shutter
button
fully
takes
the
shot.
TM[ is down
When
the
SmartMedia™
used
incorrectly
by
the
user
or
a
third
party
[
],
]
or
[
]
AE
or
AF
are
locked
with
the
shutter
button
held
half
specific
lighting
conditions.
For
Europe:
PDR-ACM1E
active
before
the
pause.
Firmly
insert
the
SmartMedia
as
far
as
it
can
go.
displayed
on is
the
LCD
monitor.
Press
ENTER.
recorded
or setting
erased
from
SmartMedia™.
Toon
write
oraterase
data
from is to be recorded. Write-protect
Sets
the
color
mode
and
photographic
sensitivity
which
the
image
“W”.
are
also
possible.
The
default
different
depending
the
destination
country/area.
Use
or
to
select
the
desired
item
Press
ENTER,
nine
images
are
displayed
simultaneously.
•Flash
If
you
shoot
a
still
picture,
when
preview
is
set
to
ON
(➲
Page
77),
1
down.
If
no
operation
is
carried
out
for
a
fixed
amount
of
time
(default:
about
one
minute),
power
ON
When
the
SmartMedia™
is
exposed
to
static
electricity
or
electrical
noise
Auto
Photography
mode
(
P.
41,
46)
Forimage
the Noise
UK:
PDR-ACM1U
:off
Displays
the
firmware
version
ofto
this
camera.
areait down
SmartMedia™,
peel
the
sticker.
camera
ready
to
take
photographs.
Warning:
increases
when
the
ISO
is
changed
higher
settings.
isis
displayed
and
a
white
frame
and
green
Green The
Compose
picture,
press
the
shutter
button
down
halfway,
and
press
:the
Automatic
adjustment
(default)
Display
Page
83
theThumbnail
recorded
image
is
displayed
on
for
about
two
]specifications
Standby
mode
[enlarged,
••-For
If
no
operation
is
carried
out
a screen
fixed
amount
offrom
time
(default:
about
1shutter
minute),
thewear.
power
iserasing
turned
TM
consumption
is
set
to
its
minimum
state
(power
almost
off)that
to
prevent
battery
This
isdown
.in
and
press
When
the
SmartMedia™
isfor
removed
ordarkens
the
camera
isPage
turned
off
while
recording
The
image
the
LCD
monitor
sometimes
the
time
the
button
isdata,
pressed
Speaker
details,
refer
to
the
of
AC
information.
adapter
127.
: on
Displays
the
SmartMedia
Playback
returns
to
the
start
ofturned
the
movie.
frame
are
displayed
the
LCD
monitor.
:
Photography
outdoors
Default
setting:
seconds.
off
to
preserve
battery
life.
This
is
called
“Auto
Power
OFF”.
To
return
to
the
normal
state,
press the
fully.
➲
Page
40
called
the
Auto
Power
OFF.
This
setting
allows
you
to
set
the
time
when
the
camera
turns
off
halfway
until
the
image
becomes
focused.
: picture,
Equivalent
to
color
ISO100
(default)
data,
frame
advance
when
images
aredefaults.
being
played
back or during
formatting
of the
DC
IN
5V
terminal
The options
are
displayed.
Histogram*
2
:
Returns
settings
to
their
Flashing
[
],
[
]
or
[
]
Self-timer
in
operation
at
a
handshake
alarm
.
Compose
the
press
the
shutter
button
down
halfway,
and
press
itdirectly
down
The
white
frame
indicates
the
entire
image,
while
the
greenrecorded
frame halfway,
:the
Photography
in
cloudy
conditions
POWER
button
again.
• The
viewfinder
LED
turns
red
while
image
data
is
being
Compose
picture,
press
the
shutter
button
press
down
• The
To
set
the
focus
or
exposure
for
a subject
outside
the
center
the intended
point
the
The
camera
takes
the
picture.
automatically.
This
function
is
not
activated
during
automatic
playback
( image,
Pageand
85) or
incamera
the it
[ only>
] PC
:appearing
High-sensitive
photography
equivalent
toofdown
color
ISO200
SmartMedia™.
Note:
image
through
the
lens
will
be
The
display
returns
to<Histogram>
thumbnail
playback.
<Standard>
<Detailed
information>
<Image
✭❅❍❏
shows
the
location
of
the
currently
enlarged
area.
halfway,
and
press
it
down
fully.
➲
Page
40
Macro
photography
:
Photography
in
bluish
fluorescent
light
fully.
➲
Page
40
About
the
Auto
★★
Power
(FULL
OFF
★★
Function
)
Additional
Information,
“AUTO
POWER
OFF
(page
110)”
at
the
subject
or
desired
exposure
(lighting),
press
and
hold
the
shutter
button
halfway.
Now,
with
the
shutter
onto
the
SmartMedia™.
ON]
Writing
to SmartMedia™
in progress
mode.
Press
ENTER.
:adapter
High-sensitive
photography
equivalent
toanother
color
ISO400
•Insert
Wedefault
recommend
copying
and
saving
important
datapower
onto
storage
medium (floppy
disk, hard
displayed
for
[LCD
].[Power
fully.
➲
Page
40
the
AC
power
plug
into
the
Electrodes
The
size
and
quality
of
the
image
can
be
reset
to
the
desired
combination.
Press
ENTER.
Memo
Sticker
button
still
held
halfway
down,
you
can
turn
the
direction
of
the
camera
and
frame
your
image
with
the
focus
•
It
is
possible
to
play
back
any
images
in
any
folders
by
pressing
or
during
playback.
(For
details
ON
: Photography
inafter
reddish
fluorescent
light
The
camera
takes
the
picture.
Photographs
can
be
taken,
however,
do not
turn thepress
power
OFF.
Tobattery
return
topower
the
state
theset
Auto
Power
OFF
has been
executed,
the
POWER
button
disk,
MO
disk,
etc.).
The
PREVIEW
manual
setting
Page
items
77
are
displayed.
Remaining
➲normal
camera
takes
the
atmonitor.
the
exposure
time.
Current
Entireofimage
and
exposure
locked.
Press
the
shutter
button
down
fully
to in
complete
capturing
the image.
Red outlet.
[☞
on picture
the
LCD
The
camera
is ready
for
burst
photography.
of displayed
folder
Page
92)
]:the
mode:
In
the
Accessing
of
SmartMedia™
[ (HALF
Photography
in] is
incandescent
light
★★
•] [is
When
shutter
speed
set
to
a)turn
speed
of
0.7 second
orprogress
slower,
photographs
taken
as extended
PC/AV
terminal
to Never
turn
the
power
on★★
again.
•During
remove
the
SmartMedia™
or
the
camera
offresult
while
recording
data or are
while
erasing
data
COLOR
Page
77
➲
the
exposure,
the
viewfinder
LED
turns
orange.
position
•
Moving
the
camera
as
you
press
the
shutter
button
will
in
a
blurred
image.
Use
,
,
or
to
select
the
area
to
enlarge.
at Page
the
last
image
displays
the
first
image,
and
pressing
atwill
thebe
firstautomatically
image
displays
the
Pressing
During
[2X],
the
ISO
be
automatically
set
to
ISO200.
[4X],ofISO
setof
exposures
(➲
68).
IfCarry
burst
photography
is to
set
the
shutter
speed
is set During
to athe
speed
0.7
second
or more
in the
[ to
Tv ]
out
steps
1will
2when
in
Photographic
(SmartMedia™
formatting).
actions
might
damage
ISO
Page
78
➲Flashing
ItClose
takes
about
twice
the
time
to while
complete
taking
the
photograph
duePDR-M81
to processing
ofenlargement
the
captured
[set
],These
[“Basic
] When
the
image
is not
in SmartMedia™.
focus.
the
SmartMedia™
cover.
Memo
•
The
PDR-M81
usesto
an
accurate
auto
focus
mechanism.
However,
the
may
have
difficulty
last
image.
Adjust
the
display
area
enlarge
viewing
the
white
and
Slow
shutter
speed
warning
ISO400.
Shutter
speed
• In
AEB
photography
(
Page
71)
or
burst
photography,
the
shutter
speed
cannot
be
set
to
0.7
second
or
longer.
★★
(SMALL
★★
)
➲
mode,
the
shutter
speed
is
automatically
changed
to
1/2
second.
Lens
•
Use
only
the
SmartMedia™
specified
for
use
with
the
PDR-M81.
The
use
of
other
SmartMedia™
SHARPNESS
Page
79
mode)”
(page
109).
Select
[QUALITY]
Settings
(
focusing
or
not
be
able
to
focus
at
all
for
subjects
and
situations
such
as
the
following:
➲
image.
Before
you
use
aother
new
SmartMedia™
the
first during
time,
be
sure
tothe
Manual
Photography
mode
( P.isspeed
58)
Images
can
bevalue
rotated
by] pressing
playback.
Movie mode
(•• frames.
P.
75)
[ for
] or
green
the
aperture
is
to
F2.9
(maximum
aperture
size),
increased
shutter
speed
restricted
If
a
mode
than
[ set
suppressed
flash
mode
is
set
inthe
flash
photography,
thedark
shutter
is
•compensation
Processing
image
Aperture
Exposure
- When
subject
is distant and
- SmartMedia™
Subjects
moving
at
high
speed
damage
camera.
CONTRAST
Page
79
➲[the
• to
The
write
protection
not
function
if in
write-protect
sticker
becomes
Use
a soft
dry cloth to
.thesecond.
oncould
the
SETUP
MENU
and
press
format
the
(may
Page
91).
rotates
an
image
counterclockwise,
and
pressing
rotates
clockwise.
Pressing
1/750
PDR-ACM1A
] •are
the
same
as
to
PDR-ACM1E
PDR-ACM1U
[PRG]
and
limited
tosecond.
between
1/2
second
and
1/250
* The
aboveitdirty.
menu
is
the
RECORDING
Charging
of
flash
progress
ON
When
there
are
objects
in
front
of
or
behind
the
subject
Very
shiny
subjects
such
as
a
mirror
or
car
body
SmartMedia™
is
aof
device.
Do do
notnot
bend,
drop,
or subject
SmartMedia™
to
DIGITAL
ZOOM
Page
• wipe
When
the
camera
isOnce
not79
inelectronic
be sure
to attach
the
lens
cap
provided
with[your
camera.
the
POWER
button
to
turn
the
power
off.
✭❅❍❏
away
any
dirt.
ause,
sticker
ispress
peeled
off,
reuse
it.
➲
Orange•Press
The
QUALITY
menu
isprecision
displayed.
combinations
the
automatically
mode.
MENU
inthe
•the
The
aperture
value
set
differ
to
the
actual
value
according
to
the
position
ofUK)
theorzoom
lens.
To
return
to
the
regular
display,
ENTER.
(Photos
cannot
be
taken
at
this
moment.)
(for
US
and
Canada)
If the
shutter
speed
is
set
to
1/350
second
or
less,
the
shutter
as
speed
an
animal
is
automatically
athe
cage
a]changed
person
in front
to 1/250
of a tree)
(for
European
Continent)
(for
Get
ready
to
take
the
photograph.
- above
Extremely
low
contrast
subjects
When
the
settings
are
made,
they
are
displayed
in(such
thepocket
following
order.
Memo
DC
IN
5V
terminal
excessive
Also,
do
not
carry
SmartMedia™
the
ofx[trousers.
This
might
The
lens
cap
can
also
be
attached
to
attachment
following
the
above
steps
to prevent
it’sthe
LCD
79
➲shocks.
The
power
turns
off.
determined
shutter
speeds
and
aperture
-in Subjects
with
little
reflection,
such
as
hair
fur mode.
•• The
size
displayed
on
the
LCD
monitor
FULL
(320
240)
HALF
(160
xorsubject
120).
The
forced
flash
mode
or
]orred-eye
forced
flash
second
ifPage
the
flash
setting
is25)
changed
tothe
thestrap
[ ]becomes
- image
Subjects
that
have
low contrast
and
merge
into
Loading
the
batteries
(➲
Page
and
the
SmartMedia™
(➲
Page
31)
into
the
camera.
being
lost.
• Flash
photography
and
burst
photography
are
not
possible.
Flashing
SmartMedia™
to
excessive
force
when
you
sit
down,
damaging
the
SmartMedia™.
Hardware
malfunction
Subjects
with
no
solidity,
such
as
smoke
or
flames
the
background
(such
as
white
walls
or
subjects
Attach
the
lens
cap
when
you
are
not
using
the
camera.
values.
However,
their
operation
capability
movies
made
in
FULL
size
is
displayed
on
the
entire
LCD
monitor,
and
those
made
in
HALF
size
If the
[ ]mode,
forcedISO
flash
[ automatically
] red-eye set
forced
flash mode
is and
set in
flash photography
the is
• In
movie
willorbe
between
ISO100
ISO400
regardless ofwhen
its setting.
dressed
inthe
theSmartMedia™
same
color
as
the
background)
-attach
Subjects
viewed
through
glass
Turn
offor
the
power
tothe
retract
the
lens
unit,
and then
the
lens
cap.
The
image
taken
in
photography
mode
may
be
blurred.
or
to
select
the
desired
setting
from
the
tab
menu
, and
press
★★
★★
★★
•Use
Do•not
use
store
in
environments
likely
to
be
affected
byisstatic
electricity
or
is
different
as
shown
the
right
table.
displayed
in
ofspeed
the
2
shutter
speed
is center
set
toin
aexposure
of
0.7
second
or
more,
the
shutter
speed
automatically
changed
to
Press
POWER
button
toscreen.
turn
power
on.
A electrical
histogram
isturn
a graphic
representation
ofthe
theistones
of the
subject.
The horizontal
histogram
• Do
If the
the
image
cannot
be
focused,
thelens
focus
automatically
fixed to infinity.
(When theaxis
flashofisthe
necessary
not
the
power
on
with
the
cap
attached.
noise.
1/2
second.
ENTER.
*
The
above
AC
adapter
is
US/Canada
Turning
the
Power
On
➲
Page
38
☞
shows
the
brightness
(increasing
brightness
from
left
to
right)
and
the
vertical
axis
shows
the
number
at
this
time,
it
is
simultaneously
fixed
to
illuminate
objects
1.5
meters
(five
feet)
away.
During
macro
•This
Dosaves
use
orsettings,
store
SmartMedia™
very
hot,
humid
oraperture
corrosive
If the
shutter
speed
value
isimages,
set toin1/1000
second,
the
value
is limited
to
F8type
andAC
F3.4.
•not
When
playing
back
movie
switching
isthe
between
standard
and
image
only.
(O
:environments.
possible
Xbetween
: not
the
and
returns
to
RECORDING
MENU.
type.
European
andpossible)
UK
photography,
the flash
islevel.
alignedthe
withdisplay
the wide
position.)
of pixels
at each brightness
Downloaded From
camera-usermanual.com
adapters differ in shape.
--110
20 -40
80
88
Exposure Compensation
or
].
to adjust the exposure.
The setting range is as follows. A larger value lightens the
exposure,and a smaller value darkens the exposure.
The value that you set is displayed on the LCD monitor.
Press to increase (brighten) exposure, and to decrease
(darken) exposure.
Playing
Back Images
Press
Taking
Photographs
Set the mode dial to [
Getting
Ready
This setting allows you to intentionally lighten or darken the entire image. Use this setting when the optimum
brightness (exposure) cannot be obtained, for example, when the brightness between the subject and the
background is not balanced or when the subject to photograph occupies only an extremely small part of the
screen.
Erasing
Images
Exposure Setting Value
Downloaded From camera-usermanual.com
- 69 -
Additional
Information
The ideal brightness sometimes cannot be obtained even if a large exposure value is set in dark
photographic conditions.
In this case, press the shutter button, and check the brightness in the preview image (photographed
still image). (PREVIEW ➲ Page 77)
Other
Applications
Compose the picture, press the shutter button down halfway, and press it down
fully. ➲ Page 40
Handy
Functions
(to – side)
(to + side)
-2.0 / -1.5 / -1.0 / -0.5 / 0 (default) / +0.5 / +1.0 / +1.5 / +2.0
Changing
the
Preset
Conditions
(RECORDING
MENU)
Photography
in
the
Program
Mode
Setting
Names
Playing
Back
the
of
Photographed
Parts
Image
Size
and
Quality
(Single-Frame
Playback)
Extended
Exposure
Photography
(Bulb
Photography)
Erasing
Images
(Erase
Frame)
(continued)
Manual
Attaching
Using
How
Taking
Enlarging
Playback
About
Turning
to
Photographs
the
SmartMedia™
Press
Settings
the
Photographed
of
Power
the
Power
Multi
Shoulder
Continuously
Outlet
Shutter
Image
On/Off
Images
Strap
Pictures
Button
(Zoom
(Burst
Playback)
Photography)
Taking
Erasing
Button
Photographs
Folders
and
(All
LCD
Images
Continuously
Monitor
in
aImages
Folder/All
(Burst
Display
Photography)
Folders)
(In
Playback
(continued)
(continued)
Mode)
Definitions
Separately
of
the
Accessories
Color
of
the
Viewfinder
LED
Taking
and
Playing
Back
Photographs
on
aMode
TV
(continued)
Changing
the
Preset
Conditions
(RECORDING
MENU)
(continued)
Exposure
Compensation
in
the
Shutter
(continued)
Speed-priority
(continued)
About
Basic
Settings
SmartMedia™
in
(Sold
the
mode)
Aperture-priority
(continued)
Mode
(continued)
LCD
Monitor
Display
(during
photography)
(continued)
Manual
Settings
(continued)
Playing
Photography
Installing
Back
Movies
batteries
(Auto
Photography)
(continued)
(continued)
(continued)
Names
of
Parts
(continued)
Getting
Ready
The shutter
camerabutton
automatically
adjusts the
shutter
and
the aperture
value
according
to the
brightness
of an
can be pressed
down
in twospeed
stages:
halfway
down and
fully
down. When
pressed
halfway
down,
This
“SmartMedia™”
Set
Play
Automatically
The
the
following
mode
shoulder
menu
back
size
photographed
is(number
used
for
items
strap
plays
setting
isadapter
for
athe
is
are
back
storage
of
taking
handy
also
the
pixels)
still
the
basic
available
subjects
for
medium
images
16
and
carrying
images
settings
quality
one
for
that
as
saving
separately
your
image
to
require
(compression
be
camera
used
images
atseveral
a
sold
for
around.
inthat
photography
items.
ratio)
seconds
the
you
multi
of
have
the
photography
to image
photograph
in
photographed.
to
[ pause
be
mode
],photographed.
such
[be
Even
in
asquick
]for
firework
or
if Europe,
the
[You
succession.
camera’s
displays
] photography
power
at the
Enlarges
selected
portions
of
images
being
played
back
at
two
levels.
Images
can
displayed
enlarged
when
In
You
this
can
color
mode,
manually
of
the
photographs
viewfinder
adjust
settings
are
LED
taken
indicates
such
continuously
asphotographed
the
exposure
state
atof
control,
atime.
the
maximum
camera.
white
speed
balance,
The
ofthe
0.8
metering
second
system,
intervals.
continuous
This
item
switches
display
on
the
LCD
monitor
when
playing
back
photographed
images.
can
switch
If
you
the
AC
(sold
separately:
PDR-ACM1A
for
the
US/Canada,
PDR-ACM1E
PDR-ACM1U
During
stopping
During
Mode
Effective
dial
Subjects
and
Set
Values
During
playback
TM
✶❉❅◗❆❉■❄❅❒
✬✥✤
Press
.of
aperture
value.
SYSTEM
Turning
Exposure
ISO
OSD
In
[prevent
[use
LANGUAGE
the
]the
INFO.
mode
control
(EXP.)
On
Close
the
SmartMedia™
cover.
Slide
the
SmartMedia
cover
release
knob
in
the
Take
photographs
or
or
battery
to
to
select
or
play
[that
the
slide
]them
or
shutter
it
[ the
back.
,]will
and
speed.
and
lock
press
Look
Use
through
to
select
the
[adjust
viewfinder
]use
and
press
to
compose
ENTER.
the
picture.
To
continue
erasing
images,
repeat
the
above
procedure
2.
.is
AF
(auto-focus)
and
AE
(auto
exposure)
are
set.
When
pressed
fully
down,
the
camera
takes
aspace
picture.
object.
This
mode
enables
carefree
photographing
similarly
to
selecting
[stable
]photographs.
in
[ from
]settings”,
mode.
Itrepeatedly
is
to
night.
To
is
Change
modes.
turned
When
the
OFF,
your
setting
using
the
camera
images
this
according
mode,
from
saved
dropping
be
to
sure
how
on
the
the
to
during
SmartMedia™
image
a(size,
photography,
tripod
is
to
to
be
keep
used
not
hang
the
and
be
camera
erased.
the
the
shoulder
remaining
SmartMedia™
strap
and
amount
prevent
around
can
ofstep
your
distortion
be
neck.
inpossible
the
of
images.
Relationship
between
your
camera
and
accessories
Connecting
tocalled
Other
Devices
(page
123)
being
played
back
one
image
at
acover,
time.
The
meaning
maximum
of
number
LED
color
of
photographs
differ
according
can
to
be
taken
mode
continuously
dial
setting.
three
photography
mode,
and
take
photographs
at
these
settings.
These
are
“Manual
which
are
saved
display
to
show
aPower
list
detailed
information
compression
ratio,
shutter
speed,
aperture,
etc.)
or
you
can
for
the
UK)
in
a
room
with
amay
power
outlet,
you
can
take
photographs
for
an
extended
period
of
time.
This
also
Mode
dial
1 Item
QUALITY
2 Options
Notes
SmartMedia™
VIDEOon
OUT
White Balance (W.B.)
Write
Protection
Removing
the Batteries
ISO
[ POWER
]
AUTO
OFF
Setting items
Turning
the
Power
Off
Using
the
LCD
Monitor
Additional
Information
Other
Applications
Handy
Functions
Erasing
Images
Playing
Back Images
Taking
Photographs
Tab menu
feed
●
Positive
(+)
Compensation
The
tab
is
displayed.
setting
isbattery
as
follows:
Make
sure
that
the
issystem
firmly
closed.
Details
image
ofmenu
operation
isrange
saved
are
or
erased,
the
same
and
as
the
taking
camera
photographs
is
then
ready
and
to
playing
take
photographs.
them
back
onon
the
LCD After
monitor.
If
you
use
the
viewfinder
to
take
photographs,
the
photography
Set
the
mode
to
[cover
].settings
direction
of
the
arrow
to
open
cover
.1-frame
ENTER.
change
the
white
and
the
metering
in(the
program
mode.
erased
SmartMedia™.
and
reused.
For
details
on
these
accessories,
refer
to
the
Instruction
Manual
for
the
accessory
you
are
using.
(information
Movies
images
in
the
multi
mode
Page
cannot
be
displayed
using
the
zoom
playback
Images
even
if the
are
camera
not
recorded
is
turned
directly
off.
SmartMedia™
but
are
stored
temporarily
within
the
buffer
memory.
display
histograms,
etc.
prevents
failed
photographs
due
to
battery
wear
or
failed
of
data
to
a
PC.
details
handling
the AC
2x-speed
playback
Set
Sets
[•✭❅❍❏
PRG
the
thebalance
whether
color
] photographed
:(/or
Photography
mode
language
not
to
and
return
photographic
of
in
menus
the
program
displayed
sensitivity
in
the
(default)
on
SETUP
the
at51)
which
LCD
(➲
MENU
Page
monitor.
the
to
image
62)
the
original
is For
to
be
factory
recorded.
settings.
For
enlarged
view
P.dial
22)
feeds
the
image
•transfer
Each
press
of
2
Copying
of
printed
(black
characters
on
white
paper)
set
the
time
(text
114)
F8
/display
F6.8
F5.6
/18.
F4.8
/Page
F4.0
/and
F3.4
/mode
F2.9
How
to
take
photographs
Page
41
1/1000,
1/750,
1/500,
1/350,
1/250,
1/180,
1/125,
1/90,
range
may
differ
from
the
actual
image.
In
this
case,
use
the
LCD
Press
the
shutter
button
down
halfway
.
the
mode
dial
to
[
],
[
]
or
[
].
1
SmartMedia™
having
the
following
storage
capacity
can
be
used
on
your
camera.
current
as
of
March
2000)
feature.
The
last
cover
recorded
image
opens
frame
image
appears
appears
on
the
on
the
LCD
LCD
monitor.
monitor.
photography
is
finished,
check
the
images
record
the
selected
ones
to
SmartMedia™.
[TIME&DATE,
]
:
Erases
images
in
the
currently
selected
folder
and
folders.
Possible
number
of31)
shots
adapter,
beSet
sure
to
read
page
•
2x-speed
playback
is
performed
for
.
Make
sure
that
the
SmartMedia™
is
correctly
loaded.
(
Page
by
one
frame.
Warning:
[•Memo
Av
]
Noise
:
OSD
Photography
increases
LANGUAGE
when
in
aperture-priority
will
the
not
ISO
be
is
reset.
changed
mode
to
(➲
higher
Page
settings.
63)
Backlit
portraits
IMPORTANT
[PROTECTED]
on
the
LCD
monitor,
cancel
the protection
( Page 108) or
remove
How
to
play
back
images
Page
80
1/60,
1/45,
1/30,
1/20,
1/10,
1/8,
1/6,
1/4,
1/3,
1/2,
monitor
for
photography.
AF
(auto-focus)
and
AE
(auto
exposure)
(➲
Additional
Information,
SET-UP
(the
P.
[English]
:109)
English
(default)
Pass
Set
out
mode
end
steps
of
dial
1the
to
to
shoulder
4[1/15,
either
]].LCD
or
inspeed-priority
[strap
“Photography
through
].
the
in
the
strap
Shutter
speed-priority
Mode”
isdisplayed
held
down.
the
duration
that
PC
mode
(mode
P.
121)
2MBCarry
Set
/4MB/8MB/16MB/32MB/64MB/128MB
the
mode
dial
to
[isin
(all
3.3
types)
]•the
adjust
:]When
Erases
the
all
brightness
folders
recorded
of
the
on
the
monitor
SmartMedia™.
Page
115
[mode
Self-timer
button
1
•V
1-frame
feed
is continued
for the
The
aperture
value
and
the
shutter
speed
corresponding
to
[•To
Tv
:write-protection
Photography
shutter
(➲that
Page
65)
Zoom
state
bright
scenes
(such
and
highly
reflective
subjects
Photography
mode
•the
You
can
also
carry
out
step
8snowfields)
while
verifying
the
image
step
7.
DPOF
(in
Page
102).
Glossary)
start
to
function.
0”7,
1”,
1”5,
2”,
3”,
4”,
6”,
8”,
10”,
15”
•Very
Do
not
remove
orV)
load
the
batteries
or
disconnect
or
connect
the
AC
adapter
while
the camera
is mode.
on.1This
]65)
:POWER
Japanese
[value
[NORMAL]
:(3.3
Equivalent
toas
color
ISO100
button
Carry
Set
Use
out
or
mode
steps
to
dial
select
1
to
to
2[erased,
the
“Manual
].
images
photographed
Settings”
(page
in
58).
the
multi
photography
You POWER
can also
connect
the
PC
card
adapter
and
floppy
disk
adapter
( in
123)
sold
separately
to transfer
SmartMedia™
Changing
the
LCD
monitor
display
Page
116
The
images
or
folders
are
and
the
camera
returns
toPage
the
is
held
down.
duration
that
are
displayed
on
the
LCD
monitor.
If
the
appropriate
(page
attachment
or
on
in
“Photography
the
camera.
in
the
Full
Manual
Mode”
(page
67).
Press
the
button
to
turn
the
power
on.
full
manual
mode
(➲
Page
67)
[
M
]
:
Photography
in
Image
Quality
button
Press
the
MENU
button.
•[2X]
Shots
made
up
predominantly
of
sky
Even
if
photography
is
terminated
midway
before
capturing
three
images
by
releasing
the
shutter
•
If
you
take
a
photograph
after
erasing
an
image,
a
number
continuing
from
the
last
photographed
When
AF
or
AE
are
locked,
the
beep
tone
(➲
Page
111)
sounds
and
the
Use
or
to
change
the
setting
in
the
tab
menu,
might
return
the
manual
settings
to
their
defaults.
If
this
happens,
manually
set
conditions
again.
:connect
High-sensitive
equivalent
to preset
color
(default)
• Before
you
oreven
disconnect
the
AC
adapter,
be
sure
to turn
thedisplay
camera
OFF.
If the
AC adapter is
Press
the
image
quality
button
to
select
the
combination
cannot
be
set
ifphotography
the
shutter
speed
isas
adjusted
toISO200
images to a
PC.
16MB
(SM-M1600D)/32MB
(SM-M3200D)/64MB
(SM-M6400D)/128M
(SM-M1280D)
The
respective
last
image
mode.
frame
appears
on
LCD
monitor.
You
can
also
select
the
image
by
the
same
operation
for
thumbnail
Page
83).
Carry
out
steps
1
to
on
page
109.
When
the
camera
is
turned
on,
set
the
mode
dial
to
the
desired
The
shutter
speed
and
the
aperture
value
corresponding
todisplay
the
Reverse
playback,
2x-speed
playback
All
descriptions
inor
this
Instruction
Manual
are
for
when
the
language
is (2set
to [ENGLISH].
Press
or
to
select
the
image.
button,
images
already
photographed
can
be
saved
and
erased
by playback
the
method.
image
is
assigned
as
image
number.
Shutter
button
●
Negative
(–)
Compensation
The
viewfinder
RECORDING
LED
turns
MENU
green.
is2
displayed.
•press
The
image
the
photograph
is
taken
is
slightly
less
clear
than
images.
(This
is 109,
connected
disconnected
with
the
power
ON,
camera
settings
may
beabove
reset
(SET-UP
Page
and
ENTER.
:before
High-sensitive
photography
equivalent
to
color
ISO400
its
limit,
the
shutter
speed
isthe
displayed
inthe
red.
Reverse
1-frame
feed
To [4X]
cancel
erasing
of
image
data,
select
[monitor.
]Photography,
and
press
ENTER.
Flash
button
quality
and
size,
while
viewing
indication
on
the
starts
a
reverse
•
The
press
of
mode.
shutter
speed
are
displayed
on
the
LCD
If
the
appropriate
The
length
of
time
to
capture
images
varies
according
to
the
photographic
conditions.
•
Images
can
also
be
erased
in
the
thumbnail
mode.
In
this
case,
the
camera
enters
the
single
frame
Select
[SYSTEM
INFO.]
on
the
SETUP
MENU
and
because
television
displays
images
at
a
lower
resolution.)
•
Spotlit
subjects,
particularly
against
dark
backgrounds
Manual
Settings
Page
58)
or
the
camera
may
malfunction.
however,
is
possible
in
this
state.
feeds
the
image
•
Each
press
of
EXP.
].
To
cancel
changing
of
settings,
press
.
Use
or
to
select
the
frame
you
want
to
enlarge.
Press
the
or
Zoom
to
switch
select
[
(
S/C
Page
].
21)
towards
“T”
to
begin
playback.
Floppy
Disk
Adapter
(FlashPath)
] mode:
is
selected,
[NO
IMAGE]
isaperture
displayed
after
allor
folders
When
playback.
Press
Set
mode
dial
inbe
the
to
[ sure
Tv
mode,
].the
or
press
in
the
shutter
button
fully
Before
photography,
make
that
the
lens
cap
has
been
2onisin.black
combination
cannot
set
even
ifflash
adjusted
to its
playback)
mode,
and
enters
the
thumbnail
playback
mode after the image is erased.
status
display.
]or
In
[[playback
Press
the
display/info
button.
Self-timer
photography
and]down
photography
are
not
possible.
•the
The
display
unit
varies
according
to
the
output
system.
•theCopying
of (frame
printed
text
(white
characters
paper)
.
press
reverse
by
one
frame.
This
adapter
allows
SmartMedia™
to
bespeed
asto
3.5"
floppy
disk.
have
been
erased
(unless
the
SmartMedia™
contains
protected
You
can
also
select
the
image
by Press
thein
same
operation
as
for
thumbnail
playback
( display
PageISO
83).will23)
Automatic
playback
begins.
•[2X],
Playback
becomes
2x-speed
to
reduce
aperture
size.
toused
increase
aperture
size.
Press
camera
takes
a
picture.
The
manual
setting
removed
the
camera.
limit,
aperture
value
isbe
displayed
red.
Photography,
however,
Playback
mode
( Status
P.
80)
the
[Scenes
M
]from
mode
to
set
the
0.7
second
Manual
During
the
ISO
will
automatically
set
between
ISO100
ISO200.
During
[4X],
be
☞
To
set
the
quality
and
size
➲shutter
Page
112
•the
With
the
NTSC
system,
images
can
be
displayed
simultaneously
on the
LCD
monitor
and( TVP.
during
•photograpy
with
low
reflectivity,
such
as
shots
green
or
dark
foliage
Flash
state
Each
press
of
the
display/info
button
switches
the
display
•of1-frame
feed
isand
continued
The
SYSTEM
INFO.
menu
displayed.
reverse
for
the
duration
This
adapter
isplayback
inserted
into
the],
floppy
your
PC,
allowing for the
images).
The
viewfinder
LED
turns
redis
image
data
being
recorded
onto
Insert
the
adapter
connector
plug
into
the
DC
IN
Self-timer
lamp
values
are
displayed
In
the
photography
modes
([while
[and ISO400.
]disk
oris
[ drive
]),on
the
lens
photography
and
playback.
is
possible
inAC
this
state.
automatically
set
between
ISO100
is
held
down.
format
as
follows:
duration
that
Note:
The
larger
the
F
value,
the
smaller
the
aperture
size
become
or
longer.
•Press
Remove
and
insert
SmartMedia™
with
the
camera’s
power
turned
off.Aperture value
is
held
down.
that
To
quit
the
SETUP
MENU,
change
the
mode
dial
setting.
Shutter
speed
Adjust
the
zoom
ratio
by
the
Zoom
switch.
(Zoom
to
display
option
menu,
press
or
to
images
recorded
on
the
SmartMedia™
to
be
transferred
to
the
PC.
the
SmartMedia™.
Sets
video
output
system
according
to
country
in
which
your camera
isSize
used.
on
the
left
ofthe
the
LCD
Press
the
shutter
button
down
halfway
and
press
5V
terminal
on
the
camera.
extends
from
the
camera
body.
•the
PAL
system,
images
cannot
bethe
displayed
When a cable
is connected, only
and
versa.
1 situations
the
image
quality
button
switches
the
quality
and
size
Gently
insert
the
SmartMedia™
as
far
as
it, simultaneously.
can
go
✭❅❍❏
[Pressing
]vice
isWith
displayed
on
the
LCD
monitor.
Viewfinder
LED
•select
Recorded
data
may
bepress
erased
(destroyed)
in
the
listed
below.Viewfinder
Note that Toshiba
White
Balance
Additional
Information,
Glossary
to
increase
shutter
speed.
Pressand
to
decrease
shutter
speed.
Press
Press
or
to
move
forward
reverse.
☞
➲
Memo
PRG
]
and
ENTER.
]
and
press
ENTER.
[
switch
Page
21)
✤❅▼❁❉●❅❄
TV
display
is
available.
monitor
screen.
When
the
camera
is
turned
on,
the
Auto
Power
OFF
function
Canceling
pause
settings
infully
the
following
order.
it
down
. system
✳▼❁■❄❁❒❄
★❉▲▼❏❇❒❁❍
✩❍❁❇❅
❏■●❙
2next
Press
or
to
select
the
item
you
desired
toMeaning
set,
Pause
with
the
SmartMedia™
electrodes
(metal
contacts)
Additional
Information,
Glossary)
[NTSC]
:allNTSC
(white
Corporation
accepts
no
responsibility
whatsoever
for
the
loss
of
recorded
data enters
in these
•Adapter
When
images
in
a
folder
are
erased,
that
folder
itself
is
also(destruction)
erased.
Quality
The
camera
determines
the
balance
by
averaging
the
various
kinds playback
of light
that actually
AC
to
to
frame/
to“T”
go
back
one
❉■❆❏❒❍❁▼❉❏■
To
prevent
valuable
data
from
being
erased,
attach
the
write•••advance
With
the
PAL
system,
images
are
played
back
with
apressing
black
frame
•frame
After
pause
is
cancelled,
the
switch
to
the
will
the
image.
Pressing
ENTER
the
setting.
or
,, SmartMedia™
and
manual
Exposure
compensation
(➲
Page
69)
using
Colorthe
When
[Zoom
M
]selects
isis
selected
on
the
[ halfway
EXP.
]remove
option
menu,
orsurrounded.
the
shutter
speed
setting
becomes
operational.
State
Never
open
the
SmartMedia™
cover
orenlarge
the
while
anmakes
image
is
being
recorded.
This
or
and
manual
setting
(➲
Page
58)
or
film
speed
Exposure
compensation
(➲
Page
69)
using
Play
back
Reverse
procedure
“Loading
the
Batteries”
and
remove
the
batteries.
•facing
Pressing
the
shutter
button
down
adjusts
the
exposure,
• Playback
paused.
[PAL]
:for
PAL
system
( camera.
Additional
Information,
Glossary)
situations:
Built-in
microphone
the
lens.
This
setting
allows
you
to
set
in
advance
the
white
balance
when
taking
photographs
under
and
press
ENTER.
the
rear
of
the
For
the
US/Canada:
PDR-ACM1A
Holding
down
or
moves
forward
or
reverse
continuously.
resumes
at
the
last
state
that
was
protect
sticker
at
the
write-protect
area.
Data
can
no
longer
be
Focus
area
may
corrupt
the
data
on
the
SmartMedia™
or
damage
the
SmartMedia™
itself.
possible,
but
does
not
make
the
exposure
compensation
possible. HoweverSelf-timer
the exposure
value
is
To
return
normal
press
the
Zoom
switch
towards
setting
(➲toPage
Page
58)magnification,
or film
speed
setting
(➲
Page
78)
using
ENTER
Pass
the
shoulder
strap
through
the
loop
and
pull.
photography
setting
(➲
78)
using
ENTER
are
also
possible.
and
pressing
the
shutter
button
fully
takes
the
shot.
TM[ is down
When
the
SmartMedia™
used
incorrectly
by
the
user
or
a
third
party
[
],
]
or
[
]
AE
or
AF
are
locked
with
the
shutter
button
held
half
specific
lighting
conditions.
For
Europe:
PDR-ACM1E
active
before
the
pause.
Firmly
insert
the
SmartMedia
as
far
as
it
can
go.
displayed
on is
the
LCD
monitor.
Press
ENTER.
recorded
or setting
erased
from
SmartMedia™.
Toon
write
oraterase
data
from is to be recorded. Write-protect
Flash
Sets
the
color
mode
and
photographic
sensitivity
which
the
image
“W”.
are
also
possible.
The
default
different
depending
the
destination
country/area.
Use
or
to
select
the
desired
item
Press
ENTER,
nine
images
are
displayed
simultaneously.
•[FIRMWARE
If
you
shoot
a
still
picture,
when
preview
is
set
to
ON
(➲
Page
77),
1
down.
If
no
operation
is
carried
out
for
a
fixed
amount
of
time
(default:
about
one
minute),
power
ON
When
the
SmartMedia™
is
exposed
to
static
electricity
or
electrical
noise
Auto
Photography
mode
(
P.
41,
46)
Forimage
the Noise
UK:is
PDR-ACM1U
VER.]
:off
Displays
the
firmware
version
ofto
this
camera.
areait down
Stop
SmartMedia™,
peel
the
sticker.
camera
ready
to
take
photographs.
Warning:
increases
when
the
ISO
is
changed
higher
settings.
displayed
and
a
white
frame
and
green
Green The
Compose
picture,
press
the
shutter
button
down
halfway,
and
press
[the
AW
] no is
:the
Automatic
adjustment
(default)
Thumbnail
Display
Page
83
recorded
image
is
displayed
on
for
about
two
]specifications
Standby
mode
[enlarged,
••-For
If
operation
is
carried
out
a screen
fixed
amount
offrom
time
(default:
about
1shutter
minute),
thewear.
power
iserasing
turned
TM
consumption
is
set
to
its
minimum
state
(power
almost
off)that
to
prevent
battery
This
isdown
.in
and
press
When
the
SmartMedia™
isfor
removed
ordarkens
the
camera
isPage
turned
off
while
recording
The
image
the
LCD
monitor
sometimes
the
time
the
button
isdata,
pressed
Speaker
details,
refer
to
the
of
AC
information.
adapter
127.
[CARD
INFO.]
: on
Displays
the
SmartMedia
Playback
returns
to
the
start
ofturned
the
movie.
frame
are
displayed
the
LCD
monitor.
]
:
Photography
outdoors
[
Default
setting:
seconds.
off
to
preserve
battery
life.
This
is
called
“Auto
Power
OFF”.
To
return
to
the
normal
state,
press the
fully.
➲
Page
40
called
the
Auto
Power
OFF.
This
setting
allows
you
to
set
the
time
when
the
camera
turns
off
halfway
until
the
image
becomes
focused.
[NORMAL]
: picture,
Equivalent
to
color
ISO100
(default)
data,
frame
advance
when
images
aredefaults.
being
played
back or during
formatting
of the
DC
IN
5V
terminal
The
options
are
displayed.
Histogram*
2
Stop
[RESET]
:
Returns
settings
to
their
Flashing
[
],
[
]
or
[
]
Self-timer
in
operation
at
a
handshake
alarm
.
Compose
the
press
the
shutter
button
down
halfway,
and
press
itdirectly
down
The
white
frame
indicates
the
entire
image,
while
the
greenrecorded
frame halfway,
[[2X]
]POWER
:the
Photography
in
cloudy
conditions
button
again.
ENTERCompose
• The
viewfinder
LED
turns
red
while
image
data
is
being
picture,
press
the
shutter
button
press
down
• The
To
set
the
focus
or
exposure
for
a subject
outside
the
center
the intended
point
the
The
camera
takes
the
picture.
automatically.
This
function
is
not
activated
during
automatic
playback
( image,
Pageand
85) or
incamera
the it
[ only>
] PC
:appearing
High-sensitive
photography
equivalent
toofdown
color
ISO200
SmartMedia™.
Note:
image
through
the
lens
will
be
The
display
returns
to<Histogram>
thumbnail
playback.
<Standard>
<Detailed
information>
<Image
✭❅❍❏
shows
the
location
of
the
currently
enlarged
area.
halfway,
and
press
it
down
fully.
➲
Page
40
Macro
photography
]
:
Photography
in
bluish
fluorescent
light
[
fully.
➲
Page
40
Setting
1
:
About
the
Auto
★★
Power
(FULL
OFF
★★
Function
)
Additional
Information,
“AUTO
POWER
OFF
(page
110)”
at
the
subject
or
desired
exposure
(lighting),
press
and
hold
the
shutter
button
halfway.
Now,
with
the
shutter
onto
the
SmartMedia™.
ON]
Writing
to SmartMedia™
in progress
mode.
Press
ENTER.
[4X]
:adapter
High-sensitive
photography
equivalent
toanother
color
ISO400
•Insert
We
recommend
copying
and
saving
important
datapower
onto
storage
medium (floppy
disk, hard
displayed
for
[LCD
].[Power
fully.
➲
Page
40
the
AC
power
plug
into
the
Electrodes
Pressing the
The
default
size
and
quality
of
the
image
can
be
reset
to
the
desired
combination.
Press
ENTER.
Memo
Sticker
button
still
held
halfway
down,
you
can
turn
the
direction
of
the
camera
and
frame
your
image
with
the
focus
•
It
is
possible
to
play
back
any
images
in
any
folders
by
pressing
or
during
playback.
(For
details
ON
Increases
the
volume.
[disk,
] MO
: Photography
inafter
reddish
fluorescent
light
The
camera
takes
the
picture.
Photographs
can
be
taken,
however,
do not
turn thepress
power
OFF.
To
return
topower
the
state
theset
Auto
Power
OFF
has been
executed,
the
POWER
button
disk,
etc.).
The
PREVIEW
manual
setting
Page
items
77
are
displayed.
Remaining
➲normal
camera
takes
the
atmonitor.
the
exposure
time.
Zoom
switch
tobattery
“T”
Current
Entireofimage
and
locked.
Press
the
shutter
button
down
fully
to in
complete
capturing
the image.
Red outlet.
[☞
on picture
the
LCD
The
camera
is ready
for
burst
photography.
of2displayed
folder
Page
92)
]:the
mode:
In
the
Accessing
of
SmartMedia™
[ (HALF
Photography
in] is
incandescent
light
[Never
Setting
: exposure
★★
•]][is
When
shutter
speed
set
to
a)turn
speed
of
0.7 second
orprogress
slower,
photographs
taken
as extended
PC/AV
terminal
to
turn
the
power
on★★
again.
•During
remove
the
SmartMedia™
or
the
camera
offresult
while
recording
data or are
while
erasing
data
COLOR
Page
77
➲
the
exposure,
the
viewfinder
LED
turns
orange.
position
Pressing the
•
Moving
the
camera
as
you
press
the
shutter
button
will
in
a
blurred
image.
Use
,
,
or
to
select
the
area
to
enlarge.
at Page
the
last
image
displays
the
first
image,
and
pressing
atwill
thebe
firstautomatically
image
displays
the
Pressing
During
[2X],
the
ISO
be
automatically
set
to
ISO200.
During
[4X],ofISO
setof
exposures
(➲
68).
IfCarry
burst
photography
is to
set
the
shutter
speed
is setthe
to volume.
athe
speed
0.7
second
or more
in the
[ to
Tv ]
Decreases
out
steps
1will
2when
in
Photographic
(SmartMedia™
formatting).
actions
might
damage
ISO
Page
78
➲Flashing
ItClose
about
twice
the
time
to while
complete
taking
the
photograph
duePDR-M81
to processing
ofenlargement
the
captured
[set
],These
[“Basic
] When
the
image
is not
in SmartMedia™.
focus.
the
SmartMedia™
cover.
Zoom switch
to
“W”
Memo
•
The
PDR-M81
usesto
an
accurate
auto
focus
mechanism.
However,
the
may
have
difficulty
last
image.
Adjust
the
display
area
enlarge
viewing
the
white
and
Slow
shutter
speed
warning
[1takes
MINUTE]
(default)
ISO400.
Shutter
speed
• In
AEB
photography
(
Page
71)
or
burst
photography,
the
shutter
speed
cannot
be
set
to
0.7
second
or
longer.
Setting
3
:
★★
(SMALL
★★
)
➲
mode,
the
shutter
speed
is
automatically
changed
to
1/2
second.
Lens
•
Use
only
the
SmartMedia™
specified
for
use
with
the
PDR-M81.
The
use
of
other
SmartMedia™
SHARPNESS
Page
79
mode)”
(page
109).
Select
[QUALITY]
Settings
(
focusing
or
not
be
able
to
focus
at
all
for
subjects
and
situations
such
as
the
following:
➲
image.
Before
you
use
aother
new
SmartMedia™
the
first during
time,
be
sure
tothe
Manual
Photography
mode
( P.isspeed
58)
Images
can
bevalue
rotated
by] pressing
playback.
Movie mode
(••• frames.
P.
75)
Difference
between
[PRG]
and
[ for
] or
green
[2 MINUTES]
the
aperture
is
to
F2.9
(maximum
aperture
size),
increased
shutter
speed
restricted
If
a
mode
than
[ set
suppressed
flash
mode
is
set
inthe
flash
photography,
thedark
shutter
is
•compensation
Processing
image
Aperture
Exposure
- When
subject
is distant and
- SmartMedia™
Subjects
moving
at
high
speed
could
damage
camera.
CONTRAST
Page
79
➲[the
• to
The
write
protection
not
function
if in
write-protect
sticker
becomes
Use
a soft
dry cloth to
.thesecond.
on
the
SETUP
MENU
and
press
format
the
(may
Page
91).
rotates
an
image
counterclockwise,
and
pressing
rotates
clockwise.
Pressing
1/750
PDR-ACM1A
] •are
the
same
as
to
PDR-ACM1E
PDR-ACM1U
[PRG]
and
limited
tosecond.
between
1/2
second
and
1/250
* The
aboveitdirty.
menu
is
the
RECORDING
[3 MINUTES]
Charging
of
flash
progress
ON
When
there
are
objects
in
front
of
or
behind
the
subject
Very
shiny
subjects
such
as
a
mirror
or
car
body
SmartMedia™
is
aof
device.
Do do
notnot
bend,
drop,
or subject
SmartMedia™
to
DIGITAL
ZOOM
Page
• wipe
When
the
camera
isOnce
not79
inelectronic
be sure
to attach
the
lens
cap
provided
with[your
camera.
the
POWER
button
to
turn
the
power
off.
✭❅❍❏
away
any
dirt.
ause,
sticker
ispress
peeled
off,
reuse
it.
➲
Orange•Press
The
QUALITY
menu
isprecision
displayed.
combinations
the
automatically
mode.
MENU
inthe
•the
The
aperture
value
set
differ
to
the
actual
value
according
to
the
position
ofUK)
theorzoom
lens.
To
return
to
the
regular
display,
ENTER.
(Photos
cannot
be
taken
at
this
moment.)
(for
US
and
Canada)
If the
shutter
speed
is
set
to
1/350
second
or
less,
the
shutter
as
speed
an
animal
is
automatically
athe
cage
a]changed
person
in front
to 1/250
of a tree)
(for
European
Continent)
(for
Get
ready
to
take
the
photograph.
- above
Extremely
low
contrast
subjects
When
the
settings
are
made,
they
are
displayed
in(such
thepocket
following
order.
Memo
DC
IN
5V
terminal
excessive
Also,
do
not
carry
SmartMedia™
the
ofx[trousers.
This
might
The
lens
cap
can
also
be
attached
to
attachment
following
the
above
steps
to prevent
it’sthe
LCD
79
➲shocks.
The
power
turns
off.
determined
shutter
speeds
and
aperture
-in Subjects
with
little
reflection,
such
as
hair
fur mode.
•• The
size
displayed
on
the
LCD
monitor
FULL
(320
240)
HALF
(160
xorsubject
120).
The
forced
flash
mode
or
]orred-eye
forced
flash
second
ifPage
the
flash
setting
is25)
changed
tothe
thestrap
[ ]becomes
- image
Subjects
that
have
low contrast
and
merge
into
Loading
the
batteries
(➲
Page
and
the
SmartMedia™
(➲
Page
31)
into
the
camera.
being
lost.
• Flash
photography
and
burst
photography
are
not
possible.
Flashing
SmartMedia™
to
excessive
force
when
you
sit
down,
damaging
the
SmartMedia™.
Hardware
malfunction
Subjects
with
no
solidity,
such
as
smoke
or
flames
the
background
(such
as
white
walls
or
subjects
Attach
the
lens
cap
when
you
are
not
using
the
camera.
values.
However,
their
operation
capability
movies
made
in
FULL
size
is
displayed
on
the
entire
LCD
monitor,
and
those
made
in
HALF
size
is
If
the
[
]
forced
flash
or
[
]
red-eye
forced
flash
mode
is
set
in
flash
photography
when
the
•
In
movie
mode,
ISO
will
be
automatically
set
between
ISO100
and
ISO400
regardless
of
its
setting.
* •Use
Histogram
dressed
inthe
theSmartMedia™
same
color
as
the
background)
-attach
Subjects
viewed
through
glass
Turn
offor
the
power
tothe
retract
the
lens
unit,
and then
the
lens
cap.
The
image
taken
in
exposure
photography
mode
may
be
blurred.
or
to
select
the
desired
setting
from
the
tab
menu
, and
press
★★
★★
★★
Do•not
use
store
in
environments
likely
to
be
affected
byisstatic
electricity
or
is
different
as
shown
in
the
right
table.
displayed
in
center
ofspeed
the
screen.
2
shutter
speed
is
set
to
a
of
0.7
second
or
more,
the
shutter
speed
automatically
changed
to
Press
POWER
button
tothe
turn
power
on.subject.
A electrical
histogram
isturn
a graphic
representation
ofthe
theistones
of the
The horizontal
histogram
• Do
If the
the
image
cannot
be
focused,
thelens
focus
automatically
fixed to infinity.
(When theaxis
flashofisthe
necessary
not
the
power
on
with
cap
attached.
noise.
1/2
second.
ENTER.
*the
The
above
AC adapter
is US/Canada
Turning
the
Power
On
➲
Page
38
☞
shows
the
brightness
(increasing
brightness
from
left
to
right)
and
vertical
axis
shows
the
number
at
this
time,
it
is
simultaneously
fixed
to
illuminate
objects
1.5
meters
(five
feet)
away.
During
macro
•This
Dosaves
use
orsettings,
store
SmartMedia™
very
hot,
humid
oraperture
corrosive
If the
shutter
speed
value
isimages,
set toin1/1000
second,
the
value
is limited
to
F8type
andAC
F3.4.
•• not
When
playing
back
movie
switching
isthe
between
standard
and
image
only.
(O
:environments.
possible
Xbetween
: not
the
and
returns
to
RECORDING
MENU.
type.
European
andpossible)
UK
photography,
the flash
islevel.
alignedthe
withdisplay
the wide
position.)
of pixels
at each brightness
Downloaded From
camera-usermanual.com
adapters differ in shape.
--110
20 -40
80
88
Taking Shots With the Automatic Exposure Bracketing (AEB Photography)
Carry out steps 1 to 2 in “Manual Settings” (page 58).
or
Taking
Photographs
Press
Getting
Ready
When it is difficult to determine the necessary exposure compensation, this mode will automatically set the
camera to photograph three consecutive pictures in -0.5, 0, and +0.5 compensation.
to select [ S/C ].
or
to
Pressing ENTER selects the setting.
Playing
Back Images
Press
to display option menu, press
select [ AEB ] and press ENTER.
Erasing
Images
Press ENTER.
Compose the picture, press the shutter button down halfway, and press it down
fully. ➲ Page 40
Memo
Downloaded From camera-usermanual.com
- 71 -
Additional
Information
• If burst photography is selected when the shutter speed is set to a speed of 0.7 second or longer, the
shutter speed is automatically changed to 1/2 second.
• The camera takes three consecutive pictures in the order of standard exposure, overexposure (+0.5)
and underexposure (-0.5) compensation.
Other
Applications
The camera will automatically take a picture in -0.5 compensation, 0 compensation, and +0.5
compensation.
Handy
Functions
The camera is ready to take photographs.
Changing
the
Preset
Conditions
(RECORDING
MENU)
Photography
in
the
Program
Mode
Setting
Names
Playing
Back
the
of
Photographed
Parts
Image
Size
and
Quality
(Single-Frame
Playback)
Extended
Exposure
Photography
(Bulb
Photography)
Erasing
Images
(Erase
Frame)
(continued)
Manual
Attaching
Using
How
Taking
Enlarging
Playback
About
Turning
to
Photographs
the
SmartMedia™
Press
Settings
the
Photographed
of
Power
the
Power
Multi
Shoulder
Continuously
Outlet
Shutter
Image
On/Off
Images
Strap
Pictures
Button
(Zoom
(Burst
Playback)
Photography)
Taking
Erasing
Button
Photographs
Folders
and
(All
LCD
Images
Continuously
Monitor
in
aImages
Folder/All
(Burst
Display
Photography)
Folders)
(In
Playback
(continued)
(continued)
Mode)
Definitions
Separately
of
the
Accessories
Color
of
the
Viewfinder
LED
Taking
and
Playing
Back
Photographs
on
aMode
TV
(continued)
Changing
the
Preset
Conditions
(RECORDING
MENU)
(continued)
Exposure
Compensation
in
the
Shutter
(continued)
Speed-priority
(continued)
About
Basic
Settings
SmartMedia™
in
(Sold
the
mode)
Aperture-priority
(continued)
Mode
(continued)
LCD
Monitor
Display
(during
photography)
(continued)
Manual
Settings
(continued)
Playing
Photography
Installing
Back
Movies
batteries
(Auto
Photography)
(continued)
(continued)
(continued)
Names
of
Parts
(continued)
Getting
Ready
The shutter
camerabutton
automatically
adjusts the
shutter
and
the aperture
value
according
to the
brightness
of an
can be pressed
down
in twospeed
stages:
halfway
down and
fully
down. When
pressed
halfway
down,
This
“SmartMedia™”
Set
Play
Automatically
The
the
following
mode
shoulder
menu
back
size
photographed
is(number
used
for
items
strap
plays
setting
isadapter
for
athe
is
are
back
storage
of
taking
handy
also
the
pixels)
still
the
basic
available
subjects
for
medium
images
16
and
carrying
images
settings
quality
one
for
that
as
saving
separately
your
image
to
require
(compression
be
camera
used
images
atseveral
a
sold
for
around.
inthat
photography
items.
ratio)
seconds
the
you
multi
of
have
the
photography
to image
photograph
in
photographed.
to
[ second
be
mode
],photographed.
such
[be
Even
in
asquick
]for
firework
or
if Europe,
the
[You
succession.
camera’s
displays
] photography
power
at the
Enlarges
selected
portions
of
images
being
played
back
at
two
levels.
Images
can
displayed
enlarged
when
In
You
this
can
color
mode,
manually
of
the
photographs
viewfinder
adjust
settings
are
LED
taken
indicates
such
continuously
asphotographed
the
exposure
state
atof
control,
atime.
the
maximum
camera.
white
speed
balance,
The
ofthe
0.8
metering
system,
intervals.
continuous
This
item
switches
display
on
the
LCD
monitor
when
playing
back
photographed
images.
can
switch
If
you
the
AC
(sold
separately:
PDR-ACM1A
for
the
US/Canada,
PDR-ACM1E
PDR-ACM1U
Mode
Effective
dial
Subjects
and
Set
Values
TM
Press
.of
aperture
value.
SYSTEM
Turning
Exposure
ISO
OSD
In
[prevent
[use
LANGUAGE
the
]the
INFO.
mode
control
(EXP.)
On
Close
the
SmartMedia™
cover.
Slide
the
SmartMedia
cover
release
knob
in
the
Take
photographs
or
or
battery
to
to
select
or
play
[that
the
slide
]them
or
shutter
it
[ the
back.
,]will
and
speed.
and
lock
press
Look
Use
through
to
select
the
[adjust
viewfinder
]use
and
press
to
compose
ENTER.
the
picture.
To
continue
erasing
images,
repeat
the
above
procedure
2.
.is
AF
(auto-focus)
and
AE
(auto
exposure)
are
set.
When
pressed
fully
down,
the
camera
takes
aspace
picture.
object.
This
mode
enables
carefree
photographing
similarly
to
selecting
[stable
]photographs.
in
[ from
]settings”,
mode.
Itrepeatedly
is
to
night.
To
is
Change
modes.
turned
When
the
OFF,
your
setting
using
the
camera
images
this
according
mode,
from
saved
dropping
be
to
sure
how
on
the
the
to
during
SmartMedia™
image
a(size,
photography,
tripod
is
to
to
be
keep
used
not
hang
the
and
be
camera
erased.
the
the
shoulder
remaining
SmartMedia™
strap
and
amount
prevent
around
can
ofstep
your
distortion
be
neck.
inpossible
the
of
images.
Relationship
between
your
camera
and
accessories
Connecting
tocalled
Other
Devices
(page
123)
being
played
back
one
image
at
acover,
time.
The
meaning
maximum
of
number
LED
color
of
photographs
differ
according
can
to
be
taken
mode
continuously
dial
setting.
three
photography
mode,
and
take
photographs
at
these
settings.
These
are
“Manual
which
are
saved
display
to
show
aPower
list
detailed
information
compression
ratio,
shutter
speed,
aperture,
etc.)
or
you
can
for
the
UK)
in
a
room
with
amay
power
outlet,
you
can
take
photographs
for
an
extended
period
of
time.
This
also
Item
QUALITY
Options
Notes
SmartMedia™
VIDEOon
OUT
White Balance (W.B.)
Write
Protection
Removing
the Batteries
ISO
[ POWER
]
AUTO
OFF
Setting items
Turning
the
Power
Off
Using
the
LCD
Monitor
Additional
Information
Other
Applications
Handy
Functions
Erasing
Images
Playing
Back Images
Taking
Photographs
Tab menu
The
tab
is
displayed.
setting
isbattery
as
follows:
Make
sure
that
the
issystem
firmly
closed.
Details
image
ofmenu
operation
isrange
saved
are
or
erased,
the
same
and
as
the
taking
camera
photographs
is
then
ready
and
to
playing
take
photographs.
them
back
onon
the
LCD After
monitor.
If
you
use
the
viewfinder
to
take
photographs,
the
photography
Set
the
mode
dial
to
[cover
].settings
direction
of
the
arrow
to
open
cover
.the
ENTER.
change
the
white
and
the
metering
in(the
program
mode.
erased
SmartMedia™.
and
reused.
For
details
on
these
accessories,
refer
to
the
Instruction
Manual
for
the
accessory
you
are
using.
(information
Movies
images
photographed
in
the
multi
mode
Page
cannot
be
displayed
using
the
zoom
playback
Images
even
if the
are
camera
not
recorded
is
turned
directly
off.
SmartMedia™
but
are
stored
within
the
buffer
memory.
display
histograms,
etc.
prevents
failed
photographs
due
to
battery
wear
or
failed
of
data
to
a
PC.
details
handling
the AC
Set
Sets
the
thebalance
whether
color
: /or
Photography
mode
language
not
to
and
return
photographic
of
in
menus
the
program
displayed
sensitivity
in
the
(default)
on
SETUP
the
at51)
which
LCD
(temporarily
MENU
Page
monitor.
to
image
62)
the
original
is For
to
be
factory
recorded.
settings.
feeds
the
image
•transfer
Each
press
of
•How
Copying
of
printed
(black
on
white
paper)
set
the
time
(text
114)
F8
/display
F6.8
F5.6
/18.
F4.8
/Page
/and
F3.4
/mode
F2.9
to
take
photographs
Page
41
1/1000,
1/750,
1/500,
1/350,
1/250,
1/180,
1/125,
range
may
differ
from
the
actual
image.
InLCD
this
case,
use
the
LCD
Press
the
shutter
button
down
halfway
.1/90,
the
mode
dial
to
[ F4.0
],
[characters
]reset.
or
[selected
].higher
SmartMedia™
having
the
following
storage
capacity
can
be
on
your
current
as
of
March
2000)
feature.
The
last
cover
recorded
image
opens
frame
image
appears
appears
on
the
on
the
LCD
monitor.
monitor.
photography
is
finished,
check
the
images
record
the
ones
tocamera.
SmartMedia™.
[TIME&DATE,
]
:
Erases
images
in
the
selected
folder
folders.
adapter,
beSet
sure
to
read
page
•
2x-speed
playback
isaperture-priority
performed
Make
sure
that
the
SmartMedia™
is
correctly
loaded.
(
Page
31)
byused
one
frame.
Warning:
Noise
:OSD
Photography
increases
LANGUAGE
when
incurrently
will
the
not
ISO
be
is for
changed
mode
to
(and
Page
settings.
63)
•
Backlit
portraits
[PROTECTED]
on
the
LCD
monitor,
cancel
the protection
( Page 108) or
remove
How
to
play
back
images
Page
80
1/60,
1/45,
1/30,
1/20,
1/10,
1/8,
1/6,
1/4,
1/3, 115
1/2,
monitor
for
photography.
AF
(auto-focus)
and
AE
(auto
exposure)
(the
Additional
Information,
: value
English
(default)
Pass
Set
the
out
mode
end
steps
of
dial
1the
to
to
shoulder
4[1/15,
either
]].LCD
or
inspeed-priority
[strap
“Photography
through
].
the
in
the
strap
Shutter
speed-priority
Mode”
isdisplayed
held
down.
the
duration
that
2MBCarry
/4MB/8MB/16MB/32MB/64MB/128MB
the
mode
dial
to
[isin
(all
3.3
types)
To
]•the
adjust
: When
Erases
the
all
brightness
folders
recorded
of
the
on
monitor
SmartMedia™.
Page
[Set
•V
1-frame
feed
is continued
for the
The
aperture
and
the
shutter
speed
corresponding
to( that
:write-protection
Photography
shutter
mode
Page
65)
• 0”7,
bright
scenes
(such
and
highly
reflective
subjects
•the
You
can
also
carry
out
step
8snowfields)
while
verifying
the
image
step
7.
DPOF
(in
Page
102).
Glossary)
start
to
function.
1”,
1”5,
2”,
3”,
4”,
6”,
8”,
10”,
15”
•Very
Do
not
remove
or monitor
load
the
batteries
or
disconnect
or
connect
the
AC
adapter
while
the camera
is mode.
on. This
:POWER
Japanese
:LCD
Equivalent
toas
color
ISO100
Carry
Set
Use
out
or
mode
steps
to
dial
select
1
to
to
2[erased,
the
“Manual
].
images
photographed
Settings”
(page
in
58).
the
multi
photography
You can also
the
PC
card
adapter
and
floppy
disk
adapter
( in
123)
sold
separately
to transfer
Changing
the
display
Page
116
Theconnect
images
or
folders
are
and
the
camera
returns
toPage
the
is
held
down.
duration
that
value
are
displayed
on
the
LCD
monitor.
If
the
appropriate
(page
attachment
65)
or
on
in
“Photography
the
camera.
in
the
Full
Manual
Mode”
(page
67).
Press
the
button
to
turn
the
power
on.
full
manual
mode
(
Page
67)
:
Photography
in
Press
the
MENU
button.
• •Shots
predominantly
of
sky
Even
ifreturn
photography
is disconnect
terminated
midway
before
capturing
three
images
bythe
releasing
theAC
shutter
• AF
If
you
take
aup
photograph
after
erasing
an
athis
number
continuing
from
last Ifphotographed
When
or
AE
are
locked,
the
beep
tone
( Page
111)
sounds
and
the
Use
ormade
to
change
the
setting
inimage,
the
menu,
might
the
manual
settings
tosame
their
defaults.
Iftab
happens,
manually
set
conditions
again.
:
High-sensitive
photography
equivalent
to
color
ISO200
(default)
Before
you
connect
or
the
AC
adapter,
be
sure
to
turn
the
camera
OFF.
the
adapter
is
Press
the
image
quality
button
to
select
the
preset
combination
cannot
be
set
even
if
the
shutter
speed
is
adjusted
to
images to a
PC.
16MB
(SM-M1600D)/32MB
(SM-M3200D)/64MB
(SM-M6400D)/128M
(SM-M1280D)
The
respective
last
image
mode.
frame
appears
on
LCD
monitor.
You
can
also
select
the
image
by
the
operation
as
for
thumbnail
display
(
Page
83).
Carry
out
steps
1
to
on
page
109.
When
the
camera
is
turned
on,
set
the
mode
dial
to
thethe
desired
The
shutter
speed
and
the
aperture
value
corresponding
todisplay
the
All
descriptions
inor
this
Instruction
Manual
are
for
when
language
is set
to [ENGLISH].
Press
or
to
select
the
image.
button,
images
already
photographed
can
be
saved
and
erased
by playback
the
method.
image
is
assigned
as
image
number.
The
viewfinder
RECORDING
LED
turns
MENU
green.
is2
displayed.
•press
The
image
the
photograph
is
taken
is
slightly
less
clear
than
images.
(This
is 109,
connected
disconnected
with
the
power
ON,
camera
settings
may
beabove
reset
(SET-UP
Page
and
ENTER.
:before
High-sensitive
photography
equivalent
to
color
ISO400
its
the
shutter
speed
isthe
displayed
inthe
red.
To limit,
cancel
erasing
of
image
data,
select
[monitor.
]Photography,
and
press
ENTER.
quality
and
size,
while
viewing
indication
on
the
starts
a
reverse
•
The
press
of
mode.
shutter
speed
are
displayed
on
the
LCD
If
the
appropriate
The
length
of
time
to
capture
images
varies
according
to
the
photographic
conditions.
•
Images
can
also
be
erased
in
the
thumbnail
mode.
In
this
case,
the
camera
enters
the
single
frame
Select
[SYSTEM
INFO.]
on
the
SETUP
MENU
and
because
television
displays
images
at
a
lower
resolution.)
•
Spotlit
subjects,
particularly
against
dark
backgrounds
Manual
Settings
Page
58)
orPage
the
camera
malfunction.
however,
is
in
this
state.
feeds the
image
•may
Each
press
oftoinbegin
EXP.
].
To
cancel
changing
of
settings,
press
.you
Use
or
todial
select
the
frame
want
to
enlarge.
Press
the
or
Zoom
to
switch
select
[( S/C
].isphotography
21)
towards
“T”
playback.
]possible
is
selected,
[NO
IMAGE]
displayed
after
all
folders
When
playback.
Press
Set
mode
in
the
to
[ sure
Tv
mode,
].the
or
press
or
the
shutter
button
fully
Before
photography,
make
that
the
lens
cap
has
been
combination
cannot
be
set
even
ifflash
aperture
isin.black
adjusted
to its
playback)
mode,
and
enters
the
thumbnail
playback mode after the image is erased.
status
display.
]or
mode:
In
[[playback
Press
the
display/info
button.
Self-timer
photography
and]down
are
not
possible.
•the
The
display
unit
varies
according
to
the
output
system.
•theCopying
of (frame
printed
text
(white
characters
on
paper)
.playback
press
reverse
by
one
frame.
This
adapter
allows
SmartMedia™
to
be
used
as
3.5"
floppy
disk.
have
been
erased
(unless
the
SmartMedia™
contains
protected
You
can
also
select
the
image
by
the
same
operation
as
for
thumbnail
playback
( [4X],
PageISO
83).
Automatic
begins.
•
Playback
becomes
2x-speed
to
reduce
aperture
size.
Press
to
increase
aperture
size.
Press
camera
takes
a
picture.
The
manual
setting
removed
the
camera.
limit,
aperture
value
isbe
displayed
in
red.
Photography,
however,
the
[Scenes
M
]from
mode
tomenu
set
the
shutter
speed
to simultaneously
0.7
second
During
[2X],
the
ISO
will
automatically
set
between
ISO100
ISO200.
During
be
set
the
quality
and
size
Page
112
•the
With
the
NTSC
system,
images
can
be
displayed
on the LCD
monitor
and TVwill
during
•To
with
low
reflectivity,
such
as
shots
green
or
dark
foliage
Each
press
of
the
display/info
button
switches
the
display
•of1-frame
feed
isand
continued
The
SYSTEM
INFO.
displayed.
reverse
for
the
duration
This
adapter
isplayback
inserted
into
the],
floppy
your
PC,
allowing for the
images).
The
viewfinder
LED
turns
redis
image
data
being
recorded
onto
Insert
the
adapter
connector
plug
into
the
DC
IN
values
are
displayed
In
the
photography
modes
([while
[and ISO400.
]disk
oris
[ drive
]),on
the
lens
photography
and
playback.
is
possible
inAC
this
state.
automatically
set
between
ISO100
is
held
down.
format
as
follows:
duration
that
Note:
The
larger
the
F
value,
the
smaller
the
aperture
size
become
or
longer.
•Press
Remove
and
insert
SmartMedia™
with
the
camera’s
power
turned
off.Aperture value
is
held
down.
that
To
quit
the
SETUP
MENU,
change
the
mode
dial
setting.
Shutter
speed
Adjust
the
zoom
ratio
by
the
Zoom
switch.
(Zoom
to
display
option
menu,
press
or
to
images
recorded
on
the
SmartMedia™
to
be
transferred
to
the
PC.
the
SmartMedia™.
Sets
video
output
system
according
to
country
in
which
your camera
is used.
on
the
left
ofthe
the
LCD
Press
the
shutter
button
down
halfway
and
press
5V
terminal
on
the
camera.
extends
from
the
camera
body.
•the
PAL
system,
images
cannot
bethe
displayed
When a cable
is connected, only
and
versa.
the
image
quality
button
switches
the
quality
and
size
Gently
insert
the
SmartMedia™
as
far
as
it, simultaneously.
can
go
[Pressing
]vice
isWith
displayed
on
the
LCD
monitor.
•select
Recorded
data
may
bepress
erased
(destroyed)
in
the
situations
listed
below. Note that Toshiba
White
Balance
Additional
Information,
Glossary
to
increase
shutter
speed.
Pressand
to
decrease
shutter
speed.
Press
Press
or
to
move
forward
reverse.
PRG
]
and
ENTER.
]
and
press
ENTER.
[
switch
Page
21)
TV
display
is
available.
monitor
screen.
When
the
camera
is
turned
on,
the
Auto
Power
OFF
function
settings
infully
the
following
order.
it
down
. system
Press
or
to
select
the
item
you
desired
toisloss
set,
with
SmartMedia™
electrodes
(metal
contacts)
Additional
Information,
Glossary)
(white
Corporation
accepts
no
whatsoever
for
the
of recorded
data enters
in these
• the
When
allNTSC
images
in
a responsibility
folder
are
erased,
that
folder
itself
also(destruction)
erased.
The
camera
determines
the
balance
by
averaging
the
various
kinds playback
of light
that actually
to
to
next
frame/
to“T”
go
back
one
To
prevent
valuable
data
being
erased,
attach
the
write••advance
With
the
PAL
images
are
played
back
with
apressing
black
frame
•frame
After
pause
is
cancelled,
the
Zoom
switch
to
the
will
the
image.
Pressing
ENTER
the
setting.
or
,, SmartMedia™
and
manual
Exposure
compensation
Page
69)
using
When
[for
M
]selects
isissystem,
selected
on
the
[ halfway
EXP.
]remove
option
menu,
orsurrounded.
the
shutter
speed
setting
becomes
operational.
Never
open
the
SmartMedia™
cover
orenlarge
the
while
anmakes
is
being
recorded.
This
or
and
manual
setting
(image
Page
58)
or
film
speed
Exposure
compensation
((from
Page
69)
using
Reverse the
procedure
“Loading
the
Batteries”
and
remove
the
batteries.
•facing
Pressing
the
shutter
button
down
adjusts
the
exposure,
• Playback
paused.
PAL
system
( camera.
Additional
Information,
Glossary)
situations:
the
lens.
This
setting
allows
you
to
set
in
advance
the
white
balance
when
taking
photographs
under
and
press
ENTER.
the
rear
of
the
For
the
US/Canada:
PDR-ACM1A
Holding
down
or
moves
forward
or
reverse
continuously.
resumes
at
the
last
state
that
was
protect
sticker
at
the
write-protect
area.
Data
can
no
longer
be
may
corrupt
the
data
on
the
SmartMedia™
or
damage
the
SmartMedia™
itself.
possible,
but
does
not
make
the
exposure
compensation
possible. However the exposure value
is
To
return
normal
press
the
Zoom
switch
towards
setting
Page
58)magnification,
or film
speed
setting
( the
Page
78)
using
ENTER
Pass
the
shoulder
strap
through
loop
and
pull.
setting
(( toPage
78)
using
ENTER
are
also
possible.
and
pressing
the
shutter
button
fully
takes
the
shot.
TM[ is down
When
the
SmartMedia™
used
incorrectly
by
the
user
or
a
third
party
[
],
]
or
[
]
AE
or
AF
are
locked
with
the
shutter
button
held
half
specific
lighting
conditions.
For
Europe:
PDR-ACM1E
active
before
the
pause.
Firmly
insert
the
SmartMedia
as
far
as
it
can
go.
displayed
on is
the
LCD
monitor.
Press
ENTER.
recorded
or setting
erased
from
SmartMedia™.
Toon
write
oraterase
data
from is to be recorded.
Sets
the
color
mode
and
photographic
sensitivity
which
the
image
“W”.
are
also
possible.
The
default
different
depending
the
destination
country/area.
Use
or
to
select
the
desired
item
Press
ENTER,
nine
images
are
displayed
simultaneously.
• no
If
you
shoot
a
still
picture,
when
preview
is
set
to
ON
(
Page
77),
down.
If
operation
is
carried
out
for
a
fixed
amount
of
time
(default:
about
one
minute),
power
ON
When
the
SmartMedia™
is
exposed
to
static
electricity
or
electrical
noise
Forimage
the Noise
UK:
PDR-ACM1U
:off
Displays
the
firmware
version
ofto
this
camera.
SmartMedia™,
peel
the
sticker.
camera
ready
to
take
photographs.
Warning:
increases
when
the
ISO
is
changed
higher
settings.
isis
displayed
and
a
white
frame
and
green
Green The
Compose
picture,
press
the
shutter
button
down
halfway,
and
press
it
down
:the
Automatic
adjustment
(default)
Display
Page
83
theThumbnail
recorded
image
is
displayed
on
for
about
two
]specifications
Standby
mode
[enlarged,
••-For
If
no
operation
is
carried
out
a screen
fixed
amount
offrom
time
(default:
about
1shutter
minute),
thewear.
power
is
turned
TM
consumption
is
set
to
its
minimum
state
(power
almost
off)that
to
prevent
battery
This
is
.in
and
press
When
the
SmartMedia™
isfor
removed
ordarkens
the
camera
isPage
turned
off
while
recording
erasing
The
image
the
LCD
monitor
sometimes
the
time
the
button
isdata,
pressed
down
details,
refer
to
the
of
AC
information.
adapter
127.
: on
Displays
the
SmartMedia
Playback
returns
to
the
start
ofturned
the
movie.
frame
are
displayed
the
LCD
monitor.
:
Photography
outdoors
Default
setting:
seconds.
off
to
preserve
battery
life.
This
is
called
“Auto
Power
OFF”.
To
return
to
the
normal
state,
press
the
fully.
Page
40
called
the
Auto
Power
OFF.
This
setting
allows
you
to
set
the
time
when
the
camera
turns
off
halfway
until
the
image
becomes
focused.
: picture,
Equivalent
to
ISO100
(default)
data,
frame
advance
when
images
aredefaults.
played
back or during
formatting alarm
of the
The options
are
displayed.
: Returns
settings
to
Flashing
[ the
],
[ color
]conditions
or their
[shutter
]being
Self-timer
in frame
operation
at a handshake
.
Compose
the
press
the
button
down
halfway,
and
press
it
down
The
white
frame
indicates
entire
image,
while
the
green
:
Photography
in
cloudy
POWER
button
again.
•
The
viewfinder
LED
turns
red
while
image
data
is
being
recorded
Compose
the
picture,
press
the
shutter
button
down
halfway,
and
press
it
down
• The
To
set
the
focus
orpicture.
exposure
forphotography
a subject
outside
the
center
the intended
theincamera
directly
The camera
takes
the
automatically.
This
function
isthrough
not
activated
during
automatic
playback
( image,
Pagepoint
85) or
the [ only>
] PC
:appearing
High-sensitive
equivalent
toofcolor
ISO200
SmartMedia™.
Note:
image
the
lens
will
be
The
display
returns
to<Histogram>
thumbnail
playback.
<Standard>
<Detailed
information>
<Image
shows
the
location
of
the
currently
enlarged
area.
halfway,
and
press
it
down
fully.
Page
40
:
Photography
in
bluish
fluorescent
light
fully.
Page
40
About
the
Auto
Power
(FULL
OFF
Function
)
Additional
Information,
“AUTO
POWER
OFF
(page
110)”
at
the
subject
or
desired
exposure
(lighting),
press
and
hold
the
shutter
button
halfway.
Now,
with
the
shutter
onto
the
SmartMedia™.
ON]
Writing
to SmartMedia™
in progress
mode.
Press
ENTER.
:adapter
High-sensitive
photography
equivalent
toanother
color
ISO400
•Insert
Wedefault
recommend
copying
and
saving
important
datapower
onto
storage
medium (floppy disk, hard
displayed
for
[LCD
].[Power
fully.
Page
40
the
AC
power
plug
into
the
The
size
and
quality
of
the
image
can
be
reset
to
the
desired
combination.
Press
ENTER.
button
still
held
halfway
down,
you
can
turn
the
direction
of
the
camera
and
frame
your
image
with
the
focus
•
It
is
possible
to
play
back
any
images
in
any
folders
by
pressing
or
during
playback.
(For
details
ON
: Photography
inafter
reddish
fluorescent
light
The
camera
takes
the
picture.
Photographs
can
be
taken,
however,
do not
turn thepress
power
OFF.
Todisk,
return
to disk,
the
normal
state
theset
Auto
Power
OFF
has been
executed,
the
POWER
button
MO
etc.).
The
PREVIEW
manual
setting
Page
items
77
are
displayed.
camera
takes
the
atmonitor.
the
exposure
time.
Current
Entireofimage
and
exposure
locked.
Press
the
button
down
fully
to in
complete
capturing
the image.
Red outlet.
[In the
on picture
the
LCD
The
camera
is ready
for
burst
photography.
of displayed
folder
Page
92)
]:the
mode:
Accessing
of
SmartMedia™
[ (HALF
Photography
in] is
incandescent
light
•] [is
When
shutter
speed
setshutter
to
a)turn
speed
of
0.7 second
orprogress
slower,
photographs
taken
as extended
to Never
turn
the
power
on 77
again.
•During
remove
the
SmartMedia™
or
the
camera
offresult
while
recording
data or are
while
erasing
data
COLOR
Page
the
exposure,
the
viewfinder
LED
turns
orange.
position
•
Moving
the
camera
as
you
press
the
shutter
button
will
in
a
blurred
image.
Use
,
,
or
to
select
the
area
to
enlarge.
the
last
image
displays
the
first
image,
and
pressing
atwill
thebe
firstautomatically
image
displays
the
Pressing
During
[2X],
the
ISO
be
automatically
set
to
ISO200.
[4X],ofISO
setof
exposures
( at Page
68).
IfCarry
burst
photography
is to
set
the
shutter
speed
is set During
to athe
speed
0.7
second
or more
in the
[ to
Tv ]
out
steps
1will
2when
in
Photographic
(SmartMedia™
formatting).
actions
might
damage
ISO
Page
78
Flashing
ItClose
takes
about
twice
the
time
to complete
taking
the
photograph
duePDR-M81
to processing
ofenlargement
the
captured
[set
],These
[“Basic
] When
the
image
is not
in SmartMedia™.
focus.
the
SmartMedia™
cover.
•
The
PDR-M81
usesto
accurate
focus
mechanism.
However,
the
have
difficulty
last
image.
Adjust
the
display
area
enlarge
viewing
theto
white
and
ISO400.
• In
AEB
photography
(an
Page
71)while
orauto
burst
photography,
the shutter
speed
cannot be setmay
to 0.7
second
or longer.
(SMALL
)
mode,
the
shutter
speed
is
automatically
changed
1/2
second.
•image.
Use
only
the
SmartMedia™
specified
for
use
with
the
PDR-M81.
The
use
of
other
SmartMedia™
SHARPNESS
Page
79
mode)”
(page
109).
Select
[QUALITY]
Settings
(
focusing
or
not
be
able
to
focus
at
all
for
subjects
and
situations
such
as
the
following:
Before
you
use
aother
new
SmartMedia™
the
first during
time,
be
sure
tothe increased
Images
can
bevalue
rotated
by] pressing
playback.
[ for
] or
green
the
aperture
is
to
F2.9
(maximum
aperture
size),
shutter
speed
restricted
•• frames.
If
a
mode
than
[ set
suppressed
flash
mode
is
set
inthe
flash
photography,
thedark
shutterisspeed
is
•79
Processing
image
- When
subject
is distant and
- SmartMedia™
Subjects
moving
at
high
speed
damage
the
camera.
CONTRAST
Page
• to
The
write
protection
not
function
if in
write-protect
sticker
becomes
Use
a soft
dry cloth to
.thesecond.
oncould
the
SETUP
MENU
and
press
format
the
(may
Page
91).
an
image
counterclockwise,
and
pressing
rotates
clockwise.
Pressing
1/750
PDR-ACM1A
] •are
the
same
as
to
PDR-ACM1E
PDR-ACM1U
[PRG]
and
[ rotates
limited
tosecond.
between
1/2
second
and
1/250
* The
aboveitdirty.
menu
is
the
RECORDING
Charging
of
flash
progress
ON
When
there
are
objects
in
front
of
or
behind
the
subject
Very
shiny
subjects
such
as
a
mirror
or
car
body
SmartMedia™
is
aofisprecision
device.
Do do
notnot
bend,
drop,
or subject
SmartMedia™
to
DIGITAL
ZOOM
Page
• wipe
When
the
camera
isOnce
not79
inelectronic
be sure
to attach
the
lens
cap
provided
with[your
camera.
the
POWER
button
to
turn
the
power
off.
away
any
dirt.
ause,
sticker
ispress
peeled
off,
reuse
it.
Orange•Press
The
QUALITY
menu
displayed.
combinations
the
automatically
mode.
MENU
inthe
•the
The
aperture
value
set
differ
to
the
actual
value
according
to
the
position
ofUK)
theorzoom
lens.
To
to
the
regular
display,
ENTER.
(Photos
cannot
be
taken
at
this
moment.)
(forreturn
US
and
Canada)
If the
shutter
speed
is
set
to
1/350
second
or
less,
the
shutter
as
speed
an
animal
is
automatically
athe
cage
a]changed
person
in front
to 1/250
of a tree)
(for
European
Continent)
(for
Get
ready
to
take
the
photograph.
- above
Extremely
low
contrast
subjects
When
the
settings
are
made,
they
are
displayed
in(such
thepocket
following
order.
excessive
shocks.
Also,
do
not
carry
SmartMedia™
the
ofx[trousers.
This
might
The
lens
cap
can
also
be
attached
to
attachment
following
the
above
steps
to prevent
it’sthe
LCD
79
The
power
turns
off.
determined
shutter
speeds
and
aperture
-in Subjects
with
little
reflection,
such
as
hair
fur mode.
•• The
size
displayed
on
the
LCD
monitor
FULL
(320
240)
HALF
(160
xorsubject
120).
The
forced
flash
mode
or
]orred-eye
forced
flash
second
ifPage
the
flash
setting
is25)
changed
tothe
thestrap
[ ]becomes
- image
Subjects
that
have
low contrast
and
merge
into
Loading
the
batteries
(
Page
and
the
SmartMedia™
(
Page
31)
into
the
camera.
being
lost.
• Flash
photography
and
burst
photography
are
not
possible.
Flashing
SmartMedia™
to
excessive
force
when
you
sit
down,
damaging
the
SmartMedia™.
Hardware
malfunction
Subjects
with
no
solidity,
such
as
smoke
or
flames
the
background
(such
as
white
walls
or
subjects
Attach
the
lens
cap
when
you
are
not
using
the
camera.
values.
However,
their
operation
capability
movies
made
in
FULL
size
is
displayed
on
the
entire
LCD
monitor,
and
those
made
in
HALF
size
If the
[ ]mode,
forcedISO
flash
[ automatically
] red-eye set
forced
flash mode
is and
set in
flash photography
the is
• In
movie
willorbe
between
ISO100
ISO400
regardless ofwhen
its setting.
dressed
inthe
theSmartMedia™
same
color
as
thelens
background)
-attach
Subjects
viewed
through
glass
Turn
offor
the
power
tothe
retract
the
unit,
and then
the
lens
cap.
The
image
taken
in
photography
mode
may
be
blurred.
or
to
select
the
desired
setting
from
the
tab
menu
, and
press
•Use
Do•not
use
store
in
environments
likely
to
be
affected
byisstatic
electricity
or
is
different
as
shown
the
right
table.
displayed
in
ofspeed
the
shutter
speed
is center
set
toin
aexposure
of
0.7
second
or
more,
the
shutter
speed
automatically
changed
to
Press
POWER
button
toscreen.
turn
power
on.
A electrical
histogram
isturn
a graphic
representation
ofthe
theistones
of the
subject.
The horizontal
histogram
• Do
If the
the
image
cannot
be
focused,
thelens
focus
automatically
fixed to infinity.
(When theaxis
flashofisthe
necessary
not
the
power
on
with
the
cap
attached.
noise.
1/2
second.
ENTER.
*
The
above
AC
adapter
is
US/Canada
Turning
the
Power
On
Page
38
shows
the
brightness
(increasing
brightness
from
left
to
right)
and
the
vertical
axis
shows
the
number
at
this
time,
it
is
simultaneously
fixed
to
illuminate
objects
1.5
meters
(five
feet)
away.
During
macro
•This
Dosaves
use
orsettings,
store
SmartMedia™
very
hot,
humid
oraperture
corrosive
If the
shutter
speed
value
isimages,
set toin1/1000
second,
the
value
is limited
to
F8type
andAC
F3.4.
•not
When
playing
back
movie
switching
isthe
between
standard
and
image
only.
(O
:environments.
possible
Xbetween
: not
the
and
returns
to
RECORDING
MENU.
type.
European
andpossible)
UK
photography,
the flash
islevel.
alignedthe
withdisplay
the wide
position.)
of pixels
at each brightness
Downloaded From
camera-usermanual.com
adapters differ in shape.
--110
20 -40
80
88
Taking Photographs Continuously (Burst Photography) (continued)
Press
or
to verify the image.
or
to select the recording method.
]
3[
]
1 to 3 can be combined regardless of their order to set saving and erasing of images.
Downloaded From camera-usermanual.com
- 73 -
Additional
Information
2[
: This setting is for saving and erasing the selected image.
Press or to select the image, and press ENTER.
The red mark appears under the selected image. To cancel selection of the image,
press ENTER again.
: This setting is for saving all images.
Press ENTER.
All images are selected, and all images with
turns into a red .
This item cannot be selected if there is not enough space on the SmartMedia™.
: This setting is for erasing all images.
Press ENTER.
Other
Applications
]
Handy
Functions
The camera is set to erase all images immediately after photography.
1[
Erasing
Images
Use
Playing
Back Images
You will be allowed to choose which image to save before it is
recorded to the SmartMedia™.
The number of photographs stored in the memory is displayed at
the bottom right of the screen, and the number in green is the
image currently displayed.
The green indication also moves as you move the image to be
displayed.
Taking
Photographs
The maximum number of photography that can be taken continuously is three.
If you release the shutter button before the camera captures three images, the camera will stop taking
pictures at that point.
After photography is finished, the LCD monitor automatically turns ON.
Getting
Ready
Compose the picture, press the shutter button down halfway, and press it down
fully. ➲ Page 40
Changing
the
Preset
Conditions
(RECORDING
MENU)
Photography
in
the
Program
Mode
Setting
Names
Playing
Back
the
of
Photographed
Parts
Image
Size
and
Quality
(Single-Frame
Playback)
Extended
Exposure
Photography
(Bulb
Photography)
Erasing
Images
(Erase
Frame)
(continued)
Manual
Attaching
Using
How
Taking
Enlarging
Playback
About
Turning
to
Photographs
the
SmartMedia™
Press
Settings
the
Photographed
of
Power
the
Power
Multi
Shoulder
Continuously
Outlet
Shutter
Image
On/Off
Images
Strap
Pictures
Button
(Zoom
(Burst
Playback)
Photography)
Taking
Erasing
Button
Photographs
Folders
and
(All
LCD
Images
Continuously
Monitor
in
aImages
Folder/All
(Burst
Display
Photography)
Folders)
(In
Playback
(continued)
(continued)
Mode)
Definitions
Separately
of
the
Accessories
Color
of
the
Viewfinder
LED
Taking
and
Playing
Back
Photographs
on
aMode
TV
(continued)
Changing
the
Preset
Conditions
(RECORDING
MENU)
(continued)
Exposure
Compensation
in
the
Shutter
(continued)
Speed-priority
(continued)
About
Basic
Settings
SmartMedia™
in
(Sold
the
mode)
Aperture-priority
(continued)
Mode
(continued)
LCD
Monitor
Display
(during
photography)
(continued)
Manual
Settings
(continued)
Playing
Photography
Installing
Back
Movies
batteries
(Auto
Photography)
(continued)
(continued)
(continued)
Names
of
Parts
(continued)
Getting
Ready
The shutter
camerabutton
automatically
adjusts the
shutter
and
the aperture
value
according
to the
brightness
of an
can be pressed
down
in twospeed
stages:
halfway
down and
fully
down. When
pressed
halfway
down,
This
“SmartMedia™”
Set
Play
Automatically
The
the
following
mode
shoulder
menu
back
size
photographed
is(number
used
for
items
strap
plays
setting
isadapter
for
athe
is
are
back
storage
of
taking
handy
also
the
pixels)
still
the
basic
available
subjects
for
medium
images
16
and
carrying
images
settings
quality
one
for
that
as
saving
separately
your
image
to
require
(compression
be
camera
used
images
atseveral
a
sold
for
around.
inthat
photography
items.
ratio)
seconds
the
you
multi
of
have
the
photography
to image
photograph
in
photographed.
to
[ second
be
mode
],photographed.
such
[be
Even
in
asquick
]for
firework
or
if Europe,
the
[You
succession.
camera’s
displays
] photography
power
at the
Enlarges
selected
portions
of
images
being
played
back
at
two
levels.
Images
can
displayed
enlarged
when
In
You
this
can
color
mode,
manually
of
the
photographs
viewfinder
adjust
settings
are
LED
taken
indicates
such
continuously
asphotographed
the
exposure
state
atof
control,
atime.
the
maximum
camera.
white
speed
balance,
The
ofthe
0.8
metering
system,
intervals.
continuous
This
item
switches
display
on
the
LCD
monitor
when
playing
back
photographed
images.
can
switch
If
you
the
AC
(sold
separately:
PDR-ACM1A
for
the
US/Canada,
PDR-ACM1E
PDR-ACM1U
Mode
Effective
dial
Subjects
and
Set
Values
TM
Press
.of
aperture
value.
SYSTEM
Turning
Exposure
ISO
OSD
In
[prevent
[use
LANGUAGE
the
]the
INFO.
mode
control
(EXP.)
On
Close
the
SmartMedia™
cover.
Slide
the
SmartMedia
cover
release
knob
in
the
Take
photographs
or
or
battery
to
to
select
or
play
[that
the
slide
]them
or
shutter
it
[ the
back.
,]will
and
speed.
and
lock
press
Look
Use
through
to
select
the
[adjust
viewfinder
]use
and
press
to
compose
ENTER.
the
picture.
To
continue
erasing
images,
repeat
the
above
procedure
2.
.is
AF
(auto-focus)
and
AE
(auto
exposure)
are
set.
When
pressed
fully
down,
the
camera
takes
aspace
picture.
object.
This
mode
enables
carefree
photographing
similarly
to
selecting
[stable
]photographs.
in
[ from
]settings”,
mode.
Itrepeatedly
is
to
night.
To
is
Change
modes.
turned
When
the
OFF,
your
setting
using
the
camera
images
this
according
mode,
from
saved
dropping
be
to
sure
how
on
the
the
to
during
SmartMedia™
image
a(size,
photography,
tripod
is
to
to
be
keep
used
not
hang
the
and
be
camera
erased.
the
the
shoulder
remaining
SmartMedia™
strap
and
amount
prevent
around
can
ofstep
your
distortion
be
neck.
inpossible
the
of
images.
Relationship
between
your
camera
and
accessories
Connecting
tocalled
Other
Devices
(page
123)
being
played
back
one
image
at
acover,
time.
The
meaning
maximum
of
number
LED
color
of
photographs
differ
according
can
to
be
taken
mode
continuously
dial
setting.
three
photography
mode,
and
take
photographs
at
these
settings.
These
are
“Manual
which
are
saved
display
to
show
aPower
list
detailed
information
compression
ratio,
shutter
speed,
aperture,
etc.)
or
you
can
for
the
UK)
in
a
room
with
amay
power
outlet,
you
can
take
photographs
for
an
extended
period
of
time.
This
also
Mode
dial
1 Item
QUALITY
2 Options
Notes
SmartMedia™
VIDEOon
OUT
White Balance (W.B.)
Write
Protection
Removing
the Batteries
ISO
[ POWER
]
AUTO
OFF
Setting items
Turning
the
Power
Off
Using
the
LCD
Monitor
Additional
Information
Other
Applications
Handy
Functions
Erasing
Images
Playing
Back Images
Taking
Photographs
Tab menu
The
tab
is
displayed.
setting
isbattery
as
follows:
Make
sure
that
the
issystem
firmly
closed.
Details
image
ofmenu
operation
isrange
saved
are
or
erased,
the
same
and
as
the
taking
camera
photographs
is
then
ready
and
to
playing
take
photographs.
them
back
onon
the
LCD After
monitor.
If
you
use
the
viewfinder
to
take
photographs,
the
photography
Set
the
mode
to
[cover
].settings
direction
of
the
arrow
to
open
cover
.the
ENTER.
change
the
white
and
the
metering
in(the
program
mode.
erased
SmartMedia™.
and
reused.
For
details
on
these
accessories,
refer
to
the
Instruction
Manual
for
the
accessory
you
are
using.
(information
Movies
images
photographed
in
the
multi
mode
Page
cannot
be
displayed
using
the
zoom
playback
Images
even
if the
are
camera
not
recorded
is
turned
directly
off.
SmartMedia™
but
are
stored
within
the
buffer
memory.
display
histograms,
etc.
prevents
failed
photographs
due
to
battery
wear
or
failed
of
data
to
a
PC.
details
handling
the AC
Set
Sets
the
thebalance
whether
color
:(/or
Photography
mode
language
not
to
and
return
photographic
of
in
menus
the
program
displayed
sensitivity
in
the
(default)
on
SETUP
the
at51)
which
LCD
(temporarily
MENU
Page
monitor.
to
image
62)
the
original
is For
to
be
factory
recorded.
settings.
For
enlarged
view
P.dial
22)
feeds
the
image
•transfer
Each
press
of
2
•How
Copying
of
printed
(black
on
white
paper)
set
the
time
(text
114)
F8
/display
F6.8
F5.6
/18.
F4.8
/Page
/and
F3.4
/mode
F2.9
to
take
photographs
Page
41
1/1000,
1/750,
1/500,
1/350,
1/250,
1/180,
1/125,
range
may
differ
from
the
actual
image.
InLCD
this
case,
use
the
LCD
Press
the
shutter
button
down
halfway
.1/90,
the
mode
dial
to
[ F4.0
],
[characters
]reset.
or
[selected
].higher
1one
SmartMedia™
having
the
following
storage
capacity
can
be
used
on
your
current
as
of
March
2000)
feature.
The
last
cover
recorded
image
opens
frame
image
appears
appears
on
the
on
the
LCD
monitor.
monitor.
photography
is
finished,
check
the
images
record
the
ones
tocamera.
SmartMedia™.
[TIME&DATE,
]
:
Erases
images
in
the
currently
selected
folder
and
folders.
Possible
number
of31)
shots
adapter,
beSet
sure
to
read
page
•
2x-speed
playback
isaperture-priority
performed
for
Make
sure
that
the
SmartMedia™
is
correctly
loaded.
(
Page
by
frame.
Warning:
Noise
:
OSD
Photography
increases
LANGUAGE
when
in
will
the
not
ISO
be
is
changed
mode
to
(
Page
settings.
63)
Memo
•
Backlit
portraits
IMPORTANT
[PROTECTED]
on
the
LCD
monitor,
cancel
the protection
( Page 108) or
remove
How
to
play
back
images
Page
80
1/60,
1/45,
1/30,
1/20,
1/10,
1/8,
1/6,
1/4,
1/3,
1/2,
monitor
for
photography.
AF
(auto-focus)
and
AE
(auto
exposure)
(the
Additional
Information,
SET-UP
(the
P.
:109)
English
(default)
Pass
Set
out
mode
end
steps
of
dial
1the
to
to
shoulder
4[1/15,
either
]].LCD
or
inspeed-priority
[strap
“Photography
through
].
the
in
the
strap
Shutter
speed-priority
Mode”
isdisplayed
held
down.
the
duration
that
PC
mode
(mode
P.
121)
2MBCarry
Set
/4MB/8MB/16MB/32MB/64MB/128MB
the
mode
dial
to
[isin
(all
3.3
types)
To
]•the
adjust
: When
Erases
the
all
brightness
folders
recorded
of
the
on
monitor
SmartMedia™.
Page
115
[mode
Self-timer
button
1
•V
1-frame
feed
is continued
for the
The
aperture
value
and
the
shutter
speed
corresponding
to
:write-protection
Photography
shutter
( that
Page
65)
Zoom
state
•button
bright
scenes
(such
and
highly
reflective
subjects
Photography
mode
•the
You
can
also
carry
out
step
8snowfields)
while
verifying
the
image
step
7.
DPOF
(in
Page
102).
Glossary)
start
to
function.
0”7,
1”,
1”5,
2”,
3”,
4”,
6”,
8”,
10”,
15”
•Very
Do
not
remove
or monitor
load
the
batteries
or
disconnect
or
connect
the
AC
adapter
while
the camera
is mode.
on.1This
:POWER
Japanese
:LCD
Equivalent
toas
color
ISO100
Carry
Set
Use
out
or
mode
steps
to
dial
select
1
to
to
2[erased,
the
“Manual
].
images
photographed
Settings”
(page
in
58).
the
multi
photography
You POWER
can also
the
PC
card
adapter
and
floppy
disk
adapter
( in
123)
sold
separately
to transfer
Changing
the
display
Page
116
Theconnect
images
or
folders
are
and
the
camera
returns
toPage
the
is
held
down.
duration
that
value
are
displayed
on
the
LCD
monitor.
If
the
appropriate
(page
attachment
65)
or
on
in
“Photography
the
camera.
in
the
Full
Manual
Mode”
(page
67).
Press
the
button
to
turn
the
power
on.
full
manual
mode
(
Page
67)
:
Photography
in
Image
Quality
button
Press
the
MENU
button.
• •Shots
made
up
predominantly
of
sky
Even
if
photography
is
terminated
midway
before
capturing
three
images
by
releasing
the
shutter
•
If
you
take
a
photograph
after
erasing
an
image,
a
number
continuing
from
the
last
photographed
When
AF
or
AE
are
locked,
the
beep
tone
(
Page
111)
sounds
and
the
Use
or
to
change
the
setting
in
the
tab
menu,
might
return
the
manual
settings
to
their
defaults.
If
this
happens,
manually
set
conditions
again.
:connect
High-sensitive
equivalent
to preset
color
(default)
Before
you
oreven
disconnect
the
AC
adapter,
be
sure
to turn
thedisplay
camera
OFF.
If the
AC adapter is
Press
the
image
quality
button
to
select
the
combination
cannot
be
set
ifphotography
the
shutter
speed
isas
adjusted
toISO200
images to a
PC.
16MB
(SM-M1600D)/32MB
(SM-M3200D)/64MB
(SM-M6400D)/128M
(SM-M1280D)
The
respective
last
image
mode.
frame
appears
on
LCD
monitor.
You
can
also
select
the
image
by
the
same
operation
for
thumbnail
Page
83).
Carry
out
steps
1
to
on
page
109.
When
the
camera
is
turned
on,
set
the
mode
dial
to
the
desired
The
shutter
speed
and
the
aperture
value
corresponding
todisplay
the
All
descriptions
inor
this
Instruction
Manual
are
for
when
the
language
is (2set
to [ENGLISH].
Press
or
to
select
the
image.
button,
images
already
photographed
can
be
saved
and
erased
by playback
the
method.
image
is
assigned
as
image
number.
ShutterThe
button
viewfinder
RECORDING
LED
turns
MENU
green.
is2
displayed.
•press
The
image
the
photograph
is
taken
is
slightly
less
clear
than
images.
(This
is 109,
connected
disconnected
with
the
power
ON,
camera
settings
may
beabove
reset
(SET-UP
Page
and
ENTER.
:before
High-sensitive
photography
equivalent
to
color
ISO400
its
the
shutter
speed
isthe
displayed
inthe
red.
To limit,
cancel
erasing
of
image
data,
select
[monitor.
]Photography,
and
press
ENTER.
Flash
button
quality
and
size,
while
viewing
indication
on
the
starts
a
reverse
•
The
press
of
mode.
shutter
speed
are
displayed
on
the
LCD
If
the
appropriate
The
length
of
time
to
capture
images
varies
according
to
the
photographic
conditions.
•
Images
can
also
be
erased
in
the
thumbnail
mode.
In
this
case,
the
camera
enters
the
single
frame
Select
[SYSTEM
INFO.]
on
the
SETUP
MENU
and
because
television
displays
images
at
a
lower
resolution.)
•
Spotlit
subjects,
particularly
against
dark
backgrounds
Manual
Settings
Page
58)
or
the
camera
may
malfunction.
however,
is
possible
in
this
state.
feeds
the
image
•
Each
press
of
EXP.
].
To
cancel
changing
of
settings,
press
.
Use
or
to
select
the
frame
you
want
to
enlarge.
Press
the
or
Zoom
to
switch
select
[
(
S/C
Page
].
21)
towards
“T”
to
begin
playback.
] mode:
is
selected,
[NO
IMAGE]
isaperture
displayed
after
allor
folders
When
playback.
Press
Set
mode
dial
inbe
the
to
[ sure
Tv
mode,
].the
or
press
in
the
shutter
button
fully
Before
photography,
make
that
the
lens
cap
has
been
2onisin.black
combination
cannot
set
even
ifflash
adjusted
to its
playback)
mode,
and
enters
the
thumbnail
playback
mode after the image is erased.
status
display.
]or
In
[[playback
Press
the
display/info
button.
Self-timer
photography
and]down
photography
are
not
possible.
•the
The
display
unit
varies
according
to
the
output
system.
•theCopying
of (frame
printed
text
(white
characters
paper)
.
press
reverse
by
one
frame.
This
adapter
allows
SmartMedia™
to
bespeed
asto
3.5"
floppy
disk.
have
been
erased
(unless
the
SmartMedia™
contains
protected
You
can
also
select
the
image
by
thein
same
operation
as
for
thumbnail
playback
( display
PageISO
83).will23)
Automatic
playback
begins.
•[2X],
Playback
becomes
2x-speed
to
reduce
aperture
size.
Press
toused
increase
aperture
size.
Press
camera
takes
a
picture.
The
manual
setting
removed
the
camera.
limit,
aperture
value
isbe
displayed
red.
Photography,
however,
Playback
mode
( Status
P.
80)
the
[Scenes
M
]from
mode
to
set
the
shutter
0.7
second
Manual
During
the
ISO
will
automatically
set
between
ISO100
ISO200.
During
[4X],
be
To
set
the
quality
and
size
Page
112
•the
With
the
NTSC
system,
images
can
be
displayed
simultaneously
on the
LCD
monitor
and( TVP.
during
•photograpy
with
low
reflectivity,
such
as
shots
green
or
dark
foliage
Flash
state
Each
press
of
the
display/info
button
switches
the
display
•of1-frame
feed
isand
continued
The
SYSTEM
INFO.
menu
displayed.
reverse
for
the
duration
This
adapter
isplayback
inserted
into
the],
floppy
your
PC,
allowing for the
images).
The
viewfinder
LED
turns
redis
image
data
being
recorded
onto
Insert
the
adapter
connector
plug
into
the
DC
IN
Self-timer
lamp
values
are
displayed
In
the
photography
modes
([while
[and ISO400.
]disk
oris
[ drive
]),on
the
lens
photography
and
playback.
is
possible
inAC
this
state.
automatically
set
between
ISO100
is
held
down.
format
as
follows:
duration
that
Note:
The
larger
the
F
value,
the
smaller
the
aperture
size
become
or
longer.
•Press
Remove
and
insert
SmartMedia™
with
the
camera’s
power
turned
off.Aperture value
is
held
down.
that
To
quit
the
SETUP
MENU,
change
the
mode
dial
setting.
Shutter
speed
Adjust
the
zoom
ratio
by
the
Zoom
switch.
(Zoom
to
display
option
menu,
press
or
to
images
recorded
on
the
SmartMedia™
to
be
transferred
to
the
PC.
the
SmartMedia™.
Sets
video
output
system
according
to
country
in
which
your camera
isSize
used.
on
the
left
ofthe
the
LCD
Press
the
shutter
button
down
halfway
and
press
5V
terminal
on
the
camera.
extends
from
the
camera
body.
•the
PAL
system,
images
cannot
bethe
displayed
When a cable
is connected, only
and
versa.
1 situations
the
image
quality
button
switches
the
quality
and
size
Gently
insert
the
SmartMedia™
as
far
as
it, simultaneously.
can
go
[Pressing
]vice
isWith
displayed
on
the
LCD
monitor.
•select
Recorded
data
may
bepress
erased
(destroyed)
in
the
listed
below.Viewfinder
Note that Toshiba
White
Balance
Additional
Information,
Glossary
to
increase
shutter
speed.
Pressand
to
decrease
shutter
speed.
Press
Press
or
to
move
forward
reverse.
Memo
PRG
]
and
ENTER.
]
and
press
ENTER.
[
switch
Page
21)
TV
display
is
available.
monitor
screen.
When
the
camera
is
turned
on,
the
Auto
Power
OFF
function
settings
infully
the
following
order.
it
down
. system
2next
Press
or
to
select
the
item
you
desired
toisloss
set,
with
SmartMedia™
electrodes
(metal
contacts)
Additional
Information,
Glossary)
(white
Corporation
accepts
no
whatsoever
for
the
of
recorded
data enters
in these
• the
When
allNTSC
images
in
a responsibility
folder
are
erased,
that
folder
itself
also(destruction)
erased.
Quality
The
camera
determines
the
balance
by
averaging
the
various
kinds playback
of light
that actually
to
to
frame/
to“T”
go
back
one
To
prevent
valuable
data
being
erased,
attach
the
write••advance
With
the
PAL
images
are
played
back
with
apressing
black
frame
•frame
After
pause
is
cancelled,
the
Zoom
switch
to
the
will
the
image.
Pressing
ENTER
the
setting.
or
,, SmartMedia™
and
manual
Exposure
compensation
Page
69)
using
When
[for
M
]selects
isissystem,
selected
on
the
[ halfway
EXP.
]remove
option
menu,
orsurrounded.
the
shutter
speed
setting
becomes
operational.
Never
open
the
SmartMedia™
cover
orenlarge
the
while
anmakes
is
being
recorded.
This
or
and
manual
setting
(image
Page
58)
or
film
speed
Exposure
compensation
((from
Page
69)
using
Reverse the
procedure
“Loading
the
Batteries”
and
remove
the
batteries.
•facing
Pressing
the
shutter
button
down
adjusts
the
exposure,
• Playback
paused.
PAL
system
( camera.
Additional
Information,
Glossary)
situations:
Built-in
microphone
the
lens.
This
setting
allows
you
to
set
in
advance
the
white
balance
when
taking
photographs
under
and
press
ENTER.
the
rear
of
the
For
the
US/Canada:
PDR-ACM1A
Holding
down
or
moves
forward
or
reverse
continuously.
resumes
at
the
last
state
that
was
protect
sticker
at
the
write-protect
area.
Data
can
no
longer
be
Focus
area
may
corrupt
the
data
on
the
SmartMedia™
or
damage
the
SmartMedia™
itself.
possible,
but
does
not
make
the
exposure
compensation
possible. HoweverSelf-timer
the exposure
value
is
To
return
normal
press
the
Zoom
switch
towards
setting
Page
58)magnification,
or film
speed
setting
( the
Page
78)
using
ENTER
Pass
the
shoulder
strap
through
loop
and
pull.
photography
setting
(( toPage
78)
using
ENTER
are
also
possible.
and
pressing
the
shutter
button
fully
takes
the
shot.
TM[ is down
When
the
SmartMedia™
used
incorrectly
by
the
user
or
a
third
party
[
],
]
or
[
]
AE
or
AF
are
locked
with
the
shutter
button
held
half
specific
lighting
conditions.
For
Europe:
PDR-ACM1E
active
before
the
pause.
Firmly
insert
the
SmartMedia
as
far
as
it
can
go.
displayed
on is
the
LCD
monitor.
Press
ENTER.
recorded
or setting
erased
from
SmartMedia™.
Toon
write
oraterase
data
from is to be recorded. Write-protect
Sets
the
color
mode
and
photographic
sensitivity
which
the
image
“W”.
are
also
possible.
The
default
different
depending
the
destination
country/area.
Use
or
to
select
the
desired
item
Press
ENTER,
nine
images
are
displayed
simultaneously.
•Flash
If
you
shoot
a
still
picture,
when
preview
is
set
to
ON
(
Page
77),
1
down.
If
no
operation
is
carried
out
for
a
fixed
amount
of
time
(default:
about
one
minute),
power
ON
When
the
SmartMedia™
is
exposed
to
static
electricity
or
electrical
noise
Auto
Photography
mode
(
P.
41,
46)
Forimage
the Noise
UK:
PDR-ACM1U
:off
Displays
the
firmware
version
ofto
this
camera.
areait down
SmartMedia™,
peel
the
sticker.
camera
ready
to
take
photographs.
Warning:
increases
when
the
ISO
is
changed
higher
settings.
isis
displayed
and
a
white
frame
and
green
Green The
Compose
picture,
press
the
shutter
button
down
halfway,
and
press
:the
Automatic
adjustment
(default)
Display
Page
83
theThumbnail
recorded
image
is
displayed
on
for
about
two
]specifications
Standby
mode
[enlarged,
••-For
If
no
operation
is
carried
out
a screen
fixed
amount
offrom
time
(default:
about
1shutter
minute),
thewear.
power
iserasing
turned
TM
consumption
is
set
to
its
minimum
state
(power
almost
off)that
to
prevent
battery
This
isdown
.in
and
press
When
the
SmartMedia™
isfor
removed
ordarkens
the
camera
isPage
turned
off
while
recording
The
image
the
LCD
monitor
sometimes
the
time
the
button
isdata,
pressed
Speaker
details,
refer
to
the
of
AC
information.
adapter
127.
: on
Displays
the
SmartMedia
Playback
returns
to
the
start
ofturned
the
movie.
frame
are
displayed
the
LCD
monitor.
:
Photography
outdoors
Default
setting:
seconds.
off
to
preserve
battery
life.
This
is
called
“Auto
Power
OFF”.
To
return
to
the
normal
state,
press the
fully.
Page
40
called
the
Auto
Power
OFF.
This
setting
allows
you
to
set
the
time
when
the
camera
turns
off
halfway
until
the
image
becomes
focused.
: picture,
Equivalent
to
color
ISO100
(default)
data,
frame
advance
when
images
aredefaults.
being
played
back or during
formatting
of the
DC
IN
5V
terminal
The options
are
displayed.
Histogram*
2
:
Returns
settings
to
their
Flashing
[
],
[
]
or
[
]
Self-timer
in
operation
at
a
handshake
alarm
.
Compose
the
press
the
shutter
button
down
halfway,
and
press
itdirectly
down
The
white
frame
indicates
the
entire
image,
while
the
greenrecorded
frame halfway,
:the
Photography
in
cloudy
conditions
POWER
button
again.
• The
viewfinder
LED
turns
red
while
image
data
is
being
Compose
picture,
press
the
shutter
button
press
down
• The
To
set
the
focus
or
exposure
for
a subject
outside
the
center
the intended
point
the
The
camera
takes
the
picture.
automatically.
This
function
is
not
activated
during
automatic
playback
( image,
Pageand
85) or
incamera
the it
[ only>
] PC
:appearing
High-sensitive
photography
equivalent
toofdown
color
ISO200
SmartMedia™.
Note:
image
through
the
lens
will
be
The
display
returns
to<Histogram>
thumbnail
playback.
<Standard>
<Detailed
information>
<Image
shows
the
location
of
the
currently
enlarged
area.
halfway,
and
press
it
down
fully.
Page
40
Macro
photography
:
Photography
in
bluish
fluorescent
light
fully.
Page
40
About
the
Auto
Power
(FULL
OFF
Function
)
Additional
Information,
“AUTO
POWER
OFF
(page
110)”
at
the
subject
or
desired
exposure
(lighting),
press
and
hold
the
shutter
button
halfway.
Now,
with
the
shutter
onto
the
SmartMedia™.
ON]
Writing
to SmartMedia™
in progress
mode.
Press
ENTER.
:adapter
High-sensitive
photography
equivalent
toanother
color
ISO400
•Insert
Wedefault
recommend
copying
and
saving
important
datapower
onto
storage
medium (floppy
disk, hard
displayed
for
[LCD
].[Power
fully.
Page
40
the
AC
power
plug
into
the
Electrodes
The
size
and
quality
of
the
image
can
be
reset
to
the
desired
combination.
Press
ENTER.
Memo
Sticker
button
still
held
halfway
down,
you
can
turn
the
direction
of
the
camera
and
frame
your
image
with
the
focus
•
It
is
possible
to
play
back
any
images
in
any
folders
by
pressing
or
during
playback.
(For
details
ON
: Photography
inafter
reddish
fluorescent
light
The
camera
takes
the
picture.
Photographs
can
be
taken,
however,
do not
turn thepress
power
OFF.
Tobattery
return
topower
the
normal
state
theset
Auto
Power
OFF
has been
executed,
the
POWER
button
disk,
MO
disk,
etc.).
The
PREVIEW
manual
setting
Page
items
77
are
displayed.
Remaining
camera
takes
the
atmonitor.
the
exposure
time.
Current
Entireofimage
and
exposure
locked.
Press
the
button
down
fully
to in
complete
capturing
the image.
Red outlet.
[In the
on picture
the
LCD
The
camera
is ready
for
burst
photography.
of displayed
folder
Page
92)
]:the
mode:
Accessing
of
SmartMedia™
[ (HALF
Photography
in] is
incandescent
light
•] [is
When
shutter
speed
setshutter
to
a)turn
speed
of
0.7 second
orprogress
slower,
photographs
taken
as extended
PC/AV
terminal
to Never
turn
the
power
on 77
again.
•During
remove
the
SmartMedia™
or
the
camera
offresult
while
recording
data or are
while
erasing
data
COLOR
Page
the
exposure,
the
viewfinder
LED
turns
orange.
position
•
Moving
the
camera
as
you
press
the
shutter
button
will
in
a
blurred
image.
Use
,
,
or
to
select
the
area
to
enlarge.
the
last
image
displays
the
first
image,
and
pressing
atwill
thebe
firstautomatically
image
displays
the
Pressing
During
[2X],
the
ISO
be
automatically
set
to
ISO200.
[4X],ofISO
setof
exposures
( at Page
68).
IfCarry
burst
photography
is to
set
the
shutter
speed
is set During
to athe
speed
0.7
second
or more
in the
[ to
Tv ]
out
steps
1will
2when
in
Photographic
(SmartMedia™
formatting).
actions
might
damage
ISO
Page
78
Flashing
ItClose
takes
about
twice
the
time
to while
complete
taking
the
photograph
duePDR-M81
to processing
ofenlargement
the
captured
[set
],These
[“Basic
] When
the
image
is not
in SmartMedia™.
focus.
the
SmartMedia™
cover.
Memo
•
The
PDR-M81
usesto
an
accurate
auto
focus
mechanism.
However,
the
may
have
difficulty
last
image.
Adjust
the
display
area
enlarge
viewing
the
white
and
Slow
shutter
speed
warning
ISO400.
Shutter
speed
• In
AEB
photography
(
Page
71)
or
burst
photography,
the
shutter
speed
cannot
be
set
to
0.7
second
or
longer.
(SMALL
)
mode,
the
shutter
speed
is
automatically
changed
to
1/2
second.
Lens
•
Use
only
the
SmartMedia™
specified
for
use
with
the
PDR-M81.
The
use
of
other
SmartMedia™
SHARPNESS
Page
79
mode)”
(page
109).
Select
[QUALITY]
Settings
(
focusing
or
not
be
able
to
focus
at
all
for
subjects
and
situations
such
as
the
following:
image.
Before
you
use
aother
new
SmartMedia™
the
first during
time,
be
sure
tothe
Manual
Photography
mode
( P.isspeed
58)
Images
can
bevalue
rotated
by] pressing
playback.
Movie mode
(•• frames.
P.
75)
[ for
] or
green
the
aperture
is
to
F2.9
(maximum
aperture
size),
increased
shutter
speed
restricted
If
a
mode
than
[ set
suppressed
flash
mode
is
set
inthe
flash
photography,
thedark
shutter
is
•compensation
Processing
image
Aperture
Exposure
- When
subject
is distant and
- SmartMedia™
Subjects
moving
at
high
speed
damage
the
camera.
CONTRAST
Page
79
• to
The
write
protection
not
function
if in
write-protect
sticker
becomes
Use
a soft
dry cloth to
.thesecond.
oncould
the
SETUP
MENU
and
press
format
the
(may
Page
91).
an
image
counterclockwise,
and
pressing
rotates
clockwise.
Pressing
1/750
PDR-ACM1A
] •are
the
same
as
to
PDR-ACM1E
PDR-ACM1U
[PRG]
and
[ rotates
limited
tosecond.
between
1/2
second
and
1/250
* The
aboveitdirty.
menu
is
the
RECORDING
Charging
of
flash
progress
ON
When
there
are
objects
in
front
of
or
behind
the
subject
Very
shiny
subjects
such
as
a
mirror
or
car
body
SmartMedia™
is
aofisprecision
device.
Do do
notnot
bend,
drop,
or subject
SmartMedia™
to
DIGITAL
ZOOM
Page
• wipe
When
the
camera
isOnce
not79
inelectronic
be sure
to attach
the
lens
cap
provided
with[your
camera.
the
POWER
button
to
turn
the
power
off.
away
any
dirt.
ause,
sticker
ispress
peeled
off,
reuse
it.
Orange•Press
The
QUALITY
menu
displayed.
combinations
the
automatically
mode.
MENU
inthe
•the
The
aperture
value
set
differ
to
the
actual
value
according
to
the
position
ofUK)
theorzoom
lens.
To
return
to
the
regular
display,
ENTER.
(Photos
cannot
be
taken
at
this
moment.)
(for
US
and
Canada)
If the
shutter
speed
is
set
to
1/350
second
or
less,
the
shutter
as
speed
an
animal
is
automatically
athe
cage
a]changed
person
in front
to 1/250
of a tree)
(for
European
Continent)
(for
Get
ready
to
take
the
photograph.
- above
Extremely
low
contrast
subjects
When
the
settings
are
made,
they
are
displayed
in(such
thepocket
following
order.
Memo
DC
IN
5V
terminal
excessive
shocks.
Also,
do
not
carry
SmartMedia™
the
ofx[trousers.
This
might
The
lens
cap
can
also
be
attached
to
attachment
following
the
above
steps
to prevent
it’sthe
LCD
79
The
power
turns
off.
determined
shutter
speeds
and
aperture
-in Subjects
with
little
reflection,
such
as
hair
fur mode.
•• The
size
displayed
on
the
LCD
monitor
FULL
(320
240)
HALF
(160
xorsubject
120).
The
forced
flash
mode
or
]orred-eye
forced
flash
second
ifPage
the
flash
setting
is25)
changed
tothe
thestrap
[ ]becomes
- image
Subjects
that
have
low contrast
and
merge
into
Loading
the
batteries
(
Page
and
the
SmartMedia™
(
Page
31)
into
the
camera.
being
lost.
• Flash
photography
and
burst
photography
are
not
possible.
Flashing
SmartMedia™
to
excessive
force
when
you
sit
down,
damaging
the
SmartMedia™.
Hardware
malfunction
Subjects
with
no
solidity,
such
as
smoke
or
flames
the
background
(such
as
white
walls
or
subjects
Attach
the
lens
cap
when
you
are
not
using
the
camera.
values.
However,
their
operation
capability
movies
made
in
FULL
size
is
displayed
on
the
entire
LCD
monitor,
and
those
made
in
HALF
size
If the
[ ]mode,
forcedISO
flash
[ automatically
] red-eye set
forced
flash mode
is and
set in
flash photography
the is
• In
movie
willorbe
between
ISO100
ISO400
regardless ofwhen
its setting.
dressed
inthe
theSmartMedia™
same
color
as
thelens
background)
-attach
Subjects
viewed
through
glass
Turn
offor
the
power
tothe
retract
the
unit,
and then
the
lens
cap.
The
image
taken
in
photography
mode
may
be
blurred.
or
to
select
the
desired
setting
from
the
tab
menu
, and
press
•Use
Do•not
use
store
in
environments
likely
to
be
affected
byisstatic
electricity
or
is
different
as
shown
the
right
table.
displayed
in
ofspeed
the
2
shutter
speed
is center
set
toin
aexposure
of
0.7
second
or
more,
the
shutter
speed
automatically
changed
to
Press
POWER
button
toscreen.
turn
power
on.
A electrical
histogram
isturn
a graphic
representation
ofthe
theistones
of the
subject.
The horizontal
histogram
• Do
If the
the
image
cannot
be
focused,
thelens
focus
automatically
fixed to infinity.
(When theaxis
flashofisthe
necessary
not
the
power
on
with
the
cap
attached.
noise.
1/2
second.
ENTER.
*
The
above
AC
adapter
is
US/Canada
Turning
the
Power
On
Page
38
shows
the
brightness
(increasing
brightness
from
left
to
right)
and
the
vertical
axis
shows
the
number
at
this
time,
it
is
simultaneously
fixed
to
illuminate
objects
1.5
meters
(five
feet)
away.
During
macro
•This
Dosaves
use
orsettings,
store
SmartMedia™
very
hot,
humid
oraperture
corrosive
If the
shutter
speed
value
isimages,
set toin1/1000
second,
the
value
is limited
to
F8type
andAC
F3.4.
•not
When
playing
back
movie
switching
isthe
between
standard
and
image
only.
(O
:environments.
possible
Xbetween
: not
the
and
returns
to
RECORDING
MENU.
type.
European
andpossible)
UK
photography,
the flash
islevel.
alignedthe
withdisplay
the wide
position.)
of pixels
at each brightness
Downloaded From
camera-usermanual.com
adapters differ in shape.
--110
20 -40
80
88
Making Movies
Make a movie of moving images. Audio can also be recorded.
Getting
Ready
Set the mode dial to [
].
Taking
Photographs
To stop making movies, press the shutter button down fully again.
Downloaded From camera-usermanual.com
- 75 -
Additional
Information
• Flash photography is not possible.
• The image size displayed on the LCD monitor becomes FULL (320 x 240) or HALF (160 x 120). The
movie made in FULL size is displayed on the entire LCD monitor, and that made in HALF size is
displayed in the center of the screen.
• When making a movie, there’s a risk of lens motor noises being recorded on the sound track.
• When making a movie, only digital zoom photography is available.
Other
Applications
Memo
Handy
Functions
If you do not do this, photography is automatically stopped when there is no more free space on the
SmartMedia™, or when the maximum size that a single movie can be recorded is reached. (Maximum
photography time ➲ Page 124)
Erasing
Images
Photography begins.
The maximum photography time (seconds) appears on the LCD monitor and on the status display.
Playing
Back Images
Compose the picture, press the shutter button down halfway, and press it down
fully. ➲ Page 40
Changing
the
Preset
Conditions
(RECORDING
MENU)
Photography
in
the
Program
Mode
Setting
Names
Playing
Back
the
of
Photographed
Parts
Image
Size
and
Quality
(Single-Frame
Playback)
Extended
Exposure
Photography
(Bulb
Photography)
Erasing
Images
(Erase
Frame)
(continued)
Manual
Attaching
Using
How
Taking
Enlarging
Playback
About
Turning
to
Photographs
the
SmartMedia™
Press
Settings
the
Photographed
of
Power
the
Power
Multi
Shoulder
Continuously
Outlet
Shutter
Image
On/Off
Images
Strap
Pictures
Button
(Zoom
(Burst
Playback)
Photography)
Taking
Erasing
Button
Photographs
Folders
and
(All
LCD
Images
Continuously
Monitor
in
aImages
Folder/All
(Burst
Display
Photography)
Folders)
(In
Playback
(continued)
(continued)
Mode)
Definitions
Separately
of
the
Accessories
Color
of
the
Viewfinder
LED
Taking
and
Playing
Back
Photographs
on
aMode
TV
(continued)
Changing
the
Preset
Conditions
(RECORDING
MENU)
(continued)
Exposure
Compensation
in
the
Shutter
(continued)
Speed-priority
(continued)
About
Basic
Settings
SmartMedia™
in
(Sold
the
mode)
Aperture-priority
(continued)
Mode
(continued)
LCD
Monitor
Display
(during
photography)
(continued)
Manual
Settings
(continued)
Playing
Photography
Installing
Back
Movies
batteries
(Auto
Photography)
(continued)
(continued)
(continued)
Names
of
Parts
(continued)
Getting
Ready
The shutter
camerabutton
automatically
adjusts the
shutter
and
the aperture
value
according
to the
brightness
of an
can be pressed
down
in twospeed
stages:
halfway
down and
fully
down. When
pressed
halfway
down,
This
“SmartMedia™”
Set
Play
Automatically
The
the
following
mode
shoulder
menu
back
size
photographed
is(number
used
for
items
strap
plays
setting
isadapter
for
athe
is
are
back
storage
of
taking
handy
also
the
pixels)
still
the
basic
available
subjects
for
medium
images
16
and
carrying
images
settings
quality
one
for
that
as
saving
separately
your
image
to
require
(compression
be
camera
used
images
atseveral
a
sold
for
around.
inthat
photography
items.
ratio)
seconds
the
you
multi
of
have
the
photography
to image
photograph
in
photographed.
to
[ second
be
mode
],photographed.
such
[be
Even
in
asquick
]for
firework
or
if Europe,
the
[You
succession.
camera’s
displays
] photography
power
at the
Enlarges
selected
portions
of
images
being
played
back
at
two
levels.
Images
can
displayed
enlarged
when
In
You
this
can
color
mode,
manually
of
the
photographs
viewfinder
adjust
settings
are
LED
taken
indicates
such
continuously
asphotographed
the
exposure
state
atof
control,
atime.
the
maximum
camera.
white
speed
balance,
The
ofthe
0.8
metering
system,
intervals.
continuous
This
item
switches
display
on
the
LCD
monitor
when
playing
back
photographed
images.
can
switch
If
you
the
AC
(sold
separately:
PDR-ACM1A
for
the
US/Canada,
PDR-ACM1E
PDR-ACM1U
Mode
Effective
dial
Subjects
and
Set
Values
TM
✶❉❅◗❆❉■❄❅❒
✬✥✤
Press
.of
aperture
value.
SYSTEM
Turning
Exposure
ISO
OSD
In
[prevent
[use
LANGUAGE
the
]the
INFO.
mode
control
Power
(EXP.)
On
Close
the
SmartMedia™
cover.
Slide
the
SmartMedia
cover
release
knob
in
the
Take
photographs
or
or
battery
to
to
select
or
play
[that
the
slide
]them
or
shutter
it
[ the
back.
,]will
and
speed.
and
lock
press
Look
Use
through
to
select
the
[adjust
viewfinder
]use
and
press
to
compose
ENTER.
the
picture.
To
continue
erasing
images,
repeat
the
above
procedure
2.
.is
AF
(auto-focus)
and
AE
(auto
exposure)
are
set.
When
pressed
fully
down,
the
camera
takes
aspace
picture.
object.
This
mode
enables
carefree
photographing
similarly
to
selecting
[stable
]photographs.
in
[ from
]settings”,
mode.
Itrepeatedly
is
to
night.
To
is
Change
modes.
turned
When
the
OFF,
your
setting
using
the
camera
images
this
according
mode,
from
saved
dropping
be
to
sure
how
on
the
the
to
during
SmartMedia™
image
a(size,
photography,
tripod
is
to
to
be
keep
used
not
hang
the
and
be
camera
erased.
the
the
shoulder
remaining
SmartMedia™
strap
and
amount
prevent
around
can
ofstep
your
distortion
be
neck.
inpossible
the
of
images.
Relationship
between
your
camera
and
accessories
Connecting
tocalled
Other
Devices
(page
123)
being
played
back
one
image
at
acover,
time.
The
meaning
maximum
of
number
LED
color
of
photographs
differ
according
can
to
be
taken
mode
continuously
dial
setting.
three
photography
mode,
and
take
photographs
at
these
settings.
These
are
“Manual
which
are
saved
display
to
show
adial
list
detailed
information
compression
ratio,
shutter
speed,
aperture,
etc.)
or
you
can
for
the
UK)
in
a
room
with
amay
power
outlet,
you
can
take
photographs
for
an
extended
period
of
time.
This
also
Mode
1 Item
QUALITY
2 Options
Notes
SmartMedia™
VIDEOon
OUT
White Balance (W.B.)
Write
Protection
Removing
the Batteries
ISO
[ POWER
]
AUTO
OFF
Setting items
Turning
the
Power
Off
Using
the
LCD
Monitor
Additional
Information
Other
Applications
Handy
Functions
Erasing
Images
Playing
Back Images
Taking
Photographs
Tab menu
●
The
tab
is
displayed.
setting
isbattery
as
follows:
Make
sure
that
the
issystem
firmly
closed.
Details
image
ofmenu
operation
isrange
saved
are
or
erased,
the
same
and
as
the
taking
camera
photographs
is
then
ready
and
to
playing
take
photographs.
them
back
onon
the
LCD After
monitor.
If
you
use
the
viewfinder
to
take
photographs,
the
photography
Set
the
mode
dial
to
[cover
].settings
direction
of
the
arrow
to
open
cover
.the
ENTER.
change
the
white
and
the
metering
in(the
program
mode.
erased
SmartMedia™.
and
reused.
For
details
on
these
accessories,
refer
to
the
Instruction
Manual
for
the
accessory
you
are
using.
(information
Movies
images
photographed
in
the
multi
mode
Page
cannot
be
displayed
using
the
zoom
playback
Images
even
if the
are
camera
not
recorded
is
turned
directly
off.
SmartMedia™
but
are
stored
temporarily
within
the
buffer
memory.
display
histograms,
etc.
prevents
failed
photographs
due
to
battery
wear
or
failed
of
data
to
a
PC.
details
handling
the AC
Set
Sets
the
thebalance
whether
color
:(
Photography
mode
language
not
to
and
return
photographic
of
in
menus
the
program
displayed
sensitivity
in
the
(default)
on
SETUP
the
at51)
which
LCD
(➲
MENU
Page
monitor.
to
image
62)
the
original
is For
to
be
factory
recorded.
settings.
For
enlarged
view
P.
22)
feeds
the
image
•transfer
Each
press
of
2
•✭❅❍❏
Copying
of
printed
(black
on
white
paper)
set
the
time
(text
114)
F8
/display
F6.8
/or
F5.6
/18.
F4.8
/Page
/and
F3.4
/mode
F2.9
How
to
take
photographs
Page
41
1/1000,
1/750,
1/500,
1/350,
1/250,
1/180,
1/125,
range
may
differ
from
the
actual
image.
InLCD
this
case,
use
the
LCD
Press
the
shutter
button
down
halfway
.1/90,
the
mode
dial
to
[ F4.0
],
[characters
]reset.
or
[selected
].higher
1
SmartMedia™
having
the
following
storage
capacity
can
be
used
on
your
current
as
of
March
2000)
feature.
The
last
cover
recorded
image
opens
frame
image
appears
appears
on
the
on
the
LCD
monitor.
monitor.
photography
is
finished,
check
the
images
record
the
ones
tocamera.
SmartMedia™.
[TIME&DATE,
]
:
Erases
images
in
the
currently
selected
folder
and
folders.
Possible
number of sh
adapter,
beSet
sure
to
read
page
•
2x-speed
playback
isaperture-priority
performed
for
Make
sure
that
the
SmartMedia™
is
correctly
loaded.
(
Page
31)
by
one
frame.
Warning:
Noise
:
OSD
Photography
increases
LANGUAGE
when
in
will
the
not
ISO
be
is
changed
mode
to
(➲
Page
settings.
63)
Memo
•
Backlit
portraits
IMPORTANT
When
[PROTECTED]
on
the
LCD
monitor,
cancel
the
protection
( button
Page 108) or
remove
How
to
play
back
images
Page
80
1/60,
1/45,
1/30,
1/20,
1/10,
1/8,
1/6,
1/4,
1/3,
1/2,
monitor
for
photography.
AF
(auto-focus)
and
AE
(auto
exposure)
(➲
Additional
Information,
SETU
PTo
(
P.
109)
: value
English
(default)
Carry
Pass
Set
the
out
mode
end
steps
of
dial
1the
to
to
shoulder
4[1/15,
either
]].LCD
or
inspeed-priority
[strap
“Photography
through
].
the
in
the
strap
Shutter
speed-priority
Mode”
isdisplayed
held
down.
the
duration
that
PC
mode
(
P.
121)
2MB
/4MB/8MB/16MB/32MB/64MB/128MB
the
mode
dial
to
[isin
(all
3.3
types)
]•the
adjust
: mode
Erases
the
all
brightness
folders
recorded
of
the
on
the
monitor
SmartMedia™.
Page
115
[Set
Selfimer
1
•V
1-frame
feed
is t
continued
for the
The
aperture
and
the
shutter
speed
corresponding
to(➲that
:write-protection
Photography
shutter
mode
Page
65)
Z
oom
state
• 0”7,
bright
scenes
(such
and
highly
reflective
subjects
Photography
mode
•the
You
can
also
carry
out
step
8snowfields)
while
verifying
the
image
step
7.
DPOF
(in
Page
102).
Glossary)
start
to
function.
1”,
1”5,
2”,
3”,
4”,
6”,
8”,
10”,
15”
•Very
Do
not
remove
or monitor
load
the
batteries
or
disconnect
or
connect
the
AC
adapter
while
the camera
is mode.
on.1
This
:POWER
Japanese
:LCD
Equivalent
toas
color
ISO100
button
Carry
Set
Use
out
or
mode
steps
to
dial
select
1
to
to
2[erased,
the
“Manual
].
images
photographed
Settings”
(page
in
58).
the
multi
photography
You POWER
can also
the
PC
card
adapter
and
floppy
disk
adapter
( in
123)
sold
separately
to transfer
Changing
the
display
Page
116
Theconnect
images
or
folders
are
and
the
camera
returns
toPage
the
is
held
down.
duration
that
value
are
displayed
on
the
LCD
monitor.
If
the
appropriate
(page
attachment
65)
or
on
in
“Photography
the
camera.
in
the
Full
Manual
Mode”
(page
67).
Press
the
button
to
turn
the
power
on.
full
manual
mode
(➲
Page
67)
:
Photography
in
Image
Quality
button
Press
the
MENU
button.
• •Shots
made
up
predominantly
of
sky
Even
if
photography
is
terminated
midway
before
capturing
three
images
by
releasing
the
shutter
•
If
you
take
a
photograph
after
erasing
an
image,
a
number
continuing
from
the
last
photographed
When
AF
or
AE
are
locked,
the
beep
tone
(➲
Page
111)
sounds
and
the
Use
or
to
change
the
setting
in
the
tab
menu,
might
return
the
manual
settings
to
their
defaults.
If
this
happens,
manually
set
conditions
again.
:connect
High-sensitive
equivalent
to preset
color
(default)
Before
you
oreven
disconnect
the
AC
adapter,
be
sure
to turn
thedisplay
camera
OFF.
If the
AC adapter is
Press
the
image
quality
button
to
select
the
combination
cannot
be
set
ifphotography
the
shutter
speed
isas
adjusted
toISO200
images to a
PC.
16MB
(SM-M1600D)/32MB
(SM-M3200D)/64MB
(SM-M6400D)/128M
(SM-M1280D)
The
respective
last
image
mode.
frame
appears
on
LCD
monitor.
You
can
also
select
the
image
by
the
same
operation
for
thumbnail
Page
83).
Carry
out
steps
1
to
on
page
109.
When
the
camera
is
turned
on,
set
the
mode
dial
to
the
desired
The
shutter
speed
and
the
aperture
value
corresponding
todisplay
the
All
descriptions
inor
this
Instruction
Manual
are
for
when
the
language
is (2
set
to [ENGLISH].
Press
or
to
select
the
image.
button,
images
already
photographed
can
be
saved
and
erased
by playback
the
method.
image
is
assigned
as
image
number.
Shutter
button
●
The
viewfinder
RECORDING
LED
turns
MENU
green.
is2
displayed.
•press
The
image
the
photograph
is
taken
is
slightly
less
clear
than
images.
(This
is 109,
connected
disconnected
with
the
power
ON,
camera
settings
may
beabove
reset
(SET-UP
Page
and
ENTER.
:before
High-sensitive
photography
equivalent
to
color
ISO400
its
the
shutter
speed
isthe
displayed
inthe
red.
To limit,
cancel
erasing
of
image
data,
select
[monitor.
]Photography,
and
press
ENTER.
Flash
button
quality
and
size,
while
viewing
indication
on
the
starts
a
reverse
•
The
press
of
mode.
shutter
speed
are
displayed
on
the
LCD
If
the
appropriate
The
length
of
time
to
capture
images
varies
according
to
the
photographic
conditions.
•
Images
can
also
be
erased
in
the
thumbnail
mode.
In
this
case,
the
camera
enters
the
single
frame
Select
[SYSTEM
INFO.]
on
the
SETUP
MENU
and
because
television
displays
images
at
a
lower
resolution.)
•
Spotlit
subjects,
particularly
against
dark
backgrounds
Manual
Settings
Page
58)
or
the
camera
may
malfunction.
however,
is
possible
in
this
state.
feeds
the
image
•
Each
press
of
EXP.
].
To
cancel
changing
of
settings,
press
.
Use
or
to
select
the
frame
you
want
to
enlarge.
Press
the
or
Zoom
to
switch
select
[
(
S/C
Page
].
21)
towards
“T”
to
begin
playback.
] mode:
is
selected,
[NO
IMAGE]
isaperture
displayed
after
allor
folders
When
playback.
Press
Set
mode
dial
inbe
the
to
[ sure
Tv
mode,
].the
or
press
in
the
shutter
button
fully
Before
photography,
make
that
the
lens
cap
has
been
2
combination
cannot
set
even
ifflash
isin.black
adjusted
to its
playback)
mode,
and
enters
the
thumbnail
playback
mode after the image is erased.
status
display.
]or
In
[[playback
Press
the
display/info
button.
Self-timer
photography
and]down
photography
are
not
possible.
•the
The
display
unit
varies
according
to
the
output
system.
•theCopying
of (frame
printed
text
(white
characters
on
paper)
.
press
reverse
by
one
frame.
This
adapter
allows
SmartMedia™
to
bespeed
asto
3.5"
floppy
disk.
have
been
erased
(unless
the
SmartMedia™
contains
protected
You
can
also
select
the
image
by Press
thein
same
operation
as
for
thumbnail
playback
(80)
PageISO
83).
Automatic
playback
begins.
•[2X],
Playback
becomes
2x-speed
to
reduce
aperture
size.
toused
increase
aperture
size.ISO200.
Press
camera
takes
a
picture.
display
P.
23)
The
manual
setting
removed
the
camera.
limit,
aperture
value
isbe
displayed
red.
Photography,
however,
Playback
(Status
mode
P.
the
[Scenes
M
]from
mode
to
set
the
0.7
second
Manual
photograpy
During
the
ISO
will
automatically
set
between
ISO100
During
[4X],
will
be
☞
set
the
quality
and
size
➲shutter
Page
112
•the
With
the
NTSC
system,
images
can
be
displayed
simultaneously
on the
LCD
monitor
and(
TV
during
•To
with
low
reflectivity,
such
as
shots
green
or
dark
foliage
Flash
state
Each
press
of
the
display/info
button
switches
the
display
•of1-frame
feed
isand
continued
The
SYSTEM
INFO.
menu
displayed.
reverse
for
the
duration
This
adapter
isplayback
inserted
into
the],
floppy
your
PC,
allowing for the
images).
The
viewfinder
LED
turns
redis
image
data
being
recorded
onto
Insert
the
adapter
connector
plug
into
the
DC
IN
Selft
imer
lamp
values
are
displayed
In
the
photography
modes
([while
[and ISO400.
]disk
oris
[ drive
]),on
the
lens
photography
and
playback.
is
possible
inAC
this
state.
automatically
set
between
ISO100
is
held
down.
format
as
follows:
duration
that
Note:
The
larger
the
F
value,
the
smaller
the
aperture
size
become
or
longer.
•Press
Remove
andzoom
insert
with
the
camera’s
power
turned
is held
down.
that
To
quit
the
SETUP
MENU,
change
the
mode
dial
setting.
Aperture
value
Shutter speed
Adjust
the
ratio
by
the
Zoom
switch.
(Zoom
display
option
menu,
press
or
to
images
recorded
onSmartMedia™
the
SmartMedia™
to
be
transferred
topress
the
PC.off.
the
SmartMedia™.
Sets
video
output
system
according
to
the
country
in
which
your
camera
isSize
used.
on
the
left
ofto
the
LCD
Press
the
shutter
button
down
halfway
and
5V
terminal
on
the
camera.
extends
from
the
camera
body.
•the
the
PAL
system,
images
cannot
be
displayed
When a cable
is connected, only
and
versa.
1situations
the
image
quality
button
switches
the
quality
and
size
Gently
insert
the
SmartMedia™
as
far
as
it, simultaneously.
can
go
✭❅❍❏
[Pressing
]vice
isWith
displayed
on
the
LCD
monitor.
•select
Recorded
data
may
bepress
erased
(destroyed)
in
the
listed
below.Viewfinder
Note that Toshiba
White
Balance
Additional
Information,
Glossary
to
increase
shutter
speed.
Pressand
to
decrease
shutter
speed.
Press
Press
or
to
move
forward
reverse.
☞
➲
Memo
PRG
]
and
ENTER.
]
and
press
ENTER.
[
switch
Page
21)
✤❅▼❁❉●❅❄
TV
display
is
available.
monitor
screen.
When
the
camera
is
turned
on,
the
Auto
Power
OFF
function
settings
infully
the
following
order.
it
down
. system
✳▼❁■❄❁❒❄
★❉▲▼❏❇❒❁❍
✩❍❁❇❅
❏■●❙
2
Press
or
to
select
the
item
you
desired
toisloss
set,
with
SmartMedia™
electrodes
(metal
contacts)
Additional
Information,
Glossary)
(white
Corporation
accepts
no
responsibility
whatsoever
for
the
of
recorded
data enters
in these
• the
When
allNTSC
images
in
a
folder
are
erased,
that
folder
itself
also(destruction)
erased.
Quality
The
camera
determines
the
balance
by
averaging
the
various
kinds playback
of light
that actually
to
to
next
frame/
to“T”
go
back
one
❉■❆❏❒❍❁▼❉❏■
To
prevent
valuable
data
from
being
erased,
attach
the
write••advance
With
the
PAL
system,
images
are
played
back
with
apressing
black
frame
•frame
After
pause
is
cancelled,
the
Zoom
switch
to
the
will
the
image.
Pressing
ENTER
the
setting.
or
,, SmartMedia™
and
manual
Exposure
compensation
(➲
Page
69)
using
When
[for
M
]selects
isis
selected
on
the
[ halfway
EXP.
]remove
option
menu,
orsurrounded.
the
shutter
speed
setting
becomes
operational.
Never
open
the
SmartMedia™
cover
orenlarge
the
while
anmakes
image
is
being
recorded.
This
or
and
manual
setting
(➲
Page
58)
or
film
speed
Exposure
compensation
(➲
Page
69)
using
Reverse the
procedure
“Loading
the
Batteries”
and
remove
the
batteries.
•facing
Pressing
the
shutter
button
down
adjusts
the
exposure,
• Playback
paused.
PAL
system
( camera.
Additional
Information,
Glossary)
situations:
Builti
n
microp
the
lens.
This
setting
allows
you
to
set
in
advance
the
white
balance
when
taking
photographs
under
and
press
ENTER.
the
rear
of
the
For
the
US/Canada:
PDR-ACM1A
Holding
down
or
moves
forward
or
reverse
continuously.
resumes
at
the
last
state
that
was
protect
sticker
at
the
write-protect
area.
Data
can
no
longer
be
Focus
area
may
corrupt
the
data
on
the
SmartMedia™
or
damage
the
SmartMedia™
itself.
possible,
but
does
not
make
the
exposure
compensation
possible. HoweverSelfthe exposure
value
is
To
return
normal
press
the
Zoom
switch
towards
setting
(➲toPage
Page
58)magnification,
or film
speed
setting
(➲
Page
78)
using
ENTER
Pass
the
shoulder
strap
through
the
loop
and
pull.
timer
pho
setting
(➲
78)
using
ENTER
are
also
possible.
and
pressing
the
shutter
button
fully
takes
the
shot.
TM[ is down
When
the
SmartMedia™
used
incorrectly
by
the
user
or
a
third
party
[
],
]
or
[
]
AE
or
AF
are
locked
with
the
shutter
button
held
half
specific
lighting
conditions.
For
Europe:
PDR-ACM1E
active
before
the
pause.
Firmly
insert
the
SmartMedia
as
far
as
it
can
go.
displayed
on is
the
LCD
monitor.
Press
ENTER.
recorded
or setting
erased
from
SmartMedia™.
Toon
write
oraterase
data
from is to be recorded. WriteSets
the
color
mode
and
photographic
sensitivity
which
the
image
“W”.
are
also
possible.
prote
The
default
different
depending
the
destination
country/area.
Use
or
to
select
the
desired
item
Press
ENTER,
nine
images
are
displayed
simultaneously.
•Flash
If
you
shoot
a
still
picture,
when
preview
is
set
to
ON
(➲
Page
77),
1
down.
If
no
operation
is
carried
out
for
a
fixed
amount
of
time
(default:
about
one
minute),
power
ON
When
the
SmartMedia™
is
exposed
to
static
electricity
or
electrical
noise
Auto
Photography
(
mode
P.
41,
46)
Forimage
the Noise
UK:
PDR-ACM1U
:off
Displays
the
firmware
version
ofto
this
camera.
area
SmartMedia™,
peel
the
sticker.
camera
ready
to
take
photographs.
Warning:
increases
when
the
ISO
is
changed
higher
settings.
isis
displayed
and
a
white
frame
and
green
Green The
Compose
picture,
press
the
shutter
button
down
halfway,
and
press
it
down
:the
Automatic
adjustment
(default)
Display
Page
83
theThumbnail
recorded
image
is
displayed
on
for
about
two
]specifications
Standby
mode
[enlarged,
••-For
If
no
operation
is
carried
out
a screen
fixed
amount
offrom
time
(default:
about
1shutter
minute),
thewear.
power
is
turned
TM
consumption
is
set
to
its
minimum
state
(power
almost
off)that
to
prevent
battery
This
is
.in
and
press
When
the
SmartMedia™
isfor
removed
ordarkens
the
camera
isPage
turned
off
while
recording
erasing
The
image
the
LCD
monitor
sometimes
the
time
the
button
isdata,
pressed
down
Speaker
details,
refer
to
the
of
AC
information.
adapter
127.
: on
Displays
the
SmartMedia
Playback
returns
to
the
start
ofturned
the
movie.
frame
are
displayed
the
LCD
monitor.
:
Photography
outdoors
Default
setting:
seconds.
off
to
preserve
battery
life.
This
is
called
“Auto
Power
OFF”.
To
return
to
the
normal
state,
press
the
fully.
➲
Page
40
called
the
Auto
Power
OFF.
This
setting
allows
you
to
set
the
time
when
the
camera
turns
off
halfway
until
the
image
becomes
focused.
: picture,
Equivalent
to
ISO100
(default)
data,
frame
advance
when
images
aredefaults.
played
back or during
formatting
of
the termin
IN press
5V
The options
are
displayed.
Histogram*
2
: Returns
settings
to
Flashing
[ the
],
[ color
]conditions
or their
[shutter
]being
Self-timer
in frame
operation
atDC
a handshake
alarm
.
Compose
the
press
the
button
down
halfway,
and
it
down
The
white
frame
indicates
entire
image,
while
the
green
:
Photography
in
cloudy
POWER
button
again.
•
The
viewfinder
LED
turns
red
while
image
data
is
being
recorded
Compose
the
picture,
press
the
shutter
button
down
halfway,
and
press
it
down
• The
To
set
the
focus
orpicture.
exposure
forphotography
a subject
outside
the
center
the intended
theincamera
directly
The camera
takes
the
automatically.
This
function
isthrough
not
activated
during
automatic
playback
( image,
Pagepoint
85) or
the [ only>
] PC
:appearing
High-sensitive
equivalent
toofcolor
ISO200
SmartMedia™.
Note:
image
the
lens
will
be
The
display
returns
to<Histogram>
thumbnail
playback.
<Standard>
<Detailed
information>
<Image
✭❅❍❏
shows
the
location
of
the
currently
enlarged
area.
halfway,
and
press
it
down
fully.
➲
Page
40
Macro
photography
:
Photography
in
bluish
fluorescent
light
fully.
➲
Page
40
About
the
Auto
★★
Power
(FULL
OFF
★★
Function
)
Additional
Information,
“AUTO
POWER
OFF
(page
110)”
at
the
subject
or
desired
exposure
(lighting),
press
and
hold
the
shutter
button
halfway.
Now,
with
the
shutter
onto
the
SmartMedia™.
ON]
Writing
to SmartMedia™
in progress
mode.
Press
ENTER.
:adapter
High-sensitive
photography
equivalent
toanother
color
ISO400
•Insert
Wedefault
recommend
copying
and
saving
important
datapower
onto
storage
medium (floppy
disk, hard
displayed
for
[LCD
].[Power
fully.
➲
Page
40
the
AC
power
plug
into
the
Electrodes
The
size
and
quality
of
the
image
can
be
reset
to
the
desired
combination.
Press
ENTER.
Memo
Sticker
button
still
held
halfway
down,
you
can
turn
the
direction
of
the
camera
and
frame
your
image
with
the
focus
•
It
is
possible
to
play
back
any
images
in
any
folders
by
pressing
or
during
playback.
(For
details
ON
: Photography
inafter
reddish
fluorescent
light
The
camera
takes
the
picture.
Photographs
can
be
taken,
however,
do not
turn thepress
power
OFF.
Todisk,
return
to disk,
the
normal
state
thepower
Auto
Power
OFF
has been
executed,
the
POWER
button
MO
etc.).
The
PREVIEW
manual
setting
Page
items
77
are
displayed.
Remaining
➲battery
camera
takes
the
atmonitor.
the
set
exposure
time.
Current
Entireofimage
and
exposure
locked.
Press
the
shutter
button
down
fully
to in
complete
capturing
the image.
Red outlet.
[☞
on picture
the
LCD
The
camera
is ready
for
burst
photography.
of displayed
folder
Page
92)
]:the
mode:
In
the
Accessing
of
SmartMedia™
[ (HALF
Photography
in] is
incandescent
light
★★
•] [is
When
shutter
speed
set
to
a)turn
speed
of
0.7 second
orprogress
slower,
photographs
taken
as extended
PC/AV
terminal
to Never
turn
the
power
on★★
again.
•During
remove
the
SmartMedia™
or
the
camera
offresult
while
recording
data or are
while
erasing
data
COLOR
Page
77
➲
the
exposure,
the
viewfinder
LED
turns
orange.
position
•
Moving
the
camera
as
you
press
the
shutter
button
will
in
a
blurred
image.
Use
,
,
or
to
select
the
area
to
enlarge.
at Page
the
last
image
displays
the
first
image,
and
pressing
atwill
thebe
firstautomatically
image
displays
the
Pressing
During
[2X],
the
ISO
be
automatically
set
to
ISO200.
[4X],ofISO
setof
exposures
(➲
68).
IfCarry
burst
photography
is to
set
the
shutter
speed
is set During
to athe
speed
0.7
second
or more
in the
[ to
Tv ]
out
steps
1will
2when
in
Photographic
(SmartMedia™
formatting).
actions
might
damage
ISO
Page
78
➲Flashing
ItClose
takes
about
twice
the
time
to while
complete
taking
the
photograph
duePDR-M81
to processing
ofenlargement
the
captured
[set
],These
[“Basic
] When
the
image
is not
in SmartMedia™.
focus.
the
SmartMedia™
cover.
Memo
•
The
PDR-M81
usesto
an
accurate
auto
focus
mechanism.
However,
the
may
have
difficulty
last
image.
Adjust
the
display
area
enlarge
viewing
the
white
and
Slow
shutter
speed
warning
ISO400.
Shutter
speed
• In
AEB
photography
(
Page
71)
or
burst
photography,
the
shutter
speed
cannot
be
set
to
0.7
second
or
longer.
★★
(SMALL
★★
)
➲
mode,
the
shutter
speed
is
automatically
changed
to
1/2
second.
Lens
•
Use
only
the
SmartMedia™
specified
for
use
with
the
PDR-M81.
The
use
of
other
SmartMedia™
SHARPNESS
Page
79
mode)”
(page
109).
Select
[QUALITY]
Settings
(
focusing
or
not
be
able
to
focus
at
all
for
subjects
and
situations
such
as
the
following:
➲
image.
Before
you
use
aother
new
SmartMedia™
the
first during
time,
be
sure
tothe increased
Manual
Photography
mo
P.isspeed
58)
Images
can
bevalue
rotated
by] pressing
playback.
Movie
(
mode
P.
75)
[ for
] or
green
the
aperture
is
to
F2.9
(maximum
aperture
size),
shutter
speed
restricted
•• frames.
If
a
mode
than
[ set
suppressed
flash
mode
is
set
inthe
flash
photography,
thedark
shutter
is
•79
Processing
image
Aperture
Exposure
compensation
- When
subject
is distant and
- SmartMedia™
Subjects
moving
at
high
speed
damage
camera.
CONTRAST
Page
➲[the
• to
The
write
protection
not
function
if in
write-protect
sticker
becomes
Use
a soft
dry cloth to
.thesecond.
oncould
the
SETUP
MENU
and
press
format
the
(may
Page
91).
rotates
an
image
counterclockwise,
and
pressing
rotates
clockwise.
Pressing
1/750
PDR-ACM1A
] •are
the
same
as
to
PDR-ACM1E
PDR-ACM1U
[PRG]
and
limited
tosecond.
between
1/2
second
and
1/250
* The
aboveitdirty.
menu
is
the
RECORDING
Charging
of
flash
progress
ON
When
there
are
objects
in
front
of
or
behind
the
subject
Very
shiny
subjects
such
as
a
mirror
or
car
body
SmartMedia™
is
aof
device.
Do do
notnot
bend,
drop,
or subject
SmartMedia™
to
DIGITAL
ZOOM
Page
• wipe
When
the
camera
isOnce
not79
inelectronic
be sure
to attach
the
lens
cap
provided
with[your
camera.
the
POWER
button
to
turn
the
power
off.
✭❅❍❏
away
any
dirt.
ause,
sticker
ispress
peeled
off,
reuse
it.
➲
Orange•Press
The
QUALITY
menu
isprecision
displayed.
combinations
the
automatically
mode.
MENU
inthe
•the
The
aperture
value
set
differ
to
the
actual
value
according
to
the
position
ofUK)
theorzoom
lens.
To
return
to
the
regular
display,
ENTER.
(Photos
cannot
be
taken
at
this
moment.)
(for
US
and
Canada)
If the
shutter
speed
is
set
to
1/350
second
or
less,
the
shutter
as
speed
an
animal
is
automatically
athe
cage
a]changed
person
in front
to 1/250
of a tree)
(for
European
Continent)
(for
Get
ready
to
take
the
photograph.
- above
Extremely
low
contrast
subjects
When
the
settings
are
made,
they
are
displayed
in(such
thepocket
following
order.
Memo
DC
IN
5V
termin
excessive
Also,
do
not
carry
SmartMedia™
the
ofx[trousers.
This
might
the
The
lens
cap
can
also
be
attached
to
attachment
following
the
above
steps
to prevent
it’s
LCD
79
➲shocks.
The
power
turns
off.
determined
shutter
speeds
and
aperture
-in Subjects
with
little
reflection,
such
as
hair
fur mode.
•• The
size
displayed
on
the
LCD
monitor
FULL
(320
240)
HALF
(160
xorsubject
120).
The
forced
flash
mode
or
]orred-eye
forced
flash
second
ifPage
the
flash
setting
is25)
changed
tothe
thestrap
[ ]becomes
- image
Subjects
that
have
low contrast
and
merge
into
Loading
the
batteries
(➲
Page
and
the
SmartMedia™
(➲
Page
31)
into
the
camera.
being
lost.
• Flash
photography
and
burst
photography
are
not
possible.
Flashing
SmartMedia™
to
excessive
force
when
you
sit
down,
damaging
the
SmartMedia™.
Hardware
malfunction
Subjects
with
no
solidity,
such
as
smoke
or
flames
the
background
(such
as
white
walls
or
subjects
Attach
the
lens
cap
when
you
are
not
using
the
camera.
values.
However,
their
operation
capability
movies
made
in
FULL
size
is
displayed
on
the
entire
LCD
monitor,
and
those
made
in
HALF
size
If the
[ ]mode,
forcedISO
flash
[ automatically
] red-eye set
forced
flash mode
is and
set in
flash photography
the is
• In
movie
willorbe
between
ISO100
ISO400
regardless ofwhen
its setting.
dressed
inthe
theSmartMedia™
same
color
as
the
background)
-attach
Subjects
viewed
through
glass
Turn
offor
the
power
tothe
retract
the
lens
unit,
and then
the
lens
cap.
The
image
taken
in
photography
mode
may
be
blurred.
or
to
select
the
desired
setting
from
the
tab
menu
, and
press
★★
★★
★★
•Use
Do•not
use
store
in
environments
likely
to
be
affected
byisstatic
electricity
or
is
different
as
shown
the
right
table.
displayed
in
ofspeed
the
2
shutter
speed
is center
set
toin
aexposure
of
0.7
second
or
more,
the
shutter
speed
automatically
changed
to
Press
POWER
button
toscreen.
turn
power
on.
A electrical
histogram
isturn
a graphic
representation
ofthe
theistones
of the
subject.
The horizontal
histogram
• Do
If the
the
image
cannot
be
focused,
thelens
focus
automatically
fixed to infinity.
(When theaxis
flashofisthe
necessary
not
the
power
on
with
the
cap
attached.
noise.
1/2
second.
ENTER.
*
The
above
AC
adapter
is
US/Canada
Turning
the
Power
On
➲
Page
38
☞
shows
the
brightness
(increasing
brightness
from
left
to
right)
and
the
vertical
axis
shows
the
number
at
this
time,
it
is
simultaneously
fixed
to
illuminate
objects
1.5
meters
(five
feet)
away.
During
macro
•This
Dosaves
use
orsettings,
store
SmartMedia™
very
hot,
humid
oraperture
corrosive
If the
shutter
speed
value
isimages,
set toin1/1000
second,
the
value
is limited
to
F8type
andAC
F3.4.
•not
When
playing
back
movie
switching
isthe
between
standard
and
image
only.
(O
:environments.
possible
Xbetween
: not
the
and
returns
to
RECORDING
MENU.
type.
European
andpossible)
UK
photography,
the flash
islevel.
alignedthe
withdisplay
the wide
position.)
of pixels
at each brightness
Downloaded From
camera-usermanual.com
adapters differ in shape.
--110
20 -40
80
88
Changing the Preset Conditions (RECORDING MENU) (continued)
The camera is now ready to take photographs.
: Do not display preview (default)
: Display preview
Erasing
Images
[OFF]
[ON]
Playing
Back Images
This setting allows you to display a photographed image on the LCD monitor for two seconds
immediately after you have taken the shot.
This allows you to check the composition and brightness of the photographed image.
Note, however, that detailed areas are sometimes lacking detail as the resolution of preview images is
low. To check detailed areas and focus, check it in the [
] playback mode (➲ Page 80).
To cancel preview, press the shutter button halfway down again.
The three images that you took are displayed for about two seconds each in the AEB photography
mode (➲ Page 71)
Taking
Photographs
PREVIEW
Getting
Ready
To quit the RECORDING MENU, press the MENU button.
Handy
Functions
COLOR
[STANDARD]
[VIVID]
[MONOCHROME]
[SEPIA]
: Standard color (default)
: Vivid color
: Black and white
: Sepia
Other
Applications
Set the color of the image to be photographed.
Additional
Information
Downloaded From camera-usermanual.com
- 77 -
Changing
the
Preset
Conditions
(RECORDING
MENU)
Photography
in
the
Program
Mode
Setting
Names
Playing
Back
the
of
Photographed
Parts
Image
Size
and
Quality
(Single-Frame
Playback)
Extended
Exposure
Photography
(Bulb
Photography)
Erasing
Images
(Erase
Frame)
(continued)
Manual
Attaching
Using
How
Taking
Enlarging
Playback
About
Turning
to
Photographs
the
SmartMedia™
Press
Settings
the
Photographed
of
Power
the
Power
Multi
Shoulder
Continuously
Outlet
Shutter
Image
On/Off
Images
Strap
Pictures
Button
(Zoom
(Burst
Playback)
Photography)
Taking
Erasing
Button
Photographs
Folders
and
(All
LCD
Images
Continuously
Monitor
in
aImages
Folder/All
(Burst
Display
Photography)
Folders)
(In
Playback
(continued)
(continued)
Mode)
Definitions
Separately
of
the
Accessories
Color
of
the
Viewfinder
LED
Taking
and
Playing
Back
Photographs
on
aMode
TV
(continued)
Changing
the
Preset
Conditions
(RECORDING
MENU)
(continued)
Exposure
Compensation
in
the
Shutter
(continued)
Speed-priority
(continued)
About
Basic
Settings
SmartMedia™
in
(Sold
the
mode)
Aperture-priority
(continued)
Mode
(continued)
LCD
Monitor
Display
(during
photography)
(continued)
Manual
Settings
(continued)
Playing
Photography
Installing
Back
Movies
batteries
(Auto
Photography)
(continued)
(continued)
(continued)
Names
of
Parts
(continued)
Getting
Ready
The shutter
camerabutton
automatically
adjusts the
shutter
and
the aperture
value
according
to the
brightness
of an
can be pressed
down
in twospeed
stages:
halfway
down and
fully
down. When
pressed
halfway
down,
This
“SmartMedia™”
Set
Play
Automatically
The
the
following
mode
shoulder
menu
back
size
photographed
is(number
used
for
items
strap
plays
setting
isadapter
for
athe
is
are
back
storage
of
taking
handy
also
the
pixels)
still
the
basic
available
subjects
for
medium
images
16
and
carrying
images
settings
quality
one
for
that
as
saving
separately
your
image
to
require
(compression
be
camera
used
images
atseveral
a
sold
for
around.
inthat
photography
items.
ratio)
seconds
the
you
multi
of
have
the
photography
to image
photograph
in
photographed.
to
[ pause
be
mode
],photographed.
such
[be
Even
in
asquick
]for
firework
or
if Europe,
the
[You
succession.
camera’s
displays
] photography
power
at the
Enlarges
selected
portions
of
images
being
played
back
at
two
levels.
Images
can
displayed
enlarged
when
In
You
this
can
color
mode,
manually
of
the
photographs
viewfinder
adjust
settings
are
LED
taken
indicates
such
continuously
asphotographed
the
exposure
state
atof
control,
atime.
the
maximum
camera.
white
speed
balance,
The
ofthe
0.8
metering
second
system,
intervals.
continuous
This
item
switches
display
on
the
LCD
monitor
when
playing
back
photographed
images.
can
switch
If
you
the
AC
(sold
separately:
PDR-ACM1A
for
the
US/Canada,
PDR-ACM1E
PDR-ACM1U
During
stopping
During
Mode
Effective
dial
Subjects
and
Set
Values
During
playback
TM
Press
.of
aperture
value.
SYSTEM
Turning
Exposure
ISO
OSD
In
[prevent
[use
LANGUAGE
the
]the
INFO.
mode
control
(EXP.)
On
Close
the
SmartMedia™
cover.
Slide
the
SmartMedia
cover
release
knob
in
the
Take
photographs
or
or
battery
to
to
select
or
play
[that
the
slide
]them
or
shutter
it
[ the
back.
,]will
and
speed.
and
lock
press
Look
Use
through
to
select
the
[adjust
viewfinder
]use
and
press
to
compose
ENTER.
the
picture.
To
continue
erasing
images,
repeat
the
above
procedure
2.
.is
AF
(auto-focus)
and
AE
(auto
exposure)
are
set.
When
pressed
fully
down,
the
camera
takes
aspace
picture.
object.
This
mode
enables
carefree
photographing
similarly
to
selecting
[stable
]photographs.
in
[ from
]settings”,
mode.
Itrepeatedly
is
to
night.
To
is
Change
modes.
turned
When
the
OFF,
your
setting
using
the
camera
images
this
according
mode,
from
saved
dropping
be
to
sure
how
on
the
the
to
during
SmartMedia™
image
a(size,
photography,
tripod
is
to
to
be
keep
used
not
hang
the
and
be
camera
erased.
the
the
shoulder
remaining
SmartMedia™
strap
and
amount
prevent
around
can
ofstep
your
distortion
be
neck.
inpossible
the
of
images.
Relationship
between
your
camera
and
accessories
Connecting
tocalled
Other
Devices
(page
123)
being
played
back
one
image
at
acover,
time.
The
meaning
maximum
of
number
LED
color
of
photographs
differ
according
can
to
be
taken
mode
continuously
dial
setting.
three
photography
mode,
and
take
photographs
at
these
settings.
These
are
“Manual
which
are
saved
display
to
show
aPower
list
detailed
information
compression
ratio,
shutter
speed,
aperture,
etc.)
or
you
can
for
the
UK)
in
a
room
with
amay
power
outlet,
you
can
take
photographs
for
an
extended
period
of
time.
This
also
Item
QUALITY
Options
Notes
SmartMedia™
VIDEOon
OUT
White Balance (W.B.)
Write
Protection
Removing
the Batteries
ISO
[ POWER
]
AUTO
OFF
Setting items
Turning
the
Power
Off
Using
the
LCD
Monitor
Additional
Information
Other
Applications
Handy
Functions
Erasing
Images
Playing
Back Images
Taking
Photographs
Tab menu
feed
Positive
(+)
Compensation
The
tab
is
displayed.
setting
isbattery
as
follows:
Make
sure
that
the
issystem
firmly
closed.
Details
image
ofmenu
operation
isrange
saved
are
or
erased,
the
same
and
as
the
taking
camera
photographs
is
then
ready
and
to
playing
take
photographs.
them
back
onon
the
LCD After
monitor.
If
you
use
the
viewfinder
to
take
photographs,
the
photography
Set
the
mode
dial
to
[cover
].settings
direction
of
the
arrow
to
open
cover
.1-frame
ENTER.
change
the
white
and
the
metering
in(the
program
mode.
erased
SmartMedia™.
and
reused.
For
details
on
these
accessories,
refer
to
the
Instruction
Manual
for
the
accessory
you
are
using.
(information
Movies
images
in
the
multi
mode
Page
cannot
be
displayed
using
the
zoom
playback
Images
even
if the
are
camera
not
recorded
is
turned
directly
off.
SmartMedia™
but
are
stored
within
the
buffer
memory.
display
histograms,
etc.
prevents
failed
photographs
due
to
battery
wear
or
failed
of
data
to
a
PC.
details
handling
the AC
2x-speed
playback
Set
Sets
[•PRG
the
thebalance
whether
color
] photographed
: /or
Photography
mode
language
not
to
and
return
photographic
of
in
menus
the
program
displayed
sensitivity
in
the
(default)
on
SETUP
the
at51)
which
LCD
(temporarily
MENU
Page
monitor.
the
to
image
62)
the
original
is For
to
be
factory
recorded.
settings.
feeds
the
image
•transfer
Each
press
of
Ú
Copying
of
printed
(black
characters
on
white
paper)
set
the
time
(text
114)
F8
/display
F6.8
F5.6
/18.
F4.8
/Page
F4.0
/and
F3.4
/mode
F2.9
How
to
take
photographs
Page
41
1/1000,
1/750,
1/500,
1/350,
1/250,
1/180,
1/125,
1/90,
range
may
differ
from
the
actual
image.
In
this
case,
use
the
LCD
Press
the
shutter
button
down
halfway
.
the
mode
dial
to
[
],
[
]
or
[
].
SmartMedia™
having
the
following
storage
capacity
can
be
used
on
your
camera.
current
as
of
March
2000)
feature.
The
last
cover
recorded
image
opens
frame
image
appears
appears
on
the
on
the
LCD
LCD
monitor.
monitor.
photography
is
finished,
check
the
images
record
the
selected
ones
to
SmartMedia™.
[TIME&DATE,
]
:
Erases
images
in
the
currently
selected
folder
and
folders.
adapter,
beSet
sure
to
read
page
•
2x-speed
playback
is
performed
for
.
Make
that
the
SmartMedia™
is
correctly
loaded.
by one
frame.
Warning:
[•Av
] sure
Noise
:OSD
Photography
increases
LANGUAGE
when
in aperture-priority
will
the not
ISObe
is reset.
changed
mode
to
( higher
Page
settings.
63) (Ú Page 31)
Backlit
portraits
[PROTECTED]
on
the
LCD
monitor,
cancel
the protection
( Page 108) or
remove
How
to
play
back
images
Page
80
1/60,
1/45,
1/30,
1/20,
1/10,
1/8,
1/6,
1/4,
1/3,
1/2,
monitor
for
photography.
AF
(auto-focus)
and
AE
(auto
exposure)
(the
Additional
Information,
[English]
: value
English
(default)
Ú
Pass
Set
the
out
mode
end
steps
of
dial
1the
to
to
shoulder
4[1/15,
either
]].LCD
or
inspeed-priority
[strap
“Photography
through
].
the
in
the
strap
Shutter
speed-priority
Mode”
isdisplayed
held
down.
the
duration
that
2MBCarry
/4MB/8MB/16MB/32MB/64MB/128MB
the
mode
dial
to
[isin
(all
3.3
types)
]•the
adjust
:]When
Erases
the
all
brightness
folders
recorded
of
the
on
monitor
SmartMedia™.
Page
[Set
Ú115
•V
1-frame
feed
is continued
for the
The
aperture
and
the
shutter
speed
corresponding
to(inthat
[•To
Tv
:write-protection
Photography
shutter
mode
Page
65)
bright
scenes
(such
and
highly
reflective
subjects
•the
You
can
also
carry
out
step
8snowfields)
while
verifying
the
image
step
7.
DPOF
(in
Page
102).
Glossary)
start
to
function.
0”7,
1”,
1”5,
2”,
3”,
4”,
6”,
8”,
10”,
15”
•Very
Do
not
remove
orV)
load
the
batteries
or
disconnect
or
connect
the
AC
adapter
while
the camera
is mode.
on. This
]65)
:POWER
Japanese
[value
[NORMAL]
:(3.3
Equivalent
toas
color
ISO100
Carry
Set
Use
out
or
mode
steps
to
dial
select
1
to
to
2[erased,
the
“Manual
].
images
photographed
Settings”
(page
in
58).
the
multi
photography
You can also
connect
the
PC
card
adapter
and
floppy
disk
adapter
(Ú
123)
sold
separately
to transfer
SmartMedia™
Changing
the
LCD
monitor
display
Page
116
The
images
or
folders
are
and
the
camera
returns
toPage
the
is
held
down.
duration
that
are
displayed
on
the
LCD
monitor.
If
the
appropriate
(page
attachment
or
on
in
“Photography
the
camera.
in
the
Full
Manual
Mode”
(page
67).
Press
the
button
to
turn
the
power
on.
full
manual
mode
(
Page
67)
[
M
]
:
Photography
in
Press
the
MENU
button.
•[2X]
Shots
predominantly
of
sky
Even
ifreturn
photography
is disconnect
terminated
midway
before
capturing
three
images
bythe
releasing
theAC
shutter
• AF
If
you
take
aup
photograph
after
erasing
an
athis
number
continuing
from
last Ifphotographed
When
or
AE
are
locked,
the
beep
tone
( Page
111)
sounds
and
the
Use
ormade
to
change
the
setting
inimage,
the
menu,
might
the
manual
settings
tosame
their
defaults.
Iftab
happens,
manually
set
conditions
again.
:
High-sensitive
photography
equivalent
to
color
ISO200
(default)
•
Before
you
connect
or
the
AC
adapter,
be
sure
to
turn
the
camera
OFF.
the
adapter
is
Press
the
image
quality
button
to
select
the
preset
combination
cannot
be
set
even
if
the
shutter
speed
is
adjusted
to
images to a
PC.
16MB
(SM-M1600D)/32MB
(SM-M3200D)/64MB
(SM-M6400D)/128M
(SM-M1280D)
The
respective
last
image
mode.
frame
appears
on
LCD
monitor.
You
can
also
select
the
image
by
the
operation
as
for
thumbnail
display
(
Page
83).
Carry
out
steps
1
to
on
page
109.
When
the
camera
is
turned
on,
set
the
mode
dial
to
thethe
desired
The
shutter
speed
and
the
aperture
value
corresponding
todisplay
the
Reverse
playback,
2x-speed
playback
All
descriptions
inor
this
Instruction
Manual
are
for
when
language
is set
to [ENGLISH].
Press
or
to
select
the
image.
button,
images
already
photographed
can
be
saved
and
erased
by playback
the
method.
image
is
assigned
as
image
number.
Negative
(–)
Compensation
The
viewfinder
RECORDING
LED
turns
MENU
green.
is2
displayed.
•press
The
image
the
photograph
is
taken
is
slightly
less
clear
than
images.
(This
is 109,
connected
disconnected
with
the
power
ON,
camera
settings
may
beabove
reset
(SET-UP
Ú Page
and
ENTER.
:before
High-sensitive
photography
equivalent
to
color
ISO400
its
limit,
the
shutter
speed
isthe
displayed
inthe
red.
Reverse
1-frame
feed
To [4X]
cancel
erasing
of
image
data,
select
[monitor.
]Photography,
and
press
ENTER.
quality
and
size,
while
viewing
indication
on
the
starts
a
reverse
•
The
press
of
mode.
shutter
speed
are
displayed
on
the
LCD
If
the
appropriate
The
length
of
time
to
capture
images
varies
according
to
the
photographic
conditions.
•
Images
can
also
be
erased
in
the
thumbnail
mode.
In
this
case,
the
camera
enters
the
single
frame
Select
[SYSTEM
INFO.]
on
the
SETUP
MENU
and
because
television
displays
images
at
a
lower
resolution.)
•
Spotlit
subjects,
particularly
against
dark
backgrounds
Manual
Settings
Ú(FlashPath)
Page
58)
orPage
the
camera
malfunction.
however,
is
in
this
state.
feeds the
image
•may
Each
press
oftoinbegin
EXP.
].
To
cancel
changing
of
settings,
press
.you
Use
or
todial
select
the
frame
want
to
enlarge.
Press
the
or
Zoom
to
switch
select
[( S/C
].isphotography
21)
towards
“T”
playback.
Floppy
Disk
Adapter
]possible
is
selected,
[NO
IMAGE]
displayed
after
all
folders
When
playback.
Press
Set
mode
in
the
to
[ sure
Tv
mode,
].the
or
press
or
the
shutter
button
fully
Before
photography,
make
that
the
lens
cap
has
been
combination
cannot
be
set
even
ifflash
aperture
isin.black
adjusted
to its
playback)
mode,
and
enters
the
thumbnail
playback mode after the image is erased.
status
display.
]or
mode:
In
[[playback
Press
the
display/info
button.
Self-timer
photography
and]down
are
not
possible.
•the
The
display
unit
varies
according
to
the
output
system.
•theCopying
of (frame
printed
text
(white
characters
on
paper)
.playback
press
reverse
by
one
frame.
This
adapter
allows
SmartMedia™
to
be
used
as
3.5"
floppy
disk.
have
been
erased
(unless
the
SmartMedia™
contains
protected
You
can
also
select
the
image
by
the
same
operation
as
for
thumbnail
playback
( [4X],
PageISO
83).will be
Automatic
begins.
•
Playback
becomes
2x-speed
to
reduce
aperture
size.
Press
to
increase
aperture
size.
Press
camera
takes
a
picture.
The
manual
setting
removed
the
camera.
limit,
aperture
value
isbe
displayed
in
red.
Photography,
however,
the
[Scenes
M
]from
mode
tomenu
set
the
shutter
speed
to simultaneously
0.7
second
During
[2X],
the
ISO
will
automatically
set
between
ISO100
ISO200.
During
set
the
quality
and
size
Page
112
•the
With
the
NTSC
system,
images
can
be
displayed
on theÚ
LCD
monitor
and Ú
TV during
•To
with
low
reflectivity,
such
as
shots
green
or
dark
foliage
Each
press
of
the
display/info
button
switches
the
display
•of1-frame
feed
isand
continued
The
SYSTEM
INFO.
displayed.
reverse
for
the
duration
This
adapter
isplayback
inserted
into
the],
floppy
your
PC,
allowing for the
images).
The
viewfinder
LED
turns
redis
image
data
being
recorded
onto
Insert
the
adapter
connector
plug
into
the
DC
IN
values
are
displayed
In
the
photography
modes
([while
[and ISO400.
]disk
oris
[ drive
]),on
the
lens
photography
and
playback.
is
possible
inAC
this
state.
automatically
set
between
ISO100
is
held
down.
format
as
follows:
duration
that
Note:
The
larger
the
F
value,
the
smaller
the
aperture
size
become
or
longer.
•Press
Remove
and
insert
SmartMedia™
with
the
camera’s
power
turned
off.Aperture value
is
held
down.
that
To
quit
the
SETUP
MENU,
change
the
mode
dial
setting.
Shutter
speed
Adjust
the
zoom
ratio
by
the
Zoom
switch.
(Zoom
to
display
option
menu,
press
or
to
images
recorded
on
the
SmartMedia™
to
be
transferred
to
the
PC.
the
SmartMedia™.
Sets
video
output
system
according
to
country
in
which
your camera
is used.
on
the
left
ofthe
the
LCD
Press
the
shutter
button
down
halfway
and
press
5V
terminal
on
the
camera.
extends
from
the
camera
body.
•the
PAL
system,
images
cannot
bethe
displayed
When a cable
is connected, only
and
versa.
the
image
quality
button
switches
the
quality
and
size
Gently
insert
the
SmartMedia™
as
far
as
it, simultaneously.
can
go
[Pressing
]vice
isWith
displayed
on
the
LCD
monitor.
Viewfinder
LED
•select
Recorded
data
may
bepress
erased
(destroyed)
in
the
situations
listed
below. Note that Toshiba
White
Balance
Additional
Information,
Glossary
to
increase
shutter
speed.
Pressand
to
decrease
shutter
speed.
Press
Press
or
to
move
forward
reverse.
PRG
]
and
ENTER.
]
and
press
ENTER.
[
switch
Page
21)
TV
display
is
available.
monitor
screen.
When
the
camera
is
turned
on,
the
Auto
Power
OFF
function
Canceling
pause
IMPORTANT
settings
infully
the
following
order.
it
down
. system
Press
or
to
select
the
item
you
desired
toMeaning
set,
Pause
with
the
SmartMedia™
electrodes
(metal
contacts)
Additional
Information,
Glossary)
[NTSC]
:allNTSC
(white
Corporation
accepts
no
whatsoever
for
the
loss
of recorded
data enters
in these
•Adapter
When
images
in
a responsibility
folder
are
erased,
that
folder
itself
is
also(destruction)
erased.
The
camera
determines
the
balance
by
averaging
the
various
kinds playback
of light
that actually
AC
to
to
next
frame/
to“T”
go
back
one
To
prevent
valuable
data
being
erased,
attach
the
write•••advance
With
the
PAL
images
are
played
back
with
apressing
black
frame
•frame
After
pause
is
cancelled,
the
switch
to
the
will
the
image.
Pressing
ENTER
the
setting.
or
,, SmartMedia™
and
manual
Exposure
compensation
Page
69)
using
Colorthe
When
[Zoom
M
]selects
isissystem,
selected
on
the
[ halfway
EXP.
]remove
option
menu,
orsurrounded.
the
shutter
speed
setting
becomes
operational.
State
Never
open
the
SmartMedia™
cover
orenlarge
the
while
anmakes
is
being
recorded.
This
or
and
manual
setting
(image
Page
58)
or
film
speed
Exposure
compensation
((from
Page
69)
using
Play
back
Reverse
procedure
“Loading
the
Batteries”
and
remove
the
batteries.
•facing
Pressing
the
shutter
button
down
adjusts
the
exposure,
• Playback
paused.
[PAL]
:for
PAL
system
( camera.
Additional
Information,
Glossary)
situations:
the
lens.
This
setting
allows
you
to
set
in
advance
the
white
balance
when
taking
photographs
under
and
press
ENTER.
the
rear
of
the
For
the
US/Canada:
PDR-ACM1A
Holding
down
or
moves
forward
or
reverse
continuously.
resumes
at
the
last
state
that
was
protect
sticker
at
the
write-protect
area.
Data
can
no
longer
be
may
corrupt
the
data
on
the
SmartMedia™
or
damage
the
SmartMedia™
itself.
possible,
but
does
not
make
the
exposure
compensation
possible. However the exposure value
is
To
return
normal
press
the
Zoom
switch
towards
setting
Page
58)magnification,
or film
speed
setting
( the
Page
78)
using
ENTER
Pass
the
shoulder
strap
through
loop
and
pull.
setting
(( toPage
78)
using
ENTER
are
also
possible.
and
pressing
the
shutter
button
fully
takes
the
shot.
TM[ is down
When
the
SmartMedia™
used
incorrectly
by
the
user
or
a
third
party
[
],
]
or
[
]
AE
or
AF
are
locked
with
the
shutter
button
held
half
specific
lighting
conditions.
For
Europe:
PDR-ACM1E
active
before
the
pause.
Firmly
insert
the
SmartMedia
as
far
as
it
can
go.
displayed
on is
the
LCD
monitor.
Press
ENTER.
recorded
or setting
erased
from
SmartMedia™.
Toon
write
oraterase
data
from is to be recorded.
Sets
the
color
mode
and
photographic
sensitivity
which
the
image
“W”.
are
also
possible.
The
default
different
depending
the
destination
country/area.
Use
or
to
select
the
desired
item
Press
ENTER,
nine
images
are
displayed
simultaneously.
•[FIRMWARE
If
you
shoot
a
still
picture,
when
preview
is
set
to
ON
(
Page
77),
down.
If
no
operation
is
carried
out
for
a
fixed
amount
of
time
(default:
about
one
minute),
power
ON
When
the
SmartMedia™
is
exposed
to
static
electricity
or
electrical
noise
Memo
Ú
Forimage
the Noise
UK:is
PDR-ACM1U
VER.]
:off
Displays
the
firmware
version
ofto
this
camera.
Stop
SmartMedia™,
peel
the
sticker.
camera
ready
to
take
photographs.
Warning:
increases
when
the
ISO
is
changed
higher
settings.
displayed
and
a
white
frame
and
green
Green The
Compose
picture,
press
the
shutter
button
down
halfway,
and
press
it
down
[the
AW
] no is
:the
Automatic
adjustment
(default)
Thumbnail
Display
Page
83
recorded
image
is
displayed
on
for
about
two
]specifications
Standby
mode
[enlarged,
••-For
If
operation
is
carried
out
a screen
fixed
amount
offrom
time
(default:
about
1shutter
minute),
thewear.
power
is
turned
TM
consumption
is
set
to
its
minimum
state
(power
almost
off)that
to
prevent
battery
This
is
.in
and
press
When
the
SmartMedia™
isfor
removed
ordarkens
the
camera
isPage
turned
off
while
recording
erasing
The
image
the
LCD
monitor
sometimes
the
time
the
button
isdata,
pressed
down
details,
refer
to
the
of
AC
information.
adapter
127.
[CARD
INFO.]
: on
Displays
the
SmartMedia
Playback
returns
to
the
start
ofturned
the
movie.
frame
are
displayed
the
LCD
monitor.
]
:
Photography
outdoors
[
Default
setting:
seconds.
off
to
preserve
battery
life.
This
is
called
“Auto
Power
OFF”.
To
return
to
the
normal
state,
press
the
fully.
Page
40
called
the
Auto
Power
OFF.
This
setting
allows
you
to
set
the
time
when
the
camera
turns
off
halfway
until
the
image
becomes
focused.
[NORMAL]
: picture,
Equivalent
to
ISO100
(default)
data,
frame
advance
when
images
aredefaults.
played
back or during
formatting alarm
of the
The
options
are
displayed.
Stop
[RESET]
: Returns
settings
to
Flashing
[ the
],
[ color
]conditions
or their
[shutter
]being
Self-timer
in frame
operation
at a handshake
.
Compose
the
press
the
button
down
halfway,
and
press
it
down
The
white
frame
indicates
entire
image,
while
the
green
[
]
:
Photography
in
cloudy
POWER
button
again.
ENTERCompose
•
The
viewfinder
LED
turns
red
while
image
data
is
being
recorded
the
picture,
press
the
shutter
button
down
halfway,
and
press
it
down
• The
To
set
the
focus
orpicture.
exposure
forphotography
a subject
outside
the
center
the intended
theincamera
directly
The
camera
takes
the
automatically.
This
function
isthrough
not
activated
during
automatic
playback
( image,
Pagepoint
85) or
the [ only>
] PC
[2X]
:appearing
High-sensitive
equivalent
toofcolor
ISO200
SmartMedia™.
Note:
image
the
lens
will
be
The
display
returns
to<Histogram>
thumbnail
playback.
<Standard>
<Detailed
information>
<Image
shows
the
location
of
the
currently
enlarged
area.
halfway,
and
press
it
down
fully.
Page
40
]
:
Photography
in
bluish
fluorescent
light
[
fully.
Page
40
Setting
1
:
About
the
Auto
Power
(FULL
OFF
Function
)
Ú
Additional
Information,
“AUTO
POWER
OFF
(page
110)”
+
at
the
subject
or
desired
exposure
(lighting),
press
and
hold
the
shutter
button
halfway.
Now,
with
the
shutter
onto
the
SmartMedia™.
ON]
Writing
to SmartMedia™
in progress
mode.
Press
ENTER.
[4X]
:adapter
High-sensitive
photography
equivalent
toanother
color
ISO400
•Insert
We
recommend
copying
and
saving
important
datapower
onto
storage
medium (floppy disk, hard
displayed
for
[LCD
].[Power
fully.
Page
40
the
AC
power
plug
into
the
Pressing the
The
default
size
and
quality
of
the
image
can
be
reset
to
the
desired
combination.
Press
ENTER.
button
still
held
halfway
down,
you
can
turn
the
direction
of
the
camera
and
frame
your
image
with
the
focus
•
It
is
possible
to
play
back
any
images
in
any
folders
by
pressing
or
during
playback.
(For
details
ON
Increases
the
volume.
[ return
] MO
: Photography
inafter
reddish
fluorescent
light
The
camera
takes
the
picture.
Photographs
can
be
taken,
however,
do not
turn thepress
power
OFF.
To
to disk,
the
normal
state
theset
Auto
Power
OFF
has been
executed,
the
POWER
button
etc.).
The
PREVIEW
manual
setting
Page
items
77
are
displayed.
camera
takes
the
atmonitor.
the
exposure
time.
Zoom switch
to disk,
“T”
Current
Entireofimage
and
locked.
Press
the
button
down
fully
to in
complete
capturing
the image.
Red outlet.
[In
on picture
the
LCD
The
camera
is ready
for
burst
photography.
of2displayed
folder
Page
92)
]:the
mode:
the
Accessing
of
SmartMedia™
[ (HALF
Photography
in] is
incandescent
light
[Never
Setting
: exposure
•]][is
When
shutter
speed
setshutter
to
a)turn
speed
of
0.7 second
orprogress
slower,
photographs
taken
as extended
to
turn
the
power
on 77
again.
•During
remove
the
SmartMedia™
or
the
camera
offresult
while
recording
data or are
while
erasing
data
COLOR
Page
the
exposure,
the
viewfinder
LED
turns
orange.
position
Pressing the
•
Moving
the
camera
as
you
press
the
shutter
button
will
in
a
blurred
image.
Use
,
,
or
to
select
the
area
to
enlarge.
the
last
image
displays
the
first
image,
and
pressing
atwill
thebe
firstautomatically
image
displays
the
Pressing
During
[2X],
the
ISO
be
automatically
set
to
ISO200.
During
[4X],ofISO
setof
exposures
( at Page
68).
IfCarry
burst
photography
is to
set
the
shutter
speed
is setthe
to volume.
athe
speed
0.7
second
or more
in the
[ to
Tv ]
Decreases
out
steps
1will
2when
in
Photographic
(SmartMedia™
formatting).
actions
might
damage
ISO
Page
78
Flashing
ItClose
about
twice
the
time
to complete
taking
the
photograph
duePDR-M81
to processing
ofenlargement
the
captured
[set
],These
[“Basic
] When
the
image
is not
in SmartMedia™.
focus.
the
SmartMedia™
cover.
Zoom switch to
“W”
•
The
PDR-M81
usesto
accurate
focus
mechanism.
However,
the
have
difficulty
last
image.
Adjust
the
display
area
enlarge
viewing
theto
white
and
[1takes
MINUTE]
(default)
ISO400.
• In
AEB
photography
(an
Page
71)while
orauto
burst
photography,
the shutter
speed
cannot be setmay
to 0.7
second
or longer.
Setting
3
:
(SMALL
)
mode,
the
shutter
speed
is
automatically
changed
1/2
second.
•image.
Use
only
the
SmartMedia™
specified
for
use
with
the
PDR-M81.
The
use
of
other
SmartMedia™
SHARPNESS
Page
79
mode)”
(page
109).
Select
[QUALITY]
Settings
(
focusing
or
not
be
able
to
focus
at
all
for
subjects
and
situations
such
as
the
following:
Before
you
use
aother
new
SmartMedia™
the
first during
time,
be
sure
tothe increased
Images
can
bevalue
rotated
by] pressing
playback.
Ú isspeed
Difference
between
[PRG]
and
[ for
] or
green
frames.
[2 MINUTES]
the
aperture
is
to
F2.9
(maximum
aperture
size),
shutter
speed
restricted
•••Ú
If
a
mode
than
[ set
suppressed
flash
mode
is
set
inthe
flash
photography,
thedark
shutter
is
•79
Processing
image
- When
subject
is distant and
- SmartMedia™
Subjects
moving
at
high
speed
could
damage
the
camera.
CONTRAST
Page
• to
The
write
protection
may
not
function
if in
write-protect
sticker
becomes
Use
a soft
dry cloth to
.thesecond.
on
the
SETUP
MENU
and
press
format
the
(Ú
Page
91).
an
image
counterclockwise,
and
pressing
rotates
clockwise.
Pressing
1/750
PDR-ACM1A
] •are
the
same
as
to
PDR-ACM1E
PDR-ACM1U
[PRG]
and
[ rotates
limited
tosecond.
between
1/2
second
and
1/250
* The
aboveitdirty.
menu
is
the
RECORDING
[3 MINUTES]
Charging
of
flash
progress
ON
Continuous
photography
When
there
are
objects
in
front
of
or
behind
the
subject
Very
shiny
subjects
such
as
a
mirror
or
car
body
SmartMedia™
is
aofisprecision
device.
Do do
notnot
bend,
drop,
or subject
SmartMedia™
to
DIGITAL
ZOOM
Page
• wipe
When
the
camera
isOnce
not79
inelectronic
be sure
to attach
the
lens
cap
provided
with[your
camera.
the
POWER
button
to
turn
the
power
off.
away
any
dirt.
ause,
sticker
ispress
peeled
off,
reuse
it.
Orange•Press
The
QUALITY
menu
displayed.
combinations
the
automatically
mode.
MENU
inthe
•the
The
aperture
value
set
differ
to
the
actual
value
according
to
the
position
ofUK)
theorzoom
lens.
To
to
the
regular
display,
ENTER.
(Photos
cannot
be
taken
at
this
moment.)
(forreturn
US
and
Canada)
If the
shutter
speed
is
set
to
1/350
second
or
less,
the
shutter
as
speed
an
animal
is
automatically
athe
cage
a]changed
person
in front
to 1/250
of a tree)
(for
European
Continent)
(for
Get
ready
to
take
the
photograph.
- above
Extremely
low
contrast
subjects
When
the
settings
are
made,
they
are
displayed
in(such
the
following
order.
Exposure
Compensation
excessive
shocks.
Also,
do
not
carry
SmartMedia™
the
pocket
ofx[trousers.
This
might
The
lens
cap
can
also
be
attached
to
attachment
following
the
above
steps
to prevent
it’sthe
LCD
79
The
power
turns
off.
Memo
determined
shutter
speeds
and
aperture
-in Subjects
with
little
reflection,
such
as
hair
fur mode.
•• The
size
displayed
on
the
LCD
monitor
FULL
(320
240)
HALF
(160
xorsubject
120).
The
]becomes
forced
flash
mode
or
]orred-eye
forced
flash
second
ifPage
the
flash
setting
is25)
changed
tothe
thestrap
[ AEB
- image
Subjects
that
have
low contrast
and
merge
into
Loading
the
batteries
(
Page
and
the
SmartMedia™
(
Page
31)
into
the
camera.
being
lost.
• Flash
photography
and
burst
photography
are
not
possible.
Flashing
SmartMedia™
to
excessive
force
when
you
sit
down,
damaging
the
SmartMedia™.
Hardware
malfunction
Subjects
with
no
solidity,
such
as
smoke
or
flames
the
background
(such
as
white
walls
or
subjects
Attach
the
lens
cap
when
you
are
not
using
the
camera.
values.
However,
their
operation
capability
movies
made
in
FULL
size
is
displayed
on
the
entire
LCD
monitor,
and
those
made
in
HALF
size
is
If
the
[
]
forced
flash
or
[
]
red-eye
forced
flash
mode
is
set
in
flash
photography
when
the
•
In
movie
mode,
ISO
will
be
automatically
set
between
ISO100
and
ISO400
regardless
of
its
setting.
* •Use
Histogram
metering
dressed
inthe
theSmartMedia™
same
color
as
thelens
background)
-attach
Subjects
viewed
through
glass
Turn
offor
the
power
tothe
retract
the
unit,
and Spot
then
the
lens
cap.
The
image
taken
in
exposure
photography
mode
may
be
blurred.
or
to
select
the
desired
setting
from
the
tab
menu
, and
press
Do•not
use
store
in
environments
likely
to
be
affected
byisstatic
electricity
or
is
different
as
shown
in
the
right
table.
displayed
in
center
ofspeed
the
screen.
shutter
speed
is
set
to
a
of
0.7
second
or
more,
the
shutter
speed
automatically
changed
to
Press
POWER
button
tothe
turn
power
on.
A electrical
histogram
isturn
a graphic
representation
ofthe
theistones
of the
subject.
The horizontal
histogram
White
balance
• Do
If the
the
image
cannot
be
focused,
thelens
focus
automatically
fixedsetting
to infinity.
(When theaxis
flashofisthe
necessary
not
the
power
on
with
cap
attached.
noise.
1/2
second.
ENTER.
*the
The
above
AC adapter
is US/Canada
Turning
the
Power
On
Page
38
shows
the
brightness
(increasing
brightness
from
left
to
right)
and
vertical
axis
shows
the
number
at
this
time,
it
is
simultaneously
fixed
to
illuminate
objects
1.5
meters
(five
feet)
away.
During
macro
•This
Dosaves
use
orsettings,
store
SmartMedia™
very
hot,
humid
oraperture
corrosive
If the
shutter
speed
value
isimages,
set toin1/1000
second,
the
value
is limited
to
F8type
andAC
F3.4.
•• not
When
playing
back
movie
switching
isthe
between
standard
and
image
only.
(O
:environments.
possible
Xbetween
: not
the
and
returns
to
RECORDING
MENU.
type.
European
andpossible)
UK
photography,
the flash
islevel.
alignedthe
withdisplay
the wide
position.)
of pixels
at each brightness
Downloaded From
camera-usermanual.com
adapters differ in shape.
--110
20 -40
80
88
Changing the Preset Conditions (RECORDING MENU) (continued)
Sets the sharpness at which the image is to be recorded.
: Normal sharpness (default)
: Soft effect
: Hard effect
CONTRAST
[NORMAL]
[STRONG]
[SOFT]
: Automatic (standard) setting (default)
: Strong contrast
: Soft contrast
Erasing
Images
DIGITAL ZOOM
LCD
[–5] to [+5]
☞ To adjust the brightness of the LCD monitor ➲ Page 115
Downloaded From camera-usermanual.com
- 79 -
Additional
Information
Adjusts the brightness of the LCD monitor. This adjustment does not adjust the brightness of the image
to be recorded.
Other
Applications
: Enables digital zoom photography. (default)
: Disables digital zoom photography.
Handy
Functions
Enlarges the center of the screen and takes photographs with apparent effect that the focal distance is
set to twice the distance.
☞ Zoom Photography ➲ Page 52
[ON]
[OFF]
Playing
Back Images
Sets the contrast of the image to be photographed.
Taking
Photographs
[NORMAL]
[SOFT]
[HARD]
Getting
Ready
SHARPNESS
Changing
the
Preset
Conditions
(RECORDING
MENU)
Photography
in
the
Program
Mode
Setting
Names
Playing
Back
the
of
Photographed
Parts
Image
Size
and
Quality
(Single-Frame
Playback)
Extended
Exposure
Photography
(Bulb
Photography)
Erasing
Images
(Erase
Frame)
(continued)
Manual
Attaching
Using
How
Taking
Enlarging
Playback
About
Turning
to
Photographs
the
SmartMedia™
Press
Settings
the
Photographed
of
Power
the
Power
Multi
Shoulder
Continuously
Outlet
Shutter
Image
On/Off
Images
Strap
Pictures
Button
(Zoom
(Burst
Playback)
Photography)
Taking
Erasing
Button
Photographs
Folders
and
(All
LCD
Images
Continuously
Monitor
in
aImages
Folder/All
(Burst
Display
Photography)
Folders)
(In
Playback
(continued)
(continued)
Mode)
Definitions
Separately
of
the
Accessories
Color
of
the
Viewfinder
LED
Taking
and
Playing
Back
Photographs
on
aMode
TV
(continued)
Changing
the
Preset
Conditions
(RECORDING
MENU)
(continued)
Exposure
Compensation
in
the
Shutter
(continued)
Speed-priority
(continued)
About
Basic
Settings
SmartMedia™
in
(Sold
the
mode)
Aperture-priority
(continued)
Mode
(continued)
LCD
Monitor
Display
(during
photography)
(continued)
Manual
Settings
(continued)
Playing
Photography
Installing
Back
Movies
batteries
(Auto
Photography)
(continued)
(continued)
(continued)
Names
of
Parts
(continued)
Getting
Ready
The shutter
camerabutton
automatically
adjusts the
shutter
and
the aperture
value
according
to the
brightness
of an
can be pressed
down
in twospeed
stages:
halfway
down and
fully
down. When
pressed
halfway
down,
This
“SmartMedia™”
Set
Play
Automatically
The
the
following
mode
shoulder
menu
back
size
photographed
is(number
used
for
items
strap
plays
setting
isadapter
for
athe
is
are
back
storage
of
taking
handy
also
the
pixels)
still
the
basic
available
subjects
for
medium
images
16
and
carrying
images
settings
quality
one
for
that
as
saving
separately
your
image
to
require
(compression
be
camera
used
images
atseveral
a
sold
for
around.
inthat
photography
items.
ratio)
seconds
the
you
multi
of
have
the
photography
to image
photograph
in
photographed.
to
[ second
be
mode
],photographed.
such
[be
Even
in
asquick
]for
firework
or
if Europe,
the
[You
succession.
camera’s
displays
] photography
power
at the
Enlarges
selected
portions
of
images
being
played
back
at
two
levels.
Images
can
displayed
enlarged
when
In
You
this
can
color
mode,
manually
of
the
photographs
viewfinder
adjust
settings
are
LED
taken
indicates
such
continuously
asphotographed
the
exposure
state
atof
control,
atime.
the
maximum
camera.
white
speed
balance,
The
ofthe
0.8
metering
system,
intervals.
continuous
This
item
switches
display
on
the
LCD
monitor
when
playing
back
photographed
images.
can
switch
If
you
the
AC
(sold
separately:
PDR-ACM1A
for
the
US/Canada,
PDR-ACM1E
PDR-ACM1U
Mode
Effective
dial
Subjects
and
Set
Values
TM
Viewfinder
LED
Press
.of
aperture
value.
SYSTEM
Turning
Exposure
ISO
OSD
In
[prevent
[use
LANGUAGE
the
]the
INFO.
mode
control
(EXP.)
On
Close
the
SmartMedia™
cover.
Slide
the
SmartMedia
cover
release
knob
in
the
Take
photographs
or
or
battery
to
to
select
or
play
[that
the
slide
]them
or
shutter
it
[ the
back.
,]will
and
speed.
and
lock
press
Look
Use
through
to
select
the
[adjust
viewfinder
]use
and
press
to
compose
ENTER.
the
picture.
To
continue
erasing
images,
repeat
the
above
procedure
2.
.is
AF
(auto-focus)
and
AE
(auto
exposure)
are
set.
When
pressed
fully
down,
the
camera
takes
aspace
picture.
object.
This
mode
enables
carefree
photographing
similarly
to
selecting
[stable
]photographs.
in
[ from
]settings”,
mode.
Itrepeatedly
is
to
night.
To
is
Change
modes.
turned
When
the
OFF,
your
setting
using
the
camera
images
this
according
mode,
from
saved
dropping
be
to
sure
how
on
the
the
to
during
SmartMedia™
image
a(size,
photography,
tripod
is
to
to
be
keep
used
not
hang
the
and
be
camera
erased.
the
the
shoulder
remaining
SmartMedia™
strap
and
amount
prevent
around
can
ofstep
your
distortion
be
neck.
inpossible
the
of
images.
Relationship
between
your
camera
and
accessories
Connecting
tocalled
Other
Devices
(page
123)
being
played
back
one
image
at
acover,
time.
The
meaning
maximum
of
number
LED
color
of
photographs
differ
according
can
to
be
taken
mode
continuously
dial
setting.
three
photography
mode,
and
take
photographs
at
these
settings.
These
are
“Manual
which
are
saved
display
to
show
aPower
list
detailed
information
compression
ratio,
shutter
speed,
aperture,
etc.)
or
you
can
for
the
UK)
in
a
room
with
amay
power
outlet,
you
can
take
photographs
for
an
extended
period
of
time.
This
also
☞
➲
Item
QUALITY
Options
Notes
SmartMedia™
VIDEOon
OUT
White Balance (W.B.)
Write
Protection
Removing
the Batteries
ISO
[ POWER
]
AUTO
OFF
Setting items
Turning
the
Power
Off
Using
the
LCD
Monitor
Additional
Information
Other
Applications
Handy
Functions
Erasing
Images
Playing
Back Images
Taking
Photographs
Tab menu
lThe
tab
is
displayed.
setting
isbattery
as
follows:
Make
sure
that
the
issystem
firmly
closed.
Details
image
ofmenu
operation
isrange
saved
are
or
erased,
the
same
and
as
the
taking
camera
photographs
is
then
ready
and
to
playing
take
photographs.
them
back
onon
the
LCD After
monitor.
If
you
use
the
viewfinder
to
take
photographs,
the
photography
Set
the
mode
dial
to
[cover
].settings
direction
of
the
arrow
to
open
cover
.the
ENTER.
change
the
white
and
the
metering
in(the
program
mode.
erased
SmartMedia™.
and
reused.
For
details
on
these
accessories,
refer
to
the
Instruction
Manual
for
the
accessory
you
are
using.
(information
Movies
images
photographed
in
the
multi
mode
Page
cannot
be
displayed
using
the
zoom
playback
Images
even
if the
are
camera
not
recorded
is
turned
directly
off.
SmartMedia™
but
are
stored
temporarily
within
the
buffer
memory.
display
histograms,
etc.
prevents
failed
photographs
due
to
battery
wear
or
failed
of
data
to
a
PC.
details
handling
the AC
➲
Set
Sets
the
thebalance
whether
color
: /or
Photography
mode
language
not
to
and
return
photographic
of
in
menus
the
program
displayed
sensitivity
in
the
(default)
on
SETUP
the
at51)
which
LCD
(Ú
MENU
Page
monitor.
to
image
62)
the
original
is For
to
be
factory
recorded.
settings.
feeds
the
image
•transfer
Each
press
of
•Memo
Copying
of
printed
text
(black
on
white
paper)
set
the
time
(➲
114)
F8
/display
F6.8
F5.6
/18.
F4.8
/Page
/and
F3.4
/mode
F2.9
How
to
take
photographs
Page
41
1/1000,
1/750,
1/500,
1/350,
1/250,
1/180,
1/125,
range
may
differ
from
the
actual
image.
InLCD
this
case,
use
the
LCD
Press
the
shutter
button
down
halfway
.1/90,
Set
the
mode
dial
to
[ F4.0
],
[characters
]reset.
or
[selected
].higher
SmartMedia™
having
the
following
storage
capacity
can
be
on
your
current
as
of
March
2000)
feature.
The
last
cover
recorded
image
opens
frame
image
appears
appears
on
the
on
the
LCD
monitor.
monitor.
photography
is
finished,
check
the
images
record
the
ones
tocamera.
SmartMedia™.
[TIME&DATE,
]
:
Erases
images
in
the
selected
folder
and
folders.
adapter,
be☞
sure
to
read
page
•
2x-speed
playback
is➲
performed
Make
sure
that
the
SmartMedia™
is
correctly
loaded.
(
Page
31)
byused
one
frame.
Warning:
Noise
:OSD
Photography
increases
LANGUAGE
when
incurrently
aperture-priority
will
the
not
ISO
be
is for
changed
mode
to
(Ú
Page
settings.
63)
•
Backlit
portraits
[PROTECTED]
on
the
LCD
monitor,
cancel
the protection
(➲ Page 108) or
remove
How
to
play
back
images
Page
80
1/60,
1/45,
1/30,
1/20,
1/10,
1/8,
1/6,
1/4,
1/3, 115
1/2,
monitor
for
photography.
AF
(auto-focus)
and
AE
(auto
exposure)
(Ú
Additional
Information,
: value
English
(default)
➲the
Pass
Set
the
out
mode
end
steps
of
dial
1the
to
to
shoulder
4[1/15,
either
]].LCD
or
inspeed-priority
[strap
“Photography
through
].
the
in
the
strap
Shutter
speed-priority
Mode”
isdisplayed
held
down.
the
duration
that
2MBCarry
/4MB/8MB/16MB/32MB/64MB/128MB
the
mode
dial
to
[isin
(all
3.3
types)
To
]•the
adjust
: When
Erases
the
all
brightness
folders
recorded
of
on
the
monitor
SmartMedia™.
Page
[Set
➲1-frame
☞
•V
feed
is continued
for the
The
aperture
and
the
shutter
speed
corresponding
to(Úthat
:write-protection
Photography
shutter
mode
Page
65)
• 0”7,
bright
scenes
(such
as
and
highly
reflective
subjects
•the
You
can
also
carry
out
step
8snowfields)
while
verifying
the
image
step
7.
DPOF
(in
Page
102).
➲to
Glossary)
start
to
function.
1”,
1”5,
2”,
3”,
4”,
6”,
8”,
10”,
15”
•Very
Do
not
remove
or monitor
load
the
batteries
or
disconnect
or
connect
the
AC
adapter
while
the camera
is mode.
on. This
:POWER
Japanese
:LCD
Equivalent
color
ISO100
Carry
Set
Use
out
or
mode
steps
to
dial
select
1
to
to
2[erased,
the
“Manual
].
images
photographed
Settings”
(page
in
58).
the
multi
photography
You can also
the
PC
card
adapter
and
floppy
disk
adapter
( in
123)
sold
separately
to transfer
●
Changing
the
display
Page
116
Theconnect
images
or
folders
are
and
the
camera
returns
toPage
the
is
held
down.
duration
that
➲
value
are
displayed
on
the
LCD
monitor.
If
the
appropriate
(page
attachment
65)
or
on
in
“Photography
the
camera.
in
the
Full
Manual
Mode”
(page
67).
Press
the
button
to
turn
the
power
on.
full
manual
mode
(Ú
Page
67)
:
Photography
in
Press
the
MENU
button.
• •Shots
predominantly
of
sky
Even
ifreturn
photography
is disconnect
terminated
midway
before
capturing
three
images
bythe
releasing
theAC
shutter
• AF
If
you
take
aup
photograph
after
erasing
an
athis
number
continuing
from
last Ifphotographed
When
or
AE
are
locked,
the
beep
tone
(Ú Page
111)
sounds
and
the
Use
ormade
to
change
the
setting
inimage,
the
menu,
might
the
manual
settings
tosame
their
defaults.
Iftab
happens,
manually
set
conditions
again.
:
High-sensitive
photography
equivalent
to
color
ISO200
(default)
Before
you
connect
or
the
AC
adapter,
be
sure
to
turn
the
camera
OFF.
the
adapter
is
Press
the
image
quality
button
to
select
the
preset
combination
cannot
be
set
even
if
the
shutter
speed
is
adjusted
to
images to a
PC.
16MB
(SM-M1600D)/32MB
(SM-M3200D)/64MB
(SM-M6400D)/128M
(SM-M1280D)
The
respective
last
image
mode.
frame
appears
on
LCD
monitor.
You
can
also
select
the
image
by
the
operation
as
for
thumbnail
display
(
Page
83).
➲
Carry
out
steps
1
to
on
page
109.
When
the
camera
is
turned
on,
set
the
mode
dial
to
thethe
desired
The
shutter
speed
and
the
aperture
value
corresponding
todisplay
the
All
descriptions
inor
this
Instruction
Manual
are
for
when
language
is set
to [ENGLISH].
Press
or
to
select
the
image.
button,
images
already
photographed
can
be
saved
and
erased
by playback
the
method.
image
is
assigned
as
image
number.
lThe
viewfinder
RECORDING
LED
turns
MENU
green.
is2
displayed.
•press
The
image
the
photograph
is
taken
is
slightly
less
clear
than
images.
(This
is 109,
connected
disconnected
with
the
power
ON,
camera
settings
may
beabove
reset
(SET-UP
Page
and
ENTER.
:before
High-sensitive
photography
equivalent
to
color
ISO400
its
the
shutter
speed
isthe
displayed
inthe
red.
To limit,
cancel
erasing
of
image
data,
select
[monitor.
]Photography,
and
press
ENTER.
quality
and
size,
while
viewing
indication
on
the
starts
a
reverse
•
The
press
of
mode.
shutter
speed
are
displayed
on
the
LCD
If
the
appropriate
The
length
of
time
to
capture
images
varies
according
to
the
photographic
conditions.
•
Images
can
also
be
erased
in
the
thumbnail
mode.
In
this
case,
the
camera
enters
the
single
frame
Select
[SYSTEM
INFO.]
on
the
SETUP
MENU
and
because
television
displays
images
at
a
lower
resolution.)
•
Spotlit
subjects,
particularly
against
dark
backgrounds
Manual
Settings
Page
58)
orPage
the
camera
malfunction.
however,
is
in
this
state.
feeds the
image
•may
Each
press
oftoinbegin
EXP.
].
To
cancel
changing
of
settings,
press
.you
Use
or
todial
select
the
frame
want
to
enlarge.
Press
the
or
Zoom
to
switch
select
[( S/C
].isphotography
21)
towards
“T”
playback.
●
]possible
is
selected,
[NO
IMAGE]
displayed
after
all
folders
When
➲
playback.
Press
Set
mode
in
the
to
[ sure
Tv
mode,
].the
or
press
or
the
shutter
button
fully
Before
photography,
make
that
the
lens
cap
has
been
combination
cannot
be
set
even
ifflash
aperture
isin.black
adjusted
to its
playback)
mode,
and
enters
the
thumbnail
playback mode after the image is erased.
status
display.
]or
mode:
In
[[playback
Press
the
display/info
button.
Self-timer
photography
and]down
are
not
possible.
•the
The
display
unit
varies
according
to
the
output
system.
•theCopying
of (frame
printed
text
(white
characters
on
paper)
.playback
press
reverse
by
one
frame.
This
adapter
allows
SmartMedia™
to
be
used
as
3.5"
floppy
disk.
have
been
erased
(unless
the
SmartMedia™
contains
protected
You
can
also
select
the
image
by
the
same
operation
as
for
thumbnail
playback
(➲ [4X],
PageISO
83).
Automatic
begins.
•
Playback
becomes
2x-speed
to
reduce
aperture
size.
Press
to
increase
aperture
size.
Press
camera
takes
a
picture.
The
manual
setting
removed
the
camera.
limit,
aperture
value
isbe
displayed
in
red.
Photography,
however,
the
[Scenes
M
]from
mode
tomenu
set
the
speed
to simultaneously
0.7
second
During
[2X],
the
ISO
will
automatically
set
between
ISO100
ISO200.
During
be
+
set
the
quality
and
size
Úshutter
Page
112
•the
With
the
NTSC
system,
images
can
be
displayed
on the LCD
monitor
and TVwill
during
•To
with
low
reflectivity,
such
as
shots
green
or
dark
foliage
Each
press
of
the
display/info
button
switches
the
display
•of1-frame
feed
isand
continued
The
SYSTEM
INFO.
displayed.
reverse
for
the
duration
This
adapter
isplayback
inserted
into
the],
floppy
your
PC,
allowing for the
images).
The
viewfinder
LED
turns
redis
image
data
being
recorded
onto
Insert
the
adapter
connector
plug
into
the
DC
IN
values
are
displayed
In
the
photography
modes
([while
[and ISO400.
]disk
oris
[ drive
]),on
the
lens
photography
and
playback.
is
possible
inAC
this
state.
automatically
set
between
ISO100
is
held
down.
format
as
follows:
duration
that
Note:
The
larger
the
F
value,
the
smaller
the
aperture
size
become
or
longer.
•Press
Remove
and
insert
SmartMedia™
with
the
camera’s
power
turned
off.Aperture value
is
held
down.
that
To
quit
the
SETUP
MENU,
change
the
mode
dial
setting.
Shutter
speed
Adjust
the
zoom
ratio
by
the
Zoom
switch.
(Zoom
to
display
option
menu,
press
or
to
images
recorded
on
the
SmartMedia™
to
be
transferred
to
the
PC.
the
SmartMedia™.
Sets
video
output
system
according
to
country
in
which
your camera
is used.
on
the
left
ofthe
the
LCD
Press
the
shutter
button
down
halfway
and
press
5V
terminal
on
the
camera.
extends
from
the
camera
body.
•the
PAL
system,
images
cannot
bethe
displayed
When a cable
is connected, only
and
versa.
the
image
quality
button
switches
the
quality
and
size
Gently
insert
the
SmartMedia™
as
far
as
it, simultaneously.
can
go
Memo
[Pressing
]vice
isWith
displayed
on
the
LCD
monitor.
•select
Recorded
data
may
bepress
erased
(destroyed)
in
the
situations
listed
below. Note that Toshiba
White
Balance
Additional
Information,
Glossary
to
increase
shutter
speed.
Pressand
to
decrease
shutter
speed.
Press
Press
or
to
move
forward
reverse.
+
Ú
PRG
]
and
ENTER.
]
and
press
ENTER.
[
switch
Page
21)
Detailed
TV
display
is
available.
monitor
screen.
➲
When
the
camera
is
turned
on,
the
Auto
Power
OFF
function
settings
infully
the
following
order.
it
down
. system
Standard
Histogram
Image
only
Press
or
to
select
the
item
you
desired
to
set,
with
SmartMedia™
electrodes
(metal
contacts)
Additional
Information,
Glossary)
(white
Corporation
accepts
no
responsibility
whatsoever
for
the
loss
of recorded
data enters
in these
• the
When
allNTSC
images
in
a
folder
are
erased,
that
folder
itself
is
also(destruction)
erased.
➲
The
camera
determines
the
balance
by
averaging
the
various
kinds playback
of light
that actually
●
to
to
next
frame/
to“T”
go
back
one
information
To
prevent
valuable
data
from
being
erased,
attach
the
write••advance
With
the
PAL
system,
images
are
played
back
with
apressing
black
frame
•frame
After
pause
is
cancelled,
the
Zoom
switch
to
the
will
the
image.
Pressing
ENTER
the
setting.
or
,, SmartMedia™
and
manual
Exposure
compensation
(Ú
Page
69)
using
When
[for
M
]selects
isis
selected
on
the
[ halfway
EXP.
]remove
option
menu,
orsurrounded.
the
shutter
speed
setting
becomes
operational.
Never
open
the
SmartMedia™
cover
orenlarge
the
while
anmakes
image
is
being
recorded.
This
or
and
manual
setting
(Ú
Page
58)
or
film
speed
Exposure
compensation
(Ú
Page
69)
using
Reverse the
procedure
“Loading
the
Batteries”
and
remove
the
batteries.
•facing
Pressing
the
shutter
button
down
adjusts
the
exposure,
• Playback
paused.
PAL
system
(➲
Additional
Information,
Glossary)
situations:
the
lens.
This
setting
allows
you
to
set
in
advance
the
white
balance
when
taking
photographs
under
and
press
ENTER.
the
rear
of
the
camera.
For
the
US/Canada:
PDR-ACM1A
Holding
down
or
moves
forward
or
reverse
continuously.
resumes
at
the
last
state
that
was
protect
sticker
at
the
write-protect
area.
Data
can
no
longer
be
may
corrupt
the
data
on
the
SmartMedia™
or
damage
the
SmartMedia™
itself.
possible,
but
does
not
make
the
exposure
compensation
possible. However the exposure value
is
To
return
normal
press
the
Zoom
switch
towards
setting
(ÚtoPage
Page
58)magnification,
or film
speed
setting
(Ú
Page
78)
using
ENTER
Pass
the
shoulder
strap
through
the
loop
and
pull.
setting
(Ú
78)
using
ENTER
are
also
possible.
and
pressing
the
shutter
button
fully
takes
the
shot.
TM[ is down
When
the
SmartMedia™
used
incorrectly
by
the
user
or
a
third
party
[
],
]
or
[
]
AE
or
AF
are
locked
with
the
shutter
button
held
half
specific
lighting
conditions.
For
Europe:
PDR-ACM1E
active
before
the
pause.
Firmly
insert
the
SmartMedia
as
far
as
it
can
go.
displayed
on is
the
LCD
monitor.
Press
ENTER.
recorded
or setting
erased
from
SmartMedia™.
Toon
write
oraterase
data
from is to be recorded.
Sets
the
color
mode
and
photographic
sensitivity
which
the
image
“W”.
are
also
possible.
The
default
different
depending
the
destination
country/area.
Use
or
to
select
the
desired
item
Press
ENTER,
nine
images
are
displayed
simultaneously.
• no
If
you
shoot
a
still
picture,
when
preview
is
set
to
ON
(Ú
Page
77),
down.
If
operation
is
carried
out
for
a
fixed
amount
of
time
(default:
about
one
minute),
power
ON
When
the
SmartMedia™
is
exposed
to
static
electricity
or
electrical
noise
Forimage
the Noise
UK:
PDR-ACM1U
:off
Displays
the
firmware
version
ofto
this
camera.
SmartMedia™,
peel
the
sticker.
camera
ready
to
take
photographs.
Warning:
increases
when
the
ISO
is
changed
higher
settings.
isis
displayed
and
a
white
frame
and
green
Green The
Compose
picture,
press
the
shutter
button
down
halfway,
and
press
it
down
:the
Automatic
adjustment
(default)
Display
Page
83
theThumbnail
recorded
image
is
displayed
on
for
about
two
]specifications
Standby
mode
[enlarged,
☞
➲
If
no
operation
is
carried
out
a screen
fixed
amount
offrom
time
(default:
about
1shutter
minute),
thewear.
power
is
turned
TM
consumption
is
set
to
its
minimum
state
(power
almost
off)that
to
prevent
battery
This
is
.in
and
press
When
the
SmartMedia™
isfor
removed
ordarkens
the
camera
isPage
turned
off
while
recording
erasing
The
image
the
LCD
monitor
sometimes
the
time
the
button
isdata,
pressed
down
details,
refer
to
the
of
AC
information.
adapter
➲
127.
: on
Displays
the
SmartMedia
Playback
returns
to
the
start
ofturned
the
movie.
☞ ••-For
frame
are
displayed
the
LCD
monitor.
:
Photography
outdoors
Default
setting:
seconds.
off
to
preserve
battery
life.
This
is
called
“Auto
Power
OFF”.
To
return
to
the
normal
state,
press
the
fully.
Ú
Page
40
called
the
Auto
Power
OFF.
This
setting
allows
you
to
set
the
time
when
the
camera
turns
off
halfway
until
the
image
becomes
focused.
: picture,
Equivalent
to
ISO100
(default)
data,
frame
advance
when
images
aredefaults.
played
back or during
formatting alarm
of the
The options
are
displayed.
: Returns
settings
to
Flashing
[ the
],
[ color
]conditions
or their
[shutter
]being
Self-timer
in frame
operation
at a handshake
.
Compose
the
press
the
button
down
halfway,
and
press
it
down
The
white
frame
indicates
entire
image,
while
the
green
:
Photography
in
cloudy
POWER
button
again.
•
The
viewfinder
LED
turns
red
while
image
data
is
being
recorded
Compose
the
picture,
press
the
shutter
button
down
halfway,
and
press
it
down
• The
To
set
the
focus
orpicture.
exposure
forphotography
a subject
outside
the
center
the intended
theincamera
directly
The camera
takes
the
automatically.
This
function
isthrough
not
activated
during
automatic
playback
(➲image,
Pagepoint
85) or
the [ only>
] PC
:appearing
High-sensitive
equivalent
toofcolor
ISO200
SmartMedia™.
Note:
image
the
lens
will
be
The
display
returns
to<Histogram>
thumbnail
playback.
<Standard>
<Detailed
information>
<Image
Memo
shows
the
location
of
the
currently
enlarged
area.
halfway,
and
press
it
down
fully.
Ú
Page
40
:
Photography
in
bluish
fluorescent
light
fully.
Ú
Page
40
About
the
Auto
HH
Power
(FULL
OFF
HH
Function
)
Additional
Information,
“AUTO
POWER
OFF
(page
110)”
at
the
subject
or
desired
exposure
(lighting),
press
and
hold
the
shutter
button
halfway.
Now,
with
the
shutter
onto
the
SmartMedia™.
ON]
Writing
to SmartMedia™
in progress
mode.
Press
ENTER.
:adapter
High-sensitive
photography
equivalent
toanother
color
ISO400
•Insert
Wedefault
recommend
copying
and
saving
important
datapower
onto
storage
medium (floppy disk, hard
displayed
for
[LCD
].[Power
fully.
Ú
Page
40
the
AC
power
plug
into
the
The
size
and
quality
of
the
image
can
be
reset
to
the
desired
combination.
Press
ENTER.
button
still
held
halfway
down,
you
can
turn
the
direction
of
the
camera
and
frame
your
image
with
the
focus
•
It
is
possible
to
play
back
any
images
in
any
folders
by
pressing
or
during
playback.
(For
details
ON
: Photography
inafter
reddish
fluorescent
light
The
camera
takes
the
picture.
Photographs
can
be
taken,
however,
do not
turn thepress
power
OFF.
Todisk,
return
to disk,
the
state
theset
Auto
Power
OFF
has been
executed,
the
POWER
button
MO
etc.).
The
PREVIEW
manual
setting
Page
items
77
are
displayed.
Únormal
camera
takes
the
atmonitor.
the
exposure
time.
Current
Entireofimage
and
exposure
locked.
Press
the
shutter
button
down
fully
to in
complete
capturing
the image.
Red outlet.
[+
on picture
the
LCD
The
camera
is ready
for
burst
photography.
of displayed
folder
Page
92)
]:the
mode:
In
the
➲shutter
Accessing
of
SmartMedia™
[ (HALF
Photography
in] is
incandescent
light
HH
•] [is
When
speed
set
to
a)turn
speed
of
0.7 second
orprogress
slower,
photographs
taken
as extended
to Never
turn
the
power
onHH
again.
•During
remove
the
SmartMedia™
or
the
camera
offresult
while
recording
data or are
while
erasing
data
COLOR
Page
77
Ú
the
exposure,
the
viewfinder
LED
turns
orange.
position
•
Moving
the
camera
as
you
press
the
shutter
button
will
in
a
blurred
image.
Use
,
,
or
to
select
the
area
to
enlarge.
at Page
the
last
image
displays
the
first
image,
and
pressing
atwill
thebe
firstautomatically
image
displays
the
Pressing
During
[2X],
the
ISO
be
automatically
set
to
ISO200.
[4X],ofISO
setof
exposures
(Ú
68).
IfCarry
burst
photography
is to
set
the
shutter
speed
is set During
to athe
speed
0.7
second
or more
in the
[ to
Tv ]
out
steps
1will
2when
in
Photographic
(SmartMedia™
formatting).
actions
might
damage
ISO
Page
78
ÚFlashing
ItClose
takes
about
twice
the
time
to complete
taking
the
photograph
duePDR-M81
to processing
ofenlargement
the
captured
[set
],These
[“Basic
] When
the
image
is not
in SmartMedia™.
focus.
the
SmartMedia™
cover.
•
The
PDR-M81
usesto
accurate
focus
mechanism.
However,
the
have
difficulty
last
image.
Adjust
the
display
area
enlarge
viewing
theto
white
and
ISO400.
• In
AEB
photography
(an
Page
71)while
orauto
burst
photography,
the shutter
speed
cannot be setmay
to 0.7
second
or longer.
HH
(SMALL
HH
)
Ú
mode,
the
shutter
speed
is
automatically
changed
1/2
second.
•image.
Use
only
the
SmartMedia™
specified
for
use
with
the
PDR-M81.
The
use
of
other
SmartMedia™
SHARPNESS
Page
79
mode)”
(page
109).
Select
[QUALITY]
Settings
(
focusing
or
not
be
able
to
focus
at
all
for
subjects
and
situations
such
as
the
following:
Ú
Before
you
use
aother
new
SmartMedia™
the
first during
time,
be
sure
tothe increased
Images
can
bevalue
rotated
by] pressing
playback.
[ for
] or
green
the
aperture
is
to
F2.9
(maximum
aperture
size),
shutter
speed
restricted
•• frames.
If
a
mode
than
[ set
suppressed
flash
mode
is
set
inthe
flash
photography,
thedark
shutterisspeed
is
•79
Processing
image
- When
subject
is distant and
- SmartMedia™
Subjects
moving
at
high
speed
damage
camera.
CONTRAST
Page
Ú[the
• to
The
write
protection
not
function
if in
write-protect
sticker
becomes
Use
a soft
dry cloth to
.thesecond.
oncould
the
SETUP
MENU
and
press
format
the
(may
Page
91).
rotates
an
image
counterclockwise,
and
pressing
rotates
clockwise.
Pressing
1/750
PDR-ACM1A
] •are
the
same
as
to
PDR-ACM1E
PDR-ACM1U
[PRG]
and
limited
tosecond.
between
1/2
second
and
1/250
* The
aboveitdirty.
menu
is
the
RECORDING
Charging
of
flash
progress
ON
When
there
are
objects
in
front
of
or
behind
the
subject
Very
shiny
subjects
such
as
a
mirror
or
car
body
SmartMedia™
is
aof
device.
Do do
notnot
bend,
drop,
or subject
SmartMedia™
to
DIGITAL
ZOOM
Page
• wipe
When
the
camera
isOnce
not79
inelectronic
be sure
to attach
the
lens
cap
provided
with[your
camera.
the
POWER
button
to
turn
the
power
off.
Memo
away
any
dirt.
ause,
sticker
ispress
peeled
off,
reuse
it.
Ú
Orange•Press
The
QUALITY
menu
isprecision
displayed.
combinations
the
automatically
mode.
MENU
inthe
•the
The
aperture
value
set
differ
to
the
actual
value
according
to
the
position
ofUK)
theorzoom
lens.
To
return
to
the
regular
display,
ENTER.
(Photos
cannot
be
taken
at
this
moment.)
(for
US
and
Canada)
If the
shutter
speed
is
set
to
1/350
second
or
less,
the
shutter
as
speed
an
animal
is
automatically
athe
cage
a]changed
person
in front
to 1/250
of a tree)
(for
European
Continent)
(for
Get
ready
to
take
the
photograph.
- above
Extremely
low
contrast
subjects
When
the
settings
are
made,
they
are
displayed
in(such
thepocket
following
order.
excessive
Also,
do
not
carry
SmartMedia™
the
ofx[trousers.
This
might
The
lens
cap
can
also
be
attached
to
attachment
following
the
above
steps
to prevent
it’sthe
LCD
79
Úshocks.
The
power
turns
off.
determined
shutter
speeds
and
aperture
-in Subjects
with
little
reflection,
such
as
hair
fur mode.
•• The
size
displayed
on
the
LCD
monitor
FULL
(320
240)
HALF
(160
xorsubject
120).
The
forced
flash
mode
or
]orred-eye
forced
flash
second
ifPage
the
flash
setting
is25)
changed
tothe
thestrap
[ ]becomes
- image
Subjects
that
have
low contrast
and
merge
into
Loading
the
batteries
(Ú
Page
and
the
SmartMedia™
(Ú
Page
31)
into
the
camera.
being
lost.
• Flash
photography
and
burst
photography
are
not
possible.
Flashing
SmartMedia™
to
excessive
force
when
you
sit
down,
damaging
the
SmartMedia™.
Hardware
malfunction
Subjects
with
no
solidity,
such
as
smoke
or
flames
the
background
(such
as
white
walls
or
subjects
Attach
the
lens
cap
when
you
are
not
using
the
camera.
values.
However,
their
operation
capability
movies
made
in
FULL
size
is
displayed
on
the
entire
LCD
monitor,
and
those
made
in
HALF
size
If the
[ ]mode,
forcedISO
flash
[ automatically
] red-eye set
forced
flash mode
is and
set in
flash photography
the is
• In
movie
willorbe
between
ISO100
ISO400
regardless ofwhen
its setting.
dressed
inthe
theSmartMedia™
same
color
as
the
background)
-attach
Subjects
viewed
through
glass
Turn
offor
the
power
tothe
retract
the
lens
unit,
and then
the
lens
cap.
The
image
taken
in
photography
mode
may
be
blurred.
or
to
select
the
desired
setting
from
the
tab
menu
, and
press
HH
HH
HH
•Use
Do•not
use
store
in
environments
likely
to
be
affected
byisstatic
electricity
or
is
different
as
shown
the
right
table.
displayed
in
ofspeed
the
shutter
speed
is center
set
toin
aexposure
of
0.7
second
or
more,
the
shutter
speed
automatically
changed
to
Press
POWER
button
toscreen.
turn
power
on.
A electrical
histogram
isturn
a graphic
representation
ofthe
theistones
of the
subject.
The horizontal
histogram
• Do
If the
the
image
cannot
be
focused,
thelens
focus
automatically
fixed to infinity.
(When theaxis
flashofisthe
necessary
not
the
power
on
with
the
cap
attached.
noise.
1/2
second.
ENTER.
*
The
above
AC
adapter
is
US/Canada
Turning
the
Power
On
Ú
Page
38
+
shows
the
brightness
(increasing
brightness
from
left
to
right)
and
the
vertical
axis
shows
the
number
at
this
time,
it
is
simultaneously
fixed
to
illuminate
objects
1.5
meters
(five
feet)
away.
During
macro
•This
Dosaves
use
orsettings,
store
SmartMedia™
very
hot,
humid
oraperture
corrosive
If the
shutter
speed
value
isimages,
set toin1/1000
second,
the
value
is limited
to
F8type
andAC
F3.4.
•not
When
playing
back
movie
switching
isthe
between
standard
and
image
only.
(O
:environments.
possible
Xbetween
: not
the
and
returns
to
RECORDING
MENU.
type.
European
andpossible)
UK
photography,
the flash
islevel.
alignedthe
withdisplay
the wide
position.)
of pixels
at each brightness
Downloaded From
camera-usermanual.com
adapters differ in shape.
--110
20 -40
80
88
Playing Back Movies
Play back movies that you have recorded. Audio can also be played back.
].
Press
.
to select the movie to play back.
Handy
Functions
Playback of the selected movie begins.
The user can control playback as shown on the table of the next
page by pressing various buttons during playback, a pause or
stopping.
Erasing
Images
or
Playing
Back Images
Press
Taking
Photographs
The last recorded image appears on the LCD monitor.
☞ To adjust the brightness of the LCD monitor ➲ Page 115
Changing the LCD monitor display ➲ Page 116
Getting
Ready
Set the mode dial to [
Other
Applications
Additional
Information
Downloaded From camera-usermanual.com
- 81 -
Changing
the
Preset
Conditions
(RECORDING
MENU)
Photography
in
the
Program
Mode
Setting
Names
Playing
Back
the
of
Photographed
Parts
Image
Size
and
Quality
(Single-Frame
Playback)
Extended
Exposure
Photography
(Bulb
Photography)
Erasing
Images
(Erase
Frame)
(continued)
Manual
Attaching
Using
How
Taking
Enlarging
Playback
About
Turning
to
Photographs
the
SmartMedia™
Press
Settings
the
Photographed
of
Power
the
Power
Multi
Shoulder
Continuously
Outlet
Shutter
Image
On/Off
Images
Strap
Pictures
Button
(Zoom
(Burst
Playback)
Photography)
Taking
Erasing
Button
Photographs
Folders
and
(All
LCD
Images
Continuously
Monitor
in
aImages
Folder/All
(Burst
Display
Photography)
Folders)
(In
Playback
(continued)
(continued)
Mode)
Definitions
Separately
of
the
Accessories
Color
of
the
Viewfinder
LED
Taking
and
Playing
Back
Photographs
on
aMode
TV
(continued)
Changing
the
Preset
Conditions
(RECORDING
MENU)
(continued)
Exposure
Compensation
in
the
Shutter
(continued)
Speed-priority
(continued)
About
Basic
Settings
SmartMedia™
in
(Sold
the
mode)
Aperture-priority
(continued)
Mode
(continued)
LCD
Monitor
Display
(during
photography)
(continued)
Manual
Settings
(continued)
Playing
Photography
Installing
Back
Movies
batteries
(Auto
Photography)
(continued)
(continued)
(continued)
Names
of
Parts
(continued)
Getting
Ready
The shutter
camerabutton
automatically
adjusts the
shutter
and
the aperture
value
according
to the
brightness
of an
can be pressed
down
in twospeed
stages:
halfway
down and
fully
down. When
pressed
halfway
down,
This
“SmartMedia™”
Set
Play
Automatically
The
the
following
mode
shoulder
menu
back
size
photographed
is(number
used
for
items
strap
plays
setting
isadapter
for
athe
is
are
back
storage
of
taking
handy
also
the
pixels)
still
the
basic
available
subjects
for
medium
images
16
and
carrying
images
settings
quality
one
for
that
as
saving
separately
your
image
to
require
(compression
be
camera
used
images
atseveral
a
sold
for
around.
inthat
photography
items.
ratio)
seconds
the
you
multi
of
have
the
photography
to image
photograph
in
photographed.
to
[ pause
be
mode
],photographed.
such
[be
Even
in
asquick
]for
firework
or
if Europe,
the
[You
succession.
camera’s
displays
] photography
power
at the
Enlarges
selected
portions
of
images
being
played
back
at
two
levels.
Images
can
displayed
enlarged
when
In
You
this
can
color
mode,
manually
of
the
photographs
viewfinder
adjust
settings
are
LED
taken
indicates
such
continuously
asphotographed
the
exposure
state
atof
control,
atime.
the
maximum
camera.
white
speed
balance,
The
ofthe
0.8
metering
second
system,
intervals.
continuous
This
item
switches
display
on
the
LCD
monitor
when
playing
back
photographed
images.
can
switch
If
you
the
AC
(sold
separately:
PDR-ACM1A
for
the
US/Canada,
PDR-ACM1E
PDR-ACM1U
During
stopping
During
Mode
Effective
dial
Subjects
and
Set
Values
During
playback
TM
Viewfinder
LED
Press
.of
aperture
value.
SYSTEM
Turning
Exposure
ISO
OSD
In
[prevent
[use
LANGUAGE
the
]the
INFO.
mode
control
(EXP.)
On
Close
the
SmartMedia™
cover.
Slide
the
SmartMedia
cover
release
knob
in
the
Take
photographs
or
or
battery
to
to
select
or
play
[that
the
slide
]them
or
shutter
it
[ the
back.
,]will
and
speed.
and
lock
press
Look
Use
through
to
select
the
[adjust
viewfinder
]use
and
press
to
compose
ENTER.
the
picture.
To
continue
erasing
images,
repeat
the
above
procedure
2.
.is
AF
(auto-focus)
and
AE
(auto
exposure)
are
set.
When
pressed
fully
down,
the
camera
takes
aspace
picture.
object.
This
mode
enables
carefree
photographing
similarly
to
selecting
[stable
]photographs.
in
[ from
]settings”,
mode.
Itrepeatedly
is
to
night.
To
is
Change
modes.
turned
When
the
OFF,
your
setting
using
the
camera
images
this
according
mode,
from
saved
dropping
be
to
sure
how
on
the
the
to
during
SmartMedia™
image
a(size,
photography,
tripod
is
to
to
be
keep
used
not
hang
the
and
be
camera
erased.
the
the
shoulder
remaining
SmartMedia™
strap
and
amount
prevent
around
can
ofstep
your
distortion
be
neck.
inpossible
the
of
images.
Relationship
between
your
camera
and
accessories
Connecting
tocalled
Other
Devices
(page
123)
being
played
back
one
image
at
acover,
time.
The
meaning
maximum
of
number
LED
color
of
photographs
differ
according
can
to
be
taken
mode
continuously
dial
setting.
three
photography
mode,
and
take
photographs
at
these
settings.
These
are
“Manual
which
are
saved
display
to
show
aPower
list
detailed
information
compression
ratio,
shutter
speed,
aperture,
etc.)
or
you
can
for
the
UK)
in
a
room
with
amay
power
outlet,
you
can
take
photographs
for
an
extended
period
of
time.
This
also
Item
QUALITY
Options
Notes
SmartMedia™
VIDEOon
OUT
White Balance (W.B.)
Write
Protection
Removing
the Batteries
ISO
[ POWER
]
AUTO
OFF
Setting items
Turning
the
Power
Off
Using
the
LCD
Monitor
Additional
Information
Other
Applications
Handy
Functions
Erasing
Images
Playing
Back Images
Taking
Photographs
Tab menu
feed
lThe
Positive
(+)
Compensation
tab
is
displayed.
setting
isbattery
as
follows:
Make
sure
that
the
issystem
firmly
closed.
Details
image
ofmenu
operation
isrange
saved
are
or
erased,
the
same
and
as
the
taking
camera
photographs
is
then
ready
and
to
playing
take
photographs.
them
back
onon
the
LCD After
monitor.
If
you
use
the
viewfinder
to
take
photographs,
the
photography
Set
the
mode
dial
to
[cover
].settings
direction
of
the
arrow
to
open
cover
.1-frame
ENTER.
change
the
white
and
the
metering
in(the
program
mode.
erased
SmartMedia™.
and
reused.
For
details
on
these
accessories,
refer
to
the
Instruction
Manual
for
the
accessory
you
are
using.
(information
Movies
images
in
the
multi
mode
Page
cannot
be
displayed
using
the
zoom
playback
Images
even
if the
are
camera
not
recorded
is
turned
directly
off.
SmartMedia™
but
are
stored
temporarily
within
the
buffer
memory.
display
histograms,
etc.
prevents
failed
photographs
due
to
battery
wear
or
failed
of
data
to
a
PC.
details
handling
the AC
2x-speed
playback
Set
Sets
[•Memo
PRG
the
thebalance
whether
color
] photographed
: /or
Photography
mode
language
not
to
and
return
photographic
of
in
menus
the
program
displayed
sensitivity
in
the
(default)
on
SETUP
the
at51)
which
LCD
(Ú
MENU
Page
monitor.
the
to
image
62)
the
original
is For
to
be
factory
recorded.
settings.
feeds
the
image
•transfer
Each
press
of
Copying
of
printed
(black
characters
on
white
paper)
set
the
time
(text
114)
F8
/display
F6.8
F5.6
/18.
F4.8
/Page
F4.0
/and
F3.4
/mode
F2.9
How
to
take
photographs
Page
41
1/1000,
1/750,
1/500,
1/350,
1/250,
1/180,
1/125,
1/90,
range
may
differ
from
the
actual
image.
In
this
case,
use
the
LCD
Press
the
shutter
button
down
halfway
.
the
mode
dial
to
[
],
[
]
or
[
].
SmartMedia™
having
the
following
storage
capacity
can
be
used
on
your
camera.
current
as
of
March
2000)
feature.
The
last
cover
recorded
image
opens
frame
image
appears
appears
on
the
on
the
LCD
LCD
monitor.
monitor.
photography
is
finished,
check
the
images
record
the
selected
ones
to
SmartMedia™.
[TIME&DATE,
]
:
Erases
images
in
the
currently
selected
folder
and
folders.
adapter,
beSet
sure
to
read
page
•
2x-speed
playback
is
performed
for
.
Make
that
the
SmartMedia™
is
correctly
loaded.
by one
frame.
Warning:
[•Av
] sure
Noise
:OSD
Photography
increases
LANGUAGE
when
in aperture-priority
will
the not
ISObe
is reset.
changed
mode
to
(Úhigher
Page
settings.
63) ( Page 31)
Backlit
portraits
[PROTECTED]
on
the
LCD
monitor,
cancel
the protection
( Page 108) or
remove
How
to
play
back
images
Page
80
1/60,
1/45,
1/30,
1/20,
1/10,
1/8,
1/6,
1/4,
1/3, 115
1/2,
monitor
for
photography.
AF
(auto-focus)
and
AE
(auto
exposure)
(Ú
Additional
Information,
[English]
: value
English
(default)
Pass
Set
the
out
mode
end
steps
of
dial
1the
to
to
shoulder
4[1/15,
either
]].LCD
or
inspeed-priority
[strap
“Photography
through
].
the
in
the
strap
Shutter
speed-priority
Mode”
isdisplayed
held
down.
the
duration
that
2MBCarry
/4MB/8MB/16MB/32MB/64MB/128MB
the
mode
dial
to
[isin
(all
3.3
types)
]•the
adjust
:]When
Erases
the
all
brightness
folders
recorded
of
the
on
the
monitor
SmartMedia™.
Page
[Set
•V
1-frame
feed
is continued
for the
The
aperture
and
the
shutter
speed
corresponding
to(Úthat
[•To
Tv
:write-protection
Photography
shutter
mode
Page
65)
bright
scenes
(such
and
highly
reflective
subjects
•the
You
can
also
carry
out
step
8snowfields)
while
verifying
the
image
step
7.
DPOF
(in
Page
102).
Glossary)
start
to
function.
0”7,
1”,
1”5,
2”,
3”,
4”,
6”,
8”,
10”,
15”
•Very
Do
not
remove
orV)
load
the
batteries
or
disconnect
or
connect
the
AC
adapter
while
the camera
is mode.
on. This
]65)
:POWER
Japanese
[value
[NORMAL]
:(3.3
Equivalent
toas
color
ISO100
Carry
Set
Use
out
or
mode
steps
to
dial
select
1
to
to
2[erased,
the
“Manual
].
images
photographed
Settings”
(page
in
58).
the
multi
photography
You can also
connect
the
PC
card
adapter
and
floppy
disk
adapter
( in
123)
sold
separately
to transfer
SmartMedia™
Changing
the
LCD
monitor
display
Page
116
The
images
or
folders
are
and
the
camera
returns
toPage
the
is
held
down.
duration
that
are
displayed
on
the
LCD
monitor.
If
the
appropriate
(page
attachment
or
on
in
“Photography
the
camera.
in
the
Full
Manual
Mode”
(page
67).
Press
the
button
to
turn
the
power
on.
full
manual
mode
(Ú
Page
67)
[
M
]
:
Photography
in
Press
the
MENU
button.
•[2X]
Shots
predominantly
of
sky
Even
ifreturn
photography
is disconnect
terminated
midway
before
capturing
three
images
bythe
releasing
theAC
shutter
• AF
If
you
take
aup
photograph
after
erasing
an
athis
number
continuing
from
last Ifphotographed
When
or
AE
are
locked,
the
beep
tone
(Ú Page
111)
sounds
and
the
Use
ormade
to
change
the
setting
inimage,
the
menu,
might
the
manual
settings
tosame
their
defaults.
Iftab
happens,
manually
set
conditions
again.
:
High-sensitive
photography
equivalent
to
color
ISO200
(default)
•
Before
you
connect
or
the
AC
adapter,
be
sure
to
turn
the
camera
OFF.
the
adapter
is
Press
the
image
quality
button
to
select
the
preset
combination
cannot
be
set
even
if
the
shutter
speed
is
adjusted
to
images to a
PC.
16MB
(SM-M1600D)/32MB
(SM-M3200D)/64MB
(SM-M6400D)/128M
(SM-M1280D)
The
respective
last
image
mode.
frame
appears
on
LCD
monitor.
You
can
also
select
the
image
by
the
operation
as
for
thumbnail
display
(
Page
83).
Carry
out
steps
1
to
on
page
109.
When
the
camera
is
turned
on,
set
the
mode
dial
to
thethe
desired
The
shutter
speed
and
the
aperture
value
corresponding
todisplay
the
Reverse
playback,
2x-speed
playback
All
descriptions
inor
this
Instruction
Manual
are
for
when
language
is set
to [ENGLISH].
Press
or
to
select
the
image.
button,
images
already
photographed
can
be
saved
and
erased
by playback
the
method.
image
is
assigned
as
image
number.
lThe
Negative
(–)
Compensation
viewfinder
RECORDING
LED
turns
MENU
green.
is2
displayed.
•press
The
image
the
photograph
is
taken
is
slightly
less
clear
than
images.
(This
is 109,
connected
disconnected
with
the
power
ON,
camera
settings
may
beabove
reset
(SET-UP
Page
and
ENTER.
:before
High-sensitive
photography
equivalent
to
color
ISO400
its
limit,
the
shutter
speed
isthe
displayed
inthe
red.
Reverse
1-frame
feed
To [4X]
cancel
erasing
of
image
data,
select
[monitor.
]Photography,
and
press
ENTER.
quality
and
size,
while
viewing
indication
on
the
starts
a
reverse
•
The
press
of
mode.
shutter
speed
are
displayed
on
the
LCD
If
the
appropriate
The
length
of
time
to
capture
images
varies
according
to
the
photographic
conditions.
•
Images
can
also
be
erased
in
the
thumbnail
mode.
In
this
case,
the
camera
enters
the
single
frame
Select
[SYSTEM
INFO.]
on
the
SETUP
MENU
and
because
television
displays
images
at
a
lower
resolution.)
•
Spotlit
subjects,
particularly
against
dark
backgrounds
Manual
Settings
Page
58)
orPage
the
camera
malfunction.
however,
is
in
this
state.
feeds the
image
•may
Each
press
oftoinbegin
EXP.
].
To
cancel
changing
of
settings,
press
.you
Use
or
todial
select
the
frame
want
to
enlarge.
Press
the
or
Zoom
to
switch
select
[( S/C
].isphotography
21)
towards
“T”
playback.
Floppy
Disk
Adapter
(FlashPath)
]possible
is
selected,
[NO
IMAGE]
displayed
after
all
folders
When
playback.
Press
Set
mode
in
the
to
[ sure
Tv
mode,
].the
or
press
or
the
shutter
button
fully
Before
photography,
make
that
the
lens
cap
has
been
combination
cannot
be
set
even
ifflash
aperture
isin.black
adjusted
to its
playback)
mode,
and
enters
the
thumbnail
playback mode after the image is erased.
status
display.
]or
mode:
In
[[playback
Press
the
display/info
button.
Self-timer
photography
and]down
are
not
possible.
•the
The
display
unit
varies
according
to
the
output
system.
•theCopying
of (frame
printed
text
(white
characters
on
paper)
.playback
press
reverse
by
one
frame.
This
adapter
allows
SmartMedia™
to
be
used
as
3.5"
floppy
disk.
have
been
erased
(unless
the
SmartMedia™
contains
protected
You
can
also
select
the
image
by
the
same
operation
as
for
thumbnail
playback
( [4X],
PageISO
83).
Automatic
begins.
•
Playback
becomes
2x-speed
to
reduce
aperture
size.
Press
to
increase
aperture
size.
Press
camera
takes
a
picture.
The
manual
setting
removed
the
camera.
limit,
aperture
value
isbe
displayed
in
red.
Photography,
however,
the
[Scenes
M
]from
mode
tomenu
set
the
speed
to simultaneously
0.7
second
During
[2X],
the
ISO
will
automatically
set
between
ISO100
ISO200.
During
be
+
set
the
quality
and
size
Úshutter
Page
112
•the
With
the
NTSC
system,
images
can
be
displayed
on the LCD
monitor
and TVwill
during
•To
with
low
reflectivity,
such
as
shots
green
or
dark
foliage
Each
press
of
the
display/info
button
switches
the
display
•of1-frame
feed
isand
continued
The
SYSTEM
INFO.
displayed.
reverse
for
the
duration
This
adapter
isplayback
inserted
into
the],
floppy
your
PC,
allowing for the
images).
The
viewfinder
LED
turns
redis
image
data
being
recorded
onto
Insert
the
adapter
connector
plug
into
the
DC
IN
values
are
displayed
In
the
photography
modes
([while
[and ISO400.
]disk
oris
[ drive
]),on
the
lens
photography
and
playback.
is
possible
inAC
this
state.
automatically
set
between
ISO100
is
held
down.
format
as
follows:
duration
that
Note:
The
larger
the
F
value,
the
smaller
the
aperture
size
become
or
longer.
•Press
Remove
and
insert
SmartMedia™
with
the
camera’s
power
turned
off.Aperture value
is
held
down.
that
To
quit
the
SETUP
MENU,
change
the
mode
dial
setting.
Shutter
speed
Adjust
the
zoom
ratio
by
the
Zoom
switch.
(Zoom
to
display
option
menu,
press
or
to
images
recorded
on
the
SmartMedia™
to
be
transferred
to
the
PC.
the
SmartMedia™.
Sets
video
output
system
according
to
country
in
which
your camera
is used.
on
the
left
ofthe
the
LCD
Press
the
shutter
button
down
halfway
and
press
5V
terminal
on
the
camera.
extends
from
the
camera
body.
•the
PAL
system,
images
cannot
bethe
displayed
When a cable
is connected, only
and
versa.
the
image
quality
button
switches
the
quality
and
size
Gently
insert
the
SmartMedia™
as
far
as
it, simultaneously.
can
go
Memo
[Pressing
]vice
isWith
displayed
on
the
LCD
monitor.
Viewfinder
LED
•select
Recorded
data
may
bepress
erased
(destroyed)
in
the
situations
listed
below. Note that Toshiba
White
Balance
Additional
Information,
Glossary
to
increase
shutter
speed.
Pressand
to
decrease
shutter
speed.
Press
Press
or
to
move
forward
reverse.
+
Ú
PRG
]
and
ENTER.
]
and
press
ENTER.
[
switch
Page
21)
Detailed
TV
display
is
available.
monitor
screen.
When
the
camera
is
turned
on,
the
Auto
Power
OFF
function
Canceling
pause
settings
infully
the
following
order.
it
down
. system
Standard
Histogram
Image
only
Meaning
Press
or
to
select
the
item
you
desired
to
set,
Pause
with
the
SmartMedia™
electrodes
(metal
contacts)
Additional
Information,
Glossary)
[NTSC]
:allNTSC
(white
Corporation
accepts
no
responsibility
whatsoever
for
the
loss
of recorded
data enters
in these
•Adapter
When
images
in
a
folder
are
erased,
that
folder
itself
is
also(destruction)
erased.
The
camera
determines
the
balance
by
averaging
the
various
kinds playback
of light
that actually
AC
to
to
next
frame/
to“T”
go
back
one
information
To
prevent
valuable
data
from
being
erased,
attach
the
write•••advance
With
the
PAL
system,
images
are
played
back
with
apressing
black
frame
•frame
After
pause
is
cancelled,
the
switch
to
the
will
the
image.
Pressing
ENTER
the
setting.
or
,, SmartMedia™
and
manual
Exposure
compensation
(Ú
Page
69)
using
Colorthe
When
[Zoom
M
]selects
isis
selected
on
the
[ halfway
EXP.
]remove
option
menu,
orsurrounded.
the
shutter
speed
setting
becomes
operational.
State
Never
open
the
SmartMedia™
cover
orenlarge
the
while
anmakes
image
is
being
recorded.
This
or
and
manual
setting
(Ú
Page
58)
or
film
speed
Exposure
compensation
(Ú
Page
69)
using
Play
back
Reverse
procedure
“Loading
the
Batteries”
and
remove
the
batteries.
•facing
Pressing
the
shutter
button
down
adjusts
the
exposure,
• Playback
paused.
[PAL]
:for
PAL
system
( camera.
Additional
Information,
Glossary)
situations:
the
lens.
This
setting
allows
you
to
set
in
advance
the
white
balance
when
taking
photographs
under
and
press
ENTER.
the
rear
of
the
For
the
US/Canada:
PDR-ACM1A
Holding
down
or
moves
forward
or
reverse
continuously.
resumes
at
the
last
state
that
was
protect
sticker
at
the
write-protect
area.
Data
can
no
longer
be
may
corrupt
the
data
on
the
SmartMedia™
or
damage
the
SmartMedia™
itself.
possible,
but
does
not
make
the
exposure
compensation
possible. However the exposure value
is
To
return
normal
press
the
Zoom
switch
towards
setting
(ÚtoPage
Page
58)magnification,
or film
speed
setting
(Ú
Page
78)
using
ENTER
Pass
the
shoulder
strap
through
the
loop
and
pull.
setting
(Ú
78)
using
ENTER
are
also
possible.
and
pressing
the
shutter
button
fully
takes
the
shot.
TM[ is down
When
the
SmartMedia™
used
incorrectly
by
the
user
or
a
third
party
[
],
]
or
[
]
AE
or
AF
are
locked
with
the
shutter
button
held
half
specific
lighting
conditions.
For
Europe:
PDR-ACM1E
active
before
the
pause.
Firmly
insert
the
SmartMedia
as
far
as
it
can
go.
displayed
on is
the
LCD
monitor.
Press
ENTER.
recorded
or setting
erased
from
SmartMedia™.
Toon
write
oraterase
data
from is to be recorded.
Sets
the
color
mode
and
photographic
sensitivity
which
the
image
“W”.
are
also
possible.
The
default
different
depending
the
destination
country/area.
Use
or
to
select
the
desired
item
Press
ENTER,
nine
images
are
displayed
simultaneously.
•[FIRMWARE
If
you
shoot
a
still
picture,
when
preview
is
set
to
ON
(Ú
Page
77),
down.
If
no
operation
is
carried
out
for
a
fixed
amount
of
time
(default:
about
one
minute),
power
ON
When
the
SmartMedia™
is
exposed
to
static
electricity
or
electrical
noise
Forimage
the Noise
UK:is
PDR-ACM1U
VER.]
:off
Displays
the
firmware
version
ofto
this
camera.
Stop
SmartMedia™,
peel
the
sticker.
camera
ready
to
take
photographs.
Warning:
increases
when
the
ISO
is
changed
higher
settings.
displayed
and
a
white
frame
and
green
Green The
Compose
picture,
press
the
shutter
button
down
halfway,
and
press
it
down
[the
AW
] no is
:the
Automatic
adjustment
(default)
Thumbnail
Display
Page
83
recorded
image
is
displayed
on
for
about
two
]specifications
Standby
mode
[enlarged,
••-For
If
operation
is
carried
out
a screen
fixed
amount
offrom
time
(default:
about
1shutter
minute),
thewear.
power
is
turned
TM
consumption
is
set
to
its
minimum
state
(power
almost
off)that
to
prevent
battery
This
is
.in
and
press
When
the
SmartMedia™
isfor
removed
ordarkens
the
camera
isPage
turned
off
while
recording
erasing
The
image
the
LCD
monitor
sometimes
the
time
the
button
isdata,
pressed
down
details,
refer
to
the
of
AC
information.
adapter
127.
[CARD
INFO.]
: on
Displays
the
SmartMedia
Playback
returns
to
the
start
ofturned
the
movie.
frame
are
displayed
the
LCD
monitor.
]
:
Photography
outdoors
[
Default
setting:
seconds.
off
to
preserve
battery
life.
This
is
called
“Auto
Power
OFF”.
To
return
to
the
normal
state,
press
the
fully.
Ú
Page
40
called
the
Auto
Power
OFF.
This
setting
allows
you
to
set
the
time
when
the
camera
turns
off
halfway
until
the
image
becomes
focused.
[NORMAL]
: picture,
Equivalent
to
ISO100
(default)
data,
frame
advance
when
images
aredefaults.
played
back or during
formatting alarm
of the
The
options
are
displayed.
Stop
[RESET]
: Returns
settings
to
Flashing
[ the
],
[ color
]conditions
or their
[shutter
]being
Self-timer
in frame
operation
at a handshake
.
Compose
the
press
the
button
down
halfway,
and
press
it
down
The
white
frame
indicates
entire
image,
while
the
green
[
]
:
Photography
in
cloudy
POWER
button
again.
ENTERCompose
•
The
viewfinder
LED
turns
red
while
image
data
is
being
recorded
the
picture,
press
the
shutter
button
down
halfway,
and
press
it
down
• The
To
set
the
focus
orpicture.
exposure
forphotography
a subject
outside
the
center
the intended
theincamera
directly
The
camera
takes
the
automatically.
This
function
isthrough
not
activated
during
automatic
playback
( image,
Pagepoint
85) or
the [ only>
] PC
[2X]
:appearing
High-sensitive
equivalent
toofcolor
ISO200
SmartMedia™.
Note:
image
the
lens
will
be
The
display
returns
to<Histogram>
thumbnail
playback.
<Standard>
<Detailed
information>
<Image
Memo
shows
the
location
of
the
currently
enlarged
area.
halfway,
and
press
it
down
fully.
Ú
Page
40
]
:
Photography
in
bluish
fluorescent
light
[
fully.
Ú
Page
40
Setting
1
:
About
the
Auto
HH
Power
(FULL
OFF
HH
Function
)
Additional
Information,
“AUTO
POWER
OFF
(page
110)”
at
the
subject
or
desired
exposure
(lighting),
press
and
hold
the
shutter
button
halfway.
Now,
with
the
shutter
onto
the
SmartMedia™.
ON]
Writing
to SmartMedia™
in progress
mode.
Press
ENTER.
[4X]
:adapter
High-sensitive
photography
equivalent
toanother
color
ISO400
•Insert
We
recommend
copying
and
saving
important
datapower
onto
storage
medium (floppy disk, hard
displayed
for
[LCD
].[Power
fully.
Ú
Page
40
the
AC
power
plug
into
the
Pressing the
The
default
size
and
quality
of
the
image
can
be
reset
to
the
desired
combination.
Press
ENTER.
button
still
held
halfway
down,
you
can
turn
the
direction
of
the
camera
and
frame
your
image
with
the
focus
•
It
is
possible
to
play
back
any
images
in
any
folders
by
pressing
or
during
playback.
(For
details
ON
Increases
the
volume.
[ return
] MO
: Photography
inafter
reddish
fluorescent
light
The
camera
takes
the
picture.
Photographs
can
be
taken,
however,
do not
turn thepress
power
OFF.
To
to disk,
the
state
theset
Auto
Power
OFF
has been
executed,
the
POWER
button
etc.).
The
PREVIEW
manual
setting
Page
items
77
are
displayed.
Únormal
camera
takes
the
atmonitor.
the
exposure
time.
Zoom switch
to disk,
“T”
Current
Entireofimage
and
locked.
Press
the
shutter
button
down
fully
to in
complete
capturing
the image.
Red outlet.
[+
on picture
the
LCD
The
camera
is ready
for
burst
photography.
of2displayed
folder
Page
92)
]:the
mode:
In
the
Accessing
of
SmartMedia™
[ (HALF
Photography
in] is
incandescent
light
[Never
Setting
: exposure
HH
•]][is
When
shutter
speed
set
to
a)turn
speed
of
0.7 second
orprogress
slower,
photographs
taken
as extended
to
turn
the
power
onHH
again.
•During
remove
the
SmartMedia™
or
the
camera
offresult
while
recording
data or are
while
erasing
data
COLOR
Page
77
Ú
the
exposure,
the
viewfinder
LED
turns
orange.
position
Pressing the
•
Moving
the
camera
as
you
press
the
shutter
button
will
in
a
blurred
image.
Use
,
,
or
to
select
the
area
to
enlarge.
at Page
the
last
image
displays
the
first
image,
and
pressing
atwill
thebe
firstautomatically
image
displays
the
Pressing
During
[2X],
the
ISO
be
automatically
set
to
ISO200.
During
[4X],ofISO
setof
exposures
(Ú
68).
IfCarry
burst
photography
is to
set
the
shutter
speed
is setthe
to volume.
athe
speed
0.7
second
or more
in the
[ to
Tv ]
Decreases
out
steps
1will
2when
in
Photographic
(SmartMedia™
formatting).
actions
might
damage
ISO
Page
78
ÚFlashing
ItClose
about
twice
the
time
to complete
taking
the
photograph
duePDR-M81
to processing
ofenlargement
the
captured
[set
],These
[“Basic
] When
the
image
is not
in SmartMedia™.
focus.
the
SmartMedia™
cover.
Zoom switch to
“W”
•
The
PDR-M81
usesto
accurate
focus
mechanism.
However,
the
have
difficulty
last
image.
Adjust
the
display
area
enlarge
viewing
theto
white
and
[1takes
MINUTE]
(default)
ISO400.
• In
AEB
photography
(an
Page
71)while
orauto
burst
photography,
the shutter
speed
cannot be setmay
to 0.7
second
or longer.
Setting
3
:
HH
(SMALL
HH
)
Ú
mode,
the
shutter
speed
is
automatically
changed
1/2
second.
•image.
Use
only
the
SmartMedia™
specified
for
use
with
the
PDR-M81.
The
use
of
other
SmartMedia™
SHARPNESS
Page
79
mode)”
(page
109).
Select
[QUALITY]
Settings
(
focusing
or
not
be
able
to
focus
at
all
for
subjects
and
situations
such
as
the
following:
Ú
Before
you
use
aother
new
SmartMedia™
the
first during
time,
be
sure
tothe increased
Images
can
bevalue
rotated
by] pressing
playback.
Difference
between
[PRG]
and
[ for
] or
green
[2 MINUTES]
the
aperture
is
to
F2.9
(maximum
aperture
size),
shutter
speed
restricted
••• frames.
If
a
mode
than
[ set
suppressed
flash
mode
is
set
inthe
flash
photography,
thedark
shutterisspeed
is
•79
Processing
image
- When
subject
is distant and
- SmartMedia™
Subjects
moving
at
high
speed
could
damage
camera.
CONTRAST
Page
Ú[the
• to
The
write
protection
not
function
if in
write-protect
sticker
becomes
Use
a soft
dry cloth to
.thesecond.
on
the
SETUP
MENU
and
press
format
the
(may
Page
91).
rotates
an
image
counterclockwise,
and
pressing
rotates
clockwise.
Pressing
1/750
PDR-ACM1A
] •are
the
same
as
to
PDR-ACM1E
PDR-ACM1U
[PRG]
and
limited
tosecond.
between
1/2
second
and
1/250
* The
aboveitdirty.
menu
is
the
RECORDING
[3 MINUTES]
Charging
of
flash
progress
ON
When
there
are
objects
in
front
of
or
behind
the
subject
Very
shiny
subjects
such
as
a
mirror
or
car
body
SmartMedia™
is
aof
device.
Do do
notnot
bend,
drop,
or subject
SmartMedia™
to
DIGITAL
ZOOM
Page
• wipe
When
the
camera
isOnce
not79
inelectronic
be sure
to attach
the
lens
cap
provided
with[your
camera.
the
POWER
button
to
turn
the
power
off.
Memo
away
any
dirt.
ause,
sticker
ispress
peeled
off,
reuse
it.
Ú
Orange•Press
The
QUALITY
menu
isprecision
displayed.
combinations
the
automatically
mode.
MENU
inthe
•the
The
aperture
value
set
differ
to
the
actual
value
according
to
the
position
ofUK)
theorzoom
lens.
To
return
to
the
regular
display,
ENTER.
(Photos
cannot
be
taken
at
this
moment.)
(for
US
and
Canada)
If the
shutter
speed
is
set
to
1/350
second
or
less,
the
shutter
as
speed
an
animal
is
automatically
athe
cage
a]changed
person
in front
to 1/250
of a tree)
(for
European
Continent)
(for
Get
ready
to
take
the
photograph.
- above
Extremely
low
contrast
subjects
When
the
settings
are
made,
they
are
displayed
in(such
thepocket
following
order.
excessive
Also,
do
not
carry
SmartMedia™
the
ofx[trousers.
This
might
The
lens
cap
can
also
be
attached
to
attachment
following
the
above
steps
to prevent
it’sthe
LCD
79
Úshocks.
The
power
turns
off.
determined
shutter
speeds
and
aperture
-in Subjects
with
little
reflection,
such
as
hair
fur mode.
•• The
size
displayed
on
the
LCD
monitor
FULL
(320
240)
HALF
(160
xorsubject
120).
The
forced
flash
mode
or
]orred-eye
forced
flash
second
ifPage
the
flash
setting
is25)
changed
tothe
thestrap
[ ]becomes
- image
Subjects
that
have
low contrast
and
merge
into
Loading
the
batteries
(Ú
Page
and
the
SmartMedia™
(Ú
Page
31)
into
the
camera.
being
lost.
• Flash
photography
and
burst
photography
are
not
possible.
Flashing
SmartMedia™
to
excessive
force
when
you
sit
down,
damaging
the
SmartMedia™.
Hardware
malfunction
Subjects
with
no
solidity,
such
as
smoke
or
flames
the
background
(such
as
white
walls
or
subjects
Attach
the
lens
cap
when
you
are
not
using
the
camera.
values.
However,
their
operation
capability
movies
made
in
FULL
size
is
displayed
on
the
entire
LCD
monitor,
and
those
made
in
HALF
size
is
If
the
[
]
forced
flash
or
[
]
red-eye
forced
flash
mode
is
set
in
flash
photography
when
the
•
In
movie
mode,
ISO
will
be
automatically
set
between
ISO100
and
ISO400
regardless
of
its
setting.
* •Use
Histogram
dressed
inthe
theSmartMedia™
same
color
as
the
background)
-attach
Subjects
viewed
through
glass
Turn
offor
the
power
tothe
retract
the
lens
unit,
and then
the
lens
cap.
The
image
taken
in
exposure
photography
mode
may
be
blurred.
or
to
select
the
desired
setting
from
the
tab
menu
, and
press
HH
HH
HH
Do•not
use
store
in
environments
likely
to
be
affected
byisstatic
electricity
or
is
different
as
shown
in
the
right
table.
displayed
in
center
ofspeed
the
screen.
shutter
speed
is
set
to
a
of
0.7
second
or
more,
the
shutter
speed
automatically
changed
to
Press
POWER
button
tothe
turn
power
on.subject.
A electrical
histogram
isturn
a graphic
representation
ofthe
theistones
of the
The horizontal
histogram
• Do
If the
the
image
cannot
be
focused,
thelens
focus
automatically
fixed to infinity.
(When theaxis
flashofisthe
necessary
not
the
power
on
with
cap
attached.
noise.
1/2
second.
ENTER.
*the
The
above
AC adapter
is US/Canada
Turning
the
Power
On
Ú
Page
38
+
shows
the
brightness
(increasing
brightness
from
left
to
right)
and
vertical
axis
shows
the
number
at
this
time,
it
is
simultaneously
fixed
to
illuminate
objects
1.5
meters
(five
feet)
away.
During
macro
•This
Dosaves
use
orsettings,
store
SmartMedia™
very
hot,
humid
oraperture
corrosive
If the
shutter
speed
value
isimages,
set toin1/1000
second,
the
value
is limited
to
F8type
andAC
F3.4.
•• not
When
playing
back
movie
switching
isthe
between
standard
and
image
only.
(O
:environments.
possible
Xbetween
: not
the
and
returns
to
RECORDING
MENU.
type.
European
andpossible)
UK
photography,
the flash
islevel.
alignedthe
withdisplay
the wide
position.)
of pixels
at each brightness
Downloaded From
camera-usermanual.com
adapters differ in shape.
--110
20 -40
80
88
Displaying a List of Images (Thumbnail Display)
Taking
Photographs
Set the mode dial to [
].
The last image frame appears on the LCD monitor.
Playing
Back Images
Press ENTER.
Nine images are displayed simultaneously.
Use , ,
or
to move the cursor to select the
image to be displayed at regular size.
Memo
Downloaded From camera-usermanual.com
- 83 -
or
during playback in the
Additional
Information
• It is possible to play back any images in any folders by pressing
thumbnail display mode. ☞ About Folders ➲ Page 92
Other
Applications
* In the thumbnail display mode,
] icon is displayed for the
[
movie data.
Handy
Functions
The selected image is displayed at its regular size.
Erasing
Images
The cursor selected image is displayed with green frame.
Pressing the buttons continuously moves the cursor continuously.
Press ENTER.
Getting
Ready
Nine reduced images are simultaneously displayed on the LCD monitor. This manual calls this display “thumbnail
display.”
This feature is useful, for example, when there are many images recorded in the SmartMedia™. After you have
displayed the thumbnail display, you can select the desired image and display it in the regular display.
Changing
the
Preset
Conditions
(RECORDING
MENU)
Photography
in
the
Program
Mode
Setting
Names
Playing
Back
the
of
Photographed
Parts
Image
Size
and
Quality
(Single-Frame
Playback)
Extended
Exposure
Photography
(Bulb
Photography)
Erasing
Images
(Erase
Frame)
(continued)
Manual
Attaching
Using
How
Taking
Enlarging
Playback
About
Turning
to
Photographs
the
SmartMedia™
Press
Settings
the
Photographed
of
Power
the
Power
Multi
Shoulder
Continuously
Outlet
Shutter
Image
On/Off
Images
Strap
Pictures
Button
(Zoom
(Burst
Playback)
Photography)
Taking
Erasing
Button
Photographs
Folders
and
(All
LCD
Images
Continuously
Monitor
in
aImages
Folder/All
(Burst
Display
Photography)
Folders)
(In
Playback
(continued)
(continued)
Mode)
Definitions
Separately
of
the
Accessories
Color
of
the
Viewfinder
LED
Taking
and
Playing
Back
Photographs
on
aMode
TV
(continued)
Changing
the
Preset
Conditions
(RECORDING
MENU)
(continued)
Exposure
Compensation
in
the
Shutter
(continued)
Speed-priority
(continued)
About
Basic
Settings
SmartMedia™
in
(Sold
the
mode)
Aperture-priority
(continued)
Mode
(continued)
LCD
Monitor
Display
(during
photography)
(continued)
Manual
Settings
(continued)
Playing
Photography
Installing
Back
Movies
batteries
(Auto
Photography)
(continued)
(continued)
(continued)
Names
of
Parts
(continued)
Getting
Ready
The shutter
camerabutton
automatically
adjusts the
shutter
and
the aperture
value
according
to the
brightness
of an
can be pressed
down
in twospeed
stages:
halfway
down and
fully
down. When
pressed
halfway
down,
This
“SmartMedia™”
Set
Play
Automatically
The
the
following
mode
shoulder
menu
back
size
photographed
is(number
used
for
items
strap
plays
setting
isadapter
for
athe
is
are
back
storage
of
taking
handy
also
the
pixels)
still
the
basic
available
subjects
for
medium
images
16
and
carrying
images
settings
quality
one
for
that
as
saving
separately
your
image
to
require
(compression
be
camera
used
images
atseveral
a
sold
for
around.
inthat
photography
items.
ratio)
seconds
the
you
multi
of
have
the
photography
to image
photograph
in
photographed.
to
[ second
be
mode
],photographed.
such
[be
Even
in
asquick
]for
firework
or
if Europe,
the
[You
succession.
camera’s
displays
] photography
power
at the
Enlarges
selected
portions
of
images
being
played
back
at
two
levels.
Images
can
displayed
enlarged
when
In
You
this
can
color
mode,
manually
of
the
photographs
viewfinder
adjust
settings
are
LED
taken
indicates
such
continuously
asphotographed
the
exposure
state
atof
control,
atime.
the
maximum
camera.
white
speed
balance,
The
ofthe
0.8
metering
system,
intervals.
continuous
This
item
switches
display
on
the
LCD
monitor
when
playing
back
photographed
images.
can
switch
If
you
the
AC
(sold
separately:
PDR-ACM1A
for
the
US/Canada,
PDR-ACM1E
PDR-ACM1U
Mode
Effective
dial
Subjects
and
Set
Values
TM
Press
.of
aperture
value.
SYSTEM
Turning
Exposure
ISO
OSD
In
[prevent
[use
LANGUAGE
the
]the
INFO.
mode
control
(EXP.)
On
Close
the
SmartMedia™
cover.
Slide
the
SmartMedia
cover
release
knob
in
the
Take
photographs
or
or
battery
to
to
select
or
play
[that
the
slide
]them
or
shutter
it
[ the
back.
,]will
and
speed.
and
lock
press
Look
Use
through
to
select
the
[adjust
viewfinder
]use
and
press
to
compose
ENTER.
the
picture.
To
continue
erasing
images,
repeat
the
above
procedure
2.
.is
AF
(auto-focus)
and
AE
(auto
exposure)
are
set.
When
pressed
fully
down,
the
camera
takes
aspace
picture.
object.
This
mode
enables
carefree
photographing
similarly
to
selecting
[stable
]photographs.
in
[ from
]settings”,
mode.
Itrepeatedly
is
to
night.
To
is
Change
modes.
turned
When
the
OFF,
your
setting
using
the
camera
images
this
according
mode,
from
saved
dropping
be
to
sure
how
on
the
the
to
during
SmartMedia™
image
a(size,
photography,
tripod
is
to
to
be
keep
used
not
hang
the
and
be
camera
erased.
the
the
shoulder
remaining
SmartMedia™
strap
and
amount
prevent
around
can
ofstep
your
distortion
be
neck.
inpossible
the
of
images.
Relationship
between
your
camera
and
accessories
Connecting
tocalled
Other
Devices
(page
123)
being
played
back
one
image
at
acover,
time.
The
meaning
maximum
of
number
LED
color
of
photographs
differ
according
can
to
be
taken
mode
continuously
dial
setting.
three
photography
mode,
and
take
photographs
at
these
settings.
These
are
“Manual
which
are
saved
display
to
show
aPower
list
detailed
information
compression
ratio,
shutter
speed,
aperture,
etc.)
or
you
can
for
the
UK)
in
a
room
with
amay
power
outlet,
you
can
take
photographs
for
an
extended
period
of
time.
This
also
☞
➲
Item
QUALITY
Options
Notes
SmartMedia™
VIDEOon
OUT
White Balance (W.B.)
Write
Protection
Removing
the Batteries
ISO
[ POWER
]
AUTO
OFF
Setting items
Turning
the
Power
Off
Using
the
LCD
Monitor
Additional
Information
Other
Applications
Handy
Functions
Erasing
Images
Playing
Back Images
Taking
Photographs
Tab menu
The
tab
is
displayed.
setting
isbattery
as
follows:
Make
sure
that
the
issystem
firmly
closed.
Details
image
ofmenu
operation
isrange
saved
are
or
erased,
the
same
and
as
the
taking
camera
photographs
is
then
ready
and
to
playing
take
photographs.
them
back
onon
the
LCD After
monitor.
If
you
use
the
viewfinder
to
take
photographs,
the
photography
Set
the
mode
dial
to
[cover
].settings
direction
of
the
arrow
to
open
cover
.the
ENTER.
change
the
white
and
the
metering
in(the
program
mode.
erased
SmartMedia™.
and
reused.
For
details
on
these
accessories,
refer
to
the
Instruction
Manual
for
the
accessory
you
are
using.
(information
Movies
images
photographed
in
the
multi
mode
Page
cannot
be
displayed
using
the
zoom
playback
Images
even
if the
are
camera
not
recorded
is
turned
directly
off.
SmartMedia™
but
are
stored
within
the
buffer
memory.
display
histograms,
etc.
prevents
failed
photographs
due
to
battery
wear
or
failed
of
data
to
a
PC.
details
handling
the AC
➲
Set
Sets
the
thebalance
whether
color
: /or
Photography
mode
language
not
to
and
return
photographic
of
in
menus
the
program
displayed
sensitivity
in
the
(default)
on
SETUP
the
at51)
which
LCD
(temporarily
MENU
Page
monitor.
to
image
62)
the
original
is For
to
be
factory
recorded.
settings.
feeds
the
image
•transfer
Each
press
of
•How
Copying
of
printed
text
(black
on
white
paper)
set
the
time
(➲
114)
F8
/display
F6.8
F5.6
/18.
F4.8
/Page
/and
F3.4
/mode
F2.9
to
take
photographs
Page
41
1/1000,
1/750,
1/500,
1/350,
1/250,
1/180,
1/125,
range
may
differ
from
the
actual
image.
InLCD
this
case,
use
the
LCD
Press
the
shutter
button
down
halfway
.1/90,
Set
the
mode
dial
to
[ F4.0
],
[characters
]reset.
or
[selected
].higher
SmartMedia™
having
the
following
storage
capacity
can
be
on
your
current
as
of
March
2000)
feature.
The
last
cover
recorded
image
opens
frame
image
appears
appears
on
the
on
the
LCD
monitor.
monitor.
photography
is
finished,
check
the
images
record
the
ones
tocamera.
SmartMedia™.
[TIME&DATE,
]
:
Erases
images
in
the
selected
folder
folders.
adapter,
be☞
sure
to
read
page
•
2x-speed
playback
is➲
performed
Make
sure
that
the
SmartMedia™
is
correctly
loaded.
(
Page
31)
byused
one
frame.
Warning:
Noise
:OSD
Photography
increases
LANGUAGE
when
incurrently
aperture-priority
will
the
not
ISO
be
is for
changed
mode
to
(and
Page
settings.
63)
•
Backlit
portraits
[PROTECTED]
on
the
LCD
monitor,
cancel
the protection
(➲ Page 108) or
remove
How
to
play
back
images
Page
80
1/60,
1/45,
1/30,
1/20,
1/10,
1/8,
1/6,
1/4,
1/3, 115
1/2,
monitor
for
photography.
AF
(auto-focus)
and
AE
(auto
exposure)
(the
Additional
Information,
: value
English
(default)
➲the
Pass
Set
the
out
mode
end
steps
of
dial
1the
to
to
shoulder
4[1/15,
either
]].LCD
or
inspeed-priority
[strap
“Photography
through
].
the
in
the
strap
Shutter
speed-priority
Mode”
isdisplayed
held
down.
the
duration
that
2MBCarry
/4MB/8MB/16MB/32MB/64MB/128MB
the
mode
dial
to
[isin
(all
3.3
types)
To
]•the
adjust
: When
Erases
the
all
brightness
folders
recorded
of
on
monitor
SmartMedia™.
Page
[Set
➲1-frame
☞
•V
feed
is continued
for the
The
aperture
and
the
shutter
speed
corresponding
to( that
:write-protection
Photography
shutter
mode
Page
65)
• 0”7,
bright
scenes
(such
as
and
highly
reflective
subjects
•the
You
can
also
carry
out
step
8snowfields)
while
verifying
the
image
step
7.
DPOF
(in
Page
102).
➲to
Glossary)
start
to
function.
1”,
1”5,
2”,
3”,
4”,
6”,
8”,
10”,
15”
•Very
Do
not
remove
or monitor
load
the
batteries
or
disconnect
or
connect
the
AC
adapter
while
the camera
is mode.
on. This
:POWER
Japanese
:LCD
Equivalent
color
ISO100
Carry
Set
Use
out
or
mode
steps
to
dial
select
1
to
to
2[erased,
the
“Manual
].
images
photographed
Settings”
(page
in
58).
the
multi
photography
You can also
the
PC
card
adapter
and
floppy
disk
adapter
( in
123)
sold
separately
to transfer
●
Changing
the
display
Page
116
Theconnect
images
or
folders
are
and
the
camera
returns
toPage
the
is
held
down.
duration
that
➲
value
are
displayed
on
the
LCD
monitor.
If
the
appropriate
(page
attachment
65)
or
on
in
“Photography
the
camera.
in
the
Full
Manual
Mode”
(page
67).
Press
the
button
to
turn
the
power
on.
full
manual
mode
(
Page
67)
:
Photography
in
Press
the
MENU
button.
• •Shots
predominantly
of
sky
Even
ifreturn
photography
is disconnect
terminated
midway
before
capturing
three
images
bythe
releasing
theAC
shutter
• AF
If
you
take
aup
photograph
after
erasing
an
athis
number
continuing
from
last Ifphotographed
When
or
AE
are
locked,
the
beep
tone
( Page
111)
sounds
and
the
Use
ormade
to
change
the
setting
inimage,
the
menu,
might
the
manual
settings
tosame
their
defaults.
Iftab
happens,
manually
set
conditions
again.
:
High-sensitive
photography
equivalent
to
color
ISO200
(default)
Before
you
connect
or
the
AC
adapter,
be
sure
to
turn
the
camera
OFF.
the
adapter
is
Press
the
image
quality
button
to
select
the
preset
combination
cannot
be
set
even
if
the
shutter
speed
is
adjusted
to
images to a
PC.
16MB
(SM-M1600D)/32MB
(SM-M3200D)/64MB
(SM-M6400D)/128M
(SM-M1280D)
The
respective
last
image
mode.
frame
appears
on
LCD
monitor.
You
can
also
select
the
image
by
the
operation
as
for
thumbnail
display
(
Page
83).
➲
Carry
out
steps
1
to
on
page
109.
When
the
camera
is
turned
on,
set
the
mode
dial
to
thethe
desired
The
shutter
speed
and
the
aperture
value
corresponding
todisplay
the
All
descriptions
inor
this
Instruction
Manual
are
for
when
language
is set
to [ENGLISH].
Press
or
to
select
the
image.
button,
images
already
photographed
can
be
saved
and
erased
by playback
the
method.
image
is
assigned
as
image
number.
The
viewfinder
RECORDING
LED
turns
MENU
green.
is2
displayed.
•press
The
image
the
photograph
is
taken
is
slightly
less
clear
than
images.
(This
is 109,
connected
disconnected
with
the
power
ON,
camera
settings
may
beabove
reset
(SET-UP
Page
and
ENTER.
:before
High-sensitive
photography
equivalent
to
color
ISO400
its
the
shutter
speed
isthe
displayed
inthe
red.
To limit,
cancel
erasing
of
image
data,
select
[monitor.
]Photography,
and
press
ENTER.
quality
and
size,
while
viewing
indication
on
the
starts
a
reverse
•
The
press
of
mode.
shutter
speed
are
displayed
on
the
LCD
If
the
appropriate
The
length
of
time
to
capture
images
varies
according
to
the
photographic
conditions.
•
Images
can
also
be
erased
in
the
thumbnail
mode.
In
this
case,
the
camera
enters
the
single
frame
Select
[SYSTEM
INFO.]
on
the
SETUP
MENU
and
because
television
displays
images
at
a
lower
resolution.)
•
Spotlit
subjects,
particularly
against
dark
backgrounds
Manual
Settings
Page
58)
orPage
the
camera
malfunction.
however,
is
in
this
state.
feeds the
image
•may
Each
press
oftoinbegin
EXP.
].
To
cancel
changing
of
settings,
press
.you
Use
or
todial
select
the
frame
want
to
enlarge.
Press
the
or
Zoom
to
switch
select
[( S/C
].isphotography
21)
towards
“T”
playback.
●
]possible
is
selected,
[NO
IMAGE]
displayed
after
all
folders
When
➲
playback.
Press
Set
mode
in
the
to
[ sure
Tv
mode,
].the
or
press
or
the
shutter
button
fully
Before
photography,
make
that
the
lens
cap
has
been
combination
cannot
be
set
even
ifflash
aperture
isin.black
adjusted
to its
playback)
mode,
and
enters
the
thumbnail
playback mode after the image is erased.
status
display.
]or
mode:
In
[[playback
Press
the
display/info
button.
Self-timer
photography
and]down
are
not
possible.
•the
The
display
unit
varies
according
to
the
output
system.
•theCopying
of (frame
printed
text
(white
characters
on
paper)
.playback
press
reverse
by
one
frame.
This
adapter
allows
SmartMedia™
to
be
used
as
3.5"
floppy
disk.
have
been
erased
(unless
the
SmartMedia™
contains
protected
You
can
also
select
the
image
by
the
same
operation
as
for
thumbnail
playback
(➲ [4X],
PageISO
83).
Automatic
begins.
•
Playback
becomes
2x-speed
to
reduce
aperture
size.
Press
to
increase
aperture
size.
Press
camera
takes
a
picture.
The
manual
setting
removed
the
camera.
limit,
aperture
value
isbe
displayed
in
red.
Photography,
however,
the
[Scenes
M
]from
mode
tomenu
set
the
shutter
speed
to simultaneously
0.7
second
During
[2X],
the
ISO
will
automatically
set
between
ISO100
ISO200.
During
be
set
the
quality
and
size
Page
112
•the
With
the
NTSC
system,
images
can
be
displayed
on the LCD
monitor
and TVwill
during
•To
with
low
reflectivity,
such
as
shots
green
or
dark
foliage
Each
press
of
the
display/info
button
switches
the
display
•of1-frame
feed
isand
continued
The
SYSTEM
INFO.
displayed.
reverse
for
the
duration
This
adapter
isplayback
inserted
into
the],
floppy
your
PC,
allowing for the
images).
The
viewfinder
LED
turns
redis
image
data
being
recorded
onto
Insert
the
adapter
connector
plug
into
the
DC
IN
values
are
displayed
In
the
photography
modes
([while
[and ISO400.
]disk
oris
[ drive
]),on
the
lens
photography
and
playback.
is
possible
inAC
this
state.
automatically
set
between
ISO100
is
held
down.
format
as
follows:
duration
that
Note:
The
larger
the
F
value,
the
smaller
the
aperture
size
become
or
longer.
•Press
Remove
and
insert
SmartMedia™
with
the
camera’s
power
turned
off.Aperture value
is
held
down.
that
To
quit
the
SETUP
MENU,
change
the
mode
dial
setting.
Shutter
speed
Adjust
the
zoom
ratio
by
the
Zoom
switch.
(Zoom
to
display
option
menu,
press
or
to
images
recorded
on
the
SmartMedia™
to
be
transferred
to
the
PC.
the
SmartMedia™.
Sets
video
output
system
according
to
country
in
which
your camera
is used.
on
the
left
ofthe
the
LCD
Press
the
shutter
button
down
halfway
and
press
5V
terminal
on
the
camera.
extends
from
the
camera
body.
•the
PAL
system,
images
cannot
bethe
displayed
When a cable
is connected, only
and
versa.
the
image
quality
button
switches
the
quality
and
size
Gently
insert
the
SmartMedia™
as
far
as
it, simultaneously.
can
go
[Pressing
]vice
isWith
displayed
on
the
LCD
monitor.
•select
Recorded
data
may
bepress
erased
(destroyed)
in
the
situations
listed
below. Note that Toshiba
White
Balance
Additional
Information,
Glossary
to
increase
shutter
speed.
Pressand
to
decrease
shutter
speed.
Press
Press
or
to
move
forward
reverse.
PRG
]
and
ENTER.
]
and
press
ENTER.
[
switch
Page
21)
TV
display
is
available.
monitor
screen.
➲
When
the
camera
is
turned
on,
the
Auto
Power
OFF
function
settings
infully
the
following
order.
it
down
. system
Press
or
to
select
the
item
you
desired
toisloss
set,
with
SmartMedia™
electrodes
(metal
contacts)
Additional
Information,
Glossary)
(white
Corporation
accepts
no
whatsoever
for
the
of recorded
data enters
in these
• the
When
allNTSC
images
in
a responsibility
folder
are
erased,
that
folder
itself
also(destruction)
erased.
➲
The
camera
determines
the
balance
by
averaging
the
various
kinds playback
of light
that actually
●
to
to
next
frame/
to“T”
go
back
one
To
prevent
valuable
data
being
erased,
attach
the
write••advance
With
the
PAL
images
are
played
back
with
apressing
black
frame
•frame
After
pause
is
cancelled,
the
Zoom
switch
to
the
will
the
image.
Pressing
ENTER
the
setting.
or
,, SmartMedia™
and
manual
Exposure
compensation
Page
69)
using
When
[for
M
]selects
isissystem,
selected
on
the
[ halfway
EXP.
]remove
option
menu,
orsurrounded.
the
shutter
speed
setting
becomes
operational.
Never
open
the
SmartMedia™
cover
orenlarge
the
while
anmakes
is
being
recorded.
This
or
and
manual
setting
(image
Page
58)
or
film
speed
Exposure
compensation
((from
Page
69)
using
Reverse the
procedure
“Loading
the
Batteries”
and
remove
the
batteries.
•facing
Pressing
the
shutter
button
down
adjusts
the
exposure,
• Playback
paused.
PAL
system
(➲
Additional
Information,
Glossary)
situations:
the
lens.
This
setting
allows
you
to
set
in
advance
the
white
balance
when
taking
photographs
under
and
press
ENTER.
the
rear
of
the
camera.
For
the
US/Canada:
PDR-ACM1A
Holding
down
or
moves
forward
or
reverse
continuously.
resumes
at
the
last
state
that
was
protect
sticker
at
the
write-protect
area.
Data
can
no
longer
be
may
corrupt
the
data
on
the
SmartMedia™
or
damage
the
SmartMedia™
itself.
possible,
but
does
not
make
the
exposure
compensation
possible. However the exposure value
is
To
return
normal
press
the
Zoom
switch
towards
setting
Page
58)magnification,
or film
speed
setting
( the
Page
78)
using
ENTER
Pass
the
shoulder
strap
through
loop
and
pull.
setting
(( toPage
78)
using
ENTER
are
also
possible.
and
pressing
the
shutter
button
fully
takes
the
shot.
TM[ is down
When
the
SmartMedia™
used
incorrectly
by
the
user
or
a
third
party
[
],
]
or
[
]
AE
or
AF
are
locked
with
the
shutter
button
held
half
specific
lighting
conditions.
For
Europe:
PDR-ACM1E
active
before
the
pause.
Firmly
insert
the
SmartMedia
as
far
as
it
can
go.
displayed
on is
the
LCD
monitor.
Press
ENTER.
recorded
or setting
erased
from
SmartMedia™.
Toon
write
oraterase
data
from is to be recorded.
Sets
the
color
mode
and
photographic
sensitivity
which
the
image
“W”.
are
also
possible.
The
default
different
depending
the
destination
country/area.
Use
or
to
select
the
desired
item
Press
ENTER,
nine
images
are
displayed
simultaneously.
• no
If
you
shoot
a
still
picture,
when
preview
is
set
to
ON
(
Page
77),
down.
If
operation
is
carried
out
for
a
fixed
amount
of
time
(default:
about
one
minute),
power
ON
When
the
SmartMedia™
is
exposed
to
static
electricity
or
electrical
noise
Forimage
the Noise
UK:
PDR-ACM1U
:off
Displays
the
firmware
version
ofto
this
camera.
SmartMedia™,
peel
the
sticker.
camera
ready
to
take
photographs.
Warning:
increases
when
the
ISO
is
changed
higher
settings.
isis
displayed
and
a
white
frame
and
green
Green The
Compose
picture,
press
the
shutter
button
down
halfway,
and
press
it
down
:the
Automatic
adjustment
(default)
Display
Page
83
theThumbnail
recorded
image
is
displayed
on
for
about
two
]specifications
Standby
mode
[enlarged,
☞
➲
If
no
operation
is
carried
out
a screen
fixed
amount
offrom
time
(default:
about
1shutter
minute),
thewear.
power
is
turned
TM
consumption
is
set
to
its
minimum
state
(power
almost
off)that
to
prevent
battery
This
is
.in
and
press
When
the
SmartMedia™
isfor
removed
ordarkens
the
camera
isPage
turned
off
while
recording
erasing
The
image
the
LCD
monitor
sometimes
the
time
the
button
isdata,
pressed
down
details,
refer
to
the
of
AC
information.
adapter
➲
127.
: on
Displays
the
SmartMedia
Playback
returns
to
the
start
ofturned
the
movie.
☞ ••-For
frame
are
displayed
the
LCD
monitor.
:
Photography
outdoors
Default
setting:
seconds.
off
to
preserve
battery
life.
This
is
called
“Auto
Power
OFF”.
To
return
to
the
normal
state,
press
the
fully.
Page
40
called
the
Auto
Power
OFF.
This
setting
allows
you
to
set
the
time
when
the
camera
turns
off
halfway
until
the
image
becomes
focused.
: picture,
Equivalent
to
ISO100
(default)
data,
frame
advance
when
images
aredefaults.
played
back or during
formatting alarm
of the
The options
are
displayed.
: Returns
settings
to
Flashing
[ the
],
[ color
]conditions
or their
[shutter
]being
Self-timer
in frame
operation
at a handshake
.
Compose
the
press
the
button
down
halfway,
and
press
it
down
The
white
frame
indicates
entire
image,
while
the
green
:
Photography
in
cloudy
POWER
button
again.
•
The
viewfinder
LED
turns
red
while
image
data
is
being
recorded
Compose
the
picture,
press
the
shutter
button
down
halfway,
and
press
it
down
• The
To
set
the
focus
orpicture.
exposure
forphotography
a subject
outside
the
center
the intended
theincamera
directly
The camera
takes
the
automatically.
This
function
isthrough
not
activated
during
automatic
playback
(➲image,
Pagepoint
85) or
the [ only>
] PC
:appearing
High-sensitive
equivalent
toofcolor
ISO200
SmartMedia™.
Note:
image
the
lens
will
be
The
display
returns
to<Histogram>
thumbnail
playback.
<Standard>
<Detailed
information>
<Image
shows
the
location
of
the
currently
enlarged
area.
halfway,
and
press
it
down
fully.
Page
40
:
Photography
in
bluish
fluorescent
light
fully.
Page
40
About
the
Auto
Power
(FULL
OFF
Function
)
Additional
Information,
“AUTO
POWER
OFF
(page
110)”
at
the
subject
or
desired
exposure
(lighting),
press
and
hold
the
shutter
button
halfway.
Now,
with
the
shutter
onto
the
SmartMedia™.
ON]
Writing
to SmartMedia™
in progress
mode.
Press
ENTER.
:adapter
High-sensitive
photography
equivalent
toanother
color
ISO400
•Insert
Wedefault
recommend
copying
and
saving
important
datapower
onto
storage
medium (floppy disk, hard
displayed
for
[LCD
].[Power
fully.
Page
40
the
AC
power
plug
into
the
The
size
and
quality
of
the
image
can
be
reset
to
the
desired
combination.
Press
ENTER.
button
still
held
halfway
down,
you
can
turn
the
direction
of
the
camera
and
frame
your
image
with
the
focus
•
It
is
possible
to
play
back
any
images
in
any
folders
by
pressing
or
during
playback.
(For
details
ON
: Photography
inafter
reddish
fluorescent
light
The
camera
takes
the
picture.
Photographs
can
be
taken,
however,
do not
turn thepress
power
OFF.
Todisk,
return
to disk,
the
normal
state
theset
Auto
Power
OFF
has been
executed,
the
POWER
button
MO
etc.).
The
PREVIEW
manual
setting
Page
items
77
are
displayed.
camera
takes
the
atmonitor.
the
exposure
time.
Current
Entireofimage
and
exposure
locked.
Press
the
button
down
fully
to in
complete
capturing
the image.
Red outlet.
[In the
on picture
the
LCD
The
camera
is ready
for
burst
photography.
of displayed
folder
Page
92)
]:the
mode:
➲shutter
Accessing
of
SmartMedia™
[ (HALF
Photography
in] is
incandescent
light
•] [is
When
speed
setshutter
to
a)turn
speed
of
0.7 second
orprogress
slower,
photographs
taken
as extended
to Never
turn
the
power
on 77
again.
•During
remove
the
SmartMedia™
or
the
camera
offresult
while
recording
data or are
while
erasing
data
COLOR
Page
the
exposure,
the
viewfinder
LED
turns
orange.
position
•
Moving
the
camera
as
you
press
the
shutter
button
will
in
a
blurred
image.
Use
,
,
or
to
select
the
area
to
enlarge.
the
last
image
displays
the
first
image,
and
pressing
atwill
thebe
firstautomatically
image
displays
the
Pressing
During
[2X],
the
ISO
be
automatically
set
to
ISO200.
[4X],ofISO
setof
exposures
( at Page
68).
IfCarry
burst
photography
is to
set
the
shutter
speed
is set During
to athe
speed
0.7
second
or more
in the
[ to
Tv ]
out
steps
1will
2when
in
Photographic
(SmartMedia™
formatting).
actions
might
damage
ISO
Page
78
Flashing
ItClose
takes
about
twice
the
time
to complete
taking
the
photograph
duePDR-M81
to processing
ofenlargement
the
captured
[set
],These
[“Basic
] When
the
image
is not
in SmartMedia™.
focus.
the
SmartMedia™
cover.
•
The
PDR-M81
usesto
accurate
focus
mechanism.
However,
the
have
difficulty
last
image.
Adjust
the
display
area
enlarge
viewing
theto
white
and
ISO400.
• In
AEB
photography
(an
Page
71)while
orauto
burst
photography,
the shutter
speed
cannot be setmay
to 0.7
second
or longer.
(SMALL
)
mode,
the
shutter
speed
is
automatically
changed
1/2
second.
•image.
Use
only
the
SmartMedia™
specified
for
use
with
the
PDR-M81.
The
use
of
other
SmartMedia™
SHARPNESS
Page
79
mode)”
(page
109).
Select
[QUALITY]
Settings
(
focusing
or
not
be
able
to
focus
at
all
for
subjects
and
situations
such
as
the
following:
Before
you
use
aother
new
SmartMedia™
the
first during
time,
be
sure
tothe increased
Images
can
bevalue
rotated
by] pressing
playback.
[ for
] or
green
the
aperture
is
to
F2.9
(maximum
aperture
size),
shutter
speed
restricted
•• frames.
If
a
mode
than
[ set
suppressed
flash
mode
is
set
inthe
flash
photography,
thedark
shutterisspeed
is
•79
Processing
image
- When
subject
is distant and
- SmartMedia™
Subjects
moving
at
high
speed
damage
the
camera.
CONTRAST
Page
• to
The
write
protection
not
function
if in
write-protect
sticker
becomes
Use
a soft
dry cloth to
.thesecond.
oncould
the
SETUP
MENU
and
press
format
the
(may
Page
91).
an
image
counterclockwise,
and
pressing
rotates
clockwise.
Pressing
1/750
PDR-ACM1A
] •are
the
same
as
to
PDR-ACM1E
PDR-ACM1U
[PRG]
and
[ rotates
limited
tosecond.
between
1/2
second
and
1/250
* The
aboveitdirty.
menu
is
the
RECORDING
Charging
of
flash
progress
ON
When
there
are
objects
in
front
of
or
behind
the
subject
Very
shiny
subjects
such
as
a
mirror
or
car
body
SmartMedia™
is
aofisprecision
device.
Do do
notnot
bend,
drop,
or subject
SmartMedia™
to
DIGITAL
ZOOM
Page
• wipe
When
the
camera
isOnce
not79
inelectronic
be sure
to attach
the
lens
cap
provided
with[your
camera.
the
POWER
button
to
turn
the
power
off.
away
any
dirt.
ause,
sticker
ispress
peeled
off,
reuse
it.
Orange•Press
The
QUALITY
menu
displayed.
combinations
the
automatically
mode.
MENU
inthe
•the
The
aperture
value
set
differ
to
the
actual
value
according
to
the
position
ofUK)
theorzoom
lens.
To
to
the
regular
display,
ENTER.
(Photos
cannot
be
taken
at
this
moment.)
(forreturn
US
and
Canada)
If the
shutter
speed
is
set
to
1/350
second
or
less,
the
shutter
as
speed
an
animal
is
automatically
athe
cage
a]changed
person
in front
to 1/250
of a tree)
(for
European
Continent)
(for
Get
ready
to
take
the
photograph.
- above
Extremely
low
contrast
subjects
When
the
settings
are
made,
they
are
displayed
in(such
thepocket
following
order.
excessive
shocks.
Also,
do
not
carry
SmartMedia™
the
ofx[trousers.
This
might
The
lens
cap
can
also
be
attached
to
attachment
following
the
above
steps
to prevent
it’sthe
LCD
79
The
power
turns
off.
determined
shutter
speeds
and
aperture
-in Subjects
with
little
reflection,
such
as
hair
fur mode.
•• The
size
displayed
on
the
LCD
monitor
FULL
(320
240)
HALF
(160
xorsubject
120).
The
forced
flash
mode
or
]orred-eye
forced
flash
second
ifPage
the
flash
setting
is25)
changed
tothe
thestrap
[ ]becomes
- image
Subjects
that
have
low contrast
and
merge
into
Loading
the
batteries
(
Page
and
the
SmartMedia™
(
Page
31)
into
the
camera.
being
lost.
• Flash
photography
and
burst
photography
are
not
possible.
Flashing
SmartMedia™
to
excessive
force
when
you
sit
down,
damaging
the
SmartMedia™.
Hardware
malfunction
Subjects
with
no
solidity,
such
as
smoke
or
flames
the
background
(such
as
white
walls
or
subjects
Attach
the
lens
cap
when
you
are
not
using
the
camera.
values.
However,
their
operation
capability
movies
made
in
FULL
size
is
displayed
on
the
entire
LCD
monitor,
and
those
made
in
HALF
size
If the
[ ]mode,
forcedISO
flash
[ automatically
] red-eye set
forced
flash mode
is and
set in
flash photography
the is
• In
movie
willorbe
between
ISO100
ISO400
regardless ofwhen
its setting.
dressed
inthe
theSmartMedia™
same
color
as
thelens
background)
-attach
Subjects
viewed
through
glass
Turn
offor
the
power
tothe
retract
the
unit,
and then
the
lens
cap.
The
image
taken
in
photography
mode
may
be
blurred.
or
to
select
the
desired
setting
from
the
tab
menu
, and
press
•Use
Do•not
use
store
in
environments
likely
to
be
affected
byisstatic
electricity
or
is
different
as
shown
the
right
table.
displayed
in
ofspeed
the
shutter
speed
is center
set
toin
aexposure
of
0.7
second
or
more,
the
shutter
speed
automatically
changed
to
Press
POWER
button
toscreen.
turn
power
on.
A electrical
histogram
isturn
a graphic
representation
ofthe
theistones
of the
subject.
The horizontal
histogram
• Do
If the
the
image
cannot
be
focused,
thelens
focus
automatically
fixed to infinity.
(When theaxis
flashofisthe
necessary
not
the
power
on
with
the
cap
attached.
noise.
1/2
second.
ENTER.
*
The
above
AC
adapter
is
US/Canada
Turning
the
Power
On
Page
38
shows
the
brightness
(increasing
brightness
from
left
to
right)
and
the
vertical
axis
shows
the
number
at
this
time,
it
is
simultaneously
fixed
to
illuminate
objects
1.5
meters
(five
feet)
away.
During
macro
•This
Dosaves
use
orsettings,
store
SmartMedia™
very
hot,
humid
oraperture
corrosive
If the
shutter
speed
value
isimages,
set toin1/1000
second,
the
value
is limited
to
F8type
andAC
F3.4.
•not
When
playing
back
movie
switching
isthe
between
standard
and
image
only.
(O
:environments.
possible
Xbetween
: not
the
and
returns
to
RECORDING
MENU.
type.
European
andpossible)
UK
photography,
the flash
islevel.
alignedthe
withdisplay
the wide
position.)
of pixels
at each brightness
Downloaded From
camera-usermanual.com
adapters differ in shape.
--110
20 -40
80
88
Auto Playback (Slideshow)
Automatically play back one image at a time in order. This feature is not supported in the movie mode.
Getting
Ready
Set the mode dial to [
].
The last image frame appears on the LCD monitor.
Taking
Photographs
Press the MENU button.
The PLAYBACK MENU is displayed.
Playing
Back Images
or
to select [SLIDE SHOW] and press
.
The slideshow begins and [
] is displayed on the LCD monitor.
The next image is displayed every three seconds.
Erasing
Images
Use
Handy
Functions
The LCD monitor displays the image when ENTER is pressed.
The slideshow is repeated until ENTER is pressed.
Other
Applications
To quit the slideshow, press ENTER.
Memo
Downloaded From camera-usermanual.com
- 85 -
Additional
Information
• The Auto Power OFF function does not operate during automatic playback.
• Auto playback is only available for images in the same folder.
• When movies are stored in the same folder, they are not played back during automatic playback.
Changing
the
Preset
Conditions
(RECORDING
MENU)
Photography
in
the
Program
Mode
Setting
Names
Playing
Back
the
of
Photographed
Parts
Image
Size
and
Quality
(Single-Frame
Playback)
Extended
Exposure
Photography
(Bulb
Photography)
Erasing
Images
(Erase
Frame)
(continued)
Manual
Attaching
Using
How
Taking
Enlarging
Playback
About
Turning
to
Photographs
the
SmartMedia™
Press
Settings
the
Photographed
of
Power
the
Power
Multi
Shoulder
Continuously
Outlet
Shutter
Image
On/Off
Images
Strap
Pictures
Button
(Zoom
(Burst
Playback)
Photography)
Taking
Erasing
Button
Photographs
Folders
and
(All
LCD
Images
Continuously
Monitor
in
aImages
Folder/All
(Burst
Display
Photography)
Folders)
(In
Playback
(continued)
(continued)
Mode)
Definitions
Separately
of
the
Accessories
Color
of
the
Viewfinder
LED
Taking
and
Playing
Back
Photographs
on
aMode
TV
(continued)
Changing
the
Preset
Conditions
(RECORDING
MENU)
(continued)
Exposure
Compensation
in
the
Shutter
(continued)
Speed-priority
(continued)
About
Basic
Settings
SmartMedia™
in
(Sold
the
mode)
Aperture-priority
(continued)
Mode
(continued)
LCD
Monitor
Display
(during
photography)
(continued)
Manual
Settings
(continued)
Playing
Photography
Installing
Back
Movies
batteries
(Auto
Photography)
(continued)
(continued)
(continued)
Names
of
Parts
(continued)
Getting
Ready
The shutter
camerabutton
automatically
adjusts the
shutter
and
the aperture
value
according
to the
brightness
of an
can be pressed
down
in twospeed
stages:
halfway
down and
fully
down. When
pressed
halfway
down,
This
“SmartMedia™”
Set
Play
Automatically
The
the
following
mode
shoulder
menu
back
size
photographed
is(number
used
for
items
strap
plays
setting
isadapter
for
athe
is
are
back
storage
of
taking
handy
also
the
pixels)
still
the
basic
available
subjects
for
medium
images
16
and
carrying
images
settings
quality
one
for
that
as
saving
separately
your
image
to
require
(compression
be
camera
used
images
atseveral
a
sold
for
around.
inthat
photography
items.
ratio)
seconds
the
you
multi
of
have
the
photography
to image
photograph
in
photographed.
to
[ second
be
mode
],photographed.
such
[be
Even
in
asquick
]for
firework
or
if Europe,
the
[You
succession.
camera’s
displays
] photography
power
at the
Enlarges
selected
portions
of
images
being
played
back
at
two
levels.
Images
can
displayed
enlarged
when
In
You
this
can
color
mode,
manually
of
the
photographs
viewfinder
adjust
settings
are
LED
taken
indicates
such
continuously
asphotographed
the
exposure
state
atof
control,
atime.
the
maximum
camera.
white
speed
balance,
The
ofthe
0.8
metering
system,
intervals.
continuous
This
item
switches
display
on
the
LCD
monitor
when
playing
back
photographed
images.
can
switch
If
you
the
AC
(sold
separately:
PDR-ACM1A
for
the
US/Canada,
PDR-ACM1E
PDR-ACM1U
Mode
Effective
dial
Subjects
and
Set
Values
TM
Press
.of
aperture
value.
SYSTEM
Turning
Exposure
ISO
OSD
In
[prevent
[use
LANGUAGE
the
]the
INFO.
mode
control
(EXP.)
On
Close
the
SmartMedia™
cover.
Slide
the
SmartMedia
cover
release
knob
in
the
Take
photographs
or
or
battery
to
to
select
or
play
[that
the
slide
]them
or
shutter
it
[ the
back.
,]will
and
speed.
and
lock
press
Look
Use
through
to
select
the
[adjust
viewfinder
]use
and
press
to
compose
ENTER.
the
picture.
To
continue
erasing
images,
repeat
the
above
procedure
2.
.is
AF
(auto-focus)
and
AE
(auto
exposure)
are
set.
When
pressed
fully
down,
the
camera
takes
aspace
picture.
object.
This
mode
enables
carefree
photographing
similarly
to
selecting
[stable
]photographs.
in
[ from
]settings”,
mode.
Itrepeatedly
is
to
night.
To
is
Change
modes.
turned
When
the
OFF,
your
setting
using
the
camera
images
this
according
mode,
from
saved
dropping
be
to
sure
how
on
the
the
to
during
SmartMedia™
image
a(size,
photography,
tripod
is
to
to
be
keep
used
not
hang
the
and
be
camera
erased.
the
the
shoulder
remaining
SmartMedia™
strap
and
amount
prevent
around
can
ofstep
your
distortion
be
neck.
inpossible
the
of
images.
Relationship
between
your
camera
and
accessories
Connecting
tocalled
Other
Devices
(page
123)
being
played
back
one
image
at
acover,
time.
The
meaning
maximum
of
number
LED
color
of
photographs
differ
according
can
to
be
taken
mode
continuously
dial
setting.
three
photography
mode,
and
take
photographs
at
these
settings.
These
are
“Manual
which
are
saved
display
to
show
aPower
list
detailed
information
compression
ratio,
shutter
speed,
aperture,
etc.)
or
you
can
for
the
UK)
in
a
room
with
amay
power
outlet,
you
can
take
photographs
for
an
extended
period
of
time.
This
also
☞
➲
Item
QUALITY
Options
Notes
SmartMedia™
VIDEOon
OUT
White Balance (W.B.)
Write
Protection
Removing
the Batteries
ISO
[ POWER
]
AUTO
OFF
Setting items
Turning
the
Power
Off
Using
the
LCD
Monitor
Additional
Information
Other
Applications
Handy
Functions
Erasing
Images
Playing
Back Images
Taking
Photographs
Tab menu
The
tab
is
displayed.
setting
isbattery
as
follows:
Make
sure
that
the
issystem
firmly
closed.
Details
image
ofmenu
operation
isrange
saved
are
or
erased,
the
same
and
as
the
taking
camera
photographs
is
then
ready
and
to
playing
take
photographs.
them
back
onon
the
LCD After
monitor.
If
you
use
the
viewfinder
to
take
photographs,
the
photography
Set
the
mode
dial
to
[cover
].settings
direction
of
the
arrow
to
open
cover
.the
ENTER.
change
the
white
and
the
metering
in(the
program
mode.
erased
SmartMedia™.
and
reused.
For
details
on
these
accessories,
refer
to
the
Instruction
Manual
for
the
accessory
you
are
using.
(information
Movies
images
photographed
in
the
multi
mode
Page
cannot
be
displayed
using
the
zoom
playback
Images
even
if the
are
camera
not
recorded
is
turned
directly
off.
SmartMedia™
but
are
stored
within
the
buffer
memory.
display
histograms,
etc.
prevents
failed
photographs
due
to
battery
wear
or
failed
of
data
to
a
PC.
details
handling
the AC
➲
Set
Sets
the
thebalance
whether
color
: /or
Photography
mode
language
not
to
and
return
photographic
of
in
menus
the
program
displayed
sensitivity
in
the
(default)
on
SETUP
the
at51)
which
LCD
(temporarily
MENU
Page
monitor.
to
image
62)
the
original
is For
to
be
factory
recorded.
settings.
feeds
the
image
•transfer
Each
press
of
•How
Copying
of
printed
text
(black
on
white
paper)
set
the
time
(➲
114)
F8
/display
F6.8
F5.6
/18.
F4.8
/Page
/and
F3.4
/mode
F2.9
to
take
photographs
Page
41
1/1000,
1/750,
1/500,
1/350,
1/250,
1/180,
1/125,
range
may
differ
from
the
actual
image.
InLCD
this
case,
use
the
LCD
Press
the
shutter
button
down
halfway
.1/90,
Set
the
mode
dial
to
[ F4.0
],
[characters
]reset.
or
[selected
].higher
SmartMedia™
having
the
following
storage
capacity
can
be
on
your
current
as
of
March
2000)
feature.
The
last
cover
recorded
image
opens
frame
image
appears
appears
on
the
on
the
LCD
monitor.
monitor.
photography
is
finished,
check
the
images
record
the
ones
tocamera.
SmartMedia™.
[TIME&DATE,
]
:
Erases
images
in
the
selected
folder
folders.
adapter,
be☞
sure
to
read
page
•
2x-speed
playback
is➲
performed
Make
sure
that
the
SmartMedia™
is
correctly
loaded.
(
Page
31)
byused
one
frame.
Warning:
Noise
:OSD
Photography
increases
LANGUAGE
when
incurrently
aperture-priority
will
the
not
ISO
be
is for
changed
mode
to
(and
Page
settings.
63)
•
Backlit
portraits
[PROTECTED]
on
the
LCD
monitor,
cancel
the protection
(➲ Page 108) or
remove
How
to
play
back
images
Page
80
1/60,
1/45,
1/30,
1/20,
1/10,
1/8,
1/6,
1/4,
1/3, 115
1/2,
monitor
for
photography.
AF
(auto-focus)
and
AE
(auto
exposure)
(the
Additional
Information,
: value
English
(default)
➲the
Pass
Set
the
out
mode
end
steps
of
dial
1the
to
to
shoulder
4[1/15,
either
]].LCD
or
inspeed-priority
[strap
“Photography
through
].
the
in
the
strap
Shutter
speed-priority
Mode”
isdisplayed
held
down.
the
duration
that
2MBCarry
/4MB/8MB/16MB/32MB/64MB/128MB
the
mode
dial
to
[isin
(all
3.3
types)
To
]•the
adjust
: When
Erases
the
all
brightness
folders
recorded
of
on
monitor
SmartMedia™.
Page
[Set
➲1-frame
☞
•V
feed
is continued
for the
The
aperture
and
the
shutter
speed
corresponding
to( that
:write-protection
Photography
shutter
mode
Page
65)
• 0”7,
bright
scenes
(such
as
and
highly
reflective
subjects
•the
You
can
also
carry
out
step
8snowfields)
while
verifying
the
image
step
7.
DPOF
(in
Page
102).
➲to
Glossary)
start
to
function.
1”,
1”5,
2”,
3”,
4”,
6”,
8”,
10”,
15”
•Very
Do
not
remove
or monitor
load
the
batteries
or
disconnect
or
connect
the
AC
adapter
while
the camera
is mode.
on. This
:POWER
Japanese
:LCD
Equivalent
color
ISO100
Carry
Set
Use
out
or
mode
steps
to
dial
select
1
to
to
2[erased,
the
“Manual
].
images
photographed
Settings”
(page
in
58).
the
multi
photography
You can also
the
PC
card
adapter
and
floppy
disk
adapter
( in
123)
sold
separately
to transfer
●
Changing
the
display
Page
116
Theconnect
images
or
folders
are
and
the
camera
returns
toPage
the
is
held
down.
duration
that
➲
value
are
displayed
on
the
LCD
monitor.
If
the
appropriate
(page
attachment
65)
or
on
in
“Photography
the
camera.
in
the
Full
Manual
Mode”
(page
67).
Press
the
button
to
turn
the
power
on.
full
manual
mode
(
Page
67)
:
Photography
in
Press
the
MENU
button.
• •Shots
predominantly
of
sky
Even
ifreturn
photography
is disconnect
terminated
midway
before
capturing
three
images
bythe
releasing
theAC
shutter
• AF
If
you
take
aup
photograph
after
erasing
an
athis
number
continuing
from
last Ifphotographed
When
or
AE
are
locked,
the
beep
tone
( Page
111)
sounds
and
the
Use
ormade
to
change
the
setting
inimage,
the
menu,
might
the
manual
settings
tosame
their
defaults.
Iftab
happens,
manually
set
conditions
again.
:
High-sensitive
photography
equivalent
to
color
ISO200
(default)
Before
you
connect
or
the
AC
adapter,
be
sure
to
turn
the
camera
OFF.
the
adapter
is
Press
the
image
quality
button
to
select
the
preset
combination
cannot
be
set
even
if
the
shutter
speed
is
adjusted
to
images to a
PC.
16MB
(SM-M1600D)/32MB
(SM-M3200D)/64MB
(SM-M6400D)/128M
(SM-M1280D)
The
respective
last
image
mode.
frame
appears
on
LCD
monitor.
You
can
also
select
the
image
by
the
operation
as
for
thumbnail
display
(
Page
83).
➲
Carry
out
steps
1
to
on
page
109.
When
the
camera
is
turned
on,
set
the
mode
dial
to
thethe
desired
The
shutter
speed
and
the
aperture
value
corresponding
todisplay
the
All
descriptions
inor
this
Instruction
Manual
are
for
when
language
is set
to [ENGLISH].
Press
or
to
select
the
image.
button,
images
already
photographed
can
be
saved
and
erased
by playback
the
method.
image
is
assigned
as
image
number.
The
viewfinder
RECORDING
LED
turns
MENU
green.
is2
displayed.
•press
The
image
the
photograph
is
taken
is
slightly
less
clear
than
images.
(This
is 109,
connected
disconnected
with
the
power
ON,
camera
settings
may
beabove
reset
(SET-UP
Page
and
ENTER.
:before
High-sensitive
photography
equivalent
to
color
ISO400
its
the
shutter
speed
isthe
displayed
inthe
red.
To limit,
cancel
erasing
of
image
data,
select
[monitor.
]Photography,
and
press
ENTER.
quality
and
size,
while
viewing
indication
on
the
starts
a
reverse
•
The
press
of
mode.
shutter
speed
are
displayed
on
the
LCD
If
the
appropriate
The
length
of
time
to
capture
images
varies
according
to
the
photographic
conditions.
•
Images
can
also
be
erased
in
the
thumbnail
mode.
In
this
case,
the
camera
enters
the
single
frame
Select
[SYSTEM
INFO.]
on
the
SETUP
MENU
and
because
television
displays
images
at
a
lower
resolution.)
•
Spotlit
subjects,
particularly
against
dark
backgrounds
Manual
Settings
Page
58)
orPage
the
camera
malfunction.
however,
is
in
this
state.
feeds the
image
•may
Each
press
oftoinbegin
EXP.
].
To
cancel
changing
of
settings,
press
.you
Use
or
todial
select
the
frame
want
to
enlarge.
Press
the
or
Zoom
to
switch
select
[( S/C
].isphotography
21)
towards
“T”
playback.
●
]possible
is
selected,
[NO
IMAGE]
displayed
after
all
folders
When
➲
playback.
Press
Set
mode
in
the
to
[ sure
Tv
mode,
].the
or
press
or
the
shutter
button
fully
Before
photography,
make
that
the
lens
cap
has
been
combination
cannot
be
set
even
ifflash
aperture
isin.black
adjusted
to its
playback)
mode,
and
enters
the
thumbnail
playback mode after the image is erased.
status
display.
]or
mode:
In
[[playback
Press
the
display/info
button.
Self-timer
photography
and]down
are
not
possible.
•the
The
display
unit
varies
according
to
the
output
system.
•theCopying
of (frame
printed
text
(white
characters
on
paper)
.playback
press
reverse
by
one
frame.
This
adapter
allows
SmartMedia™
to
be
used
as
3.5"
floppy
disk.
have
been
erased
(unless
the
SmartMedia™
contains
protected
You
can
also
select
the
image
by
the
same
operation
as
for
thumbnail
playback
(➲ [4X],
PageISO
83).
Automatic
begins.
•
Playback
becomes
2x-speed
to
reduce
aperture
size.
Press
to
increase
aperture
size.
Press
camera
takes
a
picture.
The
manual
setting
removed
the
camera.
limit,
aperture
value
isbe
displayed
in
red.
Photography,
however,
the
[Scenes
M
]from
mode
tomenu
set
the
shutter
speed
to simultaneously
0.7
second
During
[2X],
the
ISO
will
automatically
set
between
ISO100
ISO200.
During
be
set
the
quality
and
size
Page
112
•the
With
the
NTSC
system,
images
can
be
displayed
on the LCD
monitor
and TVwill
during
•To
with
low
reflectivity,
such
as
shots
green
or
dark
foliage
Each
press
of
the
display/info
button
switches
the
display
•of1-frame
feed
isand
continued
The
SYSTEM
INFO.
displayed.
reverse
for
the
duration
This
adapter
isplayback
inserted
into
the],
floppy
your
PC,
allowing for the
images).
The
viewfinder
LED
turns
redis
image
data
being
recorded
onto
Insert
the
adapter
connector
plug
into
the
DC
IN
values
are
displayed
In
the
photography
modes
([while
[and ISO400.
]disk
oris
[ drive
]),on
the
lens
photography
and
playback.
is
possible
inAC
this
state.
automatically
set
between
ISO100
is
held
down.
format
as
follows:
duration
that
Note:
The
larger
the
F
value,
the
smaller
the
aperture
size
become
or
longer.
•Press
Remove
and
insert
SmartMedia™
with
the
camera’s
power
turned
off.Aperture value
is
held
down.
that
To
quit
the
SETUP
MENU,
change
the
mode
dial
setting.
Shutter
speed
Adjust
the
zoom
ratio
by
the
Zoom
switch.
(Zoom
to
display
option
menu,
press
or
to
images
recorded
on
the
SmartMedia™
to
be
transferred
to
the
PC.
the
SmartMedia™.
Sets
video
output
system
according
to
country
in
which
your camera
is used.
on
the
left
ofthe
the
LCD
Press
the
shutter
button
down
halfway
and
press
5V
terminal
on
the
camera.
extends
from
the
camera
body.
•the
PAL
system,
images
cannot
bethe
displayed
When a cable
is connected, only
and
versa.
the
image
quality
button
switches
the
quality
and
size
Gently
insert
the
SmartMedia™
as
far
as
it, simultaneously.
can
go
[Pressing
]vice
isWith
displayed
on
the
LCD
monitor.
•select
Recorded
data
may
bepress
erased
(destroyed)
in
the
situations
listed
below. Note that Toshiba
White
Balance
Additional
Information,
Glossary
to
increase
shutter
speed.
Pressand
to
decrease
shutter
speed.
Press
Press
or
to
move
forward
reverse.
PRG
]
and
ENTER.
]
and
press
ENTER.
[
switch
Page
21)
TV
display
is
available.
monitor
screen.
➲
When
the
camera
is
turned
on,
the
Auto
Power
OFF
function
settings
infully
the
following
order.
it
down
. system
Press
or
to
select
the
item
you
desired
toisloss
set,
with
SmartMedia™
electrodes
(metal
contacts)
Additional
Information,
Glossary)
(white
Corporation
accepts
no
whatsoever
for
the
of recorded
data enters
in these
• the
When
allNTSC
images
in
a responsibility
folder
are
erased,
that
folder
itself
also(destruction)
erased.
➲
The
camera
determines
the
balance
by
averaging
the
various
kinds playback
of light
that actually
●
to
to
next
frame/
to“T”
go
back
one
To
prevent
valuable
data
being
erased,
attach
the
write••advance
With
the
PAL
images
are
played
back
with
apressing
black
frame
•frame
After
pause
is
cancelled,
the
Zoom
switch
to
the
will
the
image.
Pressing
ENTER
the
setting.
or
,, SmartMedia™
and
manual
Exposure
compensation
Page
69)
using
When
[for
M
]selects
isissystem,
selected
on
the
[ halfway
EXP.
]remove
option
menu,
orsurrounded.
the
shutter
speed
setting
becomes
operational.
Never
open
the
SmartMedia™
cover
orenlarge
the
while
anmakes
is
being
recorded.
This
or
and
manual
setting
(image
Page
58)
or
film
speed
Exposure
compensation
((from
Page
69)
using
Reverse the
procedure
“Loading
the
Batteries”
and
remove
the
batteries.
•facing
Pressing
the
shutter
button
down
adjusts
the
exposure,
• Playback
paused.
PAL
system
(➲
Additional
Information,
Glossary)
situations:
the
lens.
This
setting
allows
you
to
set
in
advance
the
white
balance
when
taking
photographs
under
and
press
ENTER.
the
rear
of
the
camera.
For
the
US/Canada:
PDR-ACM1A
Holding
down
or
moves
forward
or
reverse
continuously.
resumes
at
the
last
state
that
was
protect
sticker
at
the
write-protect
area.
Data
can
no
longer
be
may
corrupt
the
data
on
the
SmartMedia™
or
damage
the
SmartMedia™
itself.
possible,
but
does
not
make
the
exposure
compensation
possible. However the exposure value
is
To
return
normal
press
the
Zoom
switch
towards
setting
Page
58)magnification,
or film
speed
setting
( the
Page
78)
using
ENTER
Pass
the
shoulder
strap
through
loop
and
pull.
setting
(( toPage
78)
using
ENTER
are
also
possible.
and
pressing
the
shutter
button
fully
takes
the
shot.
TM[ is down
When
the
SmartMedia™
used
incorrectly
by
the
user
or
a
third
party
[
],
]
or
[
]
AE
or
AF
are
locked
with
the
shutter
button
held
half
specific
lighting
conditions.
For
Europe:
PDR-ACM1E
active
before
the
pause.
Firmly
insert
the
SmartMedia
as
far
as
it
can
go.
displayed
on is
the
LCD
monitor.
Press
ENTER.
recorded
or setting
erased
from
SmartMedia™.
Toon
write
oraterase
data
from is to be recorded.
Sets
the
color
mode
and
photographic
sensitivity
which
the
image
“W”.
are
also
possible.
The
default
different
depending
the
destination
country/area.
Use
or
to
select
the
desired
item
Press
ENTER,
nine
images
are
displayed
simultaneously.
• no
If
you
shoot
a
still
picture,
when
preview
is
set
to
ON
(
Page
77),
down.
If
operation
is
carried
out
for
a
fixed
amount
of
time
(default:
about
one
minute),
power
ON
When
the
SmartMedia™
is
exposed
to
static
electricity
or
electrical
noise
Forimage
the Noise
UK:
PDR-ACM1U
:off
Displays
the
firmware
version
ofto
this
camera.
SmartMedia™,
peel
the
sticker.
camera
ready
to
take
photographs.
Warning:
increases
when
the
ISO
is
changed
higher
settings.
isis
displayed
and
a
white
frame
and
green
Green The
Compose
picture,
press
the
shutter
button
down
halfway,
and
press
it
down
:the
Automatic
adjustment
(default)
Display
Page
83
theThumbnail
recorded
image
is
displayed
on
for
about
two
]specifications
Standby
mode
[enlarged,
☞
➲
If
no
operation
is
carried
out
a screen
fixed
amount
offrom
time
(default:
about
1shutter
minute),
thewear.
power
is
turned
TM
consumption
is
set
to
its
minimum
state
(power
almost
off)that
to
prevent
battery
This
is
.in
and
press
When
the
SmartMedia™
isfor
removed
ordarkens
the
camera
isPage
turned
off
while
recording
erasing
The
image
the
LCD
monitor
sometimes
the
time
the
button
isdata,
pressed
down
details,
refer
to
the
of
AC
information.
adapter
➲
127.
: on
Displays
the
SmartMedia
Playback
returns
to
the
start
ofturned
the
movie.
☞ ••-For
frame
are
displayed
the
LCD
monitor.
:
Photography
outdoors
Default
setting:
seconds.
off
to
preserve
battery
life.
This
is
called
“Auto
Power
OFF”.
To
return
to
the
normal
state,
press
the
fully.
Page
40
called
the
Auto
Power
OFF.
This
setting
allows
you
to
set
the
time
when
the
camera
turns
off
halfway
until
the
image
becomes
focused.
: picture,
Equivalent
to
ISO100
(default)
data,
frame
advance
when
images
aredefaults.
played
back or during
formatting alarm
of the
The options
are
displayed.
: Returns
settings
to
Flashing
[ the
],
[ color
]conditions
or their
[shutter
]being
Self-timer
in frame
operation
at a handshake
.
Compose
the
press
the
button
down
halfway,
and
press
it
down
The
white
frame
indicates
entire
image,
while
the
green
:
Photography
in
cloudy
POWER
button
again.
•
The
viewfinder
LED
turns
red
while
image
data
is
being
recorded
Compose
the
picture,
press
the
shutter
button
down
halfway,
and
press
it
down
• The
To
set
the
focus
orpicture.
exposure
forphotography
a subject
outside
the
center
the intended
theincamera
directly
The camera
takes
the
automatically.
This
function
isthrough
not
activated
during
automatic
playback
(➲image,
Pagepoint
85) or
the [ only>
] PC
:appearing
High-sensitive
equivalent
toofcolor
ISO200
SmartMedia™.
Note:
image
the
lens
will
be
The
display
returns
to<Histogram>
thumbnail
playback.
<Standard>
<Detailed
information>
<Image
shows
the
location
of
the
currently
enlarged
area.
halfway,
and
press
it
down
fully.
Page
40
:
Photography
in
bluish
fluorescent
light
fully.
Page
40
About
the
Auto
Power
(FULL
OFF
Function
)
Additional
Information,
“AUTO
POWER
OFF
(page
110)”
at
the
subject
or
desired
exposure
(lighting),
press
and
hold
the
shutter
button
halfway.
Now,
with
the
shutter
onto
the
SmartMedia™.
ON]
Writing
to SmartMedia™
in progress
mode.
Press
ENTER.
:adapter
High-sensitive
photography
equivalent
toanother
color
ISO400
•Insert
Wedefault
recommend
copying
and
saving
important
datapower
onto
storage
medium (floppy disk, hard
displayed
for
[LCD
].[Power
fully.
Page
40
the
AC
power
plug
into
the
The
size
and
quality
of
the
image
can
be
reset
to
the
desired
combination.
Press
ENTER.
button
still
held
halfway
down,
you
can
turn
the
direction
of
the
camera
and
frame
your
image
with
the
focus
•
It
is
possible
to
play
back
any
images
in
any
folders
by
pressing
or
during
playback.
(For
details
ON
: Photography
inafter
reddish
fluorescent
light
The
camera
takes
the
picture.
Photographs
can
be
taken,
however,
do not
turn thepress
power
OFF.
Todisk,
return
to disk,
the
normal
state
theset
Auto
Power
OFF
has been
executed,
the
POWER
button
MO
etc.).
The
PREVIEW
manual
setting
Page
items
77
are
displayed.
camera
takes
the
atmonitor.
the
exposure
time.
Current
Entireofimage
and
exposure
locked.
Press
the
button
down
fully
to in
complete
capturing
the image.
Red outlet.
[In the
on picture
the
LCD
The
camera
is ready
for
burst
photography.
of displayed
folder
Page
92)
]:the
mode:
➲shutter
Accessing
of
SmartMedia™
[ (HALF
Photography
in] is
incandescent
light
•] [is
When
speed
setshutter
to
a)turn
speed
of
0.7 second
orprogress
slower,
photographs
taken
as extended
to Never
turn
the
power
on 77
again.
•During
remove
the
SmartMedia™
or
the
camera
offresult
while
recording
data or are
while
erasing
data
COLOR
Page
the
exposure,
the
viewfinder
LED
turns
orange.
position
•
Moving
the
camera
as
you
press
the
shutter
button
will
in
a
blurred
image.
Use
,
,
or
to
select
the
area
to
enlarge.
the
last
image
displays
the
first
image,
and
pressing
atwill
thebe
firstautomatically
image
displays
the
Pressing
During
[2X],
the
ISO
be
automatically
set
to
ISO200.
[4X],ofISO
setof
exposures
( at Page
68).
IfCarry
burst
photography
is to
set
the
shutter
speed
is set During
to athe
speed
0.7
second
or more
in the
[ to
Tv ]
out
steps
1will
2when
in
Photographic
(SmartMedia™
formatting).
actions
might
damage
ISO
Page
78
Flashing
ItClose
takes
about
twice
the
time
to complete
taking
the
photograph
duePDR-M81
to processing
ofenlargement
the
captured
[set
],These
[“Basic
] When
the
image
is not
in SmartMedia™.
focus.
the
SmartMedia™
cover.
•
The
PDR-M81
usesto
accurate
focus
mechanism.
However,
the
have
difficulty
last
image.
Adjust
the
display
area
enlarge
viewing
theto
white
and
ISO400.
• In
AEB
photography
(an
Page
71)while
orauto
burst
photography,
the shutter
speed
cannot be setmay
to 0.7
second
or longer.
(SMALL
)
mode,
the
shutter
speed
is
automatically
changed
1/2
second.
•image.
Use
only
the
SmartMedia™
specified
for
use
with
the
PDR-M81.
The
use
of
other
SmartMedia™
SHARPNESS
Page
79
mode)”
(page
109).
Select
[QUALITY]
Settings
(
focusing
or
not
be
able
to
focus
at
all
for
subjects
and
situations
such
as
the
following:
Before
you
use
aother
new
SmartMedia™
the
first during
time,
be
sure
tothe increased
Images
can
bevalue
rotated
by] pressing
playback.
[ for
] or
green
the
aperture
is
to
F2.9
(maximum
aperture
size),
shutter
speed
restricted
•• frames.
If
a
mode
than
[ set
suppressed
flash
mode
is
set
inthe
flash
photography,
thedark
shutterisspeed
is
•79
Processing
image
- When
subject
is distant and
- SmartMedia™
Subjects
moving
at
high
speed
damage
the
camera.
CONTRAST
Page
• to
The
write
protection
not
function
if in
write-protect
sticker
becomes
Use
a soft
dry cloth to
.thesecond.
oncould
the
SETUP
MENU
and
press
format
the
(may
Page
91).
an
image
counterclockwise,
and
pressing
rotates
clockwise.
Pressing
1/750
PDR-ACM1A
] •are
the
same
as
to
PDR-ACM1E
PDR-ACM1U
[PRG]
and
[ rotates
limited
tosecond.
between
1/2
second
and
1/250
* The
aboveitdirty.
menu
is
the
RECORDING
Charging
of
flash
progress
ON
When
there
are
objects
in
front
of
or
behind
the
subject
Very
shiny
subjects
such
as
a
mirror
or
car
body
SmartMedia™
is
aofisprecision
device.
Do do
notnot
bend,
drop,
or subject
SmartMedia™
to
DIGITAL
ZOOM
Page
• wipe
When
the
camera
isOnce
not79
inelectronic
be sure
to attach
the
lens
cap
provided
with[your
camera.
the
POWER
button
to
turn
the
power
off.
away
any
dirt.
ause,
sticker
ispress
peeled
off,
reuse
it.
Orange•Press
The
QUALITY
menu
displayed.
combinations
the
automatically
mode.
MENU
inthe
•the
The
aperture
value
set
differ
to
the
actual
value
according
to
the
position
ofUK)
theorzoom
lens.
To
to
the
regular
display,
ENTER.
(Photos
cannot
be
taken
at
this
moment.)
(forreturn
US
and
Canada)
If the
shutter
speed
is
set
to
1/350
second
or
less,
the
shutter
as
speed
an
animal
is
automatically
athe
cage
a]changed
person
in front
to 1/250
of a tree)
(for
European
Continent)
(for
Get
ready
to
take
the
photograph.
- above
Extremely
low
contrast
subjects
When
the
settings
are
made,
they
are
displayed
in(such
thepocket
following
order.
excessive
shocks.
Also,
do
not
carry
SmartMedia™
the
ofx[trousers.
This
might
The
lens
cap
can
also
be
attached
to
attachment
following
the
above
steps
to prevent
it’sthe
LCD
79
The
power
turns
off.
determined
shutter
speeds
and
aperture
-in Subjects
with
little
reflection,
such
as
hair
fur mode.
•• The
size
displayed
on
the
LCD
monitor
FULL
(320
240)
HALF
(160
xorsubject
120).
The
forced
flash
mode
or
]orred-eye
forced
flash
second
ifPage
the
flash
setting
is25)
changed
tothe
thestrap
[ ]becomes
- image
Subjects
that
have
low contrast
and
merge
into
Loading
the
batteries
(
Page
and
the
SmartMedia™
(
Page
31)
into
the
camera.
being
lost.
• Flash
photography
and
burst
photography
are
not
possible.
Flashing
SmartMedia™
to
excessive
force
when
you
sit
down,
damaging
the
SmartMedia™.
Hardware
malfunction
Subjects
with
no
solidity,
such
as
smoke
or
flames
the
background
(such
as
white
walls
or
subjects
Attach
the
lens
cap
when
you
are
not
using
the
camera.
values.
However,
their
operation
capability
movies
made
in
FULL
size
is
displayed
on
the
entire
LCD
monitor,
and
those
made
in
HALF
size
If the
[ ]mode,
forcedISO
flash
[ automatically
] red-eye set
forced
flash mode
is and
set in
flash photography
the is
• In
movie
willorbe
between
ISO100
ISO400
regardless ofwhen
its setting.
dressed
inthe
theSmartMedia™
same
color
as
thelens
background)
-attach
Subjects
viewed
through
glass
Turn
offor
the
power
tothe
retract
the
unit,
and then
the
lens
cap.
The
image
taken
in
photography
mode
may
be
blurred.
or
to
select
the
desired
setting
from
the
tab
menu
, and
press
•Use
Do•not
use
store
in
environments
likely
to
be
affected
byisstatic
electricity
or
is
different
as
shown
the
right
table.
displayed
in
ofspeed
the
shutter
speed
is center
set
toin
aexposure
of
0.7
second
or
more,
the
shutter
speed
automatically
changed
to
Press
POWER
button
toscreen.
turn
power
on.
A electrical
histogram
isturn
a graphic
representation
ofthe
theistones
of the
subject.
The horizontal
histogram
• Do
If the
the
image
cannot
be
focused,
thelens
focus
automatically
fixed to infinity.
(When theaxis
flashofisthe
necessary
not
the
power
on
with
the
cap
attached.
noise.
1/2
second.
ENTER.
*
The
above
AC
adapter
is
US/Canada
Turning
the
Power
On
Page
38
shows
the
brightness
(increasing
brightness
from
left
to
right)
and
the
vertical
axis
shows
the
number
at
this
time,
it
is
simultaneously
fixed
to
illuminate
objects
1.5
meters
(five
feet)
away.
During
macro
•This
Dosaves
use
orsettings,
store
SmartMedia™
very
hot,
humid
oraperture
corrosive
If the
shutter
speed
value
isimages,
set toin1/1000
second,
the
value
is limited
to
F8type
andAC
F3.4.
•not
When
playing
back
movie
switching
isthe
between
standard
and
image
only.
(O
:environments.
possible
Xbetween
: not
the
and
returns
to
RECORDING
MENU.
type.
European
andpossible)
UK
photography,
the flash
islevel.
alignedthe
withdisplay
the wide
position.)
of pixels
at each brightness
Downloaded From
camera-usermanual.com
adapters differ in shape.
--110
20 -40
80
88
Erasing Images (Erase Frame)
Set the mode dial to [
When [
When [
], [
], [
] or [
].
] is selected, the last image frame or the thumbnail display appears on the LCD monitor.
] is selected, use
], [
or
to select the image to be erased.
] is selected, only the last recorded image can be erased.
erase button.
The erase icon is displayed at the left of the screen.
Playing
Back Images
Press the
] or [
Taking
Photographs
When [
Getting
Ready
Erases images one image at a time.
Note: Images cannot be erased when they are protected (➲ Page 106) or the SmartMedia™ is write-protected (➲ Page 34).
Erasing
Images
or
to select [
], and press ENTER.
Other
Applications
This erases the image and returns to the previous mode.
] and press ENTER.
To cancel erasing of image data, select [
Handy
Functions
Use
Additional
Information
Downloaded From camera-usermanual.com
- 87 -
Changing
the
Preset
Conditions
(RECORDING
MENU)
Photography
in
the
Program
Mode
Setting
Names
Playing
Back
the
of
Photographed
Parts
Image
Size
and
Quality
(Single-Frame
Playback)
Extended
Exposure
Photography
(Bulb
Photography)
Erasing
Images
(Erase
Frame)
(continued)
Manual
Attaching
Using
How
Taking
Enlarging
Playback
About
Turning
to
Photographs
the
SmartMedia™
Press
Settings
the
Photographed
of
Power
the
Power
Multi
Shoulder
Continuously
Outlet
Shutter
Image
On/Off
Images
Strap
Pictures
Button
(Zoom
(Burst
Playback)
Photography)
Taking
Erasing
Button
Photographs
Folders
and
(All
LCD
Images
Continuously
Monitor
in
aImages
Folder/All
(Burst
Display
Photography)
Folders)
(In
Playback
(continued)
(continued)
Mode)
Definitions
Separately
of
the
Accessories
Color
of
the
Viewfinder
LED
Taking
and
Playing
Back
Photographs
on
aMode
TV
(continued)
Changing
the
Preset
Conditions
(RECORDING
MENU)
(continued)
Exposure
Compensation
in
the
Shutter
(continued)
Speed-priority
(continued)
About
Basic
Settings
SmartMedia™
in
(Sold
the
mode)
Aperture-priority
(continued)
Mode
(continued)
LCD
Monitor
Display
(during
photography)
(continued)
Manual
Settings
(continued)
Playing
Photography
Installing
Back
Movies
batteries
(Auto
Photography)
(continued)
(continued)
(continued)
Names
of
Parts
(continued)
Getting
Ready
The shutter
camerabutton
automatically
adjusts the
shutter
and
the aperture
value
according
to the
brightness
of an
can be pressed
down
in twospeed
stages:
halfway
down and
fully
down. When
pressed
halfway
down,
This
“SmartMedia™”
Set
Play
Automatically
The
the
following
mode
shoulder
menu
back
size
photographed
is(number
used
for
items
strap
plays
setting
isadapter
for
athe
is
are
back
storage
of
taking
handy
also
the
pixels)
still
the
basic
available
subjects
for
medium
images
16
and
carrying
images
settings
quality
one
for
that
as
saving
separately
your
image
to
require
(compression
be
camera
used
images
atseveral
a
sold
for
around.
inthat
photography
items.
ratio)
seconds
the
you
multi
of
have
the
photography
to image
photograph
in
photographed.
to
[ second
be
mode
],photographed.
such
[be
Even
in
asquick
]for
firework
or
if Europe,
the
[You
succession.
camera’s
displays
] photography
power
at the
Enlarges
selected
portions
of
images
being
played
back
at
two
levels.
Images
can
displayed
enlarged
when
In
You
this
can
color
mode,
manually
of
the
photographs
viewfinder
adjust
settings
are
LED
taken
indicates
such
continuously
asphotographed
the
exposure
state
atof
control,
atime.
the
maximum
camera.
white
speed
balance,
The
ofthe
0.8
metering
system,
intervals.
continuous
This
item
switches
display
on
the
LCD
monitor
when
playing
back
photographed
images.
can
switch
If
you
the
AC
(sold
separately:
PDR-ACM1A
for
the
US/Canada,
PDR-ACM1E
PDR-ACM1U
Mode
Effective
dial
Subjects
and
Set
Values
TM
Viewfinder
LED
Press
.of
aperture
value.
SYSTEM
Turning
Exposure
ISO
OSD
In
[prevent
[use
LANGUAGE
the
]the
INFO.
mode
control
(EXP.)
On
Close
the
SmartMedia™
cover.
Slide
the
SmartMedia
cover
release
knob
in
the
Take
photographs
or
or
battery
to
to
select
or
play
[that
the
slide
]them
or
shutter
it
[ the
back.
,]will
and
speed.
and
lock
press
Look
Use
through
to
select
the
[adjust
viewfinder
]use
and
press
to
compose
ENTER.
the
picture.
To
continue
erasing
images,
repeat
the
above
procedure
2.
.is
AF
(auto-focus)
and
AE
(auto
exposure)
are
set.
When
pressed
fully
down,
the
camera
takes
aspace
picture.
object.
This
mode
enables
carefree
photographing
similarly
to
selecting
[stable
]photographs.
in
[ from
]settings”,
mode.
Itrepeatedly
is
to
night.
To
is
Change
modes.
turned
When
the
OFF,
your
setting
using
the
camera
images
this
according
mode,
from
saved
dropping
be
to
sure
how
on
the
the
to
during
SmartMedia™
image
a(size,
photography,
tripod
is
to
to
be
keep
used
not
hang
the
and
be
camera
erased.
the
the
shoulder
remaining
SmartMedia™
strap
and
amount
prevent
around
can
ofstep
your
distortion
be
neck.
inpossible
the
of
images.
Relationship
between
your
camera
and
accessories
Connecting
tocalled
Other
Devices
(page
123)
being
played
back
one
image
at
acover,
time.
The
meaning
maximum
of
number
LED
color
of
photographs
differ
according
can
to
be
taken
mode
continuously
dial
setting.
three
photography
mode,
and
take
photographs
at
these
settings.
These
are
“Manual
which
are
saved
display
to
show
aPower
list
detailed
information
compression
ratio,
shutter
speed,
aperture,
etc.)
or
you
can
for
the
UK)
in
a
room
with
amay
power
outlet,
you
can
take
photographs
for
an
extended
period
of
time.
This
also
☞
➲
Item
QUALITY
Options
Notes
SmartMedia™
VIDEOon
OUT
White Balance (W.B.)
Write
Protection
Removing
the Batteries
ISO
[ POWER
]
AUTO
OFF
Setting items
Turning
the
Power
Off
Using
the
LCD
Monitor
Additional
Information
Other
Applications
Handy
Functions
Erasing
Images
Playing
Back Images
Taking
Photographs
Tab menu
lThe
tab
is
displayed.
setting
isbattery
as
follows:
Make
sure
that
the
issystem
firmly
closed.
Details
image
ofmenu
operation
isrange
saved
are
or
erased,
the
same
and
as
the
taking
camera
photographs
is
then
ready
and
to
playing
take
photographs.
them
back
onon
the
LCD After
monitor.
If
you
use
the
viewfinder
to
take
photographs,
the
photography
Set
the
mode
dial
to
[cover
].settings
direction
of
the
arrow
to
open
cover
.the
ENTER.
change
the
white
and
the
metering
in(the
program
mode.
erased
SmartMedia™.
and
reused.
For
details
on
these
accessories,
refer
to
the
Instruction
Manual
for
the
accessory
you
are
using.
(information
Movies
images
photographed
in
the
multi
mode
Page
cannot
be
displayed
using
the
zoom
playback
Images
even
if the
are
camera
not
recorded
is
turned
directly
off.
SmartMedia™
but
are
stored
temporarily
within
the
buffer
memory.
display
histograms,
etc.
prevents
failed
photographs
due
to
battery
wear
or
failed
of
data
to
a
PC.
details
handling
the AC
➲
Set
Sets
the
thebalance
whether
color
: /or
Photography
mode
language
not
to
and
return
photographic
of
in
menus
the
program
displayed
sensitivity
in
the
(default)
on
SETUP
the
at51)
which
LCD
(Ú
MENU
Page
monitor.
to
image
62)
the
original
is For
to
be
factory
recorded.
settings.
feeds
the
image
•transfer
Each
press
of
•Memo
Copying
of
printed
text
(black
on
white
paper)
set
the
time
(➲
114)
F8
/display
F6.8
F5.6
/18.
F4.8
/Page
/and
F3.4
/mode
F2.9
How
to
take
photographs
Page
41
1/1000,
1/750,
1/500,
1/350,
1/250,
1/180,
1/125,
range
may
differ
from
the
actual
image.
InLCD
this
case,
use
the
LCD
Press
the
shutter
button
down
halfway
.1/90,
Set
the
mode
dial
to
[ F4.0
],
[characters
]reset.
or
[selected
].higher
SmartMedia™
having
the
following
storage
capacity
can
be
on
your
current
as
of
March
2000)
feature.
The
last
cover
recorded
image
opens
frame
image
appears
appears
on
the
on
the
LCD
monitor.
monitor.
photography
is
finished,
check
the
images
record
the
ones
tocamera.
SmartMedia™.
[TIME&DATE,
]
:
Erases
images
in
the
selected
folder
and
folders.
adapter,
be☞
sure
to
read
page
•
2x-speed
playback
is➲
performed
Make
sure
that
the
SmartMedia™
is
correctly
loaded.
(
Page
31)
byused
one
frame.
Warning:
Noise
:OSD
Photography
increases
LANGUAGE
when
incurrently
aperture-priority
will
the
not
ISO
be
is for
changed
mode
to
(Ú
Page
settings.
63)
•
Backlit
portraits
[PROTECTED]
on
the
LCD
monitor,
cancel
the protection
(➲ Page 108) or
remove
How
to
play
back
images
Page
80
1/60,
1/45,
1/30,
1/20,
1/10,
1/8,
1/6,
1/4,
1/3, 115
1/2,
monitor
for
photography.
AF
(auto-focus)
and
AE
(auto
exposure)
(Ú
Additional
Information,
: value
English
(default)
➲the
Pass
Set
the
out
mode
end
steps
of
dial
1the
to
to
shoulder
4[1/15,
either
]].LCD
or
inspeed-priority
[strap
“Photography
through
].
the
in
the
strap
Shutter
speed-priority
Mode”
isdisplayed
held
down.
the
duration
that
2MBCarry
/4MB/8MB/16MB/32MB/64MB/128MB
the
mode
dial
to
[isin
(all
3.3
types)
To
]•the
adjust
: When
Erases
the
all
brightness
folders
recorded
of
on
the
monitor
SmartMedia™.
Page
[Set
➲1-frame
☞
•V
feed
is continued
for the
The
aperture
and
the
shutter
speed
corresponding
to(Úthat
:write-protection
Photography
shutter
mode
Page
65)
• 0”7,
bright
scenes
(such
as
and
highly
reflective
subjects
•the
You
can
also
carry
out
step
8snowfields)
while
verifying
the
image
step
7.
DPOF
(in
Page
102).
➲to
Glossary)
start
to
function.
1”,
1”5,
2”,
3”,
4”,
6”,
8”,
10”,
15”
•Very
Do
not
remove
or monitor
load
the
batteries
or
disconnect
or
connect
the
AC
adapter
while
the camera
is mode.
on. This
:POWER
Japanese
:LCD
Equivalent
color
ISO100
Carry
Set
Use
out
or
mode
steps
to
dial
select
1
to
to
2[erased,
the
“Manual
].
images
photographed
Settings”
(page
in
58).
the
multi
photography
You can also
the
PC
card
adapter
and
floppy
disk
adapter
( in
123)
sold
separately
to transfer
●
Changing
the
display
Page
116
Theconnect
images
or
folders
are
and
the
camera
returns
toPage
the
is
held
down.
duration
that
➲
value
are
displayed
on
the
LCD
monitor.
If
the
appropriate
(page
attachment
65)
or
on
in
“Photography
the
camera.
in
the
Full
Manual
Mode”
(page
67).
Press
the
button
to
turn
the
power
on.
full
manual
mode
(Ú
Page
67)
:
Photography
in
Press
the
MENU
button.
• •Shots
predominantly
of
sky
Even
ifreturn
photography
is disconnect
terminated
midway
before
capturing
three
images
bythe
releasing
theAC
shutter
• AF
If
you
take
aup
photograph
after
erasing
an
athis
number
continuing
from
last Ifphotographed
When
or
AE
are
locked,
the
beep
tone
(Ú Page
111)
sounds
and
the
Use
ormade
to
change
the
setting
inimage,
the
menu,
might
the
manual
settings
tosame
their
defaults.
Iftab
happens,
manually
set
conditions
again.
:
High-sensitive
photography
equivalent
to
color
ISO200
(default)
Before
you
connect
or
the
AC
adapter,
be
sure
to
turn
the
camera
OFF.
the
adapter
is
Press
the
image
quality
button
to
select
the
preset
combination
cannot
be
set
even
if
the
shutter
speed
is
adjusted
to
images to a
PC.
16MB
(SM-M1600D)/32MB
(SM-M3200D)/64MB
(SM-M6400D)/128M
(SM-M1280D)
The
respective
last
image
mode.
frame
appears
on
LCD
monitor.
You
can
also
select
the
image
by
the
operation
as
for
thumbnail
display
(
Page
83).
➲
Carry
out
steps
1
to
on
page
109.
When
the
camera
is
turned
on,
set
the
mode
dial
to
thethe
desired
The
shutter
speed
and
the
aperture
value
corresponding
todisplay
the
All
descriptions
inor
this
Instruction
Manual
are
for
when
language
is set
to [ENGLISH].
Press
or
to
select
the
image.
button,
images
already
photographed
can
be
saved
and
erased
by playback
the
method.
image
is
assigned
as
image
number.
lThe
viewfinder
RECORDING
LED
turns
MENU
green.
is2
displayed.
•press
The
image
the
photograph
is
taken
is
slightly
less
clear
than
images.
(This
is 109,
connected
disconnected
with
the
power
ON,
camera
settings
may
beabove
reset
(SET-UP
Page
and
ENTER.
:before
High-sensitive
photography
equivalent
to
color
ISO400
its
the
shutter
speed
isthe
displayed
inthe
red.
To limit,
cancel
erasing
of
image
data,
select
[monitor.
]Photography,
and
press
ENTER.
quality
and
size,
while
viewing
indication
on
the
starts
a
reverse
•
The
press
of
mode.
shutter
speed
are
displayed
on
the
LCD
If
the
appropriate
The
length
of
time
to
capture
images
varies
according
to
the
photographic
conditions.
•
Images
can
also
be
erased
in
the
thumbnail
mode.
In
this
case,
the
camera
enters
the
single
frame
Select
[SYSTEM
INFO.]
on
the
SETUP
MENU
and
because
television
displays
images
at
a
lower
resolution.)
•
Spotlit
subjects,
particularly
against
dark
backgrounds
Manual
Settings
Page
58)
orPage
the
camera
malfunction.
however,
is
in
this
state.
feeds the
image
•may
Each
press
oftoinbegin
EXP.
].
To
cancel
changing
of
settings,
press
.you
Use
or
todial
select
the
frame
want
to
enlarge.
Press
the
or
Zoom
to
switch
select
[( S/C
].isphotography
21)
towards
“T”
playback.
●
]possible
is
selected,
[NO
IMAGE]
displayed
after
all
folders
When
➲
playback.
Press
Set
mode
in
the
to
[ sure
Tv
mode,
].the
or
press
or
the
shutter
button
fully
Before
photography,
make
that
the
lens
cap
has
been
combination
cannot
be
set
even
ifflash
aperture
isin.black
adjusted
to its
playback)
mode,
and
enters
the
thumbnail
playback mode after the image is erased.
status
display.
]or
mode:
In
[[playback
Press
the
display/info
button.
Self-timer
photography
and]down
are
not
possible.
•the
The
display
unit
varies
according
to
the
output
system.
•theCopying
of (frame
printed
text
(white
characters
on
paper)
.playback
press
reverse
by
one
frame.
This
adapter
allows
SmartMedia™
to
be
used
as
3.5"
floppy
disk.
have
been
erased
(unless
the
SmartMedia™
contains
protected
You
can
also
select
the
image
by
the
same
operation
as
for
thumbnail
playback
(➲ [4X],
PageISO
83).
Automatic
begins.
•
Playback
becomes
2x-speed
to
reduce
aperture
size.
Press
to
increase
aperture
size.
Press
camera
takes
a
picture.
The
manual
setting
removed
the
camera.
limit,
aperture
value
isbe
displayed
in
red.
Photography,
however,
the
[Scenes
M
]from
mode
tomenu
set
the
speed
to simultaneously
0.7
second
During
[2X],
the
ISO
will
automatically
set
between
ISO100
ISO200.
During
be
+
set
the
quality
and
size
Úshutter
Page
112
•the
With
the
NTSC
system,
images
can
be
displayed
on the LCD
monitor
and TVwill
during
•To
with
low
reflectivity,
such
as
shots
green
or
dark
foliage
Each
press
of
the
display/info
button
switches
the
display
•of1-frame
feed
isand
continued
The
SYSTEM
INFO.
displayed.
reverse
for
the
duration
This
adapter
isplayback
inserted
into
the],
floppy
your
PC,
allowing for the
images).
The
viewfinder
LED
turns
redis
image
data
being
recorded
onto
Insert
the
adapter
connector
plug
into
the
DC
IN
values
are
displayed
In
the
photography
modes
([while
[and ISO400.
]disk
oris
[ drive
]),on
the
lens
photography
and
playback.
is
possible
inAC
this
state.
automatically
set
between
ISO100
is
held
down.
format
as
follows:
duration
that
Note:
The
larger
the
F
value,
the
smaller
the
aperture
size
become
or
longer.
•Press
Remove
and
insert
SmartMedia™
with
the
camera’s
power
turned
off.Aperture value
is
held
down.
that
To
quit
the
SETUP
MENU,
change
the
mode
dial
setting.
Shutter
speed
Adjust
the
zoom
ratio
by
the
Zoom
switch.
(Zoom
to
display
option
menu,
press
or
to
images
recorded
on
the
SmartMedia™
to
be
transferred
to
the
PC.
the
SmartMedia™.
Sets
video
output
system
according
to
country
in
which
your camera
is used.
on
the
left
ofthe
the
LCD
Press
the
shutter
button
down
halfway
and
press
5V
terminal
on
the
camera.
extends
from
the
camera
body.
•the
PAL
system,
images
cannot
bethe
displayed
When a cable
is connected, only
and
versa.
the
image
quality
button
switches
the
quality
and
size
Gently
insert
the
SmartMedia™
as
far
as
it, simultaneously.
can
go
Memo
[Pressing
]vice
isWith
displayed
on
the
LCD
monitor.
•select
Recorded
data
may
bepress
erased
(destroyed)
in
the
situations
listed
below. Note that Toshiba
White
Balance
Additional
Information,
Glossary
to
increase
shutter
speed.
Pressand
to
decrease
shutter
speed.
Press
Press
or
to
move
forward
reverse.
+
Ú
PRG
]
and
ENTER.
]
and
press
ENTER.
[
switch
Page
21)
Detailed
TV
display
is
available.
monitor
screen.
➲
When
the
camera
is
turned
on,
the
Auto
Power
OFF
function
settings
infully
the
following
order.
it
down
. system
Standard
Histogram
Image
only
Press
or
to
select
the
item
you
desired
to
set,
with
SmartMedia™
electrodes
(metal
contacts)
Additional
Information,
Glossary)
(white
Corporation
accepts
no
responsibility
whatsoever
for
the
loss
of recorded
data enters
in these
• the
When
allNTSC
images
in
a
folder
are
erased,
that
folder
itself
is
also(destruction)
erased.
➲
The
camera
determines
the
balance
by
averaging
the
various
kinds playback
of light
that actually
●
to
to
next
frame/
to“T”
go
back
one
information
To
prevent
valuable
data
from
being
erased,
attach
the
write••advance
With
the
PAL
system,
images
are
played
back
with
apressing
black
frame
•frame
After
pause
is
cancelled,
the
Zoom
switch
to
the
will
the
image.
Pressing
ENTER
the
setting.
or
,, SmartMedia™
and
manual
Exposure
compensation
(Ú
Page
69)
using
When
[for
M
]selects
isis
selected
on
the
[ halfway
EXP.
]remove
option
menu,
orsurrounded.
the
shutter
speed
setting
becomes
operational.
Never
open
the
SmartMedia™
cover
orenlarge
the
while
anmakes
image
is
being
recorded.
This
or
and
manual
setting
(Ú
Page
58)
or
film
speed
Exposure
compensation
(Ú
Page
69)
using
Reverse the
procedure
“Loading
the
Batteries”
and
remove
the
batteries.
•facing
Pressing
the
shutter
button
down
adjusts
the
exposure,
• Playback
paused.
PAL
system
(➲
Additional
Information,
Glossary)
situations:
the
lens.
This
setting
allows
you
to
set
in
advance
the
white
balance
when
taking
photographs
under
and
press
ENTER.
the
rear
of
the
camera.
For
the
US/Canada:
PDR-ACM1A
Holding
down
or
moves
forward
or
reverse
continuously.
resumes
at
the
last
state
that
was
protect
sticker
at
the
write-protect
area.
Data
can
no
longer
be
may
corrupt
the
data
on
the
SmartMedia™
or
damage
the
SmartMedia™
itself.
possible,
but
does
not
make
the
exposure
compensation
possible. However the exposure value
is
To
return
normal
press
the
Zoom
switch
towards
setting
(ÚtoPage
Page
58)magnification,
or film
speed
setting
(Ú
Page
78)
using
ENTER
Pass
the
shoulder
strap
through
the
loop
and
pull.
setting
(Ú
78)
using
ENTER
are
also
possible.
and
pressing
the
shutter
button
fully
takes
the
shot.
TM[ is down
When
the
SmartMedia™
used
incorrectly
by
the
user
or
a
third
party
[
],
]
or
[
]
AE
or
AF
are
locked
with
the
shutter
button
held
half
specific
lighting
conditions.
For
Europe:
PDR-ACM1E
active
before
the
pause.
Firmly
insert
the
SmartMedia
as
far
as
it
can
go.
displayed
on is
the
LCD
monitor.
Press
ENTER.
recorded
or setting
erased
from
SmartMedia™.
Toon
write
oraterase
data
from is to be recorded.
Sets
the
color
mode
and
photographic
sensitivity
which
the
image
“W”.
are
also
possible.
The
default
different
depending
the
destination
country/area.
Use
or
to
select
the
desired
item
Press
ENTER,
nine
images
are
displayed
simultaneously.
• no
If
you
shoot
a
still
picture,
when
preview
is
set
to
ON
(Ú
Page
77),
down.
If
operation
is
carried
out
for
a
fixed
amount
of
time
(default:
about
one
minute),
power
ON
When
the
SmartMedia™
is
exposed
to
static
electricity
or
electrical
noise
Forimage
the Noise
UK:
PDR-ACM1U
:off
Displays
the
firmware
version
ofto
this
camera.
SmartMedia™,
peel
the
sticker.
camera
ready
to
take
photographs.
Warning:
increases
when
the
ISO
is
changed
higher
settings.
isis
displayed
and
a
white
frame
and
green
Green The
Compose
picture,
press
the
shutter
button
down
halfway,
and
press
it
down
:the
Automatic
adjustment
(default)
Display
Page
83
theThumbnail
recorded
image
is
displayed
on
for
about
two
]specifications
Standby
mode
[enlarged,
☞
➲
If
no
operation
is
carried
out
a screen
fixed
amount
offrom
time
(default:
about
1shutter
minute),
thewear.
power
is
turned
TM
consumption
is
set
to
its
minimum
state
(power
almost
off)that
to
prevent
battery
This
is
.in
and
press
When
the
SmartMedia™
isfor
removed
ordarkens
the
camera
isPage
turned
off
while
recording
erasing
The
image
the
LCD
monitor
sometimes
the
time
the
button
isdata,
pressed
down
details,
refer
to
the
of
AC
information.
adapter
➲
127.
: on
Displays
the
SmartMedia
Playback
returns
to
the
start
ofturned
the
movie.
☞ ••-For
frame
are
displayed
the
LCD
monitor.
:
Photography
outdoors
Default
setting:
seconds.
off
to
preserve
battery
life.
This
is
called
“Auto
Power
OFF”.
To
return
to
the
normal
state,
press
the
fully.
Ú
Page
40
called
the
Auto
Power
OFF.
This
setting
allows
you
to
set
the
time
when
the
camera
turns
off
halfway
until
the
image
becomes
focused.
: picture,
Equivalent
to
ISO100
(default)
data,
frame
advance
when
images
aredefaults.
played
back or during
formatting alarm
of the
The options
are
displayed.
: Returns
settings
to
Flashing
[ the
],
[ color
]conditions
or their
[shutter
]being
Self-timer
in frame
operation
at a handshake
.
Compose
the
press
the
button
down
halfway,
and
press
it
down
The
white
frame
indicates
entire
image,
while
the
green
:
Photography
in
cloudy
POWER
button
again.
•
The
viewfinder
LED
turns
red
while
image
data
is
being
recorded
Compose
the
picture,
press
the
shutter
button
down
halfway,
and
press
it
down
• The
To
set
the
focus
orpicture.
exposure
forphotography
a subject
outside
the
center
the intended
theincamera
directly
The camera
takes
the
automatically.
This
function
isthrough
not
activated
during
automatic
playback
(➲image,
Pagepoint
85) or
the [ only>
] PC
:appearing
High-sensitive
equivalent
toofcolor
ISO200
SmartMedia™.
Note:
image
the
lens
will
be
The
display
returns
to<Histogram>
thumbnail
playback.
<Standard>
<Detailed
information>
<Image
Memo
shows
the
location
of
the
currently
enlarged
area.
halfway,
and
press
it
down
fully.
Ú
Page
40
:
Photography
in
bluish
fluorescent
light
fully.
Ú
Page
40
About
the
Auto
HH
Power
(FULL
OFF
HH
Function
)
Additional
Information,
“AUTO
POWER
OFF
(page
110)”
at
the
subject
or
desired
exposure
(lighting),
press
and
hold
the
shutter
button
halfway.
Now,
with
the
shutter
onto
the
SmartMedia™.
ON]
Writing
to SmartMedia™
in progress
mode.
Press
ENTER.
:adapter
High-sensitive
photography
equivalent
toanother
color
ISO400
•Insert
Wedefault
recommend
copying
and
saving
important
datapower
onto
storage
medium (floppy disk, hard
displayed
for
[LCD
].[Power
fully.
Ú
Page
40
the
AC
power
plug
into
the
The
size
and
quality
of
the
image
can
be
reset
to
the
desired
combination.
Press
ENTER.
button
still
held
halfway
down,
you
can
turn
the
direction
of
the
camera
and
frame
your
image
with
the
focus
•
It
is
possible
to
play
back
any
images
in
any
folders
by
pressing
or
during
playback.
(For
details
ON
: Photography
inafter
reddish
fluorescent
light
The
camera
takes
the
picture.
Photographs
can
be
taken,
however,
do not
turn thepress
power
OFF.
Todisk,
return
to disk,
the
state
theset
Auto
Power
OFF
has been
executed,
the
POWER
button
MO
etc.).
The
PREVIEW
manual
setting
Page
items
77
are
displayed.
Únormal
camera
takes
the
atmonitor.
the
exposure
time.
Current
Entireofimage
and
exposure
locked.
Press
the
shutter
button
down
fully
to in
complete
capturing
the image.
Red outlet.
[+
on picture
the
LCD
The
camera
is ready
for
burst
photography.
of displayed
folder
Page
92)
]:the
mode:
In
the
➲shutter
Accessing
of
SmartMedia™
[ (HALF
Photography
in] is
incandescent
light
HH
•] [is
When
speed
set
to
a)turn
speed
of
0.7 second
orprogress
slower,
photographs
taken
as extended
to Never
turn
the
power
onHH
again.
•During
remove
the
SmartMedia™
or
the
camera
offresult
while
recording
data or are
while
erasing
data
COLOR
Page
77
Ú
the
exposure,
the
viewfinder
LED
turns
orange.
position
•
Moving
the
camera
as
you
press
the
shutter
button
will
in
a
blurred
image.
Use
,
,
or
to
select
the
area
to
enlarge.
at Page
the
last
image
displays
the
first
image,
and
pressing
atwill
thebe
firstautomatically
image
displays
the
Pressing
During
[2X],
the
ISO
be
automatically
set
to
ISO200.
[4X],ofISO
setof
exposures
(Ú
68).
IfCarry
burst
photography
is to
set
the
shutter
speed
is set During
to athe
speed
0.7
second
or more
in the
[ to
Tv ]
out
steps
1will
2when
in
Photographic
(SmartMedia™
formatting).
actions
might
damage
ISO
Page
78
ÚFlashing
ItClose
takes
about
twice
the
time
to complete
taking
the
photograph
duePDR-M81
to processing
ofenlargement
the
captured
[set
],These
[“Basic
] When
the
image
is not
in SmartMedia™.
focus.
the
SmartMedia™
cover.
•
The
PDR-M81
usesto
accurate
focus
mechanism.
However,
the
have
difficulty
last
image.
Adjust
the
display
area
enlarge
viewing
theto
white
and
ISO400.
• In
AEB
photography
(an
Page
71)while
orauto
burst
photography,
the shutter
speed
cannot be setmay
to 0.7
second
or longer.
HH
(SMALL
HH
)
Ú
mode,
the
shutter
speed
is
automatically
changed
1/2
second.
•image.
Use
only
the
SmartMedia™
specified
for
use
with
the
PDR-M81.
The
use
of
other
SmartMedia™
SHARPNESS
Page
79
mode)”
(page
109).
Select
[QUALITY]
Settings
(
focusing
or
not
be
able
to
focus
at
all
for
subjects
and
situations
such
as
the
following:
Ú
Before
you
use
aother
new
SmartMedia™
the
first during
time,
be
sure
tothe increased
Images
can
bevalue
rotated
by] pressing
playback.
[ for
] or
green
the
aperture
is
to
F2.9
(maximum
aperture
size),
shutter
speed
restricted
•• frames.
If
a
mode
than
[ set
suppressed
flash
mode
is
set
inthe
flash
photography,
thedark
shutterisspeed
is
•79
Processing
image
- When
subject
is distant and
- SmartMedia™
Subjects
moving
at
high
speed
damage
camera.
CONTRAST
Page
Ú[the
• to
The
write
protection
not
function
if in
write-protect
sticker
becomes
Use
a soft
dry cloth to
.thesecond.
oncould
the
SETUP
MENU
and
press
format
the
(may
Page
91).
rotates
an
image
counterclockwise,
and
pressing
rotates
clockwise.
Pressing
1/750
PDR-ACM1A
] •are
the
same
as
to
PDR-ACM1E
PDR-ACM1U
[PRG]
and
limited
tosecond.
between
1/2
second
and
1/250
* The
aboveitdirty.
menu
is
the
RECORDING
Charging
of
flash
progress
ON
When
there
are
objects
in
front
of
or
behind
the
subject
Very
shiny
subjects
such
as
a
mirror
or
car
body
SmartMedia™
is
aof
device.
Do do
notnot
bend,
drop,
or subject
SmartMedia™
to
DIGITAL
ZOOM
Page
• wipe
When
the
camera
isOnce
not79
inelectronic
be sure
to attach
the
lens
cap
provided
with[your
camera.
the
POWER
button
to
turn
the
power
off.
Memo
away
any
dirt.
ause,
sticker
ispress
peeled
off,
reuse
it.
Ú
Orange•Press
The
QUALITY
menu
isprecision
displayed.
combinations
the
automatically
mode.
MENU
inthe
•the
The
aperture
value
set
differ
to
the
actual
value
according
to
the
position
ofUK)
theorzoom
lens.
To
return
to
the
regular
display,
ENTER.
(Photos
cannot
be
taken
at
this
moment.)
(for
US
and
Canada)
If the
shutter
speed
is
set
to
1/350
second
or
less,
the
shutter
as
speed
an
animal
is
automatically
athe
cage
a]changed
person
in front
to 1/250
of a tree)
(for
European
Continent)
(for
Get
ready
to
take
the
photograph.
- above
Extremely
low
contrast
subjects
When
the
settings
are
made,
they
are
displayed
in(such
thepocket
following
order.
excessive
Also,
do
not
carry
SmartMedia™
the
ofx[trousers.
This
might
The
lens
cap
can
also
be
attached
to
attachment
following
the
above
steps
to prevent
it’sthe
LCD
79
Úshocks.
The
power
turns
off.
determined
shutter
speeds
and
aperture
-in Subjects
with
little
reflection,
such
as
hair
fur mode.
•• The
size
displayed
on
the
LCD
monitor
FULL
(320
240)
HALF
(160
xorsubject
120).
The
forced
flash
mode
or
]orred-eye
forced
flash
second
ifPage
the
flash
setting
is25)
changed
tothe
thestrap
[ ]becomes
- image
Subjects
that
have
low contrast
and
merge
into
Loading
the
batteries
(Ú
Page
and
the
SmartMedia™
(Ú
Page
31)
into
the
camera.
being
lost.
• Flash
photography
and
burst
photography
are
not
possible.
Flashing
SmartMedia™
to
excessive
force
when
you
sit
down,
damaging
the
SmartMedia™.
Hardware
malfunction
Subjects
with
no
solidity,
such
as
smoke
or
flames
the
background
(such
as
white
walls
or
subjects
Attach
the
lens
cap
when
you
are
not
using
the
camera.
values.
However,
their
operation
capability
movies
made
in
FULL
size
is
displayed
on
the
entire
LCD
monitor,
and
those
made
in
HALF
size
If the
[ ]mode,
forcedISO
flash
[ automatically
] red-eye set
forced
flash mode
is and
set in
flash photography
the is
• In
movie
willorbe
between
ISO100
ISO400
regardless ofwhen
its setting.
dressed
inthe
theSmartMedia™
same
color
as
the
background)
-attach
Subjects
viewed
through
glass
Turn
offor
the
power
tothe
retract
the
lens
unit,
and then
the
lens
cap.
The
image
taken
in
photography
mode
may
be
blurred.
or
to
select
the
desired
setting
from
the
tab
menu
, and
press
HH
HH
HH
•Use
Do•not
use
store
in
environments
likely
to
be
affected
byisstatic
electricity
or
is
different
as
shown
the
right
table.
displayed
in
ofspeed
the
shutter
speed
is center
set
toin
aexposure
of
0.7
second
or
more,
the
shutter
speed
automatically
changed
to
Press
POWER
button
toscreen.
turn
power
on.
A electrical
histogram
isturn
a graphic
representation
ofthe
theistones
of the
subject.
The horizontal
histogram
• Do
If the
the
image
cannot
be
focused,
thelens
focus
automatically
fixed to infinity.
(When theaxis
flashofisthe
necessary
not
the
power
on
with
the
cap
attached.
noise.
1/2
second.
ENTER.
*
The
above
AC
adapter
is
US/Canada
Turning
the
Power
On
Ú
Page
38
+
shows
the
brightness
(increasing
brightness
from
left
to
right)
and
the
vertical
axis
shows
the
number
at
this
time,
it
is
simultaneously
fixed
to
illuminate
objects
1.5
meters
(five
feet)
away.
During
macro
•This
Dosaves
use
orsettings,
store
SmartMedia™
very
hot,
humid
oraperture
corrosive
If the
shutter
speed
value
isimages,
set toin1/1000
second,
the
value
is limited
to
F8type
andAC
F3.4.
•not
When
playing
back
movie
switching
isthe
between
standard
and
image
only.
(O
:environments.
possible
Xbetween
: not
the
and
returns
to
RECORDING
MENU.
type.
European
andpossible)
UK
photography,
the flash
islevel.
alignedthe
withdisplay
the wide
position.)
of pixels
at each brightness
Downloaded From
camera-usermanual.com
adapters differ in shape.
--110
20 -40
80
88
Erasing Folders (All Images in a Folder/All Folders)
Erases selected folders and all contents currently recorded to the SmartMedia™ loaded on your camera. There
are two ways of erasing images, by individual folders or by all folders.
Note: Images cannot be erased when they are protected (➲ Page 106) or when the SmartMedia™ is writeprotected (➲ Page 34).
Getting
Ready
The folder to be erased differs according to the position of the mode dial.
]
: Folder of images currently being played back
[
], [
] or [
] : Folder of images currently being photographed
[
☞ About Folders ➲ Page 92
Taking
Photographs
], [
], [
] or [
].
Set the mode dial to the type of folder you want to erase.
] is selected, the last image frame or the thumbnail display appears on the LCD monitor.
When [
Hold down the
Playing
Back Images
Set the mode dial to [
erase button for two seconds.
Erasing
Images
The erase icon is displayed at the left of the screen.
Handy
Functions
Other
Applications
Additional
Information
Downloaded From camera-usermanual.com
- 89 -
Changing
the
Preset
Conditions
(RECORDING
MENU)
Photography
in
the
Program
Mode
Setting
Names
Playing
Back
the
of
Photographed
Parts
Image
Size
and
Quality
(Single-Frame
Playback)
Extended
Exposure
Photography
(Bulb
Photography)
Erasing
Images
(Erase
Frame)
(continued)
Manual
Attaching
Using
How
Taking
Enlarging
Playback
About
Turning
to
Photographs
the
SmartMedia™
Press
Settings
the
Photographed
of
Power
the
Power
Multi
Shoulder
Continuously
Outlet
Shutter
Image
On/Off
Images
Strap
Pictures
Button
(Zoom
(Burst
Playback)
Photography)
Taking
Erasing
Button
Photographs
Folders
and
(All
LCD
Images
Continuously
Monitor
in
aImages
Folder/All
(Burst
Display
Photography)
Folders)
(In
Playback
(continued)
(continued)
Mode)
Definitions
Separately
of
the
Accessories
Color
of
the
Viewfinder
LED
Taking
and
Playing
Back
Photographs
on
aMode
TV
(continued)
Changing
the
Preset
Conditions
(RECORDING
MENU)
(continued)
Exposure
Compensation
in
the
Shutter
(continued)
Speed-priority
(continued)
About
Basic
Settings
SmartMedia™
in
(Sold
the
mode)
Aperture-priority
(continued)
Mode
(continued)
LCD
Monitor
Display
(during
photography)
(continued)
Manual
Settings
(continued)
Playing
Photography
Installing
Back
Movies
batteries
(Auto
Photography)
(continued)
(continued)
(continued)
Names
of
Parts
(continued)
Getting
Ready
The shutter
camerabutton
automatically
adjusts the
shutter
and
the aperture
value
according
to the
brightness
of an
can be pressed
down
in twospeed
stages:
halfway
down and
fully
down. When
pressed
halfway
down,
This
“SmartMedia™”
Set
Play
Automatically
The
the
following
mode
shoulder
menu
back
size
photographed
is(number
used
for
items
strap
plays
setting
isadapter
for
athe
is
are
back
storage
of
taking
handy
also
the
pixels)
still
the
basic
available
subjects
for
medium
images
16
and
carrying
images
settings
quality
one
for
that
as
saving
separately
your
image
to
require
(compression
be
camera
used
images
atseveral
a
sold
for
around.
inthat
photography
items.
ratio)
seconds
the
you
multi
of
have
the
photography
to image
photograph
in
photographed.
to
[ second
be
mode
],photographed.
such
[be
Even
in
asquick
]for
firework
or
if Europe,
the
[You
succession.
camera’s
displays
] photography
power
at the
Enlarges
selected
portions
of
images
being
played
back
at
two
levels.
Images
can
displayed
enlarged
when
In
You
this
can
color
mode,
manually
of
the
photographs
viewfinder
adjust
settings
are
LED
taken
indicates
such
continuously
asphotographed
the
exposure
state
atof
control,
atime.
the
maximum
camera.
white
speed
balance,
The
ofthe
0.8
metering
system,
intervals.
continuous
This
item
switches
display
on
the
LCD
monitor
when
playing
back
photographed
images.
can
switch
If
you
the
AC
(sold
separately:
PDR-ACM1A
for
the
US/Canada,
PDR-ACM1E
PDR-ACM1U
Mode
Effective
dial
Subjects
and
Set
Values
TM
Viewfinder
LED
Press
.of
aperture
value.
SYSTEM
Turning
Exposure
ISO
OSD
In
[prevent
[use
LANGUAGE
the
]the
INFO.
mode
control
(EXP.)
On
Close
the
SmartMedia™
cover.
Slide
the
SmartMedia
cover
release
knob
in
the
Take
photographs
or
or
battery
to
to
select
or
play
[that
the
slide
]them
or
shutter
it
[ the
back.
,]will
and
speed.
and
lock
press
Look
Use
through
to
select
the
[adjust
viewfinder
]use
and
press
to
compose
ENTER.
the
picture.
To
continue
erasing
images,
repeat
the
above
procedure
2.
.is
AF
(auto-focus)
and
AE
(auto
exposure)
are
set.
When
pressed
fully
down,
the
camera
takes
aspace
picture.
object.
This
mode
enables
carefree
photographing
similarly
to
selecting
[stable
]photographs.
in
[ from
]settings”,
mode.
Itrepeatedly
is
to
night.
To
is
Change
modes.
turned
When
the
OFF,
your
setting
using
the
camera
images
this
according
mode,
from
saved
dropping
be
to
sure
how
on
the
the
to
during
SmartMedia™
image
a(size,
photography,
tripod
is
to
to
be
keep
used
not
hang
the
and
be
camera
erased.
the
the
shoulder
remaining
SmartMedia™
strap
and
amount
prevent
around
can
ofstep
your
distortion
be
neck.
inpossible
the
of
images.
Relationship
between
your
camera
and
accessories
Connecting
tocalled
Other
Devices
(page
123)
being
played
back
one
image
at
acover,
time.
The
meaning
maximum
of
number
LED
color
of
photographs
differ
according
can
to
be
taken
mode
continuously
dial
setting.
three
photography
mode,
and
take
photographs
at
these
settings.
These
are
“Manual
which
are
saved
display
to
show
aPower
list
detailed
information
compression
ratio,
shutter
speed,
aperture,
etc.)
or
you
can
for
the
UK)
in
a
room
with
amay
power
outlet,
you
can
take
photographs
for
an
extended
period
of
time.
This
also
Item
QUALITY
Options
Notes
SmartMedia™
VIDEOon
OUT
White Balance (W.B.)
Write
Protection
Removing
the Batteries
ISO
[ POWER
]
AUTO
OFF
Setting items
Turning
the
Power
Off
Using
the
LCD
Monitor
Additional
Information
Other
Applications
Handy
Functions
Erasing
Images
Playing
Back Images
Taking
Photographs
Tab menu
lThe
tab
is
displayed.
setting
isbattery
as
follows:
Make
sure
that
the
issystem
firmly
closed.
Details
image
ofmenu
operation
isrange
saved
are
or
erased,
the
same
and
as
the
taking
camera
photographs
is
then
ready
and
to
playing
take
photographs.
them
back
onon
the
LCD After
monitor.
If
you
use
the
viewfinder
to
take
photographs,
the
photography
Set
the
mode
dial
to
[cover
].settings
direction
of
the
arrow
to
open
cover
.the
ENTER.
change
the
white
and
the
metering
in(the
program
mode.
erased
SmartMedia™.
and
reused.
For
details
on
these
accessories,
refer
to
the
Instruction
Manual
for
the
accessory
you
are
using.
(information
Movies
images
photographed
in
the
multi
mode
Page
cannot
be
displayed
using
the
zoom
playback
Images
even
if the
are
camera
not
recorded
is
turned
directly
off.
SmartMedia™
but
are
stored
temporarily
within
the
buffer
memory.
display
histograms,
etc.
prevents
failed
photographs
due
to
battery
wear
or
failed
of
data
to
a
PC.
details
handling
the AC
Set
Sets
the
thebalance
whether
color
: /or
Photography
mode
language
not
to
and
return
photographic
of
in
menus
the
program
displayed
sensitivity
in
the
(default)
on
SETUP
the
at51)
which
LCD
(Ú
MENU
Page
monitor.
to
image
62)
the
original
is For
to
be
factory
recorded.
settings.
feeds
the
image
•transfer
Each
press
of
•Memo
Copying
of
printed
(black
on
white
paper)
set
the
time
(text
114)
F8
/display
F6.8
F5.6
/18.
F4.8
/Page
/and
F3.4
/mode
F2.9
How
to
take
photographs
Page
41
1/1000,
1/750,
1/500,
1/350,
1/250,
1/180,
1/125,
range
may
differ
from
the
actual
image.
InLCD
this
case,
use
the
LCD
Press
the
shutter
button
down
halfway
.1/90,
the
mode
dial
to
[ F4.0
],
[characters
]reset.
or
[selected
].higher
SmartMedia™
having
the
following
storage
capacity
can
be
on
your
current
as
of
March
2000)
feature.
The
last
cover
recorded
image
opens
frame
image
appears
appears
on
the
on
the
LCD
monitor.
monitor.
photography
is
finished,
check
the
images
record
the
ones
tocamera.
SmartMedia™.
[TIME&DATE,
]
:
Erases
images
in
the
selected
folder
and
folders.
adapter,
beSet
sure
to
read
page
•
2x-speed
playback
isaperture-priority
performed
Make
sure
that
the
SmartMedia™
is
correctly
loaded.
(
Page
31)
byused
one
frame.
Warning:
Noise
:OSD
Photography
increases
LANGUAGE
when
incurrently
will
the
not
ISO
be
is for
changed
mode
to
(Ú
Page
settings.
63)
•
Backlit
portraits
[PROTECTED]
on
the
LCD
monitor,
cancel
the protection
( Page 108) or
remove
How
to
play
back
images
Page
80
1/60,
1/45,
1/30,
1/20,
1/10,
1/8,
1/6,
1/4,
1/3, 115
1/2,
monitor
for
photography.
AF
(auto-focus)
and
AE
(auto
exposure)
(Ú
Additional
Information,
: value
English
(default)
Pass
Set
the
out
mode
end
steps
of
dial
1the
to
to
shoulder
4[1/15,
either
]].LCD
or
inspeed-priority
[strap
“Photography
through
].
the
in
the
strap
Shutter
speed-priority
Mode”
isdisplayed
held
down.
the
duration
that
2MBCarry
/4MB/8MB/16MB/32MB/64MB/128MB
the
mode
dial
to
[isin
(all
3.3
types)
To
]•the
adjust
: When
Erases
the
all
brightness
folders
recorded
of
the
on
the
monitor
SmartMedia™.
Page
[Set
•V
1-frame
feed
is continued
for the
The
aperture
and
the
shutter
speed
corresponding
to(Úthat
:write-protection
Photography
shutter
mode
Page
65)
• 0”7,
bright
scenes
(such
and
highly
reflective
subjects
•the
You
can
also
carry
out
step
8snowfields)
while
verifying
the
image
step
7.
DPOF
(in
Page
102).
Glossary)
start
to
function.
1”,
1”5,
2”,
3”,
4”,
6”,
8”,
10”,
15”
•Very
Do
not
remove
or monitor
load
the
batteries
or
disconnect
or
connect
the
AC
adapter
while
the camera
is mode.
on. This
:POWER
Japanese
:LCD
Equivalent
toas
color
ISO100
Carry
Set
Use
out
or
mode
steps
to
dial
select
1
to
to
2[erased,
the
“Manual
].
images
photographed
Settings”
(page
in
58).
the
multi
photography
You can also
the
PC
card
adapter
and
floppy
disk
adapter
( in
123)
sold
separately
to transfer
Changing
the
display
Page
116
Theconnect
images
or
folders
are
and
the
camera
returns
toPage
the
is
held
down.
duration
that
value
are
displayed
on
the
LCD
monitor.
If
the
appropriate
(page
attachment
65)
or
on
in
“Photography
the
camera.
in
the
Full
Manual
Mode”
(page
67).
Press
the
button
to
turn
the
power
on.
full
manual
mode
(Ú
Page
67)
:
Photography
in
Press
the
MENU
button.
• •Shots
predominantly
of
sky
Even
ifreturn
photography
is disconnect
terminated
midway
before
capturing
three
images
bythe
releasing
theAC
shutter
• AF
If
you
take
aup
photograph
after
erasing
an
athis
number
continuing
from
last Ifphotographed
When
or
AE
are
locked,
the
beep
tone
(Ú Page
111)
sounds
and
the
Use
ormade
to
change
the
setting
inimage,
the
menu,
might
the
manual
settings
tosame
their
defaults.
Iftab
happens,
manually
set
conditions
again.
:
High-sensitive
photography
equivalent
to
color
ISO200
(default)
Before
you
connect
or
the
AC
adapter,
be
sure
to
turn
the
camera
OFF.
the
adapter
is
Press
the
image
quality
button
to
select
the
preset
combination
cannot
be
set
even
if
the
shutter
speed
is
adjusted
to
images to a
PC.
16MB
(SM-M1600D)/32MB
(SM-M3200D)/64MB
(SM-M6400D)/128M
(SM-M1280D)
The
respective
last
image
mode.
frame
appears
on
LCD
monitor.
You
can
also
select
the
image
by
the
operation
as
for
thumbnail
display
(
Page
83).
Carry
out
steps
1
to
on
page
109.
When
the
camera
is
turned
on,
set
the
mode
dial
to
thethe
desired
The
shutter
speed
and
the
aperture
value
corresponding
todisplay
the
All
descriptions
inor
this
Instruction
Manual
are
for
when
language
is set
to [ENGLISH].
Press
or
to
select
the
image.
button,
images
already
photographed
can
be
saved
and
erased
by playback
the
method.
image
is
assigned
as
image
number.
lThe
viewfinder
RECORDING
LED
turns
MENU
green.
is2
displayed.
•press
The
image
the
photograph
is
taken
is
slightly
less
clear
than
images.
(This
is 109,
connected
disconnected
with
the
power
ON,
camera
settings
may
beabove
reset
(SET-UP
Page
and
ENTER.
:before
High-sensitive
photography
equivalent
to
color
ISO400
its
the
shutter
speed
isthe
displayed
inthe
red.
To limit,
cancel
erasing
of
image
data,
select
[monitor.
]Photography,
and
press
ENTER.
quality
and
size,
while
viewing
indication
on
the
starts
a
reverse
•
The
press
of
mode.
shutter
speed
are
displayed
on
the
LCD
If
the
appropriate
The
length
of
time
to
capture
images
varies
according
to
the
photographic
conditions.
•
Images
can
also
be
erased
in
the
thumbnail
mode.
In
this
case,
the
camera
enters
the
single
frame
Select
[SYSTEM
INFO.]
on
the
SETUP
MENU
and
because
television
displays
images
at
a
lower
resolution.)
•
Spotlit
subjects,
particularly
against
dark
backgrounds
Manual
Settings
Page
58)
orPage
the
camera
malfunction.
however,
is
in
this
state.
feeds the
image
•may
Each
press
oftoinbegin
EXP.
].
To
cancel
changing
of
settings,
press
.you
Use
or
todial
select
the
frame
want
to
enlarge.
Press
the
or
Zoom
to
switch
select
[( S/C
].isphotography
21)
towards
“T”
playback.
]possible
is
selected,
[NO
IMAGE]
displayed
after
all
folders
When
playback.
Press
Set
mode
in
the
to
[ sure
Tv
mode,
].the
or
press
or
the
shutter
button
fully
Before
photography,
make
that
the
lens
cap
has
been
combination
cannot
be
set
even
ifflash
aperture
isin.black
adjusted
to its
playback)
mode,
and
enters
the
thumbnail
playback mode after the image is erased.
status
display.
]or
mode:
In
[[playback
Press
the
display/info
button.
Self-timer
photography
and]down
are
not
possible.
•the
The
display
unit
varies
according
to
the
output
system.
•theCopying
of (frame
printed
text
(white
characters
on
paper)
.playback
press
reverse
by
one
frame.
This
adapter
allows
SmartMedia™
to
be
used
as
3.5"
floppy
disk.
have
been
erased
(unless
the
SmartMedia™
contains
protected
You
can
also
select
the
image
by
the
same
operation
as
for
thumbnail
playback
( [4X],
PageISO
83).
Automatic
begins.
•
Playback
becomes
2x-speed
to
reduce
aperture
size.
Press
to
increase
aperture
size.
Press
camera
takes
a
picture.
The
manual
setting
removed
the
camera.
limit,
aperture
value
isbe
displayed
in
red.
Photography,
however,
the
[Scenes
M
]from
mode
tomenu
set
the
speed
to simultaneously
0.7
second
During
[2X],
the
ISO
will
automatically
set
between
ISO100
ISO200.
During
be
+
set
the
quality
and
size
Úshutter
Page
112
•the
With
the
NTSC
system,
images
can
be
displayed
on the LCD
monitor
and TVwill
during
•To
with
low
reflectivity,
such
as
shots
green
or
dark
foliage
Each
press
of
the
display/info
button
switches
the
display
•of1-frame
feed
isand
continued
The
SYSTEM
INFO.
displayed.
reverse
for
the
duration
This
adapter
isplayback
inserted
into
the],
floppy
your
PC,
allowing for the
images).
The
viewfinder
LED
turns
redis
image
data
being
recorded
onto
Insert
the
adapter
connector
plug
into
the
DC
IN
values
are
displayed
In
the
photography
modes
([while
[and ISO400.
]disk
oris
[ drive
]),on
the
lens
photography
and
playback.
is
possible
inAC
this
state.
automatically
set
between
ISO100
is
held
down.
format
as
follows:
duration
that
Note:
The
larger
the
F
value,
the
smaller
the
aperture
size
become
or
longer.
•Press
Remove
and
insert
SmartMedia™
with
the
camera’s
power
turned
off.Aperture value
is
held
down.
that
To
quit
the
SETUP
MENU,
change
the
mode
dial
setting.
Shutter
speed
Adjust
the
zoom
ratio
by
the
Zoom
switch.
(Zoom
to
display
option
menu,
press
or
to
images
recorded
on
the
SmartMedia™
to
be
transferred
to
the
PC.
the
SmartMedia™.
Sets
video
output
system
according
to
country
in
which
your camera
is used.
on
the
left
ofthe
the
LCD
Press
the
shutter
button
down
halfway
and
press
5V
terminal
on
the
camera.
extends
from
the
camera
body.
•the
PAL
system,
images
cannot
bethe
displayed
When a cable
is connected, only
and
versa.
the
image
quality
button
switches
the
quality
and
size
Gently
insert
the
SmartMedia™
as
far
as
it, simultaneously.
can
go
Memo
[Pressing
]vice
isWith
displayed
on
the
LCD
monitor.
•select
Recorded
data
may
bepress
erased
(destroyed)
in
the
situations
listed
below. Note that Toshiba
White
Balance
Additional
Information,
Glossary
to
increase
shutter
speed.
Pressand
to
decrease
shutter
speed.
Press
Press
or
to
move
forward
reverse.
+
Ú
PRG
]
and
ENTER.
]
and
press
ENTER.
[
switch
Page
21)
Detailed
TV
display
is
available.
monitor
screen.
When
the
camera
is
turned
on,
the
Auto
Power
OFF
function
settings
infully
the
following
order.
it
down
. system
Standard
Histogram
Image
only
Press
or
to
select
the
item
you
desired
to
set,
with
SmartMedia™
electrodes
(metal
contacts)
Additional
Information,
Glossary)
(white
Corporation
accepts
no
responsibility
whatsoever
for
the
loss
of recorded
data enters
in these
• the
When
allNTSC
images
in
a
folder
are
erased,
that
folder
itself
is
also(destruction)
erased.
The
camera
determines
the
balance
by
averaging
the
various
kinds playback
of light
that actually
to
to
next
frame/
to“T”
go
back
one
information
To
prevent
valuable
data
from
being
erased,
attach
the
write••advance
With
the
PAL
system,
images
are
played
back
with
apressing
black
frame
•frame
After
pause
is
cancelled,
the
Zoom
switch
to
the
will
the
image.
Pressing
ENTER
the
setting.
or
,, SmartMedia™
and
manual
Exposure
compensation
(Ú
Page
69)
using
When
[for
M
]selects
isis
selected
on
the
[ halfway
EXP.
]remove
option
menu,
orsurrounded.
the
shutter
speed
setting
becomes
operational.
Never
open
the
SmartMedia™
cover
orenlarge
the
while
anmakes
image
is
being
recorded.
This
or
and
manual
setting
(Ú
Page
58)
or
film
speed
Exposure
compensation
(Ú
Page
69)
using
Reverse the
procedure
“Loading
the
Batteries”
and
remove
the
batteries.
•facing
Pressing
the
shutter
button
down
adjusts
the
exposure,
• Playback
paused.
PAL
system
( camera.
Additional
Information,
Glossary)
situations:
the
lens.
This
setting
allows
you
to
set
in
advance
the
white
balance
when
taking
photographs
under
and
press
ENTER.
the
rear
of
the
For
the
US/Canada:
PDR-ACM1A
Holding
down
or
moves
forward
or
reverse
continuously.
resumes
at
the
last
state
that
was
protect
sticker
at
the
write-protect
area.
Data
can
no
longer
be
may
corrupt
the
data
on
the
SmartMedia™
or
damage
the
SmartMedia™
itself.
possible,
but
does
not
make
the
exposure
compensation
possible. However the exposure value
is
To
return
normal
press
the
Zoom
switch
towards
setting
(ÚtoPage
Page
58)magnification,
or film
speed
setting
(Ú
Page
78)
using
ENTER
Pass
the
shoulder
strap
through
the
loop
and
pull.
setting
(Ú
78)
using
ENTER
are
also
possible.
and
pressing
the
shutter
button
fully
takes
the
shot.
TM[ is down
When
the
SmartMedia™
used
incorrectly
by
the
user
or
a
third
party
[
],
]
or
[
]
AE
or
AF
are
locked
with
the
shutter
button
held
half
specific
lighting
conditions.
For
Europe:
PDR-ACM1E
active
before
the
pause.
Firmly
insert
the
SmartMedia
as
far
as
it
can
go.
displayed
on is
the
LCD
monitor.
Press
ENTER.
recorded
or setting
erased
from
SmartMedia™.
Toon
write
oraterase
data
from is to be recorded.
Sets
the
color
mode
and
photographic
sensitivity
which
the
image
“W”.
are
also
possible.
The
default
different
depending
the
destination
country/area.
Use
or
to
select
the
desired
item
Press
ENTER,
nine
images
are
displayed
simultaneously.
• no
If
you
shoot
a
still
picture,
when
preview
is
set
to
ON
(Ú
Page
77),
down.
If
operation
is
carried
out
for
a
fixed
amount
of
time
(default:
about
one
minute),
power
ON
When
the
SmartMedia™
is
exposed
to
static
electricity
or
electrical
noise
Forimage
the Noise
UK:
PDR-ACM1U
:off
Displays
the
firmware
version
ofto
this
camera.
SmartMedia™,
peel
the
sticker.
camera
ready
to
take
photographs.
Warning:
increases
when
the
ISO
is
changed
higher
settings.
isis
displayed
and
a
white
frame
and
green
Green The
Compose
picture,
press
the
shutter
button
down
halfway,
and
press
it
down
:the
Automatic
adjustment
(default)
Display
Page
83
theThumbnail
recorded
image
is
displayed
on
for
about
two
]specifications
Standby
mode
[enlarged,
••-For
If
no
operation
is
carried
out
a screen
fixed
amount
offrom
time
(default:
about
1shutter
minute),
thewear.
power
is
turned
TM
consumption
is
set
to
its
minimum
state
(power
almost
off)that
to
prevent
battery
This
is
.in
and
press
When
the
SmartMedia™
isfor
removed
ordarkens
the
camera
isPage
turned
off
while
recording
erasing
The
image
the
LCD
monitor
sometimes
the
time
the
button
isdata,
pressed
down
details,
refer
to
the
of
AC
information.
adapter
127.
: on
Displays
the
SmartMedia
Playback
returns
to
the
start
ofturned
the
movie.
frame
are
displayed
the
LCD
monitor.
:
Photography
outdoors
Default
setting:
seconds.
off
to
preserve
battery
life.
This
is
called
“Auto
Power
OFF”.
To
return
to
the
normal
state,
press
the
fully.
Ú
Page
40
called
the
Auto
Power
OFF.
This
setting
allows
you
to
set
the
time
when
the
camera
turns
off
halfway
until
the
image
becomes
focused.
: picture,
Equivalent
to
ISO100
(default)
data,
frame
advance
when
images
aredefaults.
played
back or during
formatting alarm
of the
The options
are
displayed.
: Returns
settings
to
Flashing
[ the
],
[ color
]conditions
or their
[shutter
]being
Self-timer
in frame
operation
at a handshake
.
Compose
the
press
the
button
down
halfway,
and
press
it
down
The
white
frame
indicates
entire
image,
while
the
green
:
Photography
in
cloudy
POWER
button
again.
•
The
viewfinder
LED
turns
red
while
image
data
is
being
recorded
Compose
the
picture,
press
the
shutter
button
down
halfway,
and
press
it
down
• The
To
set
the
focus
orpicture.
exposure
forphotography
a subject
outside
the
center
the intended
theincamera
directly
The camera
takes
the
automatically.
This
function
isthrough
not
activated
during
automatic
playback
( image,
Pagepoint
85) or
the [ only>
] PC
:appearing
High-sensitive
equivalent
toofcolor
ISO200
SmartMedia™.
Note:
image
the
lens
will
be
The
display
returns
to<Histogram>
thumbnail
playback.
<Standard>
<Detailed
information>
<Image
Memo
shows
the
location
of
the
currently
enlarged
area.
halfway,
and
press
it
down
fully.
Ú
Page
40
:
Photography
in
bluish
fluorescent
light
fully.
Ú
Page
40
About
the
Auto
HH
Power
(FULL
OFF
HH
Function
)
Additional
Information,
“AUTO
POWER
OFF
(page
110)”
at
the
subject
or
desired
exposure
(lighting),
press
and
hold
the
shutter
button
halfway.
Now,
with
the
shutter
onto
the
SmartMedia™.
ON]
Writing
to SmartMedia™
in progress
mode.
Press
ENTER.
:adapter
High-sensitive
photography
equivalent
toanother
color
ISO400
•Insert
Wedefault
recommend
copying
and
saving
important
datapower
onto
storage
medium (floppy disk, hard
displayed
for
[LCD
].[Power
fully.
Ú
Page
40
the
AC
power
plug
into
the
The
size
and
quality
of
the
image
can
be
reset
to
the
desired
combination.
Press
ENTER.
button
still
held
halfway
down,
you
can
turn
the
direction
of
the
camera
and
frame
your
image
with
the
focus
•
It
is
possible
to
play
back
any
images
in
any
folders
by
pressing
or
during
playback.
(For
details
ON
: Photography
inafter
reddish
fluorescent
light
The
camera
takes
the
picture.
Photographs
can
be
taken,
however,
do not
turn thepress
power
OFF.
Todisk,
return
to disk,
the
state
theset
Auto
Power
OFF
has been
executed,
the
POWER
button
MO
etc.).
The
PREVIEW
manual
setting
Page
items
77
are
displayed.
Únormal
camera
takes
the
atmonitor.
the
exposure
time.
Current
Entireofimage
and
exposure
locked.
Press
the
shutter
button
down
fully
to in
complete
capturing
the image.
Red outlet.
[+
on picture
the
LCD
The
camera
is ready
for
burst
photography.
of displayed
folder
Page
92)
]:the
mode:
In
the
Accessing
of
SmartMedia™
[ (HALF
Photography
in] is
incandescent
light
HH
•] [is
When
shutter
speed
set
to
a)turn
speed
of
0.7 second
orprogress
slower,
photographs
taken
as extended
to Never
turn
the
power
onHH
again.
•During
remove
the
SmartMedia™
or
the
camera
offresult
while
recording
data or are
while
erasing
data
COLOR
Page
77
Ú
the
exposure,
the
viewfinder
LED
turns
orange.
position
•
Moving
the
camera
as
you
press
the
shutter
button
will
in
a
blurred
image.
Use
,
,
or
to
select
the
area
to
enlarge.
at Page
the
last
image
displays
the
first
image,
and
pressing
atwill
thebe
firstautomatically
image
displays
the
Pressing
During
[2X],
the
ISO
be
automatically
set
to
ISO200.
[4X],ofISO
setof
exposures
(Ú
68).
IfCarry
burst
photography
is to
set
the
shutter
speed
is set During
to athe
speed
0.7
second
or more
in the
[ to
Tv ]
out
steps
1will
2when
in
Photographic
(SmartMedia™
formatting).
actions
might
damage
ISO
Page
78
ÚFlashing
ItClose
takes
about
twice
the
time
to complete
taking
the
photograph
duePDR-M81
to processing
ofenlargement
the
captured
[set
],These
[“Basic
] When
the
image
is not
in SmartMedia™.
focus.
the
SmartMedia™
cover.
•
The
PDR-M81
usesto
accurate
focus
mechanism.
However,
the
have
difficulty
last
image.
Adjust
the
display
area
enlarge
viewing
theto
white
and
ISO400.
• In
AEB
photography
(an
Page
71)while
orauto
burst
photography,
the shutter
speed
cannot be setmay
to 0.7
second
or longer.
HH
(SMALL
HH
)
Ú
mode,
the
shutter
speed
is
automatically
changed
1/2
second.
•image.
Use
only
the
SmartMedia™
specified
for
use
with
the
PDR-M81.
The
use
of
other
SmartMedia™
SHARPNESS
Page
79
mode)”
(page
109).
Select
[QUALITY]
Settings
(
focusing
or
not
be
able
to
focus
at
all
for
subjects
and
situations
such
as
the
following:
Ú
Before
you
use
aother
new
SmartMedia™
the
first during
time,
be
sure
tothe increased
Images
can
bevalue
rotated
by] pressing
playback.
[ for
] or
green
the
aperture
is
to
F2.9
(maximum
aperture
size),
shutter
speed
restricted
•• frames.
If
a
mode
than
[ set
suppressed
flash
mode
is
set
inthe
flash
photography,
thedark
shutterisspeed
is
•79
Processing
image
- When
subject
is distant and
- SmartMedia™
Subjects
moving
at
high
speed
damage
camera.
CONTRAST
Page
Ú[the
• to
The
write
protection
not
function
if in
write-protect
sticker
becomes
Use
a soft
dry cloth to
.thesecond.
oncould
the
SETUP
MENU
and
press
format
the
(may
Page
91).
rotates
an
image
counterclockwise,
and
pressing
rotates
clockwise.
Pressing
1/750
PDR-ACM1A
] •are
the
same
as
to
PDR-ACM1E
PDR-ACM1U
[PRG]
and
limited
tosecond.
between
1/2
second
and
1/250
* The
aboveitdirty.
menu
is
the
RECORDING
Charging
of
flash
progress
ON
When
there
are
objects
in
front
of
or
behind
the
subject
Very
shiny
subjects
such
as
a
mirror
or
car
body
SmartMedia™
is
aof
device.
Do do
notnot
bend,
drop,
or subject
SmartMedia™
to
DIGITAL
ZOOM
Page
• wipe
When
the
camera
isOnce
not79
inelectronic
be sure
to attach
the
lens
cap
provided
with[your
camera.
the
POWER
button
to
turn
the
power
off.
Memo
away
any
dirt.
ause,
sticker
ispress
peeled
off,
reuse
it.
Ú
Orange•Press
The
QUALITY
menu
isprecision
displayed.
combinations
the
automatically
mode.
MENU
inthe
•the
The
aperture
value
set
differ
to
the
actual
value
according
to
the
position
ofUK)
theorzoom
lens.
To
return
to
the
regular
display,
ENTER.
(Photos
cannot
be
taken
at
this
moment.)
(for
US
and
Canada)
If the
shutter
speed
is
set
to
1/350
second
or
less,
the
shutter
as
speed
an
animal
is
automatically
athe
cage
a]changed
person
in front
to 1/250
of a tree)
(for
European
Continent)
(for
Get
ready
to
take
the
photograph.
- above
Extremely
low
contrast
subjects
When
the
settings
are
made,
they
are
displayed
in(such
thepocket
following
order.
excessive
Also,
do
not
carry
SmartMedia™
the
ofx[trousers.
This
might
The
lens
cap
can
also
be
attached
to
attachment
following
the
above
steps
to prevent
it’sthe
LCD
79
Úshocks.
The
power
turns
off.
determined
shutter
speeds
and
aperture
-in Subjects
with
little
reflection,
such
as
hair
fur mode.
•• The
size
displayed
on
the
LCD
monitor
FULL
(320
240)
HALF
(160
xorsubject
120).
The
forced
flash
mode
or
]orred-eye
forced
flash
second
ifPage
the
flash
setting
is25)
changed
tothe
thestrap
[ ]becomes
- image
Subjects
that
have
low contrast
and
merge
into
Loading
the
batteries
(Ú
Page
and
the
SmartMedia™
(Ú
Page
31)
into
the
camera.
being
lost.
• Flash
photography
and
burst
photography
are
not
possible.
Flashing
SmartMedia™
to
excessive
force
when
you
sit
down,
damaging
the
SmartMedia™.
Hardware
malfunction
Subjects
with
no
solidity,
such
as
smoke
or
flames
the
background
(such
as
white
walls
or
subjects
Attach
the
lens
cap
when
you
are
not
using
the
camera.
values.
However,
their
operation
capability
movies
made
in
FULL
size
is
displayed
on
the
entire
LCD
monitor,
and
those
made
in
HALF
size
If the
[ ]mode,
forcedISO
flash
[ automatically
] red-eye set
forced
flash mode
is and
set in
flash photography
the is
• In
movie
willorbe
between
ISO100
ISO400
regardless ofwhen
its setting.
dressed
inthe
theSmartMedia™
same
color
as
the
background)
-attach
Subjects
viewed
through
glass
Turn
offor
the
power
tothe
retract
the
lens
unit,
and then
the
lens
cap.
The
image
taken
in
photography
mode
may
be
blurred.
or
to
select
the
desired
setting
from
the
tab
menu
, and
press
HH
HH
HH
•Use
Do•not
use
store
in
environments
likely
to
be
affected
byisstatic
electricity
or
is
different
as
shown
the
right
table.
displayed
in
ofspeed
the
shutter
speed
is center
set
toin
aexposure
of
0.7
second
or
more,
the
shutter
speed
automatically
changed
to
Press
POWER
button
toscreen.
turn
power
on.
A electrical
histogram
isturn
a graphic
representation
ofthe
theistones
of the
subject.
The horizontal
histogram
• Do
If the
the
image
cannot
be
focused,
thelens
focus
automatically
fixed to infinity.
(When theaxis
flashofisthe
necessary
not
the
power
on
with
the
cap
attached.
noise.
1/2
second.
ENTER.
*
The
above
AC
adapter
is
US/Canada
Turning
the
Power
On
Ú
Page
38
+
shows
the
brightness
(increasing
brightness
from
left
to
right)
and
the
vertical
axis
shows
the
number
at
this
time,
it
is
simultaneously
fixed
to
illuminate
objects
1.5
meters
(five
feet)
away.
During
macro
•This
Dosaves
use
orsettings,
store
SmartMedia™
very
hot,
humid
oraperture
corrosive
If the
shutter
speed
value
isimages,
set toin1/1000
second,
the
value
is limited
to
F8type
andAC
F3.4.
•not
When
playing
back
movie
switching
isthe
between
standard
and
image
only.
(O
:environments.
possible
Xbetween
: not
the
and
returns
to
RECORDING
MENU.
type.
European
andpossible)
UK
photography,
the flash
islevel.
alignedthe
withdisplay
the wide
position.)
of pixels
at each brightness
Downloaded From
camera-usermanual.com
adapters differ in shape.
--110
20 -40
80
88
Formatting the SmartMedia™
IMPORTANT
Getting
Ready
Formatting erases all images and reformats the SmartMedia™ loaded in your camera. Protected images (➲ Page
106) are also erased. SmartMedia™ cannot be formatted if it is write-protected (➲ Page 34).
• The SmartMedia™ must be formatted on the camera before use.
When [
], [
], [
] or [
].
] is selected, the last image frame or the thumbnail display appears on the LCD monitor.
Hold down the
erase button for two seconds.
Playing
Back Images
The erase icon is displayed at the left of the screen.
Taking
Photographs
Set the mode dial to [
Erasing
Images
or
to select [
To cancel formatting, select [
], and press ENTER.
] and press ENTER.
or
to select
To cancel resetting of image numbers, select [CANCEL].
• SmartMedia must be formatted before using for the first time. Also, it is recommended to periodically
reformat the SmartMedia card to remove any miscellaneous files and ensure maximum storage
capacity.
Downloaded From camera-usermanual.com
- 91 -
Additional
Information
Memo
Other
Applications
To reset the image number, use
[EXECUTE], and press ENTER.
Handy
Functions
Use
Taking
Zoom
Changing
Photography
Photographs
Photography
theinUsing
Focus
in [the
]Flash
Mode
(Auto
Select
mode)
Taking
Photographs
a Variety
of Modes
([
] Mode)
(continued)
Additional
Information
Other
Applications
Handy
Functions
Erasing
Images
Playing
Back Images
Taking
Photographs
Getting
Ready
The
macro
photography
is used
whenaccording
the distance
totimes
the
subject
is places.
between
10special
cm
(0.33
ft) (WIDE
side
Zoom
In
the
photography
default
setting,
allows
themode
flash
you photography
to
will
take
be automatically
zoom
shots
up
set
toto
to
2.8
function
the
in dark
size
or
wide-angle
No
photography
setting
isdepending
needed
to
This
mode
enables
automatic
the
photographic
conditions.
Photographs
can
be
taken
[setting)
Sports
Press
to
option
menu,
press
orof
toscreen
to
80
cmup
(2.62
ft).display
on
set
the
off ]in
distance
the
flash.
The
to
the
subject.
firing mode
You
can be
also
set
enlarge
to suit
the
thesetting
center
conditions
the
where
flash
take
is to
photographs
be used. in the
easily
this
mode
asflash
the
camera
automatically
makes
the
suitable
to theand
conditions.
[
This
camera
cannot
focus
subjects
within
10 cm
(0.33
ft)
(WIDE
side
setting)
to
80you
cm
(2.62 to
ft)
unless
in the
select
options
press
ENTER.
digital
The effective
zoom
mode
firing
with
distance
theon
focal
of
the
distance
flash
isoptions.
increased
approximately
by a0.8
factor
m
(2.62
of
2.2.
to
3.0
(9.84
ft) (WIDE
side
setting,
Auto
Select
mode
has
the
following
Choose
the
option
toft)suit
them
image
want
photograph.
Select
this
option
toand
take
photographs
of fast-moving
subjects.
macro
photography
mode.
Though
photographs
be47
taken
even
at a distance of about 80cm (2.62 ft) or more
ISO
[2X]).
For asetting:
detailed
description
each option,
refer To
tocan
page
through
Pressing
ENTERofselects
the setting.
cancel,
press
. page 51:
in the macro photography mode, it may take time for the camera to focus.
In the...
macro
photography
mode, you
the
LCD monitor
[ the ]mode
Automatically
adjusts
exposure
settings
Page portraits
49
The
camera
automatically
adjusts
the
focus
and
...off.
To take
at night
Set
dial to
[canthenot
] focus
orturn
[ and
].
exposure
settings.
] mode
Portrait dial
Page
Set[ the
to 49
[
] or [
].
.... To take continuous shots of moving subjects
Landscape
49 thecan
[ portraits
the dial
picture
Zoom
In
the
[ ]mode
] mode,
flash
photography
when].[ key.
is selected.
.... ToCompose
take
The]16
shots that you take in this mode are
Set
the
toPage
[ using
] [
]beorset
[switch
• Pressing
the ZoomPage
switch
] Sports
50towards the “T” zooms in on the
[
saved as a single image.
... To Press
take
landscape
shots
the
flash
button
to set
to the
subject,
enlarges
the
on the
LCD desired
monitor. mode
] and
Night
Page
50 subject
[
Press
the
FOCUS
button.
Pressing
the Zoom
switch
towards
the “W”the
provides
a wider
while
viewing
the
LCDPage
monitor
status
] 16-frame
51
[ photographs
... To•When
take
ofmulti
fast-moving
subjects
you
press the
FOCUS
button,
the or
focus modes
are display.
displayed
angle
picture.
Options
When
you
pressorder
the onflash
the available flash modes are
in
the following
the button,
LCD monitor.
•displayed
position
movesthere
according
to the
Zoomthat
switch
setting.
in
the following
order.
InThe
the lens
Auto
Select
mode,
are some
settings
cannot
be changed as the camera makes the
Press
ENTER.
The
iconautomatically.
forthe
theselected
mode that
yousettings
selected
is displayed
in
settings
These
vary
according
tothe
the
mode.
The
icon
of
mode
is
displayed
on the upper
leftLCD
side of the LCD monitor.
monitor
or
the
display.
Focus
photography
The
camera
is status
ready to
take photographs.
Select this option to take photographs of people against a dusk or
...... Can be set.
night-time
When
“1m”background.
or “3m” is set, the camera will focus on subjects in a
Exposure
compensation
distance
of 1m
(3.28
ft) or 3m
(9.84 ft)
to shutter
take photos.
Compose
the
picture,
press
the
button down halfway, and press it down
] Night
movie
mode,
the 2.2X digital zoom photography is possible.
fully.•• In
Page
41 only
...... Cannot
specified.
When
the Night
mode is selected,
the flashbe
mode
is fixed(set
to automatically)
The
camera
takes
the
picture.
Slow
Synchro
(the
flash
is fired
at[ a slower
shutter
speed.)
Press
the
FOCUS
button
repeatedly
the
appears.
About
flash photography
] isuntil
selected
in[ the [] icon
] mode.
It can not be set in the
* [No
display]
Auto can be set
when
take a photograph with a dark background or at a dark
[ • If ]you
mode.
shutter on
speed
slows
down,
and
thebe
slow
shutter
................................................
Flash
can
set
as required
in this
mode.
Look place,
at
thetheimage
the
LCD
monitor
to
compose
the
picture.
speed warning is displayed. (When the shutter is pressed
halfway down,
the viewfinder
LED blinks
and the
• Optimum
print effect
for a selected
scene green
is available
by slow
using a
Compose
the
picture.
................................................
Automatically
fixed
to slow synchro
] is displayed
in the LCD
monitor.)
shutter
speed
mark [
printer.
PressTothe
shutter
button
halfway,
and
press
fully.
prevent
distorted
image,down
we recommend
using
a
tripod
to it down
Information,isGlossary
(page 134)
...............................Additional
Flash photography
not possible.
camera button
stable. down halfway, and press it down fully.
Presskeep
thethe
shutter
Using
the LCD Monitor Page 42 Automatically fixed to red-eye auto
..................................................
compatible
Page 40
Page 40
When
you
are using
the flash, the flash icons on the LCD monitor are displayed in yellow when the
About
burst
photography
shutter button is pressed halfway down.
• Macro photography is not canceled
evenphotography
if the cameraisisnot
turned
off or the
Auto Power
OFF function is
...... Burst
possible
in these
modes.
activated.
Downloaded From camera-usermanual.com
- 46 -
About Folders (continued)
Memo
Getting
Ready
Taking
Photographs
Playing
Back Images
• When taking photographs, it is not possible to select a folder for recording images. Pressing the
folder button will create a new folder. The subsequently photographed images are recorded in that
new folder.
• When a new folder is created, the frame No. is assigned from 0001.
• To play back images photographed by another camera
- Proper playback may not be possible for some image size.
- Images cannot be played back unless the file name and folder name are set correctly.
or
during playback. (For details
• It is possible to play back any images in any folders by pressing
of folder ➲ Page 92)
Erasing
Images
Handy
Functions
Other
Applications
Additional
Information
Downloaded From camera-usermanual.com
- 93 -
Taking
Zoom
Changing
Photography
Photographs
Photography
theinUsing
Focus
in [the
]Flash
Mode
(Auto
Select
mode)
Taking
Photographs
a Variety
of Modes
([
] Mode)
(continued)
Erasing
Images
Playing
Back Images
Taking
Photographs
Getting
Ready
The
macro
photography
is used
whenaccording
the distance
totimes
the
subject
is places.
between
10special
cm
(0.33
ft) (WIDE
side
Zoom
In
the
photography
default
setting,
allows
themode
flash
you photography
to
will
take
be automatically
zoom
shots
up
set
toto
to
2.8
function
the
in dark
size
or
wide-angle
No
photography
setting
isdepending
needed
to
This
mode
enables
automatic
the
photographic
conditions.
Photographs
can
be
taken
[setting)
Sports
Press
to
option
menu,
press
orof
toscreen
to
80
cmup
(2.62
ft).display
on
set
the
off ]in
distance
the
flash.
The
to
the
subject.
firing mode
You
can be
also
set
enlarge
to suit
the
thesetting
center
conditions
the
where
flash
take
is to
photographs
be used. in the
easily
this
mode
asflash
the
camera
automatically
makes
the
suitable
to theand
conditions.
[
This
camera
cannot
focus
subjects
within
10 cm
(0.33
ft)
(WIDE
side
setting)
to
80you
cm
(2.62 to
ft)
unless
in the
select
options
press
ENTER.
digital
The effective
zoom
mode
firing
with
distance
theon
focal
of
the
distance
flash
isoptions.
increased
approximately
by a0.8
factor
m
(2.62
of
2.2.
to
3.0
(9.84
ft) (WIDE
side
setting,
Auto
Select
mode
has
the
following
Choose
the
option
toft)suit
them
image
want
photograph.
Select
this
option
toand
take
photographs
of fast-moving
subjects.
macro
photography
mode.
Though
photographs
be47
taken
even
at a distance of about 80cm (2.62 ft) or more
ISO
[2X]).
For asetting:
detailed
description
each option,
refer To
tocan
page
through
Pressing
ENTERofselects
the setting.
cancel,
press
. page 51:
in the macro photography mode, it may take time for the camera to focus.
In the...
macro
photography
mode, you
the
LCD monitor
[ the ]mode
Automatically
adjusts
exposure
settings
Page portraits
49
The
camera
automatically
adjusts
the
focus
and
...off.
To take
at night
Set
dial to
[canthenot
] focus
orturn
[ and
].
exposure
settings.
] mode
Portrait dial
Page
Set[ the
to 49
[
] or [
].
.... To take continuous shots of moving subjects
Landscape
49 thecan
[ portraits
the dial
picture
Zoom
In
the
[ ]mode
] mode,
flash
photography
when].[ key.
is selected.
.... ToCompose
take
The]16
shots that you take in this mode are
Set
the
toPage
[ using
] [
]beorset
[switch
• Pressing
the ZoomPage
switch
] Sports
50towards the “T” zooms in on the
[
saved as a single image.
... To Press
take
landscape
shots
the
flash
button
to set
to the
subject,
enlarges
the
on the
LCD desired
monitor. mode
] and
Night
Page
50 subject
[
Press
the
FOCUS
button.
Pressing
the Zoom
switch
towards
the “W”the
provides
a wider
while
viewing
the
LCDPage
monitor
status
] 16-frame
51
[ photographs
... To•When
take
ofmulti
fast-moving
subjects
you
press the
FOCUS
button,
the or
focus modes
are display.
displayed
angle
picture.
Options
When
you
pressorder
the onflash
the available flash modes are
in
the following
the button,
LCD monitor.
•displayed
position
movesthere
according
to the
Zoomthat
switch
setting.
in
the following
order.
InThe
the lens
Auto
Select
mode,
are some
settings
cannot
be changed as the camera makes the
Press
ENTER.
The
iconautomatically.
forthe
theselected
mode that
yousettings
selected
is displayed
in
settings
These
vary
according
tothe
the
mode.
The
icon
of
mode
is
displayed
on the upper
leftLCD
side of the LCD monitor.
monitor
or
the
display.
Focus
photography
The
camera
is status
ready to
take photographs.
Select this option to take photographs of people against a dusk or
...... Can be set.
night-time
When
“1m”background.
or “3m” is set, the camera will focus on subjects in a
✭❅❍❏
Exposure
compensation
distance
of 1m
(3.28
ft) or 3m
(9.84 ft)
to shutter
take photos.
Compose
the
picture,
press
the
button down halfway, and press it down
] Night
Additional
Information
Other
Applications
Handy
Functions
✭❅❍❏
movie
mode,
the 2.2X digital zoom photography is possible.
fully.•• In
Page
41 only
...... Cannot
specified.
When
the Night
mode is selected,
the flashbe
mode
is fixed(set
to automatically)
The
camera
takes
the
picture.
Slow
Synchro
(the
flash
is fired
at[ a slower
shutter
speed.)
Press
the
FOCUS
button
repeatedly
the
appears.
About
flash photography
] isuntil
selected
in[ the [] icon
] mode.
It can not be set in the
* [No
display]
Auto can be set
when
take a photograph with a dark background or at a dark
[ • If ]you
mode.
place,
shutter on
speed
slows
down,
and
thebe
slow
shutter
................................................
Flash
can
set
as required
in this
mode.
Look
at
thetheimage
the
LCD
monitor
to
compose
the
picture.
✭❅❍❏
speed warning is displayed. (When the shutter is pressed
halfway down,
the viewfinder
LED blinks
and the
• Optimum
print effect
for a selected
scene green
is available
by slow
using a
Compose
the
picture.
................................................
Automatically
fixed
to slow synchro
] is displayed
in the LCD
monitor.)
shutter
speed
mark [
printer.
PressTothe
shutter
button
halfway,
and
press
fully.
prevent
distorted
image,down
we recommend
using
a
tripod
to it down
Information,isGlossary
(page 134)
...............................Additional
Flash photography
not possible.
camera button
stable. down halfway, and press it down fully.
Presskeep
thethe
shutter
Using
the LCD Monitor Page 42 Automatically fixed to red-eye auto
..................................................
compatible
Page 40
Page 40
When
you
are using
the flash, the flash icons on the LCD monitor are displayed in yellow when the
About
burst
photography
✭❅❍❏
shutter button is pressed halfway down.
• Macro photography is not canceled
evenphotography
if the cameraisisnot
turned
off or the
Auto Power
OFF function is
...... Burst
possible
in these
modes.
activated.
Downloaded From camera-usermanual.com
- 46 -
Reducing the Image Size (Resize) (continued)
or
to select [RESIZE] and press
.
Getting
Ready
Use
Taking
Photographs
The RESIZE menu is displayed.
If there are no images that can be resized, or if a movie folder is
selected, a message appears on screen and the screen returns to
the PLAYBACK MENU.
Playing
Back Images
Use
or
to select the image and press ENTER to
set image size.
The current image size is displayed under the image.
Each press of ENTER changes the icons as follows:
] ..... HALF size
[
Erasing
Images
[
] ...... SMALL size
☞ For details of image size (➲ Page 44)
or
Other
Applications
Use
to select [EXECUTE], and press ENTER.
Downloaded From camera-usermanual.com
- 95 -
or
during playback.
Additional
Information
The screen indicating that the image is being resized appears.
To quit resizing, select [CANCEL] and press ENTER.
When resizing ends, the screen returns to the PLAYBACK MENU.
To quit the PLAYBACK MENU, press the MENU button.
Memo
• It is possible to play back any images in any folders by pressing
☞ About Folders ➲ Page 92
Handy
Functions
To cancel the selection, press ENTER again.
If you want to resize two or more images, repeat the procedure for
the necessary number of images.
When the Zoom switch is pressed toward “T” during image selection, the image is displayed to fit the entire
screen. To redisplay the original image, move the Zoom switch towards the “W”. (Zoom switch ➲ Page 21)
Taking
Zoom
Changing
Photography
Photographs
Photography
theinUsing
Focus
in [the
]Flash
Mode
(Auto
Select
mode)
Taking
Photographs
a Variety
of Modes
([
] Mode)
(continued)
Erasing
Images
Playing
Back Images
Taking
Photographs
Getting
Ready
The
macro
photography
is used
whenaccording
the distance
totimes
the
subject
is places.
between
10special
cm
(0.33
ft) (WIDE
side
Zoom
In
the
photography
default
setting,
allows
themode
flash
you photography
to
will
take
be automatically
zoom
shots
up
set
toto
to
2.8
function
the
in dark
size
or
wide-angle
No
photography
setting
isdepending
needed
to
This
mode
enables
automatic
the
photographic
conditions.
Photographs
can
be
taken
[setting)
Sports
Press
to
option
menu,
press
orof
toscreen
to
80
cmup
(2.62
ft).display
on
set
the
off ]in
distance
the
flash.
The
to
the
subject.
firing mode
You
can be
also
set
enlarge
to suit
the
thesetting
center
conditions
the
where
flash
take
is to
photographs
be used. in the
easily
this
mode
asflash
the
camera
automatically
makes
the
suitable
to theand
conditions.
[
This
camera
cannot
focus
subjects
within
10 cm
(0.33
ft)
(WIDE
side
setting)
to
80you
cm
(2.62 to
ft)
unless
in the
select
options
press
ENTER.
digital
The effective
zoom
mode
firing
with
distance
theon
focal
of
the
distance
flash
isoptions.
increased
approximately
by a0.8
factor
m
(2.62
of
2.2.
to
3.0
(9.84
ft) (WIDE
side
setting,
Auto
Select
mode
has
the
following
Choose
the
option
toft)suit
them
image
want
photograph.
Select
this
option
toand
take
photographs
of fast-moving
subjects.
macro
photography
mode.
Though
photographs
be47
taken
even
at a distance of about 80cm (2.62 ft) or more
ISO
[2X]).
For asetting:
detailed
description
each option,
refer To
tocan
page
through
Pressing
ENTERofselects
the setting.
cancel,
press
. page 51:
in the macro photography mode, it may take time for the camera to focus.
In the...
macro
photography
mode, you
the
LCD monitor
[ the ]mode
Automatically
adjusts
exposure
settings
Page portraits
49
The
camera
automatically
adjusts
the
focus
and
...off.
To take
at night
Set
dial to
[canthenot
] focus
orturn
[ and
].
exposure
settings.
] mode
Portrait dial
Page
Set[ the
to 49
[
] or [
].
.... To take continuous shots of moving subjects
Landscape
49 thecan
[ portraits
the dial
picture
Zoom
In
the
[ ]mode
] mode,
flash
photography
when].[ key.
is selected.
.... ToCompose
take
The]16
shots that you take in this mode are
Set
the
toPage
[ using
] [
]beorset
[switch
• Pressing
the ZoomPage
switch
] Sports
50towards the “T” zooms in on the
[
saved as a single image.
... To Press
take
landscape
shots
the
flash
button
to set
to the
subject,
enlarges
the
on the
LCD desired
monitor. mode
] and
Night
Page
50 subject
[
Press
the
FOCUS
button.
Pressing
the Zoom
switch
towards
the “W”the
provides
a wider
while
viewing
the
LCDPage
monitor
status
] 16-frame
51
[ photographs
... To•When
take
ofmulti
fast-moving
subjects
you
press the
FOCUS
button,
the or
focus modes
are display.
displayed
angle
picture.
Options
When
you
pressorder
the onflash
the available flash modes are
in
the following
the button,
LCD monitor.
•displayed
position
movesthere
according
to the
Zoomthat
switch
setting.
in
the following
order.
InThe
the lens
Auto
Select
mode,
are some
settings
cannot
be changed as the camera makes the
Press
ENTER.
The
iconautomatically.
forthe
theselected
mode that
yousettings
selected
is displayed
in
settings
These
vary
according
tothe
the
mode.
The
icon
of
mode
is
displayed
on the upper
leftLCD
side of the LCD monitor.
monitor
or
the
display.
Focus
photography
The
camera
is status
ready to
take photographs.
Select this option to take photographs of people against a dusk or
...... Can be set.
night-time
When
“1m”background.
or “3m” is set, the camera will focus on subjects in a
✭❅❍❏
Exposure
compensation
distance
of 1m
(3.28
ft) or 3m
(9.84 ft)
to shutter
take photos.
Compose
the
picture,
press
the
button down halfway, and press it down
] Night
Additional
Information
Other
Applications
Handy
Functions
✭❅❍❏
movie
mode,
the 2.2X digital zoom photography is possible.
fully.•• In
Page
41 only
...... Cannot
specified.
When
the Night
mode is selected,
the flashbe
mode
is fixed(set
to automatically)
The
camera
takes
the
picture.
Slow
Synchro
(the
flash
is fired
at[ a slower
shutter
speed.)
Press
the
FOCUS
button
repeatedly
the
appears.
About
flash photography
] isuntil
selected
in[ the [] icon
] mode.
It can not be set in the
* [No
display]
Auto can be set
when
take a photograph with a dark background or at a dark
[ • If ]you
mode.
place,
shutter on
speed
slows
down,
and
thebe
slow
shutter
................................................
Flash
can
set
as required
in this
mode.
Look
at
thetheimage
the
LCD
monitor
to
compose
the
picture.
✭❅❍❏
speed warning is displayed. (When the shutter is pressed
halfway down,
the viewfinder
LED blinks
and the
• Optimum
print effect
for a selected
scene green
is available
by slow
using a
Compose
the
picture.
................................................
Automatically
fixed
to slow synchro
] is displayed
in the LCD
monitor.)
shutter
speed
mark [
printer.
PressTothe
shutter
button
halfway,
and
press
fully.
prevent
distorted
image,down
we recommend
using
a
tripod
to it down
Information,isGlossary
(page 134)
...............................Additional
Flash photography
not possible.
camera button
stable. down halfway, and press it down fully.
Presskeep
thethe
shutter
Using
the LCD Monitor Page 42 Automatically fixed to red-eye auto
..................................................
compatible
Page 40
Page 40
When
you
are using
the flash, the flash icons on the LCD monitor are displayed in yellow when the
About
burst
photography
✭❅❍❏
shutter button is pressed halfway down.
• Macro photography is not canceled
evenphotography
if the cameraisisnot
turned
off or the
Auto Power
OFF function is
...... Burst
possible
in these
modes.
activated.
Downloaded From camera-usermanual.com
- 46 -
Compressing Images (Quality) (continued)
or
to select [QUALITY], and press
.
Getting
Ready
Use
Taking
Photographs
The SET-UP menu is displayed.
If there are no images that can be compressed, or if a movie
folder is selected, a message appears on screen and the
screen returns to the PLAYBACK MENU.
Playing
Back Images
Use
or
to select the image, and press ENTER to
set the compression ratio.
Erasing
Images
The current compression ratio (quality) is displayed under the
image.
Each press of ENTER changes the number of stars as follows:
★★
[NORMAL]
★
[BASIC]
☞ Details of compression ratio ➲ Page 44
• It is possible to play back any images in any folders by pressing
☞ About Folders ➲ Page 92
Downloaded
or
to select [EXECUTE], and press ENTER.
The screen indicating that the image is being compressed appears.
To quit compression, select [CANCEL] and press ENTER..
When compression ends, the screen returns to the PLAYBACK MENU.
To quit
the PLAYBACK MENU, press the MENU button.
From
camera-usermanual.com
- 97 -
during playback.
Additional
Information
Use
or
Other
Applications
Memo
Handy
Functions
If you want to compress two or more images, repeat the procedure
for the necessary number of images.
When the Zoom switch is pressed toward “T” during image selection, the image is displayed to fit the entire
screen. To redisplay the original image, move the Zoom switch towards the “W”. (Zoom switch ➲ Page 21)
Taking
Zoom
Changing
Photography
Photographs
Photography
theinUsing
Focus
in [the
]Flash
Mode
(Auto
Select
mode)
Taking
Photographs
a Variety
of Modes
([
] Mode)
(continued)
Additional
Information
Other
Applications
Handy
Functions
Erasing
Images
Playing
Back Images
Taking
Photographs
Getting
Ready
The
macro
photography
is used
whenaccording
the distance
totimes
the
subject
is places.
between
10special
cm
(0.33
ft) (WIDE
side
Zoom
In
the
photography
default
setting,
allows
themode
flash
you photography
to
will
take
be automatically
zoom
shots
up
set
toto
to
2.8
function
the
in dark
size
or
wide-angle
No
photography
setting
isdepending
needed
to
This
mode
enables
automatic
the
photographic
conditions.
Photographs
can
be
taken
[setting)
Sports
Press
to
option
menu,
press
orof
toscreen
to
80
cmup
(2.62
ft).display
on
set
the
off ]in
distance
the
flash.
The
to
the
subject.
firing mode
You
can be
also
set
enlarge
to suit
the
thesetting
center
conditions
the
where
flash
take
is to
photographs
be used. in the
easily
this
mode
asflash
the
camera
automatically
makes
the
suitable
to theand
conditions.
[
This
camera
cannot
focus
subjects
within
10 cm
(0.33
ft)
(WIDE
side
setting)
to
80you
cm
(2.62 to
ft)
unless
in the
select
options
press
ENTER.
digital
The effective
zoom
mode
firing
with
distance
theon
focal
of
the
distance
flash
isoptions.
increased
approximately
by a0.8
factor
m
(2.62
of
2.2.
to
3.0
(9.84
ft) (WIDE
side
setting,
Auto
Select
mode
has
the
following
Choose
the
option
toft)suit
them
image
want
photograph.
Select
this
option
toand
take
photographs
of fast-moving
subjects.
macro
photography
mode.
Though
photographs
be47
taken
even
at a distance of about 80cm (2.62 ft) or more
ISO
[2X]).
For asetting:
detailed
description
each option,
refer To
tocan
page
through
Pressing
ENTERofselects
the setting.
cancel,
press
. page 51:
in the macro photography mode, it may take time for the camera to focus.
In the...
macro
photography
mode, you
the
LCD monitor
[ the ]mode
Automatically
adjusts
exposure
settings
Page portraits
49
The
camera
automatically
adjusts
the
focus
and
...off.
To take
at night
Set
dial to
[canthenot
] focus
orturn
[ and
].
exposure
settings.
] mode
Portrait dial
Page
Set[ the
to 49
[
] or [
].
.... To take continuous shots of moving subjects
Landscape
49 thecan
[ portraits
the dial
picture
Zoom
In
the
[ ]mode
] mode,
flash
photography
when].[ key.
is selected.
.... ToCompose
take
The]16
shots that you take in this mode are
Set
the
toPage
[ using
] [
]beorset
[switch
• Pressing
the ZoomPage
switch
] Sports
50towards the “T” zooms in on the
[
saved as a single image.
... To Press
take
landscape
shots
the
flash
button
to set
to the
subject,
enlarges
the
on the
LCD desired
monitor. mode
] and
Night
Page
50 subject
[
Press
the
FOCUS
button.
Pressing
the Zoom
switch
towards
the “W”the
provides
a wider
while
viewing
the
LCDPage
monitor
status
] 16-frame
51
[ photographs
... To•When
take
ofmulti
fast-moving
subjects
you
press the
FOCUS
button,
the or
focus modes
are display.
displayed
angle
picture.
Options
When
you
pressorder
the onflash
the available flash modes are
in
the following
the button,
LCD monitor.
•displayed
position
movesthere
according
to the
Zoomthat
switch
setting.
in
the following
order.
InThe
the lens
Auto
Select
mode,
are some
settings
cannot
be changed as the camera makes the
Press
ENTER.
The
iconautomatically.
forthe
theselected
mode that
yousettings
selected
is displayed
in
settings
These
vary
according
tothe
the
mode.
The
icon
of
mode
is
displayed
on the upper
leftLCD
side of the LCD monitor.
monitor
or
the
display.
Focus
photography
The
camera
is status
ready to
take photographs.
Select this option to take photographs of people against a dusk or
...... Can be set.
night-time
When
“1m”background.
or “3m” is set, the camera will focus on subjects in a
Exposure
compensation
distance
of 1m
(3.28
ft) or 3m
(9.84 ft)
to shutter
take photos.
Compose
the
picture,
press
the
button down halfway, and press it down
] Night
movie
mode,
the 2.2X digital zoom photography is possible.
fully.•• In
Page
41 only
...... Cannot
specified.
When
the Night
mode is selected,
the flashbe
mode
is fixed(set
to automatically)
The
camera
takes
the
picture.
Slow
Synchro
(the
flash
is fired
at[ a slower
shutter
speed.)
Press
the
FOCUS
button
repeatedly
the
appears.
About
flash photography
] isuntil
selected
in[ the [] icon
] mode.
It can not be set in the
* [No
display]
Auto can be set
when
take a photograph with a dark background or at a dark
[ • If ]you
mode.
shutter on
speed
slows
down,
and
thebe
slow
shutter
................................................
Flash
can
set
as required
in this
mode.
Look place,
at
thetheimage
the
LCD
monitor
to
compose
the
picture.
speed warning is displayed. (When the shutter is pressed
halfway down,
the viewfinder
LED blinks
and the
• Optimum
print effect
for a selected
scene green
is available
by slow
using a
Compose
the
picture.
................................................
Automatically
fixed
to slow synchro
] is displayed
in the LCD
monitor.)
shutter
speed
mark [
printer.
PressTothe
shutter
button
halfway,
and
press
fully.
prevent
distorted
image,down
we recommend
using
a
tripod
to it down
Information,isGlossary
(page 134)
...............................Additional
Flash photography
not possible.
camera button
stable. down halfway, and press it down fully.
Presskeep
thethe
shutter
Using
the LCD Monitor Page 42 Automatically fixed to red-eye auto
..................................................
compatible
Page 40
Page 40
When
you
are using
the flash, the flash icons on the LCD monitor are displayed in yellow when the
About
burst
photography
shutter button is pressed halfway down.
• Macro photography is not canceled
evenphotography
if the cameraisisnot
turned
off or the
Auto Power
OFF function is
...... Burst
possible
in these
modes.
activated.
Downloaded From camera-usermanual.com
- 46 -
Copying Images (continued)
to select the desired image, and press
Getting
Ready
Use
or
ENTER.
or
to select [EXECUTE], and press ENTER.
The screen indicating that the image is being read appears.
The message [EXCHANGE CARD] is displayed.
1 Remove the SmartMedia™.
2 Replace it with another SmartMedia™.
Other
Applications
Load the SmartMedia™ for copying the image to.
during playback.
Handy
Functions
Use
or
Erasing
Images
• It is possible to play back any images in any folders by pressing
☞ About Folders ➲ Page 92
Playing
Back Images
Memo
Taking
Photographs
This selects the image to be copied, and [ ] is displayed under
the image.
To cancel a selection, press ENTER again.
If you want to copy two or more images, repeat the procedure for
the necessary number of images.
The bar at the bottom of the screen indicates the amount of buffer
memory used to store the date of the images which have been
selected, and the remaining memory space. The amount of memory
space consumed is indicated in green.
When the Zoom switch is pressed toward “T” during image selection, the image is displayed to fit the entire
screen. To redisplay the original image, move the Zoom switch towards the “W”. (Zoom switch ➲ Page 21)
Additional
Information
Downloaded From camera-usermanual.com
- 99 -
Taking
Zoom
Changing
Photography
Photographs
Photography
theinUsing
Focus
in [the
]Flash
Mode
(Auto
Select
mode)
Taking
Photographs
a Variety
of Modes
([
] Mode)
(continued)
Additional
Information
Other
Applications
Handy
Functions
Erasing
Images
Playing
Back Images
Taking
Photographs
Getting
Ready
The
macro
photography
is used
whenaccording
the distance
totimes
the
subject
is places.
between
10special
cm
(0.33
ft) (WIDE
side
Zoom
In
the
photography
default
setting,
allows
themode
flash
you photography
to
will
take
be automatically
zoom
shots
up
set
toto
to
2.8
function
the
in dark
size
or
wide-angle
No
photography
setting
isdepending
needed
to
This
mode
enables
automatic
the
photographic
conditions.
Photographs
can
be
taken
[setting)
Sports
Press
to
option
menu,
press
orof
toscreen
to
80
cmup
(2.62
ft).display
on
set
the
off ]in
distance
the
flash.
The
to
the
subject.
firing mode
You
can be
also
set
enlarge
to suit
the
thesetting
center
conditions
the
where
flash
take
is to
photographs
be used. in the
easily
this
mode
asflash
the
camera
automatically
makes
the
suitable
to theand
conditions.
[
This
camera
cannot
focus
subjects
within
10 cm
(0.33
ft)
(WIDE
side
setting)
to
80you
cm
(2.62 to
ft)
unless
in the
select
options
press
ENTER.
digital
The effective
zoom
mode
firing
with
distance
theon
focal
of
the
distance
flash
isoptions.
increased
approximately
by a0.8
factor
m
(2.62
of
2.2.
to
3.0
(9.84
ft) (WIDE
side
setting,
Auto
Select
mode
has
the
following
Choose
the
option
toft)suit
them
image
want
photograph.
Select
this
option
toand
take
photographs
of fast-moving
subjects.
macro
photography
mode.
Though
photographs
be47
taken
even
at a distance of about 80cm (2.62 ft) or more
ISO
[2X]).
For asetting:
detailed
description
each option,
refer To
tocan
page
through
Pressing
ENTERofselects
the setting.
cancel,
press
. page 51:
in the macro photography mode, it may take time for the camera to focus.
In the...
macro
photography
mode, you
the
LCD monitor
[ the ]mode
Automatically
adjusts
exposure
settings
Page portraits
49
The
camera
automatically
adjusts
the
focus
and
...off.
To take
at night
Set
dial to
[canthenot
] focus
orturn
[ and
].
exposure
settings.
] mode
Portrait dial
Page
Set[ the
to 49
[
] or [
].
.... To take continuous shots of moving subjects
Landscape
49 thecan
[ portraits
the dial
picture
Zoom
In
the
[ ]mode
] mode,
flash
photography
when].[ key.
is selected.
.... ToCompose
take
The]16
shots that you take in this mode are
Set
the
toPage
[ using
] [
]beorset
[switch
• Pressing
the ZoomPage
switch
] Sports
50towards the “T” zooms in on the
[
saved as a single image.
... To Press
take
landscape
shots
the
flash
button
to set
to the
subject,
enlarges
the
on the
LCD desired
monitor. mode
] and
Night
Page
50 subject
[
Press
the
FOCUS
button.
Pressing
the Zoom
switch
towards
the “W”the
provides
a wider
while
viewing
the
LCDPage
monitor
status
] 16-frame
51
[ photographs
... To•When
take
ofmulti
fast-moving
subjects
you
press the
FOCUS
button,
the or
focus modes
are display.
displayed
angle
picture.
Options
When
you
pressorder
the onflash
the available flash modes are
in
the following
the button,
LCD monitor.
•displayed
position
movesthere
according
to the
Zoomthat
switch
setting.
in
the following
order.
InThe
the lens
Auto
Select
mode,
are some
settings
cannot
be changed as the camera makes the
Press
ENTER.
The
iconautomatically.
forthe
theselected
mode that
yousettings
selected
is displayed
in
settings
These
vary
according
tothe
the
mode.
The
icon
of
mode
is
displayed
on the upper
leftLCD
side of the LCD monitor.
monitor
or
the
display.
Focus
photography
The
camera
is status
ready to
take photographs.
Select this option to take photographs of people against a dusk or
...... Can be set.
night-time
When
“1m”background.
or “3m” is set, the camera will focus on subjects in a
Exposure
compensation
distance
of 1m
(3.28
ft) or 3m
(9.84 ft)
to shutter
take photos.
Compose
the
picture,
press
the
button down halfway, and press it down
] Night
movie
mode,
the 2.2X digital zoom photography is possible.
fully.•• In
Page
41 only
...... Cannot
specified.
When
the Night
mode is selected,
the flashbe
mode
is fixed(set
to automatically)
The
camera
takes
the
picture.
Slow
Synchro
(the
flash
is fired
at[ a slower
shutter
speed.)
Press
the
FOCUS
button
repeatedly
the
appears.
About
flash photography
] isuntil
selected
in[ the [] icon
] mode.
It can not be set in the
* [No
display]
Auto can be set
when
take a photograph with a dark background or at a dark
[ • If ]you
mode.
shutter on
speed
slows
down,
and
thebe
slow
shutter
................................................
Flash
can
set
as required
in this
mode.
Look place,
at
thetheimage
the
LCD
monitor
to
compose
the
picture.
speed warning is displayed. (When the shutter is pressed
halfway down,
the viewfinder
LED blinks
and the
• Optimum
print effect
for a selected
scene green
is available
by slow
using a
Compose
the
picture.
................................................
Automatically
fixed
to slow synchro
] is displayed
in the LCD
monitor.)
shutter
speed
mark [
printer.
PressTothe
shutter
button
halfway,
and
press
fully.
prevent
distorted
image,down
we recommend
using
a
tripod
to it down
Information,isGlossary
(page 134)
...............................Additional
Flash photography
not possible.
camera button
stable. down halfway, and press it down fully.
Presskeep
thethe
shutter
Using
the LCD Monitor Page 42 Automatically fixed to red-eye auto
..................................................
compatible
Page 40
Page 40
When
you
are using
the flash, the flash icons on the LCD monitor are displayed in yellow when the
About
burst
photography
shutter button is pressed halfway down.
• Macro photography is not canceled
evenphotography
if the cameraisisnot
turned
off or the
Auto Power
OFF function is
...... Burst
possible
in these
modes.
activated.
Downloaded From camera-usermanual.com
- 46 -
Copy Images (continued)
Taking
Photographs
When images are copied, the frame No. is not copied. The frame No. becomes:
• Still images:
When the SmartMedia™ at the copy destination contains the folder [xxxTOSHI], a
folder having the largest number of “xxx” incremented by 1 is created.
Example: When there are folders [101TOSHI] and [102TOSHI], the folder
[103TOSHI] is created.
When there is no [xxx TOSHI] folder, a new folder is created.
In each case, the frame No. is assigned from 0001.
Getting
Ready
The image No. for copying
Playing
Back Images
Erasing
Images
Handy
Functions
Other
Applications
Additional
Information
Downloaded From camera-usermanual.com
- 101 -
Taking
Zoom
Changing
Photography
Photographs
Photography
theinUsing
Focus
in [the
]Flash
Mode
(Auto
Select
mode)
Taking
Photographs
a Variety
of Modes
([
] Mode)
(continued)
Erasing
Images
Playing
Back Images
Taking
Photographs
Getting
Ready
The
macro
photography
is used
whenaccording
the distance
totimes
the
subject
is places.
between
10special
cm
(0.33
ft) (WIDE
side
Zoom
In
the
photography
default
setting,
allows
themode
flash
you photography
to
will
take
be automatically
zoom
shots
up
set
toto
to
2.8
function
the
in dark
size
or
wide-angle
No
photography
setting
isdepending
needed
to
This
mode
enables
automatic
the
photographic
conditions.
Photographs
can
be
taken
[setting)
Sports
Press
to
option
menu,
press
orof
toscreen
to
80
cmup
(2.62
ft).display
on
set
the
off ]in
distance
the
flash.
The
to
the
subject.
firing mode
You
can be
also
set
enlarge
to suit
the
thesetting
center
conditions
the
where
flash
take
is to
photographs
be used. in the
easily
this
mode
asflash
the
camera
automatically
makes
the
suitable
to theand
conditions.
[
This
camera
cannot
focus
subjects
within
10 cm
(0.33
ft)
(WIDE
side
setting)
to
80you
cm
(2.62 to
ft)
unless
in the
select
options
press
ENTER.
digital
The effective
zoom
mode
firing
with
distance
theon
focal
of
the
distance
flash
isoptions.
increased
approximately
by a0.8
factor
m
(2.62
of
2.2.
to
3.0
(9.84
ft) (WIDE
side
setting,
Auto
Select
mode
has
the
following
Choose
the
option
toft)suit
them
image
want
photograph.
Select
this
option
toand
take
photographs
of fast-moving
subjects.
macro
photography
mode.
Though
photographs
be47
taken
even
at a distance of about 80cm (2.62 ft) or more
ISO
[2X]).
For asetting:
detailed
description
each option,
refer To
tocan
page
through
Pressing
ENTERofselects
the setting.
cancel,
press
. page 51:
in the macro photography mode, it may take time for the camera to focus.
In the...
macro
photography
mode, you
the
LCD monitor
[ the ]mode
Automatically
adjusts
exposure
settings
Page portraits
49
The
camera
automatically
adjusts
the
focus
and
...off.
To take
at night
Set
dial to
[canthenot
] focus
orturn
[ and
].
exposure
settings.
] mode
Portrait dial
Page
Set[ the
to 49
[
] or [
].
.... To take continuous shots of moving subjects
Landscape
49 thecan
[ portraits
the dial
picture
Zoom
In
the
[ ]mode
] mode,
flash
photography
when].[ key.
is selected.
.... ToCompose
take
The]16
shots that you take in this mode are
Set
the
toPage
[ using
] [
]beorset
[switch
• Pressing
the ZoomPage
switch
] Sports
50towards the “T” zooms in on the
[
saved as a single image.
... To Press
take
landscape
shots
the
flash
button
to set
to the
subject,
enlarges
the
on the
LCD desired
monitor. mode
] and
Night
Page
50 subject
[
Press
the
FOCUS
button.
Pressing
the Zoom
switch
towards
the “W”the
provides
a wider
while
viewing
the
LCDPage
monitor
status
] 16-frame
51
[ photographs
... To•When
take
ofmulti
fast-moving
subjects
you
press the
FOCUS
button,
the or
focus modes
are display.
displayed
angle
picture.
Options
When
you
pressorder
the onflash
the available flash modes are
in
the following
the button,
LCD monitor.
•displayed
position
movesthere
according
to the
Zoomthat
switch
setting.
in
the following
order.
InThe
the lens
Auto
Select
mode,
are some
settings
cannot
be changed as the camera makes the
Press
ENTER.
The
iconautomatically.
forthe
theselected
mode that
yousettings
selected
is displayed
in
settings
These
vary
according
tothe
the
mode.
The
icon
of
mode
is
displayed
on the upper
leftLCD
side of the LCD monitor.
monitor
or
the
display.
Focus
photography
The
camera
is status
ready to
take photographs.
Select this option to take photographs of people against a dusk or
...... Can be set.
night-time
When
“1m”background.
or “3m” is set, the camera will focus on subjects in a
✭❅❍❏
Exposure
compensation
distance
of 1m
(3.28
ft) or 3m
(9.84 ft)
to shutter
take photos.
Compose
the
picture,
press
the
button down halfway, and press it down
] Night
Additional
Information
Other
Applications
Handy
Functions
✭❅❍❏
movie
mode,
the 2.2X digital zoom photography is possible.
fully.•• In
Page
41 only
...... Cannot
specified.
When
the Night
mode is selected,
the flashbe
mode
is fixed(set
to automatically)
The
camera
takes
the
picture.
Slow
Synchro
(the
flash
is fired
at[ a slower
shutter
speed.)
Press
the
FOCUS
button
repeatedly
the
appears.
About
flash photography
] isuntil
selected
in[ the [] icon
] mode.
It can not be set in the
* [No
display]
Auto can be set
when
take a photograph with a dark background or at a dark
[ • If ]you
mode.
place,
shutter on
speed
slows
down,
and
thebe
slow
shutter
................................................
Flash
can
set
as required
in this
mode.
Look
at
thetheimage
the
LCD
monitor
to
compose
the
picture.
✭❅❍❏
speed warning is displayed. (When the shutter is pressed
halfway down,
the viewfinder
LED blinks
and the
• Optimum
print effect
for a selected
scene green
is available
by slow
using a
Compose
the
picture.
................................................
Automatically
fixed
to slow synchro
] is displayed
in the LCD
monitor.)
shutter
speed
mark [
printer.
PressTothe
shutter
button
halfway,
and
press
fully.
prevent
distorted
image,down
we recommend
using
a
tripod
to it down
Information,isGlossary
(page 134)
...............................Additional
Flash photography
not possible.
camera button
stable. down halfway, and press it down fully.
Presskeep
thethe
shutter
Using
the LCD Monitor Page 42 Automatically fixed to red-eye auto
..................................................
compatible
Page 40
Page 40
When
you
are using
the flash, the flash icons on the LCD monitor are displayed in yellow when the
About
burst
photography
✭❅❍❏
shutter button is pressed halfway down.
• Macro photography is not canceled
evenphotography
if the cameraisisnot
turned
off or the
Auto Power
OFF function is
...... Burst
possible
in these
modes.
activated.
Downloaded From camera-usermanual.com
- 46 -
Print Information (continued)
to select [SELECT] or [ALL], and press
[SELECT] : Sets one image at a time.
[ALL]
: Sets all images at once.
Getting
Ready
Press
or
ENTER.
Taking
Photographs
Additional
Information
- 103 -
Other
Applications
Downloaded From camera-usermanual.com
Handy
Functions
Memo
• It is possible to play back any images in any folders by
pressing or during playback. ☞ About Folders ➲ Page 92
• The date printed in the picture will depend on the date set into
the camera. For the correct date to be printed onto the picture,
please check the date set into your camera before the image is
photographed. (To correctly set the time and date ➲ Page111)
Erasing
Images
or
to select the image, and press
or
to
1 Press
set the number of copies.
Up to 99 copies can be set for a single image.
When the Zoom switch is pressed toward “T” during
image selection, the image is displayed to fit the entire
screen. To redisplay the original image, move the Zoom
switch towards the “W”. (Zoom switch ➲ Page 21)
2 When you have finished this setting, press ENTER.
The DATE screen is displayed.
The date of the image can be printed in the lower right corner of
the picture.
or
to select [YES] or [NO], and press ENTER.
3 Press
If you want to print the date, select [YES] and press ENTER.
If you do not want to print the date, select [NO] and press ENTER.
The message “CREATE DPOF FILE?” is displayed.
Playing
Back Images
Set the number of prints and date.
Taking
Zoom
Changing
Photography
Photographs
Photography
theinUsing
Focus
in [the
]Flash
Mode
(Auto
Select
mode)
Taking
Photographs
a Variety
of Modes
([
] Mode)
(continued)
Additional
Information
Other
Applications
Handy
Functions
Erasing
Images
Playing
Back Images
Taking
Photographs
Getting
Ready
The
macro
photography
is used
whenaccording
the distance
totimes
the
subject
is places.
between
10special
cm
(0.33
ft) (WIDE
side
Zoom
In
the
photography
default
setting,
allows
themode
flash
you photography
to
will
take
be automatically
zoom
shots
up
set
toto
to
2.8
function
the
in dark
size
or
wide-angle
No
photography
setting
isdepending
needed
to
This
mode
enables
automatic
the
photographic
conditions.
Photographs
can
be
taken
[setting)
Sports
Press
to
option
menu,
press
orof
toscreen
to
80
cmup
(2.62
ft).display
on
set
the
off ]in
distance
the
flash.
The
to
the
subject.
firing mode
You
can be
also
set
enlarge
to suit
the
thesetting
center
conditions
the
where
flash
take
is to
photographs
be used. in the
easily
this
mode
asflash
the
camera
automatically
makes
the
suitable
to theand
conditions.
[
This
camera
cannot
focus
subjects
within
10 cm
(0.33
ft)
(WIDE
side
setting)
to
80you
cm
(2.62 to
ft)
unless
in the
select
options
press
ENTER.
digital
The effective
zoom
mode
firing
with
distance
theon
focal
of
the
distance
flash
isoptions.
increased
approximately
by a0.8
factor
m
(2.62
of
2.2.
to
3.0
(9.84
ft) (WIDE
side
setting,
Auto
Select
mode
has
the
following
Choose
the
option
toft)suit
them
image
want
photograph.
Select
this
option
toand
take
photographs
of fast-moving
subjects.
macro
photography
mode.
Though
photographs
be47
taken
even
at a distance of about 80cm (2.62 ft) or more
ISO
[2X]).
For asetting:
detailed
description
each option,
refer To
tocan
page
through
Pressing
ENTERofselects
the setting.
cancel,
press
. page 51:
in the macro photography mode, it may take time for the camera to focus.
In the...
macro
photography
mode, you
the
LCD monitor
[ the ]mode
Automatically
adjusts
exposure
settings
Page portraits
49
The
camera
automatically
adjusts
the
focus
and
...off.
To take
at night
Set
dial to
[canthenot
] focus
orturn
[ and
].
exposure
settings.
] mode
Portrait dial
Page
Set[ the
to 49
[
] or [
].
.... To take continuous shots of moving subjects
Landscape
49 thecan
[ portraits
the dial
picture
Zoom
In
the
[ ]mode
] mode,
flash
photography
when].[ key.
is selected.
.... ToCompose
take
The]16
shots that you take in this mode are
Set
the
toPage
[ using
] [
]beorset
[switch
• Pressing
the ZoomPage
switch
] Sports
50towards the “T” zooms in on the
[
saved as a single image.
... To Press
take
landscape
shots
the
flash
button
to set
to the
subject,
enlarges
the
on the
LCD desired
monitor. mode
] and
Night
Page
50 subject
[
Press
the
FOCUS
button.
Pressing
the Zoom
switch
towards
the “W”the
provides
a wider
while
viewing
the
LCDPage
monitor
status
] 16-frame
51
[ photographs
... To•When
take
ofmulti
fast-moving
subjects
you
press the
FOCUS
button,
the or
focus modes
are display.
displayed
angle
picture.
Options
When
you
pressorder
the onflash
the available flash modes are
in
the following
the button,
LCD monitor.
•displayed
position
movesthere
according
to the
Zoomthat
switch
setting.
in
the following
order.
InThe
the lens
Auto
Select
mode,
are some
settings
cannot
be changed as the camera makes the
Press
ENTER.
The
iconautomatically.
forthe
theselected
mode that
yousettings
selected
is displayed
in
settings
These
vary
according
tothe
the
mode.
The
icon
of
mode
is
displayed
on the upper
leftLCD
side of the LCD monitor.
monitor
or
the
display.
Focus
photography
The
camera
is status
ready to
take photographs.
Select this option to take photographs of people against a dusk or
...... Can be set.
night-time
When
“1m”background.
or “3m” is set, the camera will focus on subjects in a
Exposure
compensation
distance
of 1m
(3.28
ft) or 3m
(9.84 ft)
to shutter
take photos.
Compose
the
picture,
press
the
button down halfway, and press it down
] Night
movie
mode,
the 2.2X digital zoom photography is possible.
fully.•• In
Page
41 only
...... Cannot
specified.
When
the Night
mode is selected,
the flashbe
mode
is fixed(set
to automatically)
The
camera
takes
the
picture.
Slow
Synchro
(the
flash
is fired
at[ a slower
shutter
speed.)
Press
the
FOCUS
button
repeatedly
the
appears.
About
flash photography
] isuntil
selected
in[ the [] icon
] mode.
It can not be set in the
* [No
display]
Auto can be set
when
take a photograph with a dark background or at a dark
[ • If ]you
mode.
shutter on
speed
slows
down,
and
thebe
slow
shutter
................................................
Flash
can
set
as required
in this
mode.
Look place,
at
thetheimage
the
LCD
monitor
to
compose
the
picture.
speed warning is displayed. (When the shutter is pressed
halfway down,
the viewfinder
LED blinks
and the
• Optimum
print effect
for a selected
scene green
is available
by slow
using a
Compose
the
picture.
................................................
Automatically
fixed
to slow synchro
] is displayed
in the LCD
monitor.)
shutter
speed
mark [
printer.
PressTothe
shutter
button
halfway,
and
press
fully.
prevent
distorted
image,down
we recommend
using
a
tripod
to it down
Information,isGlossary
(page 134)
...............................Additional
Flash photography
not possible.
camera button
stable. down halfway, and press it down fully.
Presskeep
thethe
shutter
Using
the LCD Monitor Page 42 Automatically fixed to red-eye auto
..................................................
compatible
Page 40
Page 40
When
you
are using
the flash, the flash icons on the LCD monitor are displayed in yellow when the
About
burst
photography
shutter button is pressed halfway down.
• Macro photography is not canceled
evenphotography
if the cameraisisnot
turned
off or the
Auto Power
OFF function is
...... Burst
possible
in these
modes.
activated.
Downloaded From camera-usermanual.com
- 46 -
Print Information (continued)
Playing
Back Images
[CLEAR ALL]: Press this button to clear all settings.
or
to select [CLEAR ALL], and press ENTER.
1 Press
2 To clear all settings, select [EXECUTE] and press ENTER.
To cancel [CLEAR ALL], select [CANCEL] and press ENTER.
3 To remove the write-protection, select [YES] and press ENTER.
4 Select [END] and press ENTER.
Taking
Photographs
[CONFIRM]: Press this to confirm the settings.
or
to select [CONFIRM], and press ENTER.
1 Press
2 After confirming the settings, press ENTER.
3 Select [END] and press ENTER.
Getting
Ready
Select the desired operation.
Erasing
Images
Memo
Handy
Functions
Other
Applications
• When the SmartMedia™ already contains a DPOF information file, the message “RECREATE DPOF
FILE?” is sometimes displayed. Note that if you select [YES], the file is overwritten, and the
information of the existing DPOF information file is erased. The same also applies when the DPOF
information file is overwritten on a personal computer and values not supported by this camera were
set.
• Images set in the DPOF format are automatically protected. Write-protection cannot be removed by
regular methods (➲ Page 108)
• You can specify up to 99 prints or up to 999 frames in a single SmartMedia™. The maximum number
of prints you can specify in a single SmartMedia™ is limited to 10000.
Additional
Information
Downloaded From camera-usermanual.com
- 105 -
Taking
Zoom
Changing
Photography
Photographs
Photography
theinUsing
Focus
in [the
]Flash
Mode
(Auto
Select
mode)
Taking
Photographs
a Variety
of Modes
([
] Mode)
(continued)
Erasing
Images
Playing
Back Images
Taking
Photographs
Getting
Ready
The
macro
photography
is used
whenaccording
the distance
totimes
the
subject
is places.
between
10special
cm
(0.33
ft) (WIDE
side
Zoom
In
the
photography
default
setting,
allows
themode
flash
you photography
to
will
take
be automatically
zoom
shots
up
set
toto
to
2.8
function
the
in dark
size
or
wide-angle
No
photography
setting
isdepending
needed
to
This
mode
enables
automatic
the
photographic
conditions.
Photographs
can
be
taken
[setting)
Sports
Press
to
option
menu,
press
orof
toscreen
to
80
cmup
(2.62
ft).display
on
set
the
off ]in
distance
the
flash.
The
to
the
subject.
firing mode
You
can be
also
set
enlarge
to suit
the
thesetting
center
conditions
the
where
flash
take
is to
photographs
be used. in the
easily
this
mode
asflash
the
camera
automatically
makes
the
suitable
to theand
conditions.
[
This
camera
cannot
focus
subjects
within
10 cm
(0.33
ft)
(WIDE
side
setting)
to
80you
cm
(2.62 to
ft)
unless
in the
select
options
press
ENTER.
digital
The effective
zoom
mode
firing
with
distance
theon
focal
of
the
distance
flash
isoptions.
increased
approximately
by a0.8
factor
m
(2.62
of
2.2.
to
3.0
(9.84
ft) (WIDE
side
setting,
Auto
Select
mode
has
the
following
Choose
the
option
toft)suit
them
image
want
photograph.
Select
this
option
toand
take
photographs
of fast-moving
subjects.
macro
photography
mode.
Though
photographs
be47
taken
even
at a distance of about 80cm (2.62 ft) or more
ISO
[2X]).
For asetting:
detailed
description
each option,
refer To
tocan
page
through
Pressing
ENTERofselects
the setting.
cancel,
press
. page 51:
in the macro photography mode, it may take time for the camera to focus.
In the...
macro
photography
mode, you
the
LCD monitor
[ the ]mode
Automatically
adjusts
exposure
settings
Page portraits
49
The
camera
automatically
adjusts
the
focus
and
...off.
To take
at night
Set
dial to
[canthenot
] focus
orturn
[ and
].
exposure
settings.
] mode
Portrait dial
Page
Set[ the
to 49
[
] or [
].
.... To take continuous shots of moving subjects
Landscape
49 thecan
[ portraits
the dial
picture
Zoom
In
the
[ ]mode
] mode,
flash
photography
when].[ key.
is selected.
.... ToCompose
take
The]16
shots that you take in this mode are
Set
the
toPage
[ using
] [
]beorset
[switch
• Pressing
the ZoomPage
switch
] Sports
50towards the “T” zooms in on the
[
saved as a single image.
... To Press
take
landscape
shots
the
flash
button
to set
to the
subject,
enlarges
the
on the
LCD desired
monitor. mode
] and
Night
Page
50 subject
[
Press
the
FOCUS
button.
Pressing
the Zoom
switch
towards
the “W”the
provides
a wider
while
viewing
the
LCDPage
monitor
status
] 16-frame
51
[ photographs
... To•When
take
ofmulti
fast-moving
subjects
you
press the
FOCUS
button,
the or
focus modes
are display.
displayed
angle
picture.
Options
When
you
pressorder
the onflash
the available flash modes are
in
the following
the button,
LCD monitor.
•displayed
position
movesthere
according
to the
Zoomthat
switch
setting.
in
the following
order.
InThe
the lens
Auto
Select
mode,
are some
settings
cannot
be changed as the camera makes the
Press
ENTER.
The
iconautomatically.
forthe
theselected
mode that
yousettings
selected
is displayed
in
settings
These
vary
according
tothe
the
mode.
The
icon
of
mode
is
displayed
on the upper
leftLCD
side of the LCD monitor.
monitor
or
the
display.
Focus
photography
The
camera
is status
ready to
take photographs.
Select this option to take photographs of people against a dusk or
...... Can be set.
night-time
When
“1m”background.
or “3m” is set, the camera will focus on subjects in a
✭❅❍❏
Exposure
compensation
distance
of 1m
(3.28
ft) or 3m
(9.84 ft)
to shutter
take photos.
Compose
the
picture,
press
the
button down halfway, and press it down
] Night
Additional
Information
Other
Applications
Handy
Functions
✭❅❍❏
movie
mode,
the 2.2X digital zoom photography is possible.
fully.•• In
Page
41 only
...... Cannot
specified.
When
the Night
mode is selected,
the flashbe
mode
is fixed(set
to automatically)
The
camera
takes
the
picture.
Slow
Synchro
(the
flash
is fired
at[ a slower
shutter
speed.)
Press
the
FOCUS
button
repeatedly
the
appears.
About
flash photography
] isuntil
selected
in[ the [] icon
] mode.
It can not be set in the
* [No
display]
Auto can be set
when
take a photograph with a dark background or at a dark
[ • If ]you
mode.
place,
shutter on
speed
slows
down,
and
thebe
slow
shutter
................................................
Flash
can
set
as required
in this
mode.
Look
at
thetheimage
the
LCD
monitor
to
compose
the
picture.
✭❅❍❏
speed warning is displayed. (When the shutter is pressed
halfway down,
the viewfinder
LED blinks
and the
• Optimum
print effect
for a selected
scene green
is available
by slow
using a
Compose
the
picture.
................................................
Automatically
fixed
to slow synchro
] is displayed
in the LCD
monitor.)
shutter
speed
mark [
printer.
PressTothe
shutter
button
halfway,
and
press
fully.
prevent
distorted
image,down
we recommend
using
a
tripod
to it down
Information,isGlossary
(page 134)
...............................Additional
Flash photography
not possible.
camera button
stable. down halfway, and press it down fully.
Presskeep
thethe
shutter
Using
the LCD Monitor Page 42 Automatically fixed to red-eye auto
..................................................
compatible
Page 40
Page 40
When
you
are using
the flash, the flash icons on the LCD monitor are displayed in yellow when the
About
burst
photography
✭❅❍❏
shutter button is pressed halfway down.
• Macro photography is not canceled
evenphotography
if the cameraisisnot
turned
off or the
Auto Power
OFF function is
...... Burst
possible
in these
modes.
activated.
Downloaded From camera-usermanual.com
- 46 -
Protecting Images (continued)
or
to select [PROTECT] and press
.
Getting
Ready
Use
The PROTECT menu is displayed.
Taking
Photographs
Playing
Back Images
Use
or
to select the desired image to protect,
and press ENTER.
Erasing
Images
This fixes the image to be protected, and [
] is displayed under the image.
To cancel the selection, press ENTER again.
To write-protect two or more images, repeat this procedure for the
necessary number of images.
When the Zoom switch is pressed toward “T” during image selection, the
image is displayed to fit the entire screen. To redisplay the original image,
move the Zoom switch towards the “W”. (Zoom switch ➲ Page 21)
Use
or
or
during playback.
to select [EXECUTE], and press ENTER.
Memo
• When the PROTECT setup screen is displayed again, [
] is displayed under protected images.
• To cancel write-protection for an image, write-protection is simultaneously canceled if set at step 4.
Downloaded From camera-usermanual.com
- 107 -
Additional
Information
To quit write-protection, select [CANCEL] and press ENTER.
When write-protection ends, the screen returns to the PLAYBACK MENU.
To quit the PLAYBACK MENU, press the MENU button.
Other
Applications
• It is possible to play back any images in any folders by pressing
(For details of folder ➲ Page 92)
Handy
Functions
Memo
Taking
Zoom
Changing
Photography
Photographs
Photography
theinUsing
Focus
in [the
]Flash
Mode
(Auto
Select
mode)
Taking
Photographs
a Variety
of Modes
([
] Mode)
(continued)
Erasing
Images
Playing
Back Images
Taking
Photographs
Getting
Ready
The
macro
photography
is used
whenaccording
the distance
totimes
the
subject
is places.
between
10special
cm
(0.33
ft) (WIDE
side
Zoom
In
the
photography
default
setting,
allows
themode
flash
you photography
to
will
take
be automatically
zoom
shots
up
set
toto
to
2.8
function
the
in dark
size
or
wide-angle
No
photography
setting
isdepending
needed
to
This
mode
enables
automatic
the
photographic
conditions.
Photographs
can
be
taken
[setting)
Sports
Press
to
option
menu,
press
orof
toscreen
to
80
cmup
(2.62
ft).display
on
set
the
off ]in
distance
the
flash.
The
to
the
subject.
firing mode
You
can be
also
set
enlarge
to suit
the
thesetting
center
conditions
the
where
flash
take
is to
photographs
be used. in the
easily
this
mode
asflash
the
camera
automatically
makes
the
suitable
to theand
conditions.
[
This
camera
cannot
focus
subjects
within
10 cm
(0.33
ft)
(WIDE
side
setting)
to
80you
cm
(2.62 to
ft)
unless
in the
select
options
press
ENTER.
digital
The effective
zoom
mode
firing
with
distance
theon
focal
of
the
distance
flash
isoptions.
increased
approximately
by a0.8
factor
m
(2.62
of
2.2.
to
3.0
(9.84
ft) (WIDE
side
setting,
Auto
Select
mode
has
the
following
Choose
the
option
toft)suit
them
image
want
photograph.
Select
this
option
toand
take
photographs
of fast-moving
subjects.
macro
photography
mode.
Though
photographs
be47
taken
even
at a distance of about 80cm (2.62 ft) or more
ISO
[2X]).
For asetting:
detailed
description
each option,
refer To
tocan
page
through
Pressing
ENTERofselects
the setting.
cancel,
press
. page 51:
in the macro photography mode, it may take time for the camera to focus.
In the...
macro
photography
mode, you
the
LCD monitor
[ the ]mode
Automatically
adjusts
exposure
settings
Page portraits
49
The
camera
automatically
adjusts
the
focus
and
...off.
To take
at night
Set
dial to
[canthenot
] focus
orturn
[ and
].
exposure
settings.
] mode
Portrait dial
Page
Set[ the
to 49
[
] or [
].
.... To take continuous shots of moving subjects
Landscape
49 thecan
[ portraits
the dial
picture
Zoom
In
the
[ ]mode
] mode,
flash
photography
when].[ key.
is selected.
.... ToCompose
take
The]16
shots that you take in this mode are
Set
the
toPage
[ using
] [
]beorset
[swi