1
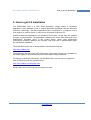
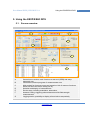
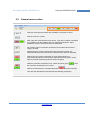
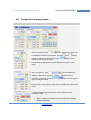
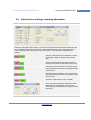
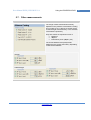
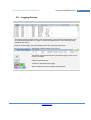
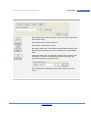
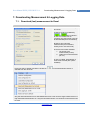
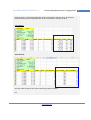
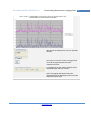
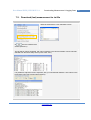
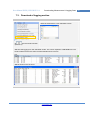
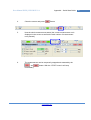
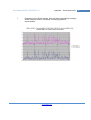
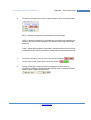
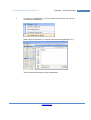
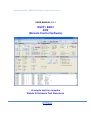
UserManualESVP/ESH3RCS(RemoteControlSoftware)V1.1 USER MANUAL V1.1 ESVP / ESH3 RCS (Remote Control Software) A simple tool for complex Rohde & Schwarz Test Receivers Enjoy Remote Measurements www.30Dbm.com © 2013 Jos Delissen UserManualESVP/ESH3RCSV1.1 Table of Content 2 1. Table of Content 1. Table of Content 2 2. Introduction 3 3. How to get it & Installation 4 4. License agreement & Set up 5 5. Using the ESVP/ESH3 RCS 6 5.1. Screen overview 6 5.2. General menu section 7 5.3. Progress information bar 8 5.4. Cockpit for frequency setup 9 5.5. Measurement selection area 11 5.6. Adjust device settings, including attenuation 12 5.7. Other measurements 13 5.8. Logging Section 14 5.9. Setup Automatic Measurements 15 5.10. Entering new values 17 6. GPIB Setup 18 7. Downloading Measurement & Logging Data 20 7.1. Download (last) measurement to Excel 20 7.2. Download (last) measurement to .txt file 23 7.3. Download of logging section 24 8. Saving and using configuration files 25 9. Appendix – Quick Start Guide 26 9.1. To make a single (set of) measurements 26 9.2. To make automated run of measurements 28 9.3. Using the scanning function 31 9.4. How to enter values in a box and save them? 33 Enjoy Remote Measurements www.30Dbm.com © 2013 Jos Delissen UserManualESVP/ESH3RCSV1.1 Introduction 2. Introduction The ESVP/ESH3 Remote Control Software (RCS) is designed to easily control the ESVP (20..1300 Mhz) and ESH3 (0.009 .. 29.9999Mhz) high end test receivers from Rohde & Schwarz. Using software to control these receivers enables Usage of these receivers in computer controlled test systems Easy graphical user interface instead of “key driven” complex measuring special functions Enhanced frequency scanning possibilities. Exit/Hold and Time driven. Display measured data in Excel or download tot .txt file. Easy setup and running of multiple measurements within a frequency range. Another advantage is that there is no need for additional programming (e.g. Matlab etc). It is a ready to use program. Its functionality is split in two parts. With its standard functionality you are able to check if the software is suitable to operate on your computer / OS / GPIB installation. If it works fine you may consider making a registration request to get access to the enhanced functionality. Standard functionality - Operating the main receiver settings, such as * RF Frequency, IF Bandwidth and demodulation mode * Level Modes (AV, PEAK, CISPR and MIL) * Threshold, Attenuation level, Operating range and Function mode Enhanced functionality (subject to registration ) - Making use of the available measurements like * Measurement of voltage (in dBm, dBµV or µV) * Frequency and frequency-offset measurements * Modulation depth and frequency deviation * Field strength, current and spectral density - Making use of the scanning functionality, including the ability to preset 10 device settings & scanning ranges Enjoy Remote Measurements www.30Dbm.com © 2013 Jos Delissen 3 UserManualESVP/ESH3RCSV1.1 How to get it & Installation 3. How to get it & Installation The ESVP/ESH3 RCS is a Click Once application. Simply stated, a ClickOnce application is any Windows Forms or console application published using the Microsoft ClickOnce technology. ClickOnce applications can be deployed to a computer from a Web location, a network share, or even from a file location such as a CD. ClickOnce-deployed applications are considered 'low impact', in that they are installed per-user, not per-machine .The application is added to the user's Start menu and to the Add/Remove Programs group in the Control Panel. Unlike other deployment technologies, nothing is added to the Program Files folder and no administrative rights are required for installation. The ESVP/ESH3 RCS can be downloaded or launched from the site: http://www.30dbm.com The application requires needs .NET Framework. If the proper version is not available on the target system, it will automatically ask to download it during installation. For using the enhanced functionality of ESVP/ESH3 RCS you need to be a registered user. A license key can be requested from: http://www.30dbm.com/Request.aspx Please make sure to enter the correct equipment used Enjoy Remote Measurements www.30Dbm.com © 2013 Jos Delissen 4 UserManualESVP/ESH3RCSV1.1 License agreement & Set up 4. License agreement & Set up The ESVP/ESH3 RCS is license protected. To enter a license key To enter the license key, select the corresponding module and push on “EDIT”. Now the license key can easily be added to your licenses setup, and it will immediately be reflected in the license overview. Enjoy Remote Measurements www.30Dbm.com © 2013 Jos Delissen 5 UserManualESVP/ESH3RCSV1.1 Using the ESVP/ESH3 RCS 5. Using the ESVP/ESH3 RCS 5.1. Screen overview B A D C F E G A B C D E F G General menu section, main functions to start tool (GPIB) and setup automatic runs Information bar about progress of measurements runs. Main cockpit for frequency setup and scanning (with 10 memory functions which also store the device setup (see D) Selection and display of measurements Device setup, including modulation, attenuation. Antenna Coding, triggering other measurement like field strength measurements Logging section, possibility to display all read values sequentially Enjoy Remote Measurements www.30Dbm.com © 2013 Jos Delissen 6 UserManualESVP/ESH3RCSV1.1 Using the ESVP/ESH3 RCS 7 5.2. General menu section Overview of all special functions with possibility to sent them to device Print the screen to a printer Start / Stop the communication to the device. Only when is button is activated it is possible to use this software with your measuring equipment. When pushed the device is cleared and set to its initial state. Go to Setup screen of automatic measurements and select the frequency range to be used Stops directly any ongoing measurement and internal processes. Any measurements done are stored and can still be used for Excel of download. Hold function (For usage in automatic or single measurement run) : temporarily interrupts the measurement run(button becomes green). Click it again to proceed measuring (button becomes red again) Starts the automatic measurement run . Button becomes green ( the automatic measurement run is active. When the measurement is completed the button becomes red again. Then also the download to Excel will start automatically (if selected) Enjoy Remote Measurements www.30Dbm.com © 2013 Jos Delissen ) when UserManualESVP/ESH3RCSV1.1 Using the ESVP/ESH3 RCS 8 5.3. Progress information bar Here the progress of the automatic runs can be displayed. An automatic run is a full measurement cycle for a specific frequency range (or time range). This means the several measurements can be executed in one run. E.g. the following measurements can be done for a specific frequency (range) Note : to start an automatic run for a range of frequencies, push least one measurement should be selected. At Information about current measurement (in this case FM modulation Mod(PK+PK)/2) It is possible to repeat a full measurement cycle. Just click on the blue number to adjust the value (default = 1, max 999 repeat cycles). This is especially useful when there is a need for multiple measurements within the same setup Enjoy Remote Measurements www.30Dbm.com © 2013 Jos Delissen UserManualESVP/ESH3RCSV1.1 Using the ESVP/ESH3 RCS 9 5.4. Cockpit for frequency setup Setup of threshold value for scanning purposes (can be adjusted by clicking on blue value). Use the and buttons to add or subtracts a predefined step value clicked upon to change its value) (which can be Preset values for the threshold can be adjusted also (click on blue value) Setup of frequency value clicking on blue value). Use the subtracts a predefined step value upon to change its value) (can be adjusted by and buttons to add or (which can be clicked Preset values for the frequency step can be adjusted also (click on blue value) To start the scanning, first make a choice between three scanning modes : 1. EXIT = When the threshold is exceeded the scanning stops immediately Enjoy Remote Measurements www.30Dbm.com © 2013 Jos Delissen UserManualESVP/ESH3RCSV1.1 Using the ESVP/ESH3 RCS 10 2. HOLD = When the threshold is exceeded the scanning keep checking the channel and will proceed scanning if the measure value drops below the threshold 3. TIME = When the threshold is exceeded a maximum time period is will be waited before the scanning continues, independent on the measured level. can be adjusted, click on blue text) (which To start the scanning, click on one of the direction buttons: . To stop click on the “green” active scanning button During scanning the measured value is displayed in the screen for information purposes (except when the “squelch” mode is selected (ESVP) and the value is below the threshold) Only for ESVP : The squelch function can be activated (no audio or measurements visible when below Threshold) or deactivated for scanning (all audio an measurements visible) All device setting can be stored in one of the 10 memory positions. To store a setting first click on with (can be cancelled ). When the button is green click on the desired memory position (e.g. ). Then, the green color of button ( ) disappears indicating that it has been stored. All memory positions can be viewed by the Enjoy Remote Measurements www.30Dbm.com © 2013 Jos Delissen button. UserManualESVP/ESH3RCSV1.1 Using the ESVP/ESH3 RCS 5.5. Measurement selection area Measurement run Click on blue text to change the device measuring time (0.005 .. 100 s) If a measurement has been made, it’s values can be sent directly to Excel (Microsoft Excel is needed for this). This button triggers the manual download into Excel of the last measurement (run) done. If a measurement has been made, it’s values can be sent directly to a .txt file. This button triggers the download to a file of your choice. It is only possible to download the last measurement (run) done Select all possible measurements (click it again and deactivate all measurements) Clear all measured values Trigger a full measurement run. When ready it restarts automatically to perform the same measurement run, taking any new device setup into account Can be stopped be clicking again on , or push on the button. Note : New device setting are only activated when a measurement cycle has been completed. Trigger a single full measurement run. After is ready it stops automatically and displays all values read in the run. For the frequency and offset several resolution can be selected (only for ESVP) Enjoy Remote Measurements www.30Dbm.com © 2013 Jos Delissen 11 UserManualESVP/ESH3RCSV1.1 Using the ESVP/ESH3 RCS 12 5.6. Adjust device settings, including attenuation Select the appropriate device setting. Only when the measurements have been finished the new device settings will be sent to the device to prevent disturbing the ongoing measurements. In case of ongoing measurements this moment it is when a cycle has been completed and it restarts. Activate or deactivate the low pass filter at input to modulation depth and FM deviation (ESVP only) Activate or deactivate the automatic frequency control (AFC) function of the device (ESVP only) Activates the short calibration cycle of the device (stops automatically). Green is an indication that it is still running. Activates the long calibration cycle of the device (stops automatically). Green is an indication that it is still running. Activates or deactivates the pre- amplifier Only in manual mode the RF attenuation and IF attenuation can be adjusted. This is done by clicking directly on its setting, or using the up and down keys. Enjoy Remote Measurements www.30Dbm.com © 2013 Jos Delissen UserManualESVP/ESH3RCSV1.1 Using the ESVP/ESH3 RCS 5.7. Other measurements The usage of these measurements heavily depends on the presence of the antenna coding key in socket 47 (e.g. with key to set the device to field strength measurements), or the selection of the antenna (k-factors). Only then values are reported in terms of (dB)µV/m dBµA/m interference power (dBpW / pW) The Unit of Measurement (UoM) will be displayed in the screen (see below), depending on the device feedback. Normal Field Strength Enjoy Remote Measurements www.30Dbm.com © 2013 Jos Delissen 13 UserManualESVP/ESH3RCSV1.1 Using the ESVP/ESH3 RCS 5.8. Logging Section The logging function enables logging of all measurements. This could be measurements part of an automated measurement run, single or continuous measurement or even during scanning (indicated with “Scan”) Please note that logging may (dramatically) impact the scanning performance! Will show the device settings in the log. E.g. This button triggers the download of the whole logging to a file of your choice (.txt format) Clears the whole logging. Activates or deactivates the logging Set the maximum number of logged measurements Enjoy Remote Measurements www.30Dbm.com © 2013 Jos Delissen 14 UserManualESVP/ESH3RCSV1.1 Using the ESVP/ESH3 RCS 15 5.9. Setup Automatic Measurements The frequency range for an automatic run is determined by the data entered in the scanning section and device setup. The settings can be stored in a memory function. To (re)view all memory setting, or to adjust the measurement from a frequency based approach to a time based approach, select the button. Any range selected here is copied directly into the scanning section to facilitate proper measurement setup. Select “Time Steps” to constantly measure a fixed frequency over a fixed time period, with fixed time steps (e.g. 1 measurement run each minute over a period of 1 hour) E.g. In example below the range of RF Band 7 is copied into the scanning section, Can be used to restrict the maximum number of runs (e.g. when step size is taken too small) Any blue value can be adjusted by clicking on it. A Frequency range can be selected. When using the copy function the settings of the selected frequency band are copied into the band of the copy button. E.g. when band 6 Enjoy Remote Measurements www.30Dbm.com © 2013 Jos Delissen UserManualESVP/ESH3RCSV1.1 Using the ESVP/ESH3 RCS 16 is selected, you can copy the settings from band 6 into 7 by clicking on copy button in band 7. This button becomes green to indicate that it has been used. The undo function resets the last copy (which was green) When measurements are not valid they can be excluded from the measurement automatically. When manually adjusting the frequency (e.g. by up and down buttons in software) the device can be set in such a way that it automatically displays the measured level in dBm or dBuV (default). Enjoy Remote Measurements www.30Dbm.com © 2013 Jos Delissen UserManualESVP/ESH3RCSV1.1 Using the ESVP/ESH3 RCS 5.10. Entering new values All the blue values can be edited. For example it is possible to change the step size and to save it into your own configuration file Click with your cursor on the (blue) text Enter the new value. Click on Ok. A check on maximum and minimum values is performed. If all ok the value will be updated in the screen On error a message like here could occur. Enjoy Remote Measurements www.30Dbm.com © 2013 Jos Delissen 17 UserManualESVP/ESH3RCSV1.1 GPIB Setup 18 6. GPIB Setup Adjust the cannel setting of your GPIB device. The address is according to device default specifications (primary address ESVP = 18, ESH3 = 17). See your NI GPIB card for further information Enter the number of Service Request (SRQ) line checks to be made before proceeding with next measurement. Enter here the time out (in sec.) between two SRQ calls. When chosen too small there is a risk of missing the final SRQ trigger. When taken too long, it dramatically can influence performance (especially during scanning) Any activity on the GPIB channel will be displayed in the message bar. This can go very fast. For testing purposes it is possible to delay the messages (say to 500 ms – 1000 ms) so that they can be easily read. However, this will of course delay the measurements at hand. Max. Limit of received characters in one string (depending on device). To be used as a safety check (do not adjust) If selected, more information will be given in message bar (e.g. number of serial polls being executed) Enjoy Remote Measurements www.30Dbm.com © 2013 Jos Delissen UserManualESVP/ESH3RCSV1.1 GPIB Setup Open GPIB communication with device. Device is reset to initial state, will reset the device. Close GPIB communication with device Clear device, channel remains open Not really a GPIB action, but resets all measurements being executed. Needed to reset software when it is in unexpected or uncontrollable state. Used to manually sent a command to the device (TX no need to wait for answer, or TX when a measurements needs to be made). E.g. TX+RX is used here to measure the level. The received value is displayed in the relevant section of the main screen. Enjoy Remote Measurements www.30Dbm.com © 2013 Jos Delissen 19 UserManualESVP/ESH3RCSV1.1 Downloading Measurement & Logging Data 20 7. Downloading Measurement & Logging Data 7.1. Download (last) measurement to Excel Excel can be started automatically in two cases A) After a single run (initiated by or , when ending it) . In case of a continuous run (currently) only the last full cycle can be downloaded(not recommended) B) After a fully automatic measurement (recommended, unless you do not have Excel) There are two formats available 1. List Format (one measurement per line) 2. Table (set of measurements per run) In case of a table, automatically a chart will be created (two options available) Excel can also be started manually by clicking on ( selected from the menu bar ) in the measurement section or Only the last measurement run is downloaded into Excel. This can be a single measurement or a fully automated measurement run. Only the last measurement of a continuous measurement Can be used. Enjoy Remote Measurements www.30Dbm.com © 2013 Jos Delissen UserManualESVP/ESH3RCSV1.1 Downloading Measurement & Logging Data Each automatic or manual generated Excel file is saved with a fixed file name. A warning is issued when the file name already exists. Then it is possible to change the name. List Format : Table Format : Only the Table format can be used for automatic graphics creation. E.g. Enjoy Remote Measurements www.30Dbm.com © 2013 Jos Delissen 21 UserManualESVP/ESH3RCSV1.1 Downloading Measurement & Logging Data 22 Will change the default Excel and .txt download directory This button in the main screen will (re)generate an Excel file (again) based on the last measurement done. It is possible to set the column separator when downloading the data into a txt file. Note. The logging download function will download the log as displayed (it will not use the separators shown here) Enjoy Remote Measurements www.30Dbm.com © 2013 Jos Delissen UserManualESVP/ESH3RCSV1.1 Downloading Measurement & Logging Data 7.2. Download (last) measurement to .txt file Starts the download to a user selectable .txt file. Or from the measurement section (Section D) The file will be column separated, with column headers. The column separator can be manually selected from the Excel setup screen (in this case “Tab”) It is possible to adjust the column separator, with your own desired character. This is done in the Excel setup menu (see previous Excel section) Enjoy Remote Measurements www.30Dbm.com © 2013 Jos Delissen 23 UserManualESVP/ESH3RCSV1.1 Downloading Measurement & Logging Data 7.3. Download of logging section Starts the download to a user selectable .txt file. Or from the logging section (Section G) Will save the logging to a user selectable .txt file. The column separator is not used here. The logging will be saved in the same format as displayed in the screen. E.g. Will be shown in the .txt file as Enjoy Remote Measurements www.30Dbm.com © 2013 Jos Delissen 24 UserManualESVP/ESH3RCSV1.1 Saving and using configuration files 25 8. Saving and using configuration files All the configuration settings can be saved and opened again. Saving will be done in a user selectable directory. Opens a configuration file, previously saved. Saves the configuration file, but file will not be used as default. Used to save and manage several configuration files Opens the default configuration file ( = file used at startup) Saves the configuration file as default file. The file specified here will also used during startup of the tool. Restores to factory defaults. Enjoy Remote Measurements www.30Dbm.com © 2013 Jos Delissen UserManualESVP/ESH3RCSV1.1 Appendix – Quick Start Guide 9. Appendix – Quick Start Guide 1. First of all make sure the GPIB connection to device is activated. Push on . If everything is ok it becomes green. . If it does not become green check the connection to the device, its GPIB address setting or the mandatory NI GPIB card drivers. 9.1. To make a single (set of) measurements 1. Select one or more measurements 2. Press “On” (will become green) 3. All measurements will take place. As soon as a measurement is completed its value will be shown. Enjoy Remote Measurements www.30Dbm.com © 2013 Jos Delissen 26 UserManualESVP/ESH3RCSV1.1 Appendix – Quick Start Guide Note: . Any device changes To continuously repeat the same measurements click on (frequency, demodulation mode etc) will be effective as soon as a cycle of all selected measurements has finished. This is done to prevent disturbance of any ongoing measurements. Please note that the last measurement done will be marked with a green back color. Enjoy Remote Measurements www.30Dbm.com © 2013 Jos Delissen 27 UserManualESVP/ESH3RCSV1.1 Appendix – Quick Start Guide 9.2. To make automated run of measurements 1. Select the requested measurement. 2. Make the required selection of frequency range (or Time Range). This can be done manually or using a predefined frequency range (or even a time range). For predefined ranges select the 3. Button Make the required selection of frequency range (or Time Range). E.g. Enjoy Remote Measurements www.30Dbm.com © 2013 Jos Delissen 28 UserManualESVP/ESH3RCSV1.1 Appendix – Quick Start Guide 4. Close the screen and press 5. Now the whole measurements starts (the current measurement run is displayed in the screen as well as the total number of measurement runs planned) 6. The measurement can be temporarily stopped and restarted by the and immediately. Button button. With the “STOP” button it will stop Enjoy Remote Measurements www.30Dbm.com © 2013 Jos Delissen 29 UserManualESVP/ESH3RCSV1.1 7. Appendix – Quick Start Guide Depending on the Excel settings, Excel will start automatically to display all the measure values in one sheet, including a graphical representation. Enjoy Remote Measurements www.30Dbm.com © 2013 Jos Delissen 30 UserManualESVP/ESH3RCSV1.1 Appendix – Quick Start Guide 9.3. Using the scanning function 1 Enter or select a frequency range. Also select a proper frequency step size 2 Select a proper Threshold value (in dBuV). However depending on the antenna coding this might also be dBuV/m or even dBuA/m). 3 Only for ESVP : The squelch function can be activated (no audio or measurements visible when below Threshold) or deactivated for scanning (all audio an measurements visible) Enjoy Remote Measurements www.30Dbm.com © 2013 Jos Delissen 31 UserManualESVP/ESH3RCSV1.1 4. Appendix – Quick Start Guide To start the scanning, first make a choice between three scanning modes EXIT = When the threshold is exceeded the scanning stops HOLD = When the threshold is exceeded the scanning keep checking the channel and will proceed scanning if the measure value drops below the threshold TIME = When the threshold is exceeded a maximum time period is will be waited before the scanning continues, independent on the measured level. 5. To start the scanning, click on one of the direction buttons: . To stop click on the “green” active scanning button 6. During scanning the measured value is displayed in the screen for information purposes (except when the squelch mode is selected (ESVP) and the value is below the threshold) Enjoy Remote Measurements www.30Dbm.com © 2013 Jos Delissen 32 UserManualESVP/ESH3RCSV1.1 Appendix – Quick Start Guide 9.4. How to enter values in a box and save them? All the blue values can be edited. For example it is possible to change the step size and to save it into your own configuration file 1. Click with your cursor on the (blue) text 2. Enter the new value. 3. Click on Ok. A check on maximum and minimum values is performed. If all ok the value will be updated in the screen On error a message like below could occur. Enjoy Remote Measurements www.30Dbm.com © 2013 Jos Delissen 33 UserManualESVP/ESH3RCSV1.1 4. Appendix – Quick Start Guide To save your configuration. You can use the save buttons (e.g. save as your default configuration). When using the first time you need to select an directory/filename. E.g. The file name and directory will be remembered. Enjoy Remote Measurements www.30Dbm.com © 2013 Jos Delissen 34