1
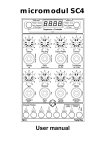
micromodul UC3
User manual
Provision of guarantee and product liability
The seller warrants for faultless material and proper manufacture for a period of 24 months from the date of
sale to the end user.
Excluded from the stated guarantee are defects on parts as the result of normal wear-and-tear. These parts are
mostly faders (sliding guides), potentiometers, encoders, buttons, switches and touchpads.
Also excluded from the guarantee are damages that are the result of :
incorrect or inappropriate handling, excessive force, mechanical or chemical influences, incorrectly
connecting the instrument with other instruments, incorrect or inappropriate use.
The warranty is void if the instrument is opened or changed. In addition, there is no warranty for individual
parts and components (in particular, semiconductors) and disposables/ consumables. The seller is not liable
for consequential damages which are not the result of criminal intent or negligence on his part. The
following conditions must be met in order to claim the warranty services:
- Instrument is either in its original packaging or similar packaging.
- Copy of the invoice with the serial number clearly visible.
- Meaningful error report or description of the error is attached.
The buyer assumes all costs and dangers of return shipments to the manufacturer. Since the user’s manual
which is included with each instrument also affects the warranty conditions (especially regarding safety
issues), it is absolutely essential that you read through and follow all instructions.
Safety precautions and servicing
- Instrument'
s intended use is based on the functions and procedures contained in this manual
- Read all instructions for use as well as all enclosed literature before using the instrument
- Use only in closed rooms (not for outdoor use)
- Never use in a moist or humid environment (laundry rooms, swimming pools, etc, …)
- Not for use in the vicinity of heat sources (radiators, ovens, etc, …)
- Operational temperature is in the range of 0° - + 40° C
- Not for use in the vicinity of flammable material
- The instrument should not be in direct or prolonged contact with sunlight
- Dusty environmental conditions should be avoided
- Connect only to USB ports of computers or hubs
- No foreign objects are permitted inside the instrument casing
- No liquids should get inside the instrument casing
- Never let the instrument fall to the ground (casing and/or control elements may be damaged)
If the instrument must be opened (for example, to remove foreign objects from the casing or for other
repairs), this may only be done by qualified personnel. The USB-cable must be disconnected before opening
the instrument. Guarantee is void for defects that occur if the instrument was opened by an unauthorised or
unqualified person.
Use a soft towel or brush to clean the instrument. Please do not use any cleaning liquids or water, so you
avoid any damages to the instrument.
Package contents
- Device
- USB cable (with angle plug)
- Manual
- CD with settings and manuals
Introduction
Thank you for choosing a Faderfox controller. These probably world’s smallest controllers are designed
for live use on stage. All Faderfox controllers are professionally manufactured in series in Germany,
ensuring high quality. The 3rd generation brings a lot of new features like USB connection with bus
powering, better controls and much more.
UC3 is a universal controller for all kinds of midi controllable software on Mac, PC and iPad.
The all-rounder UC3 has 8 push-encoders and 9 faders, all switchable to 8 groups that allow to control a
total amount of 136 control parameters. Various kinds of midi commands like program change,
pitchbend and control change in relative and absolute mode with different acceleration amounts over 7
and 14 bit resolution are possible. All these properties are fully programmable on the devices very fast
and easy for each control separately. A small display informs about programmings and control values.
The encoders can work as high resolution 14 bit controllers too (control change or pitchbend) which
makes them suitable for sensitive parameters like resonating filter cutoffs or similar things.
Use the internal 16 setups to save your individual settings.
The factory settings are perfect to control music and video software products out of the box if they
are freely assignable. So any additional device programming isn’t necessary for many applications.
Last but not least this little box is also a great extension for your Ableton Live setup. There you can
control all the continues parameters like track volumes, rack macros, send amounts, track pannings etc.
A special control surface script for Ableton Live 8 with all necessary mappings is enclosed in the
package. With that script you can also use two UC3 devices to control up to 16 tracks simultaneously.
Check out this amazing power box and you will get a reliable mate...
Features
- Universal controller for all kinds of midi controllable software
- iPad compatible with camera connection kit
- Control surface setup for Live 8 is shipped with the controller (no manual mapping necessary)
- USB interface - class compliant / no driver necessary
- 8 push encoders without detents (resolution about 36 pulses)
- 8 faders with 45 mm length
- crossfader with 45 mm length
- 4-digit-display to show control values and programming data
- 14 bit high resolution encoder mode for sensitive parameters
- data feedback for encoders avoid value jumps
- All controls fully programmable in the device by channel, type, number and mode
- Advanced programming functions like copy, paste and channel set
- 8 groups for all controls
- About 136 commands per setup (17 controls x 8 groups)
- 16 setups with backup functionality
- USB bus powering – consumption less than 500mW / 100mA
- Very compact design in a black, plastic casing with metal faceplate (180x105x70 mm, 350 g)
System requirements
- PC or Mac with a free USB port (1.0 or higher) or any USB hub
- iPad with iOS5 or higher
Ableton Live 8 setup 'faderfox UC3'
Setup 15 (Track 1-8) + Setup 16 (Track 9-16)
not used
not used
not used
Quantization
(in global group)
(in global group)
(in global group)
(in global group)
Rack 1 group select
Rack 2 group select
Rack 3 group select
Global group select
(shift + push)
(shift + push)
(shift + push)
(shift + push)
raC1
raC2
raC3
Glob
Track select
Master Pan
(in global group)
(in global group)
Sends 1 group select
Sends 3 group select
(shift + push)
(shift + push)
Snd1
Snd3
Cue volume
Master volume
(in global group)
(in global group)
Sends 2 group select
Track Pan group select
(shift + push)
(shift + push)
Snd2
Pan
Track volume of
Track 1 to 8 (setup 15)
Track 9 to 16 (setup 16)
Crossfader
(setup 15 only)
Shift functions:
Push encoder to select group
Fine control with all encoders
Fader mute on all faders
Press both shift keys
to enter / leave
edit mode
General Tips
- connect the controller with the included USB cable before you start your application
- blinking ‘USB’ display indicates that the controller is not yet recognized by the computer
- the controller is recognized by the computer as ‘Faderfox UC3’ or ‘USB audio device’
- use shift key for fader mute to avoid value jumps
- use shift key for fine control with the encoders (single step control)
- hold down the encoders while turning them to have a faster and easier control to min / center / max values
- additional bargraph in the value display shows single steps on highres 14 bit controls
- use setup 9 to 16 if you need same command numbers on faders in each group
Tips for edit mode
- control selection is possible too by shift + moving the control
- encoders send data out by shift + turning the encoder to check the encoder function in your application
- use copy / paste functions to duplicate groups or parts of them (only encoders or faders)
- hold down encoder 6 (channel set) to set the same channel to all controls within one setup
Tips for setting up with Ableton Live
- decompress the control surface setup from included CD ( file UC3.ZIP) and copy the included UC3
folder into Ableton’s midi remote script folder
* On Windows this is located in \Program\Ableton\Live x.x.x\Resources\MIDI Remote Scripts
* On OSX this is located in /Ableton/Live.app -> Right click -> show package contents.
Navigate to contents/app-resources/MIDI Remote Scripts
- don’t forget to select the control surface UC3 in Live's preferences/midi sync
and select the input & output ports 'Faderfox UC3'
- use UC3 internal setup 15 to control tracks 1 to 8 and setup 16 to control tracks 9 to 16
- encoders are automapped only to rack devices of the first three racks on each track
- manual mappingings of all controls are possible (override of instant mappings)
- prefer to use absolute mode for the encoders to get values displayed immediately (instead relative mode)
- use high resolution 14 bit mode for manual mappings to sensitive parameters like resonating filters etc. to
avoid any audible control noises (don’t forget to select midi mode ‘Absolute (14bit)’ in live’s bottom row)
Factory settings (setup 1-8, 9-16)
Encoder 1-8: all absolute 7 bit, all channel numbers = setup number, acceleration mode = 3
group: 1
CC:
008-015
008-015
2
016-023
016-023
3
024-031
024-031
4
064-071
064-071
5
072-079
072-079
6
080-087
080-087
7
088-095
088-095
8
096-103
096-103
6
104-111
104-111
7
104-111
104-111
8
104-111
104-111
Fader 1-8: all absolute 7 bit, all channel numbers = setup number
group: 1
CC:
032-039
104-111
2
040-047
104-111
3
048-055
104-111
4
056-063
104-111
5
104-111
104-111
Fader 9: (group 1-8) all absolute 7 bit, all channel number = setup number, CC 112 / CC112
Edit mode UC3
se01
Setup number
1 to 16
se16
C
C
C
C
P
p
p
p
y
y
y
y
s
g
e
f
Hold down for about
4 seconds to
Copy
current setup
completely
Copy
current group
completely
Copy
only encoders
of current group
Copy
only faders
of current group
p
p
p
p
s
s
s
s
t
t
t
t
s
g
e
f
Paste to
current setup
completely
Paste to
current group
completely
Paste
only encoders
to current group
Paste
only faders
to current group
Hold down for about
4 seconds to
1
Factory reset
of setup 1 to 8
acc3
Acceleration amount
for encoders only
Paste function
Hold down for about
4 seconds to
Acceleration amount
0 (off) to 3 (max)
Control mode
Setup number
Copy function
acc0
Hold down for about
4 seconds to
Factory reset
of setup 9 to 16
res
res
Hold down for about
4 seconds to
Hold down for about
4 seconds to
Send setup data
Receive
setup data
of current setup to setup1
rec
snd
Control select
Enc1
Encoder number
1 to 8
Enc8
Fad1
Fader number
1 to 9
Fad9
Control channel
Ch01
Channel number
1 to 16
Ch16
Hold down for about
4 seconds to
Channel set
of whole controls
in current setup
CSt
Control number
Control type
C
C
C
p
C
P
C
C
C
r
C
b
r
r
A
g
a
n
1
2
b
c
h
d
for control change &
program change types
Control change
relative mode 1
(values: 1 / 127)
for encoders only
Control change
relative mode 2
(values: 63 / 65)
for encoders only
Control change
absolute mode
(values: 0 to 127)
Program change
(values: 0 to 127)
Control change
absolute mode
high resolution
(values: 0 to 16383)
Pitch bend
(values: 0 to 16383)
n001
Control number
0 to 127
n127
Programming
The internal data structure is build on 16 setups with each 8 groups of 8 encoders + 9 faders.
Groups are selectable by shift + pushing the associated encoder. The display shows the selected group.
Enter and leave edit mode by pressing both shift keys. A small point in the lower right corner of the display
indicates the edit mode. Show up the different parameters without editing by pressing the encoders shortly.
Various functions to accelerate editing, duplicating and saving the internal data are available in edit mode.
There are copy/paste, channel set, factory reset and send/receive functions. You have to start these functions by
holding down one or two encoders until a running bargraph on the display will be disappeared. (about 4 sec)
Select and store setups by turning encoder 1.
You can copy setups, groups and parts of groups (encoders or faders) to other setups and groups.
With encoder 2 you select and start the copy function (setup, group, encoder or fader). After that choose the
destination setup/group and start the paste function with encoder 3. A small point in the left display digit
shows a full copy buffer. You can overwrite or delete it by the copy function.
To program a control you have to select the control by encoder 5 firstly. A second way is shift + moving the
control. Then you can edit the control parameters channel, type, number and mode (acceleration) by the
corresponding encoders.
You can choose between 6 different types for the encoders and 4 types for faders.
There are the control types CC relative, CC absolute, program change, CC absolute highres and pitchbend.
The most used type is CC absolute with number and value ranges about 0-127. The CC type should work with
each software so please try this at first. The type CC absolute highres sends two CC commands (one for MSB =
high value and a 2nd for LSB = low value) so you get a real 14 bit value. Possible CC numbers for this type are
0-31 (MSB) / 32-63 (LSB). The pitchbend type is send as 14 bit value too.
The mode parameter controls the acceleration amount (0-3) for the encoders so you can find your best
individual feeling with the encoders.
With the channel set function (holding down encoder 6) you set the same channel to all controls of one setup.
Pay attention that all modifications will only be stored by selecting another setup or leaving the edit mode.
Two factory reset functions allows you to get back the original content. Hold down encoders 1+2 to reset
setups 1-8 and use encoders 3+4 to reset setups 9-16.
The send function sends all setup data as midi notes to an external midi recorder. This is useful to backup all
data and to duplicate the data to a 2nd device. Choose the last setup number (encoder 1) which should be send
(16 for total backup), start your external midi recorder and then start the send function by holding down
encoders 5+6. The display shows the setup number which is currently in progress (count down). It takes about
3,5 seconds per setup (55 seconds for all 16 setups).
With the receive function you can restore the saved data. Start that function by holding down encoders 7+8
followed by starting the external midi player. Note that you play the midi file with same tempo as recorded and
don’t modificate the data otherwise.
You can also connect two devices by any routing software and play all data directly from device to device by
the send and receive functions.
User manual UC3 version 1
Mathias Fuch€ Software-Entwicklung
Op’n Idenkamp 13a
22397 Hamburg
Germany
[email protected]
www.faderfox.de