1
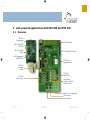
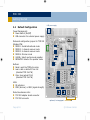
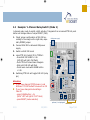
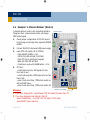
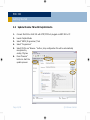
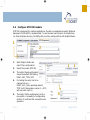
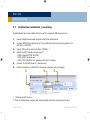
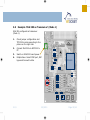
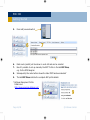
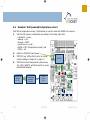
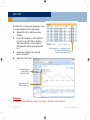
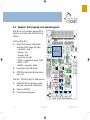
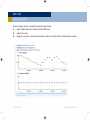
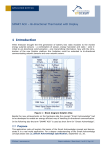
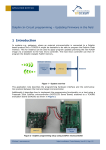
Getting Started V1.5 EDK 300 Getting Started Important Notes This information describes the type of component and shall not be considered as assured characteristics. No responsibility is assumed for possible omissions or inaccuracies. Circuitry and specifications are subject to change without notice. For the latest product specifications, refer to the EnOcean website: http://www.enocean.com. As far as patents or other rights of third parties are concerned, liability is only assumed for modules, not for the described applications, processes and circuits. EnOcean does not assume responsibility for use of modules described and limits its liability to the replacement of modules determined to be defective due to workmanship. Devices or systems containing RF components must meet the essential requirements of the local legal authorities. The modules must not be used in any relation with equipment that supports, directly or indirectly, human health or life or with applications that can result in danger for people, animals or real value. Components of the modules are considered and should be disposed of as hazardous waste. Local government regulations are to be observed. Packing: Please use the recycling operators known to you. This evaluation kit and its components are intended for use for evaluation, demonstration or engineering development purposes only. It is not considered to be a finished end product fit for consumer use. Persons handling this developer kit must have electronics expertise and observe good engineering practice standards. As such, the goods being provided are not intended to be complete in terms of required design, marketing, and/or manufacturing related protective considerations, including product safety and environmental measures typically found in end products that incorporate such electronic components or circuit board. EnOcean will not be reliable for consequences of any HW or SW changes/modifications of the developer board(s) done by the developer. Before using EDK 300 please consider country specific radio regulations and frequencies, e.g. R&TTE (EDK 300 = 868 MHz) for the European Union or FCC (EDK 300C = 315 MHz) for US. For users in Japan: This developer kit is not certified as confirming to technical regulations of radio law of Japan. If you use this kit in Japan, you are required by Radio Law of Japan to follow the instructions below with respect to this product: Use this product in a shielded room or any other test facility as defined in the notification #173 issued by Ministry of Internal Affairs and Communications on March 28, 2006, based on sub-section 1.1 of article 6 of the “Rule for Enforcement of Radio Law of Japan”. Use this kit only after you obtained the license of “Test Radio Station” as provided in Radio Law of Japan with respect to this product, or use of this product only after you obtained the technical regulations conformity certification as provided in radio law of Japan with respect to this product. Do not transfer this product, unless you give the same notice above to the transferee. Please note that if you could not follow the instructions above, you will be subject to penalties of Radio Law of Japan. Observe precautions! Electrostatic sensitive devices! Page 2/24 © EnOcean GmbH Index 1 Introduction ..............................................................................................4 2 Line-powered applications with EVA 300 and TCM 3x0 ..............................5 2.1 Overview ................................................................................................. 5 2.2 Default Configuration ................................................................................ 6 2.3 Example: „1-Channel Relay Switch‟ (Mode 2) ................................................ 7 2.4 Example: „1-Channel Dimmer‟ (Mode 4) ...................................................... 8 3 Software Installation .................................................................................9 3.1 Updates ................................................................................................... 9 3.2 Overview ................................................................................................. 9 3.3 DolphinStudio Installation ........................................................................ 10 3.4 Check FW Version with DolphinStudio ........................................................ 11 3.5 Update Module FW with DolphinStudio ....................................................... 12 3.6 Configure STM 300 module ...................................................................... 13 3.7 DolphinView installation / presetting ......................................................... 14 3.8 Example „EVA 300 as Transceiver‟ (Mode 1) ............................................... 15 4 Self-powered Applications with EVA 320 and STM 300 ............................17 4.1 Overview ............................................................................................... 17 4.2 Default Configuration .............................................................................. 18 4.3 Example: „Self-powered temperature sensor‟ ............................................. 19 4.4 Example: „Self-powered room operating panel‟ ........................................... 21 V1.5 05/2011 Page 3/24 EDK 300 Getting Started 1 Introduction EDK 300 and EDK 300C are designed to support hardware and software application development for following EnOcean modules: 868 MHz (EDK 300): TCM 3x0, STM 300 315 MHz (EDK 300C): TCM 3x0C, STM 300C Content of EDK 300 Developer‟s Kit: 1x EVA 300 evaluation board for TCM 3x0 1x EVA 320 evaluation board for STM 300 1x TCM 300 on adapter board 1x STM 300 on adapter board 1x TCM 320 2x EOP 300 programmer 1x PTM 200 with test rocker 2x USB cable 1x Package leaflet with download links to documentation and software tools TCM 320 TCM 3x0 Additional developer kits are available for self-powered radio nodes of the STM 3xy product family: EDK 310 (Solar powered STM 3xy) EDK 312 (Thermo powered STM 3xy) EDK 300 Developer‟s Kit Page 4/24 © EnOcean GmbH 2 Line-powered applications with EVA 300 and TCM 3x0 2.1 Overview EOP 300 Programmer EVA 300 Board LED: Power EOP VCCUSB LED: Power EVA VCCIO Power ON/OFF switch LED: Programmer PROGACTIVE TCM 300 on Adapter Board TCM 3x0 Repeater config. TCM 3x0 RSSI LEDs TCM 3x0 Mode config. Learn Mode Indicator (LMI) & Channel LEDs Optional / not equipped Clear button Learn button V1.5 05/2011 Page 5/24 EDK 300 Getting Started 2.2 Default Configuration USB power supply Power Management: Power Switch (On/Off) USB connector for external power supply Mode and configuration jumper for TCM 300 Standard FW: MODE 1: Serial bidirectional mode MODE 2: 1 channel receiver mode MODE 3: 4 channel receiver mode MODE 4: Dimmer mode 2LEVEL: Select one/two-level repeater REPEATER: Selector for repeater mode TCM 300 Buttons: Reset: reset the TCM3x0 module Learn: add or delete ID from list (standard TCM 3x0 FW) Clear: clear whole ID list (standard TCM 3x0 FW) LEDs: IO indicators PWM (dimmer) or RSSI (signal strength) Modul & extension slots: TCM 300 adapter board connector TCM 320 connector Page 6/24 optional / not equipped © EnOcean GmbH 2.3 Example: ‘1-Channel Relay Switch’ (Mode 2) 1-channel relay mode to switch a light actuator. Telegrams from a learned PTM 2x0 push button will change status of output ADIO7 (CH0). 1. Check jumper configuration of EVA 300 according to the image on the right side, especially MODE2 jumper USB power supply 2. Connect EVA 300 to delivered USB power supply 3. Switch on EVA 300 board 4. Learn PTM 2x0 (switch) ID to TCM3x0: - Press EVA 300 LEARN > 0.5s (LMI LED will light, CH0 flash) - Push PTM 2x0 to send learn telegram - Wait until CH0 LED will flash - Finish learn mode with LEARN button > 0.5s TCM 300 5. Switching PTM 2x0 will toggle CH0 LED (relay pin) LMI Attention: If you have changed TCM firmware: Load EnOcean TCM 300 default firmware from CD If you have changed mode settings: Clear ID - press CLEAR button > 2s (LEDs “LMI” will light & “CH0” blink) - press RESET (mode selection) CH0 optional / not equipped V1.5 05/2011 Page 7/24 EDK 300 Getting Started 2.4 Example: ‘1-Channel Dimmer’ (Mode 4) 1-channel dimmer mode to dim a electrical actuator. Telegrams from a learned push button will change PWM output signal. 1. Check jumper configuration of EVA 300 accord to the image on the right side, especially MODE4 & PWM 2. Connect EVA 300 to delivered USB power supply 3. Learn PTM 2x0 (switch) ID to TCM3x0: - Press EVA300 LEARN > 0.5s (LMI & CH2 LED will light, CH0 flash) - Push PTM 2x0 to send learn telegram - Wait until CH0 LED will flash - Finish learn mode with LEARN button > 0.5s 4. PTM 2x0: - hold O-side long time, WM signal will drop from high to low - hold I-side long time, PWM signal will rise from low to high - press 1-side short time, TCM3x0 will switch on with last PWM value - press 0-side short time, TCM3x0 will switch off USB power supply TCM 300 LMI CH2 CH1 optional / not equipped Attention: If you have changed FW: Load EnOcean TCM 300 default firmware from CD If you have changed mode settings: Clear ID - press CLEAR button > 2s (LEDs “LMI” will light & “CH0” blink) - press RESET (mode selection) Page 8/24 © EnOcean GmbH 3 Software Installation 3.1 Updates Please register for your personal account and check following website for updates: http://www.enocean.com/en/download/ 3.2 Overview DolphinAPI (for details see EDK 300 user manual) Operating system for self-powered applications Source code samples in C-Code for switching, dimming, etc. Comprehensive software libraries (wireless communication, energy management, etc.) DolphinStudio Windows application which supports the whole firmware development process (chip configuration, programming, module updating) DolphinView Visualize properites of EnOcean radio nodes Receives, sends and analyses radio telegrams according to the EnOcean standard Get detailed information e.g. subtelegram timing and signal strength Content of telegrams can be analyzed online and logged with time stamp Supports remote management features like ping, query and remote learn PC requirements - Microsoft Windows XP SP3 or Windows 7 - Microsoft .NET Framework 3.5 SP1 - 1.5 GHz CPU, 1 GB RAM, 0,3 GB Disc Space - Graphics: min. 1024x768 with DirectX 9 support V1.5 05/2011 Page 9/24 EDK 300 Getting Started 3.3 DolphinStudio Installation 3 1. Launch DolphinStudio setup program and follow instructions 2. Connect EOP300 to PC via USB cable 3. Press “Options” button within menu bar 4. “Options” window will appear, press “Refresh” to recognize EOP 300 programmer 5. Programmer settings/firmware will be update if necessary 4 Attention: If you have installed a previous DolphinStudio version, it is recommended to uninstall older version If you have already installed older FTDI USB driver, it is recommended to remove previous and install latest FTDI driver by cross marking installation menu at the end of DolphinSetup Page 10/24 © EnOcean GmbH 3.4 Check FW Version with DolphinStudio 1. Connect EVA 300 or EVA 320 with STM/TCM 3x0 plugged via EOP 300 to PC 2. Launch DolphinStudio 3. Select “EOPX (Programmer)” tab 4. Select “Chip information” 5. Press “Retrieve” button 6. Current application type and version e.g. “TCM 300 2.0.0.0” will be shown 3 5 4 6 V1.5 05/2011 Page 11/24 EDK 300 Getting Started 3.5 Update Module FW with DolphinStudio 1. Connect EVA 300 or EVA 320 with STM/TCM 3x0 plugged via EOP 300 to PC 2. Launch DolphinStudio 3. Select “EOPX (Programmer)” tab 4. Select “Programmer” 5. Select FW file via “Browse…” button; chip configuration file will be automatically recognized by ending *cfg.hex 6. Press “Execute” button to start the update process 4 3 5 6 Page 12/24 © EnOcean GmbH 3.6 Configure STM 300 module STM 300 is designed for multiple applications, therefore no application specific EnOcean Equipment Profile (EEP) is implemented. To use the auto learn function in DolphinView (or other EnOcean devices), the EEP profile must be configured first with DolphinStudio: 1 2 1. Start Dolphin Studio and select „Chip configuration‟ 2. Select the module STM 300 3. The button „Read configuration‟ shows the default EEP setting: FUNC: 0x3F, TYPE: 0x7F 4. For testing the entry has to be changed into e.g.: FUNC: 0x10 (room operating panels) TYPE: 0x03 (temperature sensor 0...40°C, with set point control) 5. The button „Write configuration‟ set the new profile. A rereading of configuration (button 3) confirmed the successful write operation. V1.5 3 05/2011 5 4 Page 13/24 EDK 300 Getting Started 3.7 DolphinView installation / presetting DolphinStudio has to be installed first, to get the required USB device driver. 1. Launch DolphinView setup program and follow instructions 2. Connect EOP 300 programmer to PC via USB cable and connect programmer to EVA 300 or EVA 320 3. Select COM port for serial interface “COM10 ...” 4. Select the ESP* serial protocol type **: - ESP2: standard TCM 300/320 - ESP2+EPM: internal use - ESP3: TCM 300/320 incl. gateway controller firmware 5. Connect to EVA 300 board (= transceiver) 6. Check connection via EVA 300 transceiver example (see next page) 3 4 5 * EnOcean Serial Protocol ** Future DolphinView versions will automatically select the serial protocol type Page 14/24 © EnOcean GmbH 3.8 Example ‘EVA 300 as Transceiver’ (Mode 1) EVA 300 configured as transceiver (Mode 1): 1. Check jumper configuration and TCM 300 module according to the picture on the right side 2. Connect EVA 300 via EOP 300 to PC 3. Switch on EVA 300 board power 4. DolphinView: Select COM port, ESP type and Connect button V1.5 05/2011 TCM 300 Page 15/24 EDK 300 Getting Started 5. Press self powered switch 6 7 6. Radio node (switch) will be shown in node list and can be selected 7. Now it‟s possible to set up manually the EEP* Profile in the tab EEP View, e.g. for the RPS telegram 8. Subsequently the node button shows the label „EEP has been selected‟ 9. The tab EEP View indicate the complete EEP profile details * EnOcean Equipment Profile Details see: http://www.enocean-alliance.org/ 8 Page 16/24 9 © EnOcean GmbH 4 Self-powered Applications with EVA 320 and STM 300 4.1 Overview EOP 300 Programmer EVA 320 Board LED: Power EOP VCCUSB - Short term cap - Gold cap - Lithium accu (optional) LED: Power EVA VCCIO ACCU ACCU LED Programmer: PROGACTIVE Power ON/OFF switch STM 300 on adapter board Multiple energy harvesters STM 300 config. LED: Radio send Energy management STM 300 sensor examples: - temperatur - light intensity - poti - energy storage voltage V1.5 Attention: If EVA 320 + STM 300 stored for more then 2 weeks in darkness, then the long term capacitor (Gold cap) has to be disconnected from STM 300: - power storage switch to external - or unplug STM 300 module For details see STM 300 manual Solar cell User buttons 05/2011 Page 17/24 EDK 300 Getting Started 4.2 Default Configuration Power Management: Power Switch (On/Off) Power Selector (USB/Solar/ExternalSolar/External) Storage Selector (Optional Accu/Goldcap /None) Connector for external power source Wake up & retransmit STM 300 standard FW: Wake Up (1s/10s/100s/None) Retransmit (7-14/70-140/None) Buttons: Reset Button1 Button2 WAKE1/Learn WAKE0/Occupancy Modul & extension slots: STM 300 on adapter board Optional Power Converter Page 18/24 © EnOcean GmbH 4.3 Example: ‘Self-powered temperature sensor’ EVA 320 as temperature sensor, DolphinView to monitor radio with EVA300 as receiver: 1. Set EVA 320 jumper configuration according to the image right side: - retransmit = every - wakeup = 10s - storage = GCAP - power source = solar - ADIO0 = NTC (temperature sensor) and DVDD = set 2. Switch on EVA 320 board power 3. STM 300 (e.g. EEP profile) has to be configured according to chapter 3.6, page 13 4. STM 300 will send temperature values every 10s, LED1 (ADIO7) will flash shortly for every transmitted telegram Self-powered Sensor EVA 320 V1.5 USB Transceiver (Mode1) EVA 300 USB STM300 PC Dolphin View 05/2011 Page 19/24 EDK 300 Getting Started Use EVA 300 in transceiver (gateway) mode to receive telegrams via DolphinView: 1. Setup EVA 300 to USB transceiver (Mode1) 2. Press the LRN button on the EVA 320 to teach-in the STM 300 in DolphinView automatically (on the basis of LRN telegram which includes the EEP no.) 3. DolphinView displays all received sensor telegrams 4. Select tab “EEP View” DB1 (data byte 1) = temperature value (for details see 4BS telegram EnOcean Equipment Profile) Selected device with Chip ID & EEP ID-label Manufacturer ID & EEP profile no. Attention: EVA320 needs sufficient energy (e.g. light) to transfer radio telegrams Page 20/24 © EnOcean GmbH 4.4 Example: ‘Self-powered room operating panel’ EVA 320 as room operating panel and DolphinView to monitor radio with EVA 300 as receiver: Configure EVA 320: 1. Set EVA 320 jumper configuration according to the image right side: - retransmit = Every - wakeup= 10s - storage= GCAP - power source=solar - ADIO0 = temperature sensor (NTC) - ADIO1 = POTI - WAKE0 = occupancy button 2. Use module under office light 3. STM 300 will send poti & temp values every 10s STM 300 EVA 300 / TCM 300 config. for USB receiver: 1. Setup EVA 300 as transceiver (gateway) and connect with DolphinView 2. Switch on EVA 300 3. Check received telegrams V1.5 05/2011 Page 21/24 EDK 300 Getting Started Sensor values can be visualized by using DolphinView: 1. Start DolphinView and select the tab „EEP View‟ 2. Select the node 3. Diagram will show received temperature sensor and „Set Point‟ potentiometer values Page 22/24 © EnOcean GmbH