1
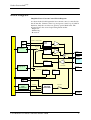
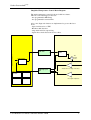
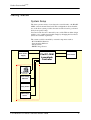
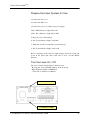
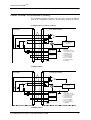
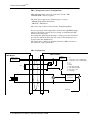
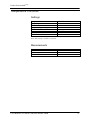
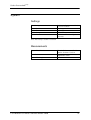
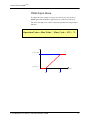
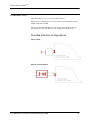
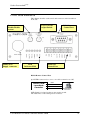
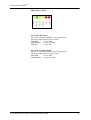
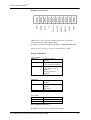
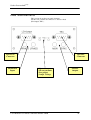
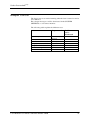
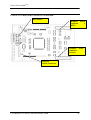
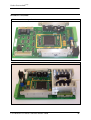
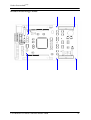
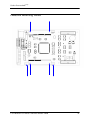
Sacher Lasertechnik Group
Pilot PC-OEM Laser Driver
User Manual
http://www.sacher-laser.com
Sacher LasertechnikGroup
Warranty
This Sacher LasertechnikGroup product is warranted against defects in
materials and workmanship for a period of three years from date of
shipment.
Duration and conditions of warranty for this product may be superceded
when the product is integrated into (becomes a part of)other Sacher
Sacher LasertechnikGroup products. During the warranty period, Sacher
LasertechnikGroup will, at its option, either repair or replace products
which prove to be defective.
The warranty period begins on the date of delivery or on the date of
installation if installed by Sacher LasertechnikGroup.
This warranty is in lieu of all other guarantees expressed or implied and
does not cover incidental or consequential loss.
Copyright 2004, Sacher LasertechnikGroup. All rights reserved.
Service
Information and advice about the performance or operation of Sacher
LasertechnikGroup products is available from our web site and our
applications engineers.
For quickest response ask for ‘Technical Support’ and have your model
and serial number available. Support is available by:
Sacher LasertechnikGroup
Rudolf-Breitscheid-Str. 1-5
35037 Marburg, Germany
Tel: +49 6421 305 – 0, Fax: +49 6421 305 - 299
[email protected]
or
5765 Equador Way
Buena Park, CA 90620
USA
Tel.: +1 800 352 3639, Fax: +1 714 670 7662
User Manual Laser Diode Controller PilotPC-OEM
Part Number:
Printed: Aug-06 Preliminary
Sacher LasertechnikGroup
Content
General Information
1
General Description .................................................... 1
Block Diagram ............................................................ 2
Getting Started ............................................................ 4
Laser Diode Connection
7
Laser Diode/ Photodiode Polarity............................... 8
Connection to Ground............................................... 10
Settings and Measurements
12
Laserdiode Current Source ....................................... 12
Temperature Controller............................................. 13
System....................................................................... 14
Service Port Operation
15
PWM Voltage Port.................................................... 15
Interlock Port ............................................................ 18
Housing Description
20
Front Side Elements .................................................. 21
Rear Side Elements ................................................... 24
Beeper Control .......................................................... 25
Specifications
26
Laser Diode Controller ............................................. 26
Appendix
32
Connector Schematics............................................... 32
Internal Butterfly Laser Diode Connections ............. 37
PilotPC-OEM Main Board Overview ....................... 39
Board Pictures ........................................................... 40
Board Mounting Holes.............................................. 41
Heatsink Mounting Holes ......................................... 42
Error Codes ............................................................... 43
Technical Support ..................................................... 44
User Manual Laser Diode Controller PilotPC-OEM
Part Number:
Printed: Aug-06 Preliminary
Sacher LasertechnikGroup
General Information
General Description
The PilotPC Laser Driver is a highly precise controller for laser diodes.
The laser current or the optical output power and the temperature of the
connected laser diode can be precisely regulated.
The laser driver is managed by a modern 16 Bit ucontroller with
internal flash memory. It is possible to update the firmware of the
driver.
The main focus, when designing the driver, was, to give the customer a
low noise laser driver with maximum safety for user and laserdiode.
The output power stage of the laser driver is designed in a low noise
power supply technology.
This causes some more thermal power losses and makes in case of a
high output current a external heatsink necessary.
The PilotPC power stage is a further development of our previous
design which is working since more then 10 years in Sacher
Lasertechnik products. So we are sure to give you a high quality and
well approved instrument.
For automated control, a RS232 interface allows remote programming
and readout from personal computers.In addition instrument drivers are
available free upon request.
The PilotPC incorporates proven laser protection features, including
exclusive clamping current limits, output shorting circuits and slowstart turn-on.
User Manual Laser Diode Controller PilotPC-OEM
1
Sacher LasertechnikGroup
Block Diagram
Simplified Laser Current Control Block Diagram
As shown in the block diagram the laser current source is controlled by
the uController. Current control loop and power control loop is build in
hardware. Only the set values are given by special DAC units. The
uController also has several supervising functions like
- Diagnostic
- Monitoring
- Protection
External
Adjust
External
Adjust
Compliance Voltage Adjust
I Limit Adjust
Compliance
Voltage
Control
I/P-Mode
16 Bit LOW Noise
DAC
LD Current
Control
Current
MonitorOutput
LD Current
Source
External
HF MODIN
uController Unit
Laser Diode
LD Power
Control
PD Amplifier
16 Bit High Speed
ADC
act PD Current
External
Adjust
128 Step
digital
Potentiometer
External
LF MODIN
act. LD Current
Open Load
Detection
Polarity
Control
Freq. Adjust
FG Enable
Amplitude
Function
Generator
Waveform Select
Freq Range select
User Manual Laser Diode Controller PilotPC-OEM
Freq Gen
Sync Output
2
Sacher LasertechnikGroup
Simplified Temperature Control Block Diagram
The main temperature control blocks are build in software.
This has some advantages for the user.
- free programmable PID Setup
- free programmable current limit
Also some diagnostic features are implemented to protect the laser
diode
- Open load detection of TEC
- Bad heat sink detection
- temp watch window supervising
- Open/ short circuit detection in sensor lines
uController Unit
16 Bit DAC
TEC
Current
Source
PID Controller
16 Bit High Speed
ADC
Open Load
Detection
Sensor Control
Limit
Diagnostics
TEC Current
Control
User Manual Laser Diode Controller PilotPC-OEM
AD590 Current to Voltage Transmitter
NTC Signal Amplification
3
Sacher LasertechnikGroup
Getting Started
System Setup
The laser system consists of an electronic controller unit – the PilotPC
OEM – and an external laser head. This configuration allows flexible
use of the laser system possible since the laser head can be positioned
freely in an optical setup.
Laser and controller are connected by two cables.This modular design
enables you to switch wavelengths simply by changing the laser head
(heads are available separately).
The system could be extended by external components such as
- PC with RS232 Interface
- Laser Activity Indicator
- Safety Switch
- PWM Voltage Source
9-12V Power
Supply
PilotPC-OEM
Laserdiode
Controller
Laser Head
Optional
PC
Laser Activity
Indicator
Safety Switch
PWM Voltage
source
User Manual Laser Diode Controller PilotPC-OEM
4
Sacher LasertechnikGroup
Main Settings Laser
Before switching on the laser the right settings should be found and
stored in the driver unit. This could be done over the RS232 Interface or
by adjusting the external trim potentiometer on the rear side.
For an easy handling an ASCII protocol is implemented in the driver, so
that the user could use a general purpose terminal program to
communicate with the driver.
The settings are classified under System , Laser-Current Source and
Temperature Controller.
The most important settings are:
Laser Current Source Settings
Laserdiode Polarity
See chapter
“Laser Diode
Connection”
RS232
Laserdiode Current Limit
External
potentiometer
Laserdiode Operation Current
RS232
Laserdriver Mode
Driver could work in RS232
Const current or
const power mode
(only in case of an
internal PD)
Temperature Controller Settings
Temperature Operation Point
Temperature Sensor
10KNTC or AD590
Temperature Controller PID
Parameters
TEC Maximum Current
TEC Polarity
RS232
RS232
RS232
RS232
RS232
A complete summary of all settings is described in chapter “Settings
and Measurements”.
User Manual Laser Diode Controller PilotPC-OEM
5
Sacher LasertechnikGroup
Prepare the Laser System for Use
1.Connect the laser cord
2.Connect the TEC cord
3.Connect the power cord with your power supply
4.The “TEC Indicator” light will be ON
4.The “Error Indicator” light will be OFF
5. Press the “Laser ON” Button
6. The “Laser Indicator Light” will blink
7. When the current is reached the system will beep
8. The “Laser Indicator Light” will be ON
Before switching on the laser the right settings should be found and
stored in the driver unit. This could only be done over the RS232
Interface.
Turn the Laser On / Off
The laser could be turned ON by 3 different ways
- Pressing the “Laser ON/OFF” Button on the front side.
- High Transition Signal on PWM Port
- “Laser ON” Command over RS323
Laser ON/OFF Switch
Laser Indicator Light
User Manual Laser Diode Controller PilotPC-OEM
6
Sacher LasertechnikGroup
Laser Diode Connection
The laser diode is connected over the “LASER CONNECTOR” on the
rear panel of the driver. To get the full performance and safety please
only connect a special laser head from Sacher Lasertechnik.
These Sacher Lasertechnik laser heads incorporate several features.
- Short circuit relay for the laser diode
- Input filter network for current transient protection
- Interlock loop
- bias-T option for high frequency modulation
- separate calibrated photodiode for const power mode (only for high
power TIGER systems)
User Manual Laser Diode Controller PilotPC-OEM
7
Sacher LasertechnikGroup
Laser Diode/ Photodiode Polarity
For maximum flexibility and laser safety the driver supports 4 different
laser diode configurations which are shown in the following schematics.
Configuration 1 (common cathode)
Laser Diode
Laser Diode Controller
2
4
7
8
Constant Current/Power
Controller
3
9
Safety
Relay Control
6
1
Interlock
Control
5
S
1 = Interlock
2 = Photodiode Cathode
3 = Ground for Laser Diode
4 = Photodiode Anode
5 = GND for Interlock
6 = Safety Relay Plus
7 = Laser Diode Minus
8 = Laser Diode Plus
9 = Safety Relay Minus
S = Shielding
Configuration 2
Laser Diode
Laser Diode Controller
2
4
7
8
Constant Current/Power
Controller
3
9
Safety
Relay Control
6
1
5
S
Interlock
Control
1 = Interlock
2 = Photodiode Cathode
3 = Ground for Laser Diode
4 = Photodiode Anode
5 = GND for Interlock
6 = Safety Relay Plus
7 = Laser Diode Minus
8 = Laser Diode Plus
9 = Safety Relay Minus
S = Shielding
Configuration 3
User Manual Laser Diode Controller PilotPC-OEM
8
Sacher LasertechnikGroup
Laser Diode
Laser Diode Controller
2
4
7
8
Constant Current/Power
Controller
3
9
Safety
Relay Control
6
1
Interlock
Control
5
S
1 = Interlock
2 = Photodiode Cathode
3 = Ground for Laser Diode
4 = Photodiode Anode
5 = GND for Interlock
6 = Safety Relay Plus
7 = Laser Diode Minus
8 = Laser Diode Plus
9 = Safety Relay Minus
S = Shielding
Configuration 4 (common anode)
Laser Diode
Laser Diode Controller
2
4
7
8
Constant Current/Power
Controller
3
9
Safety
Relay Control
6
1
Interlock
Control
5
S
1 = Interlock
2 = Photodiode Cathode
3 = Ground for Laser Diode
4 = Photodiode Anode
5 = GND for Interlock
6 = Safety Relay Plus
7 = Laser Diode Minus
8 = Laser Diode Plus
9 = Safety Relay Minus
S = Shielding
The following list gives you the correct polarity setting.
Configuration
Configuration 1 (common cathode)
Configuration 2
Configuration 3
Configuration 4 (common anode)
User Manual Laser Diode Controller PilotPC-OEM
Polarity
Positive
Negative
Positive
Negative
9
Sacher LasertechnikGroup
Connection to Ground
Ground free Operation
RS232 and PWM Port has differential or optically decoupled inputs so
that ground free operation is possible when the external 9-12V power
supply is not connected to ground.
Note: The maximum ground differential voltage from the RS232
interface is 50V.
9-12V Power
Supply
PilotPC-OEM
Laserdiode
Controller
Laser Head
LD-Operation with Connection to Ground
Laserdiode or power supply could have a connection to ground.
Several setups are possible.
In case of low noise current requirements double ground connection
should be avoided.
The two different polarity settings ensure that the laserdiode housing is
connected internally to ground.
PilotPC-OEM
Laserdiode
Controller
PilotPC-OEM
Laserdiode
Controller
PilotPC-OEM
Laserdiode
Controller
User Manual Laser Diode Controller PilotPC-OEM
10
Sacher LasertechnikGroup
TEC / Temperature Sensor Configurations
TEC and temperature sensor are connected over the “TEC
CONNECTOR” on the rear panel.
The laser driver supports two different types of sensors.
- AD590 (Temperature Transducer)
- 10K NTC (Thermistor)
The sensor type could be selected in the “Temp Setup Menu”
For best operation of the temperature controller the right PID Settings
must be found. This could be done by testing or calculating the TEC
and laser head behaviour.
For testing and qualifying the heating / cooling process the laserdriver
provides test functions where the user easily could calculate process
response time and amplification.
The temperature controller is internal realized as a PID controller, so
the user has to setup 3 parameters.
TEC Configuration
TEC Controller
TEC Module
2
AD590 Temp.
Transducer
3
9
NTC
6
8
Voltage
Reference
1 = n.c.
2 = Temperature Sensor AD590 Plus
3 = Temperature Sensor AD590 Minus
4 = n.c.
5 = n.c.
6 = GND
7 = TEC Element GND
8 = TEC Element Output
9 = NTC Sensor Plus
S = Shielding
Temperature
Controller
7
5
1
4
S
User Manual Laser Diode Controller PilotPC-OEM
Set Point
11
Sacher LasertechnikGroup
Settings and Measurements
This chapter lists all settings and measurements which could be done
over the RS232 interface. Every setting must be explicit saved to be
present after system shut down.
You will find the detailed description of all commands in the
“Programming Manual”.
Laserdiode Current Source
Settings
Laser Polarity
Laser Current Limit
Current Source Compliance Voltage
Driver Mode
Laser Status
Laser Cable Resistance
Anode Grounded /Cathode
Grounded
Important for open load
detection
Const. current or
const. power mode
ON / OFF
(important for Laserdiode
voltage measurements )
Laserdiode Current
Photdiode Current
Photodiode/Power Calibration Table
PWM Voltage Port Mode
PWM-Mode ;
Disable
ON/OFF-Mode;
Note: All Settings could be read back
Measurements
Laserdiode current
Photodiode current
Calculated Laser Power
Laserdiode Voltage
Laserdiode working hours
User Manual Laser Diode Controller PilotPC-OEM
12
Sacher LasertechnikGroup
Temperature Controller
Settings
Temperature Sensor
PID Settings
TEC Polarity
Temperature operation point
TEC Current Limit
Temperature Controller
TEMP Watch status
TEMP Watch window
10K NTC or AD590
P,I,D
ON / OFF
ON / OFF
Note: All Settings could be read back
Measurements
Temperature
TEC current
TEC voltage
TEMP Watch Status
User Manual Laser Diode Controller PilotPC-OEM
13
Sacher LasertechnikGroup
System
Settings
User Settings
RS232 Baudrate
RS232 Echo
System Beeper
System Boot
Different Settings
stored or recalled
could
be
ON / OFF
ON / OFF
Used when Firmware Update is
necessary
Note: All Settings could be read back
Measurements
System Identification
Error Code
Contains Driver name, Serial
number, Software Version
Gives an error code in case of
implausible values
System Working hours
User Manual Laser Diode Controller PilotPC-OEM
14
Sacher LasertechnikGroup
Service Port Operation
PWM Voltage Port
The “PWM Voltage Port” is used to switch the laser ON and OFF or
adjust the laser current/power. The port could also be disabled.
Internal circuit
To avoid ground loops and disturbance the input port is optically
coupled and not polarity sensitive.
User Manual Laser Diode Controller PilotPC-OEM
15
Sacher LasertechnikGroup
PWM ON /OFF Mode
To switch the Laser ON the following sequence must be present at the
port.
t-High
HIGH
LOW
The minimum high time must be 10ms
To switch the laser OFF the following sequence must be present at the
port.
t-LOW
HIGH
LOW
The minimum low time must be 10ms
User Manual Laser Diode Controller PilotPC-OEM
16
Sacher LasertechnikGroup
PWM Adjust Mode
To adjust the laser current or laser power (in const. power mode) a
PWM (pulsewith modulated signal) must be connected at the port.
The laser current/power could be adjusted with the following transfer
function.
Operation Value = Max-Value * (Duty Cycle – 25% ) * 2
I/P
I = Iset * 100%
I = Iset * 0%
Duty Cycle
25%
User Manual Laser Diode Controller PilotPC-OEM
75%
17
Sacher LasertechnikGroup
Interlock Port
The interlock port is one of several safety features.
The port acts as input port for a safety contact and as an indicator port
which could drive a LED.
The port is internally hardwired to the laser power supply so that an
open interlock loop will directly cause a shut down of the laser.
Possible Interlock Configurations
Safety Swich
Optical coupled Output
User Manual Laser Diode Controller PilotPC-OEM
18
Sacher LasertechnikGroup
Indicator LED
Interlock Disabled
User Manual Laser Diode Controller PilotPC-OEM
19
Sacher LasertechnikGroup
Housing Description
(Butterfly Version)
User Manual Laser Diode Controller PilotPC-OEM
20
Sacher LasertechnikGroup
Front Side Elements
This chapter describe each control and connector on the laserdriver
front side.
Laser Current
Adjust Switch
Laser
Enable/Disable
Switch
Main Power
Supply connector
LED
Indicator Field
RS232 Remote
Control Port
Hardware
Control Port
RS232 Remote Control Port
9pol SUBD connector for a one to one cable connection to a PC.
PilotPC-OEM
Laserdiode
Controller
RxD
TxD
GND
PC
GND Signal is isolated against power supply ground.
The status lines of the serial port are not used.
User Manual Laser Diode Controller PilotPC-OEM
21
Sacher LasertechnikGroup
LED Indicator Field
Laser ON / OFF Swich
The laser is switched ON/OFF by pressing the button.
The button light indicates the laser status.
Light OFF
-> Laser OFF
Light Blinking -> Laser in startup
Light ON
-> Laser ON
Laser Current Adjust Swich
The laser is switched ON/OFF by pressing the button.
The button light indicates the laser status.
Light OFF
-> Laser OFF
Light Blinking -> Laser in startup
User Manual Laser Diode Controller PilotPC-OEM
22
Sacher LasertechnikGroup
Hardware Control Port
PWM Voltage Port: Is used to switch on the laser or adjust the
curren/power level with a digital signal.
See am more detailed description in chapter “PWM ON /OFF Mode.
Interlock: Port: Is used to connect a external safety switch.
Indicator LED Field
T-Watch LED
LED OFF
LED ON
LED Blinking
TEC LED
LED OFF
LED ON
T- Watch function
disabled
T-Watch function is active.
(Laser operation enabled)
T-Watch function is active.
Temperature is out of
window
(Laser operation is
disabled)
Temperature Controller
disabled
Temperature Controller
enabled
TEC active
LED Blinking
Error LED
LED OFF
LED ON
LED Blinking
No error
Error appeared
RS232 Command Error
Power Supply Connector
5pol DIN connector for an external power supply.
User Manual Laser Diode Controller PilotPC-OEM
23
Sacher LasertechnikGroup
Rear Side Elements
This section shows the rear panel elements.
On this side you find all connectors to the laser head
(LD-Output, TEC) .
9pol Laser
Connector
Modulation
Inputs
9pol TEC
Connector
Adjustments
- LD current limit
- Freq adjust
- Compl. Voltage
User Manual Laser Diode Controller PilotPC-OEM
Monitor
Outputs
24
Sacher LasertechnikGroup
Beeper Control
The bepper acts as acoustical warning when the laser is turned on and as
error indicator.
Error beeper messages could be deactivated in the SYSTEM
SETTINGS or over remote interface.
The following table explains the different cases.
Action
Beeper sound
Laser delay count
50ms every
second
50ms 3 times
200ms 3 times
5ms 150 times
10ms 2 times
500ms 3 times
5ms 20 times
Laser on
Laser Current Limit reached
Temperature not reached
Temp-Watch window true
Driver Overtemperature
General fault
User Manual Laser Diode Controller PilotPC-OEM
Could
not be
deactivated
X
X
X
25
Sacher LasertechnikGroup
Specifications
Laser Diode Controller
Current Source PilotPC-OEM 500
Drive Current Output
Output Current Range:
Setpoint Resolution:
Setpoint Accuracy:
Noise:
Temperature Coefficient:
Short-Term Stability (1 hr.):
Long-Term Stability (24 hr.):
0-600mA
0.1mA
±0.1% of FS
<5µA RMS
<50ppm/°C
<20ppm
<50ppm
Preregulator Voltage(Compl. Voltage)
Adjustable :
0-7V
Drive Current Limit Settings
Range:
Resolution:
Photodiode Feedback
Type:
Photodiode Current Range :
1-600mA
0.1mA
Differential 100R Input
0-5000µA Range 1
0-500µA Range 2
0-500µA Range 2 *1
*1This is a factory option and must be activated inside the driver.
User Manual Laser Diode Controller PilotPC-OEM
26
Sacher LasertechnikGroup
Temperature Controller PilotPC-OEM 500
TEC Output
Output Type:
Constant Current Source Bridge
Compliance Voltage:
6V
Maximum Output Current:
-2A to 2A
Current Limit Setpoint Accuracy:125uA
Maximum Power:
12W
Sensor
Temperature Sensor:
Temp. Control Range :
NTC or IC Temp Sensor AD590
0 to 55°C (AD590 and NTC)
Setpoint Resolution NTC:
Setpoint Resolution AD590:
Long Time Stability:
Thermistor Sensing Current:
Sensor Bias:
0.001°C
0.001°C
0.05°C
100µA
5V
NOTES
All values relate to a one-hour warm-up period.
Operating Temperature: 0°C to 40°C
Storage Temperature: –25°C to 70°C
Humidity: 20–85 %, non condensing
User Manual Laser Diode Controller PilotPC-OEM
27
Sacher LasertechnikGroup
Current Source PilotPC-OEM 3000
Drive Current Output
Output Current Range:
Setpoint Resolution:
Setpoint Accuracy:
Noise:
Temperature Coefficient:
Short-Term Stability (1 hr.):
Long-Term Stability (24 hr.):
0-3000mA
1mA
±0.1% of FS
<20µA RMS
<50ppm/°C
<20ppm
<50ppm
Preregulator Voltage
Adjustable :
7V
Drive Current Limit Settings
Range:
Resolution:
1-3000mA
1mA
Photodiode Feedback
Type:
Photodiode Current Range :
Differential 100R Input
0-5000µA Range1
0-500µA Range 2 *1
*1This is a factory option and must be activated inside the driver.
User Manual Laser Diode Controller PilotPC-OEM
28
Sacher LasertechnikGroup
Temperature Controller PilotPC-OEM 3000
TEC Output
Output Type:
Bipolar Constant Current Source
Compliance Voltage:
6V
Maximum Output Current:
-3A to 3A
Current Limit Setpoint Accuracy:125uA
Maximum Power:
18W
Sensor
Temperature Sensor:
Temp. Control Range :
NTC or IC Temp Sensor AD590
0 to 55°C (AD590 and NTC)
Setpoint Resolution NTC:
Setpoint Resolution AD590:
Long Time Stability:
Thermistor Sensing Current:
Sensor Bias:
0.001°C
0.001°C
0.05°C
100µA
5V
User Manual Laser Diode Controller PilotPC-OEM
29
Sacher LasertechnikGroup
Options
External Interlock
Threshold Voltage:
ON Current :
PWM Port
Max. Low Voltage:
Min. High Voltage:
Frequency Range:
2V
t.b.d
1V
4V
100Hz to5KHz *1
*1 min. Pulsewith 10µsec
Internal Function generator
Freq. Range :
Amplitude:
Waveform:
100Hz ..10kHz
10% of Fullrange adjustable 128steps
Sine and Triangle
LF DC Modulation Input
Amplification:
3db Cutoff Frequency:
25mA/V PC500 125mA/V PC3000
5kHz @ 5R Load
HF DC Modulation Input
Amplification:
3db Cutoff Frequency:
1mA/V
tbd
Power Supply
Input Voltage Range (Vin):
Supply Current (Iin):
Max. thermal dissipation loss:
User Manual Laser Diode Controller PilotPC-OEM
12V
230mA + ILaser+ ITEC
t.b.d
30
Sacher LasertechnikGroup
Environmental Conditions
Operating Temperature:
Storage Temperature:
Humidity:
0°C to 40°C *1
–25°C to 70°C
20–85 %, non condensing
*1 Housing must be fixed on a heat sink with customer specific holders.
The heat sink temperature should not exceed 40°C.
Common Data
Dimensions
W x H x D:
166 x 140 x 43.5 mm
Weight
Weight
:1200g
User Manual Laser Diode Controller PilotPC-OEM
31
Sacher LasertechnikGroup
Appendix
Connector Schematics
Power Supply Connector
5pol DIN connector for an external power supply
Pin Nr.
1
2
3
4
5
Signal Name
GND Power
GND Power
12V Power Input
GND Power
12V Power Input
Description
Ground Power Supply Input
Ground Power Supply Input
12V Power Supply Input
Ground Power Supply Input
12V Power Supply Input
Connector for power cord
Ordering Information
Distributor: Buerklin
Ordering Code 70F212
US Sales Office
Buerklin Electronics USA, LLC
305 J Aspen Business Center
Aspen, Colorado 81611
User Manual Laser Diode Controller PilotPC-OEM
32
Sacher LasertechnikGroup
Laser Connectors
Laser Supply Cable to Laser Head (LD OUTPUT)
Standard Sub-D9 FEMALE 1:1 connection rated for 5A.
This connection is required.
Pin Nr.
1
2
3
4
5
6
7
8
9
Signal Name
Interlock
PDLD GND
PD+
Interlock
REL+
LDLD+
GND
Description
Photodiode Signal Minus
Laser Diode Ground
Photodiode Signal Plus
Safety Relay Plus
Laser Diode Plus
Laser Supply Cable to Laser Head Thorlabs LM14S2 Option
Pin Nr.
1
2
3
4
5
6
7
8
9
Signal Name
PDLD+
PD+
LD GND
User Manual Laser Diode Controller PilotPC-OEM
Description
Interlock
Photodiode Cathode
Laser Diode Anode
Photodiode Anode
Interlock
Laser Diode Cathode
33
Sacher LasertechnikGroup
TEC Supply Cable to Laser Head (TEC OUTPUT)
Standard Sub-D9 MALE 1:1 connection rated for 5A. This connection
is usually required, but optional if temperature control is not needed.
Pin Nr.
1
2
3
4
5
6
7
8
9
Signal Name
MGND
AD590+
AD590-
NTC
TEC-GND
TEC-OUT
NTC
Description
Temperature Sensor
Temperature Sensor
Temperature Sensor
Peltier Output
Temperature Sensor
TEC Supply Cable to Laser Head Thorlabs LM14S2 Option
Pin Nr.
1
2
3
4
5
6
7
8
9
Signal Name
Description
NTC
NTC
TEC-OUT
TEC-GND
Temperature Sensor
Temperature Sensor
Peltier Output
Peltier Ground
User Manual Laser Diode Controller PilotPC-OEM
34
Sacher LasertechnikGroup
RS232 Connector
RS232 Remote Interface Connector
Standard Sub-D9 FEMALE connector.
This connection is only used for Remote Control.
Use a 1to1 cable for connection with a standard personal computer.
Pin Nr.
1
2
3
4
5
6
7
8
9
Signal Name
Description
TxD Output
RxD Input
GND
User Manual Laser Diode Controller PilotPC-OEM
35
Sacher LasertechnikGroup
Control Port Connector
This connection is used for an external safety switch lasercurrent/power control.
Pin Nr.
1
2
3
4
1
Signal Name
V+
Interlock
Control
Control
Description
Supply Voltage interlock switch
Interlock Signal
Opt. isolated ON/OFF/PWM Input
Opt. isolated ON/OFF/PWM Input
4
User Manual Laser Diode Controller PilotPC-OEM
36
Sacher LasertechnikGroup
Internal Butterfly Laser Diode Connections
The OEM laser driver could be equipped with different adapter boards
for 14pin butterfly laserdiodes
14pin Butterfly: Pump Laser Configuration
9.00
20.80
5.115
1.50
30.00
26.00
1
8
14
8.90
12.70
2.5
7
2.54
Pin 1:
Pin 2:
Pin 3:
Pin 4:
Pin 5:
Pin 6:
Pin 7:
Pin 8:
Pin 9:
Pin 10:
Pin 11:
Pin 12:
Pin 13:
Pin 14:
Cooler +
NTC
PD Anode
PD Kathode
NTC
n.c.
PD Kathode
PD Anode
LD Kathode
LD Anode
LD Kathode
n.c.
Case Ground
Cooler -
17.78
The following schematic shows the internal connection to the laserdiode
User Manual Laser Diode Controller PilotPC-OEM
37
Sacher LasertechnikGroup
14pin Butterfly: Telekom Laser Configuration
9.00
20.80
5.115
1.50
30.00
26.00
1
8
14
8.90
12.70
2.5
7
2.54
Pin 1:
Pin 2:
Pin 3:
Pin 4:
Pin 5:
Pin 6:
Pin 7:
Pin 8:
Pin 9:
Pin 10:
Pin 11:
Pin 12:
Pin 13:
Pin 14:
NTC
NTC
LD Kathode Bias
PD Anode
PD Kathode
Cooler +
Cooler Case Ground
Case Ground
n.c.
LD Anode
LD AC In
LD Anode
n.c.
17.78
The following schematic shows the internal connection to the laserdiode
User Manual Laser Diode Controller PilotPC-OEM
38
Sacher LasertechnikGroup
PilotPC-OEM Main Board Overview
Fuse Holder
Daughter
connector
(TEC)
Daughter
connector
1(Laser)
board
2
board
Internal
RS232 Connector
User Manual Laser Diode Controller PilotPC-OEM
39
Sacher LasertechnikGroup
Board Pictures
OEM Driver without Adapter Board
OEM Driver with opened housing rear view
User Manual Laser Diode Controller PilotPC-OEM
40
Sacher LasertechnikGroup
Board Mounting Holes
User Manual Laser Diode Controller PilotPC-OEM
41
Sacher LasertechnikGroup
Heatsink Mounting Holes
User Manual Laser Diode Controller PilotPC-OEM
42
Sacher LasertechnikGroup
Error Codes
The onboard diagnostic module returns the system
status and error flags. The error number is generated
by the sum of each individual error number.
The bits are octal coded ( refer to Table 4).
The following table explains the error origin.
Laser
TEC
Range
Loop
Device
Bit #
0
1
2
3
4
5
weight
1
2
4
10
20
40
6
100
7
8
9
10
11
12
13
14
200
400
1000
2000
4000
10000
20000
40000
Status / Error
I-Limit reached
Laser Open Load / Compliance Voltage to low
Error Laser requires TEC enabled
Temp Watch Out Of Window
Temperature Out Of Range
Temperature Not Reached
Modulation Voltage Out Of Range
Photo Diode Out Of Range
Piezo Voltage Out Of Range
Laser Head Loop Open
Extern Interlock Loop Open
Tec Loop Open
Remote Control Command Error
x
Device Over Temperature
User Manual Laser Diode Controller PilotPC-OEM
43
Sacher LasertechnikGroup
Technical Support
Information and advice about the performance or operation of your
laser is available from our application engineers. For quickest response
ask for “Technical Support” and have your model and serial number
available. Support is available by:
Sacher – LasertechnikGroup
Rudolf-Breitscheid-Str. 1-5
35037 Marburg, Germany
Tel: +49 6421 305 – 290, Fax: +49 6421 305 - 299
[email protected]
or
5765 Equador Way
Buena Park, CA 90620
USA
Tel.: +1 800 352 3639, Fax: +1 714 670 7662
User Manual Laser Diode Controller PilotPC-OEM
44
http://www.sacher-laser.com
Company Profile
Sacher Lasertechnik is leading manufacturer of tunable external cavity diode
lasers (ECDLs) with more than 10 years of experience. The product range
includes anti-reflection coated diode lasers, ECDLs in Littrow and in
Littman/Metcalf configuration as well as driver electronics for diode lasers and
sophisticated measuring electronics.
Sacher Lasertechnik was founded as a spin-off company of Marburg University
in 1992. We started up with the manufacturing of anti-reflection coatings for
diode lasers according to patent 6,297,066. Based an this key knowledge, we
developed stable, narrow linewidth, wavelength tunable laser sources for
spectroscopy, patent 5,867,512. We gratefully acknowledge the Support of the
German ministry of research within contracts 1 3N6693 and13N7156.
Our product range currently covers
•
•
•
•
•
•
Diode Lasers, Fabry Perot, DFB, Antireflection coated
Tunable diode lasers in Littrow configuration
Tunable diode lasers in Littman / Metcalf configuration
High power (P>300mW) Raman lasers in Littrow configuration
Low noise diode laser Controllers
Measurement electronics
Please contact us with your measurement requirements. We would be proud to
Support you with our competence.
Sacher Lasertechnik LLC
5765 Equador Way
Buena Park, CA 90620
USA
Sacher Lasertechnik GmbH
Rudolf-Breitscheid-Str. 1-5
35037 Marburg
Germany
www.sacher.us
www.sacher.de