1
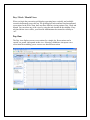
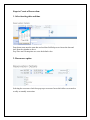
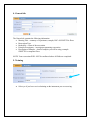
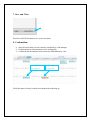
Resource Scheduler (Meeting Room Manager)
User’s Manual
Resource Scheduler (or Meeting Room Manager) is a web based software package for
reserving facilities and equipment. The NS&M web client can be run by directing your
web browser to http://nanoserver/rmr6/.
Log In
When we go to the link http://nanoserver/mrm6/, the following page will be displayed in
your web browser:
If the Network Administrator has assigned you a username and password for logging into
Resource Scheduler, type your username and password in the Login form and click
Login.
If you are using Resource Scheduler for the first time, contact your Network
Administrator, Praveen Arumugam ([email protected]) to register.
Day / Week / Month Views
When you login the reservation grid displays operating hours vertically and available
resources horizontally across the top. The grid displays both confirmed and unconfirmed
reservations. In the Web Client, there are three different viewing options: Day, Week and
Month. You can select any of the views by using the tabs located on the calendar. If any
tab listed below is not visible, your Network Administrator has turned its visibility to
‘off’.
Day View
The Day view displays resource reservations for a single day. Reservations can be
copied, cut, pasted, and opened in this view. Selecting a blank time slot opens a new
reservation form enabling you to create a new detailed reservation.
Week View
The Week view displays reservations of resources for an entire seven day week. All
reservations are displayed, including those scheduled outside of normal operating hours.
Month View
The Month view displays reservations of resources for an entire month. All reservations
are displayed, including those schedules outside of normal operating hours.
Checking Resource Availability
Using Filters
1. Select Filter on the side bar.
2. Selecting a particular resource allows you to view the availability of a particular
resource. By default the filter option is set to show the schedule and availability of
all resources.
Creating a New Reservation
Follow the instructions below to create a new reservation:
1. From the main screen, select the Reserve icon.
– OR –
Click on the resource and time for the reservation.
2. The Reservation form opens. Enter reservation title and other reservation details
according to the information set out in the following sections of this chapter.
Steps to Create a Reservation:
1. Select starting date and time
Drop down menu near the start date and end date field helps us to choose the date and
time from the calendar as above.
Prep Time and Cleanup time are set to the default value.
2. Recurrence option
Selecting the recurrence check box pops up a recurrence form which allows us to make a
weekly or monthly reservation.
3. Select resources to be reserved
Multiple resources can also be selected.
4. General tab
The General tab contains the following information
• Meeting Title – summary of experiment; example; DSC of SWNT/PVA fibers
• Reservation Type
• Booked By - owner of the reservation
• Principle Investigator - investigator sponsoring reservation
• Description of Samples – detail of samples you will be using; example:
SWNT/PVA composite fibers
NOTE: Your reservation WILL NOT be confirmed unless all fields are completed.
5. Training
• Select yes if you have received training on the instrument you are reserving.
7. Save and Close:
`
Press Save and Close button to save your reservation.
8. Confirmation:
•
•
•
Once the reservation is saved it must be confirmed by a lab manager
Confirmation may take maximum of one working day
Confirmed and unconfirmed reservations are differentiated by color
Unconfirmed
reservation
Confirmed
reservation
Check the status of newly created reservations before showing up.