1
Digital Voice Recorder
User's Manual
preeoution
In order to avoid
accidents, please read user's
manual carefully before operations.
l.
Please take out battery
ifdo
not use the recorder
forlongtime.
2.
Please keep
it from moisture, high temperature
and dust, and don't put it near fire.
3.
4.
Please avoid collision when using the recorder.
Please do qot take out the batteries during
recording and playing. Otherwise it may cause
crash problem and
information loss.
5. Please backup files regularly in computer to
avoid information loss which may be caused by
misuse orbreakdown.
6. We are not responsible for
the recording
failures
which caused by misuse or damage of the
recorder.
7.
'
Please do not disassemble or replace the inner
parts yourself. Please backup files before
sending for repair. We are not responsible for
the information loss which causedby repair.
8.
We are not responsible for the user's recording
without other's approval.
-1-
preceution
9.
' .'
We reserve the right to modift the design and
Precautions
specifications. Ifthere are ary differences due
Functionoverview . .
'
to the different technology and manrrfacturing
Appearance andButtons
batch , please subject to the voice recorder.
Tumon/off
MainMenu
RecordMode
BluetoothMode
" """-
VoiceMode
MusicMode.
SystemTime
SettingMode
ConnectwithPC
Problems and Solutions
Technical Specifi cations
-2-
-3-
'
Function Ovewia,t
l.
2.
3.
4.
MobileBluetoothrecording
Mobilephone answering andredialing
Onebuttonrecording&plaYing
FourRecordingmodes:
LP: Long time recording
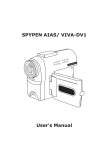
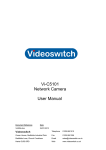
External MicroPhone
Earphone
SP: High quality recording
HP: Ultra-high quality recording
Switch (OFF/ON)
SHQ: Superhighquality
5. Timerrecording
6. Voice Activated Recording (VOPvI/AR)
7. Extemalmicrophone recording
8. Telephone conversationrecording
9. Supporting 24 languages operation
Bluetooth Switch
Play/stop playing
Menu
Forward
Recording
Mobile phone
Backward
Volume(+)
Volume(-)
10. TF card extension
I
l. The password protecting
12. Recording files folder setting
USB plug
TF card Slol
13. Time setting
14. Recording
I 5.
monitor
Automatic section-break
intelligent power control
16. 8-Class
Built-in high power loudspeaker
18.Built-in rechargeable heavy-duty polymer
17.
lithiumbattery
-4-
-5-
Operation
Operation
a
Thrn on/off
o Tirrnon:
Pushthepowerswitch (OFF/ON)
side. The screen
to "ON"
will lighten up, the recorder
is
condition, it will pop out automatically.
Supporting 128MB-8GB TF card
I
turned on. In the power-off condition, Long
time press )l button, the screen is lighted up
Long-time press " M
*.
Power-off condition: Turn
if
off the
there is
recorder
without turning the power switch off.
o
InsertTFcard
Inserting the TF card under tumed off condition
as
"
button to enter the main
menu at standby condition. The screen of the
main menu display as follows:
and "ON" shows on it, the recorderturns on.
Tirrnoff:
Push the power switch(OFF/ON)to " OFF"
side. The screen shows " OFF" and the
recorder turns off. In any standby condition,
long time press >I button, the screen shows
" OFF' and the recorder turns off. The
recorder will automatically turn off
no further operation in two minutes.
Mainmenu
I
ffiffiffi
RecordMode
Press
l(/)}
buttons at the main menu interface
to select record mode. Press " M" button to
confirm your selection. Long time repress
" M"
button to return to m-ain menu.'The
screen ofrecording mode display as follows:
follows:
@
6)
o
o
After
the
installing, please select the card
if you want to use TF card.
inserting menu
Pressing
down the card under turned off
-6-
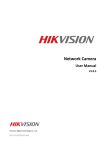
ORecord mode @serial number of file @Total files
@The number of current file @Total timl of surplus
recording files @Time of current recording file @
Operation
Operation
Electric quantity @ Recording files folder @ Date of
file @ Menu of storage @ Identification of VAR (D
card inserting): Recording file store in the
TF card.
3. Record mode: AVR, Normal
AVR adjust: l-31 (Adjust the sensitivity
for VAR. The numerical value is smaller;
the activation of VAR will be more diffrcult.
record type
OnebuttonRecording
Press O button in any pause or stop condition
could startrecording.
The "VOS" is twinkle continuouslywhen
Recording pause and saving
button
Press O button start recording, press
to stop recording and repress it to start again.
Press O button, recording stops and it is saved
theVARturnon).
)l
4. Record type: SHQ
64K:LP32K
the " +" or
to select the volume according to your
need. After flrnishing the adjustment, you can
Stop the recording and then press
-"
press O to start recording monitor. Listening
with earphone when the recording is proceeding, youcan hear what you are recording and
,u"riour effects
of
recording
in
ditferent
SP
5. Folder select: A, B, C. you can save the
recording files separately.
Recordingmonitor
"
192K: HQ l28K:
Press "
M"
button to enter in the entire above
inenu. Pressing *{or D button to setting
parameter and repress " M" button retum to
matnmenu.
r
lblephonerecord
conditions.
Automatic section-break
After recording for fu1l 3 hours, it will
automatically start a new file to continue
recording.
Recording menu
Press " M" button to enter in menu mode.
Pressing an or D button to select the playback
modes.
1. Local folder: Recording file store in the
internalmemory.
2. Card inserting menu (Displaying after
-8-
Connect the telephone under the furn off
condition as the picture displaying, and then
tum on the recorder start recording.
I
Bluetoothmode
Press(/Dbuttons at the main menu interface
to select bluetooth mode. Press " M" button to
-9-
Opglntio"
Operafion
to your voice if you speaking to the recorder'
confirm your selection. Long time repre_ss
" M" button to return to main menu. The
screen of Bluetooth mode display as
6@
Pressing
Attention: Press
O Bluetooth -offi @ s"Par "Ym* of current file
@ Total frles @The number of current file @Total
time of surplus recording files @ Time of current
a
conditionE.
Long time presses X call back, short time press
X answer. You can listen to opposite side's
voice with earphone. Opposite side could listen
-10-
O
button means normal
Voicemode
Press(i Dbuttons at the main menu interface
to select voice mode. Press " M" button to
confirm your selection. Long time repress
" M" button to return to main menu. The
screen
displays connecting
Mobile phone answering and redialing
to select the volume
recording if no message.
recording frie @Electric quantity @Recording files
folder @ Date of file @Bluetooth record OStorage
menu@Recordtlpe
Mobile phone Bluetooth connection
Tum on the Bluetooth function of your mobile
phone, and then search Recorder. Connect your
mobile phone with Recorder. Please enter 0000
if there is any password needed on your mobile
phone. Otherwise you can connect it directly.
Then it will display* .
" or " -"
repress to continue recording. PressingObutton
to stop and it is saved. The recording files will
save in folder D automatically.
€)
to8, it
"+
Press O button start recording during the
dialogue. Press )r button pause recording,
@
Turn the switch
the
according to yourneed.
Mobile phone record
follows:
l
ofvoice mode display
€)
as
@ o@
follows:
Hw.
@ CI@
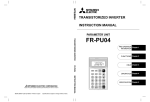
Ovoice mode @serial number of current file and
display @Total files @The number of current file
@ toial time of current recording files @ Time of
current recording frle @Circulate mode @Electric
quantity @ Recording files lolder @ Display menu
@Sound effect mode (D Current record mode
-11 -
Operafion
Onebutton Playing
In recording ceasing condition,
to play the present recordings.
o
presslt
button
PlaylPause
Press )I button to start playing, repress
pause.
)I
to
Fast forward/backward
Press
time press
)} button for next one. Long
*{orp for backward or fast
" M"
button to confirm your
selection.
I
MusicMode
Pressa{/Dbuttons
at the main menu interface
to select music mode. Press " M" button to
confirm your selection. Long . time repress
forward while playing.
Volume adjustment
Press "+" or "-" adjustthevolume.
" M"
A-B markerrepeat
button to return to main menu. The
screen of music mode display as
follows:
@ @ o@
Press O button in playing condition to confirm
point, then repress O to confirm point
" B The recorder starts to repeat from Aio B.
Press
or>Ibutton to stop repeating. The
"
M"
( )}
then prissing
a{ button for last file when recording is
playing. Press
SelectlDelete
button to enter in menu mode'
Press "
button select setting menrr:
or
Pressing
Local folder, Card inserting menu, Delete files,
Delete all (Delete all the files in a folder)
Pressine +{ or D button to select " YESA'{O "
'A"
"M"
repeat will cancel automatically after three
times playing.
o@
Play menu setting
Press " M" buttons enter in play menu. press
*{ or Dselect setting menu.
Repeat: Normal, Repeatall, Random, Intro
Total music @The number of current music @Total
time of current music @Time of current playing @
Ciiculate mode @Electric quantity @Play menu @
Equalizer: Natural, Pop, Classic, Soft, Jazz,
DBB
Press " M" button to enter in the entire above
menu. Pressing +{or
parameter and repress
"
>>
M"
button
to
set
button refurn to
@
O Music mode @ Music information and play (9
Equalizermode @Music
tYPe
The operation is the same
I
as
voice mode.
Systemtime
Press*{/}buttons
at the main menu interface
Operafion
Operarton
to select system time. Press "
c.onfi1m
M"
button to
your selection. The screen of system
time displaying as follows:
.
Indonesian.
Contrast
0-15: adjust the contrast of screen
Memoryinfo
? ? ? ? M (? ? oh) z Totalmemoryand
0
6
usedmemory.
Firmware version
OYY-frfU-Oo@Hour: Minute: Second
Press {(or D to select the part you want to
adjust, the part which is seleited witt twintte
continuously, pre9.s '.1:' or " -" to adjust the
time. Then press " M " button to refurn io main
menu.
a
Date and edition of the Firmware
Password set
" 0000" eans there is on password needed
when the recorder connect with the PC. Press
<<or >> to select the part you want to adjust,
the part which is selected will twinkle
u
to select system time. Press "
continuously, press " +" or -" to adjust the
number. Then press " M" button to save and
return to main menu. The recorder nrceds input
password after the password setting.
button to return to main menu.
Auto record
1. Record (on/off)
Settingmode
Pressan/Dbuttons
at the main menu interface
M" button to
confirm your selection. Long time press " M,,
Backlight
0-60:
60
0 is normal backlight. Youcan select
seconds. The backlight
I to
will turn off
automatically after the setting time.
Language
Simple Chinese, traditional Chinese, English,
Japanese, Korea, French, Germany, Italy,
Dutch, Portuguese, Spanish, Swedish, Czech,
Derish, Poland, Russia, Turkey, Hebrew, Thal,
Hungarian, Romanian, Arabic, Greek,
-14-
2. Record cycle
One time: record according
(Press anor
Dto
tt-" toslectday)
to setting time
selectmouth, press
"+"
or
Every day: Record automatically every day
according to setting time
Weekly: Record automatically every week
according to setting time
- 15.
Operolion
Operafion
I
Pres " M" buttons enter in record cycle. Press
anorD button selects record cycle. Press
With built-in rechargeable heavy-duty polymer
lithium baltery, the recorder catr use as USB
flash disk and charging automatically when
connecting with computer. It will stop charging
when the power is fulI about 3-4 hours later.
"M"
buttons to confirm your selection. Press
[button returns to main menu.
3.
Recordtime
Select start time and end time
Press (or)}
to select the part you want to
adjust, the part which is selected will twinkle
Attention: please push the power switch before
continuously,press "+" or "-" toadjustthe
time. Then press " M" button to retum to
charging. Then the computer could distinguish
the electric quantity exactly.
mainmenu.
&, Time reservation function
is available under the
Press the right mouth button on the popping
icon when you finishthe operation.
Please follow the promptofthe computer
power-off condition or the standby condition.
Please insure the power is enough and do not
turn the switch off.
I
-16-
Connectwithcomputer
Problcms and Solufions
Problem
The recorder
can not
ttrn
The b*ttry doesnl
Please
have enough powu.
immdiately
on
The battery
doesn't
Unable to
have enou$ powo.
record
The number of files is
fut
cnarging
charging
TF card capacity: I 28MB
immediately
8GB
Sampling rat€: LP 32KbpVSP 64Kbps/l{Q l28IGps/SHQ 192Kbps
Make srue
recording
less than one second.
recording time
file
The recording file is
hlete dre
broken
recording file
The battery
effective
broken
doesn't
Please
No sound
have enough power.
when
Check whethu
playing files
earphone is attached.
Remove the earphone
Whether the volume is
Adjusthe volume
the
is
sue
conecdy
earphone
is
connected.
connected.
Whether the volume is
Adjusthe volume
the earphone
8-
the
conectly
No sound for
-1
4GB
LP 283 hourVSP
l4l
8GB
LP 555 hourVSP 277 hours/HQ 138 hounVSHQ 92 hours
houn/HQ 70 hourVSHQ 47 hours
Music format: MP3 WMA
Record format: MP3
Make
adiust to the lowest.
70 hours/IlQ 35 hourVSHQ 23 houts
Supporting system:Windows9S/lvl el2N0lXP
inmediately
the
Check whether
2GB LP 140 hours/SP
charging
adjust to the lowest
earphone
-
Delete some files
The recording time is
is
Power:Polytner battery 3.TV 380mAh
Recording time: 17 hours
Flashmemory: 2GBtoSGB
Please
the
frozrn
Size: 93mm*3lmm*l4mml Weight: 389/8lg
Solutions
Reasons
Msta/l