1
+ )\Ftt+ffiEx+t
/!
(
**
ftEI
E
;..izl
&rfrMffi,Ftl+1trww-ffiffi,.
ilvt+fr1
1500
/ti/l
,tEIi Isoo
.A
45oo
3
tEIl
45oo
aA
ilt.d
euoo
rL'a li5ooo !ll I di t|
6
iiljr.f
,ltxl
1455
/Lf
9ooo /Lil'..]i':ljr)
tEiI
4155
;uf ;;:.
^[{]
UU.r5U0U rL1,
i
jt!d
80000
ss0u0
/L+
Eil
8oooo
7
,000
,l!iL lartrt,
I
rl!.U 7755
Tiif l
rrl'iifiIrI
JXii
272s5
rL'r:
r
'EiI
,1
/L
fnI ,|
rllr!*lrJ)
1255
I
:lt
r::',
3
0
10
r05
t0
)755
li
13505
)xA
jj
'l
=
il
);
, 1t)
|:::l
i1:
ir'"
,t4rl&.1:
?+c,1
!0
/Lf,li,ljrI
30
9750
35
i4750
7!)750
,r:;1.
/tfi!iijii
x
.f4+% B
'# h1W4.
,i0
iJ
5t750 ill.Ji:$11
79750
rr0
llil:9Il1F
: ii
0
:;;40 )L'r
IjJ
_
5505
,lijj aii;0 rrt
ffi,R
u,!E
, :r! 8ifiriif4,q il
..: *.rrtt'*a
r005
1.dil.
-ir rl.rl
+fiat I
EHfiK
'20
,11ii{
-'{i,Ld!I 1.000 rall{]
+6rHFH!4
r, Z.EilRi )
a5ils&Eits
fl:Fs
6,1311 145a 'L
'2
#+,58++
(A*fr*E)
frAffiEi€ffi
Gfr&W)
N4,ffiffi'Rffi
r,LilE
rfi.
)
3,40
l:llt,llrf
0
x*1*d*R
r |
;t!U
50000
dil
,iFJ*lJt
leaoJ
ffiil1,ff6' ffii,f&&Hilffitu fUE. XtE' fr-fiJffiR, W+'ffiEfrR'
MF*il,ffi€, TE#.ffi'R' A@*WH&SNffi Bffifi ffi X&tr€
ii
t0
S'1.qi
i? iE f,;
i!
fii3rrid'G 30\.
iiHtrfi:
+iEEEEffiffi1f;E!*n ffi4trnFn+fr#*tr*9.*EVtFiH!, EIlr}diI}EfrtJ#tE
fi{Faa#H#l"l ,
]tr-s1f;H!
+nff.+|a+i*
+ffi+EffiEE mfrllF.H#E &z\&+E
F ffi Ht rm fif, ,^.
E
if' {f H
* {i f /\
-t
)&i#trLfrY-,
*"K/8
irL
.
H
.
*,#*tr$#.,t,
x'ltn
1i 4 +fr.4frtt *tr 26 fi, ,^., iH EtJ tbffinE
Ff l+frfr.flF 2fr
tbrtfi. fi'#.nE.
H +E H! rfr #t,
*E*^Eq n." rfrX!*,fi12ffEn +
/\,
+ H tr 6
H.y* )\l*.H1&#lE+frt*Edi-Li1frtitTffi.flfrafr
* tr H'E= + E + filitr
ffi
rH
tr
116
Bt
EE
E E + #l iE
"
EE
fi!,
EI ++
*
,,\ q'fr} itr'{+
E|]
+t
* E fi,rE "
L-+ ?+Ftlit:t v-D.):, itt3n 318 rf ',4* h-eAhtu+ +L l.^ a ftq +kAri'f *.8)
: http: \\-\\'\\'.izr-li.qor'.cp 1lu*-#-'*iil:i.*,. 1 1lf 66 :: ;{;:jL: http:
s's'u'..2t'ls.gor'.cn
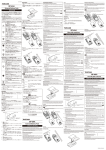
Profe$lonal Didtd Yoics Recorder
User's manual
Precoulion
In order to avoid
accidents, please read user's
manual carefully before use.
l.Please take out battery
if will
not use the
recorder for a long time.
the unit away from the high
temperature, dampness and excessive dust.
3.Please avoid strong vibration or shocks when
using the recorder.
2.Please keep
4.Please do not take out the batteries during
recording and playing, otherwise the crash
problem or loss of information would be caused.
5.To replace batteries, be sure to take out battery
after the recorder is switched off. Otherwise
information may be lost. Please do not install the
battery
in
wrong direction; otherwise the
recorder would be damaged.
6.P1ease backup important recordings
the
computer so as to avoid the loss of information
which would be caused by misuse or anything
goes wrong with the recorder.
7.We are not responsible for the recording failures
in
-l-
Precaulion
which caused by misuse or broken unit.
8.Please do not disassemble or replace the inner
parts yourself. Please backup important files on
the computer before sending for repair. We are
not responsible for the losses of information
which caused by repair or other reasons.
9.We bear
responsibility
the user's
recording without othef s approval.
no
for
-------
Time Setting
LockFunction
---------------RecordTelephone Conversation -'-'----------Record via Extemal Microphone
-3-
4
17
17
--------------- 18
----------- 18
DiskFunction
Solutions
Specifications--
USB
Problems and
Technical
1
20
22
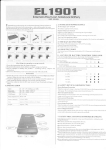
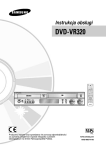
Funclion Overview
1.One button recording, One button playing
2.Recording modes:
LP: Long time recording (WAV)
SP: High quality recording, Voice Activated
Signal-in
.Mlu'oplronc
Mlcrophotrc
Volmt +-
Recording (WAV)
4.Record telephone conversation and record via
->>
EtrThonr Q
-
-
extemal microphone.
5.Automatic section-break.
6.,4.-8 marker repeat.
T.Music player function
8.FM radio tunction (Optional)
9.Battery capactty indication
10.Play via Built-in speaker
ll.Drive free USB flash disk function
l2.Time setting function.
-4-
Frstlrackward
-{(
IIP: Ultra-high quality recording (WAV)
3.Record via built-in dual microphone.
Fast forYerd
McNfDalct
Plel0auss
-5-
1.
Tlrn on/off
Tlrrn on: Open the battery case and install the
battery in correct direction as per the mark "-1"
Repress "O" button, the recording will stop and
save. Press "M" button to refum to main menu.
mark "ON" shows on it. In the power-off
condition, Long time press )r button, the
screen is lighted up and "ON" shows on it, the
"-". The screen will lighten up in 3 seconds and
SP recording mode is the defaulted recording
mode and worked as VAR recording mode. The
sensitivity of VAR could be adjusted according
to sound source (the maximum
10, the
recorder turns on.
minimum
In any standby condition, long time press >r
button, the screen shows "OFF" and the
recorder turns off. The recorder will
automatically tum off if there is no further
operation in 30 seconds or the battery power is
not enough.
2. LP
recording
SP
recordlng HP recording
is 0, 0 is
is
defaulted), following is
detailed operation:
When SP mode recording is proceeding, press
O button to stop recording. Then press +< or
> to select the levels of VAR. Repress the o
to start a new recording after finishing
adjustment. v@ will twinkle when there's no
sound input. The recording pauses. It will
automatically start recording when there,s sound
E
l-E
Press "Menu" button to enter in main menu.
Press << or
buttons to select the recording
*
-6-
input. Screen shows:
ti.i.it rli
ll:,.
lLt .:
.,,..,-.i
ila:::)
j
*ii
i
,:' ,i:
Operalions
pauses) <ffr".""-Arrg i. p.."""airrgl
Repress "O" button, recording stops and it is
saved, the screen shows like below:
(The recording
lrl
il
li
i
I
l
Automafic Section Break: When record for full
3 hours, the recorder will automatically save
files and start a new file for recording.
Attention:
Please select FAT32 system when
formating the recorder.
When the battery power is low, ,:--ril will
twinkle on the screen. If you fail to notice the
indication of low battery during recording, the
recorder will automatically save the present
recording file and automatically turn off within
30 seconds. Please replace the battery in time.
When the LCD screen shows "ERR", it indicates
the disk is full or the battery is low or it reached
-8-
If the disk is full, some files should be
deleted to keep enough space for new recording
files. If the battery is low, the recorder can only
be used normally after replacing the battery. The
recorder can save 99 pieces ofrecordings at each
recording modes.
Attention: Please do not take out the battery
mode.
during recording and playing.
It
may
cause
of information and the crash problem.
Only after formating in the computer the
recorder can refurn to work normally. When
losses
formating please select FAT32 system.
3. One button
Recording and One button
Playing
Press O button in any pause or stop condition
could start recording, repress o button to stop
recording and save file. Then
to play present recording file.
4. RecordPlryMode
-9-
press >r
button
Fast forward/backward: Long time press
<(
or rr while playing.
o button in playing
condition to confirm point "A", then repress O
to confirm point "B". The recorder starts to
repeat from A to B. Press O or "M" or x
A-B marker repeat: Press
Press <</> buttons at the main menu interface
until recorder comes to the screen like above.
Press "M" button to confirm your selection.
Repress
"M" button to refurn to main menu.
files in the recordeq
If there are recording
recorder
will automatically
the
enter into recording
play mode when powered on.
Press
x
button in recording pause condition the
button to stop repeating.
Delete: When the playing stops, press << or >t
to select the files which should be deleted. Press
"M" button for 3 seconds. It displays as follow.
Repress "M" button to confirm deletion.
recorder will automatically enter into record
play mode and start to play present recording
file.
Play/Pause: Press >r button to start playing,
repress
}l
to pause.
Volume adjustment Press"+" or'1"to adjust
the volume.
Selection: Press <<
or
>> to select last
file or
I
tlr
I
tLl
Remerks: At..
"Delete" condition, if
"rrt".irg
there's no further
operation in 3 seconds, the
recorder will automatically exit "Delete"
condition.
Attention: Please backup the important files
-10-
-11-
Operalions
>
before deleting!
to select last file or next file.
tr'ast forward/backward: Long time press
5. Music Mode
or
I
Press <</* buttons at the main menu interface
until recorder comes to the screen like above.
Press "M" button to confirm your selection (As
the picture below shows). Repress "M" bufton to
return to main menu.
I
>
A-B merker repeat: Press " O " button in
to confirm point "A", then
repress o to confirm point "B". The recorder
starts to repeat from A to B. The repeating will
playing condition
automatically stop after repeating thrice in this
O or "M" button or >! to stop
mode. Press
repeating.
Delete: The operations are the same as that in
voice mode.
6.X'MRadio (Option*)
.
Play/Pause: press
<<
in playing.
>!
llt
t1
l,l
button to start playing,
repress >r to pause.
Volume Adiustment Press "*"or
"-"
to adjust
the volume.
Select the file to play: Short time press <( or
-t2-
j
"M"
l__.l
button in standby condition to enter
into the main menu, press i< or >> until the
screen shows like picture above, then
repress "M" button to confirm and enter in FM
-l 3Press
Radio interface. Repress "M" button to retum to
mainmenu.
Scan channel: Short time press << or >>
button for manual scan, long time press << or
> for automatic scan. Then short time press
<.< or )> to stop automatic scan. When the
channel is scanned, the recorder will stop
scanning and play the channel automatically.
Volume adjustmenh Press
"*"
adjust the volume.
Record radlo: When you are listening to the
radio program, you car record the program
which you like. Press o button to record
what you are listening, repress o button to
save it. The recording format: WAV.
Remarks: Please use earphone when listening
FM radio. (The earphone works as aerial).
7. Tlme settlng
< or >r in main menu interface to select
the time setting mode(as the picture shows
Press
above), press
"M"
selection. Repress
button
to confirm
your
"M" button to return to main
menu.
Ilne adtushent: Press < or >> to select the
part you want to adjust, the part which is
will twinkle continuously, press "*" or
adjust the time. As the picture shows
G'
following:
b,
selected
"-" to
ji'--:=.:l
li,l
lr.',1
v.*
lltI
11
i'{lm.
ll x,*
ll
-
After finishing the adjustment, the recorder will
confirm it automatically. Press "M" button, the
-14-
-15-
Operalions
recorder will return to
-uir,
,*".t
Check the recorded fime: Please upload the
recording files which need to be checked the
recorded time to the computer. Right click the
mouse and open "Properties". You can check the
time data of the recording file:
(1) The creation time
is the time
when
recording started.
(2) The modified time
is the time when
recording stopped
(3) The access time
is the time
when
the
recording files uploaded to the computer.
Attention: Ifyou take out the battery after you
finishing time setting, the time will restore the
factory defaults.
Remarks: Since there's no clock function in the
recorder, the time which is indicated would be a
little different from daily time, please reset the
time when you need this function.
Push "HOLD" button until l'l, shows on the
screen (as the picture above shows), all the
buttons would be locked, and accordingly the
functions will be locked.
9. Record Telephone Conversation
Gi
rl
,.-l *" l
;
eanp,",
r-nJ
tl -r_t*
"f;lYlroneline
i
Connection: Make the telephone line and
phone connecting line (attached accessory)
connected with the telephone adaptor. Then
of the audio cable into the
jack (as
telephone adaptor, the other end to
above picture shows).
Record: Detailed operations please refer to one
button recording part.
Insert one end
-
10. Record via
External Microphone
Connection: Insert external
(optional accessory)
into
o
microphone
jack on the voice
recorder..
Record: Detailed operations please refer to one
button recording part.
11. USB Flash Disk Function
computer. The recorder can support WINDOWS
2OOO/XP/ Yista/1.
The recorder supports USB recharging.
mode and enter into
main menu or record playing standby condition,
the recorder can work properly after that.
Attenfon: please do not pull out the recorder
during data transferring; otherwise it may cause
the losses of information or crash problem. Then
the recorder can only work normally
oo.
of the uSB cable with the
recorder's USB jack"nd
and the other end with the
computer Then the recorder enters into USB mode
(like the picture above). After successful connection,the data can be transmitted between the recorPlease connect
t-d
- 18-
after
formatted in the computer (Please select FAT 32
system).
l..t
llll
Press
"M" button to exit the USB
-19-
Problems and solulions
1. The recorder can not tum on
Please check if the HOLD button is on
unlocked side or if the battery doesn't have
enough power.
2. No sound when playing files
Please make sure the connection of earphone is
OK. Please adjust the volume or
check
5. Can not connect with the computer
Please check whether the recorder and PC
were connected in right way. Please check
whether the drive is installed properly.
6. FM Radio is not very clear
Please adjust the position
recorder.
whether the hles are damaged.
3. Unable to record
This condition occurs due to some frequent
operations or misuses which lead to confusion
of inner program. Please format the recorder
on the computer(Please select the FAT32
system). Please backup important files before
formatting.
4. Crash problemd
Please format the recorder on the computer
(Please select the FAT32 system). Please
backup important files before formatting.
-20-
-21-
of
earphone and
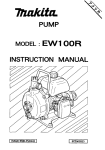
Dimension: I 02mm*28mm*
Power supply
:
I
4mm I yr'"i*1r1, 23*
One piece of AAA alkaline
hafferv 1.5V
Flash memory: IGB-4GB
R.*.d bit."ti":
LP 32Kbps / SP 128 Kbps / HP
iCe: tP
T0hours/ SP lThours/
HP I lhours
Recording ZCS, I-P l40hours/ SP 34hours/
HP 23hours
time
+CS, I-P 28Ohoursi SP 68hours/
HP 4Thours
(,'n,Itt*.t"* :
Windows20 00
Recording format: WAV
an
lp[
ista/ 7