1
PaperCut VCA Cash Acceptor
Manual
Last Updated: 2013-10-03
1.
Introduction ........................................................................................................ 2
2.
How PaperCut interfaces with the VCA .............................................................. 2
3.
Setup Phase 1: Device/Hardware Setup ............................................................ 3
4.
5.
3.1.
Networking/Firewall Configuration ............................................................... 3
3.2.
IP Address Allocation .................................................................................. 3
3.3.
Virtual Cash Acceptor (VCA) Quick Start Guide .......................................... 3
Setup Phase 2: PaperCut Configuration ............................................................. 5
4.1.
Enable External Device Integration ............................................................. 5
4.2.
Connecting to a Device ............................................................................... 5
4.3.
Configuring User Identity Numbers ............................................................. 7
Self-registration of Users .................................................................................... 7
5.1.
6.
7.
Configuring self-registration ........................................................................ 8
Configuring the Card Dispenser ......................................................................... 9
6.1.
Typical Usage ............................................................................................. 9
6.2.
Configuring the Card Dispenser .................................................................. 9
Advanced Device Configuration ....................................................................... 10
7.1.
Virtual Cash Acceptor Configuration.......................................................... 10
7.2.
Configuring a local IP address for VCC connections ................................. 13
7.3.
Configuring Swipe Card Readers .............................................................. 14
PaperCut - VCA Cash Acceptor Manual
This manual covers the VCA Cash Acceptor setup. For general PaperCut MF
documentation, please see the PaperCut MF manual.
1. Introduction
PaperCut can integrate directly with the VCA Cash Controller to allow users to top-up
their PaperCut printing account with cash (coins or notes/bills).
The Boscop Virtual Cash Acceptor allows the user to login with a swipe card or user
ID and then accept cash from the user. You can also use a receipt printer so the
user has a physical proof of purchase of the cash added to their account.
The Virtual Cash Acceptor also has an optional card dispenser unit that can be used
with PaperCut. See Section 6 for more information.
2. How PaperCut interfaces with the VCA
This section provides a high-level introduction on how the PaperCut interfaces with
the VCA Cash Acceptor hardware. This gives administrators a better grounding to
configure the system and diagnosing any problems that arise.
The VCA is connected to the network LAN. PaperCut communicates with the VCA
over the TCP network. In turn, the VCA controls the process of accepting cash from
the user and printing their receipt, etc.
An example of what occurs during the process of adding cash to the user’s account
is:
The user walks up to the VCA and is requested to login at the terminal using
the organization’s preferred authentication method – usually a swipe card, an
account number or a unique identity number. This number must match the
“Card/ID number field” in PaperCut’s user record.
The user then enters cash on the device.
The cash is loaded onto their PaperCut account.
A receipt is printed.
There is also the option for users to self-register with PaperCut. See section 5 –
“Self-registration of Users” below for more information.
Copyright © 2008-2013 PaperCut Software International Pty. Ltd., All Rights Reserved.
2 of 14
PaperCut - VCA Cash Acceptor Manual
3. Setup Phase 1: Device/Hardware Setup
Before PaperCut can be configured to use the VCA is must be connected to the
network and assigned an IP address.
Once the VCA is configured and on the network, proceed to Setup Phase 2 to setup
the device within PaperCut.
The remainder of this section provides a quick start guide for specific hardware
terminals. It is not intended to replace the documentation provided by the hardware
terminal manufacturer/supplier, but is intended to streamline the setup of the terminal
devices for use with PaperCut.
3.1.
Networking/Firewall Configuration
Ensure that your networking/firewall configuration allows outbound connections from
the PaperCut server to the VCA devices on ports 1234, and 1235.
3.2. IP Address Allocation
The VCA device acts as a network server. It connects to the network and then
accepts connections from the PaperCut system. In this respects it is very similar to a
network server. For security reasons and in-line with network server best practice,
the terminals should be allocated a static IP address. We recommend selecting the
addresses carefully and following them same checks and procedures as you would
for any server:
Ensure the address is outside your IP DHCP allocation range.
Ensure the IP is not, and will not, be used by any other device.
Follow the same procedure and care as used when allocating IPs to other
servers such as file servers.
Larger networks with many terminals should consider:
Hosting terminals on a separate detected IP subnet range (simplifies
management and avoids collisions).
Carefully recording the IP addresses allocated and where the corresponding
terminals are physically located.
3.3. Virtual Cash Acceptor (VCA) Quick Start Guide
This quick start guide describes how to connect the VCA devices to the network.
1. Plug in the VCA into the power supply. When powered and completed startup, the device’s display should show “Virtual Cash Acceptor”.
2. Plug in the connected Ethernet network cable to the device.
3. The next step is to assign the device a network address. The simplest
approach is to assign a static IP address, as described below.
Copyright © 2008-2013 PaperCut Software International Pty. Ltd., All Rights Reserved.
3 of 14
PaperCut - VCA Cash Acceptor Manual
4. Put the device into offline mode by unplugging the Ethernet cable.
5. Swipe the “Parameters card” that came with the device. The display will read:
Select Protocol
6. Use the C/B keys to select Static IP, and press #
7. Enter the IP address of the terminal device, and press #
8. Enter the network subnet mask, and press #
9. Enter the IP address of the PaperCut server, and press #. If this is not set
correctly PaperCut will not be permitted to connect to the device.
10. Enter the network gateway IP if required to communicate with the PaperCut
server. If a gateway is not required set this to 255.255.255.255. Then press
#
11. Leave the reader port and controller ports as the default values (1234 and
1235 respectively) by pressing # twice.
12. The device will then prompt with the message: Press Enter or C/CE to Exit.
Press # to confirm the changes.
13. The device will reboot to make the requested changes.
14. Reconnect the Ethernet network cable and check that the IP address is set
correctly by pinging the device from the PaperCut server. E.g. ping [deviceip].
For more information see the VCA documentation which is available from:
http://www.virtualcash.biz/downloads/vca_manual.pdf
Copyright © 2008-2013 PaperCut Software International Pty. Ltd., All Rights Reserved.
4 of 14
PaperCut - VCA Cash Acceptor Manual
4. Setup Phase 2: PaperCut Configuration
Once the terminal devices are connected to the network, some configuration
changes are required in PaperCut to enable terminal device integration.
4.1. Enable External Device Integration
By default PaperCut is configured to monitor printers. To enable integration with
external terminal devices:
1.
2.
3.
4.
Navigate to the Options tab
Select the Advanced tab
Enable the “Enable device integration (for supported devices only)” option
Press the Apply button
When enabled, PaperCut adds new features to the user interface to support external
device integration. For example, a “Devices” tab will appear across the top of the
admin interface.
4.2. Connecting to a Device
The devices are configured in PaperCut in the devices tab.
Important: Before setting up the VCA device in PaperCut, it is important to
setup the terminal and attach it to the network and assign the device a
network address. A quick start guide for connecting terminal devices is
outlined in “Setup Phase 1” above.
To create a new VCA device inside PaperCut:
1. Confirm that the terminal is set up as per the manufacturer’s directions. The
device will need an IP address assigned and should be reachable from the
PaperCut server.
2. Navigate to the “Devices” tab
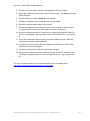
3. Click the “Create Device” action link on the left (see screenshot below)
4. Complete the details of the device:
a. Device name – unique name of the device
b. Hostname/IP – the address of the device on the network
c. Location (Optional) – describes where the copier/device is located
d. Type – the type of device – select the VCC Cash Acceptor.
5. Press the OK button, and the device will be created.
Copyright © 2008-2013 PaperCut Software International Pty. Ltd., All Rights Reserved.
5 of 14
PaperCut - VCA Cash Acceptor Manual
Figure 1: Create device action
Figure 2: Create device screen
Once the device is created, check that PaperCut has successfully connected to the
device. The “Device Status” is displayed on the “Device List” page or at the bottom
of the “External Device Configuration” section for the device. In the event that a
connection could not be established, an error is displayed in this status display. If the
device connects successfully, the status will display text: “Started - Awaiting user
login” or “Started”.
NOTE: It may take to 30 seconds to create the connection. Press the “[Refresh]” link
to see the updated status.
If PaperCut fails to connect to the device, troubleshooting will be required to
determine the cause. Some suggestions include:
Check that the terminal hostname / IP address is correct
Check that firewalls are configured to allow connections to the terminal (ports
1234 and 1235).
Try pinging the terminal device from the PaperCut server. E.g.
ping 192.168.1.50
Copyright © 2008-2013 PaperCut Software International Pty. Ltd., All Rights Reserved.
6 of 14
PaperCut - VCA Cash Acceptor Manual
Try connecting to the terminal device on the port the terminal is listening on.
E.g. telnet 192.168.1.50 1234
4.3. Configuring User Identity Numbers
To allow the user to authenticate at the terminal hardware a unique number must be
assigned to each user. The number might represent a student identity number, a
secret ID number only known to the user, or a serial number of a swipe card. This
number must be entered in the “Card/Identity Number” field in the user details page.
It is also possible to bulk import these numbers using the “Bulk User Import” tool. See
the section ”Batch User Import and Update” in the user manual.
If an attempt is made to login to a VCA and there is no matching card/identity number
in the system, the user will be show a message notifying them that their identity could
not be determined.
NOTE: For information on self-registration of users see section 5 below.
5. Self-registration of Users
(NOTE: This feature is available in PaperCut 9.3 or higher).
PaperCut has a feature called “Internal Users” which allows users to be managed by
internally by the application, instead of relying on an external source (like LDAP or
Active Directory). This can be useful for managing guest users (or anonymous
users) on your network.
PaperCut allows these internal users to be created by an administrator, or through a
self-registration form using a web browser. For more information on “Internal Users”
see the PaperCut manual chapter called “Managing Guests and Internal Users”.
The VCA may be used to self-register users. This works as follows:
1. The user swipes their card at the VCA. The card can be any card compatible
with the VCA card reader. E.g. if the VCA is equipped with a mag-stripe card
the user could swipe a credit-card.
2. If PaperCut detects that the given card is not registered with the system, the
user will be prompted to register a new user account.
3. The user will be prompted for a PIN number (which will be also set as their
password).
4. PaperCut will create the user (creating an automatically generated username
– which will be displayed to the user).
5. The user may then add cash to their account as usual.
Copyright © 2008-2013 PaperCut Software International Pty. Ltd., All Rights Reserved.
7 of 14
PaperCut - VCA Cash Acceptor Manual
Once their account is created the user can login at other devices, or use their
username and PIN/password to authenticate with PaperCut for printing, release
stations or the end-user web interface.
5.1.
Configuring self-registration
The first step in configuring VCA self-registration is to enable the “Internal Users”
feature in PaperCut (see PaperCut manual for details). The username prefix
configured there will also be used as the prefix for automatically generated
usernames created via the VCA.
The next step is to enable self-registration on the VCA device. To do this:
1. On the “Devices” tab, select the VCA device to configure.
2. Select the “Advanced Config” tab.
3. Find the “ext-device.self-registration-enabled” property, set it to “Y” and press
the “Update” button next to the value.
The VCA device will then reboot and start accepting self-registration requests.
If you do not need self-registering users to have PINs (or passwords), then the PIN
entry can be disabled by setting the “ext-device.self-registration-request-pin” setting
to “N” (in the same way as described above).
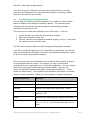
In some environments, the administrator may not want to allow all types of cards to
be self-registered with the system. For example, you may only want cards
purchased from your organization to be used for self-registration. You can configure
PaperCut to only accept cards matching a particular pattern, using the “extdevice.self-registration-allowed-card-regex” config setting (defaults to “.*” which
allows any card number). The card will only be allowed to self-register if it matches
the given regular expression. Below are some examples of regular expressions:
Regular Expression
Meaning
123456
Matches any card number containing “123456”
^123456
Matches any card number starting with “123456”.
123456$
Matches any card number ending with “123456”
^abc.*123$
Matches any card number starting with “abc” and
ending in “123”
^\d{9}=
Matches any card starting with 9 digits and then an “=”.
^200[1234]
Matches any card starting with “200” and then any one
of “1”, “2”, “3”, “4”. E.g. it would match 2004, but not
2006.
Copyright © 2008-2013 PaperCut Software International Pty. Ltd., All Rights Reserved.
8 of 14
PaperCut - VCA Cash Acceptor Manual
6. Configuring the Card Dispenser
6.1. Typical Usage
The Boscop card dispenser can be used at sites that wish to allow anonymous or
guest copying. A typical usage is to pre-load PaperCut with "Internal Users"
configured with the card numbers of a set of cards that are then dispensed. These
accounts may come with credit pre-loaded. Once a card has been dispensed its
owner may then add value to the account associated with the card.
PaperCut also has the capability to self-register new internal accounts at the VCA.
This functionality may be used to register cards purchased with the Boscop card
dispenser. See Section 5 “Self-registration of Users” for more information.
6.2. Configuring the Card Dispenser
To enable the card dispenser:
Select the VCA device to configure on the “Devices” tab.
Select the “Advanced Config” tab.
Set “ext-device.vcc.card-dispenser.enabled” to “Y”.
Set “ext-device.vcc.card-dispenser.card-cost” to the cost of a single card.
Press the “Update” button.
5. Set “ext-device.vcc.card-dispenser.max-escrow” to the maximum amount that
will be accepted when purchasing a single card. This helps avoid users put in
more cash than the card is worth because change is not given. NOTE: It is
generally recommended to set the max-escrow to the same value as the card
cost. If set to 0 then no maximum escrow amount is used.
6. Press the “Update all” button at the bottom of the screen to save the settings
changes.
1.
2.
3.
4.
NOTE: No change is given if a user inserts more cash than the card value (e.g.
not exact change). If the max-escrow is set higher than the card value, then it will be
possible for users to insert more cash than the card value and no change will be
given. If this is the case, then users should be educated that no change will be
given. We recommend that this is clearly displayed on the device.
Copyright © 2008-2013 PaperCut Software International Pty. Ltd., All Rights Reserved.
9 of 14
PaperCut - VCA Cash Acceptor Manual
7. Advanced Device Configuration
This section describes various advanced configuration settings available for the VCA.
To edit the settings for a particular device:
1. On the “Devices” tab, select the device to configure.
2. Select the “Advanced Config” tab.
3. Find the property to edit, change the value and press the “Update” button.
7.1.
Virtual Cash Acceptor Configuration
This section defines custom settings for the Virtual Cash Acceptor. These settings
can also be used to customize the text displayed on the cash acceptor or the receipts
printed.
The full VCA documentation is available here:
http://www.virtualcash.biz/downloads/vca_manual.pdf
Configuration Setting
Description
ext-device.vcc.add-value-timeoutsecs
The amount of time in seconds to wait with no
activity before ending an add-value session.
Default: 60
ext-device.vcc.print-receipts
Determines whether receipts will be printed
when an add value session is completed. If
the VCA does not have a receipt printer then
this option should be disabled.
Default: Y
ext-device.vcc.receipt-line.00
ext-device.vcc.receipt-line.01
…
ext-device.vcc.receipt-line.10
Used to customize the header and footer text
printed on the receipt. Lines 0 to 7 are for the
header, and lines 8-11 are for the footer.
A single “@” character indicates that the line
should not be printed. A blank entry will print
a blank line.
If “%username%” is found in any of the
receipt lines, it will be replaced with the
username of the logged in user.
Default (line 7):
User:
%username%
All other lines are not printed. i.e. “@”.
Copyright © 2008-2013 PaperCut Software International Pty. Ltd., All Rights Reserved.
10 of 14
PaperCut - VCA Cash Acceptor Manual
ext-device.vcc.machine-no
The machine name/no to print on the
receipts, up to 10 characters.
Default: The device name.
ext-device.vcc.use-encryption
Determines if encryption is enabled between
the server and the terminal (Y/N).
Default: Y
ext-device.vcc.login-keypad-mode
Determines whether user can enter numeric
or alphanumeric characters for the login.
Valid values are:
0 – numeric only
1 – alphanumeric (lowercase)
2 – alphanumeric (uppercase)
Default: 0 (numeric only)
ext-device.vcc.text.login-prompt
The text to display when requesting login.
The text will be automatically wrapped on the
display. To force text to a new-line use: \n
Default: Please swipe card\n or enter ID
number
ext-device.vcc.text.login-id-number
The text to display when the ID number is
entered using the keypad.
Default: * * ID Number * *
ext-device.vcc.text.enter-cash
The text displayed after the user is logged in
to prompt them to enter cash. The text will be
automatically wrapped on the display. To
force text to a new-line use: \n
Default: Add cash now
ext-device.vcc.text.session-active
The text to display to the user to while their
session is active.
Default: Press * for receipt
ext-device.self-registration-enabled
Determines whether self-registration is
enabled (NOTE: Internal users must also be
enabled in PaperCut)
Copyright © 2008-2013 PaperCut Software International Pty. Ltd., All Rights Reserved.
11 of 14
PaperCut - VCA Cash Acceptor Manual
Default: N
ext-device.self-registration-requestpin
Determines whether users are required to set
a PIN when self-registering. This PIN is also
set as the user password.
Default: Y
ext-device.self-registration-allowedcard-regex
The regular expression that determines which
cards are allowed to be self-registered. Any
card that matches the regular expression may
be registered. See section 5 – “Selfregistration of Users” above for more
information.
Default: .*
ext-device.self-registration-usecard-as-username
Determines whether to use the card number
as the username. This can be convenient
when the card number is known to the users
and will allow them to login using the card
number as their username.
Default: N
ext-device.card-no-regex
See chapter 7.3 “Configuring Swipe Card
Readers”
ext-device.card-selfassociation.use-secondary-cardnumber
Select whether user self-association should
occupy the primary or secondary card
number. It overrides the global setting unless
the keyword "GLOBAL" is specified. This is
useful when there is a mix of different nonconfigurable card readers that read different
numbers from an ID card.
Set to "Y" to use the secondary card number,
"N" to use the primary card number. Default:
"GLOBAL" to defer to the global configuration
option.
ext-device.vcc.carddispenser.enabled
Determines whether the optional card
dispenser unit is enabled.
Default: N
ext-device.vcc.card-dispenser.card-
The cost of the card. This is the amount the
Copyright © 2008-2013 PaperCut Software International Pty. Ltd., All Rights Reserved.
12 of 14
PaperCut - VCA Cash Acceptor Manual
cost
user must pay for the card before the card is
dispensed. If the cards are no cost this can
be set to 0.0.
Default: 0.0
ext-device.vcc.card-dispenser.maxescrow
The maximum amount of credit the user can
add when purchasing a card. If this is set
higher than the card cost then the user can
add more credit than the card value, and they
will not be given change. Recommended: It
is recommended to set this to the same
value as the card value to enforce users to
provide the exact change.
If set to 0, no max escrow is defined.
Default: 0.0
ext-device-msg.carddispenser.cancel
“Cancel” text displayed when prompting a
user to buy a card.
Default: Press C/CE to cancel.
7.2. Configuring a local IP address for VCC connections
This configuration is only required when the server running PaperCut is assigned
multiple IP address and all communication to the VCC devices must use a specific IP
address. An example of where this might be used would include when running
PaperCut on a cluster and all communications to the VCC should use the cluster IP
address not the physical IP address.
NOTE: On most clusters the cluster IP address will be configured as the default IP
address when the particular node is active, so this configuration is not required.
To force VCC devices to use a specific local connection:
1. Login to the PaperCut admin interface
2. Navigate to the “Options” tab and choose “Config Editor (Advanced)” from the
actions links on the left.
3. Scroll to the bottom of the page to the “Add new” section and add the
following name:
ext-device.vcc.local-ip-address
set the value to the IP address you want to use.
4. Press the “Add” button. And confirm the new entry appeared by searching
for the entry.
Copyright © 2008-2013 PaperCut Software International Pty. Ltd., All Rights Reserved.
13 of 14
PaperCut - VCA Cash Acceptor Manual
5. For this setting to take effect PaperCut needs to re-establish the connections
to the VCC devices. The simplest way to achieve this is to restart the
PaperCut application server service.
7.3. Configuring Swipe Card Readers
Swipe cards contain numbers which are used to identify users according to the card
number configured in the User Details screen under “Card/Identity” number. Some
readers report information in addition to the number encoded on the card, such as
checksums. PaperCut can treat these cases in two ways:
A typical case is the checksum being reported after the card number,
separated by an equals sign, such as in 5235092385=8. PaperCut can
handle this case by default; it will extract the number before the equal sign as
the card number: 5235092385.
For some cases, a “regular expression” may be required that will filter the
card number from the complete string of characters reported by the card
reader. Documentation on regular expressions can be found on the Internet,
e.g. at www.regular-expressions.info.
o The regular expression must be fashioned so that the card number is
returned as the first match group.
o Usually one regular expression will be used for all the devices
managed by PaperCut; this must be entered in the “Config editor
(advanced)” which you will find on the Options tab under Actions. The
key is called “ext-device.card-no-regex”.
o The global setting however can be overridden on a per-device basis:
The key “ext-device.card-no-regex” can also be found on the
“Advanced Config” tab in the device details screen. This setting will
override the global setting unless the keyword “GLOBAL” is specified.
o PaperCut developers will gladly assist in producing a regular
expression when supplied with a few sample outputs from your card
reader. Please contact PaperCut support.
o If you would like to write your own regular expressions, here are some
examples:
Use the first 10 characters (any character): (.{10})
Use the first 19 digits: (\d{19})
Extract the digits from between the two “=” characters in
“123453=292929=1221”: \d*=(\d*)=\d*
Copyright © 2008-2013 PaperCut Software International Pty. Ltd., All Rights Reserved.
14 of 14