1
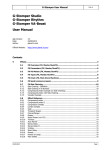
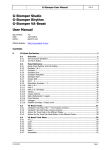
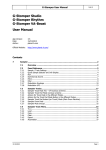
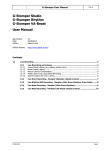
G-Stomper User Manual V.4.4 G-Stomper Studio G-Stomper Rhythm G-Stomper VA-Beast User Manual App Version: Date: Author: 4.4 03/09/2015 planet-h.com Official Website: http://www.planet-h.com/ Contents 12 03/09/2015 Parameter Automation ...................................................................................................... 2 12.1 Record Parameter Automations .......................................................................... 2 12.2 12.2.1 12.2.2 12.2.3 12.2.4 Step Edit Automations ......................................................................................... 3 Step Edit (Main Drum Machine) .................................................................................... 4 Step Edit (FX, Master/SumFX, Mixer, VA-Beast Synthesizer) ........................................... 4 Step Edit - Normal Mode.............................................................................................. 5 Step Edit - Auto-Init Steps Mode .................................................................................. 6 12.3 12.3.1 12.3.2 12.3.3 12.3.4 12.3.5 12.3.6 12.3.7 Handle existing Automations .............................................................................. 7 Sampler Parameter Automations .................................................................................. 7 VA-Beast Parameters Automations ............................................................................... 8 All other Parameter Automations .................................................................................. 9 Clear Parameter Automation ...................................................................................... 11 Initialize Parameter Automation ................................................................................. 11 Auto-Complete Parameter Automation ........................................................................ 11 Create Volume Fade-In/Fade-Out ............................................................................... 11 12.4 Record Parameter Automations in Song Mode .................................................. 12 Page 1 G-Stomper User Manual 12 V.4.4 Parameter Automation All G-Stomper apps provide full Motion Sequencing/Parameter Automation support. In other words, you can record Parameter movements (e.g. a fader movement) in real-time. Alternatively you can create and edit Parameter Automations step-by-step using the Step Edit mode (see Chapter: Step Edit Automations) 12.1 Record Parameter Automations Press Record and Play to start recording. Now, while the sequencer is running and recording, move a fader in the way you want the movement. The movement is recorded in real-time, you’ll see your recorded Automation immediately. This means, once the Pattern has looped around and reaches the point/Step where the recording started, the Sequencer starts to playback the recorded Automation (even if Record is still enabled). If you’re not yet happy with the recording, just pick the fader at any playback position and move it again to overwrite either the complete or a part of the existing Automation. Once you finished the recording, press Record again to disable Recording and return to normal Playback mode. Note: There’s no need to stop the Sequencer at any time. Everything can be done while the Sequencer is running. 03/09/2015 Page 2 G-Stomper User Manual 12.2 V.4.4 Step Edit Automations The Step Edit Mode is used to set/edit Parameter values explicitly at a particular step in the sequence. You can use the Step Edit Mode to edit already recorded parameter automations as well as to step-by-step create new automations. A parameter automation can be a smooth curve as well as a simple change of a parameter, e.g. to play a sample backwards at a particular step while all other steps play it forward. The Step Edit Mode comes with two main operation modes: Step Edit - Normal Mode (see Chapter: Step Edit - Normal Mode) Step Edit - Auto-Init Steps Mode (see Chapter: Step Edit - Auto-Init Steps Mode) Short Click Long Click Turn the Step Edit Mode ON/OFF Turn the Step Edit - Auto-Init Steps Mode ON/OFF Note: Since the Step Edit - Auto-Init Mode is a variation of the regular Step Edit Mode, it has only an effect, if Step Edit is turned ON 03/09/2015 Page 3 G-Stomper User Manual 12.2.1 V.4.4 Step Edit (Main Drum Machine) In Step Edit Mode on the Main Drum Machine, the Steps turn into a Step Selector. Click the Steps to select a particular Step to edit. 12.2.2 Step Edit (FX, Master/SumFX, Mixer, VA-Beast Synthesizer) On various screens across the application you’ll find the simple Step Edit controls. Their function is exactly the same as on the Main Drum Machine. The only difference is that the Arrow Buttons are used to select the particular Step to edit. Short Click Long Click 1 Step UP/DOWN 1 Bar UP/DOWN The text between the Arrow Buttons shows the currently edited Step position (Notation: <bar>:<step>). In the example this is 1:09, which means in fact, Bar1:Step09 03/09/2015 Page 4 G-Stomper User Manual 12.2.3 V.4.4 Step Edit - Normal Mode By Default, an initial Pattern comes without any Automation Events. In Step Edit - Normal Mode, if you create a single Automation event (set a Parameter value at a particular Step), then the Parameter gets set at this Step and it keeps its value until some later Step sets a new value. The Parameter actually keeps the value, because there’s no other Event in the Sequence, which sets another value. Depending on what you want to achieve, this behaviour might be essential, e.g. if you want to set Key Steps for the Auto-Complete Parameter Automation feature. (see Chapter: Auto-Complete Parameter Automation) In other situations it might be better to initialize all Steps with the base value of a particular Parameter first, e.g. if you want to keep a Parameter value over the complete Pattern length and you only want to change it on a particular Step. To set a value on all Steps, and then just change on one or more particular Steps (e.g. to play a sample backwards at some steps while all other steps play it forward), you have to initialize the Automation of the desired Parameter in advance. You can initialize all Steps for a Parameter … … using the the Initialize Parameter Automation function (see Chapter: Initialize Parameter Automation) … or, if you don’t want to care about the initialization, by using the Step Edit - Auto-Init Steps Mode In the Step Edit - Auto-Init Steps Mode, if you create the first Step Value for a particular Parameter, all Steps get automatically initialized with the base value of the edited Parameter. (see Chapter: Step Edit - Auto-Init Steps Mode) Important Note: If you want to set Key Steps to be used for the Auto-Complete Parameter Automation, the Auto-Init Steps Mode must be disabled. With the Auto-Init Steps Mode enabled, all Steps get automatically initialized, which means in fact, there are no more gaps to be auto completed. (see Chapter: Auto-Complete Parameter Automation) 03/09/2015 Page 5 G-Stomper User Manual 12.2.4 V.4.4 Step Edit - Auto-Init Steps Mode By Default, an initial Pattern comes without any Automation Events. In Step Edit - Auto-Init Steps Mode, if you create a single Automation event (set a Parameter value at a particular Step), then the Automation Sequence of the Parameter gets automatically initialized before the Step values gets set. Example: 1. 2. 3. 4. 5. 6. 7. 8. 9. Start with a fresh Pattern Select Track T01 Set the Volume fader to 100 Short click the Step Edit Button to turn the Step Edit Mode ON Then long click the Step Edit button to turn the Auto-Init Steps Mode ON as well Select Step 09 using the Step Buttons On Step 09, set the Volume fader to 0(zero). Now short click the Step Edit Button to turn the Step Edit Mode OFF Press Play and watch the Volume fader As you notice, the Volume fader is mainly on 100 and only changes to 0(zero) at Step 09. Technically, when you change the Fader value at Step 09 (Step Edit + Auto-Init Steps enabled), the Automation Sequence for the volume Fader gets automatically initialized with its original value 100 (all steps get set to 100) before the value 0(zero) gets set at Step 09. Important Note: If you want to set Key Steps to be used for the Auto-Complete Parameter Automation, the Auto-Init Steps Mode must be disabled. With the Auto-Init Steps Mode enabled, all Steps get automatically initialized, which means in fact, there are no more gaps to be auto completed. (see Chapter: Auto-Complete Parameter Automation) 03/09/2015 Page 6 G-Stomper User Manual 12.3 V.4.4 Handle existing Automations The G-Stomper apps come with Automation support for almost every Parameter all over the applications. Depending on the screen where an automated Parameter belongs to, the functions to handle the particular Automations (clear, initialize, etc.) are located as followed: 12.3.1 Sampler Parameter Automations Sampler Parameter Automations are Track related and can be handled (cleared, initialized, etc.) using the Track Menu (see also Chapter: Sampler > Sampler Track Menu). 03/09/2015 Page 7 G-Stomper User Manual 12.3.2 V.4.4 VA-Beast Parameters Automations VA-Beast Parameter Automations are Track related and can be handled (cleared, initialized, etc.) using the VA-Beast Track Menu (see also Chapter: VA-Beast Synthesizer > VA-Beast Track Menu). 03/09/2015 Page 8 G-Stomper User Manual 12.3.3 V.4.4 All other Parameter Automations All other Parameter Automations are screen related and can be handled (cleared, initialized, etc.) using the dedicated Menu on the related screen. 03/09/2015 Page 9 G-Stomper User Manual V.4.4 Note: The Automation Menus in the Mixer and Master/SumFX section provide two additional functions. The Volume Fade-In/Out generator is exclusively available in the Mixer and Master/SumFX section. (see Chapter: Create Volume Fade-In/Fade-Out) 03/09/2015 Page 10 G-Stomper User Manual 12.3.4 V.4.4 Clear Parameter Automation Clear Parameter Automation is used to delete all existing Automation events from the Sequence (for one or multiple Parameters). 12.3.5 Initialize Parameter Automation Initialize Parameter Automation is used to set the current Parameter value to every single Step of the Sequence (for one or multiple Parameters). 12.3.6 Auto-Complete Parameter Automation The Auto-Complete Parameter Automation feature is used to create smooth Parameter movements just by setting the key Steps. To use it, you just have to define at least 2 Automation Steps (in use of the Step Edit mode) for the desired parameter. Then call Auto-Complete Parameter Automation and enjoy the magic. The number of key Steps is not limited. The Auto-Complete just fills all the gaps between the key Steps with a smooth movement. (see also Chapter: Step Edit Automations) Keep in Mind, that you must always set at least 2 key Steps, even if one of them gets the same value as the already (statically) set Parameter value. Auto-Complete Parameter Automation is only supported for Faders, not for Buttons Important Note: If you want to set Key Steps to be used for the Auto-Complete Parameter Automation, the Auto-Init Steps Mode must be disabled. With the Auto-Init Steps Mode enabled, all Steps get automatically initialized, which means in fact, there are no more gaps to be auto completed. (see Chapters: Step Edit - Normal Mode, Step Edit - Auto-Init Steps Mode) 12.3.7 Create Volume Fade-In/Fade-Out Create Volume Fade-In and Create Volume Fade-Out are specialized versions of the Auto-Complete Parameter Automation feature. The main difference to the Auto-Complete Parameter Automation is that the key Steps are set automatically. As the name says, they’re available exclusively for Volume Parameters. Create Volume Fade-In: Creates an automated Volume Fade-In over the complete Pattern length, starting with 0 and ending with the currently set Volume. Create Volume Fade-Out: Creates an automated Volume Fade-Out over the complete Pattern length, starting with the currently set Volume and ending with 0. 03/09/2015 Page 11 G-Stomper User Manual 12.4 V.4.4 Record Parameter Automations in Song Mode If the Song Mode is enabled, and you start recording while you’re on the Pattern Set screen, the Song Arranger records your Pattern Changes (the switches from Patter A to Pattern B to Pattern C for example), and also NO-Changes (when a Pattern loops over multiple times). If the Song Mode is enabled, and you start recording while you’re NOT on the Pattern Set screen (in fact on every other screen), the Song Arranger does just play the Song instead of recording the Song structure. This way you can record Parameter Automations over multiple Patterns while a Song is playing. Let me give you an example: First, we need a short Song Arrangement. 1. 2. 3. 4. 5. 6. Show up the Pattern Set screen. Copy the same (or some variations of the original) Pattern to several Pattern Slots in a Pattern Set Chain all copied Patterns to a Song (one Pattern after another, don't use them multiple times) Make sure that the Song Mode is enabled Switch to the Main Drum Machine Press Record and Play to start recording. Now, even if the Song Mode and Recording is enabled, you notice that the Song Arranger just plays the Song instead of recording new elements to it. 8. Now, while the sequencer is running and recording, and while the Song is playing, move a fader slowly over the complete Song duration. The recorded Parameter Automation starts from Pattern A (or from wherever else you started to record) and then continues through every Pattern in the Song. Note: Since Parameter Automations get recorded in the Patterns (not in the Song), this recording method works only well, if you do not use a particular Patterns multiple times in a Song. So be sure to use every Pattern only once per Song, if you want to use this recording method. 03/09/2015 Page 12