1
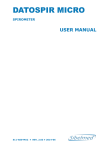
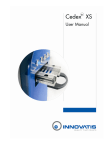
Feed-forward Control System for Fed-batch Development in Mammalian Bioreactors A Major Qualifying Project Report submitted to the faculty of WORCESTER POLYTECHNIC INSTITUTE WORCESTER, MASSACHUSSETTS in partial fulfillment of the requirements for the Degree of Bachelor of Science on the day of April 24, 2008 by ______________________________ Ceren Altin ____________________________________ Advisor: Professor David DiBiasio _______________________________ Advisor: Dr. Itzcoatl A. Pla Abstract Increasing clinical and industrial advances in the pharmaceutical world requires technological improvements in cell culture development and monoclonal antibody (mAb) production. Experiments performed with Chinese Hamster Ovary (CHO) cells producing mAbs, have shown enhanced titers with a certain feed strategy. However implementing a feedback control system is not preferable for large-scale manufacturing. In this paper, a method to create feed-forward control with BioXpert, SCADA software is presented. The results are not conclusive since there were no replicates to demonstrate reproducibility. Assuming that the results are correct, it may be concluded that feed-forward control system was successfully implemented on the fed-batch bioreactors via BioXpert software by using feed profiles generated from previous feedback experiments. Titer results obtained from BioXpert feed-forward experiments yielded higher results than manual feed-forward experiments and similar to previous feedback experiments. For future work, it is recommended to repeat BioXpert feed-forward experiment with two or more replicates maintaining the same cell line and using more frequent feeding schedule by keeping total daily feeding amount the same. i Executive Summary In this report, feed-forward control of nutrient feed via supervisory control and data acquisition (SCADA) software, BioXpert is presented. Previous feedback experiments performed by Keith Cochran at Abbott Bioresearch Center yielded high titer results; however, implementing the feedback control system is not very preferable in large-scale manufacturing. Therefore, a feed-forward control system to regulate flow of nutrient feed by using feed profiles generated from previously performed feedback experiments was created on BioXpert. During the experiments, 3L Applikon glass autoclavable reactors with Applikon ADI 1035 bio console, Applikon ADI 1030 bio controller, Sartorius TE series analytical balances and a computer with BioXpert NT version 2.25.091 were used. Methodology that was followed was to use BioXpert to feed bioreactors based on previously developed nutrient feed profiles. In order to achieve that, a method was developed after performing several leading experiments, namely 1) Calibration of tubing and feed pumps 2) A run without cells or “dry run” and 3) An actual bioreactor run with cells fed using a BioXpert preprogrammed profile. After performing the preliminary experiments, an actual BioXpert experiment was performed with fed-batch bioreactors containing Chinese Hamster Ovary (CHO) cells, which produce monoclonal antibodies (mAbs). Due to the small amount of feed that needs to be delivered into the bioreactors, Masterflex tubing with 1.6 mm internal diameter was used throughout the experiments. During the tubing calibration, it was expected to see deterioration in the tubing due to use. Therefore, flow rate of „new‟ and „used‟ (in BioXpert run with CHO cells of seven days of feeding) portions of tubing were measured and it was determined that performance of the tubing remained constant. Prior to performing experiments with CHO cells, pumps were calibrated. After testing accuracy of calibrating method, actual BioXpert experiments were performed. Pre-scheduled feeding program was used to pump desired amount of feed solution to fed-batch bioreactors when the VCD surpassed 3 million viable cells/mL. BioXpert algorithm was created for both reactors for a feeding schedule of three times per day for seven days. The feeding schedule presented in Table 1 was followed for the reactor II with three times per day feeding (every 8 hours). ii Table 1- Feeding schedule for reactor II Daily Feed Shots Feed Weight per “ON” Duration Weight (g) per day Shot (g) of Pump (sec) 1 5.95 3 1.98 65 2 7.78 3 2.59 85 3 9.52 3 3.17 104 4 10.39 3 3.46 113 5 6.18 3 2.06 68 6 4.44 3 1.48 49 7 2.65 3 0.88 30 Day Starting on the first day of inoculation the bioreactor was sampled daily to obtain readings for pH, pO2 (mmHg), pCO2 (mmHg), glucose (g/L), lactate (g/L), viable cell density (viable cells/ml), viability (%) and osmolality (mOsm). From day 9, sample was retained for protein analysis. To determine effect of BioXpert in implementing feed-forward control to fed-batch bioreactors, experimental results were compared with previously performed feedback and manual feed-forward experiments. Daily total feed amount was kept constant for these experiments; however, they yielded different results due to distinct feeding strategies. The feedback experiments were sampled and fed every 2 hours (12 times per day) with unequal feed amounts. The feed amounts were determined after the glucose analysis done during the sampling. During the manual feed-forward experiments, bioreactors were fed once daily with total amount of feed weight. For BioXpert experiment, the daily feed amount was divided into three equal smaller amounts and fed to the bioreactor every 8 hours (3 times per day). For the control run, the bioreactors were fed with glucose. In figure 1, the growth curves produced from these experiments are displayed. It may be seen that the BioXpert feed-forward experiment, being just a little bit above the control run, resulted in cell densities higher than manual feedforward experiments and lower than feedback experiments. iii Cell Density [cells/mL] 0 Feedback experiment 5 10 15 Control experiment Time [days] Manual feed-forward experiment BioXpert feed-forward experiment Figure 1- Growth curves Another way to compare results with previous experiments was to use titer results. Figure 2 shows the comparison of titer results between BioXpert experiment and previously performed feedback and manual feed-forward experiments. It may be seen that the feedback and BioXpert feed-forward experiments yielded to high titer results, which are similar however, manual feed- Titer [mg/L] forward experiment had lower titer values than the others. 0 2 4 6 8 10 12 14 Time [days] Control experiment Feedback experiment Manual feed-forward experiment BioXpert feed-forward experiment Figure 2- Titer results iv The results presented above are not conclusive since there are no replicates demonstrating reproducibility of BioXpert feed-forward experiment. Assuming that results are reproducible, BioXpert algorithm improved titer results of feed-forward strategy. For future work, it is recommended to perform BioXpert experiments with more than two replicates, maintaining current cell line and feed using feed strategy used for previous feedback experiments (12 times daily). v Acknowledgements I would like to thank the following members of the WPI and Abbott Bioresearch Center (ABC), MA community for their assistance and support in the completion of this Major Qualifying Project: Dr. David DiBiasio, Advisor (WPI) Dr. Itzcoatl A. Pla, Advisor (ABC) Keith Cochran, Supervisor (ABC) I would also like to thank the ABC for the opportunity to work on this project, and letting me use their equipment. In particular, I would like to thank the following members of the ABC community who were instrumental in the achievement of this project: Dilek Tansoy Eugene Soo Michael Lihon Sonia Sinha vi Table of Contents ABSTRACT ............................................................................................................................................................... I EXECUTIVE SUMMARY ........................................................................................................................................... II ACKNOWLEDGEMENTS .........................................................................................................................................VI TABLE OF CONTENTS............................................................................................................................................VII TABLE OF FIGURES ................................................................................................................................................ IX LIST OF TABLES ...................................................................................................................................................... X 1 INTRODUCTION ............................................................................................................................................ 1 2 BACKGROUND RESEARCH ............................................................................................................................. 2 3 2.1 MONOCLONAL ANTIBODIES (MABS)................................................................................................................... 2 2.2 CHINESE HAMSTER OVARY (CHO) CELLS ............................................................................................................ 3 2.3 FED-BATCH SYSTEM ....................................................................................................................................... 5 2.4 PROCESS CONTROL SYSTEMS ............................................................................................................................ 7 2.5 SUPERVISORY CONTROL AND DATA ACQUISITION (SCADA) ..................................................................................... 8 METHODOLOGY .......................................................................................................................................... 10 3.1 EXPERIMENTAL PROCEDURE ........................................................................................................................... 10 3.1.1 4 BioXpert Run with CHO Cells .......................................................................................................... 10 RESULTS AND DISCUSSION ......................................................................................................................... 15 4.1 TUBING CALIBRATION ................................................................................................................................... 15 4.2 CALIBRATION OF FEED PUMP.......................................................................................................................... 16 4.2.1 Flow Rate Method ......................................................................................................................... 16 4.2.2 Calibration Curve Method .............................................................................................................. 19 4.3 DRY RUN................................................................................................................................................... 20 4.4 BIOXPERT RUN WITH CHO CELLS RESULTS ........................................................................................................ 23 5 CONCLUSION AND RECOMMENDATIONS ................................................................................................... 25 6 REFERENCES................................................................................................................................................ 27 APPENDIX 1: EXPERIMENTAL DATA ..................................................................................................................... 29 A1.1. BLOOD GAS ANALYZER RESULTS ...................................................................................................................... 29 A1.1.1. pH Measurement ............................................................................................................................. 29 vii A1.1.2. Partial Pressure of Oxygen Measurement ......................................................................................... 29 A1.1.3 Partial Pressure of Carbon Dioxide Measurements ............................................................................ 30 A1.2. GLUCOSE AND LACTATE ANALYZER MEASUREMENTS............................................................................................. 30 A1.2.1. Glucose Measurement ..................................................................................................................... 30 A1.2.2. Lactate Measurement ...................................................................................................................... 31 A1.3. OSMOMETER MEASUREMENTS ....................................................................................................................... 31 APPENDIX 2: BIOXPERT SOFTWARE ..................................................................................................................... 32 A2.1. START A NEW RUN........................................................................................................................................ 32 A2.2. DEFINE ONLINE VARIABLES ............................................................................................................................. 33 A2.3. DEFINE OFFLINE VARIABLE .............................................................................................................................. 33 A2.4. DEFINE FORMULAS ....................................................................................................................................... 34 A2.5. INSTALL NEW DEVICE ..................................................................................................................................... 35 A2.6. CREATING CHARTS ........................................................................................................................................ 36 A2.7. DEFINE MANUAL SET-POINT ............................................................................................................................ 38 A2.8. CREATE CONTROL ALGORITHM......................................................................................................................... 39 A2.9. STEP-BY-STEP PROCEDURE ............................................................................................................................. 40 APPENDIX 3: PROPERTIES FOR TEST MACHINES ................................................................................................... 42 A3.1. BLOOD GAS ANALYZER .................................................................................................................................. 42 A3.2. BIOCHEMISTRY ANALYZER .............................................................................................................................. 44 A3.3. CELL DENSITY EXAMINATION (CEDEX) SYSTEM................................................................................................... 45 A3.4. OSMOMETER .............................................................................................................................................. 48 viii Table of Figures FIGURE 1- MONOCLONAL ANTIBODY PRODUCTION ............................................................................................................. 3 FIGURE 2- COMPARISON OF CHO CELL CULTURE PROCESS IN 1986 AND 2004 .......................................................................... 4 FIGURE 3- FED-BATCH BIOREACTOR ................................................................................................................................. 5 FIGURE 4- COMPARISON BETWEEN BATCH AND FED-BATCH MODES ......................................................................................... 6 FIGURE 5- FEEDBACK CONTROL SYSTEM ............................................................................................................................ 7 FIGURE 6- FEED-FORWARD CONTROL SYSTEM .................................................................................................................... 8 FIGURE 7- EXPERIMENTAL SET-UP OF BIOXPERT RUN WITH CHO CELLS .................................................................................. 11 FIGURE 8- TUBING CALIBRATION EXPERIMENTAL SET-UP...................................................................................................... 15 FIGURE 9- RESULTS OF FLOW RATE METHOD FOR REACTOR I ................................................................................................ 18 FIGURE 10- CALIBRATION CURVE FOR REACTOR I ............................................................................................................... 19 FIGURE 11- CALIBRATION CURVE FOR REACTOR II .............................................................................................................. 19 FIGURE 12- DRY RUN RESULTS FOR REACTOR I .................................................................................................................. 22 FIGURE 13- DRY RUN RESULTS FOR REACTOR II ................................................................................................................. 22 FIGURE 14- GROWTH CURVES ...................................................................................................................................... 23 FIGURE 15- TITER RESULTS .......................................................................................................................................... 24 ix List of Tables TABLE 1- FEED SCHEDULE FOR REACTOR II ....................................................................................................................... 12 TABLE 2- BIOXPERT ALGORITHM USED IN ACTUAL RUN ....................................................................................................... 13 TABLE 3- NUTRIENT SOLUTION FEEDING SCHEDULE ............................................................................................................ 16 TABLE 4- BIOXPERT ALGORITHM USED IN FLOW RATE METHOD ............................................................................................. 17 TABLE 5- FEED VALUES WITH CORRESPONDING FEEDING DURATIONS ...................................................................................... 20 TABLE 6- BIOXPERT ALGORITHM USED IN DRY RUN ............................................................................................................ 21 x 1 Introduction Clinical and industrial advances in the pharmaceutical manufacturing have been increasing greatly over the last few years. According to the Journal of Commercial Biotechnology, the market size for monoclonal antibodies (mAbs) was expected to reach 30 billion dollars in 2013 [1]. The increase in demand for antibody production emphasizes need for technological improvements in cell culture development and manufacturing of mAbs [2]. However, working with mammalian cell culture is challenging due to several considerations that need to be taken into account. Selection of bioreactor operating mode as well as amount and concentration of feed has a great effect on antibody production performance. Prior to large scale cell culture manufacturing, specific feed amounts and timing must be tested for a specific cell line. Previous feed-back control experiments carried in the Process Sciences group at Abbott Bioresearch Center by Keith Cochran, yielded increased cell peak densities and titer. Unfortunately, the need to frequently sample the bioreactor (and the increased likelihood of contamination) for the feedback control scheme, makes this approach incompatible with a robust large scale manufacturing process. Because of this, a feed-forward scheme that follows the feeding profiles generated by the feedback fed-batch system is developped. The goal of the project was to implement a feed-forward control mechanism to regulate flow of the feed by using the feed profiles generated by previously performed feed-back experiments. BioXpert software was used to control the feeding schedule. 1 2 Background Research In the background research section of the report, discussion of previously work done on monoclonal antibodies (mAbs), Chinese Hamster Ovary (CHO) cells, fed-batch systems, process control systems and Supervisory Control And Data Acquisition (SCADA) systems is presented. 2.1 Monoclonal Antibodies (mAbs) Monoclonal antibodies (mAbs), largely used in biomedical research, diagnosis and therapy of diseases, are identical proteins derived from same type of immune cell [3]. They have two important characteristics making them useful in pharmaceuticals world; 1) they are target specific; each antibody is able to recognize one antigen and attack it, 2) they become active when triggered by a specific antigen and stay active for the rest of their lifespan [4]. In 1975, with presentation of “production of antibodies of predefined specificity” idea by Kohler and Milstein, mAbs were introduced to biotechnological world. In their paper, Kohler and Milstein‟s mentioned possibility of producing antibodies, which are capable of attacking specific antigens [5]. After that milestone finding, studies on mAb manufacturing have been increasing greatly. Currently, two methods, used with in vivo and in vitro techniques, are applied for the production of mAbs: 1) cell lines and 2) clones. The cell line method, displayed in Figure 1, includes production of immortalized tumor cell, which is called hybridoma [3]. First, tumor cells introduced to mouse, start growth of B cells containing antitumor antibodies. Later, these cells are combined with immortalized myeloma cells to create immortalized antibody producing hybrid cells. Production of fused cells produces several hybrids containing different antibodies. The hybrid cell, which is capable of making desired antibody is selected among the others and used for further processes [6]. For clone technique, isolation of B cells and tissue culture or immunization of individuals are not necessary. Immunoglobulin (Ig) genes are immortalized as opposed to cells, which are immortalized in cell line production. In this technique yeast or viruses are used instead of mice, which are used for the previous method [7]. 2 Figure 1- Monoclonal Antibody Production [6] 2.2 Chinese Hamster Ovary (CHO) Cells Animal cell cultures have been used extensively for almost a decade in the pharmaceutical world. Interest towards mammalian cell cultures started in 1950‟s to meet increased demand for human vaccines [8]. Twenty to thirty years later, studies on recombinant protein technology became popular and for these researches, complex mammalian cell mechanisms, with post-translational metabolic machinery, were necessary. Currently, they are extensively used for production of advanced recombinant therapeutics such as recombinant proteins, mAbs and nucleic-acid base products [9]. There are several mammalian hosts cells, which can be used in production of proteins; such as mouse myelomas (NS0 and SP2/0), baby hamster kidney (BHK) [10], human embryonic kidney (HEK-293) and human-retina-derived (PER-C6). However, CHO cells are preferred among the other cell cultures since their cell metabolism shows similar characteristics to human cells. Additionally, it has been proven that they improve production capacity of recombinant proteins [9] and they are “capable of incorporating the appropriate post-translational 3 modifications, while at the same time maintaining the characteristics ideal for production culture”1 [10]. In 1950‟s, CHO cells were obtained from a Chinese hamster (Cricetulus griseus) ovary epithelial tumor [11]. In 1986, tissue plasminogen activator (tPA) harvested from CHO cells by Genentech, S. San Francisco, CA, USA, was approved for therapeutic use [12]. Since 1980‟s the productivity of the mammalian cells increased extensively. Enhanced cell technologies along with modified culture processes improved protein production from the CHO cells. Currently it is possible to harvest titers of up to 10g/L of recombinant protein [13]. Whereas, 10 years ago the titer amount was 50-100 mg/L [10]. Figure 2 displays a comparison between the protein production from CHO cells in 2004 and 1986. As it can be seen from the Figure 2a, viable cell concentration reached 100x105 viable cells/mL in 2004 and the same parameter stayed under 30x105 viable cells/mL in 1986. In addition, at the process performed in 1986, the viability percentage of CHO cells decreased drastically between 100 and 200 hours to 60%, whereas in 2004 process, it did not drop to the same low percentage until the 500th hour. A similar trend of low values from 1986 and high values from 2004 can be observed from Figure 2b, which displays the titer results [12]. Figure 2- Comparison of CHO cell culture process in 1986 and 2004 [12] 1 Allison, D.W., et al., Deciphering the Mechanisms of Therapeutic Protein Production. Society for Biological Engineering, 2007: p. 48-52. 4 2.3 Fed-batch System Performance of biological process is affected by operating mode of bioreactor. While selecting the mode, economic cost, high yield, purity and low pollution are factors that should be paid attention to. Also the bioreactor mode depends on reaction kinetics and product capacity of the batch. In 1998, Bibila and Robinson reported that fed-batch system is one of the best reactor modes for the production of mAbs from CHO cells due to “its operational simplicity, reliability, and flexibility for implementation in multipurpose facilities 2” [14]. In batch culture, cells grow in a vessel where an initial charge of nutrients is supplied at once. There is no further addition or removal after time zero, and product accumulate into the bioreactor with waste material. Nevertheless in the fed-batch operation, which is also called semi-batch mode, medium is fed at various times as opposed to feeding at time zero [15]. Figure 3 shows the generic view of a fed-batch bioreactor. Figure 3- Fed-batch bioreactor When compared to batch mode, fed-batch mode yield increased titer and higher cell viability [14]. Figure 4 displays plots comparing batch culture of NSO cell line to the fed-batch mode of the same cell line for viability and mAb production. For both Figure 4a (batch mode) and 4b (fed-batch mode), empty squares (□) and filled circles (●) represent mAb production and viable cell concentration as a function of time, respectively. From the plots, it may be determined 2 Bibila, T.A. and D.K. Robinson, In pursuit of the optimal fed-batch process for monoclonal antibody production. Biotechnol. Prog., 1995. 11(1): p. 1-13. 5 that the maximum viable cell concentration is lower in batch culture than fed-batch mode. Furthermore, the mAb concentration from the fed-batch system reached 1.8g/L whereas the one from the batch mode was only 0.15 g/L [14]. Figure 4- Comparison between batch and fed-batch modes [13] Other than batch and fed-batch systems, perfusion mode is used as an alternative method for cell culture. In the batch and fed-batch system, waste material is not removed from the vessel until the end of batch. Nevertheless in the perfusion systems, cell debris and inhibitory byproducts as well as enzyme produced by dead cells are removed. Since the by-products inhibit 6 product formation, their removal is likely to enhance protein production. As opposed to that advantage, there are several disadvantages of the perfusion operating mode. Nutrients are not completely used in these systems, therefore they are less cost effective than fed-batch and batch modes. Additionally, batch and/or fed-batch reactors are easier to implement to an existing facility than perfusion systems, which have high analytical costs and potential regulatory problems. Finally, long cycle period as well as risk of contamination and generic drift in perfusion systems, make the fed-batch and batch bioreactors more preferable [15]. 2.4 Process Control Systems Maintaining an optimum bioreactor environment enhances the performance of cell culture therefore control systems are used to regulate values of temperature, pH and levels of dissolved gas in bioreactors. While describing control systems, two definitions need to be given; input, which is stilmulus or command applied to process, and output, which is response of system to input [16]. Feed-forward and feedback are two type of control system configurations. In the feedback method, displayed in Figure 5, output coming out of processor is sent to feedback controller where it is compared to set-point value, which is previously defined to system. Based on divergence from the desired value, corrective action is taken by the control mechanism. However in the feed-forward system, the output has not effet on the input as it can be seen from Figure 6. Necessary deviations are predicted and regulatory action is taken before the process happens [17]. Figure 5- Feedback control system . 7 Figure 6- Feed-forward control system 2.5 Supervisory Control and Data Acquisition (SCADA) A Supervisory Control And Data Acquisition (SCADA) system, is usually implemented on top of a real-time control. SCADA system gathers data from different sensors and collects them in a central computer managing data and control system. Water management, electric power, traffic signals, mass transit, environmental control and manufacturing systems are examples of industries using SCADA systems [18]. The SCADA system consists of a signal hardware with input and output, controllers, networks, a user interface called “human machine interface” (HMI), a software and a communication equipment. The main unit of the system is remote terminal unit (RTE), which is a programmable logic converter set to design requirements. Usually the SCADA system monitors and makes necessary changes automatically but it also allows for human intervention. The data collected in real time by the SCADA sensors are sent to the RTE where they are processed, and the RTE regulates changes if necessary. The data collected by the system are also displayed to user, who could make further modifications [18]. Also the system is able to plot measured variables on-line and display tables with information about data points, set points and process variables [19]. The pharmaceutical manufacturing industry is one of the fields where the SCADA systems are highly used. An article published at Genetic Engineering and Biotechnology News, reported that SCADA system becomes especially useful when bench-scale stirred tank bioreactors (STBRs) are in use. It has been mentioned that data from the STBRs need to be manually gathered at the absence of SCADA system [19] 8 One example of a SCADA package is BioXpert, a software designed by Applikon Inc. for biotechnologists, which enables researchers to control and optimize their biological processes. BioXpert can be used to collect data and manage bioreactors and fermenters [20]. Using the BioXpert online control system, optimum values for several design parameters, such as temperature, pH, dissolved gas levels, operation of pumps, can be regulated. Detailed information on running the BioXpert software is attached at Appendix 2. 9 3 Methodology The approach was to use BioXpert, a SCADA software, to feed bioreactors based on previously developed concentrated nutrient feed profiles. In this manner, three sets of experiments were performed: 1) Calibration of tubing and feed pumps 2) A run without cells or “dry run” and 3) An actual bioreactor run with cells fed using a BioXpert preprogrammed profile. 3.1 Experimental Procedure The experiments listed above were all conducted at the Abbott Bioresearch Center (ABC), 100 Research Drive, Worcester, MA. 3L Applikon glass autoclavable reactors with a working volume of 1.5 L, Applikon ADI 1030 biocontroller, Applikon ADI 1035 bio console and Sartorius TE series analytical balances were used for the experiments. Furthermore a computer with BioXpert NT version 2.25.091 was used. 3.1.1 BioXpert Run with CHO Cells After testing performance of the calibration curves, which are explained in section 4 of the report, an actual BioXpert run with live mAb-producing CHO cells was started to use a prescheduled feeding profile. The feeding schedule was used for pumping desired amount of nutrient feed to fed-batch bioreactors using the experimental set-up shown in Figure 7. A nutrient feed bottle located on a scale to verify the feeding amount was attached to bioreactor. Another bottle containing sodium hydroxide solution regulating the pH in the vessel was linked to the vessel. Two reactors were filled with media on March 12, 2008 and controls for regulating temperature, pH and oxygen were started. The next day, both reactors were inoculated with CHO cells. 10 Feed Figure 7- Experimental set-up of BioXpert run with CHO cells After the inoculation, each bioreactor was sampled daily and results were recorded in run sheets following protocol given: 1. Record date, time, and experiment day to the run sheet. 2. Document readings from the console for pH, temperature ( oC) and dissolved oxygen (%) to the run sheet. 3. Take out 10 mL of purge and 5 mL of sampling material with a syringe. 4. Introduce sampling material into Radiometer ABL5 blood gas analyzer (BGA) for measurements of pH, pO2 (mmHg) and pCO2 (mmHg). 5. Introduce sampling material into YSI 2700 Select Glucose & Lactate Analyzer for measurements of glucose (g/L) and lactate (g/L). 6. Transfer the sampling material to a test tube from the syringe. 7. Insert 1 mL of sampling material into Cell Density Examination (CEDEX) AS20 system, which is developed by Innovatis, to receive viable cell density (viable cells/ml) and viability (%) results. 11 8. Pipette 0.25 mL of sampling material to Advanced Instruments Osmometer 3900 cassette for osmolality (mOsm) reading. 9. From day 9, start retaining the sampling material for protein analysis. Place the solution into two small test tubes with similar weights and centrifuge it for 5 minutes at 1200 rpm to precipitate the cells. Later, freeze the supernatant at -80oC and discard remaining suspension. Details about the analyses, method and machines used for the tests listed above, namely Radiometer ABL5 blood gas analyzer, YSI 2300 STAT Plus Glucose & Lactate Analyzer, Cell Density Examination (CEDEX) system and Advanced Instruments Osmometer 3900 are attached as Appendix 3. To create the BioXpert algorithm, daily feed amounts obtained from previously performed feedback experiments were divided in three and duration of feeding was calculated using the calibration curves. It was decided to start the feeding schedule when viable cell density surpassed 3 million viable cells/mL. However, reactor I never reached the desired amount of viable cells since its pH and temperature controls of were turned off on day 5 (data not shown). Therefore, the feed program, presented in Table 1, was only applied to reactor II starting on day 6. Table 1- Feed schedule for reactor II Shots per Daily total feed Feed weight per Feeding duration day (g) shot (g) (sec) 1 3 5.95 1.98 65 2 3 7.78 2.59 85 3 3 9.52 3.17 104 4 3 10.39 3.46 113 5 3 6.18 2.06 68 6 3 4.44 1.48 49 7 3 2.65 0.88 30 Day 12 Using the feeding duration information, BioXpert program, displayed in Table 2, for monitoring flow of concentrated nutrient feed to the fed-batch bioreactor was created. Feeding continued for seven days and samples were taken until the last day of feeding, which was day 13. Table 2- BioXpert algorithm used in actual run Control statement Starting time Ending time pmp1=0 0:00 0:01 pmp1=pulse(59) 0:01 0:02 pmp1=pulse(6) 0:02 0:03 pmp1=pulse(59) 8:00 8:01 pmp1=pulse(6) 8:01 8:02 pmp1=pulse(59) 16:00 16:01 pmp1=pulse(6) 16:01 16:02 pmp1=pulse(59) 24:00 24:01 pmp1=pulse(26) 24:01 24:02 pmp1=pulse(59) 32:00 32:01 pmp1=pulse(26) 32:01 32:02 pmp1=pulse(59) 40:00 40:01 pmp1=pulse(26) 40:01 40:02 pmp1=pulse(59) 48:00 48:01 pmp1=pulse(45) 48:01 48:02 pmp1=pulse(59) 56:00 56:01 pmp1=pulse(45) 56:01 56:02 pmp1=pulse(59) 64:00 64:01 pmp1=pulse(45) 64:01 64:02 pmp1=pulse(59) 72:00 72:02 pmp1=pulse(54) 72:02 72:03 pmp1=pulse(59) 80:00 80:02 pmp1=pulse(54) 80:02 80:03 pmp1=pulse(59) 88:00 88:02 pmp1=pulse(54) 88:02 88:03 pmp1=pulse(59) 96:00 96:01 pmp1=pulse(9) 96:01 96:02 pmp1=pulse(59) 104:00 104:01 pmp1=pulse(9) 104:01 104:02 pmp1=pulse(59) 112:00 112:01 13 pmp1=pulse(9) 112:01 112:02 pmp1=pulse(49) 120:00 120:01 pmp1=pulse(49) 128:00 128:01 pmp1=pulse(49) 136:00 136:01 pmp1=pulse(30) 144:00 144:01 pmp1=pulse(30) 152:00 152:01 pmp1=pulse(30) 160:00 160:01 On the 13th day, bioreactor II was harvested. For the harvest process, material was taken and centrifuged for 30 minutes at 2100 rpm. Later, the supernatant was frozen at -80oC. After that day, the experiment was terminated and the material in the bioreactor was decontaminated and disposed. 14 4 Results and Discussion In this section of the report, preliminary experiments leading to actual BioXpert run, which was described in section 3.1.1, are explained. In addition, results obtained from the actual BioXpert run with CHO cells are presented. 4.1 Tubing Calibration Due to the small amount of feed needed for the vessel size, Masterflex SKU 96420-14 tubing with 1.6 mm internal diameter was selected [21]. It was expected to see deterioration in the tubing due to use. To test that, flow rates in both „new‟ and „used‟ portions of the tubing were measured. For the „used‟ portion, the tubing was tested at the end of major experiment (BioXpert run with CHO cells described in section 3.1.1 after completing seven days of feeding schedule. When the flow rates of „new‟ and „used‟ tubing were compared, it was determined that performance of the tubing remained constant throughout the experiment. Tubing calibration experimental set-up is shown at Figure 8. Figure 8- Tubing calibration experimental set-up 15 4.2 Calibration of Feed Pump The feed pumps were calibrated prior to performing experiments with CHO cells by using two techniques: 1) Flow rate and 2) Calibration curve. 4.2.1 Flow Rate Method Deionized (DI) water was used for avoiding complications, which may arise while working with nutrient feed solution in sterile. In order to calibrate the feed pump using the flow rate method, the amount of liquid going through the system for 3 minutes was measured using a graduated cylinder and stopwatch. The measurement was repeated three times, yielding an average of 0.075 mL/sec for DI water. By using the flow rate and correcting it for a feed density of 1.09 g/mL, the operating time of the pump was calculated. In order to prevent stressing the cells due to high amounts of feed, daily feed was into three equal shots per day. To test this, DI water was pumped from a bottle to another (placed on separate scales) following the schedule on Table 3 with the same experimental setup, which was described in section 4.1. Table 3- Nutrient solution feeding schedule Shots Daily total feed Feed weight per Feed volume per Feeding per day weight (g) shot (g) shot (mL) duration (sec) 1 3 17.86 5.95 5.46 73 2 3 23.35 7.78 7.14 95 3 3 28.87 9.62 8.83 118 4 3 31.18 10.39 9.53 127 5 3 18.55 6.18 5.67 76 6 3 13.33 4.44 4.07 54 7 3 7.95 2.65 2.43 32 Day The BioXpert algorithm was created using feeding duration information presented in Table 3. Feed pump called „pmp 1‟ was defined as „online control variable, digital output‟ in the software. Systematic procedure for the experiment is given in Appendix 2.9. The program consisted of control statements of „pulse‟ and „on-off‟ functions to control liquid flow from one 16 bottle to the other. With the „on-off function,‟ control statement was considered true (ON), when the expression was equal to any value but zero. Therefore, the pump was running when the statement was „pmp1=1‟ and was stopping when „pmp1=0‟. Using the „on-off function,‟ the pumps were in use for one or more minutes, however, with the „pulse‟ function, it was possible to operate the pump for smaller durations, in seconds. For instance, if the statement was „pmp1=pulse(13),‟ the pump was working for the first thirteen seconds of recording interval. Since the recording interval was set to be 1 minute, the pump was running for thirteen seconds every other minute. Using a combination of „on-off‟ and „pulse‟ functions, the algorithm presented on Table 4 was created. Since daily feed amount was divided in three, the same control statement was repeated three times in 24 hours. Table 4- BioXpert algorithm used in flow rate method Control statement Starting time Ending time (hr:min) (hr:min) pmp1= 0 0:00 0:01 pmp1=1 0:01 0:02 pmp1=pulse(13) 0:02 0:03 pmp1=1 8:00 8:01 pmp1=pulse(13) 8:01 8:02 pmp1=1 16:00 16:01 pmp1=pulse(13) 16:01 16:02 pmp1=1 24:00 24:01 pmp1=pulse(35) 24:01 24:02 pmp1=1 32:00 32:01 pmp1=pulse(35) 32:01 32:02 pmp1=1 40:00 40:01 pmp1=pulse(35) 40:01 40:02 pmp1=1 48:00 48:01 pmp1=pulse(58) 48:01 48:02 pmp1=1 56:00 56:01 pmp1=pulse(58) 56:01 56:02 pmp1=1 64:00 64:01 pmp1=pulse(58) 64:01 64:02 pmp1=1 72:00 72:02 17 pmp1=pulse(7) 72:02 72:03 pmp1=1 80:00 80:02 pmp1=pulse(7) 80:02 80:03 pmp1=1 88:00 88:02 pmp1=pulse(7) 88:02 88:03 pmp1=1 96:00 96:01 pmp1=pulse(16) 96:01 96:02 pmp1=1 104:00 104:01 pmp1=pulse(16) 104:01 104:02 pmp1=11 112:00 112:01 pmp1=pulse(16) 112:01 112:02 pmp1=pulse(54) 120:00 120:01 pmp1=pulse(54) 128:00 128:01 pmp1=pulse(54) 136:00 136:01 pmp1=pulse(32) 144:00 144:01 pmp1=pulse(32) 152:00 152:01 pmp1=pulse(32) 160:00 160:01 At the end of the experiment, it was determined that calculated feeding durations were inaccurate and the pump was in 10% to 30% overshooting error. Results obtained during 7day feeding schedule are shown in Figure 9. 90 80 Weight [g] 70 60 50 40 30 20 Expected Experimental 10 0 0 1 2 3 4 5 Reading # Figure 9- Results of flow rate method for reactor I 18 6 7 4.2.2 Calibration Curve Method For the second run, which entailed the same experimental set-up as described in 4.1, nutrient feed solution was used instead of DI water, to solve the overshooting problem and acquire more realistic results. Time range for pump to run in “ON” mode was roughly determined from the previous experiment as 10 to 130 seconds, and weight data associated with that range of time were collected. These weight values were plotted versus time and a curve with R2 figures of 0.9996 and 0.9984 were obtained for reactor I and II, respectively. Calibration curves for reactor I and II are shown in Figure 10 and 11. 14 Weight [g] 12 10 8 6 W = 0.0945t - 0.119 R² = 0.9996 4 2 0 0 20 40 60 80 Time [sec] 100 120 140 Figure 10- Calibration curve for reactor I 14 Weight [g] 12 10 8 6 W = 0.0934t - 0.1305 R² = 0.9984 4 2 0 0 20 40 60 80 Time [sec] 100 120 Figure 11- Calibration curve for reactor II 19 140 As observed from Figure 10 and 11, equation of the fitted curves are W= 0.0945t-0.119 and W=0.0934t-0.1305 for reactor I and II, respectively. With similar slopes and y-intercepts, it was determined that pumps located on different consoles had similar performance. 4.3 Dry Run After obtaining the equations for the two reactors, an experimental dry run was performed to verify the calibration curves and feeding algorithm created on BioXpert. Time variables (t) in the equations were solved for desired feed weight values (W) by “Goal Seek” function on Microsoft Excel. The desired feed values with their corresponding pump operating times are presented in Table 5. Table 5- Feed values with corresponding feeding durations Reactor I Feed weight (g) Reactor II Feeding duration calculated from goal seek (sec) 5.95 64.22 65.10 7.78 83.59 84.69 9.62 103.06 104.40 10.39 111.21 112.64 6.18 66.65 67.56 4.44 48.24 48.93 2.65 29.30 29.77 Feed durations calculated from the calibration curves were lower than the ones obtained from the flow rate method. Since feed pump was programmed to run for shorter durations, calibration curve method was expected to reduce overshooting. Due to BioXpert software‟s inability to identify decimal digits, the feeding durations were rounded to next integer. Algorithm, presented in Table 6, was created with „pulse‟ functions. 20 Table 6- BioXpert algorithm used in dry run Reactor I Reactor II Control statement Starting Ending time time pmp1=pulse(59) pmp1=pulse(59) 0:00 0:01 pmp1=pulse(5) pmp1=pulse(6) 0:01 0:02 pmp1=pulse(59) pmp1=pulse(59) 0:02 0:03 pmp1=pulse(25) pmp1=pulse(26) 0:03 0:04 pmp1=pulse(59) pmp1=pulse(59) 0:04 0:05 pmp1=pulse(44) pmp1=pulse(45) 0:05 0:06 pmp1=pulse(59) pmp1=pulse(59) 0:06 0:07 pmp1=pulse(52) pmp1=pulse(54) 0:07 0:08 pmp1=pulse(59) pmp1=pulse(59) 0:08 0:09 pmp1=pulse(8) pmp1=pulse(9) 0:09 0:10 pmp1=pulse(48) pmp1=pulse(49) 0:10 0:11 pmp1=pulse(29) pmp1=pulse(30) 0:11 0:12 Experimental values obtained at the end of the run, were closer to expected values than with the previous method and error margin was from -4.5% to 5.8%. Even though these percentages appeared to be large, they were negligible for the experiments since they correspond to only a change of -0.46 to 0.35 g. and this was considered adequate. The results obtained from the dry run of reactor I and II are shown in Figures 12 and 13, respectively. After confirming the accuracy of the BioXpert feeding algorithm, an actual fed-batch run with CHO cells using the feed-forward BioXpert algorithm was performed as described in the methodology section of the report. 21 12 Weight [g] 10 8 6 4 Expected Experimental 2 0 0 20 40 60 80 100 120 Time [sec] Figure 12- Dry run results for reactor I 12 Weight [g] 10 8 6 Expected 4 Experimental 2 0 0 20 40 60 80 Time [sec] Figure 13- Dry run results for reactor II 22 100 120 4.4 BioXpert Run with CHO Cells Results The growth curves, presented in Figure 14, where the y-axis is removed due to confidentiality agreement between ABC and WPI, compare the cell culture performance of the current BioXpert feed-forward experiment to previously generated data from manual feedforward and feedback experiments. The graphs present the number of viable cells (vc/mL) as a function of time (days). Green and pink curves present previously done feedback and manual feed-forward experiments performed by Keith Cochran, respectively. Blue curve demonstrates the control experiment and purple curve shows the cell density results for the BioXpert feedforward run described in section 3 of the report. As displayed in the figure, the feedback experiment yielded highest cell density, whereas BioXpert and manual feed-forward experiment generated similar results. The control experiment‟s cell density was lower than feedback Cell Density [cells/mL] experiments and higher than both of the feed-forward experiments were. 0 5 10 15 Time [days] Feedback experiment Control experiment Manual feed-forward experiment BioXpert feed-forward experiment Figure 14- Growth curves 23 Figure 15, where the y-axis is removed due to confidentiality agreement between ABC and WPI, compares the titer performance of the current BioXpert experiment to previously generated data from manual feed-forward and feedback experiments This figure shows the amount of Monoclonal Antibody (mg/L) produced from CHO cells as a function of time (days). The legend of Figure 15 describes the same experiments as for Figure 14. As seen from the figure, feedback and BioXpert feed-forward experiments produced similar titer results, whereas manual feed-forward experiments had lower titers. Control experiment generated titer results, Titer which were lower than previous feedback and both of the feed-forward experiments. 0 2 4 6 8 10 12 14 Time [days] Control experiment Manual feed-forward experiment Feedback experiment BioXpert feed-forward experiment Figure 15- Titer results Results of remaining tests, which were discussed in item #4, 5 and 8 of the protocol given in section 3.1.1, are presented in Appendix A of the report. Since the information gathered from these tests is not pertinent for the results of the experiments, they are not displayed in the main body of the report. 24 5 Conclusion and Recommendations Even though the same total amount of nutrient solution was fed to the bioreactors in each of the three experiments (feedback, manual feed-forward and BioXpert feed-forward), each set performed quite differently. Reason of this result was the different feeding strategies that were used. In the previous feedback experiments, sampling was carried out every two hours and feeding performed differently for each shot. For the manual feed-forward experiments, one single daily feed was performed. Finally, for the BioXpert feed-forward experiments, the solution was fed every 8 hours (3 times daily). The results presented in section 4 and Appendix 1 of the report are not conclusive since there are no replicates to demonstrate reproducibility. Assuming that the results are accurate, Feed-forward control mechanism was successfully implemented by using feed profiles generated from previous feedback experiments. Feed-forward control was applied on the nutrient feed by BioXpert, a SCADA system software. The viable cell density results obtained from the BioXpert feed-forward experiments were comparable to manual feed-forward experiments but both were lower than the feedback experiments. Since both of the feed-forward experiments yielded similarly low cell density results, it can be concluded that feedback control had a positive effect on the growth of CHO cells. The feedback and BioXpert feed-forward experiments generated similar amounts of monoclonal antibody; whereas manual feed-forward experiment produced lower values. Therefore, it may be determined that BioXpert algorithm had a positive effect on the protein production and helped the feed-forward control strategy to produce improved titer results. Levels of pH, partial pressure of CO2, glucose, lactate and osmolality were kept at desired values (refer to Appendix A for data). Partial pressure of O2 was mistakenly kept at high values of 78 to 121 mmHg (refer to Appendix A for data). Since there were no previous experiments performed at high pO2 levels, the effect of high range cannot be determined. 25 Recommendations for future work: The experiments should be repeated with more than 2 replicates to demonstrate reproducibility. Current cell line should be maintained to ease comparisons with the BioXpert experiments described in this report. Since during the feedback experiment nutrient solution was provided many times per day in smaller amounts (and it was the best performing so far), the same strategy, of 12 times feeding per day, should be applied. pO2 levels should be kept at ranges (50-70 mmHg) to facilitate comparison of results with previous experiments. 26 6 References 1. Ziegelbauer, K. and D.R. Light, Monoclonal antibody therapeutics: Leading companies to maximise sales and market share. J Commer Biotechnol, 2007. 14(1): p. 65-72. 2. Birch, J.R. and A.J. Racher, Antibody production. Advanced Drug Delivery Reviews, 2006. 58 (5-6): p. 671-685. 3. Ward, P.A., et al., Monoclonal Antibody Production, N. Grossblatt, Editor. 1999, National Academy Press: Washington. 4. National Health Museum. Monoclonal Antibody Technology - The Basics. 1989 [cited 2008 02.20]; Available from: http://www.accessexcellence.org/RC/AB/IE/Monoclonal_Antibody.html 5. Kohler, G. and C. Milstein, Continuous cultures of fused cells secreting antibody of predefined specificity. Nature, 1975. 256(5517): p. 495-497. 6. Microsoft Encarta Online Encyclopedia. Monoclanal Antibody. [Online Encyclopedia] 2007 [cited 2008 02.19]; 2007:[Available from: http://encarta.msn.com 7. Siegel, D.L., Recombinant monoclonal antibody technology. Transfusion Clinique et Biologique, 2002. 9(1): p. 15-22. 8. Kretzmer, G., Industrial processes with animal cells. Applied Microbiology and Biotechnology, 2002. 59(2): p. 135-142. 9. Butler, M., Animal cell cultures: recent achievements and perspectives in the production of biopharmaceuticals. Applied Microbiology and Biotechnology, 2005. 68(3): p. 283291. 10. Allison, D.W., et al., Deciphering the Mechanisms of Therapeutic Protein Production. Society for Biological Engineering, 2007: p. 48-52. 11. Puck, T.T., S.J. Cieciura, and A. Robinson, Genetics of Somatic Mammalian Cells: III. Long- Term Cultivation of Euploid Cells From Humand and Animal Subjects. J. Exp. Med., 1958. 108(6): p. 945-956. 12. Wurm, F.M., Production of recombinant protein therapeutics in cultivated mammalian cells. Nat Biotech, 2004. 22(11): p. 1393-1398. 13. Cochran, K., Personal Communication, C. Altin, Editor. 2008: Worcester. 27 14. Bibila, T.A. and D.K. Robinson, In pursuit of the optimal fed-batch process for monoclonal antibody production. Biotechnol. Prog., 1995. 11(1): p. 1-13. 15. Shuler, M. and Kargi, F. Bioprocess Engineering Basic Concepts. 2002, Upper Saddle River: Prentice Hall. 16. Dukkipati, R.V., Control Systems. 2005, Alpha Science Int'l Ltd. 17. Bailey, J.E. and D.F. Ollis, Biochemical Engineering Fundamentals. 1986, New York: McGraw-Hill Book Company. 18. What is SCADA Website. The Tech- FAQ 2007 [cited 2007 12.11]; Available from: http://www.tech-faq.com/scada.shtml 19. Tutorial: Evaluation of the CellFerm-Pro STBR System in Genetic Engineering & Biotechnology News. 2005. 20. Applikon Biotechnology. SCADA software for Biotechnologists. [cited 2007 12.11]; Available from: http://www.applikon-bio.com/cgi-bin/applikonbio/menu-software.html 21. Cole- Parmer. Precision BioPharm Silicone Tubing 2008 [cited 2008 04.23]; Available from: http://www.coleparmer.in/catalog/product_view.asp?sku=9642014. 22. Applikon Dependable Instruments, BioXpert NT Supervisory Control & Data Acquisition Program User Manual. 1999. 23. YSI Corporate. YSI 2700 Select Glucose & Lactate Analyzer. 2001 [cited 2008 04.22]; Available from: http://www.ysilifesciences.com/extranet/BTKL.nsf/447554deba0f52f2852569f500696b2 1/f0bd9f7a891d90a4852569e70047a6fe!OpenDocument. 24. Radiometer. ABL5 redirect. [cited 2008 04.22]; Available from: http://www.radiometeramerica.com/abl5. 25. Innovatis AG. Cedex Trypan Blue Cell Counting Cell Viability Gold Standard Microscope Hemacytom. 2007 [cited 2008 04.22]; Available from: http://www.innovatis.com/products_cedex_product-description. 26. Dianova Inc. Innocatis AG. [cited 2008 04.22]; Available from: http://www.dianovainc.com/innovative/ProductsServices/innovatis/tabid/78/Default.aspx. 27. Advanced Instruments. Advanced 3900 Specifications. [cited 2008 04.23]; Available from: http://www.aicompanies.com/AI_products/3900/3900.htm. 28 Appendix 1: Experimental data For the graphs that are presented in Appendix A of the report, the y-axes were removed due to confidentiality agreement between ABC and WPI. A1.1. Blood Gas Analyzer Results pH A1.1.1. pH Measurement 0 2 4 6 8 10 12 14 10 12 14 Time [d] Figure A1.1- pH plot pO2 [mmHg] A1.1.2. Partial Pressure of Oxygen Measurement 0 2 4 6 8 Time [d] Figure A1.2- pO2 plot 29 pCO2 [mmHg] A1.1.3 Partial Pressure of Carbon Dioxide Measurements 0 2 4 6 8 10 12 14 Time [d] Figure A1.3- pCO2 plot A1.2. Glucose and Lactate Analyzer Measurements Glucose [g/L] A1.2.1. Glucose Measurement 0 2 4 6 8 Time [d] Figure A1.4- Glucose plot 30 10 12 14 Lactate [g/L] A1.2.2. Lactate Measurement 0 2 4 6 Time [d] 8 10 12 14 12 14 Figure A1.5- Lactate plot Osmolarity [mOsm] A1.3. Osmometer Measurements 0 2 4 6 8 10 Time [d] Figure A1.6- Osmolality plot 31 Appendix 2: BioXpert Software In this section of the report, key features of the BioXpert software are detailed and procedures for running the software are provided. The information was compiled from official BioXpert software [22] and personal experience with the software. For the experiments that are described in previous sections of the report, BioXpert NT Version 2.25.091 was used. A2.1. Start a new run 1. To start a new run on BioXpert double click on BioXpert software shortcut from the desktop. On the computer number 20203283 in laboratory 3090, there are seven shortcuts for BioXpert software on the desktop. It would be best to select the shortcut that is associated with the bioreactor that will be used during the experiments to avoid any unwanted control process. 2. After double clicking on the shortcut icon, “New Cultivation or Recalculation Window” will appear on computer screen. 3. Input user name, program mode and “fermentor number.” 4. After making the selections, press the “OK” button. Under the “run” tab of the software, clicking on “new” will open the “Cultivation Description” dialog, displayed in Figure A2-1, where organism name and comments can be inserted. 5. After hitting the “OK” button on the “Cultivation Description Dialog” window, another dialog box will be opened for putting the name of the file where the data collected from the experiment will be saved. 6. Input the file name and press the “OK” button. 7. The “Online Session window” will be opened where the start-time of the run, elapsed time of the run, online input variables and control values may be observed as well as the algorithms and profiles created, may be reached. 32 Figure A2.1 - Cultivation description dialog A2.2. Define online variables 1. In order to define an online variable to the BioXpert NT Version 2.25.091, press the “variables” button located under the tab menu “install” and input the name of the online variable. 2. Choosing between the “measure” and “control” enables different selections for further menus. For instance, the “measure” will give options for “input,” “controller output,” “dose monitor,” “value of analog output,” “value of digital output,” “status of digital output,” and “value of set-point” for defining the online variable. The “control,” will give options for “set-point,” “value of analog output,” and “status of digital output.” 3. Make desired selections and hit “OK” to confirm them. A2.3. Define offline variable The main function of editing and defining off-line variables window is to introduce a new constant value for calculations that may be performed during experiment. 33 1. Offline variables may be defined from “data editor menu” by clicking on “offline” and then, “new” buttons. 2. From the “New variable” window, shown in Figure A2.2, name, scale unit and comment for the offline variable are entered. 3. It is possible to change time intervals of the offline variable. To do so, click on “timing” button from “edit offline variables” window. 4. Clicking on the timing button will initiate another window through which default interval and time points may be modified. Figure A2.2- New variable dialog A2.4. Define formulas In BioXpert software, formulas may be used for calculations of constants, other formulas, on-line and off-line variables. There are already three sets of formulas implemented into the software for batch, fed-batch and continuous operating modes. 1. The formulas can be modified from “edit formulas” window, which is presented in Figure A2.3. 2. New formulas can be entered by clicking on “new” button leading to another screen, where name, scale unit and comment of the formula may be defined. 34 3. While defining or modifying the formula, “Items” button can be used to facilitate the procedure. Figure A2.3- Edit formulas dialog A2.5. Install new device 1. In addition to pH, temperature and oxygen probes coupled with the bio console and BioXpert software, further devices may be installed on the software through “new device” dialog under “install” tab, which leads to another window. 2. On that window, communication interface between the computer and the new device has to be defined as either “ADDA card,” shown in Figure A2.4 or “serial port,” displayed in Figure A2.5. 3. For “ADDA card” selection, the name and I/O port address of the device need to be entered and “ADDA card” test may be run to check signals between the device and computer. 4. For the “serial port” option, protocol and com ID are defined to the software. Setting of baud rate, data bits, parity and stop bits are changed from “settings” button for serial port selection. 35 Figure A2.4- ADDA card test dialog Figure A2.5- Serial port dialog A2.6. Creating charts Data collected from a BioXpert run may be displayed on a chart window. 1. To do so, it is necessary to define x and y-axes of the plot from “chart” menu. 2. “Variables in y-axis,” shown in Figure A2.6, dialog under the “chart” menu includes measured and controlled on-line variables, off-line variables, constants, formulas and formulas boxes listing all defined variables. Variables that are desired for y-axis of the plot may be highlighted from boxes located in the window. 36 Figure A2.6- y-axis variable selection dialog 3. Usually “TIME” is selected for the x-axis. However, several other possibilities for x-axis variable are listed under “time or variable in x-axis” window, which is shown in Figure A2.7. 4. The selected x-axis of the plot can be highlighted from that window. 5. In addition, scale range of the axis may be edited by inserting minimum and maximum time values in hr:min units to appropriate boxes. Figure A2.7- x-axis selection dialog 37 6. After selecting the axes, scaling of individual y-axis variables may be edited by “scaling settings” window under the “chart” menu. 7. In addition, it is possible to modify chart area via “chart options” window, which can be viewed from the same menu. Inserting a header, name for x-axis, using decimal time format, view zero lines, scale units, grid and sample points, as well as placing the y-axis name in the chart window may be done through “chart options” window. 8. Once the graph is created, it can be saved from “chart pictures” dialog and be viewed later. A plot created on BioXpert is displayed in Figure A2.8. Figure A2.8- View of chart A2.7. Define manual set-point It is possible to control cultivation parameters such as pH, temperature and dissolved oxygen level by manually defining setpoints to the software. 1. In “manual setpoint for …‟ window, displayed in Figure A2.9, value of the setpoint is entered into the box and manual box is checked. 2. The control starts as soon as user hits OK. 38 Figure A2.9- Set-point dialog A2.8. Create control algorithm A Control algorithm can be created in order to regulate control for one or more variables over time. 1. In the “control algorithm” window; first, the name of the algorithm is entered, and then control statements are listed with their starting and ending times. In that window, displayed in Figure A2.10, control interval is displayed in minutes:seconds in either “R” (reading interval) mode, “C” (custom interval) mode or “C+” (custom interval with synchronization with reading moment) mode. 2. For control, statements such as “IF…ELSE … ENDIF,” “variable=expression,” “-nr,nr,…,” “+nr, nr,…,” “GOTO nr” and “STOP” functions can be used. Additionally, Applikon bio technical services can provide support with additional functions. 39 Figure A2.10 - Control statement dialog A2.9. Step-by-step Procedure 1. Using the computer number 20203283 in laboratory 3090, click on BioXpert icon corresponding to the number of bioreactor that you are working with. 2. After double clicking on the shortcut icon, “New Cultivation or Recalculation Window” will appear on computer screen. 3. Select user name. Input program mode as “cultivation” and check to see that the “fermentor number” matches with the number of reactor that is being used. 4. After entering necessary information, press the “OK” button. 5. Under the “run” menu, click on “new.” 6. Enter organism name and comments, if desired, to appropriate boxes and click “OK.” 7. After hitting “OK,” “Cultivation parameter” window will appear on the computer screen. 8. Make sure that “access interval” is 1 minute. 9. Input the file name describing the experiment in “protocol data” box and press the “OK” button. 10. The “Online Session window” will be opened. 40 11. To define feed pump, click on “variables” from “install” menu. 12. Make sure that the device name is “AD11040(x)” where x represents the number of bioreactor that is in use. 13. Input the name of the online variable as “pmp1.” 14. Define the pump as “control” and “status of digital output.” 15. Input descriptive comment such as “nutrient feed pump.” (Units box may be left blank) 16. Choose “1” for channel number and hit “ADD,” and click on “DONE” to confirm. 17. Enter the setpoint values for temperature, pH and dO 2 from “manual setpoint for…” window and check the “manual” box and hit “OK.” 18. From “control laws menu”, click on “manual setpoint” and select variable that will be manually controlled (e.g. pHC and temperature). 19. Input the setpoint value to “manual setpoint” window and click “OK.” Repeat steps 18 & 19 if there are more than one variable controlled manually. 20. Go back to “on-line session” window. 21. Click on “algorithm” and copy the algorithm pattern given in section 3, on Table 2. 22. After completing the algorithm, click on “CHECK” to see if there are any mistakes in the algorithm such as undefined variables or statements. 23. If there is no error on the algorithm, click on “DONE.” 24. Once the algorithm is created, set the feed pump to “remote” mode from the console that is located on the bench, next to bioreactor that is in use. 25. To stop the experiment, click on “END” from the “on-line session window.” 41 Appendix 3: Properties for test machines A3.1. Blood Gas Analyzer The information below was taken from official website of the manufacturer, YSI [23]. YSI 2700 SELECT Bioprocess Monitoring Fermentations and cell cultures require tight control of system variables to achieve consistent, desirable results. Regulating variables such as oxygen, pH, and temperature has long been accepted as important for assuring viable processes. More recently, researchers have recognized the need to regulate nutrients and byproducts as well, and have determined that controlling them plays a vital role in the health and productivity of their processes. TM The YSI 2700 SELECT Biochemistry Analyzer provides vital information about your processes. It provides rapid, accurate analysis of key nutrients and byproducts, including: Glucose L-Lactate L-Glutamine L-Glutamate Ethanol Lactose Sucrose Galactose Hydrogen peroxide Methanol Sample analysis can be done two ways, off-line or on-line. Off-Line Analysis For many processes, off-line analysis is a good method for monitoring nutrients or byproducts, particularly if consumption or production rates are slow. As a benchtop analyzer, the YSI 2700 SELECT is easy to use and provides results quickly—in 60 seconds. Sample volume requirements are low (about 25 µL) which allow you to run as many samples as you want. And the best feature of all is that no sample preparation is required (no filtration and no dilution in most cases). Specifications YSI 2700 Analyzer Aspirated sample volume: Analysis time: User selects 5 to 65 microliters 60 seconds 42 Precision: Linearity: Calibration: Size: Working environment: Power: Battery backup: Regulatory Compliance: <2% CV, n=10 ±5%, calibration value to range maximum User selects frequency 35.6 x 25.4 x 35.6 cm, 11.4 kg (14 x 10 x 14 inches, 25 lbs) 15 to 35°C ambient temperature, 10 to 90% relative humidity (noncondensing) 110-120 VAC or 220-240 VAC 50-60 Hz 50 Watts nominal Rechargeable Ni-Cad batteries to back up RAM. CE, CSA Analog/Control Full Scale Voltage: Full Scale Concentration: Resolution: Selectable: +10.00 VDC or +5.00 VDC User selectable via software as 1, 2, 3 or 4 x Calibrant Concentration. 1:4096 or 0.02% FS, 2.44 mV on +10.00 VFS, 1.22 mV on +5.00 VFS Maximum Offset: ±4 LSB Linearity: ±1 LSB Minimum analog output Load Impedance: . 2K Ohms Logic output drive: 0 and 5 VDC nominal at 4 mA Logic Input levels: < 0.8 VDC = logic 0, > 3.5 VDC = logic 1 43 A3.2. Biochemistry Analyzer The information below was taken from official website of the manufacturer, Radiometer [24] . Radiometer ABL5 Fulfill your basic critical care testing needs Measures pH, pCO2 and pO2 from 85 µL wholeblood sample Improve cost efficiency High reliability, stability and standby function reduce operating costs Cost-effective analyzer - especially for units running only few tests per day Simplify your work routine Easy sample introduction Intuitive user interface Minimum maintenance Simple replacement of solutions 44 pH pCO2 pO2 A3.3. Cell Density Examination (CEDEX) System The information below was taken from official website of the manufacturer, Innovatis [25]and Dianova Inc website [26]. Product Description The Cedex is the first automated cell counting system based on the well-established Trypan Blue exclusion method for determining cell viability. Designed by innovatis AG in 1995, the proven technology has become the "Industry Gold Standard" in the pharmaceutical and biotechnology industries. Today, more than 600 systems are in operation world-wide. Cell count and cell viability are two of the most important parameters in cell culture related production and research. Traditionally, these parameters are determined manually with the aid of a microscope and a hemacytometer after staining the cells with Trypan blue. However, manual counting is known to be timeintensive, user-dependent and not reliable. The Cedex has automated the manual method in order to provide the user with more accurate and precise data about cell count, viability and additional important parameters within minutes. Sample handling, staining, cell counting and graphical analysis of the results are performed automatically by the Cedex. The result data are self-explanatory and can easily be archived. The optional MS 20 Multisampler can convey up to 20 samples in sequence to the Cedex measurement without the need for user interference. The hardware can be easily integrated into existing networks. Integration of the Cedex technology into automated process lines can be achieved via a Telnet port (TCP/IP Protocol) based on a "Remote Control" software feature. innovatis AG also offers integration services for existing Laboratory Information Management Systems (LIMS). The Cedex technology has been proven to fit into GMP processes and complies with the requirements of 21 CFR Part 11. Measurement results of Cedex: cell viability cell density cell size cell morphology aggregation rate 45 Technical Description Method of measurement Digital image recognition Viable/dead cell differentiation Trypan Blue Exclusion Method Detectable cell density range 5 x 10⁴ - 1 x 10⁷ cells per mL Detectable cell diameter range 8 µm - 40 µm Required sample volume 1000 µL Average measurement period < 4,0 min Geometric resolution 2.1 µm/Pixel Chamber height 100 µm Material and capillaries Diameter of the Teflon, 765 µm Operating temperature (Optimal image quality is achieved between 20 °C and 30 °C) 10 °C - 35 °C (50 °F - 95 °F) Operating humidity 20 % - 80 % relative humidity (non-condensing) Dimensions (Height/Width/Depth) 660 mm / 300 mm / 500 mm Weight 34 kg 46 Energy requirements 100 - 250 VAC, 50 - 60 Hz Energy consumption 60 W Computer Operating system Windows XP® Professional 47 A3.4. Osmometer The information below was taken from official website of the manufacturer, Advanced Instruments [27]. The Advanced Model 3900 Multi-Sample Osmometer is designed to automate testing for laboratories processing moderate to high volumes of samples. By using the industry-preferred method of freezing-point technology for an accurate determination of total concentration, combined with high, continuous throughput, the Advanced Instruments Model 3900 will provide your laboratory optimal efficiency - easily accurately, and reliably. Applications: Clinical Medicine Medical Research IVD Test Development Bio-Processor Control Biopharmaceutical Monitoring Exercise Physiology and Athletic Conditioning Key Features: Continuous Throughput for Increased Productivity Tamper-Proof Results Full Automation STAT Capability Unmatched Customer Service Model 3900 Multi-Sample Osmometer Specifications Sample Volume 0.2 to 0.3 mL (glass or disposable plastic tubes) Test Time 90 seconds per sample typical Sample Throughput Approximately 30 samples per hour Sample Capacity Up to 30 samples at one time, continuously re-loadable Units mOsm/kg H2O Resolution 1 mOsm/kg H2O Range Low: 0 to 1550 mOsm/kg H2O High: 1450-4000 mOsm/kg H2O Communications On-board printer, DTE RS-232 serial port, and optional barcode scanner 48 Performance at Reference Conditions* Linearity Low Range: Less than ±0.5% from a straight line between 0 and 1500 mOsm/kg H2O High Range: Less than ±1.0% from a straight line between 1500 and 4000 mOsm/kg H2O Repeatability ±2 mOsm/kg H2O (1 S.D.) between 0 and 400 mOsm/kg H2O; ±0.5% (1 S.D.) between 400 and 4000 mOsm/kg H2O Drift Less than 1 mOsm/kg H2O per month Performance Over Operating Conditions Temperature Effects Less than 1 mOsm/kg H2O per 5° C (9°F) ambient temperature change Operating Conditions Temperature Low Range: 18 to 35°C (64 to 95°F) High Range: 18 to 30°C (64 to 86 °F) Humidity 5 to 80% relative humidity, (non-condensing) Storage Temperature -40 to +45°C (-40 to +113°F) Electrical Voltage 100 to 130 VAC (50-60 Hz) or 200 to 250 VAC (50/60 Hz) Power Consumption 350 Watts Dimensions 21.5" H x 21.5" W x 20.0 " D (54.6 cm x 54.6 cm x 50.8 cm) Net Weight 66.0 lbs. (30.0 kg) Shipping Weight 105.0 lbs. (47.7kg) Warranty One-year limited warranty on workmanship and all parts except glass, plastic, and parts warranted by their makers Certification *Reference Conditions 20 to 25°C (68 to 77°F); 40 to 60% relative humidity; tolerances of reference or calibration solutions excluded For more information on the Advanced Instruments family of tests, please call 800-225-4034 49