1
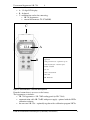
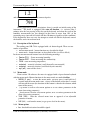
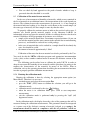
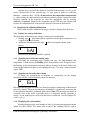
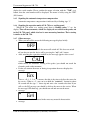
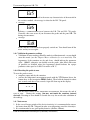
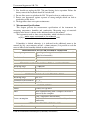
LAB-EL Elektronika Laboratoryjna Sp.J.
(Laboratory Electronics)
ul. Herbaciana 9, 05-816 Reguły
tel: (022) 7536130, fax: (022) 7536135
email: [email protected]
internet site: http://www.label.pl/
User's manual of the LB -798 hygrometer
Version 1 1.4 October 2010
from the firmware version 2R0
LB79x program version 1.05
1
Continuous development of our products sometimes causes need to make changes that are not described in this
manual
User manual hygrometer LB -798
2
CONTENTS
1.
1 DESCRIPTION OF THE HYGROMETER..................................................... 3
1.1 Elements of the hygrometer..................................................................................... 3
1.2 Performance of the measurement – short description ............................................ 5
2.
OPERATION OF THE HYGROMETER ........................................................... 5
2.1 Switching on and off................................................................................................. 5
2.2 Description of the keyboard..................................................................................... 6
2.3 Menu mode............................................................................................................... 6
2.3.1 Menu options ..................................................................................................... 6
2.4 Measurement of humidity and conductivity of the material .................................. 7
2.4.1 Measurement of material moisture...................................................................... 7
2.4.2 Conductivity measurement of the material.......................................................... 8
2.4.3 A method for filling a container with material .................................................... 8
2.5 Measurement of the material temperature ............................................................. 9
2.6 Audible signal level of humidity .............................................................................. 9
2.7 Calibration of the meter for new materials........................................................... 10
2.7.1 Entering the calibration mode........................................................................... 10
2.7.2 Performance of calibration measurements ........................................................ 11
2.7.3 Processing of measurement results ................................................................... 11
2.7.4 Entering the characteristics of the material to the meter memory – operation of
the LB79x software ......................................................................................... 12
2.7.5 Checking the meter readings for the new material ............................................ 14
2.8 Measurement of the dielectric constant of the material ....................................... 14
2.9 Displaying an additional information.................................................................... 15
2.9.1 Battery low voltage indication .......................................................................... 15
2.9.2 Signaling excess of the measuring range........................................................... 15
2.9.3 Signaling an electrodes short circuit ................................................................. 15
2.9.4 Displaying the serial number ............................................................................ 15
2.9.5 Signaling the automatic temperature compensation .......................................... 16
2.9.6 Signaling the operation mode of LB- 796 as a reading panel............................. 16
2.9.7 Other messages ................................................................................................ 16
2.10 Validation hygrometer readings............................................................................ 17
2.10.1 Resetting the probe to zero ............................................................................... 17
2.11 Notes on use............................................................................................................ 17
3.
MEASUREMENT SPECIFICATIONS ............................................................ 18
LAB-EL Elektronika Laboratoryjna (Laboratory Electronics)
2
User manual hygrometer LB -798
3
1. 1 Description of the hygrometer
LB -798 materials hygrometer is designed to measure a moisture of bulk materials,
especially construction aggregate, for example sand, grain and other materials with a
grain diameter up to several millimeters. You can save to the memory the
characteristics of the materials of any user (up to 50 characteristics) using the LB79x.
Calibration of the meter for the new material may be performed by an User or the
LAB- EL lab after delivery of material samples.
The operating principle of hygrometer is based on the measurement of constant of
dielectric material by a capacitive method. The measured material should be poured to
the container (350 ml capacity), which belongs to the meter equipment. The dielectric
constant of a dry material such as sand is about 4, while the dielectric constant of
water is 80. Wet sand has intermediate dielectric constant values - on this basis the
moisture is calculated. In addition, it is possible to estimate the conductivity of the
material and to measure its temperature (using the internal sensor is connected to the
lower part of the container).
The hygrometer is not a stand-alone device and the panel LB- 796P (or LB- 796A)
is required to read the results of measurements.
The main characteristics set hygrometer LB- 796P + LB -798 are as follows:
• easy to read LCD display, energy-efficient measuring microprocessor
• meter can be calibrated for any material supplied by the user to the lab – the
calibration parameters are stored in non-volatile memory of the meter (it is
possible to store up to 50 types of materials), you can get the meter calibration
certificate for the type of material,
• temperature measurement with a sensor built in the meter for the range of 20...70 °C, it is also possible to measure temperature using the optional
external sensor TL-2/796/DB9 which may be connected to the panel LB- 796,
• battery powered,
• measurement of the dielectric constant of the material
• ability to measure the conductivity of the material,
• sound signaling of humidity level after crossing preset humidity threshold
• the hygrometer automatic switch off after 3 minutes of inactivity,
• signaling of the measuring range exceed,
• remembering of the last selected material,
• short circuit signaling of the meter electrodes - this way we obtain an
unambiguous measurement of humidity,
• Battery low voltage indication
• auto-zero function when you turn on the meter, it is also possible to reset on
request.
Elements of the hygrometer
Location of elements on the LB- 796P panel, which are accessible for the user, is
presented one the Figure 1.
1.1
LAB-EL Elektronika Laboratoryjna (Laboratory Electronics)
3
User manual hygrometer LB -798
4
• A - 3.5 digit LCD display,
• B – keyboard,
• C - multifunction socket for connecting:
o LB-798 hygrometer,
o external thermometer TL-2/796/DB9,
C
M
%
12.4
A
B
Wilgotnościomierz materiałów - material
hygrometer
Sonda pojemnościowa - capaticance probe
Sonda rezystancyjna - resistance probe
materiał - material
wył - off
pomiar - measurement
TAK – OK
NIE – ESC, NO
Figure 1 Panel LB-796P – view from the keyboard
From the bottom there is an access to the battery.
The hygrometer set includes:
• LB -798 hygrometer + LB- 796P reading panel (or LB- 796A)
• communication cable LB- 79xRS with power supply - optional with the LB79x
calibration software,
• the converter LB-376c – optionally together with a calibration program LB79x.
LAB-EL Elektronika Laboratoryjna (Laboratory Electronics)
4
User manual hygrometer LB -798
5
Performance of the measurement – short description
This chapter presents a short description of the material moisture measurement,
the conductivity of the material and the temperature of the material. More details
regarding operation of the meter is presented in the Chapter 2, you should be aware of
them.
To measure the moisture content one should perform the following activities:
• connect hygrometer LB-798 and LB- reading panel 796 (to the socket labeled
C in Figure 1), attached to the socket with the screws included in the plug
probe,
• pour the material into a container to full (see chapter "Method for filling a
container with material" ),
• wait for the stabilization of temperature, if the material has a different
temperature than the hygrometer,
• press any button to turn the meter on except the "wył" (off) button. – wait for
the appearance of the "798" inscription and press the "Pomiar POJ" (moisture
measurement) button,
• the display will show the "CAL" inscription, which indicates auto-zeroing of
the meter and then the symbol of recently selected material, the symbol
shown on the screen will inform, that the moisture measurement mode is on.
• choose the right material by pressing the "materiał+ or materiał-" (material),
you will see its three-character code, a list of materials stored in the meter and
the corresponding codes can be found in an additional annex to the manual,
• Press the "Pomiar POJ" button again – the character % with the
measurement of humidity will be displayed on the screen,
• If the measurement result is blinking, it means exceeding the measuring range,
• when you press the "Pomiar REZ." (resistance measurement) button, the
conductivity of the material will be displayed in mS / m (miliSimens / meter) about the resistance measurement activity will inform you the symbol
on
the screen,
• after pressing the T/RH the temperature of the material will be displayed, the
activity mode is indicated by temperature symbol °C.
1.2
2. Operation of the hygrometer
Switching on and off
Before switching on, the device must be connected to reading panel LB- 796 and
LB -798 probe (socket labeled as C in Figure 1).
Turning the panel on may be done with any button other than the "wył" (off)
button, which is for the switching off. After you turn the display moisture meter on, for
a moment internal firmware version of panel LB- 796 will display with a single letter
version of the meter, for example:
2.1
2.2P
and then the firmware version of the connected probe will be shown, for example:
LAB-EL Elektronika Laboratoryjna (Laboratory Electronics)
5
User manual hygrometer LB -798
6
1.2
and after a moment the symbol of connected probe:
798
During displaying of these inscriptions, there is carried out initial testing of the
instrument. The meter is equipped with auto off function – it activates after 3
minutes after the last pressing of any key on the keyboard, and when the result of the
humidity measurement has not changed in that time by more than 10% of the
measuring range (auto off will switch off after 10 minutes regardless of this condition).
If the hygrometer does not react for attempt to switch off with the keyboard, remove
the batteries and re-insert them back.
Description of the keyboard
The reading panel LB-796 is equipped with a 6- button keypad. There are two
modes of operation:
• measurement mode - button functions are described in black,
• menu mode - button functions are described in blue (see Menu Mode).
In the measurement mode buttons have the following meanings:
• Pomiar POJ. - Starts measuring humidity
• Pomiar REZ. - Starts measuring the conductivity,
• T/RH - starts measuring temperature,
• materiał+ - material selection (scroll forward by one material)
• materiał- - material selection (scroll back by one material)
• wył. (off) - turns off the device.
2.2
Menu mode
From version 2.0 software, the meter is equipped with a 6 press button keyboard
with the menu mode. Button functions in the menu mode are marked in blue:
• MENU (2 sec.) - to start the menu mode, you may press it and hold for 2
seconds until the menu mode starts, release of the button earlier than 2 seconds
will turn off the meter (the function of this button is shared with a button, which
turns off the meter).
• ↑ up arrow is used to select menu options or to set various parameters in the
menu (increasing parameter)
• ↓ down arrow is used to select menu options, or to set various parameters in the
menu (decreasing parameter)
• TAK (YES) - enter the selected menu item or approval of an adjustable
parameter in menu,
• NIE (NO) - exit from the menu (or go up one level in the menu).
2.3
2.3.1 Menu options
• bu - threshold activation for audible signals
LAB-EL Elektronika Laboratoryjna (Laboratory Electronics)
6
User manual hygrometer LB -798
7
• Pro - calibration mode, selecting this mode will input in calibration mode (you
cannot exit this mode by pressing the "NIE" (NO) button - you have to turn off
the meter).
• nr - (no) displays serial number of probe LB -798.
2.4
Measurement of humidity and conductivity of the material
2.4.1 Measurement of material moisture
Material moisture measurement should be carried out as follows:
• connect hygrometer LB -798 and LB- reading panel 796 (to the socket labeled
C in Figure 1), attached to the socket with the screws included in the plug
probe,
• pour the material into a container to full (see chapter "Method for filling a
container with material" ),
• wait for the stabilization of temperature, if the material has a different
temperature than the hygrometer,
• after turning the hygrometer display, when the 798 inscription shows, press
"Pomiar POJ" button - the display will read after a moment:
CAL
indicating the auto-zeroing of capacitance probe (at the time do not touch the
probe electrode) and the symbol for the last selected material will show. The
displayed symbol
, informs that an activity of humidity measurement
mode is on.
• by pressing the "materiał+" button or "materiał+" button - select the material
code, which moisture has to be measured. This code will show up on the
display. The list of available materials and corresponding codes may be found
in an additional annex to the manual,
• Press the "Pomiar POJ" button again - the character % will show on the
display with some humidity measurement result (lower measurement range),
%
21.3
• If the measurement result is blinking, it means exceeding the measuring range,
• when the display shows alternately with the measurement of humidity message
like this:
%
ErL
this means that the probe electrodes short circuit (too high a conductivity of the
material caused by salinity). The measurement result may be incorrect.
• during the measurement of the moisture flashes °C, this means that the active
temperature compensation for material moisture is on.
LAB-EL Elektronika Laboratoryjna (Laboratory Electronics)
7
User manual hygrometer LB -798
8
• it is possible to set the moisture threshold, from which the system beeps (see
chapter Sound signal of the moisture level).
2.4.2 Conductivity measurement of the material
Conductivity measurement of the material should be carried out as follows:
• connect hygrometer LB -798 and LB- reading panel 796 (to the socket labeled
C in Figure 1), attached to the socket with the screws included in the plug
probe,
• pour the material into a container to full (see chapter "Method for filling a
container with material" ),
• wait for the stabilization of temperature, if the material has a different
temperature than the hygrometer,
• after turning the hygrometer on, when the display will show 798 inscription
press Pomiar REZ button. - the display will read for a moment:
CAL
indicating the auto-zeroing capacitance probe (do not touch at the time the
probe electrode) and then some conductivity measurement result in mS / m
(miliSimens / meter) will display,
6.2
• when the display shows alternately with the measurement of conductivity
message like this:
%
ErL
this means that the probe electrodes short circuit (too high a conductivity of the
material caused by salinity).
• conductivity of the material should not be confused with the conductivity of
water in the material.
2.4.3 A method for filling a container with material
The method of electrodes placing in the material has a decisive influence on the
accuracy of the measurement of humidity and conductivity of the material. First of all,
the container must be filled to full, to obtain the correct measurement result. There
are two ways to pour material to the container:
• with manual compaction of the material,
• without compaction.
It is important that the material does not create air bubbles that cause a downward
deviation of the measurement result. For construction aggregates measurement, it is
necessary to feed the container with a tablespoon, by layers at about 2cm, compacting
aggregate at every layer (with a spoon). For other materials, the material should be
filled with gradual manual compacting, unless the material is in the form of defined
LAB-EL Elektronika Laboratoryjna (Laboratory Electronics)
8
User manual hygrometer LB -798
9
pellets and does not form air bubbles - in this situation the material may be poured
without compacting (for example for grains). Material compacting should be applied
for the following materials: sand, construction aggregates, sand, slag, soil, coal
dust, fine coal, copper sulphate.
Additional information during the measurement:
• the humidity measurement (conductivity) to select the sample of the material
for the measurement to be hygro representative of the entire sample, or need to
do some measurements and average (mix the measured material)
• after the measurement, clean and wash the container
• metal elements contained in the material increase the result.
Measurement of the material temperature
A thermistor temperature sensor is placed in the bottom of the container.
Measurement of the material temperature should be carried out as follows:
• connect hygrometer LB -798 and reading panel LB- 796 (to the socket labeled
C in Figure 1), attached to the socket with the screws included in the plug
probe,
• pour the material into a container,
• if the material has a different temperature than the hygrometer, wait for
stabilization of temperature,
• After turning the display shows 798. Press T/TH - display will briefly read:
2.5
CAL
indicating the auto-zeroing capacitance probe (do not touch at the time the
probe electrode) and then displays the symbol °C and temperature measurement
results such as:
°C
23.4
• If the measurement result is blinking, it means exceeding the measuring range.
Audible signal level of humidity
The meter can be set for the humidity threshold alarm sounds. The default
threshold is 50 %, if you need a different threshold, it can be set in the range 0..199.5
% in increments of 0.5 % in the following way:
• start the menu mode and select the bu menu option,
• confirm the setting with "TAK" (YES) button, the display shows the currently
set threshold humidity, by which the sound signal is activated,
• Now you can change the threshold value by using the arrow keys ↑ ↓,
• after setting the appropriate threshold it should be confirmed by pressing YES
button, the approval will be signaled acoustically and you exit to the one level
above,
• you exit the menu mode by using the NIE (NO) button,
2.6
LAB-EL Elektronika Laboratoryjna (Laboratory Electronics)
9
User manual hygrometer LB -798
10
• You can check by hand approach to the probe electrode whether a beep is
generated when the threshold is exceeded.
Calibration of the meter for new materials
In the case of measurement of humidity of materials, which are not contained in
the list of materials in an additional annex, the interpretation of the result depends on
the user. The relations between the measurements are preserved , i.e. if one sample of
the material indicated reading is less than the result shown on the second sample (of
the same type of material), the first sample is more dry than the other.
To properly calibrate the moisture meter to indicate the result of such a mass %
moisture you should provide material samples to the laboratory LAB-EL (or
information on how to prepare the material) in order to calibrate the meter for the new
material. Guidelines for the preparation of specimens are as follows:
• sample of the material should have a maximum expected moisture (if you can
not soak the material and the water content in the material due to manufacturing
processes), and should be enclosed in a sealed package,
• in the case of materials that can be soaked in, a sample should be absolutely dry
state, also should be sealed,
• the amount of material approximately 1.5dm3
2.7
Calibration of the meter for the new material can also be performed by the User.
You need for this the LB79x calibration program and appropriate instrumentation
(scales, drier) or have another standard meter to measure the moisture content of the
material.
The following part describes how to calibrate the probe LB-798 in order to
adapt it to measure the humidity of new materials and the procedure for writing to the
memory the characteristics of the materials by means of the LB79x. Prior to
calibration, refer to the operating instructions describing the measurement of moisture
in order to properly perform calibration measurements.
2.7.1 Entering the calibration mode
Entering the calibration is done by selecting the appropriate menu option (see
Menu Mode). Therefore it is necessary:
• run mode menu and select the menu option Pro
• press the "TAK" (YES) button to confirm the selection, you will go to the
calibration mode,
blinking,
• calibration mode is indicated by the sign
• when the meter is in calibration mode press T/RH to start temperature
measurement,
• exit the calibration mode is performed only by pressing the "wył" (off)
hygrometer button.
In the calibration mode, the display shows the value of the parameter that will be
measured during the calibration measurements. This parameter should be interpreted
as a square root of the dielectric constant of material (referred to as sqrteps), the
measurement should be made in compliance with the all guidelines, which are
LAB-EL Elektronika Laboratoryjna (Laboratory Electronics)
10
User manual hygrometer LB -798
11
submitted for the moisture measurement (especially filling a container with
material).
2.7.2 Performance of calibration measurements
Meter calibration for the new material is based on performance of the parameter
measurement with the LB-798 meter (in the calibration mode) and the measurement of
moisture material with the other device, which is considered by the User as a model
device (for example by the drying-weighing method according to the PN-EN ISO
12570 standard – for construction materials and products, PN-ISO 11465 or PN-ISO
11461 for soil, or with any other standard meter) for at least two different moisture
material measurements, which would create a measurement range. Ideally, the
humidity measured values are separated, i.e. once the material, which is considered to
be almost dry, is measured, then we measure the material, which is considered as a wet
one. The calibration results consists of a table with moisture material values and
material parameter values, as it is presented in the Table 1.
Humidity [%]
0
10.8
18.1
25.3
33.6
SqrtEps
2.32
3.42
4.03
4.84
5.45
Table 1 Sample calibration table for the new material
The greater the number of measurement points, the better the later accuracy.
The calibration should be performed for the material temperature as close as possible
to 20 degrees because of the correctness of automatic temperature compensation.
The measurement of parameter with averaging is recommended, i.e. for a
specific material moisture the several measurements should be performed and the
average calculated.
If measurements are made using drying-weighing method, the best way would
be to dry material completely (0 % humidity) to measure the value of the parameter
sqtreps for dry material (the first calibration point) and then gradually add water while
stirring the material - this way new calibration points will be created up to full
saturation of the material with water.
2.7.3 Processing of measurement results
After the calibration measurements there should be drawn characteristics of the
material i.e. the function of humidity (parameter), for example in Excel. This function
should be increasing. In general, the large part of it should be a straight line, with the
curvature on the endings for the measuring ranges (for small and large humidities)
may be higher. The shape should be visually assessed and, for example, the measures,
which indicate their error during measurement, rejected (or if the data points are more
than 15). You may calculate the approximating function by, for example, polynomials
and with its help generate points evenly to write to the device. An extrapolation of
characteristics is acceptable when at the end of the range there is a clear saturation
LAB-EL Elektronika Laboratoryjna (Laboratory Electronics)
11
User manual hygrometer LB -798
12
(fold of the line) but during the extrapolation, it should be taken into account that the
range of the parameter is approximately:
• sqrteps - 1.0...10.0 - when parameter increases, the humidity increases too.
In general extrapolation (extending beyond the measured characteristics of humidity)
should be made so that the end of the measuring range for the characteristic values
would be equal to the characteristic values, for example, for 100 % humidity.
2.7.4 Entering the characteristics of the material to the meter memory –
operation of the LB79x software
Using the LB79x calibration software enter the characteristics of the material to the
memory of the meter. To do this, perform the following steps while maintaining the
specified order:
• install the LB79x software (if it was not already installed)
o run the software installer located on the CD, which is supplied with
the device a and sequentially perform the installer instructions,
o if the installation program started automatically, turn it off.
• LB -798 connection to the computer (the LB79x software should be off):
o when the LB- 79xRS communication cable is included to the set connect the cable to the LB-798 probe, on the other side of the
computer (COM port), turn on the power supply to the grid,
o when the LB- 376c converter is included to the set – connect the
converter to the meter LB-798 on the other side of the computer
(USB port) using the USB cable that is supplied with the converter
set,
after connection of the LB-376c to the computer, the
operating system should detect and automatically install the
appropriate drivers for the converter – the correct operation of
the LB-376c converter will be indicated by a red LED
(PWR) on,
if for some reason the system does not recognize the correct
converter LB-376c, the proper driver should be installed
manually. The driver is located in the USB directory of
LB79x software (typically this is C:\ Program Files \ LB79x \
USB). To do this, use the Windows Device Manager to find
improperly installed the USB device and update the driver by
indicating the position previously described.
the above described configuration of LB-376c converter
should be done only once on the first use - every the next
connection of the converter (to the same USB port) should be
automatically detected by the operating system without any
messages from of the operating system.
• start the LB79x software and select:
o COM port number (menu Settings- serial port), to which the meter
will be connected to,
for the LB- 376c converter the port will be named (USB
Serial Port)
LAB-EL Elektronika Laboratoryjna (Laboratory Electronics)
12
User manual hygrometer LB -798
13
o the LB79x program stores the original settings of the port and if the
device is connected to the same port as before, you may skip this
step.
• in the window of the LB79x program the temperature display should show
up - it proves the correctness of communication processes. When working
with LB79x do not disconnect the LB-798 probe from the computer - it
may lead to the loss of materials characteristics, which are recorded in the
meter. The meter can be disconnected from the computer after turning off
the LB79x program .
From
the
Panel
menu,
select
the
submenu
"Charakterystyki
Materiałów"(Characteristics of Materials), all the characteristics of the material
will be read, you should select a free characteristics record by a double clicking and
fill the following fields of the characteristics record:
• activate the characteristics record (mark an appropriate box),
• select the appropriate method of measurement - capacitance,
• activate (or not) temperature compensation - it is recommended to activate
the compensation, especially when the water volume is more than 10 % of
the sample material,
• enter a three characters material code, the shown digits are 0...9, letters: A,
B, C, D, E, F, G, H, I, L, N, O, P, R, T, U, U, Y, V, J, a space, when other
letter is used the minus sign will be displayed; unacceptable codes:
Er0...Er9 bat 0FF, ERL, CAL. The code will be displayed on the meter. If
possible, the code should be associated with the type of material such as
sand (in Polish - piasek) - PIA etc..
• ten characters of material name – enter the name of the material such as
sand, etc.
• number of active points – enter how many points are active in the
characteristics (2...15)
• characteristic points - enter calibration points, the maximum number of
points pairs is 15, the first and last point mark the end of the measuring
range - it will be indicated by flashing a result of the measurement, using the
"wykres" (chart) button you can see how the characteristics looks visually
and whether the points are entered correctly,
• calibration certificate number - does not apply, you can type any
indication,
• date of the characteristic creation - date when the characteristic has been
created,
• the date of characteristic entering - the date when the characteristic was
written to the device,
• temperature compensation coefficients - if temperature compensation is
activated, you should enter the coefficients values: d = 1, a = b = c = 0,
• description of the material - 40 characters, you can briefly describe the
material.
LAB-EL Elektronika Laboratoryjna (Laboratory Electronics)
13
User manual hygrometer LB -798
14
After entering the characteristics to the meter, you should record characteristics
on the disk with the "eksportuj" (export) command, this way you can easily restore the
recorded characteristic in case of system failure by (using the "importuj" (import)
command).
2.7.4.1 Authorization keys.
For each copy of LB -798 there is assigned an authorization key provided by the
manufacturer, together with the LB79x program (on request). The key is related to the
type of device and its serial number. The keys are stored in the directory: KEYS of the
LB79x program (for example C:\Program Files\LB79x\KEYS). If the user
does not have an authorization key for his/her LB79x meter, the program only will
operate in a demo mode (you cannot make setting characteristics, etc.). File with the
appropriate key should be copied to the KEYS directory (to read the key you should
turn off and turn on the LB79x program). When selecting in the window of LB79x
program select "Ustawienia→Klucze Autoryzacyjne" (Settings → Key Certificate
Authority), you can read the current key.
2.7.5 Checking the meter readings for the new material
After entering the characteristics to the memory of the meter it is recommended to
perform test measurements. The measurements should be performed in the
measurement mode, after you press "materiał+" or "materiał-" (material) to select an
appropriate material code that has been assigned to the new material. The
measurement conditions should be identical as in the calibration process, for example
a similar manner filling container with material. The effect of test display is the
humidity table, which is calculated by reference or humidity method measured with
the LB -798 meter.
Standard Humidity [%]
6,3
11,8
18,9
29,9
42,8
Humidity LB-798[%]
6,2
12,0
19,2
29,4
42,3
Table 2 Example table of the values obtained from the validation of the LB -798 meter
indications after calibration
Measurement of the dielectric constant of the material
To measure the dielectric constant of the material you have to enter the
calibration mode (Chapter Calibration meter for new materials) and perform
measurement as if the moisture in the material is measured. In the calibration mode,
the meter shows the square root of the dielectric constant of the material, to obtain the
dielectric constant you square increase the measured parameter, or press and hold the
"Pomiar POJ." button - then the display shows the dielectric constant of the material.
2.8
LAB-EL Elektronika Laboratoryjna (Laboratory Electronics)
14
User manual hygrometer LB -798
15
Another way to measure the dielectric constant of the material is to save to the
device characteristics of the material type 1:1 (two pairs of points are sufficient
humidity - parameter (0,0), (10,10), do not activate the temperature compensation
!). After creating the characteristic measurement parameter sqrteps (square root of the
dielectric constant of the material) we select the appropriate code by pressing
materiał+ or materiał- button for the assigned to sqrteps. This way you will not need
to enter the calibration mode to measure the dielectric constant of the material.
2.9
Displaying an additional information
This section describes additional messages, which are displayed on the meter.
2.9.1 Battery low voltage indication
The indication of the battery low voltage is consists of two threshold:
- poor battery but it is possible to make the measurements, it is
• flashing sign
a signal to buy a new battery,
and the inscription shown on the
• continuous illumination of the sign
display:
bAt
indicates that the battery should be replaced.
2.9.2 Signaling excess of the measuring range
Exceeding the measuring range (bottom and top), for both humidity and
temperature, is indicated by the flashing of the measurement result. In special cases,
the flashing of the measurement result may indicate damage to the meter. In the case
of measuring conductivity there is not signaling the range - it is only a short electrodes
signal - ERL.
2.9.3 Signaling an electrodes short circuit
If during the measurement of humidity or conductivity on the display
alternately with the result of humidity shows the message:
%
ErL
this means that the probe electrodes are shorted (too high a conductivity of the material
caused by salinity). Then the measurement of humidity is significantly erroneous and
its interpretation should be performed with caution. Note: This message may mean an
erroneous reset of the meter (especially when it is displayed and the container is
empty), so you should try to reset to zero the meter as instructed. (see the Chapter The
sonde zeroing)
2.9.4 Displaying the serial number
Entering displaying the serial number is done by selecting the appropriate menu
option (see Menu Mode). The menu item is named "nr" (number) may be used to
LAB-EL Elektronika Laboratoryjna (Laboratory Electronics)
15
User manual hygrometer LB -798
16
display the serial number. Please confirm the menu selection with the "TAK" (yes)
button, then the serial number will be displayed. The menu is left by using the "NIE"
(NO) button.
2.9.5 Signaling the automatic temperature compensation
Automatic temperature compensation is indicated by a flashing sign ° C.
2.9.6 Signaling the operation mode of LB- 796 as a reading panel
When LB- 796 works as a reading panel there is flashing colon ":" on the
display. Then all measurements, which are displayed are related to the probe, not
to the LB- 796 panel, which also has its own measuring functions. Their starting
is similar to the LB -798.
2.9.7 Other messages
• When you turn off the meter the following message displays briefly:
0FF
which means that after a while the meter will switch off. If it does not switch
off you have to turn the device off by pressing the "wył" (off) button.
• After switching the capacitive method on, the message appears after several
CAL
seconds:
which means the automatic zeroing of the probe (you should not touch the
electrode probe at that moment).
• If after you turn on the meter or during its operation the meter displays the
message:
Erx
where x = 0, 1, 2, 3 or 7, it means, that this is the time to deliver the meter for
the service. When x = 2 - you can try to hold the "materiał+" button for about
10 seconds till the sign '---' shows up and wait a few seconds after that. If you
still see the Er2 message you should be deliver the meter to the service. When
the message OFF shows up, you should turn off and turn on the meter.
• message:
Er4
indicates that there is not stored in the meter any material characteristic.
• message:
LAB-EL Elektronika Laboratoryjna (Laboratory Electronics)
16
User manual hygrometer LB -798
17
Er5
means that there is not stored in the meter any characteristics of the material in
the resistive method - the message is related to the LB- 796 panel.
• message:
Er6
indicates a communication error between the LB- 796 and LB -798 probe.
Generally, this error occurs if you disconnect the probe and the panel LB- 796
during measurements.
• message:
Er8
means that the reset has not been properly carried out. You should turn off the
meter and try to reset again.
2.10 Validation hygrometer readings
• Validation of meter readings should be made in calibration mode, so you should
enter this mode (see the Chapter Meter calibration for new materials). The
hygrometer, if the container are dry and clean, should indicate the parameter
value 1.00±0.2, otherwise you should reset the probe. After filled with water
(if possible use distilled water) the hygrometer should indicate the sqrteps
parameter value equal to 9.0±0.3 for water at 20 °C..
2.10.1 Resetting the probe to zero
To reset the probe to zero:
• complete empty and dry the container
• activate the temperature measurement mode with the T/TH button (above the
button there is the inscription ZERO (2sek.)). Then hold the button for about
two seconds, and after a few seconds a sign will show up on the display:
--and the meter returns to the temperature measurement, this means the end of
reset to zero.
During the zeroing you may not touch the container internal
electrode. Resetting to zero should be carried out every few weeks after validation of
the readings.
2.11 Notes on use
1. In the case of longer periods of the device inactivity, it is recommended to remove
the battery from the LB- 796 panel in order to avoid pouring out of the electrolyte.
2. It is recommended to use good quality batteries (alkaline, lithium).
LAB-EL Elektronika Laboratoryjna (Laboratory Electronics)
17
User manual hygrometer LB -798
18
3. You should not unplug the LB- 796 panel during device operation. Before the
battery removal the keyboard should be switched off.
4. Do not allow water to splash on the LB- 796 panel or dew to condensate on it.
5. Protect your hygrometer against exposure to strong sunlight, which can lead to
overheating of the device.
6. The hygrometer does not require maintenance.
3. Measurement Specifications
This chapter presents the measurement specifications of the instrument for
measuring temperature, humidity and conductivity. Measuring range of materials
available in the meter is shown on the additional annex to this manual.
The hygrometer tends to show a mass humidity, which is defined as follows:
w[%]=
water mass contained in the material
• 100
mass of the absolutely dry material
If humidity is defined otherwise, it is indicated in the additional annex to the
manual (kg / kg - mass moisture, m3/m3 - volume moisture). It is possible to scale the
meter to indicate the humidity defined in other method.
PERFORMANCE DATA FOR MATERIAL MOISTURE
Measuring range
depending on the type of material (shown in the table
with a list of materials)
Resolution of measurement 0.1%
Uncertainty of measurement 3% of measured value
PERFORMANCE DATA FOR MATERIAL CONDUCTIVITY
Measuring range
0...100mS/m
Resolution of measurement 0.1 mS / m
Uncertainty of measurement 10 % of measured value
PERFORMANCE DATA FOR TEMPERATURE
Measuring range
-20..70 °C
Resolution of measurement 0.1 ° C
Uncertainty of measurement ± 0.2 ° C
Battery
Other
POWER SUPPLY
1 battery 9V type 6F22
When communicating with a computer, the meter is
powered by the computer
Power consumption
5 mA - temperature measurement
13...18 mA mA - measurement of humidity and
conductivity
Device
OPERATING TEMPERATURE RANGE
Range
LAB-EL Elektronika Laboratoryjna (Laboratory Electronics)
18
User manual hygrometer LB -798
LB-798
0..+50°C
LB-376C
-20..+50°C
19
OTHER PARAMETERS
LB-798 dimensions
125x80x140mm
LB-376C dimensions
56x31x24mm
density of LB -798 housing IP67 - not applicable for probe plug
density of housing LB- 376c IP30
Container material
stainless steel
Standard cable length
Container capacity
1 meter
350ml
LAB-EL Elektronika Laboratoryjna (Laboratory Electronics)
19