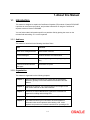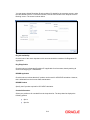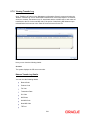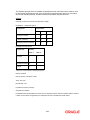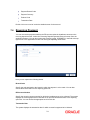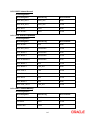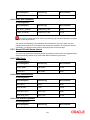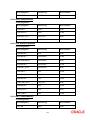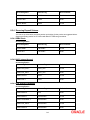
1
Certificates of Deposit Version-1.0 9NT1438-ORACLE FCUBS V.UM 11.1.US.1.0.0.0 [March] [2011] Oracle Part Number E51715-01 Document Control Author: Documentation Team Group: UBPG Created on: May 13, 2010 Revision No: Final Updated by: Documentation Team Reviewed by: Development/Testing teams Approved by: Software Quality Assurance Team Updated on: March 17, 2011 Reviewed on: March 17, 2011 Approved on: March 17, 2011 Certificates of Deposit Table of Contents 1. ABOUT THIS MANUAL................................................................................................................................ 1-1 1.1 INTRODUCTION ........................................................................................................................................... 1-1 1.1.1 Audience ............................................................................................................................................ 1-1 1.1.2 Organization ...................................................................................................................................... 1-1 1.1.3 Related Documents ............................................................................................................................ 1-2 1.1.4 Glossary of Icons ............................................................................................................................... 1-2 2. CERTIFICATE OF DEPOSITS - AN OVERVIEW .................................................................................... 2-1 2.1 INTRODUCTION ........................................................................................................................................... 2-1 2.2 CERTIFICATE OF DEPOSIT IN ORACLE FLEXCUBE ................................................................................... 2-1 Salient Features ................................................................................................................................................. 2-2 2.2.1 Pre-requisites for CD Processing ...................................................................................................... 2-2 3. CERTIFICATE OF DEPOSIT MAINTENANCE ....................................................................................... 3-1 3.1 MAINTAINING PAYIN PARAMETERS............................................................................................................ 3-1 3.1.1 Specifying UDF Values ...................................................................................................................... 3-2 3.2 VIEWING PAYIN PARAMETERS SUMMARY .................................................................................................. 3-2 3.3 MAINTAINING CLOSING MODE ................................................................................................................... 3-4 3.3.1 Specifying UDF Values ...................................................................................................................... 3-5 3.4 VIEWING CLOSING MODES SUMMARY ....................................................................................................... 3-5 3.5 MAINTAINING ACCOUNT CLASS FOR CD.................................................................................................... 3-7 3.5.1 Account Details Tab........................................................................................................................... 3-8 3.5.2 Maintaining Deposit Details .............................................................................................................. 3-9 3.6 SETTING UP INTEREST PREFERENCES FOR CD .......................................................................................... 3-21 3.6.1 Specifying Accounting Roles for Unclaimed Deposits ..................................................................... 3-21 3.6.2 Linking CD Account Class to Interest Product ................................................................................ 3-22 4. CD ACCOUNT ................................................................................................................................................ 4-1 4.1 CREATING A DEPOSIT ACCOUNT ................................................................................................................ 4-1 4.1.1 Main Tab............................................................................................................................................ 4-3 4.1.2 Viewing Amounts and Dates .............................................................................................................. 4-7 4.1.3 Beneficiary Tab .................................................................................................................................. 4-9 4.1.4 Deposit Tab ...................................................................................................................................... 4-10 4.1.5 Processing Interest Step-up/Step-down ........................................................................................... 4-22 4.1.6 Dual Currency Deposit .................................................................................................................... 4-24 4.1.7 Checklist Details .............................................................................................................................. 4-26 4.1.8 Capturing Additional Details ........................................................................................................... 4-28 4.2 VIEWING DETAILS OF CERTIFICATE OF DEPOSIT ACCOUNTS .................................................................... 4-29 4.2.1 Viewing Additional Details .............................................................................................................. 4-31 4.3 VIEWING CD ACCOUNT BALANCE ........................................................................................................... 4-35 5. CD ADDITIONAL DETAILS ........................................................................................................................ 5-1 5.1 CAPTURING ADDITIONAL DETAILS ............................................................................................................. 5-1 5.2 SPECIFYING INTEREST DETAILS .................................................................................................................. 5-2 5.3 SPECIFYING CHARGE DETAILS ................................................................................................................... 5-9 5.4 SPECIFYING LINKED ENTITIES .................................................................................................................. 5-11 5.5 SPECIFYING REG DETAILS ....................................................................................................................... 5-12 5.6 SPECIFYING RESTRICTIONS....................................................................................................................... 5-14 5.7 SPECIFYING MIS DETAILS ........................................................................................................................ 5-18 5.7.1 Viewing Change Log........................................................................................................................ 5-19 5.7.2 Viewing Transfer Log ...................................................................................................................... 5-21 5.8 SPECIFYING STATEMENT DETAILS ............................................................................................................ 5-22 5.9 SPECIFYING JOINT HOLDER DETAILS........................................................................................................ 5-28 5.10 CAPTURING USER DEFINED FIELDS .......................................................................................................... 5-30 5.11 SPECIFYING ACCOUNT SIGNATORY DETAILS ........................................................................................... 5-31 5.12 INDICATING CD PAYOUT DETAILS ........................................................................................................... 5-33 5.12.1 CD Tab ............................................................................................................................................ 5-33 5.12.2 Cashier’s Check Tab ........................................................................................................................ 5-34 5.12.3 Specifying PC Details ...................................................................................................................... 5-36 5.12.4 Capturing Payout Interest Details for Child CD ............................................................................. 5-38 5.12.5 Interest Tab (interest preferences for Child CD) ............................................................................. 5-38 5.12.6 Deposit Tab (Deposit Preferences for Child CD) ............................................................................ 5-41 5.13 VIEWING CHANGE LOG ............................................................................................................................ 5-46 5.14 VIEWING CD SUMMARY ........................................................................................................................... 5-48 5.15 SPECIFYING DEPOSIT INSTRUCTIONS ........................................................................................................ 5-49 5.15.1 Specifying UDF Values .................................................................................................................... 5-51 5.16 VIEWING INSTRUCTION SUMMARY ........................................................................................................... 5-52 5.17 VIEWING ADDITIONAL DETAILS ............................................................................................................... 5-53 5.17.1 Viewing Step-up/Step-down Interest Rate Details ........................................................................... 5-54 5.17.2 Inheriting Payin and Payout Details ............................................................................................... 5-55 5.17.3 Inheriting Original Account Opened Date....................................................................................... 5-55 5.17.4 Inheriting Opt-in Opt Out Details.................................................................................................... 5-56 6. CD OPERATIONS .......................................................................................................................................... 6-1 6.1 INTRODUCTION ........................................................................................................................................... 6-1 6.2 REDEEMING A CD ...................................................................................................................................... 6-1 6.2.1 Capturing Pay Out Details ................................................................................................................ 6-8 6.2.2 Cashiers Check Tab ......................................................................................................................... 6-10 6.2.3 Counter Party Details Tab ............................................................................................................... 6-11 6.2.4 Capturing Interest Details ............................................................................................................... 6-13 6.2.5 Interest Tab ...................................................................................................................................... 6-13 6.2.6 Deposit Tab ...................................................................................................................................... 6-16 6.2.7 Viewing Redemptions Summary ....................................................................................................... 6-22 6.3 MAINTAINING DETAILS FOR REDEMPTION DELAYED PAYMENTS ............................................................. 6-23 6.3.1 Processing Delayed Payments ......................................................................................................... 6-24 6.4 GENERATING AN ADVICE ......................................................................................................................... 6-26 6.4.1 Certificate of deposit Account Statement Format ............................................................................ 6-27 6.4.2 Certificate of deposit Rate Change Advice Format ......................................................................... 6-31 6.4.3 Certificate of deposit Rollover Advice Format ................................................................................ 6-33 6.4.4 Certificate of deposit Maturity Advice Format ................................................................................ 6-37 6.5 CLOSING A CD ......................................................................................................................................... 6-41 6.6 TRANSFERRING TO UNCLAIMED DEPOSIT ON MATURITY ......................................................................... 6-41 6.6.1 Moving Principal and Interest to Unclaimed GLs ........................................................................... 6-41 6.6.2 Moving Principal to Unclaimed Principal retaining interest in Interest Booking Account ............. 6-42 6.7 VIEWING CD EXECUTION LOG ................................................................................................................. 6-42 6.8 SIMULATING CD....................................................................................................................................... 6-44 6.8.1 Generating and Viewing Account Certificate .................................................................................. 6-46 6.8.2 Specifying Interest Details for Simulated Account........................................................................... 6-47 6.9 REPORTING FOR SUSPICIOUS ACTIVITIES.................................................................................................. 6-51 6.10 REDEEMING CERTIFICATE OF DEPOSITS PARTIALLY ................................................................................. 6-52 7. RD OPERATIONS .......................................................................................................................................... 7-1 7.1 INTRODUCTION ........................................................................................................................................... 7-1 7.2 CAPTURING PAYMENT DETAILS ................................................................................................................. 7-1 7.2.1 Viewing Accounting Entries ............................................................................................................... 7-3 7.2.2 Specifying UDF Values ...................................................................................................................... 7-4 7.3 7.4 8. VIEWING PAYMENT SUMMARY .................................................................................................................. 7-4 REVERSING PAYMENT ................................................................................................................................ 7-6 ANNEXURE A - ACCOUNTING ENTRIES ............................................................................................... 8-1 8.1 ACCOUNTING ENTRIES AND ADVICES FOR CD ........................................................................................... 8-1 8.2 EVENTS ...................................................................................................................................................... 8-1 8.3 AMOUNT TAGS ........................................................................................................................................... 8-1 8.4 ACCOUNTING ROLES .................................................................................................................................. 8-2 8.5 EVENT-WISE ACCOUNTING ENTRIES FOR PRODUCTS.................................................................................. 8-4 8.5.1 CD with Capitalization ...................................................................................................................... 8-4 8.5.2 Normal CD with Simple Interest ........................................................................................................ 8-6 8.5.3 CD with Rate Chart Allowed ............................................................................................................. 8-7 8.5.4 Recurring Deposit Scheme................................................................................................................. 8-9 9. ANNEXURE B - IC RULE SET-UP .............................................................................................................. 9-1 9.1 INTRODUCTION ........................................................................................................................................... 9-1 9.2 IC RULE MAINTENANCE ............................................................................................................................. 9-1 9.2.1 Capitalized Deposit with Penalty....................................................................................................... 9-2 9.2.2 CD with Normal Tenor and Penalty .................................................................................................. 9-6 9.2.3 Recurring Deposit Rule ..................................................................................................................... 9-9 9.2.4 Rate Chart Allowed with Penalty ..................................................................................................... 9-12 9.2.5 Different Interest Rate during Grace Days ...................................................................................... 9-14 9.2.6 CD Interest Step-up/Step-down........................................................................................................ 9-15 9.2.7 Penalty Computation ....................................................................................................................... 9-15 9.3 UDE VALUE MAINTENANCE .................................................................................................................... 9-16 9.3.1 CD with Capitalization .................................................................................................................... 9-17 9.3.2 Normal CD with Simple Interest ...................................................................................................... 9-17 9.3.3 TAX_RATE CD with Rate Chart Allowed ........................................................................................ 9-18 9.3.4 Recurring deposit Scheme ............................................................................................................... 9-18 9.4 IC RATES MAINTENANCE ......................................................................................................................... 9-18 1. About this Manual 1.1 Introduction This manual is designed to explain the Certificate of deposits (CD) module of Oracle FLEXCUBE. It provides an overview to the module, and provides information on using the Certificate of deposits module of Oracle FLEXCUBE. You can further obtain information specific to a particular field by placing the cursor on the relevant field and striking <F1> on the keyboard. 1.1.1 Audience This manual is intended for the following User/User Roles: Role Function Back office managers/officers Authorization functions Product Managers Product definition and authorization End of day operators Processing during end of day/ beginning of day Financial Controller/Product Managers Generation of reports 1.1.2 Organization This manual is organized into the following chapters: Chapter 1 About this Manual acquaints you quickly with the organization, audience, glossary of icons and related documents for this User Manual. Chapter 2 Certificate of deposits - An Overview offers a brief insight into the CD module and lists out the salient features. Chapter 3 Certificate of deposit Maintenance explains the maintenances required for creating and servicing CDs. Chapter 4 CD Account gives details about how to create a CD account. Chapter 5 CD Additional Details gives information about the additional information that can be captured while creating a CD. It also explains the procedure to maintain instructions for operating a CD. 1-1 Chapter 6 CD Operations explains the operations you can perform on a CD. Chapter 7 RD Operations explains the operations you can perform on a recurring deposit. Chapter 8 Annexure A - Accounting Entries lists the suggested event-wise accounting entries that can be set up, for the Interest and Charge product applicable for the CD module of Oracle FLEXCUBE. Chapter 9 Annexure B – IC Rule Set-up lists the Interest and Charge (IC) rules that need to be maintained for the CD module of Oracle FLEXCUBE. It also gives the UDEs and rates for which values need to be maintained. 1.1.3 Related Documents Procedures User Manual Settlements User Manual Core Entities User Manual 1.1.4 Glossary of Icons This User Manual may refer to all or some of the following icons: Icons Function New Copy Save Delete Unlock Print Close Re-open Reverse Template Roll-over 1-2 Icons Function Hold Authorize Liquidate Exit Sign-off Help Add row Delete row Option List Confirm Enter Query Execute Query Refer the Procedures User Manual for further details about the icons. 1-3 2. Certificate of Deposits - An Overview 2.1 Introduction A Certificate of Deposit (CD), also known as ‘fixed deposit’ is a deposit that is held at a financial institution for a fixed term. A fixed deposit account allows customers to deposit money for a set period of time, thereby earning a higher rate of interest in return. These are of varying maturities ranging anywhere from a day or a month to a few years. When a Certificate of Deposit is placed, the lender (the customer) understands that the money can only be withdrawn after the term has ended and in case of premature withdrawal, the financial institution can levy a penalty. In some cases, the customer may be required to give notice of withdrawal of Certificate of Deposit (in that case termed as ‘notice deposits’). When the term is over, the deposit can be withdrawn or it can be held for another term, partly or fully. Generally speaking, the longer the term the better is the yield on the money. Some banks put conditions like minimum amount of deposit and in multiples of specific units of amount. For e.g. the minimum deposit amount is Euro. 100 and deposits can be made in multiples of Euro 10. Banks may allow full or partial withdrawal of amount. Customers can place CD as collateral while availing loan facility or while availing Letters of Credit/Guarantee facility from the bank. Recurring Deposit (RD) is an account where the lender/customer deposits a fixed amount of money every month for a fixed tenure (generally ranging from one year to five years). This scheme is meant for investors who want to deposit a fixed amount every month, in order to get a lump sum after some years. The small monthly savings in the Recurring Deposit scheme enable the lender to accumulate a handsome amount on maturity. Interest at CD rates is computable on monthly or quarterly compounded basis. Dual Currency Deposit (DCD) is a short-term currency-linked deposit that allows the lender to earn a higher interest rate than regular CD. The bank provides the customer/lender with a 'yield enhancement' over and above the normal CD rate. In return, the bank has the right to convert the deposit currency into a linked currency at the pre-determined conversion rate on the fixing date. The fixing date may be few (for instance 2) working days prior to deposit maturity. Thus, at maturity, the lender shall receive the principal and interest in either the deposit currency or the linked currency, whichever is weaker. In other words, while taking the deposit the bank also buys a currency option from the depositor and the enhanced interest is the premium the bank pays for this option. 2.2 Certificate of Deposit in Oracle FLEXCUBE In Oracle FLEXCUBE, you can create and service a deposit (CD, RD and DCD) either through the CD module or by using the Savings (Teller/Branch) module. 2-1 Salient Features The salient features of CD module are listed below: Automation - Accounting, collateral tracking, rollover handling and accounting, and tracking of unclaimed deposits are completely automated. This means your staff with the treasury department can remain focused on customer service. Multi Mode Pay-in - CD can be funded using multiple pay-in modes. You can choose any combination of the following pay-in modes: Pay in by transfer from GL Pay-in by Savings Account Pay-in by Cash (Only from Savings module) Multi Mode Pay-out – In case of automatic and manual redemption, a CD can be redeemed using multiple pay-out modes. You can choose any combination of the following pay-out modes: Pay-out by Banker’s Cheque Pay-out by funds transfer to any account specified by the customer Pay-out by child CD creation – wherein another CD is created using the maturity amount Pay-out by transfer to GL Pay-out by cash (Only from Savings module) Simulation – The CD module offers a simulation tool wherein a CD can be simulated to enhance sales and service aspects to new/existing customers. You can also generate a CD Certificate. 2.2.1 Pre-requisites for CD Processing To handle a Certificate of Deposit in Oracle FLEXCUBE, you need to: 1. Set up a suitable account class 2. Set up an IC rule 3. Set up a suitable IC product 4. Maintain UDE + Account Class combination 5. Define IC rates 6. Maintain a Certificate of Deposit account 7. Define Interest ‘Conditions’ and other parameters for the deposit account 8. Maintain Pay-in and Close out mode parameters 2-2 This manual explains how you can create and service a deposit through the CD Module. For details about CD creation using Branch, you may refer the Savings User Manual. 2-3 3. Certificate of Deposit Maintenance 3.1 Maintaining Payin Parameters In case you have specified that the CD Payin be done by GL, you need to maintain the GL details through the ‘Certificate of Deposit Payin Parameters Maintenance’ screen. You can also invoke this screen by typing ‘STDTDPAY’ in the field at the top right corner of the Application tool bar and clicking the adjoining arrow button. To link appropriate GLs in case the pay in option chosen is pay in by GL, you need to maintain the following details: Branch Code Specify the branch code for which you want to maintain payin parameters. The adjoining option list displays all valid branch codes maintained in the system. You can select the appropriate one. Payin Option Select the payin option from the adjoining drop-down list. The following options are available: Payin by GL Payin by Cash General Ledger Code Specify the GL code that should be picked up the system for the CD pay in. The adjoining option list displays all valid GLs maintained in the system. You can select the appropriate one. 3-1 3.1.1 Specifying UDF Values All User Defined Fields (UDFs) linked to the function ID ‘STDTDPAY’ are displayed in the ‘User Defined Fields’ screen. Invoke this screen by clicking ‘Fields’ button on the ‘Certificate of Deposits Payin Parameters Maintenance’ screen. Here you can specify values for each UDF. Refer the User Manual titled ‘User Defined Field’ for details about defining UDFs. 3.2 Viewing Payin Parameters Summary You can view summary of all payin parameters using the ‘Certificate of Deposit Payin Parameters Summary’ screen. To invoke this screen, type ‘STSTDPAY’ in the field at the top right corner of the Application tool bar and click the adjoining arrow button. 3-2 You can query on records based on any one or all of the following criteria: Authorization Status Record Status Branch Code Payin Option Click ‘Search’ button. The system identifies all records satisfying the specified criteria and displays the following details for each one of them: Authorization Status Record Status Branch Code Payin Option Double click on a record to invoke the detailed screen for that record. 3-3 3.3 Maintaining Closing Mode When you close an account the system checks whether any Interest/Charge (IC) products linked to the account are pending liquidation. If the account does not have any IC products pending liquidation the system will display list of ‘Close Out’ modes to facilitate account closure. You can maintain the closing modes using ‘Certificate of Deposit Closing Mode Maintenance’ screen. To invoke this screen, type ‘STDCLOSE’ in the field at the top right corner of the Application tool bar and click the adjoining arrow button. Specify the following details: Closing Mode You need to maintain the following modes: CASH – This indicates closure by cash. FT – This indicates closure by funds transfer. GL – This indicates closure by transfer to GL. BCA – This indicates closure by cashier’s check. PC – This indicates closure by transfer of funds to another account using PC module. Description Give a brief description for the closing mode. Product Specify the Retail Teller product that should be used for booking withdrawal entries. It can be any one of the following: 3-4 Retail Teller Product Product linked to the instrument type Debit Credit The closure can be effected by means of a debit or a credit to the account. For each of the aforesaid closing modes, you need to select the ‘Debit’ option from the adjoining drop-down list.. 3.3.1 Specifying UDF Values All User Defined Fields (UDFs) linked to the function ID ‘STDCLOSE’ are displayed in the ‘User Defined Fields’ screen. Invoke this screen by clicking ‘Fields’ button on the ‘Certificate of Deposit Closing Mode Maintenance’ screen. Here you can specify values for each UDF. Refer the User Manual titled ‘User Defined Field’ for details about defining UDFs. 3.4 Viewing Closing Modes Summary You can view summary of all closing modes using the ‘Certificate of Deposit Closing Mode Maintenance’ screen. To invoke this screen, type ‘STSCLOSE’ in the field at the top right corner of the Application tool bar and click the adjoining arrow button. 3-5 You can query on records based on any one or all of the following criteria: Authorization Status Record Status Close Mode Debit Credit Click ‘Search’ button. The system identifies all records satisfying the specified criteria and displays the following details for each one of them: Authorization Status Record Status Close Mode Description Product Debit Credit Double click on a record to invoke the detailed screen for that record. 3-6 3.5 Maintaining Account Class for CD To handle Certificate of Deposits in Oracle FLEXCUBE, you have to set up an account class of type ‘Deposit’, in the ‘Account Class Maintenance’ screen. To invoke this screen, type ‘STDACCLS’ in the field at the top right corner of the Application tool bar and click the adjoining arrow button. Specify the following details: Account Class and Description Identify the account class you are setting up with a unique code and a brief description. Account Type Select the ‘Deposit’ from the drop-down list. Start Date Specify the date from which the account class should become active, using the adjoining calendar. You will be able to create accounts under this account class from this date. End Date You can also specify the life span of the account class by indicating the end date. The end date for an account class refers to the termination date after which, creation of new account under the account class is disallowed. Consequently, the option list for Account Class in all further transactions screen in Oracle FLEXCUBE, will not display the ‘expired’ account class as of the system date. However, the existing accounts for the account class will be active even after the end date. 3-7 If you do not specify an End Date for the account class, the account is taken to be an openended account class. 3.5.1 Account Details Tab This tab is displayed by default on invoking the ‘Account Class Maintenance’ screen. Account Code As per your bank’s requirement you can choose to classify account classes into different account codes. The bank can decide the manner in which the account classes are to be assigned to different account codes. An account code can consist of a maximum of four characters. Depending on the customer account mask maintained, the value in the account code field would be used during the generation of customer account numbers through the ‘Customer Accounts Maintenance’ screen. If you have decided to include account code as part of the customer account number (in the account number mask), then at the time of creating a new customer account number, you will need to select the account class for the account number being generated. In the option-list provided, the account class is displayed along with the associated account code. When the account number gets populated, it is the account code that forms a part of the customer account number. Dual Currency Deposit Check this box to indicate that account class is for creating dual currency deposits. You can check this box only if the account type is ‘Deposit’. Natural GL The reporting of all turnovers of the particular account class will be directed to the GL that you identify as the natural GL. Based on the characteristic of the account balance; you can specify whether the turnover is to be posted to the Debit GL or to the Credit GL. Deposit accounts normally have a credit balance. Applicable Customer Status Select the applicable customer status to indicate whether deposit product is available to minors or not. You can choose one of the following values from the adjoining drop-down list: Not Applicable Major Minor Both Note the following: By default ‘Not applicable’ option is selected when a new account class is created. 3-8 If you select ‘Minor’ option at the CIF level and ‘Applicable customer status’ as ‘Major’ at the account class level then the system will throw up the following error message: The A/c class you selected is for major customer If you uncheck ‘Minor’ option at the CIF level and select ‘Applicable customer status’ as ‘Minor’ at the account class level, then the system will throw up the following error message: The A/c class you selected is for minor customer 3.5.2 Maintaining Deposit Details Click the ‘Deposits’ button to define the parameters for a deposit type account class. The ‘Deposit Account Details’ screen is displayed. On the maturity date of a deposit, you can opt to: Rollover the deposit Liquidate the deposit Move it to an ‘unclaimed’ GL The values given here will be defaulted when the CD is opened. You can modify defaulted values for each CD. 3-9 Auto Rollover You can opt to automatically rollover a deposit if it is not liquidated on its maturity date. Check this box to automatically rollover deposits opened under the account class. CDs that are open and marked for Auto Rollover will automatically be rolled over during the Beginning of Day operations on the Maturity date. You can define the terms and conditions for the new deposit while maintaining the deposit account. Close on Maturity Deposit accounts opened under an account class can be closed automatically on the Maturity Date of the deposit. You can specify this for the account class you are maintaining by checking this box. If you check this box, then during the Beginning of Day operations on the Maturity Date, the account will be closed. The principal will be moved, if specified, to the account your customer has directed. In case you don’t check this box and the deposit remains unclaimed, you can opt to move the principal and interest to the respective ‘Unclaimed GLs’ maintained at your bank. If you check the ‘Auto Rollover’ box, you will not be able to check ‘Close on Maturity’ box. Your specifications here will default to all deposit accounts opened under the account class. However, when maintaining a deposit account, you can change the specifications that default. Note that this box will be automatically checked if you check the box ‘Recurring Deposit’ in the ‘Deposit Account Details’ screen. Allow Partial Liquidation Check this box to indicate that partial liquidation is allowed. Allow Partial Liquidation with Amount Block Check this box to indicate that partial liquidation is allowed for the deposits with amount blocks. If the CD is linked partially then partial liquidation of the CD will be allowed only if you check this box. Move Interest to Unclaimed Check this field to move the interest amount to the unclaimed GL mapped at the IC product in the accounting role ‘INT_UNCLAIMED’ on maturity date or grace period end date of the Certificate of Deposit account. If you select this option, then you will have to check the box ‘Move Principal to Unclaimed’. Move Principal to Unclaimed Check this field to move the principal amount to the unclaimed GL mapped at the IC product in the accounting role ‘PRN_UNCLAIMED’ on maturity date or grace period end date of the Certificate of Deposit account. If you select this option, only principal amount will be moved to unclaimed GL and the interest will be settled through defined CD pay-out mode. 3-10 If you check both ‘Move Interest to Unclaimed’ and ‘Move Principle to Unclaimed’ boxes, then the CD amount (i.e. Principal + Interest) will be moved to the Unclaimed GL, irrespective to the defined CD pay-out details. Rate Chart Allowed Check this box to indicate that the system should calculate CD interest based on the LDMM float rate maintained in the ‘LD MM Floating Rate input’ screen (CFDFLTRT), If you check this box, the system will pick interest rates based on different tenors, minimum amount, currency and effective date for a CD. Note that you will not be able to modify this preference once the record is authorized. Minimum Specify the minimum amount for which deposit should be created under this account class. Maximum Specify the maximum amount for which deposit can be created under this account class. The system will display a configurable override if the deposit amount contravenes the specified amount range. Grace Period for Renewal Specify the grace period for renewing a CD. Only if you opt for this option, the CD can be renewed using the ‘Certificate of Deposit Redemption’ screen (ICDREDMN) upon maturity of the CD. This option is applicable only for deposits whose interest and principal is moved to unclaimed GLs upon maturity. If you check the ‘Close on Maturity’ box, the system will ignore the value that you specify here. In other words, grace period will not be applicable on the maturity date in case of closure of the account. Grace period is a definite period following the maturity of an automatically renewing time deposit account, during which the customer may withdraw the funds without being assessed a penalty. You can maintain grace period even after the maturity of a Certificate of Deposit. If you have maintained the grace period for the CD account and the option ‘Auto Rollover’ is checked, the system rolls over the account at the end of the grace period. The grace days are added to the maturity date to derive the new maturity date. The system computes the interest from maturity date based on the current interest rate. The value date is updated as the original maturity date. The system generates a maturity notice to the customer 30 days before the maturity date of the CD. In case the product allows backdated renewal, then the notice will be generated seven days before the end of grace period. After the account has matured, renewal of the CD is possible from the beginning of day (BOD) of the maturity date to the end of day (EOD) of the grace period. The CD gets renewed with the value date as of the maturity date when the grace period is valid. 3-11 The counter for the grace period is ‘0’ on the maturity date. It is incremented by 1 during EOD processing of every subsequent day. When the grace period counter is ‘0’, CD renewal is possible before start of the EOD as of the maturity date. When the grace period counter goes to ‘1’, CD renewal is possible before start of the EOD of the (maturity date +1),and so on. Refer the section ‘Redeeming a CD’ and ‘Transferring to Unclaimed Deposit on Maturity’ in this User Manual for details about CD redemption and application of grace period respectively. Note that grace period is maintained only at the account class level. You cannot modify it for any account. Settlement Bridge GL To facilitate multi mode pay-out, you need to maintain a Bridge GL between the CD and the payout module (PC). Specify the Bridge GL that should be used for processing pay-out of CDs under this account class. The adjoining option list displays all valid GLs maintained in the system. You can select the appropriate one. Product Category To facilitate multi mode pay-out, specify a product category or select a product category from the adjoining option list. Transaction Code Specify the transaction code that should be used to process CD pay-out by PC. The adjoining option list displays all valid transaction codes maintained in the system. You can select the appropriate one. Force Rollover Account Class Specify the force rollover account class. On rollover of a CD, the system will associate the CD with the account class specified here. The option list displays all valid account classes maintained in the system. Choose the appropriate one. During rollover, if force rollover account class specified at the CD account level does not match the one specified here, the system will close the CD account and create a new CD account with a different account number. In case a force rollover account class is not maintained here or at the CD account level, the system will not create a new CD account on rollover. In that case, the rollover process will not change the CD account number. Step Up/Down Interest You can set your preferences to step up or step down the interest rate applicable to the Certificate of Deposit accounts associated with the account class. The interest step up/step down preferences will be defaulted to the CD accounts associated with the account class. Except ‘Step Up/Down Interest Applicable’ and ‘Interest Factor’, all other details can be modified at the account level. Specify the following details: 3-12 Step Up/Down Interest Applicable Check this box to enable interest step up/down of interest for the account class. While defining an interest product, the system verifies whether any account class supports step up/step down interest feature. The system defaults the status of this checkbox to the accounts associated with this account class. However, you cannot modify this at the account level. Interest Factor Specify the interest factor. If you choose to enable step up/step down interest for the account class, it is mandatory to indicate the interest factor. The drop-down list displays the following options: Step Up Step Down Choose the appropriate one. The system defaults the interest factor to the accounts associated with this account class. However, you cannot modify this at the account level. Step Interest Start Date Specify the start date for applying the new interest rate after step up or step down. Spread Specify the interest rate spread. The system adds the spread to the interest to determine the actual rate to be applied. Frequency Specify the frequency of change of interest rate spread. The drop-down list displays the following options: Monthly Quarterly Half Yearly Yearly Choose the appropriate one. Unit Specify the unit of the frequency maintained above. The rate spread change will take place on completion of the number of frequencies maintained here. 3-13 Max Interest Rate Specify the maximum interest rate to be applied on the CD accounts associated with the account class. In case of interest step-up, if the computed interest rate is higher than the maximum interest limit maintained for the CD account, the system uses the maximum interest rate. Min Interest Rate Specify the minimum interest rate to be applied on the CD accounts associated with the account class. In case of interest step-down, if the computed interest rate is lower than the minimum interest limit maintained for the CD account, the system uses the minimum interest rate. Customer Bumps You can set the limits for interest rate bumps, cumulative changes and redemptions for all CD accounts associated with a specific account class. You need to specify the following details: Max Number. of Rate Bumps Allowed Specify the maximum number of interest rate bumps allowed on a CD account associated with this account class. The system tracks the number of interest rate bumps for the CD account. The rate of interest cannot be modified once the counter hits the limit specified here. If you set the maximum number of rate bumps to one, the system will not allow interest rate modification. The rate specified during creation of the CD account will be counted as the first rate bump. On rollover or renewal of the CD account, the system resets the rate bump counter. Max Number. of Redemptions Allowed Specify the maximum number of redemptions allowed on a CD account associated with this account class. The system tracks the number of redemptions. The Certificate of Deposit cannot be redeemed once the counter hits the limit specified here. On rollover or renewal of the CD account, the system resets the redemption counter. Max Number. of Cumulative Changes Allowed Specify the maximum number of cumulative changes allowed on a CD account associated with this account class. The system tracks the number of cumulative changes for the CD account. Cumulative changes will not be allowed once the counter hits the limit specified here. On rollover or renewal of the CD account, the system resets the counter. Maintaining the CD Maturity Advice Details You need to maintain the following to facilitate the generation of CD maturity advice: 3-14 Maturity Advice Based On Indicate one of the following as the basis of maturity advice generation from the drop-down list: Maturity date Maturity date + maturity Grace period Gen. Maturity Advice before (days) Specify the number of days before maturity date, when you want the system to generate the renewal notices. The following are the two pre-conditions for generation of maturity advice: The ‘Close on Maturity’ checkbox should be checked The ‘Auto-Rollover’ check box should be unchecked Maintaining the CD Rollover Advice Details You need to maintain the following to facilitate the generation of CD Rollover advice: Rollover Advice Based on Indicate one of the following as the basis of rollover advice generation from the drop-down list: Maturity date Maturity date + maturity Grace period Gen.Rollover Advice before (days) Specify the number of days before the rollover date, when you want the system to generate the rollover or renewal notices. The following are the two pre-conditions for generation of rollover advice: The ‘Close on Maturity’ checkbox should be unchecked The ‘Auto-Rollover’ check box should be checked Default Tenor You can define a tenor for the deposits that are opened under an account class. Deposits opened under the account class will automatically acquire this tenor. However, you can change the tenor to suit the requirements of a specific deposit. Days Specify the default tenor in terms of days. 3-15 Months Specify the default tenor in terms of months. Years Specify the default tenor in terms of years. Maximum Tenor Specify the maximum tenor for which deposits can be created under this account class. Days Specify the maximum tenor in terms of days. Months Specify the maximum tenor in terms of months. Years Specify the maximum tenor in terms of years. Minimum Tenor Specify the minimum tenor for which deposits should be created under this account class. Days Specify the minimum tenor in terms of days. Months Specify the minimum tenor in terms of months. Years Specify the minimum tenor in terms of years. Dual Currency Deposits Dual Currency Deposit (DCD) is a short-term currency-linked deposit through which you earn a higher interest rate than regular Certificate of Deposits. The Bank converts the deposit currency into the linked currency at the pre-determined conversion rate on the fixing date two working days prior to deposit maturity. At maturity you receive the principal and interest in either the deposit currency or the linked currency, whichever is weaker. The following details are captured here; 3-16 Linked Currency Specify the linked currency if the account class is to be used for creating CD with Dual Currency option. Alternatively, you can also choose the currency from the adjoining option list. You will be allowed to capture this value here only if the option ‘Dual Currency Deposit’ is checked at the ‘Account Class Maintenance’ screen. You will be allowed to modify this value even after authorization. Currency Option Product Specify the currency option product under which an Options contract has to be created in case of a Dual Currency deposit. The adjoining option list displays all valid Options products with Product Type ‘CO’, available in the system. You can choose the appropriate one. On saving the account class, system validates the following to ensure that the currency option product selected here has the below features: Contract type is Trade Option Type is Call Deal Type is Buy Option Style is Plain Vanilla Barrier is not allowed Delivery type is Physical Expiration Style is American Fixing Days Specify the number of days from CD maturity date, before which the exchange rate has to be fixed. You will be allowed to capture this value here only if the option ‘Dual CCY Deposit’ is checked at the ‘Account Class Maintenance’ screen. You will be allowed to modify this value even after authorization. Recurring Deposit Specify the following details for recurring deposits. Recurring Deposit Check this box to indicate that a recurring deposit can be created under the account class. Move Maturity to Unclaimed This box is unchecked and disabled for recurring deposits.. 3-17 Move funds on Overdraft Check this option to indicate that the system should pass an overdraft in the payment account (i.e. CASA) when the account does not have sufficient funds for making RD installment payment. Installment Frequency Specify the frequency for payment of installment for RD. Days Specify the installment frequency in terms of days. Months Specify the installment frequency in terms of months. Years Specify the installment frequency in terms of years. Minimum Schedule Days Specify minimum schedule days here. Maximum Schedule Days Specify maximum schedule days here. Minimum Installment Amount Specify the minimum RD installment here. For further details about setting up an account class, refer the chapter ‘Maintaining Mandatory Information’ in the Core Entity User Manual. 3.5.2.2 Maintaining Redemption Details You can capture the redemption details for a deposit account using ‘CD – Redemption Details’ screen. To invoke the screen, click ‘Redemption Details’ button on ‘Account Class Maintenance’ screen. 3-18 Specify the following details: Account Class The system displays the account class. Description The system displays the description of the account class. Redemption Details Principal is Allowed Check this box to indicate that the principal amount is allowed for redemption. If you do not check this box, the system will not consider principal amount for redemption calculation. Interest is Allowed Check this box to indicate that the liquidated interest amount is allowed for redemption. If you do not check this box, the system will not consider liquidated interest amount for redemption calculation. Redeposit Interest is Allowed Check this box to indicate that the re-deposited interest component is allowed for the redemption. If you do not check this box, the system will not consider the interest earned amount for redemption calculation. 3-19 Redemption Fund Availability Delayed Payment Applicable Check this box to enable redemption delayed payment for CDs associated with this account class. Redemption – Penalty Options Waive Penalty Check this box to waive the penalty if the CD is redeemed before its maturity. Waive Penalty Interest Redeposit Till Maturity Check this box to waive the penalty interest redeposit till the maturity of the CD. Waive Penalty for Interest Liquidated Check this box to waive the penalty for liquidated interest. Lost All Interest If you check this option, the system will apply the sum of accrued and liquidated interests as the penalty. Penalty Override Allowed Check this box to enable penalty override for the account. If you check this option, the system will allow you to modify the option ‘Waive Penalty’ on the ‘CD Redemption’. Otherwise, you cannot modify the status if that option. It will be same as that at the account class level. Redemption Order Seq Number The system displays the sequence number. Component Specify the component for which you are defining the order. You can choose one of the following components: Principal Interest Redeposit Interest 3-20 Order Specify the order of the selected component. For example, if you need to set the component ‘Principal’ as first in the order, select ‘Principal’ as the component and enter ‘1’ as the order. 3.6 Setting Up Interest Preferences for CD You need to set up an Interest/Charge product to handle the calculation of interest and charges on a CD. You can set up a product using the ‘Islamic Profit Distribution Product Maintenance’ screen, invoked from the Application Browser. You can invoke the ‘Interest and Charges Product Maintenance’ screen by typing ‘ICDPRMNT’ in the field at the top right corner of the Application tool bar and clicking the adjoining arrow button. 3.6.1 Specifying Accounting Roles for Unclaimed Deposits In case you have checked the option ‘Move Interest to Unclaimed’ and ‘Move Principal to Unclaimed’ in the Deposit Account Details’ screen at the account class level, you will have to specify appropriate accounting roles for the IC product using the ‘Accounting Roles’ screen. Click ‘Accounting Roles’ button on the ‘Interest and Charges Product Maintenance’ screen and invoke the following screen. 3-21 Specify the following details in case you have opted for moving interest and/or principal to unclaimed GL: Accounting Role Choose ‘PRN_UNCLAIMED’ and ‘INT_UNCLAIMED’ from the adjoining list. Account Head Attach ‘INT_UNCLAIMED’ to a miscellaneous GL for unclaimed interest – for eg ‘25691234’. Similarly, map ‘PRN_UNCLAIMED’ to a miscellaneous GL for unclaimed principal – for eg ‘25691235’. 3.6.2 Linking CD Account Class to Interest Product You can link the CD Account Class to the Interest product in the ‘Interest and Charges–Interest Product Preferences’ screen. Click ‘Preferences’ button on the ‘Interest and Charges Product Maintenance’ screen and invoke the following screen. 3-22 . Here you can specify preferences for profit calculation and application on the accounts to which this product is applied. Account Details You can indicate the CD accounts on which this product should be applied. Account Class Specify the account class of ‘Deposit’ type that you have maintained for creating CDs. The adjoining option list displays all valid account classes maintained in the system. You can select the appropriate one. All CDs created under this account class will inherit the profit parameters maintained in this screen. Note that you should not link the same account class to multiple IC products. One deposit account class should be linked only to one interest product and one charge product. Special Condition Check this box for the deposit type of account class. 3-23 Repop at Liqn. If the box ‘Rate Chart Allowed’ has been checked for the account class, then you should leave this box unchecked. Refer the chapter ‘Defining Interest and Charge Products’ in the Interest and Charges User Manual for details about setting up the product. Refer the chapters ‘Annexure A - Accounting Entries and Advices’ in this User Manual for details on the accounting entry set-up for the IC products. Also refer the chapter ‘Annexure B – IC Rule Set-up’ in this User Manual for details about setting up IC rules for the products. 3-24 4. CD Account 4.1 Creating a Deposit Account You can create a certificate of deposit account using the ‘Deposit Account Booking’ screen.To invoke this screen type ‘STDCUSTD’ in the field at the top right corner of the Application tool bar and click the adjoining arrow button. Here you can capture the following details. Branch Code The system displays the branch code of the sign on branch. Customer Number Specify the customer identification (CIF) for whom you are creating a CD. The adjoining option list displays all valid CIF maintained in the system. You can choose the appropriate one. Customer Name The system displays the name of the customer based on the CIF specified. 4-1 Certificate of deposit Account Number Account numbers can either be generated automatically or you can choose to allocate them manually. If you have enabled auto generation of customer account numbers at the bank parameters level, the system will create a unique reference number to identify the CD account and display it here, on pressing the ‘P’ (populate) button. In case of manual number allocation, specify a unique account number. In case of a child CD creation (as part of payout of parent CD), the number will be automatically generated. Certificate of deposit Currency Specify the currency of the CD. A list of all the currencies maintained in the system is displayed in the available option list. You can select the appropriate one. SD User Reference The system displays the SD user reference for the CD. Account Class Specify the account class to which the particular account belongs. You can select the appropriate account class from the option list that displays all ‘deposit’ type of account classes maintained in the system. Account classes that have surpassed their end date (expired) will not be displayed in the option list. Payin By Check Specify the mode of pay-in. The dropdown list displays the following options: Check – If you choose this option, you can create the account using check Mixed – If you choose this option, you can create the account using a combination of check and other modes Others – If you choose this option, you can create the account through modes other than check Choose the appropriate one. Once you default the account class details for the CD account, the system will not allow you to change the payin mode. The check details will be defaulted to the ‘Deposit’ tab. However, you cannot modify the payin mode from the ‘Deposit’ tab. Clearing Type Specify the clearing type. This is mandatory if you choose the payin mode as ‘Check’ or ‘Mixed’. 4-2 Check Instrument Number In case you are opening a CD account with payin mode as ‘Check’ or ‘Mixed’, you need to enter the check instrument number. Drawee Account Number Specify the account number of the drawee in case you are opening the CD account with payin mode as ‘Check’ or ‘Mixed’. Routing Number Specify the routing number. This is mandatory if you are creating the CD account with payin mode as ‘Check’ or ‘Mixed’. Check Date Specify the check date. This is mandatory if you are creating the CD account with payin mode as ‘Check’ or ‘Mixed’. Details maintained in this screen are classified into four tabs: Main Here you maintain the main attributes of the CD like the account number, customer code, the account class, account currency, type of account - single or joint, account status etc. Beneficiary Here you can capture beneficiary details for the CD. Deposit Here you specify deposit-specific details. Dual Currency Deposit In this tab, you can maintain details of a dual currency deposit. Checklist Under the checklist tab, you can capture document checklist details for the account. 4.1.1 Main Tab On invoking the ‘Deposit Account Booking’ screen, this tab is displayed by default. You can specify the following details. Description This is the description of the account. Here you can enter the nature of the CD account. If a customer has two or more accounts under one account class you can specify the purpose of that account. 4-3 Account Type You have to indicate whether the account is to be opened only by the account holder or whether it can be jointly operated. Country Code Specify the country code to define country limits. The adjoining option list displays all valid country codes maintained in the system You can select the appropriate one. Mode of Operation Indicate the mode of operation. Choose one of the following options from the drop-down list: Single Jointly Either-Any one or Survivor Former or Survivor Mandate Holder Account Open Date The date on which the account has to be opened is defaulted based on the account class selected here. You can however change the opening date of account. If the payin mode is ‘Mixed’ or ‘Others’, the system displays the current system date here. In case the payin mode is ‘Check’, the expected value date of the pay-in clearing transaction is defaulted as the account open date. When you create an account using a check, the system considers the account open date as start date for interest accrual. Alternate Account Number The system displays the account number as the alternate account number. However, you can change it. Clearing Bank Code The code for the bank serving as clearing house for the account is displayed here. Legal Title Specify the legal title of the customer. The adjoining option list displays all the authorized and active legal titles maintained in the system. You can choose the appropriate one. The system will print the legal title maintained here, after the customer’s full name with a comma placed immediately after the last character of the customer name followed by a space, at the time of report or statement generation or extract generation to the customer’s full name. 4-4 System will display only the customer name at the time of account statement generation, if you have not maintained legal title abbreviation for an account holder. System will automatically truncate the legal title abbreviation, if the legal title abbreviation is not fitting in the printable area. It will not truncate the customer name in any situation The legal title abbreviation is included in the advice format for account statement next to the customer name. Address Specify the address of the customer. Location An address for a customer account is based on the ‘Location’ and ‘Media’ combination. Location codes maintained through the ‘Account Address Location Type Maintenance’ screen are made available against this field. Select the appropriate one. The address maintained here is always the primary or the default address. Each customer can have several addresses for a particular media. To distinguish between one address of a customer from another for a given media, it is essential for you to specify a unique location for each address. Media Select the media to communicate account related details to the customer, such as account maintenance related charges, fees, interest etc. from the option list. You can choose any one of the following: FAX MAIL SWIFT TELEX FED FEDWIRE Account Status The system displays the status of the CD account. Following statuses are applicable to a CD account: Open – This indicates that the deposit account is in ‘Open’ status. The system allows all transactions on accounts in ‘Open’ status. Opened Today – This status indicates that the account was opened as of the current date. The system allows all transactions except redemption on accounts in ‘Opened Today’ status. Closed - This status indicates that the account has been redeemed and thus closed. Closed Today - This status indicates that the account has been redeemed fully or closed on the current date. 4-5 Matured – This status indicates that the account is in grace period. For an account in ‘Matured’ status, the system will not allow partial/full redemption transactions. Unclaimed - This status indicates that the account is already matured and the grace period has ended. This status also applies to the accounts that are matured and moved to unclaimed GL account. For accounts in ‘Unclaimed’ status, the system will not allow redemption through ‘CD Redemption’ screen. You need to perform redemption operation through the ‘Account Transfer’ screen or the ‘Journal Entry’ screen. Certificate Issue Status Check this box to indicate that the certificate has been issued to the customer. Mail Code Details Mail code is the return code assigned for the mails, statements sent to the customer upon their return as invalid. You need to specify the following mail code details: Mail Code Specify the mail code. The adjoining option list displays all active mail codes maintained in the system. You can choose the appropriate one. This mail code will be printed for all the communication sent to the customer’s address. Mail Code Description When you select the mail code, the system populates the corresponding description of the selected mail code. Statement Date Enter the statement date. Communication Enter the communication related remarks if any. In case of multiple accounts for a customer, a single mail code will be attached across all the accounts belonging to the customer id. Option Indicate your preferences for the following: 4-6 Track Receivable Check this box if you choose to block the subsequent credit that happens to the settlement account (linked to this account class) of a loan contract or retail teller contract, if the system detects insufficient funds in the account, during liquidation. In other words, the system will track the account for receivables (credits). As and when a credit happens, the funds will be allocated to the loan or the retail teller contract for liquidation. Replicate Customer Signature Check this box to indicate that customer signature should be replicated to the account. Auto Deposit A CD can also be automatically created from a savings account if the balance in the savings account exceeds a predefined limit. You can capture the following details of such a CD: Sweep Type The system indicates the type of sweep based on which the CD was created. It can be any one of the following: -1 - This indicates ‘No sweeps’. 1 - This indicates ‘Default from account class’. 0 - This indicates that deposit is instructed. Master Account No The system displays the account number of the savings account from which this auto deposit was created. 4.1.2 Viewing Amounts and Dates You can view all financial details of this account along with the details of the previous debit or credit activities. However, access to all financial information of an account can be restricted for any user. The financial details of an account include the account balance, the uncleared debit and credit balances, the debit and credit turnover and the interest details. The turnover limit details of an account include the current financial period, currency, utilized and unutilized limit balances. Click ‘Amounts and dates’ button in the ‘Deposit Account Booking’ screen. 4-7 The total available balance displayed by the system includes the initial funding amount and unutilized line amount (in case the customer enjoys an OD limit). You can also view the outstanding debit interest and/or charges due on the account, as on the current date. You can also view the amount that can be withdrawn against uncollected funds, on the account. The system computes the allowable amount based on the ‘Withdrawable Uncollected Funds Basis’ option specified in the Branch Parameters Preferences screen. Unposted When this branch is under EOD processing, the inter-branch transactions that have originated from other branches are tanked. The funds are made available automatically after BOD and till such time they are treated as unposted items. APY Value The system displays the APY value. APY Calculation Date The system displays the APY calculation date. 4-8 4.1.2.1 Viewing Turnover Amounts In the Customer Account - Turnover Amounts screen you can view the total turnover of this customer account from the first date of this month to the current day’s system date. Also, you can view the accumulated interest associated with debit or credit transactions after the last liquidation. To view the turnovers for the account, click the ‘Turnover’ button. 4.1.3 Beneficiary Tab Click ‘Beneficiary’ tab on the ‘Deposit Account Booking’ screen. The following tab will be displayed. Specify the following details: Name Specify the name of the beneficiary. Date of Birth Specify the date of birth of the beneficiary. Relationship Specify the relationship of the beneficiary with the customer. 4-9 Address 1 to 4 Specify the address of domicile of the beneficiary. You can enter the address in four lines. You can specify a maximum of 105 alphanumeric characters in each line. Minor Check this box if the beneficiary is a minor. Guardian Name If the beneficiary is a minor, specify the name of the guardian. Relationship Specify the relationship of the guardian with the minor. Address 1 to 4 Specify the address of domicile of the guardian. You can enter the address in four lines. You can specify a maximum of 105 alphanumeric characters in each line. 4.1.4 Deposit Tab Click ‘Deposit’ tab on the ‘Deposit Account Booking’ screen. The following tab will be displayed. Specify the following details: 4-10 Maturity Date The system defaults the maturity date from the default tenor from the account class. However, you can modify this date. On this date the certificate of deposit account gets liquidated. If the escheatment days elapse the maturity date, then the funds will be moved into unclaimed GL and the CD will be closed. Auto Rollover Check this box to automatically rollover the deposit you are maintaining. You have to indicate ‘Rollover Type’ on selecting this option. If you have not maintained grace period for a CD account and this option is checked, the system rolls over the account on its maturity date. However, if you have maintained grace period for the CD account, the system rolls over the account at the end of the grace period the rollover date will be the maturity date of the CD account.. Close on Maturity Check this box to close the certificate of deposit account on maturity date and transfer the amount as per the CD pay-out details. Note that for a recurring deposit, you need to mandatorily check this box. If you check this box, the system closes the CD on the maturity date even if you have defined grace period for the account. For a CD, only one of the options – Close on Maturity or Auto Rollover – can be checked. Move Interest to Unclaimed Check this box to move the interest amount to the unclaimed GL mapped at the IC product in the accounting roles on grace period end date. If you select this option, you will have to check the box ‘Move Principal to Unclaimed’. Move Principal to Unclaimed Check this box to move the principal amount to the unclaimed GL mapped at the IC product in the accounting roles and liquidate the interest amount to the interest booking account on grace period end date. . If you select this option then only principal amount will be moved to unclaimed GL; the interest will be settled as per CD pay-out details. If you check both ‘Move Interest to Unclaimed’ and ‘Move Principle to Unclaimed’ then CD amount (i.e. Principal and interest) will be moved to the respective unclaimed GLs, irrespective of the CD pay-out details maintained. Block CD Account Check this box to block the certificate of deposit account. If a CD is blocked, the system will not allow the following operations for the CD account: 4-11 Partial or full redemption Manual renewal of CD from redemption screen Rollover after maturity date However, the system will continue to calculate the interest accrual till the maturity date. Also, the deposit amount will be moved to unclaimed GL even if you have maintained maturity payout after setting the CD for auto rollover. Blocked Reason Code Specify the code that identifies the reason for blocking the CD. The option list displays all valid block reason codes maintained in the system. Choose the appropriate one. If you check the box ‘Block CD Account’, it is mandatory to indicate the blocked reason code. Blocked Reason Based on the block reason code, the system displays the reason for blocking the CD account. Certificate of deposit Amount Specify the amount, which is paid for the time deposit creation, in the account currency. This amount should be equal to or greater than the minimum threshold amount specified for the linked account class. If you have specified the percentage in the Pay-In options, on clicking the ‘Compute’ button, the system computes the amount. And while saving, the system validates the sum of Pay-In Amounts against the ‘CD Amount’ keyed in. Computed Amount On clicking the ‘Compute’ after specifying the percentage under the ‘Pay-In Details’ section the system computes the amount of the CD in this field. On saving the record, the system validates the sum of Pay-In amounts against the ‘CD Amount’ keyed in. Next Maturity Date On selecting the rollover for the CD account, the system defaults the next maturity date from the previous tenor of the deposit. Deposit Tenor The system calculates the tenor of the deposit account to the difference between Interest start date and Maturity date and displays it. In case of change in maturity date, the system changes the value of this field. Rollover Type Indicate the components that should be rolled over by choosing one of the following options: 4-12 Principal - If you select this option, then the system will roll over the principal amount alone on CD maturity date or end of the grace period. If interest booking account is given as CD account, then on maturity date the interest amount will be first liquidated to the CD account and then settled as per the pay-out details maintained for the CD account. Principal + Interest - For you to choose this option, the interest booking account has to be the CD account. If you select this option, then the system will roll over the principal and interest amount on CD maturity date or end of the grace period. Special Amount – If you choose this option, the system will roll over the amount specified in ‘Rollover Amount’ field, irrespective of what the interest booking account is. Upon maturity of the rolled over CD, the system will roll over with the same amount special amount and settle the interest amount as per CD pay-out details maintained. Interest - For you to choose this option, the interest booking account has to be the CD account. If you select this option, then the system will roll over the interest amount on CD maturity date or end of the grace period. The principal will be settled as per the pay-out details maintained. You should choose the option ‘Principal’ if you have checked the following boxes: Auto Rollover Move Interest to Unclaimed Move Principal to Unclaimed The system will select the option ‘Principal’ and disable this field if you check the box ‘Close on Maturity’. Rollover Amount If a special amount is to be rolled over, you have to specify the amount (less than the original deposit amount) in this field. Force Rollover Account Class Specify the force rollover account class. On rollover, the system will associate the CD with the account class specified here. The option list displays all valid account classes maintained in the system. Choose the appropriate one. You cannot specify the account class of the current CD as the force rollover account class. In case the force rollover account class specified at the account class level does not match the one specified here, the system will close the current CD account and create a new CD account with a different account number. However, if you do not specify the force rollover account class, during rollover, the system will verify whether a force rollover account class is maintained at the account class level. If you have maintained a force rollover account class at the account class level, the system will rollover the account accordingly. The system will close the current CD account and create a new CD account with a different account number. 4-13 In case a force rollover account class is not maintained at the account class or CD account levels, the system will not create a new CD account on rollover. In that case, the rollover process will not change the CD account number. On force rollover, the system will carry over the pay-in and pay-out details of the original CD account to the newly created account. Rollover Interest Rate Specify the interest rate to be applied on the CD during the immediate rollover cycle. The dropdown list displays the following options: Current Rate – If you choose this, the system will use the latest interest rate of the CD account Base Rate - If you choose this, the system will use the base rate maintained in the CD account Best Rate – If you choose this, the system will choose highest of the current rate or base rate Choose the appropriate one. For step up or step down enabled CDs, system will compute the interest rate schedule based on the rollover interest rate selected. Base Rate Specify the base interest rate to be applied on the CD account during immediate rollover cycle. If you choose the rollover interest rate as base rate, it is mandatory to specify the base rate here. Opt-in/Opt-out Specify whether the CD account is in ‘Opt-in’ or ‘Opt-out’ status. Choose the appropriate one. Step Up/Down Interest The interest step up/step down preferences defined at the account class level will be defaulted to the CD accounts associated it. However, you cannot modify such details here. Specify the following details: Step Up/Down Interest Applicable Check this box to enable interest step up/down of interest for the account class. While defining an interest product, the system verifies whether any account class supports step up/step down interest feature. If the account class associated with the interest product doesn’t support step up or step down, the system will not support it for the interest product. 4-14 Interest Factor The system displays the interest factor as maintained at the account class level. You cannot modify this. Interest Rate Specify the interest rate to be applied in case of interest step up or step down. Rate Code Specify the interest rate code. Step Interest Start Date Specify the start date for applying the new interest rate after step up or step down. Spread Specify the interest rate spread. The system adds the spread to the interest to determine the actual rate to be applied. Frequency Specify the frequency of change of interest rate spread. The drop-down list displays the following options: Monthly Quarterly Half Yearly Yearly Choose the appropriate one. Unit Specify the unit of the frequency maintained above. The rate spread change will take place on completion of the number of frequencies maintained here. Max Interest Rate Specify the maximum interest rate to be applied on the CD accounts associated with the account class. In case of interest step-up, if the computed interest rate is higher than the maximum interest limit, the system uses the maximum interest rate. Min Interest Rate Specify the minimum interest rate to be applied on the CD accounts associated with the account class. In case of interest step-down, if the computed interest rate is lower than the minimum interest limit, the system uses the minimum interest rate. 4-15 For details on processing interest step-up and step-down, refer to the section ‘Processing Interest Step-up/Step-down’ in this chapter. Customer Bumps You can set the limits for interest rate bumps, cumulative changes and redemptions for a CD accounts. You need to specify the following details: Max Number of Rate Bumps Allowed Specify the maximum number of interest rate bumps allowed on the CD account. System defaults the Maximum number of interest rate bumps allowed from the account class. This can be changed in the CD account. However, this cannot be less than the maximum number of rate bumps maintained for the account class. The system tracks the number of interest rate bumps for the CD account. The rate of interest cannot be modified once the counter hits the limit specified here. If you set the maximum number of rate bumps to one, the system will not allow interest rate modification. The rate specified during creation of the CD account will be counted as the first rate bump. On rollover or renewal of the CD account, the system resets the rate bump counter. Max Number of Redemptions Allowed Specify the maximum number of redemptions allowed on the CD account. System defaults the Maximum number of Redemption allowed from the account class. However it can be changed in the CD account. The system tracks the number of redemptions. The certificate of deposit cannot be redeemed once the counter hits the limit specified here. On rollover or renewal of the CD account, the system resets the redemption counter. Max Number of Cumulative Changes Allowed Specify the maximum number of cumulative changes allowed on the CD account. System defaults the Cumulative number of interest rate changes/Redemption changes allowed from the account class. However it can be changed in the CD account. The system tracks the number of cumulative changes for the CD account. Cumulative changes will not be allowed once the counter hits the limit specified here. On rollover or renewal of the CD account, the system resets the counter. Payin Details The CD module allows you to fund a CD using multiple pay-in modes viz: 4-16 Pay in by transfer from GL Pay in by transfer from Savings Account You can also have a combination of the aforesaid modes while funding a single CD. Once the CD account is created, the system considers each of the pay-in options entered in this screen and processes it accordingly. You can specify the CD funding amount as a percentage or as an absolute value. Note that you can fund a CD by cash too. However, this option is available for CD creation through the Savings module only. You can specify the following details of the deposit: Certificate of deposit Pay-in Option Indicate the method for initial funding during account creation. Choose one of the following options: Account GL Certificate of deposit You can have multiple sets of amount being taken from different accounts to fund the same CD. You need to choose ‘Certificate of deposit’ to create a certificate of deposit combining multiple CD accounts on rollover. Set this option to ‘Certificate of deposit’ for all such certificate of deposit accounts that you wish to combine. During ICBOD batch on the maturity date of the accounts involved, the system closes all such combining accounts and transfers the total amount to a common general ledger. Based on that amount, a new CD accounts is created. The value date of the new CD account will be maturity date of the CD accounts involved. However, you can combine only such CD accounts which have the same maturity date. Otherwise, the system will not allow the combined rollover. Also, if you have maintained the payout details for the CD accounts involved, the system will rollover the CD based on those details. The accounts will not be combined in that case. If you select ‘Check’ or ‘Multi’ in the field ‘Pay-in By Check’ on the main tab, the system defaults the details of the check against pay-in details. You can have one of the following options against the field: Check – You can have the details of one check Multi – You can have the details of one check and multiple other modes such as Account, GL or CD Others – You can have multiple modes other than check 4-17 Percentage Indicate the percentage of the amount to be deposited using the specified pay-in mode. It is not applicable for CD accounts which are involved in combined rollovers. Amount Specify the amount being deposited to open a CD using the specified pay-in mode. Note the following: Input to one of the fields is mandatory - either pay-in ‘Amount’ or ‘Percentage’. If you input both ‘Amount’ and ‘Percentage’, the value in ‘Amount’ field will take precedence. Offset Branch The system populates the branch code of the account from which fund is transferred to CD account. Offset Account Specify the account number/ GL from which the fund is transferred to CD account. This field returns the branch code if the account is selected and NULL is returned if GL is selected. If the pay-in mode is GL then the system will display only GLs and if the pay-in mode is account then only accounts will be displayed in the option list. 4-18 Certificate of deposit Payout Details The CD module allows you to close a CD using multiple pay-out modes viz: Pay-out by Cashiers Check Pay-out by transfer to GL Pay-out by transfer to own bank Savings Account Pay-out by transfer to Other Bank’s Account Pay out resulting in a new child CD Note that you can also close a CD by a cash pay-out. But this option is available only from the Savings module. You can specify following pay out details of the deposit: Payout Type Indicate the method for settlement of the CD on maturity date. Choose one of the following options: Cashiers Check Payments General Ledger Account Certificate of deposit Loan Repayment Percentage Specify the percentage of the amount of redemption by the pay-out mode selected. Offset Branch The system displays the branch code of the account to which fund is transferred from CD account. Offset Account Specify the account number/ GL to which the fund is transferred to CD account. This field will return the branch code if the account is selected and NULL will be returned if GL is selected. If Pay-out mode is GL then the system will display only GLs and if the Pay-In mode is Account then only accounts will be displayed in the option list. Narrative Specify the description for the redemption. 4-19 Split Rollover Details During rollover, you can split a CD account into multiple accounts and distribute the amount among such accounts. You can set your preferences for such split rollovers in this section. You need to specify the following details: Account Class Specify the account class with which the new CD should be associated on rollover. In case of split rollover, you need to indicate the account class for each new CD account to be created on rollover. Percentage Specify the percentage of the CD amount to be allocated to the new CD account on rollover. During split rollover, the system will compute the amount based on the percentage and create new CD accounts for such amounts. You can also specify the CD amount to be allocated to the new CD in the field ‘CD Amount’. If you specify the CD amount, the system will ignore the percentage specified here and create new CD accounts as per the amounts thus allocated. CD Amount Specify the CD amount to be allocated to the new CD account. During split rollover, the system will create new CD accounts based the amount allocated for each. If you specify the CD amount and percentage for the same record, the system will ignore the percentage and create new CD accounts based on the CD amounts allocated. Remaining Amount The system displays the remaining portion of the CD amount after allocating amounts for each new CD account. On split rollover, the system creates a new CD account with the remaining amount. It is mandatory for a CD account with remaining amount option. CD Account Number The system displays the account number of the new CD. Based on the preferences set for split rollover, during ICBOD batch process on the maturity date of the original CD account, the system closes the account and creates new child CD accounts. While creating new CD accounts, the system verifies the account classes specified for each split record. In case of exceptions such as mismatch of CD amounts during rollover, the system marks the CD account as ‘Rollover Failed’. The original CD account will not be closed in that case. 4-20 Recurring Deposit Specify the following details: Auto Payment Take Down Check this box to allow the recurring deposit account to debit the payment account for the payment amount as per the installment frequency. Move Maturities to Unclaimed Check this field to move all the funds, on the maturity date, to the unclaimed GL mapped to the accounting role in the IC product. Note that this box is unchecked and disabled for RD. Payment Branch Specify the details for the branch to which the payment account belongs. Payment Accounts Specify the payment account; this can be either savings account or the current account from which the installment for the Recurring Deposit is collected as per the installment frequency Installment Amount Specify the installment amount that has to be collected from the payment account as per the installment frequency. This installment amount should be greater than the minimum amount mentioned at the account class. Recurring Deposit Account Check this box to indicate recurring deposit account. Payment Date The system displays the account booking date as the date on which the payment is made for recurring deposit account. You cannot modify it. Payment Currency The system displays the account currency of the payment account. Note the following: The system enables the offset account and branch detail fields only if the option to pay is selected as the savings account. 4-21 The Unclaimed Interest and Principal GLs are specified while maintaining an Interest and Charges (IC) Deposit Type product. The Accounting Roles for the GLs are ‘INT_UNCLAIMED’ and ‘PRN_UNCLAIMED’ respectively. When maintaining an ICDeposit type product, you have to map these Accounting Roles to the appropriate GLs maintained at your bank. The system allows you to select ‘Close on Maturity’ box, only when you specify the recurring deposit details. You have to maintain deposit transaction code as ‘DPN’ redemption transaction code as ‘RED’ and prepayment transaction code as ‘TRF’ for the recurring payments in the Branch Parameters for the Interest and Charges. On booking date, RD installment accounting entries are posted during the IC batch (Post End of Transaction Input stage). From the second installment, entries are posted during every IC BOD batch on the schedule date. If an RD installment is overdue due for insufficient funds in the payment account, then the system will collect the overdue installment amount as soon as funds are available, during the IC batch (Post End of Transaction Input stage) on that day. During the same batch the system will also calculate the number of overdue days and apply penalty on that, RD penalty amount is calculated at the EOD, but penalty is collected on account liquidation date from the interest booking account. Installment Frequency Specify the following details: Move funds on Overdraft Check this option to indicate that the system should pass an overdraft in the payment account (i.e. CASA) when the account does not have sufficient funds for making RD installment payment. Days Specify the installment frequency in terms of days. Months Specify the installment frequency in terms of months. Years Specify the installment frequency in terms of years. 4.1.5 Processing Interest Step-up/Step-down Oracle FLEXCUBE supports automatic step-up and step-down of interest for CD accounts based on the frequency and rate spread maintained for the account. You need to maintain specific SDEs and UDEs for processing interest step-up and step-down. For details, refer to the section ‘CD Interest Step-up/Step-down’ under chapter ‘Annexure B - IC Rule Set-up’ of this user manual. 4-22 4.1.5.1 Processing Step-up/Step-down for Fixed Interest Rates The system uses the interest rate defined for the CD account to compute the interest rate schedule. When you save the CD account, the system internally builds the interest rate schedule based on the interest rate, frequency and spread till the maturity date and step interest start date. Start date for interest step-up/step-down of can be the current date or a future date. The system computes the schedules based on the start date. The schedules thus computed are updated in the UDE. The following formulae are used to compute the interest rates during step-up/step-down processes: Interest Step-up = Interest Rate + (Frequency Cycle x Spread) Interest Step-down = Interest Rate – (Frequency Cycle x Spread) 4.1.5.2 Processing Step-up/Step-down for Variable Interest Rates The interest rate code which is defined in the CD account will be used for compute the interest schedule. While saving the CD account, system will compute the schedules till maturity date of the CD account based on the frequency, spread, interest rate code, maximum and minimum interest rates and the step interest start date. The effective interest rate will be updated for each schedule based on the rate code and interest rate. Rate Calculation in case of Interest Step-up Sl. Number Condition Interest Rate for Schedule 1 Previous Schedule Interest Rate < Rate Code (Effective Schedule Date) Interest Rate + Spread Rate Code (Effective Schedule Date) Interest Rate + Spread 2 Previous Schedule Interest Rate >= Rate Code (Effective Schedule Date) Interest Rate + Spread Previous Schedule Interest Rate Rate Calculation in case of Interest Step-down Sl. Number Condition Interest Rate for Schedule 1 Previous Schedule Interest Rate > Rate Code (Effective Schedule Date) Interest Rate – Spread Rate Code (Effective Schedule Date) Interest Rate + Spread 4-23 Sl. Number Condition Interest Rate for Schedule 2 Previous Schedule Interest Rate <= Rate Code (Effective Schedule Date) Interest Rate – Spread Previous Schedule Interest Rate In case the rate code is modified, the system re-computes the rate schedule for the CD account during EDO operations and updates the UDE values accordingly. If you modify the frequency, frequency unit or spread of a CD account, the system re-computes the future interest rate schedule on save. Note the following: In case of interest step-up, if the computed interest rate is higher than the maximum interest limit maintained for the CD account, the system uses the maximum interest rate. In case of interest step-down, if the computed interest rate is lower than the minimum interest limit maintained for the CD account, the system uses the minimum interest rate. If you have specified the ‘Maximum Number of Rate Bumps Allowed’, the system tracks the number of interest rate changes that take place. The interest rate will be computed for the number of rate changes thus maintained. For the following step-up/step-down cycles, the system will not update the interest rates. The last computed interest rate will be used during the forthcoming cycles. 4.1.6 Dual Currency Deposit Click ‘Dual Currency Deposit’ tab on the ‘Deposit Account Booking’ screen. The following tab will be displayed. 4-24 Specify the following details: Dual Currency Deposit You can capture the following details for the deposit. Linked Currency This option is defaulted from the account class. However you can modify this value. Currency Option Product Specify the currency option product from the option list under which the Options Contract has to be created in case of Dual Currency Deposit. The option list displays all the Option Products with Product Type ‘CO. You need to mandatorily specify this product if the ‘Linked Currency’ is entered. You will be allowed to capture this value here only if the option ‘Dual Currency Deposit’ is checked at the ‘Account Class Maintenance’ screen. You will be allowed to modify this value even after authorization. On saving the account, system validates the following to ensure that the currency option product selected here has the below features: Contract type is Trade Option Type is Call Deal Type is Buy Option Style is Plain Vanilla 4-25 Barrier is not allowed Delivery type is Physical Expiration Style is American Option Contract Ref Number. The system displays here the reference number of Options contract that is being created while authorising the dual currency CD account. Exchange Rate Specify the exchange rate between CD account currency and the linked currency. Initially, it will be defaulted with the standard exchange rate. However, you are allowed to change the same. Linked Currency Settlement A/c Here you can specify the settlement account of the linked currency in case if the settlement has to happen in the linked currency at maturity. The adjoining option list displays all valid accounts maintained in the system. You can select the appropriate one. Linked Currency GL You can capture the GL used for posting the settlement entries in the linked currency. The adjoining option list displays all valid GLs maintained in the system. You can select the appropriate one. Fixing Days Specify the number of days from CD maturity date before which the exchange rate has to be fixed. This will be defaulted from the ‘Account Class Maintenance’ screen. However you change it. Note that fixing days cannot be lesser than zero or greater than the tenor of the CD. Yield Enhancement Specify the additional yield percentage that the customer receives for agreeing on the currency Option. Inception Fair Value Specify the market value of the option contract at inception. This will be defaulted in the linked Options contract. 4.1.7 Checklist Details Click ‘Checklist’ tab in the ‘Deposit Account Booking’ screen in order to capture document checklist details for the account. 4-26 Specify the following: Mandatory Specify if the selected document category is mandatory or not by choosing one of the following options from the drop-down list: No Yes Checked Check this box to check if the document is received or not. Note the following: The checklist from the account class will be defaulted in this screen. When the account is opened for a customer type and category, the document associated with that customer type and category will be defaulted in the checklist tab from the account class maintenance. The addition, deletion and modification of the checklist items in the account class maintenance screen will be reflected in this screen for the accounts opened subsequent to the successful authorization of the account class Existing accounts will remain unaffected by the change in account class parameters, unless amended to include checklist items. System will provide an appropriate error message, if a mandatory document is not provided. The error message override enables account creation even if a mandatory document is not provided. 4-27 If you amend an existing account class to provide check list items, then the new accounts opened subsequently with the modified account class will request for verification of all the check list items 4.1.8 Capturing Additional Details You can capture additional details for the account by clicking the following buttons in the ‘Deposit Account Booking’ screen: Button Function Interest This invokes the ‘IC Special Conditions Maintenance’ screen. Charges This invokes the ‘Account level charges conditions’ screen. Linked Entities This invokes the ‘Linked Entities’ screen. Restrictions This invokes the ‘Products and Transaction Codes Restriction’ screen. MIS This invokes the ‘Management Information System’ screen. Statement This invokes the ‘Statement Details’ screen. Joint Holders This invokes the ‘Linked Entities’ screen Fields This invokes the ‘User Defined Fields’ screen. Account Signatory This invokes the ‘Signatory Details’ screen. CD Payout Details This invokes the ‘Certificate of deposit Payout Details’ screen. Additional Details This button invokes ‘CD Additional Details’ screen where you can view the details of the parent CD account after rollover. Change Log This invokes the ‘Customer Address Change Log’ screen. Step-up/down Interest Rate This invokes the ‘Step up/down Interest Rate Details’ screen where you can view the details of interest step-up and stepdown for a CD account. 4-28 Refer the chapter ‘Capturing Additional Details’ in this User Manual for details about the aforesaid buttons. 4.2 Viewing Details of Certificate of deposit Accounts You can view the details of CD accounts and operations using ‘Inquiry Screen – CD’ screen. To invoke the screen, type ‘STDTDIQY’ in the field at the top right corner of the Application tool bar and click the adjoining arrow button. Press F7 function key on the keyboard to enter the search parameters. You can search for the certificate of deposits based on the following parameters: Account Number Specify the certificate of deposit account number. When you execute the query, the system will display the details of the certificate of deposit account specified here. Branch Specify the branch to which the certificate of deposit account belongs. The system defaults the branch based on the account number. However, you can modify the branch code to suit your requirement. Once you have specified the above details, press F8 function key on the key board to execute the query. The system displays the following details of the certificate of deposit account: Basic Details Primary customer name 4-29 Other Information Passbook status Certificate issued status Account blocked Blocked reason Uncollected interest Interest due Renewal balance Uncollected principal Principal due Passbook balance Discounted amount Maturity Method of maturity payout instruction Renewal type Date of last renewal Number of times renewed Grace period Value date Force renewal term Interest Next effective rate Next step rate Grace accrual rate Schedule rate change End of grace period Interest accrual rate at grace period Number of rate bumps allowed Number of rate bumps utilized Interest redeposited prior to renewal Interest redeposit since renewal 4-30 Interest index code Interest variance Available interest Unclaimed interest Projected accrued interest at maturity Interest withheld Next interest payment date Product variance Interest Schedules Payout frequency Compounding frequency Next payout date Next compounding date Anniversary start date Next step rate Anniversary start month 4.2.1 Viewing Additional Details In addition to the above details, you can view the operation history of the CD using the buttons provided at the bottom of the screen. 4.2.1.1 Payout History You can view the details of CD payout using the ‘Payout History’ screen. Click ‘Payout History’ button to invoke the screen. 4-31 The system displays the following details: CD account number Branch code Transaction date Payment mode Amount Check number 4.2.1.2 Event History You can view the details of CD events, advices and accounting entries using the ‘Event History’ screen. Click ‘Event History’ button to invoke the screen. 4-32 The system displays the following details: Event Details The system displays the event details. You can select an event to view the accounting entries corresponding to the event. Event Description of the event Advice Details The system displays the following advice details pertaining to the CD account: Name of advice DCN Accounting Entries Details The system displays the following accounting entry details for the selected event: Type of entry – Debit or Credit Account Amount tag Account currency Event foreign currency amount Exchange rate Event local currency amount Transaction date Value date Transaction code 4.2.1.3 CD Blocked History You can view the details of all blocks placed on the CD account using the ‘CD Blocked History’ screen. Click ‘CD Blocked History’ button to invoke the screen. 4-33 The system displays the following details: Block sequence number Whether the CD is blocked or unblocked Block reason code Blocked reason Blocked remarks Block date 4.2.1.4 Rollover History You can view the details of CD account rollover using the ‘Rollover History’ screen. Click ‘Rollover History’ button to invoke the screen. The system displays the following details: Rollover sequence number 4-34 Rollover type Rollover date Interest Principal Redeposit interest Rollover amount 4.3 Viewing CD Account Balance You can query the account balance in a certificate of deposit account using ‘Balance Inquiry Screen - CD’ screen. To invoke the screen, type ‘STDTDBQY’ in the field at the top right corner of the Application tool bar and click the adjoining arrow button. Press F7 function key on the keyboard to enter the search parameters. You can search for the certificate of deposits based on the following parameters: Account Number Specify the certificate of deposit account number. When you execute the query, the system will balance display the details of the certificate of deposit account specified here. Branch Specify the branch to which the certificate of deposit account belongs. The system defaults the branch based on the account number. However, you can modify the branch code to suit your requirement. 4-35 Once you have specified the above details, press F8 function key on the key board to execute the query. The system displays the following balance details of the certificate of deposit account: General Information Primary customer name Primary customer Account currency Account status Product Officer ID Balance Available balance Principal balance Passbook balance Current balance Closing balance Hold APY Liens Maturity/Term Renewed Maturity period Next maturity date Last deposit date Deposit term Amount due at maturity Interest Interest rate Accrued interest Available interest Projected interest 4-36 Withholding tax Date of next rate change Compound interest Interest paid till date Interest payout instruction Oracle FLEXCUBE extracts the CD balance from this screen when external systems request for that information. 4-37 5. CD Additional Details 5.1 Capturing Additional Details You can capture additional details for the account by clicking the following buttons in the ‘Deposit Account Booking’ screen: Button Function Interest This invokes the ‘IC Special Conditions Maintenance’ screen. Charges This invokes the ‘Account level charges conditions’ screen. Linked Entities This invokes the ‘Linked Entities’ screen. REG This invokes the ‘REG Details’ screen. Restrictions This invokes the ‘Products and Transaction Codes Restriction’ screen. MIS This invokes the ‘Management Information System’ screen. Statement This invokes the ‘Statement Details’ screen. Joint Holders This invokes the ‘Linked Entities’ screen Fields This invokes the ‘User Defined Fields’ screen. Account Signatory This invokes the ‘Signatory Details’ screen. CD Payout Details This invokes the ‘Certificate of deposit Payout Details’ screen. Change Log This invokes the ‘Customer Address Change Log’ screen. Additional Details This invokes the ‘CD Additional Details’ screen. 5-1 5.2 Button Function Step-up/down Interest Rates This invoke ‘Step up/down Interest Rate Details’ screen where you can view the details of interest step-up and step-down for a CD account. OFAC Check This invokes the ‘OFAC Check’ screen from which you can perform online check with OFAC system at the time of account creation Specifying Interest Details Click ‘Interest’ button on the ‘Deposit Account Booking’ screen and invoke the ‘IC Special Conditions Maintenance’ screen. You can specify the following details: Calculation Account Specify the header account to which the ‘child’ accounts should be linked. The adjoining option displays all valid accounts maintained in the system. You can choose the appropriate one. By default, it will be same as the customer account. However you can change it. 5-2 Interest Booking Account You can select the account for booking interests on transaction processed at your bank. At the time of creating an IC product, if you have maintained the booking account type as Interest (in the ‘Interest and Charges – Product Definition’ screen), the Interest will be liquidated into the Interest Booking account. By default, the customer’s account in the current branch will be displayed in this screen (in the ‘Interest Booking Account’ field). However, you have the option of booking interest to a different account belonging to another branch also. The accounts maintained in the selected Booking Branch will be available in the adjoining option list. You can select the appropriate account. Interest will then be liquidated into the selected account. Charge Booking Account You can select the account for booking charges on transactions processed at your bank At the time of creating an IC product, if you have maintained the booking account type as Charge (in the ‘Interest and Charges – Product Definition’ screen), the charge will be liquidated into the Charge Booking account. By default, the customer’s account in the current branch will be displayed in this screen (in the ‘Charge Booking Account’ field). However, you have the option of booking charge to a different account belonging to another branch also. The accounts maintained in the selected Booking Branch will be available in the adjoining option list. You can select the appropriate account. Charges will then be liquidated into the selected account. Interest Statement Check this box to indicate that you would like to generate an interest statement for the account. The Interest Statement will furnish the values of the SDEs and UDEs and the interest rule that applies on the account. Interest Start Date Specify the date from which the interest accruals of CD account begins. You can specify the date as of booking the CD or any date in the future. If you specify a date in future, the system will post entries for account opening (DEBK event) on the account opening date with the value date as interest start date. It will start interest accrual calculation on the date specified in this field and post entries for IACR event. Charge Start Date For the account for which you are defining special conditions, you must specify the date from which you would like to apply charges. Charges for this account will be calculated according to the special conditions that you define subsequently. By default, charges on an account would be applied when the free banking period (if any) elapses. This means that the Charge Start Date is arrived at by the System by adding the Free Banking Period days (if any, specified for the Certificate of deposit used by the account) to the Account Opening Date. If no Free Period has been indicated for the account class used by the account, the Charge Start Date is defaulted to the Account Opening Date (that is, charges on the account would be applied right from the account opening date) and displayed in the Special Conditions Maintenance screen. 5-3 You can override the default Charge Start Date and specify the desired start date for charge application. Interest Booking Branch By default, the customer’s account in the current branch will be displayed in this screen (in the Interest/Charge Booking Account and Interest/Charge Booking Branch fields). However, you have the option of booking interest/charge to a different account belonging to another branch also. You can select the Interest/Charge Booking Branch from the option-list available. The accounts maintained in the selected Booking Branch will be available in the option-list provided for Interest/Charge Booking Account. You can select the account from this list. Interest/Charge will be liquidated into the selected account. Dr Cr Advices You can indicate whether you want to generate an interest liquidation advice for a customer account. Check this box to indicate that the system must generate payment advices when interest liquidation happens on an account. The advices are generated in the existing SWIFT or/and MAIL format. No advices will be generated if you leave this box unchecked. Charge Booking Branch By default, the customer’s account in the current branch will be displayed. However, you have the option of booking charge to a different account belonging to another branch also. You can select the Charge Booking Branch from the option-list available. The accounts maintained in the selected Booking Branch will be available in the option-list provided for Charge Booking Account. Charge will be liquidated into the selected account. Rate Chart Allowed The system defaults this preference from account class and it indicates that the system should calculate CD interest based on the LDMM float rate maintained in the ‘LD MM Floating Rate input’ screen (CFDFLTRT), If it is checked, the system will pick interest rates based on different tenors, minimum amount, currency and effective date for a CD. The system does not allow you to amend it. During account creation for CDs, if ‘Rate Chart Allowed’ is checked, the system does not allow floating rate code. During IC calculation, if the rate code is maintained for the UDE then the system derives the interest rate from the Rate Maintenance done in ‘LD MM Floating Rate input’ screen (CFDFLTRT). Consolidated Charge Account Specify the account for posting consolidated charges. The adjoining option list displays all valid accounts maintained in the system. You can select the appropriate one. Product Details Specify the following details: 5-4 Product Code Specify an interest product in order to allow calculation of interest. When you apply an interest product on the account, interest for the account will be calculated according to the interest rule attached to the product. A CD can be linked to two products only – one interest type of product and one charge type of product. The system will not allow you to maintain more products for a single CD. UDE Currency Specify the UDE currency for the product that you apply on the account. UDE values that you specify for the account subsequently will be taken to be in this currency. Interest Rate UDE Specify the interest rate UDE. Waive Interest This box is unchecked by default. However, you cannot waive interest on a CD. Leave this box unchecked. Generate UDE Change Advice Check this box to indicate that interest rate change advice has to be generated for the account at EOD. The system generates interest rate change advices for accounts when the interest rate changes as part of EOD. For those accounts, when interest rate changes the details are handed off for rate change advice generation and the same is generated in the pre determined SWIFT format as per MT 935. The advice tag used for interest rate change is ‘RTCHG_ADVICE’. The advice format for interest rate change as per MT935 is given below: Status Tag Field Name Content/Options Nu mb er M 20 Transaction Reference Number 16x 1 O 23 Further Identification 16x 2 O 25 Account Identification 35x 3 M 30 Effective Date of New Rate 6!n 4 M 37H New Interest Rate 1!a12d 5 O 72 Sender to Receiver Information 6*35x 6 M = Mandatory, O = Optional 5-5 During the account UDE change batch at Post EOTI stage, the system picks all the certificate of deposit accounts for the EOD branch for which ‘Generate UDE change advice’ option is checked at certificate of deposit account booking level. You can use the following format in generating certificate of deposit interest rate change advice (UDECA): #B Interest Component Change Advice CUSTOMER : _CUST_ _CUST-NAME_ _ADDR1_ _ADDR2_ _ADDR3_ _ADDR4_ -------------------------------------------------------------------------------BRANCH : _BRN_ ACCOUNT : _ACC_ _DESCRIPTION_ CURRENCY : _ PRODUCT : (_PROD_) _PRODDESC_ -------------------------------------------------------------------------------- Rates and other interest components have been changed.The details are : Element Existing Value New Value -------------------------------------------------------------------------------#LOOP 5-6 _RCDATE_ _UDE_ _OLDVAL_ _NEWVAL_ #ENDLOOP --------------------------------------------------------------------------------#EB For more information on rate change advice, please refer the CD Operations chapter of this user manual. For details on advice generation, please refer the chapter titled ‘Maintaining Advice Formats’ in the MS user manual under CORE module. Open You can temporarily stop applying an IC product on a CD by un-checking this box. The product will cease to be applied on the certificate of deposit. You can make the product applicable again by checking this box. Effective Date Indicate the following details: Effective Date The ‘Effective Date’ of a record is the date from which a record takes effect. You can maintain different values for a UDE, for different effective dates, for an account. When interest is calculated on a particular day for an account with special conditions applicable, the value of the UDE corresponding to the date will be picked up. Typically, you would want to open records with different Effective Dates if the values of UDEs vary within the same liquidation period. Open Typically, you would want to open records with different effective dates if the values of UDEs vary within the same liquidation period. UDE Values Specify the following details. User Defined Element ID Specify the UDE for which value is given. The adjoining option list lists all UDEs maintained for the Interest Rule. You can select the appropriate one. 5-7 UDE Value Specify the value of the UDE. For a fixed interest rate, you can specify a numeric value. Rate Code If you want to use a floating rate instead of a fixed rate, you should specify a valid IC rate code. The system will pick up the applicable rate based on the branch, currency and effective date combination maintained for the rate code in the ‘Interest & Charges Rate Input’ screen (ICDRATES). For a given tenor, the system picks up the applicable rate as per the effective dates defined for the rate code. CD Rate Code Specify the rate code to be used for CD calculation. The adjoining option list displays all rate codes maintained using the ‘LD MM Floating Rate Input’ screen (CFDFLTRT). You can select the appropriate one. You can use CD rate code only when you have checked ‘Rate Chart Allowed’ option for the account class that is linked to the IC product. In the corresponding IC rule, you need to ensure that UDE Type is maintained as ‘Rate as Rate Code’ for interest rate pick-up for this account. Refer the chapter ‘Annexure B – IC Rule Set-up’ in this User Manual for further details about IC rules. Note the following: If you specify the UDE value and also a rate code (rate code or CD rate code), the system will add the UDE value to the specified rate code value and apply that interest rate on the deposit. You can define either the rate code or the CD rate code, but not both. 5-8 5.3 Specifying Charge Details Click ‘Charges’ button on the ‘Deposit Account Booking’ screen and invoke the ‘Account level charges conditions’ screen. Note that this screen is not applicable for Certificate of deposits. You can specify the following details: Branch code The Branch Code to which the account belongs (for which you are defining special conditions) is displayed in this field. Account The Account number of customer (for which you are defining special conditions) is displayed in this field. You can click the ‘Default’ button to default the Charge Products and the corresponding details applicable for the account. You can then modify these values to define the special conditions. 5-9 5.3.1.1 Specifying Product Details Specify the following details: Product Code The system defaults a product when you click the ‘Default’ button at the time of account creation. You must modify it to identify the Charge product using which the applicable charges would be collected. Currency The charges would be collected in the currency defined for the selected charge product, and this currency is displayed on the screen. Minimum and Maximum You must indicate the charge amount range, representing the minimum and maximum charge that can be applied for the account. Free Items You must indicate the number of free items for which the customer will not be charged. Open By default, each charge consolidation charge setup that you set up is enabled and active. You can also disable the setup by checking the ‘Open’ box. Waive Charges You can choose to waive charges for an account. 5-10 5.4 Specifying Linked Entities Click ‘Linked Entities’ button on the ‘Deposit Account Booking’ screen and invoke the ‘Linked Entities’ screen. Specify the following details: Customer Select the customer from the option list with whom you want to establish the relationship with the account that you are maintaining. Description In this field, the system displays the name of customer that you have selected in the previous field. You cannot change the description. Relations By default, the system will select the customer of the account as the Primary Holder. This is a pre-shipped relationship and you will not be allowed to change the relationship. Include Relationship Check this box to indicate that relationship should be inherited for all transactions. Mailing Label You have to select the address to which the customer communications are to be sent. 5-11 Mailing label enables you to mark where the statements of an account are to be sent or received. The mailing address given under the mailing label could either be the primary or the seasonal mailing address of the customer. By default the system enables the mailing label for primary customer. However you can overwrite the mailing label for an account, if it is attached to any combined statement plan. You are allowed to mark mailing label to any of the customer in the linked entity during account opening. The first line of the mailing label will direct all mailings to the address of the customer for whom the mailing field is set. System sends an additional statement to a different address and only one statement to the non-primary owner of the account. You cannot modify the mailing label for an account, if it has been updated by the system during authorization of the combined statement plan. An account can have only one mailing label. Multiple addresses can be maintained for an account based on the date range. For a customer with no multiple addresses, and when a record is saved with no mailing address is saved, the address from the CIF main screen will be considered for all correspondence. 5.5 Specifying REG Details Reserve Requirements for Depository Institutions (Regulation D) is a US Federal Reserve Board regulation that limits the number of preauthorized withdrawals and transfers from a savings account or money market account. The regulation applies to all United States banking institutions offering such accounts. In consumer banking, ‘Regulation D’ often refers to §204.2(d)(2) of the regulation, which places a limit of six withdrawals or outgoing transfers per month from savings or money market accounts via several transaction methods. The Expedited Funds Availability Act (EFA or EFAA) was enacted in 1987 by the United States Congress in order to standardise hold periods on deposits made to commercial banks and to regulate institutions' use of deposit holds. It is called as Regulation CC or Reg CC after the Federal Reserve regulation that implemented the act. Regulation CC stipulates four types of holds that a bank may place on a check deposit, at its discretion. 5-12 You can capture limited Regulation D and regulation CC details for the customer account, using the ‘REG Details’ screen. To invoke this screen, click the ‘REG’ button in the ‘Deposit Account Booking’ screen. The screen is shown below: Reg CC Availability Check this box if the check deposits into this account should be considered for Regulation CC aggregation. Reg E Applicable Check this box to indicate that Regulation E is applicable for all accounts, thereby tracking all accounts undergoing EFT transactions. REGDD Applicable Check this box to indicate that the IC product can be used for APY/APYE calculation. However, this is defaulted from the Account Class maintenance. REGDD Product Specify the IC product required for APY/APYE calculation. Overdraft Protection Select your preference for overdraft from the drop-down list. The drop-down list displays the following options: Opt In Opt Out 5-13 Overdraft Protection Limit Amount Specify the overdraft limit amount. The system displays an error message if this is left blank when you have opted in for the overdraft facility. The Overdraft Protection is not applicable for Certificate of deposits. Reg D Period Specify the following details. Reg D Applicable Indicate whether the Regulation D limits are applicable for the account Periodicity If you indicate the periodicity of Regulation D applicability as ‘Statement Cycle’, the restricted transactions would be counted over the primary statement cycle defined for the customer account. Start Date The start date for Regulation D applicability is first set to be the date on which you mark the availability option in this screen. Subsequent to the first period, the EOD process would update the start date according to the periodicity defined. End Date Subsequent to the first period, the EOD process would update the end date according to the periodicity defined. Electronic Data Sharing Check this box to indicate that the customer has agreed to be a part of the bank’s electronic data sharing program. Electronic Data Sharing Effective Date Specify the date after which the electronic data sharing should be applicable. This date must be greater than the account opening date. 5.6 Specifying Restrictions Click ‘Restrictions’ button on the ‘Deposit Account Booking’ screen and invoke the ‘Products and Transaction Codes Restriction’ screen. 5-14 Specify the following details: Product Details Indicate the following preferences. Special Condition By default, the restrictions maintained at the account class level will be displayed here. When you define product restriction attributes for an account itself, rather than for the account class to which it belongs, it is referred to as a Special Condition. You can apply special conditions by selecting the option ‘Applicable’. If you opt to define special conditions for an account the ‘restrictions’ defined for the Account Class, to which the account belongs, will NOT apply to this account. If you wish to continue with the account class restrictions, opt for ‘Not Applicable’. Product List Specify the restriction type here. The options available are: Allowed – If you select this, the products entered in the multi-entry block will be allowed for that account. Disallowed – If you select this option, the products entered in the multi-entry block will be disallowed. 5-15 Product You can select the products and specify the type of transaction (Dr, Cr or both) that you would like to allow/disallow for each product. In contracts involving the selected products, the accounts would be used for processing the selected type of transaction. For instance, assume that for the account A1, you have allowed ‘Dr’ for the product ABCD. This would mean that if a Dr entry for the product ABCD is passed to the account, A1, it would go through but in case a Cr entry is passed for this product, then the system will display a message indicating that the transaction is restricted for the account. Description The system displays the description for the product code that which you have specified Debit During transaction processing, the system will validate whether any restrictions are placed on the account based on the product code. If you have indicated to allow ‘Dr’ Transactions for the product ABCD, and attempt to post a debit entry, the system will seek an override. If the message has been configured as an ‘override’ instead of an ‘error’, you will be able to continue the transaction, despite the restrictions, by providing appropriate reasons for the same. Otherwise you cannot continue with the transaction. During maintenance or online operations, in the respective contract screens for the restricted transactions, when you specify the customer account, the system checks whether the account is restricted for the product that has been selected, or the debit/credit transaction type. If so, an override is sought when such contracts are saved. Credit During transaction processing, the system will validate whether any restrictions are placed on the account based on the product code. If you have indicated to allow ‘Cr’ transactions for the product ABCD, and attempt to post a credit entry, the system will seek an override. If the message has been configured as an ‘override’ instead of an ‘error’, you will be able to continue the transaction, despite the restrictions, by providing appropriate reasons for the same. Otherwise you cannot continue with the transaction. During maintenance or online operations, in the respective contract screens for the restricted transactions, when you specify the customer account, the system checks whether the account is restricted for the product that has been selected, or the debit/credit transaction type. If so, an override is sought when such contracts are saved. Transaction Details Indicate the following preferences. 5-16 Special Condition By default, the restrictions maintained at the account class level will be displayed here. When you define transaction code restriction attributes for an account itself, rather than for the account class to which it belongs, it is referred to as a Special Condition. You can apply special conditions by selecting the option ‘Applicable’ at the account level. If you opt to define special conditions for an account the ‘restrictions’ defined for the Account Class, to which the account belongs, will NOT apply to this account. If you wish to continue with the account class restrictions, opt for ‘Not Applicable’. Transaction List Specify the restriction type here. The options available are: Allowed – If you select this, the transaction codes entered in the multi-entry block will be allowed for that account. Disallowed – If you select this option, the transaction codes entered in the multi-entry block will be disallowed. Transaction Code Likewise, you can maintain restrictions for transaction codes as well. Transaction code based restrictions are allowed only for entries initiated from the Data Entry module. Otherwise you should use product code based restriction. Description The system displays the description for the transaction code that you have specified Debit During transaction processing, the system will validate whether any restrictions are placed on the account based on the transaction code. If you have indicated to allow ‘Dr’ transactions for a particular transaction code, and attempt to post a credit entry, the system will seek an override. If the message has been configured as an ‘override’ instead of an ‘error’, you will be able to continue the transaction, despite the restrictions, by providing appropriate reasons for the same. Otherwise you cannot continue with the transaction. During maintenance or online operations, in the respective contract screens for the restricted transactions, when you specify the customer account, the system checks whether the account is restricted for the product that has been selected, or the debit/credit transaction type. If so, an override is sought when such contracts are saved. Credit During transaction processing, the system will validate whether any restrictions are placed on the account based on the transaction code. If you have indicated to allow ‘Cr’ transactions for a particular transaction code, and attempt to post a debit entry, the system will seek an override. If the message has been configured as an ‘override’ instead of an ‘error’, you will be able to continue the transaction, despite the restrictions, by providing appropriate reasons for the same. Otherwise you cannot continue with the transaction. 5-17 During maintenance or online operations, in the respective contract screens for the restricted transactions, when you specify the customer account, the system checks whether the account is restricted for the product that has been selected, or the debit/credit transaction type. If so, an override is sought when such contracts are saved. 5.7 Specifying MIS Details Click ‘MIS’ button on the ‘Deposit Account Booking’ screen and invoke the ‘Management Information System’ screen. Specify the following details: Branch Code The current logged-in branch code is displayed here Account The CD account number is displayed here. MIS Group For an account, the transaction type of MIS class will be picked up from the account class. Rate Code Specify the rate code. You can also select the appropriate one from the adjoining option list, which displays all valid rate codes maintained in the system 5-18 Calc Method Specify the method to be considered for MIS related component computation. Rate Type If you have indicated that rates maintained for the individual account should be picked up for MIS refinancing you have to specify the Rate Type that is to be used. The options available are: Fixed Floating – Automatic – indicating that the system should pick up the refinancing rate associated with the account. Since the account number is linked to a Rate Code the system picks up the rate code associated with the account when the EOD processes are run to refresh the various rates. Spread Specify the spread that should be applied if rate type is selected as ‘floating’ type. Pool Code/Account Level Define the Pool Code/Account Level to which the account class or product belongs. Pool Code For an account, the pool code will be picked up from the account class. Transaction MIS Group For an account, the transaction type of MIS class will be picked up from the account class. Composite MIS Group The composite type of MIS class will be defaulted from those defined for the customer. Cost Code For an account, the cost codes will be picked up from the account class. 5.7.1 Viewing Change Log Click ‘Change Log’ button on the ‘Management Information System’ screen and invoke the ‘Change Log’ screen. If MIS reclassification occurs, through changing of the MIS codes for the ‘Customer Type’ of MIS classes, the system will store the changes made, in the Customer MIS ‘Change Log’ screen. 5-19 Here you can view the following details: Branch Code The current logged-in branch code is displayed here. Account The system displays the CD account number. Change Log Details You can view the following details: MIS Class Transaction Date Old MIS Code New MIS Code 5-20 5.7.2 Viewing Transfer Log Click ‘Transfer Log’ button on the ‘Management Information System’ screen and invoke the ‘Balance Transfer Log’ screen. When MIS reclassification occurs with respect to a customer, account or contract, the balances in a GL associated with the old MIS code in each case are transferred to the GL for the new MIS code, if the option of transferring MIS balances upon reclassification has been set in the ‘Chart of Accounts’ screen for the GL. Here you can view the following details: Account The system displays the CD account number. Balance Transfer Log Details You can view the following details: Branch Code Product Code Fin Year Transaction Date GL Code MIS Class Old MIS Code New MIS Code TRF Ind 5-21 Currency Ex rate Amount 5.8 Specifying Statement Details Click ‘Statement’ button on the ‘Deposit Account Booking’ screen and invoke the ‘Statement Details’ screen. You can specify the following details: Primary A/C Statement This refers to the type of statement to be generated periodically by the system, for this account. You can specify whether you want a detailed or summary statement or if you do not want a statement for this account at all. 5-22 Generate Stat. Only On Movement Check this box to indicate that an account statement should be generated for the account only when there has been a movement of funds into the account or when funds have been transferred out of the account. For instance, let us assume that on the August 21, 2001, you have set the account statement generation frequency as Daily for the account LI020804. On the September 5, 2001, there has been no movement of funds in the particular account. If you have opted for the Generate Only on Movement option, the system will not generate a statement message for September 5, 2001. If you choose not to enable this option, account statements will be generated regardless of whether there has been a movement of funds or not. Type You can specify whether you want a detailed or summary statement or if you do not want a statement for this account at all. Account The system displays the account number for which you are setting the statement details. Cycle You can specify the frequency for generating the account statements. To specify the frequency of the statements, click on the adjoining drop-down list. The following list is displayed: Annual Semi-annual Quarterly Monthly Fortnightly Weekly Daily On For a weekly statement you specify the day of the week on which account statements should be generated and for fortnightly and monthly statements the dates of the month. To specify for weekly statements, click on the adjoining drop-down list. The following list of days will be displayed: Monday Tuesday Wednesday Thursday 5-23 Friday Saturday Sunday To specify for monthly statements enter a number between 1 and 31 (corresponding to the system date). If you set the statement date to 30, then account statements will be generated on: The last working day for months with < 30 days For months with 30 days on the 30th; if 30th is a holiday on the next working day If you set the statement date to 31, then account statements will be generated on: st The 31 for month with 31 days; if 31st is a holiday on the next working day The last working day for months < 31 days For a fortnightly statement, you could specify 1 and 15 For all other cycles, account statement will be generated on the last day of that cycle. Statement Cycle upon Account Opening The first time statement generation for an account after account opening depends on the first statement block days specified in the Account Class Maintenance screen. Statement Start Date Specify the date for generating the statement for the first time. It should not be less than the account opening date. The first statement generation date will be derived and displayed in Statement start date, based on the block days captured and cycle days mentioned in the statement details. However you are allowed to modify the displayed statement start date at account level. This maintenance is done also at secondary, and territory level of account statement to generate the statement for the first time. Example: 1 Customer ID: 12345678 Name: Mr. XYZ First Statement block days: 10 Statement Cycle: Monthly 5-24 Statement Cycle Day: 3rd of every month Account Opening Date: 25th Jul 2010 Scheduled Statement Generation Date: 3rd Aug 2010 In the above example, the 1st Statement Generation date should be 3rd Sep 2010, instead of 3rd Aug 2010 as it falls within the first 10 days of account opening date Check the 1st Statement generation date for above example the 1st Statement generation date should be 3rd Sep 2010 Example: 2 Customer ID: 12345678 Name: Mr. XYZ First Statement block days: 10 Statement Cycle: Daily Account Opening Date: 25th Jul 2010 Scheduled Statement Generation Date: 26th July 2010 In the above example, the 1st Statement Generation date should be 4th Aug 2010, instead of 26th July 2010 as it falls within the first 10 days of account opening date Example: 3 Customer ID: 12345678 Name: Mr. XYZ First Statement block days: 10 Statement Cycle: Weekly Statement Cycle On: Thursday Account Opening Date: 25th Jul 2010 Scheduled Statement Generation Date: 29th July 2010 In the above example, the 1st Statement Generation date should be 5th Aug 2010, instead of 29th July 2010 as it falls within the first 10 days of account opening date Example: 4 Customer ID: 12345678 Name: Mr. XYZ First Statement block days: 10 5-25 Statement Cycle: Quarterly Statement Cycle On: August Account Opening Date: 25th Jul 2010 Scheduled Statement Generation Date: 31st Aug 2010 In the above example, the 1st Statement Generation date should be 31st Aug 2010, as it falls after the First Cycle block days Example: 5 Customer ID: 12345678 Name: Mr. XYZ First Statement block days: 10 Statement Cycle: Semi annually Statement Cycle On: July Account Opening Date: 25th Jul 2010 Scheduled Statement Generation Date: 31st July Aug 2010 In the above example, the 1st Statement Generation date should be 31st Jan 2011, as scheduled statement date falls within First Statement block days Example: 6 Customer ID: 12345678 Name: Mr. XYZ First Statement block days: 10 Statement Cycle: Annually Statement Cycle On: August Account Opening Date: 25th Jul 2010 Scheduled Statement Generation Date: 31st Aug 2010 In the above example, the 1st Statement Generation date should be 31st Aug 2010, as it falls after the First Cycle block days Note the following: If the date arrived at by adding the first statement block days to the account opening date is less than the statement cycle date, then the default value of the settlement start date will be first statement cycle date. 5-26 If the date arrived at by adding the first statement block days to the account opening date is greater than the statement cycle date, then the default value of the settlement start date will be next statement cycle date. Secondary A/C Statement This refers to the type of statement to be generated periodically by the system, for this account. You can specify whether you want a detailed or summary statement or if you do not want a statement for this account at all. Tertiary A/c Statement This refers to the type of statement to be generated periodically by the system, for this account. You can specify whether you want a detailed or summary statement or if you do not want a statement for this account at all. Statement Account Specify the account for which the statement has to be generated. The adjoining option list displays all valid accounts maintained in the system. You can select the appropriate one. Exclude Same Day Reversal trns from Stmt If you do not wish transactions booked and reversed on the same day to be reflected in the account statement, you can specify the preference here. This feature is applicable only for the customer account legs and not for the related GL legs. Also, reversals made through the DE module will not be considered for exclusion. This specification is defaulted from the account class linked to the account. You can change it for a specific account. Interim Statement Details Generate Interim Statement Check this box if you want to generate interim statements. This is eligible only for those accounts for which the statement cycle frequency is maintained as more than a month and if an electronic transaction (PC or FT) happens for the account. The system triggers this statement on the last working day of the calendar month. Previous Statement Date The system displays the date on which the statement was last generated. Balance The system displays the interim balance in the account. 5-27 5.9 Specifying Joint Holder Details Click ‘Joint Holders’ button on the ‘Deposit Account Booking’ screen and invoke the ‘Joint Holders’ screen. Specify the following details: Branch Code The system displays the branch code of the current branch. Account The system displays the account number here. Customer No The system displays the customer account number. Joint Holder Code Specify the code number assigned to each of the joint holders of this account. Description This is the description of the joint holder. Here you can enter the name of the joint holder and also his relationship with this customer Joint Holder Type Indicate the type of authority. Select the appropriate one from the drop-down menu. The options are: Authorized Signatory 5-28 Customer Contact Person Guardian Custodian Developer Guarantor Joint and First Joint and Other Joint or First Joint or Other Beneficiary Related for Inquiry Solicitor Sole Owner Third Party Trustee Valuer Start Date Specify the date from which the joint holding of the account begins. End date Specify the date on which the joint holding of the account ends. 5-29 5.10 Capturing User Defined Fields All User Defined Fields (UDFs) linked to the function ID ‘STDCUSTD’ are displayed in the ‘User Defined Fields’ screen. Invoke this screen by clicking ‘Fields’ button on the ‘Deposit Account Booking’ screen. Here you can specify values for each UDF. Refer the User Manual titled ‘User Defined Field’ for details about defining UDFs.Click ‘Fields’ button on the ‘Deposit Account Booking’ screen and invoke the ‘User Defined Fields’ screen. 5-30 5.11 Specifying Account Signatory Details Click ‘Signatory’ button on the ‘Deposit Account Booking’ screen and invoke the ‘Signatory Details’ screen. Here you can capture the following details: Branch code The system defaults the current branch here. Account This is the account number to which signatories are to being linked. Account description The system displays the description for the account you have selected. Customer No Enter the customer signatory you want to link to the account You can link a customer signatory to an account either by: Click on the option list next to the Signatory Number. A list of customer signatory numbers, whose details have been captured will be displayed, along with their names. Pick up the signatory whom you want to make an account signatory for the account 5-31 Keying-in the customer Signatory Number and Name directly, if the signatory number has not been maintained through the Customer Signatory details screen If the signatory ID that you specify has not been maintained, the System displays an override. On confirming the override, you will be allowed to save the signatory details. An error message is displayed if you enter a duplicate Signatory ID. Each time you capture a new Signatory ID at the account level you must identify the relationship of the signatory with the customer. Minimum Number of Signatories Specify the minimum number of signatories necessary to endorse an instrument involving the account. Customer Name The system displays the name of the corresponding customer Account Message You can capture information about particular signatories. These messages could pertain to the name, number and the type of signatory your customer is. For instance you can capture a message like - "This signatory is a joint account holder with rights to sign instruments only up US 8000". Signature ID Specify the signatory identification number. Signatory Name The system displays the corresponding name of the signatory ID specified. Signatory Type Specify the signatory type. Approval Limit Specify the amount up to which the account signatory can approve for debits. Signatory Message The system displays the message corresponding to the signatory. 5-32 5.12 Indicating CD Payout Details Click ‘CD Payout Details’ button on the ‘Deposit Account Booking’ screen and invoke the ‘Certificate of deposit Payout Details’ screen to capture the parameters for automatic pay-out. Here you can capture the following details: Branch code The system defaults the current branch here. Account This is the account number to which signatories are to being linked. Currency The system defaults the CD currency. 5.12.1 CD Tab This tab is displayed by default on invoking the screen. Here you can capture details for creation of a child CD as part of pay-out of the parent CD. Customer No The system defaults the customer number. 5-33 Branch code The system defaults the current branch here. Currency The system defaults the CD currency. Default From Indicate whether the details should be picked up from the parent CD account or the account class, by choosing one of the following options: Account Account Class Account Class Specify the account class, if you have selected the ‘Default From’ as Account Class. If you select the ‘Default From’ as Account, then on clicking of ‘P’ button, the system will default the interest and deposit details from the parent CD account. Or if you select the ‘Default From’ as Account Class, then on clicking ‘P’ button, the system will default the interest and deposit details from the account class selected. For the child CD, you will have to capture interest calculation and pay-out preferences. You can do this by clicking ‘Interest’ button on the screen. Refer the section ‘Capturing Payout Interest Details for Child CD’ in this chapter for details about capturing interest preferences for Child CD in case auto pay-out by rollover option is selected. 5.12.2 Cashier’s Check Tab Click ‘Cashier’s Check’ tab to capture check related details if you have opted for CD pay-out through a Cashier’s Check. 5-34 Here you can capture the following details: Check Details Specify the following details. Bank Code Specify the bank code of the Cashiers check. Currency The system displays the CD currency. You cannot modify it. Payable Branch Specify the payable branch for the check. The adjoining option list displays all branch codes linked to the specified bank code. You can select the appropriate one. Beneficiary Details Specify the following details. Beneficiary Name Specify the name of the beneficiary for the pay-out. Passport/IC Number Specify the passport number or identification card number of the beneficiary for the pay-out. 5-35 Narrative Specify the description for the pay-out. Beneficiary Address Specify the address of the beneficiary for the pay-out. 5.12.3 Specifying PC Details Click ‘PC’ tab to capture pay-out details if you have opted for CD pay-out through PC transfer to another account. The following details are captured here: Counterparty Specify the following details. Counterparty Bank Code Specify the bank code of the counter party for the pay-out. Counterparty Account Specify the account name of the counter party for the pay-out. Currency Specify the currency of the counter party for the pay-out. 5-36 Beneficiary Details Specify the following details. Beneficiary Name Specify the name of the beneficiary for the pay-out. Beneficiary Address Specify the address of the beneficiary for the pay-out. Passport/IC Number Specify the passport or identification card number of the beneficiary for the pay-out. Narrative Specify the description for the pay-out. Note that the system will process CD payout through PC transfer using a bridge GL that is specified for the account class in the ‘Deposit Account Details’ screen. Refer the section ‘Maintaining Deposit Details’ in the chapter Certificate of deposit Maintenance’ for details about the bridge GL. 5-37 5.12.4 Capturing Payout Interest Details for Child CD As mentioned before, if you have opted for creation of a child CD on maturity of the parent CD, you need to specify interest details of the child CD. Click ‘Interest’ button on the ‘Certificate of deposit Payout Details’ screen and invoke the ‘Certificate of deposit Interest’ screen In this screen, the system defaults all the parameters maintained for the parent CD. However, you can modify them. This screen comprises two tabs viz: Interest Deposit 5.12.5 Interest Tab (interest preferences for Child CD) You need to capture the following details here: Interest Tab You can capture the following interest-related details. 5-38 Calculation Account Select the calculation account of the child certificate of deposit from the option list. Interest Booking Account You can select the accounts for booking interests on transactions processed at your bank. Charge Booking Account You can select the accounts for booking charges on transactions processed at your bank. Interest Statement You can also indicate if you would like to generate an interest statement for the account. The Interest Statement will furnish the values of the SDEs and UDEs and the interest rule that applies on the account. Consolidated Charge Account Specify the account. The option list consolidated change account Dr Cr Advices You can indicate whether you want to generate an interest liquidation advice for a customer account. Check the ‘Debit/Credit Advices’ box to indicate that the system must generate payment advices when interest liquidation happens on an account. The advices are generated in the existing SWIFT or/and MAIL format. No advices will be generated if you leave this box unchecked. The preference you have made in the Customer Account Class screen will be defaulted here. However, you can choose to change your preference to generate or suppress these Advices. Interest Start Date The system displays the Maturity date of the parent CD as the interest start date for the child CD. However, you can modify it. Interest for this account will be calculated according to the special conditions that you define subsequently. Charge Start Date For the account for which you are defining special conditions, you must specify the date from which you would like to apply charges. Charges for this account will be calculated according to the special conditions that you define subsequently. By default, charges on an account would be applied when the free banking period (if any) elapses. This means that the Charge Start Date is arrived at by the System by adding the Free Banking Period days (if any, specified for the account class used by the account) to the Account Opening Date. If no Free Period has been indicated for the account class used by the account, the Charge Start Date is defaulted to the Account Opening Date (that is, charges on the account would be applied right from the account opening date) and displayed in the Special Conditions Maintenance screen. 5-39 You can override the default Charge Start Date and specify the desired start date for charge application. Interest Booking Branch By default, the customer’s account in the current branch will be displayed in this screen (in the Interest/Charge Booking Account and Interest/Charge Booking Branch fields). However, you have the option of booking interest/charge to a different account belonging to another branch also. You can select the Interest/Charge Booking Branch from the option-list available. The accounts maintained in the selected Booking Branch will be available in the option-list provided for Interest/Charge Booking Account. You can select the account from this list. Interest/Charge will be liquidated into the selected account. Charge Booking Branch By default, the customer’s account in the current branch will be displayed in this screen (in the Interest/Charge Booking Account and Interest/Charge Booking Branch fields). However, you have the option of booking interest/charge to a different account belonging to another branch also. You can select the Interest/Charge Booking Branch from the option-list available. The accounts maintained in the selected Booking Branch will be available in the option-list provided for Interest/Charge Booking Account. You can select the account from this list. Interest/Charge will be liquidated into the selected account. Consolidated Charge Branch Select the charge booking branch from the option-list available. You have an option of booking interest/charge to a different account belonging to another branch. The accounts maintained in the selected booking branch are available in the option-list provided. The system liquidates the Interest/Charge into the selected account Product Code Specify the product code. UDE Currency Specify the UDE currency for the product that you apply on the account. UDE values that you specify for the account subsequently will be taken to be in this currency. Generate UDE Change Advice Check this box to generate the UDE change advice. Waive Charge This box is unchecked by default. However, you cannot waive charge on a CD. Leave this box unchecked. Open Check this box to make the product applicable again. More than one product may be applicable on an account class at the same time. You can temporarily stop applying a product on an account class by ‘closing’ it. You can achieve this by un-checking the box ‘Open’. The product will cease to be applied on the account class. 5-40 Effective Date Specify the effective date of a record which is the date from which a record takes effect. The system displays the maturity date of the parent CD. However, you can change it. Open Specify the open records with different Effective Dates if the values of UDEs vary within the same liquidation period. UDE ID Specify the UDE ID for the account. UDE Value Specify the values for a UDE, for different effective dates, for an account. When interest is calculated on a particular day for an account with special conditions applicable, the value of the UDE corresponding to the date will be picked up. Rate Code Specify the rate code for the account. 5.12.6 Deposit Tab (Deposit Preferences for Child CD) Click ‘Deposit’ tab to capture deposit-related details of the child CD, if you have opted for creation of a child CD on maturity of the parent CD. The system defaults all the parameters maintained for the parent CD in this screen. However, you can modify them. 5-41 You need to capture the following details here: Maturity Date The system defaults the maturity date from the default tenor from the account class. However, you can modify this date. On this date the certificate of deposit account gets Auto Rollover Check this field to automatically rollover the deposit you are maintaining. You have to indicate ‘Rollover Type’ on selecting this option Close on Maturity Check this box to close the certificate of deposit account on maturity date and transfer the amount as per the pay-out details maintained for the child CD. Move Interest to Unclaimed Check this box to move the interest amount to the unclaimed GL mapped at the IC product in the accounting roles on grace period end date. If you select this option, you will need to check the box ‘Move Principal to Unclaimed’. Move Principal to Unclaimed Check this box to move the principal amount to the unclaimed GL mapped at the IC product in the accounting roles and liquidate the interest amount to the interest booking account on grace period end date. If you select this option, the principal liquidation account should be the certificate of deposit account. Next Maturity Date On selecting the rollover for the CD account, the system defaults the next maturity date from the previous tenor of the deposit. Deposit Tenor The system calculates the tenor of the deposit account to the difference between Interest start date and Maturity date and displays it. In case of change in maturity date, the system changes the value of this field. Rollover Type Indicate the components that should be rolled over by choosing one of the following options: Principal Principal + Interest Special Amount Interest 5-42 Rollover Amount If a special amount is to be rolled over, you have to specify the amount (less than the original deposit amount) in this field. Payout Type Indicate the method for initial funding during account creation. Choose one of the following options: Account Number General Ledger Cashier’s Check Payments Percentage Specify the percentage of the amount that be rolled over. Offset Branch The system populates the branch code of the account from which fund is transferred to CD account. Account Specify the account number/ GL from which the fund is transferred to CD account. This field returns the branch code if the account is selected and NULL is returned if GL is selected. If it is Pay-In mode in GL then the system displays only GL’s and if the Pay-In mode is Account then only accounts are displayed in the option list. Narrative Specify remarks about the transaction. 5.12.6.1 Specifying Pay-out Parameters for Child CD Click ‘Payout Parameters’ button on the ‘Certificate of Deposit Interest’ screen and invoke the ‘Payout Parameters’ screen. Here you can specify pay-out preferences for the child CD. 5-43 This screen comprises two tab viz: Cashiers Check PC 5.12.6.2 Cashiers Check Tab (for auto pay-out of Child CD) By default this tab is displayed on invoking the screen. You need to capture the following details in case you want to redeem the child CD using a Cashier’s Check. Check Details Specify the following details. Bank Code Specify the bank code of the Cashiers check. Currency Specify the currency in which the check is drawn. Payable Branch Specify the payable branch for the check. The adjoining option list displays all branch codes linked to the specified bank code. You can select the appropriate one. Beneficiary Details Specify the following details. 5-44 Beneficiary Name Specify the name of the beneficiary for the pay-out. Passport/ IC Number Specify the passport or IC number of the beneficiary for the pay-out. Narrative Specify the description for the pay-out. Beneficiary Address Specify the address of the beneficiary for the pay-out. 5.12.6.3 PC Tab for Child CD Click ‘PC’ tab to capture payment details if you want to redeem the child CD through a PC transfer to another account. The following details are captured here: Counterparty Specify the following details. Counterparty Bank Code Specify the bank code of the counter party 5-45 Counterparty Account Specify the account name of the counterparty for the pay-out. Currency Specify the currency for the pay-out. Beneficiary Details Specify the following details. Beneficiary Details Specify the details of the beneficiary Beneficiary Name Specify the name of the beneficiary Passport/IC Number Specify the Passport/IC Number of the beneficiary Narrative Give a brief description for the payout. Beneficiary Address Specify the address of the beneficiary. 5.13 Viewing Change Log Click ‘Change Log’ button on the ‘Deposit Account Booking’ screen and invoke the ‘View’ screen. 5-46 Here you can view the following details: Modification Number Modification Status Maker ID Maker Date Stamp Authorization Status View Changes Remarks Maker Remarks Maker Override remarks First Checker Remarks Checker Remarks Warning Code Warning Description Field Name Old Value 5-47 New Value 5.14 Viewing CD Summary You can view a summary of all certificate of deposit accounts in the system, using the ‘Deposit Account Summary’ screen.To invoke this screen type ‘STSCUSTD’ in the field at the top right corner of the Application tool bar and click the adjoining arrow button. You can query on records based on any one or all of the following criteria: Authorization Status Record Status Branch Code Certificate of deposit Account Number Click ‘Search’ button. The system identifies all records satisfying the specified criteria and displays the following details for each one of them: Authorization Status 5-48 Branch Code Certificate of deposit Account Number Description Customer No Certificate of deposit Currency Double click on a record to invoke the detailed screen. 5.15 Specifying Deposit Instructions You can give instructions for processing auto created deposits. The values you specify here will override the parameters you have maintained in the Account Class maintenance. Invoke the ‘Certificate of deposits Instruction Maintenance’ screen from the Application Browser to maintain the deposits instructions specifically for the auto created deposits. Type ‘ICDINSTR’ in the field at the top right corner of the Application tool bar and click the adjoining arrow button. You can set the terms and a condition for a deposit as follows: Account Number Specify the account number of the certificate of deposit. The adjoining option list displays all valid CD accounts maintained in the system. You can select the appropriate one. Account Class The system displays the account class to which the CD is linked. 5-49 Customer Number The system displays the customer of the CD. Sweep Branch Specify the branch where the sweep-to account resides. The adjoining option list displays all valid branch codes maintained in the system. You can select the appropriate one. Sweep to Account Specify the account to which the sweep is carried out. The adjoining option list displays all valid accounts maintained in the sweep to branch. You can select the appropriate one. Amount Specify the deposit amount. Minimum Required Balance Specify the minimum balance required for creation of auto deposit. Only the amount above this limit will be used for auto creating deposits. Source Code Specify a code assigned for the sweep. External Reference Number The system displays the identification number of the transaction in the source system. Branch Code The system displays the branch code of the branch where the CD account resides. Sequence Number The system generates a sequence number for the instruction you are maintaining and displays it here. Currency Code The system displays the CD currency. Deposit Currency Specify the currency in which the auto deposit should be created. The adjoining option list displays all valid currency codes maintained in the sweep to branch. You can select the appropriate one. Tenor The system displays the default tenor maintained for the linked account class. 5-50 Sweep Multiple of Indicate the number in multiples of which the sweep should be carried out. Start Date Indicate the date from which instructions should be valid, using the adjoining calendar. Retry Till Date Indicate the date post which the instructions will be rendered invalid. Any failed sweeps after this date will not be picked up for processing the next day. 5.15.1 Specifying UDF Values All User Defined Fields (UDFs) linked to the function ID ‘ICDINSTR’ are displayed in the ‘User Defined Fields’ screen. Invoke this screen by clicking ‘Fields’ button on the ‘Certificate of deposits Instruction Maintenance’ screen. Here you can specify values for each UDF. Refer the User Manual titled ‘User Defined Field’ for details about defining UDFs. 5-51 5.16 Viewing Instruction Summary You can view summary of all instructions using the ‘Certificate of deposits Instruction Summary’ screen. To invoke this screen, type ‘ICSINSTR’ in the field at the top right corner of the Application tool bar and click the adjoining arrow button. You can query on records based on any one or all of the following criteria: Authorization Status Record Status Account Number Click ‘Search’ button. The system identifies all records satisfying the specified criteria and displays the following details for each one of them: Authorization Status Record Status Branch Code 5-52 Account Number Sequence Number Sweep To Account Sweep Branch Double click on a record to invoke the detailed screen for that record. 5.17 Viewing Additional Details On rollover of a certificate of deposit account, the system creates a new account with fresh details as per the preferences maintained. The CD account thus rolled over is termed as the parent CD account. You can view the details of the parent CD account using ‘CD Additional Details’ screen. To invoke the screen, click ‘Additional Details’ button on ‘CD Account Maintenance’ screen. The system displays the following details: Branch code Certificate of deposit account number Currency of the certificate of deposit account ST user reference number of the certificate of deposit account Original certificate of deposit account number Branch at which the original account was created Date of creation of the original account Officer who opened the original account 5-53 Parent CD account number after rollover Account class of the parent CD account Interest product of the parent CD account You can also view the details of the parent CD account using ‘CD Parent Account Details’ screen. To invoke the screen, click ‘Parent Details’ button on ‘CD Additional Details’ screen. This screen displays the details o the parent CD account after rollover. 5.17.1 Viewing Step-up/Step-down Interest Rate Details You can view the details of interest step-up and step-down for a CD account using ‘Step up/down Interest Rate Details’ screen. To invoke the screen, click ‘Step up/down Details’ button on ‘CD Account Maintenance’ screen: 5-54 This screen displays the following details of interest step-up and step-down on the CD account for each schedule: Schedule Frequency Due Date Actual Interest Rate Spread Computed Interest Rate Interest Charge Count Remarks 5.17.2 Inheriting Payin and Payout Details In case of force rollover, pay-in and payout details are carried over from the parent CD account to the child CD account. This is applicable in case of split rollover also. If pay-in or payout details are maintained for the account being rolled over, such details will be carried over to the child CD account on split rollover. In case of combined rollover, the system carries over the payout details of the first CD account to the child CD account. Pay-in details of the CD account involved in the combined rollover are considered. 5.17.3 Inheriting Original Account Opened Date In case of force rollover, the original opened date of the parent account will be carried over to child account. Similarly, in case of a split rollover, the original opened date of the parent account is inherited by all the child accounts. 5-55 In case of combined rollover, the original opened date of the first CD account is inherited by child account as its original opened date. 5.17.4 Inheriting Opt-in Opt Out Details During rollover, the child account carries over the opt in/opt out status from the parent. In case of combined rollover, the first opt status of the parent is carried over to child account. In case of split rollover or force rollover, the opt in/opt out status is carried over to all child accounts. 5-56 6. CD Operations 6.1 Introduction You can perform the following operations on a Certificate of deposit (CD): Redemption Advice generation Closure Simulation 6.2 Redeeming a CD The ‘Certificate of deposits Redemption Input’ screen enables you to redeem a certificate of deposit. Using this screen, you can do a premature redemption, either in full or in part and also complete redemption on maturity of the deposit. This screen also allows you to renew the CD. However, renewal of the CD is enabled only if you have specified ‘Grace period for Renewal’ option for the account. You can invoke the ‘Certificate of deposit Redemption Input’ screen by typing ‘ICDREDMN’ in the field at the top right corner of the Application tool bar and clicking the adjoining arrow button. 6-1 You have to specify the following fields for redeeming the CD. Branch Specify the branch where the CD resides. The adjoining option list displays all valid branch codes maintained in the system. You can select the appropriate one. Customer Identification The customer identification (CIF) of the customer for whom CD needs to be renewed or redeemed is displayed based on the CD account number. Certificate of deposit Account Number Specify the CD Account Number. You can also choose the appropriate one from the option list. The option list displays the deposit type of accounts maintained in the system. The option list does not display auto deposit type of accounts. Account Currency The CD currency is displayed here based on the CD account number. Reference Number The system generates a unique reference number for the redemption on save. Account Description A description of the CD is displayed here based on the CD account number. Account Balance The account balance is displayed here based on the CD account number. Waive Interest Check this box to waive penalty interest calculated on the account. Account Status The system displays the current status of the certificate of deposit account. The account status can be one of the following: Open – The deposit can be partly or prematurely redeemed. An open account is open for various transactions. Opened Today: The deposit is opened on the day of the transaction. Part or premature redemption cannot be done for this deposit. Closed: The deposit has been redeemed and thus is closed. Closed Today: The deposit has been redeemed and closed on the day of the transaction. 6-2 Unclaimed: The deposit is matured and the grace period has ended. It is thus transferred to the unclaimed GL account. This amount cannot be redeemed. Matured: The deposit has matured. Partial or premature redemption will not be allowed on this deposit. Deposit Amount The system displays the current deposit amount. Redeposit Interest In case of a rollover deposit, the system displays the redeposit interest. Interest Liquidated The system displays the liquidated interest amount. Accrued Interest The system displays the accrued interest. Redemption Reason Code The system displays the redemption code that is maintained internally. Remarks The system displays the detailed remarks for the redemption. Renewal/Redemption Choose ‘Renewal’ option to renew the accounts that are within the grace period days. Choose ‘Redemption’ to redeem the certificate of deposit. Note the following: During redemption of a CD account in grace period, the system executes the post maturity interest formula and computes the interest for the grace period. The interest amount is further transferred as per the payout details. In case of renewal of a CD account in grace period, the system renews the account on the maturity date and computes the interest with new interest rate for the grace period. Redemption Indicate the following details if you have chosen ‘Redemption’. Redemption Mode Select the mode of redemption from the following options. 6-3 Full Redemption - In this case, you can redeem the complete deposit balance of the account. On save, the redemption amount will be equal to the account balance. Full redemption will update the status of the deposit amount as closed. On complete redemption interest along with principal is redeemed. The redemption amount is equal to the total of principle and interest amounts subtracted by penalty and tax amounts. Partial Redemption - In this case you have to specify the redemption amount. Ensure that that the redemption amount is less than the account balance. On partial redemption only the principal amount is withdrawn where as the interest amount is liquidated only on liquidation cycle. Note the following: You cannot choose ‘Partial Redemption’ for a Recurring Deposit (RD). You cannot redeem an auto created deposit. In case of full or partial redemption of a CD within grace period, the system does not charge any penalty. In case of a partial redemption of a CD within grace period, the system renews the CD with the remainder amount in the account at the end of the grace period. The renewal interest calculation begins a day after the maturity date, based on the renewal rate. In case of a matured CD which is not renewed, you can calculate interest at a different rate or switch off interest calculation for the grace period. If the CD is partially or wholly redeemed, the system calculates Interest at Post Maturity Interest (PMI) Rate for the grace days. The post maturity interest rate is maintained as a UDE (PMI_RATE) in Oracle FLEXCUBE. Redemption Amount Specify the redemption amount for the partial redemption. Ensure that that the redemption amount is less than the account balance. On partial redemption only the principal amount is withdrawn where as the interest amount is liquidated only on liquidation cycle. Waive Penalty Check this field to waive any penalty related to the deposit redemption. Payment Delayed Days The system displays the number of payment delayed days. Redemption Value Date The system displays the date on which the redemption payment will be transferred to the customer account as per the payout instructions. Override Delayed Payment Check this box to override the delayed payment. If you check this box, the system will book the CD redemption and transfer the redemption amount according to the payout details maintained. This will be an online redemption. 6-4 If you do not check this box, the system will book the redemption request and update the redemption payment date as by adding the number of payment delayed days to the application date. During partial redemption, the system verifies whether the payout details (payment type, branch, redemption currency and redemption amount) match with the account class delayed payment details. If the details match, the system displays an override for the delayed payment and allows you to override the message by checking this box. Redemption Status The system displays the redemption status. Renewal You can do renew a CD only during the grace period. You can select the CD account and define the tenor for which CD should be renewed. During renewal, no accounting entry is passed. The system changes the CD interest start date as the maturity date of the old CD. In the ‘Deposit’ tab of the ‘Deposit Accounts Booking’ screen, you can see the new maturity date based on the tenor defined here. Days Specify number of days for the renewal of certificate of deposit. Months Specify number of months for the renewal of certificate of deposit. Years Specify number of years for the renewal of certificate of deposit. Note the following: On saving the tenor, the system displays the ‘Maturity Date’. The system allows the Renewal of the certificate of deposit for the tenor which is less than the maximum tenor maintained at the account class level. Next Maturity Date The system displays the new maturity date based on the given renewal period. Renewal Account Class Specify the renewal account class. On renewal, the system will associate the CD with the account class specified here. The option list displays all valid account classes maintained in the system. Choose the appropriate one. 6-5 You cannot specify the current account class of the current CD as the renewal class. During renewal, if the renewal account class is not specified and force rollover account class is specified in the account class of the CD account, the system will close the current CD account and create another CD account with a new account class. Rollover Interest Rate Specify the interest rate to be applied on the CD during the immediate renewal cycle. The dropdown list displays the following options: Current Rate – If you choose this, the system will use the latest interest rate of the CD account Base Rate - If you choose this, the system will use the base rate maintained in the CD account Best Rate – If you choose this, the system will choose highest of the current rate or base rate Choose the appropriate one. Base Rate Specify the base interest rate to be applied on the CD account during immediate renewal cycle. If you choose the rollover interest rate as base rate, it is mandatory to specify the base rate here. Certificate of deposit Redemption Pay Out Details Specify the following details for CD payout. Pay Out Type Select the pay-out type from the drop-down list. The options available are: Account General Ledger Check Payments Certificate of Deposits Loan Repayment For Dual Currency Deposits you are allowed to select only ‘GL’ and ‘Savings Account’ options as the pay-out mode. You can either select GL or Savings Account but not both. Also, you can select only one GL or one Savings account and not multiple GLs or accounts in either case. 6-6 Percentage Specify the amount of redemption in percentage. Redemption Amount Specify the actual amount of redemption. The percentage and redemption amount are conditionally mandatory. You should specify either the percentage or the redemption amount. Offset Branch Specify the branch code of the account for redemption. Offset Account Specify the account number/ GL for redemption. The adjoining option list displays a list of CD and CL accounts maintained in the system. Choose the appropriate one. Narrative Give a brief description for the redemption. Split Rollover Details During rollover, you can split a CD account into multiple accounts and distribute the amount among such accounts. You can set your preferences for such split rollovers in this section. You need to specify the following details: Account Class Specify the account class with which the new CD should be associated on rollover. In case of split rollover, you need to indicate the account class for each new CD account to be created on rollover. Percentage Specify the percentage of the CD amount to be allocated to the new CD account on rollover. During split rollover, the system will compute the amount based on the percentage and create new CD accounts for such amounts. You can also specify the CD amount to be allocated to the new CD in the field ‘CD Amount’. If you specify the CD amount, the system will ignore the percentage specified here and create new CD accounts as per the amounts thus allocated. If the pay-in type is ‘Deposit’, the system doesn’t allow you to enter the percentage. 6-7 CD Amount Specify the CD amount to be allocated to the new CD account. During split rollover, the system will create new CD accounts based the amount allocated for each. If you specify the CD amount and percentage for the same record, the system will ignore the percentage and create new CD accounts based on the CD amounts allocated. Remaining Amount The system displays the remaining portion of the CD amount after allocating amounts for each new CD account. On split rollover, the system creates a new CD account with the remaining amount. It is mandatory to specify one of the CD account as tagged with remaining amount. CD Account No. The system displays the account number of the new CD. Based on the preferences set for split rollover, during ICBOD batch process on the maturity date of the original CD account, the system closes the account and creates new child CD accounts. While creating new CD accounts, the system verifies the account classes specified for each split record. In case of exceptions such as mismatch of CD amounts during rollover, the system marks the CD account as ‘Rollover Failed’. The original CD account will not be closed in that case. In case force or split rollover is given for renewal, you not need not specify the days, months or next maturity date. In case of combined rollover, account opening date of the deposit will be changed to the maturity date of the pay-in deposit. 6.2.1 Capturing Pay Out Details Click ‘CD Pay Out’ button on the ‘Certificate of deposit Redemption Input’ screen and invoke the following screen. Here you can specify details of the child CD that should be created on maturity of the parent CD. 6-8 The ‘Certificate of deposit’ tab is displayed by default. Here you can capture the following details: Branch Code The system displays the branch code. Account No The system displays the CD account number. Customer Number The system displays the customer number. However, you can change it. Currency The system displays the CD currency. Account Class Specify the account class from which the interest and deposit should be picked up. If you have selected the ‘Account Class’ option, then you have to specify the Account Class. Else you can leave it blank. Account/Account Class Indicate whether the interest and deposit should be picked up from the parent account CD account or from the account class. The options available are: 6-9 If you select the option ‘Account’, then on clicking ‘P’ button, the system will default the interest and deposit details from the parent CD account. If you select the ‘Account Class’ option, then on clicking ‘P’ button, the system will default the interest and deposit details from the account class selected. 6.2.2 Cashiers Check Tab Click ‘Cashiers Check’ tab on the ‘Certificate of deposit’ screen and invoke the following screen. Here you can capture details of the cashier’s check by which the CD needs to be redeemed. You can capture the following details: Check Details Specify the following check details. Bank Code Specify the bank code of the Cashiers check. Check Date Specify the check date for the pay-out. Payable Branch Specify the payable branch for the check. The adjoining option list displays all branch codes linked to the specified bank code. You can select the appropriate one. 6-10 Beneficiary Details Indicate the following details. Beneficiary Name Specify the name of the beneficiary for the payout. Other Details Specify other details (if any) for the beneficiary. Narrative Give a brief description for the payout. Country Code Specify the country code for the payout address. Address Line 1 to 3 Specify the address of the beneficiary for the payout. 6.2.3 Counter Party Details Tab Click ‘Counter Party Details’ tab on the ‘Certificate of deposit’ screen and invoke the following screen. Here you can capture pay-out details for PC transfer to another bank account. You can capture the following details: 6-11 Counter Party Details Specify the following check details. Counter Party Bank Code Specify the bank code of the counter party. Counter Party Offset Account Specify the branch code of the account for redemption. Beneficiary Details Indicate the following details. Beneficiary Name Specify the name of the beneficiary. Address Line 1 to 2 Specify the address of the beneficiary. Other Details Specify other details (if any) for the beneficiary. Narrative Give a brief description for the payout. 6-12 6.2.4 Capturing Interest Details The Child CD parameters are similar to the Parent CD, except the child will not have the option to create a new CD as part of Pay-out. You can capture the details of child CD that is created by payout, by clicking on the ‘Interest’ button on the ‘Certificate of deposit’ screen. Here you can capture the following details: Branch The system displays the branch code where the child CD resides. Account Class The system displays the account class to which the CD belongs. Account The system displays the child CD account number. Customer No The customer identification (CIF) of the CD customer is displayed here. 6.2.5 Interest Tab This tab is displayed by default. You can specify the following details: 6-13 Calculation Account Specify the calculation amount of the child CD. The adjoining ooption list displays all accounts maintained in the respective branch. You can select the appropriate one. Interest Start Date Indicate the date from which interest calculation should start, using the adjoining calendar. Interest Booking Account Specify the account to which interest should be booked. You have an option of booking interest to a different account belonging to another branch. The accounts maintained in the selected booking branch are available in the option list provided. The system liquidates the interest into the selected account. Interest Booking Branch Specify the interest booking branch. The adjoining option list displays all valid branch codes available in the system. You can select the appropriate one. Interest Statement Check this box to generate an interest statement for the account. The interest statement will furnish the values of the SDEs and UDEs and the interest rule that applies on the account. Dr Cr Advices Check this box to generate payment advices when interest liquidation happens on an account. The advices are generated in the existing SWIFT or/and MAIL format. No advices will be generated if you leave this box unchecked. Charge Booking Branch Specify the charge booking branch. The adjoining option list displays all valid branch codes available in the system. You can select the appropriate one. Charge Book Account Specify the account to which charge should be booked. You have an option of booking charge to a different account belonging to another branch. The accounts maintained in the selected booking branch are available in the option list provided. The system liquidates the charge into the selected account. Charge Start Date Indicate the date from which charge calculation should start, using the adjoining calendar. Product Code Specify the interest/charge (IC) product code that should be linked to the account. The adjoining option list displays all valid IC products available in the system. You can select the appropriate one. 6-14 UDE Currency Specify the UDE Currency defined for the product. Waive Check this box to waive off an interest or a charge that has been specified. Generate UDE Change Advice Check this box to generate the UDE change advice. Open Check this box to make the product applicable again. More than one product may be applicable on an account class at the same time. You can temporarily stop applying a product on an account class by ‘closing’ it. You can achieve this by un-checking the box ‘Open’. The product will cease to be applied on the account class. Specify the following details. Effective Dates Specify the following details: Effective Date Indicate the date from which a record takes effect, using the adjoining calendar. 6-15 Open Check this box for records with different effective dates if the values of the UDEs vary within the same liquidation period. Account UDE Value Specify the following details: User Defined Element ID Specify the UDE ID for the account. UDE Value Specify the values for a UDE, for different effective dates, for an account. When interest is calculated on a particular day for an account with special conditions applicable, the value of the UDE corresponding to the date will be picked up. Rate Code Specify the rate code for the account. 6.2.6 Deposit Tab Click ‘Deposit tab’ in the ‘Interest Charges’ screen to capture deposit details. You can capture the following details: 6-16 Maturity Date The system picks up the maturity date from the default tenor from the linked account class and displays it here. However, you can modify this date. Next Maturity Date On selecting the ‘Auto Rollover’ box, the system displays the next maturity date based on the previous tenor of the deposit. Tenor The system calculates the tenor of the deposit account as the difference between interest start date and maturity date and displays it. In case of change in maturity date, the system changes the value of this field. Auto Rollover Check this box to automatically rollover the deposit you are maintaining. You have to indicate ‘Rollover Type’ on selecting this option. Close on Maturity Check this box to close the certificate of deposit account on maturity date and transfer the amount as per the pay-out details maintained for the CD. Move Interest to Unclaimed Check this field to move the interest amount to the unclaimed GL mapped at the IC product in the accounting role ‘INT_UNCLAIMED’ on grace period end date. If you select this option, you will need to check the box ‘Move Principal to Unclaimed’. Move Principal to Unclaimed Check this box to move the principal amount to the unclaimed GL mapped at the IC product in the accounting role ‘PRN_UNCLAIMED’ and liquidate the interest amount to the interest booking account on grace period end date. If you select this option then only principal amount will be moved to unclaimed GL; the interest will be settled as per CD pay-out details. If you check both ‘Move Interest to Unclaimed’ and ‘Move Principle to Unclaimed’ then CD amount (i.e. Principal and interest) will be moved to the respective unclaimed GLs, irrespective of the CD pay-out details maintained. Rollover Type Indicate the components that should be rolled over by choosing one of the following options: Principal - If you select this option, then the system will roll over the principal amount alone on EOD of CD maturity date or BOD after end of the grace period. If interest booking account is given as CD account, then on maturity date the interest amount will be first liquidated to the CD account and then settled as per the pay-out details maintained for the CD account. 6-17 Principal + Interest - For you to choose this option, the interest booking account has to be the CD account. If you select this option, then the system will roll over the principal and interest amount on EOD of CD maturity date or BOD after end of the grace period. Special Amount – If you choose this option, the system will roll over the amount specified in ‘Rollover Amount’ field, irrespective of what the interest booking account is. Upon maturity of the rolled over CD, the system will roll over with the same amount special amount and settle the interest amount as per CD pay-out details maintained. Interest - For you to choose this option, the interest booking account has to be the CD account. If you select this option, then the system will roll over the interest amount on EOD of CD maturity date or BOD after end of the grace period. The principal will be settled as per the pay-out details maintained. Rollover Amount If a special amount is to be rolled over, you have to specify the amount (less than the original deposit amount). Certificate of deposit Payout Details Specify the following details in order to allow automatic pay-out: Pay Out Type Select the pay-out mode from the drop down list. The options available are: Cashiers Check - BC Transfer to Other bank - PC Transfer to GL – GL Transfer to Savings Account – AC 6-18 Note the following: This option will be available only when account number generation is ‘Auto’. For Dual Currency Deposits you are allowed to select only ‘GL’ and ‘Savings Account’ options as the pay-out mode. You can either select GL or Savings Account but not both. You can select only one GL or one Savings account and not multiple GLs or accounts in either case. Percentage Specify the amount of redemption in percentage. Offset Branch Specify the branch code of the account for redemption. The adjoining option list displays all valid branch codes available in the system. You can select the appropriate one. Offset Account Specify the account number/ GL for redemption. The adjoining option list displays all valid accounts and GLs available in the offset branch. You can select the appropriate one. Narrative Give a brief description for the redemption. 6.2.6.5 Indicating Payout Details Click ‘Certificate of deposit Payout Out’ button in the ‘Interest Charges’ screen and invoke the following screen. 6-19 The ‘Bank Check’ tab is displayed by default. You can capture the following details for pay-out using a cashier’s check: Banks Check Specify the following check details. Bank Code Specify the bank code of the Cashiers check. Payable Branch Specify the payable branch for the check. The adjoining option list displays all branch codes linked to the specified bank code. You can select the appropriate one. Currency The currency code is displayed here. Beneficiary Details Indicate the following details. Beneficiary Name Specify the name of the beneficiary. Other Details Specify other details (if any) for the beneficiary. Narrative Give a brief description for the payout. Country Code Specify the country code for the payout address. Address Line 1 to 3 Specify the address of the beneficiary for the payout. 6.2.6.6 Counter Party Details Tab Click ‘Counter Party Details’ tab on the ‘Certificate of deposit Payout Details’ screen and invoke the following screen. Here you can capture details for pay-out through PC transfer to another bank account. 6-20 You can capture the following details: Counter Party Details Specify the following check details. Counter Party Bank Code Specify the bank code of the counter party. Counter Party Offset Account Specify the branch code of the account for redemption. Beneficiary Details Indicate the following details. Beneficiary Name Specify the name of the beneficiary. Address Line 1 to 2 Specify the address of the beneficiary. Other Details Specify other details (if any) for the beneficiary. 6-21 Narrative Give a brief description for the payout. 6.2.7 Viewing Redemptions Summary You can view a summary of the certificate of deposit redemptions using ‘Certificate of deposit Redemption Input – Summary’ screen. To invoke the screen, type ‘ICSREDMN’ in the field at the top right corner of the Application tool bar and click the adjoining arrow button. You can search for the redemption records based on one or more of the following parameters: Authorization Status Reference Number Account Number Record Status Branch Code Transaction Status 6-22 Set the search criteria and click ‘Search’ button. The system displays a summary of all records that match your search criteria. The system will not process a redemption unless it is authorized. Using this scren, you can authorize or delete unauthorized redemption records maintained in the system. You can also close the authorized records using this screen. Select a record using the adjoining checkbox and click ‘Authorize’ button. The system displays the ‘Authorization’ screen. You can verify the details. Verify the details and authorize the record. 6.3 Maintaining Details for Redemption Delayed Payments You can maintain number of delay days for combinations of payout method, branch, currency and redemption amount using ‘CD – Redemption Delayed payment – Maintenance’ screen. To invoke this screen, type ‘STDACDP’ in the field at the top right corner of the Application tool bar and click the adjoining arrow button. Specify the following details: Payout Type Specify the payment instrument type for which the payment delay details are being maintained. The drop-down list displays the following payout types: Account BC - Cashier’s Check PC GL 6-23 CD Choose the appropriate one. Branch Code Specify the branch code for which the payment delay details are being maintained. The option list displays all valid branch codes maintained in the system. Choose the appropriate one. You can also indicate ‘ALL’ to apply the delay days to all branches for the payout type and amount slab combination. Currency Specify the currency code for which the payment delay details are being maintained. The option list displays all valid currency codes maintained in the system. Choose the appropriate one. You can also indicate ‘ALL’ to apply the delay days to all currencies for the payout type and amount slab combination. Amount Slab Specify the redemption amount slab limit for applying payment delay. The system will not delay the payment if the amount slab exceeds this limit. Delay in Days Specify the payment delay in terms of days. Days Calculation Specify the type of days to be considered for determining the delay. The drop-down list displays the following options: Working Days Calendar Days Choose the appropriate one. Once you have captured the details, save the maintenance. 6.3.1 Processing Delayed Payments During BOD operations, the system will initiate the redemption activity for redemption payments that are due. The funds are transferred based on the payout instruction. 6-24 When a delayed redemption is set, the system will not allow partial/full/delayed redemption of the account until the delayed redemption is executed. The execution status is updated on ‘Certificate of deposit Redemption input’ screen. Before executing a redemption or closure, you need to close the previous delayed redemption requests. Further redemptions are allowed after closure of the request. If the delayed redemption date exceeds the maturity date of the account, the system displays an error message. You cannot continue with the delayed redemption further. If you have maintained multiple payout details for an account with different delayed days, during delayed redemption, the system considers the longest period and applies it. If multiple redemption slabs are maintained for a specific payout type, the system applies the delayed days based on the redemption amount. Example Payout type Branch Currency Amount slab Delay in days PC 000 USD 1000 2 PC 000 USD 2000 3 PC 000 USD 3000 4 PC 000 ALL 4000 5 PC ALL USD 2500 6 PC ALL ALL 3500 7 BC 000 USD 1000 4 BC 000 USD 2000 5 BC 000 USD 2500 6 BC ALL USD 3000 7 BC 000 ALL 3000 8 GL ALL ALL 2000 3 In this case, a delayed redemption request for 6000 USD with payout option 50% PC and 50% BC will get the delayed days as given below: 50% BC payout = 3000 USD As 000 Branch and USD combination is maintained, for 2500 USD, the system will consider five delayed days. 50% PC payout = 3000 USD 6-25 As 000 Branch and USD combination is maintained, for 3000 USD, the system will consider four delayed days. Of these numbers of delayed days, five is the longest period. The system will apply five delayed days for the request. If a delayed redemption is due on a holiday, the system will execute that on the previous or next working day based on the option ‘Process Till’ at the IC Branch Parameters level. The system calculates the interest for the number of delayed days. The interest rate will be repicked up on redemption date, in case rate chart is allowed. If no maintenance is available matching a redemption case, then the redemption will happen online. 6.4 Generating an Advice You can generate a CD advice using the ‘Deposit Advice generation screen. To invoke this screen, type ‘ICDBADHC’ in the field at the top right corner of the Application tool bar and click the adjoining arrow button. You need to specify the following details. Customer Account Number Specify the account for which you want to generate an advice. The adjoining option list displays all valid accounts maintained in the system. You can select the appropriate one. Click ‘Ok’ button after specifying the account number. The system will generate an advice and show the following message: 6-26 You can view the advice using the ‘Outgoing Message Browser Summary’ screen (MSSOUBRS). 6.4.1 Certificate of deposit Account Statement Format You can use the following format in generating Certificate of deposit Advice: #RH #SC _BANK-NAME_ #IF _ASOFDT_ COPY AS OF _ASOFDT_ #ENDIF ----------------------------------------------------------------------------------------------------------------------------- ------_CUSTNAME_ _ADDRESSONE_ _ADDRESSTWO_ _ADDRESSTHREE_ Account Branch : _BRNAME_ Branch Address : _BRADDR1_ _BRADDR2_ _BRADDR3_ _ADDRESSFOUR_ 6-27 Cust ID : _CUSTNO_ Account No : _ACCOUNTNO_ Account Desc. : _ACCOUNTDESC_ Account Class : _ACLASSNAME_ Account Currency: _ACYNAME_ ----------------------------------------------------------------------------------------------------------------------------- ------Statement From : _FROMDATE_ To : _TODATE_ #EC #IF _OPENBALANCE_ Account Open Date : _OPENDATE_ _A_OPENING BALANCE _DRCR_ _OPENBALANCE_ _AVLBAL_ _B_ #ENDIF #SC Certificate of deposit Details -------------------------------#IF _ACLASSNAME_ Grace Period :_GRACEPERIOD_ Interest basis :_INTBASIS_ Penalty Applied :_PENALTYAPP_ 6-28 _B_ AVAILABLE BALANCE Penalty Value :_PENALTYVAL_ Interest Rate :_INTRATE_ Floating Rate code :_FRATECODE_ Charge Amount :_CHGAMT_ Maturity Date of CD :_MATDATE_ #ENDIF #EC #EH #PH STATEMENT OF ACCOUNT Statement From _pg_ ------------------- : _FROMDATE_ ----------------- Trn Code/Narrative Closing Balance ------------------- : _ACCOUNTNO_ ---------- ---------- REFERENCE ----------------- To : _TODATE_ PAGE : --------------- ---------------- ----------------------- Book Date Value Date ---------- ---------- Withdrawal Deposit --------------- ---------------- ----------------------- #EH #B #LOOP #IF _TRNCODEDESC_ _A__TRNCODEDESC_ _TRNREFNO_ _BDT_ _CRAMOUNT_ _BALAFTERTXN_ _DUMMY_ 6-29 _VALDATE_ _DRAMOUNT_ #ENDIF #IF _ADDLINFO_ _A__ADDLINFO_ _DUMMY_ #ENDIF #ENDLOOP #EB #RF ========================================================================= ================================================================ _A_Totals _DEBITVALUE_ -------------- _A_ _CREDITVALUE_ _A_ -------------- No. of DEBITS _ND_ AND CREDITS _NC_ _B_ ========================================================================= ================================================================ CLOSING BALANCE _DRC_ _AVLBALANCE_ _B_ _CLOSEBALANCE_ _B_ AVAILABLE BALANCE _UNCOLBALANCE_ _B_ BLOCKED BALANCE #IF _UNCOLBALANCE_ UNCOLLECTED BALANCE _BLOCKEDBALANCE_ _B_ #ENDIF _A__ADVINFOBR_ _A__ADVINFOACLS_ * = UNAUTH ENTRY / R = REVERSAL *** End Of Statement *** 6-30 #EF Certificate of deposit Advice Tags The advice tags used in generating certificate of deposit advice are listed below: Advice Tags Description _GRACEPERIOD_ Grace Period _INTBASIS_ Interest basis _PENALTYAPP_ Penalty applicable _PENALTYVAL_ Penalty Value _INTRATE_ Interest Rate _FRATECODE_ Floating Rate code _CHGAMT_ Charge amounts computed on the account _MATDATE_ Maturity Date of CD Grace Period: This tag displays the period wherein the customer has the option to walk into the bank after maturity to take a decision on his deposit without any financial loss Interest basis: This is based on IC product - Actual/365, 30Euro etc. Penalty applicable: If Partial redemption happens in the deposit, then this tag in the statement would identify whether penalty was collected on that or not. Penalty Value: This tag displays the penalty value collected. Interest Rate : This tag displays the rate at which interest is calculated for CD Floating Rate code: This tag displays the floating rate code used along with UDE in interest rate calculation. This will be for the latest effective date. Charge amounts computed on the account: Under this tag, charge amount collected from the CD Account would be mentioned. Maturity date of deposit: This tag displays the date on which CD will get matured. For details on advice generation please refer the chapter titled ‘Maintaining Advice Formats’ in the MS user manual under CORE module. 6.4.2 Certificate of deposit Rate Change Advice Format The System needs to generate interest rate change advices for Certificate of deposits when the interest rate changes as part of EOD. This advice is to be generated to intimate the customer of the rate change a month in advance. 6-31 During the account UDE change batch at Post EOTI stage, the system picks all the certificate of deposit accounts for the EOD branch for which ‘Generate UDE change advice’ option is checked at certificate of deposit account booking level. For generating rate change advice, you need to maintain the account UDE change batch (ACUDCHD) which is run at EOTI. System generates the rate change advice, once the account UDE change batch is run at Post EOTI stage. The system picks all the certificate of deposit accounts for the EOD branch for which ‘Generate UDE change advice’ flag is checked. The UDE value of such accounts, changes for an effective date, which will be 30 days from the system date. In case of rate change for a particular effective date, UDCH event will be fired. The UDCH event would be used to generate advice. For the rate change advice to be generated as part of UDCH event, the effective date input should be within a month of the account opening date. The rate change is limited to the fixed rate change IC interest products and not to the floating rates. You can use the following format in generating certificate of deposit interest rate change advice (UDECA): #B Interest Component Change Advice CUSTOMER : _CUST_ _CUST-NAME_ _ADDR1_ _ADDR2_ _ADDR3_ _ADDR4_ -------------------------------------------------------------------------------BRANCH : _BRN_ 6-32 ACCOUNT : _ACC_ _DESCRIPTION_ CURRENCY PRODUCT : (_PROD_) _PRODDESC_ -------------------------------------------------------------------------------- Rates and other interest components have been changed.The details are : Element Existing Value New Value -------------------------------------------------------------------------------#LOOP _RCDATE_ _UDE_ _OLDVAL_ _NEWVAL_ #ENDLOOP --------------------------------------------------------------------------------#EB 6.4.3 Certificate of deposit Rollover Advice Format You need to maintain the CD_ROLL message type or advice format for generating certificate of deposit rollover advice. The system generates this advice on expiry of the number of advance days after the maturity date. You need to maintain the advance days in the field ‘Generate Rollover Advice before (days)’ under the ‘Deposit’ tab of ‘Account Class Maintenance’ screen. The advice may be generated after the expiry of the advance days after the maturity date to which the grace days are added. You need to maintain this in the Rollover Advice based on the account class maintenance. Event: IMAT The tags used in the CD Rollover Advice format are listed below: Advice Tag Description 6-33 Advice Tag Description _BRANCHNAME_ Branch Name _BRNADD1_ Branch address line 1 _BRNADD2_ Branch address line 2 _BRNADD3_ Branch address line 3 _TDATE_ Rollover date _REF_ Advice reference _CUSTNAME_ Customer name _ADD1_ Customer address line 1 _ADD2_ Customer address line 2 _ADD3_ Customer address line 3 _ADD4_ Customer address line 4 _TDACNO_ Certificate of deposit account number _AMT_ Rollover amount _CURRENCY_ Certificate of deposit currency _DEPTTENOR_ Certificate of deposit tenor _MATDATE_ Maturity date _MATAMT_ Maturity amount _INTRATE_ Interest rate _INTAMT_ Projected Interest amount _TDROLLTYPE_ Rollover type Given below is the sample CD rollover advice format: #RH CERTIFICATE OF DEPOSIT ROLLOVER ADVICE ---------------------------- 6-34 DATE : _TDATE_ REFERENCE NUMBER : _REF_ #SC _BRANCHNAME_ _BRNADD1_ _BRNADD2_ _BRNADD3_ #EC WE ACCEPT FROM #SC _CUSTNAME_ _ADD1_ _ADD2_ _ADD3_ _ADD4_ 6-35 #EC #SC A DEPOSIT ( _TDACNO_ ) OF _AMT_ MATURING ON _MATDATE_ _CURRENCY_ . ANNUAL PERCENTAGE YEILD IS AS FOLLOWS INTEREST RATE APPLIED FOR THE DEPOSIT TENOR _DEPTTENOR_ DAYS : _INTRATE_% TOTAL INTEREST AMOUNT : _INTAMT_ TOTAL MATURITY AMOUNT : _MATAMT_ CD ROllover Type : _TDROLLTYPE_ #EC #EH #RF FOR _BRANCHNAME_ AUTHORIZED SIGNATORY. #EF 6-36 6.4.4 Certificate of deposit Maturity Advice Format You need to maintain the TD_MAT message type or advice format for generating certificate of deposit maturity advice. The system generates this advice on expiry of the number of advance days after the maturity date. You need to maintain the advance days in the field ‘Generate Rollover Advice before (days)’ under the ‘Deposit’ tab of ‘Account Class Maintenance’ screen. The advice may be generated after the expiry of the advance days after the maturity date or the grace days. You need to maintain this in the Rollover Advice based on the account class maintenance. Event: IMAT The tags used in the CD Maturity Advice Format are listed below: Advice Tag Description _BRANCHNAME_ Branch Name _BRNADD1_ Branch address line 1 _BRNADD2_ Branch address line 2 _BRNADD3_ Branch address line 3 _TDATE_ Rollover date _REF_ Advice reference _CUSTNAME_ Customer name _ADD1_ Customer address line 1 _ADD2_ Customer address line 2 _ADD3_ Customer address line 3 _ADD4_ Customer address line 4 _TDACNO_ Certificate of deposit account number _AMT_ Rollover amount _CURRENCY_ Certificate of deposit currency _DEPTTENOR_ Certificate of deposit tenor _MATDATE_ Maturity date 6-37 Advice Tag Description _MATAMT_ Maturity amount _INTRATE_ Interest rate _INTAMT_ Projected Interest amount _TDPOTYP_ CD Payout Type _TDPOAMT_ CD Payout Amount _TDPOCURRENCY_ Payout Currency _TDOFFSETAC_ Payout offset Account Given below is the sample CD Maturity Advice Format: #RH TERM DEPOSIT MATURITY ADVICE ---------------------------- DATE : _TDATE_ REFERENCE NUMBER : _REF_ #SC _BRANCHNAME_ _BRNADD1_ _BRNADD2_ _BRNADD3_ 6-38 #EC #SC _CUSTNAME_ _ADD1_ _ADD2_ _ADD3_ _ADD4_ #EH #EC #B #SC THE DEPOSIT ( _TDACNO_ ) OF _AMT_ IS MATURING ON _MATDATE_ _CURRENCY_ . INTEREST RATE APPLIED FOR THE DEPOSIT TENOR _DEPTTENOR_ DAYS : _INTRATE_% TOTAL INTEREST AMOUNT : _INTAMT_ TOTAL MATURITY AMOUNT : _MATAMT_ --------------------6-39 MATURITY INSTRUCTIONS --------------------#LOOP #IF _TDACNO_ PAYOUT TYPE ACCOUNT PAYOUT AMOUNT CURRENCY OFFSET ----------------------------------------------------------_TDPOTYP_ _TDOFFSETAC_ _TDPOAMT_ _TDPOCURRENCY_ #ENDIF #ENDLOOP ----------------------------------------------------------- #EC #EB #RF FOR _BRANCHNAME_ AUTHORIZED SIGNATORY. #EF 6-40 6.5 Closing a CD Deposit accounts can be closed automatically on the Maturity Date of the deposit. You can specify this by choosing the ‘Close on Maturity’ option while creating the CD. A deposit acquires the specifications for the account class under which it is opened; you can change this. If you choose the ‘Close on Maturity’ option, during the Beginning of Day operations on the Maturity Date, the account will be closed. The principal will be moved, if specified, to the account your customer has directed. If the deposit remains unclaimed, you can opt to move the principal and interest to the respective ‘Unclaimed GLs’ maintained at your bank. 6.6 Transferring to Unclaimed Deposit on Maturity As explained in the ‘Deposit Tab’ section in the chapter ‘CD Account’, you can move the deposit to an unclaimed GL as per options specified in ‘Deposit’ Tab in ‘Deposits Account Booking’ screen upon deposit maturity (end of grace period). The following three options are available for unclaimed deposits: Move both Principal and Interest to the Unclaimed Principal and Unclaimed Interest GLs respectively. Move Principal to an Unclaimed Principal GL, but retain interest in the Interest Booking Account. The aforesaid options are explained in the following examples. 6.6.1 Moving Principal and Interest to Unclaimed GLs The following example explains this case. Assume the following: 26155010000889’ is the CD account opened under Account class ACCT2 for which ‘Grace period for renewal’ is 1. Interest Booking Account and Principal Liquidation account are CD accounts. The CD is maturing on July 13, 2010. Note that the grace period counter is 0 till the start of July 13 EOD. The grace period counter is 1 till the start of July 14 EOD. The CD can be renewed post maturity for ‘Principal + Interest’ as defined above till the grace period (1 day) is over. Hence, the renewal of deposit is possible till EOD starts on (maturity date+1) i.e. till July 14, 2010. But the maturity date will be taken as the value date for renewal i.e July 13, 2010. On maturity date (grace period count 0), renewal is possible and value date of CD will be July 13, 2010. On July 14, 2010 (grace period count 1), renewal is possible and value date will still be July 13, 2010. In case renewal is not done within the grace period, on lapse of the grace period, both the principal and interest will be moved to Unclaimed Principal and Unclaimed Interest Misc GLs respectively, with an instrument code (reference number for reconciliation). 6-41 July 15, 2010 onwards (grace period is over), the principal and interest can be debited from the Miscellaneous GLs using the reference number (instrument code). No renewal is possible beyond this date. 6.6.2 Moving Principal to Unclaimed Principal retaining interest in Interest Booking Account The following example explains this case. Assume the following: 26157010000906 is the CD account opened under Account class ACCT for which ‘Grace period for renewal’ is 0. Interest Booking Account is a savings account and Principal Liquidation Account is a CD account. The CD is maturing on July 05, 2010 and Interest is liquidated into the Interest booking account on July 05 during BOD. Since the grace period is ‘0’, the Principal can be redeemed through ‘Certificate of deposit Redemption Input’ screen (ICDREDMN) before EOD on July 05, 2010. If the Principal remains unclaimed until EOD on July 05, the Principal will be moved into Unclaimed Principal Miscellaneous GL with an instrument code (Reference number for reconciliation.) with the value date as the maturity date i.e. July 05, 2010. From July 06 onwards, the Principal can be debited from the Miscellaneous GL using the reference number (Instrument Code). Note the following: If you select the Move to Unclaimed GL option, then on maturity date, the funds will be stored in the CD account and further accrual will be stopped until the grace period. If you redeem the CD in the grace period, you will receive the Principal and interest amount accrued on that account as of the maturity date. If you renew the CD, the system will start interest accrual from the maturity date of the old CD. To debit the amount from the Unclaimed Interest or Unclaimed Principal, you will need the corresponding instrument Code (Reference number) as these GLs are miscellaneous credit GLs. 6.7 Viewing CD Execution Log You can view the execution log of all CDs using the ‘Certificate of deposits Execution Log Summary’ screen. To invoke this screen, type ‘ICSEXELG’ in the field at the top right corner of the Application tool bar and click the adjoining arrow button. 6-42 You can query on records based on any one or all of the following criteria: Branch Code Account Currency Code Run Date Click ‘Search’ button. The system identifies all records satisfying the specified criteria and displays the following details for each one of them: Branch Code Account Currency Code Event Tenor Amount Run Date Execution Status 6-43 Error Reason Deposit Number Maturity Date 6.8 Simulating CD Oracle FLEXCUBE allows you to simulate a CD account in order to enhance sales and services to new and existing customers. You can also provide the customer a certificate with all the details of account. This certificate is generated with a pre-printed number. You can simulate an account for a customer using the ‘Customer Accounts Simulation’ screen. The details of a account can be entered in this screen and a printed certificate of the account can be obtained by using this screen. To invoke this screen type ‘STDSCSAC’ in the field at the top right corner of the Application tool bar and click the adjoining arrow button. In this screen you can input all the details of the Deposit account. A certificate of deposit account is simulated based on all the information you provide in the screen above. You can also view and generate the details of the certificate of deposit account certificate of the account. Addtionally you can view the details of interest, charges and amounts for the simulated CD account. Branch The branch where the deposit account is being simulated is displayed here on clicking new icon in the Application Toolbar. Customer Specify the customer for whom the account is being simulated. You can also select the customer from the option list provided. 6-44 Customer Name The name of the customer for whom the account is simulated, is displayed here, based on the customer selected. Account Currency Specify the currency for the deposit account. You can also select the currency from the option list provided. Account Class Specify the ‘deposit’ type of account class under which the deposit should be simulated. You can also select the appropriate account class from the option list provided. Description Based on the account class specified, the system displays the corresponding description. Click ‘Default’ button after specifying the customer, account class and currency. Account Number The account number of the customer for whom you need to simulate a deposit account is displayed here. Status The status of the simulated account is displayed here based on the customer selected First Beneficiarys Specify the first person to hold the right to the simulated account balance after the customer’s expiration. DCN The Delivery Control Number used for uniquely identifying a message in Oracle FLEXCUBE is displayed here. Second Beneficiarys Specify the secondary person to hold the rights to the simulated account balance after the customer’s expiration. Account Open Date The date on which the account has to be opened is defaulted based on the account class selected here. You can however change the value of the opening date of account. 6-45 Media Select the media to communicate account related details to the customer, such as account maintenance related charges, fees, interest etc. from the option list. You can choose either of the following: Mail Telex SWIFT Fax Type The type of account is defaulted based on the account class selected. However, you can select the type of deposit account that you are maintaining a simulation for; you can select any one of the following options: Single Joint Clearing Bank Code The code for the bank serving as clearing house for the simulated account is displayed here Clearing Account Number The account number for the clearing activity for the simulated account is displayed here Alternate Account Number Specify an alternate account for the simulated account 6.8.1 Generating and Viewing Account Certificate To generate the details of CD account in certificate format, click the ‘Generate Certificate’ button on the ‘Customer Accounts Simulation’ screen. To view the details of the certificate generated for the simulated account, click the ‘View Certificate’ button on the ‘Customer Accounts Simulation’ screen. The following details are displayed: The Document Certificate Number The account branch The reference number The report Module The contents of the message 6-46 To procure a hard copy of the certificate click ‘Print’. The generated certificates are also available through the Messaging browser. Messaging archival or purge action determines the storage or removal of these certificates from the Application Browser. 6.8.2 Specifying Interest Details for Simulated Account To specify the interest and charge related details of the certificate of deposit account click the ‘Interest’ button. The screen is as shown below: You can define the interest and charge related details associated with the customer’s deposit account. For more information on specifying Interest details for CD refer to the section, ‘Specifying Interest Details’ in the chapter ‘CD Additional Details’ in this User Manual. 6-47 6.8.2.5 Specifying Deposit Details Click ‘Deposit’ button in the ‘IC Special Conditions Maintenance’ screen to specify preferences for the simulated account. Specify the following details: Principal Liquidation Branch Specify the branch in which the liquidation account is maintained. The adjoining option list displays all valid branches maintained in the system. You can select the appropriate one. Principal Liquidation Account On maturity, the principal of a time deposit can be liquidated into an account you specify. This would typically be the customer’s account. When maintaining a deposit, indicate the account into which the principal should be liquidated. You should also Interest Start Date Specify the date from which the interest accruals of CD account begins. Maturity Date The system defaults the maturity date from the default tenor from the account class. However, you can modify this date. On this date the certificate of deposit account gets liquidated. 6-48 Auto Rollover Check this field to automatically rollover the deposit you are maintaining. You have to indicate ‘Rollover Type’ on selecting this option Close on Maturity Check this field to close the certificate of deposit account on maturity date and transfer the amount to the principal liquidation account. If you select this option, the principal liquidation account should be an account other than the certificate of deposit account. Move Interest to Unclaimed Check this field to move the interest amount to the unclaimed GL mapped at the IC product in the accounting roles on grace period end date of the certificate of deposit account. If you select this option, the principal liquidation account should be the certificate of deposit account. Move Principal to Unclaimed Check this field to move the principal amount to the unclaimed GL mapped at the IC product in the accounting roles and liquidate the interest amount to the interest booking account on grace period end date of the certificate of deposit account.If you select this option, the principal liquidation account should be the certificate of deposit account Certificate of deposit Amount Specify the amount for which CD should be simulated. Next Maturity Date On selecting the rollover for the CD account, the system defaults the next maturity date from the previous tenor of the deposit. Deposit Tenor The system calculates the tenor of the deposit account to the difference between Interest start date and Maturity date and displays it. In case of change in maturity date, the system changes the value of this field. Rollover Type Indicate the components that should be rolled over by choosing one of the following options: Principal Principal + Interest Special Amount Rollover Amount If a special amount is to be rolled over, you have to specify the amount (less than the original deposit amount) in this field. 6-49 Certificate of deposit Pay-in Option Indicate the method for initial funding during account creation. Choose one of the following options: PAYIN BY GL PAYIN BY CASH PAYIN BY SAVINGS Offset Account Specify the account number/ GL from which the fund should transferred to CD account as part of simulation. This field returns the branch code if the account is selected and NULL is returned if GL is selected. If the pay-in mode is GL then the system will display only GLs and if the pay-in mode is account then only accounts will be displayed in the option list. Recurring Deposit Specify the following details: Auto Payment Take Down Check this field to allow the recurring deposit account to debit the payment account for the payment amount as per the installment frequency. Move Maturities to Unclaimed Check this field to move all the funds, on the maturity date, to the unclaimed GL mapped to the accounting role in the IC product. Payment Branch Specify the details for the branch to which the payment account belongs. Payment Account Specify the Payment Account; this can be either savings account or the current account from which the installment for the Recurring Deposit is collected as per the installment frequency Installment Amount Specify the installment amount that has to be collected from the payment account as per the installment frequency. This installment amount should be greater than the minimum amount mentioned at the account class. Recurring Deposit Account Check this field to indicate recurring deposit account. 6-50 Payment Date Specify the date on which the payment needs to be done for recurring deposit account. Payment Currency Specify currency of the payment amount. Note the following: The system enables the offset account and branch detail fields only if the option to pay is selected as the savings account. The Unclaimed Interest and Principal GLs are specified while maintaining an Interest and Charges (IC) Deposit Type product. The Accounting Roles for the GLs are ‘INT_UNCLAIMED’ and ‘PRN_UNCLAIMED’ respectively. When maintaining an ICDeposit type product, you have to map these Accounting Roles to the appropriate GLs maintained at your bank. The system allows you to select ‘Close on Maturity’ box, only when you specify the recurring deposit details. You have to maintain deposit transaction code as ‘DPN’ redemption transaction code as ‘RED’ and prepayment transaction code as ‘TRF’ for the recurring payments in the Branch Parameters for the Interest and Charges. All recurring deposit payments are part of IC batch beginning of day activity. Installment Frequency Specify the following details: Move funds on Overdraft Check this option to indicate whether the Recurring Deposit account funds should move to an unclaimed account if it is overdue Days Specify the installment frequency in terms of days. Months Specify the installment frequency in terms of months. Years Specify the installment frequency in terms of years. 6.9 Reporting for Suspicious Activities Suspicious Activity Report (SAR) is the report for known or suspected violations of law or suspicious activity observed by the bank subject to the regulations of the Bank Secrecy Act. 6-51 The bank can generate the SAR when it suspects the following: Insider abuse within the bank Violations of law aggregating over USD 5,000 where a subject can be identified Violations of law aggregating over USD 25,000 regardless of a potential subject Transactions aggregating USD 5,000 or more that involve potential money laundering or violations of the Bank Secrecy Act Customer doing unlicensed services or business. Oracle FLEXCUBE facilitates the handling of suspicious activities in your bank. This is done through the following process: Maintaining parameters for identifying suspicious activities Running batches to extract information about suspicious activities based on the predefined parameters Generating reports based on the information extracted during the batch runs Maintaining suspicious accounts details in the system For more information on the process and reports, refer the chapter ‘Suspicious Activity Reports’ in the ‘Current Account and Savings Account’ User Manual. 6.10 Redeeming Certificate of deposits Partially After redemption of the certificate of deposit account, the system will compute the following values: Redeposit Amount = Available Redeposit Amount – Part of the Redemption Amount Debited from Redeposit. Available Principal = Available Principal – Part of the Redemption Amount Debited from Principal Interest Amount = Available Interest Amount – Part of the Redemption Amount Debited from Interest Amount After rollover of the certificate of deposit account, the system will compute the following values: Redeposit Amount = Available Redeposit Amount + Newly Redeposit Amount for the Rollover Interest Amount = 0 After liquidation of the account, the system will compute the available interest (if book account is same deposit account) as follows: Interest Amount = Available Interest Amount + Liquidated Interest 6-52 The available principal amount, available re-deposited amount and interest amount will be used for arriving the redemption amount. If the CD has been redeemed more than once, the system will use the available principal, available interest and available redeposit amounts. Example Following are the account class level redemption details. Redemption – Component options: Component Allowed Basis Case 1 Case 2 Case 3 Principal is allowed Y N Y Interest is allowed N Y N Redeposit interest is allowed Y Y N Redemption Priority Option: Component Priority Case 1 Case 2 Principal 1 2 Redeposit Interest 2 3 Interest 3 1 A deposit is created with the following properties: Deposit: 1000101 Date of Creation: October 01, 2006 Tenor: One year Interest Rate: 12% Liquidation Frequency: Monthly Auto Rollover: Enabled Liquidated interest is deposited to the same account. Suppose that the customer redeems 3000 on October 5, 2006. For the above configurations, the redemption amount is calculated as shown below: 6-53 Deposit + Redeposit Amount Current Deposit Amount Redeposit amount Interest Liquidated Deposit Amount Redemptio n Amount Redemptio n date Maturity Date Account Opened Date/ Rollover Date Activities S.No 10000 10000 1268.2 4 0 10000.0 0 1/10/200 8 10000 1429.0 9 1268.24 11268.2 4 1/10/2008 1/10/200 9 10000 1610.3 3 2697.33 13965.5 8 1/10/2009 1/10/201 0 10000 469.71 4307.67 13965.5 8 1 INITIAL 1/10/2006 1/10/200 7 2 ROLLOVER 1 1/10/2007 3 ROLLOVER 2 4 Redemption 1 (before) 5/10/200 9 3000 Interest computation for an year, if the payout of interest is capitalized on the same CD account, is calculated as given below: Deposit Amount Capitalized Interest Interest Rate Start Date End Date Days Interest 10000 0 12% 1-Oct-06 1-Nov-06 31 101.92 10000 101.92 12% 1-Nov-06 1-Dec-06 30 99.64 10000 201.55 12% 1-Dec-06 1-Jan-07 31 103.97 10000 305.53 12% 1-Jan-07 1-Feb-07 31 105.03 10000 410.56 12% 1-Feb-07 1-Mar-07 28 95.83 10000 506.39 12% 1-Mar-07 1-Apr-07 31 107.08 10000 613.47 12% 1-Apr-07 1-May-07 30 104.68 10000 718.15 12% 1-May-07 1-Jun-07 31 109.24 10000 827.39 12% 1-Jun-07 1-Jul-07 30 106.79 10000 934.18 12% 1-Jul-07 1-Aug-07 31 111.44 10000 1045.62 12% 1-Aug-07 1-Sep-07 31 112.57 10000 1158.19 12% 1-Sep-07 1-Oct-07 30 110.05 1268.24 Redemption amount calculation for various setups is shown below: Component Priority Case 1 6-54 Priority Case 2 Priority Case 3 Redemption Component Option 1 Component Priority Case 1 Priority Case 2 Priority Case 3 Principal 3000 0 3000 If redemption amount less than 10000, principal will be debited) 0 2530.29 (if redemption amount more than 10000 and less than 14307.67., then principal 10000 will be debited first, after that redeposit amount max of 4307.67, will be allowed to debit) Max 4307.67 will be allowed Interest Not allowed 469.71 Not allowed Principal 0 0 3000 (maximum of 10000 will be redeemed) (if redemption amount more than 10000 and less than 12581.36, then principal 10000 will be debited first, after that redeposit amount max of 5833.8, will be allowed to debit) Max. of 10000 will be allowed for redemption Redeposit interest 3000 2530.29 Not allowed Interest Not allowed 469.71 Redeposit interest Redemption Component Option 2 Principal is not allowed for redemption Max. of 10000 will be allowed for redemption 6-55 Not allowed 7. RD Operations 7.1 Introduction You can perform the following operations on a Recurring Deposit (RD): Payment Reversal 7.2 Capturing Payment Details You have the option of allowing manual receipt of instalments. Invoke the ‘Recurring Deposits Payment Input’ screen from the Application by typing ‘ICDPMNTS’ in the field at the top right corner of the Application tool bar and clicking the adjoining arrow button. On invoking this screen, all the outstanding and future installments are displayed. You can choose to pay any multiple of the installment amount. To do this, the system will clear all the overdue amounts first and then allocate the amounts to current and future installments. 7-1 RD Account Details Specify the following details. Branch Code Specify the branch where the RD resides. The adjoining option list displays all valid branch codes maintained in the system. You can select the appropriate one. Transaction Date Specify the transaction date for which payment is supposed to be initiated. RD Account Number Specify the RD Account Number. You can also choose the appropriate one from the option list. The option list displays the deposit type of accounts maintained in the system. Maturity Date The system display the maturity date of the RD, on specifying the recurring deposit account. Installment amount The system displays the installment amount for the RD, on specifying the recurring deposit account. CURRENCY The system displays the currency for the RD, on specifying the recurring deposit account. Payment Details Specify the following details. Payment Branch Code Specify the code assigned to the branch in which the payment is to be made. The adjoining option list displays all valid branch codes maintained in the system. You can select the appropriate one. Payment Account Number Specify the payment account number used for manual payment for the RD. The adjoining option list displays all valid savings account and current accounts maintained in the system. You can select the appropriate one. Product Code Specify the retail teller product with combination of ARC maintenance. You have to ensure that the retail teller product is enabled for RD payments by checking the field ‘RD Payments allowed’ at the teller product level maintenance-preferences screen. 7-2 Exchange Rate Specify the exchange rate, if the account currency is different from the currency in which the payment amount is expressed. Payment Currency Specify the currency in which the payment is being made. The adjoining option list displays all valid currency codes maintained in the system. You can select the appropriate one. Payment Amount Specify the amount deposited as payment. Here you can specify the installment amount or the complete deposit amount in multiples of the a installment amount. Minimum Payment Amount The system displays the installment amount indicating the minimum amount that can be deposited in the RD account. After entering the RD accounts payment details, click ‘P' button. The system then calculates the paid amount and displays them in the respective fields. RD Account Payments On click of ‘P’ button, along with paid amount, the system calculates the due days, due date, instalment amount and RD contract status . Due Date The system displays due date of the installment Installment Amount The system displays installment amount. Payment Date Specify payment date for the RD. Normally, the payment date is the same as the transaction date. Due Days The system displays overdue days in case payment is overdue. 7.2.1 Viewing Accounting Entries Click ‘Events’ button in the ‘Recurring Deposits Payment Input’ screen and invoke the following screen. 7-3 7.2.2 Specifying UDF Values All User Defined Fields (UDFs) linked to the function ID ‘ICDPMNTS’ are displayed in the ‘User Defined Fields’ screen. Invoke this screen by clicking ‘Fields’ button on the ‘Recurring Deposit Payment Input’ screen. Here you can specify values for each UDF. Refer the User Manual titled ‘User Defined Field’ for details about defining UDFs.Click ‘Fields’ button on the ‘CD Accounts Maintenance’ screen and invoke the ‘User Defined Fields’ screen. 7.3 Viewing Payment Summary You can view summary of all RD payments using the ‘Recurring Deposit Payment Summary’ screen. To invoke this screen, type ‘ICSPMNTS’ in the field at the top right corner of the Application tool bar and click the adjoining arrow button. 7-4 You can query on records based on any one or all of the following criteria: Authorization Status Record Status Branch Code RD Account Number Payment Branch Code Payment Currency Product Code Transaction Date Click ‘Search’ button. The system identifies all records satisfying the specified criteria and displays the following details for each one of them: Authorization Status Record Status Branch Code RD Account Number 7-5 Payment Branch Code Payment Currency Product Code Transaction Date Double click on a record to invoke the detailed screen for that record. 7.4 Reversing Payment You can reverse the payments made to the RD account rather the installment amounts to the recurring deposit account. Invoke the ‘Recurring Deposit Payments Reversal’ screen from the application browser. You can also invoke this screen by typing ‘ICDPMREV’ in the field at the top right corner of the Application tool bar and clicking the adjoining arrow button. Here you can capture the following details. Branch Code Specify the code assigned to the branch in which the payment is to be made. You can also choose the branch code from the adjoining option list. RD Account Number Specify the recurring account number for which the installments are to be collected. The system displays the recurring deposit accounts that are in open and authorized status in the adjoining option list. You can choose the appropriate one from this list. Transaction Date The system displays the transaction date for which reversal is supposed to be initiated. 7-6 Auth status The system displays the authorization status. Contract Status The system displays the contract status. Reversal of a payment transaction can be done from this screen. When a transaction is reversed, the system updates the contract status as ‘V’ (Reversed). 7-7 8. Annexure A - Accounting Entries 8.1 Accounting Entries and Advices for CD This Annexure lists the suggested event-wise accounting entries that can be set up, for the Interest and Charge product applicable for the CD module of Oracle FLEXCUBE. 8.2 Events You need to set up the following events for an Interest product: Event Code Event Description ILIQ Interest Liquidation IACR Interest Accruals DEBK Deposit Booking IMAT Interest Maturity ALIQ Auto Liquidation You need to set up the following events for a Charge product: 8.3 Event Code Event Description CLIQ Charge Liquidation UDCH Change of UDE Values Amount Tags The following amount tags are available: Amount Tags Description IACQUIRED Acquired Interest Amount IACR Interest Accrual IACR_ADJ Interest Accrual Adjustments ILIQ Interest Liquidation Amount IMAT Interest Maturity PMAT Principal Maturity 8-1 8.4 Amount Tags Description TAX Tax TAX_ADJ Tax Adjustment TD-PRINC Deposit Principal Amount PRINCIPAL_LIQD Principal Liquidation Accounting Roles Accounting roles are automatically defaulted by Oracle FLEXCUBE based on the IC Rule attached to the particular IC product. An accounting role could be accrual, P/L or tax payment. For creation of role type, standard abbreviations are used across Oracle FLEXCUBE. The accounting role is created in the following format – ‘TDAA-<accounting role type>-<X> Where: TDAA represents the IC product. X represents the number of the formula for which the accounting role is created. If you have maintained more than one formula for a rule, the system will default accounting roles for each of your formulae. Example: Assume that the accounting role is ‘TDAB-ACCR-1’. This role indicates the following: The IC product is ‘TDAB’ The formula number is ‘1’. (for example credit interest accrual which was defined in formula 1) Assume that the accounting role is ‘TDAB-PNL-2’ This role indicates the following: The IC product is ‘TDAB’ The formula number is ‘2’. (for example debit interest posting against income GL defined for formula 2) You should select the appropriate accounting role on the ’Role to Head Mapping‘ screen for every product. Note that ‘TDAA-BOOK-X’ represents the settlement account where the amount is credited or debited against P/L account. This role cannot be attached to any GL on the ’Role to Head Mapping’ screen. It is used while maintaining event-wise accounting entries. 8-2 Sample accounting role for IC Rule ID like AP01 are given below: AP01-ACCR-1 AP01-ACQUIRED-1 AP01-ACR_ADJ-1 AP01-BOOK-1 AP01-BOOK-2 AP01-BOOK-3 AP01-PNL_ADJ-1 AP01-PNL_ADJ-2 AP01-PNL-1 AP01-PNL-2 AP01-TPBL_ADJ-3 AP01-TPBL-3 AP02-ACCR-1 AP02-ACQUIRED-1 AP02-ACR_ADJ-1 AP02-BOOK-1 AP02-BOOK-2 AP02-BOOK-3 AP02-PNL_ADJ-1 AP02-PNL_ADJ-2 AP02-PNL-1 AP02-PNL-2 AP02-TPBL_ADJ-3 AP02-TPBL-3 INT-BOOK INT-LIQD PRINC-BOOK PRINC-LIQD RC02-ACCR-1 RC02-ACQUIRED-1 RC02-ACR_ADJ-1 RC02-BOOK-1 RC02-BOOK-2 RC02-BOOK-3 RC02-PNL_ADJ-1 RC02-PNL_ADJ-2 RC02-PNL-1 RC02-PNL-2 8-3 RC02-TPBL_ADJ-3 RC02-TPBL-3 TDACCOUNT TDOFFSE0054 TDRD-ACCR-1 TDRD-ACQUIRED-1 TDRD-ACR_ADJ-1 TDRD-BOOK-1 TDRD-BOOK-2 TDRD-BOOK-3 TDRD-PNL_ADJ-1 TDRD-PNL_ADJ-2 TDRD-PNL-1 TDRD-PNL-2 TDRD-TPBL_ADJ-3 TDRD-TPBL-3 INT_UNCLAIMED MAT_UNCLAIMED PRN_UNCLAIMED DR_SETTL_BRIDGE LOAN_ACCOUNT 8.5 Event-wise Accounting Entries for Products You can set up various IC products for handling CDs. Some representative products are listed below: CD with Capitalization Normal CD with Simple Interest CD with Rate Chart Allowed Recurring deposit Scheme 8.5.1 CD with Capitalization You can set up event-wise accounting entries and advices for the product as suggested below. Accounting roles are for sample rule ID AP01. 8.5.1.1 DEBK: Book Accounting Entries Accounting Role Amount Tag Dr/Cr Indicator TDACCOUNT TD-PRINC Credit TDOFFSET TD-PRINC Debit 8-4 8.5.1.2 IACR: Interest Accrual Accounting Entries Accounting Role Amount Tag Dr/Cr Indicator AP01-PNL_ADJ-1 IACR_ADJ Debit AP01-ACR_ADJ-1 IACR_ADJ Credit AP01-PNL-1 IACR Debit AP01-ACCR-1 IACR Credit Accounting Role Amount Tag Dr/Cr Indicator AP01-ACCR-1 ILIQ Debit AP01-PNL_ADJ-2 IACQUIRED Credit AP01-BOOK-2 IACQUIRED Debit AP01-BOOK-1 IACQUIRED Credit AP01-ACQUIRED-1 IACQUIRED Debit AP01-BOOK-1 ILIQ Credit AP01-BOOK-3 TAX_ADJ Debit AP01-TPBL-3 TAX Credit AP01-BOOK-3 TAX Debit AP01-PNL-2 ILIQ Credit AP01-BOOK-2 ILIQ Debit AP01-TPBL_ADJ-3 TAX_ADJ Credit Accounting Role Amount Tag Dr/Cr Indicator INT-LIQD IMAT Debit INT-BOOK IMAT Credit PRINC-LIQD PMAT Debit 8.5.1.3 ILIQ: Interest Liquidation Accounting Entries 8.5.1.4 IMAT: Interest Maturity Accounting Entries 8-5 Accounting Role Amount Tag Dr/Cr Indicator PRINC-BOOK PMAT Credit Accounting Role Amount Tag Dr/Cr Indicator DR_SETTL_BRIDGE PRINCIPAL_LIQD Debit LOAN_ACCOUNT PRINCIPAL_LIQD Credit 8.5.1.5 ALIQ: Auto Liquidation Accounting Entries You need to maintain entries for each of your booking type formulae otherwise the system will not be able to process IC. Tax entries are mandatory if tax parameters are maintained for your rule. When you don’t maintain tax through the Tax sub-system, but instead you maintain it as a debit type interest component, you should use the common accounting roles and amount tags. 8.5.2 Normal CD with Simple Interest You can set up event-wise accounting entries and advices for the product as suggested below Sample accounting entries for IC Product with Rule ID AP02 are given below. 8.5.2.1 DEBK: Book Accounting Entries Accounting Role Amount Tag Dr/Cr Indicator TDACCOUNT TD-PRINC Credit TDOFFSET TD-PRINC Debit Accounting Role Amount Tag Dr/Cr Indicator AP02-PNL-1 IACR Debit AP02-ACCR-1 IACR Credit AP02-PNL_ADJ-1 IACR_ADJ Debit AP02-ACR_ADJ-1 IACR_ADJ Credit Amount Tag Dr/Cr Indicator 8.5.2.2 IACR: Interest Accrual Accounting Entries 8.5.2.3 ILIQ: Interest Liquidation Accounting Entries Accounting Role 8-6 Accounting Role Amount Tag Dr/Cr Indicator AP02-ACCR-1 ILIQ Debit AP02-PNL_ADJ-2 IACQUIRED Credit AP02-BOOK-2 IACQUIRED Debit AP02-BOOK-1 IACQUIRED Credit AP02-ACQUIRED-1 IACQUIRED Debit AP02-BOOK-1 ILIQ Credit AP02-BOOK-3 TAX_ADJ Debit AP02-TPBL-3 TAX Credit AP02-BOOK-3 TAX Debit AP02-PNL-2 ILIQ Credit AP02-BOOK-2 ILIQ Debit AP02-TPBL_ADJ-3 TAX_ADJ Credit Accounting Role Amount Tag Dr/Cr Indicator INT-LIQD IMAT Debit INT-BOOK IMAT Credit PRINC-LIQD PMAT Debit PRINC-BOOK PMAT Credit 8.5.2.4 IMAT: Interest Maturity Accounting Entries 8.5.3 CD with Rate Chart Allowed You can set up event-wise accounting entries and advices for the product as suggested below. Sample accounting entries for IC Product with Rule ID RC02 are given below. 8.5.3.1 DEBK: Book Accounting Entries Accounting Role Amount Tag Dr/Cr Indicator TDACCOUNT TD-PRINC Credit 8-7 Accounting Role Amount Tag Dr/Cr Indicator TDOFFSET TD-PRINC Debit Accounting Role Amount Tag Dr/Cr Indicator RC02-PNL-1 IACR Debit RC02-ACCR-1 IACR Credit RC02-PNL_ADJ-1 IACR_ADJ Debit RC02-ACR_ADJ-1 IACR_ADJ Credit Accounting Role Amount Tag Dr/Cr Indicator RC02-BOOK-2 ILIQ Debit RC02-BOOK-1 IACQUIRED Credit RC02-ACQUIRED-1 IACQUIRED Debit RC02-BOOK-2 IACQUIRED Credit RC02-PNL_ADJ-2 IACQUIRED Debit RC02-PNL-2 ILIQ Credit RC02-BOOK-3 TAX_ADJ Debit RC02-BOOK-3 TAX Credit RC02-TPBL_ADJ-3 TAX_ADJ Debit RC02-BOOK-1 ILIQ Credit RC02-ACCR-1 ILIQ Debit RC02-TPBL-3 TAX Credit Accounting Role Amount Tag Dr/Cr Indicator INT-LIQD IMAT Debit 8.5.3.2 IACR: Interest Accrual Accounting Entries 8.5.3.3 ILIQ: Interest Liquidation Accounting Entries 8.5.3.4 IMAT: Interest Maturity Accounting Entries 8-8 Accounting Role Amount Tag Dr/Cr Indicator INT-BOOK IMAT Credit PRINC-LIQD PMAT Debit PRINC-BOOK PMAT Credit 8.5.4 Recurring Deposit Scheme You can set up event-wise accounting entries and advices for the product as suggested below. Sample accounting entries for IC Product with Rule ID TDRD are given below. 8.5.4.1 DEBK: Book Accounting Entries Accounting Role Amount Tag Dr/Cr Indicator TDACCOUNT TD-PRINC Credit TDOFFSET TD-PRINC Debit Accounting Role Amount Tag Dr/Cr Indicator TDRD-ACR_ADJ-1 IACR_ADJ Credit TDRD-PNL_ADJ-1 IACR_ADJ Debit TDRD-ACCR-1 IACR Credit TDRD-PNL-1 IACR Debit Accounting Role Amount Tag Dr/Cr Indicator TDRD-BOOK-2 ILIQ Debit TDRD-BOOK-1 IACQUIRED Credit TDRD-ACQUIRED-1 IACQUIRED Debit TDRD-PNL_ADJ-2 IACQUIRED Credit TDRD-BOOK-2 IACQUIRED Debit 8.5.4.2 IACR: Interest Accrual Accounting Entries 8.5.4.3 ILIQ: Interest Liquidation Accounting Entries 8-9 Accounting Role Amount Tag Dr/Cr Indicator TDRD-PNL-2 ILIQ Credit TDRD-BOOK-3 TAX_ADJ Debit TDRD-TPBL-3 TAX Credit TDRD-BOOK-3 TAX Debit TDRD-BOOK-1 ILIQ Credit TDRD-ACCR-1 ILIQ Debit TDRD-TPBL_ADJ-3 TAX_ADJ Credit Accounting Role Amount Tag Dr/Cr Indicator INT-LIQD IMAT Debit INT-BOOK IMAT Credit PRINC-LIQD PMAT Debit PRINC-BOOK PMAT Credit 8.5.4.4 IMAT: Interest Maturity Accounting Entries 8-10 9. Annexure B - IC Rule Set-up 9.1 Introduction This Annexure lists the Interest and Charge (IC) rules that need to be maintained for the CD module of Oracle FLEXCUBE. It also gives the UDEs and rates for which values need to be maintained. 9.2 IC Rule Maintenance The components required to calculate interest (the principal, period, and rate) are broadly referred to as ‘Data Elements’. Data elements are of two types: System Data Elements (SDEs) User Data Elements (UDEs) In addition to specifying how the SDEs and UDEs are connected through the formulae, you also define certain other attributes for a rule using the ‘Interest and Charges Rule Maintenance’ screen. You can invoke this screen by typing ‘ICDRLMNT’ in the field at the top right corner of the Application tool bar and clicking the adjoining arrow button. Note the following: Use the SDE ‘DLY_NET_BAL_M’ for capitalization of interest when the interest booking account is mentioned as the CD account. Use the SDE ‘DEPOSIT_AMOUNT’ for simple interest calculation based on deposit amount (original principal) when interest booking account is mentioned as CD account. 9-1 Use ‘DAYS’ when the formula needs the number of days from last liquidation date of account to current date. Use ‘DAYS_FROM_START’ SDE when the formula needs the number of days from account opening date to current date. The value for ‘PENALTY_APPLY’ SDE is always set as ‘1’ (i,e Yes), If you check the box ‘Waive Penalty’ in the ‘Certificate of deposits Redemption’ screen (ICDREDMN), the system will change the SDE value to ‘0’ (i.e No) for that particular account. The value for ‘PENALTY_BASIS’ SDE is taken as the redemption amount. Use the SDE ‘PMI_PERIOD’ to indicate whether the CD is in grace period or not. If the CD is in grace period, the system will set the value of this SDE to ‘1’. It is set to ‘0’ to indicate otherwise. Use the SDE ‘WAIVE_INTEREST’ to verify whether interest has been waived off for the CD. If the checkbox ‘Waive Interest’ is checked, the system will set the value of this SDE to ‘1’. If that checkbox is not checked, the SDE value will be set t ‘0’. STEP_INT_RATE - This is the UDE for the interest rate of the UDE type ‘RATE’. This UDE will be used in the formula to compute the interest. MAX_INT_LIMIT - This is the UDE for the maximum interest rate limit of the type ‘RATE’. This UDE will be used in the rule to validate the interest rate upper limit. MIN_INT_LIMIT - This is the UDE for the minimum interest rate limit of the type ‘RATE’. This UDE will be used in the formula to validate the interest rate lower limit. For details about the screen, refer the chapter ‘Maintaining Interest Rules’ in the Interest and Charges User Manual. You can maintain rules for the following: Capitalized Deposit with Penalty CD with Normal Tenor and Penalty Recurring Deposit Rule Rate Chart Allowed with Penalty 9.2.1 Capitalized Deposit with Penalty Specify the following details: On Account Opening Month Check this box. On Account Closure Month Check this box. SDE Maintain the following SDEs: DAYS DAYS_FROM_START DLY_NET_BAL_M PENALTY_APPLY PENALTY_BASIS 9-2 TENOR YEAR UDE Maintain the following UDEs: TAX_RATE TD_1 TD_2 TD_3 TD_PNL Type For each of the UDEs, select the option ‘Rate’ from the adjoining drop-down list. Get Latest For each of the UDEs, select the option ‘Use Effective’ from the adjoining drop-down list. Click ‘Formulas’ button and invoke the ‘Formulas’ screen. You need to maintain two booked formulae and one tax formula. Formula 1 Specify the following details: Book Flag Select ‘Booked’ from the adjoining drop-down list. 9-3 Debit/Credit Select ‘Credit’ from the adjoining drop-down list. Days in a Month Select ‘30 Days’ from the adjoining drop-down list. Days in a Year Select ‘360’ from the adjoining drop-down list. Accrual Required Check this box. Rounding Required Check this box. Click ‘Formula Wizard’ button and invoke the ‘Formula Wizard’ screen. Specify the following expressions: Case Result (TENOR<=90) AND (DLY_NET_BAL_M>0) AND PENALTY_BASIS = 0 ((DLY_NET_BAL_M * DAYS * TD_1) / (100 * YEAR)) (TENOR>90 AND TENOR<=180) AND (DLY_NET_BAL_M>0) AND PENALTY_BASIS = 0 ((DLY_NET_BAL_M * DAYS * TD_2) / (100 * YEAR)) 9-4 (TENOR>180 AND TENOR<=730) AND (DLY_NET_BAL_M>0) AND PENALTY_BASIS = 0 ((DLY_NET_BAL_M * DAYS * TD_3) / (100 * YEAR)) (TENOR<=90) AND (DLY_NET_BAL_M>0) AND (PENALTY_BASIS = DLY_NET_BAL_M) ((PENALTY_BASIS * DAYS) * (TD_1TD_PNL)) / (100 * YEAR) (TENOR>90 AND TENOR<=180) AND (DLY_NET_BAL_M>0) AND (PENALTY_BASIS = DLY_NET_BAL_M) ((PENALTY_BASIS * DAYS) * (TD_2TD_PNL)) / (100 * YEAR) (TENOR>180 AND TENOR<=730) AND (DLY_NET_BAL_M>0) AND (PENALTY_BASIS = DLY_NET_BAL_M) ((PENALTY_BASIS * DAYS) * (TD_3TD_PNL)) / (100 * YEAR) Formula 2 Specify the following details: Book Flag Select ‘Booked’ from the adjoining drop-down list. Debit/Credit Select ‘Debit’ from the adjoining drop-down list. Days in a Month Select ‘30 Days’ from the adjoining drop-down list. Days in a Year Select ‘360’ from the adjoining drop-down list. Rounding Required Check this box. Click ‘Formula Wizard’ button and invoke the ‘Formula Wizard’ screen. In this screen, you need to maintain the following expression: Case Result DLY_NET_BAL_M>0 AND PENALTY_APPLY = 1 ((PENALTY_BASIS* (DAYS_FROM_START-DAYS)) * TD_PNL) / (100 * YEAR) Formula 3 Specify the following details: Book Flag Select ‘Tax’ from the adjoining drop-down list. 9-5 Debit/Credit Select ‘Debit’ from the adjoining drop-down list. Days in a Month Select ‘30 Days’ from the adjoining drop-down list. Days in a Year Select ‘360’ from the adjoining drop-down list. Rounding Required Check this box. Click ‘Formula Wizard’ button and invoke the ‘Formula Wizard’ screen. In this screen, you need to maintain the following expression: Case Result FORMULA1 >0 FORMULA1 * TAX_RATE /100 9.2.2 CD with Normal Tenor and Penalty Specify the following details: On Account Opening Month Check this box. On Account Closure Month Check this box. SDE Maintain the following SDEs: DAYS DAYS_FROM_START DLY_NET_BAL_M PENALTY_APPLY PENALTY_BASIS TENOR YEAR UDE Maintain the following UDEs: TD_1 TD_2 TD_3 9-6 TD_PNL TAX_RATE Type For each of the UDEs, select the option ‘Rate’ from the adjoining drop-down list. Get Latest For each of the UDEs, select the option ‘Use Effective’ from the adjoining drop-down list. Click ‘Formulas’ button and invoke the ‘Formulas’ screen. You need to maintain two booked formulae and one tax formula. Formula 1 Specify the following details: Book Flag Select ‘Booked’ from the adjoining drop-down list. Debit/Credit Select ‘Credit’ from the adjoining drop-down list. Days in a Month Select ‘Actuals’ from the adjoining drop-down list. Days in a Year Select ‘Actuals’ from the adjoining drop-down list. Accrual Required Check this box. Rounding Required Check this box. Click ‘Formula Wizard’ button and invoke the ‘Formula Wizard’ screen. Formula 1 Specify the following expressions: Case Result (TENOR<=90) AND (DLY_NET_BAL_M>0) AND PENALTY_BASIS = 0 ((DLY_NET_BAL_M * DAYS * TD_1) / (100 * YEAR)) (TENOR>90 AND TENOR<=180) AND (DLY_NET_BAL_M>0) AND PENALTY_BASIS = 0 ((DLY_NET_BAL_M * DAYS * TD_2) / (100 * YEAR)) 9-7 Case Result (TENOR>180 AND TENOR<=730) AND (DLY_NET_BAL_M>0) AND PENALTY_BASIS = 0 ((DLY_NET_BAL_M * DAYS * TD_3) / (100 * YEAR)) (TENOR<=90) AND (DLY_NET_BAL_M>0) AND (PENALTY_BASIS = DLY_NET_BAL_M) ((PENALTY_BASIS * DAYS) * (TD_1TD_PNL)) / (100 * YEAR) (TENOR>90 AND TENOR<=180) AND (DLY_NET_BAL_M>0) AND (PENALTY_BASIS = DLY_NET_BAL_M) ((PENALTY_BASIS* DAYS) * (TD_2TD_PNL)) / (100 * YEAR) (TENOR>180 AND TENOR<=730) AND (DLY_NET_BAL_M>0) AND (PENALTY_BASIS = DLY_NET_BAL_M) ((PENALTY_BASIS * DAYS) * (TD_3TD_PNL)) / (100 * YEAR) Formula 2 Specify the following details: Book Flag Select ‘Booked’ from the adjoining drop-down list. Debit/Credit Select ‘Debit’ from the adjoining drop-down list. Days in a Month Select ‘Actuals’ from the adjoining drop-down list. Days in a Year Select ‘Actuals’ from the adjoining drop-down list. Rounding Required Check this box. Click ‘Formula Wizard’ button and invoke the ‘Formula Wizard’ screen. In this screen, you need to maintain the following expression: Case Result DLY_NET_BAL_M>0 AND PENALTY_APPLY = 1 ((PENALTY_BASIS * (DAYS_FROM_STARTDAYS)) * TD_PNL) / (100 * YEAR) Formula 3 Specify the following details: 9-8 Book Flag Select ‘Tax’ from the adjoining drop-down list. Debit/Credit Select ‘Debit’ from the adjoining drop-down list. Days in a Month Select ‘Actuals’ from the adjoining drop-down list. Days in a Year Select ‘Actuals’ from the adjoining drop-down list. Rounding Required Check this box. Click ‘Formula Wizard’ button and invoke the ‘Formula Wizard’ screen. In this screen, you need to maintain the following expression: Case Result FORMULA1 >0 FORMULA1 * TAX_RATE /100 9.2.3 Recurring Deposit Rule Specify the following details: On Account Opening Month Check this box. On Account Closure Month Check this box. SDE Maintain the following SDEs: DAYS DLY_NET_BAL_M RD_INSTALL_DUE RD_OVERDUE_DAYS YEAR UDE Maintain the following UDEs: TD_1 OVERDUE_PENALTY 9-9 TAX_RATE Type For each of the UDEs, select the option ‘Rate’ from the adjoining drop-down list. Get Latest For each of the UDEs, select the option ‘Use Effective’ from the adjoining drop-down list. Click ‘Formulas’ button and invoke the ‘Formulas’ screen. You need to maintain two booked formulae and one tax formula. Formula 1 Specify the following details: Book Flag Select ‘Booked’ from the adjoining drop-down list. Debit/Credit Select ‘Credit’ from the adjoining drop-down list. Days in a Month Select ‘30 Days’ from the adjoining drop-down list. Days in a Year Select ‘360’ from the adjoining drop-down list. Accrual Required Check this box. Rounding Required Check this box. Click ‘Formula Wizard’ button and invoke the ‘Formula Wizard’ screen. Specify the following expressions: Case Result DLY_NET_BAL_M > 0 (DLY_NET_BAL_M* DAYS * TD_1) / (100 * YEAR) Formula 2 Specify the following details: Book Flag Select ‘Booked’ from the adjoining drop-down list. 9-10 Debit/Credit Select ‘Debit’ from the adjoining drop-down list. Days in a Month Select ‘30 Days’ from the adjoining drop-down list. Days in a Year Select ‘360’ from the adjoining drop-down list. Rounding Required Check this box. Click ‘Formula Wizard’ button and invoke the ‘Formula Wizard’ screen. In this screen, you need to maintain the following expressions: Case Result RD_INSTALL_DUE>0 (RD_INSTALL_DUE*OVERDUE_PENALTY* RD_OVERDUE_DAYS) /(100* YEAR) Formula 3 Specify the following details: Book Flag Select ‘Tax’ from the adjoining drop-down list. Debit/Credit Select ‘Debit’ from the adjoining drop-down list. Days in a Month Select ‘30 Days’ from the adjoining drop-down list. Days in a Year Select ‘360’ from the adjoining drop-down list. Rounding Required Check this box. Click ‘Formula Wizard’ button and invoke the ‘Formula Wizard’ screen. In this screen, you need to maintain the following expressions: Case Result FORMULA1>0 FORMULA1* TAX_RATE /100 9-11 9.2.4 Rate Chart Allowed with Penalty Specify the following details: On Account Opening Month Check this box. On Account Closure Month Check this box. SDE Maintain the following SDEs: DAYS DAYS_FROM_START DEPOSIT_AMOUNT PENALTY_APPLY PENALTY_BASIS YEAR UDE Maintain the following UDEs: UDE Type TD_1 Rate as Rate Code TD_PNL Rate TAX_RATE Rate Get Latest For each of the UDEs, select the option ‘Use Effective’ from the adjoining drop-down list. Click ‘Formulas’ button and invoke the ‘Formulas’ screen. You need to maintain two booked formulae and one tax formula. Formula 1 Specify the following details: Book Flag Select ‘Booked’ from the adjoining drop-down list. Debit/Credit Select ‘Credit’ from the adjoining drop-down list. 9-12 Days in a Month Select ‘Actuals’ from the adjoining drop-down list. Days in a Year Select ‘Actuals’ from the adjoining drop-down list. Accrual Required Check this box. Rounding Required Check this box. Click ‘Formula Wizard’ button and invoke the ‘Formula Wizard’ screen. Specify the following expression: Case Result DEPOSIT_AMOUNT>0 DEPOSIT_AMOUNT*TD_1*DAYS/(YEAR*100) Formula 2 Specify the following details: Book Flag Select ‘Booked’ from the adjoining drop-down list. Debit/Credit Select ‘Debit’ from the adjoining drop-down list. Days in a Month Select ‘Actuals’ from the adjoining drop-down list. Days in a Year Select ‘Actuals’ from the adjoining drop-down list. Rounding Required Check this box. Click ‘Formula Wizard’ button and invoke the ‘Formula Wizard’ screen. In this screen, you need to maintain the following expression: Case Result DEPOSIT_AMOUNT>0 AND PENALTY_APPLY = 1 PENALTY_BASIS*DAYS_FROM_START*TD_PNL/( YEAR*100) 9-13 Formula 3 Specify the following details: Book Flag Select ‘Tax’ from the adjoining drop-down list. Debit/Credit Select ‘Debit’ from the adjoining drop-down list. Days in a Month Select ‘Actuals’ from the adjoining drop-down list. Days in a Year Select ‘Actuals’ from the adjoining drop-down list. Accrual Required Check this box. Rounding Required Check this box. Click ‘Formula Wizard’ button and invoke the ‘Formula Wizard’ screen. In this screen, you need to maintain the following expression: Case Result FORMULA1 > 0 FORMULA1*TAX_RATE/100 9.2.5 Different Interest Rate during Grace Days In case of a matured CD which is not renewed, you can calculate interest at a different rate or switch off interest calculation for the grace period. Maintain the following SDEs: PMI_PERIOD WAIVE_INTEREST DLY_NET_BAL_M DAYS YEAR Maintain the following UDEs: INT_RATE PMI_RATE Maintain the following formula: 9-14 Case Result DLY_NET_BAL_M>0 AND PMI_PERIOD = 0 and WAIVE_INTEREST = 0 ((DLY_NET_BAL_M * DAYS * INT_RATE) / (100 * YEAR)) DLY_NET_BAL_M>0 AND PMI_PERIOD = 1 and WAIVE_INTEREST = 0 ((DLY_NET_BAL_M * DAYS * PMI_RATE / (100 * YEAR)) DLY_NET_BAL_M>0 AND PMI_PERIOD = 1 and WAIVE_INTEREST = 1 0 With these settings, if the CD is partially or wholly redeemed, the system calculates Interest at Post Maturity Interest (PMI) rate for the grace days. 9.2.6 CD Interest Step-up/Step-down Oracle FLEXCUBE supports automatic step-up and step-down of interest for CD accounts based on the frequency and rate spread maintained for the account. Maintain the following SDEs: DAYS DLY_NET_BAL_M YEAR Maintain the following UDEs: STEP_INT_RATE MAX_INT_LIMIT MIN_INT_LIMIT The following formulae are used to compute the interest rate. Sl. Number Rule Formula Condition Expression 1 Formula 1 Expression 1 STEP_INT_RATE <= MAX_INT_LIMIT AND STEP_INT_RATE >=MIN_INT_LIMIT DLY_NET_BAL_M* STEP_INT_RATE *DAYS/YEAR/100 2 Formula 1 Expression 2 STEP_INT_RATE > MAX_INT_LIMIT DLY_NET_BAL_M* MAX_INT_LIMIT *DAYS/YEAR/100 3 Formula 1 Expression 3 STEP_INT_RATE <MIN_INT_LIMIT DLY_NET_BAL_M* MIN_INT_LIMIT *DAYS/YEAR/100 9.2.7 Penalty Computation Maintain the following SDEs for computing the penalty: 9-15 PENALTY_BASIS REDEM_PRIN – Returns the principal part of redemption amount REDEM_REDEPT_INT– Returns the re-deposit interest part of redemption amount REDEM_INT – Returns the liquidated interest part of the redemption amount PNL_NOT_EXCD_INT – Indicates whether the penalty amount exceeds the interest PENALTY_APPLY – This SDE is used for calculating penalty for redemption LOST_ALL_INT - Returns 1 if ‘Lost all Interest’ is checked in account class PNL_OVRID - Returns 1 if ‘Penalty Override Allowed’ is checked in account class IS_REDEMPTION – This is used for executing the formula during redemption ACCR_INT – This returns the total interest liquidated + accrued for the CD account Formulae for Penalty Calculation 9.3 Condition Formula DLY_NET_BAL_M > 0 (DLY_NET_BAL_M * DAYS * INT_RATE) / (YEAR * 100 ) PENALTY_APPLY = 0 0 PENALTY_APPLY = 1 AND IS_REDEMPTION = 1 AND LOST_ALL_INT = 0 AND PMI_PERIOD = 0 AND PNL_NOT_EXCD_INT =0 (REDEM_PRIN + REDEM_REDPT_INT + REDEM_INT) * (PNL_RATE / 100) PENALTY_APPLY = 1 AND IS_REDEMPTION = 1 AND LOST_ALL_INT = 0 AND PMI_PERIOD = 0 AND PNL_NOT_EXCD_INT =1 LEAST(((REDEM_PRIN + REDEM_REDPT_INT + REDEM_INT) * PNL_RATE / 100 ),ACCR_INT) PENALTY_APPLY = 1 AND IS_REDEMPTION = 1 AND LOST_ALL_INT = 1 AND PMI_PERIOD = 0 ACCR_INT PENALTY_APPLY = 1 AND PMI_PERIOD = 1 0 UDE Value Maintenance You can maintain UDE values for the rules using the ‘Interest & Charges User Data Element Maintenance’ screen. You can invoke the ‘Interest & Charges User Data Element Maintenance’ screen by typing ‘ICDUDVAL’ in the field at the top right corner of the Application tool bar and clicking the adjoining arrow button. 9-16 For details about the screen, refer the chapter ‘Giving UDE Values for Condition’ in the Interest and Charges User Manual. In this screen, you need to maintain the following UDEs for the different IC products. Assume that you have maintained the following IC products: CD with Capitalization Normal CD with Simple Interest CD with Rate Chart Allowed Recurring deposit Scheme 9.3.1 CD with Capitalization You need to maintain values for the following UDEs under this product: TD_1 TD_2 TD_3 TD_PNL TAX_RATE 9.3.2 Normal CD with Simple Interest You need to maintain values for the following UDEs under this product: TD_1 TD_2 TD_3 9-17 TD_PNL 9.3.3 TAX_RATE CD with Rate Chart Allowed You need to maintain values for the following UDEs under this product: TD_1 TD_PNL TAX_RATE 9.3.4 Recurring deposit Scheme You need to maintain values for the following UDEs under this product: TD_1 OVERDUE_PENALTY TAX_RATE 9.4 IC Rates Maintenance You can maintain rate codes for branches using the ‘‘Interest & Charges Branch Availability Maintenance’ screen. You can invoke this screen by typing ‘ICDRESTR’ in the field at the top right corner of the Application tool bar and clicking the adjoining arrow button. You need to maintain the following rate codes for all branches of your bank: FLOATRATE For the aforesaid rate code, you need to maintain rates and effective dates in the ‘Interest and Charges Rate Input’ screen. You can invoke the ‘Interest and Charges Rate Input’ screen by typing ‘ICDRATES’ in the field at the top right corner of the Application tool bar and clicking the adjoining arrow button. 9-18 These rates are picked up by the CD module while processing interest applicable on a CD account. Refer the chapter ‘Floating Rate Codes for IC Module’ for details about rate maintenance. 9-19 Certificates of Deposit [March] [2011] Version 1.0 Oracle Corporation World Headquarters 500 Oracle Parkway Redwood Shores, CA 94065 U.S.A. Worldwide Inquiries: Phone: +1.650.506.7000 Fax: +1.650.506.7200 www.oracle.com/ financial_services/ Copyright © [2011] Oracle Financial Services Software Limited. All rights reserved. No part of this work may be reproduced, stored in a retrieval system, adopted or transmitted in any form or by any means, electronic, mechanical, photographic, graphic, optic recording or otherwise, translated in any language or computer language, without the prior written permission of Oracle Financial Services Software Limited. Due care has been taken to make this document and accompanying software package as accurate as possible. However, Oracle Financial Services Software Limited makes no representation or warranties with respect to the contents hereof and shall not be responsible for any loss or damage caused to the user by the direct or indirect use of this document and the accompanying Software System. Furthermore, Oracle Financial Services Software Limited reserves the right to alter, modify or otherwise change in any manner the content hereof, without obligation of Oracle Financial Services Software Limited to notify any person of such revision or changes. All company and product names are trademarks of the respective companies with which they are associated. 9-20