1
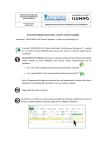
Finance & Accounts – Paybill Module
User Manual Version 1.0
Paybill Module
- User Manual Finance & Accounts Portal
Version No. 1.0
Release Date: 03/01/2013
Vayam Technologies Limited
Thapar House, 124 Janpath, New Delhi
Phone No.91-11-47101200, 47101201Fax: 91-11-23368946
Email: [email protected]
Finance & Accounts – Paybill Module
User Manual Version 1.0
In your Internet browser type the URL http://onecsir.csir.res.in in the address bar. Login page as shown
in figure 1 is displayed. On this page you can login by using your 4 digit Employee id as Login ID and a
password given to you. Pay bill can be run or generated by the user who has the role of DA (Bill). After
entering your “Login ID” and “Password” click on “Login” button.
Figure 1
Finance & Accounts – Paybill Module
User Manual Version 1.0
Once you click on Login button it will take you to the Work Page of HR Portal. Under the HR Processes
menu you will find a “Pay Bill” link and under that “Import Paybill Data” as shown in figure 2.
Figure 2
Finance & Accounts – Paybill Module
User Manual Version 1.0
As you click on “Import Paybill Data” Link you will come to the screen shown in Figure 3. Select the
“Payroll” tab. This screen has three Menus (Master, Payroll Processing and Reports). Now click on
“Import Employee Salary Data” link under the “Payroll Processing” menu as shown in Figure 3, to fetch
employee monthly pay data from HR Module to generate the Pay bill. Click on “Process Salary” button
to fetch the data. 22nd of every month is the cutoff date for fetching data from HR. “Import Employee
Salary Data” (Fetching Data) process can be run more than once before 22nd of the month.
Figure 3
Finance & Accounts – Paybill Module
User Manual Version 1.0
After fetching the data system will show a message box with “OK” button saying “Salary Data Imported
Successfully” click on “OK” to finish the process as shown in Figure 4.
Figure 4
Now go to the “Payroll Processing Menu” given on the left side of the screen and under that you will
find a “Salary Processing” menu item, click on “Salary Processing” link. It will take you to a screen shown
in Figure 5. On this screen under the “Pay Roll Processing Month Detail” bar, current Salary / payroll
month is shown with number of days in a month. Under the “Selection Criteria” bar, 4 options are
shown: Cadre, Group, Grade and Designation. These are the filter option for pay bill generation. User
can generate separate pay bill Cadre wise, Group wise Grade wise and Designation wise. If you leave all
the selection criteria dropdown list to its default value “-Select-” that means you have not chosen any
filter criteria and pay bill will be generated for all the regular employees of the lab.
Under the “Report Section” bar there is a button “View Employee Salary Reports” is available. By
clicking on this button you can view the pay sheet based on the data fetched from HR before finalizing
the pay bill. This will help you to see and analyze the net salary of an employee with head wise breakup.
So if user finds any discrepancy in any employee salary he/she can make correction at HR end and user
can import the pay data again for the same month and this activity can be done till 22nd of that month.
After importing the data you can again view pay bill sheet to see changes and their impact on pay sheet
before finalizing the pay bill as shown in Figure 5.
Under the “Processing Detail” bar, Pay bill processing date will come by default. Select the processing
section as “Administration” selects level 1 pay bill authorization Officers that is Section Officer (Bill/DDO)
and once you are sure that you have fetched the data and checked everything you can click on the “Pay
Bill Final” check box and click on “Process Salary” button to generate the Pay Bill and submit it to Section
Office (Bill/DDO) for admitting the paybill.
Finance & Accounts – Paybill Module
User Manual Version 1.0
Figure 5
Once you click on “Process Salary” button, system will process the salary and show you the message box
at the end of the salary process as shown in Figure 6. Click on “OK” to complete the process.
Figure 6
Finance & Accounts – Paybill Module
User Manual Version 1.0
Now user with DA Bill role has processed the salary bill and sent it to Section Officer/DDO (Bill). Once
Section Officer/DDO (Bill) user logs into the ERP system he/she lands on the HR portal where user will
see “Process Salary Bill“ link to process the salary as shown in figure 7.
Figure 7
As user clicks on “Process Salary Bill“, system will take the user to Finance Portal as shown in Figure 8.
Here in finance portal user needs to click on the “Payroll” tab by doing so, left side menu will be
displayed as shown in Figure 8.
Click on “Payroll Processing” menu, under that you will find “Bill Authorization” and under that user will
find “IInd level authorization” link. Click on “IInd Level Authorization” link, system will open “IInd Level
Authorization” screen as shown in Figure 8.
Finance & Accounts – Paybill Module
User Manual Version 1.0
Figure 8
Now at “IInd Level Authorization” screen, Pay bill summary is displayed with the “Print”, “Send To
Audit” and “Reject Pay Bill” option. If SO/DDO (Bill) role user wants to view the pay bill he/she needs to
click on “Print” button to view it. If User wants to approve the bill and send it to Audit section for
payments then he/she needs to select “Send To Audit” check box and then click on “Process” button. Or
if user wants to reject the bill and send it back to “DA Bill” user for correction and checking, then he/she
needs to select “Reject Pay Bill” check box and then click on Process button as shown in Figure 8.
Once SO/DDO (Bill) user selects “Send To Audit” check box and clicks on “Process” button then the pay
bill goes to Audit section at the Diarist desk.
Now the bill has gone to the Finance section, the Diarist (Audit) role user will login into the system and
come to his/her landing page; there, he/she needs to click on “Work page” button on the landing page
as shown in figure 9. As Diarist (Audit) user clicks on “Work page” the user will reach to his/her
dashboard. Now from here user can go by the dash board or by Menu Links given on the left hand side
of the page as shown in figure 10. We will go by Dashboard.
Finance & Accounts – Paybill Module
User Manual Version 1.0
Figure 9
Diarist (Audit) user will find an item “Salary Bill” on his/her dashboard, as shown in figure 9.1
Figure 9.1
Finance & Accounts – Paybill Module
User Manual Version 1.0
As you click on that item you will find a row where Salary Bill is displayed as shown in Figure 10.
Figure 10
Now go to the list and click the icon under the “Add/Modify” column to make the diary entry, as you
click on “Add/Modify” you will reach Diarization screen as shown in Figure 11.
In this page user needs to select the Dealing Assistant’s Name from the dropdown list, if there is more
than one dealing assistant handling the payment or if there is only one dealing assistant handing the
payment, his name will come selected by default. Now user has to tick “Is Complete” check box and fill
“Remarks” which is optional and then finally click on “Save” button.
Figure 11
Finance & Accounts – Paybill Module
User Manual Version 1.0
After clicking on “Save” button system will generate Diarization Number, this is Finance Diary Number
as shown in Figure 12.
Figure 12
Once the Diarist (Audit) processes the bill it will go the Dealing Assistance (Audit) role user as shown in
Figure 13. Same way as diarist did for login, Dealing Assistance (Audit) role user will also login into the
system and comes to his/her landing page on landing page user will click on “Work Page” button to go
to the “Dashboard”. At the Dashboard user will find an item “Salary Bill” on dashboard, as user clicks on
that item, he/she will find a row for salary bill is displayed as shown in Figure 13 on this page click on the
icon under the select column to process the bill as shown in Figure 13.
Finance & Accounts – Paybill Module
User Manual Version 1.0
Figure 13
As user clicks on the icon under the “Select” column, system will show a screen where user needs to
select the bank from which payment is to be made as shown in figure 14.
Figure 14
Finance & Accounts – Paybill Module
User Manual Version 1.0
Now user needs to select the bank by clicking on the icon given under the “Select” column in the grid. As
user clicks the icon, user will come to the pay bill voucher creation screen as shown in Figure 15. In this
page DA Payment (Audit) user views the pay bill data by clicking on “View Payroll Bill Click Here”. If user
wants to view the voucher he/she will click on “View Voucher Click Here”. After observation he/she will
tick Accept/Reject radio button to “Accept” or “Reject” the bill and finally click on “Save” button to pass
the bill as shown in figure 15. If user selects “Accept“ and clicks on “Save” button the pay bill goes SO
(Audit) desk for approval.
Figure 15
Just as Dealing Assistance (Audit) logged in, Section Officer (Audit) role user will also now login into the
system, and come to his landing page where he will click on “Work Page” button to go to the
“Dashboard”. At the Dashboard user will find “Salary Bill” , as it is clicked user will find a list of salary
bills displayed as shown in Figure 16. On this page click the icon under the ““BR View/Approve”” column
to process the bill as shown in Figure 16.
Figure 16
Finance & Accounts – Paybill Module
User Manual Version 1.0
As user clicks on this icon system will open the “SO Voucher Approval” screen as shown Figure 17.
On this page, SO (Audit) user observes the Pay Bill by clicking on “View Voucher (Click Here)” button.
Here SO (Audit) user can see DA Payment (Audit) user remarks. If SO (Audit) role user wants to approve
the Pay bill then he will select the “Approve Remarks“ option, tick the and click on “Save” button to
pass the bill and send to Finance & Account Officer (Audit) for approval as shown in Figure 17. Or If SO
(Audit) user wants to reject the bill then user will have to select the “Reject Remarks” option (in case of
rejection, remarks are mandatory), and click on “Save” button. If the bill is rejected it will go back to the
originating section and user, and that is Bill Section and SO/DDO (Bill) user. Once the paybill is approved
it will go to Finance & Account Officer (Audit) role user.
Figure 17
Finance & Accounts – Paybill Module
User Manual Version 1.0
Just as Section Officer (Audit) logged in, same way Finance & Account Officer (Audit) role user will also
login into the system, and come to his/her landing page. On landing page user will click on “Work Page”
button to go to the “Dashboard” where “Salary Bill” is displayed as shown in figure 18.
Figure 18
As user clicks on that item user will find a list of salary bill is displayed as shown in Figure 19. On this
page if Finance & Account Officer (Audit) role user wants to view the pay bill voucher then he will have
to click on icon given under the “Print” column. If user wants to approve the pay bill then user will have
to tick the check box given under the column “App. BR” and then click on “Submit” button to forward
the bill to “Cheque Writer” role user as shown in Figure 19.
Figure 19
Finance & Accounts – Paybill Module
User Manual Version 1.0
If Finance & Account Officer (Audit) role user wants to reject the bill to Section Officer (Audit) role user
he/she can do so by selecting the check box under the column “Ref To SO” option, giving his rejection
remarks and finally clicking on the “Submit” button as shown in Figure 20.
Figure 20
As DA Payment (Audit) logged into the system, Cheque Writer role user will also login into the system,
and come to his/her landing page where he will click on “Work Page” button to go to the “Dashboard”.
At the Dashboard, user will find an item “Salary Bill” as shown in figure 21.
Figure 21
Finance & Accounts – Paybill Module
User Manual Version 1.0
As user clicks on that item on the dashboard system will show a list of pending salary bills to the user as
shown in Figure 22. On this page under the “Pay Bill Voucher Detail” heading user needs to click on icon
given under the “Select” column. As user selects the icon, system shows one more list just below the
previous one with the “Cheque No” and “Forwarding letter View/Print” option. User can click on
“Forwarding letter View/Print” icon to generate the forwarding letter for bank. Finally to post the pay
bill voucher into the financial accounting user will have to click on “Pay Bill Voucher Post” button as
shown in Figure 22.
Figure 22
Once the cheque is prepared and payment is made then finally paybill need to be closed for the current
month and it need to be set for next month. DA (bill) role user can do so.
As DA(Bill) role user logs in and reaches to HR “Work Page” there user will see link “Payroll Close” as
shown in Figure 23.
Finance & Accounts – Paybill Module
User Manual Version 1.0
Figure 23
As user clicks on that link system will take him/her to Finance Portal at “Payroll close for the Month”
page as shown in 24. This page can also be accessed through menu links, by clicking on “PayRoll” tab and
then clicking on “Payroll Processing” menu on the left side, and under that “Payroll Close” link.
Figure 24
Finance & Accounts – Paybill Module
User Manual Version 1.0
On “Payroll close for the Month” page refer to figure 24, current payroll month is shown. Now to close
the paybill and set it for the next month, user just need to click on “Save” button as shown in figure 24,
by doing so system will automatically set it for the next month and shows a message box saying “Payroll
Close Successfully”. click on “OK” button on message box as shown in figure 25.
Figure 25
If you open the same page again through menu item link you will find the paybill is all set for next month
as shown in figure 26.
Figure 26
----- End of Document -----