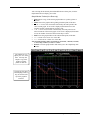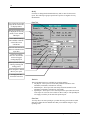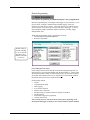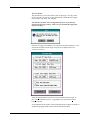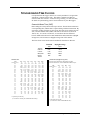
1
AMERICAN InSight & InSight For The Windows Operating System Data Analysis Software User’s Guide American Sigma, Inc. 11601 Maple Ridge Rd. PO Box 820 Medina, New York 14103 800 635 1230 +1 716 798 5580 www.americansigma.com [email protected] AS041 Oct 1, 1999 The following listings are trademarks or registered trademarks of their respective companies: InSight® and VISION® are registered trademarks of American Sigma, Inc. IBM® is a registered trademark of International Business Machines Corporation. Microsoft®, MS-DOS®, and Microsoft Windows® are either registered trademarks or trademarks of Microsoft Corporation in the United States and/or other countries. U.S. Robotics Sportster® is a registered trademark of U.S. Robotics Corporation. Adobe Illustrator is a trademark of Adobe Systems, Inc. AutoCAD® is a trademark of Autodesk, Inc. WordPerfect® is a trademark of Corel Corporation. Hayes is a trademark of Hayes Microcomputer Products, Inc. All other product names or brands are trademarks or registered trademarks of their respective companies. InSight and InSight For Windows Operating System Data Analysis Software User’s Guide American Sigma Document AS041, Part Number 4978 © 1998 American Sigma, Inc., All rights reserved. Information contained in this document is subject to change without notice. Companies, names, and data used in examples herein are fictitious and unless otherwise noted. No part of this document may be reproduced or transmitted in any form or by any means, electronic or mechanical, without the express written consent of American Sigma, Inc. i Table of Contents WELCOME................................................................................................................................................................1 DOS & MICROSOFT® WINDOWS® OPERATING SYSTEM VERSIONS OF INSIGHT® ...........................1 GETTING STARTED...............................................................................................................................................2 System Requirements ...........................................................................................................................................2 SIGMA Data Loggers........................................................................................................................................................ 2 Installing the Software .........................................................................................................................................2 Installation — InSight for DOS operating system ............................................................................................................. 2 Installing Insight from DOS .......................................................................................................................................... 2 Installing Insight from Windows® 3.1 and 3.11 Operating System.............................................................................. 2 Installation — InSight for the Windows® operating system.............................................................................................. 3 Starting InSight for DOS operating system .........................................................................................................3 Starting InSight for the Windows® operating system...........................................................................................3 How to find the information you need .................................................................................................................4 Technical Support.............................................................................................................................................................. 4 Internet Support............................................................................................................................................................. 4 Software Upgrades Available For Downloading........................................................................................................... 4 Manual Conventions ............................................................................................................................................5 ‘Grayed-Out’ menu choices .......................................................................................................................................... 5 Mouse Terminology ...................................................................................................................................................... 5 THE BASICS .............................................................................................................................................................6 Functional Overview............................................................................................................................................6 Programming.......................................................................................................................................................6 USING INSIGHT .......................................................................................................................................................8 MAIN MENU .............................................................................................................................................................8 Site Files and Merged Database Files.................................................................................................................9 Site File Naming Conventions......................................................................................................................................... 10 Database File Naming Conventions ................................................................................................................................ 10 Site Menu ........................................................................................................................................................................ 11 Open............................................................................................................................................................................ 11 Opening a Site File ................................................................................................................................................. 11 Opening a Database File ......................................................................................................................................... 12 Delete .......................................................................................................................................................................... 12 Export.......................................................................................................................................................................... 12 Export To ASCII — InSight for DOS operating system (Only) ............................................................................. 13 Comma Delimited File Format........................................................................................................................... 14 Import.......................................................................................................................................................................... 15 Import Site File into Data Directory ....................................................................................................................... 15 Import Site File into Database ................................................................................................................................ 15 Data Analysis .................................................................................................................................................................. 16 Site Information .......................................................................................................................................................... 16 Graphs and Reports ..................................................................................................................................................... 17 Graph Data.............................................................................................................................................................. 18 Plots Tab............................................................................................................................................................. 18 Plot Selection ................................................................................................................................................. 18 Graph Scaling................................................................................................................................................. 18 AS041 Rev 10-1-99 InSight Data Analysis Software ii Graph Types................................................................................................................................................... 18 Channels Tab...................................................................................................................................................... 19 Units............................................................................................................................................................... 19 Labels............................................................................................................................................................. 19 Flow Tab ............................................................................................................................................................ 20 Flow Windows ............................................................................................................................................... 20 Level Channel ................................................................................................................................................ 21 Velocity Channel ........................................................................................................................................... 21 Misc. Tab............................................................................................................................................................ 22 Title................................................................................................................................................................ 22 Data Source.................................................................................................................................................... 22 Grid Lines ...................................................................................................................................................... 22 Site id ............................................................................................................................................................. 22 File Name....................................................................................................................................................... 22 Samples (successful) ...................................................................................................................................... 22 Samples (unsuccessful) .................................................................................................................................. 22 Graph Window Toolbar (Line Plots only).......................................................................................................... 23 Scatter Plot..................................................................................................................................................... 24 Printing Graphs................................................................................................................................................... 25 Print Screens — InSight for DOS operating system (Only)........................................................................... 25 Printing to a File — InSight for DOS operating system (Only) ..................................................................... 26 Print Operations — InSight for the Windows® operating system (Only)....................................................... 26 Channels Tab...................................................................................................................................................... 27 Channel .......................................................................................................................................................... 27 Units............................................................................................................................................................... 27 Label .............................................................................................................................................................. 27 Create ............................................................................................................................................................. 27 Modify ........................................................................................................................................................... 28 Data Tab ............................................................................................................................................................. 28 Statistics ......................................................................................................................................................... 28 Data Start ....................................................................................................................................................... 28 Data Span....................................................................................................................................................... 29 Averaging Interval ......................................................................................................................................... 29 Average Forward / Backward ........................................................................................................................ 29 Start of Day / End of Day .............................................................................................................................. 29 Data Source.................................................................................................................................................... 30 Flow Tab ............................................................................................................................................................ 30 Flow Windows ............................................................................................................................................... 30 Level Channel ................................................................................................................................................ 31 Velocity Channel ........................................................................................................................................... 31 Header Tab ......................................................................................................................................................... 32 Header Checkbox........................................................................................................................................... 32 Logger Type................................................................................................................................................... 32 Title................................................................................................................................................................ 32 Description..................................................................................................................................................... 32 Site id ............................................................................................................................................................. 32 Comment #1 & #2.......................................................................................................................................... 33 Misc. Tab............................................................................................................................................................ 33 Site Information ............................................................................................................................................. 33 Time ............................................................................................................................................................... 33 Column Width................................................................................................................................................ 34 Data Format ................................................................................................................................................... 34 Total Flow...................................................................................................................................................... 34 Creating The Report....................................................................................................................................... 34 Bringing Insight Reports into a Word Processor ................................................................................................ 36 Table ....................................................................................................................................................................... 37 Edit ......................................................................................................................................................................... 38 Save .................................................................................................................................................................... 38 Close................................................................................................................................................................... 38 Goto.................................................................................................................................................................... 39 Modify................................................................................................................................................................ 39 AS041 Rev 10-1-99 InSight Data Analysis Software iii How Flow Calculations are Performed ....................................................................................................................... 39 How Changes to a Logger Program Affect Merged Database Files. ...................................................................... 39 Connect Menu ................................................................................................................................................................. 40 Connect Via RS232 to a Data Logger..................................................................................................................... 40 Connect Via Modem to a Sampler or Flow Meter .................................................................................................. 42 Advanced Modem settings button ...................................................................................................................... 43 Initialization String ........................................................................................................................................ 44 Time-out period (sec)..................................................................................................................................... 44 Security Function.................................................................................................................................................... 45 Password Security Connect Operations.............................................................................................................. 45 Unsecured Logger (Password disabled) ......................................................................................................... 45 Secured Logger (Password enabled) .............................................................................................................. 45 Password Entry Results.................................................................................................................................. 46 Recovering Forgotten Password ......................................................................................................................... 46 Possible InSight - Logger Combinations ............................................................................................................ 47 Non- Password Devices...................................................................................................................................... 48 Connected to a SIGMA Sampler or Flow Meter ............................................................................................................. 49 Retrieve Logged Data ............................................................................................................................................. 49 Current Status ......................................................................................................................................................... 50 Printing and Saving the Current Status Window ................................................................................................ 50 Remote Programming ............................................................................................................................................. 51 Fixed Settings (Flow meter) ............................................................................................................................... 51 Alarms............................................................................................................................................................ 52 Communication Setup.................................................................................................................................... 56 Data Log ........................................................................................................................................................ 60 Inputs ...................................................................................................................................................................... 63 Level \ Flow Logging (900MAX\950\960\970 only)..................................................................................... 63 Analog Inputs (900MAX\950\960\970 only)................................................................................................. 63 Level Sensor (910\920\930\940).................................................................................................................... 64 Level Sensor (900\950\960\970).................................................................................................................... 67 Primary Device .............................................................................................................................................. 68 Sampler Pacing .............................................................................................................................................. 71 Site Description.............................................................................................................................................. 72 Stormwater..................................................................................................................................................... 73 Velocity Sensor.............................................................................................................................................. 74 Real-Time Operations............................................................................................................................................. 78 Set Time & Date ............................................................................................................................................ 79 Toggle Sample Enable Line ........................................................................................................................... 80 Calibrate Level............................................................................................................................................... 80 Adjust Level................................................................................................................................................... 86 Repeat this procedure for all installed level sensors. .............................................................................................. 86 Reset Logger........................................................................................................................................................... 87 Diagnostics ............................................................................................................................................................. 88 View Event Log ................................................................................................................................................. 88 Printing the Event Log ................................................................................................................................... 90 Saving the Event Log to Disk............................................................................................................................. 91 Sample History ................................................................................................................................................... 92 Update Software (Flash)..................................................................................................................................... 92 Security................................................................................................................................................................... 92 Secure Logger .................................................................................................................................................... 92 Changing the Password ...................................................................................................................................... 93 DTUs and Password Security......................................................................................................................... 93 Unsecure Logger ................................................................................................................................................ 93 Connected to a Rain Logger........................................................................................................................................ 96 Retrieve Logged Data ............................................................................................................................................. 97 Clear Logger Memory ............................................................................................................................................ 98 Remote Programming ............................................................................................................................................. 98 Return ..................................................................................................................................................................... 99 Advanced Menu ...............................................................................................................................................100 Site Database ................................................................................................................................................................. 100 Show Toolbar ................................................................................................................................................................ 101 AS041 Rev 10-1-99 InSight Data Analysis Software iv Show Speed Group ........................................................................................................................................................ 101 Extended Keyboard Support.......................................................................................................................................... 101 Data Directories............................................................................................................................................................. 102 Create\Edit Template..................................................................................................................................................... 103 Flow Simulator .............................................................................................................................................................. 104 Scheduling ..................................................................................................................................................................... 105 Scheduling and Security............................................................................................................................................ 105 Quit................................................................................................................................................................................ 106 ARCHIVING DATA .............................................................................................................................................107 STORE ARCHIVED DATA OFF-SITE .......................................................................................................................107 INCREMENTAL BACKUP.........................................................................................................................................107 BACKUP DEVICES AND PROCEDURES....................................................................................................................107 TECHNICAL REFERENCE................................................................................................................................108 COMPATIBILITY ....................................................................................................................................................108 USING INSIGHT FOR DOS OPERATING SYSTEM UNDER MICROSOFT WINDOWS® 3.1 OR 311 OPERATING SYSTEM108 SPEED — INSIGHT FOR DOS OPERATING SYSTEM (ONLY) ...................................................................................108 KEYBOARD SHORTCUTS .......................................................................................................................................108 TROUBLESHOOTING COMMUNICATIONS PROBLEMS .............................................................................................109 Logger Connection or Data Transfer Problems..............................................................................................109 Booting Clean — InSight for the Windows® operating system (Only) ......................................................................... 109 Power Management — InSight for the DOS operating system (Only).......................................................................... 110 COM ports and UARTs ................................................................................................................................................. 110 LEVEL AND VELOCITY SENSOR GUIDE .................................................................................................................112 SYNCHRONIZED TIME CLOCKS .............................................................................................................................113 Greenwich Mean Time (GMT) ................................................................................................................................. 113 INDEX ....................................................................................................................................................................115 AS041 Rev 10-1-99 InSight Data Analysis Software 1 WELCOME Welcome to the AMERICAN SIGMA InSight Data Analysis Software manual. This book introduces you to InSight Software and gets you started quickly. It provides information on installing and using the InSight as well as details on how to program a SIGMA Data Logger to collect data. For more information about InSight, see the following topic, “How to find the information you need.” For a quick look at using InSight Software see The Basics chapter. The Getting Started chapter that follows takes you through installation and setup. DOS & MICROSOFT® WINDOWS® OPERATING SYSTEM VERSIONS OF INSIGHT® This manual describes the operation of both the DOS-based and Windows®based operating system versions of InSight. The display screens are nearly identical for both versions. Where differences do exist, the information will be identified with “InSight for DOS operating system” or “InSight for the Windows® operating system” labeling. The two versions of InSight application software are identified as follows: NAME InSight InSight For the Windows® Operating System OPERATING SYSTEM DOS-based operating system application Windows® 95 / 98 / NT operating system PART NUMBER 4973 5254 InSight® will run under Microsoft Windows® as a DOS application with some degradation in performance. You may prefer to run InSight directly from a DOS prompt (without Windows® operating system running at all) for maximum speed or if you experience any problems while running under the Windows® operating system. InSight® for the Windows® operating system will run under Windows® 95, Windows® 98, or Windows® NT operating systems; it will NOT run under Windows® 3.1 or Windows® 3.11 operating systems. AS041 Rev. 10-1-99 InSight Data Analysis Software 2 GETTING STARTED SYSTEM REQUIREMENTS • • • • • • • • 80386 PC or better — InSight for DOS operating system 80486 or better — InSight for the Windows® operating system Four Megabytes of RAM minimum. At least four megabytes of free disk space for the application. Mouse Serial Port and/or Modem for communications with a SIGMA data logger. Graphics Display. Color Printer for output of reports and graphs is recommended. SIGMA DATA LOGGERS InSight Software is compatible with the following SIGMA instruments: • SIGMA 900MAX Series Wastewater Sampler • SIGMA Open Channel Flow Meters • SIGMA Rain Logger Data Logging Rain Gauge • SIGMA Data Transfer Unit - I* • SIGMA Data Transfer Unit - II* * A SIGMA Data Transfer Unit (DTU) is a pocket-sized ‘data collector’ which lets you retrieve data from multiple data loggers for eventual transfer into your PC. INSTALLING THE SOFTWARE InSight must be installed on your PC’s hard drive. You may install and use one copy of InSight for each station in your site license. If you want to move InSight from one computer to another you must purchase a second copy or you must remove InSight from the first computer. INSTALLATION — INSIGHT FOR DOS OPERATING SYSTEM The DOS version of InSight can be installed from the DOS prompt or Windows® 3.x operating system as indicated in the procedures below: Installing InSight from DOS 1. 2. 3. 4. 5. Insert Disk One in drive A: (or B:) From the C:> prompt Type A:\INSTALL (or B:\ INSTALL) at the command line then press ENTER to proceed. Follow the instructions on screen to install InSight. Replace Disk One with Disk Two when requested. Installing InSight from Windows® 3.1 and 3.11 Operating System 1. 2. 3. 4. AS041 Rev. 10-1-99 Insert Disk One in drive A: (or B:) From the Windows® Program Manager select FILE then choose RUN... Type A:\INSTALL (or B:\INSTALL) in the command line then press ENTER or click OK to proceed. Follow the instructions on screen to install InSight. InSight Data Analysis Software 3 INSTALLATION — INSIGHT FOR THE WINDOWS® OPERATING SYSTEM Installation is as follows: 1. 2. 3. 4. Insert disk one into drive A: (or B:) Select RUN from the Start menu. Type A:\SETUP [or B:\SETUP], then press ENTER or click on the OK button to start the installation. Follow the instructions on-screen to install InSight. STARTING INSIGHT FOR DOS OPERATING SYSTEM You can start DOS version InSight from the DOS prompt or from the Windows 3.x operating system as indicated below. To start the program from DOS: 1. Change to the C:\INSIGHT directory by typing CD\INSIGHT at the C:> prompt (Note: this assumes you installed the program into the C:\INSIGHT directory. If not, then substitute the appropriate drive letter and directory). 2. Type INSIGHT then press ENTER to start the program. To start the program from Windows® 3.1 or 3.11 operating system: 1. From Windows® File Manager, select the FILE menu. 2. Click on the word RUN… 3. Type C:\INSIGHT\INSIGHT.EXE then click on OK to start the program. Note: If your PC uses power management use LAPTOP.BAT instead of INSIGHT.EXE to start InSight (see Power Management in the Technical Reference Chapter for details). STARTING INSIGHT FOR THE WINDOWS® OPERATING SYSTEM From the Start menu, select Programs; American Sigma Inc; INSIGHT 4.0. AS041 Rev. 10-1-99 InSight Data Analysis Software 4 HOW TO FIND THE INFORMATION YOU NEED TECHNICAL SUPPORT • Toll free technical support is available from 8am to 6pm EST weekdays at 1-800-635-4567. • 24 hour support is also available at 1-800-635-1230. • Outside the U.S. and Canada: (716) 798 5580 Internet Support • • E-mail at [email protected] Visit our World Wide Web home page at http://www.americansigma.com. Software Upgrades Available For Downloading American Sigma provides many embedded software “Flash Memory” upgrades and enhancements. The latest Flash upgrades are always available from the Sigma BBS or from our Internet Home Page (see above). All embedded software can be upgraded in the field or lab with a computer and an A/C power supply. Upgrades for application software (InSight, OnSite, etc.) are also available via modem. Consult the factory for instructions on downloading software upgrades. AS041 Rev. 10-1-99 InSight Data Analysis Software 5 MANUAL CONVENTIONS In this manual, the terms ‘Data Logger’ or ‘Logger’ refer to either a SIGMA flow meter, SIGMA 900MAX sampler or SIGMA Rain Logger. The term ‘PC’ refers to an IBM compatible personal computer. ‘Grayed-Out’ menu choices Menu items that are not currently available are displayed in a ‘grayed-out’ manner (shown in light gray instead of black lettering). This denotes that either the related option hardware is not installed on this logger or that another InSight menu choice must be enabled first before using this item. Mouse Terminology To ‘Click’ on something means to place the mouse pointer over the desired location and momentarily press the left mouse button. To ‘double-click’ something means to place the mouse pointer over the desired location and momentarily press the left mouse button twice in rapid succession. A double-click is generally a shortcut. The same results may also be obtained by clicking once on the desired location and then selecting the associated OK button. To ‘Select’ something means to point and click on it with the left mouse button. AS041 Rev. 10-1-99 InSight Data Analysis Software 6 THE BASICS FUNCTIONAL OVERVIEW InSight Software lets you program your data logger, then quickly retrieve, summarize and print your logged data. To do this... • Program your data logger using the Remote Programming feature of InSight Software (Models 950/960/970 can also be programmed directly from the front panel). Use InSight’s ‘Program Templates’ to speed programming chores. Program Templates store all programming steps in a disk file, letting you re-use common programs as often as you wish, quickly and easily. Next, after your data has been logged... • Bring the logged data into InSight Software by retrieving it from a SIGMA data logger (via modem or direct RS232 connection). Finally, • Select Site Files or Open Database from the toolbar or database window to view or print a graph or tabular summary report of your data. Or open an existing site file from disk to analyze or report on. Site files are automatically named and stored to your hard disk when retrieved from the logger. That’s about all there is to it. For details on how to perform each of these tasks see the following chapter, Using InSight. PROGRAMMING SIGMA loggers are easily programmed to meet your specific needs. "Programming" means answering simple questions regarding primary devices, units of measure or other features you have chosen. When you are done programming you must "run" (or execute) the program selections you have made. SIGMA models 904, 910, 920, 930 and 940 are always in a running state except for certain conditions shown below which cause a Program Complete state: 910, 920, 930 and 940 — no main power for longer than 3 hours or full slate memory. 904 — full slate memory or loss of main battery power for 70 minutes or battery discharge to less than 2.8 volts for 70 minutes or more. For SIGMA 950/960/970 loggers you may run a program, stop a program or resume a currently halted program. When a program is running the following items are activated (if enabled during programming): • Data Logging • 4-20 mA outputs • Sampler control • Alarm checking AS041 Rev. 10-1-99 InSight Data Analysis Software 7 When a program is Halted (950/960/970 only) the following occurs: • Logging continues with the last logged value • 4-20 mA outputs remain unchanged • Sampler control is disabled • Alarm checking is disabled When a program is Program Complete or Ready to Start the following occurs: • No data logging • 4-20 mA outputs stay at last value • No sampler interface • No alarm checking The program status changes to Program Complete when: • A program has been halted for longer than three hours • Complete in that logger. • See 904 meter’s manual for meaning of Program Complete in that logger. Other InSight Features Other InSight features include: • Modem Scheduling - Automate data collection by scheduling multiple loggers for unattended data retrieval at any time of day or night. • Flow Simulator - Lets you perform a wide range of open channel flow calculations. You may select any primary device (including Area/Velocity) and enter a water level value (and velocity value, if needed). InSight will calculate the flow for you. • Program Templates - Store commonly used logger program setups on disk for re-use whenever you wish. • Password Security - For American Sigma loggers that now have the password security feature built in, InSight checks for security settings and prompts for password entry when the user connects to the logger in InSight. After the correct password is entered the user can then: perform all the standard InSight functions, enable or disable password security, change the password, and even retrieve an encrypted readout of the password for decryption by American Sigma Technical Support in those cases where a password has been forgotten. AS041 Rev. 10-1-99 InSight Data Analysis Software 8 USING INSIGHT MAIN MENU The menu bar consists of several pull-down menus and a QUIT option for exiting the program. Click on the desired menu choice, as shown below, to activate it. Click here (or press ALT-S) to pull down the Site menu for example. In the example below, the InSight Toolbar, Speed Group and Database Toolbar are turned on. These items are shown only if they are checked ! in the Advanced menu. Toolbar (select common items fast, without searching through menus) (Use the Advanced menu to turn the Toolbar and Speed Group on or off) Speed Group (grabs data fast with one click via RS232) Database Tools (merge multipleITE site filesILES into a single to a text ANDfile, export ERGED file, create backups of valuable data, get help) S AS041 Rev. 10-1-99 F M DATABASE FILES InSight Data Analysis Software 9 Each time you retrieve data from a logger, a site file is created in the \INSIGHT\DATA\ directory of your PC. Tip: To merge files into a database during data transfer you must have the Database Toolbar open. Tip: Data editing is performed in the Site Data menu. Open a site file to see the Site Data menu. A site file contains the following information: • Logger Channel Data (level, flow, etc.). • All Programmed Settings in the logger. • Current Status of the logger at time of data retrieval. • Sample History (if connected to a wastewater sampler). • Event Log history of logger operation. In addition to the site file, if the database toolbar is open on the main menu, the new data is automatically merged with existing data from the same logger into a database file. Each time you retrieve logger data, with the InSight database toolbar open, the following files are created: • A standard site file is created in the \INSIGHT\DATA\ directory in your PC. • A database file is created in the \INSIGHT\DATA\MERGE\ directory of your PC. • An editable copy of the database file is created in the \INSIGHT\DATA\EDIT\ directory. If the database toolbar is open when a data transfer is initiated, the following Site Database menu is displayed after the data has been transferred. This menu lets you decide whether to add the new data to a database file, or save it as an individual site file: Checking the ⌧ Merge File Into Database box confirms that you want to merge this new data with the existing site database. New data will be appended only to the end of the existing database file, even if the files overlap. AS041 Rev. 10-1-99 InSight Data Analysis Software 10 Tip: If you elect not to merge during data transfer, the files can always be merged at a later time by using the database toolbar on the main menu. If the ⌧ Save Data As Site File selection is checked then the data is stored as an individual site file (in the \INSIGHT\DATA directory) and the files are not merged into a database. SITE FILE NAMING CONVENTIONS Site files are named with the date and time of data retrieval (as reported by the logger) and contain the permanent logger serial number in the file extension if there is one (older model data loggers may not have an embedded serial number and so the extension is set to “000”). Example site file name: 03251734.3BF Date Time Embedded Serial Number of the Meter 03/25 17:34 3BF Note that a 24-hr time format is used, where 17:34 is equal to 5:34 PM, for example. Tip: It is important that you use unique Site ID numbers in all of your data loggers so that InSight can automatically manage your data and files for you. DATABASE FILE NAMING CONVENTIONS Database file names are labeled with the Site ID number of the logger. Example database file name: 00000001.000 If data from two different loggers with the same Site ID are imported into a database, InSight increments the file extension by one digit. For example, say the 00000950.000 database already exists (from the unit with Site ID# 00000950) and you import data from a second logger having the same Site ID but different program settings. InSight would automatically create a file called 00000950.001 to show that the data is from two different meters. To make your database file names unique and easily recognizable, make sure your loggers are all programmed with different Site ID numbers. Only data from loggers with the same Site ID and with the same data logging settings (exact same channels logged at the same recording interval) can be merged. If you replace one logger with another at the same site, make sure the new logger is programmed exactly the same as the old logger (same channels logged at the same recording interval) if you expect to merge the new data with the old data. Merged and edited data files are always stored one level below the original site file directory, wherever that may be. For example if your data directory is called \DATA, then all merged database files would be stored in \DATA\MERGE and the editable copy of the database file is stored in the \DATA\EDIT directory. AS041 Rev. 10-1-99 InSight Data Analysis Software 11 SITE MENU Open This choice lets you open an existing site file or database file for reporting, editing or graphing. Opening a Site File Click the Modify button to get files from a different directory. If you select Open Site File, the Open File menu (shown below) appears with a list of all site files in the currently selected directory. To add new site files to the list, use the Import command in the Site menu (which is described on the following pages), or select a different directory by clicking on the Modify (F2) button. Use the scroll bar to see all the files in the list. Files are displayed in chronological order, by file name, with the oldest files on top. Click on the desired site file to open it (or select Return to cancel). Once a site is open you may view or print a table or graph of the data. AS041 Rev. 10-1-99 InSight Data Analysis Software 12 Opening a Database File If you select Open Database File, the Site Data menu (shown below) appears. The Modify button is grayed out since it does not apply to database files. Use the scroll bar to see all the files in the list. Files are displayed in numerical order, by file name (Site ID). The date range of the database is displayed along with the site description (if one is programmed into the logger). Site description text can be programmed into the logger with InSight software (model: 904, 910, 920, 930, 940, 950, 960) or OnSite software (model: 950, 960). Click on the desired site file to open it. Select Return or press ESC to cancel. Once a site is open you may edit data and create reports. See Data Analysis in the following section for details on data editing and creating tabular and graphical reports. Delete This choice permanently removes the desired site file from the \INSIGHT\DATA directory. Note: Use care to backup your data prior to performing this operation! See the Archiving Data chapter at the end of this manual for details on making backup copies of your valuable data. Export Export lets you convert your site files (which are in a proprietary SIGMA format) to formats which are compatible with other software programs such as spreadsheets and word processors. AS041 Rev. 10-1-99 InSight Data Analysis Software 13 Export To ASCII — InSight for DOS operating system (Only) Creates a comma-delimited ASCII (text-only) file on disk and is a feature provided in the event someone has a need for a comma-delimited text file. Note that All logged readings are exported when this feature is used; however, you may enter a start and end time. InSight places the exported file into the \INSIGHT\DATA\TXT directory on disk unless you select another location. Menu items that are not currently available are displayed in a ‘grayed-out’ manner (shown in light gray instead of black lettering). This denotes that either the related option is not installed on this logger or that another menu choice must be enabled first before using this item. Note: For both the InSight for DOS operating system and InSight for the Windows® operating system versions of InSight, the Report Generation menu provides extensive control over report generation, automatically generates a report text file, and provides a print button presented on the created report screen. (See heading: Report Generation.) AS041 Rev. 10-1-99 InSight Data Analysis Software 14 The Site file name is used as the default name for the exported data. The \INSIGHT\DATA\TXT is the default directory where the file is placed unless you pick another name or location. The three letter file name extension defaults to “.TXT”, as shown below. If you wish, you may enter a new file name and/or select a different path (disk drive and/or directory) for the exported file. Comma Delimited File Format In this example we have elected not to include the Program Settings, Events or Sample History. We only want to export the logged readings for use in a spreadsheet. The example below shows the exported file if viewed with a word processor: "Date","Time","Rain (in.)","Level (in.)","Velocity (fps)","Channel 5 (volts)","Flow (gpm)" "04/APR/96","13:05",0.00,5.070,1.88, 266.00 "04/APR/96","13:10",0.02,5.073,1.83, 259.02 "04/APR/96","13:15",0.00,5.077,1.87, 266.00 The “quotes” signify text fields. Entries without quotes signify numeric fields. Each field is separated by a comma delimiter. The comma helps a spreadsheet program determine how to place data into columns. Shown below is the same file when opened with Microsoft Excel 5.0. Date Time 4-Apr-96 4-Apr-96 4-Apr-96 13:05 13:10 13:15 AS041 Rev. 10-1-99 Rain (in.) 0.00 0.02 0.00 Level (in.) 5.070 5.073 5.077 Velocity (fps) 1.88 1.83 1.87 Flow (gpm) 266.00 259.02 266.00 InSight Data Analysis Software 15 Import Import Site File into Data Directory This choice brings a copy of a site file from another directory, network drive or floppy disk into the \INSIGHT\DATA directory for use with InSight. Use this feature to import data from floppy disks after retrieval from the field. Import Site File into Database This choice imports any site file into an existing database file. This is the same as clicking on the Import Into Database button on the database toolbar. Double-click here to move to a different directory. Double-click here to select a different disk drive. AS041 Rev. 10-1-99 InSight Data Analysis Software 16 DATA ANALYSIS The Open selection from the Site menu provides several data analysis and reporting functions. After selecting the desired file from the list, InSight opens the Site Data Menu (below). Note that selecting the Site Files button from the toolbar (shown above) is the same as opening the Site menu. Site Information The top section of the Site Data menu displays the logger program settings as well as status information taken at the moment the data was retrieved: Click on the desired button to show the associated information in the scrolling text window to the right of the buttons. AS041 Rev. 10-1-99 InSight Data Analysis Software 17 The choices are: • Settings - list of programmed settings in the logger at time of data retrieval. • Events - time and date stamped list of significant events occurring in the logger (see Event Log in the Diagnostics section of the Remote Programming chapter for details). • Current Status - real-time ‘snapshot’ of all activity in the logger at the time of data retrieval. • General Info. - Software revisions and other pertinent information related to this site file. Graphs and Reports The bottom half of the Analysis... menu is shown below. This is where you generate tabular reports and graphs. Each choice is described in the following section. AS041 Rev. 10-1-99 InSight Data Analysis Software 18 Graph Data The Graph Setup menu is shown below. The interface is similar to Windows® notebook ‘tabs’ feature. Plots Tab Select up to two plots, plus rainfall, from the pulldown lists of available channels. Enter your own scaling for the graph or click here to let InSight scale the graph for you. Select a graph type by clicking here. Click here to display the graph. Plot Selection Select the channel of data for plot one and plot two. You may select Not Displayed if you wish to hide one or both of the plotted lines. Rainfall is plotted as a bar graph along the bottom of the graph screen and may be displayed or not displayed. Graph Scaling InSight scales the Y-axis of the graph automatically if Auto-scale is selected. When Auto-scale is not selected you may enter your own scaling in the boxes provided for Minimum and Maximum. Rainfall is always auto-scaled. The X-axis is scaled automatically to logical increments and initially displays the entire data range but may be expanded and contracted while viewing the graph. Graph Types InSight provides two graph styles, Line Plot and Scatter Plot. Line Plots Line plots provide a dynamic visual representation of your data. You may zoom in for a closer look, and pan forward or backward in time to locate the information you need. AS041 Rev. 10-1-99 InSight Data Analysis Software 19 Channels Tab Rename the channels to provide a better description. Modify the Units for any of the recorded channels from the logger. Units The ‘Units’ pull down windows allow you to modify the units for each available channel to suit your needs. Click the arrow and select the desired unit from the list. This allows you to record the data using one format and display it using a different unit. After exiting and returning to the file at a later date, the units will be reset to their original settings as recorded by the logger as a default starting point. Labels The ‘labels’ column allow you to rename the recorded channel from the instrument to more descriptive name. Notice above that Channel 5 has been renamed to Battery which in this case makes more sense for reporting and graphing purposes. Once the channels have been renamed, they remain renamed until changed at a later date by the user. AS041 Rev. 10-1-99 InSight Data Analysis Software 20 Similar to Windows®, click the ‘up’ arrow to expand the window to full screen. Flow Tab Primary device settings being used to calculate Flow1. Primary device settings being used to calculate Flow2 Click here to modify the primary device used to calculate this particular flow. Click the down arrow to select a different level channel for flow calculation. Click the down arrow to select a different velocity channel for flow calculation. Use the scroll bar to arrow down and display the Flow3 window. Flow Windows The flow windows define the primary devices being used to calculate the displayed flows. By default, all three flow channels will use the primary device programmed into the logger at installation and download time. They will also use the Level and Velocity channels assigned as Level1 and Velocity1 in the logger. If you wish to calculate Flow2 or Flow3 based on a different primary device, such as when the second or third probe is installed in a different pipe, click the modify button and the primary device selection window will open as shown on the following page. AS041 Rev. 10-1-99 InSight Data Analysis Software 21 Select the desired primary device and input its settings for use with the current flow channel. As in the example above, a three inch Parshall Flume has been chosen for the Flow2 calculation. After choosing the desired primary device, the new flow calculations are performed when the graph is created. Level Channel Click the down arrow and select a different level to be used for flow calculation. Only those level channels recorded in the instrument will be available for selection from the list. Velocity Channel Click the down arrow and select a different velocity to be used for flow calculation. Only those velocity channels recorded in the instrument will be available for selection from the list. AS041 Rev. 10-1-99 InSight Data Analysis Software 22 Misc. Tab Use the site description from the logger or type your own title for the graph here. Choose original or edited data for the graph. Items with an X will appear on the graph if applicable. Title By default, InSight will use the logger site description for the graph title. You may, however, type your own title in the title box. Data Source Choose to display original or edited data for your graph by selecting the proper choice from the pull down list Grid Lines When selected, vertical and horizontal grid lines will be displayed. When deselected, no grid lines will be displayed. Site id When selected, the logger’s site id number will displayed to the lower left of the graph title. File Name When selected, the name of the site or database file being graphed will be displayed to the lower right of the graph title. Samples (successful) When selected, successful samples will be displayed as short lines on the secondary axis of the graph if the logger recorded a sample history. Samples (unsuccessful) When selected, unsuccessful samples will be displayed as slightly longer lines than the successful samples lines on the secondary axis of the graph if the logger recorded a sample history. AS041 Rev. 10-1-99 InSight Data Analysis Software 23 After selecting all the desired plots and modifications to those plots, click the Graph Data button to display your results. Graph Window Toolbar (Line Plots only) • Print outputs a copy of the current graph window to a printer, plotter or disk file. • Home focuses the graph to the beginning (first data point) of the data. • << or >> moves focus forward or backward by the same period as the entire current graph. If one week is displayed, this button moves the window forward or backward one week at a time. • < or > moves focus forward or backward by the same period as one minor increment of the current graph. If one week is displayed, this button moves the window forward or backward one day at a time. • End focuses the graph window to the end (last data point) of the data. • < + > zooms in to a closer view of the data. • < - > zooms out for a wider view of the data. Note: Zooming displays data in increments of 12 months, 3 months, 1 month, 1 week, 1 day, 12 hours, 4 hours or 1 hour. • Return Closes the graph window and returns you to the Graph Setup tabs window. The toolbar lets you adjust your view of the data. You may also output a copy of the graph to a plotter, printer or disk file. The Site ID, file name, and sampling results (if any) are shown at the top of the graph for reference. AS041 Rev. 10-1-99 InSight Data Analysis Software 24 Scatter Plot Scatter plots are an important component of flow survey data analysis. They provide a feel for the accuracy of the data by assessing the performance of the logger and the suitability of the flow monitoring site. Careful analysis of scatter plots (which is beyond the scope of this manual) yields a wealth of information about the effects of overflows, backwater conditions and tidal influences on the flows in sewers. The example below illustrates a typical scatter plot of level (yaxis) vs. Velocity (x-axis). Scatter plots must contain at least two channels of data (typically Level vs. Velocity). Scaling is automatic and all available data is used when generating a scatter plot. AS041 Rev. 10-1-99 InSight Data Analysis Software 25 Printing Graphs For InSight for the DOS operating system and InSight for the Windows® operating system versions of InSight, printing an InSight graph to a printer or plotter consists of selecting the Print button at the top of the graph window. This opens a Print menu. The print menu presented differs between two versions of InSight as indicated below. Print Screens — InSight for DOS operating system (Only) In the DOS-based version of InSight, the Print button presents the printer configuration menu shown below. The DOS-based print function requires that a printer is connected to the parallel or serial port of the PC and provides options for selecting the port and, in the case of the serial port, its configuration. The user must select from an extensive, yet limited, list of printer types (drivers). In the somewhat rare event that the printer or emulation the user desires is not listed, and additional “Print to file” capability can be selected. (See heading: Printing Graph to File.) Print [Graph] screen, DOS-based InSight Only Note: these settings only apply if you have a serial (RS232) printer attached to a COM port on your PC. Select an output device (printer or plotter) from the list. If your printer or plotter is not listed here, see your printer manual for a recommended second choice (look under: printer, emulation). Select LPT1 or LPT2 for parallel printers. For serial printers, select COM1 or COM2. Also, for serial printers only, you must select baud rate, stop bits, data AS041 Rev. 10-1-99 InSight Data Analysis Software 26 Printing to a File — InSight for DOS operating system (Only) Printing to a file creates an image of the graph in a selectable graphic-file format that can then be imported into another program that has a more extensive printer drivers list. For example a .BMP file may be opened and modified with Windows® Paintbrush application or inserted into a Microsoft® WORD document as a picture. To create a disk file of your graph, make sure you select Print to File from the Port menu, then select one of the supported file formats. Standard Graphic File Formats Supported by DOS InSight: File Extension File Format Type .AI Adobe® Illustrator .BMP Windows® Bitmap .CGM ANSI Graphic .DXF AutoCAD .HPG HPGL File .IMG GEM (b&w) .PCX Zsoft Paintbrush .PIC Color QuickDraw .TIF TIFF Tagged Image Format (compressed) .TIF TIFF Tagged Image Format (uncompressed) .VS Video Show (ANSI NAPLPS) .WMF Windows® Metafile .WPG Word Perfect Graphics Print Operations — InSight for the Windows® operating system (Only) Selecting the Print button from the graph screen will present a standard Windows® operating system style printer dialog box. The total print options available depend on the printer selected. The Windows® operating system allows the user to add new printer drivers as desired. The screen below is a typical Windows® operating system Print menu. AS041 Rev. 10-1-99 InSight Data Analysis Software 27 Report Generation The Report Generation menu is shown below. The interface is similar to Windows® notebook ‘tabs’ feature. From this menu the Create button will generate and display tabular reports. Upon Creation, the file is automatically saved to disk, as indicated under Destination File. The report may also be printed via the Print button presented on the Report screen. Define your own labels to be used for the report. These values are saved for all subsequent reports. Channels Tab Choose any valid unit to be used for your report independent of the recorded unit. Add channels to your report by checking the appropriate check box After all choices have been made, click CREATE to build the report. Click here to modify the target location and/ or name of the created report. Channel Select a channel from those recorded by the current instrument to be used for the report by checking the check box. Units You may choose to display your data using a unit other than that recorded by the instrument by selecting from the available choices in the pull down list. Label Choose to label the recorded channel to suit your needs. The name you supply next to each channel will be saved for future reports to help clarify the channel. Create After selecting all the desired settings for your report from the available tabs, click here to create your report. InSight will write the report to an ASCII text file on disk. The report will then open in print preview mode. AS041 Rev. 10-1-99 InSight Data Analysis Software 28 Modify Click here to change the destination directory and/ or name for the current report. This will help to group reports from a specific site together for easy identification. The original time and date range for the selected site are displayed here. Data Tab Statistical summaries can be displayed for each day, month, or user defined Data Span. A user defined starting time and date within the selected file can be entered here Select the total amount of data to be included in the report here. Select an averaging interval to decrease the amount of logged readings displayed. Define your own ‘Day’ by entering a starting and ending period. Select Original or Edited data for your report. Average your data forward or backward. Statistics Three individual choices are available for reporting statistics. 1. Day Report - This report will create daily statistical summaries with minimums, maximums, and totals for each day. 2. Month Report - This report will create daily statistical summaries with minimums, maximums, and totals for each month. 3. Span Report - This report is a user entered period or span of data to include in the report. It is used to select a block of data to analyze. The Span Report will supply a summary at the end of the printed report. Data Start You may choose to start reporting on your data from any point in the recorded data period. Enter the time and date here that you would like InSight to begin reporting from. AS041 Rev. 10-1-99 InSight Data Analysis Software 29 Data Span The Data Span is used to define a block of data to be analyzed within the selected file. Starting from the entered ‘Data Start’ point, the choices for the span or block of data to include are listed in the table below. Period Hours Days Weeks Months Years 6 1 1 1 1 8 2 2 Available Span Increments 12 3 5 6 3 4 6 8 12 16 20 24 Averaging Interval Select an interval for your data to be averaged across. For instance, you may record your data in one minute increments in the logger but that would display 1440 lines of logged readings on your report should you choose to include them. An alternative to that would be to select perhaps a sixty minute averaging interval to condense the displayed readings. Each one minute recorded reading would be averaged for each sixty minute interval and displayed as a single reading for that hour thus giving you only 24 logged readings for a day report. This allows you to record the data at a higher resolution for accuracy without printing sheet after sheet of recorded data in your report. Average Forward / Backward Select whether to average your readings forward or backward. The direction chosen governs whether the readings recorded before or after the averaging interval will be used to calculate that specific averaging point.. Consider this example, if you recorded data in one minute increments, and selected a fifteen minute averaging interval, the following would occur depending on choice: • Averaged Forward : Data is averaged on even increments per hour, 12:15, 12:30, 12:45 etc.…The data points recorded between 12:01 and 12:15 would be averaged and the result would be used to signify the 12:00 reading. Readings recorded from 12:16 to 12:30 would be averaged and the result would be used to signify the 12:15 reading and so on. • Averaged Backward : Data is averaged on even increments per hour, 12:15, 12:30, 12:45 etc.…The data points recorded between 12:01 and 12:15 would be averaged and the result would be used to signify the 12:15 reading. Readings recorded from 12:16 to 12:30 would be averaged and the result would be used to signify the 12:30 reading and so on. Start of Day / End of Day The definition of a ‘day’ can now be defined by the user. If your usual reporting period consists of your shift, for instance, you can tell InSight to only report on data within that period. For example, the start of day could be 8am and the end of day could be 5pm. In this case, any data from 5:01pm to 7:59am will be ignored and excluded from the report. Note : The period of time chosen for the ‘End of Day’ cannot be past midnight of the current day. In other words, a day cannot be defined as 8am to 8am for example. 8am to 11:30pm would be acceptable. AS041 Rev. 10-1-99 InSight Data Analysis Software 30 Data Source Select Original or Edited data to be used for your report. Click here to open the dialog box. From there, you can move, size, maximize, or close the window. Flow Tab Primary device settings being used to calculate Flow1. Click here to modify the primary device used to calculate this particular flow. Primary device settings being used to calculate Flow2 Click the down arrow to select a different level channel for flow calculation. Click the down arrow to select a different velocity channel for flow calculation. Use the scroll bar to arrow down and display the Flow3 window. Flow Windows The flow windows define the primary devices being used to calculate the displayed flows. By default, all three flow channels will use the primary device programmed into the logger at installation and download time. They will also use the Level and Velocity channels assigned as Level1 and Velocity1 in the logger. If you wish to calculate Flow2 or Flow3 based on a different primary device, such as when the second or third probe is installed in a different pipe, click the modify button and the primary device selection window will open as shown on the following page. AS041 Rev. 10-1-99 InSight Data Analysis Software 31 Select the desired primary device and input its settings for use with the current flow channel. As in the example above, a three inch Parshall Flume has been chosen for the Flow2 calculation. Level Channel Click the down arrow and select a different level to be used for flow calculation. Only those level channels recorded in the instrument will be available for selection from the list. Velocity Channel Click the down arrow and select a different velocity to be used for flow calculation. Only those velocity channels recorded in the instrument will be available for selection from the list. AS041 Rev. 10-1-99 InSight Data Analysis Software 32 Header Tab Check this box to add a header to your report. Enter your own text or use the defaults provided in these text boxes. Checked items here will appear as part of the header. The header tab allows you to customize the heading for your report. Please note that upon exit from the current file, the settings are not saved and will have to be reset for future reports on this site. Header Checkbox If you wish to include a header for your report, you must check this box or none will be displayed and the default ‘American Sigma InSight #.##” will be used. Logger Type Check this box to display the type of Sigma logger that recorded the data Title Check this box to display a title of your choice. Enter the desired text in the text box to the right of the checkbox. Description Check this box to display a description of the site on your report. The default description will be the site description programmed in the logger during installation and download of the current file. You may, however, delete this description and enter your own. Site id Check this box to display the numeric site identification number programmed into the logger at install and during download of the current file. AS041 Rev. 10-1-99 InSight Data Analysis Software 33 Comment #1 & #2 Enter any other useful comments here to help define your report. Misc. Tab Choose to display your logged readings in 12hr or military format Adjust the width of the columns of reported data. Checked items will be included in your report. Use decimals or commas as radix points. Select the units to be used for the totaled flow. Select the scaling for the totaled flow. Site Information • • • • • • Program Settings - Check this box to include all the programmed settings as reported by the logger during download of data. Events - Check this box to include the list of events as recorded by the meter to the point of download. Current Status - Check this box to include a ‘snapshot’ of the current status of the logger when it was downloaded. Sampler History - Check this box to include a report of successful and unsuccessful samples as recorded by the sampler or flow meter with an attached sampler. Logged Readings - Check this box to include the actual logged readings as recorded by the logger unless averaged. Primary Device - Check this box to include all the primary device settings being used to calculate the included flow readings for the desired report. These are either directly from the meter and/ or provided by you during the setup of the report using the Flow Tab. Time Choose to display all the time stamped values included in the report in either twelve or twenty-four hour format. Select the desired button. AS041 Rev. 10-1-99 InSight Data Analysis Software 34 Column Width If the displayed readings include many placeholders, you may wish to enlarge the width of the columns to accommodate more numbers for readability. Select the desired width from the pull down list. Data Format Select either decimal or comma to denote the radix point. A period is the common American radix point and the comma is the common foreign choice. Note: Selecting comma does not mean the data will be parsed with commas such as in 6,000,000. It is provided as a radix point format choice for our foreign accounts. Total Flow • • Units - Select a desired unit from the pull down list to be used for your total flow value. Totalizer Scaling - Select a scaling factor for your total flow value for ease of readability. Creating The Report After selecting all the desired settings for your report from the available tabs, click Create to create your report. InSight will write the report to an ASCII text file on disk. The report will then open in print preview mode. A reminder is displayed during report creation which shows that the report file has been placed into the \INSIGHT\DATA\TXT directory. The file name is automatically generated and is based on the original Site filename or a user defined name (see Channels Tab…Modify, listed above). A status bar appears to show the progress of the report generation as displayed below. After the report is created, it is loaded to the screen for display and review AS041 Rev. 10-1-99 InSight Data Analysis Software 35 An example of a typical daily summary report is shown below: ----------------------------------------------------------------Description: LOCKPORT NY FM18 Site Id: 00000018 ----------------------------------------------------------------PGM: 950 F.M. VERSION: 4.54 S/N: AZ7 SITE ID: 00000018 LOCATION: WEEHAWKEN NJ. FM18 LEVEL SENSOR: BUBBLER AREA VELOCITY SHAPE: CIRCULAR PIPE DIAMETER: 0036.00 in. SAMPLER PACING: OFF FLOW UNITS: mgd TOTAL FLOW UNITS: gal LEVEL UNITS: in. PROGRAM LOCK: OFF LOADED PROGRAM: 1 RS232 BAUD RATE: 19200 DAYS TO LOG: 20.1 INSTALLED MEMORY: 128 EXTENDED POWER: ON --INPUT-----UNITS--LOGGING--INTVFLOW mgd ON 5min LEVEL in. ON 5min VELOCITY fps ON 5min MEMORY MODE: WRAP ---------------------------------------------------------------=========================================== 29/SEP/95 Level Vel. Flow (in.) (fps) (mgd) ------------------------------------------Minimum: 7.983 5.70 4.41 Maximum: 11.587 9.17 11.66 Average: 8.913 6.70 5.96 Total Flow: 3124241.50 (gal) =========================================== 30/SEP/95 Level Vel. Flow (in.) (fps) (mgd) ------------------------------------------Minimum: 7.952 5.18 3.92 Maximum: 11.500 9.14 11.49 Average: 8.818 6.49 5.67 Total Flow: 5672682.00 (gal) =========================================== 01/OCT/95 Level Vel. Flow (in.) (fps) (mgd) ------------------------------------------Minimum: 7.463 5.15 3.88 Maximum: 11.749 9.83 12.73 Average: 8.742 6.40 5.53 Total Flow: 5526201.50 (gal) =========================================== AS041 Rev. 10-1-99 InSight Data Analysis Software 36 Bringing InSight Reports into a Word Processor To bring InSight reports into your favorite word processor or desktop publishing program, ‘open’ or ‘import’ the site report file directly from the \INSIGHT\DATA\TXT directory as shown below. Remember to tell your program to show you All Files (*.*) in the \INSIGHT\DATA\TXT directory. AS041 Rev. 10-1-99 InSight Data Analysis Software 37 Table The Table selection displays a table of logged readings for a single channel. Select the desired channel from the pull-down list and then click OK to view the table. The GoTo button at the top of the table lets you jump to a specific moment in time, or use the scroll bar on the right edge of the table to browse through the data. To go to a specific reading, click here. Use the scroll bar to quickly browse through the table. Select the Close button to return to the Site Report menu when done viewing. AS041 Rev. 10-1-99 InSight Data Analysis Software 38 Edit The Edit selection displays a table of logged readings for a single channel. Select the desired channel from the pull-down list and then click OK to view the channel edit window. The following buttons are displayed at the top of the edit window: Save The save button saves the edited data to disk. Merged and edited data files are always stored one level below the original site file directory, wherever that may be. For example if your data directory is called \DATA, then all merged database files would be stored in \DATA\MERGE and the editable copy of the database file is stored in the \DATA\EDIT directory. Close This button closes the edit window without saving your changes. AS041 Rev. 10-1-99 InSight Data Analysis Software 39 Goto The GoTo button at the top of the table lets you jump to a specific moment in time, or use the scroll bar on the right edge of the table to browse through the data. Modify The Modify button at the top of the edit window lets you perform several mathematical functions to any range of data. The menu below opens when the Modify button is selected. To edit a range of data: • Enter the desired value to add, subtract or replace the data in the selected range. • Select the desired time / date range to apply your edits to. • Select the Add, Subtract or Set button or press Cancel to quit without making any changes. How Flow Calculations are Performed Flows are calculated each time a report or graph is created. Therefore, if you edit a level or velocity file and then create a report or view a graph of the edited flow data, then the flow data is recalculated to reflect edits you made. How Changes to a Logger Program Affect Merged Database Files. If you make a programming change in the logger (other then those affecting the data logging channels) then merge this new data with a previously stored database, only the program settings from the most recent merged file apply to the database. AS041 Rev. 10-1-99 InSight Data Analysis Software 40 CONNECT MENU The Connect menu allows you to open communications with a SIGMA data logger via an RS232 serial port, or Modem. Once communications has been opened with the logger you may: • Retrieve logged data from a flow meter, sampler, DTU or Rain Logger. • Retrieve real-time status information from a SIGMA 900MAX sampler or SIGMA flow meter. • Remotely program a SIGMA 900MAX sampler or SIGMA flow meter. The first thing we’ll cover below is connecting to the logger via RS232 or modem. Then we’ll explore what you can do once that connection has been opened. Connect Via RS232 to a Data Logger 1. From the Connect menu, select ‘via RS232’ then select the desired logger from the list (shown above) or select the logger from the toolbar (shown below) 2. Select a COM port and baud rate. The ‘COM port’ refers to the RS232 Serial Communications port on the back of your computer. This port is usually labeled COM1 or COM2. The baud rate must match the baud rate programmed into the data logger. See the table below or the Technical Reference chapter for more information about COM ports and baud rates. AS041 Rev. 10-1-99 InSight Data Analysis Software 41 3. Make the connection between the logger and your PC using the appropriate cable (see table below). Logger Type Flow Meter Sampler (900MAX) DTU- 1 DTU-II Rain Logger Baud Rates Supported 1200-19,200 1200-19,200 19,200 (only) 1200-19,200 4800 (only) RS232 Cable Required PN1727 PN1727 PN1307 w/ separate power supply PN3513 w/ integral power supply Built-in to Rain Reader Interface 4. Click OK to initiate the communications with the logger. 5. The password security sequence will now perform its function. If the password is UNSECURED (disabled), InSight will present a fully functional “Connected to ....(logger name)” menu screen. Continue at the heading: “ Connected to SIGMA Sampler or Flow Meter.” If the password is SECURED (enabled), InSight will perform the password security sequence as described under the heading: “ Security Function.” NOTE Flow meters 904, 910, DTU i, DTU II, Rainlogger and 900MAX samplers do NOT employ the password security feature. Therefore InSight proceeds directly to the “Connected to...” screen when connecting to these devices. See the headings titled Connected to a Sigma Sampler or Flow Meter, DTU or Data Logger that follows to find out what you can do once you have connected to a logger. AS041 Rev. 10-1-99 InSight Data Analysis Software 42 Connect Via Modem to a Sampler or Flow Meter AS041 Rev. 10-1-99 1. From the Connect menu, select ‘Via Modem’. 2. 3. Select either a 900MAX sampler or flow meter from the list (shown above). In the modem setup menu below, select the modem, baud rate and COM port that best matches the modem hardware attached to your PC. 4. Select the phone number of the site you wish to connect to from the Phone Directory. Click the ‘radio button’ next to the desired site to select it. InSight Data Analysis Software 43 Click on the ‘radio button’ associated with the desired site to select it. You may enter other characters along with the phone number to perform special functions. For example: 9,,716 555 1234 dials 9 to get an outside line, then waits a few seconds before dialing the phone number. The delay (commas) is determined by the value held in the PC modem’s S-8 register, which may be modified in the modem initialization string by selecting the Advanced button in the Connect Via Modem menu. 5. 6. Click the Dial button to start the begin communications with the remote logger. Dialing takes place and modem command -string text may display briefly. The password security sequence will now perform its function. If the password is UNSECURED (disabled), InSight will present a fully functional “Connected to ....(logger name)” menu screen. Continue at the heading: “ Connected to SIGMA Sampler or Flow Meter.” If the password is SECURED (enabled), InSight will perform the password security sequence as described under the heading: “ Security Function.” NOTE 900MAX samplers do NOT employ the password security feature. Therefore InSight proceeds directly to the “Connected to...” screen when connecting to these devices Advanced Modem settings button The Advanced button opens the Advanced Settings menu. This menu provides the ability to customize the modem setup for times when the default settings are not sufficient. In most cases these settings will not require modification. AS041 Rev. 10-1-99 InSight Data Analysis Software 44 Initialization String The initialization string is dictated by the model of modem you selected from the list of modems. You may enter any valid Hayes modem command in this box. See your modem documentation for the proper initialization string for your modem. Address & IRQ The address and interrupt request line (IRQ) are determined by the choice of COM port. The IRQ only requires modification in cases of non-standard PC serial port configurations. The factory default settings are shown here for reference: Port COM 1 COM 2 COM 3 COM 4 Address 03F8 02F8 03E8 02E8 IRQ 4 3 4 3 For more information about address and IRQ settings see your modem or serial card documentation. Time-out period (sec) The time-out period may need to be increased if your phone system requires longer than 30 seconds to make the connection. See the section titled Connected to a Sigma Sampler or Flow Meter, DTU or Data Logger that follows to find out what you can do once you have connected to a logger. AS041 Rev. 10-1-99 InSight Data Analysis Software 45 Security Function American Sigma loggers which have a password security function (see list below) execute a security sequence whenever a connection is initiated with the logger. How or whether the user is allowed access to a fully functional “Connected to (logger name)” menu screen is determined by the security status (secured or unsecured) of the meter and other factors as described in the paragraphs which follow. Password Security Connect Operations Operations under this heading assume the use of the current password-capable versions of InSight and logger. For information on various combinations of password capable and nonpassword-capable versions of InSight and loggers one might encounter in the field, see the heading “Possible InSight - Logger Combinations” at the end of this section. After clicking OK in the “Connected To Logger” screen or clicking “DIAL (F7)” button in “Connect Via Modem” screen, the security feature will function as follows: Unsecured Logger (Password disabled) If the password of the logger was previously unsecured (disabled) via InSight, InSight checks for the security status of the meter, verifies the unsecured state and presents a fully functional “Connected To [logger]” screen. Secured Logger (Password enabled) If the password was previously secured (enabled) in InSight, InSight presents a password entry screen with a blinking screen cursor in the password entry box. Enter the eight-character numeric password and click OK. The password must be eight numeric characters long ( no more, no less). A series of asterisks display as the user enters the password numbers. NOTE The default password (as shipped from the factory) is eight zeros (00000000). All loggers are shipped from the factory in the unsecured condition, i.e., password entry not needed to connect with InSight software. Only numeric characters (0 - 9) are acceptable. The password entry screen which displays when a connection to InSight is initiated with a secured logger is depicted below. AS041 Rev. 10-1-99 InSight Data Analysis Software 46 Password Entry Results Correct Password Entry Entry of the correct password will present a fully functional “Connected To [logger]” menu screen. This is the major menu screen from which interaction with the logger in InSight is initiated. In addition to command buttons which allow the user to Retrieve Logged Data, view Current Status, perform Remote Programming and Diagnostics, a Security button is provided to allow the user to enable or disable the password security and to change the password used. See heading “SECURITY” latter in this manual for instructions on enabling, disabling, and changing the password security of a logger. CAUTION If the connection to a secured (password-enabled) logger is broken by any means other than the Return (disconnect) command in the “Connected...” screen or completion of a Speed Group function, that logger will remain UNsecured until communication is re-established and the logger is Secured again. Incorrect Password Entry Entry of an incorrect password will cause the “Invalid Entry!” error screen to display. Click OK to acknowledge the failed entry and present the password entry screen again. After three incorrect password entries, InSight will present a screen which shows an encrypted version of the password (see heading below). Recovering Forgotten Password If a password is lost or forgotten or a typographical error while setting the password inadvertently creates an unknown password, the logger is not hopelessly locked forever. A feature is provided which presents an encrypted password anytime three incorrect passwords are entered one after another while attempting to connect to the logger. An “Invalid Entry!” error screen follows each entry. After the third “Invalid Entry!” error screen, the encrypted password is displayed. This encrypted password is not useable as a password until decrypted into a numerical password by American Sigma Technical Support Department. The procedure for recovering a password is as follows: 1) In the password entry screen enter an incorrect password (or nothing) in the password entry box three times, each time clicking OK when the “Invalid Entry!” error screen is displayed. 2) After the third entry, the encrypted password code is displayed. Call American Sigma Technical Support and report the encrypted code. 3) Technical Support can decode the encrypted password readout and provide the actual numerical password. AS041 Rev. 10-1-99 InSight Data Analysis Software 47 Possible InSight - Logger Combinations Considering both the past and the present, the possible combinations of Loggers and InSight that one might encounter in the field are listed below. Operation under each of these situations is described in the paragraphs and table which follow. To maximize all operational capabilities, it is recommended that users upgrade to the most current release of InSight. • Newer Loggers which feature the password security (920/930/950/960/970) and the current release of InSight which supports it. • Newer Loggers which feature the password security and obsolete (no password function) versions of InSight. • Older (obsolete) versions of InSight and older loggers without the password security feature. • Newer version of InSight with password capability connecting to older nonpassword logger. • DTU i , DTU II, Rainlogger, and 900MAX samplers which are not intended to feature password security. LOGGER INSIGHT CONNECTION RESULTS VERSION VERSIO N + + As detailed above – Logger Unsecured: Connects Logger Secured: Connects after password entry. + Logger Unsecured: Connects Logger Secured: Initially, display of Connected screen gives false impression of a connection, but – a) Viewing “Event Log” from Diagnostics” screen displays “Locked” event. b) Connected screen’s buttons do not operate and – c) If clicked, some Connection screen buttons present an “X-Modem Timeout” error after a pause. Connects + Connects DTUs, 900MAX, Connects Rainlogger key: + = Password capable version of logger or InSight software. - = Earlier, Non - password capable version of logger or InSight software. “secured” = Password is enabled / on. Unsecured = Password disabled / off. “connects” = Functional “Connected To...” menu screen presented. AS041 Rev. 10-1-99 InSight Data Analysis Software 48 Non- Password Devices Devices which do not feature password security include: flow meters 904 and 910, DTUi, DTU II, Rainlogger, and 900MAX samplers. Except as noted for the DTUs below, each of these devices transition directly to a functional “Connected To..” screen when a connection is initiated in InSight. NOTE Any logger featuring password security which has been secured with a password in InSight (locked) will NOT download data to a DTU until the logger is unsecured (unlocked) in InSight. AS041 Rev. 10-1-99 InSight Data Analysis Software 49 CONNECTED TO A SIGMA SAMPLER OR FLOW METER The ‘Connect to..’ menu, above, appears once the connection has been established. Retrieve Logged Data Downloads all data from the connected logger to a Site file on disk. The file is stored in the \INSIGHT\DATA directory. Each step in the retrieval process is documented in the status window, shown above. An activity indictor at the bottom of the window keeps you updated as to the status of the data retrieval. AS041 Rev. 10-1-99 InSight Data Analysis Software 50 Current Status This choice shows you the real-time logger status. The Current Status window (shown below) is refreshed every 2-3 seconds at 19,200 baud and less frequently at lower baud rates. Printing and Saving the Current Status Window You may print and\or save the contents of the Current Status window using the buttons at the bottom of the window. The contents of the window are saved into the \INSIGHT\DATA\TXT directory as a plain text ASCII file. You must supply a file name. The default file extension is .STS. AS041 Rev. 10-1-99 InSight Data Analysis Software 51 Remote Programming Note: Remote Programming for 900MAX Samplers is not yet implemented. Remote Programming lets you configure a data logger to your preferences. You may set alarms, configure communications and data logging, select and configure level and velocity sensors. This menu also lets you calibrate and set all level sensors as well as set the real-time clock in the data logger. You may also immediately enable an attached sampler if desired by selecting Toggle Sample Enable Line. The Remote Programming menu is grouped into two areas: • Fixed Settings & Programming Buttons • Real-Time Operations Double-Click on an item to modify it. (or use the Tab and Arrow keys, then the Space Bar to select it) Fixed Settings (Flow meter) Fixed settings are listed on the left side of the Remote Programming menu. To make changes to a Fixed Setting double-click the desired choice. A menu opens showing the available settings. Fixed Settings may also be stored in a Template file on disk and recalled for later use by using the Save To File and Load From File buttons shown in the center of the menu window. Fixed Settings include: • Alarms • Communications Setup • Data Logging • Level Sensor Selection • Primary Device Selection • Sampler Pacing (if optional wastewater sampler is attached) • Site Description • Stormwater Trigger Setup (optional) • Velocity Probe Setup Note: You may only see some of the choices shown above depending on the model of the data logger to which you are connected and the options installed. AS041 Rev. 10-1-99 InSight Data Analysis Software 52 Alarms Alarms can be programmed to activate based on certain conditions (high water level, low battery power, etc.). When an alarm is tripped an action is initiated (report via modem, dial a pager, set a relay, or trigger a sampler). There are two types of alarms: • Channel Alarms • System Alarms Channel Alarms look for trip points to be reached (either high or low or both) before initiating an action (Such as closing a relay when the water level exceeds 24” or drops below 4"). System Alarms initiate an action when a trouble condition occurs. (such as closing a relay when the memory is full). Channel Alarms Channel alarms may be configured for all available data channels. Channel Alarms activate when a user definable high and\or low set point is reached. Double-Click an item to Modify it. (or use the Tab and Arrow keys then the Space Bar to select it) To program a channel alarm you must: 1. Select the method of reporting the alarm. Alarms may be reported via modem (pager) or relay contacts (if so equipped). 2. Map the alarm to the desired channel (level, flow, pH, etc.) and condition (low, high, or rate of change). AS041 Rev. 10-1-99 InSight Data Analysis Software 53 3. 4. AS041 Rev. 10-1-99 Enter the desired set-point and deadband for the alarm condition. Note that the units of measure shown reflect the settings you make in the Data Log menu. Enter the desired Deadband value (see Deadband, following this section, for more details) InSight Data Analysis Software 54 Deadband After entering the set-point you may enter a "Deadband" value. This deadband is the area between alarm "turn on" and "turn off". The purpose of setting a Deadband is to eliminate alarm relay chatter which may occur if the turn-on and turn-off values are too close together. Small fluctuations occurring when the reading is at or near the trip point can toggle an alarm relay on and off very rapidly. Alarm ‘On’ at 7.00 pH In the pH example below, the alarm is set to a 7.00 pH High Alarm and the Deadband is set to .10 pH. When the pH reached 7.00 (upper dashed line), the high pH alarm tripped, but the alarm did not turn back off until the pH fell below 6.90 pH. This difference is the Deadband setting and should be set according to the variation characteristics of the item being measured. Alarm ‘Off’ at 6.9 pH Deadband Example of a HIGH 7.00 pH alarm with 0.10 pH deadband. Multiple alarms may be enabled at one time. You may also assign individual alarm conditions to individual relays or assign all alarms to the same relay. Note: Rainfall and Flow Rate of Change alarms are HIGH set point conditions; they take no deadband; and they are time dependent. You must log rainfall to use an alarm on a rainfall condition; likewise, you must log flow in order to implement an alarm on a flow rate of change. AS041 Rev. 10-1-99 InSight Data Analysis Software 55 System Alarms To program a System Alarm you must check the box that corresponds to the desired response to each alarm condition (see below). You may send the alarm to a pager, via modem, or set one of four relays (depending on which options are installed in the logger). Column M R1 R2 R3 R4 Output Type Modem Relay One Relay Two Relay Three Relay Four Check the box in the ‘M’ column to report via Modem. Check the box in the R1 through R4 column to report via relay 1-4 (if available). A table of each system alarm and its cause is shown below: System Alarm Condition Low Main Battery Memory Battery Low Slate Memory Slate Memory Full Low Bubbler Pressure U-Sonic Echo Loss (A pulse of sound was sent but no echo was received back) Transducer Ringing U-Sonic Failure AS041 Rev. 10-1-99 Cause Batteries require charging or replacement. Internal memory battery voltage is too low. Change memory batteries. Free slate memory is less than 20% Slate memory is full. Download data and restart program. Bubbler system not developing sufficient air pressure. (Inspect air pump, reservoir and associated tubing assemblies for problem) The echo has been temporarily deflected by a change in site conditions such as floating debris or foam in the channel, wind, etc. Transducer is operating within the deadband. Transducer not plugged in. Cable damaged. Transducer thermal sensor damaged. InSight Data Analysis Software 56 System Alarm Condition RS485 Timed Out Modem Failure Clogged Bubbler Cause Problem with communications between the data logger and a remote ultrasonic sensor. May indicate open thermal sensor. Problem with communications using the modem. Verify proper operation of the phone line. Self resetting fuses may have opened due to power surge on phone line, they will reset automatically in a few seconds. Bubbler line obstructed or submerged below ten feet.. Communication Setup Communications Setup will allow you to configure the RS-232 port and modem within the logger. This does not apply to your PC’s communication settings which are set when connecting to a logger using InSight or other support software. When an alarm condition reports via modem there are two ways to deliver the alarm message to the recipient: • Direct Reporting to PC via modem. • Pager Notification via pager service. Configure your PC’s modem settings here. Transmits an alarm message to a waiting PC which displays each alarm in a scrolling window. Configure the pager option here. AS041 Rev. 10-1-99 InSight Data Analysis Software 57 Tip: Modem Reporting requires that the logger be programmed to report alarms via modem. Modem Reporting to a PC Modem Reporting lets you set up your PC as a type of data logger ‘answering machine’. The PC waits for a logger to call in via modem and report an alarm condition. The PC displays the alarm message in the Modem Reporting window before it hangs up the phone and waits for another logger to call in. Check your modem settings before hitting the OK button below. Once the OK button is pressed, the modem is set to answer incoming calls. Each alarm message is displayed in a scrolling window as shown below. At any time you may Print or Save to disk the contents of the modem reporting window. Use this feature to check on alarm conditions that occurred overnight or when you are away from your desk. AS041 Rev. 10-1-99 InSight Data Analysis Software 58 Pager Reporting The pager is implemented by using the modem, so the setup of the pager is done through the setup of the modem. Pager reporting utilizes the industry standard TAP protocol (Telelocator Alphanumeric Protocol) to deliver information to up to three alphanumeric pagers. The logger dials your paging service provider and passes the alarm code, site ID and up to three pager phone numbers to the service provider’s PC automatically. The service provider’s PC then sends the alarm code and site ID to all enabled pagers. Alarm Code, Site ID, and up to 3 pager #’s Data Logger Pager Service Provider Alarm Code & Site ID Up to 3 Pagers To enable the pager option: 1. Enter the phone number of the paging service provider. 2. Enter how many pagers you wish to call when an alarm occurs. The data logger supports up to 3 pagers. 3. Enter up to three pager phone numbers. NOTE: When contracting with your local pager service provider you must let them know that the SIGMA loggers conform to the “TAP” paging standard. With this information they will be able to configure their equipment to work with the SIGMA logger. When the logger calls the paging service during an alarm condition, it will include in the transmission a Pager Alarm Code number which corresponds to a specific alarm condition (see chart on the following page). AS041 Rev. 10-1-99 InSight Data Analysis Software 59 Alarm LOW MAIN BATTERY MEMORY BATTERY LOW SLATE MEMORY SLATE MEMORY FULL MODEM FAILURE MISSED SAMPLE PURGE FAILURE JAMMED DISTRIBUTOR BOTTLE IS FULL U-SONIC ECHO LOSS XDUCER RINGING U-SONIC FAILURE RS485 TIMED OUT UNABLE TO COOL UNABLE TO HEAT LOW BUBBLER PRES. CLOGGED BUBBLER HIGH LEVEL HIGH FLOW HIGH FLOW RATE OF CHG. HIGH pH\ORP HIGH PROCESS TEMP. HIGH RAINFALL HIGH CH1 HIGH CH2 HIGH CH3 HIGH CH4 HIGH CH5 HIGH CH6 HIGH CH7 HIGH REFERENCE TEMP. HIGH VELOCITY HIGH D.O. HIGH D.O. TEMP. HIGH CONDUCTIVITY HIGH COND. TEMP. LOW LEVEL LOW FLOW LOW pH\ORP LOW PROCESS TEMP. LOW CH1 LOW CH2 LOW CH3 LOW CH4 LOW CH5 LOW CH6 LOW CH7 LOW REFERENCE TEMP. LOW VELOCITY LOW D.O. LOW D.O. TEMP. LOW CONDUCTIVITY LOW COND. TEMP. HIGH LEVEL 2 HIGH VELOCITY 2 HIGH LEVEL 3 HIGH VELOCITY 3 LOW LEVEL 2 LOW VELOCITY 2 LOW LEVEL 3 LOW VELOCITY 3 AS041 Rev. 10-1-99 PAGER ALARM CODES Code # Equipment 1 2 3 4 5 6 900 only 7 900 only 8 900 only 9 900 only 10 11 12 13 14 900 AWRS only 15 900 AWRS only 16 17 18 19 20 21 22 23 24 25 26 27 28 29 30 31 32 33 34 35 36 37 38 39 40 41 42 43 44 45 46 47 48 49 50 51 52 53 54 55 56 57 58 59 60 61 Explanation Battery pack is less than 11.5V Internal memory battery is low Less than 10% slate memory left Slate memory is used up Modem chip\modem board failure No liquid detected when sampling Water present at sensors after purge Sensors indicate arm is not moving Full bottle option indicator is on No return signal detected The return signal is detected too soon Ultrasonic board detects an error Comm. problems with RS485 Too high a temperature in compartment Too cold a temperature in compartment Possible leak in bubble tank Bubbler tube is plugged InSight Data Analysis Software 60 Data Log SIGMA data logger’s can record more than 100,000 readings taken from multiple sensors and other data channels and store them in solid state, battery backed memory for later viewing and retrieval. From this menu you may select the input channels you wish to log, how often you want them logged (logging interval), units of measure, and how to treat the memory when it becomes full (slate or wrap). Note: The Data Log menu style may vary depending on the model of the data logger to which you are connected. Data Log menu for a SIGMA 950\960 data logger. Data Log menu (typical) for a SIGMA 904\910\920\930\940 data logger. Memory Setup Click on the radio button that corresponds to the desired memory mode. Memory can be configured in one of two ways, Slate or Wrap. Slate Memory Mode Slate Memory Mode causes logging to stop when memory becomes full. The flow meter continues to operate but no additional data is logged. This mode is best if you don't want to discard any of the logged data from the beginning of the logging period. Wrap memory mode Wrap mode removes old data and recycles the memory for reuse. This means that when memory becomes full, the oldest reading is discarded each time a new reading is taken in. When memory becomes full, the flow meter continues to operate AND log data. This mode is best if you are interested in the most recent data. AS041 Rev. 10-1-99 InSight Data Analysis Software 61 Flow Setup Flow Units Select the desired flow rate unit of measure from the pull-down list. Total Flow Units Select the desired unit of measure for total flow from the pull-down list. The flow totalizer is a series of up to three numeric counters in the 900\950\960\970 loggers which display the total flow being measured by the flow meter. All software totalizers are set to zero upon program start and all share the same unit of measure and scaling factor. Totalizer Scaling Select the desired scaling for the internal flow totalizers from the pull-down list. Scaling multipliers are provided to allow you to tailor the totalizer response to meet the requirements of the application. High flow rates may require an increased scaling factor if the totalizer increments at an unreasonably high rate during peak flow periods. Interval - Single (904\910\920\930\940 only) Select the desired interval between data readings from the pull-down list. These loggers wake up once per interval, take a reading of each channel, store those readings in memory , then go back to sleep until the next interval. This method provides the best battery performance and longest memory capacity when used with longer intervals (greater than 10 minutes). Interval - Multiple (900\950\960\970 only) InSight supports the use of multiple recording intervals for these loggers. Select the desired interval for each channel from the pull down lists. Extended Power (900\950\960 only) If Extended Power is enabled, you must also select the desired logging interval from the pull-down list. If Extended Power is not enabled then you may select individual logging intervals for each channel. Extended Power Enabled (900\950\960 only) With Extended Power enabled, these loggers wake up once per interval, take a reading of each channel, store those readings in memory, then go back to sleep until the next interval. AS041 Rev. 10-1-99 InSight Data Analysis Software 62 Extended Power Disabled (900\950\960 only) With Extended Power disabled , these loggers wake up once per minute, take a reading of each channel, store those readings in memory , then go back to sleep until the next minute. Once per interval all stored readings are averaged or summed and stored in memory. Longer intervals in this mode provide greater memory storage but do not help much in conserving battery power. A\C Power Considerations (900\950\960\970 only) If an A\C power supply is installed, these loggers stay awake at all times, taking readings approximately every second and logging an average every minute in a temporary area of memory. At the end of the logging interval, the minute by minute readings are then averaged over the period of the recording interval and stored in memory. This mode provides the fastest response to quickly changing events in the flow stream especially when output signals from the logger are controlling external devices (4-20mA current loop for example). Logging Intervals and Logger Memory Longer logging intervals means longer total recording time is available. It also means lower resolution since more averaging is done at higher logging intervals. The key is to pick the shortest logging interval possible while still making data collection convenient. If you can only get to the site once per month to collect data, then you should pick a logging interval which almost fills memory over the course of one month. For example: If the logger is equipped with 128K of RAM memory and only one channel is logged, then a 2 minute logging interval would take 24 days to completely fill the available memory (see chart below). If, on the other hand, you were to pick a 1 minute logging interval, the memory would become full after 12 days. Note: The 900\910\950\960\970 loggers have 128K of RAM standard and 512K as an option. The 920\930\940 loggers all come with 512K of RAM. See 904’s manual for similar table data. Logging Interval 1 2 3 5 6 10 12 15 20 30 60 AS041 Rev. 10-1-99 With 128K Bytes of Ram (Std.) With 512K Bytes of Ram (Opt.) (approx. 17,280 readings) (approx. 115,630 readings) Total Recording Time (days) before Total Recording Time (days) before memory is full memory is full 12 80.3 24 160.6 36 240.9 60 401.5 72 481.8 120 803.0 144 963.6 180 1204.5 240 1606.0 360 2409.0 720 4818.0 Logging Intervals vs. Total Recording Time for each memory configuration (assuming ONE logged channel). InSight Data Analysis Software 63 Inputs Each input may be logged or not logged. You may also select the unit of measure and the logging interval for each input. Level \ Flow Logging (900MAX\950\960\970 only) Level and Flow are considered a single input channel. The flow values are calculated whenever they are requested for display. The flow logging interval applies whenever flow is displayed. The logging interval is always the same for level and flow. Analog Inputs (900MAX\950\960\970 only) The configuration for these inputs requires on-site connection of a DC voltage or current meter for proper setup. Configuration must be performed using the front panel controls of the logger. No provision has been made in InSight software for remote setup of these channels. Refer to the Operating and Maintenance manual for your 900MAX Sampler or 950\960\970 Flow Meter for details. AS041 Rev. 10-1-99 InSight Data Analysis Software 64 Level Sensor (910\920\930\940) Loggers that support multiple concurrent sensors (920\930\940) require that you designate one of the sensors as the Level 1 Sensor. If you only use one sensor, you must designate it as the ‘Level 1Sensor’. If you use two sensors, designate one as Level 1 and the other as Level 2. Designate the first level sensor as ‘Level 1’. (Make sure the matching velocity sensor is also selected as the Velocity 1, if used). Designate any remaining sensors as Level 2 and Level 3. Level Sensor menu (typical) for SIGMA 910\920\930\940 data loggers. With a secondary sensor installed as a backup (in the unlikely event that a primary sensor fails while in service), it is a simple matter to swap the secondary sensor in place of the failed one without removing the logger from the manhole. This could eliminate any unnecessary (and expensive) confined space entry. AS041 Rev. 10-1-99 InSight Data Analysis Software 65 Designate the sensor priority from the pull-down list for each available sensor. Note: The Level Sensor menu style may vary depending on the model of the data logger to which you are connected. If only one level sensor is installed in the logger it is automatically designated Level 1. AS041 Rev. 10-1-99 InSight Data Analysis Software 66 Deadband For ultrasonic sensors you must also select a deadband value. Typically, deadband is the minimum distance from the ultrasonic sensor to the target. SIGMA data loggers are equipped with an adjustable deadband feature to help prevent false echoes from tops of channel walls, ladder rungs, shelves, etc. (see drawing below). A user selectable range is defined which is invisible to the flow meter. Only objects beyond the deadband value can be detected. Adjustable Deadband 2” (5 cm) Maximum Expected Level Adjustable Deadband (set to ignore the tops of channel walls) Note: Care must be taken not to extend the deadband to where it meets or overlaps the highest expected level in the channel. Whenever possible, a gap of at least 2” (5.08 cm) should be left between the invisible range and the highest expected water level. Important: The adjustable deadband distance must be greater than the minimum deadband of the sensor (See chart below). Sensor Type 40khz 75khz 75khz Zero-Deadband AS041 Rev. 10-1-99 Minimum Deadband (minimum distance to target) 15” 10” 6” (0” from face of sensor) InSight Data Analysis Software 67 Level Sensor (900\950\960\970) The SIGMA 900, 950 and 960 loggers are available with several level sensor options (bubbler, submerged probe, ultrasonic, all three), however these loggers can only use one level sensor at a time. Level Sensor menu for SIGMA 950\960 data loggers From this menu you may configure the current level sensor for your 900\950\960 logger. Level sensor selection is made via the 950\960 front panel. 1. 2. 3. AS041 Rev. 10-1-99 Bubbler (950 only) • Bubble Rate - select the bubble rate from a scale of 0-10 that represents approximately 1-5 bubbles per second. One bubble per second is usually sufficient and saves battery life with fewer compressor cycles. • You may also enable an optional Air Purge of the bubbler line on a regular basis to help keep the end of the bubble tube free of silt or other buildup. Keep in mind that air purges will reduce battery life for loggers running on DC power. Ultrasonic - enter the desired deadband. This must be equal to or greater than the sensor minimum deadband (see chart above). Submerged Transducer - Enter the sensor orientation (for when the sensor is installed), either horizontal or vertical. InSight Data Analysis Software 68 Primary Device The Primary Device information is used to calculate flow from the level data collected by the logger. Open the primary device of your choice by doubleclicking on it in the scrolling list (shown below). Double-click the desired primary device to select and/or modify it. Primary device setup includes: • Area-velocity - pipe diameter and unit of measure. • Flumes - flume size. • Manning Equation - conduit size, slope, roughness and unit of measure. • None (level only) - No primary device installed. Flow is not displayed or logged. • Nozzle (California Pipe) - nozzle size. • Power Equation (Q = K1Hn1 ± K2Hn2 ) - user entered variables K1, K2, n1, n2 • Head vs. Flow Table - User entered look up table of up to 100 pairs of head and flow values. • Level vs. Area Table - User entered look up table of up to 100 pairs of level and area values. • Weir - weir size and unit of measure. AS041 Rev. 10-1-99 InSight Data Analysis Software 69 Enter the desired values for each primary device in the appropriate places (examples are shown above and below). AS041 Rev. 10-1-99 InSight Data Analysis Software 70 Head\Flow and Level\Area Tables require you to enter a ‘look-up’ table (shown below). The logger directly measures the value in the left column and looks up the associated value in the right column of the table. Values falling in-between the data in the table are interpolated by the logger automatically. In the Head\Flow table example below, the level reading of 1.5 inches (half way between 1 and 2 inches) would return a flow value of 7.5 GPM (half way between 5 and 10 gpm). Click the Modify button (above) to enter or make changes to the Head\Flow table (shown below). Click the Next button after each pair of points has been entered. Select Done when the last set of points has been entered. You may review previously entered points in the table by selecting the Previous button. AS041 Rev. 10-1-99 InSight Data Analysis Software 71 Sampler Pacing Sampler pacing provides a flow-proportional pulse output signal to an external wastewater sampler such as a SIGMA 900 Sampler. This option requires connection of a cable between the loggers ‘Sampler’ receptacle and a wastewater sampler. Typically this is done by enabling the ‘external level control’ feature on the sampler. See your logger and sampler manuals for details concerning signal descriptions and cables. When the Sampler Pacing signal is enabled you must select a trigger value and flow unit of measure. Note: For Sampler Pacing you must also program the sampler to accept an ‘External’ flow signal interval (see your sampler manual for details). AS041 Rev. 10-1-99 InSight Data Analysis Software 72 Site Description The Site Description helps you to identify your data by entering a description of the site and an identification number. These items are used to identify a specific logger with a specific site. InSight and VISION software utilize this information to automatically place data into the proper database during data retrieval. Note: It is important that you give each logger a site ID number that is unique to each site so that InSight and\or VISION software can place new data with previously stored data automatically in the PC database. AS041 Rev. 10-1-99 InSight Data Analysis Software 73 Stormwater The Stormwater menu shown below lets you start an attached wastewater sampler when the trigger values have been reached. This feature is designed to assist you in conforming to the EPA’s NPDES (National Pollutant Discharge Elimination System) permit program. When the trigger values are reached a signal is sent to an attached wastewater sampler telling it to start its sampling program. This option requires connection of a cable between the loggers ‘Sampler’ receptacle and a wastewater sampler. Typically this is done by enabling the ‘external level control’ feature on the sampler. See your logger and sampler manuals for details concerning signal descriptions and cables. Note: For Stormwater you must connect the logger to an external wastewater sampler programmed to accept a ‘level-start’ signal (see your sampler manual for details). AS041 Rev. 10-1-99 InSight Data Analysis Software 74 Velocity Sensor Loggers that support multiple concurrent sensors (920\930\940) require that you designate one of the sensors as Velocity 1. If you only use one sensor, you must designate it as ‘Velocity 1’. If you use two sensors, designate one as the Velocity 1 and the other as Velocity 2. Designate the first and secondary sensors from the pull-down lists for each available sensor (shown below). Designate the first velocity sensor as Velocity 1 (Make sure the matching level sensor is also selected as Level 1, if used). Designate any remaining sensors as Velocity 2 and Velocity 3. With a secondary sensor installed as a backup (in the unlikely event that a primary sensor fails while in service), it is a simple matter to swap another sensor in place of the failed one without removing the logger from the manhole. This could eliminate any unnecessary (and expensive) confined space entry. Note: The Velocity Sensor menu style may vary depending on the model of the data logger to which you are connected. If only one velocity sensor is installed in the logger it is automatically designated as the Primary Sensor. Overcoming Site Problems Some sites may be difficult to monitor due to poor site conditions (see your logger manual for details). The direction, as well as the speed of the particles in the flow stream contribute to the signal received by the velocity sensor. If turbulence near the measurement point is excessive, it may be difficult for the sensor to determine the average velocity of the stream. SIGMA loggers provide several unique features to help deal with these problem sites. Velocity Direction. There are three choices: • Upstream (normal) • Downstream • Always Positive AS041 Rev. 10-1-99 InSight Data Analysis Software 75 Upstream (normal) This choice is for average sites with fairly consistent velocities, and low to medium turbulence. The flow stream should ideally travel relatively straight through the site with no drops or turns near the measurement point. Mount the sensor in the pipe, facing into the flow, where the flow stream enters the measurement area. Downstream This choice allows you to locate the sensor on the downstream side of the measurement point (where the flow stream exits the site), aiming the sensor in the downstream direction rather than the normal, upstream direction. This option is useful in sites where there is more than a single flow stream entering a site and it is desired to measure the combined flow of all streams at a single exit point. AS041 Rev. 10-1-99 InSight Data Analysis Software 76 Mounting the sensor ‘backwards’ in this manner (see below) causes the velocity direction readings to be the opposite of actual stream flow. By selecting the Downstream choice, the logger electronically reverses the measured signal to show actual flow direction. Always Positive Extreme turbulence conditions can make it difficult to detect proper flow direction due to the mixing action of very turbulent water. Reflecting particles in the flow stream (particularly near the surface of the stream) may be traveling in several different directions at once, even though the bulk of the stream is moving in the same general direction. The velocity magnitude is generally consistent in these cases, however reflections coming from the particles moving in a positive direction (same direction as the flow stream), are so mixed up with those coming from particles moving in a negative direction (opposite direction as flow stream) that determining actual direction is difficult. Note: selecting Always Positive, causes all readings to be logged as positive, regardless of the measured signal direction. This choice should not be selected for sites where negative flows normally occur, such as with tidal effects on ocean outfalls. AS041 Rev. 10-1-99 InSight Data Analysis Software 77 Velocity Cutoff \ Velocity Default Velocity Cutoff compensates for difficulty encountered at sites with very low velocities and extremely clean water. This combination of unique conditions is difficult because; the clean water may contain very few reflecting particles, and extremely low velocities usually mean little or no turbulence to add entrained air bubbles to the flow stream (which also make good reflecting targets). Rather than report erratic velocities, the Velocity Cutoff allows you to enter a default velocity value which is used when the Velocity Cutoff set-point is reached. The logger holds the default value whenever the velocity is at or below the cutoff value. Velocity Signal Strength The velocity probe must be installed in the flow stream and be connected to the logger in order for this diagnostic to work. Velocity signal strength allows you to view a ‘real time’ signal directly from the velocity probe. It shows you the current velocity Signal Strength (percentage of Doppler signal returning to the probe). Use this diagnostic to determine whether or not you have the probe mounted for optimal velocity measurement. The closer to 100% the Signal Strength is, the more stable the velocity reading will be. If the signal is lower then 50% it may be due to improper installation of the probe or lack of particulate in the flow stream to reflect the Doppler Signal. See your logger manual for details on proper site selection and sensor installation. AS041 Rev. 10-1-99 InSight Data Analysis Software 78 Real-Time Operations These operations have an immediate affect on the operation of the logger. Realtime operations include: • • • • Setting the logger time and date. Toggling an external wastewater sampler. Setting the current water level in the flow stream for all level sensors. Calibrating all level sensors. Double-click on the desired choice (above) to select it. AS041 Rev. 10-1-99 InSight Data Analysis Software 79 Set Time & Date This operation lets you set the real-time clock in the logger. You may set the clock to any time you wish or you may automatically synchronize the loggers clock with the clock in the your computer. Note that this operation causes all logged data points to be permanently cleared from the logger memory. Make sure you download the logged data before proceeding. Enter the new logger time and date or let InSight use the time from the PC. The current time and date from the logger and your PC are displayed for your reference (see below). Select the Program button to place the new time and date into the logger, or press Cancel to abort the process. Logged data is not cleared if the Cancel button is selected. See Synchronized Time Clocks in the Technical Reference chapter for details on synchronizing logger and PC clocks with international standards. AS041 Rev. 10-1-99 InSight Data Analysis Software 80 Toggle Sample Enable Line This choice lets you toggle (enable) the Sampler Start signal in the logger. This signal appears on Pin D of the Sampler receptacle. It is used to enable a sampling program on a Sigma wastewater sampler or equivalent. This line is normally allowed to float and is switched to ground for 65 seconds when toggled. Calibrate Level Level calibration procedures in this section pertain to the SIGMA 904, 910, 920, 930 and 940 loggers only. Level sensor calibration for the SIGMA 900MAX, 950 960, and 970 are performed via the front panel of the logger. See the appropriate logger manual for complete calibration instructions. Note: Previous calibration adjustments are discarded by the logger each time a calibration is started. Do not return to this screen to check the calibration, instead use the status screen to display real-time values from the sensor. Submerged Velocity Probe Level Calibration Submerged Velocity Probe calibration requires a bucket with at least six inches (16 cm) of water and a ruler. Calibration of the submerged velocity probe characterizes the logger electronics to the unique characteristics of each individual probe. In addition, the calibration compensates for any drift in the output of the sensor which may occur over long periods of time as the materials in the sensor age (one year or greater). The submerged velocity probe is a pressure transducer containing a stainless steel diaphragm. As the water pressure increases, (with increasing head in the flow stream) the diaphragm is deflected, or pushed, against a solid state device called a strain gauge. The strain gauge converts the pressure against the diaphragm to a voltage. As the head (level) in the flow stream increases so does the voltage coming from the submerged velocity probe. The voltage is read by the microprocessor in the logger at a regular interval and is converted to a number which represents the level in the flow stream. The level reading can then be converted by the logger to a flow rate based on a primary device formula or readings of the velocity circuitry. To assure optimum accuracy, re-calibration should be performed approximately once per year, when changing to a different submerged velocity probe or when changing a probe to a different flow meter. AS041 Rev. 10-1-99 InSight Data Analysis Software 81 Submerged Velocity Probe Calibration Procedure Step 1 - Remove Probe From Liquid Place the probe face down on a table top or floor with the sensor (the plate with holes) flat onto the surface you are using then press the OK key. Place probe face down on a flat surface then press OK Step 2 - Remove Air Bubbles Place the probe upside down in the bucket of water and tap gently to remove any air bubbles from under the plate. If these bubbles are not removed you may receive false readings from the sensor during calibration. Place probe upside down and tap gently to remove air bubbles. AS041 Rev. 10-1-99 InSight Data Analysis Software 82 Step 3 - Submerge Probe To A Known Depth Place the probe under at least six inches (16 cm) of water in a horizontal orientation, as shown below. Make sure the water surface is calm and the probe is stable and not moving around. Then press OK to continue. D Measure the depth of water from the bottom of the bucket to the surface of the water (‘D’ above) and enter the new value ( as shown below). Click on the Enter New Value box, then enter the new value. The real-time reading from the sensor is displayed on top for reference. Press the OK key to continue. This completes the calibration of the Submerged Velocity Probe. Note: Always adjust the level reading when re-installing the flow meter following a calibration. AS041 Rev. 10-1-99 InSight Data Analysis Software 83 Ultrasonic Level Calibration Level calibration procedures in this section pertain to the SIGMA 910, 920, 930 and 940 loggers only. Level sensor calibration for the SIGMA 900MAX, 950 960, and 970 are performed via the front panel of the logger. See the manual for your 900MAX, 950 or 960\970 for complete calibration instructions. Note: Previous calibration adjustments are discarded by the logger each time a calibration is started. Do not return to this screen to check the calibration, instead use the status screen to display real-time values from the sensor. Calibration should be performed each time the sensor is installed at a new site or whenever a sensor is moved to a different logger. Calibration of the ultrasonic sensor includes calibrating the temperature probe inside the sensor body. From this menu you may also match the current ultrasonic sensor reading to the water level in the flow stream using one of two methods, Liquid Depth or Sensor Height, which are described in the following section. Enter the new temperature value in the box provided (in degrees Celsius) by clicking on the Enter New Value box and typing (see important note below). Note: Temperature Time Constant The speed of sound in air varies with the temperature of the air. The ultrasonic sensor is equipped with temperature compensation to help eliminate the effects of temperature variation under normal site conditions. The time constant of the ultrasonic transducer is 100 minutes. The transducer temperature must be equal to the ambient air temperature at the site prior to calibration for optimum results. The sensor takes one AS041 Rev. 10-1-99 InSight Data Analysis Software 84 hundred minutes to come to total equilibrium with the surrounding air temperature. Level calibration requires entry of either the liquid depth or the sensor height. Each method has it’s advantages and disadvantages so selection of the proper method will depend upon the site conditions. Liquid Depth This choice requires you to enter the water level or depth of liquid which is contributing to flow. In a round pipe the entire depth typically contributes to flow. In a weir, only the depth which is flowing over the weir plate contributes to flow. Note: This is the same as using the Level Adjust choice in the Remote Programming menu. Liquid Depth calibration is only used when: 1. There is access to the primary device for a physical measurement of the liquid depth, AND, 2. Water is flowing during installation of the flow meter (channel is not dry). Selecting the Liquid Depth method will prompt you to make sure the sensor has stabilized for at least two minutes before entering the new water level. The Level Adjust menu (below) displays the current level reading in the top of the window for your reference. Enter the new level in the box provided at the bottom of the window. AS041 Rev. 10-1-99 InSight Data Analysis Software 85 Take a physical measurement of the liquid depth (head) and enter the new level value (make sure you enter the value in the units shown). Press the OK button when done or Cancel to abort the process. Sensor Height This choice requires you to enter the distance between the face of the ultrasonic sensor and the zero flow point in the primary device. The zero flow point in a primary device is the level at which flow ceases. In a round pipe the zero flow point would typically be the invert or bottom of the pipe. In a V-notch weir the zero flow point would correspond to when the liquid behind the weir is level with the bottom of the ‘V’ (There would still be liquid behind the weir plate but it would not be contributing to flow). Sensor Height calibration is used when: 1. Access to the primary device is difficult (such as confined space entry in a manhole), or 2. When there is no liquid flowing during installation of the flow meter (the channel is dry). Selecting Sensor Height prompts you to enter the distance from the face of the transducer to the zero flow point of the primary device. In a dry pipe the zero flow distance is the distance from the face of the sensor to the bottom of the pipe. The current distance to the nearest target (Liquid Distance) is shown at the top of the window for your reference. Enter the new Zero Flow Distance in the box provided. Note: Always re-check the Level Adjust when re-installing the flow meter following a calibration. AS041 Rev. 10-1-99 InSight Data Analysis Software 86 Adjust Level Setting the Water Level Take a physical measurement of the water level and enter the new level number using the Level Adjust menu shown above. The Current Level reading is downloaded from the logger and displayed every few seconds for your reference (menu controls are disabled during this period of time). To set the water level, measure from the surface of the water to the top of the pipe (‘A’ in Drawing above), then subtract this from the pipe diameter (‘B’ in Drawing) to get the water level in the pipe (‘C’ in Drawing). This method causes no disturbance to the flow stream which might otherwise effect the measurement (and it keeps the tape measure or ruler out of the “stuff” where it will stay clean). Repeat this procedure for all installed level sensors. AS041 Rev. 10-1-99 InSight Data Analysis Software 87 Reset Logger This choice is provided to allow you to restart a logger which has entered the Program Complete state. Program Complete is caused by full Slate Memory or loss of main power for longer than three hours). Important: All logged data is permanently erased from the loggers memory during this operation. Make sure you have retrieved and stored all logged data before proceeding. The following message is displayed after the reset is performed: AS041 Rev. 10-1-99 InSight Data Analysis Software 88 Diagnostics This screen provides more information about your logger as well as several useful utilities that help you find and fix problems fast. Diagnostics View Event Log The Event Log diagnostic provides a time\date stamped list of significant events occurring in the flow meter. These events can be reviewed to find out when an event occurred and what events preceded or followed the event of interest. AS041 Rev. 10-1-99 InSight Data Analysis Software 89 The following "fixed" alarms will also show the ON\OFF status associated with the alarm - for instance, U-SONIC ECHO LOSS ON at some time\date, then USONIC ECHO LOSS OFF when the condition ceases: Event Explanation LOW MAIN BATTERY Battery pack is less than minimum allowable voltage. Internal memory battery is low Less than 10% slate memory left Slate memory is used up Modem chip\modem board failure No return signal detected The return signal is detected too soon Ultrasonic board detects an error Communication problem with RS485 Possible leak in bubble tank Bubbler tube is plugged MEMORY BATTERY LOW SLATE MEMORY SLATE MEMORY FULL MODEM FAILURE U-SONIC ECHO LOSS XDUCER RINGING U-SONIC FAILURE RS485 TIMED OUT LOW BUBBLER PRES. CLOGGED BUBBLER The following "channel" alarms always show the value which caused the alarm to occur or go away, along with a status ON\OFF to indicate if the alarm occurred or went away at that time\date: Event LEVEL FLOW FLOW RATE OF CHG pH ORP PROCESS T EMP. RAINFALL CH1 CH2 CH3 CH4 CH5 CH6 CH7 VELOCITY D.O. D.O. TEMP. CONDUCTIVITY COND. TEMP. Other events: Sensor Calibration Event Calibration of sensors is signified by a single entry for that sensor. In the example below the pH sensor was calibrated on April 17 at 10:05 AM. Event APR17 10-05 Misc. Events Event ON OFF START PROGRAM HALT THE PROGRAM RESUME PROGRAM PROGRAM COMPLETE LOGIN AS041 Rev. 10-1-99 pH Explanation Unit was turned on Unit was turned off Program was started Program was halted Program was resumed Program complete due to 3-hr power loss or full slate memory Operator logged in with personal ID number. InSight Data Analysis Software 90 Printing the Event Log For both DOS and Windows operating system versions of InSight, printing an InSight Event Log consists of selecting the Print button at the top of the Event Log window. This opens a Print menu. The print menu presented differs between the DOS and Windows versions of InSight as indicated below. Printing Event Log — InSight for DOS operating system (only) Click on the Print button to print a copy of the event log to the local printer. If you have not already done so you may select a printer from the list that provides the closest match to your printer. If your printer is not listed, refer to your printer manual for a printer ‘emulation’ that will work with your printer. Print Event Log Screen, InSight for DOS operating system (Only) Note: Baud Rate, Stop Bits, Data Bits and Parity settings only apply to serial printers attached to COM1 or COM2. These settings do not effect parallel printers attached to the LPT1 or LPT2 ports. Printing Event Log — InSight for the Windows® operating system (Only) Selecting the Print button from the Event Log screen will present a standard Windows® operating system printer dialog box. The total print options available depend on the printer selected. The Windows operating system allows the user to add new printer drivers as desired. AS041 Rev. 10-1-99 InSight Data Analysis Software 91 The screen below is a typical Windows® operating system Print menu. Saving the Event Log to Disk Click on the Save button to save a copy of the event log to an ASCII text file on disk. The file is saved to the \INSIGHT\DATA\TXT directory with an extension of .STS by default. You may change this to any desired drive or directory. AS041 Rev. 10-1-99 InSight Data Analysis Software 92 Sample History This choice displays a history of water samples taken from an optional wastewater sampler. Time date and bottle number are displayed. Update Software (Flash) (this feature is not yet implemented) Security The Security button on the “Connected to [logger]” menu presents this menu screen which allows the user to enable password security (Secure Logger), disable password security (Unsecure Logger), and access a screen where the password can be changed. Clicking Secure Logger button will present a screen which displays the current password and buttons to Secure Logger and Change Password or Return to the previous screen. Clicking Unsecure Logger will briefly present a “Checking Security Clearance” message and then displays the “Connected to ..[logger]” menu screen. Clicking Return returns to the “Connected to .. [logger]” menu screen. Secure Logger The current password is displayed at the top of this screen as depicted below. The password box is only for display of the password; no changes or entries are accepted in this text box. Clicking Secure Logger will briefly present a “Checking Security” and then “Operation Successful” message. At this point InSight disconnects from the logger, closes all subscreens, and presents the main screen. The user may reconnect to the logger (using the password) to perform other operations with the logger, if desired. AS041 Rev. 10-1-99 InSight Data Analysis Software 93 Changing the Password Clicking Change Password will briefly present a “Checking Security Clearance” message followed by the password entry screen. Enter a new eightdigit numerical password. Clicking Ok in the password entry screen returns to this screen. Click Return to exit this screen. DTUs and Password Security As indicated in the screen above, any logger which has been secured (locked) with a password cannot transfer data to a DTU until the logger is unsecured via InSight. During an attempt to download data to a DTU from a password-locked logger, ERROR 52 Code may display on the DTU. In this instance, the code merely indicates a password-secured logger rather than a “flash memory corruption” usually associated with this error code. DTUs, themselves, cannot be locked (secured) with a password. Unsecure Logger Clicking the Unsecure Logger button will present a brief “Checking Security Clearance” message and then the “Connected to... [logger]” screen. The logger is now unsecured and will not require a password entry to access the “Connected to...” screen the next time a connection is initiated in InSight. The Return button returns to the Connected screen. AS041 Rev. 10-1-99 InSight Data Analysis Software 94 Connected to a DTU Note: Two versions of the SIGMA DTU are compatible with InSight, the DTU-I and DTU-II. The DTU (Data Transfer Unit) retrieves data from SIGMA flow meters and 900MAX series samplers. The DTU transfers data into your PC via an RS232 connection (see note at left concerning DTU-I and DTU-II model differences). The DTU-I holds data from up to 9 sites with 256k of RAM memory. It transfers data at 19,200 baud only. The DTU-II holds up to 20 sites with either 1 or 2 megabytes of RAM memory installed. Baud rates are selectable from 1200 to 19,200 baud. Note that only those cells in the DTU that contain data are shown. A Summary of each full cell is provided for your reference. Click on a radio button to select a cell. Only selected cells are retrieved. Empty cells are grayed-out and cannot be selected. Select the cell or cells you wish to download and then press the OK button to begin the retrieval process. Press the Return button to cancel and return to the previous menu. An indicator displays the status and percent complete for each DTU cell transferred. AS041 Rev. 10-1-99 InSight Data Analysis Software 95 A separate site file is created on disk for each retrieved cell. AS041 Rev. 10-1-99 InSight Data Analysis Software 96 Connected to a Rain Logger The Rain Logger is a battery powered solid state data logger that is used in conjunction with an AMERICAN SIGMA Tipping Bucket Data Logging Rain Gauge. When mated with a SIGMA Rain Reader, the Rain Logger transfers data optically into the Rain Reader and simultaneously via RS232 cable into your PC. Note: This battery is for temporary use in the field to power the Rain Reader when A/C power is not available (when using a laptop computer for example). Always disconnect this battery when not in use to conserve battery life. To connect a Rain Logger to your PC: 1. Install the Rain Reader and Rain Logger into the alignment tray as shown above. 2. Connect the A\C wall mount power supply to the Rain Reader (or use the temporary 9 volt battery if A\C power is not available). 3. Connect the Rain Reader RS232 cable to your PC’s COM port. 4. Select the proper COM port for use with your PC (shown below). Note: the Rain Logger baud rate is permanently set to 4800 baud and so the baud rate is not selectable. AS041 Rev. 10-1-99 InSight Data Analysis Software 97 Once connection has been established the Connected to Sigma Rain Logger menu appears: The current program settings from the logger are displayed in the box at the top of the window for your reference. Retrieve Logged Data Retrieves all data from the Rain Logger and stores it to a site file. See Data Analysis for details on viewing and reporting your site file data. AS041 Rev. 10-1-99 InSight Data Analysis Software 98 Clear Logger Memory Important: All logged data is permanently erased from the loggers memory during this operation. Make sure you have retrieved and stored all logged data before proceeding. Remote Programming This choice allows you to program new settings into the Rain Logger. Choices include: 1. Site Id - Enter a site description of up to 80 characters in the box provided. 2. Start Condition - Start logging data when the rain begins by selecting Record on First Tip or start logging right now by picking Start Immediately. 3. Interval - Enter the desired recording interval (1, 2, 3, 5 or 10 minutes). See chart below. 4. Memory Mode - Slate or Wrap. Slate Memory Mode causes logging to stop when memory becomes full. Wrap memory mode discards the oldest reading each time a new reading is taken in once memory becomes full. 5. Clock button - Sets the real-time clock in the Rain Logger. See Synchronized Time Clocks in the Technical Reference chapter for more information on synchronizing logger and PC clocks with international standards.. AS041 Rev. 10-1-99 InSight Data Analysis Software 99 Recording Interval Days to Log (until memory becomes full) 1 2 3 5 10 7 14 21 35 70 Click on the OK button to program the Rain Logger with the new settings and return to the previous menu. Return Click on the Return button disconnect from the RainLogger and return to the main menu. AS041 Rev. 10-1-99 InSight Data Analysis Software 100 ADVANCED MENU SITE DATABASE This choice turns on the Site Database Toolbar as shown below. This toolbar must be turned on if you wish to merge files during the download process. If it is not turned on you are not prompted to merge the data during download. You may merge the data at a later time if you wish, see the chapter titled Site Files and Merged Database Files in the beginning of this manual for details on using this toolbar. AS041 Rev. 10-1-99 InSight Data Analysis Software 101 SHOW TOOLBAR ! Check the Show Toolbar selection if you wish to display the main toolbar as shown below. The toolbar provides fast, single-click operation for RS232 and modem connection to a logger, as well as a quick way to open the Analysis menu. These buttons provide the same results as the Connect and Site\Analysis... menu items without the need to open pull-down menus. SHOW SPEED GROUP Click the Show Speed Group selection if you wish to display the Speed Group window. The Speed Group gives you quick access to the logger via RS232 only. Using the Speed Group you may quickly perform these commonly used functions (via RS232 only): • Retrieve and display the status screen from the currently attached logger. • Download the data from the currently attached logger to disk. • Retrieve and display the event log from the currently attached logger. The Speed Group is useful when visiting multiple sites using a laptop. It gets you the information you need fast and gets you on your way to the next site without delay. NOTE If the logger is password secured (locked), a password entry screen displays when one of these buttons is clicked. Enter the password to execute the function. An encrypted password displays after three wrong or empty password entries. (see heading: “Security Function” for detail.) EXTENDED KEYBOARD SUPPORT For users of laptop or other computers that do not contain a pointing device such as a mouse, trackball, etc. Enabling this selection provides function key (F1, F2, etc.) equivalents for most mouse commands. In the example below, the F2 key is the equivalent. AS041 Rev. 10-1-99 InSight Data Analysis Software 102 DATA DIRECTORIES InSight data may be stored in any directory you wish. This menu allows you to select the desired default directory for your data. All new data downloads will be sent to this directory. Enter a valid directory path manually in the top window, or select ‘Browse’ to search the current directories in your system. Select Add To List. Once a data directory has been added to the Data Directories list, it may be selected as the Current Data Directory by clicking on it. To remove a directory from the list, highlight the desired selection and click the Remove From List button. AS041 Rev. 10-1-99 InSight Data Analysis Software 103 CREATE\EDIT TEMPLATE Program templates let you create and store to disk your program settings for use later at the flow monitoring site. You may create a template from scratch or save an existing program into a template that you have retrieved from a logger (see Remote Programming for details on all programming steps required to create and use program templates). Templates store all fixed logger settings as shown below. Double-click an item to modify it. This saves you time by letting you recall a stored template instead of having to answer all the programming questions while at the site. AS041 Rev. 10-1-99 InSight Data Analysis Software 104 FLOW SIMULATOR The flow simulator is a handy tool for spot checking flow rates in open channels. To use the Flow Simulator: 1. Select any primary device by clicking on the Modify Primary Device button. 2. Next, enter a water level (and velocity value if required by the selected primary device). 3. Finally, click the Calculate button to see the resulting flow rate. Click on the Return button when finished. AS041 Rev. 10-1-99 InSight Data Analysis Software 105 SCHEDULING The Scheduling function in the Advanced menu allows a user to schedule when InSight will call a specific logger at a specific phone number at a specific time and day of the week and download the data from the logger. The logger being called must have a modem installed. Moreover, InSight must remain running on the PC after the Begin button is clicked. The number of meters that may be scheduled at one time depends on the total time required to collect data from each meter and the frequency of data retrieval. There is no limit within InSight on the number of scheduled retrievals. Click once on an item to delete it from the schedule. Click here to select and configure your modem. Click here to add a new site to the schedule. Click here to start the schedule running. Scheduling and Security When a user adds a logger to the schedule via the “Add” button and screen (see below), a text box is provided on that screen for entering the password which was set for the particular logger. The user must know and enter the password for each logger being scheduled. If a particular logger is not password secured (locked), do not enter anything in the password text box. AS041 Rev. 10-1-99 InSight Data Analysis Software 106 CAUTION An error code for a failed download connection for reasons related to password security will not display until the call is placed [which could be in the middle of the night]. For this reason, it is important that a password is entered carefully for any secured modem at the time of scheduling entry. If a password for a (secured) logger was not entered or entered incorrectly in the Scheduling Add screen, an error code similar to the screen depicted below will display when the logger is called and the connection prevented by the password security feature. The incorrect password that the logger received is listed between the parentheses at the end of the error code. If no password was entered, eight zeros are displayed between the parentheses. The telephone number of the connection that failed is identified as “not assigned” in the message box. 555-5555 not assigned QUIT Exit to operating system (DOS or Windows®) AS041 Rev. 10-1-99 InSight Data Analysis Software 107 ARCHIVING DATA Archiving creates a spare copy of your data for use in the event of failure or loss of the original. This essential precaution is often neglected by computer users until the first time they experience a disk crash or accidentally delete the only copy of the file they have been working on for the last six months. STORE ARCHIVED DATA OFF-SITE Ideally the backup copies should be kept at a different site or in a fire safe since, though your hardware may be insured against fire, the data on it is almost certainly not insured and not easily replaced. INCREMENTAL BACKUP A copy of all files which have changed since the date of some previous backup is called an Incremental Backup. The first backup of your data should include all files. Call this level 1. The next backup, level 2, would include only those files which have changed since the level 1 backup. Together the level 1 and level 2 backups will include the latest version of every file. Level 2 backups are also considerably less time consuming since they contain fewer files. BACKUP DEVICES AND PROCEDURES Backup device technology changes rapidly. Choices include floppy disk, tape cartridge, optical disk, recordable CD ROM, etc. Consult your computer vendor for the best backup solution for you. Your backup software includes valuable tips on procedures for archiving files. The important thing is to have at least one spare copy of all your important data. Hard disk drives all crash eventually, but even more common is accidentally deleting that file you worked on for the last six months. Be prepared and you’ll be back to work in no time. AS041 Rev. 10-1-99 InSight Data Analysis Software 108 TECHNICAL REFERENCE COMPATIBILITY InSight for DOS operating system is compatible with DOS (version 3.3 or higher) and runs as a DOS application or as a DOS application under Microsoft Windows® (versions 3.1, 3.11) operating systems. InSight for the Windows® operating system runs as an application under the Windows® 95, Windows® 98, or Windows® NT operating systems (Only). USING INSIGHT FOR DOS OPERATING SYSTEM UNDER MICROSOFT WINDOWS® 3.1 OR 311 OPERATING SYSTEM In most cases InSight works fine as a DOS application under Windows® 3.1 or 3.11. However, if problems arise you should quit Windows® and run InSight from the DOS prompt to see if the problem goes away. SPEED — INSIGHT FOR DOS OPERATING SYSTEM (ONLY) InSight runs fastest with the SMARTDRV.EXE device driver installed to perform disk caching, which can speed up your computer. To use SMARTDrive for disk caching, add the SMARTDRV command to your AUTOEXEC.BAT file. To use the double-buffering feature of SMARTDrive, the SMARTDRV.EXE device driver must be loaded by a DEVICE command in your CONFIG.SYS file. See your DOS or Windows® operating system manual for details. KEYBOARD SHORTCUTS These keyboard commands may be used when no mouse or other pointing device is available. Note : A mouse is required when using the report or graph setup tabs. Key TAB key Arrow Keys Space Bar Alt-x ESC key Function Keys (F1-F10) Enter ↵ Key AS041 Rev. 10-1-99 Action Cycles the focus from section to section within the current menu. Used in conjunction with the arrow keys to make menu selections. Cycles focus from field to field within the current section or box. Also cycles through choices in a pull-down menu. Selects the current item. Same as ‘clicking’ on an item. Pressing the ALT key while selecting the underlined letter of a menu or button command activates that command. Cancels current operation. Mouse button equivalent commands. Keys are labeled with equivalent function key name where available. Requires enabled Laptop Version choice in the Advanced menu. Selects the currently focused button or option. Opens a pull-down menu. InSight Data Analysis Software 109 TROUBLESHOOTING COMMUNICATIONS PROBLEMS LOGGER CONNECTION OR DATA TRANSFER PROBLEMS InSight for DOS operating system (Only) InSight for DOS operating system (Only) If you have trouble transferring data from a logger, go through the following checklist to find the source of the problem: 1. Make sure you are using the correct cable. Remove all adapters and extension cables and try again. 2. Make sure the logger is turned on and has sufficient power. 3. Double check that the baud rates of the logger, PC and\or DTU all match. 4. Try a different COM port (since they are seldom labeled it can be difficult to tell which COM port is which sometimes). 5. Quit Windows® if it is running and try again from the DOS prompt. Do not click on a DOS icon to get to DOS, make sure Windows® is completely closed. 6. If you have an older PC, lower the BAUD rate on the PC and on the logger and try again (see COM Ports and UARTS below for details). 7. If your PC uses power management use LAPTOP.BAT to start InSight (see Power Management below for details). 8. “Boot Clean” and try again (see Booting Clean below for details). 9. Try a different logger, if possible, to see if the problem resides in the logger. 10. Try a different PC, if possible, to see if the problem resides in the computer. 11. Make sure you are using the latest versions of software. Visit the American Sigma Internet Home Page (www.americansigma.com) or BBS (716-7981216) for the latest updates. Contact the factory for details. BOOTING CLEAN — INSIGHT FOR THE WINDOWS® OPERATING SYSTEM (ONLY) To boot clean means to start the computer without loading the system startup files AUTOEXEC.BAT and CONFIG.SYS. Since these files often load mouse, network, CDROM, and other driver software, these options will not be available when you boot clean. If one of these drivers is interfering with the operation of InSight then booting clean will allow InSight to work correctly. Once you determine if booting clean corrects your problem then you should contact your PC administrator for details on modifying the startup files for compatibility with InSight. 1. 2. 3. 4. 5. AS041 Rev. 10-1-99 Reboot the computer. Watch for the words “LOADING MSDOS” or “LOADING WINDOWS’95” If you see “LOADING MSDOS” then immediately press the F5 key several times. If you see “LOADING WINDOWS’95” then immediately press the F8 key several times. Your computer will bypass the startup files and take you directly to the DOS “C:>” prompt (win 3.1) or to a menu from which you can select the “Safe Mode, DOS prompt only” choice (win’95). Change to the InSight directory by typing CD\INSIGHT then press ENTER. Start InSight by typing INSIGHT, then press ENTER. InSight Data Analysis Software 110 POWER MANAGEMENT — INSIGHT FOR THE DOS OPERATING SYSTEM (ONLY) Most laptop computers and many newer desktop computers have power management features that conserve battery power and save energy. In some cases this power management software interrupts the operation of DOS based programs which use the PC’s COM port. If you have trouble transferring data using a PC with power management then you should start InSight by using the LAPTOP.BAT file instead of the INSIGHT.EXE file as in the following procedure: To start InSight from DOS: 1. Change to the C:\INSIGHT directory by typing CD\INSIGHT at the C:> prompt (Note: this assumes you installed the program into the C:\INSIGHT directory. If not, then substitute the appropriate drive letter and directory). 2. Type LAPTOP then press ENTER to start the program. To start the program from Windows® 3.1 or 3.11: 1. From Windows® File Manager, select the FILE menu. 2. Click on the word RUN… 3. Type C:\INSIGHT\LAPTOP then click on OK to start the program. To start the program from Windows® '95: 1. Click on the START button. 2. Click on RUN… 3. Type C:\INSIGHT\LAPTOP then click on OK to start the program. This procedure temporarily disables all power management features in your PC while InSight runs. Power management is then restored to its previous state when you exit InSight. COM PORTS AND UARTS UART Chips. The heart of any serial port is the Universal Asynchronous Receiver\Transmitter (UART) chip. This chip completely controls breaking the native parallel data within the PC into serial format, and later converting serial data back into the parallel format. There are several different types of UART chips on the market. The original PC and XT used the 8250 UART, which is still used in many low-price serial cards on the market. In the PC\AT (or other systems based on at least an 80286), the 16450 UART is used. The only difference between these chips is their suitability for high-speed communications. The 16450 is better suited for highspeed communications than the 8250; otherwise, both chips appear identical to most software. The 16550 UART was the first serial chip used in the PS\2 line. This chip could function as the earlier 16450 and 8250 chips, but it also included a 16-byte buffer which aided in faster communications. Unfortunately, the 16550 also had a few bugs, particularly in the buffer area. These were corrected with the release of the 16550A UART, which is used in all high-performance serial ports. Because the 16550A is a faster, more reliable chip than its predecessors, it is best to look for serial ports that use it. If you are in doubt about which chip you AS041 Rev. 10-1-99 InSight Data Analysis Software 111 have in your system, you can use the Microsoft MSD program (provided with Windows® or DOS 6) to determine the type of UART you have. How this relates to the SIGMA logger data transfer. If you are having trouble downloading from a DTU-I and you are sure the COM port setting is correct, (and if you are sure the COM port works at all) then try downloading from the logger directly to a PC (PN1727 cable) using a slower baud rate such as 4800 or 2400 (set BOTH the PC AND the logger to the same baud rate). If this works OK then try increasing the baud rate back to 19,200 baud. If it fails at the higher baud rate then you need to upgrade your PC serial port. Note that the age of the PC does not necessarily tell you if you have a faster serial port UART. Many new PC’s still ship with the slower serial ports. Use the MSD program to tell for sure. UART Chip reference in PC or AT Systems AS041 Rev. 10-1-99 Chip Description 8250 IBM used this original chip in the PC serial port card. The chip has several bugs, none of which is serious. The PC and XT ROM BIOS are written to anticipate at least one of the bugs. This chip was replaced by the 8250B. 8250B The last version of the 8250 fixes bugs from the previous two versions. The interrupt enable bug in the original 8250, expected by the PC and XT ROM BIOS software, has been put back into this chip, making the 8250B the most desirable chip for any nonAT serial port application. The 8250B chip may work in an AT under DOS, but does not run properly at 9600 bps. 16450 IBM selected the higher-speed version of the 8250 for the AT. Because this chip has fixed the interrupt enable bug mentioned earlier, the 16450 does not operate properly in many PC or XT systems, because they expect this bug to be present. OS\2 requires this chip as a minimum, or the serial ports will not function properly. It also adds a scratch-pad register as the highest register. The 16450 is used primarily in AT systems because of its increase in throughput over the 8250B. 16550A This chip is a faster 16450 with a built-in 16-character Transmit and Receive FIFO (first in, first out) buffer that works. It also allows multiple DMA channel access. You should install this chip in your AT system serial port cards if you do any serious communications at 9600 bps or higher. If your communications program makes use of the FIFO, which most will today, it can greatly increase communications speed and eliminate lost characters and data at the higher speeds. InSight Data Analysis Software 112 LEVEL AND VELOCITY SENSOR GUIDE Chart of the level and velocity sensors available for SIGMA data loggers: Data Logger 900MAX Sampler 910 Flow Meter 920 Flow Meter 930 Flow Meter 940 Flow Meter 950 Flow Meter 960 Flow Meter 970 Flow Meter AS041 Rev. 10-1-99 Available Level Sensors 40 or 75Khz Ultrasonic Sensor or Submerged Level Sensor or Submerged Level \ Velocity Sensor One Submerged Level \ Velocity Sensor One or two Submerged Level \ Velocity Sensors or One Submerged Level \Velocity Sensor and One Ultrasonic 75Khz Level Sensor Three Submerged Level \ Velocity Sensors Up to two Ultrasonic 75Khz Level Sensors (logs all velocity sensors and any three level sensors at a time) Same as 930 FM approval for Class I, Div. I environments Ultrasonic 40 or 75KHZ Level Sensors or Zero Deadband Ultrasonic 75Khz Level Sensor or Submerged Level Sensor or Submerged Level \ Velocity Sensor (or all of the above in one unit: OptiFlo model) (logs one velocity sensor and any one level sensor at a time) Same Sensors as 950 Long term monitoring package with low power consumption. Ultrasonic 50KHZ Level Sensor or One Submerged Level \Velocity Sensor or Ultrasonic 50KHZ Level Sensor with Velocity Only Probe. InSight Data Analysis Software 113 SYNCHRONIZED TIME CLOCKS It is important that the logger clock be set correctly and that it is in agreement with the PC’s internal system clock. This makes comparison of data sets consistent and more accurate. See Remote Programming \ Set Time and Date, for details on synchronizing your PC clock with those in your data loggers. Greenwich Mean Time (GMT) Data readings are always taken with respect to time. Thus all observations have a corresponding time, and that time is reported along with the measurement. By convention, weather scientists use the twenty four hour clock, and use one time zone, Greenwich Mean Time (GMT). This time is also known as Universal Time (UTC). To convert to local time, we must know the time difference between GMT and local time for both standard time and summertime (daylight savings time). Not all states use daylight savings time in the summer. The Time Zones across North America and Pacific from East to West are: Atlantic Eastern Central Mountain Pacific Alaska Standard time: GMT difference 00 01 02 03 04 05 06 07 08 09 10 11 12 13 14 15 16 17 18 19 20 21 22 23 ATL -4 8P* 9P* 10P* 11P* 12A 1A 2A 3A 4A 5A 6A 7A 8A 9A 10A 11A 12P 1P 2P 3P 4P 5P 6P 7P EST -5 7P* 8P* 9P* 10P* 11P* 12A 1A 2A 3A 4A 5A 6A 7A 8A 9A 10A 11A 12P 1P 2P 3P 4P 5P 6P CST -6 6P* 7P* 8P* 9P* 10P* 11P* 12A 1A 2A 3A 4A 5A 6A 7A 8A 9A 10A 11A 12P 1P 2P 3P 4P 5P MST -7 5P* 6P* 7P* 8P* 9P* 10P* 11P* 12A 1A 2A 3A 4A 5A 6A 7A 8A 9A 10A 11A 12P 1P 2P 3P 4P PST -8 4P* 5P* 6P* 7P* 8P* 9P* 10P* 11P* 12A 1A 2A 3A 4A 5A 6A 7A 8A 9A 10A 11A 12P 1P 2P 3P * represents previous day (i.e. 03 hours 23 January 93 is 8PM-MST 22 January) AS041 Rev. 10-1-99 ALA -9 3P* 4P* 5P* 6P* 7P* 8P* 9P* 10P* 11P* 12A 1A 2A 3A 4A 5A 6A 7A 8A 9A 10A 11A 12P 1P 2P HAW -10 2P* 3P* 4P* 5P* 6P* 7P* 8P* 9P* 10P* 11P* 12A 1A 2A 3A 4A 5A 6A 7A 8A 9A 10A 11A 12P 1P Standard Time Daylight Savings Time EST CST MST PST EDT CDT MDT PDT Summertime (Daylight savings time) For those states that observe daylight savings time. For those that do not, use the standard time table all year: GMT EDT CDT MDT PDT difference -4 -5 -6 -7 00 8P* 7P* 6P* 5P* 01 9P* 8P* 7P* 6P* 02 10P* 9P* 8P* 7P* 03 11P* 10P* 9P* 8P* 04 12A 11P* 10P* 9P* 05 1A 12A 11P* 10P* 06 2A 1A 12A 11P* 07 3A 2A 1A 12A 08 4A 3A 2A 1A 09 5A 4A 3A 2A 10 6A 5A 4A 3A 11 7A 6A 5A 4A 12 8A 7A 6A 5A 13 9A 8A 7A 6A 14 10A 9A 8A 7A 15 11A 10A 9A 8A 16 12P 11A 10A 9A 17 1P 12P 11A 10A 18 2P 1P 12P 11A 19 3P 2P 1P 12P 20 4P 3P 2P 1P 21 5P 4P 3P 2P 22 6P 5P 4P 3P 23 7P 6P 5P 4P * represents previous day (i.e. 03 hours 23 June is 9PM-MDT 22 June) InSight Data Analysis Software 114 AS041 Rev. 10-1-99 InSight Data Analysis Software A -1 — Addendum — Sigma Modbus® Address Utility Address Setting Software Utility Part No. 526 Application: 940 Intrinsically Safe Flow Meter The information provided in this addendum describes the software utility and its operation. Description This software utility allows the user to view the existing Modbus address set in the 940 meter and also allows the user to change (set) a different address for the meter. The utility software runs under the Windows® 95 or Windows® 98 operating system running on a personal computer (PC). It is not designed to run under earlier Windows® operating systems or DOS. NOTE &KDQJLQJ WKH 0RGEXV DGGUHVV RI D IORZ PHWHU ZLOO QRW KDYH DQ\ HIIHFW RQ ,Q6LJKW RU 9,6,21 RSHUDWLRQV Installation If you acquired the utility as a single Win Zip® file, double click the file name and unzip the file into an empty folder. Proceed to step one. If you received the utility as a group of files on diskette, proceed to step one. 1. Double-click the file named SETUP.EXE. This is the install program. 2. Follow the on screen instructions of the installation wizard. Connecting the PC to the Meter Connect the PC running the address utility to the meter using only the RS-232 based connection arrangement shown on the control drawings in the 911/940 manual. 8-5-99 Sigma Modbus® Address Utility A-2 — The battery powered RS-232 Intrinsically Safe Barrier is Sigma PN 4084. The AC-powered RS-232 Intrinsically Safe Barrier is Sigma PN 4738. Operation Starting the Program From the Windows START button, select Programs> ; American Sigma, Inc.; Sigma Modbus Address Utility. The program loads and displays the program screen. Operating the Program Settings are set or changed in the program screen as indicated in illustration below. 3 1 2 4 6 5 1 Click here to select the PC COM port connected to the meter via the RS-232 safety barrier. 2 Click here to select the baud rate for communicating with the meter. Default is 19,200 3 Click here— 4 to view the existing device address here. 5 To change the device’s address, enter the new address here— 6 then click here. 8-5-99 Sigma Modbus® Address Utility A -3 — Select COM Port This selection box selects which serial COM port the PC will use to connect to the meter. This is the COM port the meter connects to via the RS-232 Safety Barrier. Select Baud Rate Sigma meters are shipped from the factory with the baud rate set to 19, 200. This is also the default baud rate setting of the utility. If for any reason the meter’s baud rate was set to some other baud rate with InSight® or VISION® software, the utility software will not connect until the baud rate in the utility is set to the same baud rate as the meter. A dialog box will appear indicating an error, if a connection can not be established. Available baud rates are 19200, 9600, 4800, 2400, 1200. Get Current Modbus Address Clicking this button retrieves the Modbus address that is currently in the meter. If the utility software is not communicating with the meter, “unknown” is displayed in this box. If the address is changed in the Set Modbus Address box below it, the Get Current Address box updates to display the new address. Set Modbus Address To change the meter’s Modbus address, enter the new address in the Set Modbus Address box and click the button above it. Valid meter addresses are 0 to 247. Leading zeros are not required for one- or two-digit numbers. Modbus® is a registered trademark of Modicon, Inc. --- end --- 8-5-99 Sigma Modbus® Address Utility A-4 — 8-5-99 Sigma Modbus® Address Utility