1
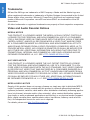
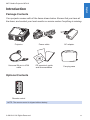
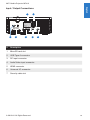
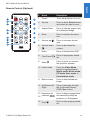
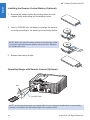
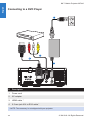
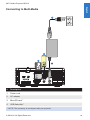
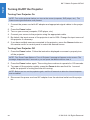
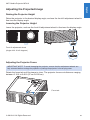
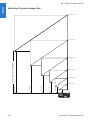
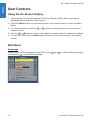
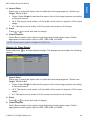
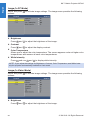
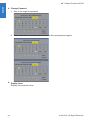
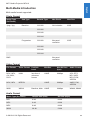
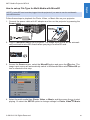
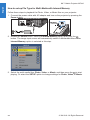
User’s Manual 3M™ Mobile Projector MP410 Safety Instructions...........................................................................................................4 Important Notice..................................................................................................................... 4 Technical Support Contact..................................................................................................... 4 Intended Use Statement......................................................................................................... 4 Safety Information................................................................................................................... 4 Safety Labels.......................................................................................................................... 6 Limited Warranty..................................................................................................................... 7 Trademarks............................................................................................................................. 9 Video and Audio Decoder Notices.......................................................................................... 9 Regulatory Notices............................................................................................................... 10 CE Statement....................................................................................................................... 11 WEEE Statement.................................................................................................................. 11 RoHS Statement................................................................................................................... 11 Introduction.....................................................................................................................12 Package Contents................................................................................................................ 12 Optional Contents................................................................................................................. 12 About Your Projector............................................................................................................ 13 Main Unit.................................................................................................................. 13 Input / Output Connections...................................................................................... 14 Control Panel........................................................................................................... 15 Remote Control (Optional)....................................................................................... 16 Installing the Remote Control Battery (Optional)...................................................... 17 Operating Range with Remote Control (Optional)................................................... 17 Installation.......................................................................................................................18 Connecting to a Computer.................................................................................................... 18 Connecting to a DVD Player................................................................................................. 19 Connecting to Multi-Media.................................................................................................... 20 Turning On/Off the Projector................................................................................................. 21 Turning Your Projector On....................................................................................... 21 Turning Your Projector Off....................................................................................... 21 Adjusting the Projected Image.............................................................................................. 22 Raising the Projector Height.................................................................................... 22 Lowering the Projector Height.................................................................................. 22 Adjusting the Projector Focus.................................................................................. 22 Adjusting Projection Image Size.............................................................................. 23 User Controls..................................................................................................................25 Using the On-Screen Display............................................................................................... 25 Main Menu............................................................................................................................ 25 © 3M 2012. All Rights Reserved. English Contents English 3M™ Mobile Projector MP410 Language................................................................................................................. 25 Source...................................................................................................................... 26 Video Mode.............................................................................................................. 27 Audio........................................................................................................................ 27 Auto Adjust............................................................................................................... 28 OSD Reset............................................................................................................... 28 Advanced................................................................................................................. 28 SN............................................................................................................................ 28 FW Version............................................................................................................... 28 Advanced Menu.................................................................................................................... 29 Display (In PC Mode)............................................................................................... 29 Display (In Video Mode)........................................................................................... 30 Image (In PC Mode)................................................................................................. 31 Image (In Video Mode)............................................................................................. 31 Power....................................................................................................................... 33 Multi-Media Introduction....................................................................................................... 36 Photo Format........................................................................................................... 36 Video Format............................................................................................................ 36 Audio Format............................................................................................................ 36 How to set-up File Type for Multi-Media with USB................................................... 37 How to set-up File Type for Multi-Media with MicroSD............................................ 38 How to set-up File Type for Multi-Media with Internal Memory................................ 39 Multi-Media Main Menu............................................................................................ 40 Multi-Media SETUP for USB, MicroSD, and Internal Memory................................. 40 Photo Setup............................................................................................................. 41 Video Setup.............................................................................................................. 42 Music Setup............................................................................................................. 43 Firmware Update...................................................................................................... 44 Appendices.....................................................................................................................45 Troubleshooting.................................................................................................................... 45 Guiding Signals........................................................................................................ 47 Compatibility Modes (Analog/Digital).................................................................................... 48 Specifications........................................................................................................................ 49 © 3M 2012. All Rights Reserved. 3M™ Mobile Projector MP410 English Safety Instructions Important Notice All statements, technical information, and recommendations related to 3M’s products are based on information believed to be reliable, but the accuracy or completeness is not guaranteed. Before using this product, you must evaluate it and determine if it is suitable for your intended application. You assume all risks and liability associated with such use. Any statements related to the product which are not contained in 3M’s current publications, or any contrary statements contained on your purchase order shall have no force or effect unless expressly set forth in a written agreement signed by an authorized officer of 3M. Technical Support Contact For technical support, call 1-866-631-1656 or email [email protected] Intended Use Statement The 3M Mobile Projector MP410 is designed to operate with the 3M power adapter and 3M I/O cables in normal office or home environments. Operation temperature: - For 0 - 2500 ft, 5 - 35 °C For 2500 - 5000 ft, 5 - 30 °C For 5000 - 10000 ft, 5 - 25 °C - Operating: 5°C ~ 35°C, 80%RH (Max.), Non-condensing Storage: -20°C ~ 60°C, 80%RH (Max.), Non-condensing Maximum Humidity: The ambient operating environment should be free of airborne smoke, grease, oil and other contaminants that can affect the operation or performance of the projector. Use of this product in adverse conditions will void the product warranty. Safety Information Please read, understand, and follow all safety information contained in these instructions prior to the use of this projector. Retain these instructions for future reference. Explanation of Signal Word Consequences Warning: Indicates a potentially hazardous situation, which, if not avoided, could result in death or serious injury and/or property damage. Caution: Indicates a potentially hazardous situation, which, if not avoided, may result in minor or moderate injury and/or property damage. Warning: Hazardous voltage © 3M 2012. All Rights Reserved. English 3M™ Mobile Projector MP410 Warning To reduce the risk associated with hazardous voltage: Do not modify this product in any way. Use only 3M approved replacement components. Do not attempt to service this projector. There are no user-serviceable parts. Service to be performed only by a 3M authorized service provider using 3M approved system components. Do not use the wall power supply in a wet environment. Do not use with a damaged wall power supply. Replace damaged part prior to use. To reduce the risk associated with fire and explosion: Do not immerse the projector in any liquid or allow either to get wet. Use only 3M approved power supply. To reduce the risks associated with choking: Keep all small parts like the remote control battery away from young children and pets. To reduce the risk associated with hazardous voltage, impact, tripping, and intense visible light: Do not use this projector around unsupervised children. Caution To reduce the risks associated with hearing loss: Be sure to read earphone manufacturer's instructions with respect to volume level. User is responsible to set a safe volume level. To reduce the risk associated with explosion, and/or chemicals from a leaking batteries: Use only with battery type CR2025. Orient the battery's plus (+) and minus (-) terminals of the batteries according to the markings found on the remote control. Do not leave the battery in the remote for an extended period of time. Do not heat or expose the battery to fire. Do not disassemble, short, or recharge battery Do not carry batteries loose in your pocket or purse. Avoid eye and skin contact in the event that battery leaks. Do not recharge the battery near a heat source or in extremely hot conditions. © 3M 2012. All Rights Reserved. 3M™ Mobile Projector MP410 English To reduce the risk associated with environmental contamination: Dispose of all system components in accordance with applicable government regulations. To reduce the risks associated with LED bright light: Do not stare directly into the projector lens. To reduce the risks associated with tripping and falling: Position the charging cord and data cables so that they are not a tripping hazard. IMPORTANT NOTE: Do not expose the projector to direct sunlight in a closed space such as a vehicle. SAVE THESE INSTRUCTIONS 25 20 LT R O 2 - L iC E LL 3 V C M nO S J A PA N H Safety Labels Remote Control (Optional) Model No. IR28012 Spec Label © 3M 2012. All Rights Reserved. English 3M™ Mobile Projector MP410 Limited Warranty This warranty applies to the continental US only. The warranty terms, conditions, remedy and limitation may vary in other countries. Contact your local 3M Company for warranty information. The 3M™ Mobile Projector MP410 (the “3M product”) is warranted to be free from defects in material or manufacture for a period of 2 year from the date of purchase. All other accessories included with the 3M product are warranted to be free from defects in material or manufacture for a period of 1 year from the date of purchase. Optional product accessories that are not sold as part of the 3M product are subject to individual warranties. THE WARRANTIES STATED ABOVE ARE EXCLUSIVE AND ARE MADE IN PLACE OF ANY AND ALL WARRANTIES, EXPRESS OR IMPLIED WARRANTIES OR CONDITIONS, INCLUDING ANY IMPLIED WARRANTY OF MERCHANTABILITY OR FITNESS FOR A PARTICULAR PURPOSE, OR ANY INDUSTRY PRACTICE OR CUSTOM OR TRADE USAGE. In the event the 3M product fails to conform to the above stated warranties within the applicable warranty period, your exclusive remedy shall be, at 3M’s option, to replace or repair the 3M product or to refund the purchase price of the 3M product. All replaced parts or products become property of 3M. If the product is repaired, 3M will repair the defective part(s) with a new or used part(s). If the 3M product is replaced, 3M will replace the 3M product with the same or equivalent model and with a new or refurbished 3M product. In the case of an approved warranty claim, the replacement 3M product will carry only the remaining term of the original 3M product’s warranty period as stated above. For warranty service, you must provide proof of the date of the original purchase else the manufacturing code date will be used to establish the start date of the warranty. The following are exclusions to the above listed warranty: a.This warranty does not cover 3M product that is modified or damaged through improper storage, misuse, abuse, accident, vandalism, improper installation, neglect, improper shipping, damage caused by acts of war, disasters such as fire, flood, and lightning, improper electrical current, software problems, interaction with non-3M products, or service other than by an 3M Authorized Service Provider, neglect or mishandling by any person. Normal wear and tear is not covered under warranty. b.3M product is designed to operate in the typical indoor environment. This warranty does not cover 3M product used outside of the following circumstances: Operation temperature: - For 0 - 2500 ft, 5 - 35 °C - For 2500 - 5000 ft, 5 - 30 °C - For 5000 - 10000 ft, 5 - 25 °C Maximum Humidity: - Operating: 5°C ~ 35°C, 80%RH (Max.), Non-condensing - Storage: -20°C ~ 60°C, 80%RH (Max.), Non-condensing c.The air intake and exhaust vent must be clear of obstructions. Inadequate air ventilation will cause the 3M product to malfunction or will cause damage to the 3M product which will void the warranty. d.This warranty does not cover any additional costs including, but not limited to, those associated with removal, cleaning or installation of the 3M product, adjustments, (mechanical or electronic) made to the 3M product. © 3M 2012. All Rights Reserved. 3M™ Mobile Projector MP410 English e.This warranty covers only normal use of the product. 24-hour-per-day or other excessive continual use causes strain and is not considered normal use. f.This warranty does not cover consumables (e.g., batteries). g.This warranty is not transferable. h.3M is not responsible for warranty service should the 3M label or logo or the rating label or serial number be removed unless otherwise stated in writing for the purposes of private labeling for partnership requirements. i.This warranty does not cover postage, insurance, or shipping costs incurred in presenting your 3M product for warranty service. Said costs are the customer’s responsibility. If a claimed defect cannot be identified or reproduced in service, the customer may be held responsible for cost incurred. Should your warranty upgrade include a “change out” service and the claimed defect cannot be identified or reproduced by the technician, the customer will be responsible for call out costs. FAILURE TO FOLLOW THE INSTRUCTIONS CONTAINED IN THE APPROPRIATE 3M PRODUCT MANUAL OR TO USE THE 3M PRODUCT IN ACCORDANCE WITH 3M’S INTENDED USE STATEMENT, WILL VOID ALL WARRANTIES AND LIMITED REMEDIES. EXCEPT AS SPECIFICALLY STATED IN THE APPLICABLE 3M PRODUCT MANUAL, 3M SHALL NOT BE LIABLE FOR ANY INDIRECT, INCIDENTAL, SPECIAL OR CONSEQUENTIAL DAMAGES (INCLUDING, BUT NOT LIMITED TO, LOSS OF PROFITS, REVENUE OR BUSINESS) RESULTING FROM, OR IN ANY WAY RELATED TO PERFORMANCE, USE OR INABILITY TO USE ANY OF THE 3M PRODUCT. This limitation applies regardless of the legal theory upon which damages are sought. For warranty support, please call or write your local 3M office or a 3M Authorized Service Provider to obtain an RMA # (Return Material Authorization number) before returning the product. If you are inside the Continental United States of America, please contact 3M Customer Service at 1-866-631-1656 or email [email protected]. What 3M Will Do To Correct Problems: If your 3M product requires service, 3M will ask you to bring or send the 3M product, securely packaged in its original container or equivalent, along with proof of the date of original purchase, to your 3M Service Dealer or 3M Service Center. 3M will, at its option, repair or replace the defective unit without charge for parts or labor. Return of the 3M product will be at 3M’s expense. When warranty service involves the exchange of the 3M product or of a part, the item replaced becomes 3M property. The exchanged 3M product or part may be new or previously refurbished to the 3M standard of quality, and at 3M’s option, the replacement may be another model of like kind and quality. 3M’s liability for replacement of the warranted 3M product or part will not exceed the original retail selling price of the 3M product. Exchange or replacement products or parts assume the remaining warranty period of the product covered by this limited warranty. © 3M 2012. All Rights Reserved. English 3M™ Mobile Projector MP410 Trademarks 3M and the 3M logo are trademarks of 3M Company. Adobe and the Adobe logo are either registered trademarks or trademarks of Adobe Systems Incorporated in the United States and/or other countries. Microsoft, PowerPoint, and Excel are registered trademarks of Microsoft Corporation. microSD and microSDHC are trademarks of the SD Association. All other trademarks or registered trademarks are property of their respective companies. Video and Audio Decoder Notices MPEG-4 NOTICE THIS PRODUCT IS LICENSED UNDER THE MPEG-4 VISUAL PATENT PORTFOLIO LICENSE FOR THE PERSONAL AND NON-COMMERCIAL USE OF A CONSUMER FOR (i) ENCODING VIDEO IN COMPLIANCE WITH THE MPEG-4 VISUAL STANDARD ("MPEG-4 VIDEO") AND/OR (ii) DECODING MPEG-4 VIDEO THAT WAS ENCODED BY A CONSUMER ENGAGED IN A PERSONAL AND NONCOMMERCIAL ACTIVITY AND/OR WAS OBTAINED FROM A VIDEO PROVIDER LICENSED BY MPEG LA TO PROVIDE MPEG-4 VIDEO. NO LICENSE IS GRANTED OR SHALL BE IMPLIED FOR ANY OTHER USE. ADDITIONAL INFORMATION INCLUDING THAT RELATING TO PROMOTIONAL, INTERNAL AND COMMERCIAL USES AND LICENSING MAY BE OBTAINED FROM MPEG LA, LLC. SEE HTTP://WWW.MPEGLA.COM. AVC VIDEO NOTICE THIS PRODUCT IS LICENSED UNDER THE AVC PATENT PORTFOLIO LICENSE FOR THE PERSONAL AND NONCOMMERCIAL USE OF A CONSUMER TO (i) ENCODE VIDEO IN COMPLIANCE WITH THE AVC STANDARD (“AVC VIDEO”) AND/OR (ii) DECODE AVC VIDEO THAT WAS ENCODED BY A CONSUMER ENGAGED IN A PERSONAL AND NON-COMMERCIAL ACTIVITY AND/OR WAS OBTAINED FROM A VIDEO PROVIDER LICENSED TO PROVIDE AVC VIDEO. NO LICENSE IS GRANTED OR SHALL BE IMPLIED FOR ANY OTHER USE. ADDITIONAL INFORMATION MAY BE OBTAINED FROM MPEG LA, L.L.C. SEE HTTP://WWW.MPEGLA.COM. MPEG LAYER-3 NOTICE Supply of this product does not convey a license nor imply any right to distribute MPEG Layer-3 compliant content created with this product in revenue-generating broadcast systems (terrestrial, satellite, cable and/or other distribution channels),streaming applications (via Internet, intranets and/or other networks), other content distribution systems (pay-audio or audio-ondemand applications and the like) or on physical media (compact discs, digital versatile discs, semiconductor chips, hard drives, memory cards and the like). An independent license for such use is required. For details, please visit http://mp3licensing.com. © 3M 2012. All Rights Reserved. 3M™ Mobile Projector MP410 English Regulatory Notices FCC STATEMENT - CLASS B This equipment generates, uses and can radiate radio frequency energy, and if not installed and used in accordance with the instruction manual may cause interference to radio communications. It has been tested and found to comply with the limits for a Class “B” computing device pursuant to Subpart B of Part 15 of the FCC Rules, which are designed to provide reasonable protection against such interference when operated in a residential installation. However, there is no guarantee that interference will not occur in a particular installation. If this equipment does cause harmful interference to radio or television reception, which can be determined by turning the equipment off and on, the user is encouraged to try to correct the interference by one or more of the following measures: Reorient or relocate the receiving antenna. Increase the separation between the equipment and receiver. Connect the equipment into an outlet on a circuit different from that to which the receiver is connected. Consult the dealer or an experienced radio/TV technician for help. NOTICE: This Class B digital apparatus complies with Canadian ICES-003. Cet appareil numérique de la classe B est conforme à la norme NMB-003 du Canada. Industry Canada regulatory information Operation is subject to the following two conditions: (1) this device may not cause interference, and (2) this device must accept any interference, including interference that may cause undesired operation of the device. The user is cautioned that this device should be used only as specified within this manual to meet RF exposure requirements. Use of this device in a manner inconsistent with this manual could lead to excessive RF exposure conditions. This Class [B] digital apparatus complies with Canadian ICES-003. Cet appareil numérique de la classe [B] est conforme à la norme NMB-003 du Canada. INSTRUCTIONS TO USERS: This equipment complies with the requirements of FCC equipment provided that the following conditions are met. If the cables include a EMI ferrite core, attach the ferrite core end of the cable to the projector. Use the cables which are included with the projector or specified. Note: Changes or modifications not expressly approved by the party responsible for compliance could void the user’s authority to operate the equipment. Complies with IDA Standards DA103121 © 3M 2012. All Rights Reserved. English 3M™ Mobile Projector MP410 CE Statement ElectroMagnectic Compatibility Statement: Meets 2004/108/EC Directive Low Voltage Directive: Meets 2006-95-EC Directive. WEEE Statement The following information is only for EU-members States: The mark shown to the right is in compliance with Waste Electrical and Electronic Equipment Directive 2002/96/EC (WEEE). The mark indicates the requirement NOT to dispose the equipment as unsorted municipal waste, but use the return and collection systems according to local law. RoHS Statement 3M Mobile Interactive Solutions can provide RoHS certification for products meeting the RoHS directive.1 European (EU) Restriction of Hazardous Substances (RoHS) Directive, 2002/95/EC, 1 RoHS compliant means that the product or part does not contain any of the substances in excess of the following maximum concentration values in any homogeneous material, unless the substance is in an application that is exempt under RoHS, as amended:(a) 0.1% (by weight) for lead, mercury, hexavalent chromium, polybrominated biphenyls or polybrominated diphenyl ethers; or (b) 0.01% (by weight) for cadmium. This information represents 3M’s knowledge and belief, which may be based on information provided by third party suppliers to 3M. 10 © 3M 2012. All Rights Reserved. 3M™ Mobile Projector MP410 English Introduction Package Contents Your projector comes with all the items shown below. Ensure that you have all the items, and contact your local reseller or service center if anything is missing. Projector Power cable AC adapter Universal 24-pin to VGA cable CD operator’s guide and documentation Carrying case Optional Contents Remote control NOTE: The remote control is shipped without battery. © 3M 2012. All Rights Reserved. 11 English 3M™ Mobile Projector MP410 About Your Projector Main Unit 1 2 3 4 5 # Description 1 Control panel 2 Focus ring 3 Lens 4 Input / Output connections 5 Tilt adjusting wheel 12 © 3M 2012. All Rights Reserved. 3M™ Mobile Projector MP410 English Input / Output Connections 1 2 USB-A Micro SD Universal I/O HDMI A/V in DC in 7 6 5 4 # Description 1 MicroSD card slot 2 USB Type A connector 3 DC input connector 4 Audio/Video input connector 5 HDMI connector 6 Universal I/O connector 7 Security cable slot © 3M 2012. All Rights Reserved. 3 13 English 3M™ Mobile Projector MP410 Control Panel 1 9 2 8 3 4 7 5 6 2 # Name Description 1 Power Turns the projector on or off. 2 Keystone adjustment Press to adjust image distortion caused by tilting the projector (+/-40 degrees). 3 Auto adjust Press to synchronize the projector to the input source. NOTE: Auto Adjust does not operate if the on-screen display (OSD) is displayed. 4 Error LED Error LED is blinking amber, one of the fans has failed. The projector will automatically shut down. 5 Temp LED If the TEMP amber indicator is on or blinking, one of the following problems could be occurring: Internal temperature of the projector is too high. 6 Menu Press to activate the OSD. Use the directional keys and the Menu button to navigate through the OSD. 7 Source Press to enter Source menu and select an input source. 8 Enter Press to confirm the selection item. 9 Four Direction- Press to navigate through the On-Screen Display (OSD) Menu al Select Keys items. 14 © 3M 2012. All Rights Reserved. 3M™ Mobile Projector MP410 English Remote Control (Optional) 1 10 2 3 11 12 4 5 13 6 14 7 8 9 © 3M 2012. All Rights Reserved. # Name Description 1 Power Turns the projector on or off. 2 Source Press to enter Source menu and select an input source. 3 Aspect Ratio Press to change aspect ratio of a displayed image. 4 Enter Press to confirm the selection. 5 Volume up Press to increase the volume. 6 Volume down Press to decrease the volume. 7 Menu Press to activate the OSD. 8 Play/Pause Press to play/pause media file. 9 Mute Press to mute or un-mute the projector speaker. 15 10 Video mode Press the Video Mode button to toggle between Bright mode, Movie mode, PC mode, User mode, or Presentation mode. 11 Blank screen Press to hide/unhide the image. 12 Up/Down/Left/ Right Press to navigate through the On-Screen Display (OSD) Menu items. 13 Keystone adjustment 14 Press to adjust image distortion caused by tilting the projector (+/-40 degrees). 15 Stop Press to stop playing media file. 15 Installing the Remote Control Battery (Optional) 25 LT C R 20 2. Insert a CR2025 coin cell battery and align the polarity correctly according to the marking in the battery holder. S . Remove the battery holder by holding down the side release firmly and pulling out the battery holder. S 25 LT 3V O NOTE: When you use the remote control for the first time, there is a plastic sheet between the battery and its contact. Remove the sheet before use. O 3V C R 20 25 20 LT R 3V O M S 3. Replace the battery holder. C English 3M™ Mobile Projector MP410 Operating Range with Remote Control (Optional) ±20° 7 m/22.97 feet NOTE: Actual operating range may slightly differ from the diagram. Additionally, a weak battery reduces or eliminates the operating range of the remote control. 16 © 3M 2012. All Rights Reserved. 3M™ Mobile Projector MP410 English Installation Connecting to a Computer 1 5 3 4 2 USB-A Micro SD Universal I/O HDMI A/V in DC in # Description 1 Power cord 2 AC adapter 3 Universal 24-pin to VGA cable 4 HDMI cable * 5 USB-A to USB-A cable * * NOTE: The accessory is not shipped with your projector. © 3M 2012. All Rights Reserved. 17 English 3M™ Mobile Projector MP410 Connecting to a DVD Player 1 4 3 2 USB-A Micro SD Universal I/O HDMI A/V in DC in # Description 1 Power cord 2 AC adapter 3 HDMI cable * 4 3.5 mm jack A/V to RCA cable * * NOTE: The accessory is not shipped with your projector. 18 © 3M 2012. All Rights Reserved. 3M™ Mobile Projector MP410 English Connecting to Multi-Media 1 4 3 2 USB-A Micro SD Universal I/O HDMI A/V in DC in # Description 1 Power cord 2 AC adapter 3 MicroSD card * 4 USB flash disk * * NOTE: The accessory is not shipped with your projector. © 3M 2012. All Rights Reserved. 19 English 3M™ Mobile Projector MP410 Turning On/Off the Projector Turning Your Projector On NOTE: Turn on the projector before you turn on the source (computer, DVD player, etc.). The Power button light blinks blue until pressed. . Connect the power cord with AC adapter and appropriate signal cables to the projector. 2. Press the Power button. 3. Turn on your source (computer, DVD player, etc). 4. Connect your source to the projector using the appropriate cable. 5. By default, the input source of the projector is set to VGA. Change the input source of the projector if necessary. 6. If you have multiple sources connected to the projector, press the Source button on the remote control or control panel to select the desired source. Turning Your Projector Off . Press the Power button. Follow the instruction displayed on screen to properly turn off the projector. NOTE: The “Press Power Button to Turn off Projector” message will appear on the screen. The message disappears after 5 seconds or you can press the Menu button to clear it. 2. Press the Power button again. The cooling fans continue to operate for 120 seconds. 3. To power off the projector quickly, press the Power button and hold for 1 second while the projector’s cooling fans are still running. NOTE: Before you turn on the projector again, wait for 60 seconds to allow the internal temperature to stabilize. 4. Disconnect the power cord and AC adapter from the electrical outlet and the projector. 20 © 3M 2012. All Rights Reserved. 3M™ Mobile Projector MP410 English Adjusting the Projected Image Raising the Projector Height Raise the projector to the desired display angle, and use the front tilt adjustment wheel to fine-tune the display angle. Lowering the Projector Height Lower the projector, and use the front tilt adjustment wheel to fine-tune the display angle. Front tilt adjustment wheel (Angle of tilt: 0 to 6 degrees) Adjusting the Projector Focus IMPORTANT NOTE: To avoid damaging the projector, ensure that the adjustment wheels are fully retracted before moving the projector or placing the projector in its carrying case. Rotate the focus tab until the image is clear. The projector focuses at distances ranging between 3.18 ft to 8.48 ft (97 cm to 258 cm). Focus tab © 3M 2012. All Rights Reserved. 21 Adjusting Projection Image Size 80” (203.2 cm) 70” (177.8 cm) Projector to screen distance 60” (152.4 cm) 50” (127.0 cm) 40” (101.6 cm) 4.23’ (1.29 m) 5.28’ (1.61 m) 6.36’ (1.94 m) 7.41’ (2.26 m) 30” (76.2 cm) 8.48’ (2.58 m) English 3M™ Mobile Projector MP410 3.18’ (0.97 m) USB-A Micro SD Universal I/O HDMI A/V in DC in 22 © 3M 2012. All Rights Reserved. 3M™ Mobile Projector MP410 Screen Size 30” (76.2 cm) 25.59” x 15.75” 40” (101.6 cm) English Screen (Diagonal) Hd Distance 65 cm x 40 cm 15.75” (40 cm) 3.18’ (0.97 m) 33.86” x 21.26” 86 cm x 54 cm 21.26” (54 cm) 4.23’ (1.29 m) 50” (127.0 cm) 42.13” x 26.38” 107 cm x 67 cm 26.38” (67 cm) 5.28’ (1.61 m) 60” (152.4 cm) 50.79” x 31.89” 129 cm x 81 cm 31.89” (81 cm) 6.36’ (1.94 m) 70” (177.8 cm) 59.45” x 37.01” 151 cm x 94 cm 37.01” (94 cm) 7.41’ (2.26 m) 80” (203.2 cm) 67.72” x 42.52” 172 cm x 108 cm 42.52” (108 cm) 8.48’ (2.58 m) Height (Hd): 81 cm NOTE: This graph is for user reference only. ” 60 94 D © 3M 2012. All Rights Reserved. m e nc ta is . :1 23 English 3M™ Mobile Projector MP410 User Controls Using the On-Screen Display . The projector has a multi-language On-Screen Display (OSD) Menu that can be displayed with or without an input source. 2. Press the Menu button on the control panel or the remote control to enter the Main Menu. 3. To select an option, press the remote control. 4. Use the or or buttons on your projector’s control panel or buttons on the control panel or remote control to adjust the settings. 5. To exit the OSD, press the Menu button directly on the control panel or the remote control. Main Menu Language Allows you to set the language for the OSD. Press es and press to change the language. 24 and to select different languag- © 3M 2012. All Rights Reserved. 3M™ Mobile Projector MP410 English Source The Source menu allows you to select your projector's input source. Auto If you select and press available input source. to activate, the Auto option will automatically find the next VGA Press to detect a VGA signal. DoUSB Allows you to display the computer/laptop screen to your projector via the USB cable. NOTE: When you connect the projector and computer via the USB cable, a USB Connected message will pop up and allow you to select input sources as DoUSB or Storage. The USB Connected Screen shown below appears: Storage Mode: Allows you to execute copy, delete, move, and more instructions from your computer (only supports microSD and internal memory). HDMI Press to detect a HDMI signal. © 3M 2012. All Rights Reserved. 25 English 3M™ Mobile Projector MP410 A/V In Allows you to display the Audio/Video source to your projector via the A/V cable. USB Allows you to playback the photo, Audio, or Video files from your USB flash disk. MicroSD Allows you to playback the photo, Audio, or Video files from your microSD card. Internal Memory Allows you to playback the photo, Audio, or Video files from internal memory of the projector. Video Mode The Video Mode menu allows you to optimize the display image. The options are: Bright, Movie, PC, User (set your preferred settings) and Presentation mode. Audio The Audio menu allows you adjust the volume setting of your projector. Press 26 to decrease the volume and to increase the volume. © 3M 2012. All Rights Reserved. 3M™ Mobile Projector MP410 English Auto Adjust Auto Adjust automatically adjusts the projector's Horizontal, Vertical, Frequency, and Tracking in PC mode. OSD Reset Select and press to reset all settings to its factory default. The below warning message appears: Reset items include both computer sources and Video source settings. Advanced See “Advanced Menu” on pages 28~32. SN Display the projector’s serial number. FW Version Display the current projector’s firmware version. © 3M 2012. All Rights Reserved. 27 English 3M™ Mobile Projector MP410 Advanced Menu The Advanced menu allows you to change settings for Display, Image, and Power. Display (In PC Mode) Select and press options: to activate display settings. The display menu provides the following Horizontal Position Press to move the image right and to move the image left. Vertical Position Press to move the image up and to move the image down. Frequency Allows you to change the display data clock frequency to match the frequency of your computer’s graphics card. If you see a vertical flickering wave, use the Frequency control to minimize the bars. This is a coarse adjustment. Tracking Synchronize the phase of the display signal with the graphic card. If you experience an unstable or flickering image, use the Tracking to correct it. This is a fine adjustment. 28 © 3M 2012. All Rights Reserved. 3M™ Mobile Projector MP410 Allows you to select the aspect ratio to adjust how the image appears. Options are: Origin, 16:9 and 4:3. Origin: Select Origin to maintain the aspect ratio of the image projector according to the input source. 16:9: The input source scales to fit the width of the screen to project a 16:9 screen image. 4:3: The input source scales to fit the screen and projects a 4:3 image. Zoom Press or to zoom and view the image. Closed Caption Select On to enable close caption and activate the closed caption menu. Select appropriate closed caption options: CC1, CC2, CC3, and CC4. NOTE: Closed caption option is available for NTSC only. Display (In Video Mode) Select and press options: to activate display settings. The display menu provides the following Aspect Ratio Allows you to select the aspect ratio to adjust how the image appears. Options are: Origin, 16:9 and 4:3. Origin: Select Origin to maintain the aspect ratio of the image projector according to the input source. 16:9: The input source scales to fit the width of the screen to project a 16:9 screen image. 4:3: The input source scales to fit the screen and projects a 4:3 image. Zoom Press or to zoom and view the image. Closed Caption Select On to enable close caption and activate the closed caption menu. Select appropriate closed caption options: CC1, CC2, CC3, and CC4. © 3M 2012. All Rights Reserved. 29 English Aspect Ratio English 3M™ Mobile Projector MP410 Image (In PC Mode) Select and press options: to activate image settings. The image menu provides the following Brightness Press and to adjust the brightness of the image. and to adjust the display contrast. Contrast Press Color Temperature Allows you to adjust the color temperature. The screen appears cooler at higher color temperatures and warmer at lower color temperatures. White Intensity Press and use and to display white intensity. NOTE: If you adjust the settings for Brightness, Contrast, Color Temperature, and White Intensity the projector automatically switches to User mode. Image (In Video Mode) Select and press options: to activate image settings. The image menu provides the following Brightness Press 30 and to adjust the brightness of the image. © 3M 2012. All Rights Reserved. 3M™ Mobile Projector MP410 English Contrast Press and to adjust the display contrast. Color Temperature Allows you to adjust the color temperature. The screen appears cooler at higher color temperatures and warmer at lower color temperatures. Saturation Allows you to adjust the video source from black and white to fully saturated color. Press to increase the amount of color in the image and to decrease the amount of color in the image. Sharpness Press to increase the sharpness and to decrease the sharpness. Tint Press to increase the amount of green in the image and amount of green in the image (available for NTSC only). to decrease the White Intensity Press and use and to display white intensity. NOTE: 1. If you adjust the settings for Brightness, Contrast, Color Temperature, Saturation, Sharpness, Tint, and White Intensity the projector automatically switches to User mode. 2. Saturation, Sharpness, and Tint are only available when input source is from A/V in. © 3M 2012. All Rights Reserved. 31 English 3M™ Mobile Projector MP410 Power Select and press options: to activate power settings. The power menu provides the following Power Saving Select Off to disable Power Saving mode. By default, the projector is set to enter power saving mode after 120 minutes of no activity. A warning message appears on screen showing a 60 seconds countdown before switching to power saving mode. Press any button during the countdown period to stop the power-saving mode. You can also set a different delay period to enter power saving mode. The delay period is the time you want the projector to wait without an input signal. Power saving can be set to 30, 60, 90, or 120 minutes. If an input signal is not detected during the delay period, the projector turns off. To turn on the projector, press the Power button. LED Mode Allows you to select between Normal or ECO mode. Normal mode operates at full power level. ECO mode operates at a lower power level which may provide longer LED life, quieter operation, and dimmer luminance output on the screen. Projector Mode Allows you to select the projector mode, depending upon how the projector is mounted. Front: This is the default option. 32 Rear: The projector reverses the image so that you can project from behind a translucent screen. Front Ceiling: The projector turns the image upside down for ceiling-mounted projection. Rear Ceiling: The projector reverses and turns the image upside down. You can project from behind a translucent screen with a ceiling-mounted projection. © 3M 2012. All Rights Reserved. 3M™ Mobile Projector MP410 When password protect is enabled, a password protect screen requesting you to enter a password will be displayed when the power plug is inserted into the electrical outlet and the power for the projector is first turned on. By default, this function is disabled. You can enable this feature by selecting Enabled. If the password has been set before, key in the password first and select the function. This password security feature will be activated the next time you turn on the projector. If you enable this feature, you will be asked to enter the projector's password after you turn on the projector. 1.First time password input request: a.Go to Power menu, press password settings. and then select Password to enable the b.Enabling the Password function will pop up a change screen. Key in a 4-digit number from the screen and press . c.To confirm, enter the password again. d.If the password verification is successful, you may resume with accessing the projector's functions and its utilities. 2.If you have entered an incorrect password, you will be given another two chances. After three invalid attempts, the projector will automatically turn off. NOTE: If you forget your password, contact 3M™ or email [email protected]. 3.To disable the password function, select the Disable option to close the function. 4. To delete the password, select the Delete option. © 3M 2012. All Rights Reserved. 33 English Password English 3M™ Mobile Projector MP410 Change Pasword 1.Key in the original password. 2.Then, enter the new password and confirm the new password again. Display Hour Display the projection time. 34 © 3M 2012. All Rights Reserved. 3M™ Mobile Projector MP410 English Multi-Media Introduction Multi-media format supported: Photo Format Image Type (Ext Name) Sub Type Encode Type Max Pixels Max Size Jpeg / Jpg Baseline YUV420 No Limitation 2GB 64x panel resolution 2GB YUV422 YUV440 YUV444 Progressive YUV420 YUV422 YUV440 YUV444 BMP 64x panel resolution Video Format File Format Video Format Profile & Level Max Res Max Bit Rate (bps) Audio Format MOV, MP4, AVI, MKV, DIVX H264 less than 4 reference frames 1080P 20Mbps AC3, DTS, MP1, MP2, MP3, PCM, ADPCM MOV, MP4 MPEG4 1080P 20Mbps AMR, PCM, ADPCM WMV WMV3 Baseline, Main 1080P 20Mbps WMA2, WMA3 Audio Format Music Type (Ext Name) Sample Rate (KHz) Bit Rate (Kbps) MP1 8-48 8-320 MP2 8-48 8-320 MP3 8-48 8-320 WMA 22-48 5-320 © 3M 2012. All Rights Reserved. 35 English 3M™ Mobile Projector MP410 How to set-up File Type for Multi-Media with USB NOTE: A USB flash disk must be plugged into the projector if you want to use the multimedia USB function. Follow these steps to playback the Photo, Video, or Music files on your projector: . Connect the power cable with AC adapter and turn on the projector by pressing the Power button. 2. Plug in a USB flash disk to your projector. USB-A Micro SD Universal I/O HDMI A/V in DC in 3. Access the Source menu, select the USB option and press the button. The image input source will automatically switch to Multimedia Menu when USB option is selected in this step. 4. Select the multi-media files: Photo, Video, or Music, and then press the to start playing. Or select the SETUP option to change settings for Photo, Video, or Music. 36 © 3M 2012. All Rights Reserved. 3M™ Mobile Projector MP410 English How to set-up File Type for Multi-Media with MicroSD NOTE: A microSD card must be plugged into the projector if you want to use the multimedia microSD function. Follow these steps to playback the Photo, Video, or Music files on your projector: . Connect the power cable with AC adapter and turn on the projector by pressing the Power button. 2. Plug in a MicroSD card to your projector. The image input source will be automatically switched to microSD screen when you plug in a microSD card. USB-A Micro SD Universal I/O HDMI A/V in DC in 3. Access the Source menu, select the MicroSD option and press the button. The image input source will automatically switch to Multimedia Menu when MicroSD option is selected in this step. 4. Select the multi-media files: Photo, Video, or Music, and then press the to start playing. Or select the SETUP option to change settings for Photo, Video, or Music. © 3M 2012. All Rights Reserved. 37 English 3M™ Mobile Projector MP410 How to set-up File Type for Multi-Media with Internal Memory Follow these steps to playback the Photo, Video, or Music files on your projector: . Connect the power cable with AC adapter and turn on the projector by pressing the Power button. 2. Access the Source menu, select the Internal Memory option and press the button. The image input source will automatically switch to Multimedia Menu when Internal Memory option is selected in this step. 3. Select the multi-media files: Photo, Video, or Music, and then press the to start playing. Or select the SETUP option to change settings for Photo, Video, or Music. 38 © 3M 2012. All Rights Reserved. 3M™ Mobile Projector MP410 English Multi-Media Main Menu Multi-Media SETUP for USB, MicroSD, and Internal Memory The multi-media setup menu allows you to change settings for Photo, Video, and Music. NOTE: Multi-media setup menu and set are the same for the USB, MicroSD, and Internal Memory. © 3M 2012. All Rights Reserved. 39 English 3M™ Mobile Projector MP410 Photo Setup Select and press following options: to activate photo setup menu. The photo setup menu provides the Display Mode Press or to select the display mode of the photo on the screen. Options are: File List, Browse Mode, Thumbnail, and Slideshow. Display Ratio Press or screen). to select the display ratio of the photo as Auto (original ratio) or Full (full Slideshow Duration Press or to select the slideshow duration. The image will automatically switch to the next photo after the time out. Options are: 5 sec, 15 sec, 30 sec, 1 min, 5 min, and 15 min. Slideshow Repeat Select On to repeat slideshow always. Or select Off to stop slideshow when it goes to the last page. Slideshow Effect Press or to select what slideshow effect you want. Options are: Random, Rect., Off, Snake, Partition, Erase, Blinds, Lines, GridCross, Cross, and Spiral. NOTE: Slideshow Duration, Slideshow Repeat, and Slideshow Effect function only support Slideshow mode. 40 © 3M 2012. All Rights Reserved. 3M™ Mobile Projector MP410 English Video Setup Select and press following options: to activate video setup menu. The video setup menu provides the Display Ratio Press or to select the display ratio of the Video. Auto: Keep original aspect ratio. Full: Full screen. Play Mode Press or to select the video play mode. Options are: Once, Repeat Once, Repeat, and Random. Auto Play Select On to play the video automatically while entering the video list. © 3M 2012. All Rights Reserved. 41 English 3M™ Mobile Projector MP410 Music Setup Select and press following options: to activate music setup menu. The music setup menu provides the Play Mode Press or to select the video play mode. Options are: Once, Repeat Once, Repeat, and Random. Show Spectrum Select On to show the spectrum plot while music is playing. Auto Play Select On to play the music automatically while entering the music list. 42 © 3M 2012. All Rights Reserved. 3M™ Mobile Projector MP410 Select and press to activate firmware update menu. The firmware update menu provides the following options: Media Select Yes to enter firmware update screen, and then select Confirm option to update your media firmware by microSD card. Image Processor Select Yes to enter firmware update screen, and then select Confirm option to update your Video decoder firmware by microSD card. NOTE: Media and Image Processor firmware update only supports microSD interface, firmware files must be stored in the microSD card. © 3M 2012. All Rights Reserved. 43 English Firmware Update English 3M™ Mobile Projector MP410 Appendices Troubleshooting If you experience problems with your projector, see the following troubleshooting tips. If the problem persists, contact your local reseller or service center. Problem Possible Solution No image appears on the screen Partial, scrolling or incorrectly displayed image Ensure that the projector is turned on. Ensure that you have chosen the correct input source on the OSD Source menu. Ensure the external graphics port is enabled. If images are not displayed properly, please upgrade the video driver of your computer. Ensure that all the cables are securely connected. Ensure that the pins of the connectors are not bent or broken. Press the Auto Adjust button on the control panel. - If you are using a portable computer, set the resolution of the computer to WXGA (1280 x 800). If you experience difficulty in changing resolutions, or if your monitor freezes, restart all the equipment and the projector. If images are not displayed properly, please upgrade the video driver of your computer. The screen does not dis- play your presentation If you are using a portable computer, press the toggle output settings. Example: [Fn]+[F4]. Image is unstable or flickering Adjust the tracking in the OSD Display settings of the Advanced menu (in PC Mode only). Image has vertical flickering bar Adjust the frequency in the OSD Display settings of the Advanced menu (in PC Mode only). Image is out of focus . Adjust the focus ring on the projector lens. 2. Ensure that the projection screen is within the required distance from the projector (3.18 ft [97 cm] to 8.48 ft [258 cm]). 44 © 3M 2012. All Rights Reserved. 3M™ Mobile Projector MP410 Possible Solution The image is stretched when displaying a 16:9 DVD The projector automatically detects the input signal format. It will maintain the aspect ratio of the projected image according to input signal format with an Original setting. If the image is still stretched, adjust the aspect ratio in the Display settings of the Advanced menu in the OSD. Error LED is blinking amber A projector fan has failed and the projector will automatically shut down. TEMP LED is solid amber The projector has overheated. The display automatically shuts down. Turn the display on again after the projector cools down. If the problem persists, contact 3M™. TEMP LED is blinking amber If the projector fan fails, the projector will automatically shut down. Clear the projector mode by pressing and holding the Power button for 10 seconds. Please wait for about 5 minutes and try to power up again. If the problem persists, contact 3M™. The remote control is not operating smoothly or works only within a limited range The battery may be low. Check if the LED indication from the remote is too dim. If so, replace with a new CR2025 battery. © 3M 2012. All Rights Reserved. 45 English Problem English 3M™ Mobile Projector MP410 Guiding Signals Projector Status Description Standby mode Projector in Standby mode. Ready to power on. Power TEMP ERROR (Blue/Amber) (Amber) (Amber) BLUE OFF OFF Flashing Warming up mode Projector takes some time to warm up BLUE and power on. OFF OFF LED on Projector in Normal mode, ready to display an image. BLUE OFF OFF BLUE OFF OFF NOTE: The OSD menu is not accessed. Cooling mode Projector is cooling to shutdown. Projector overheated Air vents might be blocked or ambient OFF temperature may be above 35 ºC. The projector automatically shuts down. Ensure that the air vents are not blocked and that the ambient temperature is within operational range. If the problem persists, contact us. AMBER OFF Fan breakdown One of the fans has failed. The projector automatically shuts down. If the problem persists, contact us. OFF AMBER OFF LED failure LED shutdown. OFF 46 Flashing OFF AMBER © 3M 2012. All Rights Reserved. 3M™ Mobile Projector MP410 English Compatibility Modes (Analog/Digital) Resolution Refresh Rate (Hz) Hsync Frequency (KHz) Pixel Clock (MHz) 640 x 350 70.087 31.469 25.175 720 x 400 70.087 31.469 28.322 720 x 400 70.087 31.469 28.322 640 x 480 59.940 31.469 25.175 640 x 480 75.000 37.500 31.500 640 x 480 85.008 43.269 36.000 800 x 600 60.317 37.879 40.000 800 x 600 75.000 46.875 49.500 800 x 600 85.061 53.674 56.250 1024 x 768 60.004 48.363 65.000 1024 x 768 75.029 60.023 78.750 1024 x 768 84.997 68.677 94.500 1280 x 720 59.855 44.772 74.500 1280 x 1024 60.020 63.981 108.000 1280 x 1024 75.025 79.976 135.000 1280 x 768 59.87 47.776 79.500 1360 x 768 60.015 47.712 85.500 1680 x 1050 59.954 65.290 146.250 1440 x 900 59.887 55.935 106.500 1920 x 1080 60.000 67.500 148.500 1280 x 800 59.810 49.702 83.500 1280 x 720 59.855 44.772 74.500 720 x 480 p60 59.940 31.469 27.000 720 x 576 p50 50.000 31.250 27.000 1280 x 720 p60 60.000 45.000 74.250 1280 x 720 p50 50.000 37.500 74.250 1920 x 1080 i60 60.000 33.750 74.250 1920 x 1080 i50 50.000 28.125 74.250 1280 x 768 -R60 59.995 47.396 68.250 1280 X 768 74.893 60.289 102.250 1280 X 768 84.837 68.633 117.500 1280 x 800 -R 59.910 49.306 71.000 1280 x 800 74.934 62.795 106.500 1280 x 800 84.880 71.554 122.500 1440 x 900 74.984 70.635 136.750 © 3M 2012. All Rights Reserved. 47 English 3M™ Mobile Projector MP410 Specifications Item Specification Light Valve 0.45” WXGA S450 DMD, DarkChip3™ Brightness 300 ANSI lumens (Typical) Contrast Ratio 10000:1 Typical (Full On/Full Off) Uniformity 80% Typical (Japan Standard - JBMA) Number of Pixels 1280 x 800 (WXGA) Internal Flash 1 GB Memory (Max.) Displayable Color 1.073 billion colors Projection Lens F-Stop: F/ 2.0 f=14.95 mm Fixed Lens Throw ratio = 1.5 wide and tele Offset ratio: 100% Projection Screen Size 30~80 inches (Diagonal) Projection Distance 3.18~8.48 ft (97 cm ~ 258 cm) Video Compatibility Composite Video: NTSC (M, 3.58, 4.43), PAL (B, D, G, H, I, M, N, 4.43), SECAM (B, D, G, K, K1, L, 4.25, 4.4) Component Video input via VGA: 1080i (50/60 Hz), 720p (50/60 Hz), 576i/p, 480i/p HDMI input: 1080p, 720p, 576i/p, 480i/p Power Supply Universal AC 100-240 50-60 Hz with 65 W power adapter Power Consumption Normal mode: 55 W ± 10% @ 110 Vac Eco mode: 45 W ± 10% @ 110 Vac Standby mode < 0.5 W Audio 1 speaker x 1 watt RMS Noise Level 36 dB(A) in Bright mode 34 dB(A) in Presentation mode 32 dB(A) in Eco mode Weight < 1.0 lbs Dimensions (W x H x D) 106.3 x 43.16 x 105 mm 48 © 3M 2012. All Rights Reserved. 3M™ Mobile Projector MP410 English Item Specification Environmental Operating temperature: 5 ºC to 35 ºC (41 ºF to 95 ºF) Humidity: 80% maximum Storage temperature: 0 ºC to 60 ºC (32 ºF to 140 ºF) Humidity: 80% maximum Power: One DC power jack VGA input: One 24-pin universal connector (Black) for analog RGB input signals and supporting Audio output. HDMI input: One HDMI connector for supporting HDMI 1.3. HDCP compliant. AV input: One 3.5 mm connector for supporting Audio/ Video input. USB (type A) port: One USB connector for supporting USB display, multimedia playback (Video/Audio/Photo), and USB Memory storage access (USB flash drive/internal memory). MicroSD card slot: One microSD connector for supporting multimedia playback (Video/Audio/Photo) and supporting media and image processor firmware upgrade. I/O Connectors Light Source Mercury-free LED (up to 20000 hours in Normal mode) NOTE: The LED life rating for any projector is a measure of brightness degradation only, and is not a specification for the time it takes a LED to fail and cease light output. LED life is defined as the time it takes for more than 50 percent of a LED sample population to have brightness decrease by approximately 50 percent of the rated lumens for the specified LED. The LED life rating is not guaranteed in any way. The actual operating life span of a projector LED will vary according to operating conditions and usage patterns. Usage of a projector in stressful conditions which may include dusty environments, under high temperatures, many hours per day, and abrupt powering-off will most likely result in a LED’s shortened operating life span or possible LED failure. © 3M 2012. All Rights Reserved. 49 Mobile Interactive Solutions 3M Austin Center 6801 River Place Blvd. Austin, TX 78726-9000 866-631-1656 www.3Mmobileprojector.com e-mail: [email protected] 3M is a trademark of 3M Company. All other trade names referenced are the service marks, trademarks or registered trademarks of their respective companies. © 2012 3M. All Rights Reserved. Made in China 78-6971-1613-1 Rev. A