1
Safety Application Example
Safety Mat Control Using CompactBlock
Guard I/O and GuardLogix Integrated
Safety Controller
Safety Network-enabled Example
Safety Rating: Category 3, according to EN954-1
Introduction............................................................................................ 1
Important User Information .....................................................................2
General Safety Information.................................................................... 3
Description............................................................................................. 3
Example Bill of Materials ....................................................................... 8
Setup and Wiring ....................................................................................8
Configure ............................................................................................... 9
Programming………………………………………………………………...15
Performance Data………………………………………………………….. 23
Additional Resources………………………………………………………. 26
Introduction
This example shows how to wire, configure and program a GuardLogix
integrated safety controller with a CompactBlock Guard I/O module for
use with a dual channel safety mat and a dual channel e-stop.
Features and Benefits
• Uses programmable safety logic to control and monitor the status of a
safety mat.
• Expandable as needed by adding additional safety inputs or outputs.
• Easier integration into Logix controllers and HMIs through standard
DeviceNet control systems.
• Seamless communication of both safety and standard data using CIP
Safety on DeviceNet networks.
2
Important User Information
Solid state equipment has operational characteristics differing from those
of electromechanical equipment. Safety Guidelines for the Application,
Installation and Maintenance of Solid State Controls (publication
SGI-1.1 available from your local Rockwell Automation sales office or
online at http://literature.rockwellautomation.com) describes some
important differences between solid state equipment and hard-wired
electromechanical devices. Because of this difference, and also because
of the wide variety of uses for solid state equipment, all persons
responsible for applying this equipment must satisfy themselves that
each intended application of this equipment is acceptable.
In no event will Rockwell Automation, Inc. be responsible or liable for
indirect or consequential damages resulting from the use or application
of this equipment.
The examples and diagrams in this manual are included solely for
illustrative purposes. Because of the many variables and requirements
associated with any particular installation, Rockwell Automation, Inc.
cannot assume responsibility or liability for actual use based on the
examples and diagrams.
No patent liability is assumed by Rockwell Automation, Inc. with respect
to use of information, circuits, equipment, or software described in this
manual.
Reproduction of the contents of this manual, in whole or in part, without
written permission of Rockwell Automation, Inc., is prohibited.
Throughout this manual, when necessary, we use notes to make you
aware of safety considerations.
Identifies information about practices or circumstances that
can cause an explosion in a hazardous environment,
which may lead to personal injury or death, property
damage, or economic loss.
Identifies information that is critical for successful
application and understanding of the product.
Identifies information about practices or circumstances that
can lead to personal injury or death, property damage, or
economic loss. Attentions help you identify a hazard, avoid
a hazard, and recognize the consequence.
Labels may be on or inside the equipment, for example, a
drive or motor, to alert people that dangerous voltage may
be present.
Labels may be on or inside the equipment, for example, a
drive or motor, to alert people that surfaces may reach
dangerous temperatures.
Publication SAFETY-AT011A-EN-P – February 2008
3
General Safety Information
This application example is for advanced users and
assumes that you are trained and experienced in safety
system requirements.
A risk assessment should be performed to make sure all
task and hazard combinations have been identified and
addressed. The risk assessment may require additional
circuitry to reduce the risk to a tolerable level. Safety
circuits must take into consideration safety distance
calculations which are not part of the scope of this
document.
Contact Rockwell Automation to find out more about our safety risk
assessment services.
Description
This document details how to interface a safety mat directly into a
1791DS Guard I/O module and maintain, at a minimum, a CAT3 safety
rating. This document will describe the operational theory, fault
detection, GuardLogix code and field wiring requirements.
The GuardLogix controller is programmed using RSLogix 5000
software. You must be familiar with this software to use this document.
Safety Function
This application example assumes use of a dual-channel safety
mat. It also assumes that the dual channels are shorted together
whenever the safety mat is stepped on. Unfortunately, when this
type of safety mat is wired directly into a 1791DS I/O module,
there is simply no way to distinguish between an actual wiring
short between the two channels, and stepping onto the mat. When
either situation occurs, a short is created between the channels.
For this reason, Machine STOP must be the go-to state when the
mat is stepped on. In other words, the machine can never START
due to a channel-to-channel field wiring short, and this would be
possible if stepping onto the mat caused the machine to start.
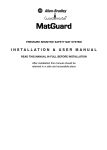
The GuardLogix controller must be capable of detecting the
channel-to-channel short that is caused by stepping onto the mat.
The easiest method to detect this channel-to-channel short is to
perform a pulse test. This diagram shows the wiring for a typical
pulse-tested circuit. The GuardLogix controller uses the 1791DS
DeviceNet Safety CompactBlock Guard I/O Module. 1791DS test
outputs supply 24V dc for the circuits. They can be configured, as
described on the following page, to automatically generate a pulse
test.
Publication SAFETY-AT011A-EN-P – February 2008
4
Safety Mat Connections to I/O Module
Test
Outputs
Safety
Inputs
Mat
Module Test Outputs
Pulse-testing Basics
Both channel sources (of 24V dc) of any safety input are normally HI,
and thus the channel inputs are HI as well. But if one source is pulsed
LO, then the corresponding channel input should go LO as well. If the
input follows the output LO, then the pulse test passes. But if the pulsed
LO channel has another path to 24V dc, such as a channel-to-channel
short, the input channel will not go LO, and the pulse test will fail. This
is how the GuardLogix controller detects when the mat has been stepped
on.
1791DS DeviceNet Safety I/O Modules are capable of performing onboard pulse-testing without any additional code in the GuardLogix
controller. However, when the 1791DS modules detect a pulse test
failure, the inputs of the failed channels fault, and remain faulted until
the input channels go LO (0V dc). Since stepping on the mat does not set
the channels LO, the only way to generate a LO signal is to break the
channels by using an inline switch.
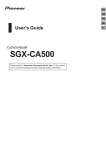
The following diagram shows an inline switch that can be opened to
generate the LO signals required to reset the 1791DS inputs in response
to an on-board pulse test fault.
Publication SAFETY-AT011A-EN-P – February 2008
5
Safety Mat with Switch
Mat
This application example assumes that this additional inline switch will
not be acceptable, and presents an alternate solution. This other solution
will not use the on-board configurable pulse-testing for the reasons
described above.
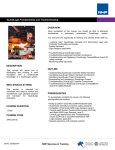
This application example shows how to generate the pulse test by
toggling two (2) 1971DS Test outputs HI and LO using ladder logic.
1791DS
Safety Inputs
1791DS Test
Outputs
Safety Mat
In1
In2
T1
T2
Using simple ladder logic, these outputs are toggled HI and LO, causing
the inputs to toggle HI and LO as well. If the mat has not been stepped
on, the inputs should always be diverse; one input HI and one input LO.
But when the mat is stepped on, a channel-to-channel short occurs, and
the HI channel has a path to both inputs. The software detects that the
inputs are no longer diverse and drops out the safety mat output.
The advantage of using ladder logic, rather than on-board pulse-testing,
is that any 1791DS faults (shorts to 24V dc, shorts to V dc, channel-tochannel short) are temporary and are automatically reset when the fault is
cleared; for example stepping off the mat.
All three 1791DS modules have test outputs capable of supporting this
application. All three 1791DS modules have four test outputs, and so two
remain for other uses.
Publication SAFETY-AT011A-EN-P – February 2008
6
The following faults are detected:
•
Mat stepped on / channel-to-channel short (cannot
differentiate between these).
•
chA shorted to 24V dc
•
chB shorted to 24V dc
•
chA shorted to GND
•
chA wire break
•
chB shorted to GND
•
chB wire break
•
DeviceNet Fault (not in this code; easy to monitor)
Fault Exclusion Affecting Category Rating
There is one combination of faults that could cause a dangerous failure of
the safety mat in this application. The three faults must occur in a
particular order to create this dangerous situation. The three faults are:
•
channel short around the safety mat.
•
wire OFF between either side of the safety mat and short.
•
wire OFF between the other side of the safety mat and short.
First, a channel short around the safety mat. This does not change the
circuit at all, and is undetectable because the circuit is not broken when
the mat is stepped on.
Safety Mat
Publication SAFETY-AT011A-EN-P – February 2008
7
Second, wire OFF on either side of the safety mat. Because of the
initial short, the wire OFF is undetectable. When the mat is stepped
on, the channels still short together, and there remains a path
between the mat and input.
Safety
Mat
Third, wire OFF on the other side of the safety mat. After this third fault,
there is a dangerous failure of the safety mat. If the mat is stepped on,
there is no channel-to-channel short between the two channels, and thus
the safety mat output will remain energized.
Safety
Mat
Publication SAFETY-AT011A-EN-P – February 2008
8
If no action is taken to detect these faults as they occur, then this safety
mat application will have to be rated to CAT3. One possible method to
detect this condition is to place a switch on either side of the mat. After
the first fault, opening this switch will not drop out the input, thus
detecting the short around the mat.
This example meets the requirements of Category 3 according to
EN954-1.
Example Bill of Material
This functional safety example uses these components.
Catalog Number
1756-L62S
1756-LSP
1791DS-IB8XOB8
1606-SL
1756-A10/B
1756-PA72
1756-ENBT
1756-DNB
440F-M2010BYNN
Setup and Wiring
Description
GuardLogix CPU
GuardLogix safety partner
CompactBlock Guard I/O module on DeviceNet
(8 safety inputs, 4 pulse test / standard outputs,
8 safety outputs)
24V DC power supply
ControlLogix chassis
ControlLogix power supply
ControlLogix ENBT module
ControlLogix DNB module
39.4” x 19.7” MatGuard safety mat
Quantity
1
1
1
1
1
1
1
1
For detailed information on installing and wiring, refer to the product
manuals listed in the Additional Resources on page 26.
System Overview
Wiring
The following diagram shows how the safety mat is wired using two test
outputs.
Test
Outputs
Safety
Inputs
Publication SAFETY-AT011A-EN-P – February 2008
Mat
9
Configure
To support the hardware configuration shown above, the following
configuration was used. The 1791DS-IB8XOB8 module was added to
the I/O configuration under the 1756-DNB DeviceNet Bridge module, as
shown.
The 1791DS-IB8XOB8 module is configured as follows.
The options for Input Data are:
• Point Status / Muting.
• Combined Status / Muting.
• Point Status / Muting / Test Output.
Combined status lumps all eight input point status into a single bit, and
the same for the outputs. Point Status provides an individual status bit for
each I/O point. To obtain the Test Output status, select the option with
Test Output.
Publication SAFETY-AT011A-EN-P – February 2008
10
The options for Output Data are:
• Safety.
• Test.
• Combined.
Safety provides tags to control the 8 safety outputs. Test provides tags to
control the 4 test outputs. Combined provides 12 tags for 8 safety outputs
and 4 test outputs. Since we are using the test outputs, select Combined.
The only choice for Data Format is Integer.
The only other options under the General tab are DeviceNet Node
number and Safety Network Number. The DeviceNet Node number is set
using the rotary dial switches on the 1791DS module.
There is much confusion regarding the Safety Network Number. When
the Safety Network Number (SNN) is used, all the devices on any safety
network should have the same SNN. If there are two DNBs, and thus
twoDeviceNet safety networks, each network should have a unique SNN.
This provides a level of safety so that if there were matching node
numbers on each DeviceNet network, the SNN is used in combination
with the DeviceNet node number to create a unique identifier:
•
•
SNN#1 / node 25
SNN#2 / node 25
There are two reasons for using a common SNN among all nodes on the
subnet.
• First, is documentation. It is much easier to recall the
SNNs of each node in case of replacement if they are all
the same.
• Second, is Auto Device Replacement (ADR). If you
replace a DeviceNet node using ADR, it will assume the
SNN of the lowest node # on the network. If they are all
the same, it will assume the correct SNN.
Publication SAFETY-AT011A-EN-P – February 2008
11
The ControlBus backplane that the GuardLogix controller sits on should
have a unique SNN as well. The ControlBus SNN in combination with
its slot number creates its unique identifier.
The following screen capture shows that the SNN of the GuardLogix
controller and the 1791DS module do not match in the ACD file.
The default data was used in the Connection and Safety tabs shown
below. They should be changed based on the throughput requirements of
your system.
Publication SAFETY-AT011A-EN-P – February 2008
12
The Input Configuration tab is shown below. There are three choices
under Point Mode.
•
•
•
Standard [input circuits not tested internally]
Safety [input circuits tested internally]
Safety Pulse Test [input circuits tested internally and wired
to a Test Source for pulse-testing]
Inputs 4 and 5 were used for the Fault reset and Circuit reset push
buttons. They are set to Standard because reset buttons are not safety
inputs.
Inputs 0 and 1 were used for the safety mat inputs. Since these are safety
inputs, they are configured as Safety inputs. They were not configured as
Safety Pulse Test because we are not using the on-board pulse-testing
feature for the reasons described at the beginning of this document.
Publication SAFETY-AT011A-EN-P – February 2008
13
The Test Output configuration is shown below. Test Outputs 2 and 3 are
being used as the source for the safety mat channels and are set to
Standard. Even though they are not Safe outputs when used in this
configuration, the redundancy (two channels) and diagnostics
(alternating the outputs makes it possible to detect all wiring faults using
ladder logic) allow the channels to achieve at least a Category 3 rating
per EN 954-1.
The Output Configuration tab is shown below. The options under Point
Mode are:
• Safety.
• Safety Pulse Test.
• not used.
Outputs 2 and 7 are being used as indicators in the ladder code and thus
are configured as safety outputs. These indicators could be driven by
standard output modules if safety outputs are in short supply.
Publication SAFETY-AT011A-EN-P – February 2008
14
Reaction to Faults
Channel-to-Channel Short / Actual Short or Stepping on Mat
Channel
A
Start
HI
Fault
ch-ch
Immediate
Reaction
HI
B
LO
ch-ch
HI
Immediate
Detection
Yes
Yes
Reaction
After
Toggle
Detection
After
Toggle
Reaction
After
Toggle
Detection
After
Toggle
HI
Yes
Short to 24V dc
Channel
A
Start
HI
Fault
Immediate
Reaction
HI
Immediate
Detection
B
LO
short
HI
Yes
A
HI
short
HI
No
B
LO
LO
HI
Short to 0V dc
Fault
short
Immediate
Reaction
LO
Channel
A
Start
HI
B
LO
LO
A
HI
HI
B
LO
Short
Immediate
Detection
Yes
Reaction
After
Toggle
Detection
After
Toggle
LO
LO
No
LO
Yes
Reaction
After
Toggle
Detection
After
Toggle
Wire OFF
Fault
off
Immediate
Reaction
LO
Channel
A
Start
HI
B
LO
LO
A
HI
HI
B
LO
off
LO
Immediate
Detection
Yes
LO
No
LO
Yes
Other Fault Results
If
Mat is stepped on with a Wire OFF fault
and in between toggles…
Mat is off on input side of mat…
Wire is off on ouput side of mat…
Publication SAFETY-AT011A-EN-P – February 2008
Then
Output turns off immediately based on
where wire came off.
Outputs short together and generate a fault.
Inputs both go HI and output turns off.
15
Programming
The safety mat channels are sourced by test outputs and monitored by
safety inputs. If all of these are LO, then the output toggling has not
started, and is jumpstarted by setting the output for channel A HI.
This rung sets the presets for the Short Circuit timers. The Short Circuit
timers provide time for the inputs to catch up to the output that is
sourcing it. This determines the amount of time to wait for the input to
follow the output HI or LO. They begin timing every time the test
outputs are toggled. If the inputs track to the same state as the Test
Outputs before the timers time out, then no faults are indicated. The
preset is entered in the Operator1Mat UDT.
This rung sets the presets for the Filter Timers which operate the same as
the Short Circuit Timers. The Filter Timers provide time for the inputs to
catch up to the output sourcing it. The filter determines the amount of
time for the input to follow the output HI or LO. These filters turn OFF
the output if they time out. If the input does not follow the output before
the filter timer times out, the safety Mat output must be turned off.
Publication SAFETY-AT011A-EN-P – February 2008
16
There are four timers, one for each channel shorted to 24V dc and GND.
There is also a filter preset for the mat and someone must be on the mat
until the filter timer times out to turn off the Mat output. The preset is
entered in the Operator1Mat UDT. The Short Circuit timers have nothing
to do with turning OFF the output, but are used for fault diagnostics. If
the Short Circuit timer is too low (less than 75 ms) it is possible to get
incorrect diagnostic indicators. It is, therefore, recommended the Short
Circuit timers have a preset no less than 75 ms. If a quicker response
time is needed for safety shutdown when the mat is stepped on, then the
Filter presets can be set lower.
These are the Short Circuit and Filter timers for channel A. They begin
running if the Output is HI and the input LO, or vice versa.
Publication SAFETY-AT011A-EN-P – February 2008
17
These are the Short Circuit and Filter timers for channel B.
The next two rungs keep the outputs toggling. If A output goes HI, then
A input should follow. When it does, set A output LO and set B output
HI. When B output goes HI, then B input should follow. When it does,
set B output LO and set A output HI, and so on.
This rung keeps everything working properly when a fault occurs.
It allows detection of a channel short to 24V dc and it also allows the
non-faulted channel to keep toggling, while the faulted channel times
out.
This rung also allows detection of a channel-to-channel short. Without it,
only channel B will incorrectly be detected as faulted simply due to the
order of the rungs. With this rung, both channels toggle together, which
can be easily monitored.
This rung does nothing if a single channel shorts to GND. When that
occurs, the toggling simply stops, and the correct channel fault is
detected.
Publication SAFETY-AT011A-EN-P – February 2008
18
Clear all fault indicators on the rising edge of the fault reset. If the fault
still exists, the next run sets the fault again. Once again, this program
cannot distinguish between stepping onto the mat and a channel-tochannel short. So the Mat Stepped on LED could actually be the
indication for a channel-to-channel short.
Latch the Fault indicators and Fault Present when the Fault timers expire.
The Short to GND faults have been removed from this rung and used
later, because they are broken down to a more granular level.
Publication SAFETY-AT011A-EN-P – February 2008
19
Rungs 10 and 11 allow the restart of the Mat output if there are not
faults. Restart requires that the inputs toggle through both safe states
(1/0) and (0/1). If using Auto Reset, wait 50 ms after toggling through
the safe states before restarting the output. If using Manual Reset, the
Circuit Reset must be set HI after toggling through the safe states.
Turn OFF the Mat output if both inputs are in the same state, and the
filter timers have expired. This occurs when the outputs are toggled, but
only one of the inputs follows their respective outputs to the correct state.
The cause is likely that the mat was stepped on, but it could also be a
wiring short to 24V dc or GND. Unless the filter timers were set very
low, it is very unlikely that network throughput caused the stop. For
example, one of the channels was sent through over DeviceNet network,
but the other channel was not.
The Mat Stepped ON Filter is required to turn OFF output when the mat
is stepped on, because rung 7 causes the outputs to toggle in the same
state, and thus the filter timers do not time out, because the inputs are
tracking the outputs.
If the mat is stepped on, the outputs (therefore inputs as well) are always
in the same state, toggling between HI and LO (once again, due to rung
7). The mat filter timer times out during this condition and turns off the
output in the rung above.
Publication SAFETY-AT011A-EN-P – February 2008
20
When a channel is shorted to GND, both inputs go LO and stay LO. This
condition lets the mat filter timer to run, incorrectly. This counter can
distinguish between the short to GND and stepping on the mat because it
will not count if a short to GND fault occurs.
When the mat is stepped on for less than the Mat filter timer, the counter
still increments. If this count is not cleared out, the next short to GND
could incorrectly be detected as stepping on the mat. The mat filter timer
enable bit clears the count when one steps off the mat to ensure that it is
cleared out as quickly as possible.
If the Mat Stepped On timer times out, and the Mat confirmation counter
is greater than 1, then the mat has been stepped on. A value of 2 or more
is used because a short to 24V dc will cause the mat confirmation
counter to increment to 1. When the mat is stepped on, the counter
increments continuously.
Since there are separate Filter and Short Circuit timers, it is possible that
the filter timer drops out the output, yet no fault condition is energized.
In these cases, an undetectable fault is declared.
Publication SAFETY-AT011A-EN-P – February 2008
21
The last five rungs were added to differentiate between a short to GND
and a wire OFF condition. Both cause the channel input to go LO, even
when the channel output is HI.
Test Output status is required for this differentiation. If a wire break
occurs, then the Test Output status remains HI. If a short to GND occurs,
the Test Output status toggles at the Input Error Latch time rate. A 5-byte
connection is needed to obtain the Test Output status.
Publication SAFETY-AT011A-EN-P – February 2008
22
Setting the 1791-DS Input Error Latch Time
We recommend that the Input Error Latch Time be set to zero.
Since the Faults are captured in software due to the output toggling, there
really is no reason to have to latch the fault. If you do set the Input Error
Latch time, the following occurs:
•
•
•
•
First, it will have no effect on turning OFF the output in the
event of a fault or stepping onto the mat. The Latch time has
no effect on the filter timer, so the output will still go LO
when the filter timer times out.
In the event of a fault (stepping onto mat or short circuit), the
fault cannot be reset during the Latch time.
In the event of a channel-to-channel short, stepping on mat,
or short to 24V dc, it is likely that both the Short to Power
and Short to GND indicators go HI.
If the mat is stepped on, the mat stepped On indicator may
not energize until the Latch timer times out. And only if you
are still on the mat.
Setting the Safety Task Period
Set the Period based on the reaction time you require. The lower the
period, the quicker the outputs will toggle, and the quicker the reaction
time. None of the operational features of the application example are
affected; they just run slower as the period increases. The Safety Task
Period becomes the 1791-DS module output-connection requested packet
interval (RPI).
Setting the RPI of 1791-DS Module
The Requested Packet Interval (RPI) setting affects the operation of the
safety mat application in the same way as the period. Lower RPIs result
in quicker reaction times. But because the I/O module RPI is
asynchronous to the safety task, if the RPI is set higher than the short
circuit timer, then you will likely see erroneous fault indications. When
the short circuit timer times out, the fault is set. The output will not
necessarily go LO if the RPI is higher than the filter timer, because if the
inputs are diverse (which they should normally be), the filter timer is
ignored.
Setting the Short Circuit Timer Preset
These timers make sure that the channel inputs follow the channel
outputs before the timers time out. If the timers time out, the appropriate
fault indicator is energized. We recommend setting this preset to the
same value as the Filter Preset but no less than 75 ms. If less than 75 ms,
then false indicators occur when the mat is stepped on, due to how the
faults are handled on the 1791-DS module.
Publication SAFETY-AT011A-EN-P – February 2008
23
Setting the Filter Timer Preset
These timers also make sure that the channel inputs follow the channel
outputs before the timers time out. Before the output is turned OFF, these
timers must time out and the inputs must be in the same state. This can
only occur if one of the channels is shorted to 24V dc or GND, or the
channels are shorted to each other, or a wire break occurs. If the delay is
only due to throughput (RPI or period set HI), and the inputs toggle after
the filter timers time out, but always remain in the opposite state, then
the filter timers will have timed out without turning off the output. Set
this preset based on how quickly the output must be set LO when the mat
is stepped on.
Performance Data
Worst Case Reaction Time Based on Period / Task / RPI /
Filter Preset
Typically, one channel is HI and one LO. When the mat is stepped on,
the channels short together, and both inputs are HI since both have a path
to the HI channel. One channel now is HI at the input terminal and the
output logically LO. This starts the filter timer, and when it times out,
since both inputs are HI, the output is turned OFF.
Worst case, the time it takes to occur is the sum of the A to E path as
described below.
C
B
D
A
E
A – Input Module delay / 16 ms + on/off delay filters
B – Input Connection Reaction Time Limit (CTRL)
The Connection Reaction Time Limit is configured in
RSLogix 5000 1791DS Module Properties. The Input
Connection defaults to 4 x RPI.
C – GuardLogix Delay
The maximum delay for the filter timer to time out is:
Period + (Filter Timer / Period)[round UP] x Period + Task
Watchdog
Publication SAFETY-AT011A-EN-P – February 2008
24
Example:
Filter Timer = 50ms
Period = 15ms
Task Watchdog = 10ms
15 + {[(50/15) = 3.33 = 4] x 15} + 10 = 85ms
The First Period accounts for the input just being missed because
of the asynchronous Communications.
During Second Period – start timer
During Third Period – time to 15
During Fourth Period – time to 30
During Fifth Period – time to 45
During Last Task Watchdog – time to 50 and set output LO
D – Output Connection Reaction Time Limit
The Connection Reaction Time Limit is configured in
RSLogix5000 1791DS Module Properties. The Output
Connection defaults to 3 x RPI.
E – Output Module Delay / 6ms (+ 20ms if using OW4 relay outputs)
Worst Case Reaction Time = A + B + C + D + E
Typical Reaction Time Based on Period / Task / RPI / Filter
Preset
Typically, one channel is HI and one LO. When the mat is stepped on,
the channels short together, and both inputs are HI since both have a path
to the HI channel. One channel now is HI at the input terminal and the
output logically LO. This starts the filter timer, and when it times out,
since both inputs are HI, the output is turned OFF.
Typically, the time it takes to occur is the sum of the A to E path as
described below.
C
B
D
Publication SAFETY-AT011A-EN-P – February 2008
A
E
25
A – Input Module delay / (max / 2) = 8ms
B – Input Connection Reaction Time / Input RPI
C – GuardLogix Delay
The maximum delay for the filter timer to time out is:
[Period / 2} + [(Filter Timer / Period)[round UP] x Period] +
Task Scan Time
Example:
Filter Timer = 50ms
Period = 15ms
Task Watchdog = 10ms
Task Scan Time = 5ms (assumption)
7.5 + {[(50/15) = 3.33 = 4] x 15} + 5 = 72.5ms
The First Period accounts for the input just being missed because
of the asynchronous Communications.
During Second Period – start timer
During Third Period – time to 15
During Fourth Period – time to 30
During Fifth Period – time to 45
During Last Task Watchdog – time to 50 and set output LO
D – Output Connection Reaction Time / Output RPI = Task Period
E – Output Module Dalay / (max / 2) = 3ms
Typical Reaction Time = A + B + C + D + E
Publication SAFETY-AT011A-EN-P – February 2008
26
Additional Resources
For more information about the products used in this example, refer to
these resources.
Resource
Description
CompactBlock Safety I/O Modules
on DeviceNet Series 1791DS
Installation Instructions,
publication 1791DS-IN001
Provides instructions for installing your
DeviceNet Safety I/O Module.
Guard I/O DeviceNet Safety Modules
User Manual,
publication 1791DS-UM001
Provides information for using the Guard I/O
DeviceNet Safety Module.
GuardLogix Controller Installation
Instructions, publication 1756-IN045
Provides instructions for installing your
GuardLogix Controller.
GuardLogix Controller Systems
Safety Reference Manual,
publication 1756-RM093
Provides safety guidelines for using your
GuardLogix Controller.
GuardLogix Controllers User Manual,
publication 1756-UM020
Provides information for using your
GuardLogix Controller.
Safety Mats Overview, publication
440F-CA500
Provides general information about
MatGuard mats, S115.
MatGuard Mats, publication 440FCA501
Provides MatGuard Mat specifications.
Product Certifications website,
http://ab.com
Provides declarations of conformity,
certificates and other certification details.
Industrial Automation Wiring and
Grounding Guidelines, publication
1770-4.1
Provides general guidelines for installing a
Rockwell Automation industrial system.
You can view or download publications at
http://literature.rockwellautomation.com. To order paper copies of
technical documentation, contact your local Rockwell Automation
distributor or sales representative.
Allen-Bradley, CompactBlock Guard, ControlLogix, GuardLogix, MatGuard, Minotaur Safety,
Rockwell Automation, and RSLogix 5000 are trademarks of Rockwell Automation, Inc.
Trademarks not belonging to Rockwell Automation are property of their respective companies.
Publication SAFETY-AT011A-EN-P – February 2008
Publication SAFETY-AT011A-EN-P – February 2008
Copyright © 2008 Rockwell Automation, Inc. All rights reserved. Printed in U.SA