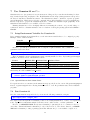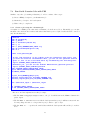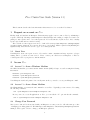
1
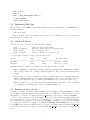
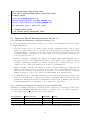
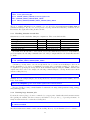
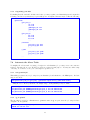
P ère Cluster User Guide (Version 1.1)
This document describes the basic information that an user need to access the P ère cluster.
1
Request an account on P ère
Faculty, staff, and students at Marquette University may apply for an account on P ère by submitting a
request to ITS help desk http://www.marquette.edu/its/help/ and sending a completed research computing account request form to [email protected]. For a student user, he/she needs to have a faculty
sponsor agreed that such account is necessary.
The research account request form can be downloaded at http://www.marquette.edu/mugrid/pdf/
account_request_form.pdf. You can save the form to your desktop, fill the required fields (including the
signature field), and send an electronic copy to [email protected].
1.1
Guest User
Non-Marquette users can request access to P ère under certain constraints and may experience a longer
waiting time to get their account created. Please contact your collaborator at Marquette or ITS [email protected] for your guest account information.
2
Access P ère
2.1
Access P ère from a Windows Machine
On a Windows machine, you can use Secure Shell Client (SSH) or Putty to access Pere using the following
information.
Hostname: pere.marquette.edu
Username: <your-Marquette-user-id>
Password: <your-Marquette-password>
Your Marquette userid and password are exactly same as those you used to access your Marquette email.
2.2
Access P ère from a Linux Machine
On a Linux machine, you can use the ssh command to access P ère . Typically, you can connect to P ère using
the following command:
ssh
<your-Marquette-user-id>@pere.marquette.edu
In case you need to access X applications on P ère , you can add the “-Y” option in the ssh command.
ssh -Y <your-Marquette-user-id>@pere.marquette.edu
2.3
Change Your Password
Since your account on P ère is associated with your Marquette account, you need to follow the same procedure
of changing your eMarq password. The link http://www.marquette.edu/its/help/emarqinfo/password.
shtml provides a guide on how to change your Marquette password.
1
3
Using Environment Modules
The Environment Modules toolkit http://modules.sourceforge.net/ allows an user to customize their
environment settings (e.g., shell variables, path, and library path, etc.) via modulefiles. This toolkit provides
user flexible controls on what version of which software package will be used when the user is compiling or
running a program. Below is a list of commands for using modules.
module
module
module
module
module
avail
load <module>
unload <module>
list
help
check which modules are available
set up shell variables for a software module
remove a module from current environment
show all loaded modules
get help on using module
For example, if you want to use openmpi version 1.4.2 compiled with gcc. You can load the environments
for the openmpi modules using the following command.
module load openmpi/gcc/1.4.2
4
Compile MPI programs
There are multiple ways to compile an MPI program. A recommended method is to use the compiler
wrapper provided in an MPI implementation e.g. mpicc, mpicxx, mpif77, and mpif90).
There are several MPI implementations on P ère to serve different user requirements. You may choose
your favorite one as default to compile your code. Here is an example using OpenMPI to compile your
code.
# set the environment for openmpi
module load openmpi/gcc/1.4.2
# compile a c code
mpicc -o prog prog.c
# compile a c++ code
mpicxx -o prog prog.c
# compile a f90 code
mpif90 -o prog prog.f
To reduce later compiling efforts, you can put the compiler compile options and commands into a Makefile
. Below is an example of the Makefile.
# Example Makefile
CC
CLINKER
F77
CFLAGS
FFLAGS
MATH_LIB
=
=
=
=
=
=
mpicc
mpicc
mpif77
-O3
-O3
-lm
default: prog
prog: prog.o
$(CLINKER) -o prog prog.o $(MATH_LIB)
.c.o:
$(CC) $(CFLAGS) -c $<
.f.o:
2
$(F77) $(FFLAGS) -c $<
clean:
rm -f *.o prog
5
Running Jobs with PBS/TORQUE
P ère is currently configured both PBS/TORQUE and Condor to manage jobs submitted to P ère . Essentially both tools provide similar functionalities and you can use either one for both serial and parallel jobs.
Here, we firs describe use PBS for job management.
5.1
Creating Job Scripts
A PBS job is described by a shell script with special shell comments used by the PBS software. The shell
script can be saved as a text file. As the job file mytestjob.qsub shown below, a PBS script consists of
two parts: the PBS directive part and the batch script part.
#!/bin/sh
#PBS -N testjob
#PBS -l nodes=8:ppn=8,walltime=01:00:00
#PBS -q batch
#PBS -o $PBS_JOBNAME-$PBS_JOBID.out
#PBS -e $PBS_JOBNAME-$PBS_JOBID.err
#PBS -M [email protected]
cd $PBS_O_WORKDIR
module load openmpi/gcc/1.4.2
mpiexec -np 64 myprog param1 param2
In this example, line 2-7 are PBS directives and line 9-11 are batch scripts.
Line 1. #!/bin/sh indicates the script will be executed by the program /bin/sh.
Line 2. #PBS -N testjob tells PBS to give your job a name. You may give a meaningful name for your job
so you can quickly know what the job is for later on.
Line 3. #PBS -l nodes=8:ppn=8,walltime=01:00:00 tells how many computing resources does you job need.
For this example, the job will use 64 processors distributed on 8 compute nodes with 8 processors per
node. It also tells PBS that your job will finish within 1 hours. After 1 hour, the job will get killed
no matter whether your job finishes. You need to specify a time long enough for your jobs to finish.
Line 4. #PBS -q batch tells PBS that your job will be put into the batch queue. Some users may need to
use different queue for certain reasons such as access to a commercial program that only has limited
number of licenses.
Line 5. #PBS -o $PBS_JOBNAME-$PBS_JOBID.out tells PBS to save your job’s output to the screen to a file
identified by your job name and job id. You can change the file name to anything you like. The
$PBS_JOBNAME and \$PBS_JOBID are PBS environment variables.
Line 6. #PBS -e \$PBS_JOBNAME-$PBS_JOBID.err is similar to line 5 except the ”-e” stands for error. So the
error message will be written to a file identified by your job name and job id.
Line 7. #PBS -M [email protected] asks PBS to send a notification when the job status change (e.g.,
started or completed). You may need this feature when you have submitted some jobs lasting days
and you don’t want to check them frequently.
3
Line 9. $PBS_O_WORKDIR is a PBS environment variable representing the absolute path of directory where
qsub was executed. By default, it is the working directory where you issued the qsub command. You
can change the value of $PBS_O_WORKDIR by inserting the following line in the job file before referring
this variable.
export PBS_O_WORKDIR = /some/path/to/run/myjob
Line 10. module load openmpi/gcc/1.4.2 sets up the environment for openmpi-gcc-1.4.2.
Line 11. mpiexec -np 64 myprog param1 param2 is the command to run your code. You can put multiple
commands or use shell scripts to run a set of commands.
5.1.1
Job Scripts for Serial Jobs
A serial job consists of a set of commands that use a single process during execution. To run serial jobs, you
can refer the following template to write your own scripts.
#!/bin/sh
#PBS -N <my-job-name>
#PBS -l walltime=01:00:00
#PBS -q batch
#PBS -j oe
#PBS -o $PBS_JOBNAME-$PBS_JOBID.log
cd $PBS_O_WORKDIR
myprog param1 param2
5.1.2
Job Scripts MPI parallel jobs
To run MPI job, you can use the following template to write your own scripts.
#!/bin/sh
#PBS -N my-job-name
#PBS -l nodes=8:ppn=8,walltime=01:00:00
#PBS -q batch
#PBS -j oe
#PBS -o $PBS_JOBNAME-$PBS_JOBID.log
cd $PBS_O_WORKDIR
module load openmpi/gcc/1.4.2
mpiexec -np 64 myprog param1 param2
5.1.3
Job Scripts for OpenMP parallel jobs
To run OpenMP job, you can refer the following template to write your own scripts. Please be reminded
that your application must be compiled with OpenMP support. Otherwise, the program may not run in
parallel. Currently, you can run up to 8 processes for each OpenMP job.
#!/bin/sh
#PBS -N my-job-name
#PBS -l nodes=1:ppn=8
#PBS -l walltime=01:00:00
4
#PBS -q batch
#PBS -j oe
#PBS -o $PBS_JOBNAME-$PBS_JOBID.log
cd $PBS_O_WORKDIR
myprog param1 param2
5.2
Submitting PBS Jobs
Once you have a correct PBS job scripts such as myjob.qsub, you can submit it to the PBS using the
following command.
qsub myjob.qsub
If the job script is correct, P ère will print the job id of your job. Otherwise, you need to check your job
scripts and remove possible errors.
5.3
Check Job Status
To check your jobs, you can use one of the following commands:
qstat
qstat -u <userid>
qstat <jobid>
qstat -f <jobid>
check
check
check
check
all jobs on the system
all jobs belongs to a specific user
a specific job
the details of a specific job
for the qstat command, you may see the following output.
Job id
------------------------6214.hn1
6272.hn1
Name
User
Time Use
---------------- --------------- -------g09
user_a
355:59:5
stata
user_b
25:17:00
S
R
C
Queue
----batch
coba
While the meaning of output is obvious, there are a few points we want to mention.
• First, each PBS job goes through several states such as from Waiting (W) to Running (R) to Existing
(E) to Completed (C). Some jobs may be in the Hold (H) state. The job state is shown in the S(tate)
column.
• Second, each job is put in a certain queue which is configured with a set of constraints such as the
number of maximum running jobs (to match the maximum licenses), the group of users who can access.
Please use the appropriate queue or ask the system administrators to create a new queue for you.
• Third, you may give your job an appropriate name with less than 16 characters so you know what the
job is running for, particularly when you have are running multiple jobs.
5.4
Running an Array of Jobs
Sometimes, you want to run a large number of similar jobs. For example, you may run multiple jobs which
process different input data using the same program. There are many ways to run these type of jobs. As
shown in later, one way is to use Condor and Condor DAG. Here we show how to run them with PBS .
Here we use the following problem as an example. We have a program called bootstrapping which takes
a set of input data data−i.in, generates a set of output files data−i.out where i = 1..10, and then summarize
the output with some statistics tools. You can create 10 PBS job files and let each job run bootstrapping
for one input data. But there is a simple to do it using the Multiple Jobs Submission provided by some
recent PBS releases. When you submit an array of jobs, these jobs will be assigned an unique PBS ARRY ID
to represent its index in the job array. You can map this PBS ARRY ID to your input and output files as
follow.
5
#!/bin/sh
#PBS -N bootstrap
#PBS -l walltime=01:00:00
#PBS -q batch
#PBS -j oe
#PBS -t 1-10
#PBS -o $PBS_JOBNAME-$PBS_JOBID.log
cd $PBS_O_WORKDIR
bootstrap-program < data-${PBS_ARRAYID}.in > data-${PBS_ARRAYID}.out
In the above sample job scripts, the line #PBS -t 1-10 tells PBS to create an array of jobs with index 1
to 10. You can also specify multiple job submissions in the qsub command and don’t include #PBS -t 1-10
in the job script.
qsub -t 1-10 myjob.qsub
qsub -t 9 myjob.qsub
qsub -t 0-10,20,30 myjob.qsub
The job script file myjob.qsub is shown as below.
#!/bin/sh
#PBS -N bootstrap
#PBS -l walltime=01:00:00
#PBS -q batch
#PBS -j oe
#PBS -o $PBS_JOBNAME-$PBS_JOBID.log
cd $PBS_O_WORKDIR
bootstrap-program < data-${PBS_ARRAYID}.in > data-${PBS_ARRAYID}.out
5.5
Common PBS Commands
For PBS , the typical commands are listed as follows.
qsub myjob.qsub
qstat
qdel <job-id>
qalter
pbsnodes
pbstop
submit a job described by scripts myjob.qsub to the system
view job status
delete job
change the attributes of a submitted job
show nodes status
show queue status
For each command, you can find its usage by typing
man <command>
Or
<command> -h
You can find brief but useful user guide on PBS at http://www.doesciencegrid.org/public/pbs/
homepage.html and most supercomputer centers’s web site.
6
6
Running jobs with Condor
Condor is a workload management system for running compute-intensive jobs on distrusted computer
systems. Like other full-featured batch systems, Condor provides capabilities like job queueing mechanism,
scheduling policy, priority scheme, resource monitoring, and resource management. When users submit their
serial or parallel jobs to Condor , Condor places them into a queue, chooses when and where to run the
jobs based upon a policy, carefully monitors their progress, and ultimately informs the user upon completion.
6.1
Setup shell environment for Condor
The environment for Condor should be automatically setup for all users. You can check if this is true by
typing the following command.
which condor_submit
If the system complains that no em condor submit was found, you may add the following lines to your
shell startup files (e.g. $HOME/.bashrc).
If you are using bash, add the following line to $HOME/.bashrc:
source /etc/profile.d/condor.sh
If you are using tcsh, add the following line to $HOME/.cshrc:
source /etc/profile.d/condor.csh
6.2
Create Condor job submit file
A Condor job submit file tells the Condor system how to run a specific job for the user. The complexity
of aCondor job submit file varies with the nature and the complexity of the user’s job. We recommend
the user reading the Condor user manual (http://www.cs.wisc.edu/condor/manual/) before submitting
a large number of jobs to P ère . You may also find many excellent tutorials about Condor at http:
//www.cs.wisc.edu/condor/tutorials/.
Below we show some sample job scripts for several most commonly used job types.
6.2.1
Job submit file for serial job
Assuming you have a serial job you can run with the following command.
myprog 4 10
You can write a Condor job submit file named serial.sub as follows:
Universe
Executable
Arguments
Log
Output
Error
=
=
=
=
=
=
vanilla
myprog
4 10
myprog.log
myprog.out
myprog.error
Queue
The lines in this file have the following meanings.
• Universe: Universe tells CONDOR the job types. The vanilla universe means a plain old job.
• Executable: The name of your program
• Arguments: These are the arguments you want. They will be the same arguments we typed above.
7
• Log: This is the name of a file where Condor will record information about your job’s execution. While
it’s not required, it is a really good idea to have a log.
• Output: Where Condor should put the standard output from your job.
• Error: Where Condor should put the standard error from your job.
6.2.2
Job submit file for parameter sweep
Parameter sweep is typical case in computational experiments in which you run the same program with a
set of inputs.
Assuming you are running the program myprog with the following three sets of parameters.
myprog 4 10
myprog 4 11
myprog 4 12
You can write a Condor job submit file named sweep.sub as follows.
Universe
Executable
Arguments
Log
Output
Error
=
=
=
=
=
=
vanilla
myprog
4 10
myprog.log
myprog.$(Process).out
myprog.$(Process).error
Queue
Arguments = 4 11
Queue
Arguments = 4 12
Queue
6.3
Submit Condor job
Once you have a Condor job submit file, you can use condor submit to submit your job to the Condor
system. For the above two case, the command would be like
condor_submit serial.sub
or
condor_submit sweep.sub
6.4
Monitor Condor job
condor q is a powerful utility provided in the Condor system to show the condor the information about
Condor jobs in the queue. You can find the usage of condor q with either of the following commands.
man condor_q
or
condor_q -h
Below are some of the typical usages.
8
condor_q
condor_q <user-id>
condor_q <job-id>
condor_q -long <job-id>
list
list
list
find
such
all jobs in the queue
all jobs submitted by user <user-id>
the job <job-id>
detailed information for job <job-id>
as which host the job is running on.
Another useful Condor command is condor status. You can use this command to find the status of
the Condor system such as how many jobs is running and how many processors are available for new jobs.
Similar, you may consult the man page of condor status to find its advanced usages.
6.5
Stop a Condor job
If you need to stop a Condor job you have submitted. You can delete that job using the following command.
condor_rm job-id
6.6
Job scripts for MPI jobs
Running MPI job is similar as running sequential jobs but requires a few changes in the Condor job scripts.
• Modify the job scripts to use ”parallel” universe.
• Replace the value of ”executable” to an appropriate MPIRUN wrapper.
• Insert your parallel program to the head of the values of the arguments.
• Specify how many processors you want to use using the following option:
machine_count =
<NUM_PROCESSORS>
• Add instruction on whether transfer file and when to transfer.
Here we use an example to show how to run an MPI job using a condor.
1. Get an MPI sample code and compile it
rsync -av /cluster/examples/condor/mpi samples
module load mvapich/gcc/1.1.0
cd sample/mpi
make
The command em rsync copy the sample files from a shared directory to a local directory.
The command em module load set up the MPI environment to use mvapich 1.1.0 compiled with gcc.
We strongly recommend to use the same implementation to compile and launch an MPI program.
If you mix two different implementations, you may unexpect run time errors such as the job is not
running as several independent serial jobs instead of a single parallel job.
After the above operations, you will find at least four files:
Makefile simple simple.c simple-mvapich1.sub
The file simple is the MPI program we will run.
2. Create a condor job submit file named as ”simple.sub” which may look like:
9
universe = parallel
executable = /cluster/share/bin/condor-mpirun-mvapich1
output = mpi.out
error = mpi.err
log = mpi.log
arguments = simple
machine_count = 4
should_transfer_files = IF_NEEDED
when_to_transfer_output = on_exit
queue
Here is an MPI wrapper for condor that we have created. Since there are multiple MPI implementations on P ère serving different requirements from users, you may choose the one that is appropriate
for you. Typically if you are compiling your program from source code, you are free to choose any of
them. However, some vendor provided MPI programs do require a specific MPI implementation and
the user should be aware of this.
In the above example, we uses mvapich gcc-1.1.0. You can modify the condor-mpirun-mvapich1 to
match other MPI implementation you want to use. Some MPI implementations use MPD to manager the MPI processors. This is normally unnecessary on P ère if you are using OpenMPI or
MVAPICH .
3. Submit the MPI job to Condor Once you have the correct submit file for an MPI job, you can treat
it as same as a serial job and use condor submit, condor q, and condor rm to manage it.
6.7
6.7.1
Condor DAGMan
Computation work flow and DAGMan
Frequently, users may run complicated jobs which consist of a set of related jobs. The relations among
these jobs usually can be described as a directed acyclic graph (DAG). For example, a typical computational
experiment may consist of several steps as shown in the following figure.
Figure 1: A set of dependent jobs represent as a DAG
Condor provides a useful utility (meta-scheduler) called DAGMan (Directed Acyclic Graph Manager)
help the user to construct a work flow to manage dependent jobs. User may refer the DAGMan documentation
at http://www.cs.wisc.edu/condor/dagman/ for more detailed information.
10
6.7.2
the Condor submit file for DAG job
You can write a condor submit file for each task in the above figure and then write another DAG description
file to describe all these jobs in a coordinated order. For the above figure, we assume the list of job scripts
are:
prepare.sub
analyze1.sub
analyze2.sub
analyze3.sub
analyze4.sub
collect.sub
summarize.sub
Then the DAG will look like the following:
Job
Job
Job
Job
Job
Job
Job
prepare prepare.sub
analyze1 analyze1.sub
analyze2 analyze2.sub
analyze3 analyze3.sub
analyze4 analyze4.sub
collect collect.sub
summarize summarize.sub
PARENT prepare CHILD analyze1 analyze2 analyze3 analyze4
PARENT analyze1 analyze2 analyze3 analyze4 CHILD collect
PARENT collect CHILD summarize
6.7.3
Submit Condor DAG job
Different from normal condor jobs, you need to use condor submit dag to submit the Condor DAG job.
Once you submit the DAG job, the Condor DAGMan system will keep track of all sub jobs and run them
unintendedly based on the the DAG description file and available system resources.
11
7
Use Gaussian 09 on P ère
Gaussian 09 is a set of programs for electronic structure modeling, used by researchers in chemistry, biochemistry, chemical engineering, and physics. The official Gaussian website http://www.gaussian.com/ provides
the latest documents for Gaussian 09 software. The Gaussian 09 software contains two separate programs:
g09 and GaussView. While g09 provides the computational modules, GaussView provides a graphical user
interface help users to prepare the Gaussian input and to examine the Gaussian output graphically. Both
Gaussian 09 and GaussView 5 are available on the P ère cluster.
Running Gaussian 09 on P ère is slightly different from running the software on a personal desktop or
workstation. On P ère , Gaussian 09 must be run on a batch mode through a queuing system such as PBS or
Condor .
7.1
Setup Environment Variables for Gaussian 09
Before running Gaussian 09 and GaussView, several environment variables have to be configured properly.
Example of these variables include:
Variable
PATH
GAUSS SCRDIR
Use
Specify where to locate the Gaussian executables
Specify the directory that a Gaussian job can use for scratch space
On P ère , you can use a gaussian module to setup the required variables. The command to load the
gaussian module is as follows.
module load gaussian/g09
There are multiple versions of Gaussian 09 software currently installed on P ère . By default, gaussian/g09
will link to the latest version of Gaussian 09 software.
Version
Module File
Release Date Relates Notes
G09 Revision A.02 gaussian/g09A August 5, 2010
G09 Revision B.01 gaussian/g09B August 19, 2010
G09 Revision C.01 gaussian/g09C October 7, 2011 www.gaussian.com/g_tech/rel_notes.pdf
To automatically load the required environment variables, you may insert the following two lines into a
shell startup file such as $HOME/.bash profile:
module load gaussian/g09
source $g09root/g09/bsd/g09.profile
7.1.1
Special Notes to Pere Guest Users
For a guest user whose account is not in the domain users group, she/he needs to use module gaussian/g09guest
instead of gaussian/g09 in the following instructions due to some file permission issues in the Gaussian
programs.
7.2
Run Gaussian 09
Once the environment is setup and loaded, you can use the following command to run g09.
$ g09 <input_file >output_file
Here input file is the input file for Gaussian you have created using GaussianView or other tools; output file
is the output file from Gaussian analysis. Both files can use either absolute or relative pathnames.
However, you SHOULD NOT directly start a Gaussian job just using the above command on P ère because that command will launch a Gaussian job only on the head node of the cluster. Instead, you HAVE
TO launch a Gaussian job using a queuing system that will start the job on an available compute node.
12
7.3
Run Serial Gaussian Jobs with PBS
Similar to any other job, running a Gaussian job on P ère consists of three steps:
1) Create a PBS job script for your Gaussian 09 job.
2) Submit the job script to the batch system.
3) Wait for the job completion.
7.3.1
Create a job script for a Gaussian job
A template for a PBS job file that starts a Gaussian jobs is shown as below. Essentially, you can just
substitute those fields in the brackets with values that match your need (the brackets should be removed
after the substitutions).
1
2
3
4
5
6
7
8
#!/bin/sh
#PBS -N [myg09job]
#PBS -q batch
#PBS -l walltime=[100:00:00]
#PBS -j oe
#PBS -o $PBS_JOBNAME-$PBS_JOBID.log
#PBS -M [[email protected]]
#PBS -m e
9
10
module load gaussian/g09
11
12
13
14
15
16
17
18
19
20
# If the /tmp partition on the compute node has sufficient disk space, and
# you will not need the intermediate data, you can set the gaussian scratch
# space to /tmo on the local hard drive by uncommenting the following line.
# export $GLOBAL_GAUSS_SCRDIR=/tmp
# Otherwise you, you can use the default NFS-mounted /guassian parition.
# export $GLOBAL_GAUSS_SCRDIR=/gaussian
mkdir $GLOBAL_GAUSS_SCRDIR/$PBS_JOBID
export GAUSS_SCRDIR=$GLOBAL_GAUSS_SCRDIR/$PBS_JOBID
cd $GAUSS_SCRDIR
21
22
23
24
Project_Dir=[$HOME/myg09project]
Gaussian_Input=[$Project_Dir/$PBS_JOBNAME.com]
Gaussian_output=[$Project_Dir/$PBS_JOBNAME.com]
25
26
g09 < $Gaussian_Input > $Gaussian_output
27
28
29
cd $GLOBAL_GAUSS_SCRDIR
rm -Rf $GLOBAL_GAUSS_SCRDIR/$PBS_JOBID
Here are some brief explanations for this job scripts.
• The line #PBS -N myg09job assigns a name to the job. It will shown in the Name column in the
qstat output.
• The line #PBS -l walltime=12:00:00 tells the batch system that your job will last at most 12 hours.
You may change the time to a longer time if your job lasts a couple of days.
• The line #PBS -M .... specifies the email address which the batch system will send the job notifications.
13
• The line #PBS -m e tells the batch system only send notification when the job finish. If you don’t want
to the notification, just simply delete these two lines.
• The line module load gaussian/g09 setup the environment required for running Gaussian 09.
• The next three lines setup a scratch directory for each Gaussian job. This directory is set up on an
NFS directory which is accessible by all compute nodes. As Gaussian job creates significant immediate
file, you may delete these files after the run.
• The last two lines delete the Gaussian scratch directory which holds the immediate files for each
Gaussian job. If you need those files, you need to copy them to your own home directory before delete
them.
7.3.2
Submit the Gaussian Job Script
Assume you have a PBS job script called myg09job.qsub, you can submit it to the queuing system with
the following command.
1
qsub myg09job.qsub
7.3.3
Check Job Completion
There are several commands you can use to check the status of your jobs. The most common one is the
qstat command. You can also use checkjob, showq, and showres commands to get more information.
Since you job may run for hours or days, you may setup your job script to let the queuing system to notify
you when your job completes.
7.4
Run Parallel Gaussian Jobs with PBS
Gaussian 09 supports parallel Gaussian jobs that can be run across multiple processors. However, to run
Gaussian 09 across multiple compute nodes, the TCP Linda package needs to be used. Because Linda is
not available on P ère , the parallel Gaussian jobs on P ère are limited to use at most 8 cores on the same
compute nodes. Running a parallel gaussian job is similar to running a serial job except the following two
changes.
• Gaussian 09 Input File for Parallel Jobs. For a parallel Gaussian job, you need to specify how
many processors the job will use by including a line similar to: %nproc=8.
• Gaussian 09 PBS Job Script. Add a line #PBS -l nodes=1:ppn=<n>, here n = 1, 2, ...8. For some
nodes that have the hyper-threading feature enabled, n can be up to 16.
Since you can only one job, you need to set the same number for ppn in the job script file and the nproc
in the Gaussian input file. A PBS job script template for running Gaussian jobs using 8 cores is shown as
below.
1
2
3
4
5
6
7
8
9
#!/bin/sh
#PBS -N [myg09job]
#PBS -q batch
#PBS -l nodes=1:ppn=8
#PBS -l walltime=[100:00:00]
#PBS -j oe
#PBS -o $PBS_JOBNAME-$PBS_JOBID.log
#PBS -M [[email protected]]
#PBS -m e
10
11
module load gaussian/g09
14
12
13
14
mkdir $GLOBAL_GAUSS_SCRDIR/$PBS_JOBID
export GAUSS_SCRDIR=$GLOBAL_GAUSS_SCRDIR/$PBS_JOBID
cd $GAUSS_SCRDIR
15
16
17
18
Project_Dir=[$HOME/myg09project]
Gaussian_Input=[$Project_Dir/$PBS_JOBNAME.com]
Gaussian_output=[$Project_Dir/$PBS_JOBNAME.com]
19
20
g09 < $Gaussian_Input > $Gaussian_output
21
22
23
cd $GLOBAL_GAUSS_SCRDIR
rm -Rf $GLOBAL_GAUSS_SCRDIR/$PBS_JOBID
7.5
7.5.1
Important Tips for Running Gaussian Jobs on P ère
Knowing the limitations of running Gaussian on P ère
In order to run gaussian jobs smoothly, you may need to be aware of several limitations of the P ère cluster
for running Gaussian jobs.
1. Slow I/O operations. P ère does not have a high performance parallel file system to support a large
number of concurrent disk accesses. So when there are many I/O intensive jobs running on the cluster
and reading/writing to a single file systems, the jobs may run much slower that when there are only
a small jobs running on the cluster. So you may consider to choose an appropriate scratch space for
your jobs as discussed in 7.5.2.
2. Limited local disk space. Originally, each compute node is equipped with a 72GB 15K SAS hard drive.
Recently, we had added a new 500GB SAS hard drive to each compute node to expand the cluster’s
capability of running large Gaussian jobs. Overall, you may use up to 435GB scratch space on each
compute node. So you may check if this space is enough for your Gaussian jobs.
3. Limited scalability. Currently, each compute node has 8 cores and 24GB memory. This puts some
limitation on the largest problems you can run on the cluster. If you accidentally launch a large job
that requires more memory, your job may use the swap space for an extended memory. A program
running on swap space could be tens of time slower than running on the physical memory.
4. No individual login node. This implies that when you run some memory intensive programs on the
head node, it may affect the overall system performance, particularly when the system is busy. For
gaussian users, this happens when they are GaussianView on the head node. Existing solutions include
1) running GaussianView on your desktop or on a compute node on the cluster.
7.5.2
Choosing an appropriate scratch space for your Gaussian Jobs
A Gaussian job normally reads/writes a considerable amount of data from/to a scratch space defined by the
environment variable $GAUSS SCRDIR. The users should pay attention to where you want the scratch space
to be. Depending on your job requirements, there are several choices.
Scratch Space
/scratch/gaussian
/tmp
/gaussian
Where Located
local to compute node
local to compute node
shared file system on HN1
MaxDisk
up to 435GB
up to 48GB
up to 3.4TB
Notes
recommended for typical jobs
recommended for typical small jobs
for jobs requiring 435+GB scratch space
Once you have decided the appropriate scratch pace, you can config it with commands similar as follows.
15
...
module load gaussian/g09
export GLOBAL_GAUSS_SCRDIR=/scratch/gaussian
mkdir $GLOBAL_GAUSS_SCRDIR/$PBS_JOBID
export GAUSS_SCRDIR=$GLOBAL_GAUSS_SCRDIR/$PBS_JOBID
...
The above example will instruct your gaussian job to use the folder /scratch/gaussian/$PBS_JOBID as
gaussian scratch space. If your job does not generate very large intermediate files and you will not use the
intermediate files again, this setting should work fine.
7.5.3
Handling Gaussian scratch files
Gaussian uses several scratch files during its computations. These scratch files include:
File Type
Checkpoint File
Read-Write File
Two-Electron Integral File
Two-Electron Integral Derivative File
Internal Input File
File name
name.chk
name.rwf
name.int
name.d2e
name.inp
Default Location
Scratch directory
Scratch directory
Scratch directory
Scratch directory
Scratch directory
File Size
small, in the order of MB
the largest, MB-GB-TB
small, in the order of KB
default empty
default empty
By default, these files should be deleted at the end of a successful run. If you use a job script similar to
previous template, the following commands at the end of the job scripts will delete the scratch files after the
job finish.
cd $GLOBAL_GAUSS_SCRDIR
rm -Rf $GLOBAL_GAUSS_SCRDIR/$PBS_JOBID
Sometimes, you may want to save the checkpoint file due to several reasons including for later use in
another Gaussian job, for use by a visualization program, and for restarting a failed job. This can be
accomplished by specifying the checkpoint file in the Gaussian input file using the %Chk command with
explicit name and location. For example, the following command will place a checkpoint file water.chk in
current working directory.
%Chk=water
Similarly, the next example will place the checkpoint files in a subfolder gaussian-scratch within your home
folder on the cluster.
%Chk=/home/MARQNET/<your-user-name>/gaussian-scratch/water
For more details, you may consult Gaussian documentation at http://www.gaussian.com/g_tech/g_
ur/m_running_w.htm.
7.5.4
Running large Gaussian jobs
For users who run very large jobs, it is recommended to set appropriate defaults values in the Default.Route
file regarding the available amounts of memory and disk in order to produce good general performance. A
sample Default.Route file contains the following lines.
-M- 22GB
-#- MaxDisk=400GB
The files Default.Route must be in the current working directory of your Gaussian jobs to be effective.
16
7.5.5
Organizing your files
For making later file retrieval both faster and easier, you may organize your Gaussian input and output files
following some directory structures you personally prefer. A template structure may look like the following:
$HOME
/gaussian
/project_a
a1.com
a2.com
g09input_a3.com
g09input_a4.com
...
/project_b
b1.com
b2.com
b3.com
...
/scratch
project_a_a1.chk
project_b_b2.chk
...
/jobs
project_a_a1.qsub
project_a_a2.qsub
...
...
7.6
Automate the Above Tasks
To simplify the tedious task of creating job scripts for each Gaussian job, you may create some customer
scripts to automate the process. We have provided two scripts for such purpose. You may use either script
or modify one of them to create your own scripts for specific needs.
7.6.1
run-gaussian-job
This utility program creates a job script for your Gaussian job and submit it to the PBS queue. Its basic
usage is as follows:
run-gaussian-job.pl [project] [gaussian-input-file] [max-wall-time]
Using the above directory structure, an example usage of run-gaussian-job may look like:
cd $HOME/gaussian
run-gaussian-job $HOME/gaussian/project_a a1.com 900:00:00
run-gaussian-job $HOME/gaussian/project_a a2.com 900:00:00
run-gaussian-job $HOME/gaussian/project_b b1.com 900:00:00
7.6.2
qg or g09sub
The qg script is created by a Gaussian user. g09sub is same as qg except it saves the job script for later
debug use. To use g09sub,
cd $HOME/gaussian/project_a
g09sub a1.com a2.com
17