1
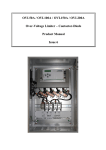
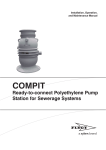
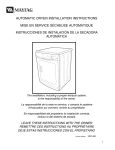
Issued: 4/12
FGC 211
Installation and user manual
This manual is applicable to the following versions:
Hardware: FGC 211
Display board: AFH1901 Rev 1.01
Main board: AHH1901 Rev 1.01
System Software: 2.42 or later
1
Supersedes:
Issued: 4/12
Supersedes:
Contents
1.Read This First ...................................... 4
4.7. Reset Function ....................................... 18
4.8. Display Language .................................. 18
1.1. Introduction .............................................. 4
1.2. Safety Regulations for Owner/Operator... 4
1.3. Guarantee ................................................. 4
1.4. Used Symbols .......................................... 4
1.5. Safety Instruction ..................................... 4
5. Configuration....................................... 19
5.1. Introduction ............................................ 19
5.2. Startup .................................................... 20
5.3. Configuring Level Switches ................... 20
5.3.1. Using a Stop Level Switch ...................... 20
5.3.2. Stopping a Pump After a Time ............... 20
5.4. Configuring a Level Sensor ................... 20
5.4.1. Start, Stop and High Levels .................... 21
5.5. Pump Configuration ............................... 21
5.5.1. Maximum Motor Current .........................21
5.6. Restoring Default Values ....................... 21
2.Short Guides .......................................... 5
2.1. Installation Checklist ............................... 5
2.2. Getting Started ......................................... 6
2.3. Menu Reference Chart ............................. 8
3.Installation ............................................. 9
3.1. Introduction ............................................ 9
3.2. Installing the FGC .................................. 9
3.2.1. Explosive or Flammable Environment ..... 9
3.2.2. Equipment Cubicle ................................... 9
3.3. Installing Sensor or Switches ................ 10
3.3.1. Cabling ...................................................... 10
3.3.2. Pneumatic Sensor LTU 301 ...................... 10
3.3.3. 4–20 mA Level Sensor .............................. 10
3.3.4. ENM-10 Level Regulators ......................... 11
3.3.5. Pressure Switch ........................................ 11
3.3.6. Flush timer or similar start blocking
relay .......................................................... 12
3.4. Connecting Thermal Contact ................ 12
3.5. Connecting Alarm Output ...................... 12
3.6. Internal Buzzer ....................................... 12
3.7. Installing Power Supply ......................... 13
3.7.1. Cabling ..................................................... 13
3.7.2. Power Supply ........................................... 13
3.7.3. Earthing (Grounding) ............................... 13
3.7.4. Overvoltage Protection ............................. 13
3.7.6. FGC 24 VDC Supply
13
3.8. FGC 211 in a LPSS application ............ 13
3.8.1. Background .............................................. 13
3.8.2. Preventing over pressure in system ......... 14
3.8.3. Avoiding simultaneous pump starts ......... 14
3.8.4. Handling pressure increases during
operation ................................................... 14
3.8.5. Preventing over flow at high pressure ...... 14
3.8.6. Resetting over current protection ............. 14
3.8.7. Flushing sewage from the system............ 14
3.8.8. System overview ....................................... 14
3.9. Wiring Diagram ..................................... 15
3.10. Controller Specification ........................ 16
6. Additional Configuration .................... 22
6.1. Introduction ............................................ 22
6.2. Level Configuration ................................ 22
6.2.1. Backup Pump Control ............................ 22
6.2.2. Stop Delay .............................................. 22
6.3. Pump Control ......................................... 22
6.3.1. Fixed Pump Delays ................................ 22
6.3.2. Automatic Maintenance Run .................. 22
6.3.3. High Temperature ................................... 22
6.3.4. EX-classified Environment ...................... 22
6.3.5. Maximum Run Time for a Pump ............. 23
6.3.6. Pump Response ..................................... 23
6.4. Alarm Configuration ............................... 23
6.4.1. Alarm Delay ............................................ 23
6.4.2. Audible or Visual Alarm Indication ......... 23
7. Basic Operation................................... 24
7.1. Introduction ............................................ 24
7.2. Viewing Runtime Data ............................ 24
7.3. Resetting Runtime Data ......................... 24
7.4. Controlling the Pump ............................. 24
7.4.1. Automatic Control (Auto Mode) ............. 24
7.4.2. Manual Control (Manual Mode) ............. 24
7.4.3. Blocked Pump (Blocked Mode) ............. 24
7.4.4. View Control Status ............................. 24
7.5. Pump Failure Block ................................ 25
7.6. Handling Alarms ..................................... 25
7.6.1. Acknowledge an Alarm .......................... 25
7.6.2. Viewing Alarms ....................................... 25
7.6.3. Clear the Alarm Log ................................ 25
8. Troubleshooting ........................................ 26
8.1. Introduction ............................................ 26
8.2. Basic Problems ...................................... 26
8.2.1. Power Supply ......................................... 26
8.2.3. Pump Failure .......................................... 26
8.2.4. Blocked Pump ........................................ 27
8.3. Diagnostic Programs ................................. 27
4.Operator Panel ...................................... 17
4.1. Introduction ........................................... 17
4.2. Front Panel ............................................ 17
4.3. Display ................................................... 17
4.4. Push Buttons ......................................... 17
4.5. Menus .................................................... 17
4.5.1. Using the Menus ....................................... 18
4.6. Pump Control ........................................ 18
2
Issued: 4/12
Contents
9. Appendix A: FGC Descriptions.......... 28
9.1. LED Descriptions ................................... 28
9.2. Alarm Descriptions ................................ 29
9.3. Menu Descriptions ................................ 30
10. Appendix B: LPSS Scenarios .......... 33
10.1. Operation variants ...............................
10.2. Permanent blocking ............................
10.3. Start, run and stop ...............................
10.3.1. Scenario A - Normal pressure .............
10.3.2. Scenario B - High pressure at start .....
10.3.3. Scenario C - High level ........................
10.3.4. Scenario D1 - Over current at start ......
10.3.5. Scenario D2 - Current rising ................
33
33
33
33
33
33
33
33
3
Supersedes:
Issued: 4/12
Supersedes:
1. Read This First!
1.1. Introduction
1.5. Safety Instruction
Before starting to use the FGC 211, read this chapter
carefully. It contains general information on
documentation, safety and guarantee.
Electrical wiring must be carried out only by a
qualified electrician. All electrical installation
work must be carried out with the equipment
disconnected from the power supply, without
any possibility of being made live, and in
accordance with local regulations.
1.2. Safety Regulations for Owner/
Operator
• All government regulations, local health and safety
codes shall be complied with.
Observe all precautions for handling
electrostatic sensitive devices before opening
the unit.
• All danger due to electricity must be avoided.
1.3. Guarantee
• Modifications or changes to the unit/installation
should be carried out only after consulting Xylem Inc.
The FGC has a high degree of protection
against moist and dirt, but should always be
installed so that it will not be unnecessarily
exposed to water or the risk of external
physical damage.
• Original spare parts and accessories authorized by
the manufacturer are essential for compliance with
the terms of the guarantee. The use of other parts
may invalidate any claims for warranty or
compensation.
A FGC may be used only in the manner
specified by the manufacturer.
1.4. Used Symbols
The manufacturer does not allow any internal
modifications to be made in the unit.
Safety instruction
Always keep this manual with the installed
unit.
Personal safety
Use cables that minimize interference from
electrical and magnetic fields. Run the cables
in a way that further minimize interference.
Safety instruction
Personal safety - dangerous voltage
The many potential sources of such
interference include relay coils, solenoid
valves, switches, thyristor units, earth
(ground) currents and static discharges.
Special attention value
Apparatus or component damage
Susceptibility to interference also varies with
the electrical environment i.e. to factors such
as cable lengths, screening and the use, or
otherwise, of interference suppression. Many
problems can be prevented by good planning.
Special information
Special information about a function.
Special information
Special information about alarms.
4
Issued: 4/12
Supersedes:
2. Short Guides
2.1. Installation Checklist
This is a short installation checklist. It is included for convenience only, and is in no way a replacement for the
Installation manual.
Check- mark
Installation step Plan the installation of the FGC to:
• Avoid all danger due to electricity
• Comply with the safety regulations
• Comply with the guarantee regulations
• Observe precautions for electrostatic sensitive devices
• Avoid unnecessary exposure of the FGC
• Minimize interference from electrical/magnetic fields
Make sure the main power supply for the FGC is off.
Mount the FGC. Ensure that the temperature in any
equipment cubicle will be neither too high, nor too low.
Install desired level sensor or switches in the pump
sump, and connect them to the FGC.
If used, connect the thermal contact for the pump to the
FGC.
If not used, make sure to place a jumper lead on the
thermal contact input in the FGC.
If used, connect an external alarm device to the
common alarm output.
Make sure a separate fuse is used for the main power
supply.
Connect an earthing (grounding) conductor to the FGC.
(Recommended) Provide the main power supply with
overvoltage protection.
Connect the FGC both to the main power supply and to
the pump.
Check that all connections are correctly installed.
Turn on the main power supply.
Configure the FGC.
5
More information
Chapter “Read This First” on page 4, especially
Chapter “Safety Instruction” on page 4.
Chapter “Installing the FGC” on page 9.
Chapter “Installing Sensor or Switches” on
page 10.
Chapter “Connecting Thermal Contact” on
page 12.
Chapter “Connecting Alarm Output” on page
12.
Chapter “Power Supply” on page 13.
Chapter “Earthing (Grounding)” on page 13.
Chapter “Overvoltage Protection” on page 13.
Chapter “Installing Power Supply” on page 13.
Chapter “Getting Started” on page 6.
Issued: 4/12
Supersedes:
2.2. Getting Started
Set Default Values - Browsing to the Menu
This is a short description on how to get started with the
FGC 211. The description is included for convenience
only, and is in no way a replacement for the Installation
manual.
At delivery, the FGC is set to factory defaults. (They are
listed in “Menu Descriptions” on page 31–33).
30-32) To use a
different set of default values:
The figure below shows the front panel of FGC 211.
1. Press the
button repeatedly until the display
shows the following:
Power Display Alarm status Relay status High level Pump status
LED
LED
LED
LED
LED
General...
7_
2. The underscore after the menu indicator (7_)
indicates that there are submenus.
Press the
1
Esc
Reset
OK
Push buttons to
navigate menus
Reset
push button
Push button to change
between automatic and
manual pump control
Push button to block
pump operation
button to access them.
3. Press the
button repeatedly until the display
shows the following:
Set default val.
7_8
No
0
FGC 211
OK
The following information is shown in the menu:
•
Menu name: "Set default val."
•
Menu indicator: "7_8". This indicator is shown for 3
seconds only.
•
Parameter value: "No".
Selecting Language
Set Default Values - Changing Values
When the FGC is started for the first time, the display will
show the following:
One of the following sensor configurations is installed in
the pump sump:
Language
< N ot s e le c t e d >
•
An analogue level sensor (4-20 mA). The sensor
measures the level in the pump sump. When the
sump level exceeds a specified start level, the pump
starts. It runs until the sump level drops below a
specified stop level.
•
Start and stop level switches. When the level in the
pump sump exceeds the start level switch, the pump
starts. It runs until the sump level drops below the
stop level switch.
•
Only start level switch. When the level in the pump
sump exceeds the start level switch, the pump starts.
It runs a specified time, and then stops.
To proceed:
1. Press the
button repeatedly until the display
shows the desired language, for example "English".
2. Press the OK button to save selected language.
The display will show "Value stored", and then
change its text to the specified language.
For each configuration, there is a set of default values.
If the following is
installed..
4-20 mA level sensor
Start and Stop level
switches
Only Start level switch
FGC is used in PSS
LPSS
6 application
Use the following default
values...
Compit analogue
Level regulator
Level reg. time
PC Pump
Issued: 4/12
To select defaults:
5. Press the
the right.
OK
1. Press the
button to be able to change the value
in the displayed Set default val. menu.
6. Press the
button repeatedly to specify the last
digit. For example, if the maximal current for the
pump is 6.0 A, enter the digit "0".
For example, if the installation includes both start and
stop level switches, select "Level regulator".
Set default val.
Level regulator
3. Press the
button to move the cursor a step to
H i g h c u r re n t P 1
6.3 A
2. Press the
button repeatedly to until the name of
the defaults is displayed.
OK
Supersedes:
7. Press the
OK
button to save the changes.
The display will show "Value stored", and then the
new parameter value.
button to save the changes.
H i g h c u r re n t P 1
6.0 A
The FGC is restarted and initialised with the selected
set of default values.
Specify Maximal Motor Current
8. Press the Esc button to exit the submenu. The
display will again show the P1 current menu. (The
shown current can differ from 0.0 A).
If the motor current for the pump exceeds this limit, the
pump is stopped and blocked. An alarm is also
generated.
P1 current
3_
00 .0 A
To specify the maximal current:
Checking the Installation
button repeatedly until the display
1. Press the
shows the P1 current menu. (The shown current can
differ from 0.0 A).
When the above configuration is complete, the unit is in
automatic mode, and should be ready for operation.
The LEDs on the front panel indicate unit status,
including potential problems. If there is a problem, check
that everything is installed and configured correctly.
P1 current
3_
00.0 A
For information on how to interpret the LEDs and
troubleshoot, refer to:
2. Press the OK button to access the submenu. The
display will show the High current P1 menu:
High current P1
3_1
5.3 A
3. Press the OK button to be able to change the value
in the displayed menu.
•
“LED Descriptions” on page 29
28
•
“Alarm Descriptions” on page 30
29
•
“Troubleshooting” on page 27
26
What’s Next
When ready:
A flashing cursor will appear.
High current P1
5.3 A
•
FGC is now initialized with default values for the
specific installation
•
Pump is now ready to run.
Trimming the FGC
4. Press the
button repeatedly to specify the first
digit. For example, if the maximal current for the
pump is 6.0 A, enter the digit "6".
If necessary, use the FGC menus to trim the installation,
see also:
7
•
“Menu Reference Chart” on page 9
8
•
“Configuration” on page 19
20
•
“Additional Configuration” on page 23
22
Issued: 4/12
Supersedes:
2.3. Menu Reference Chart
This chart shows the menu structure in the FGC.
Alarm log
1
Level
2_
A
Start level 1
2_1
A
Stop level 1
2_2
P1 current
3_
High current P1
3_1
Operating data
4_
P1 start counter
4_1
P1 run hour
4_2
Pump control
5_
P1 state
5_1
Stop delay range
5_2
Hold out run time
5_6
Blocking enable
5_7
Alarm setup
6_
Al.delay Powfail
6_1
Resp. err. alarm
6_2
General
7_
Control mode
7_1
Stop condition
7_2
Automatic reset
7_6
H. lim retry del.
7_7
A
High level
2_3
A
A
Stop delay time
5_3
B
Run time
7_3
L. lim retry del.
7_8
B
Sensor range
2_4
A
Sensor calib.
2_5
Hi.lev. run time
5_4
Max run time
5_5
Common alarm
7_4
EX mode
7_5
System version
7_9
Set default val.
7_10
Diagnos. Program
7_11
8
Language
A
Only shown when the Control mode menu (7_1) is set to “Analogue”. (4-20 mA level sensor)
B
Only shown when the Control mode menu (7_1) is set to “Digital”. (Level switches)
8
A
Issued: 4/12
3. Installation
3.1. Introduction
The installation descriptions and figures can refer to
terminals on the main board. For information on
locations, see also “Wiring Diagram” on page 15
16. The
following symbols can also be used in the figures:
Normally open
Normally closed
3.2. Installing the FGC
3.2.1. Explosive or Flammable Environment
The FGC must not be installed in an explosive
or flammable environment.
3.2.2. Equipment Cubicle
The FGC can be installed in an equipment cubicle.
Ensure that its operating temperature is between
-4°F to +113°F:
•
Heating will normally be required in winter if the
cubicle is located outdoors or in a similarly cold
environment.
•
Heating of the cubicle is also recommended to avoid
condensation.
•
The cubicle temperature may become too high in
summer if ventilation is inadequate.
9
Supersedes:
Issued: 4/12
3.3. Installing Sensor or Switches
Supersedes:
2. Check that the open bell is free from solid matter.
3. Make sure that no solid matter collects at the bottom
of the sump below the open bell.
Use either a level sensor, a start level switch, or both start
and stop level switches. As backup, a high level switch
can be used together with the start and stop level
switches, as well as with a level sensor.
4. Mount LTU 301 in the FGC.
5. Connect the pneumatic tube from the open bell
system to LTU 301.
FGC 211 in LPSS application
6. Connect LTU 301 as follows, see also figure below:
The components recommended for employing
FGC 211 in a LPSS application are highlighted
in the following texts by this light-bulb symbol.
– Connect the black wire to terminal 18 (-).
– Connect the white wire to terminal 19.
3.3.1. Cabling
– Connect the red wire to terminal 20 (+).
Cables carrying different types of signals must be run
separately. For example, make sure cables to an
analogue level sensor are run separately from cables to
digital level switches.
4-20mA
12
3.3.2. Pneumatic Sensor LTU 301
13
14
15
16
17
18
19
20
Black wire
The pneumatic sensor LTU 301 is used together with an
open bell system. The system includes a cast bell and a
pneumatic tube.
White wire
Red wire
Suitable for LPSS application
In the standard LPSS application, the digital
terminals 15 and 16 normally reserved for
Start level and Stop level regulators are
occupied by a pressure switch and a stop
relay. Instead an analog sensor is used.
LTU 301 is ideally suited for this application.
3.3.3. 4–20 mA Level Sensor
To install a 4–20 mA level sensor:
1. Install the level sensor in the pump sump.
There are two versions of LTU 301. One is for ATEXinstallations.
For more information, refer to the Installation and
operation manual for the sensor.
If the ATEX version is used, the open bell and
only the open bell can be installed in an
explosive or flammable environment
2. Connect the sensor shield to the earth (ground)
terminal of the FGC, that is, connect the shield cable
to one of terminals 5–8.
To install LTU 301:
1. Install the open bell system in the pump sump, see
also example in figure below.
For more information, refer to the Installation and
operation manual for the open bell system.
200 mm
500 mm
Open bell
10
Issued: 4/12
– If used, connect the Stop level switch to terminals
14 and 15.
3. The analogue input in the FGC (terminals 18–20) has
its own power supply, and can carry a maximum total
load of 12 V.
4-20mA
Connect the sensor as follows, see also figure below:
– Connect the black wire to terminal 19.
8
9
10
11
12
13
14
15
16
17
18
10
11
12
13
14
15
16
17
18
19
20
Black wire
– If used, connect the Start level switch to terminals
14 and 16.
4-20mA
7
9
Blue wire
– Connect the red wire to terminal 20 (+).
6
Supersedes:
19
20
4-20mA
9
Black wire
Shield wire
10
11
12
13
14
15
16
17
18
19
20
Blue wire
Red wire
Black wire
– If used, connect the High level float to terminals
14 and 17.
3.3.4. ENM-10 Level Regulators (Level
Switches)
Suitable for LPSS application
To install one or more ENM-10 level regulators:
In the standard LPSS application, the High level
switch is used.
1. Install the level regulators in the pump sump.
For more information, refer to the Installation and
operation manual for the regulators.
4-20mA
9
High level float
10
11
12
13
14
15
16
17
18
19
20
Blue wire
Black wire
Start level switch
3.3.5. Pressure Switch
Suitable for LPSS application
Stop level switch
In the standard LPSS application, a pressure
switch can be used.
An optional pressure switch can be connected to the
pumping outlet, preventing the FGC from starting the
pump while the pressure in the sewage system is high.
2. Connect the ENM-10 level regulators to FGC as
follows:
– If used, connect to terminals 14 and 16. (Switch
open
= high pressure, closed
= low).
For normal operation, use the blue and the
black wires. (The switches will be normally
open
).
Terminal 14 is the common power supply
terminal for all level switches.
4-20mA
9
11
10
11
12
13
14
15
16
17
18
19
20
– For more information, refer to the installation
instruction of the pressure switch.
Issued: 4/12
Supersedes:
3.5. Connecting Alarm Output
3.3.6. Flush timer or similar start blocking
relay
The common alarm output is a potential free, alternating
relay with a maximum rating of 250 VAC (5 A). The output
can be used to activate an audible or visual alarm device,
for example a lamp or a siren.
Suitable for LPSS application
In the standard LPSS application, a flush timer
(essentially a type of stop relay) can be used.
The common alarm output does not supply power for the
external device. It must be must be supplied from another
source.
A flush timer allows the sewage level to rise in the well
above the normal start level. The increased sewage
volume is then used for purging the sewage system.
Connect the external device to terminals 9 and 10.
– If used, connect to terminals 14 and 15. (Switch
open
= blocking, closed
= not blocking).
4-20mA
6
4-20mA
7
8
9
10
11
12
13
14
15
16
17
18
19
20
Wire with supply ~/+
9
10
11
12
13
14
15
16
17
18
19
20
When the common alarm output is:
– For more information, refer to the installation
instruction of the flush timer.
3.4. Connecting Thermal Contact
•
passive, the relay closes between terminals
9 and 11.
•
activated, or the power supply is off, the relay closes
between terminals 9 and 10.
Passive output
When a pump is installed in an explosive
environment, the thermal contact for the pump
must be connected to the FGC.
9
10
11
Active output
9
10
11
If the thermal contact for the pump is:
•
~/+
used, connect the wires from the thermal contact to
terminal 12 and 13 in the FGC.
3.6. Internal Buzzer
4-20mA
9
•
10
11
12
13
14
15
16
17
18
19
~/+
When an alarm is generated, the internal buzzer sounds
automatically. To deactivate the buzzer functionality,
remove the jumper to the buzzer, see also below.
20
not used, make sure a jumper lead is placed between
terminal 12 and 13 in the FGC.
4-20mA
9
10
11
12
13
14
15
16
17
18
19
J16
Jumper pins for buzzer
20
The thermal contact in the pump is normally closed
.
Power
Fail
On
12
Issued: 4/12
3.7. Installing Power Supply
Supersedes:
3.7.6. FGC 24 VDC Power Supply
3-phase 400 VAC (With Neutral Input)
Below describes how to connect the power supply to
Make sure to comply with the “Safety
Instruction” on page 5.
4.
the
FGC.
Below
it is described how to connect the power supply to
the FGC.
3.7.1. Cabling
Make sure to run power and signal cables separately.
3.7.2. Power Supply
A separate fuse must protect the FGC power supply.
Flygt recommends the use of automatic switch acting on
all poles.
Power Supply
24 VDC
If a Flygt pump is connected in accordance with the
instructions for its electrical connection, its direction of
rotation will always be correct.
3.8. FGC 211 in a LPSS application
When connecting a pump of a different brand,
the direction of rotation must always be
checked, even if the Phase fault LED does
not light up.
3.8.1. Background
In response to demands for a simple, efficient and
reliable solution for a LPSS system, Xylem Inc.
proposes an application where FGC 211 is
used in combination with a Flygt PC-pump (i.e. a
Progressive Cavity -pump).
3.7.3. Earthing (Grounding)
An equipment earthing (grounding) conductor must be
connected to one of the earth terminals in the FGC
(terminal 5–8).
The application presented here is typically intended for
situations where a number of family houses (e.g. villas),
each with its individual sewage tank, are connected to a
common pressurised sewage system. The FGC controls
the pump that empties the sewage tank into the system.
The earthing conductor should be connected to the best
possible earth, such as an earthed mounting plate or an
earth rod. Remember that the earthing conductor must
be as short as possible.
The shields of all shielded cables must be earthed by
connecting them to one of the earth terminals in the FGC.
3.7.4. Overvoltage Protection
Flygt recommends that the mains power supply unit be
provided with overvoltage protection (with lightning
protection). Since this will make the FGC less sensitive to
overvoltage, the FGC can be used in more severe
environments.
The protection should be connected in series with the
power supply, preferably to a separate earth (ground),
such as an earth rod, although connection to the earth
busbar in the distribution box may sometimes suffice.
A 6–10 mm² conductor should be used to connect the
overvoltage protection to earth.
13
A few problems that need to be addressed are presented
here, in order to demonstrate how certain functions and
component accessories are employed in the application.
Issued: 4/12
Supersedes:
3.8.2. Preventing over pressure in system
3.8.6. Resetting over current protection
Problem: The individual pump controls must prevent
dangerous pressure levels by regulating the number of
pumps allowed to operate simultaneously.
Problem: In the LPSS application,it is likely that over
current protection will occasionally stop a pump.
Previously FGC 211 could only handle a single restart
attempt. If this failed, due to the over current state still
remaining, restarting would be permanently blocked and
a service technician would be required before the pump
could be started again.
Solution: High pressure in the system is detected by a
pressure switch connected to the pumping outlet. When
pressure is too high, the FGC is prevented from starting
the pump. As a result, some units may have to wait for
other units to finish pumping.
High pressure is also detected indirectly by the FGC,
while monitoring the pump current. Should the work load
on the pump be too high, the current protection (i.e. motor
protection) trips the pump. This not only protects the
pump from damage but also protects the whole system
from high pressure.
Note: Using over current protection in this manner is
viable for PC-pumps. For centrifugal pumps on the other
hand, over current is more likely caused by solids or
debris clogging the pump, necessitating a service stop.
3.8.3. Avoiding simultaneous pump starts
Problem: The work load on the system is highly variable;
Many households will be pumping sewage during
approximately the same morning and evening hours.
Should a power down occur, the situation will be further
aggravated; When power is re-established, many pumps
may attempt to start pumping simultaneously, causing
sudden pressure increases in the system.
Solution: This problem is already handled in the FGC by
the power-on delay (see “Fixed Pump Delays” on
22) which randomizes the start of individual pumps
page 23)
within a 120 s time frame.
3.8.4. Handling pressure increases during
operation
Problem: When the pump starts, pressure in the outflow
increases and may exceed the sensor’s limit.
Solution: The pressure switch may only block the pump
start, i.e. when the pump is already running, only over
current protection can stop the pump prematurely.
Solution: It is now possible to enter a value for the
number of allowed restarts from 1 to 200. As soon as
the FGC successfully restarts the pump, the internal
counter of the number of consecutively blocked start
attempts is nullified.
3.8.7. Flushing sewage from the system
Problem: In normal operation, sewage in the tank seldom
rises above the start level. This may cause residue to
build up around the tank wall. Additionally, the limited
volumes pumped out of the tank with each pumping cycle
may not create sufficient flush to clear out the sand that
may be settling in the pipes.
Solution: A flush timer is used for blocking pump start for
a given time period. (Xylem Inc. does not advocate
any particular settings for time delay or interval, as these
are determined by the actual situation.) In this way, the
sewage is occasionally allowed to rise above the start
level. The increased sewage volume aids in flushing the
system.
To prevent over flow, the high level switch over rides the
flush timer and may initiate the flush when necessary.
3.8.8. System overview
This is a schematic view of the standard (*) and
optional (**) components of the LPSS application:
PS**
FGC211*
T*
H **
FT**
3.8.5. Preventing over flow at high pressure
Problem: A high sewage level suggests that the tank may
be in danger of over flowing. This must be avoided!
Solution: When the high sewage level is reached, the
pressure switch signal is no longer allowed to block the
pump start and the FGC can start the pump normally.
Note: Over current will still block the pump from running.
In order for the pump control to operate appropriately, the
blocking function is modified by the settings for number
of restart attempts described under the next heading.
14
P*
OB*
Standard components are the Tank (T), Pump (P),
FGC 211 and Open Bell level system (OB), with
LTU 301 sensor. Optionally a High level float (H),
Pressure Switch (PS) and Flush Timer (FT) may be fitted.
Issued: 4/12
Supersedes:
3.9. Wiring Diagram
Main board AHH 1901 is used to control 1 pump. The layout and contents are specified below.
Location
Description Terminal
Power
P1 P2 P3 P4 Power supply
1, 4
24 VDC
Earth terminal: 4 pcs 6 mm2. 5–8
Fuse F2: T100mA L for internal use.
Current transformer for the pump
I/O
I1 I2 Common alarm output, potential-free contact. Max. 250 VAC / 5 A. Thermal contact input for the pump.
If not used, make sure a jumper lead is placed on the input
9 –11
12–13
I3 Stop level switch input
Terminal 14 is a common terminal for all level switches (stop, start and high level)
14, 15
I4 Start level switch input
Terminal 14 is a common terminal for all level switches (stop, start and high level)
14, 16
I5 High level switch input
Terminal 14 is a common terminal for all level switches (stop, start and high level)
14, 17
I6 Analogue level sensor input, 4-20 mA 18–20
Connector
C1 C2 Jumper pins for internal buzzer. (Main board version 1.00 has no internal buzzer,
and no pins).
Connection for display unit
LED
L2 Power on indicator
L1
Power Fault Indicator
15
Issued: 4/12
Supersedes:
3.10. Controller Specification
Denomination
Relay Outputs
Model
Part. no
FGC 211-2000001
40-501830
Common alarm Voltage free, Max load 230 VAC (5 A)
Pumps LCD Display
1 Analogue input
Yes
Analogue level 4-20 mA3
3
The supply from the FGC can carry max 12 VDC.
1
Consists of:
Qty. 1 – Circuit Board
Qty. 1 – Display Card
Qty. 1 – Ribbon Cable
Qty. 1 – Overlay
Terminals
Signal 1.5 mm2
Power 6 mm2
Earth Terminal 6 mm
Power Supply
Rated voltage
Current consumption, internal Rated pump current
1-phase Basic fuses
Internal fuse
Type of level sensors to be used
24 VDC (20-28 VDC)
100 mA at 24 VDC
Pneumatic sensor LTU 301 (4-20 mA) with 0-2.5 m
sensor range.
Max. 9.9 A, Min. 0.5 A
External level sensor (4-20 mA)
ENM-10 external level regulator
100 mA (non-replaceable)
Options and Accessories
Approvals and Standards
EMC emission standard EMC immunity standard LVD electrical safety CE Marking
Level control accessories:
EN61000-6-3
EN61000-6-2
EN/IEC 61010-1
• Level regulators ENM-10. Different level switches (start, stop and high level) that provide digital input signals.
• Open bell system, and pneumatic sensor LTU 301. The open bell system includes a cast bell and a
tube that can be connected to a pneumatic sensor. It transforms the generated pressure to an analogue signal (4-20 mA).
Environment
Operational temperature2 - 4° F to +113° F
Storage Temperature
- 4° F to +158° F
Humidity (non-condensing) 90% RH
Operator Panel Class 1, IP 54, CAT II
Altitude Max. 6562 ft
Pollution degree 2
2
• Pressure sensor. It transforms the measured pressure to an analogue signal (4-20 mA).
• High water module. It is used to detect a high level in the pump sump.
The LCD display will update slower below 32° F.
Material
Operator Panel ABS V0
Data Processing Power
Processor PIC18F4620
Executed word length 8 bits
Clock frequency 32 MHz
Text memory 64 kB
Watchdog Yes
User Interface
Display LCD 2x16 characters
Push buttons 9 pcs
Alarm indications 4 LEDs
FGC status indications 3 LEDs
Digital Inputs
Start switch
Stop switch
High level switch
Thermal contact
16
Issued: 4/12
Supersedes:
4. Operator Panel
4.1. Introduction
4.4. Push Buttons
FGC 211 is a pump controller designed for single pump
installations and household usage.
Available push buttons are listed below.
Esc
4.2. Front Panel
Escape
The figure below shows the front panel of FGC 211.
Power Display Alarm status Relay status High level Pump status
LED
LED
LED
LED
LED
Left arrow
Right arrow
Up arrow
1
Esc
Reset
OK
Down arrow
0
OK
FGC 211
Push buttons to
navigate menus
Reset
push button
Push button to change
between automatic and
manual pump control
Reset
Push button to block
pump operation
The panel contains:
•
Display to show the different menus.
•
Push buttons to navigate menus and change
values.
•
A set of LED indications, see also “LED
Descriptions” on page 29.
28.
•
Any open menu is closed.
0
Manual pump stop and block
1
Automatic mode and manual pump start
You use the menus to configure the FGC, and view
relevant information, such as runtime data and alarms.
The display shows the current menu. When the display
has been idle for 10 minutes:
Light is switched off.
Reset
4.5. Menus
4.3. Display
•
OK
The following information is generally shown in a menu:
•
Menu name, for example Pump Control.
•
Menu indicator, for example "5_" or "5_1". It is shown
for 3 seconds only. If the indicator ends with an
underscore, there are submenus.
•
Parameter value.
For a complete list of menus, see also “Menu
Descriptions” on page 31.
30.
17
Issued: 4/12
4.6. Pump Control
4.5.1. Using the Menus
1. Display the desired menu:
Use the 1 and 0 buttons to change between
automatic and manual pump control, see also
“Controlling the Pump” on page 25.
24.
– Press the
button to browse forwards one
menu at a time.
– Press the
button to browse backwards one
menu at a time.
– Press the OK button to show the first menu in a
group of submenus.
– Press the Esc button to exit a group of
submenus.
2. You can now view the parameter value in the menu,
and change it if necessary.
To change the value, press the OK button. A
flashing cursor will appear. (If a value cannot be
changed, the message "Read-only" will be displayed
instead).
3. Enter or select the new value:
– Press the
button to increase the value.
– Press the
button to decrease the value.
– Press the
button to move the cursor a step
to the right. (Only valid when you enter a text or a
numerical value).
– Press the
button to move the cursor a step to
the left. (Only valid when you enter a text or a
numerical value).
4. Either:
– Press the
OK
Supersedes:
button to save the changes.
– Press the Esc button to exit the menu without
saving the value.
5. When a parameter value is saved, a message will
show the result:
– "Value stored". The value has been saved.
– "High value". The value is too high. Enter a lower
value.
– "Low value". The value is too low. Enter a higher
value.
For information on allowed values, see also “Menu
Descriptions” on page 30.
31.
18
4.7. Reset Function
With the Reset button, you can acknowledge a new alarm
or remove a pump fault block, see also:
•
25.
“Pump Failure Block” on page 26.
•
25.
“Acknowledge an Alarm” on page 26.
4.8. Display Language
The display language is changed in the Language
menu (8_). Look for the symbol. It is shown in the
top-left corner of the Language menu.
8
L a ng u a g e
E n g li s h
Issued: 4/12
Supersedes:
5. Configuration
5.1. Introduction
This chapter describes how to configure basic parameters and set-points in the FGC. (For simpler configuration, refer
to “Getting Started” on page 7.)
6).
To configure the FGC, follow the flow chart below:
Start the configuration. (The right-most rectangles contain footnotes)
Digital level
switches
Select “Digital”
in the Control mode menu (7_1)
Stop level
switch
How to
stop the pump?
Select “Stoplevel switch”
in the Stop condition A, B
menu (7_2)
How to
measure the level in
the pump sump?
Analogue level
sensor
A
B, C
Select “Analogue”
in the Control mode menu (7_1)
D
Enter the range for the sensor
in the Sensor range menu (2_4)
D
If necessary, enter an offset for the sensor
in the Sensor calib. menu (2_5)
D
Enter when the pump should start
in the Start level 1 menu (2_1)
E
Enter when the pump should stop in
in the Stop level 1 menu (2_2)
E
Enter when a high level alarm is generated
in the High level menu (2_3)
E
Stop after a
time
Select “Run on time”
in the Stop condition
menu (7_2)
A, C
Enter pump run time
in the Run time
menu (7_3)
A, C
Enter the maximum pump current in the High current menu (3_1)
F
The basic configuration is now finished, and the pump is ready to run.
Refer to the rest of the manual for information on operation, as well as additional configuration options.
For more information, refer to:
A “Configuring Level Switches” on page 21
20
E “Start, Stop and High Levels” on page 22
21
B
“Using a Stop Level Switch” on page 21
20
F
“Maximum Motor Current” on page 22
21
“Stopping a Pump After a Time” on page 21
20
G
22
“Additional Configuration” on page 23
“Configuring a Level Sensor” on page 21
20
H
“Basic Operation” on page 25
24
C
D
For a complete list of menus, refer to “Menu Descriptions” on page 31–33.
30-32.
19
G, H
Issued: 4/12
Supersedes:
5.2. Startup
5.3.2. Stopping a Pump After a Time
To measure the level in the pump sump, you can use
either:
To specify after how long time a pump should be stopped:
1. Select "Digital" in the Control mode menu (7_1).
•
Digital level switches. Continue with “Configuring
Level Switches” on page 21.
20.
2. Select "Run on time" in the Stop condition
menu (7_2).
•
Analogue level sensor. Continue with “Configuring a
Level Sensor” on page 21.
20.
3. Enter the time in the Run time menu (7_3).
5.3. Configuring Level Switches
When ready, continue with “Maximum Motor Current” on
21.
page 22.
When the level in the pump sump:
5.4. Configuring a Level Sensor
•
Exceeds the start level switch, the pump is started.
To configure a level sensor:
•
Drops below the stop level switch, the pump is
stopped. (In some installations, there is no stop level
switch, as described below).
1. Select "Analogue" in the Control mode menu (7_1).
•
Exceeds the high level switch, a "High level" alarm is
generated.
Since a pump is used to drain a pump sump, the stop
level switch is installed below any start level switch,
which is installed below the high level switch.
2. Enter the sensor range in the Sensor range
menu (2_4). For information on the range, refer to the
documentation delivered with the sensor.
3. In the pump sump, raise the sensor from the water.
4. Return to the FGC, and read the current level in the
Level menu (2_).
Since the sensor is raised from the water, the level
should read "0.00" or some other acceptable value,
for example "0.01". Since values are rounded, it is
not necessary to have "0.00".
High level switch
Start level switch
5. Optionally, you can calibrate the sensor:
Stop level switch
a. Make a note of the displayed level value,
for example "00.20 m".
b. Calculate the offset needed to display the
level "0.00 m". For example, if the displayed level
is "00.20 m", the offset needed is "-00.20 m".
When there is no stop level switch in an installation, the
pump instead can be stopped after a specified time. This
time starts to run once the level in the pump sump drops
below the start level switch. That is, the start level switch
first have to revert to its normal position.
5.3.1. Using a Stop Level Switch
To use a stop level switch:
1. Select "Digital" in the Control mode menu (7_1).
2. Select "Stoplevel switch" in the Stop condition menu
(7_2).
When ready, continue with “Maximum Motor Current” on
page 22.
21.
20
c. Enter the offset in the Sensor calib. menu (2_5).
d. Read the current level in the Level menu (2), and
make sure the displayed level is acceptable.
5. In the pump sump, lower the sensor in the water.
When ready, continue with “Start, Stop and High Levels”
on page 22.
21.
Issued: 4/12
Supersedes:
5.4.1. Start, Stop and High Levels
To specify the maximum motor current:
When the level in the pump equals specified:
1. Enter the maximum current in the High current P1
menu (3_1).
•
Start level, the pump is started.
•
Stop level, the pump is stopped.
•
High level, a "High level" alarm is generated.
2. To use automatic reset, enter "1" in the Automatic
reset menu (7_6). Otherwise, enter "0" in this menu
to disable automatic reset.
When ready, the basic configuration is complete. If
desired, you can continue with:
Since the pumps are used to empty or drain a pump
sump, stop level < start level < high level.
High level
•
22.
“Additional Configuration” on page 23.
•
“Basic Operation” on page 25
24.
5.6. Restoring Default Values
Start level
If needed, you can restore the FGC to a set of default
values. Available are:
Stop level
To specify the levels:
1. Enter the start level in the Start level 1 menu (2_1).
•
"Compit analogue" – a set of default values for an
analogue level sensor installed in a Compit pump
sump.
•
"Level regulator" – a set of default values when
using both start and stop level switches.
•
"Level reg. time" – a set of default values when using
a start level switch, but no stop level switch.
To restore default values:
2. Enter the stop level in the Stop level 1 menu (2_2).
1. Select the relevant set in the Set default value
menu (7_10).
3. Enter when the high level alarm is generated in the
High level menu (2_3).
2. Wait while the FGC restarts.
When ready, continue below.
5.5. Pump Configuration
5.5.1. Maximum Motor Current
This is the maximum allowed current for a pump motor,
and is normally the same as the nominal current of the
pump. The FGC automatically adds a 5% margin to the
specified value.
If the motor current exceeds this limit after a calculated
delay, the pump is stopped and blocked from restarting.
(An alarm is also generated). However, if the FGC is set
to "Automatic reset", the FGC will attempt to restart the
pump up to the specified number of times. This is
specified in the Automatic reset menu (7_6). Should all
attempts fail, the pump will remain blocked.
If restart is successful, but the motor protection is tripped
again during the following pump cycle, the pump is again
stopped (and possibly also blocked from restarting, as
explained above).
21
Issued: 4/12
Supersedes:
6. Additional Configuration
6.1. Introduction
pumps from running dry, enter a maximum run time in
the Stop delay time menu (5_3).
Besides the basic parameters and set-points described in
“Configuration” on page 19
20,. you may want to change the
ones described in this chapter.
6.3. Pump Control
6.3.1. Fixed Pump Delays
6.2. Level Configuration
Fixed delays are used to smoothen pump operation.
They cannot be re-configured.
6.2.1. Backup Pump Control
Minimum Stop Time. When a pump is stopped, it cannot
be restarted until after at least 5 seconds.
As backup, an installation can include a high level switch.
It can be used together with start and stop level switches,
as well as with a level sensor.
Power-on Delay. This delay prevents pumps in different
sumps from restarting simultaneously after a power
failure. When power is turned on after the power fault,
pump start is delayed 0–120 seconds. During the delay,
If the start switches or the level sensor malfunctions, the
pump is started when the level in the pump sump
exceeds the high level switch. (A "High level" alarm is
also generated).
the Relay status LED
When the level in the pump sump drops below the high
level switch, the pump will continue to run for some
additional time.
6.3.2. Automatic Maintenance Run
If a pump has not been started within 96 hours, the FGC
will start the pump for a maintenance run that lasts 1
second. This is useful to keep the mechanical seals in the
pump in shape.
Specify this additional run time in the Hi. lev. run time
menu (5_4).
6.2.2. Stop Delay
Make sure to disconnect mains power supply
before any maintenance work, since the pump
will start automatically every 96 hours as long
as mains power supply is on.
If a level sensor or level switch cannot be installed low
enough in a pump sump, a stop delay allows the pump to
empty the sump completely.
6.3.3. High Temperature
If the pump is installed in an EX-classified
environment, check the pump approvals
before pumping below the stop level.
The thermocontact in the pump can be connected to the
FGC. When the temperature in the pump is too high, the
pump is stopped, and blocked from restarting.
A pump stop can be delayed until:
•
The specified time has elapsed.
•
The pump has lowered the level in the pump sump a
specified height. (Only available for an analogue
level sensor).
displays a flashing red light.
Wait a while for the pump to cool down, and then press
the Reset button to remove the block. If the pump has
cooled down, it will be allowed to start. Otherwise, try
again a little later.
6.3.4. EX-classified Environment
To delay the pump stop a specific time:
When a pump is used in an EX classified environment,
you can set the FGC to EX mode. If no liquid is detected
in the pump sump, the FGC will prevent the pump from
starting. The starting method will not matter, that is, any
manual start attempt, or maintenance run will be blocked.
1. If you use an analogue level sensor, enter "0.0" in the
Stop delay range menu (5_2). This will disable the
stop delay based on a specific height.
2. Enter the time in the Stop delay time menu (5_3).
To configure Ex mode:
To set the pump to lower the level in the pump sump a
specific height:
1. Display the Ex mode menu (7_5).
2. Select either:
1. Enter the desired height in the Stop delay range
menu (5_2).
– "On" to set the FGC to EX mode.
2. The FGC calculates the pump run time necessary to
lower the level the required height. To prevent the
– "Off" to disable EX mode.
22
Issued: 4/12
6.3.5. Maximum Run Time for a Pump
This is the maximum time a pump can run continuously.
When this time has elapsed, the pump is stopped and
blocked from restarting. (An alarm is also generated).
Supersedes:
during this time for an alarm to be generated. For
example, if the level in the pump sump drops below the
configured high level alarm limit before the delay time has
elapsed, no alarm will be generated.
This limit is useful, for example, to stop a clogged pump
from running too long. The alarm indicates that
something is wrong, for example, that the pump impeller
is damaged and delivers insufficient flow, or that a level
sensor is faulty.
No alarm condition
present
Alarm condition
present
The specified limit must exceed one pumping cycle.
Consider that the following settings can add time to a
pumping cycle:
– If the pump is set to run on time, see also
21.
“Stopping a Pump After a Time” on page 20.
Time
Condition active
shorter time than
the alarm delay
– High level run time, see also “Backup Pump
22.
Control” on page 23.
– If a stop delay is used, see also “Stop Delay” on
page 23.
22.
To specify the maximum run time:
– Maximum run time
–
"00:00" to disable the function. (There will be no
limit for how long a pump can run).
6.3.6. Pump Response
When the FGC has set the pump to start and the pump
current exceeds 0,5 A, the pump is considered to have
started.
When the FGC has set the pump to start, but the pump
current remains below 0,5 A, the pump is considered not
to have started. An alarm can be generated.
To disable pump response alarms, select "0" in the
Automatic reset menu (7_6). Otherwise, enter a number
from "1" to "200" in this menu.
6.4. Alarm Configuration
An alarm alerts the receiver that something needs
attention. The FGC can generate alarms, for example, if
the temperature in a pump motor is too high. For a
complete list of possible alarms, see also “Alarm
Descriptions” on page 30.
29.
6.4.1. Alarm Delay
When the condition for an alarm is fulfilled, for example if
the level in the pump sump exceeds the configured high
level alarm limit, the alarm is generated.
However, alarm generation can be delayed for a
specified time. The alarm condition then has to be fulfilled
23
Alarm
generated
There are two delay types:
•
General alarm delay that affects all alarms, except
power fault alarms. This delay is 3 seconds.
•
Alarm delay for power failure alarms.
1. Display the Max run time menu (5_5).
2. Enter either:
Alarm
delay
To specify the alarm delay for power failures, enter the
delay time in the Al.delay Powfail menu (6_1).
6.4.2. Audible or Visual Alarm Indication
The common alarm output can be connected to an
audible or visual device, for example a lamp or siren. The
output turns on the device when an alarm is generated.
To configure the output:
1. Display the Common alarm menu (7_4).
2. Select either:
– "Continuous" for a steady indication.
– "Intermittent" for a flashing indication.
Issued: 4/12
Supersedes:
7. Basic Operation
7.1. Introduction
7.4.2. Manual Control (Manual Mode)
This chapter describes basic operation. For information
on configuration, refer to previous chapters.
In Auto mode, you can manually start the pump. This
changes the mode to Manual mode.
The exception is EX-mode, see also “EX22.
classified Environment” on page 23.
In Ex-mode, the pump will not start if there is
no liquid detected in the pump sump.
7.2. Viewing Runtime Data
The following runtime data can be shown in the FGC.
•
•
Level in the pump sump. When a level sensor is
used, you can view the current level in the Level
menu (2_). (When level switches are used, this menu
is hidden).
Start the Pump Manually
Press the 1 button for 5–10 seconds until the display
briefly shows "Manual mode".
Pump current. View the present current in the
P1 current menu (3_).
•
Number of pump starts. View how many times the
pump has started in the P1 start counter menu
(4_1).
•
Run time for a pump. View how long time the pump
has run in the P1 run hour menu (4_2).
Example:
A l a rm log
Ma nua l m ode
How Long Will the Pump Run?
The pump will now run until the level in the pump sump
drops below the stop level.
7.3. Resetting Runtime Data
If the level in the pump sump already is below the stop
level, the pump will run for 5 minutes.
You can reset the following runtime data:
•
Number of pump starts shown in the P1 start
counter menu (4_1).
•
Run time for a pump shown in the P1 run hour
menu (4_2).
Return to Auto Mode
When the pump cycle is complete, the FGC returns to
Auto mode.
To return immediately, press the
To reset runtime data:
0
button.
7.4.3. Blocked Pump (Blocked Mode)
1. Display the relevant menu, for example, the
P1 start counter menu.
In Auto mode, you can manually block the pump. This
changes the mode to Blocked mode.
2. Reset the value, that is:
Block the Pump Manually
OK
a. Press the
button to be able to reset the
value. The message "Reset value?" is displayed.
b. Press the
c. Press the
OK
Press the
"Blocked".
0
button. The display will briefly show
button to select "Yes".
How Long Will the Pump Remain Blocked?
button to reset the value.
The pump will now remain blocked until the
is pressed.
7.4. Controlling the Pump
1
button
Return to Auto Mode
7.4.1. Automatic Control (Auto Mode)
Press the
"Auto".
Normally, the FGC starts and stops the pump
automatically. This is called Auto mode.
1
button. The display will briefly show
7.4.4. View Control Status
View control status in the P1 state menu (5_1).
24
Issued: 4/12
Supersedes:
7.5. Pump Failure Block
7.6.3. Clear the Alarm Log
The pump can also be blocked due to a pump failure. For
example, the motor temperature is too high or the pump
has run longer that the configured maximum time.
To remove one or more inactive alarms from the log:
When the problem is corrected, press the
remove the automatic block.
Reset
1. Display the Alarm log menu (1). It shows the number
of recorded alarms.
2. Clear the log of the alarms, that is:
button to
OK
7.6. Handling Alarms
a. Press the
An alarm alerts the receiver that something needs
attention. The FGC can generate alarms, for example,
when the temperature in a pump motor is too high, or the
pump has run longer that the configured maximum time.
b. If necessary, press the
button repeatedly
until desired alarm is displayed.
c. Press the
For a complete list of alarms, see also “Alarm
Descriptions” on page 30.
29.
d. Press the
With alarms, you can:
OK
button to show the log.
button.
button to select either:
•
Acknowledge that you have received an alarm
"Current" - Only the displayed alarm will be
deleted.
•
View recorded alarms in the alarm log
"All" - All inactive alarms will be deleted.
•
Clear the alarm log from inactive alarms
e. Press the OK button to delete the inactive
alarms. The message "Log cleared" is displayed.
7.6.1. Acknowledge an Alarm
The FGC can be connected to both a buzzer, and another
audible or visual device, for example a lamp or siren. The
devices will be turned on when an alarm is generated.
Press the Reset button to acknowledge that you have
received the alarm. This will also silence any connected
buzzer or other device.
7.6.2. Viewing Alarms
The last 50 alarms are recorded in the alarm log. It shows
both inactive and active alarms.
To view the alarm log:
1. Display the Alarm log menu (1). It shows the number
of recorded alarms.
2. View the log, that is:
a. Press the OK button to show the log. The first
alarm shown is the oldest alarm.
b. Either, press the
alarm,
or, press the
the log.
c. Press the
Esc
button to display the latest
button repeatedly to browse
button to exit the log.
25
Issued: 4/12
Supersedes:
8. Troubleshooting
8.1. Introduction
6.
4. If the log contains the alarm, the pump current has
exceeded its configured maximum.
This chapter describes troubleshooting.
a. Check that the High current P1 menu (3_1) is set
to the correct maximum current, see also
“Maximum Motor Current” on page 22.
21.
Make sure mains power supply is
disconnected before any maintenance work
on the FGC or pump.
b. Check if the pump is damaged, for example
bearing failure or winding fault.
8.2. Basic Problems
c. Check if the pump impeller is jammed.
8.2.1. Power Supply
d. When the problem is corrected, press the Reset
button. The LED should no longer be continuously
lit.
Problem:
Power LED
is not lit.
Checklist:
5. Check if the Alarm log menu (1) contains the alarm
"P1 Max run".
1. The main power supply is off. Check the external
main switch and main fuse.
6. If the log contains the alarm, the pump has run longer
than the configured maximum time:
2. If the error cannot be found after following the
instructions above, contact a FLYGT service agent.
a. Check that the Max run time menu (5_5) is set to
the correct maximum current, see also “Maximum
Run Time for a Pump” on page 24.
23.
8.2.3. Pump Failure
b. Check if the pump is clogged.
Problem:
Pump status LED
c. Check if the impeller is jammed or damaged.
is continuously lit red.
d. If used, check if the level sensor is faulty.
Checklist:
e. When the problem is corrected, press the Reset
button. The LED should no longer be continuously lit.
1. Check if the Alarm log menu (1) contains the alarm
"P1 high temp".
7. If the error cannot be found after following the
instructions above, contact a FLYGT service agent.
2. If the log contains the alarm, the thermal contact in
the motor winding has opened due to high
temperature. (The contact is normally closed).
a. Check that the thermal contact is wired as shown
in the wiring diagram, see also “Connecting
Thermal Contact” on page 12.
13.
b. Check if the pump is damaged, for example,
bearing or winding failure.
c. Check if pump impeller is jammed.
d. When the problem is corrected, press the Reset
button. If the pump has cooled down, the LED
should no longer be continuously lit. Otherwise,
wait a while for the pump to cool down and then
press the button again.
3.
5. Check if the Alarm log menu (1) contains the alarm
"P1 High cur".
26
Reset
e. When the problem is corrected, press the
button. The LED should no longer be continuously
lit.
11
6. If the error cannot be found after following the
instructions above, contact a FLYGT service agent.
20
c. Check
if the impeller
8.2.4.
Blocked
Pumpis jammed or damaged.
24 Description
P1 current input
Program
10
Digital inputs
d. If used, check if the level sensor is faulty.
Problem:
Relay status LED
is continuously lit red.
e. When the problem is corrected, press the Reset
Checklist:
button. The LED should no longer be continuously
1. Iflit.
the pump fails to start:
11
6. If the
error cannot
beisfound
afterinfollowing
the
a. Check
if "Auto"
selected
the P1 State
instructions
above,
contact
a
FLYGT
service
agent.
menu (5_1).
8.2.4.
Pump
b. Blocked
If not, select
"Auto" in the P1 State menu (5_1).
The LED should stop being lit red.
Problem:
c. If the LED still is lit red, check if "On" is selected in
Relay status LED
is continuously lit red.
the Ex mode menu (7_5).
Checklist:
d. If selected, the FGC is set to Ex mode, see also
1. If the “EX-classified
pump fails to start:
22. The
Environment” on page 23.
pump will be blocked as long as there is no liquid
a. Check if "Auto" is selected in the P1 State
in the pump sump. When there again is liquid in
menu (5_1).
the pump sump, the LED should stop being lit red.
b. If not, select "Auto" in the P1 State menu (5_1).
5. If the pump starts with the LED continuously lit red,
The LED should stop being lit red.
contact a FLYGT service agent.
c. If the LED still is lit red, check if "On" is selected in
8.3.theDiagnostic
Ex mode menuPrograms
(7_5).
d. If selected,
the FGC
set to
to test
Ex mode,
see also
Diagnostic
programs
are is
used
the hardware.
“EX-classified Environment” on page 23. The
• All
otherwill
functions
are disabled
when
a diagnostic
pump
be blocked
as long as
there
is no liquid
program
is
run,
that
is,
normal
pump
control
andin
in the pump sump. When there again is liquid
operation
are
prevented.
the pump sump, the LED should stop being lit red.
•
After
10 minutes
of idle
FGC will lit red,
5. If the pump
starts with
thetime
LEDthe
continuously
automatically
revert
to
normal
operation.
contact a FLYGT service agent.
To run a diagnostic program:
8.3. Diagnostic Programs
1. Display the Diagnos. Program menu (7_9).
Diagnostic programs are used to test the hardware.
2. Select one of the diagnostic programs. Available
• Allprograms
other functions
arebelow.
disabled
when
are listed
(The
restaofdiagnostic
the programs
program
is
run,
that
is,
normal
pump
control and
are for future use).
operation are prevented.
•
• LED output
• Common
alarm output
Issued:
Analogue
input4/12
After 10 minutes
of idle
time
the FGC will
To manually
stop
a diagnostic
program, select
automatically
normal operation.
"Off"revert
in the to
Diagnosis.
Program menu.
To run a diagnostic program:
1. Display the Diagnos. Program menu (7_9).
2. Select one of the diagnostic programs. Available
programs are listed below. (The rest of the programs
are for future use).
28
To manually stop a diagnostic program, select
"Off" in the Diagnosis. Program menu.
27
20
• LED output
• Common
alarm output
Analogue input
24
P1 current input
states, for example
1001100100000000
Flashes at 1 second
interval.
Troubleshooting
Supersedes:
Shows
the raw input
values (0-16383).
Shows the raw input
Results
values (0-16383). This
Shows the digital input
starts the pump.
states, for example
1001100100000000
Flashes at 1 second
interval.
Shows the raw input
values (0-16383).
Shows the raw input
values (0-16383). This
starts the pump.
Issued: 4/12
Supersedes:
9. Appendix A: FGC Descriptions
9.1. LED Descriptions
The front panel of an FGC includes a set of LEDs, see also “Front Panel” on page 17.
18. The LEDs are described in the
table below.
LED
Power
Alarm status
Relay status
Indication
Cause
Green (on)
The power supply is on.
Off
The power supply is off, or a fuse is blown.
Red (flashing) A new alarm has occurred.
Red (on)
The new alarm has been acknowledged, but is still active.
Green (on)
The pump relay is activated.
Red (on)
The pump is stopped and blocked from restarting. Possible causes:
• Pump is blocked manually, see also “Blocked Pump (Blocked Mode)” on
page 24.
• The FGC is set to Ex mode, and there is no liquid in the pump sump, see also
“EX-classified Environment” on page 22.
Red (flashing Pump failure. Possible causes:
• Pump start is delayed, see also “Fixed Pump Delays” on page 22.
Pump status
Green (on)
The pump is running.
Red (on)
The pump is stopped and blocked from restarting. Possible causes:
• Pump current exceeds its configured maximum, see also “Maximum Motor
Current” on page 21.
• Temperature in the pump is too high, see also “High Temperature” on
page 22.
High level
Red (on)
• Pump has run longer than the configured maximum time, see also “Maximum
Run Time for a Pump” on page 23.
The level in the pump sump is high. Possible causes:
• Level exceeds a high level switch. The pump is started automatically, see
also “Backup Pump Control” on page 22.
• Level exceeds the configured high level limit, see also “Start, Stop and High
Levels” on page 21. This is only relevant if a level sensor is used.
28
Issued: 4/12
Supersedes:
Appendix A: FGC Descriptions
9.2. Alarm Descriptions
The FGC can generate the alarms listed in the table below. The columns describe the following:
• The alarm text shown in the Alarm log menu (1).
• The event or error that caused the alarm.
• Whether the pump is stopped and blocked from restarting due to the event or error.
• Whether any LED, except the Alarm status LED, is lit due to the event or error.
Text in
Alarm Log
High level
Mains error
Hi.lev.float
P1 Tripped
P1 No resp.
P1 high temp
Inval. setp.
P1 Max. run
Sensor Fault
Alarm Cause
High level in pump sump. Alarm from the level sensor.
The main power has been disrupted
The level in the sump reaches the high level switch. The pump
will be started.
High current pump 1. Alarm from the analogue current
measurement.
The pump is blocked by this alarm.
There is no response signal from pump 1. The pump has
probably not started despite activation of the power relay.
High temperature in pump 1.
The level setpoints are incorrect. The specified setpoints for
Start, Stop or High level is either outside the calibration range or
they are mutually not corresponding, i.e. the high level setpoint is
lower than the start level setpoint.
The pump 1 has exceeded the maximum allowed run time. The
pump is blocked by this alarm.
See also the Max run time set-point.
An error in the analogue sensor has been detected. The
measured level is outside the sensor range.
29
Pump is LED Indication
Blocked
No
High level
Yes
Relay status (for phase
failures)
No
High level
Yes
Pump status
No
Yes
No
Pump status
Yes
Pump status
No
Issued: 4/12
Supersedes:
Appendix A: FGC Descriptions
9.3. Menu Descriptions
2_1
Level
m
1 Start Level 1
m
1
NA
NA
00.50 Start level for the pump.
m
Read only
NA
Level
Regulator
NA
Writable Interval NA
-99.99 To 99.99
00.00 NA
m
00.15 NA
m
Menu Options
Writable
Compit
Analogue
PC Pump
2_
Menu Name
Alarm log
Factory
Settings
No
1
Level Reg.
Time
The table below describes available menus.
Description
Number of recorded alarms.
Level in pump sump
2_2
1
Stop Level 1
m
Writable Interval NA
-99.99 To 99.99
00.10 NA
m
NA
00.20 Stop level for the pump.
m
2_3
1
High Level
m
Writable Interval NA
-99.99 To 99.99
00.25 NA
m
NA
00.70 High level alarm limit.
m
2_4
1
Sensor range
m
Writable Interval NA
0.00 To 20.00
02.50 NA
m
NA
02.50 Sensor range.
m
2_5
1
Sensor calib.
m
Writable Interval NA
-99.99 To 99.99
00.00 NA
m
NA
00.00 Sensor calibration offset.
m
3_
P1 current
A
3_1
High current P1
A
Read only
Interval
0.0 To 99.9
Writable Interval 5.3 A
0.0 To 9.9
4_
Operating data
Read only
4_1
P1 start counter
Writable
0
0
0
0
0
Number of start for the pump
4_2
Writable
0:00
0:00
0:00
0:00
0:00
Run hour for the pump
5_
P1 run hour
h:min
Pump control...
5_1
P1 state
Writable
Auto
Alternative
• Auto
• Blocked
• Manual mode
Writable Interval 0.00
0.00 To 2.50
5_2
5_3
1
Stop delay range
m
Stop delay time
min:s
Measured current for the pump.
5.3 A
5.3 A
5.3 A
5.3 A
High current alarm limit for the pump.
Menu group for operating data
Read only
Menu group for pump control
Auto
Auto
Auto
Auto
0.22
0.00
0.00
0.00
Program controlled automatic or blocked
state for Pump 1
Specifies an additional height, below the
Stop level, to be pumped down.
The RTU calculates the stop delay time
required to lower this height.
0 - Inhibits the function
Writable Interval 00:00 00:45 01:00 00:00 00:01 Delays the stop of the pump with the set
00:00 To 59:59
time.
NOTE: If the calculated stop delay
function is activated, this set-point defines
the maximum allowed calculated stop
delay time
30
Issued: 4/12
Supersedes:
Menu Name
Hi.lev. run time
min:s
Level
Regulator
Level Reg.
Time
PC Pump
5_5
Max run time
min:s
5_6
Hold out run time
min:s
5_7
Blocking enable
6_
Alarm setup...
Description
Menu Options
Writable Interval 01:00 00.20 01:00 02.00 01.00 Backup control activated when there is a
00:00 To 59:59
level sensor failure. The high level switch
activates the start of the pump, which will
then run for the period set in this menu.
Writable Interval 30.00 30.00 30.00 30.00 30.00 The maximum time the pump is allowed to
00:00 To 59:59
run continuously.
0 - disables the function.
Writable Interval 00:00 00:00 00:00 00:00 00:00 The pump will continue running for the
00:00 To 59:59
duration of the interval.
0 - disables the function.
No
No
No
No
No
’Yes’ enables blocking by an external
Writable
Alternative
blocking relay, such as a purge timer.
• No
• Yes
Read only
Menu group for alarms
6_1
Al.delay Powfail
min
Writable Interval 1 min
0 To 960
1 min
1 min
1 min
1 min
The delay of a Power failure alarm before
it is recorded.
6_2
Resp. err. alarm
Writable
Alternative
• No
• Yes
Yes
Yes
Yes
Yes
7_
General...
Read only
When the pump current is below 0.5 A the
RTU will register a pump response error
alarm.
To disable the pump response error alarm
function, select 'No'.
Menu group for general set-points
7_1
Control mode
Writable
Alternative
• Digital
• Analogue
Factory
Settings
No
5_4
Compit
Analogue
Appendix A: FGC Descriptions
Yes
Digital Anal.
Digital Digital Anal.
Selects if an analogue sensor or level
switches are used for starting and
stopping the pumps.
Also referred to as analogue and digital
mode.
Selects if a stop level switch is present or
the pump is stopped after a time.
Applies to digital mode only.
7_2
2
Stop condition
Writable
Stop NA
Alternative
level
• Run on time
switch
• Stoplevel switch
7_3
2
Run time
min:s
Writable Interval 00.00 00.00 00.00 00:20 00:00 The pump running time when configured
00:00 To 59:59
to Run on time, i.e. no stop level switch is
used.
Applicable to digital mode only.
Writable
Cont. Inter. Cont. Inter. Cont. Type of common alarm output.
Alternative
Continuous or pulsating.
• Continuous
• Intermittent
Writable
Off
On
Off
Off
Off
When EX-mode is on, the pumps are not
Alternative
allowed to start unless water can be
• Off
detected in the sump. The function is used
• On
primarily in explosive environment
Writable Interval 1
0
1
1
1
Automatic reset of the pump following an
0 To 200
Over current failure.
0: Inactivated function. The RTU blocks
the pump on first Over current.
1 - 200: Activated function. The RTU will
attempt to start the pump 1 - 200 times
31
before blocking.
7_4
Common alarm
7_5
EX mode
7_6
Automatic reset
Stop Run
level on
switch time
NA
Issued: 4/12
Appendix A: FGC Descriptions
7_8
7_9
7_10
7_11
8
PC Pump
Level Reg.
Time
Level
Regulator
Compit
Analogue
Appendix A: FGC Descriptions
Factory
Settings
No
7_7
Supersedes:
Description
Menu Options
Writable Interval 00:00 00:00 00:00 00:00 30:00 The value entered is the highest possible
00:00 To 59:59
value for the randomized start retry delay.
Writable Interval 00:00 00:00 00:00 00:00 10:00 The value entered is the lowest possible
00:00 To 59:59
value for the randomized start retry delay.
Read only
The RTU system version. Please have
this number ready when calling Flygt
support.
Set default val.
Writable
Restores all parameter values to the
Alternative
selected set of default values.
• No
Operating data and the language setting
• Compit
are not affected
analogue
• Level regulator
• Level reg. time
Diagnostic program for test of the RTU
Diagnos. Program Writable
Alternative
• Off
• 1-39
¤ Language
Writable
Select display language
Alternative
• English
• Deutsch
• Nederlands
• Français
• Dansk
• Svenska
• Norsk
• Español
• Magyar
• Suomi
• Italiano
• PycckNN
• Polski
Menu Name
H. lim retry del.
min:s
L. lim retry del.
min:s
System version
1
Menu shown only when Control mode menu (7_1) is set to "Analogue". (4–20 mA level sensor)
2
Menu shown only when Control mode menu (7_1) is set to "Digital". (Level switches)
32
Issued: 4/12
10. Appendix B: LPSS Scenarios
Supersedes:
Appendix B: LPSS Scenarios
10.1. Operation variants
10.3.3. Scenario C - High level
The scenarios presented below, each describing a
complete cycle, assume that the equipment is set up as
described in chapter 3.8. FGC 211 in a LPSS application
.
1. Pressure at the pump outlet is above the pressure
sensor’s threshold value.
In these examples, pumping stops when the sewage
level gets below the stop level. Alternatively or in addition
to this, FGC 211 can be configured to stop the pump after
a certain run time. This may cause pumping to stop while
the sewage level is still above the stop level. In case the
sewage is also above the start level, this will result in a
new count down to pump start.
2. FGC blocks the pump.
3. Sewage level in the well rises above the High level.
4. FGC ignores the high pressure blocking.
5. FGC starts the pump.
6. Pumping lowers the sewage level in the well below
the start level.
7. FGC stops the pump.
10.2. Permanent blocking
10.3.4. Scenario D1 - Over current at start
Should the maximum number of allowed pump start
attempts be exceeded, the FGC will block the pump
permanently. (Otherwise "blocking" is just temporary.)
1. FGC starts the pump.
2. FGC immediately registers over current and the over
current protection trips the pump.
10.3. Start, run and stop
3. FGC blocks the pump.
The following describe the possible LPSS scenarios.
4. The "number of consecutive blocks" counter is
updated by +1 in the FGC.
10.3.1. Scenario A - Normal pressure
1. Sewage level in the well rises above the start level.
– Total number of allowed start attempts is
exceeded - Permanent blocking (5).
2. Pressure at the pump outlet is below the pressure
sensor’s threshold value.
– Total number of allowed start attempts is not
exceeded - Count down to start (6).
3. FGC starts the pump.
5. FGC blocks the pump permanently - Alarm! (end)
4. Pumping lowers the sewage level in the well below
the start level.
6. Count down to next start attempt begins:
5. FGC stops the pump.
– Motor protection trips the pump - Blocking (3).
10.3.2. Scenario B - High pressure at start
– Current is below motor protection threshold Blocking no longer in effect (7).
1. Sewage level in the well rises above the start level.
7. FGC starts the pump.
2. Pressure at the pump outlet is above the pressure
sensor’s threshold value.
8. The "number of consecutive blocks" counter in the
FGC is reset to 0.
3. FGC blocks the pump from starting.
9. Pumping lowers the sewage level in the well below
the start level.
4. Count down to next start attempt begins.
5. The pressure at the pump outlet is checked:
10.FGC stops the pump.
– Pressure is above sensor’s threshold - Continued
blocking (3).
10.3.5. Scenario D2 - Current rising
1. During pumping, resistance in the system increases.
– Pressure is below sensor’s threshold - Blocking
no longer in effect (6).
6. FGC starts the pump.
2. FGC registers over current and the over current
protection trips the pump.
7. Pumping lowers the sewage level in the well below
the start level.
3. FGC blocks the pump - Updating of consecutive
blocks counter (Scenario D1, 4, etc.)
8. FGC stops the pump.
33