1
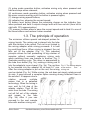
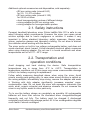
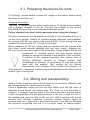
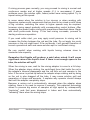
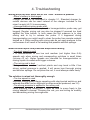
Handheld laboratory mixer Sileks LabMix Mini 201 User manual Sileks GmbH, 2013 Table of contents: 1. Description 1.1. Purpose 1.2. Description 1.3. The principle of operation 1.4. Mixer controls 1.5. Main components and additional accessories 2 2 3 4 4 2. Safety and working conditions 2.1. Safety instructions 2.2. Transportation and operation conditions 5 5 3. Device operation 3.1. Preparing the device for work 3.2. Mixing and resuspending 3.3. Homogenization 3.4. Working with magnetic nanoparticles 4. Troubleshooting Sileks GmbH Handheld laboratory mixer Sileks LabMix Mini 201 6 6 8 8 10 1 1.1. Purpose Compact handheld laboratory mixer / homogenizer Sileks LabMix Mini 201 is a tool for mixing various liquid samples in standard laboratory vessels. Basic set of the mixer is aimed towards working with standard disposable plastic tubes with volumes of 2.5, 1.5 and 0.5 ml. With additional accesories the mixer's field of application can be significantly enlarged. The mixer can be used for optimization and acceleration of isolation procedures of DNA / RNA / proteins from biological materials, for homogenization, lysis, resuspension of various samples and for many other laboratory tasks. The mixer is especially efficient when working with magnetic particles. Using this tool makes it possible to completely avoid such labourintensive operation as manual pipetting. While providing superior sample mixing quality, the mixer allows to achieve as thorough sample processing as it is possible with manual pipetting. Use of the mixer also increases results repeatability and reproducibility. 1.2. Description 1. Mixer body 2. Control panel 3. Removable mixing adapter 4. Charging socket 5. Pulse mixing button 6. Constant mixing button 7. Speed set buttons 8. Mixing speed / battery level indicator 9. Battery level display button 10. Memory buttons Fig. 1b. Control panel. The mixer's grip is simillar to standard pipette grip. The body (1) has ergonomical shape. In its upper part it has a console with controls (2). On the top side the charging socket (4) is located. It can be used to charge builtin LiIon battery. In the lower part of the mixer a motor is located. Its spindle Fig. 1a. Mixer exterior. protrudes from the mixer body and is used to connect removable mixing adapters (3). The following controls are located on the control panel (2): 2 Handheld laboratory mixer Sileks LabMix Mini 201 Sileks GmbH (5) pulse mode operation button, activates mixing only when pressed and held and stops when released; (6) continuous mode operation button, activates mixing when pressed and the mixer remains working until the button is pressed again; (7) change mixing speed buttons; (8) indicator line, showing the current speed; (9) battery level button shows the remaining charge on the indicator line; when pressed and held it outputs charge level with one red dot (from left to right with 10% approximation) (10) memory buttons allow to save the current speed and to bind it to one of the three buttons and restore it when needed. 1.3. The principle of operation The minimixer utilizes special rodshaped probes for mixing liquids. The mixing rod is placed into the tube with the solution to be mixed. The rod is not locked in the mixing adapter while mixing proceeds. It is held by centrifugal force. When mixing is stopped, the rod falls out of the adapter (Fig. 2). This patented principle allows for fast processing of big number of samples without manually replacing mixing rods when switching from one sample to another. Fig. 3 illustrates working cycle. The mixer is approached to the tube from below (Fig. 3a), making a mixing rod fit into the adapter's inner chanel (Fig. 3b). The rod has Fig. 2. The mixing adapter to be inserted into the adapter for at least 57 mm. crosssection and a After the mixing adapter is put on the rod, the mixing mixing rod. can be started (Fig. 3c). While mixing, the rod does not simply rotate around its axis. It goes around a complex spline causing strong turbulent flows in the solution. It happens due to rotation around multiple axises that is a patented technology. When the mixing is over, wait for full stop of the adapter rotation. Then lift the mixer from the tube. The mixing rod will fall out of the adapter and remain in the tube (Fig. 3d). After it you can proceed to the next sample tube with another mixing rod. Fig. 3. Fast processing of samples in series Sileks GmbH Handheld laboratory mixer Sileks LabMix Mini 201 3 1.4. Mixer controls Compact handheld laboratory mixer Sileks LabMix Mini 201 has configurable options increasing its versatility and flexibility. The mixing speed can be changed gradually. The speed is indicated on a 10step LED indicator line. To change the speed, use control buttons located to the left and to the right of the indicator. Speeds 34 are normally sufficient for easy mixing in small volumes (up to 1 ml). For more thorough mixing of various sorbents (like magnetic particles) in the same volume, speeds 46 are usually required. Higher speeds are not normally needed for such volumes. High speeds (610) can be used when mixing big volumes or utilizing special homogenization rod. The current speed can be saved and associated with one of three memory buttons. To save the current speed, press and hold one of the memory buttons for 5 seconds. After the short "beep" signal the current speed will be bound to the button. The speed can be restored anytime by short pressing this button. To make your work more comfortable the mixer has a timer beeper. When working in pulse mode (using the blue start button), the timer counts 5 sec. intervals and makes a short sound. It is very usefull for standardizing protocols. It can be set in the protocol that some of its steps require mixing for one (two, three or more) such 5 seconds periods. It is easy to follow such protocol when processing big series of samples. Battery charge level display button (with battery icon) outputs the current charge level on the LED display instead of the speed value. The level is displayed by one dot on the indicator. Its value grows from left to right by 10% per step. The closer the dot is to the left, the lower is the charge. The mixer has builtin LiIon rechargeable battery. The battery can be charged using standard MicroUSB socket on the top side of the mixer. Read more about charging the battery in chapter 2.2 "Transportation and operation conditions". 1.5. Main components and additional accessories Basic kit of the mixer includes: Sileks LabMix Mini 201 handheld mixer mixing adapter for Ø2 mm rods (attached to the mixer) battery charger Ø2 mm mixing rods (mixrod260) user manual 4 Handheld laboratory mixer Sileks LabMix Mini 201 1 pcs. 1 pcs. 1 pcs. 100 pcs. 1 pcs. Sileks GmbH Additional optional accessories and disposables, sold separately: • Ø2 mm mixing rods (mixrod260) for 2.5, 1.5, 0.5 ml tubes • Ø3 mm mixing rods (mixrod3150) for 2550 ml tubes • steel homogenization probes of different design • mixing adapter for Ø3 mm mixing rods • mixing adapter for homogenization probes 2.1. Safety instructions Compact handheld laboratory mixer Sileks LabMix Mini 201 is safe to use when following safety requirements. However the mixer can cause mixed solution spillage due to user's negligence or mistake. It makes it very important to follow standard laboratory safety measures. Always wear gloves, protective glasses and laboratory clothing. Do not allow to distract your attention when working with the device. The mixer works on builtin low voltage rechargeable battery and does not create electrical shock hazard. Follow standard electrical safety measures when using charging adapter. Do not use it in humid conditions and when temperatures are out of 0°C 40°C range. 2.2. Transportation and operation conditions Avoid dropping and hard shaking the device. Safe transportation temperatures are in range from 5°C to +50°C. Transportation in temperature conditions out of this range may cause unrecoverable damage of the LiIon battery requiring its replacement. Follow safety measures described above when using the mixer. Avoid mixer's moving parts getting dirty. In case when mixed solution is spilled on the mixing adapter, immediately stop mixing, remove the adapter and wash it. Working with dirty adapter significantly increases samples' cross contamination risks. Do not wash the mixer with agressive chemicals (like acids, alcali, organic solvents) and abrasive cleaners. Do not immerse the mixer in any liquids, wash its outer parts only. Try to use the battery charge as completely as possible. All rechargeable batteries will have their service life shortened when charged/discharged frequently and not fully. The battery must be charged if discharged completely and before long storage period. All LiIon rechargeables degrade much faster if stored uncharged. Sileks GmbH Handheld laboratory mixer Sileks LabMix Mini 201 5 3.1. Preparing the device for work It is strongly recommended to make full charge of the battery before using the mixer for the first time. Charging the battery. The mixer is charged like any other mobile device. To charge mixer's battery use a charger included in the kit. Connect the charger to the mixer's MicroUSB port and plug it into a standard electrical socket. Follow standard electrical safety measures when using the charger! Choose a neccessary mixing adapter according to your purposes and put it on the motor spindle. Default kit includes already attached mixing adapter for working with Ø2 mm mixing rods (mixrod260). These mixing rods are intended for working with 2.5, 1.5 and 0.5 ml tubes. Mixing adapters for Ø2 mm mixing rods are marked with two colored dots (this mixer model accepts adapters with red color marks). Adapters for Ø3 mm mixing rods are marked with three dots. Using adapter that do not correspond to selected mixing rod may cause solution spillage or mixing rod stucking in the adapter. If the rod stuck, it requires to be removed manually that causes loss of working efficiency. Number of colored marker dots corresponds to diameter (in millimeters) of rods that can be used with this adapter. This number do not directly characterize inner diameter of the chanel of the adapter. Its inner diameter is designed to achive required hydrodynamical effects with a specific type of mixing rod. 3.2. Mixing and resuspending Various kinds of rods are used with the mixer to mix solutions. Different rods are recommended for certain types of tubes. Place a disposable mixing rod into the tube. Make sure that the mixer is switched to low speed (not higher than "4"). Then, as it is described in chapter 1.3 on page 3, put the mixer to the tube so the rod fit into the chanel of the mixing adapter. Do not apply pressure to the rod. It does not lock in the adapter and must be able to fall out of it. When working with a new solution with unknown properties (viscosity, surface tension, ability to produce foam etc.), begin with a shortperiod mixing. It will allow to estimate the solution's properties and mix it in a correct mode at optimal speed. 6 Handheld laboratory mixer Sileks LabMix Mini 201 Sileks GmbH If mixing process goes normally, you may proceed to mixing in normal and continuous modes and at higher speeds (if it is neccessary). If some problems occur (the solution spills, foams) select lower mixing speed. Try to repeat mixing at this speed. In some cases when the solution is too viscous or when working with dispersion systems with components that are hard to be mixed or with tubes of big volumes, switching the mixer to higher speeds may be required. Increase mixing speed gradually with corresponding control buttons. After increasing the speed, begin mixing with precautions described above. Begin with short pulsemode mixing. If this test mixing succeeds, proceed to starting continuous operation. If you need softer start, you may apply small pressure to mixing rod to increase the friction between the rod and the tube. Do not apply too much pressure or the rod might bend. If the rod bends, it will prevent formation of correct symmetrical swirl and cause solution spill or insufficient mixing. Be very carefull when working with liquids having volumes close to maximum tube capacity. Remember that liquids will produce a swirl when mixed. It will cause significant raise of the liquid's level. If there is not enough space in the tube, the solution will spill! When the mixing is over, wait for the mixing adapter to come to a full stop. When the adapter stops rotating, the centrifugal force that holds the rod in the adapter's channel disappears and the rod falls out and remains in the tube. If the mixer is pulled up before the adapter stops rotating and by doing so the rod is also dragged off the tube, it may cause solution spill and generation of drops and aerosols. It explains why operator should always wait until the adapter completely stops. Because a mixing rod is automatically released when the adapter stops rotating, there is no need to remove it manually. This patented technology allows to process big series of samples at high speed by subsequently "capturing" rods that were dispensed in tubes and then automatically "releasing" them when the mixing stops. Sileks GmbH Handheld laboratory mixer Sileks LabMix Mini 201 7 3.3. Homogenization The mixer can be used for homogenization of various tissue samples. Special steel probes must be used for homogenization. With such accessories the mixer can replace standard conical pestle for Eppendorflike tubes or ceramic pestle and mortar. To homogenize a sample, attach a special mixing adapter to the mixer. Tighten its screw to prevent its detachment during operation. Insert corresponding homogenization probe into the adapter. Unlike mixing rods, homogenization probes tightly fit the adapter's hole and remain locked. The sample often requires some pretreatment. If it is too hard and dry, some softening processing has to be done. These measures almost always correspond to the pretreatment, recommended for manual homogenization. The pretreatment might include preliminary soaking in water or some buffer solutions, incubation in a thermal block, enzymatic treatment etc. In each specific situation you first have to apply to standard recommended protocol. It is recommended to homogenize samples at high mixing speed. The most efficient homogenization is achieved if the probe is immersed in a sample mix slowly. If the probe is immersed fast and a sample is dense, it may cause the probe to get bogged and stick, causing the motor to stall. While smooth immersing allows for gradual sample homogenization layer by layer. Homogenization probes can be used many times, unlike mixing rods. It makes their proper cleaning, sterilisation and decontamination an important task. Probes must be cleaned and sterilized according to standard treatment methods used for laboratory stainless steel instruments. 3.4. Working with magnetic nanoparticles Especially high efficiency growth is achieved when using the handheld mixer for magnetic particles based isolation techniques. The mixer can completely replace manual pipetting in particles resuspension operations. It gives a good optimization potential for the whole isolation procedure. Shaking on vortexlike devices in most cases is insufficient to achieve good particles resuspension quality, especially in washing procedures. As experimental data shows, using shaking often leads to unsatisfactory contaminants removal from particles' surfaces. It happens due to poor resuspension of particles' agglomerates that are bound mostly by molecules 8 Handheld laboratory mixer Sileks LabMix Mini 201 Sileks GmbH of contaminants. Pipetting provides significantly higher quality of particles' resuspension. But this procedure requires high time and plastic disposables consumption. Efficient and universal solution in this situation can be achieved when using handheld mixer. While having resuspension quality of as high grade as manual pipetting does, it allows to compete in speed with shaking on vortex and even excel it. Also when you use a magnetic rack with detachable or mobile magnetic part together with mixer, you do not have to remove tubes one by one from rack's wells as it could be required when using shaking. It is enough to remove a magnetic field source from tubes and resuspend particles with the mixer. All the procedure can be performed right in a rack (Fig. 4). Fig 4. Minimixer used in a complex with a magnetic rack (illustrated on Sileks MagRack16). Sileks GmbH 1. Minimixer 2. Magnetic base 3. Removable top part 4. Tubes in the rack Handheld laboratory mixer Sileks LabMix Mini 201 9 4. Troubleshooting Mixing does not start when one of the "start" buttons is pressed • Mixer's battery is discharged. Charge the battery as described in chapter 3.1. Standard charger for mobile devices can be used instead of the charger included in the mixer's supply kit if it is neccessary. • Homogenization/mixing probe stall. When processing dense samples, the homogenization probe may get bogged. Regular mixing rod can also be stopped if pressed too hard against the tube bottom. In both cases the first measure is to stop mixing and to try to release the probe. If it happened during homogenization you might need to clean the probe from sample material twisted on it. When working with mixing rods do not apply pressure to the rod because it will result in its bending and possible solution spillage. Mixed solution spills and produces drops while mixing • Too high speed is used It is recommended to use low and medium (not higher than 6th) speeds only when mixing and resuspending solutions in small tubes (volume ≤2 ml). Higher speeds are intended for homogenization or mixing liquids is vessels with bigger volumes. • The mixing rod is bent Mixing rods are made of resilient plastic and may bend a little if too strong vertical pressure is applied. It will cause less thorough mixing and solution spillage. Do not press the rod, it must allways rotate freely. The solution is mixed not thoroughly enough • Too low speed is used Increase mixing speed. Begin operating with shortperiod switchon and estimate the effect (no too high swirl or drops must be produced, see 3.2). • Too strong pressure is applied to the mixing rod Avoid pressing the mixing rod. It must be able to move freely in the mixing adapter's channel. Pressing the rod, you are limiting its mobility and decreasing mixing thoroughness. 10 Handheld laboratory mixer Sileks LabMix Mini 201 Sileks GmbH Sileks GmbH Handheld laboratory mixer Sileks LabMix Mini 201 11 12 Handheld laboratory mixer Sileks LabMix Mini 201 Sileks GmbH Handheld laboratory mixer Sileks LabMix Mini 201 Sileks GmbH phone: +49 76328231964 +49 76328231996 fax: email: [email protected] web: www.sileks.de Read more about our product on our website. There you can find additional media information, video tutorials and new ideas for optimizing your work using our laboratory equipment. http://www.sileks.eu/shortlink/LabMixMini201 Sileks GmbH, 2013