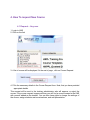
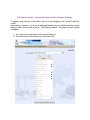
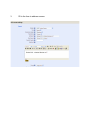
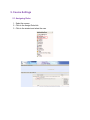
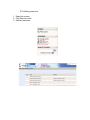
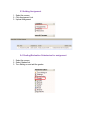
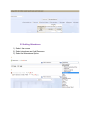
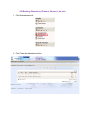
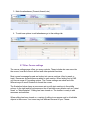
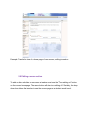
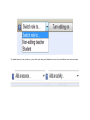
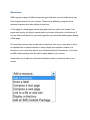
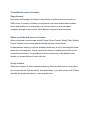
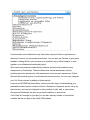
1
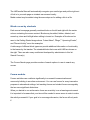
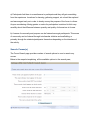
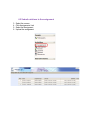
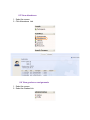
Harbinger LMS User Manual
Contents
1. Introduction ............................................................................................................................................. 3
2. Registering to LMS ................................................................................................................................. 4
3. Getting Started with Teacher ....................................................................................................................4
4. How To request New Course .................................................................................................................. 5
4.1 Request Any user .................................................................................................................................. 5
4.2 Course create A user who has a role of Course Creator ....................................................................... 6
5. Course Settings ....................................................................................................................................... 8
5.1 Assigning Roles .................................................................................................................................... 8
5.2 Adding resource .................................................................................................................................... 9
5.3 Adding Assignment ..............................................................................................................................10
5.4 Grading/Evaluation Submission for assignment ..................................................................................10
5.5 Adding Attendance ...............................................................................................................................11
5.6 Marking Attendance (Present, Absent, Late etc) .................................................................................12
5.7 Other Course settings ...........................................................................................................................13
5.8 Editing course section ..........................................................................................................................14
6. Getting Started with Student ..................................................................................................................24
6.1 View course contents ...........................................................................................................................24
6.2 Submit solutions to the assignment ......................................................................................................25
6.3 View attendance ...................................................................................................................................26
6.4 View grades on assignments ................................................................................................................26
7. Small Tip ................................................................................................................................................27
1. Introduction
In order to effectively manage training activities we have launched Harbinger LMS for all
groups in our organization. Along with managing training we are also planning to use
this LMS to track events, seminars being attended by employees.
Harbinger LMS will assist trainers to create training sessions, upload training content &
assessments, review submissions and grade students. It will also assist students for
studying uploaded training contents, search contents using Harbinger Wiki, upload
submissions, and share feedback on training sessions and view individual grades.
Contacts:
Primary: LMS Training Administrator
Secondary: Umesh Sodmise , Shweta Bhalerao
2. Registering to LMS
If you are a new user to LMS, you will need to register to the LMS. For this you will need
to follow the
below steps :
1) Go to http://lms.harbingergroup.com
2) Using you Windows Login Credentials, login to the LMS.
3) You will be taken to the User Profile page. Enter all the needed details.
4) On clicking Save, you will be prompted that you will get a registration email on the
email id that you have specified in your Profile settings.
5) On receipt on the registration email, you will be provided with account activation
details.
6) Click on the URL, which will open the LMS page with the successful activation
message
7) Click on Continue and you will be redirected to the Home page.
8) You are now an active user of LMS and all set to use the LMS with the roles
(trainer/teacher and student, as assigned to you by the LMS administrator for a
particular course)
3. Getting Started with Teacher
The purpose of this section is to give an overview of Harbinger LMS to a new user who
is a teacher on a course(s).
Before you start
• We are assuming that your site administrator has assigned you to a new, blank
course where you have teacher privileges.
• You must be logged in order to edit a course and use most of the features
described below.
4. How To request New Course
4.1 Request – Any user
1. Login to LMS
2. Click on the link
3. A list of course will be displayed. At the end of page , click on Course Request
4. Fill in the necessary details in the Course Request form. Note, that you have provided
appropriate details
This request will be sent to the training administrator who will approve or reject the
course. If the course request is approved then you will find a course created in the LMS
with yourself added as the teacher. You can then have rights to change the settings of
the course, assign students and more teachers, and add presentation.
4.2 Course create – A user who has a role of Course Creator
To create a new course you will need to have the role assigned as a Course Creator by
a LMS
administrator. However, if you are an assigned teacher you can edit the existing course
settings. (Note, there is also a role as “Non Editing Teacher “ that does not have editing
privileges.)
1. Go to the home page and click the course category
2. Click Add new course button from the below form
3.
Fill in the form to add new course.
5. Course Settings
5.1 Assigning Roles
1. Select the course
2. Click to the Assign Roles link
3. Click to the student and select the user
5.2 Adding resource
1. Select the course
2. Click Resource Link
3. Add the resources
5.3 Adding Assignment
1. Select the course
2. Click Assignment Link
3. Upload Assignment
5.4 Grading/Evaluation Submission for assignment
1. Select the course
2. Select Grades link
3. Turn Editing on and add the grades
5.5 Adding Attendance
1) Select the course
2) Select dropdown next Add Resource
3) Select the Attendance Option
5.6 Marking Attendance (Present, Absent, Late etc)
1. Click Attendances link
2. Click Take the attendance button
3. Mark the attendance (Present,Absent,Late )
4. To add new options to add attendance go to the settings tab
5.7 Other Course settings
The course settings page offers you many controls. These include who can come into
the course, how the course is laid out and other potential functions.
Most course homepage formats are broken into course sections (often by week or
topic). Resources and activities are added to each section. When writing text in LMS
you have a range of Formatting options. The Course settings are robust and offer
different ways to enroll Students or format the course.
The illustration below shows a new course set up with topic sections in the middle
column. In the right and left columns are a few of activities many blocks such as "Latest
News" or "Administration". Editing has been turned on. The teacher is ready to add
resources and activities.
When editing has been turned on, a variety of editing icons appear next to all editable
objects in the course. Your icons may look different because of your Theme.
Example: Teacher's view of a home page of new course, editing turned on
5.8 Editing course section
To add or alter activities or resources a teacher must use the "Turn editing on" button
on the course homepage. The same button will also turn editing off. Similarly, the drop
down box allows the teacher to see the course page as a student would see it.
To add items to a section, you will use the pull down boxes for activities and resources.
Resources
LMS supports a range of different resource types that allow you to include almost any
kind of digital content into your courses. These can be added by using the add a
resource dropdown box when editing is turned on.
A Text page is a simple page written using plain text from a link in the course. Text
pages aren't pretty, but they're a good place to put some information or instructions. If
you are after more options for your new page then you should be thinking about adding
a Web page.
Of course the resource may already exist in electronic form so you may want to link to
an uploaded file or external website or simply display the complete contents of a
directory in your course files and let your students pick the file themselves. If you have
an IMS content package then this can be easily added to your course.
Labels allow you to add more information between activity or resource links in your
course.
Course formats
A course format refers to the layout of a course. They can be changed by the course
administration block under settings.
Standard course formats
Weekly format
The course is organized week by week, with a clear start date and a finish date. LMS
will create a section for each week of your course. You can add content, forums,
quizzes, and so on in the section for each week.
TIP: If you want all your students to work on the same materials at the same time, this
would be a good format to choose.
Topics format
The course is organized into topic sections. Each topic section consists of activities.
Social format
Social format example
This format is oriented around one main forum, the social forum, which appears listed
on the main page. It is useful for situations that are more free form. They may not even
be courses. The LMS Lounge is an example of a social format course.
The social forum can be edited by clicking the 'Update this forum' button on the social
forum page.
LAMS course format
The Learning Activity Management System is an open source LMS which allows
teachers to use a flash based authoring environment for developing learning
sequences. LAMS has been integrated with LMS to allow teachers to develop LAMS
activities within a LMS course. This course format makes LAMS central to the course,
only displaying the LAMS interface.
TIP: If you are interested in using LAMS, check with your system administrator to see if
they have installed and configured LAMS. Very few institutions use LAMS as it
duplicates much of the LMS functionality.
SCORM format
The Sharable Content Reference Model (SCORM) is a content packaging standard.
SCORM packages are self-contained bundles of content and JavaScript activities,
which can send data to LMS about the students score and current location. LMS can
use SCORM packages as a content type (see SCORM/AICC module), or as a course
format.
TIP: If you have a large SCORM object you want to use as an entire course, then you
can select this course format and students will only be able to interact with the SCORM
object, not the rest of the LMS tools.
Weekly format, CSS/no tables
The CSS / No Tables variant of the Weekly format displays the Weekly course format
without using tables for layout. This improves the accessibility of the format, but older
browsers have trouble displaying it correctly.
Contributed course formats
Page format
Also known as Flexpage, this format is very similar to the Book resource format in a
LMS course. It consists of a theme, course format, and menu module which enables
blocks and modules to be intermixed on a 3 column layout, provide tab based
navigation through course content, inline display of resources and forums, etc.
Other contributed course formats
Other contributed course formats include Project Course Format, Weekly Tabs, Monthly
Format Timeline course format and the Shared activities course format.
An administrator wishing to remove installed formats may do so by removing the format
plugin from the installation. That is: remove the directory containing the format for the
course/format directory. You probably should not remove any of the default course
formats, or formats that are in use on the site.
Activity modules
There are a number of robust interactive learning activity modules that you may add to
your course with the "Add an activity" drop down menu. If you wish, some or all of these
activities can push information to a course grade book.
Communication and collaboration may take place using live Chats or asynchronous
discussion Forums for conversational activities. You can also use Choices to gain group
feedback. Adding Wikis to your courses is an excellent way to allow students to work
together on a collaboratively-authored project.
Work can be uploaded and submitted by students and scored by teachers using
Assignments or Workshops. These modules have several assessment options,
including instructor-assessment, self-assessment, and even peer-assessment. Online
Quizzes offer several options for automatic and manual scoring. You can even integrate
your Hot Potato quizzes by adding a Hotpot activity.
Lessons and SCORM activities deliver content and offer ways of individualizing your
presentation based upon a student's choices. Glossaries of keywords can be set up by
the instructor, and can be configured to allow students to edit, add, or rate entries.
Surveys and Databases are also very powerful additions to any course.
If all of that isn't enough for you then you can also add any number of contributed
modules that are not part of the official LMS release!
File or website link
You can also upload any type of electronic file you like. All you need to do is make sure
your students can access it with the appropriate software on their computers.
Once you've added a file to your files area, you can easily add it as a resource for your
students.
1. In Editing Mode, select "Add Link to File or Web Site" from the Resource menu
from the content block where you want to add the link to the file.
2. On the Edit page, click the "Choose or upload a file" button. A new window will
pop up with the files area directory structure.
3. Find the file you want to add in the files area. You can also upload a new file here
if you'd like.
4. On the right side of the files list, you will see a "Choose" link in bold. Click that link.
The
Files window will close, and the path to the file will be entered into the file name.
5. You can choose to display the file in a new pop-up window. Most of the time, you
won't need to worry about this with uploaded content.
6. The name of the resource will now be an active link in the content block.
Adding media content
Adding media content can help you communicate some ideas and processes more
easily than text alone. Imagine trying to teach a language without learners able to hear it
spoken. Or trying to learn how volcanoes work with either seeing a video or an
animation. Fortunately, LMS makes it easy to add rich media content to your course.
The LMS media filters will automatically recognize your media type and put the right sort
of link in to your web page so students can access it easily.
Media content may be added using the same steps as for adding a link to a file.
Blocks seen by students
Each course homepage generally contains blocks on the left and right with the center
column containing the course content. Blocks may be added, hidden, deleted, and
moved up, down and left/right when editing is turned on. Examples of blocks can be
seen in the Getting Started image above. "Latest News", "Blogs", "Upcoming Events",
and "Recent Activity" are a few examples.
A wide range of different block types can provide additional information or functionality
to the learner by the teacher. The standard blocks that come with LMS are shown on
the right. There are also many contributed developed by administrator to this list.
Search Course(s)
The Course Search page provides number of search options to user to search any
course.
Forum module
Forums activities can contribute significantly to successful communication and
community building in an online environment. You can use forums for many innovative
purposes in educational settings, but teaching forums and student forums are arguably
the two more significant distinctions.
When you decide to use a discussion forum as an activity in an e-learning environment
it is important to be aware that your time will be needed in some sense in order to make
the activity successful. If your goal is to encourage discussion, the forum will only work
if:
a) Participants feel there is a need/reason to participate and they will gain something
from the experience. Incentives for learning, gathering support, etc. should be explored
and encouraged early on in order to clearly convey the purpose of the forum to others.
Anyone considering offering grades or marks for participation is advised to think very
carefully about the difference between quantity and quality of discussions in forums.
b) A sense of community and purpose can be fostered amongst participants. This sense
of community can be fostered through tutor/teacher initiative and scaffolding, or
primarily through the students/participants themselves depending on the intentions of
the activity.
Search Forum(s)
The Forum Search page provides number of search options to user to search any
course.
Below is the snapshot explaining all the available options in the search pane,
6. Getting Started with Student
6.1 View course contents
1. Log in as a student
2. Select the course
6.2 Submit solutions to the assignment
3.
4.
5.
6.
Select the course
Click Assignments Link
Select the Assignment
Upload the assignment
6.3 View attendance
1. Select the course
2. Click Attendance Link
6.4 View grades on assignments
1. Select the course
2. Select the Grades Link
Small Tip:
In order to know more about specific feature in LMS, please click on
that is shown
in many places on our LMS that will provide help notes to assist you further.