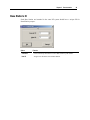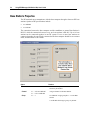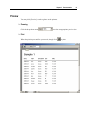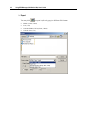
1
User's Guide
Using RFDBManager
For 433 MHz / 2.4 GHz RF
Version 1.23.01
Copyright Notice
Copyright © 2005 Syntech Information Company Limited.
All rights reserved
The software contains proprietary information of Syntech Information Company; it is provided under a
license agreement containing restrictions on use and disclosure and is also protected by copyright law.
Reverse engineering of the software is prohibited.
Due to continued product development this information may change without notice. The information and
intellectual property contained herein is confidential between Syntech Information and the client and
remains the exclusive property of Syntech Information. If you find any problems in the documentation,
please report them to us in writing. Syntech Information does not warrant that this document is error-free.
No part of this publication may be reproduced, stored in a retrieval system, or transmitted in any form or by
any means, electronic, mechanical, photocopying, recording or otherwise without the prior written
permission of Syntech Information.
For product consultancy and technical support, please contact your local sales representative. Also, you may
visit our web site for more information.
The CipherLAB logo is a registered trademark of Syntech Information Co., Ltd.
Syntech Information Company
Website: http://www.cipherlab.com
i
Contents
Chapter 1: Introduction
1
How it works.................................................................................................................................................2
Typographical Conventions..........................................................................................................................3
Revision History ...........................................................................................................................................3
Chapter 2: The RFDBManager Interface
5
Main Window ...............................................................................................................................................6
Menu Bar ......................................................................................................................................................7
File Menu ..........................................................................................................................................7
RF Link Menu ...................................................................................................................................8
Configure Menu.................................................................................................................................9
Help Menu.........................................................................................................................................9
Main Toolbar ..............................................................................................................................................10
RF Reading Dialogue..................................................................................................................................12
RF Reading Toolbar ........................................................................................................................13
RF Reading Tab...............................................................................................................................13
Editing Toolbar...........................................................................................................................................14
Device Bar ..................................................................................................................................................14
Database Tab ..............................................................................................................................................16
Status Bar....................................................................................................................................................17
Chapter 3: Demonstration
19
Execute Program.........................................................................................................................................19
General Application Window .....................................................................................................................20
Start with Open ATF ..................................................................................................................................20
Convert Data....................................................................................................................................22
Data Link.........................................................................................................................................25
Start with Open Database ...........................................................................................................................45
Set up Connection.......................................................................................................................................45
Configuration..............................................................................................................................................47
RF System .......................................................................................................................................48
Base Station's ID .............................................................................................................................49
Base Station's Properties..................................................................................................................50
Terminal ..........................................................................................................................................51
Editing ........................................................................................................................................................52
Add a record ....................................................................................................................................52
Edit a record ....................................................................................................................................53
Delete a record.................................................................................................................................54
Find a record....................................................................................................................................54
Sort records......................................................................................................................................55
Save As .......................................................................................................................................................57
Print ............................................................................................................................................................59
Preview............................................................................................................................................61
ii
Index
Contents
63
1
CHAPTER 1
Introduction
The RF Database Manager software lends itself to real-time data exchange, by updating
and/or editing database on the host computer. Working with the CipherLAB RF data
collection terminals, it can easily create or link to a back-end database according to the
pre-defined properties of lookup file/s.
Sparing your time from the tedious work of writing codes, the RFDBManager gets your
data linked to a number of legacy OLE database easily.
V
Note: The properties of lookup file/s must be defined through the RF Application
Generator in advance.
In This Chapter
How it works............................................................................... 2
Typographical Conventions ........................................................ 3
Revision History ......................................................................... 3
2
Using RFDBManager (433 MHz/2.4 GHz) User's Guide
How it works...
Options of RF specifications include 433 MHz and 2.4 GHz, depending on your application
requirements.
Introduction
3
Typographical Conventions
Before you start using this guide, it is important to understand the terms and typographical
conventions used in the documentation.
The following kinds of formatting in the text identify special information.
Formatting convention
Numbers (1, 2, 3…)
Step-by-step procedures. You can follow these instructions
to complete a specific task.
Special Bold
Items you must select, such as menu options, command
buttons, or items in a list.
Emphasis
Use to emphasize the importance of a point or for variable
expressions such as parameters.
CAPITALS
Names of keys on the keyboard. for example, SHIFT,
CTRL, or ALT.
KEY+KEY
Key combinations for which the user must press and hold
down one key and then press another, for example,
CTRL+P, or ALT+F4.
Revision History
Version
1.23.01
Type of Information
Release Date
April 22, 2005
Notes
Initial release
5
CHAPTER 2
The RFDBManager Interface
This chapter describes the main window and interface elements you need to get familiar
with before getting started.
In This Chapter
Main Window ............................................................................. 6
Menu Bar .................................................................................... 7
Main Toolbar .............................................................................. 10
RF Reading Dialogue.................................................................. 12
Editing Toolbar ........................................................................... 14
Device Bar .................................................................................. 14
Database Tab............................................................................... 16
Status Bar.................................................................................... 17
6
Using RFDBManager (433 MHz/2.4 GHz) User's Guide
Main Window
The RFDBManager's main window has menus and toolbars on the top, and, the rest of the
window displays available database and/or RF reading section.
Database
When you click on the Database tab, it displays in two panes - title of data sheet on the left and
its content on the right. It can display up to three data sheets.
RF Reading
When you click on the RF Reading tab, it simply displays data received.
V
Note: The data file tab/s vary with the lookup file attributes. (1) The Database tab will be
brought up when the application template contains a form that makes reference to lookup
file/s. (2) The RF Reading tab will be brought up when the application template contains a
form that doesn't make reference to lookup file/s.
Chapter 2 The RFDBManager Interface
7
Menu Bar
The Menu Bar contains a number of menus that specify which task you want the system to
perform. Each menu contains a list of commands and sometimes sub-menus.
Some of the options carry out commands immediately, and others display a window so that
you can enter additional information. If an option is followed by [...], it will display a
window. Otherwise, the command is carried out immediately.
File Menu
Command
Open ATF
To Do...
Open an existing application template file that was created by the RF
Application Generator.
ATF refers to "Application Template File".
Open Database |
RF Reading
If the database has been successfully created earlier, you can directly open
it without having to open the application template first.
When the previously opened template includes RF Reading only, the
command is Open RF Reading.
When it includes Database or Database + RF reading, the command is
Open Database.
Close:
(ATF file name)
Close the current application template file.
8
Using RFDBManager (433 MHz/2.4 GHz) User's Guide
Convert Data
Convert the source text data of a lookup file to database file. It allows up to
three lookup files.
Make sure that all required lookup files have been converted to database
completely.
If the date/time stamps in the ATF have been defined, a dialog box will
prompt to confirm whether the system is to generate the date/time stamp
for the records automatically.
Data Links
It supports a variety of database types. Configure the Data Link properties
and link to any legacy back-end database.
Save As
Save the current database to a new file either in database format (*.mdb) or
in text format (*.txt).
Print
Print out data from the current database.
Preferences
Configure custom settings for security concerns and others.
Exit
Close the RF Database Manager program.
RF Link Menu
The RF terminal/s must connect to the host computer through the Base Station (master or
standalone).
After a careful site survey, you may decide to have a number of base stations to form your
RF network. In this case, the base station directly being connected to the host computer is
called "Master"; the others are "Slave".
Command
To Do...
Connect
Enable the RS-232 connection between PC and the Base Station, so that the
terminal/s can be connected.
Disconnect
Disable the RS-232 connection between PC and the Base Station, so that the
terminal/s are disconnected.
Properties
Configure the COM port settings for the connection between the PC and the
Base Station.
Default settings: COM 1, 115200 bps, no flow control.
V
Note: The number of the symbolic icons on the Device Bar reveals how many devices are
currently connected.
Chapter 2 The RFDBManager Interface
9
Configure Menu
For more information, go to Configuration (on page 47) in the Demonstration Chapter.
Command
To Do...
Base Station's ID
Configure the Base Station's ID.
Base Station's Properties
Configure the Base Station's properties.
Help Menu
Command
To Do...
About ATF File's Properties
Show properties of the application template file.
About RF Database
Manager
Show information about the RF Database Manager program.
10
Using RFDBManager (433 MHz/2.4 GHz) User's Guide
Main Toolbar
The Main Toolbar gives you quick access to available commands in current stage of
application.
This Button
Does The Same As This
File > Open ATF
File > Open ATF
File > Open Database | RF Reading
File > Open Database | RF Reading
Exit
File > Exit
Convert Data
File > Convert Data
Data Link
File > Data Link
Save As
File > Save As
Print
File > Print
Connect
RF Link > Connect
Disconnect
RF Link > Disconnect
Chapter 2 The RFDBManager Interface
V
11
Note: The Convert Data button won't go away as long as there is more data (another
lookup file) needs conversion.
1. Start with Open ATF
1.1
1.2
1.3
2. Start with Open Database
2.1
2.2
12
Using RFDBManager (433 MHz/2.4 GHz) User's Guide
RF Reading Dialogue
When the application template file (ATF) includes a form that doesn't make reference to
lookup files, the RF Reading dialog box pops up right after executing the Open ATF
command.
After defining your RF Reading settings below, there appears the RF Reading Toolbar (on
page 13) as well as the RF Reading Tab (on page 13).
V
Note:
The data received can only be saved in text format (*.txt).
Option
To Do...
Directory
Specify where the data is to be saved by entering file path or click
[Browse] to select a location.
File name
Enter file name.
File mode
Choose file mode: Overwrite, Append or New Name.
Add Return character
When selected, it will add Return character to each record.
Add Line-Feed character
When selected, it will add Line-Feed character to each record.
Character replacement
(ASCII)
When selected, it will perform character replacement as specified.
[Original value ==> New value]
Chapter 2 The RFDBManager Interface
Add Date & Time stamp
When selected, it will add system date and/or time stamp to each
record.
Click [>>] to open system date and time settings.
RF Reading Toolbar
This RF Reading Toolbar appears after configuring the RF Reading setting.
- OR Button
To Do...
Setting
To re-define the RF Reading setting.
Stop | Start
To stop | start the recording of the received data.
RF Reading Tab
This RF Reading Tab appears after configuring the RF Reading setting.
V
Note:
13
The Save As and Print commands are not accessible.
14
Using RFDBManager (433 MHz/2.4 GHz) User's Guide
Editing Toolbar
After executing one of these commands to create a database, you can use the Editing
Toolbar to manage the received data manually.
Convert Data
Open Database
Data Link
Button
To Do...
Add
To add a record to the database.
Edit
To edit the data of the selected record.
Delete
To delete the selected record.
Find
To search the database according to the specified key field.
Sort
To sort the records based on the specified key field by ascending or descending.
Device Bar
The icons on the Device Bar quickly inform you how many devices are currently connected.
Move your cursor near to a symbolic icon, and the information of its identification number
will appear.
Button
Base Station
To Do...
To view Base Station's properties and the terminal/s connected to it.
This button does almost the same as Configure > Base Station's Properties,
except for the information on linked terminal's ID.
Terminal
Simply show the terminal ID when moving your cursor closer to the icon.
No further information by clicking.
Chapter 2 The RFDBManager Interface
15
Click the Base Station's icon, and it will also list all the terminal/s currently being
linked to it.
16
Using RFDBManager (433 MHz/2.4 GHz) User's Guide
Database Tab
The Database Tab lists up to three data sheets. You may click on any record, and then click
the editing tools to edit it.
On the right pane of the database window, you'll find the triangular indicator ( ) points toward
the current entry of record. You may click on any other entry to move the indicator, and then
proceed to edit the record.
On the bottom of the database content is a horizontal scroll bar. You may use the right/left scroll
arrows (
and
) to scroll through the list of records.
Chapter 2 The RFDBManager Interface
17
Status Bar
The Status Bar is located at the bottom of the application window. It gives information on
the activities between the host computer and the Base Station.
Message Column
Gives Information On...
Command received from the Base Station.
Data received from the Base Station.
Command or data sent out from the local
port.
Local COM port properties when it is open.
It will show "COM Properties" when the
COM port is closed.
19
CHAPTER 3
Demonstration
This chapter gives more information on how to use the RFDBManager in your application.
In This Chapter
Execute Program......................................................................... 19
General Application Window ..................................................... 20
Start with Open ATF................................................................... 20
Start with Open Database............................................................ 45
Set up Connection ....................................................................... 45
Configuration .............................................................................. 47
Editing......................................................................................... 52
Save As ....................................................................................... 57
Print............................................................................................. 59
Execute Program
1
Execute the RF Database Manager program.
2
The version and copyright information pops up. Click [OK] to proceed.
3
The application window pops up.
20
Using RFDBManager (433 MHz/2.4 GHz) User's Guide
General Application Window
In this stage, available functions are accessible in the Main Toolbar. For the same function,
you may click the drop-down menu from the Menu Bar as well.
Start with Open ATF (on page 20): Click [File] and choose [Open ATF] to open the application
template file.
Start with Open Database (on page 45): Click [File] and choose [Open Database] to open the
previously created database.
Click [Connect] to open the COM port.
Click [Exit] to end the program.
V
Note: The application template file (ATF) has to be defined properly with the Application
Generator before you can make use of it with the RF Database Manager.
Start with Open ATF
1
Click [Open ATF] to start with a new application template file.
Chapter 3 Demonstration
21
2
The following window pops up for specifying file path. When the file is located, click
[Open].
3
Now the application window is as shown below.
If the application template file (ATF) includes a form that specifies none for its lookup
properties, the RF Reading dialog box (on page 12) will appear.
22
Using RFDBManager (433 MHz/2.4 GHz) User's Guide
4
Proceed to click [Convert Data] to import text file, or click [Data Link](on page 25) for
access to a custom database
Convert Data
1
Click [Convert Data] to convert lookup text file into data sheet. Because up to three
lookup files are allowed in the application template, you'll have to make sure all of them
are imported to our database here.
2
The following window pops up for specifying file path. When the file is located, click
[Open].
Chapter 3 Demonstration
3
23
The application template may specify that the lookup file's data fields include date or
time attribute.
For the system to generate date and/or time stamp for each record, click Yes.
If the date and/or time stamp has been joined to the text file, simply click No to
proceed.
If the text file includes no date and/or time stamp, an error message is generated
when you click No.
V
Note: The Convert Data button won't go away as long as there is more data (another
lookup file) needs conversion.
At last, the application window shows data records in the data file tab (Database tab).
24
Using RFDBManager (433 MHz/2.4 GHz) User's Guide
Refer to ATF
You may click [Help] on the Menu Bar and select [About ATF File's Properties] to view the
settings of the template file. It reveals the relationship between the application template and
the RF Database Manager.
In the Application Generator's template:
V
In the RF Database Manager:
1st lookup file
Convert Data > data sheet #1
2nd lookup file
Convert Data > data sheet #2
3rd lookup file
Convert Data > data sheet #3
Note:
The ATF's properties cannot be changed here.
Chapter 3 Demonstration
25
Data Link
1
Click [Data Link] for link to a custom database.
2
The Data Link Properties box pops up for configuration.
3
In the Provider tab, select your OLE DB provider. See the following sections for details.
For example, a number of connection options for three major database types are
available.
Access Database (on page 26)
Microsoft Jet 3.51 OLE DB Provider
Microsoft Jet 4.0 OLE DB Provider
Microsoft OLE DB Provider for ODBC Drivers
FoxPro Database (on page 35)
Microsoft OLE DB Provider for ODBC Drivers
SQL Server (on page 41)
Microsoft OLE DB Provider for SQL Server.
26
Using RFDBManager (433 MHz/2.4 GHz) User's Guide
Access Database
Microsoft Jet 4.0 OLE DB Provider
1
In the Provider tab, select [Microsoft Jet 4.0 OLE DB Provider].
2
Click [Next >>].
Chapter 3 Demonstration
V
27
3
In the Connection tab, specify the name of target database (Microsoft Access Database:
*.mdb) and provide other required information.
4
Click [Test Connection] to verify connection.
5
Click [OK] when initial connection is set up successfully.
Note: Apply the same procedures for Microsoft Jet 3.51 OLE DB Provider.
28
Using RFDBManager (433 MHz/2.4 GHz) User's Guide
Microsoft OLE DB Provider for ODBC Drivers
1
In the Provider tab, select [Microsoft OLE DB Provider for ODBC Drivers].
2
Click [Next >>].
Chapter 3 Demonstration
29
3
In the Connection tab, select [1. Specify the source of data: Use connection string] and
provide other required information.
4
Click [Build] to select data source.
30
Using RFDBManager (433 MHz/2.4 GHz) User's Guide
5
In the File Data Source tab, click [New] to create new data source.
6
Select [Microsoft Access Driver (*.mdb)] as the driver for your data source.
7
Click [Next].
Chapter 3 Demonstration
8
Specify the name of the file data source (ODBC File Data Source: *.DSN).
9
Click [Next].
10 Click [Finish] when the configuration of database is completed.
31
32
Using RFDBManager (433 MHz/2.4 GHz) User's Guide
11 In the ODBC Microsoft Access Setup dialog box, click [Select] to select a database.
12 Specify the database you want to connect to, and then click [OK].
Chapter 3 Demonstration
13 Click [OK] in the ODBC Microsoft Access Setup dialog box.
14 Click [OK] when the file data source is correct.
33
34
Using RFDBManager (433 MHz/2.4 GHz) User's Guide
15 Again, click [OK] in the ODBC Microsoft Access Setup dialog box.
16 Click [Test Connection] to verify connection.
17 Click [OK] when initial connection is set up successfully.
18 Go to Map Lookup File (on page 43).
Chapter 3 Demonstration
FoxPro Database
1
In the Provider tab, select [Microsoft OLE DB Provider for ODBC Drivers].
2
Click [Next >>].
35
36
Using RFDBManager (433 MHz/2.4 GHz) User's Guide
3
In the Connection tab, select [1. Specify the source of data: Use connection string] and
provide other required information.
4
Click [Build] to select data source.
Chapter 3 Demonstration
5
In the File Data Source tab, click [New] to create new data source.
6
Select [Microsoft Visual FoxPro Driver] as the driver for your data source.
7
Click [Next].
37
38
Using RFDBManager (433 MHz/2.4 GHz) User's Guide
8
Specify new data source (ODBC File Data Source: *.DSN).
9
Click [Next].
10 Click [Finish] when the configuration of database is completed.
Chapter 3 Demonstration
11 In the Configure Connection dialog box, select [Free Table directory].
12 Specify the database you want to connect to.
13 Click [OK].
14 Click [OK] when the data source is created.
15 Click [OK] when the file data source is correct.
39
40
Using RFDBManager (433 MHz/2.4 GHz) User's Guide
16 Again, click [OK] in the Configure Connection dialog box.
17 Click [Test Connection] to verify connection.
18 Click [OK] when initial connection is set up successfully.
Chapter 3 Demonstration
SQL Server
1
In the Provider tab, select [Microsoft OLE DB Provider for SQL Server].
2
Click [Next >>].
41
42
Using RFDBManager (433 MHz/2.4 GHz) User's Guide
3
In the Connection tab, provide required information.
1. Select or enter a server name
2. Enter information to log on to the server
3. Select the database on the server
4
Click [Test Connection] to verify connection.
5
Click [OK] when initial connection is set up successfully.
Chapter 3 Demonstration
43
Map Lookup File
1
When being connected to database, make sure the mapping between the database and
lookup file is correct.
The table (i.e. Sample 1) of database is mapped to the lookup file specified in the
application template (ATF).
The database fields are automatically mapped to the data fields of the lookup file.
2
If your database file doesn't have as many fields as the lookup file does, the following
message will pop up.
44
Using RFDBManager (433 MHz/2.4 GHz) User's Guide
3
When data is mapped correctly, click [OK]. Data link to back-end database is set up
successfully.
Chapter 3 Demonstration
45
Start with Open Database
V
1
If the target database has been created earlier, you may simply click [Open Database].
2
The application window shows data records in the Database tab.
Note: Apply the same procedures for executing the Open RF Reading command.
Set up Connection
1
Click [Connect] to open the COM port.
46
Using RFDBManager (433 MHz/2.4 GHz) User's Guide
2
If the COM port has not yet been configured, the COM Port Properties setting box will
pop up first. Click [OK] after configuration.
3
The COM port properties will be shown on the Status Bar when it is opened.
4
If the master (or standalone) Base Station has not been physically connected to the
computer via RS-232 cable and powered on, the RF Link dialog box will pop up to
remind you. Click [OK] when physical connection is set up.
5
The system will auto detect any connected Base Station and/or terminal, and display
symbolic icons on the Device Bar.
- OR -
Chapter 3 Demonstration
47
Configuration
To set up RF link between terminal(s) and the host computer, properties of the target Base
Station (master or standalone) must be configured properly to act as a media of
transmissions and receptions.
Define Base Station's properties here, and the information can be viewed later when you
click on the Base Station's icon on the Device Bar.
48
Using RFDBManager (433 MHz/2.4 GHz) User's Guide
RF System
433 MHz RF System
One 433 MHz RF system can support up to 45 terminals and 16 base stations.
To support all 45 terminals, the 433 MHz RF base stations have to be configured into 3
groups.
Base Station's ID
(on page 49)
Base IDs (433 MHz):
01 ~ 16
Terminal (on page 51)
Terminal IDs (433 MHz):
01 ~ 45 (3 groups)
Base Station's Properties Group 1 Base Stations:
(on page 50)
Group 2 Base Stations:
support terminals 01 ~15.
Group 3 Base Stations:
support terminals 31 ~ 45.
support terminals 16 ~ 30.
2.4 GHz RF System
One 2.4 GHz RF system can support up to 99 terminals and 16 base stations.
Base Station's ID
(on page 49)
Base IDs (2.4 GHz):
01 ~ 16
Terminal (on page 51)
Terminal IDs (2.4 GHz):
01 ~ 99
Chapter 3 Demonstration
49
Base Station's ID
Each Base Station and terminal in the same RF system should have a unique ID for
identification purpose.
Option
Function
Current ID
Click on the drop-down menu to select Base Station by ID number.
New ID
Assign a new ID to the selected Base Station.
50
Using RFDBManager (433 MHz/2.4 GHz) User's Guide
Base Station's Properties
The RF terminals must communicate with the host computer through at least one RF base
stations. Options of RF specifications include:
433 MHz RF
2.4 GHz RF
The connection between the host computer and the standalone or master Base Station is
RS-232, while the connection between every two base stations is RS-485. Up to 16 base
stations can be connected together in one RF system. If two or more base stations are
connected together, the one directly connected to the host computer should be set to master
mode, and the others to slave mode.
Option
Function
ID
Channel
Click on the drop-down menu to select Base
Station by ID number.
1 ~ 4 for 433 MHz RF
Assign a channel to the Base Station.
1 ~ 6 for 2.4 GHz RF
Group
1~3
433 MHz RF: assign group ID 1 ~ 3 to the Base
Station.
2.4 GHz RF: all belong to group 1 by default.
Chapter 3 Demonstration
Power
Power level: 1 ~ 5
1: 10 dbm
2: 5 dbm
3: 4 dbm
51
433 MHz RF: set the RF output power to the
Base Station.
2.4 GHz RF: all set to power level 1 by default.
(max. 100mW)
4: 0 dbm
5: -5 dbm
Time out
1 ~ 99 seconds
Set the duration of re-try for sending data.
Mode
Standalone
Set the operation mode to the Base Station.
Master or Slave
Only one base station: standalone
Two or more: one master, the rest slave.
Baud rate
115200 /57600 / 38400 /
19200 / 9600 / 4800 /
2400 bps
Set the baud rate for RS-232 connection.
Terminal
Identification No. (ID)
Hold down the function key and press the Num key 1 or 3 to change ID (01 ~ 45 for 433
MHz RF; 01 ~ 99 for 2.4 GHz RF).
FN+1: decrease number
FN+3: increase number
Channel (CH)
Hold down the function key and press the Num key 4 or 6 to change channel (1 ~ 4 for 433
MHz RF; 1 ~ 6 for 2.4 GHz RF).
FN+4: decrease number
FN+6: increase number
Power Level (PW)
Hold down the function key and press the Num key 7 or 9 to change power level (1 ~ 5 for
433 MHz RF only).
FN+7: decrease number
FN+9: increase number
52
Using RFDBManager (433 MHz/2.4 GHz) User's Guide
Editing
After executing one of the following commands to create a database, you can use the
Editing Toolbar to manage the received data manually.
Convert Data
Open Database
Data Link
Add a record
1
Click [Add].
2
The dialog box contains fields of a record for input.
3
When input is completed, click [Update].
Chapter 3 Demonstration
4
53
The new record will be added to the bottom of the list.
Edit a record
1
Click on any part of a record so that the triangular indicator (
2
Click [Edit].
3
The dialog box contains fields of a record for editing.
4
When input is completed, click [Update].
5
The edited field/s of the original record will be updated with new input.
) points to the record.
54
Using RFDBManager (433 MHz/2.4 GHz) User's Guide
Delete a record
1
Click on any part of a record so that the triangular indicator (
2
Click [Delete].
3
The dialog box contains fields of a record (grayed out).
4
If this is the record you don't want, simply click [Delete].
5
The record will be deleted for good.
) points to the record.
Find a record
1
If you need to check on something on a long list, click [Find].
2
The dialog box contains several key fields (as many as one record contains) and its data
content for specifying your requirements.
Chapter 3 Demonstration
3
55
Click [Previous](records before the current item) or [Next](records after the current
item) to start searching.
When a certain record is found, you'll find the triangular indicator (
) points to it.
Otherwise, you'll be prompted with the following message.
Sort records
1
If you need to sort information on a long list, click [Sort].
2
The dialog box contains several key fields (as many as one record contains) and the sort
methods (Ascending or Descending) for specifying your requirements.
3
Click [Start].
56
Using RFDBManager (433 MHz/2.4 GHz) User's Guide
4
Examples:
Sorting by Item/Ascending
Sorting by Quantity/Descending
Chapter 3 Demonstration
Save As
In the database tab, the received data can be saved in two different file formats:
Access (.mdb)
Text File (.txt)
1
Click [Save As].
57
58
Using RFDBManager (433 MHz/2.4 GHz) User's Guide
2
If you open a database by using [Data Link], you'll have to configure its field properties
before saving it as a text file (.txt).
3
Select an appropriate file format, and enter the file name.
4
Click [Save].
Chapter 3 Demonstration
59
Print
Print Properties
In the database tab, you can print out the received data. Before you print, you may configure
the layout settings to meet your needs.
Option
Report
Description
Title: of the printout, optional
Person: who produced the printout, optional
Space
Field: space between fields, in millimeter
Line: space between lines or records, in millimeter
Field
Width: of each field, in millimeter
Height: of each field, in millimeter
60
Using RFDBManager (433 MHz/2.4 GHz) User's Guide
Margin
Top: margin size from top to the edge of paper, in millimeter
Bottom: margin size from bottom to the edge of paper, in millimeter
Left: margin size from left to the edge of paper, in millimeter
Right: margin size from right to the edge of paper, in millimeter
Print
1
When in the RF Reading tab, simply click [Print].
When in the Database tab, select a data sheet first. Then click [Print].
2
Select the target printer and click [Print].
Chapter 3 Demonstration
61
Preview
You may click [Preview] to take a glance at the printout.
Zooming
Click the drop-down menu
to select an appropriate preview size.
Print
When the print layout satisfies your needs, simply click
to print.
62
Using RFDBManager (433 MHz/2.4 GHz) User's Guide
Export
You may click
to export it (all or by page) to different file formats.
HTML (*.htm; *.html)
Text (*.txt)
Unicode HTML (UTF-8)(*.htm; *.html)
Unicode Text (*.txt)
63
Index
A
M
Access Database • 27
Add a record • 53
Main Toolbar • 10
Main Window • 6
Map Lookup File • 44
Menu Bar • 7
B
Base Station's ID • 50
Base Station's Properties • 51
P
C
Preview • 62
Print • 60
Configuration • 9, 48
Configure Menu • 9
Convert Data • 22
D
Data Link • 26
Database Tab • 16
Delete a record • 55
Demonstration • 19
Device Bar • 14
E
Edit a record • 54
Editing • 53
Editing Toolbar • 14
Execute Program • 19
F
File Menu • 7
Find a record • 55
FoxPro Database • 36
G
General Application Window • 20
H
Help Menu • 9
How it works... • 2
I
Introduction • 1
R
Refer to ATF • 24
Revision History • 3
RF Link Menu • 8
RF Reading Dialogue • 12
RF Reading Tab • 13
RF Reading Toolbar • 13
RF System • 49
S
Save As • 58
Set up Connection • 46
Sort records • 56
SQL Server • 42
Start with Open ATF • 21
Start with Open Database • 46
Status Bar • 17
T
Terminal • 52
The RFDBManager Interface • 5
Typographical Conventions • 3