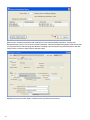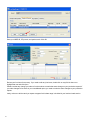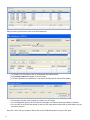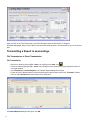
1
1. seaLandings User Manual . . . . . . . . . . . . . . . . . . . . . . . . . . . . . . . . . . . . . . . . . . . . . . . . . . . . . . . . . . . . . . . . . . . . . . . . . . . . . . . . . . . . .
1.1 Installing seaLandings software . . . . . . . . . . . . . . . . . . . . . . . . . . . . . . . . . . . . . . . . . . . . . . . . . . . . . . . . . . . . . . . . . . . . . . . . . . . .
1.1.1 Installing seaLandings on Windows 7 Machines . . . . . . . . . . . . . . . . . . . . . . . . . . . . . . . . . . . . . . . . . . . . . . . . . . . . . . . . . . .
1.1.2 Installing seaLandings Versions Older than 2013 . . . . . . . . . . . . . . . . . . . . . . . . . . . . . . . . . . . . . . . . . . . . . . . . . . . . . . . . . .
1.1.3 Installing training version of seaLandings . . . . . . . . . . . . . . . . . . . . . . . . . . . . . . . . . . . . . . . . . . . . . . . . . . . . . . . . . . . . . . . .
1.2 Changing your password in seaLandings . . . . . . . . . . . . . . . . . . . . . . . . . . . . . . . . . . . . . . . . . . . . . . . . . . . . . . . . . . . . . . . . . . . . .
1.3 Daily Production Reports . . . . . . . . . . . . . . . . . . . . . . . . . . . . . . . . . . . . . . . . . . . . . . . . . . . . . . . . . . . . . . . . . . . . . . . . . . . . . . . . .
1.3.1 Maximum Retainable Amount Worksheet . . . . . . . . . . . . . . . . . . . . . . . . . . . . . . . . . . . . . . . . . . . . . . . . . . . . . . . . . . . . . . . .
1.4 Catcher-Processor Consolidated Report Tool . . . . . . . . . . . . . . . . . . . . . . . . . . . . . . . . . . . . . . . . . . . . . . . . . . . . . . . . . . . . . . . . .
1.5 Catcher-Processor IFQ Landing Report . . . . . . . . . . . . . . . . . . . . . . . . . . . . . . . . . . . . . . . . . . . . . . . . . . . . . . . . . . . . . . . . . . . . . .
1.5.1 Creating a Catcher-Processor IFQ Report using the 'Consolidated Report' Option . . . . . . . . . . . . . . . . . . . . . . . . . . . . . . . .
1.5.2 Creating a Catcher-Processor IFQ Report using the 'Groundfish Landing Report' Option . . . . . . . . . . . . . . . . . . . . . . . . . . .
1.6 Mothership Landing Reports . . . . . . . . . . . . . . . . . . . . . . . . . . . . . . . . . . . . . . . . . . . . . . . . . . . . . . . . . . . . . . . . . . . . . . . . . . . . . . .
1.7 Crab Landing Reports . . . . . . . . . . . . . . . . . . . . . . . . . . . . . . . . . . . . . . . . . . . . . . . . . . . . . . . . . . . . . . . . . . . . . . . . . . . . . . . . . . . .
1.8 Transmitting a Report in seaLandings . . . . . . . . . . . . . . . . . . . . . . . . . . . . . . . . . . . . . . . . . . . . . . . . . . . . . . . . . . . . . . . . . . . . . . .
1.9 Processing Return Receipts . . . . . . . . . . . . . . . . . . . . . . . . . . . . . . . . . . . . . . . . . . . . . . . . . . . . . . . . . . . . . . . . . . . . . . . . . . . . . . .
1.10 How to Get More Report Numbers . . . . . . . . . . . . . . . . . . . . . . . . . . . . . . . . . . . . . . . . . . . . . . . . . . . . . . . . . . . . . . . . . . . . . . . . .
1.11 Archiving Reports in seaLandings . . . . . . . . . . . . . . . . . . . . . . . . . . . . . . . . . . . . . . . . . . . . . . . . . . . . . . . . . . . . . . . . . . . . . . . . . .
1.12 seaLandings Frequently Asked Questions . . . . . . . . . . . . . . . . . . . . . . . . . . . . . . . . . . . . . . . . . . . . . . . . . . . . . . . . . . . . . . . . . . .
1.13 Longline Catcher Processor eLogbook Instructions . . . . . . . . . . . . . . . . . . . . . . . . . . . . . . . . . . . . . . . . . . . . . . . . . . . . . . . . . . . .
1.14 Trawl Catcher Processor eLogbook Instructions . . . . . . . . . . . . . . . . . . . . . . . . . . . . . . . . . . . . . . . . . . . . . . . . . . . . . . . . . . . . . .
2
2
7
10
13
22
23
35
39
48
48
53
60
67
76
79
80
80
81
84
98
seaLandings User Manual
The seaLandings User's Guide contains chapters that explain how to transmit catch data using the stand-alone
client, also called seaLandings. This software is used by crews who do not have internet capabilities on their
vessels and who transmit their data via email. The ability to email and receive attachments is necessary to use
seaLandings.
Chapters in the seaLandings User's Guide explain how to create production reports, consolidated reports and
landing reports; how to archive reports; how to obtain more report numbers; how to transmit reports and process
return receipts; how to install seaLandings; and how to obtain more report numbers and fish ticket numbers.
If you need to refresher on Federal Recordkeeping and Reporting Requirements go here: http://alaskafisheries.noaa
.gov/regs/679a5.pdf
Installing seaLandings software
Installing seaLandings on Windows 7 Machines
Installing seaLandings Versions Older than 2013
Installing training version of seaLandings
Changing your password in seaLandings
Daily Production Reports
Maximum Retainable Amount Worksheet
Catcher-Processor Consolidated Report Tool
Catcher-Processor IFQ Landing Report
Creating a Catcher-Processor IFQ Report using the 'Consolidated Report' Option
Creating a Catcher-Processor IFQ Report using the 'Groundfish Landing Report' Option
Mothership Landing Reports
Crab Landing Reports
Transmitting a Report in seaLandings
Processing Return Receipts
How to Get More Report Numbers
Archiving Reports in seaLandings
seaLandings Frequently Asked Questions
Longline Catcher Processor eLogbook Instructions
Trawl Catcher Processor eLogbook Instructions
**
Name
Size
Creator
Creation
Labels Date
Comment
5.99
shall
sealandings2011.pdf
Apr
MB
22, 2011
None
Installing seaLandings software
How to Install seaLandings Software on Your PC
Due to differences in computer Operating Systems, we have created two separate sets of seaLandings
installation instructions.
2
For Windows 7 installation instructions, click on the following link: https://elandings.atlassian.net/wiki/display/d
oc/seaLandings+Install+on+Windows+7+Machines
Windows XP Installation Instructions
CD installation -
Place the installation CD in your CD drive.
Click on the Start menu and go to My Computer.
Double click on the CD drive which will then display the contents of the installation CD.
Double click on the file named install.bat.
Thumb Drive Installation -
Insert the installation thumb drive into your computer's USB port.
Click on the Start Menu and go to My Computer.
Double click on the thumb drive which will then display the contents of the installation folder.
Double click on the install.bat file.
If you receive a Security Warning, click the Run button.
A black dos window will pop up and needs to remain open until the software is finished installing.
A Sealandings Installer dialog box will open, make note of the change in where the software program files are
stored.
Select the Transmit type
File method - creates a zip file of your report which is saved in your transmissions folder and then
attached to an email addressed to [email protected], requires processing of return receipt.
Direct method - transmits and processes your report via the internet behind the scenes. No email
transmission is required!
3
Enter User ID - this is the ID entered when the operation was originally created.
Enter Password/Confirm Password - this is the password used in conjunction with the User ID that was
entered when the operation was created.
Type of Installation - Production is the selection you want to go with.
Software - if you are not using the sealandings reporting system but wish to use only the logbook you can
make this selection here.
If your installation was successful you will see the green screen below. Click on the Finish button to complete this
process.
4
You should now see a seaLandings icon on your desktop:
Double-click on the seaLandings icon to begin. Enter the same User ID and Password you entered when you
installed the software.
If the User ID and password doesn't match the one you entered upon installation or the one you registered
with, you will not be able to login.
You'll notice you are now logged in.
5
Request Report Numbers
If you have a fairly current version of seaLandings (November 2011) you have two different transmission options, Fil
e or Direct.
File transmission requires attaching a zipped report transmission file to an email addressed to
[email protected], saving the receipt email attachment, and processing it in seaLandings.
Direct transmission requires that the user create a report transmit file but bypasses the email process by
transmitting and processing the report behind the scenes via the internet.
File Transmission Method
Go to: Reporting...Transmit Reports.
The Transmit Reports dialog box will open. Click on the Transmit button.
A message will pop-up telling you to attach the transmission file to an email.
Open your email client and create a new email addressed to [email protected].
NOTE: You may leave the Subject line blank.
6
Click on Attachment and go to C:/ProgramData/sealandings/transmissions. Select the correct transmission
file which will have the date and time stamp of when you created the zip file.
The date format will be yyyy/mm/dd. Send the email.
Wait up to 20 minutes for your receipt.
Right click on your receipt attachment and select 'save link as' in the following directory C:\ProgramD
ata\seaLandings\transmissions.
Open your seaLandings program and go to Reporting...Process Return Receipt.
Your new receipt should appear in the receipt window.
Double-click that receipt and when the Process window pops up click on Process.
If you followed that process correctly, you should no longer see any messages about report numbers
under the toolbar of your seaLandings screen.
Now you're ready to start creating reports!
User Not Authorized to Report Error
If you forgot to transmit and process your very first transmission file you will receive this message if you try to
create a new report.
Go to Reporting...Transmit Reports and click on the Transmit Report button.
Then email the transmission file to [email protected].
Your transmission file is located in C:\program files\seaLandings\transmissions.
If you still get an error message telling you that you aren't authorized to make reports, please contact Suja Hall.
Questions? Please call (907)586-7462 or email [email protected] for assistance with installing the software.
Installing seaLandings on Windows 7 Machines
Installing seaLandings Versions Older than 2013
Installing training version of seaLandings
Installing seaLandings on Windows 7 Machines
Installing seaLandings on a Windows 7 Operating System
If you are installing seaLandings on a computer workstation with Windows 7, we recommend you take the following
steps to ensure a seamless installation.
Step 1.
Insert the cd or thumb drive into your computer. The program will not be brought up automatically, you will need to
go to your Computer and locate the cd or thumb drive in the directory and then double click on it.
7
Step 2.
Now you will want to right click on the install.bat file and select Run as administrator from the pop-up menu.
A black dos window will pop up and then the Sealandings Installer dialog box will pop up and request specific
information as shown below.
Step 3.
Select the Transmit type
File method - creates a zip file of your report which is saved in your transmissions folder and then
attached to an email addressed to [email protected], requires processing of return receipt.
Direct method - transmits and processes your report via the internet behind the scenes. No email
transmission is required!
Enter User ID - this is the ID entered when the operation was originally created.
Enter Password/Confirm Password - this is the password used in conjunction with the User ID that was
entered when the operation was created.
Type of Installation - Production is the selection you want to go with.
Software - if you are not using the sealandings reporting system but wish to use only the logbook you can
make this selection here.
8
Click on the Install button.
If you see a green screen like the one above that means you successfully installed the software. Click on
Finish to complete the process.
A sealandings Icon should have been created on your desktop, this is your shortcut to opening the
seaLandings program.
9
Step 4.
Double click on this icon and login into seaLandings.
Go to Reporting...Transmit.... to request your report numbers.
You should see a message similar to the one in the screen shot letting you know report and fish ticket
numbers were received.
NOTE - You will no longer see how many report numbers you have under the seaLandings toolbar unless
you are down to less than 10 of either type.
Now you're ready to create reports!
Installing seaLandings Versions Older than 2013
Installation Problems?
Sometimes, the standard installation process fails on Windows 7 machines due to some security issues. Usually this
happens because seaLandings requires that the installing user have permission to modify files and folders in the C
:\Program Files\sealandings directory.
If you tried logging into seaLandings and got an error message related to the user not having rights to the system or
you tried to get report numbers and received authorization errors try the steps below before re-installing the
program.
Navigate to C:\Program Files\sealandings\users
Right click on the file that has your username with a .xml extension.
10
A Properties dialog box will pop-up, click on the "Security" tab
Select the group called "Users" in the "Group or User Name" table
11
Verify that the Permissions for this user allow Full Control.
If the permissions do not allow Full Control, click Edit.
From the Edit dialog select Users, then check all the boxes in the Allow column.
12
Click Apply, then Ok.
Close the properties dialog box.
Make sure you close your seaLandings program and log into it again before trying to get report numbers.
If you still have issues with logging into seaLandings contact [email protected] or call 907-586-7462
Installing training version of seaLandings
Navigate to the following website, http://elandings.alaska.gov/seaLandings/.
Click on the file titled seaLandings-pws-4.40-6000-installer.zip.
13
Click on the Save button.
Save the .zip file to C:\program files. The .zip file will take a few minutes to download on your computer.
After the .zip file is finished downloading, find the file in C:\program files.
Right-click on the .zip file and choose Extract All. If the Extraction Wizard opens, click on the Next button and
wait for the file to be extracted.
The extraction may take a few minutes. If you're using the Extraction Wizard, make sure the box Show Extracted
Files is
checked and click on the Finish button.
14
A Microsoft explorer window will open. Double-click on the file called install.bat to start installing seaLandings.
If you receive a security warning, disregard and click on the Run button.
A black DOS screen will open in the background. Please leave the black screen open during the installation process
or the installation will stop.
15
A seaLandings installer window will open within a few minutes. Click on the Next button.
A Directories dialog box will open. Click on the Next button again.
16
Click Yes when the program asks if you wish to create a new directory called seaLandings.
Fill out the next screen exactly as shown below. Please make sure you select Training as Type of Installation. Click
Next.
17
Fill out the Communications Information dialog box as shown below. Please use the following password:
A_mackerel
Click on the Next button.
18
Click on the Finish button. It may take a few minutes for the correct files and directories to be copies onto your C:\
drive.
When the green installation screen opens, click on the Done button.
19
Go to your desktop and click on the seaLandings icon.
When the login screen appears enter the following:
User ID: amackerel
Password: A_mackerel
Click OK.
Go to the Reporting option at the top of your screen, and select Transmit Reports.
Click on the Transmit button. Click OK.
Open your email and address a new message to [email protected].
Attach your transmission file to that email, which is located in C:\program files\seaLandings\transmissions.
You may leave the subject line blank. Send the email.
Within 1-5 minutes, you should receive an email with a receipt attached.
Open the email, right-click on the attachment, and save it in C:\program files\seaLandings\transmissions.
20
Open your seaLandings program and go to Reporting and choose Process Return Receipts.
Open the receipt you just saved by highlighting the file and click on the Open button, or double-click on the
file.
21
Click on the Process File button.
Click on the OK button.
You may now begin using the training environment of seaLandings to create mock reports.
Changing your password in seaLandings
Do not reset your password without first asking NMFS staff to change it on their end
If you forget your password in seaLandings, please contact NMFS staff first so they can reset it for you.
Otherwise, there will be a mismatch and your new password will not be recognized by the system.
Once you've contacted a NMFS staff person you can take the following steps to reset it from your end.
Double-click on the seaLandings icon. When the user ID and password screen appears, click Cancel.
Go to Configuration...Users.
Highlight the user and click Open.
22
Click on the Reset Password button.
Enter your new password and click OK. Enter the same password again and click OK.
Go to File...Save to save the changes. Close your user dialog box.
Go back to File...Login. Enter your user ID and new password. Then create a transmission file by going to
Reporting...Transmit Reports, click on the Transmit button, and attach that transmission file to an email and send to
the elecrep email account. Once you receive and process the receipt, you will be able to determine if the change
was recognized.
Daily Production Reports
Creating a Vessel Production Report
Open seaLandings by double clicking on the 'seaLandings' icon on your desktop.
Enter your UserID and Password and click on Ok. (Please contact your home office or NMFS staff if you have
forgotten your user ID or password.)
Click on File...New
Verify that your vessel is listed as the Operation and choose Production as the Type of Report from the drop
down list.
Click OK.
The Production Report data entry screen will open.
23
Vessel/Location Information
Report Date
Production reports are required on a daily basis, so the report date is the date when the fish were processed.
Production reports should be submitted daily, which means weekly reports no longer need to be transmitted.
Submitting weekly reports in addition to daily reports will duplicate catch in NMFS' catch accounting system.
Federal Permit Number and ADFG Vessel Number
These values automatically fill in using values you supplied when you registered.
If these numbers are incorrect, please contact NMFS staff [email protected] to change the values in your
operation settings.
Do not change these values in your report. If you do change the vessel ID, you will receive a warning
message.
At-Sea Port Code
This value will auto-fill based on the information you provided when you registered your operation.
FCP is the correct code for catcher processors.
FLD is the correct code for motherships.
Gear
Enter the 1-2 digit number code for the gear type.
A list of all the gear codes can be found in Codes menu at the top of the seaLandings screen.
The gear codes you are mostly likely to use are:
Gear Code
Gear Description
7
Non-pelagic / bottom trawl
47
Pelagic / mid-water trawl
61
Longline/Hook-and-Line
91
Pot
Crew Size
Enter the number of crew on the vessel.
This number should include the skipper, but not observers on board.
Federal Reporting Area
Enter the 3-digit federal reporting area (such as 610, 543).
Special Area
If you are a vessel using trawl gear in the COBLZ (C. opilio bycatch limitation zone) or the RCKSA (Red king
crab savings area) in the Bering Sea, use the drop-down list to pick the appropriate code.
Choose the AISWW special area if you are fishing in the state-managed Aleutian Islands Pacific cod fishery,
unless your catch is coming off a CDQ quota or unless you are fishing in a cod parallel fishery (inside 3 miles
while a cod Federal fishery is open).
24
Otherwise, leave this field blank.
Management Program
Choose a management program using the drop down list.
Management Program Code
Description
A80
Amendment 80 cooperatives, Amendment 80 limited
access
AFA
American Fisheries Act Pollock
AIP
Aleutian Island Pollock
CDQ
Community Development Quota
EXP
Experimental
IFQ
Individual Fishing Quota
OA
Open Access (includes parallel fisheries)
RES
Research
RPP
Rockfish Pilot Program
SMO
State-managed other groundfish (Federal fisheries for
that species closed)
SMPC
State-managed Pacific cod (Federal fisheries for cod
closed)
SMS
State-managed sablefish (Federal fisheries for
sablefish closed)
STB
Salmon troll bycatch
TEST
Test fishery
Here is further information on some of management programs and when they should be used:
AFA: Any AFA-listed vessel that targets pollock and uses pelagic trawl gear in the Bering Sea should mark AFA as
the management program.
A80: Vessels that participate in the Amendment 80 limited access or Amendment 80 cooperative fisheries should
mark A80 as management program. A mothership that process fish from an Amendment 80 limited access vessel or
an Amendment 80 coop should also mark A80 as management program. A mothership that processes fish from an
25
open-access or CDQ vessel should mark OA or CDQ, respectively. If a vessel always fishes off an Amendment 80
quota, they should still mark A80 even when they fish in the Gulf of Alaska. An Amendment 80 vessel also should
mark A80 whenever their bycatch comes off an Amendment 80 quota.
RPP: Vessels that fish off a Rockfish Pilot Program quota should mark RPP. When their catch is not coming off a
Rockfish Program quota, they should choose OA or another management program. Please do not mark RPP when
fishing in the Bering Sea.
SMPC: If a vessel fishes for cod in state waters, the crew should choose SMPC as management program.
One exception is when their catch is coming off their CDQ quota, in which case they should mark CDQ as
management program.
SMPC should not be marked when a vessel is participating in the parallel fishery, even if that vessel is in
state waters.
SMPC should only be marked when Federal fisheries are closed.
An example is when a vessel is fishing for state cod in the Aleutian Islands or Gulf of Alaska.
Note: You should report AISWW as Special Area when your vessel is fishing in the Aleutian Islands state waters for
cod when the Federal fisheries are closed. AISWW should not be marked when fishing in parallel waters.
OA: When a vessel is fishing open access or in the parallel fishery, even if they are in state waters while
participating in parallel fisheries. Parallel fishing is inside 3 miles under a Federal opening. A mothership that
processes fish from an open-access vessel should mark OA.
Management Program ID
You should only enter a management program ID if you selected AFA, CDQ, or RPP as the management
program; otherwise, leave this field blank.
The values for AFA, CDQ, and RPP management program IDs are listed in the table below.
26
Management Program
Management Program ID
Description
AFA
200
AFA Catcher/processors
AFA
300
AFA Motherships
CDQ
51
Aleutian Pribilof Island Community
Development Association
CDQ
52
Bristol Bay Economic Development
Corporation
CDQ
53
Central Bering Sea Fishermen's
Association
CDQ
54
Coastal Villages Region Fund
CDQ
55
Norton Sound Economic
Development Corporation
CDQ
56
Yukon Delta Fisheries Development
Association
RPP
401*
RPP Entry Level
RPP
402
CGOA RPP CV Limited Access
RPP
403*
CGOA RPP CP Limited Access
RPP
404*
Opted Out
RPP
405
Trident Offshore Rockfish
Cooperative Association
RPP
406*
FCA Cooperative
RPP
407
I.S.A. Rockfish Cooperative
RPP
408
North Pacific Rockfish Cooperative
RPP
409
OBSI Rockfish Cooperative
RPP
410
Western Alaska Fisheries Rockfish
Coop
RPP
411
Star of Kodiak Rockfish
Cooperative
RPP
412
Best Use Cooperative
Rockfish Pilot Program Descriptions are applicable for 2010, and are subject to change in future years.
Trip Event
The Trip Event field allows crews to designate if this report is the first of a new trip for Maximum Retainable
Amount calculations.
Below are the different Trip Events that crews can designate for their report.
Enter SSL Protection Area: A new fishing trip is triggered for any fishing after entering a SSL protection
area closed to directed fishing for Pacific cod or Atka mackerel at 679.22(a)(7)
, (a)(7)(v), (a)(7)(vi), (a)(8)
(a)(8)(iv) and (a)(8)(v).
Leave SSL Protection Area: A new fishing trip is triggered for any fishing after departing a SSL protection
area closed to directed fishing for Pacific cod or Atka mackerel at 679.22(a)(7)
, (a)(7)(v), (a)(7)(vi), (a)(8)
(a)(8)(iv) and (a)(8)(v).
Directed Fishing Closure: A new fishing trip is triggered for any fishing in an area following a change in the
directed fishing status for any species retained aboard the vessel.
Offload Product: A new fishing trip is triggered for any fishing following the offload of fish or fish products.
Crews can create MRA spreadsheets for their reports but only after reports have been transmitted and receipts have
27
been processed.
There are a few Trip Events that are automatically assigned to reports, including New Week and Gear Change.
The Trip Event called New Week is assigned to all reports that fall on a Sunday, even if the user designates a
different Trip Event for that report. New Week also is assigned to reports with a report date of December 31
and January 1.
The Trip Event called Gear Change is assigned to a report if gear type changes from the previous report,
even if the user designates a different Trip Event for that report. The user does not manually select the Trip
Event of New Week and Gear Change; instead, these Trip Events are automatically assigned by
seaLandings.
Statistical Area
A six digit State statistical area is a required entry on production reports, except if you are submitting "No
Production" reports.
Statistical areas can be found in the Codes link at the top of your seaLandings program.
Place your cursor in an open field under the Stat Area heading, and enter a 6-digit statistical area.
Tab past the next two fields, which will automatically fill in for you.
Enter a percent for the amount of your catch that was hauled in this area.
If you wish to delete one of the rows you've entered, highlight any field in that row and click on the Remove
button.
If the State statistical area(s) you enter is not located in the Federal reporting area you listed earlier in the
report, you will receive an error message when you try to save it.
If you fished in a different statistical area within a different Federal reporting area, you'll need to create a
separate report.
You will receive an error message upon saving your report if you do not enter at least one state statistical
area. An exception is if you are submitting a "No Production" report, in which case statistical area is not a
required field.
Entering Production Data
Once you have completed entering information on the Vessel/Location tab, you can move on to the Production &
Discards tab.
28
Species
Enter a 3-digit species code. The Species Name will fill in automatically.
Hit the tab or return key to move to the next field.
Product Type (P/A)
Enter P for primary products and A for ancillary products.
You may leave the P/A field blank and tab past this field because the field will automatically fill in when you
tab to the next row.
However, for ambiguous product codes that can be assigned as either P or A (such as fish meal), you are
required to fill in the P or A code as it will not auto-fill when you tab to the next row._
Product Code/ Delivery Condition
Enter a 1-2 digit product code. Product codes can be found in the codes menu at the top of the seaLandings
screen. Product Description will auto-fill.
If you enter product code 97 you will need to add a comment describing what type of product was derived
from the fish.
As soon as you enter code 97, a Comment button will appear below the product table lines. Click on the
comment button and then enter your description in the text box.
NOTE If you have a version of seaLandings older than 2011 you will not have this option. Due to this error,
your production reports will not make it into our database.
Weight (mt)
All weights must be entered in metric tons to the nearest thousandth of a metric ton (such as 0.124 metric
tons).
"No Production" Reports
If you had no production for any day when you are checked in, then click on the "No Production" check box.
Products will not be saved if the "No Production" box is checked.
Only fill out a "No Production" report when you are (in theory) checked in.
If you are (in theory) checked out you should not fill out a daily production report.
If you are offloading, you should be filling out a landing report.
29
Entering Discard Data
Click into the first field of the discard section of the report.
Species
Enter a 3-digit code for discarded species. The Species Name will auto-fill.
Disposition
Enter a 2-digit disposition code. Disposition codes can be found in the Codes menu at the top of the
seaLandings screen. Disposition Description will auto-fill.
Metric Tons & Number
You may enter Metric Tons and/or Number for discards.
Metric tons should be reported to the nearest thousandth (such as 0.123).
Save and Check for errors
Save the production report by going to File...Save or by clicking on the disk icon,
.
To check for errors click on the icon,
or go to File...Check.
If there are any errors, a message screen will appear and list the errors that have occurred. You will not be
able to transmit your report until all errors have been fixed.
Special Feature: A user can copy and paste data from Excel into the products
and discard tables in seaLandings.
A user may enter their data in an Excel spreadsheet first and then copy and paste their data directly into the product
and discard tables.
Below is an example of an Excel table of products that could be pasted into the product tables in seaLandings.
DO NOT COPY AND PASTE THE HEADER ROW.
30
Species Code
Product Type (P/A)
Product Code
Weight (mt)
110
P
8
9.346
270
P
7
2.612
110
A
35
0.102
124
P
7
0.105
Below is an example of an Excel table of discards that could be pasted into seaLandings.
Species Code
Discard Disposition
Weight (mt)
127
98
.0087
191
98
.0025
159
98
.0057
After you highlight the data in the excel spreadsheet, right click with your mouse and select Copy.
Next, put your cursor in the first field of a new row of the product table and paste the data by holding down
the Ctrl key with one finger while holding down the letter V with another finger.
You will be able to see immediate results if done properly.
Deletions
To delete a row, click once on any field in that row. This should select the entire row.
Then click on the Remove button.
You will get a message asking if you really want to delete that row. Click Yes.
Another Report
If you are reporting multiple areas, management programs, or management program IDs for the same day, you may
click on the Another Report button to generate a duplicate report that will contain the same header information for
the same week ending date (same date, permits, port code, gear code, crew size).
You must save your initial report before generating Another Report!
31
When you click on the Another Report button, a second screen will open with the same date, permit
numbers, crew size, gear code, and port code.
You may change any of these fields, but you will likely receive a warning asking if you are sure about the
change.
Your initial report will remain open in the background.
Enter the new Federal reporting area, special area, management program, management program ID
(applicable only for CDQ, AFA, RPP), and State statistical area(s).
Enter production and discard data and save your report.
This can be done as many times as needed but keep in mind that production reports are to be
submitted on a daily basis not all at the end of a trip.
Checking for Duplicate Reports
If a production report already exists for the same day, gear type, port code, area, special area, management
program, and management program ID, you will receive a warning message indicating that another report
exists for that day with the same header information.
This warning message is designed to discourage users from entering duplicate reports with duplicate catch
data.
You may still create duplicate reports with the same header information, but you will receive a warning before
doing so.
32
Voiding/Deleting Duplicate Reports
To delete reports that have already been submitted, please contact NMFS staff [email protected] with a
list of report IDs that need to be deleted out of NMFS' database and justification for their deletion.
Then you will need to delete the report on the user's end by going to C:\program files\seaLandings\reports,
right-clicking on the duplicate report, and deleting it.
It is the user's responsibility to check seaLandings for duplicate reports.
Duplicate reports can mean doubling the catch in NMFS' catch accounting system.
Deleting a report on the user's end will not delete in on NMFS' end! You must contact NMFS
staff [email protected] to remove the report from the database.
Editing Existing Reports
Reports that have already been submitted may be edited at any time. However, all return receipts that
correspond to that report first must be processed.
The seaLandings system will not allow the user to edit a report for which a receipt has not yet been
processed, and will display an error message.
If you continue to try to make changes to the report without first processing the receipt, you'll receive an error
message that states that "A report that has been sent by email cannot be updated until the return receipt has
been processed."
Click OK and close out of that report without saving changes.
Then process the most recent receipt for that report.
To edit an existing report
Go to File...Open.
Double-click on the report that you wish to edit, or highlight it and click on the Open button.
Make and save changes to that report.
Then go to Reporting...Transmit Reports to transmit that report.
Please email the transmission file to [email protected].
Remember, transmission files start with the word 'transmit' and are saved in the directory C:\program
files\seaLandings\transmissions.
33
Submitting a report more than once does not duplicate data in NMFS' database. Instead, the edited version
simply overwrites the existing version. The only way to duplicate catch in NMFS' database is to create the same
report more than once and to transmit more than one report with the same catch data.
Print the Production Report
Once you have processed your return receipt, open your report by going to File...Open or click on the folder
icon
At the bottom of the production report screen, click on the Production Report PDF button.
A dialog box will appear showing you that a .pdf file (named something like PR47805.PDF) is being saved in
the seaLandings directory, C:\Program Files\seaLandings\pdf.
Click Save.
The Adobe Reader window should automatically open the PDF so that you can print it.
If Adobe does not open, use Windows Explorer and navigate to C:\Program Files\seaLandings\pdf.
Open the production report and print.
Please be advised, regulations require you print and file paper copies of production reports and keep them
on board the vessel for 3 years, including the current year.
34
Maximum Retainable Amount Worksheet
This page explains how to use the Trip Event field and access the Maximum Retainable Amount (MRA)
Worksheet.
Trip Event Field
In order to assist crews in tabulating catch for a given week and enable MRAs to be calculated, the MRA worksheet
and the Trip Event field has been added to seaLandings. Products for reports occurring in the same week (Sunday
through Saturday midnight) are automatically grouped together in an MRA worksheet. This worksheet can be saved
as a .csv file by clicking on the MRA worksheet button at the bottom of each report screen and opening the file in
Excel. The MRA worksheet button only works when the report has been transmitted and the receipt has been
processed for that report. Reports with different management programs will be listed on the same MRA worksheet
for the same week. You can designate whether a report is a new trip by selecting a Trip Event using the drop-down
box on the report screen. The following Trip Events can be designated:
Enter SSL Protection Area: A new fishing trip is triggered for any fishing after entering a SSL protection area closed
to directed fishing for Pacific cod or Atka mackerel (see regulations at 679.22(a)(7)
, (a)(7)(v), (a)(7)(vi), (a)(8) (
a)(8)(iv) and (a)(8)(v)).
35
Leave SSL Protection Area: A new fishing trip is triggered for any fishing after departing a SSL protection area
closed to directed fishing for Pacific cod or Atka mackerel (see regulations at 679.22(a)(7)
, (a)(7)(v), (a)(7)(vi),
(a)(8) (a)(8)(iv) and (a)(8)(v)).
Directed Fishing Closure: A new fishing trip is triggered for any fishing in an area following a change in the directed
fishing status for any species retained aboard the vessel.
Offload Product: A new fishing trip is triggered for any fishing following the offload of fish or fish products.
There are a few Trip Events that are automatically assigned to reports, including New Week and Gear Change. The
Trip Event called New Week is assigned to all reports that fall on a Sunday, even if the user designates a different
Trip Event for that report. New Week also is assigned to reports with a report date of December 31 and January 1.
The Trip Event called Gear Change is assigned to a report if gear type changes from the previous report, even if the
user designates a different Trip Event for that report. The user does not manually select the Trip Event of New Week
and Gear Change; instead, these Trip Events are automatically assigned by seaLandings.
MRA Spreadsheet
The MRA spreadsheet can be accessed only after the return receipt has been processed for a given report.
Creating an MRA spreadsheet for any report will include all other reports within that given week (Sunday through
Saturday, except on Jan.1). The MRA spreadsheet will include all reports for that week, even if you've selected an
MRA trip event for any of the reports during that week. In addition, the spreadsheet will add up all the round weights
for species-product code combinations for that week, even if you've selected an MRA trip event for any of the
36
reports during that week. The MRA spreadsheet is not meant to calculate MRAs outright for crews; it provides a first
step at tabulating round weight equivalents for given species and product code combinations, whereby crews can
cut, paste, and add up desired columns together.
After you've processed a receipt for your report, open the report for which you wish to create an MRA spreadsheet
by going to File...Open. Select the report and open it.
Navigate to the bottom of your report menu and click on the MRA Spreadsheet button.
37
A new dialog box will open. Click on the Save button. The MRA spreadsheet is saved in C:\program
files\seaLandings\pdf.
38
Your Excel program will open with the MRA spreadsheet saved as a .csv file.
Notice that every report is saved in its own column. If any products are completely missing from a given report, that
means that you've entered a "No Production" report for that day.
The MRA worksheet is often used by Coast Guard when conducting boardings and determining crew's MRAs for a
given week.
Catcher-Processor Consolidated Report Tool
atcher processors can use their daily production reports to create and populate landing reports and fish tickets.
NOTE: Please note that the consolidated report option should only be used by catcher processors, not motherships.
39
1. After production reports have been created, go to File....New and choose Consolidated as Type of Report.
Click OK.
2. Choose a date range for which you would like to create a consolidated landing report, based on your
production report entries. This could be done weekly, or for a whole trip. Click OK.
3. Enter the crew size of the fishing crew for this date range, which includes the skipper but not observer or the
production crew. You'll notice all of the management programs for the data range you entered are listed as
separate rows. Highlight one row at a time and click on the Enter CFEC Permit button to enter permit
information for that management program.
40
4. A Permits dialog box will open with an illustration of a CFEC permit card.
The Mag Stripe field is to be used if you have a magnetized CFEC card and a card swiper.
If you do not have a magnetized card and swiper, leave the Mag Stripe field blank. Click OK.
The CFEC permit has three parts:
1. Fishery: for example B61B
2. Permit: 5-digit number with a check digit (letter); for example, 00103F
3. Year Sequence: 4 numbers plus a check letter, for example 1201R.
The first 2 digits of this sequence are the year that the permit is issued.
The next two digits are the card number (ex: the fisherman lost his first card so it may say 02)
Enter permit information in the fields supplied.
5. Highlight the next row of a different management program and click on the Enter CFEC Permit button again.
Repeat step #4 again. You'll need to repeat these steps again until you have entered permit information for
all management programs listed for the specified date range.
When you are finished entering permit information for all management programs listed for the specified
data range, click on the OK button.
41
A landing report will be created that has separate fish tickets for each management program and for each gear type
listed. The screen shot below shows the landing report created.
Vessel/Location/Status Tab
Verify the header information that has been filled out based on your production report entries for that date
range, gear type, and management program.
Verify that the date fishing began is the first day that you processed fish for that date range of interest, and
the date of landing is the last day that you processed fish for that date range of interest.
ADF&G processing code (purchaser/owner): is preloaded from your selected operation. If you want to change
it, then choose the appropriate code from the drop down.
ADF&G Processor Code (custom processor): If you are doing custom processing then you will need your
processing code here and the F-code of the company you are processing for as the purchaser/owner.
Port of Landing: catcher processors use: FCP.
Permits & Pounds
Click on the Permits & Pounds tab.
Verify the CFEC permit information is correct. If you must make changes to the CFEC permits
entered, highlight a row and click on the Open button.
This will also be necessary if you fished under an IFQ management program so that you can enter the NMFS
ID and IFQ permits and species.
42
A Permits dialog box will open where you can make changes to your entries or add permit information as
highlighted in yellow below. Click OK.
Itemized Catch
Make sure your itemized catch is correctly assigned to your permits, and verify all the catch you expect for
that date range is included on your consolidated report.
If you wish to edit the weight or number of animals assigned to a permit, highlight a line of itemized catch and
click on the Open button.
43
An Itemized Catch dialog box will open and you can edit weight or number of animals reported, or you may
add grading and pricing information. Grading and pricing is not required on these reports.
When you are finished entering information for the line item, click on the OK button to accept changes.
The Cancel button cancels the change and the Remove button removes grading and pricing information for
that line item when the row is highlighted.
NOTE: Do not make changes to the weights or numbers of animals without also making the same changes to
your production reports off of which your landing report is based. Changing your landing report does not
automatically make the same changes to your production report.
Statistical Areas
You can leave the Statistical Areas worksheet blank since you've already entered this information on your
production reports.
The statistical areas are shown as a field in your itemized catch lines.
44
IFQ Reports Tab
If you fished for any IFQ species you will need to generate an IFQ Report.
Go to the IFQ Reports tab.
Locate and click on the Generate IFQ Report button.
By highlighting each line, you will see the stat areas and pounds caught in each area.
Verify that the pounds and areas they were caught in are accurate.
45
Save and Transmit
Prior to saving your report, go tot he header section of seaLandings and click on the checkmark icon located
there.
If there are any error in your report you will get notification of what it is.
Now you can save your report by clicking on the floppy disk icon or by going to File...Save...
The report must be closed before you can transmit it.
Transmit
Once you have saved your consolidated report, go to Reporting....Transmit Reports to transmit that report.
Make sure you email the transmission file to elecrep@noaa.
Remember, transmission files start with the word 'transmit' and are saved in the directory C:\program
files\seaLandings\transmissions.
Wait 3-5 minutes for your receipt.
Save the receipt in C:\program files\seaLandings\transmissions.
Process that receipt by going to Reporting....Process Return Receipts.
Print Your Fish Ticket
After you've transmitted the report AND processed your receipt, you can save and print the fish ticket by
highlighting one of CFEC lines and clicking on the Fish Ticket button.
A fish ticket will be saved in your directory C:\Program Files\seaLandings\pdf.
46
47
NOTE: Do not make changes to the management program or management program ID without also making the
same changes to your production reports off of which your landing report is based. Changing your landing
report does not automatically make the same changes to your production report.
Catcher-Processor IFQ Landing Report
There are two ways that you can create an IFQ landing report: you can either use the Consolidated Report option or
you can create a new landing report from scratch. The Consolidated option uses the production report data to
populate your consolidated report, whereas the Groundfish Landing option creates a brand new landing report and
you enter all the data. The consolidated landing report option reduces duplicate data entry, however if you are only
doing a landing report with IFQ species (sablefish, for example) simply starting from scratch with a groundfish
landing report can sometimes be easier.
Creating a Catcher-Processor IFQ Report using the 'Consolidated Report' Option
Creating a Catcher-Processor IFQ Report using the 'Groundfish Landing Report' Option
Creating a Catcher-Processor IFQ Report using the 'Consolidated Report'
Option
Please note that the consolidated report option should only be used by catcher processors, not motherships. Make
sure you've reported IFQ as management program in your production reports where you've fished for IFQ sablefish
so that the consolidated report contains the correct management program.
If you're choosing to use the Consolidated Report feature for halibut, please make sure you've documented all your
halibut products on your production reports before using this option. If you have not reported your halibut products
on your production reports, please use the Groundfish Landing Report option instead of the Consolidated Report
option. The Consolidated Report option assumes that your production reports document all your IFQ catch.
To create a consolidated report, go to File...New and choose Consolidated as Type of Report. Click OK.
Type in a date range and click on OK.
48
Enter the fishing crew size and number of observers onboard. Highlight the first row of management programs listed
and click on the Enter CFEC Permit button.
Enter your permit information and click OK.
Click on OK to generate a consolidated report.
49
Make sure the Vessel/Location/Status tab contains the correct vessel and date information, including your
Registered Buyer number. Click on the Permits & Pounds tab. Verify that the date fishing began is the first day that
you processed fish for that date range and the date of landing is the last day that you processed fish for that date
range. Enter the number of days fished for that date range.
Highlight your permit and click Open, or double-click in any field in the permit row.
50
Enter your NMFS ID, IFQ permit, and species code. Click OK.
Review your line items for accuracy. If you need to edit any line items, double-click on any field in that row or
highlight that row and click Open.
Please note that any change you make to line items does not make that same change on your production reports! If
you make changes to line items in your consolidated report, you need to make the same changes to your production
reports.
Lastly, make sure all the catch you expect to appear for this date range is included in your itemized catch section.
51
After you review your line items, click on the IFQ Reports tab.
To generate your IFQ reports, click on the Generate IFQ Reports button.
Only primary products will appear on the IFQ report.
IFQ report generation and submission is required for all IFQ products and IFQ/CDQ halibut.
The program may take a few moments to generate your IFQ report.
You can highlight any field in the IFQ report row and make sure that only primary products are included.
You can click on the IFQ Review button to view your IFQ report but the report must be saved before you are
allowed to preview it.
Go to File...Save. Now you should be able to click on the IFQ Review button to see your IFQ report.
52
Make sure you click on the check mark icon or go to File...Check to see if there are any errors in your report before
you transmit it.
Transmit your report by going to Reporting....Transmit Reports.
Click on the Transmit Reports button.
Attach the transmission file located in C:\program files\seaLandings\transmissions to an email addressed to el
[email protected] and send.
Wait 3-5 minutes for your receipt. Save the receipt in C:\ProgramData\seaLandings\transmissions.
Open the seaLandings program and process your receipt by going to Reporting....Process Return Receipts.
You may also create landing reports (which generate fish tickets) from scratch by choosing Groundfish Landing
Report rather than Consolidated.
Remember, the Consolidated report option uses production report data to populate your consolidated report,
whereas the Groundfish Landing Report option creates a landing report from scratch.
Printing your Fish Ticket & Landing Receipt
After you process your receipt, you'll need to print your fish ticket and landing receipt.
Open your report and go tot he Permits & Pounds tab, highlight the CFEC permit you want to get the
fish ticket for.
Once a permit row is highlighted, the Fish Ticket button will be selectable.
A window will open prompting you to save the ticket. Click Save.
The fish ticket will be generated as an Adobe PDF. Print the fish ticket.
Print your landing receipt by going to the IFQ Reports tab.
On the lower right hand side you will see the button called Print Receipt.
Click on it and then print.
Your return receipt will notify you if you have red-lined. If that happens it is likely due to a discrepancy with your
PNOL.
If this happens contact NMFS Enforcement Data Clerks at 1-800-304-4846, option #1.
Checking your IFQ report for errors after you process receipts is an important part of the transmission process.
Creating a Catcher-Processor IFQ Report using the 'Groundfish Landing
Report' Option
If you do not wish to use the Consolidated Report option to report your IFQ catch, you could use the Groundfish
Landing Report.
For example, if your offload weight differed substantially from production report weights and you find you have to
spend a lot of time editing your consolidated report.
Go to File...New and choose Groundfish Landing Report as type of report. Click OK.
53
Vessel/Location/Status Information
Enter your Gear type, Crew size, Observers, and Fishing Dates
Make sure the Registered Buyer Number field is filled out if you are reporting IFQ catch.
If the Registered Buyer Number field is blank, contact NMFS staff immediately ([email protected])
so she can plug that permit into your operation.
You will not be able to create an IFQ report without a Registered Buyer Number.
If you are a Floating Catcher Processor, make sure your port code is FCP.
Do not change your port code to the physical location you are offloading at.
Permits & Pounds
Click on the New button on the Permits & Pounds tab in the Permits section to enter your first CFEC permit
54
card.
Enter the permits listed on the CFEC card.
Select a management program (IFQ for halibut/sablefish; does not require an ID).
If you are landing IFQ catch, please enter an individual's NMFS ID and IFQ Permit number, plus the species
code (710 for sablefish; 200 for halibut).
Please leave the Area and Max out pounds fields blank unless you have more than one IFQ permit and you
want to allocate specific pound to one or the other.
You can enter more than one IFQ permit for that CFEC card holder by starting a new row underneath the IFQ
Permit field.
Itemized Catch
Click on the New button underneath the Itemized Catch section.
55
Select your Fish Ticket Number and enter your first line of itemized catch.
If you choose to use the Stat Area Worksheet (upper right hand corner of the Permits & Pounds tab), leave
the Stat Area fields blank in the Itemized Catch section.
Weight is recorded in pounds, as the processed weight of the fish as it is delivered.
Disposition code 60 is to be used for sold weight.
Weight modifier is selected only if you've weighed the IFQ catch with ice and slime.
Estimated weights are only allowed on non-IFQ species and must be changed to non-estimated weights
within 72 hours.
Click OK.
56
Click on the New button so you can add your second line of itemized catch.
Enter your second line of itemized catch.
Please make sure to enter all your discards as separate itemized catch lines.
Discarded prohibited species must be reported as number of animals.
Click OK.
Notice you have the option of selecting "Estimated" or "With Ice/Slime" in the Weight Modifier field.
The "Estimated" option may be selected for 72 hours for non-IFQ species and product code combinations if
you are not sure of the exact weight or if you are not sure of the species.
However, you must remove the weight modifier and resubmit the report within 72 hours.
57
You may not select "Estimated" for any primary IFQ species products because that will prevent you from
generating IFQ reports for that catch.
IFQ reports are required for IFQ sablefish and IFQ/CDQ halibut.
"With Ice/Slime" option allows you to report the weight of halibut or sablefish with ice and slime.
"With Ice/Slime" option is not allowable for non-IFQ species and product code combinations.
Enter your stat areas in your stat area worksheet (if you did not enter them in the Itemized Catch section) and
percentages of harvest in each State stat area.
Click on the IFQ Reports tab if you're reporting IFQ catch (halibut, sablefish).
Click on the Generate IFQ Reports button, which will create an IFQ report.
58
Once you have completed entering your permit information and itemized catch, save your report and check for any
errors.
If you don't get any errors you can close out your report and transmit it.
Save your return receipt and process it.
Now you can print out your landing receipt and fish ticket
To print out your fish ticket, go to the Permits & Pounds tab, highlight the CFEC permit you want to print the
fish ticket for.
Click on the Fish Ticket button.
You'll need to save your report before fish ticket is brought up.
Please note that you will be unable to generate IFQ reports if you have assigned an "estimated" weight to any
primary IFQ products.
You can assign "estimated" weights to products by selecting "estimated" in the Weight Modifier field in the Itemized
Catch section on your Permits and Pounds tab.
Only primary products will appear on the IFQ report, not ancillary IFQ products.
In addition, ambiguous primary products (such as 97, 32) will also not appear on IFQ reports.
NOTE: If you must edit any itemized catch lines after you've generated IFQ reports, you should delete your IFQ
reports, then make edits to your Itemized Catch section, and regenerate IFQ reports.
If you've already submitted your IFQ reports and find they need to be edited, you must call the Data Clerks (1800-304-4846, option #1) to make the change.
After you call the Data Clerks, then edit your Itemized Catch section so your line items match the manual
changes made by the Data Clerks.
You cannot edit IFQ reports after they have been submitted to NMFS, except by calling the Data Clerks to do
59
so.
After you process your receipts for your IFQ reports, please open that landing report and go to the IFQ
Reports tab to make sure you haven't "red-lined" on your IFQ reports.
If you have a message on that IFQ Reports tab that states "Contact NMFS Enf", there is a problem with your
IFQ report(s) and you should call the Enforcement Data Clerks at 1-800-304-4846, option #1.
Checking your IFQ reports for errors after you process receipts is part of the transmission process.
Mothership Landing Reports
As of January 2009, motherships are required to submit a landing report.
And subsequently, the 'fish ticket' that is created in the landings report for each catcher vessel delivery as stated at h
ttp://alaskafisheries.noaa.gov/regs/679a5.pdf.
Catcher processors can use the consolidated landing report option, but motherships must create a groundfish
landing report using the method described below.
To create a groundfish landing report, choose Groundfish Landing as Type of Report.
Enter header information for your groundfish landing report on the Vessel/Location/Status tab.
60
ADF&G No.
This is the five digit number permanently assigned by the Commercial Fishery Entry Commission (CFEC).
For motherships, enter the ADF&G number for the catcher vessel that delivers the catch to your vessel.
Gear
This is the two digit numeric code used to identify the gear used to harvest the catch.
Gear codes can be viewed by clicking on the Gear Codes link on the tool bar in your seaLandings program.
For motherships, enter the gear type for the catcher vessel that delivers the catch to your vessel.
Crew Size
The number of licensed fishing crew on board the vessel, including skipper.
For motherships, enter the crew size of the catcher vessel that delivers the catch to your vessel.
Partial Delivery
Not applicable for motherships; leave unchecked.
Observers Onboard
The number can range from zero 0 to 5, and references the number of state of Alaska certified crab or NMFS
certified groundfish observers on board the vessel for that fishing trip.
For motherships, enter the number of observers on-board the catcher vessel that delivers the catch to your
vessel.
Discard Report
Choose Not Received for motherships.
61
Tender ADF&G#
The five digit number permanently assigned by CFEC for the tender vessel involved in this landing.
Leave blank if not applicable.
Date Fishing Began
The date when gear was deployed in the water to begin fishing (MMDDYYYY).
Date of Landing
The date when the landing was completed.
Days Fished
The number of days when the gear was used to fish.
This number does not include traveling to and from the fishing grounds, or weather delays (MMDDYYYY).
Port of Landing
Mark FLD if your vessel is a mothership.
Processor Code (Owner)
The owner of the product that has just been purchased - the purchaser.
This value is auto-filled based on information entered during your User Agreement registration.
Processor Code (Custom Processor)*
Applicable only if the product is being received or processed by a third party - not the purchaser.
Leave blank if not applicable.
When you are finished entering vessel and location information, click on the Permits & Pounds tab.
62
The CFEC permit must be valid for that calendar year and valid for that fishery (species, gear, management area).
Anyone fishing and selling product under a CDQ allocation requires a separate CFEC permit.
To enter permit information, click on the New button in the Permits section of the report.
63
A Permits dialog box will open where you enter CFEC permit information in the various fields, as displayed by the
illustration below of the CFEC card.
The CFEC permit card contains the name of the individual, the specific fishery, the Permit, e.g. K91T12345Z, and a
Permit Sequence, e.g. 0501H.
Fishery: In this example would be K91TC. Since the permit is valid for a CDQ fishery, the CFEC fishery
contains an extra letter. Another example is K91TA. Each CDQ group CFEC permit contains this extra letter
that corresponds to each group A through F.
Permit: five digits that follow the CFEC fishery. In the above example the permit number is 30401S.
Year Sequence: to the right of the CFEC permit number. The permit sequence provides information on the
valid year of the permit, the sequence of issue of the permit, followed by a letter, e.g.,0401M. This Permit
Sequence example indicates that the permit is valid for 2004 - the "04" and the sequence indicates that this is
the first permit issued for this permit holder - 01. The M assists in creating a unique permit. If the permit card
was lost and a second card issued, the sequence would be 02.
Management Program: The management programs are selectable from the drop-down arrow to the right of
the management program field. Provide an ID for CDQ, RPP, and AFA programs only.
Statistical Area Worksheet
Record the six-digit ADF&G statistical area denoting the area where the catch was hauled with the percent of catch
that occurred in this stat area. Click on the New button on the Statistical Area section of your report.
64
Enter a six-digit statistical area and a percent of the catch that was hauled from that area.
If you wish to delete a row entered, click on any field in that row and click on the Remove button.
Entering Itemized Catch
To enter itemized catch for the permit you entered, click on the New button in the Itemized Catch section.
An Itemized Catch dialog box will appear. Select a fish ticket from the drop-down box, then enter the following
65
codes:
Stat Area: enter only if the Stat Area Worksheet is not used, or if this portion of the catch was harvested in a
unique or non-proportional area(s).
Species: three digit code
Condition: delivery condition of fish; how the fish were delivered to you
Weight: in pounds. Record the landed or scale weight of the catch, the weight of the catch and the delivery
condition of the fish at the point the catch is weighed. Do not calculate the itemized catch to round
pounds! Record the poundage of the catch and the corresponding delivery condition at the point that it is
weighed.
Weight Modifier: Leave blank or choose with ice and slime or estimated. You may record "with ice and slime"
for IFQ halibut and sablefish (including state managed sablefish programs) if the vessel qualifies for this
modification in weight. If "With Ice/Slime" is selected, a two (2) percent reduction in the recorded scale weight
is automatically recorded.
Number: required for crab and prohibited species discarded at sea with no scales to weigh product.
Disposition: the intended use or disposal of the product.
You may also enter grading and pricing information in the table underneath these required fields, as shown below.
Grading and pricing information is not required and you may leave the table blank. Click OK when you are finished.
Enter the products and discards that the vessel landed to you.
Highlight one line of the Itemized Catch screen. Notice that the New button near the Size/Grade section is no longer
greyed out. Click on the New button.
Printing your Fish Ticket
To print your fish ticket, highlight any field in the CFEC permit section on the Permits & Pounds tab. With that row
highlighted, click on the Fish Ticket button. A window will open prompting you to save the ticket. Click Save. The fish
ticket will appear in a new window. Print the fish ticket.
66
Generating Report Summary
You may click on the Summary tab to view a summary of the data you entered.
Then go to Reporting....Transmit Reports to transmit that report. Please email the transmission file to elecrep@noaa
.gov. Remember, transmission files start with the word 'transmit' and are saved in the directory C:\program
files\seaLandings\transmissions.
Don't forget to process your return receipt!
Crab Landing Reports
To create a crab landing report, go to File...New and choose Crab Landing Report as Type of Report.
67
Enter header information for your crab landing report on the Vessel/Location/Status tab.
ADF&G No.
This is the five digit number permanently assigned by the Commercial Fishery Entry Commission (CFEC).
Gear
This is the two digit numeric code used to identify the gear used to harvest the catch.
Gear codes can be found in the seaLandings program tool bar by clicking on the Gear Codes link.
Crew Size
The number of licensed fishing crew on board the vessel, including skipper.
68
Partial Delivery
Partial delivery of a trip; not all the catch was delivered and reported in this landing.
Last Delivery
Last delivery of a trip.
The Partial Delivery or the Last Delivery box should be check-marked for rationalized crab fisheries.
Delivery Port or Region
Operations that have an IFP port code (stationary floating processors) are able to report where they delivered
their crab catch.
Observers Onboard
The number can range from zero 0 to 5, and references the number of state of Alaska certified crab or NMFS
certified groundfish observers on board the vessel for that fishing trip.
Date Fishing Began
Date when the gear was deployed in the water to begin fishing (MMDDYYYY).
Date of Landing
Date when the landing was completed.
Days Fished
Dates when the gear was in the water for fishing.
This number does not include traveling to and from the fishing grounds, or weather delays (MMDDYYYY).
Processor Code (Owner)
The owner of the product that has just been purchased - the purchaser. This value is auto-filled from data
entered during your User Agreement registration.
Processor Code (Custom Processor)
Applicable only if the product is being received or processed by a third party - not the purchaser.
Leave blank if not applicable.
Registered Crab Receiver
Automatically filled in.
Federal Processor Number
Automatically filled in.
Port of Landing
Please mark FLD if your vessel is a mothership, FCP for catcher processors, or IFP for stationary floating
processors.
When you are finished entering vessel and location information, click on the Permits & Pounds tab.
Click on the New button in the Permits section.
69
Enter your CFEC permit information.
The CFEC permit card contains the name of the individual, the specific fishery, the Permit, e.g. K91T12345Z, and a
Permit Sequence, e.g. 0501H.
Fishery: In this example would be K91TC. Since the permit is valid for a CDQ fishery, the CFEC fishery
contains an extra letter. Another example is K91TA. Each CDQ group CFEC permit contains this extra letter
that corresponds to each group A through F.
Permit: five digits that follow the CFEC fishery. In the above example the permit number is 30401S.
Year Sequence: to the right of the CFEC permit number. The permit sequence provides information on the
valid year of the permit, the sequence of issue of the permit, followed by a letter, e.g.,0401M. This Permit
Sequence example indicates that the permit is valid for 2004 - the "04" and the sequence indicates that this is
the first permit issued for this permit holder - 01. The M assists in creating a unique permit. If the permit card
was lost and a second card issued, the sequence would be 02.
Management Program: the management programs are selectable from the down arrow to the right of the
management program field.
70
Management Program
Description
IFQ
Rationalized Tanner and King Crab of the Bering Sea
and Aleutian Islands
CDQ
Community Development Quota Crab program of the
Bering Sea and Aleutian Islands
LE
Limited Entry (CFEC) crab
OA
Open Access (State or Federal)
CPF
Commissioner's Permit Fishery
RES
Research
TEST
Cost Recovery Test Fishery (State)
ADAK
Adak Crab Fishery
ID:Provide an ID for the CDQ management program only.
Percent: Allocation of catch by percentage among the CFEC Permit Holders is an optional function. If the
landing consists of only one CFEC Permit Holder, put 100n will be 100% to the one CFEC Permit Holder. If
the landing consists of more than one CFEC Permit Holder, and each permit holder want an equal allocation
among the holders, leave the Percent field blank. If the landing consists of more than one CFEC Permit
Holder, and each permit holder wants a specific percent of the total catch, live/sold and deadloss, to be
allocated to specific percentages, list the percentages as whole numbers.
NMFS ID: Each individual CFEC permit holder identified in the landing report must have a corresponding
NMFS ID. All Hired Masters must have a NMFS ID. This permit number identifies an individual, not a
cooperative or a CDQ group. Enter the NMFS ID for each individual fishing and selling product. If the CFEC
permit holder/IFQ shareholder or cooperative Hired Master representative does not have a NMFS ID, contact
NMFS - RAM Division immediately, M-F business hours, or the IFQ Data Clerks after hours, for instruction on
how to complete the landing report.
IFQ Permit: An unlimited number of IFQ permits and the species associated with the IFQ permit(s) can be
entered for each corresponding NMFS ID. If no IFQ permits were used to collect your catch, leave this field
blank.
Species: Enter the three-digit species code that is associated with the IFQ permit.
IPQ Permit: Individual processing quota which puts a cap on the allowed A-shares a company may receive. If
you are a catcher processor fishing C or U shares, then leave IPQ blank.
Lbs. to Max-Out Permit: max our (zero out) either the IFQ account for the corresponding species entered
using this field. As quota share permit balances for the IFQ shareholder move close to exhaustion, the Lbs. to
Max-Out Permit feature can be a helpful tool to zero out the permit account. The permit holder should check
the balance on the specific permit prior to using this feature, as it will zero out the account balance within one
pound. This feature may be used only when more than one IFQ permit is associated with the landing report.
The IFQ permit may be for the same CFEC/NMFS ID individual or for more than one CFEC/NMFS ID
persons. To max out an IFQ account, enter all the CFEC and IFQ Permit Worksheet information. Select the
permit that you want to max out and enter the poundage that will zero out that account. The poundage
recorded in this field will be debited from the identified IFQ account, proportionally from the live/sold and the
deadloss recorded for the entire off-load.
Below is an example of permit information entered for IFQ crab catch.
Entering Statistical Areas
Put your cursor in the Stat Area field and enter a 6-digit statistical area, the percent of catch that was hauled in this
71
area, and the number of pot lifts that were done in this area. If you wish to remove any of the areas you entered,
highlight any field in that row and click on the Remove button.
Entering Itemized Catch
In the Itemized Catch section, click on the New button to start entering itemized catch.
Enter your catch in the Itemized Catch dialog box that opens.
72
Enter the following codes:
Species
Condition (Delivery Condition)
Pounds - enter the raw pounds of crab
Number - number of animals caught; a required field. The program calculates an average weight for each
species and will give an error message if the number of animals is unreasonable.
Pot Lifts - if you used the statistical area worksheet, leave this field blank.
Disposition - the intended use or disposal of the product; if you are a catcher processor, enter sold for human
consumption (60) or deadloss (79).
Statistical Area - if you used the statistical area worksheet, leave this field blank.
Grading and pricing is optional. Click OK when you are finished.
When you are done entering your itemized catch, click on the IFQ Reports tab.
73
Generate IFQ Reports
Click on the Generate IFQ Reports button on the IFQ Reports tab.
Your IFQ reports are now visible.
If you wish to preview your IFQ reports, click on the IFQ Review button. You first will need to save your report and
74
correct any errors.
You can delete your IFQ reports by clicking on the Clear IFQ Reports button. There are a few scenarios when you
might need to remove an unsubmitted IFQ Report:
If you generated the IFQ report, but then ended up doing a manual landing via the Data Clerks.
In this case, you should not transmit your landing report until you delete the unsubmitted IFQ repots.
You need to edit the itemized catch or stat area worksheet on your landing report.
In this case you need to clear the IFQ report, make your edits, and then re-generate the IFQ report for
the second time.
Viewing Your Report
You can view a summary of your landing report by clicking on the Summary tab.
Then go to Reporting....Transmit Reports to transmit that report. Please email the transmission file to
[email protected]. Remember, transmission files start with the word 'transmit' and are saved in the directory
C:\program files\seaLandings\transmissions.
After you process your receipt, you can view your fish ticket by clicking on the Permits & Pounds tab, highlighting a
permit, and clicking on the Fish Ticket button.
75
After you click on the Fish Ticket button, you will be directed to save the fish ticket in C:\Program
Files\seaLandings\pdf. After you save the file, the saved fish ticket will open in a new window for you to review and
print.
Transmitting a Report in seaLandings
File Transmission or Direct Transmission
File Transmission
Save your report by going to File....Save or by clicking on the Save icon |
|
Close the report by going to File....Close or by clicking the red x located in the upper right-hand corner of
the report window.
Go to Reporting...Transmit Reports. The Transmit Reports dialog box will open.
Check to be sure that the report you want to transmit has a green check mark in the "Transmit?" column.
Click on the Transmit button at the bottom of the dialog box.
A Transmit Reports dialog box will open, click OK.
76
NOTE: If no reports are checked, only a user authentication file will be created. If you get a receipt that has a user
file but no reports attached in the zip file, it's because you forgot to check the Transmit box on that report. You will
need to go back into seaLandings and check the box for the report you want to transmit and go through the process
again.
Transmitting Reports
When you click on the Transmit button, if you configured the software to transmit via File, your transmission
file will be saved in C:\Program Files\seaLandings\transmissions.
The name of the transmission file reflects the date and time it was created, in the following format: transmit_
YearMonthDay_HoursMinutesSeconds.zip.
A file named transmit_20081031_100848.zip tells you the file was created on October 31, 2008 at 10:08:48.
Please be sure you attach the correct transmission file to your email, otherwise NMFS will not receive the
data you intended to send, and you will have gaps in daily production in the database.
1. Open your email program.
2. Create an email addressed to [email protected] and attach the .zip file that you just created.
No subject text is required on the email.
3. Send the email to [email protected].
Direct Transmission
4. Save your report by going to File....Save or by clicking on the Save icon |
|
5. Close the report by going to File....Close or by clicking the red x located in the upper right-hand corner of
the report window.
6. Go to Reporting...Transmit Reports. The Transmit Reports dialog box will open.
7. Check to be sure that the report you want to transmit has a green check mark in the "Transmit?" column.
8. Click on the Transmit button at the bottom of the dialog box.
77
A dialog box will pop up telling you that your reports were submitted to the server.
Once you click Ok, the Transmit Reports window will close.
When you open the Transmit Reports window again you will see the State of your reports as Receipt
Received.
Your transmission files will still be written to your seaLandings program files in the event you run into an issue
and need to use the email transmission method. Otherwise, if you use the direct transmit method you will no
longer have to process receipts.
78
NOTE: You may send multiple reports at once. The "Transmit?" check box needs to be checked for all the reports
you want to transmit.
A check mark will automatically appear next to reports that have not been transmitted at all. A check mark will not
automatically appear next to reports that have already been transmitted if changes have not been made. A single
transmission .zip file can be created that contains multiple reports.
Processing Return Receipts
Processing your Return Receipt
1. Generally, you should receive a return receipt within 5 minutes after emailing your transmission file. However, it
may take hours to receive receipts if the mail processor is not working efficiently. If you still have not received a
receipt by the end of the day, please contact NMFS staff.
2. After 5-10 minutes have passed, you should have received an email with an attachment, subject eLandings
Report Return Receipt.
Right click the attachment, it should look something like e76480_transmit_20120515_100848_reply.zip
Select Save Link As and navigate to the C:\ProgramData\seaLandings\transmissions directory
3. Open seaLandings and log in.
4. Select Reporting...Process Return Receipt.
5. A dialog box will open to your transmission folder.
6. Highlight the zip file you just saved and select Open. Select Process File...Click Done.
Alternative Method for Saving and Processing Return Receipt
79
If you find it too difficult to navigate to C:\ProgramData\seaLandings\transmissions, you can always save the
attachment to your desktop.
Open seaLandings, go to Reporting...Process Return Receipt...
When the window pops up, right click on the attachment on your desktop and click Copy
Then put your cursor in the window, right click, and select Paste
Highlight the file and it will appear in the File Name filed, click Open and then the Processing Return Receipt
dialog box in seaLandings will open
Click Process Return Receipt
Making edits to a production report
1. You must process return receipts before you make any changes to your reports.
2. If changes need to be made to your report after you've already transmitted them to [email protected], process
your return receipt first.
Once that step has occurred, reopen your report and make your needed changes.
Save the changes and follow the same steps as you did before. Create another email and attach the second
file to [email protected].
If you try to process the same receipt more than once, seaLandings will give you an error message that
states that "This receipt has already been processed..."
If you have any questions about your data, email elandings@alaska or [email protected] instead of
[email protected].
Elecrep email is not monitored by staff for non-eLandings files.
Questions? Contact [email protected] or direct after-hours to the Data Clerks at 1-800-304-4846, option #1.
How to Get More Report Numbers
When the seaLandings application gets low on report numbers, the system will automatically detect this need and
will include more report numbers when a transmission file is sent to [email protected].
If the system is not operating at optimal levels it may not realize a user needs more report numbers. If the user runs
out of report numbers and does not receive more report numbers after they process their return receipt, please
contact NMFS staff [email protected] and we can manually generate a receipt that contains more report
numbers for you.
Archiving Reports in seaLandings
How to Archive your Reports in seaLandings
Archiving reports means that those reports will no longer be viewable when you choose File...Open or
Reporting...Transmit Reports.
The reports do not disappear forever, they are moved to the c:\program files\seaLandings\archive folder. This
feature allows the user to clean up the reports view and/or shorten their list of visible reports.
To archive your production and/or landing reports:
1.
80
1. Go to Reporting....Archive Reports
A window will open asking you to enter a report archive date.
Enter date in MM/DD/YYYY format. All reports created and modified before the date you entered will
be moved to c:\program files\seaLandings\archive
If you archived a report accidentally, you can move that report back into your seaLandings view by:
1. Go to c:\program files\seaLandings\archive (either through Windows Explorer or My Computer, Program
Files, seaLandings)
2. Open the archive folder.
Highlight the reports you want to see in the seaLandings application, right click, and select Cut.
Now open the Reports folder, right click, and select Paste.
3. You should now be able to view your previously archived reports in the seaLandings application by going to
File...Open.
seaLandings Frequently Asked Questions
Why haven't I received a return receipt yet?
Sometimes our server goes down momentarily and receipts are not immediately sent out. If you haven't received a
receipt by the end of the day and you've attempted one re-send of your transmission file, please contact NMFS staff
[email protected] or 907-586-7462; [email protected] or 907-586-7512 and notify them that receipts are not
being sent. Our programmers monitor the mail processor regularly.
What does it mean when my receipt says the report I submitted is already in the database as a submitted
report?
If a user submits a single report more than once, the receipt will notify users that the report is already in the
database as a submitted report. No further action is needed on the user's end; this message is only meant to notify
the user that the report has already been submitted in case they meant to send a different report. In the latest
version, this error message will not occur to reduce confusion among the fleet.
How do I know if my seaLandings version is the most current?
If you open your seaLandings program and go to Help...About - it should show Release 4.40 Build 6000
How do I delete duplicate reports?
81
Please email [email protected] if you've transmitted the same data in more than one report. If you've already
contacted Suja and told her about the duplicate report, you should delete that report from C:\program
files\sealandings\reports. In the reports folder, right-click on the duplicate report and delete it. That report will no
longer be visible when you navigate to File...Open in seaLandings.
NOTE: Deleting reports on your end does not delete it on NMFS' end. It takes a NMFS staff member to back the
data out of the eLandings database.
Which management program should I use?
Management program is a required field when reporting daily reports. A list of programs with explanations of when
they should be listed can be found below.
AFA: Any AFA vessel that targets pollock and uses pelagic trawl gear in the Bering Sea should mark AFA as the
management program. Management program ID is required for AFA vessels: list 200 for CPs and 300 for
motherships.
A80: Vessels that participate in the Amendment 80 limited access or Amendment 80 cooperative fisheries should
select A80 as management program.
1. A mothership that processes fish from an Amendment 80 limited access vessel or an Amendment 80 coop
should also select A80 as management program.
2. A mothership that processes fish from an open-access or BSAI limited access vessel should select OA as
management program.
3. A mothership that processes fish from a CDQ vessel should select CDQ as management program.
4. If an Amendment 80 vessel is fishing their Sideboards in the Gulf of Alaska, they should select OA as the
management program.
5. An Amendment 80 vessel should also select A80 as their management program whenever their bycatch
comes off an Amendment 80 quota.
CDQ: Vessels fishing CDQ quotas should always select CDQ as the management program. A Management
Program ID is also a required entry as each CDQ program has a different ID number.
CDQ GROUP
PROGRAM ID
APICDA
51
BBEDC
52
CBSFA
53
CVRF
54
NSEDC
55
YDFDA
56
OA: When a vessel is fishing open access or in the parallel fishery, even if they are in state waters while
participating in parallel fisheries. Parallel fishing is inside 3 miles under a Federal opening. A mothership that
processes fish from an open-access vessel should mark OA.
RPP: Vessels that fish off a Rockfish Pilot Program quota should select RPP as management program.
NOTE: If they are fishing outside of areas 620 & 630 they should select OA as the management program.
82
When their catch is not coming off a Rockfish Program quota, i.e. fishing their Sideboards, they should select OA or
another applicable management program.
SMPC: If a vessel fishes for cod in state waters, the crew should choose SMPC as management program. One
exception is when their catch is coming off their CDQ quota, in which case they should mark CDQ as management
program. SMPC should not be marked when a vessel is participating in the parallel fishery, even if that vessel is in
state waters. SMPC should only be marked when Federal fisheries are closed. One example is when a vessel is
fishing for state cod in the Aleutian Islands or Gulf of Alaska.
Note: You should also report AISWW as Special Area when your vessel is fishing in the Aleutian Islands state
waters for cod when the Federal fisheries are closed. AISWW should not be marked when fishing in parallel waters.
How do I edit existing reports?
A user can edit any report after all receipts have been processed for that report provided no more than 90 days have
passed since the report was submitted.
You will receive an error message if you attempt to edit a report whose receipt has not yet been processed.
1.
2.
3.
4.
Go to File...Open and choose the report you wish to edit.
Make and save corrections.
Transmit the report to [email protected] so our database gets updated with your changes.
If you need to edit a report that is older than 90 days, contact Suja Hall at 907-586-7462 or [email protected]
ov and she will unlock the report for you.
Does submitting a report more than once duplicate data in NMFS' database?
No. When you submit a single report more than once, the new version overwrites the old version in NMFS'
database. The only way that data becomes double-counted in NMFS' database is when users enter the same data
in different reports and transmit both reports to NMFS.
Why can't I enter dusky rockfish in my production reports anymore?
Dusky rockfish codes changed effective January 1, 2008. Species code 154 is no longer valid, the latest version of
eLandings will not allow the use of species 154.
Dusky rockfish has been broken down into two separate species:
Species code 172: Dusky rockfish (formerly light dusky rockfish)
Species code 173: Dark rockfish (formerly dusky rockfish)
If your program still allows you to enter species code 154, you are working with an outdated version of the
seaLandings program and should contact [email protected] or call her at 907-586-7462 so she can get the most
current version sent to you.
What are my logbook requirements?
If crews are submitting daily production reports, they are no longer required to complete the bottom section of their
logbook which includes products, discards, and cumulative catch. Enforcement and Coast Guard staff are in
agreement with this waiver and they are training new staff on this policy in their Fish Schools. The top tow section of
logbooks should still be filled out. Please write eLandings in the bottom section of your logbook if you chose to
discontinue filling out the product and discard section. You may still enter products and discards if you choose.
How do I get more report numbers?
When the seaLandings program is low on report numbers, the user receives more report numbers when they send a
transmission file to [email protected] and process that return receipt. If the user runs out of report numbers and
does not receive more report numbers after they process their return receipt, please email [email protected] and
83
she will help them get more report numbers.
I forgot my user ID and password.
If you forget your user ID or your password you can contact [email protected] or call 907-586-7462. You can
always contact your home office who should have a copy of your registration on file.
If you've forgotten your password but have Internet access, you can go to http://elandings.alaska.gov/ and scroll to
the bottom of the page where it asks "Forget your password?" You will need to know your UserID and enter it so that
your password can be emailed to you.
How can I change my password?
To change your password on your computer workstation, first make sure you contact [email protected] (or if
comfortable you can do this as an Admin user) and ask her to change it in the Agency Desktop. Then, open the
seaLandings program but don't log in. Instead, go to Configuration....Users, click on the Reset Password button
and enter your new password. Then you can click on File...Login and enter your user name and new password.
Next you will need to go to Transmit...Reports, click on Transmit, save the file, attach it to an email addressed to el
[email protected]. Once you receive the return receipt, process it in seaLandings and your new password will be
recognized in the system.
NOTE: If you change your password on the web, you'll also need to change it on your stand-alone client. If you
change it on your workstation computer, you'll need to contact [email protected] so it can be changed on NMFS
end as well.
How do I transmit reports?
A report cannot be transmitted until it is saved. The day and time stamp are part of the file name so that users can
locate specific transmission files.
1. Then go to Reporting...Transmit Reports.
Make sure the report you wish to transmit is check-marked in the far right column.
2. Then click on the Transmit button only one time.
Then click OK and close out of the Transmit Report box.
3. Open your email client and attach the transmission file to an email addressed to [email protected].
Your transmission file is located in C:\program files\elandings\transmissions.
4. You do not have to enter anything in the Subject line.
Send your email.
Can several reports be sent at the same time?
Yes. You can send multiple reports at the same time. When you go to Reporting...Transmit Reports, make sure all
reports you wish to email are check-marked in the far right column. Then click on the Transmit button only one time.
When you attach the transmission file to an email, all reports should be contained in that single transmission file.
Longline Catcher Processor eLogbook Instructions
eLogbook
Currently, the electronic logbook (eLogbook) in seaLandings is available for trawl and longline catcher/processors
(C/Ps).
The eLogbook replaces the paper DCPL and is required for trawl C/P's in the AFA fleet or trawl C/P's that are fishing
CDQ pollock in the Bering Sea in addition to Rockfish Program participants in 2012.
Daily logbook entries are submitted to NMFS from seaLandings via email or direct transmit along with any
84
production or landing report transmissions.
Once you have installed the most current version of seaLandings and received report numbers, you can follow the
instructions below to register and make entries in your logbook.
Step One - Register your logbook
Log-in to your seaLandings program.
Click on Logbook in the toolbar and you will get a drop-down menu to select from.
Select Register New Logbook and a dialog box will pop up.
Your operation should appear in the Operation field.
Choose your weight and depth units: Pounds/Metric Tons and Fathoms/Meters.
Once you've made your selections, click Ok.
Step Two - Transmit your logbook registration
Go to Reporting...Transmit Reports... Click on the Transmit button. A zip file is created and stored in your
Transmissions folder.
Open your email program and create an email addressed to [email protected] , attach the Transmission file
and send the email (the Subject field can be left blank).
You will receive a return receipt from the elecrep email account, save the receipt attachment to: Local Disk
C:/ProgramData/sealandings/transmissions folder.
Log-in to your seaLandings program, go to Reporting...Process Return Receipt...Select the reply zip file and
85
click Ok.
The Process Receipt dialog box will open, click on the Process Return Receipt button. Once this processes
the dialog box will close.
Click on Logbook in the header again, if you have Open Current Year Logbook as an option you have
successfully registered your logbook.
How to Navigate around your logbook
Navigating and doing data entry in the eLogbook is different than data entry for production or landing reports, there
are no tabbed pages.
Instead, you will use the panel on the left side of your logbook screen to get the the sections of the logbook where
you create voyages, hauls, add catch, and make edits.
This panel is called the left-hand navigation pane.
86
The left-hand navigation pane is hierarchical which means that if there is a sign next to an item, you can click on the
sign to expand all of the items contained below the primary item.
Likewise, if there is a (-) sign next to an item and you click on it, the items below will contract.
At the highest level of the hierarchy is your logbook.
Within the logbook you have Voyages, within Voyages are days, and within days are sets.
When you click on each of these levels in the logbook you have different options:
Voyages: when you click on a Voyage there are four things that you can do:
Add or Edit voyages
Add or Edit fishing gear information
Go active / inactive
Print a logbook pages for a date range (this is useful for printing all the logbook pages, for a date range, to
give to the the observer as they disembark)
Days: when you click on a particular day in a voyage, there are three things that you can do:
Add sets
View and print your logbook page
Add comments
87
Hauls: when you click on a particular set within a day, there are two things that you can do:
Edit set deploy/retrieval information
Add or Edit catch information
Remember, whenever you need to move around in your logbook, use the left-hand navigation pane!
Making Logbook Entries
Voyage Information
The logbook wizard will take you through creating your first Voyage entry as soon as you open your 2012 logbook
You will need to enter the following information:
Operator Name
Crew Size
Start Date
Primary Observer Cruise #
Primary Observer Name
Secondary Observer Cruise #
Secondary Observer Name
Operator IFQ Permit
Halibut CDQ Permit (if applicable)
Additional IFQ Permits (if applicable)
Click Ok
Gear Code
After you click Ok on the Voyage dialog box, the Gear Code box will pop up
Enter your Gear Code and accompanying Gear Type descriptors, then click Ok
At this point you can continue to add more gear types as needed or you can add more gear at a later time
NOTE: Anytime you want to add a new gear type, use the left hand navigation pane .
Highlight the original Voyage and then click on the Enter Gear button to record a new gear type.
88
NOTE:The system will only accept double digit hook sizes, you can find common conversion in the table below.
Two Digit
One Digit
16
3
15
4
14
5
13
6
12
7
11
8
10
9
Go Active
After you click Ok on the Gear Code dialog box the Go Active box will pop up.
Enter your Go Active date (the day you begin fishing activity) and then click Ok.
Whenever you need to change your active / inactive status, use the left-hand navigation pane, click on the
Voyage first.
Now you can click on the Go Active button. Enter the date you are going into active status. Click Ok.
Editing Voyage Information
89
If you made a data entry error and need to correct it, you can edit a specific Voyage by highlighting it, and then
clicking on the Edit Voyage button.
Adding a New Voyage
If any information about your Voyage changes, then you need to create a new one.
Examples include:
changes in the number of crew members
change in vessel operator
change in Observers.
To create a new Voyage, click on your logbook in the left-hand navigation pane and then click on the New
Voyage button.
NOTE: You do not need to create a new Voyage at the point of offload and landing report submission.
Go Inactive
The left-hand navigation pane will show active days within your Voyage with green circles and inactive days with
black squares.
If you are not engaged in fishing activity or are going to offload your catch, you will want to document that by
going Inactive.
Make sure to click on the day you are going inactive so you can access the Go Inactive button and enter the
date.
Comments - Text or Coded
90
1. To enter a comment, use the left-hand navigation pane and click on the day you want to enter a comment on.
2. Click on the Comment button.
3. Enter a text comment.
4. Click Ok. If you need more room, just create another Comment on the same day.
Your Comments will appear just below the logbook entries on the PDF page.
Entering Set Information
Set Deploys
To enter set deploy information; use the left-hand navigation pane to choose the day for which you want to
enter a set.
Click on the Add Set Deploy button, and the set deploy entry dialog box will appear.
The Set Number will auto fill based on the previous haul information. You will need to manually enter the following:
Bird Avoidance Gear ¿ select from drop down menu
Gear
Target Species (add more than one of targeting multiple species)
Management Program
Management Program ID (if applicable)
Time Set - needs to be entered in military format with or without a colon. For example, 3:00 am can be
91
entered as 0300 or 03:00
Begin Latitude & Begin Longitude - seaLandings allows you to use a variety of formats to enter the Latitude
and Longitude.
Below is a table of acceptable formats where dd = degrees, mm = minutes, ss = seconds, N or S =
North or South, etc... + for plus or - for minus.
There also needs to be a single space between degrees and minutes and if you use N and W they
need to be capital letters
Begin Buoy or Bag # & End Buoy or Bag # (optional)
End Latitude & End Longitude
Begin Depth
End Depth
Number of Pots or Skates Set
Federal Reporting Area will auto fill
*Lat/Long and Management Program Tables
Latitude
Longitude
dd mm ss N
ddd mm ss W
dd mm.m N
ddd mm.m W
N dd mm ss
W ddd mm ss
+ dd mm ss
+ddd mm.m
N dd mm.m
W ddd mm.m
dd mm.m
+ddd mm.m
dd.dddd N
ddd.ddddd W
N dd.dddd
W ddd.dddd
+dd.dddd
+ddd.dddd
Management Program
Description
OA
When a vessel is fishing open access or in the parallel
fishery, even if they are in state waters while
participating in parallel fisheries.
Parallel fishing is inside 3 miles under a Federal
opening. A mothership that processes fish from an
open-access vessel should mark OA
NOTE: Only enter a management program ID if you selected CDQ as the management program; otherwise, leave
this field blank.
The values for CDQ management program IDs are listed in the table below.
92
Management Program
Management Program ID
Description
CDQ
51
Aleutian Pribilof Island Community
Development Association
CDQ
52
Bristol Bay Economic Development
Corporation
CDQ
53
Central Bering Sea Fishermen's
Association
CDQ
54
Coastal Villages Region Fund
CDQ
55
Norton Sound Economic
Development Corporation
CDQ
56
Yukon Delta Fisheries Development
Association
Set Retrieval
1. In order to enter your Set Retrieval information you will need to go to the left hand navigation pane and highlight
the set number that you want to add retrieval data to.
2. To the right you should see the Add Set Retrieval button, click on it.
3. Enter the following information:
Time Hauled
Hail Weight
Number of Skates or Pots Lost
Click Ok
Set Retrieval Across Days
93
If you retrieved your gear on a different day then when it was set, you can account for this fairly easily by entering
the retrieval date in the time hauled field.
For example, on 3/17/12 you did not pick up Set 2 until the following day, 3/18/12 at 5:00am.
Go to the left hand navigation pane and select Set 2.
Click on the Add Set Retrieval button.
The Set Retrieval dialog box will pop up and ask for the time hauled, hail weight, and number of skates or
pots lost.
In the Time Hauled field, enter:3/18 0500 (make sure there is single space in between the date and time).
Continue entering data in the remaining fields and click ok.
Now you should be able to see that the Set display information reflects that you picked up your set on a different
day.
Adding Catch Information
Once you've completed your set deploy and retrieval information you can add catch lines.
Click on the Add Catch button on the right side of the screen.
The Catch dialog box will open and you will need to add the following information:
Species Code
Weight in pounds (or metric tons using the standard conversion (2204 lbs = 1 metric ton)
Count
Disposition code (60 - sold for human consumption)
94
If you do not enter your Catch information at the same time as your set deploy and retrieval information you can get
to the Catch window by using the left-hand navigation pane.
Click on the date you want to add information to and you'll see a fish icon with Set # next to it, click on the Set
#.
Locate the Add Catch button and click on it.
Making Edits to Set Information
Once you've added set information, you may realize that you entered incorrect data (for instance your lat/long
coordinates were off).
Fortunately, sets can easily be edited before and after submission of your logbook pages.
To make set edits:
In the left-hand navigation pane locate the set entry date and expand it so you can see the actual set #s.
Click on the set # you need to edit.
The set window should pop up. Locate and click on either the Edit Set Deploy button or the Edit Set Retrieval
button.
The appropriate dialog box should pop up.
Make the necessary changes and click OK.
You'll be able to see the changes you made in the set dialog box immediately.
The PDF will display the edited items with strike-through if you have already transmitted your logbook pages.
Here is an example of an edit made to a haul deploy longitude:
95
Making Edits to Catch Entries
Edits to catch entries are fairly simple. However, similar to making set edits, you must navigate to the actual set and
catch window to make changes.
Use the left-hand navigation pane to get to the appropriate haul date, expand the selection and click on the
haul icon.
In the catch window locate the line item you want to edit and double-click on it.
Once you've made your changes in the catch dialog box, click Ok.
You'll be able to see that the changes were made in the catch window.
Below is an example of edits to catch data.
Undo of an Unsubmitted Entry
96
In the event you realize that you made inaccurate entries in voyage, set, or catch; you can simply remove the last
thing you entered, provided you have not submitted your logbook via email or direct transmission.
With your logbook open, go to your toolbar and click on Logbook.
In the drop-down you should see a selection that says Undo Last Unsubmitted Entry, click on it.
A window will pop up asking if you're sure you want to undo your particular entry.
Click Yes and your last entry will go away.
Viewing and Printing Logbook Pages
seaLandings creates a PDF of each logbook page that you need to view and print. You can either print an individual
day or a date range.
To view an individual PDF:
Use the left-hand navigation pane to select the day you wish to view. Then click on the View PDF button.
A PDF will be saved onto your computer in C:\Program Files\seaLandings\reports
Once it is saved, the PDF should automatically open for you to print.
97
If you would like to print PDFs within a specific date range go to the left hand navigation pane.
Select the Voyage that the sets fall within
Locate the box that has the View PDFs for Date Range button and enter the dates you wish to print your PDF
for.
Click on the View PDFs for Date Range button and click save when asked.
Saving and submitting the logbook
Saving your logbook
Unlike production reports and landing reports, you do not need to save your logbook.
This is because every time you click on an "Ok" button in the logbook, the program automatically saves your
work.
Submitting your logbook
To submit the logbook:
1. Go to Reporting...Transmit Reports... Click on the Transmit button and seaLandings will create a zip file for you to
send
2. Open your email program, address it to [email protected], attach the transmission file, and send.
3. Once you receive the receipt, right click on the attachment and select Save Link As in
C:/ProgramData/sealandings/transmissions
4. Open your seaLandings program, go to Reporting...Process Return Receipts and process it.
NOTE: If using the Direct transmission method you would only follow Step 1 above as the the zip file will be
transmitted and processed behind the scenes via the internet.
Trawl Catcher Processor eLogbook Instructions
eLogbook
The electronic logbook (eLogbook) in seaLandings is available for trawl catcher/processors (C/Ps).
The eLogbook replaces the paper DCPL and is required for trawl C/P's in the AFA fleet or trawl C/P's that are fishing
CDQ pollock in the Bering Sea in addition to Rockfish Program participants in 2012.
Daily logbook entries are submitted to NMFS from seaLandings via email with production or landing report
transmissions.
Registering your Logbook
Prior to requesting/registering your logbook you will need to have requested and received report numbers.
Step One - Request a logbook
Login to your seaLandings program.
98
Go to Reporting...Transmit Reports....click on Transmit.
A zip file will be created and stored in your seaLandings program.
Open your email program, address it to [email protected], attach the transmission file, and send.
You will receive a return receipt, save the zip file in your c: drive, Transmission folder.
Open your seaLandings program and go to Reports...Process Return Receipt. Click on process.
Step Two - Register your logbook
Click on Logbook in the toolbar and you will get a drop-down menu.
Select Register New Logbook and a dialog box will pop up.
Enter the year
Chose the units for weight and depth, these will apply to your logbook for the entire year
Weight unit options are Pounds or Metric tons
Depth unit options are Fathoms or Meters
Once you've made your selections, click Ok
Step Three - transmit your logbook registration
Go to Reporting...Transmit Reports... Click on transmit.
Open your email program, address it to [email protected], attach the transmission file, and send.
Once you receive the receipt, open your seaLandings program and process it.
Click on Logbook again, if you have Open Current Year Logbook as an option you have successfully
registered your logbook.
NOTE - If you are using Direct Transmit rather than File transmit you will not have any receipts to attach or process!
How to Navigate around your logbook
99
Navigating and doing data entry in the eLogbook is different than data entry for production or landing reports, there
are no tabbed pages. Instead, you will use the panel on the left side of your logbook screen to get the the sections of
the logbook where you create voyages, hauls, add catch, and make edits. This panel is called the left-hand
navigation pane.
The left-hand navigation pane is hierarchical and if there is a
see all of the contained items.
sign next to an item, you can click on the
At the highest level of the hierarchy is your logbook.
Within the logbook you have voyages.
Within voyages are days, and within days are hauls.
When you click on each of these levels in the logbook you have different options:
Voyages: when you click on a voyage there are 3 things that you can do:
Add or Edit voyages
Add your fishing gear information
Go active / inactive
Days: when you click on a particular day in a voyage, there are 3 things that you can do:
Add hauls
100
sign to
View and print your logbook page
Add comments
Hauls: when you click on a particular haul within a day, there are 2 things that you can do:
Edits hauls
Add or Edit catch information
Remember, whenever you need to move around in your logbook, use the left-hand navigation pane!
Making Logbook Entries
Voyage Information
The logbook wizard will take you through creating your first Voyage entry as soon as you open your 2012
logbook
You will need to enter the following information:
Operator Name
Crew Size
Start Date
Primary Observer Cruise #
Primary Observer Name
Secondary Observer Cruise #
Secondary Observer Name
Click Ok.
Disregard the IFQ/CDQ permit fields, these are for the freezer longline elogbook
Gear Code
After you click Ok on the Voyage dialog box, the Gear Code box will pop up
Enter your Gear Code and then click Ok
Anytime you change fishing gear, use the left hand navigation pane, click on the Enter Gear button to record
101
the gear change and each of your logbook pages will reflect the change.
Go Active
After you click Ok on the Gear Code dialog box the Go Active box will pop up.
Enter your Go Active date (the day you begin fishing activity) and then click Ok.
Whenever you need to change your active / inactive status, use the left-hand navigation pane, click on the
Voyage first.
Now you can click on the Go Active button. Enter the date you are going into active status. Click Ok.
Editing Voyage Information or Adding a New Voyage
If you made a data entry error and need to correct it, you can edit a specific Voyage.
To edit, click on your logbook in the left-hand navigation pane, select the Voyage you want to edit and then
click on the Edit Voyage button.
If anything in your Voyage changes, for example if the number of crew members changes, vessel operators
switch, or there is a change of observers, then you need to create a new Voyage.
To create a new Voyage, click on your logbook in the left-hand navigation pane and then click on the Voyage
button.
NOTE: You do not need to create a new Voyage when you offload and submit your landing report.
102
Active or Inactive?
The left-hand navigation pane will show active and inactive days within your voyage
Green circles = Active days
Black squares = Inactive days
If you are not engaged in fishing activity or are going to offload your catch, you will want to document that by
going Inactive.
Make sure to click on the day you are going inactive so you can click on the Go Inactive button and enter the
date.
Comments - Text or Coded
To enter a comment, use the left-hand navigation pane and click on the day where you want to add a
comment.
On the right side of the screen, click on the Comment button.
Enter a text Comment and then click on Ok. If you need more room, just create another Comment on the
same day.
103
If you are moving due to salmon bycatch, click on the drop down menu located in the Comment dialog box.
You should select Moved To Avoid Salmon and then enter the time of the haul deploy in which you moved.
Your Comments will appear just below the logbook entries on the PDF page.
Entering Haul Data
Haul Deploys
To enter haul deploy information, use the left-hand navigation pane to choose the day for which you need to
enter a haul.
Click on the Add Haul button, and the haul deploy dialog box will appear.
104
The Haul Number will auto fill based on the previous haul information.
You will need to manually enter the following:
Gear deploy time in military format with or without a colon. For example, 3:00 am can be entered as 0300 or
03:00, likewise 1:00 pm can be entered as 1300 or 13:00.
Target species.
Begin latitude & begin longitude.
seaLandings allows you to use a variety of formats to enter the Latitude and Longitude. Below is a list
of acceptable formats where dd for degrees, mm for minutes, ss for seconds, N for N or S (indicating
North or South) W for E or W (indicating East or West), + for plus or minus.
There needs to be a single space between degrees and minutes. And if you use N and W, they need
to be capital letters.
Latitude
Longitude
dd mm ss N
ddd mm ss W
dd mm.m N
ddd mm.m W
N dd mm ss
W ddd mm ss
+dd mm ss
+ddd mm ss
N dd mm.m
W ddd mm.m
dd mm.m
+ddd mm.m
dd.dddd N
ddd.dddd W
N dd.dddd
W ddd.dddd
+dd.dddd
+ddd.dddd
Enter the management program from the drop down list.
Below is more information about when certain management programs should be used:
105
Management Program
Description
AFA
Any AFA-listed vessel that targets pollock and uses
pelagic trawl gear in the Bering Sea should mark AFA
as the management program
A80
Vessels that participate in the Amendment 80 limited
access or Amendment 80 cooperative fisheries should
mark A80 as management program. A mothership that
process fish from an Amendment 80 limited access
vessel or an Amendment 80 coop should also mark
A80 as management program. A mothership that
processes fish from an open-access or CDQ vessel
should mark OA or CDQ, respectively. If a vessel
always fishes off an Amendment 80 quota, they should
still mark A80 even when they fish in the Gulf of Alaska.
An Amendment 80 vessel also should mark A80
whenever their bycatch comes off an Amendment 80
quota
RPP
Vessels that fish off a Rockfish Pilot Program quota
should mark RPP. When their catch is not coming off a
Rockfish Program quota, they should choose OA or
another management program. Please do not mark
RPP when fishing in the Bering Sea
SMPC
If a vessel fishes for cod in state waters, the crew
should choose SMPC as management program, One
exception is when their catch is coming off their CDQ
quota, in which case they should mark CDQ as
management program. SMPC should not be marked
when a vessel is participating in the parallel fishery,
even if that vessel is in state waters. SMPC should only
be marked when Federal fisheries are closed
OA
When a vessel is fishing open access or in the parallel
fishery, even if they are in state waters while
participating in parallel fisheries. Parallel fishing is
inside 3 miles under a Federal opening. A mothership
that processes fish from an open-access vessel should
mark OA
Only enter a management program ID if you selected AFA, CDQ, or RPP as the management program;
otherwise, leave this field blank. The values for AFA, CDQ management program IDs are listed in the table
below.
106
Management Program
Management Program ID
Description
AFA
200
AFA Catcher/processors
AFA
300
AFA Motherships
CDQ
51
Aleutian Pribilof Island Community
Development Association
CDQ
52
Bristol Bay Economic Development
Corporation
CDQ
53
Central Bering Sea Fishermen's
Association
CDQ
54
Coastal Villages Region Fund
CDQ
55
Norton Sound Economic
Development Corporation
CDQ
56
Yukon Delta Fisheries Development
Association
Haul Retrieval
In order to enter your Haul Retrieval information you will need to go to the left hand navigation pane and
select the haul number that you want to add retrieval data to.
To the right you should see the Haul Deploy information. Locate and click on the Add Haul Retrieval button.
Enter the following information:
Gear retrieval time.
End latitude & end longitude.
Federal reporting area will auto fill based on lat/long coordinates but can be overridden as needed.
Special area (COBLZ or RKCSA) will also auto fill based on lat/long coordinates.
Average sea depth.
Average gear depth.
Hail weight.
Once you have completed entering retrieval data click Ok.
Entering Hauls that Cross Days
If you deployed your haul on one day but didn't retrieve until the following day you will need to enter that information
in the following manner
Highlight the Haul number and click on the Add Haul Retrieval button
In the Gear Retrieval Time field, enter the date in mm/dd format, hit the spacebar once, and then enter the
time of the retrieval
Enter the remaining information and click Ok
107
Adding IR/IU Species & Salmon Prohibited Species Catch (PSC)
Once you've completed your haul deploy and retrieval information you can add catch lines.
Click on the Add Catch button on the right side of the screen.
The Catch dialog box will open and you will need to add the following information:
Species Code of IR/IU catch (pacific cod and pollock)
Weight in metric tons
Disposition code (60 - sold for human consumption)
You must record prohibited species catch (PSC) and discard disposition (86 for donated and 98 for discarded
at sea) of all salmon species in each haul.
Record salmon PSC in number of animals.
If you do not enter your IR/IU harvest at the same time as your haul deploy and retrieval information you can get to
the Catch window by using the
navigation pane on the right side of the logbook screen.
Click on the date you want to add information to and you'll see a fish icon with Haul # next to it, click on the
Haul #.
Locate the Add Catch button and click on it.
108
Making Edits to Haul Information
Once you've added haul information, you may realize that you entered incorrect data (for instance your lat/long
coordinates were off).
Fortunately, hauls can easily be edited before and after submission of your logbook pages.
To make haul edits:
In the left-hand navigation pane locate the haul entry date and expand it so you can see the actual hauls.
Click on the haul # you need to edit.
The haul window should pop up. Locate and click on either the Edit Haul Deploy button or the Edit Haul
Retrieval button.
The appropriate dialog box should pop up.
Make the necessary changes and click OK.
You'll be able to see the changes you made in the haul dialog box immediately.
The PDF will display the edited items as strike-throughs. Here is an example of an edit made to a haul deploy
longitude:
Making Edits to Catch entries
Edits to catch entries are fairly simple. However, similar to making haul edits, you must navigate to the actual haul
and catch window to make changes.
Use the left-hand navigation pane to get to the appropriate haul date, expand the selection and click on the
haul icon.
In the catch window locate the line item you want to edit and double-click on it.
109
Once you've made your changes in the catch dialog box, click Ok.
You'll be able to see that the changes were made in the catch window.
Below is an example of edits to catch data.
Undo of an Unsubmitted Entry
In the event you realize that you made inaccurate entries in voyage, haul, or catch; you can simply remove the last
thing you did, provided you have not submitted your logbook via email or direct transmission.
With your logbook open, go to your toolbar and click on Logbook.
In the drop-down you should see a selection that says Undo Last Unsubmitted Entry, click on it.
A window will pop up asking you if you're sure you want to undo your particular entry.
110
Click yes and your entry will go away.
Viewing and Printing Logbook pages
seaLandings creates a PDF of each logbook page that you need to view and print. You can either print an individual
day or a date range.
To view an individual PDF:
Use the left-hand navigation pane to select the day you wish to view. Then click on the View PDF button
A PDF will be saved onto your computer in C:\Program Files\seaLandings\reports
Once it is saved, the PDF should automatically open for you to print.
If you would like to print PDFs within a specific date range go to the right hand navigation pane
Select the Voyage that the hauls fall within
Locate the box that has the View PDFs for Date Range button and enter the dates you wish to print your PDF
for.
Click on the View PDFs for Date Range button and click save when asked.
111
NOTE: in some cases your PDF file will have *more than 1 page.
Use Adobe Acrobat to view all the pages in the PDF file and be sure to print all pages.
Saving and Submitting the logbook
Unlike production reports and landing reports, you do not need to save your logbook.
This is because every time you click on an "Ok" button in the logbook, the program automatically saves your
work.
Submitting your logbook
You submit your logbook file the same way that you transmit all other reports from seaLandings. Every time you
transmit production or landing reports, your logbook will automatically be submitted in the transmission.
Go to Reporting...Transmit Reports... Click on the Transmit button and seaLandings will create a zip file for
you to send
Open your email program, address it to [email protected], attach the transmission file, and send.
Once you receive the receipt, save it to your C:/ProgramData/sealandings/transmissions folder.
Open your seaLandings program, go to Reporting...Process Return Receipt, and process it.
112