1
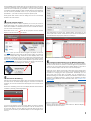
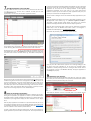
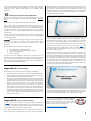
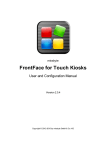
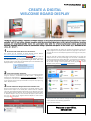
7
Add Appointments to the Calendar:
In order to allow the event source to fire events, please click on the button
. You now see a calendar in which you can add
appointments. You can add, edit or delete appointments here:
in the preview mode of the Display Assistant placeholders are not substituted
and event sources do not fire events! The scenario of running the player
application on the same PC as the Display Assistant is also regularly
supported by FrontFace, but in most cases it is not a very useful choice
because it requires you to shut down the player application every time you
update your content with the Display Assistant!
So here is how to configure and run the FrontFace Player Application on your
local PC:
Open the Windows File Explorer and create a new folder somewhere on your
PC (Right click > New > Folder), e.g. “c:\content update folder\”.
This folder is called “Content Update Folder” and serves as an interface
between the Display Assistant and the FrontFace Player Application.
Once you have created that folder, please start the application “FrontFace
Player Setup” from the Windows Start Menu (“Start > All Programs >
FrontFace for Public Displays > FrontFace Player Setup”).
Now select the previously created “Content Update Folder”:
Please click on “Add Appointment” and enter the start and end date/time
of the appointment. The subject is only for your internal reference and has no
further meaning. We recommend you fill in the name of the visitor here.
By clicking on the + button
you can now define the placeholder values for
this appointment. Select the $$NAME$$ placeholder from the list and enter
the name of the visitor in the field “Value,” e.g. “Mr. Miller”. Finally click on
OK.
Once you press OK a black screen appears with a message telling you that
no content has been published yet. At this point the FrontFace Player
Application is already running but there is nothing to show. Please click on
the ^button to return to the Windows Desktop. The player application is
now configured properly.
9
Please note that the start and end time of the appointment do reflect the time
window during which the welcome message will be shown. Thus this is not
the actual appointment time! If the actual appointment is from 3:00 pm to
4:00 pm, you could enter 2:50 pm as start time and 3:10 pm as end time.
This allows your visitor to see the welcome message, even if he/she arrives a
bit earlier or later than expected. When he/she leaves at 4:00 pm, he/she
will not see the message anymore but the “Default Playlist”.
8
Setup of the Player Application:
Publishing your Project:
Now head back to the Display Assistant and select the menu item “Player
PCs.” Here you must enter the path to the previously created Content Update
Folder for the already created “Player PC 1” as well:
Then select the “Publish” menu item and finally click on the “Publish” button:
Until now you have only used the Display Assistant to configure your project.
During normal operation your playlists are shown by the FrontFace Player
Application which is typically installed and executed on a separate PC that is
connected to your large format display (this PC is referred to as the “Player
PC”!).
How the player application is installed on a separate PC and how you set up
the connection between the PC with the Display Assistant and the Player PC
is explained in the PDF user manual for FrontFace and in the video tutorials
that are available on the FrontFace product Website.
In order to show how the welcome playlist works, we will now configure the
player application on your local PC as a sample case. This is required because
3