1
2
Contents
I Master Data
9
1 Preface
................................................................................................................................... 9
2 Master...................................................................................................................................
data
9
3 Master
...................................................................................................................................
data views
10
Toolbar functions
.......................................................................................................................................................... 12
Data input
.......................................................................................................................................................... 13
Editing view s .......................................................................................................................................................... 14
Displaying/hiding
.........................................................................................................................................................
columns
14
Sorting
......................................................................................................................................................... 16
Filtering ......................................................................................................................................................... 19
Serial change
......................................................................................................................................................... 20
Managing view
..........................................................................................................................................................
s
22
Printing
.......................................................................................................................................................... 23
Page layout......................................................................................................................................................... 23
Print selection
.........................................................................................................................................................
dialog
25
4 Master
...................................................................................................................................
data properties
26
Input fields for
..........................................................................................................................................................
all m aster data
26
Room s
.......................................................................................................................................................... 28
Classes
.......................................................................................................................................................... 30
'Class' tab ......................................................................................................................................................... 30
'Timetable' .........................................................................................................................................................
tab
32
Codes
......................................................................................................................................................... 33
Class time .........................................................................................................................................................
grid
34
Teachers
.......................................................................................................................................................... 37
'Teacher' tab
......................................................................................................................................................... 38
'Timetable' .........................................................................................................................................................
tab
40
Codes
......................................................................................................................................................... 42
Subjects
.......................................................................................................................................................... 43
'Subjects' tab
......................................................................................................................................................... 43
Codes
......................................................................................................................................................... 43
'Timetable' .........................................................................................................................................................
tab
45
Students
.......................................................................................................................................................... 46
Departm ents .......................................................................................................................................................... 47
II Lessons
48
1 Lessons
................................................................................................................................... 48
2 The lesson
...................................................................................................................................
window
49
3 Entering
...................................................................................................................................
lessons
50
Sim ple lessons
.......................................................................................................................................................... 51
Double period..........................................................................................................................................................
- block
53
Coupled lessons
.......................................................................................................................................................... 54
Coupling lessons
.......................................................................................................................................................... 56
Decoupling lessons
.......................................................................................................................................................... 57
Entering lessons
..........................................................................................................................................................
using drag&drop
58
Clipboard
.......................................................................................................................................................... 59
Contents
3
4 Lesson
...................................................................................................................................
properties
61
Tim e requests
..........................................................................................................................................................
of lessons
61
'Lessons ' tab.......................................................................................................................................................... 62
'Tim etable' tab
.......................................................................................................................................................... 64
'Codes' tab part
..........................................................................................................................................................
1
66
'Codes' tab part
..........................................................................................................................................................
2
67
'Values' and 'Coupling
..........................................................................................................................................................
line' tabs
69
All codes
.......................................................................................................................................................... 69
Locked lessons
.......................................................................................................................................................... 70
5 Toolbar
...................................................................................................................................
functions
71
6 Printing
................................................................................................................................... 73
7 Lesson
...................................................................................................................................
sequences
75
Fixed (subject)
..........................................................................................................................................................
sequence
75
Sequence in a..........................................................................................................................................................
w eek
77
Sim ultaneous..........................................................................................................................................................
lessons
77
III Optimisation
78
1 Timetable
...................................................................................................................................
optimisation
78
2 Weighting
................................................................................................................................... 78
Weighting param
..........................................................................................................................................................
eters
79
Teachers 1.........................................................................................................................................................
tab
80
Teachers 2.........................................................................................................................................................
tab
81
Classes tab
......................................................................................................................................................... 82
Subjects tab
......................................................................................................................................................... 83
Main Subjects
.........................................................................................................................................................
tab
84
Rooms tab......................................................................................................................................................... 85
Period Distribution
.........................................................................................................................................................
tab
86
Time Requests
.........................................................................................................................................................
tab
87
Analysis tab
......................................................................................................................................................... 88
General notes.......................................................................................................................................................... 89
3 Optimisation
................................................................................................................................... 90
Control data for
..........................................................................................................................................................
optim isation
90
Optimisation
.........................................................................................................................................................
process
91
Optimisation strategy
.........................................................................................................................................
(A, B, D, E)
91
Optimisation series:
.........................................................................................................................................
No. of TTs (1-20)
92
Optimisation level.........................................................................................................................................
(1-9)
92
% of periods to be
.........................................................................................................................................
scheduled
92
Similarity to previous
.........................................................................................................................................
TT
93
Lock timetable conditionally
......................................................................................................................................... 93
Only requested days
.........................................................................................................................................
off for teachers
93
Consider room capacity
......................................................................................................................................... 94
Off site buildings .........................................................................................................................................
by the half day
94
Increment percentage
......................................................................................................................................... 94
Special optimisation
.........................................................................................................................................
for double periods
94
Teacher assignment
.........................................................................................................................................................
during optimisation
94
(V) Variable teacher
......................................................................................................................................... 94
? - teacher
......................................................................................................................................... 95
Settings
......................................................................................................................................... 95
Re-assign original.........................................................................................................................................
teachers
96
Teacher optimisation
.........................................................................................................................................
code
97
Strategies
.......................................................................................................................................................... 98
3
4
Strategy A.........................................................................................................................................................
- fast optimisation
98
Strategy B.........................................................................................................................................................
- Intensive optimisation
98
Strategy D.........................................................................................................................................................
- complex %-placement
99
Strategy E.........................................................................................................................................................
- overnight optimisation
99
The accom panying
..........................................................................................................................................................
w indow
99
View ing optim
..........................................................................................................................................................
isation results
100
4 Diagnostics
...................................................................................................................................
tools
102
Percentage planning
.......................................................................................................................................................... 102
Example ......................................................................................................................................................... 102
Tim e requests
.......................................................................................................................................................... 104
Options
.......................................................................................................................................................... 105
Locked periods
.......................................................................................................................................................... 105
Weightings .......................................................................................................................................................... 106
Diagnosis .......................................................................................................................................................... 106
Selection .........................................................................................................................................................
w indow
106
Details w indow
......................................................................................................................................................... 109
Subject 1/day
.........................................................................................................................................................
impossible
111
Overall diagnosis
.......................................................................................................................................................... 112
CCC analysis.......................................................................................................................................................... 114
Information
.........................................................................................................................................................
during analysis
114
The CCC w
.........................................................................................................................................................
indow
115
Shortening
.........................................................................................................................................................
CCCs
116
List of teacher teams
......................................................................................................................................... 116
IV Manual Scheduling
116
1 Manual
...................................................................................................................................
scheduling
116
2 Scheduling
...................................................................................................................................
periods in the timetable
116
Scheduling periods
.......................................................................................................................................................... 117
Locking periods
.......................................................................................................................................................... 120
Moving periods
.......................................................................................................................................................... 121
Sw apping periods
.......................................................................................................................................................... 122
Scheduling periods
..........................................................................................................................................................
w ith clashes
125
Unscheduling
..........................................................................................................................................................
periods
128
Allocating room
..........................................................................................................................................................
s
129
Planning in the
..........................................................................................................................................................
overview tim etables
130
3 Scheduling
...................................................................................................................................
timetable
131
Scheduling periods
.......................................................................................................................................................... 133
Locking periods
.......................................................................................................................................................... 134
Sw apping periods
.......................................................................................................................................................... 135
Scheduling periods
..........................................................................................................................................................
w ith clashes
135
Deleting periods
.......................................................................................................................................................... 135
Allocating room
..........................................................................................................................................................
s
135
Undo
.......................................................................................................................................................... 138
4 The ...................................................................................................................................
scheduling dialogue
138
Allgem eines.......................................................................................................................................................... 138
The input .........................................................................................................................................................
field
139
The period
.........................................................................................................................................................
details w indow
139
Lesson search
......................................................................................................................................................... 139
Period availability
......................................................................................................................................................... 139
Time requests
......................................................................................................................................................... 140
Saving individual
.........................................................................................................................................................
settings
140
'Information'
.........................................................................................................................................................
tab
141
Contents
5
Window logic.......................................................................................................................................................... 141
Planungsfunktionen
.......................................................................................................................................................... 141
Scheduling
.........................................................................................................................................................
periods
142
Deleting periods
......................................................................................................................................................... 142
Scheduling
.........................................................................................................................................................
periods w ith clashes
142
Moving periods
.........................................................................................................................................................
w ith drag & drop
143
Undo
......................................................................................................................................................... 143
Allocating.........................................................................................................................................................
rooms
144
Displaying.........................................................................................................................................................
alternative rooms
144
Activate new
.........................................................................................................................................................
lesson
145
Locking periods
......................................................................................................................................................... 145
Optimisation
......................................................................................................................................................... 145
Assessing
.........................................................................................................................................................
the active time slot
145
Replacing.........................................................................................................................................................
teachers
146
Display functions
.......................................................................................................................................................... 147
Displaying.........................................................................................................................................................
all teachers of a class
147
Display all.........................................................................................................................................................
classes, teachers and rooms
147
Display a .........................................................................................................................................................
2nd lesson
147
Deleting row
.........................................................................................................................................................
s
147
Show lesson
.........................................................................................................................................................
colours
147
Settings ......................................................................................................................................................... 148
Displaying.........................................................................................................................................................
a particular element
148
Shortcut keys
.......................................................................................................................................................... 148
5 Swapping
...................................................................................................................................
periods
149
Suggested sw
..........................................................................................................................................................
aps
150
Consecutive..........................................................................................................................................................
sw aps
150
Chained sw aps
.......................................................................................................................................................... 152
6 Scheduling
...................................................................................................................................
half periods
154
7 Multi-timegrid
................................................................................................................................... 155
V Timetable Display
155
1 Timetable
...................................................................................................................................
display
155
2 Window
...................................................................................................................................
set-up
155
Selection w indow
.......................................................................................................................................................... 158
Tim etable w indow
.......................................................................................................................................................... 158
Period details
..........................................................................................................................................................
w indow
160
3 Timetable
...................................................................................................................................
interaction
163
4 Timetable
...................................................................................................................................
formats
167
Predefined form
..........................................................................................................................................................
ats
168
Keyw ords......................................................................................................................................................... 169
Layout details:
.........................................................................................................................................................
Layout 1
169
Format details:
.........................................................................................................................................................
Format 10
171
Format details:
.........................................................................................................................................................
Format 11
171
Format details:
.........................................................................................................................................................
Subject timetable
172
Format details:
.........................................................................................................................................................
Format 20
173
Format details:
.........................................................................................................................................................
Format 30
174
Format details:
.........................................................................................................................................................
Format 40
174
5 User-defined
...................................................................................................................................
views
175
New tim etable
..........................................................................................................................................................
view
176
Tim etable period
..........................................................................................................................................................
w indow
178
Several fields
.........................................................................................................................................................
- timetable period w indow
178
5
6
Coupled lessons
......................................................................................................................................................... 181
Layout field
......................................................................................................................................................... 184
Full name......................................................................................................................................................... 186
Lesson number
......................................................................................................................................................... 188
Special text
......................................................................................................................................................... 188
Text for the
.........................................................................................................................................................
lesson period
189
Description
......................................................................................................................................................... 190
Time requests
......................................................................................................................................................... 190
Lesson group
......................................................................................................................................................... 191
Break supervision
......................................................................................................................................................... 192
Number of.........................................................................................................................................................
students
192
Cluster (simultaneous
.........................................................................................................................................................
lessons)
192
Alias (alternative
.........................................................................................................................................................
names)
192
Start and .........................................................................................................................................................
end time
193
Standard .........................................................................................................................................................
format
194
Layout 1
.......................................................................................................................................................... 195
Layout 2
.......................................................................................................................................................... 198
Double periods
.........................................................................................................................................................
like single periods
199
Comb. class
.........................................................................................................................................................
names (2a,2b -> 2ab)
199
All classes
.........................................................................................................................................................
in one field
199
Label couplings
.........................................................................................................................................................
w ith a dot
200
Label locked
.........................................................................................................................................................
periods w ith a * mark
200
Separate .........................................................................................................................................................
periods in case of clash
201
Sorting periods
......................................................................................................................................................... 202
Cover planning
.........................................................................................................................................................
block
202
Use alias .........................................................................................................................................................
for details w indow /legend
202
DragDrop......................................................................................................................................................... 202
Changed .........................................................................................................................................................
periods
203
Auto-size.........................................................................................................................................................
for the details w indow
203
HTML index
.........................................................................................................................................................
page w ith full names
204
Show master
.........................................................................................................................................................
classes separately
204
TT display.........................................................................................................................................................
in minute mode
204
School holidays
.......................................................................................................................................................... 205
Font
.......................................................................................................................................................... 205
Colour codes.......................................................................................................................................................... 206
Colum n headings
.......................................................................................................................................................... 207
Row headings
.......................................................................................................................................................... 209
6 Printing
................................................................................................................................... 210
New print view
.......................................................................................................................................................... 210
Headings
.......................................................................................................................................................... 211
Layout
.......................................................................................................................................................... 213
Selecting tim..........................................................................................................................................................
etables
214
Details, individual
..........................................................................................................................................................
tim etables
215
Details, overview
..........................................................................................................................................................
tim etables
220
Page setup .......................................................................................................................................................... 221
Background .......................................................................................................................................................... 223
Header and footer
.......................................................................................................................................................... 224
Several classes
..........................................................................................................................................................
in one tim etable
225
Tim etables in
..........................................................................................................................................................
HTML form at
228
7 Import
...................................................................................................................................
and export of views
231
8 Using
...................................................................................................................................
the clipboard
233
VI User Tips
235
Contents
7
1 User...................................................................................................................................
tips
235
2 Settings
................................................................................................................................... 235
Tim e Grid .......................................................................................................................................................... 236
School data .......................................................................................................................................................... 236
Miscellaneous
..........................................................................................................................................................
Settings
238
The 'Auto-save'
.........................................................................................................................................................
tab
238
The 'Directories'
.........................................................................................................................................................
tab
239
The 'Timetable'
.........................................................................................................................................................
tab
239
The 'Internet'
.........................................................................................................................................................
tab
240
Licence Data.......................................................................................................................................................... 242
3 Time...................................................................................................................................
Requests
242
Specified tim..........................................................................................................................................................
e requests
242
Unspecified tim
..........................................................................................................................................................
e requests
244
Copying tim e..........................................................................................................................................................
requests
246
Deleting tim e..........................................................................................................................................................
requests
247
Core tim e .......................................................................................................................................................... 247
Colour codes.......................................................................................................................................................... 249
4 Lunch
...................................................................................................................................
breaks
249
5 Couplings
................................................................................................................................... 251
Teacher team
..........................................................................................................................................................
s
251
Class couplings
.......................................................................................................................................................... 254
6 Type-separated
...................................................................................................................................
class components
255
7 Class
...................................................................................................................................
groups
257
Defining core..........................................................................................................................................................
lessons and options
257
Illustrating the
..........................................................................................................................................................
principle
259
Display and printing
.......................................................................................................................................................... 262
8 Locking
................................................................................................................................... 264
Locking periods
.......................................................................................................................................................... 264
Locking lessons
.......................................................................................................................................................... 265
Locking m aster
..........................................................................................................................................................
data
266
Locked lessons
..........................................................................................................................................................
w indow
267
9 Room
...................................................................................................................................
logic
268
Alternative room
..........................................................................................................................................................
s
268
Alternative
.........................................................................................................................................................
room ring
268
Room allocation
.......................................................................................................................................................... 271
Room capacity
.......................................................................................................................................................... 271
Alternative
.........................................................................................................................................................
room chain
272
Room optim isation
.......................................................................................................................................................... 273
Example: .........................................................................................................................................................
step 1
274
Example: .........................................................................................................................................................
step 2
275
Example: .........................................................................................................................................................
step 3
275
Example: .........................................................................................................................................................
step 4
277
Example: .........................................................................................................................................................
step 5
278
The role of subject
..........................................................................................................................................................
room s and hom e room s
280
Off-site room..........................................................................................................................................................
s
284
Start time.........................................................................................................................................................
graduation
286
Off-site codes
......................................................................................................................................................... 287
10 Optional
...................................................................................................................................
subjects and fringe periods
289
11 Main...................................................................................................................................
subjects
290
12 Subject
...................................................................................................................................
sequences
290
7
8
Positive subject
..........................................................................................................................................................
sequence
290
Negative subject
..........................................................................................................................................................
sequence
293
13 Class
...................................................................................................................................
Clash Code (CCC)
294
14 Timetable
...................................................................................................................................
comparison
296
'Tim etable' tab
.......................................................................................................................................................... 297
'Layout 2' tab.......................................................................................................................................................... 298
Starting tim etable
..........................................................................................................................................................
com parison
298
The process..........................................................................................................................................................
of tim etable com parison
300
15 Window
...................................................................................................................................
groups
303
16 Export
...................................................................................................................................
to Microsoft Excel
306
Exporting reports
.......................................................................................................................................................... 306
Exporting to ..........................................................................................................................................................
Microsoft Excel
307
Index
309
Master Data
1
Master Data
1.1
Preface
9
Over the course of more than 30 years of development, Untis has become an extremely powerful tool.
The large number of functions and possible settings, as well as the size of this manual, may have a
daunting effect on newcomers to the application.
For this reason we would recommend that you first study the considerably shorter manual ' Getting
Started '. 'Getting Started' uses easy-to-understand examples to guide you through all the steps of
timetable creation with Untis, from installation , adding school data to your school's master data and
entering lessons to the actual creation of the timetable using Optimisation , the diagnosis of the
calculated timetable, possible manual changes and printing finished teacher, class and room schedules.
The structure of this manual is also based around this natural basic structure. However, it is intended to
be more of a work of reference than a brief guide.
For this reason, use this manual when in the course of creating your timetable you encounter situations
that are not dealt with in 'Getting Started', or when you wish to take the time to get to know Untis in
greater detail in order to be able to work more effectively with the system.
1.2
Master data
This chapter describes the input and maintenance of master data and provides a detailed description of
master data properties.
Master data are basic input details essential for the construction of school timetables. They include the
particulars of teachers , classes , rooms and subjects which are used to form the lessons in the
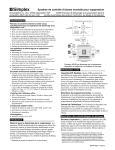
timetable, but also other important information such as students or departments . You can generally
enter new master data or modify existing master data via the menu item "Master Data" in the main tool
bar (by clicking on the appropriate submenu).
Greyed-out items indicate functions that are currently inactive. This is normally the case when the use of
the option requires an additional Untis software module.
10
Note: Adding menu items to menus
The figure shows additional entries below the menu item 'Master data formats' that are by default not
displayed in your menu. The chapter Managing views explains how you can add several menu items to
menus.
The master data categories 'Classes', 'Teachers', 'Rooms' and 'Subjects' are particularly important as
they are the main building blocks for the construction of lessons. We will therefore refer to these types of
master data s elements .
All master data are managed in so-called views. Views are windows designed for the input of new master
data and the maintenance (i.e. modification) of existing master data. All master data views are
essentially very similar in use and structure. The following chapter describes the similarities between
different master data views.
1.3
Master data views
Each type of master data element classes , teachers , rooms , subjects , students ) is managed in its
own window.
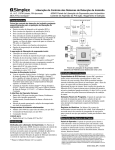
All master data windows consist of three sections: a toolbar , a grid view and a form view.
Grid view
The grid view is a table with individual rows. Each row represents one element. The grid view displays all
the attributes for the element activated (by the user) in the corresponding view. The activated attributes in
the example are the fields name, full name, alternative room, room weighting, off-site code and capacity.
Form view
The form view concentrates on one element, and displays the one element with its attributes. In the
example above, the form view displays the name of the selected room, the (more informative) full name of
the room, the room capacity etc.
Note:
You can hide and display the form view using the button at the bottom left of the screen.
Master Data
The following topics are covered later:
Toolbar
Data entry
Editing views
Managing views
Printing
11
12
1.3.1
Toolbar functions
You will find the following buttons in many Untis windows:
Resize the window
This function adjusts the size of a window to match the table it contains.
Grid adjustment (display fields))
The functions of the grid adjustment dialogue are described in detail in chapter Displaying/hiding
columns .
New
This button opens a new element. You will find more information in the chapter Data input .
Delete
This function deletes the active element. You can also mark several elements with the cursor and then
use this button to delete them.
Serial change
Use this function to systematically change the contents of a field in all rows of the grid view in a single
operation. This function is described in detail in the chapter Serial change .
Sort
This function effects automatic permanent sorting and is explained in chapter Sorting .
Show all fields with content
This a very useful function that is used to temporarily activate all columns which contain at least one
entry. Clicking on this button a second time restores the window to its original state
Lock this display
If this function is active (button pressed) the view in question will not be affected by events taking place
in other windows. Automatic synchronisation is deactivated.
Time requests
This functions is used to enter time requests. The increments for time requests for elements range from
'-3' (total block) to '+3', which indicates a strong desire for the element to be scheduled. Since time
requests are of major significance for all elements and for lessons there is a chapter Time requests
dedicated to this subject under User tips .
Colour coding
Use this button to assign any desired foreground and background colour to an element or lesson. These
colours will be used to for screen element display (but not printing), for standard timetable printing and
for the display of planning tools ( Scheduling dialogue , Scheduling timetable ). Other Untis modules
such as the Cover planning module also display elements in colour at the appropriate places.
Tip: Colouring several elements
Master Data
13
You can specify the colour coding for several elements in one operation by first marking them (with the
cursor) and then clicking on the <Colour coding> button.
Note: Deactivating colours for printing
If you wish to specify colours for screen display but not for printed timetables you can select the setting
'Print black & white' in <Settings> in the relevant timetable window.
Settings
The <Settings> button allows you to change the font type, size and similar settings.
Page layout
This option allows you to make settings for printing and to view the results at the same time. This
function is described in greater detail under Printing .
Refresh window
Refreshes the view. Alternatively you can press F5.
1.3.2
Data input
A new data element is always entered into a master data view in the last line of a grid view, which is
marked with a '*' asterisk.
As an alternative, you can click on the <New> button in the window's toolbar, which will then position the
cursor in the last line of the grid view.
Warning: Confirming input
Always confirm your input with <ENTER> or <TAB> as otherwise the final entry may in some
circumstances not be saved.
If you wish to make further entries, move the cursor to the relevant field using the mouse or cursor keys
14
and enter the desired data.
Note: Changing the (short) name
You can change the (short) name of an element by double-clicking on the 'Name' field of the element
concerned.
1.3.3
Editing views
There is a large number of columns in every master data window. However, no school ever needs all the
columns. For this reason you can specify which columns should be displayed and which should not.
You can also determine the sort order of the rows and columns.
1.3.3.1
Displaying/hiding columns
Basically you have two different ways of influencing how columns are displayed: either using <Grid
adjustment> or via the form view.
Tip: Show all fields with content
Clicking on the <Show all fields with content>
button displays all columns which contain at least
one entry. This function is particularly useful for tracking down any data entry fields.
Grid adjustment
Click on the <Grid adjustment> button and check the columns (under 'Active') that you wish to display.
Note: Additional possibilities
You can use <Grid adjustment> to determine whether a column should be included in printing and
whether the short name or full name of the element in question should be used.
Master Data
15
From the form view
Move the cursor in the Form view to the desired item until a four-headed arrow is displayed. You can now
use drag&drop to drag this item into the grid view, where it will be displayed as a column.
16
If you wish to hide the column, hold the <CTRL> key pressed and drag it from the grid view at the top to
the form view at the bottom.
1.3.3.2
Sorting
There are three sorting options available to you.
Manual sorting using drag&drop
If you wish to re-order elements, simply click in the first (grey) column of the element that you wish to
rearrange and hold the left mouse button pressed. Now drag the element to the desired position in the
list.
You can also change the order of the columns using drag&drop.
Master Data
17
Automatic temporary sorting
Clicking on the column heading will temporarily sort the table by the contents of the column in
ascending order. A further click on the column will sort the data by this column in descending order.
Warning: Temporary
After closing and reopening the window, the original order will be restored.
18
Automatic permanent sorting
Clicking on the <Sort> button
sort criteria hierarchically.
opens an additional window where you can specify up to five different
Master Data
19
Select which fields the view is to be sorted by. When the option 'Use this sorting in all drop-down menus'
is checked, the sort setting will be used at all points in the application where these elements are listed.
1.3.3.3
Filtering
If you wish to filter a specific view according to one or several criteria you can do this easily and quickly
using the filter function.
Clicking on the <Filter> button displays a row with the filter icon between the column headings and the
table contents. You can enter the filter condition in the corresponding row of this column by which you
wish to filter.
You can also define several conditions at the same time (mathematical AND relation).
20
Note: Wildcards
You can also use the wildcards '?' and '*' to represent any character or any string of characters.
1.3.3.4
Serial change
Untis provides two ways of making serial changes.
Cursor marking
Move the cursor over (i.e. mark) the desired range so that the fields are highlighted blue. Now enter the
desired value without clicking. This will be entered into each marked field.
Master Data
21
Note: Marking
You can also mark fields using the keyboard: <SHIFT>+<Down arrow> or <SHIFT> +<Up arrow>.
Serial change function
You will find the <Serial change>
button in the toolbar of the window. Clicking on this button opens
the serial change dialogue allowing you to enter the value to be changed in the 'Current content' field and
the new/desired value in the 'New content' field.
22
The change is always only effected for elements displayed in the current window. If you wish the change
to apply to all elements of this type, check the option 'Whole file'.
If you have flagged elements with the ' Marked (m) ' code, you can limit the changes to those elements
only.
Note: Setting/removing check marks
It is also possible to set or remove check marks. The value 'x' represents a check mark. Leave the field
empty if no check mark is to be set.
1.3.4
Managing views
You can change or delete existing views or create new ones. In addition, you can also define specific
views as standard views and add selected views to the menu for master data.
You will find the control elements for managing views in the drop-down list at the bottom right of each
window or via the menu item 'Master Data | Master data formats'.
Drop-down list
Use the drop-down list at the bottom right of the window to switch between the existing views for this
window or to save, rename or delete changed views.
The 'Save view as...' option creates a new view that is then displayed in the upper section of the list.
Note: Modified view
Once you modified a view, a '*' (asterisk) will be displayed next to the name of the view at the bottom
right of the window. You can now save this view or create a new view using 'Save view as...'.
Master data formats / Lesson formats
You can display a complete list of all master data views via the menu item 'Master Data | Master data
formats' ('Lessons | Overview formats') .
Master Data
23
In the 'Standard' column you can select which view should be opened as the default view .
If you wish to add further views to the master data menu, simply check the box for the corresponding
view in the 'In menu' column.
You can use the toolbar in this window to create a new view (the active view in the table will be used as
a template), or to open or delete an existing view.
1.3.5
Printing
There are two places where you can make settings for printing.
1. Page layout
Every master data and lessons window contains the <Page layout>
can make settings for printing and at the same time view the results.
button. This is where you
2. Print selection dialogue
When a view is active (i.e. has been clicked), you can access the print selection dialogue by
clicking on the <Print>
or <Print preview >
buttons in the main toolbar.
Note: Copying via the clipboard
You can mark part of the table or the whole table and use <CTRL>+C and <CTRL>+V to copy it into a
word processor or spreadsheet.
1.3.5.1
Page layout
All views (master data, lessons, cover planning) now provide the <Page layout>
button with which you
can prepare the relevant list for printing. You will find the button in the toolbar of the relevant window or in
24
the main toolbar.
The figure shows a list of lessons for class 1a. The print layout toolbar allows you to make all printingrelated settings.
Use the <Selection> button to select the elements that are to be output.
If you wish to print a column in bold, click in the column and then on the <B> button.
The meaning of the individual buttons is shown in the figure:
Master Data
25
If you wish to change the column heading, click on one of the two heading rows and enter the desired
expression.
Note: Pagination
Please note that the window also displays the pagination. Thus the column PA Max in the figure would
be printed on the second page.
1.3.5.2
Print selection dialog
This window contains settings that can also be found in Page layout (<Selection> and <Layout>
buttons).
Please note that further print fnctions are available via the combo boxdepending on the type of view.
26
These print functions are described in detail in the relevant chapter.
1.4
Master data properties
In principle, all you need to do to construct a timetable automatically is to enter a name in the Name
field. As a general rule, it is always preferable to leave a field empty if its meaning is at all unclear rather
than to restrict the optimisation algorithm by entering a large amount of unnecessary data.
Note: Do not enter too much at the beginning
If you are unfamiliar with the application, we would recommend that you only enter master data in the
small number of fields displayed in the standard grid view. All other input options should only be used at
a later date (after initial optimisation results have been obtained).
There are properties that apply to all types of master data ( element-independent properties ) as well as
properties specific to a particular type element. You will find information on this latter type in the relevant
chapters dealing with
Rooms
Classes
Teachers
Subjects
1.4.1
Input fields for all master data
The following fields are found in all types of master data.
Master Data
27
Name
This is the unique (short) name. The short name is used by the application internally to identify the
element concerned. A name must be specified for every element.
Note: No duplicate names
It is theoretically possible to give elements of different types the same name, e.g. 1a for class 1a and for
room 1a. Names are also case-sensitive. It is therefore possible to name one class 1a and another class
1A. We would urge you not to take either of these approaches.
Full name
This is where a (long) informative name can be specified that also appears on your printed reports. This
entry is optional but recommended.
Text
Explanatory text can be entered for each element.
Description
Descriptions are master data in their own right with (short) name and full name. They make sense when
descriptions apply to several elements. You select to see the short or full name of the relevant
descriptions when printing elements and in views.
Statistics codes
You can define any number of statistics codes (separated by commas) for each element. You can for
example create well-defined sub-categories for printed reports using these statistics codes. Please refer
to chapter Filtering for more information.
Marked (m)
The Marked (m) code can be set for any element. For certain functions such as printing (timetables or
master data) or serial changes you can specify whether only the marked elements should be selected
for editing.
28
Lock (X)
Lessons containing an element that is locked will be 'frozen' in the timetable. The lesson periods will not
be moved during subsequent optimisation.
Ignore (I)
Lessons containing an element for which the 'Ignore' flag has been set will be ignored in the timetable, i.
e. it will be neither scheduled nor displayed. The (period) value of the lesson will however be included
when calculating totals for teachers and classes.
In addition, elements for which the ignore flag has been set will not be exported via some interfaces.
Don't print (N)
If this flag is set no timetables or lesson overviews will be printed for the element concerned.
Time requests
This field cannot be edited. The box is checked automatically whenever time requestsare entered for an
element.
1.4.2
Rooms
The following input fields relate exclusively to rooms master data.
Master Data
29
Alternative room
An alternative room is a room that is functionally equivalent to the specified (desired) room and that Untis
can use for scheduling purposes when the desired room is unavailable. Please see the chapter on Room
logic for a detailed description of the alternative room function.
Room weighting
Room weighting gives an indication of the importance of a room for a particular lesson scheduled to take
place in that room.
Room weighting 4: a lesson can only be scheduled if the desired room or one of its alternative rooms
is available (e.g. PE classes).
Room weighting 0: Untis can schedule lessons even when neither the desired room nor one of its
alternative rooms is available (useful for lessons where no specific teaching aids are required).
Room weighting 1-3: appropriate intermediate levels.
If no weighting is entered for a room, the weighting will correspond to 2.
30
Note: Room optimisation
Please note that the allocation of rooms is affected not only by room weighting, but also to a large
degree by the slide control Room optimisation . Please refer to chapter Room logic for more information.
Off-site codes
Off-site rooms are classrooms and specialist subject rooms not located in the main building of the
school but at an external site too distant to reach within the space of a normal break. Enter the values 1
to 9 for off-site locations with start-time graduation and the values A to E for off-site locations without
start-time graduation Further details on the off-site function can be found in the section Off-site rooms .
Room capacity
This is where you can enter the maximum student capacity for a particular room.
Please read chapter Room capacity if you wish to include room capacity as a factor when assigning
rooms for lessons.
Dept.
Department. Rooms can be allocated to a specific department. These details are largely for information
purposes only and allow printouts of timetables and/or room lists to be produced for individual
departments.
Corridor (Break superv.)
Use this field to enter up to two corridors that the room adjoins. These fields are only useful in
connection with the additional module Break Supervision .
External name
The external name is only used when several schools are created in a multi-user database with shared
inter-school resources. For more details please refer to chapter Shared resourcesin the MultiUser
manual.
1.4.3
Classes
The input fields for classes are arranged in tabs in the form view . Depending on the number of additional
modules you have installed, the number of tabs displayed for master data elements may differ from the
examples shown in this manual.
Class tab
Timetable tab
Codes
Class time grid
1.4.3.1
'Class' tab
You will find the following input fields on the 'Class' tab.
Master Data
31
Male/Female
These fields allow you to enter the number of male and female students (pupils) in a class. The two
figures are added up automatically and displayed below the input fields.
These figures are only important for use with the room capacity function. For further details on the room
capacity function, please refer to chapter Room capacity .
Time range
The entries for the time range are only displayed if you have licensed the Multi-week timetable module
and are described in the relevant manual.
Class teacher
Several class teachers (form teachers) can be entered for a class. This field is used in conjunction with
the weighting function Class teacher at least once per day , when printing timetables (for display in the
heading) and lists and in Cover planning.
Alias (second name)
For certain purposes it may be desirable to use standardised designations instead of the usual names.
Examples include printouts for local authorities and data exports to databases.
Alias names can be entered either for the element in question or under menu item 'Master data | Special
data | Alias names'.
Note: One name for a group of classes
An alias can be defined for a group of classes via 'Master data | Special data | Alias names', e.g. '3abc”
for '3a+3b+3c”.
Lesson table
The Lesson table serves as a useful tool for checking subject distribution in the Lesson planning and
Value calculation module and has no other significance outside of it
Previous year's name
32
The class name from the previous year is required for use with the function< Last year’s teacher . The
name of the class in the previous year can be entered here to ensure the class teacher accompanies the
class into the new school year. This function is available if you have licensed the Lesson planning and
Value calculation module.
Dept.
Department. Classes can also be allocated to a particular department. This function is largely for
information only and allows timetables and/or class lists to be printed specifically for individual
departments. This function is particularly important for use with the e Department timetables module.
Class level
This function is only useful in connection with the modules Lesson planning and Value calculation ,
Students timetables or Course scheduling .
Regular school
For use with certain import/export interfaces.
External name
The external name is only used when several schools are created in a multi-user database with shared
inter-school resources. For more details please refer to chapter Shared resourcesin the MultiUser
manual.
1.4.3.2
'Timetable' tab
This tab allows you to enter parameters and also to set codes .
Home room
This is where you can enter the name of the classroom assigned to a particular class. This
subsequently makes the task of Entering lessons easier. Please see chapter Alternative rooms in the
User tips for details on classes with no designated classroom.
Class group
This input field is designed specifically for use in Austrian teacher training colleges, British secondary
Master Data
33
schools, Belgian Gymnasiums and German Realschulen where students have a choice between several
main and minor subject areas (core and differentiation lessons) or several subject areas of equal
standing.
Warning:
Please do not enter any data in this field if you are in any way unsure about the exact meaning of the
function. You will find a more detailed explanation of class groups in chapter User tips/ Class groups
Lunch break Min- Max
This function allows you to specify the maximum and minimum duration of the lunch break for individual
classes.
For lunch breaks of exactly one hour, enter '1,1'. If you wish Untis to schedule a lunch break of at least
zero and at most two hours, enter '0,2'.
Periods/day Min, Max
Specify the minimum and maximum number of periods / lesson units the class may be taught per day.
For example, enter '4,6' for a class that should have at least 4 periods, but no more than 6 periods, per
day.
Max main subject pers./day
You can activate the main subject for any desired subject. Use this field to specify how many main
subject periods may be taught as a maximum on any one day.
Max. consec. main subj. per/day
This function determines how many main subject periods may be taught consecutively on any one day.
Max. different less. /day
In some countries (in particular those which have all-day schooling) the authorities only allow a certain
maximum number of different subjects to be taught to a class on any one day.
You can enter this maximum value in the field 'Max. diff. less./day' for each class.
Master class
Enter the same master class for type-separated class components if you wish to print the timetables
together in a single timetable. Please see chapter User tips/ Type-separated class components and
chapter Timetable creation / Several classes in one timetable'for further details.
1.4.3.3
Codes
(P) NTPs allowed
As a rule, NTPs (non-teaching periods) should be avoided at all costs. Possible exceptions are NTPs for
pseudo classes and class components.
(F) Lessons not on adjac. days
Use this function for part-time classes that do not have lessons every day of the week if you wish to
avoid scheduling lessons on consecutive days. In this case select this code.
(H) Sched. a.m./p.m. not both
34
This function ensures that lessons can only be scheduled for one half-day of the day, i.e. Untis can
allocate lessons either in the morning OR in the afternoon of the same day.
(Y) Keep curr. loading pattern
Tick this option if you wish to block the allocation of lessons before the first and after the last periods
already scheduled (for use with a subsequent optimisation run).
Time grid showing permitted scheduling options for use with a subsequent optimisation run where option
Y is activated (the last morning lesson is period 5, the first afternoon lessons is period 6).
This means that in a subsequent optimisation already allocated lessons and NTPs may be rescheduled.
This code is typically activated when you wish to leave non-teaching time for teachers and classes
unchanged when scheduling the timetable. Extracurricular activities are not then affected by the new
timetable
Warning
This function imposes considerable restrictions on subsequent optimisation runs and should not be
activated without due consideration.
1.4.3.4
Class time grid
You will only find the <Class time grid>
other element).
button in the toolbar under 'Master Data | Classes' (i.e. for no
Master Data
35
The function is used to separate the school day into double and single periods for each class. You can
also prevent lessons from being the last period of the day if you have to take bus timetables into
consideration when scheduling.
The class time grid allows you to specify that
certain periods should be used for scheduling double periods and
certain periods should (not) be the last lesson for that class on a particular day.
1. If you wish to schedule double periods by preference in the first two periods of the day (on every day
of the week) as shown in the example, mark the desired range and click on the <Double periods> button
in the 'Schedule' block .
2. If you wish to reserve a range of the day(s) for scheduling single periods, use the <Single periods>
button accordingly.
Warning: Sufficient double periods
Please note that it is essential to define a suitable minimum and maximum number of double periods in
the lessons window of the class in question in order for this setting to work.
3. You can also use the <No> button in the 'Last period' block to specify those periods after which
lessons for the class may not end. This is important if you have to take local transport timetables
(school buses) into consideration when preparing your school timetables.
Note: Copying
Use the <Copy> button to transfer the settings you have made here to other classes.
36
The sample timetable corresponds to the settings made in the figure above.
Master Data
1.4.4
37
Teachers
You can make the following settings on the 'Teacher' tab.
Title
This field is for information only and only affects printing and export.
First name
Enter the first name of the teacher. Untis uses this information in a variety of different printouts.
Personnel number
Enter the personnel/staff number only if this is required in printouts or transfer data for local authorities.
Teacher status
Use this field for special status information such as head teacher, librarian etc.
Department(s)
You can allocate any number of departments to an individual teacher. This function is particularly
significant in connection with the Department timetables module You can also, for example, print out
separate timetables for individual departments
E-Mail address
Use this field to enter teacher email addresses.
38
The email address is only used internally in combination with the Info timetable module. You can use
this module to distribute timetables and substitution information by email to teachers for whom an email
address has been entered.
Telephone number
The telephone number field is currently used for administrative purposes only and is not used by the
application at present.
Mobile number
Use this field to enter mobile telephone numbers.
An entry in this field is only necessary in combination with the moduleInfo timetable. This module allows
you to send information to teachers usingtext messages (SMS).
Alias name
This function applies to teachers in the same way as it applies toclasses. For certain purposes it may
be desirable to use standardised designations instead of the usual (school-internal) names. Examples
include printouts for local authorities or the export of data to databases. Alias names can be entered via
the relevant element or under 'Master Data | Special data | Alias names'.
Birthdate
This field is for information only and only affects printing and export.
Regular school
This field is for information only and only affects printing and export.
Hourly rate
This field is currently only required in the German federal state of North Rhine-Westphalia
Pers.No. 2
In some countries, teachers may have two different personnel numbers. In these countries personnel
number 2 is exported with relevant data.
External name
The external name is only used when several schools are created in a multi-user database with shared
inter-school resources. For more details please refer to chapterShared resourcesin the MultiUser
manual.
Male/Female
Apart from its informational character, this field is used in conjunction with theBreak supervisionsmodule,
where you can specify that a particular break area should be supervised bymale or female teaching
staffonly.
1.4.4.1
'Teacher' tab
You can make the following settings on the 'Teacher' tab.
Master Data
39
Title
This field is for information only and only affects printing and export.
First name
Enter the first name of the teacher. Untis uses this information in a variety of different printouts.
Personnel number
Enter the personnel/staff number only if this is required in printouts or transfer data for local authorities.
Teacher status
Use this field for special status information such as head teacher, librarian etc.
Department(s)
You can allocate any number of departments to an individual teacher. This function is particularly
significant in connection with the Department timetables module You can also, for example, print out
separate timetables for individual departments
E-Mail address
Use this field to enter teacher email addresses.
The email address is only used internally in combination with the Info timetable module. You can use
this module to distribute timetables and substitution information by email to teachers for whom an email
address has been entered.
Telephone number
The telephone number field is currently used for administrative purposes only and is not used by the
application at present.
Mobile number
Use this field to enter mobile telephone numbers.
An entry in this field is only necessary in combination with the module Info timetable . This module
40
allows you to send information to teachers using text messages (SMS) .
Alias name
This function applies to teachers in the same way as it applies to classes . For certain purposes it may
be desirable to use standardised designations instead of the usual (school-internal) names. Examples
include printouts for local authorities or the export of data to databases. Alias names can be entered via
the relevant element or under 'Master Data | Special data | Alias names'.
Birthdate
This field is for information only and only affects printing and export.
Regular school
This field is for information only and only affects printing and export.
Hourly rate
This field is currently only required in the German federal state of North Rhine-Westphalia
Pers.No. 2
In some countries, teachers may have two different personnel numbers. In these countries personnel
number 2 is exported with relevant data.
External name
The external name is only used when several schools are created in a multi-user database with shared
inter-school resources. For more details please refer to chapter Shared resources in the MultiUser
manual.
Male/Female
Apart from its informational character, this field is used in conjunction with the Break supervisions
module, where you can specify that a particular break area should be supervised by male or female
teaching staffonly.
1.4.4.2
'Timetable' tab
You can make the following settings on the 'Timetable' tab .
Master Data
41
Home room
Use this field to assign a dedicated home room to a teacher. This makes entering lessons easier
subsequently.
Lunch break Min-Max
Enter the minimum and maximum duration of lunch breaks for individual teachers.
Periods/day Min,Max
Input in this field determines the minimum and maximum number of periods a teacher should teach each
day. Enter '2,5' for a teacher who should teach between 2 and 5 periods per day. Leaving this field empty
allows Untis to schedule any number of periods for a teacher.
NTPs Min,Max
Use this field to specify the minimum and maximum number of NTPs (free periods, non-contact periods)
per week for an individual teacher. An empty field is equivalent to the entry '0,0'.
Max. consec. periods/half day
This field allows you to specify the maximum number of consecutive periods a teacher should teach
before an NTP (break) is scheduled.
Daily Fr. Break
In schools where lessons continue until evening, it is often desirable to specify the length of time
between the last period in the evening and the first period in the morning to allow a sufficiently long break
between classes.
The time grid of a school shows a total of 11 periods per day. On Monday, teacher X teaches until period
9. A value of "4" entered under "Daily Fr. Break" means that Untis will attempt to keep periods 1 and 2
on Tuesday free for teacher , i.e. a total a total of 4 free periods.
Teacher optimisation code
The teacher optimisation code is important when optimisation is performed using variable teacher
assignment.
42
Permissible entries are either numbers 1 to 9 or letters A-Z.
Entering a number means that during optimisation with variable teacher assignment, the relevant
teacher's lessons can only be exchanged with those of another teacher who shares the same
optimisation code.
On the other hand, entering a letter results in lessons only being exchanged with teachers with a
different (or no) optimisation code.
1.4.4.3
Codes
(H) Sched. a.m./p.m. not both
Schedule half days only. This function ensures that lessons cannot be scheduled in the morning AND in
the afternoon of the same day.
(Y) Keep curr. loading pattern
Activate this option if you want to block the allocation of a teacher before the first and after the last
periods already scheduled for the half-day. This means that a subsequent optimisation run ignores the
teacher for the periods outside the given range. You will find an example of how to use this field correctly
in chapter Master data properties / Classes .
(R) Not in 1st and last period
You can use this code to avoid a teacher being scheduled in the first and last periods of a day
(Scheduling | Weighting | Time Requests | Time requests for teachers).
Very important
The input block ‘Very important’ allows you to specify different timetabling priorities for each individual
teacher.
No NTPs (A)
Activate this option to instruct the software to avoid scheduling NTPs for the teacher.
Lunch break (B)
Check this box if you want Untis to pay particular attention to lunch break compliance when creating the
timetable.
Max. periods/day (C)
Activating this option ensures a high level of compliance with the specifications entered under 'Periods
per day min,max'.
Max. consec. prds. (D)
Activating this option ensures a high level of compliance with the specifications entered under 'Max.
consec. periods/half day'.
Note: Do not set for all teachers
Please set codes A-D for individual teachers. If great importance is attached e.g. to avoiding nonteaching periods for all teachers you can achieve this via optimisation.
Master Data
1.4.5
Subjects
1.4.5.1
'Subjects' tab
43
Subject Group
When entering teaching qualifications for teachers, you can either enter single subjects or entire subject
groups. This field is therefore only relevant for use with the Lesson planning and Value calculation
module.
Alias name
For certain purposes (e.g. data export), it may be desirable to use standardised designations instead of
the usual names. Alias names can be entered via the relevant element or under 'Master Data | Special
data | Alias names".
1.4.5.2
Codes
You can make the following settings on the 'Timetable' tab .
44
Subject room (short name)
This function allows you to specify the name of a dedicated subject room for a subject. This
subsequently makes task ofEntering lessons easier. Please see the chapterRoom logicunderUser
tipsfor further details.
Afternoon pers./week (min,max)
The minimum and maximum number of afternoon periods for this subject. Use this field to specify the
minimum and maximum number of periods per week that the subject should / must be scheduled in the
afternoon.
Periods/week (min,max)
Minimum and maximum number of weekly subject periods. This function is only relevant for use with
theLesson planningmodule where you can enter the minimum and maximum number of periods the
subject should be taught per week (if at all).
Subj. Sequ. - Teachers
The numbers 1-9 direct the software to construct teacher timetables where subjects with the same
number are scheduled in consecutive periods. The letters A-F prevent the software from scheduling
subjects in consecutive periods. Please also see chapter Subject sequenceunderUser tips.
Subj. Sequ. - Classes
The numbers 1-9 direct the software to construct class timetables where subjects with the same number
are scheduled in consecutive periods. The letters A-F prevent the software from scheduling subjects in
consecutive periods. Please also see chapterSubject sequenceunderUser tips.
(A) In all classes
This field is only important in connection with the module 'Lesson planning and Value calculation'.
(M) Main subject
Check this box to categorise a subject as a main subject. For further details please refer to chapter
'User tips / Main subjects'.
(F) Fringe period
Use this option to categorise a subject as a fringe period subject. The attribute ensures that lessons of
this subject are scheduled preferentially at the beginning or the end of a school day or half-day
Master Data
45
(depending on the grid). For further details please refer to chapter 'User tips / Free periods and fringe
periods'
(O) Optional subject
This option allows you to categorise a subject as an optional (non-compulsory) subject. The attribute
ensures that lessons of this subject are scheduled preferentially at the beginning or the end of a school
day or half-day (depending on the grid). For further details please refer to chapter 'User tips / Free
periods and fringe periods'
(2) More than once a day
This option should only be used in special circumstances. If it is active, the optimisation algorithm can
schedule the subject at entirely irregular intervals and even several times a day. Checking this box
deactivates the weighting settings for 'The same subject cannot be taught more than once on the same
day' and 'Avoid errors with double periods'.
(G) Not a fringe period
Selecting this option causes the software to schedule lessons of this subject by preference in the middle
of a half-day, avoiding fringe periods.
D) Respect double periods
Warning
This option should only be activated in special circumstances. Please read chapter 'Lessons' before
selecting this option.
This function ensures that the automated optimisation tool will always schedule the number of permitted
(or desired) double periods. For example, use this option to avoid splitting double periods or to force the
software to schedule single periods.
Please note that the correct treatment of double periods requires an appropriate input under option
'Double periods Min,Max'.
This option is only effective when used sparingly and thoughtfully since it imposes considerable
restrictions on the optimisation function, especially with regard to subjects with many double periods.
Activate this function only when a previous optimisation run was unable to achieve the desired
outcome and you have already increased the relevant weighting parameter ("Avoid errors with double
periods") to '5'.
(E) Double periods are allowed to span *-breaks
Breaks marked with an asterisk (*) must not be bridged by double periods and will therefore affect the
distribution of double periods. If this restriction is not desired for a particular subject, simply uncheck this
option.
1.4.5.3
'Timetable' tab
You can make the following settings on the 'Timetable' tab .
46
Subject room (short name)
This function allows you to specify the name of a dedicated subject room for a subject. This
subsequently makes task of Entering lessons easier. Please see the chapter Room logic under User
tips for further details.
Afternoon pers./week (min,max)
The minimum and maximum number of afternoon periods for this subject. Use this field to specify the
minimum and maximum number of periods per week that the subject should / must be scheduled in the
afternoon.
Periods/week (min,max)
Minimum and maximum number of weekly subject periods. This function is only relevant for use with the
Lesson planning module where you can enter the minimum and maximum number of periods the subject
should be taught per week (if at all).
Subj. Sequ. - Teachers
The numbers 1-9 direct the software to construct teacher timetables where subjects with the same
number are scheduled in consecutive periods. The letters A-F prevent the software from scheduling
subjects in consecutive periods. Please also see chapter Subject sequence under User tips .
Subj. Sequ. - Classes
The numbers 1-9 direct the software to construct class timetables where subjects with the same number
are scheduled in consecutive periods. The letters A-F prevent the software from scheduling subjects in
consecutive periods. Please also see chapter Subject sequence under User tips.
1.4.6
Students
There is an additional master data element if you use the Students timetables module – students. If you
do not use the module, the menu item will be deactivated.
Note
In some school systems or at some class levels it is not the class that determines the lessons. Instead,
Master Data
47
students can select the courses they wish to take depending on their preferences. This results in
students having their own individual timetables depending on the courses they choose. Untis provides
two modules to help you manage these scheduling tasks: Student timetables and Course scheduling .
The use of student timetables is useful when the majority of lessons take place for the class as a whole
and a smaller share (up to approx. 25 %) is selected individually. The course scheduling module is used
when no class exists in the traditional sense and students are (almost) fully free to choose their
courses.
1.4.7
Departments
Additional master dataYou will find the following master data under menu item 'Master Data | Special
data' :
Student groups
Student groups facilitate student assignment in WebUntis . They play no role in lesson scheduling.
Alias names
For some purposes it may be necessary to use different names than the names specified in master data
for elements. For example:
Standardised official specialist designations for authorities
Standardised names for interfaces to official databases
Timetable printing
If you wish to use the aliases specified here in timetable printouts, you must check the box 'For the
timetable' and also set the appropriate code in the corresponding timetable view. Please refer to chapter
Alias under Timetable for more information.
Descriptions
Descriptions are master data elements in their own right with (short) name and full name. They are
useful when designations apply to several elements.
You can for example provide somewhat longer text in the full name of a description. It is then sufficient to
enter the (short) name of the description in other master data elements in order to choose between the
(short) name or full name of the corresponding description for printed reports and views.
48
Departments
You can assign each master data element to a department (in the case of teachers, to several
departments). This is only of further significance when used with the Department timetables module. If
you do not use this particular module, entering a department name is mainly for informational purposes
and can, for example, be printed out on timetables. However, some reports can be printed on a
departmental basis.
Corridors
Corridors must be specified for scheduling breaks (corridor supervision). These functions require a
license for the Break supervisionmodule.
2
Lessons
2.1
Lessons
A lesson is the combination of the elements class , teacher , subject and room with a specific number of
periods and perhaps with additional parameters. A difference is made between planned and scheduled
lessons.
A planned lesson would be e.g. that teacher Callas should teach two periods of music to class 1a in
room R1a.
The scheduled lesson would also contain the position of the lesson in the timetable, e.g. the lesson
takes place on Mo-2 and Th-1.
Planned lessons
Lessons
49
Scheduled lessons
2.2
The lesson window
Similar to all master data windows a lesson window always comprises three sections: the toolbar , the
grid view and the form view.
The function of the form and grid views is the same as with master data windows . The form view
displays one lesson at a time with all the attributes belonging to the lesson while the grid view displays a
table of all lessons. Each lesson is automatically assigned a lesson number (which you cannot alter)
which the application uses as an internal ID.
Note: Views
The lesson window is a view. This means that the information provided in chapter ' Master data views ' on
the basic use of windows ( Editing views and Managing views ) also applies to lesson windows.
50
You can open the standard views for lessons sorted by class or by teacher via menus items 'Lessons |
Classes' and 'Lessons | Teachers' respectively.
Warning: Coupled lessons
In the case of coupled lessons (lessons taking place simultaneously) you will see a + in the Cl,Te
column. Clicking on this will display all the coupling rows of the lesson concerned.
2.3
Entering lessons
Lessons can be entered in the form view or in grid view . Since there are different types of lessons they
will be described here separately.
A coupling consists of lessons that have several elements of the same type and that must take place at
the same time. In the case of a class coupling, several classes or parts of a class are taught by one
Lessons
51
teacher, and in the case of a teacher coupling several teachers teach one or more classes at the same
time.
Simple lessons
Double period - block
Couplings
Note: 'Cl,Te' field
The value in the Cl,Te field indicates how many classes and how many teachers are involved in this
lesson. A straightforward lesson involving one class and one lesson displays no value in this field.
2.3.1
Simple lessons
Open a lessons window and click on the <New> button. This will create a new lesson with one period
per week. Alternatively, you can create a new lesson in the last row of the lesson view .
Simply enter all the elements involved for the lesson (class, teacher, subject, room) and if necessary
change the number of periods per week.
Class / teacher
Depending on whether you have called 'Lessons | Classes' or 'Lessons | Teachers', the active class or
the active teacher will be automatically entered for a new lesson.
52
Home room
If you have assigned a room to each class under 'Master Data | Classes', the room will be entered
automatically in the Home room field as soon as you enter the class. A teacher can also be assigned a
home room, in which case the home room will be entered automatically in the same way.
Subject room
You can also assign rooms under 'Master Data | Subjects'. However, in this case it involves subject
rooms, for example a gymnasium for the subject PE and sport. When you enter a subject with a subject
room , the subject room will be displayed automatically in the corresponding field.
Lessons
53
Note: Subject room + home room
A subject room and a home room can be entered for a lesson. In this case, optimisation will first try to
schedule the lesson in the subject room. If this is not possible, the lesson can be scheduled in the
home room. Please refer to chapter Room logic for further information.
2.3.2
Double period - block
Double period
Lessons will be scheduled in single periods unless specified otherwise. Enter double periods in the
column Double pers. if they are desired or permitted. Use this field to specify a permitted range of
double periods:
An entry of 1-1 indicates that the range is from 1 to 1, i.e. the lesson should be scheduled in exactly one
double period.
An entry of 0-1 means that a 2-period lesson can be scheduled in a double period, but it is not an
absolute requirement (minimum 0, maximum 1 double period).
An entry of 1-2 means that a 4-period lesson can also be scheduled in one double period or two double
periods. The timetable algorithm should decide which variant is best suited from the overall timetable
perspective.
Tip: Double period condition
If it is possible to allow variability in scheduling double periods (e.g. with the 0-1 or 1-2 options), please
allow the algorithm to work with these freedoms since this can lead to a significantly better overall result.
Block
More than 2 periods scheduled consecutively are called a block of periods.
If you wish, for example, to schedule 3 periods consecutively, enter '3' in the column 'Block'.
54
If you wish to schedule a 6-period lesson in two blocks of 3, simply enter '3.3'.
2.3.3
Coupled lessons
In Untis terminology, coupled lessons (or couplings) are those in which more than one teacher and/or
more than one class participate in the lessons and the lessons in the coupling are held at the same
time.
Warning: General rule for entering coupled lessons
Several classes are entered together separated by commas but when there are several teachers each
one must be entered in a separate coupling row.
Coupled lessons (several classes)
Teacher Rubens is to teach cookery to classes 1a and 1b for two periods in the home economics room.
Per
Teacher
Subject
Class(es)
Room
2
Rub
CK
1a,1b
HE1
Proceed as in the example of the simple lesson, but enter both classes 1a and 1b in the field 'Class(es)'
separated by a comma. In this case the room will not be entered automatically because there is no
room assigned to the subject cookery. For this reason, enter it in the 'Subject room' column .
Now switch to class 1b. You will see that the lesson is automatically displayed for this class.
Coupled lessons (several classes and teachers)
We will now plan 4 periods of English in different sets for the students of the second year. This means
that students in classes 2a and 2b will be taught in three sets by three teachers (Cer, Ander, Callas) in
Lessons
three different rooms.
Per
Teacher
4
Cer
4
Ander
4
Callas
Subject
EN
EN
EN
Class(es)
2a,2b
2a,2b
2a,2b
55
Room
R2a
R2b
PS1
1.
Switch the lessons window to class 2a.
2.
Enter '4' in the 'Per' column and confirm this by pressing <TAB>.
3.
Enter the (short) name 'Cer' and confirm again with <TAB>. It does not matter which of the three
teachers you begin with.
4.
Enter 'EN' for subject.
5.
Now enter classes 2a and 2b in the 'Class(es)' column separated by a comma.
6.
Class 2a's home room – R2a – will be entered automatically.
7.
Move the mouse to the column 'Cl,Te' in the lesson you have just entered and click on '+'. Enter the
name of the next teacher ,"Ander", and again classes 2a and 2b in the empty row shaded grey.
8.
Now change the room from R2a to room R2b since teacher Cervantes will be teaching his group in
room R2a .
9.
Make the same entries for teacher Callas in the third coupling row, making sure to enter a different
room.
The '+' sign will now be permanently displayed in the 'Cl,Te' column. Clicking on this sign will display all
the information on the lesson. You can decide whether you wish to view only the first row of the lesson
or whether all coupling rows should be displayed.
56
Tip: Expanding all coupling rows
Clicking on <+> in the column heading of 'Cl,Te' will expand or collapse all coupling rows in one
operation.
You can find further information on using coupled lessons in chapters Coupling lessons and Decoupling
lessons.
2.3.4
Coupling lessons
Coupling using drag&drop
If you wish to couple two existing lessons, mark one of the lessons in the column 'Cl,Te' with the right
mouse-button and drag it over to the lesson with which you wish to link it. When you release the
dragged lesson, both lessons will be coupled.
Decoupling coupled lessons is just as simple. Drag the coupling row that you wish to decouple out of
the coupling by using the mouse in the 'Cl,Te' column and drop it. The lessons are now decoupled.
Coupling via the toolbar
If you wish to couple two existing lessons, mark one of the lessons concerned and click on the <Create
couplings> button in the toolbar. A dialogue window will be displayed already containing the marked
lesson. There are three ways to add additional lessons:
Double click on the lesson you wish to add in the lessons window.
Mark the new lesson in the lessons window and then click on <Add>.
Enter the lesson number and then click on <Add>.
Lessons
2.3.5
57
Decoupling lessons
The previous chapter described how you can decouple lessons using drag&drop.
Decoupling via button
This function allows you to convert individual coupling rows in a coupled lesson into lessons in their own
right (with their own lesson numbers).
Mark a lesson coupling and click on the button <Extended decoupling>. A window will be displayed
where you can select which coupling rows should be removed from the coupled lesson.
Warning: Split up all
Clicking on the <Split up all> button breaks up all class couplings. This can have a drastic impact on
teaching load distribution.
58
If you only wish to split up a coupled lesson into all coupling rows but wish to retain the class couplings,
mark all the rows concerned in the left section and click on the double-headed arrow in the centre of the
window.
2.3.6
Entering lessons using drag&drop
You can also use the Element-Rollup function to enter lessons using drag&drop. You can access the
Element-Rollup function under 'Master Data | Element-Rollup' or via the button of the same name in the
main toolbar.
In the Element-Rollup window you can choose between master data types and drag one or several
elements into the lessons window.
Note: Several elements
You can hold the <CTRL> key pressed and highlight several elements, which you can then drag into the
lessons window together.
If you drag several classes into the lessons window, they will all be entered into one coupling row .
Lessons
59
However, if you drag several teachers into an existing lesson, a separate coupling row will be created for
each teacher.
Note: Double-click
You can use a double click in the element window instead of the drag&drop method.
2.3.7
Clipboard
You can copy selected (highlighted) lessons to the clipboard. These functions can be accessed under
menu item 'Edit', or you can use the following shortcuts:
CTRL + X = Cut
CTRL + C = Copy
CTRL + V = Paste
Programme-internal use
The clipboard function allows you to copy one or more lessons of one class to another or from one term>
to another (with the Multiple term module.
If you wish for example to copy all lessons from class 1a to class 1b
highlight all lessons,
select 'Edit | Copy',
switch to class 1b (which still has no lessons) and
select 'Edit | Paste'.
60
Paste special
Tip: Copying timetables
The 'Paste special' functions allows you to copy timetables.
In addition to the usual paste function, the 'Edit' menu also provides the 'Paste special' function. Besides
inserting lessons, this function also inserts the timetable of the copied lessons, i.e. the timetable of the
source class is also copied.
Copying data to external programmes
You can also use the clipboard to export lessons (or other data) to external programmes such as
spreadsheets or word processors.
Many views also offer the <Print in Excel> option allowing you to export directly to a spreadsheet.
Lessons
2.4
61
Lesson properties
You can specify many additional properties for lessons apart from the basic data. With the exception of
time requests you can enter this data either in the grid view or in the form view. You will find all the tabs
described below in the form view .
Time requests
'Lessons' tab
'Timetable' tab
'Codes 1' tab
'Codes 2' tab
'Values' and 'Coupling lines' tabs
2.4.1
Time requests of lessons
You can choose between three different ways of displaying time requests:
Time requests of lessons
Each individual lesson can be assigned a special time request. The general time request function is
described in chapter Time requests in the User tips section. However, a time request for a lesson cannot
be given the value +3. In this case, you should schedule the lesson manually and lock it.
Time requests for all elements
Lessons inherit the time requests of the master data involved . For example, if Victor Hugo's free day is
Tuesday, no lesson can take place on a Tuesday if Hugo is involved.
The ‘Time requests for all elements’ option displays the time requests for all elements involved in this
62
lesson in the centre of the window. You can click on a day of the week in this section and the lower
section will indicate exactly which of the elements involved is responsible for the time request.
Time requests without rooms
Since room allocationcan still be changed during optimisation, time requests for rooms are not as
stringent as those for other elements. For this reason they can be hidden using the lower option.
2.4.2
'Lessons ' tab
You can specify the following settings on the 'Lessons' tab:
Lessons
63
Periods/week / Years periods, Teacher, Subject, Class(es), Room
The master data involved in the lesson together with the number of periods are the essential lesson
parameters. Entering data was dealt with in chapter Entering lessons .
Division number
The division number is required to ensure that the number of periods for a class are calculated correctly
for divisions. A division occurs when for example English is taught in 2 groups but the lessons are not
coupled, i.e. do not take place simultaneously. There are then two lesson rows each with 4 periods, but
only 4 hours count towards the total number of class periods.
If both lesson rows (numbers) are assigned the same division number (permitted range of values: 0 to
255) the value units will be calculated as described above. A lesson with a division number of 0 will not
count towards the total number of periods for the class.
You can assign the same division number for more than 2 lesson rows of the class. The largest number
of periods covered by the division number will then count towards the class total.
Alias name
You can assign an alias to lessons in the same way as for master data elements. Please refer to
chapter Master data – Class tab for a description of this function .
Room
This is where you can enter the desired (subject) room for the lesson. If a subject room has been defined
for a subject, it will be automatically used when the lesson is created.
Home room
If data is being entered in the view 'Lessons | Classes', the class' home room will be displayed here; if
data is being entered in the view 'Lessons | Teachers', the teacher's home room will be displayed here.
Les. groups
You can enter the lesson group here if you use the Multi-week timetable module. Please refer to
chapter Lesson groups in section Multi-week timetable .
64
Statistical code
Used in the same way as with master data. You can assign any number of statistical codes to each
lesson. These codes are very useful when you wish to filter according to specific criteria.
Subject group
If the lesson subject is assigned to a subject group, it will be displayed here. The use of subject groups
is primarily of interest in connection with teacher qualifications and the lesson table (with module
Lesson planning ).
Students M./Students F./Total
This is where you can enter the number of students (male and female) participating in the current lesson.
The total of all entries is displayed in the total field. These entries have an influence on room allocation
during optimisation and room optimisation .
Text
This field allows you to assign text of your choice to each lesson. This text is also displayed in the
'Special text' column of the timetable details window and can also be displayed in the timetable window
itself .
Line text / Line text -2
You can use these fields to assign text to the individual coupling rowsof a lesson.
2.4.3
'Timetable' tab
You can specify the following settings on the 'Timetable' tab:
Lessons
65
Double periods Min. Max.
Entering double periods and blocks was already dealt with in chapter Double period - block .
Periods in this subject room
If a subject room is defined for a lesson, the optimisation routine will attempt to schedule all periods of
the lesson in this room. This is sometimes not desired when there is a shortage of rooms or when rooms
are overbooked. If for example only two of three physics lessons are to be held in the physics lab, then
enter a '2' here. As a rule, no entry is required in this field.
Scheduling priority
When you launch optimisation, Untis will first calculate the level of difficulty for all lesson periods. A
lesson is all the more difficult to place if there are a lot of elements involved in it and if there are
restrictive time requests specified for the elements.
The algorithm that Untis uses to place a lesson starts with the most difficult periods first. You have the
chance to influence the scheduling sequence by setting a scheduling priority. The smaller the number
entered for the priority (1-9) the earlier the lesson will be placed and the greater the likelihood of finding a
'good' position.
If this field is left empty, a default priority of 5 will be assumed; values of 1-4 increase priority while
values of 6-9 decrease it. Lessons with a scheduling priority of 9 will be processed last while those with
a priority of 1 will be treated first.
Warning:
An entry in this field can have a drastic influence on the way optimisation works. As a general rule, it
can have a negative impact on the overall result, which is why it should only be used for good reason and
with due consideration.
Teacher optimisation code
With the teacher optimisation code, the Lesson planning module offers the possibility of influencing
Teacher assignment during optimisation. You will find details in chapter Teacher optimisation under
66
Optimisation .
Unscheduled periods
This value indicates how many periods of the current lesson have not yet been scheduled in the
timetable.
Time range
The Multi-week timetable module allows you to set time restrictions for lessons.
Subject sequence - Classes/Subject Sequence - Teachers
As with master data, there is also the field subject sequence for lessons. Permitted entries are 1 - 9 for
a positive subject sequence and A - E for a negative subject sequence. Please also see chapter Subject
sequence in the User tips section.
Class Clash Code (Class Clash Code, CCC)
This code allows Untis to schedule two lessons at the same time even when the same class is involved
in both lessons. Enter values 1 - 9 where a conflict is permissible between lessons with the same CCC,
and A - H where a conflict is permissible between lessons with different non-numeric CCCs. Please also
see chapter Subject sequence in the User tipssection.
2.4.4
'Codes' tab part 1
There is a large number of codes available with which you can define lessons more precisely.
(X) Locked, (i) Ignore, (m) Marked
The way these codes work was already explained in chapter Input fields for master data .
In lesson views, ignored lessons are marked with the letter (i) next to the lesson number.
Lessons
67
(E) Double pers. span *-breaks
Double periods are not allowed to span breaks, which are marked in the timetable with a '*'. Use the (E)
code to deactivate this restriction for specific lessons.
(O) Optional subject
Lessons for which this code is activated are treated during optimisation as if an optional subject were
involved. For further details, please refer to chapter User tips – Optional subjects and fringe periods .
(G) No fringe period placement
Activate this code if a particular lesson should not be scheduled in a fringe period. For further details,
please see chapter User tips – Optional subjects and fringe periods .
(K) No altern. room to be used
Lessons marked (K) may only be scheduled in the designated room. Scheduling in alternative rooms is
not allowed.
(k) Exempt from data analysis
Use this code to exclude a lesson from the automated data analysis function of the diagnosis tool.
Warning:
Activate this function only when you have made sure that the lesson in question will not obstruct the
optimisation tool.
(r) All prds. in the same room
All periods of a lesson marked with this code will take place in the same room. This code has a major
influence on room optimisation. A lesson marked with the (r ) code can even displace a class from its
own home room. Please read chapter User tips – Room logic for further details before attempting to use
this function.
Teacher allocation locked
The teacher assigned to teach a class can be locked separately for each coupling line to ensure that the
placement cannot be changed by the automated teacher allocation function (only possible with the
'Lesson planning and value calculation' module) (please see also chapter Optimisation ).
Time requests
This box will be automatically checked if time requestshave been entered for this lesson.
2.4.5
'Codes' tab part 2
Below is a description of the codes in the second column.
68
(B) Lock conditionally
Lessons marked with this code are treated as locked lessons during the first part of the optimisation run
(placement run). During the subsequent optimisation run (swap run), however, the temporary locking
function is automatically deactivated (please see also chapter Optimisation )
(D) Respect double periods
Activate this function for a lesson (or a subject) if you wish the optimisation tool to adhere strictly to the
number of permitted (desired) double periods . This also applies when double periods have been
excluded for a lesson ('0-0' in the field 'Double periods min., max.'). The function is particularly useful
when the optimisation errors 'Double per. split up', 'Unrequ. double pers. ' and 'Subject twice a day' are to
be avoided at all costs.
Warning: Use sparingly
Please use this code sparingly (if in doubt, please do not use it at all), since it places severe restrictions
on optimisation especially for subjects with a large number of periods. If necessary, increase the
corresponding weighting parameters ( Avoid errors with double period ) to 5 before using it.
Please also note that to ensure the correct treatment of double periods, data must be entered in the
'Double periods min, max' field.
Setting the (D) code excludes the use of codes (2) and (C).
(C) No single periods
Setting the (C) code gives priority to scheduling the lesson in questions as block. Single periods will be
avoided if at all possible.
This code is only useful for lessons with more than 6 periods per week.
Codes (2), (C) and (D) are mutually exclusive.
(R) Place in a fringe period
Use this option to specify lessons that should be scheduled in fringe periods in the same way as fringe
lessons. The attribute ensures that lessons marked in this way are scheduled preferentially at the
beginning or the end of a school day or half-day (depending on the timetable). Please also refer to
chapter User tips / Fringe periods and optional subjects .
Lessons
69
(S) Schedule class group later
You can change the scheduling priority for the lessons when using class groups . The code instructs
the optimisation tool to leave the scheduling of these lessons until after other classes of the same class
group have been scheduled.
Use this code only when you are familiar with working with class groups.
(2) Subject more than once/day
The Untis optimisation algorithm assumes that a subject should only be scheduled once a day for any
one class (except block lessons and double periods ). You can use this flag to override this – highly
weighted – boundary condition. Untis will then be allowed to schedule the subject as it thinks fit.
The options (2), (C) and (D) are mutually exclusive.
(V) Variable teacher
When this code is set Untis may replace the teacher(s) involved in the lesson with more suitable
teachers when bottlenecks are encountered during optimisation. Please refer to chapter Optimisation for
further details.
(L) Not in Legend
No legend will be printed for lessons where this code is set.
(U) p.m. only double periods
This code ensures that the automated optimisation function will only schedule double periods (and no
single periods) in the afternoon. This code only makes sense when
double periods are permitted for the lesson and
the subject is marked as a subject that can take place in the afternoon.
(M) Schedule manually
Lessons marked (M) are ignored by the optimisation tool. These lessons must be scheduled manually.
2.4.6
'Values' and 'Coupling line' tabs
'Values' tab
This tab will only be displayed with the module Lesson planning and value calculation . Please refer to
chapter Values under Value calculation for details on the fields.
'Coupling line' tab
This tab contains fields that are only relevant for a coupling line but not for the entire coupled lesson.
Most fields can be found on the 'Lessons' tab and are described there.
The fields 'Teacher allocation locked' and '(Teacher)' are described in chapter Automatic teacher
assignment during optimisation under Lesson planning.
2.4.7
All codes
This field, which can only be activated in the grid view via the <Grid Adjustment> button, offers an
excellent overview of the relevant timetable settings of a lesson. The 'Code' column clearly and
comprehensively displays all the codes set for a lesson. The code Z denotes lessons where a time
request has been entered.
70
Check the relevant box under <Settings> in this lessons window if you wish inherited codes, i.e. codes
entered for a master data element of these lessons, to be displayed in parentheses.
2.4.8
Locked lessons
The menu item 'Lessons | Locked lessons' allows you to open a window listing all locked lessons . It is
irrelevant if the lessons in question have been locked as individual periods , as lessons or via another
element or lesson group .
Lessons
71
You can remove locked lessons from the window by clicking on the cell in question and then clicking on
the <Delete> button in the toolbar.
Note:
It is not enough to select the row in question – you must click on the cell in the row that causes it to be
locked. You can read more about locking in chapter Locking in the User tips section.
2.5
Toolbar functions
The general functions are explained in chapter Master data / Toolbar functions .
You will only find the following special functions in the lessons window:
Create coupling
Please refer to chapter Coupling lessons .
Extended decoupling
Please refer to chapter Decoupling lessons .
Teacher suggestion
Please refer to chapter Teacher suggestions under Lesson planning .
Calendar
You can use the Multi-week timetable module to specify time restrictions for master data elements and
lessons , and define lesson groups (time ranges). The school year calendar displays the selected lesson
in green for the period in which the lesson can be held.
72
Lesson comparison
Please refer to chapter Lesson comparison under Lesson planning .
Convert lesson(s) into course(s)
Please refer to chapter Specifying courses under Course scheduling
Settings
You can select <Settings> to tailor the grid view of the lesson window to your requirements.
One week - This check box is only activated if you use the Multi-week timetable module. Only those
lessons taking place in a specific week will be displayed.
Show inherited codes - This option affects the codes field. Please refer to chapter Displaying codes
.
Lessons
73
Show total - Use this setting to display a row with totals below the header row in the grid view. The
value of individual fields will be totalled for numeric fields.
Tip: Context menu
You can also display the totals row by right-clicking on the header row.
2.6
Printing
The print function in the lesson views works in exactly the same way as the print function in the master
data views .
The <Details> window under print selection offers additional settings that are only relevant for lessons.
74
1 Page / Element
This option allows lessons of the various elements ( Teachers or classes ) to be printed on separate
pages.
Balance (Target-Actual)
This option prints a balance row. This function is only possible in combination with the module Lesson
planning and value calculation .
Lesson on one line
In the case of coupled lessons , this option deactivates the printing of rows that are not relevant for the
active element.
Reductions
The Reductions option only makes sense in combination with the module Lesson planning .
Lessons
75
Period time requests
The print selection dialog also allows you to print out period time requests ( Time requests ) for individual
lessons.
2.7
Lesson sequences
You can use the lesson sequence function, called via 'Lessons | Lesson sequences', to influence how
lessons are scheduled. There are three different types of lesson sequence:
Fixed (subject) sequences
Simultaneous lessons
Sequence in a week
2.7.1
Fixed (subject) sequence
3 Use the fixed subject sequence to specify the periods that must be scheduled in sequence.
Access ' Lessons|Lesson sequences ', set the drop-down list at the top right to Fixed sequence and
enter the lessons that are to be scheduled in sequence.
Example
The physics theory lesson for class 1a, lesson 96, should immediately precede practical physics,
lesson 97. Once the subject sequence has been specified, Untis will now schedule the periods to take
place sequentially.
76
Note: Entering with double-click
Lesson numbers for lesson sequences can also be entered by double-clicking on the lesson number in
question (in the 1st column of the lessons view.
Variable fixed (subject) sequence
In the case of a variable fixed subject sequence, the lessons still follow on from each other but their
sequence is variable. In the above example, Untis would be able to choose whether to schedule the
theory or practical (lab) lesson first.
Lessons
2.7.2
77
Sequence in a week
The week sequence allows you to specify the order of class lessons during the week. This function is
designed for use with lessons with one or two periods per week.
Access ' Lessons|Lesson sequences ', set the drop-down list at the top right to Sequence in a week and
enter the lessons that are to be scheduled in sequence.
Example
The chemistry theory lesson for class 1b is to be scheduled, with the chemistry lab lesson following
sometime later in the week.
If a sequence is now entered for the week as shown in the example, Untis will schedule lesson 98 before
lesson 99.
A maximum of 3 lesson numbers are possible in the week sequence.
2.7.3
Simultaneous lessons
In certain circumstances, for example in combination with the course scheduling module, it may be
desirable but not essential to schedule different lessons at the same time. You can define this condition
here.
78
Access ' Lessons|Lesson sequences ', set the drop-down list at the top right to Simultaneous lessons
and enter the lessons that are to be scheduled in sequence.
The difference between simultaneous lessons and coupled lessonsis that the optimisation tool is
permitted to split simultaneous lessons. Coupled lessons, on the other hand, can never be split.
3
Optimisation
3.1
Timetable optimisation
The following chapter describes the timetable optimisation function and the diagnosis tools used before
and after an optimisation run.
The program starts with an empty time grid and proceeds to fill the grid with periods. Since this alone
would not necessarily produce the best results, the constructed timetable then undergoes a series of
specific period swaps to improve the final outcome. In the end, the weighting settingsyou have specified
will determine the actual quality of the timetable.
3.2
Weighting
The weighting function forms the basis of the automated timetable optimisation tool Untis offers six
levels of importance ranging from 'unimportant' (0) to 'extremely important' (5), which allow you to specify
the level of priority given to the individual settings.
Note:
Some weighting points only become effective after specific data has been entered in the master data or
lesson window (see chapter "Data input"). Other weightings, by contrast, are data independent and
affect every optimisation run
The function "Respect the maximum and minimum number of periods per day for teachers", for instance,
is a dependent weighting item since it depends on data entered under "Periods day Min, Max" on the
"Timetable" tab under "Master Data | Teachers" (e.g. "2-4"). The weighting determines the level of
importance of these settings (i.e. the degree of compliance with the settings). Leaving the field empty
means that the weighting has no effect on the optimisation process.
Independent weighting points, by contrast, involve general settings such as "Avoid non-teaching periods
(NTPs)" or "Avoid having just one period in a half-day for teachers" since window periods and single
periods do not require additional specifications to be entered under master data or lessons .
The weighting settings can be accessed via the menu item "Scheduling | Weighting".
The weighting dialogue that is then displayed contains the different weighting parameters sorted by topic
and organised on a number of different tabs. Increase or decrease individual weighting settings by using
the slider provided From left to right, the weighting sliders offer the following 6 levels of importance
Position 0 - unimportant
Position 1 - not very important
Position 2 - fairly important
Position 3 - important
Optimisation
79
Position 4 - very important
Position 5 - extremely important
The following chapter briefly describes the individual parameters with reference to the master data and
lessondata settings relevant for dependent weighting points.
3.2.1
Weighting parameters
You can set weighting parameters according to topic on various tabs.
Teachers 1 tab
Teachers 2 tab
Classes tab
Subjects tab
Main Subjects tab
Rooms tab
Period Distribution tab
Time Requests tab
Analysis tab
80
3.2.1.1
Teachers 1 tab
Avoid having just one period in a half-day for teachers
When a teacher teaches in a half day this weighting parameter means that he/she should have more
than one period in that time.
Optimisation of NTPs for teachers
You defined minimum and maximum number of non-teaching periods under "Master Data | Teachers".
This setting controls how these values should be respected.
Avoid creating double NTPs for teachers
Besides controlling individual NTPs, you can give penalty points for any double NTP scheduled by the
software during optimisation.
Respect lunch breaks for teachers
Works in connection with the minimum and maximum values for lunch break entered under "Master Data
| Teachers".
Respect the subject sequence for teachers
Controls the level of importance of the subject sequence codes entered under "Lessons | Teachers" or
"Master Data | Subjects". Please refer to chapter "User tips - Subject sequences" for further details.
Respect breaks at beginning and end of day
Controls the level of importance of breaks between days entered on the "Timetable" tab under
"Master Data | Teachers". Please refer to chapter "Master data properties" for further details on
breaks between days.
Optimisation
3.2.1.2
81
Teachers 2 tab
Respect the maximum and minimum number of periods per day for teachers Controls how the
maximum and minimum number of periods per day for teachers set under "Master Data | Teachers" will
be respected.
Respect the maximum number of consecutive periods per day Controls how the maximum
number of consecutive periods per day set under "Master Data | Teachers" will be respected.
Input block "Periods in last morning slot"
Maximum
Teachers scheduled to have lessons on the last period of the morning are often at a disadvantage. You
can therefore specify the maximum number of last morning periods each teacher should teach.
Weighting
Indicates the level of importance you attach to this rule.
The weighting for NTPs, lunch break, maximum number of periods per day and maximum periods in
sequence for individual teachers can be increased further on the "Timetable" tab under "Master Data |
Teachers", .
82
3.2.1.3
Classes tab
Avoid non-teaching periods (NTPs)
Controls whether non-teaching periods for classes should be avoided.
Respect maximum or minimum number of periods/day for classes
Controls whether the values entered under "Master Data | Classes" should be respected.
Respect lunch break requests for classes
Controls how the minimum and maximum length of a lunch break set under "Master Data | Classes" will
be respected.
Respect the subject sequence for classes
Controls how the subject sequence codes entered under "Lessons | Classes" or "Master Data |
Subjects" will be respected.
Respect the maximum number of lessons per day for classes
Controls the importance of the entry of how many lessons each class may be taught per day. You can
find this definition in the field of the same name under "Master Data | Classes"
Class teacher at least once per day
If individual classes have been assigned a class teacher under "Master Data | Classes", the optimisation
process will attempt to schedule at least one period per day with the class for the class teacher. This
weighting setting controls the relevant importance of this.
Optimisation
3.2.1.4
83
Subjects tab
Use these weighting settings to control the level of compliance with the specifications entered for
optional subjects and fringe periods (codes (F) and (R) under "Master Data | Subjects" or "Lessons |
Subjects". In many cases these are subjects that are not taken by all the students in a class. For this
reason they should be scheduled at the beginning/end of a half day in order to avoid non-teaching
periods for the other students.
You can define the following rules for optional subjects or fringe periods using the three check boxes:
- 'in the first period', if the first period of the day is to be allowed for scheduling
- 'in the last period', if the last period of the day is to be allowed for scheduling
- 'between morning and afternoon', if the time between the morning and afternoon is to be allowed for
scheduling
The only differences between optional subjects and fringe period subjects are the different weighting
settings that you specify.
Note:
You can of course control the scheduling of fringe period subjects and optional subjects exclusively via
the time request function. However, the weighting settings here provide a higher level of flexibility for the
optimisation tool.
Lesson not to be held in fringe period if code = G
A subject or lesson for which this code is set is not to be scheduled in a fringe period but in the middle
of the day.
This weighting setting controls the importance of the checked box
84
3.2.1.5
Main Subjects tab
Main subjects are defined as such under "Master Data | Subjects" .
Respect maximum number of main subjects per day for classes
Controls the level of compliance with the maximum number of main subjects per day entered on the
"Timetable" tab or in the grid view under "Master Data | Classes" .
Respect max. no. of consecutive main subject periods for classes
You can specify the number of main subjects that may be scheduled in sequence for a class on the
"Timetable" tab or in the grid view under "Master Data | Classes" . Use this setting to control the
importance of this parameter.
Input block 'Weighting for the boundary period“
Boundary period for the following aspects
Use this input field to specify any boundary period desired.
Main subjects max. once after boundary period
Controls the priority with which a main subject is to be scheduled once per week after the boundary
period.
Main subject at least once up to boundary period
Controls the priority with which a main subject is to be scheduled once per week prior to or in the
boundary period.
Optimisation
3.2.1.6
85
Rooms tab
Optimisation of room allocation
Use the "Room weighting" tab under "Master Data | Rooms" to specify how important the room is for the
lesson. A room with no special equipment can easily be substituted with another room (a value of 0)
while sport only makes sense when the gym is free at the time in questions (a value of 4).
The 'Optimisation of room allocation' weighting setting allows you to control the importance of the room
weighting.
Caution:
If the slider control for this weighting setting is on position 5 ('extremely important') or 4 ('very important'),
and if the room weighting for the subject room is 4, a period cannot be scheduled if there is no suitable
subject room available.
Optimisation of the off-site rooms
Controls the level of compliance with the specified walking times required to reach off-site buildings
(external sites). (Please refer to chapter "User tips | Off-site rooms" for further details.)
Take room capacity into consideration
The optimisation tool and the room optimisation function generally attempt to allocate a room with a
room capacityappropriate for the number of students in the lesson. If this presents a problem, the
program searches for a room that is slightly larger than required. In extreme cases, the software may
allocate a room that is slightly smaller than required.
86
3.2.1.7
Period Distribution tab
The same subject cannot be taught more than once on the same day
A subject may only be scheduled once per day (even when it occurs in various coupled lessons).
Avoid errors with double periods
There are two types of double period errors in Untis: the breaking up of intended double periods and the
"chance" creation of unintended double periods when the same subject is scheduled in consecutive
periods. The optimisation tool assigns a higher priority to the preservation of desired double periods.
This weighting setting is connected with codes "(2) More than once a day" and "(D) Respect double
periods". You can find these settings in the master data and the lesson windows. The two codes are
mutually exclusive.
The code "(2)" sets the weighting for 'Avoid errors with double periods' to 0 ('unimportant') while the code
"(D)" boosts its importance. This boost may go so far as to prevent a lesson from being scheduled if the
double period condition cannot be respected.
When you set the weighting for "Avoid errors with double periods" to 5 (extremely important), the
optimisation tool rates the importance of the double period condition very high right from the very
beginning of the optimisation run and even increases the importance during the run so that at the end of
the optimisation process all lessons are treated automatically as if the lessons had been set with the
code "(D) Respect double periods".
Caution:
You should only use flag '(D)' explicitly in exceptional cases or not at all. Excessive use will impair
optimisation results.
2 periods/week - subjects not on consecutive days
This weighting factor refers to lessons with 2-period blocks (single, double or block periods) and is
intended to ensure that lessons are distributed evenly over the week. A high weighting factor prevents
Optimisation
87
the periods being held on consecutive days. It also prevents a block from being scheduled with one
lesson on the last day of the week and the other on the first day of the week.
3 periods/week - subjects not on consecutive days
This weighting applies in the same way as the previous one, but for 3-period blocks.
Even distribution of periods of a subject across the day
If, for example, a class has a subject in the third period on Mondays, the third period should be avoided
on other days of the week. This weighting setting controls the importance of the rule.
Try to place the same lesson at the same time on different days
If, for example, a class has a subject in the third period on Mondays, the third period on other days
should also be selected for this subject. This weighting setting controls the importance of the rule.
Large blocks in fringe periods on half-days
It is often desirable to schedule block periods at the beginning or end of a half-day for a variety of
reasons. For example, a half-day consisting of 6 periods can accommodate 2 blocks of 3 periods each..
On the other hand if a block of periods is slightly shorter than the sum of the single periods (for instance,
because there are no breaks between periods), students will be able to leave school early or start school
later than the normal start time.
3.2.1.8
Time Requests tab
Time Requests tab
You can enter time requests in the master data or in lessons windows by clicking on the corresponding
button in the toolbar. Please refer to chapter "User tips | Time requests" for further details.
Time requests for teachers
Controls compliance with time requests specified under "Master Data | Teachers" .
Time requests for classes
Controls compliance with time requests specified under "Master Data | Classes" .
88
Time requests for subjects
Controls compliance with time requests specified under "Master Data | Subjects" .
Time requests for rooms
Controls compliance with time requests specified under "Master Data | Rooms" .
Time requests for lesson periods
Controls time requestsspecified under lessons.
3.2.1.9
Analysis tab
A well-balanced distribution of the weightings is the prerequisite for a good optimisation result. The
Analysis tab offers an overview of the frequency of the different individual weighting levels given.
In the example about six weighting parameters have been set to the highest weighting level 5 (extremely
important).
You can display more information about possible problems due to the distribution of the weighting
parameters by clicking on <Details>.
Optimisation
3.2.2
89
General notes
If you have not worked with setting weighting parameters before, we would suggest you proceed as
follows:
First, familiarise yourself with all the weighting parameters and their functions.
Move the slide controls for all the attributes that do not apply to your school under any
circumstances to the very left (position 0 = 'unimportant'). This might be the case for example for
"Optimisation of the off-site rooms" if your school has no off-site rooms.
Note:
If in doubt about the relative importance of an attribute, set the slide control to position 1 ('not very
important') instead of 0.
Next, adjust the remaining slide controls in order of increasing importance from 'not very important' to
'extremely important'.
Keep an eye on the frequency with which you assign the different levels of importance We recommend
that you assign higher weightings less frequently, as illustrated in the diagram.
90
You should never end up with a distribution where the majority of weightings are set to 0 or 1
(unimportant/not very important) or to 5 (extremely important). It is also undesirable if frequency
increases with increasing weighting importance.
Caution:
The difference between the weighting level 4 and 5 is much higher than between 3 and 4. If you have
selected too many settings of "extremely important", the optimisation tool will be restricted to the extent
that it can only schedule a fraction of the periods. For this reason on set parameters to level 5 if it is
absolutely necessary
3.3
Optimisation
3.3.1
Control data for optimisation
The optimisation dialogue is accessed via the menu item "Scheduling | Optimisation". The following
section describes the individual input fields in this window.
Optimisation
3.3.1.1
91
Optimisation process
You have a choice of different strategies and optimisation depths for the optimisation run.
Strategy A - fast optimisation
Strategy B - complex optimisation
Strategy D - complex %-placement
Strategy E - overnight optimisation
3.3.1.1.1 Optimisation strategy (A, B, D, E)
Untis offers four different strategies for the creation of your timetable These strategies offer different levels
of complexity, with strategy A representing the lowest and strategy E the highest level of complexity. As
a general rule, the more complex theoptimisation strategy, the better the result, but the longer it takes
the software to compute the result. The differences between the individual strategies are described in
detail later.
92
Strategy A - fast optimisation
Strategy B - complex optimisation
Strategy D - complex %-placement
Strategy E - overnight optimisation
3.3.1.1.2 Optimisation series: No. of TTs (1-20)
Use this option to specify how many different timetables you wish the software to create per series. If
the option 'Save the results of the optimisation in work files' on the 'Auto-save' tab under "Settings |
Miscellaneous" is activated, each timetable will be saved in a dedicated file (work x .gpn where x is the
number of the file) in the active Untis directory. (However, it is advisable, to enter a dedicated path for
these work files on the "Directories" tab under "Settings | Miscellaneous".) Depending on the selected
optimisation strategy, the program will carry out further optimisation runs on the timetables.
3.3.1.1.3 Optimisation level (1-9)
This function allows you to specify the extent of the software’s "pre-calculation function" for each
optimisation run. Like a chess game program, Untis calculates before each "move" (i.e. before each
placement of a lesson) how the move will affect the situation as a whole. As a general rule, the longer it
takes the computer to arrive at a result, the better the final outcome. In the early stages of creating a
timetable, however, long optimisation runs are often counter-productive since initial results often indicate
that certain changes need to be made to the input data.
3.3.1.1.4 % of periods to be scheduled
This option allows you to specify the percentage of periods at your school you wish the software to
schedule. Leaving the field empty means that the optimisation tool will attempt to schedule all the
available periods.
Optimisation
93
Tip:
The percentage refers to the periods of the entire school. So if you specify 10% of a total of 1,000
lessons then Untis will select those 100 lessons that are regarded as to be the most difficult ones. This
is useful way of finding out quickly which lessons the algorithm considers difficult to schedule.
3.3.1.1.5 Similarity to previous TT
This field allows you to specify if and how much the next timetable should resemble the previously
created timetable. Input options range from 0 (no similarity) to 4 (high similarity). the new timetable
always reflects the modifications you make in the scheduling dialoguebetween optimisation runs.
Leaving this field empty equals a value of 0 (no similarity).
3.3.1.1.6 Lock timetable conditionally
If you lock created timetable conditionally, the next optimisation run will skip the placement run and only
carry out a swap run. This means that the resulting timetable will be very similar to the previous one.
This constitutes an even higher level of similarity than the highest similarity setting (4 = great similarity)
in the function described above.
When you combine the two functions described above by ticking the box "Lock timetable conditionally"
and increasing the percentage under "% of periods to be scheduled", the software proceeds by first
locking the previous timetable, then scheduling the remaining periods and finally carrying out a swap
optimisation run for all the periods
3.3.1.1.7 Only requested days off for teachers
Activate this option to instruct the software to schedule only the free days specified under time requests
for teachers (and no additional days).
94
3.3.1.1.8 Consider room capacity
Activate this function to instruct the optimisation tool to compare the specified room capacitywith the
number of students in a class or lesson and allocate rooms accordingly.
3.3.1.1.9 Off site buildings by the half day
This option is only active if you have entered off-site codes in "Master Data | Rooms". The algorithm tries
to avoid classes and teachers having to move from one site to another during one half-day.
3.3.1.1.10 Increment percentage
This field is relevant only with strategy Dand is discussed in the relevant chapter.
3.3.1.1.11 Special optimisation for double periods
You can check this option when at least 80 % of the lessons you have entered are to be scheduled as
double periods. Special importance is then attached to scheduling double periods in subsequent
optimisation.
Internally, this process halves the time grid and the number of periods for the lessons meaning that only
single and half periods need to be scheduled during the run.
Caution:
Please ensure that there is an even number of periods defined in the morning in the time grid. If the time
grid has a total of 10 periods per day, only 4 or 6 periods should be declared for the morning, and not 5.
3.3.1.2
Teacher assignment during optimisation
When the software encounters bottlenecks during the optimisation run (see also chapter "CCC analysis"
), the program attempts to bypass them by swapping teachers. If the software finds a suitable teacher
and if a swap with this teacher would improve the quality of the timetable, the program automatically
proceeds with the swap during the optimisation run.
The module Lesson Planning offers an extended version of this function.
Automated teacher swaps can only be carried out when at least one of the following two conditions can
be met:
The code "(V) Variable teacher" is active for some lessons;
The function "? teachers" is active for some lessons (for use with the module 'Lesson Planning and
Value Calculation'
3.3.1.2.1 (V) Variable teacher
A teacher may only be swapped if the code "(V) Variable teacher" has been activated. You can find this
option on the "Codes" tab under "Lessons | Teachers". A teacher who is the cause of an optimisation
bottleneck and for whom the code (V) is active may be replaced with another teacher.
Optimisation
95
As a rule, the code (V) applies to all the teachers of a lesson. Check the option "Teacher allocation
locked" in the appropriate row in the lesson details window (under "Lessons | Teachers") if an individual
teacher involved in the lesson is not to be swapped under any circumstances. This deactivates the code
(V) for this particular teacher in this coupled lesson (see example).
3.3.1.2.2 ? - teacher
For use with the "Lesson Planning" module. This function enables the software to search for a suitably
qualified teacher for the lessons for which this function is active.
3.3.1.2.3 Settings
The automated teacher swap function is controlled via the optimisation dialogue. The following settings
are available:
96
No optimisation of teacher assignment
Checking this box deactivates the teacher swap function. All "(V) Variable teacher" codes will be
ignored.
The following two input options are only available for use with the "Lesson Planning" module.
No swap with other subjects
Teachers can only be swapped between lessons of the same subject.
Swap only lessons with equal periods
Teachers can only be swapped between lessons with the same number of periods.
Swap only within one class level
If this option is activated, lessons can only be swapped between variable teachers when the classes
involved in the lessons are at the same level (in the same year/grade).
3.3.1.2.4 Re-assign original teachers
Press this button to delete all teacher swaps carried out in previous optimisation runs. This means that
each subject will again be taught by the teacher originally assigned to the lesson under "Lesson |
Teachers"
After a successful teacher swap, a display of all swapped and originally assigned teachers can be
viewed with the diagnosis function ( "Scheduling | Diagnosis" ). The figure shows a situation where
teacher 'Arist' has been replaced by teacher 'Gauss' for lesson 79.
The lesson details window displays the current and the replaced teacher (see figure).
Optimisation
97
3.3.1.2.5 Teacher optimisation code
With the teacher optimisation code, the Lesson Planning module offers a further method of limiting
swaps with variable teachers.
You can find the code in "Master Data | Teachers" and in the lesson windows. The codes in these two
types of windows are independent of each other.
The codes can be used to select a pool of lessons or teachers in which swaps are possible. Identical
codes mean that the teachers of the marked lessons can be swapped.
You can assign the codes 1-9 and A-Z. The codes are always an additional limitation. For instance, if
you have activated the option "Swap only within one class level" and you have entered the code 1 for the
teachers Gauss and Newton then swaps of Newton's lessons are only possible with lessons of Gauss in
the same class level.
98
3.3.2
Strategies
Untis provides four different optimisation strategies for the creation of your timetable:
Strategy A - fast optimisation
Strategy B - complex optimisation
Strategy D - complex %-placement
Strategy E - overnight optimisation
3.3.2.1
Strategy A - fast optimisation
This is the fastest optimisation variant. It does not return the best results but is ideally suited to
discovering errors in the input data. For this reason, use this strategy at the start of scheduling until
major data errors in master data and lessons have been remedied.
Tip:
Errors in input data prevent good optimisation results. Work with strategy A and with the input data
under 'Diagnosis'in order to find errors.
3.3.2.2
Strategy B - Intensive optimisation
Strategy B - complex optimisationThis strategy returns very good results and does not take too long.
Run this variant after running strategy A and look at the results. If necessary, adjust the weighting slide
controls if the timetables do not match your expectations.
Tip: Developing weighting parameters
There is an enormous difference between weighting values of 4 and 5. A weighting value of 5 will impair
the result even though a value of 4 would be sufficient. For this reason you are recommended to set the
Optimisation
99
slide controls to a maximum of 4 and only to change individual controls to 5 if the timetables generated
do not match your expectations.
3.3.2.3
Strategy D - complex %-placement
Depending on the school strategies D or B may return better results. However, since strategy D takes
considerably longer to run, you should not invoke it until you have developed weighting parameters using
strategy B. In this variant the algorithm proceeds step by step, i.e. does not process all lessons in one
go. For this reason you must enter the start and incremental percentage in the optimisation dialogue.
Tip: Start and incremental percentage
We recommend a starting percentage value of 30% and incremental percentage value of 20%.
3.3.2.4
Strategy E - overnight optimisation
As the name implies, this strategy can take a long time to run, but in most cases returns the best
results.
Use it at the very end of optimisation, i.e. after using the other strategies. How long this optimisation
takes to run depends very much on the size of the school, the number of timetables to be computed, the
optimisation steps per timetable and on how powerful the computer is that you are using. It can therefore
very well take the whole night to run.
3.3.3
The accompanying window
Start the optimisation process by opening the optimisation dialogue under "Scheduling | Optimisation",
entering the desired settings and clicking on <OK>.
If the data analysis window appears, check the displayed messages and/or rectify the displayed errors
and click on <OK>
An accompanying window appears which consists of two panes. The upper part of the window is the
information window containing functions for the management of the optimisation process (pause, cancel
etc.).
The window also provides a continuous display of key data of the current optimisation run: an evaluation
of the current timetable (penalty points), the number of unscheduled periods, window periods (for
classes) and core time infringements (these are periods with a time request of +3 that the software is
unable to fill for some reason). The windows also shows how often double-period conditions were
infringed and how often a subject was scheduled twice on the same day for a particular class. These
data provide a first, rough impression of the quality of the timetable being created. The tools for more
detailed diagnostic runs are described in chapter "Diagnostics tools" below.
100
When the yellow-blue <OK> button appears on the screen, the optimisation run is complete.
Note:
Each timetable is evaluated ('Evaluation' column). The lower the number of point for a timetable, the
better it is. The number of points depends on the quantity of data and on the weighting settings. It
therefore makes no sense to compare the number of points at your school with those of a neighbouring
school.
3.3.4
Viewing optimisation results
When the optimisation is completed the best result is loaded. Via the optimisation window you can
switch to other timetables, too. Click on the relevant line in the upper section of the window.
>Every individual timetable can be stored as a separate file (work1.gpn to work n .gpn) by selecting the
option "Save the results of the optimisation in work files" on tab "Auto-save" under "Settings |
Miscellaneous". This gives you the possibility to load, view and analyse all the results at any time.
After clicking on the yellow-blue <OK> button to confirm, the individual results can be loaded with via the
work.gpn files or via menu item "Scheduling | Optimised timetables". The latter option is only available in
the Untis session in which optimisation was launched, i.e. the option will be greyed out if the application
was closed and reopened.
Optimisation
101
Tip:
You can change the directory of the work.gpn files by entering a path in the "Optimisation results" field
on the "Directories" tab under "Settings | Miscellaneous".
102
3.4
Diagnostics tools
The master and lesson data of your school contain a vast store of information and it is often difficult to
keep track of the amount of data. his means that it is easy for inaccuracies, mistakes and errors to
creep in when entering or modifying data. Searching for these inaccuracies and errors is a cumbersome
but necessary task for which Untis provides a number of aids.
This chapter not only deals with errors, but also with so-called "input weaknesses" Input weaknesses
are data that, while not technically wrong, can cause inferior or unexpected results.
Percentage planning
Diagnosis
Overall diagnosis
3.4.1
Percentage planning
After finishing your data entry, you should initially carry out a percentage planning run (e.g. at 30%) to
identify lessons that the Untis software categorises as "difficult". As a rule, the program attempts to
place such lessons as quickly as possible to prevent them from causing an obstruction later during the
process.
Note:
The "difficulty" of a lesson is determined by the number of unavailable lesson elements, the number of
element couplings and the size of the lesson block.
If Untis encounters problems during the scheduling of the very first 30% of periods and if this very first
optimisation runis unable to schedule certain periods, the first thing to do is to increase the number of
timetables to be created and the number of optimisation steps If this fails to bring about improvements,
the input data should be examined for errors.
3.4.1.1
Example
Errors and input weaknesses are described in greater detail below. The following example provides a
brief introduction to the percentage planning function
Optimisation
103
1.
Open the file demo.gpn .
2.
Delete all timetables via the menu item "Scheduling | Delete the complete timetable".
3.
An information window appears. Click on <OK>.
4.
Carry out a timetable optimisation run (via "Scheduling | Optimisation"), entering value of 30 in the
field "% of periods to be scheduled".
5.
Display the timetable for class 1a ("Timetable | Classes").
The timetable for class 1a should correspond approximately to the timetable shown in the figure. There
may be slight variations in display depending on the software version you are using.
As mentioned before, the percentage applies to the entire school and not to individual classes. The
example shows that fewer than 30% of the periods for class 1a have been scheduled but proportionately
more for the other classes. This indicates that this class has fewer difficult lessons than the other
classes.
Click on the subject "Design".
104
The period details window shows that the subject Design is difficult to schedule because three teachers
are involved in the lesson (Andersen, Gauss and Curie) and two rooms are required (the workroom and
the textiles workroom). Furthermore, another class (1b) takes part in the lesson. If Untis attempted to
schedule this lesson towards the end of the optimisation run, the software would find it much more
difficult to find a slot on the timetable that would suit all teachers, rooms and classes involved in the
lesson.
As already mentioned, you can assume that inaccuracies and errors during data input are to blame
when the percentage planning function is unable to schedule periods.
3.4.2
Time requests
Time requests are another frequent reason why the software may find it difficult to construct the perfect
timetable. A number of predefined lists can help you search for input weaknesses and errors caused by
time requests. Most of these lists can be accessed by clicking on <Print> or <Print Preview> in the
master data or lesson windows.
Under "Print selection", a number of different types of lists are available (e.g. time requests, day
requests, etc.).
The following example is based on the conflicting period requests of a teacher team. If you have the
module Lesson Planning select "Teacher teams" as type of list in "Master Data | Teachers" . If not, you
can obtain this list by using the toolbar button <Display the teacher teams> under "Scheduling | CCCAnalysis | Diagnostics tools", .
Optimisation
105
The example shows that the only day not blocked for any of the teachers involved is Thursday.
A lesson consisting of three single periods could not be scheduled for this teacher team without violating
a block (something the optimisation tool would never do) or the single period condition (something the
optimisation tool might do, depending on your weighting settings for conditions such as "Avoid errors
with double period"). Please refer to chapter "User tips | Teacher teams"for further information on teacher
teams.
3.4.3
Options
Options An important point is the distinction between " must " and " can ".
An entry of "2-2" for a 4-period lesson in the 'double period' field forces Untis to schedule two double
periods. An entry of "1-2" ' allows the algorithm to decide whether two of the four periods should be
scheduled as two single or one double period. The more freedom the optimisation process has, the
better the results will be
3.4.4
Locked periods
Locked periodsfurthermore, try not to restrict the optimisation tool by scheduling a large number of
lessons manually. Reconsider if some periods really need to be scheduled manually (see also chapter
"Manual timetabling").
106
3.4.5
Weightings
When the software is unable to schedule large numbers of periods, it makes sense to call up the
weighting dialogue again and to determine if the setting "extremely important" (5) is appropriate in all of
the cases. It is often sufficient to reduce the setting of one or two items by one level to "very important"
(4) in order to resolve a problem, (see also chapter "General notes" under "Weighting" above).
Increase the percentage of the periods to be scheduled step by step until you are certain that all the
input weaknesses have been resolved.
Use the more complex optimisation strategies only when you are certain that all entries are correct.
Important aids for identifying and locating input errors as well as violations of conditions are the
"Diagnosis" and "Overall Diagnosis"tools. These are described in the following chapter.
3.4.6
Diagnosis
After optimising your timetable, you can analyze the results with the diagnosis function of the Untis
software using a number of different criteria.
Access the diagnosis window via the menu item "Scheduling | Diagnosis". The window is divided into
two sections – the selection window on the left and the details window on the right..
3.4.6.1
Selection window
Selection window The selection window consists of two sections:
Possible problems with input data
Optimisation
107
Infringements in the timetable
You can switch between the two halves of the window using the two tabs in the upper section of the
window. Both sections are arranged under headings that group the individual diagnosis items into
different categories. The total number of infringements for each topic is displayed on the right. A number
on a red background indicates that there is at least one serious (highly weighted) problem. As with
Windows Explorer, you can expand the topics by clicking on individual '+' symbols.
The weighting for each diagnosis item is displayed in the 'Wtg' column. The figure shows that the
diagnosis topic 'Subj 1/day imposs.' was given a weighting of 5. The weightings themselves are managed
in the Weighting dialogue . Those diagnosis items displaying a '*' in the 'Wtg' column cannot be
weighted. The 'Num' column displays how many infringements there are for the corresponding diagnosis
item.
By default, only those diagnosis items are displayed for which infringements exist. This can be seen
from the activated <Filter> button in the dialogue window toolbar and the filter fields shaded green (entry
>=1 in the 'Num' column).
The figure shows how the display of diagnosis items can be restricted to infringements that have a
weighting of 4 or higher.
108
<Complete display>
Click on this button to resize the window to its optimum size.
<Refresh list>
Clicking on this button causes the diagnosis to be performed once more. (The diagnosis window will be
recalculated even when you close it and access it once more via "Planning | Diagnosis".)
Please note that the diagnosis tool only diagnoses the timetable for one week – an essential precaution
when using the modules Multi-Week Timetable or Multiple Terms Timetable, where different timetables
may be in use in different consecutive weeks (e.g. for term teaching or block lessons). When analysing
such timetables, you can use the date setting (below the control elements) to specify which week you
want to analyse.
Optimisation
3.4.6.2
109
Details window
The details window on the right of the diagnosis window allows you to display further information about
individual items by selecting the item in the selection window.
Clicking on the link 'Display affected windows' opens the dialogues that are relevant for the diagnosed
problem. The figure shows for example that no room was specified for teacher Gauss for lesson 82.
110
As soon as the problem is solved, 'S' (status) column in the diagnosis window is checked. As soon as a
diagnosis is performed once more the item will no longer be displayed.
The diagnosis indicates possible problems in the data or in the timetable. However, it might be that you
have e.g. defined a lesson without a room. In such cases you can either choose to ignore the entry in
the diagnosis window and right-click with the mouse to select 'Ignore infringement' in order to mark the
item as ignored. If you also deactivate the option 'Display all infringements' in the context menu any
diagnosis items marked in this way will be hidden.
Optimisation
111
Note:
The item 'Ignore infringement' offered in the diagnosis context menu is only intended to support clarity
within the diagnosis. It has no effect on any timetable optimisation performed subsequently.
3.4.6.3
Subject 1/day impossible
An explanatory text is displayed in the details window of the diagnosis for each diagnosis item. However,
the item 'Subject 1/day impossible' under the heading 'Input Data | Class' deserves special attention. By
default, the scheduling algorithm attempts to schedule a subject only once per day. The relevant
subjects will be listed in the diagnosis if this is not possible since too many periods have to be spread
over the days available.
The figure below shows that a special tuition teacher is scheduled to take class 1a for the subject ST
comprising 5 periods each of English and German. This means that 10 weekly periods are defined for
the subject SN with class 1a. Untis would attempt to schedule this subject just once per day. However,
since 10 individual periods cannot be fitted into a 5-day week, the issue will be listed.
112
Possible solutions for this concrete example:
Set up double periods or block conditions
Activate the '(2) More than once a day' option for the subject ST in the subjects master data
Change the subject name of one of the lessons taught (e.g. 'ST_GE' for special tuition in German)
3.4.7
Overall diagnosis
The overall diagnosis function provides an overview of the classes and teachers that have ended up with
the worst timetables (measured against your settings). It is accessed via "Scheduling | diagnostic tools |
Overall diagnosis".
As with the diagnosis function , the overall diagnosis function applies to only one week.
Depending on the setting (class or teacher) the window lists all the elements of your school row by row.
The elements are sorted by the 'Points' column. The points are an evaluation of the quality of the
timetable for the element in question. A high number of points indicates a poor timetable.
The other columns display the three periods with the worst assessment for each element. The figure
indicates that the 6th period on Tuesday is the worst period for class 4. Clicking on the points score
displays why the period has such a poor valuation (in the 'Reason' column). An accompanying timetable
will also switch display automatically to the period in question. The example indicates the reason as
'one period in half-day'. A better valuation could be achieved by scheduling an additional period on the
same afternoon.
Optimisation
113
An empty field under "Reason" indicates that the timetable for this class or teacher is already very good
(i.e. has relatively few penalty points) In relation to the other periods, the displayed period may be one of
the three worst rated ones. It is unnecessary, therefore, to change the period manually..
In short, the diagnosis function provides an overview of all timetables while the overall diagnosis function
114
targets the worst timetables in the school and aims to improve them. The overall diagnosis window also
displays the causes of violations.
3.4.8
CCC analysis
In order to obtain a good timetable, it is important to locate possible bottlenecks that might cause an
obstruction for the scheduling tool, and to eliminate these before optimisation .
Such bottlenecks occur in the form of critical conflict chains (CCCs). These are defined as groups of
lessons that cannot be scheduled at the same time due to a conflict between classes and/or coupled
teachers.
Note:
The total number of periods per week involved in a chain is a measure of how difficult it is for the software
to schedule the lessons in the chain. If this number is greater than the number of periods available in the
time grid, it is mathematically impossible to schedule all the lessons in this chain.
Start the analysis by accessing the menu item "Scheduling | Diagnostic tools | CCC-Analysis" in order
to locate the longest conflict chains. The analysis can take up to several minutes, depending on the size
of your school.
3.4.8.1
Information during analysis
During the analysis you will see the number of the lesson currently being processed in the upper part of
the window (to the right of the word "Lesson") The two numbers in parentheses denote the number of
couplings the software has finished analysing and the total number of couplings to be analysed
respectively.
Optimisation
115
Use the <Cancel> or <Start analysis> buttons in the dialog toolbar to cancel the current analysis or to
launch another analysis.
3.4.8.2
The CCC window
As you can see in the example, there are 70 lessons and 15 couplings, resulting in over 2.8 million
combinations that need to be analysed.
Middle section of the window
The middle section of the window lists all CCCs in rows. . The first column contains the total number of
periods per week involved in each chain. The figures to the right are the numbers of the lessons involved
in the chains. The table also displays the short names of teachers in parentheses next to some of the
elements. The purpose of this function is described later.
The CCC details window
Clicking on the middle section of the window updates the details window.. In the example, lesson '56
(New)' has been activated. The details window now displays field with lesson number 56 together with
the number of periods shaded light blue. Some fields are also shaded red.
The entries in the details window can be interpreted as follows: The elements involved in lesson 56 with a
116
total of 4 periods per week are class 3b and teacher Newton (short name "New").
Some lessons involve several classes or several teachers (e.g., no. 69,1,4). In such cases the "Classes"
and "Teachers" columns list all the relevant elements next to each other.
The cells shaded red highlight the reason why the displayed lesson cannot be scheduled at the same
time as the lesson selected in the middle section of the window Lesson 56, for example, cannot be
scheduled at the same time as lesson 1 since both lessons involve class 3b. Lesson 25, in contrast,
involves a different class but the same teacher (Newton) and therefore cannot be scheduled at the same
time as lesson 56.
3.4.8.3
Shortening CCCs
The longest chain the first row in the middle section of the window contains 27 periods that cannot
be scheduled at the same time Of course, time requests or additional conditions may have been defined
for each teacher, class or lesson.
Note:
A large number of chains with many periods can soon cause serious timetabling bottlenecks.
You now have the option of shortening the chain by assigning a different teacher to individual lessons.
The teacher whose swap would cause the greatest shortening of the chain is referred to as the critical
element . The CCC analysis indicates the teacher's short name in parentheses next to the lesson
number in the middle section of the window.
A swap is unlikely to bring about an improvement if no critical element is indicated, for example when
there are a large number of classes involved.
3.4.8.3.1 List of teacher teams
You can use the buttons <Display the teacher teams> or <Print the teacher teams> in the CCC window
to gain an overview of the composition the teams of teachers.
4
Manual Scheduling
4.1
Manual scheduling
Untis offers several different possibilities for manual scheduling (the scheduling, shifting and deleting of
periods): the manual scheduling in the timetable , the scheduling timetable and the scheduling dialogue
The most important functions such as scheduling, shifting, swapping, locking and deleting of periods as
well as the manual room allocation are possible with all three tools. The scheduling timetable and the
scheduling dialogue offer special functions and additional information.
4.2
Scheduling periods in the timetable
The simplest way of scheduling periods, which does not even involve learning new windows, is by
scheduling in the regular timetable. The following tasks can be carried out manually on a normal class or
teacher timetable:
plan unscheduled lessons ,
lock periods ,
Manual Scheduling
117
swap periods that have already been scheduled,
delete periods and
allocate rooms manually.
4.2.1
Scheduling periods
The aim of the first exercise is to place periods in an empty timetable and lock them to prevent the
automated scheduling tool from moving them during a later optimisation run.
1.
Open the file demo.gpn and delete the current timetable via "Scheduling | Reset the timetable"
2.
Unscheduled periods will now be displayed next to the timetable and can be placed in the timetable
using drag & drop.
Clicking on a period that you wish to schedule will display possible time slots in the timetable.
Fields which are highlighted green indicate that these would be good slots to place the period avoiding
the risk of a clash.
The software also takes into consideration any additional settings you have made. For instance, Friday
is not displayed as a possible day for the lesson 'Mus' for class 1a because teacher 'Callas' has been
allocated a day off on Friday ("Master Data |Teachers | Time Requests").
Tip:
You can us the <Colour coding> button in the 'Time requests' window to specify the display colours for
the different time requests. This is necessary if for example there are difficulties in distinguishing
between red and green.
If you click on the <Settings> button and then check the box 'DragDrop: colours same as time requests'
on the 'Layout 2' tab, the settings will also be used for manual scheduling in the timetable.
Lessons are automatically displayed and scheduled as single or double periods (or blocks) in
accordance with settings made for double periods under lessons.
118
When there is more than one unscheduled period of a particular lesson, the individual periods will be
displayed stacked. When there are more than three periods, the number of unscheduled periods will also
be indicated.
You can determine the position of unscheduled periods yourself by simply grouping the stack around the
desired position in the timetable. After right-clicking and selecting ' Re-group unsched. prds.' the stacks
will be automatically repositioned.
Manual Scheduling
119
Alternatively, you can schedule the periods from the lessons window. To do this, click on the relevant
period in the 'Unsched Prds' column and use drag & drop to position it in the timetable.
Room allocation
Lesson cells highlighted purple indicate that it is possible to schedule the lesson without a conflict as far
120
as class and teacher are concerned but that room availability (i.e. the room allocated to the lesson and
all alternative rooms are not free) prevents the lesson being scheduled (see figure).
If you position a period on a purple cell, the lesson will be scheduled without a room being allocated. The
room allocation of the lesson already scheduled in this position will not change. A short beep will be
issued as an additional warning to indicate that the lesson has been scheduled without a room (please
refer to chapter "Allocating rooms" for further details. )
4.2.2
Locking periods
Lock a period in place by clicking on <Lock period> in the tool bar of the timetable. This will prevent the
automated scheduling tool from moving the period during a subsequent optimisation run. Alternatively,
lock the selected period by pressing <F7>. The same key can be used to unlock a period.
Locked periods are marked with an asterisk (*) in the period details window next to the lesson number.
You can also choose to display the asterisk in the timetable period (on the "Layout 2" tab under
<Timetable Settings>).
Manual Scheduling
121
Tip:
You can see all locked periods in the window "Lessons | Locked Lessons". This window also allows you
to unlock the lessons at the different levels. Please refer to chapter "Locked lessons" for more details.
4.2.3
Moving periods
Periods can easily be moved from one slot in the timetable to another using drag & drop.
Empty green cells denote slots in the timetable where a lesson may be scheduled without risk of
conflict. The different shades of green indicate the suitability of the positions for the dragged lesson. The
darker, the better. The evaluation depends on the parameters you have entered (time requests, double
periods, weighting, etc.).
Red fields indicate that the scheduling would be possible without clashes but the timetable would be
significantly worse because of e.g. a blocking (time request -3). The details window shows which
element is blocked. The timetable details window shows which element is blocked.
122
Cells highlighted purple indicate that the room allocated to the lesson is not available.
Move double periods and lesson blocks in the same way as you would move single periods. However, if
you only want to move one period of a lesson block or a double period, press the <Ctrl> key prior to
selecting the period you want to schedule. This means that the periods are then displayed as single
periods and can be moved individually.
4.2.4
Swapping periods
Periods highlighted green (green cells occupied by a period) can be swapped with other periods
highlighted green Drop a period on a green cell and a window will appear where you can specify if you
wish to swap the period or if you wish to create a conflict.
Manual Scheduling
123
Swap suggestions
Swap suggestions can be displayed via the 'Suggested swaps' function in the timetable window. 2-way
and 3-way swaps are suggested for the class. The 'Gain' column indicates whether the timetable would
be improve (positive values) or deteriorate (negative values) based on the data entered.
The 'Conseqnc.' column displays the worst conflict that the swap in question would cause if the
timetable is likely to see a deterioration. If, on the other hand, the timetable is likely to see an
improvement (positive value in the 'Gain' column) the category where the largest improvement is likely to
take place will be displayed.
Possible swap suggestions are indicated in the timetable by red arrows. Clicking on the <Swap button>
performs the selected swap.
124
Cross-class suggestions
It is often necessary to perform swaps across several classes. To do this, check the box ‘With class
leaps' in the 'Suggested swaps' window.
Example:
The German period for class 1b on Mo-5 (Monday, 5th period) is to be swapped. The swap displayed in
the figure would bring an improvement of 238 points ('Gain' column). The potential gain is high because
this would remove a core time violation (time request). However, it can only be performed without a
conflict if a second swap is effected at the same time.
Teacher Rubens, who teaches German to class 1b, has a lesson planned with class 1a in Monday-5.
The so-called leap class is therefore 1a and is indicated in the 'Leap cl.' column. The possibilities of
moving this lesson to where Rubens takes class 1a are displayed in the lower section of the 'Suggested
swaps' window. The best possibility would however lead to a deterioration in the schedule of class 1a of
66 points since it would result in an unallowed double period of German. The difference in the evaluations
of both swaps (+238 for the swap for 1b and -66 for the swap for 1a) is displayed in the 'Total' column
(+172).
Manual Scheduling
125
Only different teachers
If a teacher takes a class for more than one subject is it often undesirable for swaps to be offered
between these subjects. Checking the 'Only different teachers' box results in such swaps not being
displayed.
4.2.5
Scheduling periods with clashes
Moving a period to a non-highlighted cell is not possible without creating a clash. The lesson details
window displays the lesson number and details of the lesson in conflict with the moved period.
If you decide to drop the period in such a cell, a window will appear showing the following two options:
<Cancel> - cancels the move.
<Save block> - the 'dragged' (i.e. active) period will be scheduled and the original period will be
unscheduled.
Use the combo boxes save with teacher, class or room clash to schedule a lesson with conflicts.
126
The period details window displays all the elements of the lessons scheduled at this time. Display
conflicts in the timetable by activating the option "Separate periods in case of clash" ("Layout 2" tab
under <Timetable Settings>). Please also see chapter "Layout 2" in the section "Timetable display" ).
Each of these lessons can be selected and moved separately.
You can also move all lessons that lie on one position (either as clashes or as a cluster in course
planning).
Timetable in the cluster mode
If you wish to switch the timetable to the cluster mode altogether then check "Drag Drop: Multiple
lessons" on tab "Layout 2" in the timetable settings.
Manual Scheduling
127
Selection with the <CTRL> key
If you usually wish to select just single lessons (courses) but occasionally you also wish to shift the
whole cluster, then press <CTRL> and click on the relevant position. You can move all lessons in this
period in a single operation.
Decoupling
A coupled lesson can be decoupled direct in the timetable and the new lesson that is thereby created
can be scheduled in another position.
Example: The coupled lesson in periods 7 and 8 on Tuesdays is to be decoupled as teacher 'Ander' is to
teach his group on Thursdays. Click on the period with the right mouse button and select "Decouple".
The lesson is then decoupled and the new lesson with teacher 'Ander' can be easily rescheduled using
drag and drop.
128
4.2.6
Unscheduling periods
You can also unschedule periods by dragging them into the section with the unscheduled periods or into
the timetable details window and dropping them there.
Manual Scheduling
4.2.7
129
Allocating rooms
You can also manage room allocation directly in the timetable window. Use the <Allocate/delete this
room> button to allocate rooms to scheduled periods or to delete already scheduled rooms. A detailed
description of this function can be found in chapter "Scheduling timetable | Allocating rooms".
Tip:
All alterations to the timetable can be undone step by step by clicking on the <Undo> button
.
Changing rooms in the overview timetable
As an alternative to the room allocation dialogue you can also alter rooms in the room overview
timetables. Simply drag the period from one room to another. If the room is already occupied, a room
swap will take place.
130
4.2.8
Planning in the overview timetables
You are not limited to the single timetables for manual planning. You can also use the overview
timetables for classes and teachers. This helps you keep an overview of all teachers and classes.
Manual Scheduling
4.3
131
Scheduling timetable
You can also make manual changes to your timetable in the scheduling timetable. All functions for
manual scheduling described in chapter "Scheduling in the timetable" are also available in the
scheduling timetable. This tool also provides additional functions for scheduling lesson periods manually.
Open the file demo.gpn.
Open the scheduling timetable by selecting "Scheduling | Scheduling timetable" from the main
menu.
The scheduling timetable will open displaying the additional information relevant for scheduling for class
AA.
132
You can see the active class (1a) at the top left of the scheduling timetable. The "Unscheduled" tab lists
all lessons with unscheduled periods. Click on lesson 53 in the list of unscheduled periods. 2 periods
are still not scheduled.
In addition to all scheduled periods, the actual timetable section of the window shows additional
information about the active lesson.
The active lesson in the example is lesson 53 – German for class 1a with teacher Rub. Accordingly, you
can also see class 1a timetable.
If you now wish to schedule a period of the lesson for the 1st period on Thursday, this would prevent
teacher Callas' music ('MU') lesson with class 1a.. However, this is not the only lesson that would
prevent conflict-free scheduling on Thu-1. A lesson with teacher 'Rub' is also already scheduled for this
slot. The details window of the scheduling dialogue displays this information, too.
The details window of the scheduling dialogue therefore indicates all lessons that would prevent a
conflict-free scheduling of the currently active lesson.
Manual Scheduling
4.3.1
133
Scheduling periods
.... Denotes a period of the active lesson, (in the example, the three already scheduled periods of
lesson 53).
.... Locked period of the active lesson (please refer to chapter "Locking periods")
x.... Fields marked x are already blocked by the teacher For instance, teacher Rub is already
scheduled to teach class 1a on Mon-5, which means that lesson 53 with teacher Rub cannot be
scheduled for Mon- 5 without creating a conflict.
X.... A capital X shows a coupling involving the teacher (e.g. Wed-5).
*x*, *X*, *&*..... A marker with two asterisks denotes locked periods creating a conflict (e.g. the PE
lesson on Thu-7,8 involving teacher Rub). Locked periods cannot be moved by the automated scheduling
tool (see the chapter "Locking periods").
&.... Denotes periods with several unavailable elements (classes and/or teachers).
- .... Some periods, in which neither the class nor the teacher are busy, are marked with a "-" (e.g. on
Monday, Tuesday and Wednesday). This indicates that it is not possible to schedule in these periods.
The reason for this is that class 1a is blocked due to a time request on three afternoons in the week
(please see "Master data | Classes" <Time requests>).
134
You can schedule the active lesson in a period if a field is free.
Schedule the unscheduled period of lesson number 53 on Fr-5. You can do this by double-clicking on
the field or by clicking on the button
.
Room allocation
Click on lesson 21 on the "Unscheduled" tab. As you can see, some periods are highlighted purple. This
indicates that the allocated room (and all alternative rooms) are already occupied.
For purposes of clarity, the colour codes defined under master data and displayed in the scheduling
timetable can be deactivated by clicking on "Show lesson colours"
4.3.2
.
Locking periods
Lock scheduled periods by clicking on <Lock period> if you wish the scheduling tool to ignore them
during the optimisation run. The locked lesson will now be marked with asterisks ( , *x*, *X*) and
cannot be moved by the optimisation tool.
Manual Scheduling
4.3.3
135
Swapping periods
Find a suitable swap partner for a period on the same class timetable by dragging the period away (hold
down the left mouse button). Every period on the timetable suitable for swapping will be highlighted in
green and marked with a double arrow. Drop the period in a slot of your choice and confirm the move by
clicking on <Swap>
4.3.4
Scheduling periods with clashes
As a rule, Untis assumes that each teacher, class and room can only be involved in a single lesson at
any one time. The software displays a warning whenever you are attempting to schedule an element
(class, teacher, room) that is unavailable for the period in question.
In a similar way to scheduling in the timetable, lessons can also be scheduled with collision (see
chapter 'Scheduling in the timetable | Scheduling with clashes').
4.3.5
Deleting periods
Deleting periods Delete scheduled periods by selecting the period and clicking on <Delete Period>
or by pressing the <DEL> key The lesson will appear in the "Unscheduled" window again. (Alternatively,
delete the active lesson with a double click.)
4.3.6
Allocating rooms
Use the button <Allocate / Delete this room> to allocate a room to a specific period or to delete (or
change) rooms already allocated. You can call this function from the timetable, the scheduling timetable
of the scheduling dialogue.
The craft lesson in the 7th and 8th periods on Tuesday is to be allocated a different room.
1.
Open the file demo.gpn and then open the scheduling timetable ('Scheduling | Scheduling
timetable').
2.
Position the cursor on Tu-7 and select the <Allocate / Delete room> button. Alternatively,, you can
open the window with the key combination <CTRL>+R.
The left pane of the dialogue that is then displayed lists the rooms involved in this lesson.
You can select which lessons are to be affected by the room change from the option "Allocate the room
to":
a) a single period
b) the period block
c) all periods of the lesson
Plannedthe desired room entered for the lesson
Actual
the room actually planned
Tea
the teacher scheduled for the lesson
3
In this example. the room allocation is to be changed for the double period, and so 'the period
block' is selected.
136
The pane on right lists the rooms available. The columns indicate:
Rm.:
The (short) name of the room
Cap.:
The capacity of the room (if defined in the master data)
Alt. Rm.:
The room in question is an alternative room for the room entered for the lesson
Alt. HRm.:
>The room in question is an alternative room for home room of the class
4
Now select a room (e.g. R1a) and click on the <Allocate rm> button. Room R1a will now be
allocated instead of the workshop.
5
Click on the second row in the left pane and substitute the room 'TW' with another room (e.g.
'PL'). Instead of using the <Allocate rm.> button, you can allocate the new room with a double click.
Manual Scheduling
137
The scheduling timetable details window will now display the newly allocated rooms for periods 7 and 8.
The original rooms entered for the lesson appear in parentheses.
You can use <Delete room> to delete a room that has already been scheduled.
If you select the option "Also show occupied rooms' in the room allocation dialogue, you will also see
those rooms which are occupied in the current period. If you wish to assign one of these rooms you can
create a room conflict,
force a lesson currently scheduled in the room from the room or
perform a room swap.
138
4.3.7
Undo
Each planning step carried out in the timetable or the scheduling timetable is logged on the "History" tab
and can be undone step by step using the <Undo> button. Clicking on <Delete list> will delete all
the planning steps shown in the list.
All the functions described in chapter "Scheduling timetable" can also be called from the scheduling
dialogue.
4.4
The scheduling dialogue
The scheduling dialogue provides functions for placing and moving periods manually. Similar to a peg
board, the periods of the week are arranged in columns at the top and the elements (teachers, classes,
rooms) in rows along the side.
The following example provides an overview of the type of information displayed in the scheduling
dialogue
4.4.1
Allgemeines
Die Informationen, die im Planungsdialog angezeigt werden, sollen anhand eines Beispiels beschrieben
werden.
Manual Scheduling
139
Öffnen Sie die Datei demo.gpn und „Planung | Planungsdialog“.
4.4.1.1
The input field
Selection field Enter the number of the lesson you wish to view or modify (lesson 11 in the example) in
the selection field.
4.4.1.2
The period details window
The lower section part of the scheduling dialogue shows information relating to the active lesson. This
corresponds to the display of the period details window in the timetable. Please see chapter "Timetable
display" for a detailed description of the fields.
The centre section contains details on all the classes, teachers and rooms involved in the active lesson
for the entire week
4.4.1.3
Lesson search
Instead of entering a lesson number, you can use the selection field to search for a particular lesson by
entering a combination of details (classes, teachers and/or subjects involved), separated by a comma.
Entering 1a,DE will display the lessons of subject DE for class 1a
Entering Arist,1b will display the first lesson teacher Aristotle teaches to class 1b
4.4.1.4
Period availability
Lesson 11 is scheduled to take place on Wednesday, period 1, and Saturday, period 4, as clearly
shown by the icon in first row.
An empty cell in the grid denotes a period available for scheduling an element (teacher, class or room) In
the example, Fri-5 is still free for classes 1a and 1b. You can easily verify this by cross-checking the
details in the class timetable.
140
4.4.1.5
Time requests
Any time requests entered for the lesson (in the lesson row) or the elements involved in the lesson are
highlighted with their appropriate colour code. Time requests entered under the master data of a subject
are displayed in a separate row. The example shows that a time request has been entered for subjects
"DS" and "HE".
If you have entered unspecified time requests, you can assign these a different colour in the time request
window (e.g. purple for -3 for class 3b).
Time requests entered under master data or lessons can be deleted direct in the scheduling dialogue by
clicking on the <Delete period> button or by pressing the <Delete> key, or modified in the time request
window.
4.4.1.6
Saving individual settings
When using the Untis software on two different computers (e.g. at school and at home), you will rarely
be working with two identical systems. Differences in hardware (screen display, graphics cards etc.) can
necessitate annoying and time-consuming adjustments when switching from one system to another.
Your individual settings for the scheduling dialogue (e.g. font size, column width etc.) are therefore saved
Manual Scheduling
141
in the view.ini file which is held locally on your computer.
This saves you the trouble of having to re-enter your settings when opening the file on another computer.
4.4.1.7
'Information' tab
This is where you will find additional information on the active lesson such as the number of unscheduled
periods or the total of scheduled periods for the class per week and per year.
4.4.2
Window logic
Like most functions in the Untis application, the scheduling dialogue communicates with all other
windows.
Synchronisation
When you open a lesson view (or a timetable) and select a lesson, the scheduling dialogue
automatically displays the active lesson and, vice versa, the lesson window (or the timetable) always
displays the lesson selected in the scheduling dialogue.
Locking the view
Activate the button <Lock Period> to lock the display of the scheduling dialogue.
Window in the background
As a rule, you can bring a window to the front (i.e. activate a window) by clicking on any part of the
window. The scheduling dialogue allows you to suppress this behaviour by activating the option "Window
in the background" under <Settings>.
Moving tabs
The individual tabs of the scheduling dialogue (Unscheduled, Information...) can be placed next to each
other, too. This allows you to make better use of the timetable area and increases clarity.
4.4.3
Planungsfunktionen
Im Planungsdialog stehen Ihnen eine Reihe von verschiedenen Planungsfunktionen zur Verfügung:
Stunden verplanen
Stunden löschen
Mit Kollision verplanen
Verschieben von Stunden mit Drag&Drop
142
Rückgängig
Raum zuordnen
Ausweichraum anzeigen
Neuer aktueller Unterricht
Stunden fixieren
Optimierung
Bewertung zur aktuellen Zeit
Lehrer im Unterricht ändern
4.4.3.1
Scheduling periods
Scheduling periods Schedule periods using one of the following options:
By double clicking on a period
By clicking on the button <Schedule the period>
By pressing the key K
Via the context menu (right mouse button) ( See chapter "Deleting period blocks".)
Using drag & drop from the grid view of unscheduled periods or from the lesson view
4.4.3.2
Deleting periods
Delete (i.e. de-schedule) periods using one of the following options:
By double clicking on an active period
By clicking on the <Delete period> button
By pressing the <Delete> key
Via the context menu (right mouse button) (see example)
Using drag & drop in the period details window (see chapter "Deleting periods")
Deleting periods of a row
Click on <Delete periods of one row> if you wish to delete the entire timetable row of a particular element
(e.g. class 1a).
Delete, Activate lesson
If you wish to delete a non-active period and re-schedule it immediately, click on <Delete, Activate
Lesson> This de-schedules the lesson and automatically activates it so that you can schedule it in a
different slot straight away. Alternatively, use the key combination <CTRL>+X.
4.4.3.3
Scheduling periods with clashes
Untis will warn you if you attempt to schedule a lesson that is already occupied by another class,
teacher or room. In this case, perform a clash as described in chapter "Scheduling in the timetable |
Scheduling with clashes".
Manual Scheduling
4.4.3.4
143
Moving periods with drag & drop
Periods in the scheduling dialogue can be moved in the same way as periods in the timetable and the
scheduling timetable.
Click on a period in the scheduling dialogue and drag it away holding the left mouse-button pressed.
All periods where the lesson can be scheduled are highlighted green in the lesson row.
When the arrow passes over a scheduled period, the details of the lesson automatically appear in the
period details window.
For purposes of clarity, red arrow markings show the possible slots in the timetable where the lesson
can be moved. This enables you to see at a glance if the move would be advantageous for classes and/
or teachers.
Drop the period in a suitable slot (e.g. Fri-5) by releasing the left mouse-button.
Periods marked with the
4.4.3.5
icon are available for swapping.
Undo
Undo Each planning step carried out in the timetable or the scheduling timetable is logged on the
"History" tab and can be undone step by step using the <Undo> button. Clicking on <Delete> will
delete all the planning steps shown in the list.
144
4.4.3.6
Allocating rooms
Allocating rooms Use the <Allocate/Delete room> option in the context menu of the scheduling dialogue
(accessible via right mouse-click) to open the room allocation dialogue, or press <CTRL>+R. The
functionality of the room allocation dialogue is described in chapter "Scheduling timetable | Allocating
rooms".
When the cursor is placed in the room row under the active lesson and you click on the <Allocate/Delete
this room> button, the room already allocated is deleted immediately and replaced with the designated
room.
4.4.3.7
Displaying alternative rooms
When the cursor is placed in the room row, the function <Alternative room> becomes active. Click on
this button to display the next alternative room specified under master data. In the example, this is the
room R1b (first alternative room for R1a). Click again to show the second alternative room (R2a) etc.
You can also show the capacities of the rooms in the settings of the scheduling dialogue via the settings
if the capacities have been entered under master data.
Manual Scheduling
4.4.3.8
145
Activate new lesson
Place the cursor on a lesson and click on the <Activate lesson> button to activate it. Alternatively, use
the key combination <CTRL>+<ENTER> or double click on the lesson you wish to activate.
4.4.3.9
Locking periods
Click on <Lock period> to lock the cursor-selected period (or to unlock an already locked period).
Locked periods will not be moved by subsequent optimisation runs. Locked periods are marked in the
lesson row of the scheduling dialogue and with an asterisk (*) in the element row.
You can also highlight an entire area in the scheduling dialogue and then click on <Lock period> to lock
all the selected periods. The same function is available via the context menu accessible by clicking with
the right mouse-button.
4.4.3.10 Optimisation
This function allows you to start the optimisation process from the scheduling dialogue.
The timetable is locked conditionally. When a timetable is locked conditionally, the periods already
scheduled will not be affected by the placement optimisation process. The optimisation tool will only
place unscheduled periods. The subsequent swap optimisation tool, however, may swap all the unlocked
periods.
A timetable is calculated using strategy A.
4.4.3.11 Assessing the active time slot
This function assesses all the periods of the week to determine their suitability for scheduling at a
specific time.
Position the cursor on a free period of the class and click on the
toolbar. The slot for which a lesson is looked for is indicated by the
button in the scheduling dialogue
icon in the lesson row.
The software now assesses all the periods of the week to determine their suitability for scheduling in the
selected time slot. The assessment results are displayed in the lesson row. The lower the value, the
more suitable the time slot.
146
4.4.3.12 Replacing teachers
Use this function in the scheduling dialogue to replace a lesson teacher with another.
Activate a lesson and click on
lesson.
. A dialogue will open where you can change the teacher for the
The left pane of the window displays the teacher(s) of the active lesson. The right pane displays all the
teachers available (based on their own timetables) to take on ALL the periods of the active lesson. The
following additional details are provided to facilitate the decision-making process:
Per/Wk: Number of periods per week taught by the teacher
UnSc: Number of those periods that remain to be scheduled
Subject: Teacher already teaches this subject.
Tea. Qual. Teacher is qualified to teach this subject
The example shows that "Ander", "Gauss" and "Curie" could take the lesson. However, only "Ander" has
the qualification for the subject. Click on <Assign tea.> to assign the teacher to the lesson.
Manual Scheduling
4.4.4
147
Display functions
The functions described below can be used to change the scheduling dialogue display.
4.4.4.1
Displaying all teachers of a class
Place the cursor in a class row to display the timetables of all teachers involved in this class. Teachers
not assigned to teach a class in this period are listed first, followed by uncoupled teachers.
Place the cursor in a teacher row to display the timetables of all classes in which the teacher is involved.
4.4.4.2
Display all classes, teachers and rooms
Use this function to display all classes, teachers and rooms in your school in the timetable rows of the
scheduling dialogue. If you only wish to display classes, hold down <SHIFT> key when invoking the
function.
Place the cursor in a teacher row if you want all the teachers to be listed first (under the active lesson).
In the same way, place the cursor in a room or class row if you wish to list rooms or classes first.
4.4.4.3
Display a 2nd lesson
This function displays not only the active lesson, but also the lesson on which the cursor is placed. The
function also allows you to display additional information on the cursor-selected lesson.
4.4.4.4
Deleting rows
Use this function to delete all the rows in the timetable window below the cursor position. Please note
that the active lesson will still be displayed on the screen.
>
4.4.4.5
Show lesson colours
The colours defined for master data elements and individual lessons can be activated and deactivated
using the <Show lesson colours> button.
148
4.4.4.6
Settings
This function provides various settings affecting the layout of the scheduling dialogue.
4.4.4.7
Displaying a particular element
To call up the timetable for any element (or lesson), simply enter the name of the element or the lesson
number in any part of the timetable window and press <ENTER>
The example shows that the (short) name of Sports Hall 1, SH1, has been entered The software
responds by displaying the room availability.
If you wish to switch to another lesson but still wish to see the availability of SH1 then you can lock this
row (like any other row) by clicking on <Do not hide rows>. The element is now marked with a "+" in
front of the name and is displayed until you remove it by clicking on <Hide selected rows>.
4.4.5
Shortcut keys
Most of the scheduling dialogue functions can be activated with shortcut keys (i.e. without the use of the
mouse).
Use <CTRL> +<TAB> to switch between individual windows within Untis.
When the scheduling dialogue is open, a purple rectangle highlights the active part of the scheduling
dialogue.
Manual Scheduling
149
Switch between the different parts of the window using <F6> or <SHIFT>+<F6>.
In the upper part of the scheduling dialogue, use <ALT> +<Left Arrow> and <ALT> -<Right Arrow> to
move from tab to tab. Within a tab, use the <TAB> key to move between individual elements.
In the centre section of the scheduling dialogue, use the cursor keys to control the cursor. The following
key combinations are also available:
<CTRL> + <Right Arrow>: last period of the week <CTRL> + <Left Arrow>: first period of the week
<ALT> + <HOME>: first period of the day
<ALT> + <END>: last period of the day
<CTRL> + <Arrow Up>: first row <CTRL> + <Arrow Down>: last row <CTRL> + <Right Arrow>: next day
<CTRL> + <Left Arrow>: previous day
Various scheduling dialogue functions can also be invoked using the following shortcut keys:
<INSERT>: Schedule period
DEL>: De-schedule period
<CTRL> + <X>: Delete, activate lesson
<F7>: Lock period
<CTRL> + <ENTER>: New active lesson
<CTRL> + <R>: Room dialogue
<CTRL> + <SHIFT> + <ENTER>: 2nd active lesson
<F8>: Alternative room
<Insert>: Schedule period
<Delete>: De-schedule period
<Ctrl> - <X>: Delete, activate lesson
<F7>: Lock period
<Ctrl> - <Enter>: New active lesson
<Ctrl> - <R>: Room dialogue
<Ctrl> - <Shift> - <Enter>: 2nd active lesson
<F8>: Alternative room
4.5
Swapping periods
In addition to the period swap function using drag & drop, the scheduling dialogue (and to a limited
extent, the scheduling timetable) offers additional functions for swapping already scheduled periods. Use
these functions when the timetable requires further improvements
Suggested swaps
Consecutive swaps
Chained swaps
150
4.5.1
Suggested swaps
This function offers swap suggestions for a cursor-selected period on a class timetable To this end Untis
evaluates the timetable based on your weighting settings and indicates if the quality of the timetable
would be better or worse.
Open this function by clicking on the <Suggested swaps> button in the scheduling dialogue.
These functions are described in chapter 'Scheduling periods in the timetable | Swapping periods'.
In practice, you may want to move a lesson to a different slot on the timetable already occupied by
another lesson. This lesson would be displaced and would have to be moved to yet another slot. The
same swap rules also apply to the second lesson: either the software finds a suitable slot for the lesson
on the timetable or the lesson will displace yet another lesson This chain of events will continue until a
suitable slot has been found for every lesson
Untis supports this intuitive planning method with the functions "Consecutive swaps" and "Chained
swaps".
The main difference between the two swap functions is that consecutive swaps can be carried out using
drag & drop and also allow period swaps across classes.
4.5.2
Consecutive swaps
Carry out consecutive swaps in either the scheduling dialogue or in the scheduling timetable using drag
& drop. This is similar to working with a peg board, where you schedule a lesson by displacing another
lesson, activate the lesson you have displaced and schedule it in a different slot, activate the next
lesson you have displaced (if any) and schedule it in yet a different slot etc.
1.
Load the file demo.gpn and open the scheduling dialogue and a class timetable.
You wish to move the PE lesson (no. 73) of class 1a on Fri-8 to a better (earlier) slot on the timetable.
2.
Try dragging the lesson to a different position on the timetable while holding the <CTRL> key
pressed.
All slots in the timetable where scheduling is blocked by a single element are displayed with the
icon. For instance, if both the class and the teacher of the lesson to be scheduled in this slot are
already involved in different lessons, two lessons would be displaced and the chain would be broken.
3.
Drop the PE lesson (still holding down the <CTRL> key) on Thu-5. This slot is blocked by
lesson 2 (Callas, AR, 1b). You will not be asked if you wish to create a conflict.
Manual Scheduling
151
The PE lesson will now be scheduled in this position and lesson 2 for class 1b, the lesson originally
placed in this slot, automatically becomes the active lesson. Drag this lesson to another position
marked
and drop it, thereby continuing the chain, or alternatively place the lesson on a suitable
unoccupied slot.
Keep the <CTRL> key pressed, otherwise if you release the key the swap is interrupted and cannot be
continued.
4.
A suitable slot for this lesson is Sat-1 where lesson 2 can be scheduled without causing a
conflict (as indicated by the !1! symbol). This completes the swap chain.
The PE lesson has now been moved from Fri-8 without requiring the de-scheduling of another lesson.
Slots marked with the
is possible.
icon when a period is dragged away denote positions where a period swap
The
icon indicates that a period can be scheduled in this position without displacing another
lesson. The lower the value, the better the position for scheduling the period.
152
Please note that consecutive swaps may be carried out across different classes. The only restriction is
that the swap path for the continuation of a chain must always be unique. Where there is a fork in the
path (e.g. both teacher and class are already scheduled elsewhere), the software will ask you how you
wish to proceed (create a conflict, cancel etc.) and the chain must be restarted at that point.
4.5.3
Chained swaps
The chained swaps function is accessible from the <Chained swaps> tab in the scheduling dialogue.
1.
Open the file demo.gpn, the scheduling dialogue and a class timetable.
The aim of this exercise is to swap the cursor-defined lesson (lesson 38, Callas, MU, 2a) with a lesson
in a different slot.
2.
Start the swap chain by clicking on <Start> on the "Chained swaps" tab.
The lesson row now displays a series of number symbols in some of the cells in the time grid. The lower
the value, the better the Untis evaluates the position. Two exclamation marks after the number (e.g.
) indicate that a swap to this position would displace a lesson already scheduled for this slot. One
exclamation mark before and one after the number (e.g.
) indicate that a swap would not cause a
Manual Scheduling
153
displacement of another lesson, completing the swap chain.
You wish to move lesson 38 (Callas, 2a, MU) from Mon-1 to Tue-1. This will displace one period of
lesson 41 (Callas, 2a, AR)..
3.
Position the cursor on Tue-1 and click on <Swap>.
The original period of lesson 38 has now been moved to Tue-1. The change is also reflected on the
timetable Lesson 41 with one displaced period automatically becomes the active lesson.
Again, Untis marks suitable swap positions with numbers displayed in the lesson row.
If you are dissatisfied with the swap results, you can undo individual steps of the process or even the
entire swap chain
You now wish to schedule the displaced period of lesson 41 for Sat-1 The
not displace any further lesson and the swap chain will be complete.
4.
Position the cursor on Sat-1 and click on the <Swap> button.
indicates that this will
Lesson 41 (Callas, 2a, AR) displaced from Tue-1 has been moved to Sat-1. The swap chain is now
complete.
Please note that function "Chained swaps" only supports swaps that do not result in a significant
decrease in timetable quality (based on the weighting settings you have entered). This means that only
the swap partners identified in the lesson row can be used for swapping.
154
4.6
Scheduling half periods
If you do not always schedule full lessons you will have to decide in which part of the period the half
lesson should occur.
When scheduling a lesson block (e.g. 1.5 periods) Untis will ask whether you wish to schedule the
complete second period or whether the half lesson should be scheduled in the first or second period.
In the case of a lesson lasting a half period, you must decide whether lesson should take place in the
first or second half of the period.
Manual Scheduling
4.7
155
Multi-timegrid
If you are using different time grids, the display in the scheduling dialogue depends on the active lesson.
. The time grid of the active lesson is also the active time grid. Periods of the active time grid that are
completely or partly blocked by periods of the other time grid are marked with the symbol O This applies
to the scheduling timetable, too.
5
Timetable Display
5.1
Timetable display
When the timetable is complete, the information needs to be presented in a clear and unambiguous
fashion. Untis offers a number of different timetable layouts and numerous timetable display options. The
following chapter provides an overview of predefined timetable displays and shows the different methods
of shaping timetable layouts to suit individual requirements.
5.2
Window set-up
You can open ready-made timetables for classes, teachers, rooms and subjects under "Timetables" in
the main menu. You can also display timetables for individual students when using the Student
timetable or Course scheduling modules.
Basically, a timetable window consists of the tool bar and three separate sections: the selection window
at the top, the actual timetable in the middle and the period details window at the bottom.
156
Toolbar
The toolbar is usually located at the top of the window, but can be moved to any window edge – right, left
or bottom – and can even be dragged out of the window altogether. You can also remove unwanted
buttons from the toolbar ('Add or remove buttons' option).
Timetable Display
157
Pop-up windows
Let us assume that have opened a class timetable and perhaps now wish to view the associated teacher
timetable or wish to make a small change in the relevant a lesson window. You can use the two arrows
at the top of the screen to quickly open and close these windows.
For example,. from a class timetable you can click on the right arrow to open a teacher timetable and
the left arrow to open a lesson timetable for classes.
158
5.2.1
Selection window
The selection window in the upper section of the timetable allows you to select the type of timetable you
wish to display. The selection pane displays various items of information such as number of periods per
week and unscheduled periods.
Input field
Use the input field to enter the name of the element whose timetable you wish to display. Switch
between different elements by using the spin controls located on the right window edge or by placing the
cursor in the input field and pressing <Page Up> and <Page Down> or the up and down cursor keys.
Timetable comparison
The two selection boxes "Timetable comparison" and "Only modified timetables" are for use with the
"Timetable comparison" function described in greater detail in a later chapter.
Periods per week
Displays the number of periods per week and the number of unscheduled periods (per week) for the
active element.
5.2.2
Timetable window
The middle part of the timetable window shows the actual timetable for the active element The display
offers a variety of different settings and options that allow you to customise it to suit your individual
requirements. Please refer to chapter "User-defined views" for a detailed description of these settings.
Timetable Display
159
Clicking on a (scheduled) period on the timetable activates the period and causes the cell to be outlined
in red-yellow. All other periods associated with the active lesson are highlighted in blue-yellow. If the
display of colours in the timetable has been deactivated (colour palette icon), the active period will be
displayed pink and the other periods associated with it light blue. This shows you at a single glance how
the periods of this lesson are distributed throughout the week.
Resize the window
This function adjusts the window frame to the size of the displayed timetable window.
Note:
The buttons <Lock period>, <Undo> and <Allocate/delete room> are intended for performing manual
changes to the timetable and are therefore described in chapter “Manual timetabling".
Change size
You can easily change the size of timetables in the timetable window. Drag the dividing lines between
the columns apart or together to alter the size of the timetable accordingly.
160
5.2.3
Period details window
Since there is often not enough space in the individual cells of the timetable to display all the relevant
data for the active period, Untis provides a third window for the display of such information the period
details window. The font size used in the period details window can be changed via <Settings>. The
Timetable Display
161
period details window provides details on the currently active lesson.
L-No.
In the example the "L-No." column shows lesson number 74. Below the lesson number, you will see the
time request entered for the active period under "Master Data | Classes" ("+3").
Tea. Subj. Rm.
The second column shows all the teachers, subjects and rooms involved in the lesson. The period
details window displays one row for each coupling.
If the optimisation tool has allocated a different (alternative) room instead of the home room entered for
the lesson, the name of the home room is shown in parentheses. The example shows that room Ps1 is
the room entered for the lesson, but the actual scheduled room is the alternative room R1a.
Cla.
This column displays the class(es) involved in the active lesson (classes 1a and 1b in the example).
162
Time
The "Time" column displays time restrictions and/or periodicities – a particularly important function for
use with the Multi-week timetable module For instance, the GA lesson in the example takes place on a
fortnightly basis in weeks of type A.
Students
Shows the number of students entered for the lesson or elective subject (for use with the Course
scheduling module) Lesson 6 in the file demo.gpn, for instance, contains the student numbers for the
individual special classes.
Special text
The column "Special text" contains the text or the description entered for the lesson, and the line text
entered in the lesson details window. Lesson 6 in the file demo.gpn, for instance, contains the
description "Special Class"
Line text-2
In addition to the line text, the "Line text 2" field in the period details window can be used to define a
second, independent line of text. In the example, a line text has been defined ("Beginners" and
"Advanced") for each of the coupling lines with the subject EN (English).
Hide and show columns
Individual columns can be hidden or shown in the period details window. Right-click on the heading row
in the period details window and deactivate the desired column.
Timetable Display
163
Tip
Columns displayed in a timetable period details window are printed i in the legend when the timetable is
printed. If the legend tak es up too much space in the printout, you can simply hide columns them in the
corresponding timetable view.
5.3
Timetable interaction
Timetables can be called up manually or set to open automatically (if desired) when an element is
selected in a different window The automated function means that you will always have up-to-date
information on the screen without having to search for it.
Communication between timetables
Open the file demo.gpn and call up a timetable for classes, teachers and rooms, and arrange the
timetables next to each other. Click on Monday, period 1 ("EN") in the timetable of class 1a. As you can
see, the teacher timetable automatically switches to the timetable of the teacher involved in the lesson
(i.e. Aristotle, "Arist") and the room timetable switches to the room allocated to this lesson ("R1a").
164
Clicking on the coupling row in the period details window also synchronises all other open timetables.
Timetable Display
165
166
Communication with other windows
Open a class timetable and the master data window for classes. Click on a class in the master data
window and you will see that the timetable automatically switches to the timetable of that class.
The same occurs when you switch elements in a lesson window or in the element-rollup ("Customise"
under "Settings | Miscellaneous").
Locking timetable types
In the previous examples, the type of timetable was always locked. Open the file demo.gpn, a teacher
timetable and call up the window 'Master Data | Teachers'. In the master data view, click on one teacher
after another The timetable window always shows the timetable of the currently selected teacher.
Clicking on a class name, however, has no effect on the timetable view, i.e. the type of timetable – here
the teacher timetable – remains unchanged.
Unlocked timetables
Deactivate the type locking function by clicking on <Lock Type>. Switch between teachers, classes and
rooms in the master data views. You will see that the timetable always displays the active element,
irrespective of the type of element (classes, teachers, rooms or subjects). The displayed element
changes, as does the type of displayed element.
Tip
Unlock ed timetables are particularly practical when used together with the diagnosis tool, since this
allows the user to switch rapidly between teacher and class schedules without having to open a second
Timetable Display
167
timetable window. You can read more about diagnosis in chapter "Diagnosis".
Locking elements
Lock the timetable of a selected element – for instance a specific teacher – on the screen by "pinning"
it to the screen using the <Lock this display> button When a timetable is lock ed with two pins, the
displayed element does not change.
5.4
Timetable formats
Untis offers over 50 different predefined timetable layouts. The layouts are accessible via the menu item
"Timetable | Timetable formats".
Each timetable layout has a unique short and long name. Click on <Show the TT > or double click on
the full name of a format to open the timetable.
Standard format
Select the desired standard format, i.e. the format that will be used when you select a timetable from the
"Timetable" menu, by checking the relevant "Standard" box on the list of timetable layouts in the
"Formats / Timetables" window.
Timetables in the menu
In addition, you can specify which timetables you wish to include in the menu, i.e. which timetables you
wish to be able to access quickly.
168
5.4.1
Predefined formats
By default, the "Timetable | Timetable formats" list displays the predefined layouts for all the different
types of timetable. If you wish, you can limit the view to individual elements (class, teachers etc.).
Timetable Display
169
The names of the predefined layouts obey the following rules:
5.4.1.1
Keywords
Key words e.g. Cla 1A
Timetable names containing the key word "Cla" are class timetables. "Roo" denotes room timetables,
"Tea" teacher timetables, "Sub" subject timetables and "Stu" indicates student timetables.
5.4.1.2
Layout details: Layout 1
Format details: Format 1 Format details e.g. Cla 1 A
Format 1: This layout displays the days of the week in columns and the periods of the day in rows (see
figure). The subformat detail, e.g. Cla1 A , indicates that the layout is a variant of the master format. The
full name of this timetable format is "Class schedule big". The format is also included in the menu by
default.
170
The name of the layout can also be found on the "General" tab of a timetable under <Settings>.
Timetable Display
5.4.1.3
171
Format details: Format 10
Format 10: This format displays the days of the weeks in rows and the periods of the day in columns.
The example shows a room timetable with layout "Roo10A".
5.4.1.4
Format details: Format 11
Format 11: This layout is important for use with the Multi-week timetable module. It shows the individual
weeks of the school year in columns and the periods of the week in rows and provides a clear display of
two-weekly alternating lessons and lesson interruptions.
The example shows the timetable of class 11Wa for Mondays of school weeks 1 to 16 The lessons for
this vocational school class take place Mondays in weeks 2-3, 6-7 and 12-13.
Note:
Format 11 also allows terms, instead of week s, to be displayed column by column in periods. To
achieve this, activate the check box "One term per column" on the "Layout 2" tab under the timetable
<Settings>.
172
5.4.1.5
Format details: Subject timetable
Subject timetable
The layout of the subject timetable is identical to that of a class, teacher or room timetable. Subject
timetables display all the periods of the selected subject. The available formats are formats 1, 10 and 11.
The example shows a subject timetable for German.
Timetable Display
5.4.1.6
173
Format details: Format 20
Format 20: This layout provides a week’s overview of all the teachers (classes, rooms) in the school
(arranged in rows) and periods (arranged in columns).
174
5.4.1.7
Format details: Format 30
Format 30: This layout also provides a week’s overview of all elements. In contrast to layout 20, the
elements are arranged in columns and the periods in rows.
5.4.1.8
Format details: Format 40
Format 40: his overview is similar to the individual timetable view such as Cla1A. However, the difference
is that several elements can be displayed underneath the days. This makes it easy, for example, to view
the timetables for the specialist subject rooms in one timetable. You can determine how many elements
should be shown per screen using <Settings>.
Timetable Display
5.5
175
User-defined views
Timetable views in Untis can be customised quickly and easily to meet the individual requirements of
your school. This chapter describes how to customise the timetable display to reflect your personal
preferences.
You wish to create a customised screen display based on the standard timetable for classes in the
demo.gpn file.
176
5.5.1
New timetable view
1.
Open the file demo.gpn and call up the timetable overview under ("Timetable |Timetable formats").
2.
Click on the first timetable format class 1 and click on <New> to create a copy of this timetable
view.
3.
Assign a new short name and a descriptive full name to the view (e.g. CSD, Class Screen Display).
4.
The new timetable view appears. Access this view by double clicking on the full name of the view or
by clicking on <Show the TT>. Check the column "In menu" to include the view in the menu.
Timetable Display
177
178
5.5.2
Timetable period window
The next steps describe how to modify the contents of the period window (timetable period).
5.5.2.1
Several fields - timetable period window
Several fields - timetable period window
1.
Open the new timetable view (or open the demo.gpn file and open "Timetable | Classes" ), click on
<Settings> and select "Period window". This will open the graphics editor that can be used to
modify the contents of the timetable period window. Currently, only the subject is displayed in the
period
2.
In addition to the subject, you now wish to display the teacher and the room of the lesson. Click on
<New field>. In the "Field type" section, select "Teacher" and click on <OK>. Repeat the same
process for the room.
Timetable Display
179
3.
The next task is to arrange the three fields for subject, teacher and room next to each other in such
a way that they are easy to read. First, enlarge the period window by clicking on it (the background
will turn blue) and dragging the edges until it is the desired size.
4.
Arrange the three fields as shown in the example. Click on the field you wish to move. While the
field is blue, the cursor will change to a cross, allowing you to move the field with the cursor. When
all three fields have been arranged to your satisfaction, confirm with <OK>
180
5.
The timetable now displays the subject, teacher and room for each period:
Timetable Display
181
Tip
Holding the <CTRL> key pressed allows several fields to be marked in the graphics editor and to be
moved all together using the arrow keys. If several fields are marked, you can hold the <SHIFT> key
pressed and shrink or enlarge all fields using the arrow keys.
5.5.2.2
Coupled lessons
Coupled lessons
If you also wish to display the details of lesson couplings, proceed as follows:
1.
First, enlarge the period window by clicking on it (the background will turn blue) and dragging the
edges until it is the desired size. Details on subjects, teachers and rooms are to be displayed side by
side.
2.
Highlight the fields for subject, teacher and room using <STRG>+click and insert them using
<CTRL>+C and <CTRL>+V. Use the mouse to move them to the desired position.
182
3.
Once the field is approximately the right size and approximately in the correct position, click on
the <Align fields> button. This function adjusts all fields that are approximately the same size to a
standard size and aligns all fields that have approximately the same vertical or horizontal edge to a
standard vertical/horizontal line.
Timetable Display
183
4.
The timetable now displays the details of the first and second coupling row in the timetable
period
184
5.5.2.3
Layout field
Layout field
A field that is too short to display the entire name (e.g. Callas Thursday, period 1) can be easily
modified. You can resize any field in the timetable period by clicking on a button on the edge of the field
and dragging it to the desired size. You can also change the font size for each separate field. The
example shows how to change the font type of the subject to bold and the font size to 120% of the
preset value (Arial 9).
Timetable Display
185
186
5.5.2.4
Full name
Full name
Alternatively, you can display the full name or the alias name defined under master data. The example
shows how the full name of the teacher (12 character max.) can be displayed in the timetable.
Timetable Display
187
In addition to the class, teacher, room, subject and footnote reference fields, the following additional
information can be displayed in the period window of a timetable.
188
5.5.2.5
Lesson number
Lesson number
The unique lesson number used to designate the lesson can also be displayed as an additional item of
information in the timetable..
5.5.2.6
Special text
Special text
The special text field contains the text or the description entered for the lesson, and the line text entered
in the lesson details window. The number of text rows can also be selected.
Timetable Display
5.5.2.7
189
Text for the lesson period
Displaying this field in the timetable allows text relating to each period to be entered direct in the
timetable. right-click on the period concerned and select the option 'Text for the lesson period'. The text
entered here will only be displayed in this period of the lesson even if several periods of the lesson are
scheduled.
190
5.5.2.8
Description
Description
Besides the text, the description entered for the lesson is also displayed.
5.5.2.9
Time requests
Time requests
The time requests entered in the master data for the element in question can be displayed in the
timetable either in colour or in black/white.
Timetable Display
191
5.5.2.10 Lesson group
Lesson group
Displays the lesson group assigned to the lesson (for use with the Multi-week timetable module). The
example shows the DS lesson in weeks of type A and the PE lesson in weeks of type B.
192
5.5.2.11 Break supervision
Break supervision
Break supervisions can be displayed in teacher timetables. This function is only available with the Break
supervision module.
5.5.2.12 Number of students
Number of students
The number of students registered for the lesson or the number of students who have selected the
course can be displayed in teacher timetables (for use with the Course scheduling module).
5.5.2.13 Cluster (simultaneous lessons)
Cluster (simultaneous lessons)
The Course scheduling module allows the names of clusters (groups of simultaneous lessons) to be
displayed in the timetable.
5.5.2.14 Alias (alternative names)
Alias (alternative names)
If you wish to display a name on the timetable and the printout other than the usual name, define an
alias name for subjects, classes or teachers under "Master Data | Special data |Alias names". To
display the alias on the timetable, check the box "Timetable" in the "Alias" window and the box "Use
alias" in the timetable period.
You can also define one alias name for several classes. For example, if a teacher teaches all third-year
classes, classes 3a, 3b etc. can be combined under one name "Year 3".
Timetable Display
193
5.5.2.15 Start and end time
Start and end time
Activating this option will display two additional fields in the timetable period that show the times of the
start and the end of lessons. The fields can be moved and resized in the usual manner.
194
In addition to the editing options in the timetable period, the application also offers a number of additional
functions that can be used to customise screen displays and printouts.
5.5.2.16 Standard format
The functionality of the standard format allows the timetable to display all coupling lines with information
on classes, teachers, rooms and subjects. Optimal use is made of the space available within the
timetable cell, and the size of the type face for couplings is reduced accordingly where necessary.
The standard format can be activated and deactivated in any timetable by clicking the right mouse button
and selecting 'Timetable period: standard format'.
Timetable Display
5.5.3
195
Layout 1
The settings on the "Layout 1" tab under <Settings> can be used to change the timetable display on the
screen and the printout. The settings offer options for customising the layout of headings (e.g. weekday,
period number), scheduled periods and free periods.
196
Timetable Display
197
The Layout 1 tab also provides the possibility of displaying lines in the display and on the printout in
order, for example, to indicate the different lengths of breaks
The "Show a.m./p.m. division line" check box allows the division line to separate morning lessons from
afternoon lessons in the time grid.
Check the "Show division line between the days" box to display a thicker division line between days than
between the periods in order to improve clarity.
198
5.5.4
Layout 2
The settings on the "Layout 2" tab partly affect both the screen and the print layout, partly only the print
layout or the HTML output.
Timetable Display
5.5.4.1
199
Double periods like single periods
Double periods like single periods
Double periods are displayed like single periods.
5.5.4.2
Comb. class names (2a,2b -> 2ab)
Comb. class names (2a,2b -> 2ab))
With teacher timetables, it is often desirable to be able to see all the classes the teacher teaches.
Combined class names were created as a way of showing all classes in a single cell and thereby saving
space.. The names of all classes being displayed are combined.
5.5.4.3
All classes in one field
If a teacher takes students from more than one class for a lesson, all classes involved will be displayed
in the relevant timetable field in the period window
200
5.5.4.4
Label couplings with a dot
Label couplings with a dot
Coupled lessons are marked with a dot in the period window.
5.5.4.5
Label locked periods with a * mark
Label locked periods with a * mark
Manually locked periods are marked with an asterisk (*).
Timetable Display
5.5.4.6
201
Separate periods in case of clash
Separate periods in case of clash
Use this option to display conflicting periods (see chapter "Manual scheduling") in separate cells on the
screen, the printout and the HTML output. The example shows year 2. The courses (clusters) taking
place in parallel are output as a clash. Up to 6 clashes can be displayed next to each other per period.
For 7 or more clashes, additional fields are required in the graphics editor (see <Settings> | <Timetable
Period>).
202
5.5.4.7
Sorting periods
Sorting periods
When several lessons take place in the same period on the same week day, but in different weeks, you
can sort the lessons by start date using this function.
5.5.4.8
Cover planning block
Cover planning block
If you use the Cover planning module you can use the options listed here to influence how the changes
are displayed.
5.5.4.9
Use alias for details window/legend
Use alias for details window/legend
Displays the alias of the different elements in the timetable details window and the legend (e.g. changes
your short name "MA" to the common school name "Maths"); (please refer to chapter "Alias names").
5.5.4.10 DragDrop
DragDrop: Multiple lessons
Timetable Display
203
Please refer to chapter "Scheduling in the timetable | Scheduling with clashes".
DragDrop: colours same as time requests
Please refer to chapter "Scheduling in the timetable | Scheduling periods".
5.5.4.11 Changed periods
Changed periods
When comparing timetables and in the cover planning mode you can determine how changed periods
should be highlighted. In the example, modifications from the normal lessons are shown in red, bold and
with !.
5.5.4.12 Auto-size for the details window
Auto-size for the details window
This option automatically resizes the period details window (lower section of the timetable window) to fit
the contents.
204
5.5.4.13 HTML index page with full names
HTML index page with full names
Please refer to chapter "Timetables in HTML format".
5.5.4.14 Show master classes separately
Show master classes separately
Please refer to chapter "Type-separated class components".
5.5.4.15 TT display in minute mode
TT display in minute mode
If lesson times differ on different days it can make sense to enter the individual periods of the timetable
on a scale to the exact minute. Untis provides this option with its timetable display in minute mode.
Timetable Display
5.5.5
205
School holidays
The timetables display the free days entered under "Settings | School holidays". The prerequisite for this
is that the timetable display has been set to weeks (<Settings>, "Selection range | Calendar week").
5.5.6
Font
The overall size of the timetable window not only depends on the details displayed in the timetable
periods, but also on the selected font. The font size and type can be changed under <Settings>,
"General | Font".
The relative size of the timetable windows can also be changed.
206
Move the cursor to the dividing line between the timetable window and details window. The cursor
changes to .
Hold down the <SHIFT> key and drag the line up or down.
Release the mouse button. The timetable window adjusts to the specified size.
5.5.7
Colour codes
The colour codes specified for elements under master data will be displayed in the timetable
Timetable Display
207
The example shows the colour coding of subjects and teachers, i.e. teacher Cer (red background)
teaches a biology lesson (blue background) on Monday.
5.5.8
Column headings
Customise column headings (e.g. days of the week) under option "Column heading" on the "General" tab
under <Settings>.
208
The overview timetables with format 20 provide options for the display of additional information such as
dates or start and end times.
Timetable Display
209
Note:
The name of the period specified in the grid view can be printed instead of the period number.
5.5.9
Row headings
The row headings (e.g. start times) can be customised under option "Row heading" on the "General" tab
under <Settings>.
You can display the period number and/or the period times In addition, you can choose between single
and multiple row display and specify the font type and size As always, you will see an example of your
settings in the bottom right hand corner of the preview pane.
210
5.6
Printing
Printing timetables is effected via the <Print> or <Print Preview> buttons. Alternatively, you can use the
shortcut <CTRL>+P. Clicking on either option first displays the print selection window, where you can
make additional settings. Click on <OK> to open the print dialogue or the page preview.
Create customised print views if you wish the printed versions of your timetables to differ from the screen
display.
5.6.1
New print view
Create a new timetable view (see description under "New") based on the timetable that most resembles
the print version you wish to create. Assign a new descriptive name to the new timetable format (e.g.
TeacherTimetablePrint).
Customise the period display in the period window and in the row and column headings as described in
the previous chapters
As a general rule, the print version will be identical to the screen display unless you customise the print
versions or add additional information.
Timetable Display
5.6.2
211
Headings
Customise headings in individual printed timetables (formats 1, 10 and 11) as follows:
Open the file demo.gpn and a class timetable ("Timetable | Classes") and the window for editing the
headings of individual timetables ( under <Settings>, "General" tab, "Heading individual TT").
By default, the full and the short names of the element will be displayed. Layout and format (font size,
alignment, font style etc.) of individual headings can be changed in the upper right-hand section of the
window
Click on <New field> to insert the following additional headings into your timetable (see example below):
Text, Description
You can assign a text and a description of your choice to each master data element (via "Master Data |
Descriptions") and instruct the software to include these details in the headings of printouts.
The example shows a heading containing the text and description entered under the master data for
class 1a. The two fields are arranged side by side. The maximum number of characters has been
extended to 15 and the font style set to bold
212
Department
Allows you to include the name of a department in the heading of printed timetables (useful when
working with department timetables).
Class teacher
Allows you to include the name of the class teacher (entered under the master data of a class) in the
heading on printed class timetables.
Time range
Select the time range you want to display in the heading. You can choose between calendar week,
term, a customised date range or the total school year - depending on the date range entered under
"Selection range" under <Settings>.
Timetable Display
213
Term
Allows you to include the full or short name of a term in the heading of printed timetables (when working
with terms).
Fixed (constant) text
Text entered here (e.g. elective subject timetable) is displayed on all timetables of this format.
5.6.3
Layout
Modify the print layout on the "Layout 1" and "Layout 2" tabs under <Settings>.
Layout of fields
You can select the 3D layout option for Headings, Scheduled periods and Free periods under "3D
layout".
Print black & white
Select this option if the timetables on your screen are colour-coded, but you wish the timetables to be
printed in black & white (for instance, because your printer does not support colour printing).
Do not print empty rows
Empty rows will not be printed. This option allows for considerable savings in paper and space
(especially for summaries and timetables in HTML format).
Open the "Print selection" window via <Print> or <Print Preview> to enter further print settings. The
settings only apply to the layout of the selected timetable.
1 heading per page
You can print any number of timetables on one page and by default the heading (school name, date, file
name etc.) appears above each timetable. You can deactivate this functionality by checking "1 heading
per page" and so print just one heading on a page.
214
5.6.4
Selecting timetables
By default, the timetable displayed on screen will be printed. You can use the <Selection> option to
specify that several timetables of the same format should be printed simultaneously.
Using the mouse You can select the timetables for the desired elements by holding the left mouse
button and moving the cursor or with <CTRL> + left click (see figure).
All
This option allows you to select all the elements.
Marked
Allows you to select all the elements marked with the specific code "marked" under master data.
Inverse
Selects all the elements not previously selected (useful for print selection involving two different groups of
elements, such as part-time and full-time teachers)
Department
Timetable Display
215
Teacher timetable printing can also be restricted to the staff of a particular department.
5.6.5
Details, individual timetables
Click on <Details> under "Print selection" to access further printout options The settings options vary
depending on the timetable format. The following descriptions apply to individual timetables with formats
1 and 10:
Timetables per page Specify how many timetables you wish to print on one page. The example
shows a page containing 6 teacher timetables.
Tip
The print details are stored separately for each timetable layout. It is therefore quite easy to store
individual settings for different printing requirements. Access the print details dialogue via the <Print
details> button under <Settings> on the "General" tab.
216
Check the option "One timetable for each week" if you wish to print a separate timetable per week for
each selected element. In addition, the field "School week" can also be used to specify which weeks
should be printed. If this field remains empty, those weeks will be printed that were selected under
<Settings> This is a particularly useful option for schools with irregular lessons. Check the option "New
page for each element" if you wish timetables to start on a new page for each new class or teacher.
Timetable Display
217
Coupling legend A legend will be printed whenever there is insufficient space in the period window to
display all the relevant details of a lesson. For lesson information (in a class timetable), such details
include rooms, subjects, teachers and any time restrictions.
Use the option "Placement of the legend" to specify the location of the legend on the page or to print the
legend on a separate page. You can also specify the number of columns in the legend, the use of alias
names and if the legend should be printed in frames.
218
The font size of the legend can be customised in the timetable settings.
If you wish to exclude a certain lesson from the printed legend, simply mark the lesson with the code
"(L) Not in legend".
Timetable Display
219
Lesson Printouts of class and teacher timetables can also include the lesson view. Select the desired
lesson view with the button (<L-Tea> or <L-Cla>) in the Lessons section of the "Print details" window.
The print settings specified for the lesson view will also apply to the printout.
The example shows the timetable of teacher Hugo complete with lesson distribution.
Abbreviations
A legend can be printed for the abbreviations used for subjects and/or teachers. The following example
shows a legend containing the short and the full names of subjects.
220
5.6.6
Details, overview timetables
The following print options are available for overview timetable formats 11, 20 and 30:
Number of rows/columns per page
This option allows you to specify the number of rows and columns to be printed on one page. The
example shows an overview timetable for the room availability for classes. The number of rows and
columns is to be calculated automatically.
Timetable Display
221
Coupling legend As with individual timetables, the printed versions of overview timetables can also
include a legend containing the details for which there is insufficient space in the timetable periods. The
legend for overview timetables is always printed on a separate page.
Intermediate headings
Overview timetables can contain a large amount of data. For purposes of clarity, the row and column
headings can be repeated at regular intervals. In the example above, the short names of classes are
displayed at every change of day.
If intermediate headings are not to be repeated at regular intervals but after specific elements, please
use the field "Heading before this element".
5.6.7
Page setup
Use this option to specify the paper orientation (portrait or landscape) and the margins. Please note that
different printers require different minimum margin widths to be observed.
222
A3 print
It is often useful to print overview timetables on A3 size paper. If your printer supports printing on A3
paper, proceed as follows:
Set your printer to paper size A3 (under "File | Print Setup…"). If the A3 printer has been set as the
default printer in the Windows Control Panel and if A3 paper has been set as the standard paper feed in
the printer driver, the timetable will be printed automatically in A3 format.
Timetable Display
5.6.8
223
Background
You can include images and graphs on your printed timetables. The image must be available as a
bitmap file (Windows BMP format). Depending on the bitmap, you can use this function to print your
school logo or a background for the timetable.
Open the "Bitmap" dialogue by clicking on <Background> under “Print selection".
Select the type of bitmap file you wish to include (<Browse…>). The selected image will be shown
in a preview pane on the right of the dialogue box.
Use the "Position" fields to specify where the upper left corner of the image should be located with
respect to the left or upper margin of the timetable. Use the "Size" fields to specify the size of the
printed image. Check the box "Keep aspect ratio" to avoid distorting the image. Untis will then
calculate the dimensions of the image from the most recently entered value and the aspect ratio of
the image.
224
5.6.9
Header and footer
The information displayed in the headers and footers can be specified under 'Reports | Report settings'.
The licence text (school name and address) is always displayed and cannot be suppressed.
Timetable Display
225
5.6.10 Several classes in one timetable
When a class is divided into two components, for instance a science and a languages group, but the
timetables of the two components differ in only a few key respects, it can be useful to output the
timetables of both class components in a single timetable.
To do this, enter the combined class name of the classes whose timetables you want to print on a
single timetable in the "Master class (TT print-out)" field under "Master Data | Classes".
226
The example shows a class with a science (10a_S) group and a languages group (10a_L). The period
details window shows that the students in the science group (10a_S) are scheduled to have a Physics
lesson on Monday, period 2, while the students of the Languages group (10a_L) are scheduled to have
Latin. The combined name of the class is 10a. The screen display shows the names of all class
components (10a + 10a_S + 10a_L).
Timetable Display
227
The timetable printout contains all the information of the class components in a single timetable for class
10a.
228
Note:
If you wish to prevent timetables from being combined for specific timetable layouts, deactivate the
option "Show master classes separately" on the Layout 2 tab under <Settings>.
5.6.11 Timetables in HTML format
You can print out timetables in HTML format in order to make them available in your school's intranet or
on the Internet,
Creating timetables in HTML format is similar to creating printouts of timetables. Proceed as follows:
Activate the timetable you want to save in HTML format and open the dialogue box "Print selection"
by clicking on <Print> or <Print Preview>
Select the elements you want to print (i.e. save in HTML format) and customise settings and details
(e.g. legends etc.) in the usual way.
Click on <HTML>.
Timetable Display
229
A file dialogue box appears. Enter the name of the directory where you want to save the HTML files
and confirm with <Save>.
An index file will be created for each output, allowing access to each of the output elements. The index
file name is based on the format used (e.g. CLA_HTML). Use the file to open the index with the links to
the exported elements.
Tip
>If the full names of the elements to be output are to be used, activate the option "HTML index page
with full names" on the "Layout 2" tab under <Settings>.
230
Timetable Display
231
When using the Cover planning module, the updated timetables also contain complete details on
teaching cover.
5.7
Import and export of views
As a general rule, the views you create are saved in the current work file. In order to make these views
available for use in other files, you need to import or export them
232
Select "File | Import / Export | Timetable/Input formats".
Select the "Export of formats (gpf)" tab from the dialogue box.
Enter a name in the name field of the export file (e.g. "New.gpf").
You can export the format details of timetable views and of master data views. Select a particular
timetable view for export by clicking on <Select> in the row "Timetable formats".
From the dialogue box, select the timetable view whose format you want to export and confirm by
clicking on <OK>.
Timetable Display
233
The format data has now been saved in the file "New.gpf". You can now make your formats available to
other Untis users (minus school data) or import the formats into other files.
Use the same method to import formats from a .gpf or .gpn file.
5.8
Using the clipboard
Using the clipboard, you can export timetables to other programmes such as word processing
applications.
Proceed as follows:
Click on the timetable you wish to export (the title bar must be blue)
Copy the timetable to the clipboard (menu command "Edit | Copy" or via the shortcut <CTRL>+C.
Switch to your word processing application. Select "Edit | Paste" to insert the contents of the
clipboard in the form of an image.
234
The "Edit | Paste" function can also be used to export the legend.
Timetable Display
6
User Tips
6.1
User tips
235
This chapter describes additional options and useful settings not covered under master data and
lessons. These should help you to take full advantage of Untis in working with your timetables.
6.2
Settings
Use the „Settings“ menu to enter various other useful settings. The most important of these will be
introduced in the following section.
236
6.2.1
Time Grid
The functions of the time grid are described in detail in the brochure "Getting Started".
6.2.2
School data
Use the School Data window to enter details such as the start and end date of the school year, country,
region and type of school. The details entered in this window are required for a number of different
(statistical) processes and calculation methods.
User Tips
237
The Overview tab provides an overview of the number of classes, teachers, rooms and lessons at your
school.
238
6.2.3
Miscellaneous Settings
6.2.3.1
The 'Auto-save' tab
This is where you can specify the interval at which Untis should automatically save data and
how many backup generations should be archived. The settings in the figure mean, for
example, that Untis should save the data every 30 minutes and use four generations of
backup. These data are saved in files Save1.gpn, Save2.gpn, Save3.gpn and Save4.gpn. The
most current data are always in file save1.gpn and the oldest – in relative terms – in file
save4.gpn. In order to avoid identical save files being created we would recommend that you
check the option "Save only when the data has been changed".
When you check the option "Open with the last file saved", Untis will automatically load the
last file to be processed. You can prevent this happening by holding <SHIFT> pressed when
launching Untis.
In addition, the option "Start with current date" also allows you to determine whether windows
in which it is possible to select the date should be opened with the current date or with the
date last saved.
You can view the results of optimisation in the optimisation dialogue immediately after the
optimisation run. Check the option "Save results of the optimisation in work files" if you wish
to have these timetables available after you exit Untis. This causes the result to be saved in
User Tips
239
so-called work files.
6.2.3.2
The 'Directories' tab
This tab allows you to specify various standard paths. We would recommend that you create
your own directories for your backup and work files (i.e. the files containing the different
timetables of your school saved during optimisation) and enter the paths on this tab.
6.2.3.3
The 'Timetable' tab
The settings on this tab are relevant for a number of different timetable functions.
240
For instance, the timetable version number you can assign to each timetable version will be
included on all printouts (see the chapter Timetable construction ).
The different options for timetable comparisons are described in the chapter of the same name.
The Synchronise dates option allows you to specify if a date change implemented on one
particular timetable should also apply to all other timetables open on the screen. This function
is particularly useful for use with the Multi-Week Timetable and the Multiple Term Timetable
modules
The option "When switching terms, set the TT to the beginning of the term" is only active for
use with the Multiple Term Timetable module. The last option "Activate Drag&Drop in the
timetables" allows you to activate or deactivate the manual timetabling function.
6.2.3.4
The 'Internet' tab
User Tips
241
Untis allows you to receive information about version updates. In addition to activating the
option "Automatically check the internet for program updates", you must also specify how
your computer accesses the Internet - direct or via a proxy server. Please contact your
system administrator if you are uncertain about these settings.
You can use the <Test> button to test whether the settings you have made are correct and
whether Untis can reach the Gruber&Petters web server.
The option "Connect to the internet for user messages" is used to specify whether you wish
to receive messages from your local Gruber&Petters partner and from Gruber&Petters
direct.
242
HTTP authentication is generally not required.
6.2.4
Licence Data
Entering licence data is described in detail in the brochure "Getting Started".
6.3
Time Requests
Time requests are an important element of the Untis timetabling software. Time requests can be entered
for master data elements and for lessons. The button for this function can be found on the tool bar of the
master data or lesson window.
Time requests are graded from "-3" (completely blocked) to "+3" (core time) which corresponds to a very
strong desire to for work.
There are two different categories of time requests – specific time requests and unspecified time
requests . Specific time requests refer to specific days and periods. Unspecified time requests, by
contrast, are requests where only the duration and the type of request (e.g. 1 day of "-3") are specified
and where the selection of the day or period is up to the software program.
6.3.1
Specified time requests
Start Untis and load the file demo.gpn
Open the master data view for teachers ("Master Data | Teachers") and click on <Time Requests>
Switch to teacher New (Newton).
User Tips
243
The window on your screen should now resemble the figure on the left. The following time requests are
active:
Monday and Tuesday, periods 7 and 8: "-2". If possible, Newton should not have lessons scheduled in
these periods.
Wednesday, all day: "-3". This means that Wednesday is definitely blocked, i.e. teacher Newton is not
available to teach on Wednesdays.
Thursday (pm): "+3"; Newton wants to teach periods 6 – 8, if possible.
Please note that time requests for entire days and half-days can be entered on the right-hand side of the
time grid (bottom part of window).
Assigning the time request "+1" to days Thu - Sat, periods 1-3.
Click on "+1"
Highlight the range Thu - Sat, periods 1-3.
244
You have entered the time request "+1" for Thu - Sat, periods 1-3 for teacher New .
Please note that the button for time request "+1" remains active until you deactivate the function by
clicking on it. This means that you can enter further "+1" time requests at this time by clicking on the
relevant periods in the time grid.
Delete time requests for certain periods or blocks of periods by highlighting the cells and clicking on
<Delete>.
6.3.2
Unspecified time requests
Switch to teacher Rub (Rubens) using the previous time request example.
Assumption : teacher Rub is a part-time teacher and therefore entitled to a free day per week. If
possible, the teacher would also like two additional free afternoons.
Enter the following data under unspecified time requests:
User Tips
245
Enter "1" in the row "-3" under „Days“. This instructs the optimisation tool to schedule one free day
for teacher Rub.
Enter "2" in the row "-2" under "p.m.". The optimisation tool will attempt to schedule two additional
free afternoons for teacher Rub.
Enter time requests for half-days in the column "Halves". The optimisation tool will decide whether to
schedule the half-day in the morning or the afternoon.
Note:
Use unspecified time requests whenever possible to allow the optimisation tool as much flexibility as
possible.
Warning
Specific and unspecified time requests are cumulative. If Tuesday is block ed with a time specified time
request and an unspecified time request is entered with a priority of "-3" to k eep a full day free, two
complete days will be without periods – Tuesday plus an additional day.
In addition to the above, you can enter unspecified block ed periods for each element. The example
shows a time request for teacher Gauss. He would like three free periods (specifically periods 2 - 4) on
three days of the week.
Tip
Time requests can be entered directly in the scheduling dialogue (see chapter Scheduling dialogue ) for
more details.
246
6.3.3
Copying time requests
You can copy the time requests of an element to the clipboard and paste them in different elements. It is
also possible copy all the time requests of an element to any other in the time request window using the
<Serial Change> option
User Tips
6.3.4
247
Deleting time requests
You can also use the <Serial Change> option to delete all time requests. Remove all time requests from
one element and then copy and paste these settings to all other elements where you wish to delete time
requests.
6.3.5
Core time
If you would like Untis to schedule morning lessons first, enter a time request of "+3" for some of the
morning periods (usually the first 4) under classes. Use the <Change> function described above.
248
The time request "+3" defines the so-called core time . The optimisation tool must schedule periods in
the defined core time range, if at all possible. The Untis optimisation algorithm regards a core time
violation as a serious offence. Please ensure that the number of core time periods entered for an element
is smaller than (or equal to) the number of periods defined for the element.
User Tips
6.3.6
249
Colour codes
Use this function to customise the colour codes used to highlight the different time requests on the
timetable or in the scheduling dialogue individually.
6.4
Lunch breaks
You can specify the exact times of a lunch break between morning and afternoon lessons for classes
and teachers using the time grid
You have the following lunch break options:
Specify a uniform lunch break for the entire school (e.g. 12:00 - 13:00)
In the time grid, enter 12:00 as the time when the last morning lesson should end and 13:00 as the time
the first afternoon lesson should start. The software will treat the time between 12:00 and 13:00 as a
lunch break (not as a period).
Specify element-specific lunch break blocks (time request "- 3").
Include the lunch break in timetable creation.
250
This last lunch break scheduling option allows for a better use of subject rooms. The option enables you
to specify different lunch break durations for individual teachers and classes. Enter "1,2" in the box
Lunch break Min,Max to instruct the software to schedule either 1 or 2 lunch break periods for the
selected element
Based on the weighting, the lunch break will be scheduled during the last morning periods and/or the
first afternoon periods.
On a timetable with
scheduled either for
periods
periods
periods
5 morning periods and 4 afternoon periods, a two-period lunch break will be
4 and 5,
5 and 6, or
6 and 7.
Vary the time during which a lunch break can be scheduled by specifying the first and the last period
when a lunch break may be scheduled (on the „Breaks“ tab in the time grid ). The boundary between
morning and afternoon lessons must lie within the specified time interval (see figure below).
If your school cafeteria has a limited capacity, use the same tab to enter the maximum number of
classes that can have a lunch break at the same time (figure above).
User Tips
251
Violations against specified lunch break times are displayed in the diagnosis window.
6.5
Couplings
The composition of couplings has a major effect on the quality of a timetable. Unfavourable couplings
can prevent the construction of a high-quality timetable. The following criteria are important for the
creation of couplings.
6.5.1
Teacher teams
Teacher teams are required, for instance, in PE lessons where students of a class are divided into a
male and a female group. Each group requires its own teacher, and both teachers must always be
scheduled at the same time. Both teachers must always be scheduled together for the lesson
concerned.
As a general rule, it is desirable to keep the number of teacher teams as small as possible and to
ensure that each teacher is only part of a teacher team if absolutely necessary (see the example at the
end of this chapter).
To help you organise your teacher teams, Untis provides a "Teacher team" list where you can view all
teacher teams at a glance.
Access the list via one of the two following options:
1. Click on <Print> or <Print Preview> in the "CCC Analysis" window
2. Select the relevant print list from the "Print selection" dialogue under "Master Data | Teachers" (only
available with the "Lesson Planning" module)
Method 1 provides direct access to the list of all teacher teams.
Using method 2, you first need to open the "Print selection" dialogue by clicking on <Print> or <Print
Preview> in an active master data window for teachers. You can then change other settings in this
window.
Click on the selection window "Type of list" to obtain a list of all print lists available in connection with
teacher master data. Select the list "Teacher teams" (the <Selection> button normally used to select
individual teachers is irrelevant for the "Type of list" function and is therefore greyed out).
252
The following figure shows an example of such a list.
User Tips
253
The printout shows:
1
The total number of different teams. The general rule is: the fewer, the better.
2
The lessons (including details) in which a team is involved. The general rule is: the more, the
better.
3
The time requests entered for the individual teachers in the team. If a number of different time
requests need to be taken into consideration, the timetable quality will deteriorate as a result since a
teacher team can only be scheduled when all the teachers of the team are available.
In the example above, the PE teachers Rub ("Rubens") and Arist ("Aristotle") form teacher team no. 1.
Let us assume that you have another teacher team (e.g. team no. 4 comprising teachers Rubens and
Hugo) scheduled to teach Design. Each time, team 4 is scheduled, team 1 would be blocked since
teacher Rubens belongs to both of them.
In this case you need to decide if teacher team 4 is necessary at all (since there already is a teacher
team for Design, i.e. team 2). You could also find out if Ruben’s team colleague Arist is qualified to
teach Design, as well. If so, the Design lesson could also be taught by team 1. In any case, one teacher
254
team would be eliminated, lending a greater flexibility to the optimisation tool.
As mentioned earlier, the CCC analysis is a perfect tool for identifying such problematic compositions
(see the chapter " CCC analysis ).
Time requests and teacher teams
Time requests are another problematic issue when dealing with teacher teams. In an ideal case, the
individual time requests and especially the block ed periods for teachers in a teacher team should
overlap as much as possible.
The following figure shows a single teacher team. Please note the blocked periods (time requests "-3").
As a result of various time requests, team teachers are blocked on Monday, Tuesday, Wednesday and
Saturday. Let us assume that this teacher team is scheduled for a lesson with three single periods per
week. Two of the three periods could be scheduled on Thursday and Friday, but the third period could
only be scheduled by violating the block ed period ( time request "-3") of a teacher (something Untis will
never do) or by violating the condition that the subject should take place no more than once a day
(depending on your weighting settings , Untis may violate this rule; please see the chapter "Weighting").
6.5.2
Class couplings
The above rule for teacher teams also applies to class couplings, i.e. lesson couplings across classes
should, if possible, always involve the same classes.
In the example above, class 1a in a two-class coupling should only be coupled with class 1b; in a fourclass coupling only with classes 1b, 1c and 1d.
User Tips
6.6
255
Type-separated class components
For organisational reasons, one class sometimes consists of two type-separated class components.
For example, class 5a could consist of a Modern Languages and a Classics component. While the
former component has an Italian lesson scheduled, the latter component could have a Greek lesson
Proceed as follows in this case:
Define two classes - 5aC for the Classics component and 5aM for the Modern Languages
component.
Enter the name 5a in the "Master class" field under master data of both classes
Couple the two class components for all lessons attended by the students of both groups.
256
The timetable of both class components can then be combined in a single view. In the example
below, the combined class name 5aCM is used for all lessons attended by students of both class
components (see chapter "Timetable construction").
Note:
You can deactivate this behaviour for individual timetable formats by checking the box "Display main
classes separately" on the "Layout 2" tab under <Timetable settings>.
User Tips
6.7
257
Class groups
By default, the Untis standard software package optimises school timetables for schools based on class
structure, i.e. where each student is assigned to one particular class and the lessons scheduled for the
student are determined completely by his or her class.
By default setting, the Untis standard software package optimises school timetables for schools based
on class structure, i.e. where each student is assigned to one particular class and the lessons
scheduled for the student are determined completely by his or her class. This type of school system
allows students to choose his or her own courses, which means it is no longer the class that is the focal
point of the timetabling efforts, but the student. This scheduling situation is addressed by the Untis
Course Scheduling module.
Some school systems, such as some German Realschulen, Austrian teacher training colleges and
British secondary schools, use a combination of the two extremes described above. In these schools,
some lessons are attended by the entire class ( core lessons, main subjects ) while others represent
so-called differentiation subjects ( intensive lessons, minor subjects, options ) that are attended by a
fixed group of students from different classes. Each student’s lessons are therefore determined by the
student’s choice of main and minor subjects. The following section describes how to deal with this
timetabling situation using class groups.
The following example demonstrates the general principles of class groups.
Class C1 consists of 20 students subdivided into two groups of 10 students each One group consists of
students with an interest in modern languages, the other of the students with an interest in science. All
20 students attend the same lessons for English, PE, History and Geography. However, while one group
attends German, French and Italian lessons, the other group has Physics, Chemistry and Maths,
instead.
This means that German can be scheduled at the same time as Chemistry or Maths since Modern
Languages students do not attend Science classes. On the other hand, German, Chemistry and Maths
must not be scheduled at the same time as English or PE since these are core subjects attended by all
the students of the class.
You can use Untis to solve this problem as follows:
6.7.1
Defining core lessons and options
Under "Master Data | Classes", define a core class C1 and two differentiation groups C1_M (Modern
Languages) and C1_S (Sciences).
258
Lessons of core class C1 involves all of the students of the class while lessons of differentiation groups
involve only the students belonging to the particular group.
User Tips
259
Under "Master Data | Classes", enter the information that the class groups C1_M and C1_S consist of
students from core class C1 using the Class group code ( CG code): "1" meaning that the class is a
core class, numbers greater than 1 (2 - 9) refer to the different class groups.
Please note that the same class group code must be entered for both class groups C1_M and C1_S.
Use higher code numbers only when the students in your school can choose more than one elective
course group.
Entering the correct codes instructs the Untis to schedule lessons for class groups C1_M and C1_S
only when class C1 (i.e. the core class) is not scheduled to have lessons. The same also applies to
class C1_S.
6.7.2
Illustrating the principle
The examples on the left and below and the following explanations demonstrate the situation in a
German Realschule (in North Rhine-Westphalia):
260
User Tips
261
Take a look at year 9. Each student of this year is assigned to one of the core classes 09A, 09B or 09C
and attends undifferentiated core class lessons. Each class is therefore marked with the class group
code "1".
The classes 09fs – 09ti highlighted in light green (full name "Course" in the above figure) are the
differentiation groups (fs: French, ti: IT). Each student of core classes 09A - 09C can choose one of the
elective subject groups 09fs – 09ti. Each class group is marked with the class group code "2".
Please note when using class groups that the order in which classes are listed under "Master Data |
Classes" is not arbitrary . Core and differentiation classes of any one year must be listed in sequence,
i.e. one below the other. A class group coded with a class group code smaller than that of the class
listed immediately above denotes the beginning of a new, totally separate class sequence with
completely different details (see the example above, e.g. between 08ti and 09A, or between 09ti and 10A
Lessons of classes coded with a class group code are marked as such in the scheduling dialogue.
262
The symbol '=1=' on Tuesday, period 6, in the row of class 09A means that a class with the same class
group code '1'“ is scheduled at the same time. (For this reason, a lesson should be scheduled for class
09A in this period, if possible.)
Tuesday, period 1, contains the symbol '-2-'. This means that a lesson has already been scheduled for a
class with the class group code '2' and that it is not possible to schedule a lesson for class 09A at this
time without creating a clash .
Please also note that the additional class row for 09ti, which has a different class group code from that
of class 09A, shows the complementary entries to class 09A: Mon-1 to Mon-6 are coded '-1-' for 09ti
(scheduling not possible due to code '1'). Tue-1 to Tue-3, scheduled for 09ti, are coded '-2-' for 09A
(scheduling not possible due to code '2').
6.7.3
Display and printing
The timetables of core and differentiation classes can be displayed neatly and clearly using Untis
overview timetable format 20.
Print the core and differentiation lessons of a class on a single timetable by accessing the master data
field Master class .
User Tips
263
Please note that Untis allows you to assign several different master classes to a class. The following
example demonstrates the advantages of that option.
The differentiation lessons of class groups 09fs, 09nb, 09sw, 09tc and 09ti are elective lessons for all
students of core classes 09A, 09B and 09C. The three master class designations allow you to print
complete timetables of all core classes including differentiation groups quickly and easily.
264
6.8
Locking
Before timetable optimisation can run it is often necessary to lock certain periods, lessons or even entire
master data elements such as teachers, classes or rooms in order to prevent Untis from making
changes at the places in question.
6.8.1
Locking periods
When one or more periods have been manually set for a lesson they can be individually locked in the
timetable by clicking on <Lock period>. This ensures that these periods will not be moved during
optimisation. Locked periods are marked with an asterisk (*) in the timetable period window and in the
period details window (see figure).
Deactivate the marking in the timetable period window by unchecking the option "Label locked periods
with a * mark" on the "Layout 2" tab under <Timetable Settings>.
User Tips
6.8.2
265
Locking lessons
If all elements of a lesson are to be locked, activate "Lock (X)" for the lesson in question. A locked
lesson will also be marked with an asterisk (*) in the timetable. Please note that you cannot remove this
lock by clicking on the <Lock period> button.
266
Caution:
If you lock a lesson for which all periods have not yet been scheduled, the missing periods will be set at
the beginning of optimisation but they cannot then be moved (switched) subsequently by the algorithm.
This results in significantly worse optimisation. For this reason, please only use this mark for lessons
that have been fully scheduled.
6.8.3
Locking master data
You can also lock certain master data elements if, for example, the limited number of periods of a parttime teacher are to be entered and locked manually. In this case, use the "Lock (X)" field that is
available in all master data views. Again, it is not possible to remove the lock from periods locked in this
way using the <Lock period> button.
User Tips
6.8.4
267
Locked lessons window
As explained in the preceding chapters, locks can be entered in different ways in Untis. You can obtain
a summary of all lessons locked in the school data by opening the "Lessons | Locked Lessons" window.
The list of rows contains all the lessons which are currently locked from being moved, which Untis
(timetable optimisation) is not allowed to move. The columns indicate the level or the master data
element causing the lock. You can use the <Delete> button to remove individual locks.
268
6.9
Room logic
The following chapter is devoted to the treatment of rooms. Special attention will be placed on the
difference between (subject) rooms and home rooms and how and why Untis assigns a particular room
to a lesson during optimisation.
6.9.1
Alternative rooms
Since rooms are usually a scarce resource when it comes to timetable construction, Untis provides the
additional option of assigning an alternative room.
6.9.1.1
Alternative room ring
Since each alternative room can have its own alternative room, you can create entire alternative room
rings by entering the original home room as the alternative room of the last alternative room in the chain.
The example below shows such an alternative room ring.
Untis can allocate either one of the five rooms, depending on which would improve the optimisation
User Tips
269
results most. Both the optimisation and the room optimisation tools take into consideration the order in
which the rooms are entered – an important criteria in the following two scenarios.
You can either recreate "geographic" aspects of your school by ensuring that the alternative room order
reflects the relative locations of the rooms in the school. This would save teachers and students from
wasting precious time when moving from room to room. In an alternative room ring, neighbouring rooms
should therefore be listed in sequence.
Another option is to use alternative room rings and chains to place the function of the rooms in context.
When a room capacity has been defined for individual rooms under master data, you can list alternative
rooms with approximately the same capacity in sequence (in an alternative room ring). Another aspect
that could influence the order of rooms in alternative room rings is the equipment provided in the
individual rooms.
Classes without a designated room
If your school has classes without designated rooms you can use pseudo rooms by assigning a fictitious
room to a class. You can do this by simply assigning a fictitious room, a pseudo room, to the class in
question and blocking this room for every period of the week (using time request "-3").
Enter a room from the classroom ring as an alternative room for your pseudo room. Untis will now select
a suitable classroom for the class (see example).
270
Including pseudo rooms in an alternative room ring.
User Tips
6.9.2
271
Room allocation
Untis provides three different methods of allocating rooms:
1.
Manual room allocation in the scheduling dialogue, on the scheduling timetable or on the timetable
(see chapter " Manual timetabling ")
2.
Automated room allocation during optimisation
3.
Optimised room allocation during room optimisation
The automated room allocation function during optimisation attempts to optimise timetables not just from
the class or teacher perspective, but also from the room perspective.
Untis may even schedule a lesson for a period where a suitable room is unavailable. The lesson is then
displayed in the diagnosis window under "Subject room missing". To suppress this behaviour, set the
room weighting of the specialist subject room to "4" (under master data) and the slider for "Optimisation
of room allocation" in the weighting dialogue ("Scheduling | Weighting") on the "Rooms" tab to position 4
or 5 ("very important" or "extremely important"). Periods for which the optimisation tool is unable to find a
suitable room will then remain unscheduled.
The room situation can be re-optimised without altering the class or teacher timetables (see section after
next). This is useful when manual changes have been made to the scheduling of rooms and these
changes are to be taken into account in other areas.
6.9.3
Room capacity
When room sizes and/or class sizes at your school differ widely, set the optimisation and the room
optimisation tools to consider the capacity of individual rooms in order to prevent situations where a
small class occupies a room suitable for twice the number of students or a large class is crammed into
a small room designed for a much smaller number of students.
To ensure that the room capacity function works correctly, enter the following details (see also chapters
"Master Data" and "Lesson"):
Under "Master Data | Rooms"
Capacity
272
Under "Master Data | Classes"
Students (male, female)
For couplings under "Lessons"
Students (male, female)
6.9.3.1
Alternative room chain
If you would like the room optimisation tool to consider the room capacity of alternative rooms, the
alternative room ring must remain open, i.e. you need to create an alternative room chain, instead. The
example below illustrates this.
The example shows that room R3a has a capacity for 22 persons. When this room is unavailable, the
next suitable room for this lesson is the slightly larger room R2a. The next room in the chain is the even
larger room R2b etc. The alternative room for R1a is R1b, and the chain ends here because R3a with its
lower capacity is unsuitable as an alternative room for R1b.
Room capacity and optimisation
If you wish the room capacity to be taken into consideration, check the relevant box in the optimisation
or room optimisation dialogue before starting an optimisation or room optimisation run.
Specify the level of importance of the room capacity function by adjusting the weighting option "Take
room capacity into consideration" in the weighting dialogue ("Scheduling | Weighting") on the "Rooms"
tab.
User Tips
6.9.4
273
Room optimisation
The room optimisation tool attempts to optimize the already optimised timetable by finding the most
suitable room available for each lesson. The software obeys the following rules:
Lesson periods will not be moved.
Double periods (or period blocks) take place in the same room wherever possible.
When the software is unable to schedule all of the periods of a subject in the designated subject
room, Untis tries to ensure that all classes have the name number of lessons scheduled in the
subject room (e.g. if the school has 34 classes and only one Physics lab, Untis tries to ensure that
each class has at least one period in the specialist subject room).
When the optimisation tool is unable to schedule a lesson in a designated alternative room, the
room optimisation function ensures that the lesson takes place in the designated home room,
instead.
The software attempts to allocate the same room to a class (or teacher) for the duration of an entire
half-day. This is of particular importance for classes without a designated room. These should be
allocated with the aid of pseudo rooms.
Preference is given to alternative rooms listed close to the designated room in the alternative room
chain.
The rooms specified in”Lessons" window take precedence over alternative rooms. This is of
particular importance for classes without a designated room. A class without a designated room
must never displace another class from its designated home room and can only be scheduled for a
home room that is readily available.
When a lesson is marked "r" All periods in the same room" (on the "Codes" tab under "Lessons |
Teachers" or "Lessons | Classes"), the room optimisation tool attempts to schedule all the periods
of the lesson in the same room while at the same time taking the room capacity into account.
Rooms that are not designated home rooms are allocated first, and preferentially to double periods
274
and period blocks.
The following example demonstrates the function of the room optimisation tool:
6.9.4.1
Example: step 1
Please open the file "demo1.gpn".
Seven classes are listed under "Master Data | Classes". The column "Room" in the grid view shows that
a pseudo room has been assigned to the last two classes ("3b" and "4") This means that these two
classes do not have a designated room of their own. You can view the alternative rooms under "Master
Data | Rooms" They form the same alternative room ring that was displayed in the previous example.
The alternative rooms allocated to the two pseudo rooms are the rooms for 1 and AA ("R1a" and" R2a").
User Tips
6.9.4.2
275
Example: step 2
When you have opened the file a class timetable should already be open. Open another timetable
window via "Timetable | Rooms".
A number of columns in the class timetable may be marked "Before school starts". Select the next
week in the date selection box of the timetable window to display the timetable for the days you wish to
view.
6.9.4.3
Example: step 3
On the class timetable, click several times on <Other element in period> until the room details are
displayed. Repeat the same process for the room timetable until each period displays the class
scheduled to have lessons in the room.
276
User Tips
277
Inspect the timetable of a class and of its home room. The examples above show class 1a and its home
room R1a. As you can see, the class is not always scheduled to have lessons in its home room
because the room is occasionally occupied by other classes
6.9.4.4
Example: step 4
Select menu item "Scheduling | Room Optimisation".
278
The room optimisation dialogue appears, where you can specify if you wish to optimise locked and/or offsite rooms and if the room capacity should be taken into consideration.
6.9.4.5
Example: step 5
Click on <Start Room Optimisation>. Click on the button again when the room optimisation run finishes.
As you can see, the room optimisation tool has allocated the home room (R1a) for most of the lessons
of class 1a and the designated subject room (PE and Design) for some of the lessons.
User Tips
279
280
Please note the situation for classes without a designated room. Before room optimisation, class 3b was
scheduled to have lessons in room R1a on Tuesday, periods 4 and 5. Class 4 was scheduled for room
R1a on Saturday, period 4. The room optimisation tool moved both classes to another room since the
placement violated the rule that a class must not be displaced from its home room.
After the room optimisation run, the situation is very different. Class 1a is back in its home room on
Tuesday, period 4 and 5, and on Saturday, period 4. Instead, class 3b occupies room R1a on Monday,
period 4, when class 1a is scheduled to have a PE lesson in the sports hall. Class 4 is scheduled in
R1a on Saturday, period 5, because again, the room is not required by class 1a .
Any periods not yet allocated to a suitable room (as is often the case for classes without a designated
room) can be assigned manually using the scheduling dialogue.
6.9.5
The role of subject rooms and home rooms
The entries for the specialist subject rooms are pivotal for room scheduling.
Let us assume in the following example that rooms have been entered in the subject room and home
room fields.
Room optimisation would now attempt to schedule all periods for physics lesson number 95 in the
specialist subject room physics laboratory.
User Tips
281
Note:
If this condition cannot be met, optimisation will attempt, as in the example, to share the physics
laboratory equitably among all classes with a claim on it.
Let us assume that the physics laboratory is not free for one of the two periods in which optimisation
attempts to schedule physics lessons. In this case, room optimisation would schedule these periods in
the home room - R2a in our example.
The timetable periods detail window will then indicate that room R2a has been allocated instead of the
desired Phys (in parentheses).
As a general rule, if the desired subject room is not free, room optimisation will ensure that the period in
question is held in the home room
Please note that you could specify a (different) room to relocate lessons for each individual lesson if the
desired subject room is not available.
282
Tip:
If 3 periods of a 5-period lesson have to be held in a subject room (i.e. not in the home room), enter a 3
in the field "Periods in room".
You must do the following if it is absolutely necessary for lessons to be held in a specific (subject) room:
1. Set the room weighting for the room in question to 4, and
2. Weight the parameter "Optimisation of room allocation" on the "Rooms" tab under "Scheduling |
Weighting" with 4 or 5.
Alternatively, you can delete the entry in the home room field for the lesson in question.
User Tips
283
If you have only made an entry in either the subject room or in the home room fields (as in the above
example for lessons 59 and 60), processing will as a rule be identical:
room optimisation first tries to allocate the desired room (or one of its alternative rooms) to the all
periods of the lesson in question.
284
If this does not succeed, what happens then depends on the weighting settings on the "Rooms" tab
under "Scheduling | Weighting": the lesson periods remain unscheduled or no room is allocated.
Periods without a room will always be displayed in the diagnosis.
6.9.6
Off-site rooms
Off-site rooms are specialist subject rooms and classrooms located at such a distance from the main
school building that a whole period needs to be set aside to allow teachers and students to reach the
off-site rooms. The automated optimisation function takes the length of the walking time into account
when optimising the timetable.
A PE teacher is scheduled to teach periods 1 and 5 in the main building and period 3 at the (off-site)
sports track. The timetabling tool will ensure that periods 2 and 4 remain unscheduled for the teacher to
allow him or her sufficient time to reach the sports track.
Breaks of different lengths
Many schools use timetables where some breaks are longer than others and where it is therefore
possible to reach an off-site location during one of the longer breaks. Breaks of sufficient length to reach
an off-site location can be marked "+" in the time grid under "Breaks".
User Tips
285
The figure above shows that the break between periods 2 and 3 is sufficiently long enough to reach the
off-site location. The PE teacher in the example above would therefore be able to teach period 2 in the
main building and still manage to reach the sports track in time for period 3.
Half-day external site
With the "Half-day external site" option it is possible to specify that teachers and students may not
switch buildings for half a day, thus minimising the number of times they need to switch buildings.
286
6.9.6.1
Start time graduation
Instead of wasting an entire period to reach an off-site location, the start time of certain lessons can be
adjusted slightly to suit the situation.
Using this method, the PE teacher from the previous example can be scheduled to teach periods 1, 2
and 5 in the main building and period 3 at the off-site sports track. The software schedules a 4. free
period for period 4 to allow the teacher sufficient time to return to the main building after period 3.
User Tips
6.9.6.2
287
Off-site codes
Off-site rooms are marked with an off-site code entered under master data.
Off-site rooms with graduated lesson starts
Enter the same (numerical) off-site code for all the rooms at an off-site location where you operate a
system of start time graduation . Permitted values are between 1 and 9.
Your school has two off-site locations. The first is a 15 minute walk away from the main building, the
second a 10-minute walk away from the first off-site location. Enter a value for each off-site room as
described above to enable Untis to schedule the teacher as follows:
Period 1 – main building, Period 2 – off-site location 1, Period 3 – off-site location 2.
Untis allocates one free period for the return from one of the off-site buildings to the main building or from
off-site location 2 to off-site location 1.
Untis takes into account:
The walking times for teachers and students to off-site subject rooms and classrooms
The walking times for teachers and students from off-site subject rooms and classrooms back to the
main building
It is advisable to reduce the number of times teachers and students are obliged to move between main
and off-site buildings to an absolute minimum. The following example shows how to do this:
For teachers who teach both in the main building and at off-site locations, enter the number "1" under
Subject sequence - Teachers for lessons that take place in the main building, and the number "2" for
lessons that take place in the off-site building.
288
Untis will then attempt to schedule as many periods as possible in the same building for the teacher.
Off-site rooms without graduated lesson starts
If you are unable to graduate lesson starts as described in the previous section, you need to schedule
one free period each for the walk to and from the off-site location for teachers and students.
To achieve this use the off-site codes A – E for the relevant off-site rooms at your external locations.
To ensure the correct treatment of off-site rooms during optimisation, enter the following details:
Under "Master Data | Rooms"
Off-site code
Room weighting
Under "Scheduling | Weighting | Rooms"
Optimisation of room allocation
Optimisation of the off-site rooms
Periods scheduled for rooms with off-site code '1' are marked y and Y in the scheduling dialogue.
Periods scheduled for rooms with other off-site codes are marked z and Z (upper case letters denote
couplings).
User Tips
6.10
289
Optional subjects and fringe periods
Not every subject is attended by every student of a class. When this is the case, it may be desirable to
schedule such subjects at the beginning or the end of a half-day (in the so-called fringe periods ) to
enable students who do not take part in the subject either to come to school later, to leave school early
or to have a longer lunch break
To enable the software to schedule subjects in fringe periods, mark the subject with the code Optional
subject or Fringe period (under "Master Data | Subjects"). In principle, the two codes influence
optimisation in the same way but real differences can be made by setting different weighting factors.
The following weighting settings instruct the software to schedule optional subjects preferentially in the
last periods of a half-day, i.e. either in the last period of the morning or afternoon, while fringe period
subjects should be scheduled either in the first or the last periods of the day .
290
Code G has the opposite effect. Subjects marked " (G) Not a fringe period " are scheduled outside fringe
periods.
6.11
Main subjects
Subjects that are considered particularly strenuous or important for students can be marked with the
main subject code. This allows the optimisation tool to observe the following restrictions:
Maximum number of main subjects that may be scheduled for a class per day
Maximum number of main subjects that may be scheduled in sequence for a class
Maximum number of main subjects that may be scheduled to take place after a defined boundary
period.
To ensure the correct treatment of main subjects during optimisation, enter the following details:
Under "Weighting | Main subjects"
Respect max. number of main subjects per day for classes
Respect max. number of consecutive main subjects for classes
Boundary period
Main subjects max. once after boundary period
Main subject at least once up to boundary period
Please see a detailed description of the boundary period function under " Optimisation - Weighting
parameters ".
Under "Master Data | Subjects"
Code (M) Main subject
Under "Master Data | Classes"
Max. main subjects per day
Max. consecutive main subjects per day
6.12
Subject sequences
Subject sequence codes can be entered for subjects and lessons. Subject sequence codes entered for
subjects apply to the entire school; codes entered for lessons only apply to the classes (teachers)
involved in the lesson.
Note:
Subject sequences are 'soft' conditions for the algorithm, i.e. they may be ignored in extreme cases. A
weighting slide control can be used to control the importance attached to these fields. Use fixed subject
sequences if the subject sequence must be respected (see chapter " )Subject sequences )")
6.12.1 Positive subject sequence
Classes
It may be desirable for pedagogical or organisational reasons to schedule certain subjects in sequence.
User Tips
291
For example, to allow time for a two-period written exam, you want to schedule the subjects German
(DE) and Math (MA) in sequence. It is irrelevant in this case if the sequence is DE-MA or MA-DE.
Version 1
Applies to the entire school
Enter the same numerical subject sequence code (under "Master Data | Subjects") for both subjects, e.
g. "5" (see example below).
292
Version 2
Applies to a particular class (e.g. class "4")
Enter a numerical subject sequence code (under "Lessons | Classes") in the relevant lesson rows for
class 4, e.g. "5".
Teachers
You can also enter subject sequence requests for teachers. This is a useful function for subjects that
require elaborate experiments to be set up. For example, a teacher who teaches Physics to three
different classes of the same year may request to have these lessons scheduled in sequence to allow
him to show the same experiment several times in a row.
Another example involves teachers who teach PE plus another subject. The PE lessons should, if
possible, be scheduled in sequence so that the teacher is not obliged to change into PE clothes several
times a day.
In both cases, enter the same numerical subject sequence code for the lessons you want to schedule in
sequence (under Subject sequence - Teachers ).
User Tips
293
6.12.2 Negative subject sequence
On the other hand, it may be desirable to prevent specific subject sequences. If this is the case, simply
enter an alphabetic subject sequence code (letter from A to F). The optimisation tool will take into
account that lessons with the same alphabetic subject sequence code should not be scheduled in
sequence.
For pedagogical reasons, the Modern Languages subjects English (E) and French (F) should not be
scheduled in sequence for class 3a. Enter the letter "A" in the column "Subject sequence –
Classes" (see example).
294
The following details are required to ensure the correct treatment of subject sequences during
optimisation:
Under "Scheduling | Weighting | Teachers"
Respect subject sequence - Teachers
and/or
under "Scheduling | Weighting | Classes"
Respect class sequence - Classes
Under "Master Data | Subjects"
Subject sequence (classes or teachers)
or
under "Lesson"
Subject sequence (classes or teachers)
6.13
Class Clash Code (CCC)
Teachers, classes and rooms may never be double booked by the Untis optimisation algorithm.
However, exceptions may make sense when it is certain that lessons of the class in question are
attended by different students.
The students of class 1a attend either Choir or Orchestra, but none of the students attend both. Enter
the same numerical CCC for both lessons (permitted values 1 - 9), e.g. "5" to instruct the Untis
optimisation algorithm that the lessons Choir and Orchestra may be scheduled at the same time, but
that this is not compulsory (see example on the following page).
User Tips
295
296
Let us assume that there are three subject groups. Each student chooses one of the groups and attends
all the lessons offered within this group. Conflicts between the individual groups are therefore
permissible. Assign the same CCC letter to all lessons that must not be in conflict with other lessons.
Assign a different CCC letter to all lessons where conflicts are permissible.
Please note that entering a CCC permits , but does not enforce the creation of a conflict between
lessons. Consequently, the diagnosis tool will not display an NTP (non-teach period) for classes when
the lessons marked with the class conflict symbols A, B and C are not scheduled at the same time .
6.14
Timetable comparison
It is often useful and necessary to compare timetables with each other, for instance when you implement
manual changes or when you want to compare different versions of your timetable after the completion of
several optimisation runs. For this purpose, Untis provides the function "Timetable comparison"
described in this chapter.
User Tips
297
First, the chapter will introduce a number of settings options relevant for timetable comparisons.
Comprehensive overviews, i.e. two timetables with format 20 or 30, provide an overview of the
timetables of the entire school.
6.14.1 'Timetable' tab
Under "Settings | Miscellaneous", open the settings dialogue and select the "Timetable" tab. Here you
will find an input block with different settings for comparing timetables.
The following settings options are available:
Without rooms
Check this box if you want the software to ignore individual rooms during the timetable comparison.
Detailed comparison for couplings
Activate this option if you only want to see the timetable differences for the elements of the selected
coupling row, but not for all the elements of the selected lesson.
Classes: ignore changes in couplings
This option is only available when the previous option is active. If the timetable changes involve classes
only, the changes are only displayed on the class timetables of the classes affected by the changes.
During a timetable comparison, a second instance of Untis is started. The next three settings concern
the arrangement of the two windows.
Comparison without window arrangement
298
Select this option if you want to arrange the two windows manually.
Tile horizontally
Select this option if you want Untis to arrange the original timetable at the top and the modified version
at the bottom.
Tile vertically
Select this option if you want Untis to arrange the original timetable on the left and the modified version
on the right.
The selected window arrangement is not fixed and you can manually change the arrangement at any
time. As soon as you close the second window, the original Untis timetable reverts to its former state (e.
g. full screen).
If you have two monitors connected to your computer or later), you can display the two versions on two
separate screens.
6.14.2 'Layout 2' tab
Another settings option allows you to specify how the differences between the two versions should be
displayed. Open a timetable (e.g. "Timetable | Classes"), click on <Timetable Settings> and open the
"Layout 2" tab to view and select different display options.
Note:
The <Timetable Settings> button can only be activated when no timetable comparison is active.
6.14.3 Starting timetable comparison
Start a timetable comparison as follows:
Open a timetable (e.g. "Timetable | Classes") and, if necessary, enlarge the upper part of the window –
the details window – until the combo box "Timetable comparison" becomes visible. Activate the function
by ticking the box with your mouse.
User Tips
299
The timetable comparison dialogue window will appear and instruct you to start Untis a second time.
Specify if you wish to open the current file a second time or if you want to open a different file.
The following list summarises the different items you can compare:
Different files, i.e. timetables saved under different names
Different school weeks (of the same file). Open the same file in both Untis versions and select two
different weeks from the timetable display
Different terms of the same file (for use with the Multiple Term Timetable module)
Changes to the current work file since the file was last saved
Note:
The second timetable must have the same format and the same number of columns and rows as the first
(an important factor when comparing timetables from different files).
Select the desired option and click on <Yes> to start Untis a second time. The two versions will be
arranged as specified. You may have to move the navigation bar to the bottom or the right window edges
to be able to view the entire timetable. The second version also displays a timetable.
300
6.14.4 The process of timetable comparison
The two Untis timetable versions communicate with each other and exchange information. During this
process, the traffic light situated next to the timetable comparison combo box is green.
When the timetable comparison function is active, the two timetables are synchronised. This
means that you can scroll from class to class in one of the two timetables, and the other timetable
automatically scrolls to the same class. Move the cursor from period to period and the second timetable
will always display the same period.
The example on the following page shows an active timetable comparison. The RE lesson is highlighted
because it is scheduled for different periods (left, Tue-5; right, Thu-5).
User Tips
301
302
All three periods of German are also highlighted, the reason for which is shown in the period details
window in the bottom part of the window. In contrast to the timetable on the left, the timetable on the
right shows that a room has been allocated to the lesson. The room difference would not be displayed if
the setting "Without rooms" had been activated.
User Tips
303
Below the combo box „Timetable comparison“, you will see another combo box entitled "Only modified
timetables". This function can only be activated when a timetable comparison is active. Checking this
box automatically activates the function in both timetables. Untis proceeds to compare all the timetables
of the selected element and displays a message box showing the number of timetables in both versions
that contain differences. Close the message box by clicking on <OK>. When this function is active, you
can only scroll through timetables that contain changes. Timetables with identical contents are no longer
displayed.
The function "Timetable comparison" allows you to compare the following timetable formats:
Single timetables, i.e. two timetables of format 01 or 10, are usually displayed side by side.
6.15
Window groups
Different timetabling tasks often require the instant availability of very different types of data. When
assigning teachers to lessons, for example, you may find that an open scheduling dialogue is more a
hindrance than a help. Equally, the presence of a weighting window on screen would unnecessarily
clutter up the screen when all you are trying to do is some manual fine-tuning of the timetable.
Untis solves this problem with the Window Groups function that allows you to set up the screen for a
specific timetabling task and save the window position so you can call it up again at a later point in time.
The following example will demonstrate how to create a windows group.
1.
Open the demo.gpn file and arrange the windows as shown in the figure
304
2.
Click on the <Windows Group> button in the main tool bar. Alternatively you can open the window
via the function "Windows | Window Groups".
3.
Click on the button <Save window group as> and assign meaningful short and long names.
Enter 9 in the field "Window group number" and confirm with <OK>.
User Tips
305
Please not that a button has been added to the "Window Groups" tool bar.
If your screen does not display the tool bar, please left-click on the main tool bar and check the box
"Window Groups".
Now click on other button in the tool bar. Each button has been assigned a different window
arrangement.
306
Tip:
You can transfer the window groups from one file to another at any time. To do this, open the file into
which you wish to import the settings and select "File | Import/Export | Timetable/Input Format". On the
"Import window groups" tab you can now navigate to the .gpn file from which you wish to import the
window groups and start the import process.
6.16
Export to Microsoft Excel
Untis allows you to export reports – and, with some additional steps, timetables – to MS Excel.
6.16.1 Exporting reports
Proceed as follows if you wish to export reports:
Select the report you wish to export under "Reports | Select ..."
Click on the <Excel export> button in the main tool bar and select the desired settings for export
hen you confirm with <OK>, MS Excel will be launched and the report you selected will be
exported.
User Tips
307
6.16.2 Exporting to Microsoft Excel
Untis allows you to export all timetables and reports to MS Excel.
Exporting timetables
Proceed as follows:
Right-click on the timetable and select "Copy in HTML format"
This copies the HTML commands required to display the timetable into the clipboard
<!DOCTYPE HTML PUBLIC '-//IETF//DTD HTML//EN'>
<html>
<head>
<meta http-equiv='Content-Type' content='text/html; charset=iso-8859-1'><meta http-equiv='expires'
content='0'><meta name='keywords' content='Stundenplan, timetable'>
<meta name='GENERATOR' content='Untis 2012'>
<title>Untis 2012 Timetable 2012/2013 TestSchool DEMO 2</title>
<style type='text/css'>
a {color:#000000;}
</style>
</head>
<body class=tt>
<CENTER><font size='3' face='Arial' color='#000000'>
<TABLE border='0' cellpadding='1' ><TR><TD rowspan='2' width='5'></TD><TD> TestSchool DEMO </
308
TD><TD rowspan='2' width='5'></TD><TD>Timetable 2012/2013</TD><TD rowspan='2' width='5'></
TD><TD align='right'> Untis 2012 </TD><TD rowspan='2' width='5'> </TD></TR><TR><TD>For demo
and test</TD><TD>Valid from: 10 October</TD> <TD align='right'>8.4.2011 9:27 </TD></TR></
TABLE><BR></font>
<font size='6' face='Arial' color='#0000FF'>
1a
</font> <font size='4' face='Arial'>
Class 1a (Gauss)
</font>
(etc.)
Switch to MS Excel and select menu item "Edit | Paste" (or CTRL+V).
Please note that different versions of Excel interpret HTML code in different ways. The timetables
generally require subsequent manual reformatting in Excel in order to improve their visual appearance.
Index
Index
Diagnosis
106
Diagnostics tools
102
Display and printing
262
Division number
62
double NTPs
80
Double period
53
Double period - block
53
-((V)
94
(V) Variable teacher
94
-E-
-22 periods/week - subjects not on consecutive days
86
-AAlias name
62
Alternative room ring
268
Alternative rooms
268
Analysis tab
88
-FFixed (subject) sequence
form view
49
fringe periods
83
-BBalance
73
grid view
49
-I268
input weaknesses
102
-L-
-DDecoupling lessons
57
Defining core lessons and options
75
-G-
-CCalendar
71
CCC analysis
114
Classes tab
82
Classes without a designated room
clipboard
59
codes
66, 67
'Codes' tab part 1
66
'Codes' tab part 2
67
Control data for optimisation
90
Copy
59
core classes
262
Coupled lessons
54
Coupling lessons
56
coupling row
54
either
289
Element-Rollup
58
Entering lessons
50
Entering lessons using drag&drop
errors with double periods
86
Example: step 3
275
Example: step 5
278
257
lesson
48
Lesson comparison
71
lesson group
62
Lesson properties
61
Lesson sequences
75
Lessons
48
'Lessons ' tab
62
List of teacher teams
116
locations
287
Locked lessons
70
Locked lessons window
267
Locking
264
58
309
310
lunch break
lunch breaks
82
80
-S-
-Mmain building
287
Main subjects
84, 290
Main Subjects tab
84
Master class
262
-Nnon-teaching periods (NTPs)
NTPs
80
82
-OOff-site codes
287
off-site location
287
Off-site rooms
287
one period
80
optimisation
78
Optimisation of room allocation
85
Optimisation strategy (A, B, D, E)
91
Optional subject
289
Optional subjects and fringe periods
289
Options
105
Overall diagnosis
112
-PPercentage planning
102
Period Distribution tab
86
Period time requests
73
Periods in this subject room
Periods/week
62
Planned lessons
48
Printing
73
pseudo room
268
-TTeacher optimisation code
64, 97
Teacher suggestion
71
Teachers 1 tab
80
Teachers 2 tab
81
Text
62
The accompanying window
99
The lesson window
49
The process of timetable comparison
Time Grid
236
Time Requests
104, 242
Time requests of lessons
61
Time Requests tab
87
Timetable optimisation
78
'Timetable' tab
64
Toolbar
71
Toolbar functions
71
-UUnspecified time requests
-RRooms tab
64
Scheduling priority
64
School data
236
Selection window
106
Sequence in a week
77
Simultaneous lessons
77
Starting timetable comparison
298
Statistical code
62
Strategies
98
Strategy A - fast optimisation
98
Strategy B - Intensive optimisation
98
Strategy D - complex %-placement
99
Strategy E - overnight optimisation
99
Subject group
62
subject sequence for teachers
80
Subjects tab
83
85
-WWeighting
78
weighting dialogue
78
Weighting parameters
79
244
300
Index
weighting settings
-YYears periods
62
78
311
312
Endnotes 2... (after index)
Back Cover