1
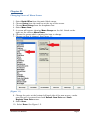
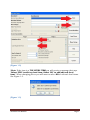
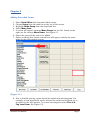
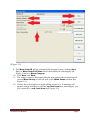
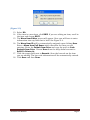
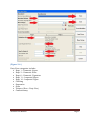
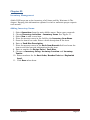
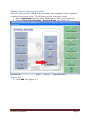
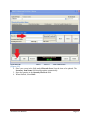
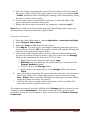
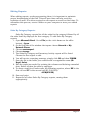
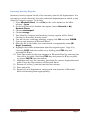
Westons POS User Manual
Aldelo POS Software
Westons POS Manual
Page 1
Table of Contents
Aldelo POS Software ................................................................................................................. 1
Introduction ................................................................................................................................ 3
Chapter 01................................................................................................................................... 4
Changing Prices of Menu Items: ...................................................................................... 4
Chapter 2 ..................................................................................................................................... 6
Adding Barcoded Items: ...................................................................................................... 6
Chapter 03................................................................................................................................. 10
Inventory Management: .................................................................................................... 10
Adding Inventory Items: .................................................................................................... 10
Editing Inventory Items: ................................................................................................... 11
Adding Items to Inventory Count: ................................................................................. 12
Chapter 04................................................................................................................................. 14
Generating Reports: ........................................................................................................... 14
Editing Reports: ................................................................................................................... 16
Westons POS Manual
Page 2
Introduction
Westons At The Airport uses a Point Of Sale (POS) system called Aldelo, a
versatile software used in businesses ranging from restaurants to convenience
stores. Aldelo contains many features allowing a business to keep track of
sales, employees, payroll, inventory and much, much more. Aldelo is also
compatible with a number of peripherals such as barcode scanners, printers
and magnetic card readers.
This guide is designed as a quick reference guide specifically for common tasks
performed by Westons employees using the Aldelo POS system. For information
not found in this guide, please refer to the Aldelo User Guide found in the Help
section of the Back Office or provided by your I.T. Support Specialist.
To help you navigate quicker, the directions in this manual referring to onscreen options are highlighted in Bold.
Westons POS Manual
Page 3
Chapter 01
Changing Prices of Menu Items:
Select Back Office from the main Aldelo menu.
Choose Setup from the task bar at the top of the screen.
Choose Menu Setup from the dropdown box.
Select Menu Item.
A screen will appear showing Menu Groups on the left. Listed on the
right are the various Menu Items.
6. Choose the group which contains the item to change.
7. Choose an item to change*. See Figure 1.1.
1.
2.
3.
4.
5.
(Figure 1.1)
8. Change the price at the bottom left hand side of the new screen – make
sure the price is entered into both Default Item Price and Cash
Register Item Price areas.
9. Select Save.
10. Select Done. See Figure 1.2.
Westons POS Manual
Page 4
(Figure 1.2)
*Note: If the item is a TOP LEVEL ITEM you will receive a message that says
“Select ‘YES’ to edit top level item, Select ‘NO’ to add/edit sub level
item”. When changing prices you will want to select NO to edit sub level items.
See Figure 1.3.
(Figure 1.3)
Westons POS Manual
Page 5
Chapter 2
Adding Barcoded Items:
Select Back Office from the main Aldelo menu.
Choose Setup from the task bar at the top of the screen.
Highlight Menu Setup from the dropdown box.
Select Menu Item.
A screen will appear showing Menu Groups on the left. Listed on the
right are the various Menu Items. See Figure 2.1.
6. Select the group of the item to be added.
7. Select an empty box. Items entered here will appear exactly the same
when in the cash register screen.
1.
2.
3.
4.
5.
(Figure 2.1.)
8. Due to limited spacing, items should be sorted into subcategories. For
example: a new box should not be selected for each kind of plush toy to
be added to the POS system. To create subcategories select This is A
Top Level Item. See Figure 2.2.
Westons POS Manual
Page 6
(Figure 2.2)
9. The Menu Item ID will be automatically assigned upon clicking Save.
Enter a Menu Item Full Name which describes the subcategory (IE:
Plush). Choose a Menu Category.
10. Click Save and Done.
11. The newly created subcategory should now appear when selecting the
correct Menu Group on the left side of the Menu Items window (see
Figure 2.1).
12. Choose the subcategory to begin adding items to it. A message will
appear asking whether to edit the top level item (the subcategory you
just created) or a sub level item (see Figure 2.3).
Westons POS Manual
Page 7
(Figure 2.3)
13. Select NO.
14. If the item is a new item, click NEW. If you are editing an item, scroll to
the item and choose EDIT.
15. The Menu Item Editor screen will appear. Here you will have to enter
information into any field that is bold. See Figure 2.4.
16. The Menu Item ID will be automatically assigned upon clicking Save.
Enter a Menu Item Full Name which describes the item you are
entering. Enter the Default Item Price and copy the price to Cash
Register Item Price. Choose None from the drop down box next to
Send To Printer At.
17. Click the empty field next to Barcode. Scan the barcode on the item
you are adding. The bar code information will be automatically entered.
18. Click Save and then Done.
Westons POS Manual
Page 8
(Figure 2.4.)
Duty
•
•
•
•
•
•
•
•
•
•
Free categories include:
Dept 1 – Domestic Liquor
Dept 3 – Domestic Wine
Dept 6 – Domestic Cigarettes
Dept 11 – Imported Liquor
Dept 14 – Imported Cigars
Clothing
Souvenirs
Gifts
Tobacco (Non – Duty Free)
Confectionary
Westons POS Manual
Page 9
Chapter 03
Inventory Management:
Aldelo POS keeps an active inventory of all items sold by Westons At The
Airport. Keeping this information updated is vital to maintain proper reports
each month.
Adding Inventory Items:
Select Operations from the main Aldelo menu. Enter your passcode.
Choose Inventory Activities – Inventory Items. See Figure 3.1.
Select New to add a new item.
Place the mouse cursor in the field for the Inventory Item Name.
Scan the item’s bar code. Enter a brief description of the item.
Enter a Pack Size Description.
Place the mouse cursor in the Each Item Barcode field and scan the
item to add the barcode information for the item.
8. Enter a number for Recipe Units / Pack Size.
9. Choose an Inventory Group, Inventory Location and Inventory
Vendor.
10. Enter numbers for the Sort Order, Reorder Point and Replenish
Level.
11. Click Save when done.
1.
2.
3.
4.
5.
6.
7.
Westons POS Manual
Page 10
(Figure 3.1)
Editing Inventory Items:
Select Operations from the main Aldelo menu. Enter your passcode.
Choose Inventory Activities – Inventory Items. See Figure 3.1.
Place the mouse cursor in the field located in the top left corner.
Scan the barcode of the item.
Make changes as necessary in the fields to the right. Items in bold must
contain information.
6. Click Save when finished.
1.
2.
3.
4.
5.
Westons POS Manual
Page 11
Adding Items to Inventory Count:
Once an item has been added to the inventory, the quantities can be updated
to reflect the current stock. To add items to your inventory count:
1. Select Operations from the main Aldelo menu. Enter your passcode.
2. Choose Inventory Activities – Receive Items. See Figure 3.2.
(Figure 3.2)
3. Click Add. See Figure 3.3.
Westons POS Manual
Page 12
(Figure 3.3)
4. Place your cursor in the field marked Barcode Scan. Scan the item to be updated. The
Inventory Item Name field should populate automatically.
5. Enter the quantity in the Quantity Received field.
6. When finished, select Done.
Westons POS Manual
Page 13
Chapter 04
Generating Reports:
To generate reports we want to connect to the cash register in the Duty Free
area remotely*, create the report and transfer the report to a local PC for
editing. To do this:
1. Launch Remote Desktop. If you do not have a shortcut it can be found
in Start – Programs – Accessories – Remote Desktop Connection. The
exact location or may vary depending on the version of Windows but it is
always found in your Accessories folder.
2. The computer name of the Duty Free computer is westonspos1. Enter
this in the Computer: field and click Connect.
3. A login screen will appear and prompt you for a username and password.
Enter the following information:
• Username: westons2
• Password: westons09
4. After logging in you should see the primary screen for the Aldelo
software. If not, double click on the Aldelo icon on the desktop to launch
the program.
*Note: Only one person can use a computer at a time. Connecting to the Duty
Free computer remotely will lock the PC from local use. Do not generate reports
while the Duty Free PC is in use.
Sales Reports:
1. In Aldelo, select Operations (enter your passcode) – Other Tools –
Sales Items By Category. You will now have to select a category (IE:
Dept1, Dept3, etc).
2. Choose Report. You will be prompted to enter the From and To dates.
3. Click Export after entering the correct dates. You will receive a message
confirming that the report has been created. Click the OK button and a
window will appear showing the contents of the generated reports folder.
4. Your newly created report will be saved in Microsoft Excel format with
the date of creation in the file name
(specificmenucategorysalesreport*date*.xls). Copy your report
into the Storage folder on the desktop of the Duty free PC. To do this:
• Right click on the report file and choose copy.
• Minimize all open windows. Be careful that you do not leave the
Remote Desktop window.
• Double click on the Storage folder.
• Right click in the empty space in the Storage folder and choose
Paste.
Westons POS Manual
Page 14
5. Open the folder containing the report from the task bar at the bottom of
the screen. Right click in the empty space in the screen and choose New
- Folder. Name the folder following the naming of the other folders (using
the dates covered in the report).
6. Click on the report created earlier and drag it to the new folder. The
report will now be saved for future use.
7. Repeat the above steps for each of the categories, skipping step 5.
Note: Steps 5 and 6 are for housekeeping only. By following these steps you
will cause less confusion within the reports folder.
Inventory Activities:
From the main Aldelo menu, choose Operations – Inventory Activities.
Select Physical Count Sheet.
Select the From and To dates for the report.
Click Export. You will receive a message confirming that the report has
been created. Click the OK button and a window will appear showing the
contents of the generated reports folder.
5. Your newly created report will be saved in Microsoft Excel format with
the date of creation in the file name. Copy your report into the Storage
folder on the desktop of the Duty free PC. To do this:
• Right click on the report file and choose copy.
• Minimize all open windows. Be careful that you do not leave the
Remote Desktop window.
• Double click on the Storage folder.
• Right click in the empty space in the Storage folder and choose
Paste.
6. Open the folder containing the report from the task bar at the bottom of
the screen. Right click in the empty space in the screen and choose
New - Folder. Name the folder following the naming of the other folders
(using the dates covered in the report).
7. Click on the report created earlier and drag it to the new folder. The
report will now be saved for future use.
1.
2.
3.
4.
The reports are now all saved in a folder called Storage which is located on the
computer named westonspos1. This folder is shared on the network and
accessible from your local computer. You can now close the Remote Desktop
Connection.
Westons POS Manual
Page 15
Editing Reports:
When editing reports, as when generating them, it is important to maintain
proper housekeeping of the files. This will save time and help avoid the
repetition of work. It is often required to edit reports a second or third time. To
streamline this process, create a folder on your computer to store your edited
reports.
Sales By Category Reports:
Sales By Category reports list all the sales for the category followed by all
the sales listed by employee for that category. To edit Sales By Category
reports:
1. Open Microsoft Excel. Go to File (or the circle known as the office
button) – Open.
2. On the left side of the window that opens choose Network or My
Network Places.
3. Choose westonspos1.
4. Choose storage.
5. The Sales By Category and Inventory Activity reports will be listed.
Choose the first report to edit.
6. You will receive a warning message, simply click OK and then FINISH.
7. Save the file in the folder you created with a recognizable name (IE:
Dept1 Sales).
8. Edit the report as needed by resizing the columns and deleting unneeded
data. Delete all data for sales by employee.
9. To show a total for all sales enter the following equation, where XX is the
first cell and YY is the second cell (IE: D10:D23):
=SUM(XX:XX)
10. Save and print.
11. Repeat for all other Sales By Category reports, naming them
appropriately.
Westons POS Manual
Page 16
Inventory Activity Reports:
Inventory Activity reports list all of the inventory data for all departments. It is
necessary to break down the lists into individual departments to attach to any
Sales By Category reports. To do this:
1. Open Microsoft Excel. Go to File (or the circle known as the office
button) – Open.
2. On the left side of the window that opens choose Network or My
Network Places.
3. Choose westonspos1.
4. Choose storage.
5. The Sales By Category and Inventory Activity reports will be listed.
Choose the Inventory Activity report.
6. You will receive a warning message, simply click OK and then FINISH.
7. Open a new instance of Microsoft Excel.
8. Save the file in the folder you created with a recognizable name (IE:
Dept1 Inventory).
9. Highlight the header information from the original report. Copy it by
choosing COPY from the toolbar or by holding the CTRL key and
pressing the C key.
10. Paste the header in the new instance of Microsoft Excel by selecting the
first cell in the table. Hold the CTRL key and press the V key to paste
or choose PASTE from the toolbar.
11. Highlight and copy the inventory data from the correct department and
paste it into the new instance of Microsoft Excel.
12. Remove all of the (1) entries from the last column.
13. Save and print.
14. Repeat for each department, saving each new instance of Microsoft
Excel and naming them appropriately.
Westons POS Manual
Page 17