1
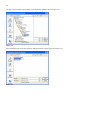
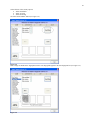
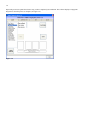
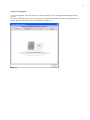
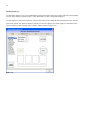
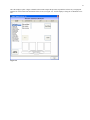
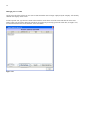
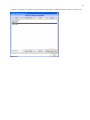
Aldelo Fingerprint Server User Manual 2 PUBLISHED BY Aldelo Systems Inc. 4641 Spyres Way, Suite 4 Modesto, CA 95356 Copyright © 1997-2007 by Aldelo Systems Inc. All rights reserved. No Part of the contents of this book may be reproduced or transmitted in any form or by any means whatsoever without the written permission of the publisher. Printed and Bound in the United States of America. This manual is available through Aldelo Systems Inc. and resellers worldwide. For further information about other languages that the manual may be translated into, please contact Aldelo Systems Inc. or visit our Web site at www.aldelo.com. Send comments about this manual to [email protected]. Aldelo® is the registered trademark of Aldelo Systems Inc. Other products or company names mentioned herein may be the trademarks of their respective owners. The example companies, organizations, products, logos, people, places, and events depicted herein are fictitious. No association with any real company, organization, product, logo, person, place, or event is intended or should be inferred. 3 Table of Contents PART 1 SETUP ____________________________________________________________ 5 Chapter 1 Requirements ___________________________________________________________________________ 7 Software Requirements ____________________________________________________________________________ 7 Hardware Requirements ___________________________________________________________________________ 7 Chapter 2 Setup __________________________________________________________________________________ 9 Software Setup __________________________________________________________________________________ 9 Installation ___________________________________________________________________________________ 9 Connecting to a Database over the Network _________________________________________________________ 18 Hardware Setup ________________________________________________________________________________ 23 PART 2 OPERATIONS _____________________________________________________ 25 Chapter 3 Software Operation _____________________________________________________________________ Aldelo Fingerprint Server Operations ________________________________________________________________ Running for the First Time ______________________________________________________________________ Testing your Fingerprint ________________________________________________________________________ Enrolling Employees __________________________________________________________________________ Managing User Accounts _______________________________________________________________________ Managing Security ____________________________________________________________________________ Aldelo For Restaurants Operations __________________________________________________________________ 27 27 27 31 32 34 36 36 Chapter 4 Troubleshooting ________________________________________________________________________ 37 4 Introduction Security has always been an issue for restaurants. Restaurant owners are always looking for better ways to track employees. Biometrics is a hard-to-replicate form of security and widely used in high security scenarios. Aldelo Fingerprint Server brings that high level of security to your restaurant. With simple integration using the Digital Persona platform, Aldelo Systems Inc. has provided a way for employees to scan their fingers rather than entering their access codes or swiping their MSR cards. No more forgetting you MSR card or having employees steal each other’s access codes. Fingerprints are unique and cannot be stolen, forged, or left at home. 5 Part 1 Setup 6 7 Chapter 1 Requirements Software Requirements The Aldelo Fingerprint Server allows employees to authenticate themselves to the system by using their fingerprints. Aldelo Systems has developed an application that provides a method for doing this while at the same time keeping the system functionality virtually the same. Instead of using an access code or MSR card, the employee simply touches a finger to the reader. There is nothing new for your employees to learn. Install the Aldelo Fingerprint Server software on the server computer (the same computer that holds the Aldelo For Restaurants software database). This installs the fingerprint database, all supporting files, the Digital Persona Platinum drivers, and the Digital Persona Engine Update. Install the client version of the Aldelo Fingerprint software and Aldelo For Restaurants on all other stations. This installs the required files and software from Digital Persona but not the database or user interface. Hardware Requirements Some systems come with the fingerprint recognition hardware built-in. Others require a standalone device that connects to the USB port of the system. The only device currently recommended by Aldelo Systems is the Digital Persona U.are.U 4000B Platinum reader. It has been tested to work with the software and is certified. One reader is required for each station using fingerprint recognition, as well as one reader at the server computer for enrolling new employees. 8 9 Chapter 2 Setup Software Setup Installation The installation of the Aldelo Fingerprint Server software is very straightforward. On the server computer, install the software using the Server option when prompted in the setup instructions. On all client stations, install the software using the Client option when prompted. To begin, make sure you have the latest version of the Aldelo software. Insert the Aldelo For Restaurants Installation CD into the CD-ROM drive of your server computer. When the Aldelo Product Installer screen appears, click on “Aldelo Fingerprint Server – English Language Installer” to start the installation process (see Figure 2-1). Figure 2-1 10 When the InstallShield Wizard appears, click the “Next” button to display the End-User License Agreement (see Figure 2-2). Figure 2-2 You must accept the terms of the End-User License Agreement or you cannot proceed with the installation. On the Customer Information screen that follows, enter your User Name, Organization Name, and select one of the installation options (see Figure 2-3). Figure 2-3 11 Next, select a destination folder for the Aldelo Fingerprint Server. In most cases, installations are made to the default folder and no change is necessary. Consult with your local System Administrator to determine if a change of destination folder is required. Since we are installing the software onto the server computer, on the following screen, select the Server Setup Type and click the “Next” button (see Figure 2-4). Figure 2-4 The Custom Setup screen displays (see Figure 2-5). Figure 2-5 12 On the Custom Setup screen, click the “Next” button to move to the Ready to Install the Program screen (see Figure 2-6). The software is now ready to begin installation. Click the “Install” button to start the process. Figure 2-6 When the installation is complete, the InstallShield Wizard Completed screen displays. Click the “Finish” button. The DigitalPersona Platinum Fingerprint Recognition Software installs automatically. When the server software installation is complete, install the client software on each of the client terminals. The procedure is substantially the same as that of installing the server software. To begin, insert the Aldelo For Restaurants Installation CD into the CD-ROM drive of your client machine. When the Aldelo Product Installer screen appears, click on “Aldelo Fingerprint Server – English Language Installer” to start the installation process. When the InstallShield Wizard appears, click the “Next” button to display the End-User License Agreement. Accept the terms of the End-User License Agreement to proceed with the installation. On the Customer Information screen that follows, enter your User Name, Organization Name, and select one of the installation options again. If necessary, select a destination folder and click the “Next” button. Since we are installing the software onto the client computer, on the following screen, select the Client Setup Type and click the “Next” button (see Figure 2-7). Figure 2-7 13 The Ready to Install the Program screen displays (see Figure 2-8). Notice that this time the Setup Type is “Client” rather than “Server.” Click the “Install” button to begin the installation. Figure 2-8 Upon completion of the installation, the InstallShield Wizard Completed screen displays. Click the “Finish” button to complete the process and launch the installation of the DigitalPersona Platinum Fingerprint Recognition Software, which installs automatically. Repeat the installation of the Client version of the software on each client computer on which you plan to install fingerprint recognition hardware. Once all systems have the software installed, share the folder that hosts the Aldelo Fingerprint Server database. This is usually located in “[Drive Letter]:\Program Files\Aldelo\Aldelo Fingerprint Server\Data\”. The “Data” folder is the best folder to share in this case. 14 To share the folder where the database is located, follow the steps below. Open “My Computer” on the desktop. Click “Tools” on the menu bar (see Figure 2-9). Figure 2-9 Navigate to and click on “Folder Options.” Click on the View tab. Select the “Show hidden files and folders” radio button in the Advanced Settings window (see Figure 2-10). This allows your system to display folders and files that are usually hidden. Figure 2-10 15 Uncheck the “Use simple file sharing (Recommended)” checkbox (see Figure 2-11). This allows the security tab to display when sharing a folder. Figure 2-11 Click “Apply” and “OK.” Navigate to “[Drive Letter]:\Program Files\Aldelo\Aldelo Fingerprint Server” (see Figure 2-12). One of the folders displayed is the Data folder. Right-click on the Data folder. Figure 2-12 16 Navigate to and click on “Sharing and Security” (see Figure 2-13). Figure 2-13 Click the “Share this folder” radio button (see Figure 2-14). Enter “Data” in the Share name field and click the “Permissions” button. Figure 2-14 17 Select “Everyone” from the Group or user names list. Make sure that the group “Everyone” has “Allow” / “Full Control” permissions (see Figure 2-15). If you require different permissions, consult with your network administrator. Figure 2-15 Click “Apply” and “OK.” Next, click the “Security” tab on the Data Properties screen to display the Access Control List for the folder security permissions (see Figure 2-16). These are different from share permissions and must be set as well. Figure 2-16 18 Click the “Add” button to add a group name. The Select Users, Computers, or Groups screen displays (see Figure 2-17). Enter the group name “Everyone” in the large textbox on the lower portion of the screen and click the “OK” button. Figure 2-17 When the system returns to the Data Properties screen, the group “Everyone” is listed in the Group or user names field. Click on the “Everyone” group to select it from the list. Make sure the “Everyone” group has “Allow” / “Modify” permissions (see Figure 2-18). If you require different permissions, consult with your network administrator. Figure 2-18 Click “Apply” and “OK.” Once you have shared the folder on the server computer, connect all the clients to the database. To connect the clients to the database, follow the steps below. Connecting to a Database over the Network When your database is ready for other machines to connect to it, make sure you have already setup the sharing permissions discussed in the previous section. This section covers connecting to the database over the network in Windows XP Professional. It is very similar to Windows 2000. These instructions may be followed to setup Windows 2000 as well. 19 To connect to a database on another computer, follow the steps below. These steps assume you have completed the folder sharing successfully and have tested to make sure you have access to the database. On your client machine, go to the Back Office of Aldelo For Restaurants. Click on “Store Settings” (see Figure 2-19). Figure 2-19 Click on the “Other” tab. Find the feature “Aldelo Finger Print Server Data Source” and double click on the blank field in the column on the right (see Figure 2-20). Figure 2-20 20 Find and click on “My Network Places” (see Figure 2-21). This displays the items under the My Network Places object. Figure 2-21 Double click on “Entire Network” (see Figure 2-22). Figure 2-22 21 On the next screen, double-click on “Microsoft Windows Network” (see Figure 2-23). Figure 2-23 A list of all the workgroups on the network displays (see Figure 2-24). Figure 2-24 22 Double-click on the appropriate workgroup name to display the list of computers in the workgroup. Double-click on the computer name that has the database stored on it to display a list of shared folders on that system (see Figure 2-25). Double-click the Data folder. Figure 2-25 This displays the database inside the Data folder (assuming you have followed the naming convention recommended in the folder sharing section of this manual). Double-click on the “IdentityDB.mdb” file (see Figure 2-26). Figure 2-26 23 Hardware Setup To install the hardware, simply plug the USB fingerprint scanner into an available USB port on the system. If you have a built in fingerprint reader with your terminal, you may disregard this step. Once the Aldelo For Restaurants or the Aldelo Fingerprint Server software starts, the fingerprint device illuminates. 24 25 Part 2 Operations 26 27 Chapter 3 Software Operation Aldelo Fingerprint Server Operations Running for the First Time When you run Aldelo Fingerprint Server for the first time on the server station, you are prompted to enter the serial number and activate the software. To do this, call Aldelo Systems Inc. Once this is complete, restart the system. The next time you start the software, a prompt notifies you that the software is being run for the first time and that you should enroll the administrator by assigning all security privileges. When you click “OK,” the enrollment screen appears. To enroll an administrator, follow the steps below. These steps assume you are the first user to enroll. Click the “Specify Aldelo DB” button (see figure 3-1). Figure 3-1 28 On your system, navigate to the location of your restaurant’s database file (see Figure 3-2). Figure 3-2 Select the database file (it has the extension .mdb) and click the “Open” button (see Figure 3-3). Figure 3-3 29 Select all three of the security options. Allow Enrollment Allow Viewing Allow Removing Click the “Enroll Admin” button (see Figure 3-4). Figure 3-4 Place a finger or thumb on the fingerprint scanner. Your fingerprint appears in the first fingerprint box (see Figure 3-5). Figure 3-5 30 Repeat the previous step until the software says you have completed your enrollment. The software displays “Fingerprint Registered” when the process is complete (see Figure 3-6). Figure 3-6 31 Testing your Fingerprint To test your fingerprint, follow the steps below. These steps assume you are running the Aldelo Fingerprint Server software. Click on the “Authenticate Test” tab. Place the finger you registered on the scanner. The user name assigned by the software displays in the textbox below the fingerprint (see Figure 3-7). Figure 3-7 32 Enrolling Employees To enroll other employees, log in as the administrator. Restart the software and scan your finger when the system prompts for login. Only employees with the security “Allow Enrollment” are able to enroll other employees. To enroll employees, follow the steps below. These steps assume you are running the Aldelo Fingerprint Server software. Click on the “Enroll” tab. Select an employee from the list. Give the employee any security rights you wish them to have (for most employees, this is usually none). Click the “Enroll” button (see Figure 3-8). Figure 3-8 33 Have the employee place a finger or thumb on the scanner. Repeat the previous step until the software says “Fingerprint Registered” in the textbox near the bottom of the screen (see Figure 3-9). Test the employee using the “Authenticate Test” tab. Figure 3-9 34 Managing User Accounts Use the View tab of the software to view user accounts and delete users no longer employed by the company. All currently enrolled users display on this screen. To find a specific user, type the user’s name in the search box on the lower left of the screen and click the “Filter User Name” button. All user names disappear from the list except the one previously typed in the search box (see Figure 3-10). To return the full list to the screen, click the “View All” button. Figure 3-10 35 To delete a user from the list, click the user name in the list and click the “Delete Selected User” button (see Figure 3-11). Figure 3-11 36 Managing Security To change the security rights for an employee, select the “Security” tab. A list of employees displays. From this list, select the employee and make any necessary changes to the security settings. Click “Save” when finished (see Figure 3-12). “Refresh” updates any changes you have made. Figure 3-12 Aldelo For Restaurants Operations Operation of the Fingerprint Server software in Aldelo For Restaurants is very simple. When prompted for your access code, just place your finger on the scanner rather than entering your numeric access code. It’s that easy! 37 Chapter 4 Troubleshooting Problem The fingerprint scanning device doesn't light up. Possible Solution - Check to see that you have the Digital Persona Platinum Fingerprint Recognition Software installed on all systems. - Check to see that you have the U .are. U Fingerprint Reader driver and Recognition Engine Update installed on all systems. - Make sure the scanner is plugged into any available USB port on your computer. The fingerprint scanning works on the server - Make sure the client version of the Aldelo Fingerprint computer but not the client stations. Server software is installed on all client machines. The fingerprint scanning does not work on - Make sure the server version of the Aldelo Fingerprint any of the computers. Server software is installed on the server computer. One or more users are not recognized by the - Make sure the employees are registered in the software. Aldelo Fingerprint Server. The fingerprint scanner seems to read the - Make sure the scanner is clean. Use a piece of fingerprints intermittently. scotch tape to clean the surface of scanner. Press the tape onto the red plastic surface and pull it off to remove it. The adhesive on the tape removes oils and dirt from the device. After adding users, the fingerprint dialog - Make sure the database path in Aldelo For boxes do not work on any station. Restaurants is correct for the Aldelo Fingerprint Server database. 38 39 Index A M Access Control List ...................................................... 17 Aldelo Finger Print Server Data Source ....................... 19 Aldelo Fingerprint Server database .............................. 13 Aldelo Fingerprint Server Operations........................... 27 Aldelo For Restaurants Operations ............................... 36 Aldelo Product Installer screen ....................................... 9 Allow Enrollment ................................................... 29, 32 Allow Removing........................................................... 29 Allow Viewing ............................................................. 29 Authenticate Test .......................................................... 33 Authenticate Test tab .................................................... 31 Managing Security ........................................................ 36 Managing User Accounts .............................................. 34 My Network Places ....................................................... 20 B O Operations ..................................................................... 36 R Ready to Install the Program screen ................... 12, 13 Running for the First Time ........................................... 27 S Data folder .................................................................... 15 Data Properties screen ............................................ 17, 18 Delete Selected User button.......................................... 35 security options ............................................................. 29 Security tab ................................................................... 36 Select Users, Computers, or Groups screen .................. 18 Server Setup Type ......................................................... 11 Setup Type .................................................................... 13 Share this folder” radio button ...................................... 16 Sharing and Security ..................................................... 16 Show hidden files and folders ....................................... 14 Software Installation ....................................................... 9 Software Requirements ................................................... 7 Software Setup ................................................................ 9 Store Settings ................................................................ 19 E T End-User License Agreement ....................................... 10 Enroll Admin ................................................................ 29 Enroll\ button ................................................................ 32 Enroll tab ...................................................................... 32 Testing your Fingerprint ............................................... 31 Troubleshooting ............................................................ 37 Back Office ................................................................... 19 C Client Setup Type ......................................................... 12 Connecting to a Database over the Network................. 18 Custom Setup screen .................................................... 11 D F Filter User Name button ............................................... 34 Fingerprint Registered ............................................ 30, 33 Folder Options .............................................................. 14 U USB port ....................................................................... 23 Use simple file sharing.................................................. 15 V View All button ............................................................ 34 H W Hardware Requirements ................................................. 7 Hardware Setup ............................................................ 23 Windows 2000 .............................................................. 18 Windows XP Professional ............................................ 18 I IdentityDB.mdb ............................................................ 22 40