1
NOTE: If the battery voltage is below 11.7 (or 23.4) volts,
the load has been automatically disconnected due to
a very low battery charge condition, and the battery
must be recharged.
NOTE: A battery below 10 volts may not start the microcontroller properly. Make sure the battery is charged
before installing the system.
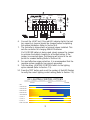
5. SOLAR First, be certain the battery (+ and –) is connected
correctly. Then connect the solar array to the SOLAR terminals.
(Be CERTAIN that the PV + and – wires are connected correctly).
The green LED will light if the array is connected during the
daytime and the array is wired correctly.
NOTE: If the SOLAR is disconnected during installation,
the controller will see this as the first night and the
length of night will be too short. This will only affect
ON/OFF/ON settings, and will automatically be corrected over 4 days. If the PV array is disconnected, it
is best to disconnect the battery and restart the
microcontroller before leaving the site.
CAUTION: Remember that the Solar array will generate power
whenever in sunlight. Also, be careful not to shortcircuit the PV array while connected to the controller, since this will damage the controller.
6. LIGHT Connect the light to the LIGHT terminals. Turn the light
on with the TEST button (Refer to Section 7.2).
If the load causes the red LED to turn on soon after the light was
activated, the battery must be recharged.
7. SEALED OR FLOODED SELECT The SunLight is shipped with
a jumper installed between the LIGHT-negative terminal (connection 5) and the SEALED OR FLOODED SELECT terminal. With
this jumper installed, the SunLight is configured for charging
SEALED batteries.
If your PV system has a FLOODED battery, simply remove the
jumper to change the SunLight to a flooded battery charger.
The SunLight can be changed between SEALED and FLOODED
as many times as you wish by using the jumper. Save the jumper
for future use in case your battery type is changed. If the jumper
is lost, a wire can also be used.
7