1
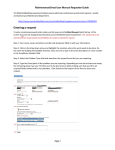
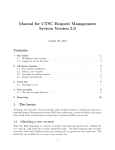
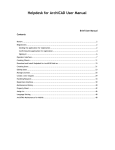
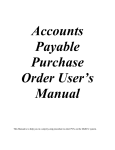
HDAccess Administrators
User Manual
Help Desk Authority 9.1.1
© 2012 ScriptLogic Corporation
ALL RIGHTS RESERVED.
ScriptLogic, the ScriptLogic logo and Point,Click,Done! are trademarks and registered
trademarks of ScriptLogic Corporation in the United States of America and other countries. All
other trademarks and registered trademarks are property of their respective owners.
2 | HDAccess Manual for Administrators
Contents
Contents ......................................................................................................................................... 3
Overview ........................................................................................................................................ 4
Logging into HDAccess ................................................................................................................. 4
The HDAccess Workspace ............................................................................................................ 5
The Toolbar ................................................................................................................................ 5
Define Layouts ....................................................................................................................... 5
Message Board ....................................................................................................................... 8
Settings ................................................................................................................................... 9
The Help Menu .................................................................................................................... 12
3 | HDAccess Manual for Administrators
Overview
HDAccess is a self-help solution that gives you an easy, online interface to your help desk issues and
your help desk organization’s knowledge base.
Through a standard internet connection and browser you can:
•
•
•
•
Enter new issues
Monitor the status of your issues
Perform queries on your issues
Access the wealth of knowledge available in your provider’s knowledge base
To get started, enter the URL of your provider’s HDAccess site in your favorite browser.
Logging into HDAccess
When you initially open HDAccess in your web browser, the Requester Login window is displayed. Click
the “Click here if you are a Help Desk Authority Administrator” link at the bottom of the login window.
1. Enter your user name in the HD Authority User Logon Name field.
2. Enter your password in the Password field.
3. Click the Submit button.
This manual is written for administrators. If you are a
requester, you will gain much more information from the
HDAccess User Manual instead of the HDAccess
Administrators Manual.
4 | HDAccess Manual for Administrators
The HDAccess Workspace
The Toolbar
The toolbar contains five options; Define Layouts, Message Board, Settings, Logout and Help. These
are explained below.
Define Layouts
As an administrator, the first window you will see upon login is the Define Layouts window as shown
below.
1. The default layout will be noted below the buttons as can be seen above. If you would like to
change the default layout, select a layout from the list and click the Set As Default * button.
2. To preview a layout, select the layout from the list and click the Preview button.
Creating a New Layout
1. To add a layout to the list, click the Add button. This will open the Customize Layout window
as shown below.
5 | HDAccess Manual for Administrators
2. Enter the name of the new layout in the Layout Name field at the top of the window.
3. For each of the listed fields, do the following:
a. In the Delete column, check the checkbox if you would like to delete this field from the
layout.
b. In the Default Value column, enter a default value in the text fields provided, or select
one from the drop-down menu
c. In the Required column, check the checkbox if you would like the field to be required.
d. In the Read Only column, check the checkbox if this field is to be read-only and not
editable.
e. In the Searchable column, check the checkbox if you would like this field to be
searchable by HDAccess in the Search pane.
f. In the Printable column, check the checkbox if you would like to give users the ability to
print this field.
g. In the Show On Submit Screen column, if you would like the field to be present on the
initial Issue creation screen (containing the Submit button), check this checkbox.
6 | HDAccess Manual for Administrators
h. In the Show On Modify Screen, if you would like the field to be present on the Issue
modification screen, check this checkbox.
4. If you have checked any fields to be deleted, click the Remove button to delete them. Click
the OK button at the prompt.
5. If you would like to add a field, click the Add Fields button. This will open the Add Fields
window as shown below.
a. The fields listed in the Regular Fields tab are the available fields not already
included in your layout. Check the checkbox beside each field you would like to add.
b. If custom fields have been created, they will appear in the Custom Fields tab. Check
the checkbox beside each field you would like to add.
c. Click the Save button when finished.
d. Click the Close button to close the window at any time.
7 | HDAccess Manual for Administrators
6. If you would like to change the order of the fields in the layout, click the Change Sequence
button. This will open the Change Sequence window shown below.
a. Select a field from the list that you would like to move up or down on the list.
b. Use the blue up or down arrow buttons to position the field where you would like it.
c. Adjust any other fields you’d like to change.
d. Click the Save button when finished.
e. Click the Close button at any time to close the window.
7. When you are satisfied with the new layout, click the Done button. The new layout will be
saved and added to the layout list that you see during the initial administrator login.
8. If you would like to edit a layout, select the layout from the list and click the Edit button. This
will open the Customize Layout window as before. Make the necessary changes and click
the Done button.
9. If you would like to delete a layout, select the layout and click the Delete button. Click the
OK button on the confirmation pop-up.
Message Board
The Message Board allows system administrators to broadcast information of interest to all users at the
same time. The headline of each message will scroll in the Message Board headline window at the top
of the HDAccess window as shown below.
8 | HDAccess Manual for Administrators
Clicking on the headline will open the Message Board window to display the text of the current headline
and message.
Settings
System Options
Selecting this option opens the System Options window as shown in the following sections.
9 | HDAccess Manual for Administrators
The Email Configuration Tab
The Email Configuration tab contains the user’s email and email server information, as well as default
email templates.
10 | HDAccess Manual for Administrators
1. Enter the name you would like to appear in the “From:” portion of your email in the From
Name field. This is required.
2. Enter the email address that the emails will be coming from in the From Email Address
field. This field is required.
3. Enter the name of your SMTP server in the SMTP Server field. This is required.
4. Enter the port number in the Port Number field. This is required. If you will be using SSL,
the default port is 465, and you should check the Use SSL checkbox.
5. If your server requires authentication, check the “My Server Requires Authentication”
checkbox.
6. If you checked the checkbox in #5, enter the SMTP User Name and Password in the
appropriate fields.
7. In the Forgot Password Subject field, enter the text you would like to use for that particular
notification email’s subject line.
8. In the Forgot Password Message field, enter the text you would like to use for that
particular notification email’s message.
9. In the Requester Registration Subject field, enter the text you would like to use for that
particular notification email’s subject line.
10. In the Requester Registration Message field, enter the text you would like to use for that
particular notification email’s message.
11. In the Requester Approval Subject field, enter the text you would like to use for that
particular notification email’s subject line.
12. In the Requester Approval Message field, enter the text you would like to use for that
particular notification email’s message.
13. In the Signature Block field, enter the default signature for the emails if you would like to
include one.
The General Tab
The General tab contains information for company and email links, as well as what to display when a
user logs into HDAccess.
1. Enter the company’s general email address in the Email Link field.
2. Enter any information about the company, such as addresses and phone numbers, in the
Company Information field.
3. Enter the URL of the company website in the Company Website field (using ‘http://”).
4. In the checkboxes following, check each item you would like to be displayed when a user
logs into HDAccess.
The Logo Settings Tab
This tab contains the links to the logos for the header and logon screen.
1. In the Header Logo section, click the Browse button to locate an image file of your logo that
you would like to appear in the header of HDAccess. Click the Select button. To preview the
image in the header, click the Apply button.
2. In the Logon Screen Logo section, click the Browse button to locate an image file of your
logo that you would like to appear on the logon screen. Click the Select button. Click the
Apply button to finalize your choice.
3. To restore the default logos at any time, click the Restore Defaults button.
11 | HDAccess Manual for Administrators
The Issue Activity Settings Tab
In this tab, administrators can select which activity types users will see when looking at Issue updates in
HDAccess. The fields and order of fields (columns in the activity viewing) can also be set in this tab.
1. In the Activity Types Setting section, select available activity types from the left pane and
move them to the right pane using the arrow keys. Each type in the right pane will be visible
to the user. Each activity type can be moved back to the left pane at any time.
2. In the Activity Fields Setting section, check the checkbox next to each field name you would
like the user to be able to view as a column header in the Activity section when viewing an
Issue. To change the order of the column headings using the arrow buttons. The top-most
field will be in the left-most column.
The Report Settings Tab
The settings in this tab will configure how the reports appear in HDAccess.
In the Report Type section, the Report Type drop-down menu will default to “Standard” and will usually
be unavailable for change.
The Viewer Type drop-down menu will contain several ways a user can view a report in HDAccess.
Select the type you would like your users to use.
You can also select to add a graphic (most often, this will be your company logo) to the header of the
report. To do this, click the Browse button and select a logo. Once the logo has been chosen, click the
Select button, then click the Apply button.
To return to the original settings, click the Restore Defaults button. To remove any graphic selected as
a report logo, click the Remove button.
When you are satisfied with the settings in all five tabs of the System Options window, click the Save
button. You can close the window at any time by clicking the Close button.
The Help Menu
HDAccess Help
Selecting HDAccess Help will open up the documentation for HDAccess. If you are logged in as
administrator, you will see the Manual for Administrators. If you are logged in as a user, you will see the
User’s Manual.
12 | HDAccess Manual for Administrators
Contact Us
Selecting the Contact Us option from the Help menu will open the Contact Us window as shown below.
Company Website
Selecting the Company Website option will open the company’s website in a new browser window.
About HDAccess
Selecting About HDAccess will open the About HDAccess window, displaying the current build
information.
13 | HDAccess Manual for Administrators