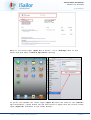
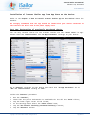
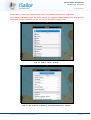
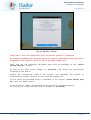
1
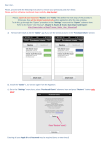
Transas iSailor
User Manual
June, 2013. Version 1.5.4.
Transas iSailor. User Manual
Version 1.5.4, June 2013
www.isailor.us
This page intentionally left blank.
Copyright © 2013 Transas Marine Limited. All rights reserved.
Page 2 of 93
Transas iSailor. User Manual
Version 1.5.4, June 2013
www.isailor.us
User Manual for Transas iSailor
Contents
1. General information about Transas “iSailor”. ................................................................................ 4
2. How to install Transas iSailor app on the device. .......................................................................... 6
3. How to purchase charts for Transas iSailor app. ........................................................................... 7
3.1
Method 1 - Search of the necessary chart folio via “Search” line ............................................ 10
3.2
Method 2 - By tapping on the necessary area of the World Chart ........................................... 13
3.3
Method 3 - Select from the list available chart folios .............................................................. 19
4. Chart layouts and user settings..................................................................................................... 22
4.1
“Chart” layout (default screen)................................................................................................. 24
4.2
“Monitoring” layout ................................................................................................................. 24
4.3
“Routes and Tracks” layout ...................................................................................................... 26
4.4
“Chart store” layout .................................................................................................................. 28
4.5
“Settings” layout....................................................................................................................... 29
5. “iSailor" functionality .................................................................................................................. 30
5.1
“User Objects” .......................................................................................................................... 30
5.2
Cursor / Locator Tool. .............................................................................................................. 36
5.3
“Chart Info” Function. .............................................................................................................. 37
5.4
“ERBL” Function. .................................................................................................................... 37
5.5
Operations with Routes. ........................................................................................................... 40
6. Routes & Tracks: Data Import and Export .................................................................................. 45
6.1
Import Data by E-mail .............................................................................................................. 45
6.2
Import Data by “iTunes” application and Personal computer .................................................. 49
6.3
How to Export data from one device and Import it on another devices. .................................. 54
6.4
How to Export data via “iTunes” application and Personal computer. .................................... 61
7. AIS Class B transponder or receiver ............................................................................................ 62
7.1
Using AIS in the Transas “iSailor” app.................................................................................... 62
7.2
Own Ship Data from AIS Class B ............................................................................................ 77
7.3
Default settings for Digital Yacht or similar devices ............................................................... 78
8. Annex I – “Settings” layout and user settings .............................................................................. 79
8.1
“Purchased Charts” menu item................................................................................................. 80
8.2
“Chart” menu item.................................................................................................................... 81
8.3
“Location” menu item. ............................................................................................................. 81
8.4
“Units” menu item. ................................................................................................................... 82
8.5
“AIS” menu item. ..................................................................................................................... 83
8.6
“Import” menu item.................................................................................................................. 83
8.7
“Export” menu item.................................................................................................................. 84
8.8
“Registration” menu item. ........................................................................................................ 84
8.9
“Feedback” menu item. ............................................................................................................ 85
8.10 “User manual” menu item. ....................................................................................................... 85
8.11 “Tips” menu item. .................................................................................................................... 86
8.12 “About” menu item. ................................................................................................................. 87
8.13 “Legal info” menu item. ........................................................................................................... 87
9. Annex II - Troubleshooting.......................................................................................................... 88
9.1
How to restore all previously purchased charts for the Transas iSailor app. ........................... 88
9.2 No “Course” and “Speed” data in the “iSailor” app ................................................................ 93
Copyright © 2013 Transas Marine Limited. All rights reserved.
Page 3 of 93
Transas iSailor. User Manual
Version 1.5.4, June 2013
www.isailor.us
1. General information about Transas “iSailor”.
Transas iSailor is the free navigational application for iPhones and iPads intended
for use on boats and yachts
Transas iSailor determines location using Apple’s internal “Location Service”. The
app can receive a signal about current position from the cell tower, internal
Apple’s “Assisted GPS” or external GPS which can work as an internal service.
While being out of range of cell towers, the device defines the position using GPS.
iPhone 4, iPhone 4S and iPhone5 are by default equipped with internal “Assisted GPS”
unit, which is compatible with iSailor.
There are two new models of an iPad:
1. iPad Wi-Fi or iPad mini Wi-Fi (without “Assisted GPS” unit. Compatible with
iSailor, but always requires an additional external GPS receiver).
2. iPad Wi-Fi + Cellular or iPad mini Wi-Fi + Cellular (with internal “Assisted GPS”
unit. Compatible with iSailor).
If you have an iPad Wi-Fi model you still may run iSailor on it as internal location
service in this device is available. In this case you have to use any external GPS
devices such as:
http://xgps150.dualav.com/
http://bad-elf.com/pages/be-gps-1000-detail
http://www.gns-gmbh.com/index.php?id=194&L=1
https://buy.garmin.com/en-US/US/in-the-air/portable-gps/glo-foraviation/prod109826.html etc
Please switch on "Location Service" on your device.
Copyright © 2013 Transas Marine Limited. All rights reserved.
Page 4 of 93
Transas iSailor. User Manual
Version 1.5.4, June 2013
www.isailor.us
NOTE:
Sometimes after the installation of iSailor app on device, information about iSailor
is unavailable in the list of apps in Location Services. In this case it is
necessary to Power OFF the device. After switching ON please check information about
iSailor app in Location Services list again.
Additional important information:
Assisted GPS (A-GPS or AGPS) is a very fast system which can improve the startup
performance or "cold startup" of the device with integrated GPS satellite-based
positioning system. But in some cases a new devices need to be up to 30 min. (in
average 15-25 min.) under the clear sky at first time to receive "almanac" and other
information directly from GPS satellites. Work of internal GPS unit in iPad device
inside of the ship, boat, etc. depends on the individual material properties of the
hull, which in some cases can block the radio signals from GPS satellites on the
path to the Apple's device.
Copyright © 2013 Transas Marine Limited. All rights reserved.
Page 5 of 93
Transas iSailor. User Manual
Version 1.5.4, June 2013
www.isailor.us
2. How to install Transas iSailor app on the device.
We strongly recommend that the app should be loaded with your device connected to
the Internet via Wi-Fi and to the power supply unit.
•
•
•
•
Open the App Store;
Find the Transas iSailor app;
Check that the correct current iTunes login account (Apple ID) is used on the
device;
Install the Transas iSailor application on the device.
Open App Store
Find the iSailor app
Install the Transas iSailor application using your Apple ID and Password.
Copyright © 2013 Transas Marine Limited. All rights reserved.
Page 6 of 93
Transas iSailor. User Manual
Version 1.5.4, June 2013
www.isailor.us
3. How to purchase charts for Transas iSailor app.
You can purchase charts for iSailor only via the “Chart store” in-app.
We strongly recommend that the data should be purchased and downloaded with your
device connected to the Internet via Wi-Fi and connected to the power supply unit.
The iTunes has information on all the in-app purchases you made in the “Chart store”
section of the Transas iSailor app. Please use the correct current iTunes login
account (Apple ID). Always use the same iTunes login account (Apple ID), because it
is only in this case that you can use the free "Restore" procedure for free
downloading and installation of all the previously purchased charts in future.
Before starting the purchasing process please check the “Restrictions” and “In-App
Purchases” settings on the device:
Installation usually takes a few minutes, but sometimes the process is interrupted
by network failures or exit from the program, etc.
Please don't close the application until the loading process is completed!
Copyright © 2013 Transas Marine Limited. All rights reserved.
Page 7 of 93
Transas iSailor. User Manual
Version 1.5.4, June 2013
www.isailor.us
Run the “iSailor” app.
Select “Chart store” layout. Find the necessary chart folio and purchase it.
Copyright © 2013 Transas Marine Limited. All rights reserved.
Page 8 of 93
Transas iSailor. User Manual
Version 1.5.4, June 2013
www.isailor.us
“Chart store” layout
There are three ways to purchase the chart folio(s):
•
Method 1. Search of the necessary chart folio via search line (you can use
for search any names, coordinates, etc.);
•
Method 2. By tapping of the necessary area on the world chart;
•
Method 3. Select from the list of available charts folios.
Copyright © 2013 Transas Marine Limited. All rights reserved.
Page 9 of 93
Transas iSailor. User Manual
Version 1.5.4, June 2013
www.isailor.us
3.1 Method 1 - Search of the necessary chart folio via “Search” line
1. Enter a search parameter in the search line and tap “Search” button:
“Search” line.
2. Tap on the “Price” button to order selected folio:
“Price” button.
Copyright © 2013 Transas Marine Limited. All rights reserved.
Page 10 of 93
Transas iSailor. User Manual
Version 1.5.4, June 2013
www.isailor.us
3. Tap again on the “Buy now” button:
“Buy now” button.
4. Press next “Buy” button for confirmation:
Pop up confirmation window with the “Buy” button.
Copyright © 2013 Transas Marine Limited. All rights reserved.
Page 11 of 93
Transas iSailor. User Manual
Version 1.5.4, June 2013
www.isailor.us
5. Enter your Apple ID password and press “OK” button finally:
Enter password and press “OK” button.
6. Check the “Installed” status:
“Installed” status is shown for all installed charts & folios.
Copyright © 2013 Transas Marine Limited. All rights reserved.
Page 12 of 93
Transas iSailor. User Manual
Version 1.5.4, June 2013
www.isailor.us
3.2 Method 2 - By tapping on the necessary area of the World Chart
1. Scroll the World chart and tap on the necessary area.
Tap on the necessary area.
Transas Chart folio for the necessary area is defined.
“Aegean Sea – Dardanelles – Bosporus” folio is shown on the example above.
Copyright © 2013 Transas Marine Limited. All rights reserved.
Page 13 of 93
Transas iSailor. User Manual
Version 1.5.4, June 2013
www.isailor.us
2. Tap on the selected folio as shown on the picture above.
Tap on the defined chart folio line
3. After that additional button line will be enabled on the “Chart store” layout. 4
buttons will be appeared after that: “General”, “Coastal”, “Approach” and
“Harbour”.
These buttons are intended for presentation of the different chart categories in
the selected folio, divide into 4 main groups. Press these buttons and check
chart coverage before the purchasing, if necessary:
“General” button.
All charts of the selected folio are presented on the display.
Copyright © 2013 Transas Marine Limited. All rights reserved.
Page 14 of 93
Transas iSailor. User Manual
Version 1.5.4, June 2013
www.isailor.us
“Coastal” button is pressed on and
“General” charts of the selected folio are excluded from presentation.
“Approach” button is pressed on and
“General” and “High Sea” charts are excluded from presentation.
Copyright © 2013 Transas Marine Limited. All rights reserved.
Page 15 of 93
Transas iSailor. User Manual
Version 1.5.4, June 2013
www.isailor.us
“Harbour” button.
Only large scale charts for Harbours and Marinas are presented on the display for
selected chart folio.
4. Tap on the “Price” button to order selected folio:
“Price” button.
Copyright © 2013 Transas Marine Limited. All rights reserved.
Page 16 of 93
Transas iSailor. User Manual
Version 1.5.4, June 2013
www.isailor.us
5. Tap again on the “Buy now” button:
“Buy now” button.
6. Press next “Buy” button for confirmation:
Pop up confirmation window with the “Buy” button.
Copyright © 2013 Transas Marine Limited. All rights reserved.
Page 17 of 93
Transas iSailor. User Manual
Version 1.5.4, June 2013
www.isailor.us
7. Enter your Apple ID password and press “OK” button finally:
Enter password and press “OK” button.
8. Check the “Installed” status:
“Installed” status is shown for all installed charts & folios.
Copyright © 2013 Transas Marine Limited. All rights reserved.
Page 18 of 93
Transas iSailor. User Manual
Version 1.5.4, June 2013
www.isailor.us
3.3 Method 3 - Select from the list available chart folios
1. Tap the “Available Chart folios” button:
“Available Chart folios” button.
2. Select the necessary chart folio and tap “Price” button:
“Price” button.
Copyright © 2013 Transas Marine Limited. All rights reserved.
Page 19 of 93
Transas iSailor. User Manual
Version 1.5.4, June 2013
www.isailor.us
3. Tap again on the “Buy now” button:
“Buy now” button.
4. Press next “Buy” button for confirmation:
Pop up confirmation window with the “Buy” button.
Copyright © 2013 Transas Marine Limited. All rights reserved.
Page 20 of 93
Transas iSailor. User Manual
Version 1.5.4, June 2013
www.isailor.us
5. Enter your Apple ID password and press “OK” button finally:
Enter password and press “OK” button.
6. Check the “Installed” status:
“Installed” status is shown for all installed charts & folios.
Copyright © 2013 Transas Marine Limited. All rights reserved.
Page 21 of 93
Transas iSailor. User Manual
Version 1.5.4, June 2013
www.isailor.us
4. Chart layouts and user settings
Run iSailor app.
Four general layouts "Chart", "Monitoring", "Track & Route", “Chart store” and
additional menu “Settings” are implemented in the application.
Access to the switcher area is carried out in the bottom part of the screen.
Chart
The layout is intended for the simple and most
complete displaying of chart data.
Monitoring
The layout is intended for monitoring of the
own ship data and its proceeding along the
route (with the route available and selected
for monitoring).
Also it enables user to plot the User Info
objects on the chart.
The own ship motion parameters panel is always
displayed. If a route is loaded, there is also
an additional panel for monitoring the passage
along the route.
Route & Track
Copyright © 2013 Transas Marine Limited. All rights reserved.
The layout is intended for work with routes
and tracks.
Page 22 of 93
Transas iSailor. User Manual
Version 1.5.4, June 2013
www.isailor.us
Chart store
Settings
The layout is intended for purchase of charts
folios.
The menu is intended for work with general
settings
To select the required functional layout, touch the screen at the bottom and choose
one.
Each layout has the following elements:
Button for quick back to the current ship
position
Button for quick access to Alarms
settings panel
(only available if the function is turned
ON in the Settings\Location\Alarms
monitoring)
The following functions: Cursor/Locator Tool, Chart objects info, ERBL, Own Ship
ERBL can be used on the each layout.
Copyright © 2013 Transas Marine Limited. All rights reserved.
Page 23 of 93
Transas iSailor. User Manual
Version 1.5.4, June 2013
www.isailor.us
4.1 “Chart” layout (default screen)
“Chart” layout.
4.2 “Monitoring” layout
“Monitoring” layout.
Copyright © 2013 Transas Marine Limited. All rights reserved.
Page 24 of 93
Transas iSailor. User Manual
Version 1.5.4, June 2013
www.isailor.us
“Monitoring” layout with the active route.
“Own ship parameters” panel
North indicator
Chart orientation
Latitude
Longitude
Course
Course-Over-Ground
Speed
Speed-Over-Ground
Additional “Monitoring” panel
Available only if the route selected for
view and monitoring
WP Name
Course to WP
Distance to WP
XTE from leg
ETA to WP
“Add user object” button
Copyright © 2013 Transas Marine Limited. All rights reserved.
Page 25 of 93
Transas iSailor. User Manual
Version 1.5.4, June 2013
www.isailor.us
4.3 “Routes and Tracks” layout
“Routes & Tracks” layout.
The screen is intended for work with routes and tracks. It allows the use of the
following functions: Chart Info, Point-To-Point ERBL, Own Ship ERBL. There is a
button for the prompt return to the current position and the alarms control panel
(if turned ON).
Routes:
“Route” panel.
“Create new route” button.
Copyright © 2013 Transas Marine Limited. All rights reserved.
Page 26 of 93
Transas iSailor. User Manual
Version 1.5.4, June 2013
www.isailor.us
“Add new way point (WP)” button.
Button is unavailable without selected route
for viewing and monitoring.
Route in list.
The route selected for viewing and
monitoring is displayed in the blue colour.
Only one route can be selected for viewing
and monitoring!
“Detailed information” button.
•
•
•
•
•
•
display of the route list ;
creating a route by using the graphic and tabular method;
capability to edit the route name, names of waypoints, coordinates of waypoints;
selecting a route for monitoring;
obtaining reference information about the route;
deleting a route.
Tracks:
“Tracks” panel.
“Track record” button is OFF.
“Track record” button is ON.
“Detailed information” button.
Copyright © 2013 Transas Marine Limited. All rights reserved.
Page 27 of 93
Transas iSailor. User Manual
Version 1.5.4, June 2013
www.isailor.us
Indicator of the track colour.
Track in list.
The track selected for viewing is displayed
in the blue colour
•
•
•
•
•
•
display of the track list;
current track recording;
capability to edit the track name, track colour;
selecting tracks for the display;
obtaining reference information on the track;
deleting a track.
4.4 “Chart store” layout
“Chart store” layout
The screen is intended for work with the built-in Chart store.
Copyright © 2013 Transas Marine Limited. All rights reserved.
Page 28 of 93
Transas iSailor. User Manual
Version 1.5.4, June 2013
www.isailor.us
Top buttons and functions:
Search line.
List of available chart folios.
Cancel of search.
•
•
•
•
Simple search of the chart folio;
Obtaining detailed coverage of the chart folio;
Obtaining detailed coverage of the charts;
Purchase of the chart folio.
4.5 “Settings” layout
“Settings” layout
The panel is intended for work with purchased charts and making user settings.
Activation of the settings panel is performed via right-bottom “gear wheel” symbol.
Advanced settings are described below in appropriate chapters. Refer for details to
the Annex I – “Settings” layout and user settings below.
Copyright © 2013 Transas Marine Limited. All rights reserved.
Page 29 of 93
Transas iSailor. User Manual
Version 1.5.4, June 2013
www.isailor.us
5. “iSailor" functionality
5.1 “User Objects”
How to add the “User Object” on the chart.
1. To add new “User Object”, drag icon from the relevant button and drop it on the
chart in the required position.
“Add user object” button
Drag and drop it on the chart to an appropriate position.
Copyright © 2013 Transas Marine Limited. All rights reserved.
Page 30 of 93
Transas iSailor. User Manual
Version 1.5.4, June 2013
www.isailor.us
2. After that, select the object type from the list:
Create type of the plotted object.
“Wreck” object is shown on example above.
Copyright © 2013 Transas Marine Limited. All rights reserved.
Page 31 of 93
Transas iSailor. User Manual
Version 1.5.4, June 2013
www.isailor.us
3. Add additional info (Text or Depth) or correct position of the object if
necessary. Press “Save” button for confirmation:
Press “Save” button.
User object is ready.
Copyright © 2013 Transas Marine Limited. All rights reserved.
Page 32 of 93
Transas iSailor. User Manual
Version 1.5.4, June 2013
www.isailor.us
How to delete the User Object from the chart.
To delete object call Cursor / Locator Tool (short tap on the screen if it is ON or
long tap if it is OFF), press and hold the cursor center (intersection of lines) and
move it to the necessary object on the screen. Short tap on the object, select
objects info on the list and delete it.
Find User Object for deletion.
Activate “Cursor / Locator Tool” by short or long tap on the chart.
Copyright © 2013 Transas Marine Limited. All rights reserved.
Page 33 of 93
Transas iSailor. User Manual
Version 1.5.4, June 2013
www.isailor.us
Move the “Cursor / Locator Tool” to the object for deletion.
NOTE: For text user objects, - set Center of “Cursor / Locator Tool” on the first
letter of the text for deletion.
“Cursor / Locator Tool” on the object.
Copyright © 2013 Transas Marine Limited. All rights reserved.
Page 34 of 93
Transas iSailor. User Manual
Version 1.5.4, June 2013
www.isailor.us
Short tap on the “Cursor/Locator Tool” for displaying chart objects info panel.
Short-tap cursor crosshairs for displaying chart objects info panel:
Short-tap on “User info” of the selected object for deletion.
Press “Delete” button to delete selected User object.
Copyright © 2013 Transas Marine Limited. All rights reserved.
Page 35 of 93
Transas iSailor. User Manual
Version 1.5.4, June 2013
www.isailor.us
User object is deleted. Long tap on the “Cursor/Locator Tool” to remove it from the
Chart display, if necessary.
5.2 Cursor / Locator Tool.
The function is intended for obtaining information about the latitude and longitude
of a point on the screen, and also indicates the place of applying other functions,
e.g., Chart Info. It is turned on/off by a long tap. It represents a north-oriented
intersection of two lines. To use it, touch the screen to acquire (press and hold)
the cursor centre (intersection of lines) and move it to the required place on the
screen. When the cursor moves on the screen, latitude and longitude of the cursor
centre point (intersection of lines) are shown in the orange-coloured oval.
Copyright © 2013 Transas Marine Limited. All rights reserved.
Page 36 of 93
Transas iSailor. User Manual
Version 1.5.4, June 2013
www.isailor.us
5.3 “Chart Info” Function.
The function is intended for obtaining reference information about the electronic
chart objects. It operates jointly with the information cursor: Free “Cursor /
Locator Tool”.
To use it, put the cursor intersection on the necessary point and short-tap the
object. On the displayed window, view the reference information about the object.
5.4 “ERBL” Function.
Point-To-Point ERBL on the electronic chart.
Copyright © 2013 Transas Marine Limited. All rights reserved.
Page 37 of 93
Transas iSailor. User Manual
Version 1.5.4, June 2013
www.isailor.us
ERBL – Electronic Range and Bearing Line
The function is intended for obtaining bearing and distance for the centre of the
information cursor to the selected point. It operates jointly with switched ON the
information cursor: Free “Cursor / Locator Tool”.
To use it, touch the screen to acquire (press and hold) the cursor centre
(intersection of lines) and move it to the necessary point on the screen. Touch the
screen with the thumb in an arbitrary point. In the touch point, an orange-coloured
circle and reference point will appear.
As any of the points moves on the screen, values of bearing and distance from the
cursor centre point (intersection of lines) to the point on the circle are displayed
in the orange-coloured oval, located in the top right corner of the display.
To Turn Off ERBL, - short-tap the cursor centre or reference point on the circle.
Own ship referenced ERBL.
Copyright © 2013 Transas Marine Limited. All rights reserved.
Page 38 of 93
Transas iSailor. User Manual
Version 1.5.4, June 2013
www.isailor.us
The function is intended for obtaining values of bearing and distance from the own
ship to the selected point.
As the own ship moves, the reference point moves
together with the ship.
To use it, touch the own ship symbol and by keeping the finger on the screen move it
to the necessary direction. A blue-coloured circle and reference point will appear.
As the own ship or reference point moves on the screen, values of bearing and
distance from the own ship current position to the reference point on the circle are
displayed in the blue oval.
To turn off, short-tap the own ship symbol or reference point on the circle.
Copyright © 2013 Transas Marine Limited. All rights reserved.
Page 39 of 93
Transas iSailor. User Manual
Version 1.5.4, June 2013
www.isailor.us
5.5 Operations with Routes.
How to create a Route
Go to the “Routes & Tracks” layout.
You can operate with Routes and WP flags only at “Routes & Tracks” layout!!!
In Routes panel tap “Create new route button”.
New “empty” route will appear in route list.
By default each new route selected as “loaded for view and monitoring”.
Copyright © 2013 Transas Marine Limited. All rights reserved.
Page 40 of 93
Transas iSailor. User Manual
Version 1.5.4, June 2013
www.isailor.us
To add new way point (WP), drag WP flag button from panel and drop it on the chart
in the required position:
Drag WP1 flag button from panel and drop it on the chart.
To change WP flag position, please touch it and you move. Also you can change WP
name if necessary. To add additional new way point (WP), drag WP flag button from
panel again and drop it on the chart in the required position, etc:
Drag and Drop other WPs for the required route
Copyright © 2013 Transas Marine Limited. All rights reserved.
Page 41 of 93
Transas iSailor. User Manual
Version 1.5.4, June 2013
www.isailor.us
Also you can use the “detailed information” button for route creation in a tabular
view, change of WPs coordinates, etc.
“Detailed information” button.
Advanced “WP list” for created / selected route.
Copyright © 2013 Transas Marine Limited. All rights reserved.
Page 42 of 93
Transas iSailor. User Manual
Version 1.5.4, June 2013
www.isailor.us
Select “WP X” for editing, if necessary.
Select “WP X” for editing, if necessary.
It is possible to add “WP name” here or edit WP coordinates in digital form.
Copyright © 2013 Transas Marine Limited. All rights reserved.
Page 43 of 93
Transas iSailor. User Manual
Version 1.5.4, June 2013
www.isailor.us
Editing of WP coordinates in digital form.
This method can be also used for the route creation in the digital format. I.e.
route may be plotted graphically at first – as preliminary route, and later all
Waypoints can be corrected manually in the digital format, by their corrections of
their latitude and longitude data.
Copyright © 2013 Transas Marine Limited. All rights reserved.
Page 44 of 93
Transas iSailor. User Manual
Version 1.5.4, June 2013
www.isailor.us
6. Routes & Tracks: Data Import and Export
6.1 Import Data by E-mail
You can Import external data via e-mail with attached *.GPX, *.KML or *.KMZ file.
Open E-mail service on the device.
Select the required attachment, tap on and then "Open in iSailor".
Copyright © 2013 Transas Marine Limited. All rights reserved.
Page 45 of 93
Transas iSailor. User Manual
Version 1.5.4, June 2013
www.isailor.us
The iSailor app will be automatically started.
In the iSailor app find attached *.GPX file.
Select attached *.GPX file and press “Import selected” button.
Copyright © 2013 Transas Marine Limited. All rights reserved.
Page 46 of 93
Transas iSailor. User Manual
Version 1.5.4, June 2013
www.isailor.us
The iSailor app will automatically identify the content and type of data in *.GPX
file:
Route with 3 waypoints is detected on example above
Select the required data and press “Import selected” button.
Copyright © 2013 Transas Marine Limited. All rights reserved.
Page 47 of 93
Transas iSailor. User Manual
Version 1.5.4, June 2013
www.isailor.us
Check the status and press “Done” button.
Find imported Route in the Routes list:
Imported Route on the Chart screen.
Copyright © 2013 Transas Marine Limited. All rights reserved.
Page 48 of 93
Transas iSailor. User Manual
Version 1.5.4, June 2013
www.isailor.us
6.2 Import Data by “iTunes” application and Personal computer
You can Import external data via connected PC and “iTunes” application. Import
format is the same as described above in the Chapter 6.1: *.GPX, *.KML or *.KMZ
file.
•
First of all, you Route / Track has to be created somewhere (3rd party
application) and stored on PC in *.GPX, *.KML or *.KMZ format. As example,
web geoplaner app can be used for that purposes (http://www.geoplaner.com/):
Create your route using external app and save on PC as *.GPX, *.KML or *.KMZ file.
Stored “Adriatic Voyage.GPX” file (as example) on the local drive as example.
•
Then, run “iTunes” application on your PC. Connect your device (using USB
cable) and make sure that device is recognized by “iTunes” app:
“iPad” button showing that Apple device is connected to PC via USB cable.
•
Press on device button (mentioned above) and select “Apps” page:
Copyright © 2013 Transas Marine Limited. All rights reserved.
Page 49 of 93
Transas iSailor. User Manual
Version 1.5.4, June 2013
www.isailor.us
Press “Device” button (“iPad” on example above).
Press “Apps” button and select installed “iSailor” app in the list below.
Copyright © 2013 Transas Marine Limited. All rights reserved.
Page 50 of 93
Transas iSailor. User Manual
Version 1.5.4, June 2013
www.isailor.us
Press “Add” button and select created “Adriatic Voyage.GPX” file from your PC.
“Adriatic Voyage.GPX” is added into “iSailor” documents folder.
•
Then, run the “iSailor” application on your device (do not disconnect the USB
cable), go to “Settings” layout and tap on “Import” menu item:
“Import” menu item.
Copyright © 2013 Transas Marine Limited. All rights reserved.
Page 51 of 93
Transas iSailor. User Manual
Version 1.5.4, June 2013
www.isailor.us
•
*.GPX, *.KML or *.KMZ file will be detected on the “Import” page:
“Adriatic Voyage.GPX” on example above
•
Tap and select the required *.GPX, *.KML or *.KMZ file and tap on below
mentioned “Import selected” button:
“Adriatic Voyage.GPX” is selected. Tap on “Import selected” button.
Copyright © 2013 Transas Marine Limited. All rights reserved.
Page 52 of 93
Transas iSailor. User Manual
Version 1.5.4, June 2013
www.isailor.us
•
Route with 4 WPs is detected. Tap on “Import selected” button again to
convert selected route into “iSailor” format.
Conversion status set as “Imported”. Selected Route is converted into “iSailor” app.
•
Check imported Route in the “iSailor” app:
“Track & Route” layout. Tap on imported route for checking purposes.
Copyright © 2013 Transas Marine Limited. All rights reserved.
Page 53 of 93
Transas iSailor. User Manual
Version 1.5.4, June 2013
www.isailor.us
6.3 How to Export data from one device and Import it on another devices.
You can create Route or Track on one device, export it via E-mail and import on
another devices. Run the iSailor app. Open “Settings” layout. In the “Export” field
press (>):
“Settings” layout, “Export” line.
Select the required Route in the list.
Copyright © 2013 Transas Marine Limited. All rights reserved.
Page 54 of 93
Transas iSailor. User Manual
Version 1.5.4, June 2013
www.isailor.us
Check that required Route is selected.
Press <Export to GPX> button.
Press <Send by Mail> button.
Copyright © 2013 Transas Marine Limited. All rights reserved.
Page 55 of 93
Transas iSailor. User Manual
Version 1.5.4, June 2013
www.isailor.us
Enter your e-mail address and press <Send> button.
Press <Done> button to close “Export’ window.
Copyright © 2013 Transas Marine Limited. All rights reserved.
Page 56 of 93
Transas iSailor. User Manual
Version 1.5.4, June 2013
www.isailor.us
On another device please run E-mail service.
Open new message with an attached file *.GPX.
Copyright © 2013 Transas Marine Limited. All rights reserved.
Page 57 of 93
Transas iSailor. User Manual
Version 1.5.4, June 2013
www.isailor.us
Tap attachment and select “Open in iSailor” option.
The iSailor app will be automatically started.
Select file.
Copyright © 2013 Transas Marine Limited. All rights reserved.
Page 58 of 93
Transas iSailor. User Manual
Version 1.5.4, June 2013
www.isailor.us
Check that file is selected.
Press <Import selected> button.
The iSailor app will automatically recognize and identify the content of the file.
Copyright © 2013 Transas Marine Limited. All rights reserved.
Page 59 of 93
Transas iSailor. User Manual
Version 1.5.4, June 2013
www.isailor.us
Check that data is selected.
Press <Import selected> button.
Check Route in the “Routes” list.
Copyright © 2013 Transas Marine Limited. All rights reserved.
Page 60 of 93
Transas iSailor. User Manual
Version 1.5.4, June 2013
www.isailor.us
6.4 How to Export data via “iTunes” application and Personal computer.
Procedure is a quite
in the Chapter 6.2
above, exception is
after that exported
*.KML or *.KMZ:
similar, as described for the “Import” via “ITunes” application
“Import Data by “iTunes” application and Personal computer”
that Route to be created in the “iSailor” app at first, and
to “iTunes” application on PC in the selected format *.GPX,
“Settings” layout. “Export” function.
Tap on “Save to iTunes” button.
Copyright © 2013 Transas Marine Limited. All rights reserved.
Page 61 of 93
Transas iSailor. User Manual
Version 1.5.4, June 2013
www.isailor.us
7. AIS Class B transponder or receiver
7.1 Using AIS in the Transas “iSailor” app.
The iSailor now supports the real-time display of AIS targets (Class A and Class B)
on the Transas charts from the own ship AIS transponder (or receiver).
To enable AIS option, it is necessary to make an In-App Purchase from the Apple
Store, but once it is done, you will be able to receive AIS targets data from any
Wi-Fi enabled AIS transponder or receiver. The data connection can be via TCP
(single device) or UDP (multiple devices), and its passes the standard VDM 1, 2, 3,
5, 18, 19, 24a and 24b sentences, so that all Class A and Class B AIS targets are
displayed on the chart.
In addition, AIS-GPS data on your own boat position, course and speed can be
received over the same Wi-Fi connection from AIS, providing a more accurate and
reliable boat position than you get from the iPad/iPhone’s internal GPS. This also
has the benefit of allowing non-3G iPads that do not have an internal GPS to be used
for navigation, or even a low cost iPod Touch.
NOTE: Currently only VDO output sentences 18, 19 (from AIS Class B transponders or
receivers) can be used for the own boat positioning, but in the future other
standard NMEA GPS messages (like RMC, GLL, VTG, GGA) will be also supported via WiFi connection and external GPS receiver!
To get AIS data in the iSailor you just need two things:
1) AIS transmitter or receiver
2) Wi-Fi transmitter
In some cases both elements can be available in one device.
Copyright © 2013 Transas Marine Limited. All rights reserved.
Page 62 of 93
Transas iSailor. User Manual
Version 1.5.4, June 2013
www.isailor.us
In what follows you can find the following information:
•
•
•
•
•
How to connect Apple device to Wi-Fi transmitter;
How to connect or disconnect iSailor to/from Wi-Fi transmitter;
How to look up information on AIS objects (targets);
How to look up Own Ship Data from AIS;
Default settings for Digital Yacht or similar devices.
Switch ON device:
Switch ON device.
Run “Settings”, select a Wi-Fi group and switch the Wi-Fi option “ON”.
Copyright © 2013 Transas Marine Limited. All rights reserved.
Page 63 of 93
Transas iSailor. User Manual
Version 1.5.4, June 2013
www.isailor.us
Connect the AIS equipment to the Wi-Fi transmitter and apply power to both devices.
Select a corresponding Wi-Fi AIS transmitter from the list (tap on “>” button).
Set the “Auto-Join” option to ON.
Copyright © 2013 Transas Marine Limited. All rights reserved.
Page 64 of 93
Transas iSailor. User Manual
Version 1.5.4, June 2013
www.isailor.us
Run the iSailor app.
Go to “Settings” layout.
Copyright © 2013 Transas Marine Limited. All rights reserved.
Page 65 of 93
Transas iSailor. User Manual
Version 1.5.4, June 2013
www.isailor.us
Select the “AIS” item from the list.
Tap on the “Price” button.
Copyright © 2013 Transas Marine Limited. All rights reserved.
Page 66 of 93
Transas iSailor. User Manual
Version 1.5.4, June 2013
www.isailor.us
Confirm your choice, press the “Buy now” button.
Confirm your purchase and press the “Buy” button.
Copyright © 2013 Transas Marine Limited. All rights reserved.
Page 67 of 93
Transas iSailor. User Manual
Version 1.5.4, June 2013
www.isailor.us
Check the Apple ID, enter your correct password and press the “OK” button.
Wait until “AIS” option is registered on Apple Store
Copyright © 2013 Transas Marine Limited. All rights reserved.
Page 68 of 93
Transas iSailor. User Manual
Version 1.5.4, June 2013
www.isailor.us
Once the AIS option is unlocked, switch on “AIS enabled”.
Select the “Add source” item.
Copyright © 2013 Transas Marine Limited. All rights reserved.
Page 69 of 93
Transas iSailor. User Manual
Version 1.5.4, June 2013
www.isailor.us
Select the protocol type, Address and Port.
Enter the “Name” of the AIS Data Source (any)
Check entered data and press the “AIS” button.
Copyright © 2013 Transas Marine Limited. All rights reserved.
Page 70 of 93
Transas iSailor. User Manual
Version 1.5.4, June 2013
www.isailor.us
Wait for the connection to be made.
As soon as a tick appears the data link is ready.
Copyright © 2013 Transas Marine Limited. All rights reserved.
Page 71 of 93
Transas iSailor. User Manual
Version 1.5.4, June 2013
www.isailor.us
Check that the AIS data is now available on the chart.
Switch the “Information cursor/Locator tool” ON (use a long tap)
and then select an AIS target.
Copyright © 2013 Transas Marine Limited. All rights reserved.
Page 72 of 93
Transas iSailor. User Manual
Version 1.5.4, June 2013
www.isailor.us
Tap on the cursor.
AIS target formular is appeared on the screen.
Copyright © 2013 Transas Marine Limited. All rights reserved.
Page 73 of 93
Transas iSailor. User Manual
Version 1.5.4, June 2013
www.isailor.us
Scroll through all of the data on the AIS target.
Lost AIS targets are shown with the “red cross” symbol on top.
It means that AIS target information was not updated in the defined time period,
given in the below mentioned table. After the corresponding timeout the “Lost AIS
target” symbol will be dropped from the chart.
Copyright © 2013 Transas Marine Limited. All rights reserved.
Page 74 of 93
Transas iSailor. User Manual
Version 1.5.4, June 2013
www.isailor.us
“Lost” and “Drop” timeouts for AIS Class A and Class B targets
Type
Status
Lost target
timeout from
latest received
VDM message
Drop target
timeout from
latest received
VDM message
Slow speed
Target speed is less than 3kn
380 sec
410 sec
Middle
speed
Target speed is in range of
3-23 kn
40 sec
70 sec
High speed
Target Speed is more than
23 kn
30 sec
60 sec
To delete a source go to the AIS settings and select the source to be deleted, if
necessary:
Select adjusted AIS source.
Copyright © 2013 Transas Marine Limited. All rights reserved.
Page 75 of 93
Transas iSailor. User Manual
Version 1.5.4, June 2013
www.isailor.us
Press the “Delete” button.
Copyright © 2013 Transas Marine Limited. All rights reserved.
Page 76 of 93
Transas iSailor. User Manual
Version 1.5.4, June 2013
www.isailor.us
7.2 Own Ship Data from AIS Class B
If you have an AIS class B transponder, you can use its GPS to provide the boat
position, speed and course over the ground in the iSailor app.
Please note that the boat position data can only be received via the TCP or UDP from
the VDO sentences (VDO#: 18, 19, 24a/24b).
Set the “Use position from AIS” option to ON.
You will then see the data from the AIS on the Monitoring window.
Copyright © 2013 Transas Marine Limited. All rights reserved.
Page 77 of 93
Transas iSailor. User Manual
Version 1.5.4, June 2013
www.isailor.us
7.3 Default settings for Digital Yacht or similar devices
Default “TCP” settings.
Default “UDP” settings.
Copyright © 2013 Transas Marine Limited. All rights reserved.
Page 78 of 93
Transas iSailor. User Manual
Version 1.5.4, June 2013
www.isailor.us
8. Annex I – “Settings” layout and user settings
Settings menu is needed to adjust user settings, purchase and adjust AIS option,
restore charts and for other functions. This chapter contains information for user
settings and links to other chapters of that document, where some functions already
described in details:
“Settings” layout.
Settings layout consists of following menu items:
•
“Purchased charts”
•
“Chart”
•
“Location”
•
“Units”
•
“AIS”
•
“Import”
•
“Export”
•
“Registration”
•
“Feedback”
•
“User manual”
•
“Tips”
•
“About”
•
“Legal info”
•
“For distributors”
Copyright © 2013 Transas Marine Limited. All rights reserved.
Page 79 of 93
Transas iSailor. User Manual
Version 1.5.4, June 2013
www.isailor.us
8.1 “Purchased Charts” menu item.
Menu “Purchased charts”.
The “Purchased Charts” menu item is only needed for following actions:
•
Restore previously purchased charts on the new user device (or when “iSailor”
app was totally removed from the same device). This procedure is clearly
described in the Chapter 9.1 “How to restore all previously purchased charts for
the Transas iSailor app”.
•
To see installed and purchased charts in the list, as “Chart store” and
purchasing procedure are described in the Chapter 3 “How to purchase charts for
the Transas iSailor app” above.
•
Use the “Chart store” button to switch over into “Chart store” layout.
Copyright © 2013 Transas Marine Limited. All rights reserved.
Page 80 of 93
Transas iSailor. User Manual
Version 1.5.4, June 2013
www.isailor.us
8.2 “Chart” menu item.
Menu “Chart”.
The “Chart” menu item is needed for following actions:
•
“Day” / “Night” buttons – Select Daylight or Night palette (be noted that
“Settings” layout will be presented in Daylight mode for both palettes at the
moment.
•
“Show user info” button – Switch ON / OFF the presentation of the plotted “User
Objects” on charts.
•
“Manual chart rotation button – Switch ON / OFF the possibility to rotate charts
manually (by fingers). Please, be noted that charts will be oriented back to the
user defined location (see “Location” menu item below) after a timeout, if chart
rotation was performed on the screen with the own ship position!
8.3 “Location” menu item.
Menu “Location”.
The “Location” menu item is needed for following actions:
Copyright © 2013 Transas Marine Limited. All rights reserved.
Page 81 of 93
Transas iSailor. User Manual
Version 1.5.4, June 2013
www.isailor.us
•
“North Up” / “Course Up” / “Head Up” buttons – Select the Chart orientation
during sailing mode: North Up, Course-Up (by Course-Over-Ground data from
internal or external GPS) or Head-Up (at the moment only internal Apple fluxgate
compass is supported in Head Up mode);
•
“Alarm monitoring” button – Enable / Disable the Alarm monitoring function.
Please, be noted that Alarm settings panel will be available or disappeared on
the chart panel accordingly:
“Alarm Settings panel”.
•
“Allowed” button – Enable / Disable the position tracking in the background mode
(Please, be noted that operation in this mode may discharge your device battery
much faster!).
8.4 “Units” menu item.
Menu “Units”.
Copyright © 2013 Transas Marine Limited. All rights reserved.
Page 82 of 93
Transas iSailor. User Manual
Version 1.5.4, June 2013
www.isailor.us
The “Units” menu item is needed for multi-unit adjustments:
•
Coordinates format: Presentation of the own ship coordinates in three possible
modes:
- Degrees & their decimals, Degrees & Minutes, Degrees & Minutes & Seconds.
•
Depth units: Presentation of depths on Transas charts (applicable also for the
User Object depth data):
- Meters, Feet, Fathoms & Feet in decimals.
•
Short distance units: Presentation of short distances (up to 1 nautical mile) in
Route data screens, ERBL data window, etc.:
- Meters, Feet.
•
Long distance units: Presentation of long distances (> than 1 nautical mile) in
Route data screens, ERBL data window, etc.:
- Kilometers, Nautical miles.
•
Speed units: Presentation of the own ship speed, target speed data, “Cruising
speed calculation” in the route data window, etc.:
- Kilometers, Nautical miles.
•
Fuel units: Fuel units for the Fuel consumption calculation in the route data
window, etc.:
- Liters, Gallons.
8.5 “AIS” menu item.
The “AIS” menu item is needed for following actions:
•
Purchasing of the “AIS” option. See Chapter 7.1 “Using AIS in the Transas
“iSailor” app” for details;
•
Adjustments for connection to the AIS Class B transponder and its usage for the
own ship positioning purposes. See Chapters 7.1, 7.2 and 7.3 for details above.
8.6 “Import” menu item.
The “Import” menu item is needed for following actions:
•
Import of the Routes / Tracks into “iSailor” application - “Import”
functionality by E-mails or using “iTunes” application. See Chapters 6.1 “Import
Data by E-mail” and 6.2 “Import Data by “iTunes” application and Personal
computer” for details.
Copyright © 2013 Transas Marine Limited. All rights reserved.
Page 83 of 93
Transas iSailor. User Manual
Version 1.5.4, June 2013
www.isailor.us
8.7 “Export” menu item.
The “Export” menu item is needed for following actions:
•
Export of the Routes / Tracks from the “iSailor” application to external
applications: “Export” functionality by E-mails or using “iTunes” application.
See Chapters 6.3 “How to Export data from one device and Import it on another
devices” and 6.4 “How to Export data via “iTunes” application and Personal
computer” for details.
8.8 “Registration” menu item.
Menu “Registration”.
You may use the “Registration” menu item and send us your Name and Location. This
information will not be disclosed to third parties and will be useful for future
service and your receiving of the future iSailor news, such as New releases or new
functionality, developed in the app.
Fill forms, check the “I want to receive iSailor news” line and press the “Send”
button to send us your registration information.
Copyright © 2013 Transas Marine Limited. All rights reserved.
Page 84 of 93
Transas iSailor. User Manual
Version 1.5.4, June 2013
www.isailor.us
8.9 “Feedback” menu item.
Menu “Feedback”.
The “Feedback” menu has following buttons and functionality:
•
“Rate in iTunes” button – you may use this button to rate the “iSailor” app in
iTunes / App Store applications. Your rating will be much appreciated and
important for us to improve the “iSailor” in future.
•
“Send Feedback” - you may use this button to send us any wishes, comments or
your story in relation to “ISailor” app and how did you use it onboard.
•
“Report a problem” – you may use this button if you have any problems or
difficulties with “iSailor” operation or Chart purchasing. Our service team
reverts to you with explanation, help or advices as soon as possible.
8.10 “User manual” menu item.
The “User manual” menu item is working as the link to the latest version of the
“Transas iSailor. User Manual” document in PDF format, which can be also obtained by
the following path: www.isailor.us/faq/i/Transas_iSailor_User_Manual.pdf. Internet
connection is required.
Copyright © 2013 Transas Marine Limited. All rights reserved.
Page 85 of 93
Transas iSailor. User Manual
Version 1.5.4, June 2013
www.isailor.us
8.11 “Tips” menu item.
Menu “Tips”.
The “Tips” menu item is intended for the presentation of interactive tips, which
describes in pictures a major functionality of the “iSailor” application. This menu
has following buttons and functions:
•
“Settings” button – you may use this button to return into the “Settings”
layout;
•
“Done” - you may use this button to close the “Tips” window;
•
“Page control bullets” on the bottom side are showing the number of tips pages
and currently selected page as well;
•
Drag selected page to the right (or left) side to show all available tips pages.
Copyright © 2013 Transas Marine Limited. All rights reserved.
Page 86 of 93
Transas iSailor. User Manual
Version 1.5.4, June 2013
www.isailor.us
8.12 “About” menu item.
The “About” menu item contains information
installed version of the “iSailor” application:
about
manufacturer
and
currently
Menu “About”.
8.13 “Legal info” menu item.
The “Legal info” menu item contains information about “End-User License Agreement”.
Menu “Legal info”.
Copyright © 2013 Transas Marine Limited. All rights reserved.
Page 87 of 93
Transas iSailor. User Manual
Version 1.5.4, June 2013
www.isailor.us
9. Annex II - Troubleshooting
9.1 How to restore all previously purchased charts for the Transas iSailor app.
We strongly recommend that the app and any other data should be downloaded with your
device connected to the Internet via Wi-Fi and connected to the power supply unit.
Two main parts:
- Correct installation of the “iSailor” app,
- Restore the previously purchased charts.
Technically, if you have only one iTunes login account (Apple ID) you can go on to
the second part (“Restore” procedure), but before that it is advisable to carefully
read the instructions.
The iTunes has information on all the in-app purchases you made in the “Chart store”
section of the Transas “iSailor” app.
Please use THE SAME iTunes login account (Apple ID) as was previously used for the
installation of the Transas “iSailor” app and all the in-app purchases of chart
folios in the Chart Store section of the Transas “iSailor” app.
It is only in this case that you can use the free "Restore" procedure for the free
download of all the previously purchased folios.
Please follow this rule, and you will not receive extra invoices from the iTunes for
the chart folios which were already bought before.
Part one. Correct installation of the iSailor app:
Open the iTunes Receipt and find the iTunes login (Apple ID) which was used for the
in-app purchase. If you have several different chart folios and various Receipts
from the iTunes, please carefully check all of them.
This iTunes login account (Apple ID from iTunes Receipts) should be set in the
device store and used for installation of the iSailor app. It is only in this case
that you can use the free "Restore" procedure for the free download of all the
previously purchased folios.
Copyright © 2013 Transas Marine Limited. All rights reserved.
Page 88 of 93
Transas iSailor. User Manual
Version 1.5.4, June 2013
www.isailor.us
Where to set iTunes login (Apple ID) on device – Go to “Settings” menu of your
device and find where “iTunes & App Stores” setting:
If you do not remember the iTunes login (Apple ID) which was used for the “iSailor”
app installation, please delete the app and install it again with the correct iTunes
login (Apple ID) available in the iTunes Receipt.
Copyright © 2013 Transas Marine Limited. All rights reserved.
Page 89 of 93
Transas iSailor. User Manual
Version 1.5.4, June 2013
www.isailor.us
Installation of Transas iSailor app from App Store on the device:
Refer to the Chapter 2 “How to install Transas iSailor app on the device” above for
details.
We strongly recommend that the app should be loaded with your device connected to
the Internet via Wi-Fi and to the power supply unit.
Part two: Restoration of previously purchased charts.
You can only restore charts for the Transas iSailor via the “Chart store” in-app.
Please check the “Restrictions” and “In-App Purchases” settings on your device:
Go to “General” settings of your device and check that “In-App Purchases” set as
“ON” and “Restrictions” setting as “Off”.
Follow the “Restore” procedure:
•
•
•
•
•
•
Run the “iSailor”;
Check that the price information is available for the all the "Paid" folios;
Tap the lower right corner of the screen;
In the Settings menu select the “Chart store” item;
Tap the “Re-install initially purchased folios(s)” button;
Tap the “Restore” button.
Copyright © 2013 Transas Marine Limited. All rights reserved.
Page 90 of 93
Transas iSailor. User Manual
Version 1.5.4, June 2013
www.isailor.us
Please don't close the application until the Restore process is completed.
We strongly recommend that the data should be restored (downloaded) with your device
connected to the Internet via Wi-Fi and to the power supply unit.
Tap on “Chart store” button.
Tap on “Re-install initially purchased folio(s)” button.
Copyright © 2013 Transas Marine Limited. All rights reserved.
Page 91 of 93
Transas iSailor. User Manual
Version 1.5.4, June 2013
www.isailor.us
Tap on “Restore” button.
Please don't close the application until the Restore process is completed.
We strongly recommend that the data should be restored (downloaded) with your device
connected to the Internet via Wi-Fi and to the power supply unit.
Check that all the previously purchased folio will be available in the "Folios
already paid for" section.
As soon as the folio status changes to "Installed", the charts are successfully
installed on the device.
Usually the installation takes a few minutes, but sometimes
interrupted by network failures or exit from the program, etc.
the
process
is
In such cases the purchased folio is available in the section "Folios already paid
for" with the "Free" status.
If the status is "Free" the download process should be restarted manually.
Just tap on the status and wait until it changes to “Installed”.
Copyright © 2013 Transas Marine Limited. All rights reserved.
Page 92 of 93
Transas iSailor. User Manual
Version 1.5.4, June 2013
www.isailor.us
9.2 No “Course” and “Speed” data in the “iSailor” app
Own ship “Position”, “Course” and “Speed” window.
Sometimes you can see aforementioned screen on the “Monitoring” layout. It means
following: Apple Location service provides to app just only position data (without
Course and Speed or without Speed only), which is based on Wi-Fi/3G triangulation
positioning data.
In that case most reasonable answer that positioning by Internal GPS (for iPad Wi-Fi
+ Cellular or iPad mini Wi-Fi + Cellular models) or by external GPS (connected to
device via Bluetooth, if available) is not possible due to following possible cases:
-
External Bluetooth GPS is turned off or discharged;
-
GPS satellites are out of visibility (for example, in buildings) or closed by
obstructions and cannot be used for positioning by internal or external GPS.
Copyright © 2013 Transas Marine Limited. All rights reserved.
Page 93 of 93