1
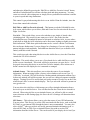
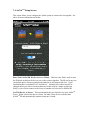
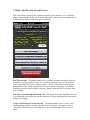
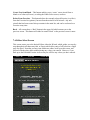
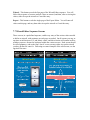
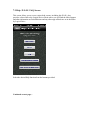
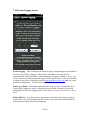
PocketHorizonTM Pro Pilot’s Operating Handbook (P.O.H.)
For PocketHorizon Pro version 1.0.0
4/28/2013
© 2013 by Logical Drive Inc.
Table of Contents
1. Introduction
1.1 What’s New in PocketHorizon Pro v1.0?
1.2 General Information
2. Pitch and Aircraft Aerodynamic Information, and Selecting
Your Aircraft
3. AirNetTM
4. Mounting the iOS Device
5. Battery Life
6. Multitasking
7. The Controls and Screens
7.1 Main Screen
7.2 Flags
7.3 Settings Screen
7.4 AirNetTM Setup Screen
7.5 Edit / Add Favorite Aircraft Screen
7.6 Editor Select Screen
7.7 Wizard Editor Sequence Screens
7.8 Expert Editor Screen
7.9 Help / P.O.H. / FAQ Screen
7.10 System Logging Screen
1. Introduction
PocketHorizon™ Pro is a Standby Artificial Horizon (Attitude Indicator) app for use in
airplanes only, that runs on the Apple iOS Platform, meaning on an iPhone®, iPad® or
iPod touch®. These devices allow for a battery-backed-up real standby system that will
operate for as much as three to four hours (or 10 hours on iPad) on battery power alone,
or indefinitely if ship-powered. Supported iOS devices include iPhone 5, 4S, 4, 3GS, 3G
and 2, iPad 1 through 4, iPad mini and iPod touch 3rd through 5th generations. A
minimum of Apple iOS 5 is required. The app uses the built-in Gyro on iPhone 5/4/4S,
iPad 2/3/4, iPad mini and iPod touch 4/5 for quick response, combined with GPS
information to determine accurate aircraft attitude. For devices without a Gyro,
PocketHorizon uses GPS-only to determine attitude, which yields accurate attitude but
with slower response.
1.1 What’s New in PocketHorizon Pro v1.0?
The original PocketHorizon app with in-app purchases to fully activate it is no longer
available. PocketHorizon Pro is now available for straight purchase, and it includes
AirNetTM Server, which was previously available only as an extra in-app purchase.
AirNetTM
Logical Drive’s AirNetTM is a unique capability of PocketHorizon (and soon other apps)
that allows you set up a “network in the air” to connect two or more Apple devices
wirelessly in the cockpit and send attitude and/or GPS data from one device to the others,
with only one device needing an external GPS. Currently, all devices will be running
PocketHorizon or PocketHorizon Pro v2.0 or greater, with one device acting as the
“Server”, sending the data, and the others acting as “Clients”, receiving the data. Each
device will then show identical attitude information, even if the Server is the only device
with a Gyro (although a Gyro is not required for either device). See below for more
detailed information, including how to set up an optional “Server”.
1.2 General Information
A WAAS/EGNOS-Enabled External GPS is required to successfully run
PocketHorizon Pro, even with a device that contains a Gyro or an Internal GPS. This is
for two reasons: WAAS accuracy, and the superior external GPS antenna. WAAS
capability increases the accuracy of the position fix from GPS, which is necessary for a
smooth attitude display; the internal GPS on Apple devices is not WAAS Enabled. Also,
the device’s internal antenna is much inferior to that of an external GPS, and an excellent
signal is critical to the needs of this app. For these reasons, an External GPS unit is
required for proper operation of PocketHorizon Pro. Three successfully tested external
GPS units are the Bad Elf, the Dual XGPS150 and the Emprum UltiMate, although most
others should work equally well. The Garmin GLO is not currently supported (see
below). NOTE that EGNOS is equivalent to WAAS in non-US parts of the world.
A good view of the sky, including good antenna placement, is also required. Testing has
shown that the above external GPS units are indeed much better than the internal GPS in
this regard due to a superior antenna that can have a clearer view of the sky because of its
separate housing. In addition, a bluetooth GPS such as the Dual can be positioned fully
forward over the instrument panel leading to excellent sky visibility, allowing you to
mount the iOS device further away from a window. It should be noted that the Bad Elf
GPS has shown excellent performance in most any mounting situation even though it is
attached to the iOS device, and our testing has shown it to be slightly superior to the Dual
in fix accuracy and thus attitude display smoothness.
What’s Wrong with the Garmin GLO?
PocketHorizon does not currently support the Garmin GLO ‘GPS’, and may not in the future. The
reason is that the GLO is unlike any other GPS on the market: It has an unstable, alwayschanging, non-standard position update rate. This means the position updates come not at 10 Hz
as advertised, but at a maximum of 10 Hz. The update rate is constantly changing, from 1 Hz to 10
Hz; According to Garmin, if a position has not been acquired it is not sent. This is different from
all other GPS units on the market, which always output positions at the selected update rate.
What does this mean? PocketHorizon makes more demands on its GPS than any other app we’re
aware of, requiring a constant, steady GPS signal for proper attitude performance, and the Garmin
fails in this regard. Note that other apps such as maps would not be affected by this problem, as
their needs are less demanding. We have been in contact with Garmin and have requested a steady
output rate, but obviously this will happen if and when Garmin decides to change it, and they do
not have a history of encouraging any aviation products other than their own. In fact, once they
realized we were app developers they went silent, with no further communication from them.
Like many, we consider Garmin a top GPS manufacturer and expert and we can’t understand why
they decided to design the GLO this way. In the meantime, if you want a bluetooth GPS then the
Dual is an excellent unit, and much less expensive than the Garmin. We highly recommend it.
Oh, and GLONASS? You don’t need it. GPS works perfectly across the world, and locks on
plenty quickly.
Gyro devices
The iOS device (including the Attitude Source device in an AirNetTM setup), if it contains
a Gyro, must be mounted either vertically, as in on or above the instrument panel, or
horizontally, as in laid flat for use on a kneeboard or above the instrument panel. It may
not be mounted at an angle, although a slightly angled mounting (up to 10º off ‘square’)
will not cause a problem. In either vertical or horizontal mounting the device may be
used in either orientation, Portrait or Landscape, as desired.
If you are using AirNetTM, you may mount the display device (the one that the pilot
views) any way you want, including angled and in any location. See below for more
information.
PocketHorizon Pro is really two apps – one for devices with a Gyro source, and one for
those without. Operationally, the difference is in response time, with the Gyro units
providing rapid response to attitude changes and the GPS-only units providing
equivalently accurate, but somewhat delayed, response to those changes. The different
device capabilities are automatically detected by the app, which switches into the correct
operating mode, although you may select ‘GPS-only attitude’ on a Gyro device if desired,
such as when you need to mount it at an angle. The app is also a “Universal App”,
meaning the same app is designed to run on all Apple devices, including iPhone, iPad and
iPod touch. The Retina Display of the latest iDevices is fully supported, giving a
remarkably crisp horizon image on those devices. Both Portrait and Landscape screen
orientations are supported as well, so you can mount it as you desire. A ‘Lay Flat’ mode
is also provided for use with Gyro devices that you want to ‘mount’ on a kneeboard.
Disclaimer
This product consists of two components, the PocketHorizon Pro software
and your Apple iOS device. Neither the PocketHorizon Pro software nor the
Apple device are FAA Certified, and therefore should only be used for
supplemental situational awareness in cooperation with other instruments
and information sources in your airplane, not as a primary flight instrument.
Logical Drive Inc. does not assume any risk from your use of either
PocketHorizon Pro or the iOS device, therefore you use these at your own
risk. If you do not agree with these provisions you are not authorized to use
the PocketHorizon software, and should not purchase this app. Thank you
for understanding.
No Aerobatics
PocketHorizon Pro is not intended for Aerobatics, and will not respond correctly during
rolls, loops or other aerobatic maneuvers as defined by the FARs. One of the reasons for
this limitation is the GPS’s role in calculating roll and pitch. While an aircraft is
inverted, changes in GPS track and altitude are reversed. Since roll and pitch indications
are calculated from GPS track and altitude values, when changes in those values are
temporarily reversed during aerobatic maneuvers you would see opposite and incorrect
roll and pitch indications.
Helicopters
PocketHorizon Pro is not designed for use in a helicopter, since forward speed is
necessary for correct attitude determination. The app is in limited functionality mode
when below a threshold groundspeed.
The Apple Gyro
A basic limitation of the system is the gyro included in Apple devices. This gyro has a
large amount of precession and other errors and cannot be relied upon as the sole source
of attitude information, especially over time. Therefore, the Gyro is used in conjunction
with the GPS to yield accurate attitude information. All devices require GPS to run
PocketHorizon, but a benefit of this requirement is that no manual calibration is required.
Calibration
No action by the pilot is required to maintain calibration of the Gyro and/or the
PocketHorizon Pro software. Calibration is automatic and continuous, provided by the
connected GPS.
2. Pitch and Aircraft Aerodynamic Information, and Selecting
Your Aircraft
Pitch is the more difficult value to derive (as opposed to Roll) due to the many factors
that combine to determine it, along with the fact that it is a slow-changing value (again,
compared to Roll). Rate of Climb, Engine Power, Angle of Attack, Airspeed
(Groundspeed), even Air Density come into play. To increase accuracy of Pitch,
PocketHorizon optionally uses aerodynamic information for the specific aircraft type you
are flying to calculate Angle of Attack (AOA), which is then applied to the Pitch
equation. This includes values specific to your airplane such as Wing Area, Wing Span,
and Typical Weight. Values such as Stall Speed and especially Rotation Speed are also
very important in displaying Pitch most accurately, most significantly in the takeoff and
landing phases of flight. PocketHorizon defaults to AOA ‘On’, but this can be selected
on the in-app Settings screen.
Selecting and Setting Up Your Favorite Aircraft
A large Predefined Aircraft List is provided that enables you to select your exact aircraft
or one very similar, adjust it as necessary, and use it for flight. You may also create new
aircraft, either from scratch or starting with an existing aircraft from the list.
Additionally, you may edit any aircraft, add it to your Favorites, or delete it from
Favorites as desired. Value entry can be in either US or Metric.
All aircraft editing facilities are located inside the PocketHorizon app. To reach this
function you enter the In-App Settings screen by pressing the Airplane button on the
main screen. Here you will see the ‘spinner’ that contains your current favorite aircraft
(the ones you can select for use during flight), plus an ‘Edit This or Add New Favorite
Aircraft’ button to enable you to select and edit aircraft.
A new Wizard function is provided to make aircraft entry or editing easy, but if you’re
already familiar with editing you may use the Expert editor for speed. In either case, the
aircraft settings system is designed to be intuitive, and in keeping with standard iOS
operational behaviors.
On the Edit/Add Favorite Aircraft screen you will see several buttons that enable you to
proceed with aircraft selection and editing. A good place to start is the ‘Select New
Favorite from Predefined Acft’ button, which presents you with hundreds of aircraft to
choose from to use as favorites.
Note that some Predefined aircraft are missing a value or two. This is due to limited
availability of this information to anyone that doesn’t possess a P.O.H. for that aircraft.
For example, the aircraft may have a speed listed for Stall (Flaps), but not one for Stall
(Clean). All values are needed, so you will need to provide any missing values before
you will be able to accept that aircraft as a favorite. Most aircraft in the list have
complete information, however.
Also, you should review all the values for any aircraft after it is selected to make sure
they are correct. We gathered aircraft information from many sources, but only rarely
had access to actual P.O.H.’s. We are providing the information you see only as a
starting point – you’ll need to verify their correctness, hopefully with your own P.O.H.,
or even with Wikipedia or Google - just take what you read on the web with a grain of
salt, as always.
Finally, each value is important, but we especially want you to set the correct Rotation
Speed (Vr), the one that you typically use, for best results.
•
•
•
•
•
•
•
Cruise Speed
Stall Speed flaps-up (Clean)
Stall Speed flaps-down (Dirty) - use 'Clean' value for no-flaps airplanes
Rotation Speed (Vr) – your typical speed
Wing Area in sq. ft.
Wing Span in ft.
Weight, typical, in lbs.
All speeds are at SEA LEVEL
3. AirNetTM
AirNet is a unique capability of PocketHorizon (either Pro or the old ‘Standard’ version)
that lets you connect two or more Apple devices wirelessly by Bluetooth in the cockpit
and send attitude and/or GPS data from one device to the others, with, for example, only
one device needing an external GPS, or one device needing a Gyro. All devices must be
running PocketHorizon v2.0 or greater or PocketHorizon Pro, with one device acting as
the “Server”, sending the data, and the others acting as “Clients”, receiving the data sent
by the Server. All devices will then show identical attitude information, even if the
Server is the only device with a Gyro (although a Gyro is not required for either device).
With the Pro version of PocketHorizon there is no longer an extra charge to create an
AirNet Server for use with an AirNet network. Note that AirNet works with either Pro or
the old Standard version 2.0.0 of PocketHorizon.
What Data Can Be Sent?
Two types of data can be sent from a Server to a Client: Attitude information and GPS
information. PocketHorizon can use Attitude info from a Server to fully duplicate the
Server’s display. It can also optionally use GPS only info from the Server and generate
its own Attitude display. The latter scenario can be useful if you want to use an older,
non-Gyro device with a good sky view as a GPS Server to provide position info to a
Client device with Gyro and a better display, but a marginal view of the sky. The
Attitude display is then generated on the Client device from the AirNet GPS info and the
internal Gyro.
Why and Where to Use AirNetTM
AirNet is designed to assist in three primary types of situations:
1. The need to mount the display device in a way that makes it difficult to either (a) get
a good sky view for GPS, or (b) squarely mount a Gyro device (like iPhone 4) as
required by PocketHorizon (for example, if you desire to yoke mount it).
2. The need or desire to duplicate attitude information in multiple locations in the
cockpit without requiring the second device to have an additional external GPS or
possibly a Gyro.
3. The desire to extend the capabilities of a device; for example, get rapid attitude
response on a non-Gyro device by using a Gyro-based Server device (like an iPod
touch 4); or, to have GPS info on a non-GPS device for running PocketHorizon.
Following are examples of usage scenarios for each type of situation.
‘Mounting Assistance’ Scenarios
1. You would like to mount the display device in a position without a good view of the
sky, such as on a kneeboard in a high-wing airplane. You can position the Server
device with an attached Bad Elf above the instrument panel running in Lay Flat
mode. There are two scenarios that cover this situation:
a. You may use the Server to send full Attitude information to the Client. In this
case it would be best to use a Gyro device as the Server, with the Client being
any other device with or without Gyro (you’ll get full Gyro response in either
case).
b. You may also use the Server to send only GPS information if you wish, for
example, to use a retina display on the pilot’s Gyro device but can’t get a good
GPS sky view. You can then use an older device like an iPod touch 3 with a
Bad Elf as the Server to send GPS only data to the display Gyro device, and
place the iPod touch in a good sky view position like above the instrument
panel.
2. Your display device must be mounted in a non-square position as related to the
airplane centerline, such as an iPad mini on a tilted yoke mount or angled toward the
pilot on the right side of the panel. Again, if you position the Server device above the
panel in Lay Flat mode then it doesn’t matter how or where the display device is
mounted.
‘Duplicate Display’ Scenarios
1. Providing an additional display in the rear of a tandem aircraft, or for a copilot in the
right seat.
2. Providing an additional display for passenger entertainment in the front or back.
‘Extending Device Capability’ Scenarios
1. You would like full Gyro capability on devices without Gyro (like iPad 1, iPhone
3GS or iPod 3). You can use a Server with Gyro and connect non-Gyro devices, and
get the same quick Gyro attitude response on all devices.
2. You need GPS capability on devices without it (like iPod touch or iPad/WiFi only).
You can use a Server with GPS capability and connect non-GPS devices running
PocketHorizon.
Plus, we expect our users to discover new ways to use AirNetTM that we haven’t yet
thought about, for example, in flight training scenarios. We would appreciate letting us
know if you come up with a new use for AirNet and PocketHorizon – thank you!
Future
GPS and Attitude information sent from the Server cannot currently be used for apps
other than PocketHorizon. Talk to the provider of your favorite app and ask them to
support PocketHorizon’s Client function by contacting us for a free license and SDK
(Software Developer’s Kit).
AirNet Restrictions
- A general-purpose WiFi access point should NOT be visible to both the Server and
Clients or you can have a situation where AirNet connects both through WiFi and
Bluetooth at the same time (as Apple does not allow an app to control this). If this
happens the connection will work but will lose some connection reliability, and you
will likely not be able to connect as many Clients. You may also possibly experience
a ‘stuttering’ in Attitude on a Client. You can disable WiFi by deactivating it on the
Server OR on the Clients; you really don’t need to disable it on both, since it needs to
be enabled on all devices in order for them to (accidentally) connect together. In
reality this will probably not be much of an issue since such access points are not
generally used in cockpits, but some devices like ADS-B do use WiFi so you should
be aware of this as a potential problem.
- Bluetooth GPS and AirNet Attitude don’t mix, since they both use Bluetooth and
there is a lot of data being transmitted between the devices. If you try using a
Bluetooth GPS you will likely see ‘wobbling’ in Attitude due to interference in the
attitude data stream. In this case you will need to use a non-Bluetooth GPS such as
the Bad Elf on the Server. Note that using a Bluetooth GPS with an AirNet GPS-only
Server works fine; the interference is minimal or inconsequential.
- Only one device should be set up as the Server. If multiple devices are so configured
the behavior of the system is undefined (i.e. could work or not work).
Multi-Client Support
AirNet supports multiple “Client” devices connected to a single “Server” device.
Whether a device is a Client or Server is simply dependent on whether “Use As Server”
is selected on the AirNet Setup & Server page, accessed from Settings.
How Many Clients Can Connect?
Theoretically up to 16 devices can connect together using AirNet, but there are real-world
practical limitations to this. We have tested 6 devices with perfect performance,
including devices old and new, and you probably won’t have a need for more than this!
But it’s clear that as you add Clients you can decrease the reliability of the connections,
causing possible unintended disconnects. If you run into difficulties with Clients
disconnecting themselves then you may be running too many Clients. We suggest
experimenting with your own setup to make sure it will do what you want before
counting on it in flight.
Multi-Client Operations
- The ‘S’ icon on the Server main screen will contain a number that indicates the
number of Clients connected. This number will only be shown when more than one
Client is connected.
- When one client disconnects, all clients will briefly appear to disconnect and then
automatically reconnect. If one does not reconnect then just sending it to the
background and restoring it to visibility will usually prompt a reconnection. If that
doesn’t work, shut down the app on the Client completely and restart it.
How to Set Up and Use AirNetTM
- On each device go to the System Settings using the icon on the main page and make
sure Bluetooth is ‘On’. There is no need to pair with any other PocketHorizon
devices. Note that each device and iOS version may be slightly different in its menu
layout, so if you have difficulty see your Apple documentation.
- On each device start PocketHorizon and go to the Settings screen
- Select the AirNet Setup & Server button
- Enter the same AirNet ID text on all devices. This text is like a ‘key’ that must match
on the two devices, and can contain spaces if desired.
o Upon installation this ID is set to a default of “AirNetUser” for all devices.
You can normally just leave this ID in place since you won’t generally have a
conflict with other AirNet setups inside a single cockpit.
- Select a device to be the Server, and on this device select the ‘Use This Device As
Server’ switch to ON.
- Return to the Settings page on both devices
- On the Server device:
o Select the Attitude Source. Note that you cannot select AirNet as this is the
Server and it cannot get information from another Server. Also note that
when AirNet is providing attitude then several controls are grayed out where
that control is only applicable on the Server device, such as Aircraft Selection
and Lay Flat mode, or when controlled by the Client, such as Use AOA.
o Select the GPS Source. Note again that you cannot select AirNet.
- On the Client devices:
o Select the Attitude Source as AirNet.
o NOTE that ‘Use AOA’ is now controlled from the Server, and the switch will
be disabled here. Once connected, the switch will indicate whether the Server
has Use AOA selected.
- Exit Settings and the devices should connect automatically. You will initially see a
grayed ‘S’ icon in the upper right of the Server screen and a grayed ‘C’ on the Client
screen. When they connect these icons will turn a solid white.
o The ‘S’ icon on the Server will contain a number that indicates the number of
Clients connected (when greater than one).
Alternate Setup Scenario
If you desire to use GPS only from the Server you may do the following:
- On the Client device:
o Select a local Attitude Source as desired (e.g. Gyro + GPS).
o Select the GPS Source as AirNet.
This enables you to use an older device such as an iPod touch 3 with a clear sky view as
the Server providing GPS info only to a Gyro device in a less advantageous sky view
position, like an iPad mini on a kneeboard running in Lay Flat mode.
Battery Life
Using Bluetooth for purposes such as AirNet can decrease battery life significantly.
While battery life is still good with most devices, you may want to consider using ship’s
power to supply your devices, especially your Server device.
Notes
- If one of the devices sends PocketHorizon to the background for any reason AirNet
will disconnect, but will automatically reconnect when PH returns to the foreground.
- All controls normally expected on the display device are coordinated with and sent to
the Server, such as the Level and GPS Restart buttons. These buttons may be
activated on either the Server or Client device.
- All flags and most alerts that appear on the Server will also appear on the Client, such
as the GPS OFF and LOW SPEED flags and the ‘Leveled’ annunciators.
- See the Logical Drive website for more information and troubleshooting for AirNet.
4. Mounting the iOS Device
All iOS devices (iPhone, iPad or iPod touch) should be mounted in the cockpit in a
secure manner to allow safe and correct operation. It is especially important to mount
Gyro devices (iPhone 4(S)/5, iPad 2/3/4/mini, iPod touch 4/5) in the proper alignment to
allow the internal Gyro to give correct information, specifically considering the roll and
pitch axes of the airplane. Several other factors should be considered in mounting,
including (a) pilot visibility, (b) GPS sky visibility (c) sunlight readability and (d)
cooling.
If you have multiple devices AirNetTM usage allows many more options in mounting
since the display device (AirNet Client) does not need to be mounted ‘square’ and does
not need a GPS, therefore not requiring a good sky view.
Mounting Methods
A device may be mounted for use with PocketHorizon in a number of ways; these are
only some of them.
a. Window suction-cup – These give excellent results with the smaller (non-iPad)
devices due to the device’s light weight and the fact that you can easily adjust the
angle and orientation to the best benefit for viewing and proper Gyro operation.
Note that when using AirNet Attitude you may mount a display (Client device) at
any angle, including non-square.
b. Kneeboard – Intended primarily for iPad, this mounting is usable for all devices,
especially when using ‘Lay Flat’ mode with Gyro devices. Care must be taken to
ensure a good GPS sky view. AirNet can help with this mounting as well.
c. Yoke – Good for AirNet Attitude Clients, non-Gyro devices, or Gyro devices with
gyro disabled (on in-app Settings screen), since (a) the yoke rotates independently
of the aircraft’s attitude, and (b) this mounting usually leads to an angled device
to be visible to the pilot. Care must be taken to ensure a good GPS sky view.
d. Custom – As long as other mounting requirements are met (see below).
Mounting Angle – Gyro Devices
Gyro devices (used either as the pilot’s display or as an AirNet Server) must be mounted
so the three axes of the device (x, y, z) are approximately aligned (‘square’) with the
three axes (roll, pitch, yaw) of the airplane, as would be necessary for any AHRS
(attitude-heading-reference-system) installation. This means the front of the device
display should be upright and parallel to the instrument panel, not severely tilted in any
direction. Think ‘square’ when considering how to mount the device.
The only exception to this rule for Gyro devices is when using ‘Lay Flat’ mode. This
mode allows a Gyro-equipped device like an iPad 2 to be used with a kneeboard. In that
case you should aim for the iPad to be parallel to the floor of the aircraft, with the
device’s top-to-bottom axis running along the aircraft’s longitudinal axis.
Mounting Angle – Non-Gyro Devices
Non-Gyro devices may be mounted at any angle desired, even on the yoke, since they do
not depend on movements about any airplane axis to show attitude. It is only important
for operation to allow the GPS a good sky view. However, we still recommend mounting
the device as ‘square’ to the aircraft’s instrument panel as possible since that’s what a
pilot expects to see when using an attitude indicator. Note that the special ‘Lay Flat’
mode is not necessary or selectable when using non-Gyro devices; feel free to lay the
device flat if you wish and still get accurate attitude information, since no Gyro is used in
that case. Remember that attitude information in non-Gyro devices is accurate but
delayed a few seconds as compared to Gyro devices.
Screen Orientation
PocketHorizon may be used in either portrait (vertical) or landscape (horizontal, to the
left) orientation. To change the orientation, position the device as desired (in one of the
two different orientations) and press the Level button. Note that simply holding the
device in the new orientation does not trigger a change in the display as might be
expected on other iOS apps since such automatic orientation changes are caused by
movements detected by the internal accelerometer, and it is important that turbulence in
an aircraft not cause unintended changes to the display. Therefore any orientation change
must be specifically requested by the pilot.
GPS Sky View
Since a good GPS signal is required by PocketHorizon it is important to make sure this is
available. And since each airplane/installation is different, you’ll need to use common
sense to get this right. For example, if you have a canopy airplane then you’ll get a
naturally better GPS signal than, say, a high-wing metal airplane.
When using a GPS unit attached to the docking port of the device (or, although not
recommended, the device’s internal GPS) it is usually important to try and mount the
device near the windshield, and above the instrument panel if possible, especially in a
high-wing metal airplane. When using an external GPS like the Bad Elf ‘dongle’-type
you can usually get away with mounting further away from the windshield due to the
superior performance of this GPS unit. You’ll have to experiment – a good mount setup
will yield a stable attitude readout with only minimal instability.
Another trick with an attached GPS is to use an iPhone Extension Cable, which plugs into
the device, with the GPS plugging into the cable. The GPS may now be placed on top of
the panel or wherever it can get a good sky view. The obvious disadvantage is that you
now have another cable to deal with in the cockpit.
Using an external Bluetooth GPS like the Dual gives you the most flexibility in mounting
since the GPS may be placed at the furthest forward point above the instrument panel
with no need for a physical connection to the device. Just remember that a Gyroequipped device still requires an approximately ‘square’ mounting as described above
even when using a bluetooth GPS. Also, to power the Bluetooth GPS with ship power
you will need a dedicated power cable.
Finally, if you really want to mount your display device in an unusual location that works
for you, but doesn’t get a good GPS signal, you may use AirNetTM and a second low-cost
device to provide GPS Only to the display device. This second ‘Server’ device may be
mounted anywhere you have a good sky view, and may be, for example, an old iPod
touch 3 with a Bad Elf GPS as long as it has at least iOS 5 installed.
Sunlight Readability
The Apple iOS devices are remarkably bright for their size, but in strong, direct sunlight
they can still become more difficult, although not impossible, to read. PocketHorizon
includes a ‘super-bright’ color scheme for use in sunlight but consideration should be
given to mounting where the sun is less imposing on the device, especially if you have a
canopy airplane.
Device Temperature and Overheating
Apple iOS devices are susceptible to excessive heat, and will darken, and eventually shut
down, if allowed to get too hot in operation. To prevent this, consideration should be
given to (a) where the sun will be during the flight, (b) shading the device, and (c)
providing some ventilation to the device. The latter will be easier with some airplanes
(like high-wing Cessnas) that have vents above the panel, but experimentation will be
necessary if you run into this problem. In any case, if the device is compromised by heat
you can remove it from direct sunlight and allow it to cool for a few minutes and it will
recover. Pressing it firmly against your hand or leg can help, too. (But be careful – it
will be hot!)
Another possibility is using a white cover around the device to reduce heat absorption.
Several of these are available on the market.
Summary
The many mounting considerations above can sometimes conflict with one another –
mount near the windshield for a good sky view, but away from the windows to reduce
heat buildup, for example. The main thing to remember is that each installation is
different, and you should experiment and do what works for you. Don’t forget that, with
Gyro-equipped devices, you can turn off the Gyro and use GPS-derived attitude only,
which will allow you to mount the device away from the windshield as long as you have
a decent GPS signal, thus eliminating problems such as excessive heat. You will,
however, have the increased lag of the GPS-only attitude display. Finally, AirNetTM can
assist with many mounting difficulties; see the AirNet section, above.
5. Battery Life
Logical Drive has tested real-world battery life in many iOS devices at full (100%)
brightness, when running PocketHorizon and an external (Bad Elf) GPS dongle powered
by the device. These devices (and thus their batteries) were of average age (i.e. not in
new condition). The results are as follows. Note that these times are not guaranteed, and
depend on your device’s age and usage:
iPhone 4
iPhone 3GS
iPad (any)
iPod touch (any)
- 4 hrs 24 min
- 3 hrs 54 min
- 9 hrs 50 min
- 2 hrs 40 min
There are also external batteries that power iOS devices that can give them almost
unlimited life, or at least as long as any flight you might want to complete. Also, in iOS
5 devices ‘hardware dimming’ is used which should significantly increase battery life
above these values when used at night.
Using AirNetTM can decrease battery life significantly due to the requirement to run the
Bluetooth radios in the devices. You may want to consider using ship’s power if the
battery life is insufficient for your needs.
High-Rate GPS: PocketHorizon Pro supports high-update-rate GPS such as the Bad Elf
multi-rate feature and the Emprum Ultimate. Our testing has shown that using high-rate
GPS can reduce battery life by 10% or so, and does not improve the performance of
PocketHorizon. If update rate is an option, such as with the Bad Elf, we suggest setting it
to 1 Hz if maximum battery life is required.
6. Multitasking
PocketHorizon Pro supports the standard IOS Multitasking function in the following
way: When moved to the background by pressing the Home button, PocketHorizon
continues to track the GPS for one minute, and then stops tracking the GPS to save
battery. The purpose of this technique is to allow you to switch to another app for up to
one minute, check its state, and return to PocketHorizon without disrupting the GPS
tracking too much. If PocketHorizon is in the background for longer than one minute the
GPS is restarted when it is restored to the foreground, so you can expect the attitude
display to ‘reset’ for a few seconds before settling down while GPS tracking is restored;
or, in some cases you may see the app restart entirely, indicated by the need to
acknowledge the startup message. This latter case indicates that iOS has shut down
PocketHorizon from the background due to the memory needs of the foreground app,
which is its prerogative and a normal operating procedure.
7. The Controls and Screens
This section describes the operation of each control, and the meaning of the various onscreen indicators. iPhone 4S screens are shown, but any screen format is supported.
7.1 Main Screen
Level – This button has three functions:
(1) When tapped once during normal flight, the horizon is leveled (zeroed) in Pitch.
This function does not operate on the ground or during initial climb. This level
setting is saved for each aircraft separately for the next run of the app.
(2) When tapped twice during normal flight, Roll is leveled (zeroed). This function
does not operate on the ground or during initial climb. This level setting is saved
for each aircraft separately for the next run of the app.
(3) When tapped once after rotating the device from Portrait orientation to Landscape
or vice versa the display rotates to match the new orientation. This orientation is
saved for the next run of the app. You may only rotate the device to the left or
upright. Note that the reason you can’t just rotate the device and have the display
rotate automatically like most iOS apps is that such auto-rotations are based on
the built-in accelerometer, and turbulence might trigger a rotation when it is least
desired.
Dim – This button allows you to dim and ‘brighten’ the screen, using either hardware or
software dimming. The default level is a normal-bright (100%) screen which can be
gradually dimmed down to 20% of its original brightness for night flying. Also, you can
increase the brightness beyond the default (100%) point, which actually changes the color
scheme to be more visible in the direct sunlight such as you might experience in a
canopy-equipped airplane. The maximum setting looks a bit garish in normal light, but is
quite visible under the sun.
Hardware dimming is used to actually reduce the brightness of the backlight, thus saving
battery. The battery life numbers above were determined using 100% brightness with no
hardware dimming.
To adjust dimming, press Dim, and the two Up(+)/Down(-) buttons slide into the screen
from the right. Press them to adjust the screen brightness. When finished you may either
press Dim again to dismiss the buttons, or wait a few seconds and they will dismiss
automatically.
GPS – This is both an Indicator and a Button. The ‘bars’ indicator shows the current
strength of the GPS signal. Remember, a good GPS signal is required for PocketHorizon
to work.
The button (under the GPS bars) allows you to Restart the GPS system within the device.
We have seen cases where the GPS stops responding, and this control can get the GPS
operating again quickly. Also, it is sometimes necessary to restart the GPS system due to
the fact that an external GPS may take more time to fully start up as compared to an
internal GPS, especially if it has not been running for a period of time.
Settings – This button selects the In-App Settings screen, where you can select the
airplane you’re flying as well as several other options.
Gyro Icon – This is an indicator of whether Gyro is present, and activated. If a
Gyro is present but not activated this symbol is gray.
,
AirNetTM Icons – When present, these indicate that a device is either acting as
a Server (‘S’) or Client (‘C’). They are white when two devices are connected, and gray
when not connected. The Server icon will also show a number to indicate the number of
Clients when two or more Clients are connected.
Continued on next page…
7.2 Flags
Two flags appear when needed to indicate that PocketHorizon is not fully operational.
GPS OFF – Indicates that the GPS signal is not sufficient for accurate display of attitude.
You should not depend on the display’s attitude information if this flag is showing.
If you have a GPS connected and this flag is visible for an extended period, you should
press the Restart GPS button (under the GPS Bars display).
LOW SPEED – Indicates that the Groundspeed is too low to calculate good GPS attitude
information. This is a normal condition during takeoff & landing roll as well as taxi
before and after flight. You should not depend on the display’s attitude information if
this flag is showing.
Continued on next page…
7.3 Settings Screen
Select Aircraft from Favorites – This ‘spinner’ control allows you to select the aircraft
for the current flight from amongst your Favorites. These Favorite aircraft are selected
and otherwise defined by pressing the ‘Edit This or Add New Favorite Aircraft’ button,
and allow PocketHorizon Pro to better calculate pitch and other parameters. You may
create new aircraft, edit existing ones or simply select a predefined aircraft that is similar
to yours in speed and wing dimensions.
This control is grayed when using this device as an AirNet Client for Attitude, since the
Server then controls this selection.
Edit This or Add New Favorite Aircraft – This button reveals the Edit/Add Favorite
Acft screen, which allows you to Select, Edit and Create New favorite aircraft for use in
flight. See below.
Use AOA – This switch allows you to select whether to use Angle of Attack when
calculating pitch. Why would you not want to use AOA? Due to the fact that
PocketHorizon uses Groundspeed instead of Airspeed to calculate AOA, in cases where
winds aloft are high the AOA calculation can be inaccurate, leading to slightly inaccurate
Pitch indications. While these pitch indications can be ‘zeroed’ with the Level button,
this can become bothersome if you are doing a lot of turning or if you are in the traffic
pattern in higher wind conditions. PocketHorizon therefore allows you to disable AOA
entirely with this switch if desired.
This switch is grayed when using this device as the AirNet Server, since the Client then
controls the Use AOA selection.
Lay Flat – This switch allows you to use a Gyro-based device while laid flat, as would
be the case on a kneeboard. The switch will not be present on a no-gyro device. It will
be grayed when using this device as an AirNet Client for Attitude, since in that case it
doesn’t matter how the display device is mounted or arranged.
Attitude Source – This selector allows you to select the source of your Attitude
information. When not using AirNet, you may select whether or not to use Gyro. If
‘GPS Only’ is selected, GPS will be used to calculate attitude information without Gyro.
In that case, attitude will still be accurate, but you will see a delayed response to attitude
changes. Turning Gyro off is useful when you need to mount a Gyro device on the Yoke,
which doesn’t allow a correct attitude display. The Gyro selection will not be present on
a no-gyro device.
You may also select AirNetTM, which means you will get Attitude information from a
device set up as an AirNet Server. You will thus become the Client device when this is
selected. When using AirNet as your Attitude Source you will not be able to control
some selections on this Settings page; the Server device’s Settings will determine those
selections.
GPS Source – This selector allows you to select the source of your GPS information.
You may select ‘This Device’ to use the GPS associated with the device, such as the Bad
Elf, Dual, or even internal GPS (though the latter is not recommended). You may also
select AirNetTM when you wish to use locally generated Attitude information (you’ve
selected GPS Only or GPS+Gyro as Attitude Source) but wish to use the GPS
information from the AirNet Server. This can be useful if your display device has Gyro
and your Server device does not, but the display device doesn’t have a good sky view for
GPS reception.
AirNetTM Setup & Server – This button reveals the AirNet Setup screen, which allows
you to configure AirNet as you desire. You can enter the required AirNet ID here, plus
select whether you want this device to act as the Server.
Help / P.O.H. – This button reveals the Help/P.O.H./FAQ screen, see below for details.
Sys Logging – This button reveals the System Logging screen, allowing you to save
diagnostics information for use by Logical Drive Support. This switch is intended for use
only when in communication with Logical Drive, when attempting to diagnose a
problem. See below for details.
Done – This button returns you to PocketHorizon’s main attitude screen. Note that all
Settings values are saved when they are selected, not when Done is pressed.
Continued on next page…
7.4 AirNetTM Setup Screen
This screen allows you to configure the AirNet system to connect devices together. See
above for more information on AirNet.
Enter Your AirNetTM ID (for Server or Client) – This text entry field is used to enter
the ID that is needed on all devices you wish to connect together. The ID can be any text,
can include spaces if desired, and must be identical on all connected devices. Upon
installation there is a default ID of “AirNetUser”. Normally this will not need to be
changed unless you wish to run more than one AirNet setup in a single cockpit (not
likely) or you wish to connect to the Server of another user who uses a different ID.
Use This Device As Server – This switch enables the use of this device as an AirNetTM
Server. When selected, the device ‘listens’ for other Client devices with the same
AirNetTM ID and automatically connects when one is found.
7.5 Edit / Add Favorite Aircraft Screen
This screen shows details for the currently selected Favorite aircraft, in U.S. or Metric,
along with buttons that enable you to Select, Edit and Create New favorite aircraft for use
in flight, plus to delete aircraft from the Favorites list.
Edit This Aircraft – This button enables you to edit the currently selected Favorite (the
one shown in yellow on this screen). It reveals the Editor Select screen, which allows
you to select either the Wizard or Expert editors. The Wizard guides you step-by-step
through entry of the various required aircraft values (speeds, wing span, etc.), and the
Expert allows you to enter all these values on a single screen (quicker if you know what
you’re doing).
Select New Favorite from Predefined Acft – This button reveals the Predefined Aircraft
List of hundreds of aircraft from which to choose as favorites (which must be done before
using them in flight).
Create New Based On Current Aircraft – This button enables you to ‘create’ a new
aircraft starting with the currently selected Favorite (in yellow). It renames it with a
“(modified)” suffix that you can modify again. It reveals the Editor Select screen, as
above.
Create New from Blank – This button enables you to ‘create’ a new aircraft from a
blank set of values (all zeros), revealing the Editor Select screen, as above.
Delete From Favorites – This button deletes the currently selected Favorite (in yellow)
from the Favorites list (spinner), but not from the main list of all aircraft. Any new
aircraft that has been created always remains in the main list, and can be reselected as a
Favorite at any time.
Back – All screens have a ‘Back’ button in the upper left which returns you to the
previous screen. This button will either be named ‘Back’ or the previous screen’s name.
7.6 Editor Select Screen
This screen routes you to the desired Editor, either the Wizard, which guides you step-bystep through aircraft data entry/edit, or Expert which allow entry of all values on a single
page for speed. Note that you may start within one editor, back up to this screen, and
proceed with the other editor without losing any values you entered. However, if you
back up to the Edit/Add Favorite Acft screen you will lose any values you have entered.
Wizard – This button reveals the first page of the Wizard Editor sequence. You will
follow this sequence of screens until all values are entered, and then, after reviewing the
values, either Accept the aircraft or Cancel the entry.
Expert – This button reveals the single page of the Expert Editor. You will enter all
values on this page, and may then either Accept the aircraft or Cancel the entry.
7.7 Wizard Editor Sequence Screens
These screens, in a predefined sequence, enable easy entry of the various values needed
to define an aircraft, with assistance on each page as needed. On all screens you may at
any time switch between U.S. and Metric values, and this selection will remain in effect
whether you move forward or backward within the various screens. Each screen should
be self-explanatory, and on the final ‘check’ screen you may either Accept the aircraft
you have defined or cancel it. Following are some examples of the edit screens; see the
app itself for more.
7.8 Expert Editor Screen
This screen allows entry of all required values to define an aircraft on a single screen, for
users that are familiar with the information needed. Upon completion you may either
Accept the aircraft or press the Back button (labeled ‘Select’ for the previous screen) to
reject your entry, or to then proceed down the Wizard path if desired. You may at any
time switch between U.S. and Metric values, and this selection will remain in effect
whether you move forward or backward within the various screens.
7.9 Help / P.O.H. / FAQ Screen
This screen allows you to access various help screens, including this P.O.H., plus
provides a direct link to the Logical Drive website where you will find the latest Support
and other information on PocketHorizon and any other apps offered now or in the future
by Logical Drive.
Select the desired Help function from the buttons provided.
Continued on next page…
7.10 System Logging Screen
System Logging – This switch turns on System Logging, saving Diagnostics information
for use by Logical Drive Support. This switch is intended for use only when in
communication with Logical Drive, when attempting to diagnose a problem. It is a “just
in case” measure for early testing, and may be removed in the future. Also, don’t hesitate
to contact Logical Drive Support by email at [email protected] with any issues,
problems or suggestions – it will be much appreciated.
Send Log by Email – This button sends all System Logs you have recorded directly to
Logical Drive Support by email. It should only be used after a System Log has been
generated by the System Logging switch. Email must be set up on your device for this to
work.
Delete Old Logs – Logs that you have generated are normally deleted upon sending to
Logical Drive. If you record logs that have not been sent, and want to discard them for
any reason, this button deletes all existing logs.
-- End --